health services code: p.4 nursing procedure title
TRANSCRIPT
Page 1 of 19
Approved: November 25, 2019
HEALTH SERVICES
CODE: P.4
NURSING PROCEDURE
TITLE: PARACENTESIS / PERITONEAL DRAINS
A. MAINTENANCE B. EMPTYING C. IRRIGATION D. DRESSING/TUBING/BAG CHANGE E. REMOVAL
CATEGORY
RN – GENERAL
LPN – GENERAL
PURPOSE
To remove drainage (pus, blood or other fluids) from the peritoneal space for diagnostic purposes and symptomatic treatment.
To promote healing and comfort by providing an exit for excessive fluid accumulating inside the body.
NOTE: Remember a drain is a conduit to drain fluid from inside the body to the outside. Care and maintenance of the drain is dependent on the location of the distal tip of the conduit. Before managing and caring for any drain a nurse must know:
Type and purpose of the drain.
Location of distal end of the drain.
Proper care and management strategies.
Potential problems.
How to troubleshoot complications.
This procedure covers peritoneal drains for care and maintenance of other types of drains refer to the following nursing procedures:
Pleural drains, nursing procedure Chest Tubes – Small Bore (pleural).
Surgical drains.
Long term Pleural (PleurX pleural) or Peritoneal (PleurX peritoneal) drains.
Chest tubes, nursing procedure Chest Tubes – Large Bore.
Biliary drains, nursing procedure Transhepatic Biliary Drains.
Nephrostomy tubes, nursing procedure Nephrostomy and Nephroureterostomy Tube Care.
HEALTH SERVICES
Page 2 of 19
Approved: November 25, 2019
CODE P.4
A. Maintenance PROCEDURE 1. Monitor and document vital signs every 15 minutes x 1 hour, then every 30 minutes x 1 hour,
then routine vital signs or as ordered by MRP.
2. Assess tube for patency, colour and amount of drainage every 4 hours and/or PRN.
3. Ensure drain is functioning properly;
Closed vacuum drain (Tru-Close®): o Ensure collection chamber is kept in a collapsed position to maintain negative
pressure. o Squeeze drainage receptacle gently to remove all of air and re-establish suction.
4. Ensure tubing is in a dependent position and free of kinks.
5. Anchor drainage bag to patient gown with a safety pin or clip if drain is a closed vacuum drain.
6. Irrigation of drain may be required if drain tubing becomes plugged with blood or tissue. (See
section C for irrigation).
7. Assess dressing around drain every 4 hours and PRN.
8. Change dressing, StatLock®, connection tubing and collection bag as needed (when wet and soiled) and minimally every 7 days. NOTE: If Drainfix securement device is used do not change, only reinforce original
dressing.
9. Assess for signs of leakage, redness or infection around insertion site during dressing change, if any report to MRP.
10. Number and label each drain if more than one drain present.
NURSING ALERT:
Peritoneal drains may be attached to gravity or vacuum collection devices.
Rapid fluid loss can cause decreased systemic circulation, putting the patient at risk of hypovolemic shock.
Patient must be monitored closely for signs of shock including pallor, tachycardia, and hypotension.
Drainage rate should be slowed or stopped and MRP informed, if symptoms occur.
Securement device (StatLock®) is used to support/anchor locking pigtail-type drains.
Pigtail drains may be secured using a locking mechanism. Ensure you know how to unlock before discontinuing this type of drain (see appendix A&B).
HEALTH SERVICES
Page 3 of 19
Approved: November 25, 2019
CODE P.4
B. Emptying
EQUIPMENT 1. PPE 2. Graduated container for measuring
PROCEDURE 1. Wash hands.
2. Don PPE.
3. Open drainage port to empty drainage device. 4. Drain fluid volumes as indicated by MRP orders.
5. Measure and record volume, color and consistency of fluid.
6. Close drainage port and ensure suction is re-established if appropriate to drainage device
NOTE: If drainage stops prior to anticipated total volumes, check patency of drainage
system. If system is patent, reposition patient and if still no drainage, notify MRP.
C. Irrigation
EQUIPMENT
1. PPE 2. ≥ 10 mL syringe 3. Sterile normal saline (5-10 mL as ordered) 4. Alcohol swabs PROCEDURE
1. Obtain MRP order for irrigation.
2. Explain procedure to patient.
3. Wash hands.
NURSING ALERT:
MRP orders are needed to irrigate drains.
Sterile Normal Saline (NS) is the only solution that should be used by nurses to irrigate.
HEALTH SERVICES
Page 4 of 19
Approved: November 25, 2019
CODE P.4
4. Don PPE.
5. Draw up ordered amount of sterile normal saline in syringe. 6. Swab connection of drain tubing and collection bag tubing with alcohol swab.
7. Disconnect drain tubing from collection bag tubing, maintaining asepsis.
8. Attach normal saline syringe to drain tubing coming from patient.
9. Flush 5-10 mL of normal saline (as ordered) into patient gently.
NOTE: If unable to flush, troubleshoot by ensuring tubing is not kinked and is free
of mucous plugs or blood clots. Notify MRP if still unable to flush after troubleshooting.
10. Re-attach drain tubing to collection bag tubing.
11. Ensure suction is re-established if appropriate to drainage device.
12. Monitor for return of flushed solution.
13. Document.
D. Dressing/Tubing/Bag Change
NURSING ALERT:
Alternative dressing supplies: o If Mepilex® foam dressing not available, sterile 4/4 gauze or drain sponge may be used. o If transparent semipermeable dressings are not available, cloth adhesive dressing may be
used.
Ensure correct size securement device (e.g. StatLock®) used for peritoneal tube in place. Tube size can be found on hub of drainage tube.
Dressing change required every 7 days and PRN with Mepilex® foam dressing or q48h and PRN with gauze dressing.
Tubing and bag change is required weekly.
For non-locking drains that are secured with a drain-fix securement device dressing, changes cannot be performed only reinforced.
EQUIPMENT 1. Personal protective equipment (PPE) 2. Sterile dressing set 3. Sterile gloves 4. Chlorhexidine 2% with 70% alcohol (ChloraPrep® 3 ml) (#310410) 5. Securement device for 6-8.5 Fr. (e.g. StatLock®) (#313500)

HEALTH SERVICES
Page 5 of 19
Approved: November 25, 2019
CODE P.4
6. Sterile foam dressing (e.g. Mepilex®) (#312722) 7. Transparent semipermeable dressing x 2 (e.g.Tegaderm) (# 319315) 8. Plastic backed pad (blue pad) 9. Tru-Close® drain bag (#311808) (for active drainage) 10. Vinyl connecting tube (#310480) (for gravity drainage) 11. 2,000 mL urinary drainage bag (#310271) (for gravity drainage) 12. Alcohol swabs PROCEDURE 1. Explain procedure to patient. 2. Perform hand hygiene and don appropriate PPE. 3. Prepare new system to be attached to peritoneal drain:
a. For Gravity Drainage: i. Attach bag to female end of vinyl connection tubing while maintaining sterility of
equipment. b. For Active Drainage:
i. Remove drain bag and attached tubing from packaging while maintain sterility of equipment.
ii. Ensure drain port at bottom of bag is closed. 4. Expose connection site of peritoneal tube and existing extension set tubing. 5. Cleanse connection site vigorously with alcohol swab for 15 seconds and allow to dry. 6. Disconnect existing extension set and drainage bag from peritoneal drain. 7. Connect new extension tubing luer lock to peritoneal drain while maintaining asepsis.
a. For Active drainage, activate suction by depressing the suction bellows. 8. Open sterile dressing set and add items required for dressing change. 9. Remove existing dressing and securement device.
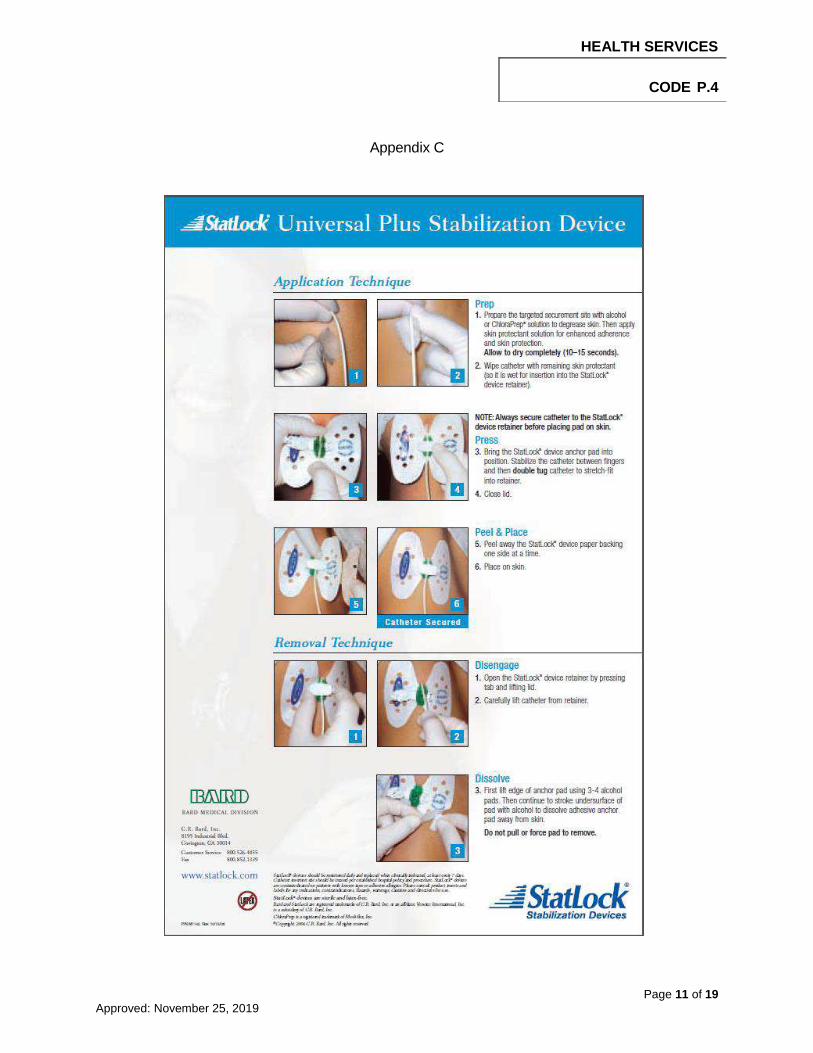
NOTE: Alcohol swab is used to remove securement device (see appendix C). 10. Perform hand hygiene and don sterile gloves. 11. Assess insertion site for signs of infection or skin breakdown. 12. Cleanse insertion site and entire area to be covered with dressing.
12.1 Lift catheter with sterile gauze. Cleanse site with chlorhexidine swab from center moving outwards and up length of catheter to be covered by dressing.
12.2 Allow to dry completely (may take up to 3 minutes). 13. Apply securement device (StatLock®), if applicable, as described in Appendix C as close to
insertion site as possible without displacing tube or causing tube to kink. 14. Cover insertion site and securement device with foam dressing.

HEALTH SERVICES
Page 6 of 19
Approved: November 25, 2019
CODE P.4
15. Cover foam dressing and securement device with transparent semipermeable dressings. 16. Ensure there are no kinks and that the bag rests lower than the insertion site to allow for
gravity drainage. 17. Document.
E. Removal EQUIPMENT 1. PPE 2. Gauze (2x2’s) 3. Non-sterile gloves 4. Normal saline 5. Transparent dressing 6. Unlocking device/key PROCEDURE 1. Verify MRP’s Order for removal of drain.
2. Explain procedure to patient. 3. Position patient comfortably with puncture site up.
4. Wash hands.
5. Don appropriate PPE.
6. Inspect drain to determine if it has a locking mechanism that must be disengaged before
removal.
NOTE: Locking mechanism looks like a string at the distal end of catheter. When pulled tight and secured, it holds pigtail end of catheter (inside patient) coiled tightly so it cannot be accidentally pulled out.
7. Identify type of locking mechanism, if present, and ensure lock is disengaged correctly before
attempting removal (see appendix A & B).
NURSING ALERT:
Check Radiology/Ultrasound/CT report or MRP progress note for exact placement of drain. Drains that are positioned in organs cannot be removed by nurses.
HEALTH SERVICES
Page 7 of 19
Approved: November 25, 2019
CODE P.4
NOTE: If you are unable to unlock ensure at least 2 nurses have assessed drain to
ensure locking device was correctly disengaged. If drain has been appropriately unlocked and continues to have significant resistance upon removal, contact interventional radiology department.
8. Remove old dressing. Note any drainage and observe site.
9. Remove StatLock® securement device (see Appendix C).
10. Cleanse site with normal saline.
11. Pull drain out with steady traction while patient is exhaling.
12. Apply pressure to the puncture site using sterile 2 x 2’s until it stops leaking fluid.
13. Discard soiled gauze and cover puncture site with a dry dressing.
NOTE: Change dressing prn if site continues to expel drainage. Dressing can be
removed after 24 hours.
14. Continue to monitor patient and dressing for one hour post drain removal. 14.1 Have patient remain lying with puncture site up for at least 30 minutes monitoring for
complications. 14.2 Continue to monitor patient’s tolerance of removal including dressing at site for an
additional 30 minutes once mobile. NOTE: For outpatients, if stable following one hour of observation, patient may be
discharged home unless MRP indicates otherwise.
15. Document.
NURSING ALERT:
If significant resistance is felt when removing drain, stop and notify Interventional Radiology for troubleshooting suggestions
If there is a locking mechanism in place, suture-like material may be longer than drain. In this case, ensure entire length of suture-like material is removed.
DO NOT cut locking mechanism off drain. If required, MRP or the Interventional Radiology Department will do so.
HEALTH SERVICES
Page 8 of 19
Approved: November 25, 2019
CODE P.4
REFERENCES Society of Gastroenterology Nurses and Associates, Inc. (2013). Gastroenterology nursing: A core
curriculum. (5th ed.). USA: Mosby, Inc. Revised by: Sharon Misfeldt, CNE, GI/Endoscopy, RQHR; Jennifer Taylor, RN, CGN(C), GI
Unit Coordinator, Pasqua Hospital Date: January 2013 Revised by: Ceigee Schrader, CNE – GI Unit; Kim Rapchalk, CNE – Medical Imaging, Kathy
Jellow, CNE – PACU/Day Surgery, Denise Kruppi, Program Development Educator – Prairie East Network
Date: March 2017 Revised by: Kim Rapchalk, CNE – Medical Imaging; Kathy Jellow, CNE – PACU/Day Surgery,
Pasqua Hospital Date: September 2019 (14Jul20-Order number updated for PeritX system) Approved by: Date:
Regina Qu’Appelle Health Region Health Services
Nursing Procedure Committee
25Nov19

HEALTH SERVICES
Page 9 of 19
Approved: November 25, 2019
CODE P.4
Unlocking a Resolve Drainage Catheter
1. Using the key, align the opening of the round section in line with the handle of the locking mechanism. Bring the flat back of the key around the catheter hub. Gently squeeze together.
2. Rotate the locking mechanism to the most proximal position
Too Far! Won’t unlock
Appendix A

HEALTH SERVICES
Page 10 of 19
Approved: November 25, 2019
CODE P.4
Unlocking a Cook® (Mac-Loc™) Drainage Catheter
Locked Unlocked Release Notch
1. While stabilizing the catheter hub with one hand, position a small, blunt object (approximately the shape and size of a ball point pen or small forceps) into release notch.
2. Pry upward until locking lever is free.
Appendix B
HEALTH SERVICES
Page 11 of 19
Approved: November 25, 2019
CODE P.4
Appendix C
Page 12 of 19
Approved: November 25, 2019
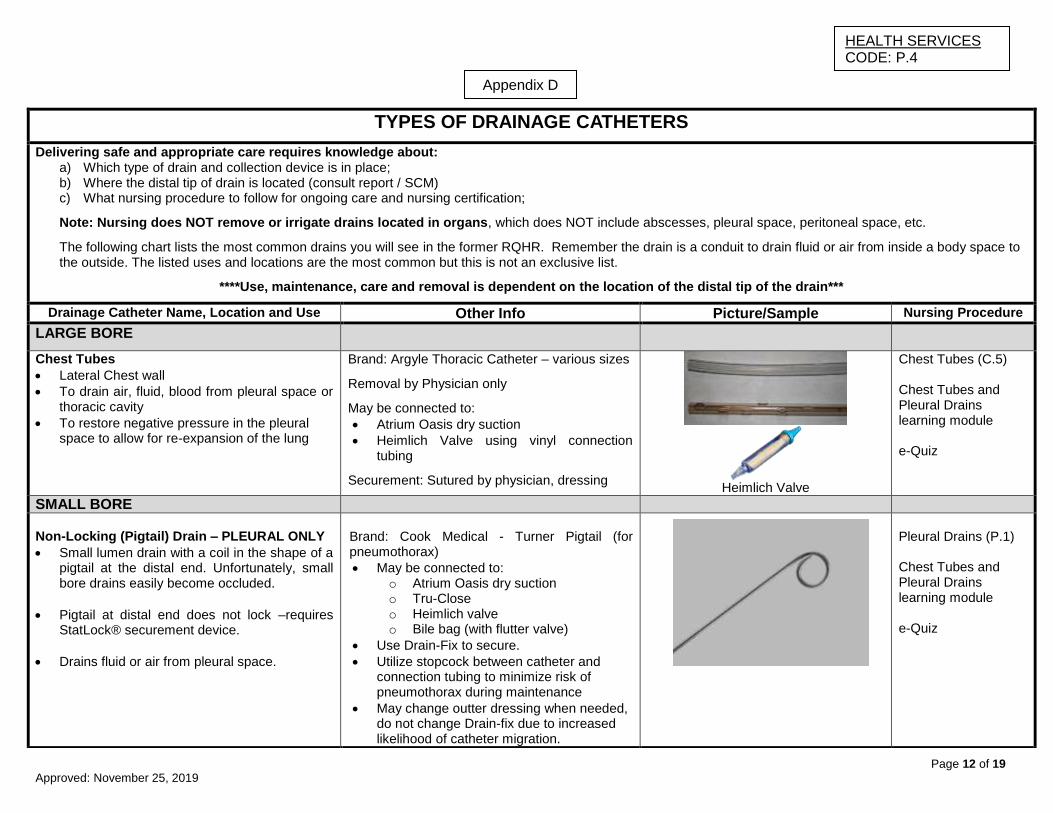
TYPES OF DRAINAGE CATHETERS
Delivering safe and appropriate care requires knowledge about: a) Which type of drain and collection device is in place; b) Where the distal tip of drain is located (consult report / SCM) c) What nursing procedure to follow for ongoing care and nursing certification;
Note: Nursing does NOT remove or irrigate drains located in organs, which does NOT include abscesses, pleural space, peritoneal space, etc.
The following chart lists the most common drains you will see in the former RQHR. Remember the drain is a conduit to drain fluid or air from inside a body space to the outside. The listed uses and locations are the most common but this is not an exclusive list.
****Use, maintenance, care and removal is dependent on the location of the distal tip of the drain***
Drainage Catheter Name, Location and Use Other Info Picture/Sample Nursing Procedure
LARGE BORE
Chest Tubes
Lateral Chest wall
To drain air, fluid, blood from pleural space or thoracic cavity
To restore negative pressure in the pleural space to allow for re-expansion of the lung
Brand: Argyle Thoracic Catheter – various sizes
Removal by Physician only
May be connected to:
Atrium Oasis dry suction
Heimlich Valve using vinyl connection tubing
Securement: Sutured by physician, dressing
Heimlich Valve
Chest Tubes (C.5) Chest Tubes and Pleural Drains learning module e-Quiz
SMALL BORE
Non-Locking (Pigtail) Drain – PLEURAL ONLY
Small lumen drain with a coil in the shape of a pigtail at the distal end. Unfortunately, small bore drains easily become occluded.
Pigtail at distal end does not lock –requires StatLock® securement device.
Drains fluid or air from pleural space.
Brand: Cook Medical - Turner Pigtail (for pneumothorax)
May be connected to: o Atrium Oasis dry suction o Tru-Close o Heimlich valve o Bile bag (with flutter valve)
Use Drain-Fix to secure.
Utilize stopcock between catheter and connection tubing to minimize risk of pneumothorax during maintenance
May change outter dressing when needed, do not change Drain-fix due to increased likelihood of catheter migration.
Pleural Drains (P.1) Chest Tubes and Pleural Drains learning module e-Quiz
Appendix D
HEALTH SERVICES CODE: P.4

Page 13 of 19
Approved: November 25, 2019
Drainage Catheter Name, Location and Use
Other Info
Picture/Sample
Nursing Procedure
SMALL BORE
Locking (Pigtail) Drains – PLEURAL ONLY
Small lumen drain with a coil in the shape of a pigtail at the distal end. Pigtail shape is locked into place with a string – when it is pulled tight during insertion, the pigtail curls inside the patient ensuring it stays in place.
Unfortunately, easily becomes occluded.
In order to remove a locking drain, the locking mechanism must be unlocked before the pigtail will uncoil.
May be used for removing fluid or air from the pleural space
Mac-Loc™ Locking Pigtail Drain Merit Medical® - Resolve Locking Pigtail Drain
May be connected to: o Atrium Oasis dry suction o Tru-Close o Heimlich valve o Bile bag o May require vinyl connection tubing
to link catheter with collection device
Securement: Match size of drain with appropriate StatLock®
Utilize stopcock between catheter and connection tubing to minimize risk of pneumothorax during care.
Merit Medical® - Resolve Locking Drainage Catheter
Mac-Loc™ Locking Drainage Catheter
Pleural Drains (P.1) Chest Tubes and Pleural Drains learning module RN Irrigation and Removal:
- Certification required - Learning Module - e-Quiz
Thora-Vent® Drain – PLEURAL ONLY
• Treats simple pneumothorax
Fluctuation of red signal diaphragm confirms placement into pleural cavity which continues to fluctuate until pneumothorax is resolved.
Can be attached to suction / water seal device using suction tubing set
Product secured by built-in adhesive
Pleural Drains (P.1) Chest Tubes and Pleural Drains learning module RN Irrigation and Removal:
- Certification required - Learning Module - e-Quiz
HEALTH SERVICES CODE: P.4

Page 14 of 19
Approved: November 25, 2019
Drainage Catheter Name, Location and Use Other Info Picture/Sample Nursing Procedure
Locking (Pigtail) Drains - Non-Pleural
Small lumen drain with a coil in the shape of a pigtail at the distal end. Pigtail shape is locked into place with a string – when it is pulled tight during insertion, the pigtail curls inside the patient ensuring it stays in place.
Unfortunately, easily becomes occluded.
In order to remove a locking drain, the locking mechanism must be unlocked before the pigtail will uncoil.
Use, maintenance, care and removal is dependent on location of distal tip of catheter.
May be used for: o Peritoneal drainage (abdomen) o Abscess drainage o Urinary drainage or diversion (flank) o Biliary tract drainage or diversion
(lower abdomen) o Remember – exit site does not
necessarily indicate purpose or function of drain.
Mac-Loc™ Locking Pigtail Drain Merit Medical® - Resolve Locking Pigtail Drain
May be connected to: o Tru-Close o Bile bag o Urinary drainage bag
Securement: Match size of drain with appropriate StatLock®
Merit Medical® - Resolve Locking Drainage Catheter
Mac-Loc™ Locking Drainage Catheter
Depends on location of distal tip of drainage catheter RN Certification required for irrigation: Transhepatic Biliary
Drain (T.6) - aka bili or chole drain
Certification not required: Paracentesis (P.4)
Nephrostomy Tubes (N.5)
Nephrouterostomy Tubes (N.5)
Abscess or other (D.2)
LONG TERM
PleurX™ (Pleural)
Long-term management of recurrent malignant or non-malignant pleural effusions
PleurX™
Requires PleurX™ vaccum bottle to maintain negative pressure (comes with dressing supplies and cap)
Tunneled under skin (no securement device)
PleurX™ Pleural (P.27)
PleurX™ (Peritoneal)
Long-term management of recurrent malignant or non-malignant ascites
PleurX™
Utilizes PeritX® bag to facilitate gravity drainage (comes with dressing supplies and cap)
Tunneled under skin (no securement device)
PleurX™ Peritoneal (P.27)
HEALTH SERVICES CODE: P.4

Page 15 of 19
Approved: November 25, 2019
Drainage Catheter Name, Location and Use
Other Info Picture/Sample Nursing Procedure
OTHER
Penrose Drain
A flat ribbon-like drain
Open system with no collection device
Used for abcess drainage in various wounds
Collection device: dressing
Drains (D.2)
Jackson-Pratt Catheter
Soft, pliable silicone drainage catheter with multiple perforations at distal tip. Other end connects to Jackson-Pratt bulb reservoir. Active suction collection device that facilitates removal of fluid
Connects to Jackson-Pratt collection bulb
Drains (D.2) typically but must confirm location of distal tip of drainage catheter
Paracentesis
Short-term drainage of ascites from peritoneal cavity
Brand: Turkel™ Safety Needle Temporary Securement: Drain Fix Collection device: Catheter bag connected to vinyl connecting tubing (or manual via 60 ml syringe)
Paracentesis (P.4)
Malecot Catheter
Drainage from open renal or bladder surgeries or nephrostomy drainage
Abscess drainage
Malecot catheters are larger bore than pigtail drains and the wings at the distal tip are used to promote catheter retention and facilitate drainage
Brand: Cook Medical – silicone catheter must not remain in place for more than 4 weeks Brand: Bard - latex catheters Connects to catheter bag or vinyl connecting tubing to urinary drainage bag.
Dependent on the location of the distal tip of the drain
HEALTH SERVICES CODE: P.4

Page 16 of 19
Approved: November 25, 2019
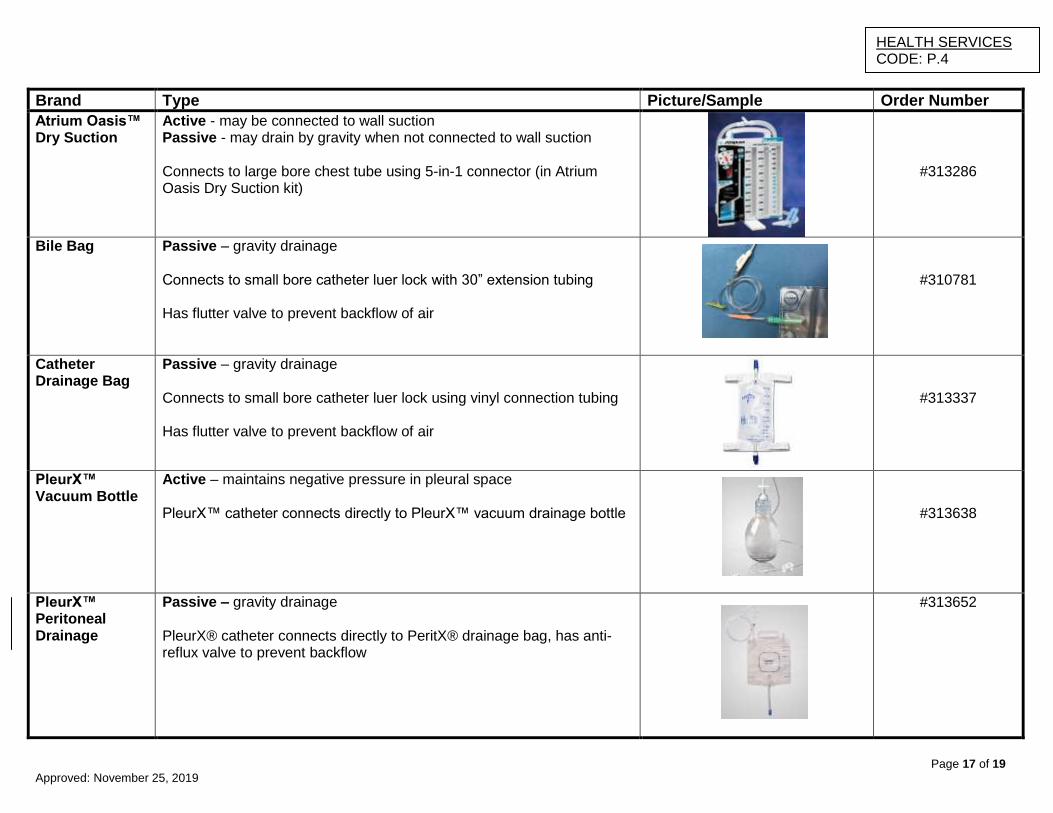
TYPES OF COLLECTION DEVICES
Brand Type Picture/Sample Order Number
Jackson-Pratt® (JP) collection device
Active – approx. 110 mmHg suction pressure Bulb reservoir collection devices connected to Jackson-Pratt drainage catheter to facilitate the drainage of fluid. The bulb must be collapsed to provide adequate suction. Reserved for wounds with small volumes of drainage (25-50 mls). Removed when minimal level of drainage within 24 hours (based on physician order). Refer to Nursing Procedure D.2.
Bulb - #311195
Tru-Close® Active – approx. 103 mmHg suction pressure Tru-Close® is a high negative pressure drain that usually connects to small bore pigtail drain via luer lock connection. No additional tubing required. May be switched to gravity drainage at the discretion of the Surgeon.
#311808
Hemovac® Active - greater than 103 mmHg suction pressure Hemovac® has multiple perforations at the distal end, but has stiffer tubing than a JP. It is connected to a collapsible collection device that when collapsed provides suction to facilitate the drainage of fluid. Can hold up to 500 mls of drainage.
Inserted in OR – not replaced by nursing
Sump Drain Active - Only inserted in Operating Room. Double or triple lumen drain collects drainage from inside the body using a large outflow lumen requiring wall suction to provide a vacuum. A smaller inflow lumen provides air venting to promote drainage. If irrigation is ordered, the third lumen may be used. Prevents build-up of fluid within the depths of the wound. Typically used post-surgically for hip and knee surgeries. Connects to wall suction.
Inserted in OR – not replaced by nursing
HEALTH SERVICES CODE: P.4
Page 17 of 19
Approved: November 25, 2019
Brand Type Picture/Sample Order Number
Atrium Oasis™ Dry Suction
Active - may be connected to wall suction Passive - may drain by gravity when not connected to wall suction Connects to large bore chest tube using 5-in-1 connector (in Atrium Oasis Dry Suction kit)
#313286
Bile Bag Passive – gravity drainage Connects to small bore catheter luer lock with 30” extension tubing Has flutter valve to prevent backflow of air
#310781
Catheter Drainage Bag
Passive – gravity drainage Connects to small bore catheter luer lock using vinyl connection tubing Has flutter valve to prevent backflow of air
#313337
PleurX™ Vacuum Bottle
Active – maintains negative pressure in pleural space PleurX™ catheter connects directly to PleurX™ vacuum drainage bottle
#313638
PleurX™ Peritoneal Drainage
Passive – gravity drainage PleurX® catheter connects directly to PeritX® drainage bag, has anti-reflux valve to prevent backflow
#313652
HEALTH SERVICES CODE: P.4

Page 18 of 19
Approved: November 25, 2019
TYPES OF CONNECTIONS AND TUBING
Name Connects Picture/Sample Order Number
Vinyl Connection Tubing
Connects small bore luer lock catheter to: - Heimlich valve - Urinary leg bag - 2000 ml urinary drainage bag (paracentesis) - Atrium Oasis dry suction
Stores #310480
30” Extension Set Connects small bore luer lock catheter to bile bag
Stores #313139
5-in-1 Connector Connects large bore chest tube to: - Atrium Oasis dry suction - Heimlich valve
Comes in Atrium package
Stores #310221
PleurX™ Lockable Drainage Line Kit
Connects peritoneal PleurX™ to modified urinary catheter bag
Stores #313644
PleurX™ Valve Cap Caps patient PleurX™ line between drainage intervals
Stores #313642
HEALTH SERVICES CODE: P.4
Page 19 of 19
Approved: November 25, 2019
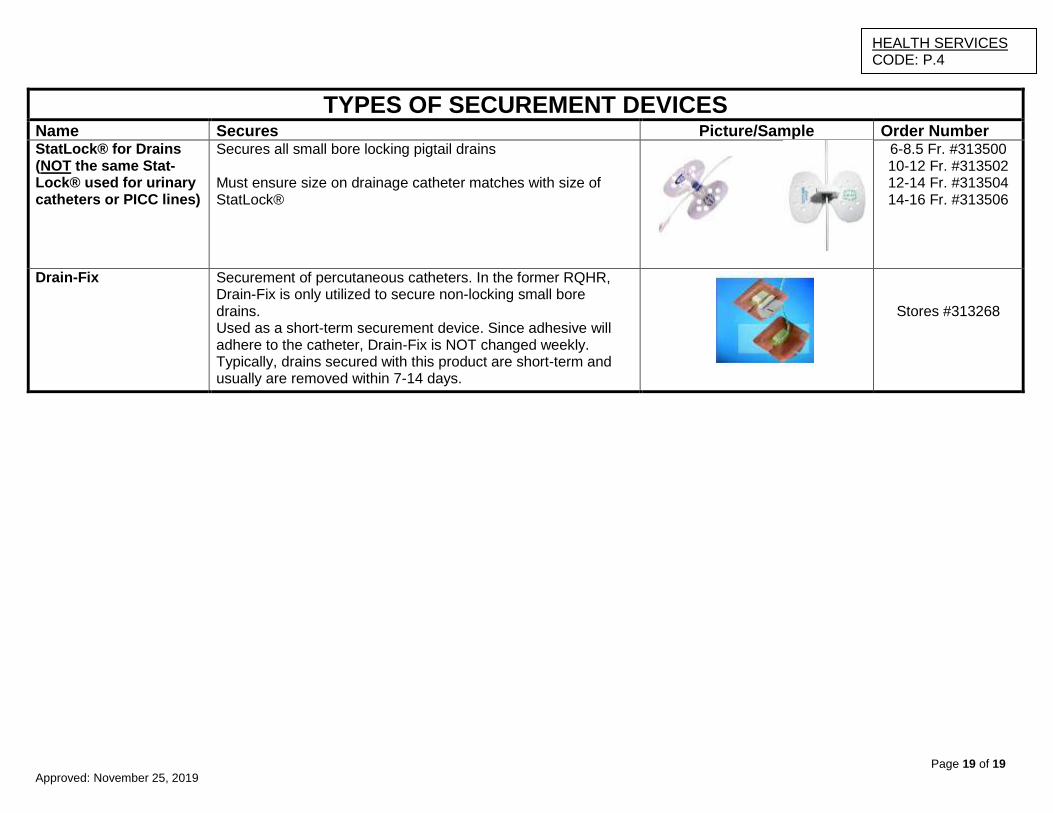
TYPES OF SECUREMENT DEVICES
Name Secures Picture/Sample Order Number StatLock® for Drains (NOT the same Stat-Lock® used for urinary catheters or PICC lines)
Secures all small bore locking pigtail drains Must ensure size on drainage catheter matches with size of StatLock®
6-8.5 Fr. #313500 10-12 Fr. #313502 12-14 Fr. #313504 14-16 Fr. #313506
Drain-Fix Securement of percutaneous catheters. In the former RQHR, Drain-Fix is only utilized to secure non-locking small bore drains. Used as a short-term securement device. Since adhesive will adhere to the catheter, Drain-Fix is NOT changed weekly. Typically, drains secured with this product are short-term and usually are removed within 7-14 days.
Stores #313268
HEALTH SERVICES CODE: P.4