hdvs ip camera md20 & md50 user manual
TRANSCRIPT

HDVS IP CAMERAMD20 & MD50
User Manual

Table of Contents
1. Overview ..................................................................................................................................3
1.1 Features .......................................................................................................................3
1.2 Package Contents ....................................................................................................... 4
1.3 Dimensions ..................................................................................................................5
1.4 Installation (For Rugged Camera) ............................................................................. 6
1.5 Connectors ...................................................................................................................7
2. Camera Cabling ......................................................................................................................8
2.1 Connect Ethernet Cable ............................................................................................. 8
2.1.1 Indoor Camera ............................................................................................. 8
2.1.2 Rugged Camera .......................................................................................... 9
3. System Requirements ..........................................................................................................10
4. Access Camera ..................................................................................................................... 11
5. Setup Video Resolution ........................................................................................................ 14
6. ConfigurationFilesExport/Import ...................................................................................... 15
AppendixA:TechnicalSpecifications .............................................................................................. 16
AppendixB:DeletetheExistingDCViewer .................................................................................... 18
AppendixC:SetupInternetSecurity ............................................................................................... 19
AppendixD:VideoResolution .........................................................................................................20
2M- Quad Streams ..................................................................................................................20
2M-TripleStreams ..................................................................................................................24
2M- Dual Streams....................................................................................................................26
2M- Single Stream ...................................................................................................................26
2M Real time- Quad Streams .................................................................................................. 27
2MRealtime-TripleStreams .................................................................................................. 31
2M Real time- Dual Streams ................................................................................................... 33
2M Real time- Single Stream................................................................................................... 34

3
1. Overview
TheFullHDMultipleStreamsCompactFixedDomeIPCameraiscapableofservingreal-time streaming and makes image quality more smoothly. In addition to MJPEG real timestreaming, thiscameradevelopsH.264codec toapply forhighresolutiondigitalbroadcast.
Withcompactandsophisticatedmechanicaldesign,theFullHDMultipleStreamsCom-pactFixedDomeIPCameraiseasyinstalledandaesthetic.
1.1 Features Progressive Scan CMOS Sensor
QuadStreamsCompression:H.264Baseline/Main/HighProfile+MJPEG
Multi-language Support
TamperingAlarm
Wide Dynamic Range
Motion Detection
Privacy Masks
SmartPictureQuality/3DNoiseReduction
Vertical View Mode (Image rotation by 90 degrees)
NetworkFailureDetection
WeatherproofDongleCable*
Weatherproof(IP66international)*
Micro SD support
SecurityTorxagainsttampering
ONVIFSupport
(*)Optional

4
1.2 Package ContentsPleasecheckthepackagecontainsthefollowingitemslistedbelow.
IndoorCamera/
Rugged Camera (with Cable)
Rubber Washer (×1, Casing)
Rubber Washers (×3,Baseplate)
(Rugged Camera only)
Self-tappingscrews(×3) Plastic Anchors (×3)
SecurityTorxQuick Guide
CD
NOTE:Thetypeofthesuppliedself-tappingscrewsismainlyforsoftersubstrate/material installation such as wood. For other installation environment such as cement wall,itisrequiredtopre-drillanduseplasticanchorsbeforefasteningthesuppliedself-tapping screw on the wall.

5
1.3 DimensionsTheIPCamera’sdimensionsareshownbelow.

6
1.4 Installation (For Rugged Camera) ForRuggedCamera,wesuggestyou to install theCameraas the followingsteps tomakesuretheCameraiswellwaterproof.
Step 1:
Put the Rubber Washers inbothsidesoftheholesontheBottomPlateoftheCamera.
Step 2:
Aim the installing hole to the target installing posi-tionandfastenthescrewsto attach the Camera to the ceiling.
Step 3:
Referto1.5 Connectors and 2. Camera Cabling to connect the cable and adjust the lens.
Step 4:
Aim the arch parts on both DomeCover and BottomPlate to attach two parts firmly together. And thenfastenthesecurityscrewsontheDomeCovertofin-ish installing the Camera.
7
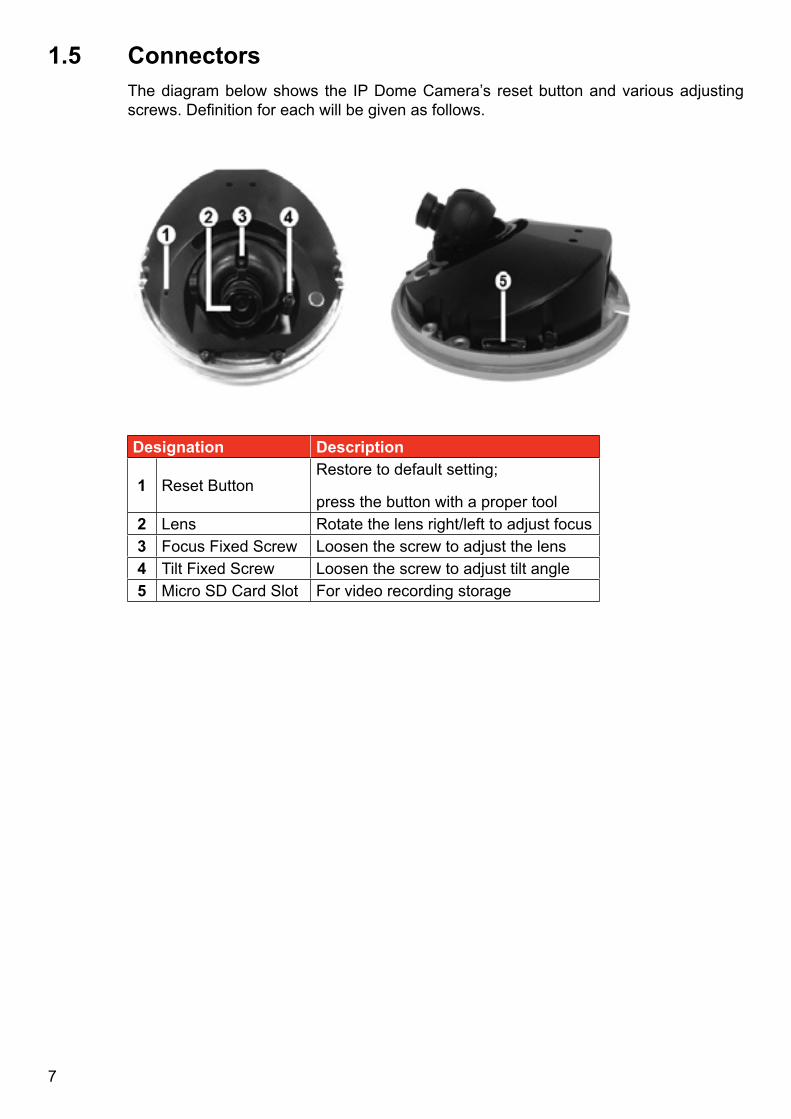
1.5 ConnectorsThediagrambelowshows the IPDomeCamera’s resetbuttonandvariousadjustingscrews.Definitionforeachwillbegivenasfollows.
Designation Description
1 ResetButtonRestoretodefaultsetting;
press the button with a proper tool2 Lens Rotatethelensright/lefttoadjustfocus3 FocusFixedScrew Loosen the screw to adjust the lens4 TiltFixedScrew Loosen the screw to adjust tilt angle5 Micro SD Card Slot For video recording storage

8
2. Camera Cabling
PleasefollowtheinstructionsbelowtocompleteIPCameraconnection.
2.1 Connect Ethernet CablePleasefollowtheinstructionsbelowtoconnectIndoor/RuggedIPDomeCamera’s
Ethernet cable.
2.1.1 Indoor CameraTheEthernetconnector,whichislocatedintherearofthecamera,isshownbelow:
PoE Connection
ConnecttheoneendoftheEthernetcabletothenetworkportonthecamera,andtheother end to Power Sourcing Equipment (PSE) like hubs or routers.
CheckthestatusofthelinkindicatorandactivityindicatorLEDs;iftheLEDsareunlit,please check the connections.
Green Link Light indicates good network connection.
OrangeActivityLightflashesfornetworkactivityindication.

9
2.1.2 Rugged CameraThe Rugged IP Dome Camera supports two kinds of Ethernet cable; one is M12 D-Coded Cable, and the other is RJ-45 Dongle Cable.
RJ-45 Dongle Cable Connection
RJ-45 Dongle
RJ-45 Dongle Cable Connection
RuntheEthernetcablethroughtheWaterproofRJ-45Screw-OnPlug.Thencon-nectoneendoftheEthernetcabletotheRJ-45dongle,tighteningthesealingnutof theWaterproofRJ-45Screw-OnPlugcompletely.Lateronconnect theotherendoftheEthernetcabletoPowerSourcingEquipment(PSE)likehubsor routers.
NOTE:PleaseuseaPoEwaterproofswitch/hubsothatthecameracanwork.

10
3. System Requirements
ToperformtheIPCameraviawebbrowser,pleaseensureyourPCisingoodnetworkconnection, and meet system requirements as described below.
Items System Requirement
Personal Computer
1. Intel® Pentium®M,2.16GHzor
Intel® CoreTM2Duo,2.0GHz
2. 2GBRAMormoreOperating System WindowsVISTA/WindowsXP/Windows7Web Browser MicrosoftInternetExplorer6.0orlater
Firefox
Chrome
SafariNetwork Card 10Base-T(10Mbps)or100Base-TX(100Mbps)operationViewer ActiveXcontrolplug-inforMicrosoftIE

11
4. Access Camera
For initial access to the IP Camera, users can search the camera through the installer program:DeviceSearch.exe,whichcanbefoundin“DeviceSearch”folderinthe
supplied CD.
Device Search Software Setup
Step 1: DoubleclickontheprogramDeviceSearch.exe.Afteritswindowappears,clickon the <Device Search> button on the top side.
Step 2: Thesecurityalertwindowwillpopup.Clickon<Unblock>tocontinue.
Device Search
Step 3: Clickon<DeviceSearch>again,andallthefindingIPdeviceswillbe listed in thepage.TheIPCamera’s defaultIPaddressis:192.168.0.250.
Step 4: Doubleclickorrightclickandselect<Browse>toaccessthecamera directly via web browser.
Step 5: Thenthepromptwindowofrequestforenteringdefaultusernameand passwordwillappearforloggingintotheIPCamera.
ThedefaultloginIDandpasswordfortheAdministratorare:
Login ID Passwordadmin admin
NOTE: ID and password are case sensitive.
NOTE: Itisstronglyadvisedthatadministrator’spasswordbealteredfor thesecurityconcerns.RefertoFullHD Multiple Streams IP Cam eraMenuTreeforfurtherdetails.

12
Additionally,userscanchangetheIPCamera’snetworkproperty,eitherDHCPorStaticIP,directlyinthedevicefindinglist.RefertothefollowingsectionforchangingtheIPCamera’snetworkproperty.
Example of Changing IP Camera’s Network Property
UserscandirectlychangeanIPCamera’snetworkproperty,ex.fromstaticIPtoDHCP,inthefindingdevicelist.ThewaytochangetheIPCamera’snetworkpropertyisspeci-fiedbelow:
Step 1: Inthefindingdevicelist,clickontheIPCamerathatyouwouldliketo changeitsnetworkproperty.Ontheselecteditem,rightclickand select “NetworkSetup.”Meanwhile,recordtheIPCamera’sMAC address, for future identifica-tion.
Step 2:The“NetworkSetup”pagewillcomeout.Select“DHCP,”andpress “Apply”buttondownthepage.
Step 3: Clickon<OK>ontheNoteofsettingchange.Waitforoneminutetore-searchthe IP Camera.
Step 4: Clickonthe<DeviceSearch>buttontosearchallthedevices.ThenselecttheIP Camera with the correct MAC address. Double click on the IP Camera, and the login window will come out.
Step 5: EnterUsernameandPasswordtoaccesstheIPCamera.
Installing DC Viewer Software Online
For the initial access to the IP Camera, a client program, DC Viewer, will be automati-cally installed to your PC when connecting to the IP Camera.
IftheWebbrowserdoesn’tallowDCViewerinstallation,pleasechecktheInternetse-curitysettingsorActiveXcontrolsandplug-inssettings (refertoSection:SetupInternetSecurity) to continue the process.
TheInformationBar(justbelowtheURLbar)maycomeoutandaskforpermissiontoinstalltheActiveXControlfordisplayingvideoinbrowser.RightclickontheInformationBarandselect<InstallActiveXControl…>toallowtheinstallation.

13
ThedownloadprocedureofDCViewersoftwareisspecifiedasfollows.
Step 1: IntheDCViewerinstallationwindow,clickon<Next>tostartinstallation.
Step 2: Thestatusbarwillshowtheinstallationprogress.Aftertheinstallationis
completed,clickon<Finish>toexittheinstallationprocess.
Step 3: Click on <Finish> to close the DC Viewer installation page.
OncetheDCViewerissuccessfullyinstalled,theIPCamera’sHomepagewillbeabletocorrectlydisplayasthefigurebelow.
Image and Focus Adjustment
TheimagedisplaysontheHomepagewhensuccessfullyaccessingtotheIPCamera.Adjustzoomandfocusasnecessarytoproduceaclearimage.
Note:Pleasereferto FullHDMultipleStreamsIPCameraMenuTreeformore
buttonfunctiondetail.
Viewer Window
Live Video Panel
Video FormatSelection
Display Mode
WebRecordingButton
VideoCompressionInfo
VideoStreamingPauseButton
SnapshotButton
SpeakerButton
TalkButton
MainTabs Languages Selection
TimeDisplay
14
5. Setup Video Resolution
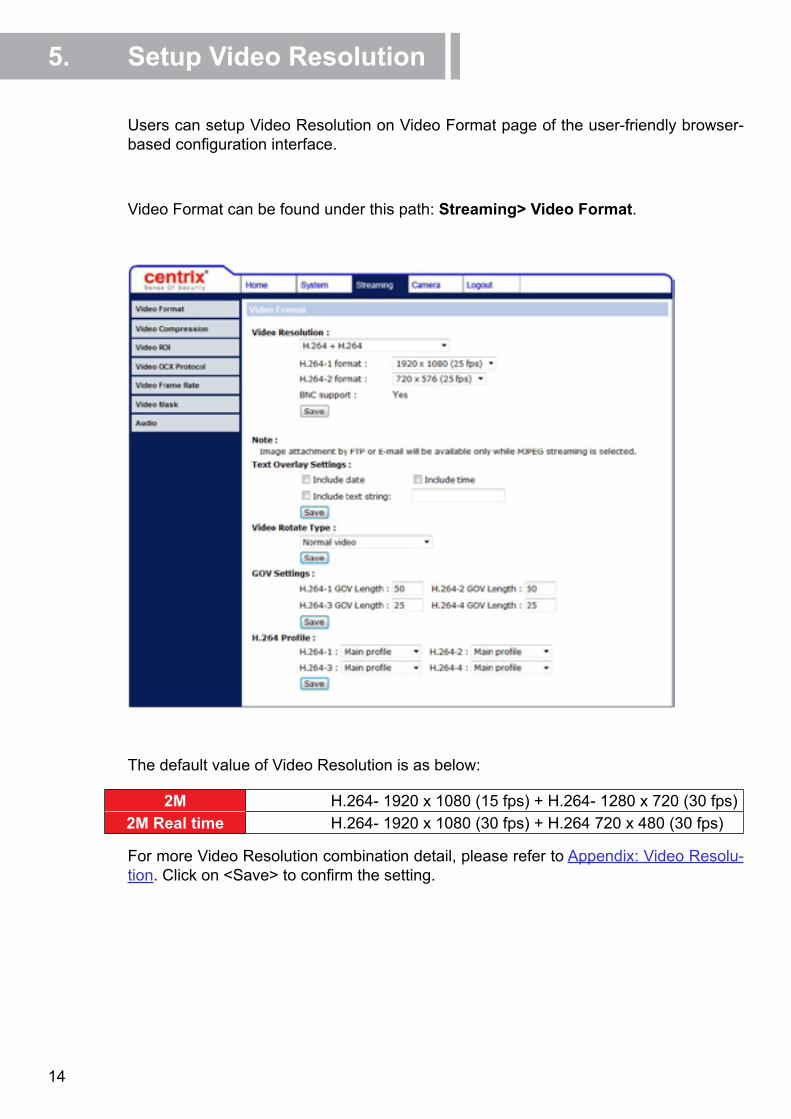
UserscansetupVideoResolutiononVideoFormatpageoftheuser-friendlybrowser-basedconfigurationinterface.
VideoFormatcanbefoundunderthispath:Streaming> Video Format.
ThedefaultvalueofVideoResolutionisasbelow:
2M H.264-1920x1080(15fps)+H.264-1280x720(30fps)2M Real time H.264-1920x1080(30fps)+H.264720x480(30fps)
FormoreVideoResolutioncombinationdetail,pleaserefertoAppendix:VideoResolu-tion.Clickon<Save>toconfirmthesetting.

15
6. ConfigurationFilesExport/Import
Toexport/ import configuration files,users canaccess theMaintenancepageon theuser-friendlybrowser-basedconfigurationinterface.
TheMaintenancesettingcanbefoundunderthispath:System> Maintenance.
UserscanexportconfigurationfilestoaspecifiedlocationandretrievedatabyuploadinganexistingconfigurationfiletotheIPCamera.
Export
Userscansavethesystemsettingsbyexportingtheconfigurationfile(.bin)toaspeci-fiedlocationforfutureuse.Clickonthe<Export>button,andthepopupFileDownloadwindowwill comeout.Clickon<Save>andspecifyadesired location forsaving theconfigurationfile.
Upload
TocopyanexistingconfigurationfiletotheIPCamera,pleasefirstclickon<Browse>toselecttheconfigurationfile,andthenclickonthe<Upload>buttonforuploading.

16
AppendixA:TechnicalSpecifications
Camera 2M 2M Real-time
Image Sensor 1/2.7”ProgressiveCMOSEffectivePixels 1920(H)x1080(V)
Minimum Illumination 0.1lux(Color)
WhiteBalance Manual/AWB/ATW
Shutter Speed 1~1/10000sec.
Lens
Focal Length 4.0 mm
FNumber F 1.5FOV 78°
Operation
Multiple LanguagesEnglish/French/German/Italian/Korean/SimplifiedChinese/
TraditionalChinese/Russian
Image Setting
BacklightCompensation On/OffWhiteBalance Auto/ManualNoiseReduction(3D) On/OffWide Dynamic Range On/OffPrivacy Mask On/OffBrightness ManualExposure Auto/ManualSharpness ManualContrast ManualSaturation ManualHue ManualDigital Zoom SupportMotion Detection On/OffPrivacyMaskType ColorTamperingAlarm On/Off
AudioOne-wayAudio* Mic inCompression G.711/G.726

17
Network
Interface RJ-45,10/100MbpsEthernetVideo Compression H.264/MJPEG
Video StreamingDualStreams-H.264+H.264/MJPEG
QuadStreams-H.264+H.264+H.264+H.264/MJPEG
Video ResolutionH.264-FullHD1080P/SXGA/HD720P/XGA/SVGA/D1/VGA/CIF
MJPEG-FullHD1080P/SXGA/HD720P/XGA/SVGA/D1/VGA/CIF
Protocol IPv4/v6,TCP/IP,UDP,RTP,RTSP,HTTP,HTTPS,ICMP,FTP,SMTP,DHCP,PPPoE,UPnP,IGMP,SNMP,QoS,ONVIF
Security HTTPS/IPFilter/IEEE802.1XEventNotification HTTP/FTP/SMTPMicroSD* microSDHC32GBsupportSupportedWebBrowser InternetExplorer(6.0+)/Chrome/Firefox/SafariUserAccount 20Password Levels UserandAdministrator
Mechanical
Lens Mounting M12BoardLensConnectors Ethernet RJ-45
General
OperatingTemperature -10°C ~ 50°C (14°F ~ 122°F)UserandAdministrator 10%~90%,NoCondensationWeatherproofStandard Rugged Camera- IP66Dimension ∅110.2x47.7mm(∅4.3x1.9in.)Weight 180 g (0.40 lb)Power Source PoEPower Consumption 3.5 WRegulatory CE/FCC/RoHS
18
Appendix B: Delete the Existing DC Viewer
ForuserswhohaveinstalledtheDCViewerinthePCpreviously,pleasefirstremovetheexistingDCViewerfromthePCbeforeaccessingtotheIPCamera.
Deleting the DC Viewer
In the Windows <Start Menu>, activate <Control Panel>, and then double click on <Add or Remove Programs>. In the <Currently installed programs> list, select <DCViewer> and click on the button <Remove>touninstalltheexistingDCViewer.
Deleting Temporary Internet Files
Toimprovebrowserperformance,itissuggestedtocleanuptheallthefilesintheTemporaryInter-net Files.
Theprocedureisasfollows:
Step 1: Clickonthe<Tools>tabonthemenubarandselect<InternetOptions>.
Step 2: Clickonthe<Delete>buttonunder<Browsinghistory>section.Thenclickonthe<DeleteFiles>buttonunderthe<TemporaryInternetfiles>section.
Step 3: Aconfirmationwindowwill popup.Clickon<Yes>tostartdeletingthefiles.

19
Appendix C: Setup Internet Security
IfActiveXcontrolinstallationisblocked,pleaseeithersetInternetsecurityleveltodefaultorchangeActiveXcontrolsandplug-inssettings.
Internet Security Level: Default
Step 1:StarttheInternetExplorer(IE).
Step 2:Clickonthe<Tools>tabonthemenubarandselect<InternetOptions>.
Step 3:Clickonthe<Security>tab,andselect<Internet>zone.
Step 4:Downthepage,clickonthe<DefaultLevel>buttonandclickon<OK>toconfirmthesetting. Close the browser window, and restart a new one later to access the IP Camera.
ActiveX Controls and Plug-ins Settings
Step 1: Repeat Steps 1~3oftheprevioussectionabove.
Step 2:Downthepage,clickonthe<CustomLevel>buttontochangeActiveXcontrolsandplug-inssettings.TheSecuritySettingswindowwillpopup.
Step 3:Under<ActiveXcontrolsandplug-ins>, setALL items (as listed below) to <Enable> or <Prompt>. Please note that the items vary by IE version.
ActiveX controls and plug-ins settings:
1. AllowpreviouslyunusedActiveXcontrolstorunwithoutprompt.
2. Allow Scriptlets.
3. AutomaticpromptingforActiveXcontrols.
4. Binaryandscriptbehaviors.
5. Displayvideoandanimationonawebpagethatdoesnotuseexternalmediaplayer.
6. DownloadsignedActiveXcontrols.
7. DownloadunsignedActiveXcontrols.
8. InitializeandscriptActiveXcontrolsnotmarkedassafeforscripting.
9. RunActiveXcontrolsandplug-ins.
10.ScriptActiveXcontrolsmarkedsafeforscripting.
Step 4: Click on <OK> to accept the settings and close the Security Settings window.
Step 5: Click on <OK> to close the Internet Options screen.
Step 6: Close the browser window, and restart a new one later to access the IP Camera.

20
Appendix D: Video Resolution 2M- Quad Streams

21

22

23

24
2M- Triple Streams

25

26
2M- Dual Streams
2M- Single Streams

27
2M Real time- Quad Streams

28

29

30

31
2M Real time- Triple Streams

32

33
2M Real time- Dual Streams

34
2M Real time- Single Stream
*1920x1080(30fps)LowLatencydoesnotsupportBNC,3DNRandMotionDetection.

35

HDVS IP CAMERAMD20 & MD50
User Manual