hd-3wxl degausser manual · continuous degaussing system . operation and installation manual ....
TRANSCRIPT

HD-2 Operation and Installation Manual
HD-2 Series Continuous Degaussing System
Operation and Installation Manual
www.GarnerProducts.com
(800) 624-1903 10620 Industrial Ave. Suite 100
Roseville, CA 95678
Manufactured in the U.S.A
PN 4075-289E

HD-2 Operation and Installation Manual
TABLE OF CONTENTS
DECLARATION OF CONFORMITY 1
GENERAL INFORMATION 2
INSPECTION 2
INTRODUCTION 2
MAGNETIC FIELDS 2 Magnetic fields measured around perimeter 2 Pace Maker Users 2
SPECIFICATIONS 3
INSTALLATION 4 Power Requirements 4 Line Voltage Selection Reference 4 Input Voltage Configuration WARNING 5 Power Plug 7 Fuse Block 7 Location 7 Cooling 7
OPERATION 8 Degaussing Instructions 8
Automatic Degaussing Degaussing Instructions for DLT Media.
Degaussing Overview: 9 Controls and Indicators: 10
POWER Button (RED) LCD Display Media Drawer
Automatic Degaussing Technical Detail 10 Error Codes 11
Charge Error Drawer Open Error Gauss Error Overheat Error
PARTS LIST MODEL HD-2 12 WARRANTY 13

HD-2 Operation and Installation Manual Page 1
DECLARATION OF CONFORMITY
HD-2 Operation and Installation Manual Page 2
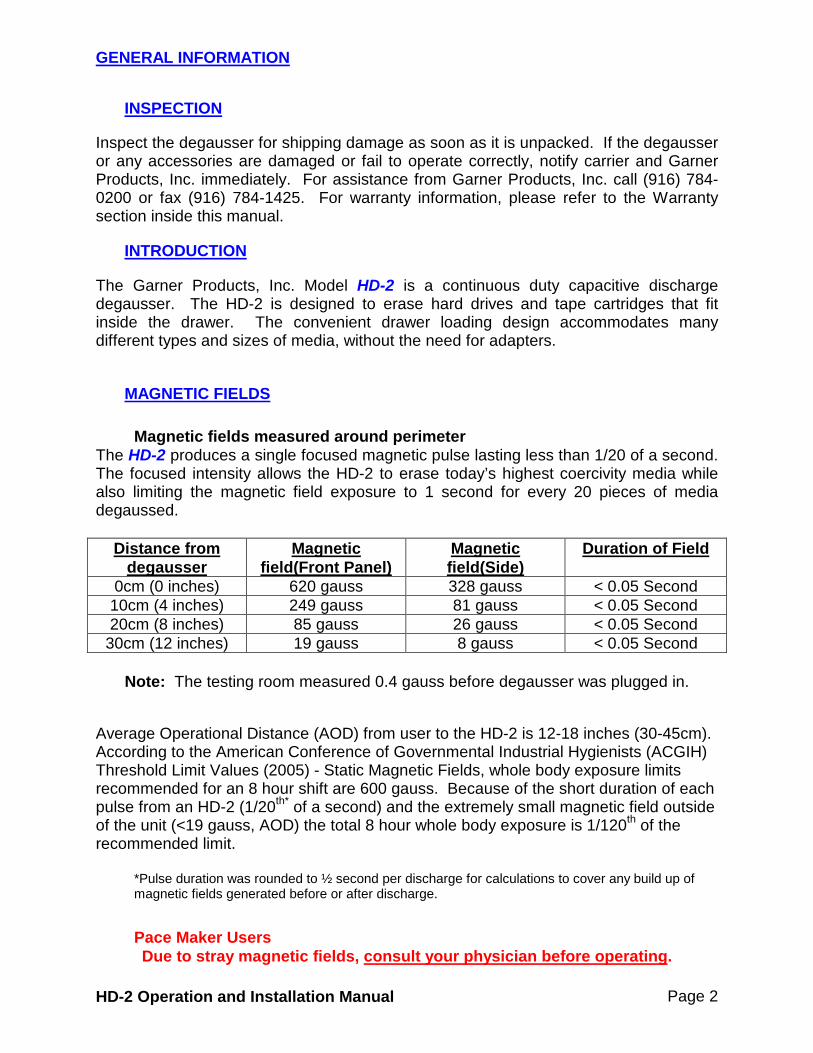
GENERAL INFORMATION
Inspect the degausser for shipping damage as soon as it is unpacked. If the degausser or any accessories are damaged or fail to operate correctly, notify carrier and Garner Products, Inc. immediately. For assistance from Garner Products, Inc. call (916) 784-0200 or fax (916) 784-1425. For warranty information, please refer to the Warranty section inside this manual.
INSPECTION
The Garner Products, Inc. Model HD-2 is a continuous duty capacitive discharge degausser. The HD-2 is designed to erase hard drives and tape cartridges that fit inside the drawer. The convenient drawer loading design accommodates many different types and sizes of media, without the need for adapters.
INTRODUCTION
Magnetic fields measured around perimeter
MAGNETIC FIELDS
The HD-2 produces a single focused magnetic pulse lasting less than 1/20 of a second. The focused intensity allows the HD-2 to erase today’s highest coercivity media while also limiting the magnetic field exposure to 1 second for every 20 pieces of media degaussed.
Distance from degausser
Magnetic field(Front Panel)
Magnetic field(Side)
0cm (0 inches)
Duration of Field
620 gauss 328 gauss < 0.05 Second 10cm (4 inches) 249 gauss 81 gauss < 0.05 Second 20cm (8 inches) 85 gauss 26 gauss < 0.05 Second
30cm (12 inches) 19 gauss 8 gauss < 0.05 Second
Note: The testing room measured 0.4 gauss before degausser was plugged in. Average Operational Distance (AOD) from user to the HD-2 is 12-18 inches (30-45cm). According to the American Conference of Governmental Industrial Hygienists (ACGIH) Threshold Limit Values (2005) - Static Magnetic Fields, whole body exposure limits recommended for an 8 hour shift are 600 gauss. Because of the short duration of each pulse from an HD-2 (1/20th* of a second) and the extremely small magnetic field outside of the unit (<19 gauss, AOD) the total 8 hour whole body exposure is 1/120th of the recommended limit.
*Pulse duration was rounded to ½ second per discharge for calculations to cover any build up of magnetic fields generated before or after discharge.
Pace Maker Users Due to stray magnetic fields, consult your physician before operating
.

HD-2 Operation and Installation Manual Page 3
SPECIFICATIONS
Power Supply (HD-2): Selectable: 95~105, 105~115, 115~125, 215~225, 225~235 or 235~240, See “Input Voltage Configuration” section of this manual.
Power Consumption (HD-2):
100V: Under Standby 0.3A While charging 5.0A At the time of ERASE 0.6A 110V: Under Standby 0.25A While charging 4.5A At the time of ERASE 0.55A 120V: Under Standby 0.2A While charging 4.0A At the time of ERASE 0.5A 220V: Under Standby 0.17A While charging 2.5A At the time of ERASE 0.35A 230V: Under Standby 0.16A While charging 2.25A At the time of ERASE 0.325A 240V: Under Standby 0.15A While charging 2.0A At the time of ERASE 0.3A
Degausser System: Capacitive Discharge Operating Time Duty Cycle: Continuous Erasing time: < 10 milliseconds Cycle time: 60 seconds per cycle. Magnetic Field: 8,500 Oe Peak ; 8,300 Oe measured in center. Max. Media Size: 108mm (4.25 in.)(W) x 38mm (1.50 in.)(H) x 149mm (5.86 in.)(D) Erasing Area Size: 108mm (4.25 in.)(W) x 38mm (1.50 in.)(H) x 149mm (5.86 in.)(D) Media: 2.5 type HDD, 3.5 type HDD, DLT, LTO, 3490 and more Temperature: 5°C - 40°C (41°F - 104°F) Humidity: 10%H - 40%H (without condensation) Weight:
HD-2: 42 lbs. (20 kg) Shipping: 48 lbs. (22.22 kg)
Dimensions: HD-2: 13 in. x 17.5 in. 7.375 in. (34cm x 45cm x 19cm) Shipping: 23 in.x18 in.x11 in. (61cm x 46cm x 30.5cm)
Warranty: 1 Year Factory Warranty Standard, Optional 3 Year Factory Warranty available.

HD-2 Operation and Installation Manual Page 4
All trouble shooting and wiring checks must be performed by a qualified electrician or authorized plant personnel.
INSTALLATION
Power Requirements It is important to ensure correct power is applied to the degausser. Unless otherwise specified and noted on the power specification label on the back of the HD-2, the HD-2 is factory configured for 120VAC. Check the power specifications label to ensure the factory configured HD-2 input voltage is configured to match the voltage from the power mains the HD-2 will plug into. Call Garner Products, Inc. if the voltage listed is not compatible with your voltage or if you have any questions. International customers call 011 916 784-0200.
Line Voltage Selection Reference The Line Voltage Selection Reference is a guide for configuring the voltage jumper to the correct tap of the transformer. This allows the HD-2 to be used world wide under a variety of voltages. For detailed instruction please see the “Input Voltage Configuration” section of this manual.
All trouble shooting and wiring checks must be performed by a qualified electrician or authorized plant personnel.

HD-2 Operation and Installation Manual Page 5
Input Voltage Configuration WARNING The HD-2 model is equipped with a voltage selection block allowing the HD-2 to be configured for use in any country. To check or change the voltage configuration of the HD-2, follow the steps listed below:
All trouble shooting and wiring checks must be performed by a qualified electrician or authorized plant personnel.
1) Read the Warning labels. All trouble shooting and wiring checks must be performed by a qualified electrician or authorized plant personnel.
2) Remove the power cord from the back of the HD-2.
3)
Using a Torx T-20 driver, remove (8) screws from the Front panel and the (5) front screws from the top panel.

HD-2 Operation and Installation Manual Page 6
4) Open the drawer and tilt back the front panel as shown. Note: Be careful not to put too much tension on the wires connecting to the front panel.
5)
To change the jumper position, pull the brown jumper wire from terminal on the right side of the fuse block and move it to the corresponding terminal that matches the power mains outlet voltage.
6)
Notice, this photo shows the correct jumper setting for 240 VAC.
7) Replace Front Panel and screws.

HD-2 Operation and Installation Manual Page 7
Power Plug Plug the EIA connector attached to the power cord supplied into the receptacle on the back of the HD-2.
Fuse Block Located behind the removable panel on the front side of the HD-2, there are six separate fuses, one each for 100, 110, 120, 220, 230 & 240 VAC power. Only one fuse is used at a time. Therefore, for any voltage range, the two unused fuses of the same value can be used as spares.
Location The degausser must be placed on a flat, hard surface. Keep at least a 6 inch (15cm) distance from any object that may interfere with the cooling fan exhaust located on the backside of the degausser. As a general rule, media not intending to be erased should be kept about 60cm (2 feet) away.
Cooling Forced air-cooling is used to maintain safe operating temperatures within the degausser. The air intake is located on the back panel and the exhaust is through the holes in the top panel. To ensure proper cooling, do not block the air-intake or exhaust and maintain at least a 15cm (6 inches) distance from the back of the degausser to any obstacle.

HD-2 Operation and Installation Manual Page 8
Degaussing Instructions
OPERATION
Automatic Degaussing
Step 1 Press power button ON. Step 2 Lift up on the drawer to unlock it and slide the drawer out
until it stops Step 3 Place the media into the drawer and push the drawer to the
closed position. Note: Closing of the drawer automatically starts the degauss cycle. After approximately 60 seconds, the LCD will read “Remove Media” indicating that the media has been degaussed and is ready for removal from the media drawer.
Step 4 Remove media by lifting up and sliding out the drawer. Step 5 Insert another hard drive or turn the power off and close the
drawer.
Degaussing Instructions for DLT Media. Remove the plastic protective cases. Simply follow the degaussing instructions above for complete erasure. Note: For DLT media that is to be re-used. Although the data is completely degaussed in one operation, a second pass rotated at 90 degrees is required to smooth out any magnetic fluctuation. Note: If the second pass is not completed, the tape drive may eject the tape from the tape drive and indicate that the tape needs cleaning. The second pass at 90 degrees will correct this condition. If you have any questions, please call Garner Products, Inc. at 1-800-624-1903 or 916-784-0200.
First Pass
Second Pass

HD-2 Operation and Installation Manual Page 9
Degaussing Overview: The LCD display gives status, automatic count, total count, software version, field strength, user instructions and fault messages. The following information appears on the LCD Display from power-up through one automatic degaussing cycle:
Action LCD Display Description Step 1:
Press POWER button ON
GARNER PRODUCTS, INC. Displays Manufacturer.
HD-2 DATA ELIMINATOR Displays Degausser Model.
FIRMWARE VER ## Displays current firmware version.
TOTAL # −− ##
Displays total erasing cycles. Number on left indicates number of times the counter reached 50,000.
Insert Media Session = 0
Ready for media to be placed in the Media Drawer.
Counter for erase cycles from power up.
Step 2:
Insert media
Drawer Open
Indicates media drawer is open – this is normal when inserting media to be erased.
Erase Cycle Initiated
Drawer has closed and the erase cycle has started.
Charging >>>>>>>>>>>>>>>> Displays capacitor charging status.
--------------===|==
Visual indicator of erasing field strength.
Data Eliminated
Indicates power and erasing field strength was verified good and data has been eliminated.
Step 3:
Remove Media Session = 0
Erase cycle has completed. Open drawer and remove media.

HD-2 Operation and Installation Manual Page 10
Controls and Indicators:
POWER Button (RED) The power button switches the power on and off. LCD Display The LCD display gives status, automatic count, total count, software version, field strength, user instructions and fault messages. Media Drawer The media drawer holds the media to be degaussed and activates and deactivates the degaussing cycle when in the closed and open positions.
Automatic Degaussing Technical Detail
1) The LCD displays “Insert Media Session = #”. 2) The media to be degaussed is inserted into the media drawer. While the drawer
is open, the LCD will display “Drawer Open”. 3) Sensors in the HD-2 detect the open / closed status of the drawer and
automatically initiate the degaussing process when the drawer is fully closed. The LCD will display “Erase Cycle Initiated” followed by “CHARGING >>>>>”
4) When the capacitors are fully charged, the capacitors energy will be released into the degaussing coil to create the erasing field.
5) To ensure complete erasure, each erase cycle is measured to ensure the strength of the erase field is sufficient for complete erasure of data. In addition, the LCD will display a Field Strength Graph “--------==I===” of the actual erase field giving the operator real time status of the HD-2. The “I” in the graph represents the strength of the erase field. The “=====” portion of the graph represents the normal range for field strength level. The “I” within the “--------=====” indicates the erase field strength. The position of the “I” can vary from cycle to cycle as it is based on the actual field strength.
6) If the field is in the normal range, the LCD will display “DATA ELIMINATED”.
7) If the field is not in the normal range, the LCD will display “ERASE FAILURE”. In this case, the media should be erased again. To clear the “ERASE FAILURE” message, power cycle the HD-2 by pushing the power button off, wait one minute and then press the power back on. If another erase failure happens, call Garner Products Customer Support for assistance.
8) When the LCD displays “REMOVE MEDIA”. Follow the steps to open the media drawer and remove the degaussed media.
9) The HD-2’s internal counter will advance one count and display the total number of media degaussed for the current session.

HD-2 Operation and Installation Manual Page 11
Error Codes
Charge Error “CHARGE ERROR” is displayed on the LCD screen. This error indicates that the HD-2 failed to charge to the determined power level necessary to successfully erase the media in the degaussing chamber. Action: Turn off the HD-2 for one minute and restart. (Turning off the power to the HD-2 will clear the error.) If the error repeats, have the power mains checked and also check the HD-2 to make sure the power setting is set to match the power mains. If error persists, call Garner Products customer support.
Drawer Open Error The LCD displays “DRAWER OPEN”. This error indicates that the Media Drawer is not completely closed. The HD-2 continuously checks to see if the Media Drawer is closed. If the drawer is not closed, the “DRAWER OPEN” will persist on the LCD. Once the drawer is closed, the HD-2 will automatically continue the erase function. Action: Check to see that drawer is seated in detent.
Gauss Error The LCD displays “GAUSS ERROR”. This error indicates the erasing field may not have been adequate to effectively erase the media in the degaussing chamber. Action: Turn off the HD-2 for approximately one minute. Turning off the power to the HD-2 will clear the error. Turn the HD-2 back on. To initiate the degauss cycle with media already in the media drawer, open the media drawer and close it. The media in the degaussing chamber will be erased if the field is sufficient otherwise the “Gauss Error” will persist on the LCD screen. If error persists, call Garner Products customer support.
Overheat Error LCD displays “OVERHEAT”. This error indicates the internal temperature has risen to a level that may be harmful to the HD-2. Action: When the HD-2 indicates an overheat error, it will inhibit any further operation until the HD-2 returns to an acceptable temperature. Leave the HD-2 powered on as the chassis fan will help reduce the heat inside the HD-2. When the temperature is low enough, the HD-2 will return to normal operation. If this error persists, call Garner Products customer support.

HD-2 Operation and Installation Manual Page 12
Part Number
PARTS LIST MODEL HD-2
Description 1500-038 Capacitor, 6800uf 550VDC 2600-016 Fan, 115V 50/60Hz 3.625” sq x 1” 2600-017 Filter Assy, HD-2 2600-018 Finger Guard, HD-2 2825-029 Feet, Rubber 320-0007 Rectifier, bridge 35A 356-0001 SS Relay, 240VAC 40A 3700-002 Sensor, reflective 375-0049 Thermostat, OP 210F 398-0073 Power cord set, 10A 120V 4300-006 Fuse, 15A AGC Fast Blow 4300-022 Fuse, 7.5A 250V Time Delay 4300-027 Fuse block, 25QD 25A 4700-043 Resistor, 33 R 100W 4800-009 Thyristor Module 4800-017 Diode module, 110A 1200V 5100-034 Switch, power rocker 5600-025 Transformer, HD-2 series SA1400-130E Assembly, coil and capacitor SA1400-135C Assy, media drawer SA1700-204G PCB Assy, SS Controller SA1800-101C Coil Assy, 160W SA2200-012C Module, pwer-control SA2803-010A Cnctr, term cap-diode SA2803-011A Cnctr, term cap-scr SA2803-012A Cnctr, term scr-diode SA3700-006B Assy, door sensor SA6000-082D Harness, main SA6000-083F Harness, control panel

HD-2 Operation and Installation Manual Page 13
GARNER PRODUCTS, INC. LIMITED WARRANTY AND
WARRANTY RETURN POLICY Garner Products, Inc. (“Garner”) warrants this Garner-branded product against defects in materials and workmanship under normal use for a period of ONE (1) YEAR from the date of purchase by the original end-user as evidenced by original end-user’s packing slip or invoice (“Warranty Period”). If a defect arises and a valid claim is received within the Warranty Period, at its option, Garner will either: (1) repair the product, (2) exchange the product, or (3) request that end-user replace defective parts with new or refurbished user-installable parts that Garner provides in fulfillment of its warranty obligations. A replacement product or part, including a user-installable part that has been installed in accordance with instructions provided by Garner, assumes the remaining warranty of the original product or ninety (90) days from the date of replacement or repair, whichever provides longer coverage. Garner’s obligation is limited to the cost of material and labor to repair or replace and does not include transportation expenses. LIMITATIONS This warranty does not apply: (a) to cosmetic damage, including but not limited to scratches, dents and broken plastic; (b) to normal wear; (c) to damage caused by accident, abuse, neglect, misuse, flood, fire, earthquake or other external causes; (d) to damage caused by operating the product outside the permitted or intended uses described by Garner; (e) to damage caused by service performed by anyone who is not a representative of Garner or a Garner authorized service provider; (f) to a product or part that has been modified to alter functionality or capability without the written permission of Garner; or (g) if any Garner serial number has been removed or defaced. DISCLAIMER TO THE EXTENT PERMITTED BY LAW, THIS WARRANTY AND REMEDIES SET FORTH ABOVE ARE EXCLUSIVE AND IN LIEU OF ALL OTHER WARRANTIES, REMEDIES AND CONDITIONS, WHETHER ORAL OR WRITTEN, STATUTORY, EXPRESS OR IMPLIED. AS PERMITTED BY APPLICABLE LAW, GARNER SPECIFICALLY DISCLAIMS ANY AND ALL STATUTORY OR IMPLIED WARRANTIES, INCLUDING, WITHOUT LIMITATION, WARRANTIES OF MERCHANTABILITY, FITNESS FOR A PARTICULAR PURPOSE AND WARRANTIES AGAINST HIDDEN OR LATENT DEFECTS, IF GARNER CANNOT LAWFULLY DISCLAIM STATUTORY OR IMPLIED WARRANTIES, THEN TO THE EXTENT PERMITTED BY LAW. ALL SUCH WARRANTIES SHALL BE LIMITED IN DURATION TO THE DURATION OF THIS EXPRESS WARRANTY AND TO REPAIR OR REPLACEMENT SERVICE AS DETERMINED BY GARNER IN ITS SOLE DISCRETION. No Garner dealer, reseller, agent, or employee is authorized to make any modification, extension, or addition to this warranty. If any term is held to be illegal or unenforceable, the legality or enforceability of the remaining terms shall not be affected or impaired. EXCEPT AS PROVIDED IN THIS WARRANTY AND TO THE EXTENT PERMITTED BY LAW, GARNER IS NOT RESPONSIBLE FOR DIRECT, SPECIAL, INCIDENTAL OR CONSEQUENTIAL DAMAGES RESULTING FROM ANY BREACH OF WARRANTY OR CONDITION, OR UNDER ANY OTHER LEGAL THEORY, INCLUDING BUT NOT LIMITED TO LOSS OF USE; LOSS OF REVENUE; LOSS OF ACTUAL OR ANTICIPATED PROFITS (INCLUDING LOSS OF PROFITS ON CONTRACTS); LOSS OF USE OF MONEY; LOSS OF BUSINESS; LOSS OF OPPORTUNITY; LOSS OF GOODWILL; LOSS OF REPUTATION; LOSS OF DAMAGE TO OR CORRUPTION OF DATA; OR ANY INDIRECT OR CONSEQUENTIAL LOSS OR DAMAGE HOWSOEVER CAUSED INCLUDING THE REPLACEMENT OF EQUIPMENT AND PROPERTY, ANY COSTS OF RECOVERING, PROGRAMMING, OR REPRODUCING ANY PROGRAM OR DATA STORED OR USED AND ANY FAILURE TO MAINTAIN THE CONFIDENTIALITY OF DATA. IN NO EVENT SHALL GARNER BE LIABLE FOR ANY CLAIMS, WHETHER ARISING FROM BREACH OF CONTRACT OR WARRANTY OR CLAIMS OF NEGLIGENCE OR NEGLIGENT MANUFACTURE, IN EXCESS OF THE PURCHASE PRICE.
WARRANTY RETURN POLICY If a problem occurs with this product, contact Garner directly by Email at [email protected] or by phone at (916) 784-0200 to obtain technical support and/or to get a Return Authorization Number (RA#). All returns must be specifically authorized by Garner prior to shipment and returned to Garner FREIGHT PREPAID with the RA# marked prominently near the shipping label. Securely package the product. It is end-user’s responsibility to ensure the product is packaged properly to prevent damage during transit to Garner. Garner will provide product packaging to end-user at end-user’s request and expense. Enclose proper documentation, including RA#, the return address, a name and phone number of the contact person, the serial number of the merchandise being returned and a description of the reason for the return. Omission of any of this information may delay service. Garner recommends end-user insure the shipment; otherwise end-user accepts the risk if product is lost or damaged in shipment. Garner will pay to ship the repaired or replacement products to end-user’s shipping dock if end-user’s delivery address is in the United States (excluding Puerto Rico and U.S. possessions and territories); otherwise Garner will ship the product to end-user freight collect. Garner will select method for return shipment. Alternate shipment methods may be made at end-user’s expense.