hands-on lab exercise guidedocs.citrixvirtualclassroom.com/events/syn2015/syn-602.pdfwindows...
TRANSCRIPT
| 1 |
SYN602 - New Features of XenApp 7.6
Hands-on Lab Exercise Guide
Worldwide Technical Enablement & Readiness May 2015
| 2 |
Table of Contents Table of Contents ........................................................................................................................................ 2
Overview ........................................................................................................................................................ 3
Scenario .......................................................................................................................................................... 5 Lab Preparation ........................................................................................................................................... 7 Attach XenCenter to Your XenServer ............................................................................................................... 7
Module 1 ......................................................................................................................................................... 8 Exercise 1: Application Folders ...................................................................................................................... 10 Exercise 2: Session Prelaunch and Session Linger ................................................................................... 23 Exercise 3: Connection Leasing ....................................................................................................................... 37 Exercise 4: Broker Throttling .......................................................................................................................... 47
Module 2 ...................................................................................................................................................... 53 Exercise 1: Assign Users to Machines in Director ..................................................................................... 54 Exercise 2: Hosted Applications Usage Report .......................................................................................... 62 Exercise 3: Licensing Alerts .............................................................................................................................. 65 Exercise 4: Using Director 7.6 with XenApp 6.5 ........................................................................................ 70

| 3 |
Overview Hands-on Training Module Objective
• This training will provide hands-on experience with the configuration and operation of several new XenApp 7.6 features.
Prerequisites
• Working knowledge of Windows server and desktop operating systems.
Audience • Citrix Partners, Customers, Sales Engineers, Consultants, Technical Support.
Lab Environment Details
The Student Desktop is accessed remotely using Citrix Receiver running on your laptop. All Windows applications such as XenCenter (the XenServer GUI management tool), are accessed from the Student Desktop.

| 4 |
Lab Guide Conventions
This symbol indicates particular attention must be paid to this step
Special note to offer advice or background information
reboot Text the student enters or an item they select from a dropdown menu is printed like this
default Default option in a dialog box, that does not need to be changed by the student
Start Bold text indicates reference to a button or object
Focuses attention on a particular part of the screen
Shows where to click or select an item on a screen shot
List of VMs and IP Addresses Used
Required Lab Credentials The credentials required to connect to the lab VMs and complete the exercises are shown below:
User Name Training\Administrator Password Citrix123
or
User Name Training\user1 Password Citrix123
VM Name IP Address Description / OS AD 192.168.10.11 Active Directory Server / Win 2012 R2 DC1 192.168.10.15 XenApp 7.6 Delivery Controller / Win 2012 R2 SQL1 192.168.10.18 MS SQL 2012 Database / Win 2012 R2 SF1 192.168.10.21 XenApp 7.6 StoreFront Server / Win 2012 R2 XA-01 DHCP XenApp 7.6 VDA / Win 2012 R2 XCL-Test DHCP VM for Testing Prelaunch & Linger / Win 8.1 XA65-C 192.168.10.31 XenApp 6.5 Controller / Win 2008 R2 XA65-W 192.168.10.32 XenApp 6.5 Worker / Win 2008 R2 Win7-n DHCP Windows 7 Desktop Win8-n DHCP Windows 8 Desktop

| 5 |
Scenario Citrix XenApp 7.6 includes new enhancements in the areas of faster access to virtual applications, with higher connection resiliency and new application usage reporting and monitoring tools. You will investigate these and other new features.

| 6 |
Note: If at any time you see a message to restart your computer, please click Restart Later.

| 7 |
Lab Preparation
Attach XenCenter to Your XenServer Overview XenCenter is a graphical user interface application used for managing one or more XenServers. You will be using XenCenter to manage the XenServer and the various VMs needed for the lab.
Step by step guidance Step Action
1.
After launching the lab, on your Student Desktop, you will notice Citrix XenCenter opens.
Click Add Server to add your XenServer to XenCenter.
2. Enter the following XenServer credentials (username is case sensitive):
IP Address 192.168.10.5 User Name hypervisoradmin Password Password1!
Click Add.
c
c
Ignore the lab credentials shown in the portal
| 8 |
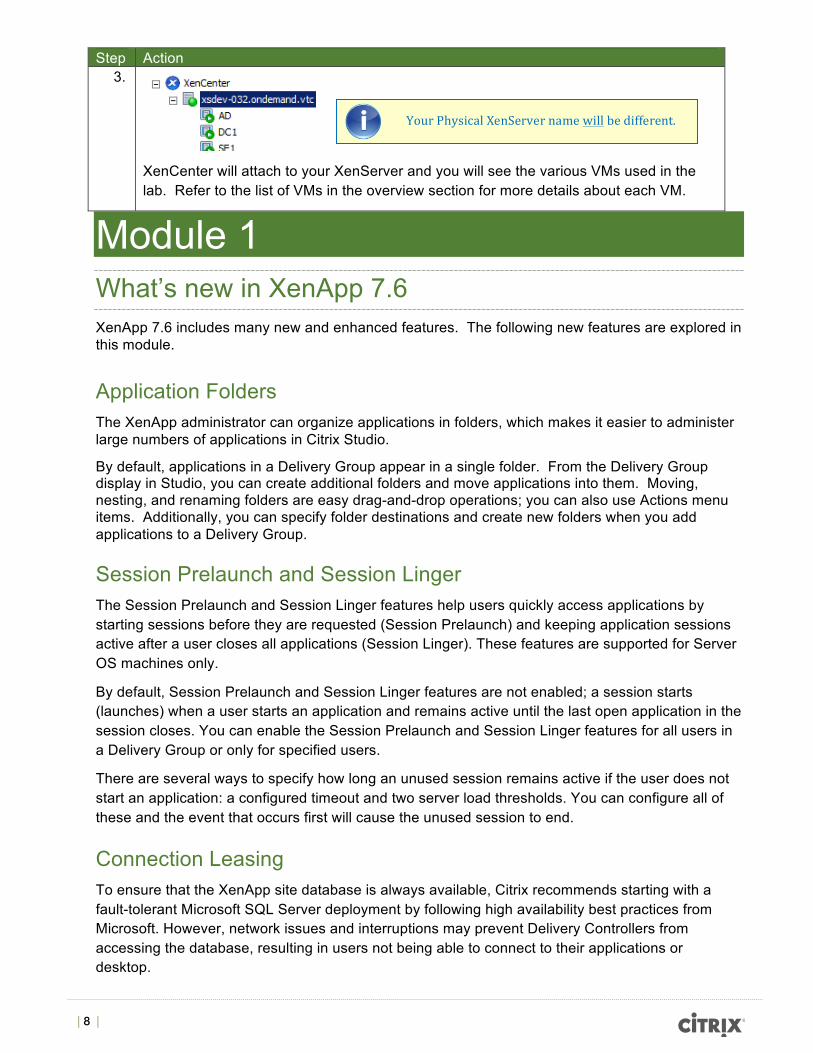
Step Action 3.
XenCenter will attach to your XenServer and you will see the various VMs used in the lab. Refer to the list of VMs in the overview section for more details about each VM.
Module 1 What’s new in XenApp 7.6 XenApp 7.6 includes many new and enhanced features. The following new features are explored in this module.
Application Folders The XenApp administrator can organize applications in folders, which makes it easier to administer large numbers of applications in Citrix Studio.
By default, applications in a Delivery Group appear in a single folder. From the Delivery Group display in Studio, you can create additional folders and move applications into them. Moving, nesting, and renaming folders are easy drag-and-drop operations; you can also use Actions menu items. Additionally, you can specify folder destinations and create new folders when you add applications to a Delivery Group.
Session Prelaunch and Session Linger The Session Prelaunch and Session Linger features help users quickly access applications by starting sessions before they are requested (Session Prelaunch) and keeping application sessions active after a user closes all applications (Session Linger). These features are supported for Server OS machines only.
By default, Session Prelaunch and Session Linger features are not enabled; a session starts (launches) when a user starts an application and remains active until the last open application in the session closes. You can enable the Session Prelaunch and Session Linger features for all users in a Delivery Group or only for specified users.
There are several ways to specify how long an unused session remains active if the user does not start an application: a configured timeout and two server load thresholds. You can configure all of these and the event that occurs first will cause the unused session to end.
Connection Leasing To ensure that the XenApp site database is always available, Citrix recommends starting with a fault-tolerant Microsoft SQL Server deployment by following high availability best practices from Microsoft. However, network issues and interruptions may prevent Delivery Controllers from accessing the database, resulting in users not being able to connect to their applications or desktop.
Your Physical XenServer name will be different.

| 9 |
The Connection Leasing feature supplements the SQL Server high availability best practices by enabling users to connect and reconnect to their most recently used applications and desktops, even when the XenApp site database is not available.
When you enable connection leasing, each Delivery Controller caches user connections to applications and desktops during normal operations (when the database is available). If the database becomes unavailable, the Delivery Controller enters Leased Connection mode and “replays” the cached operations when a user attempts to connect or reconnect to a recently used application or desktop from StoreFront.
Broker Throttling Broker throttling limits the number of actions that can be executed on the hypervisor. This prevents performance issues that result when the hypervisor is overloaded

| 10 |
Exercise 1: Application Folders Overview Application folders are an organizational tool for site administrators. Using folders, applications can be grouped by department, application type or any way that simplifies management for the administrator.
By default, applications in a Delivery Group appear in a single folder named “Applications”. In XenApp 7.6 Citrix Studio you can now create additional folders and move applications into them. Moving, nesting, and renaming folders are easy drag-and-drop operations. Additionally, you can specify folder destinations and create new folders when you add applications to a Delivery Group.
Application folders are not visible to end users, and should not be confused with the application category property, which controls the folders users see in Receiver. Also, the delegated administration function remains separate from the Application Folders feature; it is enabled in Delivery Groups using tags.
In this exercise you will:
• Explore Application Folders and the drag and drop interface for organizing applications.
Step by step guidance Estimated time to complete this exercise: 15 minutes.
Step Action 1. On the Student Desktop, double-click the DC1 desktop shortcut.
2. This will open a connection to DC1, the XenApp site Delivery Controller.
On the DC1 Desktop, double-click the Citrix Studio shortcut.
3.
Click on Delivery Groups on the left side.

| 11 |
Step Action 4. You will add a new application to the Sales Delivery Group, while specifying the application
folder in which to place it.
Ensure the Sales Delivery Group is selected and click Add Applications on the right.
5. Check the box as shown below to avoid showing the Getting Started page again:
þ Don’t show this again
Click Next.
6. The applications available on the Master Image for this Delivery Group are enumerated.
Select the following application:
þ Disk Cleanup
By default, the application will be added to the top level “Applications” folder.
Click Change…

| 12 |
Step Action 7.
Click New folder…
8. Enter the following:
Enter New Folder Name Admin
Click OK.
9.
A new “Admin” folder is created.
Click OK.
The name of the Applications top level folder cannot be changed.

| 13 |
Step Action 10.
The application will now be added to the newly created “Applications\Admin\” folder.
Click Next.
11.
Review the Summary page and click Finish.
12.
The Disk Cleanup application has been added, but is not visible in this view. But note that the total number of applications in the Delivery group has increased from 4 to 5.
Click the Applications tab at the top of the screen.

| 14 |
Step Action 13.
Notice that only the four applications directly in the in the Applications folder are counted on the Applications tab. Applications in sub-folders are not included in the Applications tab count.
Expand the Applications folder by clicking the arrow on the left side.
14.
Click the Admin folder.
15.
Notice the Admin folder contains one application, Disk Cleanup. The count (1) is shown on the applications tab.
16. You will now move an existing application from the default “Applications” folder to a new folder.
Right click the Applications folder and click Create Folder.

| 15 |
Step Action 17. Enter the following:
Enter New Folder Name Graphics
Click OK.
18.
The Graphics folder is added.
Click on the Applications folder.
19.
Click on the Paint application to select it. Release the mouse click.
Drag and drop the Paint application to the Graphics folder.
20.
Click on the Graphics folder.
The application must be selected first as a separate operation, before dragging. You can’t just click and immediately drag. The Ctrl key can be used to select multiple applications to move.

| 16 |
Step Action 21.
Notice the Paint application has been moved to the Graphics folder.
22. You will now add two more applications.
Click Create Application on the top right side of the screen.
23.
Click Next to add the application to the Sales Delivery Group.

| 17 |
Step Action 24. Click the applications selection pane, scroll down and select the following applications:
þ Windows PowerShell þ Windows PowerShell ISE
Click Change.
25.
Notice by default the new applications will be placed in the directory last selected in Studio, which in this case in the Graphics directory. You will change that.
Click the Applications folder and click New Folder.

| 18 |
Step Action 26. Enter the following:
Enter New Folder Name PowerShell
Click OK.
27.
Click OK.
28.
Notice these two applications will now be placed in the PowerShell sub-directory.
Click Next.
| 19 |
Step Action 29.
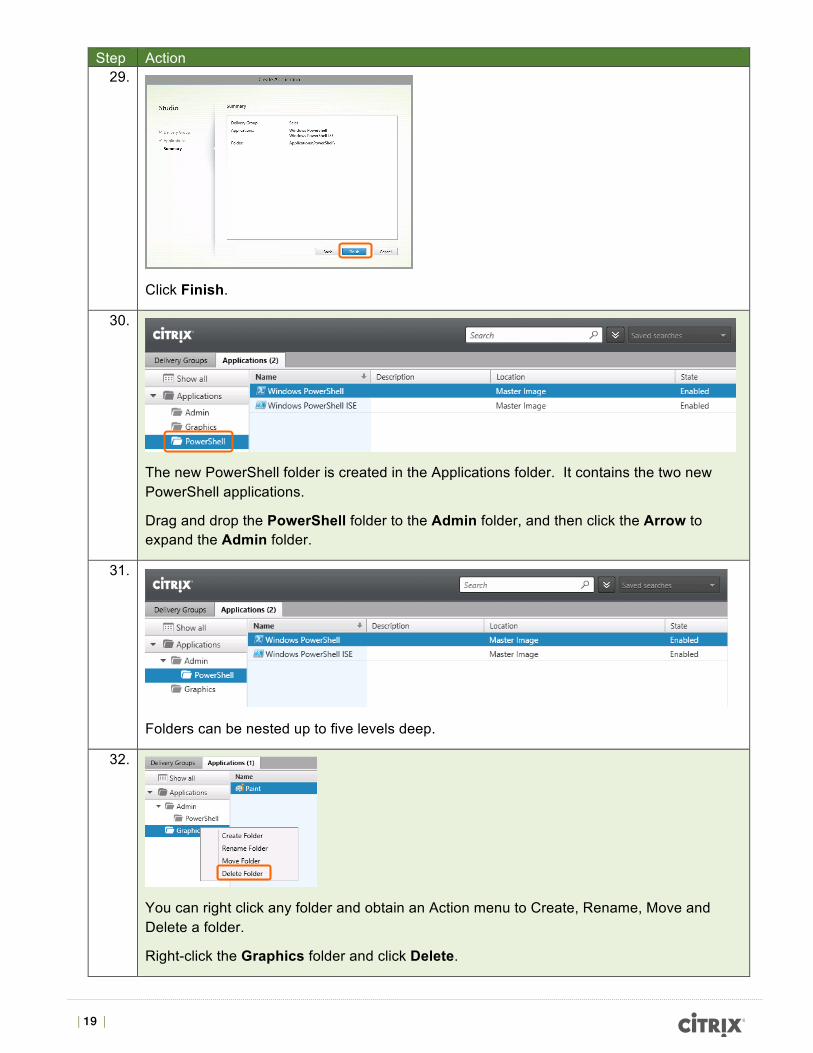
Click Finish.
30.
The new PowerShell folder is created in the Applications folder. It contains the two new PowerShell applications.
Drag and drop the PowerShell folder to the Admin folder, and then click the Arrow to expand the Admin folder.
31.
Folders can be nested up to five levels deep.
32.
You can right click any folder and obtain an Action menu to Create, Rename, Move and Delete a folder.
Right-click the Graphics folder and click Delete.

| 20 |
Step Action 33.
You are asked to confirm the Deletion of the folder and the one application it contains.
Click No.
34.
Click Show all.
35.
All folders and applications are shown.
36.
On the Student Desktop bottom left, click Internet Explorer.
37. Enter the URL of the Acme Sales Store:
http://sf1/Citrix/AcmeSalesWeb/
38. Enter the following credentials:
User Name training\User1 Password Citrix123
Click Log On.

| 21 |
Step Action 39.
Click on Apps at the bottom of the screen.
40.
Notice the user is subscribed to two applications.
Click the + on the left side to add more applications.
41.
Click All Apps.

| 22 |
Step Action 42.
Notice all of the available applications for subscription are shown as a flat list. The Delivery Group folder structure defined by the administrator in Studio, is not imposed on the user. Application Folders are only available in Citrix Studio for the administrator’s use.
Click outside of the menu to close the add applications menu.
Close Internet Explorer.
Exercise Summary In this exercise, you explored Applications Folders and the various ways they can be used and manipulated. You also showed that Application folders are only for administrator use in Citrix Studio; they are not shown to the user when subscribing to applications.
The folder structure the admin uses to organize applications in the Delivery Group is unlikely to be of use to the user. To show applications in folders for the user, the
administrator can configure application categories in Citrix Studio.
| 23 |
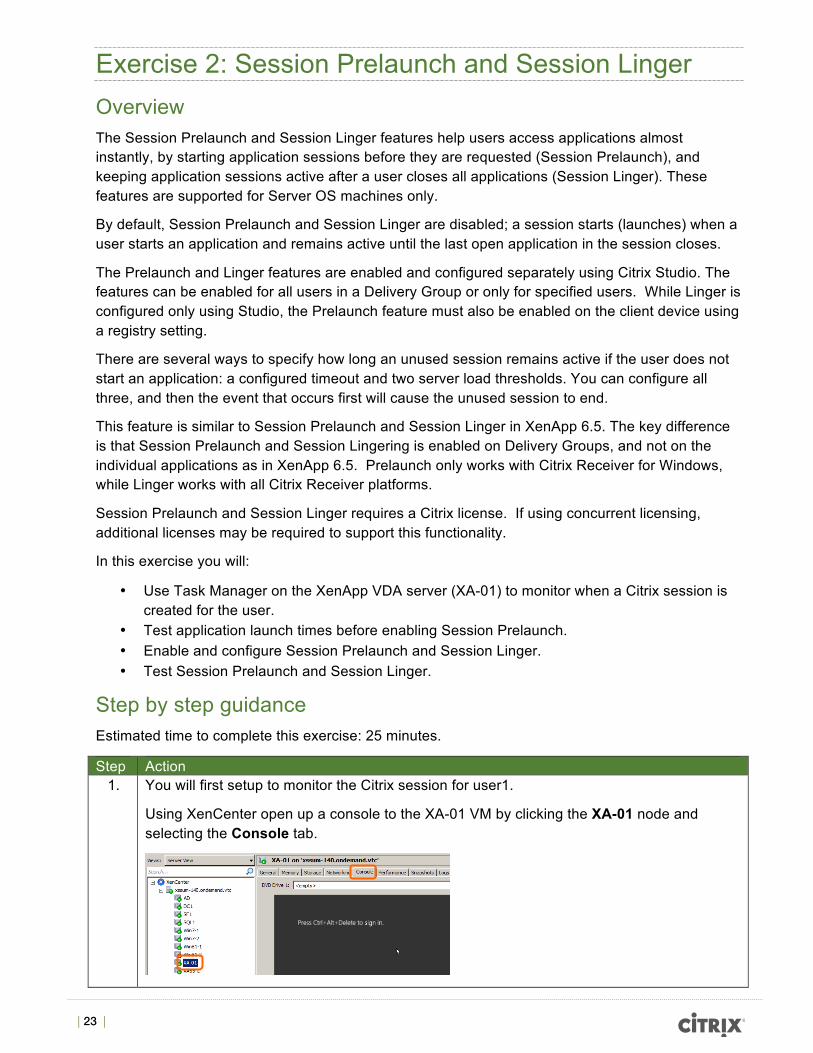
Exercise 2: Session Prelaunch and Session Linger Overview The Session Prelaunch and Session Linger features help users access applications almost instantly, by starting application sessions before they are requested (Session Prelaunch), and keeping application sessions active after a user closes all applications (Session Linger). These features are supported for Server OS machines only.
By default, Session Prelaunch and Session Linger are disabled; a session starts (launches) when a user starts an application and remains active until the last open application in the session closes.
The Prelaunch and Linger features are enabled and configured separately using Citrix Studio. The features can be enabled for all users in a Delivery Group or only for specified users. While Linger is configured only using Studio, the Prelaunch feature must also be enabled on the client device using a registry setting.
There are several ways to specify how long an unused session remains active if the user does not start an application: a configured timeout and two server load thresholds. You can configure all three, and then the event that occurs first will cause the unused session to end.
This feature is similar to Session Prelaunch and Session Linger in XenApp 6.5. The key difference is that Session Prelaunch and Session Lingering is enabled on Delivery Groups, and not on the individual applications as in XenApp 6.5. Prelaunch only works with Citrix Receiver for Windows, while Linger works with all Citrix Receiver platforms.
Session Prelaunch and Session Linger requires a Citrix license. If using concurrent licensing, additional licenses may be required to support this functionality.
In this exercise you will:
• Use Task Manager on the XenApp VDA server (XA-01) to monitor when a Citrix session is created for the user.
• Test application launch times before enabling Session Prelaunch. • Enable and configure Session Prelaunch and Session Linger. • Test Session Prelaunch and Session Linger.
Step by step guidance Estimated time to complete this exercise: 25 minutes.
Step Action 1. You will first setup to monitor the Citrix session for user1.
Using XenCenter open up a console to the XA-01 VM by clicking the XA-01 node and selecting the Console tab.

| 24 |
Step Action 2.
Click Send Ctrl-Alt-Del at the bottom on the page and enter the following credentials:
User Name training\administrator Password Citrix123
3.
From the Start screen click Task Manager.
4.
Click the Users tab.
5.
Notice that only the Administrator (you) is listed. This indicates that there are no active Citrix sessions on the XA-01 VDA.
6. You can move the XA-01 window with Task Manger out of the way to the right edge of the Student Desktop; you just need it to monitor the users.

| 25 |
Step Action 7. Session Prelaunch only works with the Citrix Receiver for Windows. To test Prelaunch you
will use a separate VM, XCL-Test.
On the Student Desktop, double-click the XCL-Test desktop icon.
8.
On the XCL-Test Desktop, double-click the Citrix Receiver icon.
9. When Receiver starts, enter the following information:
Enter your email or server address http://sf1.training.lab/Citrix/AcmeSales
Click Next.
10. Enter the following credentials:
User Name training\User1 Password Citrix123
Check the Remember my password box and click Log On.

| 26 |
Step Action 11.
You should see the two applications User1 is subscribed to.
Click the Calculator application and immediately keep an eye on Task Manager on XA-01.
12.
You should notice “User1” is added after 8 to 10 seconds. This indicates a Citrix session has been created to run the Calculator application.
13.
After a few more seconds the Calculator application opens. It took 15 to 20 second to open the application without Prelaunch enabled.
Close the Calculator application.
14.
Notice on Task manager that “User1” disappears a second or two after Calculator is closed.

| 27 |
Step Action 15.
Back on Citrix Receiver, start the Calculator application again and wait for the application to start. Notice it takes about the same length of time to start as the first time. As the previous session was disconnected, a new session had to be set up.
16.
Click on Notepad.
17.
Notice Notepad starts almost immediately. Since the Notepad application now shares the User1 Citrix session already setup, the second application starts quickly.
18. While watching Task Manager, close Notepad and after a few seconds close Calculator.
Notice User1 doesn’t disappear until shortly after the last application is closed.
19.
Using the dropdown at the top of Receiver, Log Off User1.
The subscribed icons stay on the screen, but any attempt to use them will require re-logging on.

| 28 |
Step Action 20. Now you have seen how things work without Prelaunch and Lingering enabled; you will now
enable Session Prelaunch and Lingering for the Sales Delivery Group.
Click on the Remote Desktop Connection icon at the lower left of the Student Desktop and select the DC1 Desktop.
21.
In Citrix Studio, click the Delivery Groups tab (not the Delivery Groups node).
22.
The Sales Delivery Group should be selected. Click Edit Delivery Group on the right

| 29 |
Step Action 23.
Click Application Prelaunch on the left.
24. Check the box:
þ Prelaunch when any user logs on to Receiver for Windows
This will enable Prelaunch for any user of this Delivery Group who logs on to Receiver for Windows. (In addition, Prelaunch must be enabled for each client device.)
Do not press Enter or click OK
Prelaunch is initiated by the client and only works with Receiver for Windows. No other platforms are supported.

| 30 |
Step Action 25.
Click Application Lingering.

| 31 |
Step Action 26. Check the box:
þ Keep session active until
Enter the following:
After a Specified Time Minutes 2
This will enable Session Lingering.
While Lingering works hand in hand with Prelaunch, it is controlled separately. You can use Prelaunch without Lingering and vice-versa. If only Prelaunch is enabled, without Linger, once one or more applications are launched and then are all closed, the session is disconnected and closes.
Click OK.
27.
Scroll down and review the Details pane for the Sales Delivery Group and verify the following information:
• Session Prelaunch: Prelaunch for any user • Session Lingering: Keep session active
Lingering is a server based function, and works with all Citrix Receiver platforms.

| 32 |
Step Action 28.
Click on the Remote Desktop Connection icon at the lower left of the Student Desktop and select the XCL-Test Desktop.
29. On the XCL-Test desktop click the Regedit icon.
30. While Linger is enabled simply using the Delivery Group configuration, to enable Prelaunch on the Windows client device, the registry key EnablePreLaunch must be set to “True”.
In Regedit, navigate to:
HKEY_LOCAL_MACHINE\SOFTWARE\Wow6432Node\Citrix\Dazzle
31.
Notice the EnablePreLaunch key is not set. Double-click the EnablePreLaunch key.
In production environments this registry setting can be modified with Group Policy.
| 33 |
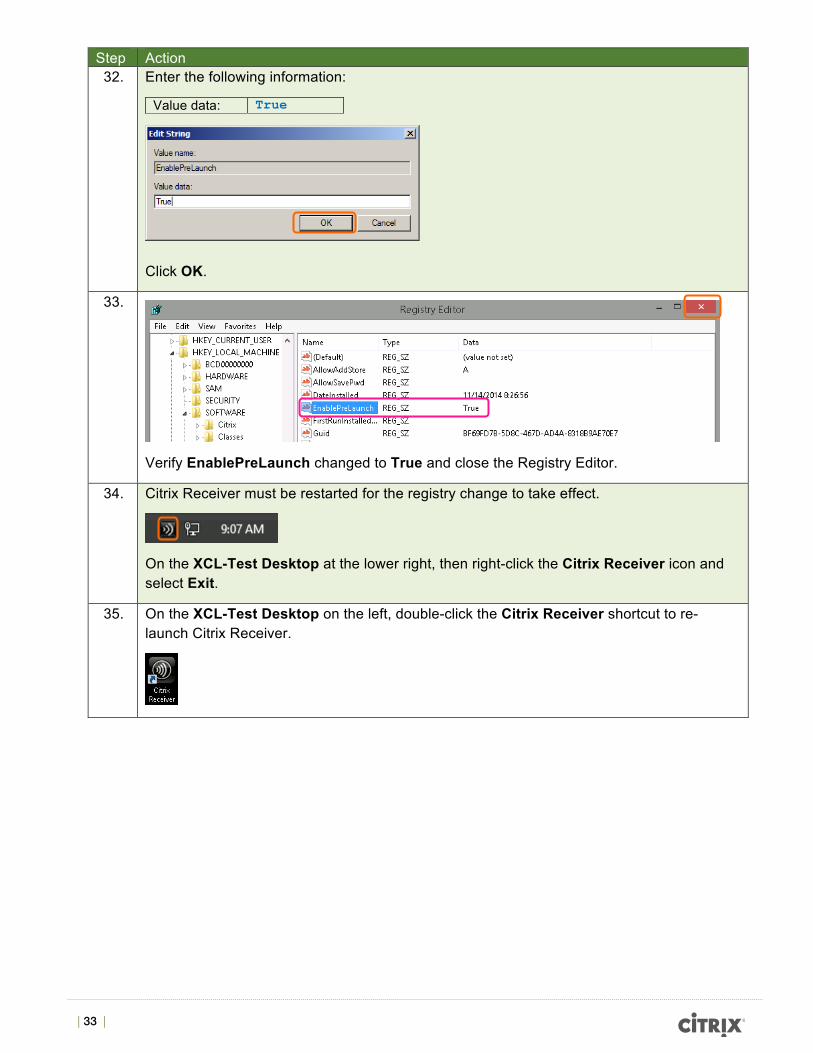
Step Action 32. Enter the following information:
Value data: True
Click OK.
33.
Verify EnablePreLaunch changed to True and close the Registry Editor.
34. Citrix Receiver must be restarted for the registry change to take effect.
On the XCL-Test Desktop at the lower right, then right-click the Citrix Receiver icon and select Exit.
35. On the XCL-Test Desktop on the left, double-click the Citrix Receiver shortcut to re-launch Citrix Receiver.

| 34 |
Step Action 36.
You are auto-logged into Receiver since you saved your password previously. (If you didn’t re-enter the password “Citrix123”.)
You should see the two applications User1 is subscribed to.
37.
After a few seconds you will see a pre-launched HDX session starting. (You may miss it if you blink!)
38.
In Task Manager on XA-01 you should now see User1 added to the users, indicating a Citrix session has been created, even though User1 has not yet started any applications.
Wait 20 seconds for the session to finish initializing.
39.
Click Calculator on the XCL-Desktop.
You may need to login to XA-‐01 again; use password Citrix123

| 35 |
Step Action 40.
Notice the Calculator app opens almost immediately on the XCL-Test desktop; it opens as fast as a local application since the Citrix (HDX) session was setup at login.
Close the Calculator application.
41.
Notice the User1 session does not disappear immediately as Session Lingering is enabled.
42.
Click Calculator again.
43.
Notice the Calculator application opens almost immediately due to Session Lingering.
If Session Lingering was not enabled, the session would have closed as soon as the Calculator application was closed, and the session would need to be recreated again. PreLaunch is a “one-shot” only function; once an application is opened and all applications in the session are closed, the session closes and Prelaunch is over.
Close the Calculator application.
44.
Watching Task Manager, notice after two to three minutes User1 disappears as the session is disconnected and closed after the two minute specified Linger time expires.

| 36 |
Step Action 45. Close the Citrix Receiver window and then the XCL-Test window.
Exercise Summary In this exercise, you configured Session Prelaunch and Session Linger for all users of the Sales Delivery Group. You used the registry editor to enable Prelaunch on the client machine’s Citrix Receiver. You tested with and without Prelaunch and accessed the Task Manager of XA-01 to monitor the Prelaunched and Lingering session for User1.

| 37 |
Exercise 3: Connection Leasing Overview To ensure that the XenApp site database is always available, Citrix recommends starting with a fault-tolerant SQL Server deployment by following high availability best practices from Microsoft. However, network issues and interruptions may prevent XenApp Delivery Controllers from accessing the database, resulting in users not being able to connect to their applications or desktop.
The Connection Leasing feature supplements the SQL Server high availability best practices by enabling users to connect and reconnect to their most recently used applications and desktops, even when the site database is not available. When Connection Leasing is enabled, each Delivery Controller caches user connections to recently used applications and desktops during normal operations (when the database is available).
The leases generated on each Delivery Controller are simple XML files which are securely stored on the Delivery Controller. The lease files are uploaded to the XenApp site database and then synchronized periodically to all other Delivery Controllers on the site. In addition to leases, each Controller’s cache holds application, desktop, icon, and worker information.
There is no inter-Controller communication of leases, either in normal, or database-down operations.
If the database becomes unavailable, the Controller enters leased connection mode and “replays” the cached operations when a user attempts to connect or reconnect to a recently used application or desktop from StoreFront.
Connections are cached for a lease period; the default is two weeks. So, if the database becomes unavailable, the desktops and applications that the user launched in the previous two weeks remain accessible to that user through StoreFront. However, desktops and applications that have not been launched during the previous two-week lease period are not accessible when the database is unavailable. For example, if a user last launched an application three weeks ago, its lease has expired, and that user cannot launch that application if the database becomes unavailable now. Leases for long-running active or disconnected application or desktop sessions are extended so that they are not they are not considered expired.
Connection leasing is supported for server-hosted applications and desktops, and static (assigned) desktops; it is not supported for pooled VDI desktops or for users who have not been assigned a desktop when the database becomes unavailable.
By default, Connection Leasing affects the entire site. Leases can be revoked for specific users preventing them from accessing applications or desktops when the Delivery Controller is in leased connection mode.
Unlike Local Host Cache, which performed a similar function in XenApp 6.5, no snapshot of the XenApp database is stored on the Delivery Controller, so no database corruption is possible, as sometimes occurred with Local Host Cache.

| 38 |
In this exercise you will:
• Demonstrate Connection Leasing functionality. • View Connection Leasing XML file locations and review XML file contents.
Step by step guidance Estimated time to complete this exercise: 25 minutes.
Step Action 1.
Back on the DC1 desktop, click PowerShell at the bottom left.
2. Enter the following command:
Add-PSSnapin Citrix.*
This loads the Citrix PowerShell “snap-ins” that are required for interacting with the Delivery Controller from PowerShell.
3. Enter the following command:
Get-Brokersite
Verify ConnectionLeasingEnabled is set to True. Connection Leasing is enabled by default.

| 39 |
Step Action 4.
On the Student Desktop, launch Internet Explorer.
5. Enter the URL of the Acme Store:
http://sf1/Citrix/AcmeSalesWeb/
6. Log on using the following credentials:
User Name training\User1 Password Citrix123
Click Log On.
7.
Click on the Windows 7 Desktop icon.
8.
User1’s Windows 7 desktop opens.

| 40 |
Step Action 9.
Close the desktop by clicking Start, then the Arrow next to Shut Down, then Log Off.
10. On the Student Desktop double-click the SQL1 desktop shortcut.
11. On the SQL1 Desktop double-click the Services shortcut.
12.
To simulate a Database failure you will stop the primary database service “SQL Server (MSSQLSERVER)”.
In the Services window, scroll down and select SQL Server (MSSQLSERVER).
Then click Stop at the top left.
13.
The options for the SQL Server (MSSQLSERVER) service should change to just “Start the Service”, indicating the service has stopped, effectively disconnecting the database from XenApp. Quickly move to the next step.

| 41 |
Step Action 14.
On the Student Desktop, return to Internet Explorer and click the Windows 7 Desktop icon.
15. After 10 to 15 seconds you will receive the following message:
Click OK.
Connection Leasing has a 90 second delay in case database access can be quickly recovered, so access to Desktop and Applications is not available during this 90 second period.
Wait 90 seconds and proceed to the next step.
16.
Click the Windows 7 Desktop icon.

| 42 |
Step Action 17.
Even though the Database is now disconnected, user1’s Windows 7 desktop opens.
18.
Close the desktop by clicking Start, then the Arrow next to Shut Down, then Log Off.
19. You will now see what happens when Connection Leasing is turned off and there is a database failure. To turn off Connection Leasing, the database must be operational, so you must first temporarily re-enable the database.
Back in the Services window on SQL1, Click Start to resume the SQL Server (MSSQLSERVER) service.
20. Return to DC1, in the PowerShell window.
Enter the following command to disable Connection Leasing:
Set-Brokersite –ConnectionLeasingEnabled $false
Verify Connection leasing has been turned off by entering the following command:
Get-Brokersite

| 43 |
Step Action 21.
Back on SQL1, disable the database again by clicking Stop.
22.
In the Student Desktop Internet Explorer, click the Windows 7 Desktop icon.
23.
After a few seconds you will get an error. When the database is disabled and Connection Leasing is disabled, the user cannot start applications or desktops (even if you wait more than 90 seconds).
Click OK.
24.
Back in the Services window on SQL1, Click Start to resume the SQL Server (MSSQLSERVER) service.
25. Return to DC1, in the PowerShell window.
Enter the following command to re-enable Connection Leasing:
Set-Brokersite –ConnectionLeasingEnabled $true
Do not miss this step.

| 44 |
Step Action 26.
On the DC1 Desktop, open File Explorer.
27. Enter the following in the address bar:
%ProgramData%\Citrix\Broker\Cache\Leases
28.
If you see no directories here, wait a few seconds while they are recovered from the database after Connection Leasing was re-enabled.
These folders contain a sub-folder structure that holds the XML files for the leases. There are two kinds of leases, Enumeration and Launch.
Enumeration leases are specific to a user and endpoint; they contain the browser names of resources that can be enumerated by the user from a specific endpoint. Launch leases contain information specific to the user and specifies the worker that was used in the last brokering.
29.
Double-click on the Enumeration directory, then double-click on the directory within, and open the XML file.

| 45 |
Step Action 30.
You will see the XML defines the available resources. The Calculator resource is highlighted above.
31.
Backtrack to the Leases directory by clicking Leases in the address bar.
32. Double-click on the Launch directory, then double-click one of the directories within and open the XML file within.
33.
You will see the expiration date and time of the lease, along with the SID of the user and the SID of the worker VDA that was used last time the application or desktop was opened.
Close the XML file.
34.
In windows explorer, click Leases in the address bar.
35. In the PowerShell window, enter the following command to disable Connection Leasing:
Set-Brokersite –ConnectionLeasingEnabled $false

| 46 |
Step Action 36.
Notice in File Explorer, the leases disappear in a few seconds. When Connection Leasing is disabled, the existing leases are removed from the controller. They will however be restored from the database if Connection Leasing is re-enabled.
37. In the PowerShell window, enter the following command to disable Connection Leasing:
Set-Brokersite –ConnectionLeasingEnabled $true
38.
Notice in File Explorer, the leases re-appear in a few seconds. The previously existing leases are restored from the database.
39. On the DC1 Desktop, Close File Explorer and the PowerShell window.
Close the SQL1 Desktop window.
Exercise Summary In this exercise, you tested Connection Leasing by launching an application while the SQL server was offline. You also reviewed the lease XML file locations and XML file contents.
You cannot enable Connection Leasing after the database has failed, since the function is enabled in the database and the leases must be recovered from the database.

| 47 |
Exercise 4: Broker Throttling Overview To improve performance, you can now specify the maximum number of simultaneous actions, simultaneous Personal Storage inventory updates, and actions per minute that can occur on a host connection.
In this exercise you will:
• Configure Broker Throttling in Citrix Studio. • Test Broker Throttling by restarting VMs.
Step by step guidance Estimated time to complete this exercise: 15 minutes.
Step Action 1.
Back on the DC1 Desktop, in Citrix Studio, click Hosting on the left.
2.
After a few seconds, the XS1 XenServer hypervisor connection should be shown.

| 48 |
Step Action 3.
Click Edit Connection on the right.
4.
The connection properties are shown.
Click Advanced on the left.

| 49 |
Step Action 5. Throttling, based on thresholds of simultaneous actions on the connection, can help when
power management settings allow too many or too few machines to start at the same time.
On the Advanced page you can specify a maximum number of simultaneous actions and the percentage of machines using this connection that can be actioned at the same time. You must specify both absolute and percentage values, but the actual limit applied is the lower of the configured values.
Enter the following:
Maximum new actions per minute. 1
Click OK.
The hypervisor connection XS1 will now be limited to performing only one new action per minute. Production environments will have a higher limit, but you are using a value of one per minute to demonstrate Broker Throttling functionality.
6.
Click Machine Catalogs on the left.

| 50 |
Step Action 7.
Double-click the Win7 Desktops Machine Catalog.
8.
Click the Win7-1 node and type Ctrl-A to select both WIN7-1 and Win7-2 servers.
9.
Arrange the XenCenter and DC1 Desktop windows as shown so you can monitor the Win7-1 and Win7-2 VMs in XenCenter.

| 51 |
Step Action 10.
In the DC1 Desktop (Citrix Studio) window, click Shut Down on the right, and click Yes to respond to the verification request to shut down two machines.
11.
….
Notice Win7-1 starts shutting down immediately.
….
A minute after the shutdown command was issued, Win7-2 starts to shut down. This is the result of Broker Throttling; only one action occurs per minute.
12.
After Win7-2 shuts down, XenDesk will restart it automatically to maintain capacity. Since XenDesktop is restarting the VM, the restart is delayed for a minute due to Broker Throttling.
As soon as you see Win7-2 restarting, using XenCenter, double-click Win7-1 to restart it. The restart happens immediately, with no delay.
The Broker Throttling settings only limits actions from XenDesktop; actions from XenCenter are not affected.

| 52 |
Exercise Summary In this exercise, you configured broker throttling for the hosting connection to XS1. You then tested the limitation on new actions by shutting down and restarting VMs from Citrix Studio and XenCenter.

| 53 |
Module 2 What’s new in Director for XenApp 7.6 This product release of Citrix Director includes several new and enhanced features. The following new features are explored in this module:
Assign Users to specific Machines in Director Director now allows users to be assigned to specific machines for Static Desktops. This does not work with Pooled Desktops.
Troubleshooting of user issues often requires the administrator to replicate these issues. Director allows administrators to assign themselves to the user’s statically assigned Windows desktop in order to log in for troubleshooting purposes, as long as the administrator belongs to the same Delivery Group.
Hosted Applications Usage Report Director provides new capacity reports that show the usage of hosted applications over time. Several new methods enable you to easily access the usage data as trends and aggregate values.
Licensing Alerts Licensing errors in an environment can cause major outages or degraded service for customers and in previous versions of XenApp/XenDesktop, it is difficult to identify when license problems affect your site or are about to impact user connections.
License alerts from the license server are now made available in the Dashboard view in Director 7.6. This new capability provides greater visibility into the licensing state of XenApp/XenDesktop so administrators are aware of impending current licensing conditions, which may affect the functionality of the product.
Using Director 7.6 with XenApp 6.5 Citrix has brought back IMA Support in Director to allow users to troubleshoot XenApp 6.5 (IMA) sessions with the enhanced features in Citrix Director 7.6.

| 54 |
Exercise 1: Assign Users to Machines in Director Overview Troubleshooting of user issues often requires the administrator to replicate the issues. Citrix Director allows administrators to assign themselves to the user’s statically assigned Windows desktop in order to log in for troubleshooting purposes, as long as the administrator belongs to the same Delivery Group.
In this exercise you will:
• Launch a Windows 7 Desktop as User1. • Assign an administrator to the same Desktop using Director. • Access the Windows 7 Desktop as the administrator. • Remove the administrator from the assigned users of the Desktop.
Step by step guidance Estimated time to complete this exercise: 15 minutes.
Step Action 1. Return to Internet Explorer on the Student Desktop.
If necessary enter the URL of the Acme store:
http://sf1/Citrix/AcmeSalesWeb/
If your session has timed out, click Log On.
2. Log on with the following credentials:
User Name training\User1 Password Citrix123
Click Log On.

| 55 |
Step Action 3.
Start a Windows 7 desktop for User1.
Click on the Windows 7 Desktop icon.
4.
User1’s Windows 7 Desktop opens.
You will now locate where it is running using Citrix Director.
5. On the Student Desktop, double-click the Mozilla Firefox shortcut.
6. Enter the URL of Citrix Director:
http://dc1.training.lab/director
7. Enter the following credentials:
User Name training\administrator Password Citrix123
Click Log on.

| 56 |
Step Action 8. You will now search for User1’s Windows 7 Desktop VM.
Click Search at the top right.
9. Enter the following information:
Search for User Search for user User1
Click User One (Training\User1) when it appears.
10.
Select the Windows 7 Desktop session.
Your display may look differently depending on when previous sessions were running and if they are still connected.
Do not press Enter after entering User1

| 57 |
Step Action 11.
Click Details at the top right.
12.
Note the current machine name assigned to User1’s desktop (in this case Win7-1), and then click Manage Users.
13.
Only User1 is assigned to this machine.
14.
In the search box, Type Administrator, then click Training\Administrator and click Add.
When you click Training\Administrator it will disappear from the search box. Click Add anyway and you will see it added to the list of Assigned Users.

| 58 |
Step Action 15.
You have added Training\Administrator to the assigned users for the machine.
Close the Assigned Users dialog box using the X at the upper right corner.
16.
Return to User1’s Windows 7 Desktop. Close the desktop by clicking Start, then the Arrow next to Shut Down, then Log Off
17. Return to the Student Desktop Internet Explorer.
Log Off User1.
18.
Click Log On.
19. Log on with the following credentials:
User Name training\administrator Password Citrix123
Click Log On.

| 59 |
Step Action 20.
Click on the Windows 7 Desktop icon.
21.
Wait for the desktop to launch.
22.
Switch back to the Firefox window running Director.
Click Search at the top right.
23. Enter the following information:
Search for User Search for user Administrator
Click (Training\Administrator) when it appears.
24.
Click the Windows 7 Desktop session.

| 60 |
Step Action 25.
Click Details at the top right.
26.
Notice that Training\Administrator was connected to the same machine (Win7-1) as User1 was using. This will allow the administrator to troubleshoot any issues the user was encountering.
27.
Switch back to the Windows 7 Desktop just started and close the desktop by clicking Start, then the Arrow next to Shut Down, then Log Off.
28.
Switch back to Firefox. You will notice that Activity Manager data is unavailable. This is because there are no longer any active session on the selected desktop.
Click Manage Users.

| 61 |
Step Action 29.
Click the X next to (TRAINING\Administrator) to un-assign administrator from this machine.
30.
Close the Users window.
31.
On Citrix Receiver, click training\administrator and then click Log Off.
Close the Internet Explorer window.
Exercise Summary In this exercise, you launched a desktop as User1, assigned an administrator to that desktop and then accessed the user’s assigned desktop as the administrator. This would allow the administrator to troubleshoot any user’s issues. You then removed the assignment.
| 62 |
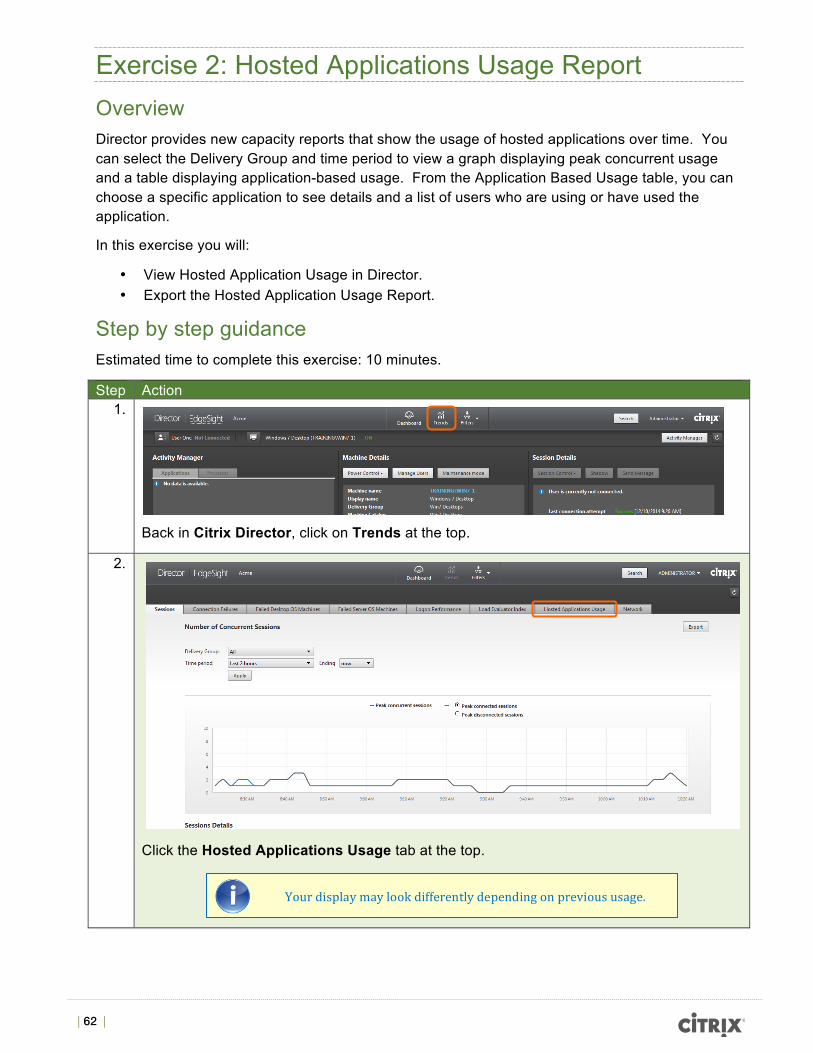
Exercise 2: Hosted Applications Usage Report Overview Director provides new capacity reports that show the usage of hosted applications over time. You can select the Delivery Group and time period to view a graph displaying peak concurrent usage and a table displaying application-based usage. From the Application Based Usage table, you can choose a specific application to see details and a list of users who are using or have used the application.
In this exercise you will:
• View Hosted Application Usage in Director. • Export the Hosted Application Usage Report.
Step by step guidance Estimated time to complete this exercise: 10 minutes.
Step Action 1.
Back in Citrix Director, click on Trends at the top.
2.
Click the Hosted Applications Usage tab at the top.
Your display may look differently depending on previous usage.

| 63 |
Step Action 3.
Change Delivery Group to Sales and Time period to Last 7 days and then click Apply.
4.
Scroll down to view the updated Application Based Usage.
5.
You can export the chart and data to a file. Scroll to the top and click Export at the top right.
6.
Enter AppUsage as the Name and click Export.

| 64 |
Step Action 7.
The export will complete in a few seconds,
Select Save File and click OK.
Exercise Summary In this exercise, you reviewed the Hosted Application Usage report, and exported a PDF copy for distribution.
| 65 |
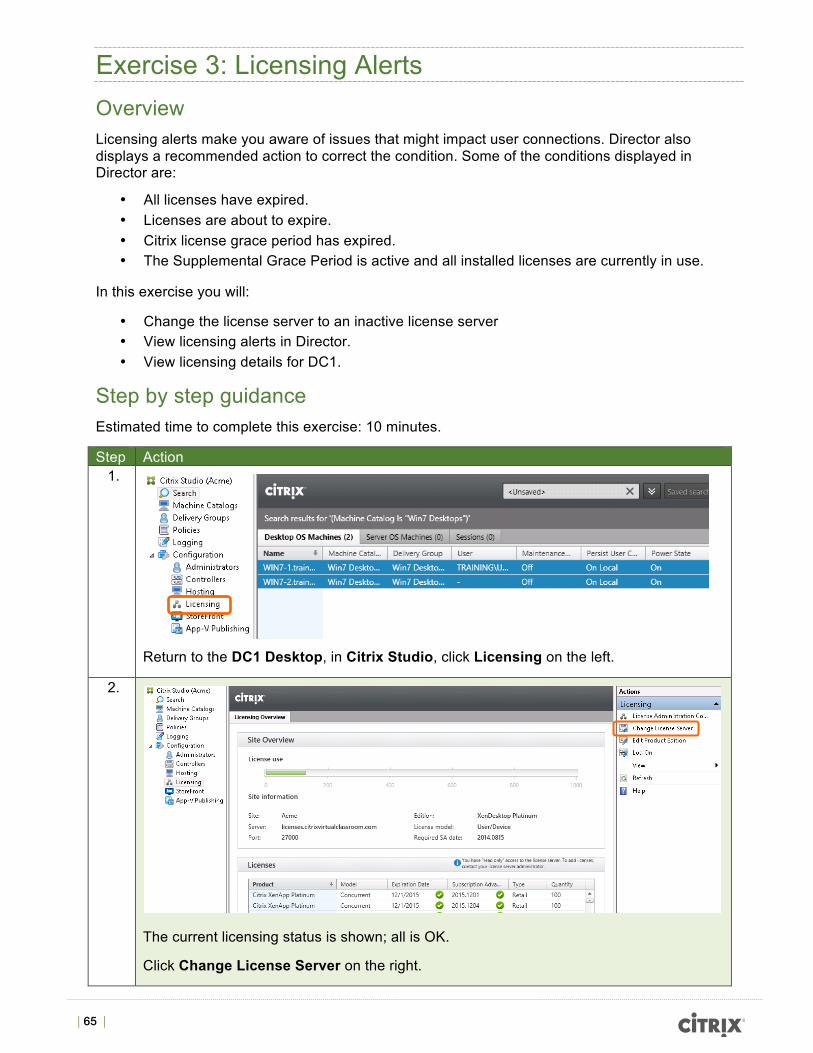
Exercise 3: Licensing Alerts Overview Licensing alerts make you aware of issues that might impact user connections. Director also displays a recommended action to correct the condition. Some of the conditions displayed in Director are:
• All licenses have expired. • Licenses are about to expire. • Citrix license grace period has expired. • The Supplemental Grace Period is active and all installed licenses are currently in use.
In this exercise you will:
• Change the license server to an inactive license server • View licensing alerts in Director. • View licensing details for DC1.
Step by step guidance Estimated time to complete this exercise: 10 minutes.
Step Action 1.
Return to the DC1 Desktop, in Citrix Studio, click Licensing on the left.
2.
The current licensing status is shown; all is OK.
Click Change License Server on the right.

| 66 |
Step Action 3.
You will see this screen for 30 seconds or so before you see a security warning.
4.
Ignore this warning (this lab is not set up using certificates) and select the following:
þ Connect Me
Click Confirm.
5. Enter the following information:
Click Connect.
License Server Address sql1.training.lab
You are changing the license server for this lab exercise to a server with no licenses installed, to demonstrate licensing alert functionality.

| 67 |
Step Action 6. Ignore the certificate warning and select the following:
þ Connect Me
Click Confirm.
7.
Click OK.
8.
You have now changed the licensing server to one with no licenses.
Verify that no product licenses are available.

| 68 |
Step Action 9.
On the Student Desktop, return to Citrix Director.
If necessary enter the URL of Citrix Director:
http://dc1.training.lab/director
and logon using the following credentials:
User Name training\administrator Password Citrix123
Click Log on.
10.
Click on Dashboard at the top.
11.
Notice that there are 2 issues with Licensing Status. If only 1 issue is reported, wait a minute and click the refresh icon at the top right.
12.
The License Server does not currently have the required product licenses installed.
13.
The Delivery Controller, DC1, is currently unlicensed and Grace Period licensing has expired.

| 69 |
Step Action 14.
Click on Details.
15.
Scroll down to review the licensing information for DC1.
16.
As this is the last exercise in the lab using the XenApp 7.6 site, there is no need to change the licensing server back to the original server.
If you wish to do so, the server address is licenses.citrixvirtualclassroom.com
Exercise Summary In this exercise, you changed the license server setting in Studio to a server with no installed licenses. You logged into Director to view the details of the licensing alerts.
| 70 |
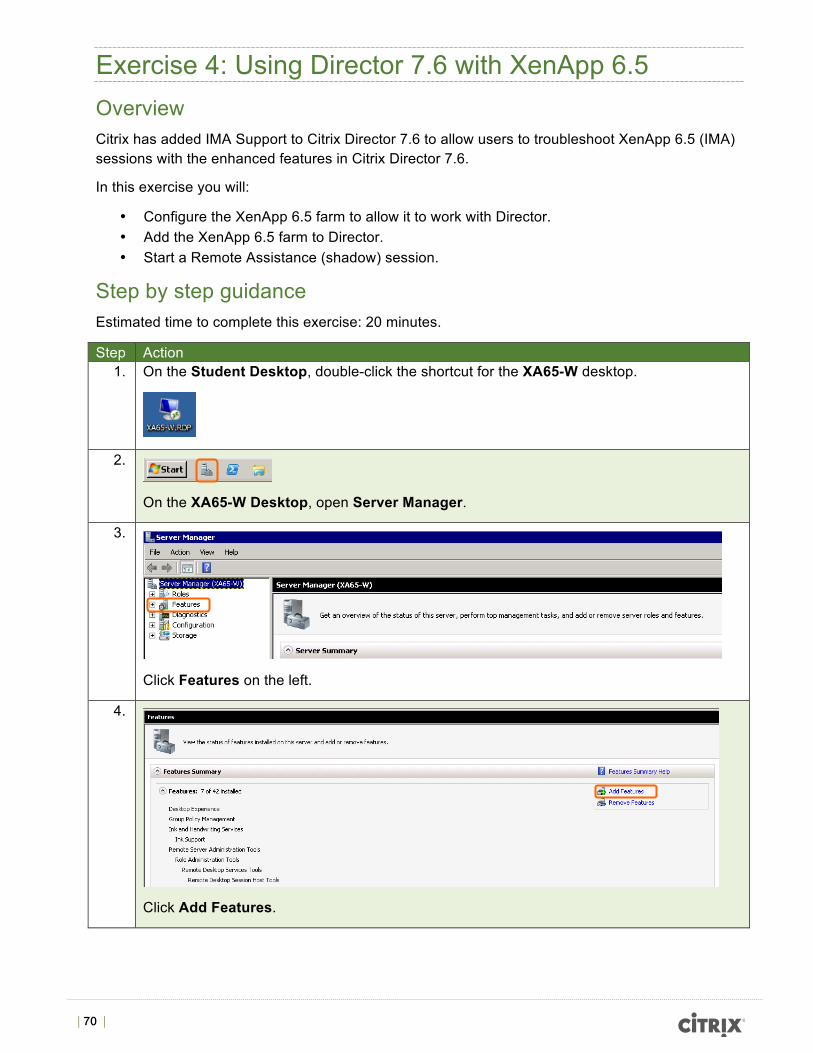
Exercise 4: Using Director 7.6 with XenApp 6.5 Overview Citrix has added IMA Support to Citrix Director 7.6 to allow users to troubleshoot XenApp 6.5 (IMA) sessions with the enhanced features in Citrix Director 7.6.
In this exercise you will:
• Configure the XenApp 6.5 farm to allow it to work with Director. • Add the XenApp 6.5 farm to Director. • Start a Remote Assistance (shadow) session.
Step by step guidance Estimated time to complete this exercise: 20 minutes.
Step Action 1. On the Student Desktop, double-click the shortcut for the XA65-W desktop.
2.
On the XA65-W Desktop, open Server Manager.
3.
Click Features on the left.
4.
Click Add Features.

| 71 |
Step Action 5. Shadowing requires Windows Remote Assistance, so you need to add that feature to
Windows.
Select Remote Assistance and click Next.
6.
Click Install.

| 72 |
Step Action 7.
Wait for installation to complete and click Close.
Close Server Manager.
8.
On XenCenter, click the XA65-W node and then click the Console tab.
9.
Using the DVD Drive 1 selector, select the XenApp_and_XenDesktop 7_6.iso installation DVD. (It’s near the bottom of the list.)
10.
Back on the XA65-W Desktop open File Explorer.

| 73 |
Step Action 11.
Navigate to D:\Support\DirectorWMIProvider and double-click DirectorWMIProvider_x64.
12.
Click Next.
13.
Check the box in front of I accept the terms … and click Next

| 74 |
Step Action 14.
Click Next to accept the default installation path.
15.
Click Install.
16.
Wait for installation to complete and click Finish.

| 75 |
Step Action 17.
Close File Explorer.
18. On the XA65-W Desktop, double-click the Command Prompt shortcut.
19. WinRM (Windows Remote Management) must be enabled and set up for remote access.
In the command prompt window enter the following command:
Winrm qc
WinRM is enabled, but is not setup to allow the remote access required.
Type y and press the Enter key to enable remote access.
Verify that the WinRM listener and firewall exception were created successfully.
20. Enter the following commands to switch to the D Drive and to switch to the Virtual Desktop Components folder:
D:
cd “x64\Virtual Desktop Components”
This command should be typed; do not copy/paste.

| 76 |
Step Action 21. In order for Director to retrieve information from the XA server, it is necessary to enable
WinRM permission for administrators.
Enter the following command:
ConfigRemoteMgmt /configwinrmuser “training\domain admins”
Verify WinRM configuration completed successfully. (Ignore the messages about Portica SDK users and WinRMRemoteWMI Users not existing.)
Close the XA65-W window.
22. Now we will add the XenApp 6.5 server to Director using DirectorConfig.exe.
On the DC1 Desktop, close the Studio window and double-click the Command Prompt shortcut.
23.
At the command prompt, enter the Commands:
cd \inetpub\wwwroot\director\tools
DirectorConfig /xenapp XA65-W
Verify the Director configuration completed successfully.
This command should be typed; do not copy/paste.

| 77 |
Step Action 24. Return to Internet Explorer on the Student Desktop.
Enter the URL of the XenApp 6.5 Web Interface:
http://XA65-C.training.lab
25. The logon prompt may take a few seconds to appear.
Enter the following information (the training domain is the only available domain)
User name User1 Password Citrix123
Click Log on.
26.
Click MS Word to launch the application.
27.
Wait for Microsoft Word to launch. You can make the window much smaller, so as not to monopolize the screen, but do not minimize or close the window.

| 78 |
Step Action 28. Return to Mozilla on the Student Desktop. You should already be logged in as
administrator. If not enter the URL:
http://DC1.training.lab/Director
and log on using the following credentials:
User name Training\Administrator Password Citrix123
Click Log on.
29.
Click Search at the top right.
30.
Type User1 and then click User One (Training\User1) when it appears.
31.
Click the MS Word session.
32.
The Activity Manager shows all running applications for User1. Click Shadow on the left.

| 79 |
Step Action 33.
Shadowing uses Windows Remote Assistance, which will take a few seconds to initialize.
34.
Click OK to open the Remote Assistance Invitation.
35.
Click Yes to allow Remote Assistance to connect to User1’s Microsoft Word session.
36.
You have successfully shadowed User1’s XenApp 6.5 MS Word session from Director.

| 80 |
Exercise Summary In this exercise, you configured XenApp 6.5 to allow it to work with Citrix Director. You then shadowed a XenApp 6.5 session using Director.
| 81 |
About Citrix
Citrix (NASDAQ:CTXS) is a cloud company that enables mobile workstyles—empowering people to work and collaborate from anywhere, securely accessing apps and data on any of the latest devices, as easily as they would in their own office. Citrix solutions help IT and service providers build clouds, leveraging virtualization and networking technologies to deliver high-performance, elastic and cost-effective cloud services. With market-leading cloud solutions for mobility, desktop virtualization, networking, cloud platforms, collaboration and data sharing, Citrix helps organizations of all sizes achieve the speed and agility necessary to succeed in a mobile and dynamic world. Citrix products are in use at more than 330,000 organizations and by over 100 million users globally. Annual revenue in 2012 was $2.59 billion. Learn more at www.citrix.com.