handcrafting traditional winter moccasins · does not fray. you could accomplish this by...
TRANSCRIPT

Handcrafting Traditional Winter MoccasinsBook 2:: Canvas Uppers
Dave and Kielyn MarroneVersion 2.0 June 2016
http://lureofthenorth.com

Note: This booklet is a continuation of a larger moccasin making series. For all other publications in this series, please see our website at lureofthenorth.com. Published instructional booklets can be found under "Info Hub" in the main navigation menu.
Booklets in the Winter Moccasins SeriesBook 1: Lowers;
Book 2: Tube-style canvas uppers (this booklet);
Book 3: Wrap-style buckskin uppers using boar, deer or other buckskin;
Note 1 - Acknowledgements: The original impetus for these instructions came from Garrett and Alexandra Conover's excellent book "A Snow Walker's Companion". They are an inspiration in this field.
Note 2 – Lure Moccasin Making Kits: These instructions are intended to be accompanied by our Moccasin Making Kit, which is available through the “Store” section of our website at: http://lureofthenorth.com. Of course, you can also gather all materials yourself and simply use these instructions as a guide, modifying to suit your requirements.
Note 3 - Distribution: Feel free to distribute these instructions to anyone you please, with the requirement that this package be distributed in its entirety with no modifications whatsoever. Thanks!
Note 4 – Feedback and Further Help: Feedback is welcomed to improve clarity in future editions. For even more assistance you might consider taking a moccasin making workshop with us. These workshops are run throughout Ontario, and includes hands-on instructions and all materials. Again, check the website for more details and a current schedule.
Our Philosophy: This booklet describes our understanding of a traditional craft – these skills and this knowledge has traditionally been handed down from person to person and now we are attempting to do the same. We are happy to have the opportunity to share this knowledge with you, however, if you use these instructions and find them helpful, please give credit where it is due. We have worked hard to produce this package and would appreciate any acknowledgements given. Thank you.
- The Lure Team, Kielyn & Dave Marrone
Version 2.0, June 2016http://lureofthenorth.com

Table of Contents:
0.0 About the Canvas, Tube-Style Uppers.................................................................................................41.0 Getting Prepared..................................................................................................................................5
1.1 Material Requirements....................................................................................................................51.2 Tool Requirements...........................................................................................................................51.3 Insulating Layers.............................................................................................................................5
2.0 Measure and Cut your Uppers.............................................................................................................63.0 Decorate...............................................................................................................................................74.0 Complete the Tube...............................................................................................................................8
4.1 Create the Upper Tunnel..................................................................................................................85.0 Final Steps............................................................................................................................................9
5.1 Add Lacing Tab to Back of Lower..................................................................................................95.2 Attach Upper to Lower..................................................................................................................10
6.0 Final Words........................................................................................................................................12Appendix 1: Pattern.................................................................................................................................13

0.0 About the Canvas, Tube-Style UppersThe canvas, tube-style upper is the classic upper styledescribed in the Conover's "A Snow Walker'sCompanion", and probably the style most often seen onwinter moccasins these days. In this design the upper issewn into a tube, and pulled on over the foot and calfjust like a modern boot.
Canvas is a fantastic option for uppers as it is:
• economical;
• lightweight;
• durable;
• breathable;
• practically wind-proof;
• quick-drying; and
• easy to customize with the use of ribbon and/ orfur.
However, being a woven fabric, it does require finishededges, which are most easily done with a sewing machine, and it is less traditional than buckskin uppers. For those that want to make their moccasins in the field without a sewing machine, want a more traditional product, or simply prefer the look of a wrap-around style upper, please see the third booklet in this series entitled "Buckskin Uppers"
Illustration 1: A typical wrap-style upper withdecorative ribbon
Illustration 2: Celebrating Completion of our Explorer's Club 2016

1.0 Getting Prepared
1.1 Material RequirementsCanvas, “tube-style” uppers require the following materials:
• A completed pair of moccasin lowers (see booklet 1 in this series);• 36” x 24” piece of 10oz. cotton canvas;• 4' of decorative ribbon;• 4', light cotton tape for binding bottom edge of canvas;• 2 x 3/8” x 50” light cotton webbing used as upper ties, ends sealed with beeswax;• 2 x 3/8” x 9' light cotton webbing uses as wrap-around ties, ends sealed w/ beeswax;• Artificial sinew – enough for project, plus extra for repair kit;• 2x “Glover's Needles” (aka. “Triangular Needles” or “Leather Needles”);• Lure of the North logo patch;• These instructions.
Illustration 3: All the materials needed to make the finished upper.
1.2 Tool Requirements• A regular household sewing machine with regular thread and denim needle;
• pins;
• scissors;
• measuring tape;
• ruler;
• large safety pin;
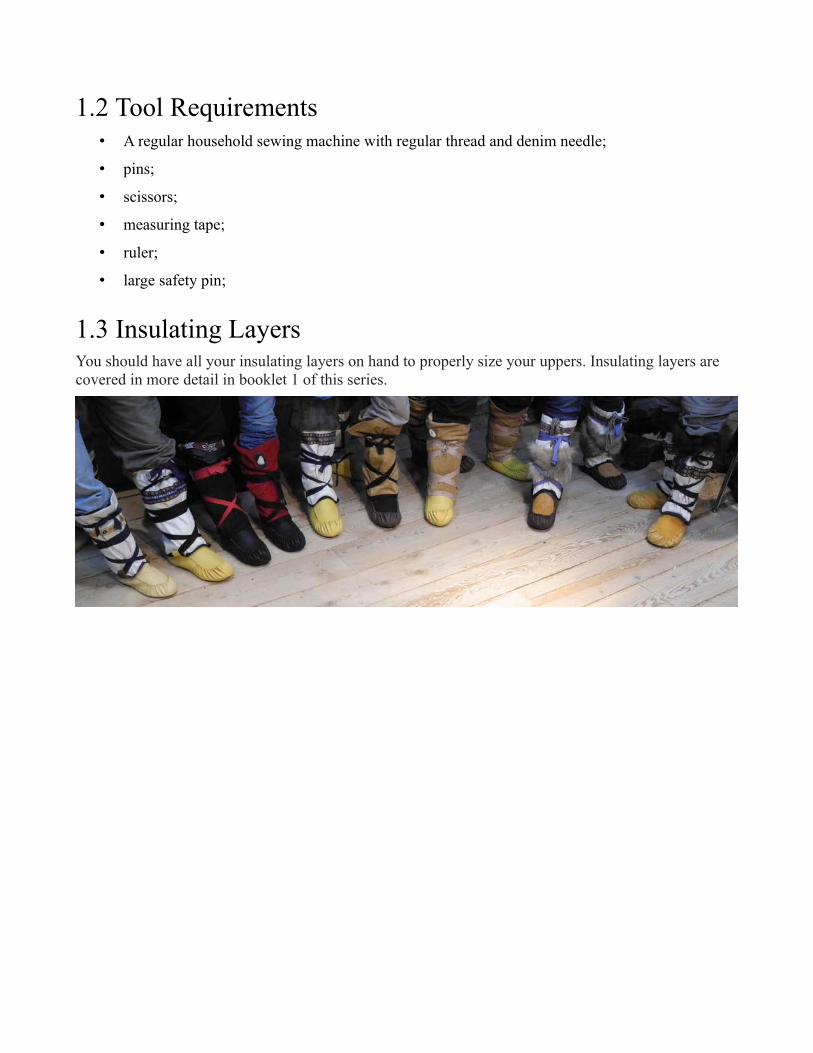
1.3 Insulating LayersYou should have all your insulating layers on hand to properly size your uppers. Insulating layers are covered in more detail in booklet 1 of this series.

2.0 Measure and Cut your UppersThe general shape of the canvas upper can be see in the illustration at right (alarger version is supplied in the appendix at the back of this booklet). Thispattern should be used as a guide to shape only, rather than as a strict pattern tobe traced. Instead you will take measurements from your completed moccasinbottoms and your body and create a custom pattern directly on your canvas. Thefirst measurement "A" (and "A1") is taken from your completed moccasins. Theremaining two measurements "H" and "C" (and "C1") are taken from your body, while wearing all insulating layers you intend to have on in your moccasins.
The Three Key Measurements
1. Measure the distance around the ankle opening of your moccasin lowers. Start at the heel seam and continue in a circle all the way around. Follow a straight line across the tongue of the moccasin, and finish up back at the heel seam. Try not to stretch the deerskin as you take your measurement. Divide this measurement in half to arrive at measurement "A" on the pattern. a) Add 1/2" to measurement A. This is "A1". b) Note: It is quite likely your two moccasin ankles will be different sizes (this is the reality of
handcrafts, and not an issue). This means that each moccasin will have an upper created specifically for it. Take each different "A" measurement and create a custom upper. Be sure to identify your lower and upper pairings so that you can match them up correctly when it comes time to join the pieces.
2. Fold your piece of canvas in half and pin to ensure it does not move while cutting. Draw a straight line starting at the fold and ending at distance "A1". Also put a mark at point "A" (1/2" shy of "A1"). Note: This can be a straight line for now. The triangular cut-out labelled "foot contour" can be removed later.
3. While wearing your insulating layers (but without the insole), measure the height of your lower leg, from the top of your moccasin lower to the desired top of your finished moccasin (usually just above the calf). Add 1 1/2" to this measurement. This is "H" on your pattern.
4. Measure and plot distance H on the "Fold" side of your pattern (Note: for clarity due to the "foot contour" this is shown on the "Seam" side of your pattern, but works best to plot on the "fold" side for now).
5. Still wearing your insulating layers measure a comfortable diameter around the widest part of
Illustration 4: Approximate shape
Illustration 5: Ankle Measurement
Illustration 6: Calf Measurement
Illustration 7: Height

your calf. This should be comfortably loose around your insulating layers to allow you to pull your finished moccasin on and off. The best way to ensure a good final fit, is to form the measuring tape into a loop of estimated diameter and try pulling it on and off your foot. It should go on easily without being sloppy. Once you have settled on a comfortable diameter, divide this measurement in half to arrive at measurement "C". Add 1/2" to this for "C1".
6. Plot measurement "C1" at the top of the pattern, parallel to "A" and "A1". Also put a tick at "C" (1/2" shy of "C1"). Draw a line to connect points "C" and "A", and a second, parallel line to connect "A1" and "C1".
7. You're nearly finished pattern should now look like the template provided at the back of this booklet. Remember it should be plotted on a fold of canvas that runs the length of your pattern.In nearly all cases, it will have a taper, with the calf (or top) of your upper being wider than the ankle (or bottom).
8. Cut your pattern. 9. Draw the small "Foot Contour" seen in the template. On an averaged size upper, this should be
about 2” wide and 1/2" tall. Snip this small triangle of material off. 10.Unpin, and unfold. Your finished, cut upper, should be twice the width of your pattern piece
and fit comfortably around your calf. 11.Repeat for the second upper. Remember: If you have significant (> 1/2") differences in the
ankle openings of your moccasin lowers, you will be creating two slightly different uppers, and should discreetly label them as such so they can be joined to their proper pair later.
3.0 DecorateIn this step you will pin on the decorative portions of the gaiter. The central ribbon is entirely optional (and may be replaced or supplemented by fur, leather fringe, etc). The lower bias tape is somewhat optional, but is highly recommended as a way to make a professional-looking finish to the bottom of your moccasin. The purpose of the lower bias tape is to finish the open canvas seam here to ensure it does not fray. You could accomplish this by 'over-casting' with a regular sewing machine, or using a Serger, but the bias tape does a really nice job.
1. Cut bias tape long enough to span bottom (ankle)edge of unfolded canvas +1 inch for grace ;
2. Pin the bottom bias tape in place:
a) Fold the bias tape in half over the bottom edge ofthe canvas and pin.
b) Because the canvas is not straight at its bottomedge (having a dip at the foot contour) you aretrying to force the bias tape into a line it wouldnot naturally take... use care and lots of pins hereto force the bias tape into following smoothcurves along the bottom edge of the canvas.
c) Ensure you have folded the bias tape fully over the edge of the fabric, so that when you sew,your stitches will bite into lots of canvas. Take your time. If your bias tape is only over a tiny edge of canvas, then the canvas will fray and your bias tape will pull off.
3. Pin the upper decorative ribbon in place approximately 2/3 - ¾ of the way up the canvas (depending on aesthetic preference). This should be on the "right" side of your canvas (ie. the side without all the pen or pencil marks placed previously.
Illustration 8: A properly pinned upper

a) Fold the canvas in half and mark on both halves of the canvas where you intend the ribbon to meet.
b) Because the ribbon is following a straight line, fewer pins are required.
c) After pinning the ribbon, fold the canvas in half again and double check that the ribbon will meet itself properly once you sew your canvas into a tube, otherwise this will be a visible cosmetic flaw at the back of your moccasin later where these ribbons do not meet each other.
4. Using your sewing machine on a straight stitch, sew the lower bias tape onto each of your gaiters.
5. Again with the sewing machine on a straight stitch, sew down the upper decorative ribbon.
4.0 Button-hole 1. Cut two button holes ~ ¾” to 1” tall in the front of your gaiter approximately 1/2” off centre on
either side. Hand sew these button holes using your sinew, a regular needle and the whip stitch. A 'button-hole' or 'blanket-stitch' can be used here to slightly nicer effect, but in the interest of simplicity the whip stitch will work just fine. Sewing your button holes is necessary in the canvas to prevent fraying.
Note: If you know how to use your button-holer then go for it! Otherwise the hand stitching works fine as well.
5.0 Complete the Tube 1. Fold you gaiters inside-out, along the pattern's original fold line.
Pin in this position.
2. Using a straight stitch, sew along the first (A) of the two parallellines that you created in Section 2 (Ie. Line AC). Sew this seamcompletely from one end of the moccasin to the other.
3. Using a tight, wide zig-zag stitch, over-cast the open edge of thecanvas (Ie. Line A1C1).
Your standard gaiter is now a decorated tube. All that remains is to create atunnel for your cotton ties and sew in 'button holes' for these ties to emergefrom.
5.1 Create the Upper TunnelIt is important that this section occurs after the moccasin has been sewninto a tube (which you did in the previous section). If done correctly youwill have a continuous upper tunnel which goes all the way around themoccasin. Intuitively, many prefer to do this step earlier, but you will endup cutting this tunnel in half when you sew your tube seam if done this way.
As this tunnel is formed right at the mouth of your tube, you should have no issue getting this to work on most any sewing machine.
Illustration 9: A finished tube, just resting on the lower. Note: the upper tunnel has not yet been completed

1. Fold ~1 ½” of the top of the canvas down inside the gaiter.
a) This will be the width of the tunnel through which you will run your upper tie. Tuck the edge under the roll-down so that you will have a finished seam and pin it in place.
2. Using a straight stitch, sew all the way around the edge of the tunnel.
3. Thread your upper ties!
a) Use a large safety pin ('blanket pin') to threadyour upper ties through your newly createdtunnel. If you are using cotton ties as I usuallydo, the best way to seal the edge is by dipping itin beeswax (Lure kits come with pre-waxedties). If you are using a synthetic tie, you canseal the edge by melting it together.
Your uppers are now complete. You are in the homestretch. Put the upper on, slip your lowers back on, andstrut your stuff. Resist the urge to duct tape the two partstogether and go for a walk – it will come soon enough!
6.0 Attach Upper to LowerThis step can be a bit confusing - lots of photos should help out here!
1. Remember that in Section 2 you may have labelledyour uppers and lowers if the ankle seams on yourlowers were different lengths. If this was the case,be sure to match up the proper lower with theproper upper at this point.
a) Note: Before beginning to attach your uppersand lowers, you should always do a 'dry run' totest the fit. That is, place the rear seam of theupper against the rear of the lower and runyour hand along both seams to ensure they lineup properly. If your uppers are slightly biggerthan your lowers, this is completely fine – youcan stretch the deerskin lowers somewhat tomatch perfectly with the canvas upper. If yourlowers are slightly bigger than your uppers,you will not be able to stretch uppers toaccommodate, however a few discrete puckersin the lower may save the day. If the uppersand lowers are significantly different, you can add orremove some stitches from the lower to adjust theankle opening to match the upper.
2. Turn both the upper and the lower inside-out.
3. Align the upper and lower.
Illustration 10: The finished button holes
Illustration 11: Almost there! Completed moccasins standing proud!
Illustration 12: Aligning the Upper and Lower
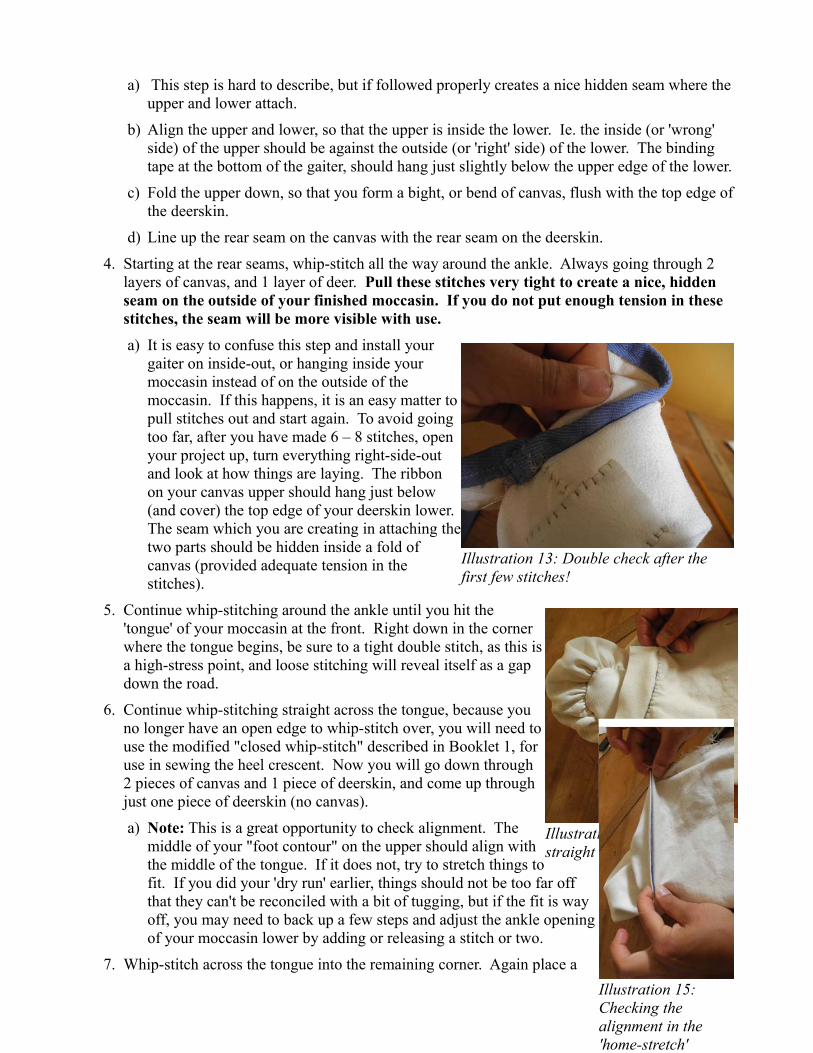
a) This step is hard to describe, but if followed properly creates a nice hidden seam where the upper and lower attach.
b) Align the upper and lower, so that the upper is inside the lower. Ie. the inside (or 'wrong' side) of the upper should be against the outside (or 'right' side) of the lower. The binding tape at the bottom of the gaiter, should hang just slightly below the upper edge of the lower.
c) Fold the upper down, so that you form a bight, or bend of canvas, flush with the top edge of the deerskin.
d) Line up the rear seam on the canvas with the rear seam on the deerskin.
4. Starting at the rear seams, whip-stitch all the way around the ankle. Always going through 2 layers of canvas, and 1 layer of deer. Pull these stitches very tight to create a nice, hidden seam on the outside of your finished moccasin. If you do not put enough tension in these stitches, the seam will be more visible with use.
a) It is easy to confuse this step and install yourgaiter on inside-out, or hanging inside yourmoccasin instead of on the outside of themoccasin. If this happens, it is an easy matter topull stitches out and start again. To avoid goingtoo far, after you have made 6 – 8 stitches, openyour project up, turn everything right-side-outand look at how things are laying. The ribbonon your canvas upper should hang just below(and cover) the top edge of your deerskin lower.The seam which you are creating in attaching thetwo parts should be hidden inside a fold ofcanvas (provided adequate tension in thestitches).
5. Continue whip-stitching around the ankle until you hit the'tongue' of your moccasin at the front. Right down in the cornerwhere the tongue begins, be sure to a tight double stitch, as this isa high-stress point, and loose stitching will reveal itself as a gapdown the road.
6. Continue whip-stitching straight across the tongue, because youno longer have an open edge to whip-stitch over, you will need touse the modified "closed whip-stitch" described in Booklet 1, foruse in sewing the heel crescent. Now you will go down through2 pieces of canvas and 1 piece of deerskin, and come up throughjust one piece of deerskin (no canvas).
a) Note: This is a great opportunity to check alignment. Themiddle of your "foot contour" on the upper should align withthe middle of the tongue. If it does not, try to stretch things tofit. If you did your 'dry run' earlier, things should not be too far offthat they can't be reconciled with a bit of tugging, but if the fit is wayoff, you may need to back up a few steps and adjust the ankle openingof your moccasin lower by adding or releasing a stitch or two.
7. Whip-stitch across the tongue into the remaining corner. Again place a
Illustration 13: Double check after the first few stitches!
Illustration 14: Whip stitch straight across the tongue
Illustration 15: Checking the alignment in the 'home-stretch'

tight double stitch in this corner to keep everything neat and secure.
8. Finish off by continuing back around to the rear seams.
a) Once you start in this 'home-stretch' you should check that the canvas and deerskin are lining up correctly. Make sure that there is no extra material. If there is extra material in the canvas just be sure to gradually stretch the deerskin while you sew it to the canvas, so that everything lines up perfectly by the time you reach the rear seams. If the extra material is in the deerskin, you may have to put in a couple of puckers to ensure everything lines up.
9. Turn everything right-side-out. Your moccasins are finished!
10.Thread your wrap-around lace through the tab you have installed at the rear of your moccasins. Slip on all your insulating layers, slide in your insole, and put on your finished product. Prance around a little. Do a jig. If you are lucky enough to do this in the winter, then play in the snow.Things will probably feel quite tight right now, especially if you have your insole in, but the deerskin will relax.
11.Enjoy!
Woohoo!! Nice Work!
Illustration 16: Our finished moccasin. Congratulations on your own!

6.0 Final WordsNow that your mocs are done, its time to get out and use them! At Lure of the North we are passionate about making aesthetically beautiful, natural handcrafts. But all of our items are also designed to be functional gear that can be used in the bush. There is no better way to truly appreciate your new craft than getting out and using them, so please, tie them on your feet, and take a hike!
Congratulations on your finished moccasins!!
Thank you so much for your support.
www.lureofthenorth.com

Appendix 1: Pattern