gwt tutorial
DESCRIPTION
GWT tutorialTRANSCRIPT

Google Web Toolkit Tutorial

i
GOOGLE WEB TOOLKIT TUTORIAL
Simply Easy Learning by tutorialspoint.com
tutorialspoint.com
ii
C O P Y R I G H T & D I S C L A I M E R N O T I C E
All the content and graphics on this tutorial are the property of tutorialspoint.com. Any content from
tutorialspoint.com or this tutorial may not be redistributed or reproduced in any way, shape, or form without the written permission of tutorialspoint.com.Failure to do so is a violation of copyright laws.
This tutorial may contain inaccuracies or errors andtutorialspointprovidesno guarantee regarding the accuracy of the site or its contents including this tutorial. If you discover that the tutorialspoint.com site or this tutorial content contains some errors, please contact us at [email protected]

iii
ABOUT THE TUTORIAL
GWT Tutorial Google Web Toolkit (GWT) is a development toolkit for building and optimizing complex browser-based applications. GWT is used by many products at Google, including Google AdWords and Orkut.
GWT is open source, completely free, and used by thousands of developers around the world. It is licensed under the Apache License version 2.0.
This tutorial will give you great understanding on GWT concepts needed to get a web application up and running.
Audience This tutorial is designed for Software Professionals who are willing to learn GWT Programming in simple and easy steps. This tutorial will give you great understanding on GWT Programming concepts and after completing this tutorial you will be at intermediate level of experties from where you can take yourself at higher level of expertise.
Prerequisites Before proceeding with this tutorial you should have a basic understanding of Java programming language, text editor and execution of programs etc. Because we are going to develop web based applications usin GWT, so it will be good if you have understanding on other web technologies like, HTML, CSS, AJAX etc.
Copyright & Disclaimer Notice
All the content and graphics on this tutorial are the property of tutorialspoint.com. Any content from
tutorialspoint.com or this tutorial may not be redistributed or reproduced in any way, shape, or form without the written permission of tutorialspoint.com. Failure to do so is a violation of copyright laws.
This tutorial may contain inaccuracies or errors and tutorialspoint provides no guarantee regarding the accuracy of the site or its contents including this tutorial. If you discover that the tutorialspoint.com site or this tutorial content contains some errors, please contact us at [email protected]

iii
Table of Contents
GWT Tutorial ............................................................................ iii Audience .................................................................................. iii Prerequisites ............................................................................ iii Copyright & Disclaimer Notice .................................................. iii GWTOverview .......................................................................... 1
What is GWT? .............................................................................................. 1
Why to use GWT? ......................................................................................... 1
Disadvantages of GWT .............................................................................. 2
The GWT Components .................................................................................. 2
Environment ............................................................................. 3
System Requirement ................................................................................. 3
Step 1 - Verify Java installation on your machine ...................................... 3
Step 2 - Setup Java Development Kit (JDK): ............................................. 4
Step 3 - Setup Eclipse IDE ........................................................................ 4
Step 4: Install GWT SDK & Plugin for Eclipse ........................................... 5
Step 5: Setup Apache Tomcat: .................................................................. 6
Applications .............................................................................. 8
Module Descriptors .................................................................................... 8
Public resources ...................................................................................... 10
Client-side code ....................................................................................... 10
Server-side code ...................................................................................... 11
Create Application .................................................................. 12
Step 1 - Create Project .......................................................................... 12
Step 2 - Modify Module Descriptor: HelloWorld.gwt.xml .......................... 15
Step 3 - Modify Style Sheet: HelloWorld.css............................................ 15
Step 4 - Modify Host File: HelloWorld.html .............................................. 16
Step 5 - Modify Entry Point: HelloWorld.java ........................................... 16
Step 6 - Compile Application.................................................................... 16
Step 6 - Run Application .......................................................................... 18
Deploy Application ................................................................. 20
Create WAR File ...................................................................................... 22
Deploy WAR file ....................................................................................... 22

iii
Run Application ........................................................................................ 22
Style with CSS ....................................................................... 24
CSS Styling APIs ..................................................................................... 24
Primary & Secondary Styles .................................................................... 25
Associating CSS Files ............................................................................. 26
GWT CSS Example ................................................................................. 26
Basic Widgets ........................................................................ 30
GWT UI Elements: ................................................................................... 30
GWT UIObject Class ............................................................................... 31
Introduction .............................................................................................. 31
Class declaration ..................................................................................... 31
Field ......................................................................................................... 31
Class constructors ................................................................................... 31
Class methods ......................................................................................... 31
Methods inherited .................................................................................... 33
GWT Widget Class .................................................................................. 34
Introduction .............................................................................................. 34
Class declaration ..................................................................................... 34
Field ......................................................................................................... 34
Class constructors ................................................................................... 34
Class methods ......................................................................................... 34
Methods inherited .................................................................................... 35
Basic Widgets .......................................................................................... 35
Label ........................................................................................................ 36
Introduction .............................................................................................. 36
Class declaration ..................................................................................... 36
CSS style rules ........................................................................................ 36
Class constructors ................................................................................... 36
Class methods ......................................................................................... 36
Methods inherited .................................................................................... 37
Label Widget Example ............................................................................. 37
HTML ....................................................................................................... 40
Introduction .............................................................................................. 40
Class declaration ..................................................................................... 40
CSS style rules ........................................................................................ 40
Class constructors ................................................................................... 40
Class methods ......................................................................................... 41
Methods inherited .................................................................................... 41
Html Widget Example .............................................................................. 41
iii
IMAGE ..................................................................................................... 43
Introduction .............................................................................................. 43
Class declaration ..................................................................................... 44
CSS style rules ........................................................................................ 44
Class constructors ................................................................................... 44
Class methods ......................................................................................... 44
Methods inherited .................................................................................... 45
Image Widget Example ............................................................................ 45
ANCHOR ................................................................................................. 47
Introduction .............................................................................................. 47
Class declaration ..................................................................................... 47
CSS style rules ........................................................................................ 48
Class constructors ................................................................................... 48
Class methods ......................................................................................... 48
Methods inherited .................................................................................... 49
Anchor Widget Example .......................................................................... 49
Form Widgets ......................................................................... 52
Form Widgets .......................................................................................... 52
Introduction .............................................................................................. 53
Class declaration ..................................................................................... 53
CSS style rules ........................................................................................ 53
Class constructors ................................................................................... 53
Class methods ......................................................................................... 54
Methods inherited .................................................................................... 54
Button Widget Example ........................................................................... 54
Introduction .............................................................................................. 57
Class declaration ..................................................................................... 57
CSS style rules ........................................................................................ 57
Class constructors ................................................................................... 57
Class methods ......................................................................................... 58
Methods inherited .................................................................................... 58
PushButton Widget Example ................................................................... 59
Introduction .............................................................................................. 62
Class declaration ..................................................................................... 62
CSS style rules ........................................................................................ 62
Class constructors ................................................................................... 62
Class methods ......................................................................................... 63
Methods inherited .................................................................................... 63
ToggleButton Widget Example ................................................................ 63

iii
Introduction .............................................................................................. 66
Class declaration ..................................................................................... 66
CSS style rules ........................................................................................ 66
Class constructors ................................................................................... 66
Class methods ......................................................................................... 66
Methods inherited .................................................................................... 67
CheckBox Widget Example ..................................................................... 68
Introduction .............................................................................................. 70
Class declaration ..................................................................................... 70
CSS style rules ........................................................................................ 71
Class constructors ................................................................................... 71
Class methods ......................................................................................... 71
Methods inherited .................................................................................... 71
RadioButton Widget Example .................................................................. 71
Introduction .............................................................................................. 74
Class declaration ..................................................................................... 74
CSS style rules ........................................................................................ 74
Class constructors ................................................................................... 75
Class methods ......................................................................................... 75
Methods inherited .................................................................................... 76
ListBox Widget Example .......................................................................... 76
Introduction .............................................................................................. 79
Class declaration ..................................................................................... 79
CSS style rules ........................................................................................ 80
Class constructors ................................................................................... 80
Class methods ......................................................................................... 80
Methods inherited .................................................................................... 82
Introduction .............................................................................................. 86
Class declaration ..................................................................................... 86
CSS style rules ........................................................................................ 86
Class constructors ................................................................................... 86
Class methods ......................................................................................... 86
Methods inherited .................................................................................... 87
TextBox Widget Example......................................................................... 87
Introduction .............................................................................................. 89
Class declaration ..................................................................................... 89
CSS style rules ........................................................................................ 90
Class constructors ................................................................................... 90
Class methods ......................................................................................... 90

iii
Methods inherited .................................................................................... 90
PasswordTextBox Widget Example ......................................................... 90
Introduction .............................................................................................. 93
Class declaration ..................................................................................... 93
CSS style rules ........................................................................................ 93
Class constructors ................................................................................... 93
Class methods ......................................................................................... 93
Methods inherited .................................................................................... 94
TextBox Widget Example......................................................................... 94
Introduction .............................................................................................. 97
Class declaration ..................................................................................... 97
CSS style rules ........................................................................................ 97
Class constructors ................................................................................... 97
Class methods ......................................................................................... 97
Methods inherited .................................................................................... 98
RichTextBox Widget Example ................................................................. 98
Introduction ............................................................................................ 101
Class declaration ................................................................................... 101
CSS style rules ...................................................................................... 101
Class constructors ................................................................................. 101
Class methods ....................................................................................... 101
Methods inherited .................................................................................. 102
FileUpload Widget Example................................................................... 102
Introduction ............................................................................................ 106
Class declaration ................................................................................... 107
Class constructors ................................................................................. 107
Methods inherited .................................................................................. 107
Hidden Widget Example ........................................................................ 108
Complex Widgets ................................................................. 111
Complex Widgets ................................................................................... 111
Introduction ............................................................................................ 112
Class declaration ................................................................................... 112
CSS style rules ...................................................................................... 112
Class constructors ................................................................................. 112
Class methods ....................................................................................... 112
Methods inherited .................................................................................. 114
Tree Widget Example ............................................................................ 115
Introduction ............................................................................................ 118
Class declaration ................................................................................... 119

iii
CSS style rules ...................................................................................... 119
Class constructors ................................................................................. 119
Class methods ....................................................................................... 120
Methods inherited .................................................................................. 121
MenuBar Widget Example ..................................................................... 122
Introduction ............................................................................................ 127
Class declaration ................................................................................... 127
CSS style rules ...................................................................................... 128
Class constructors ................................................................................. 128
Class methods ....................................................................................... 128
Methods inherited .................................................................................. 130
DatePicker Widget Example .................................................................. 130
Introduction ............................................................................................ 135
Class declaration ................................................................................... 135
Class constructors ................................................................................. 136
Class methods ....................................................................................... 136
Methods inherited .................................................................................. 137
CellTree Widget Example ...................................................................... 137
Introduction ............................................................................................ 144
Class declaration ................................................................................... 144
Class constructors ................................................................................. 144
Class methods ....................................................................................... 144
Methods inherited .................................................................................. 145
CellList Widget Example ........................................................................ 145
Introduction ............................................................................................ 149
Class declaration ................................................................................... 149
Class constructors ................................................................................. 149
Class methods ....................................................................................... 150
Methods inherited .................................................................................. 151
CellTable Widget Example .................................................................... 151
Introduction ............................................................................................ 155
Class declaration ................................................................................... 155
Class constructors ................................................................................. 156
Class methods ....................................................................................... 156
Methods inherited .................................................................................. 156
CellBrowser Widget Example ................................................................ 157
Layout Panels ...................................................................... 164
Introduction ............................................................................................ 164
Class declaration ................................................................................... 164
iii
Field ....................................................................................................... 165
Class constructors ................................................................................. 165
Class methods ....................................................................................... 165
Methods inherited .................................................................................. 165
Layout Panels ........................................................................................ 166
Introduction ............................................................................................ 167
Class declaration ................................................................................... 167
Class constructors ................................................................................. 167
Class methods ....................................................................................... 167
Methods inherited .................................................................................. 168
FlowPanel Widget Example ................................................................... 168
Introduction ............................................................................................ 170
Class declaration ................................................................................... 170
Class constructors ................................................................................. 171
Class methods ....................................................................................... 171
Methods inherited .................................................................................. 171
HorizontalPanel Widget Example .......................................................... 172
Introduction ............................................................................................ 174
Class declaration ................................................................................... 174
Class constructors ................................................................................. 174
Class methods ....................................................................................... 174
Methods inherited .................................................................................. 175
VerticalPanel Widget Example ............................................................... 175
Introduction ............................................................................................ 178
Class declaration ................................................................................... 178
CSS style rules ...................................................................................... 178
Class constructors ................................................................................. 178
Class methods ....................................................................................... 178
Methods inherited .................................................................................. 179
HorizontalSplitPanel Widget Example ................................................... 180
Introduction ............................................................................................ 182
Class declaration ................................................................................... 182
CSS style rules ...................................................................................... 183
Class constructors ................................................................................. 183
Class methods ....................................................................................... 183
Methods inherited .................................................................................. 184
VerticalSplitPanel Widget Example ........................................................ 184
Introduction ............................................................................................ 187
Class declaration ................................................................................... 187
iii
Class constructors ................................................................................. 187
Class methods ....................................................................................... 187
Methods inherited .................................................................................. 188
FlexTable Widget Example .................................................................... 188
Introduction ............................................................................................ 192
Class declaration ................................................................................... 192
Class constructors ................................................................................. 192
Class methods ....................................................................................... 192
Methods inherited .................................................................................. 193
Grid Widget Example ............................................................................. 193
Introduction ............................................................................................ 195
Class declaration ................................................................................... 195
Class constructors ................................................................................. 195
Class methods ....................................................................................... 195
Methods inherited .................................................................................. 196
DeckPanel Widget Example .................................................................. 196
Introduction ............................................................................................ 199
Class declaration ................................................................................... 199
Class constructors ................................................................................. 200
Class methods ....................................................................................... 200
Methods inherited .................................................................................. 200
DockPanel Widget Example .................................................................. 201
Introduction ............................................................................................ 203
Class declaration ................................................................................... 204
Class constructors ................................................................................. 204
Class methods ....................................................................................... 204
Methods inherited .................................................................................. 204
HTMLPanel Widget Example ................................................................. 205
Introduction ............................................................................................ 207
Class declaration ................................................................................... 207
Class constructors ................................................................................. 208
Class methods ....................................................................................... 208
Methods inherited .................................................................................. 210
TabPanel Widget Example .................................................................... 210
Introduction ............................................................................................ 213
Class declaration ................................................................................... 213
Class constructors ................................................................................. 213
Class methods ....................................................................................... 213
Methods inherited .................................................................................. 213

iii
Composite Widget Example................................................................... 214
Introduction ............................................................................................ 216
Class declaration ................................................................................... 216
Class constructors ................................................................................. 217
Class methods ....................................................................................... 217
Methods inherited .................................................................................. 217
SimplePanel Widget Example ................................................................ 217
Introduction ............................................................................................ 220
Class declaration ................................................................................... 220
Class constructors ................................................................................. 221
Class methods ....................................................................................... 221
Methods inherited .................................................................................. 222
ScrollPanel Widget Example .................................................................. 222
Introduction ............................................................................................ 224
Class declaration ................................................................................... 224
Class constructors ................................................................................. 225
Class methods ....................................................................................... 225
Methods inherited .................................................................................. 227
FocusPanel Widget Example ................................................................. 227
Introduction ............................................................................................ 229
Class declaration ................................................................................... 229
Class constructors ................................................................................. 229
Class methods ....................................................................................... 230
Methods inherited .................................................................................. 231
FormPanel Widget Example .................................................................. 231
Introduction ............................................................................................ 235
Class declaration ................................................................................... 235
Class constructors ................................................................................. 235
Class methods ....................................................................................... 235
Methods inherited .................................................................................. 238
PopupPanel Widget Example ................................................................ 238
Introduction ............................................................................................ 241
Class declaration ................................................................................... 241
Class constructors ................................................................................. 242
Class methods ....................................................................................... 242
Methods inherited .................................................................................. 243
DialogBox Widget Example ................................................................... 244
Event Handling ..................................................................... 249
Event Handler Interfaces ....................................................................... 249

iii
Event Methods ....................................................................................... 251
Example ................................................................................................. 251
Custom Widgets ................................................................... 255
Create Custom Widget with Composite Class ....................................... 255
UIBinder ............................................................................... 259
Introduction ............................................................................................ 259
UiBinder workflow .................................................................................. 259
Step 1: Create UI Declaration XML File ................................................. 259
Step 2: Use ui:field for Later Binding ..................................................... 260
Step 3: Create Java counterpart of UI XML ........................................... 260
Step 4: Bind Java UI fields with UiField annotation ................................ 260
Step 5: Bind Java UI with UI XML with UiTemplate annotation ............. 260
Step 6: Create CSS File ........................................................................ 261
Step 7: Create Java based Resource File for CSS File ......................... 261
Step 8: Attach CSS resource in Java UI Code file. ................................ 261
UIBinder Complete Example .................................................................. 261
RPC Communication ............................................................ 269
GWT RPC Components ........................................................................ 269
RPC Communication workflow .............................................................. 270
Step 1: Create a Serializable Model Class ............................................ 270
Step 2: Create a Service Interface ......................................................... 270
Step 2: Create a Async Service Interface .............................................. 271
Step 3: Create a Service Implementation Servlet class ......................... 271
Step 4: Update Web.xml to include Servlet declaration ......................... 271
Step 5: Make the remote procedure call in Application Code ................ 272
RPC Communication Complete Example .............................................. 272
JUnit Integration ................................................................... 278
Download Junit archive .......................................................................... 278
Locate GWT installation folder ............................................................... 278
GWTTestCase Class ............................................................................. 278
Using webAppCreator ............................................................................ 279
Understanding the test class: HelloWorldTest.java ................................ 280
Noteworthy Points .................................................................................. 281
GWT - JUnit Integration Complete Example .......................................... 281
Run test cases in Eclipse using generated launch configurations. ........ 285
RUN THE JUNIT TEST IN DEVELOPMENT MODE. ........................... 285
RUN THE JUNIT TEST IN PRODUCTION MODE. .............................. 286
Debug Application ................................................................ 288
Debugging Example .............................................................................. 288

iii
Step 1 - Place BreakPoints .................................................................... 291
Step 2 - Debug Application .................................................................... 292
Internationalization ............................................................... 296
Workflow of internationalizing a GWT Application ................................. 296
Step 1: Create properties files ............................................................... 296
Step 2: Add i18n module to Module Descriptor XML File ...................... 297
Step 3: Create Interface equivalent to properties file ............................. 297
Step 4: Use Message Interface in UI component. .................................. 297
Internationalization - Complete Example ............................................... 298
History Class ........................................................................ 303
History Management Workflow .............................................................. 303
Step 1: Enable History support .............................................................. 303
Step 2: Add token to History .................................................................. 303
Step 3: Retrive token from History ......................................................... 304
History Class - Complete Example ........................................................ 304
Bookmark Support ............................................................... 308
Bookmarking Example ........................................................................... 308
Logging Framework ............................................................. 313
Types of Logger ..................................................................................... 313
Log Handlers ......................................................................................... 313
Configure Logging in GWT Application .................................................. 314
Use logger to log user actions ............................................................... 314
Logging Framework Example ................................................................ 314
TUTORIALSPOINT
Simply Easy Learning Page 1
GWTOverview
This chapter describes the basic definition and concepts of Google Web Toolkit.
What is GWT?
GWT is an open source, free development toolkit.
Google Web Toolkit (GWT) is a development toolkit to create RICH Internet Application(RIA).
GWT provides developers option to write client side application in JAVA.
GWT compiles the code written in JAVA to JavaScript code.
Application written in GWT is cross-browser compliant. GWT automatically generates javascript code suitable for each browser.
GWT is open source, completely free, and used by thousands of developers around the world. It is licensed under the Apache License version 2.0.
Overall, GWT is a framework to build large scale and high performance web appliation while keeping them as easy-to-maintain.
Why to use GWT? Being Java based, you can use JAVA IDEs like Eclipse to develop GWT
applcation. Developers can use code auto-complete/refactoring/navigation/project management and all features of IDEs.
GWT provides full debugging capability. Developers can debug the client side application just as an Java Application.
GWT provides easy integration with Junit and Maven.
CHAPTER
1

TUTORIALS POINT
Simply Easy Learning Page 2
Again being Java based, GWT has a low learning curve for Java Developers.
GWT generates optimized javascript code, produces browser's specific javascript code by self.
GWT provides Widgets library provides most of tasks required in an application.
GWT is extensible and custom widget can be created to cater to application needs.
On top of everything, GWT applications can run on all major browsers and smart phones including Android and iOS based phones/tablets.
Disadvantages of GWT Though GWT comes with lots of plus points but same time we should consider the following points:
Not indexable : Web pages generated by GWT would not be indexed by search
engines because these applications are generated dynamically.
Not degradable: If your application user disables Javascript then user will just see the basic page and nothing more.
Not designer's friendly: GWT is not suitable for web designers who prefer using plain HTML with placeholders for inserting dynamic content at later point in time.
The GWT Components The GWT framework can be divided into following three major parts:
GWT Java to JavaScript compiler : This is the most important part of GWT which
makes it a powerful tool for building RIAs. The GWT compiler is used to translate all the application code written in Java into JavaScript.
JRE Emulation library : Google Web Toolkit includes a library that emulates a
subset of the Java runtime library. The list includes java.lang,
java.lang.annotation, java.math, java.io, java.sql, java.util and java.util.logging
GWT UI building library : This part of GWT consists of many subparts which
includes the actual UI components, RPC support, History management, and much more.
GWT also provides a GWT Hosted Web Browser which lets you run and execute
your GWT applications in hosted mode, where your code runs as Java in the Java Virtual Machine without compiling to JavaScript.
TUTORIALS POINT
Simply Easy Learning Page 3
Environment
This section describes how to setup your system environment before you start using Google Web Toolkit:
This will guide you on how to prepare a development environment to start your
work with GWT Framework. This tutorial will also teach you how to setup JDK, Tomcat and Eclipse on your machine before you setup GWT Framework:
System Requirement GWT requires JDK 1.6 or higher so the very first requirement is to have JDK installed in your machine.
JDK 1.6 or above.
Memory no minimum requirement.
Disk Space no minimum requirement.
Operating System no minimum requirement.
Follow the given steps to setup your environment to start with GWT application development.
Step 1 - Verify Java installation on your machine Now open console and execute the following java command.
OS Task Command
Windows Open Command Console c:\> java -version
Linux Open Command Terminal $ java -version
Mac Open Terminal machine:~ joseph$ java -version
CHAPTER
2
TUTORIALS POINT
Simply Easy Learning Page 4
Let's verify the output for all the operating systems:
OS Generated Output
Windows java version "1.6.0_21" Java(TM) SE Runtime Environment (build 1.6.0_21-b07) Java HotSpot(TM) Client VM (build 17.0-b17, mixed mode, sharing)
Linux java version "1.6.0_21" Java(TM) SE Runtime Environment (build 1.6.0_21-b07) Java HotSpot(TM) Client VM (build 17.0-b17, mixed mode, sharing)
Mac
java version "1.6.0_21" Java(TM) SE Runtime Environment (build 1.6.0_21-b07) Java HotSpot(TM)64-Bit Server VM (build 17.0-b17, mixed mode, sharing)
Step 2 - Setup Java Development Kit (JDK): If you do not have Java installed then you can install the Java Software Development Kit (SDK) from Oracle's Java site: Java SE Downloads. You will find instructions for installing JDK in downloaded files, follow the given instructions to install and configure the setup. Finally set PATH and JAVA_HOME environment variables to refer to the directory that contains java and javac, typically java_install_dir/bin and java_install_dir respectively. Set the JAVA_HOME environment variable to point to the base directory location where
Java is installed on your machine. For example:
OS Output
Windows Set the environment variable JAVA_HOME to C:\Program Files\Java\jdk1.6.0_21
Linux export JAVA_HOME=/usr/local/java-current
Mac export JAVA_HOME=/Library/Java/Home
Append Java compiler location to System Path.
OS Output
Windows Append the string ;%JAVA_HOME%\bin to the end of the system variable, Path.
Linux export PATH=$PATH:$JAVA_HOME/bin/
Mac not required
Alternatively, if you use an Integrated Development Environment (IDE) like Borland JBuilder, Eclipse, IntelliJ IDEA, or Sun ONE Studio, compile and run a simple program to confirm that the IDE knows where you installed Java, otherwise do proper setup as given document of the IDE.
Step 3 - Setup Eclipse IDE All the examples in this tutorial have been written using Eclipse IDE. So I would suggest you should have latest version of Eclipse installed on your machine based on your operating system.
TUTORIALS POINT
Simply Easy Learning Page 5
To install Eclipse IDE, download the latest Eclipse binaries from http://www.eclipse.org/downloads/. Once you downloaded the installation, unpack the binary distribution into a convenient location. For example in C:\eclipse on windows, or /usr/local/eclipse on Linux/Unix and finally set PATH variable appropriately.
Eclipse can be started by executing the following commands on windows machine, or you can simply double click on eclipse.exe
%C:\eclipse\eclipse.exe
Eclipse can be started by executing the following commands on Unix (Solaris, Linux, etc.) machine:
$/usr/local/eclipse/eclipse
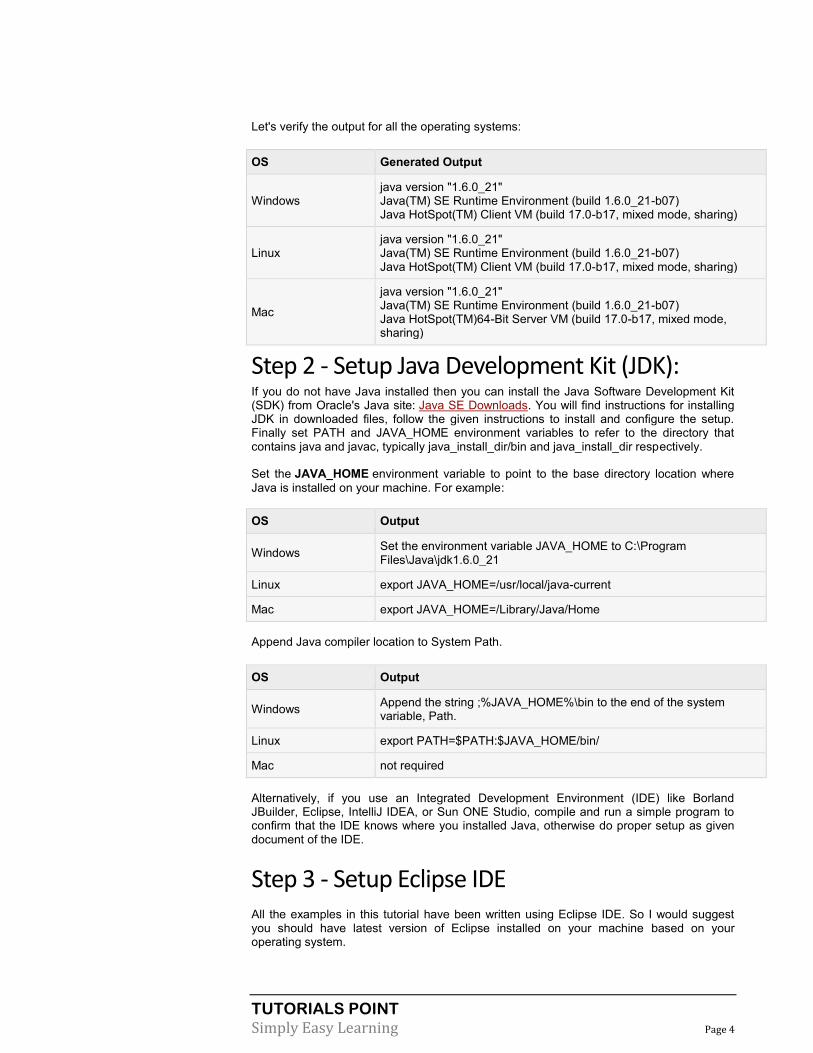
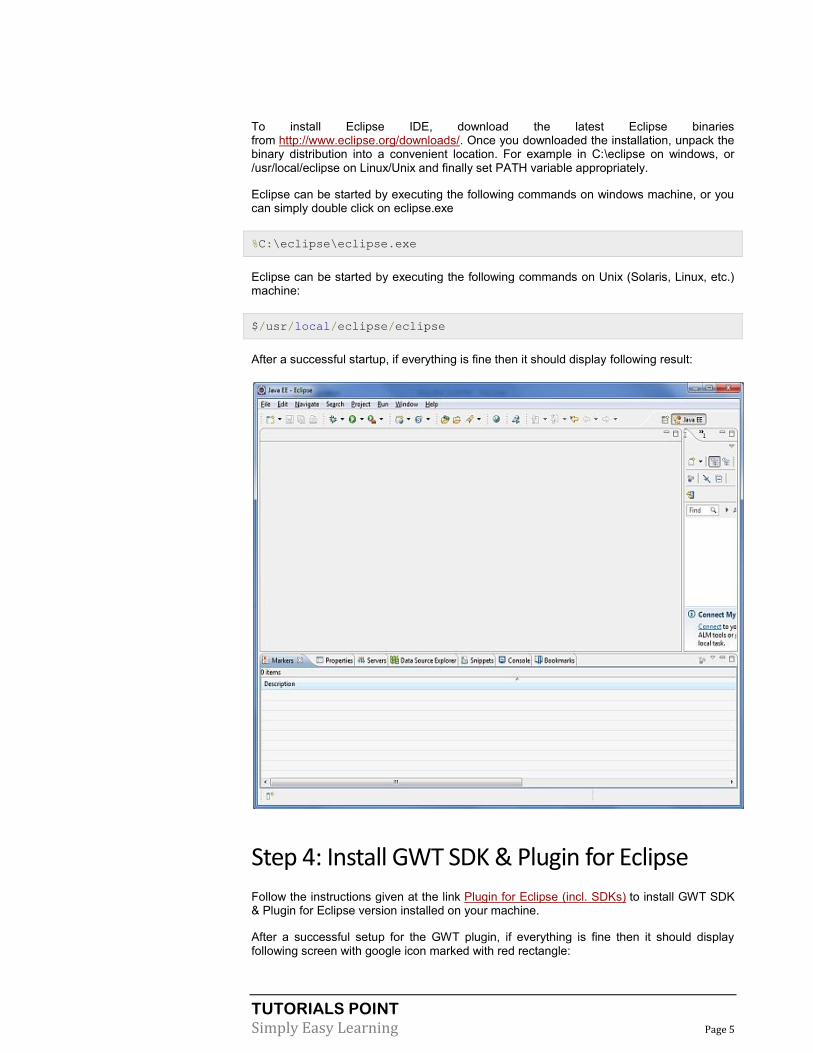
After a successful startup, if everything is fine then it should display following result:
Step 4: Install GWT SDK & Plugin for Eclipse Follow the instructions given at the link Plugin for Eclipse (incl. SDKs) to install GWT SDK & Plugin for Eclipse version installed on your machine.
After a successful setup for the GWT plugin, if everything is fine then it should display following screen with google icon marked with red rectangle:

TUTORIALS POINT
Simply Easy Learning Page 6
Step 5: Setup Apache Tomcat: You can download the latest version of Tomcat from http://tomcat.apache.org/. Once you downloaded the installation, unpack the binary distribution into a convenient location. For example in C:\apache-tomcat-6.0.33 on windows, or /usr/local/apache-tomcat-6.0.33 on Linux/Unix and set CATALINA_HOME environment variable pointing to the installation locations.
Tomcat can be started by executing the following commands on windows machine, or you can simply double click on startup.bat
%CATALINA_HOME%\bin\startup.bat
or
C:\apache-tomcat-6.0.33\bin\startup.bat
Tomcat can be started by executing the following commands on Unix (Solaris, Linux, etc.) machine:
$CATALINA_HOME/bin/startup.sh
or
/usr/local/apache-tomcat-6.0.33/bin/startup.sh

TUTORIALS POINT
Simply Easy Learning Page 7
After a successful startup, the default web applications included with Tomcat will be available by visiting http://localhost:8080/. If everything is fine then it should display
following result
Further information about configuring and running Tomcat can be found in the documentation included here, as well as on the Tomcat web site: http://tomcat.apache.org
Tomcat can be stopped by executing the following commands on windows machine:
%CATALINA_HOME%\bin\shutdown
or
C:\apache-tomcat-5.5.29\bin\shutdown
Tomcat can be stopped by executing the following commands on Unix (Solaris, Linux, etc.) machine:
$CATALINA_HOME/bin/shutdown.sh
or
/usr/local/apache-tomcat-5.5.29/bin/shutdown.sh

TUTORIALS POINT
Simply Easy Learning Page 8
Applications
This section describes the applications under Google Web Toolkit:
Beforewe start with creating actual HelloWorld application using GWT, let us see
what are the actual parts of a GWT application. A GWT application consists of following four important parts out of which last part is optional but first three parts are mandatory:
Module descriptors
Public resources
Client-side code
Server-side code
Sample locations of different parts of a typical gwt application HelloWord will be as shown
below:
Name Location
Project root HelloWorld/
Module descriptor src/com/tutorialspoint/HelloWorld.gwt.xml
Public resources src/com/tutorialspoint/war/
Client-side code src/com/tutorialspoint/client/
Server-side code src/com/tutorialspoint/server/
Module Descriptors
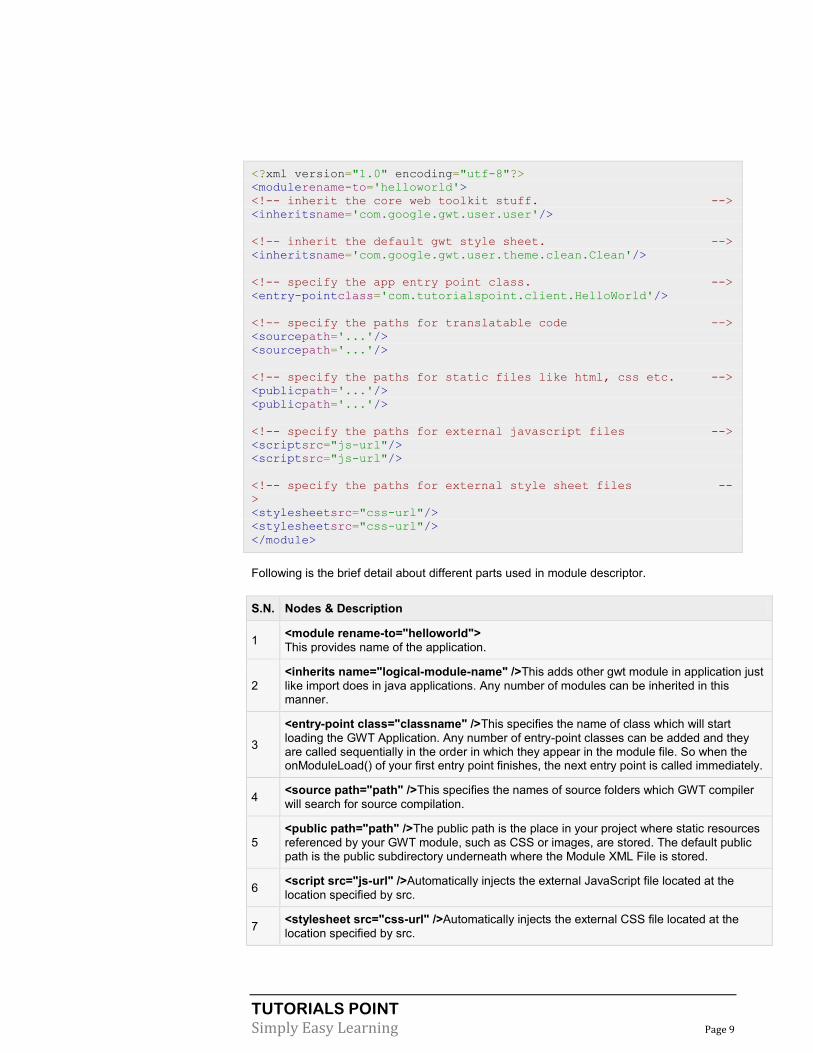
A module descriptor is the configuration file in the form of XML which is used to configure a GWT application. A module descriptor file extension is *.gwt.xml, where * is the name of
the application and this file should reside in the project's root. Following will be a default module descriptorHelloWorld.gwt.xml for a HelloWorld application:
CHAPTER
3
TUTORIALS POINT
Simply Easy Learning Page 9
<?xml version="1.0" encoding="utf-8"?>
<modulerename-to='helloworld'>
<!-- inherit the core web toolkit stuff. -->
<inheritsname='com.google.gwt.user.user'/>
<!-- inherit the default gwt style sheet. -->
<inheritsname='com.google.gwt.user.theme.clean.Clean'/>
<!-- specify the app entry point class. -->
<entry-pointclass='com.tutorialspoint.client.HelloWorld'/>
<!-- specify the paths for translatable code -->
<sourcepath='...'/>
<sourcepath='...'/>
<!-- specify the paths for static files like html, css etc. -->
<publicpath='...'/>
<publicpath='...'/>
<!-- specify the paths for external javascript files -->
<scriptsrc="js-url"/>
<scriptsrc="js-url"/>
<!-- specify the paths for external style sheet files --
>
<stylesheetsrc="css-url"/>
<stylesheetsrc="css-url"/>
</module>
Following is the brief detail about different parts used in module descriptor.
S.N. Nodes & Description
1 <module rename-to="helloworld">
This provides name of the application.
2
<inherits name="logical-module-name" />This adds other gwt module in application just
like import does in java applications. Any number of modules can be inherited in this manner.
3
<entry-point class="classname" />This specifies the name of class which will start
loading the GWT Application. Any number of entry-point classes can be added and they are called sequentially in the order in which they appear in the module file. So when the onModuleLoad() of your first entry point finishes, the next entry point is called immediately.
4 <source path="path" />This specifies the names of source folders which GWT compiler
will search for source compilation.
5
<public path="path" />The public path is the place in your project where static resources
referenced by your GWT module, such as CSS or images, are stored. The default public path is the public subdirectory underneath where the Module XML File is stored.
6 <script src="js-url" />Automatically injects the external JavaScript file located at the
location specified by src.
7 <stylesheet src="css-url" />Automatically injects the external CSS file located at the
location specified by src.

TUTORIALS POINT
Simply Easy Learning Page 10
Public resources These are all files referenced by your GWT module, such as Host HTML page, CSS or images. The location of these resources can be configured using <public path="path" /> element in module configuration file. By default, it is the public subdirectory underneath where the Module XML File is stored.
When you compile your application into JavaScript, all the files that can be found on your public path are copied to the module's output directory.
The most important public resource is host page which is used to invoke actual GWT application. A typical HTML host page for an application might not include any visible HTML body content at all but it is always expected to include GWT application via a <script.../> tag as follows:
<html>
<head>
<title>Hello World</title>
<linkrel="stylesheet"href="HelloWorld.css"/>
<scriptlanguage="javascript"src="helloworld/helloworld.nocache.js">
</script>
</head>
<body>
<h1>Hello World</h1>
<p>Welcome to first GWT application</p>
</body>
</html>
Following is the sample style sheet which we have included in our host page:
body {
text-align: center;
font-family: verdana, sans-serif;
}
h1 {
font-size:2em;
font-weight: bold;
color:#777777;
margin:40px0px70px;
text-align: center;
}
Client-side code This is the actual Java code written implementing the business logic of the application and that the GWT compiler translates into JavaScript, which will eventually run inside the browser. The location of these resources can be configured using <source path="path" /> element in module configuration file.
For example Entry Point code will be used as client side code and its location will be specified using <source path="path" />. A module entry-point is any class that is assignable to EntryPoint and that can be constructed without parameters. When a module
TUTORIALS POINT
Simply Easy Learning Page 11
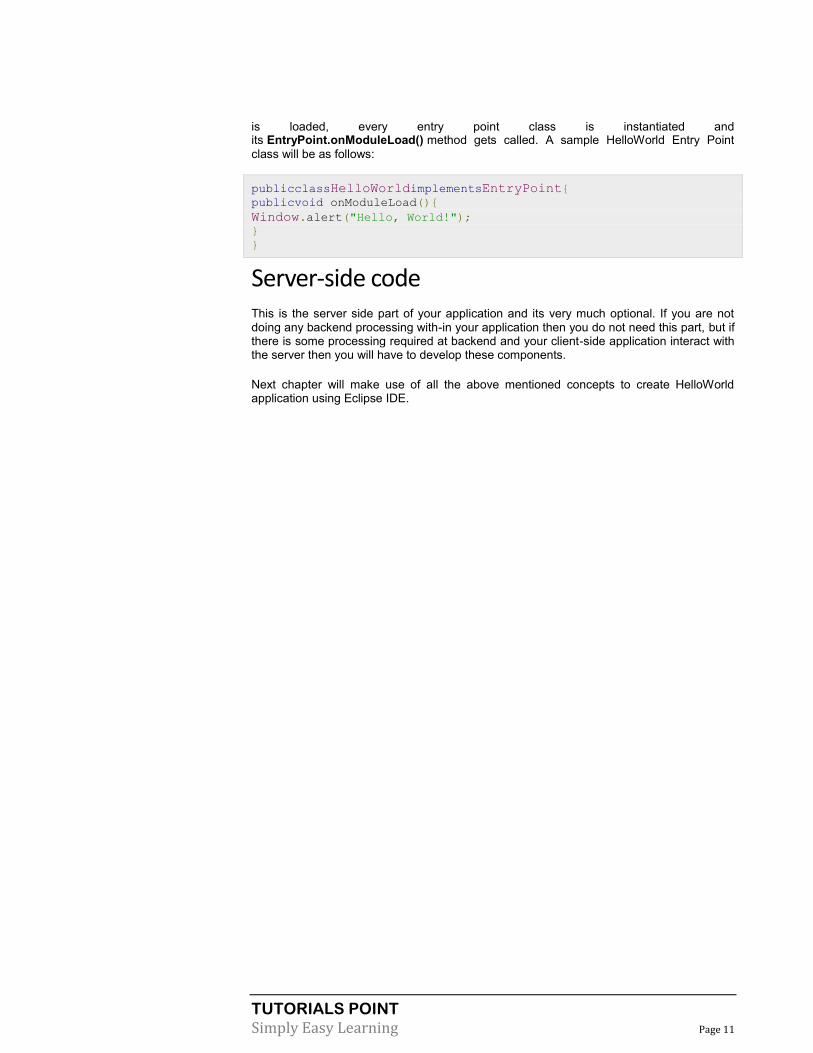
is loaded, every entry point class is instantiated and its EntryPoint.onModuleLoad() method gets called. A sample HelloWorld Entry Point
class will be as follows:
publicclassHelloWorldimplementsEntryPoint{
publicvoid onModuleLoad(){
Window.alert("Hello, World!");
}
}
Server-side code This is the server side part of your application and its very much optional. If you are not doing any backend processing with-in your application then you do not need this part, but if there is some processing required at backend and your client-side application interact with the server then you will have to develop these components.
Next chapter will make use of all the above mentioned concepts to create HelloWorld application using Eclipse IDE.

TUTORIALS POINT
Simply Easy Learning Page 12
Create Application
This section describes how to create application:
As power of GWT lies in Write in Java, Run in JavaScript, we'll be using Java
IDE Eclipse to demonstrate our examples. Let's start with a simple HelloWorld application:
Step 1 - Create Project
The first step is to create a simple Web Application Project using Eclipse IDE. Launch
project wizard using the option Google Icon > New Web Application Project....
Now name your project asHelloWorld using the wizard window as follows:
CHAPTER
4

TUTORIALS POINT
Simply Easy Learning Page 13
Unselect Use Google App Engine because we're not using it in this project and leave other default values (keep Generate Sample project code option checked) as such and
click Finish Button. Once your project is created successfully, you will have following content in your Project Explorer:

TUTORIALS POINT
Simply Easy Learning Page 14
Here is brief description of all important folders:
Folder Location
src
Source code (java classes) files.
Client folder containing the client-side specific java classes responsible for client UI display.
Server folder containing the server-side java classes responsible for server side processing.
Shared folder containing the java model class to transfer data from server to client and vice versa.
HelloWorld.gwt.xml, a module descriptor file required for GWT compiler to compile the HelloWorld project.
test
Test code (java classes) source files.
Client folder containing the java classes responsible to test gwt client side code.

TUTORIALS POINT
Simply Easy Learning Page 15
war
This is the most important part, it represents the actual deployable web application.
WEB-INF containing compiled classes, gwt libraries, servlet libraries.
HelloWorld.css, project style sheet.
HelloWorld.html, hots HTML which will invoke GWT UI Application.
Step 2 - Modify Module Descriptor: HelloWorld.gwt.xml
GWT plugin will create a default module descriptor file src/com.tutorialspoint/HelloWorld.gwt.xml which is given below. For this example we are not modifying it, but you can modify it based on your requirement.
<?xml version="1.0" encoding="UTF-8"?>
<modulerename-to='helloworld'>
<!-- Inherit the core Web Toolkit stuff. -->
<inheritsname='com.google.gwt.user.User'/>
<!-- Inherit the default GWT style sheet. You can change -->
<!-- the theme of your GWT application by uncommenting -->
<!-- any one of the following lines. -->
<inheritsname='com.google.gwt.user.theme.clean.Clean'/>
<!--<inherits name='com.google.gwt.user.theme.chrome.Chrome'/> -->
<!--<inherits name='com.google.gwt.user.theme.dark.Dark'/> -->
<!-- Other module inherits -->
<!-- Specify the app entry point class. -->
<entry-pointclass='com.tutorialspoint.client.HelloWorld'/>
<!-- Specify the paths for translatable code -->
<sourcepath='client'/>
<sourcepath='shared'/>
</module>
Step 3 - Modify Style Sheet: HelloWorld.css
GWT plugin will create a default Style Sheet file war/HelloWorld.css. Let us modify this file to keep our example at simplest level of understaning:
body {
text-align: center;
font-family: verdana, sans-serif;
}
h1 {
font-size:2em;
font-weight: bold;

TUTORIALS POINT
Simply Easy Learning Page 16
color:#777777;
margin:40px0px70px;
text-align: center;
}
Step 4 - Modify Host File: HelloWorld.html
GWT plugin will create a default HTML host file war/HelloWorld.html. Let us modify this file
to keep our example at simplest level of understaning:
<html>
<head>
<title>Hello World</title>
<linkrel="stylesheet"href="HelloWorld.css"/>
<scriptlanguage="javascript"src="helloworld/helloworld.nocache
.js">
</script>
</head>
<body>
<h1>Hello World</h1>
<p>Welcome to first GWT application</p>
</body>
</html>
You can create more static files like HTML, CSS or images in the same source directory or you can create further sub-directories and move files in those sub-directories and configure those sub-directories in module descriptor of the application.
Step 5 - Modify Entry Point: HelloWorld.java
GWT plugin will create a default Java file src/com.tutorialspoint/HelloWorld.java, which
keeps an entry point for the application. Let us modify this file to display "Hello,World!":
package com.tutorialspoint.client;
import com.google.gwt.core.client.EntryPoint;
import com.google.gwt.user.client.Window;
publicclassHelloWorldimplementsEntryPoint{
publicvoid onModuleLoad(){
Window.alert("Hello, World!");
}
}
You can create more Java files in the same source directory to define either entry points or to define helper routines.
Step 6 - Compile Application

TUTORIALS POINT
Simply Easy Learning Page 17
Once you are ready with all the changes done, its time to compile the project. Use the
option Google Icon > GWT Compile Project... to launch GWT Compile dialogue
box as shown below:
Keep default values intact and click Compile button. If everything goes fine, you will see following output in Eclipse console
Compiling module com.tutorialspoint.HelloWorld
Compiling 6 permutations
Compiling permutation 0...
Compiling permutation 1...
Compiling permutation 2...
Compiling permutation 3...
Compiling permutation 4...
Compiling permutation 5...
Compile of permutations succeeded
Linking into C:\workspace\HelloWorld\war\helloworld
TUTORIALS POINT
Simply Easy Learning Page 18
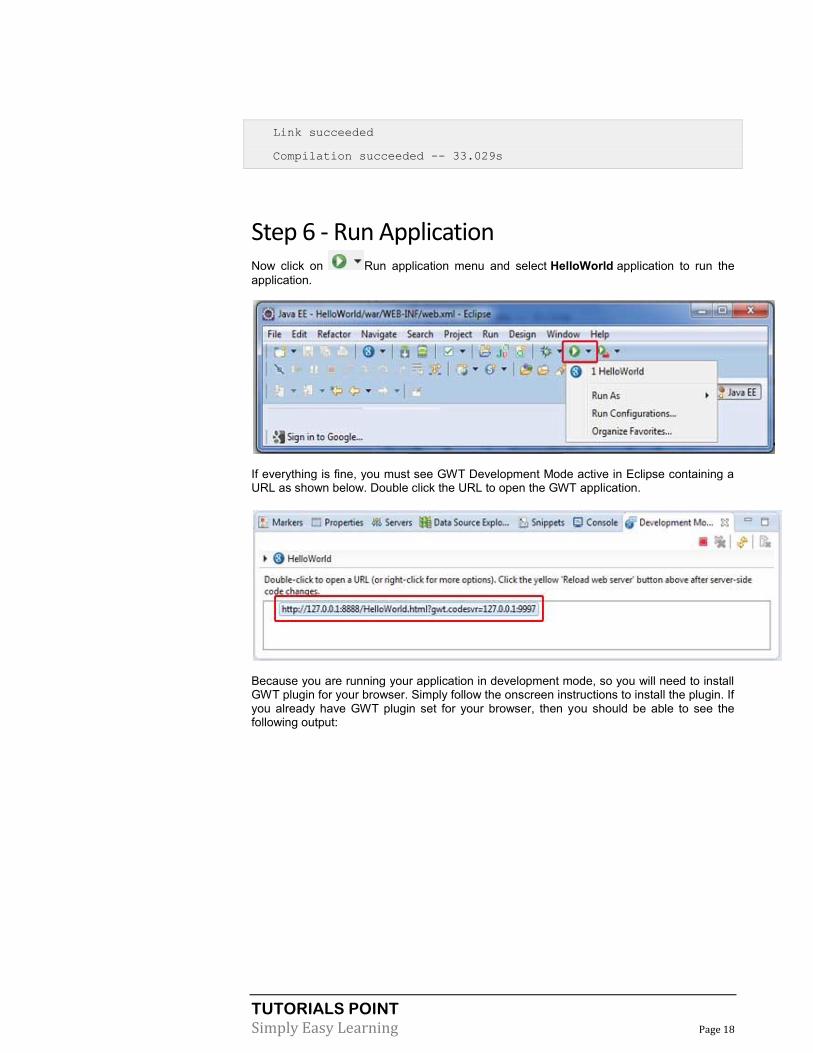
Link succeeded
Compilation succeeded -- 33.029s
Step 6 - Run Application Now click on Run application menu and select HelloWorld application to run the
application.
If everything is fine, you must see GWT Development Mode active in Eclipse containing a URL as shown below. Double click the URL to open the GWT application.
Because you are running your application in development mode, so you will need to install GWT plugin for your browser. Simply follow the onscreen instructions to install the plugin. If you already have GWT plugin set for your browser, then you should be able to see the following output:

TUTORIALS POINT
Simply Easy Learning Page 19
Congratulations! you have implemented your first application using Google Web Toolkit (GWT).

TUTORIALS POINT
Simply Easy Learning Page 20
Deploy Application
This section describes how to deploy application under Google Web Toolkit:
This tutorial will explain you how to create an application war file and how to deploy
that in Apache Tomcat Websever root. If you understood this simple example then you will also be able to deploy a complex GWT application following the same steps.
Let us have working Eclipse IDE along with GWT plug in place and follow the following steps to create a GWT application:
Step Description
1 Create a project with a name HelloWorld under a package com.tutorialspoint as explained in the GWT - Create Application chapter.
2 Modify HelloWorld.gwt.xml, HelloWorld.css, HelloWorld.html and HelloWorld.java as explained below. Keep rest of the files unchanged.
3 Compile and run the application to make sure business logic is working as per the requirements.
4 Finally, zip the content of the war folder of the application in the form of war file and
deploy it in Apache Tomcat Webserver.
5 Launch your web application using appropriate URL as explained below in the last step.
Following is the content of the modified module descriptor src/com.tutorialspoint/HelloWorld.gwt.xml.
<?xml version="1.0" encoding="UTF-8"?>
<module rename-to='helloworld'>
<!-- Inherit the core Web Toolkit stuff. -->
<inherits name='com.google.gwt.user.User'/>
<!-- Inherit the default GWT style sheet. -->
<inherits name='com.google.gwt.user.theme.clean.Clean'/>
<!-- Specify the app entry point class. -->
<entry-point class='com.tutorialspoint.client.HelloWorld'/>
CHAPTER
5
TUTORIALS POINT
Simply Easy Learning Page 21
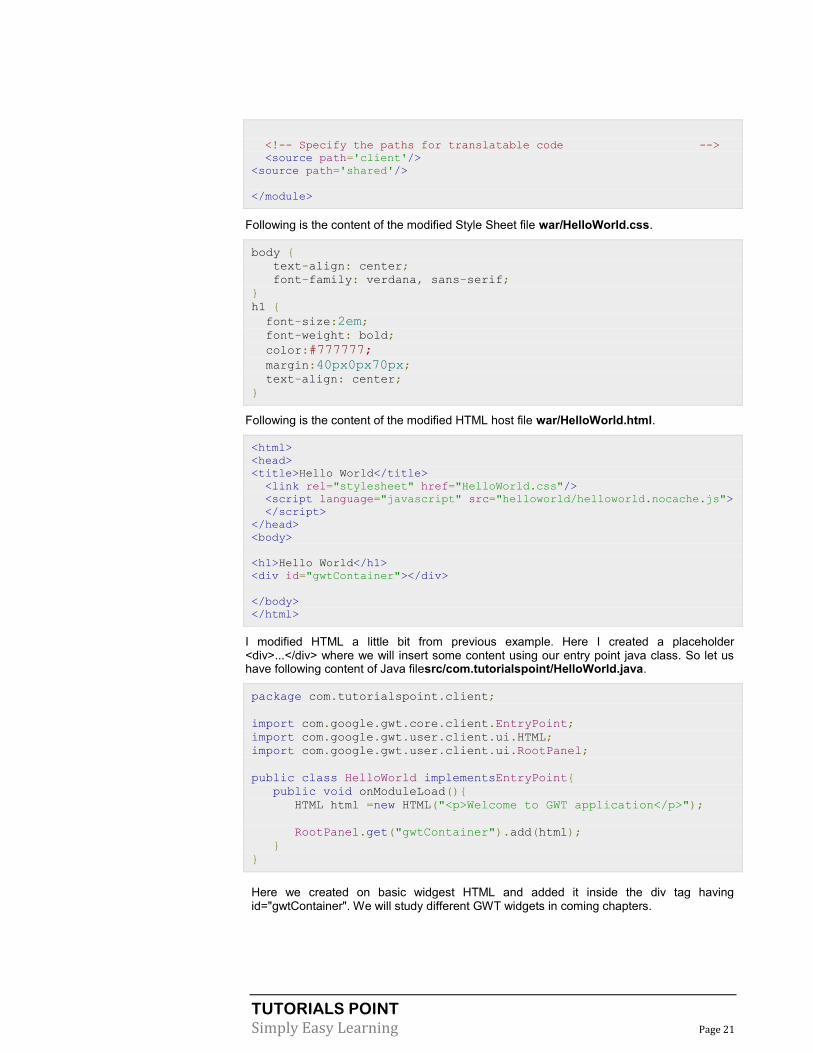
<!-- Specify the paths for translatable code -->
<source path='client'/>
<source path='shared'/>
</module>
Following is the content of the modified Style Sheet file war/HelloWorld.css.
body {
text-align: center;
font-family: verdana, sans-serif;
}
h1 {
font-size:2em;
font-weight: bold;
color:#777777;
margin:40px0px70px;
text-align: center;
}
Following is the content of the modified HTML host file war/HelloWorld.html.
<html>
<head>
<title>Hello World</title>
<link rel="stylesheet" href="HelloWorld.css"/>
<script language="javascript" src="helloworld/helloworld.nocache.js">
</script>
</head>
<body>
<h1>Hello World</h1>
<div id="gwtContainer"></div>
</body>
</html>
I modified HTML a little bit from previous example. Here I created a placeholder <div>...</div> where we will insert some content using our entry point java class. So let us have following content of Java filesrc/com.tutorialspoint/HelloWorld.java.
package com.tutorialspoint.client;
import com.google.gwt.core.client.EntryPoint;
import com.google.gwt.user.client.ui.HTML;
import com.google.gwt.user.client.ui.RootPanel;
public class HelloWorld implementsEntryPoint{
public void onModuleLoad(){
HTML html =new HTML("<p>Welcome to GWT application</p>");
RootPanel.get("gwtContainer").add(html);
}
}
Here we created on basic widgest HTML and added it inside the div tag having id="gwtContainer". We will study different GWT widgets in coming chapters.

TUTORIALS POINT
Simply Easy Learning Page 22
Once you are ready with all the changes done, let us compile and run the application in
development mode as we did in GWT - Create Application chapter. If everything is
fine with your application, this will produce following result:
Create WAR File Now our applictaion is working fine and we are ready to export it as a war file. Follow the following steps:
Go into your project's war directory C:\workspace\HelloWorld\war
Select all the files & folders available inside war directory.
Zip all the selected files & folders in a file called HelloWorld.zip.
Rename HelloWorld.zip to HelloWorld.war.
Deploy WAR file Stop the tomcat server.
Copy the HelloWorld.war file to tomcat installation directory > webapps folder.
Start the tomcat server.
Look inside webapps directory, there should be a folder helloworld got created.
Now HelloWorld.war is successfully deployed in Tomcat Webserver root.
Run Application

TUTORIALS POINT
Simply Easy Learning Page 23
Enter a url in web browser: http://localhost:8080/HelloWorld to launch the application
Server name (localhost) and port (8080) may vary as per your tomcat configuration.
TUTORIALS POINT
Simply Easy Learning Page 24
Style with CSS
This section describes CSS with Google Web Toolkit:
GWT widgets rely on cascading style sheets (CSS) for visual styling. By default,
the class name for each component is gwt-<classname>. For example, the Button widget has a default style of gwt-Buttonand similar way TextBox widgest has a default style of gwt-TextBox. In order to give all buttons and text boxes a larger font, you could put the
following rule in your application's CSS file:
.gwt-Button{ font-size:150%;}
.gwt-TextBox{ font-size:150%;}
By default, neither the browser nor GWT creates default id attributes for widgets. You must
explicitly create a unique id for the elements which you can use in CSS. In order to give a particular button with idmy-button-id a larger font, you could put the following rule in your
application's CSS file:
#my-button-id { font-size: 150%; }
To set the id for a GWT widget, retrieve its DOM Element and then set the id attribute as follows:
Button b =newButton();
DOM.setElementAttribute(b.getElement(),"id","my-button-id")
CSS Styling APIs There are many APIs available to hangle CSS setting for any GWT widget. Following are few important APIs which will help you in your day to day web programming using GWT:
S.N. API & Description
1
public void setStyleName(java.lang.String style)
This method will clear any existing styles and set the widget style to the new CSS class provided using style.
CHAPTER
6

TUTORIALS POINT
Simply Easy Learning Page 25
2
public void addStyleName(java.lang.String style)
This method will add a secondary or dependent style name to the widget. A secondary style name is an additional style name that is,so if there were any previous style names applied they are kept.
3
public void removeStyleName(java.lang.String style)
This method will remove given style from the widget and leaves any others associated with the widget.
4 public java.lang.String getStyleName()
This method gets all of the object's style names, as a space-separated list.
5
public void setStylePrimaryName(java.lang.String style)
This method sets the object's primary style name and updates all dependent style names.
For example, let's define two new styles which we will apply to a text:
.gwt-Big-Text{
font-size:150%;
}
.gwt-Small-Text{
font-size:75%;
}
.gwt-Red-Text{
color:red;
}
Now you can use setStyleName(Style) to change the default setting to new setting. After
applying the below rule, a text's font will become large:
txtWidget.setStyleName("gwt-Big-Text");
We can apply a secondary CSS rule on the same widget to change its color as follows:
txtWidget.addStyleName("gwt-Red-Text");
Using above method you can add as many styles as you like to apply on a widget. If you remove first style from the button widget then second style will still remain with the text:
txtWidget.removeStyleName("gwt-Big-Text");
Primary & Secondary Styles By default, the primary style name of a widget will be the default style name for its widget class for example gwt-Button for Button widgets. When we add and remove style names
using AddStyleName() method, those styles are called secondary styles. The final appearance of a widget is determined by the sum of all the secondary styles added to it, plus its primary style. You set the primary style of a widget with the setStylePrimaryName(String) method. To illustrate, let's say we have a Label widget. In
our CSS file, we have the following rules defined:
.MyText{
color: blue;
}

TUTORIALS POINT
Simply Easy Learning Page 26
.BigText{
font-size: large;
}
.LoudText{
font-weight: bold;
}
Let's suppose we want a particular label widget to always display blue text, and in some cases, use a larger, bold font for added emphasis. We could do something like this:
// set up our primary style
Label someText =newLabel();
someText.setStylePrimaryName("MyText");
...
// later on, to really grab the user's attention
someText.addStyleName("BigText");
someText.addStyleName("LoudText");
...
// after the crisis is over
someText.removeStyleName("BigText");
someText.removeStyleName("LoudText");
Associating CSS Files There are multiple approaches for associating CSS files with your module. Modern GWT applications typically use a combination of CssResource and UiBinder. We are using only first approach in our examples.
Using a <link> tag in the host HTML page.
Using the <stylesheet> element in the module XML file.
Using a CssResource contained within a ClientBundle.
Using an inline <ui:style> element in a UiBinder template.
GWT CSS Example This example will take you through simple steps to apply different CSS rules on your GWT widgest. Let us have working Eclipse IDE along with GWT plug in place and follow the following steps to create a GWT application:
Step Description
1 Create a project with a name HelloWorld under a package com.tutorialspoint as explained in the GWT - Create Application chapter.
2 Modify HelloWorld.gwt.xml, HelloWorld.css, HelloWorld.html and HelloWorld.java as explained below. Keep rest of the files unchanged.
3 Compile and run the application to verify the result of the implemented logic.

TUTORIALS POINT
Simply Easy Learning Page 27
Following is the content of the modified module descriptor src/com.tutorialspoint/HelloWorld.gwt.xml.
<?xml version="1.0" encoding="UTF-8"?>
<module rename-to='helloworld'>
<!-- Inherit the core Web Toolkit stuff. -->
<inherits name='com.google.gwt.user.User'/>
<!-- Inherit the default GWT style sheet. -->
<inherits name='com.google.gwt.user.theme.clean.Clean'/>
<!-- Specify the app entry point class. -->
<entry-point class='com.tutorialspoint.client.HelloWorld'/>
<!-- Specify the paths for translatable code -->
<source path='client'/>
<source path='shared'/>
</module>
Following is the content of the modified Style Sheet file war/HelloWorld.css.
body{
text-align: center;
font-family: verdana, sans-serif;
}
h1{
font-size:2em;
font-weight: bold;
color:#777777;
margin:40px0px70px;
text-align: center;
}
.gwt-Button{
font-size:150%;
font-weight: bold;
width:100px;
height:100px;
}
.gwt-Big-Text{
font-size:150%;
}
.gwt-Small-Text{
font-size:75%;
}
Following is the content of the modified HTML host file war/HelloWorld.html to
accomodate two buttons.
<html>
<head>
<title>Hello World</title>
<link rel="stylesheet" href="HelloWorld.css"/>
<script language="javascript" src="helloworld/helloworld.nocache.js">
</script>
</head>
<body>
<divid="mytext"><h1>Hello, World!</h1></div>
<div id="gwtGreenButton"></div>

TUTORIALS POINT
Simply Easy Learning Page 28
<div id="gwtRedButton"></div>
</body>
</html>
Let us have following content of Java file src/com.tutorialspoint/HelloWorld.java which
will take care of adding two buttons in HTML and will apply custom CSS style.
package com.tutorialspoint.client;
import com.google.gwt.core.client.EntryPoint;
import com.google.gwt.event.dom.client.ClickEvent;
import com.google.gwt.event.dom.client.ClickHandler;
import com.google.gwt.user.client.ui.Button;
import com.google.gwt.user.client.ui.HTML;
import com.google.gwt.user.client.ui.RootPanel;
public class HelloWorld implements EntryPoint{
public void onModuleLoad(){
// add button to change font to big when clicked.
ButtonBtn1 = newButton("Big Text");
Btn1.addClickHandler(newClickHandler(){
publicvoid onClick(ClickEventevent){
RootPanel.get("mytext").setStyleName("gwt-Big-Text");
}
});
// add button to change font to small when clicked.
ButtonBtn2 = newButton("Small Text");
Btn2.addClickHandler(newClickHandler(){
Public void onClick(ClickEventevent){
RootPanel.get("mytext").setStyleName("gwt-Small-Text");
}
});
RootPanel.get("gwtGreenButton").add(Btn1);
RootPanel.get("gwtRedButton").add(Btn2);
}
}
Once you are ready with all the changes done, let us compile and run the application in development mode as we did in GWT - Create Application chapter. If everything is fine with your application, this will produce following result:

TUTORIALS POINT
Simply Easy Learning Page 29
Now try clicking on the two buttons displayed and observe "Hello, World!" text which keeps changing its font upon clicking on the two buttons.

TUTORIALS POINT
Simply Easy Learning Page 30
Basic Widgets
This section describes the basic widgets used:
Every user interface considers the following three main aspects:
UI elements : Thes are the core visual elements the user eventually sees and
interacts with. GWT provides a huge list of widely used and common elements varying from basic to complex which we will cover in this tutorial.
Layouts: They define how UI elements should be organized on the screen and
provide a final look and feel to the GUI (Graphical User Interface). This part will be covered in Layout chapter.
Behavior: These are events which occur when the user interacts with UI
elements. This part will be covered in Event Handling chapter.
GWT UI Elements: The GWT library provides classes in a well-defined class hierarchy to create complex web-based user interfaces. All classes in this component hierarchy has been derived from the UIObject base class as shown below:
CHAPTER
7

TUTORIALS POINT
Simply Easy Learning Page 31
Every Basic UI widget inherits properties from Widget class which in turn inherits properties from UIObject. Tree and Menu will be covered in complex widgets tutorial.
S.N. Widget & Description
1
GWT UIObject Class
This widget contains text, not interpreted as HTML using a <div>element, causing it to be displayed with block layout.
2
GWT Widget Class
This widget can contain HTML text and displays the html content using a <div> element, causing it to be displayed with block layout.
GWT UIObject Class Introduction
The class UIObject is the superclass for all user-interface objects. It simply wraps a DOM
element, and cannot receive events. It provides direct child classes like Widget, MenuItem, MenuItemSeparator, TreeItem.
All UIObject objects can be styled using CSS.
Every UIObject has a primary style name that identifies the key CSS style rule that should always be applied to it.
More complex styling behavior can be achieved by manipulating an object's secondary style names.
Class declaration Following is the declaration for com.google.gwt.user.client.ui.UIObject class:
public abstract class UIObject
extends java.lang.Object
Field Following are the fields for com.google.gwt.user.client.ui.UIObject class:
public static final java.lang.String DEBUG_ID_PREFIX -- The element ID that you
specify will be prefixed by the static string DEBUG_ID_PREFIX.
Class constructors
S.N. Constructor & Description
1 UIObject()
This creates a UIObject for the child classes.
Class methods
S.N. Method & Description
1 void addStyleDependentName(java.lang.String styleSuffix)
Adds a dependent style name by specifying the style name's suffix.
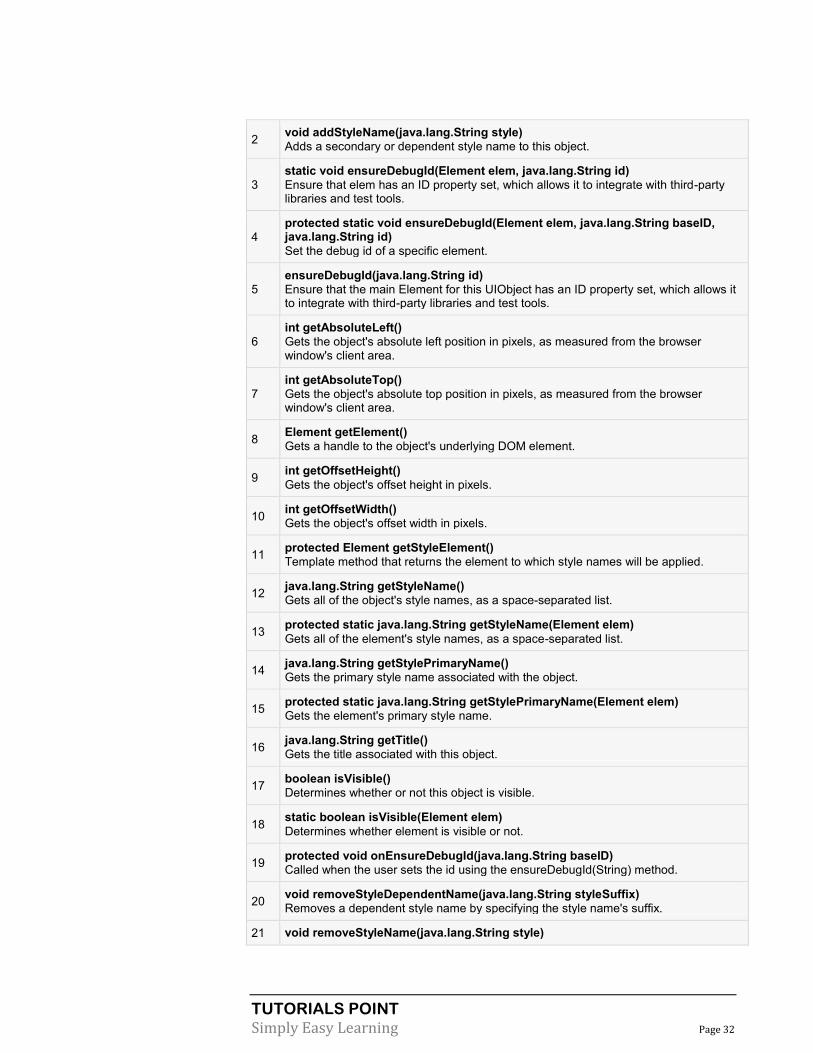
TUTORIALS POINT
Simply Easy Learning Page 32
2 void addStyleName(java.lang.String style)
Adds a secondary or dependent style name to this object.
3
static void ensureDebugId(Element elem, java.lang.String id)
Ensure that elem has an ID property set, which allows it to integrate with third-party libraries and test tools.
4
protected static void ensureDebugId(Element elem, java.lang.String baseID, java.lang.String id)
Set the debug id of a specific element.
5
ensureDebugId(java.lang.String id)
Ensure that the main Element for this UIObject has an ID property set, which allows it to integrate with third-party libraries and test tools.
6
int getAbsoluteLeft()
Gets the object's absolute left position in pixels, as measured from the browser window's client area.
7
int getAbsoluteTop()
Gets the object's absolute top position in pixels, as measured from the browser window's client area.
8 Element getElement()
Gets a handle to the object's underlying DOM element.
9 int getOffsetHeight()
Gets the object's offset height in pixels.
10 int getOffsetWidth()
Gets the object's offset width in pixels.
11 protected Element getStyleElement()
Template method that returns the element to which style names will be applied.
12 java.lang.String getStyleName()
Gets all of the object's style names, as a space-separated list.
13 protected static java.lang.String getStyleName(Element elem)
Gets all of the element's style names, as a space-separated list.
14 java.lang.String getStylePrimaryName()
Gets the primary style name associated with the object.
15 protected static java.lang.String getStylePrimaryName(Element elem)
Gets the element's primary style name.
16 java.lang.String getTitle()
Gets the title associated with this object.
17 boolean isVisible()
Determines whether or not this object is visible.
18 static boolean isVisible(Element elem)
Determines whether element is visible or not.
19 protected void onEnsureDebugId(java.lang.String baseID)
Called when the user sets the id using the ensureDebugId(String) method.
20 void removeStyleDependentName(java.lang.String styleSuffix)
Removes a dependent style name by specifying the style name's suffix.
21 void removeStyleName(java.lang.String style)

TUTORIALS POINT
Simply Easy Learning Page 33
Removes a style name.
22 protected void setElement(Element elem)
Sets this object's browser element.
23 protected void setElement(Element elem)
Sets this object's browser element.
24 void setHeight(java.lang.String height)
Sets the object's height.
25
void setPixelSize(int width, int height)
Sets the object's size, in pixels, not including decorations such as border, margin, and padding.
26 void setSize(java.lang.String width, java.lang.String height)
Sets the object's size.
27 protected static void setStyleName(Element elem, java.lang.String styleName)
Clears all of the element's style names and sets it to the given style.
28
protected static void setStyleName(Element elem, java.lang.String style, boolean add)
This convenience method adds or removes a style name for a given element.
29 void setStyleName(java.lang.String style)
Clears all of the object's style names and sets it to the given style.
30 protected static void setStylePrimaryName(Element elem, java.lang.String style)
Sets the element's primary style name and updates all dependent style names.
31 void setStylePrimaryName(java.lang.String style)
Sets the object's primary style name and updates all dependent style names.
32 void setTitle(java.lang.String title)
Sets the title associated with this object.
33 void setVisible(boolean visible)
Sets whether this object is visible.
34 static void setVisible(Element elem, boolean visible)
Sets whether this element is visible
35 void setWidth(java.lang.String width)
Sets the object's width.
36
java.lang.String toString()
This method is overridden so that any object can be viewed in the debugger as an HTML snippet.
37 void unsinkEvents(int eventBitsToRemove)
Removes a set of events from this object's event list.
Methods inherited
This class inherits methods from the following classes:
java.lang.Object
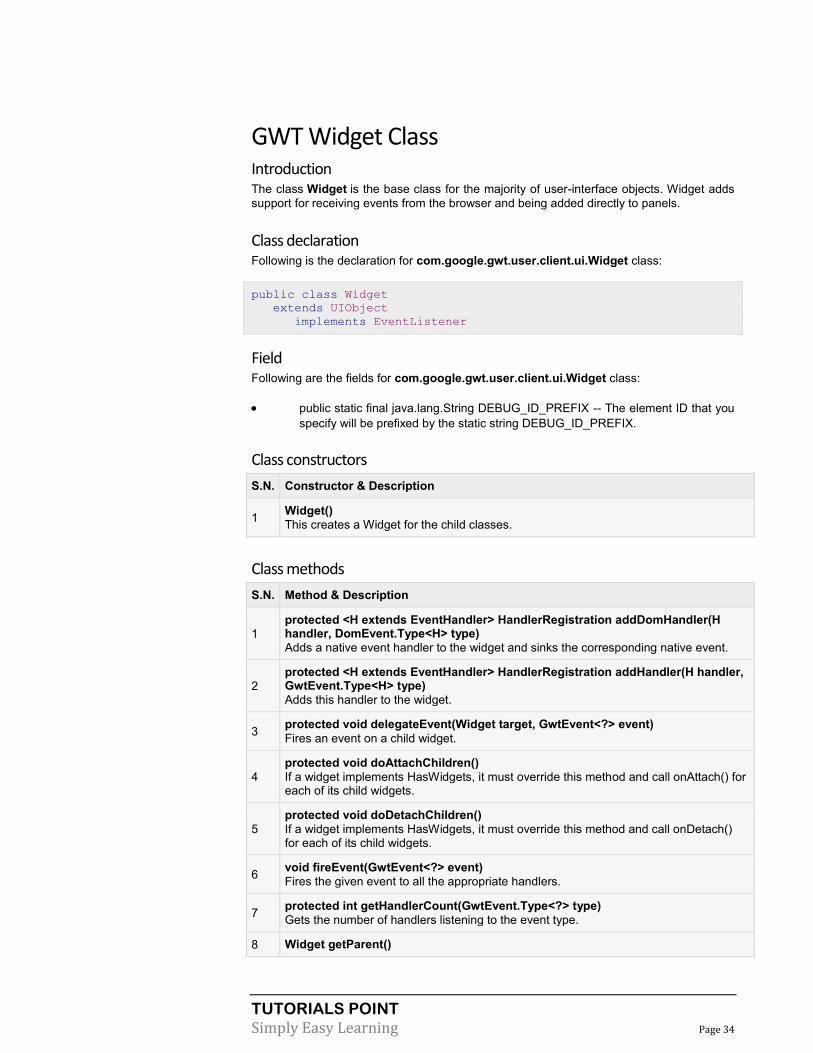
TUTORIALS POINT
Simply Easy Learning Page 34
GWT Widget Class Introduction The class Widget is the base class for the majority of user-interface objects. Widget adds
support for receiving events from the browser and being added directly to panels.
Class declaration Following is the declaration for com.google.gwt.user.client.ui.Widget class:
public class Widget
extends UIObject
implements EventListener
Field Following are the fields for com.google.gwt.user.client.ui.Widget class:
public static final java.lang.String DEBUG_ID_PREFIX -- The element ID that you
specify will be prefixed by the static string DEBUG_ID_PREFIX.
Class constructors
S.N. Constructor & Description
1 Widget()
This creates a Widget for the child classes.
Class methods
S.N. Method & Description
1
protected <H extends EventHandler> HandlerRegistration addDomHandler(H handler, DomEvent.Type<H> type)
Adds a native event handler to the widget and sinks the corresponding native event.
2
protected <H extends EventHandler> HandlerRegistration addHandler(H handler, GwtEvent.Type<H> type)
Adds this handler to the widget.
3 protected void delegateEvent(Widget target, GwtEvent<?> event)
Fires an event on a child widget.
4
protected void doAttachChildren()
If a widget implements HasWidgets, it must override this method and call onAttach() for each of its child widgets.
5
protected void doDetachChildren()
If a widget implements HasWidgets, it must override this method and call onDetach() for each of its child widgets.
6 void fireEvent(GwtEvent<?> event)
Fires the given event to all the appropriate handlers.
7 protected int getHandlerCount(GwtEvent.Type<?> type)
Gets the number of handlers listening to the event type.
8 Widget getParent()

TUTORIALS POINT
Simply Easy Learning Page 35
Gets this widget's parent panel.
9
boolean isAttached()
Determines whether this widget is currently attached to the browser's document (i.e., there is an unbroken chain of widgets between this widget and the underlying browser document).
10 protected boolean isOrWasAttached()
Has this widget ever been attached?
11 protected void onAttach()
This method is called when a widget is attached to the browser's document.
12 void onBrowserEvent(Event event)
Fired whenever a browser event is received.
13 protected void onDetach()
This method is called when a widget is detached from the browser's document.
14 protected void onLoad()
Gets a handle to the object's underlying DOM element.
15
protected void onUnload()
This method is called immediately before a widget will be detached from the browser's document.
16 void removeFromParent()
Removes this widget from its parent widget.
17
void sinkEvents(int eventBitsToAdd)
Overridden to defer the call to super.sinkEvents until the first time this widget is attached to the dom, as a performance enhancement.
Methods inherited
This class inherits methods from the following classes:
com.google.gwt.user.client.ui.UIObject
Basic Widgets
Following are few important Basic Widgets:
S.N. Widget & Description
1
Label
This widget contains text, not interpreted as HTML using a <div>element, causing it to be displayed with block layout.
2
HTML
This widget can contain HTML text and displays the html content using a <div> element, causing it to be displayed with block layout.
3 Image
This widget displays an image at a given URL.
4 Anchor
This widget represents a simple <a> element.

TUTORIALS POINT
Simply Easy Learning Page 36
Label
Introduction
The Label can contains only arbitrary text and it can not be interpreted as HTML. This
widget uses a <div> element, causing it to be displayed with block layout.
Class declaration
Following is the declaration for com.google.gwt.user.client.ui.Label class:
publicclassLabel
extendsWidget
implementsHasHorizontalAlignment,HasText,HasWordWrap,
HasDirection,HasClickHandlers,SourcesClickEvents,
SourcesMouseEvents,HasAllMouseHandlers
CSS style rules
Following default CSS Style rule will be applied to all the labels. You can override it as per your requirements.
.gwt-Label{}
Class constructors
S.N. Constructor & Description
1 Label()
Creates an empty label.
2 protected Label(Element element)
This constructor may be used by subclasses to explicitly use an existing element.
3 Label(java.lang.String text)
Creates a label with the specified text.
4 Label(java.lang.String text, boolean wordWrap)
Creates a label with the specified text.
Class methods
S.N. Method & Description
1 void addClickListener(ClickListener listener)
Adds a listener interface to receive click events.
2 void addMouseListener(MouseListener listener)
Adds a listener interface to receive mouse events.
3 void addMouseWheelListener(MouseWheelListener listener)
Gets this widget's parent panel.
4 HasDirection.Direction getDirection()
Gets the directionality of the widget.
5 HasHorizontalAlignment.HorizontalAlignmentConstant getHorizontalAlignment()

TUTORIALS POINT
Simply Easy Learning Page 37
Gets the horizontal alignment.
6 java.lang.String getText()
Gets this object's text.
7 boolean getWordWrap()
Gets whether word-wrapping is enabled.
8 void onBrowserEvent(Event event)
Removes a previously added listener interface.
9
void removeClickListener(ClickListener listener)
This method is called immediately before a widget will be detached from the browser's document.
10 void removeMouseListener(MouseListener listener)
Removes a previously added listener interface.
11 void removeMouseWheelListener(MouseWheelListener listener)
Removes a previously added listener interface.
12 void setDirection(HasDirection.Direction direction)
Sets the directionality for a widget.
13
void setHorizontalAlignment(HasHorizontalAlignment.HorizontalAlignmentConstant align)
Sets the horizontal alignment.
14 void setText(java.lang.String text)
Sets this object's text.
15 void setWordWrap(boolean wrap)
Sets whether word-wrapping is enabled.
16 static Label wrap(Element element)
Creates a Label widget that wraps an existing <div> or <span> element.
Methods inherited
This class inherits methods from the following classes:
com.google.gwt.user.client.ui.UIObject
com.google.gwt.user.client.ui.Widget
Label Widget Example
This example will take you through simple steps to show usage of a Label Widget in GWT. Follow the following steps to update the GWT application we created in GWT - Create Application chapter:
Step Description
1 Create a project with a name HelloWorld under a package com.tutorialspoint as explained in the GWT - Create Application chapter.
2 Modify HelloWorld.gwt.xml, HelloWorld.css, HelloWorld.html and HelloWorld.java as
explained below. Keep rest of the files unchanged.

TUTORIALS POINT
Simply Easy Learning Page 38
3 Compile and run the application to verify the result of the implemented logic.
Following is the content of the modified module descriptor src/com.tutorialspoint/HelloWorld.gwt.xml.
<?xml version="1.0" encoding="UTF-8"?>
<module rename-to='helloworld'>
<!-- Inherit the core Web Toolkit stuff. -->
<inherits name='com.google.gwt.user.User'/>
<!-- Inherit the default GWT style sheet. -->
<inherits name='com.google.gwt.user.theme.clean.Clean'/>
<!-- Specify the app entry point class. -->
<entry-point class='com.tutorialspoint.client.HelloWorld'/>
<!-- Specify the paths for translatable code -->
<source path='client'/>
<source path='shared'/>
</module>
Following is the content of the modified Style Sheet file war/HelloWorld.css.
body{
text-align: center;
font-family: verdana, sans-serif;
}
h1{
font-size:2em;
font-weight: bold;
color:#777777;
margin:40px0px70px;
text-align: center;
}
.gwt-Label{
font-size:150%;
font-weight: bold;
color:red;
padding:5px;
margin:5px;
}
.gwt-Green-Border{
border:1px solid green;
}
.gwt-Blue-Border{
border:1px solid blue;
}
Following is the content of the modified HTML host file war/HelloWorld.html to
accomodate two buttons.
<html>
<head>
<title>Hello World</title>
<link rel="stylesheet" href="HelloWorld.css"/>
<script language="javascript" src="helloworld/helloworld.nocache.js">
</script>

TUTORIALS POINT
Simply Easy Learning Page 39
</head>
<body>
<h1>Label Widget Demonstration</h1>
<div id="gwtContainer"></div>
</body>
</html>
Let us have following content of Java file src/com.tutorialspoint/HelloWorld.java which
will demonstrate use of Label widget.
package com.tutorialspoint.client;
import com.google.gwt.core.client.EntryPoint;
import com.google.gwt.user.client.ui.Label;
import com.google.gwt.user.client.ui.RootPanel;
import com.google.gwt.user.client.ui.VerticalPanel;
public class HelloWorld implements EntryPoint{
public void onModuleLoad(){
// create two Labels
Label label1 =newLabel("This is first GWT Label");
Label label2 =newLabel("This is second GWT Label");
// use UIObject methods to set label properties.
label1.setTitle("Title for first Lable");
label1.addStyleName("gwt-Green-Border");
label2.setTitle("Title for second Lable");
label2.addStyleName("gwt-Blue-Border");
// add labels to the root panel.
VerticalPanel panel =newVerticalPanel();
panel.add(label1);
panel.add(label2);
RootPanel.get("gwtContainer").add(panel);
}
}
Once you are ready with all the changes done, let us compile and run the application in development mode as we did in GWT - Create Application chapter. If everything is fine with your application, this will produce following result:

TUTORIALS POINT
Simply Easy Learning Page 40
HTML
Introduction
The HTML widget can cantain arbitrary HTML it can be interpreted as HTML. This widget
uses a <div> element, causing it to be displayed with block layout.
Class declaration
Following is the declaration for com.google.gwt.user.client.ui.Label class:
public class HTML
extends Label
implements HasHTML
CSS style rules
Following default CSS Style rule will be applied to all the HTML widget. You can override it as per your requirements.
.gwt-HTML {}
Class constructors
S.N. Constructor & Description
1 HTML()
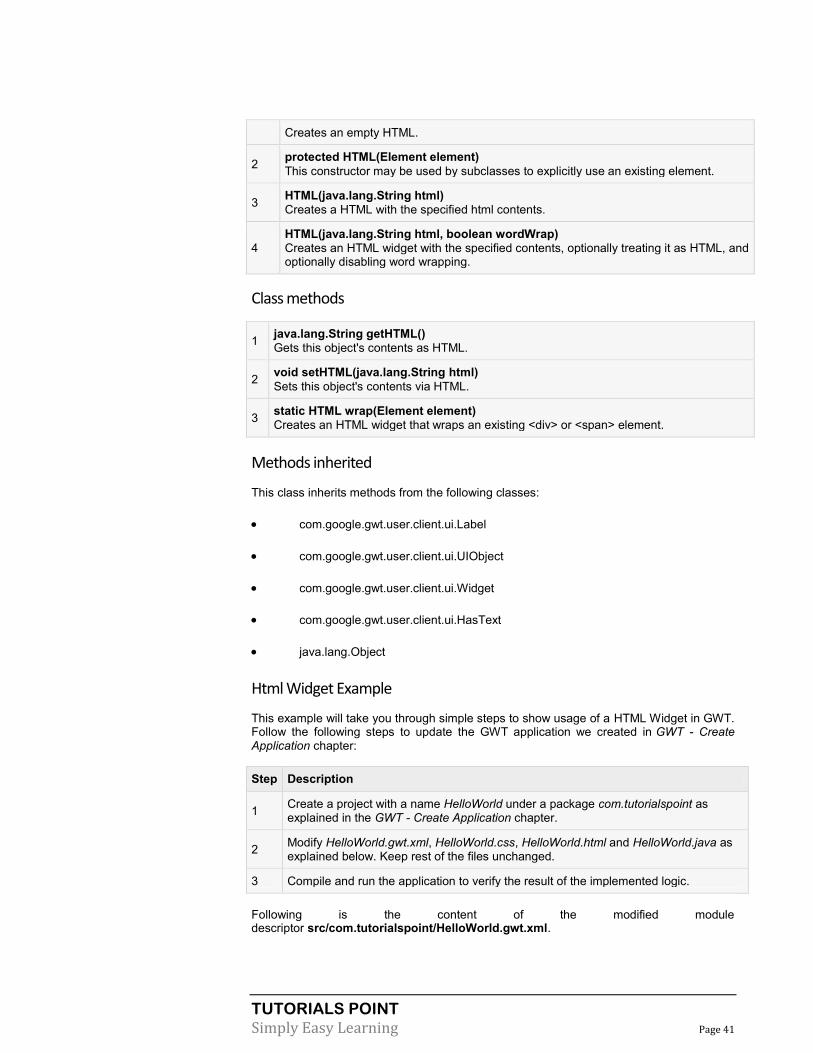
TUTORIALS POINT
Simply Easy Learning Page 41
Creates an empty HTML.
2 protected HTML(Element element)
This constructor may be used by subclasses to explicitly use an existing element.
3 HTML(java.lang.String html)
Creates a HTML with the specified html contents.
4
HTML(java.lang.String html, boolean wordWrap)
Creates an HTML widget with the specified contents, optionally treating it as HTML, and optionally disabling word wrapping.
Class methods
1 java.lang.String getHTML()
Gets this object's contents as HTML.
2 void setHTML(java.lang.String html)
Sets this object's contents via HTML.
3 static HTML wrap(Element element)
Creates an HTML widget that wraps an existing <div> or <span> element.
Methods inherited
This class inherits methods from the following classes:
com.google.gwt.user.client.ui.Label
com.google.gwt.user.client.ui.UIObject
com.google.gwt.user.client.ui.Widget
com.google.gwt.user.client.ui.HasText
java.lang.Object
Html Widget Example
This example will take you through simple steps to show usage of a HTML Widget in GWT. Follow the following steps to update the GWT application we created in GWT - Create Application chapter:
Step Description
1 Create a project with a name HelloWorld under a package com.tutorialspoint as explained in the GWT - Create Application chapter.
2 Modify HelloWorld.gwt.xml, HelloWorld.css, HelloWorld.html and HelloWorld.java as explained below. Keep rest of the files unchanged.
3 Compile and run the application to verify the result of the implemented logic.
Following is the content of the modified module descriptor src/com.tutorialspoint/HelloWorld.gwt.xml.

TUTORIALS POINT
Simply Easy Learning Page 42
<?xml version="1.0" encoding="UTF-8"?>
<module rename-to='helloworld'>
<!-- Inherit the core Web Toolkit stuff. -->
<inherits name='com.google.gwt.user.User'/>
<!-- Inherit the default GWT style sheet. -->
<inheritsname='com.google.gwt.user.theme.clean.Clean'/>
<!-- Specify the app entry point class. -->
<entry-point class='com.tutorialspoint.client.HelloWorld'/>
<!-- Specify the paths for translatable code -->
<source path='client'/>
<source path='shared'/>
</module>
Following is the content of the modified Style Sheet file war/HelloWorld.css.
body{
text-align: center;
font-family: verdana, sans-serif;
}
h1{
font-size:2em;
font-weight: bold;
color:#777777;
margin:40px0px70px;
text-align: center;
}
.gwt-Green-Border{
border:1px solid green;
}
.gwt-Blue-Border{
border:1px solid blue;
}
Following is the content of the modified HTML host file war/HelloWorld.html.
<html>
<head>
<title>Hello World</title>
<link rel="stylesheet" href="HelloWorld.css"/>
<script language="javascript" src="helloworld/helloworld.nocache.js">
</script>
</head>
<body>
<h1>HTML Widget Demonstration</h1>
<div id="gwtContainer"></div>
</body>
</html>
Let us have following content of Java file src/com.tutorialspoint/HelloWorld.java which
will demonstrate use of HTML widget.
package com.tutorialspoint.client;

TUTORIALS POINT
Simply Easy Learning Page 43
import com.google.gwt.core.client.EntryPoint;
import com.google.gwt.user.client.ui.HTML;
import com.google.gwt.user.client.ui.RootPanel;
import com.google.gwt.user.client.ui.VerticalPanel;
public class HelloWorld implements EntryPoint{
public void onModuleLoad(){
// create two HTML widgets
HTML html1 =
new HTML("This is first GWT HTML widget using <b> tag of html.");
HTML html2 =
new HTML("This is second GWT HTML widget using <i> tag of html.");
// use UIObject methods to set HTML widget properties.
html1.addStyleName("gwt-Green-Border");
html2.addStyleName("gwt-Blue-Border");
// add widgets to the root panel.
VerticalPanel panel =newVerticalPanel();
panel.setSpacing(10);
panel.add(html1);
panel.add(html2);
RootPanel.get("gwtContainer").add(panel);
}
}
Once you are ready with all the changes done, let us compile and run the application in development mode as we did in GWT - Create Application chapter. If everything is fine with your application, this will produce following result:
IMAGE Introduction The Image widget displays an image at a given URL.The image widget can be in
'unclipped' mode (the default mode) or 'clipped' mode. In clipped mode, a viewport is overlaid on top of the image so that a subset of the image will be displayed. In unclipped

TUTORIALS POINT
Simply Easy Learning Page 44
mode, there is no viewport - the entire image will be visible. Methods will operate differently depending on the mode that the image is in. These differences are detailed in the documentation for each method.
Class declaration Following is the declaration for com.google.gwt.user.client.ui.Image class:
public lass Image
extends Widget
implements SourcesLoadEvents,HasLoadHandlers,
HasErrorHandlers,SourcesClickEvents,
HasClickHandlers,HasAllMouseHandlers,
SourcesMouseEvents
CSS style rules Following default CSS Style rule will be applied to all the Image widget. You can override it as per your requirements.
.gwt-Image{}
Class constructors
S.N. Constructor & Description
1 Image()
Creates an empty image.
2 protected Image(Element element)
This constructor may be used by subclasses to explicitly use an existing element.
3 Image(java.lang.String url)
Creates an image with the specified url.
4 Image(java.lang.String html, int left, int top, int width, int height)
Creates a clipped image with a specified URL and visibility rectangle.
Class methods
S.N. Function name & Description
1 void addClickListener(ClickListener listener)
Adds a listener interface to receive click events.
2 void addLoadListener(LoadListener listener)
Adds a listener interface to receive load events.
3 void addMouseListener(MouseListener listener)
Adds a listener interface to receive mouse events.
4 void addMouseWheelListener(MouseWheelListener listener)
Gets this widget's parent panel.
5 int getHeight()
Gets the height of the image.
6 int getOriginLeft()
Gets the horizontal co-ordinate of the upper-left vertex of the image's visibility rectangle.
7 int getOriginTop()
Gets the vertical co-ordinate of the upper-left vertex of the image's visibility rectangle.

TUTORIALS POINT
Simply Easy Learning Page 45
8 java.lang.String getUrl()
Gets the URL of the image.
9 int getWidth()
Gets the width of the image.
10 void onBrowserEvent(Event event)
Removes a previously added listener interface.
11 static void prefetch(java.lang.String url)
Causes the browser to pre-fetch the image at a given URL.
12
void removeClickListener(ClickListener listener)
This method is called immediately before a widget will be detached from the browser's document.
13 void removeLoadListener(LoadListener listener)
Removes a previously added listener interface.
14 void removeMouseListener(MouseListener listener)
Removes a previously added listener interface.
15 void removeMouseWheelListener(MouseWheelListener listener)
Removes a previously added listener interface.
16 void setUrl(java.lang.String url)
Sets the URL of the image to be displayed.
17 void setUrlAndVisibleRect(java.lang.String url, int left, int top, int width, int height)
Sets the url and the visibility rectangle for the image at the same time.
18 void setVisibleRect(int left, int top, int width, int height)
Sets the visibility rectangle of an image.
19 static Image wrap(Element element)
Creates a Image widget that wraps an existing <img> element.
Methods inherited
This class inherits methods from the following classes:
com.google.gwt.user.client.ui.UIObject
com.google.gwt.user.client.ui.Widget
java.lang.Object
Image Widget Example
This example will take you through simple steps to show usage of a Image Widget in GWT. Follow the following steps to update the GWT application we created in GWT - Create Application chapter:
Step Description
1 Create a project with a name HelloWorld under a package com.tutorialspoint as explained in the GWT - Create Application chapter.
2 Modify HelloWorld.gwt.xml, HelloWorld.css, HelloWorld.html and HelloWorld.java as explained below. Keep rest of the files unchanged.

TUTORIALS POINT
Simply Easy Learning Page 46
3 Compile and run the application to verify the result of the implemented logic.
Following is the content of the modified module descriptor src/com.tutorialspoint/HelloWorld.gwt.xml.
<?xml version="1.0" encoding="UTF-8"?>
<module rename-to='helloworld'>
<!-- Inherit the core Web Toolkit stuff. -->
<inherits name='com.google.gwt.user.User'/>
<!-- Inherit the default GWT style sheet. -->
<inherits name='com.google.gwt.user.theme.clean.Clean'/>
<!-- Specify the app entry point class. -->
<entry-point class='com.tutorialspoint.client.HelloWorld'/>
<!-- Specify the paths for translatable code -->
<source path='client'/>
<source path='shared'/>
</module>
Following is the content of the modified Style Sheet file war/HelloWorld.css.
body{
text-align: center;
font-family: verdana, sans-serif;
}
h1{
font-size:2em;
font-weight: bold;
color:#777777;
margin:40px0px70px;
text-align: center;
}
Following is the content of the modified HTML host file war/HelloWorld.html.
<html>
<head>
<title>Hello World</title>
<link rel="stylesheet" href="HelloWorld.css"/>
<script language="javascript" src="helloworld/helloworld.nocache.js">
</script>
</head>
<body>
<h1>Image Widget Demonstration</h1>
<div id="gwtContainer"></div>
</body>
</html>
Let us have following content of Java file src/com.tutorialspoint/HelloWorld.java which
will demonstrate use of Image widget.
package com.tutorialspoint.client;
import com.google.gwt.core.client.EntryPoint;
import com.google.gwt.user.client.ui.Image;

TUTORIALS POINT
Simply Easy Learning Page 47
import com.google.gwt.user.client.ui.RootPanel;
import com.google.gwt.user.client.ui.VerticalPanel;
public class HelloWorld implements EntryPoint{
public void onModuleLoad(){
// Create a Image widget
Image image =newImage();
//set image source
image.setUrl("http://www.tutorialspoint.com/images/gwt-mini.png");
// Add image to the root panel.
VerticalPanel panel =newVerticalPanel();
panel.add(image);
RootPanel.get("gwtContainer").add(panel);
}
}
Once you are ready with all the changes done, let us compile and run the application in development mode as we did in GWT - Create Application chapter. If everything is fine with your application, this will produce following result:
ANCHOR Introduction The Anchor widget that represents a simple <a> element.
Class declaration Following is the declaration for com.google.gwt.user.client.ui.Anchor class:
public class Anchor
extends FocusWidget
Implements HasHorizontalAlignment,HasName,
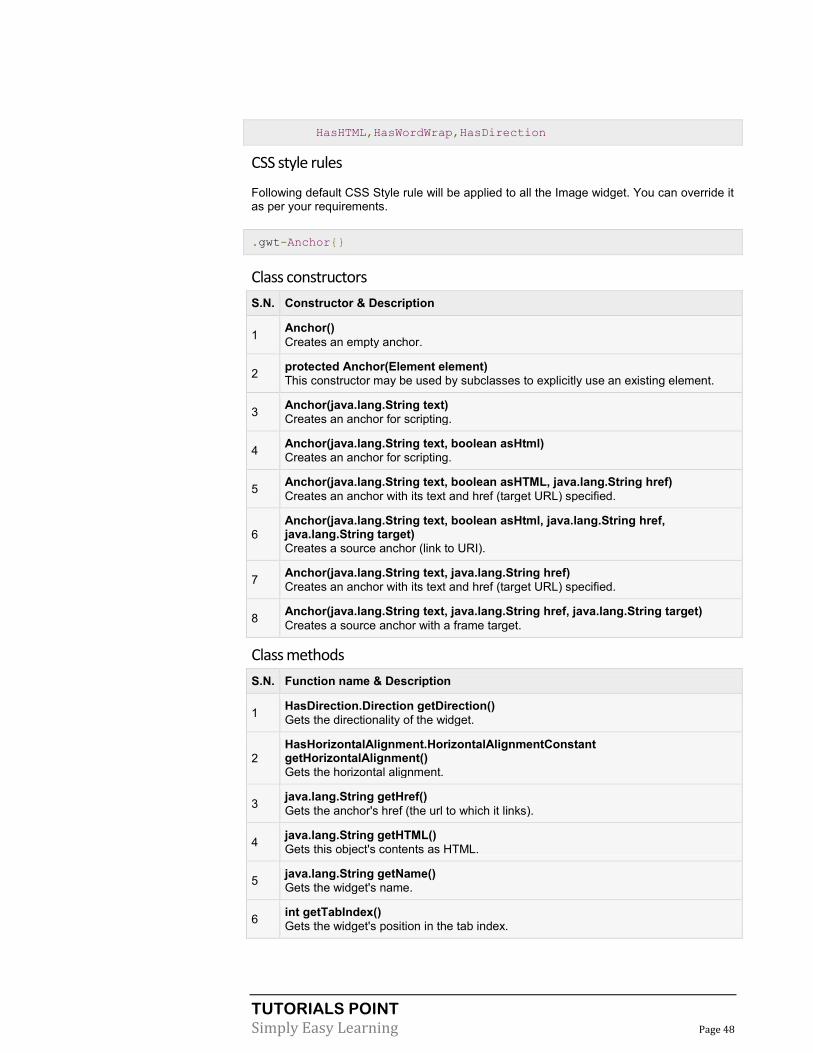
TUTORIALS POINT
Simply Easy Learning Page 48
HasHTML,HasWordWrap,HasDirection
CSS style rules
Following default CSS Style rule will be applied to all the Image widget. You can override it as per your requirements.
.gwt-Anchor{}
Class constructors
S.N. Constructor & Description
1 Anchor()
Creates an empty anchor.
2 protected Anchor(Element element)
This constructor may be used by subclasses to explicitly use an existing element.
3 Anchor(java.lang.String text)
Creates an anchor for scripting.
4 Anchor(java.lang.String text, boolean asHtml)
Creates an anchor for scripting.
5 Anchor(java.lang.String text, boolean asHTML, java.lang.String href)
Creates an anchor with its text and href (target URL) specified.
6
Anchor(java.lang.String text, boolean asHtml, java.lang.String href, java.lang.String target)
Creates a source anchor (link to URI).
7 Anchor(java.lang.String text, java.lang.String href)
Creates an anchor with its text and href (target URL) specified.
8 Anchor(java.lang.String text, java.lang.String href, java.lang.String target)
Creates a source anchor with a frame target.
Class methods
S.N. Function name & Description
1 HasDirection.Direction getDirection()
Gets the directionality of the widget.
2
HasHorizontalAlignment.HorizontalAlignmentConstant getHorizontalAlignment()
Gets the horizontal alignment.
3 java.lang.String getHref()
Gets the anchor's href (the url to which it links).
4 java.lang.String getHTML()
Gets this object's contents as HTML.
5 java.lang.String getName()
Gets the widget's name.
6 int getTabIndex()
Gets the widget's position in the tab index.

TUTORIALS POINT
Simply Easy Learning Page 49
7
java.lang.String getTarget()
Gets the anchor's target frame (the frame in which navigation will occur when the link is selected).
8 java.lang.String getText()
Gets this object's text.
9 boolean getWordWrap()
Gets whether word-wrapping is enabled.
10 void setAccessKey(char key)
Sets the widget's 'access key'.
11 void setFocus(boolean focused)
Explicitly focus/unfocus this widget.
12
void setHorizontalAlignment(HasHorizontalAlignment.HorizontalAlignmentConstant align)
Sets the horizontal alignment.
13 void setHref(java.lang.String href)
Sets the anchor's href (the url to which it links).
14 void setHTML(java.lang.String html)
Sets this object's contents via HTML.
15 void setName(java.lang.String name)
Sets the widget's name.
16 void setTabIndex(int index)
Sets the widget's position in the tab index.
17 void setText(java.lang.String text)
Sets this object's text.
18 void setWordWrap(boolean wrap)
Sets whether word-wrapping is enabled.
19 static Anchor wrap(Element element)
Creates an Anchor widget that wraps an existing <a> element.
Methods inherited
This class inherits methods from the following classes:
com.google.gwt.user.client.ui.UIObject
com.google.gwt.user.client.ui.Widget
com.google.gwt.user.client.ui.FocusWidget
Anchor Widget Example
This example will take you through simple steps to show usage of a Anchor Widget in GWT. Follow the following steps to update the GWT application we created in GWT - Create Application chapter:
Step Description

TUTORIALS POINT
Simply Easy Learning Page 50
1 Create a project with a name HelloWorld under a package com.tutorialspoint as explained in the GWT - Create Application chapter.
2 Modify HelloWorld.gwt.xml, HelloWorld.css, HelloWorld.html and HelloWorld.java as explained below. Keep rest of the files unchanged.
3 Compile and run the application to verify the result of the implemented logic.
Following is the content of the modified module descriptor src/com.tutorialspoint/HelloWorld.gwt.xml.
<?xml version="1.0" encoding="UTF-8"?>
<module rename-to='helloworld'>
<!-- Inherit the core Web Toolkit stuff. -->
<inherits name='com.google.gwt.user.User'/>
<!-- Inherit the default GWT style sheet. -->
<inherits name='com.google.gwt.user.theme.clean.Clean'/>
<!-- Specify the app entry point class. -->
<entry-point class='com.tutorialspoint.client.HelloWorld'/>
<!-- Specify the paths for translatable code -->
<source path='client'/>
<source path='shared'/>
</module>
Following is the content of the modified Style Sheet file war/HelloWorld.css.
body{
text-align: center;
font-family: verdana, sans-serif;
}
h1{
font-size:2em;
font-weight: bold;
color:#777777;
margin:40px0px70px;
text-align: center;
}
Following is the content of the modified HTML host file war/HelloWorld.html.
<html>
<head>
<title>Hello World</title>
<link rel="stylesheet" href="HelloWorld.css"/>
<script language="javascript" src="helloworld/helloworld.nocache.js">
</script>
</head>
<body>
<h1>Anchor Widget Demonstration</h1>
<div id="gwtContainer"></div>
</body>
</html>

TUTORIALS POINT
Simply Easy Learning Page 51
Let us have following content of Java file src/com.tutorialspoint/HelloWorld.java which
will demonstrate use of Anchor widget.
package com.tutorialspoint.client;
import com.google.gwt.core.client.EntryPoint;
import com.google.gwt.user.client.ui.Anchor;
import com.google.gwt.user.client.ui.RootPanel;
import com.google.gwt.user.client.ui.VerticalPanel;
public class HelloWorld implements EntryPoint{
public void onModuleLoad(){
// Create a Anchor widget,
// pass text as TutorialsPoint
// set asHtml as false,
// href as www.tutorialspoint.com,
// target as _blank
Anchor anchor = new Anchor("TutorialsPoint",
false,
"http://www.tutorialspoint.com",
"_blank");
// Add anchor to the root panel.
VerticalPanel panel =new VerticalPanel();
panel.add(anchor);
RootPanel.get("gwtContainer").add(panel);
}
}
Once you are ready with all the changes done, let us compile and run the application in development mode as we did in GWT - Create Application chapter. If everything is fine with your application, this will produce following result:

TUTORIALS POINT
Simply Easy Learning Page 52
Form Widgets
This section describes the Form Widgets under Google Web Toolkit:
Form widgets allow users to input data and provides them interaction capability with
the application. Every Form widget inherits properties from Widget class which in turn inherits properties from UIObject and Wigdet classes.
S.N. Widget & Description
1 GWT UIObject Class This widget contains text, not interpreted as HTML using a <div>element, causing it to be displayed with block layout.
2 GWT Widget Class This widget can contain HTML text and displays the html content using a <div> element, causing it to be displayed with block layout.
Form Widgets Following are few important Form Widgets:
S.N. Widget & Description
1 Button This widget represents a standard push button.
2 PushButton This widget represents a normal push button with custom styling.
3 ToggleButton This widget represents a stylish stateful button which allows the user to toggle between up and down states.
4 CheckBox This widget represents a standard check box widget. This class also serves as a base class for RadioButton.
5 RadioButton This widget represents a mutually-exclusive selection radio button widget.
CHAPTER
8
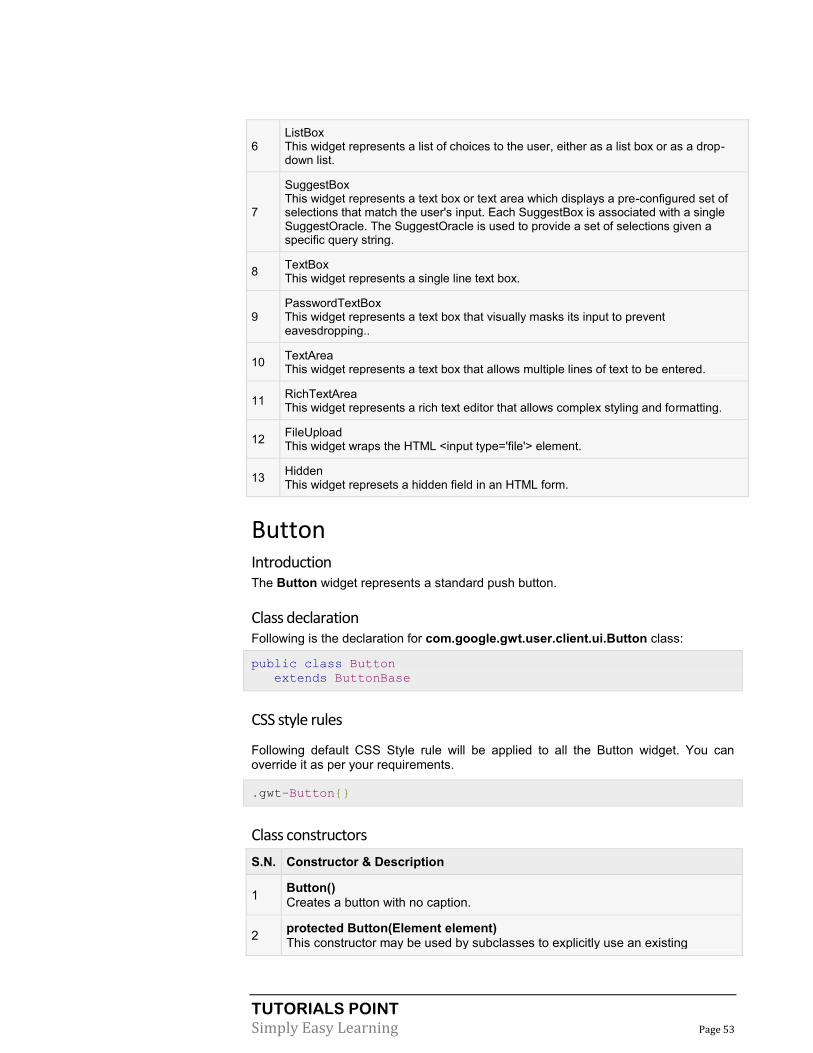
TUTORIALS POINT
Simply Easy Learning Page 53
6 ListBox This widget represents a list of choices to the user, either as a list box or as a drop-down list.
7
SuggestBox This widget represents a text box or text area which displays a pre-configured set of selections that match the user's input. Each SuggestBox is associated with a single SuggestOracle. The SuggestOracle is used to provide a set of selections given a specific query string.
8 TextBox This widget represents a single line text box.
9 PasswordTextBox This widget represents a text box that visually masks its input to prevent eavesdropping..
10 TextArea This widget represents a text box that allows multiple lines of text to be entered.
11 RichTextArea This widget represents a rich text editor that allows complex styling and formatting.
12 FileUpload This widget wraps the HTML <input type='file'> element.
13 Hidden This widget represets a hidden field in an HTML form.
Button Introduction The Button widget represents a standard push button.
Class declaration Following is the declaration for com.google.gwt.user.client.ui.Button class:
public class Button
extends ButtonBase
CSS style rules Following default CSS Style rule will be applied to all the Button widget. You can override it as per your requirements.
.gwt-Button{}
Class constructors
S.N. Constructor & Description
1 Button() Creates a button with no caption.
2 protected Button(Element element) This constructor may be used by subclasses to explicitly use an existing

TUTORIALS POINT
Simply Easy Learning Page 54
element.
3 Button(java.lang.String html) Creates a button with the given HTML caption.
4 Button(java.lang.String html, ClickListener listener) Creates a button with the given HTML caption and click listener.
Class methods
S.N. Function name & Description
1 click() Programmatic equivalent of the user clicking the button.
2 static Button wrap(Element element) Creates a Button widget that wraps an existing <a> element.
Methods inherited This class inherits methods from the following classes:
com.google.gwt.user.client.ui.UIObject
com.google.gwt.user.client.ui.Widget
com.google.gwt.user.client.ui.FocusWidget
com.google.gwt.user.client.ui.ButtonBase
java.lang.Object
Button Widget Example
This example will take you through simple steps to show usage of a Button Widget in GWT. Follow the following steps to update the GWT application we created in GWT - Create Application chapter:
Step Description
1 Create a project with a name HelloWorld under a package com.tutorialspoint as explained in the GWT - Create Application chapter.
2 Modify HelloWorld.gwt.xml, HelloWorld.css, HelloWorld.html and HelloWorld.java as explained below. Keep rest of the files unchanged.
3 Compile and run the application to verify the result of the implemented logic.
Following is the content of the modified module descriptor src/com.tutorialspoint/HelloWorld.gwt.xml.
<?xml version="1.0" encoding="UTF-8"?>
<module rename-to='helloworld'>
<!-- Inherit the core Web Toolkit stuff. -->
<inherits name='com.google.gwt.user.User'/>

TUTORIALS POINT
Simply Easy Learning Page 55
<!-- Inherit the default GWT style sheet. -->
<inherits name='com.google.gwt.user.theme.clean.Clean'/>
<!-- Specify the app entry point class. -->
<entry-point class='com.tutorialspoint.client.HelloWorld'/>
<!-- Specify the paths for translatable code -->
<source path='client'/>
<source path='shared'/>
</module>
Following is the content of the modified Style Sheet file war/HelloWorld.css.
body{
text-align: center;
font-family: verdana, sans-serif;
}
h1{
font-size:2em;
font-weight: bold;
color:#777777;
margin:40px0px70px;
text-align: center;
}
.gwt-Button{
color:red;
}
.gwt-Green-Button{
color:green;
}
.gwt-Blue-Button{
color:blue;
}
Following is the content of the modified HTML host file war/HelloWorld.html.
<html>
<head>
<title>Hello World</title>
<link rel="stylesheet" href="HelloWorld.css"/>
<script language="javascript" src="helloworld/helloworld.nocache.js">
</script>
</head>
<body>
<h1>Button Widget Demonstration</h1>
<div id="gwtContainer"></div>
</body>
</html>
Let us have following content of Java file src/com.tutorialspoint/HelloWorld.java which will demonstrate use of Button widget.
package com.tutorialspoint.client;
import com.google.gwt.core.client.EntryPoint;
import com.google.gwt.event.dom.client.ClickEvent;
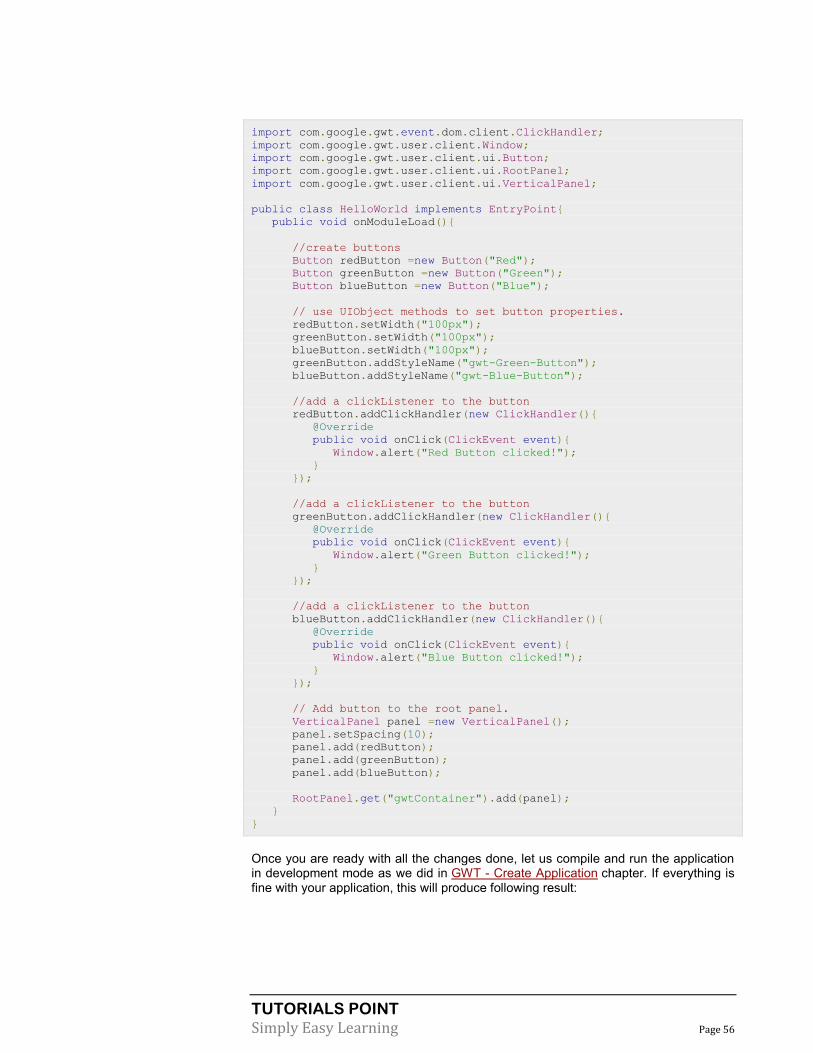
TUTORIALS POINT
Simply Easy Learning Page 56
import com.google.gwt.event.dom.client.ClickHandler;
import com.google.gwt.user.client.Window;
import com.google.gwt.user.client.ui.Button;
import com.google.gwt.user.client.ui.RootPanel;
import com.google.gwt.user.client.ui.VerticalPanel;
public class HelloWorld implements EntryPoint{
public void onModuleLoad(){
//create buttons
Button redButton =new Button("Red");
Button greenButton =new Button("Green");
Button blueButton =new Button("Blue");
// use UIObject methods to set button properties.
redButton.setWidth("100px");
greenButton.setWidth("100px");
blueButton.setWidth("100px");
greenButton.addStyleName("gwt-Green-Button");
blueButton.addStyleName("gwt-Blue-Button");
//add a clickListener to the button
redButton.addClickHandler(new ClickHandler(){
@Override
public void onClick(ClickEvent event){
Window.alert("Red Button clicked!");
}
});
//add a clickListener to the button
greenButton.addClickHandler(new ClickHandler(){
@Override
public void onClick(ClickEvent event){
Window.alert("Green Button clicked!");
}
});
//add a clickListener to the button
blueButton.addClickHandler(new ClickHandler(){
@Override
public void onClick(ClickEvent event){
Window.alert("Blue Button clicked!");
}
});
// Add button to the root panel.
VerticalPanel panel =new VerticalPanel();
panel.setSpacing(10);
panel.add(redButton);
panel.add(greenButton);
panel.add(blueButton);
RootPanel.get("gwtContainer").add(panel);
}
}
Once you are ready with all the changes done, let us compile and run the application in development mode as we did in GWT - Create Application chapter. If everything is fine with your application, this will produce following result:

TUTORIALS POINT
Simply Easy Learning Page 57
When you click Click Me button, it will show an alert message Hello World!
PushButton
Introduction The PushButton widget represents a standard push button with custom styling.
Class declaration Following is the declaration for com.google.gwt.user.client.ui.PushButton class:
public class PushButton
extends CustomButton
CSS style rules Following default CSS Style rules will be applied to all the PushButton widget. You can override it as per your requirements.
.gwt-PushButton-up {}
.gwt-PushButton-down {}
.gwt-PushButton-up-hovering {}
.gwt-PushButton-down-hovering {}
.gwt-PushButton-up-disabled {}
.gwt-PushButton-down-disabled {}
Class constructors
S.N. Constructor & Description

TUTORIALS POINT
Simply Easy Learning Page 58
1 PushButton()
Constructor for PushButton.
2 PushButton(Image upImage)
Creates a PushButton with up state image.
3 PushButton(Image upImage, ClickListener listener)
Creates a PushButton with up state image and clickListener.
4 PushButton(Image upImage, Image downImage)
Creates a PushButton with up state image.
5 PushButton(Image upImage, Image downImage, ClickListener listener)
Creates a PushButton with up state image.
6 PushButton(java.lang.String upText)
Creates a PushButton with up state text.
7 PushButton(java.lang.String upText, ClickListener listener)
Creates a PushButton with up state text and clicklistener.
8 PushButton(java.lang.String upText, java.lang.String downText)
Creates a PushButton with up state and down state text.
8
PushButton(java.lang.String upText, java.lang.String downText, ClickListener listener)
Creates a PushButton with up state, down state text and click listener.
Class methods
S.N. Function name & Description
1 protected void onClick() Called when the user finishes clicking on this button.
2 protected void onClickCancel() Called when the user aborts a click in progress; for example, by dragging the mouse outside of the button before releasing the mouse button.
3 protected void onClickStart() Called when the user begins to click on this button.
Methods inherited
This class inherits methods from the following classes:
com.google.gwt.user.client.ui.UIObject
com.google.gwt.user.client.ui.Widget
com.google.gwt.user.client.ui.FocusWidget
com.google.gwt.user.client.ui.CustomWidget
java.lang.Object

TUTORIALS POINT
Simply Easy Learning Page 59
PushButton Widget Example This example will take you through simple steps to show usage of a PushButton Widget in GWT. Follow the following steps to update the GWT application we created in GWT - Create Applicationchapter:
Step Description
1 Create a project with a name HelloWorld under a package com.tutorialspoint as explained in the GWT - Create Application chapter.
2 Modify HelloWorld.gwt.xml, HelloWorld.css, HelloWorld.html and HelloWorld.java as explained below. Keep rest of the files unchanged.
3 Compile and run the application to verify the result of the implemented logic.
Following is the content of the modified module descriptor src/com.tutorialspoint/HelloWorld.gwt.xml.
<?xml version="1.0" encoding="UTF-8"?>
<module rename-to='helloworld'>
<!-- Inherit the core Web Toolkit stuff. -->
<inherits name='com.google.gwt.user.User'/>
<!-- Inherit the default GWT style sheet. -->
<inherits name='com.google.gwt.user.theme.clean.Clean'/>
<!-- Specify the app entry point class. -->
<entry-point class='com.tutorialspoint.client.HelloWorld'/>
<!-- Specify the paths for translatable code -->
<source path='client'/>
<source path='shared'/>
</module>
Following is the content of the modified Style Sheet file war/HelloWorld.css.
body{
text-align: center;
font-family: verdana, sans-serif;
}
h1{
font-size:2em;
font-weight: bold;
color:#777777;
margin:40px0px70px;
text-align: center;
}
.gwt-PushButton{
color:red;
}
.gwt-PushButton-up {
color:green;
}
.gwt-PushButton-down {
color:blue;
}
.gwt-PushButton-up-hovering {
color:pink;

TUTORIALS POINT
Simply Easy Learning Page 60
}
.gwt-PushButton-down-hovering {
color:aqua;
}
.gwt-PushButton-up-disabled {
color:lime;
}
.gwt-PushButton-down-disabled {
color:maroon;
}
Following is the content of the modified HTML host file war/HelloWorld.html.
<html>
<head>
<title>Hello World</title>
<link rel="stylesheet" href="HelloWorld.css"/>
<script language="javascript" src="helloworld/helloworld.nocache.js">
</script>
</head>
<body>
<h1>PushButton Widget Demonstration</h1>
<div id="gwtContainer"></div>
</body>
</html>
Let us have following content of Java file src/com.tutorialspoint/HelloWorld.java which will demonstrate use of PushButton widget.
package com.tutorialspoint.client;
import com.google.gwt.core.client.EntryPoint;
import com.google.gwt.event.dom.client.ClickEvent;
import com.google.gwt.event.dom.client.ClickHandler;
import com.google.gwt.user.client.Window;
import com.google.gwt.user.client.ui.PushButton;
import com.google.gwt.user.client.ui.RootPanel;
import com.google.gwt.user.client.ui.VerticalPanel;
public class HelloWorld implements EntryPoint{
public void onModuleLoad(){
//create a push button
PushButton pushButton =newPushButton("Click Me!");
//create a push button
PushButton pushButton1 =newPushButton("Click Me!");
//disable a push button
pushButton1.setEnabled(false);
//add a clickListener to the push button
pushButton.addClickHandler(new ClickHandler(){
@Override
public void onClick(ClickEvent event){
Window.alert("Hello World!");
}
});
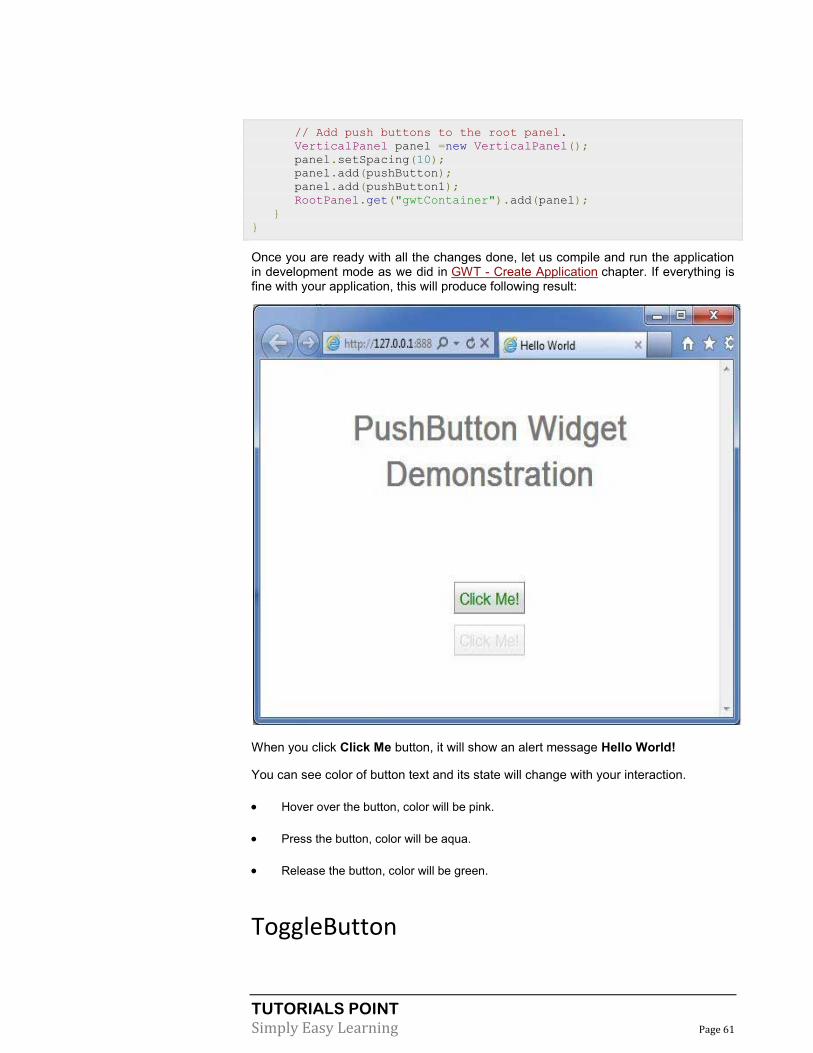
TUTORIALS POINT
Simply Easy Learning Page 61
// Add push buttons to the root panel.
VerticalPanel panel =new VerticalPanel();
panel.setSpacing(10);
panel.add(pushButton);
panel.add(pushButton1);
RootPanel.get("gwtContainer").add(panel);
}
}
Once you are ready with all the changes done, let us compile and run the application in development mode as we did in GWT - Create Application chapter. If everything is fine with your application, this will produce following result:
When you click Click Me button, it will show an alert message Hello World!
You can see color of button text and its state will change with your interaction.
Hover over the button, color will be pink.
Press the button, color will be aqua.
Release the button, color will be green.
ToggleButton
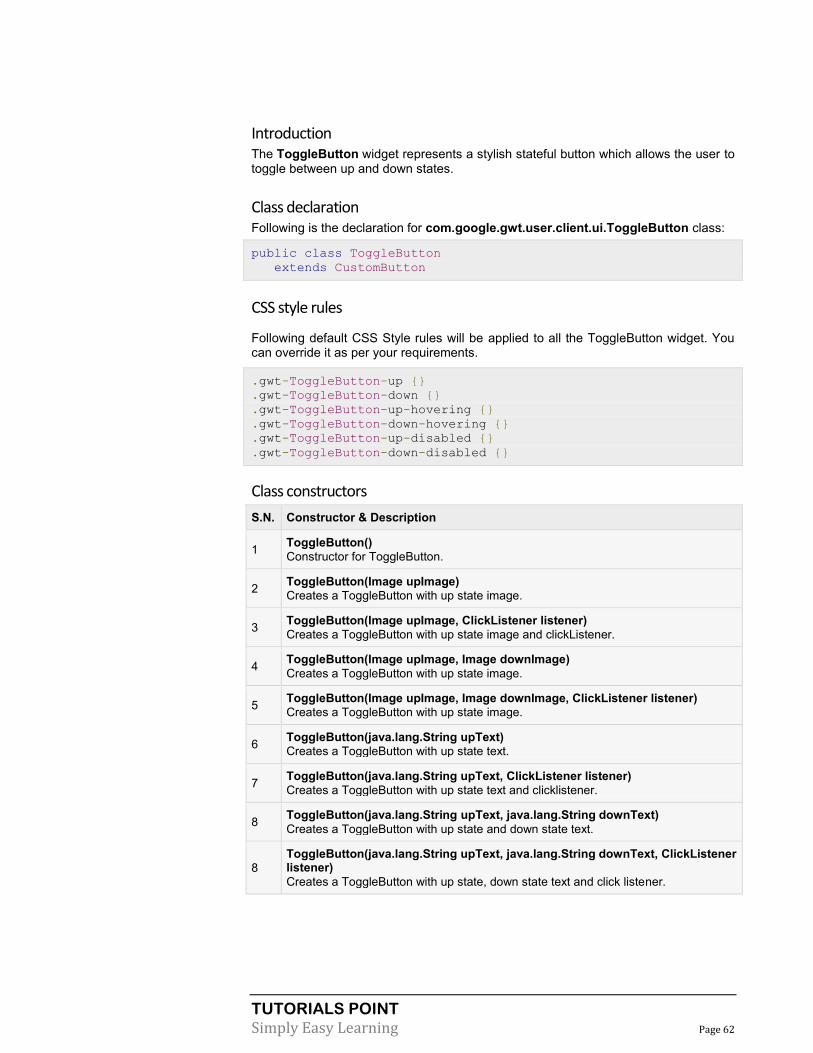
TUTORIALS POINT
Simply Easy Learning Page 62
Introduction The ToggleButton widget represents a stylish stateful button which allows the user to toggle between up and down states.
Class declaration Following is the declaration for com.google.gwt.user.client.ui.ToggleButton class:
public class ToggleButton
extends CustomButton
CSS style rules
Following default CSS Style rules will be applied to all the ToggleButton widget. You can override it as per your requirements.
.gwt-ToggleButton-up {}
.gwt-ToggleButton-down {}
.gwt-ToggleButton-up-hovering {}
.gwt-ToggleButton-down-hovering {}
.gwt-ToggleButton-up-disabled {}
.gwt-ToggleButton-down-disabled {}
Class constructors
S.N. Constructor & Description
1 ToggleButton()
Constructor for ToggleButton.
2 ToggleButton(Image upImage)
Creates a ToggleButton with up state image.
3 ToggleButton(Image upImage, ClickListener listener)
Creates a ToggleButton with up state image and clickListener.
4 ToggleButton(Image upImage, Image downImage)
Creates a ToggleButton with up state image.
5 ToggleButton(Image upImage, Image downImage, ClickListener listener)
Creates a ToggleButton with up state image.
6 ToggleButton(java.lang.String upText)
Creates a ToggleButton with up state text.
7 ToggleButton(java.lang.String upText, ClickListener listener)
Creates a ToggleButton with up state text and clicklistener.
8 ToggleButton(java.lang.String upText, java.lang.String downText)
Creates a ToggleButton with up state and down state text.
8
ToggleButton(java.lang.String upText, java.lang.String downText, ClickListener listener)
Creates a ToggleButton with up state, down state text and click listener.

TUTORIALS POINT
Simply Easy Learning Page 63
Class methods
S.N. Function name & Description
1 boolean isDown()
Is this button down?
2 protected void onClick()
Called when the user finishes clicking on this button.
3 void setDown(boolean down)
Sets whether this button is down.
Methods inherited
This class inherits methods from the following classes:
com.google.gwt.user.client.ui.UIObject
com.google.gwt.user.client.ui.Widget
com.google.gwt.user.client.ui.FocusWidget
com.google.gwt.user.client.ui.CustomWidget
java.lang.Object
ToggleButton Widget Example
This example will take you through simple steps to show usage of a ToggleButton Widget in GWT. Follow the following steps to update the GWT application we created in GWT - Create Applicationchapter:
Step Description
1 Create a project with a name HelloWorld under a package com.tutorialspoint as explained in the GWT - Create Application chapter.
2 Modify HelloWorld.gwt.xml, HelloWorld.css, HelloWorld.html and HelloWorld.java as explained below. Keep rest of the files unchanged.
3 Compile and run the application to verify the result of the implemented logic.
Following is the content of the modified module descriptor src/com.tutorialspoint/HelloWorld.gwt.xml.
<?xml version="1.0" encoding="UTF-8"?>
<module rename-to='helloworld'>
<!-- Inherit the core Web Toolkit stuff. -->
<inherits name='com.google.gwt.user.User'/>
<!-- Inherit the default GWT style sheet. -->
<inherits name='com.google.gwt.user.theme.clean.Clean'/>
<!-- Specify the app entry point class. -->
<entry-point class='com.tutorialspoint.client.HelloWorld'/>
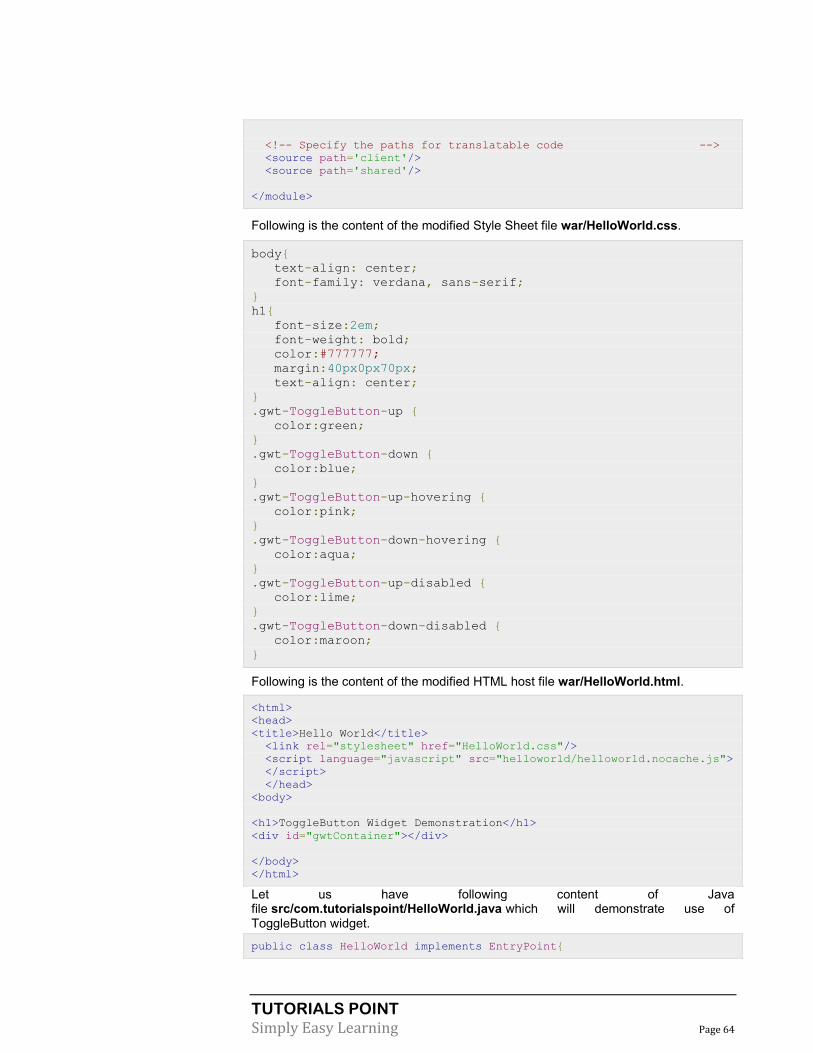
TUTORIALS POINT
Simply Easy Learning Page 64
<!-- Specify the paths for translatable code -->
<source path='client'/>
<source path='shared'/>
</module>
Following is the content of the modified Style Sheet file war/HelloWorld.css.
body{
text-align: center;
font-family: verdana, sans-serif;
}
h1{
font-size:2em;
font-weight: bold;
color:#777777;
margin:40px0px70px;
text-align: center;
}
.gwt-ToggleButton-up {
color:green;
}
.gwt-ToggleButton-down {
color:blue;
}
.gwt-ToggleButton-up-hovering {
color:pink;
}
.gwt-ToggleButton-down-hovering {
color:aqua;
}
.gwt-ToggleButton-up-disabled {
color:lime;
}
.gwt-ToggleButton-down-disabled {
color:maroon;
}
Following is the content of the modified HTML host file war/HelloWorld.html.
<html>
<head>
<title>Hello World</title>
<link rel="stylesheet" href="HelloWorld.css"/>
<script language="javascript" src="helloworld/helloworld.nocache.js">
</script>
</head>
<body>
<h1>ToggleButton Widget Demonstration</h1>
<div id="gwtContainer"></div>
</body>
</html>
Let us have following content of Java file src/com.tutorialspoint/HelloWorld.java which will demonstrate use of ToggleButton widget.
public class HelloWorld implements EntryPoint{
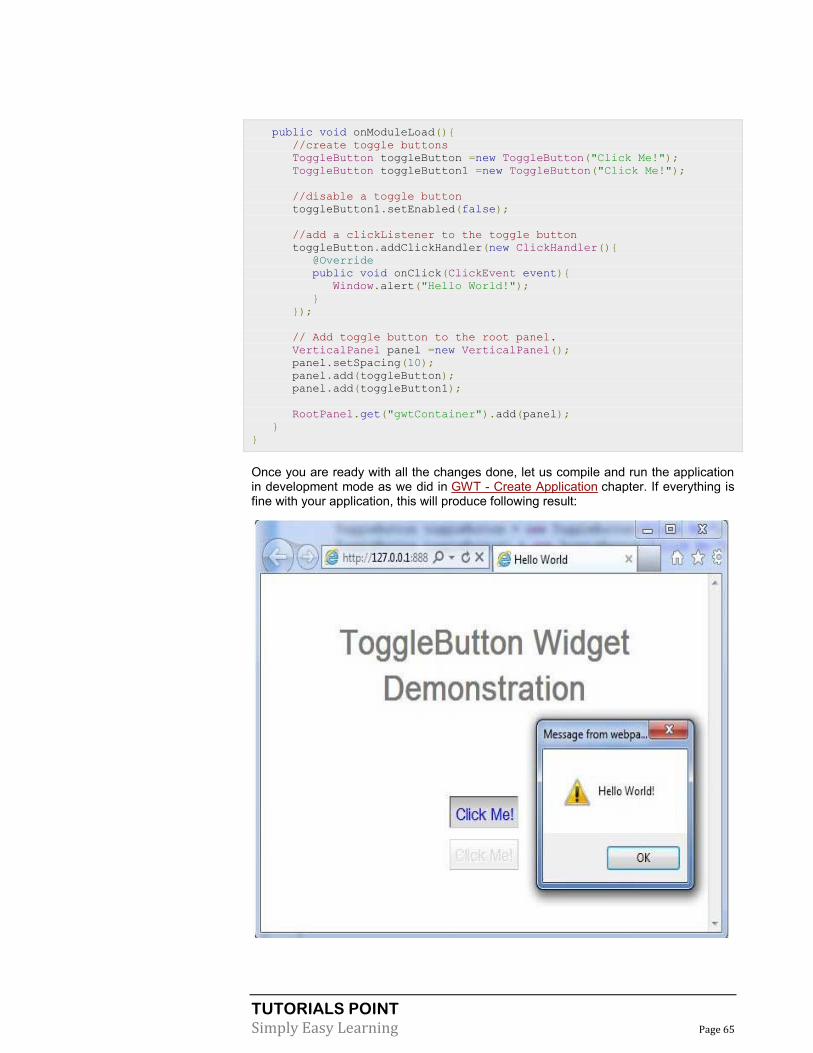
TUTORIALS POINT
Simply Easy Learning Page 65
public void onModuleLoad(){
//create toggle buttons
ToggleButton toggleButton =new ToggleButton("Click Me!");
ToggleButton toggleButton1 =new ToggleButton("Click Me!");
//disable a toggle button
toggleButton1.setEnabled(false);
//add a clickListener to the toggle button
toggleButton.addClickHandler(new ClickHandler(){
@Override
public void onClick(ClickEvent event){
Window.alert("Hello World!");
}
});
// Add toggle button to the root panel.
VerticalPanel panel =new VerticalPanel();
panel.setSpacing(10);
panel.add(toggleButton);
panel.add(toggleButton1);
RootPanel.get("gwtContainer").add(panel);
}
}
Once you are ready with all the changes done, let us compile and run the application in development mode as we did in GWT - Create Application chapter. If everything is fine with your application, this will produce following result:
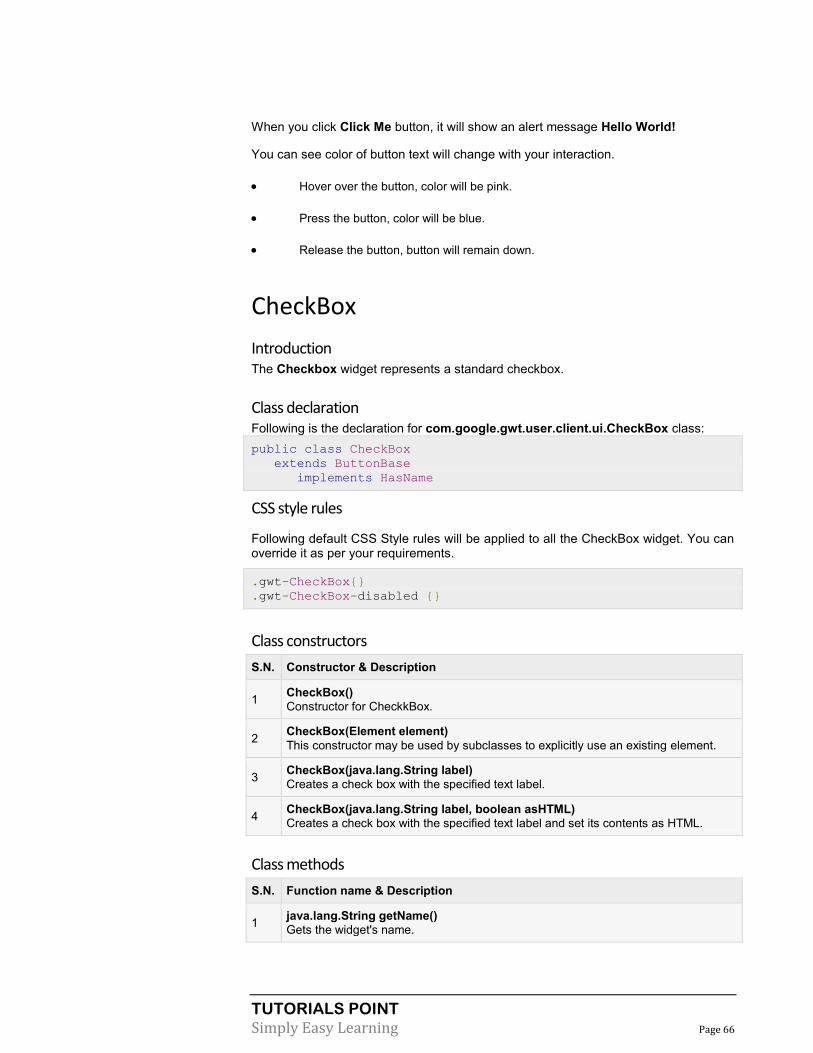
TUTORIALS POINT
Simply Easy Learning Page 66
When you click Click Me button, it will show an alert message Hello World!
You can see color of button text will change with your interaction.
Hover over the button, color will be pink.
Press the button, color will be blue.
Release the button, button will remain down.
CheckBox
Introduction The Checkbox widget represents a standard checkbox.
Class declaration Following is the declaration for com.google.gwt.user.client.ui.CheckBox class:
public class CheckBox
extends ButtonBase
implements HasName
CSS style rules
Following default CSS Style rules will be applied to all the CheckBox widget. You can override it as per your requirements.
.gwt-CheckBox{}
.gwt-CheckBox-disabled {}
Class constructors
S.N. Constructor & Description
1 CheckBox()
Constructor for CheckkBox.
2 CheckBox(Element element)
This constructor may be used by subclasses to explicitly use an existing element.
3 CheckBox(java.lang.String label)
Creates a check box with the specified text label.
4 CheckBox(java.lang.String label, boolean asHTML)
Creates a check box with the specified text label and set its contents as HTML.
Class methods
S.N. Function name & Description
1 java.lang.String getName()
Gets the widget's name.

TUTORIALS POINT
Simply Easy Learning Page 67
2 int getTabIndex()
Gets the widget's position in the tab index.
3 java.lang.String getText()
Gets this object's text.
4 boolean isChecked()
Determines whether this check box is currently checked.
5 boolean isEnabled()
Gets whether this widget is enabled.
6 protected void onEnsureDebugId(java.lang.String baseID)
Affected Elements: -label = label next to checkbox.
7 protected void onLoad()
This method is called when a widget is attached to the browser's document.
8 protected void onUnload()
This method is called when a widget is detached from the browser's document.
9 protected void replaceInputElement(Element elem)
Replace the current input element with a new one.
10 void setAccessKey(char key)
Sets the widget's 'access key'.
11 void setChecked(boolean checked)
Checks or unchecks this check box.
12 void setEnabled(boolean enabled)
Sets whether this widget is enabled.
13 void setFocus(boolean focused)
Explicitly focus/unfocus this widget.
14 void setHTML(java.lang.String html)
Sets this object's contents via HTML.
15 void setName(java.lang.String name)
Sets the widget's name.
16 void setTabIndex(int index)
Sets the widget's position in the tab index.
17 void setText(java.lang.String text)
Sets this object's text.
18 void sinkEvents(int eventBitsToAdd)
Adds a set of events to be sunk by this object.
19 java.lang.String getHTML()
Gets this object's contents as HTML.
Methods inherited
This class inherits methods from the following classes:
com.google.gwt.user.client.ui.UIObject
com.google.gwt.user.client.ui.Widget

TUTORIALS POINT
Simply Easy Learning Page 68
com.google.gwt.user.client.ui.FocusWidget
java.lang.Object
CheckBox Widget Example
This example will take you through simple steps to show usage of a CheckBox Widget in GWT. Follow the following steps to update the GWT application we created in GWT - Create Application chapter:
Step Description
1 Create a project with a name HelloWorld under a package com.tutorialspoint as explained in the GWT - Create Application chapter.
2 Modify HelloWorld.gwt.xml, HelloWorld.css, HelloWorld.html and HelloWorld.java as
explained below. Keep rest of the files unchanged.
3 Compile and run the application to verify the result of the implemented logic.
Following is the content of the modified module descriptor src/com.tutorialspoint/HelloWorld.gwt.xml.
<?xml version="1.0" encoding="UTF-8"?>
<module rename-to='helloworld'>
<!-- Inherit the core Web Toolkit stuff. -->
<inherits name='com.google.gwt.user.User'/>
<!-- Inherit the default GWT style sheet. -->
<inherits name='com.google.gwt.user.theme.clean.Clean'/>
<!-- Specify the app entry point class. -->
<entry-point class='com.tutorialspoint.client.HelloWorld'/>
<!-- Specify the paths for translatable code -->
<source path='client'/>
<source path='shared'/>
</module>
Following is the content of the modified Style Sheet file war/HelloWorld.css.
body{
text-align: center;
font-family: verdana, sans-serif;
}
h1{
font-size:2em;
font-weight: bold;
color:#777777;
margin:40px0px70px;
text-align: center;
}
.gwt-CheckBox{
color:green;
}
.gwt-CheckBox-disabled {
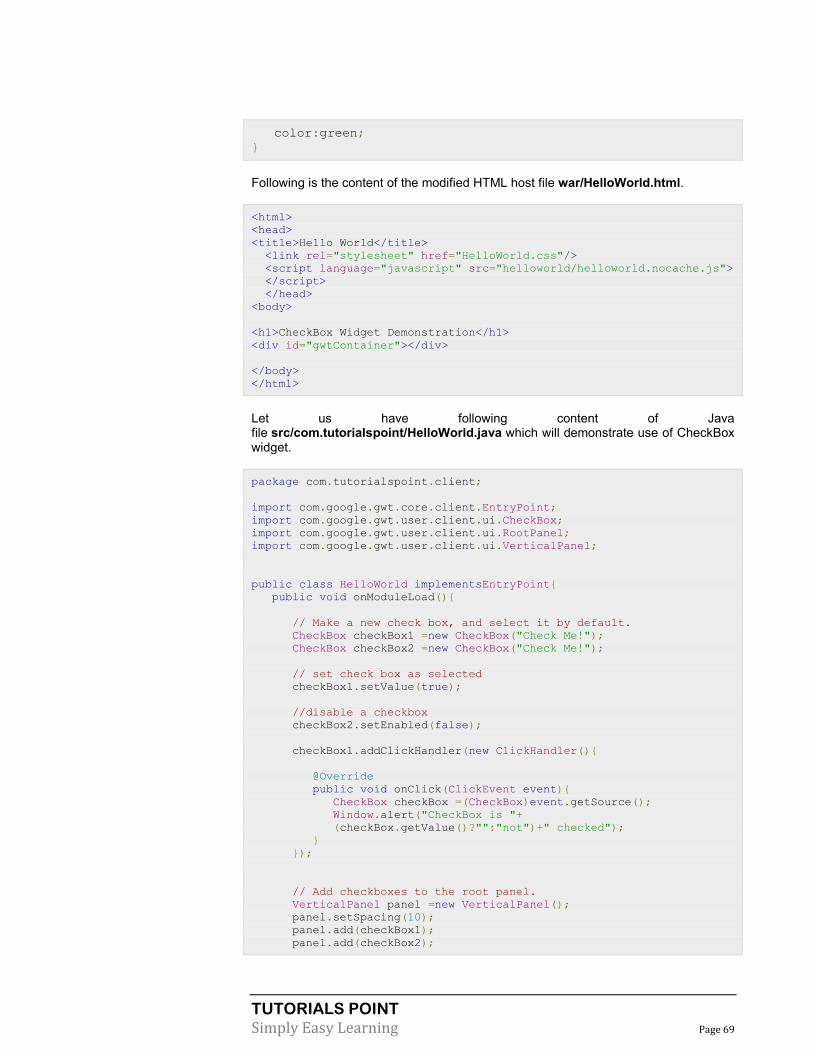
TUTORIALS POINT
Simply Easy Learning Page 69
color:green;
}
Following is the content of the modified HTML host file war/HelloWorld.html.
<html>
<head>
<title>Hello World</title>
<link rel="stylesheet" href="HelloWorld.css"/>
<script language="javascript" src="helloworld/helloworld.nocache.js">
</script>
</head>
<body>
<h1>CheckBox Widget Demonstration</h1>
<div id="gwtContainer"></div>
</body>
</html>
Let us have following content of Java file src/com.tutorialspoint/HelloWorld.java which will demonstrate use of CheckBox widget.
package com.tutorialspoint.client;
import com.google.gwt.core.client.EntryPoint;
import com.google.gwt.user.client.ui.CheckBox;
import com.google.gwt.user.client.ui.RootPanel;
import com.google.gwt.user.client.ui.VerticalPanel;
public class HelloWorld implementsEntryPoint{
public void onModuleLoad(){
// Make a new check box, and select it by default.
CheckBox checkBox1 =new CheckBox("Check Me!");
CheckBox checkBox2 =new CheckBox("Check Me!");
// set check box as selected
checkBox1.setValue(true);
//disable a checkbox
checkBox2.setEnabled(false);
checkBox1.addClickHandler(new ClickHandler(){
@Override
public void onClick(ClickEvent event){
CheckBox checkBox =(CheckBox)event.getSource();
Window.alert("CheckBox is "+
(checkBox.getValue()?"":"not")+" checked");
}
});
// Add checkboxes to the root panel.
VerticalPanel panel =new VerticalPanel();
panel.setSpacing(10);
panel.add(checkBox1);
panel.add(checkBox2);

TUTORIALS POINT
Simply Easy Learning Page 70
RootPanel.get("gwtContainer").add(panel);
}
}
Once you are ready with all the changes done, let us compile and run the application in development mode as we did in GWT - Create Application chapter. If everything is fine with your application, this will produce following result:
When you click Click Me CheckBox, it will show an alert message saying CheckBox is checked or not checked.
RadioButton
Introduction The RadioButton widget represents a mutually exclusive selection radio button.
Class declaration Following is the declaration for com.google.gwt.user.client.ui.RadioButton class:
public class RadioButton
extends CheckBox
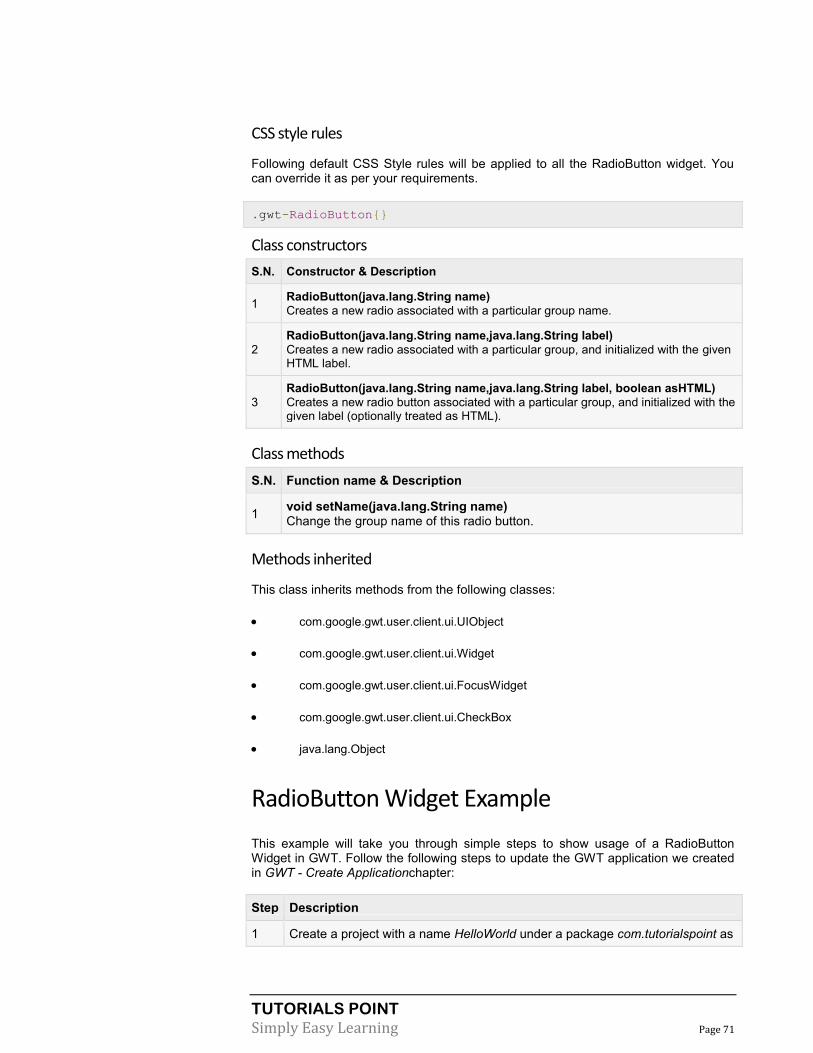
TUTORIALS POINT
Simply Easy Learning Page 71
CSS style rules
Following default CSS Style rules will be applied to all the RadioButton widget. You can override it as per your requirements.
.gwt-RadioButton{}
Class constructors
S.N. Constructor & Description
1 RadioButton(java.lang.String name)
Creates a new radio associated with a particular group name.
2
RadioButton(java.lang.String name,java.lang.String label)
Creates a new radio associated with a particular group, and initialized with the given HTML label.
3
RadioButton(java.lang.String name,java.lang.String label, boolean asHTML)
Creates a new radio button associated with a particular group, and initialized with the given label (optionally treated as HTML).
Class methods
S.N. Function name & Description
1 void setName(java.lang.String name) Change the group name of this radio button.
Methods inherited
This class inherits methods from the following classes:
com.google.gwt.user.client.ui.UIObject
com.google.gwt.user.client.ui.Widget
com.google.gwt.user.client.ui.FocusWidget
com.google.gwt.user.client.ui.CheckBox
java.lang.Object
RadioButton Widget Example
This example will take you through simple steps to show usage of a RadioButton Widget in GWT. Follow the following steps to update the GWT application we created in GWT - Create Applicationchapter:
Step Description
1 Create a project with a name HelloWorld under a package com.tutorialspoint as
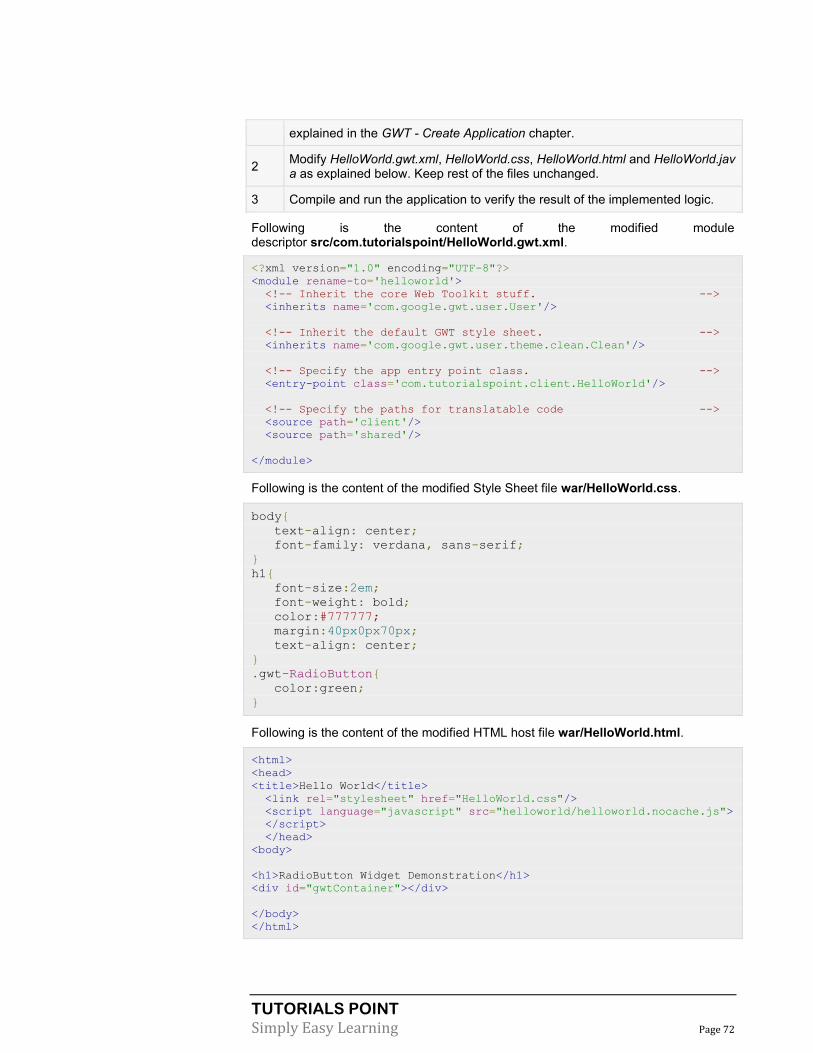
TUTORIALS POINT
Simply Easy Learning Page 72
explained in the GWT - Create Application chapter.
2 Modify HelloWorld.gwt.xml, HelloWorld.css, HelloWorld.html and HelloWorld.java as explained below. Keep rest of the files unchanged.
3 Compile and run the application to verify the result of the implemented logic.
Following is the content of the modified module descriptor src/com.tutorialspoint/HelloWorld.gwt.xml.
<?xml version="1.0" encoding="UTF-8"?>
<module rename-to='helloworld'>
<!-- Inherit the core Web Toolkit stuff. -->
<inherits name='com.google.gwt.user.User'/>
<!-- Inherit the default GWT style sheet. -->
<inherits name='com.google.gwt.user.theme.clean.Clean'/>
<!-- Specify the app entry point class. -->
<entry-point class='com.tutorialspoint.client.HelloWorld'/>
<!-- Specify the paths for translatable code -->
<source path='client'/>
<source path='shared'/>
</module>
Following is the content of the modified Style Sheet file war/HelloWorld.css.
body{
text-align: center;
font-family: verdana, sans-serif;
}
h1{
font-size:2em;
font-weight: bold;
color:#777777;
margin:40px0px70px;
text-align: center;
}
.gwt-RadioButton{
color:green;
}
Following is the content of the modified HTML host file war/HelloWorld.html.
<html>
<head>
<title>Hello World</title>
<link rel="stylesheet" href="HelloWorld.css"/>
<script language="javascript" src="helloworld/helloworld.nocache.js">
</script>
</head>
<body>
<h1>RadioButton Widget Demonstration</h1>
<div id="gwtContainer"></div>
</body>
</html>
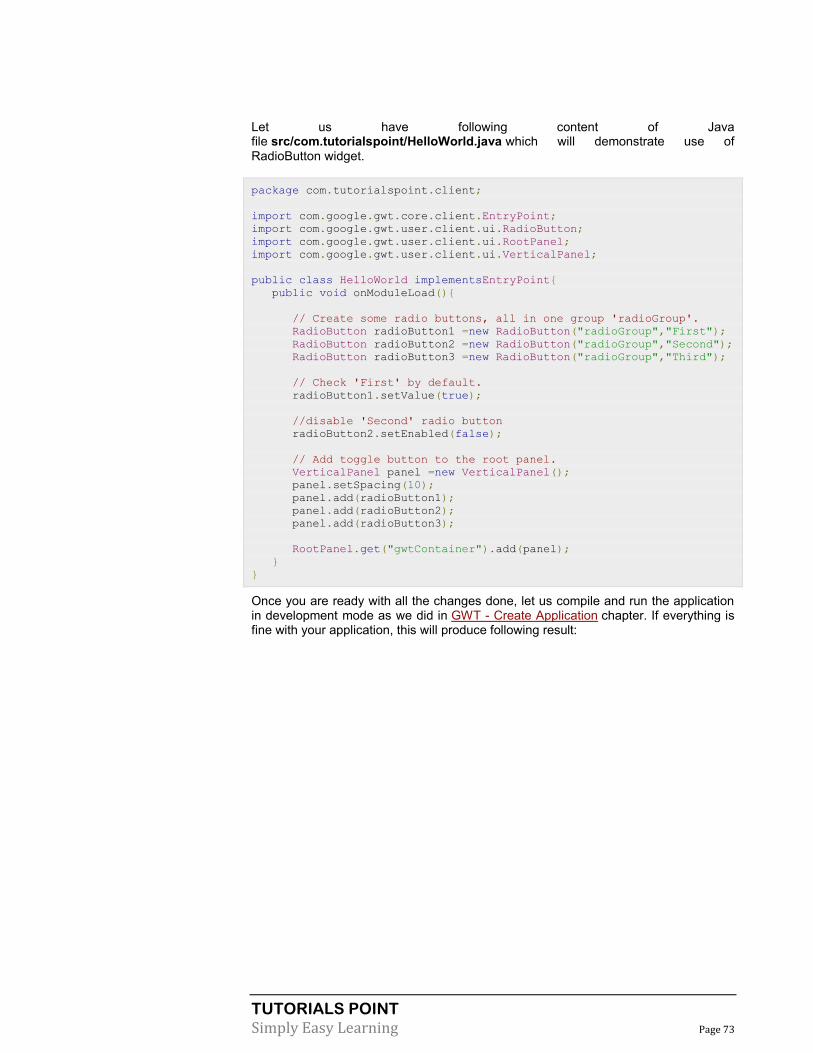
TUTORIALS POINT
Simply Easy Learning Page 73
Let us have following content of Java file src/com.tutorialspoint/HelloWorld.java which will demonstrate use of RadioButton widget.
package com.tutorialspoint.client;
import com.google.gwt.core.client.EntryPoint;
import com.google.gwt.user.client.ui.RadioButton;
import com.google.gwt.user.client.ui.RootPanel;
import com.google.gwt.user.client.ui.VerticalPanel;
public class HelloWorld implementsEntryPoint{
public void onModuleLoad(){
// Create some radio buttons, all in one group 'radioGroup'.
RadioButton radioButton1 =new RadioButton("radioGroup","First");
RadioButton radioButton2 =new RadioButton("radioGroup","Second");
RadioButton radioButton3 =new RadioButton("radioGroup","Third");
// Check 'First' by default.
radioButton1.setValue(true);
//disable 'Second' radio button
radioButton2.setEnabled(false);
// Add toggle button to the root panel.
VerticalPanel panel =new VerticalPanel();
panel.setSpacing(10);
panel.add(radioButton1);
panel.add(radioButton2);
panel.add(radioButton3);
RootPanel.get("gwtContainer").add(panel);
}
}
Once you are ready with all the changes done, let us compile and run the application in development mode as we did in GWT - Create Application chapter. If everything is fine with your application, this will produce following result:
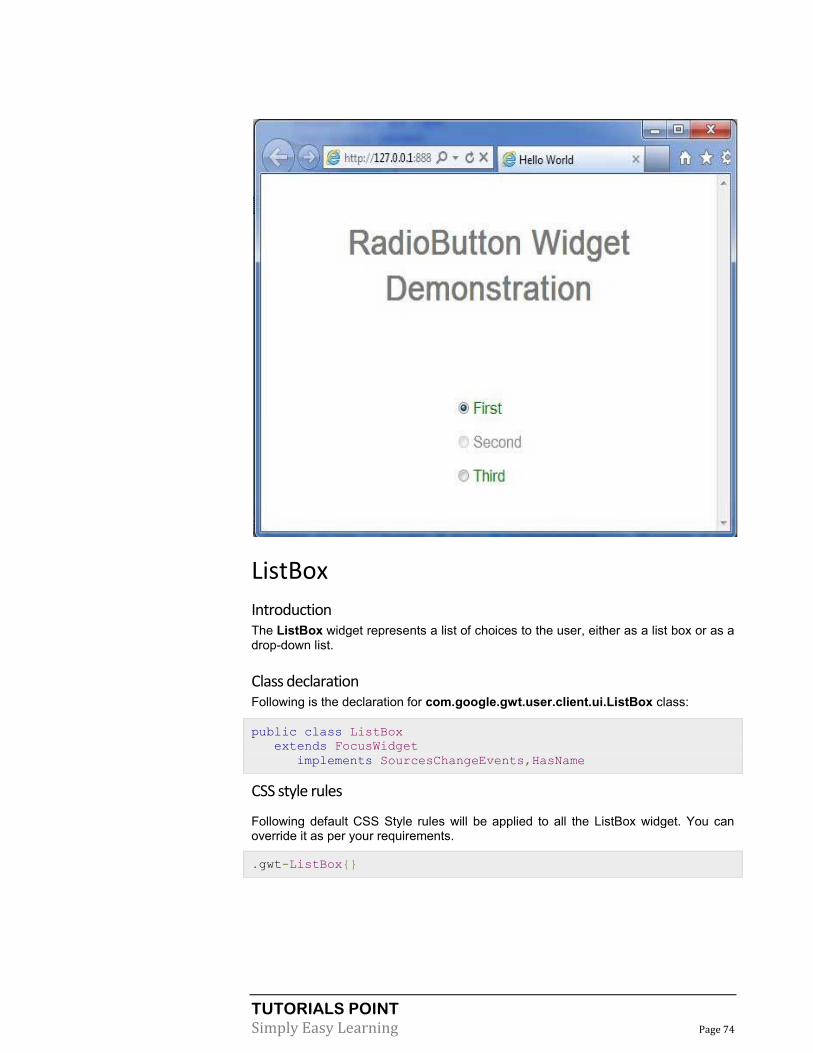
TUTORIALS POINT
Simply Easy Learning Page 74
ListBox
Introduction The ListBox widget represents a list of choices to the user, either as a list box or as a drop-down list.
Class declaration Following is the declaration for com.google.gwt.user.client.ui.ListBox class:
public class ListBox
extends FocusWidget
implements SourcesChangeEvents,HasName
CSS style rules
Following default CSS Style rules will be applied to all the ListBox widget. You can override it as per your requirements.
.gwt-ListBox{}
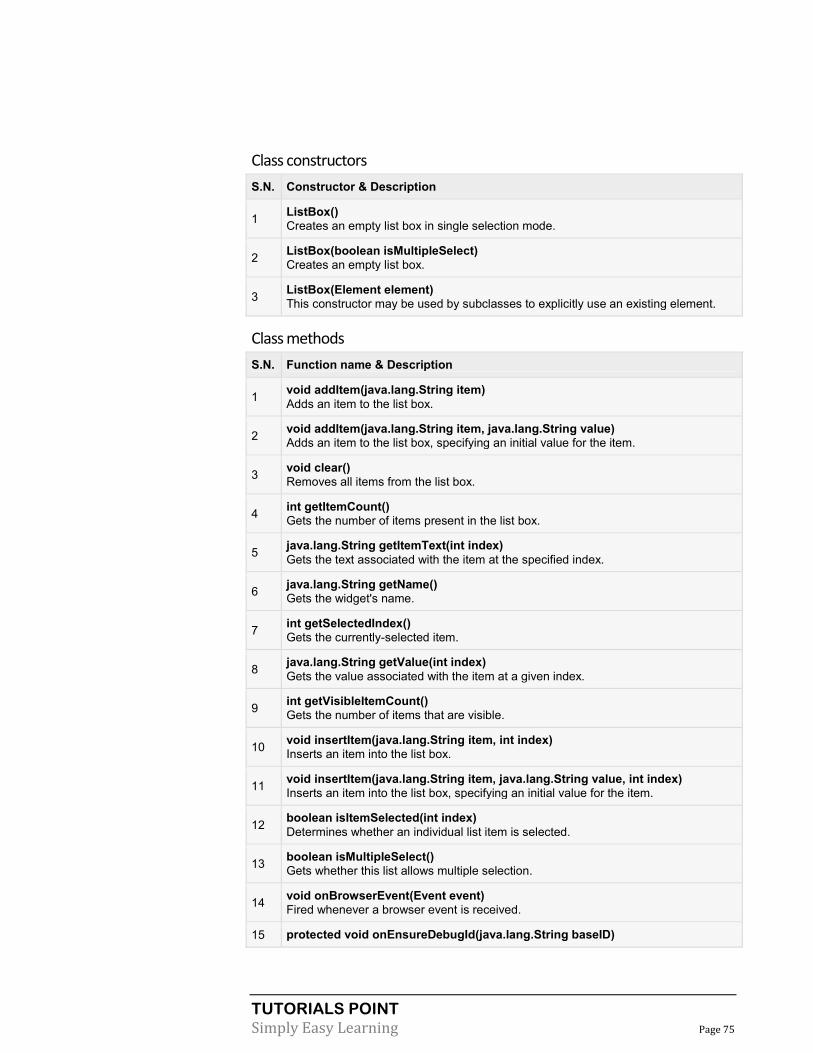
TUTORIALS POINT
Simply Easy Learning Page 75
Class constructors
S.N. Constructor & Description
1 ListBox()
Creates an empty list box in single selection mode.
2 ListBox(boolean isMultipleSelect)
Creates an empty list box.
3 ListBox(Element element)
This constructor may be used by subclasses to explicitly use an existing element.
Class methods
S.N. Function name & Description
1 void addItem(java.lang.String item)
Adds an item to the list box.
2 void addItem(java.lang.String item, java.lang.String value)
Adds an item to the list box, specifying an initial value for the item.
3 void clear()
Removes all items from the list box.
4 int getItemCount()
Gets the number of items present in the list box.
5 java.lang.String getItemText(int index)
Gets the text associated with the item at the specified index.
6 java.lang.String getName()
Gets the widget's name.
7 int getSelectedIndex()
Gets the currently-selected item.
8 java.lang.String getValue(int index)
Gets the value associated with the item at a given index.
9 int getVisibleItemCount()
Gets the number of items that are visible.
10 void insertItem(java.lang.String item, int index)
Inserts an item into the list box.
11 void insertItem(java.lang.String item, java.lang.String value, int index)
Inserts an item into the list box, specifying an initial value for the item.
12 boolean isItemSelected(int index)
Determines whether an individual list item is selected.
13 boolean isMultipleSelect()
Gets whether this list allows multiple selection.
14 void onBrowserEvent(Event event)
Fired whenever a browser event is received.
15 protected void onEnsureDebugId(java.lang.String baseID)
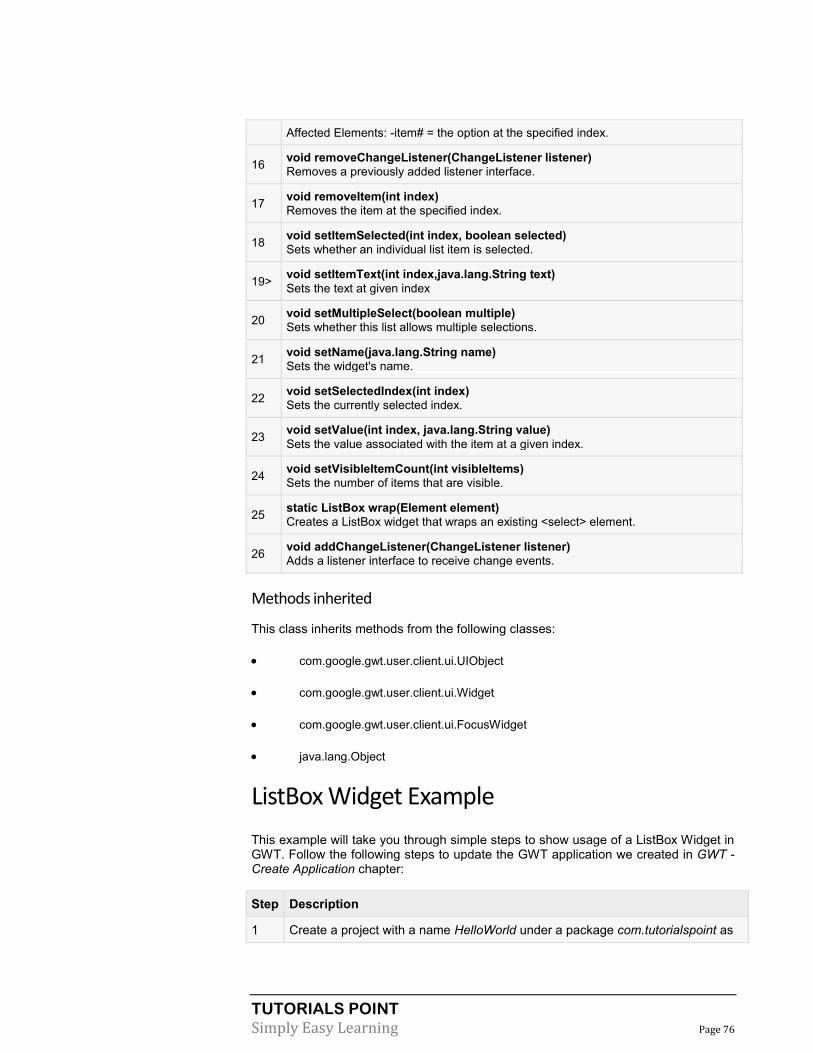
TUTORIALS POINT
Simply Easy Learning Page 76
Affected Elements: -item# = the option at the specified index.
16 void removeChangeListener(ChangeListener listener)
Removes a previously added listener interface.
17 void removeItem(int index)
Removes the item at the specified index.
18 void setItemSelected(int index, boolean selected)
Sets whether an individual list item is selected.
19> void setItemText(int index,java.lang.String text)
Sets the text at given index
20 void setMultipleSelect(boolean multiple)
Sets whether this list allows multiple selections.
21 void setName(java.lang.String name)
Sets the widget's name.
22 void setSelectedIndex(int index)
Sets the currently selected index.
23 void setValue(int index, java.lang.String value)
Sets the value associated with the item at a given index.
24 void setVisibleItemCount(int visibleItems)
Sets the number of items that are visible.
25 static ListBox wrap(Element element)
Creates a ListBox widget that wraps an existing <select> element.
26 void addChangeListener(ChangeListener listener)
Adds a listener interface to receive change events.
Methods inherited
This class inherits methods from the following classes:
com.google.gwt.user.client.ui.UIObject
com.google.gwt.user.client.ui.Widget
com.google.gwt.user.client.ui.FocusWidget
java.lang.Object
ListBox Widget Example
This example will take you through simple steps to show usage of a ListBox Widget in GWT. Follow the following steps to update the GWT application we created in GWT - Create Application chapter:
Step Description
1 Create a project with a name HelloWorld under a package com.tutorialspoint as

TUTORIALS POINT
Simply Easy Learning Page 77
explained in the GWT - Create Application chapter.
2 Modify HelloWorld.gwt.xml, HelloWorld.css, HelloWorld.html and HelloWorld.java as explained below. Keep rest of the files unchanged.
3 Compile and run the application to verify the result of the implemented logic.
Following is the content of the modified module descriptor src/com.tutorialspoint/HelloWorld.gwt.xml.
<?xml version="1.0" encoding="UTF-8"?>
<modulerename-to='helloworld'>
<!-- Inherit the core Web Toolkit stuff. -->
<inherits name='com.google.gwt.user.User'/>
<!-- Inherit the default GWT style sheet. -->
<inherits name='com.google.gwt.user.theme.clean.Clean'/>
<!-- Specify the app entry point class. -->
<entry-point class='com.tutorialspoint.client.HelloWorld'/>
<!-- Specify the paths for translatable code -->
<source path='client'/>
<source path='shared'/>
</module>
Following is the content of the modified Style Sheet file war/HelloWorld.css.
body{
text-align: center;
font-family: verdana, sans-serif;
}
h1{
font-size:2em;
font-weight: bold;
color:#777777;
margin:40px0px70px;
text-align: center;
}
.gwt-ListBox{
color:green;
}
Following is the content of the modified HTML host file war/HelloWorld.html.
<html>
<head>
<title>Hello World</title>
<link rel="stylesheet" href="HelloWorld.css"/>
<script language="javascript" src="helloworld/helloworld.nocache.js">
</script>
</head>
<body>
<h1>ListBox Widget Demonstration</h1>
<div id="gwtContainer"></div>
</body>

TUTORIALS POINT
Simply Easy Learning Page 78
</html>
Let us have following content of Java file src/com.tutorialspoint/HelloWorld.java which will demonstrate use of ListBox widget.
package com.tutorialspoint.client;
import com.google.gwt.core.client.EntryPoint;
import com.google.gwt.user.client.ui.ListBox;
import com.google.gwt.user.client.ui.RootPanel;
import com.google.gwt.user.client.ui.VerticalPanel;
public class HelloWorld implements EntryPoint{
public void onModuleLoad(){
// Make a new list box, adding a few items to it.
ListBox listBox1 =new ListBox();
listBox1.addItem("First");
listBox1.addItem("Second");
listBox1.addItem("Third");
listBox1.addItem("Fourth");
listBox1.addItem("Fifth");
// Make a new list box, adding a few items to it.
ListBox listBox2 =new ListBox();
listBox2.addItem("First");
listBox2.addItem("Second");
listBox2.addItem("Third");
listBox2.addItem("Fourth");
listBox2.addItem("Fifth");
// Make enough room for all five items
listBox1.setVisibleItemCount(5);
//setting itemcount value to 1 turns listbox into a drop-down list.
listBox2.setVisibleItemCount(1);
// Add listboxes to the root panel.
VerticalPanel panel =newVerticalPanel();
panel.setSpacing(10);
panel.add(listBox1);
panel.add(listBox2);
RootPanel.get("gwtContainer").add(panel);
}
}
Once you are ready with all the changes done, let us compile and run the application in development mode as we did in GWT - Create Application chapter. If everything is fine with your application, this will produce following result:
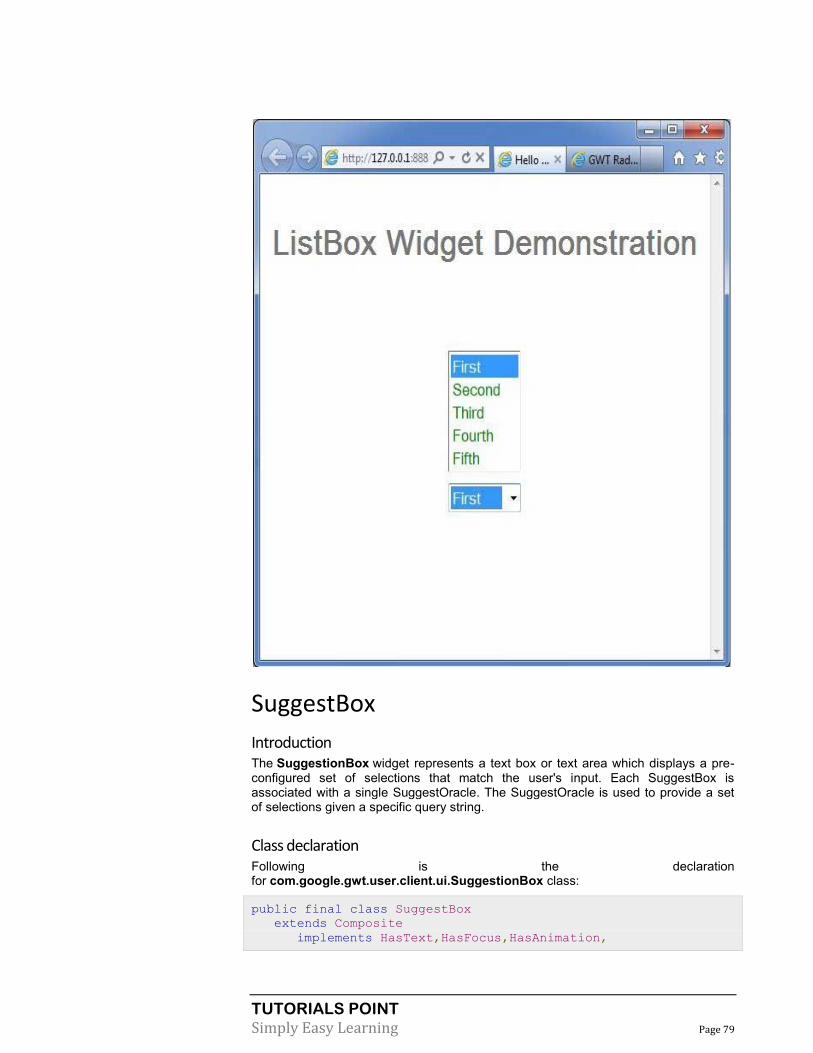
TUTORIALS POINT
Simply Easy Learning Page 79
SuggestBox
Introduction The SuggestionBox widget represents a text box or text area which displays a pre-configured set of selections that match the user's input. Each SuggestBox is associated with a single SuggestOracle. The SuggestOracle is used to provide a set of selections given a specific query string.
Class declaration Following is the declaration for com.google.gwt.user.client.ui.SuggestionBox class:
public final class SuggestBox
extends Composite
implements HasText,HasFocus,HasAnimation,

TUTORIALS POINT
Simply Easy Learning Page 80
SourcesClickEvents,SourcesFocusEvents,
SourcesChangeEvents,SourcesKeyboardEvents,
FiresSuggestionEvents
CSS style rules
Following default CSS Style rules will be applied to all the ListBox widget. You can override it as per your requirements.
.gwt-SuggestBox{}
.gwt-SuggestBoxPopup{}
.gwt-SuggestBoxPopup.item {}
.gwt-SuggestBoxPopup.item-selected {}
.gwt-SuggestBoxPopup.suggestPopupTopLeft {}
.gwt-SuggestBoxPopup.suggestPopupTopLeftInner {}
.gwt-SuggestBoxPopup.suggestPopupTopCenter {}
.gwt-SuggestBoxPopup.suggestPopupTopCenterInner {}
.gwt-SuggestBoxPopup.suggestPopupTopRight {}
.gwt-SuggestBoxPopup.suggestPopupTopRightInner {}
.gwt-SuggestBoxPopup.suggestPopupMiddleLeft {}
.gwt-SuggestBoxPopup.suggestPopupMiddleLeftInner {}
.gwt-SuggestBoxPopup.suggestPopupMiddleCenter {}
.gwt-SuggestBoxPopup.suggestPopupMiddleCenterInner {}
.gwt-SuggestBoxPopup.suggestPopupMiddleRight {}
.gwt-SuggestBoxPopup.suggestPopupMiddleRightInner {}
.gwt-SuggestBoxPopup.suggestPopupBottomLeft {}
.gwt-SuggestBoxPopup.suggestPopupBottomLeftInner {}
.gwt-SuggestBoxPopup.suggestPopupBottomCenter {}
.gwt-SuggestBoxPopup.suggestPopupBottomCenterInner {}
.gwt-SuggestBoxPopup.suggestPopupBottomRight {}
.gwt-SuggestBoxPopup.suggestPopupBottomRightInner {}
Class constructors
S.N. Constructor & Description
1 SuggestBox()
Constructor for Suggestion Box.
2 SuggestBox(SuggestOracle oracle)
Constructor for Suggestion Box.
3 SuggestBox(SuggestOracle oracle, TextBoxBase box)
Constructor for Suggestion Box.
Class methods
S.N. Function name & Description
1 void addChangeListener(ChangeListener listener)
Adds a listener to recieve change events on the SuggestBox's text box.
2 void addClickListener(ClickListener listener)
Adds a listener to recieve click events on the SuggestBox's text box.
3 void addEventHandler(SuggestionHandler handler)
Adds a handler interface to receive suggestion events.
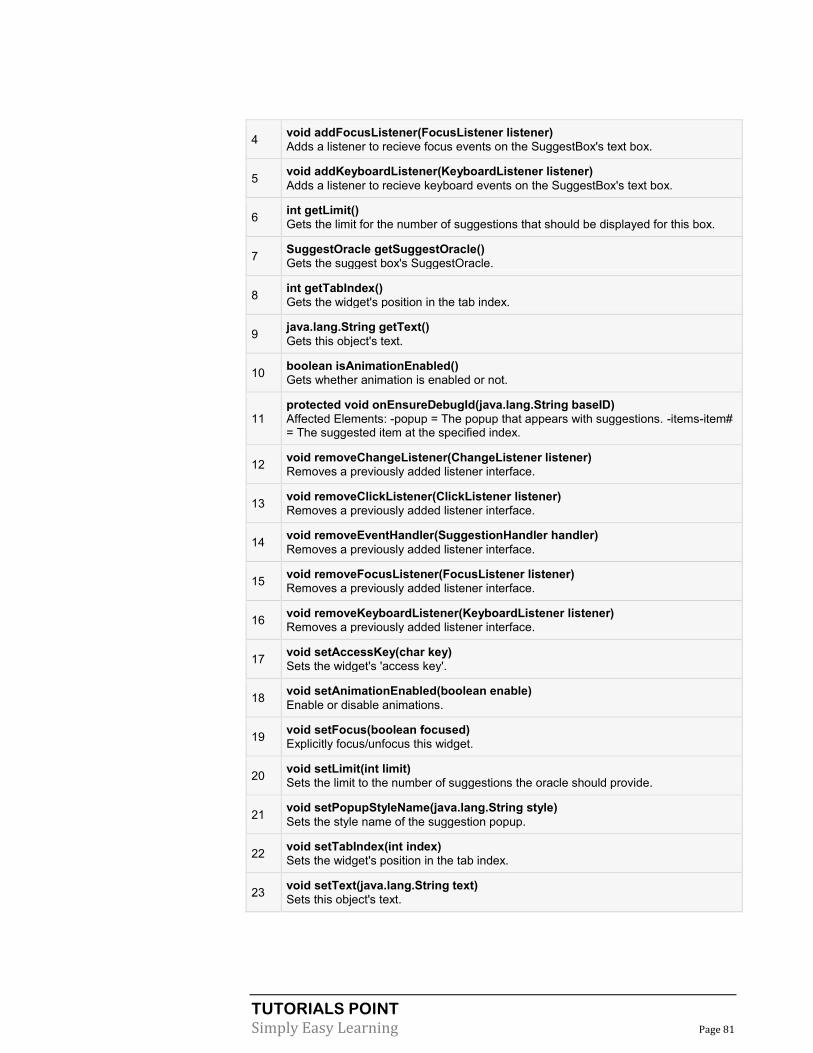
TUTORIALS POINT
Simply Easy Learning Page 81
4 void addFocusListener(FocusListener listener)
Adds a listener to recieve focus events on the SuggestBox's text box.
5 void addKeyboardListener(KeyboardListener listener)
Adds a listener to recieve keyboard events on the SuggestBox's text box.
6 int getLimit()
Gets the limit for the number of suggestions that should be displayed for this box.
7 SuggestOracle getSuggestOracle()
Gets the suggest box's SuggestOracle.
8 int getTabIndex()
Gets the widget's position in the tab index.
9 java.lang.String getText()
Gets this object's text.
10 boolean isAnimationEnabled()
Gets whether animation is enabled or not.
11
protected void onEnsureDebugId(java.lang.String baseID)
Affected Elements: -popup = The popup that appears with suggestions. -items-item# = The suggested item at the specified index.
12 void removeChangeListener(ChangeListener listener)
Removes a previously added listener interface.
13 void removeClickListener(ClickListener listener)
Removes a previously added listener interface.
14 void removeEventHandler(SuggestionHandler handler)
Removes a previously added listener interface.
15 void removeFocusListener(FocusListener listener)
Removes a previously added listener interface.
16 void removeKeyboardListener(KeyboardListener listener)
Removes a previously added listener interface.
17 void setAccessKey(char key)
Sets the widget's 'access key'.
18 void setAnimationEnabled(boolean enable)
Enable or disable animations.
19 void setFocus(boolean focused)
Explicitly focus/unfocus this widget.
20 void setLimit(int limit)
Sets the limit to the number of suggestions the oracle should provide.
21 void setPopupStyleName(java.lang.String style)
Sets the style name of the suggestion popup.
22 void setTabIndex(int index)
Sets the widget's position in the tab index.
23 void setText(java.lang.String text)
Sets this object's text.

TUTORIALS POINT
Simply Easy Learning Page 82
Methods inherited
This class inherits methods from the following classes:
com.google.gwt.user.client.ui.UIObject
com.google.gwt.user.client.ui.Widget
com.google.gwt.user.client.ui.Composite
java.lang.Object
SuggestionBox Widget Example
This example will take you through simple steps to show usage of a SuggestionBox Widget in GWT. Follow the following steps to update the GWT application we created in GWT - Create Applicationchapter:
Step Description
1 Create a project with a name HelloWorld under a package com.tutorialspoint as explained in the GWT - Create Application chapter.
2 Modify HelloWorld.gwt.xml, HelloWorld.css, HelloWorld.html and HelloWorld.java as
explained below. Keep rest of the files unchanged.
3 Compile and run the application to verify the result of the implemented logic.
Following is the content of the modified module descriptor src/com.tutorialspoint/HelloWorld.gwt.xml.
<?xml version="1.0" encoding="UTF-8"?>
<module rename-to='helloworld'>
<!-- Inherit the core Web Toolkit stuff. -->
<inherits name='com.google.gwt.user.User'/>
<!-- Inherit the default GWT style sheet. -->
<inherits name='com.google.gwt.user.theme.clean.Clean'/>
<!-- Specify the app entry point class. -->
<entry-point class='com.tutorialspoint.client.HelloWorld'/>
<!-- Specify the paths for translatable code -->
<source path='client'/>
<source path='shared'/>
</module>
Following is the content of the modified Style Sheet file war/HelloWorld.css.
body{
text-align: center;
font-family: verdana, sans-serif;
}
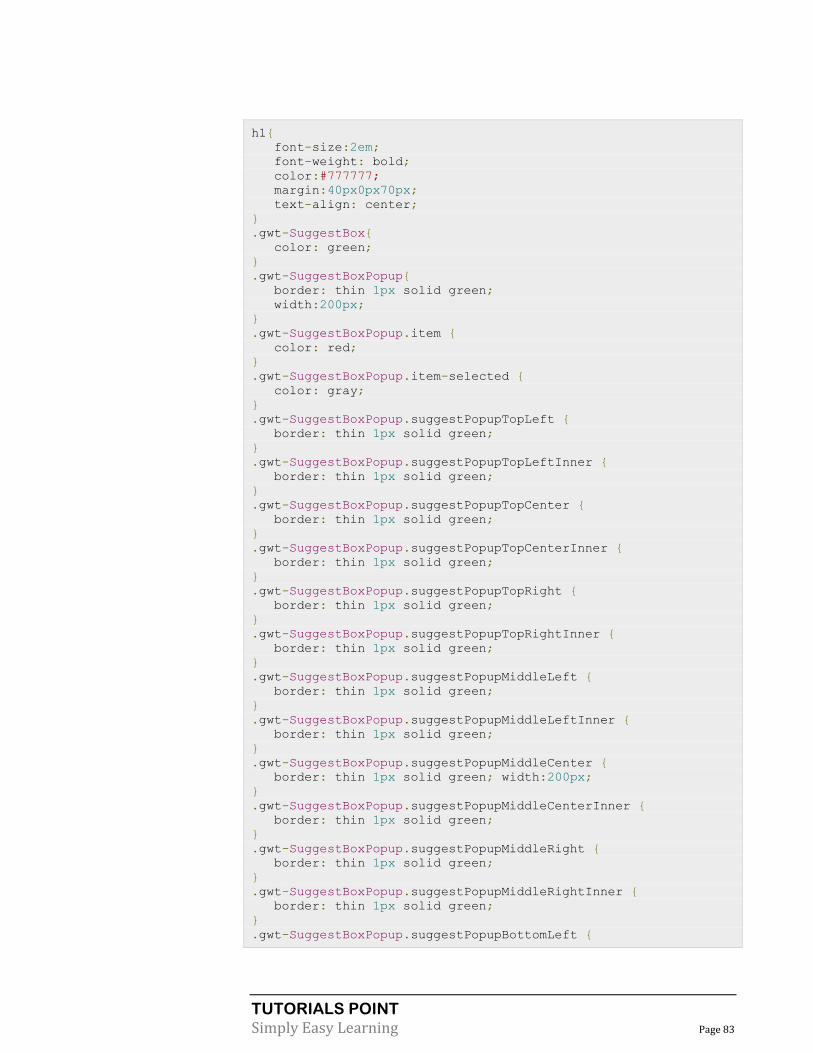
TUTORIALS POINT
Simply Easy Learning Page 83
h1{
font-size:2em;
font-weight: bold;
color:#777777;
margin:40px0px70px;
text-align: center;
}
.gwt-SuggestBox{
color: green;
}
.gwt-SuggestBoxPopup{
border: thin 1px solid green;
width:200px;
}
.gwt-SuggestBoxPopup.item {
color: red;
}
.gwt-SuggestBoxPopup.item-selected {
color: gray;
}
.gwt-SuggestBoxPopup.suggestPopupTopLeft {
border: thin 1px solid green;
}
.gwt-SuggestBoxPopup.suggestPopupTopLeftInner {
border: thin 1px solid green;
}
.gwt-SuggestBoxPopup.suggestPopupTopCenter {
border: thin 1px solid green;
}
.gwt-SuggestBoxPopup.suggestPopupTopCenterInner {
border: thin 1px solid green;
}
.gwt-SuggestBoxPopup.suggestPopupTopRight {
border: thin 1px solid green;
}
.gwt-SuggestBoxPopup.suggestPopupTopRightInner {
border: thin 1px solid green;
}
.gwt-SuggestBoxPopup.suggestPopupMiddleLeft {
border: thin 1px solid green;
}
.gwt-SuggestBoxPopup.suggestPopupMiddleLeftInner {
border: thin 1px solid green;
}
.gwt-SuggestBoxPopup.suggestPopupMiddleCenter {
border: thin 1px solid green; width:200px;
}
.gwt-SuggestBoxPopup.suggestPopupMiddleCenterInner {
border: thin 1px solid green;
}
.gwt-SuggestBoxPopup.suggestPopupMiddleRight {
border: thin 1px solid green;
}
.gwt-SuggestBoxPopup.suggestPopupMiddleRightInner {
border: thin 1px solid green;
}
.gwt-SuggestBoxPopup.suggestPopupBottomLeft {

TUTORIALS POINT
Simply Easy Learning Page 84
border: thin 1px solid green;
}
.gwt-SuggestBoxPopup.suggestPopupBottomLeftInner {
border: thin 1px solid green;
}
.gwt-SuggestBoxPopup.suggestPopupBottomCenter {
border: thin 1px solid green;
}
.gwt-SuggestBoxPopup.suggestPopupBottomCenterInner {
border: thin 1px solid green;
}
.gwt-SuggestBoxPopup.suggestPopupBottomRight {
border: thin 1px solid green;
}
.gwt-SuggestBoxPopup.suggestPopupBottomRightInner {
border: thin 1px solid green;
}
Following is the content of the modified HTML host file war/HelloWorld.html.
<html>
<head>
<title>Hello World</title>
<link rel="stylesheet" href="HelloWorld.css"/>
<script language="javascript" src="helloworld/helloworld.nocache.js">
</script>
</head>
<body>
<h1>SuggestionBox Widget Demonstration</h1>
<div id="gwtContainer"></div>
</body>
</html>
Let us have following content of Java file src/com.tutorialspoint/HelloWorld.java which will demonstrate use of SuggestionBox widget.
package com.tutorialspoint.client;
import com.google.gwt.core.client.EntryPoint;
import com.google.gwt.user.client.ui.MultiWordSuggestOracle;
import com.google.gwt.user.client.ui.RootPanel;
import com.google.gwt.user.client.ui.SuggestBox;
import com.google.gwt.user.client.ui.VerticalPanel;
public class HelloWorld implements EntryPoint{
public void onModuleLoad(){
//create the suggestion data
MultiWordSuggestOracle oracle =new MultiWordSuggestOracle();
oracle.add("A");
oracle.add("AB");
oracle.add("ABC");
oracle.add("ABCD");
oracle.add("B");
oracle.add("BC");
oracle.add("BCD");
oracle.add("BCDE");
oracle.add("C");

TUTORIALS POINT
Simply Easy Learning Page 85
oracle.add("CD");
oracle.add("CDE");
oracle.add("CDEF");
oracle.add("D");
oracle.add("DE");
oracle.add("DEF");
oracle.add("DEFG");
//create the suggestion box and pass it the data created above
SuggestBox suggestionBox =new SuggestBox(oracle);
//set width to 200px.
suggestionBox.setWidth("200");
// Add suggestionbox to the root panel.
VerticalPanel panel =new VerticalPanel();
panel.add(suggestionBox);
RootPanel.get("gwtContainer").add(panel);
}
}
Once you are ready with all the changes done, let us compile and run the application in development mode as we did in GWT - Create Application chapter. If everything is fine with your application, this will produce following result:
TextBox

TUTORIALS POINT
Simply Easy Learning Page 86
Introduction The TextBox widget represents a standard single-line text box.
Class declaration Following is the declaration for com.google.gwt.user.client.ui.TextBox class:
public classTextBox
extends TextBoxBase
Implements HasDirection
CSS style rules
Following default CSS Style rules will be applied to all the TextBox widget. You can override it as per your requirements.
.gwt-TextBox{}
.gwt-TextBox-readonly{}
Class constructors S.N. Constructor & Description
1 TextBox()
Creates an empty text box.
2 TextBox(Element element)
This constructor may be used by subclasses to explicitly use an existing element.
Class methods
S.N. Function name & Description
1 HasDirection.Direction getDirection()
Gets the directionality of the widget.
2 int getMaxLength()
Gets the maximum allowable length of the text box.
3 int getVisibleLength()
Gets the number of visible characters in the text box.
4 void setDirection(HasDirection.Direction direction)
Sets the directionality for a widget.
5 void setMaxLength(int length)
Sets the maximum allowable length of the text box.
6 void setVisibleLength(int length)
Sets the number of visible characters in the text box.
7 static TextBox wrap(Element element)
Creates a TextBox widget that wraps an existing <input type='text'> element.

TUTORIALS POINT
Simply Easy Learning Page 87
Methods inherited
This class inherits methods from the following classes:
com.google.gwt.user.client.ui.UIObject
com.google.gwt.user.client.ui.Widget
com.google.gwt.user.client.ui.FocusWidget
com.google.gwt.user.client.ui.TextBoxBase
java.lang.Object
TextBox Widget Example
This example will take you through simple steps to show usage of a TextBox Widget in GWT. Follow the following steps to update the GWT application we created in GWT - Create Application chapter:
Step Description
1 Create a project with a name HelloWorld under a package com.tutorialspoint as explained in the GWT - Create Application chapter.
2 Modify HelloWorld.gwt.xml, HelloWorld.css, HelloWorld.html and HelloWorld.java as explained below. Keep rest of the files unchanged.
3 Compile and run the application to verify the result of the implemented logic.
Following is the content of the modified module descriptor src/com.tutorialspoint/HelloWorld.gwt.xml.
<?xml version="1.0" encoding="UTF-8"?>
<module rename-to='helloworld'>
<!-- Inherit the core Web Toolkit stuff. -->
<inherits name='com.google.gwt.user.User'/>
<!-- Inherit the default GWT style sheet. -->
<inherits name='com.google.gwt.user.theme.clean.Clean'/>
<!-- Specify the app entry point class. -->
<entry-point class='com.tutorialspoint.client.HelloWorld'/>
<!-- Specify the paths for translatable code -->
<source path='client'/>
<source path='shared'/>
</module>
Following is the content of the modified Style Sheet file war/HelloWorld.css.
body{
text-align: center;
font-family: verdana, sans-serif;

TUTORIALS POINT
Simply Easy Learning Page 88
}
h1{
font-size:2em;
font-weight: bold;
color:#777777;
margin:40px0px70px;
text-align: center;
}
.gwt-TextBox{
color: green;
}
.gwt-TextBox-readonly{
background-color: yellow;
}
Following is the content of the modified HTML host file war/HelloWorld.html.
<html>
<head>
<title>Hello World</title>
<link rel="stylesheet" href="HelloWorld.css"/>
<scriptlanguage="javascript" src="helloworld/helloworld.nocache.js">
</script>
</head>
<body>
<h1>TextBox Widget Demonstration</h1>
<div id="gwtContainer"></div>
</body>
</html>
Let us have following content of Java file src/com.tutorialspoint/HelloWorld.java which will demonstrate use of TextBox widget.
package com.tutorialspoint.client;
import com.google.gwt.core.client.EntryPoint;
import com.google.gwt.user.client.ui.RootPanel;
import com.google.gwt.user.client.ui.TextBox;
import com.google.gwt.user.client.ui.VerticalPanel;
public class HelloWorld implements EntryPoint{
public void onModuleLoad(){
//create textboxes
TextBox textBox1 =new TextBox();
TextBox textBox2 =new TextBox();
//add text to text box
textBox2.setText("Hello World!");
//set textbox as readonly
textBox2.setReadOnly(true);
// Add text boxes to the root panel.
VerticalPanel panel =new VerticalPanel();
panel.setSpacing(10);
panel.add(textBox1);
panel.add(textBox2);

TUTORIALS POINT
Simply Easy Learning Page 89
RootPanel.get("gwtContainer").add(panel);
}
}
Once you are ready with all the changes done, let us compile and run the application in development mode as we did in GWT - Create Application chapter. If everything is fine with your application, this will produce following result:
PasswordTextBox
Introduction The PasswordTextBox widget represents a standard single-line text box that visually masks its input to prevent eavesdropping.
Class declaration Following is the declaration for com.google.gwt.user.client.ui.PasswordTextBox class:
public class PasswordTextBox
extends TextBox
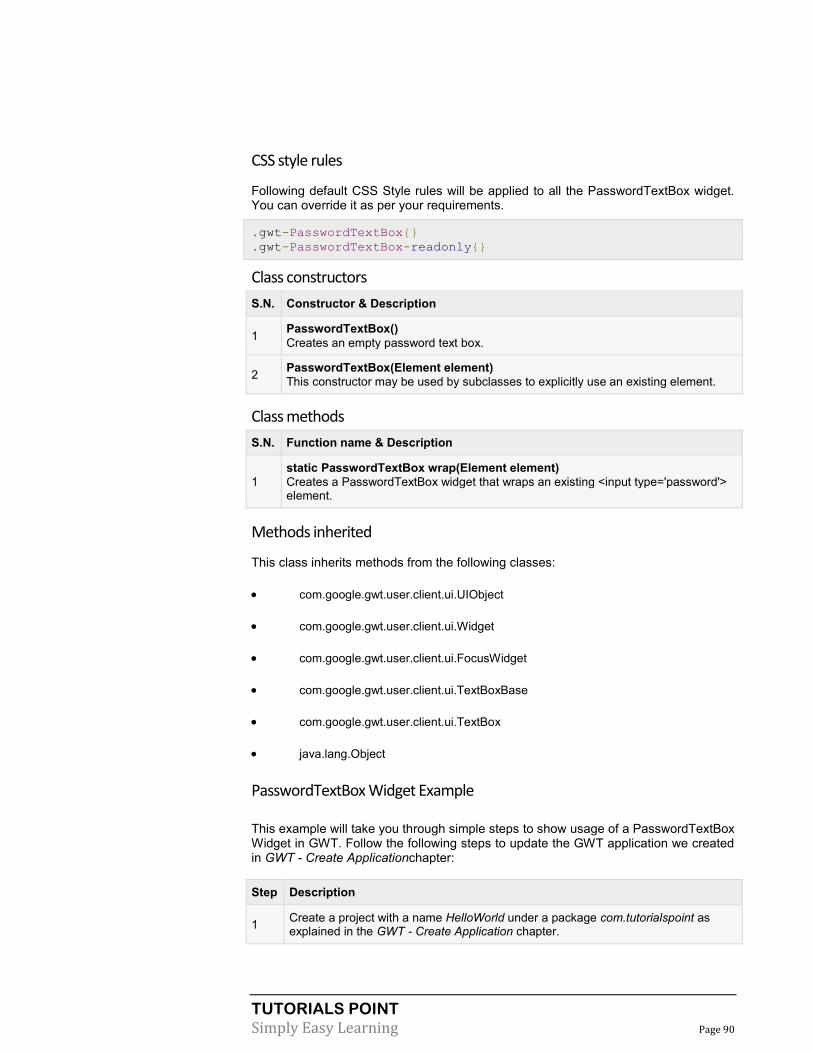
TUTORIALS POINT
Simply Easy Learning Page 90
CSS style rules
Following default CSS Style rules will be applied to all the PasswordTextBox widget. You can override it as per your requirements.
.gwt-PasswordTextBox{}
.gwt-PasswordTextBox-readonly{}
Class constructors
S.N. Constructor & Description
1 PasswordTextBox()
Creates an empty password text box.
2 PasswordTextBox(Element element)
This constructor may be used by subclasses to explicitly use an existing element.
Class methods
S.N. Function name & Description
1
static PasswordTextBox wrap(Element element)
Creates a PasswordTextBox widget that wraps an existing <input type='password'> element.
Methods inherited
This class inherits methods from the following classes:
com.google.gwt.user.client.ui.UIObject
com.google.gwt.user.client.ui.Widget
com.google.gwt.user.client.ui.FocusWidget
com.google.gwt.user.client.ui.TextBoxBase
com.google.gwt.user.client.ui.TextBox
java.lang.Object
PasswordTextBox Widget Example
This example will take you through simple steps to show usage of a PasswordTextBox Widget in GWT. Follow the following steps to update the GWT application we created in GWT - Create Applicationchapter:
Step Description
1 Create a project with a name HelloWorld under a package com.tutorialspoint as explained in the GWT - Create Application chapter.

TUTORIALS POINT
Simply Easy Learning Page 91
2 Modify HelloWorld.gwt.xml, HelloWorld.css, HelloWorld.html and HelloWorld.java as explained below. Keep rest of the files unchanged.
3 Compile and run the application to verify the result of the implemented logic.
Following is the content of the modified module descriptor src/com.tutorialspoint/HelloWorld.gwt.xml.
<?xml version="1.0" encoding="UTF-8"?>
<module rename-to='helloworld'>
<!-- Inherit the core Web Toolkit stuff. -->
<inherits name='com.google.gwt.user.User'/>
<!-- Inherit the default GWT style sheet. -->
<inherits name='com.google.gwt.user.theme.clean.Clean'/>
<!-- Specify the app entry point class. -->
<entry-point class='com.tutorialspoint.client.HelloWorld'/>
<!-- Specify the paths for translatable code -->
<source path='client'/>
<source path='shared'/>
</module>
Following is the content of the modified Style Sheet file war/HelloWorld.css.
body{
text-align: center;
font-family: verdana, sans-serif;
}
h1{
font-size:2em;
font-weight: bold;
color:#777777;
margin:40px0px70px;
text-align: center;
}
.gwt-PasswordTextBox{
color: green;
}
.gwt-PasswordTextBox-readonly{
background-color: yellow;
}
Following is the content of the modified HTML host file war/HelloWorld.html.
<html>
<head>
<title>Hello World</title>
<link rel="stylesheet" href="HelloWorld.css"/>
<script language="javascript" src="helloworld/helloworld.nocache.js">
</script>
</head>
<body>
<h1>PasswordTextBox Widget Demonstration</h1>
<div id="gwtContainer"></div>

TUTORIALS POINT
Simply Easy Learning Page 92
</body>
</html>
Let us have following content of Java file src/com.tutorialspoint/HelloWorld.java which will demonstrate use of PasswordTextBox widget.
package com.tutorialspoint.client;
import com.google.gwt.core.client.EntryPoint;
import com.google.gwt.user.client.ui.RootPanel;
import com.google.gwt.user.client.ui.PasswordTextBox;
import com.google.gwt.user.client.ui.VerticalPanel;
public class HelloWorld implements EntryPoint{
public void onModuleLoad(){
//create password textboxes
PasswordTextBox passwordTextBox1 =new PasswordTextBox();
PasswordTextBox passwordTextBox2 =new PasswordTextBox();
//add text to text box
passwordTextBox2.setText("hell@W@rld");
//set textbox as readonly
passwordTextBox2.setReadOnly(true);
// Add text boxes to the root panel.
VerticalPanel panel =new VerticalPanel();
panel.setSpacing(10);
panel.add(passwordTextBox1);
panel.add(passwordTextBox2);
RootPanel.get("gwtContainer").add(panel);
}
}
Once you are ready with all the changes done, let us compile and run the application in development mode as we did in GWT - Create Application chapter. If everything is fine with your application, this will produce following result:

TUTORIALS POINT
Simply Easy Learning Page 93
TextArea
Introduction The TextArea widget represents a text box that allows multiple lines of text to be entered.
Class declaration Following is the declaration for com.google.gwt.user.client.ui.TextArea class:
public class TextArea
Extends TextBoxBase
Implements HasDirection
CSS style rules
Following default CSS Style rules will be applied to all the TextBox widget. You can override it as per your requirements.
.gwt-TextArea{}
.gwt-TextArea-readonly{}
Class constructors
S.N. Constructor & Description
1 TextArea()
Creates an empty text area.
Class methods
S.N. Function name & Description
1
int getCharacterWidth()
Gets the requested width of the text box (this is not an exact value, as not all characters are created equal).
2
int getCursorPos()
Gets the current position of the cursor (this also serves as the beginning of the text selection).
3 HasDirection.Direction getDirection()
Gets the directionality of the widget.
4 int getSelectionLength()
Gets the length of the current text selection.
5 int getVisibleLines()
Gets the number of text lines that are visible.
6
void setCharacterWidth(int width)
Sets the requested width of the text box (this is not an exact value, as not all characters are created equal).
7 void setDirection(HasDirection.Direction direction)
Sets the directionality for a widget.
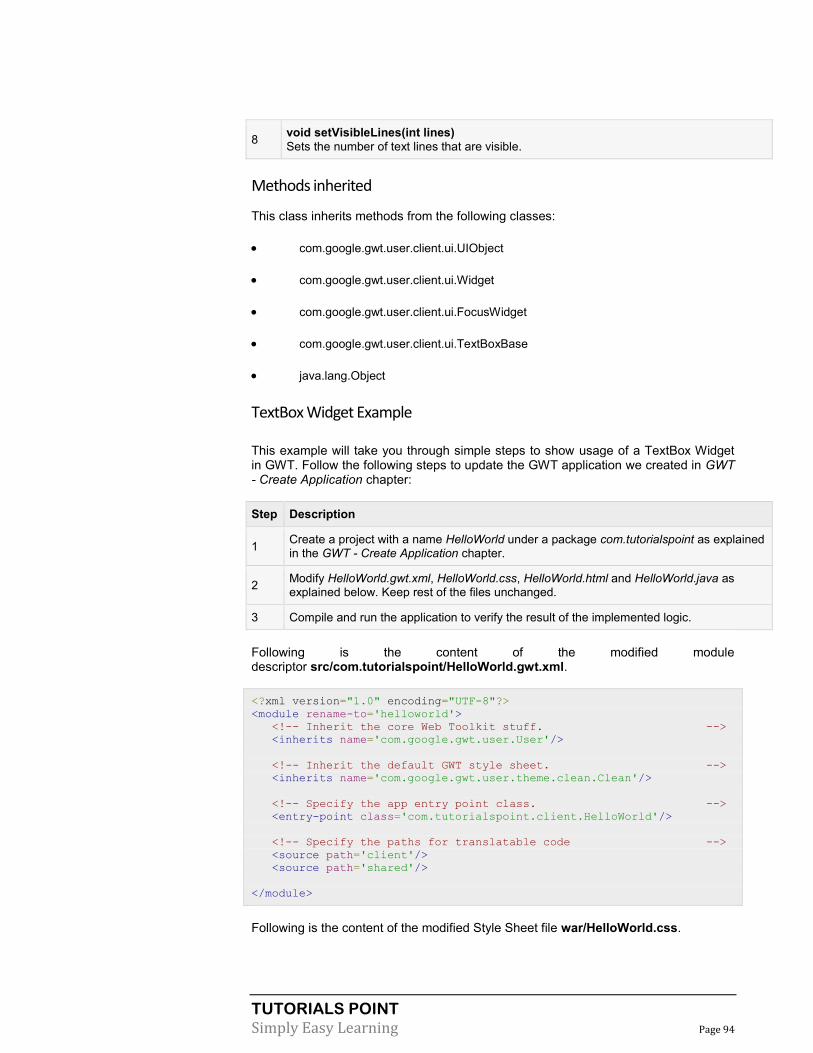
TUTORIALS POINT
Simply Easy Learning Page 94
8 void setVisibleLines(int lines)
Sets the number of text lines that are visible.
Methods inherited
This class inherits methods from the following classes:
com.google.gwt.user.client.ui.UIObject
com.google.gwt.user.client.ui.Widget
com.google.gwt.user.client.ui.FocusWidget
com.google.gwt.user.client.ui.TextBoxBase
java.lang.Object
TextBox Widget Example
This example will take you through simple steps to show usage of a TextBox Widget in GWT. Follow the following steps to update the GWT application we created in GWT - Create Application chapter:
Step Description
1 Create a project with a name HelloWorld under a package com.tutorialspoint as explained in the GWT - Create Application chapter.
2 Modify HelloWorld.gwt.xml, HelloWorld.css, HelloWorld.html and HelloWorld.java as explained below. Keep rest of the files unchanged.
3 Compile and run the application to verify the result of the implemented logic.
Following is the content of the modified module descriptor src/com.tutorialspoint/HelloWorld.gwt.xml.
<?xml version="1.0" encoding="UTF-8"?>
<module rename-to='helloworld'>
<!-- Inherit the core Web Toolkit stuff. -->
<inherits name='com.google.gwt.user.User'/>
<!-- Inherit the default GWT style sheet. -->
<inherits name='com.google.gwt.user.theme.clean.Clean'/>
<!-- Specify the app entry point class. -->
<entry-point class='com.tutorialspoint.client.HelloWorld'/>
<!-- Specify the paths for translatable code -->
<source path='client'/>
<source path='shared'/>
</module>
Following is the content of the modified Style Sheet file war/HelloWorld.css.

TUTORIALS POINT
Simply Easy Learning Page 95
body{
text-align: center;
font-family: verdana, sans-serif;
}
h1{
font-size:2em;
font-weight: bold;
color:#777777;
margin:40px0px70px;
text-align: center;
}
.gwt-TextArea{
color: green;
}
.gwt-TextArea-readonly{
background-color: yellow;
}
Following is the content of the modified HTML host file war/HelloWorld.html.
<html>
<head>
<title>Hello World</title>
<link rel="stylesheet" href="HelloWorld.css"/>
<script language="javascript" src="helloworld/helloworld.nocache.js">
</script>
</head>
<body>
<h1>TextArea Widget Demonstration</h1>
<div id="gwtContainer"></div>
</body>
</html>
Let us have following content of Java file src/com.tutorialspoint/HelloWorld.java which will demonstrate use of TextBox widget.
package com.tutorialspoint.client;
import com.google.gwt.core.client.EntryPoint;
import com.google.gwt.user.client.ui.RootPanel;
import com.google.gwt.user.client.ui.TextArea;
import com.google.gwt.user.client.ui.VerticalPanel;
public class HelloWorld implementsEntryPoint{
public void onModuleLoad(){
//create textarea elements
TextArea textArea1 =new TextArea();
TextArea textArea2 =new TextArea();
//set width as 10 characters
textArea1.setCharacterWidth(20);
textArea2.setCharacterWidth(20);
//set height as 5 lines
textArea1.setVisibleLines(5);
textArea2.setVisibleLines(5);

TUTORIALS POINT
Simply Easy Learning Page 96
//add text to text area
textArea2.setText(" Hello World! \n Be Happy! \n Stay Cool!");
//set textbox as readonly
textArea2.setReadOnly(true);
// Add text boxes to the root panel.
VerticalPanel panel =newVerticalPanel();
panel.setSpacing(10);
panel.add(textArea1);
panel.add(textArea2);
RootPanel.get("gwtContainer").add(panel);
}
}
Once you are ready with all the changes done, let us compile and run the application in development mode as we did in GWT - Create Application chapter. If everything is fine with your application, this will produce following result:

TUTORIALS POINT
Simply Easy Learning Page 97
RichTextArea
Introduction The RichTextArea widget represents a rich text editor that allows complex styling and formatting. Because some browsers do not support rich text editing, and others support only a limited subset of functionality, there are two formatter interfaces, accessed via getBasicFormatter() and getExtendedFormatter() . A browser that does not support rich text editing at all will return null for both of these,and one that supports only the basic functionality will return null for the latter getExtendedFormatter().
Class declaration Following is the declaration for com.google.gwt.user.client.ui.RichTextArea class:
public class RichTextArea
extends FocusWidget
implements HasHTML,HasInitializeHandlers,HasSafeHtml
CSS style rules
Following default CSS Style rules will be applied to all the TextBox widget. You can override it as per your requirements.
.gwt-RichTextArea{}
Class constructors
S.N. Constructor & Description
1 RichTextArea()
Creates a new, blank RichTextArea object with no stylesheet.
Class methods
S.N. Function name & Description
1 HandlerRegistration addInitializeHandler(InitializeHandler handler)
Adds an InitializeEvent handler.
2 RichTextArea.BasicFormatter getBasicFormatter()
Deprecated. use getFormatter() instead
3 RichTextArea.ExtendedFormatter getExtendedFormatter()
Deprecated. use getFormatter() instead
4 RichTextArea.Formatter getFormatter()
Gets the rich text formatting interface.
5 java.lang.String getHTML()
Gets this object's contents as HTML.
6 java.lang.String getText()
Gets this object's text.
7 boolean isEnabled()
Gets whether this widget is enabled.
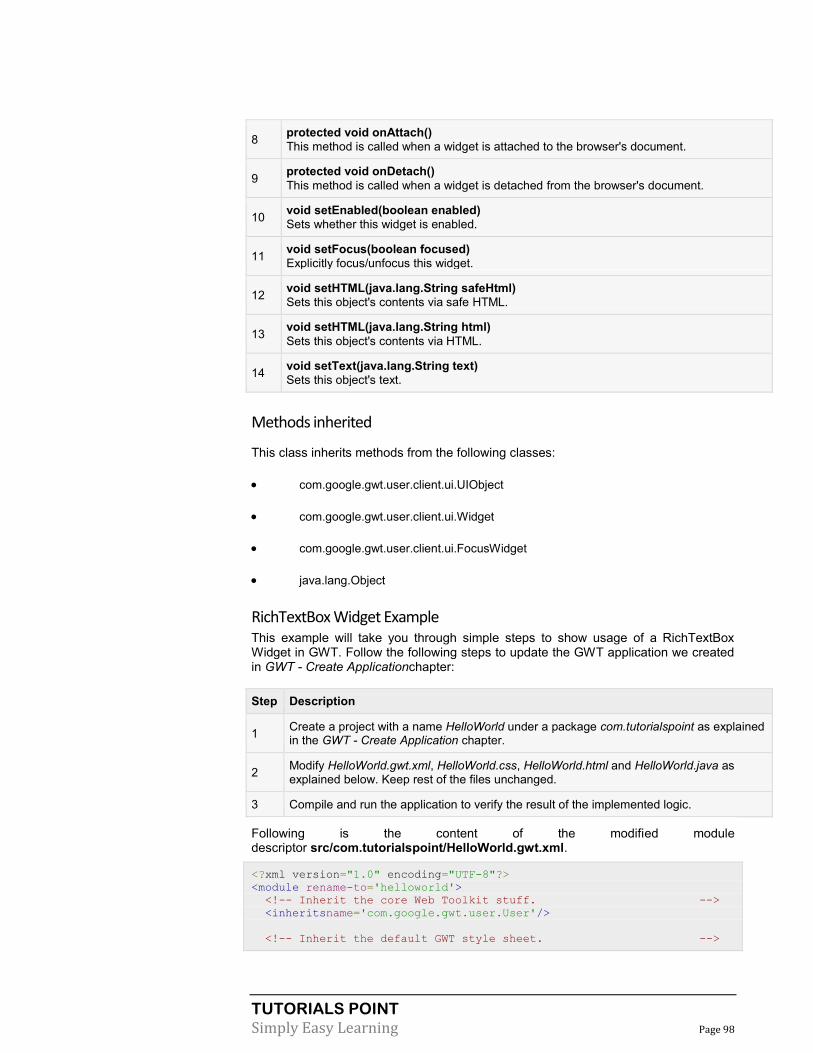
TUTORIALS POINT
Simply Easy Learning Page 98
8 protected void onAttach()
This method is called when a widget is attached to the browser's document.
9 protected void onDetach()
This method is called when a widget is detached from the browser's document.
10 void setEnabled(boolean enabled)
Sets whether this widget is enabled.
11 void setFocus(boolean focused)
Explicitly focus/unfocus this widget.
12 void setHTML(java.lang.String safeHtml)
Sets this object's contents via safe HTML.
13 void setHTML(java.lang.String html)
Sets this object's contents via HTML.
14 void setText(java.lang.String text)
Sets this object's text.
Methods inherited
This class inherits methods from the following classes:
com.google.gwt.user.client.ui.UIObject
com.google.gwt.user.client.ui.Widget
com.google.gwt.user.client.ui.FocusWidget
java.lang.Object
RichTextBox Widget Example This example will take you through simple steps to show usage of a RichTextBox Widget in GWT. Follow the following steps to update the GWT application we created in GWT - Create Applicationchapter:
Step Description
1 Create a project with a name HelloWorld under a package com.tutorialspoint as explained in the GWT - Create Application chapter.
2 Modify HelloWorld.gwt.xml, HelloWorld.css, HelloWorld.html and HelloWorld.java as explained below. Keep rest of the files unchanged.
3 Compile and run the application to verify the result of the implemented logic.
Following is the content of the modified module descriptor src/com.tutorialspoint/HelloWorld.gwt.xml.
<?xml version="1.0" encoding="UTF-8"?>
<module rename-to='helloworld'>
<!-- Inherit the core Web Toolkit stuff. -->
<inheritsname='com.google.gwt.user.User'/>
<!-- Inherit the default GWT style sheet. -->

TUTORIALS POINT
Simply Easy Learning Page 99
<inherits name='com.google.gwt.user.theme.clean.Clean'/>
<!-- Specify the app entry point class. -->
<entry-point class='com.tutorialspoint.client.HelloWorld'/>
<!-- Specify the paths for translatable code -->
<source path='client'/>
<source path='shared'/>
</module>
Following is the content of the modified Style Sheet file war/HelloWorld.css.
body{
text-align: center;
font-family: verdana, sans-serif;
}
h1{
font-size:2em;
font-weight: bold;
color:#777777;
margin:40px0px70px;
text-align: center;
}
.gwt-RichTextArea{
padding:10px;
}
Following is the content of the modified HTML host file war/HelloWorld.html.
<html>
<head>
<title>Hello World</title>
<link rel="stylesheet" href="HelloWorld.css"/>
<script language="javascript" src="helloworld/helloworld.nocache.js">
</script>
</head>
<body>
<h1>RichTextArea Widget Demonstration</h1>
<div id="gwtContainer"></div>
</body>
</html>
Let us have following content of Java file src/com.tutorialspoint/HelloWorld.java which will demonstrate use of TextBox widget.
package com.tutorialspoint.client;
import com.google.gwt.core.client.EntryPoint;
import com.google.gwt.user.client.ui.RichTextArea;
import com.google.gwt.user.client.ui.RootPanel;
import com.google.gwt.user.client.ui.VerticalPanel;
public class HelloWorld implementsEntryPoint{
public void onModuleLoad(){
//create RichTextArea elements
RichTextArea richTextArea =new RichTextArea();

TUTORIALS POINT
Simply Easy Learning Page 100
richTextArea.setHeight("200");
richTextArea.setWidth("200");
//add text to text area
richTextArea.setHTML("<b>Hello World!</b><br/><br/>"+
"<i>Be Happy!</i></br><br/><u>Stay Cool!</u>");
// Add text boxes to the root panel.
VerticalPanel panel =new VerticalPanel();
panel.add(richTextArea);
RootPanel.get("gwtContainer").add(panel);
}
}
Once you are ready with all the changes done, let us compile and run the application in development mode as we did in GWT - Create Application chapter. If everything is fine with your application, this will produce following result:

TUTORIALS POINT
Simply Easy Learning Page 101
FileUpload
Introduction The FileUpload widget wraps the HTML <input type='file'> element. This widget must be used with FormPanel if it is to be submitted to a server.
Class declaration Following is the declaration for com.google.gwt.user.client.ui.FileUpload class:
public class FileUpload
Extends Widget
Implements HasName,HasChangeHandlers
CSS style rules
Following default CSS Style rules will be applied to all the TextBox widget. You can override it as per your requirements.
.gwt-FileUpload{}
Class constructors
S.N. Constructor & Description
1 FileUpload()
Constructs a new file upload widget.
2 FileUpload(Element element)
This constructor may be used by subclasses to explicitly use an existing element.
Class methods
S.N. Function name & Description
1 HandlerRegistration addChangeHandler(ChangeHandler handler)
Adds a ChangeEvent handler.
2 java.lang.String getFilename()
Gets the filename selected by the user.
3 java.lang.String getName()
Gets the widget's name.
4 boolean isEnabled()
Gets whether this widget is enabled.
5 void onBrowserEvent(Event event)
Fired whenever a browser event is received.
6 void setEnabled(boolean enabled)
Sets whether this widget is enabled.
7 void setName(java.lang.String name)
Sets the widget's name.

TUTORIALS POINT
Simply Easy Learning Page 102
8 static FileUpload wrap(Element element)
Creates a FileUpload widget that wraps an existing <input type='file'> element.
Methods inherited
This class inherits methods from the following classes:
com.google.gwt.user.client.ui.UIObject
com.google.gwt.user.client.ui.Widget
java.lang.Object
FileUpload Widget Example
This example will take you through simple steps to show usage of a FileUpload Widget in GWT. Follow the following steps to update the GWT application we created in GWT - Create Application chapter:
Step Description
1 Create a project with a name HelloWorld under a package com.tutorialspoint as explained in the GWT - Create Application chapter.
2 Modify HelloWorld.gwt.xml, HelloWorld.css, HelloWorld.html and HelloWorld.java as explained below. Keep rest of the files unchanged.
3 Compile and run the application to verify the result of the implemented logic.
Following is the content of the modified module descriptor src/com.tutorialspoint/HelloWorld.gwt.xml.
<?xml version="1.0" encoding="UTF-8"?>
<module rename-to='helloworld'>
<!-- Inherit the core Web Toolkit stuff. -->
<inherits name='com.google.gwt.user.User'/>
<!-- Inherit the default GWT style sheet. -->
<inherits name='com.google.gwt.user.theme.clean.Clean'/>
<!-- Specify the app entry point class. -->
<entry-point class='com.tutorialspoint.client.HelloWorld'/>
<!-- Specify the paths for translatable code -->
<source path='client'/>
<source path='shared'/>
</module>
Following is the content of the modified Style Sheet file war/HelloWorld.css.
body{
text-align: center;
font-family: verdana, sans-serif;
}
h1{
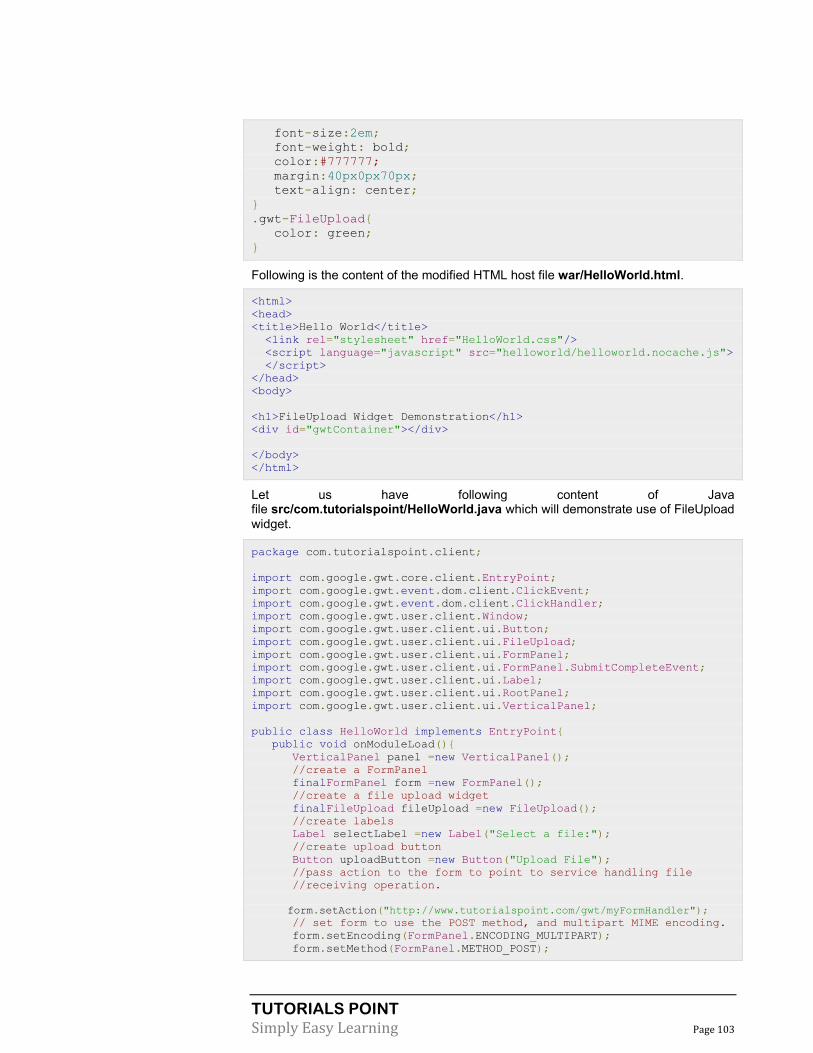
TUTORIALS POINT
Simply Easy Learning Page 103
font-size:2em;
font-weight: bold;
color:#777777;
margin:40px0px70px;
text-align: center;
}
.gwt-FileUpload{
color: green;
}
Following is the content of the modified HTML host file war/HelloWorld.html.
<html>
<head>
<title>Hello World</title>
<link rel="stylesheet" href="HelloWorld.css"/>
<script language="javascript" src="helloworld/helloworld.nocache.js">
</script>
</head>
<body>
<h1>FileUpload Widget Demonstration</h1>
<div id="gwtContainer"></div>
</body>
</html>
Let us have following content of Java file src/com.tutorialspoint/HelloWorld.java which will demonstrate use of FileUpload
widget.
package com.tutorialspoint.client;
import com.google.gwt.core.client.EntryPoint;
import com.google.gwt.event.dom.client.ClickEvent;
import com.google.gwt.event.dom.client.ClickHandler;
import com.google.gwt.user.client.Window;
import com.google.gwt.user.client.ui.Button;
import com.google.gwt.user.client.ui.FileUpload;
import com.google.gwt.user.client.ui.FormPanel;
import com.google.gwt.user.client.ui.FormPanel.SubmitCompleteEvent;
import com.google.gwt.user.client.ui.Label;
import com.google.gwt.user.client.ui.RootPanel;
import com.google.gwt.user.client.ui.VerticalPanel;
public class HelloWorld implements EntryPoint{
public void onModuleLoad(){
VerticalPanel panel =new VerticalPanel();
//create a FormPanel
finalFormPanel form =new FormPanel();
//create a file upload widget
finalFileUpload fileUpload =new FileUpload();
//create labels
Label selectLabel =new Label("Select a file:");
//create upload button
Button uploadButton =new Button("Upload File");
//pass action to the form to point to service handling file
//receiving operation.
form.setAction("http://www.tutorialspoint.com/gwt/myFormHandler");
// set form to use the POST method, and multipart MIME encoding.
form.setEncoding(FormPanel.ENCODING_MULTIPART);
form.setMethod(FormPanel.METHOD_POST);
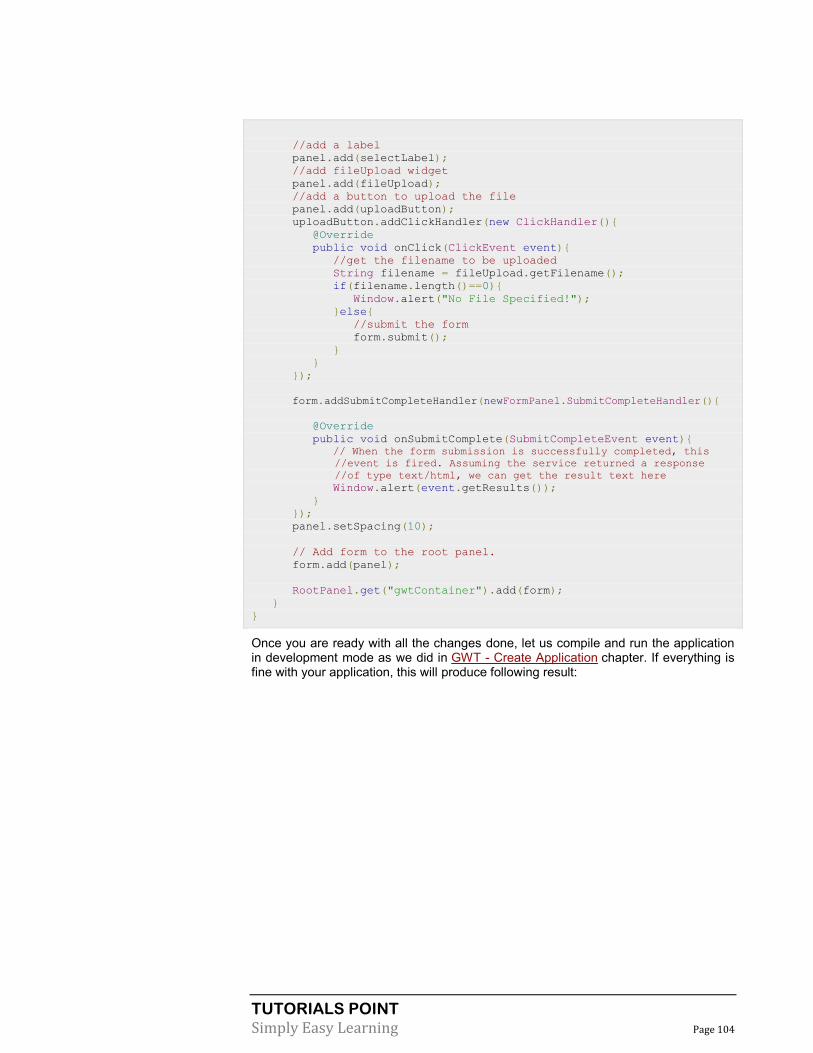
TUTORIALS POINT
Simply Easy Learning Page 104
//add a label
panel.add(selectLabel);
//add fileUpload widget
panel.add(fileUpload);
//add a button to upload the file
panel.add(uploadButton);
uploadButton.addClickHandler(new ClickHandler(){
@Override
public void onClick(ClickEvent event){
//get the filename to be uploaded
String filename = fileUpload.getFilename();
if(filename.length()==0){
Window.alert("No File Specified!");
}else{
//submit the form
form.submit();
}
}
});
form.addSubmitCompleteHandler(newFormPanel.SubmitCompleteHandler(){
@Override
public void onSubmitComplete(SubmitCompleteEvent event){
// When the form submission is successfully completed, this
//event is fired. Assuming the service returned a response
//of type text/html, we can get the result text here
Window.alert(event.getResults());
}
});
panel.setSpacing(10);
// Add form to the root panel.
form.add(panel);
RootPanel.get("gwtContainer").add(form);
}
}
Once you are ready with all the changes done, let us compile and run the application in development mode as we did in GWT - Create Application chapter. If everything is fine with your application, this will produce following result:

TUTORIALS POINT
Simply Easy Learning Page 105
Following is the java server page code snippet demonstrating server side capability for file upload
We're using Common IO and Commons FileUpload libraries to add file-upload
capability to server side page.
File will be uploaded to uploadFiles folder relative to location where upload.jsp is located on server side.
<%@pageimport="org.apache.commons.fileupload.FileItemFactory"%>
<%@pageimport="org.apache.commons.fileupload.disk.DiskFileItemFactory"%
>
<%@pageimport="org.apache.commons.fileupload.servlet.ServletFileUpload"
%>
<%@pageimport="org.apache.commons.fileupload.FileItem"%>
<%@pageimport="org.apache.commons.io.FilenameUtils"%>
<%@pageimport="java.util.List"%>
<%@pageimport="java.util.Iterator"%>

TUTORIALS POINT
Simply Easy Learning Page 106
<%@pageimport="java.io.File"%>
<%@pageimport="java.io.FileOutputStream"%>
<%@pageimport="java.io.InputStream"%>
<%
// Create a factory for disk-based file items
FileItemFactory factory =newDiskFileItemFactory();
// Create a new file upload handler
ServletFileUpload upload =newServletFileUpload(factory);
try {
// Parse the request
List items = upload.parseRequest(request);
// Process the uploaded items
Iterator iter = items.iterator();
while(iter.hasNext()){
FileItem item =(FileItem) iter.next();
//handling a normal form-field
if(item.isFormField()){
System.out.println("Got a form field");
String name = item.getFieldName();
String value = item.getString();
System.out.print("Name:"+name+",Value:"+value);
}else{//handling file loads
System.out.println("Not form field");
String fieldName = item.getFieldName();
String fileName = item.getName();
if(fileName !=null){
fileName =FilenameUtils.getName(fileName);
}
String contentType = item.getContentType();
boolean isInMemory = item.isInMemory();
long sizeInBytes = item.getSize();
System.out.print("Field Name:"+fieldName
+",File Name:"+fileName);
System.out.print("Content Type:"+contentType
+",Is In Memory:"+isInMemory+",Size:"+sizeInBytes);
byte[] data = item.get();
fileName = getServletContext()
.getRealPath("/uploadedFiles/"+ fileName);
System.out.print("File name:"+fileName);
FileOutputStream fileOutSt =new FileOutputStream(fileName);
fileOutSt.write(data);
fileOutSt.close();
out.print("File Uploaded Successfully!");
}
}
}catch(Exception e){
out.print("File Uploading Failed!"+ e.getMessage());
}
%>
Hidden
Introduction The Hidden widget represents a hidden field in an HTML form.

TUTORIALS POINT
Simply Easy Learning Page 107
Class declaration Following is the declaration for com.google.gwt.user.client.ui.Hidden class:
public class Hidden
extends Widget
implementsHasName
Class constructors S.N. Constructor & Description
1 Hidden()
Constructor for Hidden.
2 Hidden(Element element)
This constructor may be used by subclasses to explicitly use an existing element.
3 Hidden(java.lang.String name)
Constructor for Hidden.
4 Hidden(java.lang.String name, java.lang.String value)
Constructor for Hidden.
Class methods
S.N. Function name & Description
1 java.lang.String getDefaultValue()
Gets the default value of the hidden field.
2 java.lang.String getID()
Gets the id of the hidden field.
3 java.lang.String getName()
Gets the name of the hidden field.
4 java.lang.String getValue()
Gets the value of the hidden field.
5 void setDefaultValue(java.lang.String defaultValue)
Sets the default value of the hidden field.
6 void setID(java.lang.String id)
Sets the id of the hidden field.
7 void setName(java.lang.String name)
Sets the name of the hidden field.
8 void setValue(java.lang.String value)
Sets the value of the hidden field.
9 static Hidden wrap(Element element)
Creates a Hidden widget that wraps an existing <input type='hidden'> element.
Methods inherited
This class inherits methods from the following classes:
com.google.gwt.user.client.ui.UIObject

TUTORIALS POINT
Simply Easy Learning Page 108
com.google.gwt.user.client.ui.Widget
java.lang.Object
Hidden Widget Example
This example will take you through simple steps to show usage of a Hidden Widget in GWT. Follow the following steps to update the GWT application we created in GWT - Create Application chapter :
Step Description
1 Create a project with a name HelloWorld under a package com.tutorialspoint as explained in the GWT - Create Application chapter.
2 Modify HelloWorld.gwt.xml, HelloWorld.css, HelloWorld.html and HelloWorld.java as explained below. Keep rest of the files unchanged.
3 Compile and run the application to verify the result of the implemented logic.
Following is the content of the modified module descriptor src/com.tutorialspoint/HelloWorld.gwt.xml.
<?xml version="1.0" encoding="UTF-8"?>
<module rename-to='helloworld'>
<!-- Inherit the core Web Toolkit stuff. -->
<inherits name='com.google.gwt.user.User'/>
<!-- Inherit the default GWT style sheet. -->
<inherits name='com.google.gwt.user.theme.clean.Clean'/>
<!-- Specify the app entry point class. -->
<entry-point class='com.tutorialspoint.client.HelloWorld'/>
<!-- Specify the paths for translatable code -->
<source path='client'/>
<source path='shared'/>
</module>
Following is the content of the modified Style Sheet file war/HelloWorld.css.
body{
text-align: center;
font-family: verdana, sans-serif;
}
h1{
font-size:2em;
font-weight: bold;
color:#777777;
margin:40px0px70px;
text-align: center;
}
Following is the content of the modified HTML host file war/HelloWorld.html.
<html>

TUTORIALS POINT
Simply Easy Learning Page 109
<head>
<title>Hello World</title>
<link rel="stylesheet" href="HelloWorld.css"/>
<script language="javascript" src="helloworld/helloworld.nocache.js">
</script>
</head>
<body>
<h1>Hidden Widget Demonstration</h1>
<div id="gwtContainer"></div>
</body>
</html>
Let us have following content of Java file src/com.tutorialspoint/HelloWorld.java which will demonstrate use of Hidden widget.
package com.tutorialspoint.client;
import com.google.gwt.core.client.EntryPoint;
import com.google.gwt.event.dom.client.ClickEvent;
import com.google.gwt.event.dom.client.ClickHandler;
import com.google.gwt.user.client.Window;
import com.google.gwt.user.client.ui.Button;
import com.google.gwt.user.client.ui.Hidden;
import com.google.gwt.user.client.ui.RootPanel;
import com.google.gwt.user.client.ui.TextBox;
import com.google.gwt.user.client.ui.VerticalPanel;
public class HelloWorld implements EntryPoint{
public void onModuleLoad(){
//create textboxes
final TextBox textBox =new TextBox();
textBox.setWidth("275");
Button button1 =new Button("Set Value of Hidden Input");
Button button2 =new Button("Get Value of Hidden Input");
final Hidden hidden =new Hidden();
button1.addClickHandler(new ClickHandler(){
@Override
public void onClick(ClickEvent event){
hidden.setValue(textBox.getValue());
Window.alert("Value of Hidden Widget Updated!");
}
});
button2.addClickHandler(new ClickHandler(){
@Override
public void onClick(ClickEvent event){
Window.alert("Value of Hidden Widget: "+ hidden.getValue());
}
});
// Add widgets to the root panel.
VerticalPanel panel =newVerticalPanel();
panel.setSpacing(10);
panel.add(textBox);
panel.add(button1);
panel.add(hidden);
panel.add(button2);
RootPanel.get("gwtContainer").add(panel);
}

TUTORIALS POINT
Simply Easy Learning Page 110
}
Once you are ready with all the changes done, let us compile and run the application in development mode as we did in GWT - Create Application chapter. If everything is fine with your application, this will produce following result:

TUTORIALS POINT
Simply Easy Learning Page 111
Complex Widgets
This section describes Complex Widgets used under Google Web Toolkit:
Complex widgets allows users to advanced interaction capability with the application.
Every Complex widget inherits properties from Widget class which in turn inherits properties from UIObject.
S.N. Widget & Description
1 GWT UIObject Class This widget contains text, not interpreted as HTML using a <div>element, causing it to be displayed with block layout.
2 GWT Widget Class This widget can contain HTML text and displays the html content using a <div> element, causing it to be displayed with block layout.
Complex Widgets
Following are few important Complex Widgets:
S.N. Widget & Description
1 Tree This widget represents a standard hierarchical tree widget. The tree contains a hierarchy of TreeItems that the user can open, close, and select.
2 MenuBar This widget represents a standard menu bar widget. A menu bar can contain any number of menu items, each of which can either fire a Command or open a cascaded menu bar.
3 DatePicker This widget represents a standard GWT date picker.
4 CellTree This widget represents a view of a tree. This widget will only work in standards mode, which requires that the HTML page in which it is run have an explicit <!DOCTYPE> declaration.
5 CellList This widget represents a single column list of cells.
CHAPTER
9

TUTORIALS POINT
Simply Easy Learning Page 112
6 CellTable This widget represents a tabular view that supports paging and columns.
7
CellBrowser This widget represents a browsable view of a tree in which only a single node per level may be open at one time. This widget will only work in standards mode, which requires that the HTML page in which it is run have an explicit <!DOCTYPE> declaration.
Tree
Introduction
The Tree widget represents a standard hierarchical tree widget. The tree contains a hierarchy of TreeItems that the user can open, close, and select.
Class declaration
Following is the declaration for com.google.gwt.user.client.ui.Tree class:
public class Tree
extends Widget
implements HasWidgets,SourcesTreeEvents,HasFocus,
HasAnimation,HasAllKeyHandlers,HasAllFocusHandlers,
HasSelectionHandlers,HasOpenHandlers,
HasCloseHandlers,SourcesMouseEvents,HasAllMouseHandlers
CSS style rules
Following default CSS Style rules will be applied to all the Tree widget. You can override it as per your requirements.
.gwt-Tree{}
.gwt-TreeItem{}
.gwt-TreeItem-selected {}
Class constructors
S.N. Constructor & Description
1 Tree()
Constructs an empty tree.
2 Tree(TreeImages images)
Constructs a tree that uses the specified image bundle for images.
3 Tree(TreeImages images, boolean useLeafImages)
Constructs a tree that uses the specified image bundle for images.
Class methods
S.N. Function name & Description
1 void add(Widget widget)
Adds the widget as a root tree item.

TUTORIALS POINT
Simply Easy Learning Page 113
2 void addFocusListener(FocusListener listener)
Adds a listener interface to receive mouse events.
3 TreeItem addItem(java.lang.String itemText)
Adds a simple tree item containing the specified text.
4 void addItem(TreeItem item)
Adds an item to the root level of this tree.
5 TreeItem addItem(Widget widget)
Adds a new tree item containing the specified widget.
6 void addKeyboardListener(KeyboardListener listener)
Adds a listener interface to receive keyboard events.
7 void addMouseListener(MouseListener listener)
8 void addTreeListener(TreeListener listener)
Adds a listener interface to receive tree events.
9 void clear()
Clears all tree items from the current tree.
10
protected void doAttachChildren()
If a widget implements HasWidgets, it must override this method and call onAttach() for each of its child widgets.
11
protected void doDetachChildren()
If a widget implements HasWidgets, it must override this method and call onDetach() for each of its child widgets.
12
void ensureSelectedItemVisible()
Ensures that the currently-selected item is visible, opening its parents and scrolling the tree as necessary.
13
java.lang.String getImageBase()
Deprecated. Use Tree(TreeImages) as it provides a more efficent and manageable way to supply a set of images to be used within a tree.
14 TreeItem getItem(int index)
Gets the top-level tree item at the specified index.
15 int getItemCount()
Gets the number of items contained at the root of this tree.
16 TreeItem getSelectedItem()
Gets the currently selected item.
17 int getTabIndex()
Gets the widget's position in the tab index.
18 boolean isAnimationEnabled()
19 protected boolean isKeyboardNavigationEnabled(TreeItem currentItem)
Indicates if keyboard navigation is enabled for the Tree and for a given TreeItem.
20 java.util.Iterator<Widget> iterator()
Gets an iterator for the contained widgets.
21 void onBrowserEvent(Event event)
Fired whenever a browser event is received.
22 protected void onEnsureDebugId(java.lang.String baseID)

TUTORIALS POINT
Simply Easy Learning Page 114
Affected Elements: -root = The root TreeItem.
23
protected void onLoad()
This method is called immediately after a widget becomes attached to the browser's document.
24 boolean remove(Widget w)
Removes a child widget.
25 void removeFocusListener(FocusListener listener)
Removes a previously added listener interface.
26 void removeItem(TreeItem item)
Removes an item from the root level of this tree.
27 void removeItems()
Removes all items from the root level of this tree.
28 void removeKeyboardListener(KeyboardListener listener)
Removes a previously added listener interface.
29 void removeTreeListener(TreeListener listener)
Removes a previously added listener interface.
30 void setAccessKey(char key)
Sets the widget's 'access key'.
31 void setAnimationEnabled(boolean enable)
Enable or disable animations.
32 void setFocus(boolean focus)
Explicitly focus/unfocus this widget.
33
void setImageBase(java.lang.String baseUrl)
Deprecated. Use Tree(TreeImages) as it provides a more efficent and manageable way to supply a set of images to be used within a tree.
34 void setSelectedItem(TreeItem item)
Selects a specified item.
35 void setSelectedItem(TreeItem item, boolean fireEvents)
Selects a specified item.
36 void setTabIndex(int index)
Sets the widget's position in the tab index.
37 java.util.Iterator<TreeItem> treeItemIterator()
Iterator of tree items.
Methods inherited
This class inherits methods from the following classes:
com.google.gwt.user.client.ui.UIObject
com.google.gwt.user.client.ui.Widget
java.lang.Object
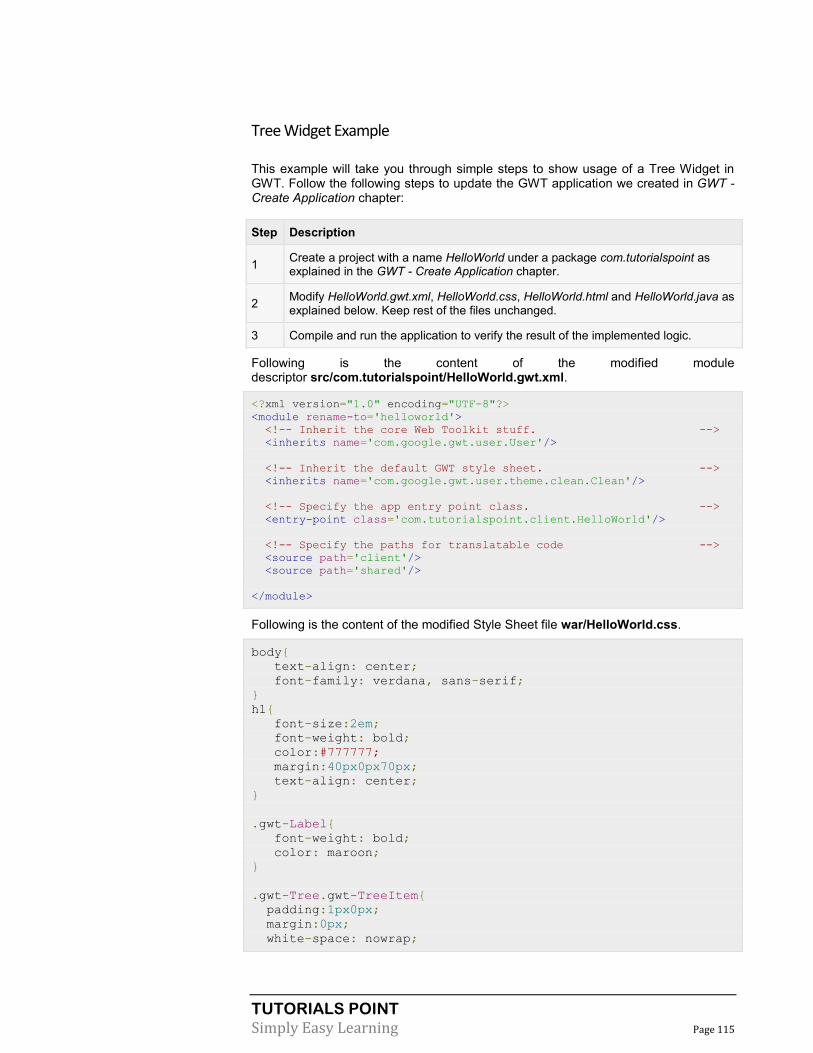
TUTORIALS POINT
Simply Easy Learning Page 115
Tree Widget Example
This example will take you through simple steps to show usage of a Tree Widget in GWT. Follow the following steps to update the GWT application we created in GWT - Create Application chapter:
Step Description
1 Create a project with a name HelloWorld under a package com.tutorialspoint as explained in the GWT - Create Application chapter.
2 Modify HelloWorld.gwt.xml, HelloWorld.css, HelloWorld.html and HelloWorld.java as explained below. Keep rest of the files unchanged.
3 Compile and run the application to verify the result of the implemented logic.
Following is the content of the modified module descriptor src/com.tutorialspoint/HelloWorld.gwt.xml.
<?xml version="1.0" encoding="UTF-8"?>
<module rename-to='helloworld'>
<!-- Inherit the core Web Toolkit stuff. -->
<inherits name='com.google.gwt.user.User'/>
<!-- Inherit the default GWT style sheet. -->
<inherits name='com.google.gwt.user.theme.clean.Clean'/>
<!-- Specify the app entry point class. -->
<entry-point class='com.tutorialspoint.client.HelloWorld'/>
<!-- Specify the paths for translatable code -->
<source path='client'/>
<source path='shared'/>
</module>
Following is the content of the modified Style Sheet file war/HelloWorld.css.
body{
text-align: center;
font-family: verdana, sans-serif;
}
h1{
font-size:2em;
font-weight: bold;
color:#777777;
margin:40px0px70px;
text-align: center;
}
.gwt-Label{
font-weight: bold;
color: maroon;
}
.gwt-Tree.gwt-TreeItem{
padding:1px0px;
margin:0px;
white-space: nowrap;

TUTORIALS POINT
Simply Easy Learning Page 116
cursor: hand;
cursor: pointer;
}
.gwt-Tree.gwt-TreeItem-selected {
background:#ebeff9;
}
Following is the content of the modified HTML host file war/HelloWorld.html.
<html>
<head>
<title>Hello World</title>
<link rel="stylesheet" href="HelloWorld.css"/>
<script language="javascript" src="helloworld/helloworld.nocache.js">
</script>
</head>
<body>
<h1>Tree Widget Demonstration</h1>
<div id="gwtContainer"></div>
</body>
</html>
Let us have following content of Java file src/com.tutorialspoint/HelloWorld.java which will demonstrate use of Tree
widget.
package com.tutorialspoint.client;
import com.google.gwt.core.client.EntryPoint;
import com.google.gwt.event.logical.shared.SelectionEvent;
import com.google.gwt.event.logical.shared.SelectionHandler;
import com.google.gwt.user.client.ui.Label;
import com.google.gwt.user.client.ui.RootPanel;
import com.google.gwt.user.client.ui.Tree;
import com.google.gwt.user.client.ui.TreeItem;
import com.google.gwt.user.client.ui.VerticalPanel;
public class HelloWorld implements EntryPoint{
public void onModuleLoad(){
//create a label
final Label labelMessage =new Label();
labelMessage.setWidth("300");
// Create a root tree item as department
TreeItem department =new TreeItem("Department");
//create other tree items as department names
TreeItem salesDepartment =new TreeItem("Sales");
TreeItem marketingDepartment =new TreeItem("Marketing");
TreeItem manufacturingDepartment =new TreeItem("Manufacturing");
//create other tree items as employees
TreeItem employee1 =new TreeItem("Robert");
TreeItem employee2 =new TreeItem("Joe");
TreeItem employee3 =new TreeItem("Chris");
//add employees to sales department
salesDepartment.addItem(employee1);
salesDepartment.addItem(employee2);
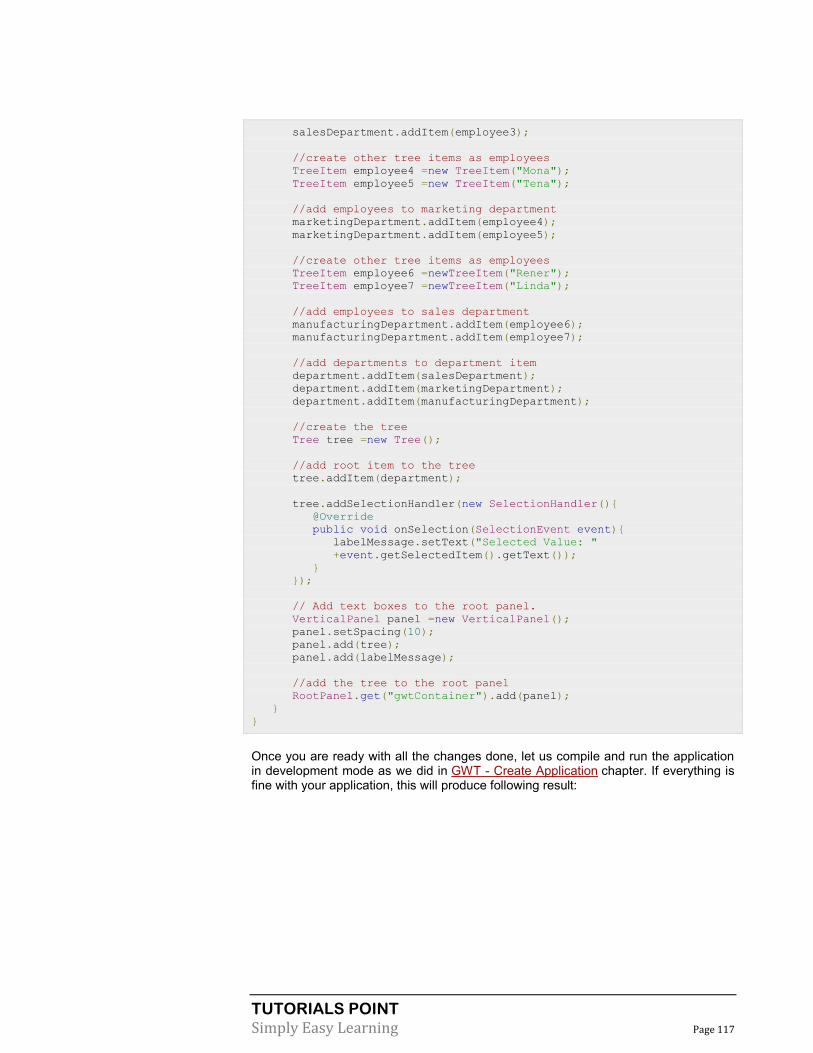
TUTORIALS POINT
Simply Easy Learning Page 117
salesDepartment.addItem(employee3);
//create other tree items as employees
TreeItem employee4 =new TreeItem("Mona");
TreeItem employee5 =new TreeItem("Tena");
//add employees to marketing department
marketingDepartment.addItem(employee4);
marketingDepartment.addItem(employee5);
//create other tree items as employees
TreeItem employee6 =newTreeItem("Rener");
TreeItem employee7 =newTreeItem("Linda");
//add employees to sales department
manufacturingDepartment.addItem(employee6);
manufacturingDepartment.addItem(employee7);
//add departments to department item
department.addItem(salesDepartment);
department.addItem(marketingDepartment);
department.addItem(manufacturingDepartment);
//create the tree
Tree tree =new Tree();
//add root item to the tree
tree.addItem(department);
tree.addSelectionHandler(new SelectionHandler(){
@Override
public void onSelection(SelectionEvent event){
labelMessage.setText("Selected Value: "
+event.getSelectedItem().getText());
}
});
// Add text boxes to the root panel.
VerticalPanel panel =new VerticalPanel();
panel.setSpacing(10);
panel.add(tree);
panel.add(labelMessage);
//add the tree to the root panel
RootPanel.get("gwtContainer").add(panel);
}
}
Once you are ready with all the changes done, let us compile and run the application in development mode as we did in GWT - Create Application chapter. If everything is fine with your application, this will produce following result:
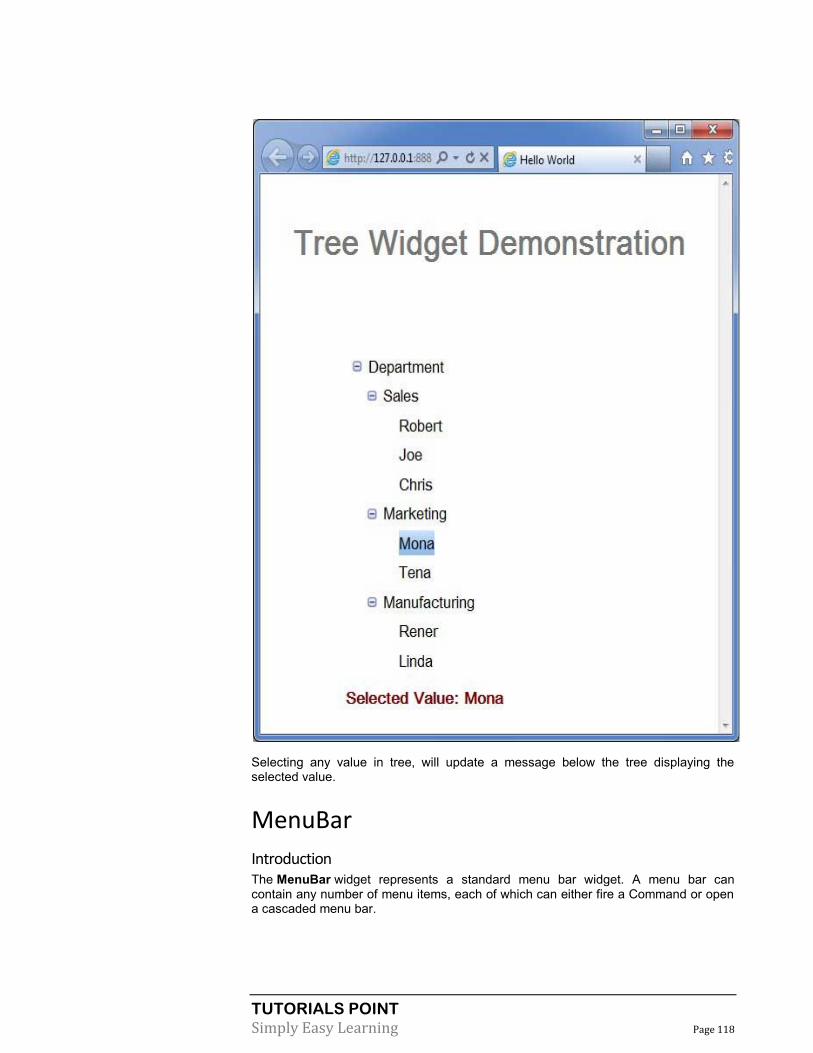
TUTORIALS POINT
Simply Easy Learning Page 118
Selecting any value in tree, will update a message below the tree displaying the selected value.
MenuBar
Introduction The MenuBar widget represents a standard menu bar widget. A menu bar can contain any number of menu items, each of which can either fire a Command or open a cascaded menu bar.
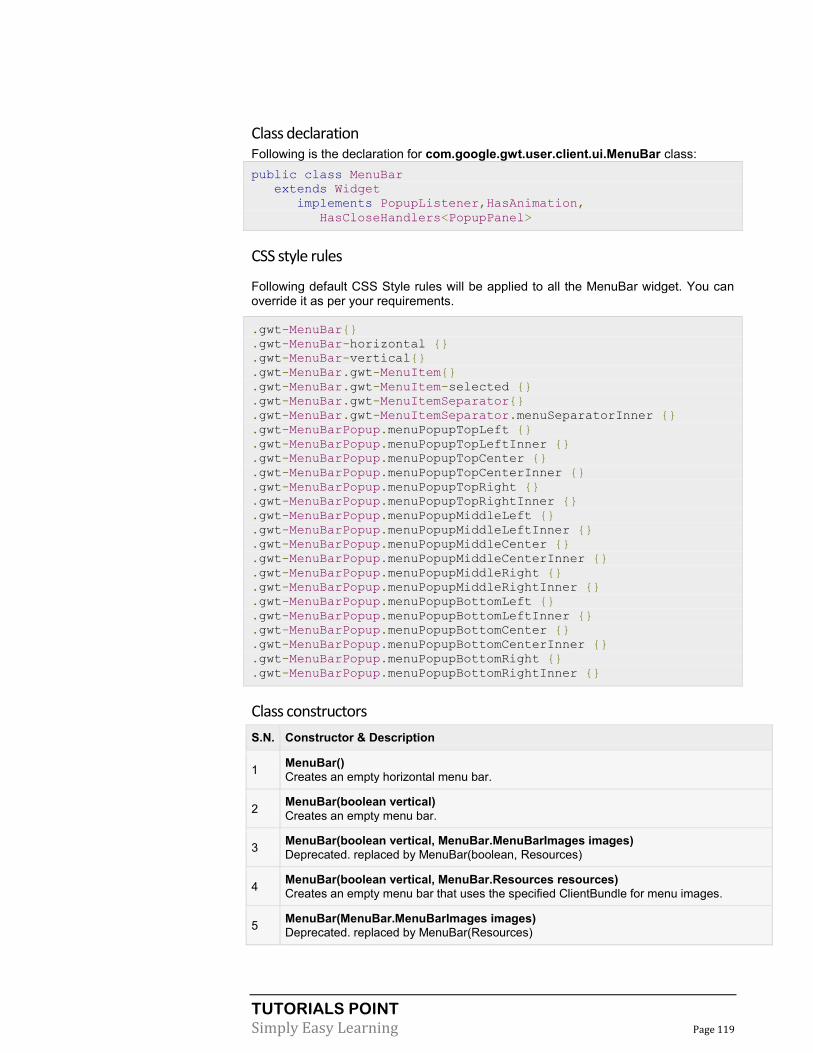
TUTORIALS POINT
Simply Easy Learning Page 119
Class declaration Following is the declaration for com.google.gwt.user.client.ui.MenuBar class:
public class MenuBar
extends Widget
implements PopupListener,HasAnimation,
HasCloseHandlers<PopupPanel>
CSS style rules
Following default CSS Style rules will be applied to all the MenuBar widget. You can override it as per your requirements.
.gwt-MenuBar{}
.gwt-MenuBar-horizontal {}
.gwt-MenuBar-vertical{}
.gwt-MenuBar.gwt-MenuItem{}
.gwt-MenuBar.gwt-MenuItem-selected {}
.gwt-MenuBar.gwt-MenuItemSeparator{}
.gwt-MenuBar.gwt-MenuItemSeparator.menuSeparatorInner {}
.gwt-MenuBarPopup.menuPopupTopLeft {}
.gwt-MenuBarPopup.menuPopupTopLeftInner {}
.gwt-MenuBarPopup.menuPopupTopCenter {}
.gwt-MenuBarPopup.menuPopupTopCenterInner {}
.gwt-MenuBarPopup.menuPopupTopRight {}
.gwt-MenuBarPopup.menuPopupTopRightInner {}
.gwt-MenuBarPopup.menuPopupMiddleLeft {}
.gwt-MenuBarPopup.menuPopupMiddleLeftInner {}
.gwt-MenuBarPopup.menuPopupMiddleCenter {}
.gwt-MenuBarPopup.menuPopupMiddleCenterInner {}
.gwt-MenuBarPopup.menuPopupMiddleRight {}
.gwt-MenuBarPopup.menuPopupMiddleRightInner {}
.gwt-MenuBarPopup.menuPopupBottomLeft {}
.gwt-MenuBarPopup.menuPopupBottomLeftInner {}
.gwt-MenuBarPopup.menuPopupBottomCenter {}
.gwt-MenuBarPopup.menuPopupBottomCenterInner {}
.gwt-MenuBarPopup.menuPopupBottomRight {}
.gwt-MenuBarPopup.menuPopupBottomRightInner {}
Class constructors
S.N. Constructor & Description
1 MenuBar()
Creates an empty horizontal menu bar.
2 MenuBar(boolean vertical)
Creates an empty menu bar.
3 MenuBar(boolean vertical, MenuBar.MenuBarImages images)
Deprecated. replaced by MenuBar(boolean, Resources)
4 MenuBar(boolean vertical, MenuBar.Resources resources)
Creates an empty menu bar that uses the specified ClientBundle for menu images.
5 MenuBar(MenuBar.MenuBarImages images)
Deprecated. replaced by MenuBar(Resources)

TUTORIALS POINT
Simply Easy Learning Page 120
6
MenuBar(MenuBar.Resources resources)
Creates an empty horizontal menu bar that uses the specified ClientBundle for menu images.
Class methods
S.N. Function name & Description
1 HandlerRegistration addCloseHandler(CloseHandler handler)
Adds a CloseEvent handler.
2 MenuItem addItem(MenuItem item)
Adds a menu item to the bar.
3
MenuItem addItem(SafeHtml html, Command cmd)
Adds a menu item to the bar containing SafeHtml, that will fire the given command when it is selected.
4 MenuItem addItem(SafeHtml html, MenuBar popup)
Adds a menu item to the bar, that will open the specified menu when it is selected.
5 MenuItem addItem(java.lang.String text, boolean asHTML, Command cmd)
Adds a menu item to the bar, that will fire the given command when it is selected.
6 MenuItem addItem(java.lang.String text, boolean asHTML, MenuBar popup)
Adds a menu item to the bar, that will open the specified menu when it is selected.
7 MenuItem addItem(java.lang.String text, Command cmd)
Adds a menu item to the bar, that will fire the given command when it is selected.
8 MenuItem addItem(java.lang.String text, MenuBar popup)
Adds a menu item to the bar, that will open the specified menu when it is selected.
9 MenuItemSeparator addSeparator()
Adds a thin line to the MenuBar to separate sections of MenuItems.
10 MenuItemSeparator addSeparator(MenuItemSeparator separator)
Adds a thin line to the MenuBar to separate sections of MenuItems.
11 void clearItems()
Removes all menu items from this menu bar.
12 void closeAllChildren(boolean focus)
Closes this menu and all child menu popups.
13 void focus()
Give this MenuBar focus.
14 boolean getAutoOpen()
Gets whether this menu bar's child menus will open when the mouse is moved over it.
15 int getItemIndex(MenuItem item)
Get the index of a MenuItem.
16 protected java.util.List getItems()
Returns a list containing the MenuItem objects in the menu bar.
17 protected MenuItem getSelectedItem()
Returns the MenuItem that is currently selected (highlighted) by the user.
18 int getSeparatorIndex(MenuItemSeparator item)
Get the index of a MenuItemSeparator.

TUTORIALS POINT
Simply Easy Learning Page 121
19 MenuItem insertItem(MenuItem item, int beforeIndex)
Adds a menu item to the bar at a specific index.
20 MenuItemSeparator insertSeparator(int beforeIndex)
Adds a thin line to the MenuBar to separate sections of MenuItems at the specified index.
21 MenuItemSeparator insertSeparator(MenuItemSeparator separator, int beforeIndex)
Adds a thin line to the MenuBar to separate sections of MenuItems at the specified index.
22 boolean isAnimationEnabled()
Returns true if animations are enabled, false if not.
23 boolean isFocusOnHoverEnabled()
Check whether or not this widget will steal keyboard focus when the mouse hovers over it.
24 void moveSelectionDown()
Moves the menu selection down to the next item.
25 void moveSelectionUp()
Moves the menu selection up to the previous item.
26 void onBrowserEvent(Event event)
Fired whenever a browser event is received.
27 protected void onDetach()
This method is called when a widget is detached from the browser's document.
28 protected void onEnsureDebugId(java.lang.String baseID)
Affected Elements: -item# = the MenuItem at the specified index.
29 void onPopupClosed(PopupPanel sender, boolean autoClosed)
Deprecated. Use addCloseHandler(CloseHandler) instead
30 void removeItem(MenuItem item)
Removes the specified menu item from the bar.
31 void removeSeparator(MenuItemSeparator separator)
Removes the specified MenuItemSeparator from the bar.
32 void selectItem(MenuItem item)
Select the given MenuItem, which must be a direct child of this MenuBar.
33 void setAnimationEnabled(boolean enable)
Enable or disable animations.
34 void setAutoOpen(boolean autoOpen)
Sets whether this menu bar's child menus will open when the mouse is moved over it.
35 void setFocusOnHoverEnabled(boolean enabled)
Enable or disable auto focus when the mouse hovers over the MenuBar.
Methods inherited
This class inherits methods from the following classes:
com.google.gwt.user.client.ui.UIObject
com.google.gwt.user.client.ui.Widget
java.lang.Object
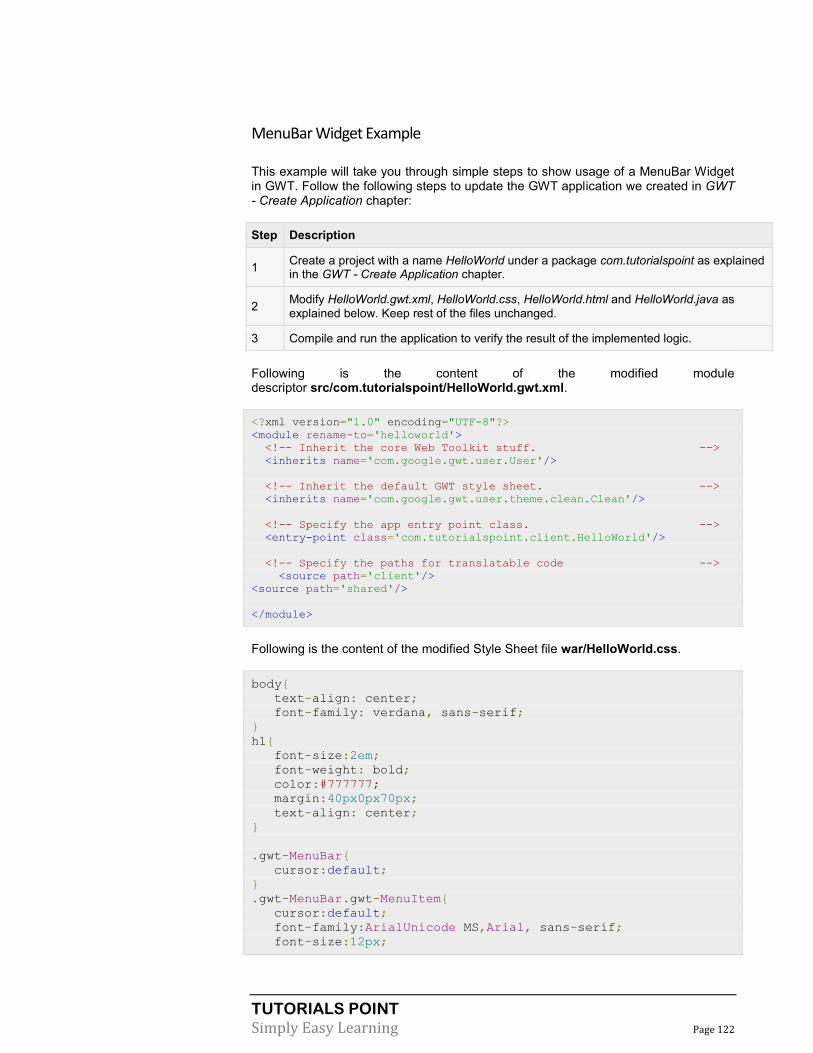
TUTORIALS POINT
Simply Easy Learning Page 122
MenuBar Widget Example
This example will take you through simple steps to show usage of a MenuBar Widget in GWT. Follow the following steps to update the GWT application we created in GWT - Create Application chapter:
Step Description
1 Create a project with a name HelloWorld under a package com.tutorialspoint as explained in the GWT - Create Application chapter.
2 Modify HelloWorld.gwt.xml, HelloWorld.css, HelloWorld.html and HelloWorld.java as
explained below. Keep rest of the files unchanged.
3 Compile and run the application to verify the result of the implemented logic.
Following is the content of the modified module descriptor src/com.tutorialspoint/HelloWorld.gwt.xml.
<?xml version="1.0" encoding="UTF-8"?>
<module rename-to='helloworld'>
<!-- Inherit the core Web Toolkit stuff. -->
<inherits name='com.google.gwt.user.User'/>
<!-- Inherit the default GWT style sheet. -->
<inherits name='com.google.gwt.user.theme.clean.Clean'/>
<!-- Specify the app entry point class. -->
<entry-point class='com.tutorialspoint.client.HelloWorld'/>
<!-- Specify the paths for translatable code -->
<source path='client'/>
<source path='shared'/>
</module>
Following is the content of the modified Style Sheet file war/HelloWorld.css.
body{
text-align: center;
font-family: verdana, sans-serif;
}
h1{
font-size:2em;
font-weight: bold;
color:#777777;
margin:40px0px70px;
text-align: center;
}
.gwt-MenuBar{
cursor:default;
}
.gwt-MenuBar.gwt-MenuItem{
cursor:default;
font-family:ArialUnicode MS,Arial, sans-serif;
font-size:12px;

TUTORIALS POINT
Simply Easy Learning Page 123
}
.gwt-MenuBar.gwt-MenuItem-selected {
background:#E3E8F3;
}
.gwt-MenuBar-horizontal {
background:#e3e8f3 url(images/hborder.png) repeat-x 0px -
2003px;
border:1px solid #e0e0e0;
}
.gwt-MenuBar-horizontal .gwt-MenuItem{
padding:5px10px;
vertical-align: bottom;
color:#000;
font-weight: bold;
}
.gwt-MenuBar-horizontal .gwt-MenuItemSeparator{
width:1px;
padding:0px;
margin:0px;
border:0px;
border-left:1px solid #ccc;
background: white;
}
.gwt-MenuBar-horizontal .gwt-
MenuItemSeparator.menuSeparatorInner {
width:1px;
height:1px;
background: white;
}
.gwt-MenuBar-vertical {
margin-top:0px;
margin-left:0px;
background: white;
}
.gwt-MenuBar-vertical table {
border-collapse: collapse;
}
.gwt-MenuBar-vertical .gwt-MenuItem{
padding:2px40px2px1px;
}
.gwt-MenuBar-vertical .gwt-MenuItemSeparator{
padding:2px0px;
}
.gwt-MenuBar-vertical .gwt-MenuItemSeparator.menuSeparatorInner
{
height:1px;
padding:0px;
border:0px;
border-top:1px solid #ccc;
overflow: hidden;
}
.gwt-MenuBar-vertical .subMenuIcon {
padding-right:4px;
}
.gwt-MenuBar-vertical .subMenuIcon-selected {
background:#E3E8F3;
}

TUTORIALS POINT
Simply Easy Learning Page 124
.gwt-MenuBarPopup{
margin:0px0px0px3px;
}
.gwt-MenuBarPopup.menuPopupTopLeftInner {
width:5px;
height:5px;
zoom:1;
}
.gwt-MenuBarPopup.menuPopupTopRightInner {
width:8px;
height:5px;
zoom:1;
}
.gwt-MenuBarPopup.menuPopupBottomLeftInner {
width:5px;
height:8px;
zoom:1;
}
.gwt-MenuBarPopup.menuPopupBottomRightInner {
width:8px;
height:8px;
zoom:1;
}
.gwt-MenuBarPopup.menuPopupTopLeft {
background: url(images/corner.png)no-repeat 0px-36px;
-background: url(images/corner_ie6.png)no-repeat 0px-36px;
}
.gwt-MenuBarPopup.menuPopupTopRight {
background: url(images/corner.png)no-repeat -5px-36px;
-background: url(images/corner_ie6.png)no-repeat -5px-36px;
}
.gwt-MenuBarPopup.menuPopupBottomLeft {
background: url(images/corner.png)no-repeat 0px-41px;
-background: url(images/corner_ie6.png)no-repeat 0px-41px;
}
.gwt-MenuBarPopup.menuPopupBottomRight {
background: url(images/corner.png)no-repeat -5px-41px;
-background: url(images/corner_ie6.png)no-repeat -5px-41px;
}
html>body .gwt-MenuBarPopup{
}
* html .gwt-MenuBarPopup.menuPopupTopLeftInner {
width:5px;
height:5px;
overflow: hidden;
}
* html .gwt-MenuBarPopup.menuPopupTopRightInner {
width:8px;
height:5px;
overflow: hidden;
}
* html .gwt-MenuBarPopup.menuPopupBottomLeftInner {
width:5px;
height:8px;
overflow: hidden;
}
* html .gwt-MenuBarPopup.menuPopupBottomRightInner {

TUTORIALS POINT
Simply Easy Learning Page 125
width:8px;
height:8px;
overflow: hidden;
}
Following is the content of the modified HTML host file war/HelloWorld.html.
<html>
<head>
<title>Hello World</title>
<link rel="stylesheet" href="HelloWorld.css"/>
<script language="javascript" src="helloworld/helloworld.nocache.js">
</script>
</head>
<body>
<h1>MenuBar Widget Demonstration</h1>
<div id="gwtContainer"></div>
</body>
</html>
Let us have following content of Java file src/com.tutorialspoint/HelloWorld.java which will demonstrate use of MenuBar widget.
package com.tutorialspoint.client;
import com.google.gwt.core.client.EntryPoint;
import com.google.gwt.user.client.Command;
import com.google.gwt.user.client.Window;
import com.google.gwt.user.client.ui.MenuBar;
import com.google.gwt.user.client.ui.MenuItem;
import com.google.gwt.user.client.ui.RootPanel;
public class HelloWorld implements EntryPoint{
private void showSelectedMenuItem(String menuItemName){
Window.alert("Menu item: "+menuItemName+" selected");
}
public void onModuleLoad(){
// Create a menu bar
MenuBar menu =newMenuBar();
menu.setAutoOpen(true);
menu.setWidth("100px");
menu.setAnimationEnabled(true);
// Create the file menu
MenuBar fileMenu =newMenuBar(true);
fileMenu.setAnimationEnabled(true);
fileMenu.addItem("New",new Command(){
@Override
public void execute(){
showSelectedMenuItem("New");
}
});
fileMenu.addItem("Open",new Command(){
@Override

TUTORIALS POINT
Simply Easy Learning Page 126
public void execute(){
showSelectedMenuItem("Open");
}
});
fileMenu.addSeparator();
fileMenu.addItem("Exit",new Command(){
@Override
public void execute(){
showSelectedMenuItem("Exit");
}
});
// Create the edit menu
MenuBar editMenu =new MenuBar(true);
editMenu.setAnimationEnabled(true);
editMenu.addItem("Undo",new Command(){
@Override
public void execute(){
showSelectedMenuItem("Undo");
}
});
editMenu.addItem("Redo",new Command(){
@Override
public void execute(){
showSelectedMenuItem("Redo");
}
});
editMenu.addItem("Cut",new Command(){
@Override
public void execute(){
showSelectedMenuItem("Cut");
}
});
editMenu.addItem("Copy",new Command(){
@Override
public void execute(){
showSelectedMenuItem("Copy");
}
});
editMenu.addItem("Paste",new Command(){
@Override
public void execute(){
showSelectedMenuItem("Paste");
}
});
menu.addItem(newMenuItem("File", fileMenu));
menu.addSeparator();
menu.addItem(newMenuItem("Edit", editMenu));
//add the menu to the root panel
RootPanel.get("gwtContainer").add(menu);
}
}
Once you are ready with all the changes done, let us compile and run the application in development mode as we did in GWT - Create Application chapter. If everything is fine with your application, this will produce following result:

TUTORIALS POINT
Simply Easy Learning Page 127
Selecting any value in menubar, will popup an alert message showing the selected value.
DatePicker
Introduction The DatePicker widget represents a standard GWT date picker.
Class declaration

TUTORIALS POINT
Simply Easy Learning Page 128
Following is the declaration for com.google.gwt.user.datepicker.client.DatePicker class:
public class DatePicker
extends Composite
implements HasHighlightHandlers<java.util.Date>,
HasShowRangeHandlers<java.util.Date>,HasValue<java.util.Date>
CSS style rules
Following default CSS Style rules will be applied to all the DatePicker widget. You can override it as per your requirements.
.gwt-DatePicker{}
.datePickerMonthSelector {}
.datePickerMonth {}
.datePickerPreviousButton {}
.datePickerNextButton {}
.datePickerDays {}
.datePickerWeekdayLabel {}
.datePickerWeekendLabel {}
.datePickerDay {}
.datePickerDayIsToday {}
.datePickerDayIsWeekend {}
.datePickerDayIsFiller {}
.datePickerDayIsValue {}
.datePickerDayIsDisabled {}
.datePickerDayIsHighlighted {}
.datePickerDayIsValueAndHighlighted {}
Class constructors
S.N. Constructor & Description
1 DatePicker()
Create a new date picker.
2
protected DatePicker(MonthSelector monthSelector, CalendarView view, CalendarModel model)
Create a new date picker.
Class methods
S.N. Function name & Description
1 HandlerRegistration addHighlightHandler(HighlightHandler<java.util.Date> handler)
Adds a HighlightEvent handler.
2
HandlerRegistration addShowRangeHandler(ShowRangeHandler<java.util.Date> handler)
Adds a ShowRangeEvent handler.
3
HandlerRegistration addShowRangeHandlerAndFire(ShowRangeHandler<java.util.Date> handler)
Adds a show range handler and immediately activate the handler on the current view.
4 void addStyleToDates(java.lang.String styleName, java.util.Date date)

TUTORIALS POINT
Simply Easy Learning Page 129
Add a style name to the given dates.
5
void addStyleToDates(java.lang.String styleName, java.util.Date date, java.util.Date... moreDates)
Add a style name to the given dates.
6
void addStyleToDates(java.lang.String styleName, java.lang.Iterable<java.util.Date> dates)
Add a style name to the given dates.
7 void addTransientStyleToDates(java.lang.String styleName, java.util.Date date)
Adds the given style name to the specified dates, which must be visible.
8
void addTransientStyleToDates(java.lang.String styleName, java.util.Date date, java.util.Date... moreDates)
Adds the given style name to the specified dates, which must be visible.
9
void addTransientStyleToDates(java.lang.String styleName, java.lang.Iterable<java.util.Date> dates)
Adds the given style name to the specified dates, which must be visible.
10
HandlerRegistration addValueChangeHandler(ValueChangeHandler<java.util.Date> handler)
Adds a ValueChangeEvent handler.
11 java.util.Date getCurrentMonth()
Gets the current month the date picker is showing.
12 java.util.Date getFirstDate()
Returns the first shown date.
13 java.util.Date getHighlightedDate()
Gets the highlighted date (the one the mouse is hovering over), if any.
14 java.util.Date getLastDate()
Returns the last shown date.
15 protected CalendarModel getModel()
Gets the CalendarModel associated with this date picker.
16 protected MonthSelector getMonthSelector()
Gets the MonthSelector associated with this date picker.
17
java.lang.String getStyleOfDate(java.util.Date date)
Gets the style associated with a date (does not include styles set via addTransientStyleToDates(java.lang.String, java.util.Date)).
18 java.util.Date getValue()
Returns the selected date, or null if none is selected.
19 protected CalendarView getView()
Gets the CalendarView associated with this date picker.
20 boolean isDateEnabled(java.util.Date date)
Is the visible date enabled?
21 boolean isDateVisible(java.util.Date date)
Is the date currently shown in the date picker?
22
void onLoad()
This method is called immediately after a widget becomes attached to the browser's document.

TUTORIALS POINT
Simply Easy Learning Page 130
23 protected void refreshAll()
Refreshes all components of this date picker.
24 void removeStyleFromDates(java.lang.String styleName, java.util.Date date)
Removes the styleName from the given dates (even if it is transient).
25
void removeStyleFromDates(java.lang.String styleName, java.util.Date date, java.util.Date... moreDates)
Removes the styleName from the given dates (even if it is transient).
26
void removeStyleFromDates(java.lang.String styleName, java.lang.Iterable<java.util.Date> dates)
Removes the styleName from the given dates (even if it is transient).
27
void setCurrentMonth(java.util.Date month)
Sets the date picker to show the given month, use getFirstDate() and getLastDate() to access the exact date range the date picker chose to display.
28 void setStyleName(java.lang.String styleName)
Sets the date picker style name.
29 void setTransientEnabledOnDates(boolean enabled, java.util.Date date)
Sets a visible date to be enabled or disabled.
30
void setTransientEnabledOnDates(boolean enabled, java.util.Date date, java.util.Date... moreDates)
Sets a visible date to be enabled or disabled.
31
void setTransientEnabledOnDates(boolean enabled, java.lang.Iterable<java.util.Date> dates)
Sets a group of visible dates to be enabled or disabled.
32 protected void setup()
Sets up the date picker.
33 void setValue(java.util.Date newValue)
Sets the DatePicker's value.
34 void setValue(java.util.Date newValue, boolean fireEvents)
Sets the DatePicker's value.
Methods inherited
This class inherits methods from the following classes:
com.google.gwt.user.client.ui.UIObject
com.google.gwt.user.client.ui.Widget
com.google.gwt.user.client.ui.Composite
java.lang.Object
DatePicker Widget Example
This example will take you through simple steps to show usage of a DatePicker Widget in GWT. Follow the following steps to update the GWT application we created in GWT - Create Application chapter:

TUTORIALS POINT
Simply Easy Learning Page 131
Step Description
1 Create a project with a name HelloWorld under a package com.tutorialspoint as explained in the GWT - Create Application chapter.
2 Modify HelloWorld.gwt.xml, HelloWorld.css, HelloWorld.html and HelloWorld.java as explained below. Keep rest of the files unchanged.
3 Compile and run the application to verify the result of the implemented logic.
Following is the content of the modified module descriptor src/com.tutorialspoint/HelloWorld.gwt.xml.
<?xml version="1.0" encoding="UTF-8"?>
<module rename-to='helloworld'>
<!-- Inherit the core Web Toolkit stuff. -->
<inherits name='com.google.gwt.user.User'/>
<!-- Inherit the default GWT style sheet. -->
<inherits name='com.google.gwt.user.theme.clean.Clean'/>
<!-- Specify the app entry point class. -->
<entry-point class='com.tutorialspoint.client.HelloWorld'/>
<!-- Specify the paths for translatable code -->
<source path='client'/>
<source path='shared'/>
</module>
Following is the content of the modified Style Sheet file war/HelloWorld.css.
body{
text-align: center;
font-family: verdana, sans-serif;
}
h1{
font-size:2em;
font-weight: bold;
color:#777777;
margin:40px0px70px;
text-align: center;
}
.gwt-DatePicker{
border:1px solid #ccc;
border-top:1px solid #999;
cursor:default;
}
.gwt-DatePicker td,
.datePickerMonthSelector td:focus {
outline: none;
}
.datePickerMonthSelector td:focus {
outline: none;
}
.datePickerDays {
width:100%;
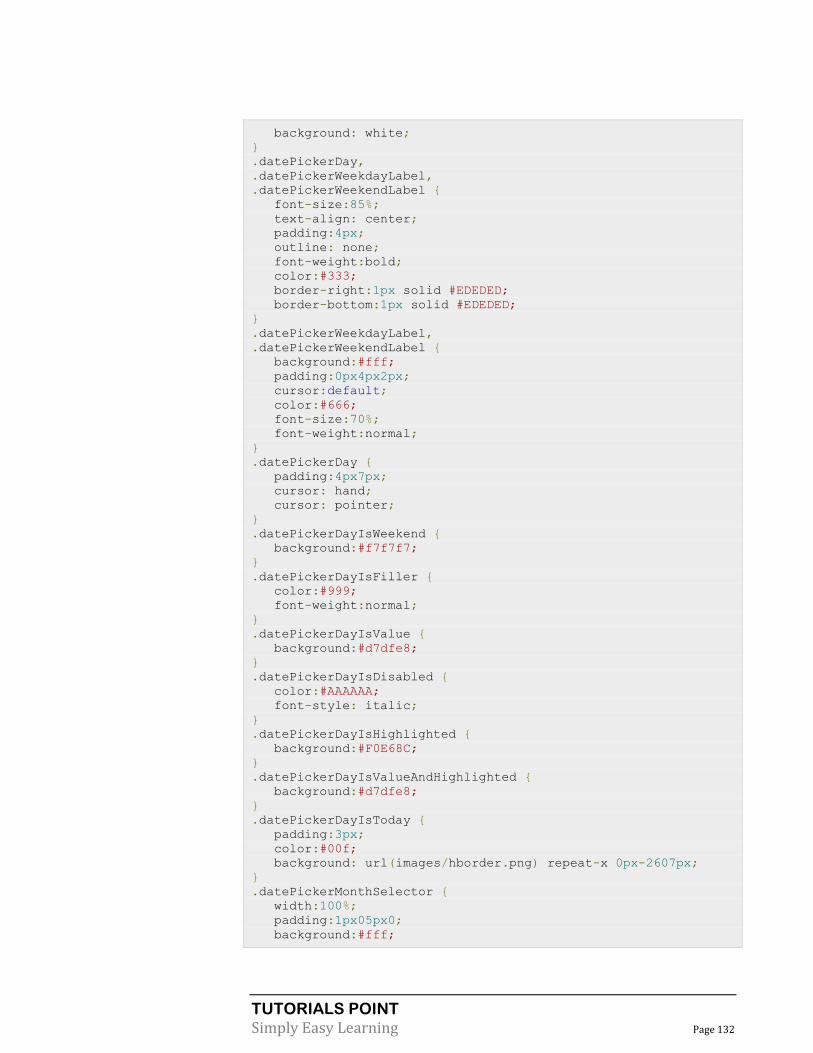
TUTORIALS POINT
Simply Easy Learning Page 132
background: white;
}
.datePickerDay,
.datePickerWeekdayLabel,
.datePickerWeekendLabel {
font-size:85%;
text-align: center;
padding:4px;
outline: none;
font-weight:bold;
color:#333;
border-right:1px solid #EDEDED;
border-bottom:1px solid #EDEDED;
}
.datePickerWeekdayLabel,
.datePickerWeekendLabel {
background:#fff;
padding:0px4px2px;
cursor:default;
color:#666;
font-size:70%;
font-weight:normal;
}
.datePickerDay {
padding:4px7px;
cursor: hand;
cursor: pointer;
}
.datePickerDayIsWeekend {
background:#f7f7f7;
}
.datePickerDayIsFiller {
color:#999;
font-weight:normal;
}
.datePickerDayIsValue {
background:#d7dfe8;
}
.datePickerDayIsDisabled {
color:#AAAAAA;
font-style: italic;
}
.datePickerDayIsHighlighted {
background:#F0E68C;
}
.datePickerDayIsValueAndHighlighted {
background:#d7dfe8;
}
.datePickerDayIsToday {
padding:3px;
color:#00f;
background: url(images/hborder.png) repeat-x 0px-2607px;
}
.datePickerMonthSelector {
width:100%;
padding:1px05px0;
background:#fff;
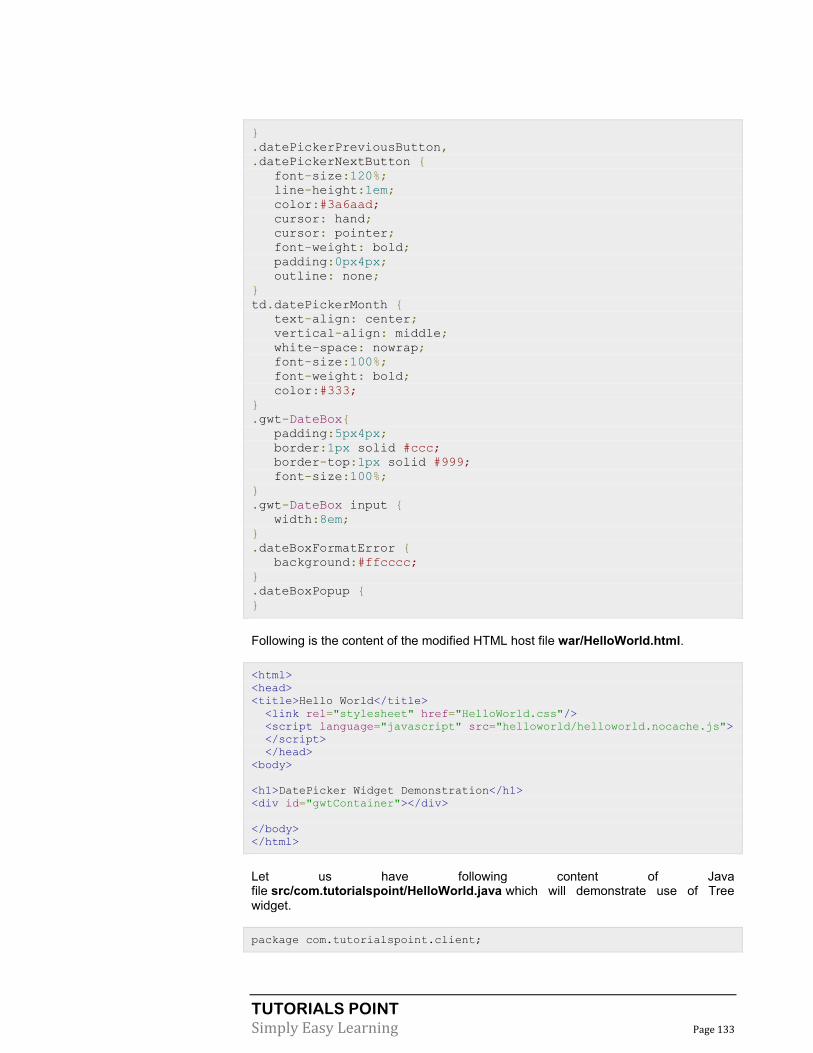
TUTORIALS POINT
Simply Easy Learning Page 133
}
.datePickerPreviousButton,
.datePickerNextButton {
font-size:120%;
line-height:1em;
color:#3a6aad;
cursor: hand;
cursor: pointer;
font-weight: bold;
padding:0px4px;
outline: none;
}
td.datePickerMonth {
text-align: center;
vertical-align: middle;
white-space: nowrap;
font-size:100%;
font-weight: bold;
color:#333;
}
.gwt-DateBox{
padding:5px4px;
border:1px solid #ccc;
border-top:1px solid #999;
font-size:100%;
}
.gwt-DateBox input {
width:8em;
}
.dateBoxFormatError {
background:#ffcccc;
}
.dateBoxPopup {
}
Following is the content of the modified HTML host file war/HelloWorld.html.
<html>
<head>
<title>Hello World</title>
<link rel="stylesheet" href="HelloWorld.css"/>
<script language="javascript" src="helloworld/helloworld.nocache.js">
</script>
</head>
<body>
<h1>DatePicker Widget Demonstration</h1>
<div id="gwtContainer"></div>
</body>
</html>
Let us have following content of Java file src/com.tutorialspoint/HelloWorld.java which will demonstrate use of Tree widget.
package com.tutorialspoint.client;

TUTORIALS POINT
Simply Easy Learning Page 134
import java.util.Date;
import com.google.gwt.core.client.EntryPoint;
import com.google.gwt.event.logical.shared.ValueChangeEvent;
import com.google.gwt.event.logical.shared.ValueChangeHandler;
import com.google.gwt.i18n.client.DateTimeFormat;
import com.google.gwt.user.client.ui.Label;
import com.google.gwt.user.client.ui.RootPanel;
import com.google.gwt.user.client.ui.VerticalPanel;
import com.google.gwt.user.datepicker.client.DateBox;
import com.google.gwt.user.datepicker.client.DatePicker;
public class HelloWorld implements EntryPoint{
public void onModuleLoad(){
// Create a basic date picker
DatePicker datePicker =new DatePicker();
finalLabel text =new Label();
// Set the value in the text box when the user selects a date
datePicker.addValueChangeHandler(new ValueChangeHandler<Date>(){
@Override
public void onValueChange(ValueChangeEvent<Date> event){
Date date =event.getValue();
String dateString =
DateTimeFormat.getFormat("MM/dd/yyyy").format(date);
text.setText(dateString);
}
});
// Set the default value
datePicker.setValue(new Date(),true);
// Create a DateBox
DateTimeFormat dateFormat =DateTimeFormat.getFormat("MM/dd/yyyy");
DateBox dateBox =new DateBox();
dateBox.setFormat(new DateBox.DefaultFormat(dateFormat));
Label selectLabel =new Label("Permanent DatePicker:");
Label selectLabel2 =new Label("DateBox with popup DatePicker:");
// Add widgets to the root panel.
VerticalPanel vPanel =new VerticalPanel();
vPanel.setSpacing(10);
vPanel.add(selectLabel);
vPanel.add(text);
vPanel.add(datePicker);
vPanel.add(selectLabel2);
vPanel.add(dateBox);
RootPanel.get("gwtContainer").add(vPanel);
}
}
Once you are ready with all the changes done, let us compile and run the application in development mode as we did in GWT - Create Application chapter. If everything is fine with your application, this will produce following result:
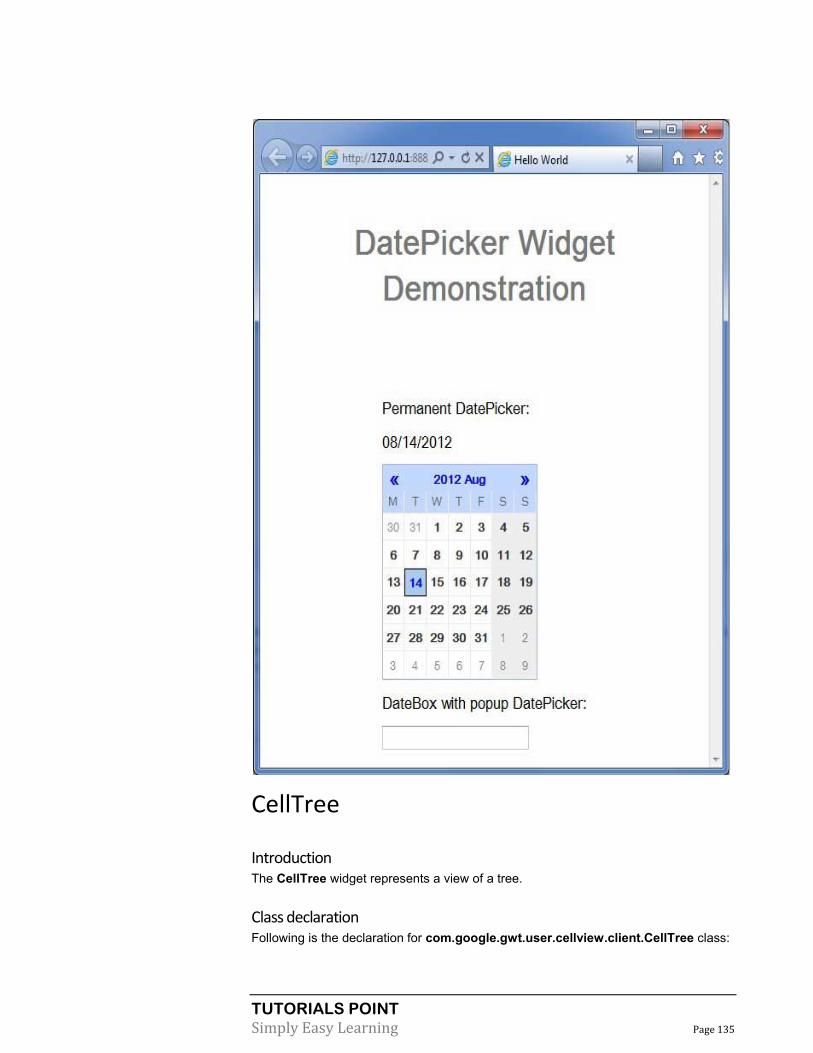
TUTORIALS POINT
Simply Easy Learning Page 135
CellTree
Introduction The CellTree widget represents a view of a tree.
Class declaration Following is the declaration for com.google.gwt.user.cellview.client.CellTree class:

TUTORIALS POINT
Simply Easy Learning Page 136
public class CellTree
extends AbstractCellTree
implements HasAnimation,Focusable
Class constructors
S.N. Constructor & Description
1 CellTree(TreeViewModel viewModel, T rootValue)
Construct a new CellTree.
2 CellTree(TreeViewModel viewModel, T rootValue, CellTree.Resources resources)
Construct a new CellTree.
Class methods
S.N. Function name & Description
1 protected char getAccessKey()
Get the access key.
2 CellTree.NodeAnimation getAnimation()
Get the animation used to open and close nodes in this tree if animations are enabled.
3 int getDefaultNodeSize()
Get the default maximum number of children to display under each tree node.
4 TreeNode getRootTreeNode()
Get the root TreeNode.
5 int getTabIndex()
Gets the widget's position in the tab index.
6 boolean isAnimationEnabled()
Returns true if animations are enabled, false if not.
7 protected void onBlur()
Called when the keyboard selected node loses focus.
8 void onBrowserEvent(Event event)
Fired whenever a browser event is received.
9 protected void onFocus()
Called when the keyboard selected node gains focus.
10 void setAccessKey(char key)
Sets the widget's 'access key'.
11 void setAnimation(CellTree.NodeAnimation animation)
Set the animation used to open and close nodes in this tree.
12 void setAnimationEnabled(boolean enable)
Enable or disable animations.
13 void setDefaultNodeSize(int defaultNodeSize)
Set the default number of children to display beneath each child node.
14 void setFocus(boolean focused)
Explicitly focus/unfocus this widget.

TUTORIALS POINT
Simply Easy Learning Page 137
15 void setTabIndex(int index)
Sets the widget's position in the tab index.
Methods inherited
This class inherits methods from the following classes:
com.google.gwt.user.client.ui.UIObject
com.google.gwt.user.client.ui.Widget
com.google.gwt.user.client.ui.Composite
com.google.gwt.user.cellview.client.AbstractCellTree
java.lang.Object
CellTree Widget Example
This example will take you through simple steps to show usage of a CellTree Widget in GWT. Follow the following steps to update the GWT application we created in GWT - Create Application chapter:
Step Description
1 Create a project with a name HelloWorld under a package com.tutorialspoint as explained in the GWT - Create Application chapter.
2 Modify HelloWorld.gwt.xml, HelloWorld.css, HelloWorld.html and HelloWorld.java as
explained below. Keep rest of the files unchanged.
3 Compile and run the application to verify the result of the implemented logic.
Following is the content of the modified module descriptor src/com.tutorialspoint/HelloWorld.gwt.xml.
<?xml version="1.0" encoding="UTF-8"?>
<module rename-to='helloworld'>
<!-- Inherit the core Web Toolkit stuff. -->
<inherits name='com.google.gwt.user.User'/>
<!-- Inherit the default GWT style sheet. -->
<inherits name='com.google.gwt.user.theme.clean.Clean'/>
<!-- Specify the app entry point class. -->
<entry-point class='com.tutorialspoint.client.HelloWorld'/>
<!-- Specify the paths for translatable code -->
<source path='client'/>
<source path='shared'/>
</module>
Following is the content of the modified Style Sheet file war/HelloWorld.css.

TUTORIALS POINT
Simply Easy Learning Page 138
body{
text-align: center;
font-family: verdana, sans-serif;
}
h1{
font-size:2em;
font-weight: bold;
color:#777777;
margin:40px0px70px;
text-align: center;
}
Following is the content of the modified HTML host file war/HelloWorld.html.
<html>
<head>
<title>Hello World</title>
<link rel="stylesheet" href="HelloWorld.css"/>
<script language="javascript" src="helloworld/helloworld.nocache.js">
</script>
</head>
<body>
<h1>CellTree Widget Demonstration</h1>
<div id="gwtContainer"></div>
</body>
</html>
Let us have following content of Java file src/com.tutorialspoint/HelloWorld.java which will demonstrate use of CellTree widget.
package com.tutorialspoint.client;
import java.util.ArrayList;
import java.util.List;
import com.google.gwt.cell.client.AbstractCell;
import com.google.gwt.cell.client.Cell;
import com.google.gwt.cell.client.TextCell;
import com.google.gwt.core.client.EntryPoint;
import com.google.gwt.core.client.GWT;
import com.google.gwt.safehtml.shared.SafeHtmlBuilder;
import com.google.gwt.user.cellview.client.CellTree;
import com.google.gwt.user.cellview.client.
HasKeyboardSelectionPolicy.KeyboardSelectionPolicy;
import com.google.gwt.user.cellview.client.TreeNode;
import com.google.gwt.user.client.ui.RootPanel;
import com.google.gwt.user.client.ui.VerticalPanel;
import com.google.gwt.view.client.ListDataProvider;
import com.google.gwt.view.client.SingleSelectionModel;
import com.google.gwt.view.client.TreeViewModel;
public class HelloWorld implements EntryPoint{
/**
* A list of songs.
*/
private static class Playlist{
private final String name;

TUTORIALS POINT
Simply Easy Learning Page 139
private final List<String> songs =new ArrayList<String>();
public Playlist(String name){
this.name = name;
}
/**
* Add a song to the playlist.
*
* @param name the name of the song
*/
public void addSong(String name){
songs.add(name);
}
Public String getName(){
return name;
}
/**
* Return the list of songs in the playlist.
*/
public List<String> getSongs(){
return songs;
}
}
/**
* A composer of classical music.
*/
private static class Composer{
private final String name;
privatefinalList<Playlist> playlists =new ArrayList<Playlist>();
public Composer(String name){
this.name = name;
}
/**
* Add a playlist to the composer.
*
* @param playlist the playlist to add
*/
public Playlist addPlaylist(Playlist playlist){
playlists.add(playlist);
return playlist;
}
publicString getName(){
return name;
}
/**
* Return the rockin' playlist for this composer.
*/
public List<Playlist> getPlaylists(){
return playlists;
}
}
/**
* The model that defines the nodes in the tree.
*/
private static class CustomTreeModel implements TreeViewModel{

TUTORIALS POINT
Simply Easy Learning Page 140
private final List<Composer> composers;
/**
* This selection model is shared across all leaf nodes.
* A selection model can also be shared across all nodes
* in the tree, or each set of child nodes can have
* its own instance. This gives you flexibility to
* determine how nodes are selected.
*/
private final SingleSelectionModel<String> selectionModel
=new SingleSelectionModel<String>();
public CustomTreeModel(){
// Create a database of information.
composers =new ArrayList<Composer>();
// Add compositions by Beethoven.
{
Composer beethoven =new Composer("Beethoven");
composers.add(beethoven);
Playlist concertos = beethoven.addPlaylist(
new Playlist("Concertos"));
concertos.addSong("No. 1 - C");
concertos.addSong("No. 2 - B-Flat Major");
concertos.addSong("No. 3 - C Minor");
concertos.addSong("No. 4 - G Major");
concertos.addSong("No. 5 - E-Flat Major");
Playlist quartets = beethoven.addPlaylist(
new Playlist("Quartets"));
quartets.addSong("Six String Quartets");
quartets.addSong("Three String Quartets");
quartets.addSong("Grosse Fugue for String Quartets");
Playlist sonatas = beethoven.addPlaylist(
new Playlist("Sonatas"));
sonatas.addSong("Sonata in A Minor");
sonatas.addSong("Sonata in F Major");
Playlist symphonies = beethoven.addPlaylist(
new Playlist("Symphonies"));
symphonies.addSong("No. 2 - D Major");
symphonies.addSong("No. 2 - D Major");
symphonies.addSong("No. 3 - E-Flat Major");
symphonies.addSong("No. 4 - B-Flat Major");
symphonies.addSong("No. 5 - C Minor");
symphonies.addSong("No. 6 - F Major");
symphonies.addSong("No. 7 - A Major");
symphonies.addSong("No. 8 - F Major");
symphonies.addSong("No. 9 - D Minor");
}
// Add compositions by Brahms.
{
Composer brahms =newComposer("Brahms");
composers.add(brahms);
Playlist concertos = brahms.addPlaylist(
newPlaylist("Concertos"));
concertos.addSong("Violin Concerto");
concertos.addSong("Double Concerto - A Minor");
concertos.addSong("Piano Concerto No. 1 - D Minor");
concertos.addSong("Piano Concerto No. 2 - B-Flat Major");

TUTORIALS POINT
Simply Easy Learning Page 141
Playlist quartets = brahms.addPlaylist(
New Playlist("Quartets"));
quartets.addSong("Piano Quartet No. 1 - G Minor");
quartets.addSong("Piano Quartet No. 2 - A Major");
quartets.addSong("Piano Quartet No. 3 - C Minor");
quartets.addSong("String Quartet No. 3 - B-Flat Minor");
Playlist sonatas = brahms.addPlaylist(
New Playlist("Sonatas"));
sonatas.addSong("Two Sonatas for Clarinet - F Minor");
sonatas.addSong("Two Sonatas for Clarinet - E-Flat Major");
Playlist symphonies = brahms.addPlaylist(
new Playlist("Symphonies"));
symphonies.addSong("No. 1 - C Minor");
symphonies.addSong("No. 2 - D Minor");
symphonies.addSong("No. 3 - F Major");
symphonies.addSong("No. 4 - E Minor");
}
// Add compositions by Mozart.
{
Composer mozart =newComposer("Mozart");
composers.add(mozart);
Playlist concertos = mozart.addPlaylist(
new Playlist("Concertos"));
concertos.addSong("Piano Concerto No. 12");
concertos.addSong("Piano Concerto No. 17");
concertos.addSong("Clarinet Concerto");
concertos.addSong("Violin Concerto No. 5");
concertos.addSong("Violin Concerto No. 4");
}
}
/**
* Get the {@link NodeInfo} that provides the children of the
* specified value.
*/
public<T>NodeInfo<?> getNodeInfo(T value){
if(value ==null){
// LEVEL 0.
// We passed null as the root value. Return the composers.
// Create a data provider that contains the list of composers.
ListDataProvider<Composer> dataProvider
=new ListDataProvider<HelloWorld.Composer>(
composers);
// Create a cell to display a composer.
Cell<HelloWorld.Composer> cell
=new AbstractCell<HelloWorld.Composer>(){
@Override
public void render(Composer value,Object key,
SafeHtmlBuilder sb){
if(value !=null){
sb.appendHtmlConstant(" ");
sb.appendEscaped(value.getName());
}
}
};
// Return a node info that pairs the data provider and the cell.
Return newDefaultNodeInfo<Composer>(dataProvider, cell);

TUTORIALS POINT
Simply Easy Learning Page 142
}elseif(value instanceofComposer){
// LEVEL 1.
// We want the children of the composer. Return the playlists.
ListDataProvider<HelloWorld.Playlist> dataProvider
=new ListDataProvider<HelloWorld.Playlist>(
((Composer) value).getPlaylists());
Cell<HelloWorld.Playlist> cell =
new AbstractCell<HelloWorld.Playlist>(){
@Override
public void render(Playlist value,Object key,
SafeHtmlBuilder sb){
if(value !=null){
sb.appendHtmlConstant(" ");
sb.appendEscaped(value.getName());
}
}
};
return new DefaultNodeInfo<Playlist>(dataProvider, cell);
}elseif(value instanceofPlaylist){
// LEVEL 2 - LEAF.
// We want the children of the playlist. Return the songs.
ListDataProvider<String> dataProvider
=new ListDataProvider<String>(
((Playlist) value).getSongs());
// Use the shared selection model.
return newDefaultNodeInfo<String>(dataProvider,newTextCell(),
selectionModel,null);
}
return null;
}
/**
* Check if the specified value represents a leaf node.
* Leaf nodes cannot be opened.
*/
public boolean isLeaf(Object value){
// The leaf nodes are the songs, which are Strings.
if(value instanceofString){
return true;
}
returnfalse;
}
}
public void onModuleLoad(){
// Create a model for the tree.
TreeViewModel model =new CustomTreeModel();
//Get CellTree style using its BasicResources
//CellTree.Resources res = GWT.create(CellTree.BasicResources.class);
/*
* Create the tree using the model. We use <code>null</code>
* as the default value of the root node. The default value will
* be passed to CustomTreeModel#getNodeInfo();
*/
CellTree tree =new CellTree(model,null);
tree.setKeyboardSelectionPolicy(KeyboardSelectionPolicy.ENABLED);
// Open the first playlist by default.
TreeNode rootNode = tree.getRootTreeNode();
TreeNode firstPlaylist = rootNode.setChildOpen(0,true);
firstPlaylist.setChildOpen(0,true);

TUTORIALS POINT
Simply Easy Learning Page 143
VerticalPanel panel =newVerticalPanel()
panel.setBorderWidth(1);
panel.setWidth("300");
panel.add(tree);
// Add the widgets to the root panel.
RootPanel.get().add(panel);
}
}
Once you are ready with all the changes done, let us compile and run the application in development mode as we did in GWT - Create Application chapter. If everything is fine with your application, this will produce following result:
CellList

TUTORIALS POINT
Simply Easy Learning Page 144
Introduction
The CellList widget represents a single column list of cells.
Class declaration
Following is the declaration for com.google.gwt.user.cellview.client.CellList<T> class:
public class CellList<T>
extends AbstractHasData<T>
Class constructors
S.N. Constructor & Description
1 CellList(Cell<T> cell)
Construct a new CellList.
2 CellList(Cell<T> cell, CellList.Resources resources)
Construct a new CellList with the specified CellList.Resources.
3 CellList(Cell<T> cell, CellList.Resources resources, ProvidesKey<T> keyProvider)
Construct a new CellList with the specified CellList.Resources and key provider.
4 CellList(Cell<T> cell, ProvidesKey<T> keyProvider)
Construct a new CellList with the specified key provider.
Class methods S.N. Function name & Description
1 protected boolean dependsOnSelection()
Check whether or not the cells in the view depend on the selection state.
2
protected void doSelection(Event event, T value, int indexOnPage)
Deprecated. use AbstractHasData.addCellPreviewHandler(com.google.gwt.view.client.CellPreviewEvent.Handler) instead
3
protected void fireEventToCell(Cell.Context context, Event event, Element parent, T value)
Fire an event to the cell.
4 protected Cell<T> getCell()
Return the cell used to render each item.
5 protected Element getCellParent(Element item)
Get the parent element that wraps the cell from the list item.
6 protected Element getChildContainer()
Return the element that holds the rendered cells.
7 SafeHtml getEmptyListMessage()
Get the message that is displayed when there is no data.
8 protected Element getKeyboardSelectedElement()
Get the element that has keyboard selection.

TUTORIALS POINT
Simply Easy Learning Page 145
9 Element getRowElement(int indexOnPage)
Get the Element for the specified index.
10 protected boolean isKeyboardNavigationSuppressed()
Check if keyboard navigation is being suppressed, such as when the user is editing a cell.
11 protected void onBlur()
Called when the widget is blurred.
12 protected void onBrowserEvent2(Event event)
Called after AbstractHasData.onBrowserEvent(Event) completes.
13 protected void onFocus()
Called when the widget is focused.
14
protected void renderRowValues(SafeHtmlBuilder sb, java.util.List<T> values, int start, SelectionModel<? super T> selectionModel)
Render all row values into the specified SafeHtmlBuilder.
15 protected boolean resetFocusOnCell()
Reset focus on the currently focused cell.
16 void setEmptyListMessage(SafeHtml html)
Set the message to display when there is no data.
17
protected void setKeyboardSelected(int index, boolean selected, boolean stealFocus)
Update an element to reflect its keyboard selected state.
18
protected void setSelected(Element elem, boolean selected)
Deprecated. this method is never called by AbstractHasData, render the selected styles in renderRowValues(SafeHtmlBuilder, List, int, SelectionModel)
19 void setValueUpdater(ValueUpdater<T> valueUpdater)
Set the value updater to use when cells modify items.
Methods inherited
This class inherits methods from the following classes:
com.google.gwt.user.client.ui.UIObject
com.google.gwt.user.client.ui.Widget
com.google.gwt.user.cellview.client.AbstractHasData
java.lang.Object
CellList Widget Example This example will take you through simple steps to show usage of a CellList Widget in GWT. Follow the following steps to update the GWT application we created in GWT - Create Application chapter:
Step Description
1 Create a project with a name HelloWorld under a package com.tutorialspoint as explained in the GWT - Create Application chapter.
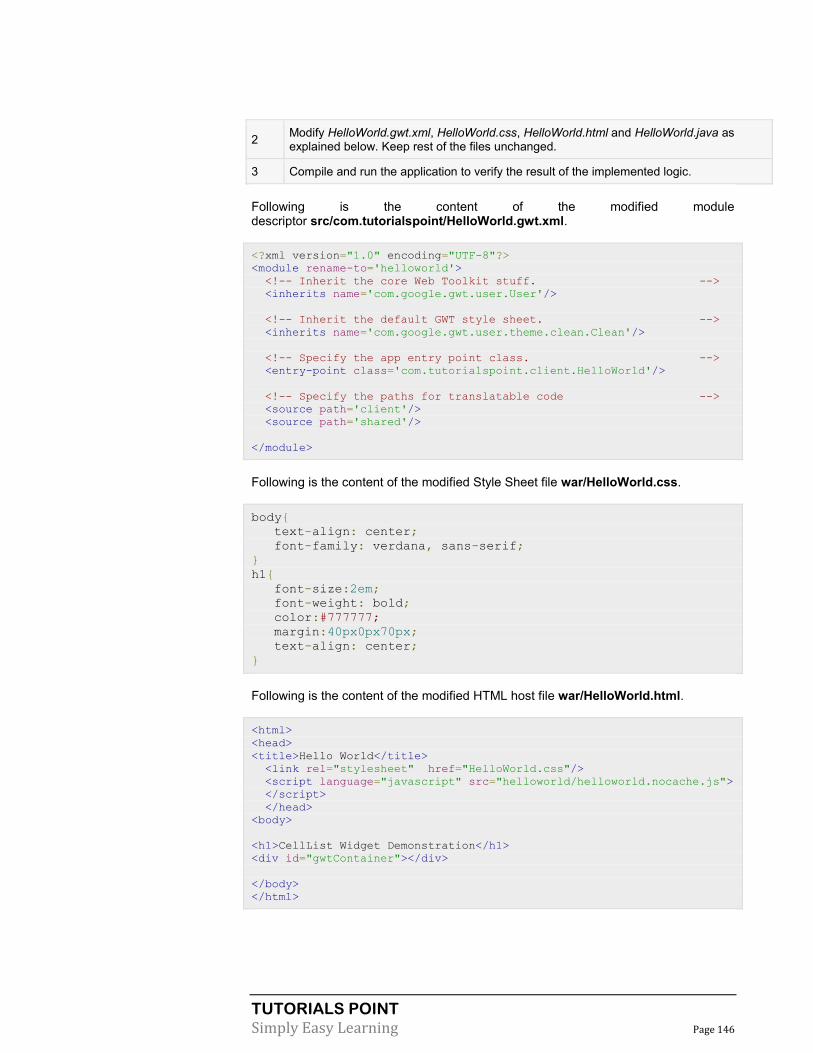
TUTORIALS POINT
Simply Easy Learning Page 146
2 Modify HelloWorld.gwt.xml, HelloWorld.css, HelloWorld.html and HelloWorld.java as explained below. Keep rest of the files unchanged.
3 Compile and run the application to verify the result of the implemented logic.
Following is the content of the modified module descriptor src/com.tutorialspoint/HelloWorld.gwt.xml.
<?xml version="1.0" encoding="UTF-8"?>
<module rename-to='helloworld'>
<!-- Inherit the core Web Toolkit stuff. -->
<inherits name='com.google.gwt.user.User'/>
<!-- Inherit the default GWT style sheet. -->
<inherits name='com.google.gwt.user.theme.clean.Clean'/>
<!-- Specify the app entry point class. -->
<entry-point class='com.tutorialspoint.client.HelloWorld'/>
<!-- Specify the paths for translatable code -->
<source path='client'/>
<source path='shared'/>
</module>
Following is the content of the modified Style Sheet file war/HelloWorld.css.
body{
text-align: center;
font-family: verdana, sans-serif;
}
h1{
font-size:2em;
font-weight: bold;
color:#777777;
margin:40px0px70px;
text-align: center;
}
Following is the content of the modified HTML host file war/HelloWorld.html.
<html>
<head>
<title>Hello World</title>
<link rel="stylesheet" href="HelloWorld.css"/>
<script language="javascript" src="helloworld/helloworld.nocache.js">
</script>
</head>
<body>
<h1>CellList Widget Demonstration</h1>
<div id="gwtContainer"></div>
</body>
</html>

TUTORIALS POINT
Simply Easy Learning Page 147
Let us have following content of Java file src/com.tutorialspoint/HelloWorld.java which will demonstrate use of CellList widget.
package com.tutorialspoint.client;
import java.util.Arrays;
import java.util.List;
import com.google.gwt.cell.client.AbstractCell;
import com.google.gwt.cell.client.Cell;
import com.google.gwt.core.client.EntryPoint;
import com.google.gwt.safehtml.shared.SafeHtmlBuilder;
import com.google.gwt.user.cellview.client.CellList;
import com.google.gwt.user.client.ui.RootPanel;
import com.google.gwt.user.client.ui.VerticalPanel;
import com.google.gwt.view.client.ProvidesKey;
import com.google.gwt.view.client.SelectionModel;
import com.google.gwt.view.client.SingleSelectionModel;
public class HelloWorld implements EntryPoint{
/**
* A simple data type that represents a contact.
*/
private static class Contact{
private static int nextId =0;
private final int id;
private String name;
public Contact(String name){
nextId++;
this.id = nextId;
this.name = name;
}
}
/**
* A custom {@link Cell} used to render a {@link Contact}.
*/
private static classContactCell extends AbstractCell<Contact>{
@Override
public void render(Contact value,Object key,SafeHtmlBuilder sb){
if(value !=null){
sb.appendEscaped(value.name);
}
}
}
/**
* The list of data to display.
*/
private static final List<Contact> CONTACTS =Arrays.asList(newContact(
"John"),newContact("Joe"),new Contact("Michael"),
newContact("Sarah"),new Contact("George"));
public void onModuleLoad(){
/*
* Define a key provider for a Contact. We use the unique ID
* as the key, which allows to maintain selection even if the
* name changes.
*/
ProvidesKey<Contact> keyProvider =new ProvidesKey<Contact>(){
public Object getKey(Contact item){
// Always do a null check.
return(item ==null)?null: item.id;

TUTORIALS POINT
Simply Easy Learning Page 148
}
};
// Create a CellList using the keyProvider.
CellList<Contact> cellList =newCellList<Contact>(newContactCell(),
keyProvider);
// Push data into the CellList.
cellList.setRowCount(CONTACTS.size(),true);
cellList.setRowData(0, CONTACTS);
// Add a selection model using the same keyProvider.
SelectionModel<Contact> selectionModel
=new SingleSelectionModel<Contact>(
keyProvider);
cellList.setSelectionModel(selectionModel);
/*
* Select a contact. The selectionModel will select based on the
* ID because we used a keyProvider.
*/
Contact sarah = CONTACTS.get(3);
selectionModel.setSelected(sarah,true);
// Modify the name of the contact.
sarah.name ="Sara";
/*
* Redraw the CellList. Sarah/Sara will still be selected because we
* identify her by ID. If we did not use a keyProvider,
* Sara would not be selected.
*/
cellList.redraw();
VerticalPanel panel =new VerticalPanel();
panel.setBorderWidth(1);
panel.setWidth("200");
panel.add(cellList);
// Add the widgets to the root panel.
RootPanel.get().add(panel);
}
}
Once you are ready with all the changes done, let us compile and run the application in development mode as we did in GWT - Create Application chapter. If everything is fine with your application, this will produce following result:
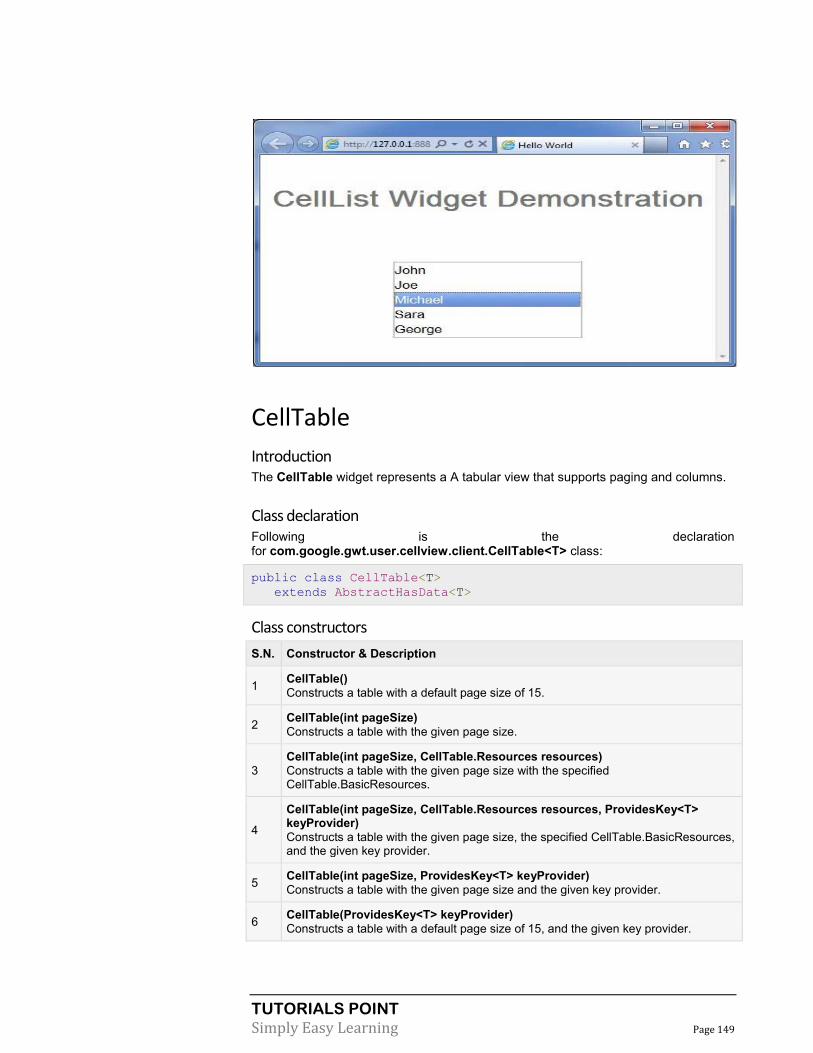
TUTORIALS POINT
Simply Easy Learning Page 149
CellTable
Introduction The CellTable widget represents a A tabular view that supports paging and columns.
Class declaration Following is the declaration for com.google.gwt.user.cellview.client.CellTable<T> class:
public class CellTable<T>
extends AbstractHasData<T>
Class constructors
S.N. Constructor & Description
1 CellTable()
Constructs a table with a default page size of 15.
2 CellTable(int pageSize)
Constructs a table with the given page size.
3
CellTable(int pageSize, CellTable.Resources resources)
Constructs a table with the given page size with the specified CellTable.BasicResources.
4
CellTable(int pageSize, CellTable.Resources resources, ProvidesKey<T> keyProvider)
Constructs a table with the given page size, the specified CellTable.BasicResources, and the given key provider.
5 CellTable(int pageSize, ProvidesKey<T> keyProvider)
Constructs a table with the given page size and the given key provider.
6 CellTable(ProvidesKey<T> keyProvider)
Constructs a table with a default page size of 15, and the given key provider.
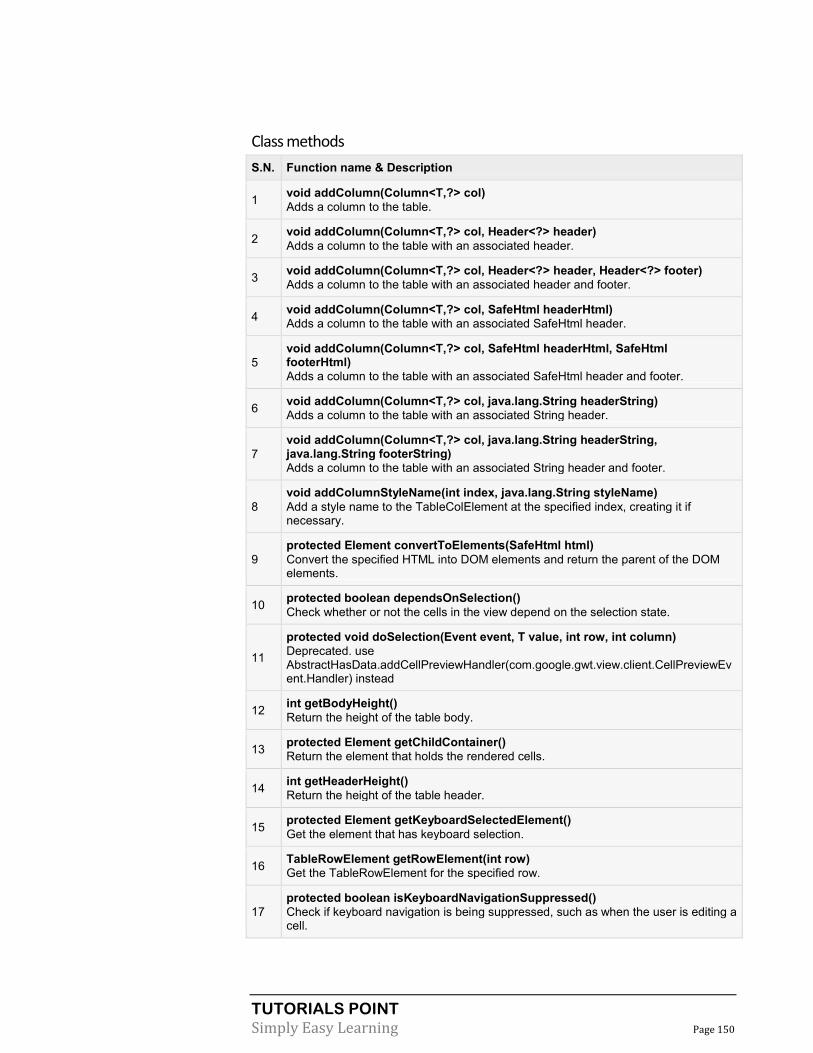
TUTORIALS POINT
Simply Easy Learning Page 150
Class methods
S.N. Function name & Description
1 void addColumn(Column<T,?> col)
Adds a column to the table.
2 void addColumn(Column<T,?> col, Header<?> header)
Adds a column to the table with an associated header.
3 void addColumn(Column<T,?> col, Header<?> header, Header<?> footer)
Adds a column to the table with an associated header and footer.
4 void addColumn(Column<T,?> col, SafeHtml headerHtml)
Adds a column to the table with an associated SafeHtml header.
5
void addColumn(Column<T,?> col, SafeHtml headerHtml, SafeHtml footerHtml)
Adds a column to the table with an associated SafeHtml header and footer.
6 void addColumn(Column<T,?> col, java.lang.String headerString)
Adds a column to the table with an associated String header.
7
void addColumn(Column<T,?> col, java.lang.String headerString, java.lang.String footerString)
Adds a column to the table with an associated String header and footer.
8
void addColumnStyleName(int index, java.lang.String styleName)
Add a style name to the TableColElement at the specified index, creating it if necessary.
9
protected Element convertToElements(SafeHtml html)
Convert the specified HTML into DOM elements and return the parent of the DOM elements.
10 protected boolean dependsOnSelection()
Check whether or not the cells in the view depend on the selection state.
11
protected void doSelection(Event event, T value, int row, int column)
Deprecated. use AbstractHasData.addCellPreviewHandler(com.google.gwt.view.client.CellPreviewEvent.Handler) instead
12 int getBodyHeight()
Return the height of the table body.
13 protected Element getChildContainer()
Return the element that holds the rendered cells.
14 int getHeaderHeight()
Return the height of the table header.
15 protected Element getKeyboardSelectedElement()
Get the element that has keyboard selection.
16 TableRowElement getRowElement(int row)
Get the TableRowElement for the specified row.
17
protected boolean isKeyboardNavigationSuppressed()
Check if keyboard navigation is being suppressed, such as when the user is editing a cell.

TUTORIALS POINT
Simply Easy Learning Page 151
18 protected void onBlur()
Called when the widget is blurred.
19 protected void onBrowserEvent2(Event event)
Called after AbstractHasData.onBrowserEvent(Event) completes.
20 protected void onFocus()
Called when the widget is focused.
21 void redrawFooters()
Redraw the table's footers.
22 void redrawHeaders()
Redraw the table's headers.
23 void removeColumn(Column<T,?> col)
Remove a column.
24 void removeColumn(int index)
Remove a column.
25 void removeColumnStyleName(int index, java.lang.String styleName)
Remove a style from the TableColElement at the specified index.
26
protected void renderRowValues(SafeHtmlBuilder sb, java.util.List<T> values, int start, SelectionModel<? super T> selectionModel)
Render all row values into the specified SafeHtmlBuilder.
27 protected void replaceAllChildren(java.util.List<T> values, SafeHtml html)
Replace all children with the specified html.
28 protected boolean resetFocusOnCell()
Reset focus on the currently focused cell.
29
protected void setKeyboardSelected(int index, boolean selected, boolean stealFocus)
Update an element to reflect its keyboard selected state.
30
void setRowStyles(RowStyles<T> rowStyles)
Sets the object used to determine how a row is styled; the change will take effect the next time that the table is rendered.
31
protected void setSelected(Element elem, boolean selected)
Deprecated. this method is never called by AbstractHasData, render the selected styles in renderRowValues(SafeHtmlBuilder, List, int, SelectionModel)
Methods inherited
This class inherits methods from the following classes:
com.google.gwt.user.client.ui.UIObject
com.google.gwt.user.client.ui.Widget
com.google.gwt.user.cellview.client.AbstractHasData
java.lang.Object
CellTable Widget Example
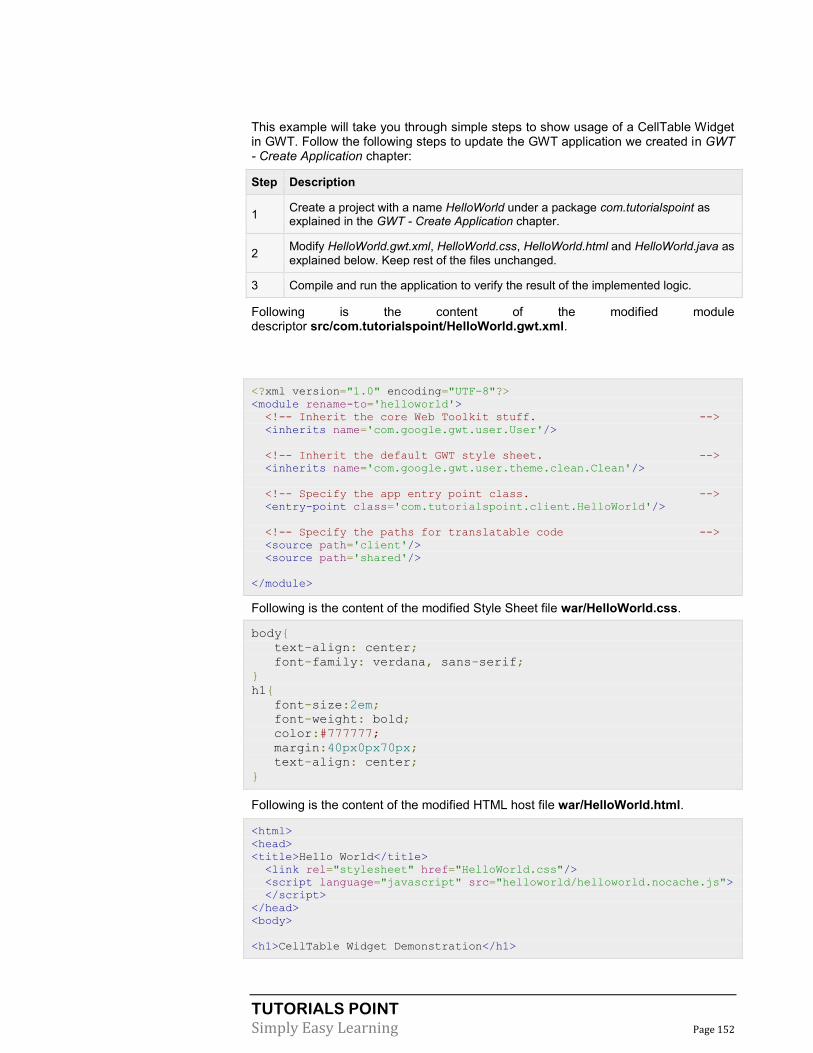
TUTORIALS POINT
Simply Easy Learning Page 152
This example will take you through simple steps to show usage of a CellTable Widget in GWT. Follow the following steps to update the GWT application we created in GWT - Create Application chapter:
Step Description
1 Create a project with a name HelloWorld under a package com.tutorialspoint as explained in the GWT - Create Application chapter.
2 Modify HelloWorld.gwt.xml, HelloWorld.css, HelloWorld.html and HelloWorld.java as
explained below. Keep rest of the files unchanged.
3 Compile and run the application to verify the result of the implemented logic.
Following is the content of the modified module descriptor src/com.tutorialspoint/HelloWorld.gwt.xml.
<?xml version="1.0" encoding="UTF-8"?>
<module rename-to='helloworld'>
<!-- Inherit the core Web Toolkit stuff. -->
<inherits name='com.google.gwt.user.User'/>
<!-- Inherit the default GWT style sheet. -->
<inherits name='com.google.gwt.user.theme.clean.Clean'/>
<!-- Specify the app entry point class. -->
<entry-point class='com.tutorialspoint.client.HelloWorld'/>
<!-- Specify the paths for translatable code -->
<source path='client'/>
<source path='shared'/>
</module>
Following is the content of the modified Style Sheet file war/HelloWorld.css.
body{
text-align: center;
font-family: verdana, sans-serif;
}
h1{
font-size:2em;
font-weight: bold;
color:#777777;
margin:40px0px70px;
text-align: center;
}
Following is the content of the modified HTML host file war/HelloWorld.html.
<html>
<head>
<title>Hello World</title>
<link rel="stylesheet" href="HelloWorld.css"/>
<script language="javascript" src="helloworld/helloworld.nocache.js">
</script>
</head>
<body>
<h1>CellTable Widget Demonstration</h1>
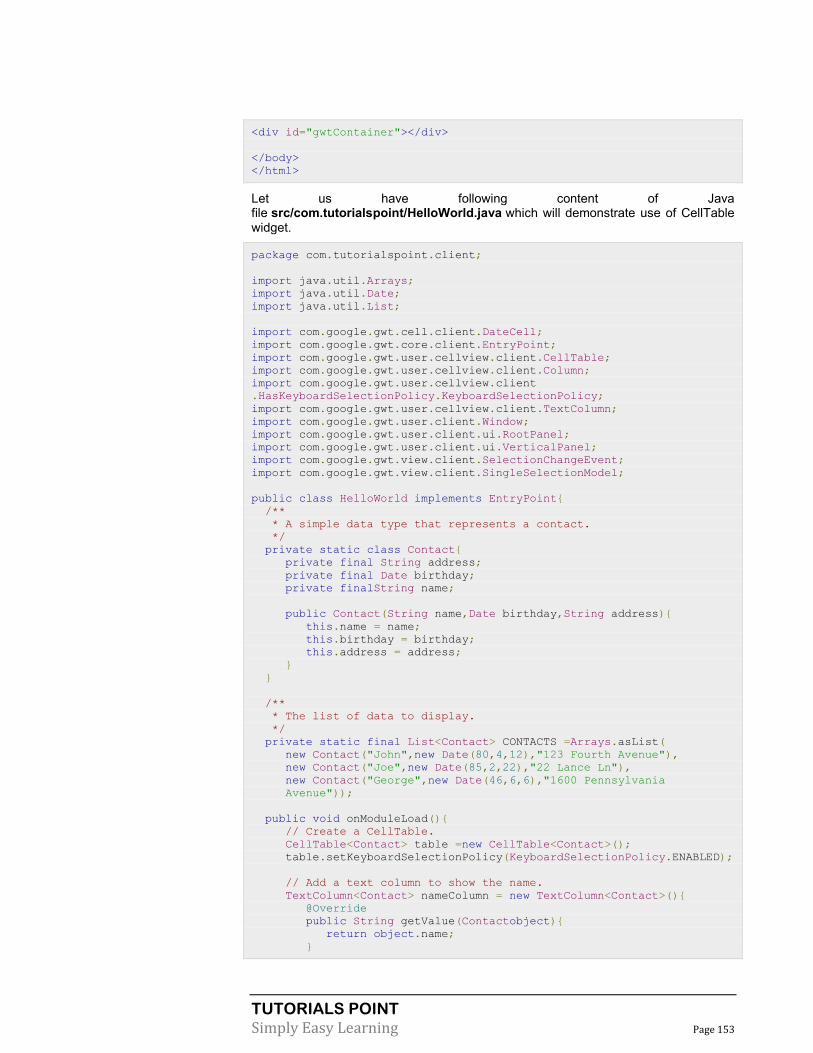
TUTORIALS POINT
Simply Easy Learning Page 153
<div id="gwtContainer"></div>
</body>
</html>
Let us have following content of Java file src/com.tutorialspoint/HelloWorld.java which will demonstrate use of CellTable widget.
package com.tutorialspoint.client;
import java.util.Arrays;
import java.util.Date;
import java.util.List;
import com.google.gwt.cell.client.DateCell;
import com.google.gwt.core.client.EntryPoint;
import com.google.gwt.user.cellview.client.CellTable;
import com.google.gwt.user.cellview.client.Column;
import com.google.gwt.user.cellview.client
.HasKeyboardSelectionPolicy.KeyboardSelectionPolicy;
import com.google.gwt.user.cellview.client.TextColumn;
import com.google.gwt.user.client.Window;
import com.google.gwt.user.client.ui.RootPanel;
import com.google.gwt.user.client.ui.VerticalPanel;
import com.google.gwt.view.client.SelectionChangeEvent;
import com.google.gwt.view.client.SingleSelectionModel;
public class HelloWorld implements EntryPoint{
/**
* A simple data type that represents a contact.
*/
private static class Contact{
private final String address;
private final Date birthday;
private finalString name;
public Contact(String name,Date birthday,String address){
this.name = name;
this.birthday = birthday;
this.address = address;
}
}
/**
* The list of data to display.
*/
private static final List<Contact> CONTACTS =Arrays.asList(
new Contact("John",new Date(80,4,12),"123 Fourth Avenue"),
new Contact("Joe",new Date(85,2,22),"22 Lance Ln"),
new Contact("George",new Date(46,6,6),"1600 Pennsylvania
Avenue"));
public void onModuleLoad(){
// Create a CellTable.
CellTable<Contact> table =new CellTable<Contact>();
table.setKeyboardSelectionPolicy(KeyboardSelectionPolicy.ENABLED);
// Add a text column to show the name.
TextColumn<Contact> nameColumn = new TextColumn<Contact>(){
@Override
public String getValue(Contactobject){
return object.name;
}

TUTORIALS POINT
Simply Easy Learning Page 154
};
table.addColumn(nameColumn,"Name");
// Add a date column to show the birthday.
DateCell dateCell =new DateCell();
Column<Contact,Date> dateColumn
=new Column<Contact,Date>(dateCell){
@Override
public Date getValue(Contact object){
return object.birthday;
}
};
table.addColumn(dateColumn,"Birthday");
// Add a text column to show the address.
TextColumn<Contact> addressColumn
=new TextColumn<Contact>(){
@Override
public String getValue(Contact object){
return object.address;
}
};
table.addColumn(addressColumn,"Address");
// Add a selection model to handle user selection.
final SingleSelectionModel<Contact> selectionModel
=newSingleSelectionModel<Contact>();
table.setSelectionModel(selectionModel);
selectionModel.addSelectionChangeHandler(
new SelectionChangeEvent.Handler(){
public void onSelectionChange(SelectionChangeEvent event){
Contact selected = selectionModel.getSelectedObject();
if(selected !=null){
Window.alert("You selected: "+ selected.name);
}
}
});
// Set the total row count. This isn't strictly necessary,
// but it affects paging calculations, so its good habit to
// keep the row count up to date.
table.setRowCount(CONTACTS.size(),true);
// Push the data into the widget.
table.setRowData(0, CONTACTS);
VerticalPanel panel =newVerticalPanel();
panel.setBorderWidth(1);
panel.setWidth("400");
panel.add(table);
// Add the widgets to the root panel.
RootPanel.get().add(panel);
}
}
Once you are ready with all the changes done, let us compile and run the application in development mode as we did in GWT - Create Application chapter. If everything is fine with your application, this will produce following result:
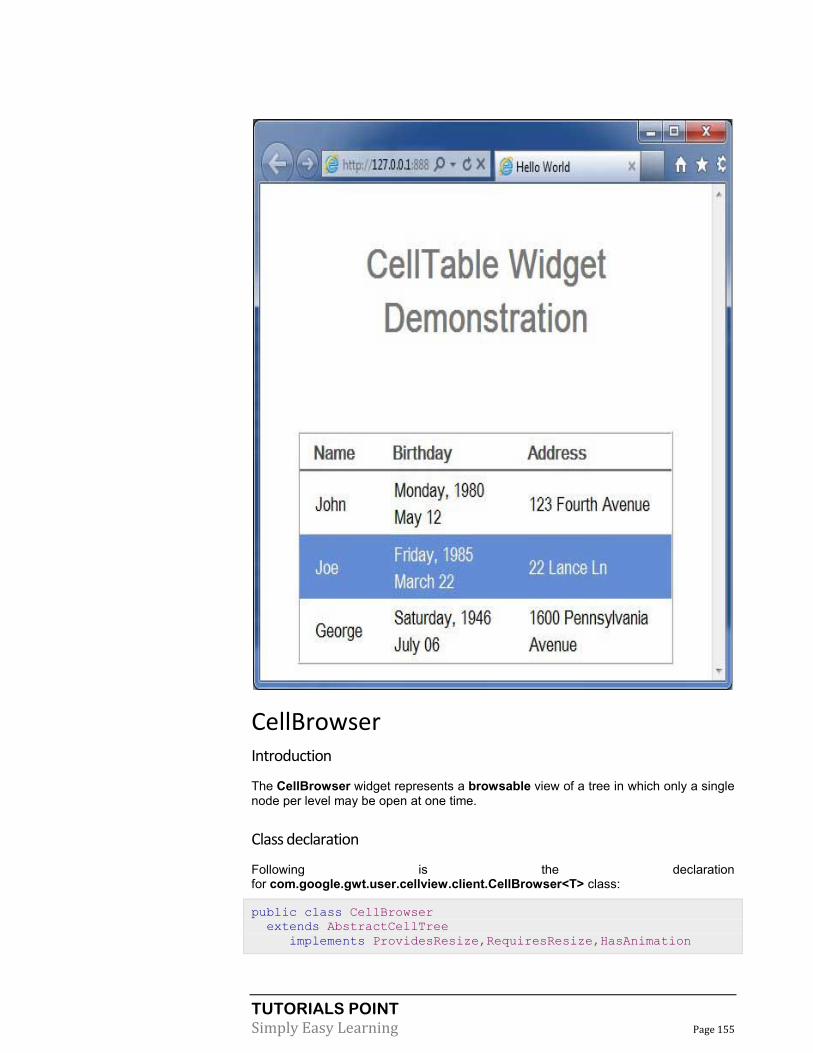
TUTORIALS POINT
Simply Easy Learning Page 155
CellBrowser
Introduction
The CellBrowser widget represents a browsable view of a tree in which only a single node per level may be open at one time.
Class declaration
Following is the declaration for com.google.gwt.user.cellview.client.CellBrowser<T> class:
public class CellBrowser
extends AbstractCellTree
implements ProvidesResize,RequiresResize,HasAnimation

TUTORIALS POINT
Simply Easy Learning Page 156
Class constructors
S.N. Constructor & Description
1 CellBrowser(TreeViewModel viewModel, T rootValue)
Construct a new CellBrowser.
2
CellBrowser(TreeViewModel viewModel, T rootValue, CellBrowser.Resources resources)
Construct a new CellBrowser with the specified CellBrowser.Resources.
Class methods
S.N. Function name & Description
1 protected Widget createPager(HasData display)
Create a pager to control the list view.
2 int getDefaultColumnWidth()
Get the default width of new columns.
3 int getMinimumColumnWidth()
Get the minimum width of columns.
4 TreeNode getRootTreeNode()
Get the root TreeNode.
5 boolean isAnimationEnabled()
Returns true if animations are enabled, false if not.
6 void onBrowserEvent(Event event)
Fired whenever a browser event is received.
7 void onResize()
This method must be called whenever the implementor's size has been modified.
8 void setAnimationEnabled(boolean enable)
Enable or disable animations.
9 void setDefaultColumnWidth(int width)
Set the default width of new columns.
10
void setKeyboardSelectionPolicy(HasKeyboardSelectionPolicy.KeyboardSelectionPolicy policy)
Set the HasKeyboardSelectionPolicy.KeyboardSelectionPolicy.
11 void setMinimumColumnWidth(int minWidth)
Set the minimum width of columns.
Methods inherited
This class inherits methods from the following classes:
com.google.gwt.user.client.ui.UIObject
com.google.gwt.user.client.ui.Widget
com.google.gwt.user.client.ui.Composite

TUTORIALS POINT
Simply Easy Learning Page 157
com.google.gwt.user.cellview.client.AbstractCellTree
java.lang.Object
CellBrowser Widget Example
This example will take you through simple steps to show usage of a CellBrowser Widget in GWT. Follow the following steps to update the GWT application we created in GWT - Create Applicationchapter:
Step Description
1 Create a project with a name HelloWorld under a package com.tutorialspoint as explained in the GWT - Create Application chapter.
2 Modify HelloWorld.gwt.xml, HelloWorld.css, HelloWorld.html and HelloWorld.java as explained below. Keep rest of the files unchanged.
3 Compile and run the application to verify the result of the implemented logic.
Following is the content of the modified module descriptor src/com.tutorialspoint/HelloWorld.gwt.xml.
<?xml version="1.0" encoding="UTF-8"?>
<module rename-to='helloworld'>
<!-- Inherit the core Web Toolkit stuff. -->
<inherits name='com.google.gwt.user.User'/>
<!-- Inherit the default GWT style sheet. -->
<inherits name='com.google.gwt.user.theme.clean.Clean'/>
<!-- Specify the app entry point class. -->
<entry-point class='com.tutorialspoint.client.HelloWorld'/>
<!-- Specify the paths for translatable code -->
<source path='client'/>
<source path='shared'/>
</module>
Following is the content of the modified Style Sheet file war/HelloWorld.css.
body{
text-align: center;
font-family: verdana, sans-serif;
}
h1{
font-size:2em;
font-weight: bold;
color:#777777;
margin:40px0px70px;
text-align: center;
}
Following is the content of the modified HTML host file war/HelloWorld.html.
<html>
<head>
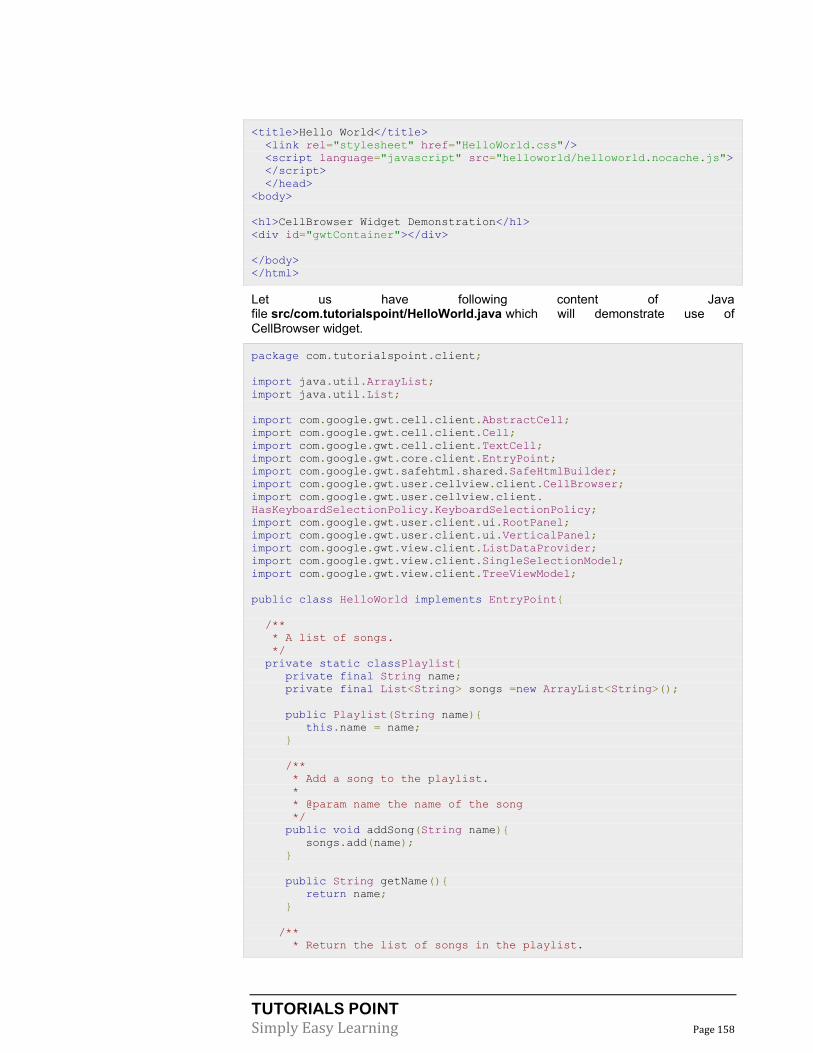
TUTORIALS POINT
Simply Easy Learning Page 158
<title>Hello World</title>
<link rel="stylesheet" href="HelloWorld.css"/>
<script language="javascript" src="helloworld/helloworld.nocache.js">
</script>
</head>
<body>
<h1>CellBrowser Widget Demonstration</h1>
<div id="gwtContainer"></div>
</body>
</html>
Let us have following content of Java file src/com.tutorialspoint/HelloWorld.java which will demonstrate use of CellBrowser widget.
package com.tutorialspoint.client;
import java.util.ArrayList;
import java.util.List;
import com.google.gwt.cell.client.AbstractCell;
import com.google.gwt.cell.client.Cell;
import com.google.gwt.cell.client.TextCell;
import com.google.gwt.core.client.EntryPoint;
import com.google.gwt.safehtml.shared.SafeHtmlBuilder;
import com.google.gwt.user.cellview.client.CellBrowser;
import com.google.gwt.user.cellview.client.
HasKeyboardSelectionPolicy.KeyboardSelectionPolicy;
import com.google.gwt.user.client.ui.RootPanel;
import com.google.gwt.user.client.ui.VerticalPanel;
import com.google.gwt.view.client.ListDataProvider;
import com.google.gwt.view.client.SingleSelectionModel;
import com.google.gwt.view.client.TreeViewModel;
public class HelloWorld implements EntryPoint{
/**
* A list of songs.
*/
private static classPlaylist{
private final String name;
private final List<String> songs =new ArrayList<String>();
public Playlist(String name){
this.name = name;
}
/**
* Add a song to the playlist.
*
* @param name the name of the song
*/
public void addSong(String name){
songs.add(name);
}
public String getName(){
return name;
}
/**
* Return the list of songs in the playlist.
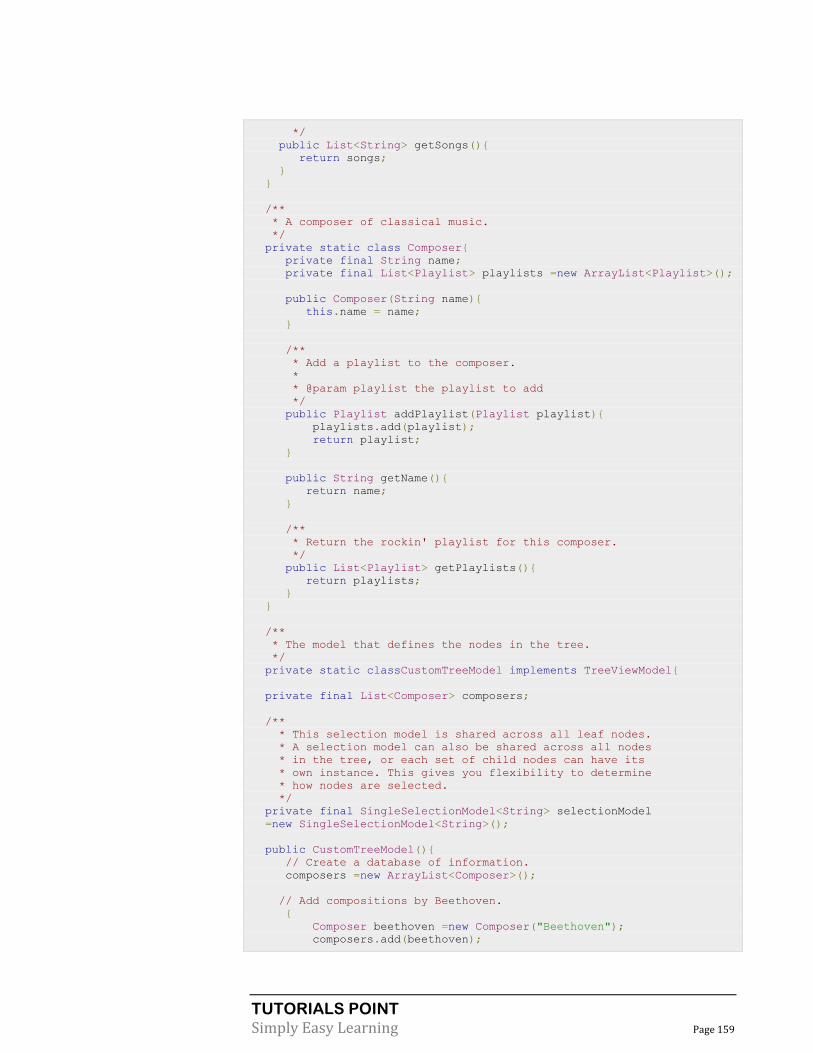
TUTORIALS POINT
Simply Easy Learning Page 159
*/
public List<String> getSongs(){
return songs;
}
}
/**
* A composer of classical music.
*/
private static class Composer{
private final String name;
private final List<Playlist> playlists =new ArrayList<Playlist>();
public Composer(String name){
this.name = name;
}
/**
* Add a playlist to the composer.
*
* @param playlist the playlist to add
*/
public Playlist addPlaylist(Playlist playlist){
playlists.add(playlist);
return playlist;
}
public String getName(){
return name;
}
/**
* Return the rockin' playlist for this composer.
*/
public List<Playlist> getPlaylists(){
return playlists;
}
}
/**
* The model that defines the nodes in the tree.
*/
private static classCustomTreeModel implements TreeViewModel{
private final List<Composer> composers;
/**
* This selection model is shared across all leaf nodes.
* A selection model can also be shared across all nodes
* in the tree, or each set of child nodes can have its
* own instance. This gives you flexibility to determine
* how nodes are selected.
*/
private final SingleSelectionModel<String> selectionModel
=new SingleSelectionModel<String>();
public CustomTreeModel(){
// Create a database of information.
composers =new ArrayList<Composer>();
// Add compositions by Beethoven.
{
Composer beethoven =new Composer("Beethoven");
composers.add(beethoven);

TUTORIALS POINT
Simply Easy Learning Page 160
Playlist concertos = beethoven.addPlaylist(
new Playlist("Concertos"));
concertos.addSong("No. 1 - C");
concertos.addSong("No. 2 - B-Flat Major");
concertos.addSong("No. 3 - C Minor");
concertos.addSong("No. 4 - G Major");
concertos.addSong("No. 5 - E-Flat Major");
Playlist quartets = beethoven.addPlaylist(
new Playlist("Quartets"));
quartets.addSong("Six String Quartets");
quartets.addSong("Three String Quartets");
quartets.addSong("Grosse Fugue for String Quartets");
Playlist sonatas = beethoven.addPlaylist(
new Playlist("Sonatas"));
sonatas.addSong("Sonata in A Minor");
sonatas.addSong("Sonata in F Major");
Playlist symphonies = beethoven.addPlaylist(
new Playlist("Symphonies"));
symphonies.addSong("No. 2 - D Major");
symphonies.addSong("No. 2 - D Major");
symphonies.addSong("No. 3 - E-Flat Major");
symphonies.addSong("No. 4 - B-Flat Major");
symphonies.addSong("No. 5 - C Minor");
symphonies.addSong("No. 6 - F Major");
symphonies.addSong("No. 7 - A Major");
symphonies.addSong("No. 8 - F Major");
symphonies.addSong("No. 9 - D Minor");
}
// Add compositions by Brahms.
{
Composer brahms =new Composer("Brahms");
composers.add(brahms);
Playlist concertos = brahms.addPlaylist(
new Playlist("Concertos"));
concertos.addSong("Violin Concerto");
concertos.addSong("Double Concerto - A Minor");
concertos.addSong("Piano Concerto No. 1 - D Minor");
concertos.addSong("Piano Concerto No. 2 - B-Flat Major");
Playlist quartets = brahms.addPlaylist(
new Playlist("Quartets"));
quartets.addSong("Piano Quartet No. 1 - G Minor");
quartets.addSong("Piano Quartet No. 2 - A Major");
quartets.addSong("Piano Quartet No. 3 - C Minor");
quartets.addSong("String Quartet No. 3 - B-Flat Minor");
Playlist sonatas = brahms.addPlaylist(
new Playlist("Sonatas"));
sonatas.addSong("Two Sonatas for Clarinet - F Minor");
sonatas.addSong("Two Sonatas for Clarinet - E-Flat Major");
Playlist symphonies = brahms.addPlaylist(
new Playlist("Symphonies"));
symphonies.addSong("No. 1 - C Minor");
symphonies.addSong("No. 2 - D Minor");
symphonies.addSong("No. 3 - F Major");
symphonies.addSong("No. 4 - E Minor");
}
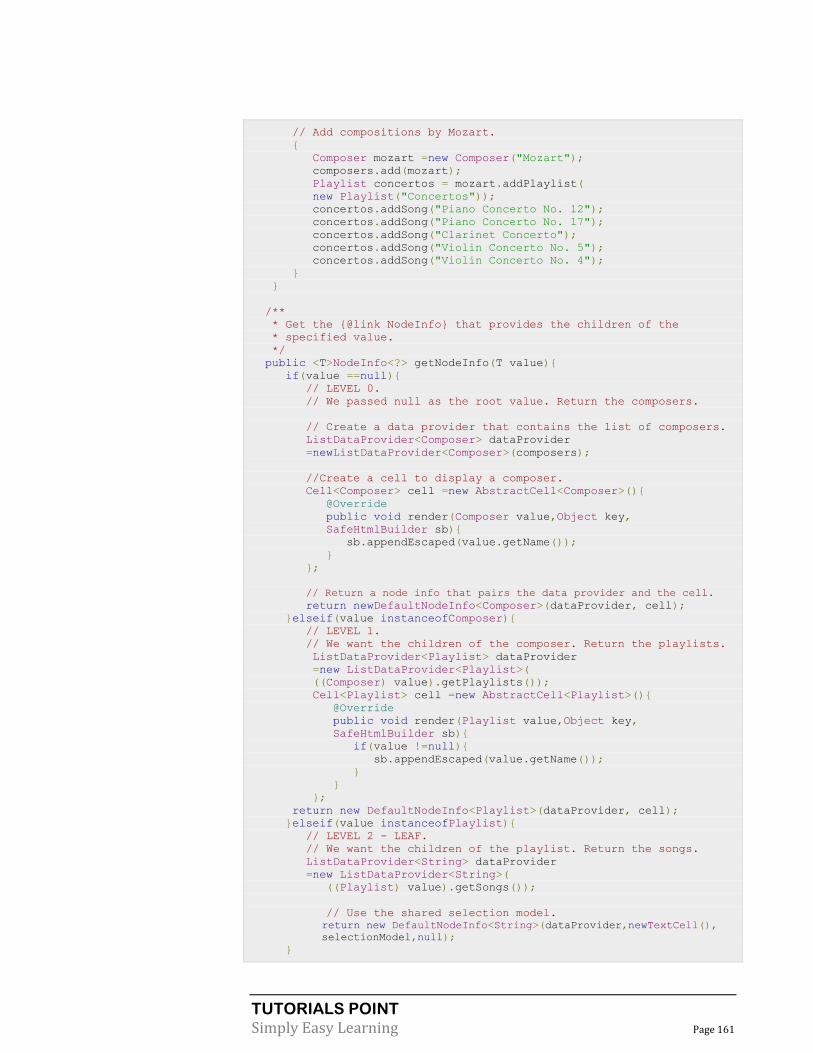
TUTORIALS POINT
Simply Easy Learning Page 161
// Add compositions by Mozart.
{
Composer mozart =new Composer("Mozart");
composers.add(mozart);
Playlist concertos = mozart.addPlaylist(
new Playlist("Concertos"));
concertos.addSong("Piano Concerto No. 12");
concertos.addSong("Piano Concerto No. 17");
concertos.addSong("Clarinet Concerto");
concertos.addSong("Violin Concerto No. 5");
concertos.addSong("Violin Concerto No. 4");
}
}
/**
* Get the {@link NodeInfo} that provides the children of the
* specified value.
*/
public <T>NodeInfo<?> getNodeInfo(T value){
if(value ==null){
// LEVEL 0.
// We passed null as the root value. Return the composers.
// Create a data provider that contains the list of composers.
ListDataProvider<Composer> dataProvider
=newListDataProvider<Composer>(composers);
//Create a cell to display a composer.
Cell<Composer> cell =new AbstractCell<Composer>(){
@Override
public void render(Composer value,Object key,
SafeHtmlBuilder sb){
sb.appendEscaped(value.getName());
}
};
// Return a node info that pairs the data provider and the cell.
return newDefaultNodeInfo<Composer>(dataProvider, cell);
}elseif(value instanceofComposer){
// LEVEL 1.
// We want the children of the composer. Return the playlists.
ListDataProvider<Playlist> dataProvider
=new ListDataProvider<Playlist>(
((Composer) value).getPlaylists());
Cell<Playlist> cell =new AbstractCell<Playlist>(){
@Override
public void render(Playlist value,Object key,
SafeHtmlBuilder sb){
if(value !=null){
sb.appendEscaped(value.getName());
}
}
};
return new DefaultNodeInfo<Playlist>(dataProvider, cell);
}elseif(value instanceofPlaylist){
// LEVEL 2 - LEAF.
// We want the children of the playlist. Return the songs.
ListDataProvider<String> dataProvider
=new ListDataProvider<String>(
((Playlist) value).getSongs());
// Use the shared selection model.
return new DefaultNodeInfo<String>(dataProvider,newTextCell(),
selectionModel,null);
}

TUTORIALS POINT
Simply Easy Learning Page 162
return null;
}
/**
* Check if the specified value represents a leaf node.
* Leaf nodes cannot be opened.
*/
public boolean isLeaf(Object value){
// The leaf nodes are the songs, which are Strings.
if(value instanceofString){
returntrue;
}
returnfalse;
}
}
public void onModuleLoad(){
// Create a model for the browser.
TreeViewModel model =new CustomTreeModel();
/*
* Create the browser using the model. We use <code>null</code> as
* the default value of the root node. The default value will be
* passed to CustomTreeModel#getNodeInfo();
*/
CellBrowser browser =new CellBrowser(model,null);
browser.setKeyboardSelectionPolicy(KeyboardSelectionPolicy.ENABLED);
browser.setHeight("200");
browser.setWidth("630");
VerticalPanel panel =newVerticalPanel();
panel.setBorderWidth(1);
panel.add(browser);
// Add the widgets to the root panel.
RootPanel.get().add(panel);
}
}
Once you are ready with all the changes done, let us compile and run the application in development mode as we did in GWT - Create Application chapter. If everything is fine with your application, this will produce following result:

TUTORIALS POINT
Simply Easy Learning Page 163

TUTORIALS POINT
Simply Easy Learning Page 164
Layout Panels
This section describes the different types of layout panels used under Google Web Toolkit:
Layout Panels can contain other widgets. These panels controls the way widgets to be
shown on User Interface. Every Panel widget inherits properties from Panel class which in turn inherits properties from Widget class and which in turn inherits properties from UIObject class.
S.N. Widget & Description
1 GWT UIObject Class This widget contains text, not interpreted as HTML using a <div>element, causing it to be displayed with block layout.
2 GWT Widget Class This widget can contain HTML text and displays the html content using a <div> element, causing it to be displayed with block layout.
3 GWT Panel Class This is an is the abstract base class for all panels, which are widgets that can contain other widgets.
GWT Panel Class
Introduction
The class Panel is the abstract base class for all panels, which are widgets that can contain other widgets.
Class declaration
Following is the declaration for com.google.gwt.user.client.ui.Panel class:
public abstract classPanel
extends Widget
implements HasWidgets.ForIsWidget
CHAPTER
10

TUTORIALS POINT
Simply Easy Learning Page 165
Field Following are the fields for com.google.gwt.user.client.ui.Panel class:
public static final java.lang.String DEBUG_ID_PREFIX -- The element ID that you
specify will be prefixed by the static string DEBUG_ID_PREFIX.
Class constructors
S.N. Constructor & Description
1 Panel()
This creates a Panel for the child classes.
Class methods
S.N. Method & Description
1 void add(IsWidget child)
2 void add(Widget child)
Adds a child widget.
3 protected void adopt(Widget child)
Finalize the attachment of a Widget to this Panel.
4 protected void adopt(Widget w, Element container)
Deprecated. Use adopt(Widget).
5 void clear()
6 protected void disown(Widget w)
Removes all child widgets.
7 protected void doAttachChildren()
Deprecated. Use orphan(Widget).
8
protected void doDetachChildren()
If a widget contains one or more child widgets that are not in the logical widget hierarchy (the child is physically connected only on the DOM level), it must override this method and call Widget.onAttach() for each of its child widgets.
9
protected void orphan(Widget child)
If a widget contains one or more child widgets that are not in the logical widget hierarchy (the child is physically connected only on the DOM level), it must override this method and call Widget.onDetach() for each of its child widgets.
10 boolean remove(IsWidget child)
This method must be called as part of the remove method of any Panel.
11 abstract boolean remove(Widget child)
Removes a child widget.
Methods inherited
This class inherits methods from the following classes:
com.google.gwt.user.client.ui.UIObject

TUTORIALS POINT
Simply Easy Learning Page 166
com.google.gwt.user.client.ui.Widget
Layout Panels
Following are few important Layout Panels:
S.N. Widget & Description
1 FlowPanel This widget represents a panel that formats its child widgets using the default HTML layout behavior.
2 HorizontalPanel This widget represents a panel that lays all of its widgets out in a single horizontal column.
3 VerticalPanel This widget represents a panel that lays all of its widgets out in a single vertical column.
4
HorizontalSplitPanel This widget represents a panel that arranges two widgets in a single horizontal row and allows the user to interactively change the proportion of the width dedicated to each of the two widgets. Widgets contained within a HorizontalSplitPanel will be automatically decorated with scrollbars when necessary.
5
VerticalSplitPanel This widget represents a A panel that arranges two widgets in a single vertical column and allows the user to interactively change the proportion of the height dedicated to each of the two widgets. Widgets contained within a VertialSplitPanel will be automatically decorated with scrollbars when necessary.
6
FlexTable This widget represents a flexible table that creates cells on demand. It can be jagged (that is, each row can contain a different number of cells) and individual cells can be set to span multiple rows or columns.
7
Grid This widget represents a A rectangular grid that can contain text, html, or a child Widget within its cells. It must be resized explicitly to the desired number of rows and columns.
8 DeckPanel panel that displays all of its child widgets in a 'deck', where only one can be visible at a time. It is used by TabPanel.
9 DockPanel This widget represents a panel that lays its child widgets out "docked" at its outer edges, and allows its last widget to take up the remaining space in its center.
10 HTMLPanel This widget represents a panel that contains HTML, and which can attach child widgets to identified elements within that HTML.
11
TabPanel This widget represents a panel that represents a tabbed set of pages, each of which contains another widget. Its child widgets are shown as the user selects the various tabs associated with them. The tabs can contain arbitrary HTML.
12 Composite This widget represents a type of widget that can wrap another widget, hiding the
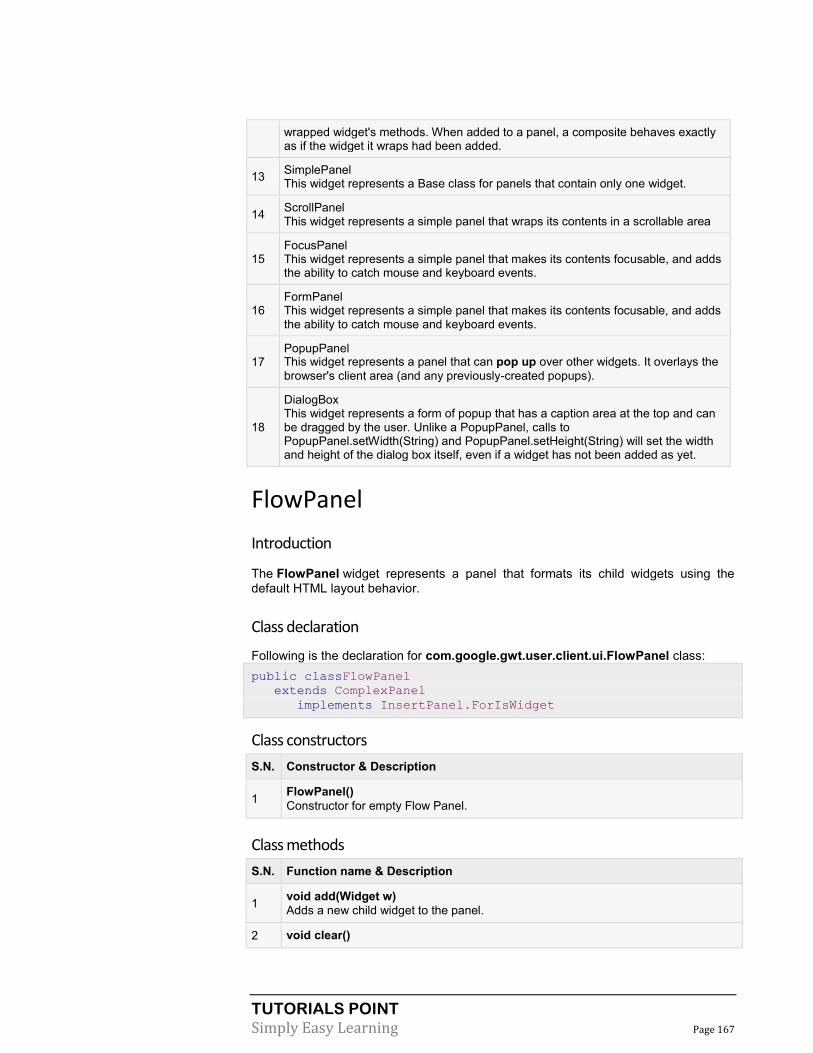
TUTORIALS POINT
Simply Easy Learning Page 167
wrapped widget's methods. When added to a panel, a composite behaves exactly as if the widget it wraps had been added.
13 SimplePanel This widget represents a Base class for panels that contain only one widget.
14 ScrollPanel This widget represents a simple panel that wraps its contents in a scrollable area
15 FocusPanel This widget represents a simple panel that makes its contents focusable, and adds the ability to catch mouse and keyboard events.
16 FormPanel This widget represents a simple panel that makes its contents focusable, and adds the ability to catch mouse and keyboard events.
17 PopupPanel This widget represents a panel that can pop up over other widgets. It overlays the
browser's client area (and any previously-created popups).
18
DialogBox This widget represents a form of popup that has a caption area at the top and can be dragged by the user. Unlike a PopupPanel, calls to PopupPanel.setWidth(String) and PopupPanel.setHeight(String) will set the width and height of the dialog box itself, even if a widget has not been added as yet.
FlowPanel
Introduction
The FlowPanel widget represents a panel that formats its child widgets using the default HTML layout behavior.
Class declaration
Following is the declaration for com.google.gwt.user.client.ui.FlowPanel class:
public classFlowPanel
extends ComplexPanel
implements InsertPanel.ForIsWidget
Class constructors
S.N. Constructor & Description
1 FlowPanel()
Constructor for empty Flow Panel.
Class methods
S.N. Function name & Description
1 void add(Widget w)
Adds a new child widget to the panel.
2 void clear()

TUTORIALS POINT
Simply Easy Learning Page 168
Removes all child widgets.
3 void insert(IsWidget w, int beforeIndex)
4 void insert(Widget w, int beforeIndex)
Inserts a widget before the specified index.
Methods inherited
This class inherits methods from the following classes:
com.google.gwt.user.client.ui.UIObject
com.google.gwt.user.client.ui.Widget
com.google.gwt.user.client.ui.Panel
com.google.gwt.user.client.ui.ComplexPanel
java.lang.Object
FlowPanel Widget Example
This example will take you through simple steps to show usage of a FlowPanel Widget in GWT. Follow the following steps to update the GWT application we created in GWT - Create Application chapter:
Step Description
1 Create a project with a name HelloWorld under a package com.tutorialspoint as explained in the GWT - Create Application chapter.
2 Modify HelloWorld.gwt.xml, HelloWorld.css, HelloWorld.html and HelloWorld.java as explained below. Keep rest of the files unchanged.
3 Compile and run the application to verify the result of the implemented logic.
Following is the content of the modified module descriptor src/com.tutorialspoint/HelloWorld.gwt.xml.
<?xml version="1.0" encoding="UTF-8"?>
<module rename-to='helloworld'>
<!-- Inherit the core Web Toolkit stuff. -->
<inherits name='com.google.gwt.user.User'/>
<!-- Inherit the default GWT style sheet. -->
<inherits name='com.google.gwt.user.theme.clean.Clean'/>
<!-- Specify the app entry point class. -->
<entry-point class='com.tutorialspoint.client.HelloWorld'/>
<!-- Specify the paths for translatable code -->
<source path='client'/>
<source path='shared'/>
</module>
Following is the content of the modified Style Sheet file war/HelloWorld.css.

TUTORIALS POINT
Simply Easy Learning Page 169
body{
text-align: center;
font-family: verdana, sans-serif;
}
h1{
font-size:2em;
font-weight: bold;
color:#777777;
margin:40px0px70px;
text-align: center;
}
.gwt-CheckBox{
margin:10px;
}
Following is the content of the modified HTML host file war/HelloWorld.html.
<html>
<head>
<title>Hello World</title>
<link rel="stylesheet" href="HelloWorld.css"/>
<script language="javascript" src="helloworld/helloworld.nocache.js">
</script>
</head>
<body>
<h1>FlowPanel Widget Demonstration</h1>
<div id="gwtContainer"></div>
</body>
</html>
Let us have following content of Java file src/com.tutorialspoint/HelloWorld.java which will demonstrate use of FlowPanel widget.
package com.tutorialspoint.client;
import com.google.gwt.core.client.EntryPoint;
import com.google.gwt.user.client.ui.CheckBox;
import com.google.gwt.user.client.ui.DecoratorPanel;
import com.google.gwt.user.client.ui.FlowPanel;
import com.google.gwt.user.client.ui.RootPanel;
public class HelloWorld implements EntryPoint{
public void onModuleLoad(){
// Create a flow panel
FlowPanel flowPanel =new FlowPanel();
// Add CheckBoxes to flow Panel
for(int i =1; i <=10; i++) {
CheckBox checkBox =new CheckBox("Item"+ i);
flowPanel.add(checkBox);
}
DecoratorPanel decoratorPanel =new DecoratorPanel();
decoratorPanel.setWidth("500");
decoratorPanel.add(flowPanel);
// Add the widgets to the root panel.

TUTORIALS POINT
Simply Easy Learning Page 170
RootPanel.get().add(decoratorPanel);
}
}
Once you are ready with all the changes done, let us compile and run the application in development mode as we did in GWT - Create Application chapter. If everything is fine with your application, this will produce following result:
Horizontal Panel
Introduction
The HorizantalPanel widget represents a panel that lays all of its widgets out in a single horizontal column.
Class declaration
Following is the declaration for com.google.gwt.user.client.ui.HorizontalPanel class:
public class HorizontalPanel
extends CellPanel
implements HasAlignment,InsertPanel.ForIsWidget
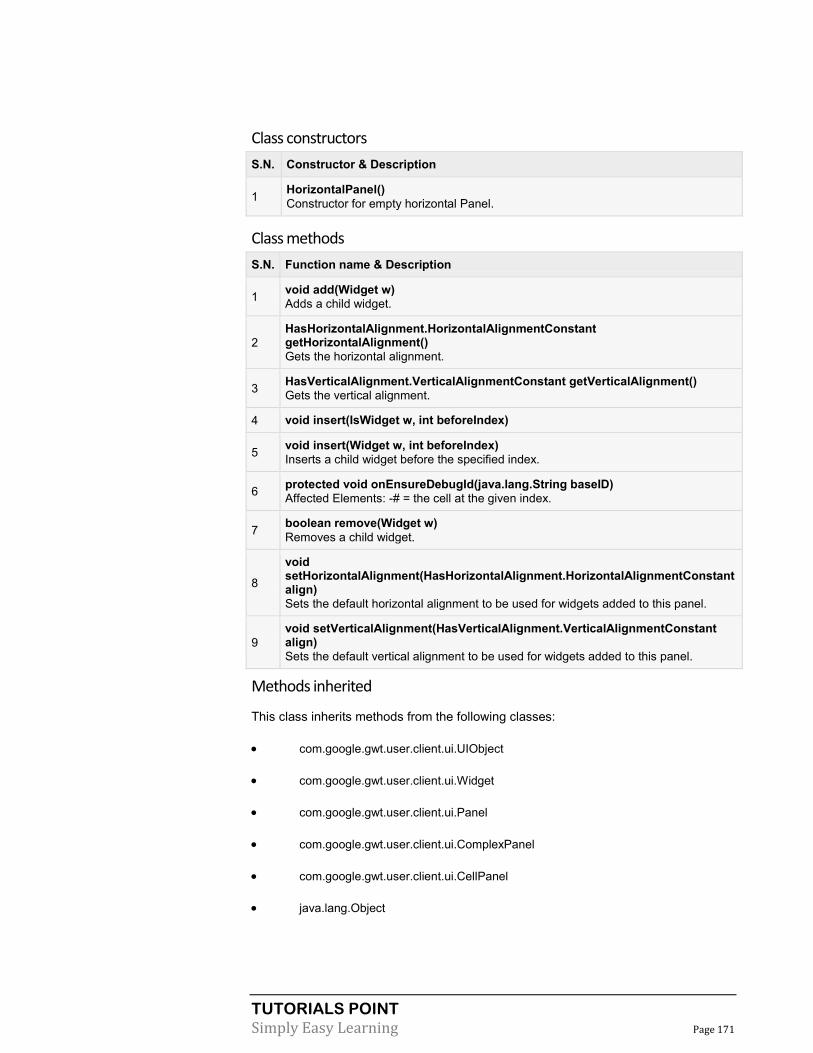
TUTORIALS POINT
Simply Easy Learning Page 171
Class constructors
S.N. Constructor & Description
1 HorizontalPanel()
Constructor for empty horizontal Panel.
Class methods
S.N. Function name & Description
1 void add(Widget w)
Adds a child widget.
2
HasHorizontalAlignment.HorizontalAlignmentConstant getHorizontalAlignment()
Gets the horizontal alignment.
3 HasVerticalAlignment.VerticalAlignmentConstant getVerticalAlignment()
Gets the vertical alignment.
4 void insert(IsWidget w, int beforeIndex)
5 void insert(Widget w, int beforeIndex)
Inserts a child widget before the specified index.
6 protected void onEnsureDebugId(java.lang.String baseID)
Affected Elements: -# = the cell at the given index.
7 boolean remove(Widget w)
Removes a child widget.
8
void setHorizontalAlignment(HasHorizontalAlignment.HorizontalAlignmentConstant align)
Sets the default horizontal alignment to be used for widgets added to this panel.
9
void setVerticalAlignment(HasVerticalAlignment.VerticalAlignmentConstant align)
Sets the default vertical alignment to be used for widgets added to this panel.
Methods inherited
This class inherits methods from the following classes:
com.google.gwt.user.client.ui.UIObject
com.google.gwt.user.client.ui.Widget
com.google.gwt.user.client.ui.Panel
com.google.gwt.user.client.ui.ComplexPanel
com.google.gwt.user.client.ui.CellPanel
java.lang.Object

TUTORIALS POINT
Simply Easy Learning Page 172
HorizontalPanel Widget Example
This example will take you through simple steps to show usage of a HorizontalPanel Widget in GWT. Follow the following steps to update the GWT application we created in GWT - Create Applicationchapter:
Step Description
1 Create a project with a name HelloWorld under a package com.tutorialspoint as explained in the GWT - Create Application chapter.
2 Modify HelloWorld.gwt.xml, HelloWorld.css, HelloWorld.html and HelloWorld.java as explained below. Keep rest of the files unchanged.
3 Compile and run the application to verify the result of the implemented logic.
Following is the content of the modified module descriptor src/com.tutorialspoint/HelloWorld.gwt.xml.
<?xml version="1.0" encoding="UTF-8"?>
<module rename-to='helloworld'>
<!-- Inherit the core Web Toolkit stuff. -->
<inherits name='com.google.gwt.user.User'/>
<!-- Inherit the default GWT style sheet. -->
<inherits name='com.google.gwt.user.theme.clean.Clean'/>
<!-- Specify the app entry point class. -->
<entry-point class='com.tutorialspoint.client.HelloWorld'/>
<!-- Specify the paths for translatable code -->
<source path='client'/>
<source path='shared'/>
</module>
Following is the content of the modified Style Sheet file war/HelloWorld.css.
body{
text-align: center;
font-family: verdana, sans-serif;
}
h1{
font-size:2em;
font-weight: bold;
color:#777777;
margin:40px0px70px;
text-align: center;
}
.gwt-CheckBox{
margin:10px;
}
Following is the content of the modified HTML host file war/HelloWorld.html.
<html>
<head>
<title>Hello World</title>
<link rel="stylesheet" href="HelloWorld.css"/>
<script language="javascript" src="helloworld/helloworld.nocache.js">

TUTORIALS POINT
Simply Easy Learning Page 173
</script>
</head>
<body>
<h1>HorizontalPanel Widget Demonstration</h1>
<div id="gwtContainer"></div>
</body>
</html>
Let us have following content of Java file src/com.tutorialspoint/HelloWorld.java which will demonstrate use of HorizontalPanel widget.
package com.tutorialspoint.client;
import com.google.gwt.core.client.EntryPoint;
import com.google.gwt.user.client.ui.CheckBox;
import com.google.gwt.user.client.ui.DecoratorPanel;
import com.google.gwt.user.client.ui.HorizontalPanel;
import com.google.gwt.user.client.ui.RootPanel;
public class HelloWorld implements EntryPoint{
public void onModuleLoad(){
// Create a horizontal panel
HorizontalPanel horizontalPanel =newHorizontalPanel();
// Add CheckBoxes to horizontal Panel
for(int i =1; i <=10; i++){
CheckBox checkBox =new CheckBox("Item"+ i);
horizontalPanel.add(checkBox);
}
DecoratorPanel decoratorPanel =new DecoratorPanel();
decoratorPanel.setWidth("500");
decoratorPanel.add(horizontalPanel);
// Add the widgets to the root panel.
RootPanel.get().add(decoratorPanel);
}
}
Once you are ready with all the changes done, let us compile and run the application in development mode as we did in GWT - Create Application chapter. If everything is fine with your application, this will produce following result:

TUTORIALS POINT
Simply Easy Learning Page 174
VerticalPanel
Introduction The VerticalPanel widget represents a panel that lays all of its widgets out in a single vertical row.
Class declaration Following is the declaration for com.google.gwt.user.client.ui.VerticalPanel class:
public classVerticalPanel
extends CellPanel
implements HasAlignment,InsertPanel.ForIsWidget
Class constructors
S.N. Constructor & Description
1 VerticalPanel() Constructor for empty vertical Panel.
Class methods
S.N. Function name & Description
1 void add(Widget w)
Adds a child widget.

TUTORIALS POINT
Simply Easy Learning Page 175
2
HasHorizontalAlignment.HorizontalAlignmentConstant getHorizontalAlignment()
Gets the horizontal alignment.
3 HasVerticalAlignment.VerticalAlignmentConstant getVerticalAlignment()
Gets the vertical alignment.
4 void insert(IsWidget w, int beforeIndex)
5 void insert(Widget w, int beforeIndex)
Inserts a child widget before the specified index.
6 protected void onEnsureDebugId(java.lang.String baseID)
Affected Elements: -# = the cell at the given index.
7 boolean remove(Widget w)
Removes a child widget.
8
void setHorizontalAlignment(HasHorizontalAlignment.HorizontalAlignmentConstant align)
Sets the default horizontal alignment to be used for widgets added to this panel.
9
void setVerticalAlignment(HasVerticalAlignment.VerticalAlignmentConstant align)
Sets the default vertical alignment to be used for widgets added to this panel.
Methods inherited
This class inherits methods from the following classes:
com.google.gwt.user.client.ui.UIObject
com.google.gwt.user.client.ui.Widget
com.google.gwt.user.client.ui.Panel
com.google.gwt.user.client.ui.ComplexPanel
com.google.gwt.user.client.ui.CellPanel
java.lang.Object
VerticalPanel Widget Example
This example will take you through simple steps to show usage of a VerticalPanel Widget in GWT. Follow the following steps to update the GWT application we created in GWT - Create Applicationchapter:
Step Description
1 Create a project with a name HelloWorld under a package com.tutorialspoint as explained in the GWT - Create Application chapter.
2 Modify HelloWorld.gwt.xml, HelloWorld.css, HelloWorld.html and HelloWorld.java a
s explained below. Keep rest of the files unchanged.
3 Compile and run the application to verify the result of the implemented logic.

TUTORIALS POINT
Simply Easy Learning Page 176
Following is the content of the modified module descriptor src/com.tutorialspoint/HelloWorld.gwt.xml.
<?xml version="1.0" encoding="UTF-8"?>
<module rename-to='helloworld'>
<!-- Inherit the core Web Toolkit stuff. -->
<inherits name='com.google.gwt.user.User'/>
<!-- Inherit the default GWT style sheet. -->
<inherits name='com.google.gwt.user.theme.clean.Clean'/>
<!-- Specify the app entry point class. -->
<entry-point class='com.tutorialspoint.client.HelloWorld'/>
<!-- Specify the paths for translatable code -->
<source path='client'/>
<source path='shared'/>
</module>
Following is the content of the modified Style Sheet file war/HelloWorld.css.
body{
text-align: center;
font-family: verdana, sans-serif;
}
h1{
font-size:2em;
font-weight: bold;
color:#777777;
margin:40px0px70px;
text-align: center;
}
.gwt-CheckBox{
margin:10px;
}
Following is the content of the modified HTML host file war/HelloWorld.html.
<html>
<head>
<title>Hello World</title>
<link rel="stylesheet" href="HelloWorld.css"/>
<script language="javascript" src="helloworld/helloworld.nocache.js">
</script>
</head>
<body>
<h1>VerticalPanel Widget Demonstration</h1>
<div id="gwtContainer"></div>
</body>
</html>
Let us have following content of Java file src/com.tutorialspoint/HelloWorld.java which will demonstrate use of VerticalPanel widget.
package com.tutorialspoint.client;

TUTORIALS POINT
Simply Easy Learning Page 177
import com.google.gwt.core.client.EntryPoint;
import com.google.gwt.user.client.ui.CheckBox;
import com.google.gwt.user.client.ui.DecoratorPanel;
import com.google.gwt.user.client.ui.VerticalPanel;
import com.google.gwt.user.client.ui.RootPanel;
public class HelloWorld implements EntryPoint{
public void onModuleLoad(){
// Create a vertical panel
VerticalPanel verticalPanel =new VerticalPanel();
// Add CheckBoxes to vertical Panel
for(int i =1; i <=10; i++){
CheckBox checkBox =newCheckBox("Item"+ i);
verticalPanel.add(checkBox);
}
DecoratorPanel decoratorPanel =new DecoratorPanel();
decoratorPanel.add(verticalPanel);
// Add the widgets to the root panel.
RootPanel.get().add(decoratorPanel);
}
}
Once you are ready with all the changes done, let us compile and run the application in development mode as we did in GWT - Create Application chapter. If everything is fine with your application, this will produce following result:

TUTORIALS POINT
Simply Easy Learning Page 178
HorizontalSplitPanel
Introduction The HorizantalSplitPanel widget represents a panel that arranges two widgets in a single horizontal row and allows the user to interactively change the proportion of the width dedicated to each of the two widgets. Widgets contained within a HorizontalSplitPanel will be automatically decorated with scrollbars when necessary.
Class declaration Following is the declaration for com.google.gwt.user.client.ui.HorizontalSplitPanel class:
@Deprecated
public final class HorizontalSplitPanel
extends Panel
CSS style rules
Following default CSS Style rules will be applied to all the HorizontalSpiltPanel widget. You can override it as per your requirements.
.gwt-HorizontalSplitPanel{}
.gwt-HorizontalSplitPanel hsplitter {}
Class constructors
S.N. Constructor & Description
1 HorizontalSplitPanel()
Deprecated.
2 HorizontalSplitPanel(HorizontalSplitPanel.Resources resources)
Deprecated. Creates an empty horizontal split panel.
3
HorizontalSplitPanel(HorizontalSplitPanel(HorizontalSplitPanelImages images))
Deprecated. replaced by HorizontalSplitPanel(Resources)
Class methods
S.N. Function name & Description
1 void add(Widget w)
Deprecated. Adds a widget to a pane in the HorizontalSplitPanel.
2 protected Element getElement(int index)
Deprecated. Gets the content element for the given index.
3
Widget getEndOfLineWidget()
Deprecated. Gets the widget in the pane that is at the end of the line direction for the layout.
4 Widget getLeftWidget()
Deprecated. Gets the widget in the left side of the panel.
5 Widget getRightWidget()
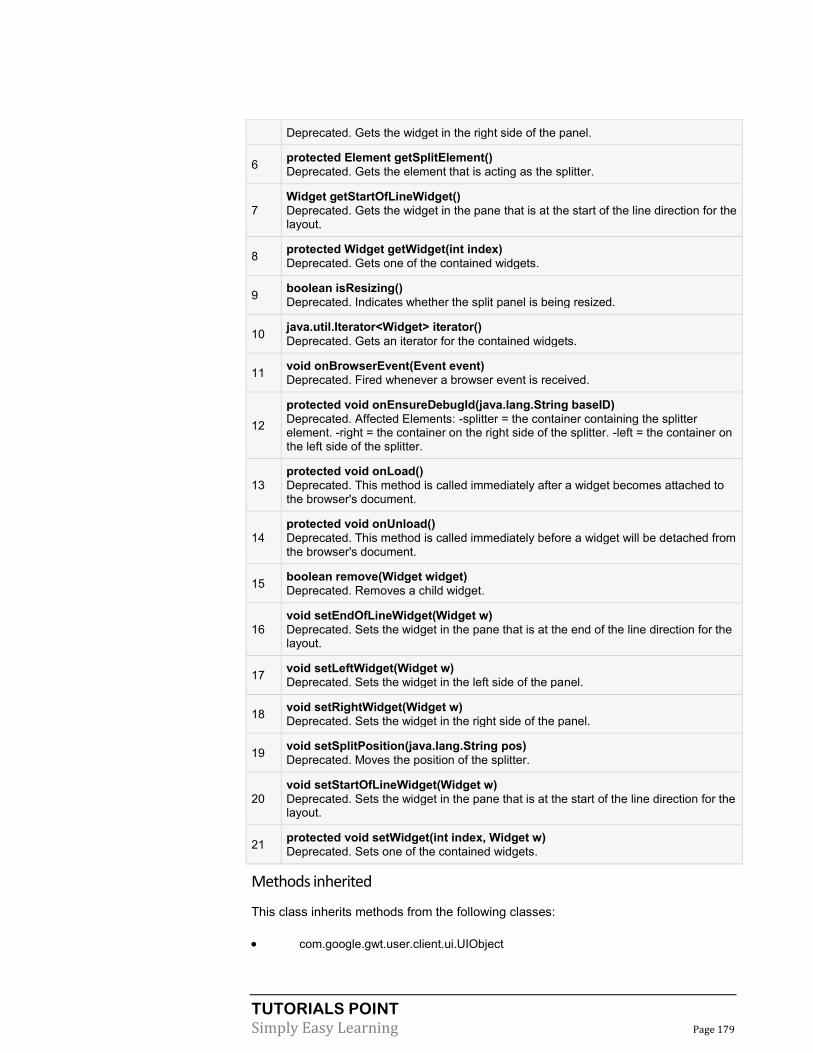
TUTORIALS POINT
Simply Easy Learning Page 179
Deprecated. Gets the widget in the right side of the panel.
6 protected Element getSplitElement()
Deprecated. Gets the element that is acting as the splitter.
7
Widget getStartOfLineWidget()
Deprecated. Gets the widget in the pane that is at the start of the line direction for the layout.
8 protected Widget getWidget(int index)
Deprecated. Gets one of the contained widgets.
9 boolean isResizing()
Deprecated. Indicates whether the split panel is being resized.
10 java.util.Iterator<Widget> iterator()
Deprecated. Gets an iterator for the contained widgets.
11 void onBrowserEvent(Event event)
Deprecated. Fired whenever a browser event is received.
12
protected void onEnsureDebugId(java.lang.String baseID)
Deprecated. Affected Elements: -splitter = the container containing the splitter element. -right = the container on the right side of the splitter. -left = the container on the left side of the splitter.
13
protected void onLoad()
Deprecated. This method is called immediately after a widget becomes attached to the browser's document.
14
protected void onUnload()
Deprecated. This method is called immediately before a widget will be detached from the browser's document.
15 boolean remove(Widget widget)
Deprecated. Removes a child widget.
16
void setEndOfLineWidget(Widget w)
Deprecated. Sets the widget in the pane that is at the end of the line direction for the layout.
17 void setLeftWidget(Widget w)
Deprecated. Sets the widget in the left side of the panel.
18 void setRightWidget(Widget w)
Deprecated. Sets the widget in the right side of the panel.
19 void setSplitPosition(java.lang.String pos)
Deprecated. Moves the position of the splitter.
20
void setStartOfLineWidget(Widget w)
Deprecated. Sets the widget in the pane that is at the start of the line direction for the layout.
21 protected void setWidget(int index, Widget w)
Deprecated. Sets one of the contained widgets.
Methods inherited
This class inherits methods from the following classes:
com.google.gwt.user.client.ui.UIObject
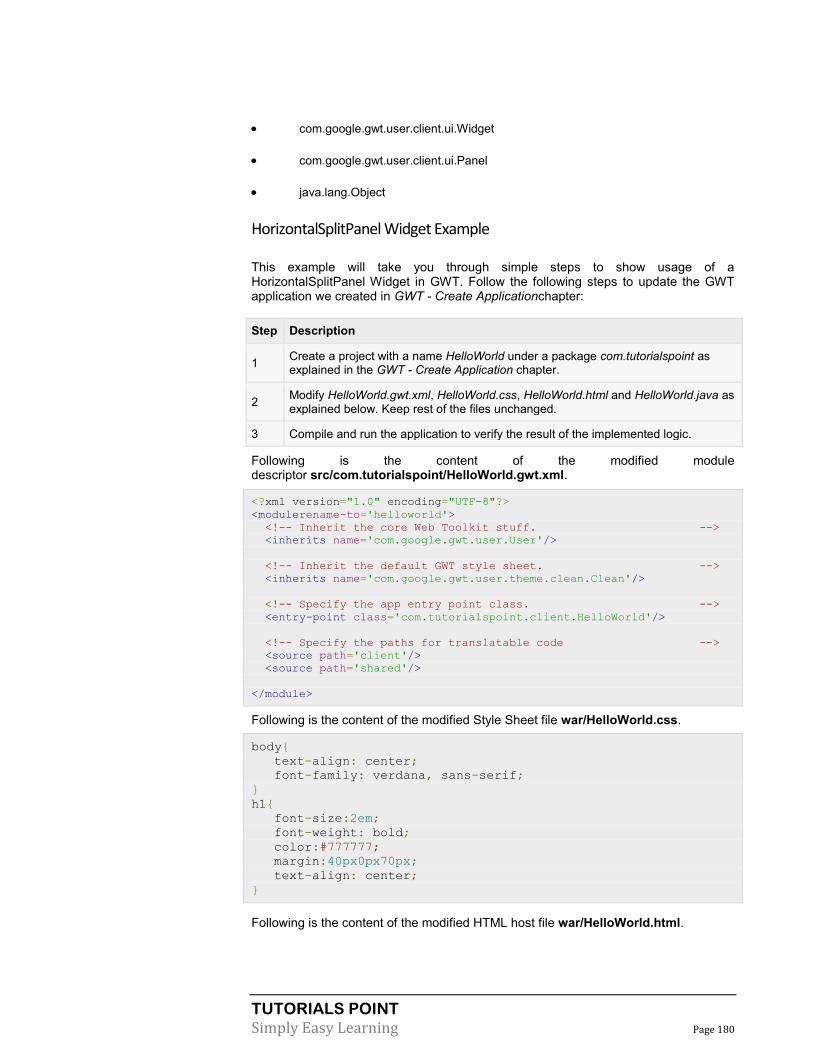
TUTORIALS POINT
Simply Easy Learning Page 180
com.google.gwt.user.client.ui.Widget
com.google.gwt.user.client.ui.Panel
java.lang.Object
HorizontalSplitPanel Widget Example
This example will take you through simple steps to show usage of a HorizontalSplitPanel Widget in GWT. Follow the following steps to update the GWT application we created in GWT - Create Applicationchapter:
Step Description
1 Create a project with a name HelloWorld under a package com.tutorialspoint as explained in the GWT - Create Application chapter.
2 Modify HelloWorld.gwt.xml, HelloWorld.css, HelloWorld.html and HelloWorld.java as explained below. Keep rest of the files unchanged.
3 Compile and run the application to verify the result of the implemented logic.
Following is the content of the modified module descriptor src/com.tutorialspoint/HelloWorld.gwt.xml.
<?xml version="1.0" encoding="UTF-8"?>
<modulerename-to='helloworld'>
<!-- Inherit the core Web Toolkit stuff. -->
<inherits name='com.google.gwt.user.User'/>
<!-- Inherit the default GWT style sheet. -->
<inherits name='com.google.gwt.user.theme.clean.Clean'/>
<!-- Specify the app entry point class. -->
<entry-point class='com.tutorialspoint.client.HelloWorld'/>
<!-- Specify the paths for translatable code -->
<source path='client'/>
<source path='shared'/>
</module>
Following is the content of the modified Style Sheet file war/HelloWorld.css.
body{
text-align: center;
font-family: verdana, sans-serif;
}
h1{
font-size:2em;
font-weight: bold;
color:#777777;
margin:40px0px70px;
text-align: center;
}
Following is the content of the modified HTML host file war/HelloWorld.html.

TUTORIALS POINT
Simply Easy Learning Page 181
<html>
<head>
<title>Hello World</title>
<link rel="stylesheet" href="HelloWorld.css"/>
<script language="javascript" src="helloworld/helloworld.nocache.js">
</script>
</head>
<body>
<h1>HorizontalSplitPanel Widget Demonstration</h1>
<div id="gwtContainer"></div>
</body>
</html>
Let us have following content of Java file src/com.tutorialspoint/HelloWorld.java which will demonstrate use of
HorizontalSplitPanel widget.
package com.tutorialspoint.client;
import com.google.gwt.core.client.EntryPoint;
import com.google.gwt.user.client.ui.CheckBox;
import com.google.gwt.user.client.ui.DecoratorPanel;
import com.google.gwt.user.client.ui.HTML;
import com.google.gwt.user.client.ui.HorizontalSplitPanel;
import com.google.gwt.user.client.ui.RootPanel;
import com.google.gwt.user.client.ui.VerticalPanel;
public class HelloWorld implements EntryPoint{
public void onModuleLoad(){
// Create a Horizontal Split Panel
HorizontalSplitPanel horizontalSplitPanel =new
HorizontalSplitPanel();
horizontalSplitPanel.setSize("300px","200px");
horizontalSplitPanel.setSplitPosition("30%");
// Add some content
String randomText ="This is a sample text.";
for(int i =0; i <2; i++){
randomText += randomText;
}
horizontalSplitPanel.setRightWidget(new HTML(randomText));
horizontalSplitPanel.setLeftWidget(new HTML(randomText));
DecoratorPanel decoratorPanel =new DecoratorPanel();
decoratorPanel.add(horizontalSplitPanel);
// Add the widgets to the root panel.
RootPanel.get().add(decoratorPanel);
}
}
Once you are ready with all the changes done, let us compile and run the application in development mode as we did in GWT - Create Application chapter. If everything is fine with your application, this will produce following result:
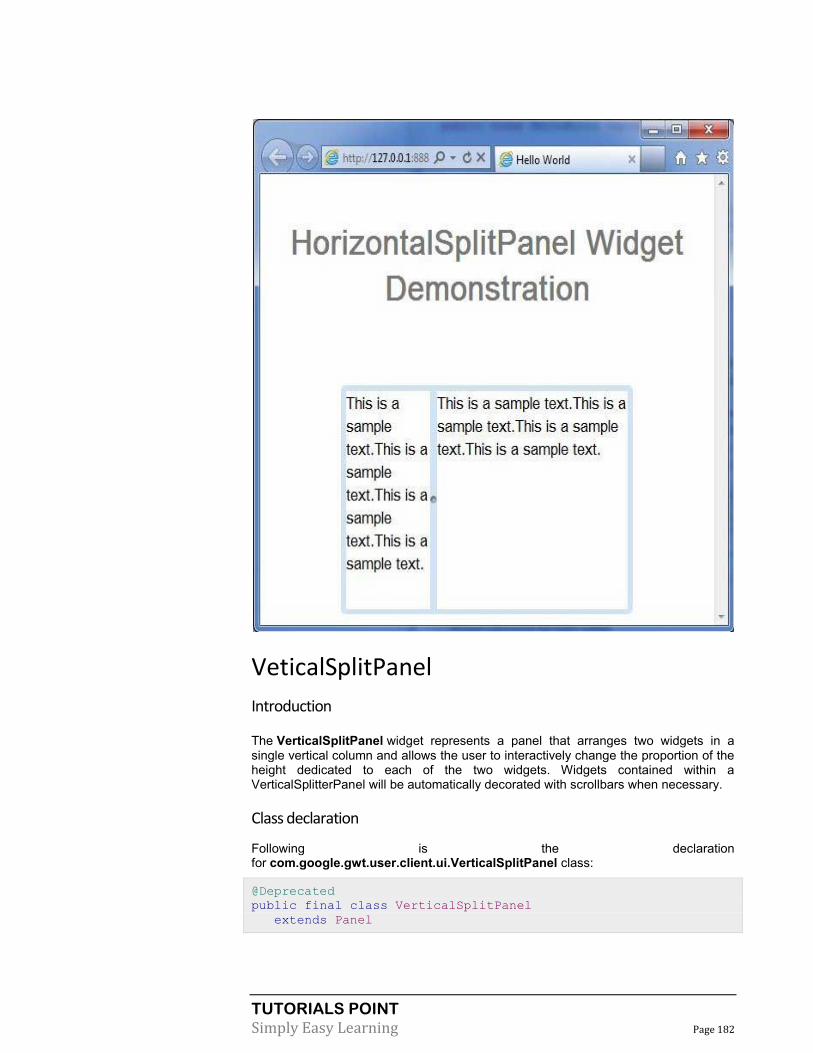
TUTORIALS POINT
Simply Easy Learning Page 182
VeticalSplitPanel
Introduction
The VerticalSplitPanel widget represents a panel that arranges two widgets in a single vertical column and allows the user to interactively change the proportion of the height dedicated to each of the two widgets. Widgets contained within a VerticalSplitterPanel will be automatically decorated with scrollbars when necessary.
Class declaration
Following is the declaration for com.google.gwt.user.client.ui.VerticalSplitPanel class:
@Deprecated
public final class VerticalSplitPanel
extends Panel

TUTORIALS POINT
Simply Easy Learning Page 183
CSS style rules
Following default CSS Style rules will be applied to all the VerticalSpiltPanel widget. You can override it as per your requirements.
.gwt-VerticalSplitPanel{}
.gwt-VerticalSplitPanel vsplitter {}
Class constructors
S.N. Constructor & Description
1 VerticalSplitPanel()
Deprecated.
2 VerticalSplitPanel(VerticalSplitPanel.Resources resources)
Deprecated. Creates an empty vertical split panel.
3 VerticalSplitPanel(VerticalSplitPanelImages images)
Deprecated. replaced by VerticalSplitPanel(Resources)
Class methods
S.N. Function name & Description
1 void add(Widget w)
Deprecated. Adds a widget to a pane in the HorizontalSplitPanel.
2 protected Element getElement(int index)
Deprecated. Gets the content element for the given index.
3
Widget getEndOfLineWidget()
Deprecated. Gets the widget in the pane that is at the end of the line direction for the layout.
4 Widget getBottomWidget()
Deprecated. Gets the widget in the bottom side of the panel.
5 Widget getTopWidget()
Deprecated. Gets the widget in the top side of the panel.
6 protected Element getSplitElement()
Deprecated. Gets the element that is acting as the splitter.
7
Widget getStartOfLineWidget()
Deprecated. Gets the widget in the pane that is at the start of the line direction for the layout.
8 protected Widget getWidget(int index)
Deprecated. Gets one of the contained widgets.
9 boolean isResizing()
Deprecated. Indicates whether the split panel is being resized.
10 java.util.Iterator<Widget> iterator()
Deprecated. Gets an iterator for the contained widgets.
11 void onBrowserEvent(Event event)
Deprecated. Fired whenever a browser event is received.
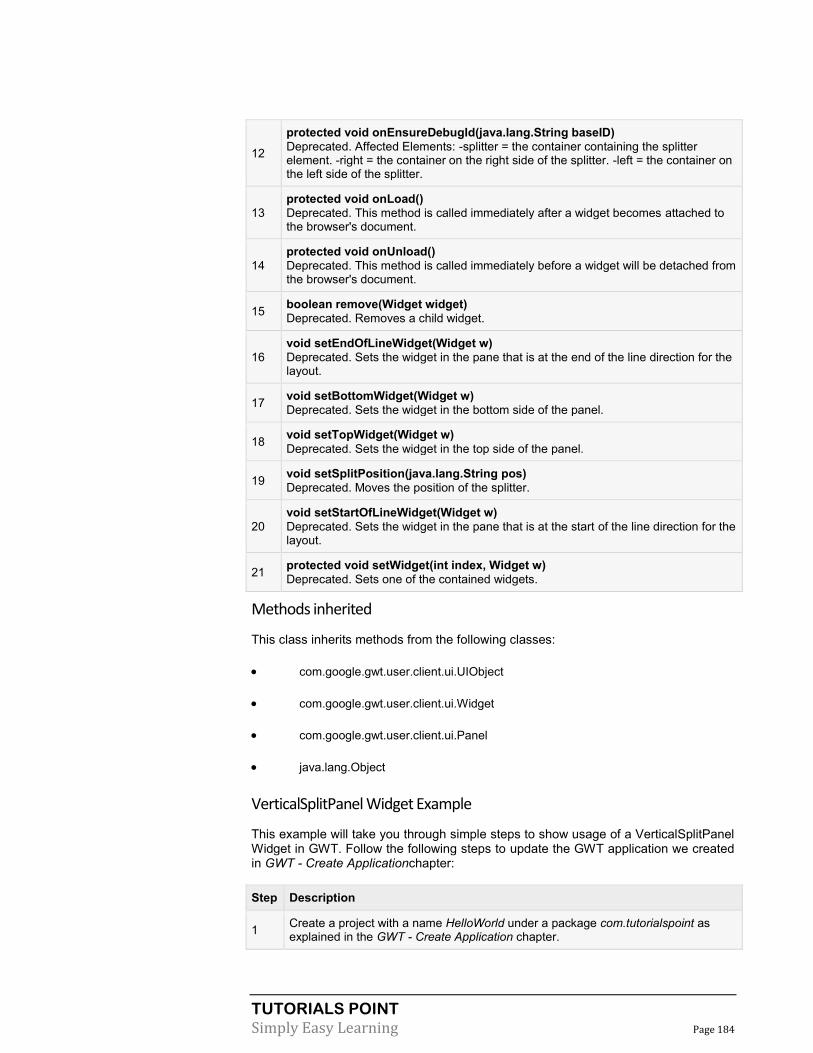
TUTORIALS POINT
Simply Easy Learning Page 184
12
protected void onEnsureDebugId(java.lang.String baseID)
Deprecated. Affected Elements: -splitter = the container containing the splitter element. -right = the container on the right side of the splitter. -left = the container on the left side of the splitter.
13
protected void onLoad()
Deprecated. This method is called immediately after a widget becomes attached to the browser's document.
14
protected void onUnload()
Deprecated. This method is called immediately before a widget will be detached from the browser's document.
15 boolean remove(Widget widget)
Deprecated. Removes a child widget.
16
void setEndOfLineWidget(Widget w)
Deprecated. Sets the widget in the pane that is at the end of the line direction for the layout.
17 void setBottomWidget(Widget w)
Deprecated. Sets the widget in the bottom side of the panel.
18 void setTopWidget(Widget w)
Deprecated. Sets the widget in the top side of the panel.
19 void setSplitPosition(java.lang.String pos)
Deprecated. Moves the position of the splitter.
20
void setStartOfLineWidget(Widget w)
Deprecated. Sets the widget in the pane that is at the start of the line direction for the layout.
21 protected void setWidget(int index, Widget w)
Deprecated. Sets one of the contained widgets.
Methods inherited
This class inherits methods from the following classes:
com.google.gwt.user.client.ui.UIObject
com.google.gwt.user.client.ui.Widget
com.google.gwt.user.client.ui.Panel
java.lang.Object
VerticalSplitPanel Widget Example
This example will take you through simple steps to show usage of a VerticalSplitPanel Widget in GWT. Follow the following steps to update the GWT application we created in GWT - Create Applicationchapter:
Step Description
1 Create a project with a name HelloWorld under a package com.tutorialspoint as explained in the GWT - Create Application chapter.

TUTORIALS POINT
Simply Easy Learning Page 185
2 Modify HelloWorld.gwt.xml, HelloWorld.css, HelloWorld.html and HelloWorld.java as explained below. Keep rest of the files unchanged.
3 Compile and run the application to verify the result of the implemented logic.
Following is the content of the modified module descriptor src/com.tutorialspoint/HelloWorld.gwt.xml.
<?xml version="1.0" encoding="UTF-8"?>
<module rename-to='helloworld'>
<!-- Inherit the core Web Toolkit stuff. -->
<inherits name='com.google.gwt.user.User'/>
<!-- Inherit the default GWT style sheet. -->
<inherits name='com.google.gwt.user.theme.clean.Clean'/>
<!-- Specify the app entry point class. -->
<entry-point class='com.tutorialspoint.client.HelloWorld'/>
<!-- Specify the paths for translatable code -->
<source path='client'/>
<source path='shared'/>
</module>
Following is the content of the modified Style Sheet file war/HelloWorld.css.
body{
text-align: center;
font-family: verdana, sans-serif;
}
h1{
font-size:2em;
font-weight: bold;
color:#777777;
margin:40px0px70px;
text-align: center;
}
Following is the content of the modified HTML host file war/HelloWorld.html.
<html>
<head>
<title>Hello World</title>
<link rel="stylesheet" href="HelloWorld.css"/>
<scriptlanguage="javascript" src="helloworld/helloworld.nocache.js">
</script>
</head>
<body>
<h1>VerticalSplitPanel Widget Demonstration</h1>
<div id="gwtContainer"></div>
</body>
</html>
Let us have following content of Java file src/com.tutorialspoint/HelloWorld.java which will demonstrate use of VerticalSplitPanel widget.
package com.tutorialspoint.client;

TUTORIALS POINT
Simply Easy Learning Page 186
import com.google.gwt.core.client.EntryPoint;
import com.google.gwt.user.client.ui.CheckBox;
import com.google.gwt.user.client.ui.DecoratorPanel;
import com.google.gwt.user.client.ui.HTML;
import com.google.gwt.user.client.ui.VerticalSplitPanel;
import com.google.gwt.user.client.ui.RootPanel;
import com.google.gwt.user.client.ui.VerticalPanel;
publicclassHelloWorldimplementsEntryPoint{
public void onModuleLoad(){
// Create a Vertical Split Panel
VerticalSplitPanel verticalSplitPanel =new VerticalSplitPanel();
verticalSplitPanel.setSize("300px","200px");
verticalSplitPanel.setSplitPosition("35%");
// Add some content
String randomText ="This is a sample text.";
for(int i =0; i <2; i++){
randomText += randomText;
}
verticalSplitPanel.setBottomWidget(new HTML(randomText));
verticalSplitPanel.setTopWidget(new HTML(randomText));
DecoratorPanel decoratorPanel =new DecoratorPanel();
decoratorPanel.add(verticalSplitPanel);
// Add the widgets to the root panel.
RootPanel.get().add(decoratorPanel);
}
}
Once you are ready with all the changes done, let us compile and run the application in development mode as we did in GWT - Create Application chapter. If everything is fine with your application, this will produce following result:
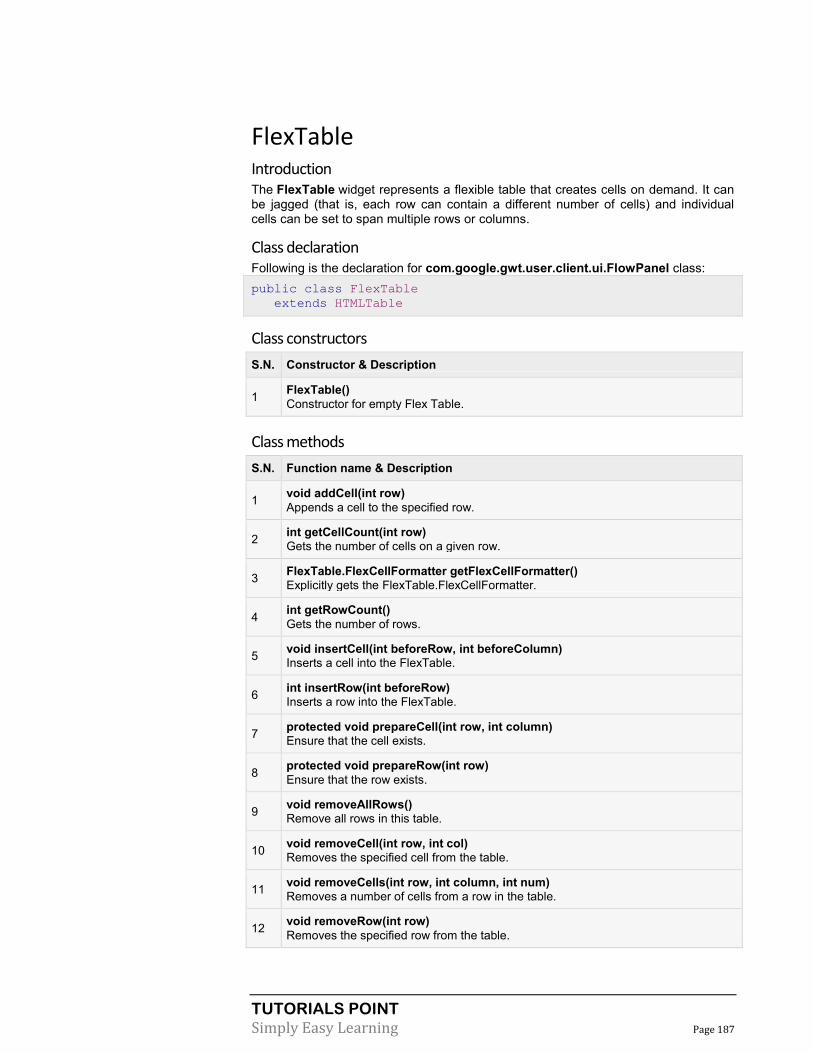
TUTORIALS POINT
Simply Easy Learning Page 187
FlexTable Introduction The FlexTable widget represents a flexible table that creates cells on demand. It can be jagged (that is, each row can contain a different number of cells) and individual cells can be set to span multiple rows or columns.
Class declaration Following is the declaration for com.google.gwt.user.client.ui.FlowPanel class:
public class FlexTable
extends HTMLTable
Class constructors
S.N. Constructor & Description
1 FlexTable()
Constructor for empty Flex Table.
Class methods
S.N. Function name & Description
1 void addCell(int row)
Appends a cell to the specified row.
2 int getCellCount(int row)
Gets the number of cells on a given row.
3 FlexTable.FlexCellFormatter getFlexCellFormatter()
Explicitly gets the FlexTable.FlexCellFormatter.
4 int getRowCount()
Gets the number of rows.
5 void insertCell(int beforeRow, int beforeColumn)
Inserts a cell into the FlexTable.
6 int insertRow(int beforeRow)
Inserts a row into the FlexTable.
7 protected void prepareCell(int row, int column)
Ensure that the cell exists.
8 protected void prepareRow(int row)
Ensure that the row exists.
9 void removeAllRows()
Remove all rows in this table.
10 void removeCell(int row, int col)
Removes the specified cell from the table.
11 void removeCells(int row, int column, int num)
Removes a number of cells from a row in the table.
12 void removeRow(int row)
Removes the specified row from the table.

TUTORIALS POINT
Simply Easy Learning Page 188
Methods inherited
This class inherits methods from the following classes:
com.google.gwt.user.client.ui.UIObject
com.google.gwt.user.client.ui.Widget
com.google.gwt.user.client.ui.Panel
com.google.gwt.user.client.ui.HTMLTable
java.lang.Object
FlexTable Widget Example
This example will take you through simple steps to show usage of a FlexTable Widget in GWT. Follow the following steps to update the GWT application we created in GWT - Create Application chapter:
Step Description
1 Create a project with a name HelloWorld under a package com.tutorialspoint as explained in the GWT - Create Application chapter.
2 Modify HelloWorld.gwt.xml, HelloWorld.css, HelloWorld.html and HelloWorld.java as explained below. Keep rest of the files unchanged.
3 Compile and run the application to verify the result of the implemented logic.
Following is the content of the modified module descriptor src/com.tutorialspoint/HelloWorld.gwt.xml.
<?xml version="1.0" encoding="UTF-8"?>
<module rename-to='helloworld'>
<!-- Inherit the core Web Toolkit stuff. -->
<inherits name='com.google.gwt.user.User'/>
<!-- Inherit the default GWT style sheet. -->
<inherits name='com.google.gwt.user.theme.clean.Clean'/>
<!-- Specify the app entry point class. -->
<entry-point class='com.tutorialspoint.client.HelloWorld'/>
<!-- Specify the paths for translatable code -->
<source path='client'/>
<source path='shared'/>
</module>
Following is the content of the modified Style Sheet file war/HelloWorld.css.
body{
text-align: center;
font-family: verdana, sans-serif;
}
h1{
font-size:2em;

TUTORIALS POINT
Simply Easy Learning Page 189
font-weight: bold;
color:#777777;
margin:40px0px70px;
text-align: center;
}
.flexTable td {
border:1px solid #BBBBBB;
padding:3px;
}
.flexTable-buttonPanel td {
border:0px;
}
.fixedWidthButton {
width:150px;
}
Following is the content of the modified HTML host file war/HelloWorld.html.
<html>
<head>
<title>Hello World</title>
<link rel="stylesheet" href="HelloWorld.css"/>
<scriptlanguage="javascript" src="helloworld/helloworld.nocache.js">
</script>
</head>
<body>
<h1>FlexTable Widget Demonstration</h1>
<div id="gwtContainer"></div>
</body>
</html>
Let us have following content of Java file src/com.tutorialspoint/HelloWorld.java which will demonstrate use of FlexTable widget.
package com.tutorialspoint.client;
import com.google.gwt.core.client.EntryPoint;
import com.google.gwt.event.dom.client.ClickEvent;
import com.google.gwt.event.dom.client.ClickHandler;
import com.google.gwt.user.client.ui.Button;
import com.google.gwt.user.client.ui.DecoratorPanel;
import com.google.gwt.user.client.ui.FlexTable;
import com.google.gwt.user.client.ui.FlexTable.FlexCellFormatter;
import com.google.gwt.user.client.ui.HasHorizontalAlignment;
import com.google.gwt.user.client.ui.HasVerticalAlignment;
import com.google.gwt.user.client.ui.Image;
import com.google.gwt.user.client.ui.RootPanel;
import com.google.gwt.user.client.ui.VerticalPanel;
public class HelloWorld implements EntryPoint{
public void onModuleLoad(){
// Create a Flex Table
final FlexTable flexTable =new FlexTable();
FlexCellFormatter cellFormatter = flexTable.getFlexCellFormatter();
flexTable.addStyleName("flexTable");
flexTable.setWidth("32em");

TUTORIALS POINT
Simply Easy Learning Page 190
flexTable.setCellSpacing(5);
flexTable.setCellPadding(3);
// Add some text
cellFormatter.setHorizontalAlignment(
0,1,HasHorizontalAlignment.ALIGN_LEFT);
flexTable.setHTML(0,0,"This is a FlexTable that supports"
+" <b>colspans</b> and <b>rowspans</b>."
+" You can use it to format your page"
+" or as a special purpose table.");
cellFormatter.setColSpan(0,0,2);
// Add a button that will add more rows to the table
Button addRowButton =new Button("Add a Row");
addRowButton.addClickHandler(new ClickHandler(){
@Override
public void onClick(ClickEvent event){
addRow(flexTable);
}
});
addRowButton.addStyleName("fixedWidthButton");
// Add a button that will add more rows to the table
Button removeRowButton =new Button("Remove a Row");
removeRowButton.addClickHandler(new ClickHandler(){
@Override
public void onClick(ClickEvent event){
removeRow(flexTable);
}
});
removeRowButton.addStyleName("fixedWidthButton");
VerticalPanel buttonPanel =new VerticalPanel();
buttonPanel.setStyleName("flexTable-buttonPanel");
buttonPanel.add(addRowButton);
buttonPanel.add(removeRowButton);
flexTable.setWidget(0,1, buttonPanel);
cellFormatter.setVerticalAlignment(0,1,
HasVerticalAlignment.ALIGN_TOP);
// Add two rows to start
addRow(flexTable);
addRow(flexTable);
// Add the widgets to the root panel.
RootPanel.get().add(flexTable);
}
/**
* Add a row to the flex table.
*/
private void addRow(FlexTable flexTable){
int numRows = flexTable.getRowCount();
flexTable.setWidget(numRows,0,
newImage("http://www.tutorialspoint.com/images/gwt-mini.png"));
flexTable.setWidget(numRows,1,
newImage("http://www.tutorialspoint.com/images/gwt-mini.png"));
flexTable.getFlexCellFormatter().setRowSpan(0,1, numRows +1);
}
/**
* Remove a row from the flex table.

TUTORIALS POINT
Simply Easy Learning Page 191
*/
private void removeRow(FlexTable flexTable){
int numRows = flexTable.getRowCount();
if(numRows >1){
flexTable.removeRow(numRows -1);
flexTable.getFlexCellFormatter().setRowSpan(0,1, numRows -1); }
}
}
Once you are ready with all the changes done, let us compile and run the application in development mode as we did in GWT - Create Application chapter. If everything is fine with your application, this will produce following result:
Grid
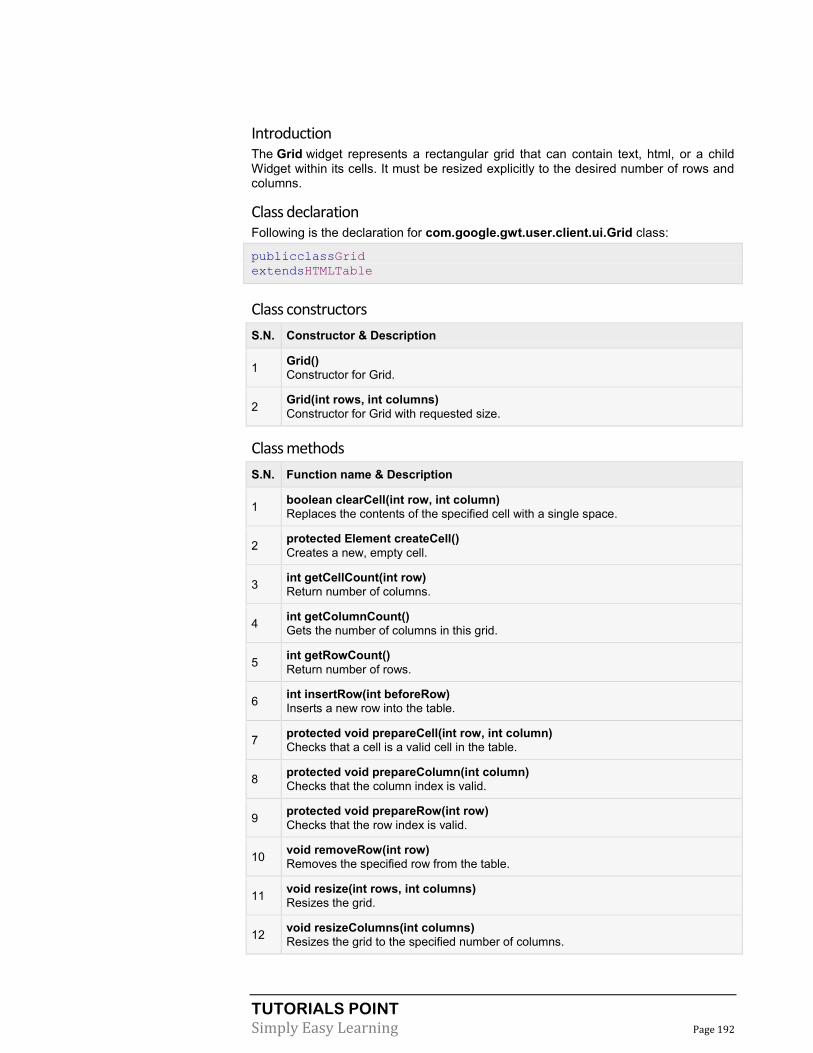
TUTORIALS POINT
Simply Easy Learning Page 192
Introduction The Grid widget represents a rectangular grid that can contain text, html, or a child Widget within its cells. It must be resized explicitly to the desired number of rows and columns.
Class declaration Following is the declaration for com.google.gwt.user.client.ui.Grid class:
publicclassGrid
extendsHTMLTable
Class constructors
S.N. Constructor & Description
1 Grid()
Constructor for Grid.
2 Grid(int rows, int columns)
Constructor for Grid with requested size.
Class methods
S.N. Function name & Description
1 boolean clearCell(int row, int column)
Replaces the contents of the specified cell with a single space.
2 protected Element createCell()
Creates a new, empty cell.
3 int getCellCount(int row)
Return number of columns.
4 int getColumnCount()
Gets the number of columns in this grid.
5 int getRowCount()
Return number of rows.
6 int insertRow(int beforeRow)
Inserts a new row into the table.
7 protected void prepareCell(int row, int column)
Checks that a cell is a valid cell in the table.
8 protected void prepareColumn(int column)
Checks that the column index is valid.
9 protected void prepareRow(int row)
Checks that the row index is valid.
10 void removeRow(int row)
Removes the specified row from the table.
11 void resize(int rows, int columns)
Resizes the grid.
12 void resizeColumns(int columns)
Resizes the grid to the specified number of columns.

TUTORIALS POINT
Simply Easy Learning Page 193
13 void resizeRows(int rows)
Resizes the grid to the specified number of rows.
Methods inherited
This class inherits methods from the following classes:
com.google.gwt.user.client.ui.UIObject
com.google.gwt.user.client.ui.Widget
com.google.gwt.user.client.ui.Panel
com.google.gwt.user.client.ui.HTMLTable
java.lang.Object
Grid Widget Example
This example will take you through simple steps to show usage of a Grid Widget in GWT. Follow the following steps to update the GWT application we created in GWT - Create Application chapter:
Step Description
1 Create a project with a name HelloWorld under a package com.tutorialspoint as explained in the GWT - Create Application chapter.
2 Modify HelloWorld.gwt.xml, HelloWorld.css, HelloWorld.html and HelloWorld.java as explained below. Keep rest of the files unchanged.
3 Compile and run the application to verify the result of the implemented logic.
Following is the content of the modified module descriptor src/com.tutorialspoint/HelloWorld.gwt.xml.
<?xml version="1.0" encoding="UTF-8"?>
<module rename-to='helloworld'>
<!-- Inherit the core Web Toolkit stuff. -->
<inherits name='com.google.gwt.user.User'/>
<!-- Inherit the default GWT style sheet. -->
<inherits name='com.google.gwt.user.theme.clean.Clean'/>
<!-- Specify the app entry point class. -->
<entry-point class='com.tutorialspoint.client.HelloWorld'/>
<!-- Specify the paths for translatable code -->
<source path='client'/>
<source path='shared'/>
</module>
Following is the content of the modified Style Sheet file war/HelloWorld.css.
body{
text-align: center;
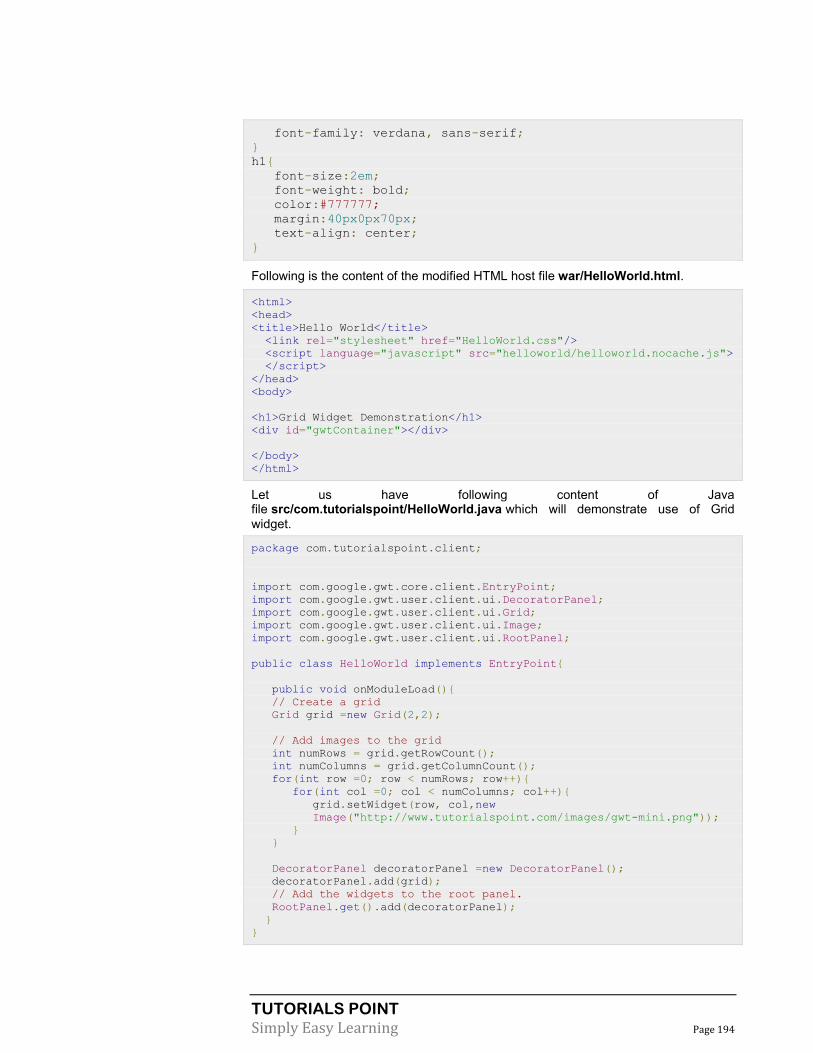
TUTORIALS POINT
Simply Easy Learning Page 194
font-family: verdana, sans-serif;
}
h1{
font-size:2em;
font-weight: bold;
color:#777777;
margin:40px0px70px;
text-align: center;
}
Following is the content of the modified HTML host file war/HelloWorld.html.
<html>
<head>
<title>Hello World</title>
<link rel="stylesheet" href="HelloWorld.css"/>
<script language="javascript" src="helloworld/helloworld.nocache.js">
</script>
</head>
<body>
<h1>Grid Widget Demonstration</h1>
<div id="gwtContainer"></div>
</body>
</html>
Let us have following content of Java file src/com.tutorialspoint/HelloWorld.java which will demonstrate use of Grid
widget.
package com.tutorialspoint.client;
import com.google.gwt.core.client.EntryPoint;
import com.google.gwt.user.client.ui.DecoratorPanel;
import com.google.gwt.user.client.ui.Grid;
import com.google.gwt.user.client.ui.Image;
import com.google.gwt.user.client.ui.RootPanel;
public class HelloWorld implements EntryPoint{
public void onModuleLoad(){
// Create a grid
Grid grid =new Grid(2,2);
// Add images to the grid
int numRows = grid.getRowCount();
int numColumns = grid.getColumnCount();
for(int row =0; row < numRows; row++){
for(int col =0; col < numColumns; col++){
grid.setWidget(row, col,new
Image("http://www.tutorialspoint.com/images/gwt-mini.png"));
}
}
DecoratorPanel decoratorPanel =new DecoratorPanel();
decoratorPanel.add(grid);
// Add the widgets to the root panel.
RootPanel.get().add(decoratorPanel);
}
}

TUTORIALS POINT
Simply Easy Learning Page 195
Once you are ready with all the changes done, let us compile and run the application in development mode as we did in GWT - Create Application chapter. If everything is fine with your application, this will produce following result:
DeckPanel
Introduction
The DeckPanel widget represents a panel that displays all of its child widgets in a 'deck', where only one can be visible at a time. It is used by TabPanel.
Class declaration Following is the declaration for com.google.gwt.user.client.ui.DeckPanel class:
public class DeckPanel
extends ComplexPanel
implements HasAnimation,InsertPanel.ForIsWidget
Class constructors S.N. Constructor & Description
1 DeckPanel()
Constructor for DeckPanel.
Class methods
S.N. Function name & Description
1 void add(Widget w)
Adds a child widget.

TUTORIALS POINT
Simply Easy Learning Page 196
2 int getVisibleWidget()
Gets the index of the currently-visible widget.
3 void insert(IsWidget w, int beforeIndex)
4 void insert(Widget w, int beforeIndex)
Inserts a child widget before the specified index.
5 boolean isAnimationEnabled()
Returns true if animations are enabled, false if not.
6 boolean remove(Widget w)
Removes a child widget.
7 void setAnimationEnabled(boolean enable)
Enable or disable animations.
8 void showWidget(int index)
Shows the widget at the specified index.
Methods inherited
This class inherits methods from the following classes:
com.google.gwt.user.client.ui.UIObject
com.google.gwt.user.client.ui.Widget
com.google.gwt.user.client.ui.Panel
com.google.gwt.user.client.ui.ComplexPanel
java.lang.Object
DeckPanel Widget Example
This example will take you through simple steps to show usage of a DeckPanel Widget in GWT. Follow the following steps to update the GWT application we created in GWT - Create Application chapter:
Step Description
1 Create a project with a name HelloWorld under a package com.tutorialspoint as explained in the GWT - Create Application chapter.
2 Modify HelloWorld.gwt.xml, HelloWorld.css, HelloWorld.html and HelloWorld.java as explained below. Keep rest of the files unchanged.
3 Compile and run the application to verify the result of the implemented logic.
Following is the content of the modified module descriptor src/com.tutorialspoint/HelloWorld.gwt.xml.
<?xml version="1.0" encoding="UTF-8"?>
<module rename-to='helloworld'>
<!-- Inherit the core Web Toolkit stuff. -->

TUTORIALS POINT
Simply Easy Learning Page 197
<inherits name='com.google.gwt.user.User'/>
<!-- Inherit the default GWT style sheet. -->
<inherits name='com.google.gwt.user.theme.clean.Clean'/>
<!-- Specify the app entry point class. -->
<entry-point class='com.tutorialspoint.client.HelloWorld'/>
<!-- Specify the paths for translatable code -->
<source path='client'/>
<source path='shared'/>
</module>
Following is the content of the modified Style Sheet file war/HelloWorld.css.
body{
text-align: center;
font-family: verdana, sans-serif;
}
h1{
font-size:2em;
font-weight: bold;
color:#777777;
margin:40px0px70px;
text-align: center;
}
.deckpanel {
border:1px solid #BBBBBB;
padding:3px;
}
Following is the content of the modified HTML host file war/HelloWorld.html.
<html>
<head>
<title>Hello World</title>
<link rel="stylesheet" href="HelloWorld.css"/>
<script language="javascript" src="helloworld/helloworld.nocache.js">
</script>
</head>
<body>
<h1>DeckPanel Widget Demonstration</h1>
<div id="gwtContainer"></div>
</body>
</html>
Let us have following content of Java file src/com.tutorialspoint/HelloWorld.java which will demonstrate use of DeckPanel widget.
package com.tutorialspoint.client;
import com.google.gwt.core.client.EntryPoint;
import com.google.gwt.event.dom.client.ClickEvent;
import com.google.gwt.event.dom.client.ClickHandler;
import com.google.gwt.user.client.ui.Button;
import com.google.gwt.user.client.ui.DeckPanel;
import com.google.gwt.user.client.ui.HorizontalPanel;
import com.google.gwt.user.client.ui.Label;

TUTORIALS POINT
Simply Easy Learning Page 198
import com.google.gwt.user.client.ui.RootPanel;
import com.google.gwt.user.client.ui.VerticalPanel;
public class HelloWorld implements EntryPoint{
public void onModuleLoad(){
// Create DeckPanel widget
final DeckPanel deckPanel =new DeckPanel();
deckPanel.setSize("300px","120px");
deckPanel.setStyleName("deckpanel");
// Create lables to add to deckpanel
Label label1 =new Label("This is first Page");
Label label2 =new Label("This is second Page");
Label label3 =new Label("This is third Page");
// Add labels to deckpanel
deckPanel.add(label1);
deckPanel.add(label2);
deckPanel.add(label3);
//show first label
deckPanel.showWidget(0);
//create button bar
HorizontalPanel buttonBar =new HorizontalPanel();
buttonBar.setSpacing(5);
// create button and add click handlers
// show different labels on click of different buttons
Button button1 =new Button("Page 1");
button1.addClickHandler(new ClickHandler(){
@Override
public void onClick(ClickEvent event){
deckPanel.showWidget(0);
}
});
Button button2 =newButton("Page 2");
button2.addClickHandler(newClickHandler(){
@Override
public void onClick(ClickEvent event){
deckPanel.showWidget(1);
}
});
Button button3 =new Button("Page 3");
button3.addClickHandler(new ClickHandler(){
@Override
public void onClick(ClickEvent event){
deckPanel.showWidget(2);
}
});
buttonBar.add(button1);
buttonBar.add(button2);
buttonBar.add(button3);
VerticalPanel vPanel =new VerticalPanel();
vPanel.add(deckPanel);
vPanel.add(buttonBar);
// Add the widgets to the root panel.
RootPanel.get().add(vPanel);
}
}
Once you are ready with all the changes done, let us compile and run the application in development mode as we did in GWT - Create Application chapter. If everything is fine with your application, this will produce following result:
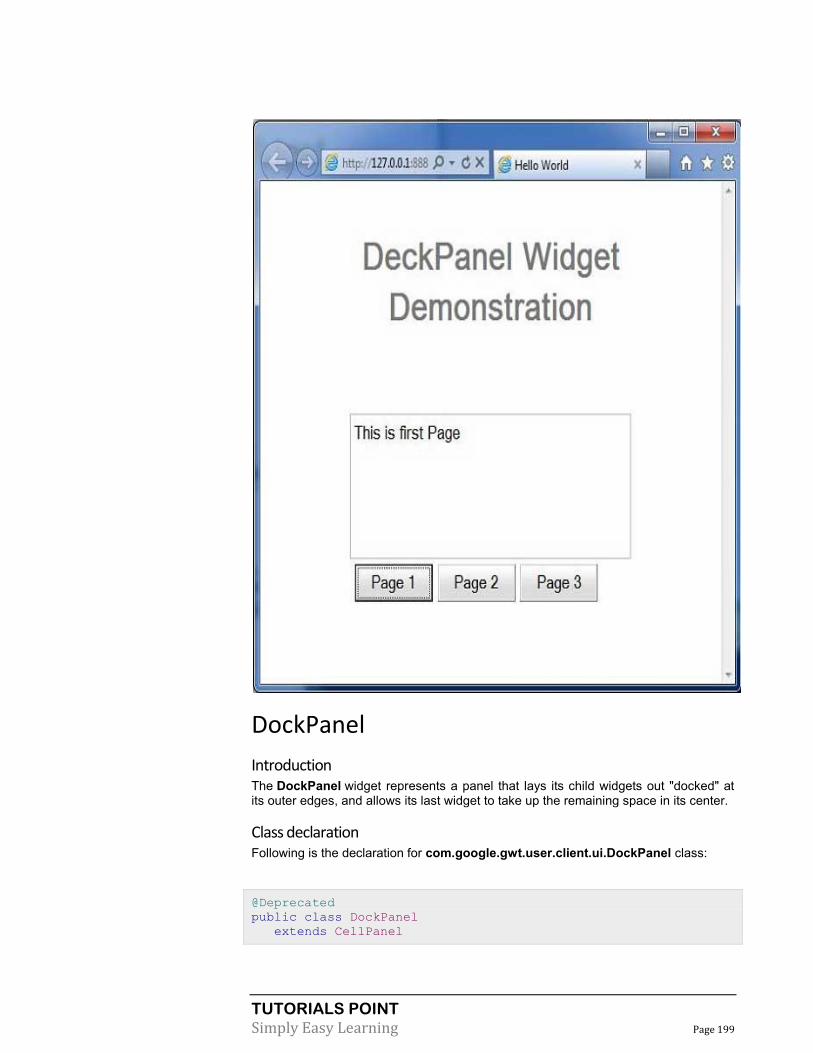
TUTORIALS POINT
Simply Easy Learning Page 199
DockPanel
Introduction The DockPanel widget represents a panel that lays its child widgets out "docked" at its outer edges, and allows its last widget to take up the remaining space in its center.
Class declaration Following is the declaration for com.google.gwt.user.client.ui.DockPanel class:
@Deprecated
public class DockPanel
extends CellPanel

TUTORIALS POINT
Simply Easy Learning Page 200
implements HasAlignment
Class constructors
S.N. Constructor & Description
1 DockPanel()
Constructor for DockPanel.
Class methods
S.N. Function name & Description
1 void add(Widget widget, DockPanel.DockLayoutConstant direction)
Deprecated. Adds a widget to the specified edge of the dock.
2 HasHorizontalAlignment.HorizontalAlignmentConstant getHorizontalAlignment()
Deprecated. Gets the horizontal alignment.
3 HasVerticalAlignment.VerticalAlignmentConstant getVerticalAlignment()
Deprecated. Gets the vertical alignment.
4 DockPanel.DockLayoutConstant getWidgetDirection(Widget w)
Deprecated. Gets the layout direction of the given child widget.
5
protected void onEnsureDebugId(java.lang.String baseID)
Deprecated. DockPanel supports adding more than one cell in a direction, so an integer will be appended to the end of the debug id.
6 boolean remove(Widget w)
Deprecated. Removes a child widget.
7
void setCellHeight(Widget w, java.lang.String height)
Deprecated. Sets the height of the cell associated with the given widget, related to the panel as a whole.
8
void setCellHorizontalAlignment(Widget w, HasHorizontalAlignment.HorizontalAlignmentConstant align)
Deprecated. Sets the horizontal alignment of the given widget within its cell.
9
void setCellVerticalAlignment(Widget w, HasVerticalAlignment.VerticalAlignmentConstant align)
Deprecated. Sets the vertical alignment of the given widget within its cell.
10
void setCellWidth(Widget w, java.lang.String width)
Deprecated. Sets the width of the cell associated with the given widget, related to the panel as a whole.
11
void setHorizontalAlignment(HasHorizontalAlignment.HorizontalAlignmentConstant align)
Deprecated. Sets the default horizontal alignment to be used for widgets added to this panel.
12 void setVerticalAlignment(HasVerticalAlignment.VerticalAlignmentConstant align)
Deprecated. Sets the default vertical alignment to be used for widgets added to this panel.
Methods inherited
This class inherits methods from the following classes:
com.google.gwt.user.client.ui.UIObject

TUTORIALS POINT
Simply Easy Learning Page 201
com.google.gwt.user.client.ui.Widget
com.google.gwt.user.client.ui.Panel
com.google.gwt.user.client.ui.ComplexPanel
com.google.gwt.user.client.ui.CellPanel
java.lang.Object
DockPanel Widget Example
This example will take you through simple steps to show usage of a DockPanel Widget in GWT. Follow the following steps to update the GWT application we created in GWT - Create Application chapter:
Step Description
1 Create a project with a name HelloWorld under a package com.tutorialspoint as explained in the GWT - Create Application chapter.
2 Modify HelloWorld.gwt.xml, HelloWorld.css, HelloWorld.html and HelloWorld.java as
explained below. Keep rest of the files unchanged.
3 Compile and run the application to verify the result of the implemented logic.
Following is the content of the modified module descriptor src/com.tutorialspoint/HelloWorld.gwt.xml.
<?xml version="1.0" encoding="UTF-8"?>
<module rename-to='helloworld'>
<!-- Inherit the core Web Toolkit stuff. -->
<inherits name='com.google.gwt.user.User'/>
<!-- Inherit the default GWT style sheet. -->
<inherits name='com.google.gwt.user.theme.clean.Clean'/>
<!-- Specify the app entry point class. -->
<entry-point class='com.tutorialspoint.client.HelloWorld'/>
<!-- Specify the paths for translatable code -->
<source path='client'/>
<source path='shared'/>
</module>
Following is the content of the modified Style Sheet file war/HelloWorld.css.
body{
text-align: center;
font-family: verdana, sans-serif;
}
h1{
font-size:2em;
font-weight: bold;
color:#777777;
margin:40px0px70px;
text-align: center;

TUTORIALS POINT
Simply Easy Learning Page 202
}
.dockpanel td {
border:1px solid #BBBBBB;
padding:3px;
}
Following is the content of the modified HTML host file war/HelloWorld.html.
<html>
<head>
<title>Hello World</title>
<link rel="stylesheet" href="HelloWorld.css"/>
<script language="javascript" src="helloworld/helloworld.nocache.js">
</script>
</head>
<body>
<h1>DockPanel Widget Demonstration</h1>
<div id="gwtContainer"></div>
</body>
</html>
Let us have following content of Java file src/com.tutorialspoint/HelloWorld.java which will demonstrate use of DockPanel widget.
package com.tutorialspoint.client;
import com.google.gwt.core.client.EntryPoint;
import com.google.gwt.user.client.ui.DockPanel;
import com.google.gwt.user.client.ui.HTML;
import com.google.gwt.user.client.ui.RootPanel;
import com.google.gwt.user.client.ui.ScrollPanel;
import com.google.gwt.user.client.ui.VerticalPanel;
public class HelloWorld implements EntryPoint{
public void onModuleLoad(){
DockPanel dockPanel =new DockPanel();
dockPanel.setStyleName("dockpanel");
dockPanel.setSpacing(4);
dockPanel.setHorizontalAlignment(DockPanel.ALIGN_CENTER);
// Add text all around
dockPanel.add(new HTML("This is the first north component."),
DockPanel.NORTH);
dockPanel.add(new HTML("This is the first south component."),
DockPanel.SOUTH);
dockPanel.add(new HTML("This is the east component."),
DockPanel.EAST);
dockPanel.add(new HTML("This is the west component."),
DockPanel.WEST);
dockPanel.add(new HTML("This is the second north component."),
DockPanel.NORTH);
dockPanel.add(new HTML("This is the second south component"),
DockPanel.SOUTH);
// Add scrollable text in the center
HTML contents =new HTML("This is a ScrollPanel contained"
+" at the center of a DockPanel. "
+" By putting some fairly large contents in the middle"
+" and setting its size explicitly, it becomes a scrollable area"
+" within the page, but without requiring the use of an IFRAME."

TUTORIALS POINT
Simply Easy Learning Page 203
+" Here's quite a bit more meaningless text that will serveprimarily"
+" to make this thing scroll off the bottom of its visible area."
+" Otherwise, you might have to make it really, really"
+" small in order to see the nifty scroll bars!");
ScrollPanel scroller =new ScrollPanel(contents);
scroller.setSize("400px","100px");
dockPanel.add(scroller,DockPanel.CENTER);
VerticalPanel vPanel =new VerticalPanel();
vPanel.add(dockPanel);
// Add the widgets to the root panel.
RootPanel.get().add(vPanel);
}
}
Once you are ready with all the changes done, let us compile and run the application in development mode as we did in GWT - Create Application chapter. If everything is fine with your application, this will produce following result:
HTMLPanel
Introduction
The HTMLPanel widget represents a panel that contains HTML, and which can attach child widgets to identified elements within that HTML.

TUTORIALS POINT
Simply Easy Learning Page 204
Class declaration
Following is the declaration for com.google.gwt.user.client.ui.HTMLPanel class:
public classHTMLPanel
extends ComplexPanel
Class constructors
S.N. Constructor & Description
1 HTMLPanel(SafeHtml safeHtml)
Initializes the panel's HTML from a given SafeHtml object.
2 HTMLPanel(java.lang.String html)
Creates an HTML panel with the specified HTML contents inside a DIV element.
3
HTMLPanel(java.lang.String tag, java.lang.String html)
Creates an HTML panel whose root element has the given tag, and with the specified HTML contents.
Class methods
S.N. Function name & Description
1 void add(Widget widget, Element elem)
Adds a child widget to the panel, contained within an HTML element.
2
void add(Widget widget, java.lang.String id)
Adds a child widget to the panel, contained within the HTML element specified by a given id.
3 void addAndReplaceElement(Widget widget, Element toReplace)
Adds a child widget to the panel, replacing the HTML element.
4 void addAndReplaceElement(Widget widget, java.lang.String id)
Adds a child widget to the panel, replacing the HTML element specified by a given id.
5
static java.lang.String createUniqueId()
A helper method for creating unique IDs for elements within dynamically- generated HTML.
6 Element getElementById(java.lang.String id)
Finds an element within this panel by its id.
Methods inherited This class inherits methods from the following classes:
com.google.gwt.user.client.ui.UIObject
com.google.gwt.user.client.ui.Widget
com.google.gwt.user.client.ui.Panel
com.google.gwt.user.client.ui.ComplexPanel
java.lang.Object
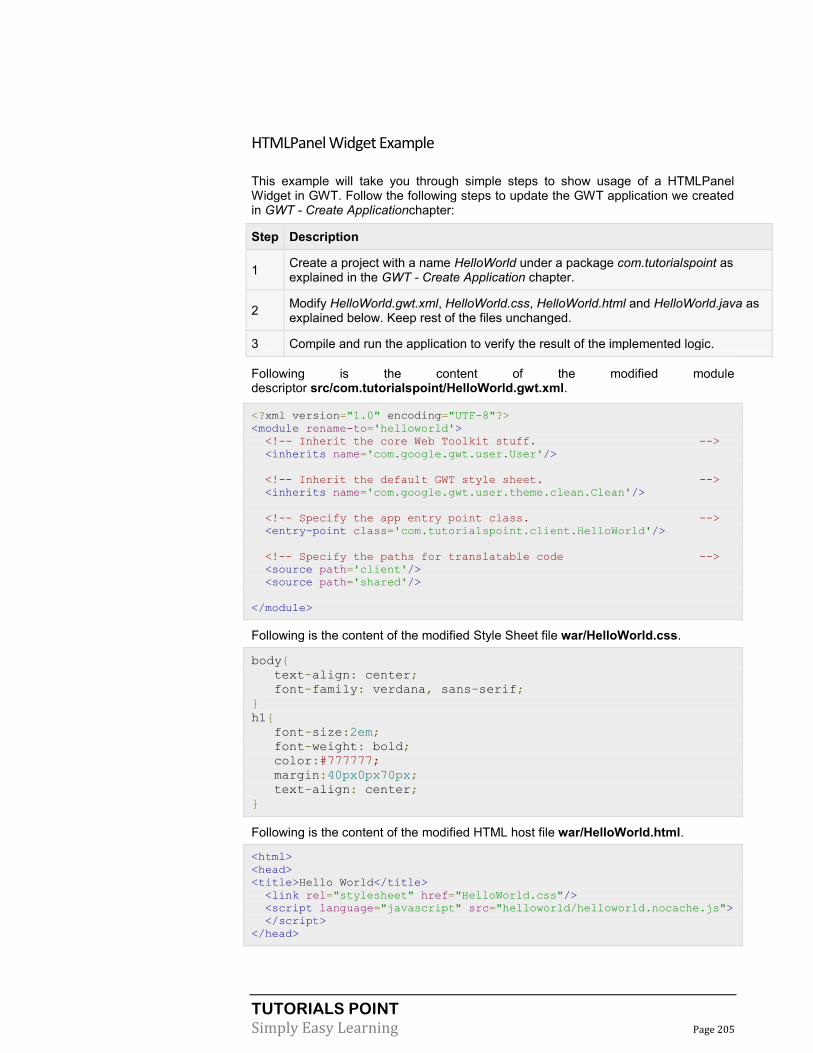
TUTORIALS POINT
Simply Easy Learning Page 205
HTMLPanel Widget Example
This example will take you through simple steps to show usage of a HTMLPanel Widget in GWT. Follow the following steps to update the GWT application we created in GWT - Create Applicationchapter:
Step Description
1 Create a project with a name HelloWorld under a package com.tutorialspoint as explained in the GWT - Create Application chapter.
2 Modify HelloWorld.gwt.xml, HelloWorld.css, HelloWorld.html and HelloWorld.java as explained below. Keep rest of the files unchanged.
3 Compile and run the application to verify the result of the implemented logic.
Following is the content of the modified module descriptor src/com.tutorialspoint/HelloWorld.gwt.xml.
<?xml version="1.0" encoding="UTF-8"?>
<module rename-to='helloworld'>
<!-- Inherit the core Web Toolkit stuff. -->
<inherits name='com.google.gwt.user.User'/>
<!-- Inherit the default GWT style sheet. -->
<inherits name='com.google.gwt.user.theme.clean.Clean'/>
<!-- Specify the app entry point class. -->
<entry-point class='com.tutorialspoint.client.HelloWorld'/>
<!-- Specify the paths for translatable code -->
<source path='client'/>
<source path='shared'/>
</module>
Following is the content of the modified Style Sheet file war/HelloWorld.css.
body{
text-align: center;
font-family: verdana, sans-serif;
}
h1{
font-size:2em;
font-weight: bold;
color:#777777;
margin:40px0px70px;
text-align: center;
}
Following is the content of the modified HTML host file war/HelloWorld.html.
<html>
<head>
<title>Hello World</title>
<link rel="stylesheet" href="HelloWorld.css"/>
<script language="javascript" src="helloworld/helloworld.nocache.js">
</script>
</head>

TUTORIALS POINT
Simply Easy Learning Page 206
<body>
<h1>HTMLPanel Widget Demonstration</h1>
<div id="gwtContainer"></div>
</body>
</html>
Let us have following content of Java file src/com.tutorialspoint/HelloWorld.java which will demonstrate use of HTMLPanel widget.
package com.tutorialspoint.client;
import com.google.gwt.core.client.EntryPoint;
import com.google.gwt.user.client.ui.DecoratorPanel;
import com.google.gwt.user.client.ui.HTMLPanel;
import com.google.gwt.user.client.ui.RootPanel;
public class HelloWorld implements EntryPoint{
public void onModuleLoad(){
String htmlString ="This is a <b>HTMLPanel</b> containing"
+" html contents. "
+" <i>By putting some fairly large contents in the middle"
+" and setting its size explicitly, it becomes a scrollable area"
+" within the page, but without requiring the use of an
IFRAME.</i>"
+" <u>Here's quite a bit more meaningless text that will serve"
+" to make this thing scroll off the bottom of its visible area."
+" Otherwise, you might have to make it really, really"
+" small in order to see the nifty scroll bars!</u>";
HTMLPanel htmlPanel =new HTMLPanel(htmlString);
DecoratorPanel panel =new DecoratorPanel();
panel.add(htmlPanel);
// Add the widgets to the root panel.
RootPanel.get().add(panel);
}
}
Once you are ready with all the changes done, let us compile and run the application in development mode as we did in GWT - Create Application chapter. If everything is fine with your application, this will produce following result:

TUTORIALS POINT
Simply Easy Learning Page 207
TabPanel
Introduction The TabPanel widget represents panel that represents a tabbed set of pages, each of which contains another widget. Its child widgets are shown as the user selects the various tabs associated with them. The tabs can contain arbitrary HTML.
Class declaration Following is the declaration for com.google.gwt.user.client.ui.TabPanel class:
@Deprecated
public classTabPanel
extends Composite
implements TabListener,SourcesTabEvents,
HasWidgets,HasAnimation,IndexedPanel.ForIsWidget,
HasBeforeSelectionHandlers<java.lang.Integer>,

TUTORIALS POINT
Simply Easy Learning Page 208
HasSelectionHandlers<java.lang.Integer>
Class constructors
S.N. Constructor & Description
1 TabPanel()
Deprecated. Creates an empty tab panel.
Class methods
S.N. Function name & Description
1 void add(IsWidget w, IsWidget tabWidget)
Deprecated. Convenience overload to allow IsWidget to be used directly.
2 void add(IsWidget w, java.lang.String tabText)
Deprecated. Convenience overload to allow IsWidget to be used directly.
3 void add(IsWidget w, java.lang.String tabText, boolean asHTML)
Deprecated. Convenience overload to allow IsWidget to be used directly.
4 void add(Widget w)
Deprecated. Adds a child widget.
5 void add(Widget w, java.lang.String tabText)
Deprecated. Adds a widget to the tab panel.
6 void add(Widget w, java.lang.String tabText, boolean asHTML)
Deprecated. Adds a widget to the tab panel.
7 void add(Widget w, Widget tabWidget)
Deprecated. Adds a widget to the tab panel.
8
HandlerRegistration addBeforeSelectionHandler(BeforeSelectionHandler<java.lang.Integer> handler)
Deprecated. Adds a BeforeSelectionEvent handler.
9
HandlerRegistration addSelectionHandler(SelectionHandler<java.lang.Integer> handler)
Deprecated. Adds a SelectionEvent handler.
10
void addTabListener(TabListener listener)
Deprecated. Use addBeforeSelectionHandler(com.google.gwt.event.logical.shared.BeforeSelectionHandler) and addSelectionHandler(com.google.gwt.event.logical.shared.SelectionHandler) instead
11 void clear()
Deprecated. Removes all child widgets.
12 protected SimplePanel createTabTextWrapper()
Deprecated. Create a SimplePanel that will wrap the contents in a tab.
13 DeckPanel getDeckPanel()
Deprecated. Gets the deck panel within this tab panel.
14 TabBar getTabBar()

TUTORIALS POINT
Simply Easy Learning Page 209
Deprecated. Gets the tab bar within this tab panel.
15 Widget getWidget(int index)
Deprecated. Gets the child widget at the specified index.
16 int getWidgetCount()
Deprecated. Gets the number of child widgets in this panel.
17 int getWidgetIndex(IsWidget child)
Deprecated. Convenience overload to allow IsWidget to be used directly.
18 int getWidgetIndex(Widget widget)
Deprecated. Gets the index of the specified child widget.
19 void insert(IsWidget widget, IsWidget tabWidget, int beforeIndex)
Deprecated. Convenience overload to allow IsWidget to be used directly.
20
void insert(IsWidget widget, java.lang.String tabText, boolean asHTML, int beforeIndex)
Deprecated. Convenience overload to allow IsWidget to be used directly.
21 void insert(IsWidget widget, java.lang.String tabText, int beforeIndex)
Deprecated. Convenience overload to allow IsWidget to be used directly.
22
void insert(Widget widget, java.lang.String tabText, boolean asHTML, int beforeIndex)
Deprecated. Inserts a widget into the tab panel.
23 void insert(Widget widget, java.lang.String tabText, int beforeIndex)
Deprecated. Inserts a widget into the tab panel.
24 void insert(Widget widget, Widget tabWidget, int beforeIndex)
Deprecated. Inserts a widget into the tab panel.
25 boolean isAnimationEnabled()
Deprecated. Returns true if animations are enabled, false if not.
26 java.util.Iterator<Widget> iterator()
Deprecated. Gets an iterator for the contained widgets.
27
boolean onBeforeTabSelected(SourcesTabEvents sender, int tabIndex)
Deprecated. Use BeforeSelectionHandler.onBeforeSelection(com.google.gwt.event.logical.shared.BeforeSelectionEvent) instead
28
protected void onEnsureDebugId(java.lang.String baseID)
Deprecated. Affected Elements: -bar = The tab bar. -bar-tab# = The element containing the content of the tab itself. -bar-tab-wrapper# = The cell containing the tab at the index. -bottom = The panel beneath the tab bar.
29
void onTabSelected(SourcesTabEvents sender, int tabIndex)
Deprecated. Use SelectionHandler.onSelection(com.google.gwt.event.logical.shared.SelectionEvent) instead
30 boolean remove(int index)
Deprecated. Removes the widget at the specified index.
31 boolean remove(Widget widget)
Deprecated. Removes the given widget, and its associated tab.
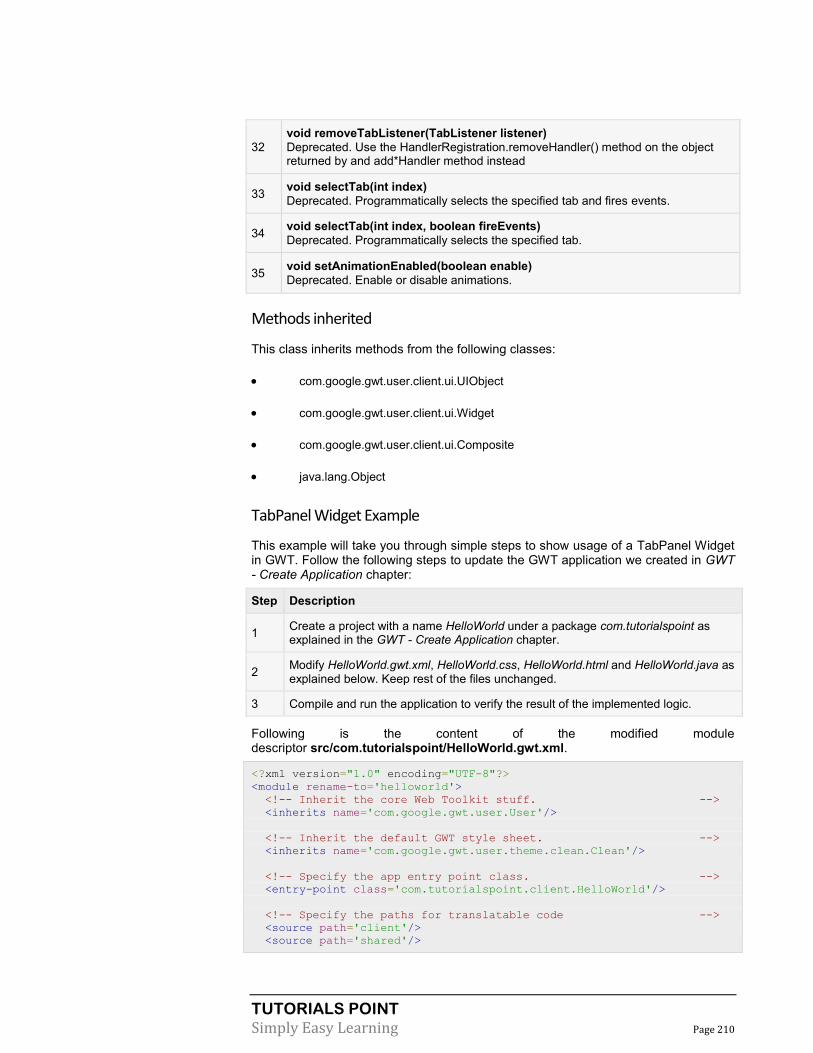
TUTORIALS POINT
Simply Easy Learning Page 210
32
void removeTabListener(TabListener listener)
Deprecated. Use the HandlerRegistration.removeHandler() method on the object returned by and add*Handler method instead
33 void selectTab(int index)
Deprecated. Programmatically selects the specified tab and fires events.
34 void selectTab(int index, boolean fireEvents)
Deprecated. Programmatically selects the specified tab.
35 void setAnimationEnabled(boolean enable)
Deprecated. Enable or disable animations.
Methods inherited
This class inherits methods from the following classes:
com.google.gwt.user.client.ui.UIObject
com.google.gwt.user.client.ui.Widget
com.google.gwt.user.client.ui.Composite
java.lang.Object
TabPanel Widget Example ,
This example will take you through simple steps to show usage of a TabPanel Widget in GWT. Follow the following steps to update the GWT application we created in GWT - Create Application chapter:
Step Description
1 Create a project with a name HelloWorld under a package com.tutorialspoint as explained in the GWT - Create Application chapter.
2 Modify HelloWorld.gwt.xml, HelloWorld.css, HelloWorld.html and HelloWorld.java as explained below. Keep rest of the files unchanged.
3 Compile and run the application to verify the result of the implemented logic.
Following is the content of the modified module descriptor src/com.tutorialspoint/HelloWorld.gwt.xml.
<?xml version="1.0" encoding="UTF-8"?>
<module rename-to='helloworld'>
<!-- Inherit the core Web Toolkit stuff. -->
<inherits name='com.google.gwt.user.User'/>
<!-- Inherit the default GWT style sheet. -->
<inherits name='com.google.gwt.user.theme.clean.Clean'/>
<!-- Specify the app entry point class. -->
<entry-point class='com.tutorialspoint.client.HelloWorld'/>
<!-- Specify the paths for translatable code -->
<source path='client'/>
<source path='shared'/>

TUTORIALS POINT
Simply Easy Learning Page 211
</module>
Following is the content of the modified Style Sheet file war/HelloWorld.css.
body{
text-align: center;
font-family: verdana, sans-serif;
}
h1{
font-size:2em;
font-weight: bold;
color:#777777;
margin:40px0px70px;
text-align: center;
}
Following is the content of the modified HTML host file war/HelloWorld.html.
<html>
<head>
<title>Hello World</title>
<link rel="stylesheet" href="HelloWorld.css"/>
<script language="javascript" src="helloworld/helloworld.nocache.js">
</script>
</head>
<body>
<h1>TabPanel Widget Demonstration</h1>
<div id="gwtContainer"></div>
</body>
</html>
Let us have following content of Java file src/com.tutorialspoint/HelloWorld.java which will demonstrate use of TabPanel widget.
package com.tutorialspoint.client;
import com.google.gwt.core.client.EntryPoint;
import com.google.gwt.user.client.ui.DecoratorPanel;
import com.google.gwt.user.client.ui.HTMLPanel;
import com.google.gwt.user.client.ui.Label;
import com.google.gwt.user.client.ui.RootPanel;
import com.google.gwt.user.client.ui.TabPanel;
public class HelloWorld implements EntryPoint{
public void onModuleLoad(){
//Create an empty tab panel
TabPanel tabPanel =newTabPanel();
//create contents for tabs of tabpanel
Label label1 =new Label("This is contents of TAB 1");
label1.setHeight("200");
Label label2 =new Label("This is contents of TAB 2");
label2.setHeight("200");
Label label3 =new Label("This is contents of TAB 3");
label3.setHeight("200");
//create titles for tabs

TUTORIALS POINT
Simply Easy Learning Page 212
String tab1Title ="TAB 1";
String tab2Title ="TAB 2";
String tab3Title ="TAB 3";
//create tabs
tabPanel.add(label1, tab1Title);
tabPanel.add(label2, tab2Title);
tabPanel.add(label3, tab3Title);
//select first tab
tabPanel.selectTab(0);
//set width if tabpanel
tabPanel.setWidth("400");
// Add the widgets to the root panel.
RootPanel.get().add(tabPanel);
}
}
Once you are ready with all the changes done, let us compile and run the application in development mode as we did in GWT - Create Application chapter. If everything is fine with your application, this will produce following result:
Composite Widget

TUTORIALS POINT
Simply Easy Learning Page 213
Introduction The Composite widget is a type of widget that can wrap another widget, hiding the wrapped widget's methods. When added to a panel, a composite behaves exactly as if the widget it wraps had been added. The composite is useful for creating a single widget out of an aggregate of multiple other widgets contained in a single panel.
Class declaration Following is the declaration for com.google.gwt.user.client.ui.Composite class:
public abstract class Composite
extends Widget
Class constructors
S.N. Constructor & Description
1 Composite()
Class methods
S.N. Function name & Description
1 protected Widget getWidget()
Provides subclasses access to the topmost widget that defines this composite.
2 protected void initWidget(Widget widget)
Sets the widget to be wrapped by the composite.
3
boolean isAttached()
Determines whether this widget is currently attached to the browser's document (i.e., there is an unbroken chain of widgets between this widget and the underlying browser document).
4 protected void onAttach()
This method is called when a widget is attached to the browser's document.
5 void onBrowserEvent(Event event)
Fired whenever a browser event is received.
6 protected void onDetach()
This method is called when a widget is detached from the browser's document.
7 protected void setWidget(Widget widget)
Deprecated. Use initWidget(Widget) instead
Methods inherited
This class inherits methods from the following classes:
com.google.gwt.user.client.ui.UIObject
com.google.gwt.user.client.ui.Widget
java.lang.Object

TUTORIALS POINT
Simply Easy Learning Page 214
Composite Widget Example
This example will take you through simple steps to show usage of a Composite Widget in GWT. Follow the following steps to update the GWT application we created in GWT - Create Application chapter:
Step Description
1 Create a project with a name HelloWorld under a package com.tutorialspoint as explained in the GWT - Create Application chapter.
2 Modify HelloWorld.gwt.xml, HelloWorld.css, HelloWorld.html and HelloWorld.java as explained below. Keep rest of the files unchanged.
3 Compile and run the application to verify the result of the implemented logic.
Following is the content of the modified module descriptor src/com.tutorialspoint/HelloWorld.gwt.xml.
<?xml version="1.0" encoding="UTF-8"?>
<module rename-to='helloworld'>
<!-- Inherit the core Web Toolkit stuff. -->
<inherits name='com.google.gwt.user.User'/>
<!-- Inherit the default GWT style sheet. -->
<inherits name='com.google.gwt.user.theme.clean.Clean'/>
<!-- Specify the app entry point class. -->
<entry-point class='com.tutorialspoint.client.HelloWorld'/>
<!-- Specify the paths for translatable code -->
<source path='client'/>
<source path='shared'/>
</module>
Following is the content of the modified Style Sheet file war/HelloWorld.css.
body{
text-align: center;
font-family: verdana, sans-serif;
}
h1{
font-size:2em;
font-weight: bold;
color:#777777;
margin:40px0px70px;
text-align: center;
}
Following is the content of the modified HTML host file war/HelloWorld.html.
<html>
<head>
<title>Hello World</title>
<linkrel="stylesheet" href="HelloWorld.css"/>
<script language="javascript" src="helloworld/helloworld.nocache.js">
</script>
</head>
<body>

TUTORIALS POINT
Simply Easy Learning Page 215
<h1>Composite Widget Demonstration</h1>
<div id="gwtContainer"></div>
</body>
</html>
Let us have following content of Java file src/com.tutorialspoint/HelloWorld.java which will demonstrate use of Composite widget.
package com.tutorialspoint.client;
import com.google.gwt.core.client.EntryPoint;
import com.google.gwt.event.dom.client.ClickEvent;
import com.google.gwt.event.dom.client.ClickHandler;
import com.google.gwt.user.client.ui.CheckBox;
import com.google.gwt.user.client.ui.Composite;
import com.google.gwt.user.client.ui.DecoratorPanel;
import com.google.gwt.user.client.ui.RootPanel;
import com.google.gwt.user.client.ui.TextBox;
import com.google.gwt.user.client.ui.VerticalPanel;
public class HelloWorld implements EntryPoint{
/**
* A composite of a TextBox and a CheckBox that optionally enables it.
*/
private static class OptionalTextBox extends Composite implements
ClickHandler{
privateTextBox textBox =new TextBox();
privateCheckBox checkBox =new CheckBox();
/**
* Constructs an OptionalTextBox with the given caption
* on the check.
* @param caption the caption to be displayed with the check box
*/
public OptionalTextBox(String caption){
// Place the check above the text box using a vertical panel.
VerticalPanel panel =new VerticalPanel();
// panel.setBorderWidth(1);
panel.setSpacing(10);
panel.add(checkBox);
panel.add(textBox);
textBox.setWidth("200");
// Set the check box's caption, and check it by default.
checkBox.setText(caption);
checkBox.setValue(true);
checkBox.addClickHandler(this);
DecoratorPanel decoratorPanel =new DecoratorPanel();
decoratorPanel.add(panel);
// All composites must call initWidget() in their constructors.
initWidget(decoratorPanel);
}
public void onClick(ClickEvent event){
if(event.getSource()== checkBox){
// When the check box is clicked,
//update the text box's enabled state.

TUTORIALS POINT
Simply Easy Learning Page 216
textBox.setEnabled(checkBox.getValue());
}
}
}
public void onModuleLoad(){
// Create an optional text box and add it to the root panel.
OptionalTextBox otb =new OptionalTextBox("Check this to enable me");
RootPanel.get().add(otb);
}
}
Once you are ready with all the changes done, let us compile and run the application in development mode as we did in GWT - Create Application chapter. If everything is fine with your application, this will produce following result:
SimplePanel
Introduction The SimplePanel widget represents a base class for panels that contain only one widget.
Class declaration Following is the declaration for com.google.gwt.user.client.ui.SimplePanel class:
public class SimplePanel
extends Panel

TUTORIALS POINT
Simply Easy Learning Page 217
implementsHasOneWidget
Class constructors
S.N. Constructor & Description
1 SimplePanel()
Creates an empty panel that uses a DIV for its contents.
2 protected SimplePanel(Element elem)
Creates an empty panel that uses the specified browser element for its contents.
Class methods
S.N. Function name & Description
1 void add(Widget w)
Adds a widget to this panel.
2
protected Element getContainerElement()
Override this method to specify that an element other than the root element be the container for the panel's child widget.
3 Widget getWidget()
Gets the panel's child widget.
4 java.util.Iterator<Widget> iterator()
Gets an iterator for the contained widgets.
5 boolean remove(Widget w)
Removes a child widget.
6 void setWidget(IsWidget w)
Set the only widget of the receiver, replacing the previous widget if there was one.
7 void setWidget(Widget w)
Sets this panel's widget.
Methods inherited
This class inherits methods from the following classes:
com.google.gwt.user.client.ui.UIObject
com.google.gwt.user.client.ui.Widget
com.google.gwt.user.client.ui.Panel
java.lang.Object
SimplePanel Widget Example
This example will take you through simple steps to show usage of a SimplePanel Widget in GWT. Follow the following steps to update the GWT application we created in GWT - Create Applicationchapter:

TUTORIALS POINT
Simply Easy Learning Page 218
Step Description
1 Create a project with a name HelloWorld under a package com.tutorialspoint as explained in the GWT - Create Application chapter.
2 Modify HelloWorld.gwt.xml, HelloWorld.css, HelloWorld.html and HelloWorld.java as explained below. Keep rest of the files unchanged.
3 Compile and run the application to verify the result of the implemented logic.
Following is the content of the modified module descriptor src/com.tutorialspoint/HelloWorld.gwt.xml.
<?xml version="1.0" encoding="UTF-8"?>
<module rename-to='helloworld'>
<!-- Inherit the core Web Toolkit stuff. -->
<inherits name='com.google.gwt.user.User'/>
<!-- Inherit the default GWT style sheet. -->
<inherits name='com.google.gwt.user.theme.clean.Clean'/>
<!-- Specify the app entry point class. -->
<entry-point class='com.tutorialspoint.client.HelloWorld'/>
<!-- Specify the paths for translatable code -->
<source path='client'/>
<source path='shared'/>
</module>
Following is the content of the modified Style Sheet file war/HelloWorld.css.
body{
text-align: center;
font-family: verdana, sans-serif;
}
h1{
font-size:2em;
font-weight: bold;
color:#777777;
margin:40px0px70px;
text-align: center;
}
Following is the content of the modified HTML host file war/HelloWorld.html.
<html>
<head>
<title>Hello World</title>
<link rel="stylesheet" href="HelloWorld.css"/>
<script language="javascript" src="helloworld/helloworld.nocache.js">
</script>
</head>
<body>
<h1>SimplePanel Widget Demonstration</h1>
<div id="gwtContainer"></div>
</body>
</html>

TUTORIALS POINT
Simply Easy Learning Page 219
Let us have following content of Java file src/com.tutorialspoint/HelloWorld.java which will demonstrate use of SimplePanel widget.
package com.tutorialspoint.client;
import com.google.gwt.core.client.EntryPoint;
import com.google.gwt.user.client.ui.DecoratorPanel;
import com.google.gwt.user.client.ui.Label;
import com.google.gwt.user.client.ui.RootPanel;
import com.google.gwt.user.client.ui.SimplePanel;
public class HelloWorld implements EntryPoint{
public void onModuleLoad(){
// Create a Simple Panel
SimplePanel simplePanel =new SimplePanel();
Label label =new Label("A Simple Label.");
//add label to simple panel
simplePanel.add(label);
//set height and width of simple panel
simplePanel.setHeight("200");
simplePanel.setWidth("200");
DecoratorPanel decoratorPanel =newDecoratorPanel();
decoratorPanel.add(simplePanel);
// Add the widgets to the root panel.
RootPanel.get().add(decoratorPanel);
}
}
Once you are ready with all the changes done, let us compile and run the application in development mode as we did in GWT - Create Application chapter. If everything is fine with your application, this will produce following result:

TUTORIALS POINT
Simply Easy Learning Page 220
ScrollPanel
Introduction
The ScrollPanel widget represents a simple panel that wraps its contents in a scrollable area.
Class declaration
Following is the declaration for com.google.gwt.user.client.ui.ScrollPanel class:
public class ScrollPanel
extends SimplePanel
implements SourcesScrollEvents,HasScrollHandlers,
RequiresResize,ProvidesResize
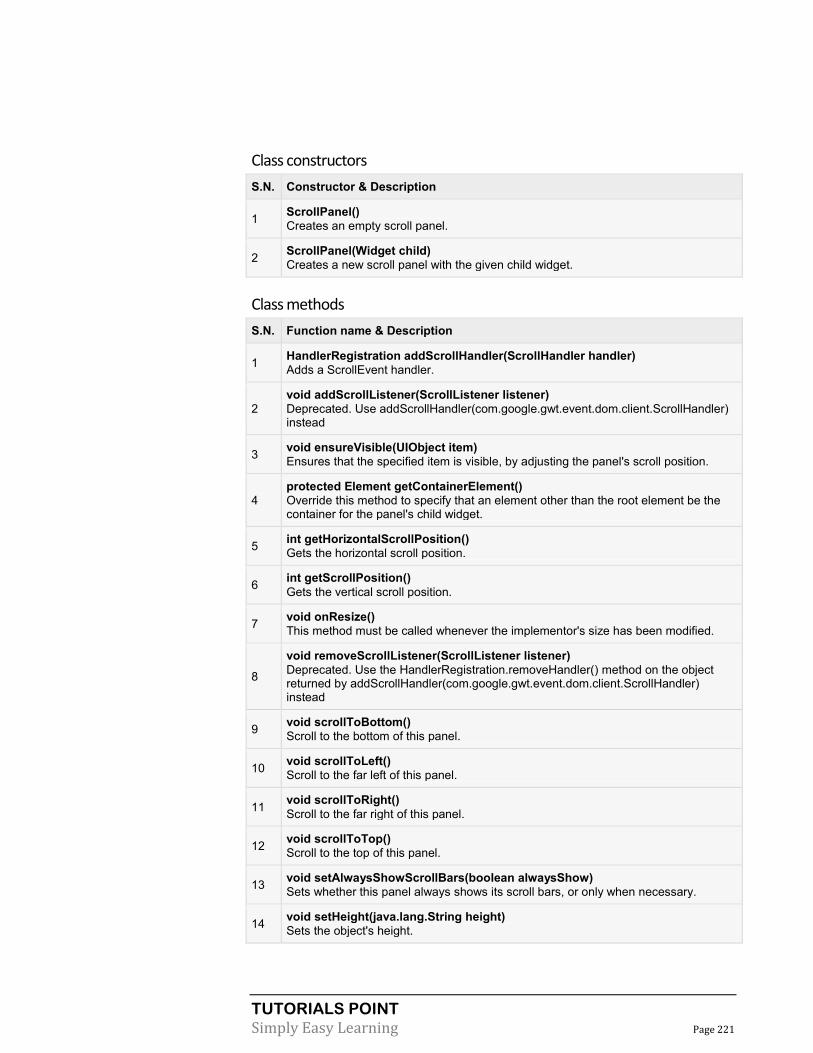
TUTORIALS POINT
Simply Easy Learning Page 221
Class constructors
S.N. Constructor & Description
1 ScrollPanel()
Creates an empty scroll panel.
2 ScrollPanel(Widget child)
Creates a new scroll panel with the given child widget.
Class methods
S.N. Function name & Description
1 HandlerRegistration addScrollHandler(ScrollHandler handler)
Adds a ScrollEvent handler.
2
void addScrollListener(ScrollListener listener)
Deprecated. Use addScrollHandler(com.google.gwt.event.dom.client.ScrollHandler) instead
3 void ensureVisible(UIObject item)
Ensures that the specified item is visible, by adjusting the panel's scroll position.
4
protected Element getContainerElement()
Override this method to specify that an element other than the root element be the container for the panel's child widget.
5 int getHorizontalScrollPosition()
Gets the horizontal scroll position.
6 int getScrollPosition()
Gets the vertical scroll position.
7 void onResize()
This method must be called whenever the implementor's size has been modified.
8
void removeScrollListener(ScrollListener listener)
Deprecated. Use the HandlerRegistration.removeHandler() method on the object returned by addScrollHandler(com.google.gwt.event.dom.client.ScrollHandler) instead
9 void scrollToBottom()
Scroll to the bottom of this panel.
10 void scrollToLeft()
Scroll to the far left of this panel.
11 void scrollToRight()
Scroll to the far right of this panel.
12 void scrollToTop()
Scroll to the top of this panel.
13 void setAlwaysShowScrollBars(boolean alwaysShow)
Sets whether this panel always shows its scroll bars, or only when necessary.
14 void setHeight(java.lang.String height)
Sets the object's height.

TUTORIALS POINT
Simply Easy Learning Page 222
15 void setHorizontalScrollPosition(int position)
Sets the horizontal scroll position.
16 void setScrollPosition(int position)
Sets the vertical scroll position.
17 void setSize(java.lang.String width, java.lang.String height)
Sets the object's size.
18 void setWidth(java.lang.String width)
Sets the object's width.
Methods inherited
This class inherits methods from the following classes:
com.google.gwt.user.client.ui.UIObject
com.google.gwt.user.client.ui.Widget
com.google.gwt.user.client.ui.Panel
com.google.gwt.user.client.ui.SimplePanel
java.lang.Object
ScrollPanel Widget Example This example will take you through simple steps to show usage of a ScrollPanel Widget in GWT. Follow the following steps to update the GWT application we created in GWT - Create Applicationchapter:
Step Description
1 Create a project with a name HelloWorld under a package com.tutorialspoint as explained in the GWT - Create Application chapter.
2 Modify HelloWorld.gwt.xml, HelloWorld.css, HelloWorld.html and HelloWorld.java as explained below. Keep rest of the files unchanged.
3 Compile and run the application to verify the result of the implemented logic.
Following is the content of the modified module descriptor src/com.tutorialspoint/HelloWorld.gwt.xml.
<?xml version="1.0" encoding="UTF-8"?>
<module rename-to='helloworld'>
<!-- Inherit the core Web Toolkit stuff. -->
<inherits name='com.google.gwt.user.User'/>
<!-- Inherit the default GWT style sheet. -->
<inherits name='com.google.gwt.user.theme.clean.Clean'/>
<!-- Specify the app entry point class. -->
<entry-point class='com.tutorialspoint.client.HelloWorld'/>
<!-- Specify the paths for translatable code -->

TUTORIALS POINT
Simply Easy Learning Page 223
<source path='client'/>
<source path='shared'/>
</module>
Following is the content of the modified Style Sheet file war/HelloWorld.css.
body{
text-align: center;
font-family: verdana, sans-serif;
}
h1{
font-size:2em;
font-weight: bold;
color:#777777;
margin:40px0px70px;
text-align: center;
}
Following is the content of the modified HTML host file war/HelloWorld.html.
<html>
<head>
<title>Hello World</title>
<link rel="stylesheet" href="HelloWorld.css"/>
<script language="javascript" src="helloworld/helloworld.nocache.js">
</script>
</head>
<body>
<h1>ScrollPanel Widget Demonstration</h1>
<div id="gwtContainer"></div>
</body>
</html>
Let us have following content of Java file src/com.tutorialspoint/HelloWorld.java which will demonstrate use of
ScrollPanel widget.
package com.tutorialspoint.client;
import com.google.gwt.core.client.EntryPoint;
import com.google.gwt.user.client.ui.DecoratorPanel;
import com.google.gwt.user.client.ui.HTML;
import com.google.gwt.user.client.ui.RootPanel;
import com.google.gwt.user.client.ui.ScrollPanel;
public class HelloWorld implements EntryPoint{
public void onModuleLoad(){
// Create scrollable text
HTML contents =new HTML("This is a ScrollPanel."
+" By putting some fairly large contents in the middle"
+" and setting its size explicitly, it becomes a scrollable area"
+" within the page, but without requiring the use of an IFRAME."
+" Here's quite a bit more meaningless text that will serve primarily"
+" to make this thing scroll off the bottom of its visible area."
+" Otherwise, you might have to make it really, really"
+" small in order to see the nifty scroll bars!");
//create scrollpanel with content
ScrollPanel scrollPanel =new ScrollPanel(contents);

TUTORIALS POINT
Simply Easy Learning Page 224
scrollPanel.setSize("400px","100px");
DecoratorPanel decoratorPanel =new DecoratorPanel();
decoratorPanel.add(scrollPanel);
// Add the widgets to the root panel.
RootPanel.get().add(decoratorPanel);
}
}
Once you are ready with all the changes done, let us compile and run the application in development mode as we did in GWT - Create Application chapter. If everything is fine with your application, this will produce following result:
FocusPanel
Introduction The FocusPanel widget represents a simple panel that makes its contents focusable, and adds the ability to catch mouse and keyboard events.
Class declaration Following is the declaration for com.google.gwt.user.client.ui.FocusPanel class:
public class FocusPanel

TUTORIALS POINT
Simply Easy Learning Page 225
extends SimplePanel
implements HasFocus,SourcesClickEvents,
SourcesMouseEvents,SourcesMouseWheelEvents,
HasAllMouseHandlers,HasClickHandlers,
HasDoubleClickHandlers,HasAllKeyHandlers,
HasAllFocusHandlers
Class constructors
S.N. Constructor & Description
1 FocusPanel()
Creates an empty focus panel.
2 FocusPanel(Widget child)
Creates a new focus panel with the given child widget.
Class methods
S.N. Function name & Description
1 HandlerRegistration addBlurHandler(BlurHandler handler)
Adds a BlurEvent handler.
2 HandlerRegistration addClickHandler(ClickHandler handler)
Adds a ClickEvent handler.
3
void addClickListener(ClickListener listener)
Deprecated. Use addClickHandler(com.google.gwt.event.dom.client.ClickHandler) instead
4 HandlerRegistration addDoubleClickHandler(DoubleClickHandler handler)
Adds a DoubleClickEvent handler.
5 HandlerRegistration addFocusHandler(FocusHandler handler)
Adds a FocusEvent handler.
6
void addFocusListener(FocusListener listener)
Deprecated. Use addFocusHandler(com.google.gwt.event.dom.client.FocusHandler) instead
7
void addKeyboardListener(KeyboardListener listener)
Deprecated. Use addKeyDownHandler(com.google.gwt.event.dom.client.KeyDownHandler), addKeyUpHandler(com.google.gwt.event.dom.client.KeyUpHandler) and addKeyPressHandler(com.google.gwt.event.dom.client.KeyPressHandler) instead
8 HandlerRegistration addKeyDownHandler(KeyDownHandler handler)
Adds a KeyDownEvent handler.
9 HandlerRegistration addKeyPressHandler(KeyPressHandler handler)
Adds a KeyPressEvent handler.
10 HandlerRegistration addKeyUpHandler(KeyUpHandler handler)
Adds a KeyUpEvent handler.
11 HandlerRegistration addMouseDownHandler(MouseDownHandler handler)
Adds a MouseDownEvent handler.

TUTORIALS POINT
Simply Easy Learning Page 226
12
void addMouseListener(MouseListener listener)
Deprecated. Use addMouseOverHandler(com.google.gwt.event.dom.client.MouseOverHandler), addMouseMoveHandler(com.google.gwt.event.dom.client.MouseMoveHandler), addMouseDownHandler(com.google.gwt.event.dom.client.MouseDownHandler), addMouseUpHandler(com.google.gwt.event.dom.client.MouseUpHandler) and addMouseOutHandler(com.google.gwt.event.dom.client.MouseOutHandler) instead
13 HandlerRegistration addMouseMoveHandler(MouseMoveHandler handler)
Adds a MouseMoveEvent handler.
14 HandlerRegistration addMouseOutHandler(MouseOutHandler handler)
Adds a MouseOutEvent handler.
15 HandlerRegistration addMouseOverHandler(MouseOverHandler handler)
Adds a MouseOverEvent handler.
16 HandlerRegistration addMouseUpHandler(MouseUpHandler handler)
Adds a MouseUpEvent handler.
17 HandlerRegistration addMouseWheelHandler(MouseWheelHandler handler)
Adds a MouseWheelEvent handler.
18
void addMouseWheelListener(MouseWheelListener listener)
Deprecated. Use addMouseWheelHandler(com.google.gwt.event.dom.client.MouseWheelHandler) instead
19 int getTabIndex()
Gets the widget's position in the tab index.
20
void removeClickListener(ClickListener listener)
Deprecated. Use the HandlerRegistration.removeHandler() method on the object returned by addClickHandler(com.google.gwt.event.dom.client.ClickHandler) instead
21
void removeFocusListener(FocusListener listener)
Deprecated. Use the HandlerRegistration.removeHandler() method on the object returned by addFocusHandler(com.google.gwt.event.dom.client.FocusHandler) instead
22
void removeKeyboardListener(KeyboardListener listener)
Deprecated. Use the HandlerRegistration.removeHandler() method on the object returned by an add*Handler method instead
23
void removeMouseListener(MouseListener listener)
Deprecated. Use the HandlerRegistration.removeHandler() method on the object returned by an add*Handler method instead
24
void removeMouseWheelListener(MouseWheelListener listener)
Deprecated. Use the HandlerRegistration.removeHandler() method on the object returned by addMouseWheelHandler(com.google.gwt.event.dom.client.MouseWheelHandler) instead
25 void setAccessKey(char key)
Sets the widget's 'access key'.
26 void setFocus(boolean focused)
Explicitly focus/unfocus this widget.
27 void setTabIndex(int index)
Sets the widget's position in the tab index.

TUTORIALS POINT
Simply Easy Learning Page 227
Methods inherited
This class inherits methods from the following classes:
com.google.gwt.user.client.ui.UIObject
com.google.gwt.user.client.ui.Widget
com.google.gwt.user.client.ui.Panel
com.google.gwt.user.client.ui.SimplePanel
java.lang.Object
FocusPanel Widget Example
This example will take you through simple steps to show usage of a FocusPanel Widget in GWT. Follow the following steps to update the GWT application we created in GWT - Create Applicationchapter:
Step Description
1 Create a project with a name HelloWorld under a package com.tutorialspoint as explained in the GWT - Create Application chapter.
2 Modify HelloWorld.gwt.xml, HelloWorld.css, HelloWorld.html and HelloWorld.java as explained below. Keep rest of the files unchanged.
3 Compile and run the application to verify the result of the implemented logic.
Following is the content of the modified module descriptor src/com.tutorialspoint/HelloWorld.gwt.xml.
<?xml version="1.0" encoding="UTF-8"?>
<module rename-to='helloworld'>
<!-- Inherit the core Web Toolkit stuff. -->
<inherits name='com.google.gwt.user.User'/>
<!-- Inherit the default GWT style sheet. -->
<inherits name='com.google.gwt.user.theme.clean.Clean'/>
<!-- Specify the app entry point class. -->
<entry-point class='com.tutorialspoint.client.HelloWorld'/>
<!-- Specify the paths for translatable code -->
<source path='client'/>
<source path='shared'/>
</module>
Following is the content of the modified Style Sheet file war/HelloWorld.css.
body{
text-align: center;
font-family: verdana, sans-serif;
}

TUTORIALS POINT
Simply Easy Learning Page 228
h1{
font-size:2em;
font-weight: bold;
color:#777777;
margin:40px0px70px;
text-align: center;
}
Following is the content of the modified HTML host file war/HelloWorld.html.
<html>
<head>
<title>Hello World</title>
<link rel="stylesheet" href="HelloWorld.css"/>
<script language="javascript" src="helloworld/helloworld.nocache.js">
</script>
</head>
<body>
<h1>FocusPanel Widget Demonstration</h1>
<div id="gwtContainer"></div>
</body>
</html>
Let us have following content of Java file src/com.tutorialspoint/HelloWorld.java which will demonstrate use of FocusPanel widget.
package com.tutorialspoint.client;
import com.google.gwt.core.client.EntryPoint;
import com.google.gwt.user.client.ui.DecoratorPanel;
import com.google.gwt.user.client.ui.FocusPanel;
import com.google.gwt.user.client.ui.HTML;
import com.google.gwt.user.client.ui.RootPanel;
public class HelloWorld implements EntryPoint{
public void onModuleLoad(){
// Create text
HTML contents =new HTML("This is a FocusPanel."
+" Click on the panel and it will attain focus.");
//create focus panel with content
FocusPanel focusPanel =new FocusPanel(contents);
focusPanel.setSize("400px","100px");
DecoratorPanel decoratorPanel =new DecoratorPanel();
decoratorPanel.add(focusPanel);
// Add the widgets to the root panel.
RootPanel.get().add(decoratorPanel);
}
}
Once you are ready with all the changes done, let us compile and run the application in development mode as we did in GWT - Create Application chapter. If everything is fine with your application, this will produce following result:
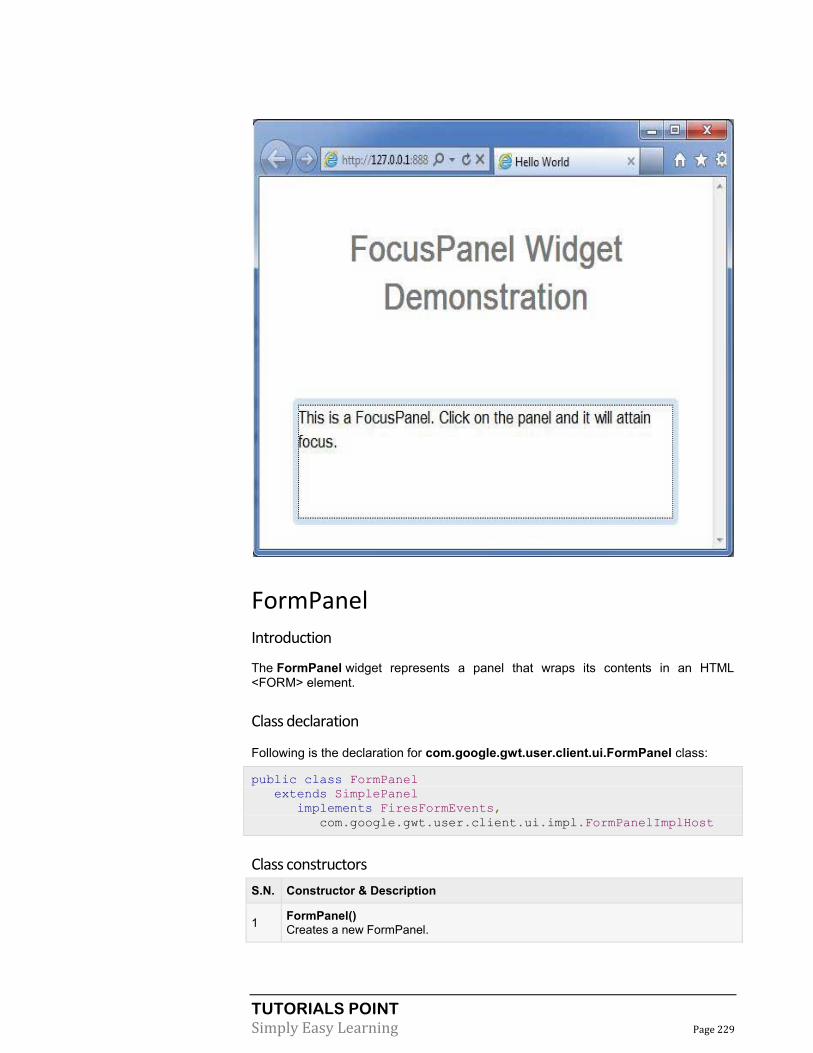
TUTORIALS POINT
Simply Easy Learning Page 229
FormPanel
Introduction
The FormPanel widget represents a panel that wraps its contents in an HTML <FORM> element.
Class declaration
Following is the declaration for com.google.gwt.user.client.ui.FormPanel class:
public class FormPanel
extends SimplePanel
implements FiresFormEvents,
com.google.gwt.user.client.ui.impl.FormPanelImplHost
Class constructors
S.N. Constructor & Description
1 FormPanel()
Creates a new FormPanel.
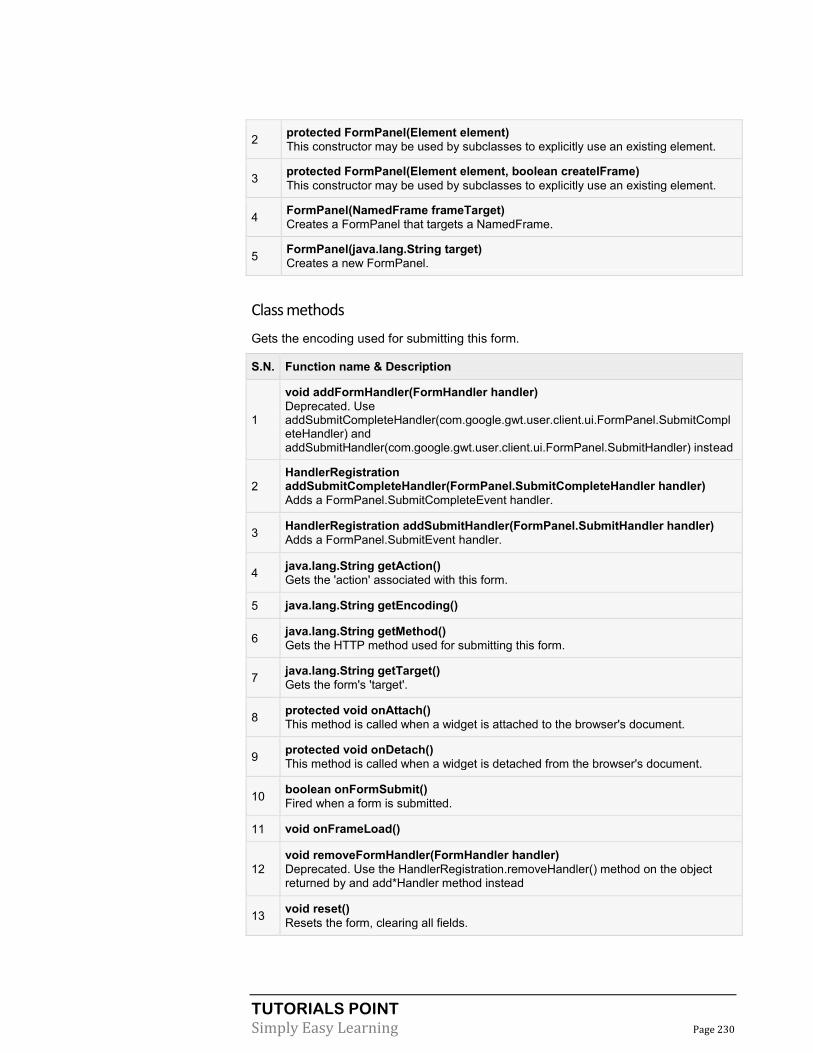
TUTORIALS POINT
Simply Easy Learning Page 230
2 protected FormPanel(Element element)
This constructor may be used by subclasses to explicitly use an existing element.
3 protected FormPanel(Element element, boolean createIFrame)
This constructor may be used by subclasses to explicitly use an existing element.
4 FormPanel(NamedFrame frameTarget)
Creates a FormPanel that targets a NamedFrame.
5 FormPanel(java.lang.String target)
Creates a new FormPanel.
Class methods
Gets the encoding used for submitting this form.
S.N. Function name & Description
1
void addFormHandler(FormHandler handler)
Deprecated. Use addSubmitCompleteHandler(com.google.gwt.user.client.ui.FormPanel.SubmitCompleteHandler) and addSubmitHandler(com.google.gwt.user.client.ui.FormPanel.SubmitHandler) instead
2
HandlerRegistration addSubmitCompleteHandler(FormPanel.SubmitCompleteHandler handler)
Adds a FormPanel.SubmitCompleteEvent handler.
3 HandlerRegistration addSubmitHandler(FormPanel.SubmitHandler handler)
Adds a FormPanel.SubmitEvent handler.
4 java.lang.String getAction()
Gets the 'action' associated with this form.
5 java.lang.String getEncoding()
6 java.lang.String getMethod()
Gets the HTTP method used for submitting this form.
7 java.lang.String getTarget()
Gets the form's 'target'.
8 protected void onAttach()
This method is called when a widget is attached to the browser's document.
9 protected void onDetach()
This method is called when a widget is detached from the browser's document.
10 boolean onFormSubmit()
Fired when a form is submitted.
11 void onFrameLoad()
12
void removeFormHandler(FormHandler handler)
Deprecated. Use the HandlerRegistration.removeHandler() method on the object returned by and add*Handler method instead
13 void reset()
Resets the form, clearing all fields.

TUTORIALS POINT
Simply Easy Learning Page 231
14 void setAction(java.lang.String url)
Sets the 'action' associated with this form.
15 void setEncoding(java.lang.String encodingType)
Sets the encoding used for submitting this form.
16 void setMethod(java.lang.String method)
Sets the HTTP method used for submitting this form.
17 void submit()
Submits the form.
18 static FormPanel wrap(Element element)
Creates a FormPanel that wraps an existing <form> element.
19 static FormPanel wrap(Element element, boolean createIFrame)
Creates a FormPanel that wraps an existing <form> element.
Methods inherited
This class inherits methods from the following classes:
com.google.gwt.user.client.ui.UIObject
com.google.gwt.user.client.ui.Widget
com.google.gwt.user.client.ui.Panel
com.google.gwt.user.client.ui.SimplePanel
java.lang.Object
FormPanel Widget Example
This example will take you through simple steps to show usage of a FormPanel Widget in GWT. Follow the following steps to update the GWT application we created in GWT - Create Application chapter:
Step Description
1 Create a project with a name HelloWorld under a package com.tutorialspoint as explained in the GWT - Create Application chapter.
2 Modify HelloWorld.gwt.xml, HelloWorld.css, HelloWorld.html and HelloWorld.java as explained below. Keep rest of the files unchanged.
3 Compile and run the application to verify the result of the implemented logic.
Following is the content of the modified module descriptor src/com.tutorialspoint/HelloWorld.gwt.xml.
<?xml version="1.0" encoding="UTF-8"?>
<module rename-to='helloworld'>
<!-- Inherit the core Web Toolkit stuff. -->
<inherits name='com.google.gwt.user.User'/>
<!-- Inherit the default GWT style sheet. -->
<inherits name='com.google.gwt.user.theme.clean.Clean'/>

TUTORIALS POINT
Simply Easy Learning Page 232
<!-- Specify the app entry point class. -->
<entry-point class='com.tutorialspoint.client.HelloWorld'/>
<!-- Specify the paths for translatable code -->
<source path='client'/>
<source path='shared'/>
</module>
Following is the content of the modified Style Sheet file war/HelloWorld.css.
body{
text-align: center;
font-family: verdana, sans-serif;
}
h1{
font-size:2em;
font-weight: bold;
color:#777777;
margin:40px0px70px;
text-align: center;
}
Following is the content of the modified HTML host file war/HelloWorld.html.
<html>
<head>
<title>Hello World</title>
<link rel="stylesheet" href="HelloWorld.css"/>
<script language="javascript" src="helloworld/helloworld.nocache.js">
</script>
</head>
<body>
<h1>FormPanel Widget Demonstration</h1>
<div id="gwtContainer"></div>
</body>
</html>
Let us have following content of Java file src/com.tutorialspoint/HelloWorld.java which will demonstrate use of FormPanel widget.
package com.tutorialspoint.client;
import com.google.gwt.core.client.EntryPoint;
import com.google.gwt.event.dom.client.ClickEvent;
import com.google.gwt.event.dom.client.ClickHandler;
import com.google.gwt.user.client.Window;
import com.google.gwt.user.client.ui.Button;
import com.google.gwt.user.client.ui.DecoratorPanel;
import com.google.gwt.user.client.ui.FileUpload;
import com.google.gwt.user.client.ui.FormPanel;
import com.google.gwt.user.client.ui.FormPanel.SubmitCompleteEvent;
import com.google.gwt.user.client.ui.FormPanel.SubmitEvent;
import com.google.gwt.user.client.ui.ListBox;
import com.google.gwt.user.client.ui.RootPanel;
import com.google.gwt.user.client.ui.TextBox;
import com.google.gwt.user.client.ui.VerticalPanel;
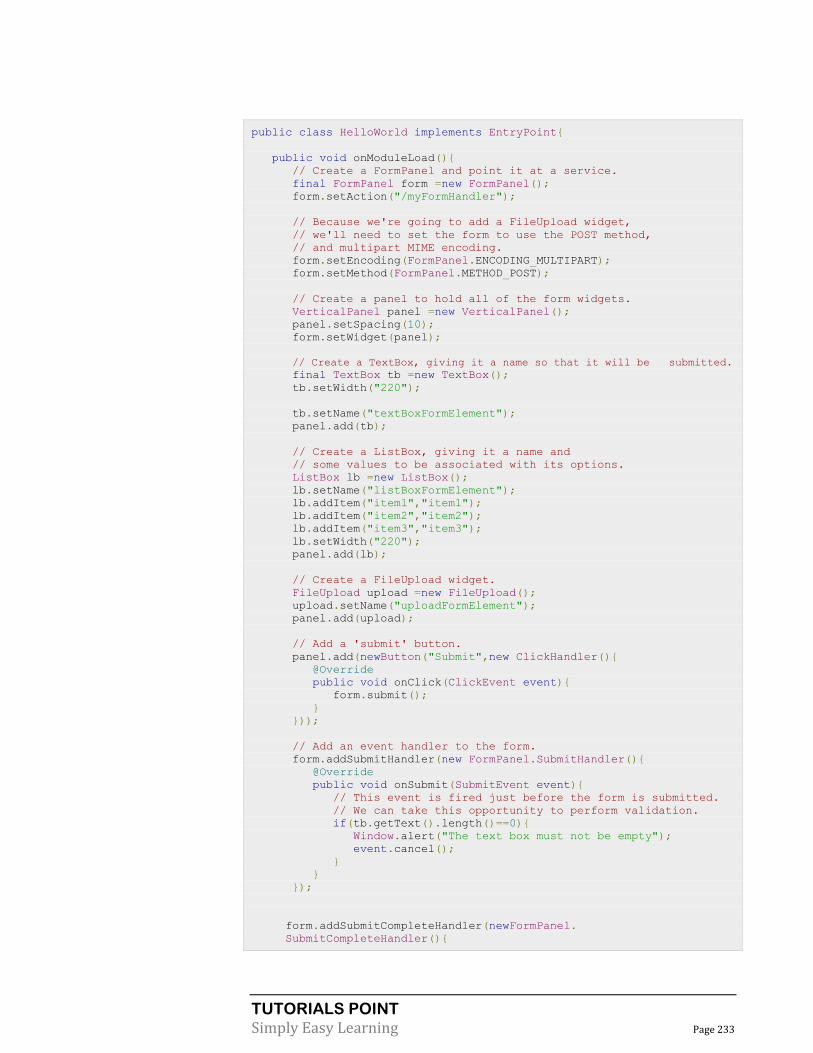
TUTORIALS POINT
Simply Easy Learning Page 233
public class HelloWorld implements EntryPoint{
public void onModuleLoad(){
// Create a FormPanel and point it at a service.
final FormPanel form =new FormPanel();
form.setAction("/myFormHandler");
// Because we're going to add a FileUpload widget,
// we'll need to set the form to use the POST method,
// and multipart MIME encoding.
form.setEncoding(FormPanel.ENCODING_MULTIPART);
form.setMethod(FormPanel.METHOD_POST);
// Create a panel to hold all of the form widgets.
VerticalPanel panel =new VerticalPanel();
panel.setSpacing(10);
form.setWidget(panel);
// Create a TextBox, giving it a name so that it will be submitted.
final TextBox tb =new TextBox();
tb.setWidth("220");
tb.setName("textBoxFormElement");
panel.add(tb);
// Create a ListBox, giving it a name and
// some values to be associated with its options.
ListBox lb =new ListBox();
lb.setName("listBoxFormElement");
lb.addItem("item1","item1");
lb.addItem("item2","item2");
lb.addItem("item3","item3");
lb.setWidth("220");
panel.add(lb);
// Create a FileUpload widget.
FileUpload upload =new FileUpload();
upload.setName("uploadFormElement");
panel.add(upload);
// Add a 'submit' button.
panel.add(newButton("Submit",new ClickHandler(){
@Override
public void onClick(ClickEvent event){
form.submit();
}
}));
// Add an event handler to the form.
form.addSubmitHandler(new FormPanel.SubmitHandler(){
@Override
public void onSubmit(SubmitEvent event){
// This event is fired just before the form is submitted.
// We can take this opportunity to perform validation.
if(tb.getText().length()==0){
Window.alert("The text box must not be empty");
event.cancel();
}
}
});
form.addSubmitCompleteHandler(newFormPanel.
SubmitCompleteHandler(){

TUTORIALS POINT
Simply Easy Learning Page 234
@Override
public void onSubmitComplete(SubmitCompleteEvent event){
// When the form submission is successfully completed,
// this event is fired. Assuming the service returned
// a response of type text/html, we can get the result
// here.
Window.alert(event.getResults());
}
});
DecoratorPanel decoratorPanel =new DecoratorPanel();
decoratorPanel.add(form);
// Add the widgets to the root panel.
RootPanel.get().add(decoratorPanel);
}
}
Once you are ready with all the changes done, let us compile and run the application in development mode as we did in GWT - Create Application chapter. If everything is fine with your application, this will produce following result:
PopupPanel

TUTORIALS POINT
Simply Easy Learning Page 235
Introduction
The PopupPanel widget represents a panel that can pop up over other widgets. It overlays the browser's client area (and any previously-created popups).
Class declaration
Following is the declaration for com.google.gwt.user.client.ui.PopupPanel class:
public class PopupPanel
extends SimplePanel
implements SourcesPopupEvents,EventPreview,
HasAnimation,HasCloseHandlers<PopupPanel>
Class constructors
S.N. Constructor & Description
1 PopupPanel()
Creates an empty popup panel.
2 PopupPanel(boolean autoHide) Creates an empty popup panel, specifying its auto-hide property.
3 PopupPanel(boolean autoHide, boolean modal) Creates an empty popup panel, specifying its auto-hide and modal properties.
Class methods
S.N. Function name & Description
1
void addAutoHidePartner(Element partner)
Mouse events that occur within an autoHide partner will not hide a panel set to autoHide.
2 HandlerRegistration addCloseHandler(CloseHandler<PopupPanel> handler)
Adds a CloseEvent handler.
3
void addPopupListener(PopupListener listener)
Deprecated. Use addCloseHandler(com.google.gwt.event.logical.shared.CloseHandler) instead
4 void center()
Centers the popup in the browser window and shows it.
5
protected Element getContainerElement()
Override this method to specify that an element other than the root element be the container for the panel's child widget.
6 protected Element getGlassElement()
Get the glass element used by this PopupPanel.
7 java.lang.String getGlassStyleName()
Gets the style name to be used on the glass element.
8 int getOffsetHeight()
Gets the panel's offset height in pixels.
9 int getOffsetWidth()
Gets the panel's offset width in pixels.

TUTORIALS POINT
Simply Easy Learning Page 236
10 int getPopupLeft()
Gets the popup's left position relative to the browser's client area.
11 int getPopupTop()
Gets the popup's top position relative to the browser's client area.
12 protected Element getStyleElement()
Template method that returns the element to which style names will be applied.
13 java.lang.String getTitle()
Gets the title associated with this object.
14 void hide()
Hides the popup and detaches it from the page.
15 void hide(boolean autoClosed)
Hides the popup and detaches it from the page.
16 boolean isAnimationEnabled()
Returns true if animations are enabled, false if not.
17
boolean isAutoHideEnabled()
Returns true if the popup should be automatically hidden when the user clicks outside of it.
18
boolean isAutoHideOnHistoryEventsEnabled()
Returns true if the popup should be automatically hidden when the history token changes, such as when the user presses the browser's back button.
19 boolean isGlassEnabled()
Returns true if a glass element will be displayed under the PopupPanel.
20
boolean isModal()
Returns true if keyboard or mouse events that do not target the PopupPanel or its children should be ignored.
21
boolean isPreviewingAllNativeEvents()
Returns true if the popup should preview all native events, even if the event has already been consumed by another popup.
22 boolean isShowing()
Determines whether or not this popup is showing.
23 boolean isVisible()
Determines whether or not this popup is visible.
24
boolean onEventPreview(Event event)
Deprecated. Use onPreviewNativeEvent(com.google.gwt.user.client.Event.NativePreviewEvent) instead
25
boolean onKeyDownPreview(char key, int modifiers)
Deprecated. Use onPreviewNativeEvent(com.google.gwt.user.client.Event.NativePreviewEvent) instead
26
boolean onKeyPressPreview(char key, int modifiers)
Deprecated. Use onPreviewNativeEvent(com.google.gwt.user.client.Event.NativePreviewEvent) instead
27 boolean onKeyUpPreview(char key, int modifiers)

TUTORIALS POINT
Simply Easy Learning Page 237
Deprecated. Use onPreviewNativeEvent(com.google.gwt.user.client.Event.NativePreviewEvent) instead
28 protected void onPreviewNativeEvent(Event.NativePreviewEvent event)
29
protected void onUnload()
This method is called immediately before a widget will be detached from the browser's document.
30 void removeAutoHidePartner(Element partner)
Remove an autoHide partner.
31
void removePopupListener(PopupListener listener)
Deprecated. Use the HandlerRegistration.removeHandler() method on the object returned by addCloseHandler(com.google.gwt.event.logical.shared.CloseHandler) instead
32 void setAnimationEnabled(boolean enable)
Enable or disable animations.
33 void setAutoHideEnabled(boolean autoHide)
Enable or disable the autoHide feature.
34 void setAutoHideOnHistoryEventsEnabled(boolean enabled)
Enable or disable autoHide on history change events.
35
void setGlassEnabled(boolean enabled)
When enabled, the background will be blocked with a semi-transparent pane the next time it is shown.
36 void setGlassStyleName(java.lang.String glassStyleName)
Sets the style name to be used on the glass element.
37 void setHeight(java.lang.String height)
Sets the height of the panel's child widget.
38
void setModal(boolean modal)
When the popup is modal, keyboard or mouse events that do not target the PopupPanel or its children will be ignored.
39 void setPopupPosition(int left, int top)
Sets the popup's position relative to the browser's client area.
40
void setPopupPositionAndShow(PopupPanel.PositionCallback callback)
Sets the popup's position using a PopupPanel.PositionCallback, and shows the popup.
41
void setPreviewingAllNativeEvents(boolean previewAllNativeEvents)
When enabled, the popup will preview all native events, even if another popup was opened after this one.
42 void setTitle(java.lang.String title)
Sets the title associated with this object.
43 void setVisible(boolean visible)
Sets whether this object is visible.
44 void setWidget(Widget w)
Sets this panel's widget.
45 void setWidth(java.lang.String width)
Sets the width of the panel's child widget.
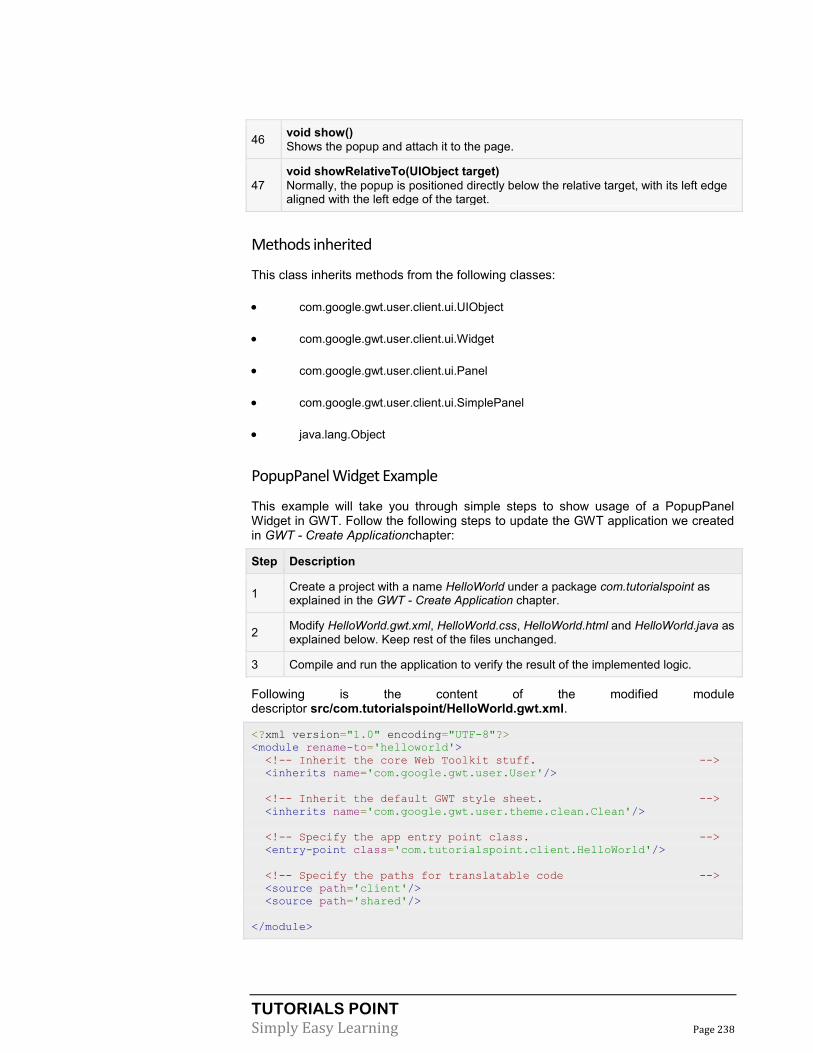
TUTORIALS POINT
Simply Easy Learning Page 238
46 void show()
Shows the popup and attach it to the page.
47
void showRelativeTo(UIObject target)
Normally, the popup is positioned directly below the relative target, with its left edge aligned with the left edge of the target.
Methods inherited
This class inherits methods from the following classes:
com.google.gwt.user.client.ui.UIObject
com.google.gwt.user.client.ui.Widget
com.google.gwt.user.client.ui.Panel
com.google.gwt.user.client.ui.SimplePanel
java.lang.Object
PopupPanel Widget Example
This example will take you through simple steps to show usage of a PopupPanel Widget in GWT. Follow the following steps to update the GWT application we created in GWT - Create Applicationchapter:
Step Description
1 Create a project with a name HelloWorld under a package com.tutorialspoint as explained in the GWT - Create Application chapter.
2 Modify HelloWorld.gwt.xml, HelloWorld.css, HelloWorld.html and HelloWorld.java as explained below. Keep rest of the files unchanged.
3 Compile and run the application to verify the result of the implemented logic.
Following is the content of the modified module descriptor src/com.tutorialspoint/HelloWorld.gwt.xml.
<?xml version="1.0" encoding="UTF-8"?>
<module rename-to='helloworld'>
<!-- Inherit the core Web Toolkit stuff. -->
<inherits name='com.google.gwt.user.User'/>
<!-- Inherit the default GWT style sheet. -->
<inherits name='com.google.gwt.user.theme.clean.Clean'/>
<!-- Specify the app entry point class. -->
<entry-point class='com.tutorialspoint.client.HelloWorld'/>
<!-- Specify the paths for translatable code -->
<source path='client'/>
<source path='shared'/>
</module>

TUTORIALS POINT
Simply Easy Learning Page 239
Following is the content of the modified Style Sheet file war/HelloWorld.css.
body{
text-align: center;
font-family: verdana, sans-serif;
}
h1{
font-size:2em;
font-weight: bold;
color:#777777;
margin:40px0px70px;
text-align: center;
}
.gwt-PopupPanel{
border:3px solid #000000;
padding:3px;
background: white;
}
.gwt-PopupPanelGlass{
background-color:#000;
opacity:0.3;
filter: alpha(opacity=30);
}
.gwt-PopupPanel.popupContent {
border: none;
padding:3px;
background: gray;
}
Following is the content of the modified HTML host file war/HelloWorld.html.
<html>
<head>
<title>Hello World</title>
<link rel="stylesheet" href="HelloWorld.css"/>
<script language="javascript" src="helloworld/helloworld.nocache.js">
</script>
</head>
<body>
<h1>PopupPanel Widget Demonstration</h1>
<div id="gwtContainer"></div>
</body>
</html>
Let us have following content of Java file src/com.tutorialspoint/HelloWorld.java which will demonstrate use of PopupPanel widget.
package com.tutorialspoint.client;
import com.google.gwt.core.client.EntryPoint;
import com.google.gwt.event.dom.client.ClickEvent;
import com.google.gwt.event.dom.client.ClickHandler;
import com.google.gwt.user.client.Window;
import com.google.gwt.user.client.ui.Button;
import com.google.gwt.user.client.ui.DecoratorPanel;
import com.google.gwt.user.client.ui.HasHorizontalAlignment;

TUTORIALS POINT
Simply Easy Learning Page 240
import com.google.gwt.user.client.ui.Label;
import com.google.gwt.user.client.ui.PopupPanel;
import com.google.gwt.user.client.ui.RootPanel;
import com.google.gwt.user.client.ui.VerticalPanel;
public class HelloWorld implements EntryPoint{
private static class MyPopup extends PopupPanel{
public MyPopup(){
// PopupPanel's constructor takes 'auto-hide' as its boolean
// parameter. If this is set, the panel closes itself
// automatically when the user clicks outside of it.
super(true);
// PopupPanel is a SimplePanel, so you have to set it's widget
// property to whatever you want its contents to be.
setWidget(new Label("Click outside of this popup to close it"));
}
}
public void onModuleLoad(){
Button b1 =new Button("Click me to show popup");
b1.addClickHandler(new ClickHandler(){
public void onClick(ClickEvent event){
// Instantiate the popup and show it.
new MyPopup().show();
}
});
Button b2 =new Button("Click me to show popup partway"
+" across the screen");
b2.addClickHandler(new ClickHandler(){
publicvoid onClick(ClickEvent event){
// Create the new popup.
final MyPopup popup =new MyPopup();
// Position the popup 1/3rd of the way down and across
// the screen, and show the popup. Since the position
// calculation is based on the offsetWidth and offsetHeight
// of the popup, you have to use the
// setPopupPositionAndShow(callback) method. The alternative
// would be to call show(), calculate the left and
// top positions, and call setPopupPosition(left, top).
// This would have the ugly side effect of the popup jumping
// from its original position to its new position.
popup.setPopupPositionAndShow(new PopupPanel.
PositionCallback(){
publicvoid setPosition(int offsetWidth,int offsetHeight){
int left =(Window.getClientWidth()- offsetWidth)/3;
int top =(Window.getClientHeight()- offsetHeight)/3;
popup.setPopupPosition(left, top);
}
});
}
});
VerticalPanel panel =new VerticalPanel();
panel.setHorizontalAlignment(HasHorizontalAlignment.ALIGN_CENTER);
panel.setSpacing(10);
panel.add(b1);
panel.add(b2);
DecoratorPanel decoratorPanel =new DecoratorPanel();
decoratorPanel.add(panel);

TUTORIALS POINT
Simply Easy Learning Page 241
// Add the widgets to the root panel.
RootPanel.get().add(decoratorPanel);
}
}
Once you are ready with all the changes done, let us compile and run the application in development mode as we did in GWT - Create Application chapter. If everything is fine with your application, this will produce following result:
DialogBox Widget
Introduction
The DialogBox widget represents a form of popup that has a caption area at the top and can be dragged by the user. Unlike a PopupPanel, calls to PopupPanel.setWidth(String) and PopupPanel.setHeight(String) will set the width and height of the dialog box itself, even if a widget has not been added as yet.
Class declaration
Following is the declaration for com.google.gwt.user.client.ui.DialogBox class:
public class DialogBox
extends DecoratedPopupPanel
implements HasHTML,HasSafeHtml,MouseListener
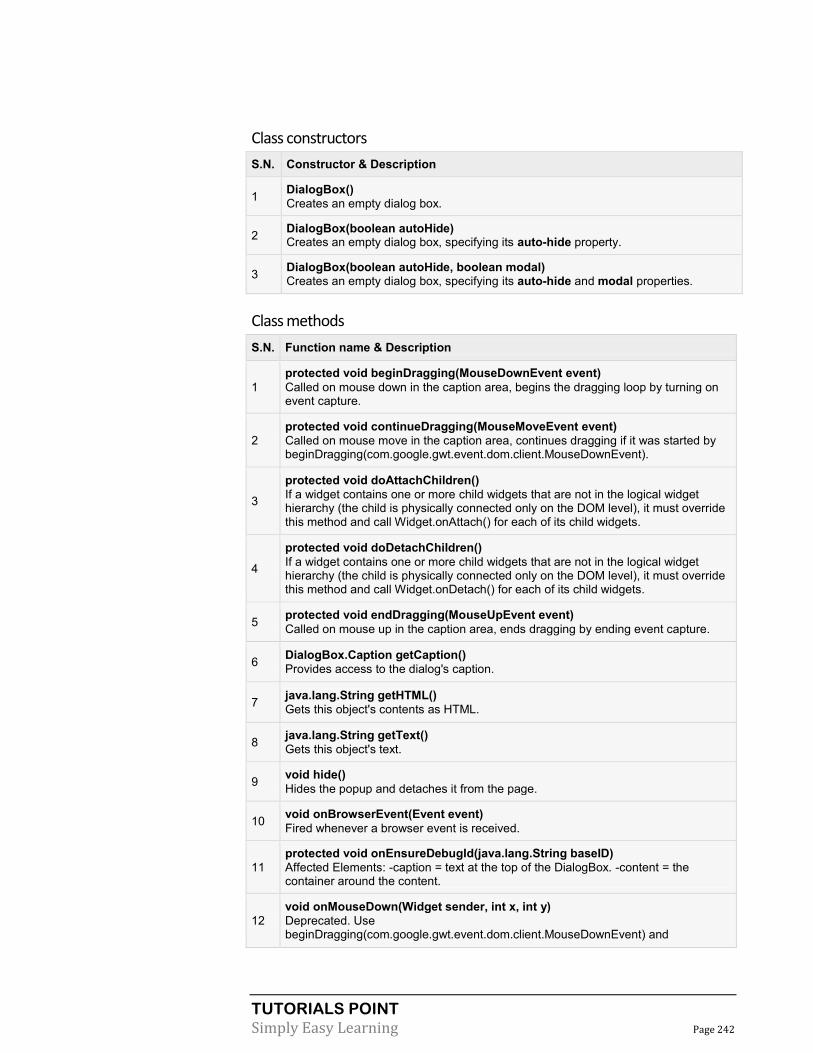
TUTORIALS POINT
Simply Easy Learning Page 242
Class constructors
S.N. Constructor & Description
1 DialogBox()
Creates an empty dialog box.
2 DialogBox(boolean autoHide) Creates an empty dialog box, specifying its auto-hide property.
3 DialogBox(boolean autoHide, boolean modal) Creates an empty dialog box, specifying its auto-hide and modal properties.
Class methods
S.N. Function name & Description
1
protected void beginDragging(MouseDownEvent event)
Called on mouse down in the caption area, begins the dragging loop by turning on event capture.
2
protected void continueDragging(MouseMoveEvent event)
Called on mouse move in the caption area, continues dragging if it was started by beginDragging(com.google.gwt.event.dom.client.MouseDownEvent).
3
protected void doAttachChildren()
If a widget contains one or more child widgets that are not in the logical widget hierarchy (the child is physically connected only on the DOM level), it must override this method and call Widget.onAttach() for each of its child widgets.
4
protected void doDetachChildren()
If a widget contains one or more child widgets that are not in the logical widget hierarchy (the child is physically connected only on the DOM level), it must override this method and call Widget.onDetach() for each of its child widgets.
5 protected void endDragging(MouseUpEvent event)
Called on mouse up in the caption area, ends dragging by ending event capture.
6 DialogBox.Caption getCaption()
Provides access to the dialog's caption.
7 java.lang.String getHTML()
Gets this object's contents as HTML.
8 java.lang.String getText()
Gets this object's text.
9 void hide()
Hides the popup and detaches it from the page.
10 void onBrowserEvent(Event event)
Fired whenever a browser event is received.
11
protected void onEnsureDebugId(java.lang.String baseID)
Affected Elements: -caption = text at the top of the DialogBox. -content = the container around the content.
12
void onMouseDown(Widget sender, int x, int y)
Deprecated. Use beginDragging(com.google.gwt.event.dom.client.MouseDownEvent) and

TUTORIALS POINT
Simply Easy Learning Page 243
getCaption() instead
13
void onMouseEnter(Widget sender)
Deprecated. Use HasMouseOverHandlers.addMouseOverHandler(com.google.gwt.event.dom.client.MouseOverHandler) instead
14
void onMouseLeave(Widget sender)
Deprecated. Use HasMouseOutHandlers.addMouseOutHandler(com.google.gwt.event.dom.client.MouseOutHandler) instead
15
void onMouseMove(Widget sender, int x, int y)
Deprecated. Use continueDragging(com.google.gwt.event.dom.client.MouseMoveEvent) and getCaption() instead
16
void onMouseUp(Widget sender, int x, int y)
Deprecated. Use endDragging(com.google.gwt.event.dom.client.MouseUpEvent) and getCaption() instead
17 protected void onPreviewNativeEvent(Event.NativePreviewEvent event)
18 void setHTML(SafeHtml html)
Sets the html string inside the caption.
19 void setHTML(java.lang.String html)
Sets the html string inside the caption.
20 void setText(java.lang.String text)
Sets the text inside the caption.
21 void show()
Shows the popup and attach it to the page.
Methods inherited
This class inherits methods from the following classes:
com.google.gwt.user.client.ui.UIObject
com.google.gwt.user.client.ui.Widget
com.google.gwt.user.client.ui.Panel
com.google.gwt.user.client.ui.SimplePanel
com.google.gwt.user.client.ui.PopupPanel
com.google.gwt.user.client.ui.DecoratedPopupPanel
java.lang.Object

TUTORIALS POINT
Simply Easy Learning Page 244
DialogBox Widget Example This example will take you through simple steps to show usage of a DialogBox Widget in GWT. Follow the following steps to update the GWT application we created in GWT - Create Application chapter:
Step Description
1 Create a project with a name HelloWorld under a package com.tutorialspoint as explained in the GWT - Create Application chapter.
2 Modify HelloWorld.gwt.xml, HelloWorld.css, HelloWorld.html and HelloWorld.java as explained below. Keep rest of the files unchanged.
3 Compile and run the application to verify the result of the implemented logic.
Following is the content of the modified module descriptor src/com.tutorialspoint/HelloWorld.gwt.xml.
<?xml version="1.0" encoding="UTF-8"?>
<module rename-to='helloworld'>
<!-- Inherit the core Web Toolkit stuff. -->
<inherits name='com.google.gwt.user.User'/>
<!-- Inherit the default GWT style sheet. -->
<inherits name='com.google.gwt.user.theme.clean.Clean'/>
<!-- Specify the app entry point class. -->
<entry-point class='com.tutorialspoint.client.HelloWorld'/>
<!-- Specify the paths for translatable code -->
<source path='client'/>
<source path='shared'/>
</module>
Following is the content of the modified Style Sheet file war/HelloWorld.css.
body{
text-align: center;
font-family: verdana, sans-serif;
}
h1{
font-size:2em;
font-weight: bold;
color:#777777;
margin:40px0px70px;
text-align: center;
}
.gwt-DialogBox.Caption{
background:#e3e8f3 url(images/hborder.png) repeat-x 0px -
2003px;
padding:4px4px4px8px;
cursor:default;
border-bottom:1px solid #bbbbbb;
border-top:5px solid #d0e4f6;
}
.gwt-DialogBox.dialogContent {
}
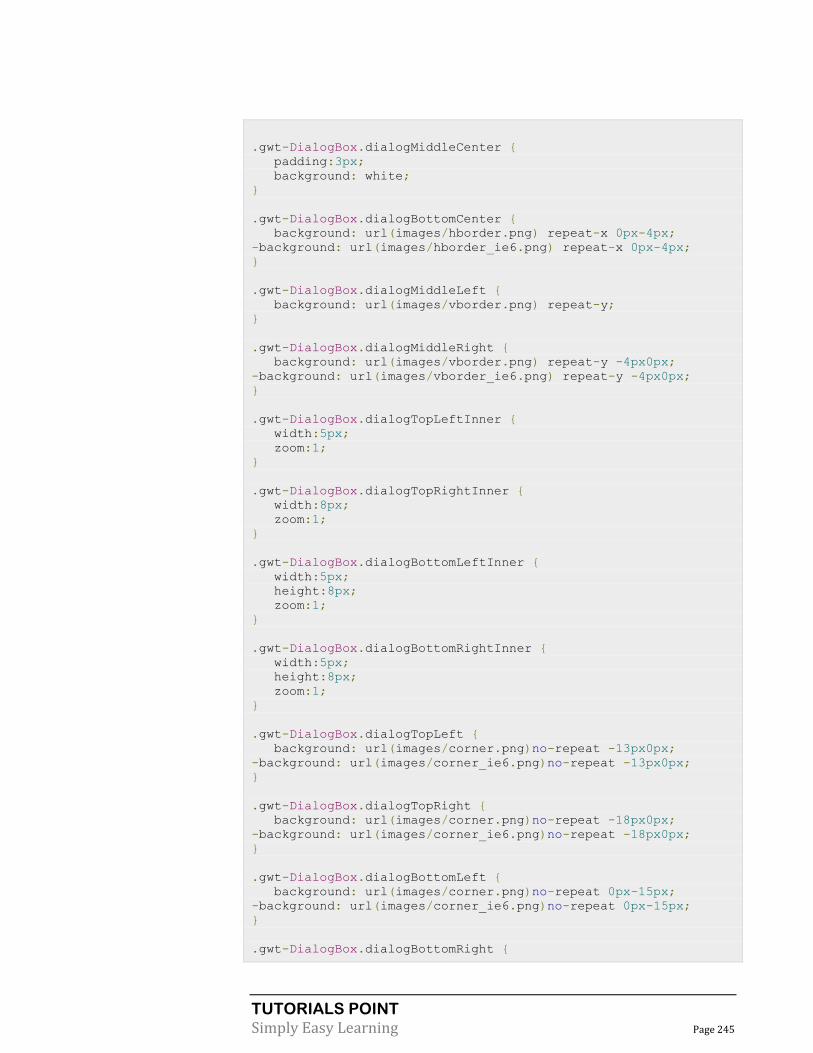
TUTORIALS POINT
Simply Easy Learning Page 245
.gwt-DialogBox.dialogMiddleCenter {
padding:3px;
background: white;
}
.gwt-DialogBox.dialogBottomCenter {
background: url(images/hborder.png) repeat-x 0px-4px;
-background: url(images/hborder_ie6.png) repeat-x 0px-4px;
}
.gwt-DialogBox.dialogMiddleLeft {
background: url(images/vborder.png) repeat-y;
}
.gwt-DialogBox.dialogMiddleRight {
background: url(images/vborder.png) repeat-y -4px0px;
-background: url(images/vborder_ie6.png) repeat-y -4px0px;
}
.gwt-DialogBox.dialogTopLeftInner {
width:5px;
zoom:1;
}
.gwt-DialogBox.dialogTopRightInner {
width:8px;
zoom:1;
}
.gwt-DialogBox.dialogBottomLeftInner {
width:5px;
height:8px;
zoom:1;
}
.gwt-DialogBox.dialogBottomRightInner {
width:5px;
height:8px;
zoom:1;
}
.gwt-DialogBox.dialogTopLeft {
background: url(images/corner.png)no-repeat -13px0px;
-background: url(images/corner_ie6.png)no-repeat -13px0px;
}
.gwt-DialogBox.dialogTopRight {
background: url(images/corner.png)no-repeat -18px0px;
-background: url(images/corner_ie6.png)no-repeat -18px0px;
}
.gwt-DialogBox.dialogBottomLeft {
background: url(images/corner.png)no-repeat 0px-15px;
-background: url(images/corner_ie6.png)no-repeat 0px-15px;
}
.gwt-DialogBox.dialogBottomRight {

TUTORIALS POINT
Simply Easy Learning Page 246
background: url(images/corner.png)no-repeat -5px-15px;
-background: url(images/corner_ie6.png)no-repeat -5px-15px;
}
html>body .gwt-DialogBox{
}
* html .gwt-DialogBox.dialogTopLeftInner {
width:5px;
overflow: hidden;
}
* html .gwt-DialogBox.dialogTopRightInner {
width:8px;
overflow: hidden;
}
* html .gwt-DialogBox.dialogBottomLeftInner {
width:5px;
height:8px;
overflow: hidden;
}
* html .gwt-DialogBox.dialogBottomRightInner {
width:8px;
height:8px;
overflow: hidden;
}
Following is the content of the modified HTML host file war/HelloWorld.html. ,
<html>
<head>
<title>Hello World</title>
<link rel="stylesheet" href="HelloWorld.css"/>
<script language="javascript" src="helloworld/helloworld.nocache.js">
</script>
</head>
<body>
<h1>DialogBox Widget Demonstration</h1>
<div id="gwtContainer"></div>
</body>
</html>
Let us have following content of Java file src/com.tutorialspoint/HelloWorld.java which will demonstrate use of DialogBox widget.
package com.tutorialspoint.client;
import com.google.gwt.core.client.EntryPoint;
import com.google.gwt.event.dom.client.ClickEvent;
import com.google.gwt.event.dom.client.ClickHandler;
import com.google.gwt.user.client.Window;
import com.google.gwt.user.client.ui.Button;
import com.google.gwt.user.client.ui.DialogBox;
import com.google.gwt.user.client.ui.HasHorizontalAlignment;
import com.google.gwt.user.client.ui.Label;
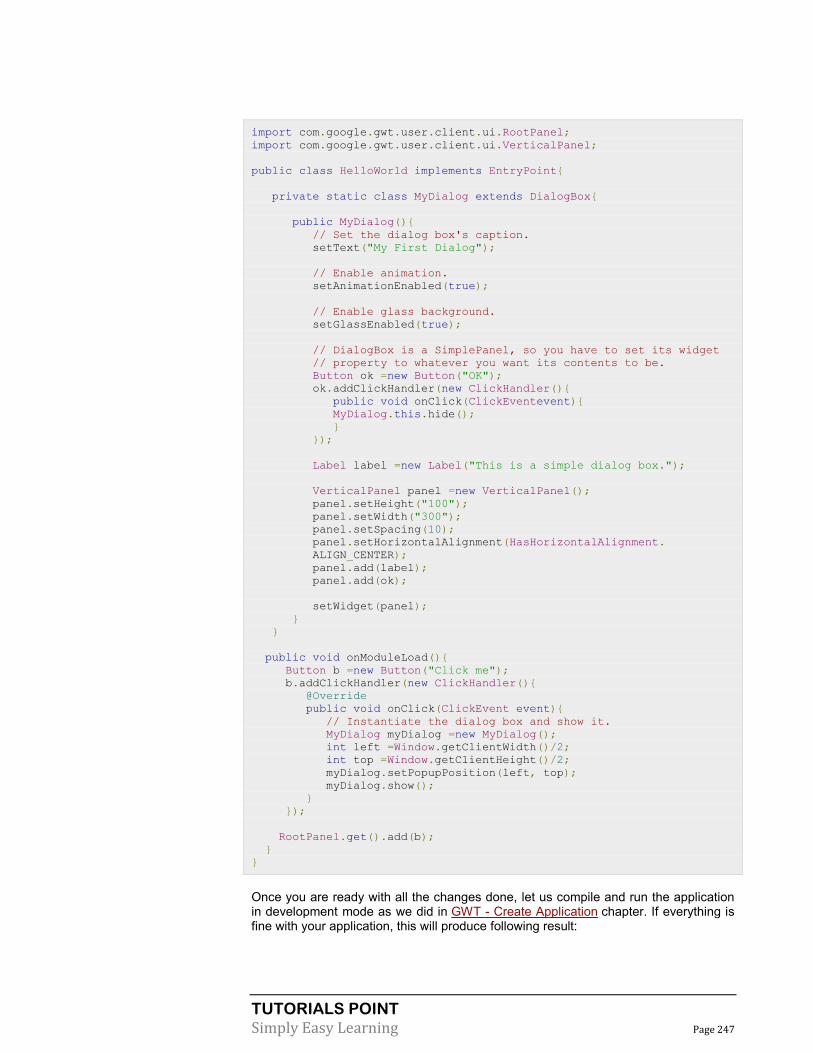
TUTORIALS POINT
Simply Easy Learning Page 247
import com.google.gwt.user.client.ui.RootPanel;
import com.google.gwt.user.client.ui.VerticalPanel;
public class HelloWorld implements EntryPoint{
private static class MyDialog extends DialogBox{
public MyDialog(){
// Set the dialog box's caption.
setText("My First Dialog");
// Enable animation.
setAnimationEnabled(true);
// Enable glass background.
setGlassEnabled(true);
// DialogBox is a SimplePanel, so you have to set its widget
// property to whatever you want its contents to be.
Button ok =new Button("OK");
ok.addClickHandler(new ClickHandler(){
public void onClick(ClickEventevent){
MyDialog.this.hide();
}
});
Label label =new Label("This is a simple dialog box.");
VerticalPanel panel =new VerticalPanel();
panel.setHeight("100");
panel.setWidth("300");
panel.setSpacing(10);
panel.setHorizontalAlignment(HasHorizontalAlignment.
ALIGN_CENTER);
panel.add(label);
panel.add(ok);
setWidget(panel);
}
}
public void onModuleLoad(){
Button b =new Button("Click me");
b.addClickHandler(new ClickHandler(){
@Override
public void onClick(ClickEvent event){
// Instantiate the dialog box and show it.
MyDialog myDialog =new MyDialog();
int left =Window.getClientWidth()/2;
int top =Window.getClientHeight()/2;
myDialog.setPopupPosition(left, top);
myDialog.show();
}
});
RootPanel.get().add(b);
}
}
Once you are ready with all the changes done, let us compile and run the application in development mode as we did in GWT - Create Application chapter. If everything is fine with your application, this will produce following result:

TUTORIALS POINT
Simply Easy Learning Page 248
TUTORIALS POINT
Simply Easy Learning Page 249
Event Handling
This section shows Event handling under Google Web Toolkit:
GWT provides a event handler model similar to Java AWT or SWING User Interface
frameworks.
A listener interface defines one or more methods that the widget calls to announce an event. GWT provides a list of interfaces corresponding to various possible events.
A class wishing to receive events of a particular type implements the associated handler interface and then passes a reference to itself to the widget to subscribe to a set of events.
For example, the Button class publishes click events so you will have to write a class to implementClickHandler to handle click event.
Event Handler Interfaces All GWT event handlers have been extended from EventHandler interface and each handler has only a single method with a single argument. This argument is always an object of associated event type. Each event object have a number of methods to manipulate the passed event object. For example for click event you will have to write your handler as follows:
/**
* create a custom click handler which will call
* onClick method when button is clicked.
*/
public class MyClickHandler implements ClickHandler{
@Override
public void onClick(ClickEvent event){
Window.alert("Hello World!");
}
}
Now any class wishing to receive click events will call addClickHandler() to register an event handler as follows:
/**
* create button and attach click handler
*/
CHAPTER
11
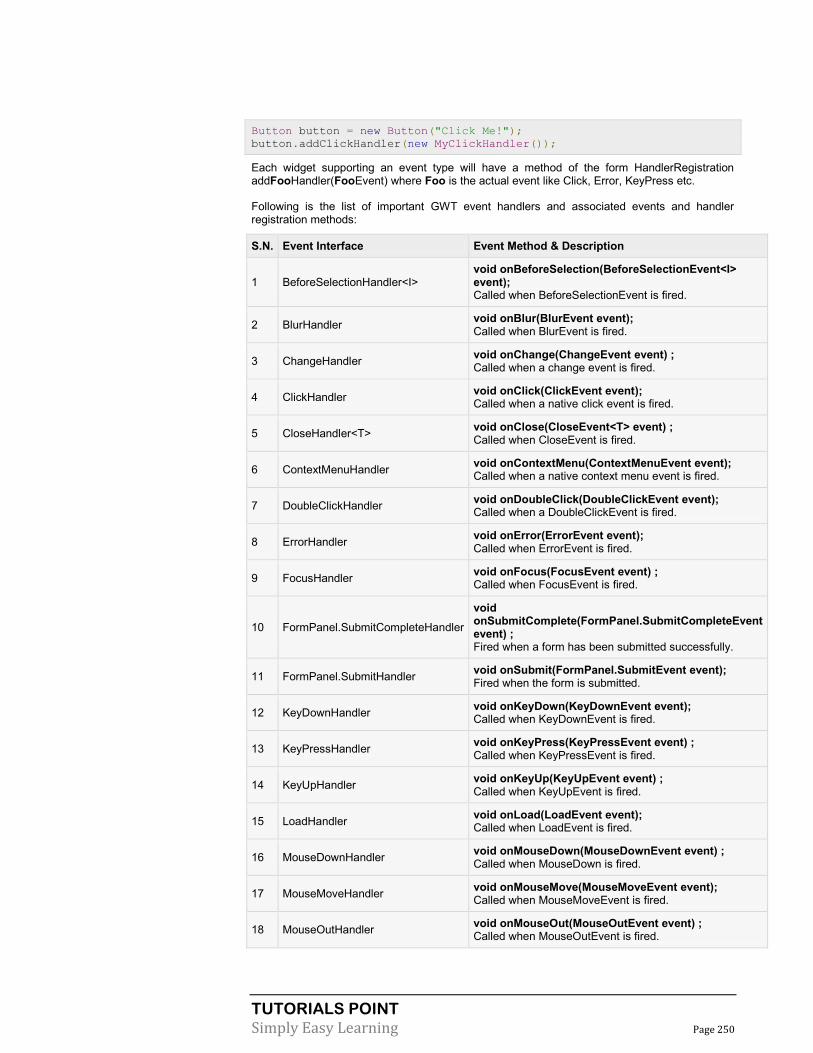
TUTORIALS POINT
Simply Easy Learning Page 250
Button button = new Button("Click Me!");
button.addClickHandler(new MyClickHandler());
Each widget supporting an event type will have a method of the form HandlerRegistration addFooHandler(FooEvent) where Foo is the actual event like Click, Error, KeyPress etc.
Following is the list of important GWT event handlers and associated events and handler registration methods:
S.N. Event Interface Event Method & Description
1 BeforeSelectionHandler<I> void onBeforeSelection(BeforeSelectionEvent<I> event); Called when BeforeSelectionEvent is fired.
2 BlurHandler void onBlur(BlurEvent event); Called when BlurEvent is fired.
3 ChangeHandler void onChange(ChangeEvent event) ; Called when a change event is fired.
4 ClickHandler void onClick(ClickEvent event); Called when a native click event is fired.
5 CloseHandler<T> void onClose(CloseEvent<T> event) ; Called when CloseEvent is fired.
6 ContextMenuHandler void onContextMenu(ContextMenuEvent event); Called when a native context menu event is fired.
7 DoubleClickHandler void onDoubleClick(DoubleClickEvent event); Called when a DoubleClickEvent is fired.
8 ErrorHandler void onError(ErrorEvent event); Called when ErrorEvent is fired.
9 FocusHandler void onFocus(FocusEvent event) ; Called when FocusEvent is fired.
10 FormPanel.SubmitCompleteHandler
void onSubmitComplete(FormPanel.SubmitCompleteEvent event) ; Fired when a form has been submitted successfully.
11 FormPanel.SubmitHandler void onSubmit(FormPanel.SubmitEvent event); Fired when the form is submitted.
12 KeyDownHandler void onKeyDown(KeyDownEvent event); Called when KeyDownEvent is fired.
13 KeyPressHandler void onKeyPress(KeyPressEvent event) ; Called when KeyPressEvent is fired.
14 KeyUpHandler void onKeyUp(KeyUpEvent event) ; Called when KeyUpEvent is fired.
15 LoadHandler void onLoad(LoadEvent event); Called when LoadEvent is fired.
16 MouseDownHandler void onMouseDown(MouseDownEvent event) ; Called when MouseDown is fired.
17 MouseMoveHandler void onMouseMove(MouseMoveEvent event); Called when MouseMoveEvent is fired.
18 MouseOutHandler void onMouseOut(MouseOutEvent event) ; Called when MouseOutEvent is fired.
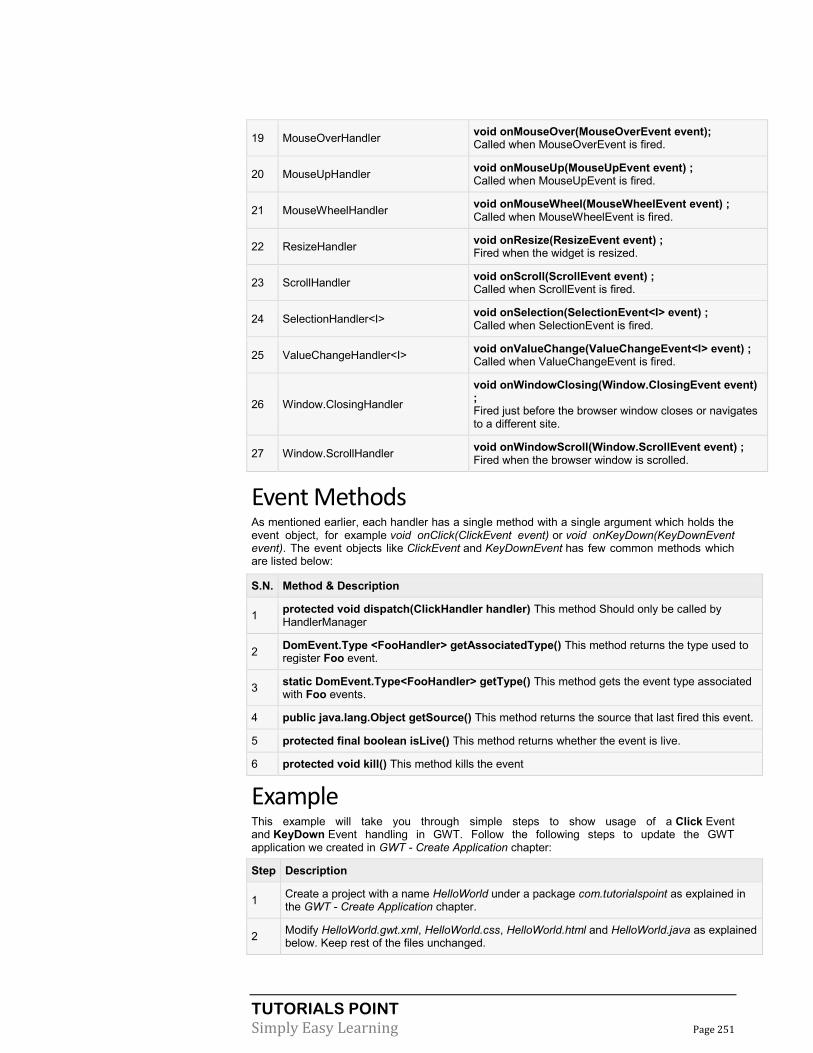
TUTORIALS POINT
Simply Easy Learning Page 251
19 MouseOverHandler void onMouseOver(MouseOverEvent event); Called when MouseOverEvent is fired.
20 MouseUpHandler void onMouseUp(MouseUpEvent event) ; Called when MouseUpEvent is fired.
21 MouseWheelHandler void onMouseWheel(MouseWheelEvent event) ; Called when MouseWheelEvent is fired.
22 ResizeHandler void onResize(ResizeEvent event) ; Fired when the widget is resized.
23 ScrollHandler void onScroll(ScrollEvent event) ; Called when ScrollEvent is fired.
24 SelectionHandler<I> void onSelection(SelectionEvent<I> event) ; Called when SelectionEvent is fired.
25 ValueChangeHandler<I> void onValueChange(ValueChangeEvent<I> event) ; Called when ValueChangeEvent is fired.
26 Window.ClosingHandler
void onWindowClosing(Window.ClosingEvent event) ; Fired just before the browser window closes or navigates to a different site.
27 Window.ScrollHandler void onWindowScroll(Window.ScrollEvent event) ; Fired when the browser window is scrolled.
Event Methods As mentioned earlier, each handler has a single method with a single argument which holds the event object, for example void onClick(ClickEvent event) or void onKeyDown(KeyDownEvent event). The event objects like ClickEvent and KeyDownEvent has few common methods which are listed below:
S.N. Method & Description
1 protected void dispatch(ClickHandler handler) This method Should only be called by HandlerManager
2 DomEvent.Type <FooHandler> getAssociatedType() This method returns the type used to register Foo event.
3 static DomEvent.Type<FooHandler> getType() This method gets the event type associated with Foo events.
4 public java.lang.Object getSource() This method returns the source that last fired this event.
5 protected final boolean isLive() This method returns whether the event is live.
6 protected void kill() This method kills the event
Example This example will take you through simple steps to show usage of a Click Event and KeyDown Event handling in GWT. Follow the following steps to update the GWT application we created in GWT - Create Application chapter:
Step Description
1 Create a project with a name HelloWorld under a package com.tutorialspoint as explained in the GWT - Create Application chapter.
2 Modify HelloWorld.gwt.xml, HelloWorld.css, HelloWorld.html and HelloWorld.java as explained below. Keep rest of the files unchanged.

TUTORIALS POINT
Simply Easy Learning Page 252
3 Compile and run the application to verify the result of the implemented logic.
Following is the content of the modified module descriptor src/com.tutorialspoint/HelloWorld.gwt.xml.
<?xml version="1.0" encoding="UTF-8"?>
<module rename-to='helloworld'>
<!-- Inherit the core Web Toolkit stuff. -->
<inherits name='com.google.gwt.user.User'/>
<!-- Inherit the default GWT style sheet. -->
<inherits name='com.google.gwt.user.theme.clean.Clean'/>
<!-- Specify the app entry point class. -->
<entry-point class='com.tutorialspoint.client.HelloWorld'/>
<!-- Specify the paths for translatable code -->
<source path='client'/>
<source path='shared'/>
</module>
Following is the content of the modified Style Sheet file war/HelloWorld.css.
body{
text-align: center;
font-family: verdana, sans-serif;
}
h1{
font-size:2em;
font-weight: bold;
color:#777777;
margin:40px0px70px;
text-align: center;
}
Following is the content of the modified HTML host file war/HelloWorld.html.
<html>
<head>
<title>Hello World</title>
<link rel="stylesheet" href="HelloWorld.css"/>
<script language="javascript" src="helloworld/helloworld.nocache.js">
</script>
</head>
<body>
<h1>Event Handling Demonstration</h1>
<div id="gwtContainer"></div>
</body>
</html>
Let us have following content of Java file src/com.tutorialspoint/HelloWorld.java which will demonstrate use of Event Handling in GWT.
package com.tutorialspoint.client;
import com.google.gwt.core.client.EntryPoint;
import com.google.gwt.event.dom.client.ClickEvent;
import com.google.gwt.event.dom.client.ClickHandler;
import com.google.gwt.event.dom.client.KeyCodes;
import com.google.gwt.event.dom.client.KeyDownEvent;
import com.google.gwt.event.dom.client.KeyDownHandler;
import com.google.gwt.user.client.Window;
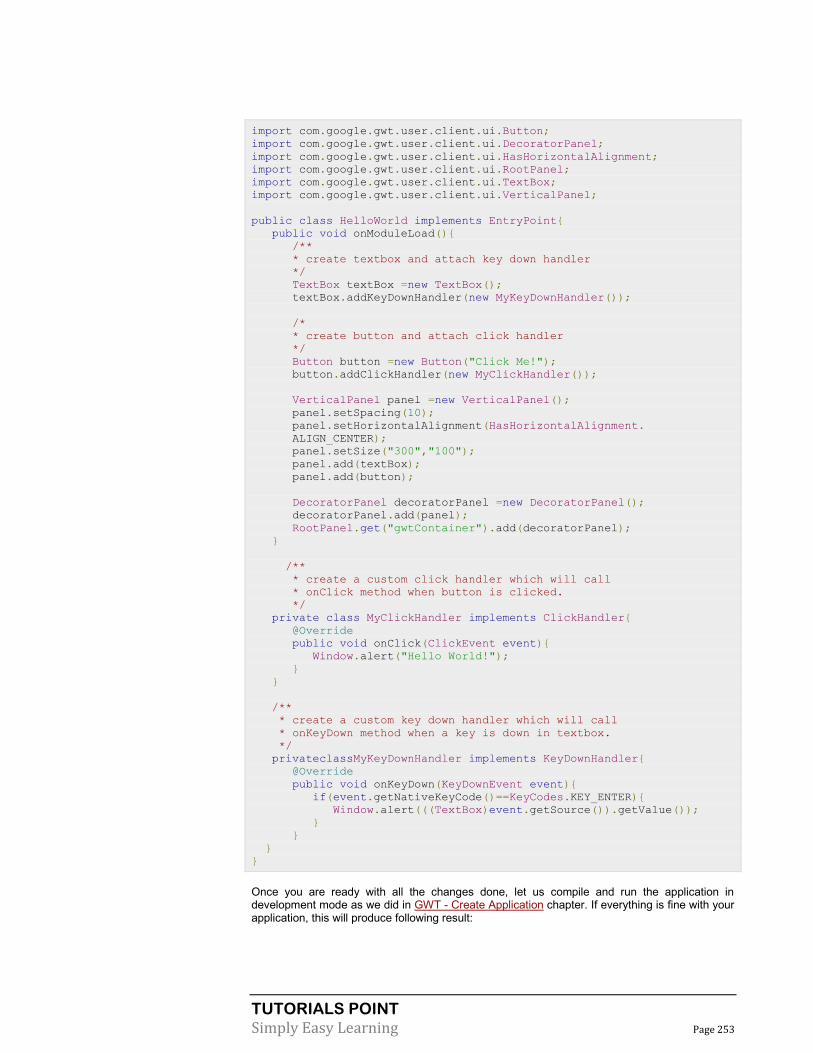
TUTORIALS POINT
Simply Easy Learning Page 253
import com.google.gwt.user.client.ui.Button;
import com.google.gwt.user.client.ui.DecoratorPanel;
import com.google.gwt.user.client.ui.HasHorizontalAlignment;
import com.google.gwt.user.client.ui.RootPanel;
import com.google.gwt.user.client.ui.TextBox;
import com.google.gwt.user.client.ui.VerticalPanel;
public class HelloWorld implements EntryPoint{
public void onModuleLoad(){
/**
* create textbox and attach key down handler
*/
TextBox textBox =new TextBox();
textBox.addKeyDownHandler(new MyKeyDownHandler());
/*
* create button and attach click handler
*/
Button button =new Button("Click Me!");
button.addClickHandler(new MyClickHandler());
VerticalPanel panel =new VerticalPanel();
panel.setSpacing(10);
panel.setHorizontalAlignment(HasHorizontalAlignment.
ALIGN_CENTER);
panel.setSize("300","100");
panel.add(textBox);
panel.add(button);
DecoratorPanel decoratorPanel =new DecoratorPanel();
decoratorPanel.add(panel);
RootPanel.get("gwtContainer").add(decoratorPanel);
}
/**
* create a custom click handler which will call
* onClick method when button is clicked.
*/
private class MyClickHandler implements ClickHandler{
@Override
public void onClick(ClickEvent event){
Window.alert("Hello World!");
}
}
/**
* create a custom key down handler which will call
* onKeyDown method when a key is down in textbox.
*/
privateclassMyKeyDownHandler implements KeyDownHandler{
@Override
public void onKeyDown(KeyDownEvent event){
if(event.getNativeKeyCode()==KeyCodes.KEY_ENTER){
Window.alert(((TextBox)event.getSource()).getValue());
}
}
}
}
Once you are ready with all the changes done, let us compile and run the application in development mode as we did in GWT - Create Application chapter. If everything is fine with your application, this will produce following result:

TUTORIALS POINT
Simply Easy Learning Page 254

TUTORIALS POINT
Simply Easy Learning Page 255
Custom Widgets
This section describes the Custom Widgets used under Google Web Toolkit:
GWT provides three ways to create custom user interface elements. There are three
general strategies to follow:
Create a widget by extending Composite Class: This is the most common and
easiest way to create custom widgets. Here you can use existing widgets to create composite view with custom properties.
Create a widget using GWT DOM API in JAVA: GWT basic widgets are created in
this way. Still its a very complicated way to create custom widget and should be used cautiously.
Use JavaScript and wrap it in a widget using JSNI: This should generally only be
done as a last resort. Considering the cross-browser implications of the native methods, it becomes very complicated and also becomes more difficult to debug.
Create Custom Widget with Composite Class This example will take you through simple steps to show creation of a Custom Widget in GWT. Follow the following steps to update the GWT application we created in GWT - Basic Widgets chapter:
Here we are going to create a custom widget by extending Composite class, which is the easiest way to build custom widgets.
Step Description
1 Create a project with a name HelloWorld under a package com.tutorialspoint as explained in the GWT - Create Application chapter.
2 Modify HelloWorld.gwt.xml, HelloWorld.css, HelloWorld.html and HelloWorld.java as explained below. Keep rest of the files unchanged.
3 Compile and run the application to verify the result of the implemented logic.
Following is the content of the modified module descriptor src/com.tutorialspoint/HelloWorld.gwt.xml.
<?xml version="1.0" encoding="UTF-8"?>
CHAPTER
12

TUTORIALS POINT
Simply Easy Learning Page 256
<module rename-to='helloworld'>
<!-- Inherit the core Web Toolkit stuff. -->
<inherits name='com.google.gwt.user.User'/>
<!-- Inherit the default GWT style sheet. -->
<inherits name='com.google.gwt.user.theme.clean.Clean'/>
<!-- Specify the app entry point class. -->
<entry-point class='com.tutorialspoint.client.HelloWorld'/>
<!-- Specify the paths for translatable code -->
<source path='client'/>
<sourcepath='shared'/>
</module>
Following is the content of the modified Style Sheet file war/HelloWorld.css.
body{
text-align: center;
font-family: verdana, sans-serif;
}
h1{
font-size:2em;
font-weight: bold;
color:#777777;
margin:40px0px70px;
text-align: center;
}
Following is the content of the modified HTML host file war/HelloWorld.html.
<html>
<head>
<title>Hello World</title>
<link rel="stylesheet" href="HelloWorld.css"/>
<script language="javascript" src="helloworld/helloworld.nocache.js">
</script>
</head>
<body>
<h1>Custom Widget Demonstration</h1>
<div id="gwtContainer"></div>
</body>
</html>
Let us have following content of Java file src/com.tutorialspoint/HelloWorld.java which will demonstrate creation of a Custom widget.
package com.tutorialspoint.client;
import com.google.gwt.core.client.EntryPoint;
import com.google.gwt.event.dom.client.ClickEvent;
import com.google.gwt.event.dom.client.ClickHandler;
import com.google.gwt.user.client.ui.CheckBox;
import com.google.gwt.user.client.ui.Composite;
import com.google.gwt.user.client.ui.HorizontalPanel;
import com.google.gwt.user.client.ui.RootPanel;
import com.google.gwt.user.client.ui.TextBox;
public class HelloWorld implements EntryPoint{
/**
* A composite of a TextBox and a CheckBox that optionally enables it.
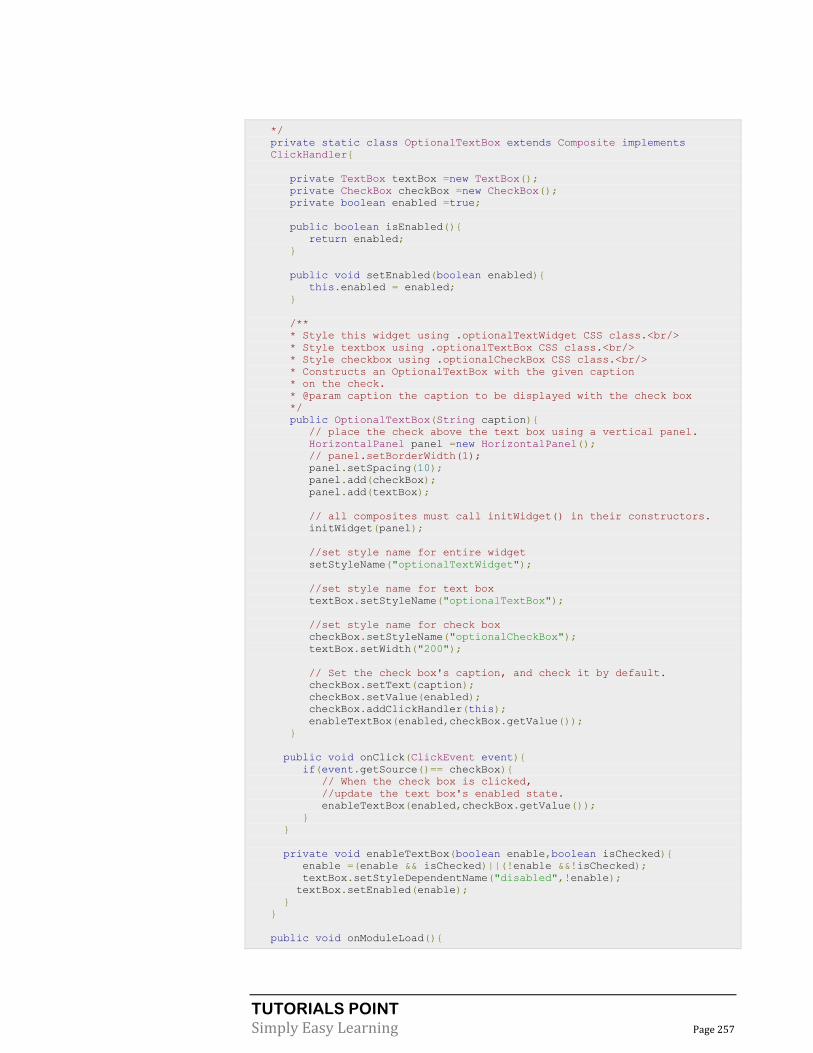
TUTORIALS POINT
Simply Easy Learning Page 257
*/
private static class OptionalTextBox extends Composite implements
ClickHandler{
private TextBox textBox =new TextBox();
private CheckBox checkBox =new CheckBox();
private boolean enabled =true;
public boolean isEnabled(){
return enabled;
}
public void setEnabled(boolean enabled){
this.enabled = enabled;
}
/**
* Style this widget using .optionalTextWidget CSS class.<br/>
* Style textbox using .optionalTextBox CSS class.<br/>
* Style checkbox using .optionalCheckBox CSS class.<br/>
* Constructs an OptionalTextBox with the given caption
* on the check.
* @param caption the caption to be displayed with the check box
*/
public OptionalTextBox(String caption){
// place the check above the text box using a vertical panel.
HorizontalPanel panel =new HorizontalPanel();
// panel.setBorderWidth(1);
panel.setSpacing(10);
panel.add(checkBox);
panel.add(textBox);
// all composites must call initWidget() in their constructors.
initWidget(panel);
//set style name for entire widget
setStyleName("optionalTextWidget");
//set style name for text box
textBox.setStyleName("optionalTextBox");
//set style name for check box
checkBox.setStyleName("optionalCheckBox");
textBox.setWidth("200");
// Set the check box's caption, and check it by default.
checkBox.setText(caption);
checkBox.setValue(enabled);
checkBox.addClickHandler(this);
enableTextBox(enabled,checkBox.getValue());
}
public void onClick(ClickEvent event){
if(event.getSource()== checkBox){
// When the check box is clicked,
//update the text box's enabled state.
enableTextBox(enabled,checkBox.getValue());
}
}
private void enableTextBox(boolean enable,boolean isChecked){
enable =(enable && isChecked)||(!enable &&!isChecked);
textBox.setStyleDependentName("disabled",!enable);
textBox.setEnabled(enable);
}
}
public void onModuleLoad(){

TUTORIALS POINT
Simply Easy Learning Page 258
// Create an optional text box and add it to the root panel.
OptionalTextBox otb =new OptionalTextBox("Want to explain the solution?");
otb.setEnabled(true);
RootPanel.get().add(otb);
}
}
Once you are ready with all the changes done, let us compile and run the application in development mode as we did in GWT - Create Application chapter. If everything is fine with your application, this will produce following result:
You can notice following points
Creation of Custom Widget by extending Composite widget is pretty easy.
We've created a widget with GWT inbuilt widgets, TextBox and CheckBox thus using the concept of reusability.
TextBox get disabled/enabled depending on state of checkbox. We've provided an API to enable/disable the control.
We've exposed internal widgets styles via documented CSS styles.
TUTORIALS POINT
Simply Easy Learning Page 259
UIBinder
This section describes the UI Binder under Google Web Toolkit:
The UIBinder under Google Web Toolkit is a framework which allows developers to
build GWT applications.
Introduction The UiBinder is a framework designed to separate Functionality and View of User
Interface.
The UiBinder framework allows developers to build gwt applications as HTML pages with GWT widgets configured throughout them.
The UiBinder framework makes easier collaboration with UI designers who are more comfortable with XML, HTML and CSS than Java source code
The UIBinder provides a declarative way of defining User Interface.
The UIBinder seperates the programmic logic from UI.
The UIBinder is similar to what JSP is to Servlets.
UiBinder workflow
Step 1: Create UI Declaration XML File
Create a XML/HTML based User Interface declaration file. We've created a Login.ui.xml file in our example.
<ui:UiBinder xmlns:ui='urn:ui:com.google.gwt.uibinder'
xmlns:gwt='urn:import:com.google.gwt.user.client.ui'
xmlns:res='urn:with:com.tutorialspoint.client.LoginResources'>
<ui:withtype="com.tutorialspoint.client.LoginResources"field="res">
</ui:with>
<gwt:HTMLPanel>
CHAPTER
13

TUTORIALS POINT
Simply Easy Learning Page 260
...
</gwt:HTMLPanel>
</ui:UiBinder>
Step 2: Use ui:field for Later Binding Use ui:field attribute in XML/HTML element to relate UI field in XML with UI field in JAVA file for later binding.
<gwt:Label ui:field="completionLabel1"/>
<gwt:Label ui:field="completionLabel2"/>
Step 3: Create Java counterpart of UI XML Create Java based counterpart of XML based layout by extending Composite widget. We've created aLogin.java file in our example.
package com.tutorialspoint.client;
...
public class Login extends Composite{
...
}
Step 4: Bind Java UI fields with UiField annotation use @UiField annotation in Login.java to designate counterpart class members to bind to XML-based fields in Login.ui.xml
public class Login extends Composite{
...
@UiField
Label completionLabel1;
@UiField
Label completionLabel2;
...
}
Step 5: Bind Java UI with UI XML with UiTemplate annotation
Instruct GWT to bind java based component Login.java and XML based layout Login.ui.xml using @UiTemplate annotation
public class Login extends Composite{
private static LoginUiBinder uiBinder = GWT.create(LoginUiBinder.class);
/*
* @UiTemplate is not mandatory but allows multiple XML templates
* to be used for the same widget.
* Default file loaded will be <class-name>.ui.xml
*/
@UiTemplate("Login.ui.xml")
interface LoginUiBinder extends UiBinder<Widget,Login>{
}
...
}

TUTORIALS POINT
Simply Easy Learning Page 261
Step 6: Create CSS File Create an external CSS fileLogin.css and Java based Resource LoginResources.java file equivalent to css styles
.blackText {
font-family:Arial,Sans-serif;
color:#000000;
font-size:11px;
text-align: left;
}
...
Step 7: Create Java based Resource File for CSS File package com.tutorialspoint.client;
...
public interface LoginResources extends ClientBundle{
public interface MyCss extends CssResource{
String blackText();
...
}
@Source("Login.css")
MyCss style();
}
Step 8: Attach CSS resource in Java UI Code file.
Attach an external CSS fileLogin.css using Contructor of Java based widget class Login.java
public Login(){
this.res = GWT.create(LoginResources.class);
res.style().ensureInjected();
initWidget(uiBinder.createAndBindUi(this));
}
UIBinder Complete Example
This example will take you through simple steps to show usage of a UIBinder in GWT. Follow the following steps to update the GWT application we created in GWT - Create Application chapter:
Step Description
1 Create a project with a name HelloWorld under a package com.tutorialspoint as explained in the GWT - Create Application chapter.
2 Modify HelloWorld.gwt.xml, HelloWorld.css, HelloWorld.html and HelloWorld.java as explained below. Keep rest of the files unchanged.
3 Compile and run the application to verify the result of the implemented logic.
Following is the content of the modified module descriptor src/com.tutorialspoint/HelloWorld.gwt.xml.
<?xml version="1.0" encoding="UTF-8"?>
<module rename-to='helloworld'>

TUTORIALS POINT
Simply Easy Learning Page 262
<!-- Inherit the core Web Toolkit stuff. -->
<inherits name='com.google.gwt.user.User'/>
<!-- Inherit the default GWT style sheet. -->
<inherits name='com.google.gwt.user.theme.clean.Clean'/>
<!-- Inherit the UiBinder module. -->
<inherits name="com.google.gwt.uibinder.UiBinder"/>
<!-- Specify the app entry point class. -->
<entry-point class='com.tutorialspoint.client.HelloWorld'/>
<!-- Specify the paths for translatable code -->
<source path='client'/>
<source path='shared'/>
</module>
Following is the content of the modified Style Sheet file war/HelloWorld.css.
body{
text-align: center;
font-family: verdana, sans-serif;
}
h1{
font-size:2em;
font-weight: bold;
color:#777777;
margin:40px0px70px;
text-align: center;
}
Following is the content of the modified HTML host file war/HelloWorld.html.
<html>
<head>
<title>Hello World</title>
<link rel="stylesheet" href="HelloWorld.css"/>
<script language="javascript" src="helloworld/helloworld.nocache.js">
</script>
</head>
<body>
<h1>UiBinder Demonstration</h1>
<div id="gwtContainer"></div>
</body>
</html>
Now create a new UiBinder template and owner class (File -> New -> UiBinder).

TUTORIALS POINT
Simply Easy Learning Page 263
Choose the client package for the project and then name it Login. Leave all of the other defaults.Click Finish button and the plugin will create a new UiBinder template and owner class.

TUTORIALS POINT
Simply Easy Learning Page 264
Now create Login.css file in the src/com.tutorialspoint/client package and place the
following contents in it
.blackText {
font-family:Arial,Sans-serif;
color:#000000;
font-size:11px;
text-align: left;
}
.redText {
font-family:Arial,Sans-serif;
color:#ff0000;
font-size:11px;
text-align: left;
}
.loginButton {
border:1px solid #3399DD;
color:#FFFFFF;
background:#555555;
font-size:11px;
font-weight: bold;
margin:05px00;
padding:4px10px5px;

TUTORIALS POINT
Simply Easy Learning Page 265
text-shadow:0-1px0#3399DD;
}
.box {
border:1px solid #AACCEE;
display: block;
font-size:12px;
margin:005px;
padding:3px;
width:203px;
}
.background {
background-color:#999999;
border:1px none transparent;
color:#000000;
font-size:11px;
margin-left:-8px;
margin-top:5px;
padding:6px;
}
Now create LoginResources.java file in the src/com.tutorialspoint/client package and
place the following contents in it
package com.tutorialspoint.client;
import com.google.gwt.resources.client.ClientBundle;
import com.google.gwt.resources.client.CssResource;
public interface LoginResources extends ClientBundle{
/**
* Sample CssResource.
*/
public interface MyCss extends CssResource{
String blackText();
String redText();
String loginButton();
String box();
String background();
}
@Source("Login.css")
MyCss style();
}
Replace the contents of Login.ui.xml in src/com.tutorialspoint/client package with the
following
<ui:UiBinder xmlns:ui='urn:ui:com.google.gwt.uibinder'
xmlns:gwt='urn:import:com.google.gwt.user.client.ui'
xmlns:res='urn:with:com.tutorialspoint.client.LoginResources'>
<ui:with type="com.tutorialspoint.client.LoginResources"field="res">
</ui:with>
<gwt:HTMLPanel>
<div align="center">
<gwt:VerticalPanel res:styleName="style.background">
<gwt:Label text="Login" res:styleName="style.greyText"/>
<gwt:TextBoxui:field="loginBox" res:styleName="style.box"/>
<gwt:Label text="Password" res:styleName="style.greyText"/>
<gwt:PasswordTextBox ui:field="passwordBox"
res:styleName="style.box"/>
<gwt:HorizontalPanel verticalAlignment="middle">
<gwt:Buttonui:field="buttonSubmit" text="Submit"
res:styleName="style.loginButton"/>

TUTORIALS POINT
Simply Easy Learning Page 266
<gwt:CheckBoxui:field="myCheckBox"/>
<gwt:Label ui:field="myLabel" text="Remember me"
res:styleName="style.greyText"/>
</gwt:HorizontalPanel>
<gwt:Label ui:field="completionLabel1"
res:styleName="style.greyText"/>
<gwt:Label ui:field="completionLabel2"
res:styleName="style.greyText"/>
</gwt:VerticalPanel>
</div>
</gwt:HTMLPanel>
</ui:UiBinder>
Replace the contents of Login.java in src/com.tutorialspoint/client package with the
following
package com.tutorialspoint.client;
import com.google.gwt.core.client.GWT;
import com.google.gwt.event.dom.client.ClickEvent;
import com.google.gwt.event.logical.shared.ValueChangeEvent;
import com.google.gwt.uibinder.client.UiBinder;
import com.google.gwt.uibinder.client.UiField;
import com.google.gwt.uibinder.client.UiHandler;
import com.google.gwt.uibinder.client.UiTemplate;
import com.google.gwt.user.client.Window;
import com.google.gwt.user.client.ui.Composite;
import com.google.gwt.user.client.ui.Label;
import com.google.gwt.user.client.ui.TextBox;
import com.google.gwt.user.client.ui.Widget;
public class Login extends Composite{
private static LoginUiBinder uiBinder = GWT.create(LoginUiBinder.class);
/*
* @UiTemplate is not mandatory but allows multiple XML templates
* to be used for the same widget.
* Default file loaded will be <class-name>.ui.xml
*/
@UiTemplate("Login.ui.xml")
interface LoginUiBinder extends UiBinder<Widget,Login>{
}
@UiField(provided =true)
final LoginResources res;
public Login(){
this.res = GWT.create(LoginResources.class);
res.style().ensureInjected();
initWidget(uiBinder.createAndBindUi(this));
}
@UiField
TextBox loginBox;
@UiField
TextBox passwordBox;
@UiField
Label completionLabel1;
@UiField
Label completionLabel2;
private Boolean tooShort =false;
/*

TUTORIALS POINT
Simply Easy Learning Page 267
* Method name is not relevant, the binding is done according to the
class of the parameter.
*/
@UiHandler("buttonSubmit")
void doClickSubmit(ClickEvent event){
if(tooShort){
Window.alert("Login Successful!");
}else{
Window.alert("Login or Password is too short!");
}
}
@UiHandler("loginBox")
void handleLoginChange(ValueChangeEvent<String> event){
if(event.getValue().length()<6){
completionLabel1.setText("Login too short (Size must be > 6)");
tooShort =true;
}else{
tooShort =false;
completionLabel1.setText("");
}
}
@UiHandler("passwordBox")
void handlePasswordChange(ValueChangeEvent<String> event){
if(event.getValue().length()<6){
tooShort =true;
completionLabel2.setText("Password too short (Size must be > 6)");
}else{
tooShort =false;
completionLabel2.setText("");
}
}
}
Let us have following content of Java file src/com.tutorialspoint/HelloWorld.java which
will demonstrate use of UiBinder.
package com.tutorialspoint.client;
import com.google.gwt.core.client.EntryPoint;
import com.google.gwt.user.client.ui.RootPanel;
public class HelloWorld implements EntryPoint{
public void onModuleLoad(){
RootPanel.get().add(new Login());
}
}
Once you are ready with all the changes done, let us compile and run the application in development mode as we did in GWT - Create Application chapter. If everything is fine with your application, this will produce following result:
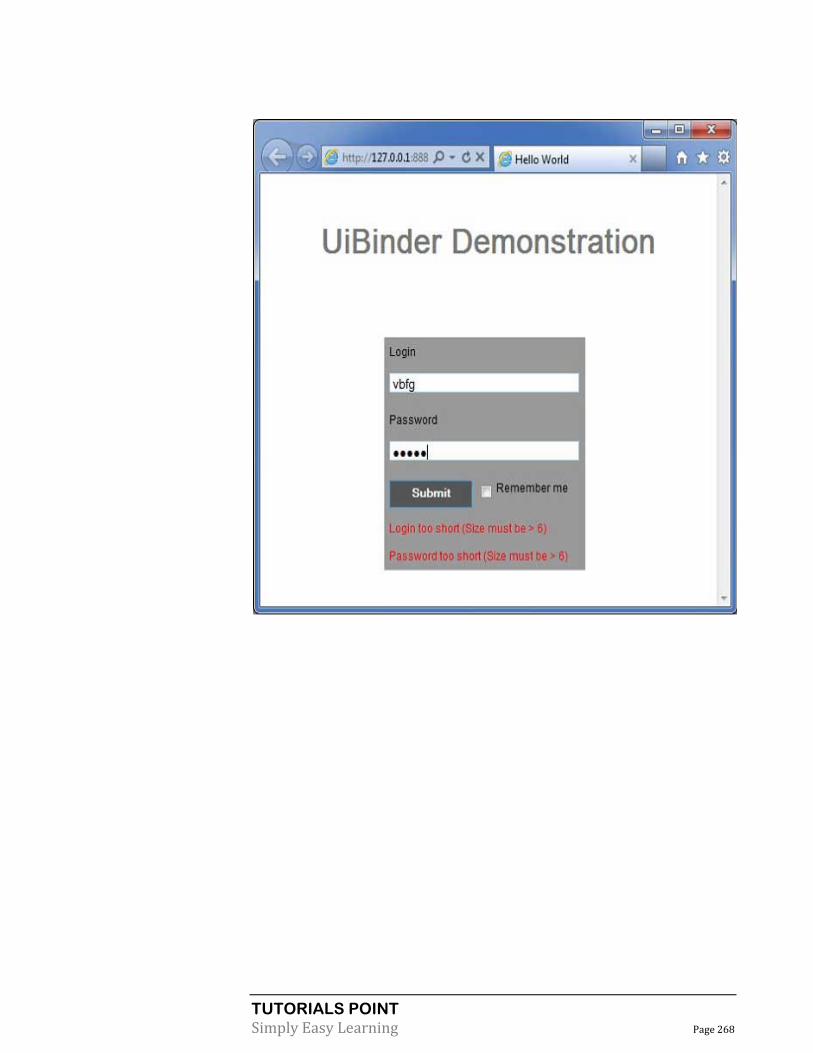
TUTORIALS POINT
Simply Easy Learning Page 268

TUTORIALS POINT
Simply Easy Learning Page 269
RPC Communication
This section describes RPC Communication under Google Web Toolkit:
AGWT based application is generally consists of a client side module and server
side module. Client side code runs in browser and server side code runs in web server. Client side code has to make an HTTP request accross the network to access server side data.
RPC, Remote Procedure Call is the mechansim used by GWT in which client code can directly executes the server side methods.
GWT RPC is servlet based.
GWT RPC is asynchronous and client is never blocked during communication.
Using GWT RPC Java objects can be sent directly between the client and the server (which are automatically serialized by the GWT framework).
Server-side servlet is termed as service.
Remote procedure call that is calling methods of server side servlets from client
side code is referred to as invoking a service.
GWT RPC Components Following are the three components used in GWT RPC communication mechanism
A remote service (server-side servlet) that runs on the server.
Client code to invoke that service.
Java data objects which will be passed between client and server.
GWT client and server both serialize and deserialize data automatically so developers are not required to serialize/deserialize objects and data objects can travel over HTTP.
CHAPTER
14
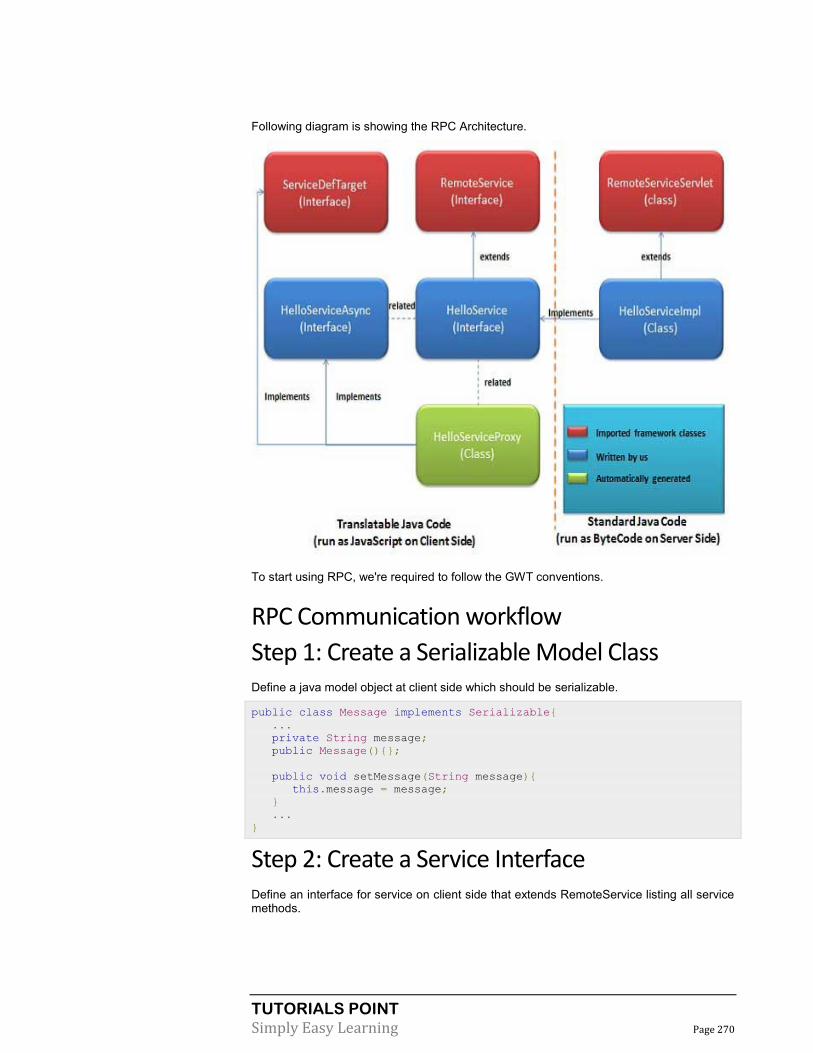
TUTORIALS POINT
Simply Easy Learning Page 270
Following diagram is showing the RPC Architecture.
To start using RPC, we're required to follow the GWT conventions.
RPC Communication workflow
Step 1: Create a Serializable Model Class Define a java model object at client side which should be serializable.
public class Message implements Serializable{
...
private String message;
public Message(){};
public void setMessage(String message){
this.message = message;
}
...
}
Step 2: Create a Service Interface Define an interface for service on client side that extends RemoteService listing all service methods.
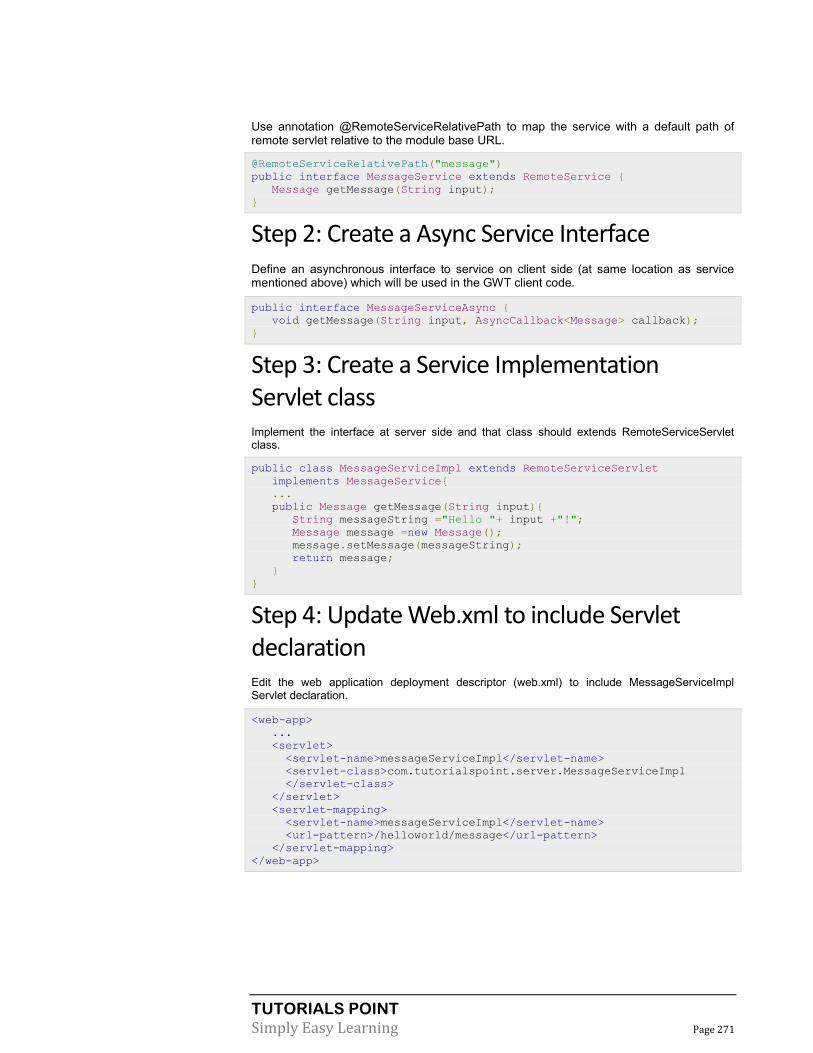
TUTORIALS POINT
Simply Easy Learning Page 271
Use annotation @RemoteServiceRelativePath to map the service with a default path of remote servlet relative to the module base URL.
@RemoteServiceRelativePath("message")
public interface MessageService extends RemoteService {
Message getMessage(String input);
}
Step 2: Create a Async Service Interface Define an asynchronous interface to service on client side (at same location as service mentioned above) which will be used in the GWT client code.
public interface MessageServiceAsync {
void getMessage(String input, AsyncCallback<Message> callback);
}
Step 3: Create a Service Implementation Servlet class Implement the interface at server side and that class should extends RemoteServiceServlet class.
public class MessageServiceImpl extends RemoteServiceServlet
implements MessageService{
...
public Message getMessage(String input){
String messageString ="Hello "+ input +"!";
Message message =new Message();
message.setMessage(messageString);
return message;
}
}
Step 4: Update Web.xml to include Servlet declaration Edit the web application deployment descriptor (web.xml) to include MessageServiceImpl Servlet declaration.
<web-app>
...
<servlet>
<servlet-name>messageServiceImpl</servlet-name>
<servlet-class>com.tutorialspoint.server.MessageServiceImpl
</servlet-class>
</servlet>
<servlet-mapping>
<servlet-name>messageServiceImpl</servlet-name>
<url-pattern>/helloworld/message</url-pattern>
</servlet-mapping>
</web-app>

TUTORIALS POINT
Simply Easy Learning Page 272
Step 5: Make the remote procedure call in Application Code Create the service proxy class.
MessageServiceAsync messageService = GWT.create(MessageService.class);
Create the AsyncCallback Handler to handle RPC callback in which server returns the Message back to client
class MessageCallBack implements AsyncCallback<Message> {
@Override
public void onFailure(Throwable caught){
Window.alert("Unable to obtain server response: "
+ caught.getMessage());
}
@Override
public void onSuccess(Message result){
Window.alert(result.getMessage());
}
}
Call Remote service when user interacts with UI
public class HelloWorld implements EntryPoint{
...
public void onModuleLoad(){
...
buttonMessage.addClickHandler(new ClickHandler(){
@Override
public void onClick(ClickEvent event){
messageService.getMessage(txtName.getValue(),
new MessageCallBack());
}});
...
}
}
RPC Communication Complete Example
This example will take you through simple steps to show example of a RPC Communication in GWT. Follow the following steps to update the GWT application we created in GWT - Create Applicationchapter:
Step Description
1 Create a project with a name HelloWorld under a package com.tutorialspoint as explained in the GWT - Create Application chapter.
2 Modify HelloWorld.gwt.xml, HelloWorld.css, HelloWorld.html and HelloWorld.java as explained below. Keep rest of the files unchanged.
3 Compile and run the application to verify the result of the implemented logic.

TUTORIALS POINT
Simply Easy Learning Page 273
Following is the content of the modified module descriptor src/com.tutorialspoint/HelloWorld.gwt.xml.
<?xml version="1.0" encoding="UTF-8"?>
<module rename-to='helloworld'>
<!-- Inherit the core Web Toolkit stuff. -->
<inherits name='com.google.gwt.user.User'/>
<!-- Inherit the default GWT style sheet. -->
<inherits name='com.google.gwt.user.theme.clean.Clean'/>
<!-- Inherit the UiBinder module. -->
<inherits name="com.google.gwt.uibinder.UiBinder"/>
<!-- Specify the app entry point class. -->
<entry-point class='com.tutorialspoint.client.HelloWorld'/>
<!-- Specify the paths for translatable code -->
<source path='client'/>
<source path='shared'/>
</module>
Following is the content of the modified Style Sheet file war/HelloWorld.css.
body{
text-align: center;
font-family: verdana, sans-serif;
}
h1{
font-size:2em;
font-weight: bold;
color:#777777;
margin:40px0px70px;
text-align: center;
}
Following is the content of the modified HTML host file war/HelloWorld.html.
<html>
<head>
<title>Hello World</title>
<link rel="stylesheet" href="HelloWorld.css"/>
<script language="javascript" src="helloworld/helloworld.nocache.js">
</script>
</head>
<body>
<h1>RPC Communication Demonstration</h1>
<div id="gwtContainer"></div>
</body>
</html>
Now create Message.java file in the src/com.tutorialspoint/client package and place the following contents in it
package com.tutorialspoint.client;
import java.io.Serializable;
public class Message implements Serializable{
private static final long serialVersionUID =1L;
private String message;
public Message(){};
public void setMessage(String message){

TUTORIALS POINT
Simply Easy Learning Page 274
this.message = message;
}
public String getMessage(){
return message;
}
}
Now create MessageService.java file in the src/com.tutorialspoint/client package and place the following contents in it
package com.tutorialspoint.client;
import com.google.gwt.user.client.rpc.RemoteService;
import com.google.gwt.user.client.rpc.RemoteServiceRelativePath;
@RemoteServiceRelativePath("message")
public interface MessageService extends RemoteService{
Message getMessage(String input);
}
Now create MessageServiceAsync.java file in the src/com.tutorialspoint/client package and place the following contents in it
package com.tutorialspoint.client;
import com.google.gwt.user.client.rpc.AsyncCallback;
public interface MessageServiceAsync {
void getMessage(String input,AsyncCallback<Message> callback);
}
Now create MessageServiceImpl.java file in the src/com.tutorialspoint/server package and place the following contents in it
package com.tutorialspoint.server;
import com.google.gwt.user.server.rpc.RemoteServiceServlet;
import com.tutorialspoint.client.Message;
import com.tutorialspoint.client.MessageService;
public class MessageServiceImpl extends RemoteServiceServlet
implements MessageService{
private static final long serialVersionUID =1L;
public Message getMessage(String input){
String messageString ="Hello "+ input +"!";
Message message =newMessage();
message.setMessage(messageString);
return message;
}
}
Update the content of the modified web application deployment descriptor war/WEB-INF/web.xml to include MessageServiceImpl Servlet declaration .
<?xml version="1.0" encoding="UTF-8"?>
<!DOCTYPE web-app
PUBLIC "-//Sun Microsystems, Inc.//DTD Web Application 2.3//EN"
"http://java.sun.com/dtd/web-app_2_3.dtd">
<web-app>
<!-- Default page to serve -->
<welcome-file-list>

TUTORIALS POINT
Simply Easy Learning Page 275
<welcome-file>HelloWorld.html</welcome-file>
</welcome-file-list>
<servlet>
<servlet-name>messageServiceImpl</servlet-name>
<servlet-class>com.tutorialspoint.server.MessageServiceImpl
</servlet-class>
</servlet>
<servlet-mapping>
<servlet-name>messageServiceImpl</servlet-name>
<url-pattern>/helloworld/message</url-pattern>
</servlet-mapping>
</web-app>
Replace the contents of HelloWorld.java in src/com.tutorialspoint/client package with the following
package com.tutorialspoint.client;
import com.google.gwt.core.client.EntryPoint;
import com.google.gwt.core.client.GWT;
import com.google.gwt.event.dom.client.ClickEvent;
import com.google.gwt.event.dom.client.ClickHandler;
import com.google.gwt.event.dom.client.KeyCodes;
import com.google.gwt.event.dom.client.KeyUpEvent;
import com.google.gwt.event.dom.client.KeyUpHandler;
import com.google.gwt.user.client.Window;
import com.google.gwt.user.client.rpc.AsyncCallback;
import com.google.gwt.user.client.ui.Button;
import com.google.gwt.user.client.ui.DecoratorPanel;
import com.google.gwt.user.client.ui.HasHorizontalAlignment;
import com.google.gwt.user.client.ui.HorizontalPanel;
import com.google.gwt.user.client.ui.Label;
import com.google.gwt.user.client.ui.RootPanel;
import com.google.gwt.user.client.ui.TextBox;
import com.google.gwt.user.client.ui.VerticalPanel;
public class HelloWorld implements EntryPoint{
private MessageServiceAsync messageService =
GWT.create(MessageService.class);
private class MessageCallBack implements AsyncCallback<Message>{
@Override
public void onFailure(Throwable caught){
/* server side error occured */
Window.alert("Unable to obtain server response: "
+ caught.getMessage());
}
@Override
public void onSuccess(Message result){
/* server returned result, show user the message */
Window.alert(result.getMessage());
}
}
public void onModuleLoad(){
/*create UI */
final TextBox txtName =new TextBox();
txtName.setWidth("200");
txtName.addKeyUpHandler(new KeyUpHandler(){
@Override
public void onKeyUp(KeyUpEvent event){
if(event.getNativeKeyCode()==KeyCodes.KEY_ENTER){
/* make remote call to server to get the message */
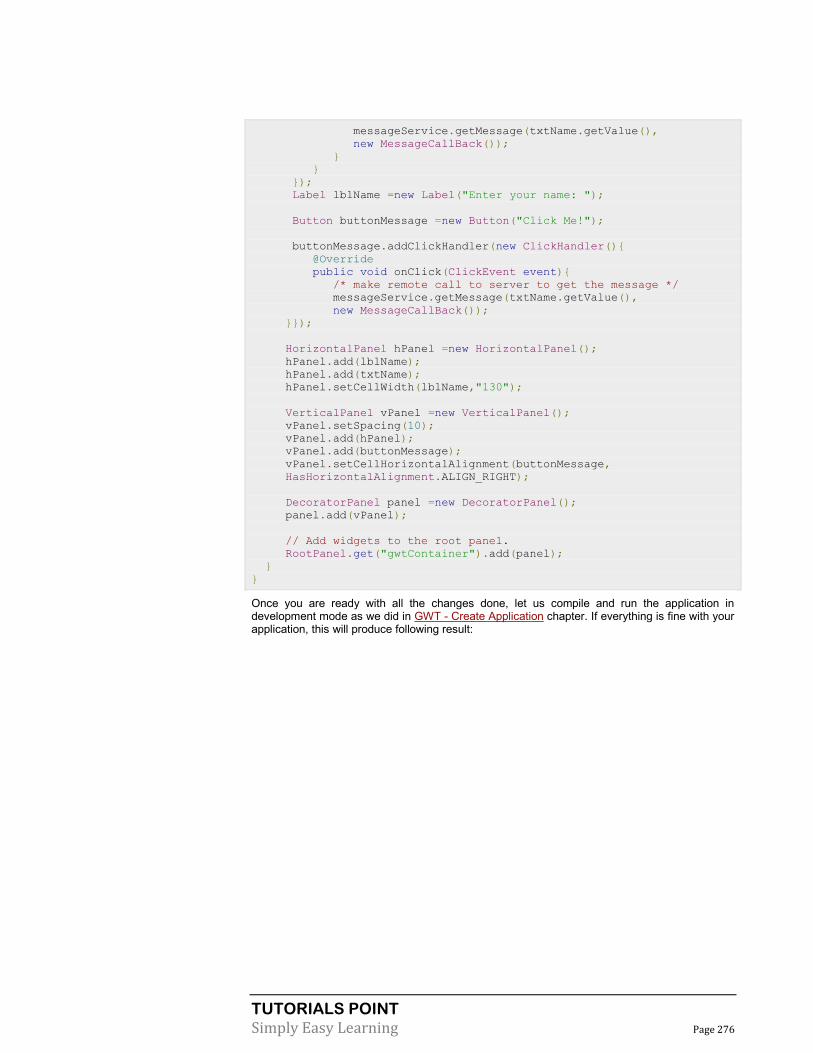
TUTORIALS POINT
Simply Easy Learning Page 276
messageService.getMessage(txtName.getValue(),
new MessageCallBack());
}
}
});
Label lblName =new Label("Enter your name: ");
Button buttonMessage =new Button("Click Me!");
buttonMessage.addClickHandler(new ClickHandler(){
@Override
public void onClick(ClickEvent event){
/* make remote call to server to get the message */
messageService.getMessage(txtName.getValue(),
new MessageCallBack());
}});
HorizontalPanel hPanel =new HorizontalPanel();
hPanel.add(lblName);
hPanel.add(txtName);
hPanel.setCellWidth(lblName,"130");
VerticalPanel vPanel =new VerticalPanel();
vPanel.setSpacing(10);
vPanel.add(hPanel);
vPanel.add(buttonMessage);
vPanel.setCellHorizontalAlignment(buttonMessage,
HasHorizontalAlignment.ALIGN_RIGHT);
DecoratorPanel panel =new DecoratorPanel();
panel.add(vPanel);
// Add widgets to the root panel.
RootPanel.get("gwtContainer").add(panel);
}
}
Once you are ready with all the changes done, let us compile and run the application in development mode as we did in GWT - Create Application chapter. If everything is fine with your application, this will produce following result:

TUTORIALS POINT
Simply Easy Learning Page 277
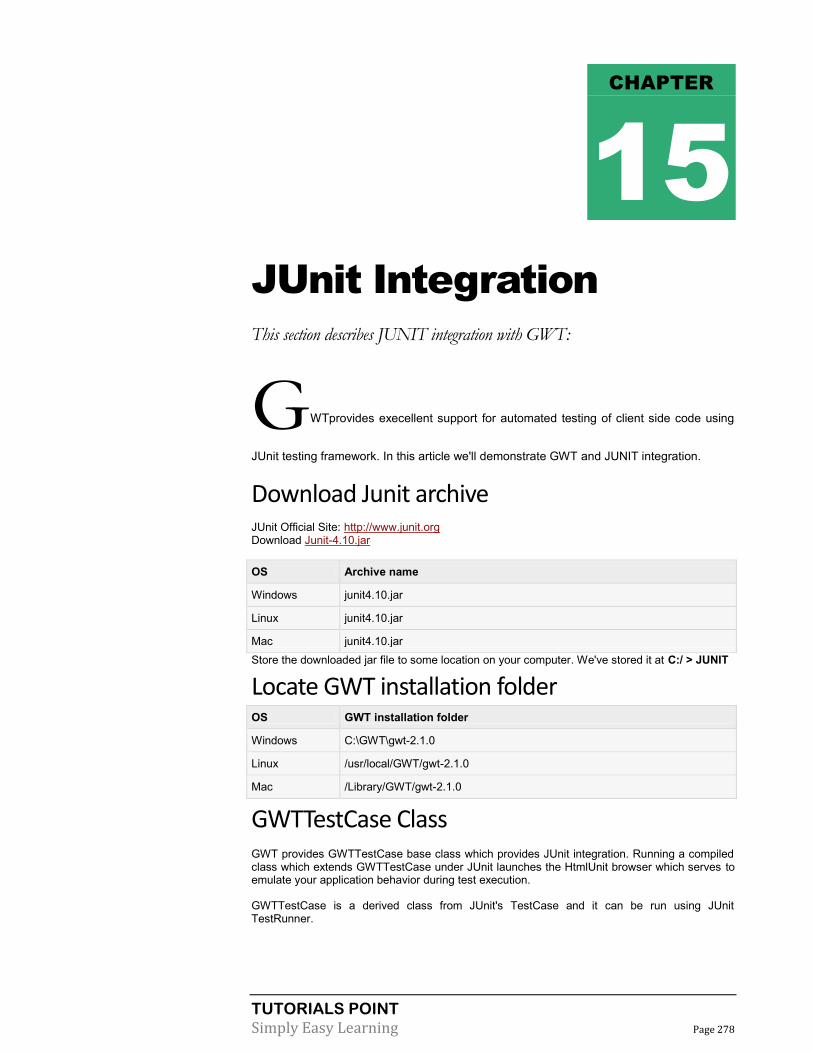
TUTORIALS POINT
Simply Easy Learning Page 278
JUnit Integration
This section describes JUNIT integration with GWT:
GWTprovides execellent support for automated testing of client side code using
JUnit testing framework. In this article we'll demonstrate GWT and JUNIT integration.
Download Junit archive
JUnit Official Site: http://www.junit.org Download Junit-4.10.jar
OS Archive name
Windows junit4.10.jar
Linux junit4.10.jar
Mac junit4.10.jar
Store the downloaded jar file to some location on your computer. We've stored it at C:/ > JUNIT
Locate GWT installation folder OS GWT installation folder
Windows C:\GWT\gwt-2.1.0
Linux /usr/local/GWT/gwt-2.1.0
Mac /Library/GWT/gwt-2.1.0
GWTTestCase Class GWT provides GWTTestCase base class which provides JUnit integration. Running a compiled class which extends GWTTestCase under JUnit launches the HtmlUnit browser which serves to emulate your application behavior during test execution.
GWTTestCase is a derived class from JUnit's TestCase and it can be run using JUnit TestRunner.
CHAPTER
15

TUTORIALS POINT
Simply Easy Learning Page 279
Using webAppCreator GWT provides a special command line tool webAppCreator which can generate a starter test case for us, plus ant targets and eclipse launch configs for testing in both development mode and production mode. Open command prompt and go to C:\ > GWT_WORKSPACE > where you want to create a new project with test support.Run the following command
C:\GWT_WORKSPACE>C:\GWT\gwt-2.1.0\webAppCreator
-out HelloWorld
-junit C:\JUNIT\junit-4.10.jar
com.tutorialspoint.HelloWorld
Noteworthy Points
We are executing webAppCreator command line utility.
HelloWorld is the name of the project to be created
-junit option instructs webAppCreator to add junit suppport to project
com.tutorialspoint.HelloWorld is the name of the module
Verify the output.
Created directory HelloWorld\src
Created directory HelloWorld\war
Created directory HelloWorld\war\WEB-INF
Created directory HelloWorld\war\WEB-INF\lib
Created directory HelloWorld\src\com\tutorialspoint
Created directory HelloWorld\src\com\tutorialspoint\client
Created directory HelloWorld\src\com\tutorialspoint\server
Created directory HelloWorld\src\com\tutorialspoint\shared
Created directory HelloWorld\test\com\tutorialspoint
Created directory HelloWorld\test\com\tutorialspoint\client
Created file HelloWorld\src\com\tutorialspoint\HelloWorld.gwt.xml
Created file HelloWorld\war\HelloWorld.html
Created file HelloWorld\war\HelloWorld.css
Created file HelloWorld\war\WEB-INF\web.xml
Created file HelloWorld\src\com\tutorialspoint\client\HelloWorld.java
Created file
HelloWorld\src\com\tutorialspoint\client\GreetingService.java
Created file
HelloWorld\src\com\tutorialspoint\client\GreetingServiceAsync.java
Created file

TUTORIALS POINT
Simply Easy Learning Page 280
HelloWorld\src\com\tutorialspoint\server\GreetingServiceImpl.java
Created file
HelloWorld\src\com\tutorialspoint\shared\FieldVerifier.java
Created file HelloWorld\build.xml
Created file HelloWorld\README.txt
Created file HelloWorld\test\com\tutorialspoint\HelloWorldJUnit.gwt.xml
Created file
HelloWorld\test\com\tutorialspoint\client\HelloWorldTest.java
Created file HelloWorld\.project
Created file HelloWorld\.classpath
Created file HelloWorld\HelloWorld.launch
Created file HelloWorld\HelloWorldTest-dev.launch
Created file HelloWorld\HelloWorldTest-prod.launch
Understanding the test class: HelloWorldTest.java package com.tutorialspoint.client;
import com.tutorialspoint.shared.FieldVerifier;
import com.google.gwt.core.client.GWT;
import com.google.gwt.junit.client.GWTTestCase;
import com.google.gwt.user.client.rpc.AsyncCallback;
import com.google.gwt.user.client.rpc.ServiceDefTarget;
/**
* GWT JUnit tests must extend GWTTestCase.
*/
public class HelloWorldTest extends GWTTestCase{
/**
* must refer to a valid module that sources this class.
*/
public String getModuleName(){
return"com.tutorialspoint.HelloWorldJUnit";
}
/**
* tests the FieldVerifier.
*/
public void testFieldVerifier(){
assertFalse(FieldVerifier.isValidName(null));
assertFalse(FieldVerifier.isValidName(""));
assertFalse(FieldVerifier.isValidName("a"));
assertFalse(FieldVerifier.isValidName("ab"));
assertFalse(FieldVerifier.isValidName("abc"));
assertTrue(FieldVerifier.isValidName("abcd"));
}
/**
* this test will send a request to the server using the greetServer
* method in GreetingService and verify the response.
*/
public void testGreetingService(){

TUTORIALS POINT
Simply Easy Learning Page 281
/* create the service that we will test. */
GreetingServiceAsync greetingService =
GWT.create(GreetingService.class);
ServiceDefTarget target =(ServiceDefTarget) greetingService;
target.setServiceEntryPoint(GWT.getModuleBaseURL()
+"helloworld/greet");
/* since RPC calls are asynchronous, we will need to wait
for a response after this test method returns. This line
tells the test runner to wait up to 10 seconds
before timing out. */
delayTestFinish(10000);
/* send a request to the server. */
greetingService.greetServer("GWT User",
new AsyncCallback<String>(){
public void onFailure(Throwable caught){
/* The request resulted in an unexpected error. */
fail("Request failure: "+ caught.getMessage());
}
public void onSuccess(String result){
/* verify that the response is correct. */
assertTrue(result.startsWith("Hello, GWT User!"));
/* now that we have received a response, we need to
tell the test runner that the test is complete.
You must call finishTest() after an asynchronous test
finishes successfully, or the test will time out.*/
finishTest();
}
});
}
}
Noteworthy Points Sr. Note
1 HelloWorldTest class was generated in the com.tutorialspoint.client package under the HelloWorld/test directory.
2 HelloWorldTest class will contain unit test cases for HelloWorld.
3 HelloWorldTest class extends the GWTTestCase class in the com.google.gwt.junit.client package.
4 HelloWorldTest class has an abstract method (getModuleName) that must return the name of the GWT module. For HelloWorld, this is com.tutorialspoint.HelloWorldJUnit.
5 HelloWorldTest class is generated with two sample test cases testFieldVerifier, testSimple. We've added testGreetingService.
6 These methods use one of the many assert* functions that it inherits from the JUnit Assert class, which is an ancestor of GWTTestCase.
7 The assertTrue(boolean) function asserts that the boolean argument passed in evaluates to true. If not, the test will fail when run in JUnit.
GWT - JUnit Integration Complete Example This example will take you through simple steps to show example of JUnit Integration in GWT. Follow the following steps to update the GWT application we created above

TUTORIALS POINT
Simply Easy Learning Page 282
Step Description
1 Import the project with a name HelloWorld in eclipse using import existing project wizard (File > Import > General > Existing Projects into workspace ).
2 Modify HelloWorld.gwt.xml, HelloWorld.css, HelloWorld.html and HelloWorld.java as explained below. Keep rest of the files unchanged.
3 Compile and run the application to verify the result of the implemented logic.
Following will be the project structure in eclipse.
Following is the content of the modified module descriptor src/com.tutorialspoint/HelloWorld.gwt.xml.
<?xml version="1.0" encoding="UTF-8"?>
<module rename-to='helloworld'>
<!-- Inherit the core Web Toolkit stuff. -->
<inherits name='com.google.gwt.user.User'/>
<!-- Inherit the default GWT style sheet. -->
<inherits name='com.google.gwt.user.theme.clean.Clean'/>
<!-- Inherit the UiBinder module. -->
<inherits name="com.google.gwt.uibinder.UiBinder"/>
<!-- Specify the app entry point class. -->
<entry-point class='com.tutorialspoint.client.HelloWorld'/>
<!-- Specify the paths for translatable code -->
<source path='client'/>
<source path='shared'/>
</module>
Following is the content of the modified Style Sheet file war/HelloWorld.css.
body{
text-align: center;
font-family: verdana, sans-serif;
}
h1{
font-size:2em;

TUTORIALS POINT
Simply Easy Learning Page 283
font-weight: bold;
color:#777777;
margin:40px0px70px;
text-align: center;
}
Following is the content of the modified HTML host file war/HelloWorld.html.
<html>
<head>
<title>Hello World</title>
<link rel="stylesheet" href="HelloWorld.css"/>
<script language="javascript" src="helloworld/helloworld.nocache.js">
</script>
</head>
<body>
<h1>JUnit Integration Demonstration</h1>
<divid="gwtContainer"></div>
</body>
</html>
Replace the contents of HelloWorld.java in src/com.tutorialspoint/client package with the following
package com.tutorialspoint.client;
import com.google.gwt.core.client.EntryPoint;
import com.google.gwt.core.client.GWT;
import com.google.gwt.event.dom.client.ClickEvent;
import com.google.gwt.event.dom.client.ClickHandler;
import com.google.gwt.event.dom.client.KeyCodes;
import com.google.gwt.event.dom.client.KeyUpEvent;
import com.google.gwt.event.dom.client.KeyUpHandler;
import com.google.gwt.user.client.Window;
import com.google.gwt.user.client.rpc.AsyncCallback;
import com.google.gwt.user.client.ui.Button;
import com.google.gwt.user.client.ui.DecoratorPanel;
import com.google.gwt.user.client.ui.HasHorizontalAlignment;
import com.google.gwt.user.client.ui.HorizontalPanel;
import com.google.gwt.user.client.ui.Label;
import com.google.gwt.user.client.ui.RootPanel;
import com.google.gwt.user.client.ui.TextBox;
import com.google.gwt.user.client.ui.VerticalPanel;
public class HelloWorld implements EntryPoint{
public void onModuleLoad(){
/*create UI */
final TextBox txtName =new TextBox();
txtName.setWidth("200");
txtName.addKeyUpHandler(new KeyUpHandler(){
@Override
publicvoid onKeyUp(KeyUpEvent event){
if(event.getNativeKeyCode()==KeyCodes.KEY_ENTER){
Window.alert(getGreeting(txtName.getValue()));
}
}
});
Label lblName =new Label("Enter your name: ");
Button buttonMessage =new Button("Click Me!");
buttonMessage.addClickHandler(new ClickHandler(){
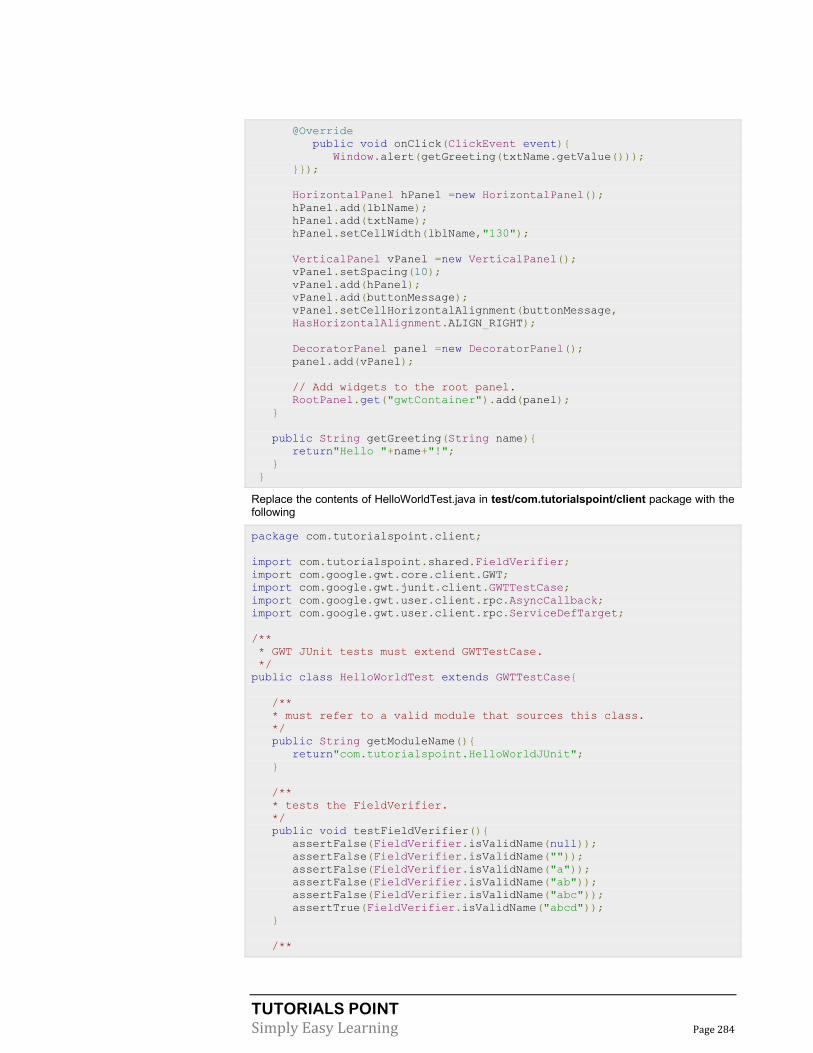
TUTORIALS POINT
Simply Easy Learning Page 284
@Override
public void onClick(ClickEvent event){
Window.alert(getGreeting(txtName.getValue()));
}});
HorizontalPanel hPanel =new HorizontalPanel();
hPanel.add(lblName);
hPanel.add(txtName);
hPanel.setCellWidth(lblName,"130");
VerticalPanel vPanel =new VerticalPanel();
vPanel.setSpacing(10);
vPanel.add(hPanel);
vPanel.add(buttonMessage);
vPanel.setCellHorizontalAlignment(buttonMessage,
HasHorizontalAlignment.ALIGN_RIGHT);
DecoratorPanel panel =new DecoratorPanel();
panel.add(vPanel);
// Add widgets to the root panel.
RootPanel.get("gwtContainer").add(panel);
}
public String getGreeting(String name){
return"Hello "+name+"!";
}
}
Replace the contents of HelloWorldTest.java in test/com.tutorialspoint/client package with the following
package com.tutorialspoint.client;
import com.tutorialspoint.shared.FieldVerifier;
import com.google.gwt.core.client.GWT;
import com.google.gwt.junit.client.GWTTestCase;
import com.google.gwt.user.client.rpc.AsyncCallback;
import com.google.gwt.user.client.rpc.ServiceDefTarget;
/**
* GWT JUnit tests must extend GWTTestCase.
*/
public class HelloWorldTest extends GWTTestCase{
/**
* must refer to a valid module that sources this class.
*/
public String getModuleName(){
return"com.tutorialspoint.HelloWorldJUnit";
}
/**
* tests the FieldVerifier.
*/
public void testFieldVerifier(){
assertFalse(FieldVerifier.isValidName(null));
assertFalse(FieldVerifier.isValidName(""));
assertFalse(FieldVerifier.isValidName("a"));
assertFalse(FieldVerifier.isValidName("ab"));
assertFalse(FieldVerifier.isValidName("abc"));
assertTrue(FieldVerifier.isValidName("abcd"));
}
/**

TUTORIALS POINT
Simply Easy Learning Page 285
* this test will send a request to the server using the greetServer
* method in GreetingService and verify the response.
*/
public void testGreetingService(){
/* create the service that we will test. */
GreetingServiceAsync greetingService =
GWT.create(GreetingService.class);
ServiceDefTarget target =(ServiceDefTarget) greetingService;
target.setServiceEntryPoint(GWT.getModuleBaseURL()
+"helloworld/greet");
/* since RPC calls are asynchronous, we will need to wait
for a response after this test method returns. This line
tells the test runner to wait up to 10 seconds
before timing out. */
delayTestFinish(10000);
/* send a request to the server. */
greetingService.greetServer("GWT User",
new AsyncCallback<String>(){
public void onFailure(Throwable caught){
/* The request resulted in an unexpected error. */
fail("Request failure: "+ caught.getMessage());
}
public void onSuccess(String result){
/* verify that the response is correct. */
assertTrue(result.startsWith("Hello, GWT User!"));
/* now that we have received a response, we need to
tell the test runner that the test is complete.
You must call finishTest() after an asynchronous test
finishes successfully, or the test will time out.
*/
finishTest();
}
});
/**
* tests the getGreeting method.
*/
public void testGetGreeting(){
HelloWorld helloWorld =new HelloWorld();
String name ="Robert";
String expectedGreeting ="Hello "+name+"!";
assertEquals(expectedGreeting,helloWorld.getGreeting(name));
}
}
}
Run test cases in Eclipse using generated launch configurations. We'll run unit tests in Eclipse using the launch configurations generated by webAppCreator for both development mode and production mode.
RUN THE JUNIT TEST IN DEVELOPMENT MODE.
From the Eclipse menu bar, select Run > Run Configurations...
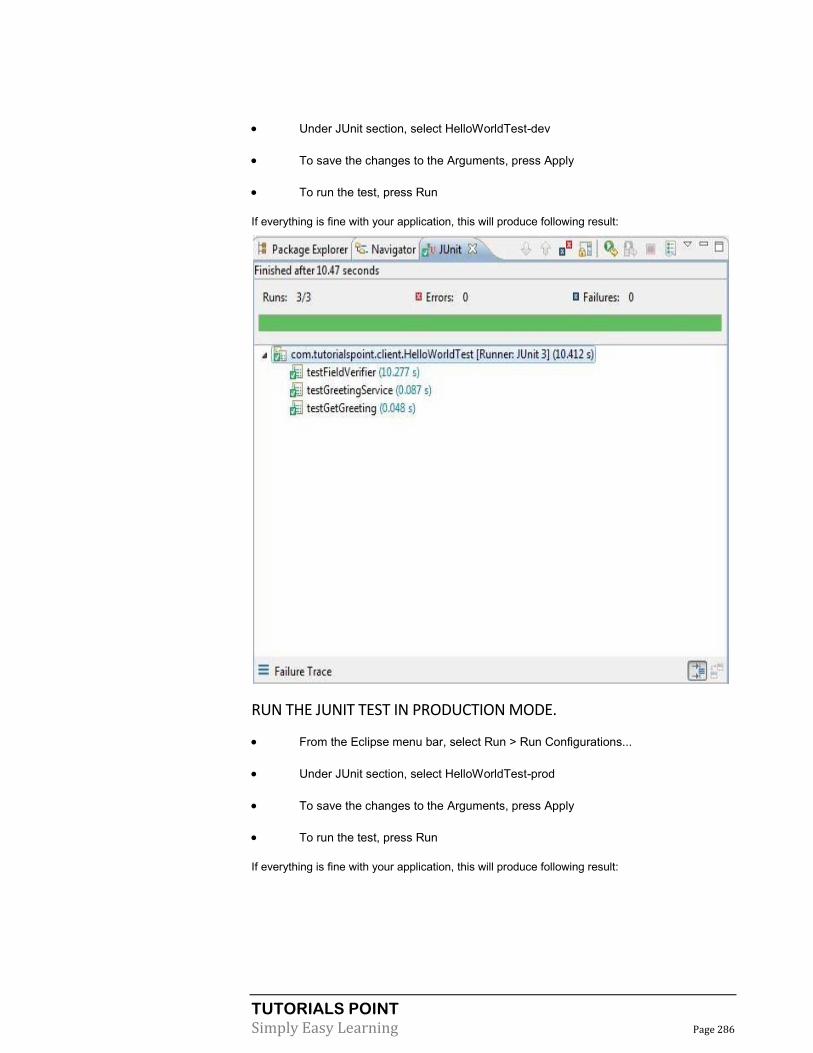
TUTORIALS POINT
Simply Easy Learning Page 286
Under JUnit section, select HelloWorldTest-dev
To save the changes to the Arguments, press Apply
To run the test, press Run
If everything is fine with your application, this will produce following result:
RUN THE JUNIT TEST IN PRODUCTION MODE.
From the Eclipse menu bar, select Run > Run Configurations...
Under JUnit section, select HelloWorldTest-prod
To save the changes to the Arguments, press Apply
To run the test, press Run
If everything is fine with your application, this will produce following result:

TUTORIALS POINT
Simply Easy Learning Page 287

TUTORIALS POINT
Simply Easy Learning Page 288
Debug Application
This section describes the Debugging Application:
GWTprovides execellent capability of debugging client side as well as server side
code.
During development mode, GWT Application is in Java code based and is not translated to JavaScript.
When an application is running in development mode, the Java Virtual Machine (JVM) is actually executing the application code as compiled Java bytecode, using GWT capability to connect to a browser window.
GWT uses browser based plugin to connect to JVM.
So developers are free to use any Java based IDE to debug both client-side GWT Code as well as server-side code.
In this article we'll demonstrate usage of debugging GWT Client code using Eclipse. We'll do the following tasks
Set break points in the code and see them in BreakPoint Explorer.
Step through the code line by line during debugging.
View the values of variable.
Inspect the values of all the variables.
Inspect the value of an expression.
Display the stack frame for suspended threads.
Debugging Example
CHAPTER
16
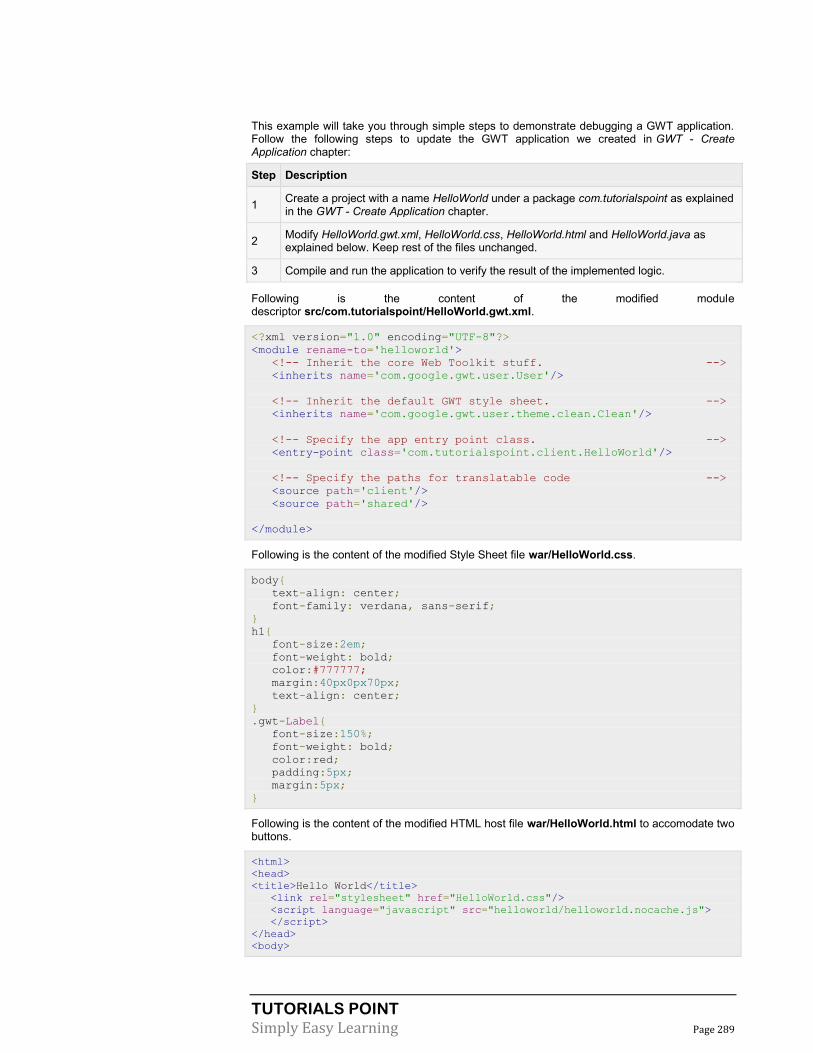
TUTORIALS POINT
Simply Easy Learning Page 289
This example will take you through simple steps to demonstrate debugging a GWT application. Follow the following steps to update the GWT application we created in GWT - Create Application chapter:
Step Description
1 Create a project with a name HelloWorld under a package com.tutorialspoint as explained in the GWT - Create Application chapter.
2 Modify HelloWorld.gwt.xml, HelloWorld.css, HelloWorld.html and HelloWorld.java as explained below. Keep rest of the files unchanged.
3 Compile and run the application to verify the result of the implemented logic.
Following is the content of the modified module descriptor src/com.tutorialspoint/HelloWorld.gwt.xml.
<?xml version="1.0" encoding="UTF-8"?>
<module rename-to='helloworld'>
<!-- Inherit the core Web Toolkit stuff. -->
<inherits name='com.google.gwt.user.User'/>
<!-- Inherit the default GWT style sheet. -->
<inherits name='com.google.gwt.user.theme.clean.Clean'/>
<!-- Specify the app entry point class. -->
<entry-point class='com.tutorialspoint.client.HelloWorld'/>
<!-- Specify the paths for translatable code -->
<source path='client'/>
<source path='shared'/>
</module>
Following is the content of the modified Style Sheet file war/HelloWorld.css.
body{
text-align: center;
font-family: verdana, sans-serif;
}
h1{
font-size:2em;
font-weight: bold;
color:#777777;
margin:40px0px70px;
text-align: center;
}
.gwt-Label{
font-size:150%;
font-weight: bold;
color:red;
padding:5px;
margin:5px;
}
Following is the content of the modified HTML host file war/HelloWorld.html to accomodate two buttons.
<html>
<head>
<title>Hello World</title>
<link rel="stylesheet" href="HelloWorld.css"/>
<script language="javascript" src="helloworld/helloworld.nocache.js">
</script>
</head>
<body>

TUTORIALS POINT
Simply Easy Learning Page 290
<h1>Debugging Application Demonstration</h1>
<divid="gwtContainer"></div>
</body>
</html>
Let us have following content of Java file src/com.tutorialspoint/HelloWorld.java using which we will demonstrate debugging capability of GWT Code.
package com.tutorialspoint.client;
import com.google.gwt.core.client.EntryPoint;
import com.google.gwt.event.dom.client.ClickEvent;
import com.google.gwt.event.dom.client.ClickHandler;
import com.google.gwt.event.dom.client.KeyCodes;
import com.google.gwt.event.dom.client.KeyUpEvent;
import com.google.gwt.event.dom.client.KeyUpHandler;
import com.google.gwt.user.client.Window;
import com.google.gwt.user.client.ui.Button;
import com.google.gwt.user.client.ui.DecoratorPanel;
import com.google.gwt.user.client.ui.HasHorizontalAlignment;
import com.google.gwt.user.client.ui.HorizontalPanel;
import com.google.gwt.user.client.ui.Label;
import com.google.gwt.user.client.ui.RootPanel;
import com.google.gwt.user.client.ui.TextBox;
import com.google.gwt.user.client.ui.VerticalPanel;
public class HelloWorld implements EntryPoint{
public void onModuleLoad(){
/*create UI */
final TextBox txtName =new TextBox();
txtName.setWidth("200");
txtName.addKeyUpHandler(new KeyUpHandler(){
@Override
public void onKeyUp(KeyUpEvent event){
if(event.getNativeKeyCode()==KeyCodes.KEY_ENTER){
Window.alert(getGreeting(txtName.getValue()));
}
}
});
Label lblName =new Label("Enter your name: ");
Button buttonMessage =new Button("Click Me!");
buttonMessage.addClickHandler(new ClickHandler(){
@Override
public void onClick(ClickEvent event){
Window.alert(getGreeting(txtName.getValue()));
}});
HorizontalPanel hPanel =new HorizontalPanel();
hPanel.add(lblName);
hPanel.add(txtName);
hPanel.setCellWidth(lblName,"130");
VerticalPanel vPanel =new VerticalPanel();
vPanel.setSpacing(10);
vPanel.add(hPanel);
vPanel.add(buttonMessage);
vPanel.setCellHorizontalAlignment(buttonMessage,
HasHorizontalAlignment.ALIGN_RIGHT);
DecoratorPanel panel =new DecoratorPanel();

TUTORIALS POINT
Simply Easy Learning Page 291
panel.add(vPanel);
// Add widgets to the root panel.
RootPanel.get("gwtContainer").add(panel);
}
public String getGreeting(String name){
return"Hello "+name+"!";
}
}
Step 1 - Place BreakPoints Place a breakpoint on the first line of onModuleLoad() of HelloWorld.java

TUTORIALS POINT
Simply Easy Learning Page 292
Step 2 - Debug Application Now click on Debug application menu and select HelloWorld application to debug the application.
If everything is fine, you must see GWT Development Mode active in Eclipse containing a URL as shown below. Double click the URL to open the GWT application.
As soon as Application launches, you will see the focus on Eclipse breakpoint as we've placed the breakpoint on first line of entry point method.

TUTORIALS POINT
Simply Easy Learning Page 293

TUTORIALS POINT
Simply Easy Learning Page 294
You can see the stacktrace for suspended threads.
You can see the values for expressions.
You can see the list of breakpoints placed.

TUTORIALS POINT
Simply Easy Learning Page 295
Now keep pressing F6 until you reach the last line of onModuleLoad() method. As reference for function keys, F6 inspects code line by line, F5 steps inside further and F8 will resume the application. Now you can see the list of values of all variables of onModuleLoad() method.
Now you can see the GWT client code can be debugged in the same way as a Java Application can be debugged. Place breakpoints to any line and play with debugging capabilities of GWT.

TUTORIALS POINT
Simply Easy Learning Page 296
Internationalization
This section describes the concept of Internationalization:
GWT provides three ways to internationalize a GWT application, We'll demonstrate
use of Static String Internationalization being most commonly used among projects.
Technique Description
Static String Internationalization
This technique is most prevalent and requires very little overhead at runtime; is a very efficient technique for translating both constant and parameterized strings;simplest to implement. Static string internationalization uses standard Java properties files to store translated strings and parameterized messages, and strongly-typed Java interfaces are created to retrieve their values.
Dynamic String Internationalization
This technique is very flexible but slower than static string internationalization. Host page contains the localized strings therefore, applications are not required to be recompiled when we add a new locale. If GWT application is to be integrated with an existing server-side localization system, then this technique is to be used.
Localizable Interface
This technique is the most powerful among the three techniques. Implementing Localizable allows us to create localized versions of custom types. It's an advanced internationalization technique.
Workflow of internationalizing a GWT Application
Step 1: Create properties files Create properties file containing the messages to be used in the application. We've created aHelloWorldMessages.properties file in our example.
enterName=Enter your name
clickMe=ClickMe
applicationTitle=Application InternationalizationDemonstration
greeting=Hello{0}
CHAPTER
17

TUTORIALS POINT
Simply Easy Learning Page 297
Create properties files containing translated values specific to locale. We've created aHelloWorldMessages_de.properties file in our example. This file contains translations in german language. _de specifies the german locale and we're going to support german language in our application. If you are creating properties file using Eclipse then change the encoding of the file to UTF-8.Select the file and then right-click in it to open its properties window.Select Text file encoding as Other UTF-8. Apply and Save the change.
enterName=GebenSieIhrenNamen
clickMe=Klick mich
applicationTitle=Anwendung InternationalisierungDemonstration
greeting=Hallo{0}
Step 2: Add i18n module to Module Descriptor XML File Update module file HelloWorld.gwt.xml to include support for german locale
<?xml version="1.0" encoding="UTF-8"?>
<module rename-to='helloworld'>
...
<extend-property name="locale" values="de"/>
...
</module>
Step 3: Create Interface equivalent to properties file Create HelloWorldMessages.java interface by extending Messages interface of GWT to include support for internalization. It should contain same method names as keys in properties file. Place holder would be replaced with String argument.
public interface HelloWorldMessages extends Messages{
@DefaultMessage("Enter your name")
String enterName();
@DefaultMessage("Click Me")
String clickMe();
@DefaultMessage("Application Internalization Demonstration")
String applicationTitle();
@DefaultMessage("Hello {0}")
String greeting(String name);
}
Step 4: Use Message Interface in UI component. Use object of HelloWorldMessages in HelloWorld to get the messages.
public class HelloWorld implements EntryPoint{
/* create an object of HelloWorldMessages interface

TUTORIALS POINT
Simply Easy Learning Page 298
using GWT.create() method */
private HelloWorldMessages messages =
GWT.create(HelloWorldMessages.class);
public void onModuleLoad(){
...
Label titleLabel =new Label(messages.applicationTitle());
//Add title to the application
RootPanel.get("gwtAppTitle").add(titleLabel);
...
}
}
Internationalization - Complete Example
This example will take you through simple steps to demonstrate Internationalization capability of a GWT application. Follow the following steps to update the GWT application we created in GWT - Create Application chapter:
Step Description
1 Create a project with a name HelloWorld under a package com.tutorialspoint as explained in the GWT - Create Application chapter.
2 Modify HelloWorld.gwt.xml, HelloWorld.css, HelloWorld.html and HelloWorld.java as explained below. Keep rest of the files unchanged.
3 Compile and run the application to verify the result of the implemented logic.
Following is the content of the modified module descriptor src/com.tutorialspoint/HelloWorld.gwt.xml.
<?xml version="1.0" encoding="UTF-8"?>
<module rename-to='helloworld'>
<!-- Inherit the core Web Toolkit stuff. -->
<inherits name='com.google.gwt.user.User'/>
<!-- Inherit the default GWT style sheet. -->
<inherits name='com.google.gwt.user.theme.clean.Clean'/>
<!-- Specify the app entry point class. -->
<entry-point class='com.tutorialspoint.client.HelloWorld'/>
<extend-property name="locale" values="de"/>
<!-- Specify the paths for translatable code -->
<source path='client'/>
<source path='shared'/>
</module>
Following is the content of the modified Style Sheet file war/HelloWorld.css.
body{
text-align: center;
font-family: verdana, sans-serif;
}
h1{
font-size:2em;
font-weight: bold;
color:#777777;
margin:40px0px70px;
text-align: center;
}
Following is the content of the modified HTML host file war/HelloWorld.html.

TUTORIALS POINT
Simply Easy Learning Page 299
<html>
<head>
<title>Hello World</title>
<linkrel="stylesheet"href="HelloWorld.css"/>
<script language="javascript"src="helloworld/helloworld.nocache.js">
</script>
</head>
<body>
<h1 id="gwtAppTitle"></h1>
<div id="gwtContainer"></div>
</body>
</html>
Now create HelloWorldMessages.properties file in the src/com.tutorialspoint/client package and place the following contents in it
enterName=Enter your name
clickMe=ClickMe
applicationTitle=Application InternationalizationDemonstration
greeting=Hello{0}
Now create HelloWorldMessages_de.properties file in the src/com.tutorialspoint/client package and place the following contents in it
enterName=GebenSieIhrenNamen
clickMe=Klick mich
applicationTitle=Anwendung InternationalisierungDemonstration
greeting=Hallo{0}
Now create HelloWorldMessages.java class in the src/com.tutorialspoint/client package and place the following contents in it
package com.tutorialspoint.client;
import com.google.gwt.i18n.client.Messages;
public interface HelloWorldMessages extendsMessages {
@DefaultMessage("Enter your name")
String enterName();
@DefaultMessage("Click Me")
String clickMe();
@DefaultMessage("Application Internationalization Demonstration")
String applicationTitle();
@DefaultMessage("Hello {0}")
String greeting(String name);
}
Let us have following content of Java file src/com.tutorialspoint/HelloWorld.java using which we will demonstrate Internationalization capability of GWT Code.
package com.tutorialspoint.client;
import com.google.gwt.core.client.EntryPoint;
import com.google.gwt.core.client.GWT;
import com.google.gwt.event.dom.client.ClickEvent;
import com.google.gwt.event.dom.client.ClickHandler;
import com.google.gwt.event.dom.client.KeyCodes;
import com.google.gwt.event.dom.client.KeyUpEvent;
import com.google.gwt.event.dom.client.KeyUpHandler;
import com.google.gwt.user.client.Window;

TUTORIALS POINT
Simply Easy Learning Page 300
import com.google.gwt.user.client.ui.Button;
import com.google.gwt.user.client.ui.DecoratorPanel;
import com.google.gwt.user.client.ui.HasHorizontalAlignment;
import com.google.gwt.user.client.ui.HorizontalPanel;
import com.google.gwt.user.client.ui.Label;
import com.google.gwt.user.client.ui.RootPanel;
import com.google.gwt.user.client.ui.TextBox;
import com.google.gwt.user.client.ui.VerticalPanel;
public class HelloWorld implements EntryPoint{
/* create an object of HelloWorldMessages interface
using GWT.create() method */
private HelloWorldMessages messages =
GWT.create(HelloWorldMessages.class);
public void onModuleLoad(){
/*create UI */
final TextBox txtName =new TextBox();
txtName.setWidth("200");
txtName.addKeyUpHandler(new KeyUpHandler(){
@Override
public void onKeyUp(KeyUpEvent event){
if(event.getNativeKeyCode()==KeyCodes.KEY_ENTER){
Window.alert(getGreeting(txtName.getValue()));
}
}
});
Label lblName =newLabel(messages.enterName()+": ");
Button buttonMessage =newButton(messages.clickMe()+"!");
buttonMessage.addClickHandler(newClickHandler(){
@Override
public void onClick(ClickEvent event){
Window.alert(getGreeting(txtName.getValue()));
}});
HorizontalPanel hPanel =new HorizontalPanel();
hPanel.add(lblName);
hPanel.add(txtName);
VerticalPanel vPanel =new VerticalPanel();
vPanel.setSpacing(10);
vPanel.add(hPanel);
vPanel.add(buttonMessage);
vPanel.setCellHorizontalAlignment(buttonMessage,
HasHorizontalAlignment.ALIGN_RIGHT);
DecoratorPanel panel =newDecoratorPanel();
panel.add(vPanel);
Label titleLabel =new Label(messages.applicationTitle());
//Add title to the application
RootPanel.get("gwtAppTitle").add(titleLabel);
// Add widgets to the root panel.
RootPanel.get("gwtContainer").add(panel);
}
public String getGreeting(String name){
return messages.greeting(name +"!");
}
}

TUTORIALS POINT
Simply Easy Learning Page 301
Once you are ready with all the changes done, let us compile and run the application in development mode as we did in GWT - Create Application chapter. If everything is fine with your application, this will produce following result:
Now update the URL to contain the locale=de.Set URL: http://127.0.0.1:8888/HelloWorld.html?gwt.codesvr=127.0.0.1:9997&locale=de. If everything is fine with your application, this will produce following result:

TUTORIALS POINT
Simply Easy Learning Page 302

TUTORIALS POINT
Simply Easy Learning Page 303
History Class
This section describes the History Class:
GWT applications are normally single page application running JavaScripts and do not
contains lot of pages thus browser do not keep track of user interaction with Application. To use browser's history functionality, application should generate a unique URL fragment for each navigable page. GWT provides History Mechanism to handle this situation. GWT uses a term token which is simply a string that the application can parse to return to a particular state. Application will save this token in browser's history as URL fragment.
For example, a history token named "pageIndex1" would be added to a URL as follows:
http://www.tutorialspoint.com/HelloWorld.html#pageIndex0
History Management Workflow
Step 1: Enable History support In order to use GWT History support, we must first embed following iframe into our host HTML page.
<iframe src = "javascript:''"
id = "__gwt_historyFrame"
style = "width:0;height:0;border:0"></iframe>
Step 2: Add token to History
Following example stats how to add token to browser history
int index =0;
History.newItem("pageIndex"+ index);
CHAPTER
18

TUTORIALS POINT
Simply Easy Learning Page 304
Step 3: Retrive token from History When user uses back/forward button of browser, we'll retrive the token and update our application state accordingly.
History.addValueChangeHandler(new ValueChangeHandler<String>(){
@Override
public void onValueChange(ValueChangeEvent<String>event){
String historyToken =event.getValue();
/* parse the history token */
try{
if(historyToken.substring(0,9).equals("pageIndex")){
String tabIndexToken = historyToken.substring(9,10);
int tabIndex =Integer.parseInt(tabIndexToken);
/* select the specified tab panel */
tabPanel.selectTab(tabIndex);
}else{
tabPanel.selectTab(0);
}
}catch(IndexOutOfBoundsException e){
tabPanel.selectTab(0);
}
}
});
Now let's see the History Class in Action.
History Class - Complete Example
This example will take you through simple steps to demonstrate History Management of a GWT application. Follow the following steps to update the GWT application we created in GWT - Create Application chapter:
Step Description
1 Create a project with a name HelloWorld under a package com.tutorialspoint as explained in the GWT - Create Application chapter.
2 Modify HelloWorld.gwt.xml, HelloWorld.css, HelloWorld.html and HelloWorld.java as explained below. Keep rest of the files unchanged.
3 Compile and run the application to verify the result of the implemented logic.
Following is the content of the modified module descriptor src/com.tutorialspoint/HelloWorld.gwt.xml.
<?xml version="1.0" encoding="UTF-8"?>
<module rename-to='helloworld'>
<!-- Inherit the core Web Toolkit stuff. -->
<inherits name='com.google.gwt.user.User'/>
<!-- Inherit the default GWT style sheet. -->
<inherits name='com.google.gwt.user.theme.clean.Clean'/>
<!-- Specify the app entry point class. -->
<entry-point class='com.tutorialspoint.client.HelloWorld'/>
<!-- Specify the paths for translatable code -->
<source path='client'/>
<source path='shared'/>
</module>

TUTORIALS POINT
Simply Easy Learning Page 305
Following is the content of the modified Style Sheet file war/HelloWorld.css.
body{
text-align: center;
font-family: verdana, sans-serif;
}
h1{
font-size:2em;
font-weight: bold;
color:#777777;
margin:40px0px70px;
text-align: center;
}
Following is the content of the modified HTML host file war/HelloWorld.html
<html>
<head>
<title>Hello World</title>
<link rel="stylesheet" href="HelloWorld.css"/>
<script language="javascript" src="helloworld/helloworld.nocache.js">
</script>
</head>
<body>
<iframe src="javascript:''"
id="__gwt_historyFrame"
style="width:0;height:0;border:0"></iframe>
<h1> History Class Demonstration</h1>
<divid="gwtContainer"></div>
</body>
</html>
Let us have following content of Java file src/com.tutorialspoint/HelloWorld.java using which we will demonstrate History Management in GWT Code.
package com.tutorialspoint.client;
import com.google.gwt.core.client.EntryPoint;
import com.google.gwt.event.logical.shared.SelectionEvent;
import com.google.gwt.event.logical.shared.SelectionHandler;
import com.google.gwt.event.logical.shared.ValueChangeEvent;
import com.google.gwt.event.logical.shared.ValueChangeHandler;
import com.google.gwt.user.client.History;
import com.google.gwt.user.client.ui.HTML;
import com.google.gwt.user.client.ui.RootPanel;
import com.google.gwt.user.client.ui.TabPanel;
public class HelloWorld implements EntryPoint{
/**
* This is the entry point method.
*/
public void onModuleLoad(){
/* create a tab panel to carry multiple pages */
finalTabPanel tabPanel =new TabPanel();
/* create pages */
HTML firstPage =new HTML("<h1>We are on first Page.</h1>");
HTML secondPage =new HTML("<h1>We are on second Page.</h1>");
HTML thirdPage =new HTML("<h1>We are on third Page.</h1>");
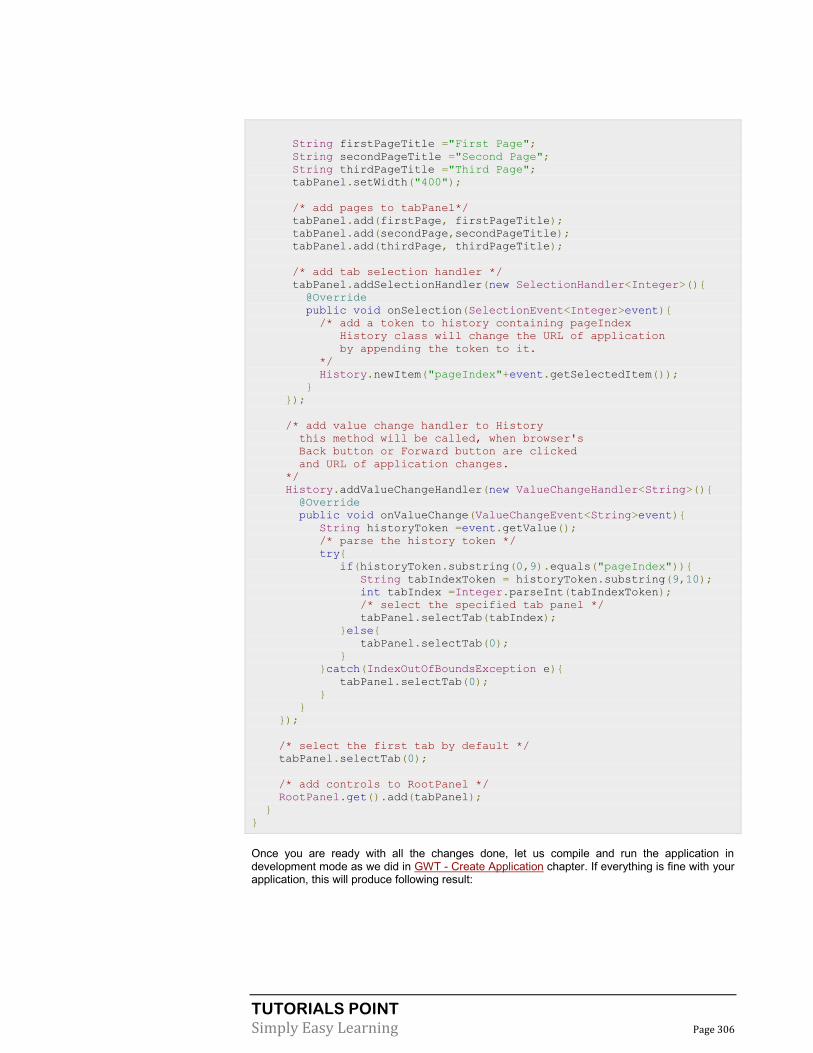
TUTORIALS POINT
Simply Easy Learning Page 306
String firstPageTitle ="First Page";
String secondPageTitle ="Second Page";
String thirdPageTitle ="Third Page";
tabPanel.setWidth("400");
/* add pages to tabPanel*/
tabPanel.add(firstPage, firstPageTitle);
tabPanel.add(secondPage,secondPageTitle);
tabPanel.add(thirdPage, thirdPageTitle);
/* add tab selection handler */
tabPanel.addSelectionHandler(new SelectionHandler<Integer>(){
@Override
public void onSelection(SelectionEvent<Integer>event){
/* add a token to history containing pageIndex
History class will change the URL of application
by appending the token to it.
*/
History.newItem("pageIndex"+event.getSelectedItem());
}
});
/* add value change handler to History
this method will be called, when browser's
Back button or Forward button are clicked
and URL of application changes.
*/
History.addValueChangeHandler(new ValueChangeHandler<String>(){
@Override
public void onValueChange(ValueChangeEvent<String>event){
String historyToken =event.getValue();
/* parse the history token */
try{
if(historyToken.substring(0,9).equals("pageIndex")){
String tabIndexToken = historyToken.substring(9,10);
int tabIndex =Integer.parseInt(tabIndexToken);
/* select the specified tab panel */
tabPanel.selectTab(tabIndex);
}else{
tabPanel.selectTab(0);
}
}catch(IndexOutOfBoundsException e){
tabPanel.selectTab(0);
}
}
});
/* select the first tab by default */
tabPanel.selectTab(0);
/* add controls to RootPanel */
RootPanel.get().add(tabPanel);
}
}
Once you are ready with all the changes done, let us compile and run the application in development mode as we did in GWT - Create Application chapter. If everything is fine with your application, this will produce following result:

TUTORIALS POINT
Simply Easy Learning Page 307
Now click on each tab to select different pages.
You should notice, when each tab is selected ,application url is changed and #pageIndex is added to the url.
You can also see that browser's back and forward buttons are enabled now.
Use back and forward button of the browser and you will see the different tabs get selected accordingly.

TUTORIALS POINT
Simply Easy Learning Page 308
Bookmark Support
This section describes Bookmarking under Google Web Toolkit:
GWT supports browser history management using a History class for which you can
reference GWT - History Class chapter. GWT uses a term token which is simply a string that the application can parse to return to a particular state. Application will save this token in browser's history as URL fragment. In GWT - History Class chapter, we handle the token creation and setting in the history by writing code.
In this article, we will discuss a special widget Hyperlink which does the token creation and history management for us automatically and gives application capability of bookmarking.
Bookmarking Example
This example will take you through simple steps to demonstrate Bookmarking of a GWT application. Follow the following steps to update the GWT application we created in GWT - Create Applicationchapter:
Step Description
1 Create a project with a name HelloWorld under a package com.tutorialspoint as explained in the GWT - Create Application chapter.
2 Modify HelloWorld.gwt.xml, HelloWorld.css, HelloWorld.html and HelloWorld.java as explained below. Keep rest of the files unchanged.
3 Compile and run the application to verify the result of the implemented logic.
Following is the content of the modified module descriptor src/com.tutorialspoint/HelloWorld.gwt.xml.
<?xml version="1.0" encoding="UTF-8"?>
<module rename-to='helloworld'>
<!-- Inherit the core Web Toolkit stuff. -->
<inherits name='com.google.gwt.user.User'/>
<!-- Inherit the default GWT style sheet. -->
<inherits name='com.google.gwt.user.theme.clean.Clean'/>
CHAPTER
19
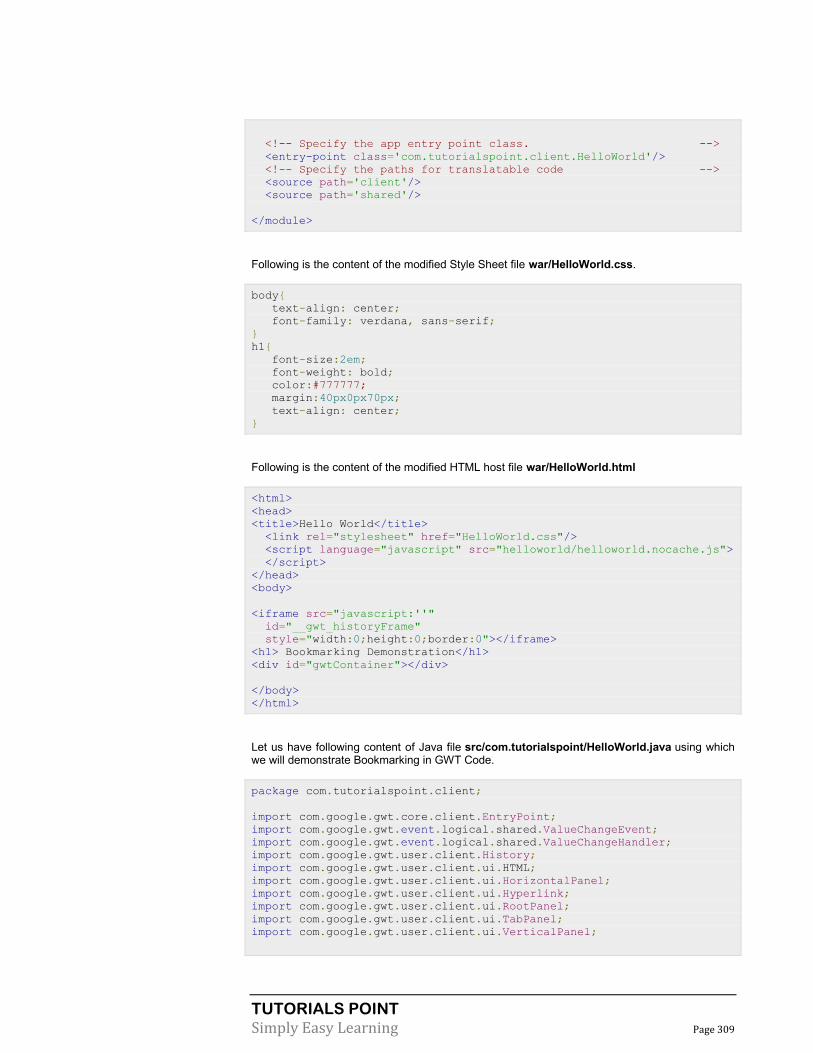
TUTORIALS POINT
Simply Easy Learning Page 309
<!-- Specify the app entry point class. -->
<entry-point class='com.tutorialspoint.client.HelloWorld'/>
<!-- Specify the paths for translatable code -->
<source path='client'/>
<source path='shared'/>
</module>
Following is the content of the modified Style Sheet file war/HelloWorld.css.
body{
text-align: center;
font-family: verdana, sans-serif;
}
h1{
font-size:2em;
font-weight: bold;
color:#777777;
margin:40px0px70px;
text-align: center;
}
Following is the content of the modified HTML host file war/HelloWorld.html
<html>
<head>
<title>Hello World</title>
<link rel="stylesheet" href="HelloWorld.css"/>
<script language="javascript" src="helloworld/helloworld.nocache.js">
</script>
</head>
<body>
<iframe src="javascript:''"
id="__gwt_historyFrame"
style="width:0;height:0;border:0"></iframe>
<h1> Bookmarking Demonstration</h1>
<div id="gwtContainer"></div>
</body>
</html>
Let us have following content of Java file src/com.tutorialspoint/HelloWorld.java using which we will demonstrate Bookmarking in GWT Code.
package com.tutorialspoint.client;
import com.google.gwt.core.client.EntryPoint;
import com.google.gwt.event.logical.shared.ValueChangeEvent;
import com.google.gwt.event.logical.shared.ValueChangeHandler;
import com.google.gwt.user.client.History;
import com.google.gwt.user.client.ui.HTML;
import com.google.gwt.user.client.ui.HorizontalPanel;
import com.google.gwt.user.client.ui.Hyperlink;
import com.google.gwt.user.client.ui.RootPanel;
import com.google.gwt.user.client.ui.TabPanel;
import com.google.gwt.user.client.ui.VerticalPanel;

TUTORIALS POINT
Simply Easy Learning Page 310
public class HelloWorld implementsEntryPoint{
private TabPanel tabPanel;
private void selectTab(String historyToken){
/* parse the history token */
try{
if(historyToken.substring(0,9).equals("pageIndex")){
String tabIndexToken = historyToken.substring(9,10);
int tabIndex =Integer.parseInt(tabIndexToken);
/* Select the specified tab panel */
tabPanel.selectTab(tabIndex);
} else{
tabPanel.selectTab(0);
}
}catch(IndexOutOfBoundsException e){
tabPanel.selectTab(0);
}
}
/**
* This is the entry point method.
*/
public void onModuleLoad(){
/* create a tab panel to carry multiple pages */
tabPanel =newTabPanel();
/* create pages */
HTML firstPage =new HTML("<h1>We are on first Page.</h1>");
HTML secondPage =new HTML("<h1>We are on second Page.</h1>");
HTML thirdPage =new HTML("<h1>We are on third Page.</h1>");
String firstPageTitle ="First Page";
String secondPageTitle ="Second Page";
String thirdPageTitle ="Third Page";
Hyperlink firstPageLink =new Hyperlink("1","pageIndex0");
Hyperlink secondPageLink =new Hyperlink("2","pageIndex1");
Hyperlink thirdPageLink =new Hyperlink("3","pageIndex2");
HorizontalPanel linksHPanel =new HorizontalPanel();
linksHPanel.setSpacing(10);
linksHPanel.add(firstPageLink);
linksHPanel.add(secondPageLink);
linksHPanel.add(thirdPageLink);
/* If the application starts with no history token,
redirect to a pageIndex0 */
String initToken =History.getToken();
if(initToken.length()==0){
History.newItem("pageIndex0");
initToken ="pageIndex0";
}
tabPanel.setWidth("400");
/* add pages to tabPanel*/
tabPanel.add(firstPage, firstPageTitle);
tabPanel.add(secondPage,secondPageTitle);
tabPanel.add(thirdPage, thirdPageTitle);
/* add value change handler to History
* this method will be called, when browser's Back button
* or Forward button are clicked.
* and URL of application changes.

TUTORIALS POINT
Simply Easy Learning Page 311
* */
History.addValueChangeHandler(newValueChangeHandler<String>(){
@Override
public void onValueChange(ValueChangeEvent<String>event){
selectTab(event.getValue());
}
});
selectTab(initToken);
VerticalPanel vPanel =newVerticalPanel();
vPanel.setSpacing(10);
vPanel.add(tabPanel);
vPanel.add(linksHPanel);
/* add controls to RootPanel */
RootPanel.get().add(vPanel);
}
}
Once you are ready with all the changes done, let us compile and run the application in development mode as we did in GWT - Create Application chapter. If everything is fine with your application, this will produce following result:

TUTORIALS POINT
Simply Easy Learning Page 312
Now click on 1, 2 or 3. You can notice that the tab changes with indexes.
You should notice, when you click on 1,2 or 3 ,application url is changed and #pageIndex is added to the url
You can also see that browser's back and forward buttons are enabled now.
Use back and forward button of the browser and you will see the different tabs get selected accordingly.
Right Click on 1, 2 or 3. You can see options like open, open in new window, open in new tab, add to favourites etc.
ight Click on 3. Choose add to favourites. Save bookmark as page 3.
Open favourites and choose page 3. You will see the third tab selected.
TUTORIALS POINT
Simply Easy Learning Page 313
Logging Framework
This section describes the Logging Framework:
The logging framework emulates java.util.logging, so it uses the same syntax and
has the same behavior as server side logging code
GWT logging is configured using .gwt.xml files.
We can configure logging to be enabled/disabled; we can enable/disable particular handlers, and change the default logging level.
Types of Logger Loggers are organized in a tree structure, with the Root Logger at the root of the
tree.
Name of the logger determine the Parent/Child relationships using . to separate
sections of the name.
As an example if we have two loggers Hospital.room1 and Hospital.room2, then they are siblings, with their parent being the logger named Hospital. The Hospital logger (and any logger with a name which does not contain a dot ".") has the Root Logger as a parent.
private static Logger room1Logger =
Logger.getLogger("Hospital.room1");
private static Logger room2Logger =
Logger.getLogger("Hospital.room2");
private static Logger hospitalLogger =
Logger.getLogger("Hospital");
private static Logger rootLogger = Logger.getLogger("");
Log Handlers GWT provides default handlers which will show the log entries made using loggers.
CHAPTER
20

TUTORIALS POINT
Simply Easy Learning Page 314
Handler Logs to Description
SystemLogHandler stdout These messages can only be seen in Development Mode in the DevMode window.
DevelopmentModeLogHandler DevMode Window
Logs by calling method GWT.log. These messages can only be seen in Development Mode in the DevMode window.
ConsoleLogHandler javascript console
Logs to the javascript console, which is used by Firebug Lite (for IE), Safari and Chrome.
FirebugLogHandler Firebug Logs to the firebug console.
PopupLogHandler popup Logs to the popup which resides in the upper left hand corner of application when this handler is enabled.
SimpleRemoteLogHandler server This handler sends log messages to the server, where they will be logged using the server side logging mechanism.
Configure Logging in GWT Application HelloWorld.gwt.xml file is to be configured to enable GWT logging as follows:
# add logging module
<inherits name="com.google.gwt.logging.Logging"/>
# To change the default logLevel
<set-property name="gwt.logging.logLevel" value="SEVERE"/>
# To enable logging
<set-property name="gwt.logging.enabled" value="TRUE"/>
# To disable a popup Handler
<set-property name="gwt.logging.popupHandler" value="DISABLED"/>
Use logger to log user actions /* Create Root Logger */
private static Logger rootLogger = Logger.getLogger("");
...
rootLogger.log(Level.SEVERE,"pageIndex selected: " +
event.getValue());
...
Logging Framework Example
This example will take you through simple steps to demonstrate Logging Capability of a GWT application. Follow the following steps to update the GWT application we created in GWT - Create Application chapter:
Step Description
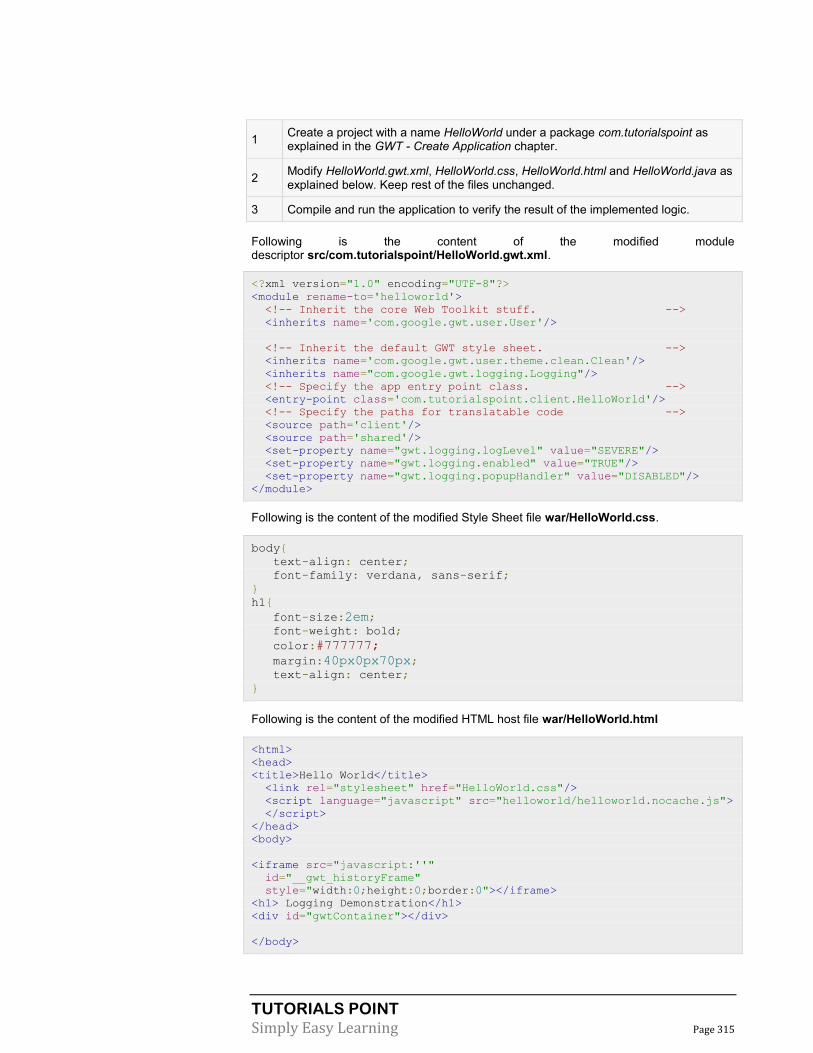
TUTORIALS POINT
Simply Easy Learning Page 315
1 Create a project with a name HelloWorld under a package com.tutorialspoint as explained in the GWT - Create Application chapter.
2 Modify HelloWorld.gwt.xml, HelloWorld.css, HelloWorld.html and HelloWorld.java as explained below. Keep rest of the files unchanged.
3 Compile and run the application to verify the result of the implemented logic.
Following is the content of the modified module descriptor src/com.tutorialspoint/HelloWorld.gwt.xml.
<?xml version="1.0" encoding="UTF-8"?>
<module rename-to='helloworld'>
<!-- Inherit the core Web Toolkit stuff. -->
<inherits name='com.google.gwt.user.User'/>
<!-- Inherit the default GWT style sheet. -->
<inherits name='com.google.gwt.user.theme.clean.Clean'/>
<inherits name="com.google.gwt.logging.Logging"/>
<!-- Specify the app entry point class. -->
<entry-point class='com.tutorialspoint.client.HelloWorld'/>
<!-- Specify the paths for translatable code -->
<source path='client'/>
<source path='shared'/>
<set-property name="gwt.logging.logLevel" value="SEVERE"/>
<set-property name="gwt.logging.enabled" value="TRUE"/>
<set-property name="gwt.logging.popupHandler" value="DISABLED"/>
</module>
Following is the content of the modified Style Sheet file war/HelloWorld.css.
body{
text-align: center;
font-family: verdana, sans-serif;
}
h1{
font-size:2em;
font-weight: bold;
color:#777777;
margin:40px0px70px;
text-align: center;
}
Following is the content of the modified HTML host file war/HelloWorld.html
<html>
<head>
<title>Hello World</title>
<link rel="stylesheet" href="HelloWorld.css"/>
<script language="javascript" src="helloworld/helloworld.nocache.js">
</script>
</head>
<body>
<iframe src="javascript:''"
id="__gwt_historyFrame"
style="width:0;height:0;border:0"></iframe>
<h1> Logging Demonstration</h1>
<div id="gwtContainer"></div>
</body>

TUTORIALS POINT
Simply Easy Learning Page 316
</html>
Let us have following content of Java file src/com.tutorialspoint/HelloWorld.java using
which we will demonstrate Bookmarking in GWT Code.
package com.tutorialspoint.client;
import java.util.logging.Level;
import java.util.logging.Logger;
import com.google.gwt.core.client.EntryPoint;
import com.google.gwt.event.logical.shared.ValueChangeEvent;
import com.google.gwt.event.logical.shared.ValueChangeHandler;
import com.google.gwt.logging.client.HasWidgetsLogHandler;
import com.google.gwt.user.client.History;
import com.google.gwt.user.client.ui.HTML;
import com.google.gwt.user.client.ui.HorizontalPanel;
import com.google.gwt.user.client.ui.Hyperlink;
import com.google.gwt.user.client.ui.RootPanel;
import com.google.gwt.user.client.ui.TabPanel;
import com.google.gwt.user.client.ui.VerticalPanel;
public class HelloWorld implements EntryPoint{
private TabPanel tabPanel;
/* Create Root Logger */
private static Logger rootLogger =Logger.getLogger("");
private VerticalPanel customLogArea;
private void selectTab(String historyToken){
/* parse the history token */
try{
if(historyToken.substring(0,9).equals("pageIndex")){
String tabIndexToken = historyToken.substring(9,10);
int tabIndex =Integer.parseInt(tabIndexToken);
/* Select the specified tab panel */
tabPanel.selectTab(tabIndex);
} else {
tabPanel.selectTab(0);
}
} catch (IndexOutOfBoundsException e){
tabPanel.selectTab(0);
}
}
/**
* This is the entry point method.
*/
public void onModuleLoad(){
/* create a tab panel to carry multiple pages */
tabPanel =newTabPanel();
/* create pages */
HTML firstPage =new HTML("<h1>We are on first Page.</h1>");
HTML secondPage =new HTML("<h1>We are on second Page.</h1>");
HTML thirdPage =new HTML("<h1>We are on third Page.</h1>");
String firstPageTitle ="First Page";
String secondPageTitle ="Second Page";
String thirdPageTitle ="Third Page";
Hyperlink firstPageLink =newHyperlink("1","pageIndex0");
Hyperlink secondPageLink =newHyperlink("2","pageIndex1");
Hyperlink thirdPageLink =newHyperlink("3","pageIndex2");
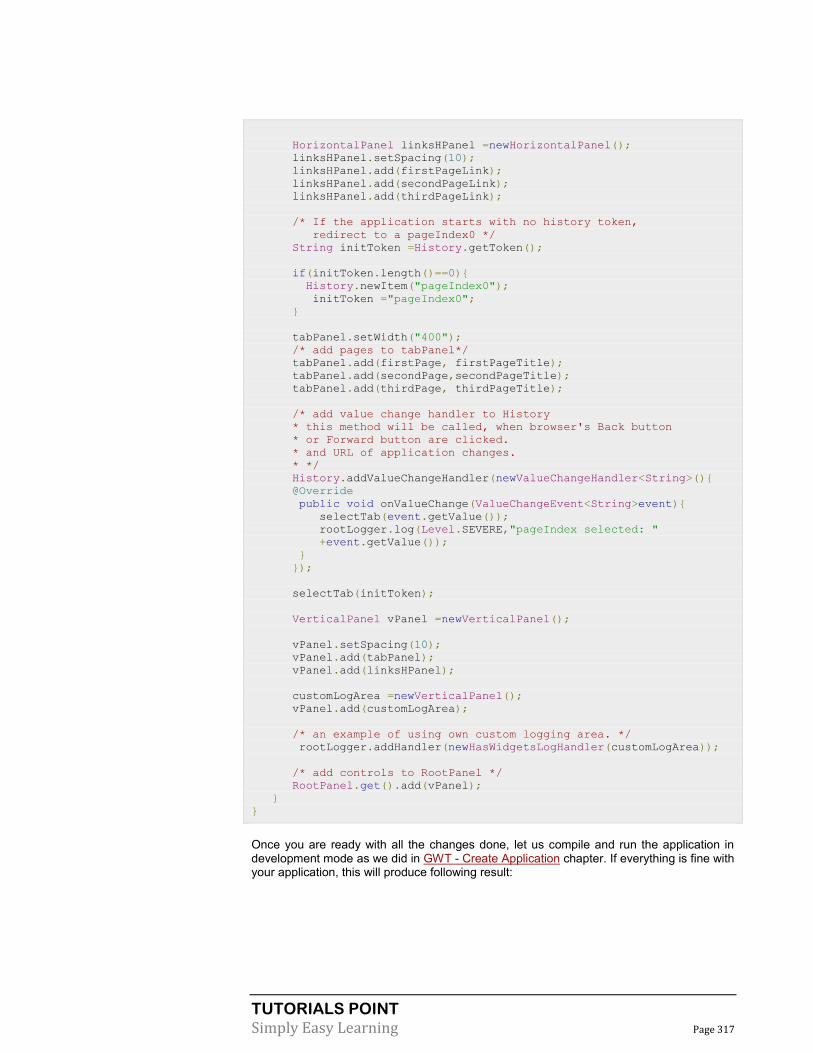
TUTORIALS POINT
Simply Easy Learning Page 317
HorizontalPanel linksHPanel =newHorizontalPanel();
linksHPanel.setSpacing(10);
linksHPanel.add(firstPageLink);
linksHPanel.add(secondPageLink);
linksHPanel.add(thirdPageLink);
/* If the application starts with no history token,
redirect to a pageIndex0 */
String initToken =History.getToken();
if(initToken.length()==0){
History.newItem("pageIndex0");
initToken ="pageIndex0";
}
tabPanel.setWidth("400");
/* add pages to tabPanel*/
tabPanel.add(firstPage, firstPageTitle);
tabPanel.add(secondPage,secondPageTitle);
tabPanel.add(thirdPage, thirdPageTitle);
/* add value change handler to History
* this method will be called, when browser's Back button
* or Forward button are clicked.
* and URL of application changes.
* */
History.addValueChangeHandler(newValueChangeHandler<String>(){
@Override
public void onValueChange(ValueChangeEvent<String>event){
selectTab(event.getValue());
rootLogger.log(Level.SEVERE,"pageIndex selected: "
+event.getValue());
}
});
selectTab(initToken);
VerticalPanel vPanel =newVerticalPanel();
vPanel.setSpacing(10);
vPanel.add(tabPanel);
vPanel.add(linksHPanel);
customLogArea =newVerticalPanel();
vPanel.add(customLogArea);
/* an example of using own custom logging area. */
rootLogger.addHandler(newHasWidgetsLogHandler(customLogArea));
/* add controls to RootPanel */
RootPanel.get().add(vPanel);
}
}
Once you are ready with all the changes done, let us compile and run the application in development mode as we did in GWT - Create Application chapter. If everything is fine with your application, this will produce following result:

TUTORIALS POINT
Simply Easy Learning Page 318
Now click on 1, 2 or 3. You can notice, when you click on 1,2 or 3 ,you can see the log is getting printed displaying the pageIndex. Check the Console output in Eclipse. You can see the log is getting printed in Eclipse console as well.
Fri Aug 31 11:42:35 IST 2012
SEVERE: pageIndex selected: pageIndex0
Fri Aug 31 11:42:37 IST 2012
SEVERE: pageIndex selected: pageIndex1
Fri Aug 31 11:42:38 IST 2012
SEVERE: pageIndex selected: pageIndex2
Fri Aug 31 11:42:40 IST 2012
SEVERE: pageIndex selected: pageIndex0
Fri Aug 31 11:42:41 IST 2012
SEVERE: pageIndex selected: pageIndex1
Fri Aug 31 11:42:41 IST 2012
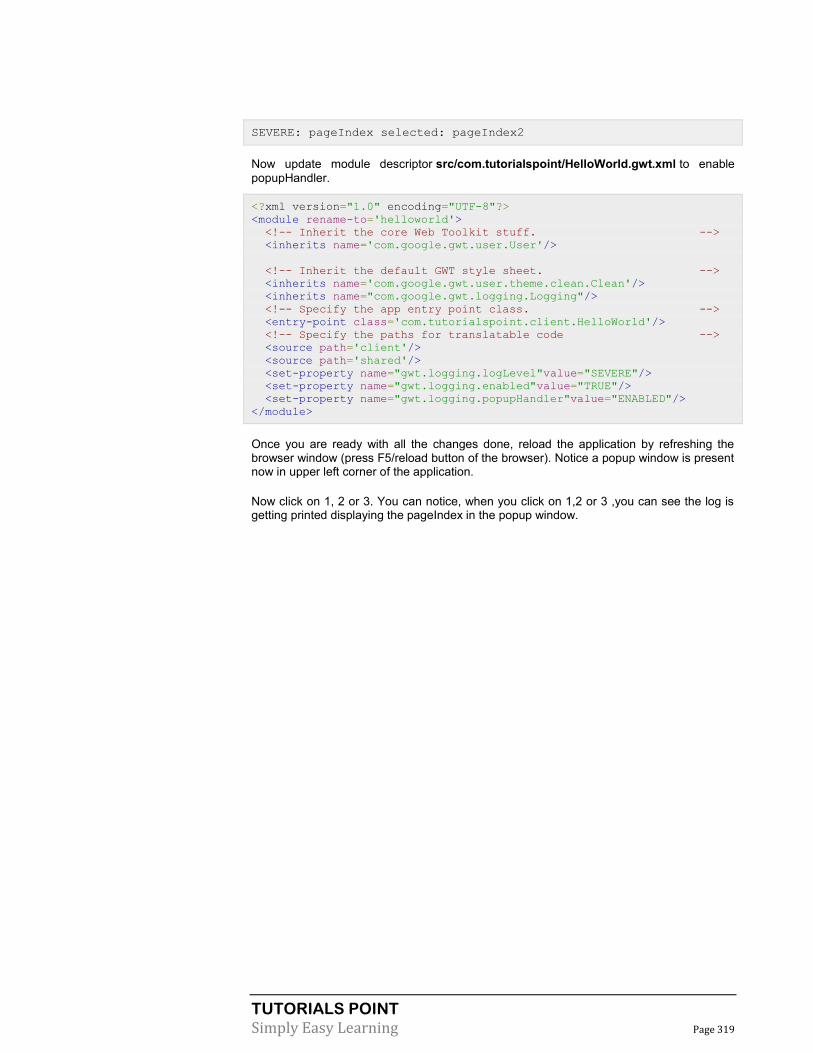
TUTORIALS POINT
Simply Easy Learning Page 319
SEVERE: pageIndex selected: pageIndex2
Now update module descriptor src/com.tutorialspoint/HelloWorld.gwt.xml to enable
popupHandler.
<?xml version="1.0" encoding="UTF-8"?>
<module rename-to='helloworld'>
<!-- Inherit the core Web Toolkit stuff. -->
<inherits name='com.google.gwt.user.User'/>
<!-- Inherit the default GWT style sheet. -->
<inherits name='com.google.gwt.user.theme.clean.Clean'/>
<inherits name="com.google.gwt.logging.Logging"/>
<!-- Specify the app entry point class. -->
<entry-point class='com.tutorialspoint.client.HelloWorld'/>
<!-- Specify the paths for translatable code -->
<source path='client'/>
<source path='shared'/>
<set-property name="gwt.logging.logLevel"value="SEVERE"/>
<set-property name="gwt.logging.enabled"value="TRUE"/>
<set-property name="gwt.logging.popupHandler"value="ENABLED"/>
</module>
Once you are ready with all the changes done, reload the application by refreshing the browser window (press F5/reload button of the browser). Notice a popup window is present now in upper left corner of the application.
Now click on 1, 2 or 3. You can notice, when you click on 1,2 or 3 ,you can see the log is getting printed displaying the pageIndex in the popup window.

TUTORIALS POINT
Simply Easy Learning Page 320