gun up down sensors 1v6p
TRANSCRIPT
8/12/2019 Gun Up Down Sensors 1V6P
http://slidepdf.com/reader/full/gun-up-down-sensors-1v6p 1/5
Gun Up/Down Sensor 1V6P
Revision Date / Version: 2/18/2014 - 2
Tools Needed:
1) Phillips Screw Driver
2) 2.5 mm Allen Wrench2) News Gun up/down Sensor with supplied small Allen wrench.
3) 3 in 1 oil or machine oil.
The Error 32 is telling you that the sensor which detects that the Gun is in the down position is either
not working or the Gun never went down to take a stone due to being stuck and not able to move in the
down position to get a stone, Or there is no air to push the gun downwards and after 2.5 seconds the
sensor times out and gives the error 32. Details on what to check are listed below.
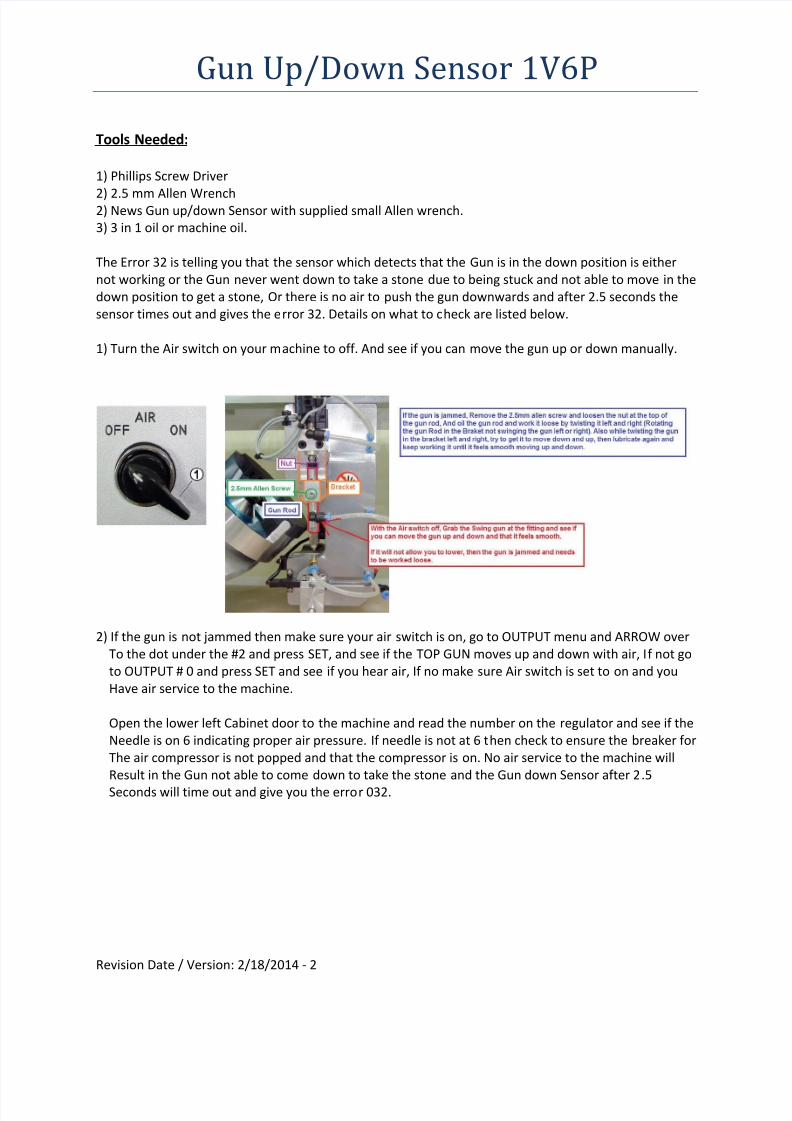
1) Turn the Air switch on your machine to off. And see if you can move the gun up or down manually.
2) If the gun is not jammed then make sure your air switch is on, go to OUTPUT menu and ARROW over
To the dot under the #2 and press SET, and see if the TOP GUN moves up and down with air, If not go
to OUTPUT # 0 and press SET and see if you hear air, If no make sure Air switch is set to on and you
Have air service to the machine.
Open the lower left Cabinet door to the machine and read the number on the regulator and see if the
Needle is on 6 indicating proper air pressure. If needle is not at 6 then check to ensure the breaker for
The air compressor is not popped and that the compressor is on. No air service to the machine will
Result in the Gun not able to come down to take the stone and the Gun down Sensor after 2.5
Seconds will time out and give you the error 032.
8/12/2019 Gun Up Down Sensors 1V6P
http://slidepdf.com/reader/full/gun-up-down-sensors-1v6p 2/5
Gun Up/Down Sensor 1V6P
Revision Date / Version: 2/18/2014 - 2
3) If the Gun is not jammed and the gun does come down when testing with Air through the OUTPUT
#2, then the issue would be the Gun Down sensor is failing and needs to be replaced. In your spare
Parts you were sent 2 of these Sensors.
They will have a grayish wire and a slender black head with the word FESTO in blue printed on them,
There are 3 wires coming out of the gray sheathing, 1 Black wire, 1 Blue Wire and 1 Brown Wire. Also
In the bag with the sensor there will be a small Allen wrench. You will need this.
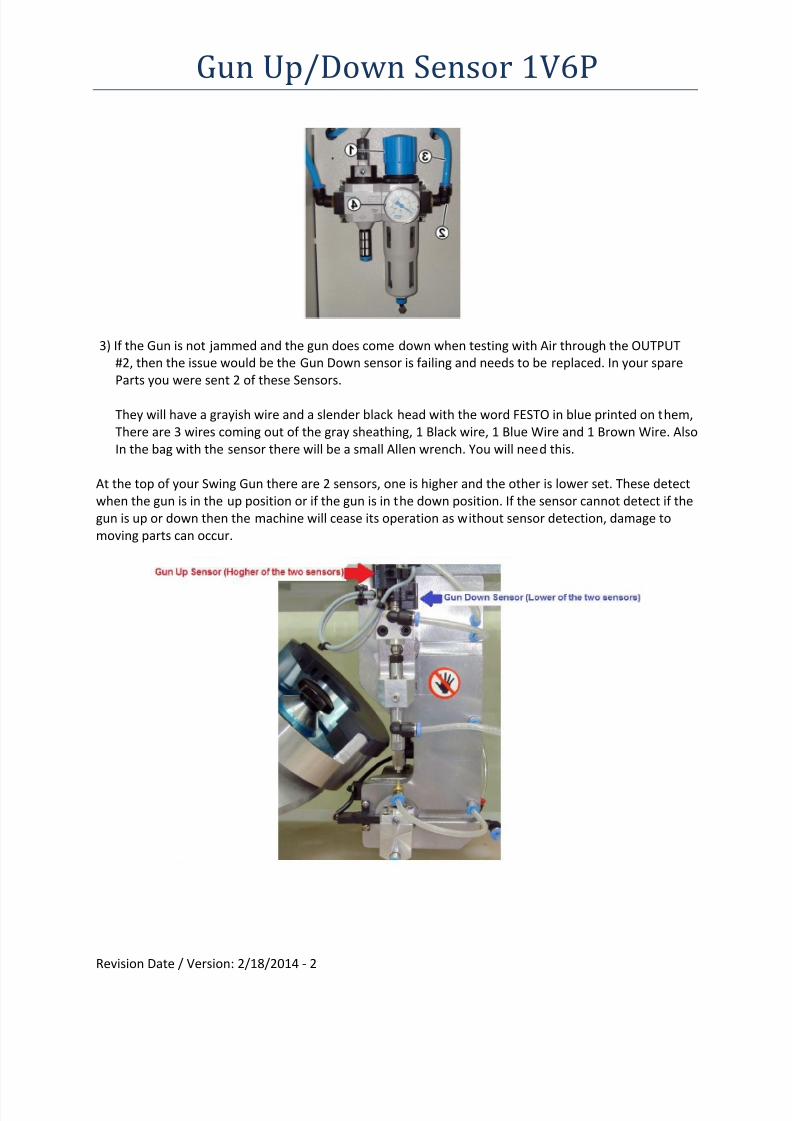
At the top of your Swing Gun there are 2 sensors, one is higher and the other is lower set. These detect
when the gun is in the up position or if the gun is in the down position. If the sensor cannot detect if the
gun is up or down then the machine will cease its operation as without sensor detection, damage to
moving parts can occur.
8/12/2019 Gun Up Down Sensors 1V6P
http://slidepdf.com/reader/full/gun-up-down-sensors-1v6p 3/5
Gun Up/Down Sensor 1V6P
Revision Date / Version: 2/18/2014 - 2
The lower of the 2 sensor detects when the gun is down in the plate taking a stone, and the higher of
the two sensors detect when the gun is in the up position. Error 32 ascribes itself to the lower of the two
sensors. So it will be the one we need to replace.
Another way of determining which sensor is the faulty one, Is to look at the yellow LED light on the
sensors, When the gun is in the up position ONLY the Yellow LED light on the upper most sensor should
be illuminated, If the lower one is also on then of course the lower sensor is grounding out and
confusing the machine.
If the gun is in the down position (Extended down into the plate) then only the Lower of the 2 sensors
Yellow LED light should be illuminated, if the upper most sensor is also lit up, then the issue would be
with the Higher of the two sensors.
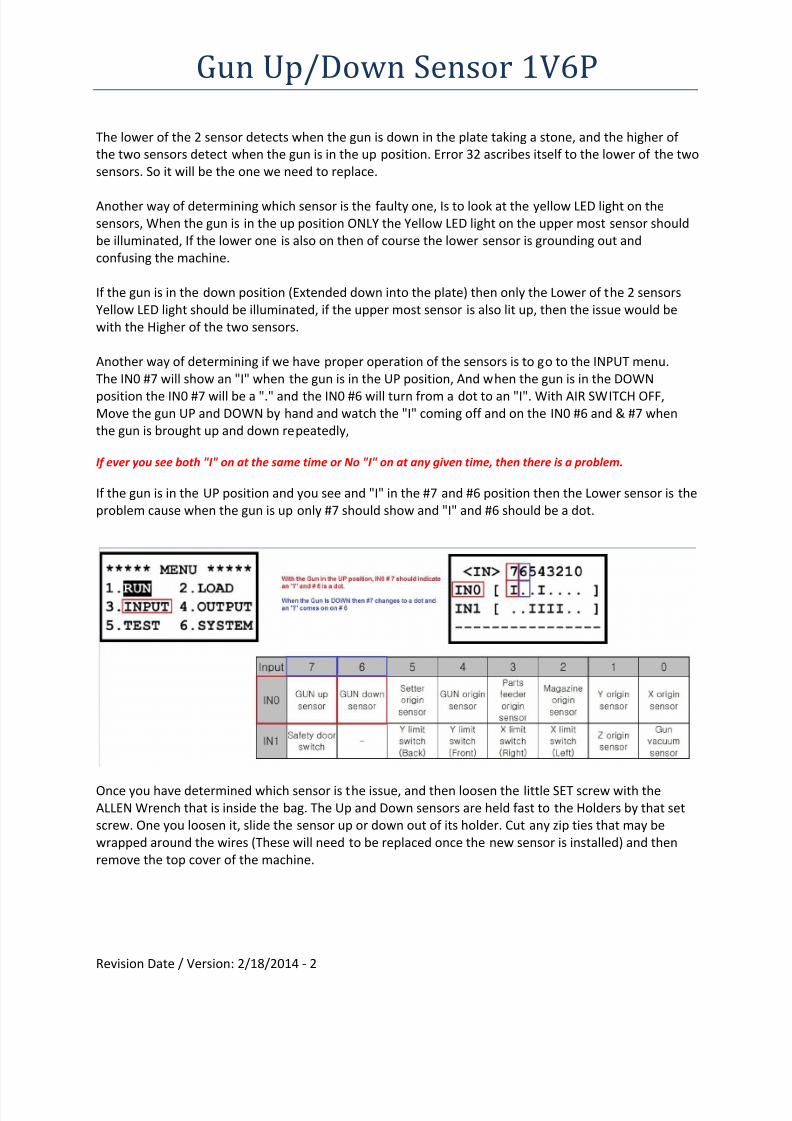
Another way of determining if we have proper operation of the sensors is to go to the INPUT menu.
The IN0 #7 will show an "I" when the gun is in the UP position, And when the gun is in the DOWN
position the IN0 #7 will be a "." and the IN0 #6 will turn from a dot to an "I". With AIR SWITCH OFF,Move the gun UP and DOWN by hand and watch the "I" coming off and on the IN0 #6 and & #7 when
the gun is brought up and down repeatedly,
If ever you see both "I" on at the same time or No "I" on at any given time, then there is a problem.
If the gun is in the UP position and you see and "I" in the #7 and #6 position then the Lower sensor is the
problem cause when the gun is up only #7 should show and "I" and #6 should be a dot.
Once you have determined which sensor is the issue, and then loosen the little SET screw with the
ALLEN Wrench that is inside the bag. The Up and Down sensors are held fast to the Holders by that set
screw. One you loosen it, slide the sensor up or down out of its holder. Cut any zip ties that may be
wrapped around the wires (These will need to be replaced once the new sensor is installed) and then
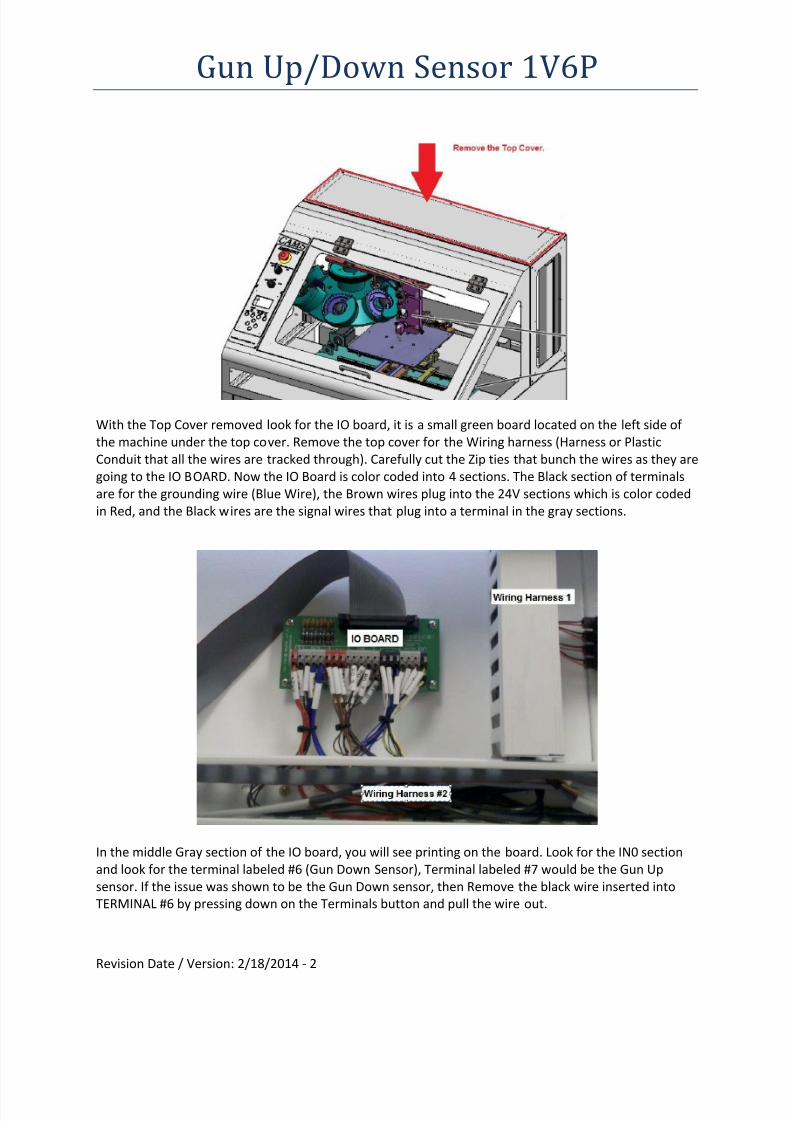
remove the top cover of the machine.
8/12/2019 Gun Up Down Sensors 1V6P
http://slidepdf.com/reader/full/gun-up-down-sensors-1v6p 4/5
Gun Up/Down Sensor 1V6P
Revision Date / Version: 2/18/2014 - 2
With the Top Cover removed look for the IO board, it is a small green board located on the left side of
the machine under the top cover. Remove the top cover for the Wiring harness (Harness or Plastic
Conduit that all the wires are tracked through). Carefully cut the Zip ties that bunch the wires as they are
going to the IO BOARD. Now the IO Board is color coded into 4 sections. The Black section of terminals
are for the grounding wire (Blue Wire), the Brown wires plug into the 24V sections which is color coded
in Red, and the Black wires are the signal wires that plug into a terminal in the gray sections.
In the middle Gray section of the IO board, you will see printing on the board. Look for the IN0 section
and look for the terminal labeled #6 (Gun Down Sensor), Terminal labeled #7 would be the Gun Up
sensor. If the issue was shown to be the Gun Down sensor, then Remove the black wire inserted into
TERMINAL #6 by pressing down on the Terminals button and pull the wire out.
8/12/2019 Gun Up Down Sensors 1V6P
http://slidepdf.com/reader/full/gun-up-down-sensors-1v6p 5/5
Gun Up/Down Sensor 1V6P
Revision Date / Version: 2/18/2014 - 2
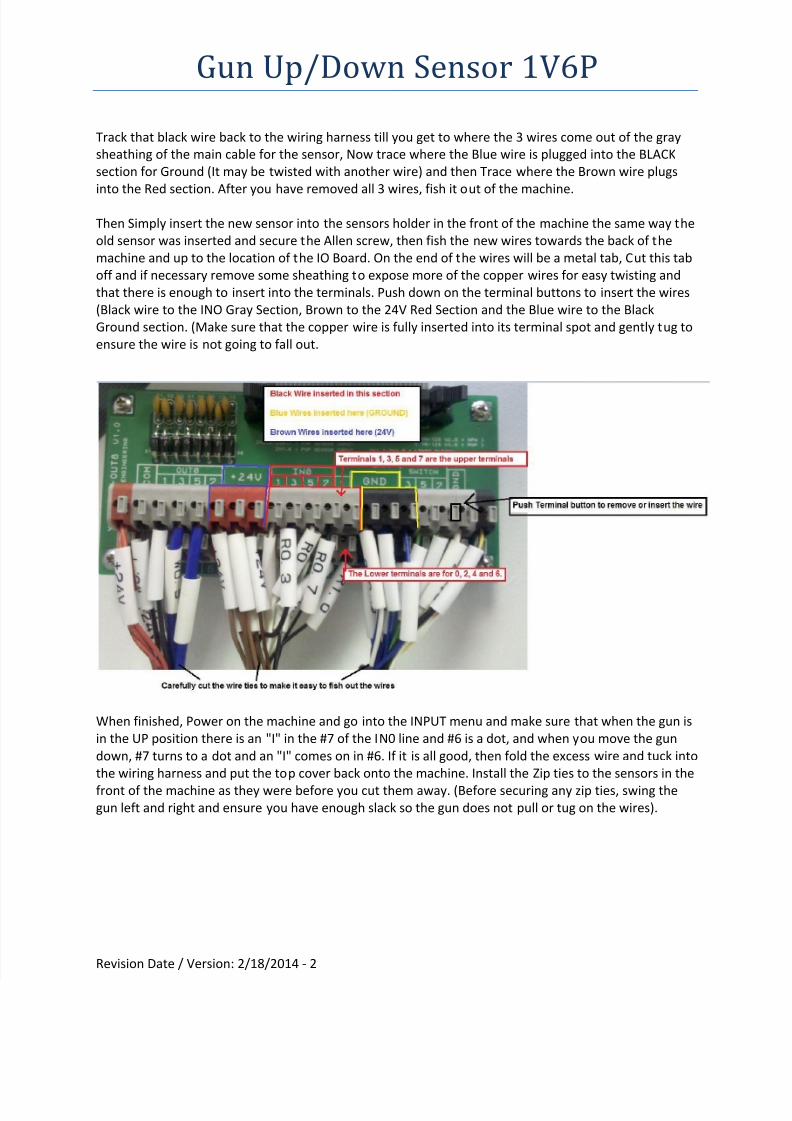
Track that black wire back to the wiring harness till you get to where the 3 wires come out of the gray
sheathing of the main cable for the sensor, Now trace where the Blue wire is plugged into the BLACK
section for Ground (It may be twisted with another wire) and then Trace where the Brown wire plugs
into the Red section. After you have removed all 3 wires, fish it out of the machine.
Then Simply insert the new sensor into the sensors holder in the front of the machine the same way the
old sensor was inserted and secure the Allen screw, then fish the new wires towards the back of the
machine and up to the location of the IO Board. On the end of the wires will be a metal tab, Cut this tab
off and if necessary remove some sheathing to expose more of the copper wires for easy twisting and
that there is enough to insert into the terminals. Push down on the terminal buttons to insert the wires
(Black wire to the INO Gray Section, Brown to the 24V Red Section and the Blue wire to the Black
Ground section. (Make sure that the copper wire is fully inserted into its terminal spot and gently tug to
ensure the wire is not going to fall out.
When finished, Power on the machine and go into the INPUT menu and make sure that when the gun is
in the UP position there is an "I" in the #7 of the IN0 line and #6 is a dot, and when you move the gun
down, #7 turns to a dot and an "I" comes on in #6. If it is all good, then fold the excess wire and tuck into
the wiring harness and put the top cover back onto the machine. Install the Zip ties to the sensors in the
front of the machine as they were before you cut them away. (Before securing any zip ties, swing the
gun left and right and ensure you have enough slack so the gun does not pull or tug on the wires).