gun training essentials - amazon s3 · col. cooper subsequently modified and distilled this...
TRANSCRIPT

GUN TRAINING ESSENTIALS
Safety, Practice &Getting Started

No book on �rearms training that deals with gun handling and marksmanship would be complete without a thorough, up-front
discussion of gun safety.
Safety, more especially gun safety, is a major concern for those shooters on and around any gun range when �rearms are present. A professional, focused demeanor must be exhibited by all shooters at all times. Any reckless, careless, unsafe and unprofessional gun handling or behavior will never be tolerated or condoned by any observers or fellow shooters. This type of behavior will only demonstrate to all of those in your presence your level of incompetence and your total disrespect for their general safety and welfare. Contrary to this disrespect and reckless disregard for safety, a focused and concerned gun owner must always exhibit proper and correct safety standards whether on the range or alone in the �eld engaged in recreational shooting.
Remember, always handle your �rearms in a safe and responsible manner and keep your head in the game! Further, the Four Universal Rules of Firearms Safety are in effect 24/7 wherever and whenever a �rearm is present. Let’s start by discussing the importance of the Four Universal Rules of Firearms Safety.
The Four Universal Rules of Firearms Safety
ens of such rules. Most of these rules were simply reiterations of the others. Re-
and insulted the viewer’s intelligence. Anyone with a half a room-temperature
the range, would not put them in any great peril. Cooper culled out all these nonsensical rules and relegated them to the trash heap. Breaking any one of the
result in death or injury to the shooter and/or his fellow range companions.
GUN SAFETY
Gun Safety

DEFENSIVE HANDGUN SKILLS
22
Col. Cooper subsequently modified and distilled this hodgepodge of useless and repetitive rules into his Four Universal Rules of Firearms Safety. Any instructor worth his reputation should faithfully promote them on his range or in his classes. I teach them with much passion and ask my students to recite them verbatim in front of their fellow students each day until they are all able to exhibit that they have them firmly committed to memory.
Stephan P. Wenger, in his book Defensive Use of Firearms, has added a fifth rule, which states “maintain control of your gun.” My feeling is that this line of reasoning is more pertinent to gun ownership and storage than to range safety. It relates to the legal problems that can accrue from having your firearm fall into the wrong hands and end up being used in the commission of a felony offense like armed robbery, murder or the wrongful death of a minor. In many states, you can be charged as an accessory to that crime, the thought being that through your negligence, you facilitated the commission of the crime. Wenger’s fifth rule makes a lot of sense and all gun owners should be mindful of its implications. However, I choose not to include it as part of the original four rules. It goes without saying that proper and lawful gun storage of firearms by all gun owners is of the utmost importance at all times.
Rule #1 Treat all weapons as if they are loaded. Many gun pundits reverse these sentiments when reciting the Four Univer-
sal Rules of Firearms Safety and say “All weapons are always loaded!” To me, there is a very obvious distinction here and it may be parsing words, but all weapons are not always loaded. A popular talk show host has a saying that I
Is this weapon loaded or unloaded? It’s impossible to tell without checking the chamber. Thus the rule: Treat all weapons as if they are loaded!
Z8883pg001-128.indd 22Z8883pg001-128.indd 22 8/17/10 2:00:30 PM8/17/10 2:00:30 PM

23
utilize in my class lectures and writings: Words have meaning and actions have consequences! Think about that for a while, please.
When you are cleaning your weapon and have chamber-checked it several times and it is now field-stripped and lying on your bench, is it loaded? Of course not. When you have decided that you need to send your weapon off to a gunsmith for a certain repair job and you have chamber checked it several times, removed the magazine and partially disassembled it, is it loaded? No. My point is that a broad-brush statement such as “all weapons are always loaded” simply does not ring true 100% of the time. For example, is a gun in a holster always loaded? True, we must always treat them as if they are loaded, and before putting them into our holsters or placing them in a gun safe or handing them to a fellow student, we need to conduct a chamber check or two. Remember, chamber checking is two seconds of cheap insurance!
Rule #2. Do not point the muzzle at anything you are not willing to destroy.
This is quintessential Cooper and refers to muzzle awareness. The muzzle of your gun is the opening at the end of the barrel out of which the bullet exits when the weapon is fired. Waving your weapon around irresponsibly on the range or in a crowd of fellow shooters on the range is highly unsafe and very disrespectful toward the safety of those around you. You could be covering them with the muzzle. By covering them, I am referring to the physical act of tracking or crossing your friend’s body parts with the muzzle of the gun. It does not have to come in physical contact with them.
Keep that muzzle clear of all body parts – including your own!
GUN SAFETY • CHAPTER 3
Z8883pg001-128.indd 23Z8883pg001-128.indd 23 8/17/10 2:00:31 PM8/17/10 2:00:31 PM

DEFENSIVE HANDGUN SKILLS
24
Who is the biggest culprit when it comes to muzzling someone? You are. In many of your gun handling drills, you will accidentally cover yourself dozens of times. While re-holstering, a new student sometimes places his support-side hand on his holster, to steady it and draw the weapon across his exposed hand. If this were a loaded firearm and you suddenly became muzzle-aware, you would immediately feel the need to never place your hand there again. The safest place for your muzzle to be pointed is always downrange while performing any of the gun handling drills. If that is not an option, then point it toward the ground, finger off the trigger. It should never be pointed anywhere near a fellow student or instructor.
Speaking as an instructor who has had dozens of guns pointed at him on the range, I get very grumpy whenever it occurs! In my defensive handgun classes, we demonstrate how this can happen (with our “index finger gun”) and how to become hyper-muzzle conscious.
Rule #3. Keep your fi nger off of the trigger and out of the trigger guard until you are pointing it at your intended target.
I consider the trigger guard to be part of the trigger itself. Resting your trig-ger finger across the trigger guard is a practice that is fraught with potential disaster. If something startles you and you flinch or pull back while in this con-dition, your trigger finger will pull right back on the trigger and fire off an ND (negligent discharge).
Safe position for trigger fi nger during practice drills: on the frame and NOT on the trigger guard!
Z8883pg001-128.indd 24Z8883pg001-128.indd 24 8/17/10 2:00:31 PM8/17/10 2:00:31 PM

25
Therefore, get in the habit of placing your trigger finger on the frame of your weapon while you are engaged in any gun handling drills or at the ready position. The only time you may place your trigger finger on the trigger is when you are pointing it at your intended target.
When not pointed at the target or resting at the ready position, your trigger finger must stay firmly pressed against the frame of your weapon, well above the trigger guard. Where, exactly? It depends on the handgun and the length of your trigger finger. Every handgun has a home base or tactile reference point. It can be an exposed shaft end or screw head that the shooter can feel with his trigger finger. The tip of your trigger finger must reside there, unless your gun is pointed at the target and you have made a conscious decision to fire it. With a revolver, your trigger finger should reside right under the cylinder, exactly as described above.
Rule #4. Know what is between you and your intended target and what is beyond.
When you’re shooting under the control of a range master, this rule may pale a bit in importance, simply because he has checked the range and deemed it safe to commence the range work at hand. He has done all the work for you. His commands to you state that the range is clear and it is safe to commence with the firing exercise. Nobody is between you and your target or behind said target.
A safe shooting environment: nothing between the shooter and the target and a well-defi ned, impenetrable backstop.
GUN SAFETY • CHAPTER 3
Z8883pg001-128.indd 25Z8883pg001-128.indd 25 8/17/10 2:00:31 PM8/17/10 2:00:31 PM

DEFENSIVE HANDGUN SKILLS
26
Out on the street, however, it is a totally different set of circumstances. You must make the determination that it is safe for you to present your weapon and possibly fire at your adversary. If you make the decision to exercise your constitutionally-guaranteed right to self-protection and fire two shots at your assailant and they either miss or overpenetrate and continue down range, the chance is great that one or both of these bullets could strike an innocent bystander. Now you have a Rule #4 violation, possibly a tragic one.
If you had practiced what we call situational awareness and looked beyond your suspected assailant and seen, for example, that a child was playing in her front yard before you presented your weapon, you might have decided that the shot was not safe and had adopted another strategy. If the worst had happened and a bystander were injured, you would now probably have a major legal battle on your hands, either criminal or civil – hence the expression that the only good gunfight is the one that you are able to avoid.
The Four Universal Rules of Firearms Safety
Rule #1 Treat all weapons as if they are loaded.
Rule #2. Do not point the muzzle at anything you are not willing to
destroy.
Rule #3. Keep your fi nger off of the trigger and out of the trigger guard
until you are pointing it at your intended target.
Rule #4. Know what is between you and your intended target and what
is beyond.
Chamber Checking
Chamber checking is often described as “two seconds of cheap insurance.” It is just that. Chamber checking is the inspection of the chamber of any weapon to determine the status or condition of the chamber or chambers, i.e., is the weapon empty or is it loaded? Unless stipulated in the description, all tech-niques are for a right-handed shooter.
Z8883pg001-128.indd 26Z8883pg001-128.indd 26 8/17/10 2:00:31 PM8/17/10 2:00:31 PM

27
Semiautomatics
Chamber Checking the Semi-Automatic: “Hand Under Dust Cover” Method
Hand under the dust cover. First thumb back the hammer with your support-side thumb. Bring your support-side hand down under the dust cover of the weapon and place your support-side thumb on the left side of the slide with your index and middle fi nger gripping the right side of the slide.
Press back to the rear with your support-side hand and crack the ejection port open about ¼". Look inside the chamber area for the presence of or the lack of brass. Release the slide to go home under its own spring tension.
GUN SAFETY • CHAPTER 3
Z8883pg001-128.indd 27Z8883pg001-128.indd 27 8/17/10 2:00:32 PM8/17/10 2:00:32 PM

DEFENSIVE HANDGUN SKILLS
28
Chamber Checking the Semi-Automatic: “Wedge” Method continued
Thumb back the hammer with your support-side thumb. Holding the weapon in your fi ring-side hand, place the web of your support-side hand against the front and top of the slide. Grip the vertical sides of the slide with your index fi nger and thumb. Grip very tight with both.
The top of the slide should be held securely in that grip. Close down with all the fi ngers of your support-side hand and press to the rear. Crack the ejection port open about ¼" and inspect for brass or the lack thereof. This gun has a cartridge in the chamber. Release the slide to close shut under its own spring tension.
Z8883pg001-128.indd 28Z8883pg001-128.indd 28 8/17/10 2:00:32 PM8/17/10 2:00:32 PM

29
This gun does not have a cartridge in the chamber. Release the slide to close shut under its own spring tension.
Chamber Checking the Semi-Automatic: “Claw” MethodAnother method, “The Claw,” is is sometimes used on semiautos that do
not have exposed hammers but do have slide-mounted decocking levers and no exposed hammer.
To chamber check using the Claw Method:
Hold the weapon in your support-side hand.
Place your fi ring-side thumb on the tang of the weapon while engaging both ears of the decocking lever on the slide with your index and middle fi nger of the fi ring-side hand.
GUN SAFETY • CHAPTER 3
Z8883pg001-128.indd 29Z8883pg001-128.indd 29 8/17/10 2:00:32 PM8/17/10 2:00:32 PM

DEFENSIVE HANDGUN SKILLS
30
Revolvers Chamber Checking the Revolver
Now press the slide to the rear by squeezing your fi ngers to the rear, using your thumb as a fulcrum, thus cracking the ejection open ¼". Check for the presence or lack thereof of brass in the chamber area. Release the slide.
Holding the weapon in your fi ring side hand, press the cylinder latch (release) forward or pull it backward, depending on the make or model.
With the index and middle fi nger of your support-side hand, press the cylinder out of the centerline of the weapon, to the left.
Chamber Checking the Semi-Automatic: “Claw” Method continued
Z8883pg001-128.indd 30Z8883pg001-128.indd 30 8/17/10 2:00:33 PM8/17/10 2:00:33 PM

31
Chamber-checking is an excellent habit to build. Get into it!
Look into and inspect each chamber for the presence of spent or live cartridges. This cylinder is fully loaded.
To close the cylinder, press it backward to the left into the centerline of the weapon with your support-side thumb.
GUN SAFETY • CHAPTER 3
Z8883pg001-128.indd 31Z8883pg001-128.indd 31 8/17/10 2:00:33 PM8/17/10 2:00:33 PM

DEFENSIVE HANDGUN SKILLS
32
Col. Jeff Cooper, here shown in a Gun Digest article from 1971, developed many of the principles of defensive guncraft.
Z8883pg001-128.indd 32Z8883pg001-128.indd 32 8/17/10 2:00:33 PM8/17/10 2:00:33 PM

TRAINING
Training
T he most common sin committed by prospective gun owners who wish to purchase a handgun for personal protection
is to buy the gun, take it to a gun range and load up a couple of rounds in it, �re them at a paper target and go home and secure the gun in their nightstand or gun safe. They believe they are all “tuned up” for the robber, should he attempt a home invasion in the middle of the night.
Such people are sadly mistaken. Unfortunately, this is often the rule rather than the exception. Remember what I said about the deterioration of the �ne motor skills during times of extreme stress, fear and anxiety? They vanish instantly, and simple tasks like reaching to open a drawer in your dresser top become very dif�cult. It is during a response to a threat that very bad things will happen, things that can affect the outcome and determine whether you survive in this situation. Even if you have trained diligently for this moment and your re�exive training takes over, you will �nd these life-saving techniques dif�cult to perform under the stress this threat to you generates. It all goes to the question, “If you have never performed this feat, how are you going to be able to accomplish it when the well-known substance hits the fan?”

DEFENSIVE HANDGUN SKILLS
66
If you are at all serious about your personal protection and your ability to survive a possible gunfi ght, you need to have undergone a minimum of 50 hours of professional fi rearms instruction at one of the better-known training schools anywhere in the country, soon after the purchase of your fi rearm. Fifty hours constitutes a lengthy four-day class or a week-long class at any of several schools.
Now, let’s talk about the type of school you should be looking into. As an example, if you were looking to learn to drive a racecar would you be looking at a school that offers a course in how to drive heavy equipment? Of course not. Same with fi rearms training: you should be looking for a school that offers a two- or four-day defensive handgun course in its curriculum. There are many fi ne schools out there with an excellent staff of instructors on them, but you need to investigate their backgrounds. Many former Green Berets, SEALs, law enforcement offi cers and competitive shooters have founded excellent training schools, but what do they teach? That which they know best. Therefore they cater to military, law enforcement departments and competitive shooters. Just seems right, doesn’t it? They teach a lot of CQB (close quarters battle) techniques, advanced tactics and other martial techniques that will be too advanced for the average new gun owner or beginning shooter.
Remember, look for the defensive handgun classes in their curriculum before applying. After you have completed your two- and four-day defensive handgun course, you will be prepared to take one of these advanced tactical courses, if your interests take you in that direction. You will have a fi rm, basic foundation of understanding in defensive handgun techniques upon which to build.
The BasicsIn your four-day defensive handgun course you should be taught, and should
develop, a mastery of chamber checking, unloading and loading, stance and grip, after-action drills, the presentation, malfunction drills, and Failure to Stop drills. Home Invasion scenarios and Shoot House exercises should also be part of any good curriculum. Practicing shooting multiple targets, range commands, range safety, night shooting and a good dose of basic marksmanship techniques will enable you to consistently get good hits on the target and will round out your training. In addition, many schools have, as part of the four-day course, an entire afternoon devoted to shooting from concealment.
Dry PracticeApart from all this good stuff in the class, you will gain an appreciation for
the merits of setting up a strict weekly dry practice regimen, so as to not lose the edge on the skills you have worked so hard to attain while attending the
Z8883pg001-128.indd 66Z8883pg001-128.indd 66 8/17/10 2:07:21 PM8/17/10 2:07:21 PM

67
class. Dry practice is the method by which you continue to hone your newly acquired skills and elevate them to the next level.
Dry practice means going through the drill strokes of a given gun handling technique with an empty firearm (emphasis on the “empty” part)! You would of course perform several chamber checks and remove the magazine and any and all ammunition from your dry practice area, prior to starting your dry practice sessions. For the serious handgunner, dry practice will program your future response to a possible life-threatening situation. Cooper often stated, “Your shooting is a programmed reflex and you program it only by familiarity.”
There are several instructors who believe and teach instinctive or point shooting. It consists of drawing and shooting from the hip or, at best, in a crouched position with the weapon extended a short distance from the body. The shooter does not acquire a sight picture. In all honesty, this may be your only option for survival, if the adversary is within approximately three meters and obviously intends you serious harm. If you have the opportunity, however, get that front sight in focus and take two well-aimed thoracic cavity shots to stop his attack. Dry practice builds the ability to perform this kind of response during your moment of great peril.
Dry practice – practicing various drills with an unloaded gun – is the best way to build familiarity with your chosen weapon.
TRAINING • CHAPTER 8
Z8883pg001-128.indd 67Z8883pg001-128.indd 67 8/17/10 2:07:21 PM8/17/10 2:07:21 PM

DEFENSIVE HANDGUN SKILLS
68
Following your scheduled school classwork, you should start a strict dry practice schedule. First, select a quiet, private and safe location to conduct this training. It must be located away from family or friends and should have a solid backstop for target location. In many cases, this may be a basement area in your home. Use a 3x5-inch card and paint about a 2-inch solid black circle in the center of it. This will be your point of aim. Mark a spot on the fl oor approximately 5 meters from the wall to which the card is taped. This will be your training distance from the target.
Remember, in defensive handgun aiming techniques, you are aiming at the center of that dot. We refer to it as shooting center of mass, as opposed to a six o’clock hold, which one does when shooting at greater distances. After you have completed your dry practice, remove the target from view. No need to tempt a passerby or other family member to try his hand at dry practice, only to touch off a negligent discharge in the process. Your sessions should last no longer than 15 minutes in duration, twice a week. Beyond that amount of time, you will get tired and lose focus. Here, it is a case of the law of diminishing returns: you are practicing imperfect techniques and rather than engrain the wrong procedures, it is better to simply stop your session, hopefully on a high note.
You should also confine your sessions to practicing just one segment or technique at a time. If you are practicing sight alignment and you feel that after 10 minutes of practice you are definitely on top of your game, then you may
Performed at the right time and in a separate session, trigger control is an essential part of dry practice.
Z8883pg001-128.indd 68Z8883pg001-128.indd 68 8/17/10 2:07:21 PM8/17/10 2:07:21 PM

69
decide to call an end to this session. No need to get tired and lose the edge you have gained at this point. Remember, engraining one procedure at a time is what develops the reflexive nature of your techniques.
Also, do not try to dry practice your trigger control at this point simply because you feel you still need another fi ve minutes of training. Save the trigger control work for your next session. Fifteen minutes of trigger control dry practice is going to bring faster results than squeezing in fi ve minutes of possibly marginal dry practice on the same technique. Trying to force your training just because you feel you owe yourself the time may be more counter productive than you realize. A better answer to this is to set up a controlled and planned regimen with a system of stops to evaluate your progress along the way. Don’t worry; as you advance through your training, you will become very aware of your progress and downfalls and will know immediately if any changes are needed to set you back on the right course. You then become your own instructor!
Regarding the speed of your sessions, start out slowly. Learn the mechanics of each technique or motion. Engrain them in your technique so you do not have to consciously think out each step, as you will at the start. When you are confident that you understand the mechanics of each technique, then the speed will begin to appear with each repetition. This will occur naturally. Do not attempt to consciously speed these moves up. If you do, you will more than likely get out of sequence and tempo and all the wheels will come off your practice session and you will need to start over again. Speed comes only after mechanics and tempo (smoothness) have been engrained. Don’t worry, you will have plenty of time to attain that blinding speed you have seen in the mov-ies or TV – which, by the way, is more a product of editing than it is of the actor’s ability.
Dry Practice: A Typical SessionWe will now run through a simulation of an actual dry practice session as it
might be conducted by a student. First, set up your area for practice and remove ALL ammunition from the room. You will use no blanks, snap caps, empty casings or other forms of dummy rounds. No ammunition! You will have no magazines in the room, as well.
Chamber check your weapon several times, until you are absolutely convinced that you are handling an empty weapon. Now, say out loud, “I am starting my dry practice session.” Establish, in your mind, what you wish to practice and begin your drill. You may chamber check your weapon from time to time to reinforce in your mind that the weapon remains empty. This is good for your focus and confidence while you practice.
TRAINING • CHAPTER 8
Z8883pg001-128.indd 69Z8883pg001-128.indd 69 8/17/10 2:07:22 PM8/17/10 2:07:22 PM

DEFENSIVE HANDGUN SKILLS
70
Again, you will not have any magazines available during your sessions. This gives pause to semiautomatic owners who wish to dry practice with guns that have an onboard magazine safety feature that requires a magazine in place to allow the weapon to cycle and the trigger to operate. In these sessions, you will need to set up a procedure for using an EMPTY magazine for those techniques that require you to cycle your slide in order to complete your practice session.
It is important that once you have completed these drills that you remove the magazine from the room. Another option is to plan your dry practice session to run those techniques that require a magazine to be used for just that one practice time. That way you can stay focused on the drills and not have to include a magazine in any of the other sessions.
When you are satisfied with your progress or have been doing it for the prescribed amount of time, then say “Stop” out loud. Then add, “My dry practice is now over.” Chamber check your weapon and safely store it away. Remove your target from the wall and double check the room to be sure there is no remaining evidence of your dry practice activities.
Live Fire Practice
Let’s discuss the live fire activity that should accompany your dry practice. I recommend that you go to your favorite range twice a month. You should not fire more than 50 rounds through your weapon at any of these sessions. You are only shooting to validate your dry practice progress. You are no longer a recreational shooter! Do not dump a magazine into the target. Do not stray from your training schedule and shoot any exercise that you have not dry practiced. As just stated, you are simply validating, with live fire, what youhave engrained and mastered through your dry practice. Fifty rounds is sufficient to accomplish this and give you insight into your progress. If you revert to your past range mentality practices, you will undo all the progress gained in the dry practice sessions and begin to backslide in your training.
There is a saying among teachers in this business that goes, “Shooting is bad for shooting.” You should no longer be thinking of yourself as a recreational plinker, but rather a combat shooter who is in training to program your response for that lethal encounter that we all hope will never happen.
“It is better to have a gun and not need it, than it is to need a gun and not have it.”
Dr. “Naish” Piazza Front Sight, Nevada 2001
Z8883pg001-128.indd 70Z8883pg001-128.indd 70 8/17/10 2:07:22 PM8/17/10 2:07:22 PM

71
Keep in mind that your dry practice to live fire ratio should now be 80% dry practice to 20% live fire. You should consciously work at maintaining this ratio. It will keep your techniques razor-sharp and your training curve on an upward trend.
Imagination helps a lot when you are dry practicing. I have said before, no ammunition or magazines are to be present during dry practice. So how can you practice your techniques without these devices around? You can use pen caps and thimbles for the empty shell casings in the malfunction clearance drills. Pantomime all the reloading drills by simply moving your hands through the strokes to complete the motion.
For the tactical reload drill, use no weapon. Accomplish the movement with empty magazines. Your hands should move in the prescribed manner to replicate the drill, as you would do on the range. All of this accomplishes the results of engraining the movements of the drill without introducing the potential for danger and risk of injuries that a negligent discharge brings.
As your training intensifies and your gun handling, confidence and accuracy soar, you will begin to feel a strong sense of pride in your accomplishments, not to mention an awareness that you are definitely in charge of your own self-protection. When this sense permeates your every minute of training, you have achieved that feeling we referred to earlier, the Comfort of Skill at Arms. It is a very rewarding and wonderful feeling that gives justification to your efforts at mastering the skills of the handgun.
TRAINING • CHAPTER 8
Z8883pg001-128.indd 71Z8883pg001-128.indd 71 8/17/10 2:07:22 PM8/17/10 2:07:22 PM

DEFENSIVE HANDGUN SKILLS
72
Chapter 9
These techniques involve the physical act of altering the status of a particu-lar weapon. Unloading and loading start and end with a chamber check
– without fail!
Unloading
Semiautomatics
Put the safety on and remove the magazine and place it in an empty pocket.
Thumb safety off . Thumb back the hammer.
Unloading and Loading the Handgun
Z8883pg001-128.indd 72Z8883pg001-128.indd 72 8/17/10 2:07:22 PM8/17/10 2:07:22 PM
73
UNLOADING AND LOADING THE HANDGUN • CHAPTER 9
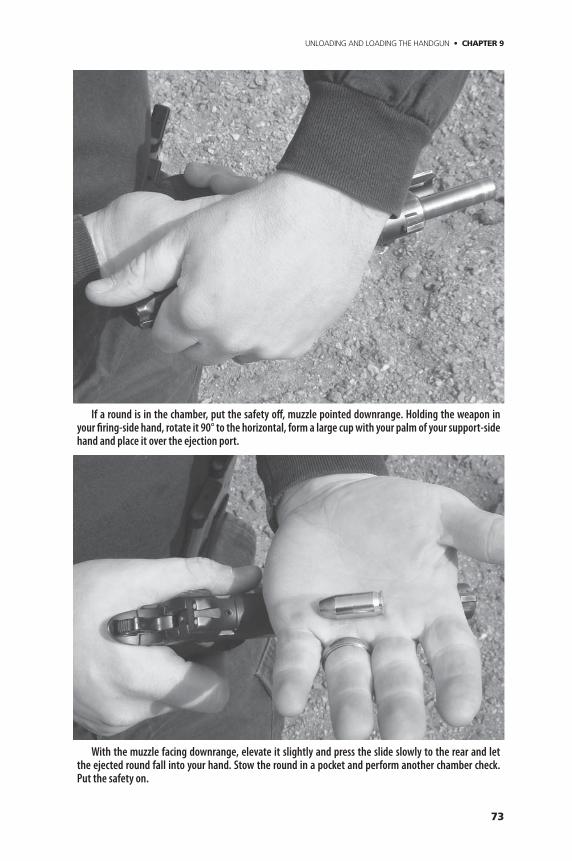
If a round is in the chamber, put the safety off , muzzle pointed downrange. Holding the weapon in your fi ring-side hand, rotate it 90° to the horizontal, form a large cup with your palm of your support-side hand and place it over the ejection port.
With the muzzle facing downrange, elevate it slightly and press the slide slowly to the rear and let the ejected round fall into your hand. Stow the round in a pocket and perform another chamber check. Put the safety on.
Z8883pg001-128.indd 73Z8883pg001-128.indd 73 8/17/10 2:07:23 PM8/17/10 2:07:23 PM

DEFENSIVE HANDGUN SKILLS
74
Revolvers
Simply perform the standard chamber check procedure and press back on the ejector rod to unload all the chambers in the cylinder.
Loading
Semiautomatics
“Wedge” chamber check method.
Z8883pg001-128.indd 74Z8883pg001-128.indd 74 8/17/10 2:07:23 PM8/17/10 2:07:23 PM

75
Safety on. Insert a fully loaded magazine.
Safety off . Rack the slide briskly to the rear with your support-side hand, release it and let it go for-ward under it own spring tension.
Your support-side hand should make contact with your fi ring-side shoulder to ensure that you have released the slide completely and have not eased it forward. Easing the slide forward with the support-side hand may induce a malfunction.
UNLOADING AND LOADING THE HANDGUN • CHAPTER 9
Z8883pg001-128.indd 75Z8883pg001-128.indd 75 8/17/10 2:07:24 PM8/17/10 2:07:24 PM

DEFENSIVE HANDGUN SKILLS
76
Perform another chamber check with the safety off . Then safety on and either holster your weapon or stand by at the ready position.
Revolvers
Perform the standard chamber check, leaving the cylinder in the open position. Use a speed loader or load individual rounds into each chamber.
Z8883pg001-128.indd 76Z8883pg001-128.indd 76 8/17/10 2:07:25 PM8/17/10 2:07:25 PM

77
and close the cylinder.
Check to be sure all chambers are full
UNLOADING AND LOADING THE HANDGUN • CHAPTER 9
Z8883pg001-128.indd 77Z8883pg001-128.indd 77 8/17/10 2:07:25 PM8/17/10 2:07:25 PM

DEFENSIVE HANDGUN SKILLS
78
In the Ready Position, the weapon’s safety can be on, if the situation dictates. It is normally is off , at the beginning. Your arms and weapon are positioned at a 45° angle to the ground.
Z8883pg001-128.indd 78Z8883pg001-128.indd 78 8/17/10 2:07:26 PM8/17/10 2:07:26 PM

FESSEND
EN
FnL1 04 01
20
01 JUYrVyB
QdWJsaWN
hdGlvbnMs
IEluYyAo
02 SW9sYS
BkaXZpc2l
vbikPR3JlZ
29yeSBL
03 cnVlZ2V
yAEuoifQE
MTAuNAI4M
AExBVVQ
04 Qy1BDD
A3NDk2MjA
xMjI4OQA=
7496201228
0
9
UPC
US $16.99
Z8883
(CAN $18.99)
ISBN-13: 978-1-4402-1381-6
ISBN-10: 1-4402-1381-X
FnL1 04 01
24
01 JUYrVyB
QdWJsaWN
hdGlvbnMs
IEluYyAo
02 SW9sYS
BkaXZpc2l
vbikPR3JlZ
29yeSBL
03 cnVlZ2V
yAEuo46cE
MTAuNAI4M
AExBkVB
04 Ti0xMw0
5NzgxNDQ
wMjEzODE
2AA==
781440213816
951699
EAN
www.gundigeststore.com
An imprint of F+W Media, Inc.
Gun Digest Books
®
Written by certified firearms trainer David Fessenden, Defensive
Handgun Skills is a simple, easy-to-follow guide to the techniques
involved in carrying and using a handgun for self-defense. Written
for the beginner, Defensive Handgun Skills contains a wealth of
valuable information, including:• Handgun Safety
• Gripping the Handgun
• The Combat Stance
• Loading and Reloading
• Aiming to Hit
• And Much More!
For a simple, illustrated approach
to learning the essentials of using the
self-defense handgun, there’s no better
volume than Defensive Handgun Skills!
Considering buying a
self -defense handgun?
Have questions about
concealed carry? D
EFEN
SIV
E H
AN
DG
UN
SK
ILLS
ABOUT THE AUTHOR:
DAVID FESSENDEN is a gun collector and a fi rearms instructor and restorer. He started
his teaching career after obtaining an NRA certifi cation for pistol, rifl e and shotgun, and
taught CCW and personal protection classes in Colorado in the 1990s. He then spent fi ve
years as a fi rearms instructor at Front Sight FTI in Pahrump, Nevada. He now lives in
Elizabeth, Colorado, and teaches his growing defensive handgun classes in Wiggins and
Aurora, Colorado, on a regular basis.
Z8883-FullCvr.indd 1
8/19/10 2:36:06 PM
This download is an excerpt from Defensive Handgun Skills.
We also recommend the Gun Digest Book of Concealed Carry, 2nd Edition.
Click here for additional handgun resources.
NEED HANDGUN HELP?
FOLLOW US
FESSEND
EN
FnL1 04 0120
01 JUYrVyBQdWJsaW
NhdGlvbnMsIEluYyAo
02 SW9sYSBkaXZpc
2lvbikPR3JlZ29yeSBL
03 cnVlZ2V
yAEuoifQEMTAuNAI4
MAExBVVQ
04 Qy1BDDA3NDk2Mj
AxMjI4OQA=
74962 012280 9
UPC
US $16.99Z8883 (CAN $18.99) ISBN-13: 978-1-4402-1381-6 ISBN-10: 1-4402-1381-X
FnL1 04 0124
01 JUYrVyBQdWJsaW
NhdGlvbnMsIEluYyAo
02 SW9sYSBkaXZpc
2lvbikPR3JlZ29yeSBL
03 cnVlZ2V
yAEuo46cEMTAuNAI4
MAExBkVB
04 Ti0xMw05NzgxND
QwMjEzODE2AA==
781440 2138169
51699
EAN
www.gundigeststore.comAn imprint of F+W Media, Inc.
Gun Digest Books®
Written by certified firearms trainer David Fessenden, Defensive Handgun Skills is a simple, easy-to-follow guide to the techniques involved in carrying and using a handgun for self-defense. Written for the beginner, Defensive Handgun Skills contains a wealth of valuable information, including:
• Handgun Safety• Gripping the Handgun• The Combat Stance
• Loading and Reloading• Aiming to Hit
• And Much More!For a simple, illustrated approach
to learning the essentials of using the self-defense handgun, there’s no better volume than Defensive Handgun Skills!
Considering buying a self-defense handgun?
Have questions about concealed carry?
DE
FE
NS
IVE
HA
ND
GU
N S
KIL
LS
ABOUT THE AUTHOR:DAVID FESSENDEN is a gun collector and a fi rearms instructor and restorer. He started
his teaching career after obtaining an NRA certifi cation for pistol, rifl e and shotgun, and taught CCW and personal protection classes in Colorado in the 1990s. He then spent fi ve years as a fi rearms instructor at Front Sight FTI in Pahrump, Nevada. He now lives in Elizabeth, Colorado, and teaches his growing defensive handgun classes in Wiggins and Aurora, Colorado, on a regular basis.
Z8883-FullCvr.indd 1 8/19/10 2:36:06 PM
NEED MORE HANDGUN HELP?