guidelines for specimen image capture and image based data ... · capture the barcode, barcode...
TRANSCRIPT

Guidelines for specimen image
capture and image based data entry
Digitising the biodiversity of the IGAD Region This document has been prepared by Denis Filer, Plant Sciences, University of Oxford in collaboration with the IGAD Biodiversity Management Programme. Document prepared June 2017, updated November 2017
Brahms © Copyright, University of Oxford, 2017. All Rights Reserved
BRAHMS 2017: http://herbaria.plants.ox.ac.uk/bol/
Coming soon: http://herbaria.plants.ox.ac.uk/bol/brahms/software/v8

Contents
CAMERA ..................................................................................................................................................... 3
CAMERA PHYSICAL SETUP AND CARE ....................................................................................................................... 3 CAMERA SETTINGS, LIGHTING AND IMAGE QUALITY ................................................................................................... 5
BARCODE AND IMAGE CAPTURE OPTIONS ................................................................................................. 6
SPECIMEN HANDLING AND POSITIONING ................................................................................................................. 6 MEASURE RULE .................................................................................................................................................. 6 SPECIMEN TEMPLATE .......................................................................................................................................... 7 IMAGE FOLDERS ................................................................................................................................................. 7 OPTIONAL ARCHIVE FOLDER .................................................................................................................................. 7 THE BARCODE/IMAGING PROCESS IN STEPS .............................................................................................................. 7 MOVING CAMERA IMAGES TO COMPUTER IN BATCHES ............................................................................................... 8 PROCESSING IMAGES ........................................................................................................................................... 8 SUBSEQUENT RELOCATION OF IMAGES .................................................................................................................... 9
DATA CAPTURE BASED ON IMAGES ............................................................................................................ 9
DESIGNING AN RDE FILE FOR YOUR PROJECT ............................................................................................................ 9 SETTING YOUR TEMPLATE AS A PROJECT TEMPLATE .................................................................................................. 10 WHEN TO OPEN A NEW RDE FILE ........................................................................................................................ 10 VIEWING IMAGES IN RDE .................................................................................................................................. 10 IMAGE BASED DATA CAPTURE – GRID OR FORM ...................................................................................................... 11 THE DUPS FIELD AND YOUR HERBARIUM CODE ...................................................................................................... 13 USING AUTOMATCH ......................................................................................................................................... 13 RECOMMENDED FIELD SETTINGS FOR AUTOMATCH................................................................................................. 14 SPECIES LOOKUP .............................................................................................................................................. 14 USING THE EXTERNAL SPECIES LIST ....................................................................................................................... 14 GEOGRAPHIC DATA ........................................................................................................................................... 15 USING THE EXTERNAL GAZETTEER LIST ................................................................................................................... 15 PRINTING LABELS FROM RDE .............................................................................................................................. 16 OPTIMISING DATA ENTRY ................................................................................................................................... 16
IMPORTING RDE FILES TO YOUR DATABASE ............................................................................................. 17
UPDATING RECORDS THAT HAVE BEEN AUTOMATCHED............................................................................................ 17 ADDING NEW RECORDS FROM RDE TO BRAHMS .................................................................................................. 18
UPS AND COMPUTER PROTECTION ........................................................................................................... 18
BACKUPS .................................................................................................................................................. 18
TWO IMPORTANT RULES .................................................................................................................................... 18 WHY BACK UP? ................................................................................................................................................ 19 ARCHIVING FILES .............................................................................................................................................. 19 CREATING BACKUPS - WHICH FILES? ..................................................................................................................... 19 BACKUP FREQUENCY ......................................................................................................................................... 19
PUBLISHING DATA AND IMAGES ONLINE USING BRAHMS ONLINE (BOL) ................................................. 19
INTRODUCTION ................................................................................................................................................ 19 WEBSITE DESIGN .............................................................................................................................................. 20 UPLOADING DATA AND IMAGES TO BOL ............................................................................................................... 21
Introduction ............................................................................................................................................ 21 Before uploading ..................................................................................................................................... 21 Register database ................................................................................................................................... 23 Linking a database to a website ............................................................................................................. 23 Upload steps for data and image metadata ........................................................................................... 24 Copying image files to your server .......................................................................................................... 24
ZOOMIFY IMAGES ............................................................................................................................................. 25 Introduction ............................................................................................................................................ 25 Licencing Zoomify .................................................................................................................................... 26 Getting Zoomify in on the act ................................................................................................................. 26 Creating PFF’s with Zoomify Enterprise .................................................................................................. 27
BOL SEARCH OPTIONS ....................................................................................................................................... 27
Camera
Camera physical setup and care
The following text applies to the Nikon D750 + Nikor AFS 50mm lens mounted on a Manfrotto
MT190xpro3 tripod fitted with a Manfrotto MH804-3w 3 Way Head. The camera is fitted with a
Hahnel cable release. The concepts reviewed are broadly applicable to similar equipment setups.
Your camera tripod should be mounted in a safe area with as much free space as possible to
facilitate movement of specimens. The balance of the tripod and camera should be such that the
(heavy) camera cannot tip forwards.
• Always replace the lens cap when the camera is being moved.
• Switch camera off when out of use.
• Take care with the D750 Live View screen as it is rather fragile.
• Be sure not to have cables on the floor to trip up on.
The camera height on the tripod is important as with the fixed 50mm lens, it determines the
frame size of the image. Clearly the height has to be adjusted so that you include all the
specimen, perhaps a little more around the edges (see ruler section below).

Imaging at the East African Herbarium in Nairobi Kenya. A large monitor displays the active RDE file. There are 4 separate camera stations at EA.
Getting started with imaging at the National Herbarium of Malawi, Zomba.

Two camera stations at the National herbarium of Ethiopia in Addis Ababa
Camera settings, lighting and image quality
Critical is that the camera date and time setting match that of the PC you are using – within a few
seconds. This is necessary to link camera images and the barcodes scanned into your RDE file.
In general, we have found useful camera image settings to be F16 (gives depth of field), ISO 100,
shutter speed 1/6 second; JPEG file size: large; jpeg image quality: fine. However, these settings
are dependent on the amount of light (e.g. less light, use longer exposure). Lighting is something
to experiment with - to avoid shadows and maximise image quality.
We have been using the autofocus features. The camera has features that adjust the way the
camera focuses. We have been using a single focus point (green rectangle) but there is a way to
adjust this to focus more widely. In the end of the day, checking image quality is the best way to
confirm you are getting what you want.
If you have access to photographic expertise, use this to examine/review your camera settings
and image quality. As many of you are embarking on a massive imaging task, it may be worth
consulting on this locally. Bear in mind that the Nikon D750 is a superb camera with a huge range
of set up options.
Barcode and image capture options
The following options make use of the Tools > Specimen barcoding and imaging available when
in an opened Botanical Record RDE file.
Specimen handling and positioning
The logistics of specimen movement requires careful planning. Each project will discover the most
appropriate way to manage their specimen folders, moving between cabinets and the imaging
area(s). Clearly, specimens must be handled with great care and be returned to the correct
folders and cabinets.
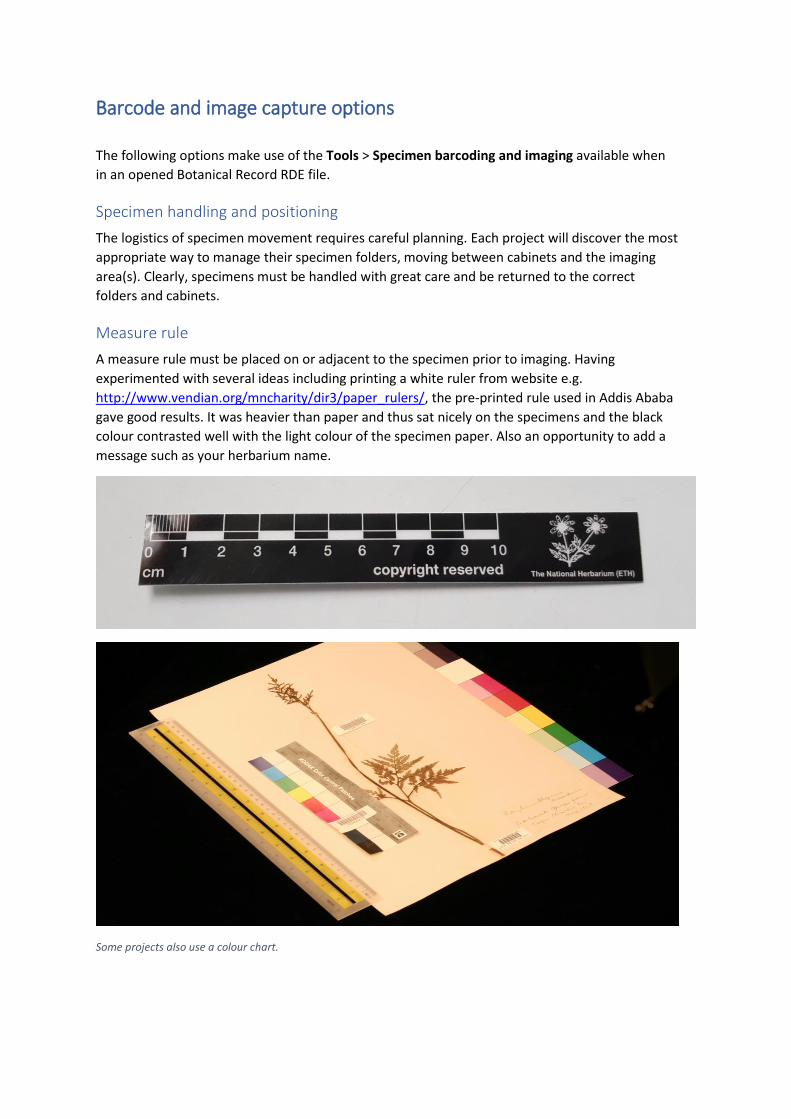
Measure rule
A measure rule must be placed on or adjacent to the specimen prior to imaging. Having
experimented with several ideas including printing a white ruler from website e.g.
http://www.vendian.org/mncharity/dir3/paper_rulers/, the pre-printed rule used in Addis Ababa
gave good results. It was heavier than paper and thus sat nicely on the specimens and the black
colour contrasted well with the light colour of the specimen paper. Also an opportunity to add a
message such as your herbarium name.
Some projects also use a colour chart.

Specimen template
Aligning the specimen under the camera, within the image frame and ready to be imaged, is one
of the tasks that uses time. Having some form of template on the imaging table is useful to allow
you to place the specimen on the table quickly. Avoid ugly pencil marks that may appear in your
images.
One suggestion is to have a slightly raised edge (perhaps a light coloured, thin wooden strip) fixed
to the table so that each specimen can be quickly aligned against this in the correct position.
Image folders
The image folder settings on the BRAHMS imaging form need only be selected once and then they
will be remembered. Folder names can be as you wish. These settings apply at the user level. If
you delete your tempfiles-brahms folder, you will need to re-select the folders.
Optional archive folder
The only purpose of the archive folder is to make a second copy of the image with the original
camera name. The value of this folder is dubious as the images are otherwise identical. The
archive option defaults to off – i.e. the archive folder is not used.
The barcode/imaging process in steps
Barcodes should be firmly placed on the specimens, ideally in a constant location. Each separate
item has its own barcode, even if a duplicate sheet or a second page of a large item. Specimens
may be barcoded in advance or at the time of imaging.

The Specimen barcoding and imaging form opened in an RDE file.
After scanning the barcode into the form field “Scan barcode here”, the barcode and the date-
time of the scan are added to a new record in your RDE file. The specimen is then placed under
the camera for imaging. Once the specimen is imaged, you should click on the ‘Confirm image
done’ button. This releases the form barcode field to receive the next barcode.
By default a short delay is set (default 1.5 seconds) after the barcode scan and writing the
barcode to the RDE file. You can reduce this delay a little. The delay is added to ensure the scan
does not add an incomplete barcode to the RDE file. The setting is edited on the form help tab.
The barcode scanning and imaging cycle is repeated until you wish to stop and transfer images
from your camera to the PC as described below.
Moving camera images to computer in batches
Once you have gained confidence in the process, you can decide how frequently to move images
from camera to PC. As the cameras have large a store capacity, in theory, this may be done twice
or even once a day. Most projects will copy images more frequently, to be sure the image –
barcodes are correctly aligned and everything is going to plan. The management of RDE files is
discussed below in the data section.
Images are moved from camera to PC rather than copied. The images will be moved to your PC
‘from camera’ folder which, if the previous processing was 100% successful, should be empty.
Processing images
When you use the ‘Process camera images’ option, the camera images are auto-renamed to the
barcode and then moved to the ‘renamed images folder’. The reference in your IMAGELIST memo
is updated accordingly with the correct folder and file name. Thus, you can now view the images

in RDE using the standard toolbar. At the same time, the original camera image is copied to
the archive folder if this option has been selected.
Subsequent relocation of images
Images can be moved to new folders at any stage. If you do this, the images will not be visible in
RDE until you use the RDE option Tools > Images in RDE > Image file and folder editing options.
Using this option, with Restrict to tagged un-checked, you can e.g. edit selected or all folders in
the RDE file (as registered in the IMAGELIST memo) to a new name, edit a drive letter, etc.
Data capture based on images
Designing an RDE file for your project
Although initially, your RDE file only requires the fields BARCODE, BARCODEDT and IMAGELIST to
capture the barcode, barcode date-time and to store the image path+file names, you will want to
include all the fields that you intend to use for data capture using RDE. Most likely, you will design
one project RDE file for everyone and then copy this file to create new files as needed. Having
said that, bear in mind that different RDE file structures can be used if necessary.
The initial botanical records RDE file is created in the RDE file manager using File > Create a new
RDE file… and this file may first be created from the “System template”. If so, it will include all of
the default RDE fields, many of which you probably will not need. The task then is to use File >
Modify file structure to remove and re-order fields are appropriate. When in the RDE file
manager or the opened RDE file, you can use the toolbar to review field names and meanings.
Tick the option “All RDE fields” on the help form to see all field explanations.
RDE field help option with All RDE fields selected
The design of RDE file for this imaging project is likely to be similar across all projects. Note that
the data capture form will auto-add any fields it requires to your RDE file – even if you opt not to
use them. Any RDE field can be left blank.
Field order in the RDE file does not influence the data capture form. It does however influence
data entry if you are adding data to the grid directly (not using the form).
Setting your template as a project template
Once you have created a template RDE file, save this with an appropriate name, for example,
EA_imaging_template, and with the RDE file closed, from the RDE manager, you can mark this as
a project template file using Tools > RDE file project templates, choosing one of the 5 options.
This means that whenever creating a new RDE file for this project, the user can more easily select
the RDE file template when using File > Create new RDE file.
When to open a new RDE file
Camera images can be added to an RDE file that already has images. However, you may decide to
open a new RDE file for each batch of transferred images. The RDE file will be the basic unit of
data entry and you may want to try to have similar numbers of records per file. The size can be
anything you want from a few records per file to many thousands of records per file.
In practice, the optimal size will probably relate to the families and genera you are imaging, folder
by folder. It may be convenient to have all records of a genus or several genera in a single file – to
expedite data entry. Some testing of this is going to be necessary to reach a good balance.
Also bear in mind that it is very easy to join 2 or more RDE files into one larger file using the RDE
manager option Tools > Merge tagged RDE filed to current.
Viewing images in RDE
Images are opened using the toolbar. You will resize the image viewer window as needed, and
either drag this off the application, potentially to a second monitor, or dock the image window on
the right side on your screen (drag far right and release).
When the image opens, the image viewer toolbar is also opened. This includes handy option to
rotate the images by 90 degrees and you probably need to do this to read the label. You can use
your mouse wheel to zoom to the label area and drag the image within the viewer to achieve
optimal label reading position. The good news is that the rotation and the zoom are remembered
as you move to the next image, minimising the need to continually re-position the image to read
the label.

Image viewer docked right, zoomed to read label and rotated 90 degrees to read
Image based data capture – grid or form
You can use the RDE data grid to add data or use the form provided on Tools > DATA capture
from specimen images. There is no difference to the final result – it comes to down efficiency and
preference. If using the grid, you will order fields in the file structure to suit, taking into
consideration any AutoMatch settings (see below). In the grid, because you will not be adding
new records (the records are already added with barcode and image), you cannot use the
toolbar as this only operates when adding new records. You can however use F4 to copy the field
from the previous record. Pressing F4 continuously will copy field by field from the record above.
You will also use F9 or a mouse right-click to look up rather than type values. Lookups are further
discussed below.
The form provides a second method for data capture – using more of a defined data capture
layout.

Data capture form showing the AutoMatch setting
The form includes options to move record (lower navigation buttons) although once opened, you
can also click on the grid to navigate. The grid toolbars are however disabled. The form includes
all the fields that most projects are likely to want to add. Any of these fields can be left blank. The
text areas for plant description, habitat description and locality notes can be expanded to larger
editing areas by dbl-clicking on the respective text areas.
Dbl-click on text areas to open a larger editing window.

The DUPS field and your herbarium code
As all the specimens will be from your herbarium, the herbarium code should be added to the
Settings tab option ‘Default herbarium code’. An example is “EA”. This will be added to the DUPS
field.
Using AutoMatch
AutoMatch is used to warn you if a specimen has already been added to your database. The
AutoMatch function is only useful if your database already has botanical records added. It
operates by locating any matching specimens based on a minimal number of fields entered – thus
saving time. The AutoMatch check takes place when you exit a designated field.
AutoMatch must include either the field NUMBER and/or the GENUS + YEAR fields. This is
because it performs an indexed search using number or genus+year with subsequent matching on
any other fields you select to match on. AutoMatch can be enabled/disabled on the data entry
Settings tab.
To set AutoMatch, open the RDE file and select the AutoM toolbar (or the Tools menu
equivalent).
In the above example, AutoM is set to check the currently logged in database. The check is made when your cursor exits the COLLYY (collection year) field. The fields used here are genus, day, month and year.
With the above settings, the user will start by entering genus, day, month and year. Any records
in the database that match these values will be listed in a selection grid. The typist then has to
decide if one of the record is the same as the label image. If it is, the typist can then select the
option Update current which backloads data from the database to the RDE file. In fact, the key
backloaded field is the database BRAHMS number added to the RDE field MYBRAHMS. This will
subsequently be used, when importing the RDE file to BRAHMS to locate the record in BRAHMS
and update the barcode and link the image.

Recommended field settings for AutoMatch
As a rule, it is better to use fields such as number, day, month, year – as these tend to be entered
consistently. The collector name may be spelt or punctuated in a variety of ways and is best
avoided. Genus name is also reliable. A combination of “genus + day month year” or “number +
day month year” works well. The best selection will take some trial and error.
Species lookup
Selecting the species name will also add the family and genus names. Ideally species names will
be selected from a list rather than typed. You can type but this is slower and may introduce
errors.
You can access your internal species list using the standard grid lookups (right-click or F9) or on
the form, by using the Int (= internal) lookup button opposite the species text box. How you
locate the name depends on your preferences but as an example, if using the ‘Name starts’
option (default), enter sufficient character to locate the genus then a space then sufficient
characters to locate the correct species. For example entering ‘cae p’ may be sufficient to locate
and select Caesalpinia pulcherrima. The number of characters you need to enter will depend on
the size of your species list.
It is better not to use the option Goto Accepted. This would be enabled if the name you selected
is marked as being a synonym of another name. Selecting the accepted name may be desirable –
but would be difficult for curation purposes.
Using the external species list
An IGAD regional species list has been provided by William Hawthorne/Cicely Marshall. This list is
based on an extensive research activity scanning the literature of the region and creating a names
list with synonymy and conservation ratings as STARS per species. For the original publication,
refer to http://www.cell.com/current-biology/abstract/S0960-9822(16)31129-0
A project that does not have a species list in their database will use the external list. Even this that
do have a list may prefer to use this list.
The external list has to be registered with your database (not imported to it). To do this, select
Admin > Project configuration > Externals > Species and locate the file IGADSPP_2016.dbf as
stored on your PC. You can view the file by selecting Taxa > External reference files > Species file.
The external file includes a number of fields you can ignore including some fields used to help calculate species distribution.

To use the external species list in the data grid, use Shift + F9 in a taxa field. On the form, choose
the Ext (= external) button.
Note that you could import the external list to become part of your database. This would mean
registering the list as a Taxa RDE file and running the import.
Geographic data
Labels provide greatly differing levels of geographic data ranging from country name only to a
precise location. Locality notes may provide a general text further defining the area, for example
1.5 km west of Morongorbwe Hill.
As with species names, ideally it will be possible to choose a place area or name from a list rather
than typing names in. Great care must be taken with this as choosing a wrong name is worse than
entering no name at all.
You may have a database that has a list of geographic place names and in which case, you can use
the standard lookups to locate and select a name. If you only know the country, clearly you can
only add this field. If the name is not in your list, you can type in the new name into the grid or on
the form.
Using the external gazetteer list
An IGAD regional gazetteer has been compiled by DLF by assembling data from the spatial data
provided on http://www.diva-gis.org/Data. Currently it includes data for Ethiopia, Kenya, Sudan
and Uganda. The file also includes data for Malawi. These data have been downloaded, reformed
into RDE format and merged to a single table. The table will be extended to include data for other
countries as needed. Projects that do not have a gazetteer in their database will use the external
list. The list may also be used by projects that do have an internal list as it may be more
comprehensive.
The external list has to be registered with your database (not imported to it). To do this, select
Geo > External reference files > External gazetteers and locate the file IGAD_gazetteer.dbf as
stored on your PC. You can use the Tools option provided to update records totals. To open the
file, dbl-click the file name.
A sample of the external gazetteer showing some entries for Ethiopia.
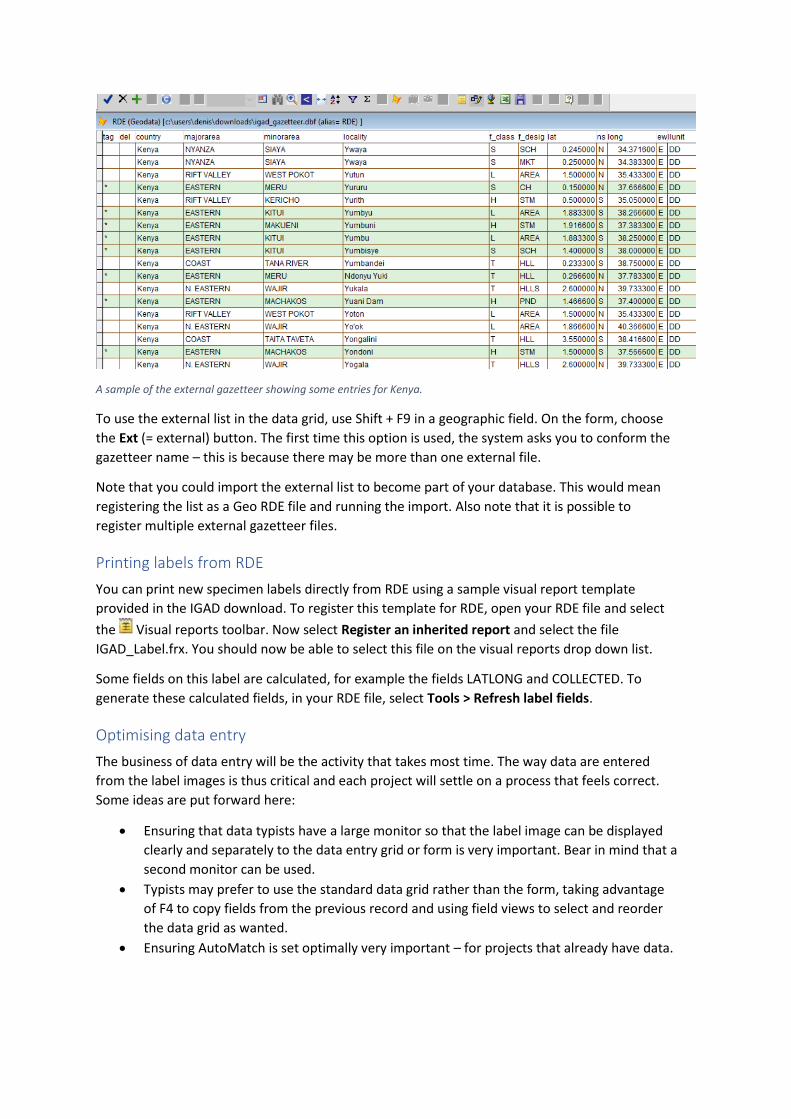
A sample of the external gazetteer showing some entries for Kenya.
To use the external list in the data grid, use Shift + F9 in a geographic field. On the form, choose
the Ext (= external) button. The first time this option is used, the system asks you to conform the
gazetteer name – this is because there may be more than one external file.
Note that you could import the external list to become part of your database. This would mean
registering the list as a Geo RDE file and running the import. Also note that it is possible to
register multiple external gazetteer files.
Printing labels from RDE
You can print new specimen labels directly from RDE using a sample visual report template
provided in the IGAD download. To register this template for RDE, open your RDE file and select
the Visual reports toolbar. Now select Register an inherited report and select the file
IGAD_Label.frx. You should now be able to select this file on the visual reports drop down list.
Some fields on this label are calculated, for example the fields LATLONG and COLLECTED. To
generate these calculated fields, in your RDE file, select Tools > Refresh label fields.
Optimising data entry
The business of data entry will be the activity that takes most time. The way data are entered
from the label images is thus critical and each project will settle on a process that feels correct.
Some ideas are put forward here:
• Ensuring that data typists have a large monitor so that the label image can be displayed
clearly and separately to the data entry grid or form is very important. Bear in mind that a
second monitor can be used.
• Typists may prefer to use the standard data grid rather than the form, taking advantage
of F4 to copy fields from the previous record and using field views to select and reorder
the data grid as wanted.
• Ensuring AutoMatch is set optimally very important – for projects that already have data.

Importing RDE files to your database
Updating records that have been AutoMatched
When you AutoMatch a record in RDE, the system backloads the data fields from BRAHMS to the
RDE file. Included in this backload is the BRAHMS number of the record and this is added to the
RDE field called MYBRAHMS. Your RDE file may contain many records that have been
AutoMatched.
If you want to update these records in the database by adding the barcode and the image, linking
both to a specimen registered at your herbarium, select Tools > Update barcode and image
based on MYBRAHMS. This option issues the following prompt:
This option locates the Botanical Record in your BRAHMS database (using the MYBRAHMS
number) and checks if there is a specimen record at your herbarium (based on the code added to
your RDE DUPS field e.g. “EA”). A specimen is added if necessary and the barcode is updated. The
image is then linked to the specimen record. All successfully processed RDE records are then
marked “*” in the TAG field.
You will see the images are registered in your image library (Images > View/edit images
registered in database) and you will be able to view the images using the camera toolbar in the
image library or when you have located the botanical record or specimen record.
You can check the barcodes by using Botanical Records > View/edit specimens. There’s a
FastSort option for BARCODE. But of course, you can also scan the actual specimen barcode into
the toolbar option or the main find form. This will locate the record for you.
A barcode option is provided on the main toolbar when the BotRec or Specimen files are opened.

Note that if you decided to move the images to a new drive or folder later on, you can simply
change the folder settings in Images > View/edit folders where images are stored. There are also
Tools options in the main image file and also in RDE to help with folder changes.
Once this process has been completed, it is suggested that you use the option Tag > Copy tagged
records to a new file (which can be suitable named…) so as to avoid adding these records to
BRAHMS a second time. Alternatively, you can leave the records in the RDE file - but use Tag >
Invert tags - and thus, when importing the new records, you can use the Transfer Tagged only
option
Adding new records from RDE to BRAHMS
Transferring new records from RDE to BRAHMS is undertaken in the standard way, first closing
the RDE file and using the transfer toolbar option (or Tools > Transfer current RDE file into
BRAHMS…). As mentioned above, you will want to avoid re-importing records that have been
AutoMatched either by removing these records from the RDE file or using Tag restriction.
When importing, ensure that you select the Image transfer option, linking images to specimens at
your herbarium.
UPS and computer protection
All computers should be protected from power cuts. If there is a risk of a power cut, you must
ensure you have an operating UPS. Sudden power loss means that BRAHMS does not have time
to transfer data in memory to disk. This leads to loss of data recently entered. More serious is the
potential to corrupt data files and databases and to damage computer hardware.
Backups
Backing up is the process of copying valuable files to a safe place in a systematic way. There is
only one way to absolutely ensure the safety of your data – rigorous adherence to a regular
program of backing up of your data. It is a nuisance to backup but this is a much better alternative
than the loss of your data.
Two important rules
1. Copy your files to a different disk/storage media. If you backup to the same storage
media (e.g. your hard disk), all your eggs are in one basket.

2. Do not continually backup to the same backup file, this overwriting the last backup. If you
do this, you may end up overwriting a good backup with bad data.
Why back up?
Be warned that some projects get their fingers burned badly before they take backing up
seriously. Years of hard work can be lost in different ways - here are some possibilities:
• A computer may be stolen.
• A computer disk may malfunction or crash with loss of all data on that disk.
• Files on a computer may be deleted by mistake.
• Files may be corrupted by a virus or hardware fault.
• You may make one or a series of complex editing errors.
• Data files may be corrupted through power failure.
• Data files may be progressively damaged by an undetected program fault.
Archiving files
It is usually best to compress files using Windows file compression, 7z, WInZip, etc.) before
backing up. Compressed backups will use far less storage space; many separate files will be stored
as one single backup zip; and there is less change of data damage as the single zip file is copied
from one storage media to another.
Creating backups - which files?
Minimally, you need to backup files that have been edited. Assuming your database project
(including RDE files and report templates) is stored within one parent folder e.g. c:\brahmsdata,
the simplest option is to backup the entire database folder. Make sure that the database folder
does not include old zip files and also that any Temp sub-folders created during upgrading have
been deleted before copying. NB It is useful from time to time to remove any BAK and TBK files.
These files tend to accumulate when you change RDE file structure. If you want to back up only an
RDE file, take care to copy the DBF and FPT file together (FPT files hold your memo field data).
BAK and TBK files can be deleted.
Backup frequency
The frequency of backing up depends on the rate of data entry. If you are editing your main
database every day, you may want to back up every day. RDE files should always be backed up
after a data entry session.
Publishing data and images online using BRAHMS online (BOL)
Introduction
For those with BOL installed locally on a server, the process with be to periodically upload the
specimen data with associated images, copying the images to the correct server folder. Images
will be Zoomified for fast internet access. To do this:
a) You need a website which consists of one to many web pages.

b) You need to upload the data and the images you wish to see online, making refernce to
that website.
BRAHMS online (BOL) is separate software to BRAHMS. It is available on the BRAHMS server
herbaria.plants.ox.ac.uk/bol/ or you can install the entire BOL system on your own server. The
latter is recommended, especially where many specimen images are required.
BRAHMS v7 has a module known as WebConnect accessed via the PublishOnline menu option.
That menu option can be enabled using Utilities > Mysetup/profile.
In order to log in, you need to be registered on the BRAHMS website as a user. The login to
WebConnect uses your BRAHMS registered username (normally your email) and the password
you are sent on registration. Note that these user names and passwords are not the same as the
login credentials used to enter BRAHMS desktop.
Once you log in to WebConnect, you will have access to website(s) that you are the owner of.
The server name where BOL is being accessed is selected on the log in form.
WebConnect includes options to create new websites, design websites using bootstrap/css,
upload and or remove data and image metadata, and to configure your website(s). The focus of
this document is on uploading data and images.
Website design
BRAHMS uses standard HTML and CSS for website design. Designing a good website requires
planning and considerable input. Most projects underestimate the time needed to do this. As a
rule, we recommend that projects wishing to make a useful website obtain help from someone
proficient in this area. Website design is not discussed further in this document. Some sample
websites are provided here: http://herbaria.plants.ox.ac.uk/bol/brahms/Publishonline/websites.
An example of a website page with considerable input can be found on:
http://brahmsonline.kew.org/msbpdraft/Regions/Asia
An example of a website with minimal formatting but strong on data can be found on:
http://brahms.cpatu.embrapa.br/herbarioian

Uploading data and images to BOL
Introduction Data are uploaded to BRAHMS online from BRAHMS using XML files. These XML files are created
by BRAHMS and uploaded to the selected server. All data uploaded are associated with the
database Identity of your BRAHMS v7 database. This identity or ‘database ID code’ is set under
Admin > Project configuration > Database ID code.
Example ID code. All data uploaded to BOL will be associated with this code.
The same ID code will be visible on the WebConnect Data tab. Note that the uploading of data is
entirely separate to the process of website design. When you upload data with an ID of e.g.
EADATA, these data may later be linked to one of more websites. The linking of uploaded data to
a website is discussed below.
Before uploading Before uploading data/images, your data must be stored in BRAHMS itself, not just in RDE - and
furthermore, the images must be linked to the appropriate records in BRAHMS. If you are
uploading images of species (habit photos), these will be linked to species records or, preferably,
to Botanical Records. If you are uploading images of physical herbarium specimens, the images
will be linked to the specimens. NB: image file names must have no spaces. Folder names can
have spaces. Avoid using TIF / TIFF files.
You can verify if images are correctly linked in BRAHMS by viewing the images using the standard
camera toolbar option. For example, open the main specimen file, locate the specimen and view
the image(s). If you locate the botanical record owning the specimen(s), you are able to view
images linked to the botanical record and to all its specimens. For most projects, a botanical
record will have one specimen and one image linked to that specimen.
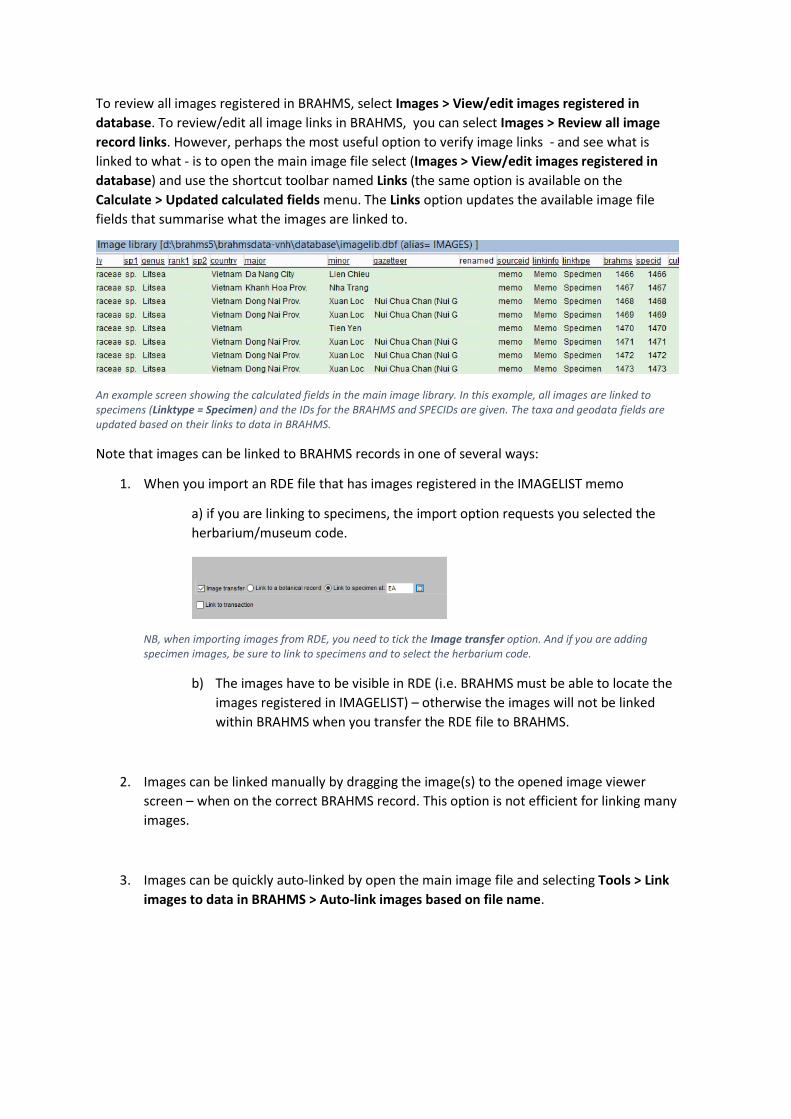
To review all images registered in BRAHMS, select Images > View/edit images registered in
database. To review/edit all image links in BRAHMS, you can select Images > Review all image
record links. However, perhaps the most useful option to verify image links - and see what is
linked to what - is to open the main image file select (Images > View/edit images registered in
database) and use the shortcut toolbar named Links (the same option is available on the
Calculate > Updated calculated fields menu. The Links option updates the available image file
fields that summarise what the images are linked to.
An example screen showing the calculated fields in the main image library. In this example, all images are linked to specimens (Linktype = Specimen) and the IDs for the BRAHMS and SPECIDs are given. The taxa and geodata fields are updated based on their links to data in BRAHMS.
Note that images can be linked to BRAHMS records in one of several ways:
1. When you import an RDE file that has images registered in the IMAGELIST memo
a) if you are linking to specimens, the import option requests you selected the
herbarium/museum code.
NB, when importing images from RDE, you need to tick the Image transfer option. And if you are adding specimen images, be sure to link to specimens and to select the herbarium code.
b) The images have to be visible in RDE (i.e. BRAHMS must be able to locate the
images registered in IMAGELIST) – otherwise the images will not be linked
within BRAHMS when you transfer the RDE file to BRAHMS.
2. Images can be linked manually by dragging the image(s) to the opened image viewer
screen – when on the correct BRAHMS record. This option is not efficient for linking many
images.
3. Images can be quickly auto-linked by open the main image file and selecting Tools > Link
images to data in BRAHMS > Auto-link images based on file name.

An example auto-link screen where the images include the barcode in the image file names. In this example, the Text before is blank and the Text after is .jpg. Thus, an image named EA0000002.jpg would be linked to a specimen with barcode EA0000002. Note that this option will not re-link images already linked.
Options 1 and/or 3 are best when linking many images – and they give the same result in
BRAHMS. In other words, it is not essential to auto-link images when importing RDE – that task
can be done later. However, it is quite efficient to use the RDE link process as it saves an extra
step.
Register database You only need to register a database online once. If your database ID (e.g. EADATA) has not been
registered on BOL, you can do this on the WebConnect Data tab Register database online. If you
do not, a warning is issued when you try to upload data from an un-registered database. If it
already registered, it will tell you this if you try to register it again. Note that when you delete an
online database, it must then be re-registered.
Linking a database to a website A website may be linked to one or many online databases. To link a database (e.g. EADATA) to a
website:
1. Select the website at the top of the WebConnect form.
2. On the Data tab, select the sub-tab option Website-database links.
3. Choose the database to link from the lower screen drop down list and select Link
database.
4. If it already linked, it will not be linked again. Linked database(s) are listed on this tab.

Upload steps for data and image metadata As a rule, you will upload data in the following order: a) Taxa, b) Botanical Records, c) Images
(metadata). The easiest way to upload smaller amounts of data (< 2000 records) for the relevant
specimens is as follows:
1. Extract the botanical records to upload – how you do this is not important – as long as
you extract the required records. NB: if a record is already uploaded to BOL, the system
will not double-upload it – but rather locate and update it.
2. In the Botanical Record extract file, choose Tools > Botanical Record extract -> Taxon
extract.
3. Then choose Tools > Botanical Record extract -> Image extract.
These tools options prepare the taxa and image extract files respectively – based on your
extracted botanical records (BR) . Thus, if your BR file has 1000 records referring to 200 species,
the taxa extract will have 200 entries, ready to upload.
4. If your physical image files are scattered across many folders and/or are difficult to isolate
from a folder containing many other images, you can use Tools > Copy images for tagged
records to a selected folder. This process will copy the physical image files to a selected
folder – making it easier to copy these images to your server. You may not need to do this
step if the required images are easy to find in another way.
To upload the taxa, choose the Webconnect Data tab. The Data mode defaults to “Upload data”
and the data category defaults to Taxa. Unless necessary, you do not need to set upload
restrictions. Choose the option Upload from Extract file (default). Select Process data to upload
the taxa. One complete, you can select Upload history to check if the data have been uploaded
without error.
Without closing the WebConnect form, you can proceed to select Botanical Records/specimens –
then again Process data.
Finally, from the same form, you can select the Images option – then again Process data. Note
that the images upload option only uploads metadata about the images (the image file names
and what they are linked to). It does not copy the image files to your server. You can use this
option before copying your images to the server – but you won’t see the images online until you
copy the relevant images to the correct online folder.
5. After uploading using these 3 options for taxa, BRs and images, select the options to
Rebuild BOL data tree views and Update online image counts – both of these options are
found on the Data tab.
6. Once complete, you can again select Upload history to check the all data have been
uploaded without error.
Copying image files to your server By default, BOL looks for the image files (as uploaded above) in a default folder in the
Brahmsonline folder called Images\DatabaseID. Thus if your database ID is EADATA, it will look in
Brahmsonline\Images\ Eadata.
Your physical image files (.jpgs or other) must be copied to this folder. If they are not, yet you
have uploaded the image metadata (as above), you will see something similar to the below:

The system knows there are linked images but cannot locate the images on your server.
The same database as above with the images on the server.
NB – the paths images are searched for can be edited using a BOL set up file and in practice, when
there are many images, you will probably want to store the BOL server images in multiple folders.
This is possible but not explained here. If you do want to read more about this topic now, refer to
the section Image folders on your server in the document http://herbaria.plants.ox.ac.uk/bol/Content/Projects/brahms/Resources/BRAHMSWebConnect.pdf
Zoomify images
Introduction Zoomify (http://www.zoomify.com/) makes high-quality images zoom-and-pan for fast,
interactive viewing on the web. BRAHMS online can use Zoomify to present images. When
Zoomified, your images (e.g. .jpg files) are converted to .pff files. You can batch process images
on the server using the Zoomify convert tool.
A folder showing some jpg images converted to pff files.
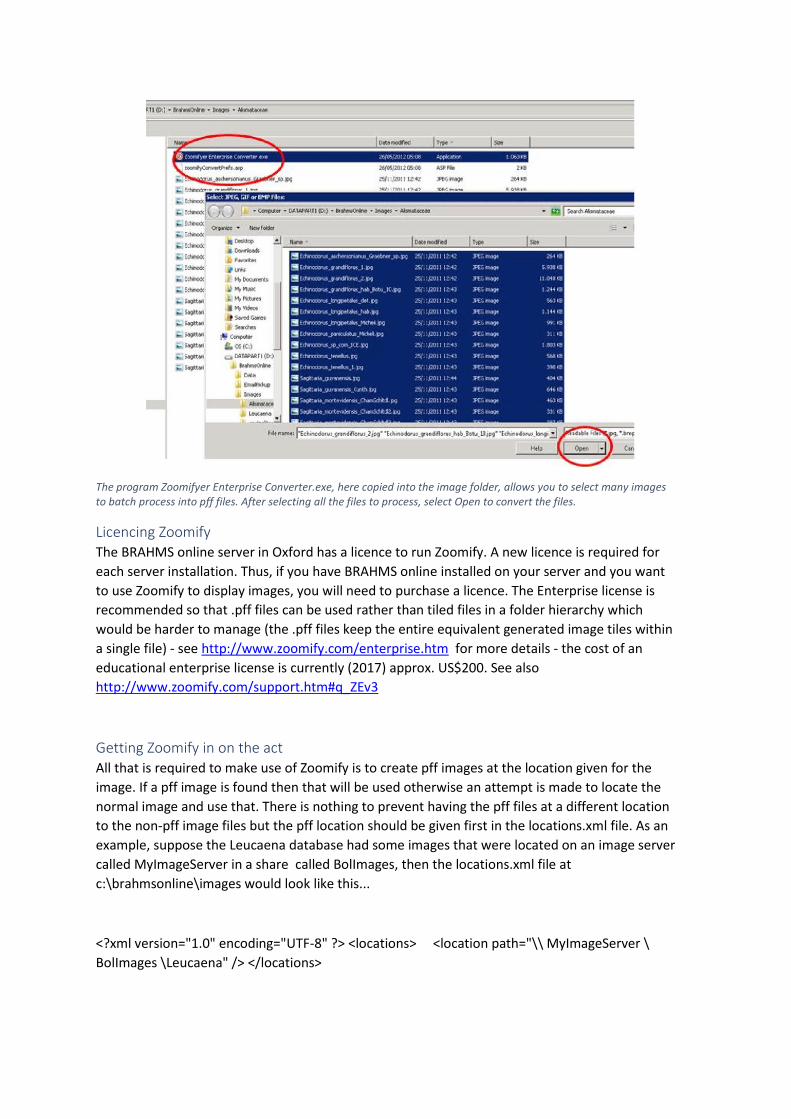
The program Zoomifyer Enterprise Converter.exe, here copied into the image folder, allows you to select many images to batch process into pff files. After selecting all the files to process, select Open to convert the files.
Licencing Zoomify The BRAHMS online server in Oxford has a licence to run Zoomify. A new licence is required for
each server installation. Thus, if you have BRAHMS online installed on your server and you want
to use Zoomify to display images, you will need to purchase a licence. The Enterprise license is
recommended so that .pff files can be used rather than tiled files in a folder hierarchy which
would be harder to manage (the .pff files keep the entire equivalent generated image tiles within
a single file) - see http://www.zoomify.com/enterprise.htm for more details - the cost of an
educational enterprise license is currently (2017) approx. US$200. See also
http://www.zoomify.com/support.htm#q_ZEv3
Getting Zoomify in on the act All that is required to make use of Zoomify is to create pff images at the location given for the
image. If a pff image is found then that will be used otherwise an attempt is made to locate the
normal image and use that. There is nothing to prevent having the pff files at a different location
to the non-pff image files but the pff location should be given first in the locations.xml file. As an
example, suppose the Leucaena database had some images that were located on an image server
called MyImageServer in a share called BolImages, then the locations.xml file at
c:\brahmsonline\images would look like this...
<?xml version="1.0" encoding="UTF-8" ?> <locations> <location path="\\ MyImageServer \
BolImages \Leucaena" /> </locations>

Now suppose you created pff files but wanted to keep them locally in a directory called
c:\PffFiles, then this location must come first and the locations.xml file would look like this - <?xml
version="1.0" encoding="UTF-8" ?> <locations> <location path="C:\PffFiles\Leucaena" />
<location path="\\ MyImageServer \ BolImages \Leucaena" /> </locations>
If you know that all of your online images are in .pff format then there is no need to give the non-
pff image location.
Creating PFF’s with Zoomify Enterprise Once you have a license for Zoomify Enterprise, nothing actually needs to be installed, you really
only need the Zoomifyer Enterprise Converter.exe file. Then you just need to create a config file
to go with it and you can then copy and run that executable anywhere to create your pff files - i.e.
no installation required.
The config file is important, it is a plain text file (i.e. created with notepad):
1. It must reside in the same folder as the Zoomifyer Enterprise Converter.exe executable 2. 2. It
must be named 'zoomifyConvertPrefs.asp' 3. It must contain the following line
'ZOOM_OUTPUT_TYPE: 1' (without the quote marks)
ZOOM_OUTPUT_TYPE: 1 indicates that you want a pff file output.
Nothing else is required, once you have the zoomifyConvertPrefs.asp file containing the line
ZOOM_OUTPUT_TYPE: 1 just put it somewhere convenient for you to run it and double click the
exe file then browse to the folder that contains the images you want to convert and select all the
images you want to convert and click ok. The converter will just work through all of the images
and put the resulting .pff image into the same folder, nothing else to it, nothing else needed.
There are other config options that could be used and other ways of running the tool but this is
the most straightforward and easy way to do it, just remember to keep the
zoomifyConvertPrefs.asp in the same place as the converter executable.
BOL search options
Broadly, searches on BRAHMS online can be carried out using the filters provided on the data
grid, image and map browse option screens - and/or using search forms with the search results
displayed as grids and maps - or in formatted reports. An example form search is provided here:
http://herbaria.plants.ox.ac.uk/bol/hanoi/formsearch.
An example of direct access to image browsing is provided here:
http://herbaria.plants.ox.ac.uk/bol/trin/explore?view=images&family=rubiaceae.
An example of direct access to a map view:
http://herbaria.plants.ox.ac.uk/bol/conifers/explore?view=map&genus=araucaria
Most users go to websites to find your data and (especially) images. Thus, rather than have a
home page cluttered with text that few will read, it is advisable to offer fast search options that
lead to images. Web pages can have elaborate text about the herbarium history and other text of
interest – but this is perhaps best stored under an About menu or other more specific menu
options.

The above site home page offers immediate search options by family, genus or species.
Browse options provide searchable access to data grids, images and maps.

The same site has a more advanced search page. Note that multiple options can be added when searching.