guide to visual basic 2008 (vb.net) - atwebpages.comdodes.atwebpages.com/docs/vb2008.pdfguide to...
TRANSCRIPT

Chris Dodemont 2012
C
Edition 1
Guide to Visual Basic 2008 (VB.NET)
Christiaan Dodemont

Contents 1. Lesson 1 .................................................................................................................................................... 5
1.1 Object Oriented Programming ............................................................................................................ 5
1.1.1 What is OOP? ............................................................................................................................... 5
1.1.2 What things make up OOP? ......................................................................................................... 5
1.2 Using Microsoft Visual Basic 2008 for the First Time. ........................................................................ 6
1.3.1 Integrated Development Environment ........................................................................................ 8
1.4 Exercise 1 ............................................................................................................................................ 9
2. Lesson 2 .................................................................................................................................................. 11
2.1 Deconstructing a Program ................................................................................................................ 11
2.1.1 What is in the Hello World program? ........................................................................................ 11
2.1.2 Classes ........................................................................................................................................ 11
2.1.3 Objects ....................................................................................................................................... 11
2.1.4 Instances .................................................................................................................................... 11
2.1.5 Method ...................................................................................................................................... 11
2.1.6 What did we actually do with this code? ................................................................................... 12
2.1.7 Naming Conventions .................................................................................................................. 12
2.2 Exercise 2 .......................................................................................................................................... 13
3. Lesson 3 .................................................................................................................................................. 14
3.1 Algorithms ......................................................................................................................................... 14
3.1.1 What is an Algorithm? ............................................................................................................... 14
3.1.2 Creating an Algorithm ................................................................................................................ 14
3.2 Exercise 3. ......................................................................................................................................... 15
3.3 Naming Conventions ......................................................................................................................... 17
4. Lesson 4 .................................................................................................................................................. 18

4.1 Control Structures ............................................................................................................................. 18
4.1.1 What is a Control Structure? ...................................................................................................... 18
4.1.2 Sequence .................................................................................................................................... 18
4.1.3 Selection ..................................................................................................................................... 18
4.2 Exercise 4a. ....................................................................................................................................... 19
4.3 Repetition .......................................................................................................................................... 21
4.4 Exercise 4b. ....................................................................................................................................... 21
5. Lesson 5 .................................................................................................................................................. 23
5.1 Flow Charts ....................................................................................................................................... 23
5.1.1 What is a Flow Chart? ................................................................................................................ 23
5.1.2 Sequence .................................................................................................................................... 23
5.1.3 Selection ..................................................................................................................................... 24
5.1.4 Exercise 5a. ................................................................................................................................ 24
5.1.5 Repetition ................................................................................................................................... 24
5.1.6 Exercise 5b. ................................................................................................................................ 24
6. Lesson 6 .................................................................................................................................................. 25
6.1 Pseudocode, Selections and Repetition. ........................................................................................... 25
6.1.1 What is Pseudocode? ................................................................................................................. 25
6.2 Sequence ........................................................................................................................................... 25
6.3 Selection ............................................................................................................................................ 25
6.4 Which Selection to Use? ................................................................................................................... 26
6.4.1 IF / THEN / ELSE .......................................................................................................................... 26
6.4.2 SELECT CASE ............................................................................................................................... 26
6.5 Repetition .......................................................................................................................................... 27
6.6 Which Repetition to Use? ................................................................................................................. 27

6.6.1 DO WHILE Loop .......................................................................................................................... 27
6.6.2 FOR Loop .................................................................................................................................... 28
6.7 Exercise 6a. ....................................................................................................................................... 28
6.8 Exercise 6b. ....................................................................................................................................... 28
6.9 Exercise 6c. ........................................................................................................................................ 28
7. Lesson 7 .................................................................................................................................................. 32
7.1 Variables and Data Types .................................................................................................................. 32
7.1.1 What is a Variable? .................................................................................................................... 32
7.1.2 What are Datatypes? ................................................................................................................. 32
7.2 Exercise 7a. ....................................................................................................................................... 33
7.3 Exercise 7b. ....................................................................................................................................... 35
8. Lesson 8 .................................................................................................................................................. 36
8.1 Functions and Procedures ................................................................................................................. 36
8.1.1 What are Functions and Subs? .................................................................................................. 36
8.1.2 What is the difference between Functions and Subs? .............................................................. 36
8.2 Sorry, I Still Don’t Understand .......................................................................................................... 37
8.3 Exercise 8a. ....................................................................................................................................... 38
8.4 Parameters ........................................................................................................................................ 39
8.5 Exercise 8b. ....................................................................................................................................... 40
8.6 Looking at the Function from Exercise 8b ........................................................................................ 41
8.7 Exercise 8c ......................................................................................................................................... 41
9. Useful Resources ..................................................................................................................................... 42

1. Lesson 1
1.1 Object Oriented Programming
1.1.1 What is OOP? We create objects in a program that perform separate tasks. We can then send / receive information from each of these objects to complete a task.
Let’s use The School of the Nations as a program example.
1.1.2 What things make up OOP? 1. Class: Define the basic characteristics of a thing ie an object. What does it look like? What can it
do? How is it used?
a. Class Classroom. A Number of chairs, whiteboard, power points, light switches, doors, windows, projectors etc.
b. Class Pen. Outer casing, ink and place for ink to go in / come out.
2. Object: An object is an example of a class that can perform specific tasks.
a. Object: Secondary Computer Lab, a type of classroom. Whiteboard, light switches, doors etc.
b. Object: Red Whiteboard Marker, a type of pen. Red ink, plastic outer casing and exit/entry point for ink.
3. Instance: An object that is in use when the program is created, ie Secondary Computer Lab or Red Whiteboard Marker.
4. Method: The things that an object can do.
a. Secondary Computer Lab can be in use, empty, lights on, lights off.
b. Red Whiteboard Marker can write.
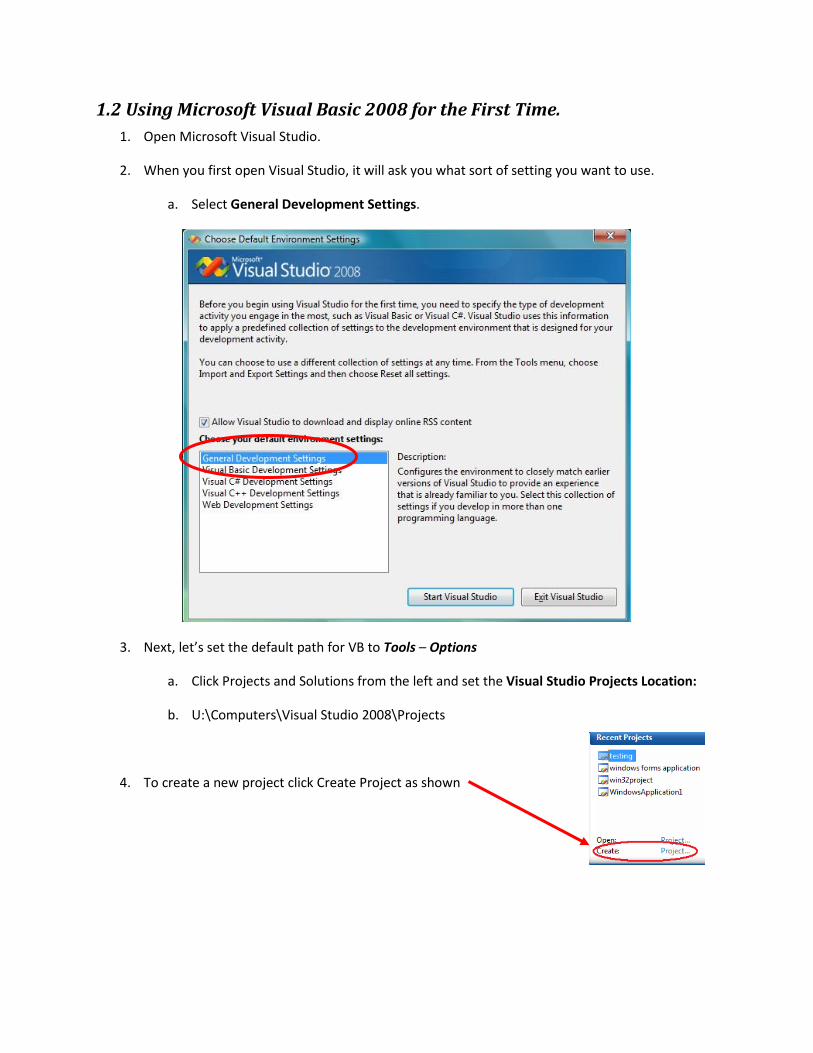
1.2 Using Microsoft Visual Basic 2008 for the First Time. 1. Open Microsoft Visual Studio.
2. When you first open Visual Studio, it will ask you what sort of setting you want to use.
a. Select General Development Settings.
3. Next, let’s set the default path for VB to Tools – Options
a. Click Projects and Solutions from the left and set the Visual Studio Projects Location:
b. U:\Computers\Visual Studio 2008\Projects
4. To create a new project click Create Project as shown
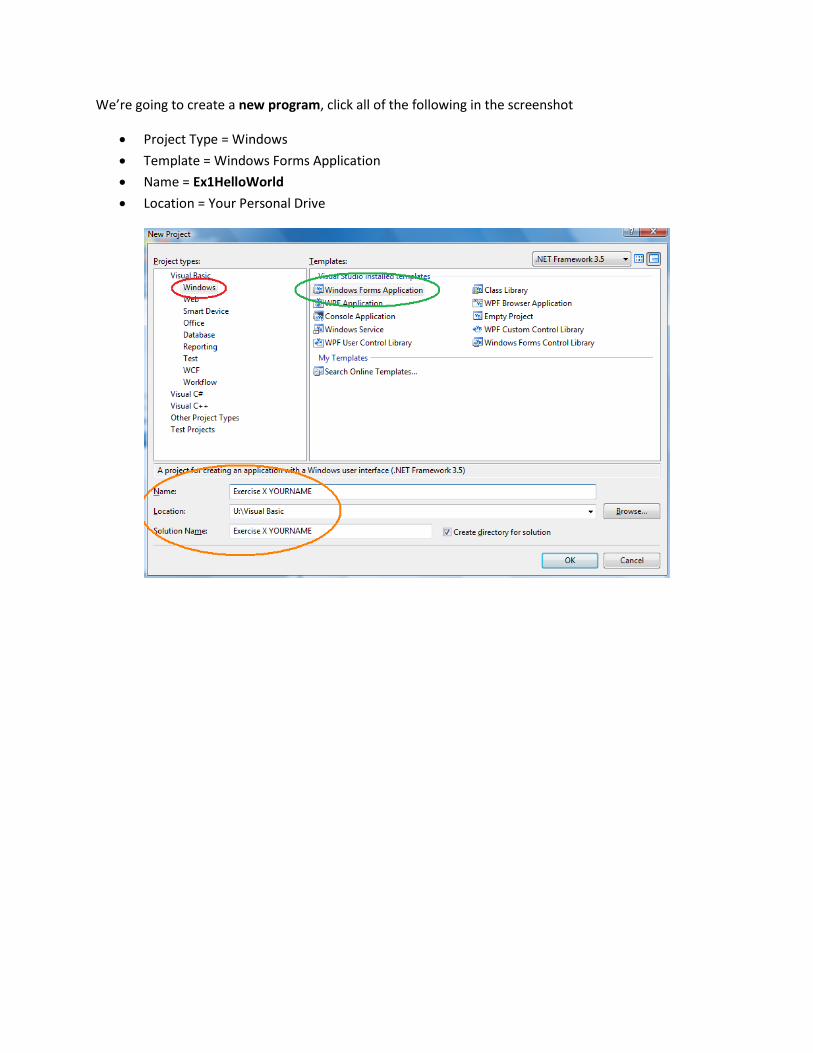
We’re going to create a new program, click all of the following in the screenshot
• Project Type = Windows • Template = Windows Forms Application • Name = Ex1HelloWorld • Location = Your Personal Drive
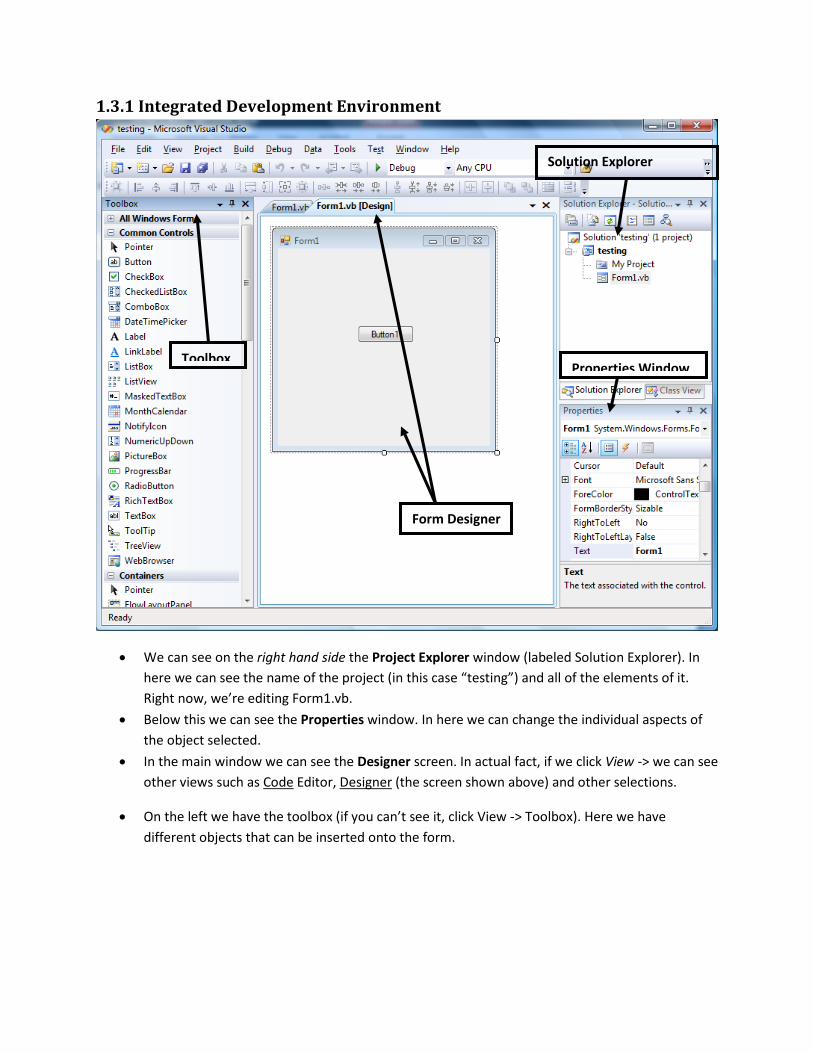
1.3.1 Integrated Development Environment
• We can see on the right hand side the Project Explorer window (labeled Solution Explorer). In here we can see the name of the project (in this case “testing”) and all of the elements of it. Right now, we’re editing Form1.vb.
• Below this we can see the Properties window. In here we can change the individual aspects of the object selected.
• In the main window we can see the Designer screen. In actual fact, if we click View -> we can see other views such as Code Editor, Designer (the screen shown above) and other selections.
• On the left we have the toolbox (if you can’t see it, click View -> Toolbox). Here we have different objects that can be inserted onto the form.
Solution Explorer
Properties Window
Form Designer
Toolbox
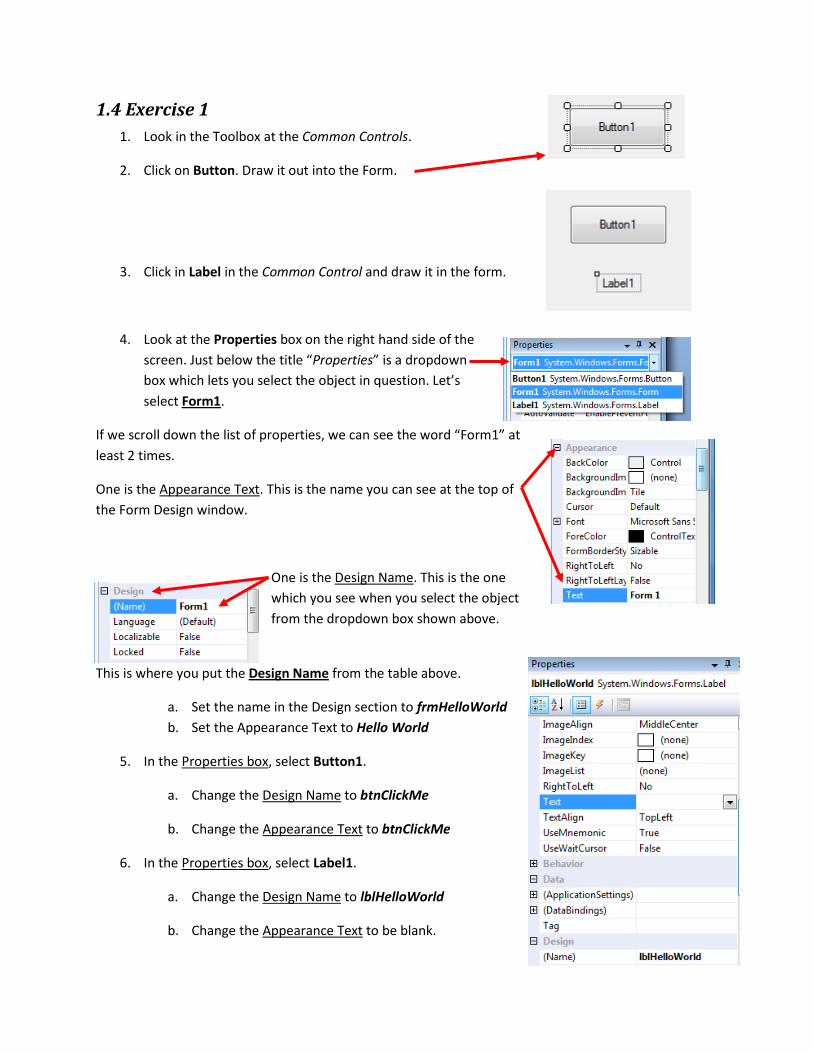
1.4 Exercise 1 1. Look in the Toolbox at the Common Controls.
2. Click on Button. Draw it out into the Form.
3. Click in Label in the Common Control and draw it in the form.
4. Look at the Properties box on the right hand side of the screen. Just below the title “Properties” is a dropdown box which lets you select the object in question. Let’s select Form1.
If we scroll down the list of properties, we can see the word “Form1” at least 2 times.
One is the Appearance Text. This is the name you can see at the top of the Form Design window.
One is the Design Name. This is the one which you see when you select the object from the dropdown box shown above.
This is where you put the Design Name from the table above.
a. Set the name in the Design section to frmHelloWorld b. Set the Appearance Text to Hello World
5. In the Properties box, select Button1.
a. Change the Design Name to btnClickMe
b. Change the Appearance Text to btnClickMe
6. In the Properties box, select Label1.
a. Change the Design Name to lblHelloWorld
b. Change the Appearance Text to be blank.

Now we’re going to make something happen on the Click Me! Button.
7. Double Click the Click Me! Button.
You should see the following code:
Public Class frmHelloWorld Private Sub btnClickMe_Click(ByVal sender As System.Object, ByVal e As System.EventArgs) Handles btnClickMe.Click End Sub End Class
8. Change the code to ensure that this is the only code on the whole screen.
Public Class frmHelloWorld Private Sub btnLogin_Click() Handles btnClickMe.Click lblHelloWorld.Text = "Hello World!" End Sub End Class
9. Notice that at the top of the Tab, it still says Form1.vb*.
The star indicates the the program is unsaved.
Form1.vb indicates the name. We need to give it something more meaningful.
a. Click File – Save Form1.vb As
b. Save it as frmHelloWorld – ensure it is on your personal drive.
10. Finally, we need to debug the program. This means make the code into a working program and test it.
a. Click the Play button next to the Debug drop down option at the top.
The program should now appear on the screen – click the button to test that it works!

2. Lesson 2
2.1 Deconstructing a Program
2.1.1 What is in the Hello World program? In the last lesson, we learned about classes, objects, instances and methods. Let’s look at our Hello World program and see what is what.
2.1.2 Classes
Here we have different controls that we can put into the program. Buttons, Labels, CheckBoxes are all examples of classes.
Also, the Form itself is an example of a class. Look at the program code:
Public Class frmHelloWorld Private Sub btnLogin_Click() Handles btnClickMe.Click lblHelloWorld.Text = "Hello World!" End Sub End Class
2.1.3 Objects The objects we have in the program are frmHelloWorld, btnClickMe and lblHelloWorld. Notice that these are our specific copies of the classes of buttons, labels and forms.
2.1.4 Instances As we can see, we have our objects btnClickMe, frmHelloWorld and lblHelloWorld. Therefore, these are the instances because we see them when the program is run.
2.1.5 Method We have one method here – the Click of the btnClickMe object. See the code:
Handles btnClickMe.Click
This is called an EVENT.
2.1.6 What did we actually do with this code? 1. We created an event, the mouse click on the btnClickMe button.
2. When the button was clicked - Handles btnClickMe.Click – we then made the object lblHelloWorld into some text “Hello World!”
This is a very simple program, but it is a program none the less!
2.1.7 Naming Conventions Notice that when we’re creating our programs, every object has a specific 3 letter code at the start of its Design Name? We do this because:
1. If we have 5, 10, 15… 100 different objects, we need to make it easier for ourselves to identify each type of class.
2. We need to give a useful design name because this is the name that the program uses when we write code – notice the lblMyName = “xxxxx” – this is how we assign the data to the object.
Here is the list of Classes and their 3 letter codes:
Object (Naming Convention) Example
Form frm frmLoginScreen
Label lbl lblLoginText
Text Box txt txtStudentName
Button btn btnOK
Combo Box cbo cboSubjects
List Box lst lstCountry
Picture Box pic picHouse
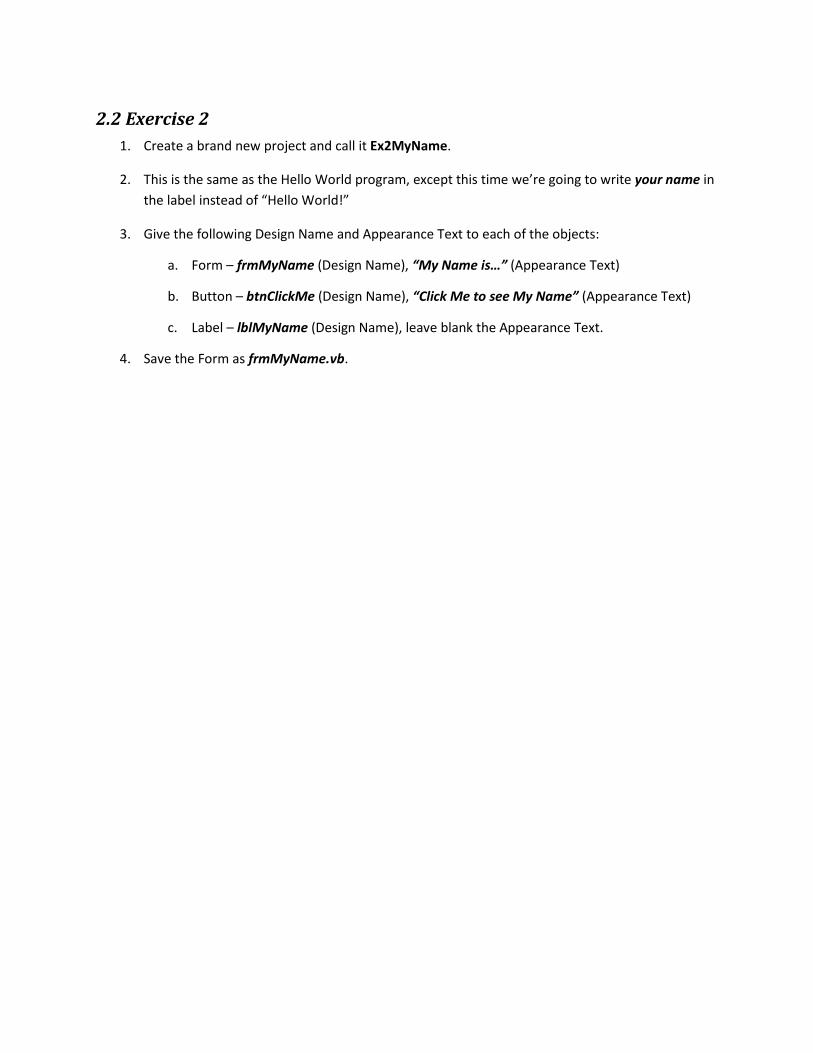
2.2 Exercise 2 1. Create a brand new project and call it Ex2MyName.
2. This is the same as the Hello World program, except this time we’re going to write your name in the label instead of “Hello World!”
3. Give the following Design Name and Appearance Text to each of the objects:
a. Form – frmMyName (Design Name), “My Name is…” (Appearance Text)
b. Button – btnClickMe (Design Name), “Click Me to see My Name” (Appearance Text)
c. Label – lblMyName (Design Name), leave blank the Appearance Text.
4. Save the Form as frmMyName.vb.

3. Lesson 3
3.1 Algorithms
3.1.1 What is an Algorithm? An Algorithm is basically a list of instructions in English (not in computer code) for a program to perform.
Before creating an Algorithm, you need to analyze a problem.
1. What do I want to put into the program – Input.
2. What do I want to get out of the program – Output.
3. What do I need to do to get the output?
We create a procedure with many steps to solve out problem.
3.1.2 Creating an Algorithm Think about this: How to get to school in the morning?
An algorithm might be:
1. Wake Up
2. Shower and Brush Teeth
3. Eat breakfast
4. Put on school uniform and pack schoolbag
5. Leave the house and catch the bus.
6. Walk from bus stop to school.
These steps MUST be followed in order – if we swapped step 3 with step 5, we would have a very different outcome.

3.2 Exercise 3. 1. Create an algorithm for making a program take a name from a text box and output it on the
screen via a pop-up box.
2. Create a new project in Visual Studio 2008. Call it Ex3aMsgBox.
3. Create the following:
Object (Naming Convention) Design -> Name Appearance -> Text
Form frm frmMsgBox Login Screen
Text Box txt txtInputName -- make this blank --
Button btn btnLogin Click to Login
Label lbl lblWelcomeText Please type your name and click Login
It should look like this at the end:
4. Save Form1.vb As frmMsgBox.vb.

5. Double Click the button end move to the Designer screen.
a. Enter the following code:
Public Class frmMsgBox
Private Sub btnLogin_Click() Handles btnLogin.Click
MsgBox(txtInputName.Text, vbOKOnly, "Login Name")
End Sub
End Class
6. Debug the program and test to see that it works.

3.3 Naming Conventions Notice that when we’re creating our programs, every object has a specific 3 letter code at the start of its Design Name? We do this because:
1. If we have 5, 10, 15… 100 different objects, we need to make it easier for ourselves to identify each type of class.
2. We need to give a useful design name because this is the name that the program uses when we write code – notice the lblMyName = “xxxxx” – this is how we assign the data to the object.
Here is the list of Classes and their 3 letter codes:
Object (Naming Convention) Example
Form frm frmLoginScreen
Label lbl lblLoginText
Text Box txt txtStudentName
Button btn btnOK
Combo Box cbo cboSubjects
List Box lst lstCountry
Picture Box pic picHouse

4. Lesson 4
4.1 Control Structures
4.1.1 What is a Control Structure? A control structure is a way of helping us create an algorithm by using a logical flow for the program.
There are 3 Control Structures.
1. Sequence
2. Selection
3. Repetition
4.1.2 Sequence This means that a solution to a problem will follow steps in a given order without missing or changing any directions.
Take our last exercise for example.
1. User enters a Name
2. User Clicks the Button
3. A Message Box appears on the screen with the user name.
4. End
These steps MUST be followed in order and there are no choices that we need to make for anything. This is the most basic type of algorithm/program.
4.1.3 Selection This means at some point in the problem, a choice needs to be made. For example take a student grade.
1. Student completes exam
2. Teacher marks exam
3. Teacher writes mark
4. If the grade is greater than or equal to 65%
a. Then Output = Pass
b. Else Output = Fail
5. End

4.2 Exercise 4a. 1. Create an algorithm for making a program:
a. Take a name from a text box and compare it to an existing name. If the names are the same, then output “Correct User” on the screen via a pop-up box. If not, then output “Incorrect User” on the screen via a pop-up box
2. Create a new project in Visual Studio 2008. Call it Ex4aSelection.
3. Create the following:
Object (Naming Convention) Design -> Name Appearance -> Text
Form frm frmLoginScreen Login Screen
Text Box txt txtInputName -- make this blank --
Button btn btnLogin Click to Login
Label lbl lblWelcomeText Please type your name and click Login
It should look like this at the end:
4. Save Form1.vb As frmLoginScreen.vb.
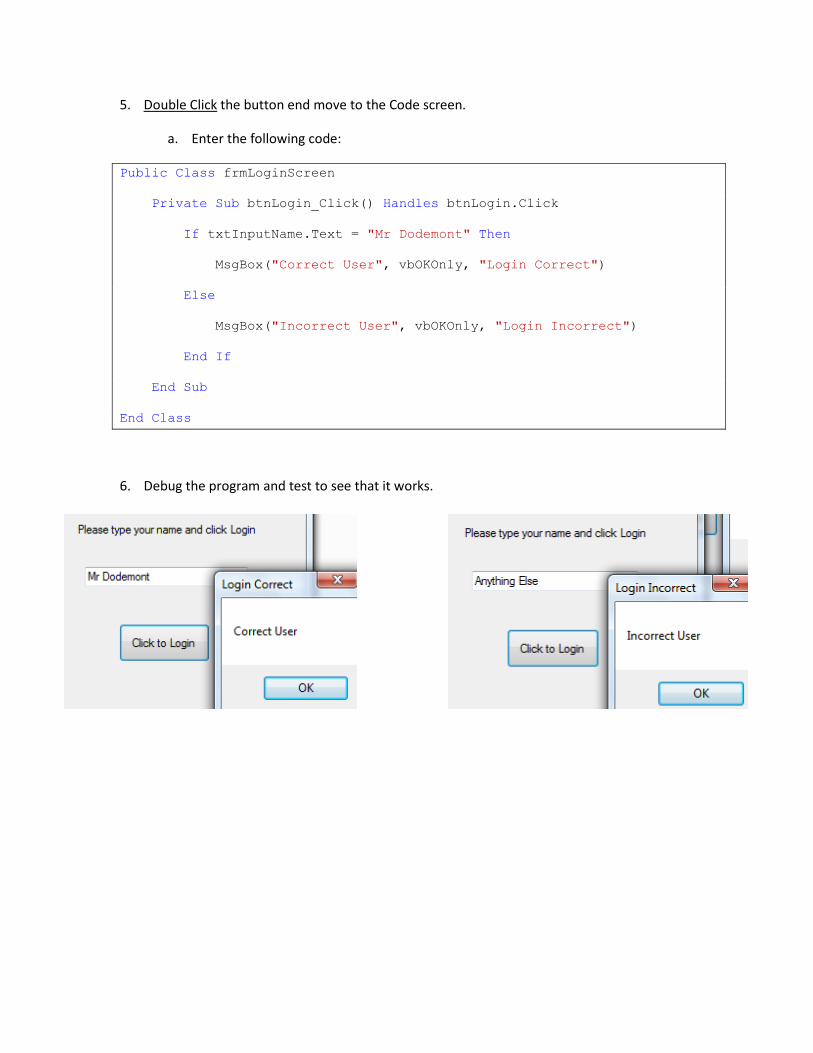
5. Double Click the button end move to the Code screen.
a. Enter the following code:
Public Class frmLoginScreen
Private Sub btnLogin_Click() Handles btnLogin.Click
If txtInputName.Text = "Mr Dodemont" Then
MsgBox("Correct User", vbOKOnly, "Login Correct")
Else
MsgBox("Incorrect User", vbOKOnly, "Login Incorrect")
End If
End Sub
End Class
6. Debug the program and test to see that it works.

4.3 Repetition At some point in the program, something will repeat (loop) over and over until a certain condition is met. For example, counting to 10.
1. Number = 1
2. Output Number on the screen
3. Is Number greater than 10?
a. No.
i. Add 1 to Number and go back to Step 1 with a new number.
b. Yes.
i. Output Number on the screen.
4. End.
4.4 Exercise 4b. 1. Create an algorithm for making a program:
a. User Clicks a Button and a program counts from 2 to 10 on the screen showing only even numbers.
2. Create a new project in Visual Studio 2008. Call it Ex4bRepetition.
3. Create the following:
Object (Naming Convention) Design -> Name Appearance -> Text
Form frm frmCounting Counting Form
List Box lst lstInputNumber -- make this blank --
Button btn btnProceed Click to Proceed
Label lbl lblInstructions Click Proceed to count the numbers.

It should look like this at the end:
4. Save Form1.vb As frmCounting.vb.
5. Double Click the button to move to the Code screen.
b. Enter the following code:
Public Class frmCounting
Private Sub btnProceed_Click() Handles btnProceed.Click
For inputNumber = 0 To 10
lstInputNumber.Items.Add(inputNumber)
inputNumber = inputNumber + 1
Next inputNumber
End Sub
End Class
6. Debug the program and test to see that it works.

5. Lesson 5
5.1 Flow Charts
5.1.1 What is a Flow Chart? A Flow chart is a simple graphical representation of an algorithm. The basic ingredients of a flow chart are:
Start / Stop – the beginning / end of a flowchart.
Process – Represents a function such as a calculation.
Input / Output – Data going in or information coming out of a program.
Decision – Selections (choice) based on given conditions.
Connector – Indicates the continuity of a flowchart to the next page if a page is not long enough.
Flow Lines – Direction of the flow of data or information.
Let’s look at the previous lesson’s Control Structures in terms of a Flow Chart.
5.1.2 Sequence This means that a solution to a problem will follow steps in a given order without missing or changing any directions. Take the exercise where we had a user enter a name, click the proceed button and the program creates a pop-up box showing the user’s name.
User enters Name
Start / Stop
Process
Input / Output
Decision
Start Show User’s Name in Pop-up Box
Stop
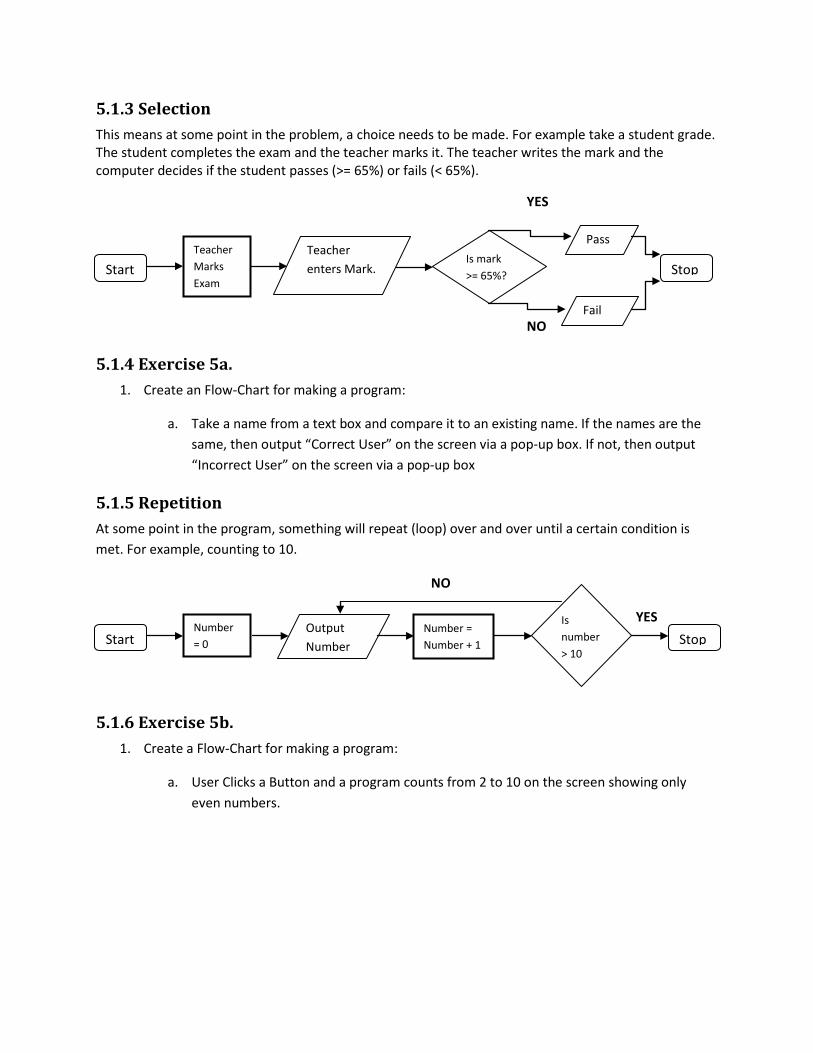
5.1.3 Selection This means at some point in the problem, a choice needs to be made. For example take a student grade. The student completes the exam and the teacher marks it. The teacher writes the mark and the computer decides if the student passes (>= 65%) or fails (< 65%).
YES
NO
5.1.4 Exercise 5a. 1. Create an Flow-Chart for making a program:
a. Take a name from a text box and compare it to an existing name. If the names are the same, then output “Correct User” on the screen via a pop-up box. If not, then output “Incorrect User” on the screen via a pop-up box
5.1.5 Repetition At some point in the program, something will repeat (loop) over and over until a certain condition is met. For example, counting to 10.
NO
YES
5.1.6 Exercise 5b. 1. Create a Flow-Chart for making a program:
a. User Clicks a Button and a program counts from 2 to 10 on the screen showing only even numbers.
Start Teacher enters Mark.
Teacher Marks Exam
Is mark >= 65%? Stop
Pass
Fail
Start Number = 0
Output Number
Is number > 10
Number = Number + 1 Stop

6. Lesson 6
6.1 Pseudocode, Selections and Repetition.
6.1.1 What is Pseudocode? Pseudocode is used to plan a program after you have completed an algorithm / flowchart. It is a mixture of Computer code and English.
Let’s continue on from our algorithms and flow charts.
6.2 Sequence Remember, a sequence means a problem will follow steps in a given order without missing or changing any directions. Take the exercise where we had a user enter a name, click the proceed button and the program creates a pop-up box showing the user’s name. Notice that each line we separate with a semicolon.
BEGIN
INPUT Username;
DISPLAY Username;
END;
6.3 Selection At some point in the problem, a choice needs to be made. For example take a student grade. The student completes the exam and the teacher marks it. The teacher writes the mark and the computer decides if the student passes (>= 65%) or fails (< 65%). We have 2 selection types – IF / THEN / ELSE and SELECT CASE.
BEGIN
Mark = 0;
INPUT Student_mark;
IF Student_mark >= 65%
THEN
DISPLAY “Pass”;
ELSE
DISPLAY “Fail”; END IF;
END;
BEGIN
Mark = 0;
INPUT Student_mark;
SELECT CASE Student_mark
CASE >= 65%
DISPLAY “Pass”;
CASE Else
DISPLAY “Fail”; END IF;
END;
YES
User enters Name
Start
Show User’s Name in Pop-up Box
Stop
Teacher enters Mark.
Teacher Marks Exam
Is mark >= 65%?
Pass Fail
Start Stop Teacher enters Mark.
Teacher Marks Exam
Is mark >= 65%?
Pass
Fail NO

6.4 Which Selection to Use? As said earlier, we have 2 types of selections to use – IF / THEN / ELSE and SELECT CASE. So how do we know when to use either one?
6.4.1 IF / THEN / ELSE When you have a selection of 2-3 choices, then it’s ok to choose IF / THEN / ELSE. If something is either one thing or anything else, then this is ideal for IF / THEN / ELSE. Examples:
Result is greater than 65 or equal to 65, PASS. ELSE Fail.
IF grade > 65
THEN
result = “PASS”;
ELSE IF grade = 65 THEN
result = “PASS”;
ELSE result = “FAIL”;
END IF;
Is the colour Black? If so then = YES otherwise the only other possibility is NO.
IF colour = black
THEN
DISPLAY “Yes”;
ELSE
DISPLAY “No”;
END IF;
6.4.2 SELECT CASE If you have 3 or more options, it’s usually better to use SELECT CASE.
Mark 90 or above = A, 80 – 89 = B, 70-79 = C, 60-69 = C–, 50-59 = D otherwise = E
SELECT CASE grade
CASE >90 result = A
CASE 80-89 result = B
CASE 70-79 result = C
CASE 60-69 result = D
CASE else result = E
END SELECT ;

6.5 Repetition At some point in the program, something will repeat (loop) over and over until a certain condition is met. For example, counting to 10. Here we have 2 types of loops, WHILE and FOR.
BEGIN
Number = 0;
DO WHILE Number > 10
DISPLAY Number
Number = Number + 1
END DO;
END;
BEGIN
Number = 0;
FOR Number = 0 TO 10
DISPLAY Number;
NEXT Number;
END;
NO
YES
6.6 Which Repetition to Use? How do we choose which repetition to use in our pseudocode and program? Let’s look at both types.
6.6.1 DO WHILE Loop Usually you would choose a DO WHILE loop if you’re not entirely certain when the loop will end. In other words, you will keep retrying until some condition is met.
Did I pass? Keep trying until l do.
DO WHILE Mark < 65
Retry Exam
Mark = New Result
LOOP
Start Number = 0
Output Number
Is number > 10
Number = Number + 1 Stop

6.6.2 FOR Loop If you have a set limit for the number of times you want to run something, then it’s best to use a FOR Loop. Notice that the last statement is incrementing the number in question.
Print out the Square of numbers 0 up to 10.
FOR number = 0 TO 10
DISPLAY number * number
NEXT number
6.7 Exercise 6a. 1. Create Pseudocode for making a program:
a. Take a name from a text box and compare it to an existing name. If the names are the same, then output “Correct User” on the screen via a pop-up box. If not, then output “Incorrect User” on the screen via a pop-up box
6.8 Exercise 6b. 1. Create Pseudocode for making a program:
a. User Clicks a Button and a program counts from 2 to 10 on the screen showing only even numbers.
6.9 Exercise 6c. 1. Create a Flowchart and Pseudocode for a program that:
a. Takes a number from a user. It will then take the number and multiply the input number exponentially by 3. It will keep doing this until the number is greater than 1000. When you reach the end of this loop, a picture of a Tick is shown on the form.
2. Create a new project and call it Ex6cExponential.
3. Create the following:
Object (Naming Convention) Design -> Name Appearance -> Text Form frm frmExponential Exponential Calculator Text Box txt txtInputNumber -- make this blank -- List Box lst lstExponential -- make this blank -- Button btn btnCalculate Click to Calculate Label lbl lblInputnumber Please put a number under 50
in the Text Box. Picture Box pic picTick -- make this blank --

Your form should look something like this.
4. Right click on the project name in the Solution Explorer.
a. Click Add – New Folder
b. Call the folder Resources.
c. Click the little arrow on the Picture Box and click Choose Image.
d. Ensure Project resource file is clicked and at the bottom, click Import.
e. Change the file type to Image Files and find the file lesson6c.jpg on the Student Shared$ drive.
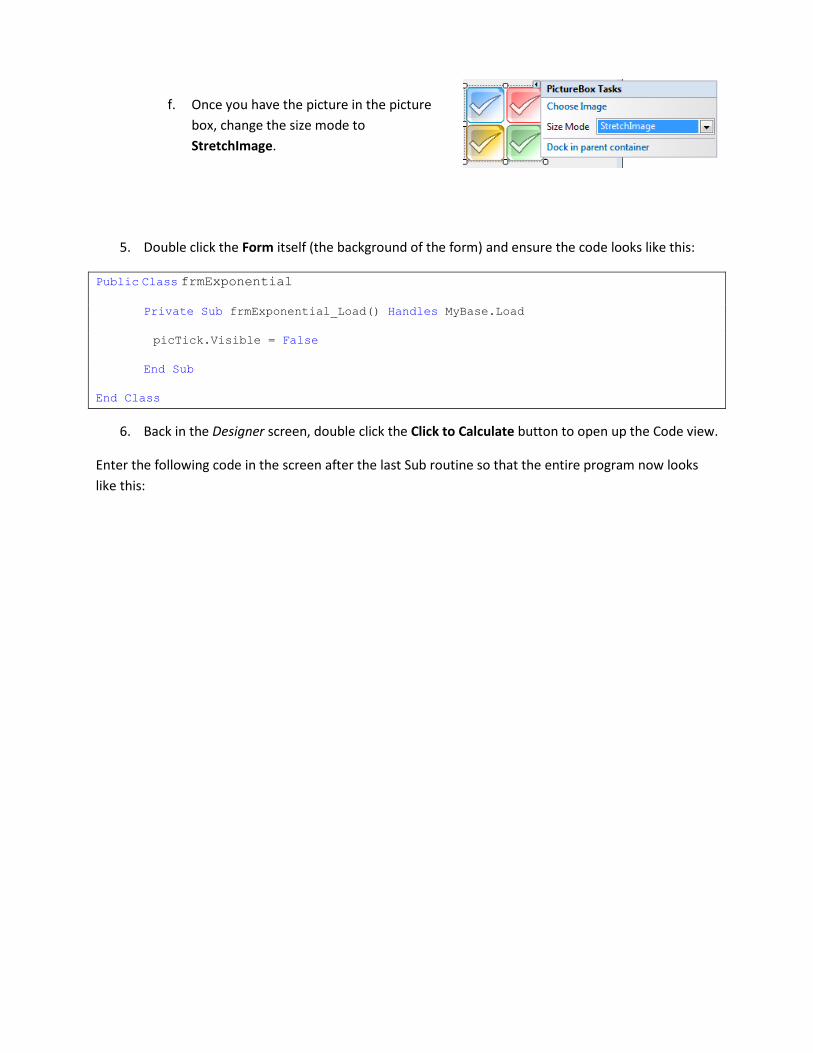
f. Once you have the picture in the picture box, change the size mode to StretchImage.
5. Double click the Form itself (the background of the form) and ensure the code looks like this:
Public Class frmExponential
Private Sub frmExponential_Load() Handles MyBase.Load
picTick.Visible = False
End Sub
End Class
6. Back in the Designer screen, double click the Click to Calculate button to open up the Code view.
Enter the following code in the screen after the last Sub routine so that the entire program now looks like this:

Public Class frmExponential
Private Sub frmExponential_Load() Handles MyBase.Load
picTick.Visible = False ' Make the ticks invisible when program loads
End Sub
Private Sub btnCalculate_Click() Handles btnCalculate.Click
Dim exponential As Integer
picTick.Visible = False ' Make the ticks invisible until exponential > 1000
exponential = Val(txtInputNumber.Text) ' make the Var = the input number
Do While exponential < 1000 ' until the number > 1000?
lstExponential.Items.Add(exponential) ' show it in the list box
exponential = exponential * 3 ' exponential value of 3
Loop
lstExponential.Items.Add(exponential) ' show the last number
picTick.Visible = True ' show the Tick
End Sub
End Class
7. See that your program works correctly.

7. Lesson 7
7.1 Variables and Data Types
7.1.1 What is a Variable? A variable is a memory location allocated (temporarily) for usage of a computer program when it is run.
What does this actually mean? Think of a variable like algebra in maths. For example: • x = 7 • x2 = 49
Why do we need to use a variable? The good thing about a variable is that you can give it a value and then use it anywhere in your program as many times as you like.
Why is this good? First, it saves typing. Imagine if you have to type
DISPLAY “Welcome to Visual Basic – Thank you for taking the time to learn this lesson on Variables”
What if we needed to put this in 5 or 10 different places in a program? This is a waste of time, energy and in the end, computer usage.
x = “Welcome to Visual Basic – Thank you for taking the time to learn this lesson on Variables”
DISPLAY x
If we need to use x again later, we only need to type DISPLAY x.
What’s also great is that if we need to change the value at some stage, then we change it in one place. For example, what happens if we noticed that we should have typed
DISPLAY “Welcome to Visual Studio 2008 – Thank you for taking the time to learn this lesson on Variables”
Can you imagine having to find this line in 5, 10, 15 different places and update it? If we have it set in one place, we only fix it once.
7.1.2 What are Datatypes? Now we realize what a Variable is, we need to tell it what TYPE of variable we want to use. Data types define the type of data that will be saved in a variable. For example:
“Welcome to Visual Studio 2008 – Thank you for taking the time to learn this lesson on
Variables” is a sentence, ie Text – it would not be categorized as a number. We call this a STRING.

Why do we bother? Well the main reason is that the computer knows how to best use its memory to save your data. This means the program works faster in the end and is generally more efficient. Below is a list of the types of data types we use in Visual Studio 2008.
Data Type Description (Usage) Prefix (Naming Convention) String Text Values str Integer Numbers int Single Numbers sng Double Numbers dbl Long Numbers lng Currency Monetary Calculations cur Date Date and Time dt Boolean Yes / No values bln
Notice that we have a naming convention as we do with the object in the database. We will look at these later.
7.2 Exercise 7a. 1. We will create a program that lets the computer randomly pick a number between 1 and 10.
The user will then guess the number until they get the number picked by the computer.
a. Create a flowchart for this program.
b. Create pseudocode for the program.
c. Create a form that contains the following objects with the corresponding properties.
Object (Naming Convention) Design -> Name Appearance -> Text Form frm frmGuessNumber Guess the Number Text Box txt txtInputNumber -- make this blank -- Label lbl lblInputnumber Enter a number between 1 – 10 Button btn btnGuess How was my Guess? Label lbl lblComputerNumber -- make this blank --
d. Save Form1.vb As frmGuessNumber.
e. Once you have created the form and have set the object properties, put the following in the Code screen.

Public Class frmGuessNumber Private Sub btnGuess_Click() Handles btnGuess.Click Dim RandomClass As New Random() 'Start Using Random Dim intRandomNumber As Integer 'Create a Variable for the computer intRandomNumber = RandomClass.Next(1, 10) 'Generate a Number between 1 and 10 If Val(txtInputNumber.Text) = intRandomNumber Then 'Val turns the value into a number lblComputerNumber.Text = "Good, " & txtInputNumber.Text & " is correct!" Else lblComputerNumber.Text = "Sorry, " & intRandomNumber & " was the number. Try again!" End If End Sub Private Sub btnClear_Click() Handles btnClear.Click txtInputNumber.Text = "" lblComputerNumber.Text = "" End Sub
End Class
Notice that we use a variable intRandomNumber. We assign a value, the randomly generated number, to it early on so that we don’t need to type it any more in the program and can change it if we need to in only 1 place.
f. Test the program – it should look like this:

7.3 Exercise 7b. 1. Edit the previous exercise and create a variable to store:
a. Success Message (a String) – set this to the Good message in 7a.
b. Failure Message (a String) – set this to the Sorry message in 7a.
c. The Input Number (an Integer) – set this to the text box value in 7a.
d. Save frmGuessNumber.vb As frmGuessNumber7b.

8. Lesson 8
8.1 Functions and Procedures
8.1.1 What are Functions and Subs? Imagine that we have a program in which we need to draw specific shapes such as triangles and squares. Let’s also imagine that we have a selection in which if someone fails a task, then a triangle appears on the screen. If the person passes the task, a square appears on the screen.
The problem is that if we have many of these tasks, then we will have to write the code to draw a square or triangle over and over again until the program is finished. This is a big waste of time.
Why not just write a quick command that draws the shape? Then we can call that command at any time whenever we need it.
We have 2 main types of these commands:
1. Functions
2. Subs
8.1.2 What is the difference between Functions and Subs? The main difference is what you get back from each type of command.
• Functions: You have a value returned.
For example say we have a Function that finds the square of a number. We don’t know what the result will be unless we give it a number to start with. So we send the number “2” to the function and it returns the value “4”.
• Subs (Sub Procedure): You don’t return any value. For example, we can write a Sub to clear the screen, or in our example above, draw a shape on the screen. These are obviously a little simpler than Functions.

So how do we know when to use each one? Well think of these examples:
1. We make a command to draw circles whenever we want.
a. Is there any comparison or work of value that needs to be saved for later?
b. Sub or Function?
2. We make a command to check whether a person has included a “@” in an email address.
a. Is there any comparison or work of value that needs to be saved for later?
b. Sub or Function?
8.2 Sorry, I Still Don’t Understand Let’s look at this tricky example:
Here is the first pseudocode:
BEGIN
Input = mark for assignment (a score on an assignment from the user)
CALL command to Calculate the percentage and put on the screen.
END
This is pretty simple – take a grade for an assignment and run a command to find the percentage of the number and output it on screen.
Now let’s look at this second pseudocode:
BEGIN
Input = mark for assignment (a score on an assignment from the user)
CALL command to Calculate the percentage and save this value in a variable intPercentage.
If intPercentage above 64%?
Yes: output PASS
No: output FAIL
End if
END

We said before that the difference is a Function returns a value, the Sub doesn’t – but wait, one of them is putting something on screen, the other is saving the value. So in effect they’re both returning something aren’t they?
Wrong.
The question you have to ask yourself is – do we care what the thing that we return?
In the first pseudocode we take the number and make a percentage. Then we show it on the screen. Do we care what the result is? No…
In the second pseudocode we take the number and make a percentage. Then we use this number for a comparison later on. Did we can what the result was? Yes!
So, the first pseudocode we would use a Sub. In the second, we use a Function.
8.3 Exercise 8a. Let’s make a program using Subs first.
1. Create a new project and call it Ex8aSubs
2. Create a form similar to the one listed here.
3. Ensure that all your objects have suitable names.
4. Save Form1.vb As frmPercentage
5. Double Click the Process button and add the following code in the code viewer:
Public Class frmPercentage Dim intInput As Integer Private Sub subCalculatePercentage() Dim intPercentage As Integer intPercentage = intInput * 2 MsgBox(intPercentage, vbOKOnly, "Percentage") End Sub Private Sub btnProcess_Click() Handles btnProcess.Click intInput = Val(txtInput.Text) Call subCalculatePercentage() End Sub End Class
6. Test the program and see if it works.

Notice again with our subCalculatePercentage, we use sub as a naming convention. Where possible, try to do this with Subs just like objects and variables.
8.4 Parameters We see in the last exercise how easy it is to call a Sub. Now before we use a Function, let’s also add the final piece of the puzzle to the mix. We’re going to learn about Parameters.
Remember in the pseudocode we looked at earlier, we passed our grade from the user into our function to see if the user passed or not. This means we have to give our function a value so it can work. This value we call a Parameter.
When we create our Function in the next exercise, we’ll see how Parameters work.

8.5 Exercise 8b. Let’s make a program using Subs first.
1. Create a new project and call it Ex8bFunctions.
2. Create a form similar to the one listed here.
3. Ensure that all your objects have suitable names.
4. Save Form1.vb As frm8bPercentage
5. Double Click the Process button and add the following code in the code viewer:
Public Class frm8bPercentage Private Function funResult(ByVal intGrade As Integer) As Boolean Dim intResult As Integer 'create a variable for our result intResult = intGrade * 2 'calculate the result If intResult >= 65 Then 'did the student pass? funResult = True Else funResult = False End If End Function Private Sub btnProcess_Click() Handles btnProcess.Click Dim intInput As Integer Dim blnResult As Boolean intInput = Val(txtInput.Text) 'get the value from the user blnResult = funResult(intInput)'pass the number to our function If blnResult = True Then 'Output the result MsgBox("Student Passed", vbOKOnly, "Result") Else MsgBox("Student Failed", vbOKOnly, "Result") End If End Sub End Class
6. Test the program and see if it works.
Notice again with the Function funResult that we use a naming convention for the Function ie fun.

8.6 Looking at the Function from Exercise 8b First we have:
Private Function funResult(ByVal intGrade As Integer) As Boolean
ByVal intGrade As Integer
• This means that the function is going to be called and sent a Parameter. We create intGrade to store this Parameter.
As Boolean
• We will be sending back a value that is a Boolean (ie True or False)
Finally look when we call the procedure:
blnResult = funResult(intInput)
• First we are going to save the result of our Function, so we save it in our blnResult variable.
• Second, notice that we add intInput inside the brackets. This is the Parameter we are passing to the function.
8.7 Exercise 8c Re-create your Paper, Scissors, Rock game from your project. This time, make it with Functions and Subs.
• You should create functions or subs to compare the result. In other words, you could have any of these options:
o 1 function or sub which has the entire matrix of possibilities
o 3 functions or subs which compare only for the choice the user has made
• You can also create a function or sub to output the result (ie user wins / loses) or you can include this in your previous functions or subs.

9. Useful Resources The following is a list of great resources for learning programming in general, and more specifically to VB.NET (Visual Basic 2008)
• http://www.homeandlearn.co.uk/NET/vbNet.html