guide to stage management - f.j. reitz theatre · preparing your stage management kit 4 ... o set...
TRANSCRIPT
F.J. Reitz High School
GUIDE TO STAGE MANAGEMENT VERSION 2017-2018

TABLE OF CONTENTS
Version 2017-2018, 02-16
1
Congratulations! 2
Preparing for Rehearsals 3
Preparing Your Stage Management Kit 4
Preparing Your Prompt Book 5
Pre-Rehearsal Meeting with Director or Choreographer 6
Running Rehearsals 7
Delegating 8
Taking Blocking 9
Rehearsal Reports & Tracking Rehearsal Times 10
Production Meetings 11
Building Run Sheets 12
Technical Rehearsals & Performances 13
The Company Meeting 14
Calling the Show 15
Cue calling protocol 16
Calling Times & Working with House Management 17
Appendix (Paperwork Forms, Templates, & Checklists) 18

Version 2017-2018, 02-16
2
CONGRATULATIONS ON BEING THE STAGE MANAGER OF AN
UPCOMING REITZ PRODUCTION!
Stage Managing is the best way to learn first-hand everything it takes to put together a show. You will have the opportunity to influence the process at every step of the way and you can be an indispensable help to your director, design team and performers. It can also be a stressful and intimidating prospect, but if you take it one step at a time you will be surprised at your ability to pull off one of the most rewarding experiences of your high school career.
For a refresher on the characteristics of a good stage manager, take a look at the book Stage Management by Lawrence Stern. His eight points explain perfectly what makes a good stage manager the best. He states that good stage managers:
þ Accept responsibility
þ Keep their cool
þ Keep their eyes and ears open and know when to share their opinions
þ Think ahead
þ Are considerate
þ Keep their sense of humor
þ Are organized and efficient
þ Are punctual and dependable
Approach all of your duties from a perspective of “What can I do to make this the show the very best it can be?” With this question at the heart of all your actions as a stage manager, you will not only make it through the process alive, but you will also shine as a great stage manager in the Reitz Department of Theater.

Version 2017-2018, 02-16
3
PREPARING FOR REHEARSALS
In order to be available to help your director and cast during the rehearsal process, you need to prepare yourself as much as possible before rehearsals begin. Being able to answer questions and point people in the right direction with minimal effort on your part will make your job a million times easier and less stressful. But the only way that will happen is to plan ahead and get organized. So let’s get to it!
Rehearsal Prep Checklist
o read and be familiar with the Department’s Safety Information Sheets found at (especially the sheets entitled General Safety Guidelines, Main Causes of Accidents, Fire Protection & Fire Safety, Clothing & Personal Protection, Rehearsals – General Safety, and Stage Management)
o get to know the theater (locate exits, first aid kits, phones, fire extinguishers, fire alarm pulls, and best paths to restrooms, dressing rooms, ticket table, concessions, etc.)
o meet with the Technical Director for a building walk-through (this must be done before you request keys)
o work with the Director to acquire tissues, pencils, highlighters, and other items commonly needed in the rehearsal space
o know the location of the nearest trash and recycling cans o generate contact sheet (cast/crew/staff phone, emails, & roles) o work with Director to generate master calendar o work with Director to schedule weekly production meetings o work with Department secretary and Director to set up the call board (Scene Shop Door)
- emergency numbers - master calendar - contact sheet - rehearsal schedule
o prepare your SM kit (see p. 4) o prepare your prompt book (see p. 5) o set up a rehearsal report form (see appendix) o set up a production email distribution list. Make sure that reports go to the director, all designers,
department heads (technical director, choreographer, costume shop manager, etc.), and all students in the stagecraft/theatre classes
o generate scene breakdown (see appendix) o get familiar with the prop plot o work with Technical Director and Director or Choreographer to coordinate pulling of rehearsal
props and furniture (get something to stand-in for every prop even if it’s not the real thing) o get familiar with the costume needs (especially hats, bags, canes, glasses – anything that a
performer will interact with like a prop) o work with Costume Shop Manager to coordinate pulling of rehearsal costumes o work with Costume Shop Manager to schedule costume measurements o for shows with a set, work with Director or Choreographer, Designer, and Technical Director to
tape out set on stage (sometimes this is done by the Stagecraft class, but if not, it is your responsibility)
PREP
AR
ING
FO
R R
EHEA
RSA
LS

Version 2017-2018, 02-16
4
PREPARING YOUR STAGE MANAGEMENT KIT
In order to be prepared for anything and to maximize rehearsal time, you’ll want to have the things you’ll need for rehearsal on hand in an easy-to-access place. Below is a list of the minimum inventory you should be sure to have, but if you think of other things that would be useful please add them to the list.
You should meet with the director to arrange for payment of any replacement items. Make sure the SM kit is complete before rehearsals begin.
SM Kit Checklist
o band-aids, assorted o breath mints o chalk o cough drops (sugarless) o erasers o flashlight o gauze o hair pins o hole punch o instant ice packs o moist towelettes, individually wrapped o nail clippers o nail file o Neosporin o note cards, 3” x 5” o paper clips
o pens, black or blue, ball-point o pencil sharpener o pencils, many, #2
o Purell hand sanitizer o rubber bands o ruler, 12” o safety pins o scissors o Scotch tape o sewing needles o Sharpies o stapler o staples o stop watch o straight pins o tailor’s measuring tape o thread, black and white o thumbtacks o tissues o toothpicks o tweezers
**Note that for health safety reasons, the Department does not provide aspirin/ibuprofen/ acetaminophen or any other medications than the ones listed above.
**First-aid supplies in the SM kit are there as a convenience and not as a replacement to any of the first-aid kits in the theaters, shops, dance studio, or front office. Quantities of these supplies in the SM kit should be kept fairly minimal.
PREP
AR
ING
FO
R R
EHEA
RSA
LS
Version 2016, 02-16
PREPARING YOUR PROMPT BOOK
The most important key to keeping yourself organized and efficient in rehearsals is to have a really well set-up prompt book. Spend some time on this project before rehearsals start. It will make all the difference to your sanity as the production moves through its various phases.
For a scripted play or dance, start with a copy of the script and a binder. Each page of the prompt book should be a page of the script blown up on an 8 ½ x 11 sheet of paper (single-sided). You want the text as big as you can get it, leaving a 1 ½” margin on the left hand side and 1” on the top, bottom and right sides. Make sure that any weird copier gray is cleaned up, since you need to be able to write in the margins.
On the back of each script page, copy the blocking sheet template from the back of this workbook. If you have a ground plan of your set, you can tape a copy of it in the blank box at the top of the template before you make the copies. This will save you some time later when you are writing in blocking.
Hole punch the script on the RIGHT hand side of the pages. This is backwards from how you would usually set up a binder, but for your prompt book you will be laying out the text of the script on the left hand side and the blocking sheets on the right side.
Use some dividers (or post-it notes on the edge of a sheet of paper) to make places for your paperwork you will be generating during rehearsals and to keep any notes on the show organized.
Examples of recent Department show prompt books are available from the Director’s office. Looking at an example is extremely helpful before getting started.
Here’s how your layout should look once you get set up. For a more in depth explanation of prompt book notation, see the appendix.
PREP
AR
ING
FO
R R
EHEA
RSA
LS

Version 2016, 02-16
PRE-REHEARSAL MEETING WITH THE DIRECTOR OR CHOREOGRAPHER
A lot of your stress can be avoided by having a good conversation with your soon-to-be-best-friend, the Director. Once again, being prepared with the right questions to ask will save you grief down the road. It’s important to get a feel for the director’s rehearsal style and what they expect from you.
Questions for your pre-rehearsal meeting with the director
o How would you like to organize the first day of rehearsal? May I have some time to make announcements to the performers before we start?
o What prop, set or costumes should I pull for our rehearsals?
o Are there any other things that you like to have around for rehearsal or that you would like the stage management team to be responsible for?
o Do you want me to help you create the master calendar of rehearsals and performances?
o When and how often do you want to build in breaks during rehearsal?
o How would you like me to get your attention when it’s time for a break?
o Do you have any particular requests in terms of blocking notes?
o Do you have any additional items you’d like to include on the rehearsal report?
At the end of your meeting, be sure to make a plan to have a daily after-rehearsal check-in. You will frequently have questions after rehearsals and it’s good to try and get the director into getting into the habit of checking-in with you before they leave for the night, since other members of rehearsal will be vying for their attention too. Remember that good communication with the director is essential for the stage manager to be effective, and if you don’t feel you are getting the information you need, you have every right to ask for it.
PREP
AR
ING
FO
R R
EHEA
RSA
LS
Version 2016, 02-16
RUNNING REHEARSALS
Once you get your first rehearsal started, you can take a deep breath. All that preparation means you can now watch the things that you’ve set in motion grow into a full-fledged show! Make sure that you take your moment before things get started to go over any announcements that you need to make about safety, paperwork and the rehearsal schedule.
During rehearsals through performances, the stage manager is the official timekeeper of the production and should call the start and stop of the rehearsal to the director so that they can keep things moving along. Calling a break during rehearsals is also part of the timekeeper role. You should discuss in advance with the director when he/she would like to fit in the break(s). For the most part, directors will run a scene, stop the scene and give notes, then reset and do the scene again. If you are working with someone who you know does not like to stop, you may try to gently tell them between the notes and resetting that after you run the scene again it would be a great time to take a break. Always ask the director before calling a break! Never just pipe up and announce “We’re taking five!”
One of the trickiest parts for a stage manager is sitting in rehearsals while artistic decisions are being made and resisting the urge to chime in with opinions on acting, choreography, or staging. This is not the function of the stage manager and it is inappropriate for the SM or ASM to give unsolicited advice. Sometimes you will work with directors who will ask for your opinion and in that case it’s fine to speak up. If you really have strong feelings about something it’s fine to make notes and speak with the director on a break or after rehearsal. Never give out these artistic ideas in front of the cast! You may not know what the director ultimately has in mind for the scene and you may disrupt the process if you throw unwanted ideas around the room. However, if you know a logistic or safety reason that something the director is trying to do won’t work, by all means say something. (For example, if the director is thinking that someone is going to make a two minute costume change in 15 seconds and be on time for their entrance then it’s important that you flag that for the director and, if needed, discuss it in a production meeting.)
RU
NN
ING
REH
EAR
SALS

Version 2016, 02-16
DELEGATING
During rehearsals you will have help with all of your duties in the form of one, if not more, assistant stage managers (ASM). The Assistant Stage Manager can ease a lot of the stress that comes from needing to be everywhere at once and if you let them, they can be your secret weapon.
Just because the stage manager is responsible for a task doesn’t mean that the SM has to personally do the task. It means that the SM needs to make sure that the task is done and done well, but delegating is the only way to make it all happen and stay sane. During regular rehearsals the tasks should be divided up:
Stage Manager Ø taking blocking or noting important moments in the choreography
Ø timing breaks, scenes, etc.
Ø taking notes for the rehearsal report
Ø tracking placement of lighting and sound cues
Assistant Stage Manager Ø being on book, when working with a script (This is actually a really big responsibility - the longer
a performer has to wait for their line to be delivered, the more “out of the moment” the cast becomes and the less productive the rehearsal becomes. It is very important to stay right on the text and jump immediately in with the line if someone calls for it.)
Ø resetting scenes or dances while the Director or Choreographer is giving notes (This is also a big one, as it saves lots of time)
Ø presetting props and prop tracking
Ø line notes, when working with a script
Once you get into tech rehearsals the ASM will be your eyes and ears backstage. They will preset props and explain to the run crew their duties. It’s a good idea to have your ASM on headset during the show as much as possible so that you have a link to what is happening back there.
Other Rehearsal Tasks to be Done by You and your ASM Team Ø sweep and set up the stage before each rehearsal
Ø call latecomers
Ø brief company members on safety issues
Ø spike set pieces or performer marks
Ø clean up, put rehearsal items away, set up ghost light, turn off room lights, close windows, and lock doors at the end of each rehearsal
Plan to meet with your ASM(s) before rehearsals start and let them know how you would like rehearsals to be run, what your expectations of them are and any information that you learned from the Director that might be useful to your team. Remember that just as you are looking to the director for guidance, your crew will be looking for your direction. R
UN
NIN
G R
EHEA
RSA
LS
Version 2016, 02-16
�
TAKING BLOCKING
A primary responsibility of the stage manager is to assist the director and cast in remembering the blocking decisions that were made during rehearsals. Having accurate notation will also make the tech process smoother for you: when the lighting designer says “Take cue 156 on their cross downstage”, you will brilliantly have that move right there in your book and you’ll know precisely where to place the cue. Some keys to taking successful blocking notes at are:
1. Be sure to delegate other tasks to your ASM(s) so that you can be focused on the director and cast. 2. Use a system of shorthand (it has to be something that you will understand later!) to swiftly make
notes as the performers move around. 3. Pay attention when the director is talking! That way if there’s any disagreement about what a
performer’s next move is supposed to be, you will – brilliantly – have the director’s preference written down.
In order to notate blocking quickly, abbreviations are used for each section of the stage, as depicted in the diagram below. (When taking blocking for a show in the round, the stage is usually divided up into the face of a clock, with 6 o’clock being the position of the tech booth.) Also for your notation shorthand, use abbreviations of the character names not performer names in case someone unfamiliar with your production has to step in and use your book. They may not know your performers’ names, but they will be able to follow characters in the script.
So if your performer playing the character Jim is crossing stage left to a table, the quick way to notate that would be “�J x SL to table.” I used the first initial of the character name and drew a circle around it so that I can see performer movements at a glance. I used “x” to stand for “cross” and just filled in the action. If it was a smaller move, only a couple of steps, I would abbreviate it “ J x 2 to table.” I don’t need the word “steps,” I know that if there’s a number there, I’m talking about that number of steps.
When you are using the blocking sheet template (see the appendix) the idea is to write the blocking on a line and then write the corresponding number for the movement in the script where the action happens. This keeps your text free from clutter so that you can place in your light and sound cues later and still be able to see all the information on a page at once. When you are picking the number on the blocking sheet to assign to a move, try to keep them in chronological order according to the order of the actions and skip lines so that if more moves get added you can still more-or-less keep them in order.
USR
(up stage right)
US
(up stage)
USL
(up stage left)
SR
(stage right)
CS
(center stage)
SL
(stage left)
DSR
(down stage right)
DS
(down stage)
DSL
(down stage left)
RU
NN
ING
REH
EAR
SALS

Version 2016, 02-16 10
REHEARSAL REPORTS
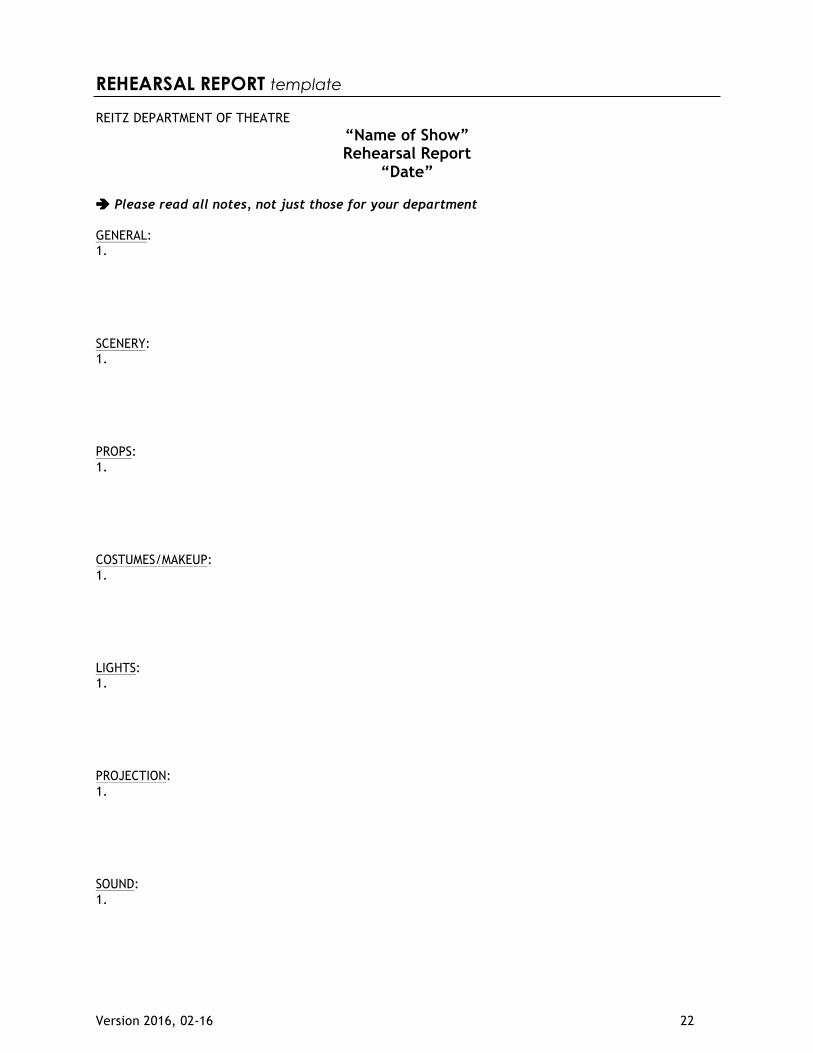
A big part of the stage manager’s job is facilitating communication and disseminating information. Writing daily rehearsal reports keeps designers and other production team members in the loop regarding what’s happening in rehearsal without the stage manager having to track each person down individually. During rehearsal, jot notes down either on a notepad or directly into the report on the computer. Keep the tone of your note neutral; “We would like to add a bottle of soda” would be a good way to word a note under the props section. In theory, all of the designers and department heads should be reading all of the rehearsal report, but sometimes they just scan their own section so it’s advisable to copy and paste notes that affect several departments into each of their sections on the report. Rehearsal reports should be sent out the same day as rehearsal. If you’re able to keep a running list in your computer during rehearsal, all you have left to do is format, read through and make sure you got all the notes and that you’ve made yourself clear, then copy and paste into the body of a fresh email and send it to your show distribution list you set up during prep.
Important: make sure that all rehearsal notes are sent as fresh emails to the distribution list (as opposed to hitting the reply all for the previous day’s email). This avoids confusion.
For a rehearsal report template, see the appendix.
TRACKING REHEARSAL TIMES
It is very helpful to designers and crew members to have a sense of how long scenes, acts, dances and costume changes will be during the show. When you get to the point in rehearsals that you are running whole scenes with minimal stopping, start timing anything that could be useful down the road. This is another great job to delegate if you have extra help since the person needs to be really focused on starting and stopping the stopwatch as accurately as possible. Every time you do a full run through of the show, time it from start to finish and put the times in the “General” section of your rehearsal report. Those numbers are helpful for everyone, especially house management and box office.
RU
NN
ING
REH
EAR
SALS
Version 2016, 02-16 11
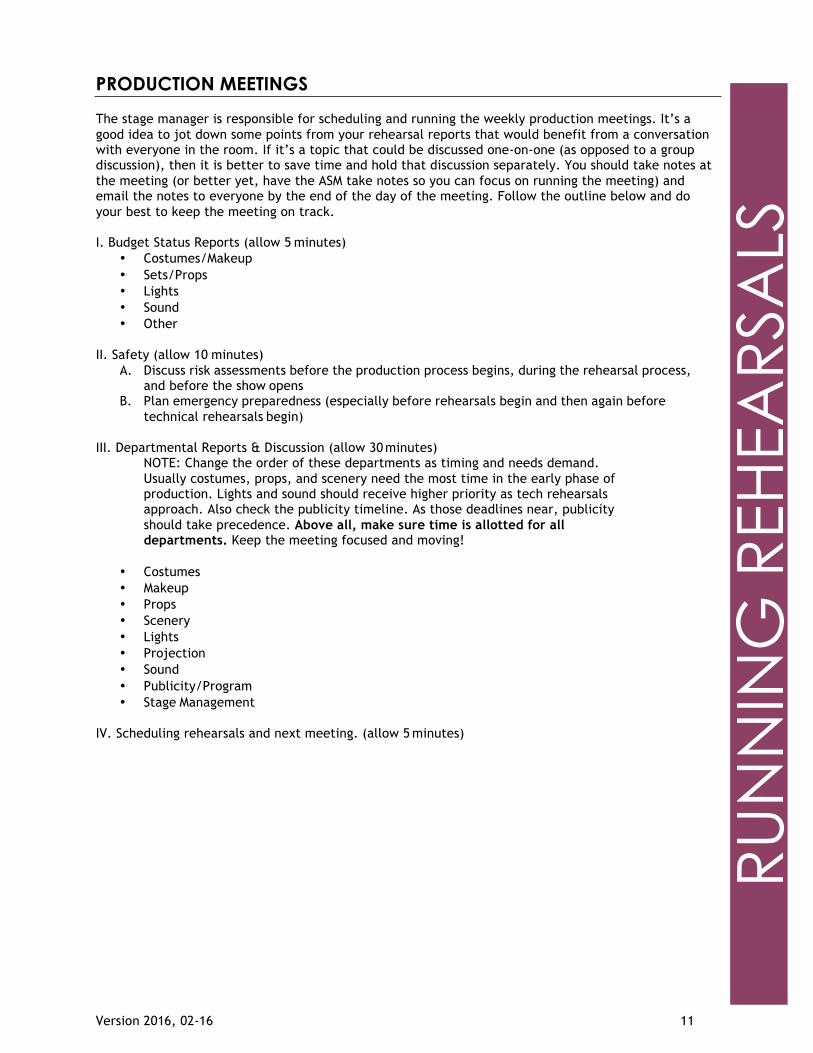
PRODUCTION MEETINGS
The stage manager is responsible for scheduling and running the weekly production meetings. It’s a good idea to jot down some points from your rehearsal reports that would benefit from a conversation with everyone in the room. If it’s a topic that could be discussed one-on-one (as opposed to a group discussion), then it is better to save time and hold that discussion separately. You should take notes at the meeting (or better yet, have the ASM take notes so you can focus on running the meeting) and email the notes to everyone by the end of the day of the meeting. Follow the outline below and do your best to keep the meeting on track.
I. Budget Status Reports (allow 5 minutes)
• Costumes/Makeup • Sets/Props • Lights • Sound • Other
II. Safety (allow 10 minutes)
A. Discuss risk assessments before the production process begins, during the rehearsal process, and before the show opens
B. Plan emergency preparedness (especially before rehearsals begin and then again before technical rehearsals begin)
III. Departmental Reports & Discussion (allow 30 minutes)
NOTE: Change the order of these departments as timing and needs demand. Usually costumes, props, and scenery need the most time in the early phase of production. Lights and sound should receive higher priority as tech rehearsals approach. Also check the publicity timeline. As those deadlines near, publicity should take precedence. Above all, make sure time is allotted for all departments. Keep the meeting focused and moving!
• Costumes • Makeup • Props • Scenery • Lights • Projection • Sound • Publicity/Program • Stage Management
IV. Scheduling rehearsals and next meeting. (allow 5 minutes)
RU
NN
ING
REH
EAR
SALS

Version 2016, 02-16 12
BUILDING RUN SHEETS
During rehearsals you and your ASM should work on building the run sheets that the crew will use to learn their parts backstage. It’s important to take the time to work on these during rehearsals so that you are not trying to construct them from memory the night before tech!
A really easy way to build your run sheets is to keep a post-it on the fist blocking page of each scene. When you get to a new scene in rehearsal, jot down all the set pieces and props needed for the scene and any set pieces or props from the previous scene that need to be struck. This will give you a quick cheat sheet of everything that will need to move, and when you get to the point in rehearsals where the director is ready to block scene changes, you will be prepared to make sure no prop gets left behind!
As soon as you get into stumble-throughs of the show, you can start to assemble your official run sheets. Working with the template in the appendix, assign specific people to as many moves as you can. This will help you see places where you might need extra crew members to move an unwieldy set piece or where an performer may have to pre-set their own prop in the wings because all of your crew is busy.
A good percentage of your crew will be from other theater classes and will not have been in rehearsal. Try to put enough information on the sheet that someone unfamiliar with the show can pick it up and follow along fairly easily but not so much information that they get bogged down in irrelevant details and miss their cues. It’s also helpful if you give everyone their own copy of the run sheets with their assignments highlighted. If you have a set that changes lot, I would recommend blowing-up sketches of the ground plan set configuration for each scene and posting them, labeled and in chronological order, on the walls backstage, out of audience sight lines (this is a great job for your ASM). That way a crew member can tell with a glance at the run sheet “I’m moving the bunk bed to stage left with the ASM” and a quick look at the wall will give them a visual sense of where the set piece is currently and where they will be moving it in the next scene. It is usually a good idea to also post your run sheets backstage so that people can have their hands free and don’t have to keep reaching in their pockets for their sheets.
No matter how well you plan ahead in rehearsals, THINGS WILL CHANGE DURING TECH. Encourage your crew to write down all of the changes and additions to their assignments on their run sheets and then have your ASM collect them at the end of rehearsal. Make changes to the master run sheets and have new, highlighted copies for everyone at the next rehearsal. Again, this is a great project for your ASM.
Dealing with run sheets in advance is a cinch and can save a lot of time and confusion during tech. Putting them off until the night before tech will make you a miserable person, so don’t let it happen!
For the run sheet template, see the appendix.
Things to note while looking at the run sheet template: 1. Don’t split a scene change across a page break. 2. Keep each person’s moves for each scene change together in chronological order. That way all they
have to do is look at their part and they won’t miss a move. 3. Be sure to put a version number at the top so that people will know if they are using the latest
version. 4. Try to put as much relevant information in the notes section, but not so much that it’s confusing.
How long someone has for a quick change is good to note, but all the pieces involved in the change should be on a separate run sheet for the wardrobe person.
5. It’s a good idea to make the footer “page ‘?’ of ‘total’ pages” so that people will know if they’ve lost a page.
RU
NN
ING
REH
EAR
SALS
Version 2016, 02-16 13
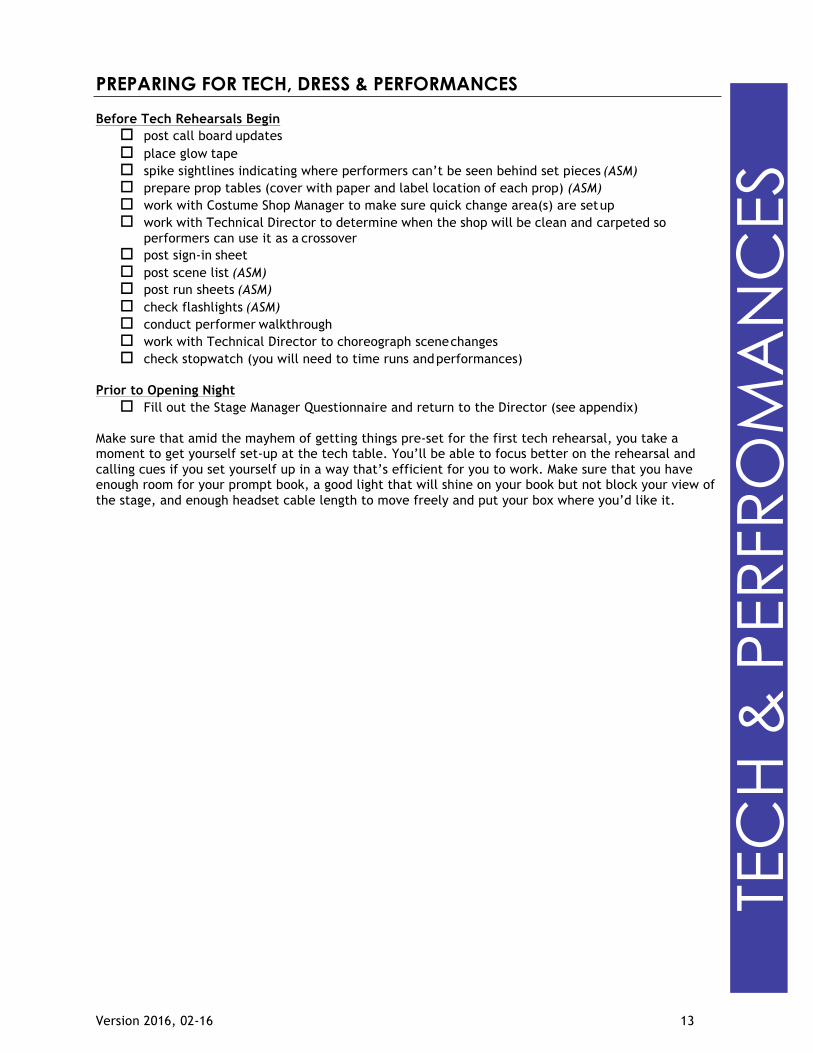
PREPARING FOR TECH, DRESS & PERFORMANCES
Before Tech Rehearsals Begin o post call board updates o place glow tape o spike sightlines indicating where performers can’t be seen behind set pieces (ASM) o prepare prop tables (cover with paper and label location of each prop) (ASM) o work with Costume Shop Manager to make sure quick change area(s) are set up o work with Technical Director to determine when the shop will be clean and carpeted so
performers can use it as a crossover o post sign-in sheet o post scene list (ASM) o post run sheets (ASM) o check flashlights (ASM) o conduct performer walkthrough o work with Technical Director to choreograph scene changes o check stopwatch (you will need to time runs and performances)
Prior to Opening Night
o Fill out the Stage Manager Questionnaire and return to the Director (see appendix)
Make sure that amid the mayhem of getting things pre-set for the first tech rehearsal, you take a moment to get yourself set-up at the tech table. You’ll be able to focus better on the rehearsal and calling cues if you set yourself up in a way that’s efficient for you to work. Make sure that you have enough room for your prompt book, a good light that will shine on your book but not block your view of the stage, and enough headset cable length to move freely and put your box where you’d like it.
TEC
H &
PER
FRO
MA
NC
ES

Version 2016, 02-16 14
THE COMPANY MEETING
A company meeting is usually scheduled at the beginning of the first technical rehearsal and the stage manager is in charge of running the meeting. The most important thing is to keep this meeting up-beat and positive! Try to stay away from negative statements as much as possible. This is an exciting time and a big list of rules will kill all enthusiasm. On the other hand, you must be very clear about the protocol for the tech process, particularly as it relates to safety. Before you go into the meeting, review the Theater Safety Information Sheets.
TYPICAL COMPANY MEETING AGENDA
I. Introductions (let everyone introduce themselves and explain their role in the production.)
II. Overview of the tech rehearsal process A. Describe each type of upcoming rehearsal (remember that some of the people in the
company have never done a show at Reitz before) B. Give the Director(s)/Choreographer(s)/Musical Director(s) a chance to add anything C. Give the Designer(s) a chance to add anything D. Give the Costume Shop Manager a chance to add anything
III. Procedures & Policies
A. Punctuality (including “Go”, “Stop” and “Dismiss” times) B. Sign-in Sheet (remind people that they should sign-in for themselves) C. No food/drink in theater, stage, shop (non-show food, that is)
1. People should return plates, etc. to dining hall; don’t leave for custodians D. Announce the rehearsal date that performers should stop walking down the aisle through the
proscenium arch to make entrances (usually first dress but confirm this) E. Announce the rehearsal date that performers and backstage personnel are no longer to
watch from the house (usually second dress but confirm this too)
IV. Emergency Preparedness o Fire Drill
§ Check-in point § No talking § Mention where to keep shoes and coats
o Location of First Aid Kit o Location of Approved Fire Exits o Location of Fire Extinguishers o Location of Fire Alarm Pull Stations o Location of Fire Blankets
1. Stop, Drop, & Roll (facing down)
V. Other A. Explain ticket/admission procedures B. Anything else as defined by the production team at the last production meeting prior to this
company meeting
VI. Wrap Up A. Final Thoughts/Questions B. Announce how long until places
1. Allow a reasonable amount of time to make an on-time “Go” feasible TEC
H &
PER
FRO
MA
NC
ES

Version 2016, 02-16 15
CALLING THE SHOW
Calling the show is a big part of the stage manager’s role, and most people find it the most enjoyable part of the job. It’s very much the equivalent of being a performer; you have to know your part (but not from memory!) and you have to be on time with your cues. There is a certain art to being able to call a show well and a lot of what it takes to be successful is – you guessed it – being organized!
Remember how we were very specific with the way that we copied the script and set-up the prompt book? Now is the time that prep pays off. During the pre-tech process you will get cues from your designers which will include the name of the cue (typically a number for lighting and a letter for sound so that they are less apt to get confused when you are calling the show) and a placement which will be based on either text in the script or an action on stage. As soon as you get the cue placements, you should go ahead and write them in your script, IN PENCIL, as things will change during tech. You should write your cues in the left-hand margin of the script (aren’t you glad we left all that room there?) and you should write exactly what you are going to say so that when you call the cue all you have to do is read exactly what is on the page.
After you have the cues in your book, you can add “Standbys.” Standbys are used to give your board operators a heads up that they have a cue coming up and it is their job to put a finger on the button at the standby so that all they have to do is push it when you call the “GO.” Try to place your standbys early enough that your board op can respond to your call (typically they respond with: “Lights” or “Sound” or whatever they are running so that you know they heard you) and get in place, but not so early that they lose focus and forget that they’re standing by. For people with cues that require them to get into place (i.e. Fly cues), allow a little extra time for them to get there. Feel free to adjust your standby placements based on feedback from your crew.
On your first rehearsal with your board ops, carve out a little bit of time before you start rehearsals to orient everyone who is on headset during the show and to go over headset protocol. Make sure that everyone knows how to turn the headset on and off and where the volume knob is located. Talk through the cue calling procedure, “First I will call a standby, you respond with ‘light, sound, etc.’ and put your finger on the button. Then I will call the cue, ‘Lights, sound, etc. … GO!’ and you will push the button on the GO; as close to the “G” of the “GO” as possible.” Also remind people to let you know when they are getting on or off headset so that you know who’s there. Getting all this said before you get started will hopefully get everyone on the same page from the start. Remember to clearly state your expectations. Also, keep in mind that that a little witty headset banter is fun but it’s the stage manager’s prerogative to cut any unnecessary chatter if it’s interfering with people’s focus on the show. And under no circumstances should any non-show chatter happen once you’re in a standby.
As for actually calling the cues, the most important thing is to try to be as clear and consistent as possible so that your crew can follow you. Always call things in the same way. Standby cues always start: “Standby cue ‘lights, sound, etc.’” GO cues always start: “Lights, sound, etc.… GO!”. The “…” is a pause for you to look at the action of the play or follow the text in the script for a moment. It’s a good idea to build this little breath into your calling so that you can be as accurate as possible. Try to be as consistent as possible with it so that your board ops aren’t left guessing when you’re going to say GO. If you have a sequence where you have a lot of cues coming up, you can combine your light and
sound standbys and GOs, for example: “Standby Lights 100-103 and Sounds A and B” then “Lights 100 and Sound A… GO!” and on to the rest of the sequence. There’s a decent YouTube clip here: www.youtube.com/watch?v=5TXBqdDAXgE that demonstrates a calm and collected stage manager calling cues for a tech rehearsal of the musical Hairspray. Listen to how consistent he is being even though there is a lot going on!
TEC
H &
PER
FRO
MA
NC
ES

Version 2016, 02-16 16
CUE CALLING PROTOCOL
Calling Single Cues:
WARNING – Used when there are very few cues and a lot of time between them. Also good for giving run crew a head’s up on a cue that may require them to get from one side of the stage to the other. Action - Operator finger is not on the button yet / Run crew moving into position.
Stage Manager: “Warning Lights 53” Light Operator: “Lights”
STANDBY – Typically placed ½ page prior to the cue for plays. Dance pieces tend to be in constant standby. Action – Operator puts finger on button to prepare for “GO” / Run crew takes brake off the line set and holds rope.
Stage Manager: “Standby Lights 53” Light Operator: “Lights”
GO! – The command triggers the cue. Your verbal timing is extremely important on this one. Action – Operator presses the “GO” button / Run crew executes move
Stage Manager: “Lights 53… GO” Light Operator pushes button
Calling Multiple Cues:
STANDBY
Stage Manager: “Standby Lights 53, Sound G and Slide 27” Light Operator: “Lights” Sound Operator: “Sound” Projection Operator: “Slide”
GO!
Stage Manager: “Lights 53, Sound G and Slide 27… GO” Operators push button / execute cue
Note that "Slide" is used to mean any form of projection cue. Despite being a completely out of date word, it's handy for calling the show because it has only one syllable, like "Lights" or "Sound." (And new technologies have yet to provide anything better.)
TEC
H &
PER
FRO
MA
NC
ES

Version 2016, 02-16 17
CALLING TIMES
Once you are into dress rehearsals and performances you’ll want to make sure that your crew understands their responsibilities so that you are free to watch the clock. It might feel strange at first to not be running around while everyone else is, but as the stage manager it’s your responsibility to make sure that you are free to deal with any last minute issues and double check your crew’s work. Also, it is super important to always be keenly aware of the time. You are in charge of making sure that everything stays on schedule. Be sure to announce the time to everyone – cast, crew, and house manager. Be loud and clear and make sure that you get a response when call the time. If you call half- hour, the response from the people you’re talking to should be “Thank you half-hour.” Insist that they get in the habit of doing this to avoid an “I never heard you call fifteen!” freak-out.
“30 minutes until house open” – called 30 minutes before opening the house
“Fifteen minutes until house open” – 15 minutes before opening the house
“Five minutes until house open” – 5 minutes before opening house
“Half-hour & House Open” – called 30 minutes before the show “GO” time (see “Working with House Management, below)
“Fifteen minutes” – 15 minutes to show “GO” time
“Five minutes” – It’s actually a good idea to call this about 7 minutes before show time so that people
have a little more time than they think
“Places” – Check in with House Management before you call this to make sure that there aren’t any reasons to “hold the house” in case of late audience members, seating issues, or any other number of things that can go wonky at the last minute. If things are going well, call this about two minutes before the actual start time so that people have a chance to get to places. You will either call place over the paging system or call it yourself backstage and then head to the booth, so make sure that you have an ASM assigned to be on headset to tell you when you have places.
At intermission, either ten or fifteen minutes long, you will call five minutes at about seven ‘til and places at two ‘til. Don’t forget to start your timer at the beginning of each intermission.
WORKING WITH HOUSE MANAGEMENT
When you get into performances, you will have the additional duty of working with the house manager. Traditionally the stage manager takes responsibility for everything that happens from the front of the stage back and the house manager is responsible for everything front of house including the audience experience. Before or at half-hour, the stage manager “turns the house over” to the house manager and tells them that they are free to open the house. It’s important to communicate frequently with the house manager up to the start of the show and at intermission. It’s considered good form to keep to a regular routine each performance so that the house manager and your crew never have to go looking for you. If you need to disappear for a moment, be sure to let someone know where you’re going. Consider the house manager part of your run crew team and give them the same attention as you would your crew.
TEC
H &
PER
FRO
MA
NC
ES

Version 2016, 02-16 18
APPENDIX
Stage Management Forms & Templates Prompt Book Notation 19 Blocking Sheet Form 20 Dance Notation for Light Example 21 Contact Sheet Template 21 Rehearsal Report Template 22 Scene Breakdown Template 23 Scene Shifts Example 24 Line Notes Form 25
Stage Manager Questionnaire 26
Box Office Checklist for Ushers & Assistant House Managers 27
Strider Theater Stage Manager Checklists Pre-Rehearsal and Post Rehearsal 28 Pre-show 29 Intermission 31 Post-show 32

Version 2016, 02-16 19
PROMPT BOOK NOTATION

Version 2016, 02-16 20
BLOCKING SHEET form
1.
2.
3.
4.
5.
6.
7.
8.
9.
10.
11.
12.
13.
14.
15.

Version 2016, 02-16 21
CONTACT SHEET template
REITZ DEPARTMENT OF THEATRE
PERFORMERS
“Name of Show”
Contact Sheet “Name and class year”
Role phone number e-mail Name as it should
appear in program “Name and class year”
Role phone number e-mail Name as it should
appear in program “Name and class year”
Role phone number e-mail Name as it should
appear in program
ARTISTIC STAFF “Name”
Director phone number e-mail Name as it should
appear in program “Name”
Choreographer phone number e-mail Name as it should
appear in program “Name”
Set Designer (etc.) phone number e-mail Name as it should
appear in program
STAGE MANAGEMENT “Name”
Stage Manager phone number e-mail Name as it should
appear in program “Name”
Assistant Stage Manager phone number e-mail Name as it should
appear in program “Name”
Assistant Stage Manager phone number e-mail Name as it should
appear in program
IMPORTANT NUMBERS: F.J. Reitz High School: 888-888-8888 Director Cell: 812-431-2856 Stage Management Cell: 888-888-8888
Version 2016, 02-16 22
REHEARSAL REPORT template
REITZ DEPARTMENT OF THEATRE “Name of Show” Rehearsal Report
“Date” è Please read all notes, not just those for your department
GENERAL: 1.
SCENERY: 1.
PROPS: 1.
COSTUMES/MAKEUP: 1.
LIGHTS: 1.
PROJECTION: 1.
SOUND: 1.

Version 2016, 02-16 23
SCENE BREAKDOWN template
The scene breakdown should be arranged either by the scenes as listed in the script or by scenes as the director will want to rehearse. The purpose of the breakdown is to see what character is in which scenes so that you can easily set a rehearsal call or see if everyone is there for an upcoming scene. Below is an example of a scene breakdown from The Lion in Winter. The listing next to the page numbers is the characters and the listing below is the actors so that there’s not confusion about who is supposed to be there.
REITZ DEPARTMENT OF THEATRE “Name of Show” Scene Breakdown
Act I sc. 1- Alais Room p. 1- 4 Alais, Henry (character names)
L. Godart, K. Paquin (actor names)
Act I sc. 2- Reception Hall p. 4-5 John, Geoffrey, Richard
S. Dube, D. Harvey, Z. Knower
p. 5- 6 John, Geoffery, Richard, Henry, Alais, Eleanor S. Dube, L. Godart, D. Harvey, Z. Knower, C. McMurdo-Wallis, K. Paquin
p. 6- 7 John, Geoffery, Richard, Henry, Alais, Philip
M. Balsley, S. Dube, L. Godart, D. Harvey, Z. Knower, K. Paquin
p. 7- 8 John, Geoffery, Richard, Henry, Alais S. Dube, L. Godart, D. Harvey, Z. Knower, K. Paquin
p. 8- 10 Eleanor, Henry
L. Godart, C. McMurdo-Wallis
Act I sc. 3- Eleanor Room p. 10- 11 Eleanor, Richard
D. Harvey, C. McMurdo-Wallis
p. 11- 12 Eleanor, Richard, John, Geoffrey, Henry, Alais S. Dube, L. Godart, D. Harvey, Z. Knower, C. McMurdo-Wallis, K. Paquin
p. 12- 14 Eleanor, Richard, John, Geoffery
S. Dube, D. Harvey, Z. Knower, C. McMurdo-Wallis
p. 14- 16 Eleanor, Richard D. Harvey, C. McMurdo-Wallis
Continue with this format until you have mapped out the whole play. This is a great task to assign to an ASM if you have their help before rehearsals. Be sure to fill them in on any insight from your pre- rehearsal meeting with the director before they get started.

Version 2016, 02-16 24
SCENE SHIFTS example

Version 2016, 02-16 25
LINE NOTES form
performer: page: date:
correct line:
o paraphrased o inverted lines o jumped cue o mixed up words
o dropped line o dropped word/phrase
added word(s):
performer: page: date:
correct line:
o paraphrased o inverted lines o jumped cue o mixed up words
o dropped line o dropped word/phrase
added word(s):
performer: page: date:
correct line:
o paraphrased o inverted lines o jumped cue o mixed up words
o dropped line o dropped word/phrase
added word(s):

Version 2016, 02-16 26
STAGE MANAGER QUESTIONNAIRE
Stage Manager: Phone: E-mail:
Show title:
Director:
Running time of show:
How many intermissions?
How far into show is intermission?
Intermission will be 10 (ten) minutes UNLESS otherwise noted
Are there tickets being set aside by the director/ cast/crew? Yes No How many? For whom?
Will there be open flame used during the show? Yes (which act(s)? ) No Will there be a strobe light? Yes (which act(s)? ) No Will there be any gunshots? Yes (which act(s)? ) No
Will performers be using any outside doors for exits or entrances? Yes No If Yes, which doors?
(It is the Stage Managers’ responsibility to ensure these doors are accessible before top of show)
Exactly how many seats are being used? Will you allow use of the Balcony for seating? Yes No Is late seating allowed? (See the Director)
Strider Theater: Yes, balcony ONLY No Other (specify) If Yes, when is late seating allowed?
Cellar Theater: Yes No If Yes, when is late seating allowed?
Will the show be videotaped? (See Mrs. Harmon) Yes No If Yes, which night(s)? Do you need seats set aside for this? Yes No How many?
House is to open 30 minutes before top of show. I will contact the House Manager 35 minutes prior to the top of show House Manager should contact me 35 minutes prior to the top of show
OPEN HOUSE CALL WILL COME FROM DIRECTOR or ADULT STAFF ONLY. Other comments:
Please fill out and give to the House Management before opening night. Please meet with House Manager to go over any details or questions before the house opens on the opening night of your production. Thank you.
Version 2016, 02-16 27
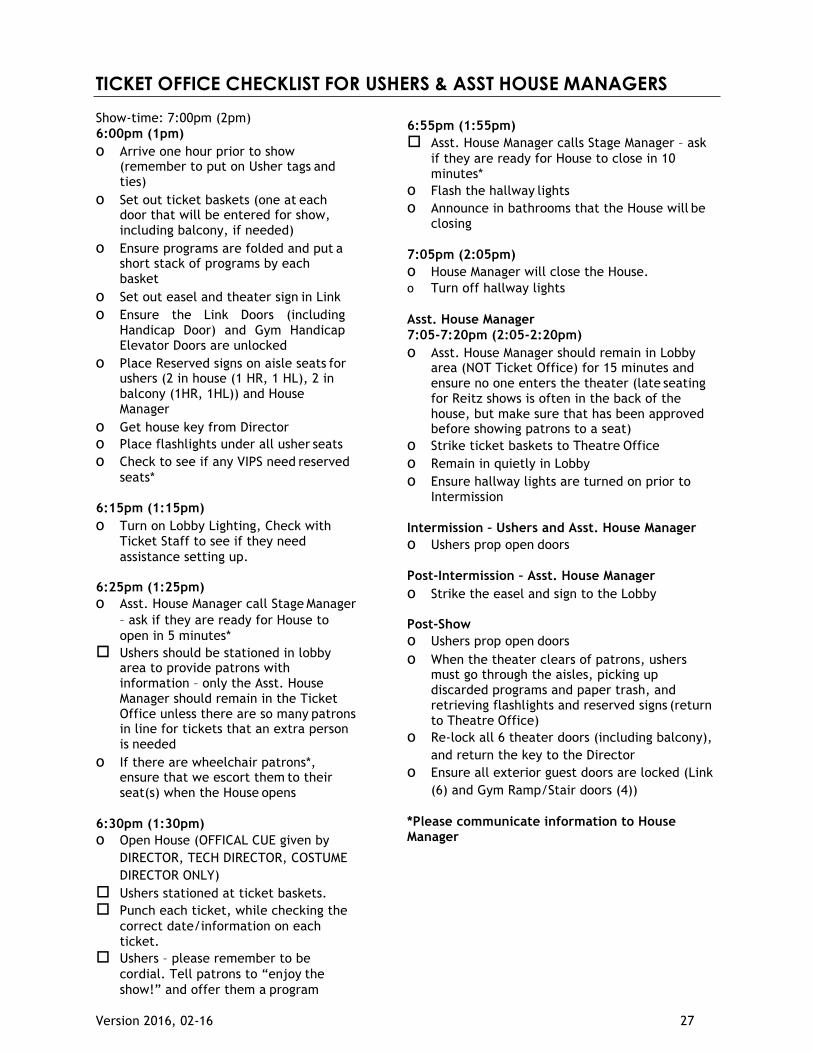
TICKET OFFICE CHECKLIST FOR USHERS & ASST HOUSE MANAGERS
Show-time: 7:00pm (2pm) 6:00pm (1pm) o Arrive one hour prior to show
(remember to put on Usher tags and ties)
o Set out ticket baskets (one at each door that will be entered for show, including balcony, if needed)
o Ensure programs are folded and put a short stack of programs by each basket
o Set out easel and theater sign in Link o Ensure the Link Doors (including
Handicap Door) and Gym Handicap Elevator Doors are unlocked
o Place Reserved signs on aisle seats for ushers (2 in house (1 HR, 1 HL), 2 in balcony (1HR, 1HL)) and House Manager
o Get house key from Director o Place flashlights under all usher seats o Check to see if any VIPS need reserved
seats*
6:15pm (1:15pm) o Turn on Lobby Lighting, Check with
Ticket Staff to see if they need assistance setting up.
6:25pm (1:25pm) o Asst. House Manager call Stage Manager
– ask if they are ready for House to open in 5 minutes*
o Ushers should be stationed in lobby area to provide patrons with information – only the Asst. House Manager should remain in the Ticket Office unless there are so many patrons in line for tickets that an extra person is needed
o If there are wheelchair patrons*, ensure that we escort them to their seat(s) when the House opens
6:30pm (1:30pm) o Open House (OFFICAL CUE given by
DIRECTOR, TECH DIRECTOR, COSTUME DIRECTOR ONLY)
o Ushers stationed at ticket baskets. o Punch each ticket, while checking the
correct date/information on each ticket.
o Ushers – please remember to be cordial. Tell patrons to “enjoy the show!” and offer them a program
6:55pm (1:55pm) o Asst. House Manager calls Stage Manager – ask
if they are ready for House to close in 10 minutes*
o Flash the hallway lights o Announce in bathrooms that the House will be
closing
7:05pm (2:05pm) o House Manager will close the House. o Turn off hallway lights
Asst. House Manager 7:05-7:20pm (2:05-2:20pm) o Asst. House Manager should remain in Lobby
area (NOT Ticket Office) for 15 minutes and ensure no one enters the theater (late seating for Reitz shows is often in the back of the house, but make sure that has been approved before showing patrons to a seat)
o Strike ticket baskets to Theatre Office o Remain in quietly in Lobby o Ensure hallway lights are turned on prior to
Intermission
Intermission – Ushers and Asst. House Manager o Ushers prop open doors
Post-Intermission – Asst. House Manager o Strike the easel and sign to the Lobby
Post-Show o Ushers prop open doors o When the theater clears of patrons, ushers
must go through the aisles, picking up discarded programs and paper trash, and retrieving flashlights and reserved signs (return to Theatre Office)
o Re-lock all 6 theater doors (including balcony), and return the key to the Director
o Ensure all exterior guest doors are locked (Link (6) and Gym Ramp/Stair doors (4))
*Please communicate information to House Manager

Version 2016, 02-16 28
PRE-REHEARSAL CHECKLIST FOR REITZ THEATER STAGE MANAGERS
UPON ARRIVAL TO BUILDING (At Least 10 Minutes prior to the rehearsal): o Door 14 (Stage Door in Tunnel) Propped o House right theater door unlocked o Lights turned on o All rehearsal items pre-set & ready for rehearsal o Stage swept o Director’s table in place o Rehearsal sound system turned on if necessary
POST-REHEARSAL CHECKLIST FOR STRIDER THEATER STAGE MANAGERS
PRIOR TO DEPARTURE FROM BUILDING (You should be the last to leave the building): o All rehearsal items neatly stored away o Door 14 (Stage Door in Tunnel) closed and locked o Both pairs of theater doors at either end of first row locked and pushed tightly shut o Both pairs of theater doors at back of house locked and pushed tightly shut o Lights turned off in front lobby

Version 2016, 02-16 29
PRE-SHOW CHECKLIST FOR REITZ THEATER STAGE MANAGERS
*This list is intended for use at all Tech Rehearsals and Performances (Front-of-house staff are only present at performances)
UPON ARRIVAL TO BUILDING (At Least 15 Minutes prior to the call time)
o Complete “Pre-Rehearsal Checklist for Stage Managers” o House right theater door unlocked o Lights turned on o All rehearsal items pre-set & ready for rehearsal o Stage swept o Director’s table in place o Door 14 (Stage Door in Tunnel) Propped o Shop unlocked (one door) and lights turned on o Turn on stair lights by dressing rooms Women’s Dressing Room:
o Both doors unlocked o Hall light, mirror lights, bathroom lights all turned on o Monitor volumes set to: 10
Men’s Dressing Room: o Both doors unlocked o Hall light, mirror lights, bathroom lights all turned on o Monitor volumes set to: 10
Scene Shop Room: o Doors unlocked o Lights turned on o Monitor volume set to: 10
Light Booth: o Door unlocked o Fluorescent lights turned on o Window unlocked and open o Stage Manager monitor volume set to: 10
Sound Booth: o Door propped open o Fluorescent lights turned on o Window unlocked and open o Monitor volume set to: 10
5:00pm (12:00pm-Noon) o Check attendance on sign-in sheet and call latecomers o Preset all off-stage props, gels, etc. (ASM’s / crew) o Sweep and mop glass hall and stairs leading to dressing rooms and green room (ASM’s / crew) o Vacuum shop rugs (ASM’s / crew) o Confirm that light and sound checks are underway/planned
o Check here when Light Operator has notified you that light check is complete o Check here when Sound Operator has notified you that sound check is complete

Version 2016, 02-16 30
PRE-SHOW CHECKLIST continued
5:30pm (12:30pm) o Call “1 Hour until house open” o Inspect glow tape and fix if necessary o Inspect spike marks and fix if necessary o Sweep and mop the stage (make sure floor is sealed) (ASM’s / crew) o Vacuum backstage rugs (ASM’s / crew)
6:00pm (1:00pm)
o Call “30 minutes until house open” o Body pack mic checks begin
6:15pm (1:15pm)
o Call “15 minutes until house open” o Pre-set all onstage furniture, props, etc. (ASM’s / crew) o Check run lights (backstage blues)
6:20pm (1:20pm)
o Cast heads to vocal/physical warm-up in scene shop 6:25pm (1:25pm)
o Call “5 minutes until house open” o Fluorescent lights turned off in light booth, sound booth o Light booth door & light and sound booth windows shut (but left unlocked) o Call first light and sound cues o All work lights turned off, “System Lockout” on, house light control tested o Confirm with House Manager that you are ready to open house in five minutes
6:30pm (1:30pm)
o Make sure the stage is clear o Notify House Manager that you are ready to open house o CONFIRM HOUSE OPEN with ADULTS before opening house o Call “Half-hour and house is open”
6:45pm (1:45pm)
o Call “15 minutes” 6:55pm (1:55pm)
o Call “5 minutes” o Confirm with House Manager that you are ready for house to close in 10 minutes
7:00pm (2:00pm)
o Call “Places” o Confirm with House Manager that you are ready for house to close in 5 minutes
7:05pm (2:05pm)
o Confirm with House Manager that house is closed o Confirm that all performers and any pre-show presenters are in place o Start the show (don’t forget to start your stop watch)

Version 2016, 02-16 31
INTERMISSION CHECKLIST FOR REITZ THEATER STAGE MANAGERS
*Intermissions are 10 minutes unless otherwise noted 5 Minutes before end of Intermission
o Call “5 minutes” o Confirm with House Manager that you are ready for house to close in 5 minutes
2 Minutes before end of Intermission
o Call “Places” o Confirm with House Manager that you are ready for house to close in 2 minutes
End of Intermission
o Confirm with House Manager that house is closed o Confirm that all performers are in place o Continue the show (don’t forget to start your stop watch)
Version 2016, 02-16 32
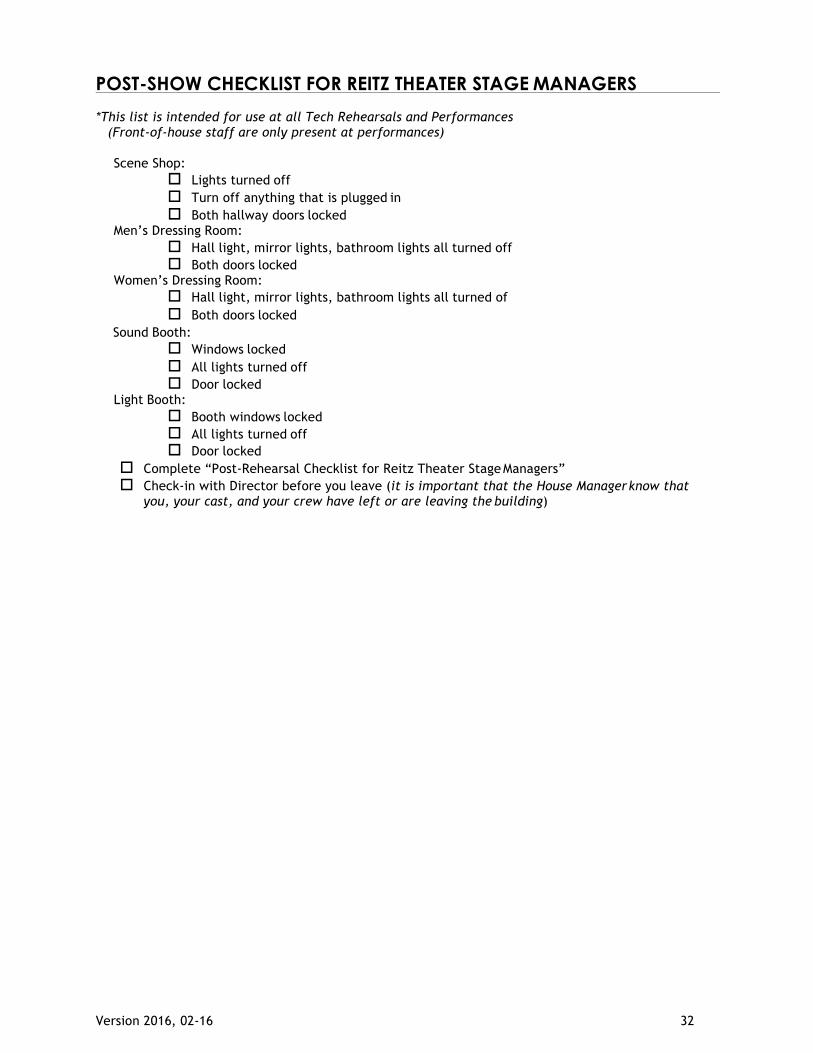
POST-SHOW CHECKLIST FOR REITZ THEATER STAGE MANAGERS
*This list is intended for use at all Tech Rehearsals and Performances (Front-of-house staff are only present at performances)
Scene Shop:
o Lights turned off o Turn off anything that is plugged in o Both hallway doors locked
Men’s Dressing Room: o Hall light, mirror lights, bathroom lights all turned off o Both doors locked
Women’s Dressing Room: o Hall light, mirror lights, bathroom lights all turned of o Both doors locked
Sound Booth: o Windows locked o All lights turned off o Door locked
Light Booth: o Booth windows locked o All lights turned off o Door locked
o Complete “Post-Rehearsal Checklist for Reitz Theater Stage Managers” o Check-in with Director before you leave (it is important that the House Manager know that
you, your cast, and your crew have left or are leaving the building)