gsx 190
TRANSCRIPT

USER'S MANUAL 9-WIRE DOT MATRIX PRINTER

________________________________________________________ 2
CITIZEN®
GSX-190 User's Manual
Citizen America Corporation 2102 Alton Parkway, Suite A
Irvine, CA 92606-4907
Trademark Acknowledgement Citizen, Command-Vue, Color On Command, VuePrint: Citizen America Corporation Epson: Seiko Epson Corporation IBM, Proprinter: International Business Machines Corporation Windows: Microsoft Corporation Copyright © 2003 Citizen America Corporation All rights reserved.

________________________________________________________ 3
Important Safety Instructions Provided by Underwriters Laboratories, Inc. I. Read all of these instructions and save them for later reference. 2. Follow all warnings and instructions marked on the product. 3. Unplug this product from the wall outlet before cleaning. Do not use liquid or aerosol
cleaners. Use a damp cloth for cleaning, 4. Do not use this product near water. 5. Do not place this product on an unstable cart, stand or table. The product may fall, causing
serious damage to the product. 6. Slots and openings on the cabinet and the back or bottom are provided for ventilation. To
ensure reliable operation of the product and to protect it from overheating, do not block or cover these openings. The openings should never be blocked by placing the product on a bed, sofa, rug or other similar surface. This product should never be placed near or over a radiator or heat register. This product should not be placed in a built-in installation unless proper ventilation is provided.
7. This product should be operated from the type of power source indicated on the marking label. If you are not sure of the type of power available, consult your dealer or local power company.
8. This product is equipped with a 3-wire grounding-type plug, a plug having a third {grounding} pin. This plug will only fit into a grounding-type power outlet. This is a safety feature. If you are unable to insert the plug into the outlet, contact your electrician to replace your obsolete outlet. Do not defeat the safety purpose of the grounding-type plug.
9. Do not allow anything to rest on the power cord. Do not locate this product where the cord will be walked on.
10. If an extension cord is used with this product, make sure that the total of the ampere ratings on the products plugged into the extension cord do not exceed the extension cord ampere rating. Also, make sure that the total of all products plugged into the wall outlet does not exceed 15 amperes.
II. Never push objects of any kind into this product through cabinet slots as they may touch dangerous voltage points or short out parts that could result in a risk of fire or electric shock. Never spill liquid of any kind on the product.
12. Except as explained elsewhere in this manual, don't attempt to service this product yourself. Opening and removing those covers that are marked "Do Not Remove" may expose you to dangerous voltage points or other risks. Refer all servicing on those compartments to service personnel.
13. Unplug this product from the wall outlet and refer servicing to qualified service personnel under the following conditions: A. When the power cord or plug is damaged or frayed. B. If liquid has been spilled into the product. C. If the product has been exposed to rain or water. D. If the product does not operate normally when the operating instructions are followed.
Adjust only those controls that are covered by the operating instructions since improper adjustment of other controls may result in damage and will often require extensive work by a qualified technician to restore the product to normal operation.
E. If the product has been dropped or the cabinet has been damaged. F. If the product exhibits a distinct change in performance, indicating a need for service.

________________________________________________________ 4
Table of Contents Introduction……………………………6 GSX-190 Features………………………6 About this Manual………………………8
Service and Support Information……….9 Chapter 1 Setup 10
Unpacking and Setting Up the Printer 10 Installing the Ribbon 14 Connecting to a Power Outlet 16 Connecting Your Computer 16
Chapter 2 Command-VueTM III Control Panel 18 ON LINE Menu Group 20
FONT 1 Menu Group and FONT 2 Menu Group 21 PITCH Menu Group 22 MODE Menu Group 23 INSTALL Menu Group 24 VuePrintT~ Menu Group 24 Other Command-Vue Functions 30
Chapter 3 Paper Handling 32 Setting the Paper Thickness Lever 32 Setting the Paper Select Lever 34 Printing on Single Sheets 34 The Tractor Unit 36 Printing on Continuous Paper 39 Paper Tear-Off 42 Paper Parking 44 Printing on Envelopes 46 Printing on Overhead Transparencies 49 Printing on Multi-part Forms & Labels 49 Top-of-Form Fine Adjustment 52 Chapter 4 Setting Up Commercial Software 55

________________________________________________________ 5
Appendix A Options 57
Color-On CommandTM 58 Sheet Feeders 64 Serial Interface 65 Printer Stand 66
Appendix B Maintenance 67
Cleaning 67 Alarms 68 Troubleshooting 70
Appendix C Specifications 77 Printer Specifications 77 FCC Compliance Statement 79 EMI Compliance Statement 79
Appendix D Command Reference 81
Citizen Commands 81 Epson FX-850 Emulation Commands 83 IBM Proprinter Emulation Commands 86 Index 89

________________________________________________________________
6
Introduction Your new Citizen GSX-190 is a high-quality 9-wire printer well suited to the needs of your home or office. The GSX-190 blends sophisticated styling and Near Letter Quality output with versatile paper handling. With Citizen Acoustic Technology {C.A.T.}TM, the GSX-190 is among the world's quietest printers. The Command~VueTM control panel gives you full control of the GSX-190's many powerful features, all in plain English.
GSX-190 Features Compatibility
* Built-in emulations for both Epson FX-series printers and the IBM Proprinter III plus GSX-unique print features.
* The ability to define printer settings in a macro lets you easily
restore preferred default settings. Printing Features
* Maximum print speed up to 240 CPS in draft and 45 CPS in near letter quality.
* Citizen Acoustic Technology, (C.A.T.), Citizen's patented noise
control technology.
* Near letter quality fonts in Roman, Sans Serif, Courier, Prestige, Script, and Orator.
* Standard print features such as expanded, condensed,
emphasized, doublestrike, italics, superscripts and subscripts, and reverse white-on-black print.
• High-resolution graphics (240 dpi x 216 dpi).

____________________________________________________________________ 7
Introduction _______________________________________________________________________
Command-Vue IIITM Control Panel
* The Command-Vue III control panel clearly indicates the current state of the printer and menu settings.
* Control the entire array of printer default settings for functions
and features with the VuePrint menu.
* Change print color, pitch, and font with easy-access menus available at the press of a key!
Paper-handling Flexibility
* The GSX-190's paper parking feature lets you quickly switch between continuous paper and single sheets feeding.
* A top-of-form fine adjustment customizes the first printing
position, to suit your forms!
* The printer automatically advances continuous-feed paper to the tear bar for easy removal.
* The GSX-190 prints envelopes, multi-copy forms, continuous labels, and thick paper.
Spectacular Color Printing
* Add the optional Color on Command user installable kit for brilliant full color text and graphics.

______________________________________________________________________________ 8
About this Manual ______________________________________________________________________________ Option
* Expand your printer's capabilities with an optional serial interface. Easy on the Environment
Citizen, accepting our responsibility to protect the environment, strives to produce earth-friendly printers:
* The cardboard container is made from 75% recycled materials and is 100%
recyclable.
* No CFCs {chlorofluorocarbons} are used in the manufacturing of the printer, its components, or the carton. The foam end pads have been replaced with easy-to-recycle cardboard.
About this Manual Notes, cautions, and warnings are used like this:
Notes contain helpful hints and other important information that help you use your GSX-190 printer better.
Cautions provide information about procedures, which, if not observed, could result in damage to the GSX-190 or other equipment. Warnings mean failure to follow specific procedures and practices may result in personal injury.
In our continuing effort to provide the best products possible, we welcome your suggestions and comments on how we can improve the GSX-1 90 or its documentation.

____________________________________________________________________ 9
Introduction _______________________________________________________________________
Service, Support and Supplies It is our goal to make your GSX-190 ownership experience a satisfying one. Citizen’s support staff is available to respond to your needs for setup, operational and trouble-shooting assistance and to arrange for convenient repair service if needed. Refer to the service and support contact information that follows or write us at Citizen America Corporation. Technical Support For technical information or assistance with setup, operation or troubleshooting your GSX-190 beyond what your dealer can provide, call Citizen’s Technical Support Group at (949) 428-3700 ext 3 Monday through Friday between 8:00 AM and 5:00 PM pacific time or contact us anytime by email at [email protected] to obtain printer drivers and other technical information as well. Repair Service In the U.S.A. and Canada, to verify whether your printer requires service, and to arrange for repairs, call Citizen America at (949) 428-3700 ext 2 Monday through Friday between 8:00 AM and 5:00 PM pacific time. You may also visit our website www.citizen-america.com for further information. In Mexico, central and south America, contact the dealer from whom your printer was purchased for referral to the nearest Citizen-Authorized repair center, or contact Citizen America. Supplies and Parts Supplies such as ribbons are available through your local Citizen dealer. For added convenience, supplies and service parts for out of warranty requirements may be ordered from Citizen’s authorized part and supply distributors. In the U.S.A. and Canada, contact Citizen America at (949) 428-3700 ext 2 for the dealer nearest you or you may also visit our website www.citizen-america.com. In Mexico, central and south America, contact the dealer from whom your printer was purchased.

________________________________________________________ 10
Chapter 1 Setup
Before unpacking your printer any further, take a few moments to consider where you plan to put it.
* Choose a flat, stable desk or printer stand that also
accommodates your paper supply. Be sure there is enough room around the printer to allow the paper to flow easily in and out.
* If you are using a wooden table, protect the surface from
possible damage by placing a mat under the printer.
* Position the printer so that the power cord and computer cable do not interfere with the paper flow.
* Avoid sudden, severe changes in temperature and humidity, as
well as direct sunlight, dust and grease. Pick a clean area for daily operations.
* Select a steady source of 120-volt electricity and check for other
appliances that may be using the same circuit. Copiers, heaters, air conditioners, and other motorized equipment can cause power fluctuations that may interfere with your printing projects.
Unpacking and Setting Up the Printer
Unpack the printer, and save all original packing materials. They are specially designed to protect the printer and will make repacking easy if you ever need to ship the printer.

________________________________________________________ 11
Chapter 1: Setup
________________________________________________________________
All packing materials {carton, cardboard inserts} are 100% recyclable if you do not plan to save them.
Carton Contents
In your printer carton you should have received the six items shown in Figure 1-1. If anything is missing, contact your dealer. Before continuing, remove all packing material from the printer.
Figure 1-1. With the GSX-190 printer come these additional items: a. Users Manual (this book); b. ribbon cassette; c. paper guide; d. paper feed knob; and e. Quick Start Sheet

________________________________________________________ 12
Unpacking and Setting Up the Printer _________________________________________________________________
Figure 1-2. Printer Components
Identifying Printer Components Figures 1-1 and 1-2 highlight the main components of the GSX-190 printer.
Installing the Paper Feed Knob To install the paper feed knob, simply insert the cylinder end of the knob with the four prongs into the knob opening on the printer as shown in Figure 1-3. Push the knob in gently until it engages. Then turn it to ensure that the platen moves.

________________________________________________________ 13
Chapter 1: Setup _______________________________________________________________
Opening the Top Cover
The top cover is a two-part hinged cover with a tear bar at one edge. You must open it to install and change ribbons, and to make other adjustments to the printer. When you open the cover, you should
open it in two stages—first, fold it open at the hinge, and then lift it out. {See Figure 1-4.}
Figure 1-3. Installing the paper feed knob
Figure 1-4. Open the top cover in two steps: 1} fold back the cover to the hinge, then 2} lift the cover out.

________________________________________________________ 14
Installing the Ribbon _________________________________________________________________ Replacing the Top Cover
Installing the top cover is also a two-stage process. Each half of the cover should click into place separately to ensure complete closure.
Begin by holding the cover folded open at the hinge. Grasp it with a hand at each end or with one hand in the middle. Insert the tabs at the front edge of the cover into the two small slots located on the inside lip of the printer opening. Recline the cover into position and press each corner. You can hear the corners click into place.
Then unfold the transparent part of the cover and press it into place.
Installing the Ribbon
Ribbon installation is a quick procedure but please heed these two precautions:
If you are replacing a ribbon, be sure the printer is off and the printhead has had time to cool.
Carefully follow the instructions for correct ribbon placement. Improper placement can cause smudged printing and may jam the ribbon.
1. Open the top cover, and slide the printhead to the center of the
platen for convenience.
2. Remove the new cassette from the packaging and position it with the ribbon knob aligned over the post protruding from the left end of the floor of the printer opening.
3. Lower the ribbon cassette into place and snap it down. When properly installed, the ribbon cassette will not lift out easily; it "snaps" out. See Figure 1-5.

________________________________________________________ 15
Chapter 1: Setup _________________________________________________________________
4. Slide the ribbon down into position between the printhead and the metal ribbon mask. This is easy to do! Do not force the ribbon between the ribbon mask and the ribbon guide {the black plate closest to the platen}. See Figure 1-5.
5. Turn the knob clockwise, and advance the ribbon until there
is no slack.
6. Slide the printhead right and left a few times to be sure that it moves smoothly without snagging the ribbon.
7. If you are installing a ribbon that is not the same type as the ribbon it replaces, be sure to select the correct type with the VuePrint menu or the Command-Vue INSTALL menu. See Chapter 2 for more information on making these settings.
Figure 1-5.Iinstall the ribbon cassette.

________________________________________________________ 16
Connecting to a Power Outlet _______________________________________________________________
Connecting to a Power Outlet First look at the on/off switch and be certain it is off. Plug the cord into a standard 120-volt grounded outlet {see Figure 1-6}. It's a good idea to protect your printer with a surge protector.
Connecting Your Computer
Your GSX-190 printer and your computer communicate through a cable that is readily available at local computer dealers. You will need a Centronics parallel printer cable {also called a parallel printer interface cable} because your new printer has a parallel interface. This connector is standard. The computer connector, however, varies slightly between computers, so be sure to check your computer owner's manual for exact details on the kind of connector you need on the other end. Nearly all IBM-compatible computers use the same type of connector. Standard parallel printer cables are six feet long. Longer cables may cause problems. If you have the GSX-190 optional serial interface, see its manual for installation and computer connection instructions.
Figure 1-6. Connect the printer to a power outlet.
________________________________________________________ 17
Chapter 1: Setup _______________________________________________________________________
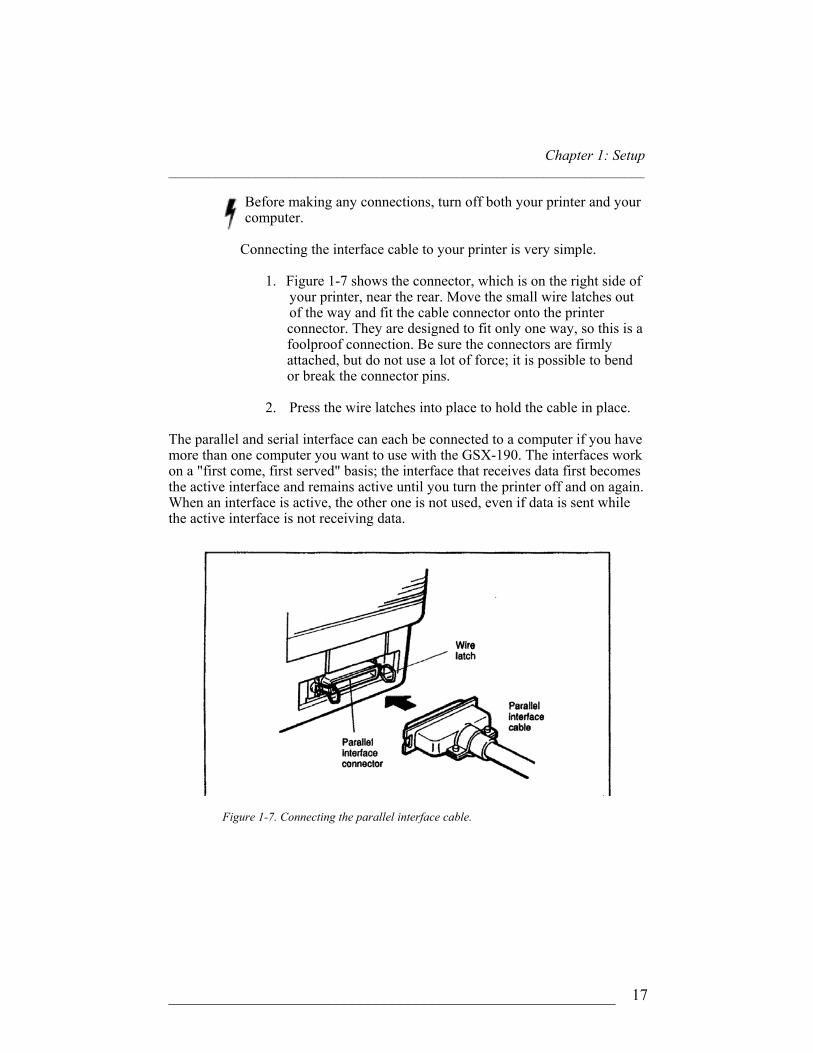
Before making any connections, turn off both your printer and your computer.
Connecting the interface cable to your printer is very simple.
1. Figure 1-7 shows the connector, which is on the right side of your printer, near the rear. Move the small wire latches out of the way and fit the cable connector onto the printer
connector. They are designed to fit only one way, so this is a foolproof connection. Be sure the connectors are firmly attached, but do not use a lot of force; it is possible to bend or break the connector pins.
2. Press the wire latches into place to hold the cable in place.
The parallel and serial interface can each be connected to a computer if you have more than one computer you want to use with the GSX-190. The interfaces work on a "first come, first served" basis; the interface that receives data first becomes the active interface and remains active until you turn the printer off and on again. When an interface is active, the other one is not used, even if data is sent while the active interface is not receiving data.
Figure 1-7. Connecting the parallel interface cable.

________________________________________________________ 18
Chapter 2
Command-VueTM III Control Panel
The Command-Vue III control panel lets you easily control many of the GSX-190's features. To select a particular option, move one of the slide switches until the desired option is displayed in a window. Then activate the option by pressing its corresponding key. The menu light beside the window comes on so you know the option has been selected.
Slide Switches and Menu Windows
The slide switches are used to select a menu group. By moving the slide switch up or down, you enter a particular menu group and thus change the options displayed in the windows. The control panel has two slide switches: the MENU slide switch (the larger of the two) and the STYLE slide switch.
You can move the STYLE slide switch only when the MENU slide switch is at STYLE. The STYLE slide switch is locked out if the
MENU slide switch is at ON LINE, INSTALL or VuePrint.
During normal operation, leave the MENU slide switch in the ON LINE position. The ON LINE menu group controls the most frequently used printer functions.
The key to the right of each window selects or cancels the option displayed in the window. The menu light to the left of each window indicates the current state of each option. The option displayed in the window is active when its corresponding menu light is on; the option is inactive if the light is off.

________________________________________________________ 19
Chapter 2: Command-Vue III Control Panel _________________________________________________________________
In most cases, a key acts like a toggle; pressing the key turns the displayed option on and off. On some menus, pressing the key performs a particular function {like advancing the paper}.
Also note that a key may have dual functions. In some menu groups, a key performs one function when the printer is on-line but performs another function when the printer is off line. Details of a key's function are explained in each respective menu group later in this chapter.
Indicator Lights
• The ON LINE indicator comes on when the printer is on line; it goes out when the printer is off line.
• The PAPER OUT/POWER indicator comes on when the
printer is on and ready for use. This light flashes when the printer is out of paper, or paper is jammed in the printer

_______________________________________________________
20
ON LINE Menu Group __________________________________________________________
.
ON LINE Menu Group
Move the MENU slide switch to ON LINE to enter the ON LINE menu group. This menu group lets you select the paper handling and other functions most frequently used during printing. Table 2-1 shows the functions available in the group.

________________________________________________________ 21
Chapter 2: Command-Vue Ill Control Panel _________________________________________________________________ On Line and Off Line Modes
When the printer is "on line"—its normal operating mode—it can receive data from your computer and print. When the printer is "off line," it stops printing and responds only to control-panel instructions, such as moving the paper.
Parking Continuous Forms
When you turn on the printer, it brings the continuous paper to the top-of-form position. {This is the first line of printing on a page. See 'Top-of-Form Fine Adjustment" in Chapter 3 to change this position.} After you print a document, the printer automatically advances the paper forward to the tear-off position. {The paper is positioned so the perforation is directly beneath the tear bar.}
The PARK/LOAD key lets you manually move the paper from the top-of-form position, to the tear-off position, and to the park position with a mere push of a k~r. When the printer is off line, each press of the PARK/LOAD key moves the paper to another position. The paper moves—in sequence-from top-of-form, to the tear-off position, to the park position, back to the top-of-form position, and so on.
FONT 1 Menu Group and FONT 2 Menu Group
When you enter the FONTI or FONT2 menu groups, you can select one of the eight typefaces shown in Table 2-2. To enter either of these menu groups, move the MENU slide switch to style, and move the STYLE slide switch to FONT I or to FONT 2.

________________________________________________________ 22
PITCH Menu Group
_______________________________________________________________________
You can move the STYLE slide switch only when the
MENU slide switch is at STYLE. The STYLE slide switch is locked out if the MENU slide switch is at ON LINE, INSTALL orVuePrint.
Key With printer on Iine or off line DRAFT FONT 1: Draft
HI-SPEED FONT 1: High Speed ROMAN FONT 1: Roman
SANSSERIF FONT 1: Sans Serif
COURIER FONT 2: Courier
PRESTIGE FONT 2: Prestige
SCRIPT FONT 2: Script ORATOR FONT 2: Orator
PITCH Menu Group
The PITCH menu group lets you select the type size in characters per inch {cpi}. To enter the PITCH menu group, set the MENU slide switch to STYLE and set the STYLE slide switch to PITCH. See Table 2-3.

________________________________________________________ 23
Chapter 2: Command-Vue III Control Panel
_________________________________________________________________
MODE MENU GROUP
The MODE menu group is selected when the MENU slide switch is at STYLE and the STYLE slide switch is set at MODE.
When you select a mode with the control panel you cannot cancel it with a software command.
Key. With printer on lIne oft line
1OCPI ABCDEfghij. 10 CPI
I2CPI ABCDEfghij 12 CPI
I5CPI ABCDEfghij 15 CPI
PROPOR TIONAL
ABCDEfghij Proportional
EXPANDED Selects/cancels expanded printing. The selected typeface is printed double-wide and double-high.
FONT LOCK Selects/cancels font protection. If you select font lock, font-selection commands sent by your software are ignored: The printer uses the font you have selected with the control panel.
CONDENSED Selects/cancel~ condensed printing, which compresses text to 60% of its standard widths This setting is Ignored it 15 CPI is selected in the PITCH menu group.
Key With printer on line or off line EMPHASIZED Selects/cancels emphasized
printing. The selected typeface is printed in bold.

________________________________________________________________
24
Install Menu Group ______________________________________________________________________
.
INSTALL Menu Group Move the MENU slide switch to INSTALL to enter the INSTALL menu group. This menu group lets you select among several optional accessories as well as selecting envelope-printing mode. Table 2-5 shows the functions available in the group.
VuePrintTM Menu Group The VuePrint Menu System is Citizen's unique feature for viewing and adjusting the printer's default settings. The settings you make on the other Command-Vue menus are temporary. They are lost whenever you turn the printer power off. Settings you make on the VuePrint menu, however, are stored as a macro in the printer's permanent memory. {A macro is a complete set of printer settings

________________________________________________________ 25
Chapter 2: Command-Vue Ill Control Panel
_______________________________________________________________________
that describes the entire printer default environment.} This macro remains in memory when you turn the power off, and is automatically restored to the current settings area whenever you turn the power on. If you send software commands that override the macro {default} settings, you can then send a command to reset the printer {or turn off the printer}, which causes the macro settings to be restored to the current settings area. You can also load the macro settings by pressing the SELECT and MENU keys for three seconds.
You can save your other Command-Vue menu settings to the macro memory {default settings} area. To do so, move the MENU slide
switch to VuePrint, and then press the SAVE button for three seconds.
Enter the VuePrint menu group by moving the MENU slide switch to VuePrint.
Key With printer on line or off tine MENU Enters the VuePrint menu system
when pressed for three seconds. Advances to the next menu without changing the setting of the current menu.
SELECT Moves Ihe printhead to the next item in the current menu.
SAVE Saves the selected item in the current menu as a default setting.
PRINT Prints VuePrint default settings when pressed for three seconds.
________________________________________________________ 26
VuePrintTM Menu Group
_______________________________________________________________________

____________________________________________________________________ 27
Chapter 2: Command-Vue III Control Panel _________________________________________________________________
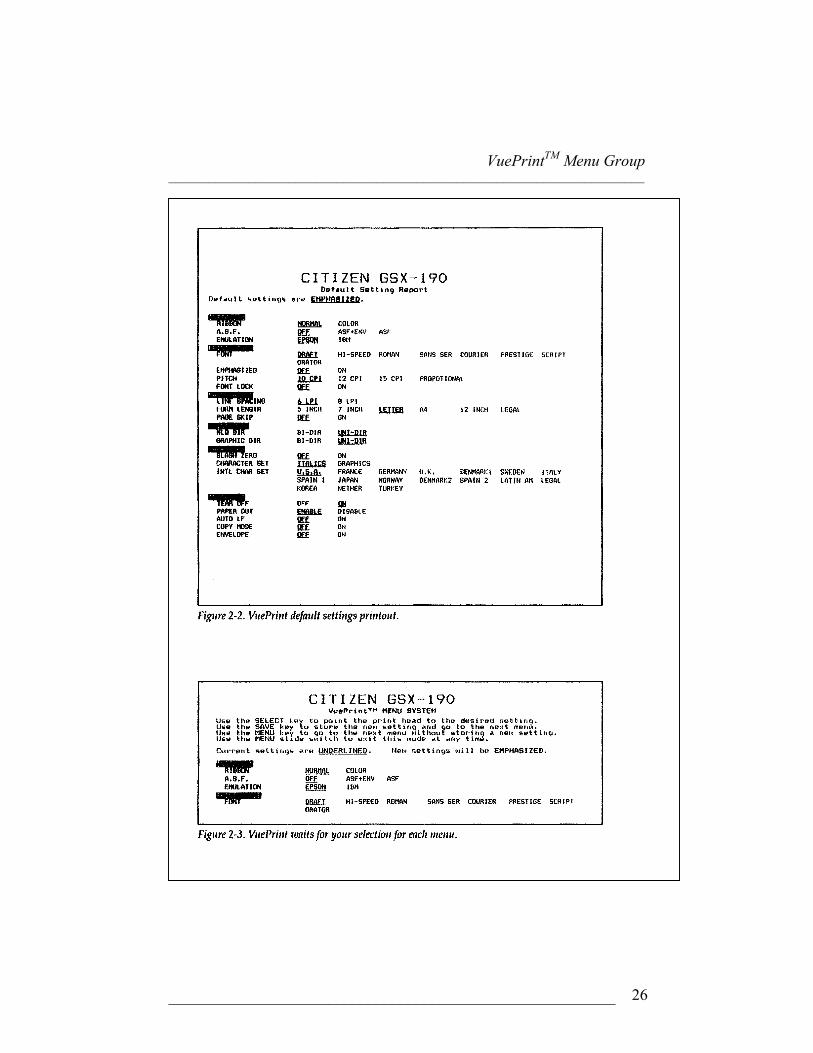
To see a printout of the current default settings, press PRINT for three seconds. {See Figure 2-2.} The printer prints a default report, which lists all the VuePrint menus—one menu per line. The options in each menu are printed horizontally across the line, and the current default setting is underlined.
To change one or more default settings, press the MENU key for three seconds to enter the VuePrint menu system. {Be sure there is no data in the print buffer,} The MENU, SELECT, and SAVE lights flash, and the printer enters the VuePrint mode. It prints some helpful instructions followed by the options of the first menu, underlines the current setting, and awaits your instructions. See Figure 2-3.
You'll find it easier to see the printed menus and the option that the printhead is pointing to if you remove the top cover.
If you are happy with the current setting, simply press the MENU key The printer retains this setting and advances to the next menu. It prints out the options of the next default menu, underlines the current setting, and awaits your instructions.
To change a setting, simply press the SELECT key until the printhead is beneath the option you desire, and then press SAVE. The printer fills in the new setting and advances to the next menu.
You can advance to the next menu without making changes by pressing the MENU key—even if. you have moved the printhead with the SELECT key. However, as soon as you press the SAVE
key, your new setting for the current menu item is stored in the printer's permanent memory.
Proceed through the default settings, menu by menu, until you have made all the changes you desire. You can exit the VuePrint menu system at any time by moving the MENU slide switch. The printer also automatically exits the VuePrint menu system when you press MENU or SAVE at the last menu. Either way, the settings you have saved are retained in the printer's memory. The new default settings take effect the next time you power up the printer or when
you load the macro.

____________________________________________________________________ 28
VuePrint TM Menu Group _________________________________________________________________
Default settings are normally read during initial power up. The old default settings remain in effect until you turn the power off. If you wish to print with the new default settings, you must load them by pressing the SELECT and MENU keys for three seconds.
VuePrint Menu Options Many of the menus in the VuePrint menu system provide the same options as their Command-Vue menu counterparts. They also appear on the VuePrint menu so you can store those settings as part of your default macro; if you always use a color ribbon, for example, the VuePrint menu is the better way to make the setting. These menus, which are listed below, are described earlier in this chapter.
* RIBBON {see "Optional Ribbons" in the "INSTALL Menu
Group" section}
* A.S.F. {equivalent to ASF MODE on the INSTALL menu}
A.S.F. on the VuePrint allows you to select ASF for regular sheet feeders, or ASF+ENV for sheet feeders with an envelope feeder. Make this setting when you install your A.S.F.
* FONT {equivalent to the FONT 1 and FONT 2 menu groups} * PITCH {equivalent to the PITCH menu group} * FONT LOCK {equivalent to FONT LOCK on the MODE menu} * ENVELOPE {see "Envelope Mode" in the "INSTALL Menu Group" section}

________________________________________________________ 29
Chapter 2: Command-Vue III Control Pane
_________________________________________________________________
A few additional settings are available only through the VuePrint menu {or through software commands, which are explained in Appendix D}. These settings are explained in Table 2-7.
Menu Description Emulation Selects Epson FX-800 commands or IBM
Proprinter Ill commands. Be sure you select the same printer commands here as you have chosen In your software.
Line spacing Selects 6 lines per Inch {standard typewriter spacing} or 8 lines per Inch. You can specify other spacing values with software commands.
Form length Selects among several standard form lengths. Set this to match your paper size, whether you use continuous forms or single sheets.
Page skip {Epson emulation only}
Selects/cancels a bottom margin of one inch.
NLO dir Selects bi-directional or unidirectional printing of text. Bi-directional prints faster; unidirectional prints with bolter quality.
Graphic dir Selects bi-directional or unidirectional printing of bit-Image graphics.
Slash zero Selects/cancels printing a slash through zeros so they are easily distinguished from the letter 0.
Character set Selects among different character sets.
International character set {Epson emulation only}
Selects among the foreign-language character sets.
Table 2-7. VuePrint menu options.

________________________________________________________ 30
Other Command-Vue Functions
Code page {IBM emulation only}
Selects among code pages, a method that DOS computers use to display and print foreign-language characters.
Tear off Selects/cancels the feature where the GSX-190 advances continuous forms to the tear bar for easy removal after printing.
Paper out Enables/disables the paper-out sensor. Auto CR {IBM emulation only}
Automatically returns the print head to the left margin after every line-feed command.
Auto LF Automatically advances the paper one line after each carriage return command.
Other Command-Vue Functions In addition to the options and functions shown in the menu windows, the Command-Vue control panel performs some other functions that are not so obvious. These functions are summarized in Table 2-8.
Function Procedure Adjust top margin {top-of -form position}
With paper at the top-of-form position and the printer on line, press PARK/LOAD or LF/FF br three seconds. See "Top-of-Form Fine Adjustment" in Chapter 3 for more information.
Adjust tear-off position
-
With paper at the tear bar, press ON LINE and QUIET/SAVE for three seconds. See 'PaperTear-Off Adjustment" in Chapter 3 for more Information.
Clear print buffer While the printer is oft line, press QUIET/SAVE {in the ON LINE menu group} for more than three seconds.
Turn on color printing while printer is on line
Switch to Install menu, press COLOR RIBBON key for three seconds.
Hexadecimal dump of print stream
Press QUIET/SAVE while turning the printer power on. See "Hex Dump" in Appendix B for more information.
Table 2-8. Other Command-Vue Functions.

________________________________________________________ 31
Chapter 2: Command-Vue III Control Panel
_______________________________________________________________________ Table 2-8. Other Command-Vue Functions. (cont’d) Print demo page Switch to the VuePrint menu end press PRINT
and SAVE for at least three seconds. The printer prints a test page that demonstrates its capabilities.
Print complete character set for current emulation
Press PRINT and SELECT keys for three seconds.
Print maintenance self test Press ON LINE and LF/FF while turning the printer power on. See "Maintenance Test" in Appendix B for more information.
Print sliding character self test
Press ON LINE while turning the printer power on. See "Self Test" in Appendix B for more information.
Restore factory default settings
While the printer Is on line, press PARKJLOAD, LF/FF, and QUIET/SAVE for more than three seconds.
Load macro in the VuePrint menu, press SELECT and MENU for three seconds.
Save Command-Vue menu settings to macro memory
In the VuePrint menu, press SAVE for three seconds.

___________________________________________________________________
32
Chapter 3 Paper Handling
Your GSX-190 printer offers great versatility in the kinds of paper you can use and ways of loading and unloading them, This chapter discusses the detail of these features. .
Setting the Paper Thickness Lever
Paper up to .007 inches thick will feed smoothly through this printer. This allows you to use bond or ledger up to 27 lb. For thick paper, however, you need to adjust the print head away from the platen. Adjust the paper-thickness lever mounted on a notched brace at the left side of the printer. Move the lever toward the front of the printer for thicker paper.
Regardless of paper thickness, do not use a setting closer to the platen than the standard position pointer! Smudged output or damage to the printhead could result. See Table 3-1 for the
recommended paper thickness settings for the number of copies you are using.
A small bump on the brace {see Figure 3-1} identifies the standard {zero} location that is appropriate for most papers. Use Table 3-1 to find the recommended setting for the paper you are using. How you install the tractor unit and load paper into the printer depends on what kind of paper you select. The tractor unit has two positions: push and pull.
The tractor unit is mounted in the push position at the factory. When installed, it fits snugly into the rear of the printer. It works by gripping the edges of the continuous paper and pushing it under and around the platen until the paper comes out the top of the printer.

________________________________________________________ 33
Chapter 3: Paper Handling_______________________________________________________________________
Paper thickness lever position
Number of copies {including original}
-2 -1 0 +1 +2 +3 +4 +5 +6
Not used Not used 1 o r2 3 4 or envelope Envelope Envelope Envelope Envelope
Figure 3-1. Location of paper thickness lever.
Table 3-1. Paper thickness settings.
You'll find that thicker paper feeds best when you use the bottom-feeding feature of the GSX-190.

________________________________________________________ 34
Setting the Paper Select Lever _______________________________________________________________________
Setting the Paper Select Lever
The paper select lever {Figure 3-2 on page 28} sets the GSX-190 for either continuous or single sheet paper. If you look closely at the lever, you'll see what looks like a paper stack and single sheet of paper embossed next to the lever. The lever is moved forward {to the paper stack} for continuous paper and back {to the single sheet} for single sheets:
Printing on Single Sheets
Single sheet feeding allows you to print on your company letterhead as well as many other types of paper that are not available as continuous paper. The GSX-190 can print on paper as narrow as 7.2 inches and can print up to 8 inches wide on paper as wide as 10.1 inches. Follow these steps:
1. Be sure the tractor is in the push position. {If not, follow the
installation instructions later in this chapter.} If you already have continuous paper loaded, simply press the PARK/LOAD key to back the paper out of the way. See "Paper Parking" in this chapter for more information.
2. Install the paper guide in the upright position used for inserting
paper. See Figure 3-2. To do this, hold the paper guide so that the two corner extensions point downward into the printer. Slide the guide pins onto the L-shaped channel slot. At the same time, position the paper guide forward slightly allowing the pins to slip into the vertical channel. When installed correctly, the paper guide sits in an upright position.
3. Change the paper select lever to the rear {single sheet} position. To use the paper guide, simply move the left paper holder to the left as far as it will go. This is the normal position, however, you can adjust it according to the size of paper you will be using. insert a sheet of paper and adjust the right paper holder to the paper width.

________________________________________________________ 35
Chapter 3: Paper Handling _______________________________________________________________________
4. Insert a piece of paper head in, face down, between the paper holders {as you would load paper in a typewriter}. See Figure 3-3. Push the paper down gently to be sure it is all the way in.
5. Wait a brief time. The paper automatically feeds into the
printer and stops when it reaches the correct position for the starting line of print.
6. Prepare to print by pressing the ON LINE key.
Your printer is now ready to receive data from your computer and print a document on single sheets. The printer waits between pages for you to insert each new sheet and the control panel display reminds you to load paper by flashing the PAPER OUT indicator.
Figure 3-2. Installing the paper guide.

________________________________________________________ 36
The Tractor Unit _________________________________________________________________
Loading single sheets repeatedly is faster and more efficient with the automatic sheet feeder or manual sheet feeder. Read more about them in Appendix A, "Options."
The Tractor Unit The tractor unit can be mounted in either the push or the pull position. {The tractor was mounted in the push position at the factory.} The tractor must always be in the proper position to suit the paper you're printing on. Use Table 3-2 to determine the correct tractor position.
Figure 3-3. Adjusting the paper holders.

________________________________________________________ 37
Chapter 3: Paper Handling
_________________________________________________________________
Continuous Single-sheet Multi-copy*
Labels Envelopes**
Push
Push Pull Pull Push
Rear Top Bottom Bottom Top
Front Back Front Front Back
0 0 +1 or +2 +1 +2 to +6
* To print on 4-part forms Set COPY MODE {on the STYLE menu} on. ** Set ENVELOPE {on the INSTALL menu} on.
When you load paper that is narrower than the capacity of the printer, place the paper near the left side of the printer. The paper- out sensor is about two inches from the left edge of the printer
and the paper needs to cover it for successful operation. Installing the Tractor in the Push Position.
When the tractor is mounted in the push position, it holds the edges of the continuous paper and pushes it under and around the platen until the paper comes out the top. Follow the instructions below to change the tractor to the push position.
1. Remove any paper from the tractor.
2. With your thumbs on the release tabs and your fingers on the
side of the printer, push the tractor rearward. The unit will easily pop off the locating tabs.
3. Set the tractor unit down in the rear printer opening. The front
of the tractor edges should butt against the two locating pins that point outward from the sides of the mounting brace.
4. Place your forefingers between the ends of the tractor and the rear of the printer opening and press the tractor forward until release tabs lock onto the locator pins.
Paper type Tractor position
Paper-feed method
Paper select lever
Paper thickness lever
Table 3-2. Paper handling summary.

________________________________________________________ 38
The Tractor Unit _________________________________________________________________
Installing the Tractor in the Pull Position
When the tractor is mounted in the pull position, it pulls the paper up from the bottom and sends it straight up past the platen. Use the pull position when you need a straighter paper path {as with labels}. Follow the instructions below to change the tractor to the pull position.
1. Remove any paper from the tractor.
2. With your thumbs on the release tabs and you fingers on the
side of the printer, push the tractor rearward. The unit will easily pop off the locating tabs.
3. Hold the tractor unit so the sprockets face toward you and
the round crossbar is above the square crossbar. Gently lower the tractor into the printer until each end of the tractor rests on the flats of the mounting brace.
4. Gently press the tractor down and slightly forward until the
tractor's notches engage the forward locating pins.
Figure 3-4. Removing and installing the tractor unit in the push position.

________________________________________________________ 39
Chapter 3: Paper Handling _________________________________________________________________
5. Set the paper select lever to the forward {continuous-feed}
position.
Printing on Continuous Paper Your printer can print up to 8 inches wide on continuous-feed paper that's from 4 to 10 inches wide. Standard continuous-feed paper can be fed from either the bottom or the rear. With rear-feeding you can take advantage of the GSX-190 special features of paper tear off, top-of-form fine adjustment and paper parking. You can stack the paper on the desk or table behind the printer. {Be sure to allow space for the exiting paper so that it does not interfere with the incoming paper.} With bottom-feeding, you have convenient paper storage and less curling around the platen. We recommend the push position and rear feeding.
Figure 3—5. Installing tile tractor unit in the putt position.

________________________________________________________ 40
Printing on Continuous Paper
_________________________________________________________________
Because of the advanced paper-handling features of the GSX-190 it is seldom necessary to turn the paper feed knob. Most times turning the paper feed knob simply causes misaligned forms. Use the control panel instead.
Follow these steps to load continuous paper:
1. Be sure the tractor is mounted in the push position.
2. Move the paper select lever to the forward {paper stack} position.
3. Unlock the lock levers on the tractor feeders and adjust them to the
approximate paper width. See Figure 3-6.
4. Open the tractor feeder covers and place the paper on the sprocket pins. Close the covers to clamp the paper.
5. Adjust the tractor feeders until the paper is just taut between them,
and then relock the levers.
6. Install the paper guide/sheet separator in the sheet separator position see Figure 3-7. Do this by sliding the small pins that point into the printer onto the L-shaped channel openings on the outside of the paper guide extensions.
Lean the paper guide backward. At the same time, slide the paper guide forward slightly. Correctly installed, the paper guide lies flat on top of the printer case above the paper.

________________________________________________________ 41
Chapter 3: Paper Handling_______________________________________________________________________
Figure 3-7. Installing the paper guide/sheet separator.
Figure 3-6. Adjusting the tractor feeders.

________________________________________________________ 42
Paper Tear-Off _________________________________________________________________
7. Move the paper holders from the sides into the middle of the paper guide. This prevents your printed output from becoming accidentally jammed in the paper guide on its way out of the printer. See Figure 3-8.
8. Press the PARK/LOAD ▲ key. This advances the paper to
the starting print position.
9. Press the ON LINE key.
Paper Tear-Off The top cover of your printer has a tear bar at the rear edge so you can easily tear off perforated sheets without wasting paper.
Figure 3-8. Continuous paper feeding into the rear of the printer.

________________________________________________________ 43
Chapter 3: Paper Handling _______________________________________________________________________
You must be printing on continuous paper with the tractor unit in the push position to use this feature.
When your computer indicates the end of a print job {by sending a form feed command and no further data}, the GSX-190 automatically advances the continuous paper so the perforation is at the tear bar. To remove the paper, just pull it across the tear bar. The printer automatically retracts to the correct top-of-form {starting position} when your computer starts the next print job.
Sometimes a print job will end in the middle of a page. To advance the paper to the tear-off-position, press the ON LINE key to take the printer off line, and then hold the LF/FF key for 2 to 3 seconds.
If the paper you are using does not advance to the perforation, check the length of the paper against the form length setting on your printer.
Figure 3-9. Using the tear bar.

________________________________________________________ 44
Paper Parking _________________________________________________________________
Occasionally, you may not want the paper to automatically advance to the paper tear-off. You can turn off this feature by changing TEAR OFF to OFF in the VuePrint menu.
Paper Tear-Off Adjustment
The paper tear-off position is adjusted at the factory for standard continuous paper. When this is not suitable for the paper you're using, adjust the tear-off position by doing the following:
1. Load your paper with the tractor in the push position.
2. Make certain that the MENU slide switch is in the ON LINE
position. Switch the printer off line.
3. Press the PARK/LOAD ▲ key to advance the paper to the tear bar.
4. Hold the ON LINE and QUIET/SAVE keys for three seconds.
ThePARK/LOAD and LF/FF indicators blink. Release the keys.
5. To adjust the edge of the paper upward to the tear bar by 1/72”-
inch increments press the PARK/LOAD ▲ key. Pressing the LF/FF ▼ key adjusts the paper downward in 1/72” -inch increments.
To save your adjustment, press the QUIET/SAVE key. This setting remains in effect, even if you turn the printer off, until you repeat this procedure to set a different tear-bar position.
Paper Parking
Paper parking is a convenient feature that allows you to switch quickly between continuous-feed paper and single sheets. To use it, your continuous paper must be fed in through the rear of the printer with the tractor in the push position. This feature is disabled when the tractor is in the pull position. It works by backing the continuous paper out of the printer to where it is no longer touching the platen. However, the paper remains in the tractor feeders, ready to feed into the printer.

________________________________________________________ 45
Chapter 3: Paper Handling _________________________________________________________________
To park your continuous paper:
1. After the current job finishes, tear off the paper after the last page. Press the ON LINE key to take the printer off line.
2. Press the PARK/LOAD ▲ key. The paper retracts to the
parking position. The printer reverse feeds the paper a maximum of the current page length plus 6 inches.
You can now feed single sheets into the printer, following the directions earlier in this chapter. Remember to raise the paper guide from the paper separator position to the upright paper insertion position and change the paper select lever to the rear setting {for single sheets}.
When you are ready to switch back to continuous paper, follow these steps:
1. Eject a single sheet of paper {if one remains inserted} by taking
the printer off line and pressing the LF/FF ▼ key for 2 or 3 seconds.
2. Pull the paper select lever forward.
3. Press the PARK/LOAD ▲ key. The paper in the push tractor
advances to the top-of-form.
4. Press the ON LINE key to print again on continuous paper.

________________________________________________________ 46
Printing on Envelopes
_________________________________________________________________ Printing on Envelopes
Single sheet feeding allows you to print on #10, #6¾, #7¾, and DL size envelopes with a paper weight of 12 to 20 lb.
Follow these steps:
1. Be sure the tractor is in the push position. {If not, follow
the installation instructions earlier in this chapter.}
If you already have continuous paper loaded, simply press the PARK/LOAD key to back the paper out of the way. See "Paper Parking" in this chapter for more information
2. Change the paper select lever {shown in Figure 3-2} to the rear
{single sheet} position.
3. Set the paper thickness lever to +2, +3, +4, +5 or +6, depending on the thickness of the envelope. Setting the paper thickness lever is critical to print quality when printing on envelopes. Experiment with several paper thickness settings and choose the one that best suits your particular envelope.
4. Install the paper guide in the upright position used for inserting
paper. {See Figure 3-2 earlier in this chapter.}
5. Set the left paper holder {see Figure 3-10}. Insert the envelope just enough to adjust the right paper holder to the envelope width; then, remove the envelope momentarily.
6. Open the flap of an envelope before inserting it.
7. Insert the envelope head in, face down, flap open between the paper holders {as you would load paper in a typewriter}. See Figure 3-10. Push the envelope down gently to be sure it is all the way in.

________________________________________________________ 47
Chapter 3: Paper Handling
_________________________________________________________________
8. Wait a brief time {approximately half a second}. The envelope automatically feeds into the printer and stops when it reaches the correct position for the starting line of print.
9. Move the MENU slide switch to INSTALL, Press the
ENVELOPE key to turn envelope mode on.
10. Move the MENU slide switch back to ON LINE and press the ON LINE key.
Figure 3-l0. Adjusting the paper holders for printing with envelopes.

________________________________________________________ 48
Printing on Envelopes
We recommend that you set the VTOP option to +144 when printing on envelopes. This starts your printing on the envelope— not the flap. See "Top-of-Form Fine Adjustment" in this chapter for more information on VTOP settings.
Figure 3-11. printable area for envelopes Your printer is now ready. The printer waits between envelopes for you to insert each new one and the control panel display reminds you to load a new envelope by flashing the PAPER OUT indicator.
When printing on envelopes, avoid printing near edges of the envelope or in areas where the paper is triple thickness {glued together}. Figure 3-11 shows the recommended printable area of a typical envelope.
________________________________________________________ 49
Chapter 3: Paper Handling
_________________________________________________________________ Printing on Overhead Transparencies
Your printer can also print in color on overhead transparencies for outstanding presentations. It's best to use transparencies specifically designed for dot matrix printers, such as Arkwright Dot Matrix Film {P/N 312-21-01} which have a slightly rough surface rather than a smooth surface,
To load transparencies, follow the instructions for "Printing on Single Sheets," earlier in this chapter.
Unlike paper, the ink on transparencies takes longer to dry. Be careful not to smudge the ink when handling newly printed
transparencies. For best results, select dark colors for printing, such as black, red, blue, or violet.
Printing on Multi-part Forms and Labels Printing on multi-part forms uses the bottom-feeding method with the tractor in the pull position in order to grip the exiting forms and pull them out. Feeding paper in this way allows the forms to feed almost straight through the printer with minimal curling around the platen. However, you will not be able to use the paper tear off, top-of-form fine adjustment, and paper parking features.
The printer is mounted on a printer stand allowing your supply of forms to sit below the printer. {See Appendix A, "Options," for the recommended printer stand, as shown in Figure 3-12.}

________________________________________________________ 50
Printing on Multi-part Forms and Labels _________________________________________________________________
Figure 3-12. Bottom paper feeding.
Follow these steps to load multi-part forms or labels:
1. Be sure the tractor is in the pull position. If not, install it by following the instructions earlier in this chapter.
2. Turn off the printer before loading the forms or labels from
the bottom.
3. Remove the top cover.
4. Set the printer on its rear side.
5. Insert the forms or labels through the slot in the bottom of the printer. See Figure 3-13. Pull the forms or labels through so that 4 or 5 inches extend out of the printer. Make sure the paper covers the paper out sensor, which is about 2 inches from the left side of the printer.
6. Set the printer right-side-up again.
____________________________________________________________________ 51
Chapter 3: Paper Handling _________________________________________________________________
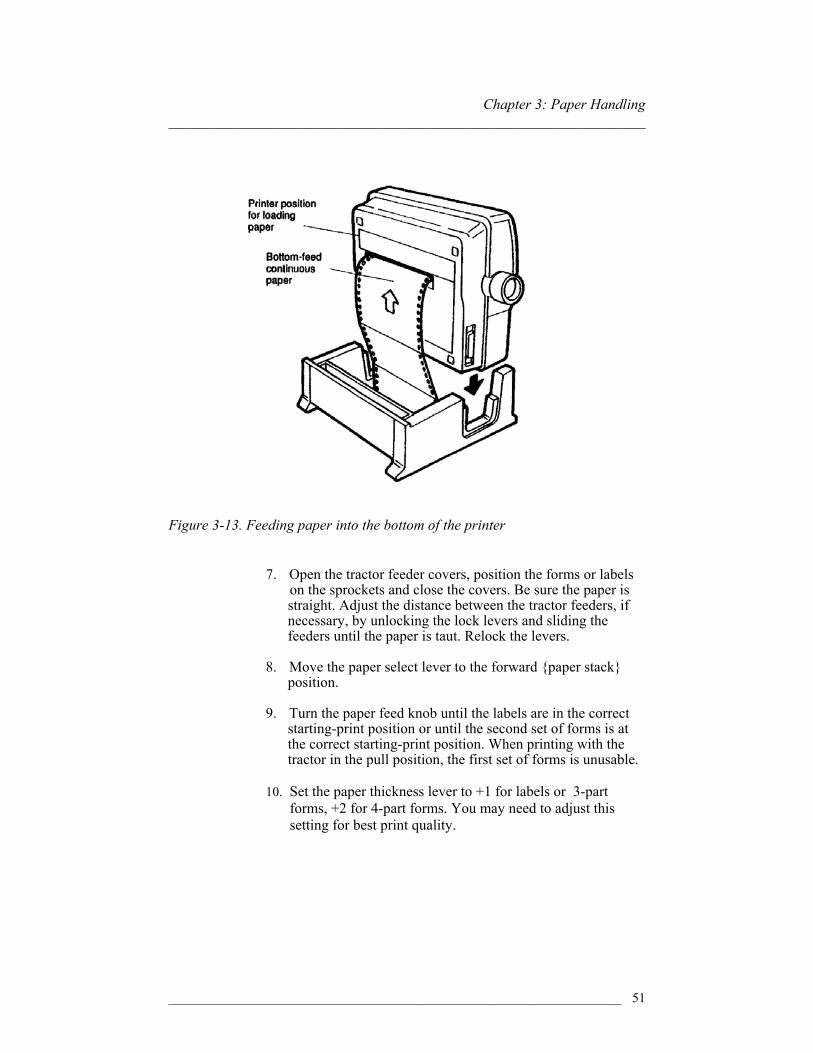
Figure 3-13. Feeding paper into the bottom of the printer
7. Open the tractor feeder covers, position the forms or labels on the sprockets and close the covers. Be sure the paper is
straight. Adjust the distance between the tractor feeders, if necessary, by unlocking the lock levers and sliding the feeders until the paper is taut. Relock the levers.
8. Move the paper select lever to the forward {paper stack} position.
9. Turn the paper feed knob until the labels are in the correct starting-print position or until the second set of forms is at the correct starting-print position. When printing with the tractor in the pull position, the first set of forms is unusable.
10. Set the paper thickness lever to +1 for labels or 3-part
forms, +2 for 4-part forms. You may need to adjust this setting for best print quality.

________________________________________________________ 52
Top-of-Form Fine Adjustment
_________________________________________________________________
11. Replace the top cover. The transparent part of the cover rests against the tractor unit.
12. Turn on the printer.
Top-of-Form Fine Adjustment You never need to use the paper feed knob for setting the top-of-form. You can make minute modifications to the top-of-form on continuous or single sheets by following these steps:
Your top margin is usually set by your software, You shouldn't need to change the top-of-form setting very often.
1. Load paper onto the push tractor or into the paper guide. If you
are using single sheets, the paper automatically advances to the top-of-form, so skip the next step.
2. If you are using continuous paper, press the PARK/LOAD ▲
key to move the paper to the top-of-form position.
3. Press the ON LINE key to set the printer on line.
4. Press and hold the PARK/LOAD ▲ key or the LF/FF ▼ key for two to three seconds. This step directly enters the function to chance the top-of-form position. The PARK/LOAD and LF/FF indicators blink to let you know you're in top-of-form fine adjustment mode.
The variable top-of-form setting of zero is the factory setting, which is approximately one inch from the edge of the paper to the top of a normal height character.

________________________________________________________ 53
Chapter 3: Paper Handling
_________________________________________________________________
5. Press the PARK/LOAD ▲ key to adjust the paper upwards in 1/72-inch increments. Or, you can press the LF/FF ▼ key to adjust the paper downwards in 1/72-inch increments.
You can adjust the top-of-form from –60/72-inch to +144/72-inch.
6. Save your new top-of-form as the default setting by pressing the
QUIET/SAVE key for about two seconds.
If you want to print on the first line on the paper, set variable top-of-form to –60/72-inch. If you want your new variable top-of-form to be only a temporary setting, do not press the QUIET/SAVE key. Simply press ON LINE. If you do not save it, the new variable top-of-form setting is discarded as soon as the printer is turned off.
You can set one variable top-of-form for single sheets and another for continuous paper and save both settings in one macro. The GSX-190 senses which variable top-of-form to use by the position of the paper select lever. This convenience eliminates the need to change the top-of-form each time you switch between continuous paper and single sheets.
When variable top-of-form is set between -24 and -60:
* Print quality in the top 6/7 inch of the page may not be as good
as the rest of the page.
* Occasional paper feeding problems may occur.
* Do not print in the first or last 1 inch {10 characters at 10 cpi} of the first two lines of the page as shown in Figure 3-14.

________________________________________________________ 54
Top-of-Form Fine Adjustment_______________________________________________________________________
Envelopes should not be used with -71 through -60 variable top-of- form settings. Paper feeding problems may occasionally occur.
The default top of form is 1". With 11" paper, this leaves you with 10' of printable area. Reduce the page height in your software to10" to compensate.
A simple test of how your software and the GSX-190 work together is to create a document that's nothing but numbered lines from 1 to66. Print this document to see what fits on a page.
You can reset top of form to its default position by holding the PARK/LOAD ▲ key until the paper is advanced as far as it will go Then press the key again for 2 seconds. The paper will return to its default position.
Figure 3-14. Extend the variable top of form setting.

________________________________________________________ 55
Chapter 4 Setting Up Commercial Software
The GSX-190 is designed to work easily with many popular commercial software packages. The software is designed to print a file by sending codes for letters, numbers, punctuation, and so on in addition to activating various printer features. Some commands control rather simple features, such as ending a line or advancing the paper. Other commands control character pitch, font style, fine line spacing increments and graphics.
The commands to control these features are different on nearly every brand of printer. Citizen chose to use the same commands as the Epson FX-series, and the IBM Proprinter Ill—and then enhanced these command sets with extra commands that permit additional print styles, such as reverse {white on black} printing.
Printer drivers in your software are the easiest method for' sending these commands to the printer; these generally offer support for the greatest number of printer features.
Other methods are to create your own printer driver, use embedded printer commands, or set up a group of commands that can be sent each time the program begins to print.
When you install new software, you are usually asked to select a driver from a list supplied by the software application. It helps to know what features some of these drivers offer when you make your selection. Table 4-1 lists a few of the most common features associated with Citizen and Epson FX drivers.

________________________________________________________ 56
Chapter 4: Setting Up Commercial Software
_________________________________________________________________ The printer models in Table 4-1 are listed in order of their similarity to {i.e., compatibility with} the GSX-190. Therefore, as you search your software for the appropriate driver, you should look first for the printer model listed first. If it's not available, look for the second model, and so on.
Driver Features Color NLQ fonts*
Citizen GSX-190 YES YES
Citizen 2000X YES YES
Citizen HSP-500 YES YES
Epson FX-850 YES Epson Lx-8l0 YES Epson EX.800 YES YES
Epson JX-80 YES YES
*Some drivers may not support all of the GSX-1 90 NLQ fonts.
If none of these drivers are listed by your software, choose any other Epson FX-series printer because Citizen uses the same commands.
If no Epson FX. EX or RX drivers are available, select IBM Proprinter III.
Table 4-1. Printer driver selection for the GSX-190.

________________________________________________________ 57
Appendix A Options
Figure A-1. Enhance your GSX-190 printer with any of these options.

________________________________________________________ 58
Appendix A: Options _________________________________________________________________
Color On CommandTM With Citizen's exclusive Color on Command, your GSX-190 prints in the four colors on the ribbon {red, blue, yellow, and black} plus three mixed colors {green, orange, and violet}. You can select one of these color by moving the MENU slide switch to the INSTALL position while the printer is on line.
For more complex color printing, such as printing more than one color per page, use your software to send commands to the printer to change colors. The more sophisticated programs support up to 256 colors.
In your software program, select a printer driver that supports color printing. In many programs, the Citizen GSX-190, 200 GX, or the Epson EX-800 or JX-80 driver can print in color.
Installing the Color Kit
1. Turn the power off, and remove the top cover.
2. Remove the standard ribbon cassette by snapping it out of the printer.
3. Hold the color motor so its gear side faces left. Fit the two slots on the front and rear bottom of the motor into the two notches on the top of the frame in the printer. See Figure A-2.
4. Connect the color motor to the printer's connector. Be careful
not to bend the pins on the color motor connector.
5. Slide the printhead to the center of the platen.
6. Slide the ribbon roller guide to the center of the cassette. Position the color ribbon cassette so the ribbon roller guide is directly above the printhead. See Figure A-4.

________________________________________________________ 59
Color On CommandTM
_______________________________________________________________________
Figure A-3. Connecting the color motor to the printer.
Figure A-2. Installing the color motor.

________________________________________________________ 60
Appendix A: Options _______________________________________________________________________
Figure A-4. Installing the color ribbon cassette
7. Lower the cassette into the printer until the three locating pins {one on the left side of the cassette, 2 on the right} snap into their corresponding notches on the printer. The 2 pins on the right end fit into notches on the color motor. Be sure the ribbon fits between the printhead and the ribbon mask.
8. Move the printhead left and right. Be sure ribbon knob turns clockwise as the ribbon advances, and that the ribbon doesn't snag or bunch up.
9. Check that the fine adjustment lever is set to the middle position. {See Figure A-5}.
10. Set the paper thickness lever to the O position. You may need
to adjust this setting for best print quality.
11. Replace the top cover. 12. Turn the power on, and configure the printer.
Figure A-4. Installing the color ribbon cassette.

________________________________________________________ 61
Color On CommandTM _______________________________________________________________________
You must use the menu to install the color option before using the printer to avoid damage to the printer. This menu selection causes more power to be applied to the carriage motor when the color
ribbon is installed.
Once you install the color motor, you need not remove it to replace the color ribbon cassette with a standard black ribbon cassette.
Configuring the Printer
If you plan to use the color ribbon only for a short time, you can use the control panel's INSTALL menu; to configure the printer. Settings you make this way are lost when you turn the printer off. If you plan to leave the color ribbon installed in the printer, use the VuePrint menu to store your change in the GSX-190's nonvolatile macro memory. Both methods are described below.
To make a temporary setting, follow these steps: 1. Switch the printer off line. {With the MENU slide switch in the
ON LINE position, press the ON LINE key until the ON LINE indicator is off.}
2. Move the MENU slide switch to the INSTALL position.
3. Press the COLOR RIBBON key to turn its menu light on.
4. Switch the printer on line. {Move the MENU slide switch back
to ON LINE and press the ON LINE If you switch back to the normal black ribbon, simply repeat these steps to turn the COLOR RIBBON menu light off.

________________________________________________________ 62
Appendix A: Options
_________________________________________________________________ There is a short cut for turning on color when the printer is on line.
Simply move the MENU slide switch to the INSTALL position and hold the COLOR RIBBON key for 3 seconds. You can then select colors by pressing the COLOR RIBBON key additional times as described below.
To configure the printer's macro memory for a color ribbon, follow these steps:
I. Move the MENU slide switch to VuePrint.
2. Press and hold the MENU key for three seconds to enter the
VuePrint menu.
3. The first item on the VuePrint menu is RIBBON. Press the SELECT key until the printhead points to COLOR.
4. Press the SAVE key to save the setting.
5. Move the MENU slide switch back to the ON LINE position.
If you change back to a normal black ribbon, repeat these steps and select NORMAL.
Selecting Colors with the Control Panel
If you have installed the color kit and color ribbon and configured your printer as described in the preceding sections, you can use the control panel to select a color for printing. To do so, follow these steps:
1. Be sure the printer is on line. {The ON LINE indicator should
be lit.} 2. Move the MENU slide switch to the INSTALL position.
3. Press the COLOR RIBBON key the number of times indicated
in Table A-I to select a color. The menu lights by the colored menu windows tell you which color you have selected.
4. Press any other key or move the MENU slide switch to return
on line and resume printing.

________________________________________________________ 63
Color On CommandTM _________________________________________________________________
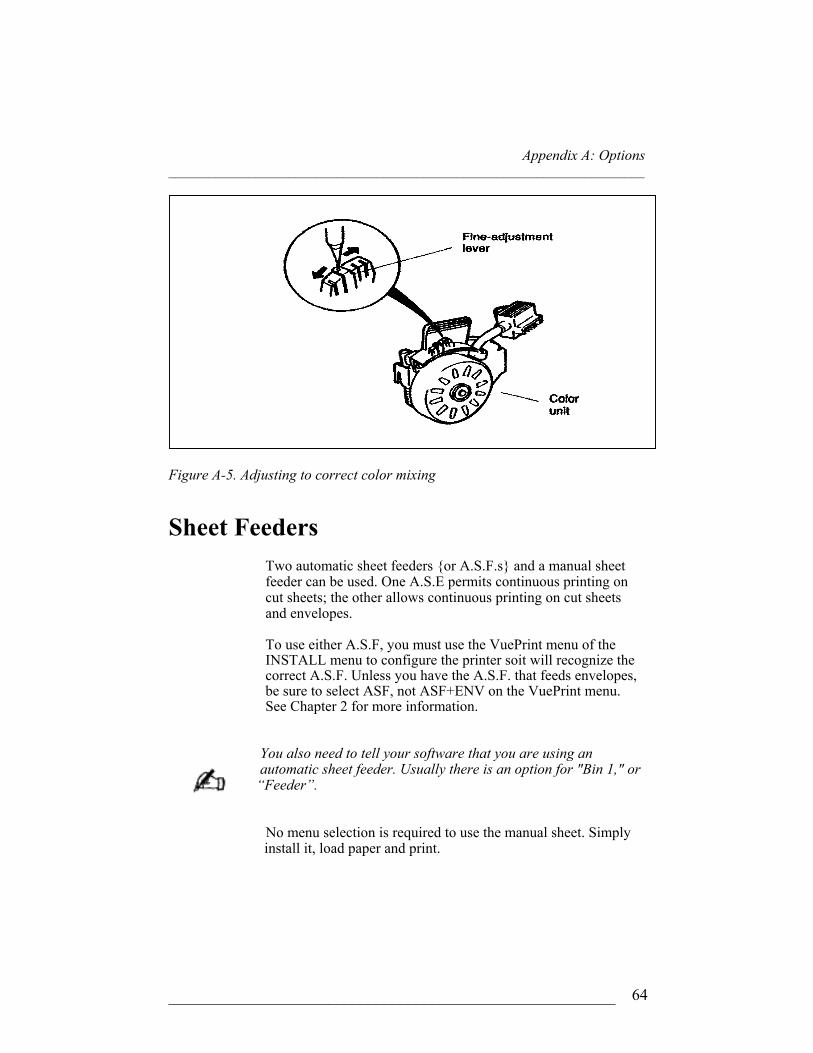
Correcting Color Mixing
When you select colors, the printer chooses the proper color band on the color ribbon. If the bottom part of letters pick up the color in the next band, fine-adjust the color band selection by moving the small adjustment lever on top of the color motor. The normal setting is in the center. See Figure A-S.
Table A-1. Key presses and indicator lights for selecting colors.
Before sliding the adjustment lever, move the lever a little bit to the right to release the lock.
________________________________________________________ 64
Appendix A: Options _______________________________________________________________________
Figure A-5. Adjusting to correct color mixing
Sheet Feeders
Two automatic sheet feeders {or A.S.F.s} and a manual sheet feeder can be used. One A.S.E permits continuous printing on cut sheets; the other allows continuous printing on cut sheets and envelopes.
To use either A.S.F, you must use the VuePrint menu of the INSTALL menu to configure the printer soit will recognize the correct A.S.F. Unless you have the A.S.F. that feeds envelopes, be sure to select ASF, not ASF+ENV on the VuePrint menu. See Chapter 2 for more information.
You also need to tell your software that you are using an automatic sheet feeder. Usually there is an option for "Bin 1," or “Feeder”.
No menu selection is required to use the manual sheet. Simply install it, load paper and print.

________________________________________________________ 65
Serial Interface
_________________________________________________________________
Serial Interface The serial interface permits your GSX-190 printer to communicate with a computer that requires an RS-232C serial interface. The serial interface supports speeds from 150 through 9600 baud, and it can use XON/XOFF and DTR protocols.
You can share your printer among two computers by using the serial interface; connect one computer to the parallel interface and one to the serial interface. The interface from which data is received first after the power is turned on is selected; the other interface is inactive. This condition continues until the printer is turned off. To select the inactive interface, turn the printer off and on again, and then send data through that interface.
The serial interface is not shipped with, a serial interface cable. Contact your dealer for a null modem serial interface cable.

________________________________________________________ 66
Appendix A: Options _________________________________________________________________
Baud rate Switch 3-1 Switch 3-2 Switch 3-3 *9600 ON ON ON
4800 ON OFF OFF
2400 OFF ON OFF
1200 ON ON OFF
600 OFF OFF ON
300 ON OFF ON
150 OFF ON ON
Table A-2. Serial interface default switches 3-1, 3-2, 3-3. Default Switch OFF ON 3-4 *XON/XOFF DTR {Data Ready}
3-5 *8 data bits 7 data bits 3-6 *Parity check off Parity check on 3-7 *Even parity Odd parity 3-8 *Reserved Reserved
{Factory default} Table A-3. Serial interface default switches 3-4, through 3-8.
Printer Stand
A printer stand allows you to easily use bottom-feed continuous paper, multi-part forms, labels, and thick paper. See Chapter 3 for details.

________________________________________________________ 67
Appendix B Maintenance Cleaning
Periodically clean out paper dust and other stray particles that may find their way into your printer. It is a good idea to keep your printer covered when it's not being used.
If the GSX-190 is used heavily or in a dusty environment, consult your service center for advice on periodic cleaning and lubrication.
1. Turn off the printer. Wipe the outside of the printer with a lint-free cloth that has been moistened with a mild detergent solution.
2. Remove the top covet, and remove the ribbon cassette.
Be sure the printhead is cool before performing any procedures inside the printer. 3. Use a soft brush to whisk paper lint and dust away from the area around the platen, printhead, and carriage shaft. Move the
printhead as necessary and take care not to damage the cables and pulleys.
4. Turn the paper feed knob, and wipe the surface of the platen
with a soft cloth dampened with alcohol.
5. Reinstall the ribbon cassette and the top cover.

________________________________________________________ 68
Appendix B: Maintenance
_________________________________________________________________
Alarms When an alarm occurs, the indicator lights shown in Figure B-I will flash. The alarms you can receive, their probable causes, and remedies are listed below
The position of the slide switches does not matter in this case.
Figure B-I shows the MENU switch in the ON LINE position and we'll use those labels to identify the indicator lights.
Alarm: POWER/PAPER OUT flashes.
Cause: 1. The printer is out of paper.
2. The paper in the printer is jammed.
Remedy: 1. Load more paper.
2. Clear the jam and reload paper. Figure Figure B-1. Alarm indicator lights.

________________________________________________________ 69
Alarms
_________________________________________________________________ Alarm: LF/FF and QUIET alternately flash. Cause: This is a warning that the printhead is hot, which can occasionally happen during times of heavy printing. Remedy: No action is required. The printer automatically resumes printing when the printhead has cooled. Alarm: PARK/LOAD and LF/FF alternately flash. Cause: 1. The paper select lever is set in the rear position while the tractor
is installed in the push position.
2. The paper select lever was moved after the paper was inserted into the printer.
Remedy: 1. Move the paper select lever forward if the tractor is in the pull
position.
2. Reset the paper select lever to its original position.
3. Press the ONLINE key to continue printing. Alarm: All indicators on. Cause: Hardware error. Remedy: Turn the printer off and then on again. If the problem still occurs,
contact your dealer or Authorized Service Center. Alarm: ON LINE and PARK/LOAD alternately flash. Cause: The printhead was not positioned correctly. Remedy: Press the ON LINE key to position the printhead correctly, or turn
the printer off and then on again. If the problem still occurs, contact your dealer or Authorized Service Center.

____________________________________________________________________ 70
Appendix B: Maintenance _________________________________________________________________
Troubleshooting This section discusses some of the difficulties users sometimes encounter. All of the possible user actions are listed. If these suggestions do not solve the problem, contact your dealer or Authorized Service Center. Do not try to repair the printer yourself.
Power
Problem: Printer is turned on but the POWER light on the control panel remains off.
√ Check the power cord. Is it firmly connected to the wall outlet?
√ Plug a lamp or other device into the wall outlet to be sure it is
working. Paper Feeding Problem: Continuous-feed paper jams.
√ Are the tractor feeders locked? √ Is the paper select lever set to the forward {paper stack}
position?
√ Is the paper thickness lever correctly set for the type of paper you are using?
√ Is the top cover installed and closed properly?
√ Is the unprinted paper stack straight?
√ Does the exiting paper have a clear path which does not interfere
with the incoming paper?
√ Is the incoming paper tangling with the power cord and/or computer cable?
√ Is a label or other paper jammed under the platen?

________________________________________________________ 71
Troubleshooting
_________________________________________________________________ Problem: Paper does not feed.
√ Is your continuous paper set in the tractor feeders correctly?
√ Be sure the paper select lever is in the correct position. Problem: Paper parking does not operate or paper doesn't advance to the tear-
off position.
√ The paper select lever must be set for continuous paper {forward position} to park the paper.
√ Check the tractor. It must be in the push position.
√ Be sure the printer is off line. Problem: Tear-off position is not at the perforation.
√ Check the length of your paper against the setting made with the
VuePrint menu. They must match.
√ Be sure the A.S.F. selection {either the VuePrint menu or in the INSTALL menu} is off if the automatic sheet feeder is not installed.
√ Perhaps you turned the paper feed knob manually, which should
not be done.
√ Try parking the paper again.

________________________________________________________ 72
Appendix B: Maintenance _________________________________________________________________ Problem: Paper does not feed from the automatic sheet feed&.
√ Is the paper select lever in the rear {single sheet} position?
√ Be sure the A.S.F. {automatic sheet feeder} is enabled by setting the VuePrint menu or the INSTALL menu.
√ Be sure the paper loading lever of the automatic sheet
feeder was not left in the "paper release" position?
√ Turn off the printer and turn the paper feed knob clockwise. If the automatic sheet feeder ejection rollers DO NOT rotate, remove the ASF and reinstall it correctly.
√ Be sure your software is set up for "Bin 1" or "Feeder."
Problem: Paper does not feed from the manual sheet feeder.
√ Be sure the A.S.E {automatic sheet feeder} selection made with the Vueprint menu or the INSTALL menu is off.
Problem: An envelope feeds crooked.
√ You should open the envelope flap before feeding.
√ Is the paper select lever in the rear {single sheet} position? Printing Operation Problem: Printhead does not move.
√ Open the top cover and try turning the ribbon knob. if it is jammed, replace the ribbon cassette with a new one.
√ Check inside the printer for excessive dust or dirt that may be
restricting the printhead's movement.

________________________________________________________ 73
Troubleshooting
_________________________________________________________________ Printing Results Problem: Printer does not print at all.
√ Is the ribbon cassette properly installed so that the ribbon feeds between the printhead and the ribbon mask {not between the ribbon mask and the black ribbon guide against the platen}?
√ Be sure the printhead cables are attached to the printhead. Problem: Printing is faint.
√ Check the paper thickness lever for correct location.
√ Remove the ribbon cassette and try turning the ribbon knob. If it is jammed, replace the cassette.
Problem: Printing is faint on fourth copy. -
√ Four-part forms should always be bottom-fed through the printer.
√ Old carbonless forms don't create as dark an image as fresh
forms. √ We recommend using the Sans Serif font because it is the most
readable font. √ Adjust the paper thickness lever. √ Use copy mode and/or emphasized print.
Problem: Ink smudges on paper.
√ Check the paper thickness lever. Adjust the lever 1 or 2 notches away from the platen when printing on thick paper or multi-part forms.
√ Check that the envelope flap is open if you are printing on an
envelope.

________________________________________________________ 74
Appendix B: Maintenance
_________________________________________________________________ Color Printing Problem: Printer will not print in color. √ Is the color ribbon installed correctly?
√ Is the color motor installed correctly?
√ Check that the color ribbon is selected on the INSTALL menu.
√ Be sure your software is set for a color printer. See Table 4-1. Problem: Colors mix.
√ Is the color ribbon installed correctly? Be sure it is snapped in all the way.
√ The ribbon may be at the wrong height. It can be adjusted with
the small lever on the color motor. Problem: The printing color cannot be changed on the control panel.
√ Check that the color ribbon is selected.
√ Check that the printer is on line. Printing Characteristics Problem: Printer does not produce expected printing characteristics.
√ Be sure that the printer selected in your software matches the printer you have selected with the VuePrint menu. Refer to Chapter 4, "Setting Up Commercial Software."
Problem: The font setting on the Command-Vue control panel is canceled
when you print with your word processing software.

________________________________________________________________
75
Troubleshooting
_______________________________________________________________ √ Your word processing software may be sending a reset
command that cancels this control panel setting. Set FONT LOCK to on using the control panel to protect font settings from software override. See Chapter 2, "Command-Vue Control Panel." {FONT LOCK cannot protect a pitch setting. Set a pitch with your word processing software.}
Self Tests
The self tests provide assurance that the printer is working. There are two self test patterns, a sliding character set, and an H-pattern. To print the sliding character set, hold the ON LINE key while you turn on the printer. To print the H-pattern, hold the ONLINE and LF/FF keys while you turn on the printer.
Interrupt the test by pressing the ON LINE key once. This interrupts the test print but does not actually stop it. If you wish to continue the test, press ON LINE again. When you want to discontinue the test, turn off the printer.

________________________________________________________ 76
Appendix B: Maintenance ___________________________________________________ Hex Dump
The hex dump is a useful tool for debugging programs. It shows the hexadecimal values of the codes actually sent by your computer, printing 16 codes on each line. In addition, the character each code represents is printed at the right side of the sheet. Control codes—codes with hexadecimal value less than 20—are shown as periods. Figure B-4 is an example of the hex dump printout.
To enter hex dump mode, turn the printer power off. Then, while holding the QUIET key, turn on the printer. Send data from your computer.
Exit hex dump printing by turning the printer off.
Character Set
You can print a complete character set for the current emulation. Simply hold the PRINT and SELECT keys for three seconds. It will print the character set in the currently selected font.

________________________________________________________ 77
Appendix C Specifications Printing Printing Speed Draft characters I5 CPI: 270 CPS I2 CPI: 216 CPS 10 CPI: 240 CPS {high speed} 10 CPI: 180 CPS Near Letter quality {NLQ} I5 CPI: 68 CPS I2 CPI: 54 CPS 10 CPI: 45 CPS Buffer Memory 8K bytes
Emulations Epson FX-850, EX-800, IBM Proprinter III
Character Sets Epson Emulation
IBM Emulation Column width {8 inches}
Line Spacing
Epson italic, Epson graphics, international characters for 16 languages, legal symbols, Windows ANSI {USA} Code pages 437,850,860,861,863, 865, Turkish, Scandinavian, Windows ANSI {USA} CPI Column width
CPI 10 80 12 96 15 120 17.1 137 20 160 1/6,1/8,7/72 {standard}, n/72 n/144. or n/216 inch programmable
NOTE: CPI stands for Character Per Inch; CPS stands for Character Per Second

________________________________________________________ 78
Appendix C: Specifications _________________________________________________________________ Bit Image Modes 60, 72, 80, 90, 120, 144, and 240 dots per inch (Horizontal) Paper Continuous Forms Width: 4-10 inches Weight: 14-27 lbs {single-part}
Thickness: Up to 4 parts, maximum form thickness 0.2mm
Single Sheets Width: 7.2-10 inches Weight: 14-27 lbs Printer Dimensions Height: 5.4 inches {136 mm} Width: {including knob}: 17.0 inches {432 mm} Depth: 12.6 inches {320 mm} Weight 11.5 lbs. {5.2 kg} Power 115V ±10%, 60±3 Hz Requirements Power At standby: 10W Consumption During printing of ASCII 96 sliding pattern: 38 W Environment Temperature: Operating: 41 to 950F {5 to 350C} Storage: —22 to 1400F {—30 to 600C} Relative Humidity: Operating: 10 to 80% Storage: 5 to 85% Printer MTBF 4,000 house {excluding printhead} Printer MTTR 20 minutes or less Printhead Life 200 million strokes per wire Parallel Interface Interface Centronics-compatible Cable IBM parallel printer cable or equivalent {cable length not to exceed
10 feet} Connector 57-30360 Amphenol

____________________________________________________________________ 79
FCC COMPLIANCE STATEMENT This equipment has been tested and found to comply with the limits for a Class B Digital device, pursuant to Part 15 of the FCC Rules. These limits are designed to provide reasonable protection against harmful interference in a residential installation. This equipment generates, uses and can radiate radio frequency energy and, if not installed and used in accordance with the instructions, may cause harmful interference to radio communications. However, there is no guarantee that interference will not occur in a particular installation, If this equipment does cause harmful interference to radio or television reception, which can be determined by turning equipment off and on, the user Is encouraged to try to correct the interference by one or more of the following measures: • Reorient or relocate the receiving antenna. • Increase the separation between the equipment. • Connect the equipment into an outlet on a circuit different from that to which the
receiver is connected. • Consult the dealer or an experienced radio/TV technician for help. CAUTION: The use of a non-shielded interface cable with this equipment is prohibited. Only peripherals{computer input/output devices, terminals, etc.} certified to comply with the limits for the Class B digital device may be attached to this computer peripheral. Operation with non-certified peripherals is also likely to result in harmful interference to radio and TV reception.
EMI COMPLIANCE STATEMENT This equipment generates and uses radio frequency energy and if not installed and used properly, that is, in strict accordance with the manufacturer's instructions, may cause interference to radio and television reception. This digital apparatus does not exceed the Class B limits for radio noise emissions from digital apparatus set out in the Radio Interference Regulations of the Canadian Department of Communications. This equipment is designed to provide reasonable protection against such interference in a residential installation. However, there is no guarantee that interference will not occur in a particular installation. If this equipment does cause interference to radio or television reception, which can be determined by turning the equipment off and on, the user is encouraged to try to correct the interference by one or more of the following measures: • Reorient the receiving antenna • Relocate the computer with respect to the receiver • Move the computer into a different outlet so that computer and receiver are on
different branch circuits.

____________________________________________________________________ 80
Appendix C: Specifications _________________________________________________________________ ETAT DE CONFORMITE EMI A L'USAGE Cet équipment produit et utilise l'énergie à radiofréquences et s'il n'est pas installé et utilisé correctment, c'est à dire en accord strict avec les instructions du fabricant, il risque de provoquer des interférences avec la réception de la radio et de la télévision. Le présent appareil numérique n'émet pas de bruite radio électriques dépassant les limites applicables aux appareils numéiques de la classe B prescrites dans le Réglement sur le brouillage radio électrique édicté par le ministére des Communications du Canada. Cet équipment est concu pour fournir une protection satisfaisante contre de telles interferences dans une installation résidentielle. Cependant, il n'y a pas de garantie contre les interferences avec les réceptions radio ou télévison, provoquées par Ia mise en et hors circuit de l'équipment; aussi, il est demandé a l'utilisateur d'essayer de corriger l'interférence par lune ou plus des mesures suivantes: • Réorienter l'antenne de réception. • Installer l'ordinateur autre part, par égard pour le récepteur. • Brancher l'ordinateur dans une prise de courant différente de facon à ce que l'ordinateur et le
récepteur soient branchés sur des circuits différents.

____________________________________________________________________ 81
Appendix D Command Reference In the following tables, ESC indicates the Escape character. Braces around a number, for example 124}, indicates that you should use the character with that decimal value.
Citizen Commands Citizen commands work in both emulations. Printer Control Commands
High Speed Draft Mode On ESC ~ 81 Off ESC ~ 80 Top-of –form position 9/16 inch ESC ~ T1 1 inch ESC ~ T0 Top-of –form adjustment Continuous Form ESC ~ V n 0 Single Sheets ESC ~ V n 1 Park continuous paper Paper tear-off Enable ESC ~ C1 Disable ESC ~ C0 Copy mode On ESC ~ 1 1 Off ESC ~ 1 0 Font lock On ESC ~ F 1 Off ESC ~ F 0 Emulation Epson FX-850 ESC ~ 5 0 IBM Proprinter III ESC ~5 1 Vertical Motion Commands Line spacing n/144 inch ESC~ 0 n Print Style Commands Select Font Roman ESC ~ x 0 Sans serif ESC ~ x 1 Courier ESC ~x 2 Prestige ESC ~ x 3 Script ESC ~ x 4 Orator ESC ~ x 7

________________________________________________________ 82
Appendix D: Command Reference _________________________________________________________________ Print Size Commands Pitch Pica ESC ~ 3 0 Elite ESC ~ 3 1 13.3 pitch ESC ~3 5 Fifteen pitch ESC ~ 3 6 17 pitch ESC ~ 3 2 20 pitch ESC ~ 3 7 Expanded print On ESC ~1 3 Off ESC ~1 0 Quadruple width print On ESC ~1 4 Off ESC~ 1 0 Double-high print On ESC ~ 11 Off ESC~ 1 0 Double-high, double wide print On ESC~15 Off ESC ~10 Quadruple-high print On ESC ~ 1 2 Off ESC ~10 Quadruple-high, quadruple-wide print On ESC ~16 Off ESC~10 Print Enhancement Commands Reverse print On ESC~21 Off ESC~20 Character Table Commands Zero Slashed ESC ~41 Not slashed ESC ~ 40 Select code page USA {437} ESC ~ R 0 Multilingual {850} ESC ~ R I
Portugal {860} ESC ~ R 2 Canada-French {863} ESC ~ R 3 Norway {865} ESC ~ R 4 Scandinavia ESC ~ R 5
Turkish ESC ~ R12 Icelandic {861} ESC ~ R13
Select Widows ANSI Character set ESC~ s Print complete character set set ESC~ S

____________________________________________________________________ 83
Epson FX-850 Emulation Commands _________________________________________________________________ Epson FX-850 Emulation Commands Default switch is 1-1 off Printer Control Commands Master Reset ESC @ Delete character {127} Cancel line {24} Unidirectional print On ESC U 1 Off ESC U 0 One line ESC< Half speed mode On ESC s 1 Off ESC s 0 Immediate mode On ESC i 1 Off ESC i 0 Paper-out Sensor Enable ESC 9 Disable ESC8 Automatic sheet feeder A.S.F.on ESC {25} 4 A.S.F.off ESC {25} 0 Eject Sheet ESC {25} R MSB control MSB = 1 ESC> MSB = 0 ESC= Cancel MSB control ESC # Vertical Motion Commands Advance paper One line {10} n lines ESC f {1} n To next TOF {12} n/216 inch ESC J n To next vertical tab Position {11} Retract paper n/216 inch ESC j n Set page length n lines ESC C n n inches ESC C{10} n Skip over performance n lines ESC N n Cancel ESC O Line spacing 1/6 inch ESC 2 1/8 inch ESC 0 7/72 inch ESC 1 n/72 inch ESC A n n/216 inch ESC 3 n Set vertical tabs in channel 0 ESC B n1 n2 …{0} in channel c ESC b n1 n2 …{0} Every n lines 0 ESC e {1} n Select vertical tab channel ESC / c

____________________________________________________________________ 84
Appendix D: Command Reference _________________________________________________________________ Horizontal Motion Commands Move printhead To left margin {13} Backspace {8}
n columns to the right ESC f {10} n To next horizontal tab position {9} Absolute position ESC $ n1 n2 Relative position ESC \ n1 n2 Margins Left ESC 1 n Right ESC Q n Set horizontal tabs Column n1, n2, etc. ESC D n1 n2 …{0} Every n columns ESC e {0} n
Print Style Commands Select print quality Near letter quality ESC x 1 Draft ESC x 0 Select front Roman ESC k 0
Sans serif ESC k 1 Courier ESC k 2 Prestige ESC k 3 Script ESC k 4
Orator ESC k 7 Select print style n = sum of attributes ESC ! n
Elite 1 Proportional 2 Condensed 4 Emphasized 8
Doublestrike 16 Expanded 32 Italic 64 Underline 128 Print Size Commands Pitch Pica ESC P Elite ESC M Fifteen pitch ESC g Expanded print On ESC W 1
Off ESC W 0 Expanded print On {14}
{one line} Off {20} Condensed print On {15}
Off {18} Proportional spacing On ESC p 1
Off ESC p 0 Double-high print On ESC w 1 Off ESC w 0

____________________________________________________________________ 85
Epson FX-850 Emulation Commands ___________________________________________________ Print Enhancement Commands Emphasized print On ESC E Off ESC F Doublestrike print On ESC G
Off ESC H Italic print On ESC 4
Off ESC 5 Underling On ESC - 1
Off ESC - 0 Superscript/subscript Superscript ESC S 0 Subscript ESC S 1
Off ESC T Select color Black ESC r 0
Magenta ESC r 1 Cyan ESC r 2
Violet ESC r 3 Yellow ESC r 4
Orange ESC r 5 Green ESC r 6
Justification Flush left ESC a 0 Centered ESC a 1 Flush right ESC a 2
Justified left & right ESC a 3 Set intercharacter spacing ESC {space} n
Character Table Commands Characters 128-255 Italics ESC t {0} Epson graphics characters ESC t {1} Characters 128-159 Control codes ESC 7
Printable characters ESC 6 Select Character Set USA ESC R {0}
France ESC R {1} Germany ESC R {2} United Kingdom ESC R {3} Denmark I ESC R {4} Sweden ESC R {5} Italy ESC R {6} Spain I ESC R {7} Japan ESC R {8} Norway ESC R {9} Denmark II ESC R {10} Spain II ESC R {11} Latin America ESC R {12} Korea ESC R {13} Legal ESC R {64}
Expand code area Printable codes ESC 11 Control codes ESC 10

___________________________________________________________________ 86
Appendix D: Command Reference ______________________________________________________________________________
Download Character Commands Download Character Commands Define character ESC & {0} data
Copy ROM to RAM ESC : {0} n {0} Select download characters ESC % 1 Cancel download
characters ESC % 0
Graphics Commands Bit image graphics Single-density ESC K n1 n2 data
Double-density ESC L n1 n 2 data Hi-speed dbl-density ESC Y n1 n2 data Quadruple-density ESC Z n1 n2 data Graphic mode m ESC * m n1 n2 data Reassign graphics mode ESC ? n m 9-pin graphics ESC ^ m n1 n2 data
IBM Proprinter III Emulation Commands Default switch 1-1 on Printer Control Commands Initialize printer ESC [ K c {0} int {3} p1 p2 Cancel line {24} Unidirectional print On ESC U 1 Off ESC U0 Automatic line feed On ESC 5 1 Off ESC 5 0 Automatic sheet feed A.S.F. on ESC {25} 4 A.S.F. off ESC {25} 0 Eject sheet ESC {25} R Select/deselect Deselect {19} Deselect ESC Q {3} Select {17}
Vertical Motion Commands Advance paper One line {10} To next TOF {12} n / 216 inch ESC J n To next vertical Tab position {11} Set top-of-form ESC 4 Set page length n lines ESC C n n inches ESC C {0} n

____________________________________________________________________ 87
IBM Proprinter III Emulation Commands _______________________________________________________________________ Skip-over performance n lines ESC N n Cancel ESC O Line spacing Start text line spacing ESC 2 1 / 8 inch ESC 0
7 / 72 inch ESC 1 n / 72 inch ESC A n n / 216 inch ESC 3 n
Vertical tabs Set vertical tabs ESC B n1 n2 …{0} Clear all tabs ESC R Horizontal Motion Commands Move printhead To left margin {13} Backspace {8} To next horizontal
tab position {9} Let & right margins ESC X l r Horizontal tabs Set horizontal tabs ESC D n1 n2 …{0} Clear all tabs ESC R Print Style Commands Select font Draft 10 pitch ESC I {0} High-speed draft
12 pitch ESC I {1} NLQ ESC I {2} NLQ II ESC I {3} NLQ italic ESC I {11}
Print Size Commands Pitch Pica {18} Elite ESC :
Condensed {15} Expanded print On ESC W 1 Off ESC W 0 Expanded print {one line} On {14} Of {20} Proportional spacing On ESC P 1 Off ESC P 0 ESC [ @ {4} {0} {0} {0} n1 n2
Print Enhancement Commands Emphasize print On ESC E Off ESC F Doublestrike print On ESC G Off ESC H Underlining On ESC - 1 Off ESC - 0

____________________________________________________________________ 88
Appendix D: Command Reference _______________________________________________________________________ Overscoring On ESC _ 1 Off ESC _ 0 Superscript/subscript Superscript ESC S 0
Subscript ESC S 1 Off ESC T
Select color Black ESC r 0 Magenta ESC r 1 Cyan ESC r 2
Violet ESC r 3 Yellow ESC r 4
Orange ESC r 5 Green ESC r 6
Character Table Commands Select character set Set 1 ESC 7 Set 2 ESC 6 Print all characters set Continuous ESC \ n1 n2
One character ESC ^ n
Download Character Commands Define characters ESC = data Select download characters Draft 10 pitch ESC I {4} High-speed draft
12 pitch ESC I {5} NLQ ESC I {6} NLQ II ESC I {7} NLQ italic ESC I {15}
Graphics Commands Bit image graphics Single-density ESC K n1 n2 data
Double-density ESC L n1 n 2 data Hi-speed dbl-density ESC Y n1 n2 data Quadruple-density ESC Z n1 n2 data

________________________________________________________ 89
Index A A.S.F. 64 Accessories, ordering 9 Alarms 68-70 ASF MODE key 24 Auto CR 30 AutoLF 30 Automatic sheet feeder 24, 28, 64, 71 B Bottom feeding See Paper, bottom feeding Buffer, clearing 30 C Cable, parallel interface 16-17 Cautions 8 Character sets 29, 31, 77 Cleaning 67 Code page 29, 77 Color kit 58 Color On Command 58, 60-61, 63-64 Color printing See Color On Command Color ribbon 24, 58, 60-61, 63-64 COLOR RIBBON key 24, 61, 63 Colors, selecting 24, 62-63 Command-Vue 18, 20-21 FONT I menu 21-22 FONT 2 menu 21-22 INSTALL menu 24, 61 keys 18
menu lights 18 menu windows 18 MODE menu 23 See also names of keys ON LINE menu 20-21 PITCH menu 22 slide switches 18 VuePrint menu 24-31, 62 Command-Vue control panel 7 Commercial software 55 Computer, connecting 16-17 CONDENSED key 23 COURIER key 22 D Default setting report 26—27 Default settings 31 Demo page 30 DRAFT key 22 E emulation 6, 29, 77 ENVELOPE key 24 Envelope mode 24 Envelopes See Paper, envelopes Environmental information vii Epson emulation 29, 55, 83 F Factory default settings 31 l5CPIkey 23 FONT LOCK key 23

________________________________________________________ 90
Fonts v, 21-22, 28 Foreign-language characters See Code page, International characters Form feed 20 Form length 29 G Graphic dir 29 H Hexadecimal dump 30, 76 I IBM emulation 29, 55, 86 Indicator lights 68—70 International characters 29 L Labels 42-44 LF/FF key 20 Line feed 20 Line spacing 29 M Macro 6, 25 loading 31 saving 31 Maintenance 67 Maintenance self test 31, 75 Manual sheet feeder 72 Margins 29 MENU key 25 MENU slide switch 18 Menu windows 18 N Notes 8 NLQdir 29
O Off line mode 21 ON LINE indicator 19 ONLINE key 20 ON LINE menu 20-21 On line mode 21 Optional accessories 5—58, 60-61, 63-65 ORATOR key 15 P Page skip 29 Paper bottom feeding 49-50. 66 continuous 39—40, 42 envelopes 24, 29, 46, 48, 72
loading 34—35, 39—40, 42, 46, 48—50
multi-part forms 49—50 parking 20—21, 71 rear feeding 39—40, 42 single sheets 34—35 thick 33 transparencies 49 Paper feed knob 12, 52 Paper guide/paper separator 34, 40—41 Paper jams 70 PAPER OUT indicator See POWER/PAPER OUT indicator Paper parking 7, 44 Paper select lever 34 Paper thickness lever 33 Paper-out sensor 30 Parallel interface 16—17, 78 PARK/LOAD key 20-21 Parts, ordering 9 Pitch 22 Power cord 16 Power requirements 78

________________________________________________________ 91
POWER/PAPER OUT indicator 20, 36, 68 PRESTIGE key 22 PRINT key 25 Printer drivers 55—56 Printer stand 49, 66 PROPORTIONAL key 23 Push position 20 Q QUIET/SAVE key 20 R Rear feeding
See Paper, rear feeding Recycling 8 Ribbon 28
color 24, 58, 60-61, 63-64 installing 14, 16 ordering 9
Ribbon guide 15 Ribbon mask 15 ROMAN key 22 R5232-C 65 S SANS SERIF key 22 SAVE key 25 SCRIPT key 22 SELECT key 25 Self test 31, 75—76 Serial interface 17, 65 Service centers 9 Setup 10, 12—14, 16—17 software 55—56 Sheet feeder 64 Single sheets See Paper, single sheets Slashed zero 29 Slide switches 18 Software 55—56
Specifications 78 Speed 6, 77 STYLE slide switch 18, 22 T Tear bar 29 Tear off 29 Tear-off adjustment 30 Tear-off position 42, 44. 71 Technical support 9 IOCPI key 23 Top cover 13-14 Top-of-form adjustment vi, 20, 30, 52—54 Tractor unit 36 push position 32 Troubleshooting alarms 68—70 color 64—64, 74 hexadecimal dump 76 paper feeding 70—71 power 70 print quality 73 print style 74 printer operation 72 12CPI key 23 U Unidirectional print 29 Unpacking 10 V Variable top-of-form See Top-of-form adjustment VTOP See Top-of-form adjustment VuePrint menu 7, 24—29, 62 W Warnings 8
Z Zero, slashed 29

________________________________________________________________
92
Citizen America, Inc. Limited Warranty Citizen America, Inc. hereby warrants that it will repair or replace, at its option, any part of the Citizen product with which this warranty is enclosed which proves defective by reason of improper workmanship and/or material, without charge for parts or labor, for a period of 24 months. This warranty period commences on the date of original purchase by the buyer other than for purposes of resale, and this warranty applies only ii such original purchase by the buyer was made in the United States. To obtain service under this warranty you must return your Citizen product, properly packaged in its original container or an equivalent, to the nearest authorized Citizen Service Center or the Dealer from whom the product was purchased. Any postage, insurance and shipping costs incurred in presenting or sending your Citizen product for service are your responsibility. The Dealer's original bill of sale or other satisfactory proof of the date of the original buyer purchase of your Citizen product must be made available to obtain service under this warranty. This warranty applies only if your Citizen product fails to function properly under normal use and within manufacturer's specifications. This warranty does not apply if the Citizen label or logo, or the rating label or serial number, has been removed from your Citizen product, or if, in the sole opinion of Citizen, your Citizen product has been damaged by accident, misuse, neglect, or improper packing, shipping, modification or servicing, by other than Citizen or an authorized Citizen Service Center. SOME CITIZEN PRDDUCTS HAVE A COMPARTMENT CONTAINING STATIC-SENSITIVE ELECTRONIC CIRCUITRY. THIS COMPARTMENT IS CLEARLY LABELED. DO NOT OPEN IT! THIS WARRANTY WILL BECOME VOID IF YOU ATTEMPT TO MODIFY OR ADJUST ANY ROM OR OTI-IER PART OR DEVICE IN SUCH A COMPARTMENT, DRIP YOU ATTEMPT TO ADD OR INSERT ANY ROM OR OTHER PART OR DEVICE. IF ANY OP THESE STEPS IS REQUIRED, BRING YOUR CITIZEN PRODUCT TO AN AUTHORIZED CITIZEN DEALER. THE DURATION OF ANY IMPLIED WARRANTY OP MERCHANTABILITY, FITNESS POR A PARTICULAR PURPOSE, OR OTHERWISE, ON YOUR CITIZEN PRODUCT SHALL BE LIMITED TO THE DURATION OP THE EXPRESS WARRANTY SET FORTH ABOVE. IN NO EVENT SHALL CITIZEN AMERICA, INC. OR ITS AFFILIATES BE LIABLE POR ANY LOSS, INCONVENIENCE, OR DAMAGE WHETHER DIRECT, INCIDENTAL, CONSEQUENTIAL OR OTHERWISE, AND WHETHER CAUSED BY NEGLIGENCE OR OTHER FAULT RESULTING PROM BREACH OP ANY EXPRESS OR IMPLIED WARRANTY OF MERCHANTABILITY, FITNESS FOR A PARTICULAR PURPOSE, OR OTHERWISE, WITH RESPECT TO YOUR CITIZEN PRODUCT, EXCEPT AS SET FORTH HEREIN. SOME STATES DO NOT ALLOW LIMITATIONS ON HOW LONG AN IMPLIED WARRANTY LASTS AND SOME STATES DO NOT ALLOW THE EXCLUSION OR LIMITATION OP INCIDENTAL OR CONSEQUENTIAL DAMAGES, SO THE ABOVE LIMITATIONS AND EXCLUSIONS MAY NOT APPLY TO YOU.
You may request information on how to obtain service under its warranty by contacting the Dealer from whom your Citizen product was purchased, or by contacting Citizen America, Inc. at the address printed below
Citizen America Corporation 2102 Alton Parkway, Suite A
Irvine, CA 92606-4907 949-428-3700
fax 949-428-3719
This warranty gives you specific legal rights, and you may also have other rights, which vary from state to state. Part No. AK74919-01 940914-So