growing guide - true leaf market
TRANSCRIPT

Growing Guide
Welcome to your True Leaf Market
Vegetable Planting Guide In this booklet yoursquoll find
handy and concise instructions on how to best sprout grow and harvest
your very own home garden Whether new to gardening
or just in need of a quick garden reference this
booklet is your go-to guide for starting and
maintaining your best vegetable garden
3 TRUELEAFMARKETCOM
Table of ContentsKnow your Seeds
The Vegetables
Treated SeedPelleted amp Multi-PelletedOpen PollinatedHeirloomHybridLife Cycle TermsWhat Is GMO SeedKnow Your Grow ZoneKnow Your Site amp SunlightKnow Direct SowingKnow Your Soil And Itrsquos Drainage RateKnow How To Water Each PlantKnow About Companion Planting
ArtichokeAsparagusBush BeanPole BeanBeetBroccoliBrussels Sprouts Cabbage
9101011121516171819212425
2930313233343536
4TRUELEAFMARKETCOM
CarrotCauliflowerCeleriac CeleryChardCollards Corn CucumberEggplantEndiveGourds KaleKohlrabiLeekLettuceMelonMustardOkraOnion OrachParsnipPeaPepperPumpkinPurslaneRadicchioSpring Radish
373839404142434445464748495051525354555657585960616263
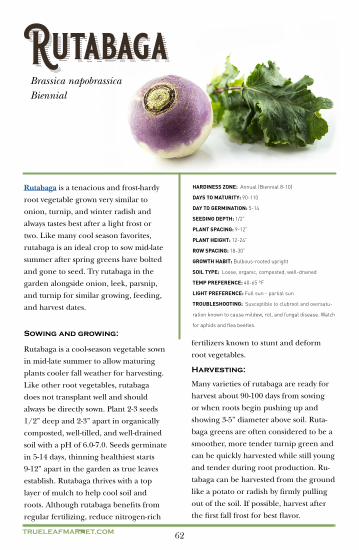
Winter RadishRhubarb Rutabaga SalsifySpinachSummer Squash Winter Squash Strawberry Tomato Turnip Watermelon
Personal Notes
646566676869707172737476
6TRUELEAFMARKETCOM
We know it can be overwhelming looking at all the varieties of seeds and their types reading terms like ldquotreatedrdquo ldquountreated seedsrdquo and ldquoheirloomrdquo and ldquoopen pollinatedrdquomdashyou just hope that yoursquoll pick the right ones for you We hope that the following will help you understand seed identifiers and how it can help you purchase the best seed for you and your style of gardening
Treated Seed
There are several kinds of seed treatments in the seed business While treatments can vary the most common treated seed we offer is a fungicide treat-ed seed which helps to keep the seed from rotting in the ground in unstable spring weather when soil conditions are less than idealmdashusually too moist All treated seed is clearly marked as being treated in the title of the seed ie Treated Blue Lake Bush Beans Treated seed is typically purchased by our larger com-mercial customers
7 TRUELEAFMARKETCOM7
Pelleted amp Multi-pelleted Seed
When using a mechanism of some kind to plant their seeds farmers and gardeners will turn to pelleted seeds which are seeds usually coated in an inert clay Very small seeds that are difficult to handle are coated to make them more manageable by ma-chines and people for accurate and easy seed sowing For example some gardeners prefer working with pelleted carrot seeds because carrot seeds are so tiny and difficult to plant accurately Often some flower seeds are pelleted and multi-pelleted because of their microscopic size such as Lobelia seeds Multi-pelleted seeds are multiple seeds bound together and coated in inert clay With several seeds in one pellet gardeners can expect germination The clay will dissolve away leaving the seeds in ideal conditions to sprout
Open Pollinated
Simply open pollinated seeds are seeds produced from crops that are allowed to pollinate naturally by means of insects birds wind and other natural mechanisms Some seeds self-pollinate and donrsquot require pollinators
8TRUELEAFMARKETCOM 8
There is no officially accepted definition of ldquoheirloomrdquo In common use the term is universally used to indicate an open pollinated seed which has remained consistent for several decades In our prod-uct line we use the term Heirloom for open pollinat-ed cultivars with which we have had experience for 30 or more of our 45 years in the seed business Some people claim heirloom seeds are the ldquooriginalrdquo variety of a plant but thatrsquos not necessarily true If you trace a plantrsquos genetics back far enough you will find that these now heirloom varieties likely came from an intentional or natural crossing of two different plants which leads us to our next term Hybrid
Heirloom
9 TRUELEAFMARKETCOM
The term ldquohybridrdquo indicates the crossing of two plants whether intentional or not Hybrids are fre-quently frowned upon online usually because they are confused with GMOs but also frequently because some claim that the seed companies who sell them have engineered the seed to be ldquosterilerdquo or unable to reproduce so that one cannot save their seed This ar-gument takes on the form of a conspiracy to control the worldrsquos seed supply Again not true especially for us who pride ourselves on our sustainable practices
It is true that saving your seed from a hybrid is not advisable but saved seed will grow it is just unlikely that your second-generation plant will pro-duce similar results to the original plant The reason is based in genetics not a board room (which after 43 years we have yet to acquire) Letrsquos look at dog breeding as an example of hybridization to see what is actually happening
Hybrid
Figure 1
10TRUELEAFMARKETCOM
When breeding a Poodle with a Labrador the outcome is a Labradoodle as seen in Figure 1 The Labradoodle is the hybrid If we take our ldquohybridrdquo puppy and breed him with another dog even if it also is a Labradoodle the outcome is unlikely to result in a Labradoodle that looks identical to our first puppy Still considered labradoodles but aesthetically these hybrids look very different from each other as seen in Figure 2
The new 2nd generation puppy may take on more of the Poodle or more of the Labrador line That is the same with hybrid seeds It is not that they wonrsquot produce it is just that there is no way to guar-antee that the plant wonrsquot revert back to more of one of its parental lines Like most of the dog breeds we have today hybrid seeds will become stable as con-tinued generations create a ldquostable and consistentrdquo population and eventually these seeds may become our grandkidsrsquo heirlooms
Hybrid plants work the same waymdashthey require
Figure 2
11 TRUELEAFMARKETCOM
several generations of selective crossing to become stable enough to produce uniformly Planting the seeds produced from a first-generation hybrid (marked as ldquoF1rdquo) plant wonrsquot produce the same crop it will likely revert back to one of its parents or cross breed with another plant nearby producing some-thing other than the expected production of the pre-vious season People tend to label these seeds ldquosterilerdquo because they donrsquot produce the same results a second time however that is only because they donrsquot have the genetic history behind them like heirloom seeds to be tenacious and to produce a reliable crop year after year For example the bicolor corn seen in Figure 3 may revert back to yellow or white corn if itrsquos saved seeds are planted again next season
Figure 3
12TRUELEAFMARKETCOM
Life Cycle Terms Annual - Plants that go through a full life cycle over the course of one season or year meaning the seed grows into a plant to seed again Annuals will grow differently depending on the climate For example some annuals can bolt and go to seed very quickly in very hot climates thus ending its life cycle Biennial - A plant that requires two years to complete its life cycle Biennials take a period of dormancy to complete its life cycle which may be fruiting or going to seed Usually the first year the plants produce a root system stems and leaves The second year is when the plant flowers or fruitsPerennial - Plants that live for three years or more where top foliage will die during the cold season each year but then regrowing from the root system left behind Some perennials have extensive lifespans such as trees
13 TRUELEAFMARKETCOM
What is GMO Seed
The term GMO is a term that is feared misun-derstood and misused leading to confusion about what a GMO seed really means Genetically Modified Organisms (GMO) are living things including seeds whose DNA has been engineered outside the natural process of cross pollination to inherit desirable traits When we see anti-GMO social media posts or speak with people about what GMO means to them we find that most people donrsquot really know why GMO is bad they just know it is We are a little concerned that the lack of understanding of GMO is frequently dragging non-GMO seeds such as Hybrids into the discussion We do have a concern with GMO but like most people who spend time really understanding the topic our concern is that the science is moving faster than the protections labeling laws and crop protocols Many of the GMO products being grown today have used very impressive technologies to introduce NON-PLANT BASED genetics into plants It is this ldquocrossingrdquo of two living organisms that nature would otherwise NOT allow that has us and many others so concerned For us we reiterate that we donrsquot carry any type of GMO seed here at True Leaf Market
14TRUELEAFMARKETCOM
Know Your Grow Zone
Also known as hardiness zones grow zones are USDA recommendations that track each regionrsquos Average Annual Extreme Minimum Temperature allowing gardeners to know the coldest their garden may experience during the year Grow zones donrsquot determine whether a plant is suitable for a region but merely enable you to know the average lowest temperature to determine whether a particular crop may do well in your garden Understanding grow zones is generally most important for outdoor perennial gardening because most vegetable and flower crops will grow as a seasonal annual here in the United States As mentioned the USDA Hardiness Zone map does not provide any summer data including humid-ity precipitation urban heating mapping or maxi-mum temperature averages However understanding which summer crops prefer cooler conditions helps growers plan their sowing dates around the final frost of the spring and the first hard autumn frost Frost hardy vegetables such as broccoli cabbage and kale will bolt to seed in the middle of summer if not grown in cool temperate gardens Growers can adjust their sowing dates so that the mature vegetable greens will experience the chill of an early spring or the light frost at the beginning of fall
15 TRUELEAFMARKETCOM
Know Your Site and Sunlight
The next question you want to ask yourself is ldquoHow much space do I realistically have to gardenrdquo Second question is ldquoHow much light does that area receive throughout the day and where is the sunrsquos positionrdquo Be aware of its trajectory As the sun moves during the growing season so do the conditions of that space Be sure to pick a spot that will be consis-tent and beneficial to your garden throughout the growing season It may be easier for you to find a spot if you have a yard but donrsquot be discouraged if you live in a place with only a patio or less
Urban gardening is much easier to accomplish than you might think Just build your garden around the available space Opt for vegetables and herbs that are known to grow well in containers and the amount of sunlight available Determine the kind of light that space will see over the season If you live in an apart-ment flat with a deck but without direct sunlight choose shade tolerant plants such as lettuce chard
16TRUELEAFMARKETCOM
Know Direct Sowing vs Indoor Sowing
beet and carrot If you have a small patio consider growing crops that have an upright trailing habit such as pole beans and peas to best utilize space If you only have roof access or live in south-facing plac-es that receive the heaviest sunlight consider plant-ing heat tolerant plants such as dill fennel tomato and pepper
When and how you choose to sow your seeds is a critical factor when it comes to a successful garden Look at the climate of where you live and determine the length of your grow season The idea here is to let your environment inform you of when and how you sow your seeds for the coming season You can di-rectly sow them outside when temperatures are right if the length of your season permits or sow them in plug trays indoors Much of this is determined by the seed variety itself When growing indoors a grow light is neces-sary if you donrsquot have a window that receives direct sunlight for eight hours of the daymdashand even then with certain varieties more light exposure is required for optimal growth Start seeds several weeks before your last frost date of the year The number of weeks
17 TRUELEAFMARKETCOM
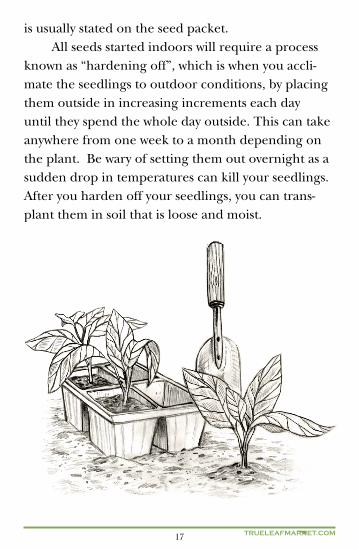
is usually stated on the seed packet All seeds started indoors will require a process known as ldquohardening offrdquo which is when you accli-mate the seedlings to outdoor conditions by placing them outside in increasing increments each day until they spend the whole day outside This can take anywhere from one week to a month depending on the plant Be wary of setting them out overnight as a sudden drop in temperatures can kill your seedlings After you harden off your seedlings you can trans-plant them in soil that is loose and moist
18TRUELEAFMARKETCOM
Soil Types and Textures The make-up of your soil will determine the success of your plant growth It is rare for soils to go unamended in a garden Most are treated using fertil-izers cover crops mulch and other texture additives We recommend all-natural cover crops Understand-ing soil textures also helps you choose the best soil to purchase for the varieties of plants you wish to grow in planters or containers Understanding the elements that make up each soil type will help you to know what to add to your soil to accommodate each plant
Know Your Soil and Its Drainage Rate
Clay Soil
When wet this soil is lumpy and sticky When dry soil is rocky and hard Poor drainage and low oxygen levels Lack of drainage usually needs to be remedied using sand andor small pebbles Suitable for perennial shrubs early vegetable crops aster and bergamot flower plants
19 TRUELEAFMARKETCOM
Sandy Soil
Silty Soil
Peaty Soil
Chalky Soil
A gritty sandy texture that dries out fast and drains quickly Holds fewer nutrients than other soils Requires soil amendments to bolster nutri-ent content Suitable for vegetable root crops such as carrot parsnip beet pepper corn squash and salad crops
A soft and fluffy texture that holds moisture very well Nutrient content is plentiful as well Less than adequate drainage but otherwise a healthy soil Manure and organic biomass can help with drainage Suitable for most vegetable and fruit crops grasses and trees
An acidic soil that is spongy fluffy and feels damp due to the high levels of peat moss Soil heats up quickly but retains moisture well--may need drainage help Suitable for root crops lettuces legumes and brassicas
The stoniest texture of all soils being very pebbly and gravely Low nutrient content and very alkaline Needs nutrients additives such as
20TRUELEAFMARKETCOM
Loamy Soil
pH Balance of Soil
The ideal garden soil texture with an even mix-ture of sand silt and clay A fine texture full of nutrients with good drainage Requires nutrient replenishing after each grow season Suitable for most garden crops
manure mulch and organic biomass Suitable for spinach sweet corn and cabbage
pH is simply the acidity or alkaline levels of a substance When it comes to soil it is important be-cause certain plant diseases or fungi thrive in highly acidic or basic conditions Most plants need slightly acidic soil to grow so they can properly absorb iron Some soil amendments such as organic worm cast-ings offer a neutral 70 pH to help balance the acidity or alkalinity in soils The right pH level allows mi-croorganisms to convert nitrogen into a form plants can absorb If the soilrsquos pH is too low your plant can become poisoned by too much manganese
21 TRUELEAFMARKETCOM
Know How to Water Each Plant
Lightly press your finger into the soil and feel for an ideal moisture It should feel moist to the touch but not soggy Use this touch method accordingly as your seeds germinate and subsequently grow Know that plants in containers will dry out quicker than those planted in garden beds So close attention needs to be paid to the soilrsquos moisture content Same with raised beds since they are elevated beds the soil does dry out quicker than plants growing directly in the ground Adding mulch vermiculite or peat moss to your raised beds is another great additive that can help your soil retain moisture without overwatering
Remember to aim your water stream toward the roots Avoid getting any water on the leaves or foliage of your plants as moist leaves can lead to diseases
The first drink of water in the morning is usually the most important and itrsquos no truer than with your gar-den plants It gives your plant a headstart on the day by allowing it to consume the water without having to fight against evaporation Also if leaves or foliage
Donrsquot overwatermdashWater consistently yet consciously
Root Watering
Morning Watering
22TRUELEAFMARKETCOM
Know About Companion Planting
Mulches and or straw can be a great option for pre-serving moisture They help reduce surface runoff and slow evaporation
Sometimes known as crop rotation intercrop-ping or even cover cropping companion planting follows an age-old belief that some plants may be mutually beneficial for each other Although the idea of companion planting is not a hard science and still leaves much up for debate and conjecture there are some proven situations of plants thriving with the help of other plants For example cover crops are a variety of legumes and cereal grains that are able to grow over winter or during the warm season to provide all-natural weed suppression and pest control while replenishing depleted soils of vital nitrogen Pea clover fava bean mustard rye and wheat are just some examples of cover crops either grown alongside a seasonal crop or during the winter months to ensure a garden is as healthy as possible
Mulch
of the plant get wet they have time to dry over the course of the day Whereas if the leaves and foliage were to remain moist overnight it may be detrimen-tal to the plantrsquos health
23 TRUELEAFMARKETCOM
Marigolds are also popularly intercropped through-out larger farms because they emit a chemical into the soil known as limonene which is sold as a store-bought concentrate pesticide In simplest terms companion planting aims to create diversity in the garden while fighting against monoculture which is known to foster disease and pests Whether a simple crop rotation or intercrop-ping with cover crops diversity will invite beneficial insects and pollinators to help turn your seasonal garden into a healthy and vibrant little ecosystem
25 TRUELEAFMARKETCOM
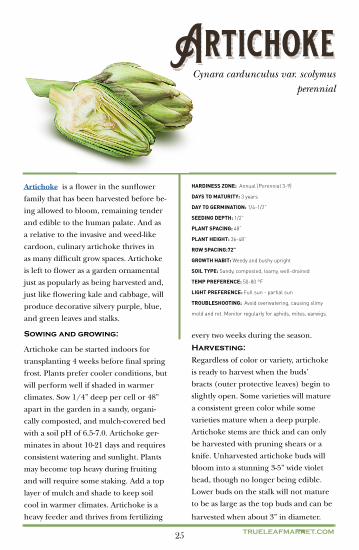
Cynara cardunculus var scolymusperennial
HARDINESS ZONE Annual (Perennial 3-9)
DAYS TO MATURITY 3 years
DAY TO GERMINATION 14-12rdquo
SEEDING DEPTH 12rdquo
PLANT SPACING 48rdquo
PLANT HEIGHT 36-48rdquo
ROW SPACING72rdquo
GROWTH HABIT Weedy and bushy upright
SOIL TYPE Sandy composted loamy well-drained
TEMP PREFERENCE 50-80 degF
LIGHT PREFERENCE Full sun - partial sun
TROUBLESHOOTING Avoid overwatering causing slimy
mold and rot Monitor regularly for aphids mites earwigs
Artichoke is a flower in the sunflower
family that has been harvested before be-
ing allowed to bloom remaining tender
and edible to the human palate And as
a relative to the invasive and weed-like
cardoon culinary artichoke thrives in
as many difficult grow spaces Artichoke
is left to flower as a garden ornamental
just as popularly as being harvested and
just like flowering kale and cabbage will
produce decorative silvery purple blue
and green leaves and stalks
Artichoke can be started indoors for
transplanting 4 weeks before final spring
frost Plants prefer cooler conditions but
will perform well if shaded in warmer
climates Sow 14rdquo deep per cell or 48rdquo
apart in the garden in a sandy organi-
cally composted and mulch-covered bed
with a soil pH of 65-70 Artichoke ger-
minates in about 10-21 days and requires
consistent watering and sunlight Plants
may become top heavy during fruiting
and will require some staking Add a top
layer of mulch and shade to keep soil
cool in warmer climates Artichoke is a
heavy feeder and thrives from fertilizing
Regardless of color or variety artichoke
is ready to harvest when the budsrsquo
bracts (outer protective leaves) begin to
slightly open Some varieties will mature
a consistent green color while some
varieties mature when a deep purple
Artichoke stems are thick and can only
be harvested with pruning shears or a
knife Unharvested artichoke buds will
bloom into a stunning 3-5rdquo wide violet
head though no longer being edible
Lower buds on the stalk will not mature
to be as large as the top buds and can be
harvested when about 3rdquo in diameter
Sowing and growing
Harvesting
every two weeks during the season
26TRUELEAFMARKETCOM
Asparagus officinalisPerennial
Asparagus is a long-term perennial veg-
etable that requires planning patience
and dedication yet is always worth the
wait Asparagus is notorious for not being
ready for harvest until its third year but
once established will produce seasonal
spears for several decades At any time
while growing asparagus spears can be
whitened or ldquoblanchedrdquo by limiting sun
exposure creating a uniquely flavorful
variety devoid of the grassy earthy chlo-
rophyll notes of a green crop
Asparagus is a perennial crop that
requires three years before a harvest but
like a fruit tree will produce for several
decades Seeds are best started indoors
8-10 weeks before the final spring frost
Sow 2-3 seeds 12rdquo deep per cell or peat
pot into light loamy well-drained soil
with a pH of 65-70 Transplant after
10-12 weeks once all danger of frost has
passed In the garden dig a 6-12rdquo deep
and 18rdquo wide trench for transplants
Spread a 1rdquo layer of compost at the bot-
tom of the trench before filling with soil
As mentioned asparagus requires three
years until harvest but will produce for
more than twenty years when established
In the third year harvest young aspara-
gus spears with a sharp knife at the base
once they have reached 7-9rdquo tall and
about the thickness of a pencil Harvest
often to encourage further growth More
established plants will have a harvest
season of about 8 weeks while younger
plants may have a window of 4 weeks
After the harvest plants will sprout aspar-
agus greens to restore lost energy to the
roots These asparagus greens are widely
used by florists as an ornamental filler
Sowing and growing
Harvesting
HARDINESS ZONE Perennial 3-9
DAYS TO MATURITY 3 years
DAY TO GERMINATION 7-21
SEEDING DEPTH 12rdquo
PLANT SPACING 12-18rdquo
PLANT HEIGHT 7-9rdquo
ROW SPACING 36rdquo
GROWTH HABIT Upright
SOIL TYPE Sandy light organically rich well-drained
TEMP PREFERENCE 65-85 degF
LIGHT PREFERENCE Full sun - partial sun
TROUBLESHOOTING Allow soil to dry between waterings as
asparagus is highly susceptible to fungus and mold
27 TRUELEAFMARKETCOM
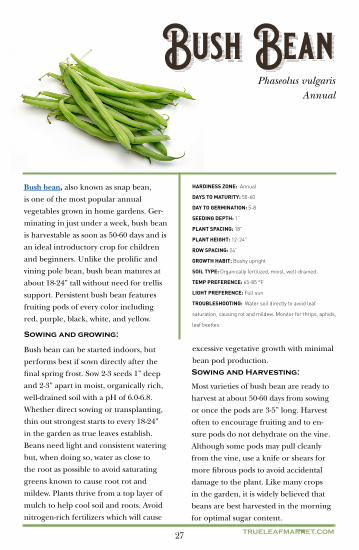
Phaseolus vulgarisAnnual
Bush bean also known as snap bean
is one of the most popular annual
vegetables grown in home gardens Ger-
minating in just under a week bush bean
is harvestable as soon as 50-60 days and is
an ideal introductory crop for children
and beginners Unlike the prolific and
vining pole bean bush bean matures at
about 18-24rdquo tall without need for trellis
support Persistent bush bean features
fruiting pods of every color including
red purple black white and yellow
Bush bean can be started indoors but
performs best if sown directly after the
final spring frost Sow 2-3 seeds 1rdquo deep
and 2-3rdquo apart in moist organically rich
well-drained soil with a pH of 60-68
Whether direct sowing or transplanting
thin out strongest starts to every 18-24rdquo
in the garden as true leaves establish
Beans need light and consistent watering
but when doing so water as close to
the root as possible to avoid saturating
greens known to cause root rot and
mildew Plants thrive from a top layer of
mulch to help cool soil and roots Avoid
nitrogen-rich fertilizers which will cause
Most varieties of bush bean are ready to
harvest at about 50-60 days from sowing
or once the pods are 3-5rdquo long Harvest
often to encourage fruiting and to en-
sure pods do not dehydrate on the vine
Although some pods may pull cleanly
from the vine use a knife or shears for
more fibrous pods to avoid accidental
damage to the plant Like many crops
in the garden it is widely believed that
beans are best harvested in the morning
for optimal sugar content
Sowing and growing
Sowing and Harvesting
HARDINESS ZONE Annual
DAYS TO MATURITY 50-60
DAY TO GERMINATION 5-8
SEEDING DEPTH 1rdquo
PLANT SPACING 18rdquo
PLANT HEIGHT 12-24rdquo
ROW SPACING 24rdquo
GROWTH HABIT Bushy upright
SOIL TYPE Organically fertilized moist well-drained
TEMP PREFERENCE 65-85 degF
LIGHT PREFERENCE Full sun
TROUBLESHOOTING Water soil directly to avoid leaf
saturation causing rot and mildew Monitor for thrips aphids
leaf beetles
excessive vegetative growth with minimal
bean pod production
28TRUELEAFMARKETCOM
Phaseolus vulgarisAnnual
Like bush bean the vining pole bean is
another familiar summer annual found
in many home gardens Pole bean is
quick to mature and ready to harvest
in about 70 days and if given plenty
of climbing space will vine taller than
20 feet Although not as convenient as
the bush varieties pole beans popularly
boast sweeter bigger and more abun-
dant fruits with a much wider harvest
window Try growing pole beans as a
quickly vining yet deliciously edible
privacy wall or cover
Pole bean can be started indoors but
performs best if sown directly after the
final spring frost Sow 2-3 seeds 1rdquo deep
and 2-3rdquo apart in moist organically rich
well-drained soil with a pH of 60-68
Whether direct sowing or transplanting
thin out strongest starts to every 6-8rdquo
in the garden as true leaves establish
Pole bean requires immediate trellis
support as seedlings will be looking to
vine as soon as true leaves emerge Plants
thrive from a top layer of mulch to help
cool soil and roots Avoid nitrogen-rich
fertilizers which will cause excessive
Most varieties of pole bean are ready to
harvest at about 70-80 days from sowing
or once the pods are 3-5rdquo long Harvest
often to encourage fruiting and to en-
sure pods do not dehydrate on the vine
Although some pods may pull cleanly
from the vine use a knife or shears for
more fibrous pods to avoid accidental
damage to the plant Like many crops in
the garden it is widely believed that pole
beans are best harvested in the morning
for optimal sugar content
Sowing and growing
Harvesting
HARDINESS ZONE Annual (Short Perennial 3-10)
DAYS TO MATURITY 65-80
DAY TO GERMINATION 5-8
SEEDING DEPTH 12rdquo
PLANT SPACING 6-8rdquo
PLANT HEIGHT 10-20 ft
ROW SPACING 18rdquo
GROWTH HABIT Vining
SOIL TYPE Organically fertile moist well-drained
TEMP PREFERENCE 65-85 degF
LIGHT PREFERENCE Full sun
TROUBLESHOOTING Water soil directly to avoid leaf
saturation causing rot and mildew Watch for thrips aphids
leaf beetles
vegetative growth with minimal bean pod
production
29 TRUELEAFMARKETCOM
Beta vulgarisAnnual
Beets are a sweet sugary and short-term
cool weather favorite able to be sown
multiple times during the year for quick
and successive harvests Just like carrot
radish and many other root vegetables
beet is quick to maturity and thrives
when sown directly outside in the garden
bed Although widely known for being a
deep burgundy color the hardy beetroot
is available in many shapes and colors in-
cluding heirloom classics White Detroit
Golden Detroit and Chioggia
Beet is a cool weather favorite best sown
directly outdoors 4-5 weeks prior to final
spring frost or 4-5 weeks before the first
autumn frost Sow 3-4 seeds 12rdquo deep
and 1-2rdquo apart in fertile organically rich
well-drained soil with a pH of 60-70
Seeds germinate in 5-10 days thinning
best starts to every 3-4rdquo as true leaves
establish Beet seeds may be pre-soaked
for 24 hours to encourage germination
Beets can be sown every 2-3 weeks for
replete season-long harvests Avoid using
fertilizers high in nitrogen causing plants
to produce plentiful vegetation but
smaller roots A top layer of mulch will
help roots cool and retain moisture
Most varieties of beet are ready to
harvest in about 50-60 days from sowing
or when showing 1rdquo in diameter above
soil but will remain tender even up to
3-4rdquo in diameter In compacted soils
carefully loosen soil around roots before
harvesting with help of a gardening fork
Beet greens can be harvested like lettuce
or any culinary herb when 2-3rdquo tall Small
tender greens can be enjoyed fresh in
a salad mix while larger coarser greens
taste best when lightly sauteacuteed
Sowing and growing
Sowing and Harvesting
HARDINESS ZONE Annual (Biennial 6-11)
DAYS TO MATURITY 45-65
DAY TO GERMINATION 5-14
SEEDING DEPTH 12rdquo
PLANT SPACING 3-4rdquo
PLANT HEIGHT 36-48rdquo
ROW SPACING 12rdquo
GROWTH HABIT Rooted and leafy upright
SOIL TYPE Loose sandy loamy well-drained
TEMP PREFERENCE 55-70 degF
LIGHT PREFERENCE Full sun - partial shade
TROUBLESHOOTING Monitor for aphids and leafhoppers
which may lead to any number of yellowing and leaf-spotting
diseases
30TRUELEAFMARKETCOM
Brassica oleracea var italicaAnnual
Broccoli is a timeless annual staple of
the home garden found just as often
growing in the garden bed as on the
kitchen counter Broccoli has always
been a tolerant frost hardy favorite
but is currently in its renaissance as a
vitamin-rich crop popularly used in
indoor gardening such as microgreens
sprouts and hydroponics Like other
annual Brassicas such as cabbage kale
and cauliflower broccoli requires very
similar growing conditions with similar
harvest windows
Broccoli is a cool weather full-sun crop
able to be sown directly but for earliest
starts begin indoors 6-8 weeks prior
to final spring frost or in mid-summer
about 3 months from autumn frost Plant
2-3 seeds 12rdquo deep per cell or 4-6rdquo apart
in the garden in organic fertile and
well-drained soil with a pH of 60-70
Seeds germinate in 3-14 days thinning
out best starts every 12-18rdquo in the garden
once true leaves establish Broccoli heads
grow fullest with full sun but for warmer
regions plants will benefit from mid-
summer shade For warmer grow zones
try a cultivar with a quicker harvest and
maturity date to best accommodate for a
shortened cool spring season
Most varieties of broccoli are ready to
harvest in about 85 days from sowing Us-
ing a small knife remove the main head
above the smaller florets once reaching
a diameter of about 5-6rdquo allowing sec-
ondary side shoots to continue maturing
Heads will taste bitter if no longer
compact and have begun to flower Like
other Brassicas the entire broccoli plant
is harvestable and edible and considered
to taste best after a light frosts
Sowing and growing
Harvesting
HARDINESS ZONE Annual
DAYS TO MATURITY 85-90
DAY TO GERMINATION 3-14
SEEDING DEPTH 12rdquo
PLANT SPACING 18rdquo
PLANT HEIGHT 24-30rdquo
ROW SPACING 24-36rdquo
GROWTH HABIT Upright
SOIL TYPE Moist organically fertilized well-drained
TEMP PREFERENCE 40-70 degF
LIGHT PREFERENCE Full sun - partial shade
TROUBLESHOOTING Broccoli has no serious diseases
but watch for cabbage worms flea beetles thrips slugs
and aphids
31 TRUELEAFMARKETCOM
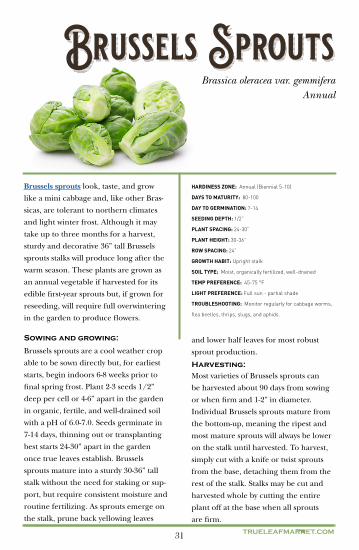
Brassica oleracea var gemmiferaAnnual
Brussels sprouts look taste and grow
like a mini cabbage and like other Bras-
sicas are tolerant to northern climates
and light winter frost Although it may
take up to three months for a harvest
sturdy and decorative 36rdquo tall Brussels
sprouts stalks will produce long after the
warm season These plants are grown as
an annual vegetable if harvested for its
edible first-year sprouts but if grown for
reseeding will require full overwintering
in the garden to produce flowers
Brussels sprouts are a cool weather crop
able to be sown directly but for earliest
starts begin indoors 6-8 weeks prior to
final spring frost Plant 2-3 seeds 12rdquo
deep per cell or 4-6rdquo apart in the garden
in organic fertile and well-drained soil
with a pH of 60-70 Seeds germinate in
7-14 days thinning out or transplanting
best starts 24-30rdquo apart in the garden
once true leaves establish Brussels
sprouts mature into a sturdy 30-36rdquo tall
stalk without the need for staking or sup-
port but require consistent moisture and
routine fertilizing As sprouts emerge on
the stalk prune back yellowing leaves
and lower half leaves for most robust
sprout production
Most varieties of Brussels sprouts can
be harvested about 90 days from sowing
or when firm and 1-2rdquo in diameter
Individual Brussels sprouts mature from
the bottom-up meaning the ripest and
most mature sprouts will always be lower
on the stalk until harvested To harvest
simply cut with a knife or twist sprouts
from the base detaching them from the
rest of the stalk Stalks may be cut and
harvested whole by cutting the entire
plant off at the base when all sprouts
are firm
Sowing and growing
Harvesting
HARDINESS ZONE Annual (Biennial 5-10)
DAYS TO MATURITY 80-100
DAY TO GERMINATION 7-14
SEEDING DEPTH 12rdquo
PLANT SPACING 24-30rdquo
PLANT HEIGHT 30-36rdquo
ROW SPACING 24rdquo
GROWTH HABIT Upright stalk
SOIL TYPE Moist organically fertilized well-drained
TEMP PREFERENCE 45-75 degF
LIGHT PREFERENCE Full sun - partial shade
TROUBLESHOOTING Monitor regularly for cabbage worms
flea beetles thrips slugs and aphids
32TRUELEAFMARKETCOM
Brassica oleracea var capitataAnnual
Cabbage is often mistakenly thought to
be one of the more intimidating difficult
vegetable crops to try as a home garden-
er because of its preference for colder
more northern gardens Despite the
slander cabbage is a Brassica no more
challenging to grow than kale broccoli
or collards Whether as a garden crop or
flowering ornamental variety cabbage is
available anywhere from rich burgundy
to a familiar pale green and easy enough
to grow for anyone willing to try
Cabbage is a cool weather crop able to be
planted multiple times throughout the
season for successive year-round harvests
Cabbage performs best when started in-
doors 6-8 weeks prior to final spring frost
or 6-8 weeks before first autumn frost
Plant 2-3 seeds 14rdquo deep per cell or peat
pot in organically rich well-drained soil
with a pH of 60-70 Seeds germinate in
5-12 days transplanting strongest starts
every 18-24rdquo in the garden once true
leaves establish Cabbage requires regu-
lar moisture during vegetative growth to
keep heads from splitting before harvest
Plants are heavy feeders and thrive from
Depending on the specific cultivar and
when sown in the season most varieties
of cabbage are ready to harvest at about
100 days from sowing or when heads are
firm with a diameter of about 5-7rdquo Some
varieties may overwinter requiring more
than 120 days for harvesting Using a
knife cut heads at the base and remove
yellow leaves from the cut head keeping
healthy loose green leaves attached
to help protect cabbage heads during
storage
Sowing and growing
Harvesting
HARDINESS ZONE Annual
DAYS TO MATURITY 90-150
DAY TO GERMINATION 5-12
SEEDING DEPTH 14rdquo
PLANT SPACING 18-24rdquo
PLANT HEIGHT 12-30rdquo
ROW SPACING 18rdquo
GROWTH HABIT Leafy mound
SOIL TYPE Moist fertile composted well-drained
TEMP PREFERENCE 55-75 degF
LIGHT PREFERENCE Full sun - partial sun
TROUBLESHOOTING No serious diseases but monitor
regularly for cabbage worms flea beetles thrips slugs
and aphids
rich garden composting and routine
fertilizing
33 TRUELEAFMARKETCOM
Daucus carota subsp SativusAnnual
Carrot is a sugary sweet root vegetable
second only to the beet in overall sugar
content Carrot is one of the easiest
quickest and most satisfying garden
crops and lends itself to as many savory
dishes as it does sweet Although consid-
ered a predominantly orange vegetable
the carrot is available in a wide selection
of exquisite heirloom colors such as red
purple yellow and white Carrots can be
sown every couple weeks for successive
season-long harvesting
Carrot is a cool weather crop best
sown directly 2-3 weeks before final
spring frost and every 2 weeks after
for successive harvests Like many root
vegetables carrot does not transplant
well and should be sown directly Plant
2-3 seeds 12rdquo deep and 1-2rdquo apart in
loamy loose and well-drained soil with a
pH of 60-70 Seeds germinate in 14-21
days thinning back to 1 plant every 2-4rdquo
as true leaves establish Carrots require
a deep well-tilled garden for straight tap-
root growth Avoid using nitrogen-rich
fertilizers which are known to cause root
abnormalities as well as excessive greens
and weak root development
Most varieties of carrot are ready for
harvest about 70-80 days from sowing
while smaller varieties such as Parisian
are ready a few weeks sooner Regardless
of color carrots are usually ripe for har-
vest when the root begins to show above
soil A sandy and well-tilled garden will
help in harvesting providing a loose soil
to safely uproot the carrot crop without
the need for tools For more hardened
soils use a specialized hand cultivator or
garden hori-hori knife
Sowing and growing
Harvesting
HARDINESS ZONE Annual
DAYS TO MATURITY 60-80
DAY TO GERMINATION 14-21
SEEDING DEPTH 12rdquo
PLANT SPACING 2-4rdquo
PLANT HEIGHT 6-18rdquo
ROW SPACING 16-24rdquo
GROWTH HABIT Taproot upright
SOIL TYPE Loose loamy composted well-drained
TEMP PREFERENCE 55-75 degF
LIGHT PREFERENCE Full sun
TROUBLESHOOTING No serious pests or diseases but
can be susceptible to aster yellows Watch for carrot rust fly
and wireworm
34TRUELEAFMARKETCOM
Brassica oleracea var botrytisAnnual
Cauliflower is one of the more chal-
lenging Brassicas in the home garden
because it does not perform well in
either hot or cold climates yet excels in
moderate regions with full sun Although
cauliflower heads (curds) are thought to
be white they naturally develop green or
purple and only become white through
a labor-intensive process called ldquoblanch-
ingrdquo in which the outer leaves are bound
together to keep the young heads from
developing color from sun exposure
Cauliflower is a temperamental and chal-
lenging cool season favorite best planted
in early spring or fall Begin indoors 4-6
weeks prior to final spring frost or 6-8
weeks before first autumn frost Plant
2-3 seeds 12rdquo deep per cell or 3-4rdquo apart
in the garden in organic fertile and
well-drained soil with a pH of 60-70
Germinates in 4-10 days transplanting or
thinning out outdoor starts 18-24rdquo apart
in the garden as true leaves establish Al-
though some varieties are self-blanching
cauliflower is not naturally white and re-
quires a labor-intensive effort to achieve
the familiar white heads Cauliflower
Similar to cabbage cauliflower is ready
to harvest when compact firm and has
reached the desired color Use a harvest-
ing knife to gently cut the head loose
from the stem and base while leaving
the large surrounding leaves intact to
the head It is natural for some heads to
develop undersize and underweight yet
still fully mature in color Harvest these
smaller heads sooner because they will
not increase in size
Sowing and growing
Harvesting
HARDINESS ZONE Annual
DAYS TO MATURITY 70-120
DAY TO GERMINATION 7-14
SEEDING DEPTH 12rdquo
PLANT SPACING 18rdquo
PLANT HEIGHT 36-48rdquo
ROW SPACING 36-48rdquo
GROWTH HABIT Leafy mound
SOIL TYPE Moist organically fertilized well-drained
TEMP PREFERENCE 55-75 degF
LIGHT PREFERENCE Full sun
TROUBLESHOOTING Monitor regularly for cabbage worms
flea beetles thrips slugs and aphids
thrives from a nitrogen-rich fertilizer
35 TRUELEAFMARKETCOM
Apium graveolens var rapaceumBiennial Grown as Annual
Celeriac also widely known as celery
root is one of the more unfamiliar and
understated root vegetables found in
the home garden Despite its familiar
celery-like greens above soil celeriac
is cultivated for its large bulbous root
that looks similar to kohlrabi or turnip
Garden celeriac not only tolerates a light
frost but actually thrives in it as flavor
improves with some seasonal chill Grow
celeriac as an exclusive Mediterranean
substitute for any traditional culinary
root crop
Celeriac is a cool weather crop able to
be sown directly in 3-4 weeks before final
spring frost but for best starts begin
indoors 8-10 weeks sooner Plant 2-3
seeds 18rdquo deep per cell or peat pot in
organically rich moist well-drained soil
with a pH of 60-70 Seeds germinate
in 14-21 days transplanting best starts
12-18rdquo apart in the garden as true leaves
establish Leave only 3-5 top shoots to
encourage root development Celeriac
benefits from compost and consistent
moisture throughout the season with
proper drainage and ventilation
During the season remove any lateral
shoots to ensure that roots remain
smooth for harvest Between 90-120 days
celeriac is ready to harvest as roots be-
come visible above ground and develop
green celery-like shoots of about 3-4rdquo
Celeriac is a shallow-rooted vegetable
and can be safely pulled from the soil
when harvesting The flavor of celeriac
can be enhanced by a light frost but be
sure to harvest these plants before the
first hard autumn freeze
Sowing and growing Harvesting
HARDINESS ZONE Annual (Biennial 6-10)
DAYS TO MATURITY 90-120
DAY TO GERMINATION 14-21
SEEDING DEPTH 18rdquo
PLANT SPACING 12-18rdquo
PLANT HEIGHT 24-36rdquo
ROW SPACING 24-30rdquo
GROWTH HABIT Bulbous upright
SOIL TYPE Fertile consistently moist well-drained
TEMP PREFERENCE 60-65 degF
LIGHT PREFERENCE Full sun - partial sun
TROUBLESHOOTING Susceptible to root rot from poorly
drained soils Watch for aphids slugs and any kind of worms
36TRUELEAFMARKETCOM
Apium graveolens var dulceBiennial
Celery is one of the most popular veg-
etable crops in the entire world yet still
seldom grown by many home gardeners
Much like lettuce broccoli and kale
garden celery can be harvested repeat-
edly throughout the season as a ldquocut and
come againrdquo variety able to be pushed
up until the frost Once established
celery is one of the most productive and
low-maintenance grows of the season
certain to find its way back into the
garden bed year after year
Celery is a cool weather favorite best
started in early spring or late summer
Begin indoors 10-12 weeks prior to final
frost or 8-10 to first autumn frost Press
without covering 2-3 seeds per cell in
organic moist well-drained potting mix
with a pH of 6-7 Seeds germinate in 14-
21 days transplant best starts 9-12rdquo apart
in the garden as true leaves establish
Requires steady watering and a cooling
top layer of mulch to keep from bolting
Benefits from additional compost
throughout the season with properly
Celery is known to have a longer harvest
date but once established can offer
repeat harvests like leafy greens Celery
can be traditionally harvested whole
or in ldquocut and come againrdquo fashion
Harvest outer stalks when at least 6-8rdquo
tall by cutting from the base allowing
inner stalks to continue producing Be
careful of shallow roots cutting above
ground Darker green stalks will yield
more nutrition but will also have a more
coarse texture
Sowing and growing
Harvesting
drained and ventilated soil
HARDINESS ZONE Annual (Biennial 6-10)
DAYS TO MATURITY 110-130
DAY TO GERMINATION 14-21
SEEDING DEPTH Press without covering
PLANT SPACING 9-12rdquo
PLANT HEIGHT 12-24rdquo
ROW SPACING 24rdquo
GROWTH HABIT Leafy upright
SOIL TYPE Moist fertile composted well-drained
TEMP PREFERENCE 60-70 degF
LIGHT PREFERENCE Full sun
TROUBLESHOOTING Susceptible to root rot from poorly
drained soils Watch for aphids slugs and any kind of worms
37 TRUELEAFMARKETCOM
Beta vulgaris var ciclaBiennial
Chard is a leafy colorful and quickly
maturing relative to the sweet garden
beet Tolerant to both light frost and
summer heat chard is often recom-
mended as an easy yet rewarding crop
for children or novice gardeners Chard
seeds can be sown nearly anytime of sea-
son for either a midsummer harvest or
even a late fall crop Available in a variety
of assorted colors try growing chard
as a bright and vibrant addition to any
ornamental garden or flower patch
Chard grows best in cool gardens yet
is quite tolerant to heat Chard is best
if sown directly 2-3 before final spring
frost or 5-6 weeks before first autumn
frost Chard may sown outdoors nearly
anytime from spring to fall for quick and
successive harvests Sow 2-3 seeds 12rdquo
deep and 2-3rdquo apart in loose organic
and well-drained soil with a pH of 6-7
Chard seeds are often pre-soaked for 4-6
hours to accelerate germination to 5-14
days Thin back starts to 12rdquo apart in the
garden as true leaves establish For best
flavor and texture keep plants under
12rdquo tall
Most varieties are ready to harvest about
50-60 days from sowing while the first
and youngest leaves can be harvested at
about 30 days For ldquocut and come againrdquo
harvesting cut the stalks carefully 1-2rdquo
above the ground so as not to harm the
center of the plant Harvest larger outer
leaves for continual seasonal growth or
cut stalks 3-4rdquo from the base allowing
plants to grow again Chard plants may
also be harvested entirely whole from the
base like celery
Sowing and growing
Harvesting
HARDINESS ZONE Annual (Biennial 6-10)
DAYS TO MATURITY 50-60
DAY TO GERMINATION 5-14
SEEDING DEPTH 12rdquo
PLANT SPACING 12rdquo
PLANT HEIGHT 12-18rdquo
ROW SPACING 18-24rdquo
GROWTH HABIT Upright
SOIL TYPE Loose moist organic well-drained
TEMP PREFERENCE 60-80 degF
LIGHT PREFERENCE Full sun - partial sun
TROUBLESHOOTING Susceptible to fungal leaf spotting
mildews and mold from oversaturation Watch for aphids
and flea beetles
38TRUELEAFMARKETCOM
Brassica oleracea var viridisBiennial
Collard greens are a broadleaf Brassica
relative to the similar-tasting broccoli
cabbage and kale And its nutrient-dense
relatives collard greens are cold hardy
and even thought to taste best after a
light frost or two Collards grow a similar
look and texture to kale and cabbage
leaves yet boast a far more tender silkier
and leafier green Like broccoli and
kale collards are a ldquocut and come againrdquo
crop that will continue to deliver well
into the fall
Collard greens are a cool-hardy crop best
if sown in early spring or late summer
For early starts begin indoors 4-6 weeks
prior to final frost or for a fall harvest
sow 3-4 weeks before first frost Sow 2-3
seeds 14rdquo deep per cell or 4rdquo apart
in the garden in organic well-drained
soil with a pH of 60-65 Germinates in
5-12 days thinning out best starts every
12-18rdquo once true leaves establish Water
regularly to keep collard greens from
drying and becoming bitter but do not
oversaturate causing mold mildew and
rot Collards thrive from a composted
soil bed and require little fertilizing
throughout the season unless leaves
begin to yellow
About 8-10 weeks after transplanting
collards are ready for harvest Like
with many ldquocut and come againrdquo crops
harvest frequently to boost production
Collard leaves can be harvested at any
size based on preference but larger
leaves become more coarse and bitter
Entire plants may be harvested whole or
simply pick the leaves from the bottom as
needed to allow further production For
best flavor allow greens a frost or two
before harvesting
Sowing and growing
Harvesting
HARDINESS ZONE Annual 2-10 (Biennial 6-10)
DAYS TO MATURITY 75-85
DAY TO GERMINATION 5-12
SEEDING DEPTH 14rdquo
PLANT SPACING 12-18rdquo
PLANT HEIGHT 10-12rdquo
ROW SPACING 30rdquo
GROWTH HABIT Upright greens
SOIL TYPE Moist organic composted well-drained
TEMP PREFERENCE 50-70 degF
LIGHT PREFERENCE Full sun
TROUBLESHOOTING No serious diseases but monitor
regularly for cabbage worms flea beetles thrips aphids
and harlequin bugs
39 TRUELEAFMARKETCOM
Zea maysAnnual
Corn is an ancient wild grass and effort-
less nearly foolproof summertime staple
Often known as the ldquocobrdquo or ldquoearrdquo the
edible portion is actually the ripened
flower with the individual kernels in the
husk each containing a seed for future
propagation Although sweet corn is the
most popular variety garden corn comes
in a variety of flavors and colors includ-
ing stunning and unique ornamental
varieties such as Glass Gem Blue Hopi
and Earth Tones Dent
Corn is a hardy full sun grass performing
best when sown directly outdoors after
the final spring frost Plant 2-3 seeds 1-2rdquo
deep and 3-4rdquo apart in loose organically
rich well-drained soil with a pH of 58-
62 Germinates in 7-14 days thinning
out best starts to every 12rdquo once true
leaves establish Avoid overhead watering
by watering soil directly To prevent
cross-pollination from altering a corn
crop keep like varieties with like varieties
(SU with SU SE with SE SH2 with SH2
and ORNAMENTAL with ORNAMEN-
TAL) Check individual seed packet to
know whether a variety is Sugary (SU)
Sugary Enhanced (SE) Supersweet
(SH2) or Ornamental
Most varieties of corn are ready to har-
vest about 75 days from sowing Unlike
other garden favorites corn only fruits
once Ears are ripe once they turn dark
green silks become brown and kernels
are plump Test ripeness by squeezing
kernels for a milk-like juice To harvest
firmly pull the ear downwards while
twisting
Sowing and growing
Harvesting
HARDINESS ZONE Annual
DAYS TO MATURITY 60-90
DAY TO GERMINATION 7-14
PLANT SPACING 12rdquo
PLANT HEIGHT 5-8ft
ROW SPACING 30-36rdquo
GROWTH HABIT Upright stalk
SOIL TYPE Sandy composted loamy well-drained
TEMP PREFERENCE 75-90 degF
LIGHT PREFERENCE Full sun
TROUBLESHOOTING No serious pests but watch for corn
leaf aphids flea beetles and thrips Water soil directly to
avoid saturating stalks
40TRUELEAFMARKETCOM
Cucumis sativusAnnual
Cucumber is one of the easiest and most
productive summertime favorites suited
for just about any home garden Grown
similarly to summer melons cucumbers
are heat and drought tolerant and
once matured will produce vigorously
well into fall Whether small pickling
cucumbers or a larger more familiar
slicing variety cucumbers are available
as either short convenient bush types or
long vining climbers that will produce
well into fall
Cucumber is a warm weather crop best
if begun indoors 4-6 weeks prior to final
spring frost Plant 3-4 seeds 1rdquo deep
per individual cell in loamy sandy well-
drained soil with a pH of 6-65 Seeds
germinate in 3-10 days transplanting
best starts 36-48rdquo apart in the garden
once true leaves establish Cucumbers
perform best when grown on 8rdquo tall
mounds and provided a trellis to mini-
mize crowding Shallow roots will benefit
from regular watering and top layer of
mulch Bush varieties perform well in
pots and containers
Many varieties of cucumber are ready
for harvest about 60 days from sowing
while smaller pickling varieties may be
ready sooner Ripe cucumbers are solid
green and firm becoming bitter and
yellow if left on the vine too long Classic
slicing cucumbers are sweetest when 7-9rdquo
long becoming starchy and grainy when
reaching 12rdquo or more Remove fruits with
scissors or a knife rather than twisting or
plucking to prevent damaging the vine
Sowing and growingHarvesting
HARDINESS ZONE Annual
DAYS TO MATURITY 55-70
DAY TO GERMINATION 3-10rdquo
SEEDING DEPTH 1rdquo
PLANT SPACING 36-48rdquo
PLANT HEIGHT 6-12rdquo
ROW SPACING 36rdquo
GROWTH HABIT Vining or bush
SOIL TYPE Loamy sandy fertilized well drained
TEMP PREFERENCE 65-75 degF
LIGHT PREFERENCE Full sun
TROUBLESHOOTING Watch for cucumber beetles squash
bugs and aphids Mildew and leaf spotting may occur in
poorly drained soils
41 TRUELEAFMARKETCOM
Solanum melongenaAnnual
Eggplant is a short and compact fruiting
vegetable that is often likened to a
ldquosmall treerdquo growing in the garden box
Eggplant matures at a convenient and
sturdy 24-36rdquo tall and although related
to the tomato fruits very similarly to a
pepper Eggplant perennially overwinters
in warm enough climates making it an
ideal vegetable for indoor container
gardening Try heirloom selections
featuring unique shapes sizes and varie-
gated and multi-colored varieties
Eggplant is a full sun favorite often sown
directly after the final spring frost but
for earliest starts begin indoors 8-10
weeks prior Plant 2-3 seeds 14rdquo deep
per cell or 4-6rdquo apart in the garden in
sandy loamy and well-drained soil with
a pH of 55-72 Germinates in 7-14 days
thin out best starts to 1 plant per pot
or every 18-24rdquo in the garden as true
leaves establish Cover soil with a layer of
organic mulch and fertilize at least twice
during growth stage Stabilize plants with
a pole or support as they can become
top-heavy during fruiting
Sowing and growing
Harvesting
HARDINESS ZONE Annual (Perennial 10-11)
DAYS TO MATURITY 100-120
DAY TO GERMINATION 7-14
SEEDING DEPTH 14rdquo
PLANT SPACING 18-24rdquo
PLANT HEIGHT 24-36rdquo
ROW SPACING 24-36rdquo
GROWTH HABIT Dwarfed upright
SOIL TYPE Sandy loamy fertilized well-drained
TEMP PREFERENCE 70-85 degF
LIGHT PREFERENCE Full sun
TROUBLESHOOTING Susceptible to bacterial spotting
verticillium and fusarium wilt and aphids Watch for small
pests or leaf hoppers
Due to the protective and toxic solanine
produced by members of the nightshade
family avoid consuming eggplant before
completely ripened Most eggplant variet-
ies are ready for harvest about 70-90 days
after transplanting Harvest fruits before
wrinkling and going to seed Carefully
snip each eggplant from the branch with
scissors or a garden knife while leaving 1rdquo
of the stem on the fruit Avoid pulling or
twisting off eggplants by hand
42TRUELEAFMARKETCOM
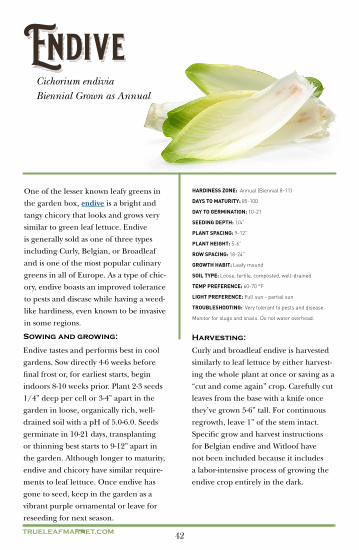
Cichorium endiviaBiennial Grown as Annual
One of the lesser known leafy greens in
the garden box endive is a bright and
tangy chicory that looks and grows very
similar to green leaf lettuce Endive
is generally sold as one of three types
including Curly Belgian or Broadleaf
and is one of the most popular culinary
greens in all of Europe As a type of chic-
ory endive boasts an improved tolerance
to pests and disease while having a weed-
like hardiness even known to be invasive
in some regions
Endive tastes and performs best in cool
gardens Sow directly 4-6 weeks before
final frost or for earliest starts begin
indoors 8-10 weeks prior Plant 2-3 seeds
14rdquo deep per cell or 3-4rdquo apart in the
garden in loose organically rich well-
drained soil with a pH of 50-60 Seeds
germinate in 10-21 days transplanting
or thinning best starts to 9-12rdquo apart in
the garden Although longer to maturity
endive and chicory have similar require-
ments to leaf lettuce Once endive has
gone to seed keep in the garden as a
vibrant purple ornamental or leave for
reseeding for next season
Curly and broadleaf endive is harvested
similarly to leaf lettuce by either harvest-
ing the whole plant at once or saving as a
ldquocut and come againrdquo crop Carefully cut
leaves from the base with a knife once
theyrsquove grown 5-6rdquo tall For continuous
regrowth leave 1rdquo of the stem intact
Specific grow and harvest instructions
for Belgian endive and Witloof have
not been included because it includes
a labor-intensive process of growing the
endive crop entirely in the dark
Sowing and growing Harvesting
HARDINESS ZONE Annual (Biennial 8-11)
DAYS TO MATURITY 85-100
DAY TO GERMINATION 10-21
SEEDING DEPTH 14rdquo
PLANT SPACING 9-12rdquo
PLANT HEIGHT 5-6rdquo
ROW SPACING 18-24rdquo
GROWTH HABIT Leafy mound
SOIL TYPE Loose fertile composted well-drained
TEMP PREFERENCE 60-70 degF
LIGHT PREFERENCE Full sun - partial sun
TROUBLESHOOTING Very tolerant to pests and disease
Monitor for slugs and snails Do not water overhead
43 TRUELEAFMARKETCOM
CucurbitaceaePerennial
Gourds have got to be the most diverse
showy and unique crop growing in any
home garden Available in countless
shapes sizes colors and textures
ornamental gourds have become as
synonymous with autumn as falling leaves
or apple cider Unlike soft melons or
squash gourds have an unusually thick
skin and will not be bothered by critters
in the garden
Gourds are a full sun crop sown direct
after the final frost but for earliest starts
begin indoors 4-6 weeks prior Plant
3-4 seeds 1-2rdquo deep per cell or every
48-60rdquo in the garden in an organic and
nutrient-dense soil with a pH of 65-75
Gourd seeds may take 7-35 days to
germinate but are commonly pre-soaked
for 24 hours to accelerate germination
Gourds perform best when grown on
8-10rdquo tall mounds to accommodate long
trailing vines and given plenty of trellis
support For longneck varieties trellis
and allow gourds to hang straight for a
bottling effect Gourds are a heavy feeder
and benefit from regular fertilizing
Most varieties of gourds are ready to
harvest about 100 days from sowing
while larger shell types require an extra
month Harvest gourds once they have
hardened in the fall and stems have
turned brown Gourds will rot if left on
the vine too long and also if harvested
too soon Similar to squash harvest
gourds by snipping fruits off the vine
rather than twisting or pulling leaving
about 1rdquo of stem attached to prolong
shelf life storage and decorative orna-
mental use
Sowing and growing
Harvesting
HARDINESS ZONE Annual (Perennial 8-10)
DAYS TO MATURITY 100-140
DAY TO GERMINATION 7-35
SEEDING DEPTH 12rdquo
PLANT SPACING 9-12rdquo
PLANT HEIGHT 36-48rdquo
ROW SPACING 8 ft
GROWTH HABIT Climbing and spreading vine
SOIL TYPE Moist organically composted well-drained
TEMP PREFERENCE 70-85 degF
LIGHT PREFERENCE Full sun
TROUBLESHOOTING Monitor for aphids squash bugs
and cucumber beetle known to cause bacterial wilt Do not
water overhead
44TRUELEAFMARKETCOM
Brassica oleracea var acephalaAnnual
Kale has recently become one of the
most popular vegetables both in and
out of the garden Whether because of
unparalleled health benefits ease of
growing or showy decorative color there
is almost no reason not to have a place
for kale in the garden box Kale is one
of the most hardy Brassicas boasting a
tolerance to both heat and cold extremes
and even overwintering in moderate
climates Kale is more diverse than you
think available in a variety of unique
colors shapes sizes and textures
Kale is a cool hardy crop able to be
sown directly in early spring or late fall
For best starts begin indoors 3-4 weeks
before final spring frost or 6-8 before
the first autumn frost Plant 3-4 seeds
14rdquo deep per cell and 3-4rdquo apart in
the garden in nitrogen-rich organic
well-drained soil with a pH of 60-75
Germinates in 3-10 days thinning out
best starts to 1 plant per pot or every 12-
18rdquo in the garden as true leaves establish
Kale benefits from fertilizer every 4
weeks Extended summer heat will cause
plants to bolt and become bitter
Most kale is ready to begin harvesting
about 60 days from sowing Kale is a ldquocut
and come againrdquo crop and continuously
harvesting younger outer leaves will
encourage growth Carefully cut back
any yellowing leaves that may appear at
the base In warm enough climates kale
can produce over winter but in colder
regions lay a tarp or row cover to further
a winter harvest
Sowing and growing Harvesting
HARDINESS ZONE Annual (Biennial 7-10)
DAYS TO MATURITY 55-75
DAY TO GERMINATION 3-10
SEEDING DEPTH 14rdquo
PLANT SPACING 12-18rdquo
PLANT HEIGHT 12-18rdquo
ROW SPACING 24rdquo
GROWTH HABIT Leafy upright
SOIL TYPE Nitrogen-rich loamy well-drained
TEMP PREFERENCE 55-70 degF
LIGHT PREFERENCE Full sun - partial sun
TROUBLESHOOTING No serious diseases but monitor regu-
larly for aphids cabbage worms flea beetles and thrips
45 TRUELEAFMARKETCOM
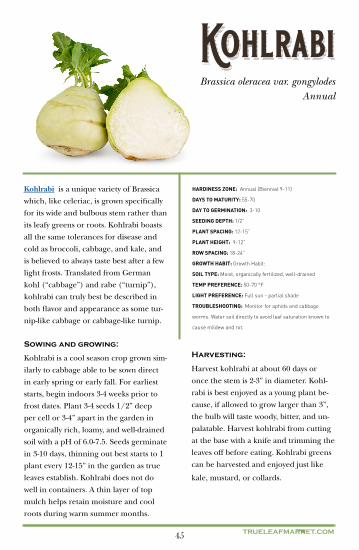
Brassica oleracea var gongylodesAnnual
Kohlrabi is a unique variety of Brassica
which like celeriac is grown specifically
for its wide and bulbous stem rather than
its leafy greens or roots Kohlrabi boasts
all the same tolerances for disease and
cold as broccoli cabbage and kale and
is believed to always taste best after a few
light frosts Translated from German
kohl (ldquocabbagerdquo) and rabe (ldquoturniprdquo)
kohlrabi can truly best be described in
both flavor and appearance as some tur-
nip-like cabbage or cabbage-like turnip
Kohlrabi is a cool season crop grown sim-
ilarly to cabbage able to be sown direct
in early spring or early fall For earliest
starts begin indoors 3-4 weeks prior to
frost dates Plant 3-4 seeds 12rdquo deep
per cell or 3-4rdquo apart in the garden in
organically rich loamy and well-drained
soil with a pH of 60-75 Seeds germinate
in 3-10 days thinning out best starts to 1
plant every 12-15rdquo in the garden as true
leaves establish Kohlrabi does not do
well in containers A thin layer of top
mulch helps retain moisture and cool
roots during warm summer months
Harvest kohlrabi at about 60 days or
once the stem is 2-3rdquo in diameter Kohl-
rabi is best enjoyed as a young plant be-
cause if allowed to grow larger than 3rdquo
the bulb will taste woody bitter and un-
palatable Harvest kohlrabi from cutting
at the base with a knife and trimming the
leaves off before eating Kohlrabi greens
can be harvested and enjoyed just like
kale mustard or collards
Sowing and growingHarvesting
HARDINESS ZONE Annual (Biennial 9-11)
DAYS TO MATURITY 55-70
DAY TO GERMINATION 3-10
SEEDING DEPTH 12rdquo
PLANT SPACING 12-15rdquo
PLANT HEIGHT 9-12rdquo
ROW SPACING 18-24rdquo
GROWTH HABIT Growth Habit
SOIL TYPE Moist organically fertilized well-drained
TEMP PREFERENCE 50-70 degF
LIGHT PREFERENCE Full sun - partial shade
TROUBLESHOOTING Monitor for aphids and cabbage
worms Water soil directly to avoid leaf saturation known to
cause mildew and rot
46TRUELEAFMARKETCOM
Allium porrumBiennial
Leeks are an overwintering biennial
that boast a milder and less pungent
variation of the onion while having all
the same tolerances to frost disease and
pests Above the soil leeks appear to be
a thicker broader onion plant without
growing the bulbous root Leek matures
up to 24rdquo tall and takes up only a few
inches width in the garden Grow leeks
alongside other winter favorites such as
scallions garlic shallots and onion for
similar growing and harvesting times
Leeks are a cool hardy crop able to
be sown directly in early spring or late
fall Begin indoors 10-12 weeks before
final spring frost or 6-8 before the first
autumn frost Plant 2-3 seeds 14rdquo deep
per cell and 2-3rdquo apart in the garden in
deeply tilled organic well-drained soil
with a pH of 60-70 Germinates in 7-14
days thinning back to 1 plant every 4-6rdquo
in the garden Leeks have a shallow root
system and require regular watering and
a top layer of cooling mulch
Many varieties have a longer harvest
time but some may be ready as soon as
80 days Like asparagus spears harvest
leek stalks from beneath the soil by
carefully prying them up from the roots
with a gardening fork As a relative of
the onion leeks are also eaten somewhat
similarly with the white portion of the
stalk being the most flavorful and prized
part of the vegetable
Sowing and growing Harvesting
HARDINESS ZONE Annual (BIennial 7-11)
DAYS TO MATURITY 90-130
DAY TO GERMINATION 7-14
SEEDING DEPTH 14rdquo
PLANT SPACING 4-6rdquo
PLANT HEIGHT 18-24rdquo
ROW SPACING 8-16rdquo
GROWTH HABIT Sturdy upright
SOIL TYPE Loose lighty fertile well-drained
TEMP PREFERENCE 55-75 degF
LIGHT PREFERENCE Full sun
TROUBLESHOOTING Susceptible to mildew leaf spotting
and bulb rot from oversaturated and poorly drained soils
Watch for thrips and onion maggots
47 TRUELEAFMARKETCOM
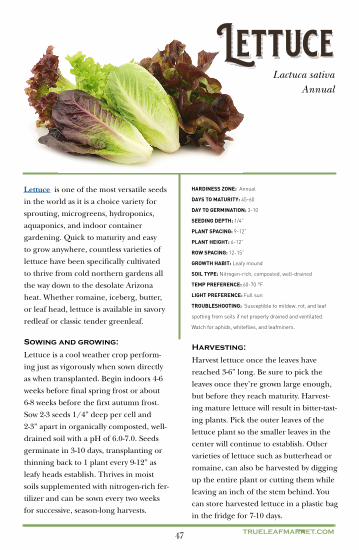
Lactuca sativaAnnual
Lettuce is one of the most versatile seeds
in the world as it is a choice variety for
sprouting microgreens hydroponics
aquaponics and indoor container
gardening Quick to maturity and easy
to grow anywhere countless varieties of
lettuce have been specifically cultivated
to thrive from cold northern gardens all
the way down to the desolate Arizona
heat Whether romaine iceberg butter
or leaf head lettuce is available in savory
redleaf or classic tender greenleaf
Lettuce is a cool weather crop perform-
ing just as vigorously when sown directly
as when transplanted Begin indoors 4-6
weeks before final spring frost or about
6-8 weeks before the first autumn frost
Sow 2-3 seeds 14rdquo deep per cell and
2-3rdquo apart in organically composted well-
drained soil with a pH of 60-70 Seeds
germinate in 3-10 days transplanting or
thinning back to 1 plant every 9-12rdquo as
leafy heads establish Thrives in moist
soils supplemented with nitrogen-rich fer-
tilizer and can be sown every two weeks
for successive season-long harvests
Harvest lettuce once the leaves have
reached 3-6rdquo long Be sure to pick the
leaves once theyrsquore grown large enough
but before they reach maturity Harvest-
ing mature lettuce will result in bitter-tast-
ing plants Pick the outer leaves of the
lettuce plant so the smaller leaves in the
center will continue to establish Other
varieties of lettuce such as butterhead or
romaine can also be harvested by digging
up the entire plant or cutting them while
leaving an inch of the stem behind You
can store harvested lettuce in a plastic bag
in the fridge for 7-10 days
Sowing and growingHarvesting
HARDINESS ZONE Annual
DAYS TO MATURITY 45-60
DAY TO GERMINATION 3-10
SEEDING DEPTH 14rdquo
PLANT SPACING 9-12rdquo
PLANT HEIGHT 6-12rdquo
ROW SPACING 12-15rdquo
GROWTH HABIT Leafy mound
SOIL TYPE Nitrogen-rich composted well-drained
TEMP PREFERENCE 60-70 degF
LIGHT PREFERENCE Full sun
TROUBLESHOOTING Susceptible to mildew rot and leaf
spotting from soils if not properly drained and ventilated
Watch for aphids whiteflies and leafminers
48TRUELEAFMARKETCOM
Cucumis melonAnnual
Melons come in a wide variety of shapes
sizes and colors including the timeless
cantaloupe muskmelon honeydew
and canary but also feature unique
heirlooms such as the casaba galia santa
claus and ldquowinterrdquo melon Regardless of
variety melons are full sun performers
that thrive with a little trellis support and
plenty of space to spread Melons may
not be as productive as tomatoes or cu-
cumbers but nothing will ever beat the
flavor of a homegrown summer melon
Melons are a full sun favorite able to
be sown direct after the final frost date
but for earliest starts begin indoors 4-6
weeks prior Plant 2-3 seeds 12rdquo deep
per peat pot or every 9-12rdquo in the garden
in sandy composted and well-drained
soil with a pH of 60-65 Seeds germinate
in 4-10 days transplanting or thinning
best starts 36-60rdquo apart Melons perform
best when grown on 8-10rdquo tall mounds
to accommodate long trailing vines and
can be easily trellised for tighter grow
spaces Thrives from regular watering
during fruiting and slight drought when
ripening
Most varieties of melon can be harvested
80-100 days from sowing or when the
fruit begins to show signs of ripening
Regardless of variety or color all melons
will emit a wildly sweet fruity aroma
and fall off the vine when ripe Melons
can also be snipped from the vine with
about 1rdquo of stem left attached to the
fruit Cantaloupe and muskmelon will
turn evenly tan when ripe and honeydew
should turn creamy yellow instead of
green Yellow canary and thicker skin
melons may not fall off the vine or
perfume when ripe
Sowing and growing
Harvesting
HARDINESS ZONE Annual
DAYS TO MATURITY 80-100
DAY TO GERMINATION 4-10
SEEDING DEPTH 1rdquo
PLANT SPACING 36-60rdquo
PLANT HEIGHT 6-12rdquo
ROW SPACING 36-60rdquo
GROWTH HABIT Trailing vine
SOIL TYPE Sandy loamy fertilized well-drained
TEMP PREFERENCE 70-90 degF
LIGHT PREFERENCE Full sun
TROUBLESHOOTING Water soil directly at the roots to
minimize mildew Watch regularly for aphids spider mites
and cucumber beetles
49 TRUELEAFMARKETCOM
Brassica or SinapisAnnual
Mustard is currently in its renaissance as
a vital sprouting microgreens and cover
crop variety grown just as popularly on
the kitchen counter as in the garden
bed Mustard leaf features a wide selec-
tion of color flavor and leaf types such
as classic broadleaf curly and mizuna
As a cover crop mustard is sown in the
fall to repair and replenish depleted and
hardened soils only to be mulched back
into the spring garden as an all-natural
organic ldquogreenrdquo fertilizer
Mustard is a tenacious cool weather
favorite with a weed-like hardiness best
sown directly outdoors 4-6 weeks before
the final spring frost or in late fall 2-4
weeks before the first frost Sow 3-4 seeds
12rdquo deep and 4rdquo apart in organically
rich moist well-drained soil with a pH
of 60-75 Seeds germinate in 3-7 days
thinning best starts every 12-18rdquo in
the garden once true leaves establish
Mustard is a popular overwintering cover
crop specifically grown to help repair
poor malnourished soils and is able to
thrive in a variety of gardens
Most varieties of mustard are ready for
harvest about 80 days from sowing Like
other Brassicas such as kale broccoli
and collards mustard leaf is a ldquocut and
come againrdquo crop able to produce well
into the frost Carefully cut outermost
leaves from the stem while leaving rest
of the plant intact Mustard can be
left in the garden to easily reseed for
next season Sow mustard in the fall to
overwinter and till back into the soil
for a springtime nitrogen-rich organic
fertilizer
Sowing and growing Harvesting
HARDINESS ZONE Annual Biennial 8-10)
DAYS TO MATURITY 80-95
DAY TO GERMINATION 3-7
SEEDING DEPTH 12rdquo
PLANT SPACING 12-18rdquo
PLANT HEIGHT 12-18rdquo
ROW SPACING 12-24rdquo
GROWTH HABIT Well-stemmed upright
SOIL TYPE Fertile organically rich well-drained
TEMP PREFERENCE 50-70 degF
LIGHT PREFERENCE Full sun - partial sun
TROUBLESHOOTING Watch for aphids flea beetles
and slugs
50TRUELEAFMARKETCOM
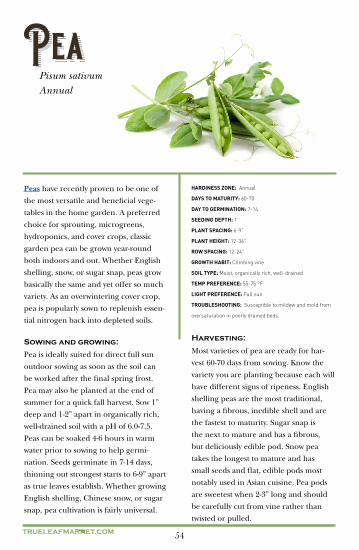
Abelmoschus esculentus Annual
Okra is a heat-loving summertime favor-
ite synonymous with some of the hottest
most humid regions in the country Okra
is a fruiting crop that produces tender
2-3rdquo edible pods all the way through the
warmest months of the year Related to
both hibiscus and hollyhock okra is also
celebrated for its huge gorgeous flowers
that bloom in shades of orange pink
red and white Okra thrives alongside
other full sun staples such as melon
cucumber and eggplant
Okra is a full sun crop that does not
perform well in cold soils Seeds can
be sown direct after the final frost date
but for earliest starts begin indoors 3-4
weeks prior Plant 2-3 seeds 12rdquo deep
per peat pot or 4-6rdquo apart in the garden
in sandy organically fertile and well-
drained soil with a pH of 58-70 Okra
germinates in 4-10 days transplanting or
thinning your best starts to 18-24rdquo apart
in the garden Seeds may pre-soak 12-18
hours to accelerate germination but is
not required Okra thrives from regular
watering and fertilizing
Okra is most flavorful when harvested at
2-3rdquo long or about 60 days after sowing
Harvest often to keep up with fruiting
while encouraging production Wear
gloves when handling okra plants be-
cause the fine hairs are known to cause
skin irritation Using a knife simply cut
okra pods from the plant while leaving
some stem attached to the fruit Garden
fresh okra does not store well and should
be enjoyed the day it is picked
Sowing and growing Harvesting
HARDINESS ZONE Annual
DAY TO GERMINATION 4-14
SEEDING DEPTH 12rdquo
PLANT SPACING 18-24rdquo
PLANT HEIGHT 36-60rdquo
ROW SPACING 36rdquo
GROWTH HABIT Bushy upright
SOIL TYPE Rich loamy composted well-drained
TEMP PREFERENCE 75-90 degF
LIGHT PREFERENCE Full sun
TROUBLESHOOTING Susceptible to rot in poorly drained
soil Monitor for aphids whiteflies spider mites and corn
earworms
51 TRUELEAFMARKETCOM
Allium cepaAnnual
Onion is a cold hardy favorite able to
be sown in either spring or fall for an
effortless biannual harvest Onions are
often started in the garden from store-
bought bulbs but growing from seed
allows for a greater variety of selection
among the red yellow white and sweet
cultivars When planting look to see if a
ldquolong-dayrdquo or a ldquoshort-dayrdquo onion variety
is best suited for the summers in your
region Try an onion crop in the garden
bed alongside similar garlic shallots
or leeks
Onion is a cool hardy vegetable that can
be sown directly 6-8 weeks prior to final
spring frost or about 4-6 weeks before
the first autumn frost Seeds may also
be begun indoors for early starts Soil
should be well-tilled nitrogen-rich with
a pH of 60-70 For outdoor sowing
create a shallow 1rdquo deep trench for a
minimum of 12rdquo Onion seed is very
small so sprinkle generously into the
trench and lightly cover with about 14rdquo
of soil As seedlings begin to sprout from
the row trim back to favor the strongest
starts every 4-6rdquo apart ldquoLong-dayrdquo onions
grow best in the northern half of the
country while ldquoshort-dayrdquo thrives in the
southern half
Most onions sown in the spring are ready
for harvest about 90 days from sowing
and seeds planted in the fall can mature
as early as May or June the following year
Onions are ready to harvest once the
plantsrsquo greens have dried out yellowed
and begun to bow over Loosen the soil
from the bulb to check for consistent
coloring while allowing the bulb to further
dry Sweet onions do not store as well as
more pungent yellow and brown varieties
Sowing and growing
Harvesting
HARDINESS ZONE Annual
DAYS TO MATURITY 90-110
DAY TO GERMINATION 4-10
SEEDING DEPTH 12rdquo
PLANT SPACING 4-6rdquo
PLANT HEIGHT 12-18rdquo
ROW SPACING 18-24rdquo
GROWTH HABIT Bulbous-rooted upright
SOIL TYPE Sandy loose composted well-drained
TEMP PREFERENCE 55-75 degF
LIGHT PREFERENCE Full sun
TROUBLESHOOTING Watch for thrips and onion maggots
Susceptible to onion yellows virus which may stunt and infect
nearby onions
52TRUELEAFMARKETCOM
Atriplex hortensisAnnual
Orach is often called ldquomountain spinachrdquo
and widely cultivated as a warm-weather
substitute to traditional garden spinach
Tolerant to drought and both heat and
cold extremes orach is still plenty tender
and flavorful maturing into a far more
vibrant and complex crop than spinach
Try orach as a delicious ldquocut and come
againrdquo leafy vegetable while keeping it
in the garden bed as a bold and vibrant
ornamental available in bright greens
and magentas
Orach is a full sun crop best sown
directly 2-3 weeks after final spring frost
but for best starts begin indoors 4-6
weeks prior Plant 2-3 seeds 14rdquo deep
per cell or 3-4rdquo apart in the garden in
organic fertile well-drained soil with a
pH of 65-75 Seeds germinate in 14-21
days thinning back or transplanting
12-18rdquo apart in the garden as true leaves
establish orach thrives annually in a
wide variety of regions reseeding itself
in the garden for as long as yoursquoll have it
around Plants can be clipped for shorter
and more vigorous growth
Orach is ready to harvest at about 50
days from sowing or when leaves have
reached 4-6rdquo tall Smaller leaves will be
more tender and flavorful than larger
ones Orach comes in many colors so
gauge ripeness based on size rather
than color Often compared to spinach
orach is also a leafy ldquocut and come againrdquo
variety able to be harvested repeatedly
throughout the season to be used in the
kitchen exactly like any other garden
fresh leafy green
Sowing and growing
Harvesting
HARDINESS ZONE Annual
DAYS TO MATURITY 40-60
DAY TO GERMINATION 7-14
SEEDING DEPTH 14rdquo
PLANT SPACING 12-18rdquo
PLANT HEIGHT 36-60rdquo
ROW SPACING 24-36rdquo
GROWTH HABIT Bushy upright
SOIL TYPE Fertile organic moist well-drained
TEMP PREFERENCE 60-70 degF
LIGHT PREFERENCE Full sun
TROUBLESHOOTING Although heat and drought tolerant
can still bolt somewhat easily Watch for aphids and
whiteflies
53 TRUELEAFMARKETCOM
Pastinaca sativaAnnual
Parsnip is one of the lesser known
root vegetables growing very similar
to carrot and Hamburg rooted parsley
While looking like a bleached carrot
parsnip also produces rich leafy greens
that look taste and behave just like a
large-leaf parsley Garden parsnip is an
overwintering classic able to be sown in
either spring or fall and like many root
vegetables is believed to get sweeter
after a few light frosts Grow parsnip
to naturally aerate tough soils with its
penetrating taproot
Parsnip is a cool weather crop able to be
sown directly 3 weeks before final spring
frost or 3-4 weeks before first autumn
frost for an early spring harvest Like
many root vegetables parsnip does not
transplant well and should always be
sown direct Plant 2-3 seeds 12rdquo deep
and 1-2rdquo apart in very loose well-tilled
and well-drained soil with a pH of 60-70
Seeds germinate in 10-28 days thinning
out strongest starts to 6-9rdquo apart in the
garden Parsnips grow best with some
drought becoming wider and longer in
search of moisture
Most varieties of parsnip may be
harvested about 100 days after sowing
but for sweetest flavor allow parsnip to
experience a frost or two before harvest-
ing Parsnips are ready to harvest once
their foliage has died back dried and
bowed over Like carrots parsnip can be
safely removed from the ground with a
gardening fork If sowing in the fall for a
spring harvest cover parsnip seeds with a
top layer of mulch and harvest crop once
the ground thaws
Sowing and growing Harvesting
HARDINESS ZONE Annual
DAYS TO MATURITY 100-120
DAY TO GERMINATION 10-28
SEEDING DEPTH 12rdquo
PLANT SPACING 6-9rdquo
PLANT HEIGHT 18-24rdquo
ROW SPACING 24rdquo
GROWTH HABIT Leafy taproot
SOIL TYPE Loose organic composted well-drained
TEMP PREFERENCE 45-75 degF
LIGHT PREFERENCE Full sun - partial sun
TROUBLESHOOTING Few known pests and diseases
Watch for carrot rust fly known to infect plants with parsnip
root canker
54TRUELEAFMARKETCOM
Pisum sativumAnnual
Peas have recently proven to be one of
the most versatile and beneficial vege-
tables in the home garden A preferred
choice for sprouting microgreens
hydroponics and cover crops classic
garden pea can be grown year-round
both indoors and out Whether English
shelling snow or sugar snap peas grow
basically the same and yet offer so much
variety As an overwintering cover crop
pea is popularly sown to replenish essen-
tial nitrogen back into depleted soils
Pea is ideally suited for direct full sun
outdoor sowing as soon as the soil can
be worked after the final spring frost
Pea may also be planted at the end of
summer for a quick fall harvest Sow 1rdquo
deep and 1-2rdquo apart in organically rich
well-drained soil with a pH of 60-75
Peas can be soaked 4-6 hours in warm
water prior to sowing to help germi-
nation Seeds germinate in 7-14 days
thinning out strongest starts to 6-9rdquo apart
as true leaves establish Whether growing
English shelling Chinese snow or sugar
snap pea cultivation is fairly universal
Most varieties of pea are ready for har-
vest 60-70 days from sowing Know the
variety you are planting because each will
have different signs of ripeness English
shelling peas are the most traditional
having a fibrous inedible shell and are
the fastest to maturity Sugar snap is
the next to mature and has a fibrous
but deliciously edible pod Snow pea
takes the longest to mature and has
small seeds and flat edible pods most
notably used in Asian cuisine Pea pods
are sweetest when 2-3rdquo long and should
be carefully cut from vine rather than
twisted or pulled
Sowing and growing Harvesting
HARDINESS ZONE Annual
DAYS TO MATURITY 60-70
DAY TO GERMINATION 7-14
SEEDING DEPTH 1rdquo
PLANT SPACING 6-9rdquo
PLANT HEIGHT 12-36rdquo
ROW SPACING 12-24rdquo
GROWTH HABIT Climbing vine
SOIL TYPE Moist organically rich well-drained
TEMP PREFERENCE 55-75 degF
LIGHT PREFERENCE Full sun
TROUBLESHOOTING Susceptible to mildew and mold from
oversaturation in poorly drained beds
55 TRUELEAFMARKETCOM
Capscium annum Perennial
Pepper is one of the most diverse showy
and flavorful fruits grown in the annual
garden bed Available in nearly every
possible color and shape from the super
sweet to super spicy pepper grows stron-
ger and tastes better with a season of full
sun and high heat Pepper plants thrive
in pots and containers and can even
perennially overwinter in warm enough
regions maturing into bushy vibrant
and well-stemmed patio favorites
Pepper is a heat-loving crop that does
not perform well in shade or cold soils
Seeds are best if started indoors 4-6
weeks prior to final spring frost for
transplanting Sow 2-3 seeds 14rdquo deep
per cell or peat pot in fertile organically
rich and well-drained soil with a pH
of 60-68 Germinates in 7-21 days
transplanting best starts 12-18rdquo apart in
the garden or one plant per container
Pepper plants thrive in pots and con-
tainers with a phosphorus-rich potting
mix and will benefit from staking and
support as they become top-heavy during
fruit production
Some sweet and bell peppers can be
harvested as soon as 60-70 days but most
hot varieties are ready about 100 days
from sowing or when skin has changed
color Know the individual variety you are
sowing to know when color has reached
ripeness Peppers can be picked early to
ripen indoors or left to ripen and change
color on the vine Using a knife or
shears carefully snip off peppers while
leaving some stem attached to the fruit
If working with hot peppers wear gloves
to avoid skin contact with capsaicin
Sowing and growing
Harvesting
HARDINESS ZONE Annual (Perennial 9-11)
DAYS TO MATURITY 70-100
DAY TO GERMINATION 7-21
SEEDING DEPTH 14rdquo
PLANT SPACING 12-18rdquo
PLANT HEIGHT 18-36rdquo
ROW SPACING 18-24rdquo
GROWTH HABIT Sturdy upright
SOIL TYPE Fertile organically rich well-drained
TEMP PREFERENCE 70-85 degF
LIGHT PREFERENCE Full sun
TROUBLESHOOTING Susceptible to fungus leaf spotting
and rot in poorly drained oversaturated soils Watch for
aphids and whiteflies
56TRUELEAFMARKETCOM
CucurbitaAnnual
Pumpkin is a full sun winter squash that
thrives in the heat trailing and vining
just like a gourd or cucumber And
like any other winter squash pumpkin
features a wide variety of colors and
sizes for both ornamental and culinary
use Pumpkins are able to grow multiple
on the vine but for largest and most
decorative squash plants can be pruned
to force enormous even competition size
pumpkins just in time for autumn fun
Pumpkin is able to be sown directly after
the final spring frost but for earliest starts
begin indoors 3-4 weeks prior Plant 2-3
seeds 1rdquo deep per cell or for outdoor
sowing plant atop 8-10rdquo tall mounds of
soil every 5-6 ft to accommodate long
heavy trailing vines Seeds germinate in
4-10 days and transplanted to composted
well-drained soil with a pH of 60-68
Fertilize crop every 3 weeks and harvest
pumpkins before the autumn frost Once
a few pumpkins begin to show on the
vine pinch off vines to inhibit vegetative
growth directing energy to producing the
most optimal pumpkins
Most small to medium pumpkins are
ready to harvest 90-100 days from sowing
while larger varieties require an extra few
weeks Regardless of color or size pump-
kins are generally ripe once the stem
is solid and rind is tough unable to be
pierced by a fingernail Clip pumpkins
from the vine with shears leaving about
4rdquo of stem intact and once harvested
leave out to naturally cure in the sun for
10-14 days The curing process will help
pumpkins last up to 3 months longer
after harvesting
Sowing and growing
Harvesting
HARDINESS ZONE Annual
DAYS TO MATURITY 90-120
DAY TO GERMINATION 4-10
SEEDING DEPTH 1rdquo
PLANT SPACING 5-6 ft
PLANT HEIGHT 12-15rdquo
ROW SPACING 10-15 ft
GROWTH HABIT Wide-spreading mound
SOIL TYPE Fertile composted moist well-drained
TEMP PREFERENCE 60-90 degF
LIGHT PREFERENCE Full sun
TROUBLESHOOTING Watch for cucumber beetles squash
bugs and aphids Mildew and leaf spotting may occur in
poorly drained soils
57 TRUELEAFMARKETCOM
Portulaca oleracea Annual
Purslane is one of the rare succulents
considered a garden vegetable and even
treated like a lettuce or kale as a seasonal
ldquocut and come againrdquo salad green A
desert succulent tolerant to heat
drought and poor soils purslane grows
so aggressively that it is widely considered
an invasive species Purslane is a member
of the showy and ornamental Portulaca
family and boasts stunning pink orange
yellow and red blooms ideal for patios
and flower bedding
Purslane is a high-heat crop with a
weed-like hardiness best if sown directly
in spring after the final frost or begun
indoors 6-8 beforehand Purslane is
generally cold stratified (ldquorefrigeratedrdquo)
2-3 weeks prior to sowing to accelerate
germination Lightly press 3-4 seeds per
cell or 2-3rdquo apart in average to poor
well-drained soil with a pH of 55-70
Germinates in 7-14 days thin out stron-
gest starts to 9-18rdquo in the garden Allow
soil to dry between waterings as purslane
is considered an invasive species in many
areas and tolerant to poor arid soils
Purslane greens are ready for harvest
about 50 days from sowing or when
succulent leaves are big and tender
Plants do not mature to be very big and
can be harvested whole or left in the
garden as a ldquocut and come againrdquo variety
When harvesting individual leaves care-
fully cut with a knife or clippers to not
accidentally uproot the shallow plant
Purslane is widely considered a weed and
can be pulled from the ground exactly
like yard weeds
Sowing and growing
Harvesting
HARDINESS ZONE Annual
DAYS TO MATURITY 50
DAY TO GERMINATION 7-14
SEEDING DEPTH Lightly press without covering
PLANT SPACING 9-18rdquo
PLANT HEIGHT 3-9rdquo
ROW SPACING 12-18rdquo
GROWTH HABIT Mounding succulent
SOIL TYPE Average moderately dry well-drained
TEMP PREFERENCE 75-100 degF
LIGHT PREFERENCE Full sun
TROUBLESHOOTING Drought tolerant with few known
pests or diseases Susceptible to mold and mildew from
overwatering
58TRUELEAFMARKETCOM
Cichorium intybus var foliosumPerennial
Radicchio is the deliciously bitter and
tender head or heart of the chicory
plant Just like cabbage cauliflower or
iceberg lettuce the radicchio head is
safely wrapped in a leafy protective layer
that simply needs peeling back when
harvested Like other chicory radicchio
thrives in cooler gardens especially when
sown mid-summer so maturing plants
may benefit from a few light autumn
frosts before harvesting
Radicchio is a cool weather chicory
ideally transplanted in mid-late summer
so maturing plants have a cooler grow
season Seeds may also be started indoors
8-10 weeks before final spring frost in
regions with moderate summers Plant
2-3 seeds 14rdquo deep per cell or peat pot
in loose fertile well-drained soil Seeds
germinate in 5-14 days transplanting
best starts every 18-24rdquo in the garden
with a soil pH of 65-70 Chicory is a
leafy-headed mound similar to cabbage
and radicchio is merely the small purple
head or heart of the chicory plant
Radicchio is ready for harvest about 80
days from sowing Similar to cabbage
cauliflower and iceberg lettuce
radicchio is the head of the chicory
plant protected by leafy layers that can
be simply peeled back and composted
Unlike other chicories outer radicchio
greens are not the most tender Plants
can be carefully cut at the base leaving
roots intact for perennial growth but
following harvests will be smaller and
bitter Radicchio tastes and performs best
as an annual
Sowing and growing Harvesting
HARDINESS ZONE Annual (Perennial 5-8)
DAYS TO MATURITY 80-90
DAY TO GERMINATION 5-14
SEEDING DEPTH 14rdquo
PLANT SPACING 18-24rdquo
PLANT HEIGHT 18-24rdquo
ROW SPACING 24-36rdquo
GROWTH HABIT Leafy-headed mound
SOIL TYPE Loose fertile loamy well-drained
TEMP PREFERENCE 50-70 degF
LIGHT PREFERENCE Full sun
TROUBLESHOOTING Radicchio is a chicory with a weed-
like hardiness and drought tolerance No serious pests
or diseases
59 TRUELEAFMARKETCOM
Raphanus sativusAnnual
Spring Radish is the smaller shallow
and often pink or magenta variety that
does not grow a deep taproot like winter
radish And whereas winter radish grows
a broader deeper root requiring 50-70
days until harvest spring radish can be
harvested as soon as 25 days and is one of
the fastest maturing crops available Try
the classic Cherry Belle radish for a quick
zesty harvest or fill the garden bed with
unique French Breakfast Purple Plum
or white Hailstone
Spring radish is a cool season crop best
sown directly 4-6 weeks before final
spring frost Like many root vegetables
radish does not transplant well and
should not be started indoors Plant 2-3
seeds 12rdquo deep and 1-2rdquo apart in very
loose organic well-drained soil with a
pH of 65-70 Seeds germinate in 3-7
days thinning out best starts to 2-3rdquo apart
as true leaves establish Minimize nitro-
gen content when fertilizing to reduce
small spindly roots and excessive greens
Radish will bolt to seed in excessive
summer heat if not provided afternoon
shade or sown late
Many varieties of spring radish are ready
to harvest in less than a month from
sowing Using a gardening fork harvest
as roots begin to show 1-2rdquo diameter
above the soil Sample one plant to
determine if the rest of the crop is ready
Harvest radish promptly because roots
will quickly spoil in the ground from
heat and maturity Some varieties of
radish greens are edible and often used
in pestos salads and sauteacutes
Sowing and growingHarvesting
HARDINESS ZONE Annual
DAYS TO MATURITY 25-40
DAY TO GERMINATION 3-7
SEEDING DEPTH 12rdquo
PLANT SPACING 2-3rdquo
PLANT HEIGHT 6-8rdquo
ROW SPACING 4-6rdquo
GROWTH HABIT Bulbous rooted upright
SOIL TYPE Loose light fertilized well-drained
TEMP PREFERENCE 50-70 degF
LIGHT PREFERENCE Full sun
TROUBLESHOOTING Monitor regularly for flea beetles and
aphids Water soil directly to avoid saturating greens known
to cause mildew
60TRUELEAFMARKETCOM
Raphanus sativusAnnual
Winter radish is the larger deeper
taproot variation of the smaller spring
crop growing very similar to the spring
radish except needing a little extra time
and space to mature While Daikon is
widely considered the standard of winter
radishes varieties such as Black Spanish
Round China Rose or the hypnotic
Watermelon offer surprising color and
diversity for a winter hardy crop Winter
radish is a frost tolerant cover crop
specifically grown to repair and replenish
poor and uncultivated soils
Winter radish is a cool hardy staple best
sown directly in mid-late summer for a
fall harvest Like many root vegetables
radish does not transplant well and
should not be started indoors Plant 2-3
seeds 12rdquo deep and 1-2rdquo apart in very
loose organic well-drained soil with a
pH of 65-70 Seeds germinate in 3-7
days thinning out best starts to 4-6rdquo apart
depending on variety sown Minimize
nitrogen content when fertilizing to
reduce small spindly roots and excessive
greens Winter radish such as Daikon is
an overwintering cover crop specifically
Many varieties of winter radish are ready
to harvest in about 60-70 days from
sowing Using a gardening fork harvest
as roots begin to show 1-2rdquo diameter
above the soil Sample one plant to
determine if the rest of the crop is ready
Harvest radish promptly because roots
will quickly spoil in the ground from the
first winter frost Not all winter radish is
white and individual color showing will
help determine if roots are ripe
Sowing and growing
Harvesting
HARDINESS ZONE Annual
DAYS TO MATURITY 60-70
DAY TO GERMINATION 3-7
SEEDING DEPTH 12rdquo
PLANT SPACING 4-6rdquo
PLANT HEIGHT 12-18rdquo
ROW SPACING 12-18rdquo
GROWTH HABIT Upright taproot
SOIL TYPE Loose light fertilized well-drained
TEMP PREFERENCE 50-65 degF
LIGHT PREFERENCE Full sun - partial shade
TROUBLESHOOTING Monitor regularly for flea beetles and
aphids Water soil directly to avoid saturating greens known
to cause mildew
grown to repair and replenish poor and
uncultivated soils during the winter
61 TRUELEAFMARKETCOM
Rheum x hybridumPerennial
Rhubarb is mistakenly considered to be
one of the most challenging vegetables
in the home garden because like aspara-
gus requires nearly 3 years before a first
harvest However once fully established
rhubarb will produce annually for the
next 10-20 years as one of the most
frost-hardy crops available Similar to
some berries and fruits edible rhubarb
stalks are sweeter and more ripe the
deeper the color
Rhubarb is a perennial winter hardy
vegetable best if started indoors 8-10
weeks before final spring frost Plant
2-3 seeds 1rdquo deep per cell or peat pot in
loamy fertile and well-drained soil with
a pH of 60-68 Germinates in 7-21 days
choosing healthiest starts for hardening
off and transplanting 36-48rdquo apart to a
sunny compost-rich place in the garden
Rhubarb greens can mature to be as
large as Elephant Ear plants and risks
casting other crops in shade Rhubarb
is a perennial that will appear to die off
each winter only to come right back
at first sign of spring Mature rhubarb
plants can be quickly cloned by splitting
entire plant in half and replanting
Like asparagus rhubarb should not be
harvested until its 3rd year but once
established will produce annually for
the next 10-20 years Rhubarb produces
thick meaty celery-like stalks 9-18rdquo long
when ready to harvest Stalks can be
twisted from the base if ripe enough or
for safety carefully cut from the base
with a knife to not damage roots Similar
to a strawberry edible rhubarb stalks are
sweeter more flavorful the deeper red
the color Rhubarb greens are toxic to
humans and small animals and should be
composted after harvesting
Sowing and growing
Harvesting
HARDINESS ZONE Biennial 2-10 (Perennial 2-7)
DAYS TO MATURITY 3 years
DAY TO GERMINATION 7-21
SEEDING DEPTH 1rdquo
PLANT SPACING 36-48rdquo
PLANT HEIGHT 24-36rdquo
ROW SPACING 4-5 ft
GROWTH HABIT Wide-spreading upright
SOIL TYPE Loamy sandy composted well-drained
TEMP PREFERENCE 50-75 degF
LIGHT PREFERENCE Full sun
TROUBLESHOOTING Watch for beetles Susceptible to
crown rot in poorly drained soils
62TRUELEAFMARKETCOM
Brassica napobrassicaBiennial
Rutabaga is a tenacious and frost-hardy
root vegetable grown very similar to
onion turnip and winter radish and
always tastes best after a light frost or
two Like many cool season favorites
rutabaga is an ideal crop to sow mid-late
summer after spring greens have bolted
and gone to seed Try rutabaga in the
garden alongside onion leek parsnip
and turnip for similar growing feeding
and harvest dates
Rutabaga is a cool-season vegetable sown
in mid-late summer to allow maturing
plants cooler fall weather for harvesting
Like other root vegetables rutabaga
does not transplant well and should
always be directly sown Plant 2-3 seeds
12rdquo deep and 2-3rdquo apart in organically
composted well-tilled and well-drained
soil with a pH of 60-70 Seeds germinate
in 5-14 days thinning healthiest starts
9-12rdquo apart in the garden as true leaves
establish Rutabaga thrives with a top
layer of mulch to help cool soil and
roots Although rutabaga benefits from
regular fertilizing reduce nitrogen-rich
fertilizers known to stunt and deform
root vegetables
Many varieties of rutabaga are ready for
harvest about 90-100 days from sowing
or when roots begin pushing up and
showing 3-5rdquo diameter above soil Ruta-
baga greens are often considered to be a
smoother more tender turnip green and
can be quickly harvested while still young
and tender during root production Ru-
tabaga can be harvested from the ground
like a potato or radish by firmly pulling
out of the soil If possible harvest after
the first fall frost for best flavor
Sowing and growing
Harvesting
HARDINESS ZONE Annual (Biennial 8-10)
DAYS TO MATURITY 90-110
DAY TO GERMINATION 5-14
SEEDING DEPTH 12rdquo
PLANT SPACING 9-12rdquo
PLANT HEIGHT 12-24rdquo
ROW SPACING 18-30rdquo
GROWTH HABIT Bulbous-rooted upright
SOIL TYPE Loose organic composted well-drained
TEMP PREFERENCE 40-65 degF
LIGHT PREFERENCE Full sun - partial sun
TROUBLESHOOTING Susceptible to clubroot and oversatu-
ration known to cause mildew rot and fungal disease Watch
for aphids and flea beetles
63 TRUELEAFMARKETCOM
Salsify is generally ready to harvest in
early fall when the foliage has yellowed
and died Roots taste best if harvested af-
ter a few light frosts Salsify is essentially
a garden weed and may be harvested in
the same way that a weed is carefully up-
rooted from the yard Unlike carrot salsi-
fy roots do not hold flavor for long and
should be used soon after harvest Salsify
may be grown in the garden as a culinary
herb harvested for its top greens rather
than delicate flavorful roots
Harvesting
Tragopogon porrifoliusBiennial
Salsify is a delicate yet nearly foolproof
root vegetable often overshadowed by
more popular Daikon parsnip and
turnip Widely known as Oyster plant
salsify is one of the rare garden selections
grown just as often for its roots as its
flavorful greens and ornamental blooms
Harvest what you need from salsify in the
fall and leave the rest to reseed and over-
winter finishing off the season with bold
and exotic blooms commonly known as
Jerusalem Star
Salsify is a tenacious cool-season crop
with a weed-like hardiness able to be
sown direct 2-3 weeks before final spring
frost or late summer Like many root
crops salsify does not transplant well
and should be sown direct Plant 3-4
seeds 12rdquo deep 1-2rdquo apart in loose
composted well-drained soil with a pH
of 60-75 Seeds germinate in 14-28 days
thinning best starts to 2-4rdquo apart Soil
must be well-tilled 12rdquo deep for roots to
grow unobstructed Salsify thrives from
a fertilizer low in nitrogen to minimize
excess vegetation and spindly deformed
roots
Sowing and growing
HARDINESS ZONE Annual (Biennial 6-8)
DAYS TO MATURITY 120-150
DAY TO GERMINATION 14-28
SEEDING DEPTH 12rdquo
PLANT SPACING 2-4rdquo
PLANT HEIGHT 12-36rdquo
ROW SPACING 18-24rdquo
GROWTH HABIT Weedy upright
SOIL TYPE Loose sandy composted well-drained
TEMP PREFERENCE 40-65 degF
LIGHT PREFERENCE Full sun - partial sun
TROUBLESHOOTING Salsify is considered a weedy invasive
species with no serious pests or diseases Allow soil to dry
between waterings
64TRUELEAFMARKETCOM
Spinacia oleraceaAnnual
Spinach is one of the fastest most tender
and delicious ldquocut and come againrdquo
varieties in the home garden A quickly
maturing leafy vegetable spinach is able
to be sown in spring summer and fall
in many cooler gardens for year-round
harvests Similar to other leafy greens
spinach thrives from frequent harvesting
and is known to vigorously regrow cut
leaves in just days Garden spinach
features unique varieties to try all year
long from classic Bloomsdale and Giant
Nobel to the exclusive French heirloom
Viroflay
Spinach is a cool weather favorite able to
be sown in early spring late summer or
winters in warm enough regions Spinach
can be started indoors 4-6 weeks prior
to final spring frost but for best starts
sow directly outdoors 5-6 weeks prior
to final spring frost Sow 2-3 seeds 12rdquo
deep and 4rdquo apart in fertile composted
well-drained soil with a pH of 65-70
Seeds germinate in 7-21 days thinning
to 1 plant every 6-12rdquo in the garden as
true leaves establish Harvest large outer
leaves often to boost production while
allowing smaller leaves to continue to
mature Avoid nitrogen-rich fertilizers
known to spoil spinach flavor
Most varieties of spinach are ready to
harvest 35-50 days from sowing Spinach
is one of the most productive and most
popular ldquocut and come againrdquo varieties in
the home garden and takes only days for
regrowth Using scissors simply snip larg-
er outer leaves for harvest while allowing
smaller leaves to continue vegetative
growth Harvest often to encourage pro-
duction Shoots that begin to bolt can be
harvested to redirect plant energy from
seed production to leafing
Sowing and growing
Harvesting
HARDINESS ZONE Annual
DAYS TO MATURITY 35-50
DAY TO GERMINATION 7-21
SEEDING DEPTH 12rdquo
PLANT SPACING 2-4rdquo
PLANT HEIGHT 6-12rdquo
ROW SPACING 12rdquo
GROWTH HABIT Leafy upright
SOIL TYPE Fertile organic composted well-drained
TEMP PREFERENCE 40-70 degF
LIGHT PREFERENCE Full sun - partial sun
TROUBLESHOOTING Susceptible to fungus and mildew from
oversaturation Monitor regularly for aphids and leaf miners
65 TRUELEAFMARKETCOM
Cucurbita pepoAnnual
Summer squash boasts one of the most
productive reliable and fastest growing
crops available in the summer Whether
zucchini crookneck cousa or Mexican
squash once these sun-loving squashes
start fruiting theyrsquoll continue producing
non-stop all the way until the frost
Summer squash thrives from frequent
harvests and if left unattended for even
a day or two is notorious for spitting out
unexpected 18-24rdquo monsters when you
werenrsquot looking
Summer squash is a full sun staple able
to be sown directly after the final spring
frost but for earliest starts begin indoors
3-4 weeks prior Plant 2-3 seeds 1rdquo deep
per cell or every 4-6rdquo in medium moist
organic well-drained soil with a pH of
65-70 Whether transplanting or sowing
direct plant seeds on 6-8rdquo tall mounds of
soil to accommodate heavy vegetation
Germinates in 4-14 days thinning out
best starts and transplants to 1 plant
24-36rdquo apart per mound Summer squash
benefits from a top layer of mulch to
help cool soil and roots Fertilize after
the first set of blooms appear and again
Sowing and growing
HARDINESS ZONE Annual
DAYS TO MATURITY 50-60
DAY TO GERMINATION 4-14
SEEDING DEPTH 1rdquo
PLANT SPACING 24-36rdquo
PLANT HEIGHT 36-48rdquo
ROW SPACING 36-48rdquo
GROWTH HABIT Leafy branching mound
SOIL TYPE Medium moist organic fertile well-drained
TEMP PREFERENCE 60-85 degF
LIGHT PREFERENCE Full sun
TROUBLESHOOTING Monitor regularly for disease-carry
pests such as squash bugs squash borers and cucumber
beetles
during fruiting stage
HarvestingSummer squash is one of the fastest most
productive crops in the garden and with
frequent harvests will continue to
produce all the way until the frost Most
varieties are ready to harvest 50-60 days
from sowing or ideally when 6-8rdquo long
Summer squash will quickly reach a
starchy and less flavorful 18-24rdquo long if
not harvested promptly Using shears or a
knife carefully clip off fruits at the stem
Do not harvest young and tender squash
by twisting or pulling
66TRUELEAFMARKETCOM
Cucurbita maximaAnnual
Winter squash definitely grows one of the
most fun exciting and durable fruits to
ever come out of the garden Despite be-
ing called a ldquowinterrdquo squash these plants
are grown in high heat and full sun just
like summer squash staples zucchini and
yellow crookneck Winter squash features
a timeless selection of exotic decorative
and deliciously edible heirlooms such as
butternut acorn cushaw hubbard and
the autumn favorite turban squash
Winter squash is a full sun staple best if
sown directly after the final spring frost
but for earliest starts begin indoors
3-4 weeks prior Plant 2-3 seeds 1rdquo deep
per cell in medium moist organic well-
drained soil with a pH of 65-70 Whether
transplanting or sowing direct plant seeds
on 6-8rdquo tall mounds of soil to accommo-
date heavy trailing vegetation Germinates
in 4-14 days thinning out best starts and
indoors transplants to 1 plant 8-12 ft apart
per mound depending on variety Winter
squash benefits from a top layer of mulch
to help cool soil and roots Fertilize after
the first set of blooms appear and again
during fruiting stage
Most small to medium winter squash are
ready to harvest about 100 days from sow-
ing while larger varieties require an extra
few weeks Regardless of color or size
winter squash are generally ripe once the
stem is solid and rind is tough unable to
be pierced by a fingernail Clip squash
from the vine with shears leaving about
4rdquo of stem intact and once harvested
leave out to naturally cure in the sun for
10-14 days The curing process will help
winter squash last up to 3 months longer
after harvesting
Sowing and growing
Harvesting
HARDINESS ZONE Annual
DAYS TO MATURITY 80-120
DAY TO GERMINATION 4-14
SEEDING DEPTH 1rdquo
PLANT SPACING 8-12 ft
PLANT HEIGHT 9-15rdquo
ROW SPACING 72rdquo
GROWTH HABIT Heavy-spreading mound
SOIL TYPE Medium moist organic fertile well-drained
TEMP PREFERENCE 60-85 degF
LIGHT PREFERENCE Full sun
TROUBLESHOOTING Watch for disease-carry pests such as
squash bugs squash borers and cucumber beetles
67 TRUELEAFMARKETCOM
Fragaria ananassaAnnual
Strawberry plants mature at a tidy 4-6rdquo
tall and trailing just as wide making it
the premier crop for windowsill patio
and container gardening Most strawber-
ry plants are ready for harvest after about
a month and are always the first fruit to
ripen each spring Strawberries are one
of the most exciting rewarding and
delicious fruits for beginners and kids
currently in a renaissance as a world-class
hydroponic
Strawberry is a quickly maturing crop
that thrives in pots and containers able
to be sown direct after final spring frost
but for best starts begin indoors 4-6
weeks sooner Plant 2-3 seeds 12rdquo deep
per individual cell or 2-3rdquo in the garden
in organically rich consistently moist
well-drained soil with a pH of 55-70
Seeds are traditionally cold stratified
(refrigerated) for an entire month be-
fore sowing to help germination Seeds
germinate in 14-28 days thinning best
starts and transplants to 4-6rdquo apart in the
garden or container Plants are a full sun
crop but benefit from shade if summer
heat exceeds 90 degF Add a nutrient-rich
compost after the first harvest
There are three different types of
strawberries with three different fruiting
schedules over the course of the summer
Know which type you have bought before
sowing June-Bearing seeds produce all
their fruit at once in June Ever-Bearing
strawberries fruit heavily in the spring
and fall with a light harvest in summer
Day-Neutral seeds steadily produce all
through the season Strawberries are
ready for harvest when plump and bright
red by pinching off at the stem
Sowing and growing
Harvesting
HARDINESS ZONE Annual (Perennial 5-8)
DAYS TO MATURITY 30-45
DAY TO GERMINATION 14-28
SEEDING DEPTH 12rdquo
PLANT SPACING 5-6rdquo
PLANT HEIGHT 4-6rdquo
ROW SPACING 36rdquo
GROWTH HABIT Small trailing mound
SOIL TYPE Moist fertile composted well-drained
TEMP PREFERENCE 60-80 degF
LIGHT PREFERENCE Full sun - partial sun
TROUBLESHOOTING Susceptible to aphids spider mites and
strawberry weevils Plants suffer in poorly drained soils
68TRUELEAFMARKETCOM
Solanum lycoperscium Annual
Tomato is the quintessential staple of
summer gardening and arguably offers
the most seed diversity among all season-
al fruits Available in every possible color
shape and size tomato is a high-heat
and full sun favorite that thrives from
container and patio gardening Along
with cucumber and summer squash the
tomato plant is one of the most produc-
tive hardy and heavy fruiting crops of
the season
Tomato is a warm weather crop best if
started indoors about 6-8 weeks prior
to final spring frost Plant 2-3 seeds
14rdquo deep per individual cell in fertile
humusy and well-drained soil with a
pH of 60-68 Germinates in 5-14 days
transplanting starts to 1 per pot or
18-36rdquo apart in the garden depending
on variety Before sowing know whether
the seed is determinate or indetermi-
nate as each will have different grow
habits Determinate varieties mature to
a predetermined size producing all of
its fruit at once with only minor need
for staking Indeterminate varieties grow
indefinitely through the season produc-
ing non-stop fruit while requiring heavy
trellis support
Smaller varieties such as the cherry are
ready to harvest at about 80 days from
sowing while larger varieties like the
beefsteak may require a few extra weeks
Although vine-ripened fruit is always
preferred tomatoes can just as easily
be harvested early and ripen indoors by
being stored in a paper bag or box along
with a banana for its ethylene gas Ripest
tomatoes may be pulled from the vine by
hand while more firm ones should be
clipped with shears
Sowing and growing
Harvesting
HARDINESS ZONE Annual
DAYS TO MATURITY 80-110
DAY TO GERMINATION 5-14
SEEDING DEPTH 14rdquo
PLANT SPACING 18-36rdquo
PLANT HEIGHT 36-72rdquo
ROW SPACING 24-36rdquo
GROWTH HABIT Tall-reaching upright
SOIL TYPE Moist fertile composted well-drained
TEMP PREFERENCE 65-85 degF
LIGHT PREFERENCE Full sun
TROUBLESHOOTING Susceptible to fusarium wilt verti-
cillium wilt and blight Watch for aphids flea beetles and
tomato hornworms
69 TRUELEAFMARKETCOM
Brassica rapa subsp rapaAnnual
Turnip is one of the unsung heroes of
the garden bed along with rutabaga
kohlrabi and celeriac One of the rare
root crops whose leafy greens might
be more popular than the root itself
tender turnip greens are able to be
harvested well into fall similar to spinach
or collards Most varieties of turnip are
ready to harvest in about 50 days when
bright purple roots begin to show but
always taste best if harvested after a light
frost or two
Turnip is a cool-season vegetable sown
3-4 weeks before final spring frost or
mid-late summer to allow maturing
plants cooler fall weather for harvesting
Like other root vegetables turnip does
not transplant well and should always be
directly sown Plant 2-3 seeds 12rdquo deep
and 1-2rdquo apart in organically composted
well-tilled and well-drained soil with a
pH of 60-75 Seeds germinate in 3-10
days thin out healthiest starts to every
4-6rdquo in the garden as true leaves estab-
lish Turnip thrives with a top layer of
mulch to help cool soil and roots Unlike
other root vegetables turnip benefits
from a nitrogen-rich fertilizer during
vegetative growth
Depending on variety turnip is ready for
harvest about 40-70 days from sowing
or when roots begin pushing up and
showing 3-4rdquo diameter above soil Turnip
greens are just as popular as the turnip
root and can be quickly harvested while
still young and tender during root pro-
duction Turnips are shallow-rooted and
can be harvested from the ground like a
potato or radish by firmly pulling out of
the soil If possible harvest after the first
autumn frost for best flavor
Sowing and growing
Harvesting
HARDINESS ZONE Annual
DAYS TO MATURITY 40-60
DAY TO GERMINATION 3-10
SEEDING DEPTH 12rdquo
PLANT SPACING 4-6rdquo
PLANT HEIGHT 6-12rdquo
ROW SPACING 12-15rdquo
GROWTH HABIT Bulbous-rooted upright
SOIL TYPE Loose organic composted well-drained
TEMP PREFERENCE 40-65 degF
LIGHT PREFERENCE Full sun - partial sun
TROUBLESHOOTING Susceptible to clubroot and oversatu-
ration known to cause mildew rot and fungal disease Watch
for aphids and flea beetles
70TRUELEAFMARKETCOM
Citrullus lanatus Annual
Watermelon is the unofficial herald of
summer and without doubt the largest
and juiciest fruit you could possibly
hope for in the garden Most popularly
known as a red-flesh fruit watermelon
is also available in both yellow and
orange along with a surprising selection
of shape and size Most varieties boast
20-30 pound fruits with regular watering
and like pumpkins and gourds may
be pruned and pinched back to direct
growth towards competition size melons
Watermelon is best sown direct after the
final spring frost but for earliest starts
begin indoors 3-4 weeks prior Plant 2-3
seeds 1rdquo deep per individual cell or 6-8
ft apart directly in the garden in loamy
consistently moist and well-drained
soil with a pH of 60-68 Watermelon
performs best when grown on 8-10rdquo tall
soil mounds to accommodate long heavy
trailing vines Watermelon is a heavy
feeder and benefits from a nitrogen-rich
fertilizer every 3 weeks until fruiting
then minimize nitrogen content in
fertilizer Fruits contain 90 water and
plants require heavy routine watering to
produce 20-30 lb melons
Most watermelons are ready to harvest
about 90 days from sowing or when
showing signs of ripeness The most
important tip to picking vine-ripened
watermelon is to locate the small tendril
attached to the melon on the vine If this
tendril is completely brown and dead
the melon is ripe for harvest but if the
tendril is still even slightly green the
watermelon is not ready Heirloom water-
melon rinds will soften slightly when ripe
and feel less like an impenetrable gourd
Use scissors or shears to carefully remove
watermelon from the vine
Sowing and growing
Harvesting
HARDINESS ZONE Annual
DAYS TO MATURITY 80-110
DAY TO GERMINATION 14-12rdquo
SEEDING DEPTH 1rdquo
PLANT SPACING 6-8 ft
PLANT HEIGHT 9-15rdquo
ROW SPACING 5-8 ft
GROWTH HABIT Heavy-trailing mound
SOIL TYPE Loose moist fertile well-drained
TEMP PREFERENCE 65-95 degF
LIGHT PREFERENCE Full sun
TROUBLESHOOTING Susceptible to wilt mildew and rot
Watch for cucumber beetles aphids and squash bugs
At trueleafmarketcom it is easy to find
everything you are looking for to start
growing today With an easy-to-use
website discover thousands of varieties
of garden seeds and growing supplies to
grow this season and for seasons to come
We Believe Everyone Should
Experience the Joy of Growing
Your Own Food
DATE NOTES
DATE NOTES
DATE NOTES
DATE NOTES
DATE NOTES
- Vegetable-growing-guide-hyperlink_01
- Vegetable-growing-guide-hyperlink_02
- Vegetable-growing-guide-hyperlink_03
- Vegetable-growing-guide-hyperlink_04
- Vegetable-growing-guide-hyperlink_05
- Vegetable-growing-guide-hyperlink_06
- Vegetable-growing-guide-hyperlink_07
- Vegetable-growing-guide-hyperlink_08
- Vegetable-growing-guide-hyperlink_09
- Vegetable-growing-guide-hyperlink_10
- Vegetable-growing-guide-hyperlink_11
- Vegetable-growing-guide-hyperlink_12
- Vegetable-growing-guide-hyperlink_13
- Vegetable-growing-guide-hyperlink_14
- Vegetable-growing-guide-hyperlink_15
- Vegetable-growing-guide-hyperlink_16
- Vegetable-growing-guide-hyperlink_17
- Vegetable-growing-guide-hyperlink_18
- Vegetable-growing-guide-hyperlink_19
- Vegetable-growing-guide-hyperlink_20
- Vegetable-growing-guide-hyperlink_21
- Vegetable-growing-guide-hyperlink_22
- Vegetable-growing-guide-hyperlink_23
- Vegetable-growing-guide-hyperlink_24
- Vegetable-growing-guide-hyperlink_25
- Vegetable-growing-guide-hyperlink_26
- Vegetable-growing-guide-hyperlink_27
- Vegetable-growing-guide-hyperlink_28
- Vegetable-growing-guide-hyperlink_29
- Vegetable-growing-guide-hyperlink_30
- Vegetable-growing-guide-hyperlink_31
- Vegetable-growing-guide-hyperlink_32
- Vegetable-growing-guide-hyperlink_33
- Vegetable-growing-guide-hyperlink_34
- Vegetable-growing-guide-hyperlink_35
- Vegetable-growing-guide-hyperlink_36
- Vegetable-growing-guide-hyperlink_37
- Vegetable-growing-guide-hyperlink_38
- Vegetable-growing-guide-hyperlink_39
- Vegetable-growing-guide-hyperlink_40
- Vegetable-growing-guide-hyperlink_41
- Vegetable-growing-guide-hyperlink_42
- Vegetable-growing-guide-hyperlink_43
- Vegetable-growing-guide-hyperlink_44
- Vegetable-growing-guide-hyperlink_45
- Vegetable-growing-guide-hyperlink_46
- Vegetable-growing-guide-hyperlink_47
- Vegetable-growing-guide-hyperlink_48
- Vegetable-growing-guide-hyperlink_49
- Vegetable-growing-guide-hyperlink_50
- Vegetable-growing-guide-hyperlink_51
- Vegetable-growing-guide-hyperlink_52
- Vegetable-growing-guide-hyperlink_53
- Vegetable-growing-guide-hyperlink_54
- Vegetable-growing-guide-hyperlink_55
- Vegetable-growing-guide-hyperlink_56
- Vegetable-growing-guide-hyperlink_57
- Vegetable-growing-guide-hyperlink_58
- Vegetable-growing-guide-hyperlink_59
- Vegetable-growing-guide-hyperlink_60
- Vegetable-growing-guide-hyperlink_61
- Vegetable-growing-guide-hyperlink_62
- Vegetable-growing-guide-hyperlink_63
- Vegetable-growing-guide-hyperlink_64
- Vegetable-growing-guide-hyperlink_65
- Vegetable-growing-guide-hyperlink_66
- Vegetable-growing-guide-hyperlink_67
- Vegetable-growing-guide-hyperlink_68
- Vegetable-growing-guide-hyperlink_69
- Vegetable-growing-guide-hyperlink_70
- Vegetable-growing-guide-hyperlink_71
- Vegetable-growing-guide-hyperlink_72
- Vegetable-growing-guide-hyperlink_73
- Vegetable-growing-guide-hyperlink_74
- Vegetable-growing-guide-hyperlink_75
- Vegetable-growing-guide-hyperlink_76
-

Welcome to your True Leaf Market
Vegetable Planting Guide In this booklet yoursquoll find
handy and concise instructions on how to best sprout grow and harvest
your very own home garden Whether new to gardening
or just in need of a quick garden reference this
booklet is your go-to guide for starting and
maintaining your best vegetable garden
3 TRUELEAFMARKETCOM
Table of ContentsKnow your Seeds
The Vegetables
Treated SeedPelleted amp Multi-PelletedOpen PollinatedHeirloomHybridLife Cycle TermsWhat Is GMO SeedKnow Your Grow ZoneKnow Your Site amp SunlightKnow Direct SowingKnow Your Soil And Itrsquos Drainage RateKnow How To Water Each PlantKnow About Companion Planting
ArtichokeAsparagusBush BeanPole BeanBeetBroccoliBrussels Sprouts Cabbage
9101011121516171819212425
2930313233343536
4TRUELEAFMARKETCOM
CarrotCauliflowerCeleriac CeleryChardCollards Corn CucumberEggplantEndiveGourds KaleKohlrabiLeekLettuceMelonMustardOkraOnion OrachParsnipPeaPepperPumpkinPurslaneRadicchioSpring Radish
373839404142434445464748495051525354555657585960616263
Winter RadishRhubarb Rutabaga SalsifySpinachSummer Squash Winter Squash Strawberry Tomato Turnip Watermelon
Personal Notes
646566676869707172737476
6TRUELEAFMARKETCOM
We know it can be overwhelming looking at all the varieties of seeds and their types reading terms like ldquotreatedrdquo ldquountreated seedsrdquo and ldquoheirloomrdquo and ldquoopen pollinatedrdquomdashyou just hope that yoursquoll pick the right ones for you We hope that the following will help you understand seed identifiers and how it can help you purchase the best seed for you and your style of gardening
Treated Seed
There are several kinds of seed treatments in the seed business While treatments can vary the most common treated seed we offer is a fungicide treat-ed seed which helps to keep the seed from rotting in the ground in unstable spring weather when soil conditions are less than idealmdashusually too moist All treated seed is clearly marked as being treated in the title of the seed ie Treated Blue Lake Bush Beans Treated seed is typically purchased by our larger com-mercial customers
7 TRUELEAFMARKETCOM7
Pelleted amp Multi-pelleted Seed
When using a mechanism of some kind to plant their seeds farmers and gardeners will turn to pelleted seeds which are seeds usually coated in an inert clay Very small seeds that are difficult to handle are coated to make them more manageable by ma-chines and people for accurate and easy seed sowing For example some gardeners prefer working with pelleted carrot seeds because carrot seeds are so tiny and difficult to plant accurately Often some flower seeds are pelleted and multi-pelleted because of their microscopic size such as Lobelia seeds Multi-pelleted seeds are multiple seeds bound together and coated in inert clay With several seeds in one pellet gardeners can expect germination The clay will dissolve away leaving the seeds in ideal conditions to sprout
Open Pollinated
Simply open pollinated seeds are seeds produced from crops that are allowed to pollinate naturally by means of insects birds wind and other natural mechanisms Some seeds self-pollinate and donrsquot require pollinators
8TRUELEAFMARKETCOM 8
There is no officially accepted definition of ldquoheirloomrdquo In common use the term is universally used to indicate an open pollinated seed which has remained consistent for several decades In our prod-uct line we use the term Heirloom for open pollinat-ed cultivars with which we have had experience for 30 or more of our 45 years in the seed business Some people claim heirloom seeds are the ldquooriginalrdquo variety of a plant but thatrsquos not necessarily true If you trace a plantrsquos genetics back far enough you will find that these now heirloom varieties likely came from an intentional or natural crossing of two different plants which leads us to our next term Hybrid
Heirloom
9 TRUELEAFMARKETCOM
The term ldquohybridrdquo indicates the crossing of two plants whether intentional or not Hybrids are fre-quently frowned upon online usually because they are confused with GMOs but also frequently because some claim that the seed companies who sell them have engineered the seed to be ldquosterilerdquo or unable to reproduce so that one cannot save their seed This ar-gument takes on the form of a conspiracy to control the worldrsquos seed supply Again not true especially for us who pride ourselves on our sustainable practices
It is true that saving your seed from a hybrid is not advisable but saved seed will grow it is just unlikely that your second-generation plant will pro-duce similar results to the original plant The reason is based in genetics not a board room (which after 43 years we have yet to acquire) Letrsquos look at dog breeding as an example of hybridization to see what is actually happening
Hybrid
Figure 1
10TRUELEAFMARKETCOM
When breeding a Poodle with a Labrador the outcome is a Labradoodle as seen in Figure 1 The Labradoodle is the hybrid If we take our ldquohybridrdquo puppy and breed him with another dog even if it also is a Labradoodle the outcome is unlikely to result in a Labradoodle that looks identical to our first puppy Still considered labradoodles but aesthetically these hybrids look very different from each other as seen in Figure 2
The new 2nd generation puppy may take on more of the Poodle or more of the Labrador line That is the same with hybrid seeds It is not that they wonrsquot produce it is just that there is no way to guar-antee that the plant wonrsquot revert back to more of one of its parental lines Like most of the dog breeds we have today hybrid seeds will become stable as con-tinued generations create a ldquostable and consistentrdquo population and eventually these seeds may become our grandkidsrsquo heirlooms
Hybrid plants work the same waymdashthey require
Figure 2
11 TRUELEAFMARKETCOM
several generations of selective crossing to become stable enough to produce uniformly Planting the seeds produced from a first-generation hybrid (marked as ldquoF1rdquo) plant wonrsquot produce the same crop it will likely revert back to one of its parents or cross breed with another plant nearby producing some-thing other than the expected production of the pre-vious season People tend to label these seeds ldquosterilerdquo because they donrsquot produce the same results a second time however that is only because they donrsquot have the genetic history behind them like heirloom seeds to be tenacious and to produce a reliable crop year after year For example the bicolor corn seen in Figure 3 may revert back to yellow or white corn if itrsquos saved seeds are planted again next season
Figure 3
12TRUELEAFMARKETCOM
Life Cycle Terms Annual - Plants that go through a full life cycle over the course of one season or year meaning the seed grows into a plant to seed again Annuals will grow differently depending on the climate For example some annuals can bolt and go to seed very quickly in very hot climates thus ending its life cycle Biennial - A plant that requires two years to complete its life cycle Biennials take a period of dormancy to complete its life cycle which may be fruiting or going to seed Usually the first year the plants produce a root system stems and leaves The second year is when the plant flowers or fruitsPerennial - Plants that live for three years or more where top foliage will die during the cold season each year but then regrowing from the root system left behind Some perennials have extensive lifespans such as trees
13 TRUELEAFMARKETCOM
What is GMO Seed
The term GMO is a term that is feared misun-derstood and misused leading to confusion about what a GMO seed really means Genetically Modified Organisms (GMO) are living things including seeds whose DNA has been engineered outside the natural process of cross pollination to inherit desirable traits When we see anti-GMO social media posts or speak with people about what GMO means to them we find that most people donrsquot really know why GMO is bad they just know it is We are a little concerned that the lack of understanding of GMO is frequently dragging non-GMO seeds such as Hybrids into the discussion We do have a concern with GMO but like most people who spend time really understanding the topic our concern is that the science is moving faster than the protections labeling laws and crop protocols Many of the GMO products being grown today have used very impressive technologies to introduce NON-PLANT BASED genetics into plants It is this ldquocrossingrdquo of two living organisms that nature would otherwise NOT allow that has us and many others so concerned For us we reiterate that we donrsquot carry any type of GMO seed here at True Leaf Market
14TRUELEAFMARKETCOM
Know Your Grow Zone
Also known as hardiness zones grow zones are USDA recommendations that track each regionrsquos Average Annual Extreme Minimum Temperature allowing gardeners to know the coldest their garden may experience during the year Grow zones donrsquot determine whether a plant is suitable for a region but merely enable you to know the average lowest temperature to determine whether a particular crop may do well in your garden Understanding grow zones is generally most important for outdoor perennial gardening because most vegetable and flower crops will grow as a seasonal annual here in the United States As mentioned the USDA Hardiness Zone map does not provide any summer data including humid-ity precipitation urban heating mapping or maxi-mum temperature averages However understanding which summer crops prefer cooler conditions helps growers plan their sowing dates around the final frost of the spring and the first hard autumn frost Frost hardy vegetables such as broccoli cabbage and kale will bolt to seed in the middle of summer if not grown in cool temperate gardens Growers can adjust their sowing dates so that the mature vegetable greens will experience the chill of an early spring or the light frost at the beginning of fall
15 TRUELEAFMARKETCOM
Know Your Site and Sunlight
The next question you want to ask yourself is ldquoHow much space do I realistically have to gardenrdquo Second question is ldquoHow much light does that area receive throughout the day and where is the sunrsquos positionrdquo Be aware of its trajectory As the sun moves during the growing season so do the conditions of that space Be sure to pick a spot that will be consis-tent and beneficial to your garden throughout the growing season It may be easier for you to find a spot if you have a yard but donrsquot be discouraged if you live in a place with only a patio or less
Urban gardening is much easier to accomplish than you might think Just build your garden around the available space Opt for vegetables and herbs that are known to grow well in containers and the amount of sunlight available Determine the kind of light that space will see over the season If you live in an apart-ment flat with a deck but without direct sunlight choose shade tolerant plants such as lettuce chard
16TRUELEAFMARKETCOM
Know Direct Sowing vs Indoor Sowing
beet and carrot If you have a small patio consider growing crops that have an upright trailing habit such as pole beans and peas to best utilize space If you only have roof access or live in south-facing plac-es that receive the heaviest sunlight consider plant-ing heat tolerant plants such as dill fennel tomato and pepper
When and how you choose to sow your seeds is a critical factor when it comes to a successful garden Look at the climate of where you live and determine the length of your grow season The idea here is to let your environment inform you of when and how you sow your seeds for the coming season You can di-rectly sow them outside when temperatures are right if the length of your season permits or sow them in plug trays indoors Much of this is determined by the seed variety itself When growing indoors a grow light is neces-sary if you donrsquot have a window that receives direct sunlight for eight hours of the daymdashand even then with certain varieties more light exposure is required for optimal growth Start seeds several weeks before your last frost date of the year The number of weeks
17 TRUELEAFMARKETCOM
is usually stated on the seed packet All seeds started indoors will require a process known as ldquohardening offrdquo which is when you accli-mate the seedlings to outdoor conditions by placing them outside in increasing increments each day until they spend the whole day outside This can take anywhere from one week to a month depending on the plant Be wary of setting them out overnight as a sudden drop in temperatures can kill your seedlings After you harden off your seedlings you can trans-plant them in soil that is loose and moist
18TRUELEAFMARKETCOM
Soil Types and Textures The make-up of your soil will determine the success of your plant growth It is rare for soils to go unamended in a garden Most are treated using fertil-izers cover crops mulch and other texture additives We recommend all-natural cover crops Understand-ing soil textures also helps you choose the best soil to purchase for the varieties of plants you wish to grow in planters or containers Understanding the elements that make up each soil type will help you to know what to add to your soil to accommodate each plant
Know Your Soil and Its Drainage Rate
Clay Soil
When wet this soil is lumpy and sticky When dry soil is rocky and hard Poor drainage and low oxygen levels Lack of drainage usually needs to be remedied using sand andor small pebbles Suitable for perennial shrubs early vegetable crops aster and bergamot flower plants
19 TRUELEAFMARKETCOM
Sandy Soil
Silty Soil
Peaty Soil
Chalky Soil
A gritty sandy texture that dries out fast and drains quickly Holds fewer nutrients than other soils Requires soil amendments to bolster nutri-ent content Suitable for vegetable root crops such as carrot parsnip beet pepper corn squash and salad crops
A soft and fluffy texture that holds moisture very well Nutrient content is plentiful as well Less than adequate drainage but otherwise a healthy soil Manure and organic biomass can help with drainage Suitable for most vegetable and fruit crops grasses and trees
An acidic soil that is spongy fluffy and feels damp due to the high levels of peat moss Soil heats up quickly but retains moisture well--may need drainage help Suitable for root crops lettuces legumes and brassicas
The stoniest texture of all soils being very pebbly and gravely Low nutrient content and very alkaline Needs nutrients additives such as
20TRUELEAFMARKETCOM
Loamy Soil
pH Balance of Soil
The ideal garden soil texture with an even mix-ture of sand silt and clay A fine texture full of nutrients with good drainage Requires nutrient replenishing after each grow season Suitable for most garden crops
manure mulch and organic biomass Suitable for spinach sweet corn and cabbage
pH is simply the acidity or alkaline levels of a substance When it comes to soil it is important be-cause certain plant diseases or fungi thrive in highly acidic or basic conditions Most plants need slightly acidic soil to grow so they can properly absorb iron Some soil amendments such as organic worm cast-ings offer a neutral 70 pH to help balance the acidity or alkalinity in soils The right pH level allows mi-croorganisms to convert nitrogen into a form plants can absorb If the soilrsquos pH is too low your plant can become poisoned by too much manganese
21 TRUELEAFMARKETCOM
Know How to Water Each Plant
Lightly press your finger into the soil and feel for an ideal moisture It should feel moist to the touch but not soggy Use this touch method accordingly as your seeds germinate and subsequently grow Know that plants in containers will dry out quicker than those planted in garden beds So close attention needs to be paid to the soilrsquos moisture content Same with raised beds since they are elevated beds the soil does dry out quicker than plants growing directly in the ground Adding mulch vermiculite or peat moss to your raised beds is another great additive that can help your soil retain moisture without overwatering
Remember to aim your water stream toward the roots Avoid getting any water on the leaves or foliage of your plants as moist leaves can lead to diseases
The first drink of water in the morning is usually the most important and itrsquos no truer than with your gar-den plants It gives your plant a headstart on the day by allowing it to consume the water without having to fight against evaporation Also if leaves or foliage
Donrsquot overwatermdashWater consistently yet consciously
Root Watering
Morning Watering
22TRUELEAFMARKETCOM
Know About Companion Planting
Mulches and or straw can be a great option for pre-serving moisture They help reduce surface runoff and slow evaporation
Sometimes known as crop rotation intercrop-ping or even cover cropping companion planting follows an age-old belief that some plants may be mutually beneficial for each other Although the idea of companion planting is not a hard science and still leaves much up for debate and conjecture there are some proven situations of plants thriving with the help of other plants For example cover crops are a variety of legumes and cereal grains that are able to grow over winter or during the warm season to provide all-natural weed suppression and pest control while replenishing depleted soils of vital nitrogen Pea clover fava bean mustard rye and wheat are just some examples of cover crops either grown alongside a seasonal crop or during the winter months to ensure a garden is as healthy as possible
Mulch
of the plant get wet they have time to dry over the course of the day Whereas if the leaves and foliage were to remain moist overnight it may be detrimen-tal to the plantrsquos health
23 TRUELEAFMARKETCOM
Marigolds are also popularly intercropped through-out larger farms because they emit a chemical into the soil known as limonene which is sold as a store-bought concentrate pesticide In simplest terms companion planting aims to create diversity in the garden while fighting against monoculture which is known to foster disease and pests Whether a simple crop rotation or intercrop-ping with cover crops diversity will invite beneficial insects and pollinators to help turn your seasonal garden into a healthy and vibrant little ecosystem
25 TRUELEAFMARKETCOM
Cynara cardunculus var scolymusperennial
HARDINESS ZONE Annual (Perennial 3-9)
DAYS TO MATURITY 3 years
DAY TO GERMINATION 14-12rdquo
SEEDING DEPTH 12rdquo
PLANT SPACING 48rdquo
PLANT HEIGHT 36-48rdquo
ROW SPACING72rdquo
GROWTH HABIT Weedy and bushy upright
SOIL TYPE Sandy composted loamy well-drained
TEMP PREFERENCE 50-80 degF
LIGHT PREFERENCE Full sun - partial sun
TROUBLESHOOTING Avoid overwatering causing slimy
mold and rot Monitor regularly for aphids mites earwigs
Artichoke is a flower in the sunflower
family that has been harvested before be-
ing allowed to bloom remaining tender
and edible to the human palate And as
a relative to the invasive and weed-like
cardoon culinary artichoke thrives in
as many difficult grow spaces Artichoke
is left to flower as a garden ornamental
just as popularly as being harvested and
just like flowering kale and cabbage will
produce decorative silvery purple blue
and green leaves and stalks
Artichoke can be started indoors for
transplanting 4 weeks before final spring
frost Plants prefer cooler conditions but
will perform well if shaded in warmer
climates Sow 14rdquo deep per cell or 48rdquo
apart in the garden in a sandy organi-
cally composted and mulch-covered bed
with a soil pH of 65-70 Artichoke ger-
minates in about 10-21 days and requires
consistent watering and sunlight Plants
may become top heavy during fruiting
and will require some staking Add a top
layer of mulch and shade to keep soil
cool in warmer climates Artichoke is a
heavy feeder and thrives from fertilizing
Regardless of color or variety artichoke
is ready to harvest when the budsrsquo
bracts (outer protective leaves) begin to
slightly open Some varieties will mature
a consistent green color while some
varieties mature when a deep purple
Artichoke stems are thick and can only
be harvested with pruning shears or a
knife Unharvested artichoke buds will
bloom into a stunning 3-5rdquo wide violet
head though no longer being edible
Lower buds on the stalk will not mature
to be as large as the top buds and can be
harvested when about 3rdquo in diameter
Sowing and growing
Harvesting
every two weeks during the season
26TRUELEAFMARKETCOM
Asparagus officinalisPerennial
Asparagus is a long-term perennial veg-
etable that requires planning patience
and dedication yet is always worth the
wait Asparagus is notorious for not being
ready for harvest until its third year but
once established will produce seasonal
spears for several decades At any time
while growing asparagus spears can be
whitened or ldquoblanchedrdquo by limiting sun
exposure creating a uniquely flavorful
variety devoid of the grassy earthy chlo-
rophyll notes of a green crop
Asparagus is a perennial crop that
requires three years before a harvest but
like a fruit tree will produce for several
decades Seeds are best started indoors
8-10 weeks before the final spring frost
Sow 2-3 seeds 12rdquo deep per cell or peat
pot into light loamy well-drained soil
with a pH of 65-70 Transplant after
10-12 weeks once all danger of frost has
passed In the garden dig a 6-12rdquo deep
and 18rdquo wide trench for transplants
Spread a 1rdquo layer of compost at the bot-
tom of the trench before filling with soil
As mentioned asparagus requires three
years until harvest but will produce for
more than twenty years when established
In the third year harvest young aspara-
gus spears with a sharp knife at the base
once they have reached 7-9rdquo tall and
about the thickness of a pencil Harvest
often to encourage further growth More
established plants will have a harvest
season of about 8 weeks while younger
plants may have a window of 4 weeks
After the harvest plants will sprout aspar-
agus greens to restore lost energy to the
roots These asparagus greens are widely
used by florists as an ornamental filler
Sowing and growing
Harvesting
HARDINESS ZONE Perennial 3-9
DAYS TO MATURITY 3 years
DAY TO GERMINATION 7-21
SEEDING DEPTH 12rdquo
PLANT SPACING 12-18rdquo
PLANT HEIGHT 7-9rdquo
ROW SPACING 36rdquo
GROWTH HABIT Upright
SOIL TYPE Sandy light organically rich well-drained
TEMP PREFERENCE 65-85 degF
LIGHT PREFERENCE Full sun - partial sun
TROUBLESHOOTING Allow soil to dry between waterings as
asparagus is highly susceptible to fungus and mold
27 TRUELEAFMARKETCOM
Phaseolus vulgarisAnnual
Bush bean also known as snap bean
is one of the most popular annual
vegetables grown in home gardens Ger-
minating in just under a week bush bean
is harvestable as soon as 50-60 days and is
an ideal introductory crop for children
and beginners Unlike the prolific and
vining pole bean bush bean matures at
about 18-24rdquo tall without need for trellis
support Persistent bush bean features
fruiting pods of every color including
red purple black white and yellow
Bush bean can be started indoors but
performs best if sown directly after the
final spring frost Sow 2-3 seeds 1rdquo deep
and 2-3rdquo apart in moist organically rich
well-drained soil with a pH of 60-68
Whether direct sowing or transplanting
thin out strongest starts to every 18-24rdquo
in the garden as true leaves establish
Beans need light and consistent watering
but when doing so water as close to
the root as possible to avoid saturating
greens known to cause root rot and
mildew Plants thrive from a top layer of
mulch to help cool soil and roots Avoid
nitrogen-rich fertilizers which will cause
Most varieties of bush bean are ready to
harvest at about 50-60 days from sowing
or once the pods are 3-5rdquo long Harvest
often to encourage fruiting and to en-
sure pods do not dehydrate on the vine
Although some pods may pull cleanly
from the vine use a knife or shears for
more fibrous pods to avoid accidental
damage to the plant Like many crops
in the garden it is widely believed that
beans are best harvested in the morning
for optimal sugar content
Sowing and growing
Sowing and Harvesting
HARDINESS ZONE Annual
DAYS TO MATURITY 50-60
DAY TO GERMINATION 5-8
SEEDING DEPTH 1rdquo
PLANT SPACING 18rdquo
PLANT HEIGHT 12-24rdquo
ROW SPACING 24rdquo
GROWTH HABIT Bushy upright
SOIL TYPE Organically fertilized moist well-drained
TEMP PREFERENCE 65-85 degF
LIGHT PREFERENCE Full sun
TROUBLESHOOTING Water soil directly to avoid leaf
saturation causing rot and mildew Monitor for thrips aphids
leaf beetles
excessive vegetative growth with minimal
bean pod production
28TRUELEAFMARKETCOM
Phaseolus vulgarisAnnual
Like bush bean the vining pole bean is
another familiar summer annual found
in many home gardens Pole bean is
quick to mature and ready to harvest
in about 70 days and if given plenty
of climbing space will vine taller than
20 feet Although not as convenient as
the bush varieties pole beans popularly
boast sweeter bigger and more abun-
dant fruits with a much wider harvest
window Try growing pole beans as a
quickly vining yet deliciously edible
privacy wall or cover
Pole bean can be started indoors but
performs best if sown directly after the
final spring frost Sow 2-3 seeds 1rdquo deep
and 2-3rdquo apart in moist organically rich
well-drained soil with a pH of 60-68
Whether direct sowing or transplanting
thin out strongest starts to every 6-8rdquo
in the garden as true leaves establish
Pole bean requires immediate trellis
support as seedlings will be looking to
vine as soon as true leaves emerge Plants
thrive from a top layer of mulch to help
cool soil and roots Avoid nitrogen-rich
fertilizers which will cause excessive
Most varieties of pole bean are ready to
harvest at about 70-80 days from sowing
or once the pods are 3-5rdquo long Harvest
often to encourage fruiting and to en-
sure pods do not dehydrate on the vine
Although some pods may pull cleanly
from the vine use a knife or shears for
more fibrous pods to avoid accidental
damage to the plant Like many crops in
the garden it is widely believed that pole
beans are best harvested in the morning
for optimal sugar content
Sowing and growing
Harvesting
HARDINESS ZONE Annual (Short Perennial 3-10)
DAYS TO MATURITY 65-80
DAY TO GERMINATION 5-8
SEEDING DEPTH 12rdquo
PLANT SPACING 6-8rdquo
PLANT HEIGHT 10-20 ft
ROW SPACING 18rdquo
GROWTH HABIT Vining
SOIL TYPE Organically fertile moist well-drained
TEMP PREFERENCE 65-85 degF
LIGHT PREFERENCE Full sun
TROUBLESHOOTING Water soil directly to avoid leaf
saturation causing rot and mildew Watch for thrips aphids
leaf beetles
vegetative growth with minimal bean pod
production
29 TRUELEAFMARKETCOM
Beta vulgarisAnnual
Beets are a sweet sugary and short-term
cool weather favorite able to be sown
multiple times during the year for quick
and successive harvests Just like carrot
radish and many other root vegetables
beet is quick to maturity and thrives
when sown directly outside in the garden
bed Although widely known for being a
deep burgundy color the hardy beetroot
is available in many shapes and colors in-
cluding heirloom classics White Detroit
Golden Detroit and Chioggia
Beet is a cool weather favorite best sown
directly outdoors 4-5 weeks prior to final
spring frost or 4-5 weeks before the first
autumn frost Sow 3-4 seeds 12rdquo deep
and 1-2rdquo apart in fertile organically rich
well-drained soil with a pH of 60-70
Seeds germinate in 5-10 days thinning
best starts to every 3-4rdquo as true leaves
establish Beet seeds may be pre-soaked
for 24 hours to encourage germination
Beets can be sown every 2-3 weeks for
replete season-long harvests Avoid using
fertilizers high in nitrogen causing plants
to produce plentiful vegetation but
smaller roots A top layer of mulch will
help roots cool and retain moisture
Most varieties of beet are ready to
harvest in about 50-60 days from sowing
or when showing 1rdquo in diameter above
soil but will remain tender even up to
3-4rdquo in diameter In compacted soils
carefully loosen soil around roots before
harvesting with help of a gardening fork
Beet greens can be harvested like lettuce
or any culinary herb when 2-3rdquo tall Small
tender greens can be enjoyed fresh in
a salad mix while larger coarser greens
taste best when lightly sauteacuteed
Sowing and growing
Sowing and Harvesting
HARDINESS ZONE Annual (Biennial 6-11)
DAYS TO MATURITY 45-65
DAY TO GERMINATION 5-14
SEEDING DEPTH 12rdquo
PLANT SPACING 3-4rdquo
PLANT HEIGHT 36-48rdquo
ROW SPACING 12rdquo
GROWTH HABIT Rooted and leafy upright
SOIL TYPE Loose sandy loamy well-drained
TEMP PREFERENCE 55-70 degF
LIGHT PREFERENCE Full sun - partial shade
TROUBLESHOOTING Monitor for aphids and leafhoppers
which may lead to any number of yellowing and leaf-spotting
diseases
30TRUELEAFMARKETCOM
Brassica oleracea var italicaAnnual
Broccoli is a timeless annual staple of
the home garden found just as often
growing in the garden bed as on the
kitchen counter Broccoli has always
been a tolerant frost hardy favorite
but is currently in its renaissance as a
vitamin-rich crop popularly used in
indoor gardening such as microgreens
sprouts and hydroponics Like other
annual Brassicas such as cabbage kale
and cauliflower broccoli requires very
similar growing conditions with similar
harvest windows
Broccoli is a cool weather full-sun crop
able to be sown directly but for earliest
starts begin indoors 6-8 weeks prior
to final spring frost or in mid-summer
about 3 months from autumn frost Plant
2-3 seeds 12rdquo deep per cell or 4-6rdquo apart
in the garden in organic fertile and
well-drained soil with a pH of 60-70
Seeds germinate in 3-14 days thinning
out best starts every 12-18rdquo in the garden
once true leaves establish Broccoli heads
grow fullest with full sun but for warmer
regions plants will benefit from mid-
summer shade For warmer grow zones
try a cultivar with a quicker harvest and
maturity date to best accommodate for a
shortened cool spring season
Most varieties of broccoli are ready to
harvest in about 85 days from sowing Us-
ing a small knife remove the main head
above the smaller florets once reaching
a diameter of about 5-6rdquo allowing sec-
ondary side shoots to continue maturing
Heads will taste bitter if no longer
compact and have begun to flower Like
other Brassicas the entire broccoli plant
is harvestable and edible and considered
to taste best after a light frosts
Sowing and growing
Harvesting
HARDINESS ZONE Annual
DAYS TO MATURITY 85-90
DAY TO GERMINATION 3-14
SEEDING DEPTH 12rdquo
PLANT SPACING 18rdquo
PLANT HEIGHT 24-30rdquo
ROW SPACING 24-36rdquo
GROWTH HABIT Upright
SOIL TYPE Moist organically fertilized well-drained
TEMP PREFERENCE 40-70 degF
LIGHT PREFERENCE Full sun - partial shade
TROUBLESHOOTING Broccoli has no serious diseases
but watch for cabbage worms flea beetles thrips slugs
and aphids
31 TRUELEAFMARKETCOM
Brassica oleracea var gemmiferaAnnual
Brussels sprouts look taste and grow
like a mini cabbage and like other Bras-
sicas are tolerant to northern climates
and light winter frost Although it may
take up to three months for a harvest
sturdy and decorative 36rdquo tall Brussels
sprouts stalks will produce long after the
warm season These plants are grown as
an annual vegetable if harvested for its
edible first-year sprouts but if grown for
reseeding will require full overwintering
in the garden to produce flowers
Brussels sprouts are a cool weather crop
able to be sown directly but for earliest
starts begin indoors 6-8 weeks prior to
final spring frost Plant 2-3 seeds 12rdquo
deep per cell or 4-6rdquo apart in the garden
in organic fertile and well-drained soil
with a pH of 60-70 Seeds germinate in
7-14 days thinning out or transplanting
best starts 24-30rdquo apart in the garden
once true leaves establish Brussels
sprouts mature into a sturdy 30-36rdquo tall
stalk without the need for staking or sup-
port but require consistent moisture and
routine fertilizing As sprouts emerge on
the stalk prune back yellowing leaves
and lower half leaves for most robust
sprout production
Most varieties of Brussels sprouts can
be harvested about 90 days from sowing
or when firm and 1-2rdquo in diameter
Individual Brussels sprouts mature from
the bottom-up meaning the ripest and
most mature sprouts will always be lower
on the stalk until harvested To harvest
simply cut with a knife or twist sprouts
from the base detaching them from the
rest of the stalk Stalks may be cut and
harvested whole by cutting the entire
plant off at the base when all sprouts
are firm
Sowing and growing
Harvesting
HARDINESS ZONE Annual (Biennial 5-10)
DAYS TO MATURITY 80-100
DAY TO GERMINATION 7-14
SEEDING DEPTH 12rdquo
PLANT SPACING 24-30rdquo
PLANT HEIGHT 30-36rdquo
ROW SPACING 24rdquo
GROWTH HABIT Upright stalk
SOIL TYPE Moist organically fertilized well-drained
TEMP PREFERENCE 45-75 degF
LIGHT PREFERENCE Full sun - partial shade
TROUBLESHOOTING Monitor regularly for cabbage worms
flea beetles thrips slugs and aphids
32TRUELEAFMARKETCOM
Brassica oleracea var capitataAnnual
Cabbage is often mistakenly thought to
be one of the more intimidating difficult
vegetable crops to try as a home garden-
er because of its preference for colder
more northern gardens Despite the
slander cabbage is a Brassica no more
challenging to grow than kale broccoli
or collards Whether as a garden crop or
flowering ornamental variety cabbage is
available anywhere from rich burgundy
to a familiar pale green and easy enough
to grow for anyone willing to try
Cabbage is a cool weather crop able to be
planted multiple times throughout the
season for successive year-round harvests
Cabbage performs best when started in-
doors 6-8 weeks prior to final spring frost
or 6-8 weeks before first autumn frost
Plant 2-3 seeds 14rdquo deep per cell or peat
pot in organically rich well-drained soil
with a pH of 60-70 Seeds germinate in
5-12 days transplanting strongest starts
every 18-24rdquo in the garden once true
leaves establish Cabbage requires regu-
lar moisture during vegetative growth to
keep heads from splitting before harvest
Plants are heavy feeders and thrive from
Depending on the specific cultivar and
when sown in the season most varieties
of cabbage are ready to harvest at about
100 days from sowing or when heads are
firm with a diameter of about 5-7rdquo Some
varieties may overwinter requiring more
than 120 days for harvesting Using a
knife cut heads at the base and remove
yellow leaves from the cut head keeping
healthy loose green leaves attached
to help protect cabbage heads during
storage
Sowing and growing
Harvesting
HARDINESS ZONE Annual
DAYS TO MATURITY 90-150
DAY TO GERMINATION 5-12
SEEDING DEPTH 14rdquo
PLANT SPACING 18-24rdquo
PLANT HEIGHT 12-30rdquo
ROW SPACING 18rdquo
GROWTH HABIT Leafy mound
SOIL TYPE Moist fertile composted well-drained
TEMP PREFERENCE 55-75 degF
LIGHT PREFERENCE Full sun - partial sun
TROUBLESHOOTING No serious diseases but monitor
regularly for cabbage worms flea beetles thrips slugs
and aphids
rich garden composting and routine
fertilizing
33 TRUELEAFMARKETCOM
Daucus carota subsp SativusAnnual
Carrot is a sugary sweet root vegetable
second only to the beet in overall sugar
content Carrot is one of the easiest
quickest and most satisfying garden
crops and lends itself to as many savory
dishes as it does sweet Although consid-
ered a predominantly orange vegetable
the carrot is available in a wide selection
of exquisite heirloom colors such as red
purple yellow and white Carrots can be
sown every couple weeks for successive
season-long harvesting
Carrot is a cool weather crop best
sown directly 2-3 weeks before final
spring frost and every 2 weeks after
for successive harvests Like many root
vegetables carrot does not transplant
well and should be sown directly Plant
2-3 seeds 12rdquo deep and 1-2rdquo apart in
loamy loose and well-drained soil with a
pH of 60-70 Seeds germinate in 14-21
days thinning back to 1 plant every 2-4rdquo
as true leaves establish Carrots require
a deep well-tilled garden for straight tap-
root growth Avoid using nitrogen-rich
fertilizers which are known to cause root
abnormalities as well as excessive greens
and weak root development
Most varieties of carrot are ready for
harvest about 70-80 days from sowing
while smaller varieties such as Parisian
are ready a few weeks sooner Regardless
of color carrots are usually ripe for har-
vest when the root begins to show above
soil A sandy and well-tilled garden will
help in harvesting providing a loose soil
to safely uproot the carrot crop without
the need for tools For more hardened
soils use a specialized hand cultivator or
garden hori-hori knife
Sowing and growing
Harvesting
HARDINESS ZONE Annual
DAYS TO MATURITY 60-80
DAY TO GERMINATION 14-21
SEEDING DEPTH 12rdquo
PLANT SPACING 2-4rdquo
PLANT HEIGHT 6-18rdquo
ROW SPACING 16-24rdquo
GROWTH HABIT Taproot upright
SOIL TYPE Loose loamy composted well-drained
TEMP PREFERENCE 55-75 degF
LIGHT PREFERENCE Full sun
TROUBLESHOOTING No serious pests or diseases but
can be susceptible to aster yellows Watch for carrot rust fly
and wireworm
34TRUELEAFMARKETCOM
Brassica oleracea var botrytisAnnual
Cauliflower is one of the more chal-
lenging Brassicas in the home garden
because it does not perform well in
either hot or cold climates yet excels in
moderate regions with full sun Although
cauliflower heads (curds) are thought to
be white they naturally develop green or
purple and only become white through
a labor-intensive process called ldquoblanch-
ingrdquo in which the outer leaves are bound
together to keep the young heads from
developing color from sun exposure
Cauliflower is a temperamental and chal-
lenging cool season favorite best planted
in early spring or fall Begin indoors 4-6
weeks prior to final spring frost or 6-8
weeks before first autumn frost Plant
2-3 seeds 12rdquo deep per cell or 3-4rdquo apart
in the garden in organic fertile and
well-drained soil with a pH of 60-70
Germinates in 4-10 days transplanting or
thinning out outdoor starts 18-24rdquo apart
in the garden as true leaves establish Al-
though some varieties are self-blanching
cauliflower is not naturally white and re-
quires a labor-intensive effort to achieve
the familiar white heads Cauliflower
Similar to cabbage cauliflower is ready
to harvest when compact firm and has
reached the desired color Use a harvest-
ing knife to gently cut the head loose
from the stem and base while leaving
the large surrounding leaves intact to
the head It is natural for some heads to
develop undersize and underweight yet
still fully mature in color Harvest these
smaller heads sooner because they will
not increase in size
Sowing and growing
Harvesting
HARDINESS ZONE Annual
DAYS TO MATURITY 70-120
DAY TO GERMINATION 7-14
SEEDING DEPTH 12rdquo
PLANT SPACING 18rdquo
PLANT HEIGHT 36-48rdquo
ROW SPACING 36-48rdquo
GROWTH HABIT Leafy mound
SOIL TYPE Moist organically fertilized well-drained
TEMP PREFERENCE 55-75 degF
LIGHT PREFERENCE Full sun
TROUBLESHOOTING Monitor regularly for cabbage worms
flea beetles thrips slugs and aphids
thrives from a nitrogen-rich fertilizer
35 TRUELEAFMARKETCOM
Apium graveolens var rapaceumBiennial Grown as Annual
Celeriac also widely known as celery
root is one of the more unfamiliar and
understated root vegetables found in
the home garden Despite its familiar
celery-like greens above soil celeriac
is cultivated for its large bulbous root
that looks similar to kohlrabi or turnip
Garden celeriac not only tolerates a light
frost but actually thrives in it as flavor
improves with some seasonal chill Grow
celeriac as an exclusive Mediterranean
substitute for any traditional culinary
root crop
Celeriac is a cool weather crop able to
be sown directly in 3-4 weeks before final
spring frost but for best starts begin
indoors 8-10 weeks sooner Plant 2-3
seeds 18rdquo deep per cell or peat pot in
organically rich moist well-drained soil
with a pH of 60-70 Seeds germinate
in 14-21 days transplanting best starts
12-18rdquo apart in the garden as true leaves
establish Leave only 3-5 top shoots to
encourage root development Celeriac
benefits from compost and consistent
moisture throughout the season with
proper drainage and ventilation
During the season remove any lateral
shoots to ensure that roots remain
smooth for harvest Between 90-120 days
celeriac is ready to harvest as roots be-
come visible above ground and develop
green celery-like shoots of about 3-4rdquo
Celeriac is a shallow-rooted vegetable
and can be safely pulled from the soil
when harvesting The flavor of celeriac
can be enhanced by a light frost but be
sure to harvest these plants before the
first hard autumn freeze
Sowing and growing Harvesting
HARDINESS ZONE Annual (Biennial 6-10)
DAYS TO MATURITY 90-120
DAY TO GERMINATION 14-21
SEEDING DEPTH 18rdquo
PLANT SPACING 12-18rdquo
PLANT HEIGHT 24-36rdquo
ROW SPACING 24-30rdquo
GROWTH HABIT Bulbous upright
SOIL TYPE Fertile consistently moist well-drained
TEMP PREFERENCE 60-65 degF
LIGHT PREFERENCE Full sun - partial sun
TROUBLESHOOTING Susceptible to root rot from poorly
drained soils Watch for aphids slugs and any kind of worms
36TRUELEAFMARKETCOM
Apium graveolens var dulceBiennial
Celery is one of the most popular veg-
etable crops in the entire world yet still
seldom grown by many home gardeners
Much like lettuce broccoli and kale
garden celery can be harvested repeat-
edly throughout the season as a ldquocut and
come againrdquo variety able to be pushed
up until the frost Once established
celery is one of the most productive and
low-maintenance grows of the season
certain to find its way back into the
garden bed year after year
Celery is a cool weather favorite best
started in early spring or late summer
Begin indoors 10-12 weeks prior to final
frost or 8-10 to first autumn frost Press
without covering 2-3 seeds per cell in
organic moist well-drained potting mix
with a pH of 6-7 Seeds germinate in 14-
21 days transplant best starts 9-12rdquo apart
in the garden as true leaves establish
Requires steady watering and a cooling
top layer of mulch to keep from bolting
Benefits from additional compost
throughout the season with properly
Celery is known to have a longer harvest
date but once established can offer
repeat harvests like leafy greens Celery
can be traditionally harvested whole
or in ldquocut and come againrdquo fashion
Harvest outer stalks when at least 6-8rdquo
tall by cutting from the base allowing
inner stalks to continue producing Be
careful of shallow roots cutting above
ground Darker green stalks will yield
more nutrition but will also have a more
coarse texture
Sowing and growing
Harvesting
drained and ventilated soil
HARDINESS ZONE Annual (Biennial 6-10)
DAYS TO MATURITY 110-130
DAY TO GERMINATION 14-21
SEEDING DEPTH Press without covering
PLANT SPACING 9-12rdquo
PLANT HEIGHT 12-24rdquo
ROW SPACING 24rdquo
GROWTH HABIT Leafy upright
SOIL TYPE Moist fertile composted well-drained
TEMP PREFERENCE 60-70 degF
LIGHT PREFERENCE Full sun
TROUBLESHOOTING Susceptible to root rot from poorly
drained soils Watch for aphids slugs and any kind of worms
37 TRUELEAFMARKETCOM
Beta vulgaris var ciclaBiennial
Chard is a leafy colorful and quickly
maturing relative to the sweet garden
beet Tolerant to both light frost and
summer heat chard is often recom-
mended as an easy yet rewarding crop
for children or novice gardeners Chard
seeds can be sown nearly anytime of sea-
son for either a midsummer harvest or
even a late fall crop Available in a variety
of assorted colors try growing chard
as a bright and vibrant addition to any
ornamental garden or flower patch
Chard grows best in cool gardens yet
is quite tolerant to heat Chard is best
if sown directly 2-3 before final spring
frost or 5-6 weeks before first autumn
frost Chard may sown outdoors nearly
anytime from spring to fall for quick and
successive harvests Sow 2-3 seeds 12rdquo
deep and 2-3rdquo apart in loose organic
and well-drained soil with a pH of 6-7
Chard seeds are often pre-soaked for 4-6
hours to accelerate germination to 5-14
days Thin back starts to 12rdquo apart in the
garden as true leaves establish For best
flavor and texture keep plants under
12rdquo tall
Most varieties are ready to harvest about
50-60 days from sowing while the first
and youngest leaves can be harvested at
about 30 days For ldquocut and come againrdquo
harvesting cut the stalks carefully 1-2rdquo
above the ground so as not to harm the
center of the plant Harvest larger outer
leaves for continual seasonal growth or
cut stalks 3-4rdquo from the base allowing
plants to grow again Chard plants may
also be harvested entirely whole from the
base like celery
Sowing and growing
Harvesting
HARDINESS ZONE Annual (Biennial 6-10)
DAYS TO MATURITY 50-60
DAY TO GERMINATION 5-14
SEEDING DEPTH 12rdquo
PLANT SPACING 12rdquo
PLANT HEIGHT 12-18rdquo
ROW SPACING 18-24rdquo
GROWTH HABIT Upright
SOIL TYPE Loose moist organic well-drained
TEMP PREFERENCE 60-80 degF
LIGHT PREFERENCE Full sun - partial sun
TROUBLESHOOTING Susceptible to fungal leaf spotting
mildews and mold from oversaturation Watch for aphids
and flea beetles
38TRUELEAFMARKETCOM
Brassica oleracea var viridisBiennial
Collard greens are a broadleaf Brassica
relative to the similar-tasting broccoli
cabbage and kale And its nutrient-dense
relatives collard greens are cold hardy
and even thought to taste best after a
light frost or two Collards grow a similar
look and texture to kale and cabbage
leaves yet boast a far more tender silkier
and leafier green Like broccoli and
kale collards are a ldquocut and come againrdquo
crop that will continue to deliver well
into the fall
Collard greens are a cool-hardy crop best
if sown in early spring or late summer
For early starts begin indoors 4-6 weeks
prior to final frost or for a fall harvest
sow 3-4 weeks before first frost Sow 2-3
seeds 14rdquo deep per cell or 4rdquo apart
in the garden in organic well-drained
soil with a pH of 60-65 Germinates in
5-12 days thinning out best starts every
12-18rdquo once true leaves establish Water
regularly to keep collard greens from
drying and becoming bitter but do not
oversaturate causing mold mildew and
rot Collards thrive from a composted
soil bed and require little fertilizing
throughout the season unless leaves
begin to yellow
About 8-10 weeks after transplanting
collards are ready for harvest Like
with many ldquocut and come againrdquo crops
harvest frequently to boost production
Collard leaves can be harvested at any
size based on preference but larger
leaves become more coarse and bitter
Entire plants may be harvested whole or
simply pick the leaves from the bottom as
needed to allow further production For
best flavor allow greens a frost or two
before harvesting
Sowing and growing
Harvesting
HARDINESS ZONE Annual 2-10 (Biennial 6-10)
DAYS TO MATURITY 75-85
DAY TO GERMINATION 5-12
SEEDING DEPTH 14rdquo
PLANT SPACING 12-18rdquo
PLANT HEIGHT 10-12rdquo
ROW SPACING 30rdquo
GROWTH HABIT Upright greens
SOIL TYPE Moist organic composted well-drained
TEMP PREFERENCE 50-70 degF
LIGHT PREFERENCE Full sun
TROUBLESHOOTING No serious diseases but monitor
regularly for cabbage worms flea beetles thrips aphids
and harlequin bugs
39 TRUELEAFMARKETCOM
Zea maysAnnual
Corn is an ancient wild grass and effort-
less nearly foolproof summertime staple
Often known as the ldquocobrdquo or ldquoearrdquo the
edible portion is actually the ripened
flower with the individual kernels in the
husk each containing a seed for future
propagation Although sweet corn is the
most popular variety garden corn comes
in a variety of flavors and colors includ-
ing stunning and unique ornamental
varieties such as Glass Gem Blue Hopi
and Earth Tones Dent
Corn is a hardy full sun grass performing
best when sown directly outdoors after
the final spring frost Plant 2-3 seeds 1-2rdquo
deep and 3-4rdquo apart in loose organically
rich well-drained soil with a pH of 58-
62 Germinates in 7-14 days thinning
out best starts to every 12rdquo once true
leaves establish Avoid overhead watering
by watering soil directly To prevent
cross-pollination from altering a corn
crop keep like varieties with like varieties
(SU with SU SE with SE SH2 with SH2
and ORNAMENTAL with ORNAMEN-
TAL) Check individual seed packet to
know whether a variety is Sugary (SU)
Sugary Enhanced (SE) Supersweet
(SH2) or Ornamental
Most varieties of corn are ready to har-
vest about 75 days from sowing Unlike
other garden favorites corn only fruits
once Ears are ripe once they turn dark
green silks become brown and kernels
are plump Test ripeness by squeezing
kernels for a milk-like juice To harvest
firmly pull the ear downwards while
twisting
Sowing and growing
Harvesting
HARDINESS ZONE Annual
DAYS TO MATURITY 60-90
DAY TO GERMINATION 7-14
PLANT SPACING 12rdquo
PLANT HEIGHT 5-8ft
ROW SPACING 30-36rdquo
GROWTH HABIT Upright stalk
SOIL TYPE Sandy composted loamy well-drained
TEMP PREFERENCE 75-90 degF
LIGHT PREFERENCE Full sun
TROUBLESHOOTING No serious pests but watch for corn
leaf aphids flea beetles and thrips Water soil directly to
avoid saturating stalks
40TRUELEAFMARKETCOM
Cucumis sativusAnnual
Cucumber is one of the easiest and most
productive summertime favorites suited
for just about any home garden Grown
similarly to summer melons cucumbers
are heat and drought tolerant and
once matured will produce vigorously
well into fall Whether small pickling
cucumbers or a larger more familiar
slicing variety cucumbers are available
as either short convenient bush types or
long vining climbers that will produce
well into fall
Cucumber is a warm weather crop best
if begun indoors 4-6 weeks prior to final
spring frost Plant 3-4 seeds 1rdquo deep
per individual cell in loamy sandy well-
drained soil with a pH of 6-65 Seeds
germinate in 3-10 days transplanting
best starts 36-48rdquo apart in the garden
once true leaves establish Cucumbers
perform best when grown on 8rdquo tall
mounds and provided a trellis to mini-
mize crowding Shallow roots will benefit
from regular watering and top layer of
mulch Bush varieties perform well in
pots and containers
Many varieties of cucumber are ready
for harvest about 60 days from sowing
while smaller pickling varieties may be
ready sooner Ripe cucumbers are solid
green and firm becoming bitter and
yellow if left on the vine too long Classic
slicing cucumbers are sweetest when 7-9rdquo
long becoming starchy and grainy when
reaching 12rdquo or more Remove fruits with
scissors or a knife rather than twisting or
plucking to prevent damaging the vine
Sowing and growingHarvesting
HARDINESS ZONE Annual
DAYS TO MATURITY 55-70
DAY TO GERMINATION 3-10rdquo
SEEDING DEPTH 1rdquo
PLANT SPACING 36-48rdquo
PLANT HEIGHT 6-12rdquo
ROW SPACING 36rdquo
GROWTH HABIT Vining or bush
SOIL TYPE Loamy sandy fertilized well drained
TEMP PREFERENCE 65-75 degF
LIGHT PREFERENCE Full sun
TROUBLESHOOTING Watch for cucumber beetles squash
bugs and aphids Mildew and leaf spotting may occur in
poorly drained soils
41 TRUELEAFMARKETCOM
Solanum melongenaAnnual
Eggplant is a short and compact fruiting
vegetable that is often likened to a
ldquosmall treerdquo growing in the garden box
Eggplant matures at a convenient and
sturdy 24-36rdquo tall and although related
to the tomato fruits very similarly to a
pepper Eggplant perennially overwinters
in warm enough climates making it an
ideal vegetable for indoor container
gardening Try heirloom selections
featuring unique shapes sizes and varie-
gated and multi-colored varieties
Eggplant is a full sun favorite often sown
directly after the final spring frost but
for earliest starts begin indoors 8-10
weeks prior Plant 2-3 seeds 14rdquo deep
per cell or 4-6rdquo apart in the garden in
sandy loamy and well-drained soil with
a pH of 55-72 Germinates in 7-14 days
thin out best starts to 1 plant per pot
or every 18-24rdquo in the garden as true
leaves establish Cover soil with a layer of
organic mulch and fertilize at least twice
during growth stage Stabilize plants with
a pole or support as they can become
top-heavy during fruiting
Sowing and growing
Harvesting
HARDINESS ZONE Annual (Perennial 10-11)
DAYS TO MATURITY 100-120
DAY TO GERMINATION 7-14
SEEDING DEPTH 14rdquo
PLANT SPACING 18-24rdquo
PLANT HEIGHT 24-36rdquo
ROW SPACING 24-36rdquo
GROWTH HABIT Dwarfed upright
SOIL TYPE Sandy loamy fertilized well-drained
TEMP PREFERENCE 70-85 degF
LIGHT PREFERENCE Full sun
TROUBLESHOOTING Susceptible to bacterial spotting
verticillium and fusarium wilt and aphids Watch for small
pests or leaf hoppers
Due to the protective and toxic solanine
produced by members of the nightshade
family avoid consuming eggplant before
completely ripened Most eggplant variet-
ies are ready for harvest about 70-90 days
after transplanting Harvest fruits before
wrinkling and going to seed Carefully
snip each eggplant from the branch with
scissors or a garden knife while leaving 1rdquo
of the stem on the fruit Avoid pulling or
twisting off eggplants by hand
42TRUELEAFMARKETCOM
Cichorium endiviaBiennial Grown as Annual
One of the lesser known leafy greens in
the garden box endive is a bright and
tangy chicory that looks and grows very
similar to green leaf lettuce Endive
is generally sold as one of three types
including Curly Belgian or Broadleaf
and is one of the most popular culinary
greens in all of Europe As a type of chic-
ory endive boasts an improved tolerance
to pests and disease while having a weed-
like hardiness even known to be invasive
in some regions
Endive tastes and performs best in cool
gardens Sow directly 4-6 weeks before
final frost or for earliest starts begin
indoors 8-10 weeks prior Plant 2-3 seeds
14rdquo deep per cell or 3-4rdquo apart in the
garden in loose organically rich well-
drained soil with a pH of 50-60 Seeds
germinate in 10-21 days transplanting
or thinning best starts to 9-12rdquo apart in
the garden Although longer to maturity
endive and chicory have similar require-
ments to leaf lettuce Once endive has
gone to seed keep in the garden as a
vibrant purple ornamental or leave for
reseeding for next season
Curly and broadleaf endive is harvested
similarly to leaf lettuce by either harvest-
ing the whole plant at once or saving as a
ldquocut and come againrdquo crop Carefully cut
leaves from the base with a knife once
theyrsquove grown 5-6rdquo tall For continuous
regrowth leave 1rdquo of the stem intact
Specific grow and harvest instructions
for Belgian endive and Witloof have
not been included because it includes
a labor-intensive process of growing the
endive crop entirely in the dark
Sowing and growing Harvesting
HARDINESS ZONE Annual (Biennial 8-11)
DAYS TO MATURITY 85-100
DAY TO GERMINATION 10-21
SEEDING DEPTH 14rdquo
PLANT SPACING 9-12rdquo
PLANT HEIGHT 5-6rdquo
ROW SPACING 18-24rdquo
GROWTH HABIT Leafy mound
SOIL TYPE Loose fertile composted well-drained
TEMP PREFERENCE 60-70 degF
LIGHT PREFERENCE Full sun - partial sun
TROUBLESHOOTING Very tolerant to pests and disease
Monitor for slugs and snails Do not water overhead
43 TRUELEAFMARKETCOM
CucurbitaceaePerennial
Gourds have got to be the most diverse
showy and unique crop growing in any
home garden Available in countless
shapes sizes colors and textures
ornamental gourds have become as
synonymous with autumn as falling leaves
or apple cider Unlike soft melons or
squash gourds have an unusually thick
skin and will not be bothered by critters
in the garden
Gourds are a full sun crop sown direct
after the final frost but for earliest starts
begin indoors 4-6 weeks prior Plant
3-4 seeds 1-2rdquo deep per cell or every
48-60rdquo in the garden in an organic and
nutrient-dense soil with a pH of 65-75
Gourd seeds may take 7-35 days to
germinate but are commonly pre-soaked
for 24 hours to accelerate germination
Gourds perform best when grown on
8-10rdquo tall mounds to accommodate long
trailing vines and given plenty of trellis
support For longneck varieties trellis
and allow gourds to hang straight for a
bottling effect Gourds are a heavy feeder
and benefit from regular fertilizing
Most varieties of gourds are ready to
harvest about 100 days from sowing
while larger shell types require an extra
month Harvest gourds once they have
hardened in the fall and stems have
turned brown Gourds will rot if left on
the vine too long and also if harvested
too soon Similar to squash harvest
gourds by snipping fruits off the vine
rather than twisting or pulling leaving
about 1rdquo of stem attached to prolong
shelf life storage and decorative orna-
mental use
Sowing and growing
Harvesting
HARDINESS ZONE Annual (Perennial 8-10)
DAYS TO MATURITY 100-140
DAY TO GERMINATION 7-35
SEEDING DEPTH 12rdquo
PLANT SPACING 9-12rdquo
PLANT HEIGHT 36-48rdquo
ROW SPACING 8 ft
GROWTH HABIT Climbing and spreading vine
SOIL TYPE Moist organically composted well-drained
TEMP PREFERENCE 70-85 degF
LIGHT PREFERENCE Full sun
TROUBLESHOOTING Monitor for aphids squash bugs
and cucumber beetle known to cause bacterial wilt Do not
water overhead
44TRUELEAFMARKETCOM
Brassica oleracea var acephalaAnnual
Kale has recently become one of the
most popular vegetables both in and
out of the garden Whether because of
unparalleled health benefits ease of
growing or showy decorative color there
is almost no reason not to have a place
for kale in the garden box Kale is one
of the most hardy Brassicas boasting a
tolerance to both heat and cold extremes
and even overwintering in moderate
climates Kale is more diverse than you
think available in a variety of unique
colors shapes sizes and textures
Kale is a cool hardy crop able to be
sown directly in early spring or late fall
For best starts begin indoors 3-4 weeks
before final spring frost or 6-8 before
the first autumn frost Plant 3-4 seeds
14rdquo deep per cell and 3-4rdquo apart in
the garden in nitrogen-rich organic
well-drained soil with a pH of 60-75
Germinates in 3-10 days thinning out
best starts to 1 plant per pot or every 12-
18rdquo in the garden as true leaves establish
Kale benefits from fertilizer every 4
weeks Extended summer heat will cause
plants to bolt and become bitter
Most kale is ready to begin harvesting
about 60 days from sowing Kale is a ldquocut
and come againrdquo crop and continuously
harvesting younger outer leaves will
encourage growth Carefully cut back
any yellowing leaves that may appear at
the base In warm enough climates kale
can produce over winter but in colder
regions lay a tarp or row cover to further
a winter harvest
Sowing and growing Harvesting
HARDINESS ZONE Annual (Biennial 7-10)
DAYS TO MATURITY 55-75
DAY TO GERMINATION 3-10
SEEDING DEPTH 14rdquo
PLANT SPACING 12-18rdquo
PLANT HEIGHT 12-18rdquo
ROW SPACING 24rdquo
GROWTH HABIT Leafy upright
SOIL TYPE Nitrogen-rich loamy well-drained
TEMP PREFERENCE 55-70 degF
LIGHT PREFERENCE Full sun - partial sun
TROUBLESHOOTING No serious diseases but monitor regu-
larly for aphids cabbage worms flea beetles and thrips
45 TRUELEAFMARKETCOM
Brassica oleracea var gongylodesAnnual
Kohlrabi is a unique variety of Brassica
which like celeriac is grown specifically
for its wide and bulbous stem rather than
its leafy greens or roots Kohlrabi boasts
all the same tolerances for disease and
cold as broccoli cabbage and kale and
is believed to always taste best after a few
light frosts Translated from German
kohl (ldquocabbagerdquo) and rabe (ldquoturniprdquo)
kohlrabi can truly best be described in
both flavor and appearance as some tur-
nip-like cabbage or cabbage-like turnip
Kohlrabi is a cool season crop grown sim-
ilarly to cabbage able to be sown direct
in early spring or early fall For earliest
starts begin indoors 3-4 weeks prior to
frost dates Plant 3-4 seeds 12rdquo deep
per cell or 3-4rdquo apart in the garden in
organically rich loamy and well-drained
soil with a pH of 60-75 Seeds germinate
in 3-10 days thinning out best starts to 1
plant every 12-15rdquo in the garden as true
leaves establish Kohlrabi does not do
well in containers A thin layer of top
mulch helps retain moisture and cool
roots during warm summer months
Harvest kohlrabi at about 60 days or
once the stem is 2-3rdquo in diameter Kohl-
rabi is best enjoyed as a young plant be-
cause if allowed to grow larger than 3rdquo
the bulb will taste woody bitter and un-
palatable Harvest kohlrabi from cutting
at the base with a knife and trimming the
leaves off before eating Kohlrabi greens
can be harvested and enjoyed just like
kale mustard or collards
Sowing and growingHarvesting
HARDINESS ZONE Annual (Biennial 9-11)
DAYS TO MATURITY 55-70
DAY TO GERMINATION 3-10
SEEDING DEPTH 12rdquo
PLANT SPACING 12-15rdquo
PLANT HEIGHT 9-12rdquo
ROW SPACING 18-24rdquo
GROWTH HABIT Growth Habit
SOIL TYPE Moist organically fertilized well-drained
TEMP PREFERENCE 50-70 degF
LIGHT PREFERENCE Full sun - partial shade
TROUBLESHOOTING Monitor for aphids and cabbage
worms Water soil directly to avoid leaf saturation known to
cause mildew and rot
46TRUELEAFMARKETCOM
Allium porrumBiennial
Leeks are an overwintering biennial
that boast a milder and less pungent
variation of the onion while having all
the same tolerances to frost disease and
pests Above the soil leeks appear to be
a thicker broader onion plant without
growing the bulbous root Leek matures
up to 24rdquo tall and takes up only a few
inches width in the garden Grow leeks
alongside other winter favorites such as
scallions garlic shallots and onion for
similar growing and harvesting times
Leeks are a cool hardy crop able to
be sown directly in early spring or late
fall Begin indoors 10-12 weeks before
final spring frost or 6-8 before the first
autumn frost Plant 2-3 seeds 14rdquo deep
per cell and 2-3rdquo apart in the garden in
deeply tilled organic well-drained soil
with a pH of 60-70 Germinates in 7-14
days thinning back to 1 plant every 4-6rdquo
in the garden Leeks have a shallow root
system and require regular watering and
a top layer of cooling mulch
Many varieties have a longer harvest
time but some may be ready as soon as
80 days Like asparagus spears harvest
leek stalks from beneath the soil by
carefully prying them up from the roots
with a gardening fork As a relative of
the onion leeks are also eaten somewhat
similarly with the white portion of the
stalk being the most flavorful and prized
part of the vegetable
Sowing and growing Harvesting
HARDINESS ZONE Annual (BIennial 7-11)
DAYS TO MATURITY 90-130
DAY TO GERMINATION 7-14
SEEDING DEPTH 14rdquo
PLANT SPACING 4-6rdquo
PLANT HEIGHT 18-24rdquo
ROW SPACING 8-16rdquo
GROWTH HABIT Sturdy upright
SOIL TYPE Loose lighty fertile well-drained
TEMP PREFERENCE 55-75 degF
LIGHT PREFERENCE Full sun
TROUBLESHOOTING Susceptible to mildew leaf spotting
and bulb rot from oversaturated and poorly drained soils
Watch for thrips and onion maggots
47 TRUELEAFMARKETCOM
Lactuca sativaAnnual
Lettuce is one of the most versatile seeds
in the world as it is a choice variety for
sprouting microgreens hydroponics
aquaponics and indoor container
gardening Quick to maturity and easy
to grow anywhere countless varieties of
lettuce have been specifically cultivated
to thrive from cold northern gardens all
the way down to the desolate Arizona
heat Whether romaine iceberg butter
or leaf head lettuce is available in savory
redleaf or classic tender greenleaf
Lettuce is a cool weather crop perform-
ing just as vigorously when sown directly
as when transplanted Begin indoors 4-6
weeks before final spring frost or about
6-8 weeks before the first autumn frost
Sow 2-3 seeds 14rdquo deep per cell and
2-3rdquo apart in organically composted well-
drained soil with a pH of 60-70 Seeds
germinate in 3-10 days transplanting or
thinning back to 1 plant every 9-12rdquo as
leafy heads establish Thrives in moist
soils supplemented with nitrogen-rich fer-
tilizer and can be sown every two weeks
for successive season-long harvests
Harvest lettuce once the leaves have
reached 3-6rdquo long Be sure to pick the
leaves once theyrsquore grown large enough
but before they reach maturity Harvest-
ing mature lettuce will result in bitter-tast-
ing plants Pick the outer leaves of the
lettuce plant so the smaller leaves in the
center will continue to establish Other
varieties of lettuce such as butterhead or
romaine can also be harvested by digging
up the entire plant or cutting them while
leaving an inch of the stem behind You
can store harvested lettuce in a plastic bag
in the fridge for 7-10 days
Sowing and growingHarvesting
HARDINESS ZONE Annual
DAYS TO MATURITY 45-60
DAY TO GERMINATION 3-10
SEEDING DEPTH 14rdquo
PLANT SPACING 9-12rdquo
PLANT HEIGHT 6-12rdquo
ROW SPACING 12-15rdquo
GROWTH HABIT Leafy mound
SOIL TYPE Nitrogen-rich composted well-drained
TEMP PREFERENCE 60-70 degF
LIGHT PREFERENCE Full sun
TROUBLESHOOTING Susceptible to mildew rot and leaf
spotting from soils if not properly drained and ventilated
Watch for aphids whiteflies and leafminers
48TRUELEAFMARKETCOM
Cucumis melonAnnual
Melons come in a wide variety of shapes
sizes and colors including the timeless
cantaloupe muskmelon honeydew
and canary but also feature unique
heirlooms such as the casaba galia santa
claus and ldquowinterrdquo melon Regardless of
variety melons are full sun performers
that thrive with a little trellis support and
plenty of space to spread Melons may
not be as productive as tomatoes or cu-
cumbers but nothing will ever beat the
flavor of a homegrown summer melon
Melons are a full sun favorite able to
be sown direct after the final frost date
but for earliest starts begin indoors 4-6
weeks prior Plant 2-3 seeds 12rdquo deep
per peat pot or every 9-12rdquo in the garden
in sandy composted and well-drained
soil with a pH of 60-65 Seeds germinate
in 4-10 days transplanting or thinning
best starts 36-60rdquo apart Melons perform
best when grown on 8-10rdquo tall mounds
to accommodate long trailing vines and
can be easily trellised for tighter grow
spaces Thrives from regular watering
during fruiting and slight drought when
ripening
Most varieties of melon can be harvested
80-100 days from sowing or when the
fruit begins to show signs of ripening
Regardless of variety or color all melons
will emit a wildly sweet fruity aroma
and fall off the vine when ripe Melons
can also be snipped from the vine with
about 1rdquo of stem left attached to the
fruit Cantaloupe and muskmelon will
turn evenly tan when ripe and honeydew
should turn creamy yellow instead of
green Yellow canary and thicker skin
melons may not fall off the vine or
perfume when ripe
Sowing and growing
Harvesting
HARDINESS ZONE Annual
DAYS TO MATURITY 80-100
DAY TO GERMINATION 4-10
SEEDING DEPTH 1rdquo
PLANT SPACING 36-60rdquo
PLANT HEIGHT 6-12rdquo
ROW SPACING 36-60rdquo
GROWTH HABIT Trailing vine
SOIL TYPE Sandy loamy fertilized well-drained
TEMP PREFERENCE 70-90 degF
LIGHT PREFERENCE Full sun
TROUBLESHOOTING Water soil directly at the roots to
minimize mildew Watch regularly for aphids spider mites
and cucumber beetles
49 TRUELEAFMARKETCOM
Brassica or SinapisAnnual
Mustard is currently in its renaissance as
a vital sprouting microgreens and cover
crop variety grown just as popularly on
the kitchen counter as in the garden
bed Mustard leaf features a wide selec-
tion of color flavor and leaf types such
as classic broadleaf curly and mizuna
As a cover crop mustard is sown in the
fall to repair and replenish depleted and
hardened soils only to be mulched back
into the spring garden as an all-natural
organic ldquogreenrdquo fertilizer
Mustard is a tenacious cool weather
favorite with a weed-like hardiness best
sown directly outdoors 4-6 weeks before
the final spring frost or in late fall 2-4
weeks before the first frost Sow 3-4 seeds
12rdquo deep and 4rdquo apart in organically
rich moist well-drained soil with a pH
of 60-75 Seeds germinate in 3-7 days
thinning best starts every 12-18rdquo in
the garden once true leaves establish
Mustard is a popular overwintering cover
crop specifically grown to help repair
poor malnourished soils and is able to
thrive in a variety of gardens
Most varieties of mustard are ready for
harvest about 80 days from sowing Like
other Brassicas such as kale broccoli
and collards mustard leaf is a ldquocut and
come againrdquo crop able to produce well
into the frost Carefully cut outermost
leaves from the stem while leaving rest
of the plant intact Mustard can be
left in the garden to easily reseed for
next season Sow mustard in the fall to
overwinter and till back into the soil
for a springtime nitrogen-rich organic
fertilizer
Sowing and growing Harvesting
HARDINESS ZONE Annual Biennial 8-10)
DAYS TO MATURITY 80-95
DAY TO GERMINATION 3-7
SEEDING DEPTH 12rdquo
PLANT SPACING 12-18rdquo
PLANT HEIGHT 12-18rdquo
ROW SPACING 12-24rdquo
GROWTH HABIT Well-stemmed upright
SOIL TYPE Fertile organically rich well-drained
TEMP PREFERENCE 50-70 degF
LIGHT PREFERENCE Full sun - partial sun
TROUBLESHOOTING Watch for aphids flea beetles
and slugs
50TRUELEAFMARKETCOM
Abelmoschus esculentus Annual
Okra is a heat-loving summertime favor-
ite synonymous with some of the hottest
most humid regions in the country Okra
is a fruiting crop that produces tender
2-3rdquo edible pods all the way through the
warmest months of the year Related to
both hibiscus and hollyhock okra is also
celebrated for its huge gorgeous flowers
that bloom in shades of orange pink
red and white Okra thrives alongside
other full sun staples such as melon
cucumber and eggplant
Okra is a full sun crop that does not
perform well in cold soils Seeds can
be sown direct after the final frost date
but for earliest starts begin indoors 3-4
weeks prior Plant 2-3 seeds 12rdquo deep
per peat pot or 4-6rdquo apart in the garden
in sandy organically fertile and well-
drained soil with a pH of 58-70 Okra
germinates in 4-10 days transplanting or
thinning your best starts to 18-24rdquo apart
in the garden Seeds may pre-soak 12-18
hours to accelerate germination but is
not required Okra thrives from regular
watering and fertilizing
Okra is most flavorful when harvested at
2-3rdquo long or about 60 days after sowing
Harvest often to keep up with fruiting
while encouraging production Wear
gloves when handling okra plants be-
cause the fine hairs are known to cause
skin irritation Using a knife simply cut
okra pods from the plant while leaving
some stem attached to the fruit Garden
fresh okra does not store well and should
be enjoyed the day it is picked
Sowing and growing Harvesting
HARDINESS ZONE Annual
DAY TO GERMINATION 4-14
SEEDING DEPTH 12rdquo
PLANT SPACING 18-24rdquo
PLANT HEIGHT 36-60rdquo
ROW SPACING 36rdquo
GROWTH HABIT Bushy upright
SOIL TYPE Rich loamy composted well-drained
TEMP PREFERENCE 75-90 degF
LIGHT PREFERENCE Full sun
TROUBLESHOOTING Susceptible to rot in poorly drained
soil Monitor for aphids whiteflies spider mites and corn
earworms
51 TRUELEAFMARKETCOM
Allium cepaAnnual
Onion is a cold hardy favorite able to
be sown in either spring or fall for an
effortless biannual harvest Onions are
often started in the garden from store-
bought bulbs but growing from seed
allows for a greater variety of selection
among the red yellow white and sweet
cultivars When planting look to see if a
ldquolong-dayrdquo or a ldquoshort-dayrdquo onion variety
is best suited for the summers in your
region Try an onion crop in the garden
bed alongside similar garlic shallots
or leeks
Onion is a cool hardy vegetable that can
be sown directly 6-8 weeks prior to final
spring frost or about 4-6 weeks before
the first autumn frost Seeds may also
be begun indoors for early starts Soil
should be well-tilled nitrogen-rich with
a pH of 60-70 For outdoor sowing
create a shallow 1rdquo deep trench for a
minimum of 12rdquo Onion seed is very
small so sprinkle generously into the
trench and lightly cover with about 14rdquo
of soil As seedlings begin to sprout from
the row trim back to favor the strongest
starts every 4-6rdquo apart ldquoLong-dayrdquo onions
grow best in the northern half of the
country while ldquoshort-dayrdquo thrives in the
southern half
Most onions sown in the spring are ready
for harvest about 90 days from sowing
and seeds planted in the fall can mature
as early as May or June the following year
Onions are ready to harvest once the
plantsrsquo greens have dried out yellowed
and begun to bow over Loosen the soil
from the bulb to check for consistent
coloring while allowing the bulb to further
dry Sweet onions do not store as well as
more pungent yellow and brown varieties
Sowing and growing
Harvesting
HARDINESS ZONE Annual
DAYS TO MATURITY 90-110
DAY TO GERMINATION 4-10
SEEDING DEPTH 12rdquo
PLANT SPACING 4-6rdquo
PLANT HEIGHT 12-18rdquo
ROW SPACING 18-24rdquo
GROWTH HABIT Bulbous-rooted upright
SOIL TYPE Sandy loose composted well-drained
TEMP PREFERENCE 55-75 degF
LIGHT PREFERENCE Full sun
TROUBLESHOOTING Watch for thrips and onion maggots
Susceptible to onion yellows virus which may stunt and infect
nearby onions
52TRUELEAFMARKETCOM
Atriplex hortensisAnnual
Orach is often called ldquomountain spinachrdquo
and widely cultivated as a warm-weather
substitute to traditional garden spinach
Tolerant to drought and both heat and
cold extremes orach is still plenty tender
and flavorful maturing into a far more
vibrant and complex crop than spinach
Try orach as a delicious ldquocut and come
againrdquo leafy vegetable while keeping it
in the garden bed as a bold and vibrant
ornamental available in bright greens
and magentas
Orach is a full sun crop best sown
directly 2-3 weeks after final spring frost
but for best starts begin indoors 4-6
weeks prior Plant 2-3 seeds 14rdquo deep
per cell or 3-4rdquo apart in the garden in
organic fertile well-drained soil with a
pH of 65-75 Seeds germinate in 14-21
days thinning back or transplanting
12-18rdquo apart in the garden as true leaves
establish orach thrives annually in a
wide variety of regions reseeding itself
in the garden for as long as yoursquoll have it
around Plants can be clipped for shorter
and more vigorous growth
Orach is ready to harvest at about 50
days from sowing or when leaves have
reached 4-6rdquo tall Smaller leaves will be
more tender and flavorful than larger
ones Orach comes in many colors so
gauge ripeness based on size rather
than color Often compared to spinach
orach is also a leafy ldquocut and come againrdquo
variety able to be harvested repeatedly
throughout the season to be used in the
kitchen exactly like any other garden
fresh leafy green
Sowing and growing
Harvesting
HARDINESS ZONE Annual
DAYS TO MATURITY 40-60
DAY TO GERMINATION 7-14
SEEDING DEPTH 14rdquo
PLANT SPACING 12-18rdquo
PLANT HEIGHT 36-60rdquo
ROW SPACING 24-36rdquo
GROWTH HABIT Bushy upright
SOIL TYPE Fertile organic moist well-drained
TEMP PREFERENCE 60-70 degF
LIGHT PREFERENCE Full sun
TROUBLESHOOTING Although heat and drought tolerant
can still bolt somewhat easily Watch for aphids and
whiteflies
53 TRUELEAFMARKETCOM
Pastinaca sativaAnnual
Parsnip is one of the lesser known
root vegetables growing very similar
to carrot and Hamburg rooted parsley
While looking like a bleached carrot
parsnip also produces rich leafy greens
that look taste and behave just like a
large-leaf parsley Garden parsnip is an
overwintering classic able to be sown in
either spring or fall and like many root
vegetables is believed to get sweeter
after a few light frosts Grow parsnip
to naturally aerate tough soils with its
penetrating taproot
Parsnip is a cool weather crop able to be
sown directly 3 weeks before final spring
frost or 3-4 weeks before first autumn
frost for an early spring harvest Like
many root vegetables parsnip does not
transplant well and should always be
sown direct Plant 2-3 seeds 12rdquo deep
and 1-2rdquo apart in very loose well-tilled
and well-drained soil with a pH of 60-70
Seeds germinate in 10-28 days thinning
out strongest starts to 6-9rdquo apart in the
garden Parsnips grow best with some
drought becoming wider and longer in
search of moisture
Most varieties of parsnip may be
harvested about 100 days after sowing
but for sweetest flavor allow parsnip to
experience a frost or two before harvest-
ing Parsnips are ready to harvest once
their foliage has died back dried and
bowed over Like carrots parsnip can be
safely removed from the ground with a
gardening fork If sowing in the fall for a
spring harvest cover parsnip seeds with a
top layer of mulch and harvest crop once
the ground thaws
Sowing and growing Harvesting
HARDINESS ZONE Annual
DAYS TO MATURITY 100-120
DAY TO GERMINATION 10-28
SEEDING DEPTH 12rdquo
PLANT SPACING 6-9rdquo
PLANT HEIGHT 18-24rdquo
ROW SPACING 24rdquo
GROWTH HABIT Leafy taproot
SOIL TYPE Loose organic composted well-drained
TEMP PREFERENCE 45-75 degF
LIGHT PREFERENCE Full sun - partial sun
TROUBLESHOOTING Few known pests and diseases
Watch for carrot rust fly known to infect plants with parsnip
root canker
54TRUELEAFMARKETCOM
Pisum sativumAnnual
Peas have recently proven to be one of
the most versatile and beneficial vege-
tables in the home garden A preferred
choice for sprouting microgreens
hydroponics and cover crops classic
garden pea can be grown year-round
both indoors and out Whether English
shelling snow or sugar snap peas grow
basically the same and yet offer so much
variety As an overwintering cover crop
pea is popularly sown to replenish essen-
tial nitrogen back into depleted soils
Pea is ideally suited for direct full sun
outdoor sowing as soon as the soil can
be worked after the final spring frost
Pea may also be planted at the end of
summer for a quick fall harvest Sow 1rdquo
deep and 1-2rdquo apart in organically rich
well-drained soil with a pH of 60-75
Peas can be soaked 4-6 hours in warm
water prior to sowing to help germi-
nation Seeds germinate in 7-14 days
thinning out strongest starts to 6-9rdquo apart
as true leaves establish Whether growing
English shelling Chinese snow or sugar
snap pea cultivation is fairly universal
Most varieties of pea are ready for har-
vest 60-70 days from sowing Know the
variety you are planting because each will
have different signs of ripeness English
shelling peas are the most traditional
having a fibrous inedible shell and are
the fastest to maturity Sugar snap is
the next to mature and has a fibrous
but deliciously edible pod Snow pea
takes the longest to mature and has
small seeds and flat edible pods most
notably used in Asian cuisine Pea pods
are sweetest when 2-3rdquo long and should
be carefully cut from vine rather than
twisted or pulled
Sowing and growing Harvesting
HARDINESS ZONE Annual
DAYS TO MATURITY 60-70
DAY TO GERMINATION 7-14
SEEDING DEPTH 1rdquo
PLANT SPACING 6-9rdquo
PLANT HEIGHT 12-36rdquo
ROW SPACING 12-24rdquo
GROWTH HABIT Climbing vine
SOIL TYPE Moist organically rich well-drained
TEMP PREFERENCE 55-75 degF
LIGHT PREFERENCE Full sun
TROUBLESHOOTING Susceptible to mildew and mold from
oversaturation in poorly drained beds
55 TRUELEAFMARKETCOM
Capscium annum Perennial
Pepper is one of the most diverse showy
and flavorful fruits grown in the annual
garden bed Available in nearly every
possible color and shape from the super
sweet to super spicy pepper grows stron-
ger and tastes better with a season of full
sun and high heat Pepper plants thrive
in pots and containers and can even
perennially overwinter in warm enough
regions maturing into bushy vibrant
and well-stemmed patio favorites
Pepper is a heat-loving crop that does
not perform well in shade or cold soils
Seeds are best if started indoors 4-6
weeks prior to final spring frost for
transplanting Sow 2-3 seeds 14rdquo deep
per cell or peat pot in fertile organically
rich and well-drained soil with a pH
of 60-68 Germinates in 7-21 days
transplanting best starts 12-18rdquo apart in
the garden or one plant per container
Pepper plants thrive in pots and con-
tainers with a phosphorus-rich potting
mix and will benefit from staking and
support as they become top-heavy during
fruit production
Some sweet and bell peppers can be
harvested as soon as 60-70 days but most
hot varieties are ready about 100 days
from sowing or when skin has changed
color Know the individual variety you are
sowing to know when color has reached
ripeness Peppers can be picked early to
ripen indoors or left to ripen and change
color on the vine Using a knife or
shears carefully snip off peppers while
leaving some stem attached to the fruit
If working with hot peppers wear gloves
to avoid skin contact with capsaicin
Sowing and growing
Harvesting
HARDINESS ZONE Annual (Perennial 9-11)
DAYS TO MATURITY 70-100
DAY TO GERMINATION 7-21
SEEDING DEPTH 14rdquo
PLANT SPACING 12-18rdquo
PLANT HEIGHT 18-36rdquo
ROW SPACING 18-24rdquo
GROWTH HABIT Sturdy upright
SOIL TYPE Fertile organically rich well-drained
TEMP PREFERENCE 70-85 degF
LIGHT PREFERENCE Full sun
TROUBLESHOOTING Susceptible to fungus leaf spotting
and rot in poorly drained oversaturated soils Watch for
aphids and whiteflies
56TRUELEAFMARKETCOM
CucurbitaAnnual
Pumpkin is a full sun winter squash that
thrives in the heat trailing and vining
just like a gourd or cucumber And
like any other winter squash pumpkin
features a wide variety of colors and
sizes for both ornamental and culinary
use Pumpkins are able to grow multiple
on the vine but for largest and most
decorative squash plants can be pruned
to force enormous even competition size
pumpkins just in time for autumn fun
Pumpkin is able to be sown directly after
the final spring frost but for earliest starts
begin indoors 3-4 weeks prior Plant 2-3
seeds 1rdquo deep per cell or for outdoor
sowing plant atop 8-10rdquo tall mounds of
soil every 5-6 ft to accommodate long
heavy trailing vines Seeds germinate in
4-10 days and transplanted to composted
well-drained soil with a pH of 60-68
Fertilize crop every 3 weeks and harvest
pumpkins before the autumn frost Once
a few pumpkins begin to show on the
vine pinch off vines to inhibit vegetative
growth directing energy to producing the
most optimal pumpkins
Most small to medium pumpkins are
ready to harvest 90-100 days from sowing
while larger varieties require an extra few
weeks Regardless of color or size pump-
kins are generally ripe once the stem
is solid and rind is tough unable to be
pierced by a fingernail Clip pumpkins
from the vine with shears leaving about
4rdquo of stem intact and once harvested
leave out to naturally cure in the sun for
10-14 days The curing process will help
pumpkins last up to 3 months longer
after harvesting
Sowing and growing
Harvesting
HARDINESS ZONE Annual
DAYS TO MATURITY 90-120
DAY TO GERMINATION 4-10
SEEDING DEPTH 1rdquo
PLANT SPACING 5-6 ft
PLANT HEIGHT 12-15rdquo
ROW SPACING 10-15 ft
GROWTH HABIT Wide-spreading mound
SOIL TYPE Fertile composted moist well-drained
TEMP PREFERENCE 60-90 degF
LIGHT PREFERENCE Full sun
TROUBLESHOOTING Watch for cucumber beetles squash
bugs and aphids Mildew and leaf spotting may occur in
poorly drained soils
57 TRUELEAFMARKETCOM
Portulaca oleracea Annual
Purslane is one of the rare succulents
considered a garden vegetable and even
treated like a lettuce or kale as a seasonal
ldquocut and come againrdquo salad green A
desert succulent tolerant to heat
drought and poor soils purslane grows
so aggressively that it is widely considered
an invasive species Purslane is a member
of the showy and ornamental Portulaca
family and boasts stunning pink orange
yellow and red blooms ideal for patios
and flower bedding
Purslane is a high-heat crop with a
weed-like hardiness best if sown directly
in spring after the final frost or begun
indoors 6-8 beforehand Purslane is
generally cold stratified (ldquorefrigeratedrdquo)
2-3 weeks prior to sowing to accelerate
germination Lightly press 3-4 seeds per
cell or 2-3rdquo apart in average to poor
well-drained soil with a pH of 55-70
Germinates in 7-14 days thin out stron-
gest starts to 9-18rdquo in the garden Allow
soil to dry between waterings as purslane
is considered an invasive species in many
areas and tolerant to poor arid soils
Purslane greens are ready for harvest
about 50 days from sowing or when
succulent leaves are big and tender
Plants do not mature to be very big and
can be harvested whole or left in the
garden as a ldquocut and come againrdquo variety
When harvesting individual leaves care-
fully cut with a knife or clippers to not
accidentally uproot the shallow plant
Purslane is widely considered a weed and
can be pulled from the ground exactly
like yard weeds
Sowing and growing
Harvesting
HARDINESS ZONE Annual
DAYS TO MATURITY 50
DAY TO GERMINATION 7-14
SEEDING DEPTH Lightly press without covering
PLANT SPACING 9-18rdquo
PLANT HEIGHT 3-9rdquo
ROW SPACING 12-18rdquo
GROWTH HABIT Mounding succulent
SOIL TYPE Average moderately dry well-drained
TEMP PREFERENCE 75-100 degF
LIGHT PREFERENCE Full sun
TROUBLESHOOTING Drought tolerant with few known
pests or diseases Susceptible to mold and mildew from
overwatering
58TRUELEAFMARKETCOM
Cichorium intybus var foliosumPerennial
Radicchio is the deliciously bitter and
tender head or heart of the chicory
plant Just like cabbage cauliflower or
iceberg lettuce the radicchio head is
safely wrapped in a leafy protective layer
that simply needs peeling back when
harvested Like other chicory radicchio
thrives in cooler gardens especially when
sown mid-summer so maturing plants
may benefit from a few light autumn
frosts before harvesting
Radicchio is a cool weather chicory
ideally transplanted in mid-late summer
so maturing plants have a cooler grow
season Seeds may also be started indoors
8-10 weeks before final spring frost in
regions with moderate summers Plant
2-3 seeds 14rdquo deep per cell or peat pot
in loose fertile well-drained soil Seeds
germinate in 5-14 days transplanting
best starts every 18-24rdquo in the garden
with a soil pH of 65-70 Chicory is a
leafy-headed mound similar to cabbage
and radicchio is merely the small purple
head or heart of the chicory plant
Radicchio is ready for harvest about 80
days from sowing Similar to cabbage
cauliflower and iceberg lettuce
radicchio is the head of the chicory
plant protected by leafy layers that can
be simply peeled back and composted
Unlike other chicories outer radicchio
greens are not the most tender Plants
can be carefully cut at the base leaving
roots intact for perennial growth but
following harvests will be smaller and
bitter Radicchio tastes and performs best
as an annual
Sowing and growing Harvesting
HARDINESS ZONE Annual (Perennial 5-8)
DAYS TO MATURITY 80-90
DAY TO GERMINATION 5-14
SEEDING DEPTH 14rdquo
PLANT SPACING 18-24rdquo
PLANT HEIGHT 18-24rdquo
ROW SPACING 24-36rdquo
GROWTH HABIT Leafy-headed mound
SOIL TYPE Loose fertile loamy well-drained
TEMP PREFERENCE 50-70 degF
LIGHT PREFERENCE Full sun
TROUBLESHOOTING Radicchio is a chicory with a weed-
like hardiness and drought tolerance No serious pests
or diseases
59 TRUELEAFMARKETCOM
Raphanus sativusAnnual
Spring Radish is the smaller shallow
and often pink or magenta variety that
does not grow a deep taproot like winter
radish And whereas winter radish grows
a broader deeper root requiring 50-70
days until harvest spring radish can be
harvested as soon as 25 days and is one of
the fastest maturing crops available Try
the classic Cherry Belle radish for a quick
zesty harvest or fill the garden bed with
unique French Breakfast Purple Plum
or white Hailstone
Spring radish is a cool season crop best
sown directly 4-6 weeks before final
spring frost Like many root vegetables
radish does not transplant well and
should not be started indoors Plant 2-3
seeds 12rdquo deep and 1-2rdquo apart in very
loose organic well-drained soil with a
pH of 65-70 Seeds germinate in 3-7
days thinning out best starts to 2-3rdquo apart
as true leaves establish Minimize nitro-
gen content when fertilizing to reduce
small spindly roots and excessive greens
Radish will bolt to seed in excessive
summer heat if not provided afternoon
shade or sown late
Many varieties of spring radish are ready
to harvest in less than a month from
sowing Using a gardening fork harvest
as roots begin to show 1-2rdquo diameter
above the soil Sample one plant to
determine if the rest of the crop is ready
Harvest radish promptly because roots
will quickly spoil in the ground from
heat and maturity Some varieties of
radish greens are edible and often used
in pestos salads and sauteacutes
Sowing and growingHarvesting
HARDINESS ZONE Annual
DAYS TO MATURITY 25-40
DAY TO GERMINATION 3-7
SEEDING DEPTH 12rdquo
PLANT SPACING 2-3rdquo
PLANT HEIGHT 6-8rdquo
ROW SPACING 4-6rdquo
GROWTH HABIT Bulbous rooted upright
SOIL TYPE Loose light fertilized well-drained
TEMP PREFERENCE 50-70 degF
LIGHT PREFERENCE Full sun
TROUBLESHOOTING Monitor regularly for flea beetles and
aphids Water soil directly to avoid saturating greens known
to cause mildew
60TRUELEAFMARKETCOM
Raphanus sativusAnnual
Winter radish is the larger deeper
taproot variation of the smaller spring
crop growing very similar to the spring
radish except needing a little extra time
and space to mature While Daikon is
widely considered the standard of winter
radishes varieties such as Black Spanish
Round China Rose or the hypnotic
Watermelon offer surprising color and
diversity for a winter hardy crop Winter
radish is a frost tolerant cover crop
specifically grown to repair and replenish
poor and uncultivated soils
Winter radish is a cool hardy staple best
sown directly in mid-late summer for a
fall harvest Like many root vegetables
radish does not transplant well and
should not be started indoors Plant 2-3
seeds 12rdquo deep and 1-2rdquo apart in very
loose organic well-drained soil with a
pH of 65-70 Seeds germinate in 3-7
days thinning out best starts to 4-6rdquo apart
depending on variety sown Minimize
nitrogen content when fertilizing to
reduce small spindly roots and excessive
greens Winter radish such as Daikon is
an overwintering cover crop specifically
Many varieties of winter radish are ready
to harvest in about 60-70 days from
sowing Using a gardening fork harvest
as roots begin to show 1-2rdquo diameter
above the soil Sample one plant to
determine if the rest of the crop is ready
Harvest radish promptly because roots
will quickly spoil in the ground from the
first winter frost Not all winter radish is
white and individual color showing will
help determine if roots are ripe
Sowing and growing
Harvesting
HARDINESS ZONE Annual
DAYS TO MATURITY 60-70
DAY TO GERMINATION 3-7
SEEDING DEPTH 12rdquo
PLANT SPACING 4-6rdquo
PLANT HEIGHT 12-18rdquo
ROW SPACING 12-18rdquo
GROWTH HABIT Upright taproot
SOIL TYPE Loose light fertilized well-drained
TEMP PREFERENCE 50-65 degF
LIGHT PREFERENCE Full sun - partial shade
TROUBLESHOOTING Monitor regularly for flea beetles and
aphids Water soil directly to avoid saturating greens known
to cause mildew
grown to repair and replenish poor and
uncultivated soils during the winter
61 TRUELEAFMARKETCOM
Rheum x hybridumPerennial
Rhubarb is mistakenly considered to be
one of the most challenging vegetables
in the home garden because like aspara-
gus requires nearly 3 years before a first
harvest However once fully established
rhubarb will produce annually for the
next 10-20 years as one of the most
frost-hardy crops available Similar to
some berries and fruits edible rhubarb
stalks are sweeter and more ripe the
deeper the color
Rhubarb is a perennial winter hardy
vegetable best if started indoors 8-10
weeks before final spring frost Plant
2-3 seeds 1rdquo deep per cell or peat pot in
loamy fertile and well-drained soil with
a pH of 60-68 Germinates in 7-21 days
choosing healthiest starts for hardening
off and transplanting 36-48rdquo apart to a
sunny compost-rich place in the garden
Rhubarb greens can mature to be as
large as Elephant Ear plants and risks
casting other crops in shade Rhubarb
is a perennial that will appear to die off
each winter only to come right back
at first sign of spring Mature rhubarb
plants can be quickly cloned by splitting
entire plant in half and replanting
Like asparagus rhubarb should not be
harvested until its 3rd year but once
established will produce annually for
the next 10-20 years Rhubarb produces
thick meaty celery-like stalks 9-18rdquo long
when ready to harvest Stalks can be
twisted from the base if ripe enough or
for safety carefully cut from the base
with a knife to not damage roots Similar
to a strawberry edible rhubarb stalks are
sweeter more flavorful the deeper red
the color Rhubarb greens are toxic to
humans and small animals and should be
composted after harvesting
Sowing and growing
Harvesting
HARDINESS ZONE Biennial 2-10 (Perennial 2-7)
DAYS TO MATURITY 3 years
DAY TO GERMINATION 7-21
SEEDING DEPTH 1rdquo
PLANT SPACING 36-48rdquo
PLANT HEIGHT 24-36rdquo
ROW SPACING 4-5 ft
GROWTH HABIT Wide-spreading upright
SOIL TYPE Loamy sandy composted well-drained
TEMP PREFERENCE 50-75 degF
LIGHT PREFERENCE Full sun
TROUBLESHOOTING Watch for beetles Susceptible to
crown rot in poorly drained soils
62TRUELEAFMARKETCOM
Brassica napobrassicaBiennial
Rutabaga is a tenacious and frost-hardy
root vegetable grown very similar to
onion turnip and winter radish and
always tastes best after a light frost or
two Like many cool season favorites
rutabaga is an ideal crop to sow mid-late
summer after spring greens have bolted
and gone to seed Try rutabaga in the
garden alongside onion leek parsnip
and turnip for similar growing feeding
and harvest dates
Rutabaga is a cool-season vegetable sown
in mid-late summer to allow maturing
plants cooler fall weather for harvesting
Like other root vegetables rutabaga
does not transplant well and should
always be directly sown Plant 2-3 seeds
12rdquo deep and 2-3rdquo apart in organically
composted well-tilled and well-drained
soil with a pH of 60-70 Seeds germinate
in 5-14 days thinning healthiest starts
9-12rdquo apart in the garden as true leaves
establish Rutabaga thrives with a top
layer of mulch to help cool soil and
roots Although rutabaga benefits from
regular fertilizing reduce nitrogen-rich
fertilizers known to stunt and deform
root vegetables
Many varieties of rutabaga are ready for
harvest about 90-100 days from sowing
or when roots begin pushing up and
showing 3-5rdquo diameter above soil Ruta-
baga greens are often considered to be a
smoother more tender turnip green and
can be quickly harvested while still young
and tender during root production Ru-
tabaga can be harvested from the ground
like a potato or radish by firmly pulling
out of the soil If possible harvest after
the first fall frost for best flavor
Sowing and growing
Harvesting
HARDINESS ZONE Annual (Biennial 8-10)
DAYS TO MATURITY 90-110
DAY TO GERMINATION 5-14
SEEDING DEPTH 12rdquo
PLANT SPACING 9-12rdquo
PLANT HEIGHT 12-24rdquo
ROW SPACING 18-30rdquo
GROWTH HABIT Bulbous-rooted upright
SOIL TYPE Loose organic composted well-drained
TEMP PREFERENCE 40-65 degF
LIGHT PREFERENCE Full sun - partial sun
TROUBLESHOOTING Susceptible to clubroot and oversatu-
ration known to cause mildew rot and fungal disease Watch
for aphids and flea beetles
63 TRUELEAFMARKETCOM
Salsify is generally ready to harvest in
early fall when the foliage has yellowed
and died Roots taste best if harvested af-
ter a few light frosts Salsify is essentially
a garden weed and may be harvested in
the same way that a weed is carefully up-
rooted from the yard Unlike carrot salsi-
fy roots do not hold flavor for long and
should be used soon after harvest Salsify
may be grown in the garden as a culinary
herb harvested for its top greens rather
than delicate flavorful roots
Harvesting
Tragopogon porrifoliusBiennial
Salsify is a delicate yet nearly foolproof
root vegetable often overshadowed by
more popular Daikon parsnip and
turnip Widely known as Oyster plant
salsify is one of the rare garden selections
grown just as often for its roots as its
flavorful greens and ornamental blooms
Harvest what you need from salsify in the
fall and leave the rest to reseed and over-
winter finishing off the season with bold
and exotic blooms commonly known as
Jerusalem Star
Salsify is a tenacious cool-season crop
with a weed-like hardiness able to be
sown direct 2-3 weeks before final spring
frost or late summer Like many root
crops salsify does not transplant well
and should be sown direct Plant 3-4
seeds 12rdquo deep 1-2rdquo apart in loose
composted well-drained soil with a pH
of 60-75 Seeds germinate in 14-28 days
thinning best starts to 2-4rdquo apart Soil
must be well-tilled 12rdquo deep for roots to
grow unobstructed Salsify thrives from
a fertilizer low in nitrogen to minimize
excess vegetation and spindly deformed
roots
Sowing and growing
HARDINESS ZONE Annual (Biennial 6-8)
DAYS TO MATURITY 120-150
DAY TO GERMINATION 14-28
SEEDING DEPTH 12rdquo
PLANT SPACING 2-4rdquo
PLANT HEIGHT 12-36rdquo
ROW SPACING 18-24rdquo
GROWTH HABIT Weedy upright
SOIL TYPE Loose sandy composted well-drained
TEMP PREFERENCE 40-65 degF
LIGHT PREFERENCE Full sun - partial sun
TROUBLESHOOTING Salsify is considered a weedy invasive
species with no serious pests or diseases Allow soil to dry
between waterings
64TRUELEAFMARKETCOM
Spinacia oleraceaAnnual
Spinach is one of the fastest most tender
and delicious ldquocut and come againrdquo
varieties in the home garden A quickly
maturing leafy vegetable spinach is able
to be sown in spring summer and fall
in many cooler gardens for year-round
harvests Similar to other leafy greens
spinach thrives from frequent harvesting
and is known to vigorously regrow cut
leaves in just days Garden spinach
features unique varieties to try all year
long from classic Bloomsdale and Giant
Nobel to the exclusive French heirloom
Viroflay
Spinach is a cool weather favorite able to
be sown in early spring late summer or
winters in warm enough regions Spinach
can be started indoors 4-6 weeks prior
to final spring frost but for best starts
sow directly outdoors 5-6 weeks prior
to final spring frost Sow 2-3 seeds 12rdquo
deep and 4rdquo apart in fertile composted
well-drained soil with a pH of 65-70
Seeds germinate in 7-21 days thinning
to 1 plant every 6-12rdquo in the garden as
true leaves establish Harvest large outer
leaves often to boost production while
allowing smaller leaves to continue to
mature Avoid nitrogen-rich fertilizers
known to spoil spinach flavor
Most varieties of spinach are ready to
harvest 35-50 days from sowing Spinach
is one of the most productive and most
popular ldquocut and come againrdquo varieties in
the home garden and takes only days for
regrowth Using scissors simply snip larg-
er outer leaves for harvest while allowing
smaller leaves to continue vegetative
growth Harvest often to encourage pro-
duction Shoots that begin to bolt can be
harvested to redirect plant energy from
seed production to leafing
Sowing and growing
Harvesting
HARDINESS ZONE Annual
DAYS TO MATURITY 35-50
DAY TO GERMINATION 7-21
SEEDING DEPTH 12rdquo
PLANT SPACING 2-4rdquo
PLANT HEIGHT 6-12rdquo
ROW SPACING 12rdquo
GROWTH HABIT Leafy upright
SOIL TYPE Fertile organic composted well-drained
TEMP PREFERENCE 40-70 degF
LIGHT PREFERENCE Full sun - partial sun
TROUBLESHOOTING Susceptible to fungus and mildew from
oversaturation Monitor regularly for aphids and leaf miners
65 TRUELEAFMARKETCOM
Cucurbita pepoAnnual
Summer squash boasts one of the most
productive reliable and fastest growing
crops available in the summer Whether
zucchini crookneck cousa or Mexican
squash once these sun-loving squashes
start fruiting theyrsquoll continue producing
non-stop all the way until the frost
Summer squash thrives from frequent
harvests and if left unattended for even
a day or two is notorious for spitting out
unexpected 18-24rdquo monsters when you
werenrsquot looking
Summer squash is a full sun staple able
to be sown directly after the final spring
frost but for earliest starts begin indoors
3-4 weeks prior Plant 2-3 seeds 1rdquo deep
per cell or every 4-6rdquo in medium moist
organic well-drained soil with a pH of
65-70 Whether transplanting or sowing
direct plant seeds on 6-8rdquo tall mounds of
soil to accommodate heavy vegetation
Germinates in 4-14 days thinning out
best starts and transplants to 1 plant
24-36rdquo apart per mound Summer squash
benefits from a top layer of mulch to
help cool soil and roots Fertilize after
the first set of blooms appear and again
Sowing and growing
HARDINESS ZONE Annual
DAYS TO MATURITY 50-60
DAY TO GERMINATION 4-14
SEEDING DEPTH 1rdquo
PLANT SPACING 24-36rdquo
PLANT HEIGHT 36-48rdquo
ROW SPACING 36-48rdquo
GROWTH HABIT Leafy branching mound
SOIL TYPE Medium moist organic fertile well-drained
TEMP PREFERENCE 60-85 degF
LIGHT PREFERENCE Full sun
TROUBLESHOOTING Monitor regularly for disease-carry
pests such as squash bugs squash borers and cucumber
beetles
during fruiting stage
HarvestingSummer squash is one of the fastest most
productive crops in the garden and with
frequent harvests will continue to
produce all the way until the frost Most
varieties are ready to harvest 50-60 days
from sowing or ideally when 6-8rdquo long
Summer squash will quickly reach a
starchy and less flavorful 18-24rdquo long if
not harvested promptly Using shears or a
knife carefully clip off fruits at the stem
Do not harvest young and tender squash
by twisting or pulling
66TRUELEAFMARKETCOM
Cucurbita maximaAnnual
Winter squash definitely grows one of the
most fun exciting and durable fruits to
ever come out of the garden Despite be-
ing called a ldquowinterrdquo squash these plants
are grown in high heat and full sun just
like summer squash staples zucchini and
yellow crookneck Winter squash features
a timeless selection of exotic decorative
and deliciously edible heirlooms such as
butternut acorn cushaw hubbard and
the autumn favorite turban squash
Winter squash is a full sun staple best if
sown directly after the final spring frost
but for earliest starts begin indoors
3-4 weeks prior Plant 2-3 seeds 1rdquo deep
per cell in medium moist organic well-
drained soil with a pH of 65-70 Whether
transplanting or sowing direct plant seeds
on 6-8rdquo tall mounds of soil to accommo-
date heavy trailing vegetation Germinates
in 4-14 days thinning out best starts and
indoors transplants to 1 plant 8-12 ft apart
per mound depending on variety Winter
squash benefits from a top layer of mulch
to help cool soil and roots Fertilize after
the first set of blooms appear and again
during fruiting stage
Most small to medium winter squash are
ready to harvest about 100 days from sow-
ing while larger varieties require an extra
few weeks Regardless of color or size
winter squash are generally ripe once the
stem is solid and rind is tough unable to
be pierced by a fingernail Clip squash
from the vine with shears leaving about
4rdquo of stem intact and once harvested
leave out to naturally cure in the sun for
10-14 days The curing process will help
winter squash last up to 3 months longer
after harvesting
Sowing and growing
Harvesting
HARDINESS ZONE Annual
DAYS TO MATURITY 80-120
DAY TO GERMINATION 4-14
SEEDING DEPTH 1rdquo
PLANT SPACING 8-12 ft
PLANT HEIGHT 9-15rdquo
ROW SPACING 72rdquo
GROWTH HABIT Heavy-spreading mound
SOIL TYPE Medium moist organic fertile well-drained
TEMP PREFERENCE 60-85 degF
LIGHT PREFERENCE Full sun
TROUBLESHOOTING Watch for disease-carry pests such as
squash bugs squash borers and cucumber beetles
67 TRUELEAFMARKETCOM
Fragaria ananassaAnnual
Strawberry plants mature at a tidy 4-6rdquo
tall and trailing just as wide making it
the premier crop for windowsill patio
and container gardening Most strawber-
ry plants are ready for harvest after about
a month and are always the first fruit to
ripen each spring Strawberries are one
of the most exciting rewarding and
delicious fruits for beginners and kids
currently in a renaissance as a world-class
hydroponic
Strawberry is a quickly maturing crop
that thrives in pots and containers able
to be sown direct after final spring frost
but for best starts begin indoors 4-6
weeks sooner Plant 2-3 seeds 12rdquo deep
per individual cell or 2-3rdquo in the garden
in organically rich consistently moist
well-drained soil with a pH of 55-70
Seeds are traditionally cold stratified
(refrigerated) for an entire month be-
fore sowing to help germination Seeds
germinate in 14-28 days thinning best
starts and transplants to 4-6rdquo apart in the
garden or container Plants are a full sun
crop but benefit from shade if summer
heat exceeds 90 degF Add a nutrient-rich
compost after the first harvest
There are three different types of
strawberries with three different fruiting
schedules over the course of the summer
Know which type you have bought before
sowing June-Bearing seeds produce all
their fruit at once in June Ever-Bearing
strawberries fruit heavily in the spring
and fall with a light harvest in summer
Day-Neutral seeds steadily produce all
through the season Strawberries are
ready for harvest when plump and bright
red by pinching off at the stem
Sowing and growing
Harvesting
HARDINESS ZONE Annual (Perennial 5-8)
DAYS TO MATURITY 30-45
DAY TO GERMINATION 14-28
SEEDING DEPTH 12rdquo
PLANT SPACING 5-6rdquo
PLANT HEIGHT 4-6rdquo
ROW SPACING 36rdquo
GROWTH HABIT Small trailing mound
SOIL TYPE Moist fertile composted well-drained
TEMP PREFERENCE 60-80 degF
LIGHT PREFERENCE Full sun - partial sun
TROUBLESHOOTING Susceptible to aphids spider mites and
strawberry weevils Plants suffer in poorly drained soils
68TRUELEAFMARKETCOM
Solanum lycoperscium Annual
Tomato is the quintessential staple of
summer gardening and arguably offers
the most seed diversity among all season-
al fruits Available in every possible color
shape and size tomato is a high-heat
and full sun favorite that thrives from
container and patio gardening Along
with cucumber and summer squash the
tomato plant is one of the most produc-
tive hardy and heavy fruiting crops of
the season
Tomato is a warm weather crop best if
started indoors about 6-8 weeks prior
to final spring frost Plant 2-3 seeds
14rdquo deep per individual cell in fertile
humusy and well-drained soil with a
pH of 60-68 Germinates in 5-14 days
transplanting starts to 1 per pot or
18-36rdquo apart in the garden depending
on variety Before sowing know whether
the seed is determinate or indetermi-
nate as each will have different grow
habits Determinate varieties mature to
a predetermined size producing all of
its fruit at once with only minor need
for staking Indeterminate varieties grow
indefinitely through the season produc-
ing non-stop fruit while requiring heavy
trellis support
Smaller varieties such as the cherry are
ready to harvest at about 80 days from
sowing while larger varieties like the
beefsteak may require a few extra weeks
Although vine-ripened fruit is always
preferred tomatoes can just as easily
be harvested early and ripen indoors by
being stored in a paper bag or box along
with a banana for its ethylene gas Ripest
tomatoes may be pulled from the vine by
hand while more firm ones should be
clipped with shears
Sowing and growing
Harvesting
HARDINESS ZONE Annual
DAYS TO MATURITY 80-110
DAY TO GERMINATION 5-14
SEEDING DEPTH 14rdquo
PLANT SPACING 18-36rdquo
PLANT HEIGHT 36-72rdquo
ROW SPACING 24-36rdquo
GROWTH HABIT Tall-reaching upright
SOIL TYPE Moist fertile composted well-drained
TEMP PREFERENCE 65-85 degF
LIGHT PREFERENCE Full sun
TROUBLESHOOTING Susceptible to fusarium wilt verti-
cillium wilt and blight Watch for aphids flea beetles and
tomato hornworms
69 TRUELEAFMARKETCOM
Brassica rapa subsp rapaAnnual
Turnip is one of the unsung heroes of
the garden bed along with rutabaga
kohlrabi and celeriac One of the rare
root crops whose leafy greens might
be more popular than the root itself
tender turnip greens are able to be
harvested well into fall similar to spinach
or collards Most varieties of turnip are
ready to harvest in about 50 days when
bright purple roots begin to show but
always taste best if harvested after a light
frost or two
Turnip is a cool-season vegetable sown
3-4 weeks before final spring frost or
mid-late summer to allow maturing
plants cooler fall weather for harvesting
Like other root vegetables turnip does
not transplant well and should always be
directly sown Plant 2-3 seeds 12rdquo deep
and 1-2rdquo apart in organically composted
well-tilled and well-drained soil with a
pH of 60-75 Seeds germinate in 3-10
days thin out healthiest starts to every
4-6rdquo in the garden as true leaves estab-
lish Turnip thrives with a top layer of
mulch to help cool soil and roots Unlike
other root vegetables turnip benefits
from a nitrogen-rich fertilizer during
vegetative growth
Depending on variety turnip is ready for
harvest about 40-70 days from sowing
or when roots begin pushing up and
showing 3-4rdquo diameter above soil Turnip
greens are just as popular as the turnip
root and can be quickly harvested while
still young and tender during root pro-
duction Turnips are shallow-rooted and
can be harvested from the ground like a
potato or radish by firmly pulling out of
the soil If possible harvest after the first
autumn frost for best flavor
Sowing and growing
Harvesting
HARDINESS ZONE Annual
DAYS TO MATURITY 40-60
DAY TO GERMINATION 3-10
SEEDING DEPTH 12rdquo
PLANT SPACING 4-6rdquo
PLANT HEIGHT 6-12rdquo
ROW SPACING 12-15rdquo
GROWTH HABIT Bulbous-rooted upright
SOIL TYPE Loose organic composted well-drained
TEMP PREFERENCE 40-65 degF
LIGHT PREFERENCE Full sun - partial sun
TROUBLESHOOTING Susceptible to clubroot and oversatu-
ration known to cause mildew rot and fungal disease Watch
for aphids and flea beetles
70TRUELEAFMARKETCOM
Citrullus lanatus Annual
Watermelon is the unofficial herald of
summer and without doubt the largest
and juiciest fruit you could possibly
hope for in the garden Most popularly
known as a red-flesh fruit watermelon
is also available in both yellow and
orange along with a surprising selection
of shape and size Most varieties boast
20-30 pound fruits with regular watering
and like pumpkins and gourds may
be pruned and pinched back to direct
growth towards competition size melons
Watermelon is best sown direct after the
final spring frost but for earliest starts
begin indoors 3-4 weeks prior Plant 2-3
seeds 1rdquo deep per individual cell or 6-8
ft apart directly in the garden in loamy
consistently moist and well-drained
soil with a pH of 60-68 Watermelon
performs best when grown on 8-10rdquo tall
soil mounds to accommodate long heavy
trailing vines Watermelon is a heavy
feeder and benefits from a nitrogen-rich
fertilizer every 3 weeks until fruiting
then minimize nitrogen content in
fertilizer Fruits contain 90 water and
plants require heavy routine watering to
produce 20-30 lb melons
Most watermelons are ready to harvest
about 90 days from sowing or when
showing signs of ripeness The most
important tip to picking vine-ripened
watermelon is to locate the small tendril
attached to the melon on the vine If this
tendril is completely brown and dead
the melon is ripe for harvest but if the
tendril is still even slightly green the
watermelon is not ready Heirloom water-
melon rinds will soften slightly when ripe
and feel less like an impenetrable gourd
Use scissors or shears to carefully remove
watermelon from the vine
Sowing and growing
Harvesting
HARDINESS ZONE Annual
DAYS TO MATURITY 80-110
DAY TO GERMINATION 14-12rdquo
SEEDING DEPTH 1rdquo
PLANT SPACING 6-8 ft
PLANT HEIGHT 9-15rdquo
ROW SPACING 5-8 ft
GROWTH HABIT Heavy-trailing mound
SOIL TYPE Loose moist fertile well-drained
TEMP PREFERENCE 65-95 degF
LIGHT PREFERENCE Full sun
TROUBLESHOOTING Susceptible to wilt mildew and rot
Watch for cucumber beetles aphids and squash bugs
At trueleafmarketcom it is easy to find
everything you are looking for to start
growing today With an easy-to-use
website discover thousands of varieties
of garden seeds and growing supplies to
grow this season and for seasons to come
We Believe Everyone Should
Experience the Joy of Growing
Your Own Food
DATE NOTES
DATE NOTES
DATE NOTES
DATE NOTES
DATE NOTES
- Vegetable-growing-guide-hyperlink_01
- Vegetable-growing-guide-hyperlink_02
- Vegetable-growing-guide-hyperlink_03
- Vegetable-growing-guide-hyperlink_04
- Vegetable-growing-guide-hyperlink_05
- Vegetable-growing-guide-hyperlink_06
- Vegetable-growing-guide-hyperlink_07
- Vegetable-growing-guide-hyperlink_08
- Vegetable-growing-guide-hyperlink_09
- Vegetable-growing-guide-hyperlink_10
- Vegetable-growing-guide-hyperlink_11
- Vegetable-growing-guide-hyperlink_12
- Vegetable-growing-guide-hyperlink_13
- Vegetable-growing-guide-hyperlink_14
- Vegetable-growing-guide-hyperlink_15
- Vegetable-growing-guide-hyperlink_16
- Vegetable-growing-guide-hyperlink_17
- Vegetable-growing-guide-hyperlink_18
- Vegetable-growing-guide-hyperlink_19
- Vegetable-growing-guide-hyperlink_20
- Vegetable-growing-guide-hyperlink_21
- Vegetable-growing-guide-hyperlink_22
- Vegetable-growing-guide-hyperlink_23
- Vegetable-growing-guide-hyperlink_24
- Vegetable-growing-guide-hyperlink_25
- Vegetable-growing-guide-hyperlink_26
- Vegetable-growing-guide-hyperlink_27
- Vegetable-growing-guide-hyperlink_28
- Vegetable-growing-guide-hyperlink_29
- Vegetable-growing-guide-hyperlink_30
- Vegetable-growing-guide-hyperlink_31
- Vegetable-growing-guide-hyperlink_32
- Vegetable-growing-guide-hyperlink_33
- Vegetable-growing-guide-hyperlink_34
- Vegetable-growing-guide-hyperlink_35
- Vegetable-growing-guide-hyperlink_36
- Vegetable-growing-guide-hyperlink_37
- Vegetable-growing-guide-hyperlink_38
- Vegetable-growing-guide-hyperlink_39
- Vegetable-growing-guide-hyperlink_40
- Vegetable-growing-guide-hyperlink_41
- Vegetable-growing-guide-hyperlink_42
- Vegetable-growing-guide-hyperlink_43
- Vegetable-growing-guide-hyperlink_44
- Vegetable-growing-guide-hyperlink_45
- Vegetable-growing-guide-hyperlink_46
- Vegetable-growing-guide-hyperlink_47
- Vegetable-growing-guide-hyperlink_48
- Vegetable-growing-guide-hyperlink_49
- Vegetable-growing-guide-hyperlink_50
- Vegetable-growing-guide-hyperlink_51
- Vegetable-growing-guide-hyperlink_52
- Vegetable-growing-guide-hyperlink_53
- Vegetable-growing-guide-hyperlink_54
- Vegetable-growing-guide-hyperlink_55
- Vegetable-growing-guide-hyperlink_56
- Vegetable-growing-guide-hyperlink_57
- Vegetable-growing-guide-hyperlink_58
- Vegetable-growing-guide-hyperlink_59
- Vegetable-growing-guide-hyperlink_60
- Vegetable-growing-guide-hyperlink_61
- Vegetable-growing-guide-hyperlink_62
- Vegetable-growing-guide-hyperlink_63
- Vegetable-growing-guide-hyperlink_64
- Vegetable-growing-guide-hyperlink_65
- Vegetable-growing-guide-hyperlink_66
- Vegetable-growing-guide-hyperlink_67
- Vegetable-growing-guide-hyperlink_68
- Vegetable-growing-guide-hyperlink_69
- Vegetable-growing-guide-hyperlink_70
- Vegetable-growing-guide-hyperlink_71
- Vegetable-growing-guide-hyperlink_72
- Vegetable-growing-guide-hyperlink_73
- Vegetable-growing-guide-hyperlink_74
- Vegetable-growing-guide-hyperlink_75
- Vegetable-growing-guide-hyperlink_76
-
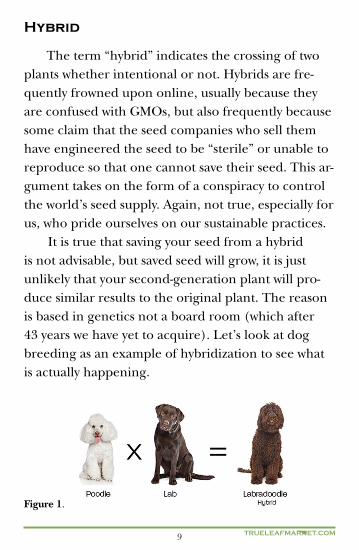
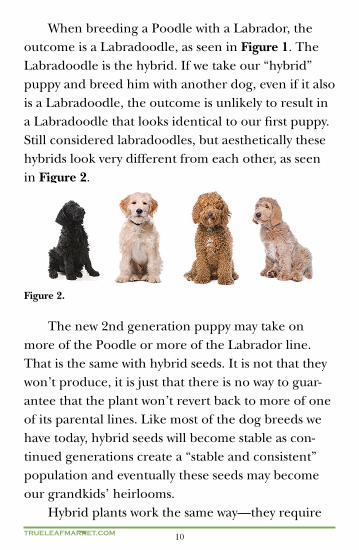