group blocks and management workbook · pdf file · 2018-01-19opera system training...
TRANSCRIPT

OPERA System Training Workbook
Group Blocks and Management
1 │
Wyndham Hotel Group, LLC (“WHG”) offers the suggestions in this presentation and in any provided materials for your consideration. You have full and complete control over, and responsibility for, your contracts, daily operations, labor relations, employment practices, as well as the safety and security of your property. WHG does not represent, warrant or make any guaranty regarding the accuracy or completeness of the information provided, or that you will achieve any specific results if you implement these suggestions. Nothing herein constitutes an offer, commitment or obligation of any kind on the part of WHG. ©Wyndham Hotel Group, LLC. All rights reserved. Except as otherwise noted on any specific forms or pages, these materials are confidential and may not be reproduced in any manner without the prior written consent of Wyndham Hotel Group, LLC.
Group Blocks and Management
Document Overview
Introduction Group blocks are an important component of the OPERA system, allowing the creation of “Groups” or blocks of rooms to be held and reserved using a specific price and/or conditions.
This workbook delivers the foundation for the use and management of Group Blocks.
Use this workbook as a standalone resource or in conjunction with the available OPERA Short Videos, available via the SoHO Learning Zone.
Contents
Section See Page
Building New Group Blocks 2
Allocating Inventory & Pricing to Blocks 12
Group Reservations 17
Canceling a Group Block 26

OPERA System Training Workbook
Group Blocks and Management
Return to the Top 2 │
Building New Group Blocks
Overview
Introduction Groups or Blocks may also be referred to as Group Master or Business Blocks. Groups are created in OPERA to allocate inventory and pricing for a specific time frame to a business or special event. Groups are generally classified as having 10 or more rooms.
There are 2 different variations of blocks depending on the Brand and
version of OPERA installed, Quick Business Blocks and Business Blocks.
Accessing Blocks
Verify the version of blocks used in OPERA by accessing Blocks in the PMS.
To access blocks, follow one of the paths below.
Dashboard (Ctrl + F4) > “Make a New Block” or “Edit an Existing
Block”
Menu Path Reservations > Blocks
The Blocks screen will appear. Review the window title to determine the block type installed in OPERA, either Quick Business Blocks or Business Blocks. Refer to the appropriate sections below on building new group
blocks.
Contents
Topic See Page
Building a New Quick Business Block 3
Building a New Business Block 7

OPERA System Training Workbook
Group Blocks and Management
Return to the Top 3 │
Building a New Quick Business Block
Building a New Quick Business Block
In this section, we will review:
- Access Quick Business Blocks
- Quick Business Block Header Screen
- Build a New Quick Business Block
Access Quick Business Blocks
To access Quick Business Blocks in the OPERA PMS, follow one of the paths below:
Dashboard (Ctrl + F4) > “Make a New Block” or “Edit an Existing Block”
Menu Path Reservations > Blocks
Click NEW to create a new block.
Quick Business Block Header Screen
The Quick Business Block screen contains the components that make up the group block. This includes the group information, status and control functions. Use the grid below to understand the different parts of the Quick Business Block screen.
Part Description
1 Group Information. This sections contains the group name, group dates, block code, status and market/source information.
2 Control Information. This section contains the controls of the block and how the block is the be managed.
3 Block Options and Save buttons.
Continued on next page

OPERA System Training Workbook
Group Blocks and Management
Return to the Top 4 │
Building a New Quick Business Block, Continued
Build a New Quick Business Block
Follow the steps in the table below to create a new Quick Business Block.
Step Action Screenshot/Notes
1 Enter group name in to the Name field.
Note: Special characters cannot be used in this field
except for “/”.
For hotels connected to the Wyndham CRS (WYN2), there is a 32-character limit. For hotels connected to SynXis CR (SYNXIS2), there is a 60-character limit.
2 Enter Start and End
Date of the group. Do not include any shoulder dates.
3 Block Code will auto populate, format is based on the CRS system. Block codes
must be unique.
Block codes formats are:
Wyndham CRS will be in “CGDDAA” format. All groups start with CG, DD is the arrival day of the group and AA is the first 2 alpha-numeric characters of the group name. Example CG30OP
SynXis CR will be in “MMDDYYAAA”. MM is the arrival month of the group, DD is the arrival day, YY is the year and AAA is the first 3 alpha-numeric characters of the group name. Example 063017OPE
4 Status will remain in TEN or tentative until inventory is allocated.
5 Res Type is a defaulted value and should not be
changed.
6 Market & Source codes need to be assigned using the options listed in the drop down
menu.

OPERA System Training Workbook
Group Blocks and Management
Return to the Top 5 │
Continued on next page
Building a New Quick Business Block, Continued
Build a New Quick Business Block, continued
Step Action Screenshot/Notes
7 Elastic is used to allow shoulder dates to be used for reservations for flexible arrival, departure dates and room types when booking against a block with this feature activated. Shoulder dates can be assigned after the group header has been saved.
8 Cutoff Date & Cutoff Days is used to assign a date or rolling number of days when unused room inventory will be dropped or cutoff from the block and CRS.
Note: You can choose either Cutoff Date or Cutoff Days
Cutoff Date – After this date any rooms not picked up by the group will be released back into house inventory.
Cutoff Days – Sets a fixed number of days in advance of each night to release rooms that have not been picked up for that night only. This is a rolling number of days remaining before cut off each night of the block.
9 Rate Code & Packages are used to attach a specific rate code and it corresponding rate to a group and/or add an existing package element(s) to the
group.
Note: Rate Code is generally not used for groups.
10 Resv Method is an indicator on how reservations will be made for this group. Choose a method from
the drop down menu.
Note: This indicator is displayed to the front desk during a new group reservation.
Continued on next page

OPERA System Training Workbook
Group Blocks and Management
Return to the Top 6 │
Building a New Quick Business Block, Continued
Build a New Quick Business Block, continued
Step Action Screenshot/Notes
11 Type is used for informational purposes only to define the type of group. Choose a type from the drop
down menu.
Note: Some OPERA versions may not have this option.
12 Control Block Locally when checked is used to prevent this group from being bookable in the CRS, reservations may only be made at
the hotel level.
Note: This feature is only supported for hotels connected to the Wyndham CRS, it is not supported in SynXis CR. For hotels connected to SynXis CR, this feature must be configured in the SynXis Control Center.
13 Once all information is completed in the block header, press SAVE.
The block is now built.
You can now set shoulder dates if you
selected Elastic.
To allocate inventory and rates, refer to the next section, Allocating Inventory and Pricing to Blocks.
OPERA System Training Workbook
Group Blocks and Management
Return to the Top 7 │
Building a New Business Block
Building a New Business Block
In this section, we will review:
- Access Business Blocks
- Business Block Header Screen
- Build a New Business Block
Access Business Blocks
To access Business Blocks in the OPERA PMS, follow one of the paths below:
Dashboard (Ctrl + F4) > “Make a New Block” or “Edit an Existing Block”
Menu Path Reservations > Blocks
Click NEW to create a new block.
Continued on next page

OPERA System Training Workbook
Group Blocks and Management
Return to the Top 8 │
Building a New Business Block, Continued
Access Business Blocks, continued
Business Block Header Screen
The Business Block screen contains the components that make up the group block. This includes the group information, status and control functions. Use the grid below to understand the different parts of the Business Block screen.
Part Description
1 Group Information. This sections contains the group name, group dates, status and market/source information.
2 Control Information. This section contains block code and the controls of the block and how the block is the be managed.
3 Room Revenue / Catering Revenue. Provides a summary overview of revenue attributes for rooms and catering of the block.
4 Block Options and Save buttons.
Continued on next page

OPERA System Training Workbook
Group Blocks and Management
Return to the Top 9 │
Building a New Business Block, Continued
Build a New Business Block
Follow the steps in the table below to create a new Business Block.
Step Action Screenshot/Notes
1 Enter group name in to the Name field.
Note: Special characters cannot be used in this field
except for “/”.
For hotels connected to the Wyndham CRS (WYN2), there is a 32-character limit. For hotels connected to SynXis CR (SYNXIS2), there is a 60-character limit.
2 Enter Start and End Date of the group.
Note: Do not include any shoulder dates.
3 Status will remain TEN or Tentative until
inventory is allocated.
4 Market & Source codes need to be assigned using the options listed in the drop down
menu.
Continued on next page

OPERA System Training Workbook
Group Blocks and Management
Return to the Top 10 │
Building a New Business Block, Continued
Build a New Business Block, continued
Step Action Screenshot/Notes
5 Block Code will auto populate, format is based on the CRS system. Block codes
must be unique.
Block codes formats are:
Wyndham CRS will be in “CGDDAA” format. All groups start with CG, DD is the arrival day of the group and AA is the first 2 alpha-numeric characters of the group name. Example CG30OP
SynXis CR will be in “MMDDYYAAA”. MM is the arrival month of the group, DD is the arrival day, YY is the year and AAA is the first 3 alpha-numeric characters of the group name. Example 063017OPE
6 Res Type is a defaulted value and should not be
changed.
7 Print Rate is checked by default.
Note: If unchecked, the rate will not print on any customer facing print outs such a registration card or guest folio.
8 Suppress Rate is unchecked by default.
Note: If checked, the rate amount will not appear on the Reservation List Grid screen when making a group reservation.
9 Rate Code & Packages are used to attach a specific rate code and it corresponding rate to a group and/or add an existing package element(s) to the
group.
Note: Rate Code is generally not used for groups.
Continued on next page

OPERA System Training Workbook
Group Blocks and Management
Return to the Top 11 │
Building a New Business Block, Continued
Build a New Business Block, continued
Step Action Screenshot/Notes
10 Inv. Control allows the ability to set shoulder dates and allotment controls to the group inventory. Shoulder dates can be assigned after the group header
has been saved.
Non Elastic – The group is confined to the set amount of inventory rooms blocked and reservation dates must be within the start and end dates of the block.
Elastic – Allows the ability to stretch the block to accommodate reservation demand over and above the number of allotted rooms given the hotel still has availability and/or stay dates of the block.
Sell Limit – Same as Elastic, but inventory limits can be placed instead of using hotel availability.
11 Cutoff Date & Cutoff Days is used to assign a date or rolling number of days when unused room inventory will be dropped or cutoff from the block
and CRS.
Note: You can choose either Cutoff Date or Cutoff Days
Cutoff Date – After this date any rooms not picked up by the group will be released back into house inventory.
Cutoff Days – Sets a fixed number of days in advance of each night to release rooms that have not been picked up for that night only. This is a rolling number of days remaining before cut off each night of the block.
12 Follow up Date can be used as a reminder to staff to follow up on this block on a specified date.
13 Decision Date can be used as a reminder to staff on the date the group must make a decision.
14 Once complete, click SAVE. The block is now built. You can now set shoulder dates if you selected Elastic
or Sell Limit.
To allocate inventory and rates, refer to the next section, Allocating Inventory
and Pricing to Blocks.
OPERA System Training Workbook
Group Blocks and Management
Return to the Top 12 │
Allocating Inventory & Pricing to Blocks
Overview
Introduction Once the group block header has been created and saved, inventory and pricing must be set before reservations can be made against the block.
Contents
Topic See Page
Allocating Inventory and Pricing 13

OPERA System Training Workbook
Group Blocks and Management
Return to the Top 13 │
Allocating Inventory and Pricing
Allocating Inventory and Pricing
In this section, we will review:
Access Grid screen
Grid Screen
Allocate Inventory and Pricing in the Grid
Change existing Inventory / Pricing in the Grid
Access Grid Screen
Once the Group Block Header is completed and saved, use the GRID button to access the Grid screen from within the Block Header Screen.
Grid Screen
Part Description
1 Search Criteria section where the Date field will be the start date of the block as long as the block does not occur in the past. Other components can be filtered and may vary by OPERA version installed.
2 Inventory/Rate Grid which list each room type, inventory allocations and rates by day. Dates listed in yellow indicate shoulder dates if the Elastic option was checked on the group header and shoulder dates entered. Dates in white are within the start and end date of the block.
3 Grid Function Buttons allows access to several grid features.
Continued on next page

OPERA System Training Workbook
Group Blocks and Management
Return to the Top 14 │
Allocating Inventory and Pricing, Continued
Allocate Inventory and Pricing in the Grid
Follow the steps in the table below to allocate inventory and pricing in the grid screen.
Step Action Screenshot/Notes
1 To start allocating inventory and pricing for the block, use the RANGE button located at the
bottom of the grid.
2 Enter a date range to apply new rates and inventory to the block. In the Date Range section, by default the Core radio button is selected and applies to the block core dates From/Nights/To values above. Optionally, Shoulder Begin and Shoulder End can be selected for elastic blocks or All Dates for both Core and Shoulder dates.
Note: Cutoff Date and Cutoff Days should not be used since these values are placed on the Block Header.
3 In the room type section, select the Room Type(s) this action is to apply to. If inventory allotments and rates are the same, multiple room types can be selected. If not, each room type, inventory and rate combination must be applied as a separate action.
4 In the Values section, specify the No. of Rooms to allocate for the room type(s).
- Wyndham CRS hotels, rates need to be filled in the Rate 1, 2, 3 & 4 fields regardless if there are rates changes.
- SynXis CR hotels, rates need to be filled in the Rate 1 & 2 fields only.
If any extra adult charge, place the additional amount in the Addl. Rate field. If no extra occupant charge, make this value 0.00.
Continued on next page

OPERA System Training Workbook
Group Blocks and Management
Return to the Top 15 │
Allocating Inventory and Pricing, Continued
Allocate Inventory and Pricing in the Grid, continued
Step Action Screenshot/Notes
5 Click OK to apply action.
Result: The grid updates.
6 Repeat step 1 - 5 for additional Room Type / Inventory / Rate combination. Once complete, the grid screen list the room allocations and rate pricing. You can confirm correct pricing by clicking on the + next to Rates.
7 Click CLOSE to return to the Block Header.
8 Once all inventory and pricing is complete, the Status of the block must be changed to DEFINITE.
IMPORTANT: Do not leave a block in Tentative status with inventory allocations and pricing applied. All blocks built will flow up to the CRS regardless of the block status. This will cause an inventory inbalance between CRS and OPERA.
Continued on next page

OPERA System Training Workbook
Group Blocks and Management
Return to the Top 16 │
Allocating Inventory and Pricing, Continued
Change existing Inventory / Pricing in the Grid
Changes to inventory allocations and pricing can be made from the grid screen after the block status has been changed to Definite.
Field Description
Original Displays the room block originally created when the status was changed to Definite.
Current Displays the number of rooms currently blocked. Includes both picked-up and non-pick-up rooms.
Pickup Displays the number of rooms picked up per room type per day.
Sell Limit Displays the current sell limit. This feature is only available for certain versions of OPERA if Sell Limit was selected in the group header.
Rates 1-4, Add Rate Displays the rates for each occupancy.
Additional Information
Changes to allocations and pricing can be made directly from the Grid screen.
To change allocations, insert the cursor into the CURRENT field and change inventory. If there are any rooms already picked up, this number cannot be less than rooms currently picked up.
To change pricing, insert the cursor into the RATE 1, 2 ,3, 4 or ADD RATE fields. Pricing changes do not affect reservations already picked up.
Changes are updated immediately.

OPERA System Training Workbook
Group Blocks and Management
Return to the Top 17 │
Group Reservations
Overview
Introduction Group reservations can be managed from within the group block itself for a variety of functions including creating new group reservations, viewing and managing existing reservations, updating all reservations in the block and additional options.
Access Group Reservations
Reservations can be accessed from directly within the group block using the Resv. button in the block header.
Note: If this is the first time accessing the Resv. button from the block header, OPERA will ask “Post Master reservation will be created. Would you like to continue?” Answer YES. If answering No, the Reservation List screen
cannot be accessed.
Contents
Topic See Page
Reservation List Screen Overview 18
Group Reservation Options 19
Block Options 22
Group Reservation Mass Update 24

OPERA System Training Workbook
Group Blocks and Management
Return to the Top 18 │
Reservation List Screen Overview
Reservation List screen
The Reservation List screen allows the ability to create a new reservation or edit an existing reservation.
Part Description
1 Reservation List – This section list all reservations attached to the block.
2 Room Type List – Displays a list of all room type(s) in the hotel. Depending on the menu option selected, the grid will display the number of available rooms available, picked up, or the rates by occupancy.
3 Group Reservations Options and Save buttons

OPERA System Training Workbook
Group Blocks and Management
Return to the Top 19 │
Group Reservation Options
Group Reservation Options
In this section, we will review the following Group Reservation Options:
- Access Group Options
- Rooming List
- Check In Group
- Room Assign
- Room Status
- Print Registration Cards
- Cut Keys
- Confirmation
Access Group Options
Click the GROUP OPT button to access
group options from the Reservation List
screen.
Rooming List Rooming list is used for creating new reservations, usually used for a rooming list group where reservations can be created in a bulk process. Follow the Steps in the table below to complete a rooming list.
Step Action Screenshot
1 When the Rooming List screen appears, the first line will have the group name in the Name field with the group’s arrival and departure date. Fill in guest name in the Name and First fields and correct dates if necessary.
2 Select a Room Type using the drop down arrow. Only room types attached to the group can be used. Fill in Rms, Adult & Child fields.
Continued on next page

OPERA System Training Workbook
Group Blocks and Management
Return to the Top 20 │
Group Reservation Options, Continued
Rooming List, continued
Step Action Screenshot
3 Scroll over and insert Payment type and CC No. if applicable.
4 Use the arrow key to move down the list until the rooming list is complete.
5 Share reservations can be created in the list by identifying the first sharer, then select one or more consecutive reservations immediately following the first sharer. An OPERA window may prompt to select the appropriate type of share amounts.
If no shares are to be created, skip to the next step.
6 Click the SAVE button. OPERA will create the reservations and insert the confirmation number(s) in the Conf. No. field.
Note: If shares were created, they are denoted with an asterisk (*) next to the confirmation number.
7 Click CLOSE to exit.
Continued on next page

OPERA System Training Workbook
Group Blocks and Management
Return to the Top 21 │
Group Reservation Options, Continued
Check In Group
Allows for a mass check in of all reservations which have been assigned to a room with a housekeeping status of vacant clean or vacant inspected room (if Inspected feature is active for hotel) for the group at one time. This option is available when the arrival date of the group is the same as the business date in OPERA.
Room Assign Allows for an automatic room assignment to individual reservations in the group. This feature will consider any room feature preferences or smoking request on the reservation. It will not consider items in the Special Request field on the reservation.
Room Status Displays the housekeeping status of DUE IN reservations that have assigned rooms in the group. This is option is for display purposes only.
Print Registration Cards
Allows the ability to print registration cards for reservations in the group.
Cut Keys For hotels with an interface to a key machine, provides the ability to makes keys for reservations in the group.
Confirmation Allows the ability to print or email confirmation letters for reservations in the group.

OPERA System Training Workbook
Group Blocks and Management
Return to the Top 22 │
Block Options
Group Block Options
In this section, we will review the following Block Options:
- Add PM
- Changes
- Copy
- Cutoff
- Deposit/Cancel
- Notes
- Refresh Rates
- Shift Date
- Statistics
- Wash Schedule
Access Block Options
Click the OPTIONS button to access
group options from the Business Block
screen.
Add PM Adds an additional posting master(s) to the group.
Changes View the user activity log of changes recorded for the block.
Cutoff Offers the ability to manually cutoff the block and return any unused blocked inventory back to the house inventory. Any reservations canceled after a manual cutoff will return to house availability and not the block inventory.
Copy Allows the copying of the original block and its attributes into a new identical block.
Deposit/CXL Option to post a deposit to the group block.
Notes Notes about the group block can be placed here. Reservation notes are copied to future individual group reservations.
Continued on next page

OPERA System Training Workbook
Group Blocks and Management
Return to the Top 23 │
Block Options, Continued
Refresh Rates Only used if a rate code is attached in the group block header. Will refresh the group rate(s) to the current rate(s) of the attached rate code. Reservations already made against the block are not updated.
Shift Dates This feature will shift the entire group block start and end dates to a new date. Can only be used if there are no active reservations in the block.
Statistics Calculates potential and actual revenue of the block. Amounts do not include any generates (taxes).
Wash Schedule
Makes it possible to reduce either a percentage or a fixed number of rooms from the block on a preset schedule, for any number of days and/or room types prior to the cutoff date.
OPERA System Training Workbook
Group Blocks and Management
Return to the Top 24 │
Group Reservation Mass Update
Introduction OPERA provides the ability to make updated changes to all or selected reservations in the group without accessing each reservation separately.
This process is useful for updates to items after reservations have been created such as tax types, reservation comments or routing to a group master etc.
Group Reservations Mass Update Steps
Follow the Steps in the table below to apply a mass update to group reservations.
Step Action Screenshot
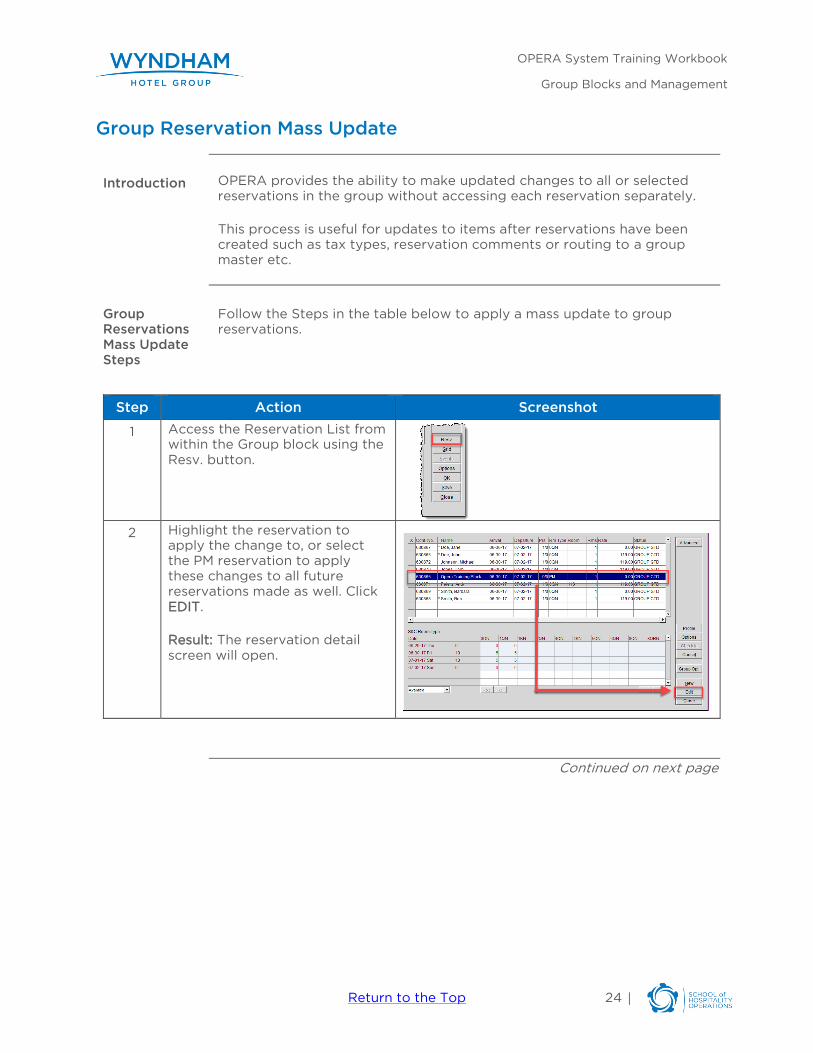
1 Access the Reservation List from within the Group block using the
Resv. button.
2 Highlight the reservation to apply the change to, or select the PM reservation to apply these changes to all future reservations made as well. Click
EDIT.
Result: The reservation detail
screen will open.
Continued on next page

OPERA System Training Workbook
Group Blocks and Management
Return to the Top 25 │
Group Reservation Mass Update, Continued
Group Reservations Mass Update Steps, continued
Step Action Screenshot
3 Make changes to the reservation that are to be applied, click OK to save and exit reservation.
OPERA will prompt to confirm how the changes are to be applied, select an option and
click OK.
- This Guest Only: Applies
to this reservation only.
- All Guest in the Group: Applies to all reservations
in group.
- Selected Guest: Applies to selected guest that are chosen from a list of
group reservations.
- Only Guest with Same Arrival Date: Applies changes to all group reservations having the
same arrival date.
- All Checked In Guest: Applies changes to a group reservations with a
CHECKED IN status.
- Guest In House between: Applies to all reservations arriving between the
selected date ranges.
4 OPERA will process the changes to the reservations as defined in the previous step and return to the Reservation List screen once
complete.

OPERA System Training Workbook
Group Blocks and Management
Return to the Top 26 │
Canceling a Group Block
Introduction To successfully cancel a group block in OPERA and the CRS, specific steps must be completed. Proper cancellation requires that all rooms in the block
be released before changing the status of the block to Cancelled.
Canceling a Group Block Steps
Follow the steps in the table below to successfully cancel a group block.
Step Action Screenshot
1 From the block header of the group to be cancelled, click
OPTIONS.
2 Click on CUTOFF
Rationale: Before cancelling, blocks must release all inventory in both OPERA and CRS.
3 OPERA prompt will appear, “Are you sure you want to Cutoff all the Rooms in this Block?”
Click YES to continue.
Result: For hotels with an interface to SynXis CR or WHG CRS, OPERA will release the inventory in both the group block within OPERA and in CRS. SynXis CR hotels should check in SynXis Control Center to confirm inventory has been released.
Continued on next page

OPERA System Training Workbook
Group Blocks and Management
Return to the Top 27 │
Canceling a Group Block, Continued
Canceling a Group Block Steps, continued
Step Action Screenshot
4 Click CLOSE in the Block Options box.
5 From the block header, change the status from Definite to CANCELLED. Click OK.
6 Click SAVE on the block header.
Result: OPERA prompt will ask “You are about to change the block status from DEF to CXL. Do you wish to continue?” Answer YES.
7 In the Cancel Block box, click the drop down arrow in Reason field to choose from a predefined cancellation reason. Additional information about the cancellation can be placed in the text box below.
Click OK to cancel.
Result: The block is now cancelled in OPERA and the cancellation message is sent to the CRS through the interface.