groundwater study guide - wisconsin department of natural
TRANSCRIPT

GROUNDWATERWisconsin’sburied treasure
Table of Contents
Introduction ................................... 1
The Water Cycle
‘Round and ‘Round it Goes! .... 5
How Groundwater Moves
Porosity and Permeability ........ 7
Well, Well, Well ........................ 9
Wisconsin’s Major Aquifers ... 12
A Plume of Contamination..... 14
Household Water
Where Does it Come From,
Where Does it Go? ................. 16
How Septic Systems Work ..... 18
Caution: This Product
May Be Hazardous
to Your Health! ....................... 20
Part 1: Reading
Product Labels .................... 20
Part 2: Home
Chemical Search ................. 21
Resource Protection,
Value and Confl ict
It’ll Go With the Flow ............ 22
What if Water Cost
as Much as Gasoline? ............. 24
Rights or Fights ...................... 25
Trouble in Paradise ................. 27
More Groundwater Activity Ideas 30
Publications ................................ 31
Selected DPI Wisconsin Model
Academic Standards ................... 32
PUB-DG-076 2006
IntroductionTo educators
The groundwater activities in this guide are written for 6th to 9th grade students; however, many of the activities are suitable for older or younger students. You will fi nd a list of relevant DPI Wisconsin Model Academic Standards at the beginning of each activity: Letters identify the appropriate subject or subjects (SC = science, EE = environmental education, SS = social studies, HE=health educa-tion, M=Math).
As you begin to use the activities in the publication, you should apply all safety guidelines and protocols you typically use in your classroom to each activity. The Department of Natural Resources views science classroom safety as fundamen-tally important to any laboratory science and feels strongly that the science teacher is the safety expert. The science teacher will provide all needed safety guidelines for each activity.
Cool, clear water is a precious and
vulnerable resource. In Wisconsin, more
than 70 percent of us depend on ground-
water for drinking. Agriculture—and thus
our food supply—depends on it. Industry
depends on it. Yet, until recently, most
people rarely thought about this buried
treasure. Today we’re becoming more
aware of groundwater, mainly because of
increasing reports of contamination.
This study guide is designed to help
you and your students begin thinking
about groundwater — where it comes
from, why it’s important, and how it can
be conserved and protected. The guide
includes a brief overview of groundwa-
ter, a glossary, suggested activities, and
a list of related Wisconsin Department
of Public Instruction (DPI) Wisconsin
Model Academic Standards (WMASs)
for science, environmental education,
health education, social studies and math.
The guide is designed to stand alone, yet
complements a Wisconsin Department
of Natural Resources publication titled
Groundwater: Wisconsin’s Buried Trea-sure (PUBL-DG-055 2006) included with
the Groundwater Study Guide packet.
Talk with your students before begin-
ning your lessons to learn what they
already know and think about ground-
water. What is groundwater? Where does it come from? Why is it important? How can it become contaminated? How can we protect it? By learning your students’
thoughts and opinions about groundwater,
you can help them connect new concepts
with what they already know. We encour-
age you to adapt the activities to meet
your students’ needs. You are welcome to
reproduce any part of this guide for distri-
bution to students and other educators.
© 2006 Wisconsin Department of Natural Resources

Water Table
SaturatedZone
UnsaturatedZone
2
Wisconsin’s Buried TreasurePicture all the water in lakes and streams
in the United States. Now, try to imagine
20 times that much water hidden under-
ground, fi lling cracks and pores in the
earth. That’s 30–60 quadrillion gallons
of water within ½ mile of the earth’s
surface! However, this vast supply of
groundwater isn’t evenly distributed.
Some areas have ample supplies of usable
groundwater, other areas have little.
Wisconsin is water-rich. In fact, our
state’s name comes from the Chippewa
word “Wees-kan-san” which means
“gathering of waters.” You’re probably
aware of the large amounts of water
in our lakes and rivers, but did you
know that 1.2 quadrillion gallons of
water—enough to cover the entire state
to a depth of over 100 feet—lie hidden
underground?
What is Groundwater?Groundwater originates as rain or snow.
As precipitation falls on the earth’s sur-
face, some evaporates, some runs off over
land into lakes and streams and some
soaks into the ground. A portion of water
that enters the soil is taken up and used
by plants. (A large, leafy tree can take up
a ton of water in a day!) The rest perco-
lates deeper into the earth.
Not all water found in the ground
is groundwater. “Groundwater” refers
specifi cally to water that is held in the
saturated zone below the water table.
Rock and soil material store water in
voids or pore spaces, much like a sponge.
Imagine two sponges, stacked one on
top of the other. The bottom sponge has
been soaked in water. It represents the
“saturated zone”—all of its pore spaces
are fi lled with water. The top sponge
has been wetted, but the water has been
squeezed out. This sponge represents the
“unsaturated zone”—some of the spaces
are fi lled with water, some are fi lled with
air. The boundary between the two zones
represents the “water table.” The water in
the saturated sponge represents ground-
water.
Where is it Found?Contrary to popular myths, groundwater
doesn’t fl ow in mysterious underground
rivers nor is it stored in underground
lakes. Most groundwater is found in aqui-
fers—underground layers of porous rock
and soil that are saturated with water (like
a sponge). Four major aquifers underlie
most of our state, but the amount and
quality of water they contain is variable.
The composition of soil—clay, loam,
silt, sand or rock—generally determines
the amount of groundwater and the depth
at which it is found in a given area.
Coarse materials such as sand and gravel,
which have large spaces between grains,
allow for excellent storage and movement
of water. On the other hand, fi ne-grained
materials such as clay or shale restrict
water movement.
Like surface water, groundwater fl ows
from higher to lower elevations, moving
through connected spaces in soil material.
But, unlike water in rivers and streams,
groundwater moves slowly—from a few
inches to a few feet per day. Variation in
rainfall and pumping from wells can af-
fect the rate and direction of groundwater
fl ow.
Why is it Important?Water has helped shape Wisconsin’s
geography, history and industry. More
than 70 percent of Wisconsin’s homes use
groundwater. An average family of four
uses 220 gallons of water/day. Over 200
million gallons per day is withdrawn for
use in our homes. Nearly 300 million gal-
lons/day is used for irrigation and other
agricultural activities. Wisconsin indus-
tries like cheese making, beer brewing
and paper manufacturing all require lots
of water. All together, we use over 800
million gallons of groundwater in Wis-
consin each day (Water Use in Wisconsin, 2000, U. S. Geological Survey Open File
Report 02-356).
Groundwater is also valuable as a
source of water for our lakes, rivers,
wetlands and springs. It provides the
basefl ow for most streams and rivers and
is the primary source of water for most
lakes and wetlands. So it’s important to
wildlife and to recreation such as fi shing,
boating and swimming.

LeakingStorage
Tank
HazardousWaste
Road Salt
3
How Does Groundwater Become Contaminated?Groundwater is never a pure combination
of hydrogen and oxygen atoms (H20). As
water soaks into the ground, it dissolves
minerals and gases from the rock material
it encounters. “Natural” groundwater
contains many dissolved minerals and
gases that may give it a particular taste,
odor or color. Typical concentrations of
most naturally-occurring contaminants
pose no health risk.
Percolating groundwater can also
carry human-made pollutants. Con-
tamination can be serious if groundwater
contains substances (natural or human-
made) that pose a health threat—bacteria,
viruses, nitrate, metals such as mercury
or lead, pesticides and other synthetic or-
ganic compounds. Carelessness and lack
of understanding can lead to groundwater
contamination from a variety of sources
including:
❖ leaking underground petroleum pipes
and tanks
❖ use and storage of road salt
❖ improper use, disposal and storage of
hazardous materials
❖ improper disposal of solid waste
❖ practices such as over-application of
fertilizers and pesticides
❖ improper management of animal
wastes
Since groundwater fl ow is generally slow,
pollution may take decades to show up
in a well, lake or stream. Removal of
contaminants is expensive and diffi cult
(if not impossible), so prevention of
contamination is the key to maintaining
groundwater quality.
How Can You Help?By doing one or more of the exercises in
this Study Guide, you and your stu-
dents will gain a better understanding of
groundwater principles and the impor-
tance of protecting our “Buried Treasure.”
In addition, here are some other ideas for
you and your students:
❖ Follow local groundwater issues so
you’re aware of what the concerns
are in your area. Consider with your
students how
activities going
on locally can
affect ground-
water quantity or
quality.
❖ If your school
has its own well,
consider the
recommenda-
tions for protect-
ing that well
contained in a
letter to schools
at dnr.wi.gov/org/
water/dwg/gw/whp/
whpschools.pdf.
❖ If your school
gets water from a
municipal water
utility, ask the
water utility if it
has completed
a wellhead
protection plan to
protect its well or
wells from con-
tamination. For
more informa-
tion on wellhead
protection, go to
dnr.wi.gov/org/water/
dwg/gw/wellhead.htm.
❖ Consider installing a rain garden on
school property to promote recharge
to groundwater. Check out the fol-
lowing links for more information:
clean-water.uwex.edu/pubs/raingarden and
dnr.wi.gov/org/water/wm/nps/rg/index.htm.
❖ Consider becoming a “Green and
Healthy School”. Learn about it at
dnr.wi.gov/greenandhealthyschools.
❖ Work with your students to iden-
tify ways to reduce the amount of
materials going to landfi lls so that
fewer landfi lls are needed. If your
county has a Clean Sweep program,
encourage students and their families
to take advantage of this opportunity
to recycle hazardous chemicals. Visit
the Department of Agriculture, Trade
and Consumer Protection Clean
Sweep website at datcp.state.wi.us/arm/
agriculture/pest-fert/pesticides/clean-sweep/
index.jsp for more information.
❖ If your students have private wells,
ask them to check to see if there
are potential contaminant sources
near their well and whether the well
is tested annually for bacteria and
nitrate levels. For more information,
visit dnr.wi.gov/org/water/dwg/wells.htm.
❖ Work with your students to identify
ways to share information with their
parents or the community about the
importance of groundwater protec-
tion and water conservation at home
and in the community. Consider
becoming a Groundwater Guardian
community. Go to groundwater.org for
more information.
For additional ideas on protecting
groundwater, see Groundwater:Wiscon-sin’s Buried Treasure and Better Homes and Groundwater included with the
Groundwater Study Guide packet.
We should all treat water as if our lives
depend on it—they do!

4
Buried Treasure Wisconsin’s groundwater would cover the state’s 36 million
acres to a depth of 105 feet
More than 70% of us drink groundwater in our homes
There are more than 800,000 private or municipal wells in Wis-
consin
Wisconsin uses over 800 million gallons of groundwater each
day
25% of Wisconsin’s groundwater is used in our homes for bath-
ing, cooking, etc.
20% of Wisconsin’s groundwater is used by industry
Groundwater discharges to lakes, rivers, wetlands and springs
Glossary
Aquifer: A rock or soil layer capable of
storing, transmitting and yielding water
to wells.
Artesian: A condition referring to ground-
water that is under enough pressure
to rise above the aquifer containing it.
Sometimes artesian wells will fl ow at the
surface.
Basefl ow: That part of stream discharge
from groundwater seeping into the
stream.
Dolomite: Calcium magnesium carbon-
ate, a common rock-forming mineral.
Many rocks in Wisconsin generally
referred to as limestone are actually
dolomite.
Evaporation: The process by which water
is changed from a liquid or solid into a
vapor.
Groundwater: Water beneath the surface
of the ground in a saturated zone.
Hazardous waste: Waste that causes
special problems for living organisms or
the environment because it is poisonous,
explosive, dissolves fl esh or metal, ignites
easily (with or without a fl ame) or carries
disease.
Infi ltration: The movement of water into
and through soil.
Leachate: A liquid formed by water per-
colating through soluble waste material.
Leachate from a landfi ll has a high con-
tent of organic substances and dissolved
minerals.
Limestone: A sedimentary rock consist-
ing chiefl y of the mineral calcite (calcium
carbonate).
Permeability: The capacity of soil or rock
to transmit a fl uid, usually water.
pH: From the phrase p(otential) of
H(ydrogen), pH is a measure of acidity
or alkalinity. As a solution becomes more
acidic, its pH decreases; as it becomes
less acidic its pH increases. A solution
with a pH of 7 is considered neutral; a pH
less than 7 is acidic and a pH greater than
7 is considered alkaline.
Porosity: The amount of open space in a
rock or soil sample, normally expressed
as the percentage of the total rock or soil
volume.
Sanitary landfi ll: A specially engineered
site for disposing solid waste on land.
Constructed in a way that reduces hazards
to health and safety.
Spring: A natural discharge of water at
the ground’s surface.
Static water level: The elevation above
sea level of the surface of water in
monitoring wells. Used to determine the
direction of groundwater fl ow.
Transpiration: The release of water vapor
and waste products through the pores
(stomata) of plants.
Water cycle (or hydrologic cycle): The
complete cycle of phases through which
water passes from the atmosphere to the
earth and back to the atmosphere.
Water table: The level below which the
soil or rock is saturated with water. The
upper surface of the saturated zone.
Well: A vertical excavation that taps an
underground formation; in Wisconsin,
usually to obtain a source of water, to
monitor the quality of groundwater or to
determine the elevation of the water table.
Note: Words or phrases italicized in the exercises are defi ned in the glossary.

Atmospheric
Movement
Evaporation
Precipitation
Infiltration
The WaterCycle
Groundwater &
Surface Flow
Transpiration
5
The Water Cycle‘Round and ‘Round it Goes!
Learning Objectives: Students will:
(1) identify where water is found in our
environment, (2) explain the steps of the
water cycle and how water moves from
one location to another, (3) defi ne the
components of the water cycle and (4)
describe how human activities can affect
water quality as it passes through the
water cycle.
Subjects: Environmental Education,
Health Education and Science
Wisconsin Model Academic Standards
(WMASs): EE: B.8.10, B.8.15, B.8.18
HE: A.8.2
SC: A.8.6, E.8.1, H.8.3
Grades: 6–9
Materials:
❖ Groundwater and Land Use in the
Water Cycle poster
❖ ’Round and ’Round it Goes!
activity sheets
❖ Dictionary
Background: Water is our most recycled
resource. Consider, for example, that the
water you bathed in this morning may
have contained the same molecules of
water that washed over a South Pa-
cifi c coral reef a million years ago! The
amount of water on Earth is basically
constant, but the distribution of water
changes over time and space due to a
dynamic process called the water cycle or hydrologic cycle. The water cycle is
powered by solar energy and gravity.
Warmth from the sun causes evapora-tion of water from lakes, streams and
soils. Solar energy also drives a process
called transpiration—the release and
evaporation of water from tiny pores
in the leaves of plants. Evaporated and
transpired water vapor is stored in the at-
mosphere until it condenses and is pulled
by gravity back to earth as rain, sleet,
snow, hail, dew or frost.
Up to 80 percent of this precipitated
water is returned directly to the atmo-
sphere by evaporation. The rest may run
off over land and into lakes and streams
or may soak into the ground. Some of
the water that soaks into the ground stays
in the unsaturated zone. This zone is the
rock or soil layer in which some of the
spaces between particles are fi lled with
air and some are fi lled with water. Some
of the water in the unsaturated zone is
taken up by plant roots and returned to
the atmosphere by transpiration.
The rest of the water is pulled deeper
into the ground by gravity, fi lling all
the cracks and spaces in the underlying
layers of soil, gravel and rock. Water in
the saturated zone is called groundwa-ter. The top of the saturated zone is the
water table. Water continues to move
underground from areas of high elevation
toward lowland areas. This movement is
generally slow, from a few feet per day to
a few feet per year. Wherever the water
table meets the land surface a spring may
form or groundwater may seep into to
a lake, stream, wetland or ocean. Once
above ground, the water can evaporate
and return to the atmosphere, and the
water cycle begins again.
Human activities may affect the qual-
ity of water at any point in the cycle. Air
pollution can change the chemical com-
position of rain and snow. Runoff from
rainfall and snow melt can pick up soil,

6
excess plant nutrients, pesticides, animal
wastes, and municipal and industrial pol-
lutants as it fl ows over land and into lakes
and streams.
Contaminated runoff can also soak
into the ground and pollute groundwater.
Water percolating through soil and rock
may pick up natural minerals or other
contaminants. Knowledge of the water
cycle can help us understand how water
becomes polluted and how pollution can
be prevented (see Groundwater: Wiscon-sin’s Groundwater for more information).
Procedure:1. Distribute copies of the poster. Dis-
cuss the background information.
2. Working in small groups, complete
the activity sheets. Use the “Water
Cycle” poster as a reference.
Going Beyond:1. Your students can learn about the
water cycle online at: dnr.wi.gov/
eek/earth/groundwater/watercycle.htm or
ga.water.usgs.gov/edu/watercycle.htm.
2. Design and construct a graphic or
mural of the water cycle for your
community. Include the community’s
water system and local human im-
pacts on the water cycle.
3. Create a mini-water cycle for your
classroom. In an aquarium (ter-
rarium) or wide-mouth glass jar,
put a one-inch layer of gravel for
drainage. Next, add a layer of peat
moss and then a layer of soil. Small
houseplants such as violets and
ferns can be planted in the terrarium.
Water your terrarium lightly and
cover it with a piece of glass, leaving
approximately ½ inch uncovered for
air movement. Keep the terrarium
in your classroom and watch what
happens over the next week. The
plants will take moisture from the
soil and release (transpire) it from
their leaves. Water molecules will
condense on the glass and “rain”
back onto the soil.
4. Research how long it might take a
drop of water to pass through the
entire water cycle.
Adapted from: Groundwater Study Guide, 1984, Wisconsin Department of
Natural Resources, Bureau of Informa-
tion and Education (out of print).
RecycledThe glass of water you’re about to drink
Deserves a second thought, I think
For Avogadro, oceans and those you follow
Are all involved in every swallow.
The molecules of water in a single glass
In number, at least fi ve times, outclass
The glasses of water in stream and sea,
Or wherever else that water can be.
The water in you is between and betwixt,
And having traversed is thoroughly mixed,
So someone quenching a future thirst
Could easily drink what you drank fi rst!
The water you are about to taste
No doubt represents a bit of waste
From prehistoric beast and bird—
A notion you may fi nd absurd.
The fountain spraying in the park
Could well spout bits of Joan of Arc,
or Adam, Eve, and all their kin;
You’d be surprised where your drink has been!
Just think! The water you cannot retain
Will some day hence return as rain,
Or be held as the purest dew.
Though long ago it passed through you!
Verne N. Rockcastle

7
How Groundwater Moves
Porosity and Permeability
Learning Objectives: Students will: (1)
predict which soil materials are more
porous and permeable, (2) measure and
compare the porosity and permeability
of different soil materials to test their hy-
pothesis, (3) calculate porosity of gravel,
sand, and clay, (4) create bar graphs of
the experimental results and (5) interpret
and discuss the results.
Subjects: Science and Math
Wisconsin Model Academic Standards
(WMASs): SC: A.8.6, C.8.4, C.8.6, E.8.1
M: D.8.3, E.8.2, E.8.4, E.8.5
Grades: 6–9
Materials:
❖ Porosity and Permeability activity
sheet
❖ gravel*
❖ sand*
❖ clay*
❖ potting soil*
❖ containers for used clay, soil, sand
and gravel
For each group of 2–3 students:
❖ 4 test tubes
❖ test tube rack
❖ 100 milliliter (ml) glass beaker
❖ small funnel
❖ 100 ml graduated cylinder
❖ 4 sheets of round fi lter paper
❖ glass marking crayon
* These materials must be very dry. Spread
soil materials on a cookie sheet and dry
in oven at 250–275° F. Break up clay and
potting soil after drying so that no clumps
remain.
Background: Just how solid is “solid
ground?” The material beneath our feet is
rarely solid. Soil is made up of particles
of rock and the spaces between these
particles. The amount of space between
soil particles is called porosity. You can
estimate the porosity of a soil by measur-
ing the amount of water it can hold.
Underground, water percolates down
through soil and fl ows from higher
elevations (such as a hill) to lower eleva-
tions. The ease with which water moves
through a soil or rock type is called
permeability. You can estimate the per-
meability of soil by timing how quickly
water can fl ow through it.
Physical characteristics of soil par-
ticles, such as size and shape, infl uence
the porosity and permeability of soils and
rocks. Coarse materials, like gravel and
sand, tend to be both porous (they have
large pore spaces that can fi ll with water)
and permeable (water passes easily
between the large particles). Some fi ne
materials, such as clay, may hold a lot
of water yet transmit very little because
water cannot move easily through the tiny
pore spaces.
An aquifer is a rock or soil formation
that can both store and transmit a signifi -
cant amount of water. A well drilled in
a sand aquifer is likely to yield a lot of
water; a well drilled in clay will probably
yield little.
Procedure:A) Predicting porosity and permeability.
1. Examine the gravel, sand, soil and
clay. Predict which materials can
hold the most water and which ones
water will fl ow through fastest. Re-
cord your predictions on the chalk-
board. Then, in small groups, either
investigate each material or assign
groups to one soil material and com-
pile class results on the chalkboard.
B) Measuring porosity.
1. With a marking crayon, place a
line about ½ way up the side of a
small beaker. Fill the beaker with
water to the line. Pour this water into
a 100 ml graduated cylinder. Record
this volume on your data sheet under
“total volume.” Dry the beaker.

Fill to here with gravel
Mark test tube
Funnel
Fold
Tim
e fo
r w
ater
to
pass
thr
ough
(se
cond
s)
Am
ount
of
wat
erhe
ld (
mill
ilite
rs)
1 2 3 4 1 2 3 4
least permeable
most permeable
least porous
most porous
8
2. Fill the beaker with gravel to the
line and fi ll the graduated cylinder
to the 100 ml mark with water. Pour
water from the graduated cylinder
into the beaker until it reaches the
line. Record the volume of water
needed to saturate (fi ll the pores of)
the gravel on your data sheet under
“pore space.” Divide this volume
by the “total volume” and multiply
by 100 to get percent pore space
in your sample of gravel. Record
this value under “porosity” (% pore
space). Repeat the investigation with
samples of sand, soil and clay. (Note: For potting soil and clay, make sure that the water has time to soak in completely.) Record your results.
C) Measuring permeability.
With a marking crayon, place a line
about ½ way up a test tube. Put the
test tube in the rack and put the
stem of a small funnel inside the test
tube. Fold a circular fi lter paper into
quarters, open it into a cone, and
insert it into the funnel. Fill the cone
with gravel to about ½ inch from the
top. Pour water from a beaker into
the fi lter. Using a clock, a watch or
by counting, time how long it takes
to fi ll the test tube to the line. Record
the results on your data sheet under
“permeability.” Return the sample of
gravel to the used gravel container
and discard the fi lter paper. Repeat
the experiment with sand, soil and
clay.
Make bar graphs of your results and
complete questions on the “Porosity and
Permeability” activity sheet. Discuss your
results and answers:
❖ Did your results match your predic-
tions?
❖ Which material is the most perme-
able? Why?
❖ Which is the least permeable? Why?
❖ Which soil is the most porous? Why?
❖ Which is the least porous? Why?
❖ If you drilled a well in these materi-
als, which one do you think would
yield the most water?
Going Beyond:1. Invite a certifi ed soil tester or county
on-site waste disposal (septic sys-
tem) specialist to discuss how poros-
ity and permeability of soil and rock
are measured in the laboratory and in
the fi eld.
2. Compare the porosity of a variety of
rocks. Record the weights of small
pieces of limestone, sandstone,
shale, granite, obsidian, lava, etc.
Soak the rocks in water for several
days. Remove them from the water
and pat them dry. Weigh the rock
pieces again and record your results.
Compare the mass of each rock be-
fore and after soaking. Discuss your
results in terms of the rock’s ability
to hold water. Note: water may move through cracks in rock as well as through the pore spaces. The amount of cracking in a rock determines its “secondary porosity.”
3. Investigate the effect of organic ma-
terial on a soil’s permeability and its
ability to fi lter contaminants. Prepare
four “contaminated” water samples
containing 1) vegetable oil, 2) vin-
egar, 3) detergent and 4) green food
coloring. Pour small amounts of each
sample through 1) sand, 2) equal
amounts of sand + potting soil, 3)
clay, 4) equal amounts of clay + pot-
ting soil. Compare fi ltering times of
the different soils. Compare appear-
ance of contaminant samples before
and after fi ltering (use pH paper for
vinegar). Filter plain tap water as a
control.
Adapted from: Groundwater: A Vital Resource, Cedar Creek Learning Cen-
ter and the Tennessee Valley Authority,
Knoxville, TN 37902.

Protective cover pipe
Surface seal
Bentonite orbentenet
with sandor cement
Benntonite seal
Fine sand
Filter packmaterial
Screen
Backfill material
Well casing
Land surface
Well screen
Monitoring Well
Cheese cloth
1" diameterplastictubing
3"
9
Well, Well, Well...
Learning Objectives: Students will: (1)
describe how a well works, (2) explain
the relationship between groundwater and
precipitation and (3) visualize the move-
ment of contaminants with groundwater.
Subjects: Science, Health Education and
Environmental Education
WMASs: SC: A.8.6, C.8.4, C.8.5, C.8.6,
E.8.1, H.8.3
HE: A.8.2, C.8.3
EE: A.8.4, A.8.5, B.8.10, B.8.15, B.8.16,
B.8.18, B.8.21
Grades: 6–9
Materials:
❖ Well, Well, Well... activity sheet
❖ one 10 gallon aquarium (may be
adapted for 5 gallon aquarium)
❖ one 5 gallon bucket fi lled with
coarse, clean sand
❖ one quart of aquarium gravel
❖ one piece 1" (inch) wide diameter
plastic tubing
❖ three pieces 1∕3" outside diameter
glass tubing:
✔ one piece, 20" long
✔ two pieces, 4" long
❖ two pieces 1∕3" outside diameter rub-
ber tubing:
one piece 3' (feet) long
one piece 2' long
❖ two glass rods 12" long (or similar
diameter wooden dowels)
❖ two #7 rubber stoppers:
✔ one 1-holed
✔ one 2-holed
❖ one 500 milliliter Erlenmeyer glass
fl ask
❖ one hand pump/siphon*
❖ small nail
❖ watering can or spray bottle
❖ 3" X 3" piece of cheesecloth
❖ small rubber band
❖ aquarium glue
❖ green food coloring
❖ 5 gallons of water
* available at sporting goods stores, pet
shops and hardware stores
Background: Wells are constructed to
bring groundwater to the land surface
so we can use it (or monitor its quality).
Holes are drilled and pipes put in the
ground to a depth below the water table.
Pumps are connected to the well pipe so
that water in and around the well is drawn
up the pipe and into a house or wherever
the water is used.
Following are instructions for con-
structing a well model. You can use the
model to demonstrate how surface water
soaks into the ground to become ground-
water and how a pump recovers water.
By adding food coloring to represent a
contaminant, you can also use the model
to demonstrate how groundwater can
become polluted.
Procedure:A) Preparation.
1. Using a small nail, make approxi-
mately 30 1∕16" (inch) diameter holes
beginning at one end of the 1" di-
ameter plastic tubing and extending
three inches from that end. Cover the
bottom of the tube with cheesecloth
and secure with a small rubber band.
This will prevent sand from entering
the bottom of the tube later.

3' rubbertubing
1-holedstopper
20" pieceof glasstubing
3' rubbertubing
2' piecesof rubbertubing
bulb orhand pump
Pond
Sand
Rubber stopper
rubber orplastic tubing
bulb orhand pump
"water supply line"glass tubing
"Well casing"plastic tube water table
Aquarium
1" diameterplastictubing
glass rods
gravel
10
2. Using aquarium glue, attach the
two glass rods (or dowels) and the 1"
diameter plastic tube to the long side
of the aquarium perpendicular to the
bottom. Allow glue to dry.
3. Place gravel so that all holes at
the bottom of the 1" diameter plastic
tubing are covered. The gravel will
help keep sand from entering the
well during pumping.
4. Insert the 20" piece of glass tubing
into the one-holed stopper so that the
tube extends one to two inches above
the top of the stopper.
5. Attach one end of the 3' (foot)
rubber tubing to glass tube extending
out of the stopper.
6. Insert this assembly into the 1"
plastic tube in aquarium.
7. Insert two 4” pieces of glass
tubing into holes of 2-holed stopper
so that 1" of tubing extends above
the stopper. Attach the loose end of
3' rubber tubing to one of the glass
tubes extending from 2-holed stop-
per.
8. Attach one end of 2' piece of
rubber tubing to the other glass tube
extending from the stopper.
9. Insert stopper into the fl ask.
10. Attach the hand pump/siphon to
the other end of the 2' tubing. Check
that all connections are airtight.
11. The model works best when
the fl ask is positioned lower than
the aquarium to create a continuous
siphon thus eliminating the need to
continuously pump.
12. Fill the aquarium ½ to ¾ full
with sand. Create a depression in
sand opposite to the well. This simu-
lates a pond or lake.
13. Add water to the aquarium so
that it’s about ½ full. The completed
model should look like the illustra-
tion below.
B) Demonstration.
1. Discuss the model. Identify the
groundwater and the water table.
Mark the water table on the side of
the aquarium with a wet erase or
other nonpermanent marker. Begin
to slowly pump water from the well.
Note the level of the water table and
pond surface. As the surface level
of the pond is lowered, a rain storm
may be simulated by pouring water
from a watering can over the land
and water.
2. Experiment with more rain-
fall (“recharge”) than pumping to
simulate a wet year, and with more
pumping (“withdrawal”) than rainfall
to simulate a drought. Groundwater
“overdraft” occurs when the rate of
withdrawal of water is greater than
recharge, resulting in a lowering of
the water table. Observe the runoff
and infi ltration. When you are fi n-
ished with the experiments, continue
pumping until the fl ask is full.

11
3. Empty the fl ask and “pollute” the
pond or the land surface with green
food coloring. Pump the well and see
what happens to the polluted water
(food coloring represents a water-sol-
uble pollutant). Point out that, unlike
food coloring, many contaminants
don’t change the color, odor or taste
of water. These contaminants are
diffi cult to detect. Many other pol-
lutants may be fi ltered out by soil or
broken down by chemical or physical
processes before they reach ground-
water. Notice also that the dyes in the
food coloring move at different rates
through the soil.
Note: If using model for consecutive classes, leave time to fl ush dye pol-lutant from model (by adding water and pumping) or work dye contami-nant into next demonstration, e.g. have students determine the source of contamination, fi nd how much water/how much pumping is required to remove contaminant, etc.
C) Discussion.
1. Complete the activity sheet. Dis-
cuss your answers.
Going Beyond:1. Contact a licensed well driller (check
the yellow pages of your phone
book). Arrange a fi eld trip to a drill-
ing site. Ask the driller to show and
discuss the drilling record. Using a
fl ashlight, look down the new well
(attach fl ashlight to a string to make
sure it isn’t lost down the well).
Attach a cork to a fi shing line and
lower down well to measure depth of
the water table. When the cork fl oats,
mark the spot on the fi shing line that
is even with the top of the well cas-
ing. Pull the line up and measure the
length of line from the mark to the
cork and subtract the distance that
the casing extends above the ground.
The resulting distance is the depth
of the water table from the ground
surface. Compare your measurement
to the well driller’s measurement.
A 2-dimensional groundwater sand tank model can be purchased from the Center
for Watershed Science and Education at the University of Wisconsin–Stevens
Point. For more information, go to uwsp.edu/stuorg/awra/h2omodel.html or call (715)
346-4613. For a list of locations from which a groundwater model can be bor-
rowed, go to dnr.wi.gov/org/water/dwg/gw/education/models.pdf.
1. Fertilizer/Pesticide Model
Build the groundwater model as
directed. Sprinkle powdered grape
drink mix on the surface to represent
fertilizer or pesticide put on a fi eld.
Sprinkle water over the surface to
simulate rain. Observe and discuss.
2. Landfi ll/Abandoned Waste Site
Model
Roll a paper towel into a ball and
saturate it with food coloring. Bury it
just beneath the surface to represent
an improperly designed or abandoned
waste disposal site. Pour water on the
surface. Observe and discuss.
3. Leaking Underground
Storage Tank Model
Fill a fi lm canister with colored water
and puncture it in several places with
a pin. Bury it just beneath the surface
(not along the side of the box). Pour
water on the surface. Observe and
discuss.
4. Abandoned Well Model
Puncture a drinking straw in several
places with a pin and plug the bottom
with clay. Bury the straw, plugged
end down, in the sand to represent
an abandoned well. Pour colored
water into the abandoned well. Pump
from the working well. Observe and
discuss.
5. Leaky Lagoon Model
Cut the bottom off a small paper cup
and puncture the bottom in several
places with a pin. Partially bury the
cup bottom in the sand to simulate a
settling lagoon. Fill the lagoon with
colored water. Pump from your well.
Observe and discuss.
From: GREAT: Groundwater Re-sources and Educational Activities for Teaching, 1989, Iowa Department of
Natural Resources, Wallace Building,
Des Moines, IA 50319.
More ways to use your groundwater model
Repeat your fi eld trip when the well,
pump and piping are complete and
ask driller to explain how well and
pressure tank work to bring water to
the surface. Ask well driller to ex-
plain a “pitless adapter.” Inspect the
adapter with a fl ashlight. Collect a
water sample for bacterial and nitrate
analysis.
Adapted from: Groundwater Study Guide, 1984, Wisconsin Department of
Natural Resources, Bureau of Informa-
tion and Education (out of print).
Sand & GravelAquifer
Sandstone &Dolomite Aquifer
CrystalineBedrock Aquifer
EasternDolomite
MaquoketaShale
confining layer
+1000'
+1500'
+1000'
+500'
Sea Level
-500'
-1000'
+500'
Sea Level
-500'
-1000'
West East
West East
Maps are not to scale.
Mis
siss
ippi
Riv
er
Chi
ppew
a R
iver
Eau
Cla
ire
St.
Cro
ix R
iver
Hud
son
Junc
tion
City
Ste
vens
Poi
nt
De
Per
e
Kew
aune
e
Lake
Mic
higa
n
Pra
irie
du
Chi
en
Bos
cobe
l
Mad
ison
Wau
kesh
a
Milw
auke
eus
es L
ake
Mic
higa
nfo
r w
ater
sup
ply
Lake
Mic
higa
n
NORTHERN WISCONSIN
SOUTHERN WISCONSIN
12
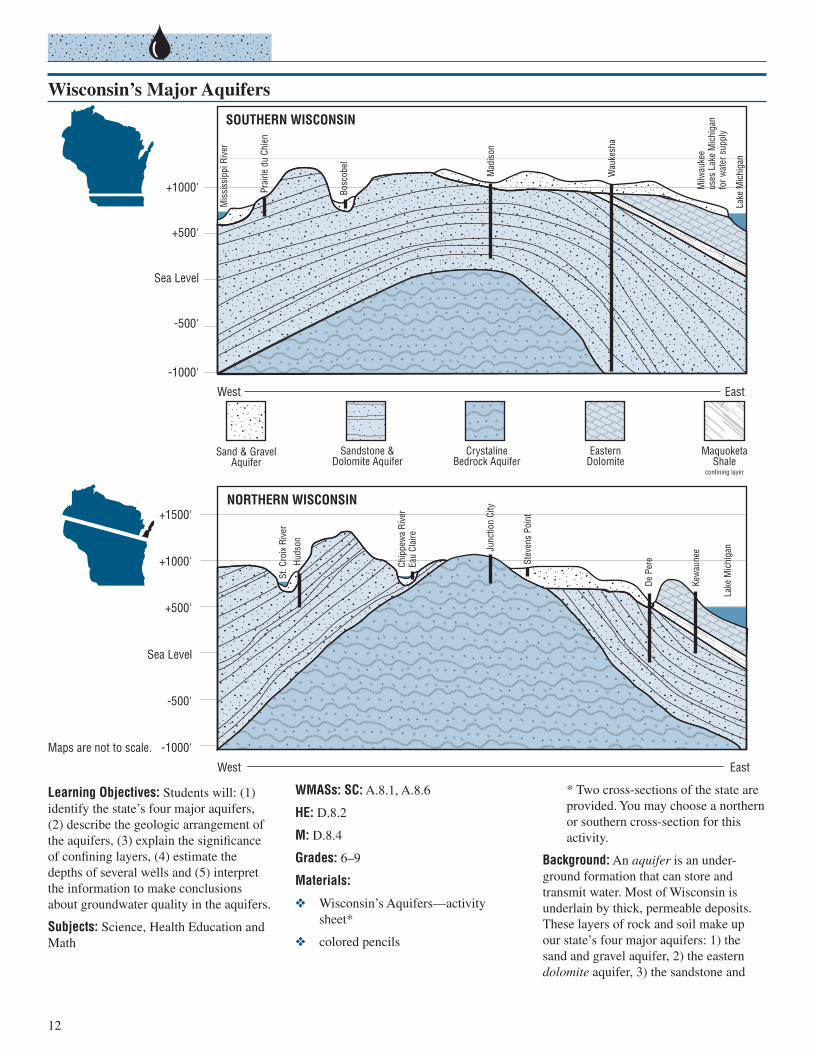
Wisconsin’s Major Aquifers
Learning Objectives: Students will: (1)
identify the state’s four major aquifers,
(2) describe the geologic arrangement of
the aquifers, (3) explain the signifi cance
of confi ning layers, (4) estimate the
depths of several wells and (5) interpret
the information to make conclusions
about groundwater quality in the aquifers.
Subjects: Science, Health Education and
Math
WMASs: SC: A.8.1, A.8.6
HE: D.8.2
M: D.8.4
Grades: 6–9
Materials:
❖ Wisconsin’s Aquifers—activity
sheet*
❖ colored pencils
* Two cross-sections of the state are
provided. You may choose a northern
or southern cross-section for this
activity.
Background: An aquifer is an under-
ground formation that can store and
transmit water. Most of Wisconsin is
underlain by thick, permeable deposits.
These layers of rock and soil make up
our state’s four major aquifers: 1) the
sand and gravel aquifer, 2) the eastern
dolomite aquifer, 3) the sandstone and
Sand & gravel aquifer
Dolomite
Sandstone & dolomite
Crystalline bedrock
13
dolomite aquifer and 4) the crystalline
bedrock aquifer. A few areas in north-
ern Wisconsin are made up of clay soils
overlying granite or other non-porous
materials. Since these materials can’t
store or transmit much water, substantial
well water supplies aren’t available there
(see Groundwater: Wisconsin’s Buried Treasure for more information).
1) The sand and gravel aquifer covers
most of Wisconsin, except for the
unglaciated areas in the southwestern
part of the state. This aquifer layer
was deposited by glacial ice and
river fl oodplains between 10,000
and 1 million years ago. Many of
the irrigated farmlands in southern
and northwestern Wisconsin tap this
aquifer. Because the top of the sand
and gravel aquifer is also the land
surface, the groundwater it contains
may easily become contaminated.
2) The eastern dolomite aquifer lies
beneath the sand and gravel aquifer
in eastern Wisconsin, and extends
from Door County to the Wisconsin-
Illinois border. It is made up of the
Niagara dolomite formation under-
lain by the Maquoketa shale forma-
tion. These layers were deposited
about 400 million years ago.
Dolomite is like limestone and con-
tains groundwater in interconnected
cracks. The yield of water from
wells in this aquifer is variable and
depends on the number of fractures
through which a well passes. Where
this fractured formation is close to
the land surface, groundwater may
easily be contaminated.
The underlying Maquoketa shale
layer doesn’t transmit water readily.
This formation isn’t important as an
aquifer but as a confi ning layer or
barrier between the eastern dolomite
aquifer and the sandstone and dolo-
mite aquifer.
3) The sandstone and dolomite aquifer
is made up of layers of sandstone and
dolomite bedrock. Water is found
in fractures in the dolomite layers.
In the sandstone, water also occurs
in pore spaces between the loosely
cemented sand grains. This aquifer
covers the entire state, except for the
north central region. Materials in the
sandstone and dolomite aquifer were
deposited between 425 and 600 mil-
lion years ago. This is the principal
bedrock aquifer for southern and
western portions of the state. Most
cities and industries in eastern Wis-
consin also tap this deep aquifer.
4) The crystalline bedrock aquifer is
made up of a variety of rock types
formed between 600 and 4,000
million years ago. This granite-like
rock formation underlies the entire
state. In the north central region this
aquifer lies directly beneath the sand
and gravel aquifer. Water is stored in
cracks that may be many feet apart.
To draw water from this aquifer a
well must pass through some of these
cracks. Good quality water can be
obtained from shallow wells in this
formation, but wells that penetrate
deep into the aquifer have been
found to yield salty water because
the water becomes concentrated with
naturally occurring salts and miner-
als as it passes through many rock
layers.
Procedure:1. Discuss the background information.
2. Complete the activity sheet for either
the northern or southern cross-sec-
tion.
3. Discuss your answers.
Going Beyond:1. Investigate what aquifer your town
well taps, its depth, and how much
water is pumped per minute, per day
and per year. Investigate the water
quality and treatment methods used.
Visit or contact your local water
department for this information. You
can also obtain information by visit-
ing the DNRs Bureau of Drinking
Water and Groundwater website at
dnr.wi.gov/org/water/dwg/index.
htm. Click on “Public Water Sys-
tems” or “Well construction” and
type in the name of your community.
Also see the “Where Does it Come
From? …Where Does it Go? exer-
cise.
2. Construct a geological model of your
area using topographic, geologic,
and groundwater susceptibility maps.
Maps are available from the Wis-
consin Geologic and Natural History
Survey (visit uwex.edu/wgnhs). Using
modeling clay, markers, and labels,
show local soil and rock types,
topography, depth to bedrock, depth
to groundwater, and groundwater
susceptibility. (This activity could be
used as an art class project.)
From: GREAT: Groundwater Resources and Educational Activities for Teaching, 1989, Iowa Department of Natural Re-
sources, Wallace Building, Des Moines,
IA 50319.
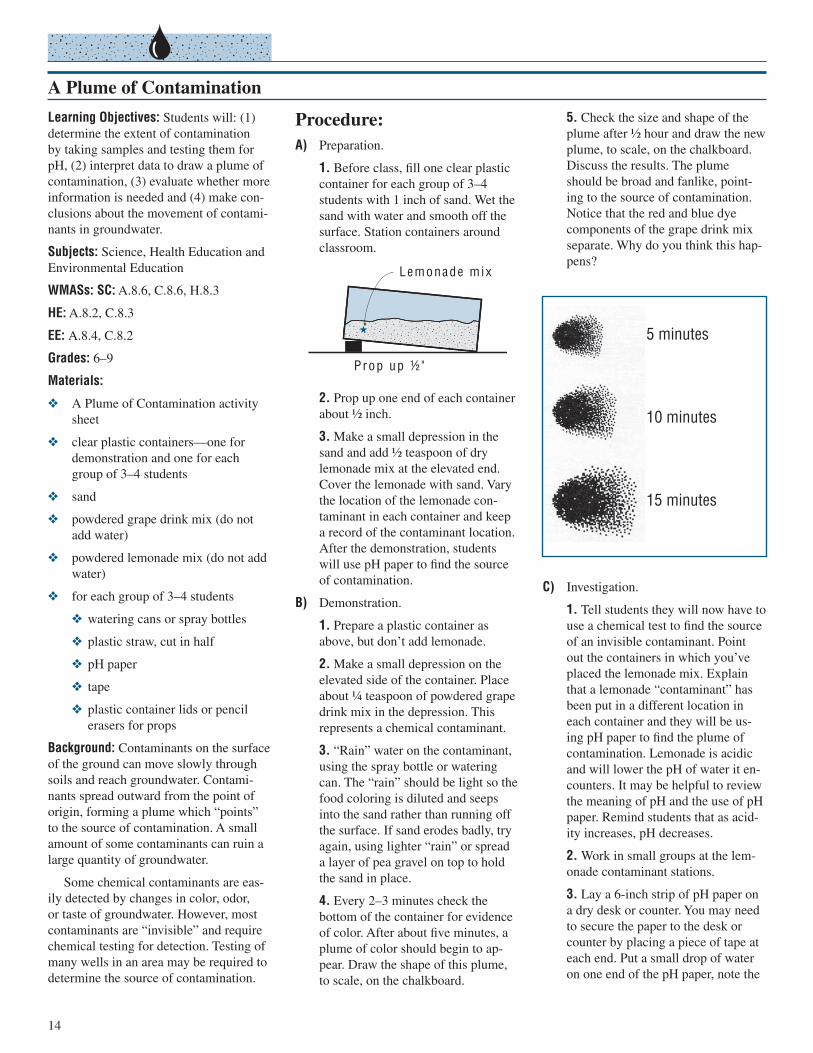
Lemonade mix
Prop up ½"
14
A Plume of Contamination
Learning Objectives: Students will: (1)
determine the extent of contamination
by taking samples and testing them for
pH, (2) interpret data to draw a plume of
contamination, (3) evaluate whether more
information is needed and (4) make con-
clusions about the movement of contami-
nants in groundwater.
Subjects: Science, Health Education and
Environmental Education
WMASs: SC: A.8.6, C.8.6, H.8.3
HE: A.8.2, C.8.3
EE: A.8.4, C.8.2
Grades: 6–9
Materials:
❖ A Plume of Contamination activity
sheet
❖ clear plastic containers—one for
demonstration and one for each
group of 3–4 students
❖ sand
❖ powdered grape drink mix (do not
add water)
❖ powdered lemonade mix (do not add
water)
❖ for each group of 3–4 students
❖ watering cans or spray bottles
❖ plastic straw, cut in half
❖ pH paper
❖ tape
❖ plastic container lids or pencil
erasers for props
Background: Contaminants on the surface
of the ground can move slowly through
soils and reach groundwater. Contami-
nants spread outward from the point of
origin, forming a plume which “points”
to the source of contamination. A small
amount of some contaminants can ruin a
large quantity of groundwater.
Some chemical contaminants are eas-
ily detected by changes in color, odor,
or taste of groundwater. However, most
contaminants are “invisible” and require
chemical testing for detection. Testing of
many wells in an area may be required to
determine the source of contamination.
Procedure:A) Preparation.
1. Before class, fi ll one clear plastic
container for each group of 3–4
students with 1 inch of sand. Wet the
sand with water and smooth off the
surface. Station containers around
classroom.
2. Prop up one end of each container
about ½ inch.
3. Make a small depression in the
sand and add ½ teaspoon of dry
lemonade mix at the elevated end.
Cover the lemonade with sand. Vary
the location of the lemonade con-
taminant in each container and keep
a record of the contaminant location.
After the demonstration, students
will use pH paper to fi nd the source
of contamination.
B) Demonstration.
1. Prepare a plastic container as
above, but don’t add lemonade.
2. Make a small depression on the
elevated side of the container. Place
about ¼ teaspoon of powdered grape
drink mix in the depression. This
represents a chemical contaminant.
3. “Rain” water on the contaminant,
using the spray bottle or watering
can. The “rain” should be light so the
food coloring is diluted and seeps
into the sand rather than running off
the surface. If sand erodes badly, try
again, using lighter “rain” or spread
a layer of pea gravel on top to hold
the sand in place.
4. Every 2–3 minutes check the
bottom of the container for evidence
of color. After about fi ve minutes, a
plume of color should begin to ap-
pear. Draw the shape of this plume,
to scale, on the chalkboard.
5. Check the size and shape of the
plume after ½ hour and draw the new
plume, to scale, on the chalkboard.
Discuss the results. The plume
should be broad and fanlike, point-
ing to the source of contamination.
Notice that the red and blue dye
components of the grape drink mix
separate. Why do you think this hap-
pens?
C) Investigation.
1. Tell students they will now have to
use a chemical test to fi nd the source
of an invisible contaminant. Point
out the containers in which you’ve
placed the lemonade mix. Explain
that a lemonade “contaminant” has
been put in a different location in
each container and they will be us-
ing pH paper to fi nd the plume of
contamination. Lemonade is acidic
and will lower the pH of water it en-
counters. It may be helpful to review
the meaning of pH and the use of pH
paper. Remind students that as acid-
ity increases, pH decreases.
2. Work in small groups at the lem-
onade contaminant stations.
3. Lay a 6-inch strip of pH paper on
a dry desk or counter. You may need
to secure the paper to the desk or
counter by placing a piece of tape at
each end. Put a small drop of water
on one end of the pH paper, note the
5 minutes
10 minutes
15 minutes
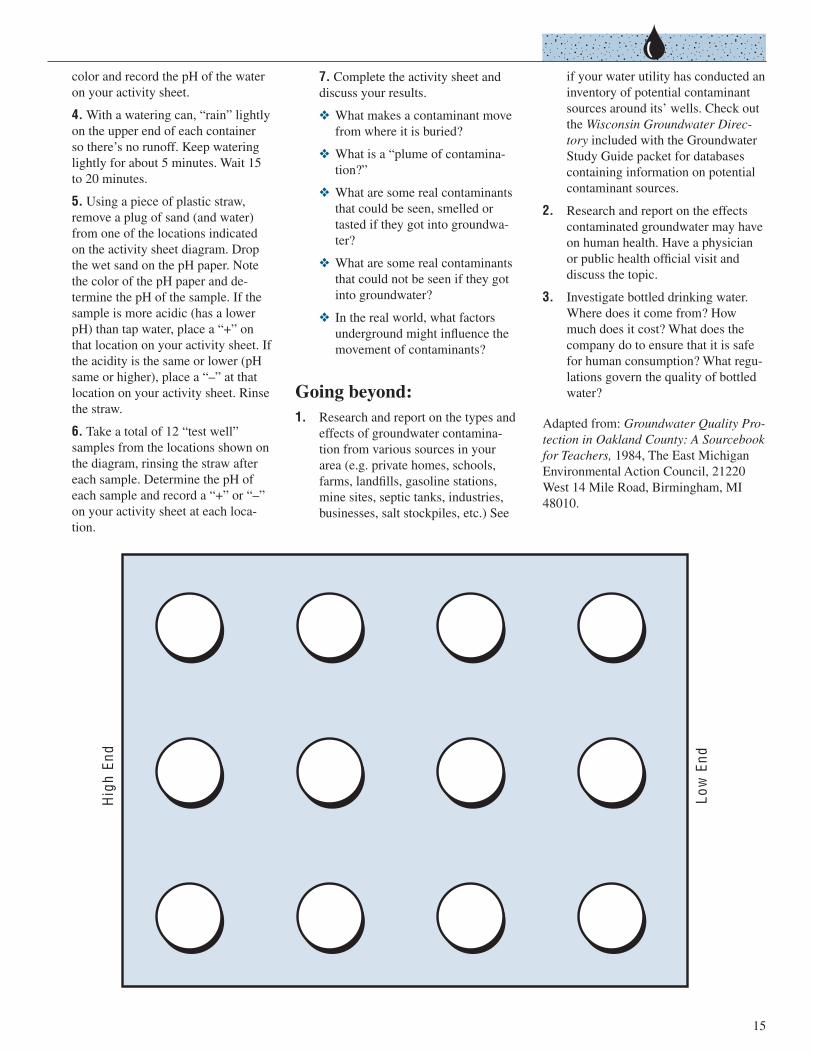
Hig
h E
nd
Lo
w E
nd
15
color and record the pH of the water
on your activity sheet.
4. With a watering can, “rain” lightly
on the upper end of each container
so there’s no runoff. Keep watering
lightly for about 5 minutes. Wait 15
to 20 minutes.
5. Using a piece of plastic straw,
remove a plug of sand (and water)
from one of the locations indicated
on the activity sheet diagram. Drop
the wet sand on the pH paper. Note
the color of the pH paper and de-
termine the pH of the sample. If the
sample is more acidic (has a lower
pH) than tap water, place a “+” on
that location on your activity sheet. If
the acidity is the same or lower (pH
same or higher), place a “–” at that
location on your activity sheet. Rinse
the straw.
6. Take a total of 12 “test well”
samples from the locations shown on
the diagram, rinsing the straw after
each sample. Determine the pH of
each sample and record a “+” or “–”
on your activity sheet at each loca-
tion.
7. Complete the activity sheet and
discuss your results.
❖ What makes a contaminant move
from where it is buried?
❖ What is a “plume of contamina-
tion?”
❖ What are some real contaminants
that could be seen, smelled or
tasted if they got into groundwa-
ter?
❖ What are some real contaminants
that could not be seen if they got
into groundwater?
❖ In the real world, what factors
underground might infl uence the
movement of contaminants?
Going beyond:1. Research and report on the types and
effects of groundwater contamina-
tion from various sources in your
area (e.g. private homes, schools,
farms, landfi lls, gasoline stations,
mine sites, septic tanks, industries,
businesses, salt stockpiles, etc.) See
if your water utility has conducted an
inventory of potential contaminant
sources around its’ wells. Check out
the Wisconsin Groundwater Direc-tory included with the Groundwater
Study Guide packet for databases
containing information on potential
contaminant sources.
2. Research and report on the effects
contaminated groundwater may have
on human health. Have a physician
or public health offi cial visit and
discuss the topic.
3. Investigate bottled drinking water.
Where does it come from? How
much does it cost? What does the
company do to ensure that it is safe
for human consumption? What regu-
lations govern the quality of bottled
water?
Adapted from: Groundwater Quality Pro-tection in Oakland County: A Sourcebook for Teachers, 1984, The East Michigan
Environmental Action Council, 21220
West 14 Mile Road, Birmingham, MI
48010.

Water Treatment Plant
16
Household Water
Where Does it Come From?…Where Does it Go?
Learning Objectives: Students will: (1)
summarize and illustrate how a water
treatment plant and wastewater treatment
plant work, (2) describe the source of wa-
ter for their community and the adequacy
of groundwater to meet the community’s
needs and (3) explain where the wastewa-
ter goes after it has been treated.
Subjects: Environmental Education,
Science, Health Education and Social
Studies
WMASs: EE: A.8.1, B.8.22
SC: C.8.1, G.8.1
HE: D.8.2
SS: D.8.4, E.8.5
Grades: 6–9
Materials:
❖ pencils and paper
Background: Have you ever wondered
where the water comes from when you
turn on your tap or where it goes after it
drains from your bathtub? Water for most
urban and suburban areas in Wisconsin
comes from city or town wells that tap an
underlying aquifer. Groundwater from
these wells passes through a water treat-
ment facility on the way to our homes
and through a wastewater treatment facil-
ity after draining from our sinks, bathtubs
and toilets.
The following fi eld trips (or guest
speakers) can help students understand
the workings of these facilities and en-
courage them to think about where their
water comes from, how it is changed as
it passes through their homes and how
it must be treated before it is allowed to
return to the groundwater supply.
Procedure:A) Investigate a water treatment facility.
1. Contact your municipal water
treatment facility and obtain per-
mission to visit it. Arrange with the
manager or other resource person
to guide your trip and be available
to answer questions. If a fi eld trip
is not possible, arrange for a water
treatment specialist to speak to your
class.
2. Before visiting the water treat-
ment plant or having a guest speaker,
develop a list of questions you would
like answered. Send the list to the
guide or guest speaker in advance so
he/she can prepare responses. Ques-
tions to consider include:
❖ From what aquifer(s) does your
school or municipality get its
water?
❖ What is the extent (area), bound-
aries and depth of the aquifer?
❖ What geological materials make
up the aquifer?
❖ How many wells does your school
or community use? Where are
they? How deep are they? How
much water can they pump per
minute/hour/day? When were they
installed?
❖ What is a “cone of depression?”
What is the extent of the cone
of depression surrounding the
well(s)? How does the cone of
depression affect groundwater
movement in the area?
❖ What time of the day, year, does
the system pump the most water?
Why?
❖ What is the natural chemical
composition of the water before it
is treated? How does the natural
chemical composition compare
with other wells around the state?

Wastewater Treatment Plant
17
❖ How is water transported from
the treatment plant to homes and
businesses?
❖ Does the municipality have an
adequate water supply for future
needs?
❖ Are there any present or potential
sources of contamination to the
well(s)?
❖ What does the treatment plant do
to ensure that the water is safe to
drink? What treatment methods
are used?
❖ Is your community planning to
drill new wells in the near future?
If so, how much will it cost? Who
will pay?
❖ How are local households charged
for the water they use? (Do all
local homes have water meters?)
❖ Does the price per gallon of water
increase, decrease or stay the
same as the amount used goes up?
Does this pricing system encour-
age conservation?
❖ Does your community encourage
water conservation in any other
way?
3. Ask students to draw a diagram
of a water treatment plan (including
wells and aquifers) and describe how
the facility works.
B) Investigate a wastewater treatment
facility.
1. Arrange a fi eld trip or guest
speaker as outlined in part A.
2. Prepare and send a list of ques-
tions you would like answered to the
fi eld trip guide or guest speaker so
he/she can prepare responses. Ques-
tions to consider include:
❖ What household water passes
through a wastewater treatment
plant?
❖ Are all the homes in the com-
munity connected to a wastewater
treatment facility?
❖ How does a wastewater treatment
facility work?
❖ What is “graywater?”
❖ What is “sludge?” Is it solid or
hazardous waste? Why?
❖ What is done with sludge from
the treatment plant?
❖ How much wastewater is pro-
cessed each day?
❖ What training does the operator
have?
❖ What happened to wastewater be-
fore the treatment plant was built?
❖ How might wastewater affect
groundwater?
❖ What household materials should
not be washed down the drain?
Why?
❖ Can household chemicals affect
bacteria at the wastewater treat-
ment facility?
❖ How might sludge affect ground-
water?
❖ What is the difference between a
septic system and a wastewater
treatment plant?
❖ How might a septic system affect
groundwater?
3. Ask students to draw a diagram
of a wastewater treatment plant and
describe how the facility works.
Adapted from: Groundwater Study Guide, 1984, Wisconsin Department of
Natural Resources, Bureau of Informa-
tion and Education (out of print).

Soil Absorption Bed VentSepticTank
Purification
Groundwater
Well
18
How Septic Systems Work
Learning Objectives: Students will: (1)
construct a model of a septic system, (2)
examine and describe how the compo-
nents of a septic system work and (3)
discuss the location of a septic system
as a potential threat to groundwater and
surface water with someone who has a
septic system.
Subjects: Environmental Education,
Science, Health Education and Social
Studies
WMASs: EE: A.8.3, A.8.5
SC: A.8.6
HE: A.8.2
SS: A.8.10, D.8.11
Grades: 6–9
Materials:
❖ How Septic Systems Work activity
sheet
❖ 6 Steps to a Successful Septic Tank
System overhead*
❖ The Septic Tank at Work overheads*
❖ for each group of 2–4 students:
❖ one small (6–8 oz. (ounce)) glass
jar or beaker
❖ one large (12 oz.) glass jar or
beaker
❖ sand
❖ paper towel
❖ potting soil
❖ green food coloring
❖ fl exible straws
❖ small pieces of white paper (e.g.
holes from paper punch)
* masters provided
Background: Many rural homes use septic
tank systems for disposal of wastewater
from sinks, bathtubs and toilets. Septic
systems are a type of onsite wastewater
treatment device used to treat domestic
wastes where there is no public wastewa-
ter treatment system available. The Wis-
consin Department of Commerce uses the
term “private onsite wastewater treatment
system” (or POWTS) to identify these
systems. The Department of Commerce
allows a number of different designs for
new or replacement installation. This
exercise focuses on septic systems since
the vast majority of onsite wastewater
treatment systems in use today are septic
systems.
There are two parts to a septic system:
a settling/storage container (septic tank)
and a fi ltering area (soil absorption or
leaching fi eld). Both parts of this sys-
tem are essential for proper wastewater
disposal.
The main purpose of the settling tank
is to protect the soil absorption fi eld.
Inside the settling tank, solids settle
and form a sludge layer on the bottom
and fl oating materials accumulate in a
scum layer at the water surface. Clari-
fi ed wastewater leaves the settling tank
through a submerged outlet. The scum
and sludge are left behind. This is impor-
tant because scum and sludge can clog
soil pores and cause the leach fi eld to fail.
Bacteria in the septic tank helps to
break down the scum and sludge that
remains. Decomposition of these layers is
slow, so scum and sludge gradually build
up and must be removed periodically. Us-
ing kitchen garbage disposals increases
the amount of solids in wastewater and
speeds up sludge accumulation. (Com-
posting vegetable matter instead of put-
ting it down the garbage disposal keeps
extra solids out of septic systems and also
provides good fertilizer for fl owerbeds
and gardens.)
The soil absorption or leaching fi eld
does two things. It slowly disposes of
wastewater below the surface of the
ground, and it fi lters out harmful bacteria
and many chemical contaminants before
they reach groundwater.
Watertight pipes transport wastewater
from the septic tank to the absorption
fi eld. In the absorption fi eld, the water is
divided among several trenches. Perfo-
rated, rigid plastic pipe or agricultural
drain tile distributes the water throughout
the trenches. A gravel bed below the
distribution pipes temporarily stores the
wastewater until it is absorbed by soil
surrounding the trench.
Septic systems can pollute groundwa-
ter if the capacity of the surrounding soil
to fi lter the wastewater is exceeded or if
the underlying soils are very permeable,
allowing contaminants to move rapidly to
the water table before fi ltering is com-
plete. Groundwater may also become
contaminated if chemicals that are not
decomposed by soil bacteria are dumped
down sinks or toilets.
Adequate spacing of homes and
proper planning, design, construction and
maintenance of septic systems is the best
insurance against groundwater contami-
nation by household wastewater. Planners
must consider the location of buildings,
water supplies and soil characteristics.
They must also decide how large a septic
tank and absorption fi eld is needed.
Proper maintenance of the system
includes periodic pumping of sludge from
the septic tank. Depending on the size
of the tank and the number of persons in

Soil
Sand
Soil
Sand
Paper Towel
Paper Towel
Paper Towel
Paper Towel
Flexible Straw
Leach Field
Wastewater
Riser
"Leach Field"
"Septic Tank"
"Leach Field"
19
the household, cleaning may be needed
as often as every two years or as seldom
as every 10 years, but tanks should be
checked yearly.
Procedure:A) Explanation.
1. Using the overheads, briefl y dis-
cuss where wastewater goes in rural
areas. Explain how a septic system
works.
B) Investigation.
1. Work in small groups. Prepare a
“wastewater” sample—water, sand,
bits of paper and 2–3 drops of green
food coloring.
2. Construct a model septic tank
system:
a) Label small jar or beaker “septic
tank.”
b) Pour a well-stirred sample of
wastewater into the septic tank
until it is about ¾ full.
c) Allow the sample to settle. Make
observations.
d) Prepare a “leach fi eld” as follows:
Add alternating layers of sand and
potting soil, separated by paper
towels to the large jar or beaker.
Wet the leach fi eld.
e) Set the septic tank on a book or
other riser. Place the leach fi eld
directly below the septic tank.
Bend the fl exible straw and fi ll
it with water. Place fi ngers over
both ends to keep the water in.
After the wastewater has settled,
connect the septic tank with the
leach fi eld as shown. Keep fi ngers
over the ends of the straw until it
is placed in the wastewater. This
should create a siphon, allowing
wastewater to fl ow onto the leach
fi eld. (It may be helpful to demon-
strate this step for your students.)
Observe the action of wastewater
on the leach fi eld.
3. Discuss your results.
❖ What settled to the bottom of the
septic tank? What stayed on the
surface?
❖ What was fi ltered out of the
wastewater as it passed through
the leach fi eld? What was not?
As in your septic system model,
some components of wastewater
(such as bacteria) are usually
fi ltered out by soil. Other compo-
nents (such as chloride, nitrates
and volatile organic chemicals)
are not effectively fi ltered and
may be carried into groundwater.
❖ How did the green dye change as
it passed through the leach fi eld
soil layers? Why?
4. Using part B of the worksheet,
interview a friend or relative who
has a septic tank system (instead
of being connected to a municipal
wastewater treatment plant). Find
answers to the following ques-
tions:
❖ Where does their water come
from?
❖ If their water is from a private
well, how far is the septic tank
from their well?
❖ How far is the absorption fi eld
from their well?
❖ How far is their house from the
septic tank?
❖ How far is their house from the
leach fi eld?
❖ Refer to the table on the work-
sheet. Is there anything closer to
the septic tank or absorption fi eld
than the recommended minimum
separation distance? If so, circle
the unit and record next to the
table how close it is.
❖ What is one other factor (besides
separation distance) to consider
when planning a septic system?
Students may fi nd that many people
don’t know the answers to these ques-
tions. Should they? Why is this impor-
tant? Discuss.
Going Beyond:Investigate and compare different types
of onsite wastewater treatment systems.
Visit wra.org/pdf/government/landuse/onsite_sys-
tem_descriptions.pdf for a copy of General
Descriptions of Common Types of Onsite
Sewage Systems. Invite the county on-
site waste disposal specialist to speak to
your class. Ask him/her to bring diagrams
of conventional and mound septic sys-
tems. Under what circumstances should
a mound system be built? Are there other
onsite wastewater treatment system de-
signs? When are they used?
Adapted from: GREAT: Groundwater Resources and Educational Activities for Teaching, 1989, Iowa Department of
Natural Resources, Wallace Building,
Des Moines, IA 50319.

A n t i -F re e z e
GASPremium
Dinosaur Juice D R A I NO P E N E R
FURNITURESTRIPPER
M O T O RO I L
Pain tTh inner Spot
Remover
20
Caution: This Product May be Hazardous to Your Health!
Learning Objectives: Students will: (1)
locate and interpret information on use,
storage, disposal, and hazards of house-
hold products, (2) explain how disposal
and storage of chemicals can cause po-
tential groundwater contamination and
(3) compare and contrast less harmful
alternatives that can be used in place of
many household hazardous products.
Subjects: Environmental Education,
Health Education and Science
WMASs: EE: B.8.5, B.8.18, B.8.21
HE: A.8.2, B.8.4, D.8.2, G.8.3
SC: C.8.2, H.8.3
Grades: 6–9
This activity is divided into two parts:
Part 1 is designed to teach students to
read instructions and information on
household chemical labels. In Part 2,
students are asked to complete a home
inventory of hazardous materials with the
help of their parents.
Part 1: ReadingProduct Labels.Materials:
❖ Reading Product Labels activity
sheet
❖ Letter to Parents handout (for Home
Search activity)
❖ A Home Chemical Search activity
sheet (for Home Search activity)
Background: Many materials commonly
found in our homes can be hazardous for
children, adults and pets. The U.S. Envi-
ronmental Protection Agency estimates
that each home throws out an average of
six pounds of hazardous waste every year.
While six pounds may not seem like very
much, it all adds up. A town of 10,000
homes can generate 60,000 pounds of
hazardous waste in just one year! Take
a quick inventory of materials you use
and store in your kitchen, basement and
garage. Many of the products you might
fi nd, including aerosol sprays, cleaners,
insect repellents and poisons, motor ve-
hicle products, paints, paint thinners, fur-
niture strippers and fabric stain removers
are considered hazardous. They should be
used, stored and disposed of with care.
Chances are the only advice you re-
ceive for using and storing these products
is from the label on the container. Un-
fortunately, many product labels contain
little or no information for disposal of
leftover material or empty containers. If
these products are poured or buried in
the backyard or dumped into the drain
or toilet they can soak through soils and
reach groundwater (they can also run off
into surface waters). Many products can
also interfere with your wastewater treat-
ment plant by killing bacteria essential
for treating sewage.
It is important to read and follow
product labels carefully to avoid possible
illness, death and environmental damage
that can result from misuse of or improp-
er disposal of hazardous materials.
Procedure:1. Using the following information,
discuss what “hazardous” means.
Explain toxic, corrosive, reactive,
and ignitable.
Hazardous materials and wastes are
chemical substances that can harm,
contaminate or kill living organisms.
Hazardous materials have one or
more of the following characteristics:
❖ Toxic: Poisonous, potentially
harmful to human health, can
cause cancer and/or birth defects,
and can contaminate, harm or kill
fi sh and wildlife.
❖ Corrosive: A substance that can
corrode storage containers or
damage human tissue if touched.
❖ Reactive: An unstable substance
that can react if exposed to heat,
shock, air or water. Reactions
include explosions.
❖ Ignitable: A substance that can
explode, catch fi re or emit toxic
gases or fumes into the environ-
ment.
2. Generate a list of hazardous materi-
als from each category that might be
found in the home. How do people
know how to use, store and dispose
of these materials?
3. Complete the “Reading Labels”
activity sheet.
4. Discuss your answers.
❖ How might this product fi nd its
way into groundwater?
❖ What effects might contamina-
tion have on people drinking the
water?
❖ Can you think of any alternatives
to using the product?
5. Distribute the “Household Chemical
Search” activity sheet and the “Letter
to Parents.” Ask students to fi ll out
only the fi rst two columns on the
activity sheet (i.e. mark with an X
if the product is found and estimate
the amount of chemical present). Go
through the list of substances and
possible locations in the home. Ask
students if they have questions about
any of the substances.
This activity can be an excellent opportu-
nity for students and their parents to learn
about hazardous chemicals together. Re-mind students to ask their parents for help fi lling out the worksheet, to avoid touching any of the substances, to read container labels carefully and to wash

21
their hands when through. Students
should have 1–2 days to complete the
inventory.
You might also investigate hazardous
materials in your school by conducting
a hazardous chemical search of your sci-
ence room or cleaning supply closet!
Adapted from: Groundwater Quality Pro-tection in Oakland County: A Sourcebook for Teachers, 1984, The East Michigan
Environmental Action Council, 21220
West 14 Mile Road, Birmingham, MI
48010.
Many counties, cities and towns offer a “Clean Sweep” collection program. This
is an opportunity for home owners to bring household hazardous materials to a
central location for safe disposal. To fi nd out about Clean Sweep programs in
your area, contact your city or county health department or visit the Department
of Agriculture, Trade and Consumer Protection Clean Sweep website at datcp.state.
wi.us/arm/agriculture/pest-fert/pesticides/clean-sweep/index.jsp.
Part 2: A Home Chemical Search
Materials:
❖ Can Some of Your Household Prod-
ucts Harm You? Handout
❖ Household Hazardous Waste Wheel
patterns and directions
❖ Completed Home Chemical Search
activity sheet
❖ glue
❖ manila folders (2 per student)
❖ brads
❖ scissors
Procedure:1. Distribute “Household Hazardous
Waste Wheel” patterns, directions
and materials. Construct Household
Hazardous Waste Wheels (follow
directions printed on activity sheet
8-6). When the wheels are com-
plete, demonstrate how to use them.
It would be helpful to have some
examples of hazardous household
products in the room.
2. Work in small groups. Using the
“Can Some of Your Household
Products Harm You?” handout, rate
the toxicity of the products found in
your homes. Ratings are 1–6, with 1
representing the least toxic materi-
als and 6 the most toxic. Record
your ratings on the “Home Chemical
Search” activity sheet.
3. Calculate the total quantity of sub-
stances listed in each category (1–6)
for your group. Using the Household
Hazardous Waste Wheels, list direc-
tions for disposing of all products
which are at least “very toxic” (a
toxicity rating of 4 or greater). For
all products which are at least “very
toxic,” also list at least one viable
alternative to using the product.
4. Discuss the completed activity
sheets.
❖ What kinds of products were
found in each toxicity category?
❖ What was the total quantity of
hazardous material in each cat-
egory for your class?
❖ What makes these products
hazardous (e.g. toxic, corrosive,
reactive, fl ammable)?
❖ What alternatives were suggested?
❖ How viable are these alternatives?
Discuss advantages and disad-
vantages of using the alternatives
and of using the products with a
toxicity rating of 4 or greater.
❖ Which products represent “needs”
and which represent “wants?”
❖ Using your homes as the average,
estimate how much hazardous
waste would be found in your
community, in the state and in the
nation.
❖ How might these products enter
groundwater?
❖ How should these materials be
disposed?
❖ What kinds of warnings did you
fi nd on the containers? How can
you tell if a product is considered
hazardous?
Going beyond:1. Research the disposal of household
hazardous materials in your area.
Does your county, city or town of-
fer a Clean Sweep program? If so,
when is it? What products should be
taken there for disposal? How much
hazardous waste is collected at the
Clean Sweep each year? Does your
community have a waste oil disposal
facility? How much waste oil is
collected there each year? What is
done with the waste oil? Do people
in your community know that these
services exist? Do most people use
them? If not, what do they do with
their household hazardous waste?
Your city/county Health Department
should be able to provide informa-
tion on household hazardous waste
disposal programs or see box below.
2. For more information on alterna-
tives to household hazardous wastes
and options for disposal, see Better Homes and Groundwater included
with the Groundwater Study Guide
packet.
Adapted from: Groundwater Quality Pro-tection in Oakland County: A Sourcebook for Teachers, 1984, The East Michigan
Environmental Action Council, 21220
West 14 Mile Road, Birmingham, MI
48010.

TestWell#1
TestWell#2
TestWell#3
410 400 390 380 370 360 350 340 330 320 310
5"½"
22
Resource Protection, Value and Confl ictIt’ll Go With the Flow...
Learning Objectives: Students will: (1)
construct a water table elevation con-
tour map, (2) predict groundwater fl ow
patterns using the water table elevation
contour map and (3) evaluate a hypotheti-
cal landfi ll site based on the direction of
groundwater fl ow.
Subjects: Environmental Education, Sci-
ence, Social Studies, Health Education
and Math
WMASs: EE: A.8.2, A.8.4, B.8.17, B.8.18,
D.8.1
SC: A.8.1, C.8.6, D.8.6, E.8.1, H.8.3
SS: A.8.1, C.8.7
HE: A.8.2, B.8.4, C.8.3
M: E.8.4
Grades: 7–9
Materials:
❖ It’ll Go With the Flow activity sheet
❖ It’ll Go With the Flow teachers key
❖ rulers
❖ pencils
❖ book and a marble for demonstration
(optional)
Background: Groundwater usually fl ows
in the same direction as the land slopes,
often toward a nearby lake or stream.
Many factors, such as rate of percola-
tion from the surface and pumping from
wells, can infl uence the direction and rate
of groundwater fl ow, but it is possible
to get an idea of how groundwater is
moving in a given area by determining
the slope or “plane” of the water table.
To do this, at least three monitoring wells
must be installed (three points determine
a plane). By measuring the “static water level” (SWL), or elevation of the water
table above sea level, we can estimate
how groundwater will fl ow at a certain
location.
Groundwater fl ows from areas of high
static water levels to areas of low static
water levels. This can be illustrated using a
book and a marble. The marble will roll off
the book in the direction of the slope and
the speed of the marble will be determined
by the steepness of the slope. Groundwater
moves in much the same way.
It is important to consider the direction
and rate of groundwater fl ow when plan-
ning land development to avoid potential
contamination problems. Using static
water level data, students will be asked to
determine the general direction and rela-
tive rate of groundwater fl ow on a given
map, and evaluate a proposed landfi ll site
on the basis of this information.
Procedure:A) Determine the slope of the water
table and the direction of ground-
water fl ow. The activity sheet gives
land elevation/depth to water table.
Ask students to subtract depth to
water table from land elevation to
get static water levels (SWL’s). Mark
SWL’s on activity sheet next to each
well. Remind students that SWL’s
are height above sea level not depth
from the land surface. Point out that
the water table generally follows the
contour of the land surface.
Construct contour lines by doing the
following for each adjacent pair of
wells:
1. Draw a line between the two
wells. Measure the length of the line.
2. Subtract the smaller of the two
SWL’s from the larger. This is the
difference in water table elevation (in
feet) between these two wells.
3. Divide the line between the two
wells into units representing 10 ft.
(foot) intervals.
a) Calculate the number of subdivi-
sions needed by dividing the dif-
ference in water table elevations
by 10.
b) Calculate the distance between
subdivisions by dividing the
distance between the wells by the
number of subdivisions needed
(see example).
4. Label each subdivision mark with
the appropriate SWL as in example.
Example:
Distance between wells = 5 inches
SWL A = 410 ft. SWL B = 310 ft.
SWL difference: 410–310 = 100 ft.
Number of subdivisions: 100 ft./10
ft. intervals = 10
Distance between subdivisions: 5
inches/10 subdivisions = ½ inch per
subdivision

44020
CityWell
Mud River
Monitoring well
Pleasant Valley
➲
N
S
EW ProposedLandfill Site
Key
41515
37818
41717
42020
39919
31616
23
5. Repeat steps 1–4 for each pair of adjacent
wells.
6. Connect equivalent SWL’s with light dashed
pencil lines. These lines represent the contour
of the water table elevation. (The lines are
analogous to contour lines on a topographic
map which connect equivalent land eleva-
tions.)
7. After all contour lines have been drawn,
round sharp “corners” and draw solid lines
over the original dashed lines. The groundwa-
ter fl ow at any point on your maps is perpen-
dicular to the contour lines at that location.
(See Teacher’s Key)
B) Evaluate the proposed landfi ll site, marked
“✩,” using groundwater fl ow information from
your contour maps.
1. Write a paragraph evaluating the proposed
landfi ll site based on groundwater fl ow at “✩.”
(Note locations of the private wells.) If you
think that locating the landfi ll at “✩” is not
advisable, suggest two locations that might
be better suited for a landfi ll. Support your
choices by comparing rate and direction of
groundwater movement at your proposed sites
with that at “✩.”
C) Discuss your fi ndings.
❖ What is “static water level?” How is it dif-
ferent from water table depth?
❖ How are SWL’s used to determine the slope
or plane of the water table? How does the
plane of the water table affect groundwater
fl ow (direction and rate)? What other fac-
tors might infl uence groundwater fl ow?
❖ What do the contour lines on your map
show?
❖ In what general direction does groundwater
fl ow in Pleasant Valley?
❖ Can we make assumptions about the speed of
groundwater movement at certain locations?
❖ Would the contour lines change if you had
SWL information from more wells? Fewer
wells?
❖ What is the level of Mud River as it passes
by town?
❖ Is “X” a good location for the landfi ll? Why?
❖ Can you suggest better locations for the land-
fi ll, based on groundwater fl ow? If so, why do
you think these sites are better than “X”?
Going Beyond:Conduct a hearing to decide where to locate a landfi ll in your community. Take
on roles of people involved in making the decision: local landowners, politi-
cians, industry representatives, geologists, environmentalists, waste managers
and others. The Groundwater Contamination Susceptibility in Wisconsin map
(in your packet) and topographic maps of your area may be helpful.
Adapted from: Groundwater: Michigan’s Hidden Resource Workbook, 1989,
Michigan Department of Natural Resources, Environmental Response Divi-
sion, P O Box 30028, Lansing, MI 48909.

24
What if Water Cost as Much as Gasoline?
Learning Objectives: Students will: (1)
explain how the availability of a resource
has an effect on how much people are
willing to pay for a resource, (2) describe
how cost infl uences the willingness of
people to conserve natural resources and
(3) discuss ways to encourage people to
conserve natural resources.
Subjects: Environmental Education, Sci-
ence and Social Studies
WMASs: EE: B.8.16, C.8.3
SC: E.8.6
SS: A.8.11, D.8.2, D.8.11
Grades: 6–9
Materials:
❖ What if Water Cost as Much as
Gasoline? activity sheet
❖ play money
❖ legal size envelope for each student
Background: At one time energy—gaso-
line and fuel oil—was so inexpensive that
people did little to conserve it. People
drove as much as they wanted, energy-
effi cient cars were less of a concern and
homes were built with very little insula-
tion. Today water is relatively inexpen-
sive. Few people try to conserve water
just as few people conserved gasoline or
fuel oil when they were less expensive.
This activity is designed to help students
begin thinking about the value of water.
Procedure:1. Interview a grandparent or older
neighbor. Ask about the present and
past price of gasoline, fuel oil and
water. Ask also about conservation
of these resources. Questions should
include:
❖ What is the lowest price you re-
member paying for gasoline? Did
you conserve gasoline then?
❖ What price do you pay for gaso-
line today? Do you try to conserve
it now? If so, how?
❖ When you began driving, what
would your response have been
if someone had told you that the
price of gas would reach more
than $3.00/gallon?
❖ Do you remember when it was
less expensive to heat your home?
Did you conserve energy then?
How?
❖ How much does it cost to heat
your home in the winter today?
Do you try to conserve energy
now? How?
❖ How much water do you use in
your home in a year? Do you try
to conserve water? Why? How?
❖ Do you work harder to conserve
energy or water? Why?
2. Discuss your fi ndings.
3. Ask students to imagine they are
taking a trip into the future over a
specifi ed weekend. Water costs the
same as the current price of gasoline
(record current price on activity sheet
master before photocopying or write
a whole dollar amount on sheet to
make calculations easier). They will
have to purchase all the water they
use in a weekend by placing “mon-
ey” in an envelope. (Make a master
sheet of play money and make copies
to distribute to the students.)
Since some people have more money
than others do, some students should
be given more money than others.
Randomly give students $30, $40,
$50. Students should also be given
the “Sale on Water” activity sheet to
record the water they use. Remind
them to estimate the amount of water
used on their behalf when a parent
does laundry or prepares a meal (e.g.
wash 4 loads of laundry, 4 people in
family, assume that the water for one
load was used on the behalf on the
student).
Each time water is used, calculate
the cost and deposit money in the
envelope.
4. Discuss your results.
❖ Who used the least water? Who
used the most? What accounted
for the difference?
❖ Was it easy
to live within
your water
budget?
❖ Did you have
to conserve
water? Why?
How did you
try to con-
serve water?
❖ Should people try to conserve
water? Why or why not?
❖ Should water cost so much that
some people are forced to con-
serve it more than others?
❖ Making a natural resource
expensive is one way to encour-
age people to conserve. What are
other ways to encourage people to
conserve natural resources?
Examples:
Education programs—try to teach
people to conserve the resource
Rationing programs—set strict limits
on water use
Tax credits and deductions—Provide
economic incentives to conserve the
resource
❖ Which methods to encourage
conservation do you think would
be most effective? Which are the
most fair?
❖ Should people conserve water even
if it’s inexpensive? If so, why?
Going Beyond:As a class, investigate how a public
works department in a dry western/south-
western city (e.g. Tucson, Santa Fe, Den-
ver, Los Angeles or Las Vegas) charges
residents for water. Do they encourage
conservation? If so, how?
Adapted from: Local Watershed Problem Studies, 1981, Cooperative Educational
Service Agency 16, Waukesha, and the
Water Resources Institute, 1975 Willow
Drive, University of Wisconsin, Madison
(out of print).
UPUP

25
Rights or Fights
Learning Objectives: Students will: (1)
explain the four doctrines of ground-
water use law, (2) compare and contrast
doctrines of groundwater use law and (3)
decide a groundwater case based on the
groundwater use law.
Subjects: Environmental Education, Sci-
ence and Social Studies
WMASs: EE: B.8.16, B.8.22, B.8.23,
D.8.4
SC: F.8.10
SS: E.8.11
Grades: 9 (and up)
Materials:
❖ Groundwater Law activity sheets
Background: Who owns groundwater?
Who has the right to use it? How much
can they use? Should they be allowed
to change its quality? Can water rights
be sold? As with any limited resource,
we must have rules and laws to regulate
groundwater use and protect its quality.
Making groundwater laws is not easy.
Courts and lawmakers must consider
competing uses, water availability and
water quality. Laws must evolve as uses,
availability and quality change.
Groundwater rights involve two
separate issues, WATER USE (quantity)
and WATER QUALITY. In Wisconsin,
groundwater quality is generally cov-
ered by legislative law. Legislative law
is created by the State’s legislative or
administrative processes. Legislative laws
include constitutions, treaties, statutes,
administrative rules and regulations, and
ordinances.
Groundwater quantity laws, on the
other hand, are generally based on “com-
mon law.” Common law is law which is
developed through court case decisions.
A judge establishes societal values as
law by issuing decisions in cases that
he/she hears. Common law may change
as societal values change. This activity
focuses on the evolution of Wisconsin’s
groundwater common law.
Over time,
four doctrines
of groundwater
use law have
evolved in the
United States.
Each state
treats ground-
water confl icts
differently,
relying on one
or more of
the following
doctrines as
the basis for its
groundwater
use law.
1. English Rule:
Groundwater use is a property right.
Under this doctrine, a landowner has the
right to use the water under his or her
land at any time and for any purpose. The
landowner may also sell or allow others
to use his or her water. This rule grew out
of the belief that groundwater movement
could not be understood and that land-
owners couldn’t anticipate the conse-
quences of pumping groundwater.
2. Reasonable Use Rule:
Groundwater use is a property right. But
water may only be used for “reasonable”
purposes. A property owner may use the
water on the land from which it came or
elsewhere, as long as his or her use is rea-
sonable in comparison to the water needs
and uses of his neighbors.
3. Correlative Rights Rule:
All landowners in an area have a right to
use groundwater. The amount of water
each landowner can use depends on the
amount of land he or she owns. The land-
owner cannot pump more than his or her
share of water, even for use on his or her
own land if other water users don’t have
enough water to meet their needs.
4. Appropriation Rule:
Sometimes called the rule of “fi rst in
time, fi rst in right.” Groundwater rights
under this doctrine are not connected to
land ownership. A person has a right to
use groundwater if he or she has obtained
it and put it to a benefi cial use such as
irrigation, mining, manufacturing, power
generation, raising fi sh, watering farm
animals, household or recreational uses.
(Water uses may be assigned priority.)
Water may be used on the land from
which it came or from elsewhere. Ap-
propriation rights may be sold or given to
others.
Under the Appropriation Doctrine, in
times of water shortage, those who have
used the water longest (i.e. those who
have the earliest “appropriation date”)
may use all the water they have used
in the past and newcomers may be left
with little or no water. If a person stops
using his share of water for a benefi cial
purpose, he or she may lose the right to
use the water at all.
With a better understanding of ground-
water movement and the water cycle,
there has been a general trend from view-
ing groundwater as private property
to recognizing it as a valuable public resource. The two Wisconsin landmark
cases used for this activity, Huber v. Merkel and State v. Michels Pipeline,
illustrate this trend. Another recent trend
in groundwater use law is increased
legislation rather than a dependence on
case law.

26
Until 1974, Wisconsin’s groundwater
law was based on the English Rule. In
1903, a Wisconsin Supreme Court deci-
sion (in Huber v. Merkel) established that
a landowner has an absolute property
right to use groundwater under his/her
land. The judge determined that a land-
owner may use his or her water for any
purpose, including malicious waste.
As you can probably imagine, the
1903 decision was heavily criticized, but
the English Rule stood until 1974, when
the State took Michels Pipeline Construc-
tion, Inc. to court for harming local wells
and building foundations when they de-
watered soil for construction of a sewage
pipeline. The Court in State of Wisconsin v. Michels Pipeline determined that such
injury could be considered a “public
nuisance.” The 1903 decision was over-
ruled as the judge found in favor of the
State on the basis of a Modifi ed Reason-
able Use Rule. This doctrine is the basis
of Wisconsin’s groundwater use common
law today. (Huber v. Merkel and State v. Michels Pipeline are outlined in greater
detail on Rights or Fights activity sheet.)
Groundwater use is still considered a
property right under Wisconsin’s Modi-
fi ed Reasonable Use Rule, but a landown-
er may withdraw and use groundwater
only for benefi cial purposes and only if
pumping does not cause unreasonable
harm to his/her neighbors. “Unreason-
able” harm includes lowering the water
table, reducing artesian pressure and
direct effects on water levels of streams
and lakes.
Procedure:1. Explain the four doctrines of ground-
water rights law.
2. Read aloud Huber v. Merkel from
activity sheet. (It may be helpful to
explain fl owing artesian wells.)
3. Discuss Huber v. Merkel.
❖ Why did Mr. Huber take Mr.
Merkel to court?
❖ What is a fl owing artesian well?
❖ How did Mr. Merkel’s actions af-
fect neighboring wells?
❖ What did the State Supreme Court
decide in this case?
❖ On what groundwater doctrine
was the Court’s decision based?
4. Read aloud State of Wisconsin v. Michels Pipeline Construction, Inc.
from activity sheet.
5. Discuss State v. Michels Pipeline.
❖ Why did the State take Michels
Pipeline Construction Co. to
court?
❖ What did dewatering the soil do to
local wells and properties?
❖ What did the State ask that the
company do to correct this prob-
lem?
❖ What did the Court decide in this
case?
❖ On the basis of what groundwater
doctrine was this case decided?
❖ What is the difference between
this doctrine and the one used to
decide Huber v. Merkel? What are
the similarities?
❖ How would this case have been
decided on the basis of the old
English Rule Doctrine?
❖ How did the State v. Michels
Pipeline case change the course of
groundwater use law in Wiscon-
sin?
6. Ask students to imagine that they’re
on the 1903 Wisconsin Supreme
Court. Work in small groups and
assign a scenario (a–c on the activity
sheet) to each group. Tell students
that they are responsible for decid-
ing Huber v. Merkel. Complete the
appropriate section of your activity
sheets.
7. As a class, complete scenario d.
8. Discuss your answers.
❖ How would the case have been
decided using Wisconsin’s Modi-
fi ed Reasonable Use Doctrine?
The Correlative Rights Doctrine?
The Appropriation Doctrine?
❖ Which doctrine do you think is
the most fair for deciding scenario
d? Why?
❖ Do you think water availability in-
fl uences the groundwater doctrine
followed by individual states? If
so, how?
❖ In some states groundwater and
surface water laws are based on
different doctrines. What prob-
lems might result if a state used
the Appropriation Doctrine for
its surface water and the English
Rule for its groundwater? (Hint:
think about the water cycle!)
Going Beyond:1. Invite an attorney or other Wiscon-
sin water law expert to discuss laws
pertaining to groundwater quality in
Wisconsin. Discuss State of Wiscon-
sin v. Michels Pipeline. What laws
would the Court need to consider if
the State’s complaint was groundwa-
ter contamination by the construction
company?
2. Wisconsin follows the modifi ed
Reasonable Use Doctrine. Research
and report on a state that follows the
English Rule, Appropriation or the
Correlative Rights Doctrine. How is
this state different from Wisconsin?
What historical and/or environmen-
tal factors do you think infl uenced
groundwater use laws in that state?
3. Collect newspaper and magazine
articles on groundwater-related is-
sues in Wisconsin. Using a map of
the state, make a display of issues by
location. Discuss related groundwa-
ter laws, personal costs, responsibil-
ity, solutions, etc.
4. Watch the Wisconsin Public Televi-
sion video Water Rich Water Poor
and discuss and compare groundwa-
ter quality and quantity issues in dif-
ferent parts of the state. See the back
of the Groundwater Study Guide
packet cover letter for information on
the video. See if your school library
or public library has a copy.
5. Collect newspaper and magazine
articles about groundwater-related
issues in a western state (e.g. Cali-
fornia or Colorado). Using a map of
the state, make a display of issues
by location. How are the problems
similar to those in Wisconsin? How

27
7. Research and report on how water
resources have infl uenced the history
of your community. How has water
helped your community develop?
Has groundwater played a special
role? Many areas of Wisconsin are
known for having “healthful” spring
water. Is part of your community’s
history related to spring water? How
does your community feel about
protecting groundwater?
8. Groundwater is important in the
production and processing of many
Wisconsin products such as cheese,
beer and paper. Investigate some of
these products. How much water do
they use? How clean should the wa-
ter be? Are there laws or regulations
that govern the quality of the water
they use?
are they different? Compare personal
costs, responsibility, solutions, etc.
6. Research and report on which
governmental agencies (municipal,
county, state, and federal) regulate
and protect groundwater. How do
these groups work together? Discuss
roles that other groups play (for
more information, see Groundwater: Wisconsin’s Buried Treasure).
Trouble in Paradise
Learning Objectives: Students will: (1)
determine the source of groundwater
contamination in the mythical town of
Paradise using knowledge gained from
previous activities, (2) discuss the impli-
cations of groundwater contamination
in Paradise and (3) recommend possible
solutions to the groundwater contamina-
tion problem in Paradise.
Subjects: Environmental Education,
Science, Health Education and Social
Studies
WMASs: EE: A.8.4, A.8.5, B.8.10, B.8.15,
B.8.17, B.8.21, B.8.23, C.8.2, D.8.1
SC: A.8.6, B.8.6, C.8.6, E.8.1
HE: A.8.2, G.8.3
SS: A.8.1, A.8.11, D.8.11
Grades: 7–9 (and up)
Materials:
❖ Trouble in Paradise handouts
❖ colored pencils—red, blue and green
Background: In this activity, wells in
the mythical town of Paradise have
been contaminated with volatile organic
compounds (VOCs). VOCs are a group of
commonly used chemicals that evaporate,
or “volatilize” when exposed to air. Since
they dissolve many other substances,
VOCs are widely used as cleaning and
liquifying agents in fuels, degreasers,
solvents, cosmetics, polishes, drugs and
dry cleaning solutions. VOCs are found
at airports and service stations; machine,
print and paint shops; electronics and
chemical plants; dry cleaning establish-
ments; and in household products. Two
common VOCs—1,2-dichloroethylene
and trichloroethylene—are referred to in
this activity.
When VOCs are spilled or dumped,
some will evaporate and some will soak
into the ground. Once in the soil, VOCs
can be carried deeper into the ground by
percolating rainwater. If they reach the
water table, VOCs can persist for years
because the cool, dark, low-bacteria
environment does not promote decompo-
sition. If VOCs in groundwater migrate to
nearby wells, they can end up in some-
one’s drinking water.
At least one VOC has been detected
in about 2,500 drinking water wells in
Wisconsin. Over 80 different VOCs have
been found in Wisconsin’s groundwater,
with trichloroethylene being the VOC
most commonly found. Some 770 private
or public water supply wells have had
concentrations of at least one VOC above
a Wisconsin groundwater standard.
Some VOCs can harm the central
nervous system, liver and kidney. For
these types of health effects, researchers
can determine a “no-observable-effect
level”— a maximum VOC dose that does
not produce any effect in exposed experi-
mental animals. This “no-observable-ef-
fect level” is further reduced by a safety
factor, which ranges from one tenth to
one ten thousandth (depending on the
strength of scientifi c evidence). From this
number state groundwater standards are
established.
Some VOCs (such as trichloroethyl-
ene) are known or suspected carcinogens
(cancer-causers). State groundwater stan-
dards for carcinogens in drinking water
are conservatively set so that lifetime
consumption of the water will cause no
more than 1 to 10 additional cancers for
every million persons exposed. Addition-
al information on how Wisconsin ground-
water quality standards are developed
can be found in Wisconsin’s groundwater
law, chapter 160, Wis. Stats., at: legis.state.
wi.us/statutes/1993/93stat0160.pdf. Chapter NR
140, Wis. Administrative Code, contains
the groundwater quality standards that
have been adopted in Wisconsin. NR 140
can be found online at: legis.state.wi.us/rsb/
code/nr/nr140.pdf.
Federal drinking water standards
(Maximum Contaminant Levels) are set
in a similar manner by the U. S. Environ-
mental Protection Agency. Check out epa.
gov/safewater/standards.html for information
on how federal drinking water standards
are developed.
Several factors infl uence a well’s
vulnerability to VOC contamination. One
factor is the distance between the well
and the source or sources of contamina-
tion. Another factor is time. Groundwater
usually moves very slowly and it can
sometimes take years for a spilled con-
taminant to reach nearby wells. The time
and distance contaminants must travel are
extremely important because many wells
which presently show no contamination
may eventually become contaminated by
spills that have already occurred. In other
words, we may not know the full effects
of contamination we already have caused
for many years to come (For more infor-
mation, see Groundwater: Wisconsin’s Buried Treasure).
There are two options for dealing with
VOC contamination. The well owner can
either construct a new well or treat water
from the contaminated one. Treatment of
the well water has the benefi t of remov-
ing contaminated water from the ground.
Both options are expensive. Drilling a
new municipal well can cost as much

WaterTable
Well
Cone ofDepression
28
as $1 million or more; building a water
treatment facility for a contaminated
municipal well generally costs between
$500,000 and $1 million.
Activity setting:VOC contamination has occurred in “Par-
adise” and your students will be asked to
determine where the VOCs came from
and what should be done about the prob-
lem. The contamination was fi rst noticed
after the installation of a high capacity
community well. Wells that draw a large
volume of water can affect the direction
and rate of groundwater fl ow by creating
a “cone of depression.” As groundwater is
depleted under the well site, it is replaced
by groundwater from soils surround-
ing the well. So even water that initially
fl owed away from the well can be drawn
toward it as groundwater immediately
under the well is removed.
The new municipal well in “Paradise”
has created a cone of depression and is
drawing water and the plume of VOC
contamination toward itself. The source
of contamination is the closed landfi ll
at the Johnson farmsite which, while it
operated, may have accepted wastes con-
taining VOCs from local industries and
households. This landfi ll was designed
as a “natural attenuation” site, meaning
that the landfi ll depended only on the
characteristics of surrounding soils to
contain and fi lter leachate from the waste
deposited there. Today landfi lls must be
lined with a layer of impermeable clay
which helps to contain leachate. Modern
waste disposal regulations also limit the
type of wastes that can be deposited in a
municipal landfi ll.
Note: The groundwater standard listed for 1,2-dichloroethylene (1,2-DCE) on the activity sheets is actually the ground-water standard for 1,2-dichloroethylene (cis), which is an isomer of 1,2-DCE. On the activity sheets, 1,2-DCE is consid-ered to be one substance to simplify the exercise.
Procedure:1. Using How Much is a Part per
Billion? handout, discuss the idea
of parts per trillion (ppt), parts per
billion (ppb) and parts per million.
Explain that drinking water stan-
dards and laboratory results are often
stated in micrograms per liter (μg/L)
which is equivalent to ppb. Because
it’s easier to understand the concept
of ppb than μg/L, the Trouble in
Paradise Activity Sheets use parts per
billion.
2. Tell students that the mythical town
they will be investigating is based on
several Wisconsin communities that
actually experienced groundwater
contamination. Explain what VOCs
are and their many sources. Briefl y
discuss how groundwater standards
are set in Wisconsin.
3. Distribute “Trouble in Paradise”
handouts. Have students read the
case study.
4. Ask individual students to read aloud
the problems on the activity sheet.
Clarify any uncertainties about the
problems.
5. Working in small groups, complete
the activity sheet. Remind students
that they will need to use the infor-
mation given in the case study AND
what they have learned in previous
activities to answer the questions. It
may be helpful to review the reading
of topographic maps.
6. Using the completed worksheets,
construct a master time line on the
chalkboard. Discuss the time line and
answers to activity sheet questions.
❖ In what general direction does
groundwater fl ow in Paradise?
❖ What is the source of contamina-
tion? How do you know?
❖ Where would you place test wells
to confi rm the source of contami-
nation?
❖ What is a plume of contamina-
tion?
❖ How did the shape of the plume
of VOC contamination change?
What caused it to change?
❖ Why did it take so long for the
VOCs to move from their source
into surrounding wells?
❖ Why did the contamination appear
in the Hansens’ well then seem to
disappear?
❖ Why was there such a delay
between the time that VOCs were
fi rst discovered in the Hansens’
well and when city offi cials de-
cided to take action?
7. Discuss the implications of ground-
water contamination in Paradise.
❖ What are VOCs used for?
❖ Who might have put materials
containing VOCs in the landfi ll?
❖ When is groundwater “contami-
nated”? Is water that contains 200
ppb 1,2-dichloroethylene consid-
ered contaminated? Is 200 ppb
1,2-dichloroethylene considered
unhealthy?
❖ Does contaminated necessarily
mean unhealthy?

930
920
910
900
890
890
900
910
920
930
940950
N
SEW
N
SEW
ParadisePond
Abandonedlandfill site
Johnson farmsite
Hansenfarm
Thompson farm
Smith farm
Bill's gas station
Tranquil Acres
ChemicalCompany
To downtown
Paradise
Paint Company
Municipalhigh capacitywell
Private well
Map A
Map B
ParadisePond
29
❖ Why do you think the
groundwater standard for
1,2-DCE is so much higher
than the MCL for trichloro-
ethylene (TCE)?
❖ Who’s to blame for the con-
tamination?
❖ Who should pay to solve the
problem?
❖ How did the citizens react
to the contamination? Were
their demands reasonable?
What else could citizens do?
❖ How did the contamination
affect private well owners?
❖ Should the Smiths’ and
Thompsons’ well water be
restored (either by construc-
tion of a new well or by
treating water from existing
wells)? If so, who should
pay?
❖ Could the contamination
affect the new community
well?
❖ How long can Paradise’s
problem continue?
❖ If hazardous materials are
removed from the landfi ll
in Paradise, they may have
to be moved to a hazard-
ous waste landfi ll in an-
other state. Is that fair? Who
should pay to maintain and
operate the disposal site?
❖ Could the contamination
have been avoided? If so,
how?
❖ What can Paradise do about
the contamination now?
❖ Could your community have
problems like this?
❖ How can your community help
prevent groundwater contamina-
tion problems?
Going Beyond:Going Beyond:
1. Using selected discussion questions
as an outline, research and report on
a groundwater contamination issue in
your area.
2. Use the websites listed in this exer-
cise as a starting point to learn how
Wisconsin groundwater standards
and federal Maximum Contaminant
Levels are established. Look at the
similarities and differences in how
health standards are set and in which
substances have standards at the state
and federal level.
3. Have your students do calculations to
understand the concepts of 1 part per
million, 1 part per billion and 1 part
per trillion. For example, how long is
1 million seconds? How long is 1 bil-
lion feet?
Adapted from: Discovering Groundwa-ter: A Supplementary Activities Guide for Upper Elementary Social Studies and Science Classes, 1984, Wisconsin De-
partment of Natural Resources, Western
District (out of print).

30
More Groundwater Activity Ideas!❖ Make a collection of rocks and soils
important in Wisconsin’s aquifers.
Make a display for your school or
local library.
❖ Schools must have their water tested
regularly. Find out how often your
school’s water is tested. Who collects
the water? What tests are run? Obtain
a copy of the most recent test results
and discuss.
❖ Send a sample of your school’s water
to a certifi ed water testing lab for
nitrate and bacteria testing. Labs that
test for bacteria in water are certi-
fi ed by the Wisconsin Department
of Agriculture, Trade and Consumer
Protection and can be found online
at dnr.wi.gov/org/water/dwg/SDWAbactilist.
pdf. The Wisconsin DNR certifi es
labs that test for contaminants such
as nitrate, pesticides, metals, and
VOCs; that list is available online at
dnr.wi.gov/org/es/science/lc/info/lablists.
htm. You can also look in your yellow
pages for certifi ed water testing labs
in your area.
❖ Visit the State Laboratory of Hygiene
(2601 Agriculture Drive) in Madison
or a certifi ed water testing labora-
tory. What water tests are done at the
laboratory? How much do the tests
cost? How often are public wells
tested? What tests are run on public
water supplies? How often should
private wells be tested? What tests
are normally run on private water
supplies? When is water considered
“contaminated?” When is water
considered “unhealthy?”
❖ If you and your students are inter-
ested in water conservation in your
school, consider becoming a “Green
and Healthy School.” Learn about it
at dnr.wi.gov/greenandhealthyschools.
❖ Research and report on methemo-
globenemia (blue baby syndrome)
caused by high levels of nitrate in
drinking water.
❖ Interview someone who has had a
contaminated well. How did she/he
determine that the well was con-
taminated? With what was the well
contaminated? What was the source
of contamination? Was the problem
solved? If so, how?
❖ Visit a beverage or food-processing
industry. What is produced at the
site? Is water used in the produc-
tion? How? Where does the water
come from? How does the company
ensure that the water used is of good
quality? Is wastewater produced? If
so, what does it contain? How is it
disposed of?
❖ Investigate your home or school’s
use of lawn chemicals. What chemi-
cals are used? What do they do for
the lawn? How are they stored? How
are excess chemicals disposed of?
Where do chemicals placed on lawns
go when it rains? What effects might
the chemicals have if they get into
groundwater? Are there any alterna-
tives to using lawn chemicals?
❖ Invite the county Extension agri-
cultural agent to speak to your class
about the advantages and disadvan-
tages of insecticide and herbicide
use. How should pesticides be used?
What can be done to decrease the
amount of chemical applied to a fi eld
or garden? Are there any pesticide
contamination problems in your
county? If so, what is being done
about them? Can farmers eliminate
the use of pesticides? Check into
Wisconsin’s School Integrated Pest
Management program at ipcm.wisc.
edu/programs/school/default.htm.
❖ Interview someone who farmed
before the time of widespread use of
nitrogen fertilizers. Find out about
yields, prices, profi ts, conservation
practices and groundwater concerns.
❖ Invite an organic gardener or farmer
to speak to your class. What is or-
ganic farming? What alternatives to
pesticides are used? How are natural
pest controls, such as insect preda-
tors and companion planting used?
How does not using pesticides affect
crop yield? Crop appearance? Crop
sales?
❖ Research and report on water needs
of various agricultural crops grown
in Wisconsin. How are these water
needs met? What are some ways to
irrigate farmland? Which methods
cause the greatest and the least water
loss (though runoff and evapora-
tion)? What is the relationship
between pesticide use and irrigation
practices on groundwater?
❖ Interview a person involved in the
production or distribution of pes-
ticides or fertilizer. Ask about use,
disposal, health, pollution, etc.
❖ Using newspapers and magazines,
research groundwater contamina-
tion by landfi lls and dumps. Where
did the contamination happen? Who
was affected? What were the health
consequences? Were there economic
consequences? How was the source
of contamination determined? Who
was responsible for clean-up? How
much will clean-up cost?
❖ Demonstrate that groundwater
provides the basefl ow for rivers and
streams. Visit a stream in early fall or
late spring. What is the temperature
of the stream? Why is the stream
cold? Has it rained or snowed re-
cently? Do you see water running off
the land? If not, where do you think
the water for the stream comes from?
❖ Research and report on the potential
environmental and health effects of
placing disposable diapers in munici-
pal landfi lls. Compare the cost of us-
ing cloth diapers and a diaper service
to that of using disposable diapers.
❖ Find out what materials are used
to make paper, plastic and glass.
What happens to these materials in
a landfi ll? What effects might these
materials, if leached from a landfi ll,
have on groundwater?
❖ Make a magazine photo display of
environmentally safe products sold
in non-polluting packaging.
❖ Organize or participate in a recycling
project. Report on how the recycled
materials are used.

31
❖ Invent and demonstrate new uses for
product packaging that you would
normally just throw away.
❖ Write a list of rules and guidelines
for your home for handling, storing
and disposing of household hazard-
ous materials.
❖ Interview a person who operates a
gas station or other business that uses
underground storage tanks. What is
kept in the tanks? Could this material
be harmful if it got into groundwa-
ter? How often are the tanks checked
for leaks? How does the owner know
if the tanks develop a leak? What is
done if the tanks leak?
❖ Make a poster showing how your
family or school can conserve water.
❖ Make a display of newspaper clip-
pings involving groundwater issues
for your school or local library.
Adapted from: Groundwater Study Guide and Groundwater Resources and Educa-tional Activities for Teaching.
Additional Field Trip Ideas:When planning a fi eld trip, be sure to se-
cure permission and discuss your activity
with people at the site before your visit.
❖ municipal or county landfi ll site—
possibly monitoring wells
❖ municipal water treatment plant, well
and water tower
❖ agricultural operation—irrigation
with wells, integrated pest manage-
ment
❖ water resource sites—springs, rivers,
lakes, wetlands
❖ rock exposures showing groundwater
effects
Resource People:Representatives from the following
groups can explain their interest in
groundwater and can often give insight
into groundwater problems or issues of
local interest. Contact with the com-
munity not only helps reinforce what is
learned in the classroom, but also helps
develop concern and sustains the enthusi-
asm of students.
Before you involve a resource person
in your class, discuss with him or her
your objectives and what you expect from
his/her visit.
❖ water chemists
❖ licensed well driller (check the yel-
low pages of your phone book)
Publications
❖ pump dealers
❖ Department of Natural Resources
environmental specialists (addresses
of DNR regional offi ces are found on
the back of the Groundwater Study
Guide packet cover letter).
❖ municipal/county health or environ-
mental specialists or county planners
❖ county University of Wisconsin–Ex-
tension resource or agricultural
agents
❖ water treatment plant operators
❖ hydrologists, hydrogeologists, and
engineers – private industry and
governmental agencies
In addition to this booklet and activity
sheets, the Groundwater Study Guide
packet contains additional materials
which are excellent sources of additional
information.
❖ The Wisconsin Groundwater Direc-tory contains contact information
and resources available on a variety
of groundwater topics, including
groundwater protection and land
use, groundwater contamination and
clean-up and groundwater education.
The Directory is included with the
Groundwater Study Guide packet
and is also available online by going
to uwsp.edu/cnr/gndwater/info/in-
dex.htm.
❖ Groundwater: Wisconsin’s Bur-ied Treasure includes introduc-
tory information on groundwater,
discusses the threats to groundwater,
describes what Wisconsin agencies
do to protect groundwater and lists
steps individuals can take to protect
this valuable resource. It is available
online by going to dnr.wi.gov/org/
water/dwg/gw/educate.htm.
❖ Better Homes and Groundwater
describes actions that individuals can
implement and practice to protect,
conserve, and replenish groundwater.
Topics include yard care, raingar-
dens, household cleansers, wise
water use, water conserving fi xtures,
water supply protection, and safe dis-
posal practices. It can be downloaded
online at dnr.wi.gov/org/water/dwg/
gw/pubs/bhgw.pdf.
❖ Groundwater Models Available
provides a listing of locations from
which it might be possible to borrow
a groundwater model for use in the
classroom. The list is also available
at dnr.wi.gov/org/water/dwg/gw/edu-
cation/models.pdf.
❖ Water Resources Websites is a listing
of websites for additional informa-
tion on water resources, especially
groundwater.
PRINTED ONRECYCLEDPAPER
The purpose of the Department of Natural Resources study guides is to help increase Wisconsin citizens’ knowledge about and understanding of our state’s environment. We hope to provide information about
important environmental issues, encourage respect for the environment and help citizensbecome active stewards of our natural resources.
Credits and Acknowledgements:This is a revision of a 1990 publication by the Wisconsin Department of Natural Resources Bureau of Information and Education. The author and
project coordinator of that original publication was Jo Temte. The project consultant was Dennis Yockers, Ph. D. The advisory committee consisted of
Dennis, Cathy Cliff, Ron Hennings, Chris Mechenich, Dan Sivek, Ph. D.
This revision was coordinated by David Lindorff. Special thanks for assisting in the revision go to Deb Lyons-Roehl, Christal Campbell, Laura Chern
and Blll Phelps. Thanks go to following persons for reviewing the publication: Shelley Lee, Carrie Morgan, Michael Scott, Suzanne Wade, Dr. Dennis
Yockers and the Groundwater Coordinating Council Education Subcommittee.
The Wisconsin Department of Natural Resources provides equal opportunity in its employment, programs, services, and functions under an Affi rma-
tive Action Plan. If you have any questions, please write to Equal Opportunity Offi ce, Department of Interior, Washington, D.C. 20240.
This publication is available in alternative format (large print, Braille, audio tape, etc) upon request. Please call (608) 266-0821 for more information.
Please address comments and questions about this study guide to:
Wisconsin Department of Natural Resources
Bureau of Drinking Water and Groundwater
Groundwater Section
PO Box 7921
Madison, Wisconsin 53707-7921
(608) 266-0821
Environmental Education StandardsA. Questioning and Analysis
B. Knowledge of Environmental Pro-
cess and Systems
C. Environmental Issue Investigation
Skills
D. Decision and Action Skills
Health Education StandardsA. Health Promotion and Disease Pre-
vention
B. Healthy Behaviors
C. Goal Setting and Decision Making
D. Information and Services
G. Advocacy
Science StandardsA. Science Connections
B. Nature of Science
C. Science Inquiry
D. Physical Science
E. Earth and Space Science
F. Life and Environmental Science
G. Science Applications
H. Science in Social and Personal
Perspectives
Social Studies StandardsA. Geography: People, Places, and
Environment
C. Political Science and Citizenship:
Power, Authority, Governance and
Responsibility
D. Economics: Production, Distribu-
tion, Exchange, and Consumption
E. The Behavioral Sciences: Individu-
als, Institutions, and Society
Math StandardsD. Measurement
E. Statistics and Probability
Activities in this guide may also
relate to other subject areas such as:
English/Language Arts and Family
and Consumer Education. For detailed
descriptions of all the Wisconsin Model
Academic Standards including those
listed in this guide please visit dpi.wi.gov/
standards/index.html.
Selected Department Of Public Instruction (DPI) Wisconsin Model Academic Standards For Environmental Education, Health Education, Science, Social Studies And Math Relevant To The Activities In This Booklet