golden island cosmo - championsnet.net · safety regulations for the user: ... the golden island...
TRANSCRIPT


We thank you for choosing
Golden Island CosmoWe recommend you, for a satisfactory use of your Golden Island Cosmo, that you read themanual exactly.
We wish you much success and much joy with your Golden Island Cosmo.
Please store this manual in such a way as to make it readily at hand if so required.
For additional queries, our Hotline is at your service.
Call: +43 (0) 7229 78040 250
E-Mail: [email protected]
Your TAB-Austria Team
Technical Info Golden Island Cosmo Manual
More information on the page:
http://www.tab.at/download
( WS, 9th September 2010)
The text passages and illustrations contained within this document were put together with thegreatest amount of care and attention, however, mistakes cannot be completely ruled out.
The manufacturer accepts no legal responsibility or liability in any form with regard to errors indetail, and any consequences that may arise from such errors.
The manufacturer is thankful for any suggestions for improvement or pointers leading to errors.
All rights - including any arising from photomechanical reproduction and storage in electronic orany other medium - are reserved. The program, handbook, and all components are subject tointernational copyright regulations.
Haider Strasse 40, 4052 Ansfelden, Austria
Phone +43 (0) 7229 78040, Fax +43 (0) 7229 78660
All rights reserved.
Page: i

Modification History:11.11.2008 First Revision08.01.2009 V2.0122.01.2009 V2.03: additions for OTM16.03.2009 V2.02 and V2.04: additions for maintenance of printer and coin and note acceptor;changes in operator mode for hopper statistics, refill and revision10.06.2009 V2.07: new game Aloha Hawaii; machine serial number will be read from cctalk don-gle25.06.2009 V2.10: new game Hot Fruits; seperate machine accounting for supervisor10.11.2009 V2.13: Network settings11.03.2010 V2.20: TITO by OTM server; new games Secrets of Maya and Bingo03.09.2010 V2.22: new OTM registration03.09.2010 V2.22: new game Mystic Ocean
Page: ii

Contents
Contents iii
1 Safety Information 1
2 Description 32.1 General . . . . . . . . . . . . . . . . . . . . . . . . . . . . . . . . . . . . . . . . 32.2 System components . . . . . . . . . . . . . . . . . . . . . . . . . . . . . . . . . 3
Options . . . . . . . . . . . . . . . . . . . . . . . . . . . . . . . . . . . . . . . . 3PC System . . . . . . . . . . . . . . . . . . . . . . . . . . . . . . . . . . . . . . 3
2.3 Operating Elements . . . . . . . . . . . . . . . . . . . . . . . . . . . . . . . . . . 4
3 Technical Data 53.1 Machine dimensions . . . . . . . . . . . . . . . . . . . . . . . . . . . . . . . . . 53.2 Electrical Data . . . . . . . . . . . . . . . . . . . . . . . . . . . . . . . . . . . . . 5
. . . . . . . . . . . . . . . . . . . . . . . . . . . . . . . . . . . . . . . . . 5
4 Initial Operation 7
5 Boot Up menu by activated test switch 9
6 Update process 11
7 Info Page 13
8 Service Menu 15
9 Configuration settings 179.1 Basic Settings . . . . . . . . . . . . . . . . . . . . . . . . . . . . . . . . . . . . . 17
Languages . . . . . . . . . . . . . . . . . . . . . . . . . . . . . . . . . . . . . . 17Date / Time . . . . . . . . . . . . . . . . . . . . . . . . . . . . . . . . . . . . . . 17Security . . . . . . . . . . . . . . . . . . . . . . . . . . . . . . . . . . . . . . . . 18Machine ID . . . . . . . . . . . . . . . . . . . . . . . . . . . . . . . . . . . . . . 18
9.2 Game + Limit Settings . . . . . . . . . . . . . . . . . . . . . . . . . . . . . . . . 19Games . . . . . . . . . . . . . . . . . . . . . . . . . . . . . . . . . . . . . . . . . 19Limits . . . . . . . . . . . . . . . . . . . . . . . . . . . . . . . . . . . . . . . . . 19Hopper Limits . . . . . . . . . . . . . . . . . . . . . . . . . . . . . . . . . . . . . 19
9.3 Function Assignment . . . . . . . . . . . . . . . . . . . . . . . . . . . . . . . . . 209.4 Hardware Settings . . . . . . . . . . . . . . . . . . . . . . . . . . . . . . . . . . 20
Coin acceptor . . . . . . . . . . . . . . . . . . . . . . . . . . . . . . . . . . . . . 20Note acceptor . . . . . . . . . . . . . . . . . . . . . . . . . . . . . . . . . . . . . 20Remote / Collect . . . . . . . . . . . . . . . . . . . . . . . . . . . . . . . . . . . 20Hopper . . . . . . . . . . . . . . . . . . . . . . . . . . . . . . . . . . . . . . . . . 21Ticket Printer . . . . . . . . . . . . . . . . . . . . . . . . . . . . . . . . . . . . . 21Mechanical Meters . . . . . . . . . . . . . . . . . . . . . . . . . . . . . . . . . . 22
9.5 Currency . . . . . . . . . . . . . . . . . . . . . . . . . . . . . . . . . . . . . . . . 239.6 OTM . . . . . . . . . . . . . . . . . . . . . . . . . . . . . . . . . . . . . . . . . . 23
Page: iii
9.7 File Check . . . . . . . . . . . . . . . . . . . . . . . . . . . . . . . . . . . . . . . 249.8 Reset . . . . . . . . . . . . . . . . . . . . . . . . . . . . . . . . . . . . . . . . . 24
10 Operator menu 2510.1 Accountancy . . . . . . . . . . . . . . . . . . . . . . . . . . . . . . . . . . . . . . 25
Main accounting . . . . . . . . . . . . . . . . . . . . . . . . . . . . . . . . . . . . 25Main Accounting . . . . . . . . . . . . . . . . . . . . . . . . . . . . . . . 25Long term accounting . . . . . . . . . . . . . . . . . . . . . . . . . . . . . 25Mechanical Meters . . . . . . . . . . . . . . . . . . . . . . . . . . . . . . 25
Journal . . . . . . . . . . . . . . . . . . . . . . . . . . . . . . . . . . . . . . . . . 25Hopper . . . . . . . . . . . . . . . . . . . . . . . . . . . . . . . . . . . . . . . . . 26
Hopper statistic . . . . . . . . . . . . . . . . . . . . . . . . . . . . . . . . 26Refill Hopper . . . . . . . . . . . . . . . . . . . . . . . . . . . . . . . . . 26Hopper Revision . . . . . . . . . . . . . . . . . . . . . . . . . . . . . . . 26
Game statistics . . . . . . . . . . . . . . . . . . . . . . . . . . . . . . . . . . . . 2710.2 Test mode . . . . . . . . . . . . . . . . . . . . . . . . . . . . . . . . . . . . . . . 27
Display / Touch . . . . . . . . . . . . . . . . . . . . . . . . . . . . . . . . . . . . 27Audio . . . . . . . . . . . . . . . . . . . . . . . . . . . . . . . . . . . . . . . . . 27PC . . . . . . . . . . . . . . . . . . . . . . . . . . . . . . . . . . . . . . . . . . . 27Coin Acceptor . . . . . . . . . . . . . . . . . . . . . . . . . . . . . . . . . . . . . 27Note Acceptor . . . . . . . . . . . . . . . . . . . . . . . . . . . . . . . . . . . . . 27Buttons / Switches / Lamps . . . . . . . . . . . . . . . . . . . . . . . . . . . . . . 27Mechanical Meters (if installed) . . . . . . . . . . . . . . . . . . . . . . . . . . . . 27Hopper . . . . . . . . . . . . . . . . . . . . . . . . . . . . . . . . . . . . . . . . . 28
10.3 Configuration Settings . . . . . . . . . . . . . . . . . . . . . . . . . . . . . . . . 28
11 Supervisor Menu 2911.1 Start Page . . . . . . . . . . . . . . . . . . . . . . . . . . . . . . . . . . . . . . . 2911.2 Ticket Payout . . . . . . . . . . . . . . . . . . . . . . . . . . . . . . . . . . . . . 29
Scan and Payout . . . . . . . . . . . . . . . . . . . . . . . . . . . . . . . . . . . 29Ticket List . . . . . . . . . . . . . . . . . . . . . . . . . . . . . . . . . . . . . . . 30
11.3 Journal . . . . . . . . . . . . . . . . . . . . . . . . . . . . . . . . . . . . . . . . . 3011.4 Audit Info . . . . . . . . . . . . . . . . . . . . . . . . . . . . . . . . . . . . . . . 30
Long term accounting . . . . . . . . . . . . . . . . . . . . . . . . . . . . . . . . . 30Game statistics . . . . . . . . . . . . . . . . . . . . . . . . . . . . . . . . . . . . 30
11.5 Accounting . . . . . . . . . . . . . . . . . . . . . . . . . . . . . . . . . . . . . . 30Supervisor . . . . . . . . . . . . . . . . . . . . . . . . . . . . . . . . . . . . . . . 30Attendant 1, 2 and 3 . . . . . . . . . . . . . . . . . . . . . . . . . . . . . . . . . 31Machine accounting* . . . . . . . . . . . . . . . . . . . . . . . . . . . . . . . . . 31Main accounting (Operator)* . . . . . . . . . . . . . . . . . . . . . . . . . . . . . 31
11.6 Configuration Settings* . . . . . . . . . . . . . . . . . . . . . . . . . . . . . . . . 3111.7 Basic Settings . . . . . . . . . . . . . . . . . . . . . . . . . . . . . . . . . . . . . 31
12 Attendant 1/2/3 Menu 3312.1 Start Page . . . . . . . . . . . . . . . . . . . . . . . . . . . . . . . . . . . . . . . 3312.2 Ticket Payout . . . . . . . . . . . . . . . . . . . . . . . . . . . . . . . . . . . . . 3312.3 Journal . . . . . . . . . . . . . . . . . . . . . . . . . . . . . . . . . . . . . . . . . 3312.4 Attendant accounting . . . . . . . . . . . . . . . . . . . . . . . . . . . . . . . . . 33
Page: iv
12.5 Basic Settings . . . . . . . . . . . . . . . . . . . . . . . . . . . . . . . . . . . . . 33
13 Demo mode 35
14 Games 3714.1 Pyramids of Giza . . . . . . . . . . . . . . . . . . . . . . . . . . . . . . . . . . . 3714.2 Euro Soccer . . . . . . . . . . . . . . . . . . . . . . . . . . . . . . . . . . . . . . 3714.3 Indian Treasure . . . . . . . . . . . . . . . . . . . . . . . . . . . . . . . . . . . . 3714.4 Caribbean Gold . . . . . . . . . . . . . . . . . . . . . . . . . . . . . . . . . . . . 3814.5 Royal Liner . . . . . . . . . . . . . . . . . . . . . . . . . . . . . . . . . . . . . . 3814.6 Roulette . . . . . . . . . . . . . . . . . . . . . . . . . . . . . . . . . . . . . . . . 3814.7 Royal Poker . . . . . . . . . . . . . . . . . . . . . . . . . . . . . . . . . . . . . . 3814.8 Keno . . . . . . . . . . . . . . . . . . . . . . . . . . . . . . . . . . . . . . . . . . 3914.9 Aloha Hawaii . . . . . . . . . . . . . . . . . . . . . . . . . . . . . . . . . . . . . 3914.10Hot Fruits . . . . . . . . . . . . . . . . . . . . . . . . . . . . . . . . . . . . . . . 3914.11Secrets of Maya . . . . . . . . . . . . . . . . . . . . . . . . . . . . . . . . . . . . 3914.12Bingo . . . . . . . . . . . . . . . . . . . . . . . . . . . . . . . . . . . . . . . . . 4014.13Double Bingo . . . . . . . . . . . . . . . . . . . . . . . . . . . . . . . . . . . . . 4014.14Mystic Ocean . . . . . . . . . . . . . . . . . . . . . . . . . . . . . . . . . . . . . 40
15 Protocol IDs 41
16 Error messages 43
17 Comestero RM5/6 Coin Acceptor maintenance 45
18 ITL - NV9 Bill Acceptor Maintenance 47
19 Replacing Coin or Bill acceptor 51
20 Declaration of CE conformity 53
21 EULA for Microsoft Software 55
22 Warranty terms by TAB-Austria GmbH & CoKG 59
23 Notes 63
Page: v

1Safety Information
Safety regulations for the user: The machine should only be operated in a dry room and connectedto a safety plug socket that complies with the relevant safety standards.
• Before starting the machine, it should be allowed to attain room temperature.
• Check the main voltage before connecting the machine!
• The machine is designed for an alternating voltage of 230 Volts (or 115 Volts if specified onthe type plate), 50 Hz (or 60 Hz) and 120 W / 0,7 A (1,4 A) power.
• The machine may only be operated with two 3,15 amp fuses.
• In case of damage to housing parts, protruding wires, machine fires or smashed picturetubes, the machine must be immediately switched off and the main plug disconnected.
• Defective or bare wire cables, especially power cables and plug connecters must be re-placed.
IMPORTANT !In such cases ensure that any machine contact is avoided and that it cannot be switchedon !
• The recommended ambient temperature is between 5 and 35 degrees on the Celsius scale.
• The recommended working temperature is between 15 and 40 Degrees on the Celsiusscale.
• The recommended absolute humidity is between 30% and 75% RG, not condensed.
• When positioned alongside other machines, interference in normal operation may occur.
Please pay attention to the licensing terms and conditions of Microsoft (see chapter 21, page 55)
Page: 1
Disposal of Old Electrical and Electronic Equipment (Applica-ble in the European Union and other European countries withseparate collection systems)
This symbol on the product or on its packaging indicates that this product shall not be treatedas household waste. Instead it shall be handed over to the applicable collection point for therecycling of electrical and electronic equipment. By ensuring this product is disposed of correctly,you will help prevent potential negative consequences for the environment and human health,which could otherwise be caused by inappropriate waste handling of this product. The recyclingof materials will help to conserve natural resources. For more detailed information about recyclingof this product, please contact your local city office, your household waste disposal service or thecompany where you purchased the product.
IMPORTANT:When you work on the machine, you must turn off the machine and plug out the power.Service on the machine may be done only from qualified personal.
Inside of the machine there is the following sticker. Please show it to the qualified personalbefore servicing.
Page: 2
2Description
2.1 General
The Golden Island Cosmo is an ergonmically designed gaming machine.The machine contains normally an electronic coin acceptor, an electronic banknote acceptor, a17 inches TFT display with touchscreen and a complete PC system.
2.2 System components
• 17 inch TFT-display with touch screen
• Electronic coin acceptor (Comestero RM5 or RM6)
Options
• Switch lock system (USB EKEY-TAB)
• Key switch
• Banknote reader Innovative NV9 with stacker 300
PC System
• PC System with Intel Pentium Core 2 Duo E4300 (2x1,8 GHz) or E4600 (2x2,4 GHz) orhigher
• PCIe-graphics card 46xx-series with ATITMchip (1280 x 1024 resolution)
• On-Board 16 bit soundcard
• Mimimum 80 GB SATA hard disk drive
• TAB I/O controller with secure memory
Page: 3
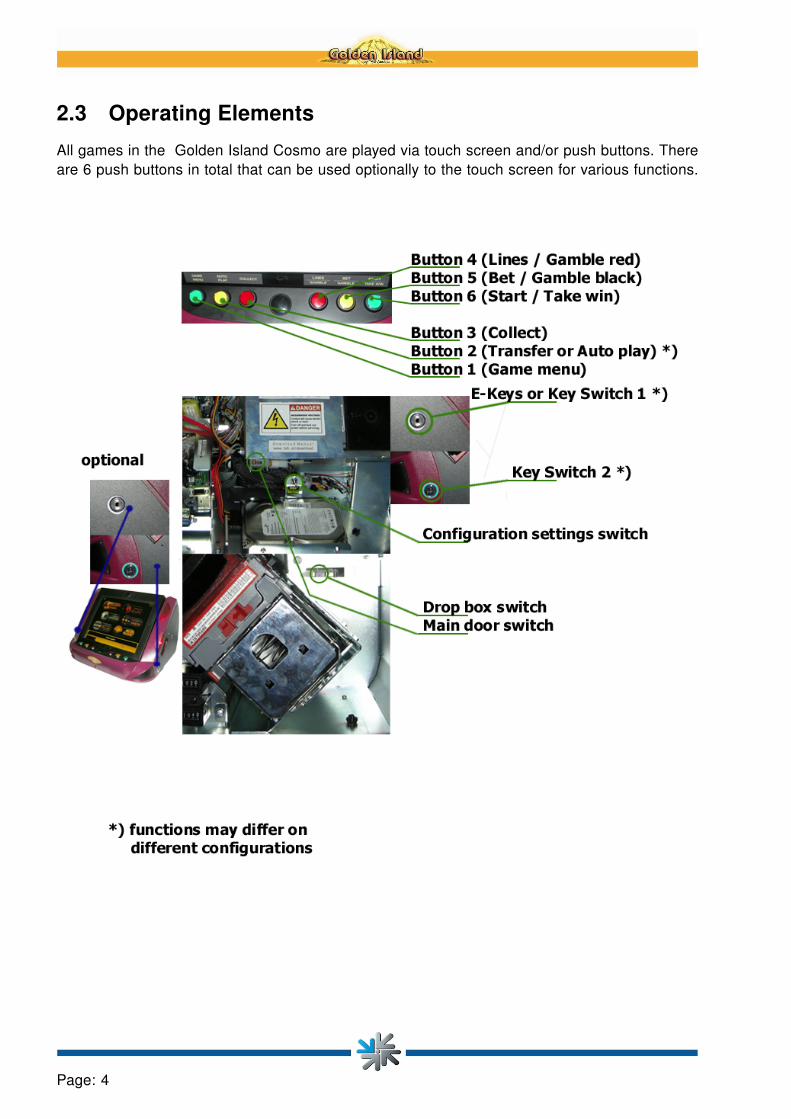
2.3 Operating Elements
All games in the Golden Island Cosmo are played via touch screen and/or push buttons. Thereare 6 push buttons in total that can be used optionally to the touch screen for various functions.
Page: 4

3Technical Data
3.1 Machine dimensions
Unpacked PackedDepth 44 cm (17 1/3") 49 cm (19 1/3")Width 55 cm (21 5/8") 58 cm (23")Height 37 cm (14 1/2") 73 cm (17")Weight1 25 kg (55lbs) 28 kg (61lbs)
3.2 Electrical Data
Electricity 230 V AC 50 - 60 HzPerformance 120 wattsCutout 2 x 3,15 amperes
Note:When you have more then one machine on a voltage splitter please note: With a normal installedelectricity port with a cutout from 16 ampere do not plug in more then 3 machines.
1The weight may vary depending on the installed optional components
Page: 5

4Initial Operation
Each machine has already been tested at the factory and is delivered with initial settings pre-programmed.
We recommend a 15 minutes warm up time before initial operation so that the machine can reachoptimal operation temperature.
However, temperature differences can change the touch screen settings so that they are no longercorrect. Therefore, when a machine is put in operation for the first time, we recommend perform-ing a Touch screen calibration
1. Connect the power cordOpen the Main doorInsert the power cord from the back into the machine and plug it into the socket on therocker switch
2. Turn on the machine:Turn on the rocker switchThe machine will boot and the program starts automatically
3. Touch screen calibration:
a) enter the Operator menu by turning on the operator switch
• select Test mode and press button perform touch calibration
• sit in a perfectly straight way, well-centered position, at a 90◦ angle in front of themachine and follow the instructions on the display exactly
or
b) enter the Supervisor or Attendant 1/2/3 menu by inserting the corresponding EKEY
• select menu Basic Settings
• press button perform touch calibration
• sit in a perfectly straight way, well-centered position, at a 90◦ angle in front of themachine and follow the instructions on the display exactly
4. Setting the volume:
a) enter the Operator menu by turning on the operator switch - adjust the volume on thetop page by using the slideror
b) enter the Supervisor or Attendant 1/2/3 menu by inserting the corresponding EKEY
• select menu Basic Settings
• adjust the volume by using the slider
Page: 7
5. If you set up the machine for the first time, please proceed with the following steps:
a) enter the Configuration settings menu (see chapter 9, page 17)
b) perform either a
• RAM clear (all accounting data, statistic data and event logs will be cleared)or a
• Factory reset (all configuration settings will be reset to their default values and allaccounting data, statistic data and event logs will be cleared)
(see chapter 9.8, page 24)
c) check and set all Configuration settings
Page: 8

5Boot Up menu by activated testswitch
By switching on the test switch (also called operator switch, located by the rocker switch) beforebooting the machine you are able to enter the following programs (only during normal start):
You can select the different buttons by pressing the hardware buttons on the panel of the machine
• Calibrate touch screen4 point calibration of the touch screen will be performed
• Log Collectortransfers warning and error logs from the machine to a connected USB stick. As the transferfolder on the USB stick contains the machine number, the stick can be used to collect datafrom multiple machines
Page: 9
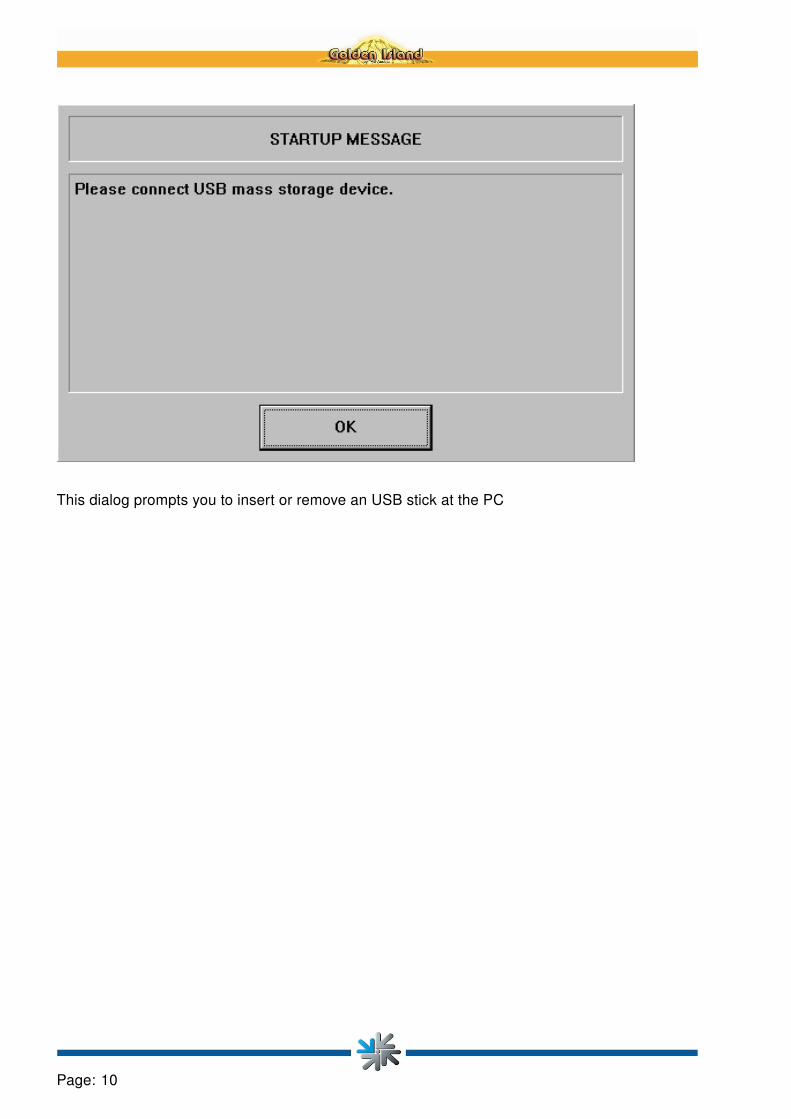
This dialog prompts you to insert or remove an USB stick at the PC
Page: 10
6Update process
Note: For some configurations the PC box is sealed or there is no Update connector on the PCbox because it is not allowed to perform an Update.
During the Update process the PC box must be connected to the cable harness because theinitialisation process will determine the type of machine by cable detection and perform the rightinitialisation.
If you get a new Update from TAB with new games or you have to update the machine becauseof a defect hard disk drive please perform the following:
• Switch off the PC (switch on the power supply) or the whole machine
• Turn down the PC box so you have access to the Update disk connector located outside onthe top of the PC
• Insert the Update disk into the connector
• Switch on the PC
• The Update process will start automatically. It is finished when you see the message: „UP-DATE FINISHED - Please switch off, remove Update disk and switch on again“.
Please perform in that way.
• After switching on again the installation process will perform until the message „pleasecalibrate touch screen“ will appear.
• Please perform the 4 point touch screen calibration in any way because some initial datawill be stored on the hard disc.
After the initialisation process the „enhanced write filter“ will be activated and it is no longerpossible to perform this initial touch screen calibration.
• The machine will boot up into normal game mode or
• The message „Secure Memory Error!“ will appear if you have changed the dongle or in-stalled a new version of Golden Island Software.
In this case please perform a Factory reset (see chapter 9.8, page 24) and proceed withthe Configuration settings menu (see chapter 9, page 17)
• Factory Reset: Enter the Configuration settings menu by turning on the Configuration set-tings switch which is located inside the Logic box
On the screen press the button „Perform Factory reset“
All configuration settings will be reset to their default values and all accounting data, statisticdata and event logs will be cleared! The machine will boot up once more and afterwardsyou can setup the configuration setting:
Page: 11
• Please check at least these configuration settings:
– Time / Date
select your time zone first and if you like automatically daylight saving changes (strictlyrecommended).Correct the actual time and date if necessary (can be changed only after RAM Clearor Factory Reset)Note: if you are using OTM you only have to select the correct time zone. The dateand time will be synchronized with the server during the first data transmission.
– Machine ID
Enter the minimum data of the site and the machine :
- Location Name of Casino / Arcade / Pub
– Function Assignment
Define the assignment of the different functions to the keys
– Hopper
If one or two hopper are connected, please check for the correct hopper coins
– Ticket printer
Please enter the following fields:
- Validity (30 - 60 days)
- Banner Text
- Validation Text
– Mechanical Meters
Set the start value of the mechanical meters.
– Currency
– OTM
For a detailed description of these settings please see: „Configuration settings menu“, chap-ter 9, page 17
Page: 12
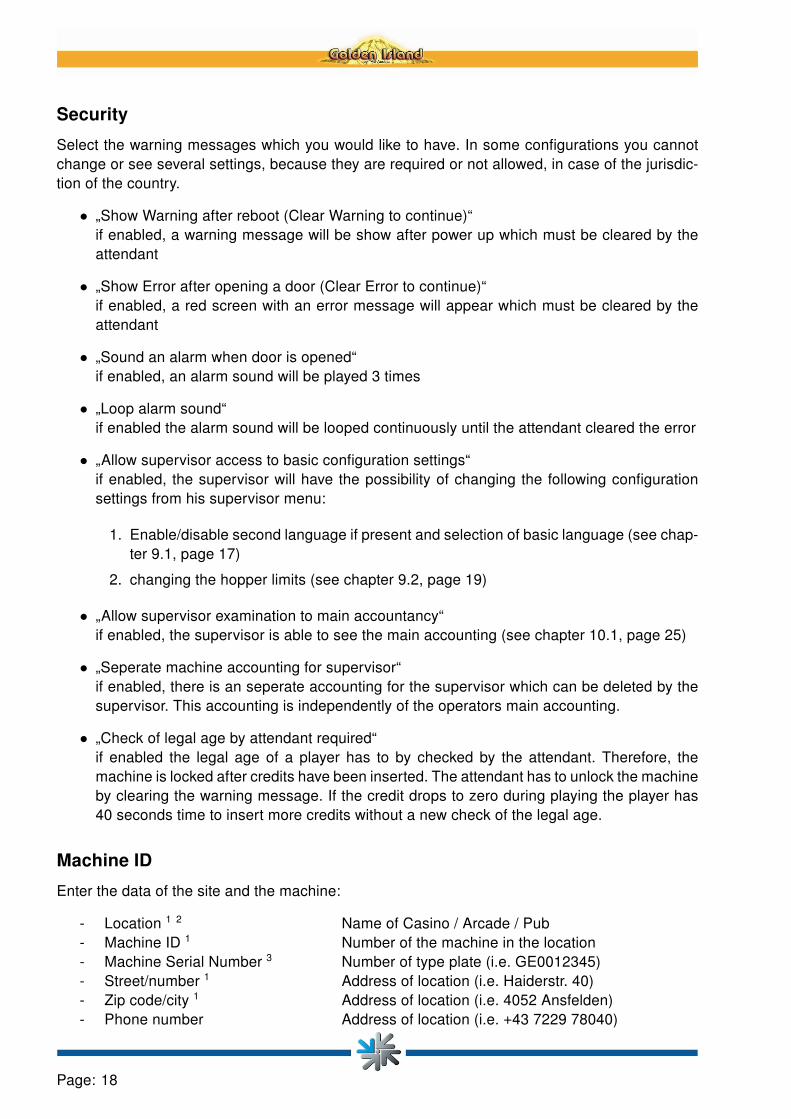
7Info Page
By pressing the INFO button in normal game mode (or by touching the INFO button on the upperright corner on the touch screen) for a minimum of 3 seconds the following screen will appear:
On this Screen you can see:
• Actual date and time
• MD5 checksum of the program
• Configuration and Dongle version number
• Software version and System version
• Machine serial number
• Machine ID (if set in configuration settings)
• OTM number (if registered on OTM server)
Page: 13


8Service Menu - different levels
There are different security levels:
• Configuration settings menuInitial set up and configuration by the operator(see chapter 9, page 17)
• Operator menuAccountancy (Main accounting, Journal, Game statistics), Test mode, non-critical Configu-ration settings (language, hopper limits)(see chapter 10, page 25)
• Supervisor menuHand Deposit, Hand Pay, Ticket Pay, Journal, Volume, Touch calibration, Supervisor andAttendant accountancy, Main Accountancy*, Configuration settings** if allowed (see Configuration settings: Security, chapter 9.1, 18)(see chapter 11, page 29)
• Attendant 1 / 2 / 3 menuHand Deposit, Hand Pay, Ticket Pay, Attendant accountancy, Volume, Touch calibration(see chapter 12, page 33)
Page: 15


9Configuration settings menu
All of the configuration settings can only be modified if credits are empty.Some of these settings can be changed only after RAM clear or Factory reset.
Enter the Configuration settings menu by turning on the Configuration settings switch which islocatedinside the Logic box:
• open the Main door
• open the Display door
• open the Logic box
• turn on the Configuration settings switch
Note:this manual describes all possible settings of the International version.Some of these settings may not exist in your configuration.
9.1 Basic Settings
Languages
Select the languages which should be enabled and the basic language.The machine will switch to the basic language when:
• Credits are zero
and
• No interaction for one minute
Date / Time
Select your time zone 1 first and if you like automatically daylight saving changes (strictly recom-mended).Correct the actual time and date if necessary (can be changed only after RAM Clear or FactoryReset)Note: if you are using OTM you only have to select the correct time zone 1. The date and time willbe synchronized with the server during the first data transmission.
1. only possible for specific countries
Page: 17
Security
Select the warning messages which you would like to have. In some configurations you cannotchange or see several settings, because they are required or not allowed, in case of the jurisdic-tion of the country.
• „Show Warning after reboot (Clear Warning to continue)“if enabled, a warning message will be show after power up which must be cleared by theattendant
• „Show Error after opening a door (Clear Error to continue)“if enabled, a red screen with an error message will appear which must be cleared by theattendant
• „Sound an alarm when door is opened“if enabled, an alarm sound will be played 3 times
• „Loop alarm sound“if enabled the alarm sound will be looped continuously until the attendant cleared the error
• „Allow supervisor access to basic configuration settings“if enabled, the supervisor will have the possibility of changing the following configurationsettings from his supervisor menu:
1. Enable/disable second language if present and selection of basic language (see chap-ter 9.1, page 17)
2. changing the hopper limits (see chapter 9.2, page 19)
• „Allow supervisor examination to main accountancy“if enabled, the supervisor is able to see the main accounting (see chapter 10.1, page 25)
• „Seperate machine accounting for supervisor“if enabled, there is an seperate accounting for the supervisor which can be deleted by thesupervisor. This accounting is independently of the operators main accounting.
• „Check of legal age by attendant required“if enabled the legal age of a player has to by checked by the attendant. Therefore, themachine is locked after credits have been inserted. The attendant has to unlock the machineby clearing the warning message. If the credit drops to zero during playing the player has40 seconds time to insert more credits without a new check of the legal age.
Machine ID
Enter the data of the site and the machine:
- Location 1 2 Name of Casino / Arcade / Pub- Machine ID 1 Number of the machine in the location- Machine Serial Number 3 Number of type plate (i.e. GE0012345)- Street/number 1 Address of location (i.e. Haiderstr. 40)- Zip code/city 1 Address of location (i.e. 4052 Ansfelden)- Phone number Address of location (i.e. +43 7229 78040)
Page: 18
- Fax number Address of location (i.e. +43 7229 78660)- Email address Address of location (i.e. [email protected])- Dongle Serial Number 3 Number of the configuration Dongle device- Machine data 3 Several data’s of machine like part number or
configuration
Note: after OTM-registration, these datas can only be modified on the OTM server.
1. data’s marked with 1 will be printed on the ticket, if a printer is installed (see chapter 9.4,page 21)
2. data’s marked with 2 must be entered for OTM registration
3. Non-editable field. Data is set automatically from a Dongle device
9.2 Game + Limit Settings
Games
• Enable/disable games
• Enable/disable secondary games (i.e. Gamble)
• Changing of payout percentage (only if possible in current configuration)
Limits
This menu/settings are only visible in certain configurations.
• Selection of Minimum and Maximum Bet
• Selection of Gamble Limit and the maximum number of Gamble upIf the winnings are higher than half the Gamble limit, the Amount will be collected automat-ically.If the gamble limit would be reached by winning the next stage of the Gamble game, themachine finishes the Gamble automatically and collects the Win.
Hopper Limits
This section is only visible and available if minimum one hopper is activated.
• Direct Pay To
If the credit is higher than this level and the player presses „Hopper Payout“ the message„Hopper payout limit. Please call Attendant“ will be shown.
If a „Direct Pay To“ Limit is set and on Players Payout request are not enough coins in thehoppers the message „Hopper low: Hand Pay required“ will be shown.
The Attendant must perform Hand Pay of the whole amount.
Page: 19
• Lockout Level
If hopper level is below this level, banknote acceptor will be disabled (locked) and the text„coins only“ will be shown on the display bar of the game
• Hopper Float Level If hopper level is below this level, the text „insufficient coins (<value ofhopper coin>)“ will be shown
• Hopper Divert Level Maximum number of coins allowed in the hopper. If hopper level isabove this level, all coins are diverted into the drop box
9.3 Function Assignment
Here you can see the assignment of the different functions to the keysHow to change an assignment:
• Press the corresponding „Change“ button, the message „Press switch or insert E-Key“ willappear
• Press the switch of insert the E-Key you would like to map for this function.
– if you press/turn a key, confirm with „OK“
– if you insert a E-Key you can select the colour of the key and label it with i.e. the nameof the Attendant, then confirm with „OK“
The configuration settings switch cannot be relocated.Each function assignment can be cleared by pressing the corresponding „Clear“ button.
9.4 Hardware Settings
Coin acceptor
Here you can enable / disable the different coin channels
Note acceptor
Here you can enable / disable the different note channelsEnter the „cctalk encryption key“ if required by the Note acceptor
Remote / Collect
This menu is only visible in certain configurations. Additional settings may appear or are notavailable.
• Hand Depositif enabled, Hand Deposit (from the supervisor or attendants menu) is allowed
• Hand Payif enabled, Hand Pay (from the supervisor or attendants menu or with the correspondingkey switch / E-Key which is assigned to that function (see chapter 9.3, page 20)) is allowed
Page: 20
• Collect Button active -> Call Attendant Messageif enabled, the collect button is active. If a player presses the collect button, the message„Hand Pay required, please call Attendant“ will appear on the screen and the machine islocked
Hopper
If one or two hopper are connected, you can activate them by selecting the box „activate“Once a hopper is activated, you can select the value of the hopper coins(These settings can be changed only after RAM Clear or Factory Reset)
The gaming machine will pay the minimum number of coins(as many as possible with the higher coin, the rest with the lower coin)
If the hopper content is less than the whole amount, the following message will be shown:„Insufficient coins for Payout. Please call Attendant“
You can change the payout strategy by enabling or disabling the checkbox „If Hopper 2 is runningempty, payout of remaining amount with Hopper 1“
Ticket Printer
This menu is only visible in certain configurations.If a ticket printer is connected, you can activate it by selecting the box „activate“ATTENTION: for ticket printing the machine must be registered to the OTM server and must havea stable internet connection!
• Validity (30 - 60 days)select the number of days the ticket is valid
• Banner Textselect the text printed above the bar code
• Validation Textselect the „validation“ text
• Advertising Textselect the text you want to be printed in the advertising field
Examples of Cashout Tickets (depending on the configuration there are two different layoutspossible):
- Location * Name of establishment- Street/number * Street / Number- Zip code/city * Zip code / City- Banner Text CASHOUT TICKET- Validation Text VALIDATION- Next Voucher number 1- Validity 30
Page: 21

- Machine ID * 1- Avdertising Text „your advertising text“
* data’s marked with * are defined in menu Machine ID (see chapter 9.1, page 18)
Mechanical Meters
This menu is only visible in certain configurations.Here you can set the start value of the mechanical meters.Once set correctly, you will have an electronic copy to monitor the mechanical meters (see Ac-countancy, chapter 10.2, page 27).If the machine is working correctly, there should occur only a small difference during a long periodof time which can occur by switching off the machine while the mechanical meters are runningThe Value per digit (impulse) defines the value of one digit.If this value is higher than the smallest coin the coins will be accumulated and the meter countsone digit after each Digit value completed.
Page: 22
The machine also counts the right number in case of power loss.Therefore the basic value of the currency (i.e. 1 Euro) is recommended for this setting.(These settings can be changed only after RAM Clear or Factory Reset)
9.5 Currency
On some configurations you are able to select the Currency.
On some configurations it is also possible to change all game displays to credits instead of thecurrency.If Credits are selected, you can change the value for one credit.(These settings can be changed only after RAM Clear or Factory Reset)
9.6 OTM
This menu is only visible in certain configurations.If so, the machine can be connected to the OTM System of TAB-Austria.If connected, the machine will transmit several data’s to the OTM-Server of TAB-Austria.The operator can check the accountings „Total In“ and „Total Out“ on a secure TAB webpage(https://service.championsnet.net) and therefore he is able to supervise all his machines whichare connected to the system.
OTM number:This is a number which will be assigned from the server to this machine during the registrationprocess.If there will occur a problem, this number is important for the Hotline of TAB.
Location number:This is a number which will be assigned from the server to the location of this machine during theregistration process.
Button „Check connection“:Here you basically can check the connectivity to the internet.
Registration for Live systems:Press one of the Registration Buttons to register the machine either for a new location or anexisting location. For a new location you can to fill out all location specific data on the machine orupdate this information on the website. To register a machine for an existing location just providethe location name or the location number.
TAN-Code:For registering a machine to the system, please enter a valid TAN-Code from your OTM accountand press button „Register“.
The machine has to be connected with a CAT-5 network cable to a router which is configured forDHCP (obtain an IP address automatically)ATTENTION:
Page: 23
for security reasons DO NOT connect the machine to the internet directly without a router withNAT (network address translation)!
If you are running a network with integrated firewall please make sure that the following port isopen:TCP 443 outgoing
Connection (expert mode):These settings you only need in special environments (like company networks) where you haveto configure a proxy server. In this case, please ask the network administrator for the data’s.If you don’t have such a special enviroment please make sure that the check box ’use DHCP’ isselected!
9.7 File Check
If one or more files are corrupt, they will be displayed on this page.(if the machine is still working)
9.8 Reset
• Perform RAM clearAll accounting data, statistic data and event logs will be cleared!
• Perform Factory resetAll configuration settings will be reset to their default values and all accounting data,statistic data and event logs will be cleared!
Page: 24
10Operator menu
Enter the operator menu by activating the switch or E-Key which is assigned to this function (seechapter 9.3, page 20).The default mapping is the operating switch inside of the machine behind the main door labelledwith „TEST“ beside the rocker switch.
On the start page you can adjust the volume and activate „Demo mode“ For „Demo mode“ pleasesee chapter 13, page 35
10.1 Accountancy
Main accounting
Main Accounting
This page is the main accounting page for the operator.You will see a summary of all Cash In and Cash Out devices and the Total Result.In the box „Accounting with Supervisor“ you will see the Total amount of money the supervisorhas to give to you (the operator) (colour green) or will get from you (colour red).On the right you see the power up and door opening meters
This Accounting you may normally clear after each collecting of cash box.
Long term accounting
A separate accounting page of the most important meters.It depends on the Configuration if this page can be cleared or not.
Mechanical Meters
A electronically copy of the mechanical metersIf the start value was set correctly (please see chapter 9.4, page 22) this value must correspondto the mechanical meters.Maybe it can differ if the machine has been switched off frequently while the mechanical metersare counting.
Journal
Some sections may not be visible in certain configurations.Here you can see the following data’s:
• Last 10 Game data (visualized)
• Latest data (last 10 coins, last 10 Banknotes, last 10 Game data)
• Last 1000 games
Page: 25

• Last Tickets printed
• Machine journal (all changes of settings, door openings, actions of Supervisor and atten-dants, ...)
• Error log (if the machine is running fine, you should not see any errors on this page)
Hopper
Hopper statistic
Here you can see a detailed list of all hopper accountings:
• Hopper IN: Coins went into hopper through coin acceptor during normal play
• Coin acceptor refill: Amount of coins inserted trough coin acceptor from Operator, Supervi-sor or Attendant during Hopper refill mode
• Manual Refill: Amount of coins which are refilled manually by the operator (the operator hasto enter the amount manually, please see chapter 10.1, page 26)
• Hopper OUT: Coins which were paid out from hopper
• Too many Coins: the bookkeeping system detected a higher amount of coins in the hopperthan expected
• Missing coins: Amount of missing coins. If the hopper runs out of coins during payout butthere should be already some coins in the hopper.
• Unexpected Payout: Coins from a unattended pay out
• Manipulated payout: coins which are paid out in case of manipulation
• Hopper Revision: Amount of coins which are corrected manually during the hopper revision(please see chapter 10.1, page 26)
• Hopper content: Virtual amount of coins (cash) in the hopper
The statistics will be resetted by clearing the main accounting.
Refill Hopper
On this page you can refill the hopper either with insertion of coins through the coin acceptor orby filling the coins into the hopper directly - but then you have to enter the amount of the refilledcoins manually.
Hopper Revision
Here you can count the content (number of coins) of the hopper and adjust or correct it to thecorrect hopper level.The coins will be paid out but will not be booked on any accounting.You have to return them into the hopper.If the amount differs please correct it by entering the correct number of coins.
Page: 26

Game statistics
Detailed list of Number of games, Bet, Win and Win percentage of primary games and secondarygames.The operator is able to clear this statistics at any time.
10.2 Test mode
The Test mode gives you the possibility to test the whole machine without an influence of theaccounting.
Display / Touch
Show test image - to adjust the displayVerify touch calibrationPerform touch calibration - 4 point touch calibration
Audio
Test the left and right speaker
PC
Detailed list of all parts of the PC For inspection please check:
• CPU temperature (should be not higher than 70◦C)
• CPU Fan (should not be zero!)
• Hard disk temperature (should be not higher than 60◦C)
Coin Acceptor
Test the different coin channels
Note Acceptor
Test the different bank note channels
Buttons / Switches / Lamps
Test all buttons, switches and lamps.If you press on of the game buttons the corresponding lamp will lit.
Mechanical Meters (if installed)
You can see if the meters are connected and if there are some outstanding ticks.It is not possible to test the meters because by a test the figure of the meters would not be correctanymore.
Page: 27
Hopper
Here you can test the hopper by paying out one coin or all coins.If you leave this menu, the payout will be stopped.No payout will be counted in this mode.
10.3 Configuration Settings
Depending on the configuration, it is possible to change some configuration settings like the basiclanguage or hopper limits.
Page: 28
11Supervisor Menu
Enter the supervisor menu by activating the switch or E-Key which is assigned to this function(see chapter 9.3, page 20).The default mapping is the supervisor key switch on the right side outside of the machine.Depending on configuration, some menus may not be available.
11.1 Start Page
This is the most important page for the supervisor. His attendants have the same Start page butcounting on their own accountancy.
• Credits: in the first field the actual value of credit is displayed
• Hand Deposit: Possibility to add Credits.It will be counted to the Supervisors „Hand Deposit“
• Hand Pay: Possibility to reset Credits.It will be counted to the Supervisors „Hand Pay“
• Hopper Refill: Possibility to refill both Hopper.It will be counted to the Supervisors „Hopper Refill“(only available when Hopper are activated)
Note: Some fields are not available on several configurations.
11.2 Ticket Payout
This menu is only visible in some configurations. OTM registration is required!
Scan and Payout
This page is used to pay out tickets. The ticket can be inserted into the banknote reader or thevalidation code can be entered manually.After a valid ticket was inserted the ticket information will be shown. The ticket information includeall essential information to pay out the ticket:
• Amount
• Validation code
• Date and Time
• Ticket number
• Location
• Machine ID
Page: 29
If the ticket can not be payed out the reason will be show:
• Ticket is invalid - If the ticket was inserted it might have been read incorrectly. If the codewas entered manually it might have been misstyped.
• Ticket is expired
• Ticket is from another location
• Ticket is already paid
Ticket List
On this page the tickets on the server can be viewed. All tickets of the selected time period andall unpaid tickets will be shown. Unpaid tickets will be shown in red, paid tickets will be shown ingreen and expired tickets will be shown in blue.
11.3 Journal
Please see chapter 10.1, page 25
11.4 Audit Info
This menu is only visible in the configuration ZA.
Long term accounting
A separate accounting page of the most important meters.
Game statistics
Detailed list of Number of games, Bet, Win before and after Gamble of primary games and sec-ondary games.
11.5 Accounting
Supervisor
This is the main accounting page for the Supervisor.
In the first field the accountings of the Supervisor are displayed. The supervisor can delete theseaccountings at any time.This will not affect the accountancy on the Operator’s main accounting page where the Operatormakes the settlement with the Supervisor.
In the second field there is the statement of all 3 Attendant accountings
Page: 30
In the third field there is the summary of the accountings of Supervisor and Attendant 1, 2 and 3and the total sum which the Supervisor has to give to the Operator (in colour red) or which he willget from the Operator (in colour green).
Attendant 1, 2 and 3
The Supervisor is responsible for the settlement with the Attendants 1, 2 and 3.For that procedure, there are 3 additional Tabs for the 3 Attendants which are showing the respon-sible accountings and the total sum which the Supervisor will get from the Attendant (in colourgreen) or he has to give to the Attendant (in colour red).
To clear an Attendants’ accounting, insert the corresponding E-Key of the Attendant, then pressbutton „Clear“. (After removing the Attendant’s E-Key please reinsert the Supervisor’s E-Keyagain, otherwise the Supervisor Menu will be left when switching to another menu)
Machine accounting*
This page shows the accounting of the machine which can be deleted by the supervisor. Thisaccounting is independently of the operators accounting.
* This page is only visible for the Supervisor if the checkbox „Seperate machine accounting forsupervisor“ is enabled in the Configuration settings - Security. (see chapter 9.1, page 18)
Main accounting (Operator)*
This page is the main accounting page of the operator.The Supervisor is only able to see this accounting, he cannot delete it.
* This page is only visible for the Supervisor if the checkbox „Allow supervisor examination tomain accountancy“ is enabled in the Configuration settings - Security. (see chapter 9.1, page18)
11.6 Configuration Settings*
Depending on the configuration here it is possible to change some configuration setting like thebasic language or hopper limits
* This page is only visible for the Supervisor if the checkbox „Allow supervisor access to basicconfiguration settings“ is enabled in the Configuration settings - Security. (see chapter 9.1, page18)
11.7 Basic Settings
Here you can adjust the volume, check and calibrate the Touch screen.
Page: 31


12Attendant 1/2/3 Menu
Enter the attendant menu by activating the switch or E-Key which is assigned to this function (seechapter 9.3, page 20).There is no default mapping.
12.1 Start Page
Please see chapter 11.1, page 29
12.2 Ticket Payout
Please see chapter 11.2, page 29
12.3 Journal
Please see chapter 10.1, page 25
12.4 Attendant accounting
This is the main accounting page for the Attendant.
This accounting only can be cleared from the Supervisor Menu - Attendant accounting - on thecorresponding Attendant Tab.Please see chapter 11.5, page 30
12.5 Basic Settings
Please see chapter 11.7, page 31
Page: 33

13Demo mode
Only available in certain configurations
The operator can set the machine into Demo mode on his start page.
If Demo mode is activated, you can test and play with the machine but no events will be recordedor accounted.
If credit will come to zero, credit will be increased automatically.
By pressing and holding the Collect button while pressing start on most of the Reel games willtrigger the feature game combination.Holding the Collect button by pressing start during the feature games, the sequence will beaborted.On Royal Poker the combination for Ace bonus will be triggered.
Page: 35

14Games
The availability of games may depend on configuration.
14.1 Pyramids of Giza
10-line, 5-reel gameAll wins pay left to rightSPHINX substitutes for all symbols except PYRAMIDS
Feature GamePYRAMID on reel 1, 3 and 5 awards 10 Feature GamesDuring Feature Games also PYRAMID substitutes for all symbols.Feature Games can be won again during the feature and are played at current bet.
14.2 Euro Soccer
10-line, 5-reel gameAll wins pay left to rightBALL substitutes for all symbols except GOAL
Feature Game3, 4 or 5 scattered GOAL awards 15 Feature GamesDuring Feature Games all wins pay double.Feature Games can be won again during the feature and are played at current bet.
14.3 Indian Treasure
10-line, 5-reel gameAll wins pay left to rightPocahontas substitutes for all symbols except Treasure.
Feature Game3, 4 or 5 scattered Treasure awards 15 Feature GamesDuring Feature Games all wins pay triple.Feature Games can be won again during the feature and are played at current bet.
Page: 37

14.4 Caribbean Gold
5-line, 5-reel gameAll wins pay left to right
14.5 Royal Liner
5-line, 9-reel gameAll wins pay left to right
14.6 Roulette
Roulette with 36 numbers and Zero.Players may place their chips on the following positions:
• „Red“ - „Black“
• „Even“ - „Odd“
• „1-18“ - „19-36“
• „First dozen“ - „Second dozen“ - „Third dozen“
• „Colonne“... on the columns 1-34, 2-35 or 3-36
• „Six line“... on six consecutive numbers consisting of two consecutive cross rows (e.g. 4-5-6-7-8-9)
• „Corner“... on four numbers that create a square on the table (e.g. 1-2-4-5)
• „Street“... on three consecutive numbers consisting of one cross row on the table (e.g. 1-2-3but also 0-1-2 or 0-2-3)
• „Split“... on two numbers that are either vertical or horizontal neighbours (e.g. 15/18 or28/29)
• „Full Number“... on one of the 37 numbers
14.7 Royal Poker
The game is played with 52 cards plus one Joker.
Rules of the game:The „1st Deal“ is started with the „Start“ button and your bet is deducted from your credit.Five consecutive cards will be dealt face up. If „AutoHold“ is selected, a hold suggestion will bedisplayed for the best possible winnings.This hold suggestion may be changed by pressing the cards.
Page: 38
The „2nd Deal“ is started with the „Start“ button with no deduction from your credit.All cards which are not held will be changed.
14.8 Keno
The computer will draw 20 numbers from a total of 80 at random.Select between two and ten numbers by pressing the desired numbers.The selected number fields will be displayed in yellow.Pressing a number a second time deselects it.All possible prizes are shown in the prize table.The values in the prize table change depending on the number of selected numbers.The game is started with the Start button.Twenty numbers will be drawn.If a drawn number corresponds to a selected number (hit), this number field will be shown ingreen, otherwise it will be shown in red.
14.9 Aloha Hawaii
10-line, 5-reel gameAll wins pay left to rightHula Girl substitutes for all symbols except Surfer.Hula Girl doubles win when substituting
Feature Game3, 4 or 5 scattered Surfer award 15 Feature GamesDuring Feature Games all wins pay double.Feature Games can be won again during the feature and are played at current bet.
14.10 Hot Fruits
10-line, 5 reel gameAll wins pay left to right except Scatters
14.11 Secrets of Maya
10-line (5-line in configuration ZA), 5 reel gameAll wins pay left to right except ScattersPyramid substitutes for all symbols except Calendar
Feature Game3, 4 or 5 scattered Calendars award 10 Feature GamesDuring Feature Games Pyramids on Reel 1, 3 and 5 substitute for the whole reel.Feature Games can be won again during the feature and are played at current bet.
Page: 39
14.12 Bingo
Bingo game with 3-8 tips
Game rules:Highest win only paid.Between three and eight numbers can be selected.20 numbers from a total of 80 are drawn.If „Extra Balls“ are won the player has the possibility to buy two more balls for the same bet.The values in the prize table change depending on the number of selected numbers.
14.13 Double Bingo
Bingo game with 3-8 tips
Game rules:Highest win only paid.Between three and eight numbers can be selected.20 numbers from a total of 81 are drawn.The ball „x2“ doubles the win.If „Extra Balls“ are won the player has the possibility to buy two more balls for the same bet. Thevalues in the prize table change depending on the number of selected numbers.
14.14 Mystic Ocean
10-line, 5-reel gameAll wins pay left to rightMermaid substitutes for all symbols except Dolphin.Mermaid doubles win when substituting
Feature Game3, 4 or 5 scattered Dolphin award 15 Feature GamesDuring Feature Games all wins pay triple.Feature Games can be won again during the feature and are played at current bet.
Page: 40

15Protocol IDs
GameID Game name1 Roulette2 Keno3 Royal Poker4 Caribbean Gold5 Royal Liner6 Pyramids of Giza7 Euro Soccer8 Indian Treasure9 Aloha Hawaii
10 Hot Fruits11 Mystic Ocean12 Secrets of Maya13 Bingo14 Double Bingo
50000 MenuPayoutGame (configuration ZA only)
Page: 41

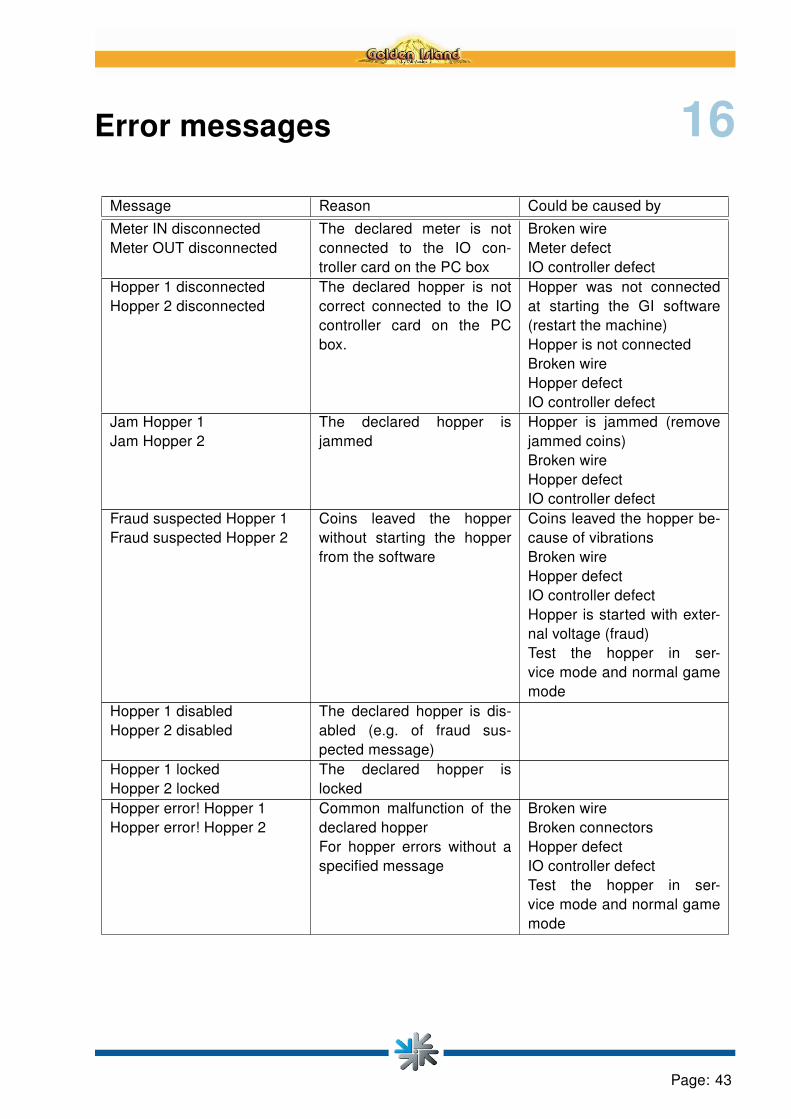
16Error messages
Message Reason Could be caused by
Meter IN disconnectedMeter OUT disconnected
The declared meter is notconnected to the IO con-troller card on the PC box
Broken wireMeter defectIO controller defect
Hopper 1 disconnectedHopper 2 disconnected
The declared hopper is notcorrect connected to the IOcontroller card on the PCbox.
Hopper was not connectedat starting the GI software(restart the machine)Hopper is not connectedBroken wireHopper defectIO controller defect
Jam Hopper 1Jam Hopper 2
The declared hopper isjammed
Hopper is jammed (removejammed coins)Broken wireHopper defectIO controller defect
Fraud suspected Hopper 1Fraud suspected Hopper 2
Coins leaved the hopperwithout starting the hopperfrom the software
Coins leaved the hopper be-cause of vibrationsBroken wireHopper defectIO controller defectHopper is started with exter-nal voltage (fraud)Test the hopper in ser-vice mode and normal gamemode
Hopper 1 disabledHopper 2 disabled
The declared hopper is dis-abled (e.g. of fraud sus-pected message)
Hopper 1 lockedHopper 2 locked
The declared hopper islocked
Hopper error! Hopper 1Hopper error! Hopper 2
Common malfunction of thedeclared hopperFor hopper errors without aspecified message
Broken wireBroken connectorsHopper defectIO controller defectTest the hopper in ser-vice mode and normal gamemode
Page: 43
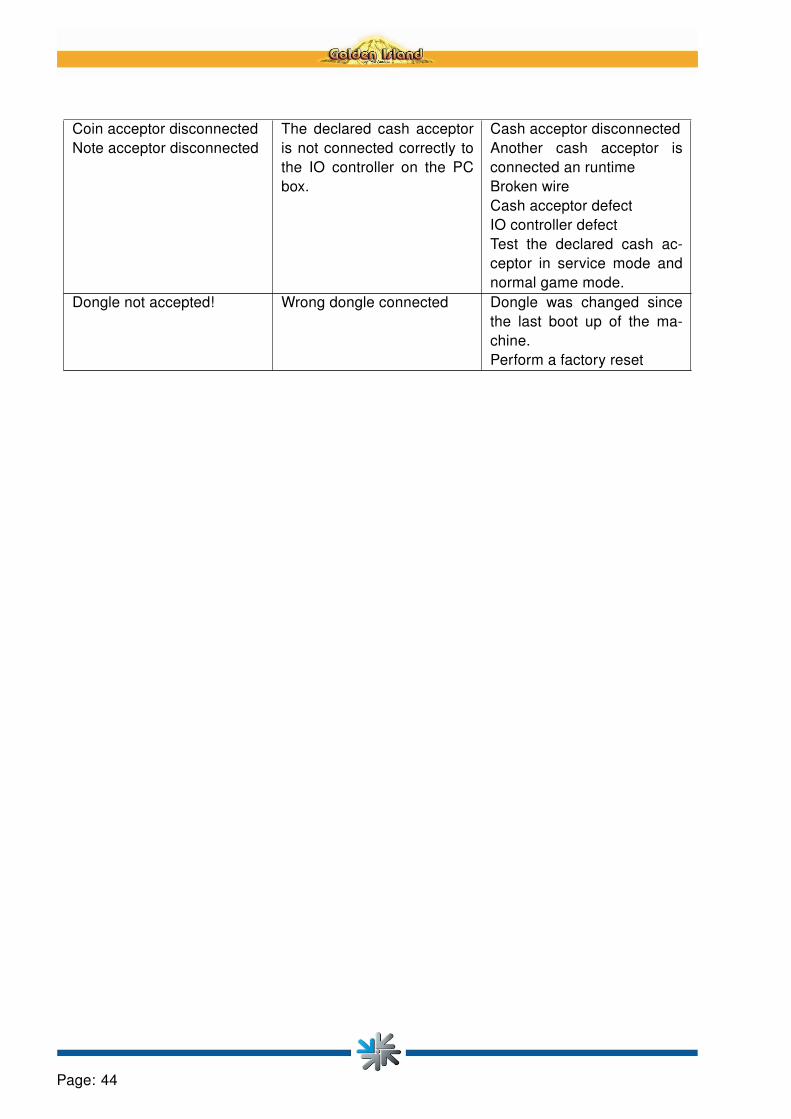
Coin acceptor disconnectedNote acceptor disconnected
The declared cash acceptoris not connected correctly tothe IO controller on the PCbox.
Cash acceptor disconnectedAnother cash acceptor isconnected an runtimeBroken wireCash acceptor defectIO controller defectTest the declared cash ac-ceptor in service mode andnormal game mode.
Dongle not accepted! Wrong dongle connected Dongle was changed sincethe last boot up of the ma-chine.Perform a factory reset
Page: 44
17Comestero RM5/6 Coin Acceptormaintenance
This fact sheet provides the necessary information for the clearing and maintenance of the RM5/6electronic coin validator.Cleaning at regular intervals assures a high quality standard of coin recognition and, in the longrun, reduces the risk of error and failure.
External cleaning
The external surfaces of the coin validator are made of a plastic shockproof material (ABS). Toclean them it is recommended to use a soft cloth with a neutral detergent. For more resistant dirtethyl alcohol can be used. To remove excess dust from the coin slots and other narrow spacesthe use of compressed air or a paintbrush is recommended.
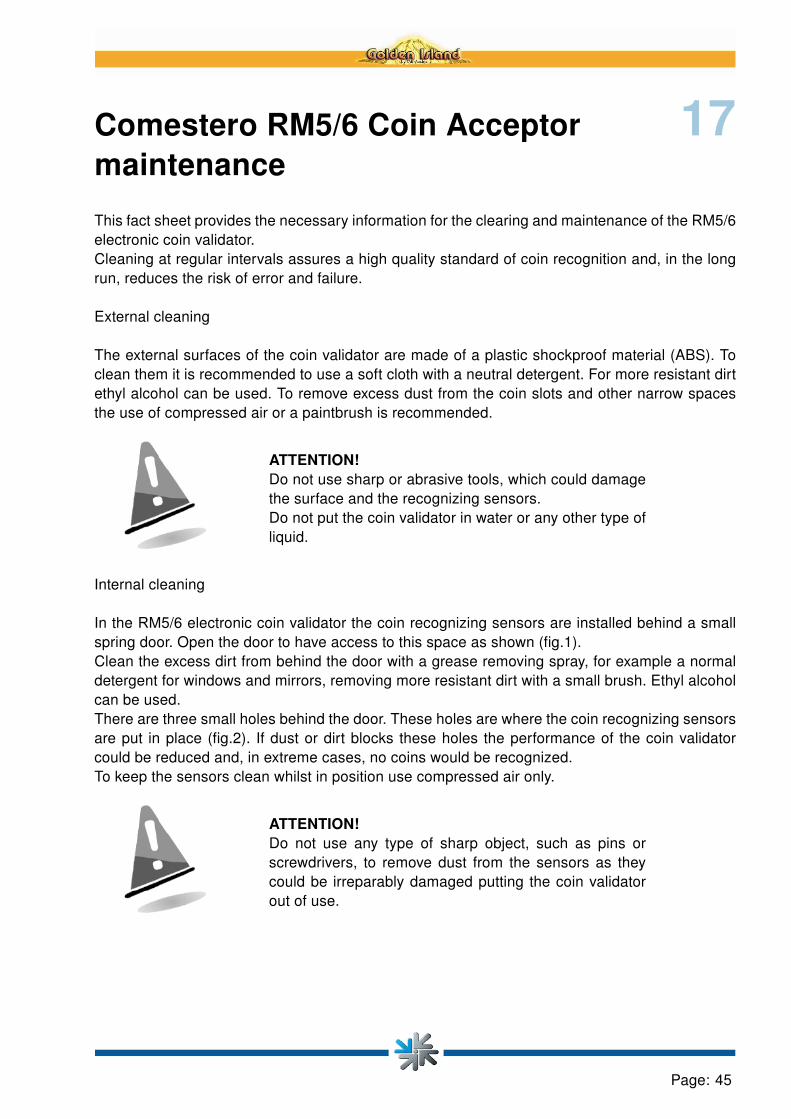
ATTENTION!Do not use sharp or abrasive tools, which could damagethe surface and the recognizing sensors.Do not put the coin validator in water or any other type ofliquid.
Internal cleaning
In the RM5/6 electronic coin validator the coin recognizing sensors are installed behind a smallspring door. Open the door to have access to this space as shown (fig.1).Clean the excess dirt from behind the door with a grease removing spray, for example a normaldetergent for windows and mirrors, removing more resistant dirt with a small brush. Ethyl alcoholcan be used.There are three small holes behind the door. These holes are where the coin recognizing sensorsare put in place (fig.2). If dust or dirt blocks these holes the performance of the coin validatorcould be reduced and, in extreme cases, no coins would be recognized.To keep the sensors clean whilst in position use compressed air only.
ATTENTION!Do not use any type of sharp object, such as pins orscrewdrivers, to remove dust from the sensors as theycould be irreparably damaged putting the coin validatorout of use.
Page: 45

(a) Fig. 1 (b) Fig. 2
If the coin validator is still inefficient after cleaning do not hesitate to contact our hotline.
Page: 46
18ITL - NV9 Bill AcceptorMaintenance
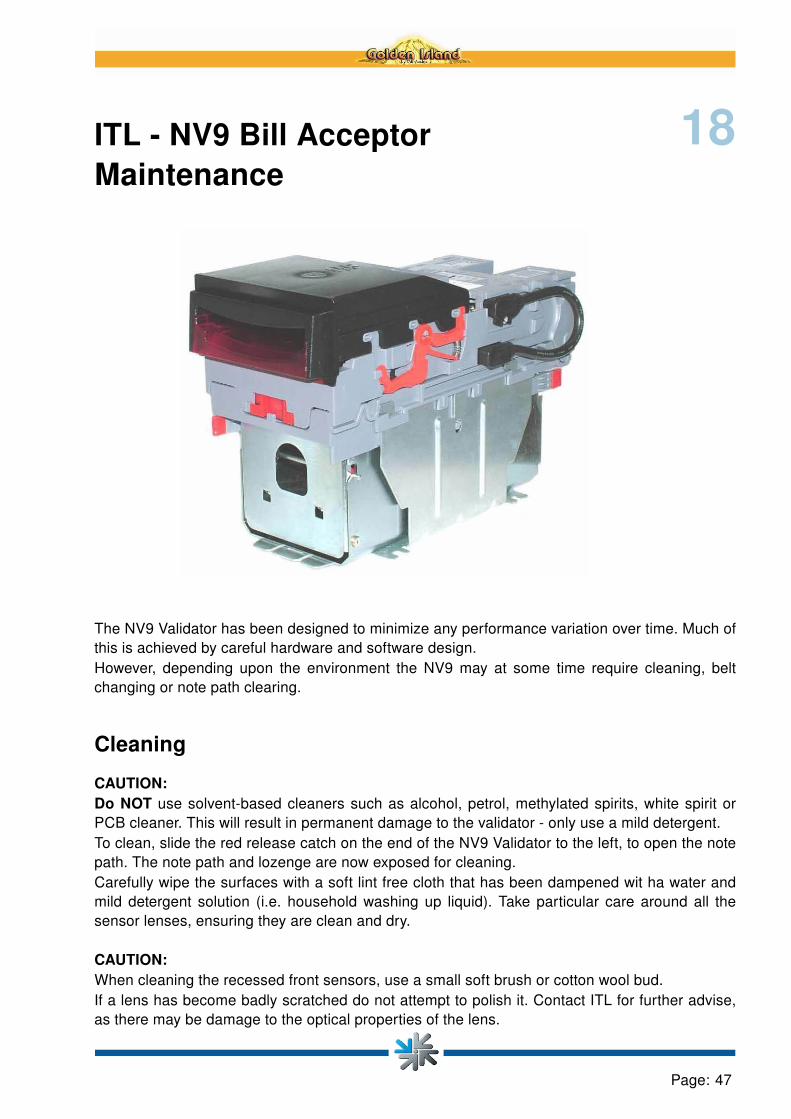
The NV9 Validator has been designed to minimize any performance variation over time. Much ofthis is achieved by careful hardware and software design.However, depending upon the environment the NV9 may at some time require cleaning, beltchanging or note path clearing.
Cleaning
CAUTION:Do NOT use solvent-based cleaners such as alcohol, petrol, methylated spirits, white spirit orPCB cleaner. This will result in permanent damage to the validator - only use a mild detergent.To clean, slide the red release catch on the end of the NV9 Validator to the left, to open the notepath. The note path and lozenge are now exposed for cleaning.Carefully wipe the surfaces with a soft lint free cloth that has been dampened wit ha water andmild detergent solution (i.e. household washing up liquid). Take particular care around all thesensor lenses, ensuring they are clean and dry.
CAUTION:When cleaning the recessed front sensors, use a small soft brush or cotton wool bud.If a lens has become badly scratched do not attempt to polish it. Contact ITL for further advise,as there may be damage to the optical properties of the lens.
Page: 47
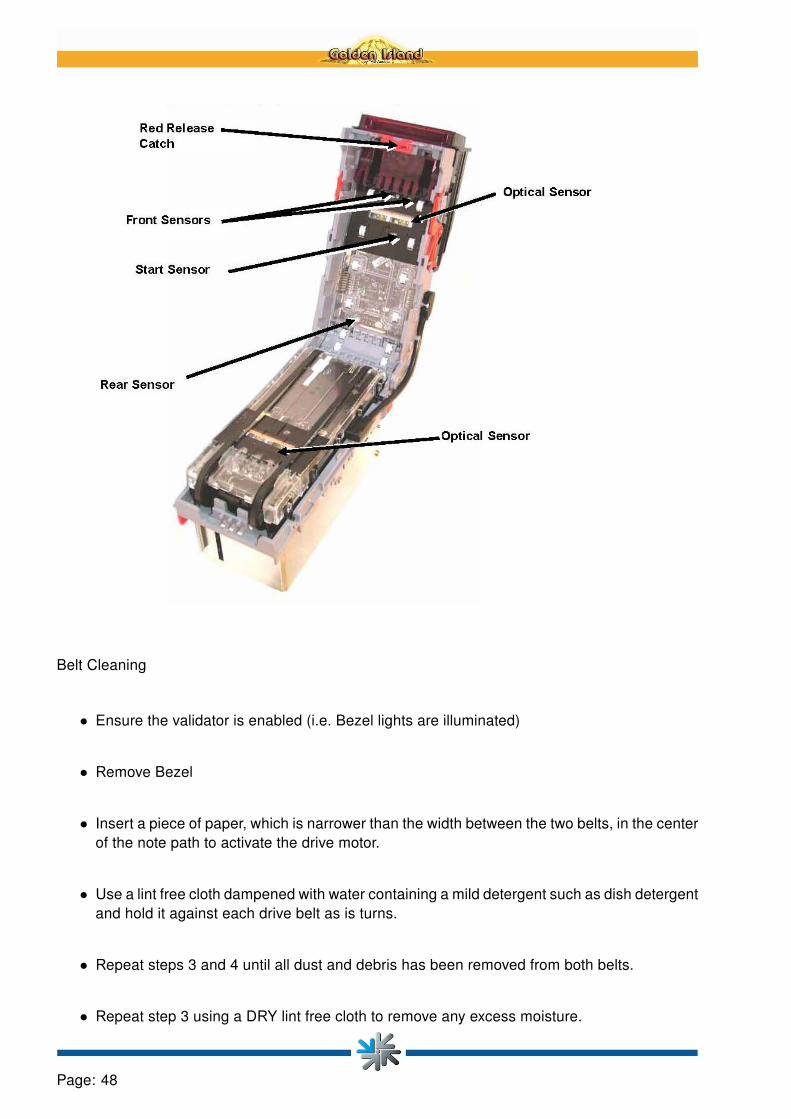
Belt Cleaning
• Ensure the validator is enabled (i.e. Bezel lights are illuminated)
• Remove Bezel
• Insert a piece of paper, which is narrower than the width between the two belts, in the centerof the note path to activate the drive motor.
• Use a lint free cloth dampened with water containing a mild detergent such as dish detergentand hold it against each drive belt as is turns.
• Repeat steps 3 and 4 until all dust and debris has been removed from both belts.
• Repeat step 3 using a DRY lint free cloth to remove any excess moisture.
Page: 48

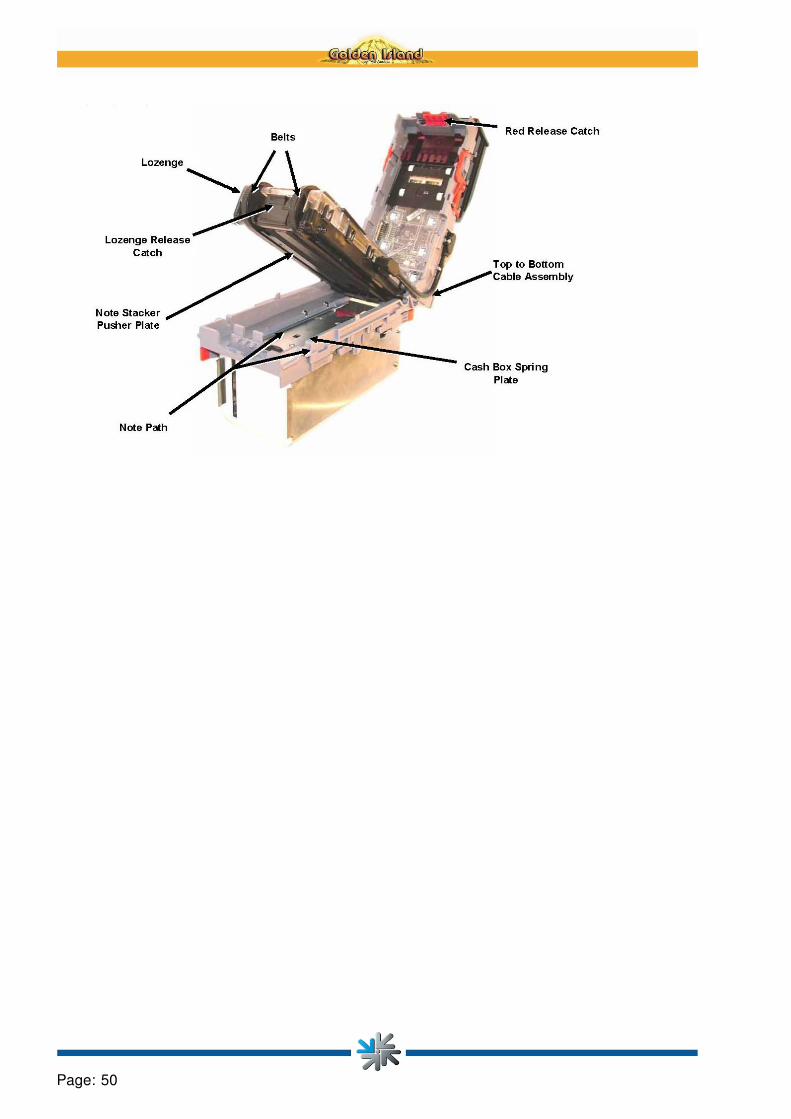
Note Path Debris Clearing / Belt Changing
To access the note path and lozenge, slide the red release catch on the end of the NV9 Validatorand lift to open. Push the lozenge release catch and lift; the note path and lozenge are nowexposed for maintenance.
Debris Clearing
Examine the note path, lozenge and the note stacker for any dirt or debris.
Carefully clear and wipe the surfaces of the note path and lozenge with a soft lint free cloth thathas been dampened with a water and mild detergent solution (i.e. household washing up liquid).Take particular care around all the sensor lenses, ensuring they are clean and dry.
Check that the note stacker and cash box spring plate are not jammed.
Belt Changing
With the NV9 lozenge exposed carefully unplug the bottom connector of the „top to bottom cableassembly“ from the lozenge.
Remove and place the lozenge on a clean dry surface and remove the belts, sliding them off thesmallest wheels first. Replace the belts using the reverse procedure from the above.
NOTE: With the Locking Cash Box, the Locking screw must be removed first.
Page: 49
Page: 50
19Replacing Coin or Bill acceptor
If a coin acceptor or a bill acceptor has to be changed in case of malfunction or bad performance,please proceed with the following steps:
1. switch off machine
2. replace the acceptor
3. switch on machine
4. check the coin or note settings in the Configuration settings menu - Hardware settings -Coin / Note acceptor (see chapter 9.4, page 20)
5. test the new acceptor in the test mode of the Operator menu (see chapter 10.2, page 27)
Note:If the new coin acceptor has additional coin channels, these channels are disabled and can beenabled in the Configuration settings menu
Page: 51

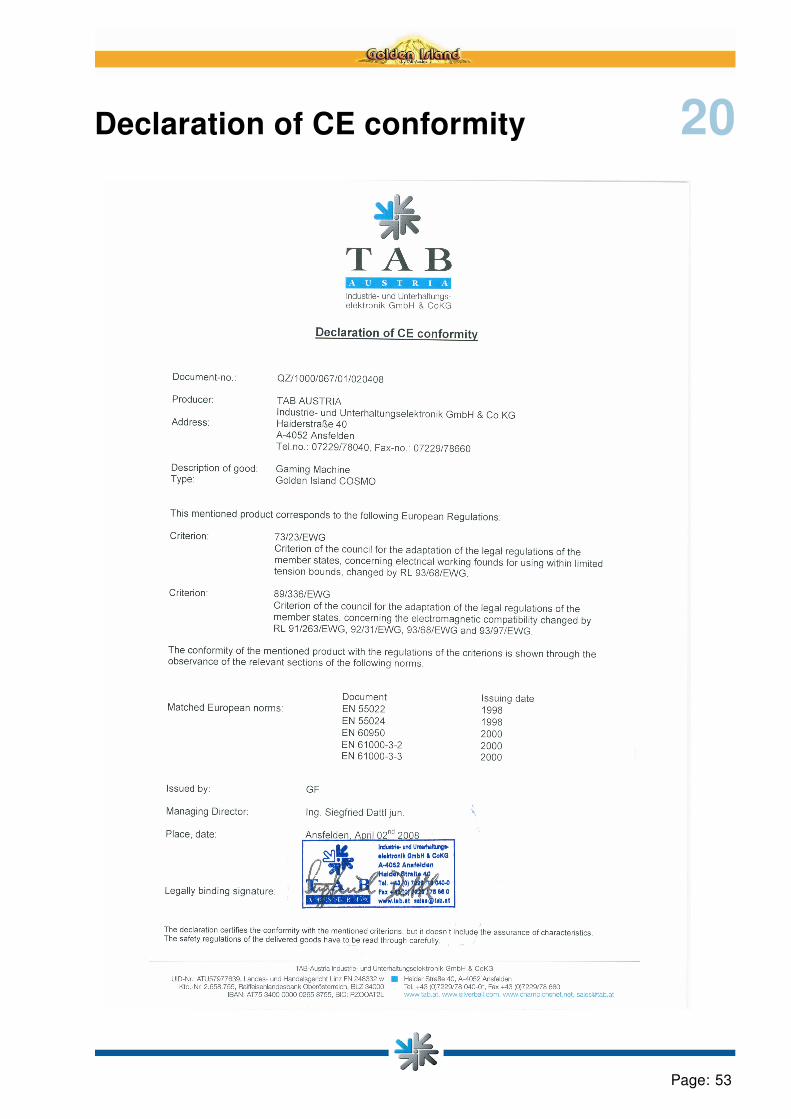
20Declaration of CE conformity
Page: 53

21End-User License Agreementfor Microsoft Software
IMPORTANT - READ CAREFULLY:This End-User License Agreement ( „EULA“) is a legal agreement between you (either anindividual or a single entity) and the manufacturer („Manufacturer“) or the special pur-pose computing device („SYSTEM“) you acquired which includes certain Microsoft soft-ware product(s) installed on the SYSTEM („SOFTWARE PRODUCT“ or „SOFTWARE“). TheSOFTWARE includes computer software, the associated media, any printed materials, andany „online“or electronic documentation. By installing, copying or otherwise using theSOFTWARE, you agree to be bound by the terms of this EULA. If you do not agree to theterms of this EULA, Manufacturer and Microsoft Corporation („Microsoft“) are unwillingto license the SOFTWARE to you. In such event, you may not use or copy the SOFTWARE,and you should promptly contact Manufacturer for instructions on return of the unusedproduct(s) for a refund.
SOFTWARE LICENSE
The SOFTWARE is protected by copyright laws and international copyright treaties, as well asother intellectual property laws and treaties. The SOFTWARE is licensed, not sold.
1. GRANT OF LICENSE. This EULA grants you the following rights:
• Software. You may use the SOFTWARE as installed on the System.
• Application Sharing. The SOFTWARE may contain technology that enables applica-tions to be shared between two or more SYSTEMS, even if an application is installedon only one of the SYSTEMS. You should consult your application license agreementor contact the application licensor to determine whether sharing the application is per-mitted by its licensor.
• Storage/Network Use. If the SOFTWARE PRODUCT is installed on the SYSTEMover an internal network from a server, you must acquire and dedicate a license forthe SOFTWARE PRODUCT for each SYSTEM on which the SOFTWARE PRODUCTis used or to which it is distributed. A license for the SOFTWARE PRODUCT may notbe shared or used concurrently on different SYSTEMS.
• Back-up Copy. If MANUFACTURER has not included a copy of the SOFTWARE onseparate media with the SYSTEM, you may make a single copy of the SOFTWARE foruse solely for archival purposes with the SYSTEM.
2. DESCRIPTION OF OTHER RIGHTS AND LIMITATIONS.
• Limitation on Reverse Engineering, De-compilation and Disassembly. You maynot reverse engineer, decompile, or disassemble the SOFTWARE, except and only tothe extent that such activity is expressly permitted by applicable law not withstandingthis limitation.
Page: 55
• Single SYSTEM. The SOFTWARE is licensed with the SYSTEM as a single integratedproduct. The SOFTWARE may only be used with the SYSTEM.
• Rental. You may not rent or lease the SOFTWARE.
• Software Transfer. You may permanently transfer all of your rights under this EULAonly as part of a sale or transfer of the SYSTEM, provided you retain no copies, youtransfer all of the SOFTWARE (including all component parts, the media, any up-grades or backup copies, and this EULA, and if applicable, the Certificate(s) of Au-thenticity), and the recipient agrees to the terms of this EULA. If the SOFTWARE is anupgrade, any transfer must include all prior versions of the SOFTWARE.
• Termination. Without prejudice to any other rights, Manufacturer or Microsoft mayterminate this EULA if you fail to comply with the terms and conditions of this EULA.In such event, you must destroy all copies of the SOFTWARE and all of its componentparts.
• Single EULA. The package for the SOFTWARE may contain multiple versions of thisEULA, such as multiple translations and/or multiple media versions (e.g., in the userdocumentation and in the software). In this case, you are only licensed to use one (1)copy of the SOFTWARE PRODUCT.
3. UPGRADES AND RECOVERY MEDIA.
• If the SOFTWARE is provided by Manufacturer on media separate from the SYSTEMand is labeled „For Upgrade Purposes Only“ (Upgrade SOFTWARE), you may installone copy of the Upgrade SOFTWARE onto the SYSTEM as a replacement copy forthe SOFTWARE originally installed on the SYSTEM and use it in accordance withSection 1 of this EULA. You may also install additional copies of the Upgrade SOFT-WARE as replacement copies onto additional SYSTEMS which are the same brandand model as the SYSTEM and contain a duly licensed copy of the same version andlanguage release of the SOFTWARE („ADDITIONAL SYSTEMS“), provided that (1)Manufacturer has supplied a corresponding serialized sticker for each additional copyof the Upgrade SOFTWARE, and (2) you affix a serialized sticker per Manufacturer’sinstructions for each unit of Upgrade SOFTWARE you install.
• If the SOFTWARE is provided by Manufacturer on separate media and labeled as „Re-covery Media“, you may not make a copy of the SOFTWARE as described in Section1 for archival purposes. Instead, you may use the Recovery Media solely to restore orreinstall the same version and language release of the SOFTWARE as originally in-stalled on the SYSTEM and thereafter use the SOFTWARE as restored or reinstalledin accordance with Section 1 of this EULA. A single unit of Recovery Media may beused by you to restore or reinstall the SOFTWARE on ADDITIONAL SYSTEMS.
4. COPYRIGHT.
• All title and copyrights in and to the SOFTWARE (including but not limited to anyimages, photographs, animations, video, audio, music, text and „applets“, incorporatedinto the SOFTWARE), the accompanying printed materials, and any copies of theSOFTWARE, are owned by Microsoft or its suppliers. You may not copy the printedmaterials accompanying the SOFTWARE. All rights not specifically granted under thisEULA are reserved by Microsoft.
Page: 56

5. PRODUCT SUPPORT.
• Product support for the SOFTWARE is not provided by Microsoft or its subsidiaries.For product support, please refer to Manufacturer’s support number provided in thedocumentation for the SYSTEM. Should you have any questions concerning this EULA,or if you desire to contact Manufacturer for any other reason, please refer to the ad-dress provided in the documentation for the SYSTEM.
6. LIMITED WARRANTY.
• Limited Warranty. Manufacturer warrants that the SOFTWARE will perform substan-tially in accordance with the accompanying written materials for a period of ninety (90)days from the date of receipt. Any implied warranties on the SOFTWARE are limitedto ninety (90) days. Some states/jurisdictions do not allow limitations on duration of animplied warranty, so the above limitation may not apply to you.
• Customer Remedies. Manufacturer’s and its suppliers’ entire liability and your exclu-sive remedy shall be, at Manufacturer’s option, either (a) return of the price paid, or(b) repair or replacement of the SOFTWARE that does not meet the above LimitedWarranty and which is returned to Manufacturer with a copy of your receipt. This Lim-ited Warranty is void if failure of the SOFTWARE has resulted from accident, abuse,or misapplication. Any replacement SOFTWARE will be warranted for the remainderof the original warranty period or thirty (30) days, whichever is longer.
• No Other Warranties. EXCEPT AS EXPRESSLY PROVIDED IN THE LIMITED WAR-RANTY SECTION ABOVE, THE SOFTWARE IS PROVIDED TO THE END USER „ASIS“ WITHOUT OF ANY KIND, EITHER EXPRESSED OR IMPLIED, INCLUDING, BUTNOT LIMITED TO, WARRANTIES OF NON-INFRINGEMENT, MERCHANTABILITY,AND/OR FITNESS FOR A PARTICULAR PURPOSE. THE ENTIRE RISK OF THEQUALITY AND PERFORMANCE OF THE SOFTWARE IS WITH YOU.
• No Liability for Consequential Damages. MANUFACTURER’S SUPPLIERS SHALLNOT BE HELD TO ANY LIABILITY FOR ANY DAMAGES SUFFERED OR INCURREDBY THE END USER (INCLUDING, BUT NOT LIMITED TO, GENERAL, SPECIAL,CONSEQUENTIAL OR INCIDENTAL DAMAGES INCLUDING DAMAGES FOR LOSSOF BUSINESS PROFITS INTERRUPTION, LOSS OF BUSINESS INFORMATIONAND THE LIKE), ARISING FROM OR IN CONNECTION WITH THE DELIVERY, USEOR PERFORMANCE OF THE SOFTWARE.
Note on Java Support
THE SOFTWARE PRODUCT MAY CONTAIN SUPPORT FOR PROGRAMS WRITTEN IN JAVA.JAVA TECHNOLOGY IS NOT FAULT TOLERANT AND IS NOT DESIGNED, MANUFACTURED,OR INTENDED FOR USE OR RESALE AS ON-LINE CONTROL EQUIPMENT IN HAZARDOUSENVIRONMENTS REQUIRING FAIL-SAFE PERFORMANCE, SUCH AS IN THE OPERATIONOF NUCLEAR FACILITIES, AIRCRAFT NAVIGATION OR COMMUNICATION SYSTEMS, AIRTRAFFIC CONTROL, DIRECT LIFE SUPPORT MACHINES, OR WEAPONS SYSTEMS, IN WHICHTHE FAILURE OF JAVA TECHNOLOGY COULD LEAD DIRECTLY TO DEATH, PERSONAL IN-JURY, OR SEVERE PHYSICAL OR ENVIRONMENTAL DAMAGE.
Page: 57


22Warranty terms by TAB-AustriaGmbH & CoKG
(Tab hereinafter)
We are granting a warranty for this machine under the following conditions:
Insofar as the „General Terms of Business of TAB-AUSTRIA Industrie- und Unterhaltungselek-tronik GmbH & Co KG“ are not modified by the following, which sets out the conditions and scopeof our warranty performance, these terms will continue to apply without change.
The warranty period for our products from delivery is:
• 24 months for all Silverball Terminals
– Silverball Strato
– Silverball Strato Max
– Silverball Cosmo
– Silverball Cosmo Max
– Silverball Pro
– Silverball Max Pro
– Silverball Beetle Pro
– Silverball Beetle Max Pro
• 24 months for
– Max Fire
– Max Fire Video
– Virtual Pinball
– Golden Island
– Fun4Four
• 12 months for
– all other products, particularly betting terminals
• Six months
– for all spare partshowever, if a warranty period of more than six months still obtains for the machines,this period will apply in its entirety to the spare part.
Page: 59

The warranty will only be granted for new products by TAB, not for their spare parts, not forproducts of different brands and manufacturers and corresponding spare parts. No warranty isgranted for used products either.
In accordance with the following provisions, we shall repair defects to the machine that have beendemonstrably caused by a material and/or manufacturing fault which already existed at the timethe product was handed over, and which was reported within 14 days of it becoming apparentto our sales partner or the first end user while still within the warranty period. No warranty isassumed for used machines.
The warranty exclusively covers such components that are essential to operating the product. Itdoes not include easily damaged parts or wearing parts, such as, for example, glass, plastic orlight bulbs. Minor deviations from the desired composition insignificant to the value and usabilityof the machine will not result in any warranty obligations. Damage caused by physical, chemical,electrical or electrochemical or other effects not related to the customary dedicated use will notresult in any warranty obligations; neither does damage caused by water or abnormal environ-mental conditions or inappropriate operating conditions. Also, no warranty can be assumed formachine defects caused by transport damage for which we are not responsible, incorrect instal-lation and assembly, incorrect use, non-observance of operating or assembly instructions or lackof care.
The warranty claim becomes void if repairs or interventions have been carried out by the customerhimself/herself or by persons who were not accordingly authorized or who were not authorized byus or in the event of our machines being fitted with spare, supplementary or accessory parts thatare not original parts, or if parts have been removed.
The warranty performance will be made in such a way that defective components will at ourdiscretion be repaired or replaced with faultless components free of charge unless improvementor exchange are impossible or would result in for us unreasonable cost. In such cases, a reductionin price or, in the event of not only a minor defect, cancellation of sale may be claimed.
Machines for which a warranty performance is being claimed on the basis of this warranty mustbe handed over or sent to us. Repairs at the installation site are not possible. The customer willbear transport costs and the transport risk.
Exchanged parts will become our property.
Warranty performances will neither result in an extension of the warranty period nor will theyinitiate a new warranty period.
Further or other claims (in particular claims for damages suffered beyond the machine) are ex-cluded insofar as liability is not mandatory by law. These warranty terms apply to machines pur-chased and operated in Austria. They apply to machines conveyed to other countries only insofaras they possess the technical requirements (e.g. voltage, frequency, etc.) for the correspondingcountry, have been officially approved for use there and are suited to the individual climate andenvironmental conditions.
Page: 60
The TFT LCD display consists of more than 1,000,000 Thin-Film Transistors (TFT). A smallamount of missing, black, or luminous points is characteristic for TFT LCD technology. The war-ranty performance will be granted if more than 15 missing, black, or luminous points are present.
Page: 61
In case of any irregularities in the machine, please check power and all plug-in connections!
In case you cannot remove an error, please call our hotline:
Call +43-7229-780-40 ext. 250
Page: 62
23Notes
Page: 63
