gm 5.0 ch 9 edited 06/14/05 1 getting gps data into geomedia 5.0 at this point, you have...
TRANSCRIPT

GM 5.0 ch 9 Edited 06/14/05
1
Getting GPS Data into GeoMedia 5.0
At this point, you have successfully collected, corrected, and exported your data using Pathfinder Office. The next step is to get your data into
your GIS. GeoMedia has tools created to help you with this process, which we will cover within the next few slides.

GM 5.0 ch 9Edited 06/14/05
2
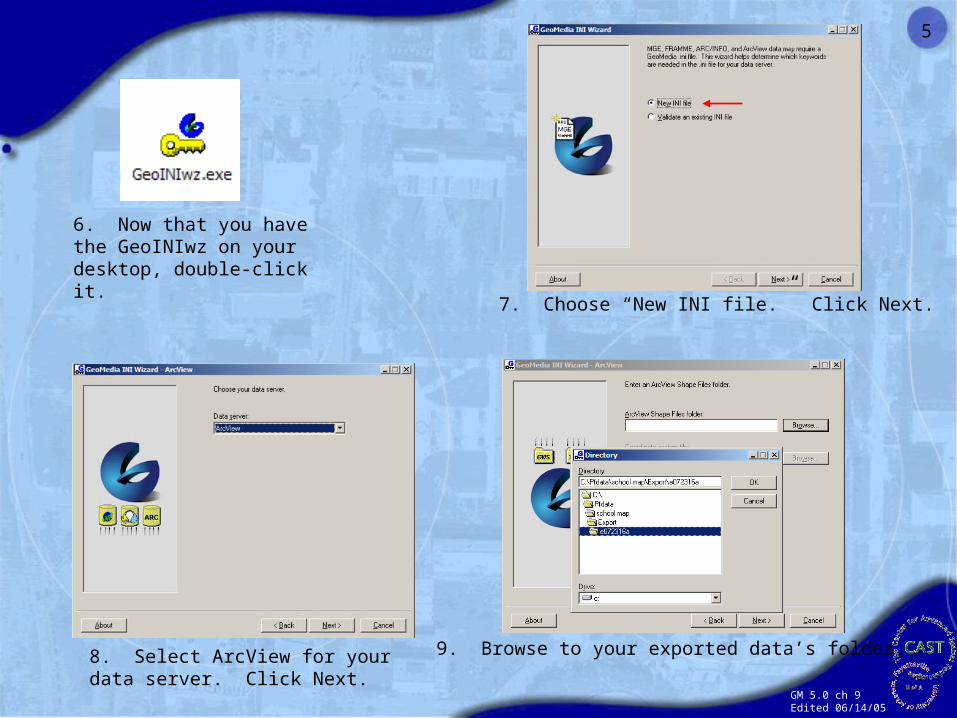
1. First, look to see if the GeoINIwz.exe shortcut is on your desktop. If so you may skip to page 5.
Since your GPS data is exported in the ArcView format, you must prepare the data for use in GeoMedia.
Getting your GPS Data Into GeoMedia Professional 5.0

GM 5.0 ch 9Edited 06/14/05
3
2. Open up a Windows Explorer and navigate to the your “Program Files” folder.
3. Then Navigate to GeoMedia Professional and the file within it called “Program.”

GM 5.0 ch 9Edited 06/14/05
4
4. Look for the GeoINIwz.exe and right click on it.
5. Select “Send To” and then Desktop. The shortcut will now be on your desktop.
GM 5.0 ch 9Edited 06/14/05
5
6. Now that you have the GeoINIwz on your desktop, double-click it.
7. Choose “New INI file.” Click Next.
8. Select ArcView for your data server. Click Next.
9. Browse to your exported data’s folder.

GM 5.0 ch 9Edited 06/14/05
6
10. Click “Create/Modify Coordinate File. Within the Define Coordinate System window select Geographic.
11. Click the Geographic Space Tab and make sure that the Geodetic datum is “WGS84.” Click OK
12. Name your .csf file geographic. Click Save. Then click Next. 13. Click Next.

GM 5.0 ch 9Edited 06/14/05
7
14. Click Finish. You will see a message telling you that an .ini file has been created.
We have been throwing some unfamiliar terms at you, like “INI file,” “Coordinate System,” and “Geodetic Datum.” Try not to worry about the meaning of these terms just now. As you advance in your training these terms will be described and should make sense to you later.

GM 5.0 ch 9Edited 06/14/05
8
15. Go to the Warehouse menu, then “New Connection”.
16. Select ArcView as your connection type. Click “Next”.
17. Name your connection and select “Browse” to navigate to the folder where your GPS data is stored.
18. Select your exported file.

GM 5.0 ch 9Edited 06/14/05
9
19. Your warehouse configuration file will appear in the box below. If it does not, click the Browse button and navigate to the INI file you created before. Click “Next”.
20. With “Access all features in the warehouse,” selected, click “Next”.
21. “Let the wizard open the connection as read-only,” will automatically be selected for you. Click “Finish”.
GM 5.0 ch 9Edited 06/14/05
10
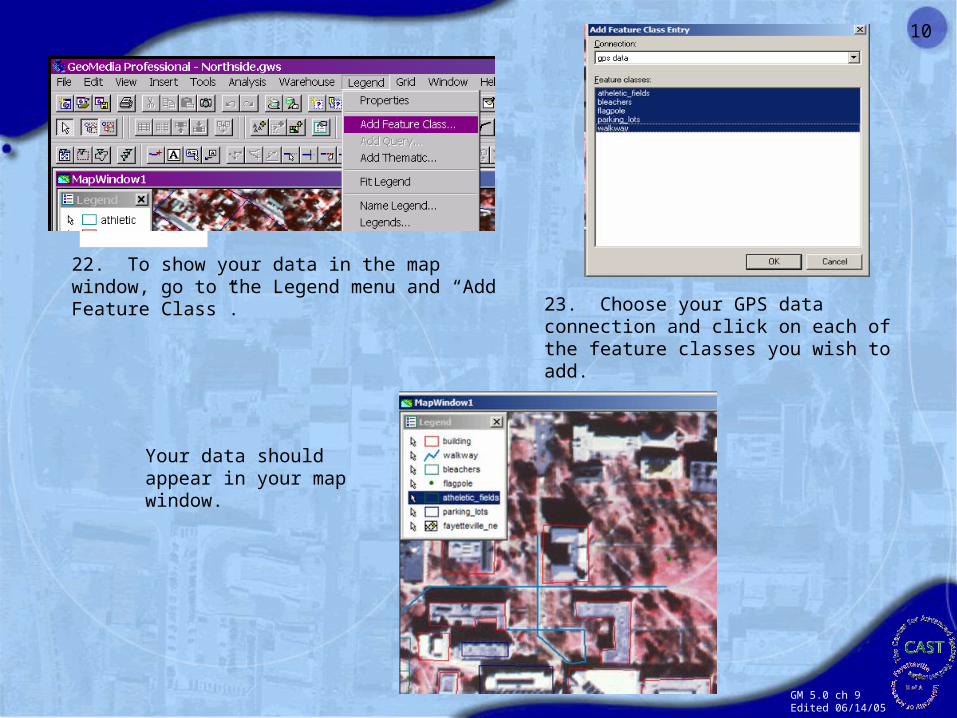
22. To show your data in the map window, go to the Legend menu and “Add Feature Class”.
23. Choose your GPS data connection and click on each of the feature classes you wish to add.
Your data should appear in your map window.

GM 5.0 ch 9Edited 06/14/05
11
Editing Your GPS Data in GeoMedia
You may find that you need to make changes to your attributes, the shape of your features, or that you need to add more features to your map. This lesson should be helpful in guiding you through some of the steps.
You may not have been able to record all of your buildings on campus due to obstructions, poor signal reception or other problems. You can edit your data as described in chapter 2 and even add new features if needed. The remainder of this chapter describes how to add features to your geoworkspace.

GM 5.0 ch 9Edited 06/14/05
12
The data that you have been working with in this chapter so far is in ArcView and therefore read only. To edit your data you must convert from the ArcView format to GeoMedia.
24. First go to the Warehouse menu and select, “Import From Warehouse”. 25. Click “Next”.
GM 5.0 ch 9Edited 06/14/05
13
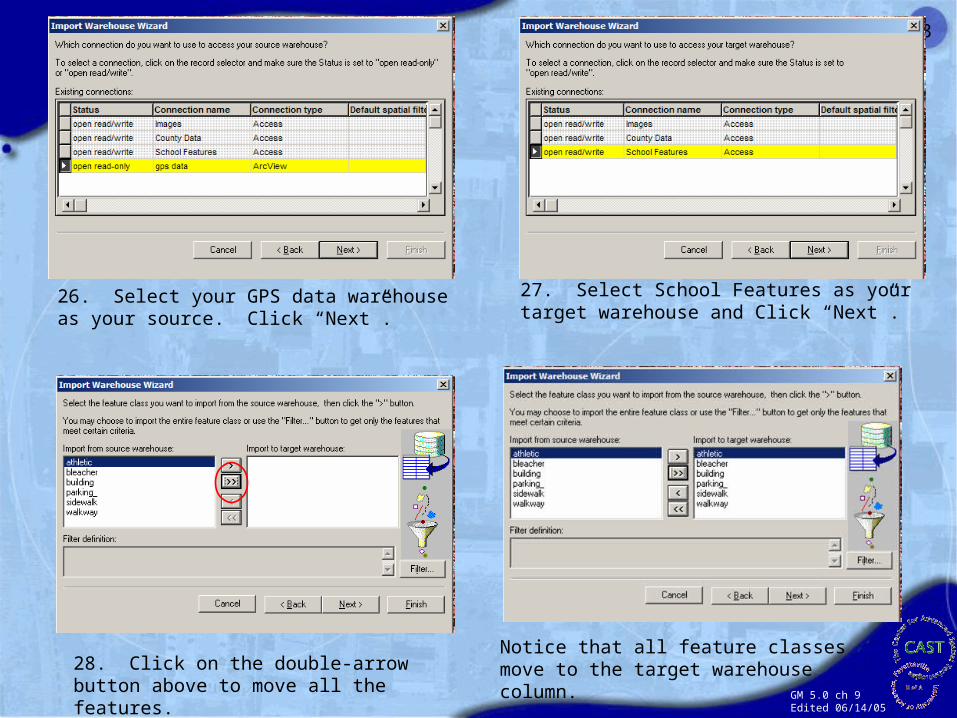
26. Select your GPS data warehouse as your source. Click “Next”.
27. Select School Features as your target warehouse and Click “Next”.
28. Click on the double-arrow button above to move all the features.
Notice that all feature classes move to the target warehouse column.

GM 5.0 ch 9Edited 06/14/05
14
29. You may see a number at the end of each feature class. If so, use the backspace key to remove it. Click “Next”.
30. Be sure that all boxes under “Append” and “Update,” are checked. Click “Next”.
31. Check, “Do not create new legend entries.” Click “Next”.
32. Wait for the processing to finish and then click the close button. You will now be able to edit your data.

GM 5.0 ch 9Edited 06/14/05
15
35. Select your warehouse and feature class in the drop-down menu that appears just above the Insert Feature button.
36. You may see this window pop up. If so click “OK” and continue.
33. To add features, find a feature (in this case, a building) on the image that was not captured with the GPS.
34. Click on the Insert Feature Button. Looks like a plus sign with a tail.
GM 5.0 ch 9Edited 06/14/05
16
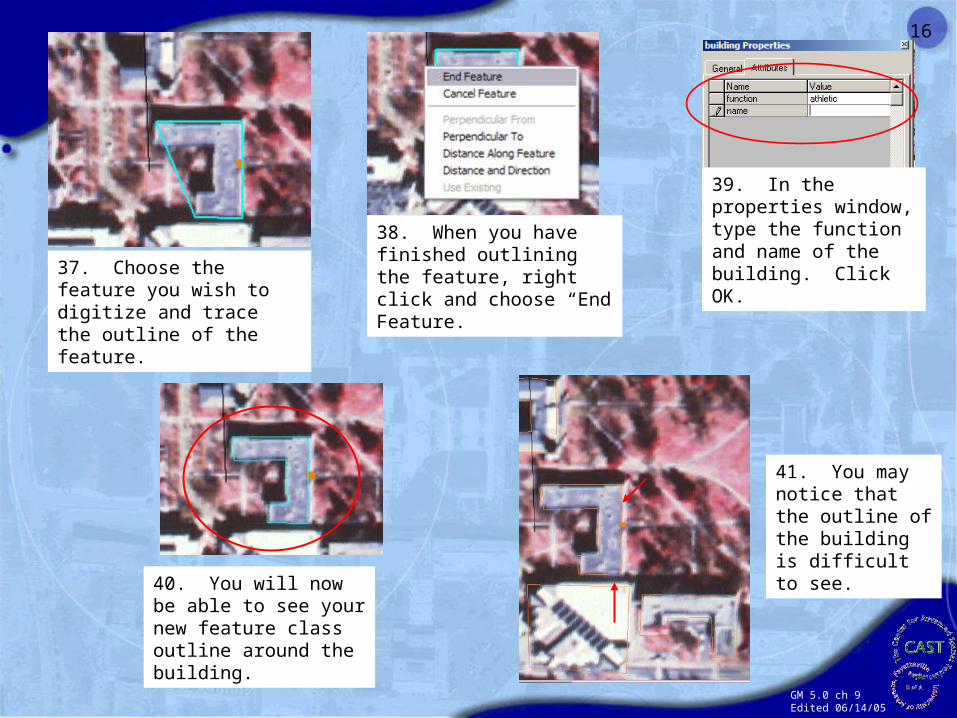
37. Choose the feature you wish to digitize and trace the outline of the feature.
39. In the properties window, type the function and name of the building. Click OK.
40. You will now be able to see your new feature class outline around the building.
41. You may notice that the outline of the building is difficult to see.
38. When you have finished outlining the feature, right click and choose “End Feature.
GM 5.0 ch 9Edited 06/14/05
17
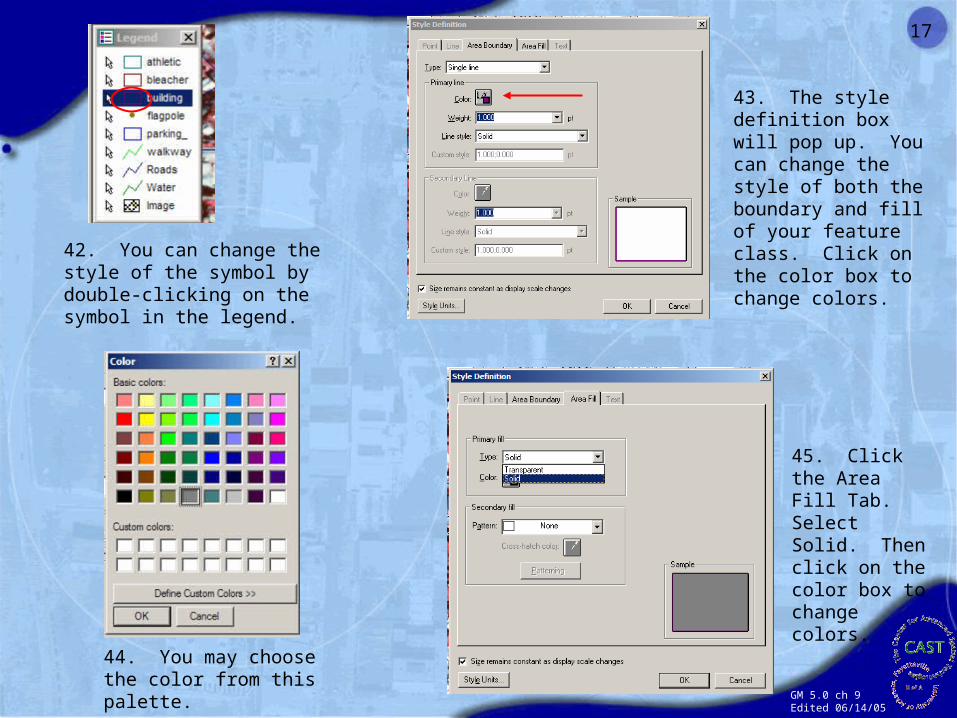
45. Click the Area Fill Tab. Select Solid. Then click on the color box to change colors.
44. You may choose the color from this palette.
42. You can change the style of the symbol by double-clicking on the symbol in the legend.
43. The style definition box will pop up. You can change the style of both the boundary and fill of your feature class. Click on the color box to change colors.

GM 5.0 ch 9Edited 06/14/05
18
Your feature class is now customized to your specifications.

GM 5.0 ch 9Edited 06/14/05
19
At this point we should have mapped:An athletic fieldA flagpoleThe buildings around campus
Now, you need to decide how you will finish your work. You can use either GPS or heads-up digitizing to map. You will need to map:
All the athletic fields on your campusParking lots around campusAny gyms or assembly locationsAny other buildings that haven’t been mappedOther features that are important on your school grounds
We want you to take some time to develop your skills and a final product that you can be proud of. When you are done with this, move onto the next chapter.