glossary warranty and support information · long lamp life: the riohd led-2’s led based lamp is...
TRANSCRIPT


Introduc tion ------------------------------------------------------------------------------
Safety instructions ----------------------------------------------------------------------
Getting started ---------------------------------------------------------------------------
Connecting a PC to your projector --------------------------------------------------
Projector setup ---------------------------------------------------------------------------
Image adjustment -----------------------------------------------------------------------
Menu settings ----------------------------------------------------------------------------
Troubleshooting -------------------------------------------------------------------------
Specifications ----------------------------------------------------------------------------
Warranty and support information ---------------------------------------------------
1
2
3
7
8
9
10
13
15
16
Glossary Warranty and support informationYour RioHD-LED-2 projector is guaranteed to be free of defects in material and workmanship for a period of 45 days from the date of receipt. Should your RioHD-LED-2 projector develop an issue requiring it to be repaired within this time frame, we will repair or exchange any defective or damaged unit at no cost to you. FAVI Entertainment will pay round trip shipping for warranty claims within the USA (excludes: HI, AK, APO, USA Territories, and international orders)
After 45 days has passed, your RioHD-LED-2 will then be covered under our parts warranty which is valid up to one year from the date of receipt. We will repair the unit, and bill you for a flat rate for labor and return shipping costs. You will not be billed for the cost of replacement parts.
FAQ’s and other support information can be found at:
17
Accessories -------------------------------------------------------------------------------
17
http://www.favientertainment.com/help.asp

116
● No warm up time: Plug in the projector, turn it on, and it begins projecting almost immediately.
● Small size: At just over 8 inches wide and weighing under 3 pounds, the RioHD-LED-2 is designed with portability in mind.
● Low power consumption: Uses only 60 watts of electricity.
● Long lamp life: The RioHD LED-2’s LED based lamp is rated for a life of 20,000 hours.
We hope that you enjoy using your new FAVI projector, and that it fulfills your home theater or business presentation needs.
Introduction
Remote control VGA cable
A/V cableDC power adapter
Power cord This user guide
AccessoriesThe following accessories are included with your projector:
The RioHD-LED-2 uses new LED based lamp technology to provide a projector small and light enough to be carried with one hand, yet bright enough for most everyday uses. The RioHD-LED-2 is designed with a number of features at an affordable price such as:

152
Do not operate this projector in an environment where the temperature is above 104 ºF.Doing so could damage your projector and void your warranty.
Do not expose this projector, or its power supply to liquids. If the projector’s casing becomes dirty,use a damp soft cloth or paper towel to clean it.
While the projector is operating, do not look directly into the lens. Doing so could damage your eyes.
This projector should be placed on a stable surface prior to being operated.
This projector needs adequate ventilation in order to operate properly. Inadequate ventilation willcause the projector to overheat and shut down. Excessive overheating could damage the projector’sinternal optics.
Please unplug the projector from its power supply before cleaning it.
If you do not plan to use your projector for an extended period of time, or if an electrical storm de-velops, please unplug the projector. An electrical surge could damage your projector’s power supply.
LCD 3.2” TFT LCD panel
LCD native resolution 640x480
Video inputs HDMI, VGA, Component (Y/Pb/Pr), S-Video, and Composite video.
Audio inputs
32 ºF ~ 100 ºF Storage temperature -4~140 º F
Operating humidity 10~90%
8.07x6.29x2.75 inches
Weight 2.75 lbs
Supported resolutions 640x480 up to 1920x1080
HDMI audio, and stereo line input jacks.
LED lamp power 50 watts
LED lamp life 20,000 hours
24 to 120 inchesProjected image size
Power consumption 60 watts
External power supply 19 V DC 3.7 Amps
Operating temperature
Size
SpecificationsSafety instructions

14
1 2
35•
3
The following diagrams point out the features of your projector:
4
6 7
8
9 10
11
1: Power button2: Indicator LED3: Front ventilation slots4: Lens5: A/V and power input panel.
6: IR sensor7: Rear ventilation slots8: VGA input
9: Keystone adjustment wheel10: Front height adjustment foot11: Speakers
Problem: Solution:Small text is hard to read in VGA mode.
First, check to make sure the projector is properly connected to your computer. Try shuting down your computer, connecting the projector, and rebooting. Your computer should automatically detect your projector.
If you are running a dual display configuration, first check to make sure your computer is detecting your projector. Also make sure your desktop resolution is set at or below 1920x1080 with a 60 hertz refresh rate.
Set your desktop resolution to 800x600 or lower.
Troubleshooting (continued) Getting started
I can’t get my desktop to appear in VGA mode.

134
V ideoS-videoY /PB /PRV GAHDMI
Selecting a video modePress the “AV/TV” button on the remote control to bring up the following menu screen:
This menu screen will appear in the upper right hand corner of the image. Use the up and down arrow buttonsto highlight the selection you want, then press the right arrow button to switch over to that video mode.
Powering on/off your projectorAfter plugging your projector in, press the power button on either the remote control, or the projector. To turnthe projector off, press the power button twice. Problem: Solution:
TroubleshootingGetting started (continued)If you have any issues setting up or using your RioHD-LED-2, before contacting us please refer to the following troubleshooting guide:
Projector will not power on.Make sure that the power supply is plugged in correctly. The power supply has a built in indicator LED which should glow when plugged in.
Projector powers up but only displays a screen that says “NO SYNC”.
Check your video source selection and video cable connections.
I can’t get the projector to change from one video mode to another.
Make sure you are pressing the right navigation arrow button to select the video mode that you want. Pressing the MENU button will only close the source selection menu.
I connected my projector to my stereo with an adapter cable, and the sound is distorted.
Try setting the projector’s volume to 50% or lower, and use your stereo’s volume control to adjust the volume.

12
5
Here is a picture of your projector’s A/V and power input panel. The connectors are all labeled, and are self explainatory.
If you want the best possible image clarity, use theComponent (Y/Pb/Pr) jacks, or the HDMI port. If you wantto make use of the 16:9 downsampling, or you have adevice that only supports Composite or S-Video, thenyou should use either the Composite (Video) jack, or
The stereo line audio jacks at the top of the panel areused by the Composite, Component, and S-Video jacks.The HDMI standard has audio integrated with the video.
C O NTRAST
H-PO SITIO N
C LO C K
PC
V-PO SITIO N
BRIG HTNESS
PHASE
MO VE SELEC T EXITMENU
PC
LANG UAG E
H-PO SITIO N
HALF TO NE
C HINESE
O SD
V-PO SITIO N
DURATIO N
MO VE SELEC T EXITMENU
PC
This menu screen is only available in the VGA videomode. When switching to VGA mode, the projector willautomatically calibrate the image upon receiving a VGAsignal. This menu screen allows you to adjust some ofthese calibration settings.
The OSD menu screen allows you to adjust the settings forthe menu itself. The “LANGUAGE” setting will change themenu language from English to Chinese, German, French,Spanish, Itallian, Portuguese, or Russian. The “H-POSITION”, and“V-POSITION” settings change the menuscreen’s position. The “DURATION” setting changes howlong the menu will stay on the screen without user inputbefore automatically closing. The “HALFTONE” setting ad-justs the transparency of the menu screen. The “MEMORYRECALL” setting will reset all the menu settings back totheir factory defaults.
the S-Video jack.
HDMI audio is independent of the line audio jacks.
The Audio Out jack allows you to connect your projectorto either a pair of headphones, amplified computer speakers, or a stereo system. You may need a headphoneadapter cable (not included) to connect your projector to a stereo system.
Menu settings (continued) Getting started (continued)
11
6
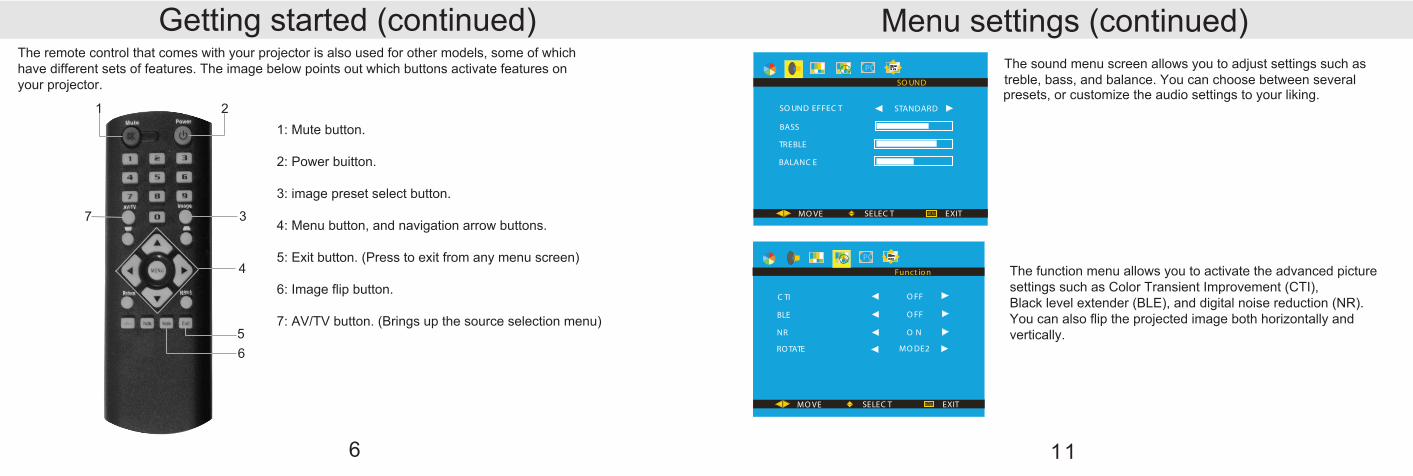
The remote control that comes with your projector is also used for other models, some of which have different sets of features. The image below points out which buttons activate features on your projector.
1 2
3
4
56
7
1: Mute button.
2: Power buitton.
3: image preset select button.
4: Menu button, and navigation arrow buttons.
5: Exit button. (Press to exit from any menu screen)
6: Image flip button.
7: AV/TV button. (Brings up the source selection menu)
BASS
TREBLE
BALANC E
SO UND EFFEC T STANDARD
SO UND
MO VE SELEC T EXITMENU
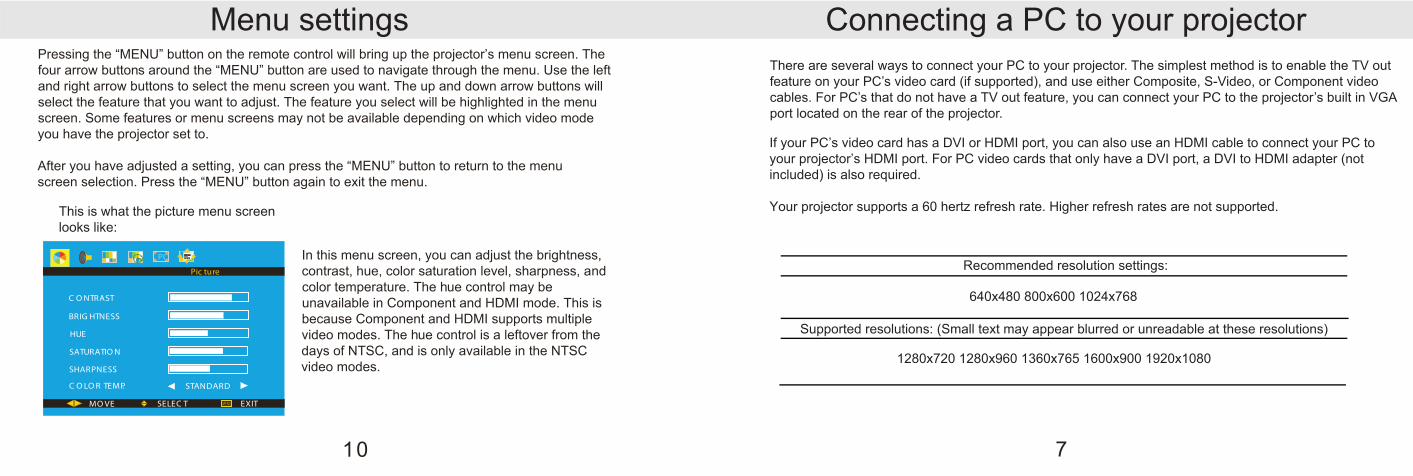
PC The sound menu screen allows you to adjust settings such astreble, bass, and balance. You can choose between several
C TI
RO TATE MO DE2
O FF
O FF
O N
BLE
NR
MO VE SELEC T EXITMENU
PC
Funct io n The function menu allows you to activate the advanced picturesettings such as Color Transient Improvement (CTI), Black level extender (BLE), and digital noise reduction (NR). You can also flip the projected image both horizontally and vertically.
Getting started (continued) Menu settings (continued)
presets, or customize the audio settings to your liking.
710
If your PC’s video card has a DVI or HDMI port, you can also use an HDMI cable to connect your PC to your projector’s HDMI port. For PC video cards that only have a DVI port, a DVI to HDMI adapter (not included) is also required.
Your projector supports a 60 hertz refresh rate. Higher refresh rates are not supported.
C O NTRAST
BRIG HTNESS
HUE
C O LO R TEMP. STANDARD
Pic ture
SATURATIO N
SHARPNESS
MO VE SELEC T EXITMENU
PC
Pressing the “MENU” button on the remote control will bring up the projector’s menu screen. Thefour arrow buttons around the “MENU” button are used to navigate through the menu. Use the leftand right arrow buttons to select the menu screen you want. The up and down arrow buttons willselect the feature that you want to adjust. The feature you select will be highlighted in the menuscreen. Some features or menu screens may not be available depending on which video modeyou have the projector set to.
After you have adjusted a setting, you can press the “MENU” button to return to the menuscreen selection. Press the “MENU” button again to exit the menu.
This is what the picture menu screen looks like:
In this menu screen, you can adjust the brightness,contrast, hue, color saturation level, sharpness, andcolor temperature. The hue control may beunavailable in Component and HDMI mode. This isbecause Component and HDMI supports multiplevideo modes. The hue control is a leftover from thedays of NTSC, and is only available in the NTSCvideo modes.
Menu settings Connecting a PC to your projector
Recommended resolution settings:
1280x720 1280x960 1360x765 1600x900 1920x1080
Supported resolutions: (Small text may appear blurred or unreadable at these resolutions)
640x480 800x600 1024x768
There are several ways to connect your PC to your projector. The simplest method is to enable the TV out feature on your PC’s video card (if supported), and use either Composite, S-Video, or Component video cables. For PC’s that do not have a TV out feature, you can connect your PC to the projector’s built in VGA port located on the rear of the projector.

8 9
Front projection Table mount
Rear projection Table mount
screen screenprojector projector
The projector is angled too far to the right.
The projector is angled too far to the left
The projector is set up correctly.
The following diagrams are examples of how your projector can be set up for use.
For the best image results, the projector should be directly facing the screen. Adjustments to the focus and keystone controls will help to improve the image quality.
The projector’s keystone control needs to be adjusted.
Focus adjustment Keystone correction
1
2
Rotating the lens clockwise will make it retract into the projector, while rotating it counter clockwise will make it extend.
Front height foot adjustment
Rotating the front height adjustment foot counter clockwise will allow the foot to extend, and will raise the front height of the projector. The foot’s maximum extension is 1.5 inches. Continuing to rotate it will remove the foot from the projector. If this happens, you can simply screw it back in. Once you have adjusted thefront height, you may need to readjust the key-stone correction.
Projector setup Image adjustment
After setting up your projector and powering it on, the image may look trapezoid shaped even after the projectopr is properly positioned. You can adjust the keystone adjustment wheel to correct the image. The keystone adjustment wheel is located on the bottom of your projector. (Please see page 3) Gently move the wheel either left or right to adjust the keystone correction.