glassworks - original style
TRANSCRIPT
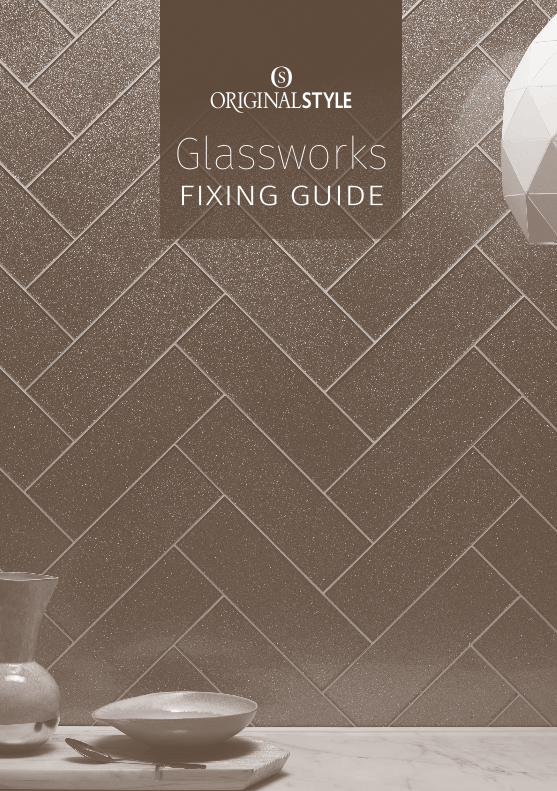
GlassworksFIXING GUIDE

Introduction 3Glossary of tiling terms 4
The right tools for the job 5Selecting your tiles / suitability 6
Colour and shade variation 8How many tile will you need? 9
Cutting glass tiles 10Successful tiling 11
Planning and preparation 12Tanking systems 13
Adhesives 14Grouts 16
Finishing off 17Cleaning 17
Photography 18Limits of liability 18
GlassworksContents
FIXING GUIDE
2 3
Introduction
Original Style Glassworks tiles and splashbacks are available in a wide range of colours, sizes and finishes, to suit every taste.
Using this guide will help you to:
• Understand the limitations and difficulties that may be experienced with glass tiles • Calculate how many tiles you require • Prepare and plan for the installation • Mark out the work area• Successfully cut and drill• Fix and grout the glass tiles• Clean and maintain your finished installation
Please also visit www.originalstyle.com/fixing-guides/ to view our instructional videos on how to cut and install glass tiles.

Adhesive spreader/ bedding trowel
The notched edge of this tool ensures an even spread of adhesive of an even depth.
Chinagraph pencilFor marking any tiles that need cutting. This will not stain the tiles and will resist being washed away when using a water-fed cutting machine. Never use a felt tip pen as they can leave permanent marks.
Drill bit A hollow tipped, diamond coated, water fed drill bit is advised.Cut part way through the back and then from the front to meet.
Epoxy squeegee A rigid squeegee specifically designed for the application ofepoxy grouts.
Eye protection, glovesand dust mask
It is vital that you use all possible protection when using any cutting or drilling machinery. Always use personal protective equipment as advised by the HSE. Visit www.hse.gov.uk for further health andsafety advice.
Gauging trowel For removing the grout from its container, or the vessel used for mixing the grout. Use it to place adhesive onto a bedding trowel.
Grout finishing toolThis tool is run along the grout lines before they set completely to give consistent, neat finished grout lines. A piece of dowel can work just as well. NB: NOT to be used on epoxy grout.
Spacers
These small pieces of plastic are inserted between the tiles to provide consistent spacing. Push them in side-on so they are at right angles to the surface and place them at regular intervals to maintain the spaces. Remove them before the grout is applied. 2mm size for small glass tiles and 3mm size for large glass tiles.
Spirit level/laser level/plumb line
One or more of these tools will be necessary to ensure that your tile installation is level and that verticals are straight.A plumb line can be made from a small weight on a length of string.
SpongesUse to remove grout residue and for smooth joints. Always use new sponges and grouting tools rather than old sponges and tools which may have adhesive or grout residue which could scratch tiles.
Squeegee or rubber trowel Used for spreading grouting compound into the spaces betweenthe tiles.
Wooden ruler/tape measure For accurate measuring. Steel rulers may scratch the glass tiles.
Scribe and snapstraight cutter
A simple tile cutter for straight cuts on Painted Back glass tiles only. An 18mm scribing wheel is recommended.Not suitable for cutting Vinyl Backed or Double Pressed glass tiles (see opposite)
Tile gauge A device for accurately measuring and shaping your tiles.
Tile nippers A specialist tool for ‘nibbling’ away unwanted sections of glass tiles.
Wedges These are wooden or plastic for minute tile adjustment.
The right tools for the job
These tools will help you complete your tiling project to a professional standard. Most are readily available to buy or hire.
4 5
AdhesiveThe glue used to fix tiles to the substrate.There is a wide choice available, so always ask your stockist for advice on your particular project and type of tiles.
GroutA hardening compound used to seal the joints between tiles. There is such a wide choice available, it is best to seek advice from your stockist on your particular project and type of tiles to be used.
Movement joints
Where tiles meet another surface such as a shower tray; the joint is filled with silicone sealant, not grout, to allow for expansion and contraction. Should be placed according to architect’s specifications, over existing joints and any changes in plane such as wall to wall or wall to floor. Movement joints eliminate stress transferring from the substrate and reduce the possibility of the glass tile cracking.
Decoupling systemA special matting placed between the substrate and tile to absorb expansion and contraction between the substrate and the glass tile. This will help reduce the possibility of cracking from stresses set up between the different expansions and contractions between the substrate and the glass tiles.
PointingWhere grout is mixed to a thicker consistency than usual and applied into the joints with a squeegee, pressed in firmly and finished off with a grouting tool to give a neat finish. Any excess is removed using a damp sponge and the surface wiped clean.
Render A wall finish made up of sand and cement, usually made up of sand/cement in the ratio of 4:1.
Silicone sealant A material with elastic and waterproofing properties used to fill movement joints instead of grout.
Slurry grouting
Where the grout mix is runnier than normal and is spread across a large area at a time using a spreader. Care is needed to ensure the grout goes right into the joint and no areas are missed out. This method is recommended where a pitted tile has been fitted and the pits or holes need to be filled in for hygiene or cleaning reasons, for example on a kitchen splashback
Stud wall Internal walls in a home, usually constructed of plasterboard over a wooden framework.
Substrate Any surface on to which tiles are laid.
Thin set A layer of adhesive applied to a depth of less than 5mm / 1/4”
Glossary of tiling terms
Glass tile typesPainted Back The colour or design is painted onto the back surface of the glass.
Vinyl Backed The colour or design is applied to the back of the tile as a vinyl film.
Double Pressed The colour or design is sandwiched between two layers of glass.
6 7
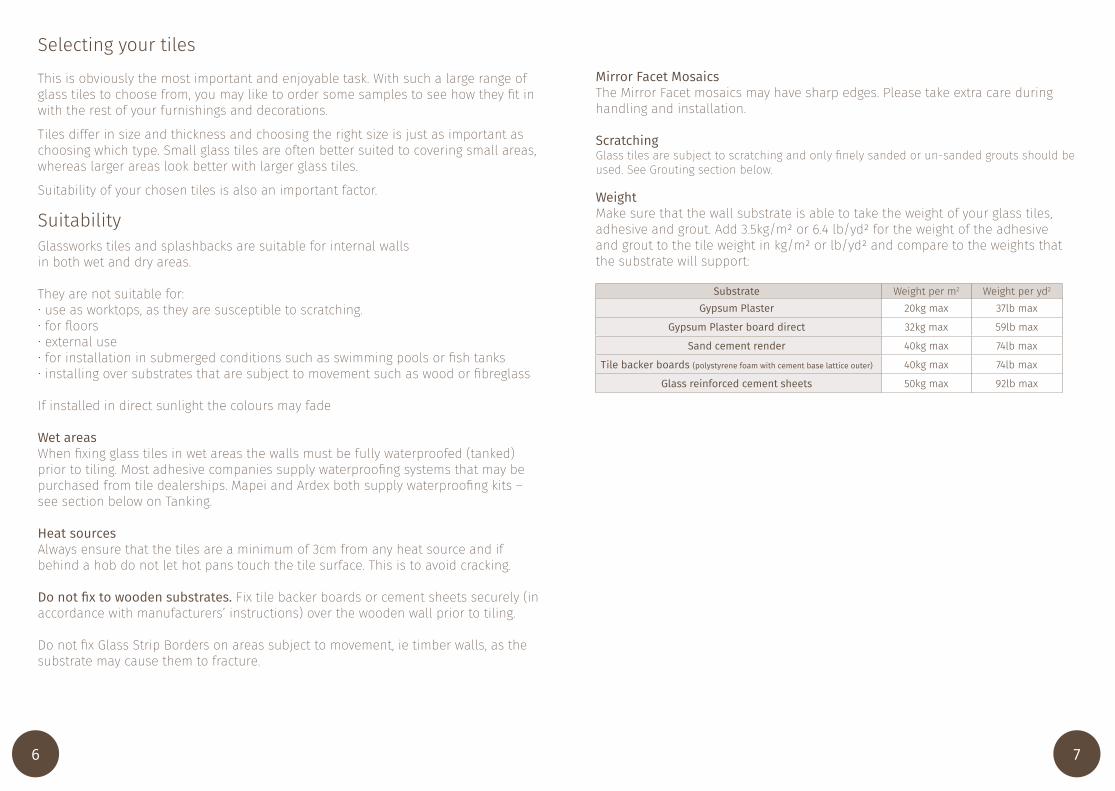
Selecting your tiles
This is obviously the most important and enjoyable task. With such a large range of glass tiles to choose from, you may like to order some samples to see how they fit in with the rest of your furnishings and decorations.
Tiles differ in size and thickness and choosing the right size is just as important as choosing which type. Small glass tiles are often better suited to covering small areas, whereas larger areas look better with larger glass tiles.
Suitability of your chosen tiles is also an important factor.
SuitabilityGlassworks tiles and splashbacks are suitable for internal wallsin both wet and dry areas.
They are not suitable for: • use as worktops, as they are susceptible to scratching.• for floors• external use • for installation in submerged conditions such as swimming pools or fish tanks• installing over substrates that are subject to movement such as wood or fibreglass
If installed in direct sunlight the colours may fade
Wet areasWhen fixing glass tiles in wet areas the walls must be fully waterproofed (tanked) prior to tiling. Most adhesive companies supply waterproofing systems that may be purchased from tile dealerships. Mapei and Ardex both supply waterproofing kits – see section below on Tanking.
Heat sourcesAlways ensure that the tiles are a minimum of 3cm from any heat source and if behind a hob do not let hot pans touch the tile surface. This is to avoid cracking.
Do not fix to wooden substrates. Fix tile backer boards or cement sheets securely (in accordance with manufacturers’ instructions) over the wooden wall prior to tiling.
Do not fix Glass Strip Borders on areas subject to movement, ie timber walls, as the substrate may cause them to fracture.
Mirror Facet MosaicsThe Mirror Facet mosaics may have sharp edges. Please take extra care during handling and installation.
ScratchingGlass tiles are subject to scratching and only finely sanded or un-sanded grouts should be used. See Grouting section below.
Substrate Weight per m2 Weight per yd2
Gypsum Plaster 20kg max 37lb max
Gypsum Plaster board direct 32kg max 59lb max
Sand cement render 40kg max 74lb max
Tile backer boards (polystyrene foam with cement base lattice outer) 40kg max 74lb max
Glass reinforced cement sheets 50kg max 92lb max
WeightMake sure that the wall substrate is able to take the weight of your glass tiles, adhesive and grout. Add 3.5kg/m2 or 6.4 lb/yd2 for the weight of the adhesive and grout to the tile weight in kg/m2 or lb/yd2 and compare to the weights that the substrate will support:

8 9
Glassworks SplashbacksCare must be taken when handling Splashbacks before and during installation. Most of our Splashback are made from toughened (also known as tempered) glass, which is a type of safety glass. Toughened glass should receive the same care as annealed (ordinary) glass. Careless handling and improper installation sometimes causes edge damage, and delayed breakage can occur when edge-damaged tempered glass is subjected to mechanical stress, as in installation. Further, if cut, knocked or dropped, this material will produce instantaneous total fragmentation.
Splashbacks must be a minimum of 3cm / 11/8 “ from any direct heat source and radiant heat sources such as hobs, heated towel rails or radiators. Hot pans must not come into direct contact with glass splashbacks. When cooking on hobs hot pans must be kept from splashbacks by a minimum of 3cm / 11/8” to avoid scorching.
Colour and shade variationLay out and mix the glass tiles prior to fixing to evenly distribute small variations in shade. Check that the tiles are all from one batch by looking at the labels on the individual boxes. If they are not from one batch they will be replaced. Do not fix the glass tiles if you are unhappy with the shade variation or any other quality aspect.
No liability for shading issues can be accepted after installation.
As most tiles are individually coloured, there may be distinctive yet subtle variations in shade, especially between batches. This is an inherent feature of our tiles. You may wish, therefore, to spend some time to achieve the most pleasing distribution of shades before fixing. When planning designs it is important to dry lay the tiles prior to fixing. This is particularly relevant regarding Metallica tiles. We strongly recommend that you buy all the tiles you need for your project at one time. Decorative tiles are made individually and therefore unique. Due to the different density, 5mm and 10mm tiles will vary in tone.
Because of the way they are made, the Aurora Borealis tiles have distinct differences between them, and if they are placed together they may not match or line up with each other, however the overall effect will be stunning. There may also be shade variations with Champagne and Zinc Splashbacks and tiles.
Arabia, Arabia Mosaic, Ammon Mosaic, Siva Mosaic: The backs of these tiles and mosaics are painted by hand and so each individual tile will be unique.
SPECIAL NOTEArctic White Glassworks tilesBecause the Arctic White colour is achieved by using an optically clear glass, when two tiles of different length are placed side by side the amount of light passing through the tile can affect the colour. This effect is caused by refraction, prismatic effect or chromatic aberration. We recommend that any voids (e.g. corners) are fully filled before tiling to reduce the possibility of this or other shadowing effects.
How many tiles will you need?
Nominal size* Per m2 Per ft2
Tiles48 x 48mm 17/8” x 17/8” 435.0 36.0100 x 100mm 4” x 4” 100.0 9.0152 x 50mm 2” x 6” 131.0 12.0150 x 75mm 3” x 515/16” 88.0 8.0152 x 75mm 3” x 6” 86.0 8.0200 x 75mm 3” x 77/8” 66.66 6.2220 x 76mm 3” x 85/8” 59.8 5.56200 x 98mm 4” x 8” 50.0 4.5200 x 100mm 4” x 8” 50.0 4.5295 x 295mm 115/8 x 115/81 x Hexagon Sheet - 17.5 1.63300 x 100mm 4” x 113/4” 33.33 3.06300 x 300mm 1113/16” x 1113/16” 10.7 1305 x 305mm 12” x 12” 10.4 1
Nominal size* Per m2 Per ft2
Tiles310 x 310mm 123/16” x 123/16” 10.4 1315 x 305mm 12 x 123/8” 10.4 1398 x 80mm 31/8” x 153/4” 31.0 2.9398 x 198mm 77/8” x 153/4” 12.5 1.2402 x 205mm 81/8” x 1513/16” 12.13 1.13600 x 300mm 1113/16” x 235/8” 5.55 0.52600 x 200mm 77/8” x 235/8” 8.3 0.75600 x 750mm 29½” x 235/8” 3.70 0.21900 x 750mm 29½” x 357/16” 2.22 0.141000 x 140mm 51/2” x 393/8” 7.14 0.67Borders Per linear m Per linear ft298mm 113/4” 3.4 1.0300mm 113/4” 3.3 1.0

10 11
Cutting Glassworks tiles and Splashbacks
Glass tiles are brittle and need special tools for cutting.
Visit www.originalstyle.com/fixing-guides/ to view our instructional videos on how to cut and install glass tiles.
Scribe and snap method(For straight cuts on painted back glass tiles only)Use a scribe and snap tool fitted with an 18mm scribing tool. Scribe the painted back and then firmly snap the tile. Always snap the tile at one end or the other of the scribe line Take care to wear gloves and eye goggles when cutting glass tiles.Not suitable for vinyl backed tiles, double pressed tiles or Splashbacks.
Water fed disc cutter(Recommended for all glass tiles, including vinyl backed and double pressed types but not all Splashbacks – see list below).Always use a *water fed disc specially designed for glass tiles. The disc is coated around the circumference with small, fine industrial diamonds and is made specifically for cutting glass tiles under wet conditions. The disc must be fed with plenty of clean water and the cutting rpm needs to be lower than normal at approximately 1200 rpm. Cut slowly with a low pressure on the glass tile.
For L-shaped cuts, drill a small hole and use a disc cutter as above to cut to the hole. This reduces the stress on the tile and the possibility of cracking during the cutting process. Drill the hole (approx. 10mm/5/16”) at the 90 degree turn, ie at the intersection of the two straight cuts. The glass cutting discs must be in good condition. Cut at a low rpm with minimum pressure on the glass tile.
Take extra care when cutting around sockets. Mark or trace the cut size on the back of the tile. Drill a small hole (approx. 10mm/5/16”) at each corner. This will prevent stress transferring through the tile. Carefully cut out the shape using a small disc designed for cutting glass tiles fixed to a small hand held angle grinder fed with plenty of water to cut between the holes.When drilling use hollow tipped, water fed, diamond coated drill bits.Drill at a low rpm with minimum pressure.
* PLEASE NOTEOTHER TYPES OF DISC ARE NOT SUITABLE AND MAY CAUSE THE TILES TO CRACK.
If any difficulty cutting or drilling the glass tiles is experienced the tiles may be cut at a water jet cutting facility. Check online for local facilities.
DO NOT under any circumstances attempt to cut or drill a Splashback, unless it is on the following list. These CAN be cut.GW-AQU3606C and 2406C Aurora Borealis Aqua GlossGW-AUR3606C and 2406C Aurora Borealis AuraGW-VEN3606C and 2406C Aurora Borealis Ventus
Vinyl Backed TilesThese 600 x 300mm decorative tiles have a vinyl backing:• Aduro• Arctic Crushed Pearl• Caeli• Cleopatra• Copper Leaf• Copper Leaf Bold• Crushed Pearl
• Graphite Wave• Gold Leaf Bold• Honfleur Gold• Karnak• Mercury• Paua• Saturn
• Silver Crest• Silver Leaf• Silver Leaf Bold• Solar• Solstice• Spun Silk• Tutankhamun
Other tiles in the range (excluding Splashbacks) have either a painted back or are double pressed. See the glossary on page 4.
Successful tiling The key to success is to:
1. Gather together all the tools, tiles and materials you need before you start 2. Plan the installation 3. Thoroughly prepare the surfaces to be tiled; time spent on this will save time later 4. Keep the work area clear and clean as you go along 5. Work methodically and avoid mistakes by allowing sufficient time for each task
This guide is not intended to be a definitive guide to fixing glass tiles. If you are uncertain about anything having read this guide you should consult a professional tile installer who is experienced with the installation of glass tiles.
PLEASE NOTE
There are no installation or specification standards for glass tiles, (unlike ceramic tiles and mosaics), except in the USA.
It is the purchaser’s responsibility:
• To check the tiles by laying them out and viewing them prior to installation. Please be advised that installation constitutes acceptance of the quality, colour, texture, shade and size of the tiles. This applies even if the home owner is not present during the installation process• To store products in an adequate, clean, dry and secure space that is free from frost and moisture• To ensure that installation is carried out in adequate artificial lighting conditions• To ensure that work is adequately protected during and after fixing• If you are in doubt about anything stated within this Fixing Guide please ask your retailer for further information

12 13
Planning Wet rooms and showersGlass tiles can be used in showers provided you take certain precautions in preparing the surfaces and use the correct adhesive and grout. It is vitally important to prepare all substrates in any area subject to frequent water (such as around a bath, basin or shower) carefully to protect them from water reaching the back of the glass tile. The best substrates are normally water resistant boards such as Wedi or Marmox. The underlying surface must be waterproofed first, using a waterproofing kit known as a tanking system (see below), to prevent the ingress of water into the substrate. There must also be sufficient falls for water to drain away.
PreparationMarking out the work area
First, make a tiling gauge.Use approximately 1m/39” length of straight, planed, wooden batten approximately30 x 20mm / 11/8” x 3/4” in cross-section. Use a pencil to mark off the length of your tiles, plus the space between them. For instance, if you are fixing tiles that measure300 x 300mm /1113/16” x 1113/16” and have gaps between each tile of 2mm /1/16”you will mark every 302mm /117/8”.
Mark out the work area. You must always check to see whether the ceiling is level first.Aim to position the tiles so that they fit either at the top or at the bottom. This way you will be cutting one edge. This can only be achieved if the floor or ceiling is level.
The first row you fix is the most important. If this is sloping or uneven, then all the other rows will be uneven too.
If the skirting board or floor looks even you may be tempted to start tiling directly up to it. Don’t! Very few properties, old or new, have walls and floors that are perfectly square so you will need to set the level for the first row.
Here’s how: take a straight length of timber batten (dimensions as above). Using a spirit level, make sure the top of the wooden batten is perfectly level then lightly nail it horizontally along the area to be tiled.
NB. Check for concealed plumbing or electrical wiring before nailing into any walls.
Place your homemade gauge vertically against the wall, its end on the top edge of the fixed wooden batten. Work up the wall making pencil marks as you go, making sure that you won’t have to cut lots of fiddly small tiles at the top.
Now use a measure to find the horizontal mid-point of the wall. Put your gauge against this point and work horizontally to determine the location of the last whole tile, and mark the batten. Again, make sure you are not left with small slivers of tiles at each end and, if necessary, adjust the ‘mid-point’ slightly to avoid this.
Next hang the plumb line so that the line hangs directly over the batten mark.Alternatively, you can use a laser level, a long set-square or an upright spirit level to produce a vertical line. Once you have the precise starting point for your first tile you can begin tiling.
Tanking SystemsWe recommend using a tanking system for power showers, shower cubicles, steam rooms and wet rooms in hotels, guest houses, leisure centres, fitness centres and in domestic homes. These normally consist of a primer, a liquid waterproofing membrane that you brush onto the wall and floor, and a tape for reinforcing all internal corners. Please refer to specific manufacturer instructions or, preferably, get a professional to do this job. Tanking a previously painted surface is not recommended. You can usually apply the tile adhesive 24 hours after the wall is waterproofed.
For steam rooms and saunas use epoxy adhesives and grouts.
We recommend that all waterproofing processes are carried out by a professional.

14 15
Fixing Tiles
For smaller tiles install with a 2mm grout gap and for larger tiles a 3mm gap. At changes of plane such as wall to wall and wall to floor and where the glass tiles meet materials of a different type such as shower trays, fill the gap with a neutral cure silicone to form an expansion joint.
Glass tiles must NEVER be butt jointed against one another as they could either crack or de-bond.
Where a large area is to be tiled with glass tiles incorporate a decoupling membrane between the substrate and glass tiles as an extra precaution against cracking due to expansion and contraction differences between the substrate and glass tile.
AdhesivesFor fixing glass tiles we recommend a thin-set white cement based, latex modified adhesive type such as Mapei Keraquick with Latex Plus (C2 S2) or an epoxy (R2) type in white such as Mapei Kerapoxy or Kerapoxy Design. In the USA Laticrete Platinum 254 in white with the use of a latex additive is a suitable option.
We do not recommend the use of cement based adhesives mixed with water as this forms alkalis which may attack some of the glass tile backings.
For steam rooms and saunas use an epoxy adhesive and grout.
For splashbacks use a silicone mirror adhesive or silicone MS polymer adhesive. These are applied in strips in accordance with the manufacturer’s instructions on the silicone tube.Do not seal around the splashback for 24 hours to allow the silicone to fully air cure. Suitable silicone mirror adhesives/MS silicone adhesives are Bostik, Geocel, Graft, Kingfisher and Soudal.
Be careful when selecting modified cement based adhesives for fixing glass tiles as they may form very strong alkalis when mixed with water. The alkalis may attack some of the glass tile backings. If you mix appropriate cement based adhesives with latex instead of water alkali formation is limited and the likely hood of attacking the glass backing is minimised.
Applying the AdhesivePrime the surface to be tiled with acrylic primer and leave to dry. Spread adhesive over as much of the wall as you can work on, within about 15 minutes; approximately one square metre /one square yard is usually about right.
Spread an even layer about 4 to 6 mm (1/4’’) thick using a notched trowel to form parallel lines. Work to the lines you have drawn on the walls for centre points and level lines and then begin to apply the tiles. Back butter the glass tiles with 1 to 2 mm of adhesive before placing into the ribbed adhesive on the wall.
This will improve adhesion and reduce the possibility of the ribs in the adhesive on the wall showing through the glass tiles.
Place the first whole tile into the ribbed adhesive on the wall and press down firmly. Check the first tile is straight and level. Now lay the adjacent tiles in the same way, using spacers to create an even joint between them.
When you get to the edges of the room, cut the tiles to fit the gap if necessary and clean away any excess adhesive from the corners. The corners will receive silicone for expansion purposes following grouting. Be careful to keep adhesive off the face of the tiles. Wipe away any surplus with a clean damp sponge as you go.
You may find it necessary to cut individual tiles to fit in small areas. Extreme care should be taken especially when cutting small pieces.
Spacers that have been used during the fixing process must be removed from the joints before the adhesive set¬ting time is reached.
Where the wall tiles meet the floor, a neater finish will be achieved if the wall tiles sit over the floor tiles. Fill the gap between the wall and the floor with silicone.
Where there is any chance of movement from the substrate it is important to use a flexible adhesive (C2 S2) type. This will accommodate for tiny movements and will reduce the possibility of the glass tiles and grout from cracking. All changes of plane will require expansion joints. In addition, where the glass tiles meet different materials such as shower bases the joint must be also filled with silicone. Always seek professional advice.
Adhesive is available as standard set or rapid set. Standard set can take up to 24 hours to go off, whereas rapid set can take up to two hours depending on the thickness and temperature and humidity conditions.
16 17
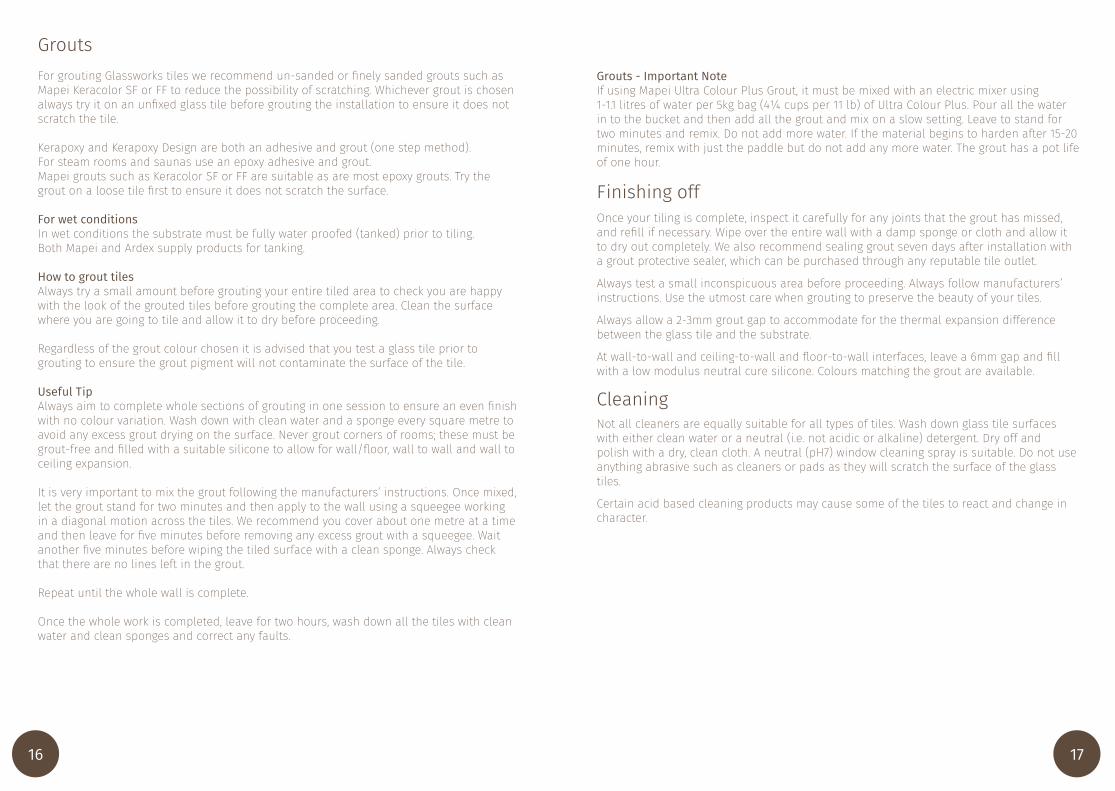
Grouts - Important NoteIf using Mapei Ultra Colour Plus Grout, it must be mixed with an electric mixer using1-1.1 litres of water per 5kg bag (4¼ cups per 11 lb) of Ultra Colour Plus. Pour all the water in to the bucket and then add all the grout and mix on a slow setting. Leave to stand for two minutes and remix. Do not add more water. If the material begins to harden after 15-20 minutes, remix with just the paddle but do not add any more water. The grout has a pot life of one hour.
Finishing offOnce your tiling is complete, inspect it carefully for any joints that the grout has missed, and refill if necessary. Wipe over the entire wall with a damp sponge or cloth and allow it to dry out completely. We also recommend sealing grout seven days after installation with a grout protective sealer, which can be purchased through any reputable tile outlet.
Always test a small inconspicuous area before proceeding. Always follow manufacturers’ instructions. Use the utmost care when grouting to preserve the beauty of your tiles.
Always allow a 2-3mm grout gap to accommodate for the thermal expansion difference between the glass tile and the substrate.
At wall-to-wall and ceiling-to-wall and floor-to-wall interfaces, leave a 6mm gap and fill with a low modulus neutral cure silicone. Colours matching the grout are available.
Cleaning Not all cleaners are equally suitable for all types of tiles. Wash down glass tile surfaces with either clean water or a neutral (i.e. not acidic or alkaline) detergent. Dry off and polish with a dry, clean cloth. A neutral (pH7) window cleaning spray is suitable. Do not use anything abrasive such as cleaners or pads as they will scratch the surface of the glass tiles.
Certain acid based cleaning products may cause some of the tiles to react and change in character.
GroutsFor grouting Glassworks tiles we recommend un-sanded or finely sanded grouts such as Mapei Keracolor SF or FF to reduce the possibility of scratching. Whichever grout is chosen always try it on an unfixed glass tile before grouting the installation to ensure it does not scratch the tile.
Kerapoxy and Kerapoxy Design are both an adhesive and grout (one step method). For steam rooms and saunas use an epoxy adhesive and grout.Mapei grouts such as Keracolor SF or FF are suitable as are most epoxy grouts. Try the grout on a loose tile first to ensure it does not scratch the surface.
For wet conditionsIn wet conditions the substrate must be fully water proofed (tanked) prior to tiling.Both Mapei and Ardex supply products for tanking.
How to grout tiles Always try a small amount before grouting your entire tiled area to check you are happy with the look of the grouted tiles before grouting the complete area. Clean the surface where you are going to tile and allow it to dry before proceeding.
Regardless of the grout colour chosen it is advised that you test a glass tile prior to grouting to ensure the grout pigment will not contaminate the surface of the tile.
Useful TipAlways aim to complete whole sections of grouting in one session to ensure an even finish with no colour variation. Wash down with clean water and a sponge every square metre to avoid any excess grout drying on the surface. Never grout corners of rooms; these must be grout-free and filled with a suitable silicone to allow for wall/floor, wall to wall and wall to ceiling expansion.
It is very important to mix the grout following the manufacturers’ instructions. Once mixed, let the grout stand for two minutes and then apply to the wall using a squeegee working in a diagonal motion across the tiles. We recommend you cover about one metre at a time and then leave for five minutes before removing any excess grout with a squeegee. Wait another five minutes before wiping the tiled surface with a clean sponge. Always check that there are no lines left in the grout.
Repeat until the whole wall is complete.
Once the whole work is completed, leave for two hours, wash down all the tiles with clean water and clean sponges and correct any faults.
18
PhotographyOwing to variations in studio lighting and printing inks, the tile colours shown in the Original Style brochure and website may differ slightly from those of the actual tiles.Samples of glass tiles may be obtained for viewing before purchase.
Limits of Liability Before making your choice it is always advisable to ask your Original Style dealership to show you samples.
Original Style Ltd. accepts no liability for the faulty installation of its tiles. In the case of any claim relating to the tiles themselves, Original Style’s liability, to the extent permitted by law, is limited to either the replacement of the product or a refund of the cost of the product, and does not extend to cover any consequential loss. Claims must be reported within seven working days from receipt of the tiles. Tiles must be inspected prior to installation and claims cannot be considered after the tiles have been installed. Please be advised that installation constitutes acceptance of the quality, colour, texture, shade and size of tiles.
Original Style Ltd. warrants that its tiles conform to their description and are fit for their purpose. Original Style Ltd. makes no other express or implied warranty as to fitness or suitability of the products for particular installations. We extend no guarantees, express or implied, as to wear resistance or maintenance procedures.
Please note, the use of certain acid based cleaning products may cause some of the tiles to react and change in character. In addition, abrasive cleaners must be avoided as they will scratch the surface of the tiles.
Please note: In the USA please follow the recommendations of reputable product manufacturers in conjunction with this Fixing Guide.

Falcon Road, Sowton Industrial Est.Exeter, Devon, EX2 7LF, EnglandTelephone: +44(0)1392 473004
Fax: +44(0)1392 473014
©Original Style LtdV1/03/21