glass painting techniques secrets from an english stained glass … · 2013-02-28 · glass...
TRANSCRIPT

Glass Painting Techniques & Secrets from an English Stained Glass Studio
Part 1 - The Classical Foundations
“How You Can Trace, Shade, Flood & Highlight (Front & Back) in a Single Firing & Why You Need a Lump of Paint to Do this (Not a Teaspoonful)”

How You Can Trace, Shade, Flood & Highlight in a Single Firing & Why You Absolutely Need a Lump of Paint to do This
� What You’ll Learn from Part 1Glass Painting Part 1 — The Foundations
Contents
What you’ll learn from Part 1 3
How to mix you paint and manage your palette 10
Silhouettes and what they teach you about glass painting ��
Softened Lines or “How to shade before you trace” 35
It’s that Pike again 51
How to put traced lines exactly where you want them 55
What you’ll learn from Part � 71
Case study #1 – Dog roses 73
Case Study #� – Lion 77
How to mix glass paint and oil 83
Moth 84
Phoenix and other beasts 88
Duck 103
Gargoyle 118
King’s head 1�0
Saint Martha 1�3
Part 3 — �0 quick points about silver stain 136
Media 137
The method 137
Firing schedules 139
Discovering the best schedule for your kiln 140
Different brands of oil and where to get them 141
Green man – step-by-step project 14�
Green man – design 150
Afterword 151
How You Can Trace, Shade, Flood & Highlight in a Single Firing & Why You Absolutely Need a Lump of Paint to do This
3 What You’ll Learn from Part 1Glass Painting Part 1 — The Foundations
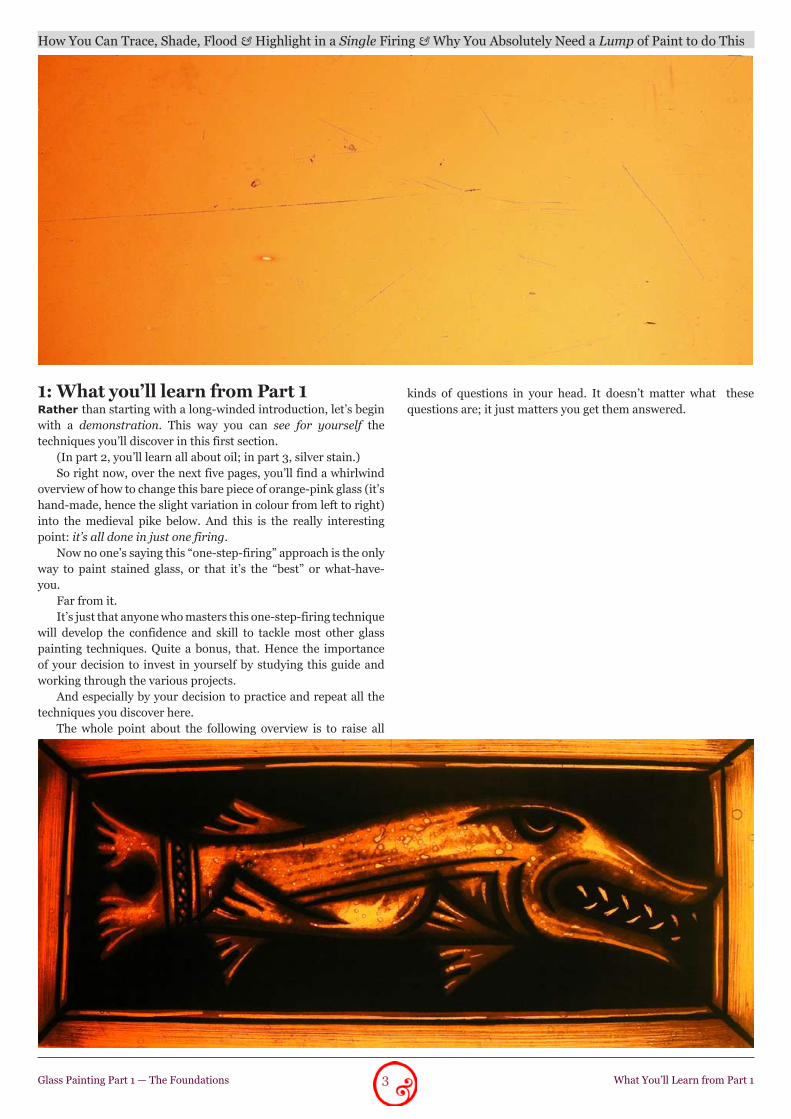
1: What you’ll learn from Part 1Rather than starting with a long-winded introduction, let’s begin with a demonstration. This way you can see for yourself the techniques you’ll discover in this first section.
(In part �, you’ll learn all about oil; in part 3, silver stain.) So right now, over the next five pages, you’ll find a whirlwind
overview of how to change this bare piece of orange-pink glass (it’s hand-made, hence the slight variation in colour from left to right) into the medieval pike below. And this is the really interesting point: it’s all done in just one firing.
Now no one’s saying this “one-step-firing” approach is the only way to paint stained glass, or that it’s the “best” or what-have-you.
Far from it. It’s just that anyone who masters this one-step-firing technique
will develop the confidence and skill to tackle most other glass painting techniques. Quite a bonus, that. Hence the importance of your decision to invest in yourself by studying this guide and working through the various projects.
And especially by your decision to practice and repeat all the techniques you discover here.
The whole point about the following overview is to raise all
kinds of questions in your head. It doesn’t matter what these questions are; it just matters you get them answered.

4 What You’ll Learn from Part 1
How You Can Trace, Shade, Flood & Highlight in a Single Firing & Why You Absolutely Need a Lump of Paint to do This
Glass Painting Part 1 — The Classical Foundations
1. The best way to clean your glass �. How to use an undercoat to prime your glass 3. How to use the blender - think about the grip, rhythm and speed of blending
4. The huge benefit of starting with an undercoat like this - it’s often so much better than bare glass 5. A useful tip to help stop tiredness in your eyes
6. Good ways to use the painting bridge (look at the left hand)
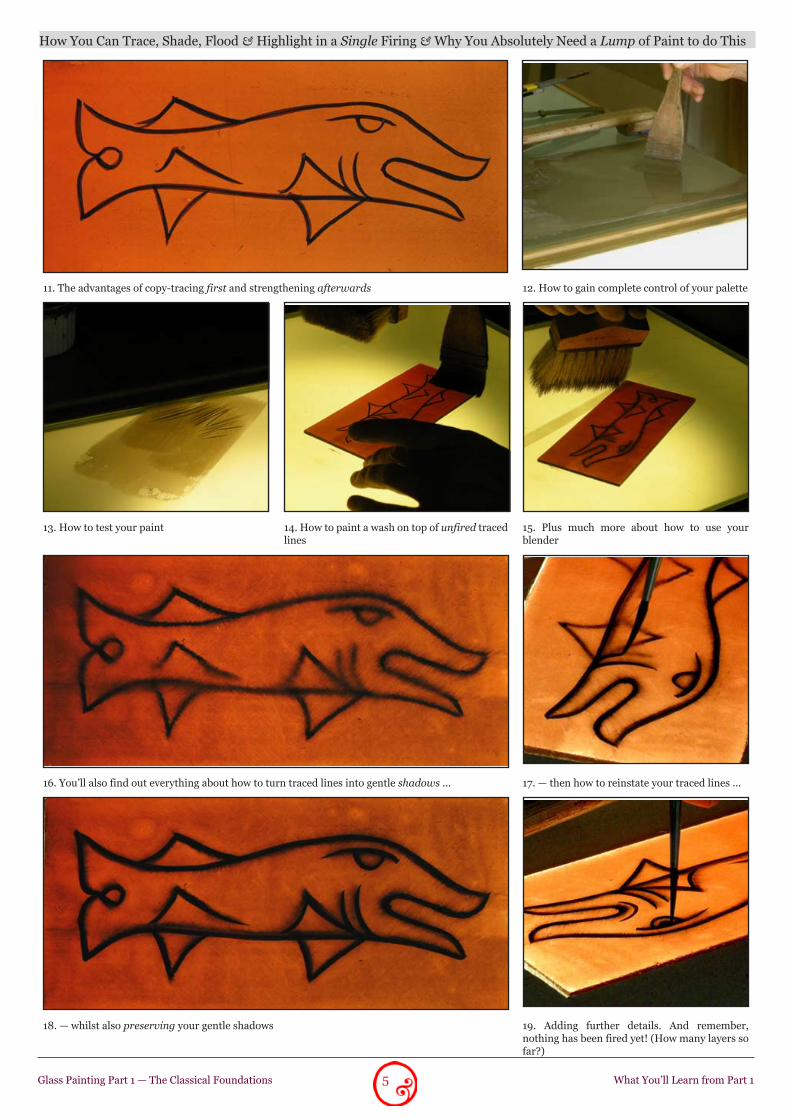
7. How to “copy-trace” a line - it’s not the same as “tracing”
8. Discover which lines you should copy-trace (not all of them if you also want to shade)
9. The advantages of copy-tracing, and the general benefits of painting layer upon layer, rather than doing it all at once. Clue: it allows the image to emerge because nothing’s fixed until the very end
10. How to strengthen your copy-traced lines
5 What You’ll Learn from Part 1
How You Can Trace, Shade, Flood & Highlight in a Single Firing & Why You Absolutely Need a Lump of Paint to do This
Glass Painting Part 1 — The Classical Foundations
11. The advantages of copy-tracing first and strengthening afterwards 1�. How to gain complete control of your palette
13. How to test your paint 14. How to paint a wash on top of unfired traced lines
15. Plus much more about how to use your blender
16. You’ll also find out everything about how to turn traced lines into gentle shadows ... 17. — then how to reinstate your traced lines ...
18. — whilst also preserving your gentle shadows 19. Adding further details. And remember, nothing has been fired yet! (How many layers so far?)

6 What You’ll Learn from Part 1
How You Can Trace, Shade, Flood & Highlight in a Single Firing & Why You Absolutely Need a Lump of Paint to do This
Glass Painting Part 1 — The Classical Foundations
�0. Now the fish is starting to look smart, but you won’t stop here — �1. You’ll also learn how to build a “wall” of glass paint
��. A wall like this �3. How to fill the walled area with thick paint
�4. Maybe you imagine this paint will blister in the kiln? (How many layers so far?)
�5. But no, it won’t blister when you know you to do it properly
�6. How to add highlights ... �7. Like this
7 What You’ll Learn from Part 1
How You Can Trace, Shade, Flood & Highlight in a Single Firing & Why You Absolutely Need a Lump of Paint to do This
Glass Painting Part 1 — The Classical Foundations
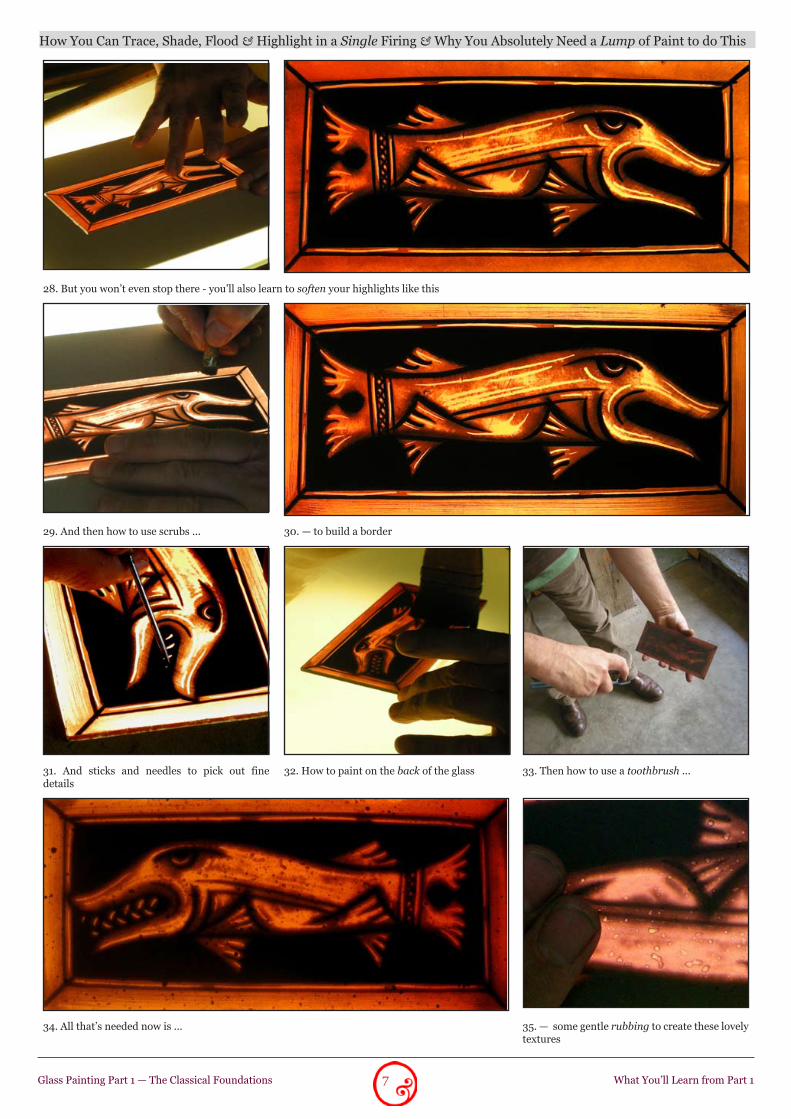
�8. But you won’t even stop there - you’ll also learn to soften your highlights like this
�9. And then how to use scrubs ... 30. — to build a border
31. And sticks and needles to pick out fine details
3�. How to paint on the back of the glass 33. Then how to use a toothbrush ...
34. All that’s needed now is ... 35. — some gentle rubbing to create these lovely textures

8 What You’ll Learn from Part 1
How You Can Trace, Shade, Flood & Highlight in a Single Firing & Why You Absolutely Need a Lump of Paint to do This
Glass Painting Part 1 — The Classical Foundations
36. And there you are - ready to fire if you wish. So, to summarize ... How to clean glass
And how and why to prime the glass How to copy-trace And how to strengthen
How to turn traced lines into gentle shadows How to reinstate the traced lines and keep
the shadows - this is very important! Plus how to add fine extra details
How to flood and silhouette All about highlighting Plus adding texture, shadows and highlights on the back ... all in just one firing
How You Can Trace, Shade, Flood & Highlight in a Single Firing & Why You Absolutely Need a Lump of Paint to do This
9 What You’ll Learn from Part 1Glass Painting Part 1 — The Foundations
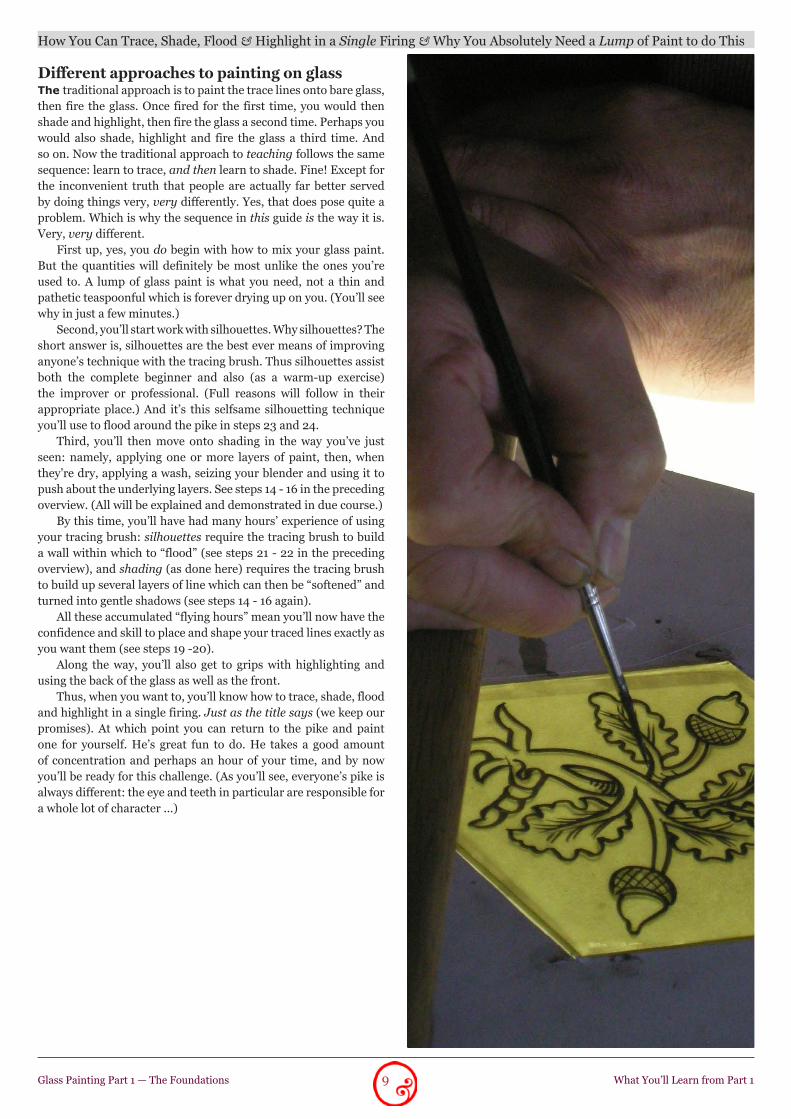
Different approaches to painting on glassThe traditional approach is to paint the trace lines onto bare glass, then fire the glass. Once fired for the first time, you would then shade and highlight, then fire the glass a second time. Perhaps you would also shade, highlight and fire the glass a third time. And so on. Now the traditional approach to teaching follows the same sequence: learn to trace, and then learn to shade. Fine! Except for the inconvenient truth that people are actually far better served by doing things very, very differently. Yes, that does pose quite a problem. Which is why the sequence in this guide is the way it is. Very, very different.
First up, yes, you do begin with how to mix your glass paint. But the quantities will definitely be most unlike the ones you’re used to. A lump of glass paint is what you need, not a thin and pathetic teaspoonful which is forever drying up on you. (You’ll see why in just a few minutes.)
Second, you’ll start work with silhouettes. Why silhouettes? The short answer is, silhouettes are the best ever means of improving anyone’s technique with the tracing brush. Thus silhouettes assist both the complete beginner and also (as a warm-up exercise) the improver or professional. (Full reasons will follow in their appropriate place.) And it’s this selfsame silhouetting technique you’ll use to flood around the pike in steps �3 and �4.
Third, you’ll then move onto shading in the way you’ve just seen: namely, applying one or more layers of paint, then, when they’re dry, applying a wash, seizing your blender and using it to push about the underlying layers. See steps 14 - 16 in the preceding overview. (All will be explained and demonstrated in due course.)
By this time, you’ll have had many hours’ experience of using your tracing brush: silhouettes require the tracing brush to build a wall within which to “flood” (see steps �1 - �� in the preceding overview), and shading (as done here) requires the tracing brush to build up several layers of line which can then be “softened” and turned into gentle shadows (see steps 14 - 16 again).
All these accumulated “flying hours” mean you’ll now have the confidence and skill to place and shape your traced lines exactly as you want them (see steps 19 -�0).
Along the way, you’ll also get to grips with highlighting and using the back of the glass as well as the front.
Thus, when you want to, you’ll know how to trace, shade, flood and highlight in a single firing. Just as the title says (we keep our promises). At which point you can return to the pike and paint one for yourself. He’s great fun to do. He takes a good amount of concentration and perhaps an hour of your time, and by now you’ll be ready for this challenge. (As you’ll see, everyone’s pike is always different: the eye and teeth in particular are responsible for a whole lot of character ...)

How You Can Trace, Shade, Flood & Highlight in a Single Firing & Why You Absolutely Need a Lump of Paint to do This
10Glass Painting Part 1 — The Classical Foundations How to Mix Paint and Manage Your Palette
2: How to Mix Paint and Manage Your Palette
How you mix and manage your paint is crucial to how well you paint on glass. The truth is when you mix your paint
properly and look after it on your palette, you’ll find it so much easier to paint glass beautifully. That’s precisely why you must learn about the technique that has been of such great help to our many students - yes, in just two days with us at our studio, we watch complete beginners learn to paint glass beautifully, and we know that this is due to two factors:
How they learn to mix their paintHow they learn to use their paletteWhen you too learn these skills, all the other techniques
– undercoating, copy-tracing, reinstating, softening etc. etc. – will be so much easier.
It is interesting to see how little attention is given to this subject in other “how to” books. Perhaps there’s a paragraph or two on mixing paint, but rarely more. There are various factors here:
“How you mix paint” is considered to be a preparatory subject, and everyone is eager to rush ahead and start painting
It takes determination to express what professional glass painters often do by instinct
On both counts, this section here on mixing paint is crucial to you and your glass painting projects. In fact, mixing paint is no more “preparatory” than your final brush stroke. This is because you experience the consequences of how you mix your paint throughout the whole time that you paint with it. Hence the importance of what follows.
Now, getting used to a new technique is often a strange experience. So it may actually be easier to follow our advice if you’re about to paint on glass for the very first time. By contrast, if you already paint on glass, you will almost certainly need to learn to do
1.�.
•
•
things differently, and this takes a lot of patience. Either way, we are absolutely certain that your patience will bear fruit. Therefore — beginner, improver or professional — try this technique for just one month. Adjust it gently to suit your own environment. Make it part of you. Our confident experience is that this technique will help you in a multitude of ways. We know this because of the feed-back that we’ve had from the hundreds of students who have worked with us at our studio, and also from the host of people all over the world who have used this very guide you’re reading now.
So now we’ll begin to explain this technique for mixing glass paint with water, taking things in this order:
The strategy behind the techniqueThe ingredients and equipmentThe technique in detailQuestions and answersSome wider-ranging thoughts and considerations about glass
paint and palette managementThere is a lot of information to give you here, so please always
remember this: if you mix your paint well and manage it properly on your palette, you’ll definitely find it easier to paint beautifully on glass. Remember, the brush is not a magic wand. It can only work with what is there already.
Also, remember, if we didn’t tell you what we’re going to tell you now, the later sections would be little more than “showing off”: it is unlikely you could copy the techniques for yourself because you wouldn’t have seen the vital steps. That’s precisely why we have devoted so many pages to the subject of mixing glass paint, gum Arabic and water. Others don’t, but we do, because we know it makes a huge difference. When you mix glass paint and use your palette as you see here, you can learn to control a whole range of consistencies, thus permitting you to paint layer upon layer and ... trace, shade, flood and highlight in a single firing. Which is why you need a lump of paint — not a teaspoonful and also why you must learn to manage it on your palette.
•••••

How You Can Trace, Shade, Flood & Highlight in a Single Firing & Why You Absolutely Need a Lump of Paint to do This
11Glass Painting Part 1 — The Classical Foundations How to Mix Paint and Manage Your Palette
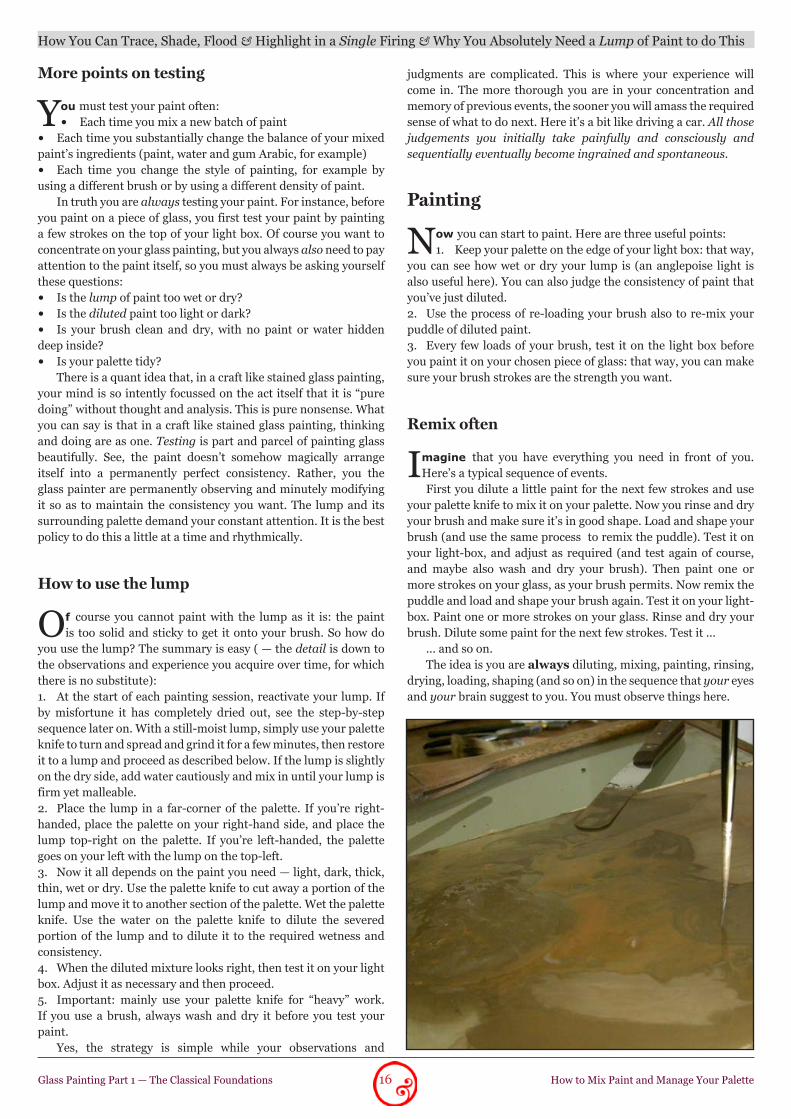
1. Strategy
Here is a photograph of our palette with mixed glass paint on it. Three features stand out.
The quantity of paint — it’s a lump (not a teaspoonful);The consistency of the paint — it is solid enough to hold itself
together in a firm, large mound. It is also wet and glistening;The palette is tidy.What you are looking at is well-mixed paint that is ready for
you to cut and dilute (a little at a time) to the consistency you need for the kind of painting / the kind of strokes (light or dark, thick or thin) you plan to do.
Which brings you to the benefit of painting with a lump of paint (not a teaspoonful) ...
Quantity
Many books tell you to paint with just a teaspoonful of paint. Our approach is different. When you paint with just a
teaspoon of paint, the water will evaporate quickly. This means you’ll forever be re-mixing and grinding. This is a waste of time. On the other hand, when you paint with a lump of paint like you see here, the water will evaporate more slowly. This means you won’t need to be grinding and mixing your paint every few minutes. This in turn means you can spend more time painting and also build up a steady rhythm of time spent painting and time spend managing your palette. (How often you’ll actually need to grind and mix your paint depends on the temperature where you are amongst other things.)
This is just one of many areas where you will find the advice we
1.�.
3.
give you is different from the advice you get elsewhere. But you’ll see for yourself how it works like a dream. The fact is, you’ll paint better if you learn to paint with a lump like the one you see above. It is indeed a false economy of time and money to paint with a small quantity of paint.
Consistency
When your lump of paint is firm and moist, you have a mixture that is actually too thick and concentrated to use
as it is. It would clog your brush. But this means you can dilute it a little at a time in order to get the consistency you require for the next few brush strokes. This has three benefits.
By diluting it a little at a time, the diluted paint has only a brief opportunity to dry out. This means you won’t waste it, and it will also be a quick job to keep it in perfect condition for the stage in hand (undercoating, copy-tracing, flooding and so forth);
You can make the paint light or dark, depending on what you need for a particular series of strokes;
You can make the paint runny or thick depending on your immediate needs.
This is why we recommend that you prepare and maintain a lump of paint that is firm and moist.
Tidy palette
When you keep your palette tidy, you’ll be able to paint better than you would with a messy palette. Remember: you’re
reading this guide because you want to know about glass painting,
1.
�.
3.

How You Can Trace, Shade, Flood & Highlight in a Single Firing & Why You Absolutely Need a Lump of Paint to do This
1�Glass Painting Part 1 — The Classical Foundations How to Mix Paint and Manage Your Palette
so, whatever your current working practice, definitely try this out: always keep your palette tidy. The point is, you must be in charge of your palette, not at its mercy. The best hand-to-eye coordination in the world, the finest brushes, and the loveliest glass – these things will be of little use if your palette isn’t properly organized. Therefore you need a firm lump of paint on a tidy palette. Manage your paint and palette well, and you will make it easier for yourself to paint beautifully on glass. Yes, tidiness may seem contrary to the myth of the titanic, passionate and self-expressive artist, so maybe the myth of untidiness is how the self-expressive artist keeps down the competition.
2. Equipment and ingredients
You will need water, glass paint, Gum Arabic, a teaspoon, a small porcelain bowl, a palette knife, a glass palette, a cover
for the glass paint, and various brushes. Always wear protective clothing, protective gloves and a mask as required. Always follow the manufacturer’s instructions.
Important: not all glass paints are equal
Not all makes of glass paint are suitable for making a lump as you see here. Indeed there are makes which don’t hold water
but which dissolve and spread across the palette like collapsing jelly fish on a sun-lit beach. They’re no use at all for your purposes. So if you understand the reasoning behind the approach — namely, a lump is the best shape to retain moisture; and you just dilute it a little at a time to make the consistency you require — then you also understand of seeking out a make of paint which holds water in the desired fashion. Anything else is a waste of time. It doesn’t matter if the chosen make costs more, for what’s the point of using a paint that doesn’t do what you want — isn’t that paint the costlier one? Nor does it matter if you already happen to have a packet, even a large one, of some other make; again, hang the expense — if it doesn’t do what you want, there’s no point.
Happily, there’s a perfect make that’s readily available either from the manufacturers themselves if you wish to buy in bulk; or in smaller quantities from a reliable world-wide supplier. The manufacturer is Reusche: specifically, tracing black (DE401) and bistre brown (DE40�). Reusche’s minimum line order is 8 ounces (��6 grams). The reliable world-wide supplier is PELI Glass Products who are based in the Netherlands and who will mail your order world-wide.
Please note this carefully: we don’t take commission for these
links. We simply provide you with information that has been useful to us. We are completely impartial except insofar as we have received excellent products and excellent service from both Reusche and PELI. We wouldn’t mention this except that so much seems to be paid sponsorship these days, and that’s not how we work.
3. Technique step-by-step
To help your understanding, you have three choices. You can read this set of instructions just below, and/or you can look
at the sequence of step-by-step photographs on the next three pages.
3. Technique
Just as most cooking recipes aren’t scientific and exact but require your discrimination, so too with these instructions.
“About” is close enough.Add about 3.5 ounces / 100 grams of glass paint to the bowl. If
you’re anxious about the quantities and currently just paint with a teaspoonful, you can halve these suggested quantities and gain confidence in that way.
Use your palette knife to make a well in the powder.Add a little under one level teaspoonful of liquid gum Arabic.Add some water and use the palette knife to mix together.
Caution: add water a little at a time. It’s always easy to add a bit more water (it’s far harder to judge the correct quantities when you need to add more glass paint and gum Arabic).
When you have a crumbly dustless mixture, use the palette knife to transfer it to the palette.
Once on the palette, spend a few minutes beating and grinding and scraping the paint.
Add more water very cautiously now to bring the mixture together into a homogeneous and controllable lump.
The best thing is then to cover and seal the lump and leave it overnight, then test and adjust it in the morning when the grains of glass paint have had good time to expand and settle.
In the morning, grind and slap the lump around again. If you’ve ever made bread from real dough, you will know there is a time when, with kneading, the dough comes together and loses its stickiness. It’s similar with (but not identical to) your lump of glass paint here. After some turning and agitation, your lump will cling differently to your palette knife, and then you are ready to start painting. (See later.)
1.
�.3.4.
5.
6.
7.
8.
9.

13
How You Can Trace, Shade, Flood & Highlight in a Single Firing & Why You Absolutely Need a Lump of Paint to do This
How to Mix Paint and Manage Your PaletteGlass Painting Part 1 — The Classical Foundations
1. Measure about 100 grams or 3 1/� ounces of glass paint into the mixing bowl
�A. For liquid gum Arabic, make a hole in the centre of the glass paint. Add a little less than one level teaspoonful of liquid gum Arabic. Now go to step 3
�B. For powdered gum Arabic, add about � grams of powdered gum Arabic: this is roughly 0.07 ounces or a bit less than half a level teaspoonful. Use your palette knife and mix glass paint and gum Arabic together thoroughly. Make a hole in the centre of the mixture
3. Pour a little water into the well. It is extremely important you don’t add too much. Start mixing the glass paint and water
4. Round and round you go with the palette knife, each time stirring a little more powder into the water

14
How You Can Trace, Shade, Flood & Highlight in a Single Firing & Why You Absolutely Need a Lump of Paint to do This
How to Mix Paint and Manage Your PaletteGlass Painting Part 1 — The Classical Foundations
6. All the powder has been absorbed
5. After a little while, the mixture gathers into a very thick paste. Keep on stirring and mixing 7. Collect the paste on your palette knife
8. Transfer the thick paste onto your glass palette. Use your palette knife to mix and grind the paint for as long as necessary: this depends on how coarse you glass paint is. At the very least, mix and grind your paste for several minutes
9. Here’s the mixed paint. Notice how the glass palette is tidy. This is possible because the paste is not runny: it doesn’t run all over the place. Just so: it is a lump of paint. It keeps its shape. If possible, cover the lump with a porcelain bowl, seal it with a mixture of water and paint, and leave it overnight to settle

15
How You Can Trace, Shade, Flood & Highlight in a Single Firing & Why You Absolutely Need a Lump of Paint to do This
How to Mix Paint and Manage Your PaletteGlass Painting Part 1 — The Classical Foundations
10. Now it’s time to test your paint: that is, to test whether there is a usable proportion of gum Arabic to water and glass paint. Take your hake. Dip it in water. Carefully mix it with a little of the lump. Note this: it is extremely important not to flood the palette with water — the lump must keep its shape
11. To test your paint, use the “softened lines” technique. First, paint a light undercoat. Second, trace some light lines. Third, strengthen the lines by tracing over them a second time.
1�. The final stage is to paint a light tone over these layers and to observe how easy / difficult it is to soften the traced lines into gentle shadows
13. This is the effect to aim for: it suits the style of painting described in this guide. 14. Another test: scratch some highlights. Observe how you easily can soften them. Also observe how easily the paint “bruises”: is the paint too fragile, just right or just plain immovable?
How You Can Trace, Shade, Flood & Highlight in a Single Firing & Why You Absolutely Need a Lump of Paint to do This
16Glass Painting Part 1 — The Classical Foundations How to Mix Paint and Manage Your Palette
More points on testing
You must test your paint often:Each time you mix a new batch of paint
Each time you substantially change the balance of your mixed paint’s ingredients (paint, water and gum Arabic, for example)
Each time you change the style of painting, for example by using a different brush or by using a different density of paint.
In truth you are always testing your paint. For instance, before you paint on a piece of glass, you first test your paint by painting a few strokes on the top of your light box. Of course you want to concentrate on your glass painting, but you always also need to pay attention to the paint itself, so you must always be asking yourself these questions:
Is the lump of paint too wet or dry? Is the diluted paint too light or dark?Is your brush clean and dry, with no paint or water hidden
deep inside? Is your palette tidy? There is a quant idea that, in a craft like stained glass painting,
your mind is so intently focussed on the act itself that it is “pure doing” without thought and analysis. This is pure nonsense. What you can say is that in a craft like stained glass painting, thinking and doing are as one. Testing is part and parcel of painting glass beautifully. See, the paint doesn’t somehow magically arrange itself into a permanently perfect consistency. Rather, you the glass painter are permanently observing and minutely modifying it so as to maintain the consistency you want. The lump and its surrounding palette demand your constant attention. It is the best policy to do this a little at a time and rhythmically.
How to use the lump
Of course you cannot paint with the lump as it is: the paint is too solid and sticky to get it onto your brush. So how do
you use the lump? The summary is easy ( — the detail is down to the observations and experience you acquire over time, for which there is no substitute):
At the start of each painting session, reactivate your lump. If by misfortune it has completely dried out, see the step-by-step sequence later on. With a still-moist lump, simply use your palette knife to turn and spread and grind it for a few minutes, then restore it to a lump and proceed as described below. If the lump is slightly on the dry side, add water cautiously and mix in until your lump is firm yet malleable.
Place the lump in a far-corner of the palette. If you’re right-handed, place the palette on your right-hand side, and place the lump top-right on the palette. If you’re left-handed, the palette goes on your left with the lump on the top-left.
Now it all depends on the paint you need — light, dark, thick, thin, wet or dry. Use the palette knife to cut away a portion of the lump and move it to another section of the palette. Wet the palette knife. Use the water on the palette knife to dilute the severed portion of the lump and to dilute it to the required wetness and consistency.
When the diluted mixture looks right, then test it on your light box. Adjust it as necessary and then proceed.
Important: mainly use your palette knife for “heavy” work. If you use a brush, always wash and dry it before you test your paint.
Yes, the strategy is simple while your observations and
••
•
•••
•
1.
�.
3.
4.
5.
judgments are complicated. This is where your experience will come in. The more thorough you are in your concentration and memory of previous events, the sooner you will amass the required sense of what to do next. Here it’s a bit like driving a car. All those judgements you initially take painfully and consciously and sequentially eventually become ingrained and spontaneous.
Painting
Now you can start to paint. Here are three useful points:Keep your palette on the edge of your light box: that way,
you can see how wet or dry your lump is (an anglepoise light is also useful here). You can also judge the consistency of paint that you’ve just diluted.
Use the process of re-loading your brush also to re-mix your puddle of diluted paint.
Every few loads of your brush, test it on the light box before you paint it on your chosen piece of glass: that way, you can make sure your brush strokes are the strength you want.
Remix often
Imagine that you have everything you need in front of you. Here’s a typical sequence of events.First you dilute a little paint for the next few strokes and use
your palette knife to mix it on your palette. Now you rinse and dry your brush and make sure it’s in good shape. Load and shape your brush (and use the same process to remix the puddle). Test it on your light-box, and adjust as required (and test again of course, and maybe also wash and dry your brush). Then paint one or more strokes on your glass, as your brush permits. Now remix the puddle and load and shape your brush again. Test it on your light-box. Paint one or more strokes on your glass. Rinse and dry your brush. Dilute some paint for the next few strokes. Test it ...
... and so on. The idea is you are always diluting, mixing, painting, rinsing,
drying, loading, shaping (and so on) in the sequence that your eyes and your brain suggest to you. You must observe things here.
1.
�.
3.

How You Can Trace, Shade, Flood & Highlight in a Single Firing & Why You Absolutely Need a Lump of Paint to do This
17Glass Painting Part 1 — The Classical Foundations How to Mix Paint and Manage Your Palette
Questions
“What does gum Arabic do and how much should I add?”
The main purpose of the gum Arabic is to help the paint to stick to the glass before you fire it. This is not required for all the
different glass painting techniques that there are: adhesion is not an absolute good in itself, and some glass painters don’t use gum Arabic at all. Therefore, the proportion of gum Arabic to water and glass paint depends on the style of painting that you intend to do. You will need to choose a style before you mix your paint.
The quantity of gum Arabic we suggest above is a good all-purpose quantity for the specified amount of paint and water. However, just as the amount of water will vary depending on the temperature and the brand of the paint itself (for example), so too the amount of gum will vary depending on the style of painting that you intend to do. At Williams & Byrne, we usually paint many layers of paint on top of one another in order to postpone for as long as possible the point at which the paint is permanently fixed by firing. This requires more than the bare minimum amount of gum Arabic; and the recipe we give you is the one that’s necessary for you to learn the style of painting described in this guide. In particular, it allows you to turn traced lines into softened shadows as you see in step 16 of the pike.
Now do be aware it is certainly possible to add too much gum Arabic. The more gum Arabic you add, the harder you will find it to shade as we suggest by turning traced lines into softened shadows. Also, highlighting can become difficult. For example, it will be difficult to use a scrub to soften a highlight that you’ve created with a sharp stick. Another consequence of too much gum Arabic is that, when you try to create a highlight by using a needle or stick, bits of dried paint will shatter away. Also, the more gum Arabic you add, the more likely it is that the glass paint will blister when you fire it in the kiln. This is especially dangerous when you are flooding and blocking in silhouettes as explained soon. So go easy on the gum Arabic. It’s simpler to add a few drops more than
to compensate for having added too much.
“Why do you prefer liquid gum Arabic?”
Gum Arabic comes as a liquid and a powder. We use it as a liquid. Other glass painters insist on using it as a powder. On
the face of it, it seems largely to be a question of what’s available or what you’re already used to: when you add gum Arabic, adding it as liquid means adding less other liquid (e.g. water) overall, whilst adding it as powder means adding more other liquid overall.
So what’s the real difference? In our experience, liquid gum Arabic is more easily absorbed
than powder. Also, it doesn’t need grinding. These qualities are particularly advantageous when you are
testing and adjusting a new lump of paint, and also when you are – as you will be – remixing an old lump of paint: we think that liquid gum Arabic is easier for making small and ongoing adjustments to the adhesive / binding property of your paint. You can literally add two drops, mix them in and immediately see the difference.
The situation is different with powdered gum Arabic. You must first grind and dissolve the powder in water on one side of your palette and then combine it in with the main body of your glass paint. We think this is more complicated than just adding a few more drops of liquid gum Arabic.

How You Can Trace, Shade, Flood & Highlight in a Single Firing & Why You Absolutely Need a Lump of Paint to do This
18Glass Painting Part 1 — The Classical Foundations How to Mix Paint and Manage Your Palette
“What colour glass paint do you use?”
When we are doing our own painting at Williams & Byrne (as opposed to the restoration and conservation work we do),
we use a mixture of tracing black and bistre brown from Reusche.We mix black with red paint roughly in the proportion 4 parts black to 1 part bistre brown. There are two reasons why we prefer this mixture to paint that is pure black:
While we are painting, we can see if the two colours are beginning to separate. They can separate either in the lump or in the diluted paint. If the coloured do separate, this tells us we need to mix them more. Having a mixture of glass paint thus serves as a useful visual reminder that we must constantly keep an eye on our paint.
When the mixture fires, we think the mixture adds warmth to the darkness of our lines and tones. Pure black on its own is just too black.
If you decide to use a mixture like ours, thoroughly mix the powders together before you add any liquid, but be careful not to stir up any dust. (A good way to do this is to place all the powder in a sealable container and shake it vigorously with its lid firmly on. Leave time for the dust to settle before you take the lid off.)
“How long do I need to grind and mix the paint?”
The time depends on the glass paint that you are using. Some paint is coarse and needs a lot of grinding, for example 15
minutes; other paint needs just a little grinding. Most of our glass paint from Reusche just needs to be ground for a few minutes, then left overnight as suggested, before use.
1.
�.
“How do I store glass paint overnight?”
To store glass paint overnight, take a natural sponge, wet it in water, squeeze it out, and place it on top of the paint. Cover
the paint with a bowl or jar that is made from glass or porcelain. (Metal is prone to rusting; plastic is too light.) Take your hake, dip it in water, and run it around the edge of the cover: when the water evaporates, the paint will form a seal. This will stick the cover to the palette. This means that less air will get to the paint. This will help to keep the paint moist (as will the sponge).
Note: always cover your paint when you aren’t using it for more than a few minutes. Uncovered paint will dry out more quickly than covered paint: this means you will need to mix it again and probably add more water or gum Arabic or both. Also, bits of dust or dirt may land in it.
“What other media can I use?”This guide describes how to mix glass paint with water. There are various reasons:
Its wide availability;The fact that it doesn’t create any health and safety issues over
and above those which already pertain to using glass paint;Painting with water-based glass paint can be considered a
foundational technique of glass painting. It’s been part of the glass painting repertoire in most parts of the world and at most times.
But you can also use other media than water; other media have different properties; other media are mixed and stored in different ways. Examples of other media are any of various oils: white vinegar: or turpentine. Each one of these media gives itself to different glass painting techniques. We ourselves especially use various oils. But – for the sake of clarity – different media have different health and safety implications. Some are toxic to the touch, some are harmful to breathe in, and some create a fire hazard; and so on. If you want to experiment, always use different equipment for different media, and always take the greatest possible precaution.
When you get interested in working with oil, there are two other guides you must read. The titles speak for themselves:
“Glass Painting Stage � - How You Can Use Oil to Shade Effortlessly and Leisurely and Still Do ALL Your Stained Glass Painting, Front and Back, in Just One Firing”
and also:“Glass Painting Stage 3 - Silver Stain: How to Trace, Blend,
Shade and Flood from a Reliable Batch that Lasts for Months”
“How do you fire your glass”
Every kiln is different. For example, each one heats at different rates, each one cools at different rates, each one circulates
air differently. And don’t be surprised to learn that “675 celsius / 1�50 Fahrenheit” in one kiln gets different results from the same reading in a different kiln. Mostly, these differences don’t matter. Just learn about other people’s schedules and then test them for yourself in your own kiln. You can download a free guide to our own firing schedules from the Guides page.
“What do I do when my lump of paint dries out?”See the step-by-step photos on the next page.
••
•

19
How You Can Trace, Shade, Flood & Highlight in a Single Firing & Why You Absolutely Need a Lump of Paint to do This
How to Mix Paint and Manage Your PaletteGlass Painting Part 1 — The Classical Foundations
Even when you cover and seal your glass paint as we describe, you’ll sometimes have to deal with a situation like this
1. Take your hake and wet it in water �. Lightly wet the whole surface of the palette
3. Don’t add too much water. Just add enough water to moisten the whole surface
4. Take your palette knife, scrape up all the dried paint, grind and disolve it
5. Cut into the dried lump of paint.
6. Cut and mix and grind 7. Keep cutting and grinding. Sometimes you’ll find you need to add more water
8. Once the lump is smooth, then you can remove any excess water
9. The palette is now tidy and fairly dry. Notice the paint is at one end
10. Choose your brush 11. Use the brush to carry water onto the palette - or use your palette knife if you need a lot
1�. Dilute a little of the lump with the water and make the puddle of paint into the consistency you need for the painting that you’re going to do
13. Wash and dry your brush. Then load it, test and adjust the paint as needed, and start to paint. Note this: the newsletter contains a free video on how to tidy your palette at the end of a painting session so this problem you see here is far less likely to occur. Make sure you’re signed up.

How You Can Trace, Shade, Flood & Highlight in a Single Firing & Why You Absolutely Need a Lump of Paint to do This
�0Glass Painting Part 1 — The Classical Foundations How to Mix Paint and Manage Your Palette
It all happens on your palette
Imagine you’re with us in our studio
You are standing in front of one of our work-benches, and we are standing on the other side. You are closely watching us.
We are working at a light-box, painting glass.What will you notice about the arrangement of our working
environment?
5 quick observationsYou’ll see the palette is on the same side as the hand we paint
with. This is so that we don’t travel with a loaded brush across the surface of the glass we’re painting – a small but important consideration, especially when you may spend hours working on a single piece.
You’ll see that we often place our palette on the edge of our light-box. It’s a balance between, on the one hand, using the light-box to assist our judgement about the consistency and density of the paint that’s on the palette; and, on the other hand, not allowing the palette to get over-heated. Sometimes, therefore, especially in full summer, we’ll put the palette on the work-bench, beside the light-box. Here, away from the heat, the paint will dry less quickly. And then we might well use an angle-poise to illuminate the palette from above. It’s essential you always do whatever’s necessary to observe and understand the paint on your palette - and good light, whether from beneath and/or above, is vital here.
You’ll see that our lump of glass paint is tidily situated towards one corner of the palette, away from us. The rest of the palette (roughly, the bottom two-thirds) is our “working-area” where we prepare and care for the glass paint that our brush is currently using. The working-area is therefore spacious, rather than cramped. And the working-area is tidy, yes, tidy: the whole palette must be kept tidy at all times. There will almost certainly be occasions when you think you must press ahead without sparing the time to tidy up. And things will usually go wrong. A tidy palette saves time and waste.
You’ll often see us cover our lump of glass paint with a small porcelain bowl or glass jar. This is while we’re painting - not just when we take a break. This cover serves two purposes. Firstly, it protects the lump from dust and other contaminants which can damage the paint or clog the brush. Secondly, it slows down the rate at which the lump dries out. This is a good idea, because it will take a lot of your time and energy to reconstitute dried paint.
You’ll often see us use our palette knife, for example to mix the glass paint or to sprinkle the lump with water. The blade of the palette knife is made of metal. It can therefore endure the kind of vigorous activity that would quickly ruin a brush. That’s why the
1.
�.
3.
4.
5.
palette knife is in our hands every few minutes. If you’re new to painting with a palette, it may come as a surprise how often you will use a palette knife. Be prepared to acquire this vital habit. The palette knife is one of your most useful tools for making perfect glass paint.
Abracadabra — now watch us paint stained glass!
And now look again and imagine that you are watching us as we paint the a stained glass face. Imagine this is a glass painting
demonstration just for you – a private lesson, one-to-one. Where will you cast your eyes? What will you watch?
Unfair as it is of us to make assumptions, here’s what we think you’ll do.
You’ll start off with fine intentions. So you’ll move your gaze from face to palette and back again, following our rhythm as we mix some paint, then load our brush, paint another stroke, then do more mixing, then paint again. And so forth, back and forth you’ll look between the palette where we mix our paint and the glass we’re painting.
But, after a few minutes, we think things will change. We think you’ll remain fixedly starring at the stained glass, watching the face as it appears, line by line and shadow by shadow. You’ll forget about the palette. The act of painting will exert a mesmerising effect on you. And this is perfectly understandable. You want to know how to paint stained glass. So of course you think that you must watch the glass we’re painting.
It’s useful here to imagine we are not teachers but fiendish magicians who want to deceive you. Imagine that we want you to look at the wrong thing (the glass we’re painting). Imagine that we want to distract you so that you will remain ignorant of the source of our magic – which is of course the palette.
“So now,” you hear us say, “just look at this amazing face as it takes shape. Don’t bother looking at our palette – what on earth could possibly interest you there? It’s wet and dark, and ugly, too! And our brush (such a fine brush, made exclusively for us in London) and our hands and eyes (we have such exquisite hand-eye co-ordination!) – these things are the real source of all our talent!”
And so, thinking like this – and falling for our sleight of hand – you might condemn yourself to ignorance.
Thankfully, this is not our wish for you.
The palette is where the real work is done
You will only succeed in glass painting when you understand the importance of the palette on which you mix and store your
paint. If there are problems on your palette, your brush will just
How You Can Trace, Shade, Flood & Highlight in a Single Firing & Why You Absolutely Need a Lump of Paint to do This
�1Glass Painting Part 1 — The Classical Foundations How to Mix Paint and Manage Your Palette
transfer these problems to your painted glass. This is because your brush depends on you to feed it. So, if you feed it dry paint, your stroke will exhaust itself half-way along a line. If you feed it sloppy paint, your stroke will run all over the place. If you feed it unmixed paint, your stroke will be whatever it will be – sometimes dark, sometimes light, and not at all what you want it to be. The trick is to observe and understand the paint on your palette, and to know how to transform it efficiently from one consistency and density to another. This transformation all happens on your palette, not in your brush. When everything is perfect on your palette, you simply use your brush to move the paint from palette to glass. The brush can’t transform paint; it only transfers it.
This is not to say it’s easy to use a brush. It’s just that you cannot use a brush to paint glass beautifully unless the paint on your palette is as it should be. Clearly you need the correct brush for a particular job. But the brush has no transformational, pseudo-magical powers of its own. None whatsoever: sludge on your palette will simply become sludge on your glass.
Therefore always – always - watch the palette.
The 2 fundamental laws of glass painting espionage
Always watch how other glass painters grind and prepare their glass paint;
Always observe closely how they use their palette.Note this: you’ll make many more new friends (and also keep
them) when you also pass on tips and techniques to other glass painters. For the sake of the craft, don’t keep things to yourself.
“What makes an excellent palette?”
Glass painters’ palettes are made from glass. Our own palettes are made from either toughened or laminated glass. They are
¼ inch / 5 mm thick. They are the size of this very sheet of paper: that is, a little larger than 8 inches by 11 inches / �10 mm by �90 mm. Our own palettes are sand-blasted on one surface: whilst we always use the smooth side when we’re painting, we sometimes use the sand-blasted side when we’re grinding and mixing paint. The sand-blasting also serves to diffract the light-box’s glare when we’re painting. Our palettes have bevelled edges to reduce the risk of accidental cuts.
You’ll understand from all this that you must have palettes which are solid, large and safe. You, as a glass painter, should no more accept a weak or small palette than a good cook would accept an ill-equipped kitchen. After all, the palette is where you prepare and look after your paint. Here, as everywhere else in glass painting, you must do things properly: never “make do” with anything less than the right tools and materials. The money you spend on new palettes like ours is money well spent. The return on your investment will last for years.
“How many palettes do I need?”
We ourselves have separate palettes for different media such as water and oil. We also have separate palettes for different
kinds of paint such as tracing paint and silver-stain — thus, all in all a dozen palettes. But it’s perfectly possible to clean the palette thoroughly before changing medium and/or paint. So there’s no need to over-stock on palettes. Get two or three good ones like
1.
�.
ours, and you’ll be fine. Then you don’t have to change palette each and every time you change paint or medium.
1 disaster and 5 mishaps on a palette
Here is a collection of things which can go wrong on your palette:
The lump collapses wetly and runs all over the palette (this is the disaster; sometimes you can recover from it, but it’s best never to allow the lump to collapse);
The lump dries out;Too much water in the working-area of the palette;Dried paint all over the working-area of the palette (this will
clog your brush);Working-area paint is too light/too dark (this is just part of the
minute-by-minute rhythm of being a glass painter);Working-area paint too thick/too thin (as above).Are you expecting full solutions to these problems right here
and now? All in good time, when other things are clear.
9 ways to use a palette knifeRemember how we said that you’ll often need to use your
palette knife? Here are some typical uses:Use it to keep your palette organized – this is much better than
using and abusing your brushes, which will only shorten their life and make them dirty
Use it to chop off small slices from your lump of glass paintUse it to push these slices into your palette’s working-areaUse it to add drops of water to these slicesUse it to grind and squash these slices into whatever consistency
of paint that you requireWhen this reservoir of working-area paint begins to dry, use
your palette knife to add more water and keep it workable Use it to scrape up dried paint and keep your palette tidyWhen you require a different consistency of paint, use your
palette knife to push aside the remains of previous reservoirAnd, occasionally, use it to moisten the top of your lump of
concentrated glass paint, so preventing it from drying out
Remember this
In real life, when painting glass, you are forever adjusting the consistency and density of glass paint in the working-area of
your palette. The process never stops. Even when you’ve prepared a sizeable dilution of perfect paint
within your working-area, you must forever re-adjust and re-mix it in order to keep it in perfect condition for the work in hand. That’s the bitter truth. Remember these wise words and you’ll be fine.
We shall finish by repeating this fundamental truth of glass painting:
What you do on your palette is essential to the success of your painting on stained glass.
And now to do some painting!
•
•••
•
•
1.
�.3.4.5.
6.
7.8.
9.

How You Can Trace, Shade, Flood & Highlight in a Single Firing & Why You Absolutely Need a Lump of Paint to do This
���� Silhouettes and What They Teach YouGlass Painting Stage 1 — The Foundations
3: Silhouettes and What They Teach You about Glass Painting
We began by showing you how to mix your paint. We began there because most other books neglect this essential
subject. They “explain” it in one or two paragraphs, as if mixing glass paint were self-evident and straight-forward. But we knew that we owed it to you to explain things properly right from the start. True, “mixing glass paint” doesn’t sound like an exciting subject, but that’s not the point. The point is to preserve the centuries-old tradition of glass painting. The tradition will otherwise become extinct. We think there’s a right way to mix your glass paint. And we know that well-mixed glass paint is essential to painting well on glass. That’s why we started there. And the general point is that, if you’re having problems painting on glass, you must always check your paint.
Now, in this chapter, we’re once again going to start in an unexpected place. We’re not doing it as the other books do it. The other books would say: “Take your tracing brush and paint the outline of this shape ...” What use is that? How does it explain what you should do? What we want to do is to show you how to use tracing brushes. We want to communicate the experience that we have when using them so that you can use them like we do, and with the same control. So this is what we’ve done: we’ve prepared a series of exercises that will develop your skills with a tracing brush. Silhouettes are the first exercise. You start with silhouettes. Then, in the next section, we’ll show you another exercise which will develop your painting skills by making gorgeous shadows. And by then we know you’ll be tracing better than ever you did before. So you’ll be more than ready for the pike and images like that..
Why start with silhouettes?
Silhouettes are a great way to improve your skill in painting with a tracing brush on glass. This is because, unlike the details
of a human face (for example), silhouettes are “forgiving”. That is, you generally don’t have to be absolutely exact: towards the end of the project, for example, you can usually correct a line if you dislike it. (This is not always the case with a painted smile, for example, or a painted eye.) And, all the time you practise painting silhouettes, you’ll be improving your hand-eye co-ordination, almost without realizing it. This means that the next time you come to use a tracing brush, you’ll have grown in confidence. And this confidence will mean better concentration. Better concentration in turn means
you have a better chance of tracing more fluently than you did before: you’ll have started to remove the anxiety about making the “perfect line” which is the graveyard of beautiful glass painting.
Yes, you indeed must paint the perfect line. That’s our ambition for you. And we’re sure you will. But do believe us: you’re unlikely to paint the perfect line if you’re anxious! Silhouettes can help remove anxiety: they can help you to feel absolutely calm about painting a fine and delicate line on glass.
It’s not just in this guide we start with silhouettes. We’re so certain of their capacity to enlarge people’s confidence and skill, we also start with silhouettes whenever we run glass painting courses at our design and glass painting studio in the lovely county of Shropshire. Yes, we ask our students to be patient with us (because they often want to start tracing straight away). But, after painting silhouettes for a day, their painting has improved a huge amount, and they are then ready to start painting shadows as we describe in the next section. So for now let’s just enjoy the calm experience of painting silhouettes.
It’s also important to say this section isn’t purely a means to an end. It is also an end in itself. For example, we designed and painted a stained glass window for the home of Kate Charles, the US crime writer. It depicts an angel in a medieval style, some bars of music with a special significance, their beloved dog and ... a silhouette of Kate herself and her husband. See left. And also look at the musical notes themselves. And the blocking in around and within the chain which leads up to the swinging thurible (incense burner). Lastly, remember also the blocking in around the pike? The fact is, this technique is essential to classical stained glass painting; it blocks off light completely, allowing light to punch through more strongly elsewhere.
What you will learn in this section
In this section, we’re going to show you many things:How to use the surface of your light box as a test area for the
brush-strokes that you paint on glass: this is such an important thing for you to know;
How to paint a light tone of paint that gives you an excellent surface on which you can accurately trace all kinds of designs (not just silhouettes): again, this is a practical and astonishing technique that can revolutionise how you paint on glass;
How to trace a light, dry, thin and graceful line: this takes practise, but we’ll help you to develop your skill;
How to strengthen this light, thin line to the darkness that you want;
How to fill specific areas with a thick layer of paint: we call this “flooding”. There’s a technique here that we’ll explain to you. As we said, once you’ve mastered it, there are many other times you’ll use it when you paint on glass;
How to use sticks and needles to sharpen wobbly lines and also to create highlights;
These are the main points we intend to explain. We think you’ll learn them more or less effortlessly by the process of painting silhouettes as we suggest. And now let’s start.
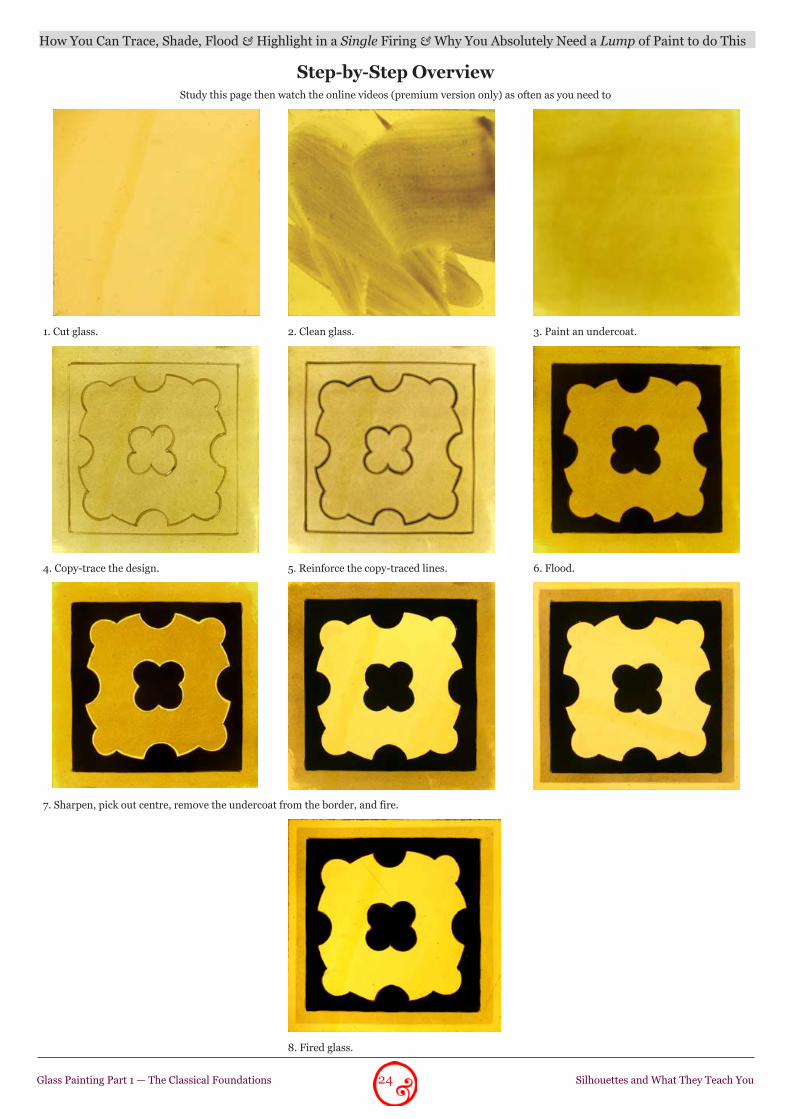
Overview
This is the sequence you’ll follow to paint a silhouette:Cut your glass to size;
Clean it thoroughly;
1.
�.
3.
4.
5.
6.
1.�.

How You Can Trace, Shade, Flood & Highlight in a Single Firing & Why You Absolutely Need a Lump of Paint to do This
�3�3 Silhouettes and What They Teach YouGlass Painting Stage 1 — The Foundations
Paint a light undercoat over the whole surface of the glass, then use a blender to smooth the surface of this undercoat before it dries;
Copy-trace a light fine outline of the silhouette;Strengthen the outline;Flood the outline;Pick out and sharpen the outline;Fire.Let’s consider the separate painting stages here.
Undercoat
Why paint an undercoat? The reason is, it primes the surface of the bare glass and makes it easier for you to trace. An
undercoat isn’t essential; it simply gives you more control.
Blend
Here, you want the undercoat to be as smooth as possible. (There may be other occasions where you don’t; but here you
do.) Even with practice and a good technique, it’s nearly impossible to apply the wet paint exactly as you want it to be. That’s why you use your blender – gently and quickly to adjust the wet paint into a smooth “canvas” on which to trace.
Copy-trace
Why paint an initial trace and then strengthen it? Why not paint it in one go? The answer is, sometimes you will
indeed be called upon to paint a traced line in one go. Most times, however, it’s easier to paint light, thin “sketch” lines with the glass on top of the design, and then, with the design on one side, to build up these sketch lines to the required width and density. It’s far easier to judge the required width and density without the design beneath the glass. You can then — when you strengthen the line (next stage) — really concentrate on the line itself.
Strengthen
Here, once the paint is dry, you’re looking to double up the darkness of the line. Please note: in this instance, make
the traced line darker, but do not make it thicker. (This is good training.)
Flood
Flooding is where you use dark, medium-thick paint to block off large areas of glass. In silhouettes, flooding is used to block
in a particular shape. But it’s also used on many other occasions when you paint stained glass. Stylistically, you rarely cut a piece of glass to the exact size of the painted object. The reason is, this would make the object appear cramped. Thus there is usually space between the outline of a head, for example, and the lead. Otherwise the head looks like it’s wearing a space helmet. So you usually leave a space that you then flood with paint. The next time you look at painted stained glass – in a church or in a book – see how often this is done.
3.
4.5.6.7.8.
For your own sake, you must learn how the same lump of glass paint can be diluted into different consistencies. The paint you make and use for flooding is as thick as it ever gets. So, once you know how to make it, you’ll have experienced the whole range from light to dark (the undercoat being the lightest). And, once you’ve had that experience, you’ll be ready to work on real examples of your own.
Pick out and sharpen
One of the useful characteristics of painting with glass paint that you fire in the kiln is that, until it’s fired, you often have
the means to adjust the work you’ve done. You add a little gum Arabic to make sure that the unfired glass paint isn’t excessively fragile. Then, at certain points before the glass is fired, you can take a wooden stick or a needle and scrape back unwanted paint. And then you fire your glass.
Conclusion
It’s a good idea to do your first silhouette carefully but quickly. If you like it, fire it in the kiln; if you don’t like it, rub it off and
start again. The point is, everyone paints better when they know where
they’re going. So, whilst you should always be as careful as possible, don’t be obsessive the first time you do this. Your mind will probably be more relaxed the second time, so your second silhouette will almost certainly be better.
Tools & materials you will need
You will need: The designs – you’ll find them at the end of this section;
Glass;Glass cutter;Glass paint mixed with water and gum Arabic;Glass palette, painting bridge/arm rest;Light-box;Palette knife;Jar of water;Hake, wide thick blender, tracing brushes;Sharp sticks and scrubs;Paper clothes to clean glass;Kiln and controller.
Essential
Do things like this:Study the step-by-step sequence on the next page.
If you have the premium version, also watch the online videos.
Then, on your light box — that is, don’t yet use a piece of glass for real — practice, practice, practice. If you do this 30 minutes a day for seven days, you’ll make incredible progress. You’ll generally feel so much more relaxed working on your light box. It’s such a good way to gain confidence and experience.
••••••••••••
1.�.
3.
�4
How You Can Trace, Shade, Flood & Highlight in a Single Firing & Why You Absolutely Need a Lump of Paint to do This
Silhouettes and What They Teach YouGlass Painting Part 1 — The Classical Foundations
Step-by-Step OverviewStudy this page then watch the online videos (premium version only) as often as you need to
1. Cut glass. �. Clean glass. 3. Paint an undercoat.
4. Copy-trace the design. 5. Reinforce the copy-traced lines. 6. Flood.
7. Sharpen, pick out centre, remove the undercoat from the border, and fire.
8. Fired glass.

How You Can Trace, Shade, Flood & Highlight in a Single Firing & Why You Absolutely Need a Lump of Paint to do This
�5�5 Silhouettes and What They Teach YouGlass Painting Stage 1 — The Foundations
Step-by-step technique
Cut and clean your glass
Use your glass cutter to cut some glass. Choose light glass rather than dark glass, especially the first time: you need to
be able to see through the glass to the design underneath. Once the glass is cut, make sure you roughen the edges of your glass. This lessens the likelihood that you’ll cut your fingers when handling it during painting. It can also extend the life of your brushes: sharp edges can remove their hairs!
Prepare your glass paint. If you’re using old paint, re-grind it thoroughly and re-test it. Remember these points:
If your glass paint is badly mixed, you won’t be able to paint as well as you can.
By contrast, well-mixed glass paint is a great step towards painting glass beautifully.
It’s difficult to paint with a small quantity of paint and water. That’s why we always use a “lump” of glass paint.
When painting silhouettes, you usually don’t need as much gum Arabic as with other types of painting. This is because you’ll be “flooding” paint to cover large areas of glass: too much gum is one factor that can make the paint blister when you fire it in the kiln. We say more about this at the end of this section.
Your glass must be absolutely clean. If there is any dirt or grease on it, the paint won’t go on smoothly.
The best way to clean glass is to clean it with glass paint: if the paint goes on smoothly, you know the glass is clean. So there’s generally no need to use detergent or window cleaner: just use glass paint. Here’s what you do.
Take your hake.Soak its tip in the jar of water to make it wet.Rub the hake around the side of your lump of paint so that
some of the lump of paint is diluted into the water. If you need more diluted paint, dip your hake in the water
again and repeat the previous step.
1.
�.
3.
4.
1.�.3.
4.
When you have enough diluted paint at the base of your lump, load your hake with paint and rub it vigorously over both sides of the glass and also along the sides.
Take a paper cloth and rub the wet paint to remove the paint from the glass.
Perhaps your paint goes on smoothly the very first time, suggesting that the glass is already clean: this is possible but unlikely.
Even if the paint goes on smoothly the very first time, it is sensible to repeat the process a second time.
Sometimes, if the glass is particularly dirty, you must repeat the process as many as five times or more. That doesn’t matter. It’s essential your glass is thoroughly clean: otherwise you can’t paint on it.
Always take as long as you need to clean your glass thoroughly all over.
Apply and blend the undercoat
Now apply the undercoat. This step gives you a lovely surface on your glass to paint on with your tracing brush in the next
step. It resembles what you do when you decorate a room: you first paint an undercoat. Just so here: you’re preparing the bare, shiny surface of the glass for all the painting that you’ll do afterwards. This light tone of paint will help you paint delicately with your tracing bushes.
The important thing — it is also the difficult thing — is to make this undercoat as light, dry and even as you possibly can.
Here’s why: when you come to paint the design, you will need to be able to see through the undercoat and the glass to the design underneath.
Here’s how you paint a light tone.Take your hake. It’s already wet from cleaning your glass, so its
hairs have already expanded to their full capacity (which is good: a dry brush can be difficult to paint with).
If you’ve already diluted enough paint, you can start painting straight away. If there’s no diluted paint left over from the previous step (when you cleaned your glass), dilute some more paint.
5.
6.
1.
�.

How You Can Trace, Shade, Flood & Highlight in a Single Firing & Why You Absolutely Need a Lump of Paint to do This
�6�6 Silhouettes and What They Teach YouGlass Painting Stage 1 — The Foundations
Load your hake with paint.How do you know the paint is the right lightness and consistency
for what you want to do? The answer’s simple: test it on your light box first.
This is a general principle of beautiful glass painting: test everything on your light box first. Everything!
Each time you dilute more paint by adding water to your lump of paint, test the mixture on your light box before you use it on your glass.
Each time you load your brush, test it on your light box before you paint on your glass.
This is important. Please do as we suggest. It will soon become “second nature” and instinctive. We’ll continue to repeat the point: always test everything on your light box first. It’s the best way to prevent yourself from spoiling a piece. So, on your light box, use your hake to paint two or three light, dry strokes with each stroke as close as possible to its neighbour.
You already understand why the strokes must be light: the purpose of this stage is to give you a better surface on which to paint the design which, in the next stage, you’ll place beneath the glass for copying. But why must the strokes be as dry as possible? Well, if the strokes are watery, the paint won’t have enough gum Arabic in it to stick to the glass. Another reason is that watery strokes are difficult to blend and make smooth. Up above are some watery
3.4.
Too watery for a good undercoat
strokes: you can tell they are watery, because of the dark patch on the right-hand side where the strokes finish. Therefore, keep testing and changing the consistency of your diluted paint until you get two or three light, dry, even strokes on your light-box.
Now take a blender.On your light-box – in order to rehearse what you will do when
you actually come to paint your glass – take your blender and blend the strokes until they are smooth. As you use your blender, observe how quickly the paint dries: this information is useful when you come to paint your glass. Also observe how the strokes react to your blender: consider whether there is anything about your strokes that you might change the next time. Now’s your chance to prevent problems from occurring.
If your diluted paint is too dark, take a paper towel and blot some up. Then use your hake to mix in a little bit more water, taking care not to remove any additional paint from your main lump of paint: the paint is already dark enough.
If your diluted paint is too watery, you’ve two options. First, you can take a paper towel and remove some paint. Second, you can shake your hake to get it dry, then load the front-half of it with paint. That is, don’t load the whole brush with paint: if you load the whole brush, the watery paint at the back will exert pressure on the paint at the front and will push it onto your glass in a potentially uncontrollable manner.
If your strokes are too dark (even though the diluted paint is light), wash your hake: it obviously contains a lot of hidden paint.
Having practised on the light box, you’ve now rehearsed exactly what you’re going to do: so now, do it for real:
Touch your glass. Is it cool or warm? Cool glass is easiest to paint on. If it’s warm, remove it from the light-box and wait until it’s cool.
Paint the two or three neighboring strokes that you’ve practised on your light box, making them as light, even and dry as possible.
Take your blender (if needed) and blend the strokes so that you can’t see where each one joins its neighbor.
When you’ve done this, don’t touch your glass again until the paint is absolutely dry.
If you touch the glass while the paint is still wet, your fingers may break the delicate surface tension of the drying paint and spoil its finish.
1.
�.
3.
4.

How You Can Trace, Shade, Flood & Highlight in a Single Firing & Why You Absolutely Need a Lump of Paint to do This
�7�7 Silhouettes and What They Teach YouGlass Painting Stage 1 — The Foundations
Copy-trace
Now is the time to place the glass on top of the design and “copy-trace” the outline of the silhouette as lightly and dryly
as possible.Here’s the strategy: when painting on glass, it is often best to
build up darkness gradually. But very few people realize that this is desirable (or possible). Many people think that, if a line is meant to be dark and heavy, they must paint a dark line in one go. It is true: sometimes you must. But usually it’s better not to do this.
Create darkness and depth in stages, not all at once. You have far more control like that. This is something we always do at our studio, whatever we are painting.
You should nearly always let paint dry completely before you paint over it a second / third / fourth time. If the paint is still drying when you touch it again with your brush, your brush will do several things. First, it will disturb the balance between water and gum Arabic. Second, it will prevent the drying paint from finding its own level. Both of these “interferences” can cause the paint to blister in the kiln. In our view, it is the fact of painting over wet paint — not the mere fact of painting over paint (which is what’s often claimed) — which is a main cause of blistering.
So use these two tips: try what we say, and decide for yourself.Here’s what you do:Check that the glass you’re going to paint is cool. If the glass
is warm, remove it from the light box and wait until it has cooled down.
Place the design on the light-box. Place the glass on top of the design.You need some light paint to work with: as needed, use your
palette knife or tracing brush to transfer a little water onto your palette and mix into it some paint from your lump.
As needed, clean and dry your tracing brush. It must not be dirty or excessively wet.
Swirl its tip around in the paint for several moments: Test this paint on your light box: here, you should test it
on the tests that are left over from the previous stage. If you’ve cleaned them off, just make some more. What you always want is for your test area on your light box to resemble the state of your glass as closely as possible. That way, your tests are as accurate as possible.
Begin to trace the outline lightly.Each time you load your brush, first re-mix the paint, then test
it on your light box before you paint on your glass.Another reason for testing paint on the light box before you use
it on your glass is that this helps to get the paint flowing from your
1.
�.3.4.
5.
6.7.
8.9.
brush. Sometimes the paint flows too quickly: in that case, it’s just as well you tested it on your light box rather than rushing ahead and painting on your glass!
Use the side of your painting bridge to steady and guide your hand when you need to paint straight lines:
If you want to, it’s OK to paint straight lines from one edge of the glass to the other. This is because you can use a scrub and remove the excess later.
Move the design and glass around to suit you. Never get yourself into a position where you feel cramped. You are in control of things here, so make yourself comfortable.
There’s no hurry: it’s important to enjoy what you’re doing.When you’ve finished, let the paint dry thoroughly and put the design on one side where you can see it if you need to.You see below the kind of light, fine stroke you’re aiming for. Slight unevenness doesn’t matter, nor particularly do “brush-joins”. When you strengthen these lines (next stage), most if not all of these superficial errors will disappear. (And remember there’s still the flooding to be done.)

How You Can Trace, Shade, Flood & Highlight in a Single Firing & Why You Absolutely Need a Lump of Paint to do This
�8�8 Silhouettes and What They Teach YouGlass Painting Stage 1 — The Foundations
Strengthen
Now you paint over your lines again to make them medium-dark. Why do you do this? The answer is, What you’re doing
here is building a “wall” of paint that will provide the boundaries to the flooding that you’ll do in the next stage. If your outline is too light, the flood of paint will pour over it. But, if the line is too dark, it’ll rise above the flood of paint and look ugly.
A medium-dark line will blend perfectly with the flooded paint, and your silhouette will look graceful.
We can’t judge for you whether your second outline needs to be stronger or weaker than your first, or even just the same: you must observe things for yourself.
If you first outline was particularly light, you can do a stronger second outline. If your first outline was rather heavy, do a light one now.
So why not paint the outline in one go? The answer is, as we said before, it’s difficult and unnecessary to paint it in one go.
It’s difficult to control a tracing brush that has a lot of dark paint in it.
Also, the ability to trace lightly and then reinforce a line with different depths of tone is a marvellous skill for you to learn and value in all the glass painting that you’ll do.
Therefore, although you could build up the wall of paint in just
one go, we don’t want you to! We want you to learn the blessing of how to trace lightly and how to strengthen.
It’s important to keep the line as thin as it was before: don’t thicken it now.
Here’s what you do:Put the design on one side so that you can look at it when you
want to. Do what you did before when you lightly traced the outline,
but remember that the outcome of this stage is a medium-dark outline. Not a dark one. Not a thicker one.
Remember always to use your light box as a test area for all the painting that you do. That is, on your light box you need an area of paint that mimics your glass: a light, dry and even tone of paint with some light, dry and even trace lines on it. If you’ve no such area, make one now. It doesn’t matter that this takes time: it’s what has to be done!
Now strengthen the light outline that you made before, testing each stroke on the light box before you paint it on your glass.
When you’ve finished strengthening the copy-traced outline, let the paint dry thoroughly.
1.
�.
3.
4.
5.

How You Can Trace, Shade, Flood & Highlight in a Single Firing & Why You Absolutely Need a Lump of Paint to do This
�9�9 Silhouettes and What They Teach YouGlass Painting Stage 1 — The Foundations
Flooding
Now you’ll use a tracing brush to “pour” thick paint within the boundaries of your outline: This is unlike other uses that you
make of your tracing brush: in this stage, your brush is really just the means of carrying large quantities of thick dark paint from your palette to your glass. And you scarcely use your tracing brush to shape the paint: the paint should just pour off your brush with minimum intervention from you. Eventually the paint will just stop at the outline you’ve created in the previous two steps. Here’s what you do:
Use your palette knife to cut away some slices from the lump.Places these slices well away from the lump.Use the palette knife or a brush to transfer some water, a little
at a time, to the slices.Use the palette knife to grind and squash the slices into the
water until you end up with a thick and slightly runny liquid.You need a large quantity of thick paint which has something
like consistency of melted runny chocolate. This is how you test the paint for thickness. Load your brush. Go to the test area of your light-box. Hold your brush vertically. Bring it down so that the tip of your brush just begins to touch the surface of your light
1.�.3.
4.
5.
box. What you want to happen is for the paint to FLOW from your brush: your paint should flow downwards to cover a small circle with NO EFFORT on your part. If your paint flows like this, your paint is good for flooding. But, if the paint gushes down (rather than flows) and begins to separate, it’s too thin. If it doesn’t flow at all from your brush, it’s too thick.
Once the initial flow has happened — this flow lasts for perhaps five or six seconds — return to the palette, load up with some more paint, and use your tracing brush to transfer it to your glass. You must reload your brush frequently. The tip of your brush goes down when you arrive with a fresh lot of paint, then goes up when you leave three seconds later to get more paint: it goes “load with paint-down-1-2-3-4-5-6-up-load with more paint” and so on. This is the secret of smoothly flooded paint. While you brush is flooding paint onto the glass, keep it down: don’t go up and down! – That will stop the surface of the paint from being smooth.
It follows that you’ll use a lot of paint. So what you always need to be doing is adding more water to the top of the lump and letting it flow down while you paint. Then, when you come to load your brush again, you must always remix the puddle at the bottom so that the paint which has newly descended is perfectly incorporated with the diluted paint that remained from earlier. Just keep reminding yourself to reload your brush every few seconds, and, every few loads, to replenish the water that flows down the sides of your lump of paint.
Since the consistency of the paint is such that it simply falls off your tracing brush, don’t use a newly loaded tracing brush too close to the outline itself (the paint might otherwise flow over the boundary).
When you’ve flooded the outline, let the paint dry thoroughly. This will take at least 30 minutes under normal conditions.
Never touch the paint once it has left your brush. Wait until it is dry.
You absolutely must resist the temptation to shape the paint: just let it stop where it chooses to. Never “play” with it or push it around.
Leave the glass lying flat until it is completely dry. Otherwise the paint will run.
6.
7.
8.
9.

How You Can Trace, Shade, Flood & Highlight in a Single Firing & Why You Absolutely Need a Lump of Paint to do This
3030 Silhouettes and What They Teach YouGlass Painting Stage 1 — The Foundations
Tidying up
Now you’re going to clean off some of the undercoat that you applied at the very beginning. The main reason why we’re
doing this is to increase the contrast between the clarity of the clean and shining glass and the darkness of the silhouette. It’s a question of style and choice, not necessity: you don’t always have to do this. When you do another silhouette, you can try something different e.g. rubbing the tone to give it texture. You need sticks, needles and scrubs.
Take a sharp stick or needle. Hold it firmly and carefully. With your hand resting comfortably on your painting bridge
(this is so that you don’t damage the painting that you’ve already done), use the stick or needle to cut through the light paint which is right at the edge of the area that you’ve just flooded. At this stage, you can correct a wobbly line: a little at a time, use your stick or
1.�.
needle to carve back the dark paint until it has the appearance that you want.
Continue until you have picked round your flooding.When you’ve done this, take a small scrub and brush the paint
away from the line you’ve just picked out. Do this carefully so as not to breathe in any of the dust (which can be dangerous).
Now take a larger scrub and clean up the rest of the light tone.Hold your silhouette up to the light and have a good look at it.You can use a stick to continue to sharpen any lines you don’t
like, and you can use your scrub to remove any little bits of the tone of paint that still remain.
The last step is to take a scrub and clean the paint away from the edge of the glass.
Be careful not to cut your fingers on the edge of the glass.
3.4.
5.6.7.
8.

How You Can Trace, Shade, Flood & Highlight in a Single Firing & Why You Absolutely Need a Lump of Paint to do This
3131 Silhouettes and What They Teach YouGlass Painting Stage 1 — The Foundations
Fire your glass
Because paint has been applied thickly, we would sometimes use a slower firing schedule which allows the paint to dry
thoroughly before moving up to a top temperature that is itself slightly lower than usual. Please refer to the suggested firing schedules to see what we do.
Blisters!
The biggest risk when painting silhouettes is blistering: your fired paint looks full of ugly bubbles.
There are three main causes:Too much gum Arabic in the paint.Incorrect flooding.Firing schedule too fast or too hot.Read on ...
Too much gum Arabic
There are some styles of glass painting which almost demand gum Arabic: for example, when you are painting many coats
of light paint on top of one another (as we will show you how to do in our other guides). Without the gum Arabic, the layers will blur into one another. But there are other styles which don’t need gum Arabic at all or don’t need much. Silhouettes don’t need much gum Arabic. When painting silhouettes, it is better to use too little gum Arabic than too much. If there is too little, perhaps the worst thing that can happen is that your hand might accidentally rub some paint away.
On the other hand, if there’s too much gum Arabic, your paint will probably blister. If you think your paint has too much gum Arabic, you’ll need to add more paint and water in order to change the proportions. Here are’s a test to see if there’s “too much” gum Arabic in your paint. Paint a series of light stripes on your light-box, and use your blender to blend them smooth. When the stripes are dry, rub them with the ball of your thumb or with a fingertip (taking care not to breath in any dust). If it’s difficult to remove any paint from your light-box, there’s probably too much gum Arabic in your mixture.
Incorrect flooding
In our experience, this is the main cause of blistering. To repeat a point we made before: when you flood, you use your tracing
brush in a different way than you usually would. In a sense, you’re not painting at all. You’re using your brush to move thick paint between the palette and the glass. There are three areas in particular where the technique needs special attention.
The thick diluted paint on the glass palette must be constantly mixed every time you load your brush.
The paint must simply pour from your brush onto the glass. If it doesn’t, it’s the wrong consistency.
You must not push the paint around once it has left your brush: it must find its own balance.
To test these three points, load your brush with paint and flood some paint onto a piece of glass. Then load your brush again and enlarge the flooded area. Now do this a third time. Let the paint
1.�.3.
1.
�.
3.
dry. Then hold the glass up to the daylight and move it around so that you can inspect the surface of the flooded paint: inspect how smooth or rough is the surface of the dried paint. Some joins are inevitable. But the surface of the paint must not look rough. If it looks rough, it is probable the paint will blister. If it looks rough, we think that you need to pay attention to one or all of the three points above.
Mix the paint each time you load your brush, let the paint pour from your brush, and don’t push it around at all.
Above is an image of some rough paint: when this is fired, it will blister. This is because the paint has not been allowed to flow by itself; the paint has been pushed:
Below is an image of some unfired paint that has been allowed to flow by itself.

How You Can Trace, Shade, Flood & Highlight in a Single Firing & Why You Absolutely Need a Lump of Paint to do This
3�3� Silhouettes and What They Teach YouGlass Painting Stage 1 — The Foundations
Firing schedule too fast
Ensure the paint is given a good long “soak” to dry it out thoroughly at about 100o Celsius / �10o Fahrenheit before
progressing to your chosen top temperature. Also ensure the kiln does not get hotter than about 660o Celsius / 1��0o Fahrenheit.
Conclusion
Here are the important points to remember:Don’t trace on bare glass unless it’s absolutely necessary:
always paint an undercoat. This will give you a lovely surface on which to use your tracing brushes.
Make this undercoat as light, dry and even as possible.Don’t touch the undercoat until it is perfectly dry.Test everything on your light-box first. Make sure that what
you have on your light-box is the same as what you have on your glass: that way your light-box can provide you with an excellent place to practice calmly.
When you trace, it’s usually a good idea to build up a medium- dark line in several layers: there’s often no need to trace a line in just one go. (And remember that the undercoat will contribute to the line’s darkness.)
Make sure each layer of paint is dry before you paint over it again.
1.
�.3.4.
5.
6.
When you flood paint over an area of glass, don’t “play” with the paint: let it fall from the brush and let it flow where it flows.
When you flood paint, load your brush frequently: much better too frequently than too rarely. By doing this, you’ll find it easier to let the paint flow by itself.
Silhouettes make lovely decorations. More importantly, though, the skills you need will always be useful when you paint on glass. So it’s a good idea to start each day’s painting with a simple and enjoyable silhouette: it’s a great warm-up. And when you’re warmed up, just check out this magnificent silhouetted beast below.
7.
8.

How You Can Trace, Shade, Flood & Highlight in a Single Firing & Why You Absolutely Need a Lump of Paint to do This
3333 Silhouettes and What They Teach YouGlass Painting Stage 1 — The Foundations
How You Can Trace, Shade, Flood & Highlight in a Single Firing & Why You Absolutely Need a Lump of Paint to do This
3434 Silhouettes and What They Teach YouGlass Painting Stage 1 — The Foundations

How You Can Trace, Shade, Flood & Highlight in a Single Firing & Why You Absolutely Need a Lump of Paint to do This
Softened Lines, or “How to Shade before You Trace”Glass Painting Part 1 — The Classical Foundations35
4: Softened Lines, or “How to Shade before You Trace”
In this section, you’ll discover an extraordinary technique that is worth its weight in gold: you’re going to learn all about a
marvellous way of creating shadows. Why is this important? We all know the expression that nature abhors a vacuum. But in fact there’s something that nature abhors more than a vacuum. Namely, an outline. Outlines don’t exist; shadows do. So you’re going to learn how you can change a harsh outline like the one top-left into a soft, gentle, lovely shadow like the one top-right:
When you use this technique, your painting will enter a completely different dimension because you’ll develop the skill and confidence to explore new territories. We’re excited to be showing you this technique: we haven’t seen it illustrated in any of the many books we’ve read, yet we know that it will make such a huge difference to how you paint on glass.
As with the earlier section on silhouettes, this technique is important in itself: you’ll suddenly see how to do many new things with shadows and shading. – And many of you, we know (because you’ve told us), find it hard to shade. Shading is difficult. But this technique will help. – Yet the technique is also important for another reason: namely, you’ll find that it will also improve your skill in painting with a tracing brush. Here’s why.
When you soften a line as we’ll show you how, the line changes. It moves, grows larger, and becomes lighter. The line you first painted becomes something altogether different. Therefore, you can relax a little with the line you paint right at the beginning. This initial line isn’t going to stay like that: you’re going to soften it. So you’ll be able to practice a lot with your tracing brush without getting too anxious about whether the line is exactly where you want it to be. This in turn will help to give you fluency. And fluency is as important as accuracy when it comes to painting beautifully on glass. Accuracy is important but it isn’t everything. Lines can be accurate and ugly. Fluency makes a lot of difference, because lines which are accurate and fluent are also beautiful.
This technique of softened lines will help with fluency; and, by practising it, you’ll also begin to acquire the confidence and skill which alone can make you accurate. You’re then well on your way to understanding how to paint glass beautifully. That’s why we’re excited to show you this technique. Like the first section on mixing glass paint, it’s actually one of those techniques that are generally kept secret. Don’t ask us why. Explanations don’t matter. What matters is that the techniques continue to get handed down. That’s what we’re writing down what we know and answering your questions.
What you will learn in this section
There are two new points we cover in this section:How to change a thin dark line into a wide, gentle
shadow;How to reinforce this shadow selectively so as to create a lovely
range of tone from lightest shadow to darkest shadow.In visual terms, we’re going to explain how to create shadows
1.
�.
like these which we painted in our stained glass dove (right).There’s also an important piece of theory that we’ll introduce
you to: the sequence in which you decide to paint your lines. That is, which lines come first when you are painting a design? You’ll need all the skills we’ve shown you in the previous sections. This doesn’t mean you need to be an expert in them yet: on the contrary, what you learn in this chapter will improve what you learnt earlier. But we won’t repeat the points that we’ve explained before.
Tools & materials you need
You need:The design - this is at the end of the section
Glass and glass cutterGlass paint mixed with water and gum ArabicGlass palettePainting bridge/arm restLight-boxPalette knifeJar of waterA hake, a badger blender, and tracing brushes of various sizesSharp pointed sticks and needles ScrubsPaper towels to clean your glassKiln
Overview
There are two main parts in this section: exercises (two of them) and practical designs. The purpose of the exercises is
to bring you to understand exactly what’s involved in painting the design. In the first of the two exercises, you’ll use a large tracing brush to make large shadows. In the second exercise, you’ll use a small tracing brush to make delicate shadows. By then you will understand the techniques you need to paint the practical designs that follow.
•••••••••••••

How You Can Trace, Shade, Flood & Highlight in a Single Firing & Why You Absolutely Need a Lump of Paint to do This
Softened Lines, or “How to Shade before You Trace”Glass Painting Part 1 — The Classical Foundations36
First exercise
All this takes place on your light box. Make sure your lump of glass paint is in good order and that your palette is tidy. Use
your hake plus some glass paint to clean and prepare the centre section of your light box. This is where you will paint.
Take your large tracing brush. If you haven’t used it for a while, soak it in water, then let it rest horizontally on your light box for several minutes. When it has had a good chance to absorb the water, flick it several times until it is dry.
As needed, take your palette knife and cut away a small piece from the lump. Grind and crush it, and add a little water, then grind and crush again. You need a medium tone that is similar to the paint you used for copy-tracing in the previous section.
Load and shape the brush. The aim is to paint a good wide line. Therefore you must flatten the brush against the palette until it broadens out to the width you want.
Paint two slow, straight, broad strokes on the chosen area of your light box. Let them dry.
Once the stroke are completely dry, take your hake. Prepare some paint that is similar to the kind of paint you used to apply an undercoat in section 3. Load and shape your hake. Now, lightly and deliberately, apply a band of tone on top of the lines you painted earlier.
Now wait a few seconds. This to allow the water to soften the gum Arabic in the strokes themselves.
Pick up your badger blender. Use your blender to push the lines this way and that, left and right, up and down, down and up, right and left: whatever direction it takes to change the lines into lovely gentle shadows.
Note this: you don’t have much time. You can only blend while the top coat is still wet. And each stroke of the blender dries the top coat a little bit more. So maybe you have time and moisture enough for four or five sweeps of your blender. Maybe fewer than that. Therefore every stroke must count, especially the first one. With the first stroke of your blender, you must really get the paint moving. Of course, if you hit too hard with your blender, you risk destroying the line completely. But then if you are too timid and gentle, you won’t get the line moving before the paint dries. This is all down to experience. You need to practice and practice. Do this 10 or �0 times a day for several days. It’s similar to how a musician will practice scales and arpeggios — and why shouldn’t glass painters also have their own equivalent?
Once you feel yourself becoming confident with the basic exercise, there are several variations you can practice, such as painting several lines about a centimeter apart from one another; such as painting curved lines; such as painting a circle or a zig-zag or a spiral. Not all of these will work. That is fine. This is all part of your gaining experience and understanding of where this technique of softening can be successfully used.
Paint two straight strokes and let them dry
Use your hake to paint an “undercoat” on top of them
So ... and now wait a few seconds for the water to “bite”
Take your badger blender and blend this way and that
Aim to transform the harsh strokes into softened lines like these ones here
A well-shaped number 6 tracing brush made for Williams & Byrne and PELI Glass by A.S. Handover of London

How You Can Trace, Shade, Flood & Highlight in a Single Firing & Why You Absolutely Need a Lump of Paint to do This
Softened Lines, or “How to Shade before You Trace”Glass Painting Part 1 — The Classical Foundations37
Second exercise
This time use your hake and start with an undercoat. So on your light box, paint two strokes right next to one another,
then, as needed, use your badger blender to blend them smooth. Stop blending before the undercoat begins to dry.
Take a fine tracing brush — a number 1 or the equivalent; the kind you used to copy-trace and strengthen the silhouettes — and paint a single straight line. Let this dry.
When it’s dry, strengthen it.When the strengthened line is dry, prepare some paint that is
similar to the paint you used for the undercoat. Load and shape your hake. Lightly and confidently, repeat the strokes you made for your undercoat.
Wait a few seconds.Take your blender. As in the exercise before this one, the
purpose is to turn these traced lines into gentle shadows. As before, if your blender destroys the traced lines altogether, maybe the traced lines weren’t strong enough, maybe they weren’t completely dry before you painted over them, maybe you were too vigourous with your blending, or maybe there is not enough gum Arabic in your glass paint. If on the other hand your blender can’t shift the traced lines at all, maybe they are too strong, or maybe you are blending too delicately, or maybe there is too much gum Arabic in your paint. Only you can solve these problems. Everyone faces them. As you observe, analyse, conclude and test, you gradually acquire experience and skill which in time mounts up to give you the confidence and ability to paint glass beautifully.
When you’re ready, it’s time for a real bit of glass painting. As with the silhouette, your first time through the whole sequence will help to give you your bearings. The second and third time through, you will know exactly what it is you’re doing, and consequently you will soon start to improve. The main thing is practice and concentration. Every glass painter must practice and concentrate. There is no other way.
Prepare the hake
Paint an undercoat and blend it smooth
Load and shape the tracing brush (size �)
Paint two straight lines and let them dry
Strengthen the two lines
Paint another “undercoat”, wait, then blend ...
... and soften the lines.

38
How You Can Trace, Shade, Flood & Highlight in a Single Firing & Why You Absolutely Need a Lump of Paint to do This
Glass Painting Part 1 — The Classical Foundations Softened Lines, or “How to Shade before You Trace”
Step-by-Step Overview
1. Clean glass. �. Undercoat. 3. Copy-trace.
4. Strengthen. 5. Soften. 8. Reinforce.
9. Minor details. 10. Copy-trace. 11. Strengthen.
1�. Flood. 13. Highlight and soften. 14. Fire.

39
How You Can Trace, Shade, Flood & Highlight in a Single Firing & Why You Absolutely Need a Lump of Paint to do This
Glass Painting Part 1 — The Classical Foundations Softened Lines, or “How to Shade before You Trace”
1. Cut and clean the glass. We use glass paint to clean the glass (above).
�. Prepare some glass paint that is suitable for an undercoat. (See Chapter �.) Test it on your light box before you use it on your glass.
3. Also test the paint by blending it: can you make it smooth? Adjust the paint as needed.
4. Load your haik/wide brush. Paint broad light stripes over the whole surface of the glass.
5. The glass looks like this. 6. While the paint is still wet, take your blender and smooth the stripes so that they blend with one another.
7. Let the undercoat dry. 8. Place the glass on top of the design. 9. Prepare some paint that is suitable for copy-tracing. Test it on your light box first: test it on the undercoat that is there from earlier. Adjust the paint as necessary.
10. Copy-trace the main lines. You omit the minor lines because you do not want to soften them (see photos �1 — �7).
11. Your brush strokes are light and dry. 1�. Your brush strokes are also thin.

40
How You Can Trace, Shade, Flood & Highlight in a Single Firing & Why You Absolutely Need a Lump of Paint to do This
Glass Painting Part 1 — The Classical Foundations Softened Lines, or “How to Shade before You Trace”
14. Mix and test some paint for strengthening the main lines.
13. Here you see how we have copy-traced the main lines. 15. Put the design on one side.
16. Strengthen the main lines by painting over them a second time.
17. Move the glass so that you are always in a comfortable position to paint.
18. Observe the test patch on the light box: use your test patch often.
19. Do you see how we’re using it? �0. We’ve now strengthened the main lines by painting over them a second time.
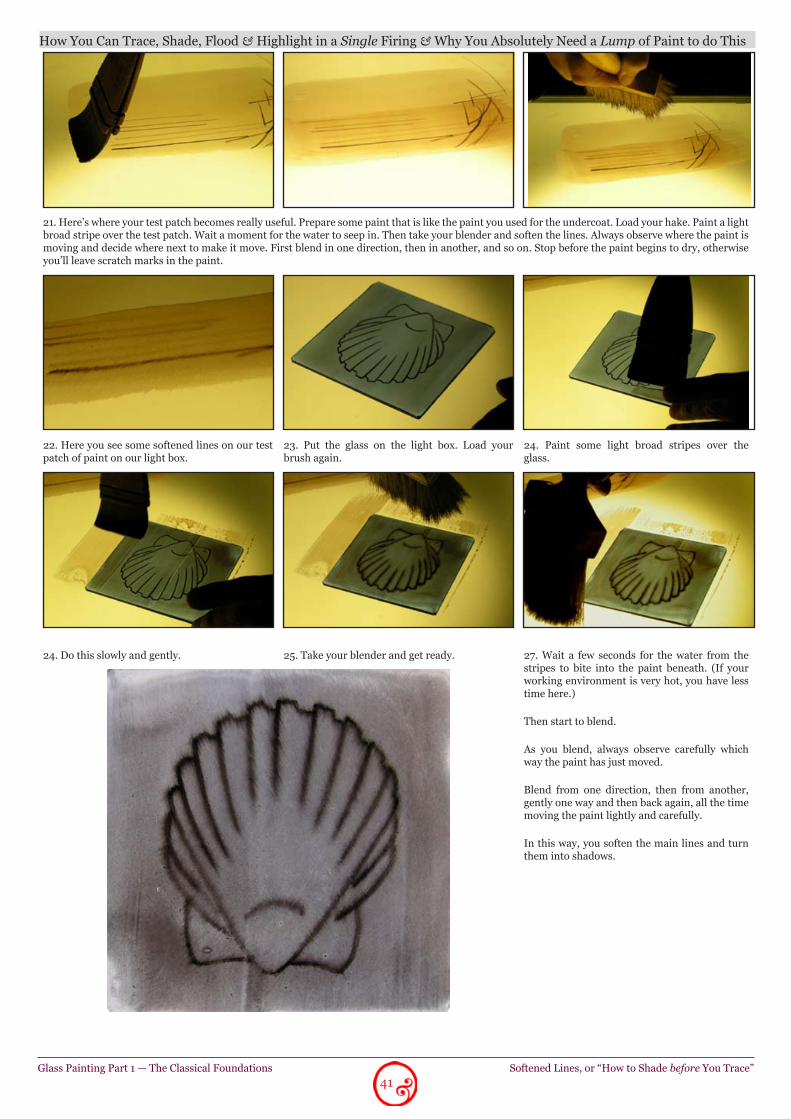
41
How You Can Trace, Shade, Flood & Highlight in a Single Firing & Why You Absolutely Need a Lump of Paint to do This
Glass Painting Part 1 — The Classical Foundations Softened Lines, or “How to Shade before You Trace”
�1. Here’s where your test patch becomes really useful. Prepare some paint that is like the paint you used for the undercoat. Load your hake. Paint a light broad stripe over the test patch. Wait a moment for the water to seep in. Then take your blender and soften the lines. Always observe where the paint is moving and decide where next to make it move. First blend in one direction, then in another, and so on. Stop before the paint begins to dry, otherwise you’ll leave scratch marks in the paint.
��. Here you see some softened lines on our test patch of paint on our light box.
�3. Put the glass on the light box. Load your brush again.
�4. Paint some light broad stripes over the glass.
�4. Do this slowly and gently. �5. Take your blender and get ready. �7. Wait a few seconds for the water from the stripes to bite into the paint beneath. (If your working environment is very hot, you have less time here.)
Then start to blend.
As you blend, always observe carefully which way the paint has just moved.
Blend from one direction, then from another, gently one way and then back again, all the time moving the paint lightly and carefully.
In this way, you soften the main lines and turn them into shadows.
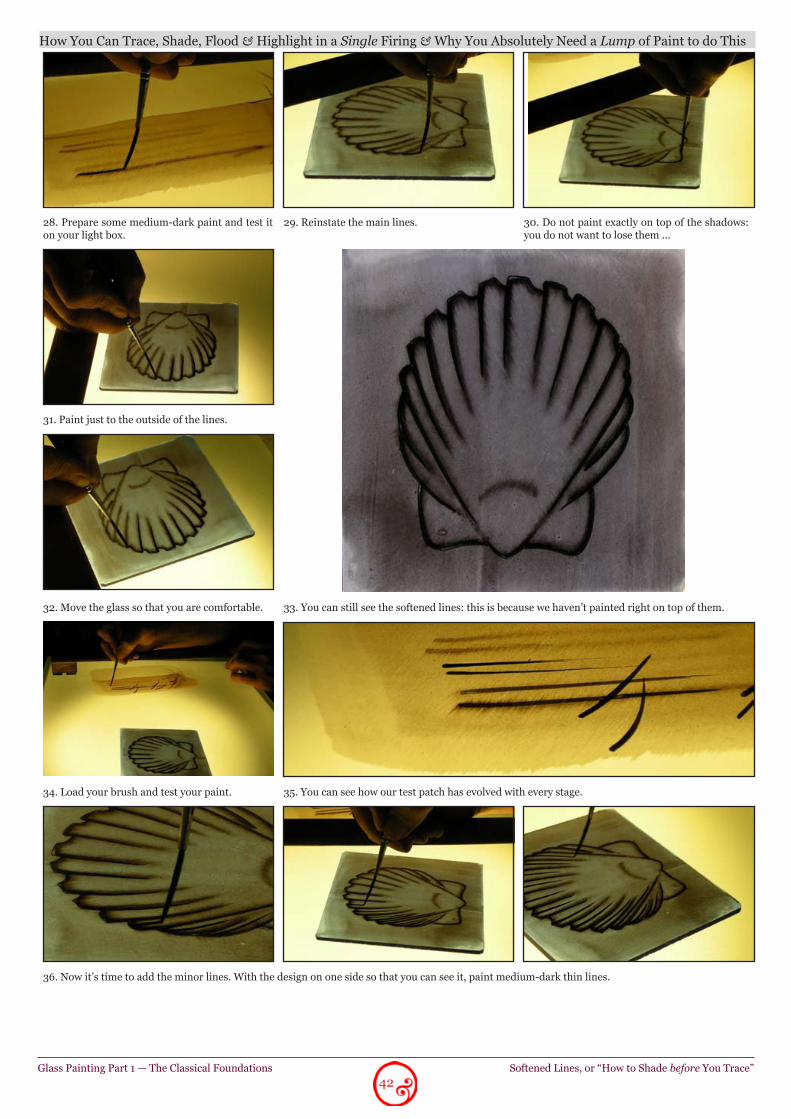
4�
How You Can Trace, Shade, Flood & Highlight in a Single Firing & Why You Absolutely Need a Lump of Paint to do This
Glass Painting Part 1 — The Classical Foundations Softened Lines, or “How to Shade before You Trace”
�8. Prepare some medium-dark paint and test it on your light box.
�9. Reinstate the main lines. 30. Do not paint exactly on top of the shadows: you do not want to lose them ...
31. Paint just to the outside of the lines.
3�. Move the glass so that you are comfortable. 33. You can still see the softened lines: this is because we haven’t painted right on top of them.
34. Load your brush and test your paint. 35. You can see how our test patch has evolved with every stage.
36. Now it’s time to add the minor lines. With the design on one side so that you can see it, paint medium-dark thin lines.

43
How You Can Trace, Shade, Flood & Highlight in a Single Firing & Why You Absolutely Need a Lump of Paint to do This
Glass Painting Part 1 — The Classical Foundations Softened Lines, or “How to Shade before You Trace”
37. Each time you load your brush, first test it on your light box. That way, you can be confident the paint will be as you want it to be.
39. Testing on the light box again ...
38. Here’s the shell with the minor lines now added. 40. Put the glass on top of the design. Copy-trace the outer circle with light paint.
41. Let the paint dry. 4�. Strengthen the outer circle. 43. You’ve now built up a wall as you know from Chapter �.
44. Mix and test some paint for flooding. 45. It’s the same consistency as melted chocolate. Begin to flood.

44
How You Can Trace, Shade, Flood & Highlight in a Single Firing & Why You Absolutely Need a Lump of Paint to do This
Glass Painting Part 1 — The Classical Foundations Softened Lines, or “How to Shade before You Trace”
46. Let the paint flow from your brush.
47. Work around the whole shell. 48. Here’s our flooded shell. Let the paint dry thoroughly before you pick it up.
49. Test your highlights. 50. Start to scratch lines. 51. Hold the glass firmly.
5�. Move the glass as needed.
53. Work around the glass. 54. Here’s our shell with picked out highlights.

45
How You Can Trace, Shade, Flood & Highlight in a Single Firing & Why You Absolutely Need a Lump of Paint to do This
Glass Painting Part 1 — The Classical Foundations Softened Lines, or “How to Shade before You Trace”
55. Now you can soften some of the highlights. Take a scrub. Test it on your light box. Gently, slowly and lightly soften some of the highlights.
56. When you soften highlights, you still want to be able to see the sharp highlights underneath.
57. Scrub lightly.
58. Don’t soften too much. 59. Here’s our shell.
60. A final piece of softening. We use our bare, dry fingers. If your glass paint contains lead, you must wash your hands carefully.

46
How You Can Trace, Shade, Flood & Highlight in a Single Firing & Why You Absolutely Need a Lump of Paint to do This
Glass Painting Part 1 — The Classical Foundations Softened Lines, or “How to Shade before You Trace”
6�. Take a scrub and clean the border.
61. Here’s the shell now softened by our fingers. 63. Hold the glass firmly.
64. Ready to fire.
This technique of softened lines has endless marvellous uses. Perhaps its greatest significance is this: it begins to free you of the need always to fire our paint in the kiln before you paint over it again. This means that each layer of paint — because none of the paint is fixed in the kiln until the end — remains alive and in some measure adjustable as other layers are added on top. But you’ve also learned an exciting and straightforward technique for creating shadows (shadows which you can create before you start to trace fine details). This is a natural way of thinking about paint: you want to use glass paint to capture the shapes and depths that shadows have. The shape and depth of shadows is altogether more important than those strange and harshly traced outlines which you often see on painted glass. The technique of softened lines is enormously helpful in showing you how to think this way. Of course, it’s perfectly possible to add shadows on top of glass paint that you’ve already fired. The point is, though, that you don’t have to paint this way – you can also add shadows first, as we’ve shown here.
65. Fired.

How You Can Trace, Shade, Flood & Highlight in a Single Firing & Why You Absolutely Need a Lump of Paint to do This
Softened Lines, or “How to Shade before You Trace”Glass Painting Part 1 — The Classical Foundations47

How You Can Trace, Shade, Flood & Highlight in a Single Firing & Why You Absolutely Need a Lump of Paint to do This
Softened Lines, or “How to Shade before You Trace”Glass Painting Part 1 — The Classical Foundations48
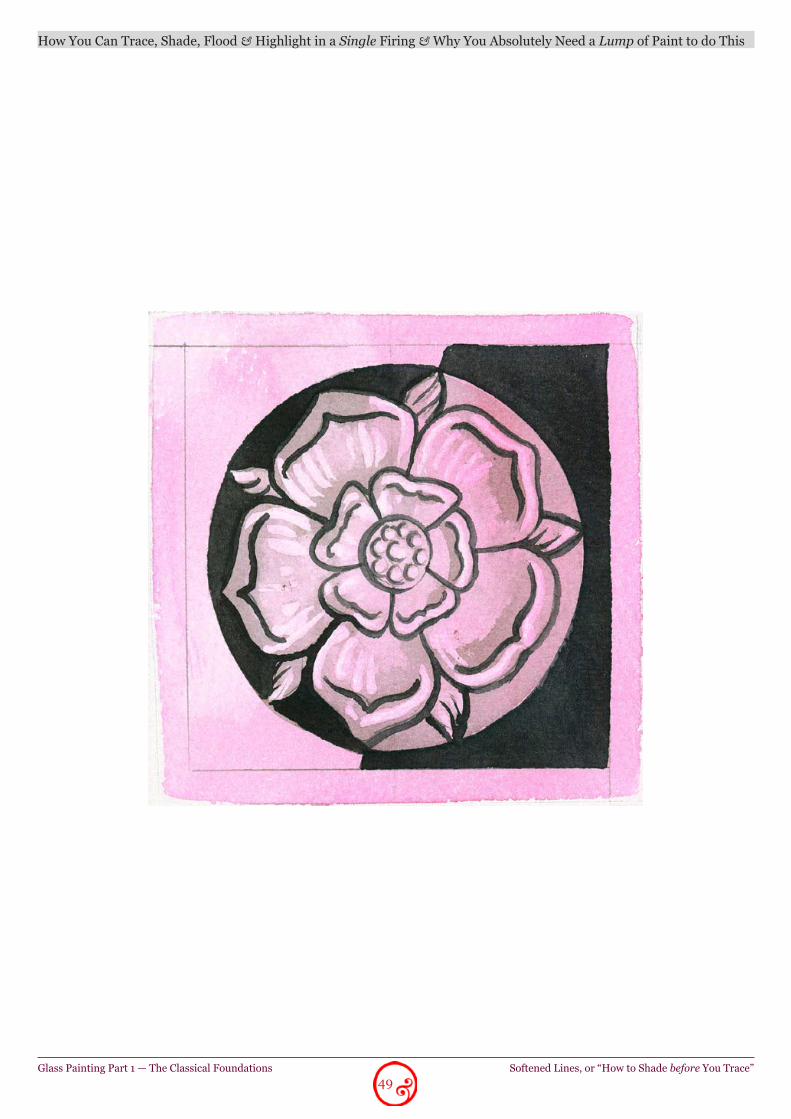
How You Can Trace, Shade, Flood & Highlight in a Single Firing & Why You Absolutely Need a Lump of Paint to do This
Softened Lines, or “How to Shade before You Trace”Glass Painting Part 1 — The Classical Foundations49

How You Can Trace, Shade, Flood & Highlight in a Single Firing & Why You Absolutely Need a Lump of Paint to do This
Softened Lines, or “How to Shade before You Trace”Glass Painting Part 1 — The Classical Foundations50

How You Can Trace, Shade, Flood & Highlight in a Single Firing & Why You Absolutely Need a Lump of Paint to do This
It’s that Pike againGlass Painting Part 1 — The Classical Foundations 51
5: It’s that Pike again
So now, through this guide and the bonus videos (if you chose that option), you’ve seen how to trace, shade and highlight,
front and back, in a single firing. This is very different from the normal approach where you trace
then fire, then shade and fire again, then maybe trace or shade again and fire your glass a third time. And so on. As we said before, it’s not that this “trace/fire” approach is wrong. Our criticism is rather that it doesn’t develop your confidence and skill.
Yet many glass painters only know the “trace/fire” approach. This is a pity because it means they haven’t gone as far as they
might. It’s also a pity because they often assume their way is the only
way, and those of them who teach then pass on this ignorance to others.
Which is one reason why the “trace/fire” approach has become so entrenched.
Teacher tells it to pupil and instructs him never to deviate. Pupil spends his whole life muddling through with the supposedly sacred knowledge he was given by his master. Finally he gives his limited knowledge to the next generation as if it were the Last Word on the subject.
Never mind! It’s enough for you to know the “trace/fire” approach indeed has many good uses but that it will cramp your style if it’s the only approach you know.
Indeed, when you master the alternative approach, the one you see in this guide which you hold in your hands, you’ll find most other styles of glass painting much easier by virtue of your greater confidence and skill.
Yes, it does call for attention, discipline, eye-sight, co-ordination and patience. So be prepared — no one will become a master glass painter without a great deal of hard work.
But, taken in the right spirit, the hard work is enjoyable, because you’re acquiring a new skill.
It’s also enjoyable by virtue of the mental alertness which is demanded of you.
You can’t think of anything else.You can’t even be listening to the radio — at least, not until
you’re very, very good.You have to focus.And focus is its own reward.Let’s briefly look at this and a few other topics which are equally
important.
Focus and attention
It’s maybe not fashionable to say this but you can’t paint stained glass unless you can focus and pay attention.The reason we say is this is you need to realize it’s not enough
to have all the right tools and materials.You also need to have the right outlook. This means you. You
absolutely need the right outlook. Part of this outlook is an ability to concentrate for long periods of time.
And you might wonder, Where in modern civilian life is this ability really called for?
Even when you drive, you mostly do this automatically.Maybe rock-climbers pay attention, or soldiers, or brain
surgeons and the like.For the rest of us, it is of little consequence if our attention
wanders off for a few minutes while we work.
But in glass painting, as in any genuine craft, excellence is incompatible with the absence of attention.
If you don’t like it, you’d better leave the room right now!If on the other hand you’re prepared to settle down and keep
your mind strictly on the task in hand, you’ll soon learn how to pay attention first for five minutes, then for 10, then �0, and so on.
And one day you’ll wonder where the morning went - you were so unaware of the passage of minutes and hours.
Patience
It’s no use rushing. Rushing ruins everything. If you’re always in a rush, you’ll need to learn a different way of working before
you can make a success of glass painting. See, it doesn’t matter if it takes you 10 minutes to prepare the
paint. What does 10 minutes matter if the paint then flows down the brush, onto the glass, exactly as it should?
Equally, it doesn’t matter how long it takes you to shape your brush so it’s exactly how you want it. There’s just no point in starting the stroke if the brush is the wrong shape to begin with — the stroke will be a wretched failure. Imagine a classical violinist who didn’t bother to tune up. Imagine a professional chef who didn’t bother to wash his hands. Imagine an impatient glass painter ...
No, you’ll need vast reserves of patience.If this isn’t you, be assured it’s possible to acquire them.But it won’t happen in a day. Yes, you need to be patient ...
Common sense
People have been painting stained glass for the best part of ten centuries. So it’s not like you need the kind of brain which
understands quantum physics to do it well. But you do need a certain kind of practicality.
Again, this is something you can learn with time — provided that you have a basic ability to pose questions and, when things go wrong, not accept them as they are.
So, where something goes wrong, you need to start by observing the whole situation and then ask yourself what could be causing the problem. Maybe this sounds obvious but it’s amazing how many people don’t stop and think.
Here’s an example. Suppose you’ve prepared a batch of light-coloured paint. Yet every time you paint a stroke, it comes out thick and dark - not at all like the paint on your palette. It’s a mystery, yes? No! If you observe the situation, you already know the answer. Which is that your brush needs cleaning. Common sense. Experience leads you more or less quickly to the answer; common sense ensures you ask the question in the first place and don’t just put up with an unacceptable situation.
We mention this point because it’s so important for you to realize how many problems you can actually sort out for yourself.
Yes, indeed. There is a vast number of problems you’ll meet which — with focus, patience and common sense — you will solve for yourself.
And now let’s have a quick look at the pike again.It’ll all make so much sense now: well done!

How You Can Trace, Shade, Flood & Highlight in a Single Firing & Why You Absolutely Need a Lump of Paint to do This
It’s that Pike againGlass Painting Part 1 — The Classical Foundations 5�

How You Can Trace, Shade, Flood & Highlight in a Single Firing & Why You Absolutely Need a Lump of Paint to do This
It’s that Pike againGlass Painting Part 1 — The Classical Foundations 53
1. Bare clean glass (both sides) �. Undercoat
3. Copy-trace main lines 4. Strengthen main lines
5. Soften 6. Reinstate
7. Add minor details 8. Copy-trace then strengthen outer lines
9. Flood 10. Pick out highlights
11. Soften highlights 1�. Teeth
13. Undercoat on back, then flicked with glass paint 14. Rubbed on back, highlights picked out to match the front: ready!

How You Can Trace, Shade, Flood & Highlight in a Single Firing & Why You Absolutely Need a Lump of Paint to do This
It’s that Pike againGlass Painting Part 1 — The Classical Foundations 54
Spottling the Pike’s behind
This is perfectly legal in the UK. Just check with the authorities in your own country to see if you enjoy a similarly liberal
condition.Spottling is a great way to add texture to the back of a piece of
glass and also to suggest the appearance of age.Here’s what you do:Prepare some paint that is suitable for an undercoat. Load and
shape your hake. Test the paint and adjust it as needed. Cover the whole surface of the glass with a light undercoat. Take your badger blender and, while the paint is still wet, blend it smooth.
Let the paint dry.Take a soft-bristled toothbrush. Load it with glass paint that is
slightly darker than what you’d use for copy-tracing. In one easy motion, slowly flick glass paint wherever you want your spots and texture to be.
Let the paint dry.Using a clean dry finger, or the soft part of your thumb, gently
rub away at the spots. Repeat, gently. Clean and dry your finger / thumb often to remove dust. Continue until you’ve got the effect you wanted. If it doesn’t work, just rub it off and start again.
When you use this technique, the main thing to watch out for is when you’re spottling the back of an unfired piece of painted glass. When you use the hake, you don’t want any of the undercoat to seep onto what is the unfired front side of the glass. You must particularly watch out to stop your glass sliding onto wet paint that’s on top of the light box. This is because any wetness will damage your unfired painting. Other than that, this technique is simple, quick and effective.
In the next section, you’ll discover other ways of tackling the backside of the glass — it all depends on what’s appropriate for the design you’ve painted on the front.
1.
�.3.
4.5.

How You Can Trace, Shade, Flood & Highlight in a Single Firing & Why You Absolutely Need a Lump of Paint to do This
55 Putting Traced Lines Exactly Where You Want ThemGlass Painting Part 1 — The Classical Foundations
6: How to put traced lines exactly where you want them
There is no big mystery to this topic — except one.“Why is this topic usually tackled first, when no one has
yet learned enough about glass paint, about concentration, about hand-eye co-ordination ... about anything?”
All we can say is, It’s a mad, mad world. It seems plain crazy to expect anyone to trace a line they can be proud of unless they’ve gone through a whole series of exercises and experiences which cultivate the appropriate skill. And that skill is what you’ll now have in abundance when you’ve spent time mixing glass paint as we suggest, learning how to care for it, how to manage your palette and keep it tidy, how to move from one consistency of glass paint to another and back again, how to apply undertones, how to copy-trace and strengthen, how to soften lines then reinforce them. Now and only now will you have a completely different sense of the whole pace and rhythm of glass painting.
So for instance you won’t feel any sense of rush when it takes a few minutes to tidy your palette and prepare and test the kind of paint you need. And you’ll take whatever time you need to load and shape your brush. There’s no rush here. How could there be? Maybe this line will endure for one hundred years or more, so a few minutes’ preparation are insignificant. Perhaps your first test on the light box isn’t satisfactory. But now you know what you’re looking for — you didn’t know this before, you didn’t know this until you had painted several silhouettes and begun to experience the different kinds of paint you yourself can create and control. But now you know. So if the test is wrong, you don’t say to yourself, “Oh well, I’ll carry on and see if it comes out right on the glass ...”
What disastrous words those are! If the test doesn’t work, you must change something. And now you’ve developed an understanding of what to change. It’s just the way of the world that sometimes tests don’t work. But that’s why we have them, to give us information and feed-back. So now you pause to think, again without any sense of pressure, make whatever changes are necessary, clean and dry your brush (to remove all vestiges of the previous test), then load and shape your brush a second time, test again, and move forward accordingly.
In this spirit, putting a traced line exactly where you want it to be is a simple, calm matter of knowing how to prepare. You know this now, you didn’t know this before. And it really does all start with the beautiful paint on your palette. Remember that, and you’ll go far.
So now let’s paint this lovely honey bee you see above ...

56 Putting Traced Lines Exactly Where You Want Them
How You Can Trace, Shade, Flood & Highlight in a Single Firing & Why You Absolutely Need a Lump of Paint to do This
Glass Painting Part 1 — The Classical Foundations
Step-by-Step Overview
1. Cut and clean the light-coloured glass. �. Paint a medium-coloured undercoat. 3. Copy-trace the main details.
4. Reinforce the main details. 5. Paint areas of medium tone. 6. Thicken the outline.
7. Add details. 8. Flood. 9. Add more details.
10. Add highlight. 11. Scrub the border and soften highlights 1�. Paint tone on the back of the glass.
13. Soften the tone on the back of the glass. 14. Fire the glass.

57 Putting Traced Lines Exactly Where You Want Them
How You Can Trace, Shade, Flood & Highlight in a Single Firing & Why You Absolutely Need a Lump of Paint to do This
Glass Painting Part 1 — The Classical Foundations
�. Cut glass to size and clean it on both sides.
1. This is the bee you’re going to paint. 3. Prepare paint for undercoat.
4. Paint a medium-dark undercoat. 5. Blend the undercoat as needed. 6. Here’s the glass now.
7. Prepare some light paint for a light copy-trace. Place the glass on top of the design. Take a fine tracing brush. Start to copy-trace in the order you see here.
8. Remember to move the glass and design as needed so that you are always comfortable. Also, re-mix and test your paint each time you load your brush.

58 Putting Traced Lines Exactly Where You Want Them
How You Can Trace, Shade, Flood & Highlight in a Single Firing & Why You Absolutely Need a Lump of Paint to do This
Glass Painting Part 1 — The Classical Foundations
10. As needed, re-mix your paint
9. Here’s the glass now 11. Put the design on one side.
1�. Reinforce the lightly traced lines. 13. Re-mix your paint each time you load your brush.
14. Work in the same sequence as before.
15. Each time you are about to strengthen a different section, move the glass around so that you are comfortable. It is often a good idea to rehearse each stroke in the air above the glass before you actually paint the glass. That way, you make sure that you can do it comfortably. Rest as needed: there is no rush. This requires careful tracing.Remember to re-mix the paint each time you load your brush, and then to test it on the light-box.
16. Here’s the glass now.

59 Putting Traced Lines Exactly Where You Want Them
How You Can Trace, Shade, Flood & Highlight in a Single Firing & Why You Absolutely Need a Lump of Paint to do This
Glass Painting Part 1 — The Classical Foundations
17. Take a wider tracing brush. 18. Test the paint on your light-box. 19. Start to fill with medium-dark paint.
�0. Move the glass as needed.
�1. Test on your light-box before you paint. ��. Here’s the glass now.
�3. Put the glass on top of the design.
�4. Start to paint the stripes. �5. The paint is medium-dark. It needs to be a bit watery, because, if it is too dry, the brush will scratch and remove the undercoat.
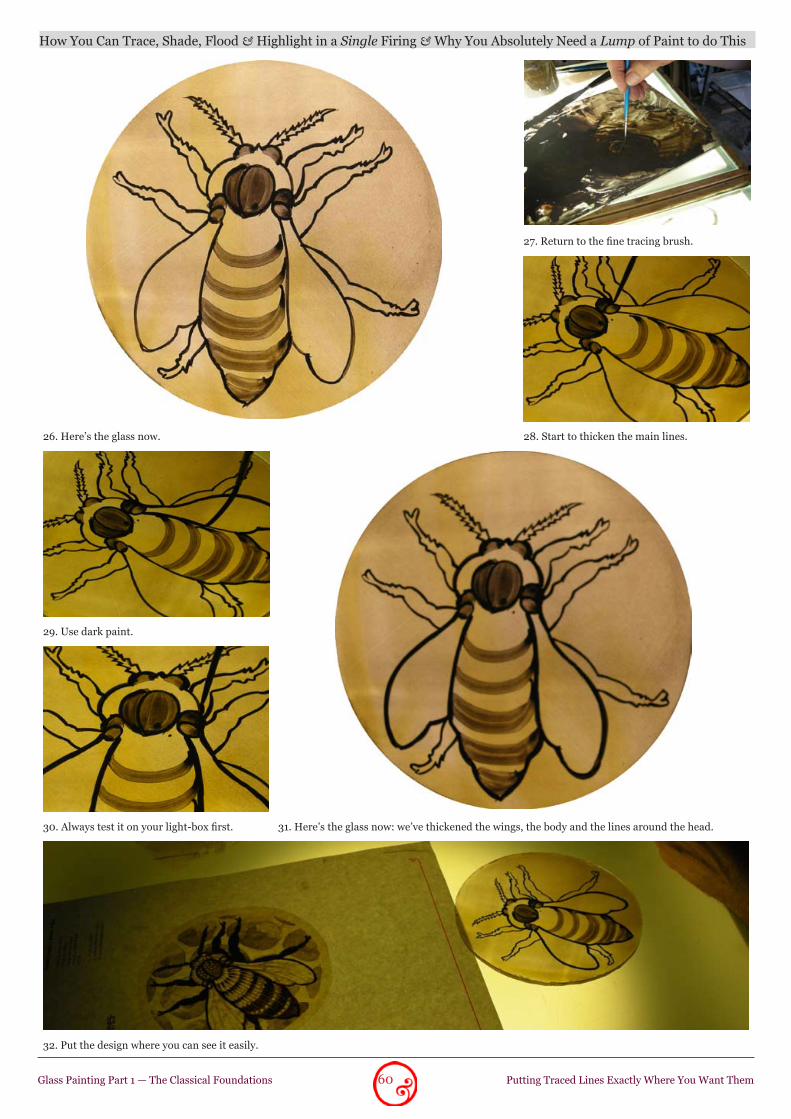
60 Putting Traced Lines Exactly Where You Want Them
How You Can Trace, Shade, Flood & Highlight in a Single Firing & Why You Absolutely Need a Lump of Paint to do This
Glass Painting Part 1 — The Classical Foundations
27. Return to the fine tracing brush.
�6. Here’s the glass now. �8. Start to thicken the main lines.
�9. Use dark paint.
30. Always test it on your light-box first. 31. Here’s the glass now: we’ve thickened the wings, the body and the lines around the head.
3�. Put the design where you can see it easily.

61 Putting Traced Lines Exactly Where You Want Them
How You Can Trace, Shade, Flood & Highlight in a Single Firing & Why You Absolutely Need a Lump of Paint to do This
Glass Painting Part 1 — The Classical Foundations
33. Continue with your fine tracing brush. Now add further details. Notice that the paint is dark.
34. Move the glass as needed. 35. Here’s the glass now.
36. Continue with the fine tracing brush. Prepare some wet, dark paint that is suitable for flooding. Test it on your light-box: first, see if your paint pours smoothly outwards the moment your brush touches the glass. Second, see if you can evenly fill an area.
37. Load your brush. Start to flood the legs and arms. Some of the spaces are narrow; therefore you must not put too much paint on your brush. Where the space is narrow, you must pull paint into it.
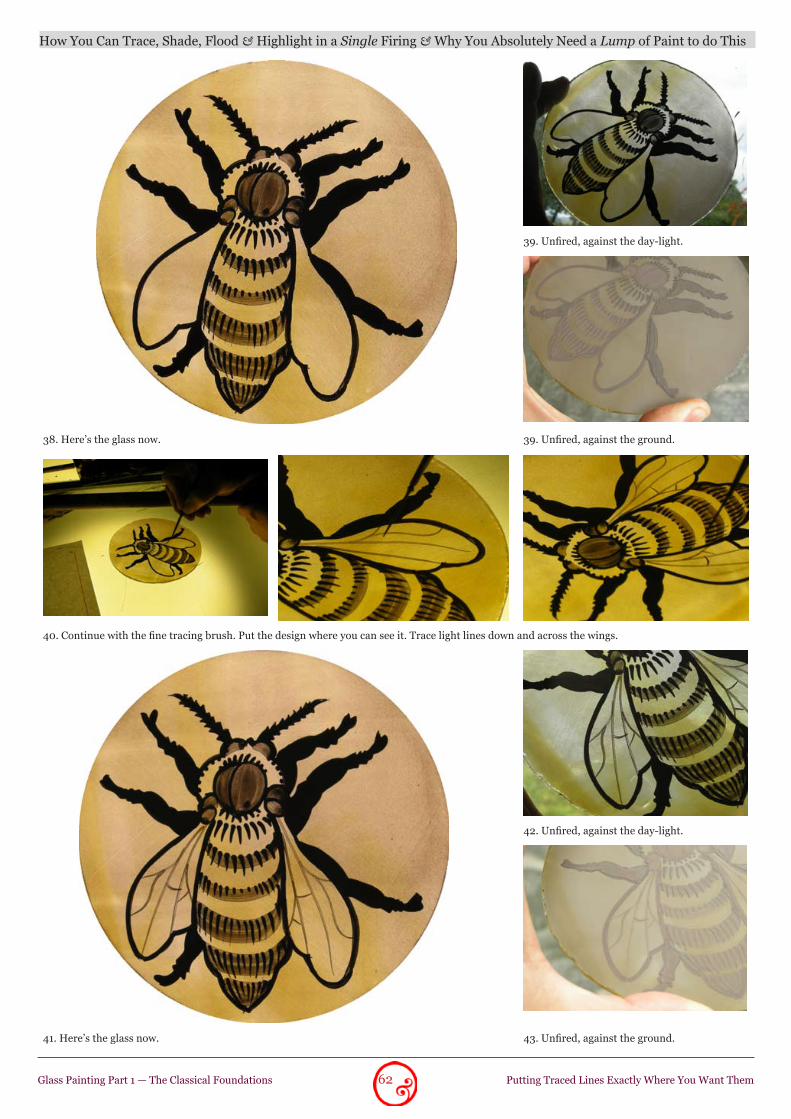
6� Putting Traced Lines Exactly Where You Want Them
How You Can Trace, Shade, Flood & Highlight in a Single Firing & Why You Absolutely Need a Lump of Paint to do This
Glass Painting Part 1 — The Classical Foundations
39. Unfired, against the day-light.
38. Here’s the glass now. 39. Unfired, against the ground.
40. Continue with the fine tracing brush. Put the design where you can see it. Trace light lines down and across the wings.
42. Unfired, against the day-light.
41. Here’s the glass now. 43. Unfired, against the ground.

63 Putting Traced Lines Exactly Where You Want Them
How You Can Trace, Shade, Flood & Highlight in a Single Firing & Why You Absolutely Need a Lump of Paint to do This
Glass Painting Part 1 — The Classical Foundations
45. Hold the glass firmly.
44. Take a wooden stick. Start to make highlights. 46. Make clean, careful highlights.
47. Be careful not to cause any accidentally damage to the unfired paint.
48. Here’s a close-up. 49. Here’s the glass now.

64 Putting Traced Lines Exactly Where You Want Them
How You Can Trace, Shade, Flood & Highlight in a Single Firing & Why You Absolutely Need a Lump of Paint to do This
Glass Painting Part 1 — The Classical Foundations
50. Take a scrub. Clean around the border.
51. Dry and clean your fingers. 5�. Gently rub and soften the highlights.
53. Always keep your finger clean and dry.
54. Rub gently and lightly. 55. Here’s the glass now.
56. You’re now going to work on the back of the glass. Turn the design over. Turn the glass over. Put the reversed glass on top of the reversed design.This is important: you are now going to paint the back of the glass.This is also important: the back of the glass must be clean. If you need to, carefully clean it now. Be careful not to damage any unfired painting on the front.

65 Putting Traced Lines Exactly Where You Want Them
How You Can Trace, Shade, Flood & Highlight in a Single Firing & Why You Absolutely Need a Lump of Paint to do This
Glass Painting Part 1 — The Classical Foundations
57. Use your fine tracing brush.
58. Trace the outline of the honeycomb. 59. Here’s the glass now: you can see these lights are light-coloured, not dark.
60. Take the wider tracing brush. 61. Test the paint: this is too dark. 6�. This medium-coloured paint is good.
63. Still working on the back of the glass, now fill in the honeycomb.
64. See how the paint is fairly wet. 65. Here’s the glass now. Let the paint dry.

66 Putting Traced Lines Exactly Where You Want Them
How You Can Trace, Shade, Flood & Highlight in a Single Firing & Why You Absolutely Need a Lump of Paint to do This
Glass Painting Part 1 — The Classical Foundations
66. Use a clean, dry finger. 67. Gently rub and bruise the paint. 68. Take a scrub.
68. Carefully clean around the paint.
69. Tidy all around the paint. 70. Here’s the glass now, seen from the reverse. Double-check the highlights, and then it’s ready to fire.
Note: there are many different approaches you can take with the back of the glass. With the pike, you used spottling to create the suggestion of age and texture. With the bee, you painted the honeycomb itself, so helping to suggest a sense of depth. A third approach is decorative: you apply an undercoat, then blend it smooth, then pick out a pattern as in this piece here.

How You Can Trace, Shade, Flood & Highlight in a Single Firing & Why You Absolutely Need a Lump of Paint to do This
67 Putting Traced Lines Exactly Where You Want ThemGlass Painting Part 1 — The Classical Foundations
Flowers painted with water and oil in a single firing — discover how!
What’s next?
Good question. And the answer depends on you. Whilst there’s enough material here to take you forward a huge distance,
some of you will also want to learn more techniques which build on those you already know. So what else will interest you?
There are two techniques in particular which are essential to any sound practice of the craft of stained glass painting.
Amazingly, these techniques were widely employed throughout the 16th, 17th and 18th centuries, then slowly fell out of favour in the 19th century — only to become moreorless forgotten in the �0th century. What a loss and waste. We ourselves reinstated these techniques in a sense because we had to. The Williams & Byrne studio doesn’t simply design and make new windows. It also restores and conserves antique stained glass. Thus we get to see some of the finest ancient glass there is. And when it requires attention, you have to find out how. Which necessity brought us to two re-discoveries which will interest you. First, tracing and shading with oil-based paint on top of unfired water-based paint. Second, silver staining with oil.
The advantage of the second re-discovery is that it allows you to make a long-lasting batch of stain and use it with as much confidence and panache as you would use ordinary glass paint. And if you’ve ever experienced the anxiety of using stain with the traditional media of water or vinegar, you’ll immediately see what a benefit that is.
You can find all this essential information in the next two technique-packed sections:
“How You Can Use Oil to Shade Effortlessly and Leisurely and Still Do ALL Your Stained Glass Painting, Front and Back, in Just One Firing (or Two if You Really Must)”
and“Silver Stain: How to Trace, Blend, Shade and Flood from a
Reliable Batch that Lasts for Months”
Saint Cecilia painted with water and oil in a single firing, then stained with various silver stains in a second firing - beautiful!

68 Bonus Case Study #1 — English Gargoyle
How You Can Trace, Shade, Flood & Highlight in a Single Firing & Why You Absolutely Need a Lump of Paint to do This
Glass Painting Part 1 — The Classical Foundations

69 Bonus Case Study #1 — English Gargoyle
How You Can Trace, Shade, Flood & Highlight in a Single Firing & Why You Absolutely Need a Lump of Paint to do This
Glass Painting Part 1 — The Classical Foundations
1. Choose and cut the glass. Groze its edges so that you can handle them safely. Clean the glass thoroughly on both sides.
�. Prepare some glass paint that is suitable for an undercoat. Load and shape your hake. Test the paint on the light box, and adjust as needed.Then paint an undercoat on the glass and blend smooth.
3. Prepare some glass paint that is suitable for copy-tracing. Take a fine tracing brush. Load the brush. To test the paint on the light box, paint some fine lines on the patch you made earlier. Adjust the color of the paint and test again as needed. Now copy-trace the main lines as shown. From time to time, it is important to use the brush to re-mix the paint. And, each time you re-mix the paint, test it on the light box before you use it on the glass. When you’ve finished, take a rest and let the paint dry thoroughly.
4. Re-mix the paint. Load the brush. Test the paint by painting over some of your earlier strokes on the light box. Then reinforce the main lines as you see here. Let the paint dry.
5. Re-mix the paint. You’re going to add fine details so just load the tip of your brush. Test the paint on your light box. Now add fine details to the ears, hair, eyes, cheek and tongue.
6. Mix some paint that is suitable for flooding. It needs to be the consistency of thick, melted chocolate. Test it on your light box: holding you brush vertically, the paint must simply flow smoothly but controllably onto the glass. If the paint is too dry, add a little bit more water, re-mix and test again. If it’s too wet. dilute some more of the lump, re-mix the paint and test again. When the paint is ready, flood paint around the head. Also flood the mouth and eyes.

70 Bonus Case Study #1 — English Gargoyle
How You Can Trace, Shade, Flood & Highlight in a Single Firing & Why You Absolutely Need a Lump of Paint to do This
Glass Painting Part 1 — The Classical Foundations
7. Take a sharp wooden stick. Pick out the teeth.
8. Take a scrub. Make highlights by removing some of the undercoat as shown.
9. Turn the glass over. Prepare some paint like the paint you used for the undercoat. Use the hake to paint light broad stripes across the back of the glass. As needed, blend the stripes smooth. Let the paint dry.
10. Note: this is still on the back of the glass. Take a soft-haired toothbrush. Rub it in glass paint. Lift the glass and hold it at an angle so that you can see what you are doing, then flick spots of paint all over it. Let the paint dry.
11. When the spots are dry, hold the glass up to the light and gently rub the spots with your finger until the spots begin to fade. You must clean your hands thoroughly after doing this.
12. Double-check your highlights on the front. Then fire the glass.