giraffes can't dance - d3ndagut9sanks.cloudfront.netcan't+dance.pdf · then, if they...
TRANSCRIPT

D E E P S P A C E S P A R K L E & T H E M E M B E R S C L U B
DEEP SPACE
GIRAFFES CAN’T DANCE

D E E P S P A C E S P A R K L E & T H E M E M B E R S C L U B �2
HERE’S WHAT YOU’LL NEED:
2 sheets of 12” x 18” sulphite
paper (white for the background and
yellow/orange for the giraffe)
Liquid tempera paint (blue, light
blue (optional) white, yellow and
green)
Plastic cup & pencil
Black marker for drawing
Medium paint brush and water
White glue
Scissors
Orange and brown broad tip markers

D E E P S P A C E S P A R K L E & T H E M E M B E R S C L U B �3
TIMING THE LESSONSYou’ll need about three, 40-minute classes to complete this project. If you don’t have that much
time with the students, you can paint the background and draw the giraffe but leave the cutting
part up to you or a parent helper.
First Day
9:00-9:05 Children settle onto the carpet in front of me. I sit in a chair with book in hand and
visuals of the art project beside me on the white board.
9:05-9:15 Read the book.
9:15-9:20 I quickly demonstrate how to draw the dancing giraffe on the white board. I do this so
the kids know what to expect.
9:20-9:35 Children sit at their tables, pick up a marker and show me they are ready. Using the
guided drawing technique, children draw their giraffe. If they make a mistake, they move on until
the end of the lesson. Then, if they like, they can turn over the paper and draw again.
9:35-9:40 Write names on paper, place caps on markers, tuck in chairs and dismiss tables.
Second Day
9:00 -9:05 Children sit in chairs. Each table has a white piece of paper, paint, pencil, cup and
brushes.
9:05-9:15 I demonstrate how to draw the moon and paint the background.
9:15-9:35 Children paint their background. If they finish, I hand their giraffe’s back and they color
in the spots.
9:35-9:40 Clean-up
Third Day
Color spots on giraffe, Cut out giraffe, glue to background.

D E E P S P A C E S P A R K L E & T H E M E M B E R S C L U B �4
GUIDED DRAWING TIPS
You can choose to give each child a copy of the drawing handout or you can do a guided
drawing. Before your guided drawing, watch the video and practice drawing the giraffe. When
you are ready to teach the guided drawing, try this script:
“We are going to draw a Gerald the Giraffe together. Use your marker and yellow paper. If
you draw a line that you don’t like, keep going. After we compete the drawing and you aren’t
happy with it, you can turn the paper over and draw the giraffe again. Is that okay with
everyone?
I want you to watch and listen to instruction. Try not to have conversation with your neighbor
until after the drawing is finished.
When my cap is off my marker, it’s my turn to draw and your turn to watch. When I place the
cap on my marker, it’s your turn.
Are you ready?”

D E E P S P A C E S P A R K L E & T H E M E M B E R S C L U B �5

D E E P S P A C E S P A R K L E & T H E M E M B E R S C L U B �6
PAINTING THE BACKGROUND
1
5432
1. Trace a cup or container with a pencil for the moon. Fill with WHITE paint. 2. Paint around the white moon with LIGHT BLUE then BLUE paint, blending with the white to create a
glow. 3. Draw a HORIZON line with the blue paint. Fill space above blue line with blue sky. Fill below line
with YELLOW paint. 4. Paint over yellow paint with GREEN paint and immediately scratch lines or blades of grass using the
back end of the brush.

D E E P S P A C E S P A R K L E & T H E M E M B E R S C L U B �7
ASSEMBLING
Once the kids draw the giraffe and figure out where to place the arms and legs, you might notice that a few kids have more than 4 legs. This is pretty typical so you can either say nothing at all or suggest they cut off the extra appendage.
Bring out the colored markers and encourage the kids to color in the spots. When the spots are colored, cut out the giraffe. This can take a while with younger kids but it’s great practice.
Glue giraffe onto dry painted background.
A nice touch that I always wanted to try but never had the time, was to add droplets of glue to the sky and sprinkle fine glitter over the glue. This would make a lovely, sparkly sky, don’t you think?

D E E P S P A C E S P A R K L E & T H E M E M B E R S C L U B �8
Giraffes Can’t Dance GRADE 1
D E E P S P A C E S P A R K L E & T H E M E M B E R S C L U B �9
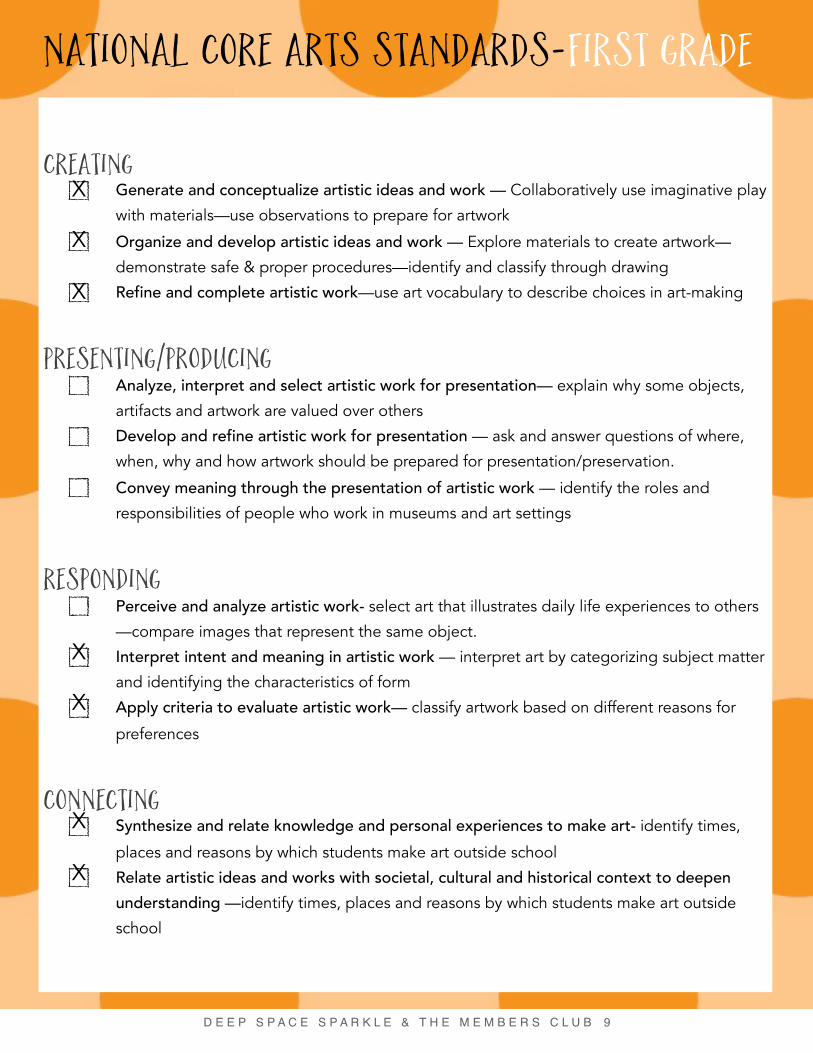
CREATING Generate and conceptualize artistic ideas and work — Collaboratively use imaginative play
with materials—use observations to prepare for artwork
Organize and develop artistic ideas and work — Explore materials to create artwork—
demonstrate safe & proper procedures—identify and classify through drawing
Refine and complete artistic work—use art vocabulary to describe choices in art-making
Presenting/producing Analyze, interpret and select artistic work for presentation— explain why some objects,
artifacts and artwork are valued over others
Develop and refine artistic work for presentation — ask and answer questions of where,
when, why and how artwork should be prepared for presentation/preservation.
Convey meaning through the presentation of artistic work — identify the roles and
responsibilities of people who work in museums and art settings
Responding Perceive and analyze artistic work- select art that illustrates daily life experiences to others
—compare images that represent the same object. Interpret intent and meaning in artistic work — interpret art by categorizing subject matter
and identifying the characteristics of form
Apply criteria to evaluate artistic work— classify artwork based on different reasons for
preferences
Connecting Synthesize and relate knowledge and personal experiences to make art- identify times,
places and reasons by which students make art outside school Relate artistic ideas and works with societal, cultural and historical context to deepen understanding —identify times, places and reasons by which students make art outside
school
NATIONAL CORE ARTS STANDARDS-FIRST GRADE
X
X
X
X
X
X
X

D E E P S P A C E S P A R K L E & T H E M E M B E R S C L U B �10
CREATING Generate and conceptualize artistic ideas and work — Brainstorm multiple approaches to
art and design—use of various materials to make art
Organize and develop artistic ideas and work — Explore materials to explore personal
interests in art-making—demonstrate safe use/cleaning—repurpose objects into something
new
Refine and complete artistic work—discuss/reflect with peers about choices when creating
artwork
Presenting/producing Analyze, interpret and select artistic work for presentation— categorize artwork based on
a theme or concept for an exhibition
Develop and refine artistic work for presentation — distinguish between different
materials or artistic techniques for preparing artwork for presentation
Convey meaning through the presentation of artistic work — analyze how art exhibited
inside and outside school contributes to communities
Responding Perceive and analyze artistic work- describe aesthetic characteristics of the natural world—
categorize images based on expression Interpret intent and meaning in artistic work — interpret art by identifying the mood
suggested and describing relevant subject matter and identifying the characteristics of
form
Apply criteria to evaluate artistic work— use learned art vocabulary to express preferences
about artwork
Connecting Synthesize and relate knowledge and personal experiences to make art- create works of
art about events in home, school or community life Relate artistic ideas and works with societal, cultural and historical context to deepen understanding —create works of art about events in home, school or community life
NATIONAL CORE ARTS STANDARDS-second grade
X
X
X
X
X
X
X
X

D E E P S P A C E S P A R K L E & T H E M E M B E R S C L U B �11
• Today I will learn about LINE and SHAPE, so that I CAN use the GUIDED DRAWING technique to draw a GIRAFFE using MARKER inspired by the book, Giraffes Can’t Dance.
• Today I will learn about CURVED LINES, so that I CAN position different sections of the drawing to make the giraffe have MOVEMENT or appear to be dancing.
• Today I will learn about VALUE and TEXTURE, so that I CAN blend white with blue paint to create TINTS. I’ll also SCRATCH away lines of paint to reveal colors underneath for my grass.
Common Core STANDARDS FOR DANCING GIRAFFECCSS.ELA-Literacy.RL.1.1 Ask and answer questions about key details in a text.
You can apply this standard by reading through Giraffes Can’t Dance and asking students questions
as you look through the pages about the main ideas of the story. This gives them some background
knowledge before starting their artwork.
CCSS.ELA-Literacy.RL.1.7 Use illustrations and details in a story to describe its characters, setting, or events.
As you read Giraffes Can’t Dance with the students, you can have students describe the different
elements of art they see in the illustrations. Ask them to refer specifically to the images when
describing the colors, lines, shapes, etc. they see.
CCSS.ELA-Literacy.W.1.1 Write opinion pieces in which they introduce the topic or name the book they are writing about,
state an opinion, supply a reason for the opinion, and provide some sense of closure.
Students address this standard when completing the artist statement worksheet of this packet (page
14). They are writing their opinion about the artwork they made based on how it was created and
how they were inspired.
I can statements FOR DANCING GIRAFFE

D E E P S P A C E S P A R K L E & T H E M E M B E R S C L U B �12
I LIKE MY ART BECAUSE…
MY NAME IS:
circle the supplies used in this art project
my supplies:

D E E P S P A C E S P A R K L E & T H E M E M B E R S C L U B �13
ASSESSMENT CHECKLIST
Student Name:
Did the student create a giraffe that appears to have movement?
Did the student create tints of blue?
Did the student use the scratching technique
to make blades of grass?
Main Ideas from Giraffes Can’t Dance: