getting started with microsoft powerpoint 2003
TRANSCRIPT
Handout Created by Cheryl Tice, Instructional Support Specialist, GST BOCES
1
Getting Started with Microsoft PowerPoint 2003 Overview: This handout provides basic introductory information about Microsoft PowerPoint and its application in the classroom. Audience: All instructional staff Related Links: PowerPoint in the Classroom http://www.actden.com/pp/ Microsoft Education: Convey Ideas with PowerPoint 2003 http://www.microsoft.com/Education/PowerPoint.aspx
Handout Created by Cheryl Tice, Instructional Support Specialist, GST BOCES
2
Introduction Microsoft PowerPoint is a program used to create slide show presentations and has many educational applications. It can be utilized by both teachers and students in many different ways. Teachers can use this program to create interactive multimedia modules for their students to use to learn new information or review concepts taught. Students can use this program in a variety of creative ways to complete assignments. Some things to keep in mind when using PowerPoint:
Create an outline of the information you plan to include in your PowerPoint Create a title slide and a slide with objectives that will be covered in your presentation Keep slides brief and to the point with: • Bulleted lists • Phrases - not sentences • Summaries - not full descriptions • Pictures to illustrate points • Prompts to encourage participation during the slide show
Use animation and sound when appropriate (too much can become distracting) Keep it simple and not too “flashy” Choose appropriate colors and text: • Use large font size – 24pt or larger
• Use fonts that are easy to read.
• Choose light text on a dark background for projection and dark text on a light background for
acetate printed versions.
• Avoid non-standard fonts. If the font is not present on the teaching machine, Windows will substitute another font which might make your slides hard to read.
• Choose text and background colors carefully. Go for high contrast. Subtle differences are difficult to read and this may be worsened by a projector.
• Background patterns and graphics generally interfere with readability. Background patterns that are light work well with dark colors and vice versa, but background designs that have both light and dark elements do not work well with either light or dark text.
• Experiment with slide transitions and animated text. The slow reveal features can be very distracting to the audience and pace-altering for the lecturer. Make sure that any effects you apply enhance your presentation. Animated text can be helpful - just like revealing parts of an overhead transparency a little at a time. Don't go over the top with it - use it when necessary or it can become monotonous for presenter and audience.
Use images, movie clips, and sound sparingly and only to enhance a slide or concept Use hyperlinks • To launch a web browser • To navigate to different parts of the same presentation
Resource: Smith, Christine. "Designing Presentations with PowerPoint ." 20 Mar 2004. Warwick Centre for Academic Practice. The University of Warwick. 12 Oct 2004 <http://www2.warwick.ac.uk/services/cap/resources/eguides/classroom/designingppt>.
Handout Created by Cheryl Tice, Instructional Support Specialist, GST BOCES
3
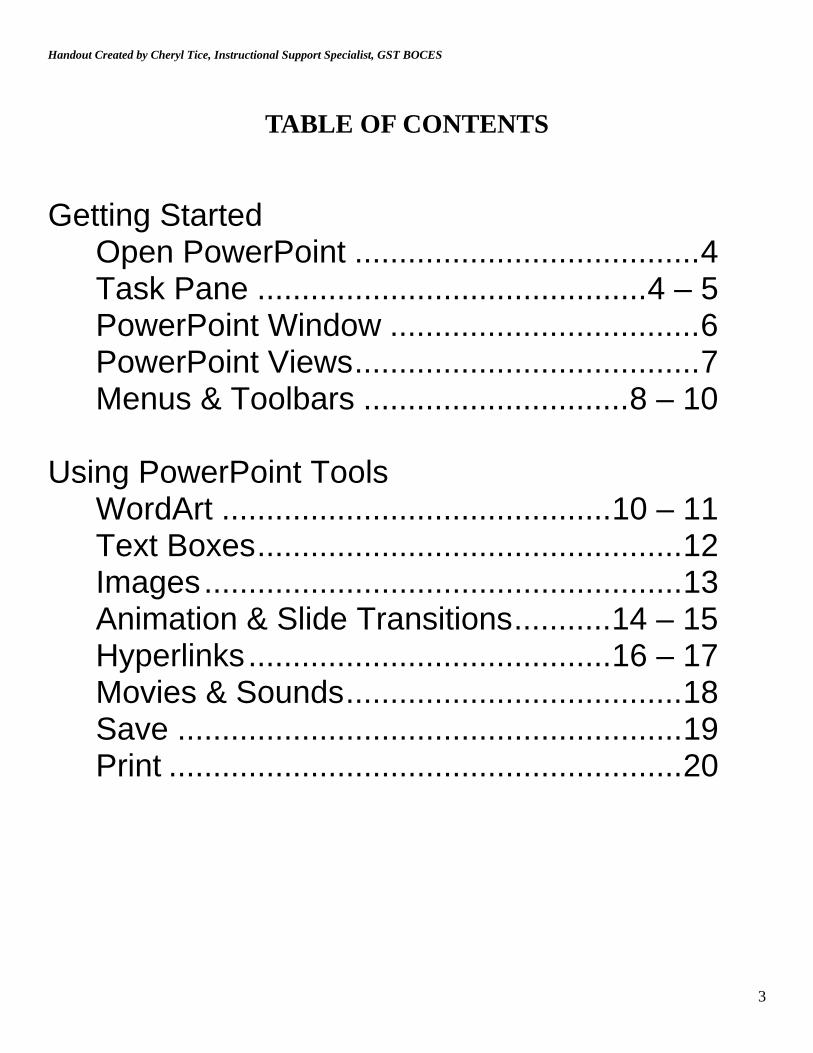
TABLE OF CONTENTS
Getting Started Open PowerPoint .......................................4 Task Pane ............................................4 – 5 PowerPoint Window ...................................6 PowerPoint Views.......................................7 Menus & Toolbars ..............................8 – 10
Using PowerPoint Tools WordArt ............................................10 – 11 Text Boxes................................................12 Images......................................................13 Animation & Slide Transitions...........14 – 15 Hyperlinks.........................................16 – 17 Movies & Sounds......................................18 Save .........................................................19 Print ..........................................................20
Handout Created by Cheryl Tice, Instructional Support Specialist, GST BOCES
4
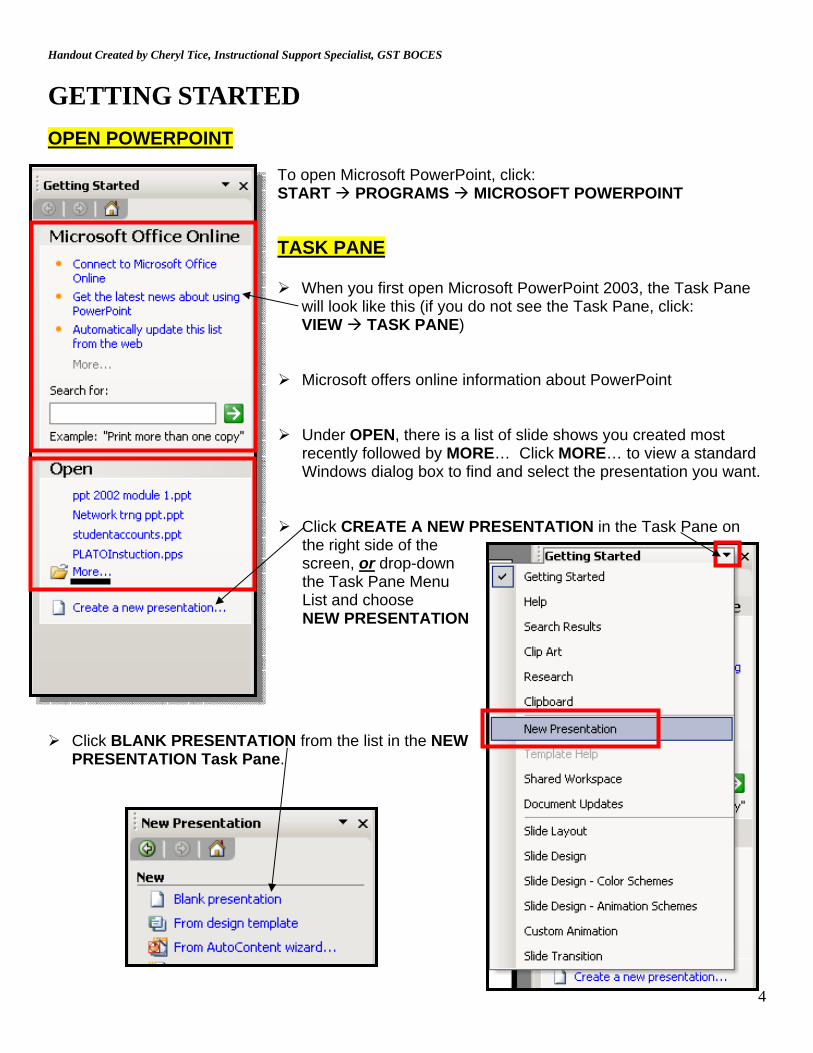
GETTING STARTED OPEN POWERPOINT
To open Microsoft PowerPoint, click: START PROGRAMS MICROSOFT POWERPOINT
TASK PANE
When you first open Microsoft PowerPoint 2003, the Task Pane will look like this (if you do not see the Task Pane, click: VIEW TASK PANE)
Microsoft offers online information about PowerPoint
Under OPEN, there is a list of slide shows you created most
recently followed by MORE… Click MORE… to view a standard Windows dialog box to find and select the presentation you want.
Click CREATE A NEW PRESENTATION in the Task Pane on
the right side of the screen, or drop-down the Task Pane Menu List and choose NEW PRESENTATION
Click BLANK PRESENTATION from the list in the NEW
PRESENTATION Task Pane.

Handout Created by Cheryl Tice, Instructional Support Specialist, GST BOCES
5
Choose the BLANK SLIDE LAYOUT from the Task Pane
To add more slides to your presentation, you can do one of the following:
Click the down arrow next to the slide layout you chose and select INSERT NEW SLIDE.
OR Press CTRL+M on the keyboard
OR Click the NEW SLIDE button on the Formatting Toolbar
OR go to INSERT NEW SLIDE on the Main Menu
Handout Created by Cheryl Tice, Instructional Support Specialist, GST BOCES
6
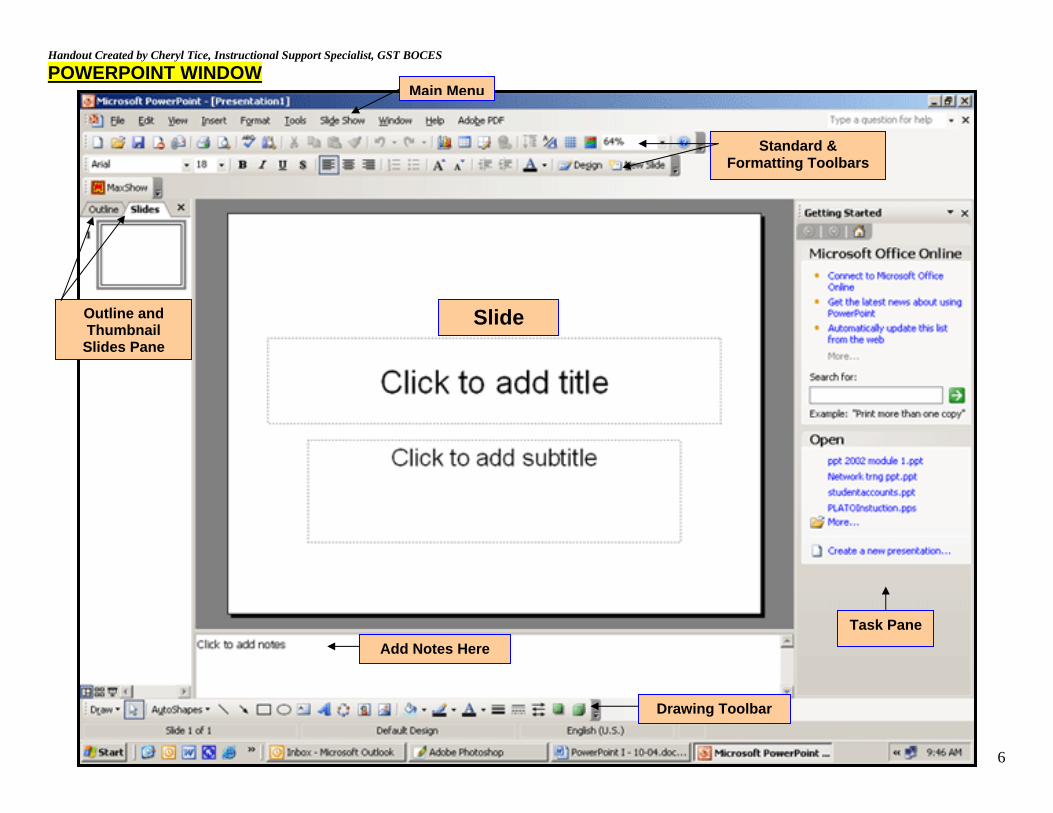
POWERPOINT WINDOW
Main Menu
Standard & Formatting Toolbars
Task Pane
Drawing Toolbar
Slide Outline and Thumbnail
Slides Pane
Add Notes Here
Handout Created by Cheryl Tice, Instructional Support Specialist, GST BOCES
7
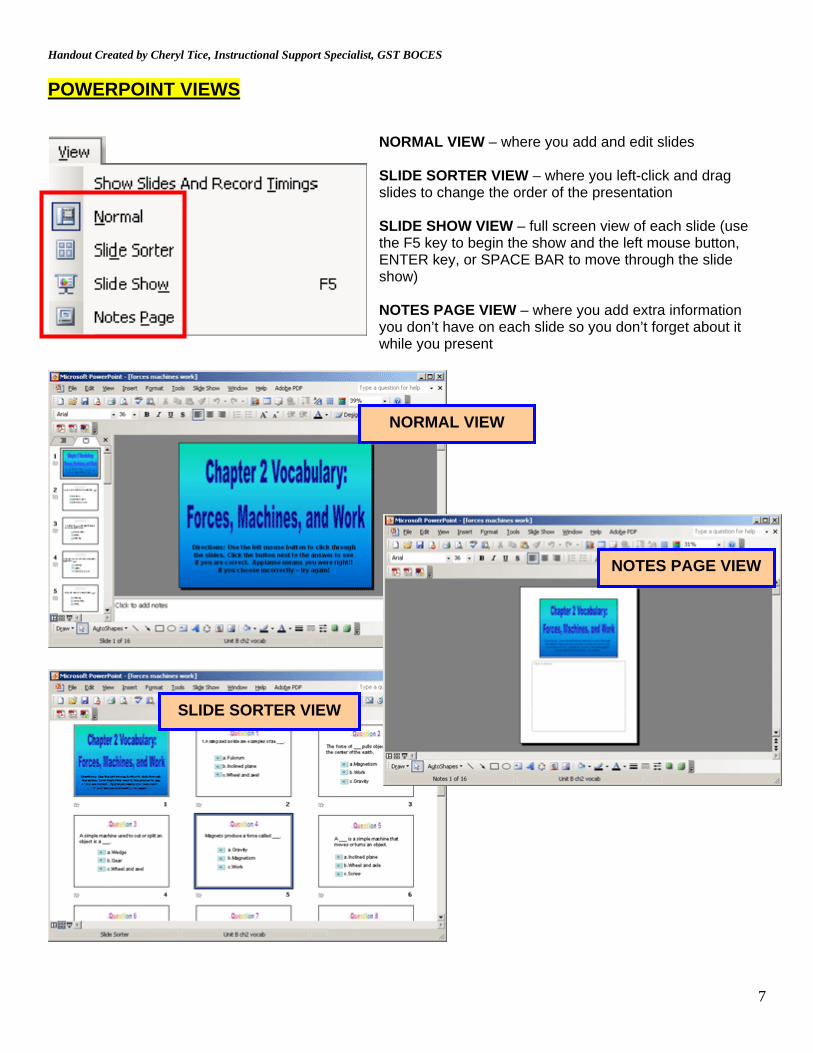
POWERPOINT VIEWS
NORMAL VIEW – where you add and edit slides SLIDE SORTER VIEW – where you left-click and drag slides to change the order of the presentation SLIDE SHOW VIEW – full screen view of each slide (use the F5 key to begin the show and the left mouse button, ENTER key, or SPACE BAR to move through the slide show) NOTES PAGE VIEW – where you add extra information you don’t have on each slide so you don’t forget about it while you present
NORMAL VIEW
SLIDE SORTER VIEW
NOTES PAGE VIEW

Handout Created by Cheryl Tice, Instructional Support Specialist, GST BOCES
8
Menus & Toolbars Notice that the menus and toolbars for PowerPoint are very similar to those in other Microsoft applications. MENUS
Handout Created by Cheryl Tice, Instructional Support Specialist, GST BOCES
9
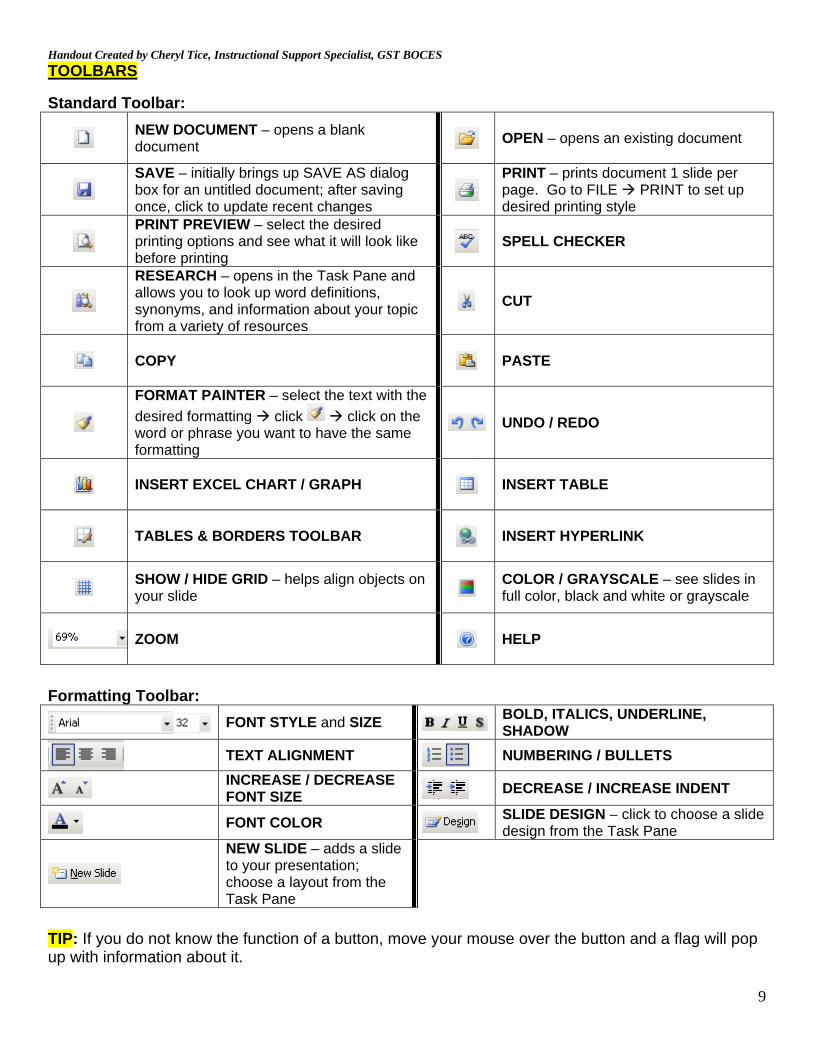
TOOLBARS Standard Toolbar:
NEW DOCUMENT – opens a blank document OPEN – opens an existing document
SAVE – initially brings up SAVE AS dialog box for an untitled document; after saving once, click to update recent changes
PRINT – prints document 1 slide per page. Go to FILE PRINT to set up desired printing style
PRINT PREVIEW – select the desired printing options and see what it will look like before printing
SPELL CHECKER
RESEARCH – opens in the Task Pane and allows you to look up word definitions, synonyms, and information about your topic from a variety of resources
CUT
COPY PASTE
FORMAT PAINTER – select the text with the desired formatting click click on the word or phrase you want to have the same formatting
UNDO / REDO
INSERT EXCEL CHART / GRAPH INSERT TABLE
TABLES & BORDERS TOOLBAR INSERT HYPERLINK
SHOW / HIDE GRID – helps align objects on your slide
COLOR / GRAYSCALE – see slides in full color, black and white or grayscale
ZOOM HELP
Formatting Toolbar:
FONT STYLE and SIZE BOLD, ITALICS, UNDERLINE, SHADOW
TEXT ALIGNMENT NUMBERING / BULLETS
INCREASE / DECREASE FONT SIZE DECREASE / INCREASE INDENT
FONT COLOR SLIDE DESIGN – click to choose a slide design from the Task Pane
NEW SLIDE – adds a slide to your presentation; choose a layout from the Task Pane
TIP: If you do not know the function of a button, move your mouse over the button and a flag will pop up with information about it.
Handout Created by Cheryl Tice, Instructional Support Specialist, GST BOCES
10
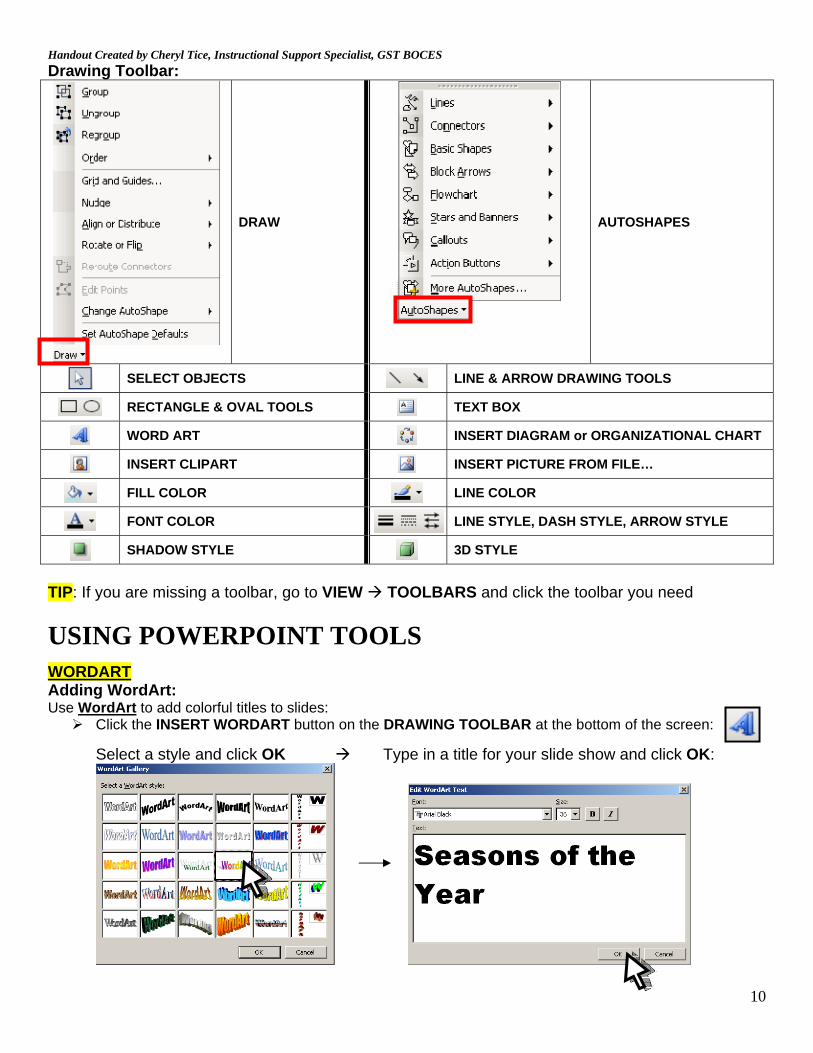
Drawing Toolbar:
DRAW
AUTOSHAPES
SELECT OBJECTS LINE & ARROW DRAWING TOOLS
RECTANGLE & OVAL TOOLS TEXT BOX
WORD ART INSERT DIAGRAM or ORGANIZATIONAL CHART
INSERT CLIPART INSERT PICTURE FROM FILE…
FILL COLOR LINE COLOR
FONT COLOR LINE STYLE, DASH STYLE, ARROW STYLE
SHADOW STYLE 3D STYLE
TIP: If you are missing a toolbar, go to VIEW TOOLBARS and click the toolbar you need
USING POWERPOINT TOOLS WORDART Adding WordArt: Use WordArt to add colorful titles to slides:
Click the INSERT WORDART button on the DRAWING TOOLBAR at the bottom of the screen: Select a style and click OK Type in a title for your slide show and click OK:
Handout Created by Cheryl Tice, Instructional Support Specialist, GST BOCES
11
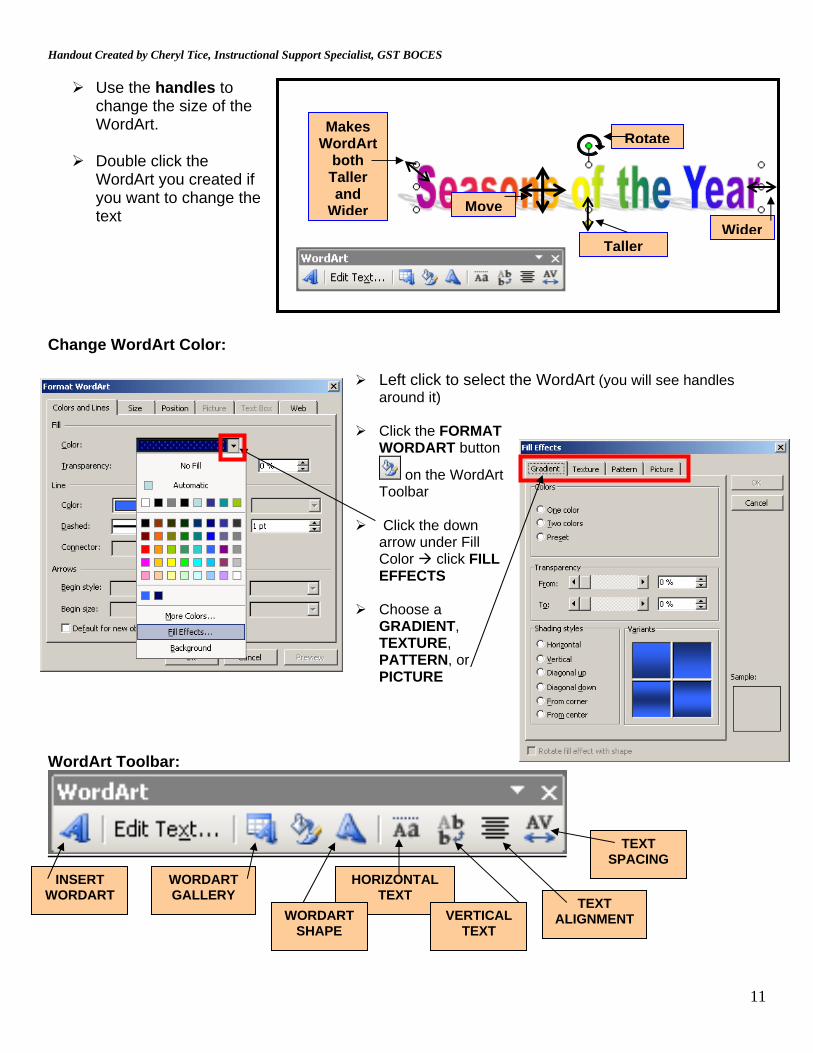
Use the handles to
change the size of the WordArt.
Double click the
WordArt you created if you want to change the text
Change WordArt Color:
Left click to select the WordArt (you will see handles
around it)
Click the FORMAT WORDART button
on the WordArt Toolbar
Click the down arrow under Fill Color click FILL EFFECTS
Choose a GRADIENT, TEXTURE, PATTERN, or PICTURE
WordArt Toolbar:
WiderTaller
Rotate
Move
Makes WordArt
both Taller and
Wider
INSERT WORDART
WORDART GALLERY
HORIZONTAL TEXT
VERTICAL TEXT
WORDART SHAPE
TEXT ALIGNMENT
TEXT SPACING

Handout Created by Cheryl Tice, Instructional Support Specialist, GST BOCES
12
TEXT BOXES You will use Text Boxes to enter text onto slides. Creating a Text Box:
Click the TEXT BOX tool on the DRAWING TOOLBAR
Move the mouse over the slide - it will look like this:
Click and drag a rectangle over the spot where you want the text box to appear (see image below)
*** It will only be as tall as your font size. It will grow taller as you type. TIPS:
Set the desired font size and style BEFORE you add additional slides or create any text boxes so the font is consistent from slide to slide.
Remember to use at least 24 pt font or larger for your presentations
Bulleted words and phrases are easiest to read (instead of sentences)
Be brief and concise
Handout Created by Cheryl Tice, Instructional Support Specialist, GST BOCES
13
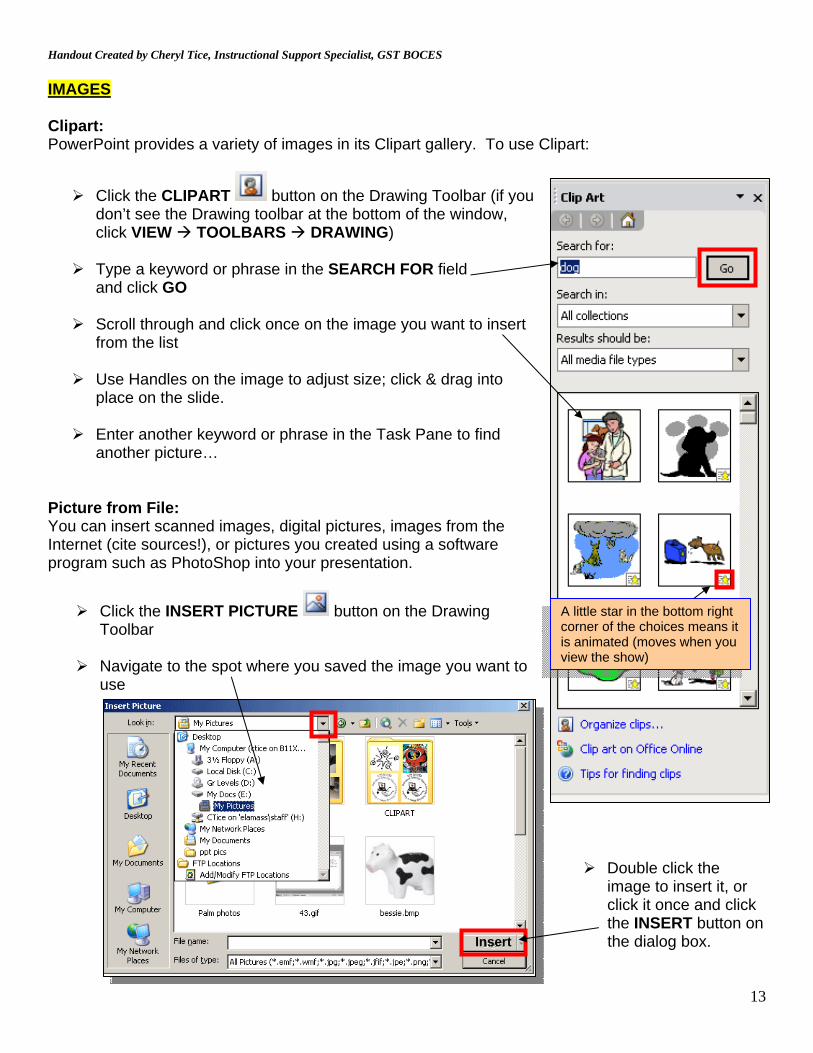
IMAGES Clipart: PowerPoint provides a variety of images in its Clipart gallery. To use Clipart:
Click the CLIPART button on the Drawing Toolbar (if you don’t see the Drawing toolbar at the bottom of the window, click VIEW TOOLBARS DRAWING)
Type a keyword or phrase in the SEARCH FOR field and click GO
Scroll through and click once on the image you want to insert from the list
Use Handles on the image to adjust size; click & drag into place on the slide.
Enter another keyword or phrase in the Task Pane to find another picture…
Picture from File: You can insert scanned images, digital pictures, images from the Internet (cite sources!), or pictures you created using a software program such as PhotoShop into your presentation.
Click the INSERT PICTURE button on the Drawing Toolbar
Navigate to the spot where you saved the image you want to use
Double click the image to insert it, or click it once and click the INSERT button on the dialog box.
Insert
A little star in the bottom right corner of the choices means it is animated (moves when you view the show)

Handout Created by Cheryl Tice, Instructional Support Specialist, GST BOCES
14
ANIMATION & SLIDE TRANSITIONS Animation can be a fun addition to your presentation. Use it for emphasis, but keep in mind it can become distracting. Animate Images:
Click once on the image to select it (you will see “handles” around it)
Click SLIDE SHOW CUSTOM ANIMATION
In the Task Pane, click ADD EFFECT ENTRANCE (you can also choose: EMPHASIS, EXIT, or MOTION PATHS)
MORE EFFECTS
Click to choose an effect and click OK
Handout Created by Cheryl Tice, Instructional Support Specialist, GST BOCES
15
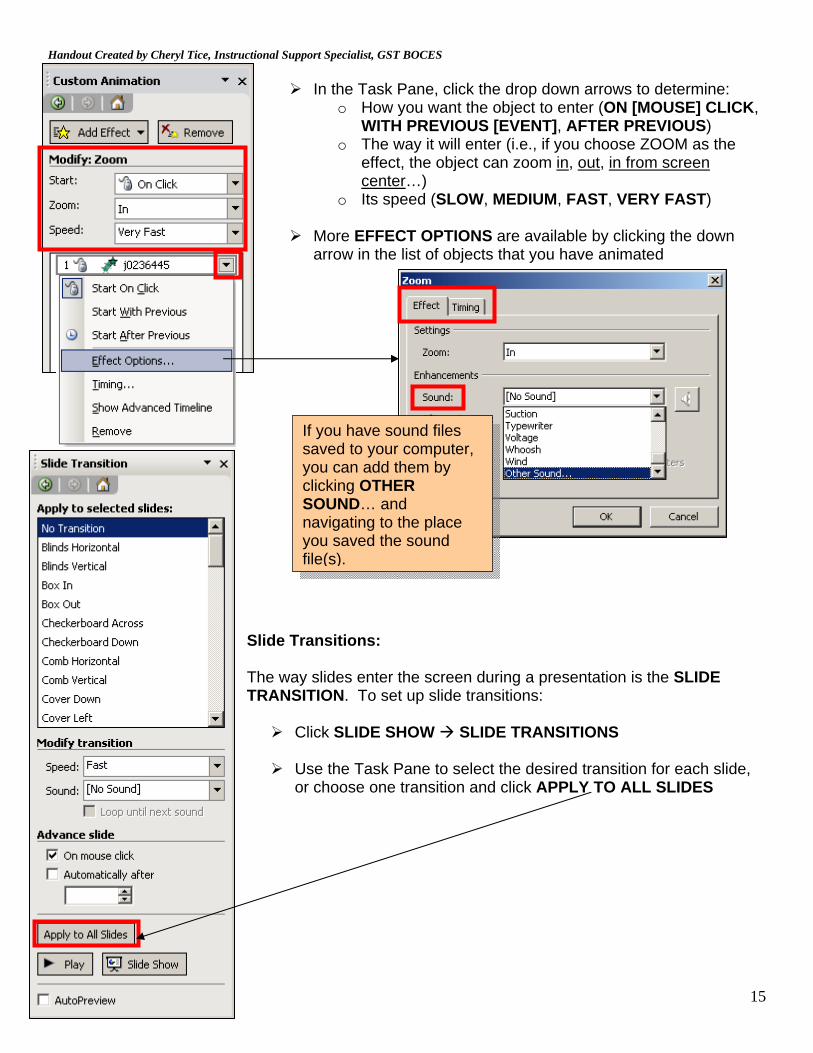
In the Task Pane, click the drop down arrows to determine:
o How you want the object to enter (ON [MOUSE] CLICK, WITH PREVIOUS [EVENT], AFTER PREVIOUS)
o The way it will enter (i.e., if you choose ZOOM as the effect, the object can zoom in, out, in from screen center…)
o Its speed (SLOW, MEDIUM, FAST, VERY FAST)
More EFFECT OPTIONS are available by clicking the down arrow in the list of objects that you have animated
Slide Transitions: The way slides enter the screen during a presentation is the SLIDE TRANSITION. To set up slide transitions:
Click SLIDE SHOW SLIDE TRANSITIONS
Use the Task Pane to select the desired transition for each slide, or choose one transition and click APPLY TO ALL SLIDES
If you have sound files saved to your computer, you can add them by clicking OTHER SOUND… and navigating to the place you saved the sound file(s).

Handout Created by Cheryl Tice, Instructional Support Specialist, GST BOCES
16
HYPERLINKS A hyperlink is text or an image you click to launch a web page. Hyperlinks are a great way to add depth to a presentation. Picture Hyperlinks: Picture Hyperlinks are helpful, especially for those who cannot read or who lack the fine motor skills to control a mouse. To create Picture Hyperlinks:
Open a web browser and find the web site to which you will hyperlink
Right click the URL in the Address Bar at the top of the browser window and left click COPY
In PowerPoint, insert and click the picture you want to hyperlink so it has handles around it
Click the INSERT HYPERLINK button on the Standard Toolbar
Press CTRL+V on your keyboard simultaneously to PASTE the web address into the Address field and click OK
CTRL V
Handout Created by Cheryl Tice, Instructional Support Specialist, GST BOCES
17
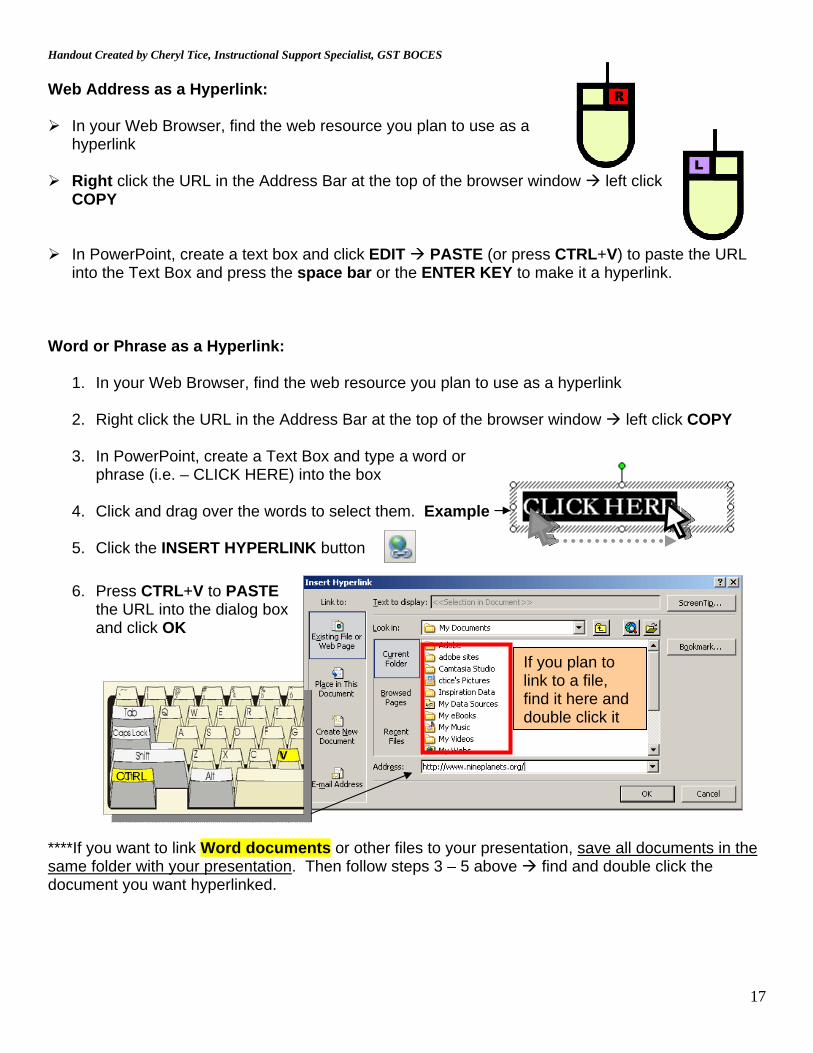
Web Address as a Hyperlink:
In your Web Browser, find the web resource you plan to use as a hyperlink
Right click the URL in the Address Bar at the top of the browser window left click
COPY
In PowerPoint, create a text box and click EDIT PASTE (or press CTRL+V) to paste the URL
into the Text Box and press the space bar or the ENTER KEY to make it a hyperlink. Word or Phrase as a Hyperlink:
1. In your Web Browser, find the web resource you plan to use as a hyperlink
2. Right click the URL in the Address Bar at the top of the browser window left click COPY
3. In PowerPoint, create a Text Box and type a word or phrase (i.e. – CLICK HERE) into the box
4. Click and drag over the words to select them. Example
5. Click the INSERT HYPERLINK button
6. Press CTRL+V to PASTE
the URL into the dialog box and click OK
****If you want to link Word documents or other files to your presentation, save all documents in the same folder with your presentation. Then follow steps 3 – 5 above find and double click the document you want hyperlinked.
CTRL
V
If you plan to link to a file, find it here and double click it
Handout Created by Cheryl Tice, Instructional Support Specialist, GST BOCES
18
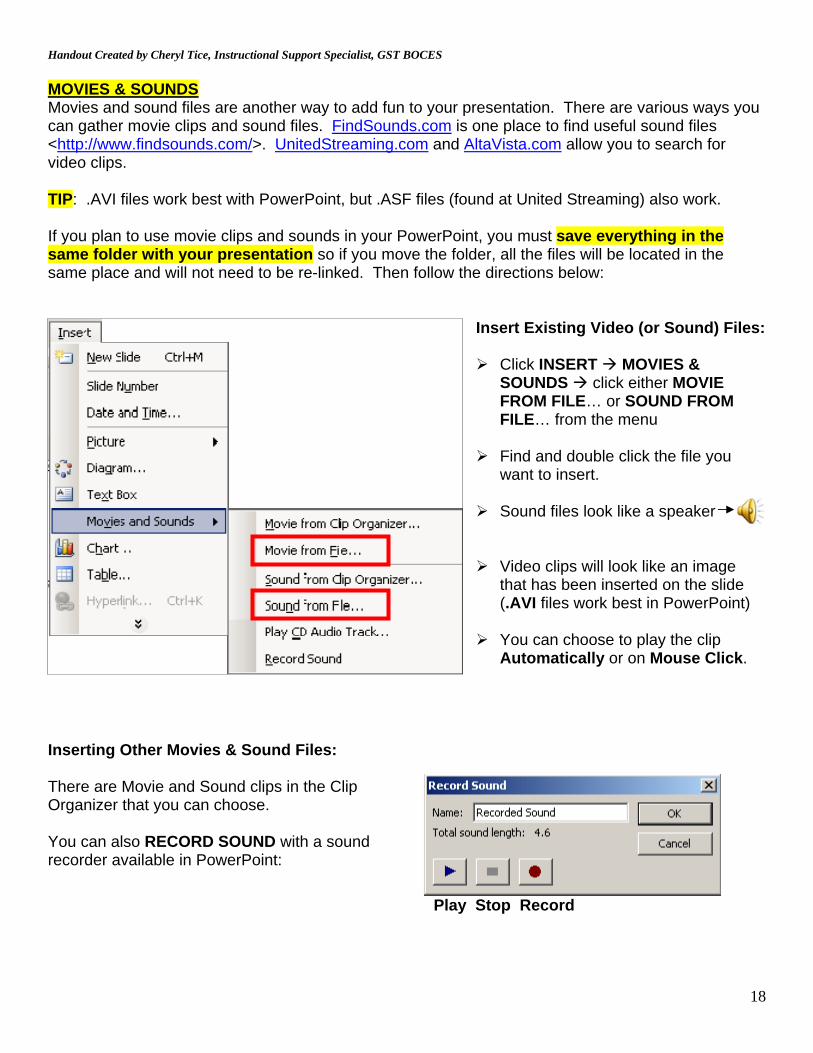
MOVIES & SOUNDS Movies and sound files are another way to add fun to your presentation. There are various ways you can gather movie clips and sound files. FindSounds.com is one place to find useful sound files <http://www.findsounds.com/>. UnitedStreaming.com and AltaVista.com allow you to search for video clips. TIP: .AVI files work best with PowerPoint, but .ASF files (found at United Streaming) also work. If you plan to use movie clips and sounds in your PowerPoint, you must save everything in the same folder with your presentation so if you move the folder, all the files will be located in the same place and will not need to be re-linked. Then follow the directions below:
Insert Existing Video (or Sound) Files:
Click INSERT MOVIES & SOUNDS click either MOVIE FROM FILE… or SOUND FROM FILE… from the menu
Find and double click the file you want to insert.
Sound files look like a speaker
Video clips will look like an image that has been inserted on the slide (.AVI files work best in PowerPoint)
You can choose to play the clip Automatically or on Mouse Click.
Inserting Other Movies & Sound Files: There are Movie and Sound clips in the Clip Organizer that you can choose. You can also RECORD SOUND with a sound recorder available in PowerPoint:
Play Stop Record
Handout Created by Cheryl Tice, Instructional Support Specialist, GST BOCES
19
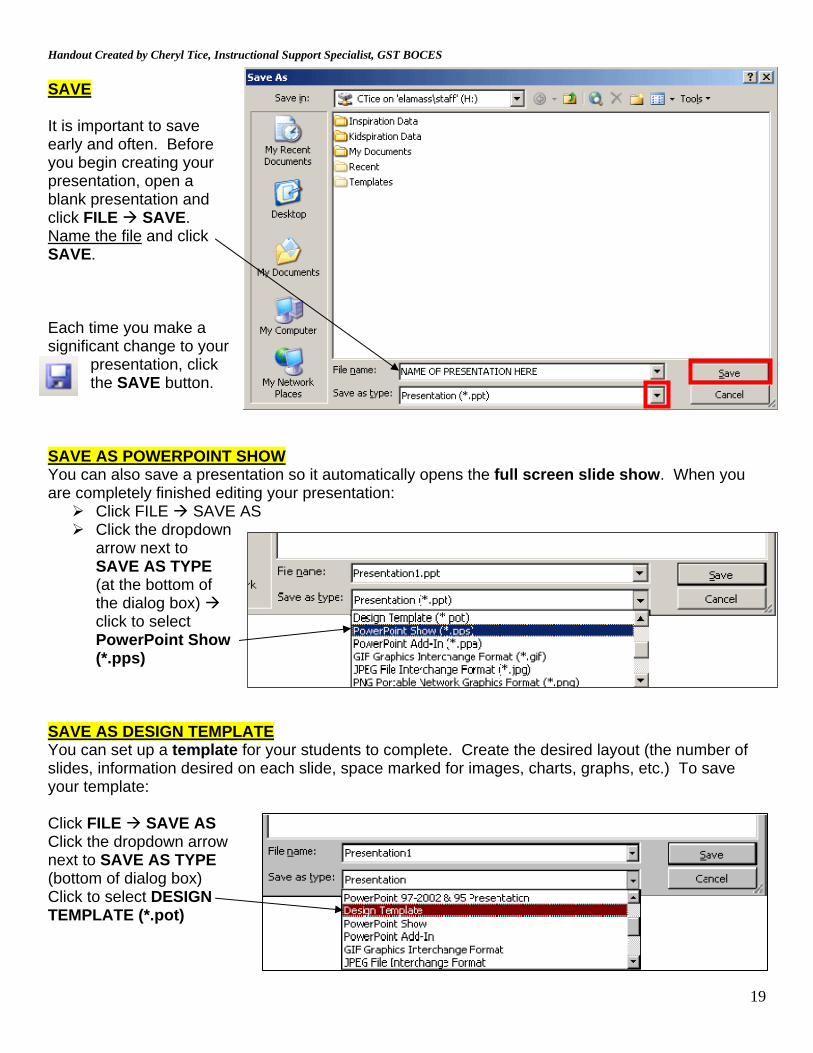
SAVE It is important to save early and often. Before you begin creating your presentation, open a blank presentation and click FILE SAVE. Name the file and click SAVE. Each time you make a significant change to your
presentation, click the SAVE button.
SAVE AS POWERPOINT SHOW You can also save a presentation so it automatically opens the full screen slide show. When you are completely finished editing your presentation:
Click FILE SAVE AS Click the dropdown
arrow next to SAVE AS TYPE (at the bottom of the dialog box) click to select PowerPoint Show (*.pps)
SAVE AS DESIGN TEMPLATE You can set up a template for your students to complete. Create the desired layout (the number of slides, information desired on each slide, space marked for images, charts, graphs, etc.) To save your template: Click FILE SAVE AS Click the dropdown arrow next to SAVE AS TYPE (bottom of dialog box) Click to select DESIGN TEMPLATE (*.pot)
Handout Created by Cheryl Tice, Instructional Support Specialist, GST BOCES
20
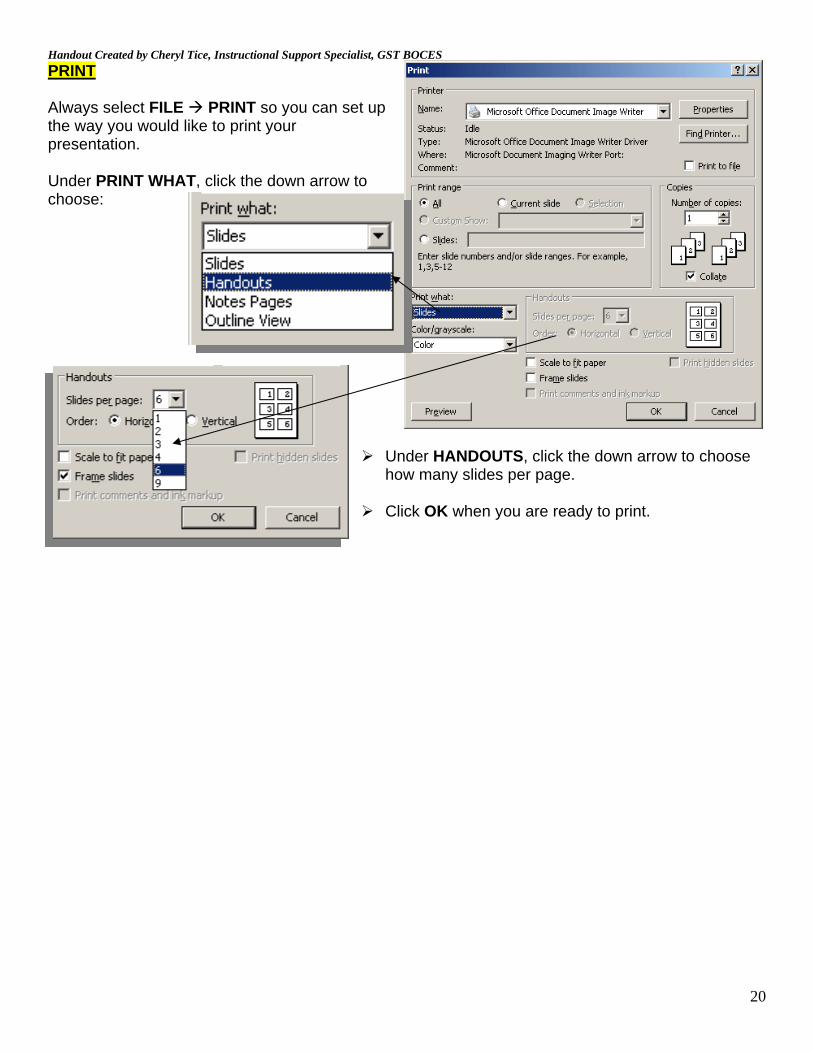
PRINT Always select FILE PRINT so you can set up the way you would like to print your presentation. Under PRINT WHAT, click the down arrow to choose:
Under HANDOUTS, click the down arrow to choose how many slides per page.
Click OK when you are ready to print.