getting started with 1 logitech® wireless touch keyboard k400 · verifique a orientação das...
TRANSCRIPT

1
2
K400
Getting started withLogitech® Wireless Touch Keyboard K400
Getting started withLogitech® Wireless Touch Keyboard K400
AAAA
1 2 3 4 5
6
EnglishTouchpad gesturesPoint and scroll1. Point and slide one finger anywhere on
the touchpad to move the screen pointer.2. Scroll with two fingers, up or down.Left and right click3. Press for left mouse click.*4. Press for right mouse click.*You can also tap the touchpad surface to perform a click. To disable touchpad tap, press the Fn-key plus the left mouse button. To re-enable touchpad tap, press the Fn-key plus the left mouse button again.
Tips for a personalized experience!To adjust your touchpad experience, download and install software from www.logitech.com/support/K400. The software allows you to modify the speed of the on-screen pointer, adjust scrolling, and disable touchpad tap.
ItalianoMovimenti per il touchpadPuntamento e scorrimento1. Puntare e far scivolare il dito ovunque
sul touchpad per spostare il puntatore visualizzato sullo schermo.
2. Scorrere con due dita, verso l’alto o verso il basso.
Clic con il pulsante destro o sinistro3. Premere per fare clic con il pulsante
sinistro.*4. Premere per fare clic con il pulsante
destro.* È possibile fare clic anche toccando leggermente la superficie del touchpad. Per disattivare la risposta del touchpad al tocco, premere il tasto Fn e il pulsante sinistro del mouse. Per riattivare la risposta del touchpad al tocco, premere di nuovo il tasto Fn e il pulsante sinistro del mouse.
Suggerimenti per la personalizzazionePer personalizzare il funzionamento del touchpad, scaricare e installare il software da www.logitech.com/support/K400. Il software consente di regolare lo scorrimento, modificare la velocità del puntatore visualizzato sullo schermo e disattivare il touchpad.
EspañolGestos de touchpadSeñalar y desplazar1. Señale y deslice un dedo en cualquier
parte del touchpad para mover el puntero en pantalla.
2. Desplazar con dos dedos, hacia arriba o abajo.
Clic izquierdo y derecho3. Pulse para realizar un clic con el botón
izquierdo del ratón.*4. Pulse para realizar un clic con el botón
derecho del ratón.*También puede puntear la superficie del touchpad para hacer un clic. Para desactivar el punteo de touchpad, pulse la tecla Fn más el botón izquierdo del ratón. Para volver a activar el punteo de touchpad, pulse la tecla Fn más el botón izquierdo del ratón.
Sugerencias para una experiencia personalizada.Para ajustar la experiencia con el touchpad, descargue e instale software de www.logitech.com/ support/K400. El software permite modificar la velocidad del puntero en pantalla, ajustar el desplazamiento y desactivar el punteo de touchpad.
PortuguêsGestos no touchpadApontar e deslocar1. Aponte e deslize um dedo em qualquer
local do touchpad para mover o ponteiro no ecrã.
2. Desloque com dois dedos, para cima ou para baixo.
Clique com os botões esquerdo e direito3. Prima para clicar com o botão esquerdo
do rato.*4. Prima para clicar com o botão direito
do rato.*Também pode tocar na superfície do touchpad para fazer clique. Para desactivar o toque no touchpad, prima a tecla Fn e clique no botão esquerdo do rato. Para reactivar o toque no touchpad, prima novamente a tecla Fn e clique no botão esquerdo do rato.
Sugestões para uma experiência personalizada!Para ajustar a utilização do touchpad, transfira e instale o software em www.logitech.com/support/K400. O software permite-lhe modificar a velocidade do ponteiro no ecrã, ajustar o deslocamento e desactivar o toque do touchpad.
ΕλληνικάΚινήσεις touchpadΚατάδειξη και κύλιση1. Τοποθετήστε ένα δάχτυλο οπουδήποτε
πάνω στο touchpad και σύρετέ το για να μετακινήσετε τον δείκτη της οθόνης.
2. Πραγματοποιήστε κύλιση με τα δύο δάχτυλα προς τα πάνω ή προς τα κάτω.
Αριστερό και δεξί κλικ.3. Πατήστε για αριστερό κλικ ποντικιού.*4. Πατήστε για δεξί κλικ ποντικιού.*Μπορείτε, επίσης, να πατήσετε στην επιφάνεια του touchpad για να κάνετε κλικ. Για να απενεργοποιήσετε το πάτημα στο touchpad, πατήστε το πλήκτρο Fn και το αριστερό κουμπί του ποντικιού. Για να ενεργοποιήσετε εκ νέου το πάτημα στο touchpad, πατήστε ξανά το πλήκτρο Fn και το αριστερό κουμπί του ποντικιού.
Συμβουλές για εξατομικευμένη χρήση!Αν θέλετε να προσαρμόσετε τη χρήση του touchpad, κάντε λήψη και εγκατάσταση λογισμικού από τη διεύθυνση www.logitech.com/support/K400. Το λογισμικό σάς επιτρέπει να τροποποιείτε την ταχύτητα του δείκτη που εμφανίζεται στην οθόνη, να προσαρμόζετε την κύλιση και να απενεργοποιείτε το touchpad.
EnglishFeaturesHotkeys1. Left mouse click2. Mute3. Volume down 4. Volume up5. Internet home Battery compartment6. Nano receiver storage
ItalianoCaratteristicheTasti dedicati1. Clic con il pulsante sinistro2. Disattivazione del volume3. Riduzione del volume 4. Aumento del volume5. Pagina iniziale Internet Vano batterie6. Alloggiamento
del ricevitore Nano
EspañolCaracterísticasBotones de acceso rápido1. Clic con el botón
izquierdo2. Silencio3. Bajar volumen 4. Subir volumen5. Inicio de Internet Compartimento de pilas6. Compartimento
del nano receptor
PortuguêsCaracterísticasTeclas de atalho1. Clique com o botão
esquerdo2. Sem som3. Diminuir volume 4. Aumentar volume5. Página inicial da Internet Compartimento das pilhas6. Armazenamento
do nano-receptor
ΕλληνικάΧαρακτηριστικάΠλήκτρα συντόμευσης1. Αριστερό κλικ ποντικιού2. Σίγαση3. Μείωση έντασης 4. Αύξηση έντασης5. Αρχική σελίδα στο Internet Θήκη μπαταριών6. Χώρος αποθήκευσης
νανοδέκτη
1
3 4
2
What do you think?Cosa ne pensi?
¿Cuál es su opinión?O que acha?
Ποια είναι η άποψή σας;
Please take a minute to tell us. Thank you for purchasing our product.
Dedicaci qualche minuto del tuo tempo e inviaci un commento. Grazie per avere acquistato questo prodotto.
Nos gustaría conocerla, si puede dedicarnos un minuto. Le agradecemos la adquisición de nuestro producto.
Despenda um minuto para nos dar a sua opinião. Obrigado por adquirir o nosso produto.
Θα θέλαμε να την ακούσουμε. Σας ευχαριστούμε για την αγορά σας.
www.logitech.com/ithink
www.logitech.com/support
België/Belgique Dutch: +32-(0)2 200 64 44; French: +32-(0)2 200 64 40
Česká Republika +420 239 000 335
Danmark +45-38 32 31 20
Deutschland +49-(0)69-51 709 427
España +34-91-275 45 88
France +33-(0)1-57 32 32 71
Ireland +353-(0)1 524 50 80
Italia +39-02-91 48 30 31
Magyarország +36 (1) 777-4853
Nederland +31-(0)-20-200 84 33
Norge +47-(0)24 159 579
Österreich +43-(0)1 206 091 026
Polska 00800 441 17 19
Portugal +351-21-415 90 16
Россия +7(495) 641 34 60
Schweiz/Suisse D +41-(0)22 761 40 12 Svizzera F +41-(0)22 761 40 16 I +41-(0)22 761 40 20 E +41-(0)22 761 40 25
South Africa 0800 981 089
Suomi +358-(0)9 725 191 08
Sverige +46-(0)8-501 632 83
Türkiye 00800 44 882 5862
United Arab 8000 441-4294 Emirates
United Kingdom +44-(0)203-024-81 59
European, English: +41-(0)22 761 40 25 Mid. East., & Fax: +41-(0)21 863 54 02 African Hq. Morges, Switzerland
Eastern Europe English: 41-(0)22 761 40 25
United States +1 646-454-3200
Argentina +0800 555 3284
Brasil +0800 891 4173
Canada +1-866-934-5644
Chile +1230 020 5484
Latin America +1 800-578-9619
Mexico +001 800 578 9619
M/N:C-U0007
CMIIT ID: 2010DJ0355 Approval No.: ETA-418/2010/WRLO
5
Z855
DZL-C-U0007
,
IC: 4418A-CU0007FCC ID: JNZCU0007
14418/POSTEL/2010 2100
CCAI10LP0020T1
www.logitech.com
© 2011 Logitech. All rights reserved. Logitech, the Logitech logo, and other Logitech marks are owned by Logitech and may be registered. All other trademarks are the property of their respective owners. Logitech assumes no responsibility for any errors that may appear in this manual. Information contained herein is subject to change without notice.
620-003213.006
EnglishHelp with setup•Is the keyboard powered on?•Power Off and power On the keyboard.•Is the Unifying receiver securely plugged
into a computer USB port? Try changing USB ports. •If the Unifying receiver is plugged
into a USB hub, try plugging it directly into a USB port on your computer.•Did you pull the battery tab?
Check the orientation of the batteries inside the keyboard, or replace the two AA alkaline batteries. •Remove metallic objects between
the keyboard and its Unifying receiver.•Try moving the Unifying receiver to
a USB port closer to the keyboard.•Try reconnecting the keyboard and Unifying
receiver using the Logitech Unifying software (Refer to the Unifying section in this guide.)
ItalianoProblemi di installazione•Verificare che la tastiera sia accesa.•Spegnere e accendere la tastiera.•Verificare che il ricevitore Unifying sia
collegato correttamente a una porta USB. Provare a utilizzare un’altra porta USB. •Se il ricevitore Unifying è collegato
a un hub USB, provare a collegarlo direttamente al computer.•La linguetta di protezione delle batterie
è stata rimossa? Verificare la polarità delle batterie all’interno della tastiera oppure sostituire le due batterie alcaline AA. •Rimuovere eventuali oggetti metallici
presenti tra tastiera e ricevitore Unifying.•Spostare il ricevitore Unifying su un’altra
porta USB più vicina alla tastiera.•Connettere nuovamente la tastiera e
il ricevitore Unifying utilizzando il software Logitech Unifying (consultare la sezione Unifying del presente manuale).
EspañolAyuda con la instalación•¿Ha encendido el teclado?•Apague y encienda el teclado.•¿Está el receptor Unifying conectado
correctamente a un puerto USB del ordenador? Pruebe otros puertos USB. •Si el receptor Unifying está
conectado a un concentrador USB, conéctelo directamente a un puerto USB del ordenador.•¿Ha tirado de la lengüeta de las pilas?
Compruebe la orientación de las pilas dentro del teclado, o sustituya las dos pilas alcalinas AA. •Retire cualquier objeto metálico situado
entre el teclado y el receptor Unifying.•Lleve el receptor Unifying a un puerto USB
más cercano al teclado.•Vuelva a conectar el teclado y el receptor
Unifying mediante el software Logitech Unifying (consulte la sección Unifying de esta guía)
PortuguêsAjuda com a configuração•O teclado está ligado?•Ligar e desligar o teclado.•O receptor Unifying está correctamente
ligado a uma porta USB do computador? Experimente mudar de porta USB. •Se o receptor Unifying estiver ligado
a um concentrador USB, tente ligá-lo directamente a uma porta USB no seu computador.•Retirou a película das pilhas?
Verifique a orientação das pilhas no interior do teclado ou substitua as duas pilhas alcalinas AA. •Remova objectos metálicos entre o teclado
e o receptor Unifying.•Experimente deslocar o receptor Unifying
para uma porta USB mais próxima do teclado.•Tente voltar a ligar o teclado e o receptor
Unifying, utilizando o software Logitech Unifying (Consulte a secção Unifying neste guia).
ΕλληνικάΒοήθεια με την εγκατάσταση• Έχετε ενεργοποιήσει το πληκτρολόγιο;• Απενεργοποιήστε και ενεργοποιήστε ξανά
το πληκτρολόγιο.• Έχετε συνδέσει σωστά το δέκτη Unifying
σε μια θύρα USB του υπολογιστή; Δοκιμάστε να αλλάξετε θύρα USB.
• Εάν ο νανοδέκτης είναι συνδεδεμένος σε έναν διανομέα USB, δοκιμάστε να τον συνδέσετε απευθείας σε μια θύρα USB στον υπολογιστή σας.
• Έχετε τραβήξει την ασφάλεια της μπαταρίας; Ελέγξτε τον προσανατολισμό των μπαταριών στο εσωτερικό του πληκτρολογίου ή αντικαταστήστε τις δύο αλκαλικές μπαταρίες μεγέθους AA.
• Απομακρύνετε τυχόν μεταλλικά αντικείμενα ανάμεσα στο πληκτρολόγιο και τον δέκτη Unifying.
• Προσπαθήστε να μετακινήσετε τον δέκτη Unifying σε μια θύρα USB πιο κοντά στο πληκτρολόγιο.
• Δοκιμάστε να επανασυνδέσετε το πληκτρολόγιο και τον δέκτη Unifying χρησιμοποιώντας το λογισμικό Logitech Unifying (ανατρέξτε στην ενότητα Unifying του οδηγού αυτού).
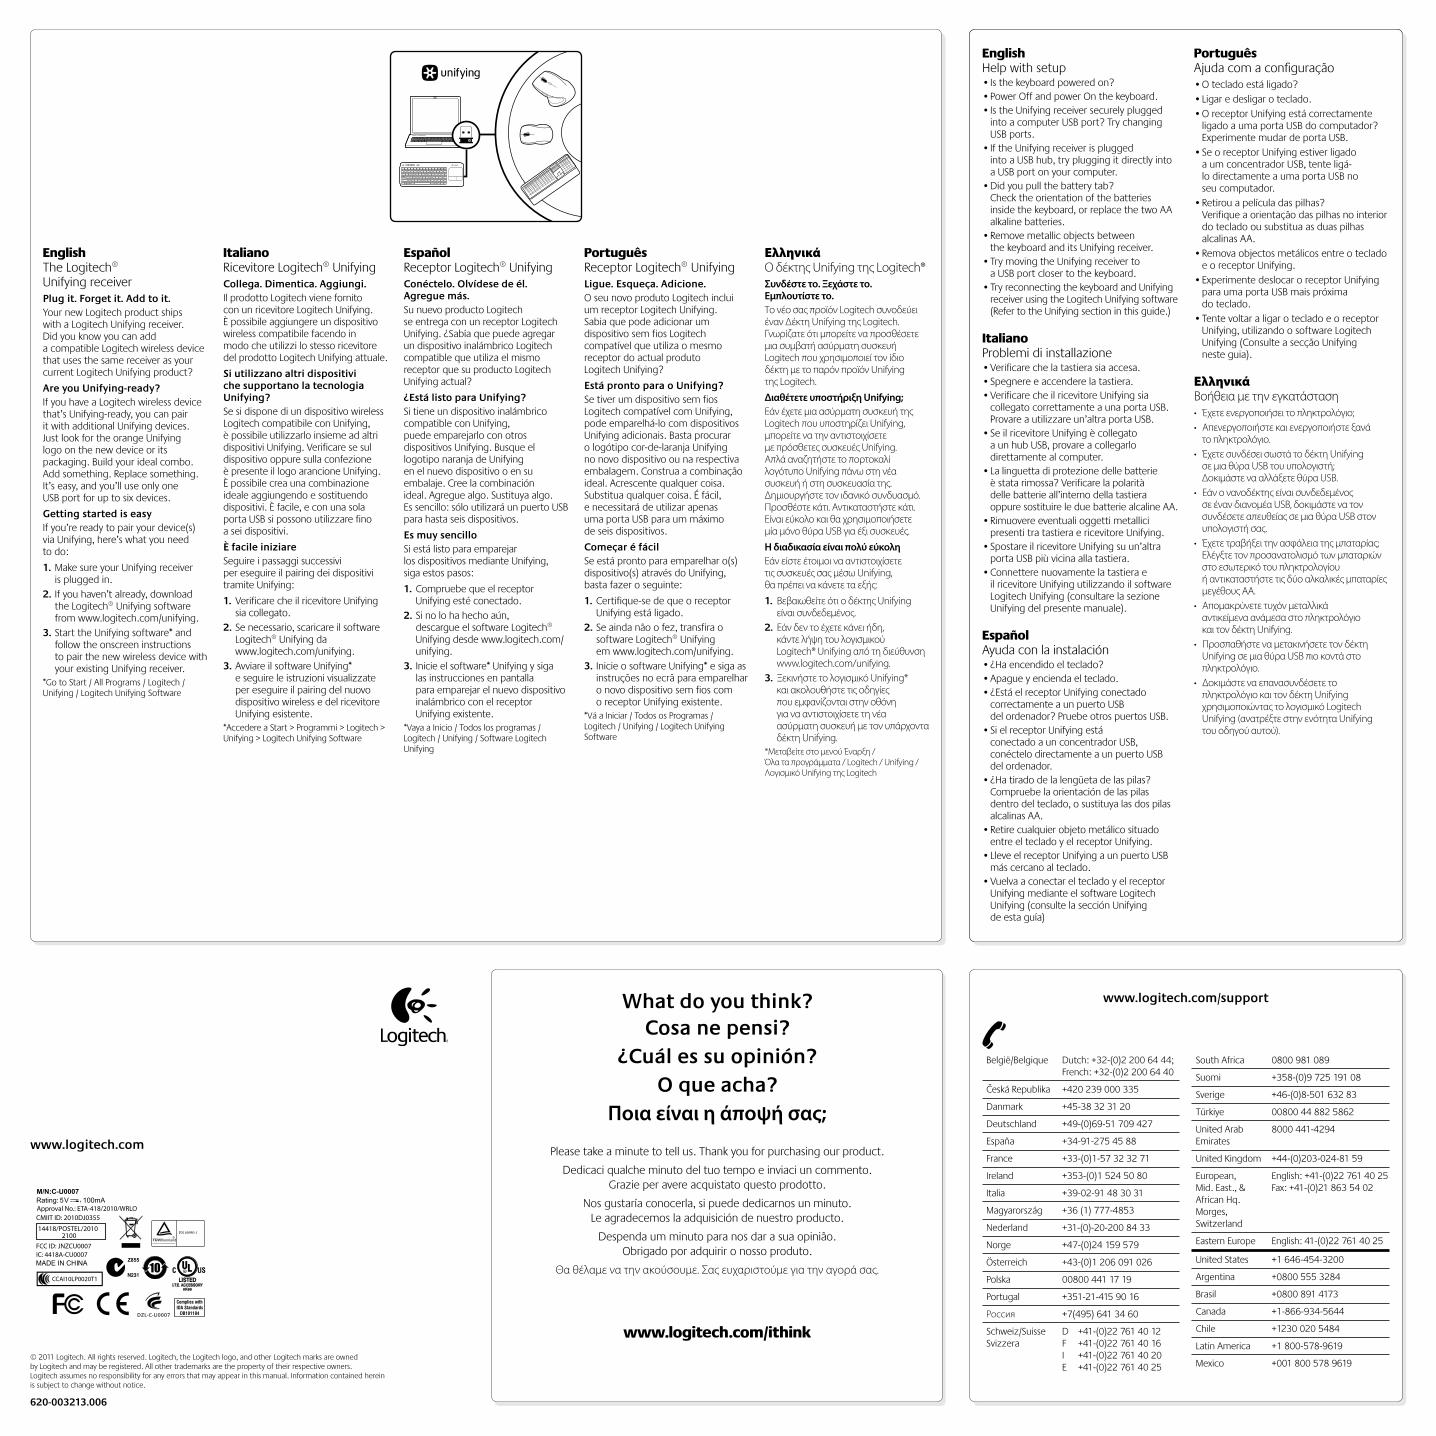
EnglishThe Logitech® Unifying receiverPlug it. Forget it. Add to it.Your new Logitech product ships with a Logitech Unifying receiver. Did you know you can add a compatible Logitech wireless device that uses the same receiver as your current Logitech Unifying product?
Are you Unifying-ready?If you have a Logitech wireless device that’s Unifying-ready, you can pair it with additional Unifying devices. Just look for the orange Unifying logo on the new device or its packaging. Build your ideal combo. Add something. Replace something. It’s easy, and you’ll use only one USB port for up to six devices.
Getting started is easyIf you’re ready to pair your device(s) via Unifying, here’s what you need to do:
1. Make sure your Unifying receiver is plugged in.
2. If you haven’t already, download the Logitech® Unifying software from www.logitech.com/unifying.
3. Start the Unifying software* and follow the onscreen instructions to pair the new wireless device with your existing Unifying receiver.
*Go to Start / All Programs / Logitech / Unifying / Logitech Unifying Software
ItalianoRicevitore Logitech® UnifyingCollega. Dimentica. Aggiungi.Il prodotto Logitech viene fornito con un ricevitore Logitech Unifying. È possibile aggiungere un dispositivo wireless compatibile facendo in modo che utilizzi lo stesso ricevitore del prodotto Logitech Unifying attuale.
Si utilizzano altri dispositivi che supportano la tecnologia Unifying?Se si dispone di un dispositivo wireless Logitech compatibile con Unifying, è possibile utilizzarlo insieme ad altri dispositivi Unifying. Verificare se sul dispositivo oppure sulla confezione è presente il logo arancione Unifying. È possibile crea una combinazione ideale aggiungendo e sostituendo dispositivi. È facile, e con una sola porta USB si possono utilizzare fino a sei dispositivi.
È facile iniziareSeguire i passaggi successivi per eseguire il pairing dei dispositivi tramite Unifying:
1. Verificare che il ricevitore Unifying sia collegato.
2. Se necessario, scaricare il software Logitech® Unifying da www.logitech.com/unifying.
3. Avviare il software Unifying* e seguire le istruzioni visualizzate per eseguire il pairing del nuovo dispositivo wireless e del ricevitore Unifying esistente.
*Accedere a Start > Programmi > Logitech > Unifying > Logitech Unifying Software
EspañolReceptor Logitech® UnifyingConéctelo. Olvídese de él. Agregue más.Su nuevo producto Logitech se entrega con un receptor Logitech Unifying. ¿Sabía que puede agregar un dispositivo inalámbrico Logitech compatible que utiliza el mismo receptor que su producto Logitech Unifying actual?
¿Está listo para Unifying?Si tiene un dispositivo inalámbrico compatible con Unifying, puede emparejarlo con otros dispositivos Unifying. Busque el logotipo naranja de Unifying en el nuevo dispositivo o en su embalaje. Cree la combinación ideal. Agregue algo. Sustituya algo. Es sencillo: sólo utilizará un puerto USB para hasta seis dispositivos.
Es muy sencilloSi está listo para emparejar los dispositivos mediante Unifying, siga estos pasos:
1. Compruebe que el receptor Unifying esté conectado.
2. Si no lo ha hecho aún, descargue el software Logitech® Unifying desde www.logitech.com/unifying.
3. Inicie el software* Unifying y siga las instrucciones en pantalla para emparejar el nuevo dispositivo inalámbrico con el receptor Unifying existente.
*Vaya a Inicio / Todos los programas / Logitech / Unifying / Software Logitech Unifying
PortuguêsReceptor Logitech® UnifyingLigue. Esqueça. Adicione.O seu novo produto Logitech inclui um receptor Logitech Unifying. Sabia que pode adicionar um dispositivo sem fios Logitech compatível que utiliza o mesmo receptor do actual produto Logitech Unifying?
Está pronto para o Unifying?Se tiver um dispositivo sem fios Logitech compatível com Unifying, pode emparelhá-lo com dispositivos Unifying adicionais. Basta procurar o logótipo cor-de-laranja Unifying no novo dispositivo ou na respectiva embalagem. Construa a combinação ideal. Acrescente qualquer coisa. Substitua qualquer coisa. É fácil, e necessitará de utilizar apenas uma porta USB para um máximo de seis dispositivos.
Começar é fácilSe está pronto para emparelhar o(s) dispositivo(s) através do Unifying, basta fazer o seguinte:
1. Certifique-se de que o receptor Unifying está ligado.
2. Se ainda não o fez, transfira o software Logitech® Unifying em www.logitech.com/unifying.
3. Inicie o software Unifying* e siga as instruções no ecrã para emparelhar o novo dispositivo sem fios com o receptor Unifying existente.
*Vá a Iniciar / Todos os Programas / Logitech / Unifying / Logitech Unifying Software
ΕλληνικάΟ δέκτης Unifying της Logitech®Συνδέστε το. Ξεχάστε το. Εμπλουτίστε το.Το νέο σας προϊόν Logitech συνοδεύει έναν Δέκτη Unifying της Logitech. Γνωρίζατε ότι μπορείτε να προσθέσετε μια συμβατή ασύρματη συσκευή Logitech που χρησιμοποιεί τον ίδιο δέκτη με το παρόν προϊόν Unifying της Logitech.
Διαθέτετε υποστήριξη Unifying;Εάν έχετε μια ασύρματη συσκευή της Logitech που υποστηρίζει Unifying, μπορείτε να την αντιστοιχίσετε με πρόσθετες συσκευές Unifying. Απλά αναζητήστε το πορτοκαλί λογότυπο Unifying πάνω στη νέα συσκευή ή στη συσκευασία της. Δημιουργήστε τον ιδανικό συνδυασμό. Προσθέστε κάτι. Αντικαταστήστε κάτι. Είναι εύκολο και θα χρησιμοποιήσετε μία μόνο θύρα USB για έξι συσκευές.
Η διαδικασία είναι πολύ εύκοληΕάν είστε έτοιμοι να αντιστοιχίσετε τις συσκευές σας μέσω Unifying, θα πρέπει να κάνετε τα εξής:
1. Βεβαιωθείτε ότι ο δέκτης Unifying είναι συνδεδεμένος.
2. Εάν δεν το έχετε κάνει ήδη, κάντε λήψη του λογισμικού Logitech® Unifying από τη διεύθυνση www.logitech.com/unifying.
3. Ξεκινήστε το λογισμικό Unifying* και ακολουθήστε τις οδηγίες που εμφανίζονται στην οθόνη για να αντιστοιχίσετε τη νέα ασύρματη συσκευή με τον υπάρχοντα δέκτη Unifying.
*Μεταβείτε στο μενού Έναρξη / Όλα τα προγράμματα / Logitech / Unifying / Λογισμικό Unifying της Logitech