getting started programming the atmel atmega32 in assembly ... started in ass… · - and select...
TRANSCRIPT

1
Getting started programming the Atmel
ATmega32 in assembly using AVRStudio
by
Dr.-Ing. Joerg MossbruckerEECS Department
Milwaukee School of Engineering
August 20, 2005
This manual covers the following:
• How to create and code a new project
• How to build and simulate the tutorial
• How to download and execute the tutorial on the hardware platform

2
1 New Project
- Go to “D:\Atmel\AVRTools\AvrStudio4”
- and double-click “AVRStudio.exe”

3
- click “Create New Project”
- and fill out the dialog box as shown above.; make sure that the Location is set as above and that
“Create initial file” is checked. Click “Next>>”
- and select “AVR Simulator” and “ATmega32”. Click “Finish”. This closes the dialog box.

4
AVRStudio is an integrated development environment. The user interface consists of the follow-
ing area:
A: The workspace; this area will either show the structure of the current project or the simulator
B: The source code window(s)
C: The status window
Please note that depending on the configuration of AVRStudio many more windows might appear.
AB
C

5
Click on the source code window (B) and input the following assembly program:
; Copyright (c) 2004 Joerg Mossbrucker <[email protected]>
.include "m32def.inc" ; include the register def file
.equ Zero = 0
.equ Time = 255 ; this used in a timing loop
.def Counter= r21 ; use r21 as the counter register
.dseg ; data segment
.org 0x60 ; set SRAM address to hex 60Data: .byte 1 ; reserve a byte at SRAM
.cseg ; code segment
.org 0 ; set the RESET vector torjmp Reset ; the beginning of our code
.org 0x2A ; set Program Counter to hex 2AReset:
ldi r20,0xff ; load immediate 0xff into r20out DDRB,r20 ; output that on DDRB
ldi r20,Zero ; load r20 with 0sts Data,r20 ; store r20 in Dataout PORTB,r20 ; and out to PORTB
start: ldi Counter,time ; load Counter with time
loop: dec Counter ; decrement Counterbrne loop ; branch if not equal back to loop
lds r20,Data ; load r20 with Datainc r20 ; increment r20sts Data,r20 ; store r20 into Dataout PORTB,r20 ; out r20 on PORTB
rjmp start ; back to start
After coding save your project by clicking “File->Save All”.
6
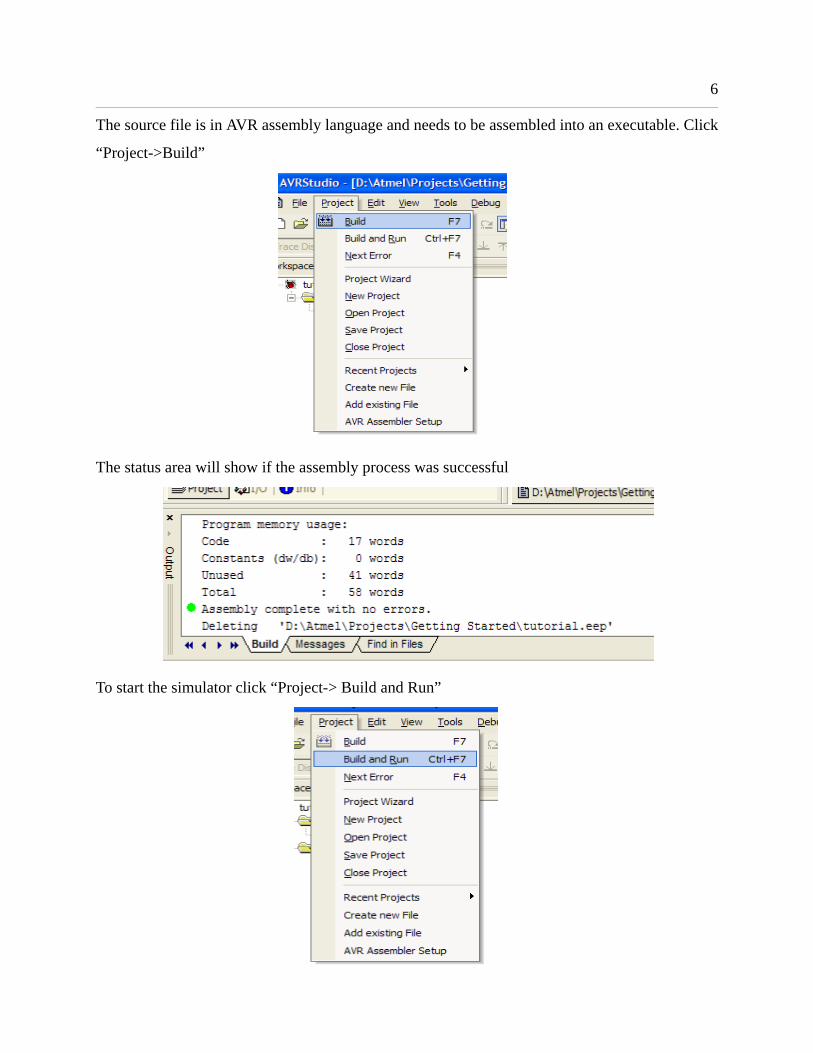
The source file is in AVR assembly language and needs to be assembled into an executable. Click
“Project->Build”
The status area will show if the assembly process was successful
To start the simulator click “Project-> Build and Run”

7
This assembles and starts the simulator
The simulator is capable of simulating a variety of AVR microcontroller. Click “Debug -> Select
Platform and Device”

8
and select the appropriate microcontroller
- Click “Finish”. Click “Debug -> Simulator Options”

9
and change the settings accordingly
The I/O view in the workspace contains every register of the selected microcontroller.

10
The debug menu contains every command for debugging using the simulator, such as single step-
ping through the code
The I/O view reflects the changes of every step in the program

11
By enabling the Watch view (click “View -> Watch”) variables can be traced throughout the pro-
gram by simply selecting the variable name
right-click and select “Add to Watch: Counter”

12
which adds the variable to the watch list

13
2 Downloading
Connect the AVR ISP programmer to the ISP header on the development platform and to an open
serial port on a PC. Click “Tools -> STK500/AVR ISP/JTAG ICE...”
AVR ISP will then connect with the microcontroller. Hit “Cancel” if you are asked to upgrade the
Firmware of AVRISP.

14
The AVR microcontroller has many different modes of operation. Make sure that the fuse settings
are as follows (Click “Fuses”)
and that the Lock Bits are as shown (click “LockBits”)

15
To download an executable to the microcontroller, click “Program” and select the appropriate
.hex-file in the Flash section.
click “Program” and the executable is downloaded and executed on the micro controller.