getting started guide photo album - secureserver.netrotating and flipping photos! 25 changing the...
TRANSCRIPT

AKJZNAzsqknsxxkjnsjxGetting Started Guide Page 1
Photo Album // Getting Started Guide
Getting Started GuidePhoto AlbumManage Your Media Online

Getting Started Guide: Photo Album
Version 1.2 (11.08.11)
© Copyright 2011 GoDaddy.com, Inc. All rights reserved.
Trademarks used in this book Java™ is a trademark of Sun Microsystems, Inc.Flash® is a registered trademark of Adobe Systems, Inc.
Distribution of this work or derivative of this work is prohibited unless prior written permission is obtained from the copyright holder.
All other trademarks and copyrights are the property of their respective owners.
AKJZNAzsqknsxxkjnsjxGetting Started Guide Page 2
Photo Album // Getting Started Guide

Table of ContentsWelcome to Photo Album 6SETTING UP YOUR PHOTO ALBUM ACCOUNT! 6
CHANGING YOUR PHOTO ALBUM USER NAME! 8
CHANGING YOUR PHOTO ALBUM PASSWORD! 9
CHANGING YOUR PHOTO ALBUM SITE TITLE! 10
SETTING A PHOTO ALBUM THEME! 10
Working with Galleries 12CREATING GALLERIES! 12
SETTING GALLERY THEMES! 14
PASSWORD PROTECTING GALLERIES! 15
MAKING GALLERIES PRIVATE! 16
AKJZNAzsqknsxxkjnsjxGetting Started Guide Page 3
Photo Album // Getting Started Guide

Working with Media 18ADDING MEDIA TO A PHOTO ALBUM ! 18
ADDING PHOTOS TO A GALLERY ! 18
ADDING VIDEOS TO A GALLERIES ! 21
ADDING AND EDITING CAPTIONS AND TITLES! 22
ADDING KEYWORD TAGS TO MEDIA ! 23
Working with Photos 24EDITING PHOTOS! 24
CROPPING PHOTOS ! 24
ROTATING AND FLIPPING PHOTOS! 25
CHANGING THE BRIGHTNESS IN PHOTOS! 27
CHANGING THE CONTRAST IN PHOTOS! 27
ADDING MUSIC TO PHOTO ALBUM SLIDESHOWS! 28
AKJZNAzsqknsxxkjnsjxGetting Started Guide Page 4
Photo Album // Getting Started Guide

Protecting Your Photos on the Internet 30
AKJZNAzsqknsxxkjnsjxGetting Started Guide Page 5
Photo Album // Getting Started Guide
Welcome to Photo AlbumWith Photo Album, you can share your photos and videos with anyone you choose.
After setting up your account, you can upload photos and videos and organize them in to categories. Then you can customize your settings, such as making your galleries public (accessible to all visitors), password-protected (only accessible by password), or private (accessible only by you).
SETTING UP YOUR PHOTO ALBUM ACCOUNT
The first time you launch Photo Album, you must enter your login and account information.
To Set Up Your Photo Album Account
1. Log in to your Account Manager.
2. From the My Products section, click Photo Album.
3. Click Setup Account next to the account you want to create.
4. Read the End User License Agreement, and then click I Accept.
5. On the Account Settings page, enter the email address you want to use to send photos by email and for password recovery, and then select your Domain Name Settings:
AKJZNAzsqknsxxkjnsjxGetting Started Guide Page 6
Photo Album // Getting Started Guide

Create a new subdomainEnter the subdomain prefix and select one of the domain names in your list.
Select an available domain name from your accountSelect from a list of domain names for this account.
Enter a domain name not registered hereEnter the full domain name.
If you enter a domain name that you registered with another registrar, please update the A Record for your domain name so it points to the IP address 208.109.80.29. For more information, contact your domain name registrar.
6. Click Save.
Your account is set up. We send a unique user name and password to the email address you provided. You can update the user name and password at any time.
AKJZNAzsqknsxxkjnsjxGetting Started Guide Page 7
Photo Album // Getting Started Guide

CHANGING YOUR PHOTO ALBUM USER NAME
If you would like to alter your Photo Album user information, you can easily change the user name associated with your account.
To Change Your Photo Album User Name
1. Log in to your Account Manager.
2. From the My Products section, click Photo Album.
3. Click Manage Account next to the account you want to use.
4. From the Settings menu, select Account Settings.
5. On the Specify Account Settings page, next to User name, click Edit.
6. Enter the user name you want to use to log in to your account.
7. Click Save.
Your user name is updated.
AKJZNAzsqknsxxkjnsjxGetting Started Guide Page 8
Photo Album // Getting Started Guide

CHANGING YOUR PHOTO ALBUM PASSWORD
If you would like to alter your Photo Album user information, you can easily change the password associated with your account.
To Change Your Photo Album Password
1. Log in to your Account Manager.
2. From the My Products section, click Photo Album.
3. Click Manage Account next to the account you want to use.
4. From the Settings menu, select Account Settings.
5. Next to Password, click Edit.
6. In the New password and New password again fields, enter your new password.
7. Click Save.
Your password is updated.
AKJZNAzsqknsxxkjnsjxGetting Started Guide Page 9
Photo Album // Getting Started Guide
CHANGING YOUR PHOTO ALBUM SITE TITLE
When visitors come to your Photo Album site, their browsers display your Photo Album Site Title in the browser’s title bar. Photo Album users your account’s URL as the site title by default, but you can change it to any title you prefer.
To Change Your Photo Album Site Title
1. Log in to your Account Manager.
2. In the My Products section, click Photo Album.
3. Click Manage Account next to the account you want to use.
4. From the Settings menu, select Site Settings.
5. In the Site title field, edit the title of your Website.
6. Click Save.
Your site title is updated.
SETTING A PHOTO ALBUM THEME
In Photo Album, you can select a theme to establish the look and feel of your photo album. You can also set themes for individual galleries.
AKJZNAzsqknsxxkjnsjxGetting Started Guide Page 10
Photo Album // Getting Started Guide

To Set a Photo Album Theme
1. Log in to your Account Manager.
2. In the My Products section, click Photo Album.
3. Click Manage Account next to the account you want to use.
4. From the Settings menu,select Default Theme.
5. Filter the list of themes to view by selecting options from the following lists:
Category View all themes associated with a specific category.
Color View all themes associated with a specific color.
6. On the Filmstrip display, click the theme you want to use.
7. Click Save.
You can preview the theme by clicking Preview Theme.
AKJZNAzsqknsxxkjnsjxGetting Started Guide Page 11
Photo Album // Getting Started Guide

Working with GalleriesOrganizing your photos and videos into galleries in Photo Album lets you easily organize and share them. You can create multiple galleries, and then upload your photos and videos to those galleries.
CREATING GALLERIES
You can create a gallery and add media later, or you can create the gallery and add media immediately.
To Create a Gallery
1. Log in to your Account Manager.
2. In the My Products section, click Photo Album.
3. Click Manage Account next to the account you want to use.
4. Click Create Gallery.
5. In the Gallery name field, enter the name you want to use for the gallery.
AKJZNAzsqknsxxkjnsjxGetting Started Guide Page 12
Photo Album // Getting Started Guide

6. In the Gallery description field, enter a description for your photo gallery.
7. In the Privacy settings section, select one of the following:
Public Makes galleries available for public view.
Private Makes galleries private so only you can view them. Private galleries do not support video uploads.
Password Protected
Makes the gallery accessible only to visitors who enter the correct password. Password-protected galleries do not support video uploads.
8. Click Create Gallery to create your gallery and add media later, or click Create and add media to add to your gallery now.
AKJZNAzsqknsxxkjnsjxGetting Started Guide Page 13
Photo Album // Getting Started Guide

SETTING GALLERY THEMES
By default, your Photo Album gallery themes are the same as your site's theme. However, you can change the gallery theme to customize the look and feel of your galleries.
To Set a Gallery Theme
1. Log in to your Account Manager.
2. In the My Products section, click Photo Album.
3. Click Manage Account next to the account you want to use.
4. From the Galleries menu, select Edit Galleries.
5. Select the gallery or galleries for which you want to change the theme.
6. From the Apply this action menu, select Change Theme.
7. Click Go.
AKJZNAzsqknsxxkjnsjxGetting Started Guide Page 14
Photo Album // Getting Started Guide

8. Filter the list of themes you want to view by selecting an option from one of these lists:
Category View all themes associated with a specific category.
Color View all themes associated with a specific color.
9. Select the theme you want to use.
10.Click Save.
PASSWORD PROTECTING GALLERIES
If you password protect a gallery, only visitors that enter the correct password can view the gallery.
Password-protected galleries do not currently support video uploads.
To Password Protect a Gallery
1. Log in to your Account Manager.
2. In the My Products section, click Photo Album.
3. Click Manage Account next to the account you want to use.
AKJZNAzsqknsxxkjnsjxGetting Started Guide Page 15
Photo Album // Getting Started Guide

4. Hover your mouse over the gallery you want to edit, and click Edit Gallery.
5. From the Privacy settings section, select Password protected.
6. In the Enter Password field, enter the password you want to use.
7. Click Save.
MAKING GALLERIES PRIVATE
You can also make galleries private, so that they are hidden from public view and are accessible only by you.
Video upload to private galleries is not supported at this time.
AKJZNAzsqknsxxkjnsjxGetting Started Guide Page 16
Photo Album // Getting Started Guide

To Make a Gallery Private
1. Log in to your Account Manager.
2. In the My Products section, click Photo Album.
3. Click Manage Account next to the account you want to use.
4. Hover your mouse over the gallery you want to edit, and click Edit Gallery.
5. From the Privacy settings section, select Private.
6. Click Save.
AKJZNAzsqknsxxkjnsjxGetting Started Guide Page 17
Photo Album // Getting Started Guide

Working with MediaPhoto Album hosts two types of media: photos and video. There are multiple ways to upload media to your online photo album site using the Basic Uploading Tool or the Advanced Uploading Tool. Additionally, you can tag and add captions and titles to your media to help your site's visitors find specific photos or videos.
ADDING MEDIA TO A PHOTO ALBUM
Uploading photos and video into Photo Album makes it easy to share your life with your friends. While you provide all your photo and video content, we provide all the music to accompany your media.
ADDING PHOTOS TO A GALLERY
You can upload your photos individually using the Basic Uploading Tool,or in bulk with the Advanced Uploading Tool.
The Advanced Uploading Tool requires the Adobe® Flash® plug-in. If you use the Basic Uploading Tool, individual files you upload can be up to 50 MB in size. The size of your image files determine how long it takes to upload. We recommend resizing your photos using the Resize option.
AKJZNAzsqknsxxkjnsjxGetting Started Guide Page 18
Photo Album // Getting Started Guide

You can upload photos in the JPG, GIF, PNG or BMP file formats.
To Add Photos to a Gallery Using the Advanced Uploading Tool
1. Log in to your Account Manager.
2. In the My Products section, click Photo Album.
3. Click Manage Account next to the account you want to use.
4. Click Upload.
5. If this is the first time you've accessed the Add Photos page, you might need to follow the instructions for installing the Adobe Flash plug-in.
6. From the Select a gallery menu, select the gallery you want to use.
7. Click Browse.
8. Locate and select the photos you want to upload, and then click Open. To select multiple files, hold the Ctrl or Shift key while selecting the files you want to upload.
9. Click Upload.
AKJZNAzsqknsxxkjnsjxGetting Started Guide Page 19
Photo Album // Getting Started Guide
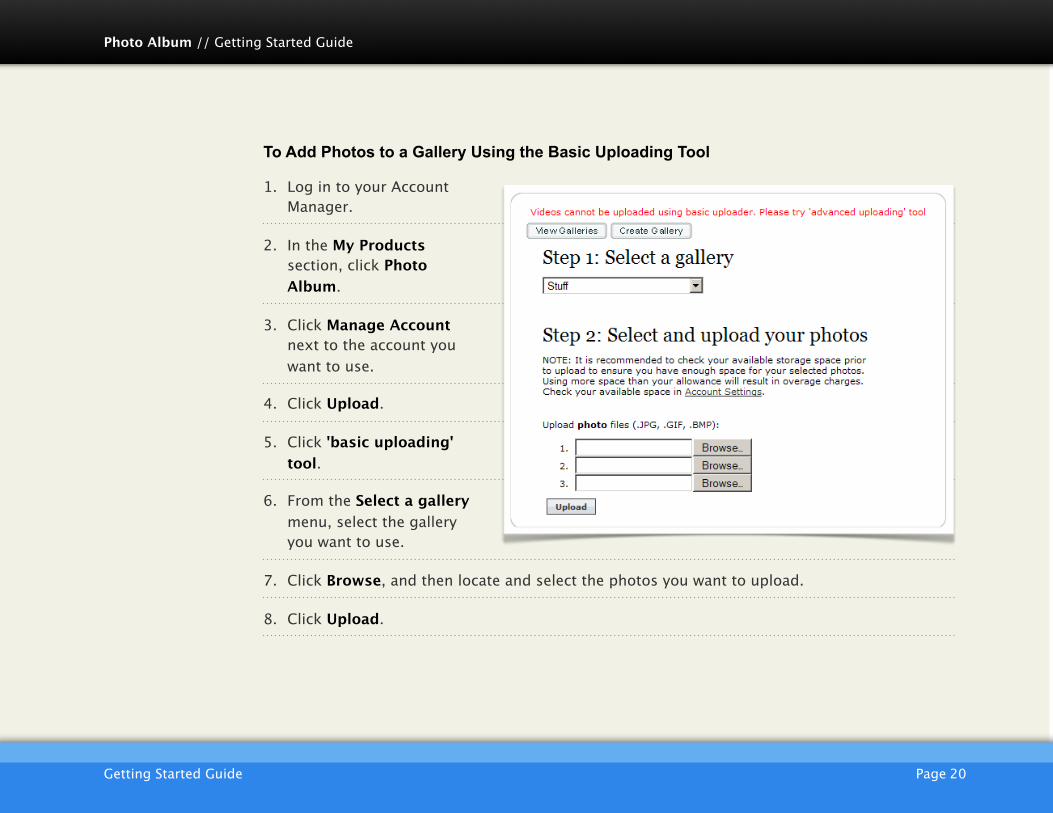
To Add Photos to a Gallery Using the Basic Uploading Tool
1. Log in to your Account Manager.
2. In the My Products section, click Photo Album.
3. Click Manage Account next to the account you want to use.
4. Click Upload.
5. Click 'basic uploading' tool.
6. From the Select a gallery menu, select the gallery you want to use.
7. Click Browse, and then locate and select the photos you want to upload.
8. Click Upload.
AKJZNAzsqknsxxkjnsjxGetting Started Guide Page 20
Photo Album // Getting Started Guide

ADDING VIDEOS TO A GALLERIES
Using the Advanced Uploading Tools, you can upload videos to public galleries. Videos uploaded to private or password-protected galleries don’t display properly. If you add a video to a private or password-protected gallery, you can add it to public galleries to display your videos.
Photo Album requires the most recent version of Flash to upload videos. If you do not have the most updated version, we recommend you download it before uploading videos. Uploads are limited to 150 MB per file and 5 files per upload.
To Add Videos
1. Log in to your Account manager.
2. In the My Products section, click Photo Album.
3. Click Manage Account next to the account you want to use.
4. Click Upload.
5. From the Select a gallery menu, select the gallery you want to upload the video.
6. Click Browse, and then locate and select the video you want to upload to.
AKJZNAzsqknsxxkjnsjxGetting Started Guide Page 21
Photo Album // Getting Started Guide

7. Click Upload.
ADDING AND EDITING CAPTIONS AND TITLES
By default, Photo Album uses the photo and video file name as the title, but you can edit it at any time. You can also add and edit a caption. If you use the Advanced Uploading Tool to add photos, you can edit the title before you upload the photo.
To Add or Edit a Caption and Title from the Gallery
1. Log in to your Account Manager.
2. In the My Products section, click Photo Album.
3. Click Manage Account next to the account you want to use.
4. Select the gallery you want to view.
5. In the Thumbnail or Filmstrip view, click the photo or video title. The title displays in a text box, and a caption text box displays below it.
6. Update the title and caption.
7. Click Save.
AKJZNAzsqknsxxkjnsjxGetting Started Guide Page 22
Photo Album // Getting Started Guide

ADDING KEYWORD TAGS TO MEDIA
In Photo Album, you can "tag" media with keywords that describe them. Tag media individually, or, from the Manage Galleries page, tag all media in selected galleries.
To find the media that share a specific tag, click the tag in the sidebar and all media tagged with that keyword display in the list.
To Add Tags to Media
1. Log in to your Account Manager.
2. In the My Products section, click Photo Album.
3. Click Manage Account next to the account you want to use.
4. Click the gallery you want to add tags to.
5. In the Thumbnail or Filmstrip View, click the photo or video you want to add tags to.
6. Click Click to edit title, caption, and tags.
7. In the Tags field, enter keywords.
8. Click Save.
AKJZNAzsqknsxxkjnsjxGetting Started Guide Page 23
Photo Album // Getting Started Guide

Working with PhotosWith Photo Album, you also have access to easy-to-use tools to edit your photos, making sure they look their very best.
EDITING PHOTOS
Improve your photos with photo-editing features. If you aren't happy with the edits you've made, you can restore your image to its original state.
CROPPING PHOTOS
You can crop photos in Photo Album by specifying the width-to-height ratio you want to maintain and then selecting the portion of the photo you want to keep. When you crop the photo, only the portion you selected remains.
To Crop a Photo
1. Click the name of the gallery you want to view.
2. Click Edit Photo above the photo you want to
3. modify.
4. Click Crop, and holding down the mouse button,
AKJZNAzsqknsxxkjnsjxGetting Started Guide Page 24
Photo Album // Getting Started Guide

5. drag diagonally to select the portion of the photo you want to keep.
6. When you crop the photo, this portion will be the only part of the photo remaining.
NOTE:Once you have created the area to be cropped, you can resize the area or move the entire selected area.
7. Click Apply, and then click Save.
If you need to start over at any time, click the Reset button.
If you edit a photo without saving, the next time you try to edit a photo, Photo Album gives you an option to resume the editing session for the unsaved photo.
ROTATING AND FLIPPING PHOTOS
Using Photo Album, you can rotate photos left or right or you can flip them vertically or horizontally.
To Rotate or Flip a Photo
1. Log in to your Account Manager.
2. In the My Products section, click Photo Album.
AKJZNAzsqknsxxkjnsjxGetting Started Guide Page 25
Photo Album // Getting Started Guide

3. Click Manage Account next to the account you want to use.
4. Click the gallery you want to view.
5. In the Thumbnail or Filmstrip view, click Edit Photo above the photo you want to use.
6. To rotate or flip the photo, click one of the following:
Rotate Left Rotates the photo 90 degrees to the left (counterclockwise).
Rotate Right Rotates the photo 90 degrees to the right (clockwise).
Flip Horizontal Flips the photo horizontally (sideways).
Flip Vertical Flips the photo vertically (up and down).
7. If you need to start over at any time, click Reset.
8. Click Save.
AKJZNAzsqknsxxkjnsjxGetting Started Guide Page 26
Photo Album // Getting Started Guide

CHANGING THE BRIGHTNESS IN PHOTOS
You can enhance or decrease photo lighting by changing the brightness. When you select to change a photo's brightness, Photo Album creates several thumbnails with different brightness levels applied to them. Select the thumbnail you want to use, and apply the change.
To Change the Brightness on a Photo
1. Click the name of the gallery you want to view.
2. Click Edit Photo above the photo you want to use.
3. Click Brightness, and then use the Adjust brightness slider to select the brightness value you want to use.
4. Click Apply, and then click Save.
CHANGING THE CONTRAST IN PHOTOS
You can enhance or decrease photo details by changing the contrast. When you select to change the photo's contrast, Photo Album creates several thumbnails with different contrast levels applied to them. Select the thumbnail you want to use, and apply the change.
To Change the Contrast on a Photo
1. Click the name of the gallery you want to view.
AKJZNAzsqknsxxkjnsjxGetting Started Guide Page 27
Photo Album // Getting Started Guide

2. Click Edit Photo above the photo you want to use.
3. Click Contrast, and then use the Adjust contrast slider to select the contrast value you want to use.
4. Click Apply, and then click
5. Save.
ADDING MUSIC TO PHOTO ALBUM SLIDESHOWS
Photo Album offers a variety of music tracks to play during your slideshows. When you play or share a slideshow, the music you select plays.
To Add Music to a Slideshow
1. Log in to your Account Manager.
2. In the My Products section, click Photo Album.
3. Click Manage Account next to the account you want to use.
4. Click the gallery you want to add music to.
5. Click Slideshow.
AKJZNAzsqknsxxkjnsjxGetting Started Guide Page 28
Photo Album // Getting Started Guide

6. From the Choose Music menu, select a music track.
To Remove Music from a Slideshow
1. Log in to your Account Manager.
2. In the My Products section, click Photo Album.
3. Click Manage Account next to the account you want to use.
4. Click the gallery you want to add music to.
5. Click Slideshow.
6. From the Choose Music menu, select None.
AKJZNAzsqknsxxkjnsjxGetting Started Guide Page 29
Photo Album // Getting Started Guide
Protecting Your Photos on the InternetIf you send photos using the Internet, it is possible for someone to print or use them elsewhere. You can take measures to protect your photos, but there is no completely secure method for stopping determined thieves. The problem is that there are many ways that your images can be stolen, and it is impossible to block all.
Here are some measures you can take to protect your photos and deter people from printing or using them:
• Watermark your photos with an overlay containing another image or copyright information. A watermark can be a visible logo or invisibly embedded into the image. A watermark in the image doesn't stop someone from taking your photos, but a watermark is difficult to remove and remains on the photo when it is printed.
• Place an embedded GIF over your photo using a style sheet so right-clicking on the image saves a transparent GIF rather than your photo.
• Reduce the resolution and print size to distort the photo if someone prints it.
• Embed your image files in Java Applets or Flash files to make it difficult to copy your photos.
• Include copyright information in all correspondence regarding your photos. All of these are ways you can protect your photos. However, it is still possible for people to print or use your images if you exchange them using the Internet.
AKJZNAzsqknsxxkjnsjxGetting Started Guide Page 30
Photo Album // Getting Started Guide