getting started guide - ca technologiesehealth-spectrum.ca.com/support/secure/products/... ·...
TRANSCRIPT

OneClick ConsoleGetting Started Guide
Document 5130

OneClick ConsoleGetting Started Guide
Page 2
Document 5130
NoticeCopyright Notice Copyright © 2004 by Aprisma Management Technologies, Inc. All rights reserved worldwide. Use, duplication, or disclosure by the United States government is subject to the restrictions set forth in DFARS 252.227-7013(c)(1)(ii) and FAR 52.227-19.
Liability Disclaimer Aprisma Management Technologies, Inc. (�Aprisma�) reserves the right to make changes in specifications and other information contained in this document without prior notice. In all cases, the reader should contact Aprisma to inquire if any changes have been made.
The hardware, firmware, or software described in this manual is subject to change without notice.
IN NO EVENT SHALL APRISMA, ITS EMPLOYEES, OFFICERS, DIRECTORS, AGENTS, OR AFFILIATES BE LIABLE FOR ANY INCIDENTAL, INDIRECT, SPECIAL, OR CONSEQUENTIAL DAMAGES WHATSOEVER (INCLUDING BUT NOT LIMITED TO LOST PROFITS) ARISING OUT OF OR RELATED TO THIS MANUAL OR THE INFORMATION CONTAINED IN IT, EVEN IF APRISMA HAS BEEN ADVISED OF, HAS KNOWN, OR SHOULD HAVE KNOWN, THE POSSIBILITY OF SUCH DAMAGES.
Trademark, Service Mark, and Logo Information SPECTRUM, IMT, and the SPECTRUM IMT/VNM logo are registered trademarks of Aprisma Management Technologies, Inc., or its affiliates. APRISMA, APRISMA MANAGEMENT TECHNOLOGIES, the APRISMA MANAGEMENT TECHNOLOGIES logo, MANAGE WHAT MATTERS, DCM, VNM, SpectroGRAPH, SpectroSERVER, Inductive Modeling Technology, Device Communications Manager, SPECTRUM Security Manager, and Virtual Network Machine are unregistered trademarks of Aprisma Management Technologies, Inc., or its affiliates. For a complete list of Aprisma trademarks, service marks, and trade names, go to:
http://www.aprisma.com/manuals/trademark-list.htm
All referenced trademarks, service marks, and trade names identified in this document, whether registered or unregistered, are the intellectual property of their respective owners. No rights are granted by Aprisma Management Technologies, Inc., to use such marks, whether by implication, estoppel, or otherwise. If you have comments or concerns about trademark or copyright references, please send an e-mail to [email protected]; we will do our best to help.
Restricted Rights Notice (Applicable to licenses to the United States government only.)This software and/or user documentation is/are provided with RESTRICTED AND LIMITED RIGHTS. Use, duplication, or disclosure by the government is subject to restrictions as set forth in FAR 52.227-14 (June 1987) Alternate III(g)(3) (June 1987), FAR 52.227-19 (June 1987), or DFARS 52.227-7013(c)(1)(ii) (June 1988), and/or in similar or successor clauses in the FAR or DFARS, or in the DOD or NASA FAR Supplement, as applicable. Contractor/manufacturer is Aprisma Management Technologies, Inc. In the event the government seeks to obtain the software pursuant to standard commercial practice, this software agreement, instead of the noted regulatory clauses, shall control the terms of the government's license.
Virus Disclaimer Aprisma makes no representations or warranties to the effect that the licensed software is virus-free. Aprisma has tested its software with current virus-checking technologies. However, because no antivirus system is 100-percent effective, we strongly recommend that you write protect the licensed software and verify (with an antivirus system with which you have confidence) that the licensed software, prior to installation, is virus-free.
Contact Information Aprisma Management Technologies, Inc., 273 Corporate Drive, Portsmouth, NH 03801 USA
Phone: 603.334.2100U.S. toll-free: 877.468.1448Web site: http://www.aprisma.com

OneClick ConsoleGetting Started Guide
Page 3
Document 5130
Contents
Notice ........................................................................................... 2
Preface ......................................................................................... 5
Intended Audience ..................................................................... 5
Text Conventions ....................................................................... 5
Document Feedback ................................................................... 6
Online Documents ...................................................................... 6
Overview ...................................................................................... 7
First Time Launch of OneClick Client ............................................ 8
Solaris: Starting OneClick Client for the First Time .......................... 8
Troubleshooting Common OneClick Client Problems: Solaris ...........10
Windows: Starting OneClick Client for the First Time ......................12
Troubleshooting Common OneClick ClientProblems: Windows ................................................................14
Changing Your OneClick User Password ..................................... 16
OneClick Console Interface ......................................................... 18
OneClick Console Panels ............................................................19
Navigation Panel .......................................................................19
Alarm Filtering .....................................................................20
Contents Panel .........................................................................20
Alarms ...............................................................................20
Search ...........................................................................20
Alarm List Heading ..........................................................20
Alarm List Columns .........................................................20
Topology .............................................................................22
List ....................................................................................22
Component Details ....................................................................23
Alarm Details ..................................................................24
Information ....................................................................24

OneClick ConsoleGetting Started Guide
Page 4
Document 5130
Interfaces ......................................................................24
Performance ...................................................................24
Alarm History .................................................................24
Neighbors ......................................................................24
Events ...........................................................................25
Menu Bar .................................................................................25
Console Toolbar ........................................................................26
Status Bar ...............................................................................27
Connection Status ................................................................28
Working with OneClick Console ...................................................29
Undocking and Docking Panels ...............................................29
Customizing OneClick Console Views ......................................30
Exporting Data from OneClick ..................................................... 31
Using OneClick Table Data Externally ...........................................31
Keyboard Shortcuts .................................................................... 32
Index .......................................................................................... 34

OneClick ConsoleGetting Started Guide
Page 5
Document 5130
Preface
In This Section
Intended Audience [page 5]
Text Conventions [page 5]
Document Feedback [page 6]
Online Documents [page 6]
Intended Audience
This guide is intended for users and administrators of the SPECTRUM OneClick Console application.
Text Conventions
The following text conventions are used in this document:
Element Convention Used Example
Variables
(The user supplies a value for the variable.)
Courier and Italic in angle brackets (<>)
Type the following:
DISPLAY=<workstation name>:0.0 export display
The directory where you installed SPECTRUM
(The user supplies a value for the variable.)
<$SPECROOT> Navigate to:
<$SPECROOT>/app-defaults
Solaris and Windows directory paths
Unless otherwise noted, directory paths are common to both operating systems, with the exception that slashes (/) should be used in Solaris paths, and backslashes (\) should be used in Windows paths.
<$SPECROOT>/app-defaults on Solaris is equivalent to <$SPECROOT>\app-defaults on Windows.
On-screen text Courier The following line displays:
path=”/audit”
User-typed text Courier Type the following path name:
C:\ABC\lib\db

OneClick ConsoleGetting Started Guide
Page 6
Document 5130
Document Feedback
Please send feedback regarding SPECTRUM documents to the following e-mail address:
Thank you for helping us improve our documentation.
Online Documents
SPECTRUM documents are available online at:
http://www.aprisma.com/manuals
Check this site for the latest updates and additions.
Cross-references Underlined and hypertext-blue
See Document Feedback [page 6].
References to SPECTRUM documents (title and number)
Italic SPECTRUM Installation Guide (0675)
Element Convention Used Example

OneClick ConsoleGetting Started Guide
Page 7
Document 5130
Overview
OneClick Console is designed to deliver SPECTRUM information relevant to network operators and troubleshooters in an intuitive user interface. It provides customized access to information and tools for individual users who monitor and/or troubleshoot specific portions of a network managed by SPECTRUM.
OneClick Console is the first product to implement SPECTRUM�s next-generation user interface. This new architecture builds on the Web Operator Suite of applications with the additional advantages of returning the interface to a stand-alone desktop client application. This is done using the Java Network Launch Protocol (JNLP) and Java Web Start. JNLP is a new standard for the delivery of applications without requiring traditional installers or the launching of executables. After installation, the client communicates with a web server using port 80 by default and the web server communicates as a single client of the SpectroSERVER using the CORBA interface.

OneClick ConsoleGetting Started Guide
Page 8
Document 5130
First Time Launch of OneClick Client
This section contains instructions and troubleshooting information applicable to launching the OneClick client for the first time.
Note: This section assumes that the OneClick web server has been installed and properly configured per the instructions in the OneClick Installation Guide (5142). Additional installation details and OneClick troubleshooting information are also available in the OneClick Installation Guide (5142).
In This Section
Solaris: Starting OneClick Client for the First Time [page 8]
Troubleshooting Common OneClick Client Problems: Solaris [page 10]
Windows: Starting OneClick Client for the First Time [page 12]
Troubleshooting Common OneClick Client Problems: Windows [page 14]
Solaris: Starting OneClick Client for the First Time
Procedure
1. After the OneClick web server is installed and properly configured, you can access the OneClick main web page from a client by entering a URL in the following format in a web browser:
http://<hostname>:<portnumber>/spectrum/
Note: The :<portnumber> is required only if the OneClick server is set to use other than the default of port 80.
2. Supply your login credentials for the OneClick main web page if prompted.
3. Install the JRE on the OneClick client machine:
a. Click the Install JRE link on the main OneClick web page (see Figure 1).
b. Download and install the JRE making note of the installation path.

OneClick ConsoleGetting Started Guide
Page 9
Document 5130
c. Exit all running instances of Netscape.
d. Restart Netscape.
4. Ensure that Netscape is configured to use the JRE to run JNLP applications. To manually configure Netscape to launch JNLP applications (such as OneClick):
a. Select Edit > Preferences in Netscape.
b. Expand the Navigator tree and select Applications.
c. Click New and add the following:
Description: JNLP
MIMEType: application/x-java-jnlp-file
Suffixes: jnlp
d. Select the Handled By > Application radio button and enter the following in the field provided:
<JRE install directory>/javaws/javaws %s
where <JRE install directory> is the path used in step b of Solaris: Starting OneClick Client for the First Time [page 8].
e. Click OK in both windows to get back to the main OneClick web page (see step 1 for the URL).
5. Click the Start Console link (Figure 1) to launch the OneClick client.
Figure 1: OneClick Main Web Page
6. Click Start in the resulting Security Warning dialog.
OneClick ConsoleGetting Started Guide
Page 10
Document 5130
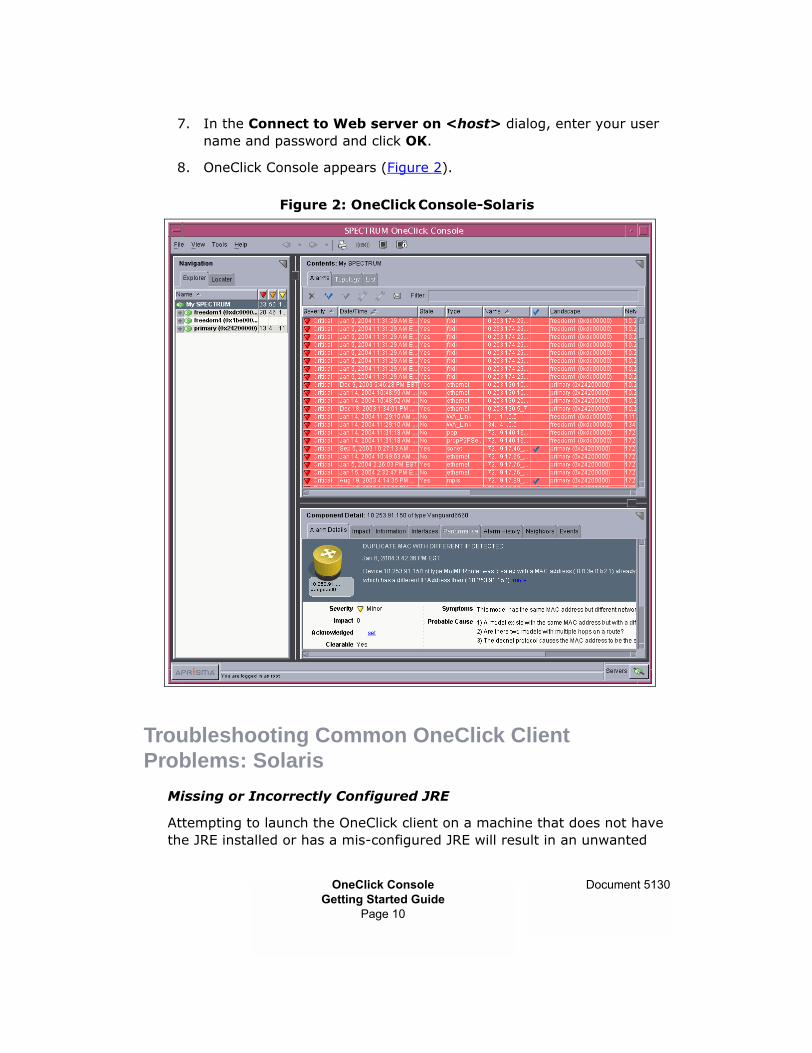
7. In the Connect to Web server on <host> dialog, enter your user name and password and click OK.
8. OneClick Console appears (Figure 2).
Figure 2: OneClick Console-Solaris
Troubleshooting Common OneClick Client Problems: Solaris
Missing or Incorrectly Configured JRE
Attempting to launch the OneClick client on a machine that does not have the JRE installed or has a mis-configured JRE will result in an unwanted

OneClick ConsoleGetting Started Guide
Page 11
Document 5130
oneclick.jnlp download dialog (Figure 3) rather than launching the OneClick client.
Figure 3: Solaris JNLP Download Dialog
1. The OneClick client machine must have version 1.4.2 of the JRE installed. If it does not, install the JRE from the main OneClick web page (see Solaris: Starting OneClick Client for the First Time [page 8]).
2. Ensure that Netscape is configured to use the JRE to run JNLP applications. To manually configure Netscape to launch JNLP applications (OneClick):
a. Select Edit > Preferences in Netscape.
b. Expand the Navigator tree and select Applications.
c. Click New and add the following:
Description: JNLP
MIMEType: application/x-java-jnlp-file
Suffixes: jnlp
d. Select the Handled By > Application radio button and enter the following in the field provided:
<JRE install directory>/javaws/javaws %s

OneClick ConsoleGetting Started Guide
Page 12
Document 5130
where <JRE install directory> is the path used in step b of Solaris: Starting OneClick Client for the First Time [page 8].
e. Click OK in both windows to get back to the main OneClick web page.
f. Click the Start Console link.
Windows: Starting OneClick Client for the First Time
Complete details about installing the required Java runtime environment and launching the OneClick client from the main OneClick web page, as well as additional OneClick troubleshooting information, are available in the OneClick Installation Guide (5142).
Procedure
1. After the OneClick server is installed and properly configured, you can access the OneClick main web page from a client by entering a URL in the following format in a web browser:
http://<hostname>:<portnumber>/spectrum/
Note: The :<portnumber> is required only if the OneClick server is set to use other than the default of port 80.
2. In your Web browser�s user authentication dialog box, type your user name and password; then click OK.
The OneClick main page appears (Figure 4).
Note: Any date and time information shown in OneClick is localized to reflect the time zone where the OneClick client is installed and running.

OneClick ConsoleGetting Started Guide
Page 13
Document 5130
Figure 4: OneClick Main Web Page
3. Install the JRE before clicking on Start Console from the main OneClick web page to launch the OneClick client. If you do click Start Console but have not yet installed the JRE, a file download dialog box for the oneclick.jnlp file (Figure 5) will open instead of the OneClick client startup. If this happens, click Cancel and install the JRE by clicking on the Install JRE link.
Figure 5: Error: oneclick.jnlp File Download Dialog
4. Click Start Console from the resulting main OneClick web page (Figure 4) to launch the OneClick client.

OneClick ConsoleGetting Started Guide
Page 14
Document 5130
5. Click Start Application in the resulting Java WebStart security dialog.
6. Login to the OneClick server with your username and password.
Note: You may need to click the login window (behind the Web Start Desktop Integration window) and bring it to the front to log in.
7. Switch (ALT+Tab) to the Java Web Start Desktop Integration window and click Configure. Choose the Never or Always radio button and click OK.
8. If necessary, use ALT+Tab to switch back to the running OneClick client.
Troubleshooting Common OneClick ClientProblems: Windows
Missing or Incorrectly Configured JRE
Ensure that version 1.4.2 of the JRE from the main OneClick web page (see Windows: Starting OneClick Client for the First Time [page 12]) has been installed on the OneClick client machine.
Ensure that the .jnlp file extension is mapped to the javaws.exe application
Note: This applies to first time launches of OneClick as well as subsequent launches where OneClick fails to launch with the following error dialogs on Windows during File Download:
opening oneclick.jnlp ...
Access to the specified device, path, or file is denied
1. Right Click on the Windows Start button, and select Explore.
2. In Windows Explorer, select the Tools > Folder Options > File Types tab.
3. Under Registered File Types, scroll down until you see the JNLP entry. Select the JNLP row entry.
4. Details for 'JNLP' extension here must specify:Opens with: javaws

OneClick ConsoleGetting Started Guide
Page 15
Document 5130
5. If this does not specify Opens with: javaws, you must manually configure it. To manually map the .jnlp file extension to the javaws.exe application:
a. Under Details for 'JNLP' extension, click the Change button.
b. In the resulting Open With dialog, scroll down and select 'javaws' and click OK.
c. Click OK in Folder Options.
d. Exit Windows Explorer.
e. Restart the OneClick application (see Windows: Starting OneClick Client for the First Time [page 12]).
6. Ensure that you have installed the JRE before clicking on Start Console from the main OneClick web page to launch the OneClick client. If you have not yet installed the JRE, a file download dialog box for the oneclick.jnlp file (Figure 5) will open instead of the OneClick client startup. If this happens, click Cancel and install the JRE by clicking on the Install JRE link.

OneClick ConsoleGetting Started Guide
Page 16
Document 5130
Changing Your OneClick User Password
Note: Users with read-only privileges can also change their OneClick password using this method.
To change your password:
1. Navigate to the OneClick main web page at http://<hostname>:<portnumber>/spectrum/ and login to OneClick when prompted.
2. At the bottom of the main web page, click the Change Password link (Figure 6).
Figure 6: Change Password Link
3. In the Change Password Dialog [page 17], enter your current password in the Old Password field, enter the new password in both the New Password and Confirm Password fields and click Submit.

OneClick ConsoleGetting Started Guide
Page 17
Document 5130
Figure 7: Change Password Dialog

OneClick ConsoleGetting Started Guide
Page 18
Document 5130
OneClick Console Interface
To view details, click an area on the image below when your cursor changes to .
OneClick ConsoleGetting Started Guide
Page 19
Document 5130
OneClick Console Panels
OneClick Console Alarm Manager displays information in 3 panels (see OneClick Console Interface [page 18]):
� Navigation Panel [page 19]
� Contents Panel [page 20]
� Component Details [page 23]
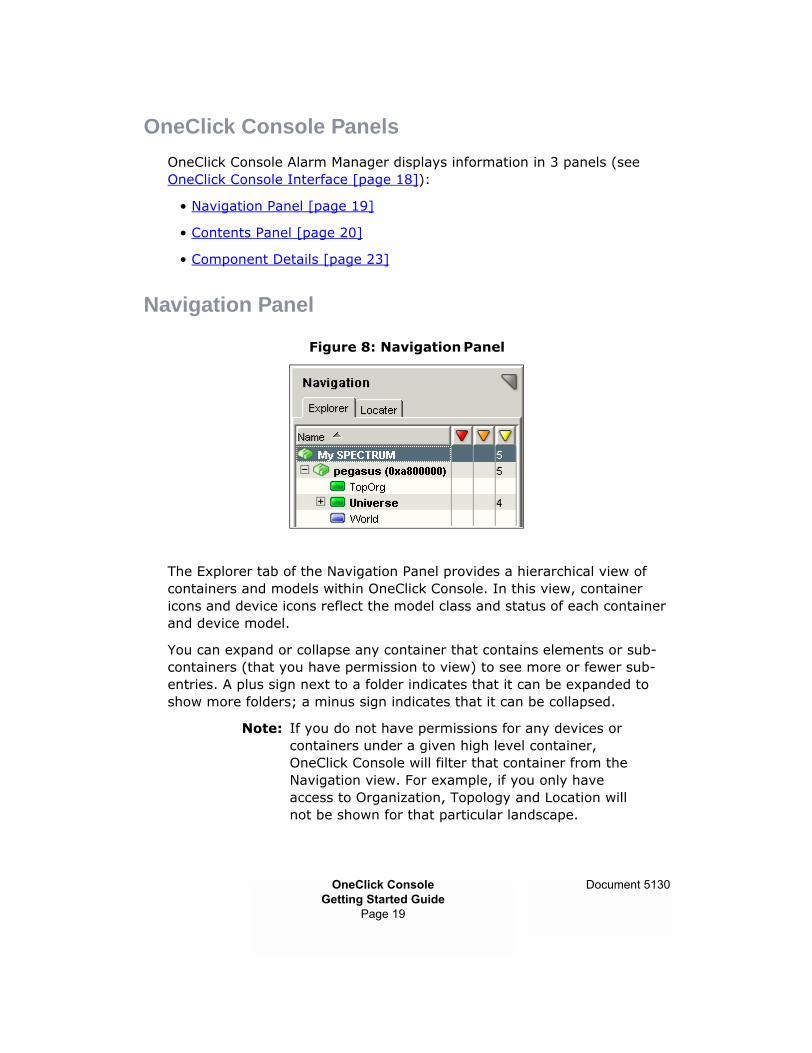
Navigation Panel
Figure 8: Navigation Panel
The Explorer tab of the Navigation Panel provides a hierarchical view of containers and models within OneClick Console. In this view, container icons and device icons reflect the model class and status of each container and device model.
You can expand or collapse any container that contains elements or sub-containers (that you have permission to view) to see more or fewer sub-entries. A plus sign next to a folder indicates that it can be expanded to show more folders; a minus sign indicates that it can be collapsed.
Note: If you do not have permissions for any devices or containers under a given high level container, OneClick Console will filter that container from the Navigation view. For example, if you only have access to Organization, Topology and Location will not be shown for that particular landscape.

OneClick ConsoleGetting Started Guide
Page 20
Document 5130
Alarm Filtering
Select a container from the Name column to show alarms (in the Alarms Tab of Contents Panel [page 20]) or topology (in the Topology Tab [page 22]) for contained devices and their sub-components including applications and interfaces.
Contents Panel
Figure 9: Alarms Tab of Contents Panel
The Contents Panel provides the Alarms [page 20], Topology [page 22], and List [page 22] tabs.
Alarms
Figure 9 shows the Alarm List tab of the Contents panel.
SearchThe quick filter search filters on all attribute values for visible columns in the alarm list. As you type in the search field, the alarm list displays only those alarms with attributes that match the current text in the search field.
Alarm List HeadingHeading information is available based on the alarm group selected in the Navigation Panel [page 19].
Alarm List ColumnsYou can specify which columns to display in the alarm list. To do this, right-click on a column heading. In the resulting pop-up window listing column headings (Figure 10), check each heading you want to display. To resize a column, click and drag a column header to the left or right.

OneClick ConsoleGetting Started Guide
Page 21
Document 5130
Figure 10: Column Headings Preferences
You can sort the alarm list based on the attribute value in any column header. For example, to sort the alarm list by severity, click on the severity column header. Clicking the column header toggles the sorting of the list between ascending order and descending order. The icon displayed in the column headers points up or down depending on ascending or descending sort order, respectively.

OneClick ConsoleGetting Started Guide
Page 22
Document 5130
Topology
Figure 11 shows the Topology tab of the Contents panel.
Figure 11: Topology Tab
Note: The Topology tab is not available if either My SPECTRUM or a landscape is selected in the Navigation Panel [page 19].
List
This tab view displays all models of the container currently selected in the Explorer tab view.
If a device is selected in the Explorer view, all models are displayed for that device's container. This view is updated dynamically (when models are added or removed, attributes are updated). Double clicking on an entry in the List view causes the Explorer to select that model. Like the Topology view, nothing is shown in the List view for the MySpectrum and Landscape containers.
OneClick ConsoleGetting Started Guide
Page 23
Document 5130
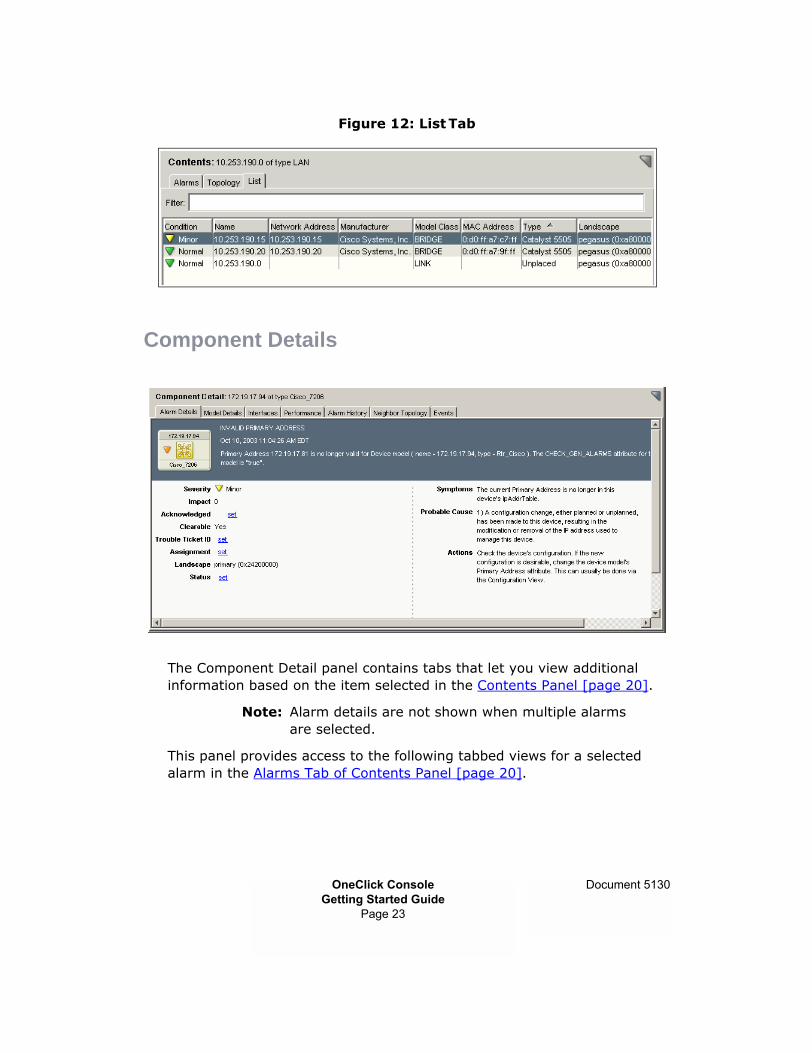
Figure 12: List Tab
Component Details
The Component Detail panel contains tabs that let you view additional information based on the item selected in the Contents Panel [page 20].
Note: Alarm details are not shown when multiple alarms are selected.
This panel provides access to the following tabbed views for a selected alarm in the Alarms Tab of Contents Panel [page 20].

OneClick ConsoleGetting Started Guide
Page 24
Document 5130
Note: For a model in the Topology Tab [page 22] or List Tab [page 23], only Information [page 24], Interfaces [page 24], Performance [page 24], Neighbors [page 24], and Events [page 25] are shown.
Alarm Details [page 24]
Information [page 24]
Interfaces [page 24]
Performance [page 24]
Alarm History [page 24]
Neighbors [page 24]
Events [page 25]
Alarm DetailsThis tab displays alarm information grouped by Alarm Details and Probable Cause Information.
InformationThe Information tab displays details for the selected model.
InterfacesThe Interfaces tab displays interface information for the selected alarm or device.
PerformanceThe Performance tab displays performance information for the selected device.
Alarm HistoryThe Alarm History tab displays alarm history information for the selected alarm.
NeighborsWhen you select an alarm from the Contents Panel [page 20] or a device from the topology view and choose the Component Details [page 23] Neighbor Topology tab, the panel will display a radial topological view. This view, centered on the device icon associated with the alarm selected, shows the icons of the root cause device�s neighbors, grouped by status. If

OneClick ConsoleGetting Started Guide
Page 25
Document 5130
a neighbor icon has a status of Normal, SPECTRUM checks the status of the link between the neighbor and the root cause device. SPECTRUM will also check to see if any upstream ports have been administratively disabled. If the interface has a status of both Admin and Oper down the view will alert the user.
EventsThe Events tab displays event information for the selected alarm.
Menu Bar
The Menu Bar provides access to many of the features of OneClick Console.
File
View
See Customizing OneClick Console Views [page 30].
Tools
Help

OneClick ConsoleGetting Started Guide
Page 26
Document 5130
Console Toolbar
The Console Toolbar is a common set of tools that are used by all applications within OneClick Console.
Icon Action Description
Print Launch the print manager window to print selected information from a visible panel within OneClick Console.
Ping Send an ICMP Ping to the selected device from the SpectroSERVER modeling the device.
Telnet Establish a communication session with the selected device using Telnet from the SpectroSERVER modeling the device.
Secure Shell (SSH)
Establish an encrypted communication session with the selected device using Secure Shell (SSH) from the SpectroSERVER modeling the device.
Navigation Navigation buttons are similar to browser buttons. They follow selections within the Navigation window and provide a convenient way to return to a selected device or container.
Navigate Back
Go back to a previous container or device. Click the down arrow to select from a list of recent locations.
Navigate Forward
Go forward to a container or device after navigating back. Click the down arrow to select from a list of recent locations.

OneClick ConsoleGetting Started Guide
Page 27
Document 5130
Status Bar
The Status Bar displays information about the OneClick Console system infrastructure. This includes the connection status of the servers and services required by OneClick Console to provide accurate, real-time network information.
See also Customizing OneClick Console Views [page 30].
Icon Action Description
Open Connection Status
Click the Servers button to access the Connection Status [page 28] view. This view provides a list of all connected servers and access to specific information about each server.

OneClick ConsoleGetting Started Guide
Page 28
Document 5130
Connection Status
To access the Connection Status view (Figure 13), click the Servers button in the Status Bar [page 27] in the lower right-hand corner of the OneClick Console window.
Figure 13: Connection Status

OneClick ConsoleGetting Started Guide
Page 29
Document 5130
Working with OneClick Console
Selecting an alarm from the Contents Panel [page 20] highlights it and displays the alarm details for that alarm in the Component Details [page 23]. Selecting a model from the Contents Panel [page 20] highlights it and displays the model interfaces for that model in the Component Details [page 23].
Undocking and Docking Panels
Each panel can be undocked, docked, or hidden using the icons in Figure 14. An undocked panel exists in its own window. You can dock a panel using the View menu or by closing an undocked panel. If you close an undocked panel and would like it visible again, click the View menu (Figure 15) and select the panel.
Figure 14: Application Buttons
This button undocks/docks a OneClick Console panel.
These buttons minimize, maximize, and close the OneClick Console application, respectively. Clicking the close button on an undocked panel hides it.

OneClick ConsoleGetting Started Guide
Page 30
Document 5130
Customizing OneClick Console Views
You can customize OneClick Console to show or hide each tool bar and panel using the View menu (Figure 15).
Figure 15: View Settings
Select or clear a user interface element from the View menu (for example, Tool Bar) to toggle its display in OneClick Console.

OneClick ConsoleGetting Started Guide
Page 31
Document 5130
Exporting Data from OneClick
This section explains how to use OneClick table data with other applications such as spreadsheet programs.
In This Section
Using OneClick Table Data Externally [page 31]
Using OneClick Table Data Externally
Table data in the Alarms and List tabs of the Contents panel can be used externally. To do this:
1. Select the alarm(s) you want to export in the Alarms tab of the Contents panel (Figure 16).
Note: To select all alarms in the Alarms tab, click any alarm and press CTRL+A.
Figure 16: Select and Copy Alarm(s)
2. Press CTRL+C to copy the selected alarm(s) as tab-delimited text.
3. In a spreadsheet or text document, press CTRL+V to paste the tab-delimited text (Figure 17).
Figure 17: Tab-delimited Text

OneClick ConsoleGetting Started Guide
Page 32
Document 5130
Keyboard Shortcuts
This section lists and describes the available keyboard shortcuts in OneClick Console.
Table 1: Shortcut Keys
Keystroke Combination
Result
File Menu (ALT+F)
CTRL+P Print
Tools Menu
CTRL+G Send an ICMP Ping to the selected device from the SpectroSERVER modeling the device.
CTRL+T Establish a communication session with the selected device using Telnet from the SpectroSERVER modeling the device.
CTRL+H Establish an encrypted communication session with the selected device using Secure Shell (SSH) from the SpectroSERVER modeling the device.
View Menu (ALT+V)
ALT+Left Arrow Go back to a previous container or device.
ALT+Right Arrow Go forward to a container or device after navigating back.
ALT+V T Toggle the visibility of the Tool Bar.
ALT+V S Toggle the visibility of the Status Bar.
ALT+V N Toggle the visibility of the Navigation Panel.
ALT+V C Toggle the visibility of the Contents Panel.
ALT+V D Toggle the visibility of the Component Detail Panel.

OneClick ConsoleGetting Started Guide
Page 33
Document 5130
ALT+V A Toggle the visibility of the Alarms Tool Bar.
ALT+V O Toggle the visibility of the Topology Tool Bar.
Help Menu (ALT+H)
ALT+H O Access online help in a web browser.
Keystroke Combination
Result

OneClick ConsoleGetting Started Guide
Page 34
Document 5130
Index
AAlarm Filtering [20]Alarms [20]
CComponent Details [23]Connection Status [28]Console Toolbar [26]Contents Panel [20]Customizing OneClick Console Views [30]
DData Export [31]
FFind [22]
KKeyboard Shortcuts [32]
NNavigation [26], [32]Navigation Panel [19]
OOneClick Client
Running [8], [12]OneClick Installation Guide (5142) [12]oneclick.jnlp [13], [15]

OneClick ConsoleGetting Started Guide
Page 35
Document 5130
PPassword
Changing [16]Ping [26], [32]Print [26], [32]
SSecure Shell (SSH) [26], [32]Security [19]Status Bar [27]
TTelnet [26], [32]Topology [22]