getting started (for the absolute beginner: download and install python) task 1: creating 3 widgets:...
TRANSCRIPT

Getting started (For the absolute beginner: download and install python)• Task 1: Creating 3 widgets: a label, text entry and a button (and ‘PACK’)• Task 2: Changing the text on the label and the button• Task 3: Producing output on button click• Task 4: Creating a username and password login GUI (making it look pretty)• Task 5: Changing the position of objects using ‘PLACE’• Task 6: Changing the position of objects using the ‘GRID’ method• *Some additional tips and tricks on layout (alternative methods and code)• Task 7: Final outcome: Getting a Login Screen (username and password) to work
using selection
Mastering Python GUI programming Part 1
Some useful tasks to get you started (from absolute scratch) on GUI programming using tkinter in Python 3. Use these slides as teaching tools or to aid independent learning for students learning how to code.

Did you know?Guido van Rossum, the guy on the right, created python! He is a Dutch computer programmer and completed his degree in the university of Amsterdam
He was employed by Google from 2005 until December 2012, where much of his time was spent developing the Python language. In 2013, Van Rossum started working for Dropbox.
Python is intended to be a highly readable language. It has a relatively uncluttered visual layout, frequently using English keywords where other languages use punctuation.
Guido van Rossum, the creator of Python
An important goal of the Python developers is making Python fun to use. This is reflected in the origin of the name which comes from Monty Python

Did you know?A software bug is an error or flaw in a computer program.
As a programmer, you are going to come up a lot of these and it is important that you are patient and persevere!
The first ever bug was an actual bug!
Operators traced an error in the Mark II to a moth trapped in a relay, coining the term bug. This bug was carefully removed and taped to the log book
Stemming from this we now call glitches in a computer a bug.
A page from the Harvard Mark IIelectromechanical computer's log, featuring a dead moth that was removed from the device

Getting started for the absolute beginnerSkip this if you have already installed python
https://www.python.org/downloads/
We have downloaded Python 3.4.3
You can read more about the difference between Python 2 and 3 on the site.

Getting started for the absolute beginnerVisit the following site to download python. The version we use in these tutorials is:
Python 3.4.3
Once you’ve followed the instructions and have python on your computer, create a short cut on your desktop (if possible).
Open the IDLE SHELL and create a new file (module) see screenshot on the right.
You are ready to start programming in python,Remember to save all files with the ending“.py”
Skip this if you have already installed python

What is Tkinter?• Before we begin, you ought to know that
the Tkinter module (“Tk interface”) is the standard Python interface to the Tk GUI toolkit from Scriptics (it was formerly developed by Sun Labs).
• Simply put, Tkinter consists of a number of modules.
• The Tk interface is provided by a binary extension module named _tkinter. This module contains the low-level interface to Tk, and should never be used directly by application programmers.
• The public interface is provided through a number of Python modules. The most important interface module is the Tkinter module itself. To use Tkinter, all you need to do is to import the Tkinter module:
• import Tkinter
• Or, more often: from tkinter import *

Task 1: Creating 3 widgets. Copy (or preferably type word for word) the code provided to create a simple GUI with a label, text entry box and button. Go to File – Run to execute the program.
#import the 'tkinter moduleimport tkinterwindow = tkinter.Tk()#create the title for the windowwindow.title("Creating 3 Widgets - label, textentry and button")#creating a label widget (label1)label1=tkinter.Label(window, text="Label")#creating a text entry widget (txtentry)txtentry=tkinter.Entry(window)#creating a button widget (called btn)btn=tkinter.Button(window, text ="Button")
#Adding the widgets, in order to the created window. Keyword =packlabel1.pack()txtentry.pack()btn.pack()
#Finally, draw the window + start the applicationwindow.mainloop()
Anything beginning with a # is a “comment”. They are not part of the
program
The 3 Variables that we are creating here are Label1,
txtentry and btn. Particular widgets (or objects) are
assigned to these variables.
Packing allows you to control the layout. If you change the order
here, the order in which the widgets appear on the window will also
change. Experiment a little!

Challenge 1: Edit the design and labels
Change the code to get it looking like the shown screenshot.
Don’t worry about functionality yet – we will get to that!
Extension: If you finish, see if you can add additional labels, text inputs
and buttons to the window. See below

Task 2: Getting some output!Copy (or preferably type word for word) the code provided to create a simple GUI which asks for a user’s name and outputs a result “Hello there” (at this point it isn’t making any reference to the actual entered text)
#import the 'tkinter moduleimport tkinter
def mhello(): label1 = tkinter.Label(window, text="Hello, nice to meet you").pack()
window = tkinter.Tk()#create the title for the windowwindow.title("Creating 3 Widgets - label, textentry and button")#creating a label widget (label1)label1=tkinter.Label(window, text="Enter your Name")
#creating a text entry widget (txtentry)txtentry=tkinter.Entry(window)#creating a button widget (called btn)
btn=tkinter.Button(window, text ="Click me now", command = mhello, fg='red')
#Adding the widgets, in order to the created window. Keyword =packlabel1.pack()txtentry.pack()btn.pack()
#Finally, draw the window + start the applicationwindow.mainloop()
Step 1: Add this bit of code to your previous program. It specifies the
need to call a command called ‘mhello’ and also turns the
foreground ‘red’
Step 2: Here we have defined the command mhello, and create the
output to appear in another label.

Task 3: Passing text input to label outputCopy (or preferably type word for word) the code provided to create a simple GUI which asks for a user’s name then outputs the entered name into another label. (this time it is actually storing the entered text as a variable and retrieving it for output)
Play around with the colour of the background and foreground of labels.
import sysfrom tkinter import *def hellothere(): texttopass = nameentry.get() label2=Label(myGui, text=texttopass).pack() return
myGui = Tk()nameentry = StringVar()
myGui.geometry('450x450+400+300')myGui.title('Hello there app')
Label1 = Label(myGui, text='Enter your name').pack()
button1=Button(myGui, text='Click me', command = hellothere, fg = 'white', bg = 'red').pack()
textentry1= Entry(myGui, textvariable=nameentry).pack()

Task 4: Making the GUI look pretty!Copy (or preferably type word for word) the code provided to create a simple login system GUI. Experiment with changing the colour of the labels, buttons, and background of the window.
You can also include an image or logo to the window to make it look all the more professional. (see if you can google this to find out how! Remember this is Python 3)
import sysfrom tkinter import *
myGui = Tk()myGui.configure(background='light blue')
myGui.geometry('450x450+400+300')myGui.title('Login Screen')
Label1 = Label(myGui, text='Username').pack()textentry1= Entry(myGui).pack()Label2 = Label(myGui, text='Password').pack()textentry2= Entry(myGui).pack()button1=Button(myGui, text='Login', fg = 'white', bg = 'blue').pack()

Task 5: Changing the position of the objectsCopy the code provided.You will notice the use of the PLACE keyword. (instead of Pack)
Inside, you specify the position of the object on the X and Y grid. X=0, Y=0 would be referring to the top left hand corner of the screen.
Challenge: See if you can fix the GUI to get all the objects lined up!
import sysfrom tkinter import *
#often called 'root' instead of myGuimyGui = Tk()myGui.configure(background='light blue')
myGui.geometry('450x450+500+300')myGui.title('Login Screen')
Label1 = Label(myGui, text='Username').place(x=20, y=20)textentry1= Entry(myGui).place(x=20, y=40)Label2 = Label(myGui, text='Password').place(x=20, y=40)textentry2= Entry(myGui).place(x=20, y=60)button1=Button(myGui, text='Login', fg = 'white', bg = 'blue').place(x=20,y=80)
These two labels aren’t quite in the right place. Can you get them to line
up properly (each to the left of its respective text entry box)
Using ‘Place’

Task 6: Changing the position of the objectsCopy the code provided.
This time we will be using the GRID method. (instead of Pack or Place)
import sysfrom tkinter import *
#often called 'root' instead of myGuimyGui = Tk()myGui.configure(background='light blue')
myGui.geometry('450x450+500+300')myGui.title('Login Screen')
Label1 = Label(myGui, text='Username').grid(row=1,column=0, sticky=N)textentry1= Entry(myGui).grid(row=0, column=0)Label2 = Label(myGui, text='Password').grid(row=1,column=0)textentry2= Entry(myGui).grid(row=1,column=1)button1=Button(myGui, text='Login', fg = 'white', bg = 'blue').grid(row=0,column=0)
Using ‘Grid’
Column 0 Column 1
Row 0 Username Label
Text Entry 1 Box
Row 1 Password Label
Text Entry 2 Box
Row 2 Submit Button
Look at the grid layout hint on the left and see if you can change the row
and column numbers below to get this to line up correctly!
Look up the sticky command and see if you can find out what it does!
Experiment with it!

6c: A few more tips and tricks on layout!import sysfrom tkinter import *
myGui = Tk()nameentry = StringVar()
#myGui.geometry('450x450')myGui.title('Playing with the layout of Buttons')
Label1 = Label(myGui, text='Enter Text Here').pack()textentry1= Entry(myGui, textvariable=nameentry).pack()
button1=Button(myGui, text='Button 1').pack(side=LEFT,padx=5)button2=Button(myGui, text='Button 2').pack(side=LEFT,padx=5)button3=Button(myGui, text='Button 3').pack(side=LEFT,padx=5)button4=Button(myGui, text='Button 4').pack(side=LEFT,padx=5)
Using ‘pack’ and ‘side=LEFT padx’
Try it yourself. Experiment with what will happen if you change the ‘padx’
value to 10….or 20! (how it will affect the spacing of the buttons)
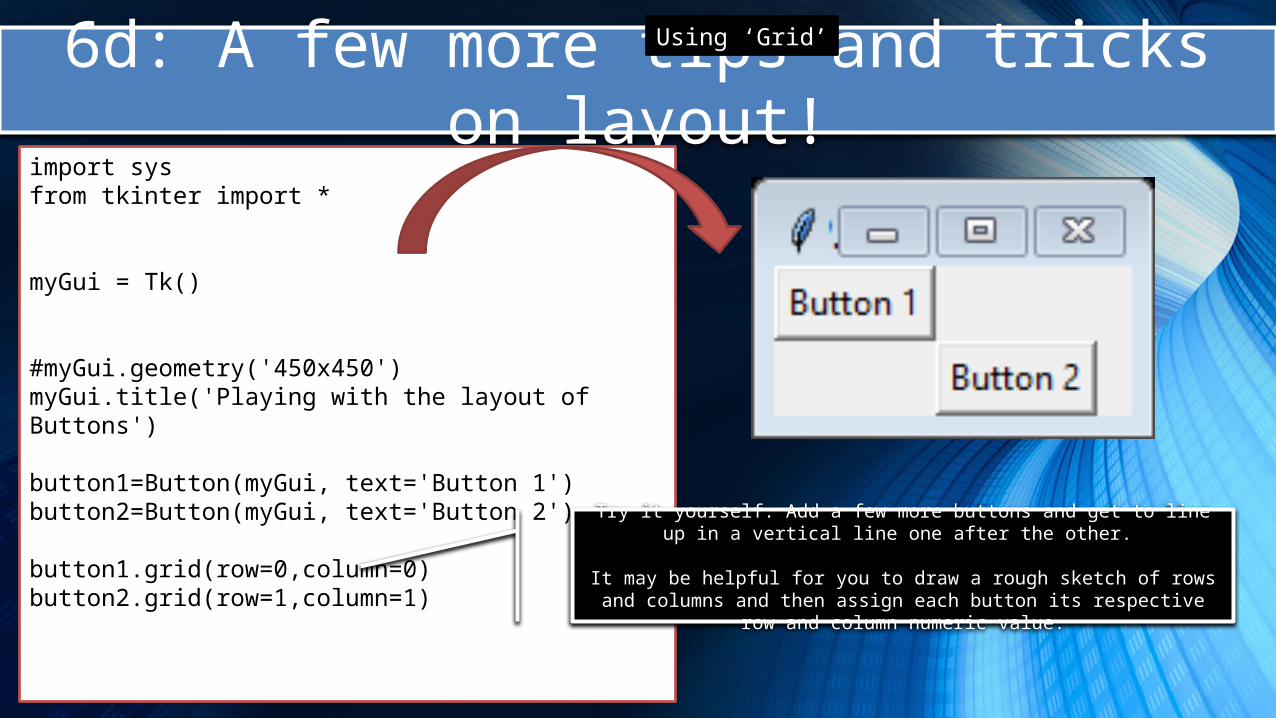
6d: A few more tips and tricks on layout!import sysfrom tkinter import *
myGui = Tk()
#myGui.geometry('450x450')myGui.title('Playing with the layout of Buttons')
button1=Button(myGui, text='Button 1')button2=Button(myGui, text='Button 2')
button1.grid(row=0,column=0)button2.grid(row=1,column=1)
Using ‘Grid’
Try it yourself. Add a few more buttons and get to line up in a vertical line one after the other.
It may be helpful for you to draw a rough sketch of rows and columns and then assign each button its respective row and column numeric value.

6e: More Complex Layout (Using Frames)import sysfrom tkinter import *
myGui = Tk()
myGui.title('Using a Frame')
f = Frame(myGui)
button1 = Button(f, text="Button 1")button2 = Button(f, text="Button 2")button3 = Button(f, text="Button 3")button1.pack(side=LEFT)button2.pack(side=LEFT)button3.pack(side=LEFT)
label1 = Label(myGui, text="Working with frames")label1.pack()f.pack()
Using the Frame method
A frame is just a widget and all it does is – contain other widgets! This allows groups of widgets, whether packed or placed in a grid, to be combined into a single Frame. Frames may then be packed with other widgets and frames. This feature lets us create just about any kind of layout (a useful thing to know if you are creating more complicated interfaces). *the place method would take ages if you had a lot to work with!

Task 7a: Use of selection (If statement)
Copy the code provided.Here we will see text entry and the use of SELECTION (an if statement) that will decide on the output depending on whether or not the input is correct, as specified,Challenge: Can you extend this to create a full login screen (username and password both need to be correct for access to be granted) Try it yourself before looking at the answers (next slide)
import sysfrom tkinter import *myGui = Tk()myGui.geometry('450x450+400+300')myGui.title('Hello there app')Label1 = Label(myGui, text='Say Hello').pack()
E1=Entry(myGui)E1.pack()
def hellothere(): if E1.get()=="Hello": welcome=Label(myGui,text="Hello to you too!") welcome.pack() else: denied=Label(myGui,text="Sorry, You need to follow instructions!") denied.pack() button1=Button(myGui, text='Click me', command = hellothere, fg = 'white', bg = 'red').pack()
See speaker notes for solution (for username and password solution)

Task 7b: Use of selection (If statement)
Login application:
Copy the code!
Only if the provided username and password match, will access be granted, else, access denied.
Challenge: Play around with the code and see if you can add an additional required entry (e.g. code number).
#import tkinterfrom tkinter import *
#to initialise tkinter we have to create a Tk root widget#this is basically an ordinary window, with a title bar and other decoration as necessary#the root widget (only one can be created for each program) must be created before any other widgetsroot = Tk()
#creating and packing a Label which says "Login Screen"w = Label(root, text="Login Screen")w.pack()#creating and packing a Label which has lots of stars!e1 = Label(root, text="******************************")e1.pack()#creating and packing a Label which says "Username"w1 = Label(root, text="Username")w1.pack()
#creating and packing a text entry input box (this will come under Username)e = Entry(root)e.pack()
#creating and packing a Label which says "Username"w2 = Label(root, text="Password")w2.pack()
#creating and packing a second text entry input box (this will come under Username)e1 = Entry(root)e1.pack()
#This is another interesting layout feature - it creates a tool bartoolbar = Frame(root)
#creates a button (variable b) called 'Enter'b = Button(toolbar, text="Enter", width=9)b.pack(side=LEFT, padx=2, pady=2)
#creates a button called 'Cancel'b = Button(toolbar, text="Cancel", width=9)b.pack(side=LEFT, padx=2, pady=2)
#This is the interesting bit - it's a function called 'callback#it has an IF function that asks for two specific text inputs for username and password#it displays a label message depending on whether the input was validdef callback(): if e.get()=="Hello" and e1.get()=="God": welcome = Label(root,text="Welcome - Access Granted") welcome.pack() else: denied = Label(root,text="Sorry, Access Denied") denied.pack() #This produces a final 'Sign up' button -it's in order, so goes after the 'Cancel' Button#Notice it is this button that contains a CALL to the callback function above.b = Button(toolbar, text="Sign-Up", command=callback, width=9)b.pack(side=LEFT, padx=2, pady=2)#this defines the position and layout of the toolbar.toolbar.pack(side=TOP, fill=X)
See speaker notes for solution (for username and password solution)

Subscribe to www.teachingcomputing.com
Mastering Python GUI programming Part 2
What you will learn1. Creating a Menu2. Adding functionality (using funtions) to menu buttons/items3. How to work with integers/numbers in a GUI4. Creating an ADD program (taking two inputs and adding them together, output in
a label)5. Creating a program that converts string input into numeric output (using string
manipulation)6. Application: Input string: hh:mm – convert to number of total minutes7. Application: (teachers only) for Vehicle Speeding controlled assessment – similar
application that calculates that average speed of an athlete running 800metres