getting around 3ds max williams command, create panel and main toolbar
TRANSCRIPT

Getting Around 3DS MaxWilliams Command, Create Panel and Main Toolbar

The 3ds Max Interface
•Here is a brief rundown of what you need to know about the UI and how to navigate in Max’s 3d space

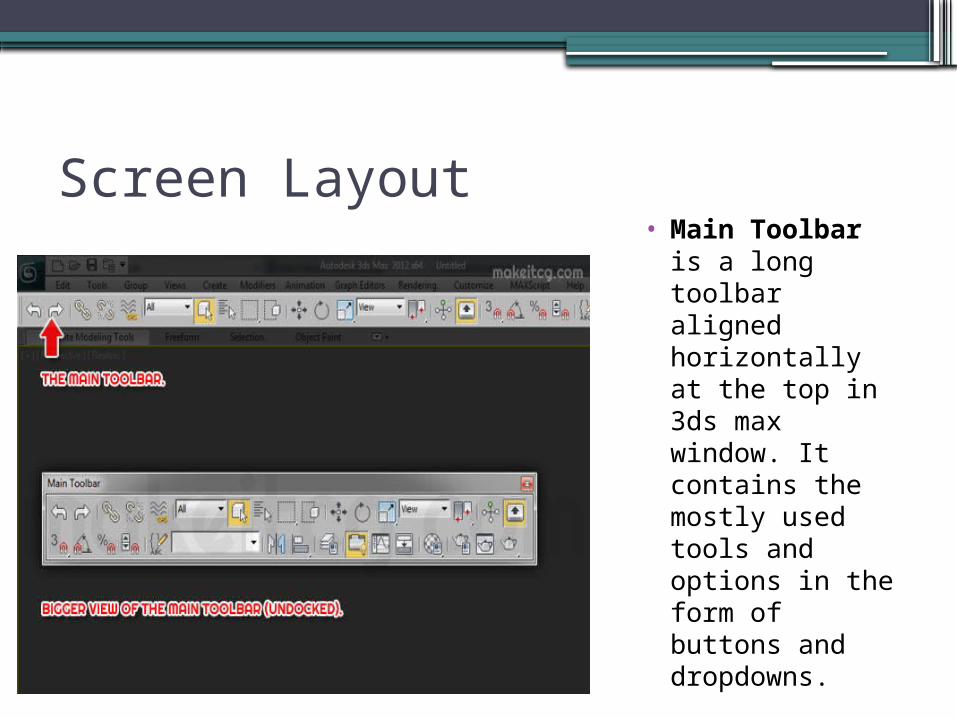
Screen Layout• Main Toolbar is
a long toolbar aligned horizontally at the top in 3ds max window. It contains the mostly used tools and options in the form of buttons and dropdowns.

Main Tool Bar• Right under the Menu Bar
is the main toolbar, which contains the most often accessed tool icons.
• Everything from Undo to Render is in the main toolbar for easy access.
• The main toolbar contains the tools most commonly used in Max conveniently located at the top of the interface.
• The toolbar can be rearranged as a floating pallet or docked on the bottom, left, or right side of the interface.

Main Tool Bar- Icons
1
2
3
45
67
8
9
100
11
141312

Assignment
•Please fill out the sheet of Notes.
•Move your cursor over the Icon to view the name of the Icon
•There will be a Quiz on the Icons Next class.
•We will review after class

Command Panel

Command Panel• The Command panel is
divided into tabs according to function.
• You easily access several commands and functions through the different panels that make a quick workflow in Max.
• Everything you need to create, manipulate, and animate objects can be found here.

Command Panel
•You can easily scroll up and down a panel to access tools that are not visible on thescreen because the panel is too long vertically.
•When you encounter a panel with more to show, Max will display a thin vertical scroll bar on the right side, as seen here.
•Your cursor will also turn into a hand cursor when you can click and drag the panel up and down.

Command Panel- Icons

Create Panel- Icons
•The first panel, the Create panel, is used primarily for creating various objects for your scene.
•There are seven categories for the kinds of objects you can create. The panels under the Create panel are listed here:

Create Panel- Subfunctions/icons

Create Panel DefinitionsGeometry Shapes
• Is responsible for render able objects, also known as PRIMITIVE or parametric objects (i.e., an object whose parameters may be changed at any time to adjust its original shape or appearance).
• The default is Standard Primitives.
• Click on the drop-down window to access more object types, such as extended primitives, compound objects, and particles.
• Shapes are 2D lines or splines that can be used as is. You can also create objects using modifiers, such as Extrude
• You can use stock shapes, such as a circle or rectangle, or you can use the Line tool to create free-form shapes.
• Lines are used as components to create other objects. You can use splines to create motion paths, extrusions, lathes, lofts, and 3d objects.

Create Panel DefinitionsLights Camera
• You can create lights that simulate indoor lights (such as incandescent or florescent lights), outdoor lights (such as the sun or street lights), or lights that don’t simulate anything but the look you need for your scene.
• Max provides two types of lights you can use: Standard and Photometric.
• They are used to record the action you animate, and they output through rendering.
• Just as with real-world cameras, Max’s camera objects allow you to use a variety of lens types.
• There isa standard camera and a camera that has a target to make it easier to follow an object

Create Panel DefinitionsHelpers Space Warp
• They help you construct scenes, but they aren’t necessarily part of the scenes.
• Helpers help you position, measure, and animate a scene’s renderable geometry.
• You can create ripples, waves, and even blow up objects by applying Space Warp objects to them.
• In order for the space warp to work, it must be bound to the object using “bind to space warp.”