geol 302 - otago.ac.nz · web viewfor example, seismic data or gravity models can be incorporated...
TRANSCRIPT

GEOL 302Handbook
2019
GEOL302 handbook. Page 1 of 28

GEOL302 INDEPENDENT FIELD STUDIES
PREREQUISITES: GEOL 251 and 252 CO-REQUISITES: GEOL 344
PAPER COORDINATOR: Steven Smith
TEACHING STAFF: All
FORMAT: Full year; no lectures, no laboratories.
FIELDWORK:
Independent field-based project.
ASSESSMENT AND DEADLINES: (further information on each of these components is provided below). A 5% penalty per day applies to any work submitted late.
Assessment Weighting Deadline
Finished chapter(s): Introduction and Geological History/Previous Work
10% Friday 5th April, 5 pm
Raw field data 15% Friday 3rd May, 5 pm
Presentation of final graphic synthesis (i.e. map sheet)
25% Friday 24th May, 10 am – 12 pm
Final report – electronic and hard-copy versions
50% Thursday 5th September, 5 pm
Acceptance of project is dependent upon all samples, thin sections and fossils being adequately curated with Dianne Nyhof. Due Friday 6th September, 5 pm.
PRIZES AND AWARDS:
JD Campbell Prize in Geology – 300-level project
Established in 1984 by a group of friends and former students of Associate Professor J.D. Campbell. The prize is awarded annually by the University Council on the recommendation of the Pro-Vice-Chancellor (Sciences), to the student presenting the best independent project for Geology at 300-level.
GEOL302 Department Merit Awards:
At the end of GEOL302, a sum of $250 will be awarded to all students who have achieved an overall mark of 75% or higher for the paper including a mark of 75% or higher for the final report.
Geol 302 Handbook. Page 2 of 28

BACKGROUND REQUIREMENTS:
Basic field skills, geological mapping skills, geological analysis in the field (e.g. stereographic analysis, sedimentary analysis), hand-specimen identification, and petrographic skills. Tertiary-level writing skills.
TEXTBOOKS: these may be helpful.
Coe, A. (ed.); 2010. Geological Field Techniques. Wiley-Blackwell Fry, N. The Field Description of Metamorphic Rocks. Wiley.Jerram, D. & Petford, N. The Field Description of Igneous Rocks. Wiley.Lisle, R., Brabham, P & Barnes, J. Basic Geological Mapping. Wiley.McClay, K. Mapping of Geological Structures, Wiley.Tucker, M.E. Sedimentary Rocks in the Field: A Practical Guide. Wiley.
PURPOSE:
This paper is intended to develop a range of geological skills, including some of stratigraphy, mapping, structural geometry, facies analysis, petrography, and library research. The report resulting from the independent project develops abilities in written communication and geological interpretation.
CONTENT:
Participants in the course will investigate a range of topics dependent upon the specific area chosen for their independent field project. The participant’s supervisor will suggest appropriate readings and laboratory methods related to project aims. The supervisor will be available for field consultation at some time during the project, and will offer guidance on a first draft of the written report.
Geol 302 Handbook. Page 3 of 28

GEOL 302: Marking and expectations
Marking criteria for field data, written reports, presentations and map sheets are provided at the end of this Handbook. Study the marking criteria carefully.
GEOL302 is your opportunity to demonstrate an understanding of standard analytical techniques that are used widely in academia and industry.
To obtain a good mark in this paper, you must demonstrate that you can apply appropriate forms of geological data collection and analysis. At the foot of this page is a short list of standard techniques that can be used to collect, analyze and interpret the geological history, composition and structure of rocks. This list is not exhaustive, and you will be able to think of other techniques that you have already come across. Where appropriate, you are expected to use these techniques during your GEOL302 project.
For example:
If you map an area that contains sedimentary rocks, you will be expected to apply standard techniques such as stratigraphic logging, facies analysis, grain size and paleocurrent analysis, analysis of grain compositions (and so on). If you map an area that contains sedimentary rocks and you do not apply these standard techniques, you will not receive a good mark.
If you map an area that contains deformed basement rocks, you will be expected to apply standard techniques such as structural analysis (with data presented on e.g. stereoplots), analysis of crosscutting relationships, determination of metamorphic grade, fault rock analysis (and others). If you map an area that contains deformed basement rocks and you do not apply these standard techniques, you will not receive a good mark.
The same reasoning applies for other rock types, field areas and types of project.
Some standard geological techniques that you are expected to use, where appropriate, during your GEOL302 project:
Stratigraphic logging Paleocurrent analysis Clast composition and grain size analysis Facies analysis Stereoplot presentation and analysis of structural data Detailed mapping and assessment of cross-cutting relationships Point counting of mineral abundances Qualitative and quantitative thin section descriptions
GEOL302 handbook. Page 4 of 28
GEOL302 Independent field-based project: Timetable 2019
Friday 1st March: 09:00Mandatory introduction to GEOL302. If you miss this meeting you will not be allowed to take GEOL302.
Friday 8th MarchFinal date for submission of 1) logistics and project description form (page 7) and, 2) health and safety form (page 10). No fieldwork is allowed without adequately completed safety and logistics documentation.
March and AprilCarry out field work. Visit field area for several days (Geology has a week without 300-level classes before Easter for this purpose, and Easter week is also a good time to perform field work). Arrange supervisor visit mid-way through fieldwork.
Friday 5th April, 5 pm (10%)Deadline for completed chapter on Introduction/Geological Background/Previous Work. Note that this is not a draft chapter, it should be the final polished version. This will be marked carefully and given back to you, so that you can improve it for inclusion in to the final report.
Friday 3rd May, 5 pm (15%)Deadline to hand in raw field data (Notebooks, and as appropriate: field maps, field cross sections, field GVS [stratigraphy], sedimentary logs, field stereonets etc) and a digital copy of all field data (scanned copies of all of the data handed in including notebook pages) submitted via Blackboard.
6th – 8th MayTraining in making thin sections. Groups of 3-5 students should arrange a training time with Brent Pooley. Training is not available outside these dates. Untrained users will not be allowed in the thin section lab.
Friday 10th May, 5 pmDeadline for students to send personal letters of thanks to landowners. Addressed envelopes with letters should be brought to the academic administrator. Your project will not be marked as complete without this letter.
Friday 24th May, 10 am – 12 pm (25%)Presentation of final graphic synthesis (i.e. map sheet). You must bring your printed hard-copy map sheet with you to the presentation session. This hard-copy will be submitted immediately after the presentations. The electronic version must be submitted by 5 pm on the same day. More details at the back of the Handbook.
Friday 19th July, 5 pmLast day students are allowed to use laboratory facilities (including thin section making).
Thursday 5th September, 5 pm (50%)Deadline for submission of completed report. Electronic version should be submitted on Blackboard: PDF format at <30MB. Hard-copy version should be printed double-sided and soft-bound. Please fold your final map sheet and insert in to a map pocket in the back of your report.
Friday 6th September, 5 pmYou must catalogue your rock specimens/thin sections/fossil samples and hand them to Dianne Nyhof. There is a form at the back of the GEOL302 Handbook for this purpose. Your project will not be marked without this.
Geol 302 Handbook. Page 5 of 28

GEOL 302: Supervision and project selection
Supervision: Project selection is your responsibility, but should be done after consultation with potential supervisors. Be specific about your interests and transport limitations. You may have ideas of your own, which you are welcome to discuss with potential supervisors.
The project should involve geological mapping and more detailed field-based work (sedimentary logging, structural analysis, field petrology, geophysical data etc). Detailed field-based work should be framed in the context of a geological map - even if that map is limited in its scope to address only the specific problem being addressed. Unless your supervisor has research funds and is agreeable, most projects will need to be within a half day round trip of Dunedin to allow supervision. Projects that involve no fieldwork are only available for students with extenuating circumstances (e.g. medical problems) that prevent fieldwork activity. If the project is not framed in the context of a geological map then prior agreement with the paper coordinator is required to establish what will be submitted as “field data” and “graphic syntheses” (instead of a final map). See form on page 14.
Your supervisor will be available to discuss your project work in the department and to direct you toward relevant literature, etc. Questions on general planning and organization of the project should be referred in the first place to the project supervisor. Advice of other members of the Department whose specialist interests are relevant to aspects of your work should also be sought. After you have completed some of your own field work, you should make an appointment with your supervisor for a half-day in the field (generally the earlier the better), which allows you to give an overview of your work.
Your supervisor is expected to provide feedback on drafts of your chapters and final report, as well as your map sheet. Make sure that you agree a timetable for feedback with your supervisor- do not leave this to the last minute. If you send chapters/report/map sheet to your supervisor the day before the deadlines, they will not have time to provide feedback.
Project area and scope: This should be discussed in detail with your supervisor so that you can complete the safety and logistics form. If you are making a geological map there is no set map area and what you cover depends upon mapping scale(s). In terrain and outcrop comparable to Swinburn one might map a few km2 at the 1:10,000 scale, or a larger area (10-20 km2) in less detail (e.g. at 1:25,000). Maps in areas having good exposure and complicated geology, or maps for projects that are topic-based, or projects incorporating drill core or other subsurface samples, or projects that additionally utilize geophysical techniques, or. . . (the list is almost endless), may be much smaller. Again, there is no general area requirement.
Time in the field. About seven full days' fieldwork is regarded as appropriate. Less than 5 days is definitely not enough. More than 10 days is probably more than necessary. The week without 200-300 level Geology classes before Easter Break is intended for your project fieldwork, but you can do it at other times as well providing that all Health and Safety documentation has been completed.
Geol 302 Handbook. Page 6 of 28

GEOL302 Project Intention Form
Name:………………………………………… Supervisor: ……………………………………
Project area: …………………………………………………………………………………………….
Provisional Project title (e.g. Geological Mapping of Swinburn, Sedimentology of Boatman’s Harbour, Oamaru)
Brief project description (e.g. traditional mapping project, facies analysis, structural analysis.)
What scales of mapping do you intend to use?
What other field data will you collect?
What field data do you think you will hand in on the 11th May?
If it is inappropriate to hand in “field data” and/or a “final mapsheet”, what will you submit instead? (note that this option will require previous consultation and agreement from the paper coordinator)
Any other comments?
Geol 302 Handbook. Page 7 of 28
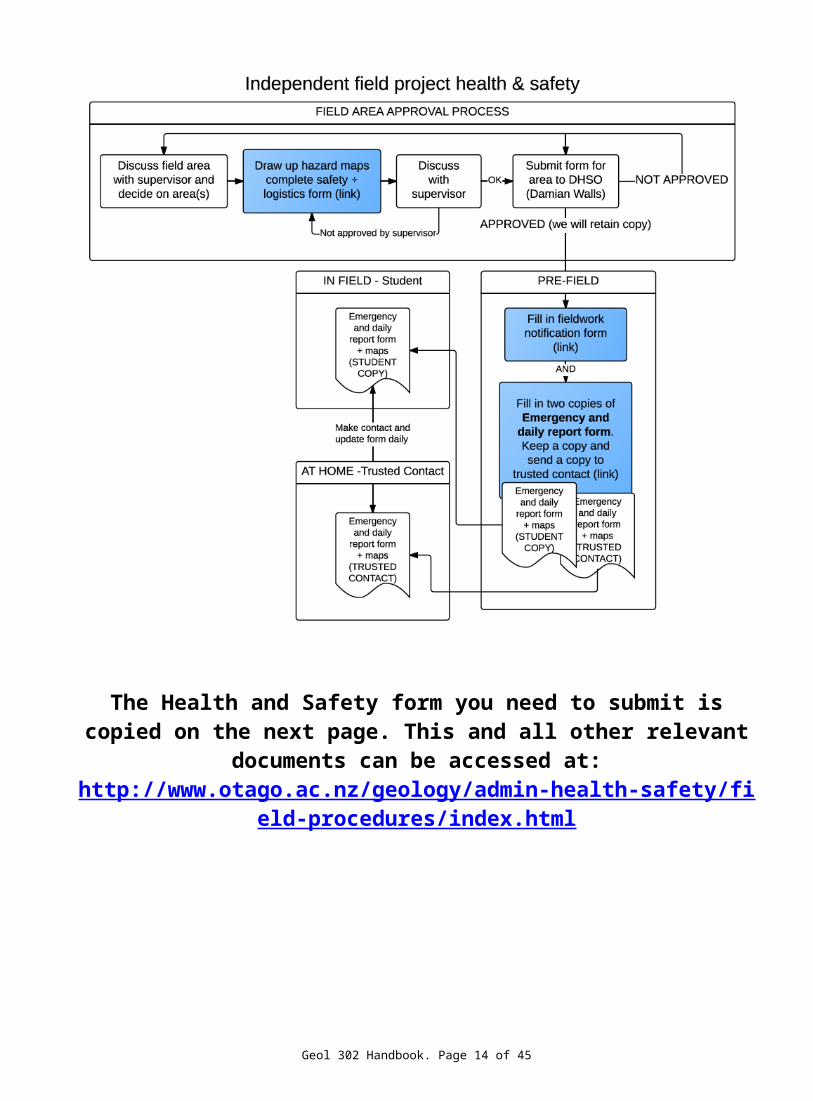
IN THE FIELDField Safety. All the generic safety requirements for class field trips (as outlined in lab books) apply for GEOL302 project field work. Students should have already read the Department Health and Safety policy: this is available on the web (http://www.otago.ac.nz/geology/admin-health-safety/field-procedures/index.html). All of the documents in the next 3 pages of this handbook, together with examples of a hazard map and of completed daily report and emergency forms, are available at this site. Students will not be sanctioned to carry out independent fieldwork until they have:
1. Attended the health and safety briefing included in the introduction to GEOL302.2. Completed safety and logistics documentation on page 10 (see flow diagram on next page) and
had this signed off. The document must include an annotated hazard map for the field area and documentation of daily reporting procedures that will be used in the field. Supervisors must have designated the “terrain” and “remoteness” (see web link as above) of the area and students must agree to work in the field according to the logistical requirements these determine.
3. You must set up a trusted person to whom you will report your safe return from each field day. Daily report forms are provided to help you and your trusted person report your daily field activities and to help that person decide on action in case of a problem.
Permission for access to land. Students in all cases should ensure that they obtain permission to carry out their field work from the appropriate land owners, run holders and/or DOC. The following website provides some useful information: http://www.walkingaccess.govt.nz/walking-access-mapping/. Landowner details are accessed using the field map template on the GIS database. Fill in a form for access to the GIS database. We have had particular problems in the Hyde area recently. A letter of introduction for landowners in your area can be obtained from the Department. You MUST speak to landowners in person; entering land without permission or leaving notes is not acceptable until you have made personal contact. Do not cause damage, light fires, or leave gates open in your field area. If you are working on DOC land then you must complete a “low impact collecting and research application” available from the web (http://www.doc.govt.nz/get-involved/apply-for-permits/research-and-collection/).
Personal and professional ethics. Students are expected to apply high ethical standards to all aspects of their work. A short document on ethics is appended to this document. Additionally students should look at the code of ethics of the Geoscience Society of New Zealand (http://www.gsnz.org.nz/information/rules-policies-i-4.html scroll to bottom of page)
Geol 302 Handbook. Page 8 of 28

The Health and Safety form you need to submit is copied on the next page. This and all other relevant documents can be accessed at:
http://www.otago.ac.nz/geology/admin-health-safety/field-procedures/index.html
Geol 302 Handbook. Page 9 of 28

GEOL302 Independent Project Safety and Logistics Form
Name:………………………………………… Supervisor: ……………………………………
Project area: …………………………………………………………………………………………….
Field area and field safetyA map (or maps) must be attached showing the areas in which fieldwork is likely to take place. The maps should be annotated to outline any specific hazards identified in the field area (consult your supervisor- who needs to sign this off) and the mitigation strategies required to minimize the risks posed by these hazards.
Transport. Outline the details of the transport you will use:
a. Public transportb. Private transport
If students wish to use their own transport for their field project, permission may be given on the understanding that the Geology Department accepts no liability, financial or otherwise for the driver or passengers of such vehicles.
Permissions.It is the student’s responsibility to seek land access permissions.Does the area include DOC land: YES/NOIf yes fill in the section below (work on DOC land not sanctioned without permit)Collecting Permit obtained: Date: ………………………… Number: ………………………..DoC Office: …………………………………………………….
Daily Reporting1. You must let the department know the dates you are going to the field. This can be done with an email to Ray
Marx and your supervisor at least the day before you depart. Indicate your departure and return dates. 2. You must designate a trusted person (and alternate) who you will notify each day you go out in the field and to
whom you will indicate safe return from field. Forms will be provided to help you with this. You may find more appropriate people in the field. Inform the department of changes to your trusted person list.
Trusted Person: Name: ……………………… Relationship (family, flatmate, other): …………………Phone Number: ……………………………..
Alternate: Name: ……………………… Relationship (family, flatmate, other): ……………………Phone Number: ……………………………..
I accept the Geology Department transport policy.
Student signature: ………………………………… Date: ……………………………..
I have read and understood the Geology Department’s general field safety policies, and agree to follow these. I agree to work in the field according to the logistical requirements dictated by the terrain and remoteness categories of my area.
Student signature: ………………………………… Date: ……………………………..
The student has discussed this field project with me and the attached maps include a realistic assessment of the areas that may be visited and outline completely the hazards as known to me. I have estimated the terrain and remoteness of the area as indicated below (circle categories that apply). Definitions and logistical implications are in an excel file at: http://www.otago.ac.nz/geology/admin-health-safety/field-procedures/index.html
Terrain: T1 T2 T3 T4 T5 T6 T7 T8 T9 T10 T11 T12
Remoteness R1 R2 R3 R4 R5 R6 R7 R8 R9 [ ] Acceptable range for 302 Projects
Logistical implications (HOD/safety officer to complete)
Supervisor signature: ………………………………… Date: ……………………………..Checked by HOD or safety officer. Signature: ………………… Date: ……………………………..
Student has attended pre-independent fieldwork safety briefing
HOD signature or safety officer signature: …………………… Date: ……………………………..
Geol 302 Handbook. Page 10 of 28

GEOL302 Support facilities available to you
1. Maps; Following training in GEOL344, you should be able to set up, organize and print base maps from GIS that are appropriate to your mapping project. This might include topo maps, aerial photos, previous geophysical surveys, and so on. Follow the templates and guidance that you had for the GEOL344 field trips. Basemaps should be made in consultation with your supervisor. Aim to get overlapping A4 field-slips on high quality card. Additionally, you may need a paper copy that covers the whole area to draft final maps and you will need electronic copies of the maps for production of the final map sheet. If you need graph paper for field sections and logs, these are available. Help and advice is available on all aspects of GIS, graphics and illustration.
2. Air Photos and topo maps: All of these digital resources are available on the GIS database, or on https://data.linz.govt.nz/data/category/aerial-photos/ Photos can be downloaded free. Note that these are orthophotos and cannot be used for stereoscopic viewing. If you want stereo-pairs, check the Department collections (Gn7A) and the collections at GNS.
3. Field Equipment: Altimeters, tape measures, spades, acid bottles, stereonets, GPS, safety beacons, etc. can be borrowed from the Geology Department where necessary. If you need it, and have a good reason to use it, we can probably find it for you, so let us know!
4. Thin sections: You make them, label them, cite them by GR, and hand them all in with the project. See the training dates on the timetable and make arrangements in groups of 3-5 with Brent Pooley for instructions on how to make thin sections. Untrained users will not be allowed in the thin section lab. It is not appropriate to make more than 15 thin sections (including the ones that don’t work) for most projects – discuss this with your supervisor.
5. X-Ray Diffraction. If you wish to use this analytical technique for your project work, you must consult with Gemma Kerr to arrange appropriate training and analysis time. You will need to demonstrate a clear and specific reason for using this technique.
Geol 302 Handbook. Page 11 of 28

PREPARING FINAL MAP SHEETS - TECHNICAL DETAILS
Note that these are the same instructions given during GEOL344. Preparation of your final map sheet should be done in consultation with your project supervisor.
If your 302 project involves geological mapping then you must prepare a final map sheet, in the same way that you did for GEOL344. The final map sheet shows your interpretation of the geology and should have professional production values. You must produce a final map sheet using a computer drawing package (Inkscape, Adobe Illustrator etc) or a GIS package (ArcGIS). You will produce computer-based maps in GEOL344 as training. Use your GEOL344 final map sheet and the specific and general feedback you received for this as a guide as to how to proceed.
The final map sheet must include:
1. A title, which indicates where the mapped area is located.
2. The name of the author and the date mapping completed.
3. Location map(s) of the area (with scale). These should enable anyone to locate the working area precisely without reference to data not presented on the map (you can assume that the average person will know where New Zealand is). Redraw these maps or use the template provided in the GIS database. Do not cut and paste from the web.
4. A final, lithostratigraphic solid geology map at a scale (or scales) appropriate to summarizing the data from the areas mapped. Lithostratigraphic units should be indicated by colour and letters so that the map is usable in black and
white. If the map(s) are drawn to emphasize solid geology you should still show the location of superficial
deposits, but these should be subordinate to the solid geology. The boundaries of superficial deposits should be marked but the deposits should not normally be colored. Solid geology should normally be colored through the drift deposits.
If a substantial part of your work relates to the superficial deposits then you should treat superficial deposits as you would solid geology units assigning a color and symbol on your map(s), sections and GVS.
The map(s) should contain as much representative data (bedding, foliation, lineation etc) as is necessary to define the structure of the area. In an area of structural complexity, it may be appropriate to transfer most or all of the data from the field maps. In simple areas, where most readings are similar, fewer data need be transferred.
The map(s) should not generally include topographic information (breaks of slope etc). The map(s) should not include locality numbers. The map (s) can show where rocks are exposed (as x symbols if there is no structural reading to indicate
exposure). The map(s) must include a correct scale bar, N. arrow and an indication of magnetic declination. The map(s) must be located with respect to national survey grids (e.g. NZGD2000 datum, NZTM
projection) and/or latitude and longitude.
5. At least one cross section at the same scale as the map with no vertical exaggeration. The section must be properly located on the map. If the section is not vertical the orientation should be justified (e.g. profile plane section). In an area of more complex geology it is advisable to construct more than one cross section if you wish to properly represent the geology.
6. A generalized vertical section (GVS = stratigraphic column) that provides the key to lithostratigraphy on maps and cross sections. Your own formal stratigraphic names should be assigned. Any units that do not appear in the GVS (e.g. intrusive units) can be included as boxes (with colour and letters) separate to the GVS. Areas where no lithostratigraphy can be established may have a lithological key and no GVS is needed.
7. A key to all lines and symbols (lithostratigraphy covered by GVS)
Geol 302 Handbook. Page 12 of 28

Printing your hard-copy map sheet:
You must print your hard-copy map sheet in time for the presentations on Friday 24th May. You can print your map in the department, but you will not be able to do this on the morning of the presentations. Print your map at least 1 day before the presentations, so that you have time to carefully proof-check everything.
Make sure the printed map scale is correct, and that all other technical details are correct (e.g. N. Arrow, grid references, colours etc).
Bring your printed map sheets (unfolded) to the presentations and pin them up on the boards provided.
Submitting your electronic map sheet:
The electronic version of the final map sheet must be submitted on Blackboard before 5 pm on Friday 24th
May. This version must be identical to the hard copy map that you presented earlier in the day. Map sheets can be any file size (most often these are <20MB) and must be submitted in PDF or PNG format (resolution should be >300 ppi).
FINAL MAP SHEETS – PRESENTING YOUR WORK (Friday 24th May, 10 am – 12 pm.)Electronic versions must be submitted on Blackboard by 5 pm on the same day.
A0 poster boards will be provided for your map sheets. This is an interactive session, much like a conference session, in which you will be expected to talk to staff and other students about your map sheet and the geology of your area. You must bring your printed map sheet with you. You are also allowed to bring additional datasets that might make your discussions more interesting (e.g. additional field data, field photos, supporting information etc).
The session will begin at 10 am. Staff and other students will walk around the various poster boards and ask you questions about your project. One aim is to help you identify things that will be interesting for follow-up work during your project.
Geol 302 Handbook. Page 13 of 28
GEOL302 Projects involving geophysical datasets
If your project involves the collection and analysis of geophysical datasets (e.g., boomer seismic data collected on board Polaris II, hammer seismic refraction data, gravity data, magnetic data) assessment of your data and results will differ. However, in most cases, you will still be undertaking mapping of some sort that will still need to be submitted and assessed.
FIELD DATA
Additional field data should be submitted. This should include: a basemap showing the extent of geophysical surveys undertaken and/or used and regions that
have been mapped in the field details of any co-incident GPS surveying, etc. used to support the data paper copies of field data, with preliminary interpretations and annotations;
observations/interpretations of seismic facies and/or lithostratigraphic units should be explained and justified
preliminary analysis of data in the form of graphs, charts, or maps
The presentation of field data should also include a summary report detailing: the acquisition and analysis method(s) the justification for the positioning of data collection points or transects.
PROJECT REPORT AND FINAL GRAPHIC SYNTHESIS
Final submissions will be assessed using rubrics and assessment schedules that are slightly modified from those used for assessing maps alone. The 10% of the mark allocated for the final map and cross sections, will also include the suitable presentation of interpreted geophysical datasets (e.g., annotated seismic lines, final gravity model plots, or magnetic anomaly maps, cross sections that incorporate geophysical data into the geological model.)
Geophysical data often enable the development or enhancement of stratigraphic columns. Be sure to annotate such features appropriately: what features are inferred from geophysical data and which features are identified directly.
If appropriate, consider adding interpreted data to your final map plot to enhance its value. For example, seismic data or gravity models can be incorporated in a cross section to highlight specific stratigraphic or structural configurations. Magnetic anomalies can be plotted directly on a map.
If geophysical data are offshore, a summary map that includes both offshore and onshore areas is required with at least one cross section that includes offshore and onshore data. Appropriate map scales are worth considering. Field mapping will often be at a very different spatial scale that geophysical data collected.
The report must present both geological and geophysical data and must integrate these to present the best constrained model for the geometry, stratigraphy and geological history of the area.
Geol 302 Handbook. Page 14 of 28

Report Final reports should be submitted both as a single .pdf file (<30Mb) and a printed softbound version with map pocket. Final maps (or equivalents) will be folded to fit in the pocket at the back of the bound report. Reports should not exceed 10,000 words. Appendices are allowed for extensive datasets that are not appropriate for the main report. Reports should be as systematic, complete, and concise as possible. Keep observation clearly separated from interpretation. Ensure that data are used to support your interpretations. See timetable for deadline.
SPELLING AND GRAMMAR (also see following pages)
At 300-level we are expecting high quality writing from you. In this day and age, spellcheckers and other online tools are available to help you produce a polished document, and there is absolutely no excuse for poor spelling and other mistakes. We will not look favorably on your report if it is littered with spelling mistakes. Make sure you leave enough time to thoroughly proof read your documents. A proof read does not mean a quick glance through your report – it means a close line-by-line inspection to eliminate mistakes, this may take you several hours.
Geol 302 Handbook. Page 15 of 28

Report StructureThe report should be written with a logical and informative structure, so that the reader can easily understand:
1. Where the area is, the general geology of the region, and how your area fits into that regional geology.
2. What you did; i.e. make it clear what is your work and what is derived from other workers.
3. The nature and significance of your work, in the context of the regional geology, and also any applied geology aspects.
Most reports will have a set of chapter headings, such as those that follow. There is no unique way to structure a report, but it should follow standard scientific conventions:
a) Abstract. This should be informative and specific wherever possible. It should summarise the geology of your area, with emphasis on your observations. Include facts and numbers wherever possible: thicknesses of units, ages from fossils, typical scale of active landslides, orientations of fold axes, etc.
b) Introduction and Geological Background/Previous Work. These chapter(s) should give a regional geological introduction, with references to sources. Refer to standard articles/maps/books, not lecture notes or student theses. Describe how your area fits into the regional geology, e.g. at the 1:250 000 map scale. Say why you selected the area especially if you were addressing a particular geological problem. Informative regional geology maps and locality maps are essential.
Chapters on “Macroscale” field observations – the number of chapters you submit here depends on what you have done in the field, and whether or not you have chosen to focus on a specific type of geology in your project. Some examples follow, but you will likely have other chapters to submit.
c) Description and quantification of rock units. These should be described in order from oldest to youngest. Present your field descriptions in a logical way and include as much detail and quantification as possible; for example using a top down approach. Describe map scale features (where the outcrop is) before outcrop scale features (bedding characteristics, sedimentary structures, schist segregations, contact relationships etc) before details of individual rocks (the minerals present and their textures). Separate descriptions of secondary features such as joints, weathering features and erosional characteristics from primary rock descriptions. Wherever possible, be quantitative. Wherever possible use figures: see below
Keep all inferences/guesses on origins separate from your observations. For example, sentences such as: “Outcrops have cross bedding indicating the current flowed from the west” are not acceptable in the description section. Describe the cross bedding: scale,
Geol 302 Handbook. Page 16 of 28

type, orientation (with measurements wherever possible). The inference of flow directions should come later.
d) Structural geology. This section can include descriptions of e.g., folds, faults, and unconformities, joint sets in various rocks, landslides etc. Apportionment of material between this section and the rock descriptions can be problematic; discuss this with your supervisor if you are having trouble. Wherever possible use figures: see below
e) Applied geology issues. This is not essential, but it can give a more “real world” context to your project. Results of your mapping may be of interest to a wide variety of different commercial interests. It is good practice to think of potential uses for your work, e.g.
(i) hazards, such as landslides, active faults, or coastal erosion
(ii) resources such as hard-rock gold, alluvial gold, groundwater (including springs), road/building aggregate
(iii) soil issues such as erosion, chemical effects from underlying rock, or loess covering.
Chapters on “Microscale” observations – the number of chapters you submit here depends on what you have done in the lab as follow-up work. Two examples follow, but you will likely have other chapters to submit depending on what you did in the field, and whether or not you have chosen to focus on a specific type of geology in your project.
f) e.g. Thin section analysis: This may include a detailed petrographic description of samples that you collected in the field. Mineralogy, textures, deformation microstructures etc. Determination of metamorphic facies, shear sense, mineralization sequences.
g) e.g. Micropaleontology to determine microfossil types, provide absolute age constraints.
h) Discussion/Interpretations. This is an extremely important chapter that is always present in a scientific report. In this chapter, you need to discuss your own field observations, and provide some interpretations of the primary observations presented in previous chapters. This is where you summarize and synthesize your own observations, and interpret them in the context of what we already know about regional geology and geological processes (i.e. the literature). This chapter(s) can be organized in any way you like, but it should be logical and clearly structured. It should span the entire range of observations presented in previous chapters. Use figures whenever possible to synthesize information
h) Conclusions. Give a succinct summary of your own principal observations, and how they contribute to understanding the geology of the area. Outline results from your work in any detailed study you did, and/or applied geology aspects.
Geol 302 Handbook. Page 17 of 28

h) References. List all references that you have used information from, and make sure they are cited in the text appropriately. As for all scientific writing, you should only list references that are cited in the text. Most projects have at least 30 references; if you have fewer, you probably have not cited some references (this is plagiarism), or you have not done sufficient background reading. Use a single, consistent, complete format for listed references; journals offer good examples.
i) Acknowledgements. Briefly thank staff and students who have been particularly helpful to you. Also thank landowners, providers of transport etc.
k) Map sheet. This is one of the most important components of the project. Make sure you have referred to it extensively in the text, with grid references (see below) where appropriate. Given that your map (and cross section and GVS) has been drawn on a computer it is worth considering using simplified versions in the body of the report to make it much easier for the reader.
Geol 302 Handbook. Page 18 of 28

Using grid references and grid reference systems: As mentioned in the Final Map section on page 12, the map(s) itself must be located with respect to national survey grids (e.g. NZGD2000 datum, NZTM projection) and/or latitude and longitude. However, if it is necessary to refer to map localities in your report, it is often better to use a grid reference system (MapA 032 607) rather than full NZTM coordinates (1403205, 4960724). Providing full NZTM coordinates is acceptable in some situations where more precise locations are necessary or useful (e.g. a table of fossil localities). Use these resources to understand and make grid reference systems:
https://blogs.otago.ac.nz/si-geology/2013/09/11/grid-reference-systems-what-are-they/
https://blogs.otago.ac.nz/si-geology/2013/09/11/grid-reference-systems-how-to-make-one/
FIGURES. Good figures are often the difference between a good project and a poor one. Use a range of figures (maps, cross sections, field sketches, graphic logs, sketches of thin sections, stereonets, palaeo-environment reconstructions, kinematic cartoons, field and sample photos, photomicrographs etc). Make sure that the figures are well annotated - this is particularly important for photos- you won’t get marks for presenting a photo album. Redraw maps- don’t just cut and paste from the web. All figures must:
Be cited in the text. The first citation should appear before the figure and should indicate why the figure is there. e.g:o “ Figure 3 shows the extent of the phyllite in the area…”o “… comprises randomly oriented interpenetrating needles of
hornblende (fig. 8)o “.. and palaeocurrent data suggest these sediments represent a
braided river system that flowed broadly from east to west as shown in fig. 14”. Have a caption. The caption should enable the reader to understand the
figure without repeating (substantially) information in the text. Captions that might correspond to the examples listed above are:o “ Fig. 3. Simplified geological map of the Swinburn area.”o “ Fig. 8. Sketch of thin section of a metabasite unit in the Schist.
Sample OU…. Collected at grid reference (…..).o “ Fig. 14. Palaeogeographic reconstruction for the Palaeocene
from the sedimentary log data presented in section 3.1”
Geol 302 Handbook. Page 19 of 28

Scientific writing and reports
Scientific writing has four principal aspects that need close attention:
1. Organisation and logic. Information must be presented in a logical way, or a reader cannot understand it. Before writing, make an outline:
a) Make a list of headings (topics) that you want to cover.
b) Put these in a logical order for presentation.
c) Group the headings, where possible into more than 1 tier (major headings, subheadings). Avoid more than three levels of headings.
d) If you are writing a draft, discuss the outline with your supervisor.
2. Ambiguity. Check each sentence for ambiguity. If there is more than one way of interpreting the sentence, add words or rewrite.
3. Grammar. Good grammar is essential. Poor grammar will be marked down or rejected. It is also harder for markers to properly assess the science through poor grammar.
4. Spelling. Consistent and correct spelling is essential. Persistent incorrect spelling gets penalised.
FEEDBACK
To minimise waste of staff time, you can expect serious feedback only on Points 1 and 2 above. Points 3 and 4 are your problem. The following suggestions may help if you have grammar and spelling problems.
1. Get someone else to read what you have written and comment on it.
2. Read it aloud to yourself.
3. Use a word processor, e.g. Microsoft Word has spelling and grammar tools. Turn these on from “Options” (PC) or “Preferences” (Mac). Then, tick all boxes on what the grammar checker evaluates. (The default is nothing – thanks, Bill). If the grammar check doesn’t flag anything, it is not turned on. If your sentence is underlined in green, the grammar is incorrect, according to Bill Gates. If a word is underlined in red, the software dictionary doesn’t recognise it.Note: this is not foolproof, but will solve >90% of your errors.
4. Read a book or take a course on writing style.
It is extremely discourteous to staff to expect them to read work that has not had some form of checking, as outlined above. If you do not check your written work, do not be surprised if staff lose patience after 2 - 3 pages and return your work to you for rewriting.
Geol 302 Handbook. Page 20 of 28

Environmental Care CodeProtect Plants and AnimalsTreat New Zealand’s forest and birds with care and respect. They are unique and often rare.
Remove RubbishLitter is unattractive, harmful to wildlife and can increase vermin and disease. Plan your visits to reduce rubbish, and carry out what you carry in.
Bury Toilet WasteIn areas without toilet facilities, bury your toilet waste in a shallow hole well away from waterways, tracks, campsites and huts.
Keep Streams and Lakes CleanWhen cleaning and washing, take the water and wash well away from the water source. Because soaps and detergents are harmful to water life, drain used water into the soil to allow it to be filtered. If you suspect the water may be contaminated, either boil it for at least three minutes, or filter it, or chemically treat it.
Take Care With FiresPortable fuel stoves are less harmful to the environment and are more efficient than fires. If you do use a fire, keep it small, use only dead wood and make sure it is out by dousing it with water and checking the ashes before leaving.
Camp CarefullyWhen camping, leave no trace of your visit.
Keep to the TrackBy keeping to the track, where one exists, you lessen the chance of damaging fragile plants.
Consider OthersPeople visit the back-country and rural areas for many reasons. Be considerate of other visitors who also have a right to enjoy the natural environment.
Respect Our Cultural HeritageMany places in New Zealand have a spiritual and historical significance. Treat these places with consideration and respect.
Enjoy Your VisitEnjoy your outdoor experience. Take a last look before leaving an area; will the next visitor know that you have been there?
Protect the environment for your own sake, for the sake of those who come after you, and for the environment itself.
Water Care CodeFind Out FirstFind out and follow the regulations governing recreational use of waterways and access. They are designed to minimise conflict between users and protect everyone’s health and safety.
Stay on Established Tracks and Use Existing FacilitiesBy using existing facilities, where these are provided, you run less chance of disturbing wildlife and damaging riverbanks and foreshores.
Take Care of Your GearCareless use of equipment can harm wildlife and other users.
Remove RubbishLitter is unattractive, harmful to wildlife and pollutes water. Plan your visit to reduce rubbish, and carry out what you carry in.
Dispose of Toilet Waste ProperlyImproper disposal of toilet waste can contaminate water, damage the environment and is culturally offensive. Use disposal facilities where provided or bury waste in a shallow hole at least 50 metres away from waterways.
Be Careful with ChemicalsUse chemicals sparingly, and refuel with care. Dispose of cooking or washing water well away from the source.
Respect Our Cultural HeritageMany New Zealand waterways have special cultural, spiritual or historical values. Treat these places with consideration and respect.
Take Only the Food You NeedWhen taking food from the sea or freshwater, don’t overdo it. Sustain life in our waterways by taking only what you need and no more than the legal limit.
Consider Plants and AnimalsRemember we are only visitors to water environments. Other animal and plant species live there all the time.
Consider Other PeopleRespect other visitors … everyone has the right to enjoy the environment in safety.
GEOL302 handbook. Page 21 of 28

Cataloguing of specimens and fossil record formsIt is a requirement for acceptance of your project report that fossil collections, a representative set of rock specimens, and thin sections, appropriately catalogued, be lodged in the Department collection. The set of rocks and minerals should include all specimens referred to in the project report (please keep size of samples small), and additional reference material where appropriate. The fossil collections must include duplicate samples of any matrix used for micropaleontology. Fossils must be catalogued in the fossil catalogue, not the rock catalogue. Fossil record forms must also be completed for representative fossil collections (discuss this with Daphne Lee or Ewan Fordyce).
Labeling of Samples
SLIDES
Labeling should be done neatly in black ink and remain consistent in form with the following example:NB 30711
Rock analysisGeology Dept
Otago University
-- Specimen number used in report (3rd year students’ samples will not generally be catalogued with OU numbers)-- special information
Labels to be placed with writing the same way up, as shown
PhonoliteC. A. Tapia
NZTME1234567N5678912
Geology DeptOtago University
-- rock type-- student name-- coordinate systemEasting or LongitudeNorthing or Latitude
Microprobe slides, polished briquettes and crushed powders should also be handed in.
Description data is entered into a Microsoft Excel spreadsheet. Three different spreadsheets are used according to whether the specimen is a New Zealand rock, an overseas rock or a mineral; the data type instructions for New Zealand rocks are listed below. Discs and instructions for the less commonly used overseas and mineral spreadsheets are available from the Curator.
Fossil curation is supervised by Ewan Fordyce.
GEOL302 handbook. Page 22 of 28
DATA TYPE RULES FOR NEW ZEALAND ROCKS
Field Number unlimited alphanumeric (this field will not be loaded into the database)
Coordinate system used e.g. NZTM, NZMG, WGS84 (Must be recorded!)
Easting or Longitude Number of digits to reflect precision
Northing or Latitude Number of digits to reflect precision
Collector Names initials and last name (e.g., J. M. Smith)
Year 4 digits: (19DD/20DD)
Slide types 1 to 4 UPPERCASE alphanumeric: a combination of T (thin section), G (grain mount), P (polished section), B (briquette)
Analysis types 1 to 7 UPPERCASE alphanumeric: Analyses performed, a combination of D (X-ray diffraction), S(sedimentology), M (whole rock major element chemistry, T (whole rock trace element chemistry), G (geochronology), I (isotopic), P (microprobe), O (other).
Proj. Stat. 1 digit: Project status:
1: Exchange 2: Other 3: 3rd year thesis 4: 4th year thesis and DipSci 5: MSc thesis 6: PhD thesis 7: Staff research
Rock type Standard rock classification (e.g., Sedimentary, sandstone; Volcanic, Andesite; Metamorphic, Gneiss)
Other up to 255 alphanumeric: any other pertinent data such as Formation, description of location, interesting features etc. Keep it brief and useful! Don't load the database up with trivia.
Geol 302 Handbook. Page 23 of 28

Sample curation formYour project will not be considered until Dianne Nyhof has received this form.
NAME: ..................................................................................
A representative set of rock specimens and thin sections has been satisfactorily catalogued and lodged in the Department collection.
(signed) ...............................................................Dianne Nyhof (Curator)
Date: .............................................................
Fossil collections, including representative samples of matrix used for micropaleontology, have been entered on the Fossil Record File, have been satisfactorily catalogued and have been lodged in the Department collection.
(signed) ...............................................................R E Fordyce
Date:.....................................................................
Geol 302 Handbook. Page 24 of 28

Marking Schedule for 302 Raw Field DataThis Schedule is for field projects with a substantive map componentSchedule should be modified for other projects
Student Name
Markers
Mark Substantiveness (data, observations etc)
Organization/ Clarity/ Legibility Completeness
0No Data Submitted
1Just a few bits of data
There are some data but illegibility, lack of titles etc
makes data uselessJust a few pencil lines.
2
Data substantially less than that expected of 7 days of fieldwork
or equivalentRange from 1 to 4 Map incomplete, with no key.
3Range from 2 to 5 Range from 1 to 4 Range from 2 to 4
4Range from 2 to 5
Difficult to understand what individual pieces of work are.
Basic map complete with lithological key and legend but
no cross sections or GVS
5
Original data volume thin for seven days of fieldwork or
equivalent
Reader can understand what individual pieces of work are
but little more.
Basic map complete with lithological key and legend,
cross section and GVS
6Range from 5 to 7 Range from 5 to 7 Range from 5 to 7
7
Original data volume appropriate but not exceptional
for seven days of fieldwork or equivalent
Reader can understand individual bits of work and
roughly how they fit together
Good effort to develop an range of data sets to understand the
area
8Range from 7 to 10 Range from 7 to 10 Range from 7 to 10
9Range from 7 to 10 Range from 7 to 10 Range from 7 to 10
10
Substantial volume of original data.
All individual pieces of work fully titled and clearly cross-
referenced.
All data needed to provide a clear structural and
stratigraphic framework for area
Mark out of 10
Marking descriptors for Final Map sheets – technical detailsGeol 302 Handbook. Page 25 of 28

% Description
A++ 10
Outstanding work with professional production values. Presents a clear geological model that makes stratigraphic and geometrical sense. No omissions or technical errors. Layout of map sheet is neat and organized. Scale, grid references, north arrow etc are all correct.
A+ 9 Excellent work with near professional production values. Presents a clear geological model that makes stratigraphic and geometrical sense. May have minor omissions or errors. Scale, grid references, north arrow etc are all correct.
A- 8 Very good work with near professional production values. Presents a reasonably clear geological model that may have some elements that do not make stratigraphic or geometrical sense. May have minor omissions or errors. Scale, grid references, north arrow etc are all correct.
B 7 Good work with high production values. Presents a reasonably clear model geological that may have some elements that do not make stratigraphic or geometrical sense. May have minor omissions or errors. A less substantial piece of work. Scale, grid references, north arrow etc may have some errors.
C+ 6 Adequate work with moderate production values. Presents a reasonably clear geological model that may have some elements that do not make stratigraphic or geometrical sense. May have significant omissions or errors. Work perceived as a bit thin. Scale, grid references, north arrow etc may have some errors.
C- 5-
Unsatisfactory work (pass) with poor production values or presents a geological model with significant components that do not make stratigraphic or geometrical sense. May have significant omissions or errors. Work perceived as a bit thin. Scale, grid references, north arrow etc may have some errors.
D 4 Deficient with poor production values and presents a geological model that makes no stratigraphic or geometrical sense. May have significant omissions or errors. Perceived as a very thin piece of work.
D 3 Very deficient with very poor production values and presents a geological model that makes no stratigraphic or geometrical sense. May have significant omissions or errors. Perceived as a very thin piece of work.
F 0-2 Totally inadequate, no final map.
Geol 302 Handbook. Page 26 of 28

Marking descriptors for Final Map sheets - presentations
Student Name :
Assessor Name:
Other Comments
Geol 302 Handbook. Page 27 of 28
Mark
Knowledge and understanding (20)
Student demonstrates a detailed understanding of the geology of their mapped area
5 4 3 2 1Student has a poor understanding of the geology of their mapped area
Student provides a clear introduction to mapped area (e.g. location, why chosen, main aims etc.)
5 4 3 2 1Student does not provide a clear introduction to mapped area (e.g. location, why chosen, main aims etc.)
Student provides a clear overview of the mapped sequence of rocks
5 4 3 2 1Student does not provide a clear overview of the mapped sequence of rocks
Good attempt to provide a synthesis of data and initial ideas
5 4 3 2 1No attempt to provide a synthesis of data and initial ideas
Delivery and interaction with audience (10)Student makes good use of the map sheet to illustrate their main points
5 4 3 2 1Student does not make any use of the map sheet to illustrate their main points
Relaxed delivery and interaction with audience
5 4 3 2 1 Stiff, apathetic, looks untidy, ignores audience
Overall Map sheet (5) – note that technical details of map sheet will be evaluated
separatelyMap sheet – overall impression is excellent 5 4 3 2 1 Map sheet – overall
impression is poor“Value-added” (5)
Additional points for dealing with questions during the presentation session.
5 4 3 2 1
= TOTAL SCORE out of 40

302 Chapter and Final Report Marking descriptors% Description
A++95-100
Outstanding work. Outstanding handling of data, innovative and original, with maximum information obtained from results, whether quantitative or otherwise. Implications evaluated both in the light of other, published work & of the limitations of experimental procedures used. Where appropriate full statistical treatment employed. Awareness of how the work might develop. Clear separation of evidence and interpretation. Outstanding evaluation of relevant (and recent) literature. Professional presentation and organization. References correctly cited and presented. Information can be grasped at a glance; no duplication. Very well written. Extensive evidence of supplementary reading
A+ 90-94
Excellent work. As above, but with a few omissions in both treatment and interpretation of information. No evidence of over interpreting data. Some corrections, deletions & amendments are needed. Style of writing clear and perceptive. Evidence of wide supplementary reading
A 85-89A- 80-84
Very good work. Handling of own information and literature excellent for the most part, but just occasionally reading more into the data than errors and/or good judgement would warrant. Clear separation of evidence and interpretation. Very good dissertation, clear and easy to read, but with occasional repetition and some inadequacy of style, leading to occasional misunderstanding. Sound evidence of supplementary reading.
B+ 75-79B 70-74
Good work. On the whole data & literature handled very well, though the full implications of all the data not appreciated & some data over-enthusiastically interpreted. Clear separation of evidence and interpretation. Logical presentation. Writing style generally good, but some paragraphs obscure. Some repetition of both information and remarks. Evidence of outside reading. Can be read with pleasure and interest.
B- 65-69C+ 60-64
Adequate work As above, but some of the data handled poorly, use of literature incomplete and interpretations sometimes presented as though they are evidence. Writing style not very good. Often inappropriate choice of illustrations, possibly too few, too many, too small too complex etc. Graphs and Tables not very well laid out. Repetition of ideas and information. Some outside reading.
C 55-59C- 50-54-
Unsatisfactory work (pass) Handling of results is poor, e.g. evidence incorrectly interpreted (evidence and interpretation not clearly separated), wrong statistical procedures, but, on the whole, data comprehensively presented. Little awareness of literature or of how the work might develop. Overall impression satisfactory & reasonable knowledge of major findings of the project, but presentation is poor e.g. poor choice of illustrations, graphs with too few points & bad scale, writing style unclear and repetitive, poor organization of references etc. Little sign of outside reading.
D 40-49
Deficient Insufficient data collected to support valid interpretations. Handling of results shows many inadequacies and a sizable portion of the data wrongly interpreted. Literature awareness is minimal. Dissertation is poorly presented, with many inadequacies, omissions and errors; difficult to ascertain all that has been discovered. However some relevant facts are correct and a large portion of the report is reasonably understandable.
D 30-39
Very deficient Insufficient data collected to support valid interpretations. Inadequate handling of most results in every way. The majority of the data wrongly interpreted. No literature awareness. Information mixed up & not sensibly organized, many omissions and errors. Only a few facts are correct. Painful reading and, at the end, little clear idea of major findings of the investigation.
F 0-30
Totally inadequate, Insufficient data collected to support valid interpretations. Totally inadequate handling of results in every way. All/nearly all data wrongly interpreted, or left uninterpreted. No literature awareness. Dissertation is very poor; approach may be all wrong. Dreadful presentation, style and grammar. Information disorganised, lack of any logical sequence of facts and ideas. Findings incoherent.
Geol 302 Handbook. Page 28 of 28