genwatch3 gw archiver software version 2.14 module book€¦ · · 2017-08-242.11 converted to...
TRANSCRIPT

GenWatch3® GW_Archiver
Software Version 2.14 Module Book
600-2.14.0-H.1 2/20/2017

© 2006-2017 The Genesis Group 2 All Rights Reserved Printed in the U.S.A. 600-2.14.0-H.1

© 2006-2017 The Genesis Group 3 All Rights Reserved Printed in the U.S.A. 600-2.14.0-H.1
Trademarks
Any other brand or product names are trademarks or registered trademarks of their respective holders.
The Genesis Group Trademark Information
GenWatch3® is a registered trademark of GenCore Candeo, LTD., a subsidiary of Burks GenCore Co., Inc.
D.B.A. The Genesis Group and Phil Burks.
Copyright
Copyright © 2006-2017; Burks GenCore Co., Inc. D.B.A. The Genesis Group and Phil Burks. All rights are
reserved. No part of this publication or the associated program may be reproduced, transmitted, transcribed,
in whole or in part, in any form or by any means, whether it is mechanical, magnetic, optical, electronic,
manual or otherwise, without the prior written consent of Burks GenCore Co., Inc. D.B.A:
The Genesis Group and Phil Burks
5800 Eagles Nest Blvd
Tyler, Texas 75703.
Includes technology licensed from Motorola.
Disclaimer
The GenWatch3 Users Manual is printed in the U.S.A. Burks GenCore Co., Inc. D.B.A. The Genesis Group
and Phil Burks believe that the information included in this manual is correct; however, Burks GenCore Co.,
Inc. D.B.A. The Genesis Group and Phil Burks reserves the right to alter, revise and make periodic changes
to the manual and its contents. Burks GenCore Co., Inc. D.B.A. The Genesis Group does not assume
responsibility to notify any person of such revisions or changes. While we have taken strides to carefully
examine our software and documentation and believe that it is reliable, the Genesis Group and Phil Burks
assume no responsibility for the use of the manual, or GenWatch3 software, nor for any patent infringements
or other rights of third parties who may use the manual or the GenWatch3 software. Burks GenCore Co., Inc.
D.B.A. The Genesis Group and Phil Burks make no representations or warranties with respect to the contents
or fitness for a particular purpose beyond the cost of the software paid by the end-user.
The software contains valuable trade secrets and proprietary information. Unauthorized use of the manual or
software can result in civil damages and criminal prosecution. As an end user, you agree to abide by and heed
these statements.
License
Title to the media on which the program is recorded and to the documentation in support of the product is
transferred to you, but title to the program, and all subsequent copies of the program, despite the form or
media in or on license is not a sale of the original or any subsequent copy. You assume responsibility for the
selection of the program to achieve your intended results, and for the installation, use, and results obtained
from the program.
Refer to the GenWatch3 Manual Overview for your full license. All license information contained on pages
4-7 (Book 600-2.14.0-AA.1) are to be considered as contained herein.
Support
Customer satisfaction is our number one priority at Genesis. We are here to provide you with the best
software possible, and we want to know when you have any questions, concerns or problems with
GenWatch3 so that we can make it a better product for everyone.
Refer to the Troubleshooting & Support section of the GenWatch3 Manual Shell (Book 600-2.14.0-AA.1) for
complete support and contact information.

© 2006-2017 The Genesis Group 4 All Rights Reserved Printed in the U.S.A. 600-2.14.0-H.1
Document History
Revision Description Author
2.0.2 Initial Release JAW
2.0.3 Updated Screenshots CBH
2.0.3 Added the Forensic Reporting chapter JAW
2.0.3 Revision before release JAW
2.0.3 Added a description for Archived Systems tab JAW
2.0.4 Added process for repairing orphan users for
database restored from one PC to another
JAW
2.0.4 Updated Purging Options KIH
2.0.5 Revision before release TDW
2.0.6 Updated screenshots with F1 Help image REB
2.0.6 Updated screenshots CLB
2.0.6.6 Changes before release WRK
2.3 Revisions Before Release CWF
2.4 Revisions Before Release CWF
2.5 Revisions Before Release CWF
2.6 Revisions Before Release CWF
2.8 Revisions Before Release ATG
2.9 Revisions Before Release CWF
2.10 Revisions Before Release ATG
2.11 Converted to Docx format CWF
2.12 Updated screenshots and document version JAW
2.13 Revisions Before Release ATG
2.14 Revisions Before Release JAW

© 2006-2017 The Genesis Group 5 All Rights Reserved Printed in the U.S.A. 600-2.14.0-H.1
Table of Contents
Trademarks ........................................................................................................................................... 3 The Genesis Group Trademark Information ......................................................................................... 3 Copyright .............................................................................................................................................. 3 Disclaimer ............................................................................................................................................. 3 License .................................................................................................................................................. 3 Support .................................................................................................................................................. 3
DOCUMENT HISTORY ................................................................................................................................. 4
TABLE OF CONTENTS ............................................................................................................................. 5
ABOUT THIS MANUAL ............................................................................................................................ 7
GOALS ........................................................................................................................................................ 7 WHO SHOULD READ THIS MANUAL? ......................................................................................................... 7 HOW THIS MANUAL IS ORGANIZED ........................................................................................................... 7
CHAPTER 1 OVERVIEW ..................................................................................................................... 9
TERMS ........................................................................................................................................................ 9 WHAT IS THE GW_ARCHIVER? .................................................................................................................. 9 SYSTEM ID ................................................................................................................................................. 9 PACKET TYPE SETTINGS ............................................................................................................................. 9
Bad Packets ..........................................................................................................................................10 System Events .......................................................................................................................................11 Packet Throttling .................................................................................................................................11
PURGING SETTINGS ...................................................................................................................................12 Date-Based Purging .............................................................................................................................12 Log Purging Option .............................................................................................................................13
DATABASE DOWN FUNCTIONALITY ..........................................................................................................14
CHAPTER 2 FORENSIC REPORTING .............................................................................................15
LOADING THE SQL SERVER MANAGEMENT STUDIO APPLICATION ...........................................................16 Windows 7 ............................................................................................................................................16 Windows 8 ............................................................................................................................................17
PERFORMING A DATABASE BACKUP..........................................................................................................18 PERFORMING A DATABASE RESTORE ........................................................................................................20
Special Case – Restore from One PC to Another .................................................................................22 Restore Cleanup ...................................................................................................................................23

© 2006-2017 The Genesis Group 6 All Rights Reserved Printed in the U.S.A. 600-2.14.0-H.1

© 2006-2017 The Genesis Group 7 All Rights Reserved Printed in the U.S.A. 600-2.14.0-H.1
About this Manual
Goals
This document describes the role and function of the GW_Archiver module in the
GenWatch3 solution.
Who Should Read This Manual?
This manual is written for an expected audience of mid-level PC users. Reporting
and archiving personnel should read this manual.
How This Manual Is Organized
This manual is organized as follows:
Overview: Describes the GW_Archiver module and options available in
the GW_Archiver GUI (Graphical User Interface).
Forensic Reporting: Describes the process of backing up and restoring
the GenWatch3 database in order to satisfy forensic reporting needs.
This manual contains the following images, used to indicate that a segment of text
requires special attention:
Additional Information: Additional information is used to indicate
shortcuts or tips.
Warning: Warnings are used to indicate possible problem areas,
such as a risk of data loss, or incorrect/unexpected functionality.

© 2006-2017 The Genesis Group 8 All Rights Reserved Printed in the U.S.A. 600-2.14.0-H.1
© 2006-2017 The Genesis Group 9 All Rights Reserved Printed in the U.S.A. 600-2.14.0-H.1
Chapter 1 Overview
This chapter describes the GW_Archiver module and options available in the
GW_Archiver module configuration screen.
This chapter contains the following sections:
Terms: Describes basic terms related to GW_Archiver.
What is GW_Archiver?: Describes the GW_Archiver module.
System ID: Describes the GW_Archiver system ID selection feature.
Packet Type Settings: Describes the GW_Archiver packet type settings.
Purging Settings: Describes the GW_Archiver purging settings.
Database Down Functionality: Describes GW_Archiver behavior when
disconnected from the database.
Terms
Archiving: Writing data to a database. This data is available through reporting.
Packet: Data received from a GenWatch3 input.
Decode: The act of converting 0s and 1s into readable data.
Purging: Deleting data from the database. This is generally based on time,
where all data older than x hours, days, months, etc. is deleted. This operation
frees up room in the database and allows reporting to run more efficiently.
What is the GW_Archiver?
The GW_Archiver module archives decoded GenWatch3 input packets to an
SQL database. The GW_Archiver GUI allows you to manipulate the following
categories of GW_Archiver settings on a per-system basis:
Packet Types: The types of packets that are archived.
Purging: Options for purging archived data. Purging data manages the
amount of hard drive space the database consumes.
System ID
This feature allows you to choose separate GW_Archiver options for each of your
licensed systems. The System ID list contains a System ID and alias for each of
your licensed systems. GW_Archiver’s Packet Types and Purging panels show
the GW_Archiver options for the system ID selected in the System ID list.
Packet Type Settings
The packet type list, under the Packet Types tab, contains an entry for each
archived packet type. If a packet type in this list is checked, then that packet type

© 2006-2017 The Genesis Group 10 All Rights Reserved Printed in the U.S.A. 600-2.14.0-H.1
is archived to the SQL database by the GW_Archiver module. If it is not
checked, then it is not archived.
Figure 1.1 – Packet Types Options
Many of the GenWatch3 reports rely on the data in the Channel Assignments table. If these packets
are not archived, many of the reports will not show data. Genesis recommends archiving all packet types.
Generally each packet type received by GW_Archiver has a corresponding
archive table in the database. For example, when GW_Archiver receives a Call
Alert packet, it stores this packet in the ARC_CallAlerts table. However, there
are some archive tables that include a broader range of packets.
Bad Packets
Each packet that this marked as Corrupt qualifies as a Bad Packet. These are
stored in the ARC_BadPackets table. Because these packets cannot be reliably
decoded, GW_Archiver simply stores their source (WACN, System, RFSS and
Site) and their corruption type (see the Type column of the ARC_BadPackets
table):
1. Reported Corrupt from Device
2. Previous Word was Invalid
3. Invalid structure for packet from this source
4. Orphan call activity (call continuation without a corresponding start of
call)

© 2006-2017 The Genesis Group 11 All Rights Reserved Printed in the U.S.A. 600-2.14.0-H.1
System Events
When GW_Archiver does not know which archive table to store a packet in, it
stores the packet in GW_SystemEvents. This table stores the packet’s source
(WACN, System, RFSS and Site), the packet’s type, raw data and the values
decoded from the raw data.
Packet Throttling
Some tables are protected against duplicate packet reporting by Archiver’s packet
throttling feature. The following table shows which archive tables are protected
by packet throttling and the packet throttling limits enforced per table:
Table Name Time Threshold
(seconds)
Quantity Threshold
ARC_Affiliations 3 4
ARC_BSIs 3 4
ARC_CallAlerts 3 4
ARC_ChangeMes 3 4
ARC_ControlChannel 600 N/A
ARC_Deaffiliations 1.25 4
ARC_DynamicRegroupings 3 4
ARC_EmergencyAlerts 3 4
ARC_Failsofts 3 4
ARC_Inhibits 3 4
ARC_Messages 3 4
ARC_RejectReasons 3 4
ARC_RMRTs 3 4
ARC_Selectors 3 4
ARC_Statuses 3 4
ARC_SystemDiagnostics 3 2
When a packet targeting one of the tables above is received, if the packet time
threshold between packets is reached the packet is archived. If the quantity
threshold is reached within the time threshold, the packet is archived.

© 2006-2017 The Genesis Group 12 All Rights Reserved Printed in the U.S.A. 600-2.14.0-H.1
Purging Settings
Date-Based Purging
The purging settings inform the GW_Archiver module when data should be
deleted from the archive tables in the SQL database. Tables in the GW database
that begin with the prefix ARC_ are archive tables. The purging table list, in the
Purging tab, contains an entry for each archive table in the GW database.
Each table has its own separate purge setting. The GW_Archiver module
performs purging when the module is started and every hour after it is started. If
a table contains records older than its purging option, then these records are
permanently deleted during the hourly purging operation.
Purge duration options include:
-- Never --
After 1 hour
After 4 hours
After 12 hours
After 1 day
After 2 days
After 1 week
After 2 weeks
After 1 month (30 days)
After 3 months (90 days)
After 6 months (180 days)
After 1 year
Your purging options should reflect your reporting needs. If your biggest report
is a monthly report, then set purging to occur every 3 months. If your biggest
report is a bi-weekly report, then set purging to occur every month. Regular
purging will allow your reports to run more quickly.
Packet types with a purging interval of After 2 Weeks or longer are kept for an additional 7 days. This
allows you to set the purge interval to After 1 Month and still have 6-7 days to run your monthly reports
before data is purged.

© 2006-2017 The Genesis Group 13 All Rights Reserved Printed in the U.S.A. 600-2.14.0-H.1
Figure 1.2 – Purging Options
Select a purge interval in the Set all Purge Intervals To list to set all of the above
purge intervals to the selected purge interval.
Log Purging Option
Each hour GW_Archiver performs a purge operation. This operation compares
the timestamp of the archived data with the current time of the GenWatch3
machine that is hosting the GenWatch3 service. GW_Archiver deletes each
record with a timestamp that differs from the machine time by greater than the
date-based purging option selected for the record’s type.
For example, if you selected After 6 months (180 days) for Affiliations, each hour
GW_Archiver will delete each affiliation record archived more than 187 days ago
(down to the second, and including the 7 days of padding applied to all intervals
greater than 2 weeks).
If the Log Purging Results option is checked on this screen, GW_Archiver
module will report:
When the purging operation begins.
When the purging operation ends, reporting the results of the purging
operation (number of records purged for each archive table purged).
These results will show in the Windows event viewer (in the GenWatch event log)
and are sent via the GW_SysLog module. See the GW_SysLog section of the
GenWatch3 Core manual for more information on GW_SysLog.
Chapter 2 describes how to backup data so that you can do forensic reporting on
data more than your allowed archiving time period.

© 2006-2017 The Genesis Group 14 All Rights Reserved Printed in the U.S.A. 600-2.14.0-H.1
Database Down Functionality
In remote database configurations of GenWatch3, GW_Archiver is designed to
continue operation while the database is down or unreachable due to network
issues. While the database is unavailable, GW_Archiver queues archive records
in memory and, if needed, to the disk drive. Once the database is restored, the
queued records are written to the database.

© 2006-2017 The Genesis Group 15 All Rights Reserved Printed in the U.S.A. 600-2.14.0-H.1
Chapter 2 Forensic Reporting
As described in the previous chapter, GW_Archiver limits the amount of time
archived data is stored in the GW database. This section contains detailed
instructions on how to backup data and restore backed up data, so that you may
report on data that is older than your allowed archiving time period.
This chapter contains the following sections:
Loading the SQL Server Management Studio Application: Describes
the steps required to load the SQL Server Management application.
Performing a Database Backup: Describes the steps required to perform
a GenWatch3 database backup.
Performing a Database Restore: Describes the steps required to perform
a restore of a GenWatch3 database backup.
© 2006-2017 The Genesis Group 16 All Rights Reserved Printed in the U.S.A. 600-2.14.0-H.1
Loading the SQL Server Management Studio Application
Backups and restores are performed in the SQL Server management studio
application. These steps are referenced in the Performing a Database Backup
section and Performing a Database Restore sections of this chapter. To load this
application, follow the steps below. These steps may vary depending on the
version of SQL Server being used.
Windows 7
1. Click the Windows Start button. This will show the Start menu.
2. Click the All Programs or Programs item. This will show the program
folders and programs installed on this machine.
3. Click the Microsoft SQL Server item. This will show the program folders
and programs under this category.
4. Click on SQL Server Management Studio Express or SQL Server
Management Studio. This entries name will vary between SQL Server
Express and SQL Server for Workgroups. This will load the SQL Server
management application.
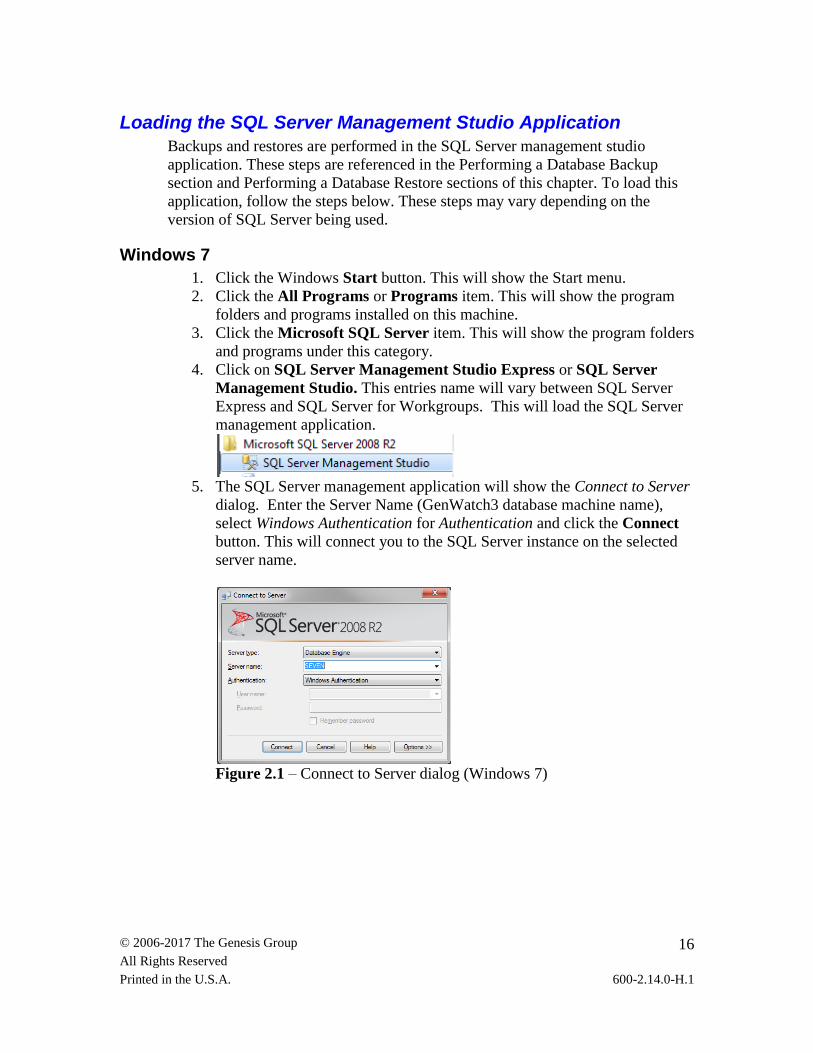
5. The SQL Server management application will show the Connect to Server
dialog. Enter the Server Name (GenWatch3 database machine name),
select Windows Authentication for Authentication and click the Connect
button. This will connect you to the SQL Server instance on the selected
server name.
Figure 2.1 – Connect to Server dialog (Windows 7)

© 2006-2017 The Genesis Group 17 All Rights Reserved Printed in the U.S.A. 600-2.14.0-H.1
Windows 8
1. Press the Windows key. This will show the Start screen.
2. Right click on the Start screen. This will display the All apps button in the
bottom right corner.
3. Click the All apps button. This will show the program folders and
programs installed on this machine.
4. Click on SQL Server Management Studio Express or SQL Server
Management Studio. This entries name will vary between SQL Server
Express and SQL Server for Workgroups. This will load the SQL Server
management application.
5. 6. The SQL Server management application will show the Connect to Server
dialog. Enter the Server Name (GenWatch3 database machine name),
select Windows Authentication for Authentication and click the Connect
button. This will connect you to the SQL Server instance on the selected
server name.
Figure 2.2 – Connect to Server dialog (Windows 8)

© 2006-2017 The Genesis Group 18 All Rights Reserved Printed in the U.S.A. 600-2.14.0-H.1
Performing a Database Backup
A database backup is a snapshot of your database at a given point in time. This
operation creates a copy of your database while it is still archiving data. This
process will result in a single file. This file can be 3.5 gigabytes or greater in size,
depending on your system activity.
It is best to store these files off-site or at least off of the GenWatch3 machine, as
they can act as a complete database backup as well as a forensic reporting archive.
To backup your GenWatch3 database, follow the steps below:
1. Load the SQL Server management application. This is described in the
Loading the SQL Server Management Studio Application section of this
chapter.
2. In the Object Explorer section of the SQL Server management screen,
expand the Databases item. This will show all of the databases under this
SQL Server instance, including the GW database.
3. Right-click on the GW database. This will show the database options
menu.
4. Click the Tasks option. This will show the Tasks options menu.
Figure 2.3 – Tasks options
5. Click the Backup… option. This will show the Back Up Database screen.
6. Under the Backup set section, change the Name to GW-<yyyy-mm>
where yyyy = the 4-digit year and mm = the 2-digit month. For example, a
backup performed on 12-31-2007 would be named GW-2007-12.

© 2006-2017 The Genesis Group 19 All Rights Reserved Printed in the U.S.A. 600-2.14.0-H.1
7. In the Destination section, click the Remove button. This will remove the
default destination entry.
Figure 2.4 – Back Up Database dialog
8. In the Destination section, click the Add… button. This will show the
Select Backup Destination screen.
9. In the File name section, type the backup destination. The destination
drive can be any writeable hard drive, such as local hard disk or an
external hard disk. The drive must be local to this machine. Network
drives are not supported. The folder that you choose must already exist on
the drive that you choose. Name the backup file GW-yyyy-mm.BAK where
yyyy is the 4-digit year and mm is the 2-digit month. For example, a
backup performed on 12-31-2007 would have a destination named GW-
2007-12.BAK.
10. Click OK to confirm the file name. This will close the Select Backup
Destination screen and return you to the Back Up Database screen.
11. Click the OK button. This will perform the backup process. (Notice the
progress of this operation in the Progress section)
12. Once this process is complete, you are ready to move your GenWatch3
database backup file from the destination location to an off-site location.

© 2006-2017 The Genesis Group 20 All Rights Reserved Printed in the U.S.A. 600-2.14.0-H.1
Performing a Database Restore
A database restore is a process used to make forensic data temporarily available
for reporting. This process restores a database backup file to the GenWatch3
machine’s SQL Server instance. After a restore, you may use GW_Reports to
select the restored database as the data source.
If you are restoring a GW database that was backed up on a different PC than you are restoring to,
please see the Special Case section below.
To perform a GenWatch3 database restore, follow the steps below:
1. Load the SQL Server management studio application. This is described in
the Loading the SQL Server Management Studio Application section.
2. In the Object Explorer section of the SQL Server management screen,
right-click in the Databases item. This will show the Databases options
menu.
3. Click the Restore Database… option. This will show the Restore
Database screen.
Figure 2.5 - Object Explorer
4. In the Source section, select the Device option.
5. Click the button at the end of the Device option. This will load the
Select backup devices screen.
6. In the Select backup devices screen, for the Backup media type option,
choose File.
7. Click the Add button. This will show the Locate Backup File screen.
8. Click on your backup file (created via the Database Backup process) and
click the OK button. This will return you to the Select backup devices
screen.
9. Click OK in the Select backup devices screen. This will return you to the
Restore Database screen and populate the Backup sets to restore list with
one entry.

© 2006-2017 The Genesis Group 21 All Rights Reserved Printed in the U.S.A. 600-2.14.0-H.1
10. Verify that the checkbox in the Restore column of the Backup sets to
restore list is checked.
Figure 2.6 – Restore Database dialog – General page
11. Under the Destination section, type GW_Restore.
12. In the Select a page section, click on the Files item. This will show the
Files options panel.
13. In the Restore the database files as section, click on the Restore As
column for the GW_Data entry. This will allow you to modify the file
name.
14. Change the Restore As file name to GW_Data_Restore.MDF.
15. Click on the Restore As column for the GW_Data_log entry. This will
allow you to modify the file name.
16. Change the Restore As file name to GW_Log_Restore.LDF.
Ensure that the files GW_Data_Restore.MDF and GW_Log_Restore.LDF files do not already exist in
the Restore As folder.

© 2006-2017 The Genesis Group 22 All Rights Reserved Printed in the U.S.A. 600-2.14.0-H.1
Figure 2.7 – Restore Database dialog – Files page
17. Click the OK button. This will perform the restore process.
18. Upon completion, SQL Server management shows a dialog stating that the
restore is complete.
Figure 2.8 – Restore Complete dialog
19. You can now choose the GW_Restore database as a reporting source in
GW_Reports.
Special Case – Restore from One PC to Another
If you backup a GW database on one PC and restore it to another, you must
perform additional setup to map the SQL Server Logins to the users in the
restored database. Restoring the GW database to a machine that has never hosted
the GW database will require even further setup. Please contact GenWatch3
support for further instructions.

© 2006-2017 The Genesis Group 23 All Rights Reserved Printed in the U.S.A. 600-2.14.0-H.1
Restore Cleanup
Once you have completed your forensic reporting, cleanup is required. This
process ensures that the next time you need forensic reporting, you can perform a
restore without having to worry about pre-existing restored databases.
If the Restore Cleanup process is not performed, the Restore Database process may fail.
You must close the GW_Reports screen and all Microsoft Excel instances that reported on the
GW_Restore database before performing these steps.
To perform restore cleanup, follow the steps below:
1. Load the SQL Server management studio application. This is described in
the Loading the SQL Server Management Studio Application section.
2. In the Object Explorer section of the SQL Server management screen,
right-click on the GW_Restore database. This will show the Databases
options menu.
3. Click on the Delete option. This will show the Delete Object screen.
Figure 2.9 – Delete Object dialog
4. Uncheck the Delete backup and restore history information for
databases option.
5. Click the OK button. This will detach the database from the SQL Server
instance and delete the files created in the Restore Database process.