genesi - open desktop workstation – user manual
TRANSCRIPT
Genesi - Open Desktop Workstation – User Manual
Genesi - Open Desktop Workstation – User Manual
Introduction
Welcome to your new Genesi Open Desktop Workstation (ODW).
Included in the package you should have;
• Open Desktop Workstation (low-profile chassis)• S-Video to Composite Adapter (TV-out)• Composite cable (TV-out)• 4 “vertical standing” feet• US 115V power cord• This manual + initial setup sheet
Genesi - Open Desktop Workstation – User Manual
Initial Setup
Power Supply Voltage & Cabling
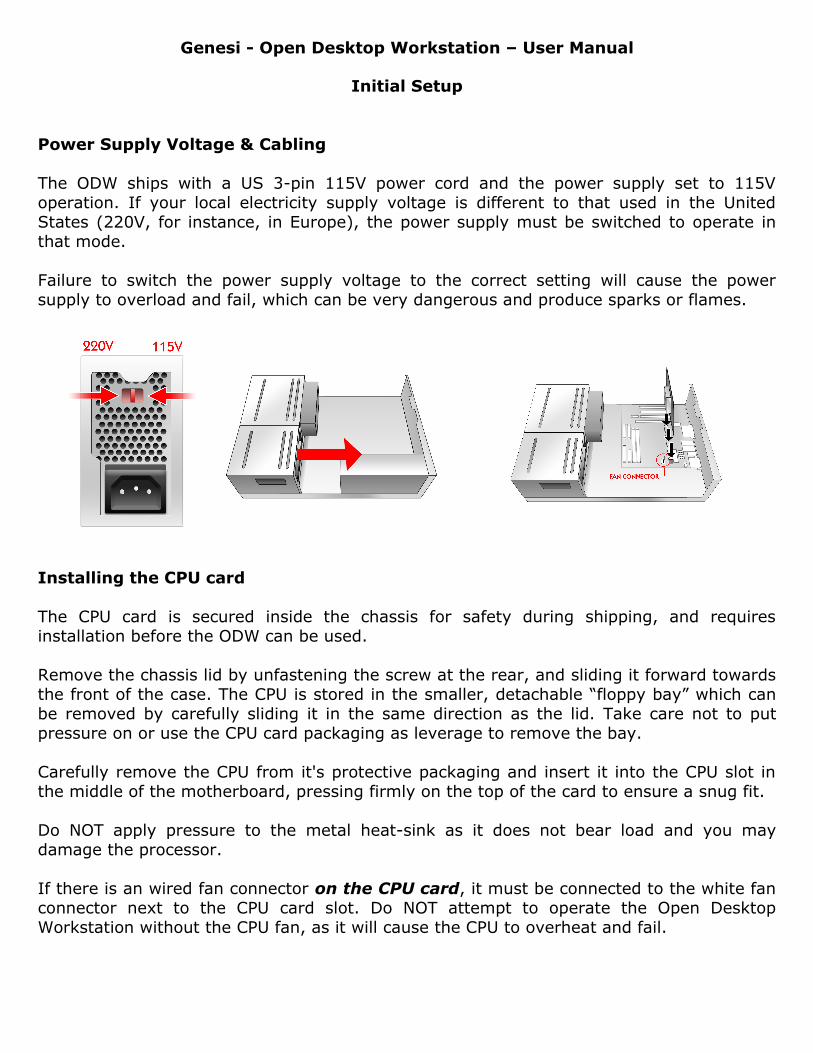
The ODW ships with a US 3-pin 115V power cord and the power supply set to 115V operation. If your local electricity supply voltage is different to that used in the United States (220V, for instance, in Europe), the power supply must be switched to operate in that mode.
Failure to switch the power supply voltage to the correct setting will cause the power supply to overload and fail, which can be very dangerous and produce sparks or flames.
Installing the CPU card
The CPU card is secured inside the chassis for safety during shipping, and requires installation before the ODW can be used.
Remove the chassis lid by unfastening the screw at the rear, and sliding it forward towards the front of the case. The CPU is stored in the smaller, detachable “floppy bay” which can be removed by carefully sliding it in the same direction as the lid. Take care not to put pressure on or use the CPU card packaging as leverage to remove the bay.
Carefully remove the CPU from it's protective packaging and insert it into the CPU slot in the middle of the motherboard, pressing firmly on the top of the card to ensure a snug fit.
Do NOT apply pressure to the metal heat-sink as it does not bear load and you may damage the processor.
If there is an wired fan connector on the CPU card, it must be connected to the white fan connector next to the CPU card slot. Do NOT attempt to operate the Open Desktop Workstation without the CPU fan, as it will cause the CPU to overheat and fail.
Genesi - Open Desktop Workstation – User Manual
Inside the ODW – Internal Connections
The Open Desktop Workstation includes multiple expansion ports and peripheral options. Installing peripherals should be done with the power supply DISCONNECTED from the mains for safety.
Chassis Fan
The chassis includes a 7V extractor fan on the right hand side. It does not need to be connected for normal operation of the system, but in cases where there may be excessive heat from the atmosphere or user-installed components (e.g. faster hard disk, 3.5-inch device in the empty bay, fan-cooled graphics card) or CPU upgrades, this fan may be required to provide adequate airflow. Connection requires an adapter cable which is not included in the ODW.
Front Panel connections (audio, USB)
The ODW provides USB2.0 peripheral support on the front panel of the chassis. The headphone and microphone audio connections are for future expansion and are not connected. These signals can be sourced on the back panel of the ODW.
Genesi - Open Desktop Workstation – User Manual
Genesi - Open Desktop Workstation – User Manual
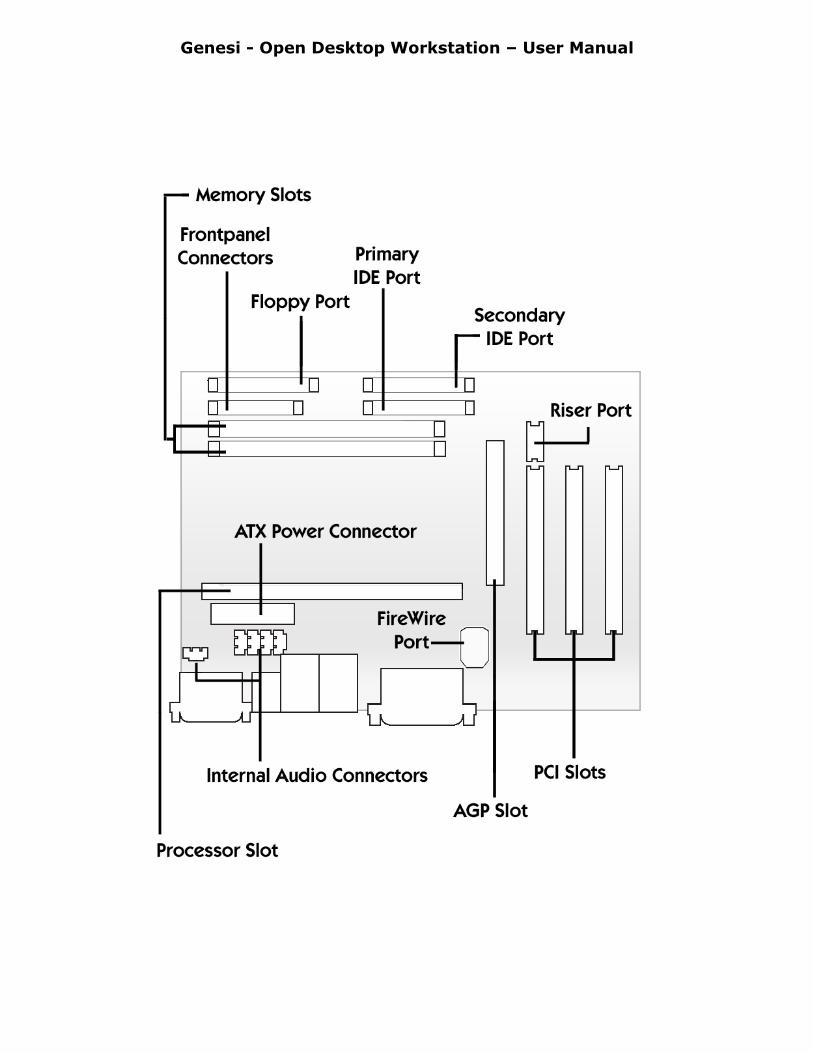
Floppy Disk Drive Connector
The standard PC floppy drive controller is located at the front of the board, closest to the PC floppy bay.
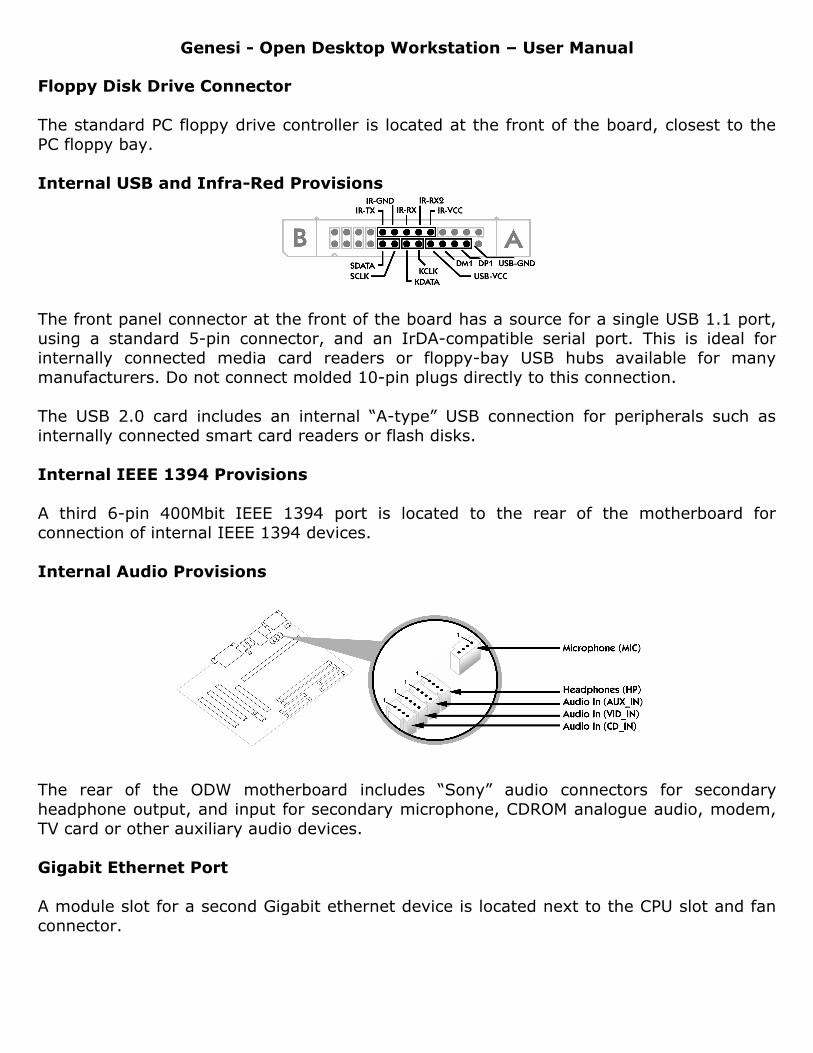
Internal USB and Infra-Red Provisions
The front panel connector at the front of the board has a source for a single USB 1.1 port, using a standard 5-pin connector, and an IrDA-compatible serial port. This is ideal for internally connected media card readers or floppy-bay USB hubs available for many manufacturers. Do not connect molded 10-pin plugs directly to this connection.
The USB 2.0 card includes an internal “A-type” USB connection for peripherals such as internally connected smart card readers or flash disks.
Internal IEEE 1394 Provisions
A third 6-pin 400Mbit IEEE 1394 port is located to the rear of the motherboard for connection of internal IEEE 1394 devices.
Internal Audio Provisions
The rear of the ODW motherboard includes “Sony” audio connectors for secondary headphone output, and input for secondary microphone, CDROM analogue audio, modem, TV card or other auxiliary audio devices.
Gigabit Ethernet Port
A module slot for a second Gigabit ethernet device is located next to the CPU slot and fan connector.
Genesi - Open Desktop Workstation – User Manual
TV Output Format
The installed ATI Radeon graphics adapter needs a jumper setting to determine whether TV output is to be in PAL or NTSC formats. This jumper is located above the heat-sink of the adapter. Note that output to TV requires operating system support.
PCI Slots
The ODW has two free PCI slots for user expansion, however one of them is blocked by the VGA connector for the graphics adapter. If VGA is not required or a DVI-to-VGA adapter is used (not included) this cable can be removed to gain an extra back panel slot.
The riser connector on the first PCI slot has no use in the ODW chassis.

Genesi - Open Desktop Workstation – User Manual
External Connections and Devices
Genesi - Open Desktop Workstation – User Manual
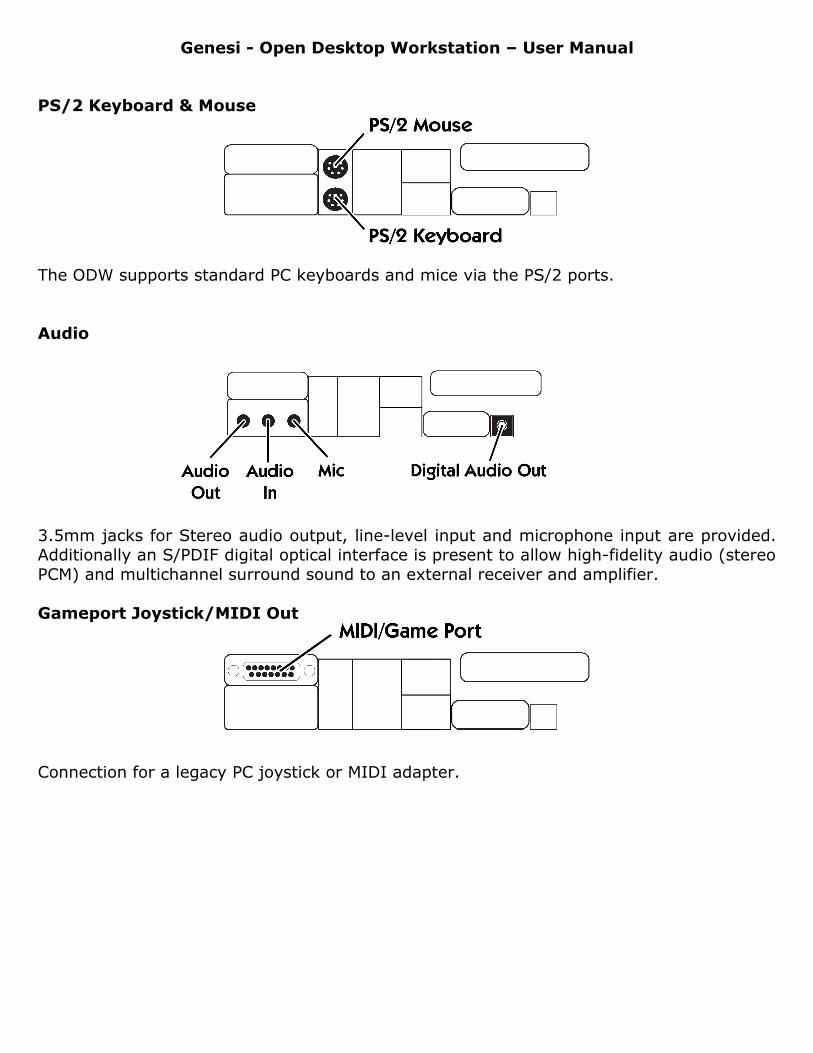
PS/2 Keyboard & Mouse
The ODW supports standard PC keyboards and mice via the PS/2 ports.
Audio
3.5mm jacks for Stereo audio output, line-level input and microphone input are provided. Additionally an S/PDIF digital optical interface is present to allow high-fidelity audio (stereo PCM) and multichannel surround sound to an external receiver and amplifier.
Gameport Joystick/MIDI Out
Connection for a legacy PC joystick or MIDI adapter.
Genesi - Open Desktop Workstation – User Manual
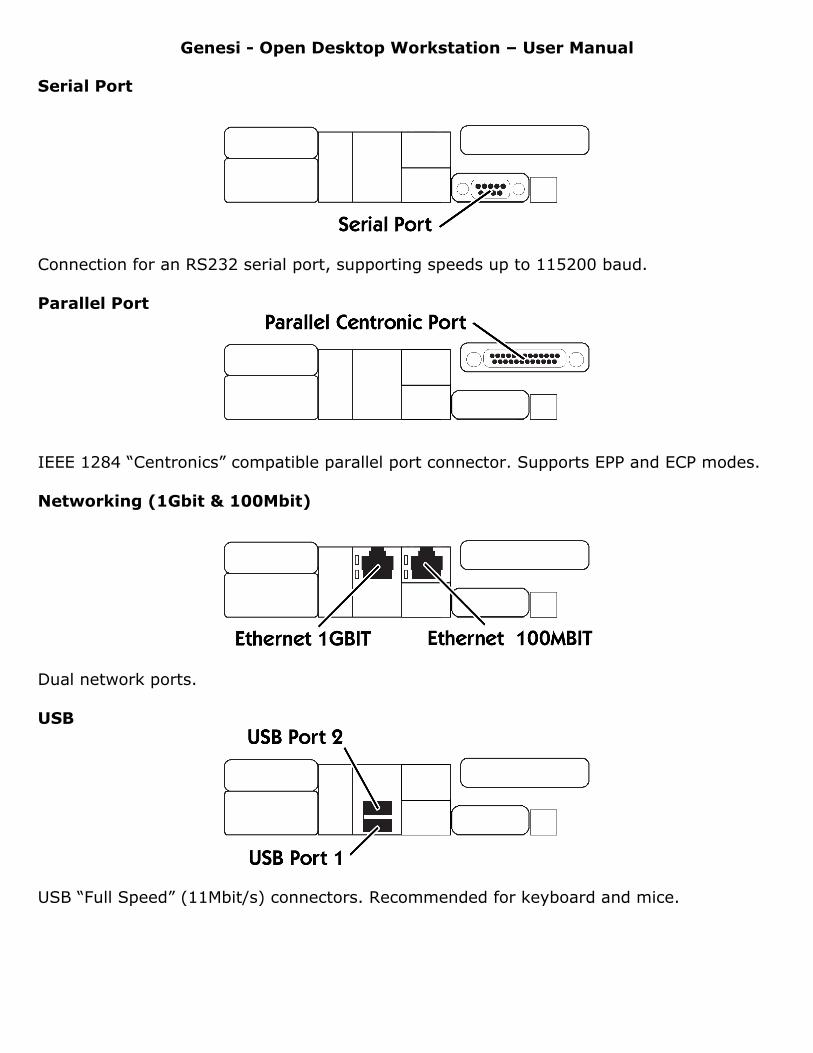
Serial Port
Connection for an RS232 serial port, supporting speeds up to 115200 baud.
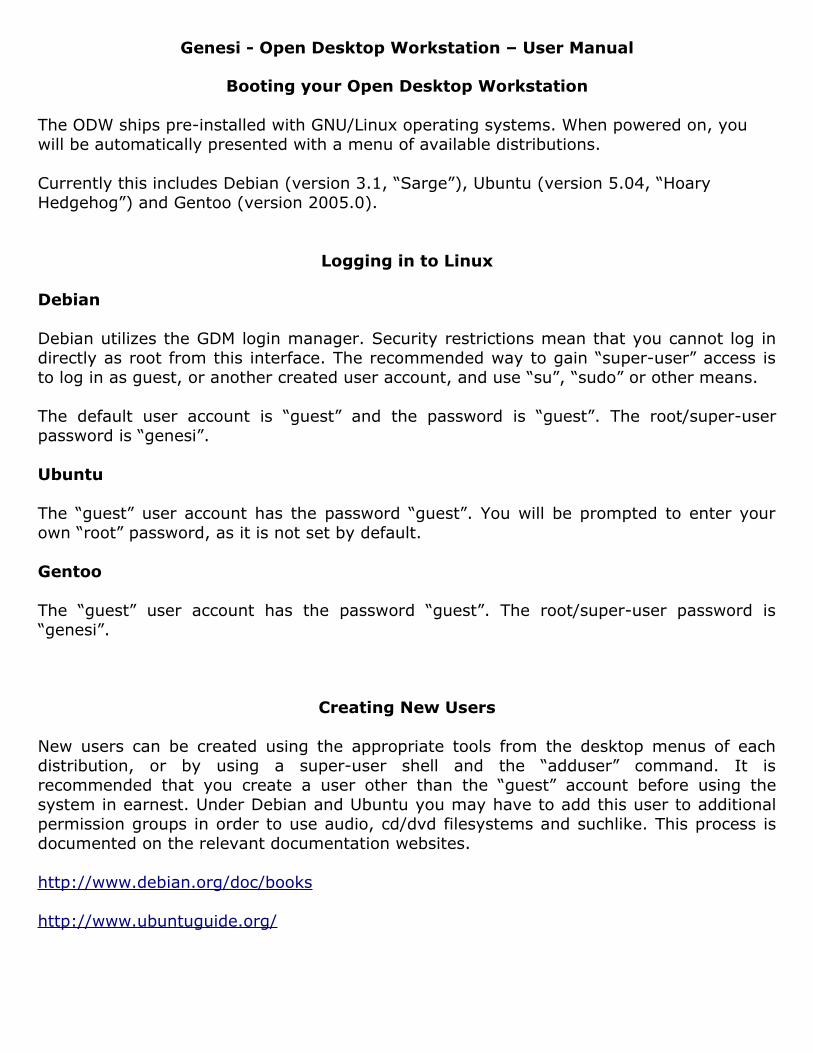
Parallel Port
IEEE 1284 “Centronics” compatible parallel port connector. Supports EPP and ECP modes.
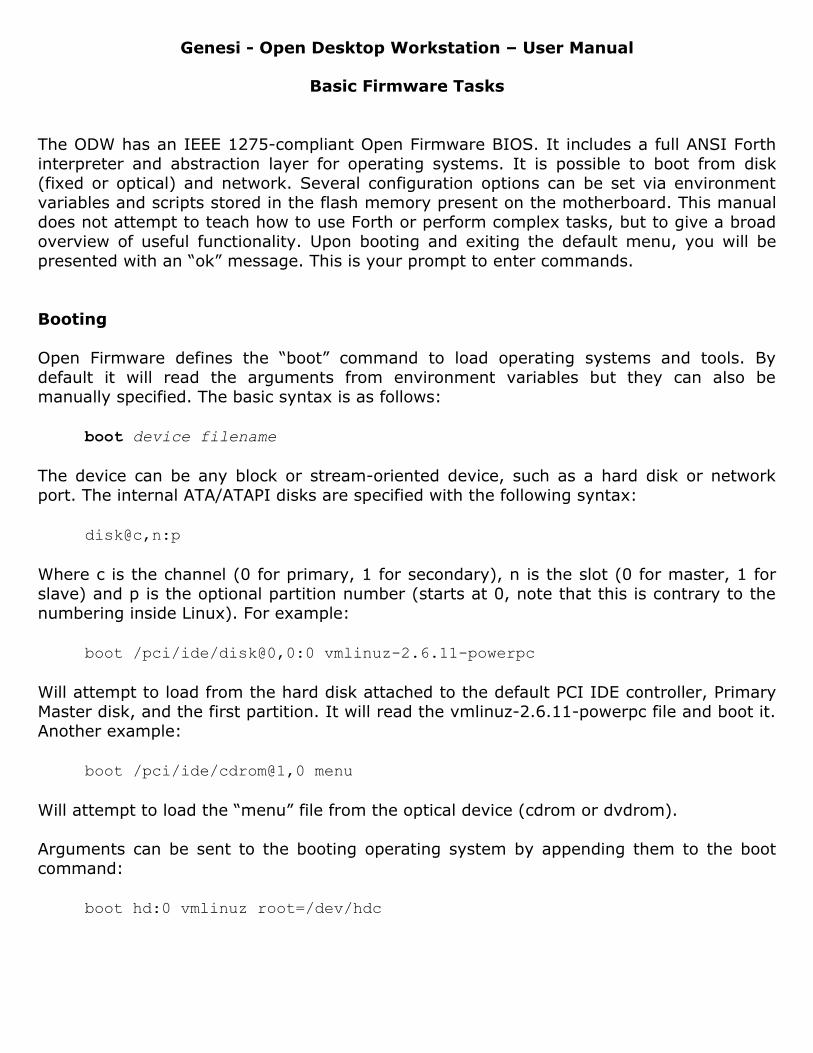
Networking (1Gbit & 100Mbit)
Dual network ports.
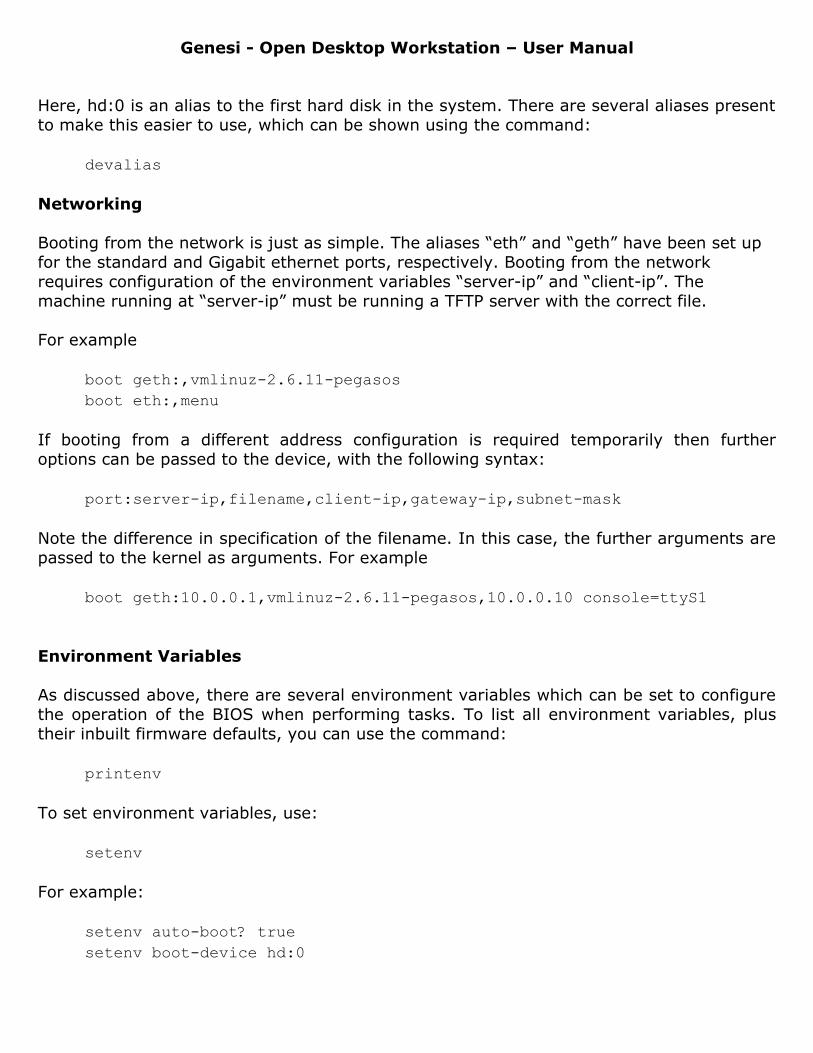
USB
USB “Full Speed” (11Mbit/s) connectors. Recommended for keyboard and mice.

Genesi - Open Desktop Workstation – User Manual
IEEE 1394
IEEE 1394 peripheral connectors, supporting 400 Mbit/s transfer rates, ideal for disk drives, audio, and video (camcorder/webcam) peripherals.
Genesi - Open Desktop Workstation – User Manual
Booting your Open Desktop Workstation
The ODW ships pre-installed with GNU/Linux operating systems. When powered on, you will be automatically presented with a menu of available distributions.
Currently this includes Debian (version 3.1, “Sarge”), Ubuntu (version 5.04, “Hoary Hedgehog”) and Gentoo (version 2005.0).
Logging in to Linux
Debian
Debian utilizes the GDM login manager. Security restrictions mean that you cannot log in directly as root from this interface. The recommended way to gain “super-user” access is to log in as guest, or another created user account, and use “su”, “sudo” or other means.
The default user account is “guest” and the password is “guest”. The root/super-user password is “genesi”.
Ubuntu
The “guest” user account has the password “guest”. You will be prompted to enter your own “root” password, as it is not set by default.
Gentoo
The “guest” user account has the password “guest”. The root/super-user password is “genesi”.
Creating New Users
New users can be created using the appropriate tools from the desktop menus of each distribution, or by using a super-user shell and the “adduser” command. It is recommended that you create a user other than the “guest” account before using the system in earnest. Under Debian and Ubuntu you may have to add this user to additional permission groups in order to use audio, cd/dvd filesystems and suchlike. This process is documented on the relevant documentation websites.
http://www.debian.org/doc/books
http://www.ubuntuguide.org/

Genesi - Open Desktop Workstation – User Manual
Genesi - Open Desktop Workstation – User Manual
Basic Firmware Tasks
The ODW has an IEEE 1275-compliant Open Firmware BIOS. It includes a full ANSI Forth interpreter and abstraction layer for operating systems. It is possible to boot from disk (fixed or optical) and network. Several configuration options can be set via environment variables and scripts stored in the flash memory present on the motherboard. This manual does not attempt to teach how to use Forth or perform complex tasks, but to give a broad overview of useful functionality. Upon booting and exiting the default menu, you will be presented with an “ok” message. This is your prompt to enter commands.
Booting
Open Firmware defines the “boot” command to load operating systems and tools. By default it will read the arguments from environment variables but they can also be manually specified. The basic syntax is as follows:
boot device filename
The device can be any block or stream-oriented device, such as a hard disk or network port. The internal ATA/ATAPI disks are specified with the following syntax:
disk@c,n:p
Where c is the channel (0 for primary, 1 for secondary), n is the slot (0 for master, 1 for slave) and p is the optional partition number (starts at 0, note that this is contrary to the numbering inside Linux). For example:
boot /pci/ide/disk@0,0:0 vmlinuz-2.6.11-powerpc
Will attempt to load from the hard disk attached to the default PCI IDE controller, Primary Master disk, and the first partition. It will read the vmlinuz-2.6.11-powerpc file and boot it. Another example:
boot /pci/ide/cdrom@1,0 menu
Will attempt to load the “menu” file from the optical device (cdrom or dvdrom).
Arguments can be sent to the booting operating system by appending them to the boot command:
boot hd:0 vmlinuz root=/dev/hdc
Genesi - Open Desktop Workstation – User Manual
Here, hd:0 is an alias to the first hard disk in the system. There are several aliases present to make this easier to use, which can be shown using the command:
devalias
Networking
Booting from the network is just as simple. The aliases “eth” and “geth” have been set up for the standard and Gigabit ethernet ports, respectively. Booting from the network requires configuration of the environment variables “server-ip” and “client-ip”. The machine running at “server-ip” must be running a TFTP server with the correct file.
For example
boot geth:,vmlinuz-2.6.11-pegasosboot eth:,menu
If booting from a different address configuration is required temporarily then further options can be passed to the device, with the following syntax:
port:server-ip,filename,client-ip,gateway-ip,subnet-mask
Note the difference in specification of the filename. In this case, the further arguments are passed to the kernel as arguments. For example
boot geth:10.0.0.1,vmlinuz-2.6.11-pegasos,10.0.0.10 console=ttyS1
Environment Variables
As discussed above, there are several environment variables which can be set to configure the operation of the BIOS when performing tasks. To list all environment variables, plus their inbuilt firmware defaults, you can use the command:
printenv
To set environment variables, use:
setenv
For example:
setenv auto-boot?.truesetenv boot-device hd:0
Genesi - Open Desktop Workstation – User Manual
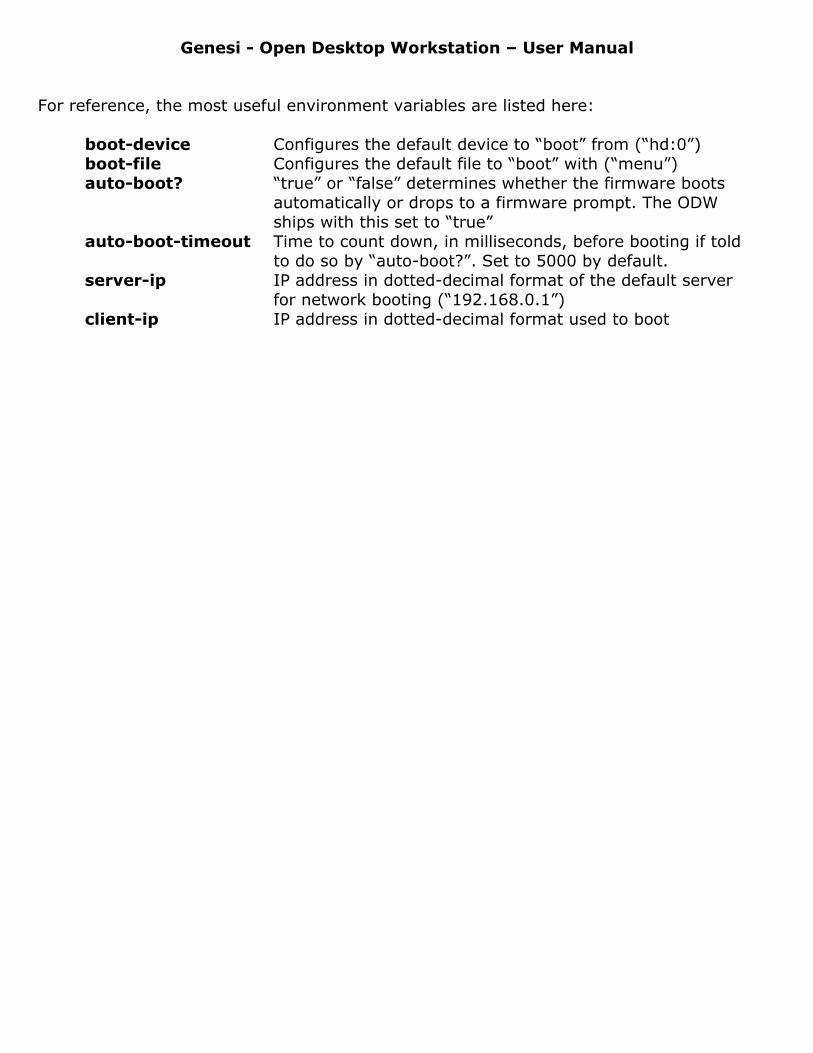
For reference, the most useful environment variables are listed here:
boot-device Configures the default device to “boot” from (“hd:0”)boot-file Configures the default file to “boot” with (“menu”)auto-boot? “true” or “false” determines whether the firmware boots
automatically or drops to a firmware prompt. The ODW ships with this set to “true”
auto-boot-timeout Time to count down, in milliseconds, before booting if toldto do so by “auto-boot?”. Set to 5000 by default.
server-ip IP address in dotted-decimal format of the default serverfor network booting (“192.168.0.1”)
client-ip IP address in dotted-decimal format used to boot

Genesi - Open Desktop Workstation – User Manual