general chemistry lab spring - openstax cnx
TRANSCRIPT
General Chemistry Lab Spring
By:Mary McHale

General Chemistry Lab Spring
By:Mary McHale
Online:< http://cnx.org/content/col10506/1.56/ >
C O N N E X I O N S
Rice University, Houston, Texas

This selection and arrangement of content as a collection is copyrighted by Mary McHale. It is licensed under the
Creative Commons Attribution 2.0 license (http://creativecommons.org/licenses/by/2.0/).
Collection structure revised: April 3, 2009
PDF generated: October 26, 2012
For copyright and attribution information for the modules contained in this collection, see p. 86.

Table of Contents
1 Practical Examples of the Gas Laws . . . . . . . . . . . . . . . . . . . . . . . . . . . . . . . . . . . . . . . . . . . . . . . . . . . . . . . . . . . . 12 Colligative Properties and Ice Cream . . . . . . . . . . . . . . . . . . . . . . . . . . . . . . . . . . . . . . . . . . . . . . . . . . . . . . . . . . . 53 Pervasive Polymers . . . . . . . . . . . . . . . . . . . . . . . . . . . . . . . . . . . . . . . . . . . . . . . . . . . . . . . . . . . . . . . . . . . . . . . . . . . . . . 114 Determine the Value of an Equilibrium Constant by Complex Ion Forma-
tion . . . . . . . . . . . . . . . . . . . . . . . . . . . . . . . . . . . . . . . . . . . . . . . . . . . . . . . . . . . . . . . . . . . . . . . . . . . . . . . . . . . . . . . . . . . . . 155 indigestion? Which is the Best Commercial Antacid? . . . . . . . . . . . . . . . . . . . . . . . . . . . . . . . . . . . . . . . 196 Acid and Bases to Bu�ers . . . . . . . . . . . . . . . . . . . . . . . . . . . . . . . . . . . . . . . . . . . . . . . . . . . . . . . . . . . . . . . . . . . . . . . 257 Forensics . . . . . . . . . . . . . . . . . . . . . . . . . . . . . . . . . . . . . . . . . . . . . . . . . . . . . . . . . . . . . . . . . . . . . . . . . . . . . . . . . . . . . . . . . . 298 The Curious Case of Catalase . . . . . . . . . . . . . . . . . . . . . . . . . . . . . . . . . . . . . . . . . . . . . . . . . . . . . . . . . . . . . . . . . . . 379 Organic Reactions . . . . . . . . . . . . . . . . . . . . . . . . . . . . . . . . . . . . . . . . . . . . . . . . . . . . . . . . . . . . . . . . . . . . . . . . . . . . . . . . 4310 Kitchen Synthesis of Nanorust . . . . . . . . . . . . . . . . . . . . . . . . . . . . . . . . . . . . . . . . . . . . . . . . . . . . . . . . . . . . . . . . 5311 Electrochemistry and Alchemy . . . . . . . . . . . . . . . . . . . . . . . . . . . . . . . . . . . . . . . . . . . . . . . . . . . . . . . . . . . . . . . . 5912 From Cells and Electrodes to Golden Pennies . . . . . . . . . . . . . . . . . . . . . . . . . . . . . . . . . . . . . . . . . . . . . . . 6913 Amphoteric Aluminum . . . . . . . . . . . . . . . . . . . . . . . . . . . . . . . . . . . . . . . . . . . . . . . . . . . . . . . . . . . . . . . . . . . . . . . . . 7714 Crystal Violet Kinetics . . . . . . . . . . . . . . . . . . . . . . . . . . . . . . . . . . . . . . . . . . . . . . . . . . . . . . . . . . . . . . . . . . . . . . . . . 81Index . . . . . . . . . . . . . . . . . . . . . . . . . . . . . . . . . . . . . . . . . . . . . . . . . . . . . . . . . . . . . . . . . . . . . . . . . . . . . . . . . . . . . . . . . . . . . . . . 85Attributions . . . . . . . . . . . . . . . . . . . . . . . . . . . . . . . . . . . . . . . . . . . . . . . . . . . . . . . . . . . . . . . . . . . . . . . . . . . . . . . . . . . . . . . . . 86

iv
Available for free at Connexions <http://cnx.org/content/col10506/1.56>
Chapter 1
Practical Examples of the Gas Laws1
Practical Examples of the Gas LawsObjectives
• Learn and understand physical properties of gases and explain observations in terms of the kineticmolecular theory of gases.
• Plot and calculate the root mean square speed of the Carvone molecules. (Comparison with speed invacuum).
• Estimate volume and volume change of a balloon when it goes from room temperature (RT) to liquidnitrogen temperature.
• Observe and explain behavior of gas in: a soda can, a balloon in a �ask, Cartesian diver, etc., when achange in pressure or temperature is applied.
1.1 Grading
You grade will be determined according to the following:
• Pre-lab (10%)• Lab Report Form (80%)• TA points (10%)
IntroductionExpanding and contracting balloons, imploding soda cans, exploding marshmallows are just some of the
demonstrations that are often used to illustrate the empirical gas laws and the kinetic molecular theoryof gases. In this experiment, you will be performing these and other `demonstrations' and using yourunderstanding of the physical properties of gases to explain your observations.
There will be two demonstrations laid out at each of the seven di�erent stations around the room and youwill go as a group, half the group working at each station (you don't need to start with #2). If your groupstarts with, for example station 5, you should then follow the following order: 5, 6, 7, 8, 2, etc. Your groupshould spend no more than 15 minutes at each station, in some cases 5 minutes is su�cient. Perform theexperiment by following the instructions placed at each station. Then discuss your observations with yourgroup. For each of the activities, it is important to ask yourself what is going on; "how can our observations beexplained using the kinetic molecular theory of gases?" Remember that for some demonstrations calculationsmay also be required. Be thorough and precise in your explanations.
Important Safety Notes:Remember to use tongs, hot grips as appropriate when dealing with hot liquids, vapors and containers.
1This content is available online at <http://cnx.org/content/m19475/1.4/>.
Available for free at Connexions <http://cnx.org/content/col10506/1.56>
1

2 CHAPTER 1. PRACTICAL EXAMPLES OF THE GAS LAWS
Liquid nitrogen is extremely cold, with a boiling point of −196 ◦C and if it comes into contact with skincan result in severe frostbite.
The vacuum dessicator should be regarded as a potential implosion hazard when evacuated. Handle itcarefully.
When doing the egg experiment do not put the hot �ask immediately in the water bath (let it for at least3 minutes sitting on the bench) as it will crack.
Observe and record what happens in your laboratory report form and explain your observations in termsof the Kinetic Molecular Theory of Gases.
You are encouraged to discuss among yourselves possible explanations to your observations.Experimental ProcedureDi�usion:
• The goal of this experiment is to measure the rate of di�usion of carvone, a major component ofspearmint oil. We will do these trials altogether, with volunteers, at the end of the pre-lab lecture.You will all stand in a line, with the �rst person in the group holding the bottle of carvone and severalpaper towels. All four people should be 1 meter apart. You will need to know the distance each personis from the bottle of carvone. The fourth person should act as the timekeeper.
• When the timekeeper gives the signal, the �rst person should place a few drops of carvone on the papertowels. Record the time that it takes for each person to smell the carvone. Seal the paper towel in aplastic bag when you are �nished.
• After the odor has dissipated, we will repeat the experiment twice with more volunteers.• Using Excel plot the data in distance traveled versus time. Obtain a least squares �t ( R2, R squared
value) for this data and determine from it the rate of di�usion of carvone in meters per second. Createa graph for each trial. Calculate the average of the rates for the three trials. Calculate the root meansquare speed of carvone molecules at 25 ◦C. Your TA will help you with this equation. Compare theresult with the di�usion rate you measured.
• If they are signi�cantly di�erent, o�er an explanation.• Would the di�usion take place faster in a vacuum?
Note: The formula of carvone is C10H14O, MW=150.22 g/mol.Since, PV = nRTand nRT = (1/3)Nm µ2.Solving for µ gives:µ =
√3RT/M .
where M = mN/n or the molar mass in kg/mol, T is in k, and R is 8.3145 kg ∗m2/s2 ∗mol ∗K. Theµ, we are using is the root mean square speed, as it is the root of the sum of the squares of the individualvelocities.
The plots can be prepared when you have �nished the lab.
1. Gas Laws in a Soda Can:
1. Pour 15 mL of water into an aluminum soda can. Set the can on a hot plate and turn on to a hightemperature setting. While the can water heats, �ll a 1000-mL beaker with cold water (You may havea metal tin set out for this purpose). Continue heating the can until the water inside boils vigorouslyand until steam escapes from the mouth of the can for about 20 seconds.
2. Using the hot grips to grip the can near the bottom, quickly lift the can from the burner and invert itin the beaker of cold water so water covers the mouth of the can.
3. Describe what happens.4. Explain why it happens. You may repeat this experiment using a second soda can if you wish.5. Why is it necessary to invert the can in the water? What would happen if a rigid container were used?6. Balloon in liquid nitrogen:
Available for free at Connexions <http://cnx.org/content/col10506/1.56>

3
Review the safety notes above regarding the handling of liquid nitrogen.1. In�ate a balloon and tie the end (several balloons may have already been in�ated and tied). Using
tongs, place the balloon in a Dewar �ask containing liquid nitrogen. After the balloon stops changing size,remove it from the Dewar and allow it to warm to room temperature.
2. Observe and record the changes (you should be able to measure the radius and estimate volume).Estimate the size of the balloon in liters.
3. What is the pressure inside the balloon before it is placed in the liquid nitrogen?4. What is the pressure inside the balloon after it is placed in the liquid nitrogen?5. Use the ideal gas law to calculate the percent change in volume expected on going from room temper-
ature to liquid nitrogen temperature.6. Is the volume of the cold balloon consistent with what you calculated, or is it larger or smaller?7. Suggest an explanation for your observation. Explain all of your observations in detail using the
kinetic molecular theory of gases.8. How does the liquid nitrogen cool the gas in the balloon?
1. Kissell's tygon tube in liquid nitrogen:
Review the safety notes above regarding the handling of liquid nitrogen.
1. Place a 2 foot long tygon clear tube in a Dewar with liquid nitrogen.2. Observe what happens and explain.3. Balloon in a �ask:
1. Place about 5 mL of water in a 125-mL Erlenmeyer �ask. Heat the �ask on a hot plate until the waterboils down to a volume of about 1 mL.
2. Meanwhile, in�ate a balloon and then let the air out (this may not be necessary if balloons on tablehave been previously used).
3. Remove the �ask from the heat, hold it with a towel, and immediately place the open end of the balloonover the mouth of the �ask.
4. Observe the e�ect as the �ask cools.5. Can you get the balloon back out again?6. If you can, How?7. Cartesian diver:
The Cartesian diver is named for Rene Descartes (1596-1650), noted French scientist and philosopher. Atthis station, you will �nd a plastic soda bottle containing a medicine dropper, water, and air. Squeeze thebottle.
What happens? Why?
1. The Egg:
1. Lightly grease the inside of the neck of a 1 L Erlenmeyer �ask with stopcock grease. Clamp the �askonto the stand. Place about 5 mL H2O in the �ask and gently warm it with a Bunsen burner untilthe water vaporizes. Do not boil the water to dryness.
2. Meanwhile, prepare an ice water bath in an evaporating dish. While the �ask is warm, seat the egg,narrow end down, in the mouth of the �ask. Unclamp the �ask, allow to cool slightly sitting on thebench and then immerse it in the ice water. (Read the safety notes above to avoid breaking the �ask)
3. Can you get the egg back out again?4. Assuming that the �ask reaches the maximum vacuum (minimum pressure) possible before the egg is
drawn into the �ask, calculate the minimum pressure reached in the �ask.5. Expanding balloon:
Available for free at Connexions <http://cnx.org/content/col10506/1.56>

4 CHAPTER 1. PRACTICAL EXAMPLES OF THE GAS LAWS
1. Partially in�ate a balloon. Place the balloon inside the vacuum chamber and close the chamber withthe black rubber circle and the top of the chamber carefully centered on the base (A partially in�atedballoon may already be in the dessicator).
2. Close the needle valve (at the bottom of the black rubber tubing) by turning it clockwise. Turn thestopcock to the up position to connect the chamber to the vacuum pump.
3. What happens? Explain? To open the chamber, turn the stopcock to the left position and open theneedle valve.
Moore's bonus 2 points:1pt to name a real life example of the physical properties of gases at work1pt for a good explanation of how and why it works according to what you have learned in the lab.
Available for free at Connexions <http://cnx.org/content/col10506/1.56>

Chapter 2
Colligative Properties and Ice Cream1
Colligative Properties and Ice CreamObjectives
• To record facile and fast data collection from the computer interface, ubiquitous in industry and, inthis case, to calculate the molecular weight of the unknown solute using freezing point depression
• To learn the de�nition of molality and the importance of molality in colligative property calculations• To learn to calculate the molality of a solution• To measure the freezing point depression caused when adding antifreeze to tert-butanol• To calculate the molecular weight of the unknown solute using freezing point depression
2.1 Grading
You will be determined according to the following:
• Pre-lab (10%)• Lab Report Form (80%) � including temperature plots• TA evaluation of lab procedure (10%)
IntroductionAlthough colligative properties involve solutions, they do not depend on the interactions between the
solvent and the solute molecules but rather on the number of solute particles dissolved in solution. Colligativeproperties include vapor pressure lowering, osmotic pressure, boiling point elevation, and freezing pointdepression. In this experiment you will explore freezing point depression using a solution of ethylene glycolin tert-butanol. You will then use freezing point depression to calculate the molar mass of an unknown solutethat is dissolved in tert-butanol.
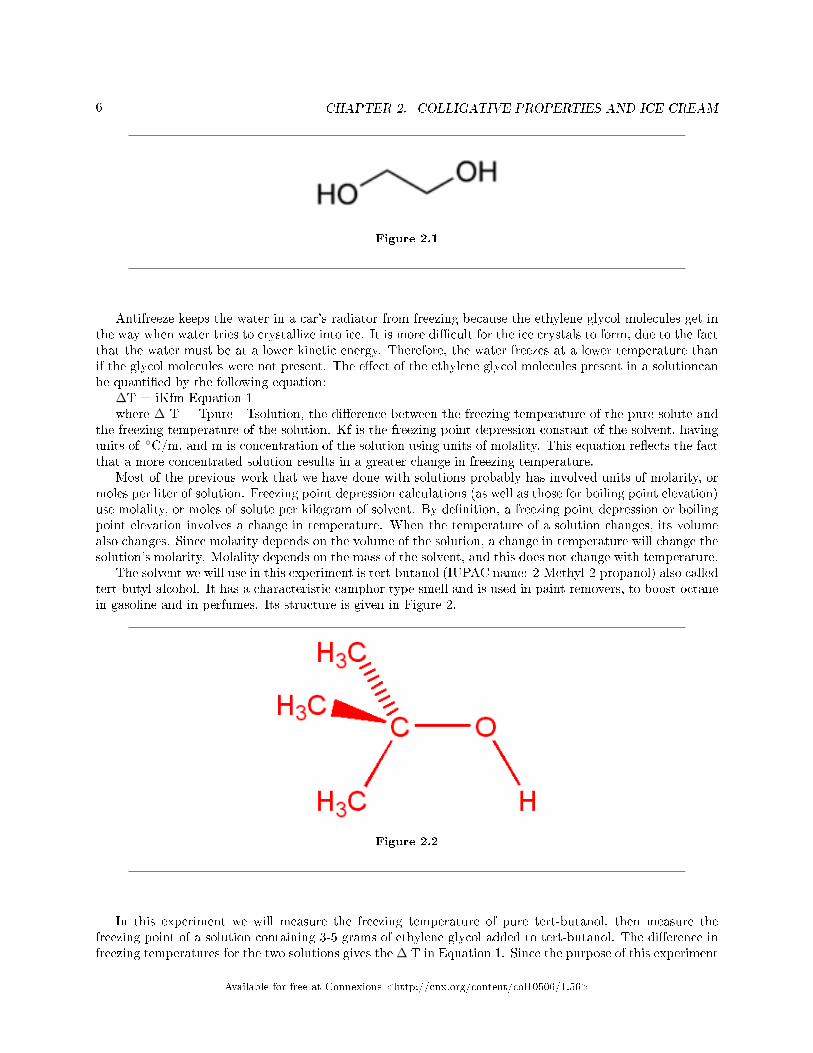
Ethylene glycol, (CH2OH)2 the major component of antifreeze, is a large organic molecule that dissolveseasily in water. The structure of ethylene glycol is shown in Figure 1.
1This content is available online at <http://cnx.org/content/m19545/1.4/>.
Available for free at Connexions <http://cnx.org/content/col10506/1.56>
5
6 CHAPTER 2. COLLIGATIVE PROPERTIES AND ICE CREAM
Figure 2.1
Antifreeze keeps the water in a car's radiator from freezing because the ethylene glycol molecules get inthe way when water tries to crystallize into ice. It is more di�cult for the ice crystals to form, due to the factthat the water must be at a lower kinetic energy. Therefore, the water freezes at a lower temperature thanif the glycol molecules were not present. The e�ect of the ethylene glycol molecules present in a solutioncanbe quanti�ed by the following equation:
∆T = iKfm Equation 1where ∆ T = Tpure - Tsolution, the di�erence between the freezing temperature of the pure solute and
the freezing temperature of the solution. Kf is the freezing point depression constant of the solvent, havingunits of ◦C/m, and m is concentration of the solution using units of molality. This equation re�ects the factthat a more concentrated solution results in a greater change in freezing temperature.
Most of the previous work that we have done with solutions probably has involved units of molarity, ormoles per liter of solution. Freezing point depression calculations (as well as those for boiling point elevation)use molality, or moles of solute per kilogram of solvent. By de�nition, a freezing point depression or boilingpoint elevation involves a change in temperature. When the temperature of a solution changes, its volumealso changes. Since molarity depends on the volume of the solution, a change in temperature will change thesolution's molarity. Molality depends on the mass of the solvent, and this does not change with temperature.
The solvent we will use in this experiment is tert-butanol (IUPAC name: 2-Methyl-2-propanol) also calledtert-butyl alcohol. It has a characteristic camphor type smell and is used in paint removers, to boost octanein gasoline and in perfumes. Its structure is given in Figure 2.
Figure 2.2
In this experiment we will measure the freezing temperature of pure tert-butanol, then measure thefreezing point of a solution containing 3-5 grams of ethylene glycol added to tert-butanol. The di�erence infreezing temperatures for the two solutions gives the ∆ T in Equation 1. Since the purpose of this experiment
Available for free at Connexions <http://cnx.org/content/col10506/1.56>

7
is to �nd the molecular weight of the solute, Equation 1 can be rewritten to include molecular weight of thesolute:
Figure 2.3
For this experiment, use a Kf for tert-butanol of 8.37 ◦C/m.The only unknown in equation 2 is the molar mass of the solute. If you algebraically rearrange Equation
2, you can then solve for molar mass. This algebraic manipulation is left as an exercise for you to complete.SAFETY PRECAUTIONS: Ethylene glycol and tert-butanol are safe if handled properly, but are mildly
poisonous if swallowed. These chemicals can also cause allergic reactions with skin contact. Wear plasticgloves when pouring and measuring these chemicals. If you spill any on your hands, wash immediately withsoap and water. Be sure to wear safety glasses at all times during this experiment.
Experimental ProcedurePart 1: Freezing point of tert-butanol
1. Open the MicroLab Program by clicking on the shortcut to MicroLab.exe tab on the desktop.2. On the �Choose an Experiment Type� tab, enter a name for your experiment, and then double click
on the MicroLab Experiment icon.3. Click �Add Sensor�, choose sensor = Temperature (thermistor).4. To choose an input, click on the red box that corresponds to the port which the thermistor is connected.5. Choose label = Thermistor, sensor units = ◦ C, click next.6. Click �Perform New Calibration�.7. Click �Add Calibration Point� and place the thermistor and a thermometer in an ice water bath. Wait
until the temperature is constant, then read the temperature on the thermometer and enter that valueinto the �Actual Value� box in MicroLab and hit �ok�.
8. Again, click �Add Calibration Point� and place the thermistor and a thermometer in a warm waterbath. Wait until the temperature is constant, then read the temperature on the thermometer and enterthat value into the �Actual Value� box in MicroLab and hit �ok�.
9. Under Curve Fit Choices, click on �First order (linear)� and then �Accept and Save this Calibration�,when prompted to enter units, enter as �deg C�. Save as your name-experiment data.
10. Click �Add Sensor�, choose sensor = Time11. Choose an input, click on the red box that corresponds any of the timers.12. Label = Time 1, click next, click �nish.13. Left click on thermistor and drag to: the Y-axis over �data source two�, column B on the spreadsheet,
and the digital display window.14. Left click on time and drag to: the X-axis over �data source one�, column A on the spreadsheet, and
the digital display window.15. When ready to obtain data, click start.16. Take a clean, dry 10cm test tube, and �ll it half-way with tert-butanol, dispensed by your TA.
Available for free at Connexions <http://cnx.org/content/col10506/1.56>

8 CHAPTER 2. COLLIGATIVE PROPERTIES AND ICE CREAM
NOTE: The tert-butanol must be distributed by your TA to avoid impurities that will cause tremendouserrors in the experiment. You will need a very clean and very dry test tube for each of your experimentruns. If any impurities (especially water) mix with the tert-butanol, your data will be severely a�ected.
ANOTHER NOTE: Make sure that your solution in your test tube is below the level of the water in thewater bath
1. Warm the test tube to 30-35 ◦C by placing it in a warm water bath. Start your data acquisitionprogram, and place the test tube in an ice/water bath. You must constantly stir the tert-butanol toprevent supercooling.
2. The temperature of the tert-butanol should steadily drop, then level o�, as the liquid freezes. Whenthe tert-butanol is completely solid and the temperature starts decreasing again, you may stop yourexperiment. This will be the freezing temperature you use as Tpure when you calculate ∆ T. Recordthis value in your data sheet. If your cooling curve does not �atten out very well and it is di�cultto determine the freezing temperature, warm your sample with the hot water bath, and measure thefreezing point again.
Note: If you do not get an acceptable curve (your TA can verify if it's acceptable) on your second try,then you should ask for a new sample of tert-butanol. The rest of your results for this lab depend on thismeasurement being accurate.
Part 2: Freezing point depression
1. After �nding the freezing temperature of pure tert-butanol you will make a solution of tert-butanoland antifreeze. Set your test tube inside a 50 or 100 mL beaker and then place the beaker on thebalance to weigh your sample.
2. First, weigh only the empty test tube and record this value in your data sheet.3. Fill the test tube half full of tert-butanol (again from your TA), weigh again, and record this value.4. Finally, add a few drops of antifreeze (3 or 4 drops is su�cient), weigh the beaker/test tube combination
a third time, and record this value. Use the same balance for all three weighings. Use subtraction to�nd the masses of the tert-butanol and the added antifreeze. It is not critical how many drops youadd, but the mass that you measure is the important value.
5. Find the freezing temperature for your solution in the same way you found the freezing temperaturefor pure tert-butanol. The �at portion of your temperature curve will be smaller and more di�cultto see for your mixed solution than for the pure tert-butanol. If you are running a live graph in yourprogram, you should be able to tell where the freezing point of your solution occurs. As before, youmay re-warm your solution and run it again if your cooling curve does not show a clear freezing point.If time permits, you may want to perform more than one run on each solution to con�rm your freezingtemperatures.
6. Subtract the freezing temperature your solution from the freezing temperature of pure tert-butanol.Record this ∆ T value in your data sheet.
7. Use the information recorded in your data sheet to calculate the molar mass of ethylene glycol. Calcu-late the percent error for your experimentally determined molar mass. See your TA if you are unsurehow to make this calculation.
8. Repeat Steps 1 through 5 for the unknown solutes. After calculating the molar mass of the unknowns,identify them using the following information:
Compound Molar Mass (g/mol)
Acetone 58.08
Ethyl Acetate 88.10
Water 18.02
Table 2.1
Available for free at Connexions <http://cnx.org/content/col10506/1.56>
9
Part 3: Chemistry of Life: Ice CreamAs we found above, adding a solute to a solvent lowers the freezing point of that solvent. This occurs
because as a substance freezes, a crystal is formed, but if a solute is added to the solvent more kinetic energymust be removed from the solvent in order to freeze, since it's harder for the solvent molecules to form theregular pattern of the crystal. Therefore, the more solute molecules you add, the lower the freezing pointbecomes. We can use this to our advantage to lower the freezing point of water by enough to freeze icecream, since ice cream is mostly water.
This is a recipe that you could use at home:Put 59.15 ml (¼ cup) of sugar, 118.29 ml (½ cup) of milk, 118.29 ml (½ cup) of whipping cream, and 1.23ml
(¼ teaspoon) vanilla (4-hydroxy-3-methoxybenzaldehyde) into a one-quart Ziploc � bag. Seal the bag andmix well by carefully shaking.
Put this one-quart Ziploc � bag into a one-gallon Ziploc � bag that has 2 cups of ice..
1. However, we are going to cheat by using 6 packets of Junket ice cream mix + 7 ½ cups of whole milk+ 4 ½ cups of whipping cream in a one galloon jug.
2. Measure and record the temperature of the ice with your thermometer in the one-gallon Ziploc � bag .3. Weigh and pour 177.44 ml (¾ cup) of sodium chloride into the gallon bag.4. Place the smaller bag inside the larger bag and seal the large bag securely.5. Holding the large bag by the zipper seal, carefully shake the bag back and forth.
NOTE: Do not touch the part of the bag with the ice as it could cause tissue damage.
1. Continue until your ice cream is solid, approximately 10 � 15 min.2. Measure and record the temperature of the salt/ice mixture.3. Remove the frozen ice cream and place into a Styrofoam cup and enjoy!
Available for free at Connexions <http://cnx.org/content/col10506/1.56>

10 CHAPTER 2. COLLIGATIVE PROPERTIES AND ICE CREAM
Available for free at Connexions <http://cnx.org/content/col10506/1.56>
Chapter 3
Pervasive Polymers1
Pervasive Polymers
3.1 Objectives
In this laboratory you will become familiar with the classi�cations of polymers by synthesizing and examiningseveral of the following:
• a polyamide (nylon)• a cross-linked condensation copolymer (Glyptal TM resin)• a cross-linked polyvinyl alcohol• a loosely cross-linked silicon-based condensation polymer (a polymethylsiloxane)
Additional information about polymers can be found in Chapter 12 of your textbook.
3.2 Grading
Your grade will consist of the following:
• Pre-lab (10%)• Correctness and thoroughness of your observations and the answers to the questions on the report form
(80%)• TA evaluation of lab procedure (10%)
Before Coming to Lab . . .
• Complete the pre-lab exercise• Read the introduction and any related materials provided to you
NOTE: If you wear contact lenses, for this week's lab, you may prefer to wear your prescription glasses.IntroductionApproximately 50% of the industrial chemists in the United States work in some area of polymer chem-
istry, a fact that illustrates just how important polymers are to our economy and standard of living. Thesepolymers are essential to the production of goods ranging from toys to roo�ng materials. So just what exactlyare polymers? Polymers are substances composed of extremely large molecules, termed macromolecules, withmolecular masses ranging from 104 to 108 amu. Macromolecules consist of many smaller molecular units,
1This content is available online at <http://cnx.org/content/m19573/1.4/>.
Available for free at Connexions <http://cnx.org/content/col10506/1.56>
11

12 CHAPTER 3. PERVASIVE POLYMERS
monomers, joined together through covalent bonds. The molar mass of the polymer is quoted as an averagemolar mass.
Both natural and synthetic polymers are ubiquitous in our lives: elastomers (polymers with elastic,rubber-like properties), plastics (the �rst plastic was used in 1843 to make buttons), textile �bers, resins,and adhesives. The more common polymers include acrylics, alkyds, cellulosics, epoxy resins, phenolics,polycarbonates, polyamides, polyesters, poly�uorocarbons, polyole�ns, polystyrenes, silicones, and vinylplastics, to name but a few.
Naturally occurring macromolecules are derived from living things: wood, wool, paper, cotton, starch,silk, rubber and have provided us for centuries with materials for clothing, food, and housing. Starch,glycogen, and cellulose are all polymeric versions of the monomer glucose. Again, we see that minor struc-tural variations create chemicals with very di�erent properties. Proteins are macromolecules composed ofmonomeric units of alpha amino acids; nucleic acids are composed of subunits (nucleotides) containing anitrogeneous base, sugar and phosphate groups. Natural rubber is a latex exudate of certain trees and com-posed of monomers called isoprene units. The usefulness of latex was �rst discovered by Lord Mackintoshin Malaysia in the 19th century and provided the foundation of his waterproof rainwear empire.
When scientists linked the special properties of these substances (physical properties such as tensilestrength and �exibility) to the sizes of their molecules, the next logical step involved chemical modi�cationsof naturally occurring polymers.
Synthetic celluloid derives from natural cellulose and stems from an accident that Christian Schoenbein,a chemistry professor, had in 1846. The age of plastic had begun, although the interest in cellulose nitratewas initially more for its explosive properties. When cellulose (from wood chips or �ber) is treated witha mixture of nitric acid, camphor, and alcohol, the resultant product is called Celluloid TM and bearsvery little resemblance to the starting material. Celluloid TM possesses the ability to be molded into hard,smooth billiard balls (replacing the original, very expensive ivory balls) and into thin sheets for makingmovie pictures. Celluloid TM is highly �ammable and today has been replaced by greatly improved syntheticpolymers such as Bakelite discovered in 1907 by the Belgian-American Chemist, Leo H. Baekeland.
When cellulose is treated with sodium hydroxide and carbon disul�de (CS2), cellulose xanthate is formed.A viscous (thick) solution of cellulose xanthate, forced through �ne holes into dilute sulfuric acid, regeneratesthe cellulose as �ne, continuous, cylindrical threads called rayon. If the solution is forced instead through anarrow slit, a thin transparent �lm or sheet is obtained called cellophane.
Experimental ProcedureA. Synthesis of Nylon (to be performed in the hood by Dr McHale): Two liquids are mixed in a small
beaker and nylon is formed at their interface. The nylon is pulled from the beaker; a continuous thread10-15 ft long can be formed. CAUTION: Wear gloves while performing this experiment; do not touch thenylon with your bare hands until it has been rinsed thoroughly with water.
1. Solutions A and B have been prepared for you:
• Solution A: A 0.5 M basic solution of hexamethylenediamine (or 2,6-diaminohexane, H −NH (CH2)6 NH − H) was prepared as follows: Weigh 5.81 g in a large beaker and dilute to 100 mLwith 0.5 M NaOH solution (20 g of NaOH per liter). Warm the solid until it melts. Wear gloves;hexamethylenediamine is absorbed through the skin.
• Solution B: Adipoyl chloride(Cl− (C = O)− (CH2)−
4(C = O)− Cl
), 0.25 M: Weigh 4.58 g and dilute
to 100 mL with cyclohexane.• Place 5 mL of solution A in a small beaker. Place 5 mL of solution B in a second beaker• Slowly add solution A to solution B by gently pouring it down the side of the beaker. Do not stir or
mix. Solution A should form a separate layer on top of solution B.• A �lm will form at the interface of the two solutions.• Carefully hook the �lm with a bent paper clip and pull the �lm from the beaker.• Continue pulling until the solutions are exhausted.• If you want to keep the nylon, rinse it several times with water until it is free of all traces of amine.
Available for free at Connexions <http://cnx.org/content/col10506/1.56>
13
B. Glyptal TM Resin (linear condensation copolymer): A small aluminum dish is used to mold the polymer.A coin, favorite small stone, or small �ower may be placed on the bottom of the mold if you wish to make asouvenir of this experiment. This will harden several hours after your lab has �nished.
CAUTION: Use care when heating any of the solutions � if the solutions come in contact with your skin,severe burns could result.
1. In a large test tube, mix 4.0 mL glycerol, 0.5 g sodium acetate, and 10.0 g phthalic anhydride.2. Carefully heat the mixture with a low �ame, starting at the top of the contents and moving down
toward the bottom as the mixture melts. Remember to point the test tube towards the back of thefume hood for safety reasons. CAUTION Excessive heating during step 2 can cause the hot contentsto spurt out. If the hot liquid contacts the skin, severe burns result.
3. Continue heating until the melt appears to boil, and then continue heating for 5 minutes. Su�cientheating is required to produce a nonsticky product but excessive heating turns the product into abrittle amber material.
4. If desired, place a clean and dry coin into the aluminum dish used for a mold.5. Carefully pour the hot liquid into the mold.6. Allow the material to cool until the end of the laboratory period.7. After the material has cooled, peel the mold from the cooled polymer and describe its appearance.
C. Cross-linked polyvinyl alcohol aka Slime!CAUTION: The poly(vinyl alcohol) is a �ne dust which you should avoid inhaling. For this reason, you
will only use it in solution.
1. Measure 50 mL of poly(vinyl alcohol) solution into a paper cup or small beaker and observe its proper-ties. Vinyl alcohol does not exist. Poly(vinyl alcohol) is prepared by �rst forming poly(vinyl acetate)from vinyl acetate following by hydrolysis to the alcohol.
2. Measure 7-8 mL of sodium tetraborate solution into another cup or beaker and observe its properties.Add a few drops of food coloring at this step, if you wish.
3. Pour sodium tetraborate into the poly(vinyl alcohol) solution while stirring vigorously with a wooden
stick. The borate forms a complex structure called tetraborate, B4O5 (OH)2−4
, that links the poly(vinylalcohol) polymer strands together by hydrogen bonds.
4. Wearing safety gloves, examine the properties of the cross-linked polymer. See how far the polymerwill �ow from your hand. Is the �owing endothermic or exothermic?
D. Silicone Plastic aka Silly PuttySilicone plastic, commonly called Silly Putty, can be successfully approximated with Elmer's Glue instead
of silicone oil. You may each make your own silly putty if you wish and if you want to keep it, bring a Ziplocbag � great �nger exerciser, stress reliever, bouncy ball etc.
1. Mix the food coloring with 30 mL of 50% Elmer's Glue solution.2. Add the 5 mL of 4% sodium tetraborate (Borax) solution and stir for 2 minutes in the cups provided.3. Wearing your safety gloves, roll around the lump in your hands for two minutes, after which time it
will cease to be sticky.4. Examine the properties of this inorganic polymer.5. If you wish to keep your silly putty, bring a Ziploc bag to lab.
Available for free at Connexions <http://cnx.org/content/col10506/1.56>

14 CHAPTER 3. PERVASIVE POLYMERS
Available for free at Connexions <http://cnx.org/content/col10506/1.56>
Chapter 4
Determine the Value of an Equilibrium
Constant by Complex Ion Formation1
Determine the Value of an Equilibrium Constant by Complex Ion Formation
4.1 Objectives
In this laboratory you will:
• Use MicroLab to take colorimetric measurements• Use Beer's Law to measure the equilibrium concentration of a complex ion• Review Le Chatelier's Principle• Calculate the equilibrium constant for the formation of a complex ion
4.2 Grading
Your grade will consist of the following:
• Pre-lab (10%)• Correctness and thoroughness of your observations and the answers to the questions on the report form
(80%)• TA evaluation of lab procedure (10%)
Before Coming to Lab . . .
• Complete the pre-lab exercise• Read the introduction and any related materials provided to you
IntroductionWhen two reactants are mixed, the reaction typically does not go to completion. Rather, they will
react to form products until a state is reached whereby the concentrations of the reactants and productsremain constant at which point the rate of formation of the products is equal to the rate of formation of thereactants. The reactants and products are then in chemical equilibrium and will remain so until a�ected bysome external force. The equilibrium constant Kc for the reaction relates the concentration of the reactantsand products.
1This content is available online at <http://cnx.org/content/m19605/1.3/>.
Available for free at Connexions <http://cnx.org/content/col10506/1.56>
15

16CHAPTER 4. DETERMINE THE VALUE OF AN EQUILIBRIUM
CONSTANT BY COMPLEX ION FORMATION
In our experiment we will study the equilibrium properties of the reaction between iron (III) ion andthiocyanate ion:
Fe3+ (aq) + SCN− (aq)→ FeSCN2+ (aq) Equation 1When solutions containing Fe3+ ion and thiocyanate ion are mixed, the deep red thiocyanatoiron (III)
ion ( FeSCN2+) is formed. As a result of the reaction, the starting concentrations of Fe3+ and SCN− willdecrease: so for every mole of FeSCN2+ that is formed, one mole of Fe3+ and one mole of SCN− will react.The equilibrium constant expression Kc, according to the Law of Chemical Equilibrium, for this reaction isformulated as follows:[
FeSCN2+]/[Fe3+
] [SCN−
]= Kc Equation 2
Remember, square brackets ([]) are used to indicate concentration in mol/liter, i.e., molarity (M).The value of Kc is constant at a given temperature. This means that mixtures containing Fe3+ and
SCN− will react until the above equation is satis�ed, so that the same value of the Kc will be obtained nomatter what initial amounts of Fe3+ and SCN− were used. Our purpose in this experiment will be to �ndKc for this reaction for several mixtures made up in di�erent ways, and to show that Kc indeed has thesame value in each of the mixtures.
The reaction is a particularly good one to study because Kc is of a convenient magnitude and the redcolor of the FeSCN2+ ion makes for an easy analysis of the equilibrium mixture using a spectrophotometer.The amount of light absorbed by the red complex is measured at 447 nm, the wavelength at which thecomplex most strongly absorbs. The absorbance, A, of the complex is proportional to its concentration, M,and can be measured directly on the spectrophotometer:
A = kM Equation 3We know it as the Beer-Lambert law which relates the amount of light being absorbed to the concentration
of the substance absorbing the light and the pathlength through which the light passes:A = εbc Equation 4In this equation, the measured absorbance (A) is related to the molar absorptivity constant ( ε), the
path length (b), and the molar concentration (c) of the absorbing species. The concentration is directlyproportional to absorbance.
Thiocyanate ( SCN−) is an interesting ion and is widely used in a variety of industrial processes such asthe manufacturing of thiourea, photo�nishing, metal separation, and electroplating. It is also found in goldmining wastewater as a result of treating the cyanide rich ore with sulfur dioxide in order to produce theless toxic thiocyanate( SCN−) ion. Iron, as you will see later on in the semester, has the unique ability toinexpensively clean up and produce drinking quality water in Third World countries.
4.3 Procedure
4.4 Equipment
• 5 test tubes• Burette (0.1 ml graduations) �lled with 0.0200M Fe (NO3)3 in 0.5 M HNO3
• Neighboring partners' burette �lled with 6.00× 10⁻⁴ M KSCN• stirring rod• small labels or china clay pencil• 5 cuvettes for the spectrophotometers• 250 ml bottle acetone for rinsing
4.5 Hazard: As always wear Safety glasses while performing thisexperiment
Contamination Notes: If your �ask is wet before you prepare your standard/sample solutionsensure that the �ask is wet with dilutant (in this case it is 0.5 M HNO3).
Available for free at Connexions <http://cnx.org/content/col10506/1.56>
17
Calibration Of MicroLab/SpectrophotometerN.B. Do not use test tubes from your drawer!Find and open the MicroLab program.
1. Find and open the MicroLab program. This brings up a box that will enable you to select from a listof experiments. Select colorimeter. Check that the accompanying box has power and is turned on, andthat it is connected to the laptop via the USB plug.
2. In the tab labeled �New� you will �nd the icon for the �Spectrophotometer�, please double click this.Make sure that you click on the absorbance tab.
3. This brings up the program, at which point you should take a reading of a blank, this is done by �llinga vial with 15 mL of 0.5 M HNO3(not deionized water in this case) and placing in the appropriateslot. Covering with the �lm case to exclude ambient light from entering the system. When the blanksample is in place, click the button �Read Blank�. This will generate a series of data points.
4. A solution of 0.0200M Fe (NO3)3 in 0.5 M HNO3has been prepared for you.5. Dilute 1.5, 3.0, 4.5 and 6.0 mL portions of 6.00×10⁻⁴ M KSCN to 20 mL with the 0.0200M Fe (NO3)3
in 0.5 M HNO3. For this you can use some of the smaller beakers in your lab drawer. These needto be rinsed and dried thoroughly before each use. Use two clean, dry burettes to dispense the twosolutions.
6. This will give you 4 solutions which can be assumed to be 6.0 × 10⁻⁵M, 1.2 × 10⁻⁴ M,1.8 × 10−4 Mand 2.4× 10⁻⁴ M in FeSCN2+
7. Take the most concentrated solution and collect a visible spectrum from 400 to 800 nm to determineλmax.
8. Measure the absorbance of all the solutions at λmax, using 0.5 M HNO3 as the blank/reference solution.9. Measure the absorbance of these solutions again at 430nm, under the same conditions.10. Plot absorbance vs. [ FeSCN2+] for both wavelengths using Excel and add a linear trendline passing
through the origin (under Options, set intercept equal to 0). Using Beer's law and the equation of thetrendline, �nd the molar absortivity.
4.6 Experimental Determination of Kc
The mixtures will be prepared by mixing solutions containing known concentrations of iron (III) nitrate,Fe (NO3)3, and potassium thiocyanate, KSCN. The color of the FeSCN2+ ion formed will allow us to de-termine its equilibrium concentration. Knowing the initial composition of a mixture and the equilibriumconcentration of FeSCN2+, we can calculate the equlibrium concentrations of the rest of the pertinent speciesand then determine Kc.
1. Label �ve regular test tubes 1 to 5, with labels or by noting their positions in the test tube rack.2. Dilute 0.02 M Fe (NO3)3 in 0.5 M HNO3by a factor of 10 using the volumetric �ask that you have in
your drawer. Remember to do the dilution with 0.5 M HNO3 not water.3. Pour about 25 mL 0.002 M Fe (NO3)3 in 0.5 M HNO3 into a clean, dry burette.4. Dispense 5.00 mL of that solution into each test tube.5. Then pour about 20 mL 6.00× 10⁻⁴ M KSCN into another clean, dry burette.6. Dispense 1,2,3,4, and 5 mL from the KSCN burette into each of the corresponding test tubes labeled
1 to 5.7. Using a small graduated cylinder, dispense the proper number of milliliters of 0.5 M HNO3 into each
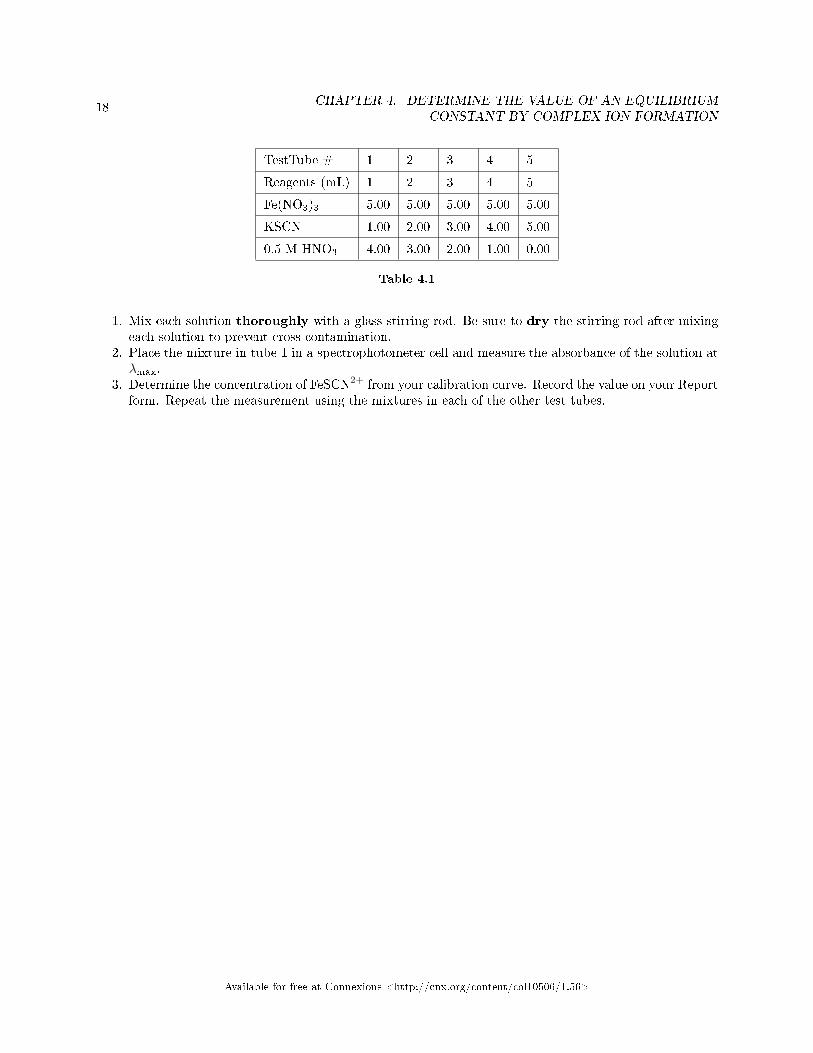
test tube to bring the total volume in each tube to 10.00 mL.8. The volumes of reagents to be added to each tube are summarized in the table.
Available for free at Connexions <http://cnx.org/content/col10506/1.56>
18CHAPTER 4. DETERMINE THE VALUE OF AN EQUILIBRIUM
CONSTANT BY COMPLEX ION FORMATION
TestTube # 1 2 3 4 5
Reagents (mL) 1 2 3 4 5
Fe(NO3)3 5.00 5.00 5.00 5.00 5.00
KSCN 1.00 2.00 3.00 4.00 5.00
0.5 M HNO3 4.00 3.00 2.00 1.00 0.00
Table 4.1
1. Mix each solution thoroughly with a glass stirring rod. Be sure to dry the stirring rod after mixingeach solution to prevent cross-contamination.
2. Place the mixture in tube 1 in a spectrophotometer cell and measure the absorbance of the solution atλmax.
3. Determine the concentration of FeSCN2+ from your calibration curve. Record the value on your Reportform. Repeat the measurement using the mixtures in each of the other test tubes.
Available for free at Connexions <http://cnx.org/content/col10506/1.56>

Chapter 5
indigestion? Which is the Best
Commercial Antacid?1
5.1 Indigestion? Which is the best Commercial Antacid?
5.1.1 Objectives
• Measure the quantity of commercial antacid required to neutralize a simulated stomach acid (0.15M hydrochloric acid) and then compare the e�ectiveness of several brands of antacids in neutralizingacids.
• Learn and practice the back-titration method.
5.1.2 Grading
You grade will be determined according to the following:
• Pre-lab (10%)• Lab Report Form (80%)• TA points (10%)
5.1.3 Introduction
The parietal cells in the stomach secrete hydrochloric acid at a quite high concentration of about 0.155 M. The�ow of HCl increases when food enters the stomach. When you eat or drink too much, your digestive systemmay generate too much acid. You may develop a condition called "heartburn" or indigestion. Antacids areswallowed to neutralize this excess acid and "relieve" but not eliminate the condition. The reaction thattakes place is an acid/base reaction. A small amount of NaOH might be as e�ective, although rough on therest of the digestive system, so antacids have been formulated to reduce acidity while avoiding physiologicalside-e�ects. Many antacids use CaCO3 for this purpose.
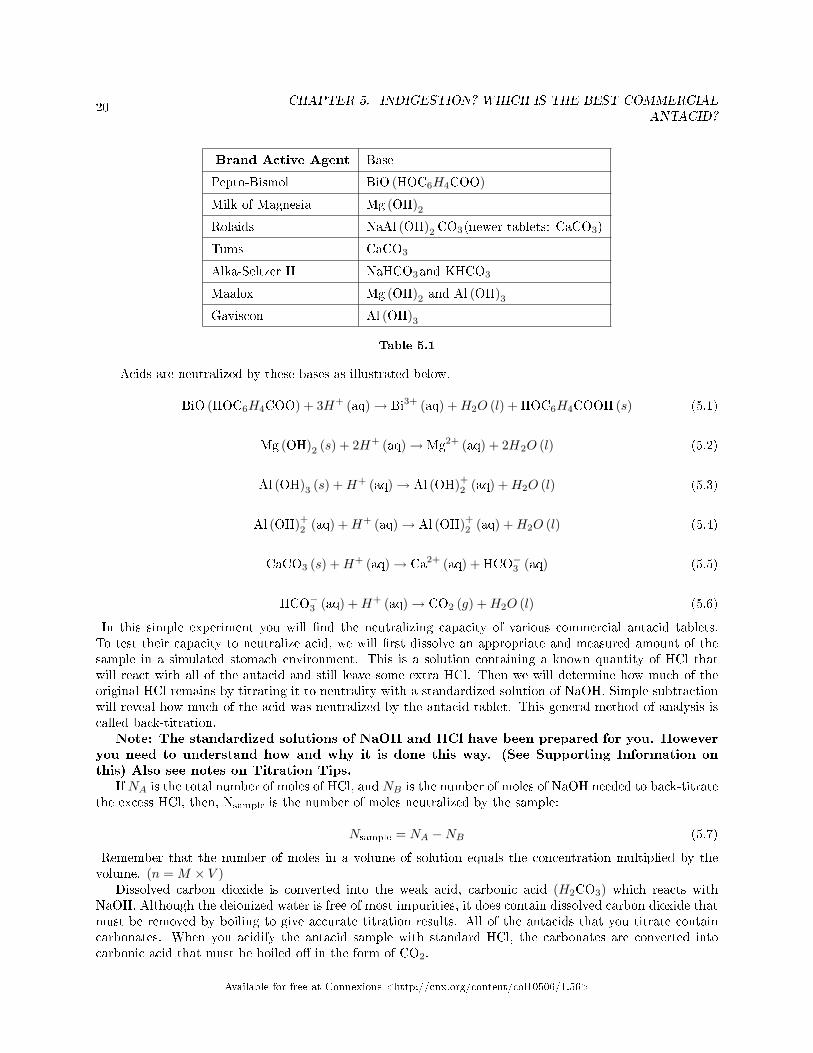
In addition to the active ingredient (base), tablets may also contain �avors, sweeteners, binders, �llers,antifoam agents, pain relievers (aspirin), etc. In this experiment, the tablets will be analyzed only for theirability to neutralize acids. The base in antacids varies with the brand. Below is an example of active agentsin several brands.
1This content is available online at <http://cnx.org/content/m19622/1.5/>.
Available for free at Connexions <http://cnx.org/content/col10506/1.56>
19
20CHAPTER 5. INDIGESTION? WHICH IS THE BEST COMMERCIAL
ANTACID?
Brand Active Agent Base
Pepto-Bismol BiO (HOC6H4COO)
Milk of Magnesia Mg (OH)2Rolaids NaAl (OH)2 CO3(newer tablets: CaCO3)
Tums CaCO3
Alka-Seltzer II NaHCO3and KHCO3
Maalox Mg (OH)2 and Al (OH)3Gaviscon Al (OH)3
Table 5.1
Acids are neutralized by these bases as illustrated below.
BiO (HOC6H4COO) + 3H+ (aq)→ Bi3+ (aq) +H2O (l) + HOC6H4COOH (s) (5.1)
Mg (OH)2 (s) + 2H+ (aq)→ Mg2+ (aq) + 2H2O (l) (5.2)
Al (OH)3 (s) +H+ (aq)→ Al (OH)+2 (aq) +H2O (l) (5.3)
Al (OH)+2 (aq) +H+ (aq)→ Al (OH)+2 (aq) +H2O (l) (5.4)
CaCO3 (s) +H+ (aq)→ Ca2+ (aq) + HCO−3 (aq) (5.5)
HCO−3 (aq) +H+ (aq)→ CO2 (g) +H2O (l) (5.6)
In this simple experiment you will �nd the neutralizing capacity of various commercial antacid tablets.To test their capacity to neutralize acid, we will �rst dissolve an appropriate and measured amount of thesample in a simulated stomach environment. This is a solution containing a known quantity of HCl thatwill react with all of the antacid and still leave some extra HCl. Then we will determine how much of theoriginal HCl remains by titrating it to neutrality with a standardized solution of NaOH. Simple subtractionwill reveal how much of the acid was neutralized by the antacid tablet. This general method of analysis iscalled back-titration.
Note: The standardized solutions of NaOH and HCl have been prepared for you. Howeveryou need to understand how and why it is done this way. (See Supporting Information onthis) Also see notes on Titration Tips.
If NA is the total number of moles of HCl, and NB is the number of moles of NaOH needed to back-titratethe excess HCl, then, Nsample is the number of moles neutralized by the sample:
Nsample = NA −NB (5.7)
Remember that the number of moles in a volume of solution equals the concentration multiplied by thevolume. (n = M × V )
Dissolved carbon dioxide is converted into the weak acid, carbonic acid (H2CO3) which reacts withNaOH. Although the deionized water is free of most impurities, it does contain dissolved carbon dioxide thatmust be removed by boiling to give accurate titration results. All of the antacids that you titrate containcarbonates. When you acidify the antacid sample with standard HCl, the carbonates are converted intocarbonic acid that must be boiled o� in the form of CO2.
Available for free at Connexions <http://cnx.org/content/col10506/1.56>
21
In this experiment you will titrate one commercial antacid twice. Each lab section will compile theirresults and decide which antacid is the "best buy" in terms of neutralizing ability per dollar. The generalapproach to this quantitative determination is volumetric.
Experimental Procedure
5.1.3.1 Titration of Antacids
Your TA will randomly assign you one of the commercial brands of antacid tablets which you will analyzetwice.
1. Weigh one whole tablet using the analytical balance. Record the mass of the intact tablet.2. Break or cut the tablet to obtain pieces roughly the size indicated in the table below (e.g.. ½, 1/3,
etc.) and weigh two of these pieces separately on sheets of weighing paper. (Don't forget to subtract or tarethe weight of the paper.) After weighing, fold over the paper and gently crush the sample fragments usingthe round portion of your padlock, so it dissolves faster.
3. Use the burettes around the periphery of the lab to dispense 25.00 mL of standardized HCl into a clean125 mL Erlenmeyer �ask and add about 20 mL of deionized water. This solution will be used to dissolvethe fraction you weighed of the antacid tablet.
4. Transfer one of the weighted crushed samples (without any spilling) into the �ask containing the HClsolution. Repeat for the other weighed fraction in another �ask and label each �ask (1 and 2) to keep trackof which sample and which portion is being titrated.
5. Warm gently to dissolve the sample and then boil solution for about a minute. Some components ofthe samples may remain undissolved, but these will not cause problems.
6. Let the �ask cool down sitting on the bench for couple minutes, and then cool the outside of the �askwith tap water.
7. When room temperature is reached add a few drops of methyl purple indicator solution. The �askshould now be purple in color. (If it is green instead of purple, you have used too large a fragment andhave neutralized all of the HCl. (In this case add 5mL of HCl and observe the color change. If needed addmeasured amounts of HCl little by little until solution is purple. Remember to record the amount of HCladded and add to the �rst 25mL of HCl.)
8. It is important that you read Titration Tips in Supporting Information below before you titrate, oryou may have to repeat titration several times.)
9. Titrate with your standardized NaOH solution until you reach the endpoint, a change in color frompurple to green. Some samples may not give color changes as sharp as for the HCl standardizations; for theseuse your best judgment to estimate the endpoint. Endpoints will generally be sharper for quick titrationsthan for slow ones.
10. Repeat the above procedure with a new sample of the same antacid. Enter your data in a wiki inthe designated laptop, check the web page later on the week and make a �nal comment on the overall costto neutralize one mole of HCl for various brands. Use the data from your lab section (i.e. all of Tuesdayafternoon, Monday night, etc.).THIS IS PART OF YOUR REPORT AND IF DATA IS NOT FOUND ONTHE WEB YOU SHOULD CONTACT YOUR TA. (No excuses)
Available for free at Connexions <http://cnx.org/content/col10506/1.56>

22CHAPTER 5. INDIGESTION? WHICH IS THE BEST COMMERCIAL
ANTACID?
5.1.3.2 Retail Cost Maximum
Label Antacid Brand Price (cents per tablet) Fraction
B Walgreens Antacid Tablets 2.66 1/6
C Titralac Plus 5.99 1/4
E Rolaids 2.69 1/4
J Tums Regular 2.86 1/6
K Tums Plus 5.32 1/6
M Eckerd Antacid 2.19 1/6
Table 5.2
*Active ingredient in all of these antacids is CaCO3 .
5.1.3.3 Supporting Information on Standardization:
Molarity is the most commonly used concentration term when one is interested in the amount of materialsinvolved in a chemical reaction in solution. Molarity (M) is de�ned as the number of moles of solute perliter of solution.
M = moles(solute)Liters(solution) (1)
The number of moles is calculated by dividing the mass of the sample in grams by the gram formulaweight (GFW or molar mass). One GFW is the same as one mole.
Number moles = grams(solute)GFW
(2)For example in a 0.150 M HNO3 solution, there are 0.150 moles of HNO3 in one liter of this solution.
The following factors may then be used in chemical calculations:0.150molHNO31L(solution) or 1L(solution)
0.150molHNO3
In a chemical reaction that takes place in solution, the volume and the molarity of one reactant and themolarity of the second reactant can be used, together with the stoichiometry of the equation, to �nd thevolume of the second reactant needed to react completely with the �rst reactant.
Titration is a process in which a solution of one reagent, usually the base, is added to an accuratelymeasured volume of another solution, usually the acid, until the reaction is complete. The concentration ofone of the reagents is known. From the known concentration and the measured volumes, the concentrationof the second solution can be calculated.
In acid-base reactions the end of the reaction or equivalence point is detected by adding a compoundthat undergoes a color change as it changes from its acid form to its basic form. This compound is calledan indicator. An indicator is an organic dye that changes color at a characteristic H+ ion concentration. Adye can be an indicator if it has an intense color that changes when it gains or loses H+ ions.
HIn + OH− → In− +H2O (3)The change of an indicator dye from Color A to Color B depends upon the concentration of H+ (or
OH−) ions. Care must be taken in selecting an indicator to be sure that the color change (endpoint) occursat the H+ ion concentration that corresponds to the equivalence point. Phenolphthalein, methyl red, methylorange, and litmus are examples of indicators.
A primary standard is usually a solid reactant that:(1) is available in a high purity form(2) does not change chemically when stored or exposed to air(3) has a high formula weight to minimize errors in weighing(4) is soluble in the solvent being used.
Available for free at Connexions <http://cnx.org/content/col10506/1.56>
23
Sodium carbonate, Na2CO3, is commonly used as a primary standard base for standardizing acids, whilepotassium acid phthalate (KHP), KHC8H4O4, and oxalic acid dihydrate, H2C2O4 · 2H2O, are primarystandard acids used for standardizing bases.
Na2CO3 (s) + 2HCl→ H2O + CO2 + 2NaCl(4)KHC8H4O4 (s) + NaOH→ KNaC8H4O4 +H2O(5)(COOH)2 · 2H2O (s) + 2NaOH→ Na2 (COO)2 + 4H2O (6)The dry solid is carefully weighed on an analytical balance and then diluted in a volumetric �ask to give
a known molarity. The molarity of an acid or base is determined by titrating a measured volume of the acidor base with the primary standard. Then these acid or base solutions can in turn be used to determine themolarity of another acid or base (this is the case with the standardized solutions of NaOH and HCl used inthis experiment).
In the example below a known amount of KHP will be titrated with a solution of NaOH to determinethe NaOH solution concentration.
EXAMPLE:If 0.8168 g of KHP requires 39.35 mL of NaOH to reach the endpoint in a titration, what isthe molarity of the NaOH? (1 mol KHP = 204.2 g)
0.8168gKHP×(
1molKHP
204.2gKHP
)(1molNaOH
1molKHP
)(1
39.35mLNaOH
)(1000mL
1L
)= 0.1016mol/L = 0.1016M
(5.8)
5.1.3.4 Notes on titration method:
1. Clean the burette until it drains smoothly.2. Make sure the stopcock doesn't leak. The level should hold for ∼3 minutes.3. Remove air bubbles from burette tip before beginning. Rapid spurts usually work.4. Rinse the burette two or three times with 5 mL portions of titrant (the solution you will use to titrate).
Hold it horizontal and rotate to rinse.5. Don't forget to record the initial reading. It does not need to be 0.00 mL.6. Use a reading card to �nd the bottom of the meniscus.7. Always read and record burette volumes to 0.01 mL.8. Remember that the burette scale reads down, not up.9. Put white paper under the �ask to see color change easily.10. Swirl the �ask with one hand while turning the stopcock with the other or use stir bar and stir plate.11. Add titrant slowly near the endpoint. Color that dissipates can be seen when getting close to
endpoint.12. Drops can be "split" by quickly turning the stopcock through the open position.13. Near the endpoint use deionized water from wash bottle to rinse the �ask walls from any splashed
drops (adding water does not a�ect number of moles you have).14. Don't drain burette below 25 mL (You won't be able to determine �nal volume accurately). If
necessary, read the burette level, re�ll, read the level, and continue.
5.1.3.5 Calculation Clari�cation
Only part of the HCl is neutralized by the fragment of the antacid tablet. Since the solution is still acidic,NaOH is used to �nally cause the change in color. The number of moles of NaOH is equal to the excess ofHCl that was not neutralized by the antacid. We can use the formula in the procedure to �ll in the part ofthe report form where it asks for the number of moles of HCl neutralized by the antacid:
nHClneutralizedbyAntacid = nHCladded − nHClexcess (5.9)
So then, this would be the 2.5× 10⁻³mol HCl � the excess which is calculated by converting the volume ofNaOH used into moles, this number of moles then equals the number of moles of HCl.
Available for free at Connexions <http://cnx.org/content/col10506/1.56>
24CHAPTER 5. INDIGESTION? WHICH IS THE BEST COMMERCIAL
ANTACID?
25ml of HCLVolume titrated by NaOHNaOHVolume titrated byantacid
Figure 5.1
Available for free at Connexions <http://cnx.org/content/col10506/1.56>

Chapter 6
Acid and Bases to Bu�ers1
6.1 Acids and Bases to Bu�ers
6.1.1 Objective
• To reinforce the importance of titration as an analytical tool.• To graphically verify the number of donated protons per molecule of phosphoric acid.• To prepare a phosphate bu�er and realize the importance of bu�ers in our everyday life.
6.1.2 Grading
• Pre-Lab (10%)• Lab Report Form (80%)• TA Points (10%)
6.1.3 Background Information
Phosphoric acid (H3PO4) is a chemical that is commonly found in everyday products such as soft drinksand cleaning agents. It is called a polyprotic acid because it can donate more than one proton (H+ ion) perphosphoric acid molecule. The released protons combine with water to form hydronium ions (H3O
+).Phosphoric acid releases its protons in a step-wise manner:H3PO4 + H2O ↔ H3O
+ + H2PO−4Ka1 = 7.5 �10-3 (1)
H2PO4- + H2O ↔ H3O
+ + HPO2−4
Ka2 = 6.2�10-8 (2)
HPO2−4+ H2O ↔ H3O
+ + PO3−4
Ka3 = 4.2�10-13 (3)
For example, reaction (2) will not occur until reaction (1) is complete.The Ka values listed after each reaction are called acid ionization constants. They indicate the relative
ease with which each reaction occurs. A small Ka value shows that a reaction does not occur easily. The Ka
value for phosphoric acid's second donated proton is much smaller than for the �rst donated proton, whilethe third Ka is �ve orders of magnitude smaller than the second.
To determine the amount of acid in an unknown sample, you will need to add a known amount of baseuntil the acid and base are neutralized. This technique is known as titration, and it is widely used inchemistry and other natural sciences.
During a titration, the pH of the solution is constantly monitored while the known acid or base (called thetitrant) is slowly added to the unknown solution. The pH of the unknown solution will stay fairly constant
1This content is available online at <http://cnx.org/content/m15809/1.13/>.
Available for free at Connexions <http://cnx.org/content/col10506/1.56>
25
26 CHAPTER 6. ACID AND BASES TO BUFFERS
until the moles of titrant added equals the moles of unknown acid or base. When the moles of acid andbase are the same, further additions of titrant will cause a dramatic change in pH until the pH eventuallystabilizes. A graph of pH versus added titrant is called a titration curve, and the point at which the pHchanges drastically is called the equivalence point.
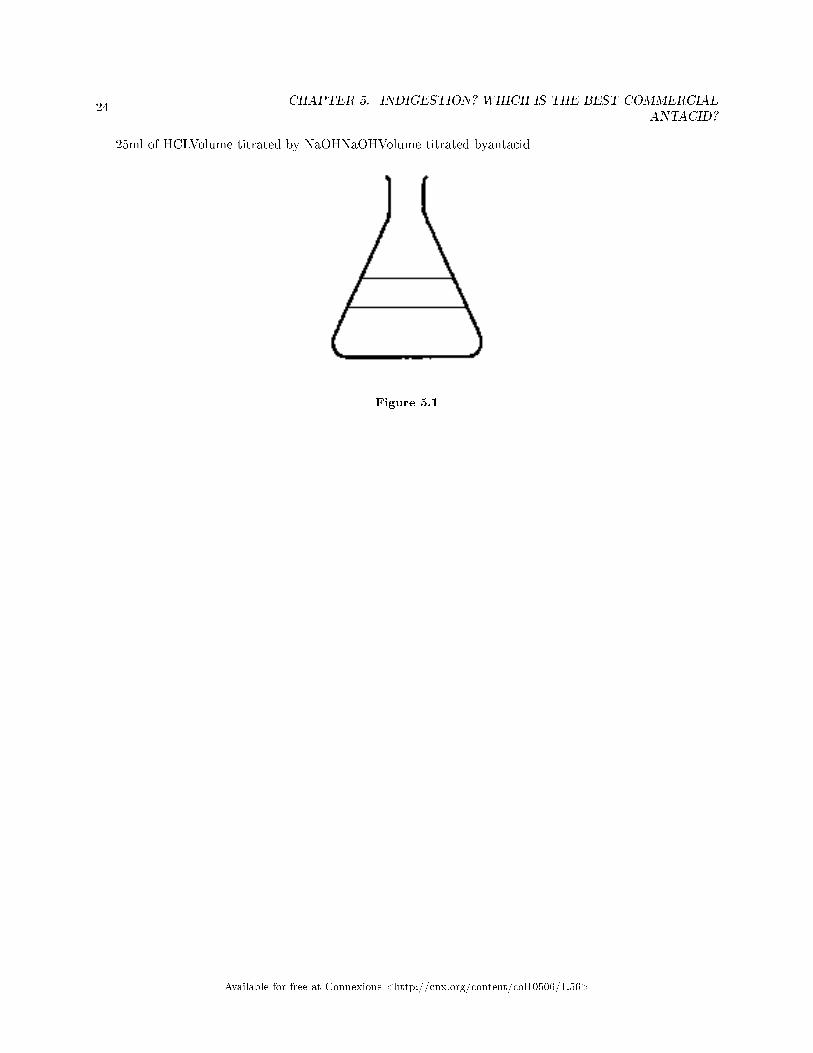
The titration curve for a polyprotic acid will have more than one equivalence point. As the added basecompletely removes each proton from the acid, the pH will jump signi�cantly. Figure 1 shows the titrationcurve for ascorbic acid, a polyprotic acid also known as Vitamin C:
Figure 1. Titration curve for ascorbic acid.
Figure 6.1
2nd equiv.point1st equiv.pointBy graphing the pH versus volume of base added during an acid-base titration, you can easily see the
successive ionization steps taking place. To �nd the concentration of a polyprotic acid, the volume of baserequired to reach the �rst equivalence point is needed. The half-equivalence points on this graph can alsobe used to obtain the Ka value of each successive ionization.
In the third part of the lab, you will be making a bu�er solution. Bu�ers are important in everyday lifebecause they regulate the pH in our blood, keeping the pH between 7.35 and 7.45; if pH values for our bloodgo outside this range, death can result. A bu�er is composed of a weak acid and its conjugate base (or aweak base and its conjugate acid). When a strong acid or base is added to a bu�er, one of the species willreact to maintain the pH within a small range.
To determine the amount of conjugate acid and base needed to make a bu�er of a certain pH, theHenderson-Hasselbach must be employed.
pH = pKa + log(
[base][acid]
)(4)
With a given pH and known pKa, the solution of the Henderson-Hasselbach equation gives the logarithmof a ratio which can be solved by performing the antilogarithm of pH/pKa.
10pH−pKa = [base][acid] (5)
Available for free at Connexions <http://cnx.org/content/col10506/1.56>

27
6.1.4 Experimental Procedure
6.1.4.1 Materials Required
• pH electrode and pH 7 bu�er for calibration• burette• 250 mL beaker• magnetic stirrer• 0.4 M and 0.1 M NaOH• 0.2 M phosphoric acid• bu�er solutions (pH 4 and pH 7)
6.1.5 Part I. Demo During PreLab Lecture: Drink Anyone?
1. Six wine glasses are �lled with the same �mystery� liquid.2. Each glass takes on a di�erent color of the rainbow, despite the fact that the same liquid was added
to each.
6.1.6 Part II. Titration of Phosphoric Acid
1. Obtain a pH probe and connect it to pH/mV 1 on the Microlab interface. Open the MicroLab programand select �Microlab Experiment.� Choose �Add Sensor.� This will bring up a window where you needto select �pH /D.O.�, click on the appropriate port of the interface, and choose �pH� out of the twooptions below. To calibrate the pH probe, click �next.�
2. Take a sample of two bu�er pH standards at pH 4.00 and 7.00. Calibrate the pH probe with these twosolutions. This is done by selecting �Add Calibration Point� and entering the correct pH value notedon the bottle. Note that the pH probe should always be rinsed with deionized water andcarefully patted dry before being inserted into a solution so as to avoid cross contamina-tion. A large waste beaker is useful to have for rinsing. After the two points are entered, select linearcalibration, and save the calibration data.
3. In a dry beaker, obtain 30 mL of a 0.2 M phosphoric acid solution. Use a graduated cylinder to add 50mL of deionized water to a 250 mL beaker. Rinse your 10 mL volumetric pipette with the phosphoricacid solution and pipette 10 mL of the acid into the water. Rinse and �ll your 25 mL burette with 0.4M NaOH. The initial burette reading should be 0 mL. Remember to clear the air out of the tip of theburette.
4. Place the beaker on the magnetic stirrer and add a stir bar. Position the burette ready for titration.Insert the pH probe. Turn on the magnetic stirrer and adjust the stirring rate to moderate speed(without allowing the stir bar to splash or hit the probe).
5. On the Microlab main screen choose �Add Sensor� and select �Keyboard� under the sensor drop box.Click �Next.� This will bring up a prompt in which you should enter �KBD� in the top box and �mL�in the bottom �units� box, and then hit �Finish.�
6. Drag the keyboard sensor from the top left of the screen to �Data Source 1� on the x-axis of the graph.Drag the pH sensor to �Data Source 2� on the y-axis of the graph. Drag the pH sensor to the box inthe bottom right corner.
7. Click �Start.� Enter your starting volume, 0 mL, in the window that appears, and hit enter. Thewindow will not disappear. Slowly add a small volume of NaOH to the beaker, approximately 0.5 mL,enter the reading on your burette into the box, and hit enter. Repeat this process until both peakshave been observed and the pH has stabilized.
8. To save your data, choose �export data� under File, and select �comma separated value.� For help withplotting the data and derivative of the data see the �Data Analysis� section below.
Available for free at Connexions <http://cnx.org/content/col10506/1.56>

28 CHAPTER 6. ACID AND BASES TO BUFFERS
6.1.7 Part III. Bu�ers (Use the same MicroLab program)
1. Using equations (4 and 5), calculate the ratio of concentrations of Na2HPO4 and NaH2PO4 to pro-duce 100 mL of bu�er solution with pH = 6.91. Show your calculations to your TA before proceeding.
2. Prepare your bu�er solution from 0.1 M Na2HPO4 and 0.1 M NaH2PO4 solutions.3. Insert the pH probe in your bu�er solution and wait until the reading becomes stable and write down
the value in your report form. Don't worry if the pH reading isn't exactly 6.91. The important thingis that there isn't a drastic change in pH upon addition of acid or base.
4. Pour 50 mL of the bu�er solution into another beaker so that you have two beakers each with 50 mLof your bu�er solution.
5. Add 1 mL of 0.1 M NaOH to the �rst beaker and mix the solution with a glass rod. Wait until the pHreading becomes stable and write down the value in your report form. If the pH of your bu�er solutionchanges by more than 0.3 pH units, you will need to redo the calculations and re-prepare the bu�ersolution in order to get an acceptable result.
6. Add 1 mL of 0.1 M HCl to the second beaker and mix the solution with the glass rod. Insert the pHprobe into the second beaker. Wait until the pH reading becomes stable and write down the value inyour lab report form. If the pH of your bu�er solution changes by more than 0.3 pH units, you willneed to redo the calculations and re-prepare the bu�er solution in order to get an acceptable result.
Data AnalysisTwo plots need to be made from the data taken in Part II. One plot, pH vs. volume of NaOH, can be
made directly from the data that is initially present. The data needs to be further analyzed to make theplot of the �rst derivative. This plot should be ( ∆ pH / ∆vol NaOH) vs. volume of NaOH. Remember toinclude a title and axis labels.
Available for free at Connexions <http://cnx.org/content/col10506/1.56>
Chapter 7
Forensics1
7.1 Forensic Lab
ObjectivesTo appreciate the variety of tests available to Forensic Scientists
• To observe latent �ngerprinting development• To study ink identi�cation and observe invisible ink• To do a breathalyzer analysis• To use luminal to detect chemicals present in blood• To perform Chemical Spot Tests and analyze your dollar bill for possible drug residues
The Crime SceneYou are part of the CSI (Chemistry Scientists Investigators) team and are called to a crime scene where
a kidnapped man has been murdered during a drug raid. Your task is to analyze the �ngerprint evidence todetermine who the culprit is. In addition, you need to identify the pen that the kidnapper used to write theransom note. Determine whether alcohol and drugs were present at the scene. Finally, similar to a sceneout of `The Da Vinci Code', the murdered man wrote the initials of the murderer before he expired.
IntroductionPart 1: Latent Fingerprint DevelopmentThe earliest recognition of the uniqueness of �ngerprints and their suitability for personal identi�cation
came from the ancient Chinese, who employed a thumbprint in lieu of a signature on legal conveyances andeven criminal confessions. Since literacy was uncommon, this proved a practical measure. The �rst scienti�crecognition of �ngerprints in the West came in the 17th century, when the �rst studies on �ngerprints werepublished in England and Italy. Two hundred years later Sir Francis Galton published a book, Finger Prints,were he proposed that no two �ngers have identical ridge characteristics and �ngerprints remain unchangedduring the individual's lifetime. Today the practice of utilizing �ngerprints as means of identi�cation is anindispensable aid to modern law enforcement.Fingerprint identi�cations have solved a vast amount of cases.Crime scene �ngerprints fall into three types:
1. Patent or visible impressions occur as the result of transferring a foreign material (paint, grease, bloodor ink) coating the skin of the �ngers to the object.2. Plastic or molded impressions are deposited when thehands, �ngers or feet are pressed into a soft rubbery type material (wax, putty, clay or tar) that will retainthe impression of the ridge pattern in this material.3. Latent or hidden impressions are left on polishedsurfaces such as wood, metal or glass by the sweat-moist ridges of the �ngertips. Since latent �ngerprintsare not visible to the naked eye, they need to be developed using one of the following techniques:
1This content is available online at <http://cnx.org/content/m19954/1.7/>.
Available for free at Connexions <http://cnx.org/content/col10506/1.56>
29

30 CHAPTER 7. FORENSICS
• `Powder and brush' technique: The surface is dusted with a very �ne powder that sticks to the oils andperspiration that are left behind from the friction ridges of the skin. Some surfaces, however, absorbthis powder and the �ngerprints are not identi�able.
• Laser luminescence: Involves illumination of �ngerprints which �uoresce due to particles picked upduring everyday life such as paints, inks and oil. It can be used on metals, plastic, cloth and wood.
• Ninhydrin test: Indantrione hydrate is sprayed onto the �ngerprint where it reacts with the aminoacids, giving a dark purple deposit. It can be used to develop very old prints (made over 30 years ago).
• Iodine vapor: Can be used to develop �ngerprints on fabrics and rough surfaces. Iodine vapor aloneis useful only for prints up to 24 hours old; however a mixture of the vapor with steam allows thismethod to be e�ective for up to two months. Prints developed by this method disappear rapidly, so itworks well in situations where you want to conceal your work.
• Silver nitrate: Silver nitrate reacts with chlorides in the �ngerprints, to give the insoluble salt, silverchloride, which rapidly turns black on exposure to light. This method is not suitable for fabrics orrough surfaces.
After developing the latent impression it is photographed and lifted with a clear tape to be placed on abacking card with a contrasting background. It can then be entered into a computer, which allows it to bequickly and easily recalled and compared to the �ngerprint of a suspect. Identi�cation depends on showinga minimum of twelve matching characteristics in the ridge pattern. When these points of comparison areshown, it is considered that the proof of identity has been established. In this lab you will be developingyour �ngerprints using the iodine vapor and silver nitrate methods.
Part 2a: Identi�cation of InksThe identi�cation of inks often plays an important part in document examination. As a rule, the ex-
amination centers on the question as to whether the ink of certain passages or of alternations in the text isidentical with the ink found in the possession of the suspect. For this reason the examination of questioneddocuments seldom consists of a complete determination of the inks in question but is usually restricted to acomparative analysis of certain properties of these inks.
Many di�erent nondestructive techniques of the examination of inks are available: re�ected infraredradiation, re�ectance microspectrophotometry, lasers and scanning electron microscopy. Unfortunately, there�ectance methods are often subject to interference e�ects from �bronzing� or �sheering� of the ink.
Semi-destructive methods involve high-performance liquid chromatography (HPLC) and thin layer chro-matography (TLC). Most chromatographic techniques are based on the minute sampling of a single writtencharacter representative of the questioned text. Small samples of ink bearing paper are removed from thedocument, they are then extracted with a suitable solvent, and the components of the solution are separatedusing HPLC and TLC. If the inks being compared show di�erent composition, they did not come from thesame pen.
In this lab you will be separating dyestu�s of several ballpoint pens using thin layer chromatography.Comparison of the dye composition will allow you to �nd out which pen was used by your TA to spot theTLC plate.
Part 2b: Invisible InkInvisible ink has been used to conceal secret messages for a long time. Many di�erent liquids can be used
as invisible inks such as lemon juice, milk, vinegar or a solution of phenolphthalein.Part 3: BreathalyzerTo determine whether a driver is driving under the in�uence of alcohol, law enforcement o�cers perform
a Breathalyzer test to measure the blood alcohol content of the bloodstream. In the breath analyzer test, abreath sample is passed through a solution containing acidi�ed potassium dichromate (K2Cr2 O7), which isbright yellow. Potassium dichromate, a strong oxidizing agent, oxidizes ethyl alcohol to acetic acid (vinegar).The chromium is consequently reduced from the VI to the III oxidation state, which is green. The unbalancedequation for this reaction is
Cr2O72- + H++ C2H5OH �> Cr3+ + CH3CO2H + H2O
The amount of alcohol in a breath analyzer sample is therefore proportional to the amount of potassiumdichromate that is used up and also therefore to the loss of yellow color.
Available for free at Connexions <http://cnx.org/content/col10506/1.56>
31
The Blood Alcohol Concentration (BAC) may then be calculated from the equationBAC = 0.8 A/WRWhere W is a body weight of the individual being tested, A is the amount of alcohol in the body (in
mL) and R is a �Widmark R Factor�, approximately 0.68 for men and 0.55 for women. In most states, aBAC of 0.1 percent is su�cient to be convicted for driving under the in�uence of alcohol; in some states thethreshold BAC is even lower.
Part 4: Blood Stain Analysis Using ChemiluminescenceInvestigators often �nd bloodstains during their examination of a crime scene. They also �nd stains that
could be similar substance, something other then blood, such as red paint. How would you test a stain to seeif it is blood? Human blood contains a pigment called hemoglobin, which is used to transport oxygen throughour body. This pigment is used by number of tests to identify the presence of blood. One most common testused by investigators that reveals the presence of blood is the Luminol Test. In this test the bloodstain canbe made to glow with a blue light due to chemoluminescent reaction of the luminol reagent with the iron(Fe) in the hemoglobin. Chemoluminescence is the reversed case of photoreaction: by a chemical reaction,an excited particle is formed, which looses its energy by producing a light quantum of light. The mostimportant characteristic is that the light is emitted in cold. In other words, chemoluminescence happenswhen a molecule capable of �uorescing is raised to an excited level during a chemical reaction. Upon itsreturn to the ground state, energy in the form of light is emitted. Luminol is one of the most outstandingmolecules that emit appreciable amounts of light.
Part 5: Spot Tests and Analysis of a Dollar BillThe urban legend that 3 out of 4 dollar bills, which usually have a life span of 9 years, are contaminated
with trace amounts of cocaine is not only true but they could also be silent carriers of diseases such asHepatitis C too (Note: SARS and AIDS cannot be spread by contaminated bank notes). The contaminationarises from a dollar bill being used to snort cocaine or handled by a cocaine user, since cocaine is excreted inskin oils and the contamination is then spread in bank sorting machines. Interestingly, Australia introducedplastic currency in 1988 to prevent the ability of the crystalline structure of illicit drugs to gain a `foothold'on paper money, to make it harder for counterfeiters to reproduce and to last four times longer. They nowprint polymeric notes for many countries including: Israel, Malaysia, Mexico and Romania.
Investigators often use Chemical Spot Tests (CST) as simple chemical reagents to test unknown suspectpowders by observing a quick colour change that will con�rm or deny the presence of a drug or a class of drugs.A caveat needs to be sounded here, since multiple compounds of the same class of drugs may give the samecolour change, e.g benadryl with active ingredient, diphenhydramine, a �rst generation anti-histamine drugand since it has sedative properties is also used in sleep aids such as Tylenol PM where it is combined withacetaminophen (paracetamol). Consequently, this is by no means conclusive evidence for that, you wouldneed to use more expensive, sophisticated instrumentation: such as gas chromatograph � mass spectrometer(GC-MS), Fourier transform � infrared (FT-IR) and UV- visible techniques but is obviously easier to dothese simple, screening tests in the �eld.
Interesting FactsThe highest amount of cocaine detected on a single one-dollar bill was 1327 micrograms.One gram of cocaine = head of a thumbtackHeroin and ecstasy are less often found on banknotes as they degrade more rapidly than cocaine.Germany had a problem with their Euros cracking and disintegrating due to the presence of sulfates from
the manufacture of methamphetamines mixing with human sweat to form sulfuric acid.Experimental ProcedurePart 1a: Latent Fingerprint Development using Iodine vaporsCaution! Iodine vapors are poisonous and should not be inhaled. Keep the jar with iodine in the fume
hood at all times.1. Press you �nger onto a piece of �lter paper.2. Using tweezers place the �lter paper into a jar with iodine and recap it.3. When you can see the �ngerprint clearly, remove the �lter paper using tweezers and keep it until the
end of the lab.
Available for free at Connexions <http://cnx.org/content/col10506/1.56>
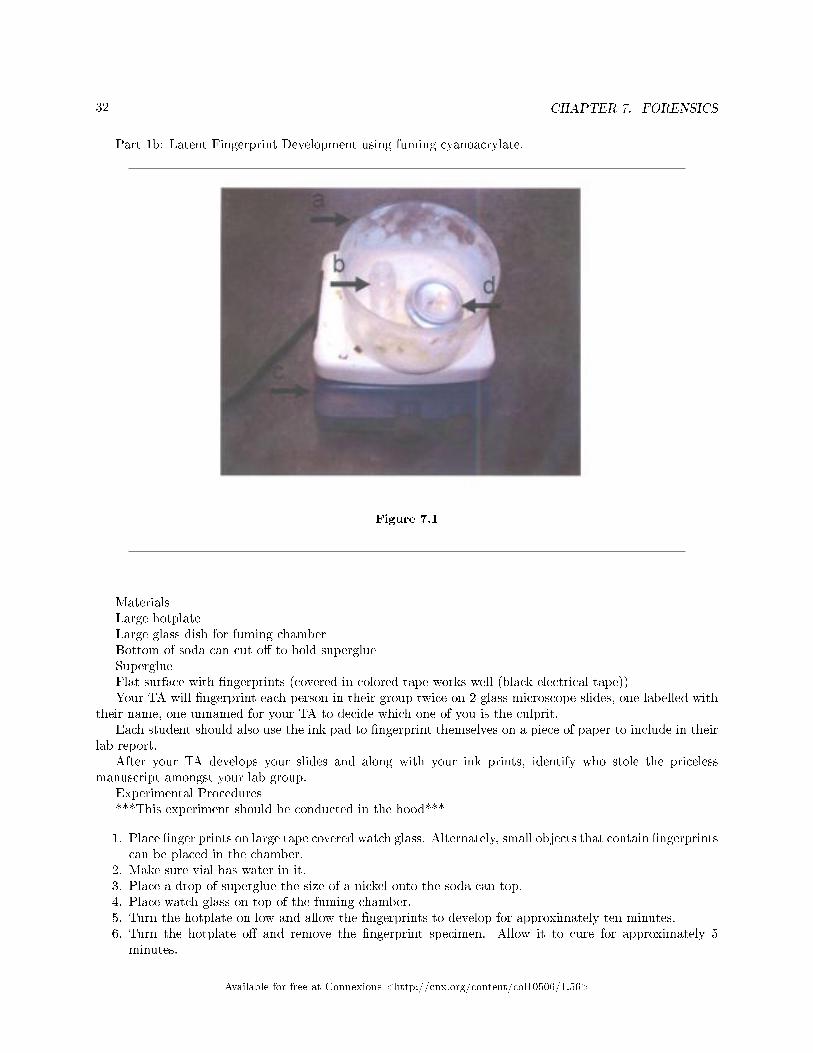
32 CHAPTER 7. FORENSICS
Part 1b: Latent Fingerprint Development using fuming cyanoacrylate.
Figure 7.1
MaterialsLarge hotplateLarge glass dish for fuming chamberBottom of soda can cut o� to hold superglueSuperglueFlat surface with �ngerprints (covered in colored tape works well (black electrical tape))Your TA will �ngerprint each person in their group twice on 2 glass microscope slides, one labelled with
their name, one unnamed for your TA to decide which one of you is the culprit.Each student should also use the ink pad to �ngerprint themselves on a piece of paper to include in their
lab report.After your TA develops your slides and along with your ink prints, identify who stole the priceless
manuscript amongst your lab group.Experimental Procedures***This experiment should be conducted in the hood***
1. Place �nger prints on large tape covered watch glass. Alternately, small objects that contain �ngerprintscan be placed in the chamber.
2. Make sure vial has water in it.3. Place a drop of superglue the size of a nickel onto the soda can top.4. Place watch glass on top of the fuming chamber.5. Turn the hotplate on low and allow the �ngerprints to develop for approximately ten minutes.6. Turn the hotplate o� and remove the �ngerprint specimen. Allow it to cure for approximately 5
minutes.
Available for free at Connexions <http://cnx.org/content/col10506/1.56>

33
Caution! Overheating cyanoacrylate can produce highly toxic hydrogen cyanide gas. The reaction shouldtake place in a well ventilated area with the hot plate on low.
Caution! Superglue can bond instantly to �ngers and other body parts. Take caution in using it. In theevent of an inadvertent bonding, use acetone to soften the glue.
Part 1c: Ink Pad1. Press your �nger on the ink pad and place on your report form.Part 2a: Ink Identi�cationYour TA has written a ransom note and given it to you. Your task: determine which pen was used.1. Obtain a precut TLC plate. Do not touch the white surface and handle carefully only by the edges.2. Using a pencil, draw a light line across the shorter dimension 1 cm from the bottom. Using a ruler as
a guide on the line, mark o� �ve equally spaced intervals on the line as shown in Figure 1.
Figure 7.2
Figure 1. TLC plate3. Cut a few letters out of the ransom note written in ink. Dissolve the pieces in about 1 mL of acetone.
Use this to spot your TLC plate as the unknown using a capillary tube.4. In a similar manner, spot using capillary tubes, your TLC plate with three `standards' diluted in test
tubes:Pen #1 : Foray super comfort grip retractable black gel ink pen �ne point (0.7 mm)Pen #2 : Paper Mate gel bold black ink (1.0mm)Pen #3 : Pilot G2 gel black ink rolling ball �ne pointThe applied spots should be no bigger than 1-2 mm.
Available for free at Connexions <http://cnx.org/content/col10506/1.56>
34 CHAPTER 7. FORENSICS
5. Use a 400 mL beaker for the development chamber. Add the solvent mixture (ethyl ac-etate/ethanol/water in a ratio of 50:30:20) to the beaker to a depth of about 0.5 cm. Remember: thelevel of the solvent must be below the spots on the plate. Using tweezers or forceps, place the spotted platein the development chamber so that it rests in the solvent and against the beaker wall. Cover the beaker(with a paper towel) and allow the plate to develop. It might take more than 10 min, so you can proceedwith Part 3 and Part 4.
6. When the solvent has risen on the plate to within 1 cm from the top, remove the plate from the beakerwith tweezers or forceps. Using a pencil, mark the position of the solvent front.
7. Allow the plate to air dry and observe the colored separation. Note how many dye components makeup the individual pens, along with their color.
8. Using a millimeter ruler, measure the distance that each spot (use the center of each spot for consis-tency) has traveled relative to the solvent front. Calculate the Rf values for each spot.
Part 2b: Invisible Ink
Method 1Caution! Iodine vapors are poisonous and should not be inhaled. Keep the jar with iodine vapor in the
fume hood at all times.1. Mix 1 g of cornstarch with 10 mL of water in a beaker and stir until smooth.2. Heat the mixture for several minutes. Soften the point of a toothpick in the mixture and write a letter
or a message with it. Let the paper dry.3. To observe the message, place it in a jar with iodine vapor in the hood. Recap the jar and let it stand
for more than 1 minute.Method 21. Pour about 5 mL of phenolphthalein solution in a beaker. Soften the point of a toothpick in the
solution and write a letter or a message with it. Allow the paper to dry.2. To read the invisible writing, dip a small piece of cotton wool into the 1 M NaOH solution and carefully
wipe the paper (do not rub!).Method 31. Pour about 5 mL of the milk solution in a beaker. Soften the point of a toothpick in the solution and
write a letter or a message with it. Allow the paper to dry.2. To read the invisible writing, heat the paper using a heat gun or hair dryerPart 3: BreathalyzerCaution! Sodium dichromate is a strong oxidizing agent. Avoid contact with the skin.You are given four unknown clear, colorless liquids. Use the sodium dichromate to determine which one
is ethyl alcohol.1. Pour 2 mL of each unknown into the test tube with the same number label and add 2 mL of acidic
sodium dichromate solution to each test tube. Mix gently and record your observations.Part 4: Luminol AnalysisThe Luminol solution and fake blood are prepared as follows, but it will be made for you ahead of time
for this lab.Solution 1: Prepare by dissolving 0.1g of Luminol in 20 ml of 10% NaOH in a 50 ml beaker and diluting
this solution to 200ml in your spray bottle and set aside.Solution 2 (�blood�): Prepare by dissolving 0.5g of K3[Fe(CN)6] in 20 ml of 5% hydrogen peroxide solution.
This solution is only stable for a short period of time so look ahead and know what you need to do nextbefore you make the solution.
1. Go to a hood which is blacked out by construction paper and observe the initial of the killer writtenby his victim just before he expired. Your TA will have smeared some �blood� (solution 2) ontothe bench inside the hood with a paper towel for you.
2. Quickly spray the wet �blood� stain with the luminol solution (solution 1) and close the hood to thepoint that you can barely see at the bottom and record your observations.
Part 5: Spot Tests and Analysis of a Dollar Bill2 bottles Cobalt thiocyanate reagent A (Each bottle: 0.5 g cobalt thiocyanate in 25 mL deionized water)
Available for free at Connexions <http://cnx.org/content/col10506/1.56>

35
2 bottles Cobalt thiocyanate reagent B (Each bottle: 1 g stannous chloride in 20 mL deionized water)EthanolSpot wells
1. Your TA will give you your spot wells to analyze.2. Put 1 or 2 drops of the cobalt thiocyanate solution in deionized water into each well, if cocaine is
present a blue precipitate will form, if not, a colourless solution will be observed.3. Be aware that lidocaine hydrochloride will also test positive.4. Then soak your dollar bill on a watch glass in 10 mL ethanol to which you will add 5 or 6 drops
of stannous chloride solution in deionized water. Then add up to 5 drops of cobalt thiocyanate indeionized water and observe any precipitate.
Available for free at Connexions <http://cnx.org/content/col10506/1.56>

36 CHAPTER 7. FORENSICS
Available for free at Connexions <http://cnx.org/content/col10506/1.56>
Chapter 8
The Curious Case of Catalase1
8.1 The Curious Case of Catalase
8.1.1 Objective
• To prepare the enzyme o-diphenoloxidase from a vegetable or fruit.• To study the e�ects of temperature.• To study the speci�city of enzyme activity.• To observe the change in enzyme activity due to changes in pH.• To study the e�ect of an inhibitor on your prepared enzyme.• To put you o� potatoes for life!
8.1.2 Grading
• Pre-Lab (10%)• Lab Report Form (80%)• TA Points (10%)
8.1.3 Background Information
Many details of how catalysis occurs have been obtained from the study of enzymatic reactions in biologicalsystems, where speci�c protein molecules called enzymes function as homogeneous catalysts. They producean increase in the rate of reaction by providing an alternate lower-energy pathway for the formation ofproducts. This phenomenon of enzymatic catalysis makes biological reactions necessary for the maintenanceof life possible. As biological catalysts, enzymes retain the characteristics of chemical catalysts: they increasethe reaction rate, remain unchanged after the reaction, have no e�ect on the equilibrium constant (Keq) oron the ultimate equilibrium conditions for a reaction, and are highly e�cient. Enzymes help orient thereaction participants to be more likely to react, to discriminate between one possible reactant molecule andanother with uncanny speci�city, and sometimes to provide a coupling mechanism that ensures one reactionalways is accompanied by another reaction in a speci�c sequence.
A molecule acted upon by an enzyme is referred to as the substrate of that enzyme. The presence orabsence of a single atom, or a single charge, may decide whether a molecule is the optimum substrate or isrejected by the enzyme. The ability of the enzyme to select from among many possible molecules with whichit could react is called enzyme speci�city.
1This content is available online at <http://cnx.org/content/m15868/1.3/>.
Available for free at Connexions <http://cnx.org/content/col10506/1.56>
37
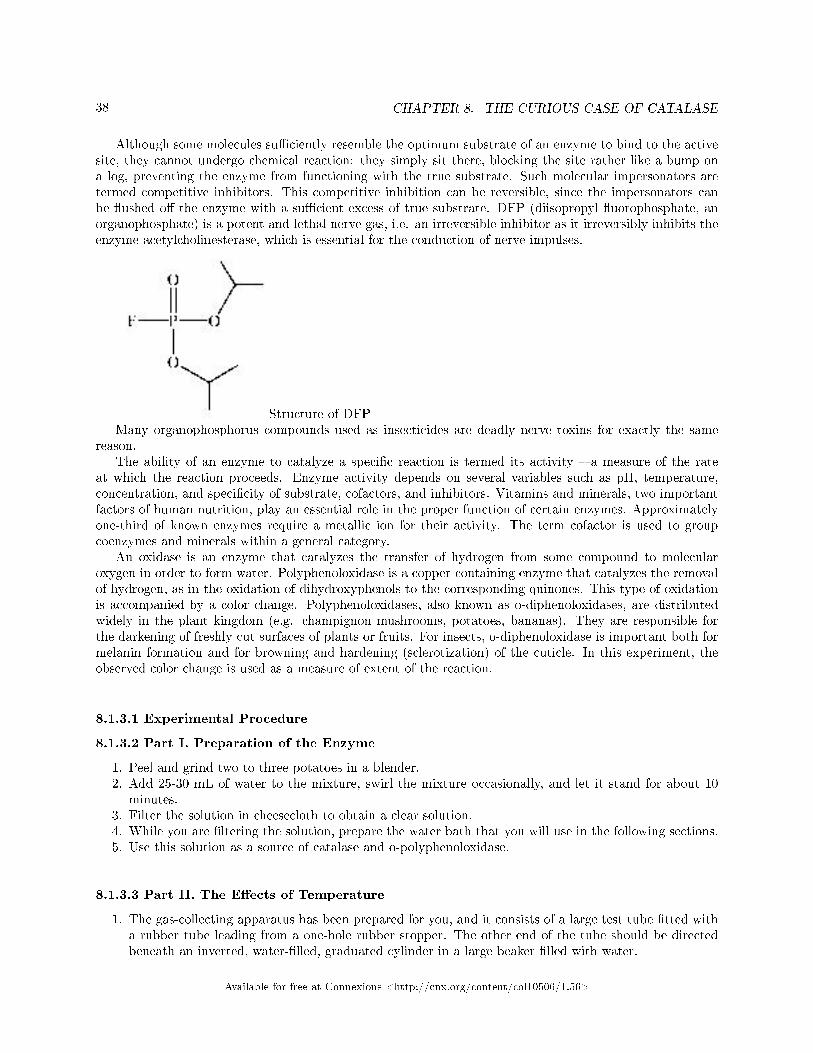
38 CHAPTER 8. THE CURIOUS CASE OF CATALASE
Although some molecules su�ciently resemble the optimum substrate of an enzyme to bind to the activesite, they cannot undergo chemical reaction: they simply sit there, blocking the site rather like a bump ona log, preventing the enzyme from functioning with the true substrate. Such molecular impersonators aretermed competitive inhibitors. This competitive inhibition can be reversible, since the impersonators canbe �ushed o� the enzyme with a su�cient excess of true substrate. DFP (diisopropyl �uorophosphate, anorganophosphate) is a potent and lethal nerve gas, i.e. an irreversible inhibitor as it irreversibly inhibits theenzyme acetylcholinesterase, which is essential for the conduction of nerve impulses.
Structure of DFPMany organophosphorus compounds used as insecticides are deadly nerve toxins for exactly the same
reason.The ability of an enzyme to catalyze a speci�c reaction is termed its activity � a measure of the rate
at which the reaction proceeds. Enzyme activity depends on several variables such as pH, temperature,concentration, and speci�city of substrate, cofactors, and inhibitors. Vitamins and minerals, two importantfactors of human nutrition, play an essential role in the proper function of certain enzymes. Approximatelyone-third of known enzymes require a metallic ion for their activity. The term cofactor is used to groupcoenzymes and minerals within a general category.
An oxidase is an enzyme that catalyzes the transfer of hydrogen from some compound to molecularoxygen in order to form water. Polyphenoloxidase is a copper-containing enzyme that catalyzes the removalof hydrogen, as in the oxidation of dihydroxyphenols to the corresponding quinones. This type of oxidationis accompanied by a color change. Polyphenoloxidases, also known as o-diphenoloxidases, are distributedwidely in the plant kingdom (e.g. champignon mushrooms, potatoes, bananas). They are responsible forthe darkening of freshly cut surfaces of plants or fruits. For insects, o-diphenoloxidase is important both formelanin formation and for browning and hardening (sclerotization) of the cuticle. In this experiment, theobserved color change is used as a measure of extent of the reaction.
8.1.3.1 Experimental Procedure
8.1.3.2 Part I. Preparation of the Enzyme
1. Peel and grind two to three potatoes in a blender.2. Add 25-30 mL of water to the mixture, swirl the mixture occasionally, and let it stand for about 10
minutes.3. Filter the solution in cheesecloth to obtain a clear solution.4. While you are �ltering the solution, prepare the water bath that you will use in the following sections.5. Use this solution as a source of catalase and o-polyphenoloxidase.
8.1.3.3 Part II. The E�ects of Temperature
1. The gas-collecting apparatus has been prepared for you, and it consists of a large test tube �tted witha rubber tube leading from a one-hole rubber stopper. The other end of the tube should be directedbeneath an inverted, water-�lled, graduated cylinder in a large beaker �lled with water.
Available for free at Connexions <http://cnx.org/content/col10506/1.56>

39
2. Add about 5 mL of hydrogen peroxide, at room temperature, to the tube.3. Quickly add 3 mL of catalase extract.4. Stopper the test tube, swirl it once to mix, and collect the gas in the graduated cylinder.5. Note the time required to collect 5 mL of the gas.6. Repeat the procedure using both extract and hydrogen peroxide cooled in an ice bath. Record the
temperature and the time required to produce 5 mL of oxygen.7. Repeat using extract and hydrogen peroxide warmed in a water bath to 37 ◦C. Again, record the
temperature and the time required to collect 5 mL of oxygen.8. From your results, answer the question: What e�ect does temperature have on enzyme activity?
8.1.3.4 Part III. The Speci�city of Enzyme Activity
In this part of the experiment, you will evaluate the speci�city of the substrate structure required for enzymeactivity. The substrate structure varies to demonstrate the need for:
1. an aromatic or aliphatic ring2. one or two hydroxy groups3. proximity of hydroxy groups on the ring
The substrates include the following:
1. deionized water2. cyclohexanol
Figure 8.1
1. 1,4 cyclohexanediol
Figure 8.2
Available for free at Connexions <http://cnx.org/content/col10506/1.56>

40 CHAPTER 8. THE CURIOUS CASE OF CATALASE
1. phenol
Figure 8.3
1. catechol (o-hydroxyphenol)
Figure 8.4
1. resorcinol (m-hydroxyphenol)
Figure 8.5
1. hydroquinone (p-hydroxyphenol)
Available for free at Connexions <http://cnx.org/content/col10506/1.56>

41
Figure 8.6
Caution: Some of the solutions used in the next step are toxic and can be absorbed through the skin. Avoidskin contact.
1. Prepare seven labeled 6-inch (15-cm) test tubes with labels and contents as follows:
Tube 1: 1.0 mL distilled waterTube 2: 1.0 mL 0.01 M cyclohexanolTube 3: 1.0 mL 0.01 M 1,4-cyclohexanediolTube 4: 1.0 mL 0.01 M phenolTube 5: 1.0 mL 0.01 M catecholTube 6: 1.0 mL 0.01 MresorcinolTube 7: 1.0 mL 0.01 M hydroquinone
To each tube add an additional 3.0 mL of distilled water. (These are the substrate tubes.)
1. Place all the labeled substrate test tubes into a 37 ◦C water bath.2. Transfer 3.0 mL of vegetable extract into each of another set of seven test tubes, and then place them
into the constant temperature water bath. (These are the enzyme tubes.)3. Allow the two sets of test tubes to remain in the constant temperature bath for �ve minutes.4. Quickly add the contents of the enzyme tubes to the substrate tubes.5. Remove all the test tubes from the water bath and compare the intensity of any developed color to
Tube 1, which contains distilled water.6. Arrange the test tubes in progressive intensity of color and record the sequence. Tube 1 (blank) is
assigned a value of 0; the other tubes are then ranked 1, 2, 3, and so on.7. What can you conclude about the development of a color?8. On your report form, list the substrates that do not react with the enzyme.
8.1.3.5 Part IV. The Change in Enzyme Activity Due to Change in pH
The �nal part of the experiment will involve an investigation into the e�ect of pH on enzyme activity.
1. Prepare �ve small test tubes with labels and contents as follows:
Tube 1: 4 mL of pH 4.0 bu�er solutionTube 2: 4 mL of pH 6.0 bu�er solutionTube 3: 4 mL of pH 7.0 bu�ersolutionTube 4: 4 mL of pH 8.0 bu�er solutionTube 5: 4 mL of pH 10.0 bu�er solution
1. Add to each of these test tubes 15 drops of 0.01 M solution of the most active substrate and 15 dropsof extract solution (enzyme).
2. Mix gently, and then incubate the test tubes in the constant-temperature water bath set at 37 ◦C.While you are waiting 15 minutes for the color to develop, do not start the �nal section involvingcopper sulfate.
3. After 15 minutes, examine each test tube for color changes and record your results.4. From your results answer the question: What is the optimum pH range for maximum activity of the
o-diphenoloxidase enzyme?
Available for free at Connexions <http://cnx.org/content/col10506/1.56>

42 CHAPTER 8. THE CURIOUS CASE OF CATALASE
8.1.3.6 Part V. The E�ect of Adding Copper Sulfate
1. Place 5 mL of hydrogen peroxide in a test tube.2. Place 5 mL of the catalase solution in a second test tube.3. Add 5-10 drops of copper sulfate solution to the second test tube.4. Place both test tubes in a water bath at 20 ◦C for 5 min.5. Mix the test tubes and measure the amount of oxygen produced in 5 min.6. Record your observations on your report form.
Available for free at Connexions <http://cnx.org/content/col10506/1.56>

Chapter 9
Organic Reactions1
9.1 Organic Reactions
9.1.1 Objectives
• Synthesis of some important esters.• Oxidation of a primary alcohol �rst to an aldehyde and then a carboxylic acid.• To saponify a typical vegetable oil.
9.1.2 Grading
You will be assessed on
• detailed answers required in the lab report.• the correctness and thoroughness of your observations.
9.1.3 Introduction
Esters are an important class of organic compounds commonly prepared from the esteri�cation reaction ofan organic acid with an alcohol in the presence of a strong mineral acid (usually H2SO4). They are chie�yresponsible for the pleasant aromas associated with various fruits, and as such are used in perfumes and�avorings. Some esters also have useful physiological e�ects. The best known example is the analgesic("pain killing") and anti-pyretic ("fever reducing") drug acetylsalicylic acid, otherwise known by its tradename aspirin.
Liniments used for topical relief of sore muscles contain the ester methyl salicylate ("oil of wintergreen"),which is prepared from the reaction of methyl alcohol with the acid group of salicylic acid. Methyl salicylateacts as an analgesic and is absorbed through the skin; however, methyl salicylate is also a skin irritant(like many organic substances), which in this instance provides the bene�cial side e�ect of the sensation ofwarming in the area of the skin where the liniment is applied.
Oxidation of a primary alcohol may yield either an aldehyde or a carboxylic acid, depending on thereaction conditions. For example, mild oxidation of ethanol produces acetaldehyde, which under morevigorous conditions may be further oxidised to acetic acid. The oxidation of ethanol to acetic acid isresponsible for causing wine to turn sour, producing vinegar.
A number of oxidising agents may be used. Acidi�ed sodium dichromate (VI) solution at room temper-ature will oxidise primary alcohols to aldehydes and secondary alcohols to ketones. At higher temperaturesprimary alcohols are oxides further to acids.
1This content is available online at <http://cnx.org/content/m15483/1.3/>.
Available for free at Connexions <http://cnx.org/content/col10506/1.56>
43
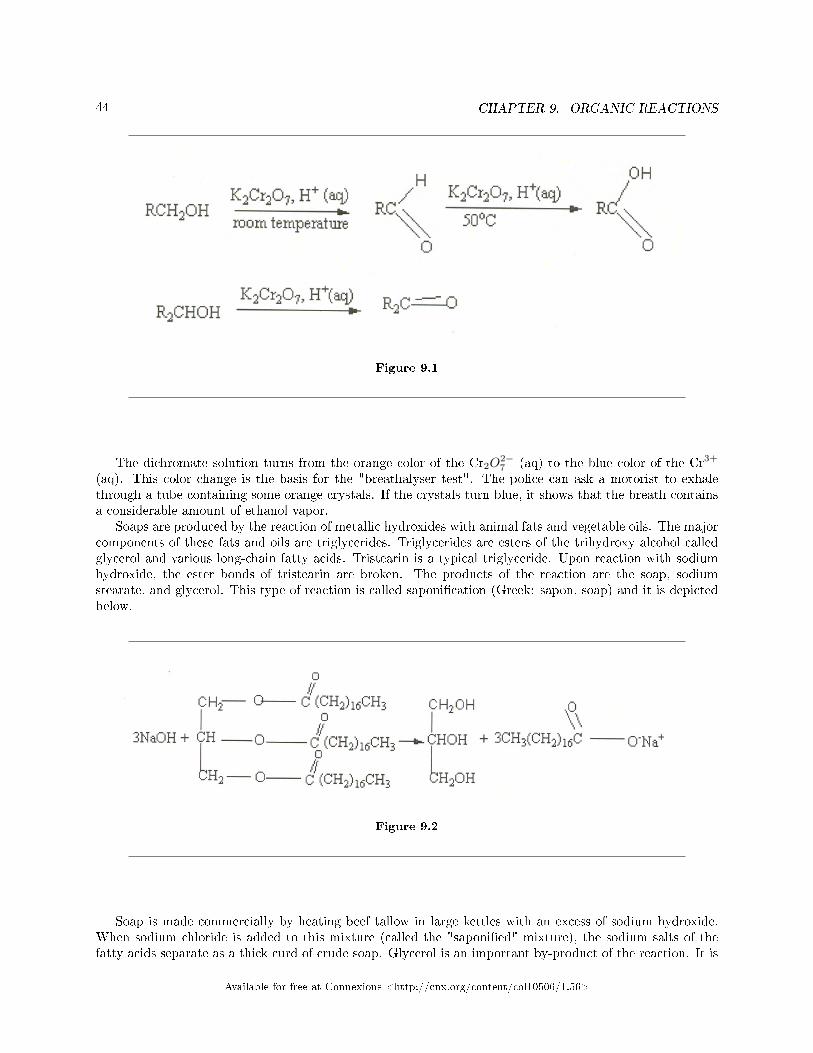
44 CHAPTER 9. ORGANIC REACTIONS
Figure 9.1
The dichromate solution turns from the orange color of the Cr2O2−7 (aq) to the blue color of the Cr3+
(aq). This color change is the basis for the "breathalyser test". The police can ask a motorist to exhalethrough a tube containing some orange crystals. If the crystals turn blue, it shows that the breath containsa considerable amount of ethanol vapor.
Soaps are produced by the reaction of metallic hydroxides with animal fats and vegetable oils. The majorcomponents of these fats and oils are triglycerides. Triglycerides are esters of the trihydroxy alcohol calledglycerol and various long-chain fatty acids. Tristearin is a typical triglyceride. Upon reaction with sodiumhydroxide, the ester bonds of tristearin are broken. The products of the reaction are the soap, sodiumstearate, and glycerol. This type of reaction is called saponi�cation (Greek: sapon, soap) and it is depictedbelow.
Figure 9.2
Soap is made commercially by heating beef tallow in large kettles with an excess of sodium hydroxide.When sodium chloride is added to this mixture (called the "saponi�ed" mixture), the sodium salts of thefatty acids separate as a thick curd of crude soap. Glycerol is an important by-product of the reaction. It is
Available for free at Connexions <http://cnx.org/content/col10506/1.56>
45
recovered by evaporating the water layer. The crude soap is puri�ed, and coloring agents and perfumes areadded to meet market demands.
9.1.3.1 EXPERIMENTAL PROCEDURE
CAUTION WEAR EYE PROTECTION!
CAUTION - Concentrated sulfuric acid will burn and stain the skin as well as damage clothing. In caseof skin or clothing contact, wash the area immediately with large amounts of water.
9.1.3.2 Synthesis of esters
1. Place approximately 2 g (or 2 mL if the substance is a liquid) of the organic acid and 2 mL of thealcohol in a large test tube.
2. Add 5 - 7 drops of concentrated (18 M) sulfuric acid, mix the solution well with a glass stirring rodand then place the test tube in a hot water bath (largest beaker in your drawer) (∼ 80 ◦C) for 5 - 10minutes.
3. Remove the test tube from the hot water bath and cautiously pour the mixture into about 15 mL ofsaturated sodium bicarbonate contained in a small beaker. The sodium bicarbonate will destroy anyunreacted acid.
4. Observe the aroma produced from each of the following esteri�cation reactions. Write the structure ofthe esters produced, and the balanced equations for the esteri�cation and the acid/sodium bicarbonatereactions:
Complete the following reactions using the procedure above and record your observations.
(1) C7H6O3 + CH3OH→salicylic acid + methyl alcohol(2) CH3CH2CH2CH2CH2CH2CH2CH2OH + CH3COOH→1 - octanol + glacial acetic acid(3) CH3CH2CH2CH2CH2OH + CH3COOH→amyl alcohol + glacial acetic acid(4) C2H5OH + CH3COOH→ethanol + acetic acid
9.1.3.3 Oxidation of an alcohol with acidi�ed potassium dichromate(VI) solution
• Add 10 drops of dilute sulfuric acid (6M) and 5 drops of potassium dichromate(VI) solution (0.01M)to 5 drops of ethanol. The oxidising agent is added slowly to the alcohol so that the temperature iskept below that of the alcohol and above that of the carbonyl compound. (Carbonyl compounds aremore volatile than the corresponding alcohols). Usually the alcohol is in excess of the oxidant and thealdehyde is distilled o� to avoid further oxidation.
• Note the color and smell cautiously (Royal Wave).• Warm the mixture and smell cautiously (Royal Wave).• Repeat the experiment using �rst methanol and then propan-2-ol in place of ethanol.
Describe what happens and explain the color changes.What conditions and techniques would favour the oxidation of ethanol toa. ethanal rather than ethanoic acid.b. ethanoic acid rather than ethanal?
Available for free at Connexions <http://cnx.org/content/col10506/1.56>
46 CHAPTER 9. ORGANIC REACTIONS
9.1.3.4 Oxidation of an alcohol with acidi�ed potassium permanganate (VII) solution
• Add 10 drops of dilute sulfuric acid and 5 drops of potassium permanganate (VII) solution (0.01M) to5 drops of ethanol. Note the color and smell cautiously.
• Warm the mixture and smell cautiously (Royal Wave).• Repeat the experiment using �rst methanol and then propan-2-ol in place of ethanol.• Take the pH of your �nal mixture using Universal indicator paper
Describe what happens and explain the color changes.What is your �nal product?
9.1.3.5 Saponi�cation of a vegetable oil
CAUTION - Sodium hydroxide is a very caustic material that can cause severe skin burns. Eye burns causedby sodium hydroxide are progressive: what at �rst appears to be a minor irritation can develop into a severeinjury unless the chemical is completely �ushed from the eye. If sodium hydroxide comes in contact withthe eye, �ush the eye with running water continuously for at least 20 minutes. Notify your TA immediately.If sodium hydroxide is spilled on some other parts of the body, �ush the a�ected area with running watercontinuously for at least 2-3 minutes. Notify your TA immediately.
Never handle sodium hydroxide pellets with your �ngers. Use weighing paper and a scoopula. Solidsodium hydroxide will absorb water from the atmosphere. It is hygroscopic. Do not leave the container ofsodium hydroxide open.
Keep ethanol and ethanol-water mixtures away from open �ames.Aqueous iron chloride will stain clothes permanently and is irritating to the skin. Avoid contact with this
material.
In this experiment, you will saponify a vegetable oil
1. Pour 5 mL (5.0 g) of vegetable oil into a 250-mL beaker.2. Slowly dissolve 2.5 g of NaOH pellets in 15 mL of the 50% ethanol/water mixture in a 50-mL beaker.3. Add 2-3 mL of the NaOH solution to the beaker containing the oil. Heat the mixture over a hot plate
with stirring. CAUTION: Keep your face away from the beaker and work at arm's length. Stirringis required to prevent spattering. Every few minutes, for the next 20 minutes, add portions of theethanol/water mixture while continuing to stir to prevent spattering. After about 10 more minutes ofheating and stirring, the oil should be dissolved and a homogenous solution should be obtained.
4. Add 25 mL of water to the hot solution. Using the hot grips, pour this solution into a 250 mL beakercontaining 150 mL of saturated NaCl solution. Stir this mixture gently and permit it to cool for a fewminutes.
5. Skim the soap layer o� the top of the solution and place it in a 50-mL beaker.6. Into a test tube, place a pea-sized lump of your soap. Place a similar amount of laundry detergent in a
second tube and a similar amount of laundry detergent in a second tube and a similar amount of handsoap in a third tube. Add 10 mL of water to each tube. Stopper each tube and shake thoroughly.
7. Estimate the pH of the solution using wide-range indicator solution or wide-range test paper. Recordthe results. Pour the contents of the test tubes into the sink and rinse the tubes with water.
Figure 9.3
Available for free at Connexions <http://cnx.org/content/col10506/1.56>

47
9.2 Pre-Lab: Introductory Organic Reactions
9.3 (Total 25 Points)
Hopefully here2 for the Pre-LabName(Print then sign): ___________________________________________________Lab Day: ___________________Section: ________TA__________________________This assignment must be completed individually and turned in to your TA at the beginning of lab. You
will not be allowed to begin the lab until you have completed this assignment.For questions 1-4, draw the structural formulae of:1) 2,2 - dimethylbutane
2) 3-ethyl-2,4-dimethylpentane
3) 2,3,4-trimethylhexane
4) 3-ethyl-2-methylheptane
For questions 5-8, give the names of5) CH3CH2CH2CH2CH = CH2
6) CH3CH = C = CH2
7) CH3CH = CHCH3
8) (CH3)2 C = CHCH3
For questions 9-11, give the structural formulae for:9) hex-3-ene
10) 3-methylhex-1-ene
11) 2,5- dimethylhex-2-ene
For questions 12-14, give the names of:12)
2http://cnx.org/content/m15483/latest/PreLabOR07.doc
Available for free at Connexions <http://cnx.org/content/col10506/1.56>
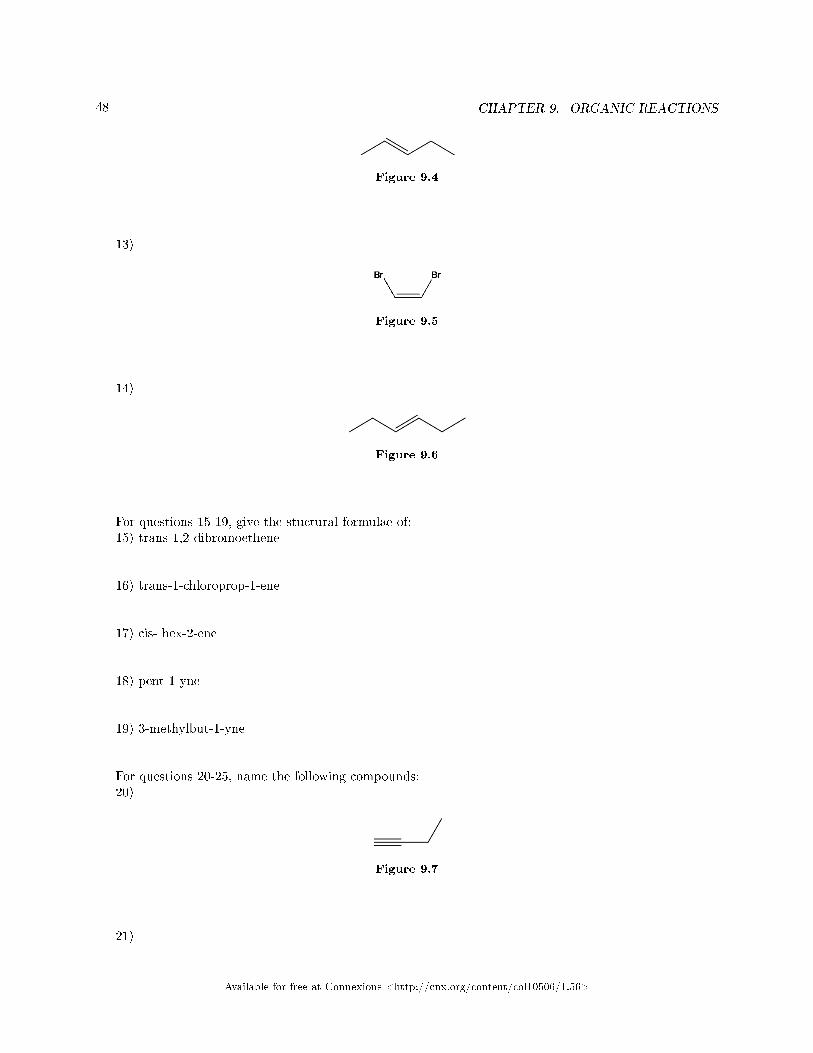
48 CHAPTER 9. ORGANIC REACTIONS
Figure 9.4
13)
Figure 9.5
14)
Figure 9.6
For questions 15-19, give the stuctural formulae of:15) trans-1,2-dibromoethene
16) trans-1-chloroprop-1-ene
17) cis- hex-2-ene
18) pent-1-yne
19) 3-methylbut-1-yne
For questions 20-25, name the following compounds:20)
Figure 9.7
21)
Available for free at Connexions <http://cnx.org/content/col10506/1.56>
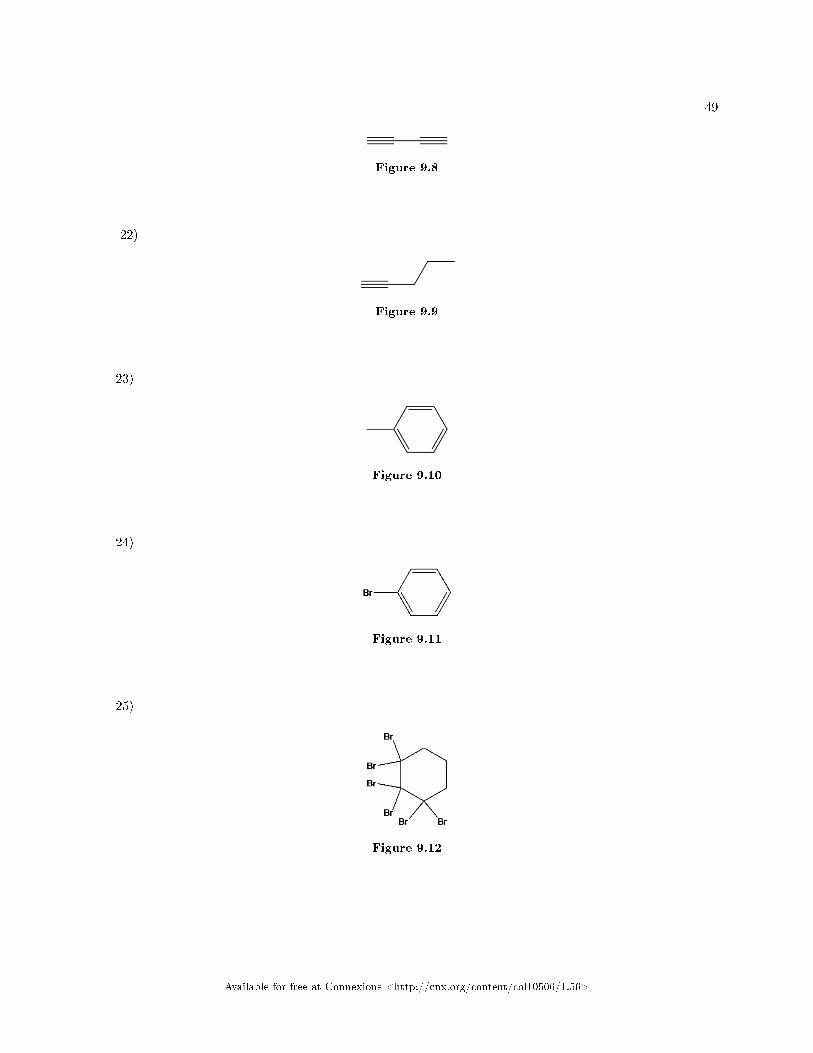
49
Figure 9.8
22)
Figure 9.9
23)
Figure 9.10
24)
Figure 9.11
25)
Figure 9.12
Available for free at Connexions <http://cnx.org/content/col10506/1.56>

50 CHAPTER 9. ORGANIC REACTIONS
9.4 Report: Organic Reactions
Hopefully here3 for the Report FormNote: In preparing this report you are free to use references and consult with others. However, you may
not copy from other students' work (including your laboratory partner) or misrepresent your own data (seehonor code).
Name(Print then sign): ___________________________________________________Lab Day: ___________________Section: ________TA__________________________
9.4.1 Observations:
9.4.1.1 Synthesis of esters
Reagents Product Observations
C7H6O3(salicylic acid ) +CH3OH(methyl alcohol)
CH3CH2CH2CH2CH2CH2CH2CH2OH(1 - octanol ) +CH3COOH(glacial acetic acid)
CH3CH2CH2CH2CH2OH(amylalcohol) +CH3COOH (glacialacetic acid)
C2H5OH (ethanol) +CH3COOH(acetic acid)
Table 9.1
9.4.2 Oxidation of an alcohol with acidi�ed potassium dichromate(VI) solution.
Remember to describe what happens and explain the color changes.What conditions and techniques would favour the oxidation of ethanol toa. ethanal rather than ethanoic acid.b. ethanoic acid rather than ethanal?
Add 10 drops of dil. H2SO4 to 5drops of K2Cr2O7 to the follow-ing alcohols
Observations: color/smellSmellcautiously!
Observations: color/smell onwarmingSmell cautiously!
Ethanol
Methanol
continued on next page
3http://cnx.org/content/m15483/latest/ReportOR07.doc
Available for free at Connexions <http://cnx.org/content/col10506/1.56>
51
Propan-2-ol
Table 9.2
9.4.3 Oxidation of an alcohol with acidi�ed potassium permanganate (VII) solu-tion
Remember to describe what happens and explain the color changes.What is your �nal product?
Add 10 drops of dil. H2SO4 to 5drops of KMnO4 to the followingalcohols
Observations: color/smellSmellcautiously!
Observations: color/smell onwarmingSmell cautiously!
Ethanol
Methanol
Propan-2-ol
Table 9.3
9.4.4
9.4.5 Saponi�cation of a vegetable oil
Reagent pH from indicator paper
Your soap
Laundry Detergent
Hand Soap
Table 9.4
w from the File menu, and then double-click your template.
Available for free at Connexions <http://cnx.org/content/col10506/1.56>

52 CHAPTER 9. ORGANIC REACTIONS
Available for free at Connexions <http://cnx.org/content/col10506/1.56>
Chapter 10
Kitchen Synthesis of Nanorust1
Kitchen Synthesis of NanorustJ.T. Mayo, Courtney Payne, Lauren Harrison, Cafer Yavuz, Dr. Mary McHale, Professor
Vicki ColvinObjectives
• To perform a kitchen synthesis• To obtain functional iron oxide nanocrystals that can be used for water puri�cation of arsenic in Third
World countries by using everyday items found in any kitchen.• To appreciate the many forms of iron and the many uses of iron oxide nanocrystals.• To appreciate the advanced analytical instruments that are used in the continuing research of nan-
otechnology.• Remember: Thinking simple saves money and lives.
GradingYour grade will be determined according to the following:
• Pre-lab (10%)• Lab Report Form (80%)• TA points (10%)
Background
1This content is available online at <http://cnx.org/content/m20813/1.3/>.
Available for free at Connexions <http://cnx.org/content/col10506/1.56>
53
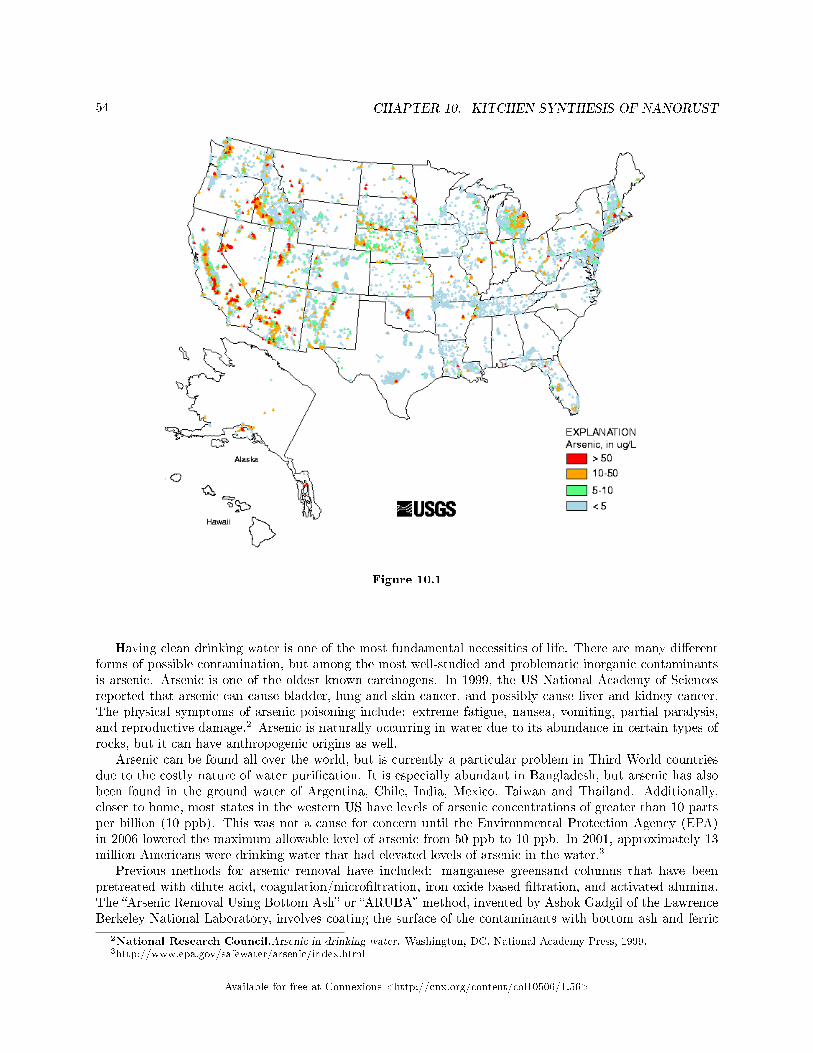
54 CHAPTER 10. KITCHEN SYNTHESIS OF NANORUST
Figure 10.1
Having clean drinking water is one of the most fundamental necessities of life. There are many di�erentforms of possible contamination, but among the most well-studied and problematic inorganic contaminantsis arsenic. Arsenic is one of the oldest known carcinogens. In 1999, the US National Academy of Sciencesreported that arsenic can cause bladder, lung and skin cancer, and possibly cause liver and kidney cancer.The physical symptoms of arsenic poisoning include: extreme fatigue, nausea, vomiting, partial paralysis,and reproductive damage.2 Arsenic is naturally occurring in water due to its abundance in certain types ofrocks, but it can have anthropogenic origins as well.
Arsenic can be found all over the world, but is currently a particular problem in Third World countriesdue to the costly nature of water puri�cation. It is especially abundant in Bangladesh, but arsenic has alsobeen found in the ground water of Argentina, Chile, India, Mexico, Taiwan and Thailand. Additionally,closer to home, most states in the western US have levels of arsenic concentrations of greater than 10 partsper billion (10 ppb). This was not a cause for concern until the Environmental Protection Agency (EPA)in 2006 lowered the maximum allowable level of arsenic from 50 ppb to 10 ppb. In 2001, approximately 13million Americans were drinking water that had elevated levels of arsenic in the water.3
Previous methods for arsenic removal have included: manganese greensand columns that have beenpretreated with dilute acid, coagulation/micro�ltration, iron oxide based �ltration, and activated alumina.The �Arsenic Removal Using Bottom Ash� or �ARUBA� method, invented by Ashok Gadgil of the LawrenceBerkeley National Laboratory, involves coating the surface of the contaminants with bottom ash and ferric
2National Research Council.Arsenic in drinking water. Washington, DC, National Academy Press, 1999.3http://www.epa.gov/safewater/arsenic/index.html
Available for free at Connexions <http://cnx.org/content/col10506/1.56>
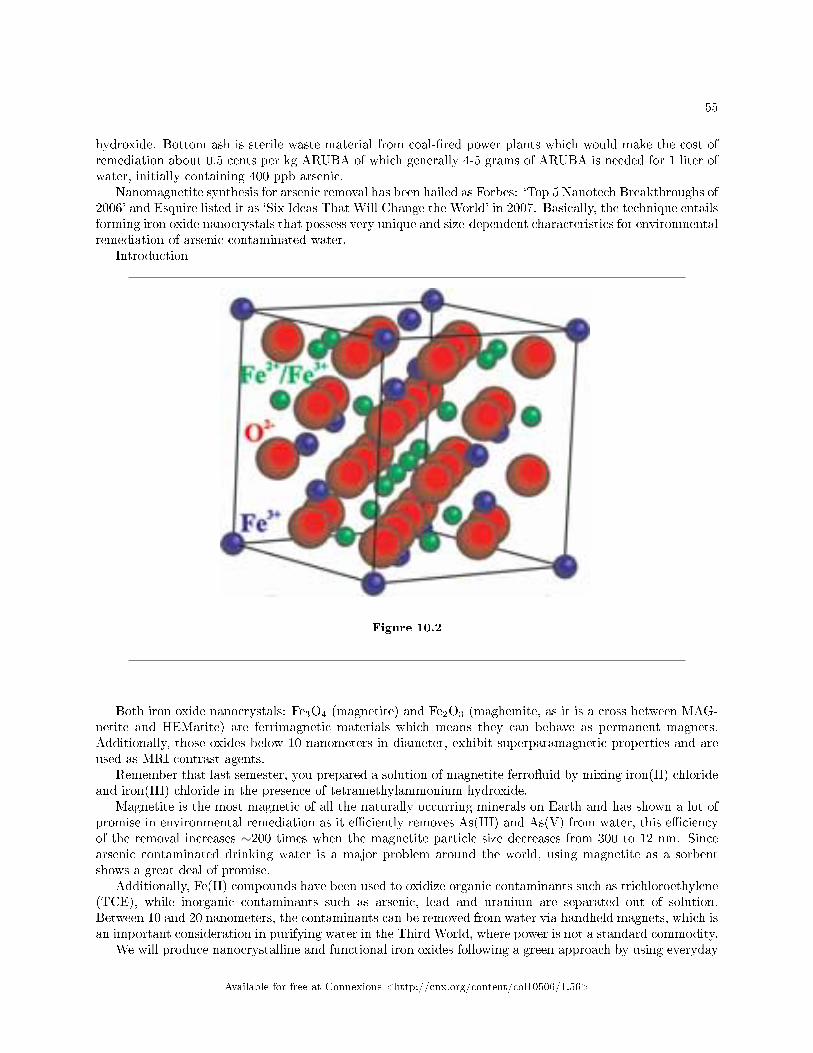
55
hydroxide. Bottom ash is sterile waste material from coal-�red power plants which would make the cost ofremediation about 0.5 cents per kg ARUBA of which generally 4-5 grams of ARUBA is needed for 1 liter ofwater, initially containing 400 ppb arsenic.
Nanomagnetite synthesis for arsenic removal has been hailed as Forbes: `Top 5 Nanotech Breakthroughs of2006' and Esquire listed it as `Six Ideas That Will Change the World' in 2007. Basically, the technique entailsforming iron oxide nanocrystals that possess very unique and size-dependent characteristics for environmentalremediation of arsenic contaminated water.
Introduction
Figure 10.2
Both iron oxide nanocrystals: Fe3O4 (magnetite) and Fe2O3 (maghemite, as it is a cross between MAG-netite and HEMatite) are ferrimagnetic materials which means they can behave as permanent magnets.Additionally, those oxides below 10 nanometers in diameter, exhibit superparamagnetic properties and areused as MRI contrast agents.
Remember that last semester, you prepared a solution of magnetite ferro�uid by mixing iron(II) chlorideand iron(III) chloride in the presence of tetramethylammonium hydroxide.
Magnetite is the most magnetic of all the naturally occurring minerals on Earth and has shown a lot ofpromise in environmental remediation as it e�ciently removes As(III) and As(V) from water, this e�ciencyof the removal increases ∼200 times when the magnetite particle size decreases from 300 to 12 nm. Sincearsenic contaminated drinking water is a major problem around the world, using magnetite as a sorbentshows a great deal of promise.
Additionally, Fe(II) compounds have been used to oxidize organic contaminants such as trichloroethylene(TCE), while inorganic contaminants such as arsenic, lead and uranium are separated out of solution.Between 10 and 20 nanometers, the contaminants can be removed from water via handheld magnets, which isan important consideration in purifying water in the Third World, where power is not a standard commodity.
We will produce nanocrystalline and functional iron oxides following a green approach by using everyday
Available for free at Connexions <http://cnx.org/content/col10506/1.56>

56 CHAPTER 10. KITCHEN SYNTHESIS OF NANORUST
items and equipment found in kitchens worldwide. The nanocrystalline and functional oxides are producedby thermal decomposition of the iron-precursors in order to form highly uniform, isolatable nanocrystalsof tunable size. The iron precursors will decompose into iron oxides in organic solvents (thermally stablenon-polar solvents, aka fatty acids such as oleic acid) at temperatures in excess of 200ºC; the presence ofamphiphilic stabilizers, in this case fatty acids derived from soap, limits the growth of crystalline productswhich are either magnetite, maghemite, or mixtures of both phases.
The beauty of this method lies in the ability to use inexpensive iron sources, such as rust, to formiron carboxylate intermediates, that when scaled to the gram level e�ectively produces a relatively low costmethod for removal of arsenic from contaminated water (see Table 1).
Rust is a mixture of iron hydroxides, oxides, and in some cases even zero-valent iron, but is as e�ectiveas FeOOH used in any laboratory method. The fatty acid used in conventional methods is oleic acid, anunsaturated 18 carbon fatty acid. It can be replaced by many cooking oils that can be processed to create ahomemade soap through saponi�cation, by the addition of a base such as lye. The soap is allowed to cure fora few days and then dissolved in a weak acid, such as vinegar. The organic layer of the liquid can be collectedand used without further processing. The �fatty acid mixture� or FAM is an impure fatty acid whose exactcomposition depends on the starting edible oil. Olive oil contains the most oleic acid; coconut oils containmore lineolic acid. For this lab, the FAM is derived from vegetable oil, a standard starting reactant.
Pure lab chemicals Everyday chemicals
Chemical Price per kg Chemical Price per kg
FeOOH $ 778.00 Rust $ 0.20*
Oleic acid $ 20.60 Edible oil (coconut oil) $ 0.25
1-octadecene $ 24.75 Crystal drain opener (NaOH) $ 1.24
Vinegar $ 0.65
Magnetite Nanocrystals $ 2,624.00 Magnetite Nanocrystals $ 21.7
Table 10.1
Table 1. Cost comparison of the materials needed for a FAM/rust synthesis of magnetite nanocrystalswith a conventional laboratory synthesis. Most of the savings results from the reduction in cost of the ironsource. *Cost of the rust is an estimate.
In the kitchen synthesis, the black product that forms can be separated from the solution by simply usinga handheld magnet rather than the expensive and large centrifuges used in a conventional laboratory setting.
Experimental ProcedureCaution!! While all of the following chemicals and utensils can be found in a kitchen, this
procedure is potentially dangerous (even the soap is caustic). Gloves and goggles must beworn at all times!!
Materials
• vegetable oil• lye or 100% NaOH drain opener• wooden spoon• glass bowl• 5% vinegar• cooking pot• hot plate• turkey baster or plastic pipette• rust
Available for free at Connexions <http://cnx.org/content/col10506/1.56>

57
Part 1: Soap making processThis step requires a week of advanced preparation and has been done for you
1. In a crystallization dish or a similar container, weigh 100 g. of the liquid oil (if not liquid gently meltit and keep as melted).
2. In a 50 mL vial (or a cup) weigh 15 g. of crystal drain opener (or caustic soda, or sodium hydroxide,or potash).
3. Add 30 mL of tap water and shake (or stir) until all solid is dissolved (CAUTION: solution gets hot!).While still warm pour it into the liquid oil.
4. Stir with a spoon (or a magnetic stir bar) for about 15 minutes (or until tracing occurs � tracing isthe visible tracks of stirring).
5. Let it sit open to air in a hood (or ventilated area) to dry and cure for a few weeks. If a shorter timespan is allotted, the soap can be dried in an oven. To help the drying process, the excess oil can bedecanted after 48 hours. Use caution when decanting the soap as there may be excess unreacted NaOHpresent.
Part 2: Oleic acid from soap with commercial vinegar
1. Grate the soap given to you and weigh it. You should have approximately 30 grams. If you have extrasoap, do not discard it; give it back to your TA.
2. Check the vinegar's acidity (i.e. 5%).3. Use 1 mL of acid for every gram of soap (i.e. 30 mL of acid, 600 mL of commercial vinegar with 5%
acidity).4. Combine the vinegar and soap in a cooking pot.5. Heat on med-high and stir with a wooden spoon until all of the chunks are dissolved (light boiling is
preferred). � This takes 15 to 30 minutes.
Caution!! This must be done a hood or other well-ventilated area!!
1. Turn o� the heating and cool the solution down.2. Pour your solution into the 1L beaker provided. You should see two layers separating from each other.3. Separate the top yellowish layer using a turkey baster or plastic pipette into a 50 mL beaker. Make
sure you get as much of the organic layer that as you can out of the vinegar/acid mixture.4. Separate the organic layer o� again into another 50 mL beaker so that you are left with only the organic
layer. This is your fatty acid mixture (FAM)5. Thoroughly clean your cooking pot in the sink with soap and water.
Part 3: Magnetite nanocrystals from rust and fatty acids
1. Carefully measure 0.5 grams of rust. Do not discard excess rust; put it back in the stock container.2. Mix the rust with the fatty acid mixture in the cooking pot.3. Cover the top of the container with a loose cap for proper ventilation. The reaction smokes and steams.
This method produces 50-90 nm nanocrystals.4. Start heating and timing. The rust should be heated for roughly 1 hour, until the solution is dark
black with little or no smoking. Remember to continue stirring at regular intervals. Do not heat the oilto the point of popping and spattering. Adjust the heat as necessary so that the solution only steamsand smokes.
Caution!! This must be done a hood or other well-ventilated area!!
1. If your rust solution looks like it might dry out, notify your TA immediately and they will provideyou with extra oleic acid to complete your reaction. DO NOT LET YOUR RUST DRY ONTO THEFRYING PAN!!!!!!!
Available for free at Connexions <http://cnx.org/content/col10506/1.56>

58 CHAPTER 10. KITCHEN SYNTHESIS OF NANORUST
2. Once the rust solution appears dark black and little to no smoke is being produced, pour the nanorustsolution into a 50 mL beaker.
3. Hold a magnet to the side of the beaker and observe what happens. Hold the magnet to the beakerfor several minutes.
4. Clean the cooking pot thoroughly again with soap and water. If there is any black or burnt crusting,this needs to be scrubbed away.
Available for free at Connexions <http://cnx.org/content/col10506/1.56>

Chapter 11
Electrochemistry and Alchemy1
11.1 Electrochemistry and Alchemy:
11.2 Molar Mass of Cu and Turning Cu into Au
11.2.1 Objectives
• To learn Faraday's two laws of electrolysis• To relate an electric current to the passage of an amount of electric charge• To discuss electrolysis in molten salts and in aqueous solutions• To determine the molar mass of copper by electrodeposition from an aqueous solution• To turn copper into �gold� (please bring a penny that is pre-1982 to lab with you)
11.2.2 Grading
You grade will be determined according to the following:
• Pre-lab (10%)• Report Form (80%)• TA evaluation of lab procedure (10%) which includes bringing a pre-1982 penny to lab
11.2.3 Before Coming to Lab . . .
• Read and complete the pre-lab• Read the background information• Read and be familiar with the Lab Instructions• Find a pre-1982 penny and bring it with you to lab
11.2.4 Introduction
Electrochemistry describes the interaction between electrical energy and chemical processes. Electricitycontinues to intrigue us, as it has since people �rst observed the sky shattered by bolts of lightning. Elec-trochemistry is of great practical value to contemporary living. Consider the number of batteries used forpowering the many portable items of pleasure and need � everything from cassette recorders to hearing
1This content is available online at <http://cnx.org/content/m21301/1.4/>.
Available for free at Connexions <http://cnx.org/content/col10506/1.56>
59
60 CHAPTER 11. ELECTROCHEMISTRY AND ALCHEMY
aids, from calculators to pacemakers. Pure metals are produced from natural ores, inorganic and organiccompounds are synthesized, metal surfaces are plated with other metals or coated with paint to enhancetheir value and utility � all through electrochemistry.
Electricity is a moving stream of electrical charges. This �ow, or electric current, can occur as electronsmoving through a wire or as ions �owing through an aqueous solution. If the electrons lost and gained in aspontaneous reaction can �ow through a wire on their pathway from the substance oxidized to the substancereduced, the energy of the reaction is released as electrical energy. Conversely, a non-spontaneous redoxreaction can be driven forward by the introduction into the system of electrical energy from another source.Any device in which either process can occur is called an electrochemical cell.
There are two types of electrochemical cells. The �rst type generates electrical energy from a spontaneousredox reaction. These are called voltaic or galvanic cells, common household batteries are classic examples.An Italian physicist, Allesandro Volta in 1800 explained that electricity is generated by the connection oftwo dissimilar metals separated by any moist body (not necessarily organic). A simple voltaic cell, similarto that made by Volta, can be assembled using twelve pennies and twelve nickels (construct a column ofalternating pennies and nickels with each coin separated by disk-size pieces of wet �lter paper soaked in saltwater).
In the second type of electrochemical cell, called an electrolytic cell, a non-spontaneous redox reactionis caused by the addition of electrical energy from a direct current source such as a generator or a storagebattery. The process of generating a non-spontaneous redox reaction by means of electrical energy is calledelectrolysis.
Electrolysis can be used for purifying a metal through the electrolytic dissolution of an impure anodeand the subsequent re-crystallization of the pure metal on the cathode. The impurities are left behind insolution. Copper is re�ned commercially by this electrolytic technique.
Electrolysis is often used for electroplating a metal to another material acting as the cathode. The othermaterial must also be electrically conducting. Non-conducting materials, such as leaves, can also be platedby �rst being painted with a metallic conductive paint. Silver plating can be done with a silver anode andthe object to be plated as the cathode.
Electrolytic reduction (cathodic reduction) has developed into a useful technique for the restoration ofartifacts such as corroded nails and encrusted silver. In the case of silver, the degradation is usually due tothe surface formation of insoluble (black) silver sul�de ( Ag2S). The artifact (a silver coin, for example) isattached to the negative electrode of the electrolysis cell. The Ag+ ions of the silver sul�de pick up electronsand are converted back to metallic silver:
Ag2S (s) + 2e− → 2Ag (s) + S2− (aq) (11.1)
The sul�de ions are swept away by the water and the surface of the object is restored.In this experiment, you will electroplate copper quantitatively to a copper cathode (the anode is also
composed of copper). The current is measured over an interval of approximately one hour so that the amountof charge passing through the cell is known. The molar mass of copper is calculated from its equivalent massusing Faraday's second law. In the second part of the experiment, you will use turn copper into �gold�!
11.2.5 Background Information
In the 1830s, Michael Faraday published his experiments using the recently discovered voltaic column todecompose substances through the use of electric current. Electrolysis is an oxidation-reduction processinvolving a conversion of electrical energy to chemical energy. The electrolytic cell is a galvanic cell operatingin reverse. The automobile battery is acts as a collection of galvanic cells when delivering electric current,but acts as a collection of electrolytic cells when being recharged.
Faraday �rst described the quantitative relationships between the amount of electric charge (number ofelectrons) that has passed through an electrolytic cell and the amount of materials that have formed at theelectrodes. These are summarized as Faraday's Laws of Electrolysis:
Available for free at Connexions <http://cnx.org/content/col10506/1.56>
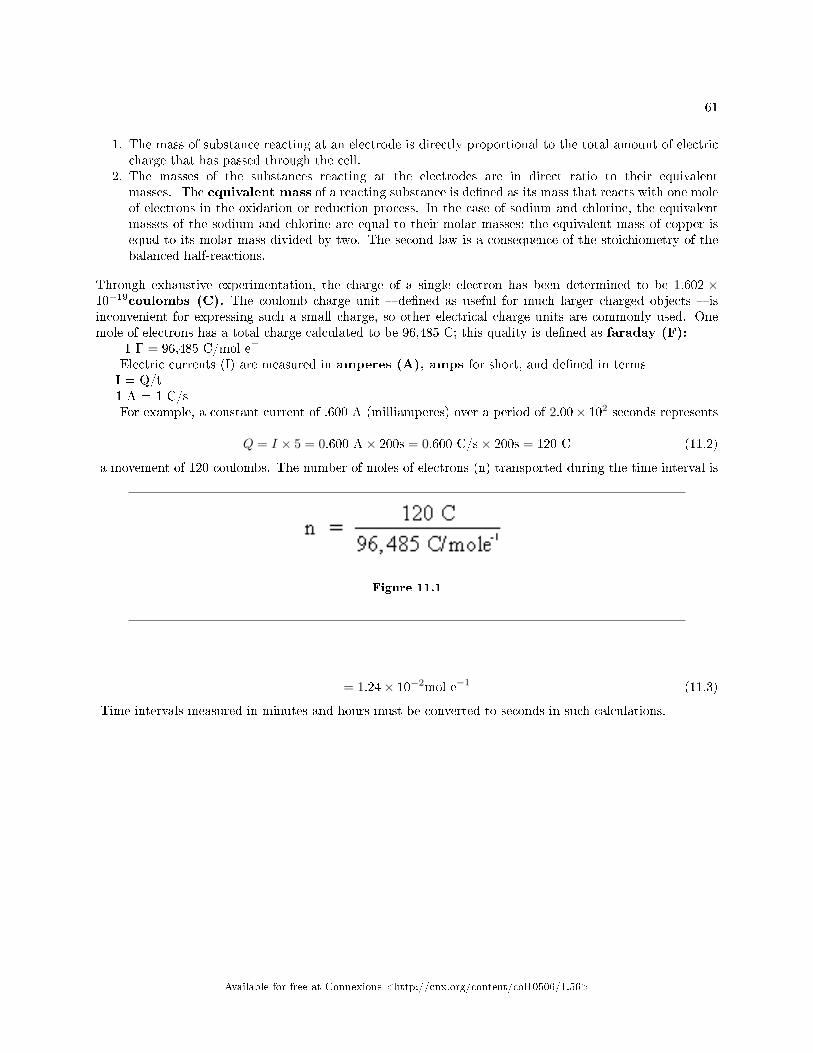
61
1. The mass of substance reacting at an electrode is directly proportional to the total amount of electriccharge that has passed through the cell.
2. The masses of the substances reacting at the electrodes are in direct ratio to their equivalentmasses. The equivalent mass of a reacting substance is de�ned as its mass that reacts with one moleof electrons in the oxidation or reduction process. In the case of sodium and chlorine, the equivalentmasses of the sodium and chlorine are equal to their molar masses; the equivalent mass of copper isequal to its molar mass divided by two. The second law is a consequence of the stoichiometry of thebalanced half-reactions.
Through exhaustive experimentation, the charge of a single electron has been determined to be 1.602 ×10⁻¹⁹coulombs (C). The coulomb charge unit � de�ned as useful for much larger charged objects � isinconvenient for expressing such a small charge, so other electrical charge units are commonly used. Onemole of electrons has a total charge calculated to be 96,485 C; this quality is de�ned as faraday (F):
1 F = 96,485 C/mol e−
Electric currents (I) are measured in amperes (A), amps for short, and de�ned in termsI = Q/t1 A = 1 C/sFor example, a constant current of .600 A (milliamperes) over a period of 2.00× 10² seconds represents
Q = I × 5 = 0.600 A× 200s = 0.600 C/s× 200s = 120 C (11.2)
a movement of 120 coulombs. The number of moles of electrons (n) transported during the time interval is
Figure 11.1
= 1.24× 10⁻²mol e−1 (11.3)
Time intervals measured in minutes and hours must be converted to seconds in such calculations.
Available for free at Connexions <http://cnx.org/content/col10506/1.56>

62 CHAPTER 11. ELECTROCHEMISTRY AND ALCHEMY
11.2.5.1 Experimental Procedure
Figure 11.2
CAUTION WEAR EYE PROTECTION!
Available for free at Connexions <http://cnx.org/content/col10506/1.56>

63
CAUTION: The 6 M nitric acid used in the next step will burn and stain the skin as wellas damage clothing. In case of skin or clothing contact, wash the area immediately with largeamounts of water.
1. Obtain a piece of copper mesh (about 5 cm× 8 cm) and remove any loose pieces of copper. Clean andrinse. Place the copper mesh on a watch glass in the drying oven. Be careful not to touch the cleanedsurfaces. This is the cathode.
2. Obtain 1 piece of copper foil (about 2 cm× 8 cm). Holding the foil with tweezers or tongs, dip it into6 M nitric acid several times until its surface is bright and shiny. Do not allow tweezers or tongs totouch the acid solution. Rinse the foil in de-ionized water and set it aside. This is the anode. Set thenitric acid aside to use in the electroplating exercise.
3. Add 350 mL 1.0 M KNO3 solution to a 400 mL beaker.
CAUTION: The copper sulfate used in the next step is toxic. Avoid skin contact!
1. To this solution, add about 5 mL of 1 M H2SO4 and 10 g of CuSO4 · 5H2O. Stir until the coppersulfate pentahydrate is fully dissolved.
2. Assemble the apparatus shown in Figure 1, but leave the copper mesh electrode in the oven. Add amagnetic stirring bar to the beaker. If necessary, add additional 1.0 M KNO3 to bring solution levelin the beaker within 2 cm of the rim. You will either measure the electricity directly with an ammeterin series with the electrolytic cell or you will measure the current indirectly by measuring the voltageacross a resistor of known value (about 10 ohms).
3. Remove the copper mesh electrode from the oven, let it cool, and determine its mass to the nearestmilligram.
4. Attach the copper mesh electrode to the negative terminal of your power supply using an alligator clip.Turn on the magnetic stirrer.
5. Turn on the low voltage power supply and adjust the current until about 140 mA are �owing throughthe cell. Record the time and current.
6. Record the time and current every �ve minutes for an hour.7. After the last reading, gently remove the cathode from the solution while leaving it attached to the
power supply. After the copper mesh has cleared the solution, remove the wire and turn o� the powersupply.
8. Gently dip-rinse the copper mesh electrode several times in a beaker of deionized water, and place iton a watch glass in the drying oven. Be careful not to rinse the mesh too harshly because you don'twant any copper that has deposited on it to come o�.
9. When dry, remove the electrode from the oven and let it cool. Reweigh the mesh electrode.10. Remove the magnetic stirring bar from your beaker and dispose of the solution in the sink.
11.3 Alchemy: Copper into Gold
Place your pre-1982 copper penny in an watch glass and heat with a mixture that �rst turns it silver, thensuddenly turns it �gold� when the penny is then heated on a hot plate.
Caution: Wear safety goggles and gloves and do the reaction in the fume hood with thesash down. Note step 10: special disposal.
1. Place approximately 2 g of zinc in an watch glass.2. Add enough NaOH solution to cover the zinc and �ll the dish about one-third.3. Place the dish on a hot plate and heat until the solution is near boiling.4. Prepare a copper penny (pre-1982) by cleaning it thoroughly with a light abrasive (steel wool pads
work well).5. Using crucible tongs or tweezers, place the cleaned penny in the mixture in the dish.6. Leave the penny in the dish for 3-4 min. You will be able to tell when the silver coating is complete.
Available for free at Connexions <http://cnx.org/content/col10506/1.56>

64 CHAPTER 11. ELECTROCHEMISTRY AND ALCHEMY
7. Remove the penny, rinse it, and blot dry with paper towels. (Do not rub!) Remove particles of zinc.8. Using crucible tongs or tweezers, place the coated penny on the hot plate. The gold color appears
immediately.9. When the gold color forms, remove the coin, rinse it, and dry it with paper towels.10. Special disposal procedures: Do not discard the waste zinc in the trash container. When zinc dries,
it forms a powder that may spontaneously ignite. Rinse the NaOH-zinc mixture several times withwater. Then add the solid to a beaker that contains 200 mL of 1 M H2SO4. When all of the soliddissolves, �ush the zinc sulfate solution down the drain.
11.3.1 THE GOLDEN PENNY EXPERIMENT.
1. Your TA will set this up for you by putting 8 g of 30 mesh zinc in the bottom of a 400-mL beaker. Itis best to weigh-out the zinc in a watch glass and pour the zinc into a tilted 400-mL beaker so as tokeep the zinc on one side of the beaker. Use a spatula and tilt and tap the beaker on the bench top inorder to get all the granular zinc to cover about half the bottom of the beaker (one-half not covered:see Figure 5). Carefully pour 200 mL of 1 NaOH down the side of the beaker, being careful not todisturb the distribution of zinc. Use a stirring rod or spatula to clear any remaining granules so thathalf of the beaker bottom is completely free of zinc granules. Place the beaker on a hot plate in thefume hood and turn the hot plate to medium heat. The solution should be heated to about 80-90 ◦C;if it is heated to boiling the distribution of zinc granules will be disturbed. Continually monitor andcheck the temperature to keep it in this range. 20-25min.
2. While waiting for the solution to heat, bu� six copper pennies with steel wool until they are shiny.Wash them with deionized water and dry. Solder 10-cm lengths of 20-gauge copper wire to two of thepennies, overlapping the wire and penny about 2 to 3 mm from the edge. Solder the free end of oneof the copper wires to a 5 x 100 mm strip of zinc metal, as shown in Figure 5. Clean any rosin o� thesoldered joints with steel wool, and rinse with water.
Available for free at Connexions <http://cnx.org/content/col10506/1.56>
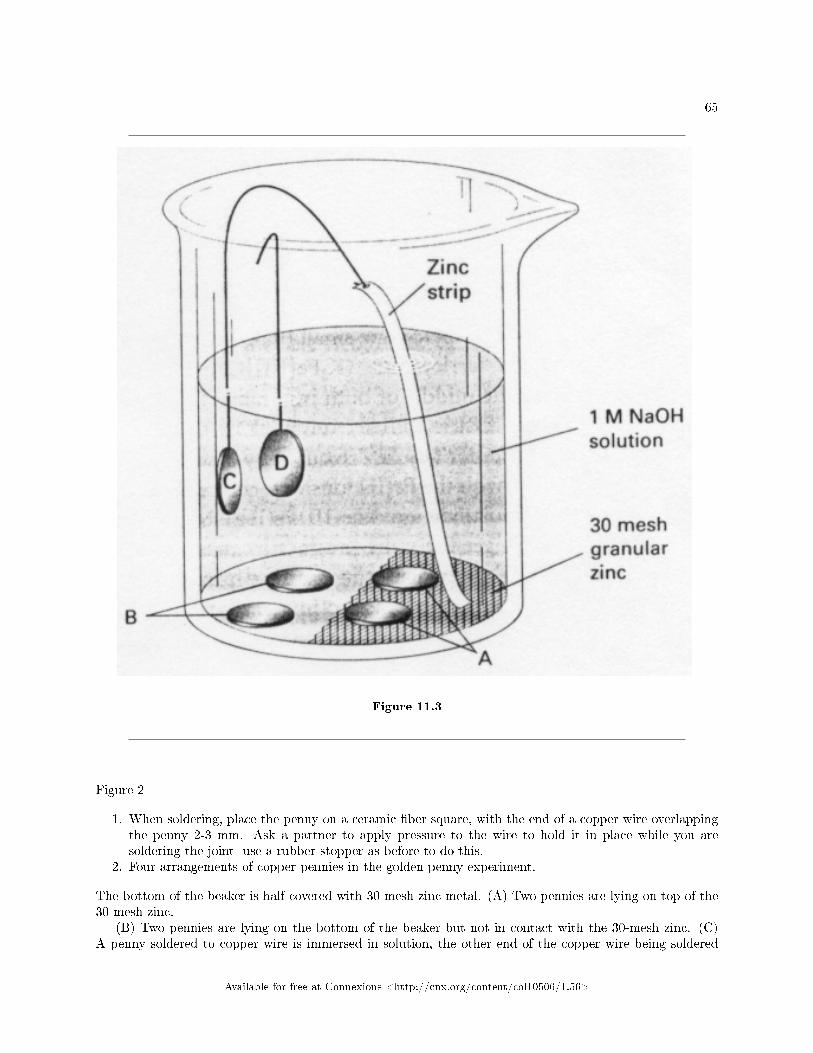
65
Figure 11.3
Figure 2
1. When soldering, place the penny on a ceramic �ber square, with the end of a copper wire overlappingthe penny 2-3 mm. Ask a partner to apply pressure to the wire to hold it in place while you aresoldering the joint -use a rubber stopper as before to do this.
2. Four arrangements of copper pennies in the golden penny experiment.
The bottom of the beaker is half-covered with 30-mesh zinc metal. (A) Two pennies are lying on top of the30-mesh zinc.
(B) Two pennies are lying on the bottom of the beaker but not in contact with the 30-mesh zinc. (C)A penny soldered to copper wire is immersed in solution, the other end of the copper wire being soldered
Available for free at Connexions <http://cnx.org/content/col10506/1.56>

66 CHAPTER 11. ELECTROCHEMISTRY AND ALCHEMY
to a strip of zinc metal in contact with 30-mesh zinc on the bottom of the beaker. (D) A penny soldered tocopper wire is immersed in solution. The solution in the beaker is 1 M NaOH.
Review the General Soldering Instructions in Part I. Place the freshly tinned tip of the pennynext to the wire angling the iron to get good thermal contact. Don't dab at the joint with the tip of theiron while soldering.
1. When the solution has warmed, use forceps to place two copper pennies on top of the granular zincmetal and two pennies in the area that is free of granular zinc (make sure that the pennies on theuncovered side do not contact even one grain of zinc). Bend a small "foot" on the penny in the beakeras shown in Figure 5. The "foot" of the zinc strip should rest on the granular size so that both arein direct contact. The penny should be completely immersed in solution but should not contact anygranular zinc metal on the bottom of the beaker. Finally, hang the last penny (the one with only copperwire soldered to it) over the edge of the beaker so that the penny is completely immersed in solution.See Figure 5. HINT- use an empty 400-mL beaker to bend and shape your soldered metalpieces to match what is pictured in Figure 5. Do this before attempting to put them in the400-mL beaker containing your warm NaOH solution. 30min.
2. Leave the pennies in the beaker until some of them turn a silvery color. This may take anywhere from5 to 30 min., depending on the temperature of the solution. (Some of the pennies will never turn silvereven after waiting an hour or more.)
3. Which pennies turn a silvery color? Is it the three pennies that are in contact with thesolution and with zinc, either directly or through the copper wire? Or is it the threepennies in contact with the solution but not indirect or indirect contact with zinc metal?5-10min.
4. Using a pair of forceps, remove the pennies that have turned a uniform silvery color, rinse them withwater, and put the pennies on a hot plate for a few seconds. Watch what happens to the silver-coloredpennies as they heat on the hot plate. Keep the solution warm in the beaker in case you need to repeatsome part of the experiment or try some new experiment, as described below. 5-10min.
5. Further Experiments. Solder another length of copper wire to a shiny clean penny. Actually, you canuse the lone penny soldered to the copper wire from the �rst part of the experiment, just clean it withsteel wool and deionized water. Connect one lead of a voltmeter to a zinc strip and the other leadto the copper wire soldered to the penny. Using the same solution you prepared earlier, immerse thezinc strip and penny in the solution.Is there a voltage di�erence between the zinc strip andthe copper wire soldered to the copper penny? Which metal is the electron source (thenegative terminal of this electrochemical cell)?5-10min.
6. Do you think a current �ows in the copper wire connecting the zinc strip and copperpenny when both are immersed in the solution? If so, which direction will electrons�ow, and what are the anode and cathode reactions?Put the digital voltmeter into its currentmeasuring mode on its most sensitive (microampere) scale. Then see if any current is �owing when youconnect the meter in series between the copper wire soldered to the penny and to the zinc strip -boththe penny and the zinc strip should be immersed in the hot 1 M NaOH solution. The series connectionsshould look like this: Penny/copper wire/(+) ammeter(-)/zinc strip. How large a current �ows? .Is the current (charge �ow) from penny to zinc strip or vice versa?
7. In wires the charge carriers are electrons. Current (de�ned as a �ow of positive charge) is opposite tothe �ow of electrons. In which direction are electrons �owing: from penny to zinc strip orvice versa?
11.3.1.1 Example of the calculation of Molar Mass:
1. Graph the electric current (in amps) on the y-axis against time (in seconds) on the x-axis. The totalcharge that passed through the electrolysis cell is given by the area beneath this curve. If the currentis constant, this area is:
Available for free at Connexions <http://cnx.org/content/col10506/1.56>
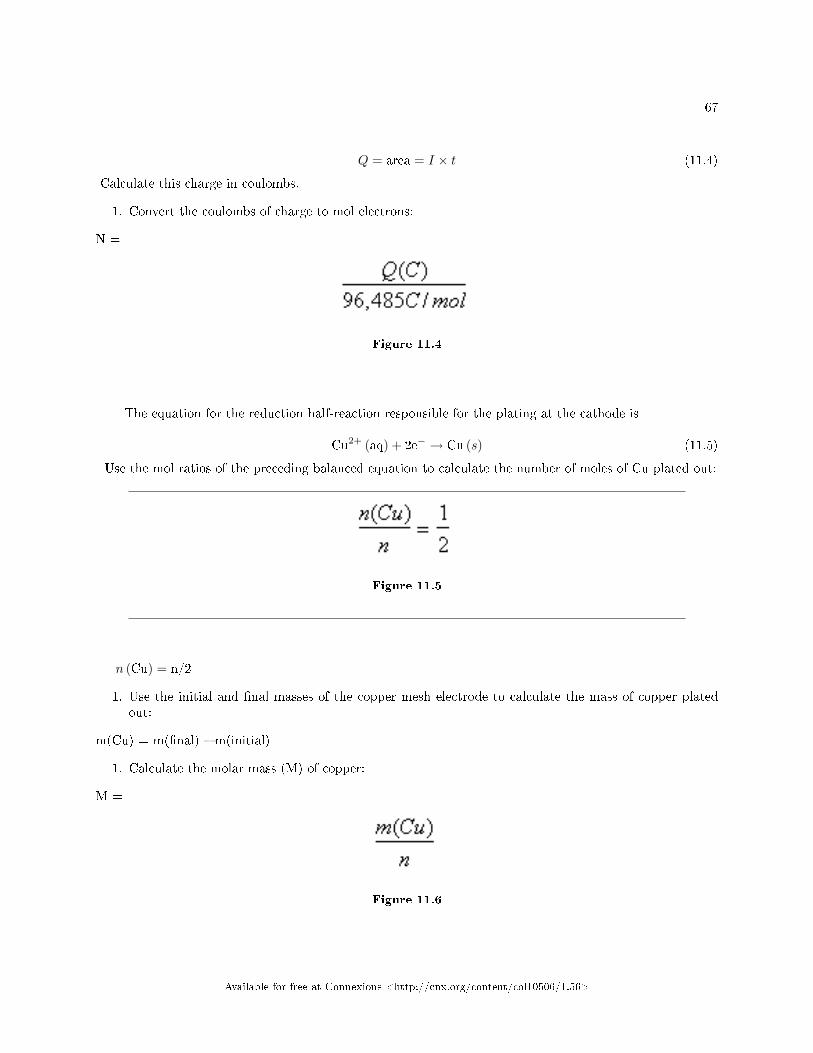
67
Q = area = I × t (11.4)
Calculate this charge in coulombs.
1. Convert the coulombs of charge to mol electrons:
N =
Figure 11.4
The equation for the reduction half-reaction responsible for the plating at the cathode is
Cu2+ (aq) + 2e− → Cu (s) (11.5)
Use the mol ratios of the preceding balanced equation to calculate the number of moles of Cu plated out:
Figure 11.5
n (Cu) = n/2
1. Use the initial and �nal masses of the copper mesh electrode to calculate the mass of copper platedout:
m(Cu) = m(�nal) � m(initial)
1. Calculate the molar mass (M) of copper:
M =
Figure 11.6
Available for free at Connexions <http://cnx.org/content/col10506/1.56>

68 CHAPTER 11. ELECTROCHEMISTRY AND ALCHEMY
Available for free at Connexions <http://cnx.org/content/col10506/1.56>
Chapter 12
From Cells and Electrodes to Golden
Pennies1
Protocol adapted from 'Chemistry in the Laboratory'
12.1 ElectroGels - Metal Corrosion, Anodic Protection and theGolden Penny
12.1.1 Objective
The goal of this experiment is:
• Observe the deposition of zinc metal on a penny in contact with metallic zinc and to develop a hy-pothesis to explain how this happens.
• Observe how iron may be corroded or protected from corrosion depending on whether it is connectedto copper or to zinc.
• Observe the plating of a penny with zinc and subsequent color changes.
12.1.2 Grading
You will be assessed on:
• completion of the report form.• TA evaluation of lab procedure.
12.1.3 Introduction
12.1.3.1 Electrochemistry is Everywhere
In general, whenever two condensed phases (solid or liquid) are brought into contact, a potential (or voltage)di�erence develops across the interface. Because the interface region is very thin, even transfer of a smallamount of charge across the interface can create a very large electric �eld. For example, transferring aboutone picomole ( 10−12 mole) of electron charge per square centimeter of area will typically create a potentialdi�erence of approximately 1 volt across an interface layer about one nanometer thick. The electric �eld in
1This content is available online at <http://cnx.org/content/m15879/1.7/>.
Available for free at Connexions <http://cnx.org/content/col10506/1.56>
69
70 CHAPTER 12. FROM CELLS AND ELECTRODES TO GOLDEN PENNIES
this interface region would be about 109 volts/meter. Electric �elds this large can cause the transfer of elec-trons across an interface layer or the transfer of ions between the inside and outside of ells in living organisms.Because contacts between condensed phases are very common in nature, electrochemical phenomena are verycommon, even though we are often unaware of them. At the cellular level, electrochemical phenomena arecrucial to the propagation of nerve impulses, the timing of muscular contractions of the heart, and activityin your brain cells.
Most of the electrical technology created by humans involves the simplest kind of chemical change;electron transfer across an interface. Often, the interface is between a good electron conductor, called anelectrode, and a solution containing molecules or ions. The electrode might be a solid (like platinum orcopper metal or graphite), or it could be liquid (like mercury metal). When electrons are transferred fromthe electrode to a molecule, we say the molecule has been reduced. Electron transfer in the opposite sense(from molecule to electrode) is called oxidation.
There are two parts to this lab the �rst, ANODIC PROTECTION, you will perform in pairs. By coatingsteel (which is mostly iron metal) with a more active metal like zinc, a process called galvanizing, the steel'scorrosion can be retarded or entirely prevented. Often, simply making a good electrical connection betweena piece of iron and a piece of zinc is su�cient to keep the iron from corroding. We will study the accelerationand the prevention of iron corrosion by connecting it to various metals.
In the second part of this lab, we will be revisiting THE GOLDEN PENNY EXPERIMENT, which willbe set up for you by your TA, so that you can make observations. As you remember, the golden pennyexperiment involves the plating of a penny with zinc metal. First, the penny is immersed in a solutioncontaining 1 M NaOH and granular zinc. Subsequent heating of the penny for a few seconds on a hot platecauses the silver color of the penny to turn a bright golden yellow. Explaining the details of the processpresents a challenge.
12.1.4 EXPERIMENTAL PROCEDURE
12.1.4.1 Special Supplies:
Part 1: Nominal 100 x 15 mm disposable polystyrene. Petri dishes (three per group); �ne steel wool;approximately one soldering kit for every six students consisting of 140-watt soldering iron, rosin-core solder,and one 6 x 6 inch ceramic �ber square (available from Flinn Scienti�c Inc.); digital voltmeters with alligatorclip leads and 2 short lengths (3 cm) of Pt wire to use as voltage probes.
Part 2: Digital voltmeters with alligator clip leads, 6 pennies per group (preferably clean and bright),hot plates, stainless steel forceps; approximately one soldering kit (see the description in Part 1) for everysix students.
12.1.4.2 Chemicals:
Part 1: Agar (powder), 1% phenolphthalein indicator, 0.1 M potassium ferricyanide [hexacyanoferrate)III],K3Fe (CN)6; two zinc metal strips, 6 x 40 mm, cut from 0.01-inch thick zinc foil; two copper metal strips 6x 40 mm, cut from 0.01- (or 0.005)-inch thick copper foil; 2 ungalvanized �nishing nails per group (beforeuse, clean by soaking brie�y in 3 M H2SO4 acid, rinsing with deionized water, and drying in an oven).
Part 2: 30-mesh zinc metal; zinc metal powder, 6 x 100 mm strips of zinc metal (one per group) cutfrom 0.01-inch thick zinc foil; 20 gauge copper wire; 1 M NaOH, 1 M HCL in dropper bottles, and a 1 MNaOH/Zn (NO3)2 50:50 mix solution.
! SAFETY PRECAUTIONS WEAR EYE PROTECTION AT ALL TIMES. Sodium hydroxide is cor-rosive. You may want to provide latex rubber gloves for handling pennies that have been in contact with 1M NaOH.
WASTE COLLECTION: Your instructor may direct you to waste containers for NaOH solutions used inthis experiment. These substances can be disposed of down the drain only if they are neutralized by sodiumbicarbonate.
5-10 min.
Available for free at Connexions <http://cnx.org/content/col10506/1.56>

71
METAL CORROSION AND ANODIC PROTECTION.
1. Obtain two 6 x 40 mm strips of zinc foil, two 6 x 40 mm strips of copper foil, and two 4-penny (40 mmlong) ungalvanized iron �nishing nails (which should have been previously cleaned by immersion in 3M H2SO4, then rinsed with deionized water, and dried in an oven).
2. Clean the zinc and copper strips with steel wool to produce a clean, shiny surface.3. Use detergent (1% alconox located by each sink)to remove the �lm of oil on the strips, rinse them with
deionized water, and dry them with a tissue.15 min. experienced, 30 min. novice4. General Soldering Instructions. Go to a soldering station where you will �nd a ceramic �ber square,
soldering iron, and rosin core solder. When soldering, place the zinc strip on a ceramic �ber squareand position the copper strip so the ends of the two strips overlap by about 4-5 mm. Ask a partner toapply pressure to the copper strip, holding it in place while you are soldering the joint. (Your partnermay use almost any tool for this except a bare �nger, because the strip will get very hot- a rubberstopper is recommended.) In the combination using a iron nail, have the nail ontop of the other metal,heat the nail in order to make a good seal.
5. Plug the soldering iron in and let it heat up for a couple minutes. Then tin the tip of the iron withsolder, wiping o� all excess with a damp sponge or damp paper towels. Place the freshly tinned tip onthe copper strip next to the zinc strip, angling the iron to get good thermal contact. Let the copperstrip heat up for a good 30 seconds.
6. Feed the solder into the area between the zinc strip and the tip of the soldering iron. When the copperstrip is hot enough, the solder will �ow into the joint. Don't dab at the joint with the tip of iron whilesoldering. The tip must be kept in continuous good thermal contact with the joint so that the copperstrip heats up. Using steel wool, remove any rosin remaining from the soldering operation; then rinsethe soldered joints, and dry the metal strips with a tissue.
7. If the metal strips no longer have a clean, shiny surface due to excessive touching and handling,use detergent to remove the oily �lm as before and rinse them thoroughly with deionized water.WARNING!- be very gentle cleaning your soldered metal strips to avoid breaking the joint you justmade!
8. If you are a novice at soldering or have never soldered before, check out the helpful hints at: How toSolder.2
9. Now you should have a Zn/Cu piece, a Cu/Fe piece, and a Zn/Fe piece. (Once these soldered bimetalpieces have been made, they can be cleaned and reused several times, so don't throw them away at theend of the experiment unless your instructor direct you to.) 10-15 min.
10. Add 3 g of agar to 225 mL of boiling deionized water in a 600-mL beaker. At this point it's best toturn down the heat and stir with a large magnetic stir bar until the agar is dissolved. Be patient, theagar tends to clump and complete dissolution can take 10 min. Be careful not to heat the agar somuch that it scorches or boils over. While the agar suspension is hot, add 2 mL of 1% phenolphthaleinindicator with a calibrated transfer pipette. Continue stirring for a couple minutes.5-10min.
11. Get three nominal 100 x 15 mm polystyrene Petri dishes. Put each of the three soldered bimetal piecesin the bottom (taller) half or a Petri dish. Protecting your hands from the beaker containing the hotagar solution with "hot hands" or paper towels, pour the agar over the metal pieces in the Petri dishes.Cover the metal pieces, but do not �ll the dish beyond half its depth. There should be no voids orbubbles underneath the metal strips.
12. After the agar cools and gels (approximately 20 min.), use a �ne-tipped transfer pipette to place onesmall (0.02 mL) drop of 0.1 M potassium ferricyanide K3Fe [III] [CN]6 along side each iron nail, about1 cm away from the middle. The ferricyanide salt will di�use radially outward. If the ferricyanideions encounter any Fe2+ formed by oxidation of Fe, they will react with the Fe(II) ions to form a darkblue compound formulated as KFe (III)Fe (II) (CN)6. (It's reported that you get the same produce bymixing Fe3+ with K4Fe [II] [CN]6). Evidently in the �nal product the iron atoms have exchanged anelectron so that the Fe2+ ion is oxidized to Fe(III), and the Fe(III) originally in the ferricyanide ion is
2http://aaroncake.net/electronics/solder.htm
Available for free at Connexions <http://cnx.org/content/col10506/1.56>

72 CHAPTER 12. FROM CELLS AND ELECTRODES TO GOLDEN PENNIES
reduced to Fe(II). WARNING!- the drop of potassium ferricyanide will not immediately "soak" intothe agar gel. It will remain on top like a bead of water. Be careful not to jar or move the Petri dishtoo much after placing the drop.
13. During the course of the afternoon, make periodic observations of the Petri dishes. Look for evidenceof formation of hydroxide ion, which will turn the phenolphthalein pink; the formation of insolublemetal ion-hydroxide salts, which will appear as a cloudy band; or the formation of a blue compoundin those dishes containing iron nails (with an added drop of 0.1 M potassium ferricyanide, K3Fe [CN]6,indicating oxidation of Fe to form Fe2+.20-25min.
14. Obtain two short lengths (about 3 cm long) of platinum wire and a digital voltmeter with leadsconnected to alligator clips to hold short lengths of wire that will be used as voltage probes. Adjustthe voltmeter to its most sensitive voltage range (200 millivolts). First, carefully clamp the alligatorclips to the platinum voltage probes and immerse the probes in the agar, one probe midway alongsideone metal and the other probe midway along the other jointed metal. (Support the probes at alltimes with your hands and keep the probes upright, perpendicular to the Petri dish. Make sure theprobes do not touch the metal strips.) Note whether there is any voltage di�erence. Note the polarity.Which metal is nearest the positive (+) end? Any voltage di�erence indicates an electric �eld betweenthe two points in the agar created by the formation of positive and negative ions in the two regions.Considering the polarity of the measured �eld, what ions do you think might be responsible fore thepresence of the electric �eld? Write plausible reactions for the formation of positive ions (metal atomoxidation) and negative ions (reduction of water or oxygen).
15. Next, touch the probes directly to the two metals at their midpoints and note any voltage reading.(The voltage reading is expected to be zero volts because metals are such good electronic conductorsthat only a tiny electric �eld can exist in the two metals together.) The metals soldered together aresaid to form an equipotential surface (a surface where the potential is constant, so that the voltagedi�erence between any two points on the metal is zero.)
16. Put the top cover on your Petri dish, and tape the top cover in place with two or three short strips oftape. Write your initials or other identifying marks on the tape.
17. Continue visual observations in your next lab period, looking for evidence of formation of any pink coloror any visible precipitates. Make sketches, and write verbal descriptions of the changes you observe.
12.1.5 REACTIONS THAT MIGHT FORM OH- ION.
When a pink color develops around a metal in a gel containing phenolphthalein indicator, it means that thesolution next to the metal is basic. In an aqueous gel, the pink color means that some hydroxide ions havebeen formed.
Although any electrons given up when a reactive metal is oxidized might react at the spot where theoxidation occurs, they can also readily travel to any other spot on the surface of the two joined pieces ofmetal. That means, it is possible that the point where metals atoms are oxidized could be some distancefrom the point where hydroxide ions are produced.
Now let's think about what might be most likely to accept these available electrons. Metal atomstypically don't accept electrons to form negatively charged metal ions. Rather, metal ions tend to give upelectrons to form positive ions. Things that are easy to reduce have the most positive standard reductionpotentials, like halogens, but we don't have any halogens in our system. The gel surrounding the metalconsists mainly of water with about one percent of agar. Although water is not easy to reduce, becausewater has a negative standard reduction potential in basic solution, this substance can be reduced whenthe reaction is coupled to the oxidation of Zn metal in basic solution, as shown by the following standardreduction potentials:
Zn (OH)2−4 + 2e− → Zn (s) + 4OH−(E ◦in1MOH− = −1.28volts
)(12.1)
Available for free at Connexions <http://cnx.org/content/col10506/1.56>
73
2H2O + 2e− → H2 (g) + 2OH− (E ◦in1MOH− = −0.80volts
)(12.2)
Agar is a polysaccharide (like starch), and polysaccharides are not easy to reduce. Finally we must notforget that the Petri dishes are open to the air, so the agar gel also contains dissolved oxygen, a good acceptorof electrons. At least two reactions involving oxygen deserve serious consideration:
O2 (g) +H2O + 2e− → H−2 + OH−(
E ◦in1MOH− = −0.065volts)
(12.3)
O2 (g) + 2H2O + 4e− → 4OH− (E ◦in1MOH− = −0.40volts
)(12.4)
The E ◦ for reduction of oxygen in basic solution is considerably more positive than for the reduction ofwater. So we de�nitely must consider the possibility that oxygen might be the species that could most easilybe reduced, with OH− (and possibly hydrogen peroxide) being the reduction product.
The reduction of either water or oxygen produces hydroxide ions, but the formation of a pink color withphenolphthalein does not tell us which reaction might be responsible. Thermodynamics (as measured by thestandard reduction potentials) favors reduction of oxygen over reduction of water. However, the reductionof oxygen on many metals is known to have a large activation energy, which usually causes the reaction tobe slow. Thus, kinetics may favor the reduction of water, particularly because the concentration of water ismuch greater than the concentration of oxygen in the agar gel. Can you think of an experiment that mightallow you to distinguish if water or oxygen is the major species being reduced? 20-25min.
12.1.6 THE GOLDEN PENNY EXPERIMENT.
1. Your TA will set this up for you by putting 8 g of 30 mesh zinc in the bottom of a 400-mL beaker. Itis best to weigh-out the zinc in a watch glass and pour the zinc into a tilted 400-mL beaker so as tokeep the zinc on one side of the beaker. Use a spatula and tilt and tap the beaker on the bench top inorder to get all the granular zinc to cover about half the bottom of the beaker (one-half not covered:see Figure 5). Carefully pour 200 mL of 1 NaOH down the side of the beaker, being careful not todisturb the distribution of zinc. Use a stirring rod or spatula to clear any remaining granules so thathalf of the beaker bottom is completely free of zinc granules. Place the beaker on a hot plate in thefume hood and turn the hot plate to medium heat. The solution should be heated to about 80-90 ◦C;if it is heated to boiling the distribution of zinc granules will be disturbed. Continually monitor andcheck the temperature to keep it in this range. 20-25min.
2. While waiting for the solution to heat, bu� six copper pennies with steel wool until they are shiny.Wash them with deionized water and dry. Solder 10-cm lengths of 20-gauge copper wire to two of thepennies, overlapping the wire and penny about 2 to 3 mm from the edge. Solder the free end of oneof the copper wires to a 5 x 100 mm strip of zinc metal, as shown in Figure 5. Clean any rosin o� thesoldered joints with steel wool, and rinse with water.
Available for free at Connexions <http://cnx.org/content/col10506/1.56>

74 CHAPTER 12. FROM CELLS AND ELECTRODES TO GOLDEN PENNIES
Figure 12.1
Figure 5
1. When soldering, place the penny on a ceramic �ber square, with the end of a copper wire overlappingthe penny 2-3 mm. Ask a partner to apply pressure to the wire to hold it in place while you aresoldering the joint -use a rubber stopper as before to do this.
2. Four arrangements of copper pennies in the golden penny experiment.
The bottom of the beaker is half-covered with 30-mesh zinc metal. (A) Two pennies are lying on top of the30-mesh zinc.
(B) Two pennies are lying on the bottom of the beaker but not in contact with the 30-mesh zinc. (C)A penny soldered to copper wire is immersed in solution, the other end of the copper wire being solderedto a strip of zinc metal in contact with 30-mesh zinc on the bottom of the beaker. (D) A penny soldered tocopper wire is immersed in solution. The solution in the beaker is 1 M NaOH.
Available for free at Connexions <http://cnx.org/content/col10506/1.56>

75
Review the General Soldering Instructions in Part I. Place the freshly tinned tip of the penny next tothe wire angling the iron to get good thermal contact. Don't dab at the joint with the tip of the iron whilesoldering.
1. When the solution has warmed, use forceps to place two copper pennies on top of the granular zincmetal and two pennies in the area that is free of granular zinc (make sure that the pennies on theuncovered side do not contact even one grain of zinc). Bend a small "foot" on the penny in the beakeras shown in Figure 5. The "foot" of the zinc strip should rest on the granular size so that both arein direct contact. The penny should be completely immersed in solution but should not contact anygranular zinc metal on the bottom of the beaker. Finally, hang the last penny (the one with onlycopper wire soldered to it) over the edge of the beaker so that the penny is completely immersed insolution. See Figure 5. HINT- use an empty 400-mL beaker to bend and shape your soldered metalpieces to match what is pictured in Figure 5. Do this before attempting to put them in the 400-mLbeaker containing your warm NaOH solution. 30min.
2. Leave the pennies in the beaker until some of them turn a silvery color. This may take anywhere from5 to 30 min., depending on the temperature of the solution. (Some of the pennies will never turn silvereven after waiting an hour or more.)
3. Which pennies turn a silvery color? Is it the three pennies that are in contact with the solution andwith zinc, either directly or through the copper wire? Or is it the three pennies in contact with thesolution but not indirect or indirect contact with zinc metal? 5-10min.
4. Using a pair of forceps, remove the pennies that have turned a uniform silvery color, rinse them withwater, and put the pennies on a hot plate for a few seconds. Watch what happens to the silver-coloredpennies as they heat on the hot plate. Keep the solution warm in the beaker in case you need to repeatsome part of the experiment or try some new experiment, as described below. 5-10min.
5. Further Experiments. Solder another length of copper wire to a shiny clean penny. Actually, you canuse the lone penny soldered to the copper wire from the �rst part of the experiment, just clean it withsteel wool and deionized water. Connect one lead of a voltmeter to a zinc strip and the other lead tothe copper wire soldered to the penny. Using the same solution you prepared earlier, immerse the zincstrip and penny in the solution. Is there a voltage di�erence between the zinc strip and the copperwire soldered to the copper penny? Which metal is the electron source (the negative terminal of thiselectrochemical cell)? 5-10min.
6. Do you think a current �ows in the copper wire connecting the zinc strip and copper penny when bothare immersed in the solution? If so, which direction will electrons �ow, and what are the anode andcathode reactions? Put the digital voltmeter into its current measuring mode on its most sensitive(microampere) scale. Then see if any current is �owing when you connect the meter in series betweenthe copper wire soldered to the penny and to the zinc strip -both the penny and the zinc strip should beimmersed in the hot 1 M NaOH solution. The series connections should look like this: Penny/copperwire/(+) ammeter(-)/zinc strip. How large a current �ows? . Is the current (charge �ow) from pennyto zinc strip or vice versa?
7. In wires the charge carriers are electrons. Current (de�ned as a �ow of positive charge) is opposite tothe �ow of electrons. In which direction are electrons �owing: from penny to zinc strip or vice versa?
Available for free at Connexions <http://cnx.org/content/col10506/1.56>

76 CHAPTER 12. FROM CELLS AND ELECTRODES TO GOLDEN PENNIES
Available for free at Connexions <http://cnx.org/content/col10506/1.56>
Chapter 13
Amphoteric Aluminum1
Properties of Aluminum and Its Compounds
13.1 Objectives
• To prepare common alum, KAl (SO4)2 .12H2O, from a discarded aluminum beverage can.• To perform qualitative analysis on alum.• To investigate the acid-base behavior of aluminum compounds.
GradingYou grade will be determined based on the following:[U+F0B7] Pre-lab (10%)[U+F0B7] Lab Report Form (80%)[U+F0B7] TA evaluation of lab procedure (10%)Before coming to lab . . ...[U+F0B7] Read the lab instructions[U+F0B7] Print out the lab instructions and report form
• Complete the pre-lab, due at the beginning of the lab. See page 616 in Brown, LeMay and Burstenfor the de�nition of amphoteric behavior.
13.2 Introduction
Aluminum is the most abundant metal in the earth's surface (7.5% by mass). The abundance of aluminum,coupled with its attractive combination of physical and chemical properties, accounts for the fact that it isone of the principal industrial raw materials used by industrialized societies. Production of aluminum fromraw materials is an energy intensive process.
Since the metal is not consumed rapidly by corrosion, the amount of scrap aluminum grows rapidly whilethe available supply of raw materials for the manufacture of aluminum decreases. The average predictedlongevity of an aluminum can along the roadside is 100 years.
Environmental problems thus created are typical of those of several di�erent metals. One obvious solutionto the problem is to recycle the used fabricated aluminum into other useful metallic objects or into aluminumcompounds. Aluminum metal can be recovered from scrap by melting the metal and separating it from solidsand volatile impurities. This process uses a large amount of energy. The energy requirement to prepare analuminum can from recycling is only 5% of the energy required to produce the can from bauxite ore.
1This content is available online at <http://cnx.org/content/m15790/1.10/>.
Available for free at Connexions <http://cnx.org/content/col10506/1.56>
77

78 CHAPTER 13. AMPHOTERIC ALUMINUM
This experiment illustrates a chemical recovery process in which waste aluminum is converted chemicallyinto an aluminum compound, hydrated potassium aluminum sulfate, KAl (SO4)2 .12H2O, or common alum.Although alum is an important industrial compound, the method of preparation in this experiment is not theway alum is obtained for use in industry. Nevertheless, this experiment will illustrate an interesting exampleof the reduction of environmental waste. "Alum" is a generic term that describes hydrated double salts ofcertain metals having the generalized formula, [MM' (SO4)2 .12H2O], in which M (univalent) is commonlyNa+, K+, NH4+ , or Rb+ and M' (trivalent) is commonly Al3+, Ga3+, V 3+, Cr3+, Mn3+, Fe3+, or Co3+.True alums crystallize in well-de�ned octahedral shapes and many are beautifully colored, particularly thosecontaining d-block transition metals. The ancient Egyptians, Greeks and Romans used alum as a mordantin dyeing cloth. A mordant contains metal ions that bind dyes to the fabric. Presently alum is used toharden photographic �lm, to prepare pickles, as a mordant, and for other purposes.
13.3 Experimental Procedure
Wear safety goggles. Wear gloves when using concentrated acid and base.
13.4 Part 1: Preparation of Alum/Quantative Analysis (Calculationof % Yield)
1. Cut a 5cm x 5cm square piece of aluminum from a scrap aluminum can and sand the paint o� usingsteel wool.
2. Cut this piece into smaller pieces (about 0.5 cm long) and weigh out ∼1g. Record the weight to3 decimal places.
3. Place the aluminum in a 400-mL beaker and add 50 mL of 4 M KOH.4. Place beaker on the heating mantle and heat gently.CAUTION - H2 GAS (VERY EXPLOSIVE) IS PRODUCED.ENSURE THAT YOU ONLY HEAT THE
BOTTOM OF THE BEAKER AND DO NOT LET THE FLAMES GET NEAR THE TOP.5. When the bubbles have stopped, remove from the heat, i.e., hydrogen is no longer evolved.6. Vacuum �lter the solution and save the �ltrate, you may toss out the solid. (Ask your TA if you
need instruction in performing a vacuum �ltration.)7. Carefully rinse your graduated cylinder, pour out 25-30 mL of 9 M H2SO4 and then add slowly to
the �ltrate.CAUTION - H2SO4IS A STRONG ACID AND DEHYDRATOR. SEE TA IMMEDIATELY IF YOU
SPILL ANY!8. Heat gently while stirring until the solution becomes clear. Boil the solution down to a volume of
about 45 mL.7. While the solution is boiling, prepare an ice bath by �lling a bowl half-way with ice and then
adding water until the bowl is three-quarters full.8. After the "boiling o�", let the beaker cool to room temperature and then place it in the ice bath.
Crystals of alum should form. Allow to cool for 15 minutes.9. After 15 minutes, vacuum �lter the product and wash with 10 mL of ethanol.10. Allow to dry for a few minutes. Dry completely in the microwave at less than 50% power in 10 sec
intervals until the weight no longer changes.11. Calculate the percent yield and describe the appearance of the crystals.
13.5 Part 2: Qualitative Analysis of Alum
1. Use a straw spatula to transfer a few of the alum crystals (about 5 mg) to a watch glass. Add 3 dropsof water to the crystals. Stir gently until the crystals dissolve.
Available for free at Connexions <http://cnx.org/content/col10506/1.56>
79
2. Use a small piece of indicator paper to see whether the solution is acidic, basic, or neutral.3. Now add 1 drop of 0.5 M BaCl2 (barium chloride) to the solution. Record your observations.4. A really good test for the presence of potassium is a �ame test. Using the hot grips, hold a stainless
spatula in the �ame of a Bunsen burner to volatilize impurities from the spatula.5. When one end of the spatula is red hot, remove it, and quickly touch it to a small cluster of
crystals. Several should stick.6. Slowly bring the spatula (plus crystals) toward the �ame and watch carefully. Hold the crystals
in the �ame for at least 5 seconds (until the solid glows). Record your observations.7. Remove the spatula and place on a non-asbestos mat.
13.6 Part 3: Acid-Base Properties of Aluminum Compounds
Clean 3 test-tubes and label them.Tube 1:Place 10 drops of 1M aluminum nitrate solution and 2 drops of 6.0 M sodium hydroxide solution, mix
well and record your observations on your lab report Then add more sodium hydroxide solution to tube 1until a reaction is observed (around 7 drops). Mix well. Record your observations.
Tube 2Place 10 drops of 1M aluminum nitrate solution and 2 drops of 6.0 M sodium hydroxide solution, mix well
and record your observations on your lab report Then add 4 mL of 6M HCl and record your observations.Tube 3Add 3 mL of 6M ammonium hydroxide, i.e aqueous ammonia to your alum and record your observations.
Available for free at Connexions <http://cnx.org/content/col10506/1.56>

80 CHAPTER 13. AMPHOTERIC ALUMINUM
Available for free at Connexions <http://cnx.org/content/col10506/1.56>
Chapter 14
Crystal Violet Kinetics1
14.1 Crystal Violet Kinetics
14.1.1 Objective
• To study the reaction rate of crystal violet with NaOH using the LabWorks Interface colorimeter.• To determine the reaction order with respect to each of the reactants.• To calculate the room temperature rate constant for the reaction.
14.1.2 Grading
• Pre-Lab 10%• Lab Report Form 80%• TA Points 10%
14.1.3 Background Information
14.1.3.1 Reaction Chemistry
Chemical kinetics is the study of reaction rates. In this experiment, the kinetics of the reaction betweencrystal violet and NaOH will be studied. The MicroLab Interface colorimeter will be used to monitor thechange in concentration of crystal violet as a function of time. The reactant and product structures andthe reaction stoichiometry are shown in Figure 1.
All of the reactants and products shown in Figure 1 are colorless except for crystal violet which has anintense violet color. Thus, during the course of the reaction, the reaction mixture color becomes less andless intense, ultimately becoming colorless when all of the crystal violet has reacted with the OH−.
1This content is available online at <http://cnx.org/content/m15811/1.3/>.
Available for free at Connexions <http://cnx.org/content/col10506/1.56>
81

82 CHAPTER 14. CRYSTAL VIOLET KINETICS
Figure 14.1
14.1.3.2 Figure 1. Net ionic reaction between Crystal Violet and NaOH
The color that crystal violet exhibits is due to the extensive system of alternating single and double bonds,which extends over all three benzene rings and the central carbon atom. This alternation of double andsingle bonding is termed conjugation, and molecules which have extensive conjugation are usually highlycolored. The color is due to continuous movement of electrons between single and double bonds. Whencrystal violet reacts with a base (−OH), the conjugation is disrupted and the color is lost. Note that in thereaction product, the three rings are no longer in conjugation with one another, and hence the material iscolorless. This reaction has kinetics slow enough that the change in color can be observed over time as themolecules are being changed. In today's experiment, you will trace the loss of conjugation in the crystalviolet structure by using colorimetry.
14.1.3.3 Kinetic rate laws
The rate of the reaction of crystal violet with NaOH is given by the generalized rate expressionRate = k
[OH−
]x[CV]y(1)
In Equation (1), k is the rate constant for the reaction, CV is an abbreviation for crystal violet,C25H30N
+3, x is the order of reaction with respect to OH−, and y is the order of reaction with respect
to CV. The values of x and y will be determined experimentally. Possible values are 0, 1, or 2 (zeroeth order,�rst order or second order).
In the experiment you will perform, the [ OH−] will always be much greater than [CV]. Thus the changein [ OH−] has a negligible e�ect on the initial [ OH−]. For this reason,
[OH−
]xcan be treated as a constant
and Equation (1) can be rewrittenRate = k' [CV]y(2)where k' = k [OH]x. k' is termed a pseudo rate constant.The integrated form of the rate law depends on the order of reaction with respect to the concentration
of CV. The integrated rate laws for y = 0, 1, and 2 are given in Equations 3 through 5.[CV]t = −k't+ [CV]o(zero order)(3)ln [CV]t = −k't+ ln [CV]o(�rst order)(4)1 = k't+ 1 (second order)(5)[CV]t [CV]oIn Equations 3 - 5, [CV]o is the concentration of crystal violet in the reaction mixture at time zero before
any reaction occurs; [CV]t is the concentration at any time during the course of the reaction. Equations 3,4b, and 5 are each an equation of a straight line. If a plot of [CV]t versus time is linear, y = 0 and the
Available for free at Connexions <http://cnx.org/content/col10506/1.56>

83
reaction is zero order in CV. Similarly, a linear plot of ln [CV]t versus time indicates a �rst order reactionin CV, and a linear plot of 1 / [CV]t versus time indicates second order behavior. In every case, the slopeof the resulting straight line would be the pseudo rate constant, k'. All three of these plots will be made todetermine the actual value of y and the value of k'.
In order to do the graphing just described, we will need to have data showing how the concentration ofCV changes with time. This data will be obtained using the MicroLAB colorimeter at the 590 nm wavelengthand the Kinetics program. The light from the LED will pass through the solution containing CV and NaOHand then fall on the system photocell. The photocell circuit will then produce a current in microamps (I)which is proportional to the light intensity striking the photocell surface. This current is divided by thecurrent obtained with the blank, and the result is termed Transmittance.
Solutions of crystal violet obey Beer's Law. Thus, the relationship between the observed current and theconcentration of CV is given by
At = −log (It/Io) = εbc(6)In Equation (6), At is the reaction solution absorbance at any time t; Io is the photocell current observed
for pure water (the blank value); It is the current observed for the CV reaction mixture at time t, ε is themolar absorptivity of crystal violet; b is the cell path length (2.54 cm for the MicroLAB colorimeter) vial;and c is the molar concentration of CV at time t, [CV]t. Since ε and b are constants at a given wavelength,it should be clear that the absorbance, At, is directly proportional to the concentration of CV at any timeduring the reaction and can be used in place of [CV]t in preparing the graphs described above.
14.1.3.4 Experimental Procedure
14.1.3.5 Part I.
MeasurementsOpen the MicroLAB program by selecting it, then click on the Kinetics Experiment Icon. Enter the
experiment �lename (CV then your name) when requested, then click OK. Data will come from the interface.Be sure the MicroLAB interface is connected to the computer and turned on. From that point follow theprocedures listed below.
1. Before beginning kinetic measurements, the current reading for pure H2O, Io, will be obtained. Filla clean, rinsed colorimeter vial about ¾ full with distilled H2O, dry the outside of the cell thoroughlywith a KimWipe being careful to remove any �nger prints, insert the cell into the colorimeter and placethe black cap over the cell. Note carefully and mark the positioning of the cell for future reference.
2. Click on the Blank button. The program will now measure Io for each of the 10 wavelengths, divideeach by itself and multiply by 100 to get the 100 % transmittance value.
3. Empty the vial and dry it thoroughly inside and out.4. Set the Time Interval to 5 seconds, and the Number of Points to 300.5. Using the buret provided, dispense exactly 9.00 mL of 1.50 × 10⁻⁵ M crystal violet solution into a
clean, dry colorimeter vial6. Using the calibrated plastic dropper provided, add 1.0 mL of 0.050 M NaOH to the CV solution as
rapidly as possible without splashing. Cap the vial, rotate it twice to mix the CV/NaOH, place the cellin the colorimeter in exactly the same manner as was used for the blank and cap the colorimeter. Allof the operations in this step should be completed as quickly as possible so that the �rst measurementwill be made as close to the beginning of the reaction as possible.
7. As soon as the vial is in place and capped, press the Start button, the program will take readings at 5second intervals for a period of 60 minutes and then automatically stop. If there is a need to stop datacollection prior to the end of 60 minutes, click on the Stop button and the program will terminate. It300 points is insu�cient, increase the number of points.
8. When the reaction is completed, save the �le with the name CV.kin.XM.DH, where CV.kin de�nesthe type of data, XM indicates the NaOH concentration (0.10 or 0.05, etc), and DH is the student'sinitials.
Available for free at Connexions <http://cnx.org/content/col10506/1.56>
84 CHAPTER 14. CRYSTAL VIOLET KINETICS
14.1.3.6 Data Analysis
1. Retrieve your MicroLAB data �le under the name you saved it.
Click on the Linear - Zero Order tab at the bottom of the graph. If the reaction you just did was zero orderon the concentration of crystal violet, this will show a horizontal straight line. Print this screen as follows:
• Press Ctrl-Print Screen to capture the screen image.• Open Wordpad by clicking Start > Programs > Accessories > Wordpad.• Press Ctrl-V to paste the screen image into Wordpad.• Press Ctrl-P to print the item.• Repeat step (2), clicking on the Logarithmic - First Order tab. A linear graph in this instance would
indicate �rst order dependence on the concentration of crystal violet. Print this screen also.• Finally, click on the Inverse - Second Order tab to determine if the reaction is second order in crystal
violet. Also print this screen• With the linear plot you have identi�ed the value of y, i.e., the order of the reaction with respect to
CV. Record the value of y in your lab book. The slope of the straight line at the top of the linearregression plot is the best value of k'. Record this value with proper units and to the correct numberof signi�cant �gures in your lab book. Attach your graphs to your lab book.
14.1.3.7 Part II.
14.1.3.8 Measurements
Recall that the k' just obtained is a pseudo rate constant, whose value depends upon the concentration ofOH−, i.e. k' = k
[OH−
]x. In this part of the experiment, the value of x will be determined as well as the
value of the true rate constant, k.In Part I of the experiment, 9.00 mL of 1.50× 10⁻⁵ M crystal violet and 1.0 mL of 0.050 M NaOH were
combined to form the reaction mixture. A second kinetic run will now be made in exactly the same wayexcept that the concentration of NaOH will be doubled to 0.10 M.
1. Repeat each of the six experimental steps 4 through 8 using 1.0 mL of 0.10 M NaOH in place of 0.050M NaOH.
14.1.3.9 Data Analysis
1. Repeat data treatment steps 1 through 6 above, and again record the value of k' on your data sheet.2. From the ratio of the two k' values to one another, determine the order of reaction with respect to
OH− (the value of x). Clearly indicate your reasoning in evaluating x.
Note: The value of x should be an integer. If your value is not an integer, it is probably due to experimentalerror (probably in measuring and adding the NaOH solutions). If necessary, round your value to the nearestinteger.
1. Calculate the value of the true rate constant k using each of the k' values. In the calculations, theconcentrations of OH− will have to be adjusted to account for the dilutions which occurred when theNaOH and crystal violet solutions were mixed. Finally, average the two k values obtained. Again, besure to watch signi�cant �gures and use proper units.
2. Using the linear plot from your �rst kinetics experiment, calculate the value of the molar absorptivity,ε, for crystal violet under these experimental conditions. Include units in your answer. The colorimetervial is 2.54 cm thick. (Hint: The intercept of your linear plot is important.).
Available for free at Connexions <http://cnx.org/content/col10506/1.56>
INDEX 85
Index of Keywords and Terms
Keywords are listed by the section with that keyword (page numbers are in parentheses). Keywordsdo not necessarily appear in the text of the page. They are merely associated with that section. Ex.apples, � 1.1 (1) Terms are referenced by the page they appear on. Ex. apples, 1
A antacids, � 5(19)
B Back-titration, � 5(19)blood alcohol analysis, � 7(29)
C Complex, � 4(15)Constant, � 4(15)Copper, � 11(59)
D Depression, � 2(5)
E Equilibrium, � 4(15)
F �ngerprints, � 7(29)Formation, � 4(15)Freezing, � 2(5)
G Gases, � 1(1)Golden, � 11(59)
I inks, � 7(29)
Ion, � 4(15)
K Kinetic, � 1(1)Kitchen, � 10(53)
M Mass, � 11(59)Molar, � 11(59)Molecular, � 1(1)
N Nanorust, � 10(53)
O of, � 1(1), � 10(53)
P Pennies, � 11(59)Playing with di�erent polymers, � 3(11)Point, � 2(5)
S spot tests, � 7(29)synthesis, � 10(53)
T Theory, � 1(1)
Available for free at Connexions <http://cnx.org/content/col10506/1.56>
86 ATTRIBUTIONS
Attributions
Collection: General Chemistry Lab Spring
Edited by: Mary McHaleURL: http://cnx.org/content/col10506/1.56/License: http://creativecommons.org/licenses/by/2.0/
Module: "Practical Examples of the Gas Laws"By: Mary McHaleURL: http://cnx.org/content/m19475/1.4/Pages: 1-4Copyright: Mary McHaleLicense: http://creativecommons.org/licenses/by/2.0/
Module: "Colligative Properties and Ice Cream"By: Mary McHaleURL: http://cnx.org/content/m19545/1.4/Pages: 5-9Copyright: Mary McHaleLicense: http://creativecommons.org/licenses/by/2.0/
Module: "Pervasive Polymers"By: Mary McHaleURL: http://cnx.org/content/m19573/1.4/Pages: 11-13Copyright: Mary McHaleLicense: http://creativecommons.org/licenses/by/2.0/
Module: "Determine the Value of an Equilibrium Constant by Complex Ion Formation"By: Mary McHaleURL: http://cnx.org/content/m19605/1.3/Pages: 15-18Copyright: Mary McHaleLicense: http://creativecommons.org/licenses/by/3.0/
Module: "indigestion? Which is the Best Commercial Antacid?"By: Mary McHaleURL: http://cnx.org/content/m19622/1.5/Pages: 19-24Copyright: Mary McHaleLicense: http://creativecommons.org/licenses/by/3.0/
Module: "Acid and Bases to Bu�ers"By: Mary McHaleURL: http://cnx.org/content/m15809/1.13/Pages: 25-28Copyright: Mary McHaleLicense: http://creativecommons.org/licenses/by/2.0/
Available for free at Connexions <http://cnx.org/content/col10506/1.56>

ATTRIBUTIONS 87
Module: "Forensics"By: Mary McHaleURL: http://cnx.org/content/m19954/1.7/Pages: 29-35Copyright: Mary McHaleLicense: http://creativecommons.org/licenses/by/3.0/
Module: "Enzyme Kinetics/Mr Potato"Used here as: "The Curious Case of Catalase"By: Mary McHaleURL: http://cnx.org/content/m15868/1.3/Pages: 37-42Copyright: Mary McHaleLicense: http://creativecommons.org/licenses/by/2.0/
Module: "Organic Reactions"By: Mary McHaleURL: http://cnx.org/content/m15483/1.3/Pages: 43-51Copyright: Mary McHaleLicense: http://creativecommons.org/licenses/by/2.0/
Module: "Kitchen Synthesis of Nanorust"By: Mary McHaleURL: http://cnx.org/content/m20813/1.3/Pages: 53-58Copyright: Mary McHaleLicense: http://creativecommons.org/licenses/by/3.0/
Module: "Electrochemistry and Alchemy"By: Mary McHaleURL: http://cnx.org/content/m21301/1.4/Pages: 59-67Copyright: Mary McHaleLicense: http://creativecommons.org/licenses/by/3.0/
Module: "From Cells and Electrodes to Golden Pennies"By: Mary McHaleURL: http://cnx.org/content/m15879/1.7/Pages: 69-75Copyright: Mary McHaleLicense: http://creativecommons.org/licenses/by/2.0/
Module: "Amphoteric Aluminum"By: Mary McHaleURL: http://cnx.org/content/m15790/1.10/Pages: 77-79Copyright: Mary McHaleLicense: http://creativecommons.org/licenses/by/2.0/
Available for free at Connexions <http://cnx.org/content/col10506/1.56>

88 ATTRIBUTIONS
Module: "Crystal Violet Kinetics"By: Mary McHaleURL: http://cnx.org/content/m15811/1.3/Pages: 81-84Copyright: Mary McHaleLicense: http://creativecommons.org/licenses/by/2.0/
Available for free at Connexions <http://cnx.org/content/col10506/1.56>

About ConnexionsSince 1999, Connexions has been pioneering a global system where anyone can create course materials andmake them fully accessible and easily reusable free of charge. We are a Web-based authoring, teaching andlearning environment open to anyone interested in education, including students, teachers, professors andlifelong learners. We connect ideas and facilitate educational communities.
Connexions's modular, interactive courses are in use worldwide by universities, community colleges, K-12schools, distance learners, and lifelong learners. Connexions materials are in many languages, includingEnglish, Spanish, Chinese, Japanese, Italian, Vietnamese, French, Portuguese, and Thai. Connexions is partof an exciting new information distribution system that allows for Print on Demand Books. Connexionshas partnered with innovative on-demand publisher QOOP to accelerate the delivery of printed coursematerials and textbooks into classrooms worldwide at lower prices than traditional academic publishers.