general banking manual (account opening)
TRANSCRIPT
Page 1 of 304
GENERAL BANKING USER MANUAL
FOR
FCUBS-11.2
Page 2 of 304
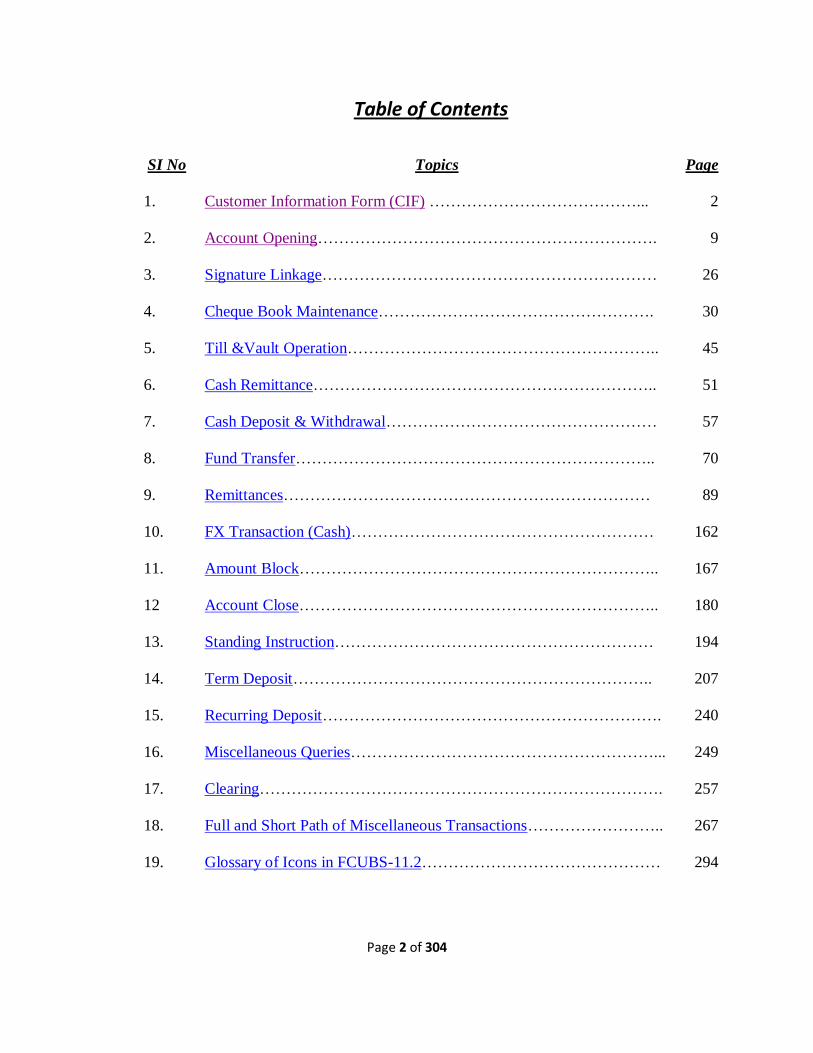
Table of Contents
SI No Topics Page
1. Customer Information Form (CIF) …………………………………...
2
2. Account Opening……………………………………………………….
9
3. Signature Linkage………………………………………………………
26
4. Cheque Book Maintenance…………………………………………….
30
5. Till &Vault Operation…………………………………………………..
45
6. Cash Remittance………………………………………………………..
51
7. Cash Deposit & Withdrawal……………………………………………
57
8. Fund Transfer…………………………………………………………..
70
9. Remittances……………………………………………………………
89
10. FX Transaction (Cash)…………………………………………………
162
11. Amount Block…………………………………………………………..
167
12 Account Close…………………………………………………………..
180
13. Standing Instruction……………………………………………………
194
14. Term Deposit…………………………………………………………..
207
15. Recurring Deposit……………………………………………………….
240
16. Miscellaneous Queries…………………………………………………...
249
17. Clearing………………………………………………………………….
257
18. Full and Short Path of Miscellaneous Transactions……………………..
267
19. Glossary of Icons in FCUBS-11.2………………………………………
294

Page 3 of 304
Concept & Disclaimer:
This user manual was prepared according to the functionalities of FCUBS-11.2 as of Sep 05,
2011 for introducing the operational procedures of the Core Banking Software to the End Users
of the Bank. The functionalities accommodated in this user manual are only the most common
daily GB related activities of a branch and reflects the operational procedure of those
transactions in FCUBS-11.2. Operational variances may found between this manual and post-
live situation which should be considered as the modification / customization done in the
system after Sep 05, 2011. It should be noted that this user manual must not be considered as
the General Banking Manual of the Bank and if any operational procedure of this manual is
contradictory with the GB Manual of the bank or any guidelines of the regulatory bodies, then
the procedures described here must not be practiced by the Bank/Branch users.
Page 4 of 304

Page 5 of 304
Concept: Customer Information Files (CIF) is the basic of a customer creation. Opening an account we must have to create a CIF. The processes of creating CIF are given bellow: In the ‘Customer Maintenance’ screen, teller maintains various personal and business details of the customers of our bank. The CIF details are maintained at the branch level. These details can be accessed by all branches and therefore a duplicate customer record for a customer in two different branches need not be maintained.
1. CIF (STDCIF): To create a CIF teller has to go to Menu →Customers → Operation → Customer
Input.
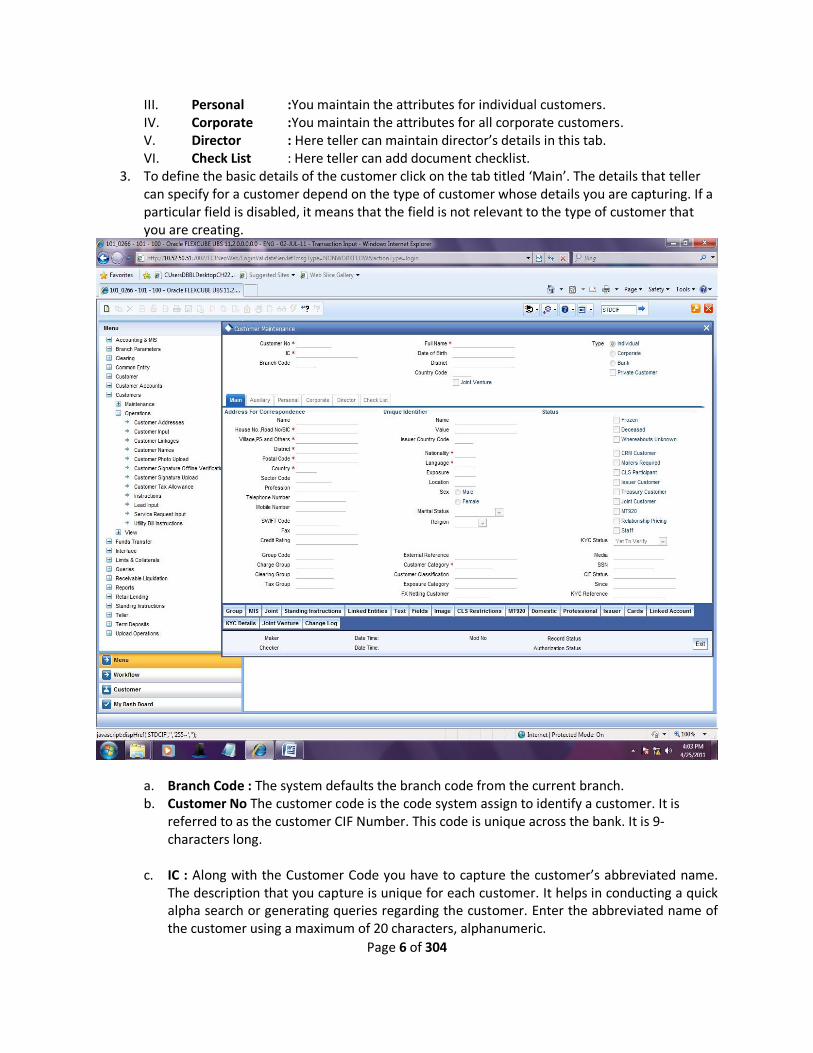
2. Teller can invoke the ‘Customer Maintenance’ screen by typing ‘STDCIF’ in the field at the top right corner of the Application tool bar and clicking the adjoining arrow button. The five parameters listed on top right are the five lines along which teller maintain customer details. These details have been classified into the following broad heads: I. Main Tab : You maintain the main attributes of all customers, individuals and
corporate houses
II. Auxiliary :This screen shows the other details pertaining to the customer.
Page 6 of 304
III. Personal :You maintain the attributes for individual customers. IV. Corporate :You maintain the attributes for all corporate customers. V. Director : Here teller can maintain director’s details in this tab. VI. Check List : Here teller can add document checklist.
3. To define the basic details of the customer click on the tab titled ‘Main’. The details that teller can specify for a customer depend on the type of customer whose details you are capturing. If a particular field is disabled, it means that the field is not relevant to the type of customer that you are creating.
a. Branch Code : The system defaults the branch code from the current branch. b. Customer No The customer code is the code system assign to identify a customer. It is
referred to as the customer CIF Number. This code is unique across the bank. It is 9-characters long.
c. IC : Along with the Customer Code you have to capture the customer’s abbreviated name. The description that you capture is unique for each customer. It helps in conducting a quick alpha search or generating queries regarding the customer. Enter the abbreviated name of the customer using a maximum of 20 characters, alphanumeric.
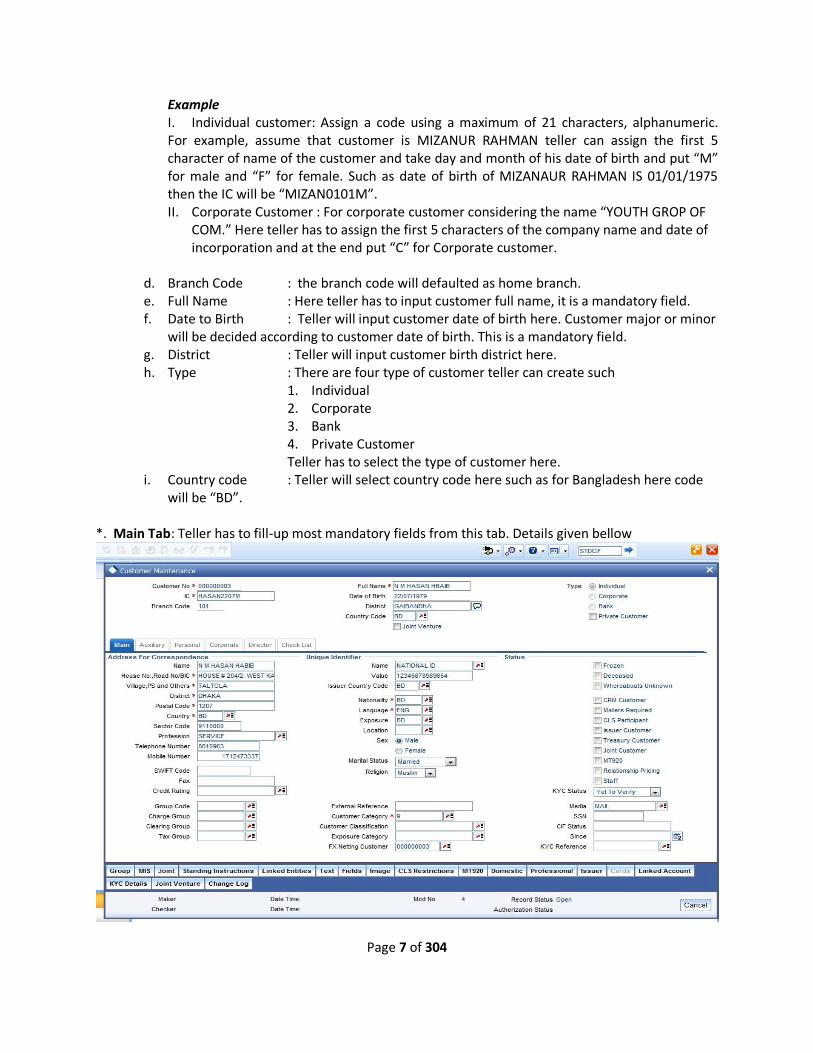
Page 7 of 304
Example I. Individual customer: Assign a code using a maximum of 21 characters, alphanumeric. For example, assume that customer is MIZANUR RAHMAN teller can assign the first 5 character of name of the customer and take day and month of his date of birth and put “M” for male and “F” for female. Such as date of birth of MIZANAUR RAHMAN IS 01/01/1975 then the IC will be “MIZAN0101M”. II. Corporate Customer : For corporate customer considering the name “YOUTH GROP OF
COM.” Here teller has to assign the first 5 characters of the company name and date of incorporation and at the end put “C” for Corporate customer.
d. Branch Code : the branch code will defaulted as home branch. e. Full Name : Here teller has to input customer full name, it is a mandatory field. f. Date to Birth : Teller will input customer date of birth here. Customer major or minor
will be decided according to customer date of birth. This is a mandatory field. g. District : Teller will input customer birth district here. h. Type : There are four type of customer teller can create such
1. Individual 2. Corporate 3. Bank 4. Private Customer Teller has to select the type of customer here.
i. Country code : Teller will select country code here such as for Bangladesh here code will be “BD”.
*. Main Tab: Teller has to fill-up most mandatory fields from this tab. Details given bellow
Page 8 of 304
A. Address for correspondents : Teller has to fill-up customer correspondents’ name, address, telephone number, mobile number, all the necessary data and most important fields are given bellow:
1. Name : If the full name and the correspondents name is same then no need to fill up , after save full name will be populated as correspondents name.
2. Address : According to CIB format we have arrange the address fields. Teller has to fill up the address.
3. Sector Code : Teller has to input sector code here. 4. Profession : Select customer profession here, 5. Mobile no. : Input mobile no.
B. Unique Identifier: Under this teller has to input what photo ID customer is supplying to the bank as a unique identifier. Such as national ID card, Driving License, Commissioner Certificate etc. Here teller also selects some other field as given bellow,
1. : language : Default “ENG” 2. :Nationality :Default “BD” 3. Sex : Teller will select the sex of a customer here 5. Marital status : Select the Marital status of the customer 6. Religion :Select customer’s Religion such as Muslim, Hindu etc. 7. Customer Category: Select Customer category here, such as Individual
Resident, Individual Foreign, Privet limited, Public limited etc. C. Status : Teller has to select the customer status under the status hiding, There a there are some other fields needs to be field up such as 1. KYC status : Select the KYC status here 2. Media : Select Mail, Fax, etc. what will the media to communicate with the customer. 3. SSN : input Social Security Number here *. Auxiliary Tab: Here teller will input auxiliary information. For utility bill provider teller has to
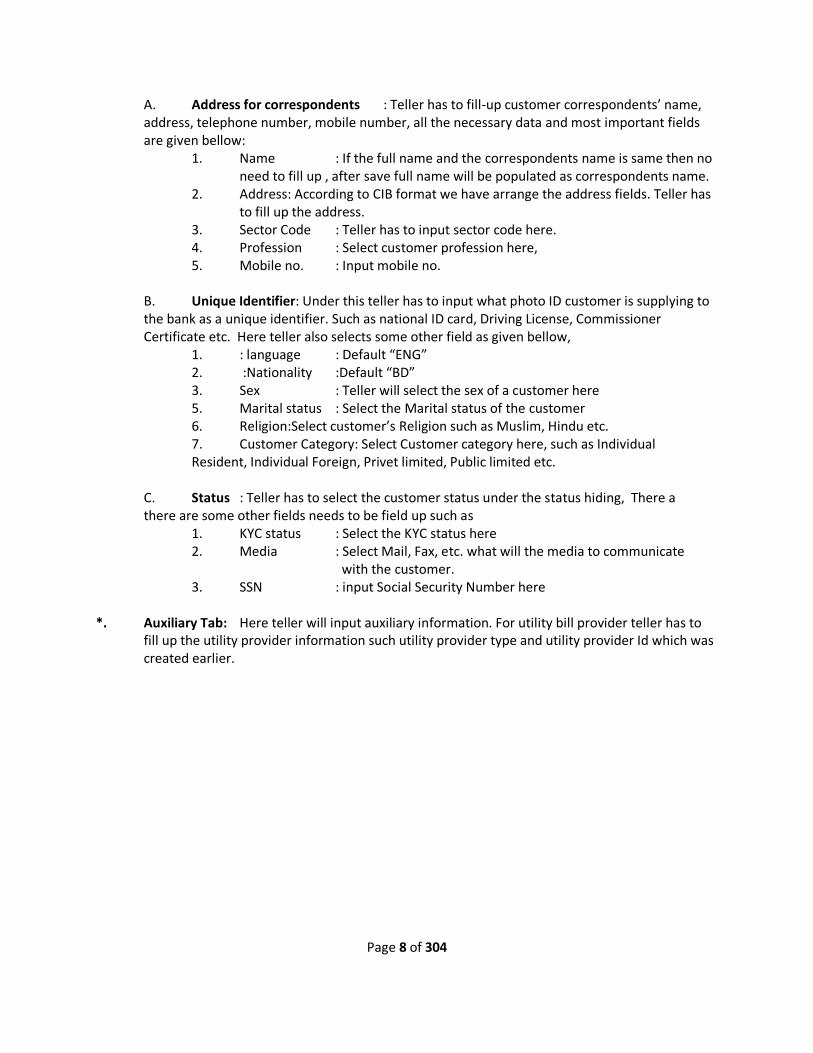
fill up the utility provider information such utility provider type and utility provider Id which was created earlier.
Page 9 of 304
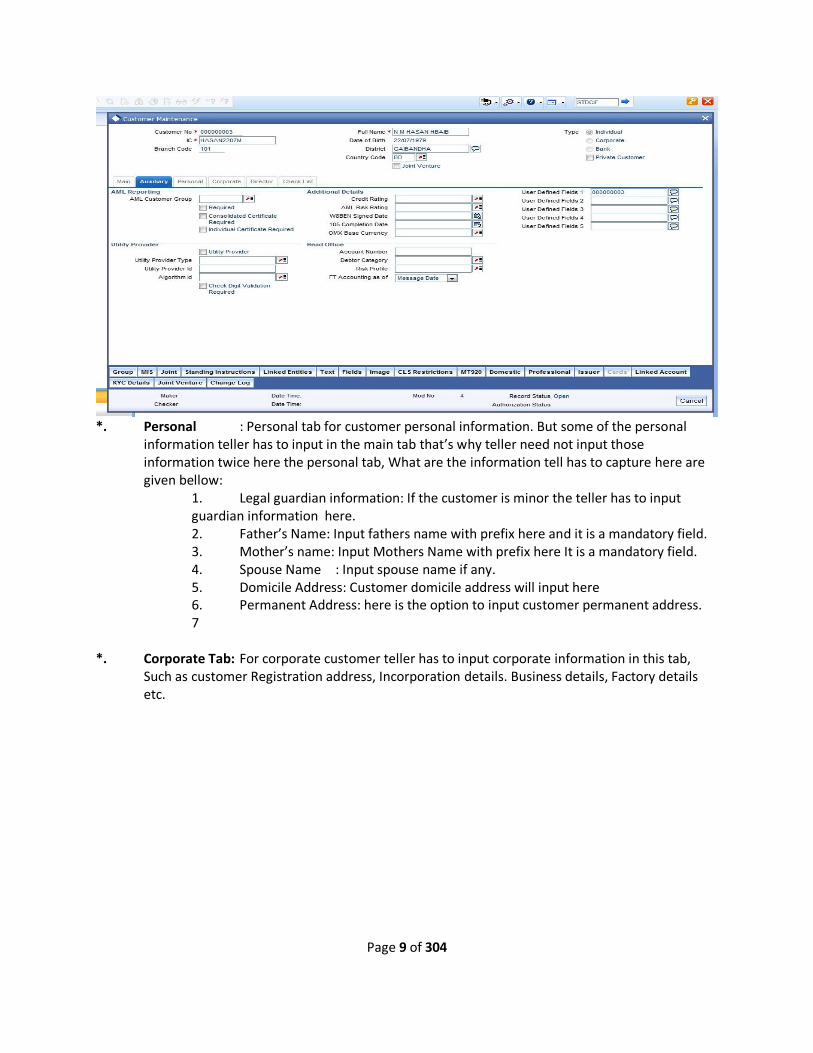
*. Personal : Personal tab for customer personal information. But some of the personal
information teller has to input in the main tab that’s why teller need not input those information twice here the personal tab, What are the information tell has to capture here are given bellow:
1. Legal guardian information: If the customer is minor the teller has to input guardian information here. 2. Father’s Name: Input fathers name with prefix here and it is a mandatory field. 3. Mother’s name: Input Mothers Name with prefix here It is a mandatory field. 4. Spouse Name : Input spouse name if any. 5. Domicile Address: Customer domicile address will input here 6. Permanent Address: here is the option to input customer permanent address. 7
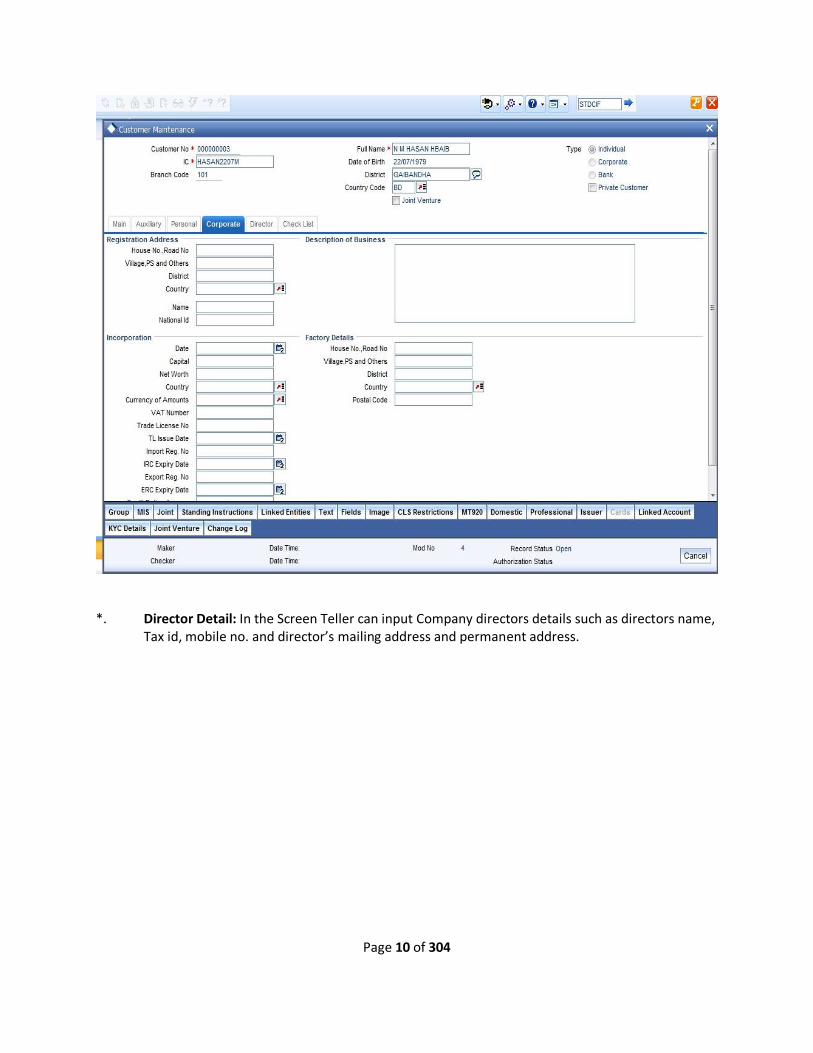
*. Corporate Tab: For corporate customer teller has to input corporate information in this tab,
Such as customer Registration address, Incorporation details. Business details, Factory details etc.
Page 10 of 304
*. Director Detail: In the Screen Teller can input Company directors details such as directors name,
Tax id, mobile no. and director’s mailing address and permanent address.
Page 11 of 304
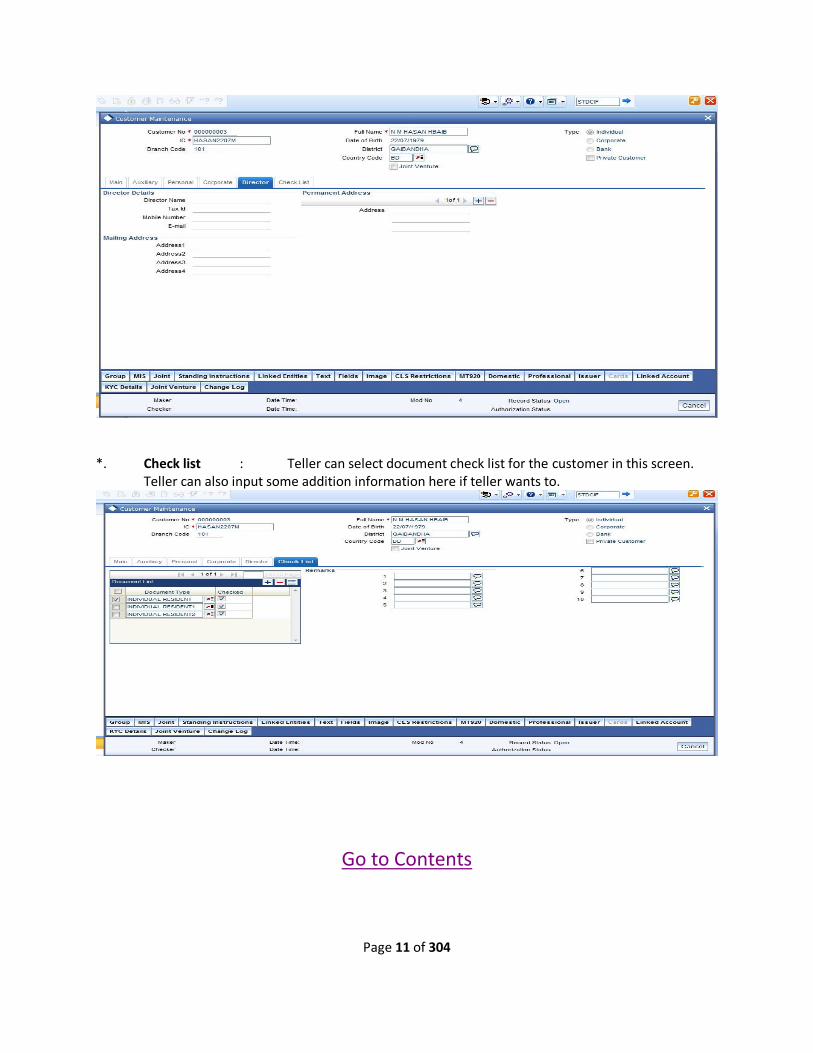
*. Check list : Teller can select document check list for the customer in this screen.
Teller can also input some addition information here if teller wants to.
Go to Contents

Page 12 of 304
Page 13 of 304
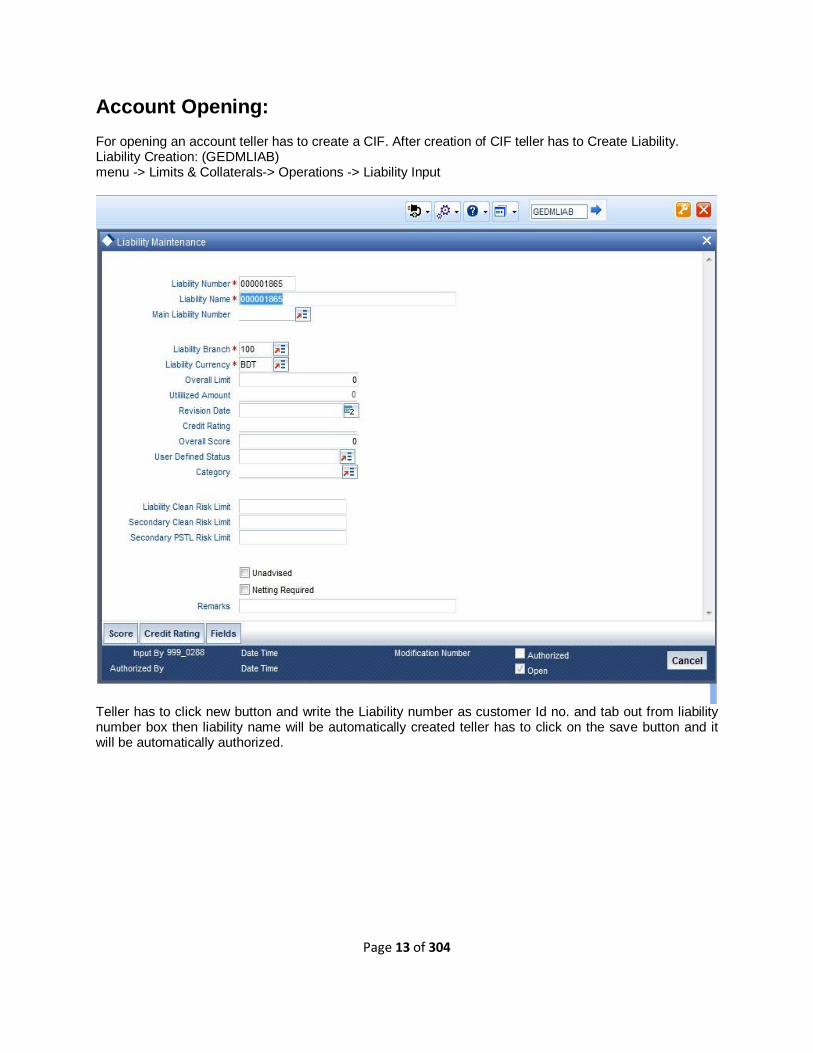
Account Opening: For opening an account teller has to create a CIF. After creation of CIF teller has to Create Liability. Liability Creation: (GEDMLIAB) menu -> Limits & Collaterals-> Operations -> Liability Input
Teller has to click new button and write the Liability number as customer Id no. and tab out from liability number box then liability name will be automatically created teller has to click on the save button and it will be automatically authorized.
Page 14 of 304
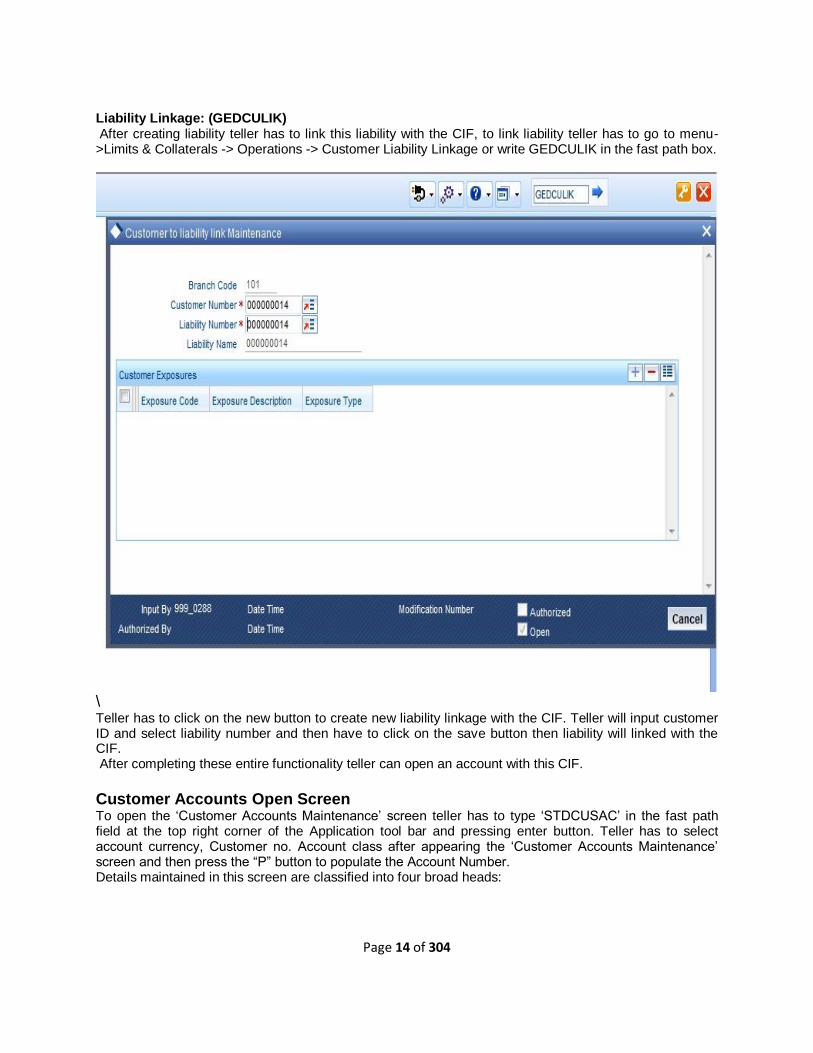
Liability Linkage: (GEDCULIK) After creating liability teller has to link this liability with the CIF, to link liability teller has to go to menu->Limits & Collaterals -> Operations -> Customer Liability Linkage or write GEDCULIK in the fast path box.
\ Teller has to click on the new button to create new liability linkage with the CIF. Teller will input customer ID and select liability number and then have to click on the save button then liability will linked with the CIF. After completing these entire functionality teller can open an account with this CIF.
Customer Accounts Open Screen To open the „Customer Accounts Maintenance‟ screen teller has to type „STDCUSAC‟ in the fast path field at the top right corner of the Application tool bar and pressing enter button. Teller has to select account currency, Customer no. Account class after appearing the „Customer Accounts Maintenance‟ screen and then press the “P” button to populate the Account Number. Details maintained in this screen are classified into four broad heads:
Page 15 of 304
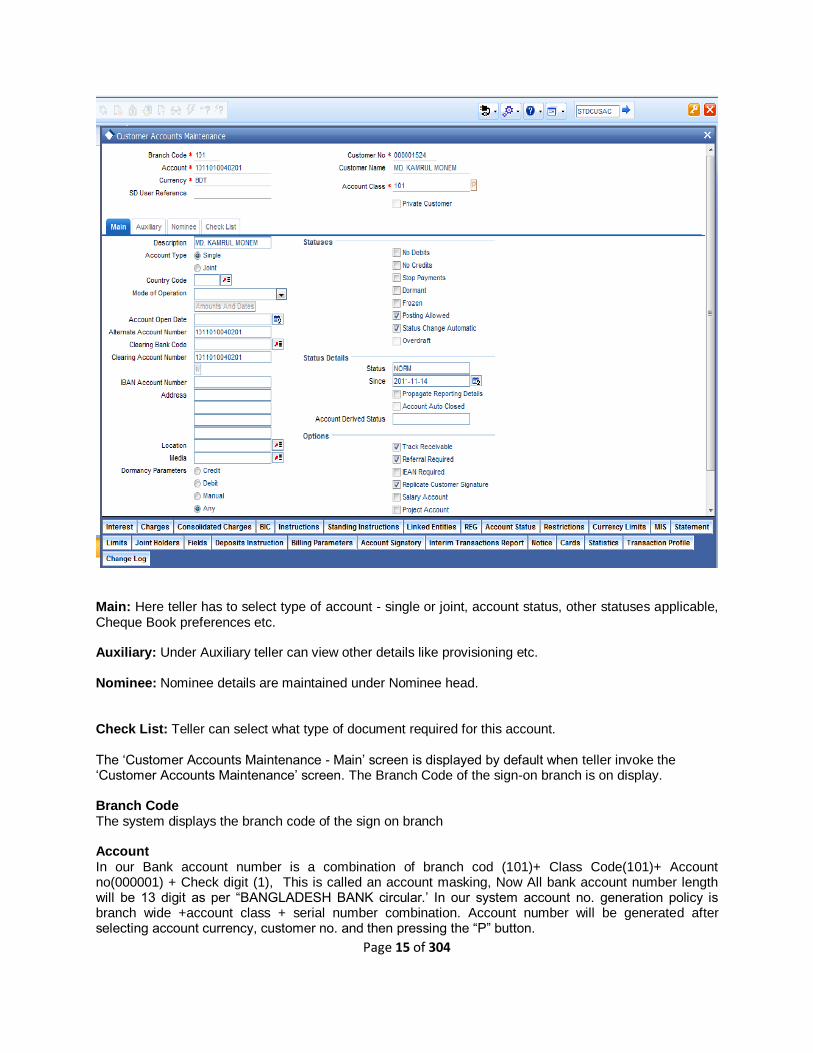
Main: Here teller has to select type of account - single or joint, account status, other statuses applicable, Cheque Book preferences etc. Auxiliary: Under Auxiliary teller can view other details like provisioning etc. Nominee: Nominee details are maintained under Nominee head. Check List: Teller can select what type of document required for this account. The „Customer Accounts Maintenance - Main‟ screen is displayed by default when teller invoke the „Customer Accounts Maintenance‟ screen. The Branch Code of the sign-on branch is on display. Branch Code The system displays the branch code of the sign on branch Account In our Bank account number is a combination of branch cod (101)+ Class Code(101)+ Account no(000001) + Check digit (1), This is called an account masking, Now All bank account number length will be 13 digit as per “BANGLADESH BANK circular.‟ In our system account no. generation policy is branch wide +account class + serial number combination. Account number will be generated after selecting account currency, customer no. and then pressing the “P” button.

Page 16 of 304
Customer No This is the ID No. of a customer. If teller wants to create an account no. in the system, has to create a customer CIF ID No. or has to write or select a customer no from LOV of „Customer account maintenance” screen. Customer Name The name of the customer is displayed based on the CIF ID that teller has mentioned in „Customer No‟ field. Currency Teller has to write/select the currency of the customer account. A list of all the currencies maintained in the system will be displayed in currencies LOV. Teller can select the currency of transaction for the respective account. Account Class In FCR we are used to use different type of product such as for “Saving account” „101‟ for “current account” „110‟. Here in UBS account class is nothing but product which we have used in FCR, Such as for savings account teller has to select „101‟ account class or for current account „110‟ account class. Here in UBS the Account Class name and the FCR product Name are same. While maintaining a specific account teller has to identify the class to which the particular account belongs. Teller can select the appropriate account class from the list of all the valid account classes maintained in the system. SD User Reference The system displays the SD user reference for the account. This is actually Txn reference no.
Main Tab Details
Description This is the description of the account. During account opening system automatically populated customer full name here. During transaction time system will display the account description. Account Type Teller has to indicate whether the account is to be opened only by the account holder or whether it can be jointly operated/ joint account. Country Code Specify the country of the customer. This adjoining option list displays all valid country codes maintained in the system. Teller can choose/write the appropriate one. Such as for Bangladesh teller will write “BD” only. The country information is captured to enable Mantas to analyses the transactions for possible money laundering activities. Account Open Date Teller has to capture the date on which the account was opened. If it is bank then system will take the system date. Alternate Account Number System will automatically set the populated account number in this field. Teller can define an alternate account number for the account teller is defining. The alternate account number that teller specify should
Page 17 of 304
be unique for each customer. Teller can capture the old account numbers used by your bank before installing the Oracle FLEXCUBE system. The old account numbers would be mapped with the new account numbers. This would facilitate quick tracking of the account and generating queries. In the Data Entry Module, you can input a transaction using the alternate account number instead of the actual account number. Clearing Account Number The clearing account number for the customer account is generated automatically. Account number and the clearing account no is the same. IBAN Account Number To capture the detail of the IBAN account for a specific customer, you have to enable the „IBAN Required‟ option by enabling it. Subsequently, click the „M‟ button. The IBAN details sub-screen will be displayed. In this screen, you can capture the IBAN Account Number as well as the bank code of the bank where the IBAN account resides. Location The address maintained here is always the primary or the default address. Each customer can have several addresses for a particular media. To distinguish between one address of a customer from another for a given media, it is essential for teller to specify a unique location for each address. Also, if teller is amending an address here, the same gets updated in the „Customer Account Address - Detailed‟ table after the validations are through. Media Indicate the media for which the charge should be levied. Select one of the following options from the option list: • Mail • Telex • SWIFT • Fax Status Details The account status reflects the status of the account. The account may have a No Credit or No Debit order issued against it or a Stop Payment order or it may have been frozen for some reason and therefore dormant. While posting transactions to the customer account, the system checks the status of the account before the entry is processed. If the status of the account is dormant, then the system will display an override message indicating the same. Example:
No Debits No debits can be posted to the account. For example, Mr. M.Rahman, a customer of our
bank, going abroad for a year instructs us not to debits his account till his return. Teller can execute this instruction by checking this box. No Credits
No credits can be posted to the customer account by checking No Credits check box. Frozen If teller has frozen a customer account in the „Customer Information Maintenance – Basic‟ screen
the accounts gets frozen. For instance, at the behest of a court order, the status of the account is reflected here in the „Customer Accounts Maintenance‟ screen. Status Change Automatic This option will be defaulted from the account class to which the account belongs. However, teller has the option of changing it at the customer account level. If teller check this option, the status of the account will
Page 18 of 304
be changed automatically by the system as per the conditions maintained in the „Status Rule Definition‟ Account Class Maintenance screen. If Teller dose not select this option, teller has to change the status manually through the „Manual Status Change‟ screen. Stop Payments If a stop payment instruction is issued (for a cheque or an amount) against the account number, the system will automatically check the „Stop Payment‟ box. When the stop payment instruction is withdrawn, the status gets updated accordingly. If a customer has requested for stop payment of multiple cheques, the „Stop Payment‟ option will continue to remain checked till the last request is also cancelled. After cancellation of the last stop payment instruction, the option gets updated (unchecked) immediately. Dormant The system updates this status for an account based on the dormancy days specified in the Account Class Maintenance screen Posting Allowed If checked, indicates that the account class being created is to be used while creating IRA monetary accounts. Monetary accounts used for IRA need to be distinguished from the other accounts in Oracle FLEXCUBE, so that these accounts do not come up for posting in the other Oracle FLEXCUBE screens.
Viewing Status Details Status At the time of maintaining a customer account for the first time, the account status will be „NORM‟ (Normal) by default. The „Status Since‟ field will display the current system date i.e. the date on which the account is maintained in the system. The system will update the status whenever a status change occurs. Therefore, at any point of time, this field will display the current status of the account. The „Since‟ field will reflect the date on which the account moves to the current status. Since The date on which the status of the account is changed to the current status is displayed here Propagate Reporting Details This field indicates whether the reporting lines defined for status movement, for the account class that this account reports to, must also be applicable to it. The GL‟s are defined in the Account Class Maintenance for posting account balances when a status movement occurs on any accounts belonging to the account class. Account Auto Closed The system checks this box to indicate that the account has been closed automatically through the auto account closure feature. Teller will not be allowed to modify this. Account Derived Status The system displays the current status of the account here. This is applicable for CASA accounts (current accounts and savings accounts) Track Receivable During liquidation of loan contracts as well as processing of retail teller contracts, if the system detects insufficient funds in the settlement account, then teller can choose to block the subsequent credit that happens to the settlement account. In other words, the system will track the account for receivables (credits). As and when a credit happens, the funds will be allocated to the loan or retail teller contract, for liquidation. If the track receivable option is checked for the account, the system will track the receivables for the account if sufficient funds are not available in the account. Referral Required

Page 19 of 304
Referral refers to the process of handling customer transactions, which force the accounts involved in such a transaction to exceed the overdraft limit. Examples of typical transactions, which force an account to move into overdraft, are Payment and Collections, Funds Transfers, Standing Instructions or Clearing transactions. Note that teller should have checked the box „Referral Required‟ in the product preferences screen of the aforesaid modules and the Clearing product applicable to them. The „Referral Required‟ option is defaulted from the account class linked to the account. Teller can change it for a specific account. If an account is marked for referral, the details of transactions resulting in the account moving into Overdraft will be sent to the referral queue. Note that charge, fee or interest debited to the customer account will not be referred to the Referral Queue. Teller can view referral transactions in the „Referral Queue Summary‟ screen Replicate Customer Signature The signature of the customer gets defaulted from the account class level to account level. This value is defaulted only if the customer type is individual with single mode of operation. Salary Account Check this box to indicate the salary account which should be selected for loan recovery on salary credit. By default this option is unchecked. Dormancy Parameters If Transaction Code associated with the account has the Consider for Account Activity option enabled, the dormant status of the account will be updated to Active. Apart from this, teller can specify the parameter that is required for re-activating the account. Choose from the following options to indicate the re-activation parameters for the dormant account. • Debit • Credit • Any • Manual In case of a transaction, the system will check for the parameter you have specified here and accordingly change the status of the account. The parameter you specify here will super cede the parameter we have maintained at the account class level.
Viewing Details of Amounts and Dates In the Customer Accounts Maintenance - Amounts and dates screen teller can view all financial details of this customer‟s account along with the details of the previous debit or credit activities. However, access to all financial information of an account can be restricted for any user. The financial details of an account include the account balance, the un-cleared debit and credit balances, the debit and credit turnover and the interest details. The turnover limit details of an account include the current financial period, currency, utilized and unutilized limit balances.
Auxiliary Details Click on the „Auxiliary‟ tab to invoke the following screen
Capturing Positive Pay Details Positive Pay For the account you are maintaining, you can specify whether you want positive pay facility for the account or not. When a check comes in for payment, the system validates for any unpaid record only for those accounts that are under positive pay. For all the other accounts that are not specified for positive pay, the system does not do any validation before making payments for the checks. Funding Mod 9 Validation Required Validation Digit Stale Days

Page 20 of 304
Branch Into Deferred Reconciliation
Capturing Provisioning Details An account inherits the provisioning parameters defined for the account class it uses. Teller can change the defaulted parameters and make the following specifications, as required, in the Provision Details section of the Customer Account Maintenance screen: Auto Provisioning Required Teller can indicate whether provisioning is applicable for the account. If teller indicate so, the provisioning batch, when executed, picks up the account for provisioning. Exposure Category Teller can specify the exposure category in the Customer Account Maintenance screen. Risk Free Exposure Amount Teller can indicate the risk-free collateral amount that would be used in computing the provisioning amount for the account. Provisioning Currency Provisioning Currency specification is defaulted from the preferences for the account class used by the account and teller can alter it if necessary.
Capturing Escrow Transfer Details Escrow transfer processing refers to transfer of certain percentage of credit amount that comes to project account (Trust account) to the designated account (Escrow account). This is based on defined transaction codes and cut-off time defined for the account currency. Transactions with the transaction code and credit account for which the box „Escrow Processing‟ is checked in the „Transaction Code Maintenance‟ screen are considered for the Escrow sweeps. The system computes percentage of credit amount and places an amount block on project account. Teller can view the details of such system generated Escrow amount blocks using the „Amount Block Maintenance‟ screen (CADAMBLK) wherein the field „Amount Block Type‟ will display „Escrow‟. Escrow Transfer Applicable This box is checked by default if the customer account belongs to an account class for which Escrow transfer is enabled. This box should be checked for Project/Trusted account(s) only. Branch Code Select the branch code in which the Escrow account has to be created from the adjoining option list. Escrow Account Select a valid account to be used as an Escrow account from the adjoining option-list. The list displays all valid accounts based on the selected Escrow branch and the currency of the project account. The system does not allow the circular linkage of Project account and Escrow accounts. Escrow Percentage Specify the percentage of the credited amount, which has to be transferred to the Escrow account.
Specifying Other Options Consolidation for Inward Clearing
Page 21 of 304
Teller needs to indicate whether consolidation for inward clearing is required at the Customer Account level. This option gets defaulted from the Account Class Maintenance screen. Back Period Entry Allowed You can choose to allow the posting of back-valued entries into the account by enabling the Back Period Entry Allowed option. If you choose not to restrict back period entries, you will be allowed to post journal entry transactions to past periods as long as the account is open. This specification is defaulted from the account class linked to the account. You can choose to change it for a specific account. While posting back-valued transactions, the System verifies whether the Back Period Entry Allowed option has been enabled for the account. If the option has not been enabled an error message is displayed. This check is also performed while uploading journal entry transactions. MT210 Required Lodgment Book Euro Cheques Euro cheque book can be issued to a customer whose account has checked for „Euro cheques‟ option in the customer account maintenance screen the account should be a account with EUR currency only. Max No. of Cheque Rejections The system defaults the value of maximum number of cheque rejections that can be allowed for an account from the account class. However, you can modify it at the account level. If „Max No of Cheque Rejections‟ is not maintained at customer account maintenance, system will not mark the cheque facility to „N‟ for any number of cheque rejections. If the bank resets the check book facility to „Y‟ which was earlier updated to „N‟ by the system because of violation of max no of check rejections, the cheque rejection count will be taken by the system freshly.
Specifying Turnover Limit Preferences The account inherits the turnover limit code linked to the parent account class. Turnover Limit Code The system displays the turnover limit code applicable to the account.
Specifying Account Facilities As part of specifying the account facilities, teller can indicate whether the account holder can avail of the following facilities: • A cheque book facility • A passbook facility • An ATM facility Teller can indicate that the account holder can avail of a Cheque book, Passbook, ATM facility by checking the box positioned next to each of these fields. Cheque If checked, indicates that this account holder can avail of a check book facility. This shall be defaulted from the Account Class screen, where we had defined this facility for all accounts belonging to a class. The option specified at the account level will supersede that specified for the account class. Passbook If checked, indicates that this account number can avail of a passbook facility. This shall be defaulted from the account class screen, where we had defined this facility for all accounts belonging to a class. The option specified at the account level will supersede that specified for the account class. ATM If checked, indicates that this account number can avail of an ATM facility. This shall be defaulted from the Account Class screen, where we had defined this facility for all accounts belonging to a class. The option specified at the account level will supersede that specified for the account class.
Page 22 of 304
Specifying Nominees First Nominee Teller can nominate two persons who would have the right to the balances in your account after the account holder‟s demise Subsequent to the account holder, the first nominee is called to claim the balances in the account. If the first nominee is no more or is missing then the second nominee is called upon to claim the balances in the account. Second Nominee Teller can nominate two persons who would have the right to the balances in your account after the account holder‟s demise. Subsequent to the account holder, the first nominee is called to claim the balances in the account. If the first nominee is no more or is missing then the second nominee is called upon to claim the balances in the account.
Specifying Initial Funding Account Opening Amount Specify the amount being deposited to open a customer account. While saving the record, the system checks whether this amount is equal to or greater than the minimum limit maintained for the linked account class. If the amount is less than the applicable limit, the system will display an error message. If it is equal to or greater than the limit amount, the system will proceed with saving. Input to this field will be mandatory if limit amount has been maintained for the linked account class. Pay-In Option Indicate the method for initial funding during account creation. Choose one of the following options: • Pay In By Account • Pay In By GL Offset Account If teller has chosen „Pay In By Account‟, as the pay-in option, teller will has to specify the customer account that should be debited while posting accounting entries. The adjoining option list displays all valid customer accounts and customer GLs maintained in the system. Teller can choose the appropriate one. If teller chooses „Pay In By GL‟, the system will display the offset GL maintained for the branch in the „Term Deposit Pay-in Parameters Maintenance‟ screen. Waive Account Opening Charges Check this box to indicate that account opening charges should be waived for individual customer account.
Specifying Nominee Details Click „Nominee‟ tab in the „Customer Accounts Maintenance‟ screen in order to capture nominee details for the account. Specify the following details: Name Specify the name of the nominee of the account. Date of Birth Specify the date of birth of the account nominee. Relationship Specify the relationship that the nominee shares with the primary account holder. Address 1 to 4 Specify the address of the nominee. Minor Check this box to indicate that the nominee is a minor (less than 18 years old). Guardian Name
Page 23 of 304
In case the nominee is a minor, specify the name of the nominee‟s guardian. Relationship Specify the relationship that the nominee shares with the guardian. Address 1 to 4 Specify the guardian‟s address.
Additional Details Teller can capture additional details for the account by clicking the following buttons in the „Customer Accounts Maintenance‟ screen: Interest : This invokes the „IC Special Conditions Maintenance‟ screen. Teller can wave interest and charges from this screen and also can change interest and charge booking branch and account from this screen. Click the „Interest‟ button in the „Customer Accounts Maintenance‟ screen to invoke this screen. Specify the following details:
Interest Booking Branch By default, the customer‟s account in the current branch will be displayed in this screen Interest/Charge Booking Account and Interest/Charge Booking Branch fields. However, Teller has the option of booking interest/charge to a different account belonging to another branch also.
Interest Booking Account Teller can select the accounts for booking of interests. Interest will be liquidated into the Interest Booking account. By default, the customer‟s account in the current branch will be displayed in this screen (in the „Interest Booking Account‟ field). However, teller has the option of booking interest to a different account belonging to another branch also.
Charge Booking Branch By default, the customer‟s account in the current branch will be displayed in the Interest/Charge Booking Account and Interest/Charge Booking Branch fields. However, Teller has the option of booking interest/charge to a different account belonging to another branch also.
Charge Booking Account Teller can select the accounts for booking of charges. The charge will be liquidated into the Charge Booking account. By default, the customer‟s account in the current branch will be displayed in the „Charge Booking Account‟ field. However, Teller has the option of booking charge to a different account belonging to another branch also.
Interest Statement Teller can also indicate if we need to generate an interest statement for the account.
Consolidated Charge Branch By default it will be same as the current branch. However teller can select the branch of the consolidated charge account from the adjoining option list.
Consolidated Charge Account Select the account that is identified as the master account for collecting the consolidated Fall Below Fee. The Fall Below Fee is a kind of fee that is charged if sum of average monthly balance of all the accounts is less than the minimum required balance. Note the following: • The master account should be in the same currency as of the other account currencies. • For the master account, the field should be left blank. This master account is maintained as consolidated charge account on the other set of accounts. • All the accounts should be belonging to the same customer. • The Fall Below Fee is waived if the master account or any one of the account has overdraft facility.
Interest Start Date For the account for which teller is defining special conditions, teller must specify the date from which teller would like to apply interest. Interest for this account will be calculated according to the special conditions that are define subsequently.
Charge Start Date

Page 24 of 304
For the account for which teller is defining special conditions, teller must specify the date from which teller would like to apply charge. Charge for this account will be calculated according to the special conditions that are define subsequently.
Product For the account for which teller wants to defining special conditions, choose the product(s) that teller wish to apply. To recall, teller can define a Special Condition for an account only if the account class of the account has a General Condition defined for the product.
Waive Product Check this box if teller want to waive of a particular interest or charge product that has been specified.
Generate UDE Change Advice If teller wants to generate UDE Rate Change advice then has to check this option.
Open More than one product may be applicable on an account class at the same time. You can temporarily stop applying a product on an account class by „closing‟ it You can achieve this by un-checking the box „Open‟. The product will cease to be applied on the account class. You can make the product applicable again by checking the „Open‟ box.
Effective Date The „Effective Date‟ of a record is the date from which a record takes effect. You can maintain different values for a UDE, for different effective dates, for an account. When interest is calculated on a particular day for an account with special conditions applicable, the value of the UDE corresponding to the date will be picked up. Typically, you would want to open records with different Effective Dates if the values of UDEs vary within the same liquidation period. Charges: Teller can capture details of charges for the account, using the „Account level charges conditions‟ screen. To invoke this screen, click the „Charge‟ button in the „Customer Accounts Maintenance‟ screen.
Branch The Branch Code to which the account belongs (for which teller is defining special conditions) is displayed in this field.
Account The Account number of customer (for which teller is defining special conditions) is displayed in this field. Teller can click the „Default‟ button to default the Charge Products and the corresponding details applicable for the account. Teller can then modify these values to define the special conditions.
Product The system defaults a product when you click the „Default‟ button at the time of account creation. Teller must modify it to identify the Charge product using which the applicable charges would be collected.
Currency The charges would be collected in the currency defined for the selected charge product, and this currency is displayed on the screen.
Minimum and Maximum Teller must indicate the charge amount range, representing the minimum and maximum charge that can be applied for the account.
Free Items Teller must indicate the number of free items for which the customer will not be charged.
Open By default, each charge consolidation charge setup that teller set up is enabled and active. Teller can also disable the setup by un-checking the „Open‟ box.
Waive Charges You can choose to waive charges for an account.
Consolidated Charge
Page 25 of 304
Teller can capture details of consolidated charges for the account, using the „Account Level Consolidated Charges Conditions‟ screen. To invoke this screen, click the „Consolidated Charge‟ button in the „Customer Accounts Maintenance‟ screen.
Branch The Branch Code to which the account belongs (for which teller are defining special conditions) is displayed in this field.
Product Teller must identify the consolidated charge product using which the applicable charges would be consolidated. The charges would be consolidated in the currency defined for the selected consolidated charge product, and this currency is displayed on the screen.
Currency The charges would be consolidated in the currency defined for the selected consolidated charge product, and this currency is displayed on the screen.
Minimum Teller must indicate the minimum charge that can be applied for the account
Maximum Teller must indicate the maximum charge that can be applied for the account
Open By default, each charge consolidation charge setup that teller set up is enabled and active. Teller can also disable the setup by checking the Open box.
Waive Charges Teller can choose to waive consolidated charges for an account
Discount Amount In this field, teller can indicate the flat discount amount, if any, which would be applicable for the consolidated charge calculated for the account.
Discount Percentage Teller can indicate the discount percentage, if any, which would need to be applied to the calculated charge. After the discounting has been applied, the Maximum and Minimum validations are performed. The discount, if any, which is applicable, can also be specified as a flat discount amount
BIC Teller can capture details of all SWIFT BIC that should be allowed for a customer account, using the „Authorized SWIFT BICs for Customer Account‟ screen. To invoke this screen, click „BIC‟ button in the „Customer Accounts Maintenance‟ screen.
Account Number The system defaults the account number of the customer in this field
BIC Code Specify the BIC here. Teller can choose any valid BIC maintained in the „BIC Code Maintenance‟ screen
Description The system displays the description for the corresponding BIC that teller has specified. Instructions: This invokes the „Account Operating Instructions Maintenance‟ screen. Teller can view and modify the Account operating instruction from this screen. Standing Instruction Teller can capture details of standing instructions for the account, using the „Instruction Diary Summary‟ screen. To invoke this screen; click the „Standing Instructions‟ button in the „Customer Accounts Maintenance‟ screens. Linked Entities:
Page 26 of 304
This invokes the „Linked Entities‟ screen. Teller can capture details of linked entities for the account, using the „Linked Entities‟ screen. To invoke this screen; click the „Linked Entities‟ button in the „Customer Accounts Maintenance‟ screen.
Customer Select the customer from the option list with whom teller wants to establish the relationship with the customer account that teller are maintaining.
Description In this field, the system displays the name of customer that teller has selected in the previous field. teller cannot change the description.
Relationship Teller has to choose a relationship code to establish a relationship between the customer being selected and the customer account are maintaining. By default, the system will select the customer of the account as the Primary Holder. This is a pre-shipped relationship and teller will not be allowed to change the relationship. REG: This invokes the „REG Details‟ screen.
Account Status Teller can specify status details for the account, using the „Status Details‟ screen. To open the screen, click the „Account Status‟ button in the „Customer Accounts Maintenance‟ screen.
Branch The system defaults the code of the current branch
Account Number The system defaults the account number from the main screen
Status Teller can select the different status codes applicable to the account class, in this field. Use the Add icon to define each status and the attributes for the same. Teller can use the navigation icons to move from one status to the other. On selection of the status, the associated description will be displayed alongside
Dr and Cr GL Line Select the debit GL account, to which all debit balances within a specific account class will report to, when it moves to the status being defined. Teller can identify the debit GL from the list of existing GLs. Likewise, all credits within a particular account class will report to the GL account that teller has identified to track credits.
Dr Central Bank Line Specify the Central Bank line to which this account will report to, if it is in debit. This line is maintained in the „Reporting Lines Maintenance‟ screen.
Cr Central Bank Line Specify the Central Bank line to which this account will report to, if it is in credit. This central bank line is maintained in the „Reporting Lines Maintenance‟ screen.
Dr Head Office Line Specify the Debit Head Office GL to which the account will report, if they are in a debit
Cr Head Office Line Specify the Credit Head Office GL to which this account will report, if it is running in credit
Restriction Teller can specify restrictions for the account, using the „Products and Transaction Codes Restriction‟ screen. To invoke this screen, click the „Restriction‟ button in the „Customer Accounts Maintenance‟ screen.
Product/Transaction Restriction Teller can Restrict product or transaction through this restriction button though restriction maintained in the account class level. Teller can use Allowed or Disallowed option to block or unblock the product or transaction. To invoke the screen teller has to click the restriction button.
Page 27 of 304
Currency Limits: This invokes the „Limits‟ screen where teller can restrict different currency here. MIS : This invokes the „Management Information System‟ screen. Statement: Teller can specify restrictions for the account, using the „Statement Details‟ screen. To invoke this screen, click the „Statement‟ button in the „Customer Accounts Maintenance‟ screen.
Account Number The system displays the account number for which teller is setting the statement details
Primary A/c Statement This refers to the type of statement to be generated periodically by the system, for this account. Teller can specify whether teller want a detailed or summary statement or if teller does not want a statement for this account at all. Limits: This invokes the „Account Limits‟ screen. Joint Holders: This invokes the „Linked Entities‟ screen. Here teller can input the joint holder id, If the account is joint account teller has to link the joint holder ID here, and teller has to select the relation from the “Joint holder type” field that is “Joint and first” or “Joint and Other” or “Authorized signatory” etc. After selecting the relation teller has to input the “Start date” and “End date”. Fields: This invokes the „UDF‟ screen. Here teller has to select what type of debit card is required for the account from the “DEBIT_CARD_TYPE” field and teller can write the introducer account no in the “INTRODUCER_ACC_NO” field. Deposits Instructio0n: This invokes the „Deposits Instruction‟ screen. Billing Parameters This invokes the „Billing Parameters‟ screen. Account Signatory: Teller can capture details of signatories for the account, using the „Signatory Details‟ screen. To invoke this screen, click the „Account Signatory‟ button in the „Customer Accounts Maintenance‟ screen. Here teller can capture the following details:
Branch The system defaults the current branch here
Account Number This is the account number to which signatories are to being linked
Account Description The system displays the description for the account teller has selected
Customer Number Teller can link a customer signatory to an account either by: • Click on the option list next to the Signatory Number. A list of customer signatory numbers, whose details have been captured, will be displayed, along with their names. Pick up the signatory whom teller wants to make an account signatory for the account • Keying-in the customer Signatory Number and Name directly, if the signatory number has not been maintained through the Customer Signatory details screen If the signatory ID that teller specify has not been maintained, the System displays an override. On confirming the override, you will be allowed to save the signatory details. An error message is displayed if you enter a duplicate Signatory ID. Each time you capture a new Signatory ID at the account level you must identify the relationship of the signatory with the customer.
Customer Name The system displays the name of the corresponding customer
Page 28 of 304
Minimum Number of Signatories Specify the minimum number of signatories necessary to endorse an instrument involving the account
Account Message Teller can input account operating instruction here.
Signatory ID The system displays values maintained in CIF signatory for the customer number. Teller has to select the signatory id here.
Signatory Name The system displays the corresponding name of the signatory number specified in the signatory id field
Approval Limit Specify the amount up to which the account signatory can approve for debits. Signatory Message: Teller can write any kind of message related to the signatory. Solo sufficient: Teller can indicate whether the signatory is solo sufficient or not by checking the solo sufficient check box. Signature: Teller can view the signatory‟s signature here by clicking the signature button. Notice: This invokes the „Notice Preferences‟ screen Cards: This invokes the „Cards Summary‟ screen. Transaction Profile: This invokes the „Transaction Profile‟ screen. Here teller can input the transaction profile detail which is very much required for CASA and it is also requirement form the “Central Bank”. Transaction Code” Teller has to select the Transaction code from the transaction code field. Which transaction teller needs to consider for transaction profile has to select here. Transaction Description: Here transaction description will display. What transaction code teller will select in the transaction code field that description will show here. Change Log: This invokes the „Customer Address Change Log‟ screen.
Go to Contents
Page 29 of 304

Page 30 of 304
Customer signature and image upload ( STDCIFIS ): In the UBS we have more flexibility to link signature
and photo; one customer can use multiple signature for multiple account. To upload signature and
photo teller needs to click on Customers → details → customers signature and image upload
*. Adding customer signature and Image : To add a customer signature /photo in the customer
Id teller has to click on the add button on the menu tool bar, then teller has to input the following
information :
1. Customer Id : Teller has to input/select the customer id in the customer id in the
customer id text box,
2. Signature ID : Here teller has to input a signature ID which will be unique according
to customer ID.
3. Branch : Branch will be automatically selected according to the customer ID, It
means customer ID’s home branch will be selected here.

Page 31 of 304
4. Signature Name: Signature name will be automatically populated if not populated then
teller will have to write the customer name here.
5. Customer Title : Customer title will be automatically populated if not then teller will
input customer title here
6. Replicate to account: Teller has to click on this check box. If not checked then
signature/ image will not show in the account level.
7. Add row (+) : To add signature/image teller has to click on the Add row (+) button to
select signature/image here, after clicking on the button, one row will be created bellow
then teller will has to select
a. Image type : Teller has to select signature or photo image what
will be upload in this row that means signature or photo, if signature then select
signature or if photo then select image.
b. Sequence/Specimen Number: It will automatically populate according
to the number of specimen of signature, If customer have more than one specimen
then teller will input the number sequentially.
C. Record Status : Whether the record status Normal or Closed , it will
show here, teller dose not required to do any thing here.
Page 32 of 304
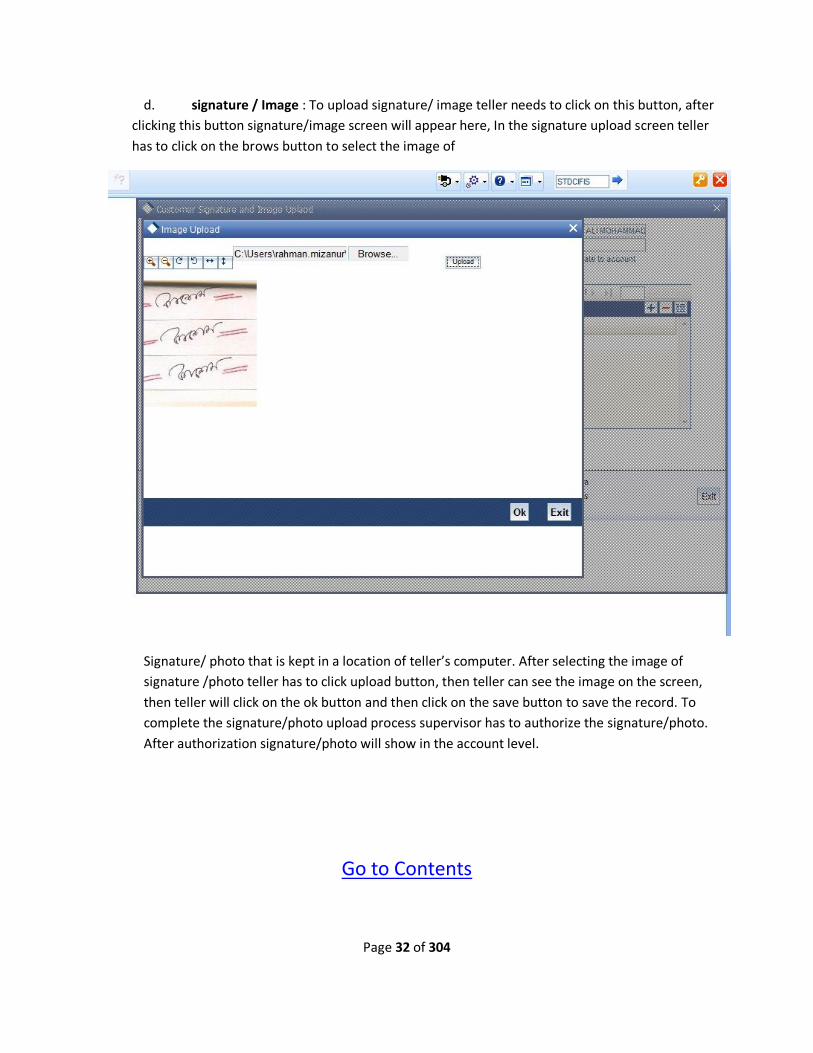
d. signature / Image : To upload signature/ image teller needs to click on this button, after
clicking this button signature/image screen will appear here, In the signature upload screen teller
has to click on the brows button to select the image of
Signature/ photo that is kept in a location of teller’s computer. After selecting the image of
signature /photo teller has to click upload button, then teller can see the image on the screen,
then teller will click on the ok button and then click on the save button to save the record. To
complete the signature/photo upload process supervisor has to authorize the signature/photo.
After authorization signature/photo will show in the account level.
Go to Contents
Page 33 of 304
Page 34 of 304
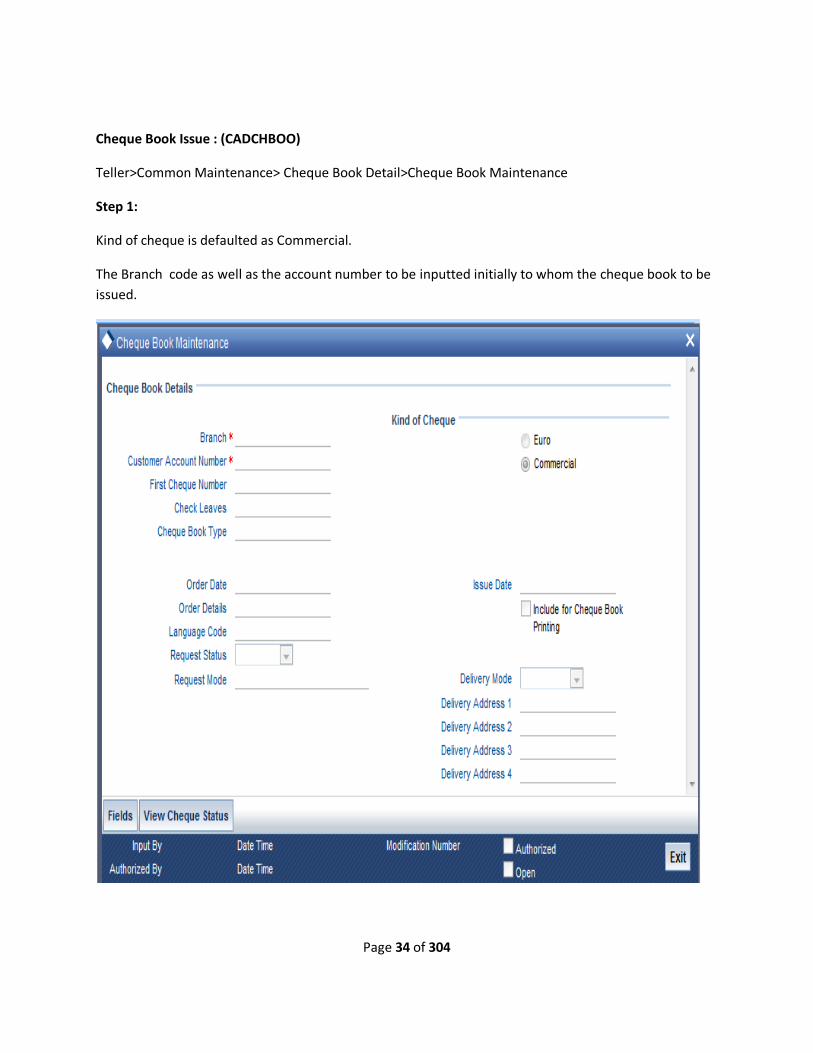
Cheque Book Issue : (CADCHBOO)
Teller>Common Maintenance> Cheque Book Detail>Cheque Book Maintenance
Step 1:
Kind of cheque is defaulted as Commercial.
The Branch code as well as the account number to be inputted initially to whom the cheque book to be
issued.

Page 35 of 304
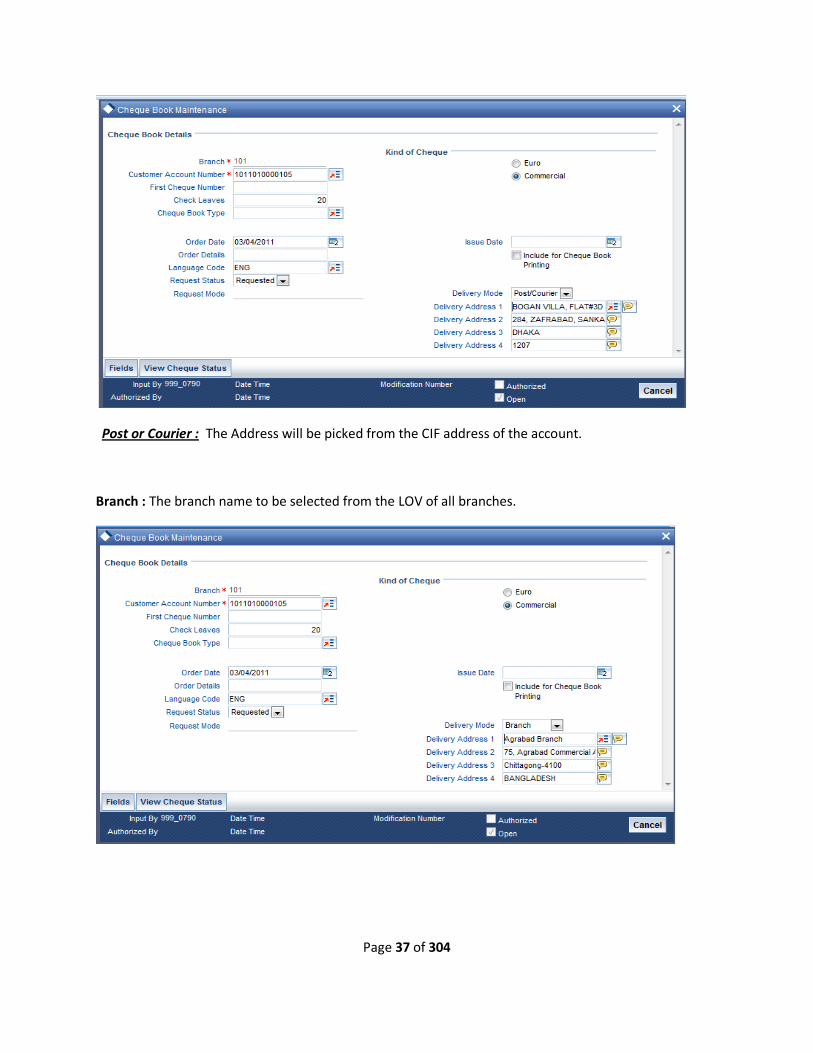
Step 2:
Cheque leaves is defaulted as 20 but we can change this to 50 or other as per our requirement.
Order date is the system date and language is defaulted as English.
There are several request mode as :
i) Requested
ii) Generated
iii) Delivered &
iv) Destroyed
For issuing cheque we shall use select requested mode.

Page 36 of 304
Step 3:
Issue date defaulted from the system date. Include for cheque book printing is not required to be
checked.
There are two types of delivery mode available :
i) Post or Courier
ii) Branch
Page 37 of 304
Post or Courier : The Address will be picked from the CIF address of the account.
Branch : The branch name to be selected from the LOV of all branches.

Page 38 of 304
Step 4:
After completing all the formalities the first cheque number will be generated from the system.
Step 8:
After the cheque book has been issued, the cheque book need to be delivered by selecting the request
status as delivered. The cheque book becomes usable.
Page 39 of 304
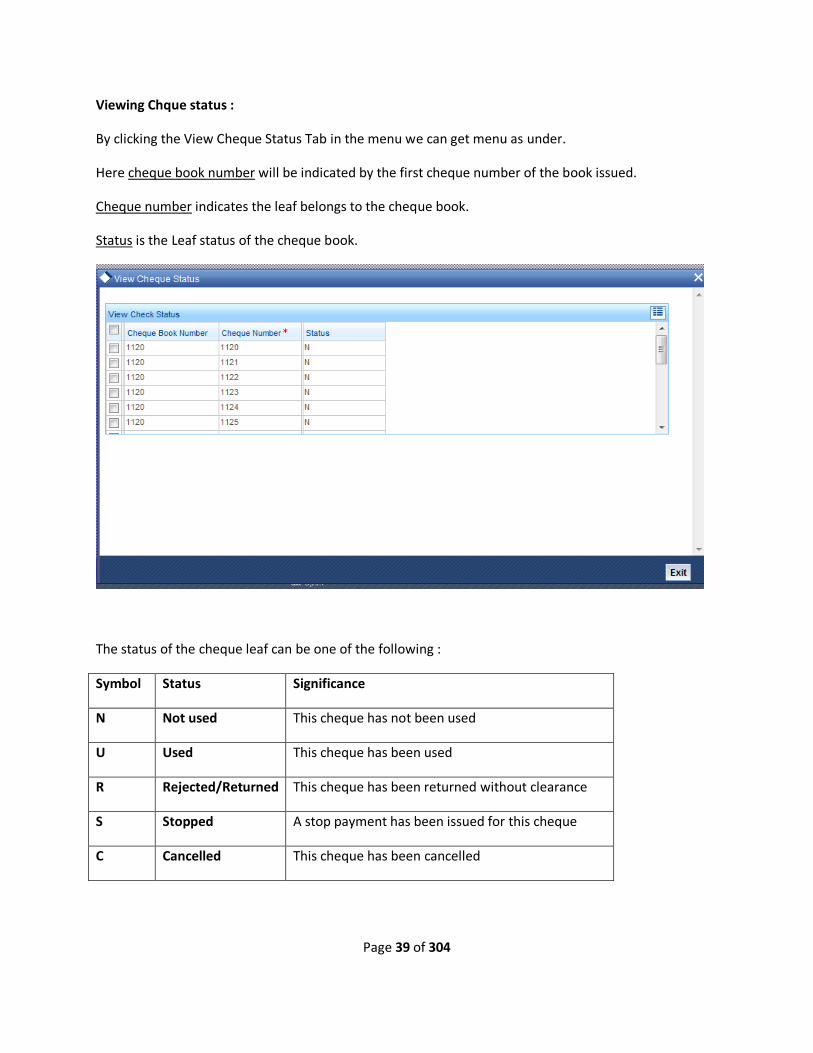
Viewing Chque status :
By clicking the View Cheque Status Tab in the menu we can get menu as under.
Here cheque book number will be indicated by the first cheque number of the book issued.
Cheque number indicates the leaf belongs to the cheque book.
Status is the Leaf status of the cheque book.
The status of the cheque leaf can be one of the following :
Symbol Status Significance
N Not used This cheque has not been used
U Used This cheque has been used
R Rejected/Returned This cheque has been returned without clearance
S Stopped A stop payment has been issued for this cheque
C Cancelled This cheque has been cancelled
Page 40 of 304
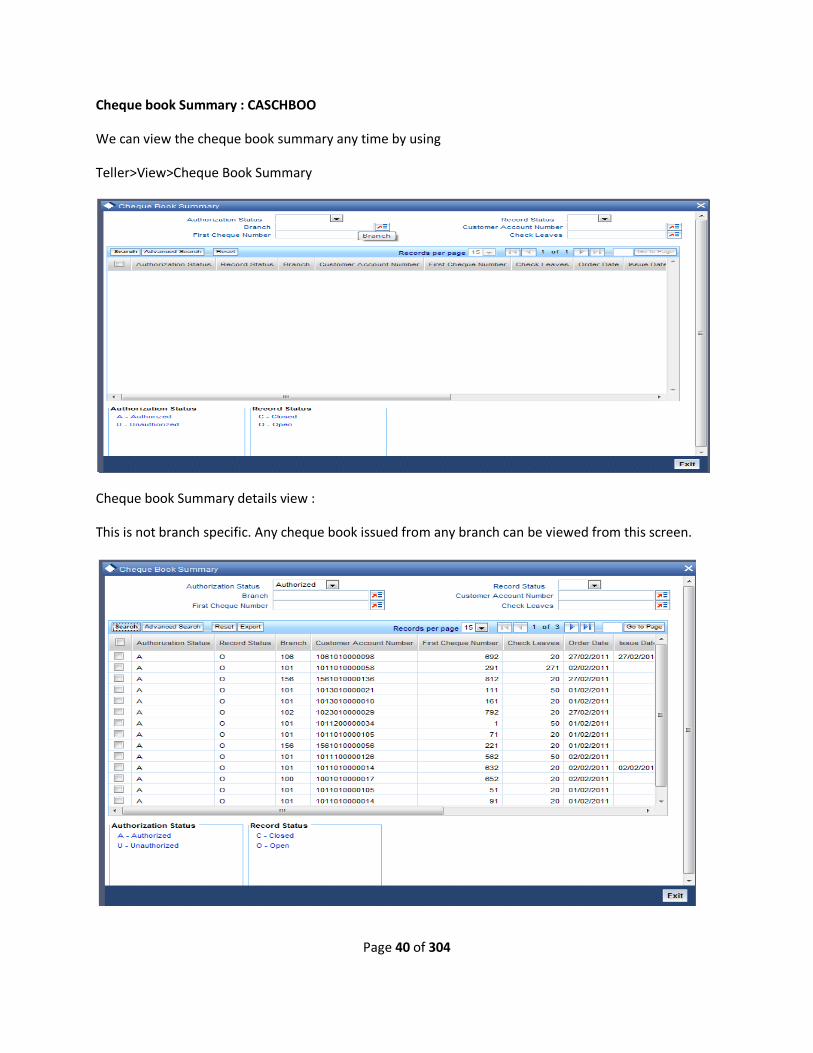
Cheque book Summary : CASCHBOO
We can view the cheque book summary any time by using
Teller>View>Cheque Book Summary
Cheque book Summary details view :
This is not branch specific. Any cheque book issued from any branch can be viewed from this screen.
Page 41 of 304
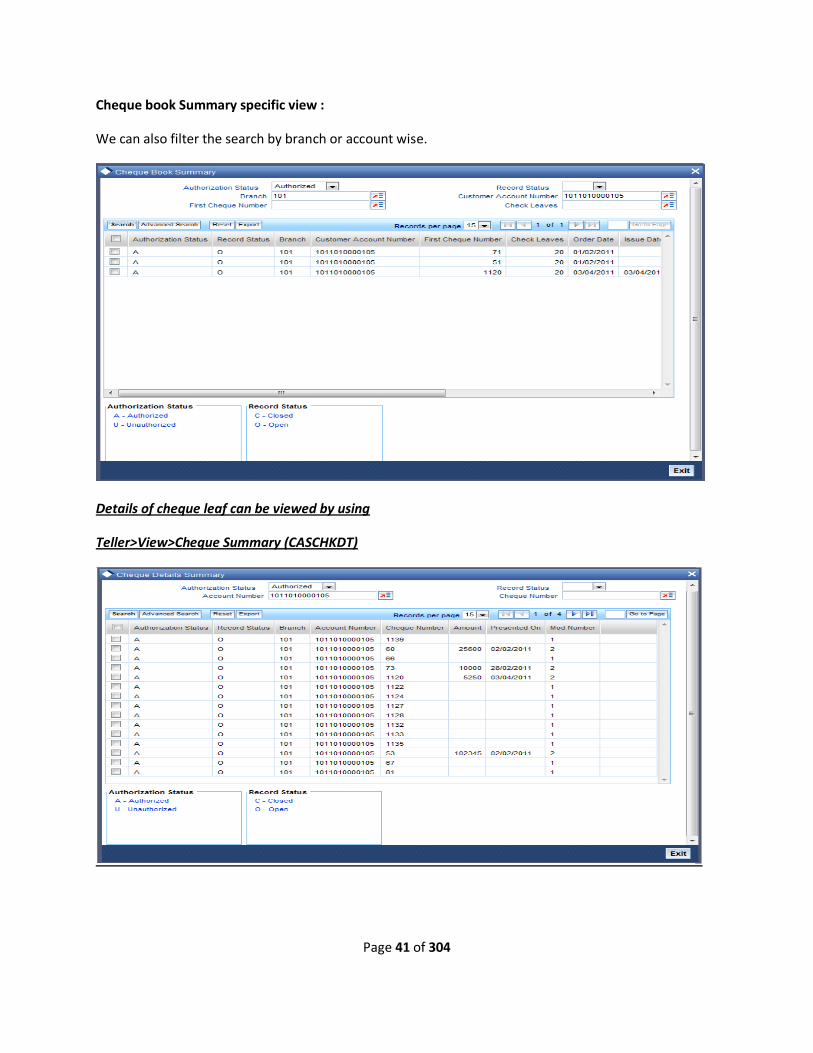
Cheque book Summary specific view :
We can also filter the search by branch or account wise.
Details of cheque leaf can be viewed by using
Teller>View>Cheque Summary (CASCHKDT)

Page 42 of 304
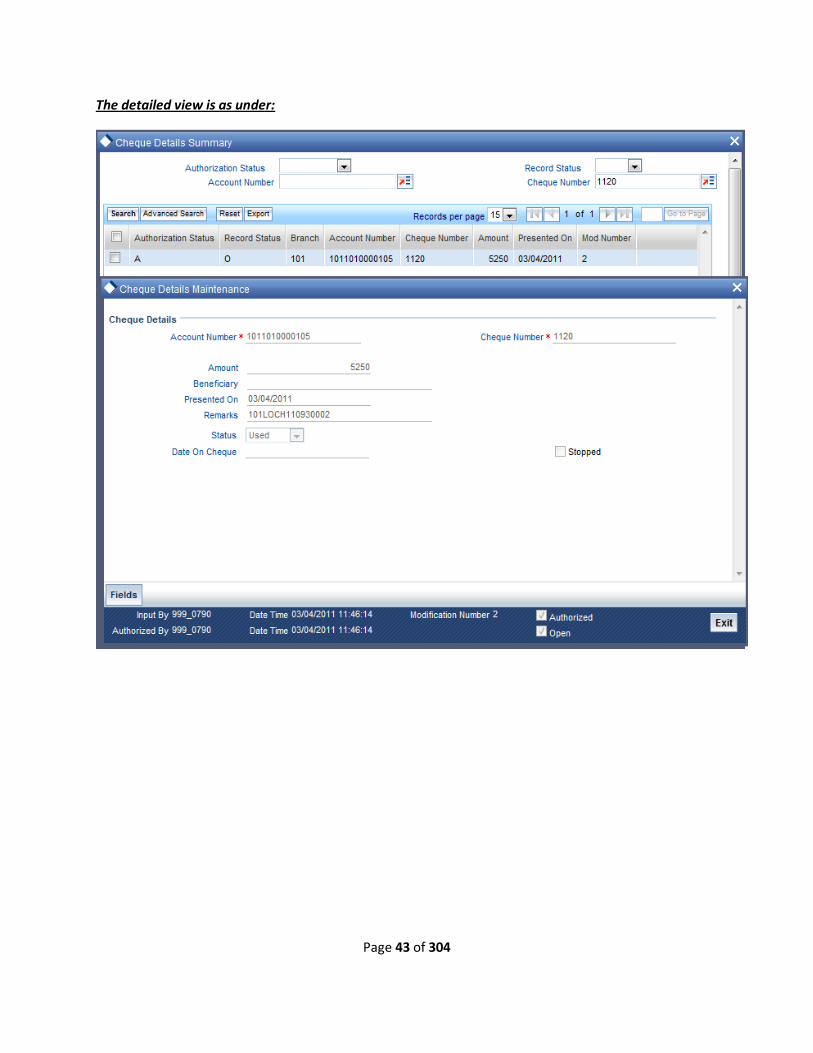
By selecting any of the leaf we can view the details of the leaf as under.
We can also view this menu by using CADCHKDT (Details of cheque leaf status) and using F7 query key
to put Account Number and Cheque Number and pressing F8 if complete.
Teller>View>Cheque Summary (CASCHKDT)
Details of specific cheque leaf can be viewed by using the cheque number only as under:
Page 43 of 304
The detailed view is as under:
Page 44 of 304
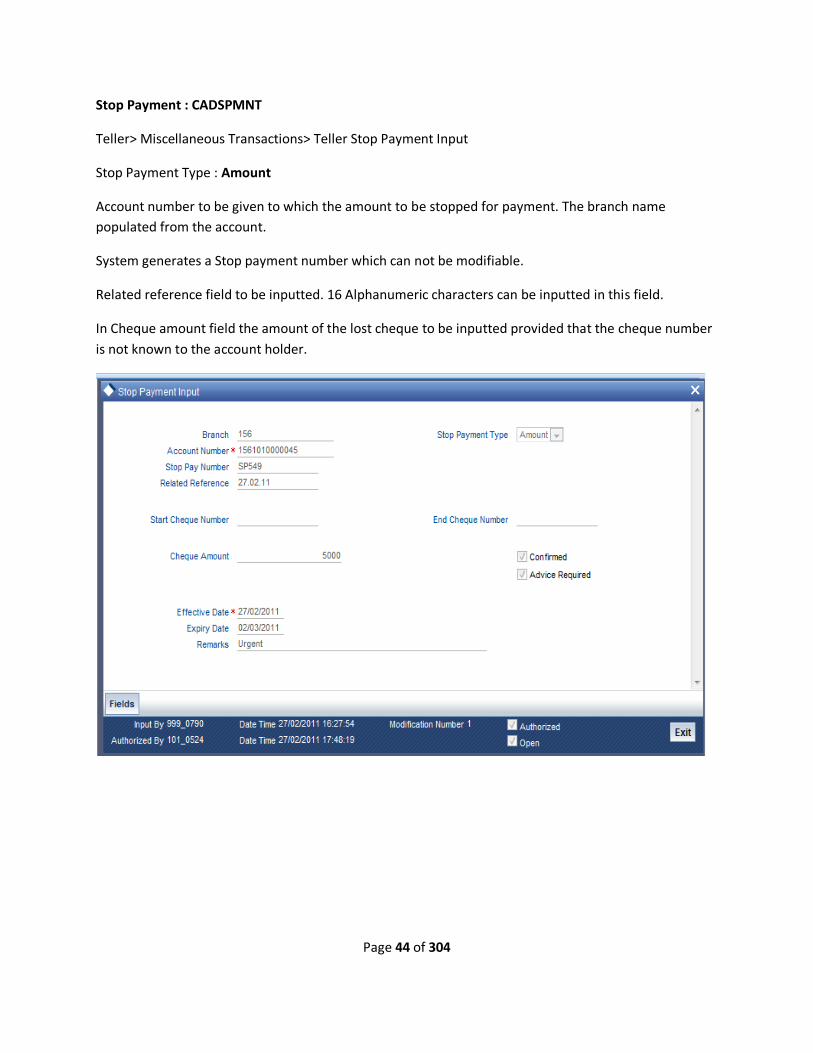
Stop Payment : CADSPMNT
Teller> Miscellaneous Transactions> Teller Stop Payment Input
Stop Payment Type : Amount
Account number to be given to which the amount to be stopped for payment. The branch name
populated from the account.
System generates a Stop payment number which can not be modifiable.
Related reference field to be inputted. 16 Alphanumeric characters can be inputted in this field.
In Cheque amount field the amount of the lost cheque to be inputted provided that the cheque number
is not known to the account holder.
Page 45 of 304
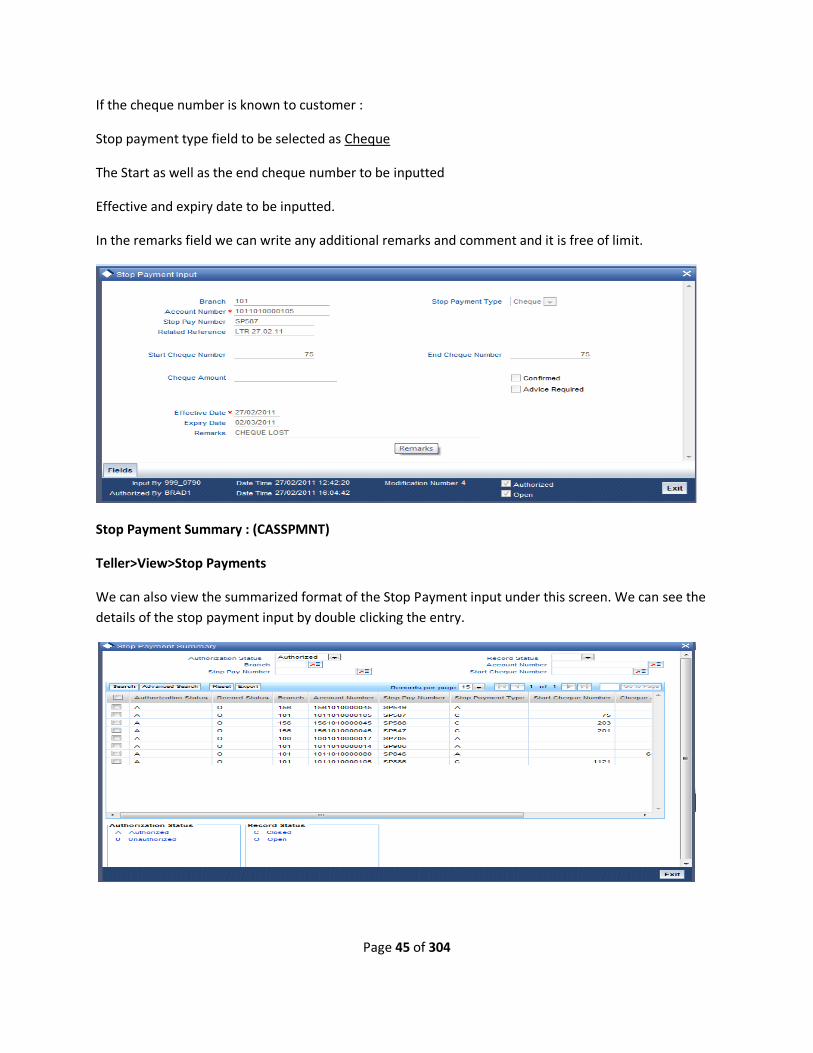
If the cheque number is known to customer :
Stop payment type field to be selected as Cheque
The Start as well as the end cheque number to be inputted
Effective and expiry date to be inputted.
In the remarks field we can write any additional remarks and comment and it is free of limit.
Stop Payment Summary : (CASSPMNT)
Teller>View>Stop Payments
We can also view the summarized format of the Stop Payment input under this screen. We can see the
details of the stop payment input by double clicking the entry.
Page 46 of 304
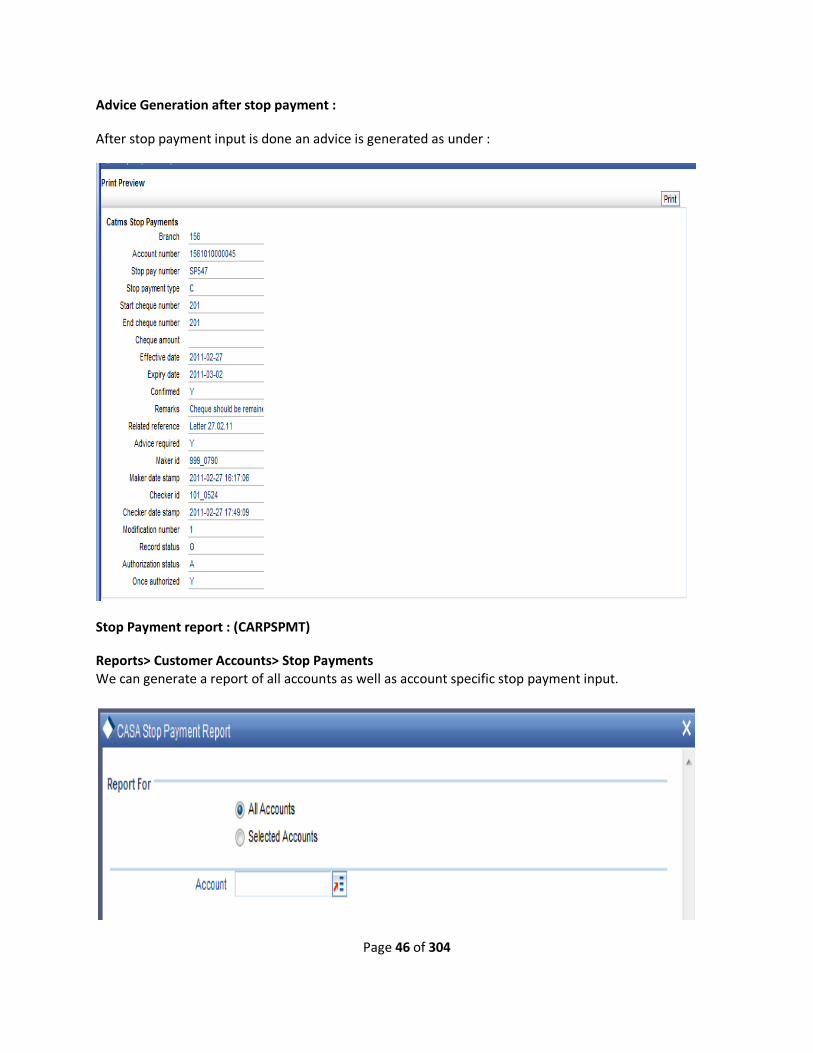
Advice Generation after stop payment :
After stop payment input is done an advice is generated as under :
Stop Payment report : (CARPSPMT)
Reports> Customer Accounts> Stop Payments We can generate a report of all accounts as well as account specific stop payment input.
Page 47 of 304
For viewing report it is convenient to select the format as HTML
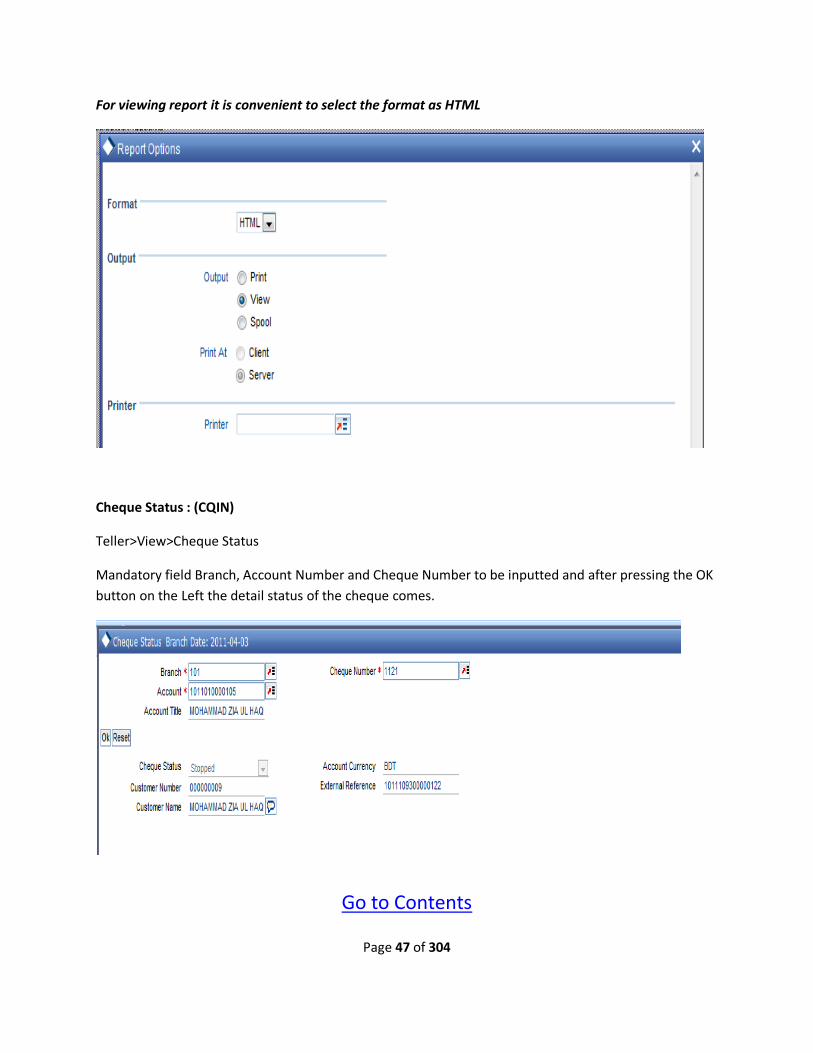
Cheque Status : (CQIN)
Teller>View>Cheque Status
Mandatory field Branch, Account Number and Cheque Number to be inputted and after pressing the OK
button on the Left the detail status of the cheque comes.
Go to Contents

Page 48 of 304
Page 49 of 304
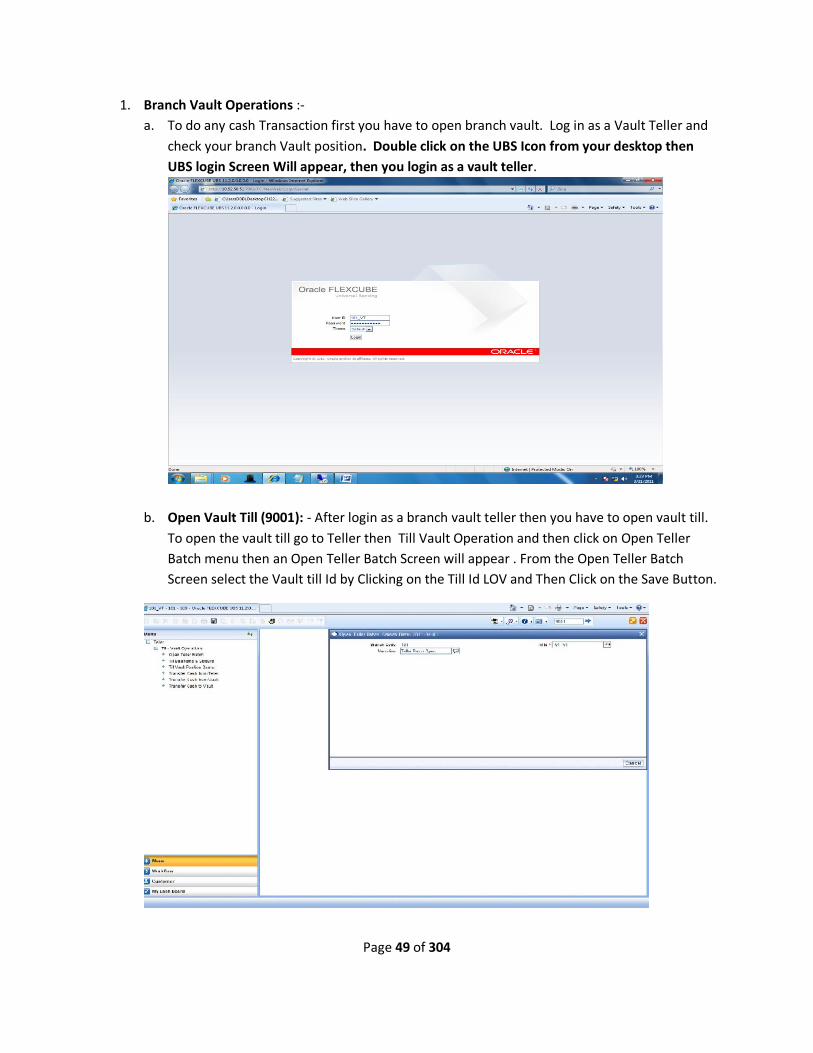
1. Branch Vault Operations :-
a. To do any cash Transaction first you have to open branch vault. Log in as a Vault Teller and
check your branch Vault position. Double click on the UBS Icon from your desktop then
UBS login Screen Will appear, then you login as a vault teller.
b. Open Vault Till (9001): - After login as a branch vault teller then you have to open vault till.
To open the vault till go to Teller then Till Vault Operation and then click on Open Teller
Batch menu then an Open Teller Batch Screen will appear . From the Open Teller Batch
Screen select the Vault till Id by Clicking on the Till Id LOV and Then Click on the Save Button.
Page 50 of 304
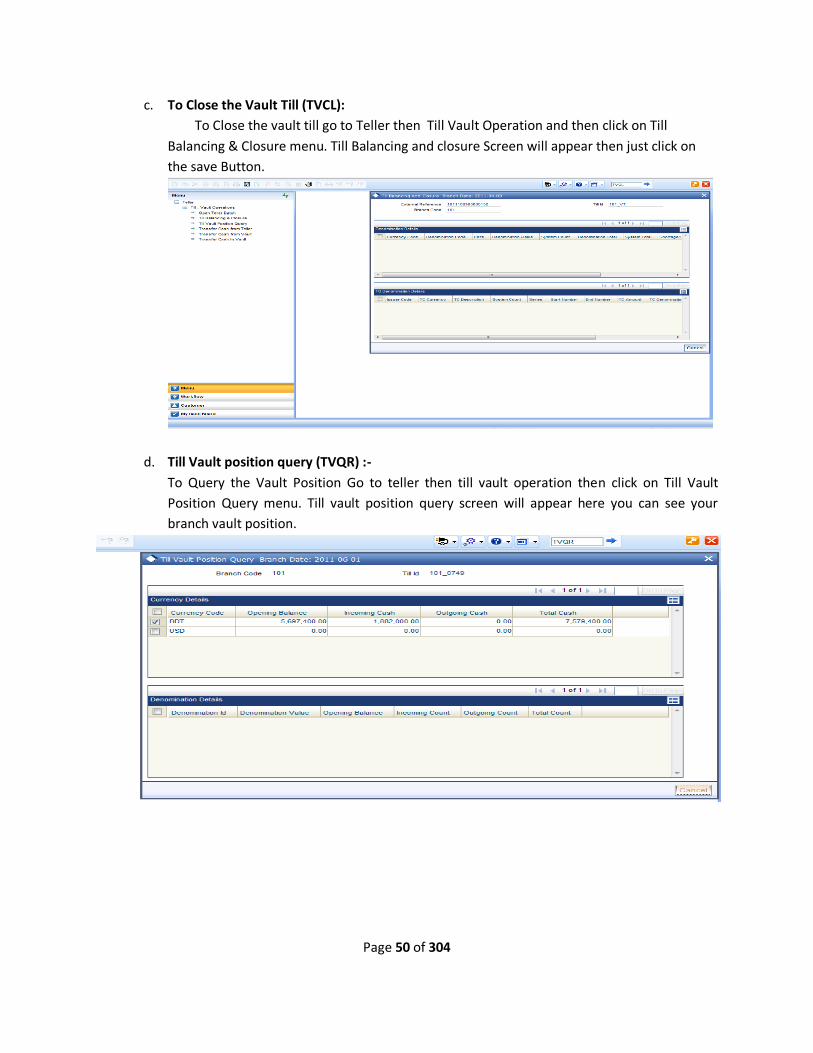
c. To Close the Vault Till (TVCL):
To Close the vault till go to Teller then Till Vault Operation and then click on Till
Balancing & Closure menu. Till Balancing and closure Screen will appear then just click on
the save Button.
d. Till Vault position query (TVQR) :-
To Query the Vault Position Go to teller then till vault operation then click on Till Vault
Position Query menu. Till vault position query screen will appear here you can see your
branch vault position.
Page 51 of 304
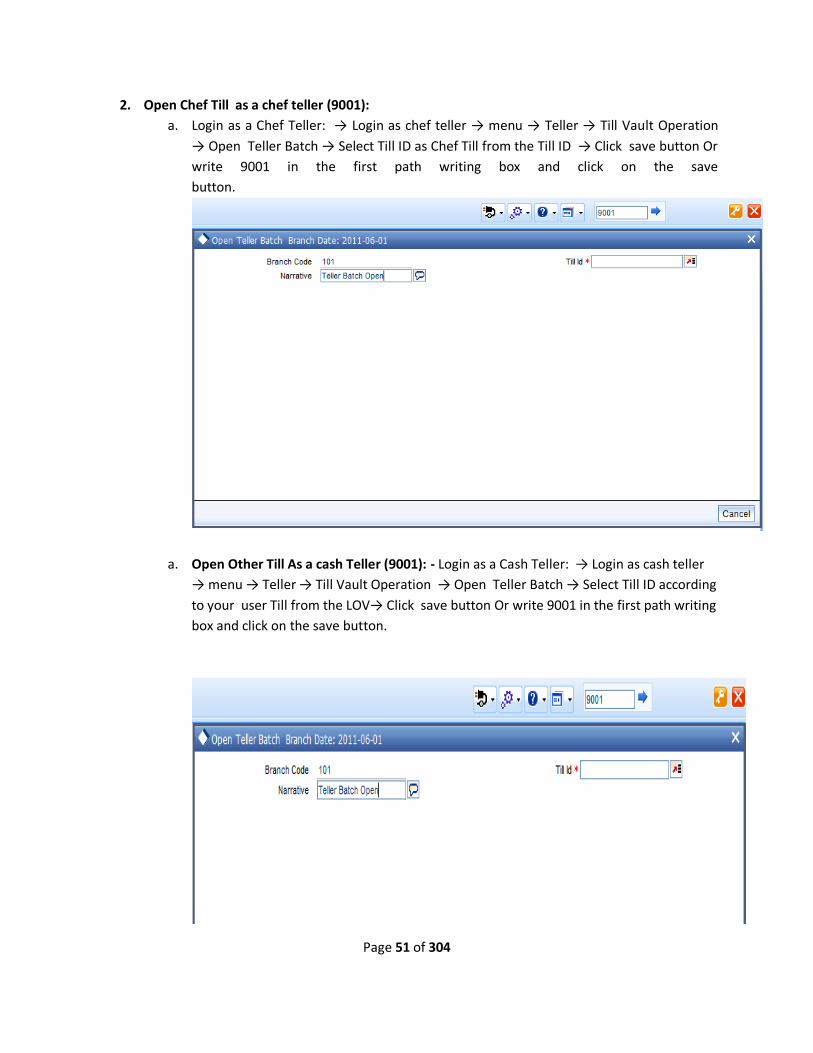
2. Open Chef Till as a chef teller (9001):
a. Login as a Chef Teller: → Login as chef teller → menu → Teller → Till Vault Operation
→ Open Teller Batch → Select Till ID as Chef Till from the Till ID → Click save button Or
write 9001 in the first path writing box and click on the save
button.
a. Open Other Till As a cash Teller (9001): - Login as a Cash Teller: → Login as cash teller
→ menu → Teller → Till Vault Operation → Open Teller Batch → Select Till ID according
to your user Till from the LOV→ Click save button Or write 9001 in the first path writing
box and click on the save button.

Page 52 of 304
3. To Close the Teller Batch/Till (TVCL): To Close the teller/till → Teller → Till Vault Operation →
Till Balancing & Closure menu. Till Balancing and closure Screen will appear then just click on the
save button.
4. Till/teller position query (TVQR) :- To Query the Till/Teller Position Go to teller → till vault
operation → Till Vault Position Query menu. Till vault position query screen will appear here you
can see your Till / Teller position.
Page 53 of 304
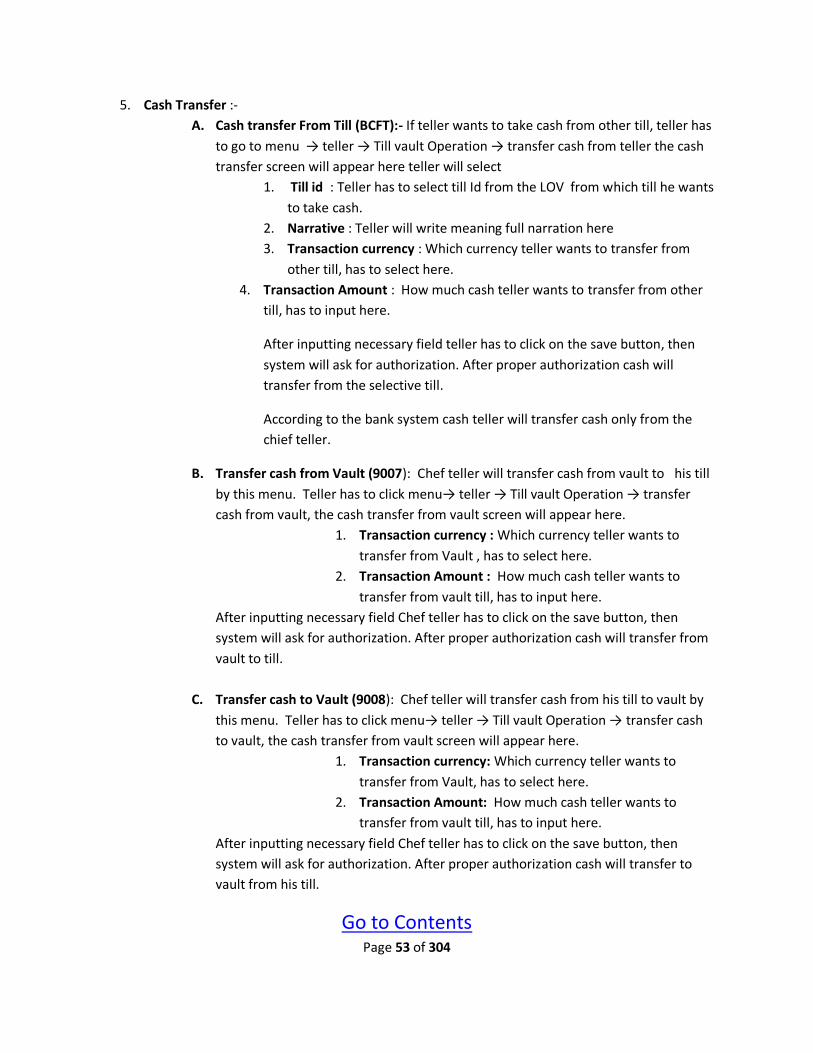
5. Cash Transfer :-
A. Cash transfer From Till (BCFT):- If teller wants to take cash from other till, teller has
to go to menu → teller → Till vault Operation → transfer cash from teller the cash
transfer screen will appear here teller will select
1. Till id : Teller has to select till Id from the LOV from which till he wants
to take cash.
2. Narrative : Teller will write meaning full narration here
3. Transaction currency : Which currency teller wants to transfer from
other till, has to select here.
4. Transaction Amount : How much cash teller wants to transfer from other
till, has to input here.
After inputting necessary field teller has to click on the save button, then
system will ask for authorization. After proper authorization cash will
transfer from the selective till.
According to the bank system cash teller will transfer cash only from the
chief teller.
B. Transfer cash from Vault (9007): Chef teller will transfer cash from vault to his till
by this menu. Teller has to click menu→ teller → Till vault Operation → transfer
cash from vault, the cash transfer from vault screen will appear here.
1. Transaction currency : Which currency teller wants to
transfer from Vault , has to select here.
2. Transaction Amount : How much cash teller wants to
transfer from vault till, has to input here.
After inputting necessary field Chef teller has to click on the save button, then
system will ask for authorization. After proper authorization cash will transfer from
vault to till.
C. Transfer cash to Vault (9008): Chef teller will transfer cash from his till to vault by
this menu. Teller has to click menu→ teller → Till vault Operation → transfer cash
to vault, the cash transfer from vault screen will appear here.
1. Transaction currency: Which currency teller wants to
transfer from Vault, has to select here.
2. Transaction Amount: How much cash teller wants to
transfer from vault till, has to input here.
After inputting necessary field Chef teller has to click on the save button, then
system will ask for authorization. After proper authorization cash will transfer to
vault from his till.
Go to Contents
Page 54 of 304
Page 55 of 304
To remit Cash to the Central Bank and bought required cash from the Central Bank is very much easy in
the UBS system. How to do the same is given bellow
I. Remit Cash to Central Bank (9010) :- If teller wants to Remit cash to the Central Bank then
teller has go to Manu → Teller → Cash Transaction → Remit cash to Local Office
The above screen will appear then teller has to fill up the following fields:
a. Transaction Currency: - Teller has to select / write currency, such as Bangladeshi Taka as
BDT, US Dollar as USD.
b. Narrative: - Teller has to write the meaningful narration in the narrative field.
c. Transaction Amount: - Teller has to input how much cash, wants to remit to the Central
Bank.
d. After Inputting all the necessary field teller has to click on the save button then another
denomination screen will appear
e. If every inputted field is ok then click the save button again then It will ask for authorization.
Page 56 of 304
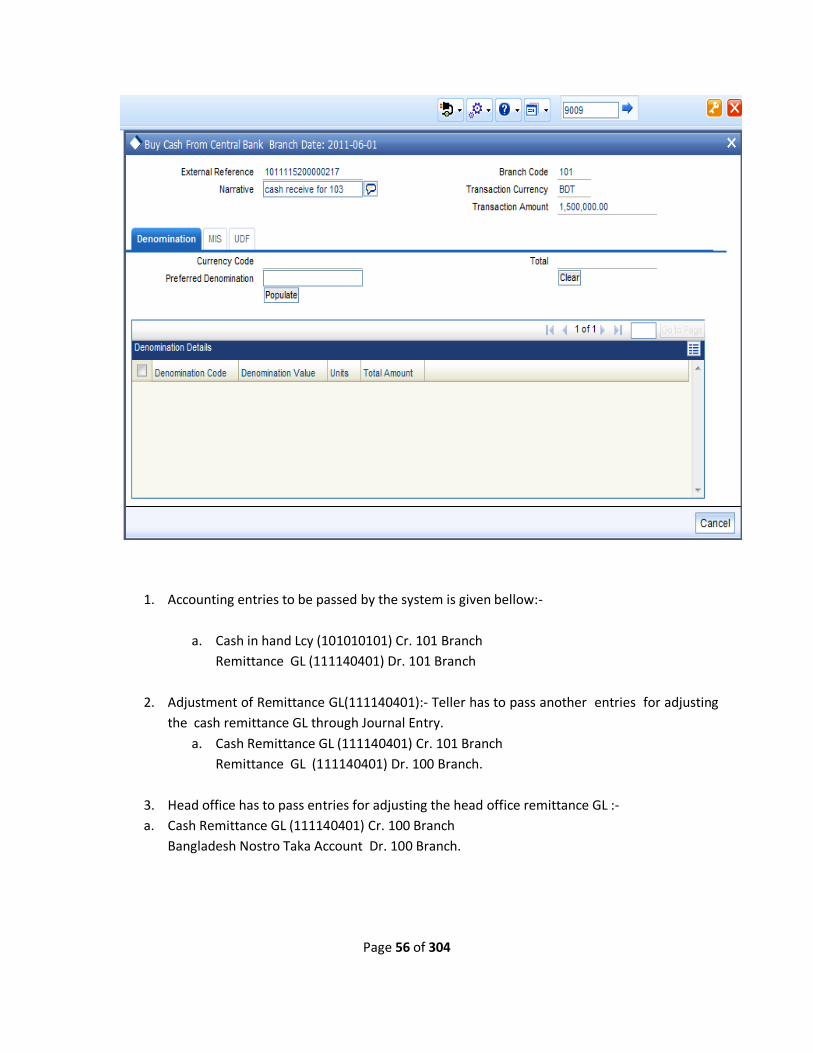
1. Accounting entries to be passed by the system is given bellow:-
a. Cash in hand Lcy (101010101) Cr. 101 Branch
Remittance GL (111140401) Dr. 101 Branch
2. Adjustment of Remittance GL(111140401):- Teller has to pass another entries for adjusting
the cash remittance GL through Journal Entry.
a. Cash Remittance GL (111140401) Cr. 101 Branch
Remittance GL (111140401) Dr. 100 Branch.
3. Head office has to pass entries for adjusting the head office remittance GL :-
a. Cash Remittance GL (111140401) Cr. 100 Branch
Bangladesh Nostro Taka Account Dr. 100 Branch.

Page 57 of 304
II. Receive cash from Central Bank (9009) : - If teller wants to buy cash from Central Bank then
teller has go to Manu → Teller → Cash Transaction → Receive cash from Local Office
The above screen will appear then teller has to fill up the following fields:
a. Transaction Currency: - Teller has to select / write currency, such as Bangladeshi Taka as
BDT, US Dollar as USD.
b. Narrative: - - Teller has to write the meaningful narration In the narrative field.
c. Transaction Amount: - Teller has to input how much cash, wants to remit to the Central
Bank .
After inputting all the necessary field teller has to click on the save button then it will ask for
authorization.
III. Accounting entries are passed by the system is given bellow:-
b. Cash in hand Lcy (101010101) Dr. 101 Branch
Remittance GL (111140401) Cr. 101 Branch
IV. Adjustment of Remittance GL(111140401):- Teller has to pass another entries for adjusting the
cash remittance GL through Journal Entry.
b. Cash Remittance GL (111140401) Dr. 101 Branch
Remittance Gl (111140401) Cr. 100 Branch.
V. Head office has to pass entries for adjusting the head office remittance GL :-
b. Cash Remittance GL (111140401) Dr. 100 Branch
Bangladesh Nostro Taka Account Cr. 100 Branch.
Page 58 of 304
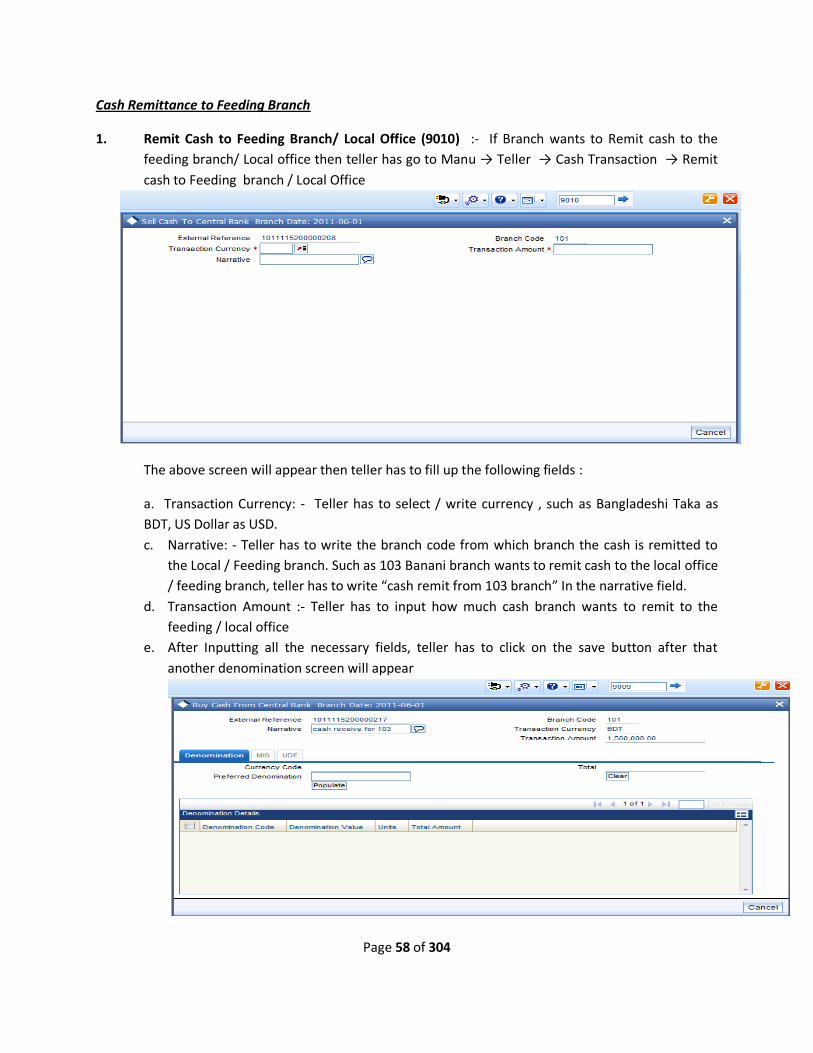
Cash Remittance to Feeding Branch
1. Remit Cash to Feeding Branch/ Local Office (9010) :- If Branch wants to Remit cash to the
feeding branch/ Local office then teller has go to Manu → Teller → Cash Transaction → Remit
cash to Feeding branch / Local Office
The above screen will appear then teller has to fill up the following fields :
a. Transaction Currency: - Teller has to select / write currency , such as Bangladeshi Taka as
BDT, US Dollar as USD.
c. Narrative: - Teller has to write the branch code from which branch the cash is remitted to
the Local / Feeding branch. Such as 103 Banani branch wants to remit cash to the local office
/ feeding branch, teller has to write “cash remit from 103 branch” In the narrative field.
d. Transaction Amount :- Teller has to input how much cash branch wants to remit to the
feeding / local office
e. After Inputting all the necessary fields, teller has to click on the save button after that
another denomination screen will appear
Page 59 of 304
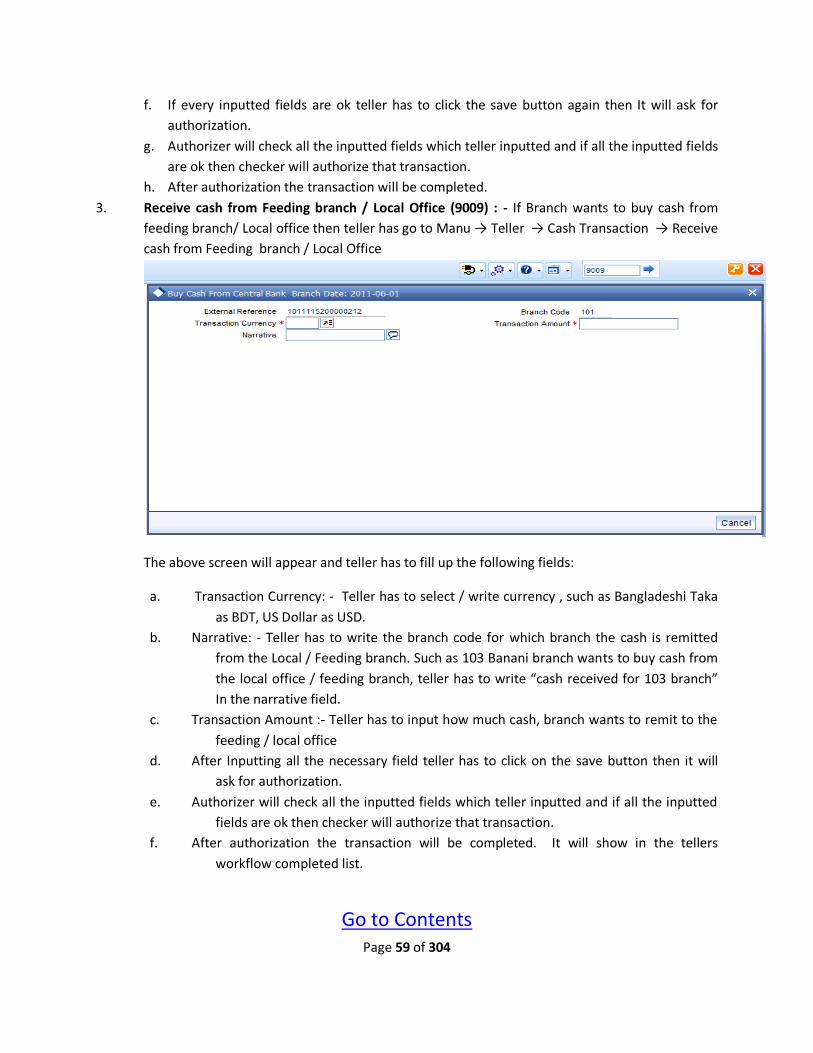
f. If every inputted fields are ok teller has to click the save button again then It will ask for
authorization.
g. Authorizer will check all the inputted fields which teller inputted and if all the inputted fields
are ok then checker will authorize that transaction.
h. After authorization the transaction will be completed.
3. Receive cash from Feeding branch / Local Office (9009) : - If Branch wants to buy cash from
feeding branch/ Local office then teller has go to Manu → Teller → Cash Transaction → Receive
cash from Feeding branch / Local Office
The above screen will appear and teller has to fill up the following fields:
a. Transaction Currency: - Teller has to select / write currency , such as Bangladeshi Taka
as BDT, US Dollar as USD.
b. Narrative: - Teller has to write the branch code for which branch the cash is remitted
from the Local / Feeding branch. Such as 103 Banani branch wants to buy cash from
the local office / feeding branch, teller has to write “cash received for 103 branch”
In the narrative field.
c. Transaction Amount :- Teller has to input how much cash, branch wants to remit to the
feeding / local office
d. After Inputting all the necessary field teller has to click on the save button then it will
ask for authorization.
e. Authorizer will check all the inputted fields which teller inputted and if all the inputted
fields are ok then checker will authorize that transaction.
f. After authorization the transaction will be completed. It will show in the tellers
workflow completed list.
Go to Contents

Page 60 of 304
Page 61 of 304
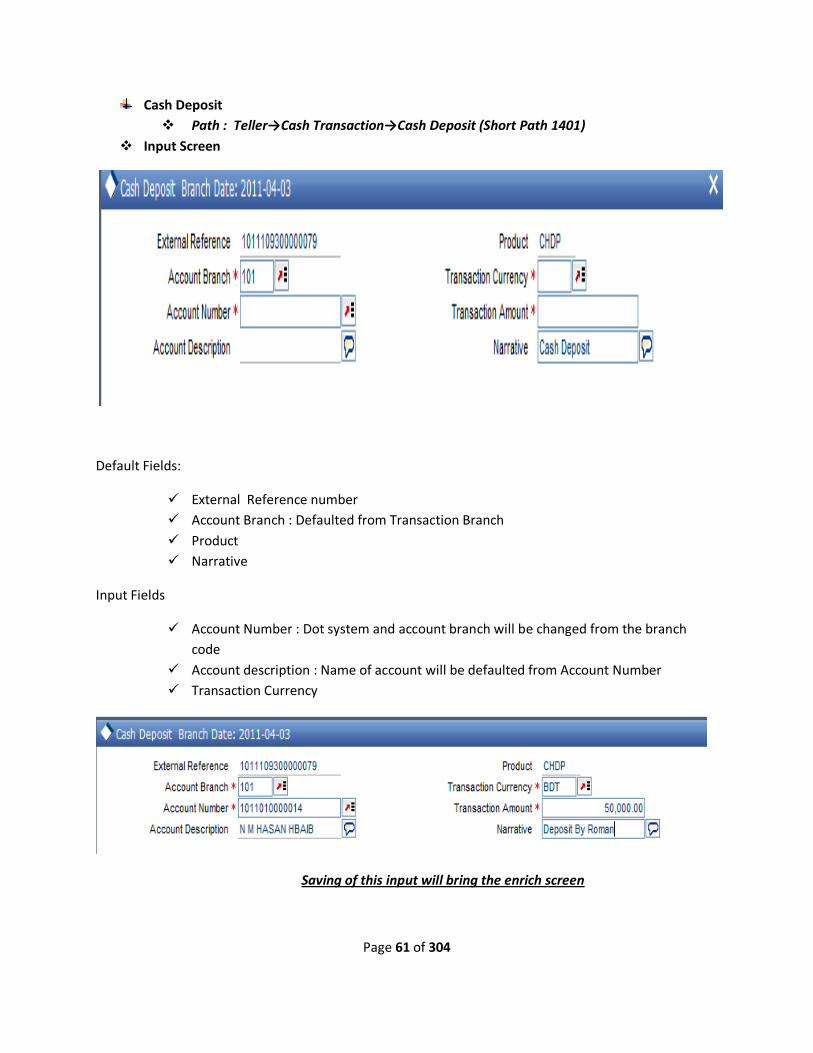
Cash Deposit
Path : Teller→Cash Transaction→Cash Deposit (Short Path 1401)
Input Screen
Default Fields:
External Reference number
Account Branch : Defaulted from Transaction Branch
Product
Narrative
Input Fields
Account Number : Dot system and account branch will be changed from the branch
code
Account description : Name of account will be defaulted from Account Number
Transaction Currency
Saving of this input will bring the enrich screen

Page 62 of 304
Enrich Screen (Cash Deposit)
Currency Denominations and Charge Screen will Come
If everything is OK, press save button to complete the transcation.
Page 63 of 304
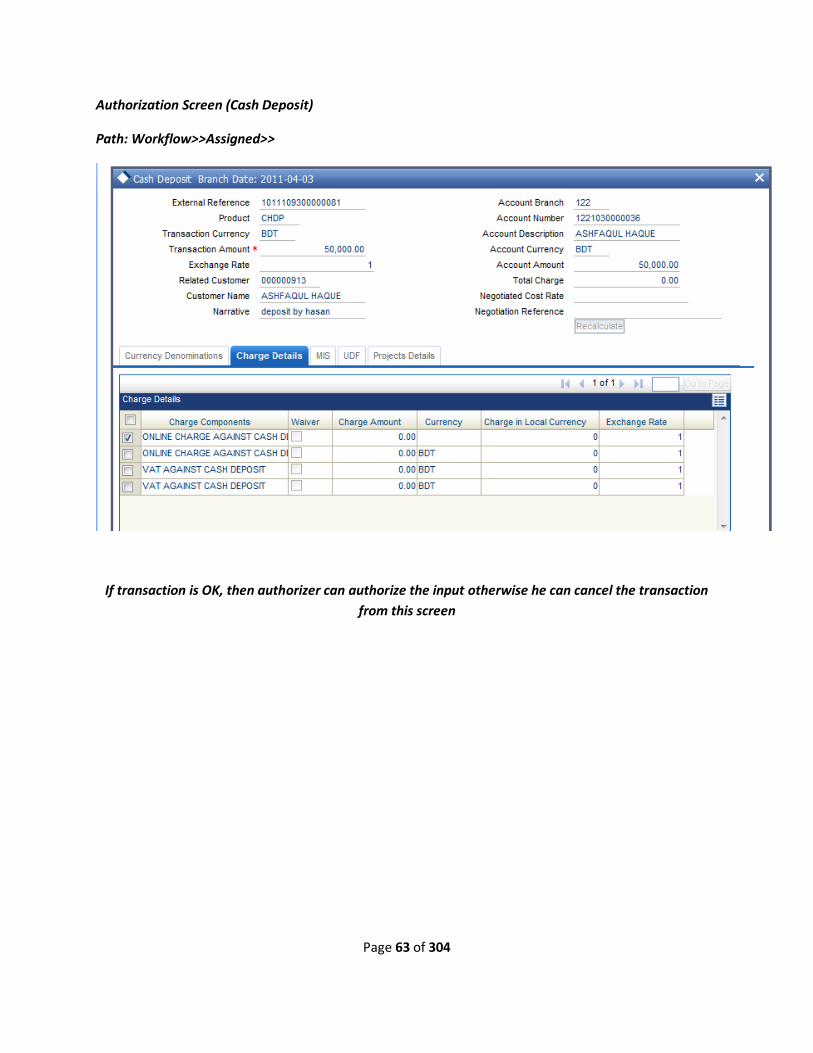
Authorization Screen (Cash Deposit)
Path: Workflow>>Assigned>>
If transaction is OK, then authorizer can authorize the input otherwise he can cancel the transaction
from this screen
Page 64 of 304
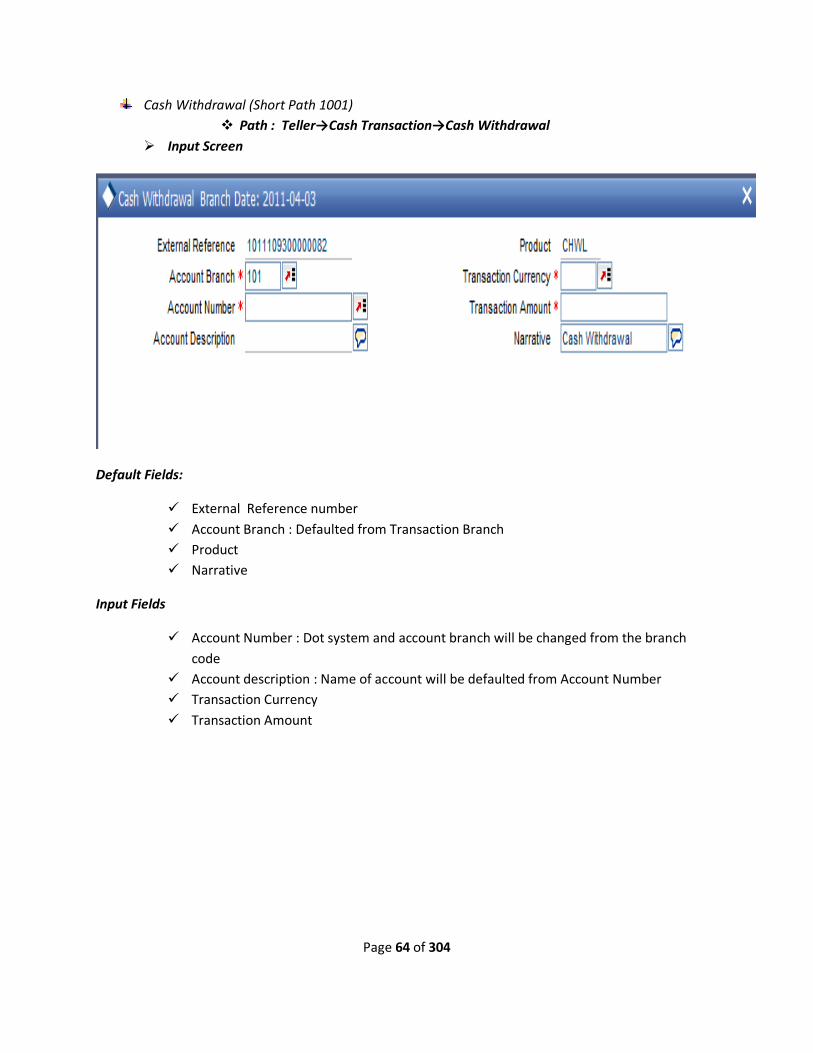
Cash Withdrawal (Short Path 1001)
Path : Teller→Cash Transaction→Cash Withdrawal
Input Screen
Default Fields:
External Reference number
Account Branch : Defaulted from Transaction Branch
Product
Narrative
Input Fields
Account Number : Dot system and account branch will be changed from the branch
code
Account description : Name of account will be defaulted from Account Number
Transaction Currency
Transaction Amount
Page 65 of 304
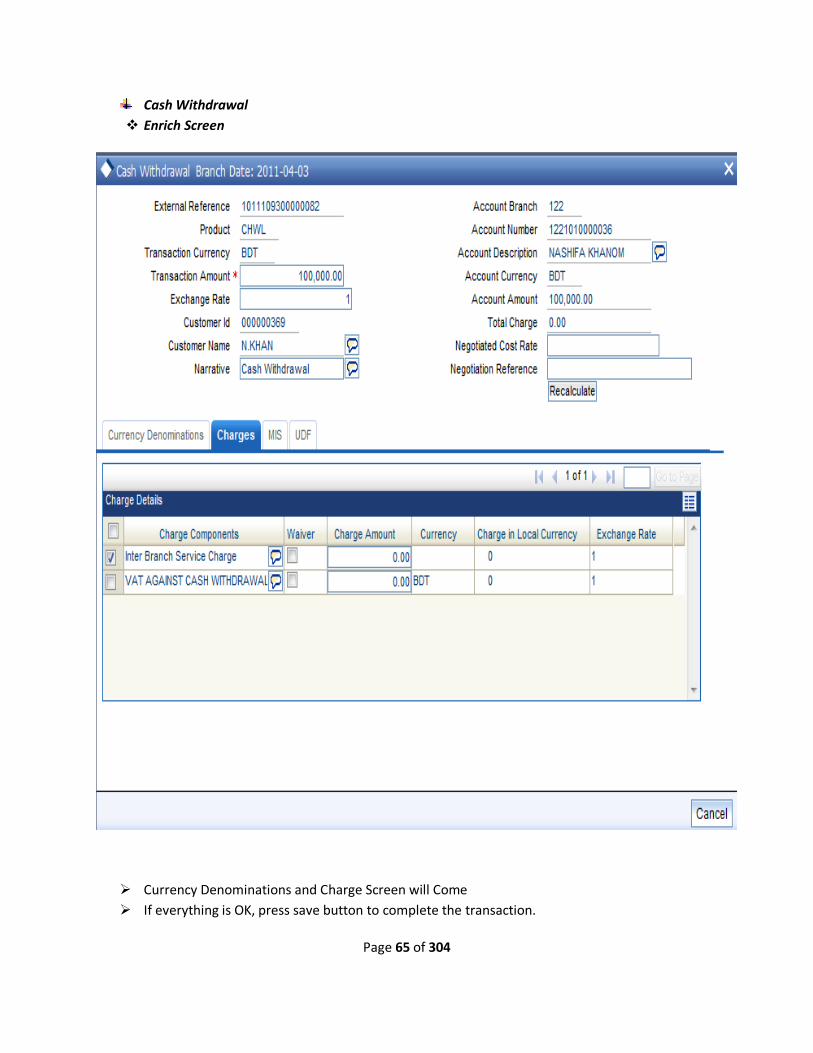
Cash Withdrawal
Enrich Screen
Currency Denominations and Charge Screen will Come
If everything is OK, press save button to complete the transaction.

Page 66 of 304
Cash Withdrawal
Authorization Screen
Authorization Screen (Cash Deposit)
Path : Workflow>>Assigned>>
If transaction is OK, then authorizer can authorize the input otherwise he can cancel the transaction
from this screen

Page 67 of 304
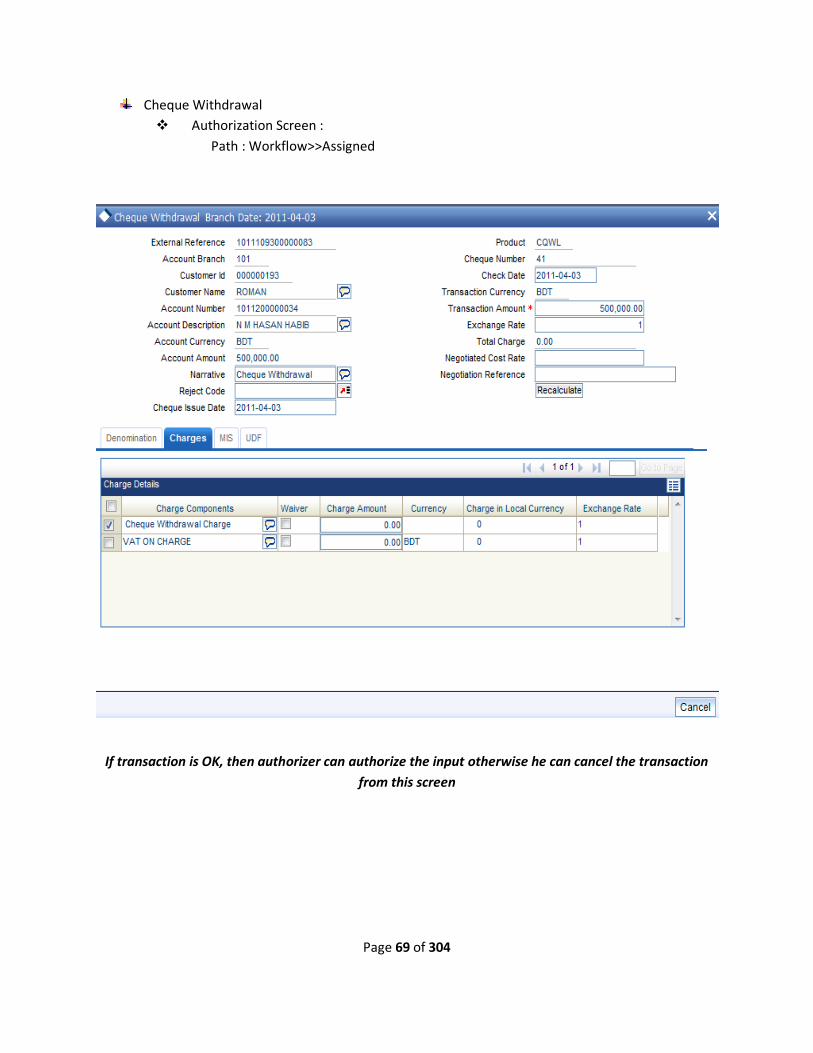
Cheque Withdrawal (Short Path 1013)
Input Screen
Path : Teller→Cash Transaction→Cheque Withdrawal
Default Fields:
External Reference number
Account Branch : Defaulted from Transaction Branch
Product
Narrative
Check date
Input Fields
Account Number : Dot system and account branch will be changed from the branch
code
Account description : Name of account will be defaulted from Account Number
Cheque Number
Cheque Issue Date
Transaction Currency
Transaction Amount
Page 68 of 304
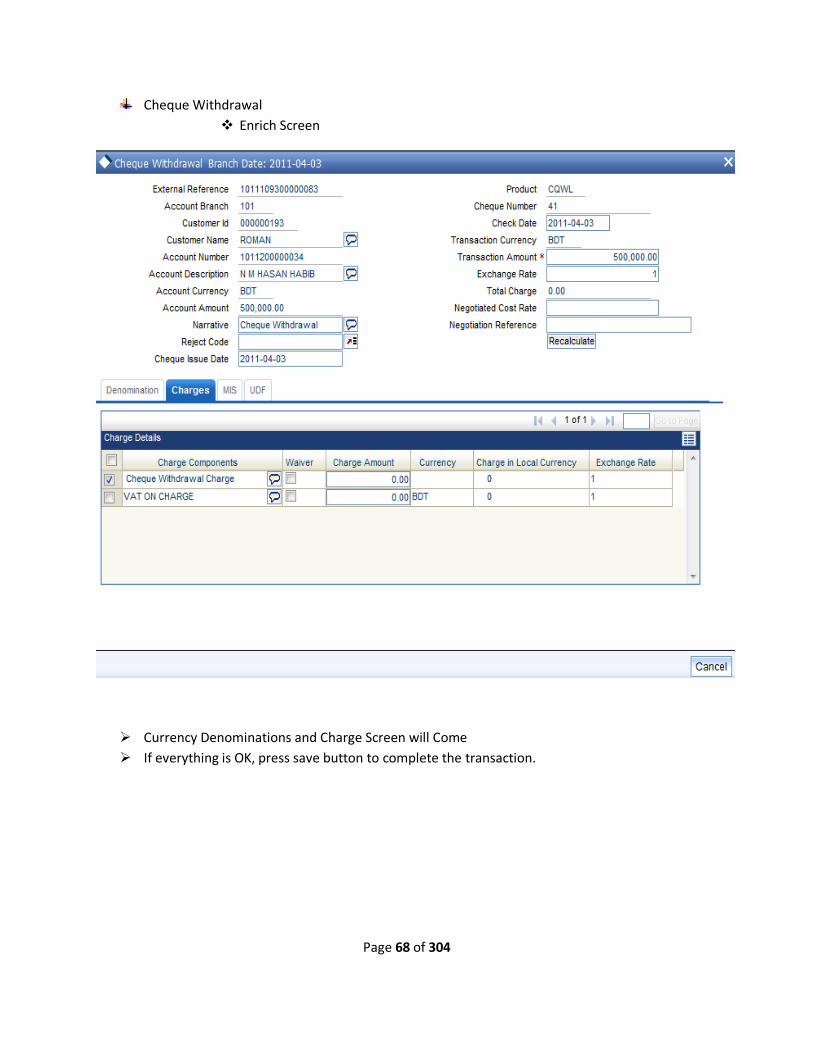
Cheque Withdrawal
Enrich Screen
Currency Denominations and Charge Screen will Come
If everything is OK, press save button to complete the transaction.
Page 69 of 304
Cheque Withdrawal
Authorization Screen :
Path : Workflow>>Assigned
If transaction is OK, then authorizer can authorize the input otherwise he can cancel the transaction
from this screen

Page 70 of 304
Miscellaneous GL Credit (Short Path 1460)
Path : Teller >>Cash Transaction>> Miscellaneous GL Credit
Input Screen
Default Fields:
External Reference number
Product
Input Fields
GL Account Number : GL no of the transaction branch
GL Description : Name of account will be defaulted from Account Number
GL Currency
Reference Number
Transaction Currency
Transaction Amount
Narrative

Page 71 of 304
Miscellaneous GL Credit
Enrich Screen
Currency Denominations and Charge Screen will Come
If everything is OK, press save button to complete the transaction.
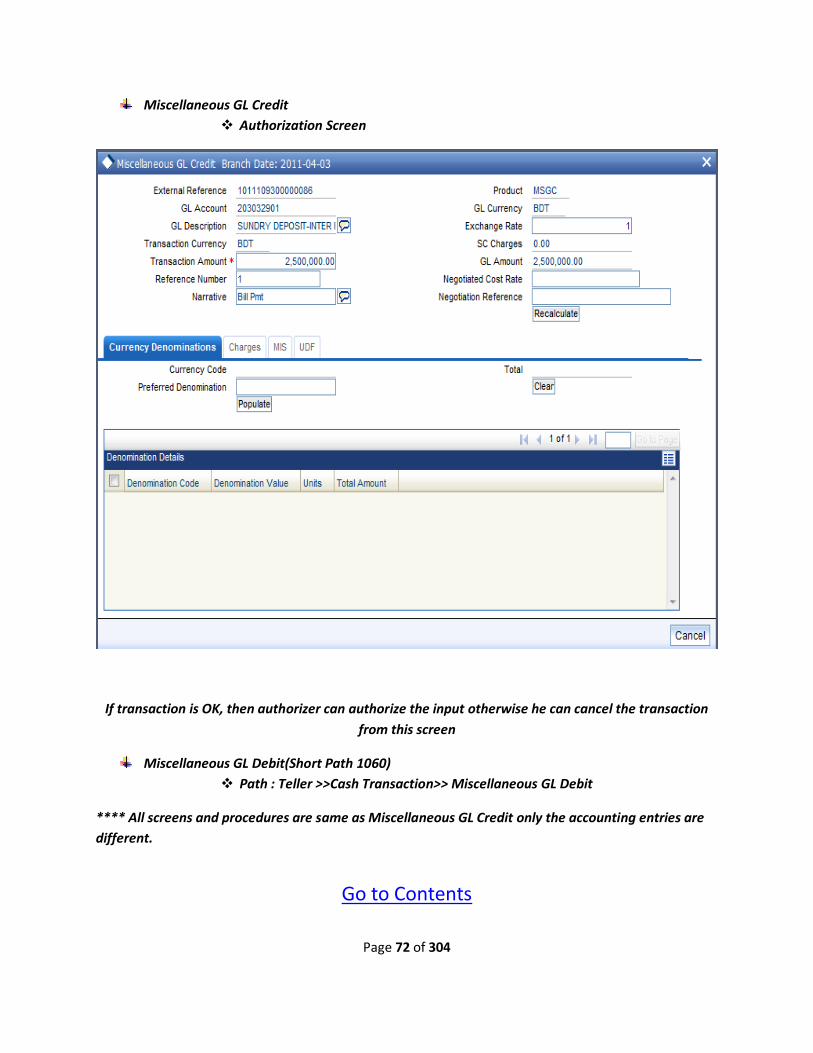
Page 72 of 304
Miscellaneous GL Credit
Authorization Screen
If transaction is OK, then authorizer can authorize the input otherwise he can cancel the transaction
from this screen
Miscellaneous GL Debit(Short Path 1060)
Path : Teller >>Cash Transaction>> Miscellaneous GL Debit
**** All screens and procedures are same as Miscellaneous GL Credit only the accounting entries are
different.
Go to Contents

Page 73 of 304
Page 74 of 304
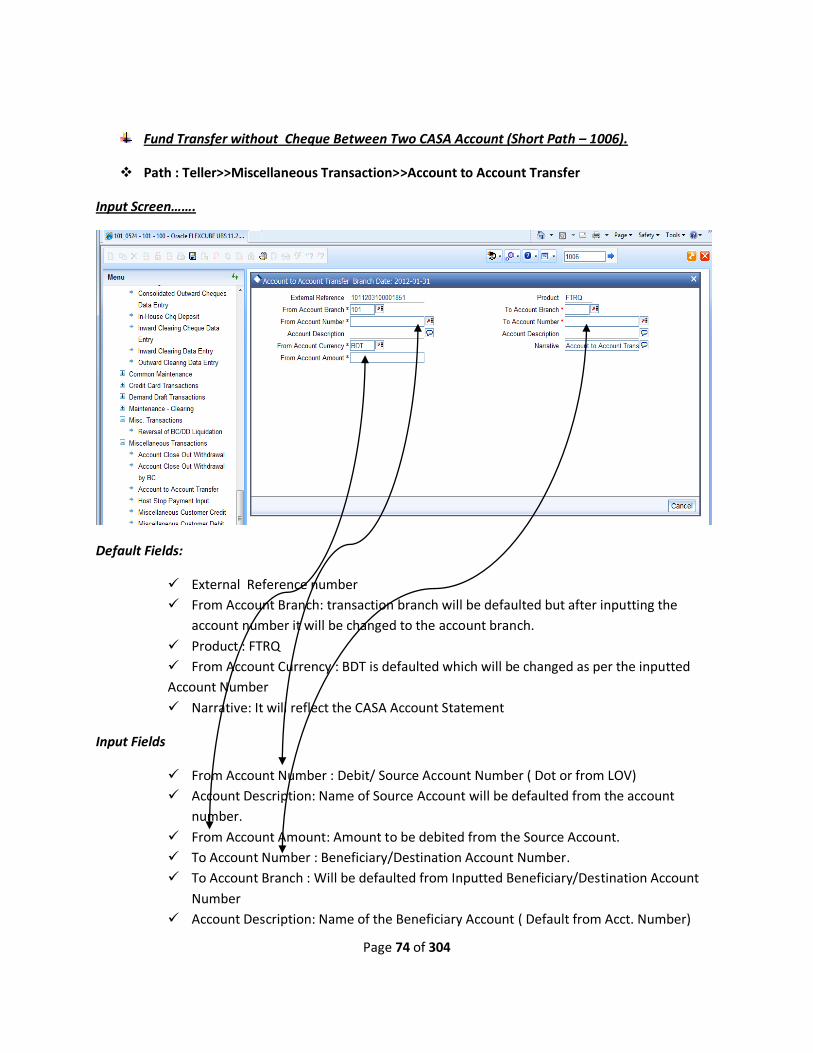
Fund Transfer without Cheque Between Two CASA Account (Short Path – 1006).
Path : Teller>>Miscellaneous Transaction>>Account to Account Transfer
Input Screen…….
Default Fields:
External Reference number
From Account Branch: transaction branch will be defaulted but after inputting the
account number it will be changed to the account branch.
Product : FTRQ
From Account Currency : BDT is defaulted which will be changed as per the inputted
Account Number
Narrative: It will reflect the CASA Account Statement
Input Fields
From Account Number : Debit/ Source Account Number ( Dot or from LOV)
Account Description: Name of Source Account will be defaulted from the account
number.
From Account Amount: Amount to be debited from the Source Account.
To Account Number : Beneficiary/Destination Account Number.
To Account Branch : Will be defaulted from Inputted Beneficiary/Destination Account
Number
Account Description: Name of the Beneficiary Account ( Default from Acct. Number)
Page 75 of 304
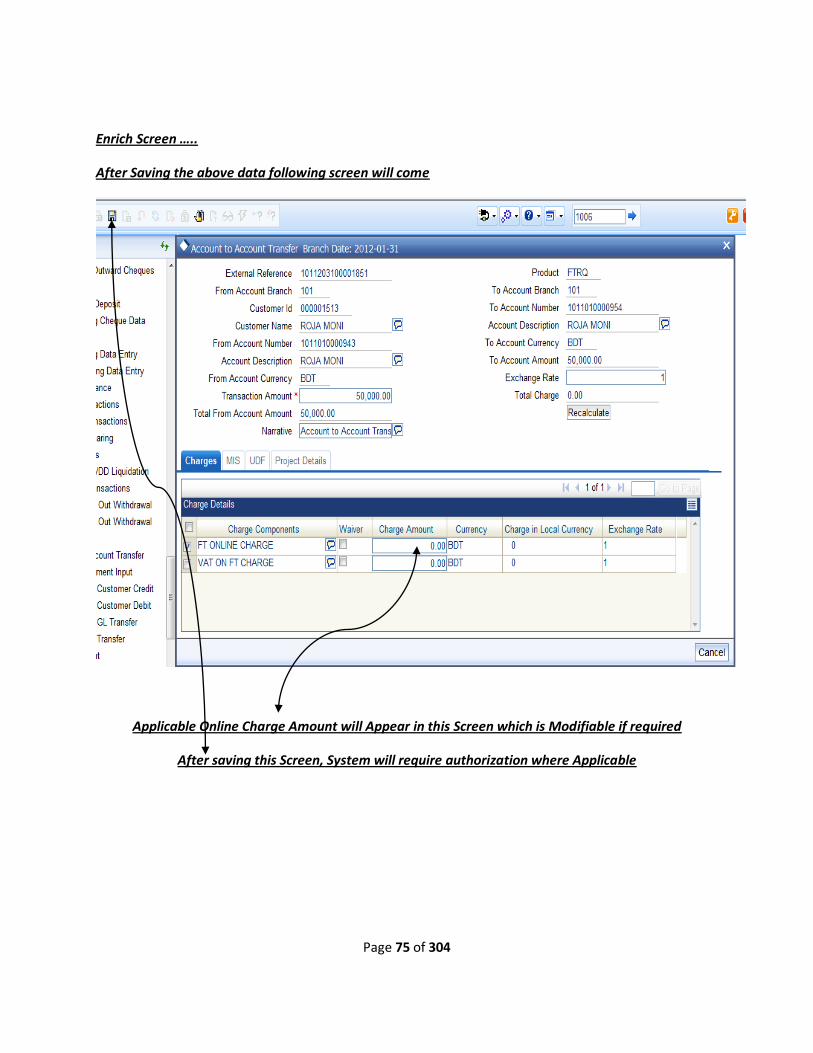
Enrich Screen …..
After Saving the above data following screen will come
Applicable Online Charge Amount will Appear in this Screen which is Modifiable if required
After saving this Screen, System will require authorization where Applicable
Page 76 of 304
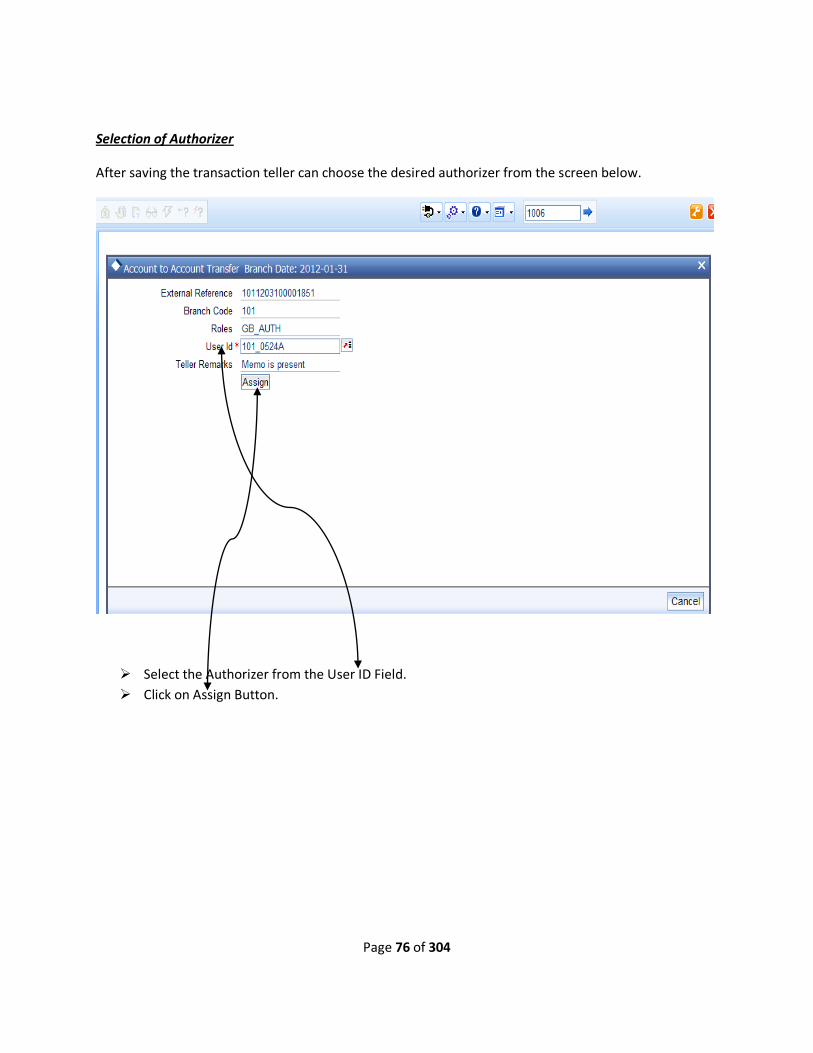
Selection of Authorizer
After saving the transaction teller can choose the desired authorizer from the screen below.
Select the Authorizer from the User ID Field.
Click on Assign Button.

Page 77 of 304
Authorizer Screen……
Path : Workflow>>Assigned>>Click>>Account to Account Transfer
Clicking on the transaction, above screen will appear and authorizer has to click on
Authorization Button.
After Clicking on the Authorization Button, system will bring the following Screen.

Page 78 of 304
Authorizer Screen……
From above screen, Authorizer can be aware that;
Memo is there or not.
He can read the override messages by clicking on the Override Message Option.
From above, Authorizer can take decision whether he will Allow or Reject the transaction.

Page 79 of 304
Fund Transfer with Cheque Between Two CASA Account (Short Path – LOCH).
Path : Teller>>Cheque Transaction>>In House Cheque Deposit
Input Screen…..
Default Fields:
External Reference number
From Account Branch: transaction branch will be defaulted but after inputting the
account number it will be changed to the account branch.
Product : LOCH
From Account Currency : BDT is defaulted which will be changed as per the inputted
Account Number
Narrative: It will reflect the CASA Account Statement
Input Fields
From Account Number : Debit/ Source Account Number ( Dot or from LOV)
Account Description: Name of Source Account will be defaulted from the account
number.
Amount: Amount to be debited from the Source Account.
To Account Number : Beneficiary/Destination Account Number
To Account Branch : Will be defaulted from Inputted Beneficiary/Destination Account
Number
Cheque Number : Cheque Leaf Number ( Mandatory)
Check date : System date.
Page 80 of 304
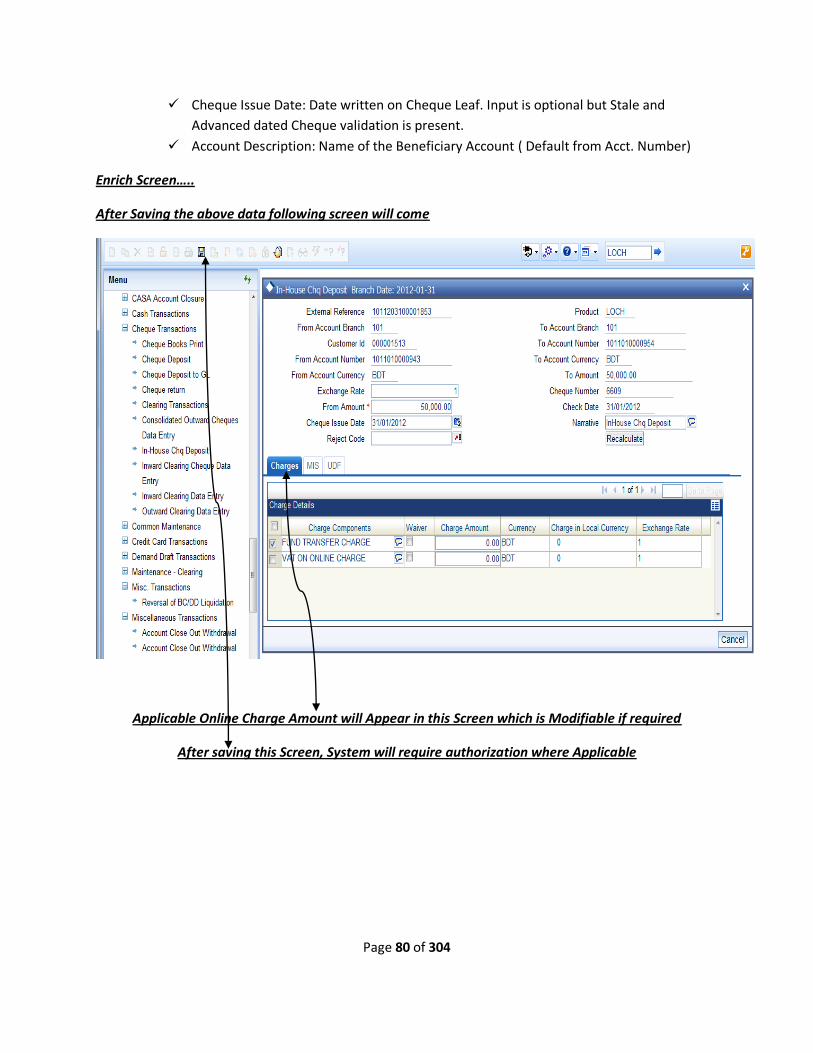
Cheque Issue Date: Date written on Cheque Leaf. Input is optional but Stale and
Advanced dated Cheque validation is present.
Account Description: Name of the Beneficiary Account ( Default from Acct. Number)
Enrich Screen…..
After Saving the above data following screen will come
Applicable Online Charge Amount will Appear in this Screen which is Modifiable if required
After saving this Screen, System will require authorization where Applicable
Page 81 of 304
Authorizer Screen……
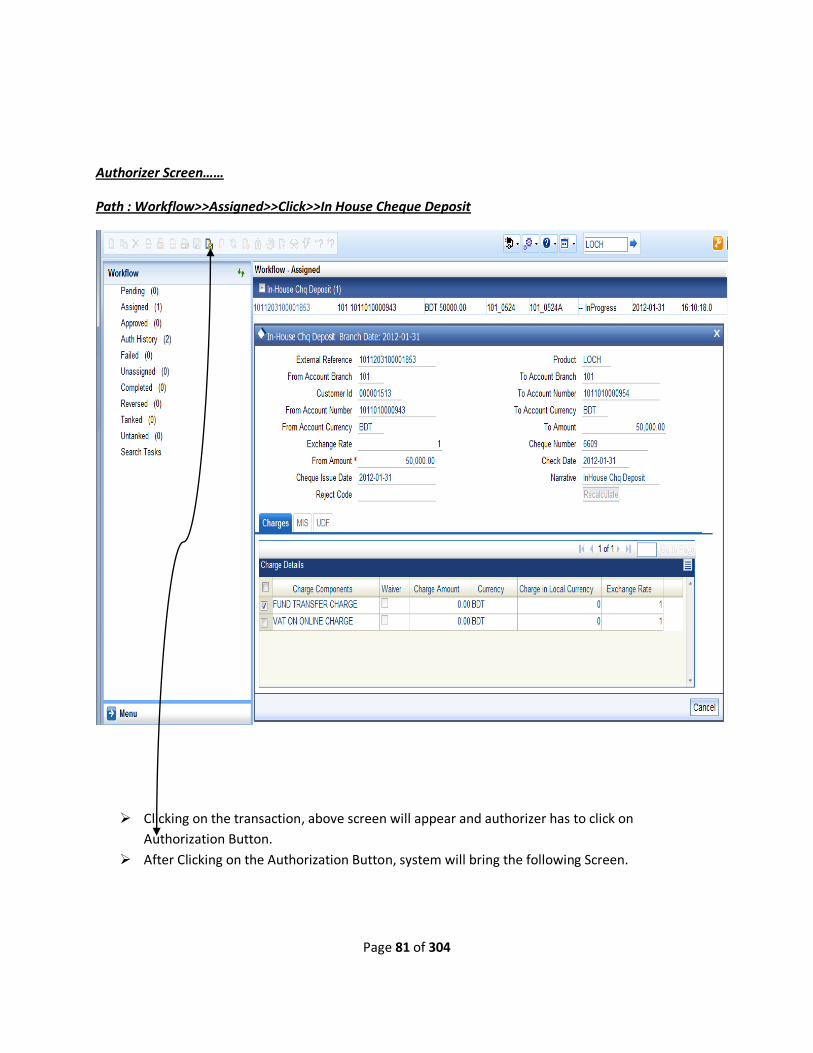
Path : Workflow>>Assigned>>Click>>In House Cheque Deposit
Clicking on the transaction, above screen will appear and authorizer has to click on
Authorization Button.
After Clicking on the Authorization Button, system will bring the following Screen.
Page 82 of 304
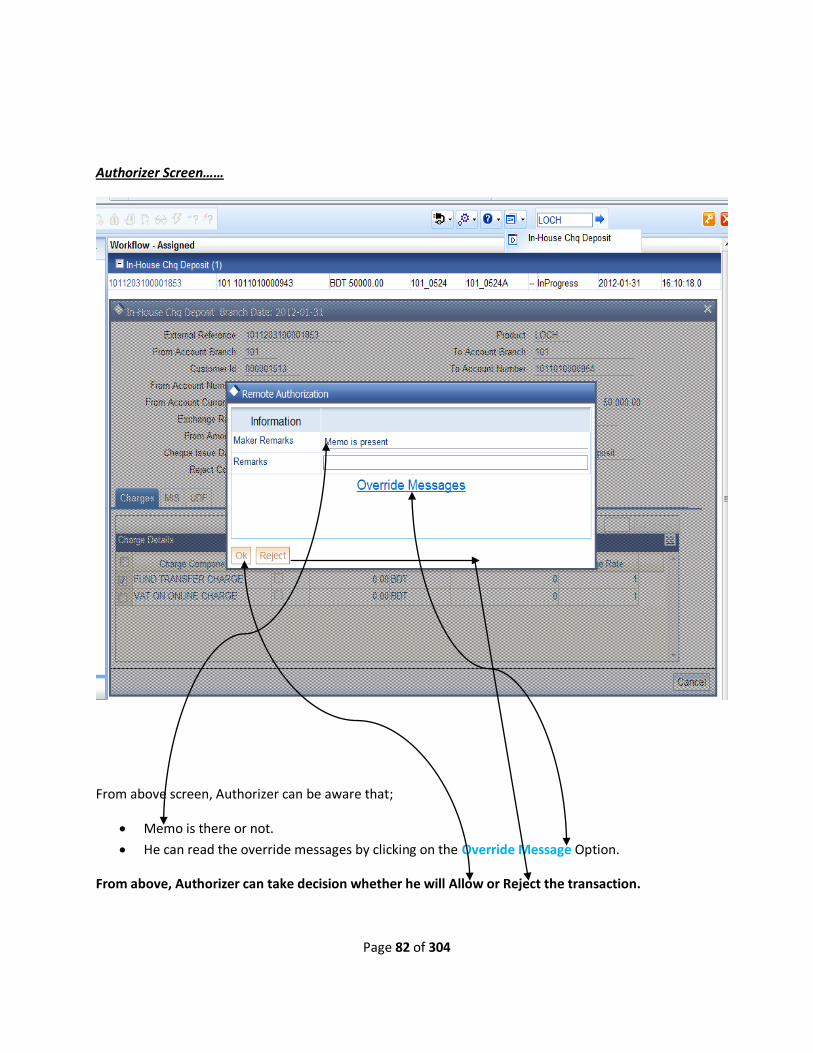
Authorizer Screen……
From above screen, Authorizer can be aware that;
Memo is there or not.
He can read the override messages by clicking on the Override Message Option.
From above, Authorizer can take decision whether he will Allow or Reject the transaction.
Page 83 of 304
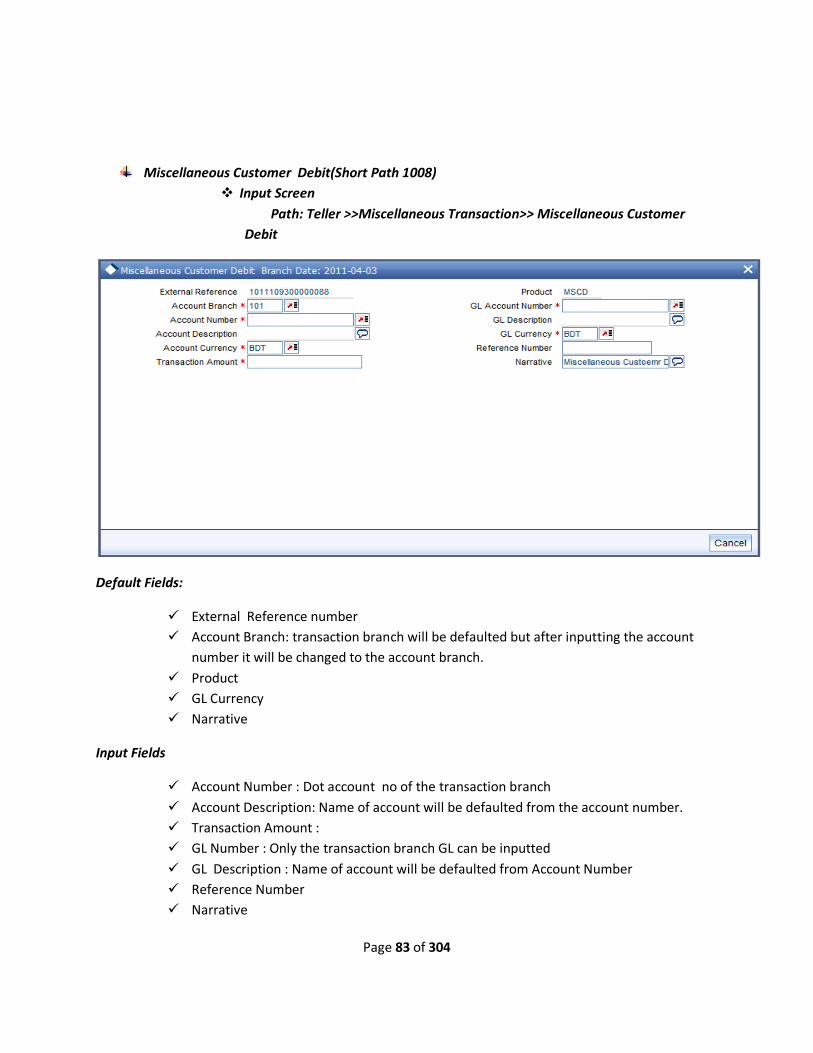
Miscellaneous Customer Debit(Short Path 1008)
Input Screen
Path: Teller >>Miscellaneous Transaction>> Miscellaneous Customer
Debit
Default Fields:
External Reference number
Account Branch: transaction branch will be defaulted but after inputting the account
number it will be changed to the account branch.
Product
GL Currency
Narrative
Input Fields
Account Number : Dot account no of the transaction branch
Account Description: Name of account will be defaulted from the account number.
Transaction Amount :
GL Number : Only the transaction branch GL can be inputted
GL Description : Name of account will be defaulted from Account Number
Reference Number
Narrative
Page 84 of 304
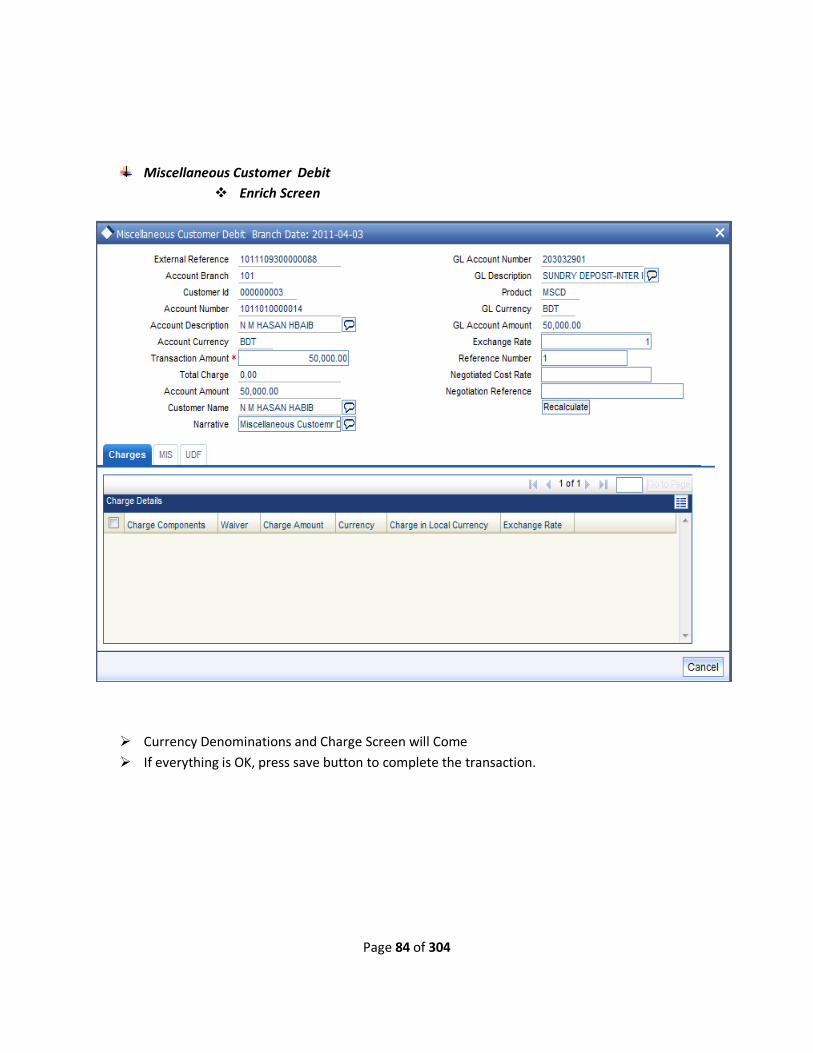
Miscellaneous Customer Debit
Enrich Screen
Currency Denominations and Charge Screen will Come
If everything is OK, press save button to complete the transaction.
Page 85 of 304
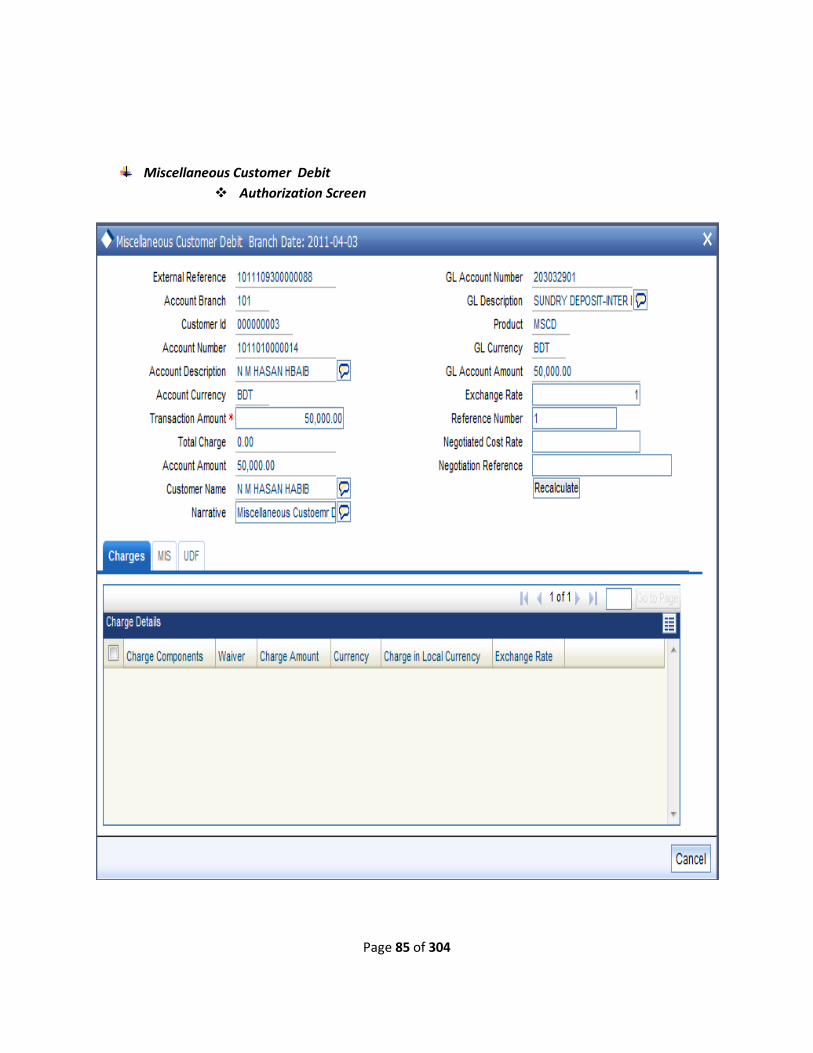
Miscellaneous Customer Debit
Authorization Screen

Page 86 of 304
If transaction is OK, then authorizer can authorize the input otherwise he can cancel the transaction
from this screen
Miscellaneous Customer Credit (Short Path 1408)
Input Screen
Path: Teller >> Miscellaneous Transaction>> Miscellaneous Customer
Credit
Default Fields:
External Reference number
Account Branch: transaction branch will be defaulted but after inputting the account
number it will be changed to the account branch.
Product
Account Currency
Narrative
Input Fields
Account Number : Dot account no of the transaction branch
Account Description: Name of account will be defaulted from the account number.
Transaction Amount :
GL Number : Only the transaction branch GL can be inputted
GL Description : Name of account will be defaulted from Account Number

Page 87 of 304
Reference Number
Narrative
Miscellaneous Customer Credit
Enrich Screen
Currency Denominations and Charge Screen will Come
If everything is OK, press save button to complete the transaction.
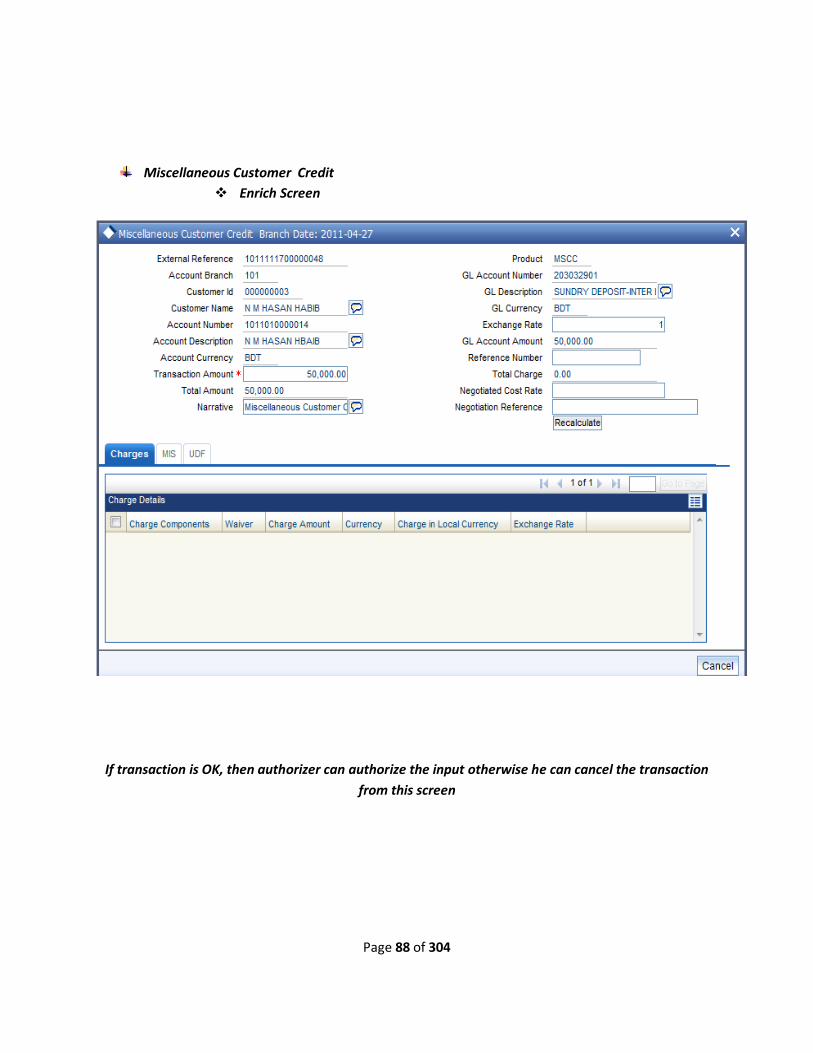
Page 88 of 304
Miscellaneous Customer Credit
Enrich Screen
If transaction is OK, then authorizer can authorize the input otherwise he can cancel the transaction
from this screen
Page 89 of 304
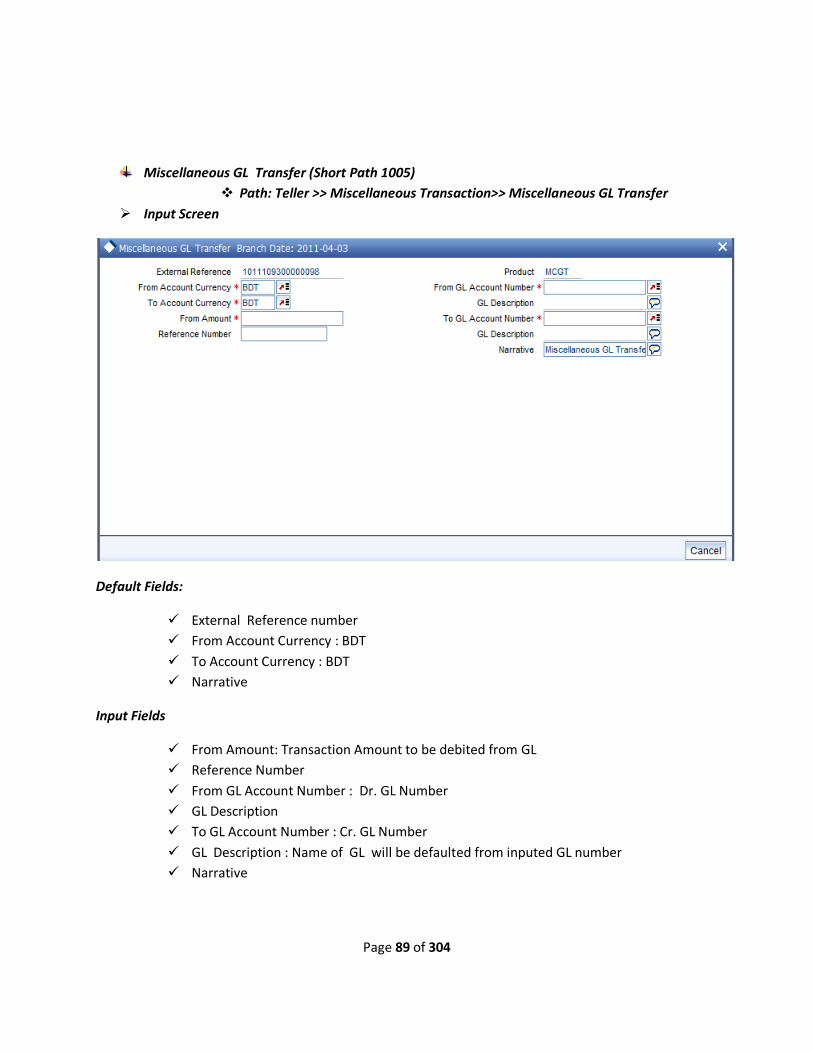
Miscellaneous GL Transfer (Short Path 1005)
Path: Teller >> Miscellaneous Transaction>> Miscellaneous GL Transfer
Input Screen
Default Fields:
External Reference number
From Account Currency : BDT
To Account Currency : BDT
Narrative
Input Fields
From Amount: Transaction Amount to be debited from GL
Reference Number
From GL Account Number : Dr. GL Number
GL Description
To GL Account Number : Cr. GL Number
GL Description : Name of GL will be defaulted from inputed GL number
Narrative

Page 90 of 304
Miscellaneous GL Transfer
Enrich Screen
Currency Denominations and Charge Screen will Come
If everything is OK, press save button to complete the transaction.

Page 91 of 304
Miscellaneous GL Transfer
Authorization Screen
If transaction is OK, then authorizer can authorize the input otherwise he can cancel the transaction
from this screen
Go to Contents

Page 92 of 304

Page 93 of 304
BC and DD Instrument Maintenance
Input Screen : ISDINSMS
Path : TellerCommon MaintenanceInstrument Types
Purpose:

Page 94 of 304
BC and DD Instrument number to be maintained in system for issuance of the same.
System will pick the last available instrument number at the time of BC and DD Issuance.
Input Field :
Instrument Type :
BCI : To be selected in case of Pay Order.
DDI: To be selected in case of Demand Draft.
Branch: Branch code from where the Instrument will be issued.
Account : Not required for BCI and DDI
Cheque Book Number : 1st leaf number of the Pay Order/ DD Book
No of Leaves : Number of total leaves conataining in the book
Account Branch: Not required.
saving this screen will initiate the transaction for authorization.

Page 95 of 304
Authorizer Screen
Path : Teller >>View>>Instrument - Cheque Book Summary
Short Path : ISSINSMS
Unauthorized records are searched here.
Clicking on the record the input screen will come and pressing the authorize button the
transaction will be completed.
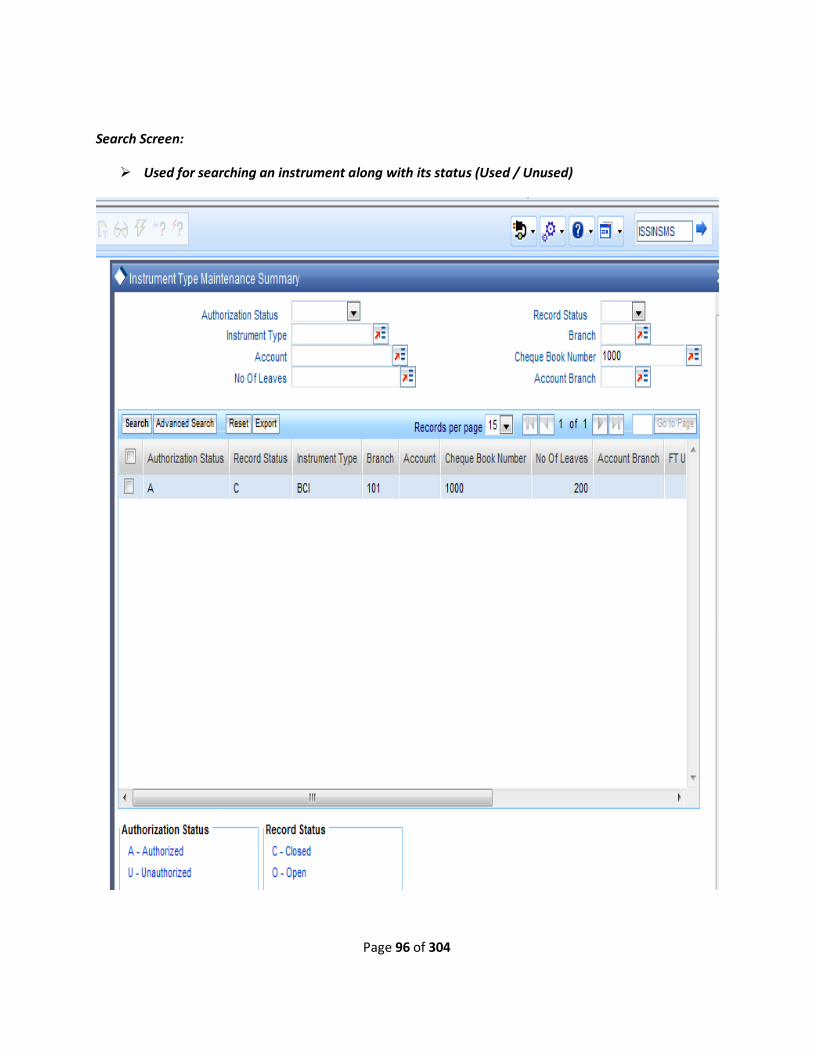
Page 96 of 304
Search Screen:
Used for searching an instrument along with its status (Used / Unused)
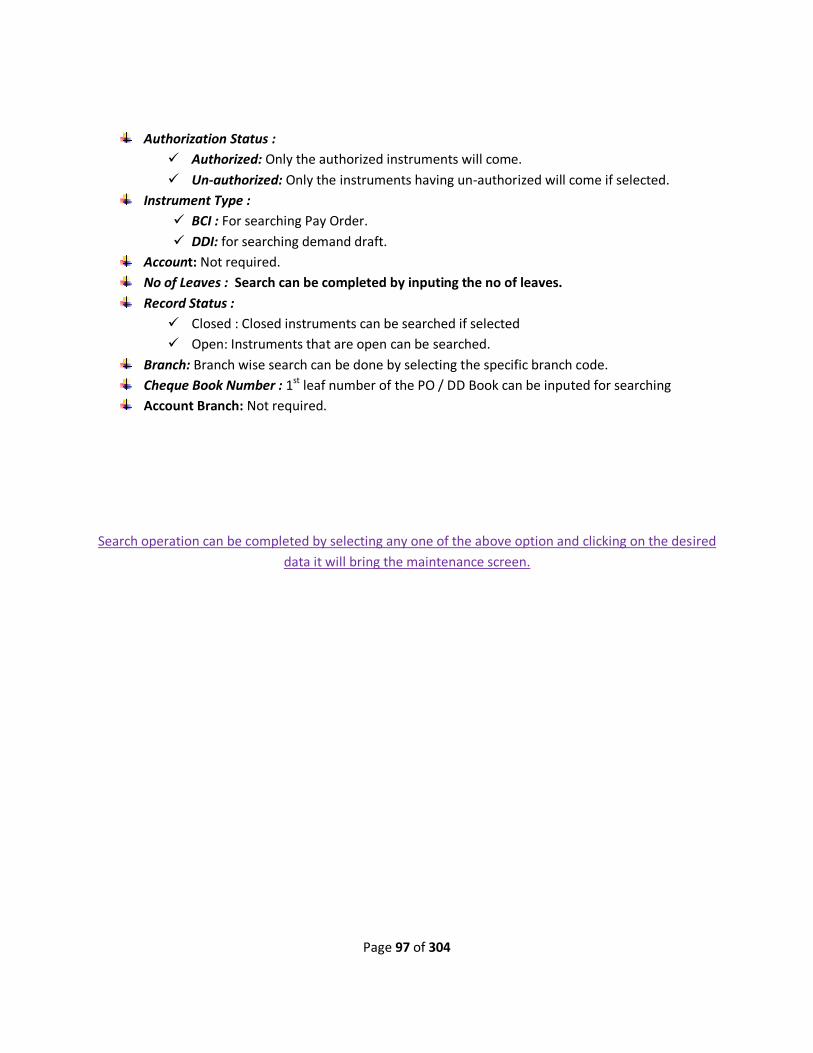
Page 97 of 304
Authorization Status :
Authorized: Only the authorized instruments will come.
Un-authorized: Only the instruments having un-authorized will come if selected.
Instrument Type :
BCI : For searching Pay Order.
DDI: for searching demand draft.
Account: Not required.
No of Leaves : Search can be completed by inputing the no of leaves.
Record Status :
Closed : Closed instruments can be searched if selected
Open: Instruments that are open can be searched.
Branch: Branch wise search can be done by selecting the specific branch code.
Cheque Book Number : 1st leaf number of the PO / DD Book can be inputed for searching
Account Branch: Not required.
Search operation can be completed by selecting any one of the above option and clicking on the desired
data it will bring the maintenance screen.
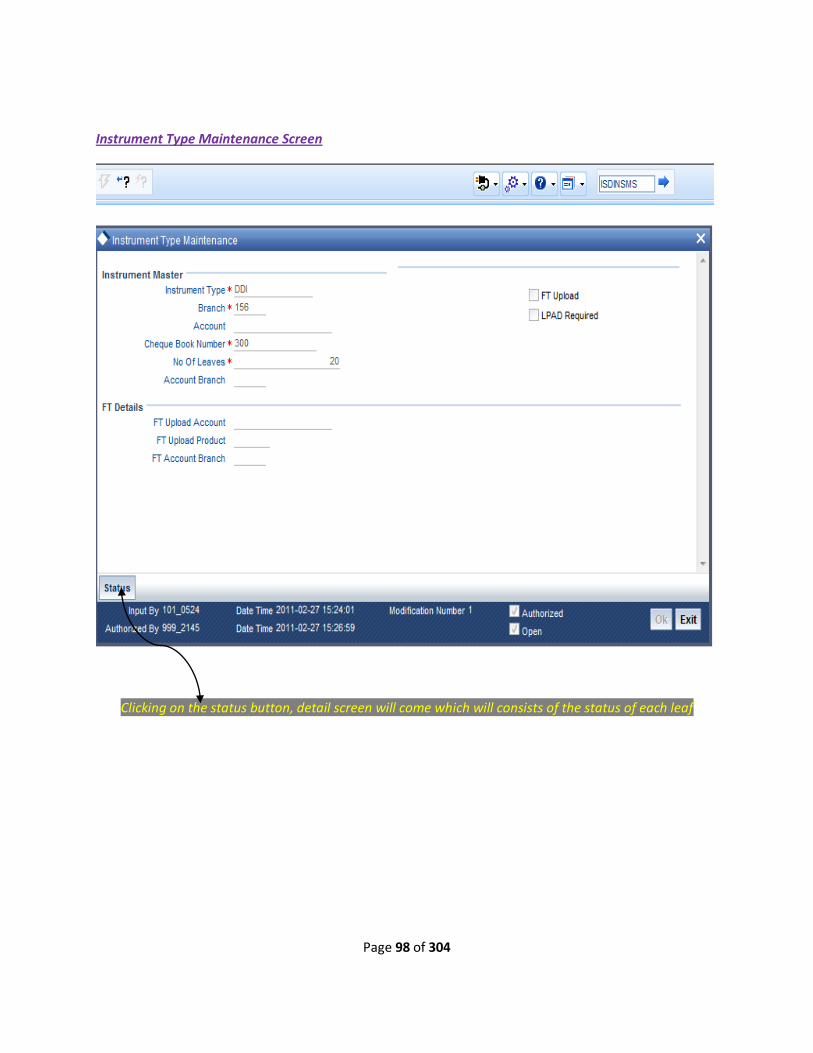
Page 98 of 304
Instrument Type Maintenance Screen
Clicking on the status button, detail screen will come which will consists of the status of each leaf

Page 99 of 304
Status
Status of each leaf of a book can be viewed here
Go to Contents
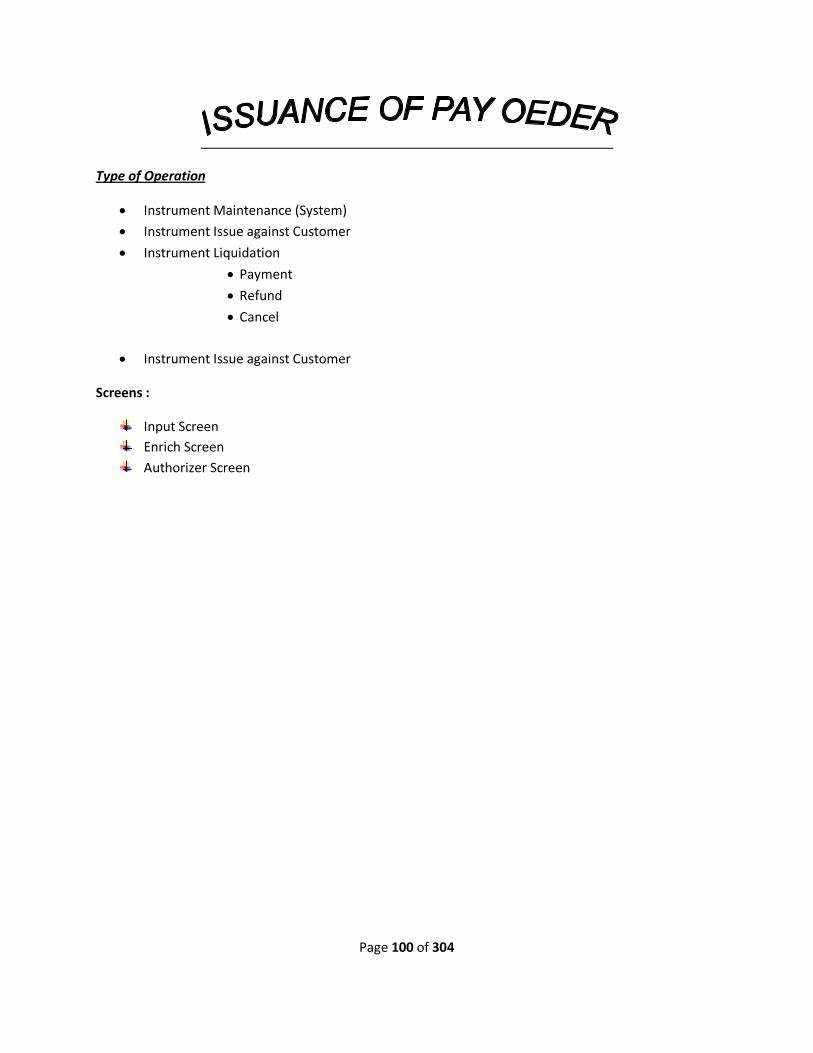
Page 100 of 304
Type of Operation
Instrument Maintenance (System)
Instrument Issue against Customer
Instrument Liquidation
Payment
Refund
Cancel
Instrument Issue against Customer
Screens :
Input Screen
Enrich Screen
Authorizer Screen
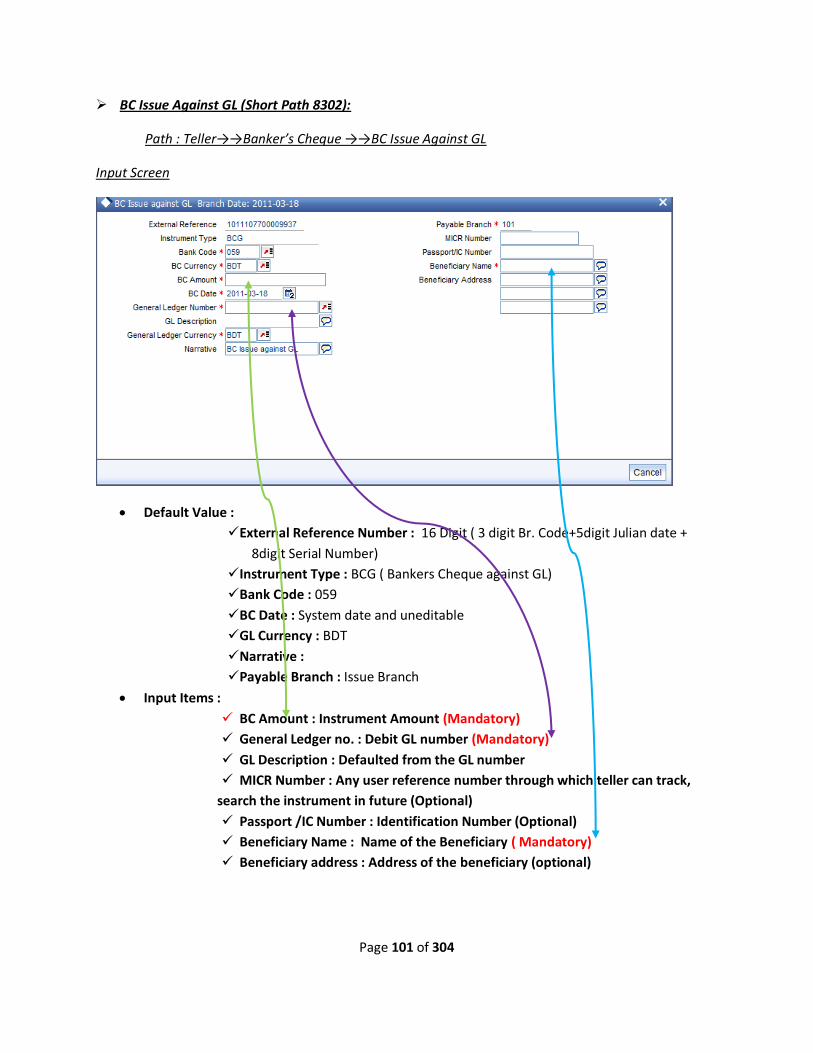
Page 101 of 304
BC Issue Against GL (Short Path 8302):
Path : Teller→→Banker’s Cheque →→BC Issue Against GL
Input Screen
Default Value :
External Reference Number : 16 Digit ( 3 digit Br. Code+5digit Julian date +
8digit Serial Number)
Instrument Type : BCG ( Bankers Cheque against GL)
Bank Code : 059
BC Date : System date and uneditable
GL Currency : BDT
Narrative :
Payable Branch : Issue Branch
Input Items :
BC Amount : Instrument Amount (Mandatory)
General Ledger no. : Debit GL number (Mandatory)
GL Description : Defaulted from the GL number
MICR Number : Any user reference number through which teller can track,
search the instrument in future (Optional)
Passport /IC Number : Identification Number (Optional)
Beneficiary Name : Name of the Beneficiary ( Mandatory)
Beneficiary address : Address of the beneficiary (optional)

Page 102 of 304
Enrich Screen
New Fields :
Transaction Currency Rate : Default from system
Charges : Sum of Charge and VAT
Instrument Number : System generated but editable. Number will be picked up as next
available number in the system. If that number does not match with the leaf number present at
the tellers end, teller can input the desired number.
Validate : If Instrument numberis inputed by the teller ,( s)he can validate the number whether
the inputed number is maintained in the system or not/ genuineness of the instrument.
Recalculate : Associated with the charge Tab
Charge Tab : Charge components associated with BC issue will be defaulted here with Waiver
option. If we waive charges here, then the button Recalculate will be pressed by the teller and
system will give the new amount.
MOST IMPORTANT
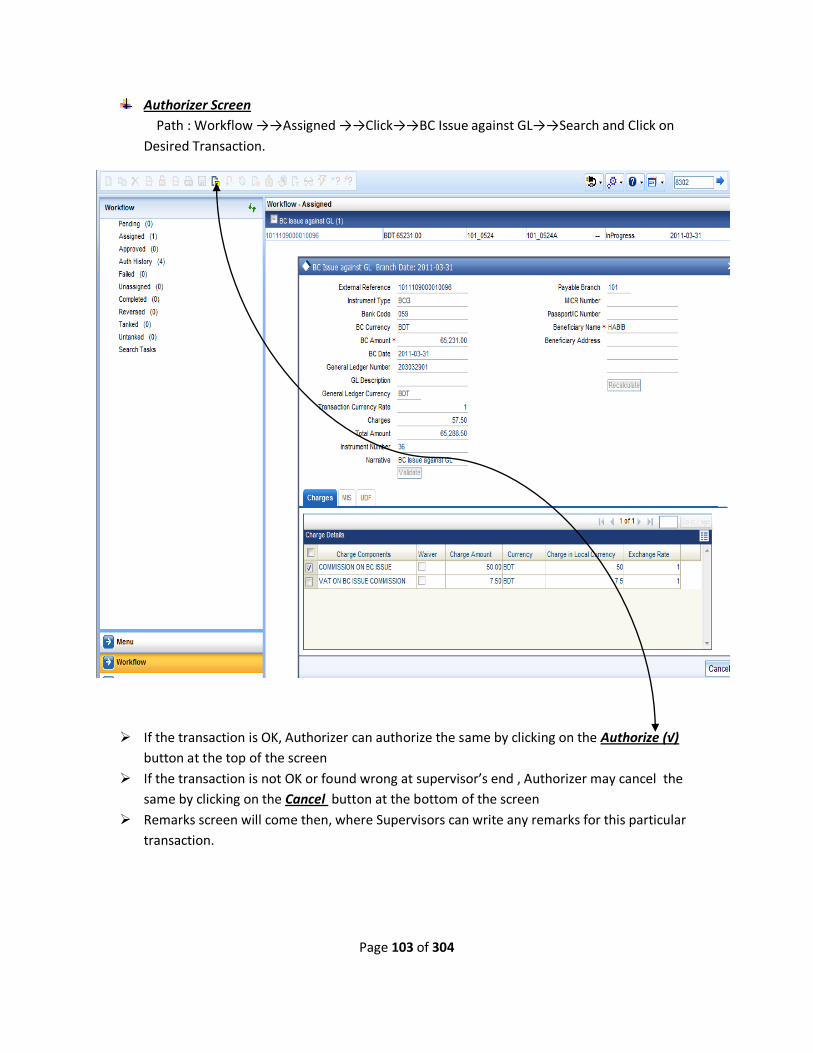
Page 103 of 304
Authorizer Screen
Path : Workflow →→Assigned →→Click→→BC Issue against GL→→Search and Click on
Desired Transaction.
If the transaction is OK, Authorizer can authorize the same by clicking on the Authorize (√)
button at the top of the screen
If the transaction is not OK or found wrong at supervisor’s end , Authorizer may cancel the
same by clicking on the Cancel button at the bottom of the screen
Remarks screen will come then, where Supervisors can write any remarks for this particular
transaction.

Page 104 of 304
BC Issue Against Walk In (Short Path 8301):
Path : Teller→→Banker’s Cheque →→BC Issue Against Walk-in (Cash)
Input Screen
Default Value :
External Reference Number : 16 Digit ( 3 digit Br. Code+5digit Julian date +
8digit Serial Number)
Instrument Type : BCW ( Bankers Cheque against Walk- In)
Instrument Status : INIT
Bank Code : 059
BC Currency : BDT
BC Date : System date and uneditable
Narrative :
Payable Branch : Issue Branch
Input Items :
BC Amount : Instrument Amount (Mandatory)
Transaction Currency : BDT ( Mandatory)
MICR Number : Any user reference number through which teller can track,
search the instrument in future (Optional)
Passport /IC Number : Identification Number (Optional)
Beneficiary Name : Name of the Beneficiary ( Mandatory)
Beneficiary address : Address of the beneficiary (optional)

Page 105 of 304
Enrich Screen
New Fields :
Transaction Currency Rate : Default from system
Charges : Sum of Charge and VAT
Instrument Number : System generated but editable. Number will be picked up as next
available number in the system. If that number does not match with the leaf number present at
the tellers end, teller can input the desired number.
Validate : If Instrument numberis inputed by the teller ,( s)he can validate the number whether
the inputed number is maintained in the system or not/ genuineness of the instrument.
Recalculate : Associated with the charge Tab
Charge Tab : Charge components associated with BC issue will be defaulted here with Waiver
option. If we waive charges here, then the button Recalculate will be pressed by the teller and
system will give the new amount.
MOST IMPORTANT
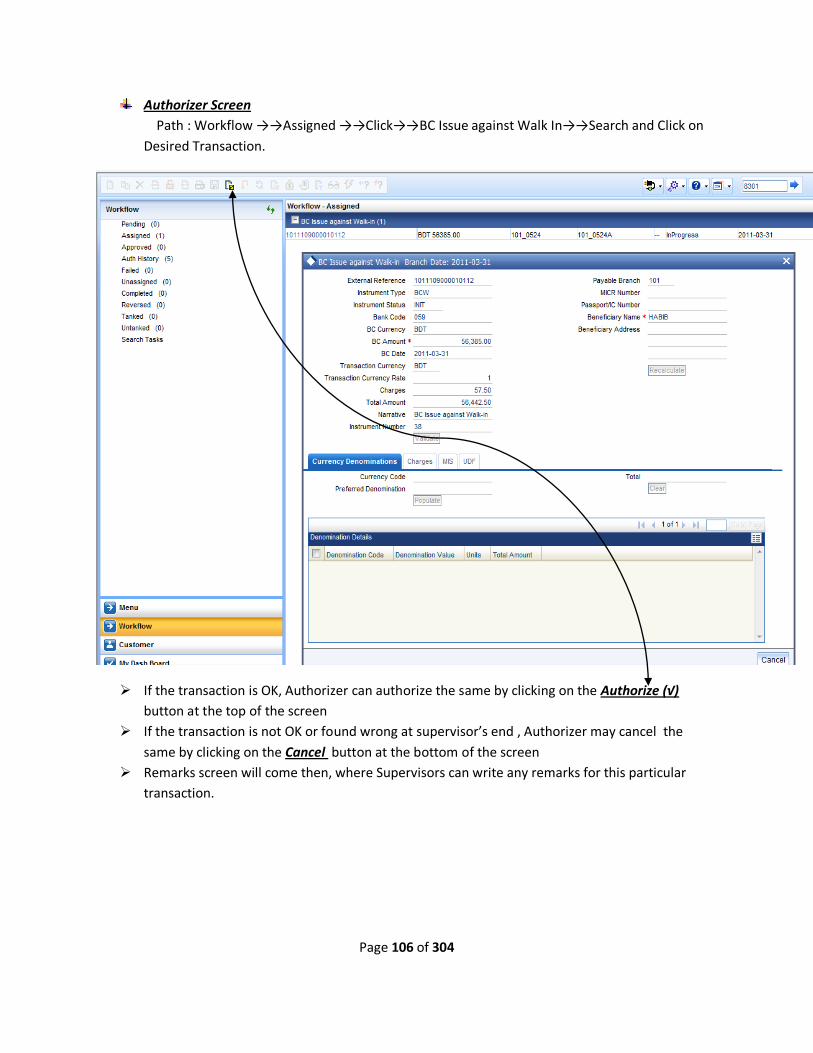
Page 106 of 304
Authorizer Screen
Path : Workflow →→Assigned →→Click→→BC Issue against Walk In→→Search and Click on
Desired Transaction.
If the transaction is OK, Authorizer can authorize the same by clicking on the Authorize (√)
button at the top of the screen
If the transaction is not OK or found wrong at supervisor’s end , Authorizer may cancel the
same by clicking on the Cancel button at the bottom of the screen
Remarks screen will come then, where Supervisors can write any remarks for this particular
transaction.
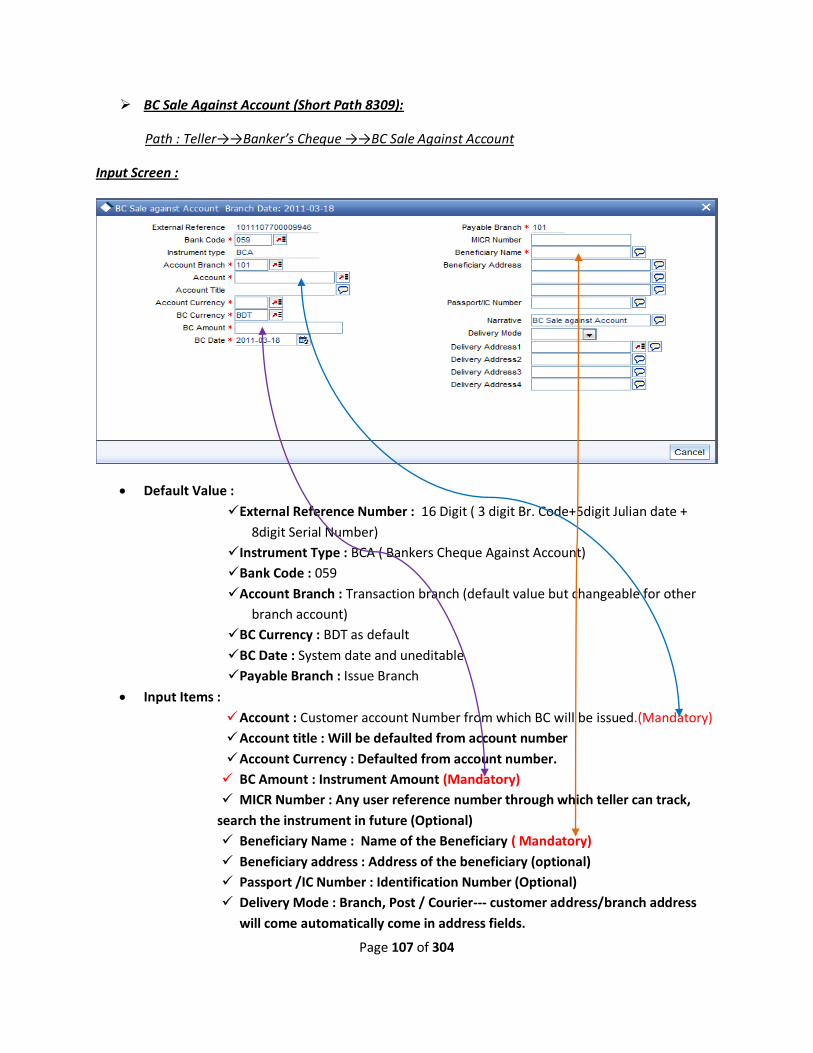
Page 107 of 304
BC Sale Against Account (Short Path 8309):
Path : Teller→→Banker’s Cheque →→BC Sale Against Account
Input Screen :
Default Value :
External Reference Number : 16 Digit ( 3 digit Br. Code+5digit Julian date +
8digit Serial Number)
Instrument Type : BCA ( Bankers Cheque Against Account)
Bank Code : 059
Account Branch : Transaction branch (default value but changeable for other
branch account)
BC Currency : BDT as default
BC Date : System date and uneditable
Payable Branch : Issue Branch
Input Items :
Account : Customer account Number from which BC will be issued.(Mandatory)
Account title : Will be defaulted from account number
Account Currency : Defaulted from account number.
BC Amount : Instrument Amount (Mandatory)
MICR Number : Any user reference number through which teller can track,
search the instrument in future (Optional)
Beneficiary Name : Name of the Beneficiary ( Mandatory)
Beneficiary address : Address of the beneficiary (optional)
Passport /IC Number : Identification Number (Optional)
Delivery Mode : Branch, Post / Courier--- customer address/branch address
will come automatically come in address fields.

Page 108 of 304
Enrich Screen
New Fields :
Exchange Rate : Default from system
Charges : Sum of Charge and VAT
Instrument Number : System generated but editable. Number will be picked up as next
available number in the system. If that number does not match with the leaf number present at
the tellers end, teller can input the desired number.
Validate : If Instrument numberis inputed by the teller ,( s)he can validate the number whether
the inputed number is maintained in the system or not/ genuineness of the instrument.
Recalculate : Associated with the charge Tab
Charge Tab : Charge components associated with BC issue will be defaulted here with Waiver
option. If we waive charges here, then the button Recalculate will be pressed by the teller and
system will give the new amount.
MOST IMPORTANT
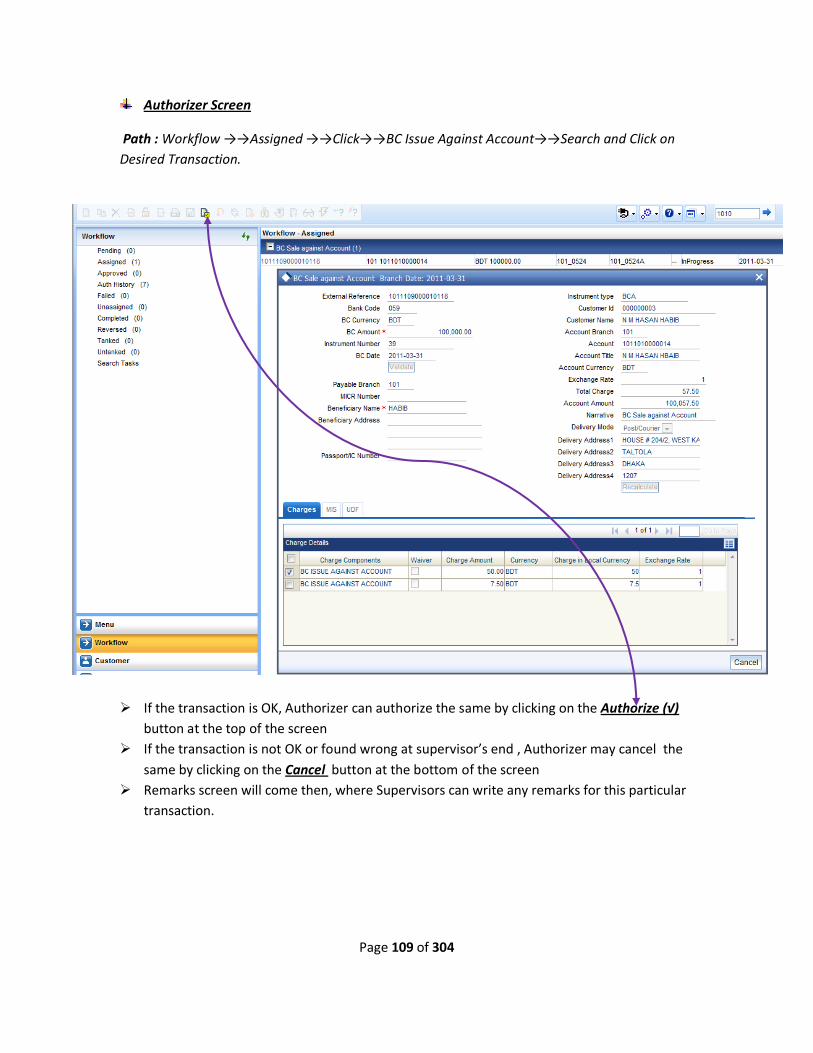
Page 109 of 304
Authorizer Screen
Path : Workflow →→Assigned →→Click→→BC Issue Against Account→→Search and Click on
Desired Transaction.
If the transaction is OK, Authorizer can authorize the same by clicking on the Authorize (√)
button at the top of the screen
If the transaction is not OK or found wrong at supervisor’s end , Authorizer may cancel the
same by clicking on the Cancel button at the bottom of the screen
Remarks screen will come then, where Supervisors can write any remarks for this particular
transaction.

Page 110 of 304
BC Sale Against Cheque ( Short path 8335):
Path : Teller→→Banker’s Cheque →→BC Sale Against Cheque
Input Screen :
Default Value :
External Reference Number : 16 Digit ( 3 digit Br. Code+5digit Julian date +
8digit Serial Number)
Instrument Type : BCC ( Bankers Cheque Against Cheque)
Bank Code : 059
Account Branch : Transaction branch (default value but changeable for other
branch account)
BC Currency : BDT as default
BC Date : System date and uneditable
Payable Branch : Issue Branch
Input Items :
Account : Customer account Number from which BC will be issued.(mandatory)
Account title : Will be defaulted from account number
Account Currency : Defaulted from account number.
Cheque number : Mandatory
Cheque Date : Valid date of cheque. Validation present
BC Amount : Instrument Amount (Mandatory)
MICR Number : Any user reference number through which teller can track,
search the instrument in future (Optional)
Beneficiary Name : Name of the Beneficiary ( Mandatory)
Beneficiary address : Address of the beneficiary (optional)
Passport /IC Number : Identification Number (Optional)

Page 111 of 304
Enrich Screen
New Fields :
Exchange Rate : Default from system
Charges : Sum of Charge and VAT
Instrument Number : System generated but editable. Number will be picked up as next
available number in the system. If that number does not match with the leaf number present at
the tellers end, teller can input the desired number.
Validate : If Instrument numberis inputed by the teller ,( s)he can validate the number whether
the inputed number is maintained in the system or not/ genuineness of the instrument.
Recalculate : Associated with the charge Tab
Charge Tab : Charge components associated with BC issue will be defaulted here with Waiver
option. If we waive charges here, then the button Recalculate will be pressed by the teller and
system will give the new amount.
MOST IMPORTANT

Page 112 of 304
Authorization Screen
Path : Workflow →→Assigned →→Click→→BC Sale against Cheque→→Search and Click on
Desired Transaction.
If the transaction is OK, Authorizer can authorize the same by clicking on the Authorize (√)
button at the top of the screen
If the transaction is not OK or found wrong at supervisor’s end , Authorizer may cancel the
same by clicking on the Cancel button at the bottom of the screen
Remarks screen will come then, where Supervisors can write any remarks for this particular
transaction.
Go to Contents
Page 113 of 304
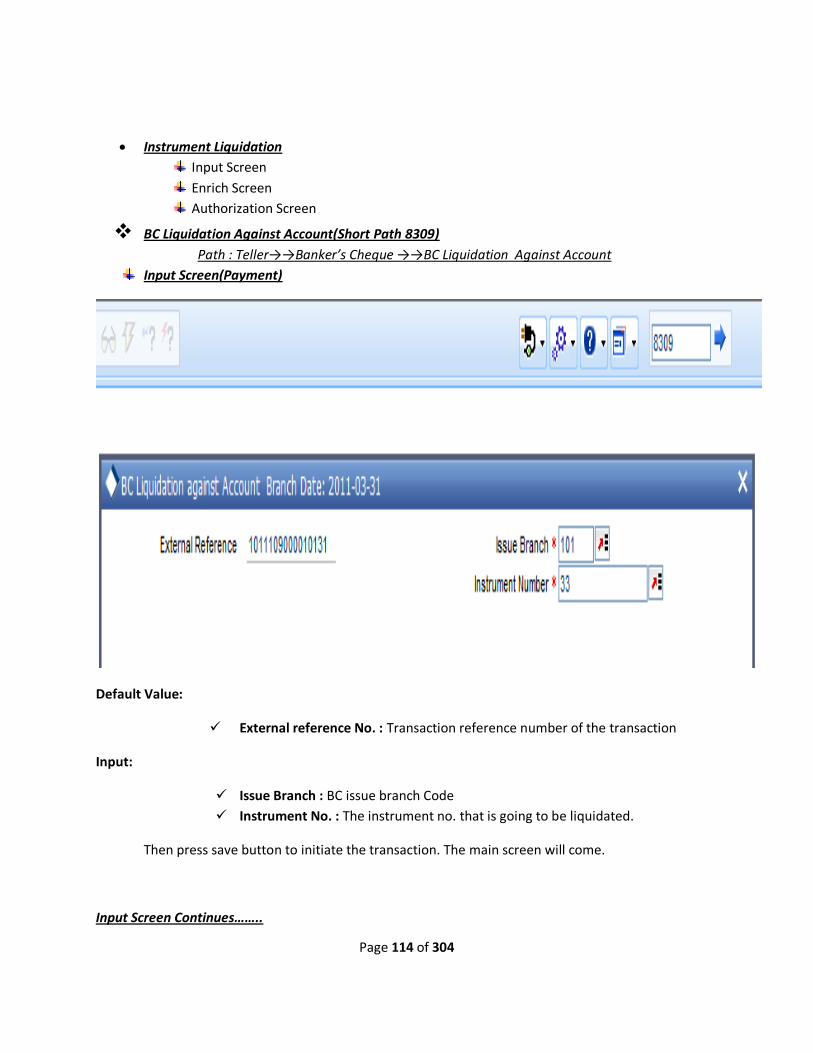
Page 114 of 304
Instrument Liquidation
Input Screen
Enrich Screen
Authorization Screen
BC Liquidation Against Account(Short Path 8309)
Path : Teller→→Banker’s Cheque →→BC Liquidation Against Account
Input Screen(Payment)
Default Value:
External reference No. : Transaction reference number of the transaction
Input:
Issue Branch : BC issue branch Code
Instrument No. : The instrument no. that is going to be liquidated.
Then press save button to initiate the transaction. The main screen will come.
Input Screen Continues……..

Page 115 of 304
Default Value:
External Reference number
Issue Branch
Payable Branch
Payable Bank
Issue Date
Beneficiary Name
Beneficiary Address
Instrument Type
Liquidation Mode:
Payment
Refund
Cancel
Instrument Number
Transaction Currency
Account Branch
BC Currency
BC Amount
MICR Number
Payable Branch
Passport /IC number
Input Value:
Dot System Account Number
Account Title: will be defaulted automatically.
MOST IMPORTANT
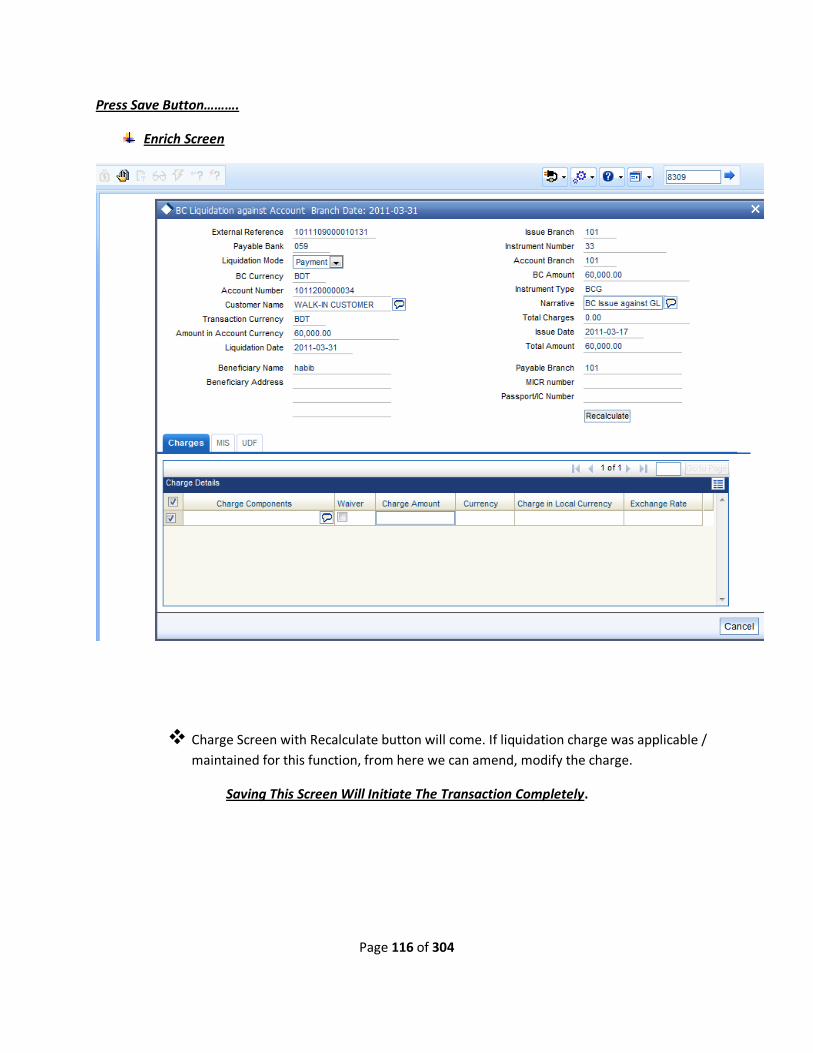
Page 116 of 304
Press Save Button……….
Enrich Screen
Charge Screen with Recalculate button will come. If liquidation charge was applicable /
maintained for this function, from here we can amend, modify the charge.
Saving This Screen Will Initiate The Transaction Completely.

Page 117 of 304
Authorization Screen
Path : Workflow →→Assigned →→Click→→BC Liquidation Against Account→→Search and Click
on Desired Transaction.
If the transaction is OK, Authorizer can authorize the same by clicking on the Authorize (√)
button at the top of the screen
If the transaction is not OK or found wrong at supervisor’s end , Authorizer may cancel the
same by clicking on the Cancel button at the bottom of the screen
Remarks screen will come then, where Supervisors can write any remarks for this particular
transaction.
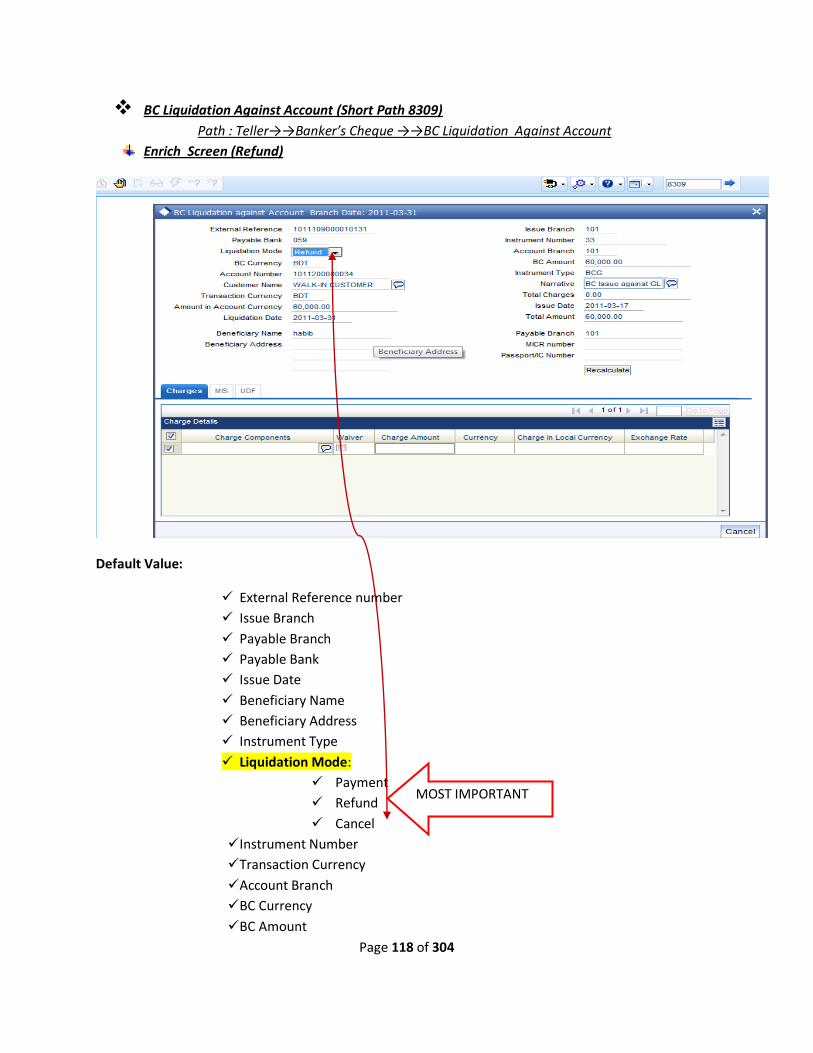
Page 118 of 304
BC Liquidation Against Account (Short Path 8309)
Path : Teller→→Banker’s Cheque →→BC Liquidation Against Account
Enrich Screen (Refund)
Default Value:
External Reference number
Issue Branch
Payable Branch
Payable Bank
Issue Date
Beneficiary Name
Beneficiary Address
Instrument Type
Liquidation Mode:
Payment
Refund
Cancel
Instrument Number
Transaction Currency
Account Branch
BC Currency
BC Amount
MOST IMPORTANT
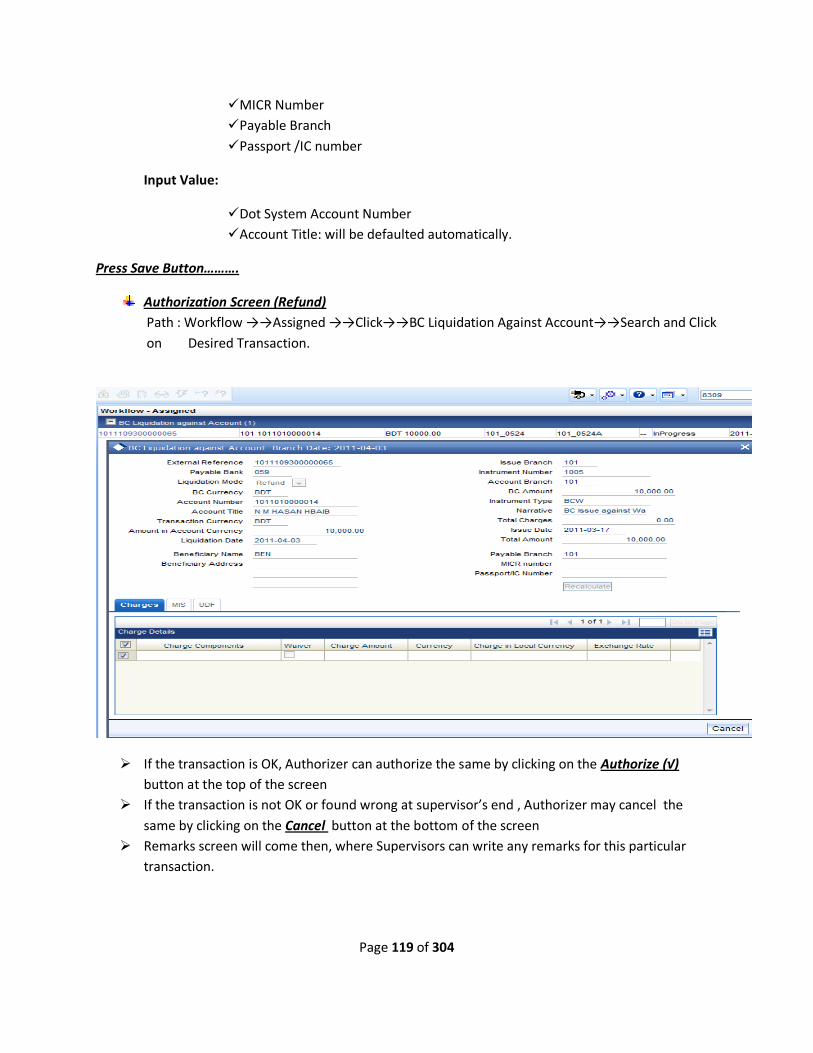
Page 119 of 304
MICR Number
Payable Branch
Passport /IC number
Input Value:
Dot System Account Number
Account Title: will be defaulted automatically.
Press Save Button……….
Authorization Screen (Refund)
Path : Workflow →→Assigned →→Click→→BC Liquidation Against Account→→Search and Click
on Desired Transaction.
If the transaction is OK, Authorizer can authorize the same by clicking on the Authorize (√)
button at the top of the screen
If the transaction is not OK or found wrong at supervisor’s end , Authorizer may cancel the
same by clicking on the Cancel button at the bottom of the screen
Remarks screen will come then, where Supervisors can write any remarks for this particular
transaction.
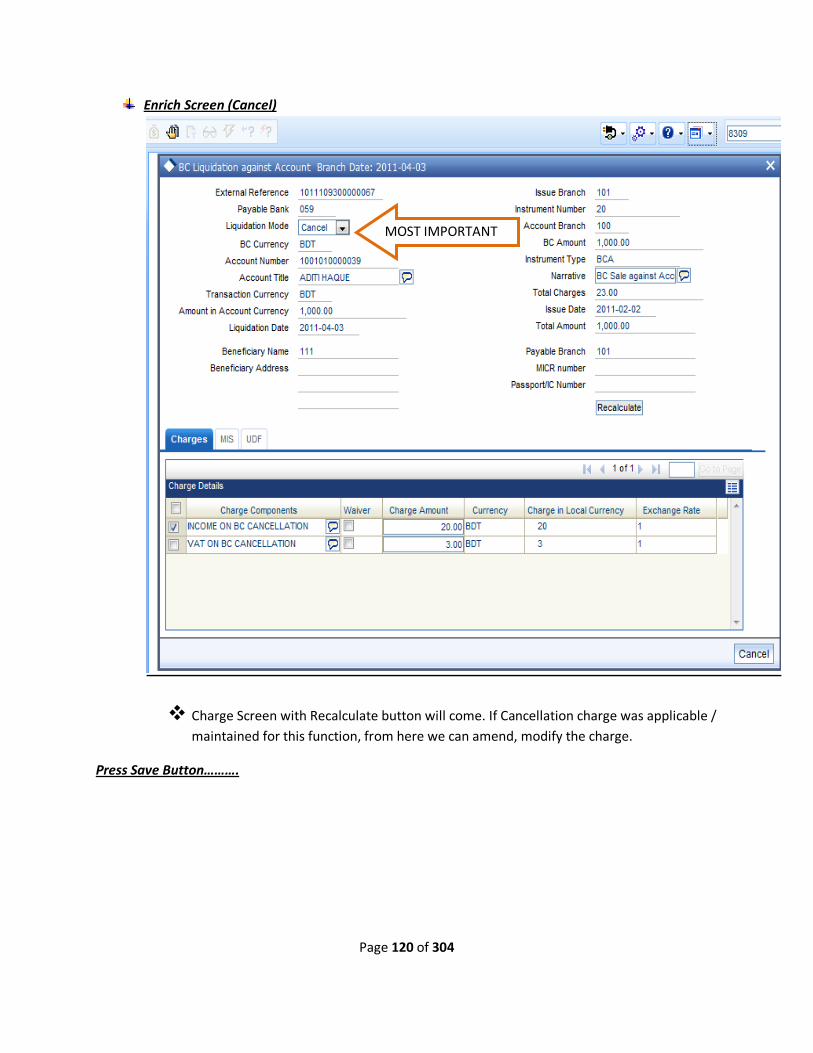
Page 120 of 304
Enrich Screen (Cancel)
Charge Screen with Recalculate button will come. If Cancellation charge was applicable /
maintained for this function, from here we can amend, modify the charge.
Press Save Button……….
MOST IMPORTANT

Page 121 of 304
Authorization Screen (Cancel)
Path : Workflow →→Assigned →→Click→→BC Liquidation Against Account→→Search and Click
on Desired Transaction.
If the transaction is OK, Authorizer can authorize the same by clicking on the Authorize (√)
button at the top of the screen
If the transaction is not OK or found wrong at supervisor’s end , Authorizer may cancel the
same by clicking on the Cancel button at the bottom of the screen
Remarks screen will come then, where Supervisors can write any remarks for this particular
transaction.
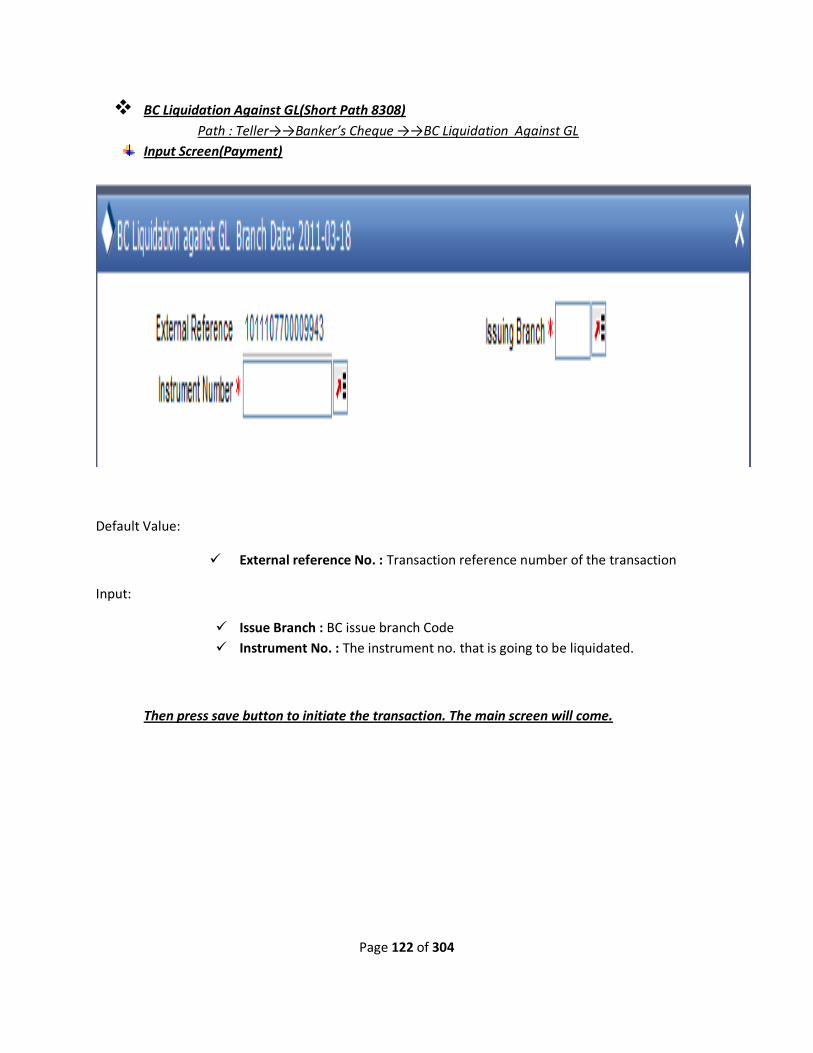
Page 122 of 304
BC Liquidation Against GL(Short Path 8308)
Path : Teller→→Banker’s Cheque →→BC Liquidation Against GL
Input Screen(Payment)
Default Value:
External reference No. : Transaction reference number of the transaction
Input:
Issue Branch : BC issue branch Code
Instrument No. : The instrument no. that is going to be liquidated.
Then press save button to initiate the transaction. The main screen will come.

Page 123 of 304
Input Screen
Continues……..
Default Value:
External Reference number
Liquidation Type (BCW)
Clearing Bank Code
General Ledger Currency
Payable Branch
Issue Date
Liquidation date
BC Number
BC Status
Beneficiary Name
Beneficiary Address
Instrument Type
Liquidation Mode:
Payment
Refund
Cancel
Instrument Number
BC Currency
BC Amount
Input Value:
General Ledger Number
GL Description
MOST IMPORTANT
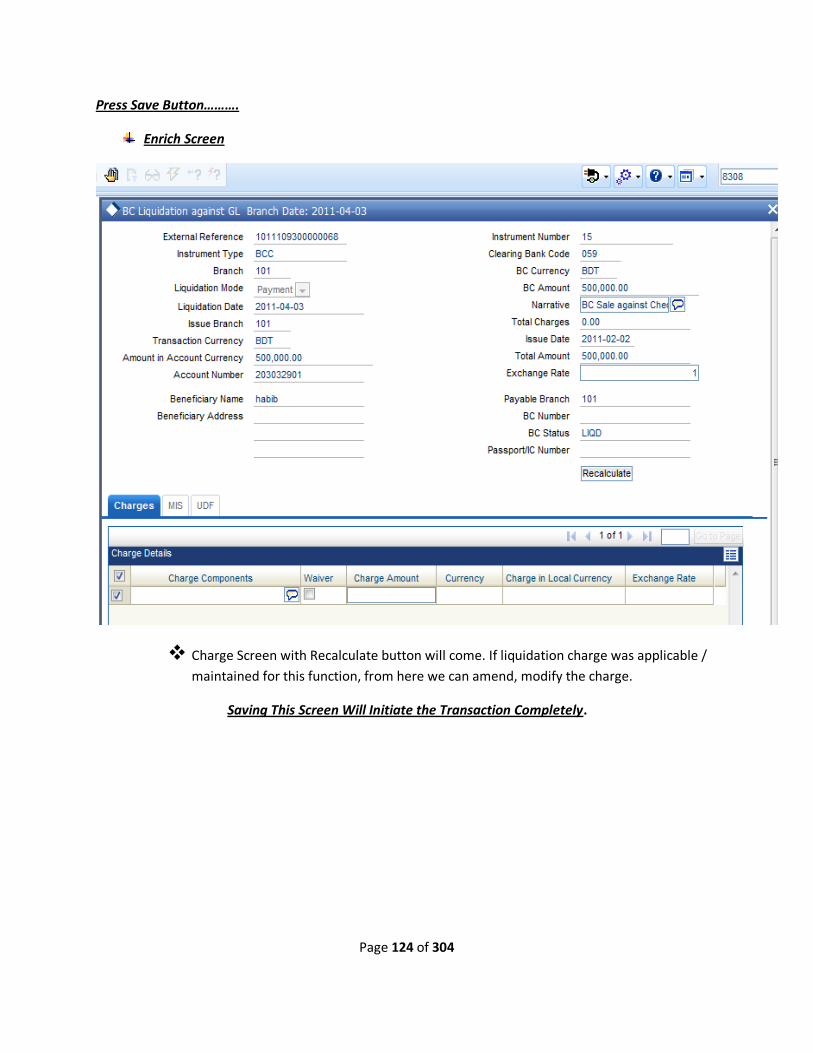
Page 124 of 304
Press Save Button……….
Enrich Screen
Charge Screen with Recalculate button will come. If liquidation charge was applicable /
maintained for this function, from here we can amend, modify the charge.
Saving This Screen Will Initiate the Transaction Completely.

Page 125 of 304
Authorization Screen
Path : Workflow →→Assigned →→Click→→BC Liquidation Against GL→→Search and Click on
Desired Transaction.
If the transaction is OK, Authorizer can authorize the same by clicking on the Authorize (√)
button at the top of the screen
If the transaction is not OK or found wrong at supervisor’s end , Authorizer may cancel the
same by clicking on the Cancel button at the bottom of the screen
Remarks screen will come then, where Supervisors can write any remarks for this particular
transaction.

Page 126 of 304
BC Liquidation Against GL
Path : Teller→→Banker’s Cheque →→BC Liquidation Against GL
Input Screen(Refund)
Default Value:
External Reference number
Liquidation Type (BCW)
Clearing Bank Code
General Ledger Currency
Payable Branch
Issue Date
Liquidation date
BC Number
BC Status
Beneficiary Name
Beneficiary Address
Instrument Type
Liquidation Mode:
Payment
Refund
Cancel
Instrument Number
BC Currency
BC Amount
Input Value:
General Ledger Number
GL Description
MOST IMPORTANT
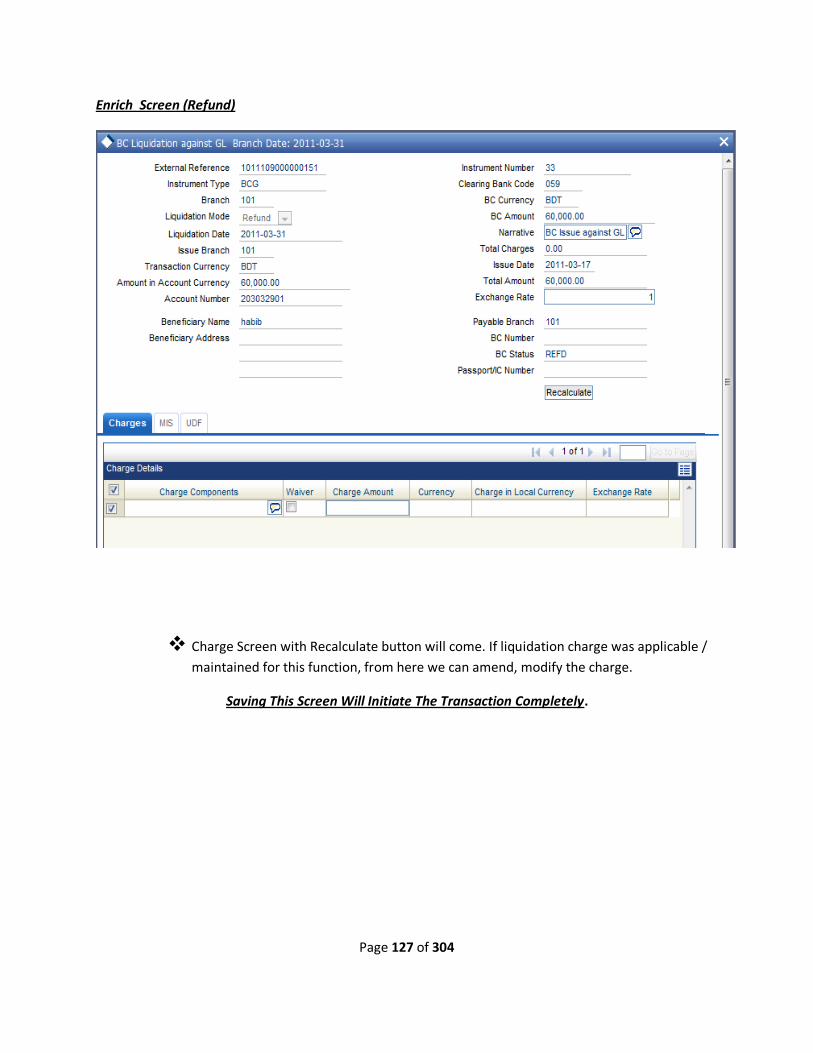
Page 127 of 304
Enrich Screen (Refund)
Charge Screen with Recalculate button will come. If liquidation charge was applicable /
maintained for this function, from here we can amend, modify the charge.
Saving This Screen Will Initiate The Transaction Completely.
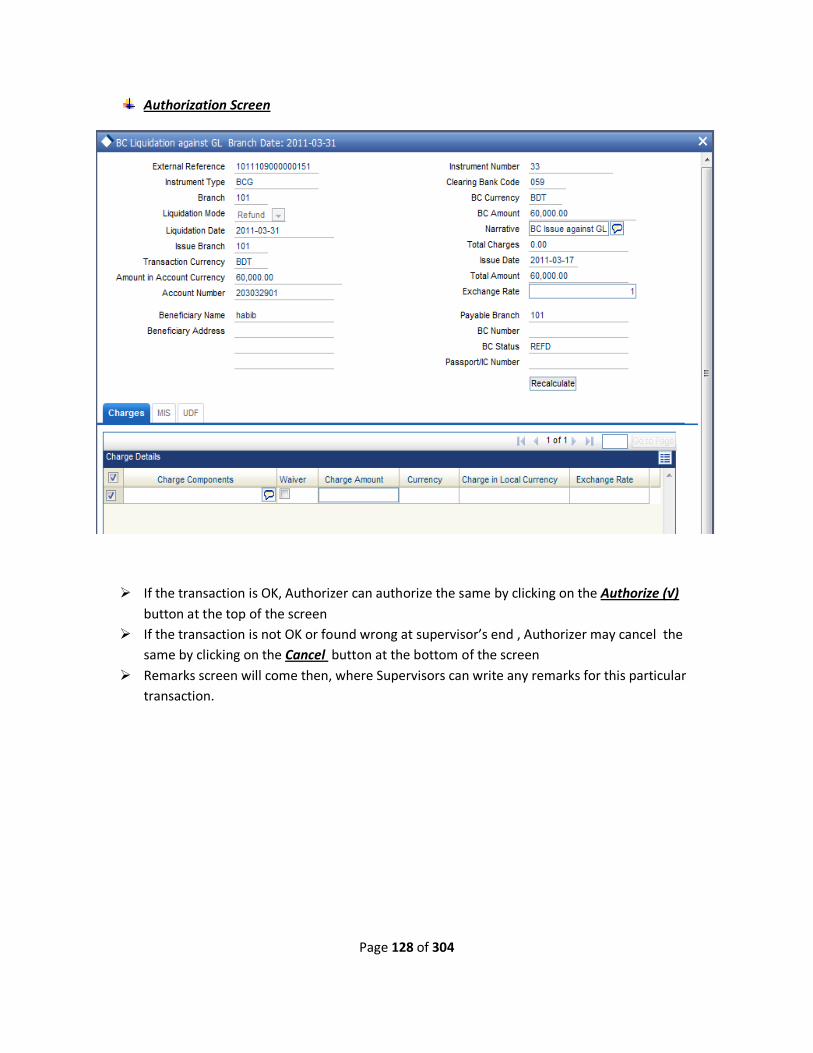
Page 128 of 304
Authorization Screen
If the transaction is OK, Authorizer can authorize the same by clicking on the Authorize (√)
button at the top of the screen
If the transaction is not OK or found wrong at supervisor’s end , Authorizer may cancel the
same by clicking on the Cancel button at the bottom of the screen
Remarks screen will come then, where Supervisors can write any remarks for this particular
transaction.
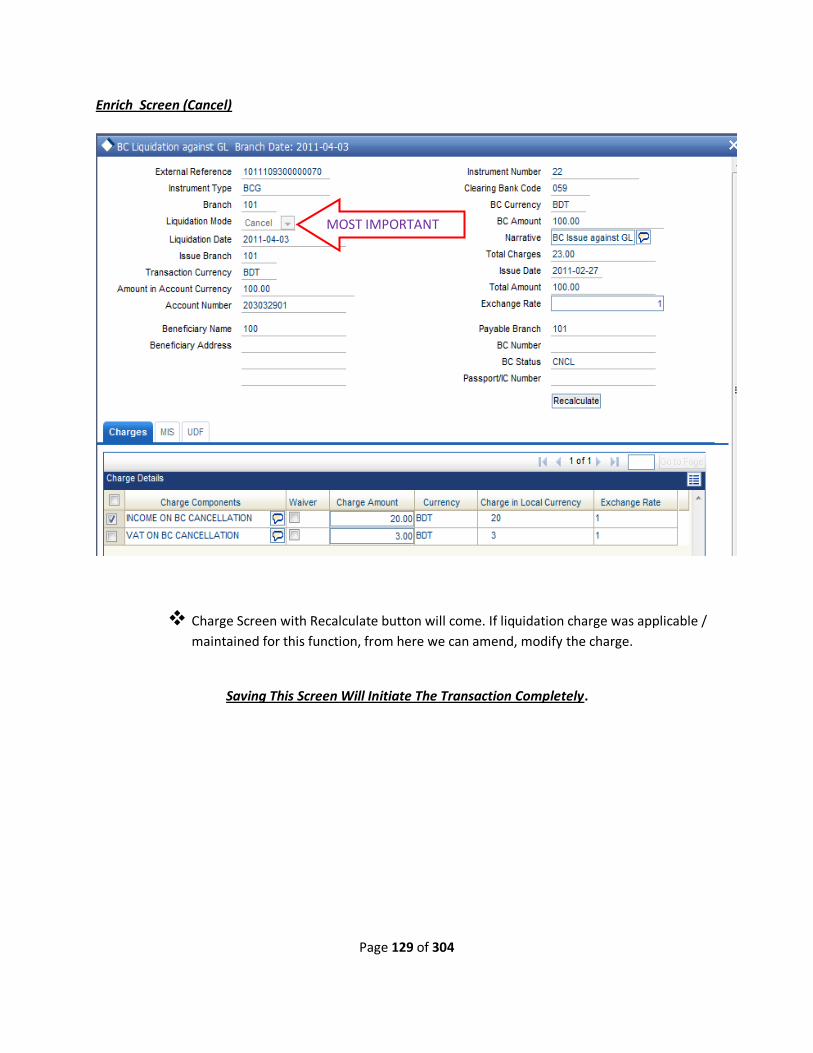
Page 129 of 304
Enrich Screen (Cancel)
Charge Screen with Recalculate button will come. If liquidation charge was applicable /
maintained for this function, from here we can amend, modify the charge.
Saving This Screen Will Initiate The Transaction Completely.
MOST IMPORTANT
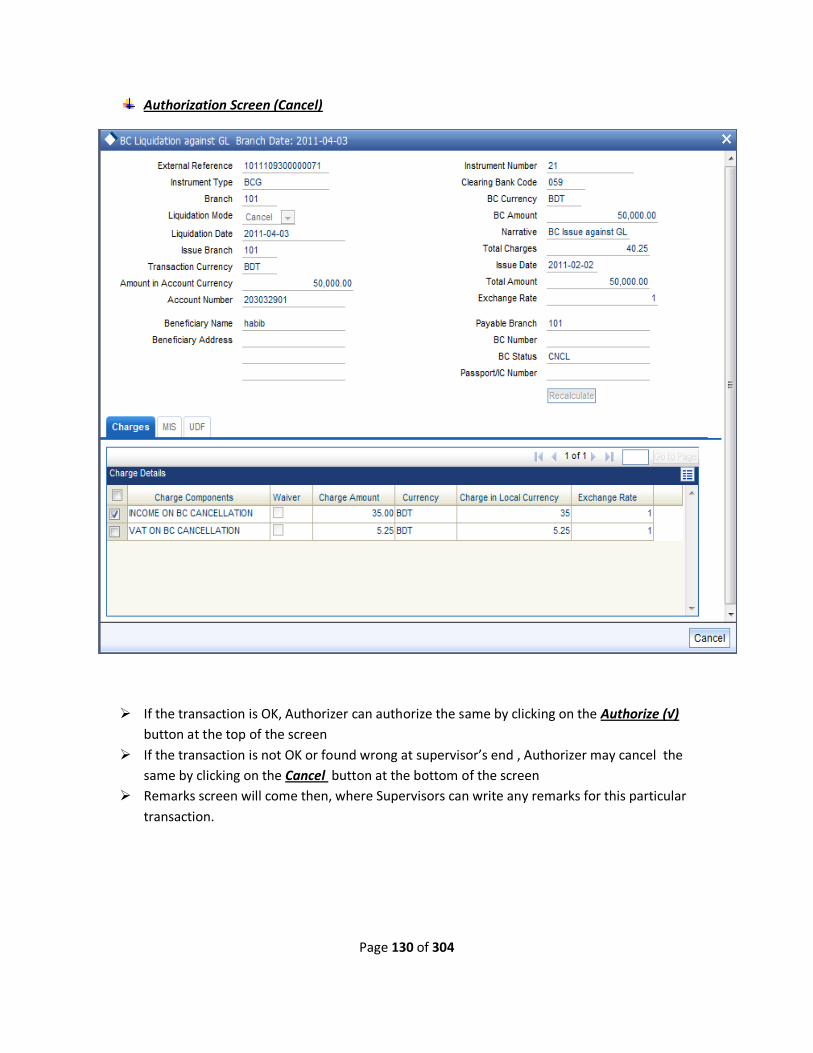
Page 130 of 304
Authorization Screen (Cancel)
If the transaction is OK, Authorizer can authorize the same by clicking on the Authorize (√)
button at the top of the screen
If the transaction is not OK or found wrong at supervisor’s end , Authorizer may cancel the
same by clicking on the Cancel button at the bottom of the screen
Remarks screen will come then, where Supervisors can write any remarks for this particular
transaction.
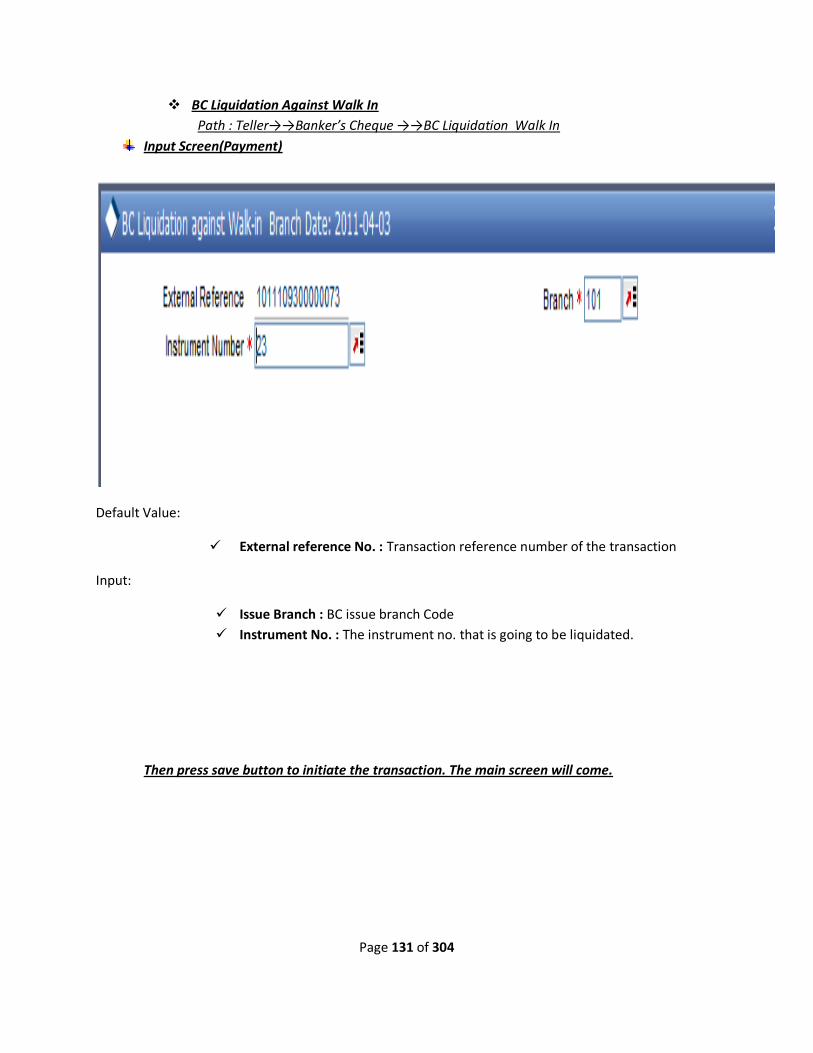
Page 131 of 304
BC Liquidation Against Walk In
Path : Teller→→Banker’s Cheque →→BC Liquidation Walk In
Input Screen(Payment)
Default Value:
External reference No. : Transaction reference number of the transaction
Input:
Issue Branch : BC issue branch Code
Instrument No. : The instrument no. that is going to be liquidated.
Then press save button to initiate the transaction. The main screen will come.

Page 132 of 304
Input Screen Continues……..
Default Value:
External Reference number
Liquidation Type (BCW)
Bank Code
Transaction Currency
Branch
BC Date
Drawee Account Number : Transaction Branch Code
Narrative
Payable Branch
MICR No.
BC Status
Passport/IC number
Issue Date
Liquidation date
Beneficiary Name
Beneficiary Address
Liquidation Mode:
Payment
Refund
Cancel
Instrument Number
BC Currency
BC Amount
Input Value:
General Ledger Number
GL Description
MOST IMPORTANT

Page 133 of 304
Press Save Button……….
Enrich Screen
Charge Screen with Recalculate button will come. If liquidation charge was applicable /
maintained for this function, from here we can amend, modify the charge.
Saving This Screen Will Initiate The Transaction Completely.
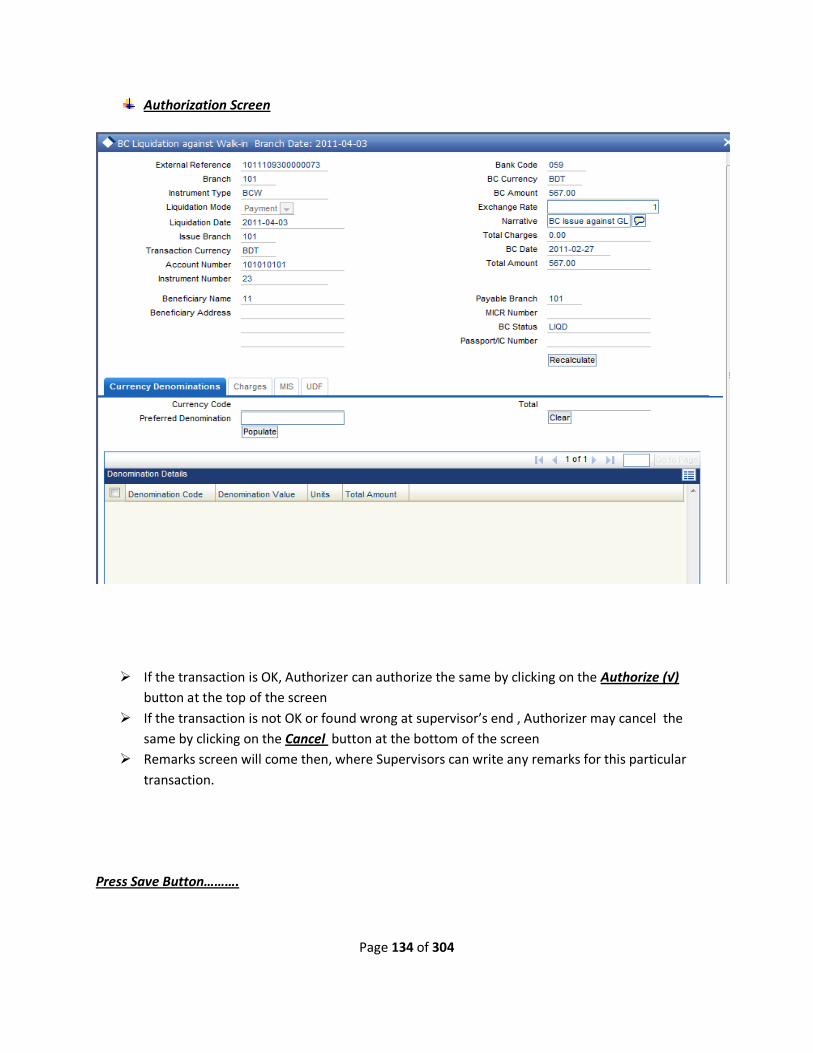
Page 134 of 304
Authorization Screen
If the transaction is OK, Authorizer can authorize the same by clicking on the Authorize (√)
button at the top of the screen
If the transaction is not OK or found wrong at supervisor’s end , Authorizer may cancel the
same by clicking on the Cancel button at the bottom of the screen
Remarks screen will come then, where Supervisors can write any remarks for this particular
transaction.
Press Save Button……….

Page 135 of 304
BC Liquidation Against Walk In (Refund)
Enrich Screen
Charge Screen with Recalculate button will come. If liquidation charge was applicable /
maintained for this function, from here we can amend, modify the charge.
Saving This Screen Will Initiate The Transaction Completely.
MOST IMPORTANT
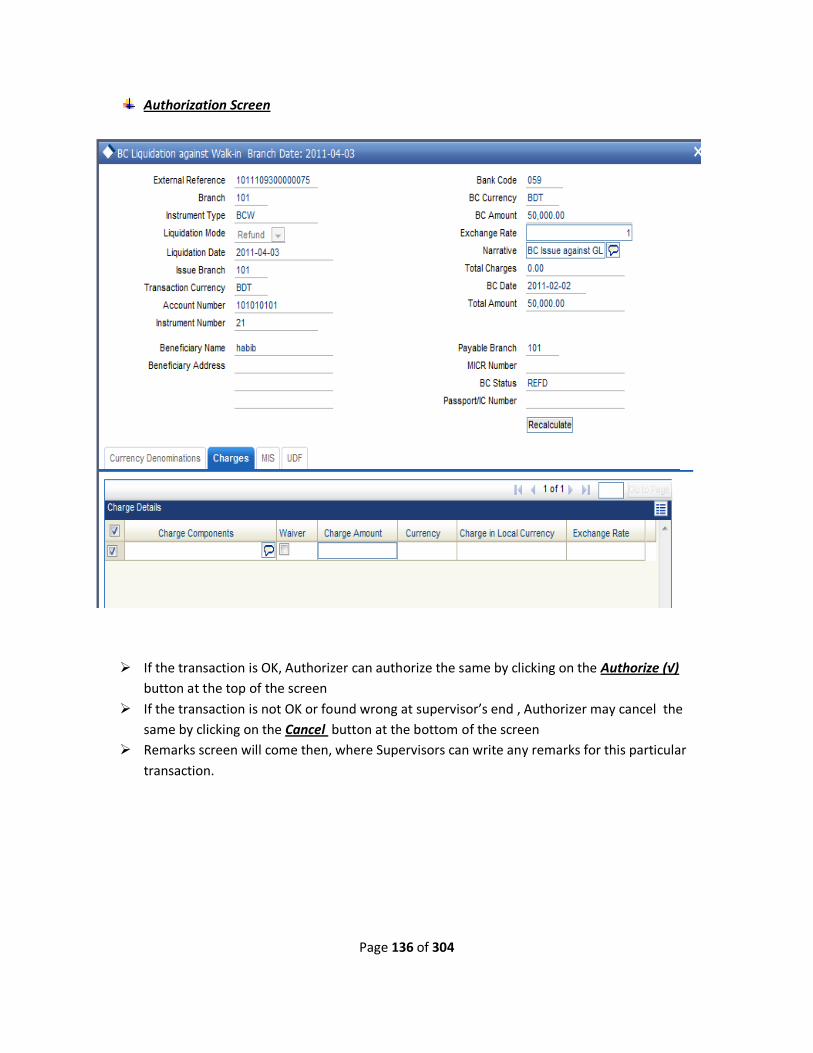
Page 136 of 304
Authorization Screen
If the transaction is OK, Authorizer can authorize the same by clicking on the Authorize (√)
button at the top of the screen
If the transaction is not OK or found wrong at supervisor’s end , Authorizer may cancel the
same by clicking on the Cancel button at the bottom of the screen
Remarks screen will come then, where Supervisors can write any remarks for this particular
transaction.
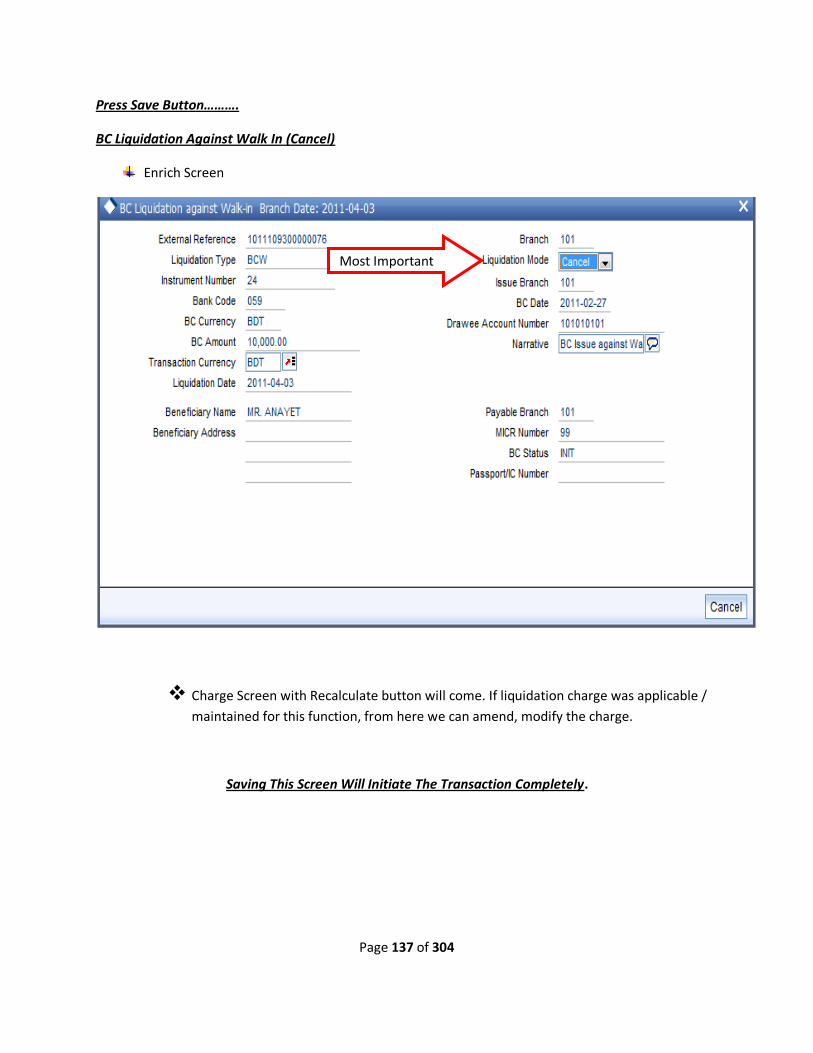
Page 137 of 304
Press Save Button……….
BC Liquidation Against Walk In (Cancel)
Enrich Screen
Charge Screen with Recalculate button will come. If liquidation charge was applicable /
maintained for this function, from here we can amend, modify the charge.
Saving This Screen Will Initiate The Transaction Completely.
Most Important
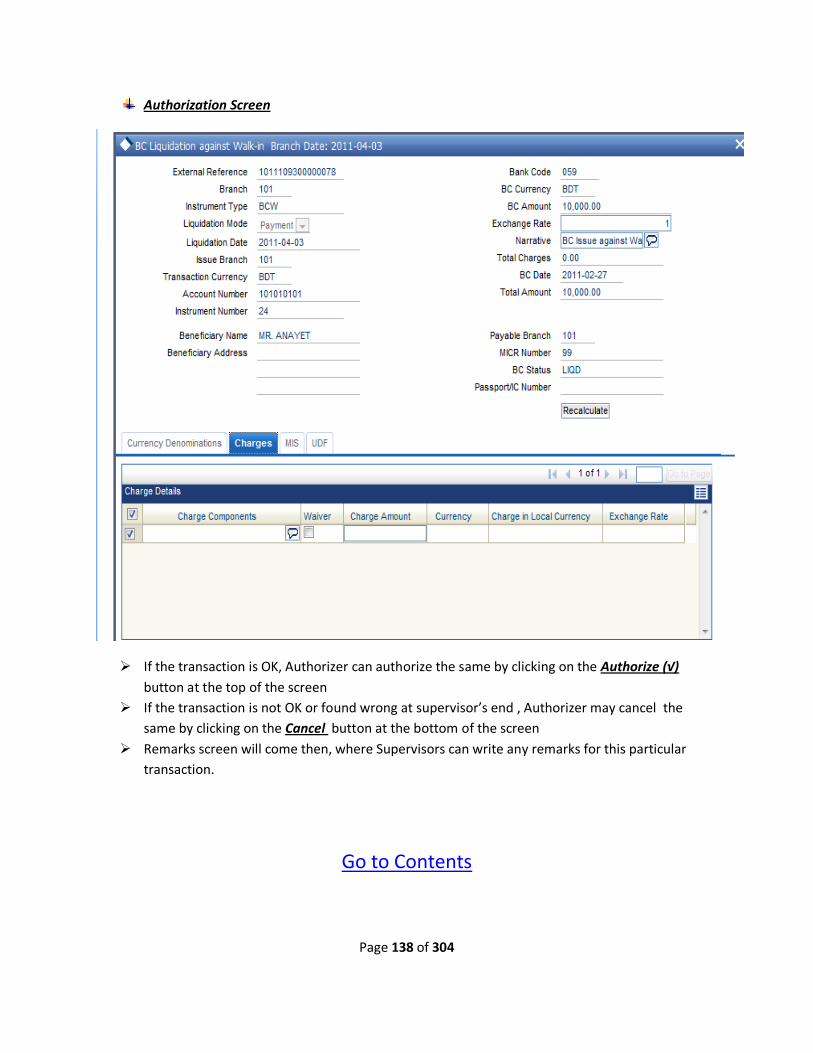
Page 138 of 304
Authorization Screen
If the transaction is OK, Authorizer can authorize the same by clicking on the Authorize (√)
button at the top of the screen
If the transaction is not OK or found wrong at supervisor’s end , Authorizer may cancel the
same by clicking on the Cancel button at the bottom of the screen
Remarks screen will come then, where Supervisors can write any remarks for this particular
transaction.
Go to Contents
Page 139 of 304
Type of Operation
Instrument Maintenance (System)
Instrument Issue against Customer
Instrument Liquidation
Payment
Refund
Cancel
Instrument Issue against Customer
Screens :
Input Screen
Enrich Screen
Authorizer Screen
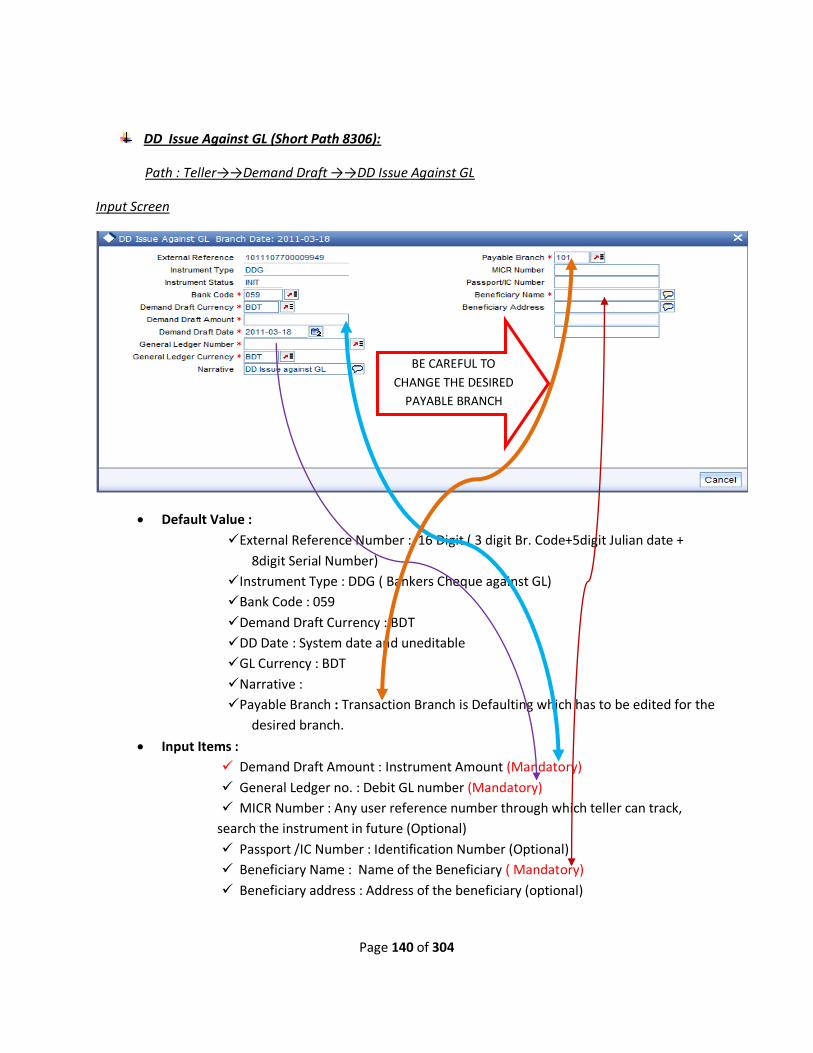
Page 140 of 304
DD Issue Against GL (Short Path 8306):
Path : Teller→→Demand Draft →→DD Issue Against GL
Input Screen
Default Value :
External Reference Number : 16 Digit ( 3 digit Br. Code+5digit Julian date +
8digit Serial Number)
Instrument Type : DDG ( Bankers Cheque against GL)
Bank Code : 059
Demand Draft Currency : BDT
DD Date : System date and uneditable
GL Currency : BDT
Narrative :
Payable Branch : Transaction Branch is Defaulting which has to be edited for the
desired branch.
Input Items :
Demand Draft Amount : Instrument Amount (Mandatory)
General Ledger no. : Debit GL number (Mandatory)
MICR Number : Any user reference number through which teller can track,
search the instrument in future (Optional)
Passport /IC Number : Identification Number (Optional)
Beneficiary Name : Name of the Beneficiary ( Mandatory)
Beneficiary address : Address of the beneficiary (optional)
BE CAREFUL TO
CHANGE THE DESIRED
PAYABLE BRANCH

Page 141 of 304
After Saving the inputed data, system will bring the Enrich Screen with Instrument Number and Charge which can
be Modified (Same as Pay Order). After Saving that Enrich Screen , System will ask for authorization where
applicable.
DD Issue against Walk In (Short Path 8305)
Path : Teller→→Demand Draft →→DD Issue Against Walk In
Input Screen
Default Value :
External Reference Number : 16 Digit ( 3 digit Br. Code+5digit Julian date +
8digit Serial Number)
Instrument Type : DDW( DD Issue Against Walk In)
Bank Code : 059
Demand Draft Currency : BDT
DD Date : System date and uneditable
Narrative :
Payable Branch : Transaction Branch is Defaulting which has to be edited for the
desired branch.
Input Items :
Demand Draft Amount : Instrument Amount (Mandatory)
MICR Number : Any user reference number through which teller can track,
search the instrument in future (Optional)
Passport /IC Number : Identification Number (Optional)
Beneficiary Name : Name of the Beneficiary ( Mandatory)
Beneficiary address : Address of the beneficiary (optional)
BE CAREFUL TO
CHANGE THE DESIRED
PAYABLE BRANCH
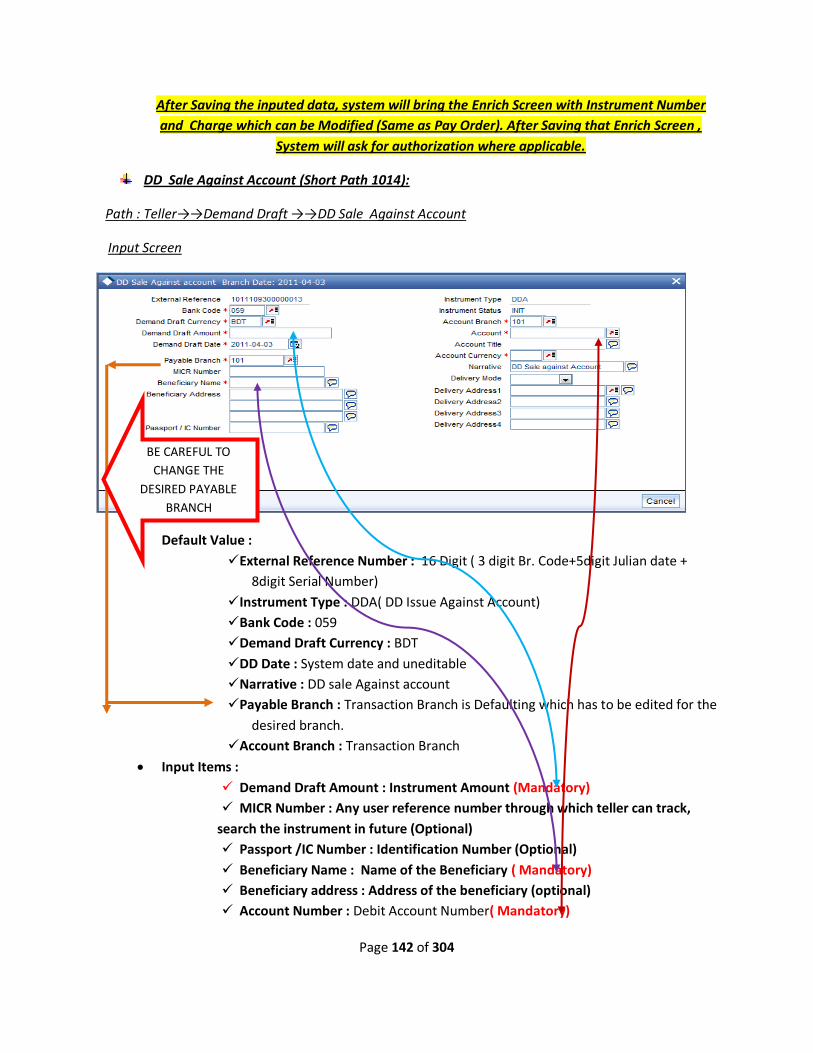
Page 142 of 304
After Saving the inputed data, system will bring the Enrich Screen with Instrument Number
and Charge which can be Modified (Same as Pay Order). After Saving that Enrich Screen ,
System will ask for authorization where applicable.
DD Sale Against Account (Short Path 1014):
Path : Teller→→Demand Draft →→DD Sale Against Account
Input Screen
Default Value :
External Reference Number : 16 Digit ( 3 digit Br. Code+5digit Julian date +
8digit Serial Number)
Instrument Type : DDA( DD Issue Against Account)
Bank Code : 059
Demand Draft Currency : BDT
DD Date : System date and uneditable
Narrative : DD sale Against account
Payable Branch : Transaction Branch is Defaulting which has to be edited for the
desired branch.
Account Branch : Transaction Branch
Input Items :
Demand Draft Amount : Instrument Amount (Mandatory)
MICR Number : Any user reference number through which teller can track,
search the instrument in future (Optional)
Passport /IC Number : Identification Number (Optional)
Beneficiary Name : Name of the Beneficiary ( Mandatory)
Beneficiary address : Address of the beneficiary (optional)
Account Number : Debit Account Number( Mandatory)
BE CAREFUL TO
CHANGE THE
DESIRED PAYABLE
BRANCH
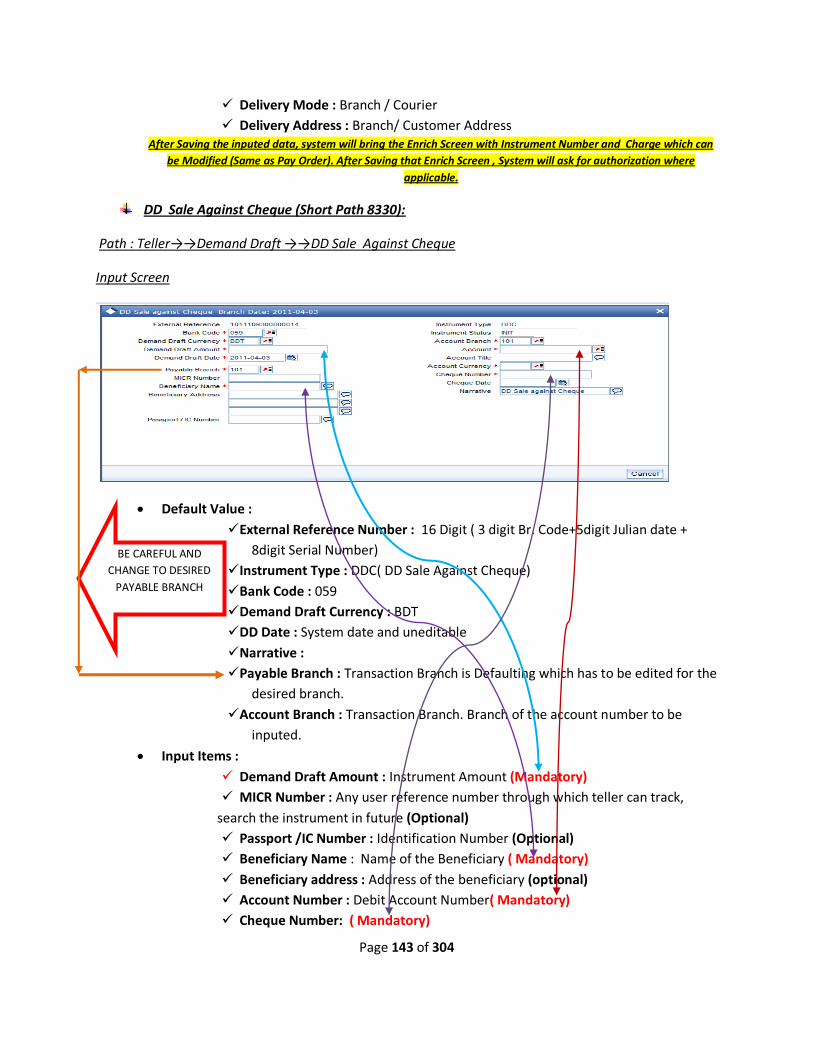
Page 143 of 304
Delivery Mode : Branch / Courier
Delivery Address : Branch/ Customer Address After Saving the inputed data, system will bring the Enrich Screen with Instrument Number and Charge which can
be Modified (Same as Pay Order). After Saving that Enrich Screen , System will ask for authorization where
applicable.
DD Sale Against Cheque (Short Path 8330):
Path : Teller→→Demand Draft →→DD Sale Against Cheque
Input Screen
Default Value :
External Reference Number : 16 Digit ( 3 digit Br. Code+5digit Julian date +
8digit Serial Number)
Instrument Type : DDC( DD Sale Against Cheque)
Bank Code : 059
Demand Draft Currency : BDT
DD Date : System date and uneditable
Narrative :
Payable Branch : Transaction Branch is Defaulting which has to be edited for the
desired branch.
Account Branch : Transaction Branch. Branch of the account number to be
inputed.
Input Items :
Demand Draft Amount : Instrument Amount (Mandatory)
MICR Number : Any user reference number through which teller can track,
search the instrument in future (Optional)
Passport /IC Number : Identification Number (Optional)
Beneficiary Name : Name of the Beneficiary ( Mandatory)
Beneficiary address : Address of the beneficiary (optional)
Account Number : Debit Account Number( Mandatory)
Cheque Number: ( Mandatory)
BE CAREFUL AND
CHANGE TO DESIRED
PAYABLE BRANCH
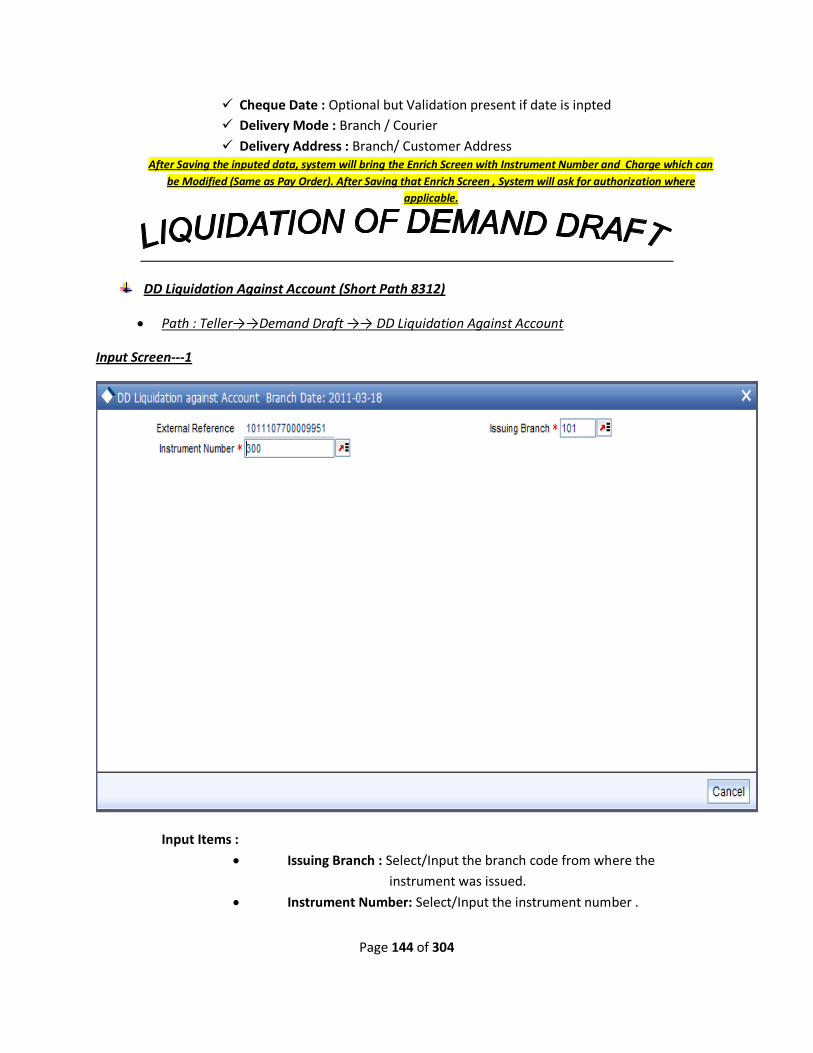
Page 144 of 304
Cheque Date : Optional but Validation present if date is inpted
Delivery Mode : Branch / Courier
Delivery Address : Branch/ Customer Address After Saving the inputed data, system will bring the Enrich Screen with Instrument Number and Charge which can
be Modified (Same as Pay Order). After Saving that Enrich Screen , System will ask for authorization where
applicable.
DD Liquidation Against Account (Short Path 8312)
Path : Teller→→Demand Draft →→ DD Liquidation Against Account
Input Screen---1
Input Items :
Issuing Branch : Select/Input the branch code from where the
instrument was issued.
Instrument Number: Select/Input the instrument number .
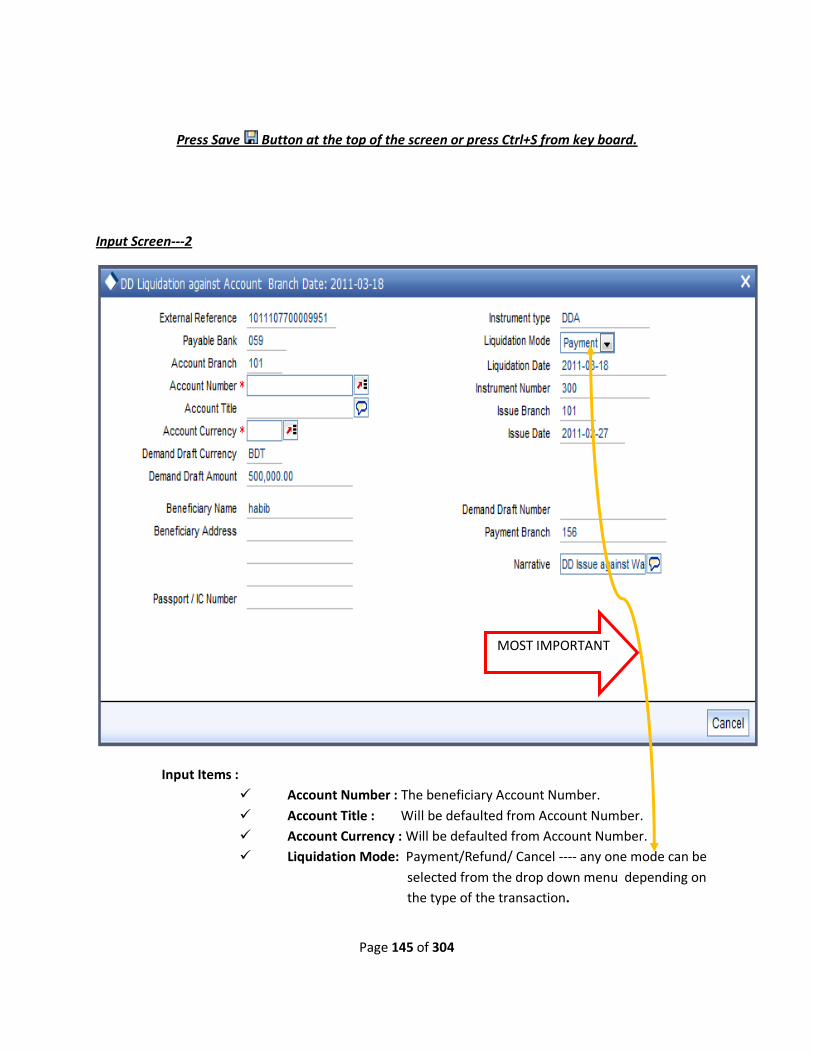
Page 145 of 304
Press Save Button at the top of the screen or press Ctrl+S from key board.
Input Screen---2
Input Items :
Account Number : The beneficiary Account Number.
Account Title : Will be defaulted from Account Number.
Account Currency : Will be defaulted from Account Number.
Liquidation Mode: Payment/Refund/ Cancel ---- any one mode can be
selected from the drop down menu depending on
the type of the transaction.
MOST IMPORTANT
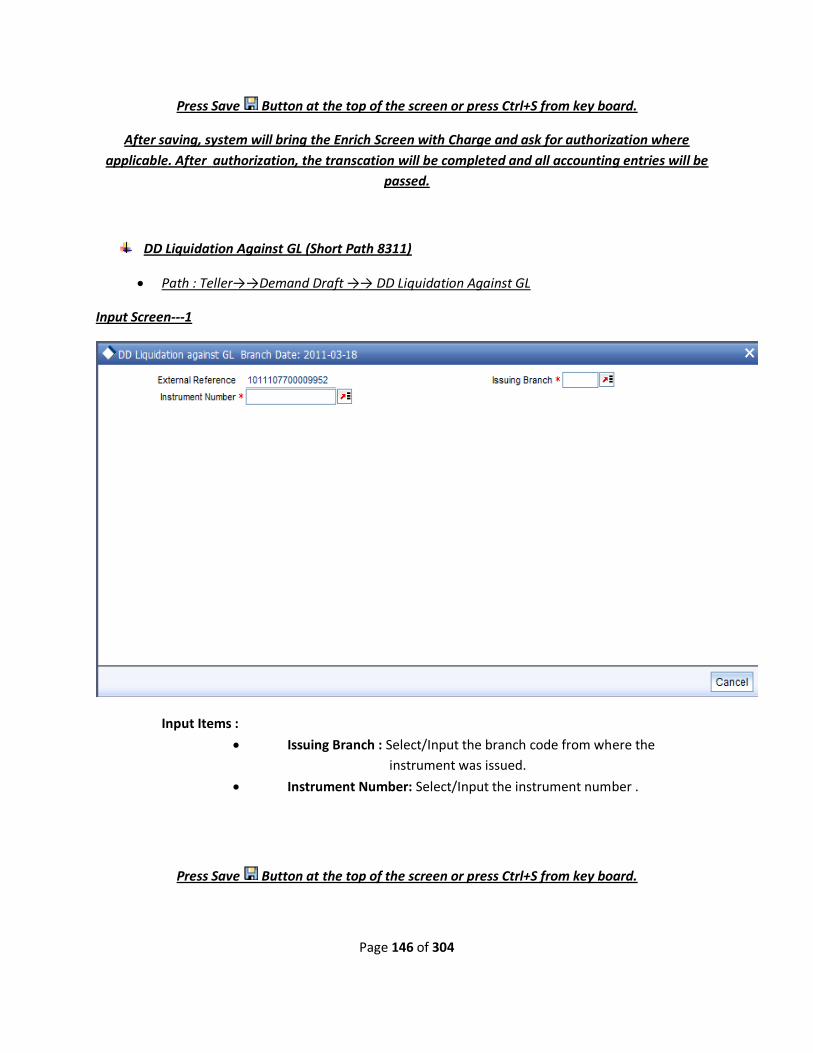
Page 146 of 304
Press Save Button at the top of the screen or press Ctrl+S from key board.
After saving, system will bring the Enrich Screen with Charge and ask for authorization where
applicable. After authorization, the transcation will be completed and all accounting entries will be
passed.
DD Liquidation Against GL (Short Path 8311)
Path : Teller→→Demand Draft →→ DD Liquidation Against GL
Input Screen---1
Input Items :
Issuing Branch : Select/Input the branch code from where the
instrument was issued.
Instrument Number: Select/Input the instrument number .
Press Save Button at the top of the screen or press Ctrl+S from key board.
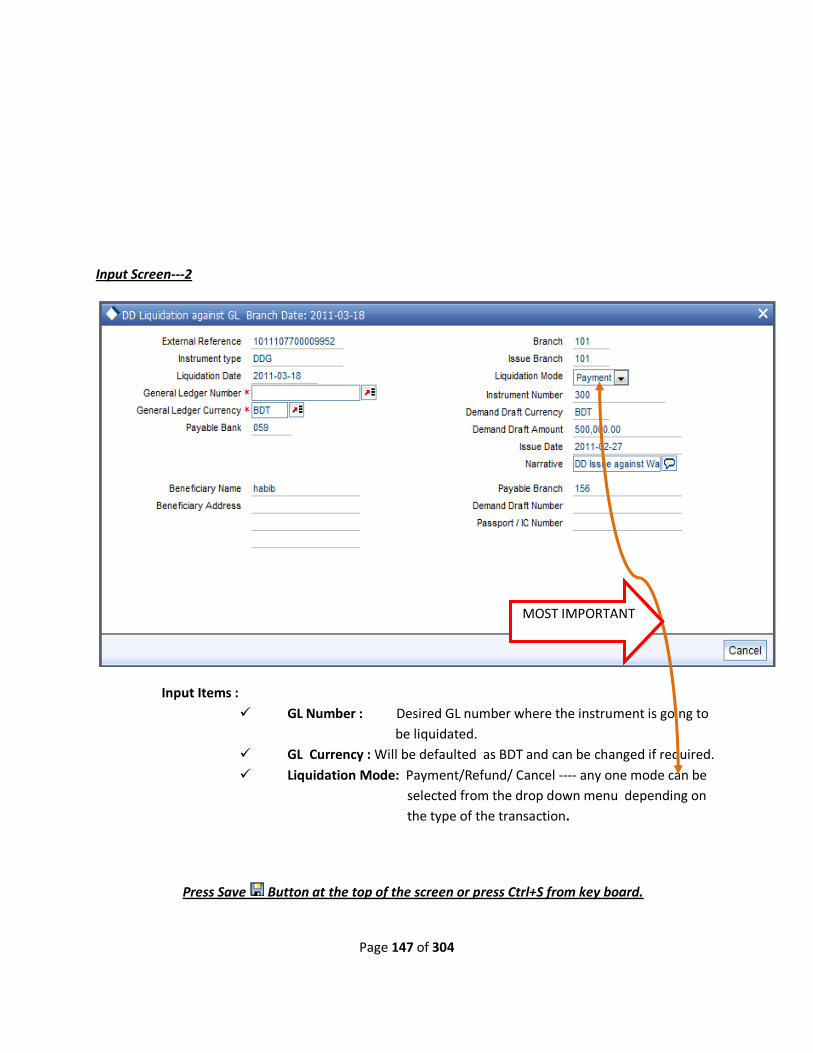
Page 147 of 304
Input Screen---2
Input Items :
GL Number : Desired GL number where the instrument is going to
be liquidated.
GL Currency : Will be defaulted as BDT and can be changed if required.
Liquidation Mode: Payment/Refund/ Cancel ---- any one mode can be
selected from the drop down menu depending on
the type of the transaction.
Press Save Button at the top of the screen or press Ctrl+S from key board.
MOST IMPORTANT MOST IMPORTANT MOST IMPORTANT
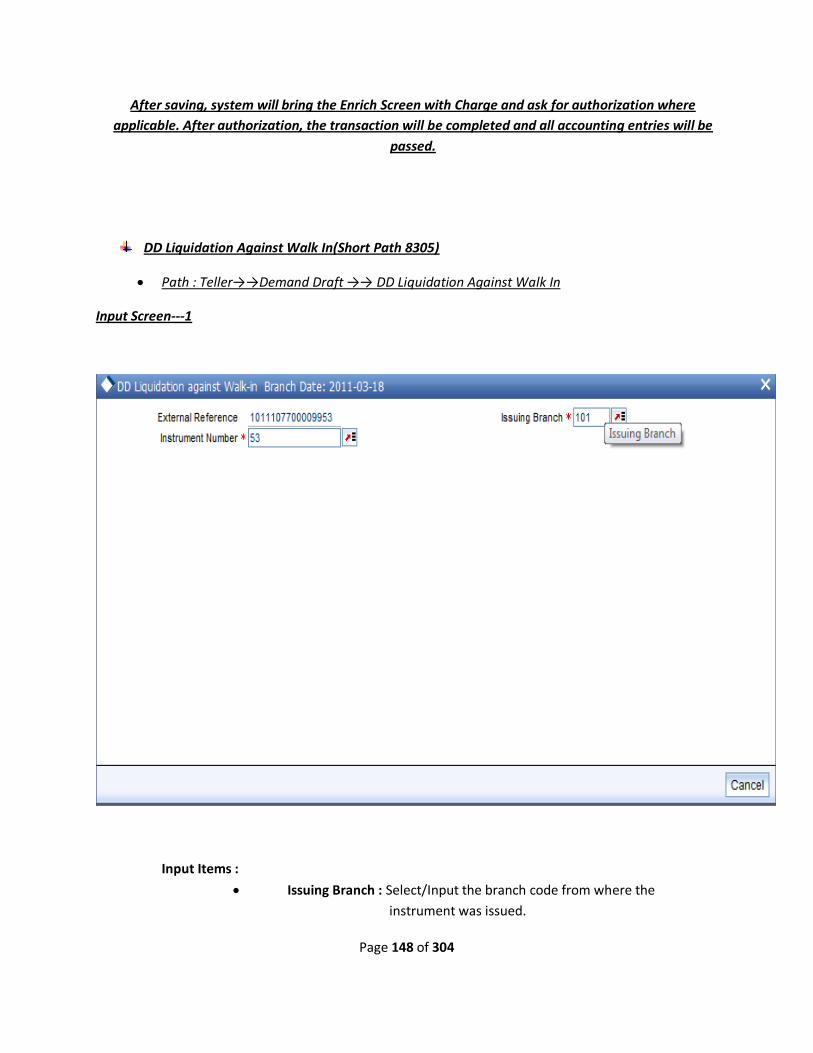
Page 148 of 304
After saving, system will bring the Enrich Screen with Charge and ask for authorization where
applicable. After authorization, the transaction will be completed and all accounting entries will be
passed.
DD Liquidation Against Walk In(Short Path 8305)
Path : Teller→→Demand Draft →→ DD Liquidation Against Walk In
Input Screen---1
Input Items :
Issuing Branch : Select/Input the branch code from where the
instrument was issued.
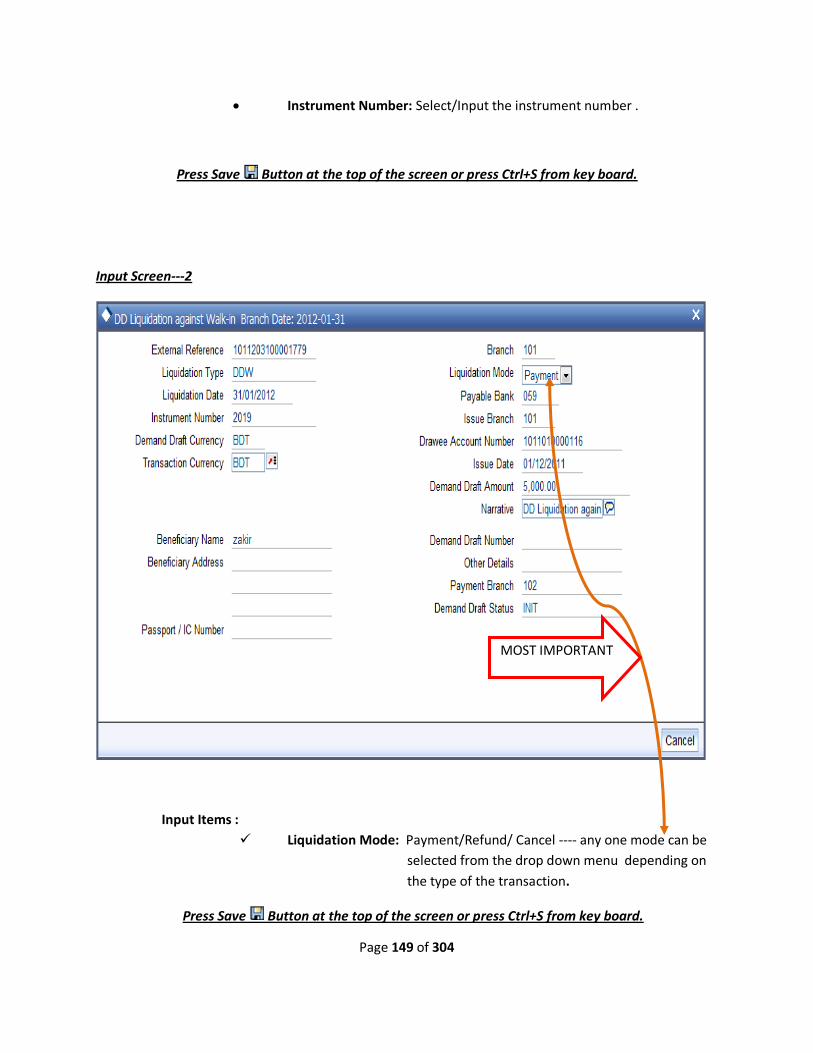
Page 149 of 304
Instrument Number: Select/Input the instrument number .
Press Save Button at the top of the screen or press Ctrl+S from key board.
Input Screen---2
Input Items :
Liquidation Mode: Payment/Refund/ Cancel ---- any one mode can be
selected from the drop down menu depending on
the type of the transaction.
Press Save Button at the top of the screen or press Ctrl+S from key board.
MOST IMPORTANT
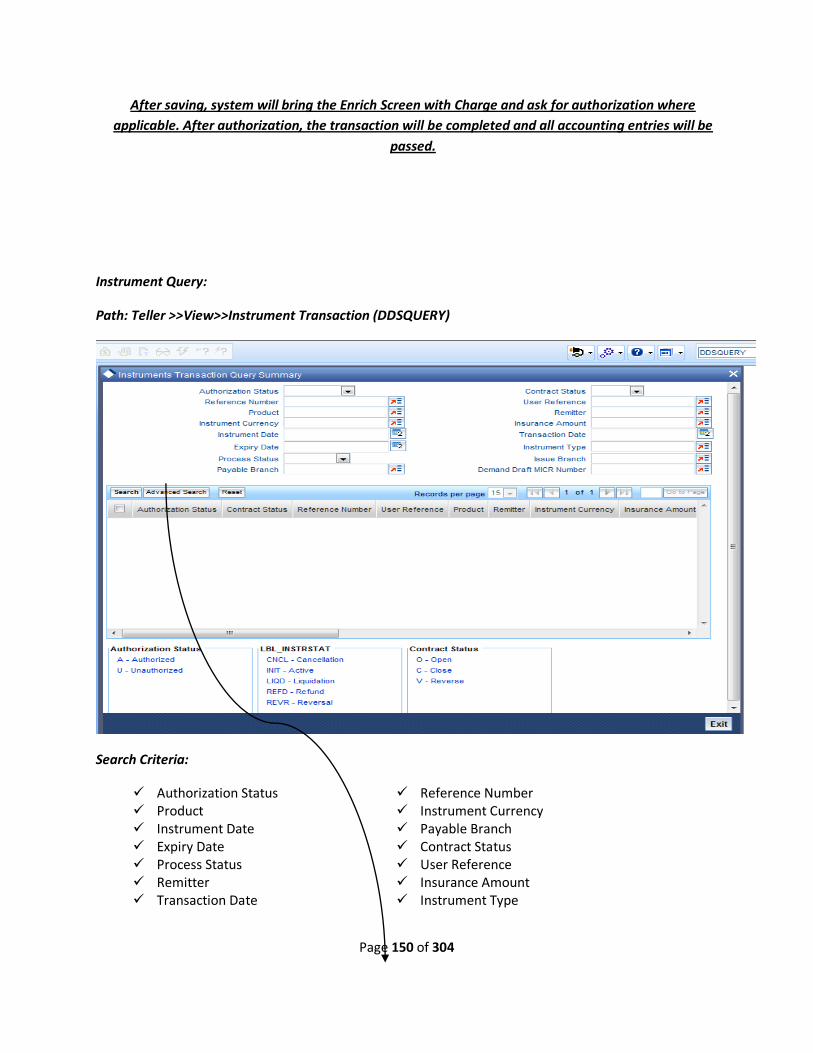
Page 150 of 304
After saving, system will bring the Enrich Screen with Charge and ask for authorization where
applicable. After authorization, the transaction will be completed and all accounting entries will be
passed.
Instrument Query:
Path: Teller >>View>>Instrument Transaction (DDSQUERY)
Search Criteria:
Authorization Status Reference Number Product Instrument Currency Instrument Date Payable Branch Expiry Date Contract Status Process Status User Reference Remitter Insurance Amount Transaction Date Instrument Type

Page 151 of 304
Issue Branch Demand Draft MICR Number
Along with the above, Advanced Search option will provide the following options .
Instrument Number Account Branch Account Number Beneficiary Name
Selecting any one of the above, search can be completed
For Example, if instrument number is selected as 100 from the Advanced Search option, the
following screen will come.
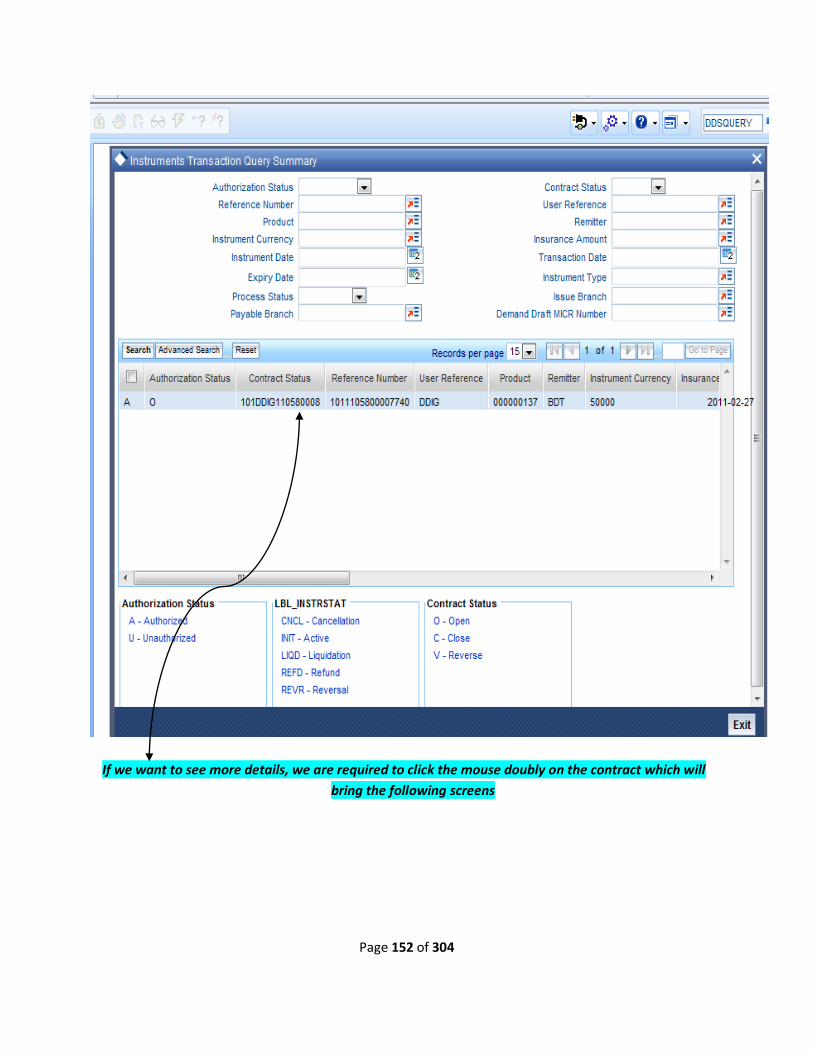
Page 152 of 304
If we want to see more details, we are required to click the mouse doubly on the contract which will
bring the following screens
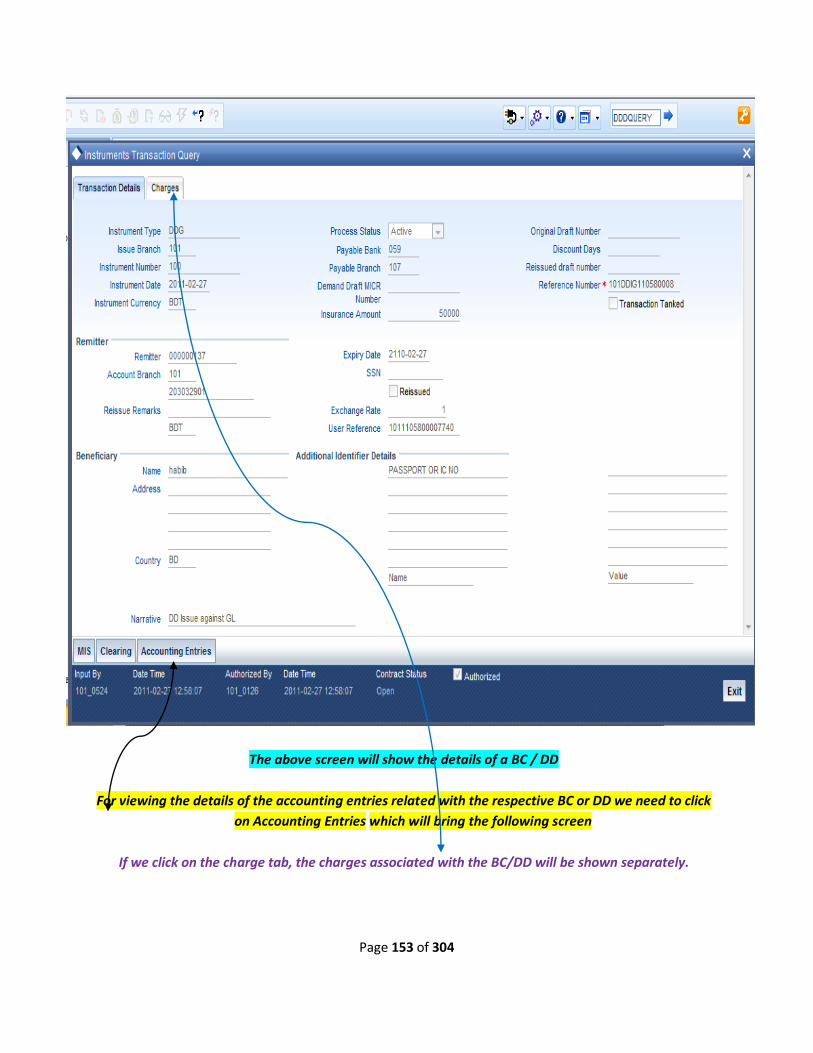
Page 153 of 304
The above screen will show the details of a BC / DD
For viewing the details of the accounting entries related with the respective BC or DD we need to click
on Accounting Entries which will bring the following screen
If we click on the charge tab, the charges associated with the BC/DD will be shown separately.

Page 154 of 304
From the above screen the details of the accounting entries of a BC /DD can be viewed.
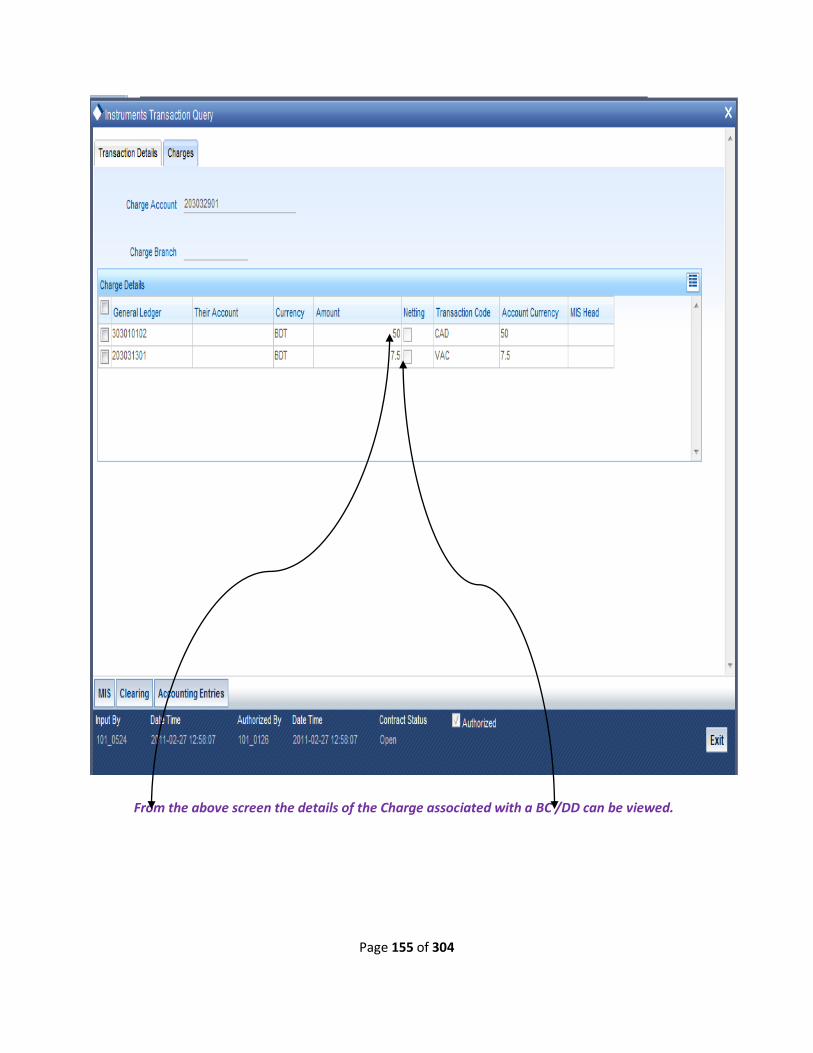
Page 155 of 304
From the above screen the details of the Charge associated with a BC /DD can be viewed.
Page 156 of 304
Stop Instruments
Stop of Used instruments :
Stop after the issuance against the customer
Stop of Un-used Instruments:
Stop before the issuance against the customer
Stop of Used Instruments:
Input Screen
Path : Teller>> Miscellaneous Transaction>>Stop Instruments (CADSTINS)
For marking Stop/Lost /Damage we need to click on new button which will bring the following screen.

Page 157 of 304
Default Field:
Branch Code: Transaction branch is defaulted.
Reference Number: System generated.
Input Field:
Instrument Number: The instrument that is going to be marked as stopped/lost.
Related Reference: Transaction reference will be picked up by system.
Remarks: Reason for marking Stop/Lost.
Type: Instrument type (BC/DD to be selected)
Status :
Lost >> to mark an instrument as LOST
Damaged>>to mark an instrument as damaged
Revalidate>> to clear the status LOST/Damaged.
Page 158 of 304
After input teller has to save the screen by pressing Ctrl+S or the Save Button
To ease the process, this operation will not require authorization.
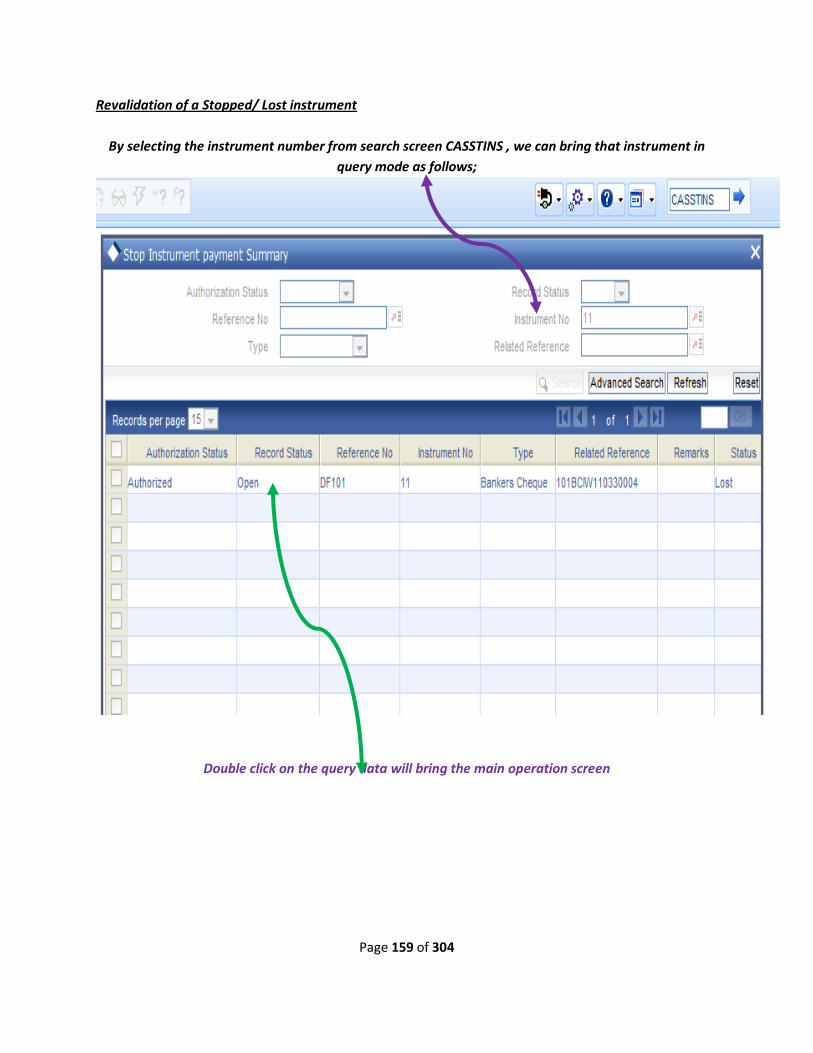
Page 159 of 304
Revalidation of a Stopped/ Lost instrument
By selecting the instrument number from search screen CASSTINS , we can bring that instrument in
query mode as follows;
Double click on the query data will bring the main operation screen
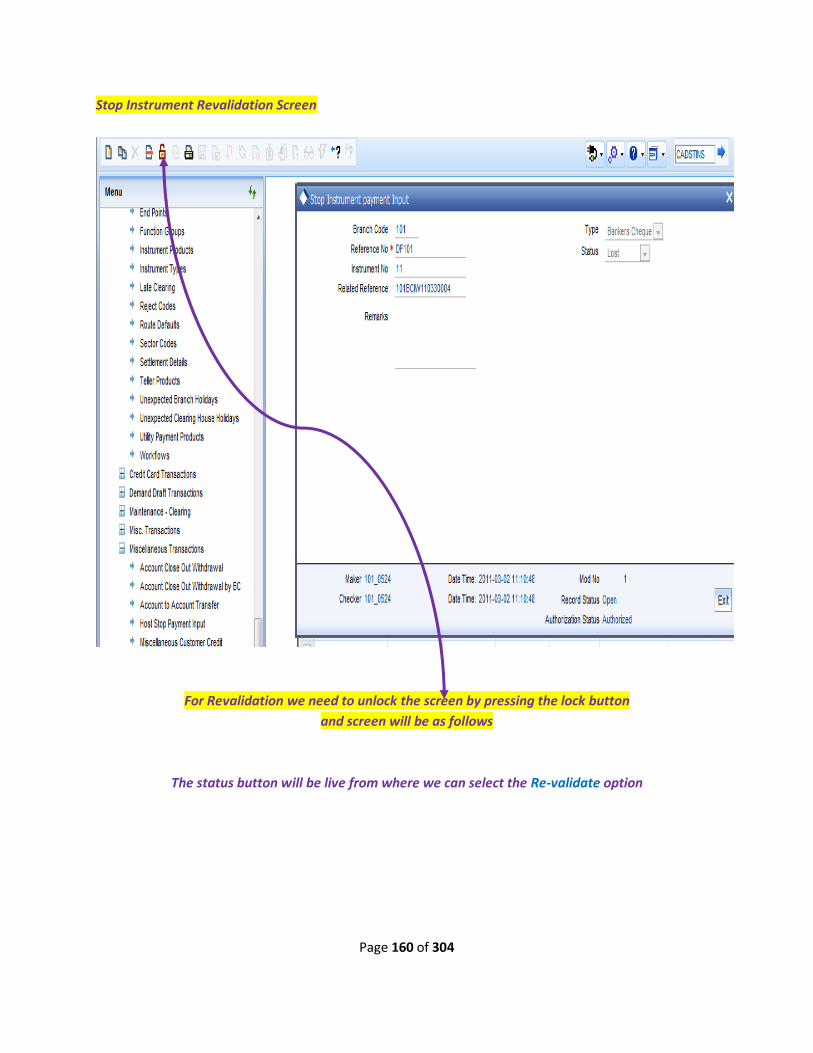
Page 160 of 304
Stop Instrument Revalidation Screen
For Revalidation we need to unlock the screen by pressing the lock button
and screen will be as follows
The status button will be live from where we can select the Re-validate option
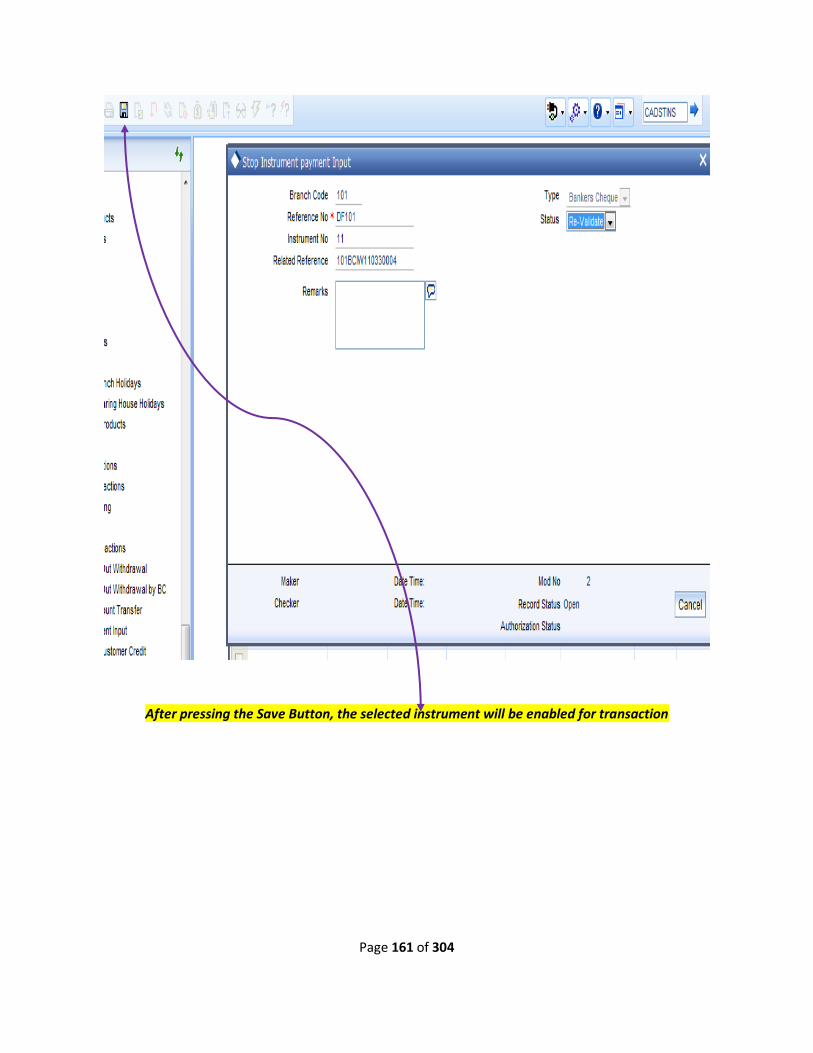
Page 161 of 304
After pressing the Save Button, the selected instrument will be enabled for transaction
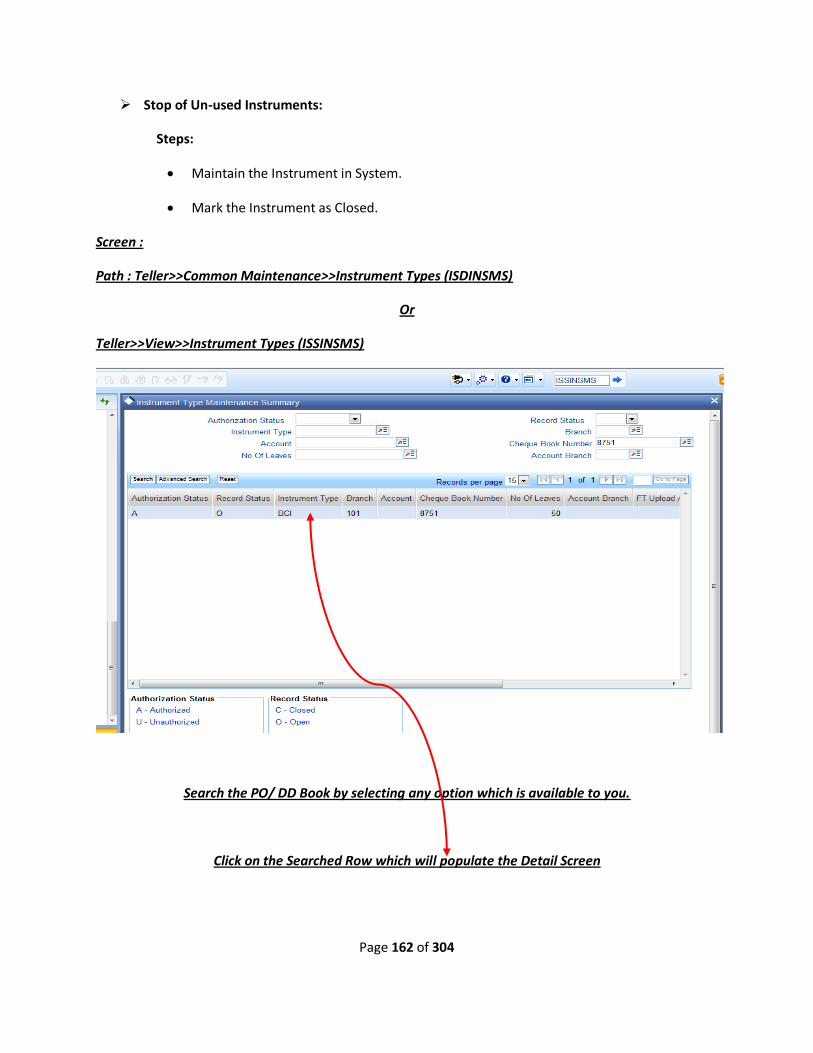
Page 162 of 304
Stop of Un-used Instruments:
Steps:
Maintain the Instrument in System.
Mark the Instrument as Closed.
Screen :
Path : Teller>>Common Maintenance>>Instrument Types (ISDINSMS)
Or
Teller>>View>>Instrument Types (ISSINSMS)
Search the PO/ DD Book by selecting any option which is available to you.
Click on the Searched Row which will populate the Detail Screen
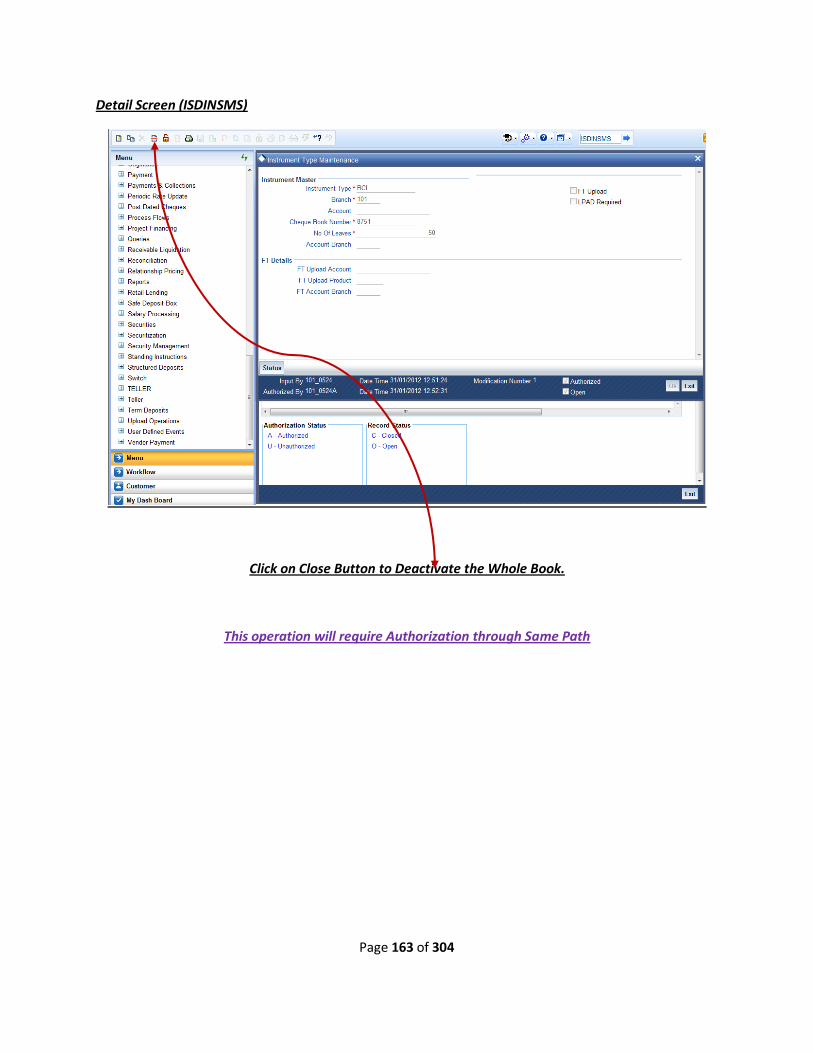
Page 163 of 304
Detail Screen (ISDINSMS)
Click on Close Button to Deactivate the Whole Book.
This operation will require Authorization through Same Path
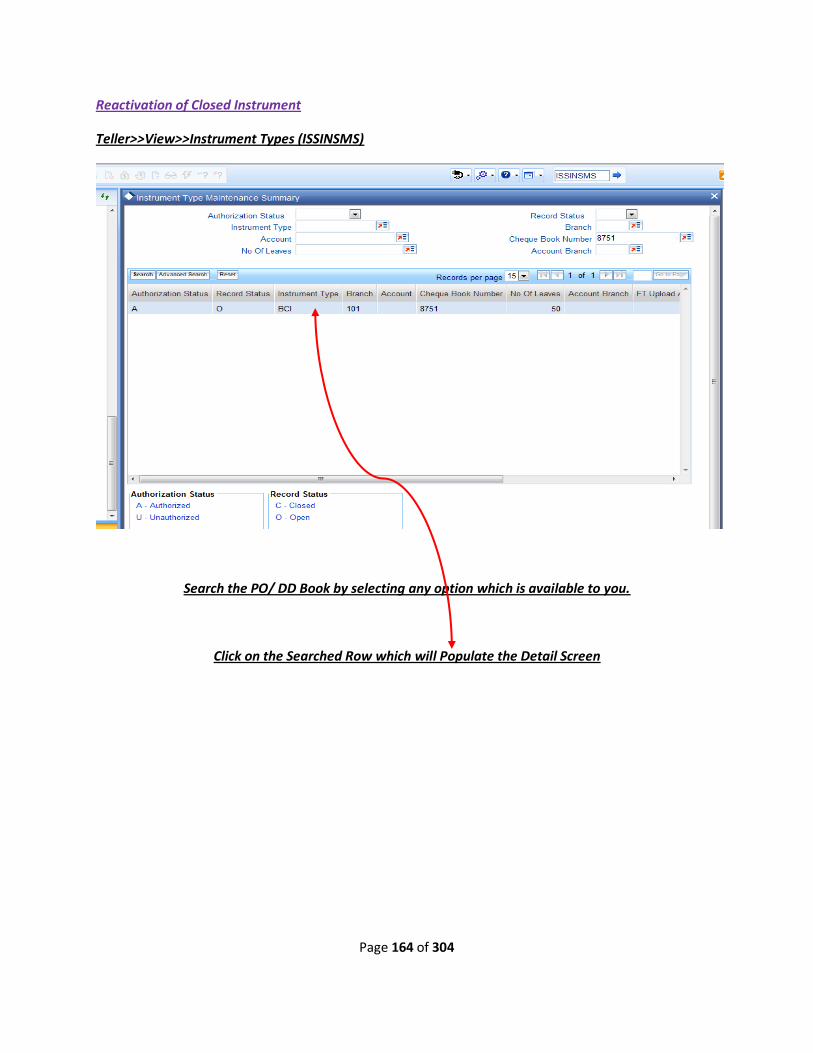
Page 164 of 304
Reactivation of Closed Instrument
Teller>>View>>Instrument Types (ISSINSMS)
Search the PO/ DD Book by selecting any option which is available to you.
Click on the Searched Row which will Populate the Detail Screen
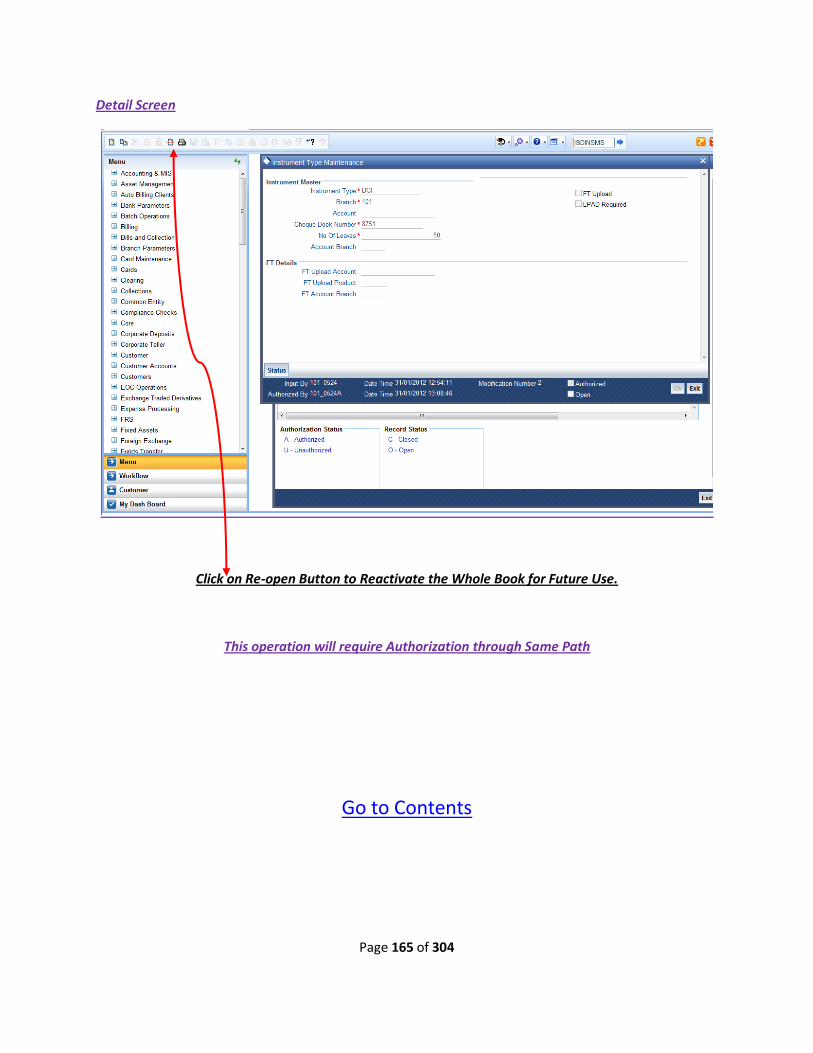
Page 165 of 304
Detail Screen
Click on Re-open Button to Reactivate the Whole Book for Future Use.
This operation will require Authorization through Same Path
Go to Contents

Page 166 of 304
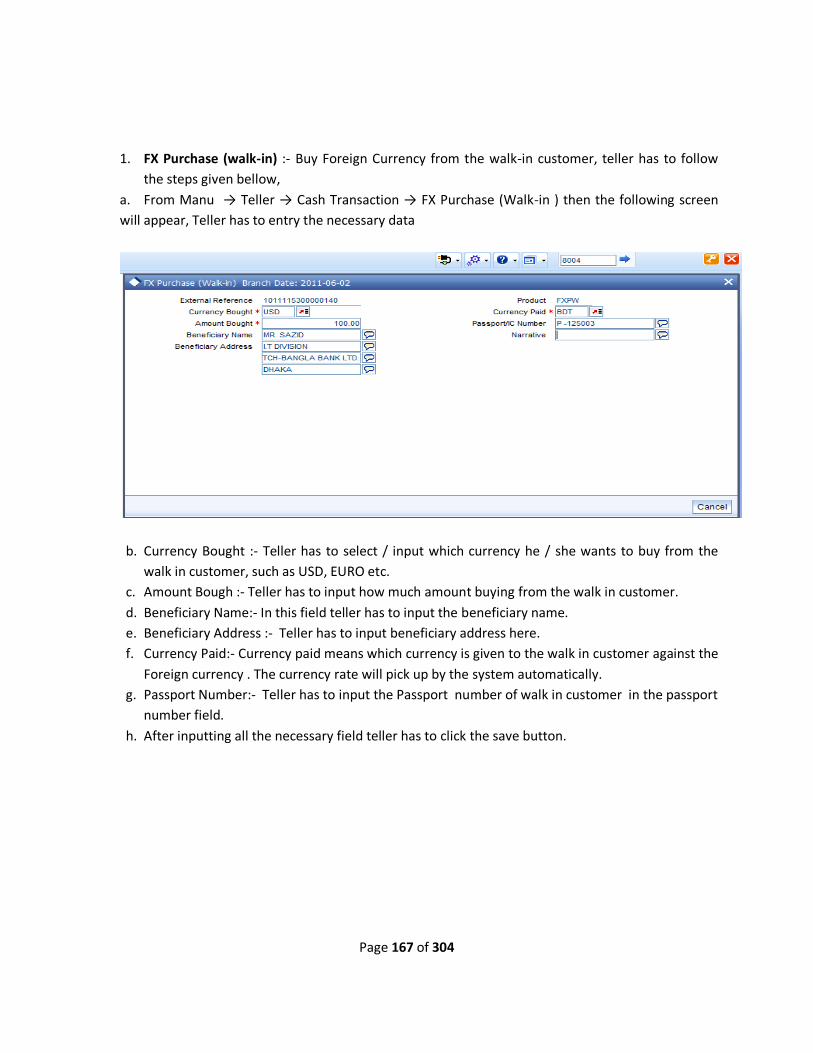
Page 167 of 304
1. FX Purchase (walk-in) :- Buy Foreign Currency from the walk-in customer, teller has to follow
the steps given bellow,
a. From Manu → Teller → Cash Transaction → FX Purchase (Walk-in ) then the following screen
will appear, Teller has to entry the necessary data
b. Currency Bought :- Teller has to select / input which currency he / she wants to buy from the
walk in customer, such as USD, EURO etc.
c. Amount Bough :- Teller has to input how much amount buying from the walk in customer.
d. Beneficiary Name:- In this field teller has to input the beneficiary name.
e. Beneficiary Address :- Teller has to input beneficiary address here.
f. Currency Paid:- Currency paid means which currency is given to the walk in customer against the
Foreign currency . The currency rate will pick up by the system automatically.
g. Passport Number:- Teller has to input the Passport number of walk in customer in the passport
number field.
h. After inputting all the necessary field teller has to click the save button.

Page 168 of 304
i. After clicking the save button first time then the above screen will appear, Teller has to
check all the inputted data and if necessary to change the exchange rate then teller will
modify the same.
j. After checking all the data teller has to click the save button again. Then the transaction will
ask for authorization.
k. Authorizer will check all the inputted fields which teller inputted and if all the inputted fields
are ok then checker will authorize that transaction.
l. After authorization the transaction will be completed.
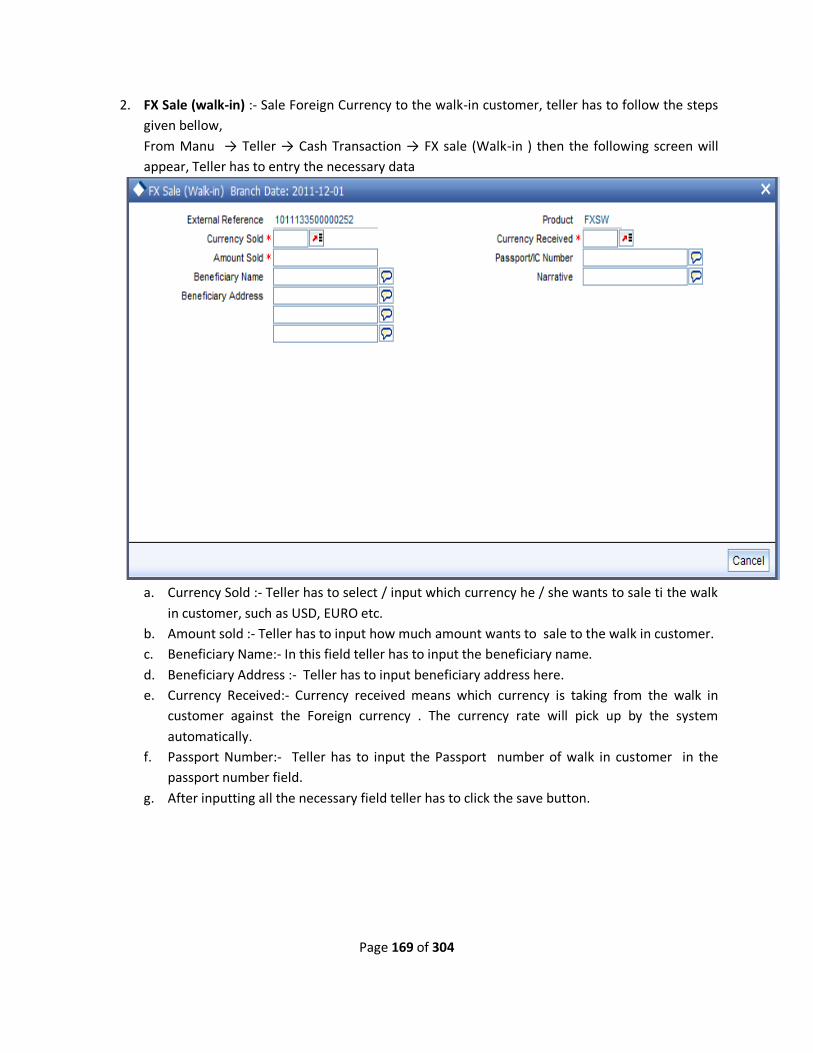
Page 169 of 304
2. FX Sale (walk-in) :- Sale Foreign Currency to the walk-in customer, teller has to follow the steps
given bellow,
From Manu → Teller → Cash Transaction → FX sale (Walk-in ) then the following screen will
appear, Teller has to entry the necessary data
a. Currency Sold :- Teller has to select / input which currency he / she wants to sale ti the walk
in customer, such as USD, EURO etc.
b. Amount sold :- Teller has to input how much amount wants to sale to the walk in customer.
c. Beneficiary Name:- In this field teller has to input the beneficiary name.
d. Beneficiary Address :- Teller has to input beneficiary address here.
e. Currency Received:- Currency received means which currency is taking from the walk in
customer against the Foreign currency . The currency rate will pick up by the system
automatically.
f. Passport Number:- Teller has to input the Passport number of walk in customer in the
passport number field.
g. After inputting all the necessary field teller has to click the save button.
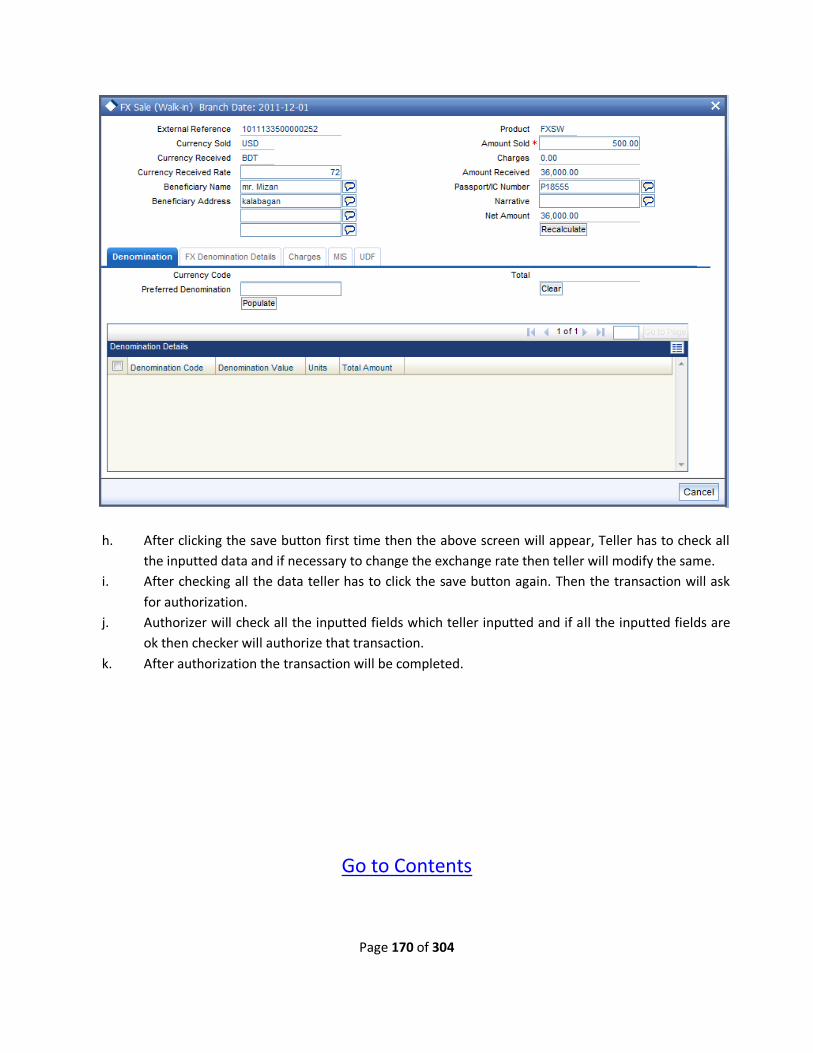
Page 170 of 304
h. After clicking the save button first time then the above screen will appear, Teller has to check all
the inputted data and if necessary to change the exchange rate then teller will modify the same.
i. After checking all the data teller has to click the save button again. Then the transaction will ask
for authorization.
j. Authorizer will check all the inputted fields which teller inputted and if all the inputted fields are
ok then checker will authorize that transaction.
k. After authorization the transaction will be completed.
Go to Contents

Page 171 of 304
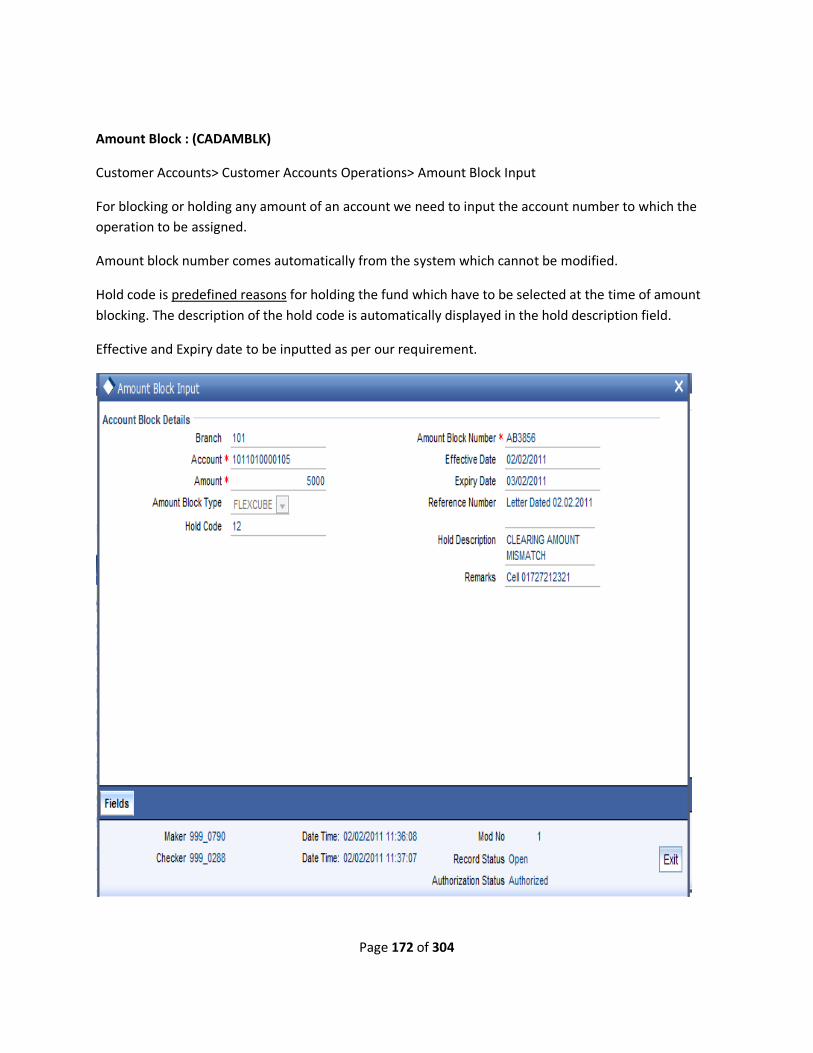
Page 172 of 304
Amount Block : (CADAMBLK)
Customer Accounts> Customer Accounts Operations> Amount Block Input
For blocking or holding any amount of an account we need to input the account number to which the
operation to be assigned.
Amount block number comes automatically from the system which cannot be modified.
Hold code is predefined reasons for holding the fund which have to be selected at the time of amount
blocking. The description of the hold code is automatically displayed in the hold description field.
Effective and Expiry date to be inputted as per our requirement.
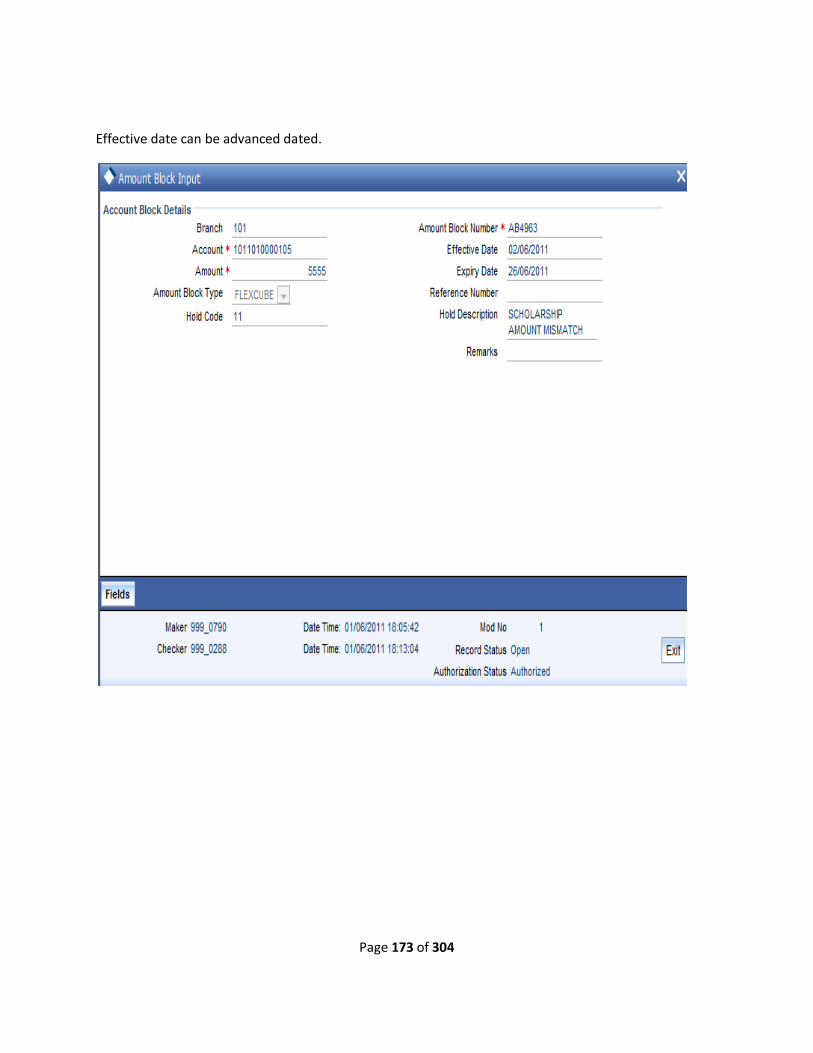
Page 173 of 304
Effective date can be advanced dated.

Page 174 of 304
We can view the summery of amount blocked in the following screen: CASAMBLK
Customer Accounts>Customer Accounts View>Amount Block Summary
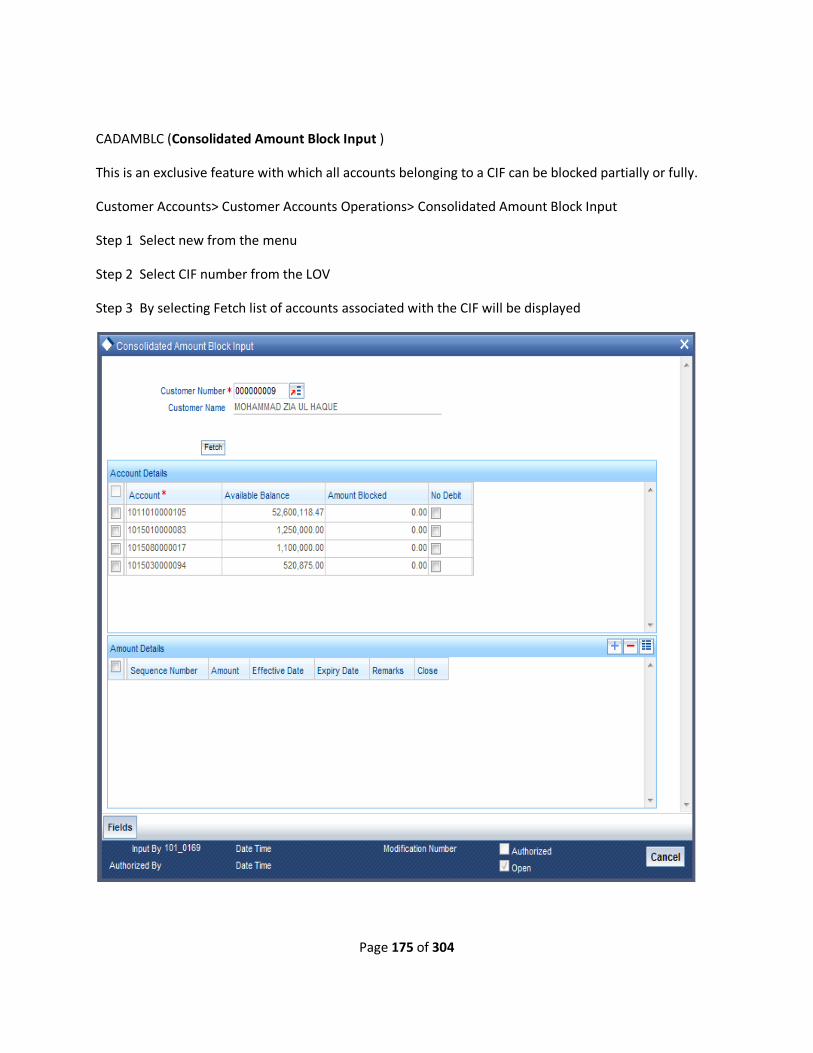
Page 175 of 304
CADAMBLC (Consolidated Amount Block Input )
This is an exclusive feature with which all accounts belonging to a CIF can be blocked partially or fully.
Customer Accounts> Customer Accounts Operations> Consolidated Amount Block Input
Step 1 Select new from the menu
Step 2 Select CIF number from the LOV
Step 3 By selecting Fetch list of accounts associated with the CIF will be displayed

Page 176 of 304
Step 4: Select any one of the account. A raw will be displayed under amount details screen where we
get the option to entry values with effective date, expiry date and remarks.
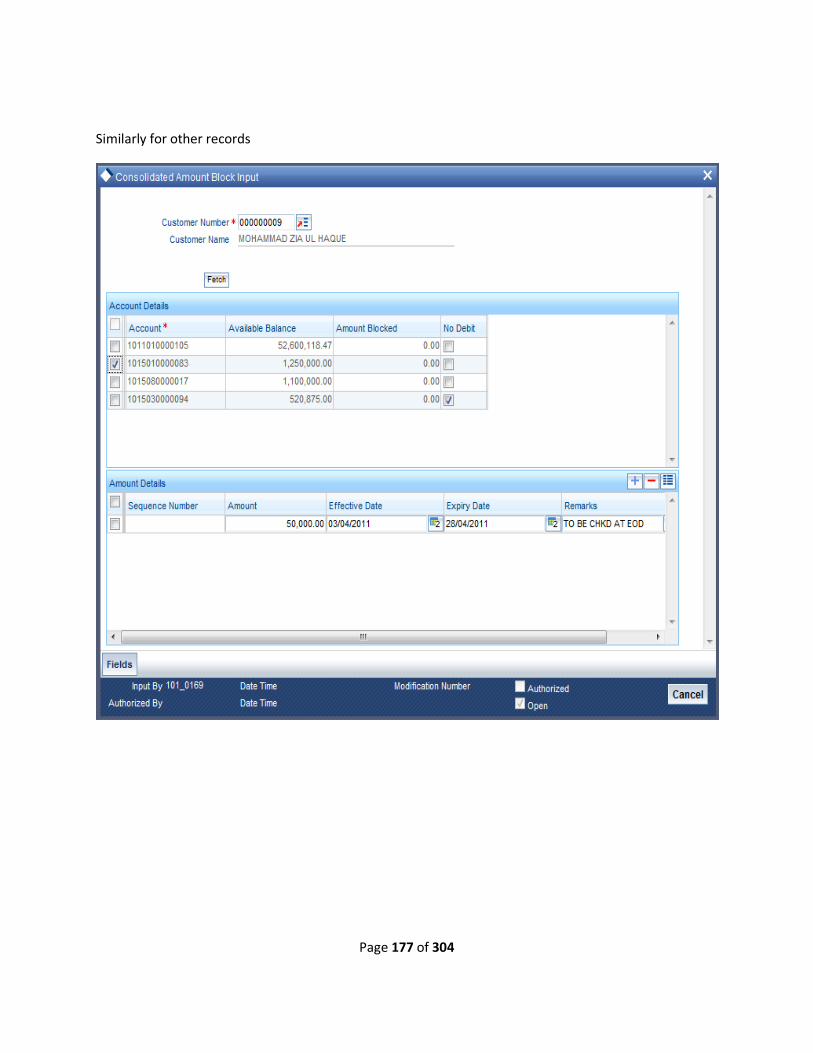
Page 177 of 304
Similarly for other records

Page 178 of 304
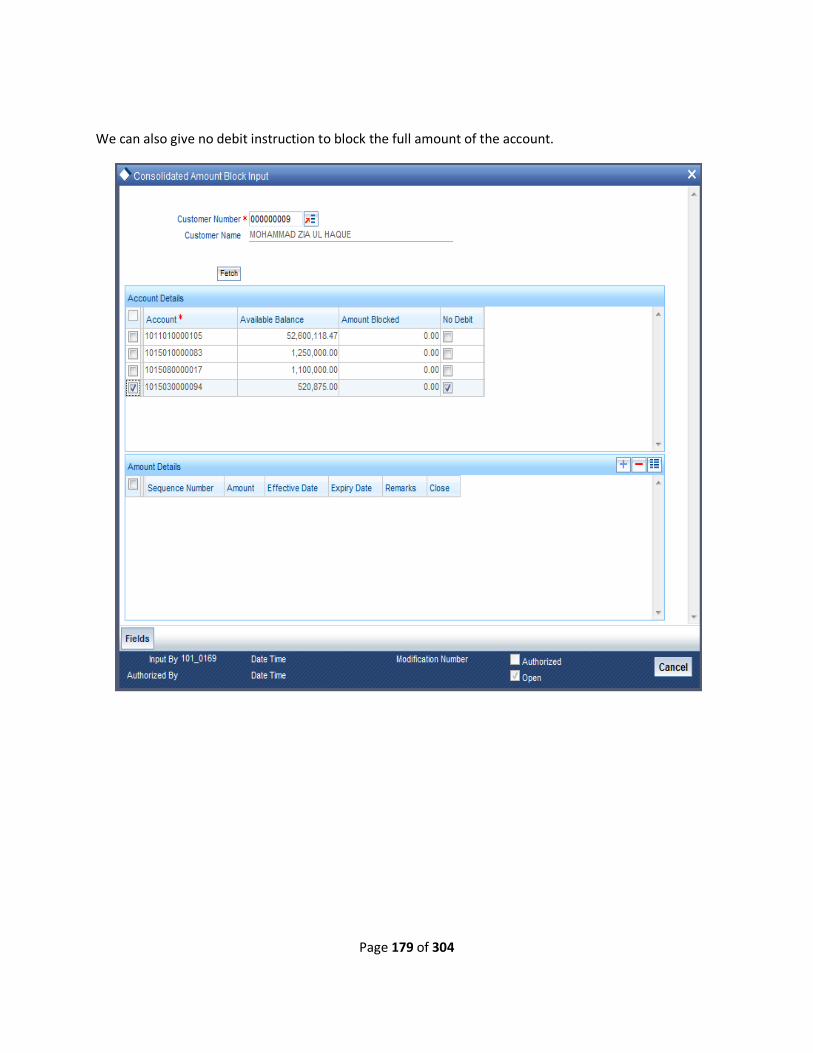
Page 179 of 304
We can also give no debit instruction to block the full amount of the account.

Page 180 of 304
We can also block different amounts of an account with different effective and expiry date.
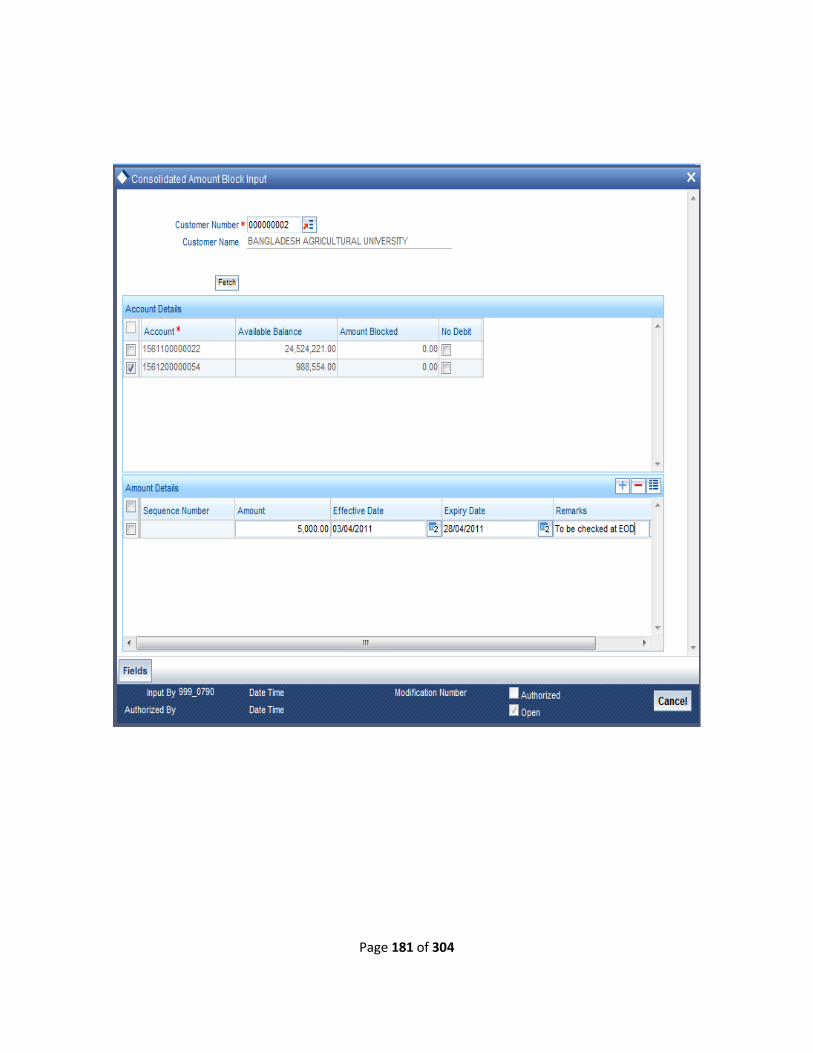
Page 181 of 304

Page 182 of 304
After saving, the consolidated amount is displayed against the account.

Page 183 of 304
In every cases sequence number is auto generated from the system.
Go to Contents
Page 184 of 304
Page 185 of 304
Closing of Account When we close an account, the system will check whether an IC product linked to the account is pending
liquidation. If an IC Product is pending liquidation, we will be prompted to perform the liquidation
before closing the account.
We can click on the ‘Liquidate’ button to imitate the process whereby the system will calculate all
outstanding amounts for all products involving the account and display the same. On confirming the
details that are displayed the system liquidates the products.
If any provisioning has been done in respect of the account, the relevant amount is written back to the
GL as specified in the maintenance, on Closure. If the account does not have any IC products pending
liquidation the system will display list of ‘Close Out’ modes in the Account Closure Details screen.
In this screen we can select the Close Mode, which is to be used to close the account. The option list
positioned next to this field contains a list of all the Close Modes maintained in the Customer Account
Closing Modes screen. The product linked to the close mode will be defaulted.
Some of the close out modes may require additional details to complete the transaction. These
additional details can pertain to either of the following:
• The Offset Account
• The Instrument (when the Close Out is through an Instrument) with which we payoff the balance in
the account
Thus, based on the mode selected the withdrawal entries are booked against the appropriate product.
The balance of the account will drop down to zero. Subsequently, the account is marked as closed.
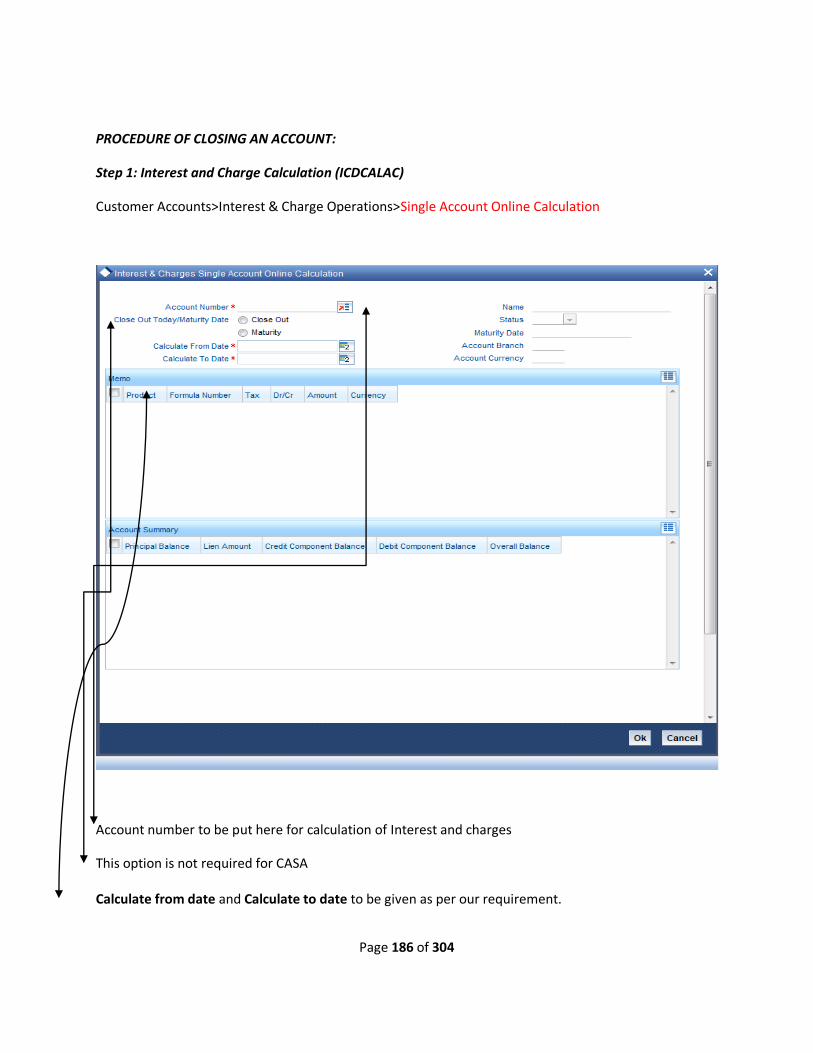
Page 186 of 304
PROCEDURE OF CLOSING AN ACCOUNT:
Step 1: Interest and Charge Calculation (ICDCALAC)
Customer Accounts>Interest & Charge Operations>Single Account Online Calculation
Account number to be put here for calculation of Interest and charges
This option is not required for CASA Calculate from date and Calculate to date to be given as per our requirement.
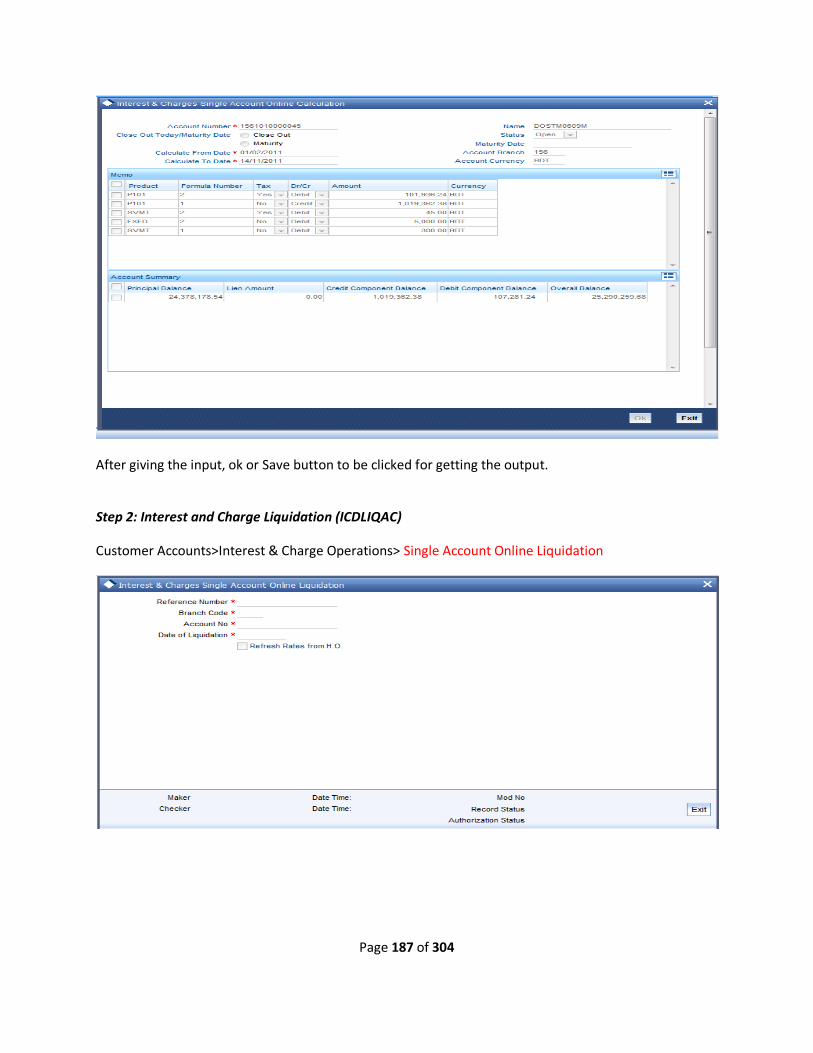
Page 187 of 304
After giving the input, ok or Save button to be clicked for getting the output.
Step 2: Interest and Charge Liquidation (ICDLIQAC)
Customer Accounts>Interest & Charge Operations> Single Account Online Liquidation
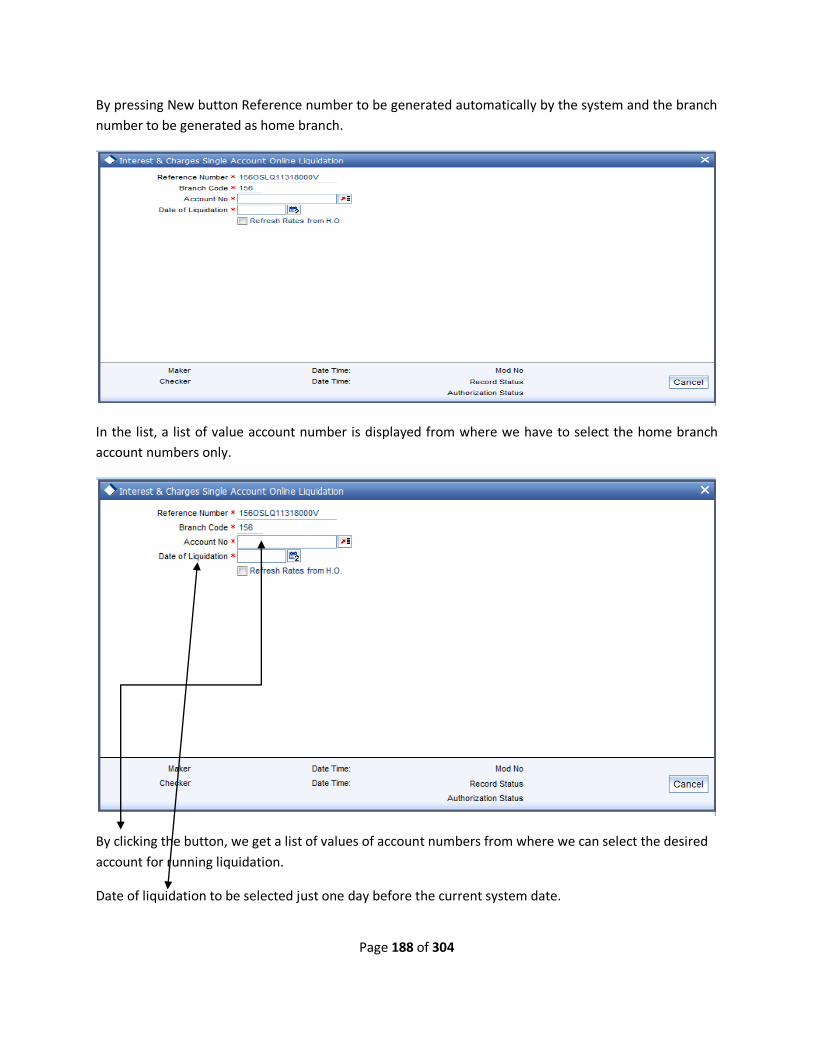
Page 188 of 304
By pressing New button Reference number to be generated automatically by the system and the branch
number to be generated as home branch.
In the list, a list of value account number is displayed from where we have to select the home branch
account numbers only.
By clicking the button, we get a list of values of account numbers from where we can select the desired
account for running liquidation.
Date of liquidation to be selected just one day before the current system date.
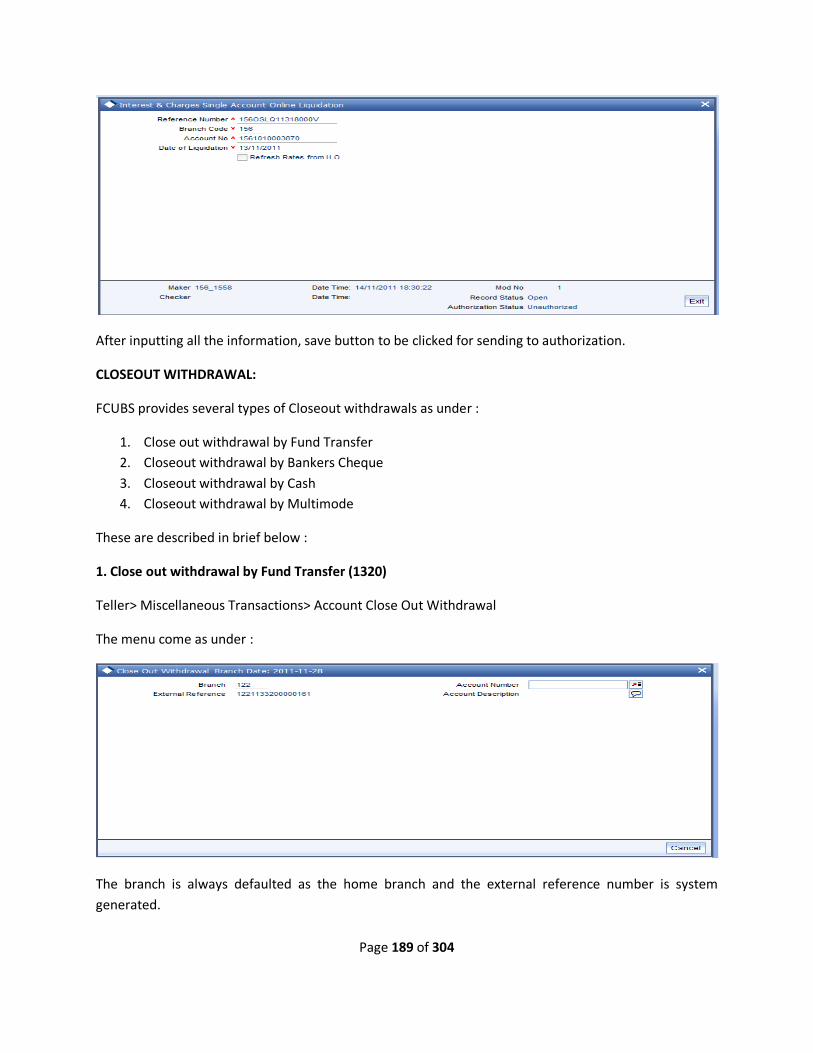
Page 189 of 304
After inputting all the information, save button to be clicked for sending to authorization.
CLOSEOUT WITHDRAWAL:
FCUBS provides several types of Closeout withdrawals as under :
1. Close out withdrawal by Fund Transfer
2. Closeout withdrawal by Bankers Cheque
3. Closeout withdrawal by Cash
4. Closeout withdrawal by Multimode
These are described in brief below :
1. Close out withdrawal by Fund Transfer (1320)
Teller> Miscellaneous Transactions> Account Close Out Withdrawal
The menu come as under :
The branch is always defaulted as the home branch and the external reference number is system
generated.
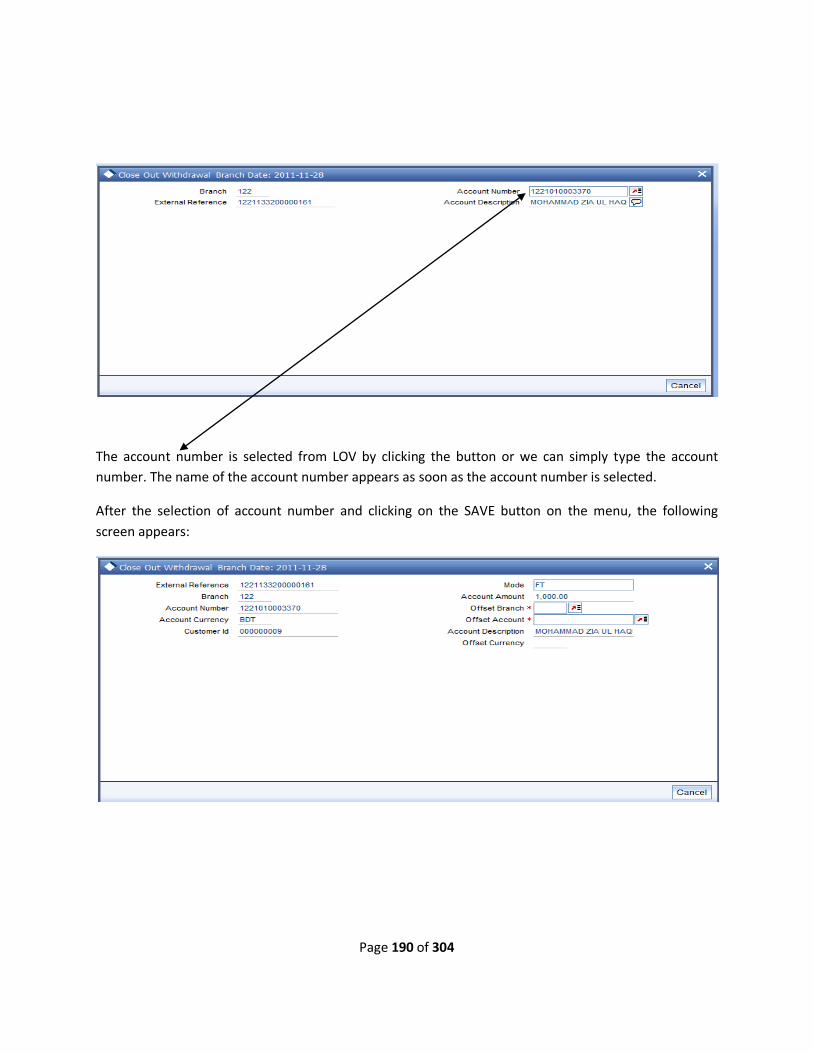
Page 190 of 304
The account number is selected from LOV by clicking the button or we can simply type the account
number. The name of the account number appears as soon as the account number is selected.
After the selection of account number and clicking on the SAVE button on the menu, the following
screen appears:
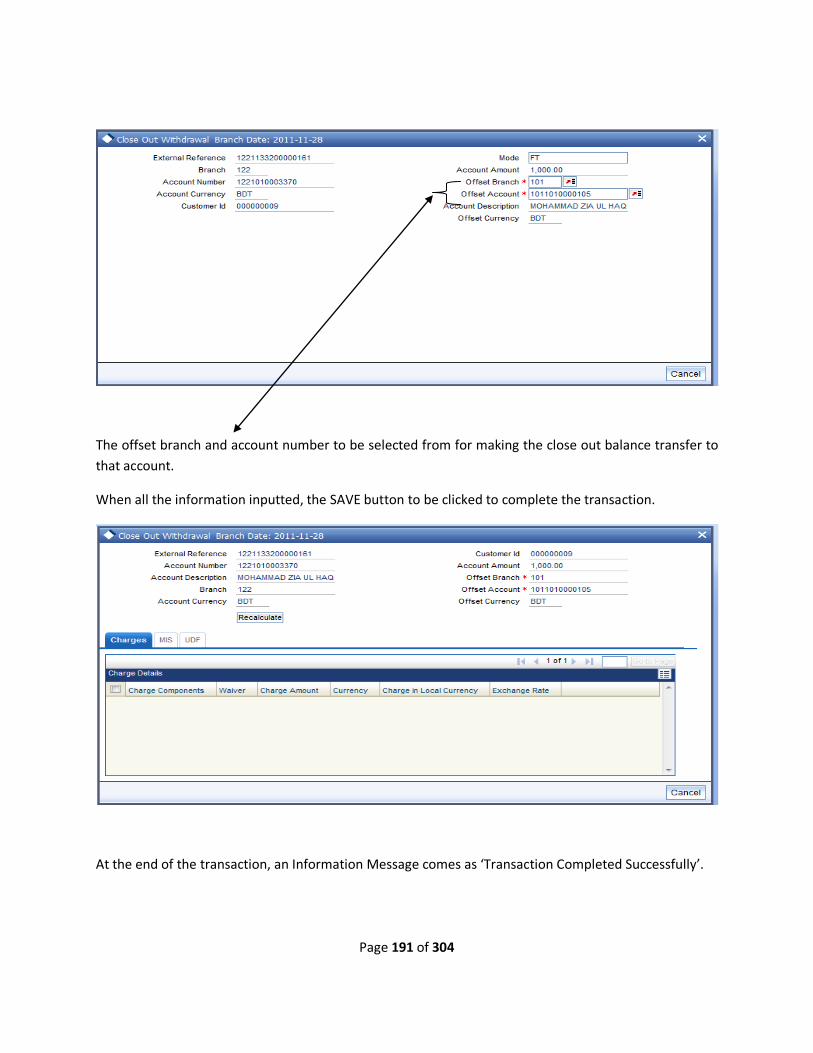
Page 191 of 304
The offset branch and account number to be selected from for making the close out balance transfer to
that account.
When all the information inputted, the SAVE button to be clicked to complete the transaction.
At the end of the transaction, an Information Message comes as ‘Transaction Completed Successfully’.
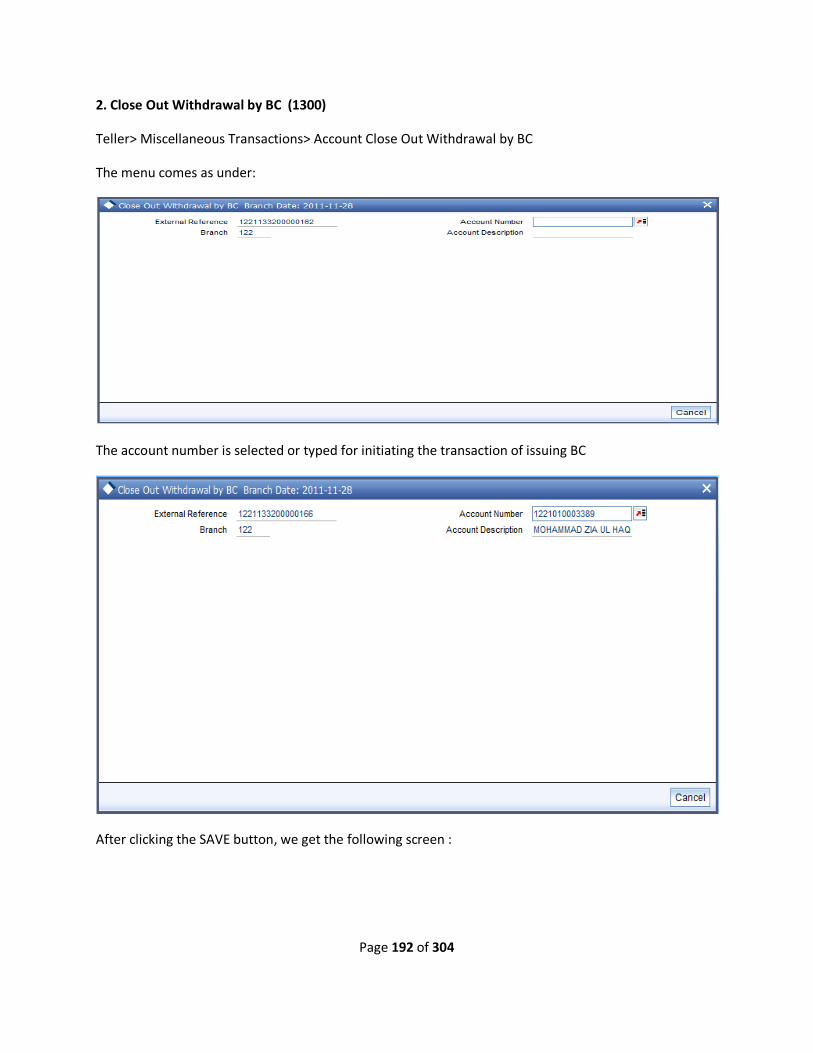
Page 192 of 304
2. Close Out Withdrawal by BC (1300)
Teller> Miscellaneous Transactions> Account Close Out Withdrawal by BC
The menu comes as under:
The account number is selected or typed for initiating the transaction of issuing BC
After clicking the SAVE button, we get the following screen :

Page 193 of 304
The issue screen is as under:

Page 194 of 304
The associated charge related with BC issue comes after clicking the SAVE button and user have option
to waive the charge.
At the end of the transaction, an Information Message comes as ‘Transaction Completed Successfully’.
3. Closeout withdrawal by Cash (1301)
Teller> Cash Transactions> Close Out Withdrawal
The menu comes as under:
We may type the account number or select that number from the LOV.
After clicking the SAVE button, the following screen appears:
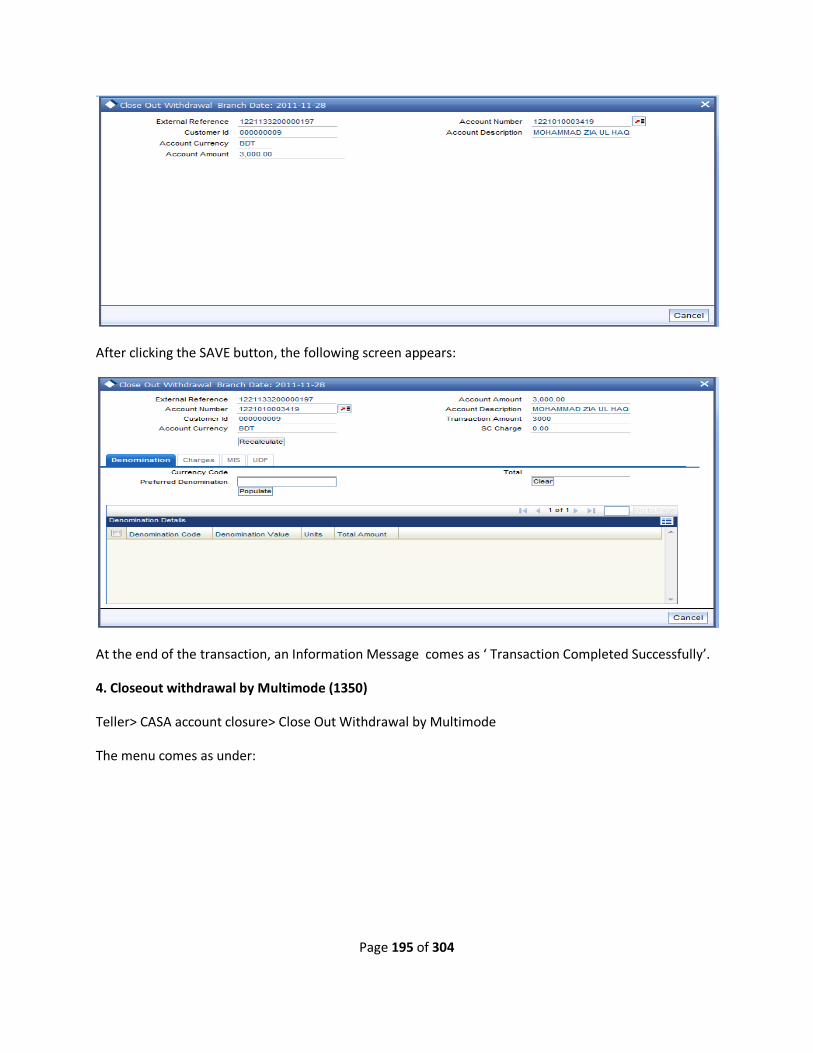
Page 195 of 304
After clicking the SAVE button, the following screen appears:
At the end of the transaction, an Information Message comes as ‘ Transaction Completed Successfully’.
4. Closeout withdrawal by Multimode (1350)
Teller> CASA account closure> Close Out Withdrawal by Multimode
The menu comes as under:

Page 196 of 304
After selection of account number and pressing the SAVE button, the following screen appears :
Here we get the multimodal pawet type in one screen. Here we can select either Banker cheque or FT
pawet mode for close out payment. Certainly, Cash is restricted to Cash teller only. But for operational
convenience we have provided another screen for cash users.
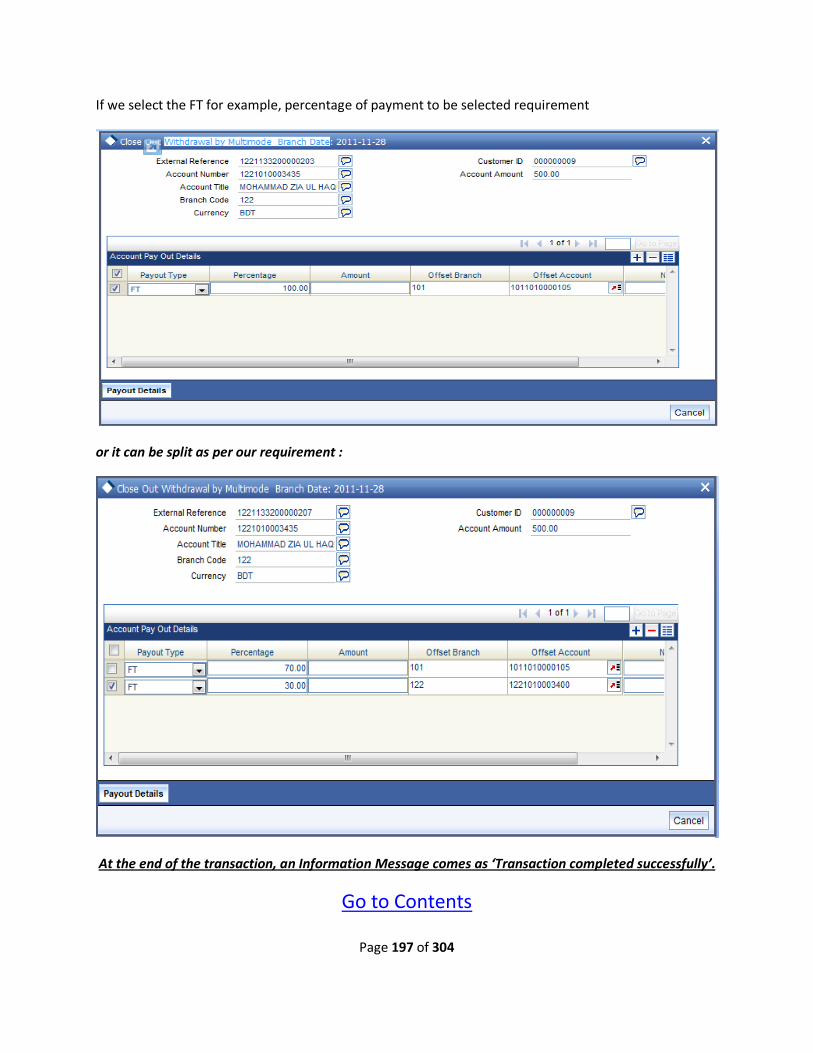
Page 197 of 304
If we select the FT for example, percentage of payment to be selected requirement
or it can be split as per our requirement :
At the end of the transaction, an Information Message comes as ‘Transaction completed successfully’.
Go to Contents

Page 198 of 304
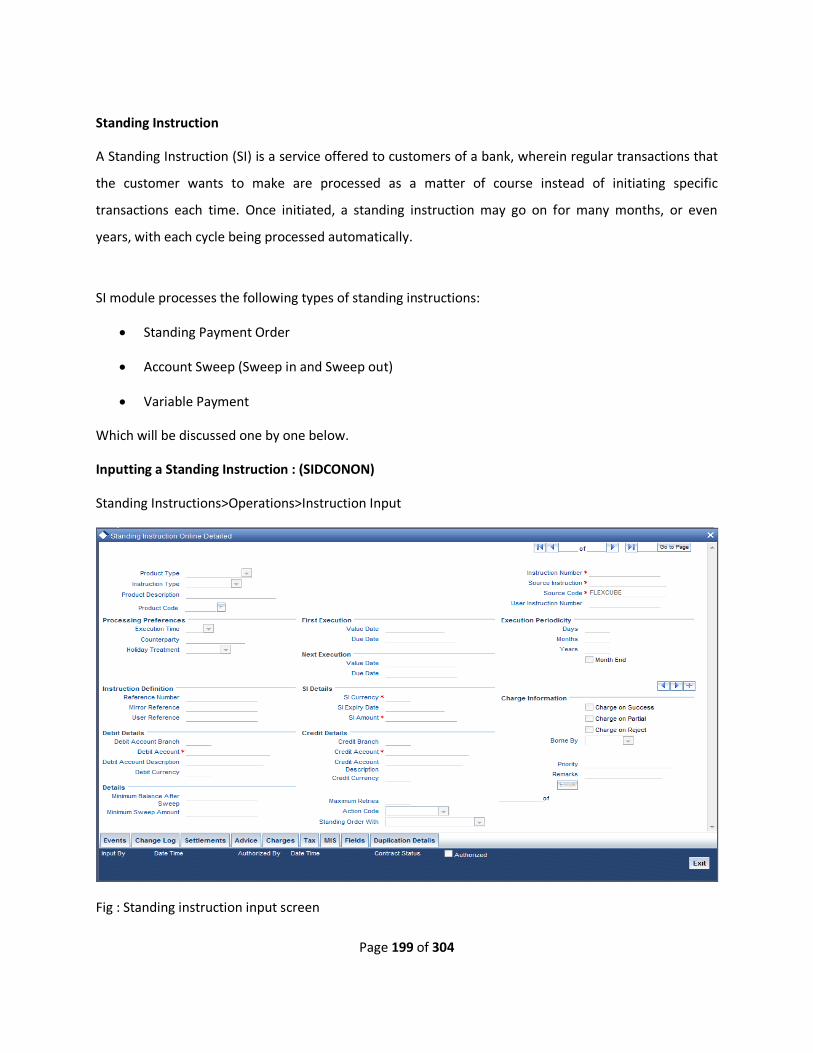
Page 199 of 304
Standing Instruction
A Standing Instruction (SI) is a service offered to customers of a bank, wherein regular transactions that
the customer wants to make are processed as a matter of course instead of initiating specific
transactions each time. Once initiated, a standing instruction may go on for many months, or even
years, with each cycle being processed automatically.
SI module processes the following types of standing instructions:
Standing Payment Order
Account Sweep (Sweep in and Sweep out)
Variable Payment
Which will be discussed one by one below.
Inputting a Standing Instruction : (SIDCONON)
Standing Instructions>Operations>Instruction Input
Fig : Standing instruction input screen

Page 200 of 304
Basic steps of inputting Standing Instruction :
i ) In Standing Instruction Online Detailed screen select New for a making new SI
ii) In the product code box select which type of product we want to select.
iii) After selection press P to populate the auto instruction number.
iv) Instruction number, source instruction, user instruction number all are by default are same but we
can change the user instruction number if required.
v) First Execution and Next Execution date are the defaulted from the system date.
vi) Execution periodicity to be inputted as per our requirement. e.g. If we put 2 in Days field, the SI will
be generated after each 2nd day from inception of SI. Usually we shall keep 1 in the field as required. If
we want the SI to be enabled in month end, the Month End button to be ticked.
vii) In SI details we have to put the SI currency, SI expiry date and SI amount.
viii) In Debit details and Credit details we need to put the Debit and Credit account details.
ix) Charge realization from remitter or beneficiary to be selected from charge information.
x) Priority can be given if there is several SI.
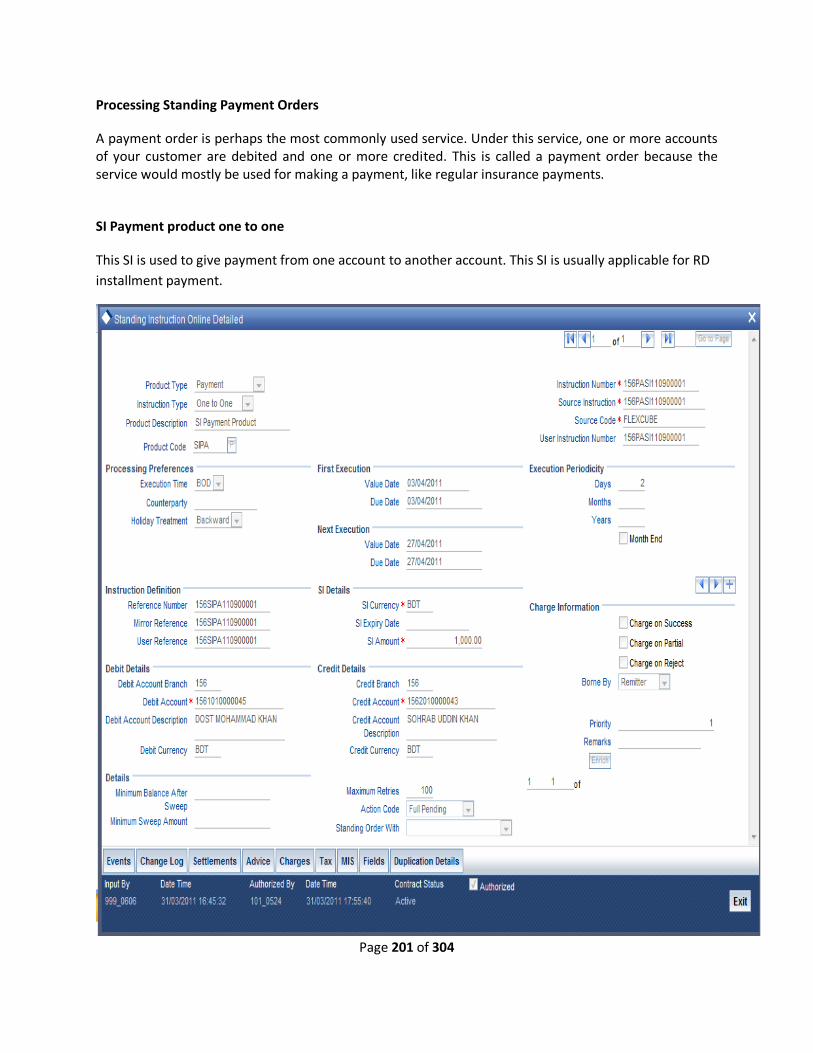
Page 201 of 304
Processing Standing Payment Orders
A payment order is perhaps the most commonly used service. Under this service, one or more accounts of your customer are debited and one or more credited. This is called a payment order because the service would mostly be used for making a payment, like regular insurance payments.
SI Payment product one to one
This SI is used to give payment from one account to another account. This SI is usually applicable for RD
installment payment.

Page 202 of 304
SI Payment product one to many
When it is required to pay from one account to few more accounts, this type of SI is applicable.
The debit account remains the same but the credit account can be added with
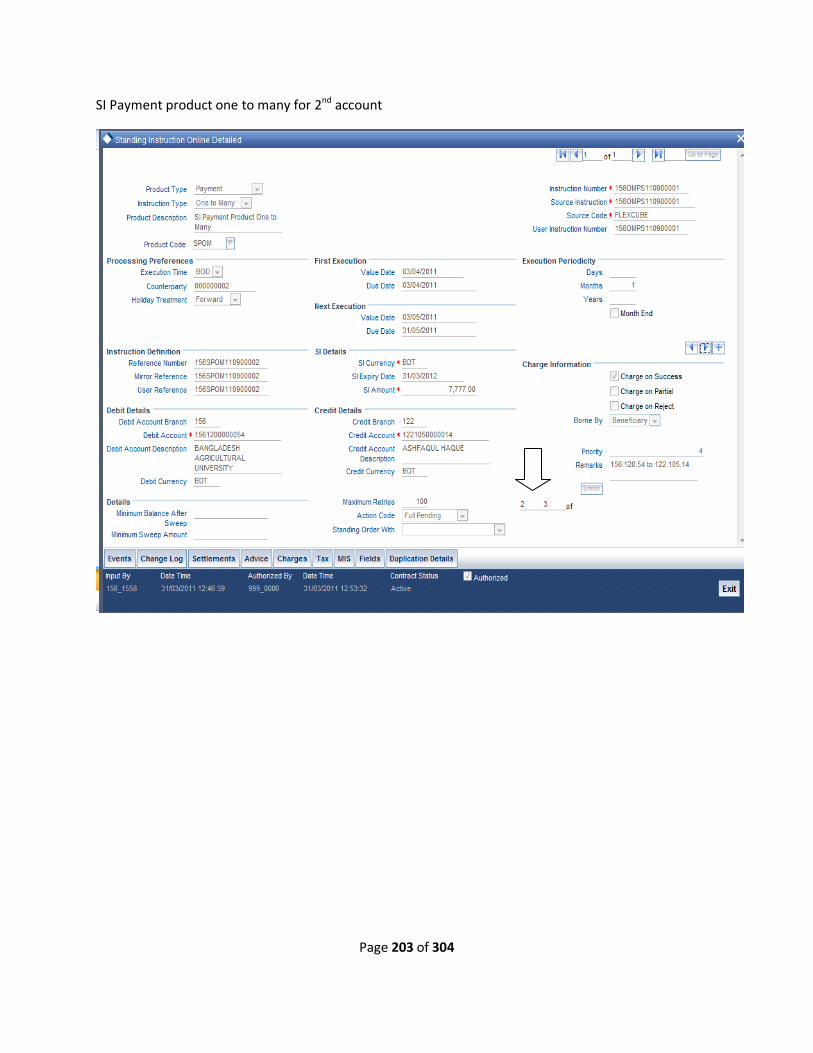
Page 203 of 304
SI Payment product one to many for 2nd account
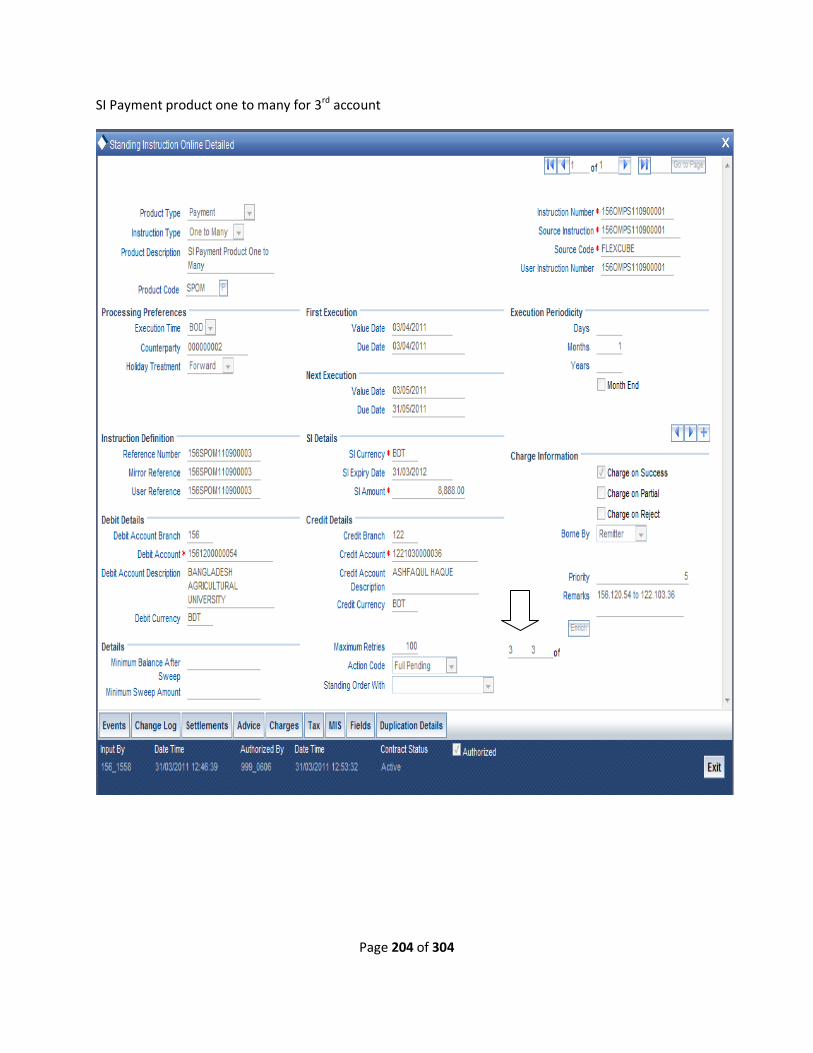
Page 204 of 304
SI Payment product one to many for 3rd account
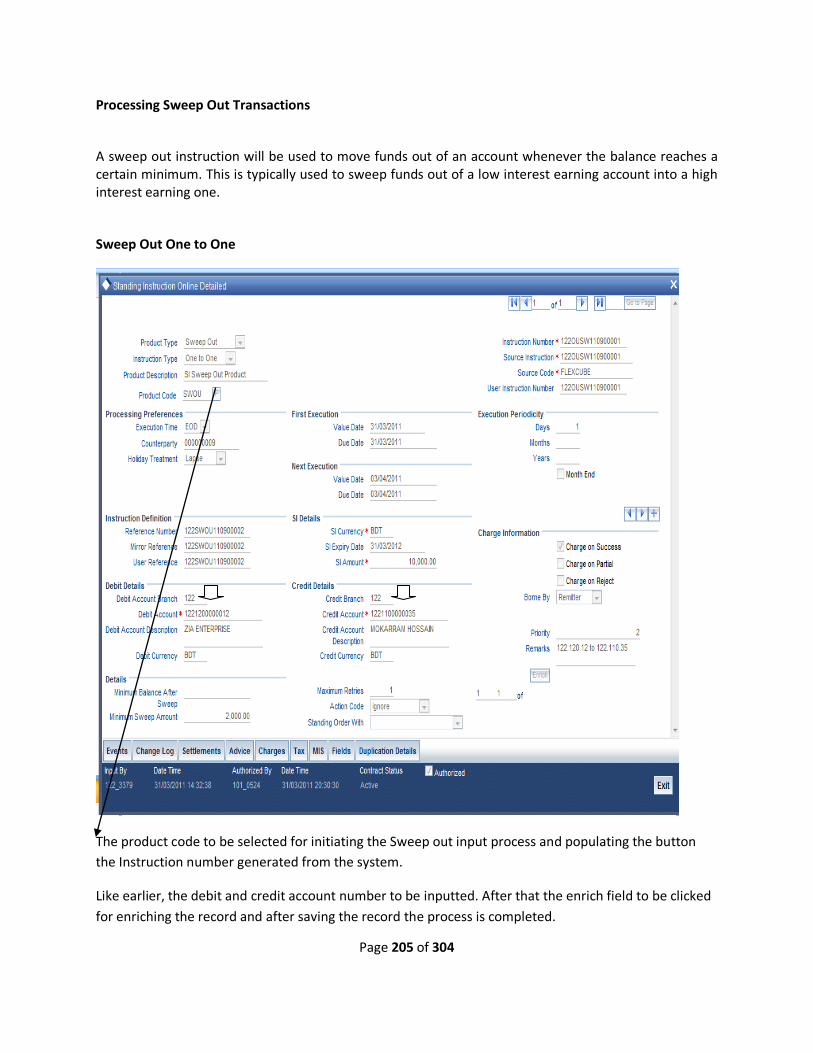
Page 205 of 304
Processing Sweep Out Transactions
A sweep out instruction will be used to move funds out of an account whenever the balance reaches a certain minimum. This is typically used to sweep funds out of a low interest earning account into a high interest earning one.
Sweep Out One to One
The product code to be selected for initiating the Sweep out input process and populating the button
the Instruction number generated from the system.
Like earlier, the debit and credit account number to be inputted. After that the enrich field to be clicked
for enriching the record and after saving the record the process is completed.

Page 206 of 304
Processing Sweep In Transactions
A sweep in instruction will be used when the balance in a customer account should constantly be maintained at a certain balance. A sweep in instruction ensures that whenever the balance in the customer account goes below a certain amount, money is swept in from another account.
Sweep in one to One
This type of Sweep in is used especially for those accounts in Credit side which have Over draft facility
such as CC, OD etc.
This facility is also available for Many account to one account as Sweep in Many to one.
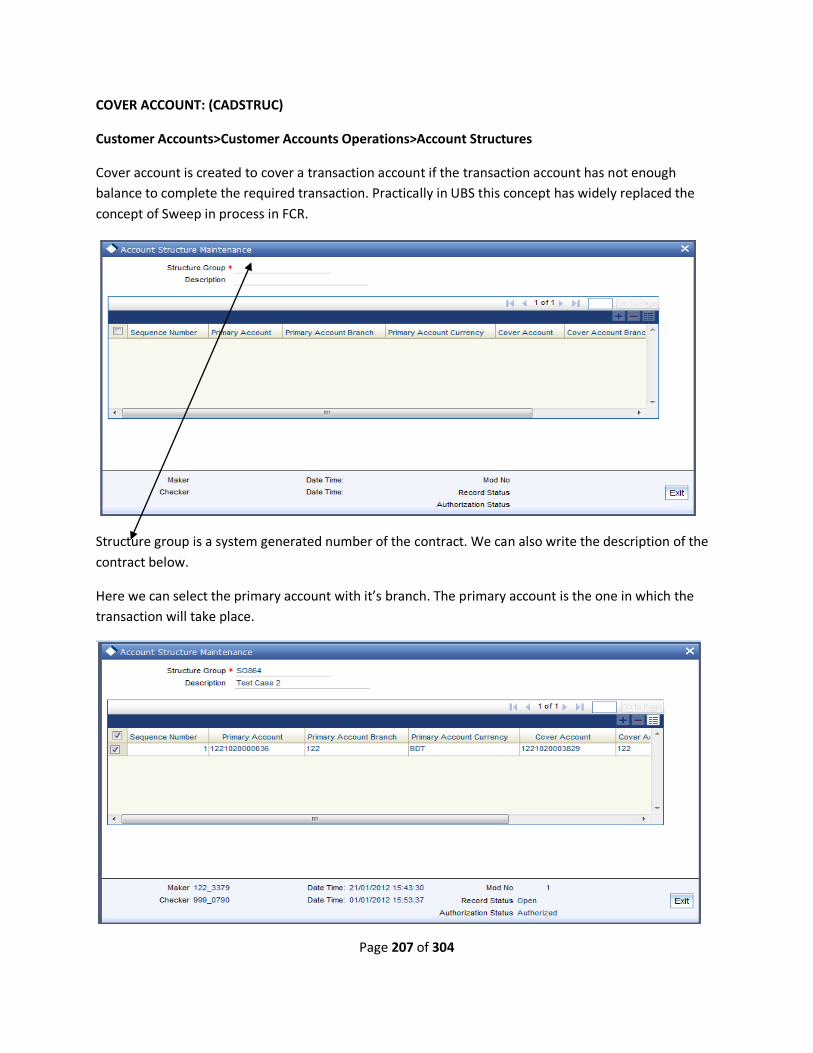
Page 207 of 304
COVER ACCOUNT: (CADSTRUC)
Customer Accounts>Customer Accounts Operations>Account Structures
Cover account is created to cover a transaction account if the transaction account has not enough
balance to complete the required transaction. Practically in UBS this concept has widely replaced the
concept of Sweep in process in FCR.
Structure group is a system generated number of the contract. We can also write the description of the
contract below.
Here we can select the primary account with it’s branch. The primary account is the one in which the
transaction will take place.
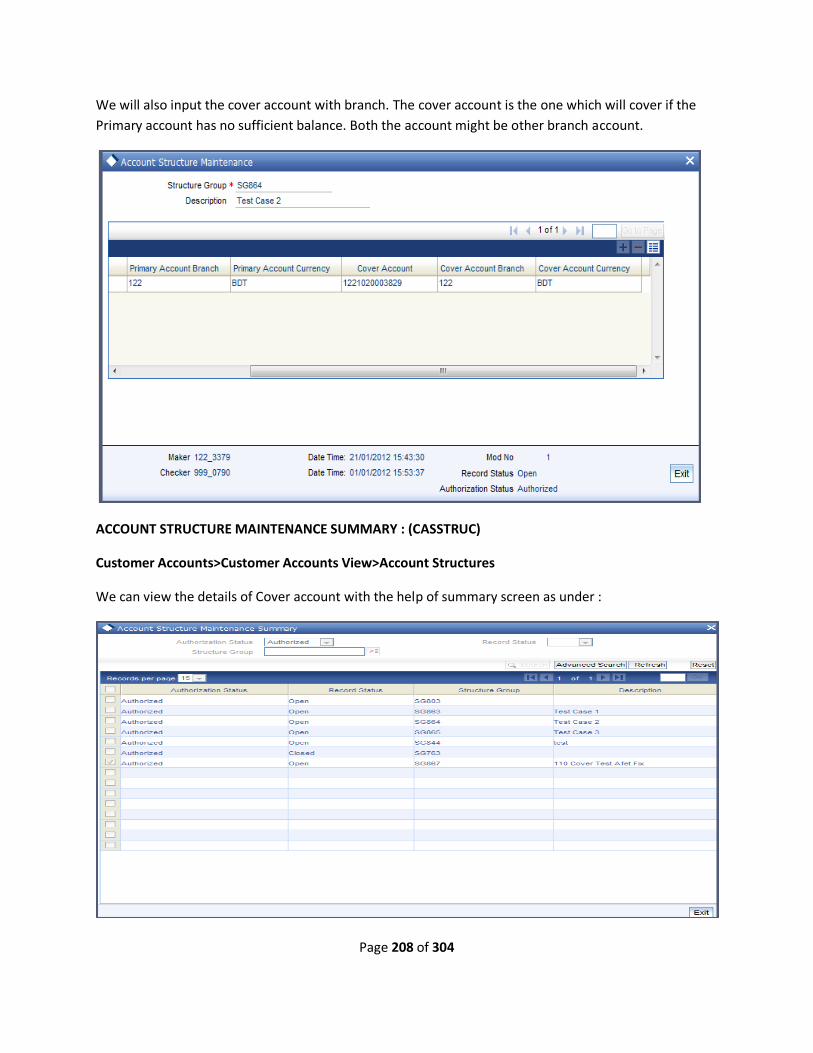
Page 208 of 304
We will also input the cover account with branch. The cover account is the one which will cover if the
Primary account has no sufficient balance. Both the account might be other branch account.
ACCOUNT STRUCTURE MAINTENANCE SUMMARY : (CASSTRUC)
Customer Accounts>Customer Accounts View>Account Structures
We can view the details of Cover account with the help of summary screen as under :
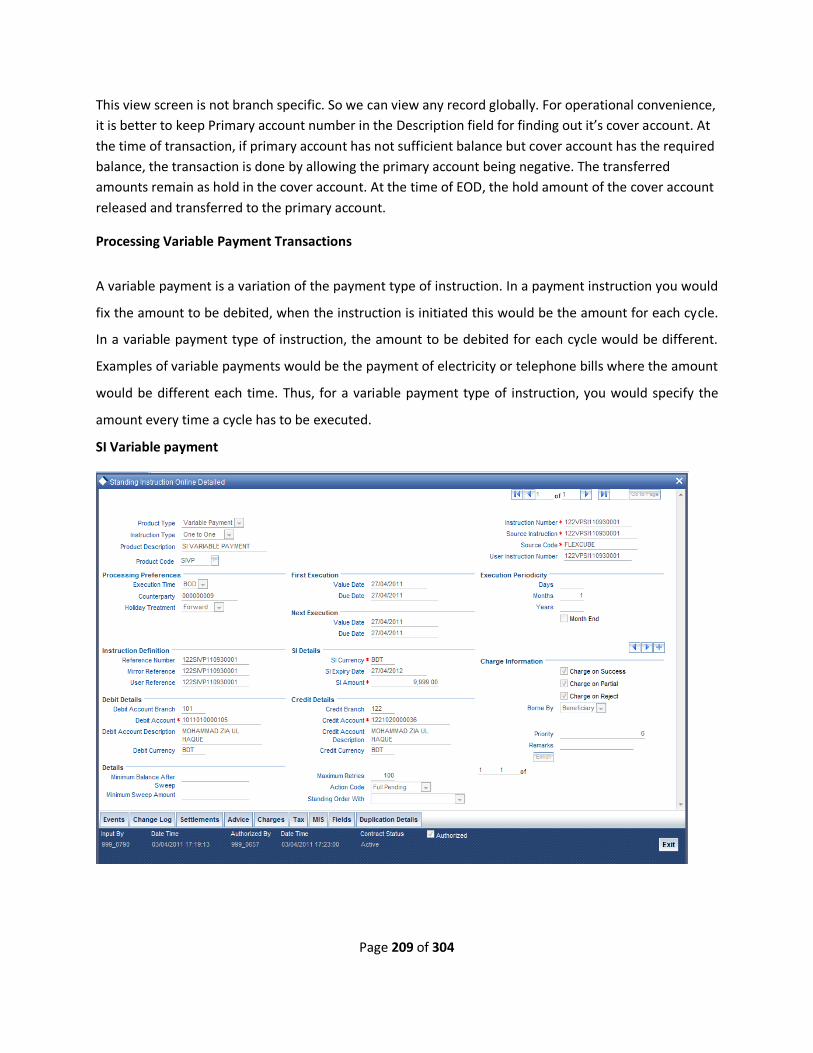
Page 209 of 304
This view screen is not branch specific. So we can view any record globally. For operational convenience,
it is better to keep Primary account number in the Description field for finding out it’s cover account. At
the time of transaction, if primary account has not sufficient balance but cover account has the required
balance, the transaction is done by allowing the primary account being negative. The transferred
amounts remain as hold in the cover account. At the time of EOD, the hold amount of the cover account
released and transferred to the primary account.
Processing Variable Payment Transactions
A variable payment is a variation of the payment type of instruction. In a payment instruction you would
fix the amount to be debited, when the instruction is initiated this would be the amount for each cycle.
In a variable payment type of instruction, the amount to be debited for each cycle would be different.
Examples of variable payments would be the payment of electricity or telephone bills where the amount
would be different each time. Thus, for a variable payment type of instruction, you would specify the
amount every time a cycle has to be executed.
SI Variable payment
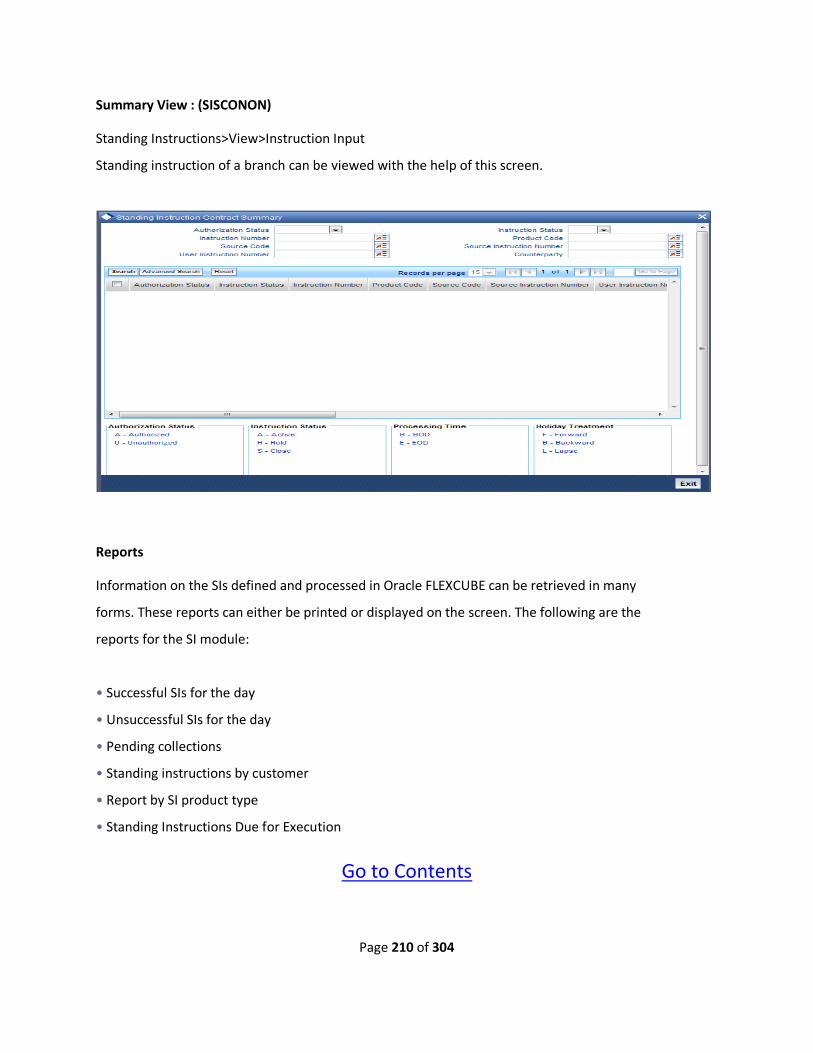
Page 210 of 304
Summary View : (SISCONON)
Standing Instructions>View>Instruction Input
Standing instruction of a branch can be viewed with the help of this screen.
Reports
Information on the SIs defined and processed in Oracle FLEXCUBE can be retrieved in many
forms. These reports can either be printed or displayed on the screen. The following are the
reports for the SI module:
• Successful SIs for the day
• Unsuccessful SIs for the day
• Pending collections
• Standing instructions by customer
• Report by SI product type
• Standing Instructions Due for Execution
Go to Contents
Page 211 of 304

Page 212 of 304
TERM DEPOSIT PRODUCT (AVAILABLE IN FCUBS 11.2)
Account Class Code (Product
Code)
Title of the Account Class (Product Title)
501 Monthly Term Deposit
502 Term Deposit for 03 Months
503 Term Deposit for 06 Months
504 Term Deposit for 12 Months
505 Term Deposit for 24 Months
506 Term Deposit for 36 Months
507 Term Deposit 12 Months Payout
508 Term Deposit 24 Months Payout
509 Term Deposit 36 Months Payout
510 Term Deposit 24 Months 1 year Payout
511 Term Deposit 36 Months 1 year Payout
512 Term Deposit Above 36 Months
513 Periodic Benefit Scheme 3 years MPO
514 Periodic Benefit Scheme 3 years QPO
515 Periodic Benefit Scheme 5 years MPO
516 Periodic Benefit Scheme 5 years QPO
541 Monthly Term Deposit Banks
542 Term Deposit 3 Months Banks
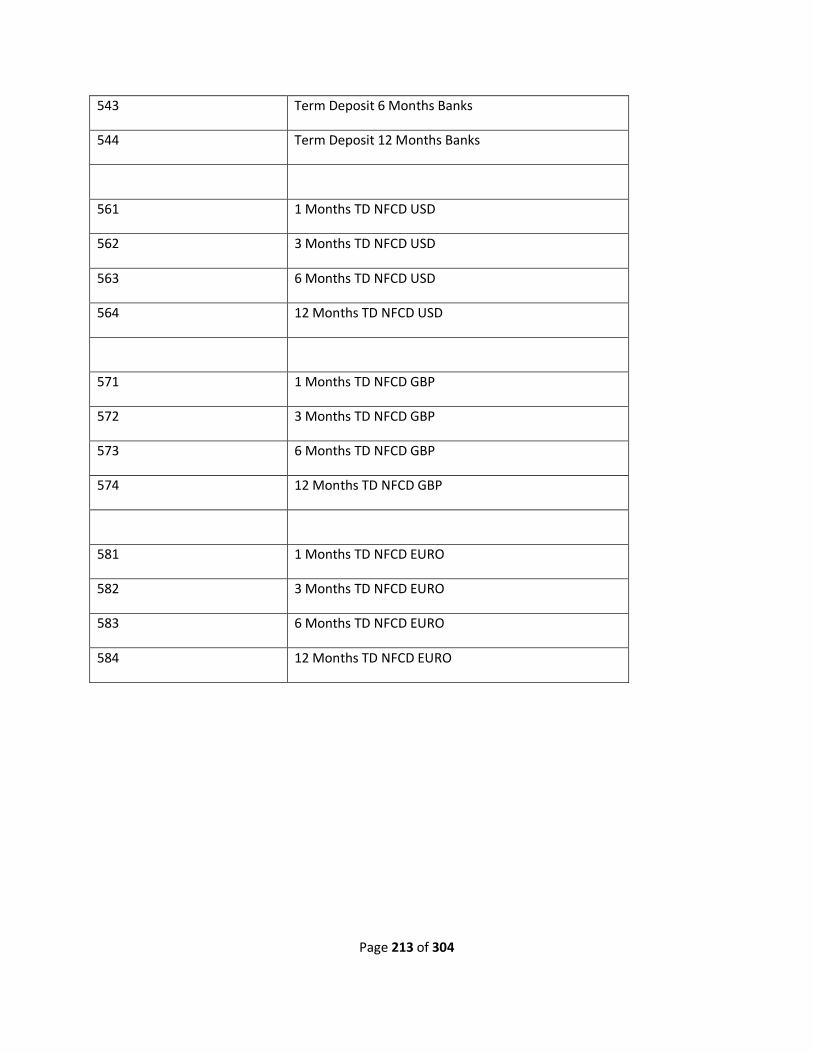
Page 213 of 304
543 Term Deposit 6 Months Banks
544 Term Deposit 12 Months Banks
561 1 Months TD NFCD USD
562 3 Months TD NFCD USD
563 6 Months TD NFCD USD
564 12 Months TD NFCD USD
571 1 Months TD NFCD GBP
572 3 Months TD NFCD GBP
573 6 Months TD NFCD GBP
574 12 Months TD NFCD GBP
581 1 Months TD NFCD EURO
582 3 Months TD NFCD EURO
583 6 Months TD NFCD EURO
584 12 Months TD NFCD EURO
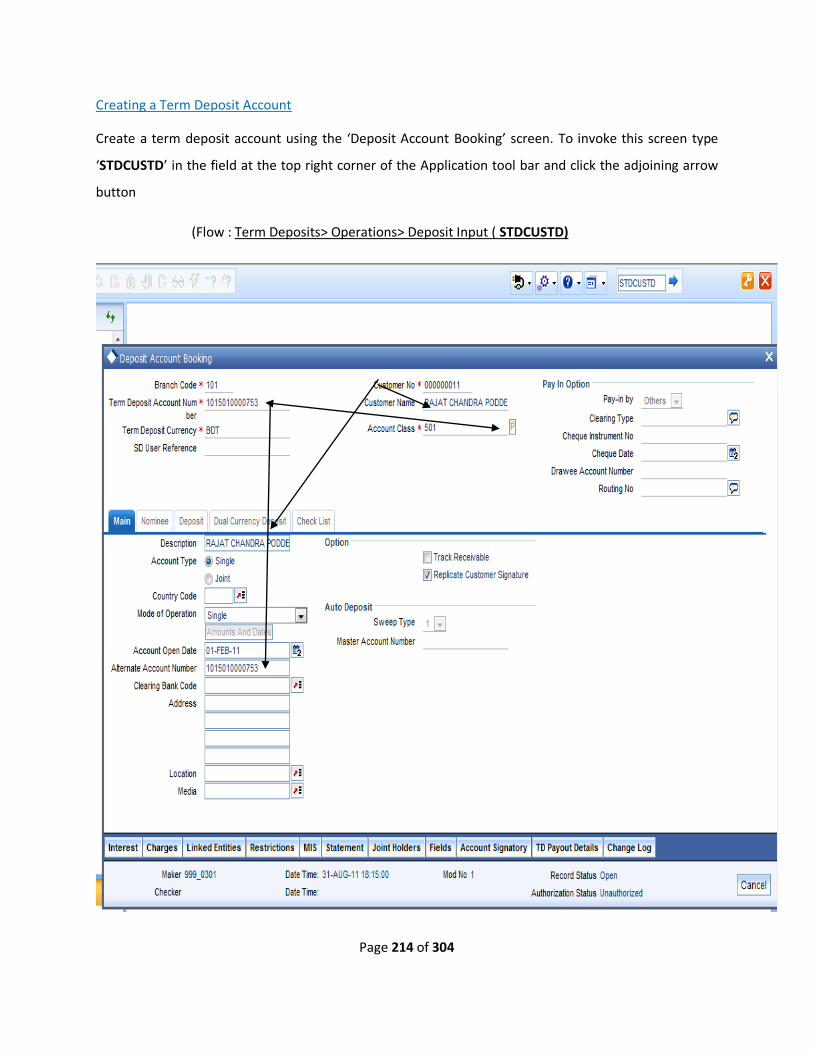
Page 214 of 304
Creating a Term Deposit Account
Create a term deposit account using the ‘Deposit Account Booking’ screen. To invoke this screen type
‘STDCUSTD’ in the field at the top right corner of the Application tool bar and click the adjoining arrow
button
(Flow : Term Deposits> Operations> Deposit Input ( STDCUSTD)
Page 215 of 304
Here you can capture the following details
Branch Code The system displays the branch code of the sign on branch (Home Branch – Default Value) Customer No. Specify the customer identification (CIF) for whom you are creating a TD. The adjoining option list displays all valid CIF maintained in the system. You can choose the appropriate one.
Customer Name The system displays the name of the customer based on the CIF specified. Account Class Specify the account class to which the particular account belongs. You can select the appropriate account class from the option list that displays all ‘deposit’ type of account classes maintained in the system. Currency The system displays the currency from account class. Term Deposit A/C Number System will create a unique reference number to identify the TD account and display it here, on pressing the ‘P’ (populate) button. Main Tab On invoking the ‘Deposit Account Booking’ screen, this tab is displayed by default. You can specify the following details
Description The system displays the name of the customer based on the CIF specified. If the account is Joint A/C then teller can type the second name in this field.
Account Type
You have to indicate whether the account is to be opened only by the account holder or whether it can
be jointly operated.
Page 216 of 304
Mode of Operation
Indicate the mode of operation. Choose one of the following options from the drop-down list
Single
Jointly
Either-Anyone or Survivor
Former or Survivor
Mandate Holder
Account Open Date
The date on which the account has to be opened is defaulted based on the account class selected here.
You can however change the opening date of account. Note that this date cannot be greater than the
current system date (i.e. the date cannot be in future)
Address
If you specify the address in account level, this address will come only for one account. (For account
statement address will defaulted from CIF)
Replicate Customer Signature
Check this box to indicate that customer signature should be replicated to the account.
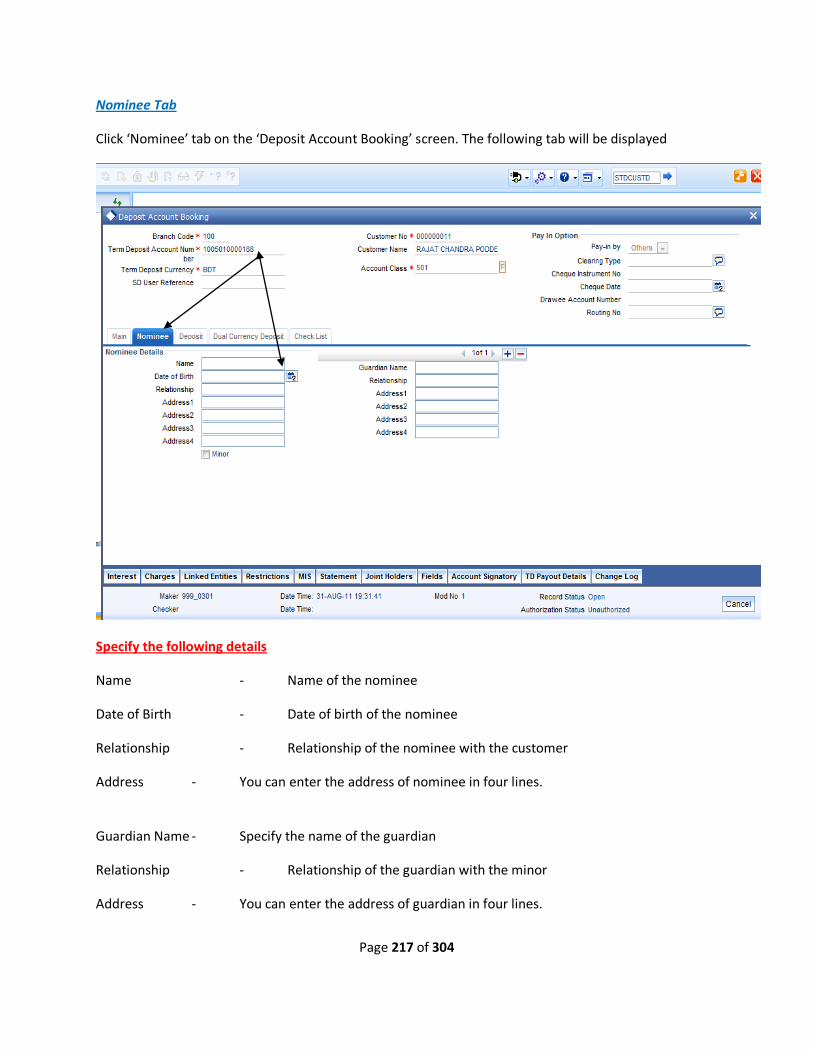
Page 217 of 304
Nominee Tab
Click ‘Nominee’ tab on the ‘Deposit Account Booking’ screen. The following tab will be displayed
Specify the following details
Name - Name of the nominee
Date of Birth - Date of birth of the nominee
Relationship - Relationship of the nominee with the customer
Address - You can enter the address of nominee in four lines.
Guardian Name - Specify the name of the guardian
Relationship - Relationship of the guardian with the minor
Address - You can enter the address of guardian in four lines.

Page 218 of 304
Deposit Tab
Click ‘Deposit’ tab on the ‘Deposit Account Booking’ screen. The following tab will be displayed
Maturity Date
The system defaults the maturity dates from the default tenor from the account class. On this date the
term deposit account gets liquidated.
Auto Rollover
Check this box to automatically rollover the deposit account.
Close on Maturity
Check this box to close the term deposit account on maturity date and transfer the amount as per the
TD pay-out details.
For a Term Deposit account, only one of the options – Close on Maturity or Auto Rollover – can be
checked.
Page 219 of 304
Term Deposit Amount
Specify the amount, which is paid for the time deposit creation, in the account currency.
Rollover Type
Indicate the components that should be rolled over by choosing one of the following options:
Principal - If you select this option, then the system will roll over the principal amount alone on
TD maturity date. If interest amount goes to interest booking account i.e. CASA account and Tax
amount will be deducted from CASA A/C.
Principal + Interest – If you select this option, then the system will roll over the principal and interest amount on TD maturity date.
Special Amount - If you choose this option, the system will roll over the amount specified in ‘Rollover Amount’ field. Upon maturity of the rolled over TD, the system will roll over the same amount of special amount and settle the interest amount as per TD pay-out details maintained.
If a special amount is to be rolled over, you have to specify the amount (less than the original deposit amount) in this field.
Pay-in Details
The TD module allows you to fund a TD using multiple pay-in modes viz:
Pay in by transfer from Savings Account
Pay in by transfer from GL
You can also have a combination of the aforesaid modes while funding a single TD. Once the TD account is created, the system considers each of the pay-in options entered in this screen and processes it accordingly. You can specify the TD funding amount as a percentage or as an absolute value.
Offset Account
Specify the account number/GL from which the fund is transferred to TD account. This field returns the branch code if the account is selected and NULL is returned if GL is selected. If the pay-in mode is GL then the system will display only GLs and if the pay-in mode is account then only accounts will be displayed in the option list.
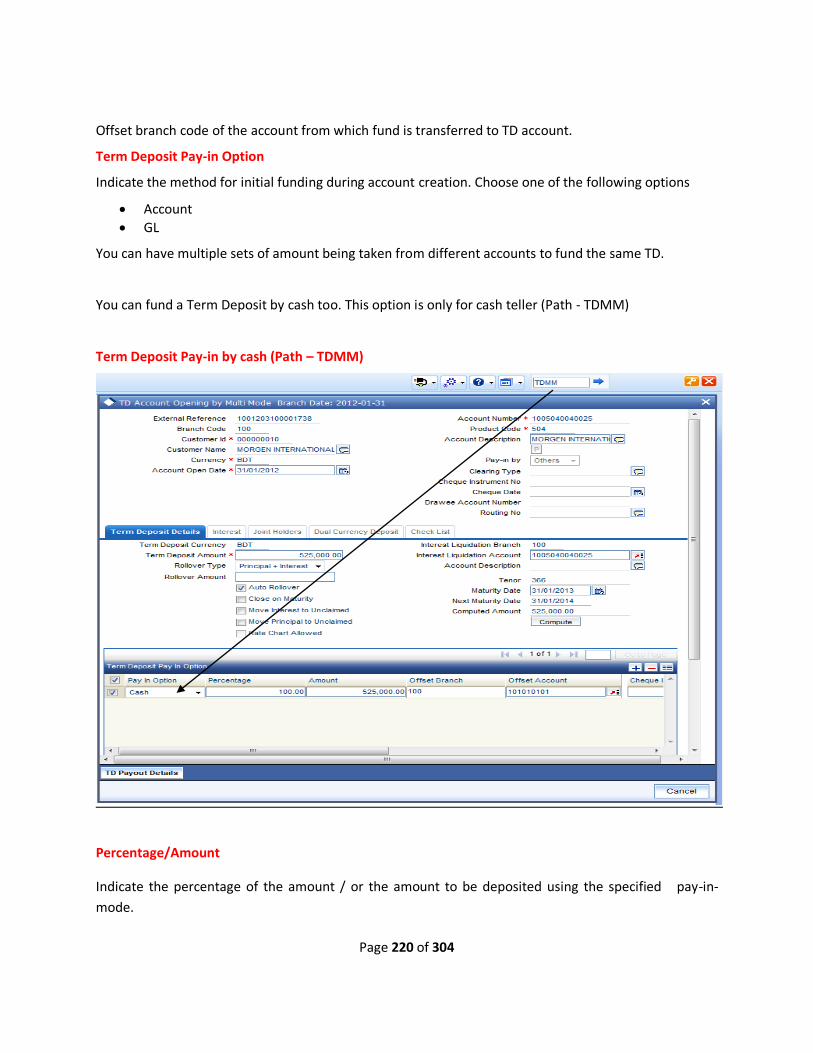
Page 220 of 304
Offset branch code of the account from which fund is transferred to TD account.
Term Deposit Pay-in Option
Indicate the method for initial funding during account creation. Choose one of the following options
Account
GL
You can have multiple sets of amount being taken from different accounts to fund the same TD.
You can fund a Term Deposit by cash too. This option is only for cash teller (Path - TDMM)
Term Deposit Pay-in by cash (Path – TDMM)
Percentage/Amount
Indicate the percentage of the amount / or the amount to be deposited using the specified pay-in-
mode.
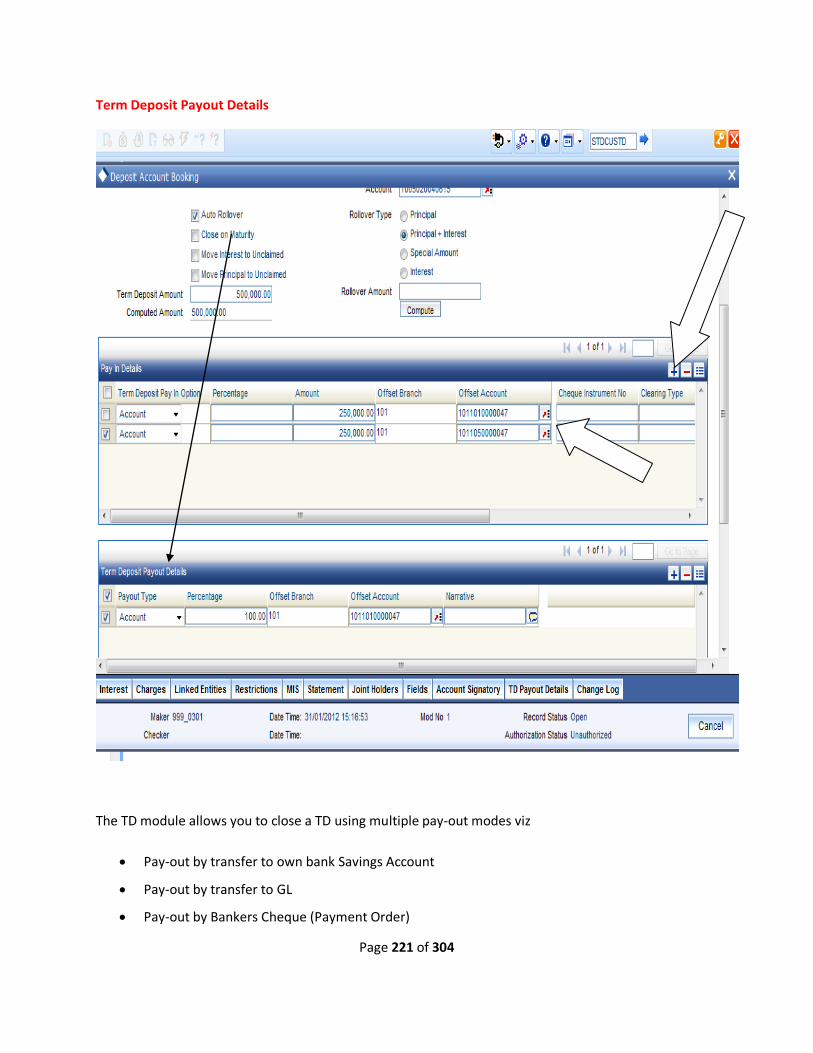
Page 221 of 304
Term Deposit Payout Details
The TD module allows you to close a TD using multiple pay-out modes viz
Pay-out by transfer to own bank Savings Account
Pay-out by transfer to GL
Pay-out by Bankers Cheque (Payment Order)
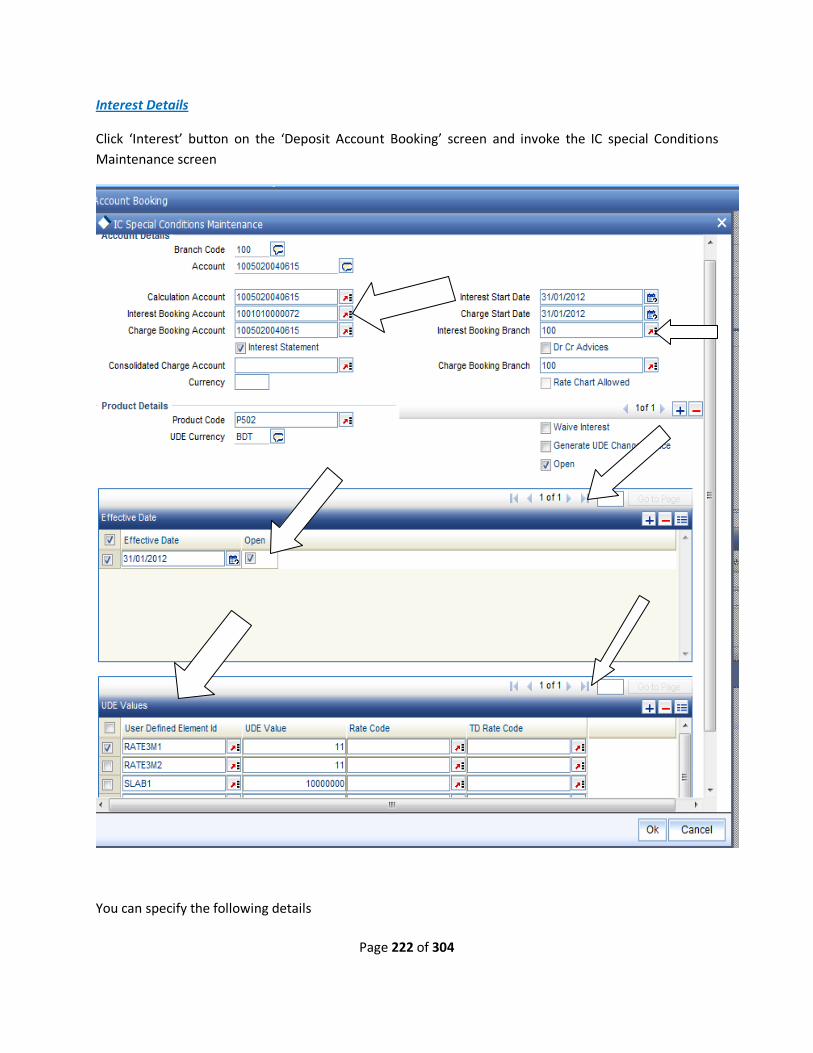
Page 222 of 304
Interest Details
Click ‘Interest’ button on the ‘Deposit Account Booking’ screen and invoke the IC special Conditions
Maintenance screen
You can specify the following details
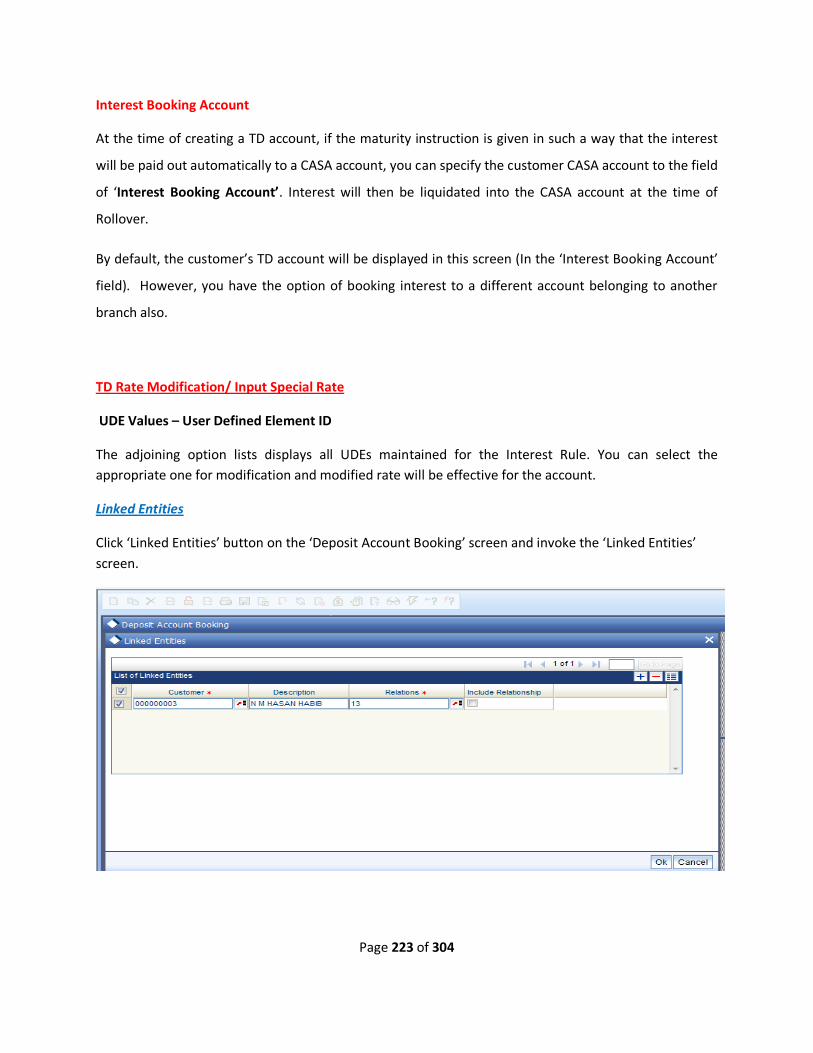
Page 223 of 304
Interest Booking Account
At the time of creating a TD account, if the maturity instruction is given in such a way that the interest
will be paid out automatically to a CASA account, you can specify the customer CASA account to the field
of ‘Interest Booking Account’. Interest will then be liquidated into the CASA account at the time of
Rollover.
By default, the customer’s TD account will be displayed in this screen (In the ‘Interest Booking Account’
field). However, you have the option of booking interest to a different account belonging to another
branch also.
TD Rate Modification/ Input Special Rate
UDE Values – User Defined Element ID
The adjoining option lists displays all UDEs maintained for the Interest Rule. You can select the
appropriate one for modification and modified rate will be effective for the account.
Linked Entities
Click ‘Linked Entities’ button on the ‘Deposit Account Booking’ screen and invoke the ‘Linked Entities’
screen.
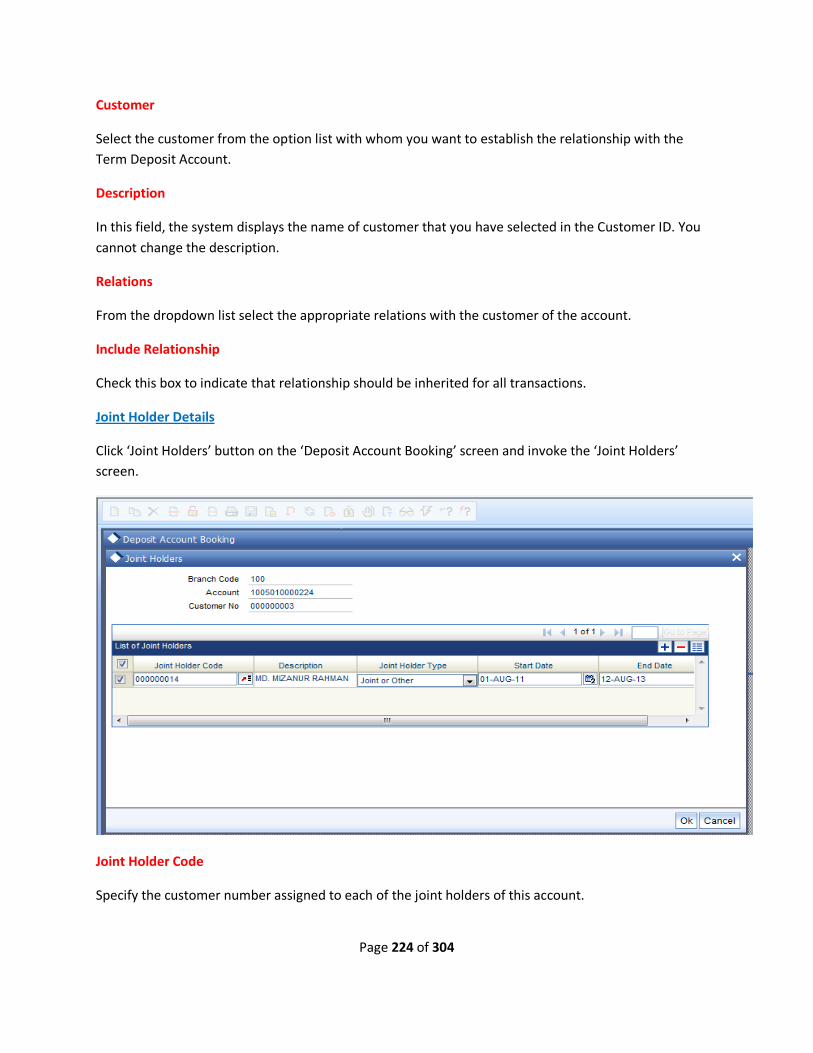
Page 224 of 304
Customer
Select the customer from the option list with whom you want to establish the relationship with the
Term Deposit Account.
Description
In this field, the system displays the name of customer that you have selected in the Customer ID. You
cannot change the description.
Relations
From the dropdown list select the appropriate relations with the customer of the account.
Include Relationship
Check this box to indicate that relationship should be inherited for all transactions.
Joint Holder Details
Click ‘Joint Holders’ button on the ‘Deposit Account Booking’ screen and invoke the ‘Joint Holders’
screen.
Joint Holder Code
Specify the customer number assigned to each of the joint holders of this account.
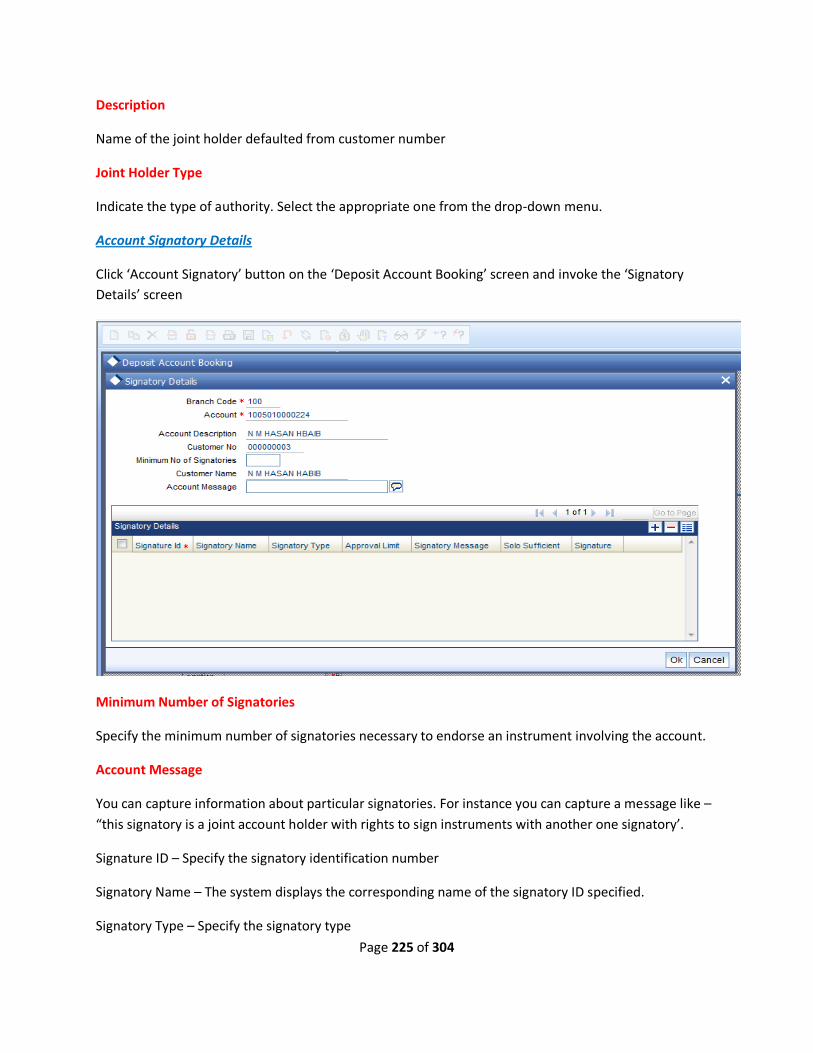
Page 225 of 304
Description
Name of the joint holder defaulted from customer number
Joint Holder Type
Indicate the type of authority. Select the appropriate one from the drop-down menu.
Account Signatory Details
Click ‘Account Signatory’ button on the ‘Deposit Account Booking’ screen and invoke the ‘Signatory
Details’ screen
Minimum Number of Signatories
Specify the minimum number of signatories necessary to endorse an instrument involving the account.
Account Message
You can capture information about particular signatories. For instance you can capture a message like –
“this signatory is a joint account holder with rights to sign instruments with another one signatory’.
Signature ID – Specify the signatory identification number
Signatory Name – The system displays the corresponding name of the signatory ID specified.
Signatory Type – Specify the signatory type
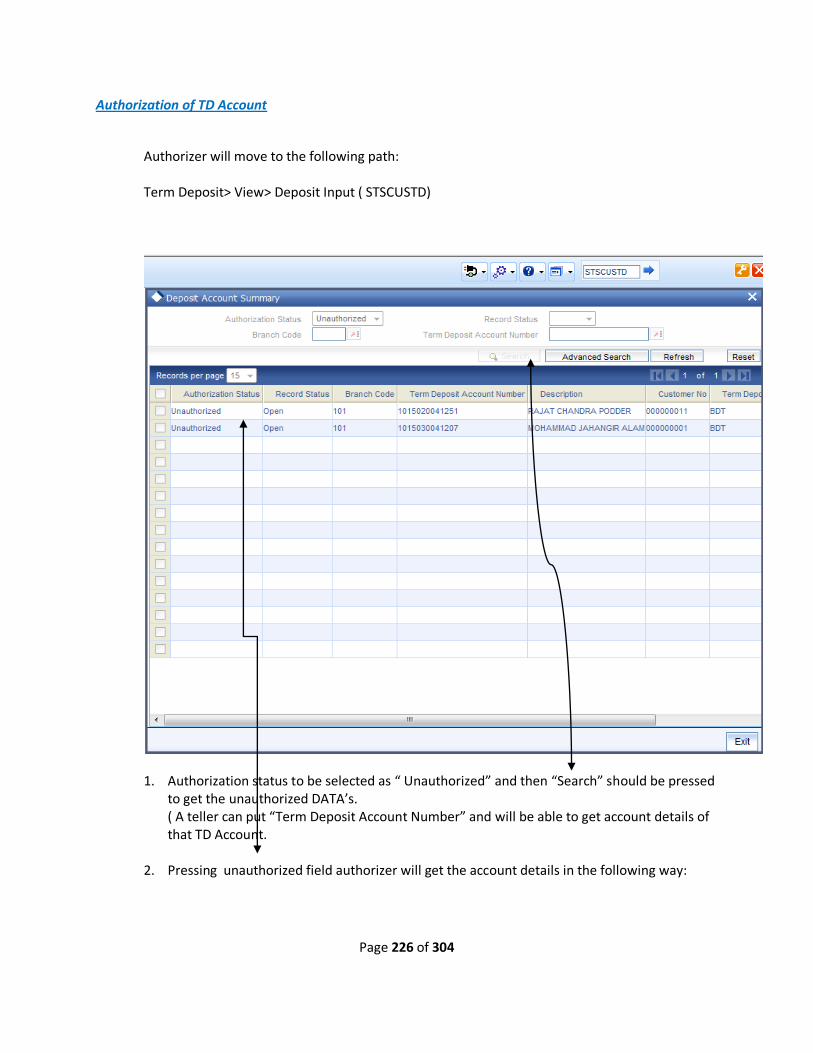
Page 226 of 304
Authorization of TD Account
Authorizer will move to the following path: Term Deposit> View> Deposit Input ( STSCUSTD)
1. Authorization status to be selected as “ Unauthorized” and then “Search” should be pressed to get the unauthorized DATA’s. ( A teller can put “Term Deposit Account Number” and will be able to get account details of that TD Account.
2. Pressing unauthorized field authorizer will get the account details in the following way:
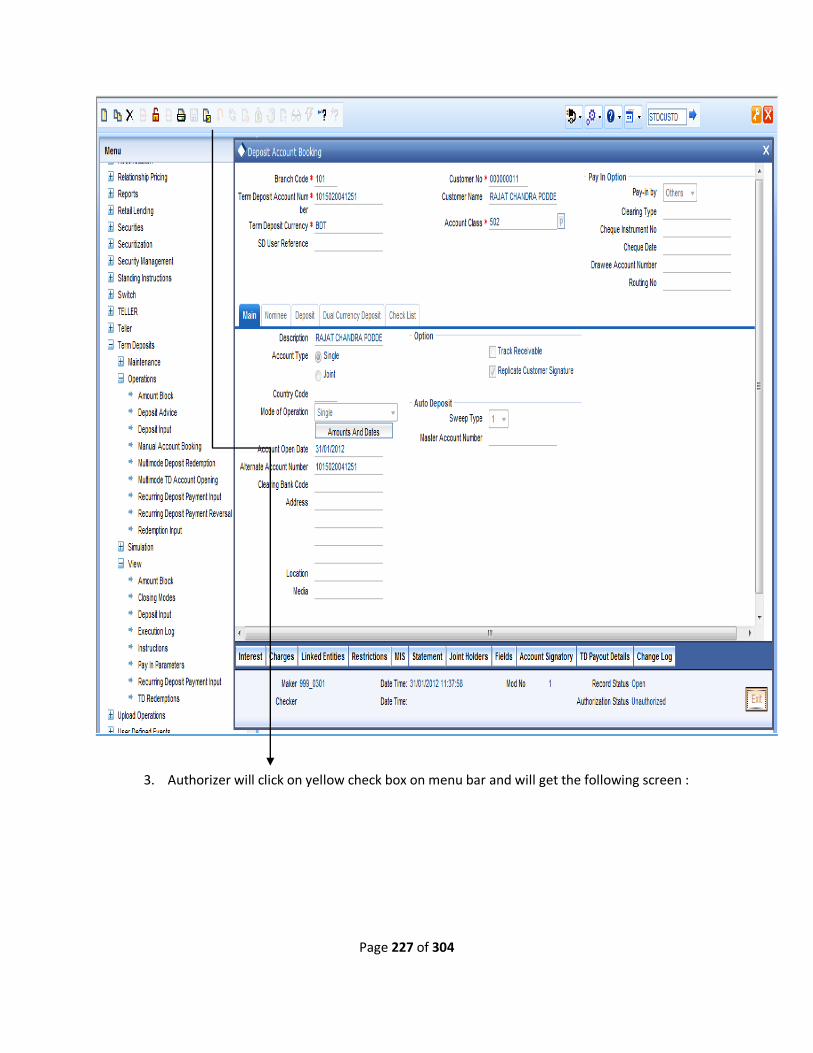
Page 227 of 304
3. Authorizer will click on yellow check box on menu bar and will get the following screen :

Page 228 of 304
4. Authorizer will click on accept button and the account will be authorized.
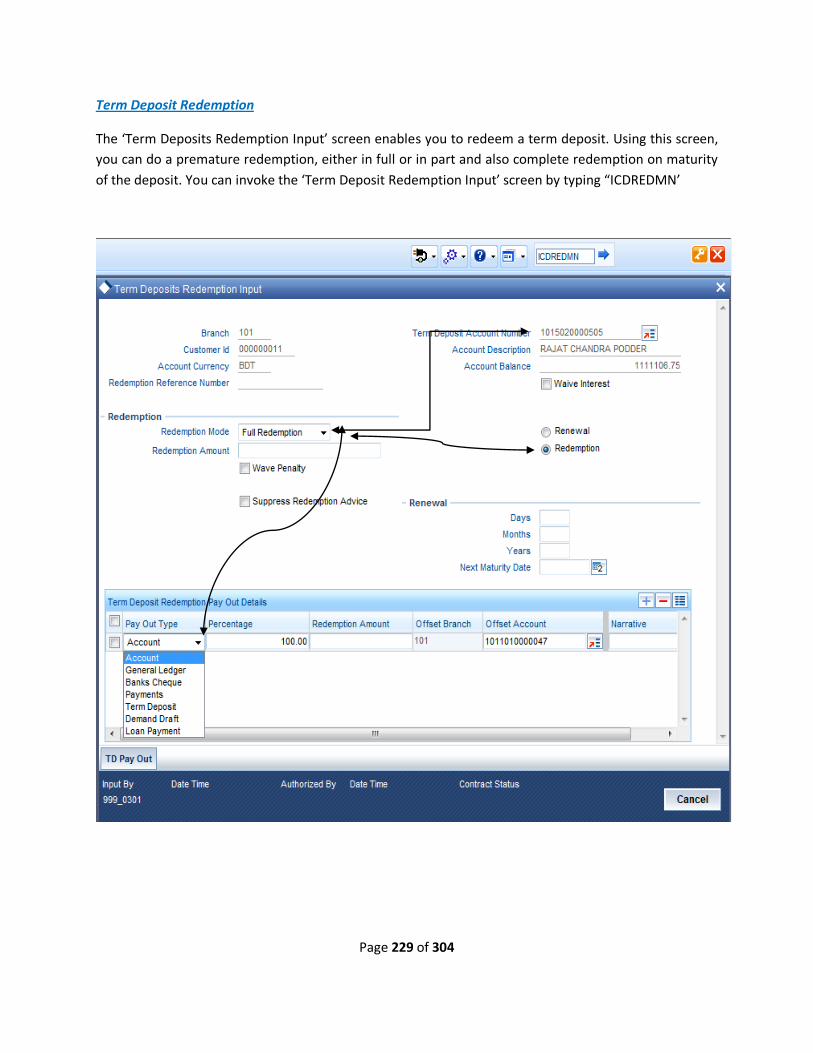
Page 229 of 304
Term Deposit Redemption
The ‘Term Deposits Redemption Input’ screen enables you to redeem a term deposit. Using this screen,
you can do a premature redemption, either in full or in part and also complete redemption on maturity
of the deposit. You can invoke the ‘Term Deposit Redemption Input’ screen by typing “ICDREDMN’

Page 230 of 304
Term Deposit Account Number
Specify the TD Account Number. You can also choose the appropriate one from the option list. The
option list displays the deposit type of accounts maintained in the system.
Account Currency + Account Description + Account Balance
Displayed based on the TD account number
Redemption Mode
Select the mode of redemption from the following options.
Full Redemption – In this case, you can redeem the complete deposit balance of the account. On
Save, the redemption amount will be equal to the account balance. Full redemption will update
the status of the deposit amount as closed. On complete redemption interest along with
principal is redeemed. The redemption amount is equal to the total of principle and interest
amounts excluding penalty and tax amounts.
Partial Redemption – In this case, you have to specify the redemption amount. Ensure that the
redemption amount is less than the account balance. On partial redemption only the principal
amount is withdrawn where as the interest amount is liquidated only on liquidation cycle.
Waive Penalty - Not required
Interest Waive - Not functioning in ICDREDMN (Work Around)
Term Deposit Redemption Pay Out Details
Select the pay-out type from the drop-down list. The options available are
Account
General Ledger (GL)
Banker’s Cheque
Term Deposit

Page 231 of 304
TD Redemption by cash is possible from Multimode Deposit Redemption screen which is
applicable for Cash Teller (Short path - 1317)
Percentage/Redemption Amount
The percentage and redemption amount are conditionally mandatory. You should specify either the
percentage or the redemption amount.
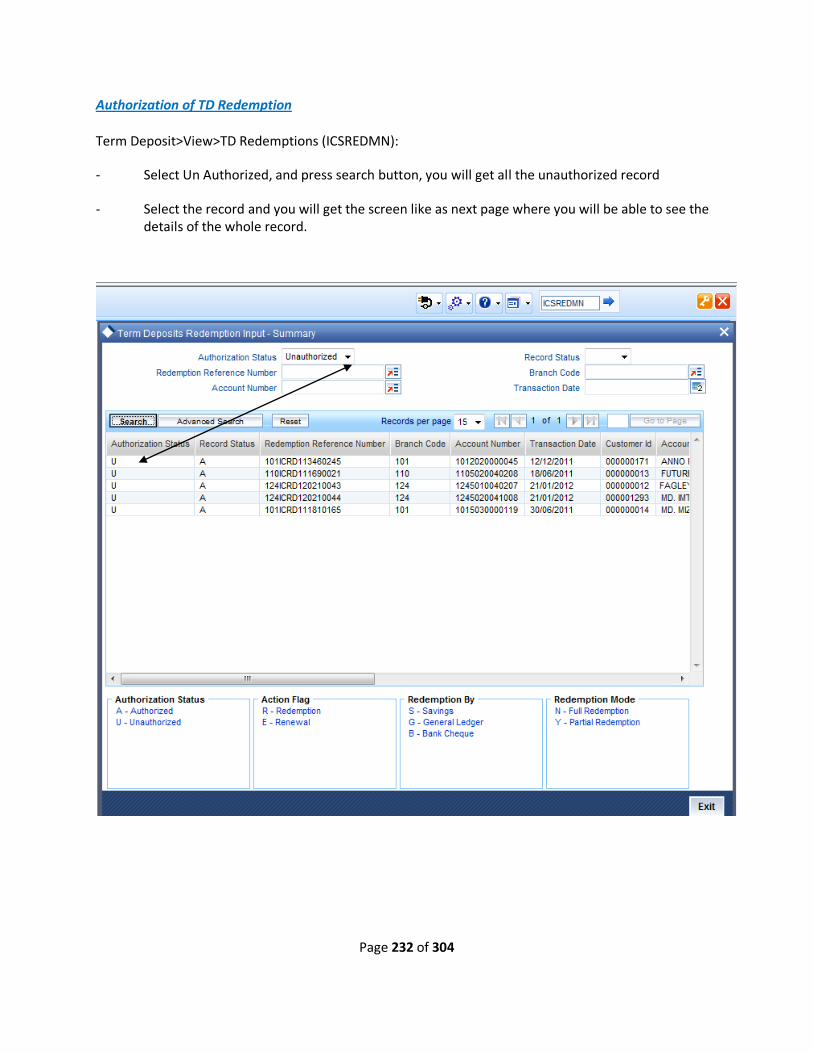
Page 232 of 304
Authorization of TD Redemption
Term Deposit>View>TD Redemptions (ICSREDMN):
- Select Un Authorized, and press search button, you will get all the unauthorized record
- Select the record and you will get the screen like as next page where you will be able to see the details of the whole record.

Page 233 of 304
- Click on Tick button and press ok for authorize the record.
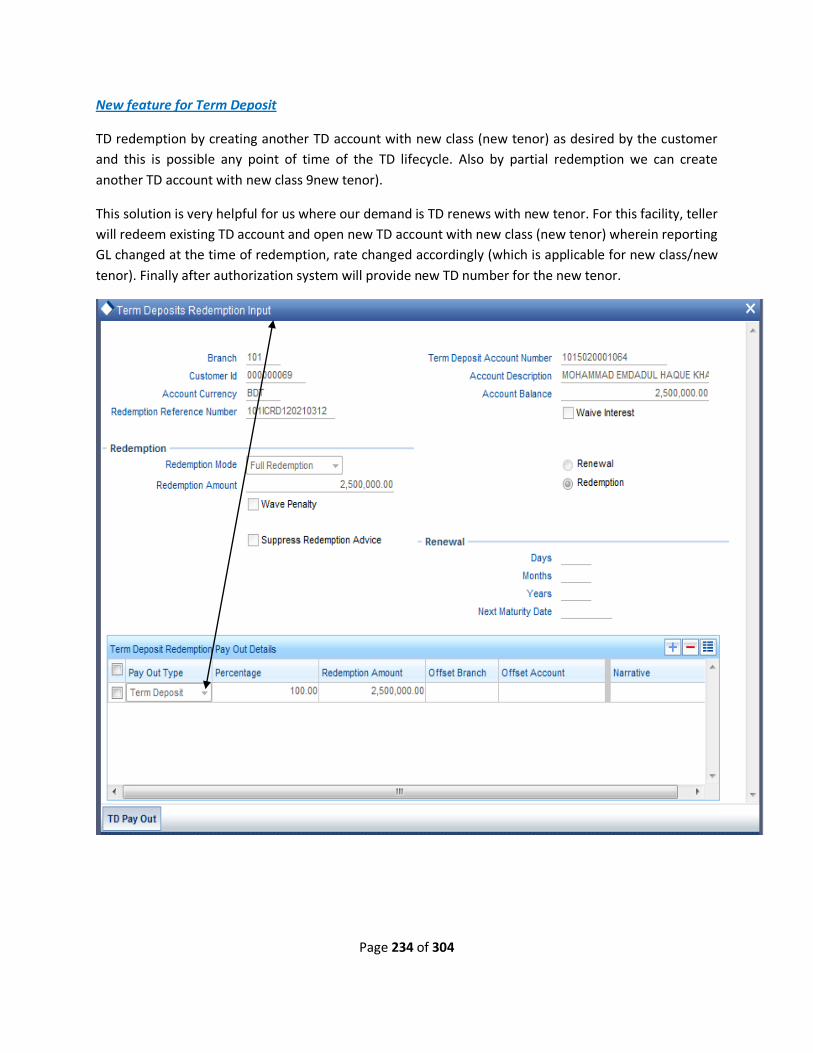
Page 234 of 304
New feature for Term Deposit
TD redemption by creating another TD account with new class (new tenor) as desired by the customer
and this is possible any point of time of the TD lifecycle. Also by partial redemption we can create
another TD account with new class 9new tenor).
This solution is very helpful for us where our demand is TD renews with new tenor. For this facility, teller
will redeem existing TD account and open new TD account with new class (new tenor) wherein reporting
GL changed at the time of redemption, rate changed accordingly (which is applicable for new class/new
tenor). Finally after authorization system will provide new TD number for the new tenor.
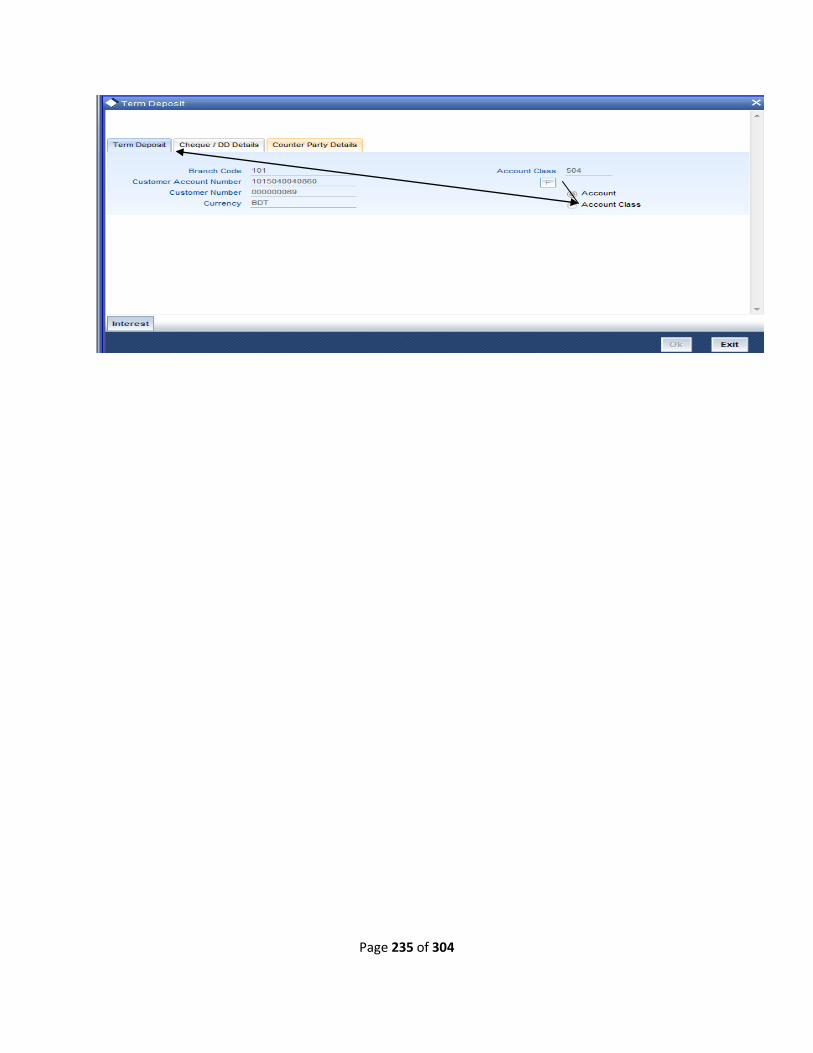
Page 235 of 304

Page 236 of 304
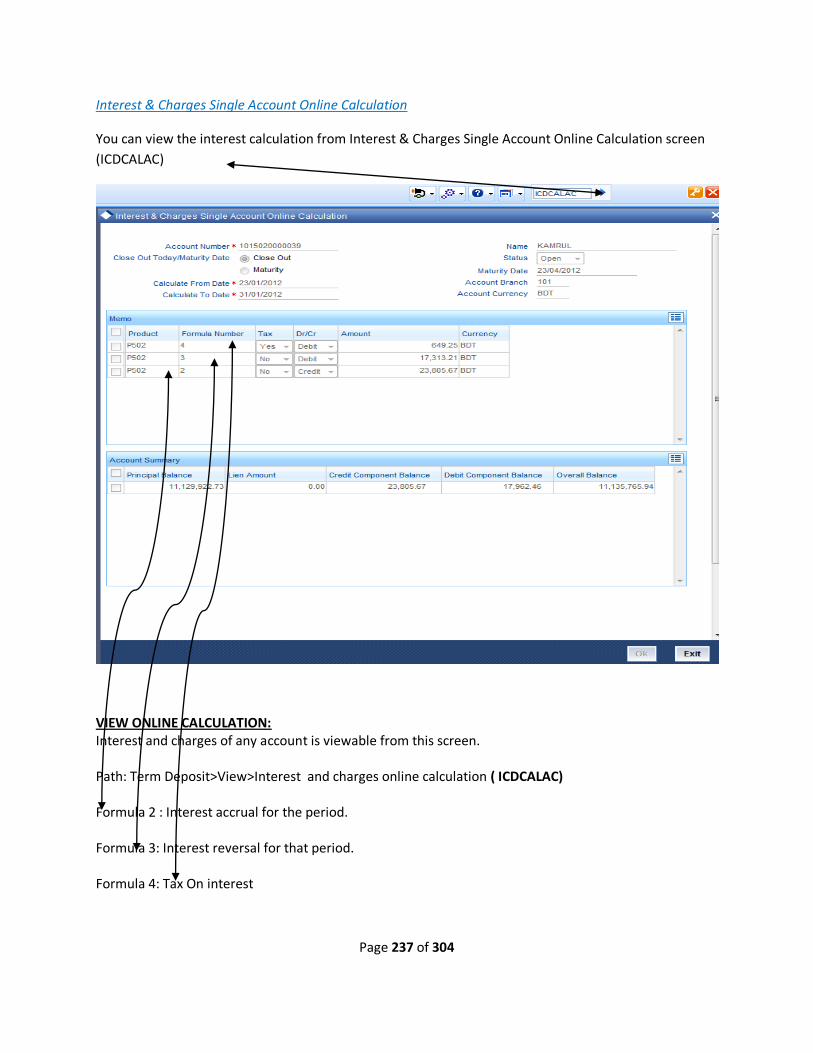
Page 237 of 304
Interest & Charges Single Account Online Calculation
You can view the interest calculation from Interest & Charges Single Account Online Calculation screen
(ICDCALAC)
VIEW ONLINE CALCULATION: Interest and charges of any account is viewable from this screen. Path: Term Deposit>View>Interest and charges online calculation ( ICDCALAC) Formula 2 : Interest accrual for the period. Formula 3: Interest reversal for that period. Formula 4: Tax On interest
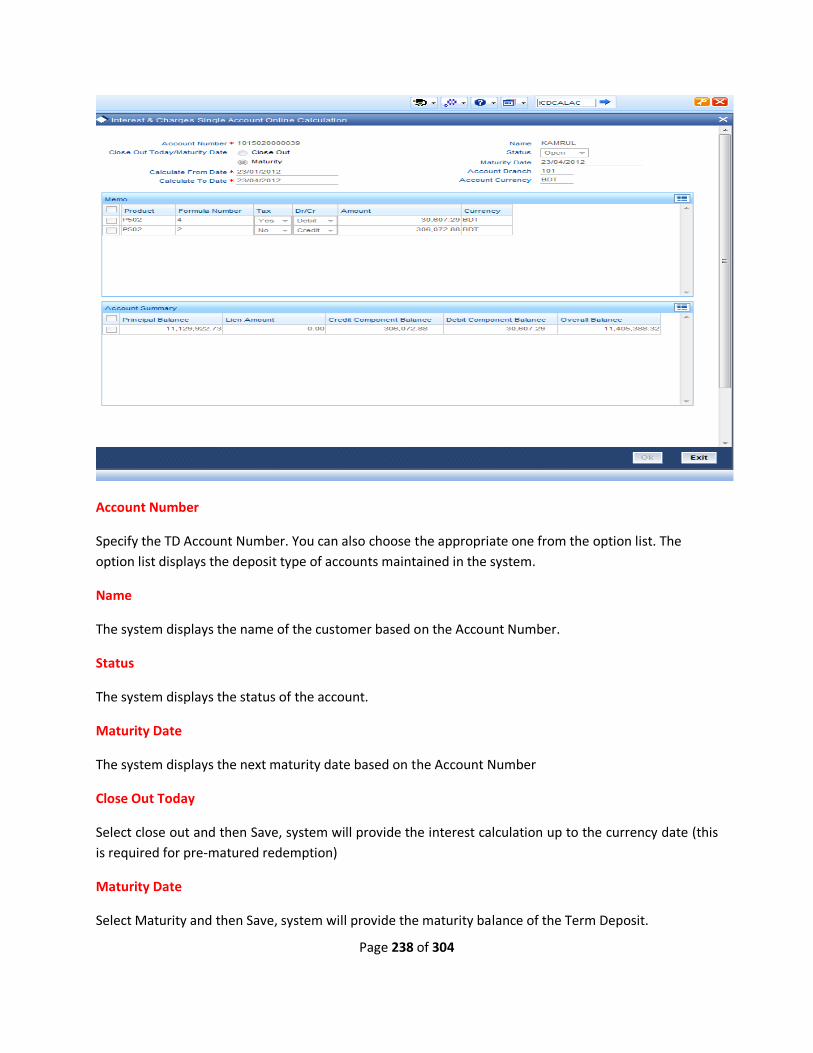
Page 238 of 304
Account Number
Specify the TD Account Number. You can also choose the appropriate one from the option list. The
option list displays the deposit type of accounts maintained in the system.
Name
The system displays the name of the customer based on the Account Number.
Status
The system displays the status of the account.
Maturity Date
The system displays the next maturity date based on the Account Number
Close Out Today
Select close out and then Save, system will provide the interest calculation up to the currency date (this
is required for pre-matured redemption)
Maturity Date
Select Maturity and then Save, system will provide the maturity balance of the Term Deposit.

Page 239 of 304
TD Amount Block Input
You can block the Term Deposit from TD Amount Block Input screen
(STDAMBLK)
Branch
Please select the Branch Code
Account
Specify the TD Account Number. You can also choose the appropriate one from the option list. The option list displays the deposit type of accounts maintained in the system.
Amount
Specify the TD Block Amount and block amount will be the equal or less than the TD principal amount.
Hold Code
Specify the hold code. The adjoining option list displays all Hold Code (Reason) maintained in the system. You can choose the appropriate one. Amount Block Number
System will provide amount block number and for further reference you can write-down the amount block number. Effective Date & Expiry Date
Specify the effective date & expiry date.
Remarks
For any comments you can note here for future reference
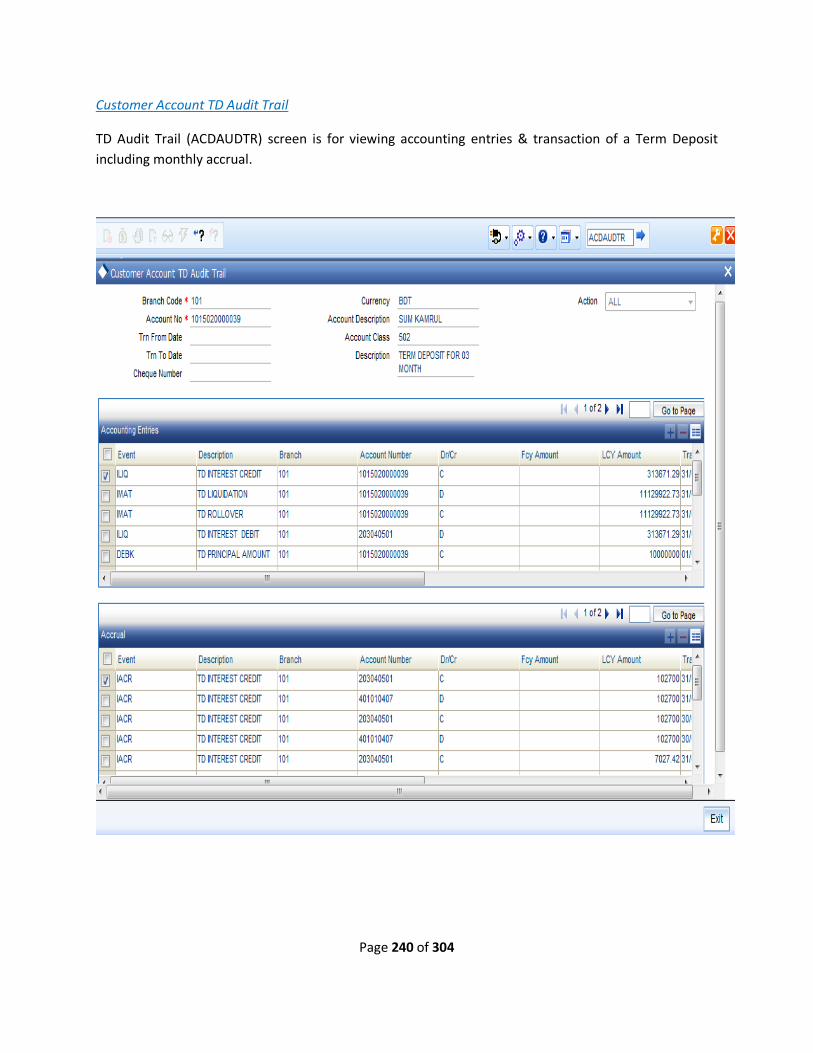
Page 240 of 304
Customer Account TD Audit Trail
TD Audit Trail (ACDAUDTR) screen is for viewing accounting entries & transaction of a Term Deposit
including monthly accrual.
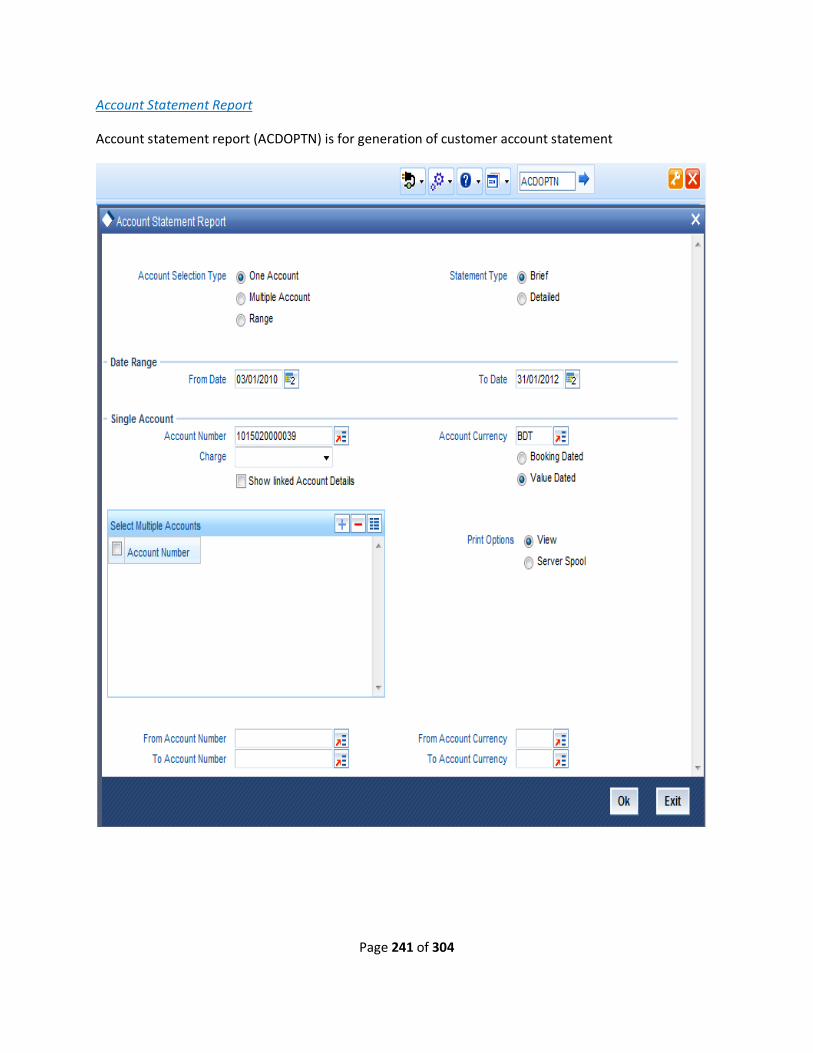
Page 241 of 304
Account Statement Report
Account statement report (ACDOPTN) is for generation of customer account statement
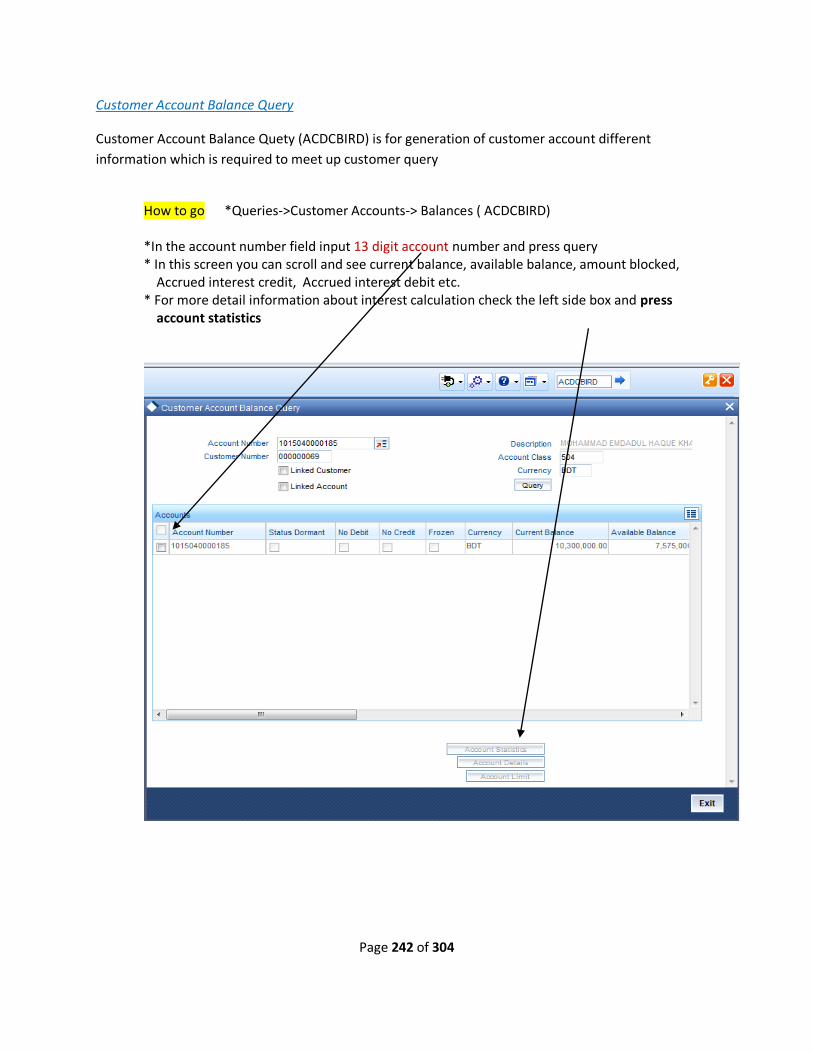
Page 242 of 304
Customer Account Balance Query
Customer Account Balance Quety (ACDCBIRD) is for generation of customer account different
information which is required to meet up customer query
How to go *Queries->Customer Accounts-> Balances ( ACDCBIRD) *In the account number field input 13 digit account number and press query * In this screen you can scroll and see current balance, available balance, amount blocked, Accrued interest credit, Accrued interest debit etc. * For more detail information about interest calculation check the left side box and press account statistics
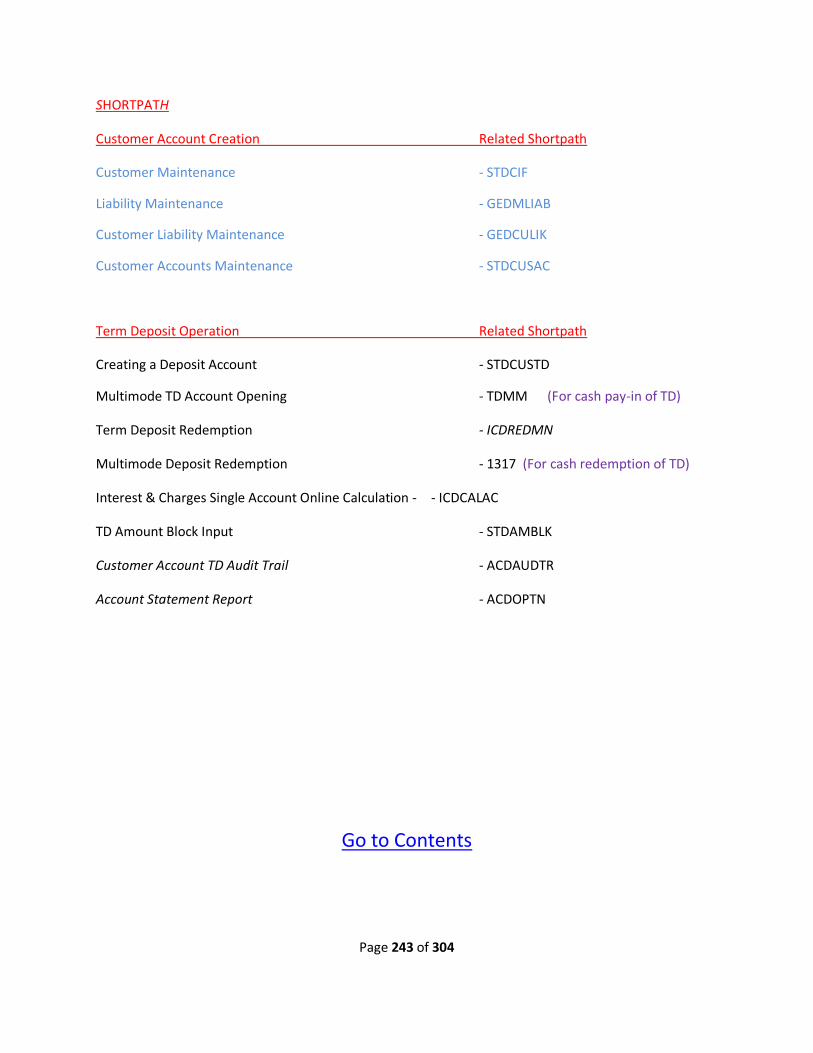
Page 243 of 304
SHORTPATH
Customer Account Creation Related Shortpath
Customer Maintenance - STDCIF
Liability Maintenance - GEDMLIAB
Customer Liability Maintenance - GEDCULIK
Customer Accounts Maintenance - STDCUSAC
Term Deposit Operation Related Shortpath
Creating a Deposit Account - STDCUSTD
Multimode TD Account Opening - TDMM (For cash pay-in of TD)
Term Deposit Redemption - ICDREDMN
Multimode Deposit Redemption - 1317 (For cash redemption of TD)
Interest & Charges Single Account Online Calculation - - ICDCALAC
TD Amount Block Input - STDAMBLK
Customer Account TD Audit Trail - ACDAUDTR
Account Statement Report - ACDOPTN
Go to Contents
Page 244 of 304
Page 245 of 304
PRODUCTS:
201: DBBL PENSION PLUS SCHEME (PP)
202: DBBL DEPOSIT PLUS SCHEME (DPS)
203: DBBL CHILDREN EDUCATION SCHEME ( CHESS)
205: BOCHORE DERGUN SCHEME ( BDS)
FEATURES:
1. A customer having a DBBL CASA account can open an RD account at any time of the month from any branch.
2. Customer need not to come branch Installment will be deduct monthly from the CASA account at anniversary date ( account opening date) of each month.
3. System will consider the holidays in case of realization of installment, that is interest calculation starts from value dated entry.
4. Customer has to pay penalty if he does not maintain sufficient money on the installment date. The penalty will be realized on interest liquidation date. At present interest accrual happens monthly and liquidate half yearly (Six month from the start date of the account).
5. The account will be dormant if the customer fails to pay installment for consecutive three month and account will be close if such account remains inactive for next three months (6+3=9 month). An exception report will be generated and accounts inactive for last 9 months need to close manually.
6. Customer will not get any interest if he closes the account before 6 month. He will get interest at the savings rate if the closes the account before 3 years , but more than 6 month. In all the cases customer has to pay premature closing charge along with vat.
PROCEDURE IN UBS 11.2 TO OPEN A RECURRING DEPOSIT ACCOUNT:
1. Open a Customer Information (CIF) Number for a new customer. ( Please follow CIF manual) 2. Open CASA account for the customer. ( Please follw CASA account opening manual) 3. Open RD account using the CIF and link to that CASA account as installment account.
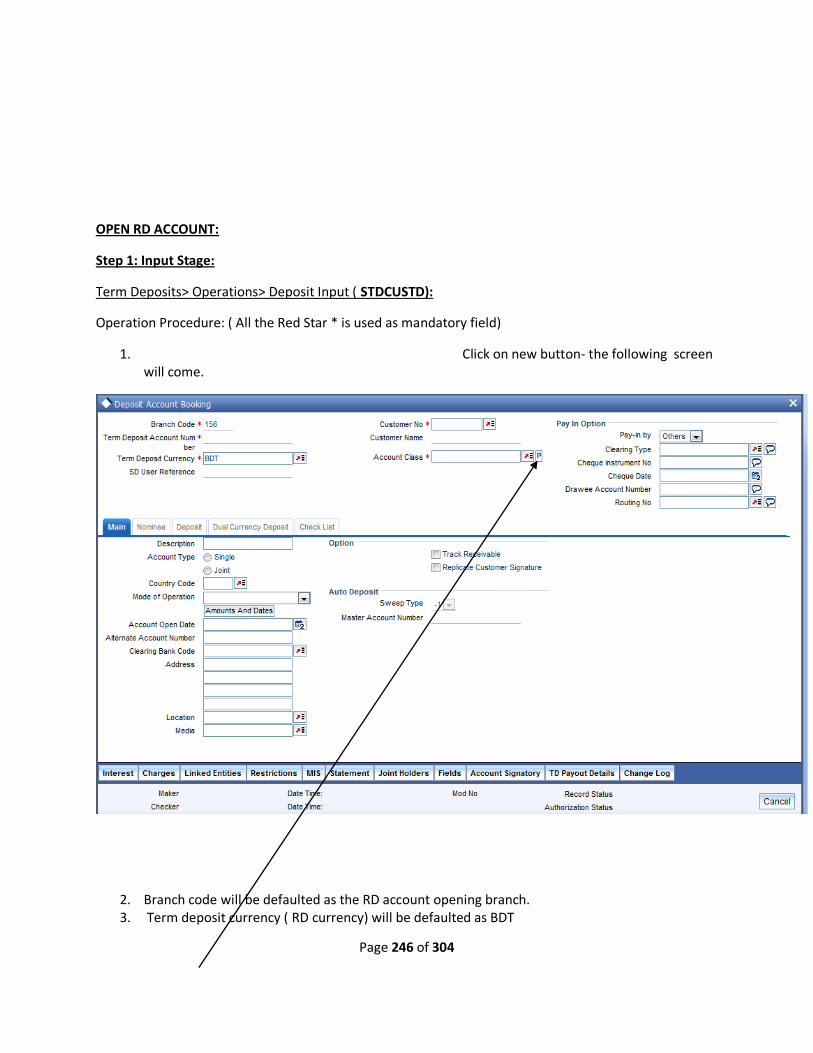
Page 246 of 304
OPEN RD ACCOUNT:
Step 1: Input Stage:
Term Deposits> Operations> Deposit Input ( STDCUSTD):
Operation Procedure: ( All the Red Star * is used as mandatory field)
1. Click on new button- the following screen will come.
2. Branch code will be defaulted as the RD account opening branch. 3. Term deposit currency ( RD currency) will be defaulted as BDT

Page 247 of 304
4. Input 9 digit customer number in customer no field and press tab. 5. Type Account Class code* and Press Tab 6. Click on P (Populate) button and account number will be populated immediately.
*Account Class Code ( Product Code) Description
201 Class Code for Pension Plus
202_3 Class Code for DPS of 3 years tenor
202_5 Class Code for DPS of 5 years tenor
202_8 Class Code for DPS of 8 years tenor
202_10 Class Code for DPS of 10 years tenor
203_3 Class Code for CHESS of 3 years tenor
203_5 Class Code for CHESS of 5 years tenor
203_8 Class Code for CHESS of 8 years tenor
203_10 Class Code for CHESS of 10 years tenor
205 Class Code for BDS
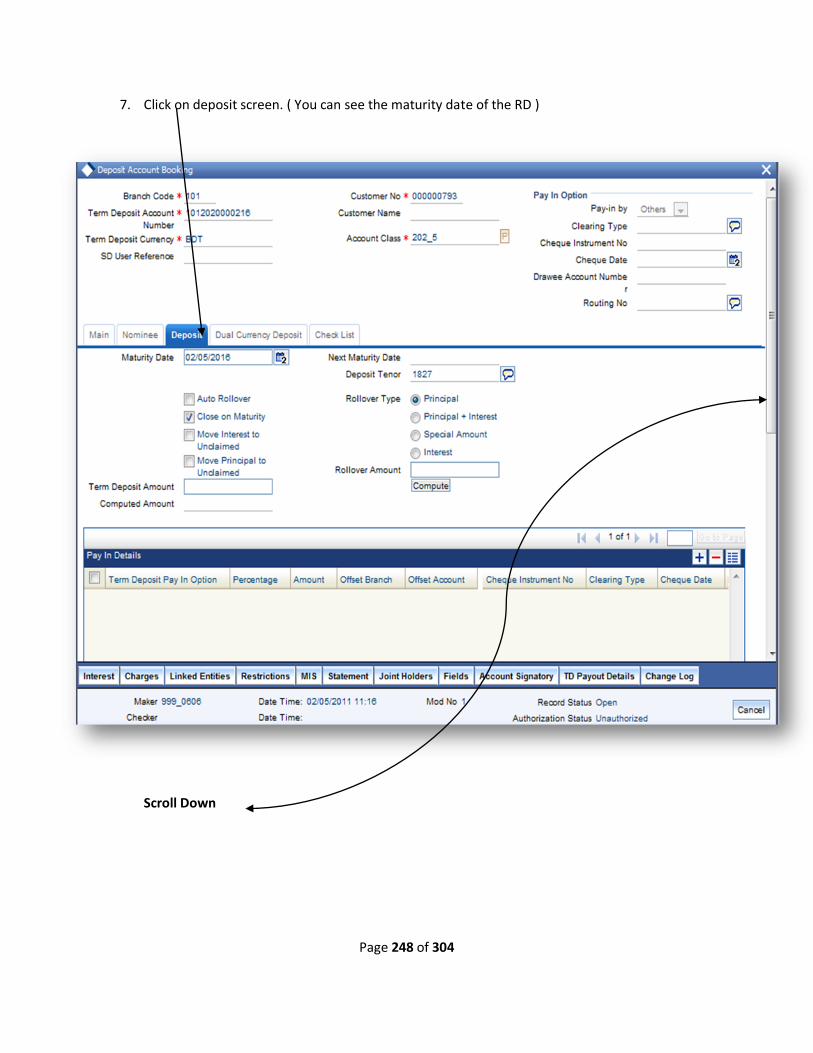
Page 248 of 304
7. Click on deposit screen. ( You can see the maturity date of the RD )
Scroll Down
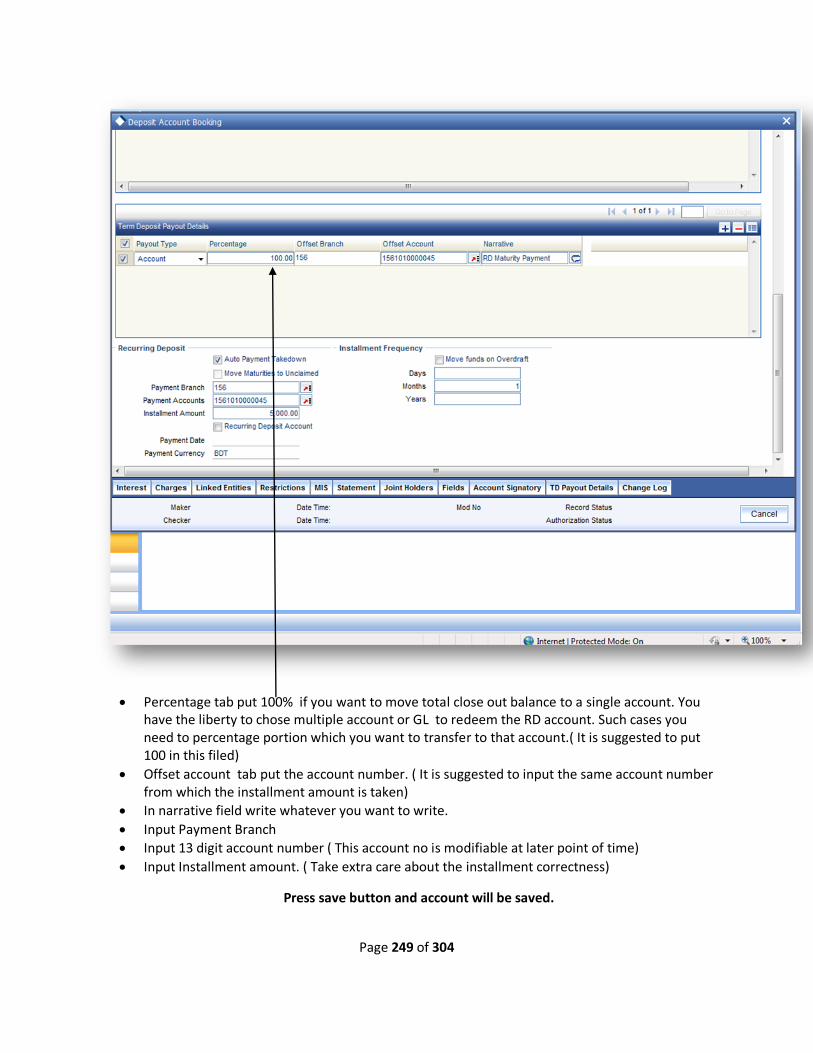
Page 249 of 304
Percentage tab put 100% if you want to move total close out balance to a single account. You have the liberty to chose multiple account or GL to redeem the RD account. Such cases you need to percentage portion which you want to transfer to that account.( It is suggested to put 100 in this filed)
Offset account tab put the account number. ( It is suggested to input the same account number from which the installment amount is taken)
In narrative field write whatever you want to write.
Input Payment Branch
Input 13 digit account number ( This account no is modifiable at later point of time)
Input Installment amount. ( Take extra care about the installment correctness)
Press save button and account will be saved.
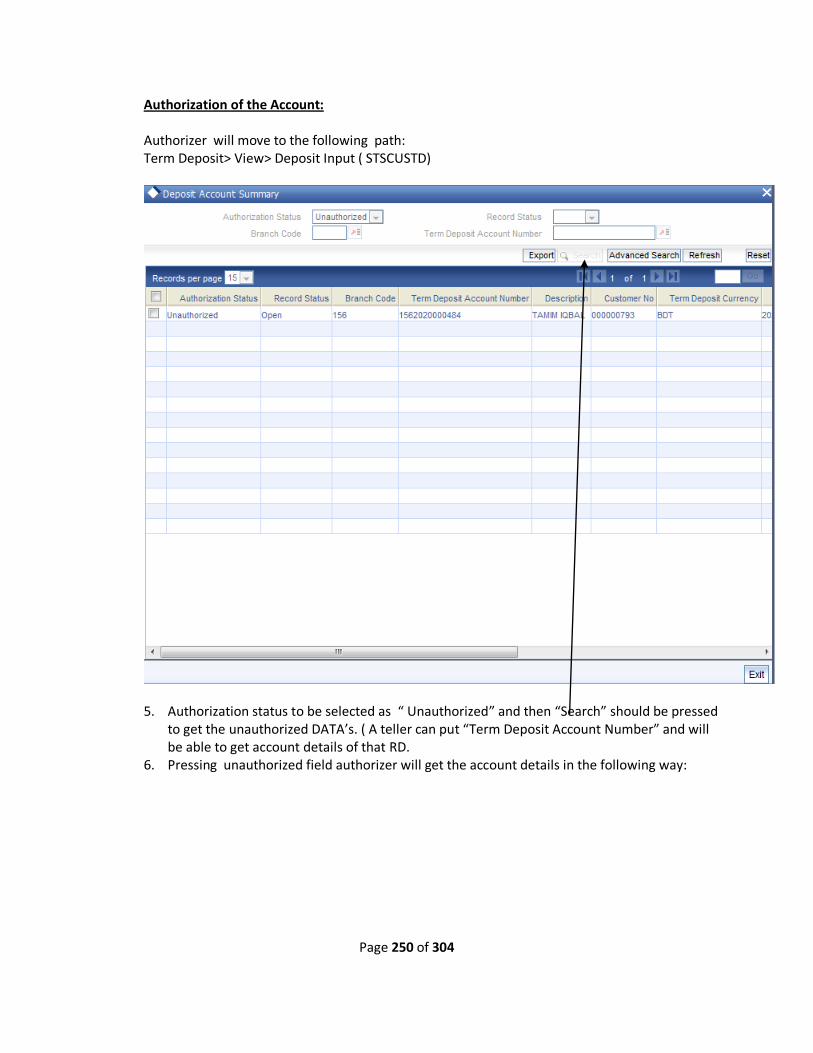
Page 250 of 304
Authorization of the Account: Authorizer will move to the following path: Term Deposit> View> Deposit Input ( STSCUSTD)
5. Authorization status to be selected as “ Unauthorized” and then “Search” should be pressed
to get the unauthorized DATA’s. ( A teller can put “Term Deposit Account Number” and will be able to get account details of that RD.
6. Pressing unauthorized field authorizer will get the account details in the following way:
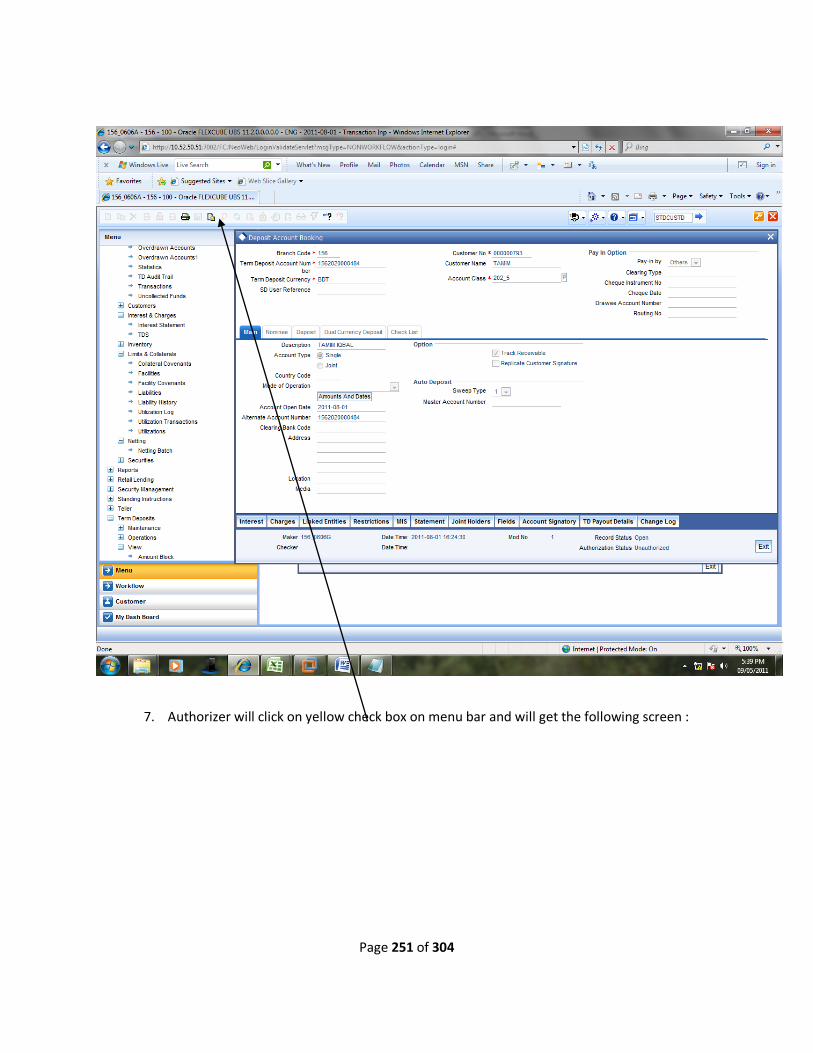
Page 251 of 304
7. Authorizer will click on yellow check box on menu bar and will get the following screen :

Page 252 of 304
8. Authorizer will click on accept button and the account will be authorized.
Go to Contents

Page 253 of 304
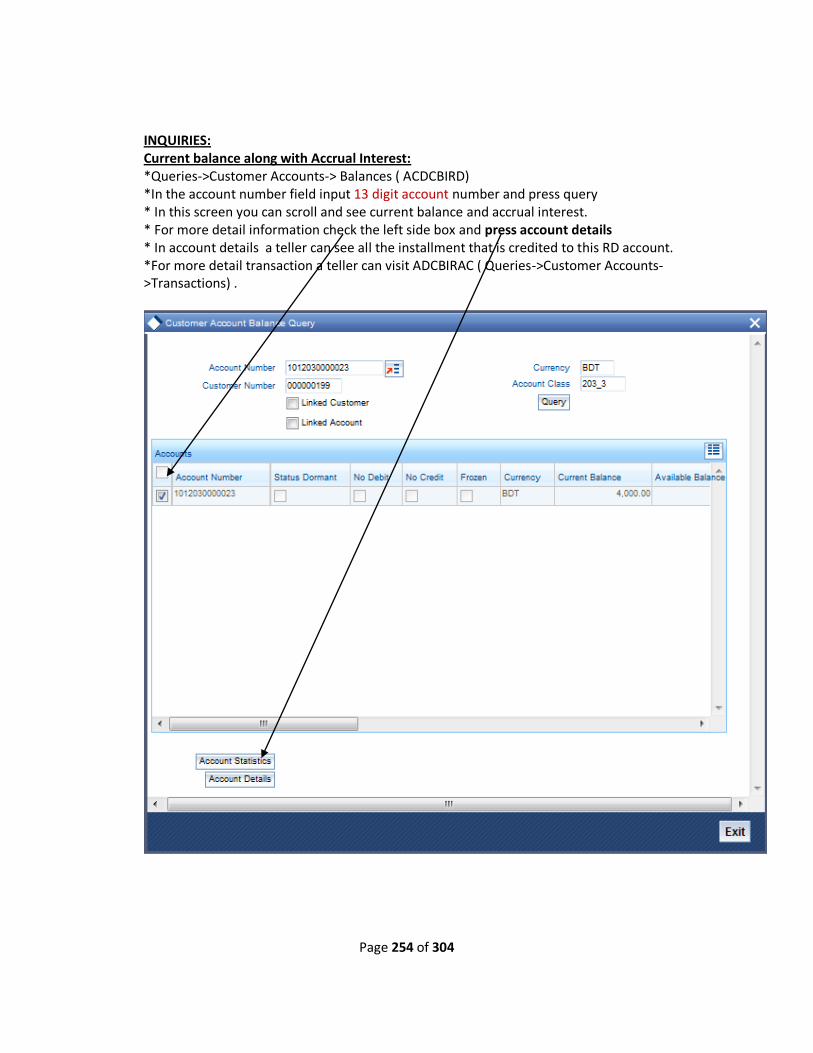
Page 254 of 304
INQUIRIES: Current balance along with Accrual Interest: *Queries->Customer Accounts-> Balances ( ACDCBIRD) *In the account number field input 13 digit account number and press query * In this screen you can scroll and see current balance and accrual interest. * For more detail information check the left side box and press account details * In account details a teller can see all the installment that is credited to this RD account. *For more detail transaction a teller can visit ADCBIRAC ( Queries->Customer Accounts->Transactions) .
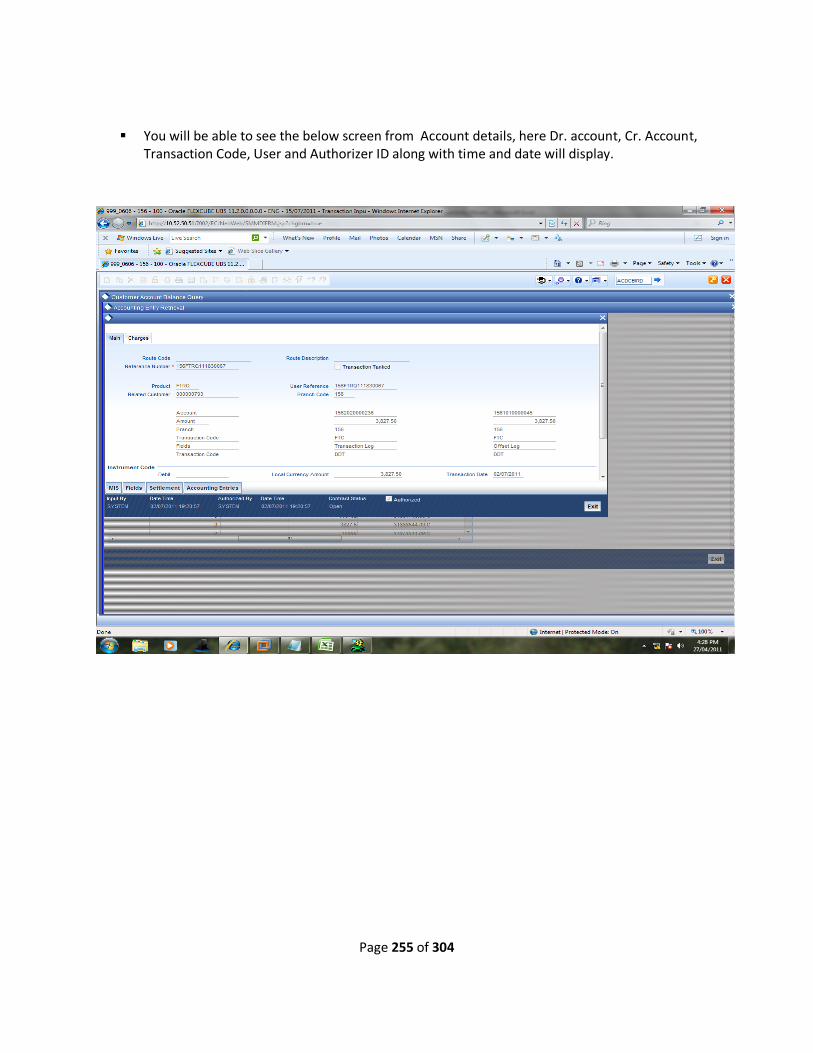
Page 255 of 304
You will be able to see the below screen from Account details, here Dr. account, Cr. Account, Transaction Code, User and Authorizer ID along with time and date will display.
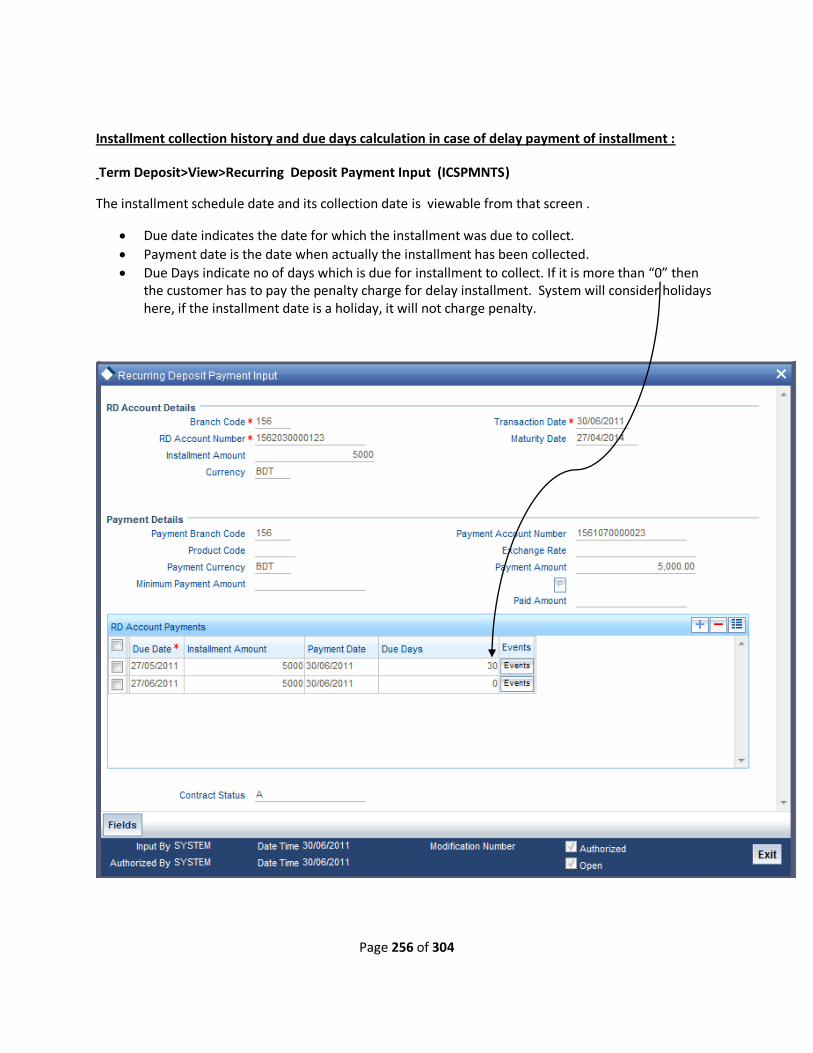
Page 256 of 304
Installment collection history and due days calculation in case of delay payment of installment :
Term Deposit>View>Recurring Deposit Payment Input (ICSPMNTS)
The installment schedule date and its collection date is viewable from that screen .
Due date indicates the date for which the installment was due to collect.
Payment date is the date when actually the installment has been collected.
Due Days indicate no of days which is due for installment to collect. If it is more than “0” then the customer has to pay the penalty charge for delay installment. System will consider holidays here, if the installment date is a holiday, it will not charge penalty.

Page 257 of 304
VIEW ONLINE CALCULATION: Interest and charges of any account is viewable from this screen. Path: Term Deposit>View>Interest and charges online calculation ( ICDCALAC) Formula 1 : Interest accrual for the period. Formula 2: Interest reversal for that period. Formula 3: Tax On interest Formula 4: Late Payment charge Formula 5: Vat on Late payment charge Formula 6 : Pre mature closing charge Formula 7: Vat on closing charge
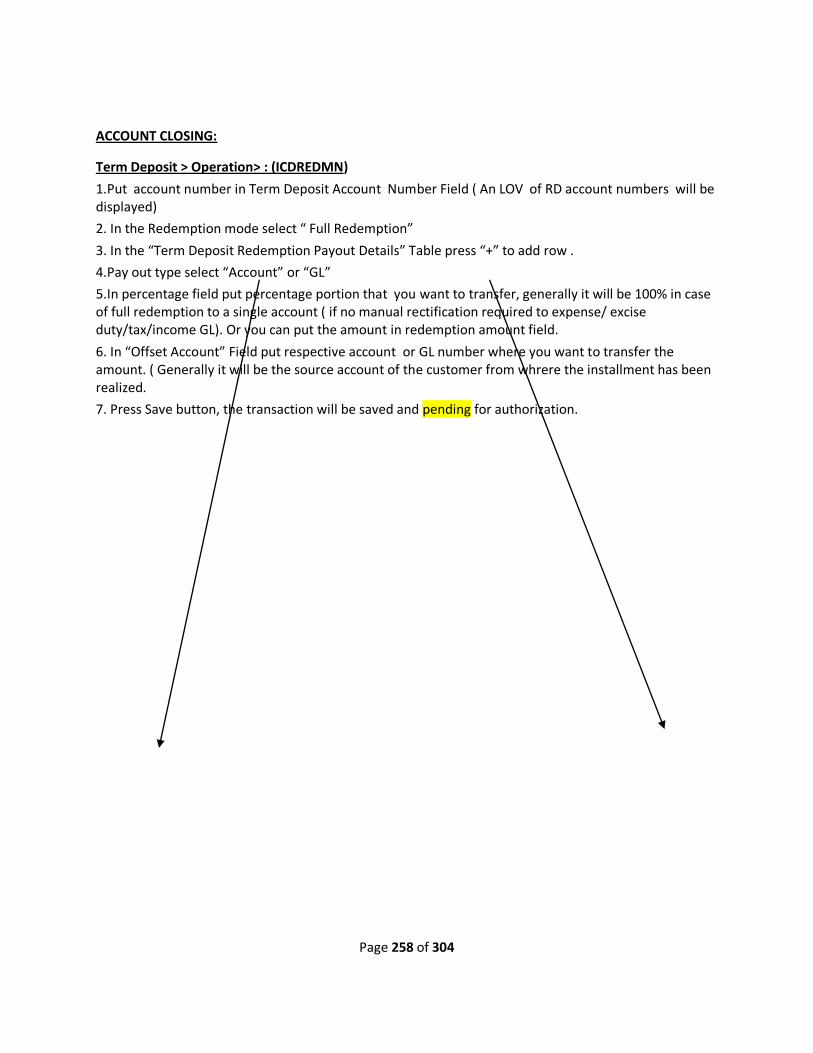
Page 258 of 304
ACCOUNT CLOSING:
Term Deposit > Operation> : (ICDREDMN)
1.Put account number in Term Deposit Account Number Field ( An LOV of RD account numbers will be displayed)
2. In the Redemption mode select “ Full Redemption”
3. In the “Term Deposit Redemption Payout Details” Table press “+” to add row .
4.Pay out type select “Account” or “GL”
5.In percentage field put percentage portion that you want to transfer, generally it will be 100% in case of full redemption to a single account ( if no manual rectification required to expense/ excise duty/tax/income GL). Or you can put the amount in redemption amount field.
6. In “Offset Account” Field put respective account or GL number where you want to transfer the amount. ( Generally it will be the source account of the customer from whrere the installment has been realized.
7. Press Save button, the transaction will be saved and pending for authorization.

Page 259 of 304
Authorization of RD Redemption:
Term Deposit>View>TD Redemptions (ICSREDMN):
1.Select Un Autorized, and press search button, you will get all the unauthorized record ( For both RD and TD).
2. Select the record and you will get the screen like as next page where you will be able to see the details of the whole record.
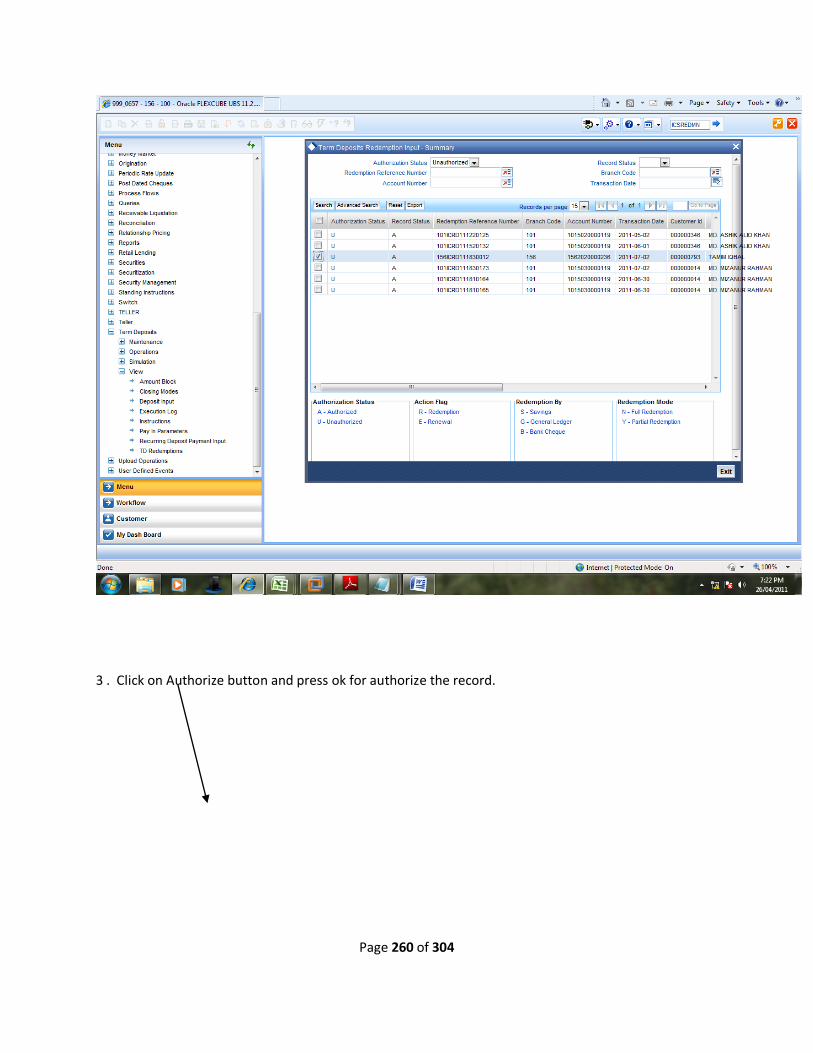
Page 260 of 304
3 . Click on Authorize button and press ok for authorize the record.
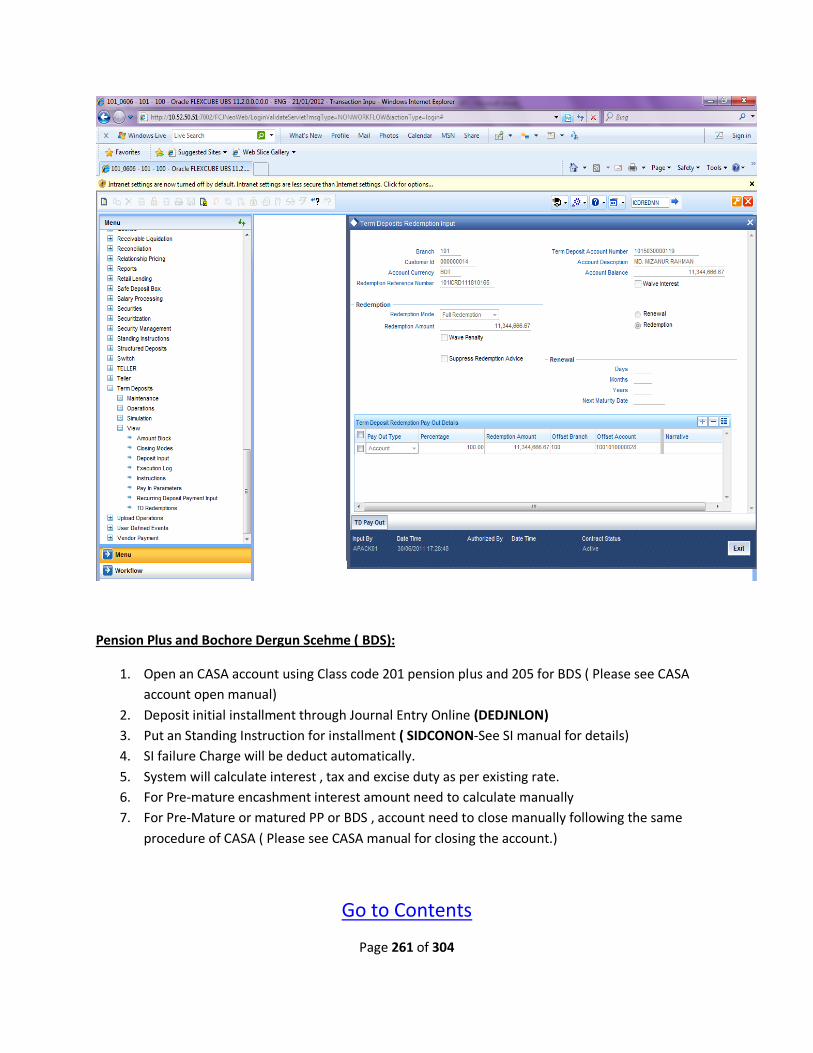
Page 261 of 304
Pension Plus and Bochore Dergun Scehme ( BDS):
1. Open an CASA account using Class code 201 pension plus and 205 for BDS ( Please see CASA
account open manual)
2. Deposit initial installment through Journal Entry Online (DEDJNLON)
3. Put an Standing Instruction for installment ( SIDCONON-See SI manual for details)
4. SI failure Charge will be deduct automatically.
5. System will calculate interest , tax and excise duty as per existing rate.
6. For Pre-mature encashment interest amount need to calculate manually
7. For Pre-Mature or matured PP or BDS , account need to close manually following the same
procedure of CASA ( Please see CASA manual for closing the account.)
Go to Contents

Page 262 of 304
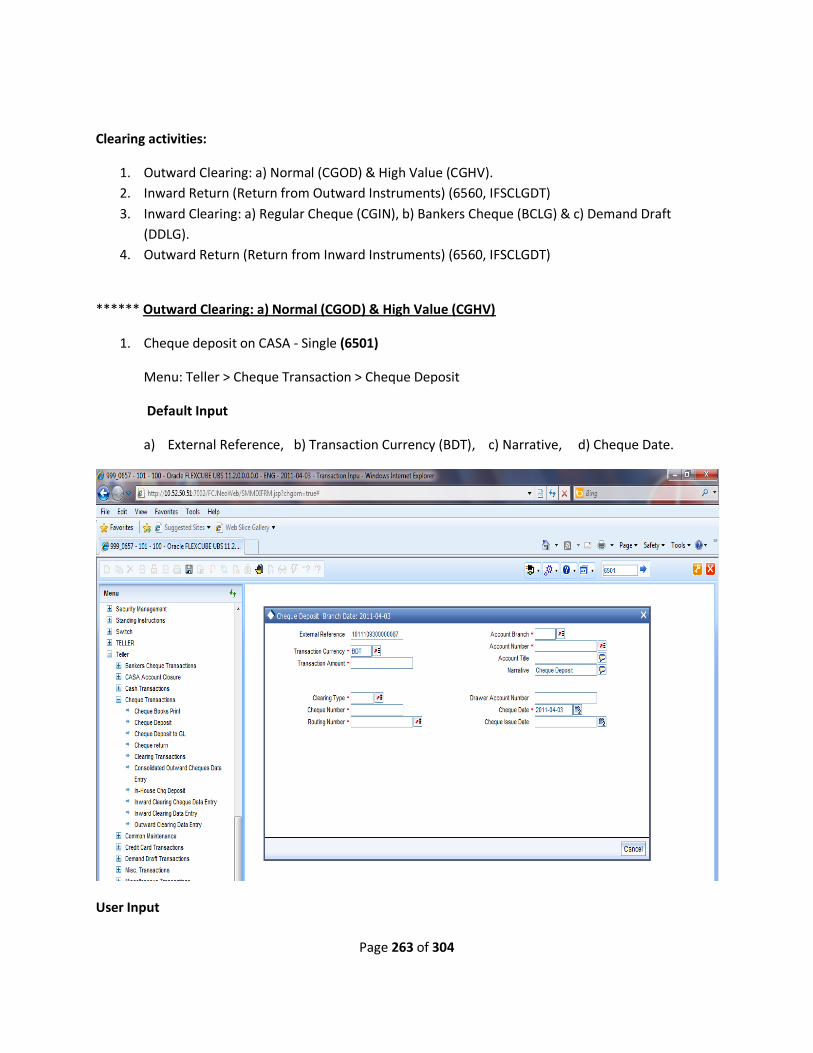
Page 263 of 304
Clearing activities:
1. Outward Clearing: a) Normal (CGOD) & High Value (CGHV).
2. Inward Return (Return from Outward Instruments) (6560, IFSCLGDT)
3. Inward Clearing: a) Regular Cheque (CGIN), b) Bankers Cheque (BCLG) & c) Demand Draft
(DDLG).
4. Outward Return (Return from Inward Instruments) (6560, IFSCLGDT)
****** Outward Clearing: a) Normal (CGOD) & High Value (CGHV)
1. Cheque deposit on CASA - Single (6501)
Menu: Teller > Cheque Transaction > Cheque Deposit
Default Input
a) External Reference, b) Transaction Currency (BDT), c) Narrative, d) Cheque Date.
User Input

Page 264 of 304
a) Transaction amount, b) Account Br., c) Account Number, d) Clearing Type, e) Cheque
Number, f) Routing Number, g) Drawer Account Number & h) Cheque Issue Date.
Then save.
After click on SAVE icon on menu bar showing all information at a glance
For saving the entry finally click again on SAVE icon on menu bar
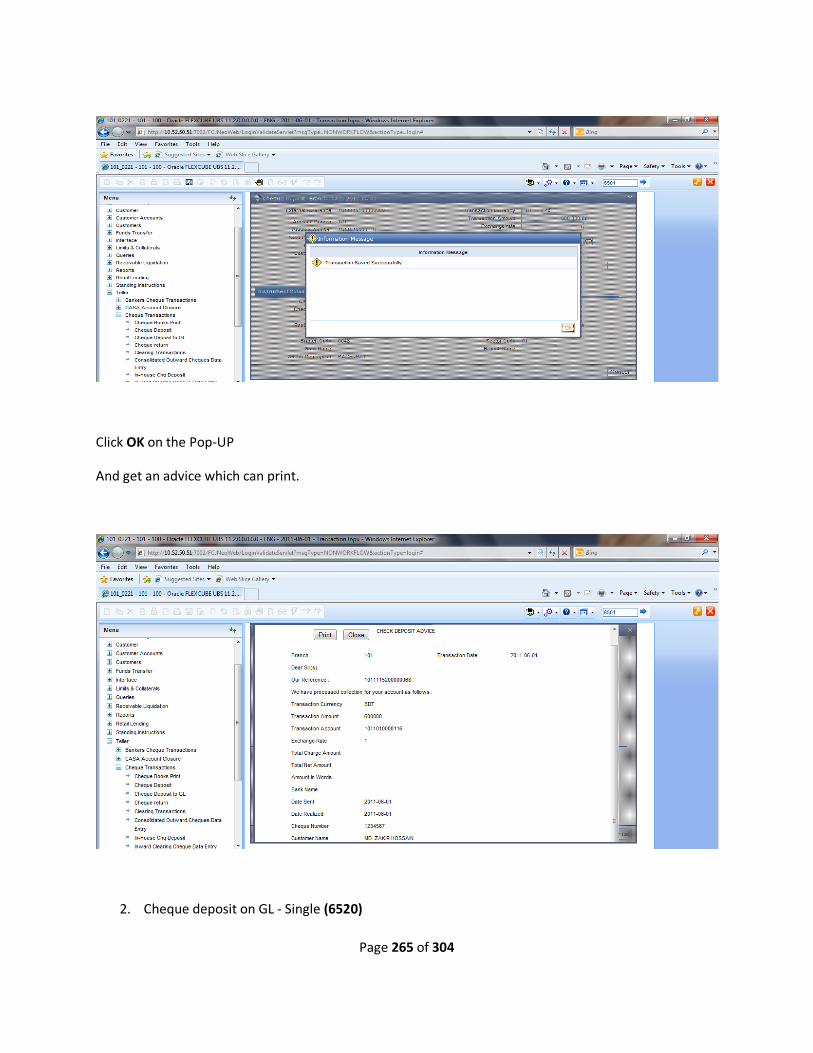
Page 265 of 304
Click OK on the Pop-UP
And get an advice which can print.
2. Cheque deposit on GL - Single (6520)
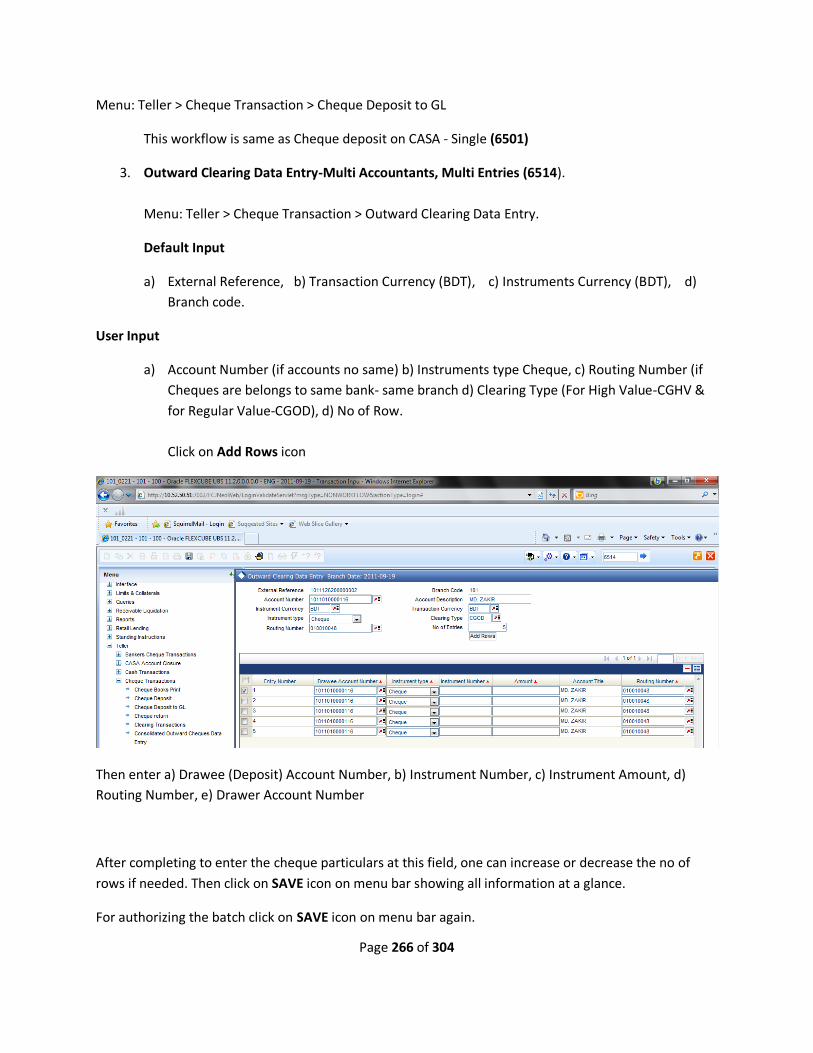
Page 266 of 304
Menu: Teller > Cheque Transaction > Cheque Deposit to GL
This workflow is same as Cheque deposit on CASA - Single (6501)
3. Outward Clearing Data Entry-Multi Accountants, Multi Entries (6514).
Menu: Teller > Cheque Transaction > Outward Clearing Data Entry.
Default Input
a) External Reference, b) Transaction Currency (BDT), c) Instruments Currency (BDT), d)
Branch code.
User Input
a) Account Number (if accounts no same) b) Instruments type Cheque, c) Routing Number (if
Cheques are belongs to same bank- same branch d) Clearing Type (For High Value-CGHV &
for Regular Value-CGOD), d) No of Row.
Click on Add Rows icon
Then enter a) Drawee (Deposit) Account Number, b) Instrument Number, c) Instrument Amount, d)
Routing Number, e) Drawer Account Number
After completing to enter the cheque particulars at this field, one can increase or decrease the no of
rows if needed. Then click on SAVE icon on menu bar showing all information at a glance.
For authorizing the batch click on SAVE icon on menu bar again.
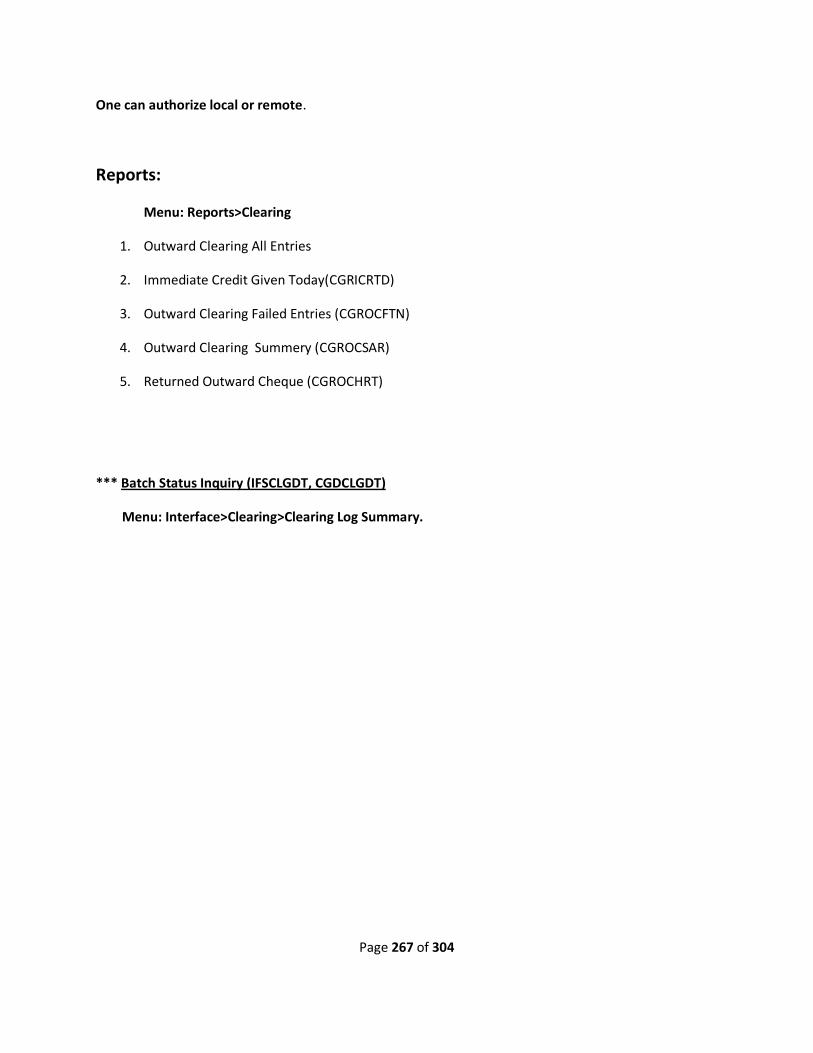
Page 267 of 304
One can authorize local or remote.
Reports:
Menu: Reports>Clearing
1. Outward Clearing All Entries
2. Immediate Credit Given Today(CGRICRTD)
3. Outward Clearing Failed Entries (CGROCFTN)
4. Outward Clearing Summery (CGROCSAR)
5. Returned Outward Cheque (CGROCHRT)
*** Batch Status Inquiry (IFSCLGDT, CGDCLGDT)
Menu: Interface>Clearing>Clearing Log Summary.
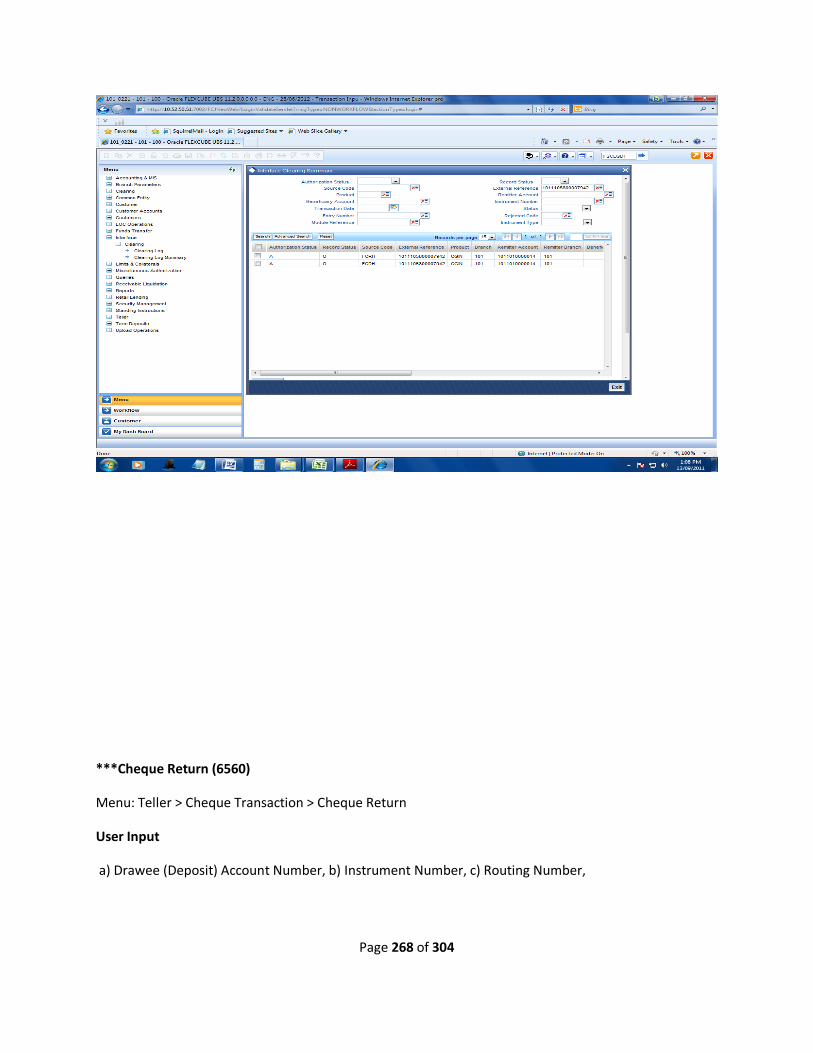
Page 268 of 304
***Cheque Return (6560)
Menu: Teller > Cheque Transaction > Cheque Return
User Input
a) Drawee (Deposit) Account Number, b) Instrument Number, c) Routing Number,
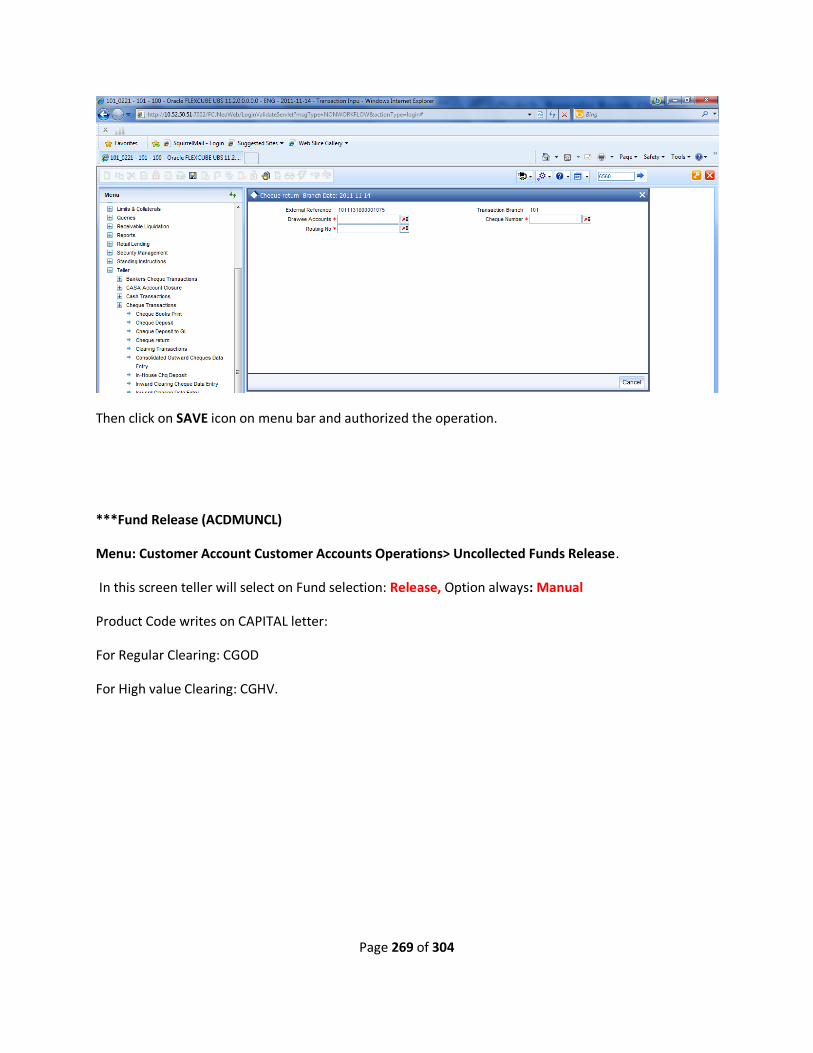
Page 269 of 304
Then click on SAVE icon on menu bar and authorized the operation.
***Fund Release (ACDMUNCL)
Menu: Customer Account Customer Accounts Operations> Uncollected Funds Release.
In this screen teller will select on Fund selection: Release, Option always: Manual
Product Code writes on CAPITAL letter:
For Regular Clearing: CGOD
For High value Clearing: CGHV.
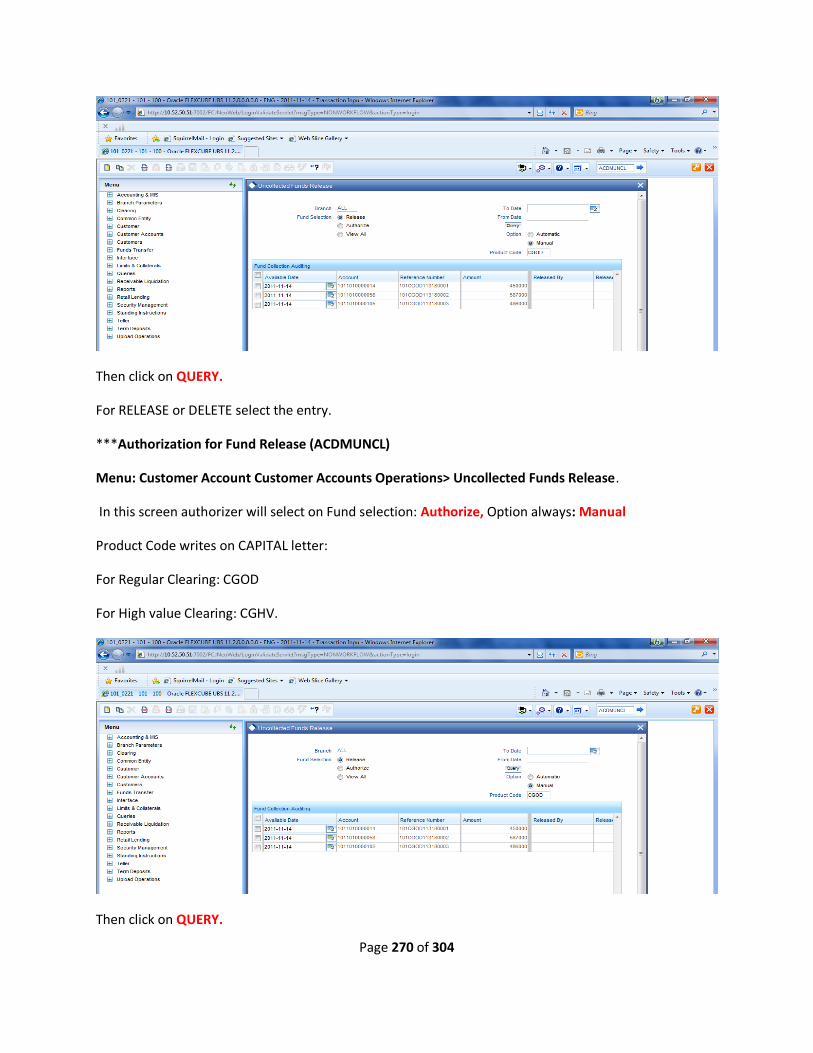
Page 270 of 304
Then click on QUERY.
For RELEASE or DELETE select the entry.
***Authorization for Fund Release (ACDMUNCL)
Menu: Customer Account Customer Accounts Operations> Uncollected Funds Release.
In this screen authorizer will select on Fund selection: Authorize, Option always: Manual
Product Code writes on CAPITAL letter:
For Regular Clearing: CGOD
For High value Clearing: CGHV.
Then click on QUERY.
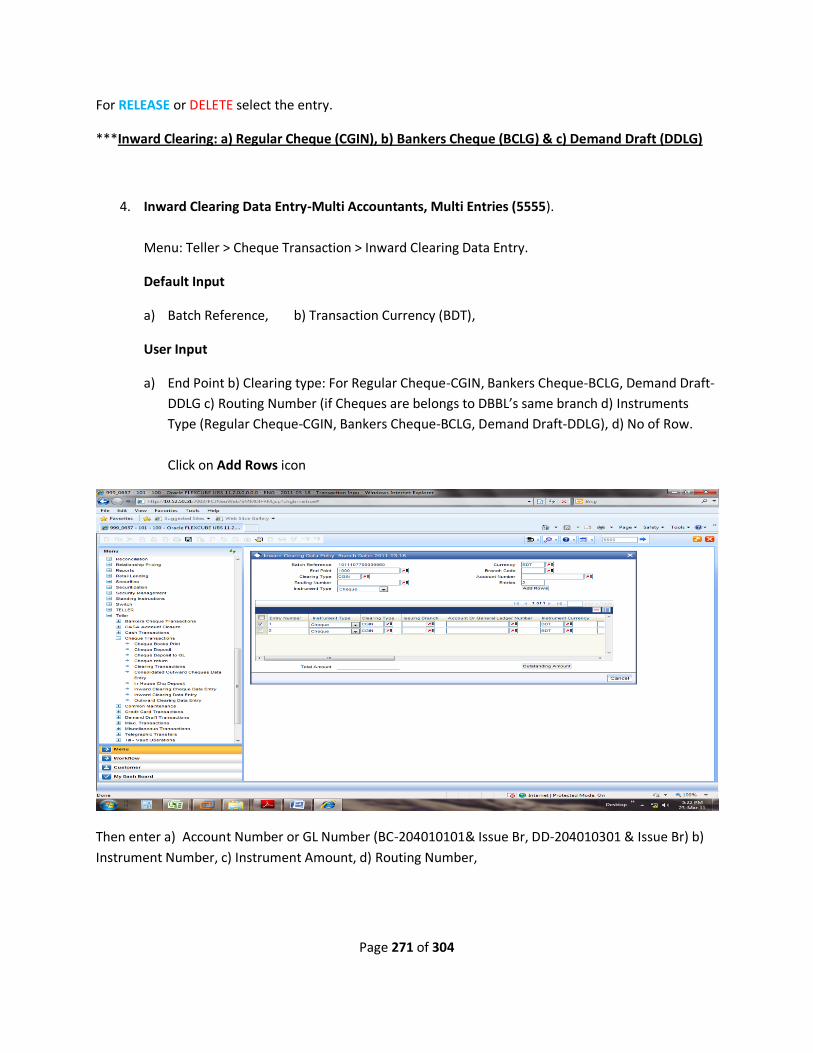
Page 271 of 304
For RELEASE or DELETE select the entry.
***Inward Clearing: a) Regular Cheque (CGIN), b) Bankers Cheque (BCLG) & c) Demand Draft (DDLG)
4. Inward Clearing Data Entry-Multi Accountants, Multi Entries (5555).
Menu: Teller > Cheque Transaction > Inward Clearing Data Entry.
Default Input
a) Batch Reference, b) Transaction Currency (BDT),
User Input
a) End Point b) Clearing type: For Regular Cheque-CGIN, Bankers Cheque-BCLG, Demand Draft-
DDLG c) Routing Number (if Cheques are belongs to DBBL’s same branch d) Instruments
Type (Regular Cheque-CGIN, Bankers Cheque-BCLG, Demand Draft-DDLG), d) No of Row.
Click on Add Rows icon
Then enter a) Account Number or GL Number (BC-204010101& Issue Br, DD-204010301 & Issue Br) b)
Instrument Number, c) Instrument Amount, d) Routing Number,
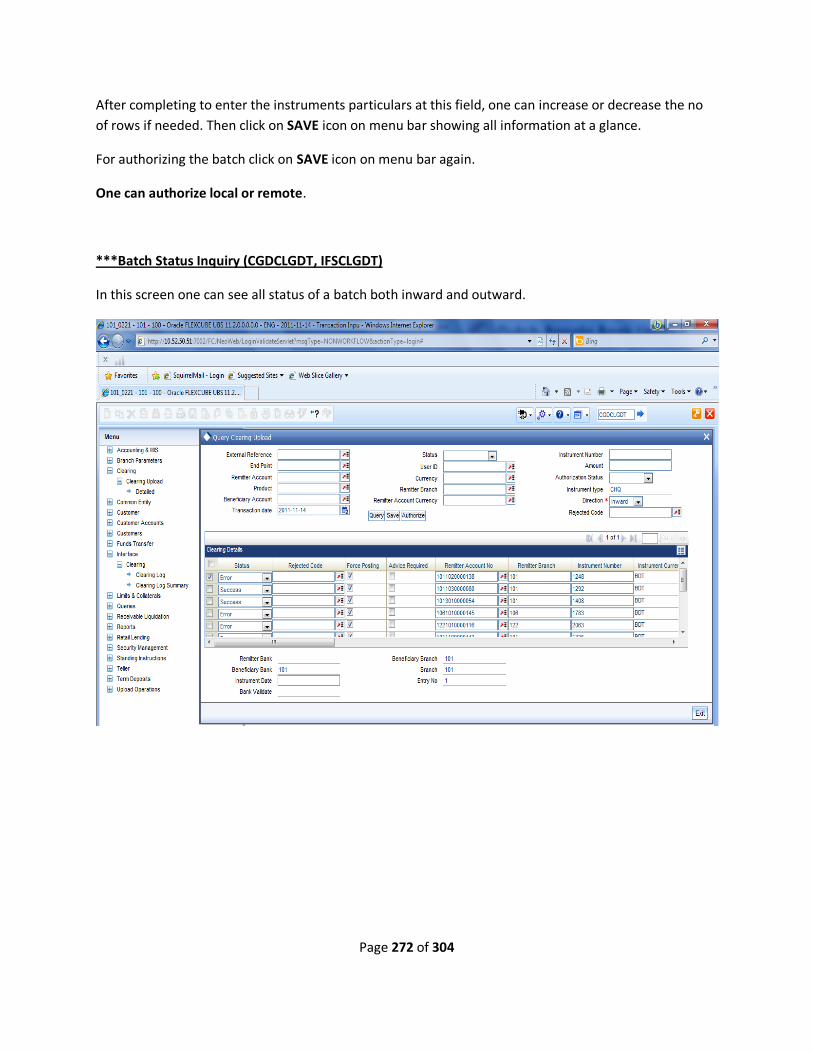
Page 272 of 304
After completing to enter the instruments particulars at this field, one can increase or decrease the no
of rows if needed. Then click on SAVE icon on menu bar showing all information at a glance.
For authorizing the batch click on SAVE icon on menu bar again.
One can authorize local or remote.
***Batch Status Inquiry (CGDCLGDT, IFSCLGDT)
In this screen one can see all status of a batch both inward and outward.
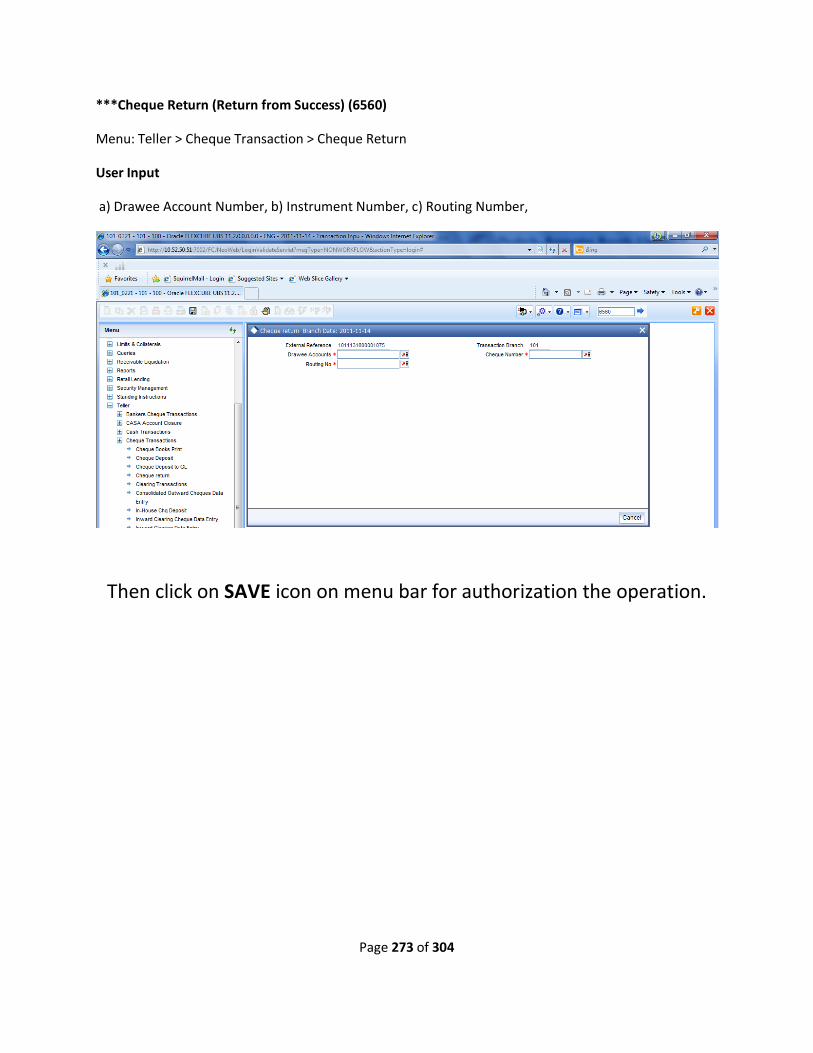
Page 273 of 304
***Cheque Return (Return from Success) (6560)
Menu: Teller > Cheque Transaction > Cheque Return
User Input
a) Drawee Account Number, b) Instrument Number, c) Routing Number,
Then click on SAVE icon on menu bar for authorization the operation.

Page 274 of 304
***Cheque Status change (Success/Error) (IFSCLGDT)
In this screen teller input instrument details and click on search. Double click on the respective row.
After Unlock the screen one can change the status (Success/Error) via authorization.
Go to Contents

Page 275 of 304
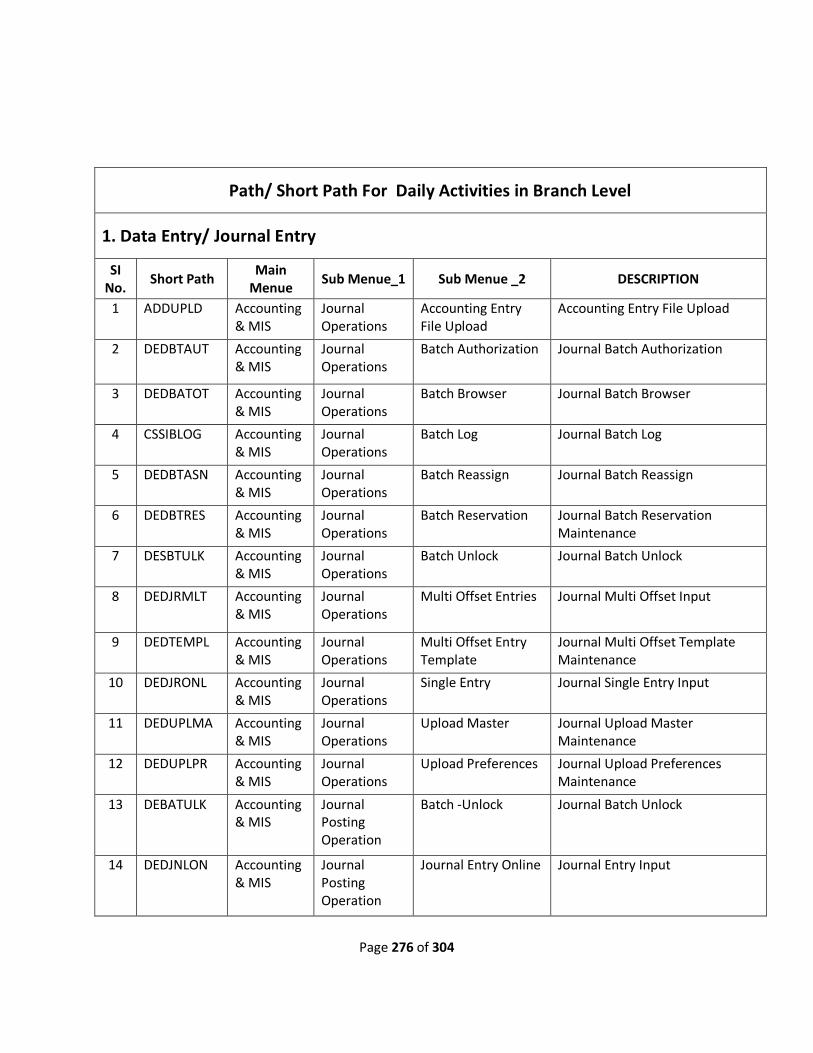
Page 276 of 304
Path/ Short Path For Daily Activities in Branch Level
1. Data Entry/ Journal Entry
SI No.
Short Path Main
Menue Sub Menue_1 Sub Menue _2 DESCRIPTION
1 ADDUPLD Accounting & MIS
Journal Operations
Accounting Entry File Upload
Accounting Entry File Upload
2 DEDBTAUT Accounting & MIS
Journal Operations
Batch Authorization Journal Batch Authorization
3 DEDBATOT Accounting & MIS
Journal Operations
Batch Browser Journal Batch Browser
4 CSSIBLOG Accounting & MIS
Journal Operations
Batch Log Journal Batch Log
5 DEDBTASN Accounting & MIS
Journal Operations
Batch Reassign Journal Batch Reassign
6 DEDBTRES Accounting & MIS
Journal Operations
Batch Reservation Journal Batch Reservation Maintenance
7 DESBTULK Accounting & MIS
Journal Operations
Batch Unlock Journal Batch Unlock
8 DEDJRMLT Accounting & MIS
Journal Operations
Multi Offset Entries Journal Multi Offset Input
9 DEDTEMPL Accounting & MIS
Journal Operations
Multi Offset Entry Template
Journal Multi Offset Template Maintenance
10 DEDJRONL Accounting & MIS
Journal Operations
Single Entry Journal Single Entry Input
11 DEDUPLMA Accounting & MIS
Journal Operations
Upload Master Journal Upload Master Maintenance
12 DEDUPLPR Accounting & MIS
Journal Operations
Upload Preferences Journal Upload Preferences Maintenance
13 DEBATULK Accounting & MIS
Journal Posting Operation
Batch -Unlock Journal Batch Unlock
14 DEDJNLON Accounting & MIS
Journal Posting Operation
Journal Entry Online Journal Entry Input
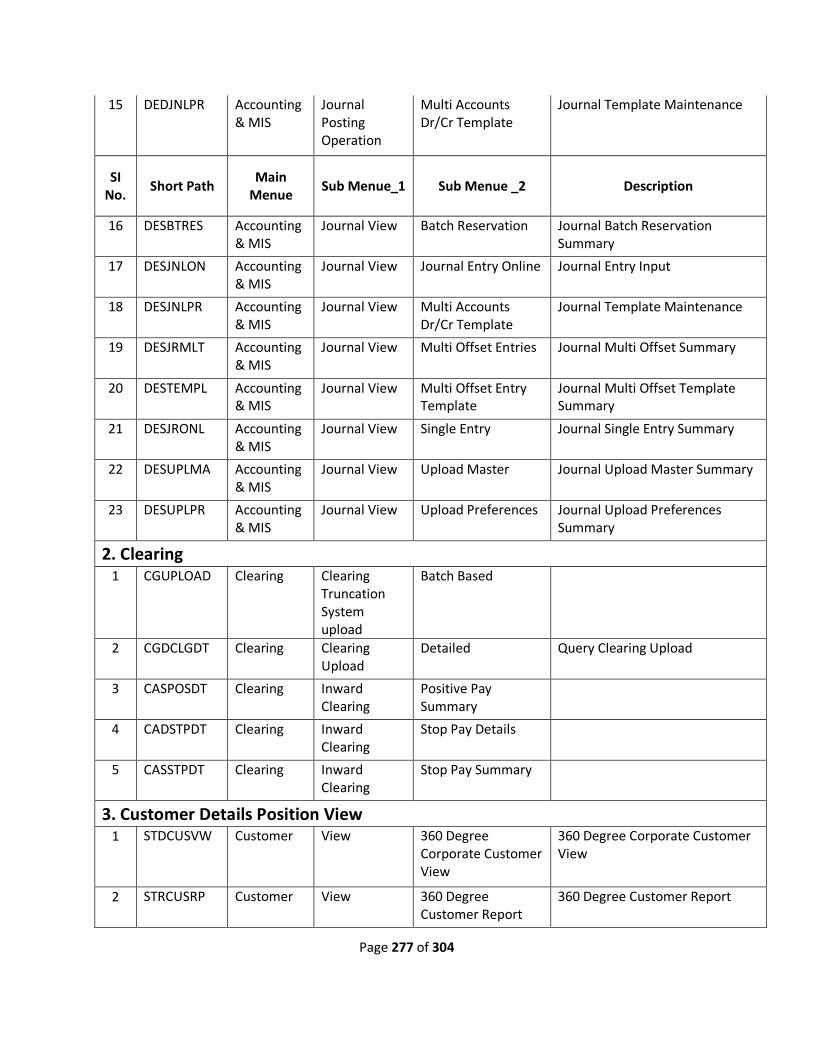
Page 277 of 304
15 DEDJNLPR Accounting & MIS
Journal Posting Operation
Multi Accounts Dr/Cr Template
Journal Template Maintenance
SI No.
Short Path Main
Menue Sub Menue_1 Sub Menue _2 Description
16 DESBTRES Accounting & MIS
Journal View Batch Reservation Journal Batch Reservation Summary
17 DESJNLON Accounting & MIS
Journal View Journal Entry Online Journal Entry Input
18 DESJNLPR Accounting & MIS
Journal View Multi Accounts Dr/Cr Template
Journal Template Maintenance
19 DESJRMLT Accounting & MIS
Journal View Multi Offset Entries Journal Multi Offset Summary
20 DESTEMPL Accounting & MIS
Journal View Multi Offset Entry Template
Journal Multi Offset Template Summary
21 DESJRONL Accounting & MIS
Journal View Single Entry Journal Single Entry Summary
22 DESUPLMA Accounting & MIS
Journal View Upload Master Journal Upload Master Summary
23 DESUPLPR Accounting & MIS
Journal View Upload Preferences Journal Upload Preferences Summary
2. Clearing 1 CGUPLOAD Clearing Clearing
Truncation System upload
Batch Based
2 CGDCLGDT Clearing Clearing Upload
Detailed Query Clearing Upload
3 CASPOSDT Clearing Inward Clearing
Positive Pay Summary
4 CADSTPDT Clearing Inward Clearing
Stop Pay Details
5 CASSTPDT Clearing Inward Clearing
Stop Pay Summary
3. Customer Details Position View 1 STDCUSVW Customer View 360 Degree
Corporate Customer View
360 Degree Corporate Customer View
2 STRCUSRP Customer View 360 Degree Customer Report
360 Degree Customer Report

Page 278 of 304
3 STDRETVW Customer View 360 Degree Retail Customer View
360 Degree Retail Customer View
SI No.
Short Path Main
Menue Sub Menue_1 Sub Menue _2 Description
4
STSCUSVW Customer View 360Degree Customer View
360Degree Customer View Entry Point
4. CASA Account Maintenance 1 MSDCACAD Customer
Accounts Customer Accounts Operations
Account Addresses Account Address Maintenance
2 STDACTFR Customer Accounts
Customer Accounts Operations
Account Class Transfer
Account Class Transfer
3 STDACINS Customer Accounts
Customer Accounts Operations
Account Instructions Account Instruction Maintenance
4 CADAMBLK Customer Accounts
Customer Accounts Operations
Amount Block Input Amount Block Input
5 CADAMBLC Customer Accounts
Customer Accounts Operations
Consolidated Amount Blocks
Consolidated Amount Block Input
6 STDCUSAC Customer Accounts
Customer Accounts Operations
Customer Account Input
Customer Accounts Maintenance
7 STDEXLIN Customer Accounts
Customer Accounts Operations
External Deal Linkages
External Deal Linkage Detail
8 IFDXTACC Customer Accounts
Customer Accounts Operations
Replicated Accounts Replicated Account Maintenance
9 STDSTMNT Customer Accounts
Customer Accounts Operations
Status Change Manual Status Change Input
10 ACDMUNCL Customer Accounts
Customer Accounts Operations
Uncollected Funds Release
Uncollected Funds Release
11 STSACLOC Customer Accounts
Customer Accounts View
Account Address Locations
Account Address Location Summary
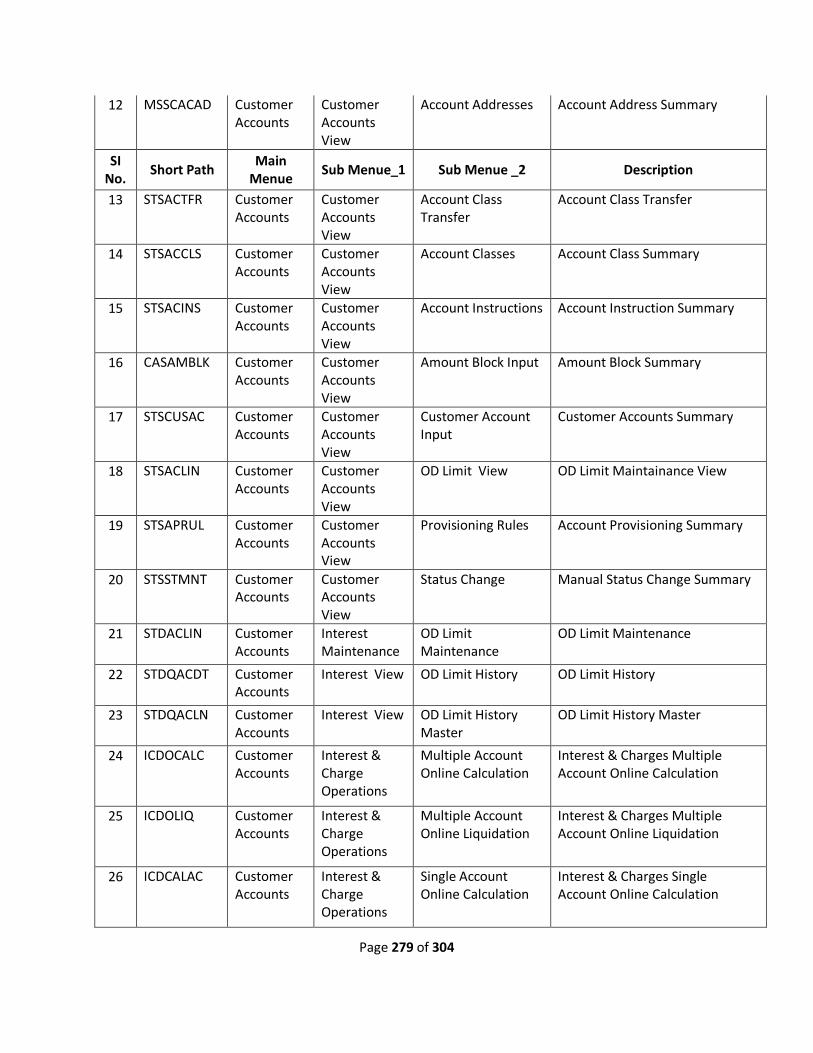
Page 279 of 304
12 MSSCACAD Customer Accounts
Customer Accounts View
Account Addresses Account Address Summary
SI No.
Short Path Main
Menue Sub Menue_1 Sub Menue _2 Description
13 STSACTFR Customer Accounts
Customer Accounts View
Account Class Transfer
Account Class Transfer
14 STSACCLS Customer Accounts
Customer Accounts View
Account Classes Account Class Summary
15 STSACINS Customer Accounts
Customer Accounts View
Account Instructions Account Instruction Summary
16 CASAMBLK Customer Accounts
Customer Accounts View
Amount Block Input Amount Block Summary
17 STSCUSAC Customer Accounts
Customer Accounts View
Customer Account Input
Customer Accounts Summary
18 STSACLIN Customer Accounts
Customer Accounts View
OD Limit View OD Limit Maintainance View
19 STSAPRUL Customer Accounts
Customer Accounts View
Provisioning Rules Account Provisioning Summary
20 STSSTMNT Customer Accounts
Customer Accounts View
Status Change Manual Status Change Summary
21 STDACLIN Customer Accounts
Interest Maintenance
OD Limit Maintenance
OD Limit Maintenance
22 STDQACDT Customer Accounts
Interest View OD Limit History OD Limit History
23 STDQACLN Customer Accounts
Interest View OD Limit History Master
OD Limit History Master
24 ICDOCALC Customer Accounts
Interest & Charge Operations
Multiple Account Online Calculation
Interest & Charges Multiple Account Online Calculation
25 ICDOLIQ Customer Accounts
Interest & Charge Operations
Multiple Account Online Liquidation
Interest & Charges Multiple Account Online Liquidation
26 ICDCALAC Customer Accounts
Interest & Charge Operations
Single Account Online Calculation
Interest & Charges Single Account Online Calculation

Page 280 of 304
27 ICDLIQAC Customer Accounts
Interest & Charge Operations
Single Account Online Liquidation
Interest & Charges Single Account Online Liquidation
SI No.
Short Path Main
Menue Sub Menue_1 Sub Menue _2 Description
28 ICSOLIQ Customer Accounts
Interest & Charges View
Online Liquidation-Multiple Accounts
Online Liquidation - Multiple Accounts Summary
29 ICSLIQAC Customer Accounts
Interest & Charges View
Online Liquidation-Single Accounts
Online Liquidation - Single Accounts Summary
30 MSDCUSAD Customers Operations Customer Addresses Customer Address Maintenance
5. CIF Operation 1 STDCIF Customers Operations Customer Input Customer Maintenance
2 STDCUREL Customers Operations Customer Linkages Customer Linkage Maintenance
3 STDCIFNM Customers Operations Customer Names Customer Name Maintenance
4 STDCIFX Customers Operations Customer Photo Upload
Customer Photo Upload
5 STDCUSSH Customers Operations Customer Search Detail
Customer Party Summary
6 SVDCIFOL Customers Operations Customer Signature Offline Verification
Signature Verifications
7 SVDCIFSG Customers Operations Customer Signature Upload
Signature Upload
8 STDCULMT Customers Operations Customer Tax Allowance
Customer Tax Allowance Maintenance
9 CSDINSTR Customers Operations Instructions Instructions Maintenance
10 UPDAUINS Customers Operations Utility Bill Instructions
Utility Bill Instruction Capture
11 STDCUSBL Customers View Customer Account balance
Customer Account Balance
12 MSSCUSAD Customers View Customer Addresses Customer Address Summary
13 STSCSCAT Customers View Customer Categories
Customer Categories Summary
14 STSCCMNT Customers View Customer Classifications
Customer Classification Summary
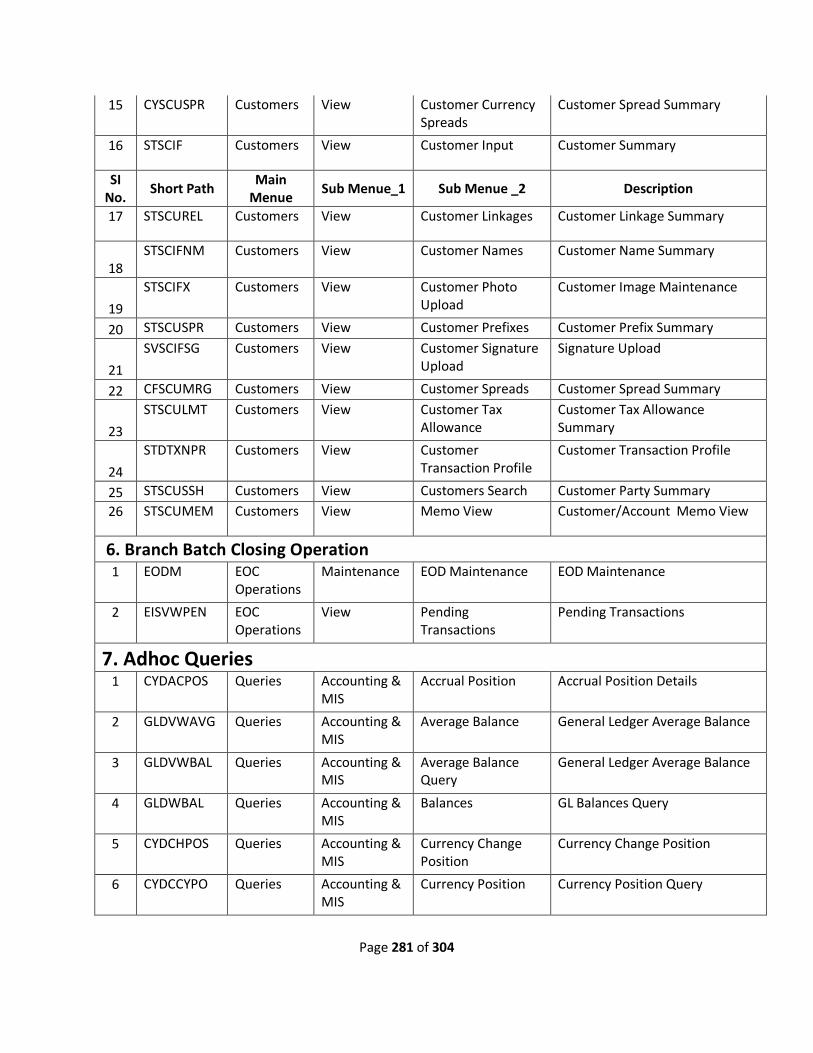
Page 281 of 304
15 CYSCUSPR Customers View Customer Currency Spreads
Customer Spread Summary
16 STSCIF Customers View Customer Input Customer Summary
SI No.
Short Path Main
Menue Sub Menue_1 Sub Menue _2 Description
17 STSCUREL Customers View Customer Linkages Customer Linkage Summary
18 STSCIFNM Customers View Customer Names Customer Name Summary
19
STSCIFX Customers View Customer Photo Upload
Customer Image Maintenance
20 STSCUSPR Customers View Customer Prefixes Customer Prefix Summary
21
SVSCIFSG Customers View Customer Signature Upload
Signature Upload
22 CFSCUMRG Customers View Customer Spreads Customer Spread Summary
23
STSCULMT Customers View Customer Tax Allowance
Customer Tax Allowance Summary
24
STDTXNPR Customers View Customer Transaction Profile
Customer Transaction Profile
25 STSCUSSH Customers View Customers Search Customer Party Summary
26 STSCUMEM Customers View Memo View Customer/Account Memo View
6. Branch Batch Closing Operation 1 EODM EOC
Operations Maintenance EOD Maintenance EOD Maintenance
2 EISVWPEN EOC Operations
View Pending Transactions
Pending Transactions
7. Adhoc Queries 1 CYDACPOS Queries Accounting &
MIS Accrual Position Accrual Position Details
2 GLDVWAVG Queries Accounting & MIS
Average Balance General Ledger Average Balance
3 GLDVWBAL Queries Accounting & MIS
Average Balance Query
General Ledger Average Balance
4 GLDWBAL Queries Accounting & MIS
Balances GL Balances Query
5 CYDCHPOS Queries Accounting & MIS
Currency Change Position
Currency Change Position
6 CYDCCYPO Queries Accounting & MIS
Currency Position Currency Position Query
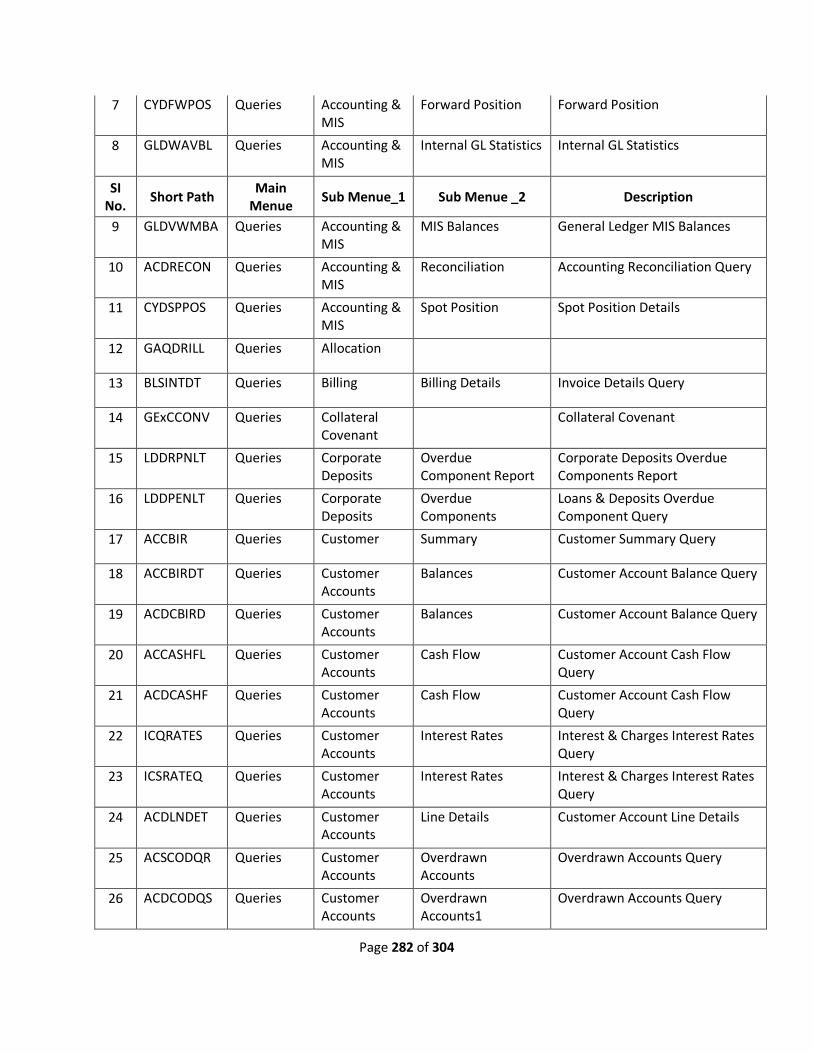
Page 282 of 304
7 CYDFWPOS Queries Accounting & MIS
Forward Position Forward Position
8 GLDWAVBL Queries Accounting & MIS
Internal GL Statistics Internal GL Statistics
SI No.
Short Path Main
Menue Sub Menue_1 Sub Menue _2 Description
9 GLDVWMBA Queries Accounting & MIS
MIS Balances General Ledger MIS Balances
10 ACDRECON Queries Accounting & MIS
Reconciliation Accounting Reconciliation Query
11 CYDSPPOS Queries Accounting & MIS
Spot Position Spot Position Details
12 GAQDRILL Queries Allocation
13 BLSINTDT Queries Billing Billing Details Invoice Details Query
14 GExCCONV Queries Collateral Covenant
Collateral Covenant
15 LDDRPNLT Queries Corporate Deposits
Overdue Component Report
Corporate Deposits Overdue Components Report
16 LDDPENLT Queries Corporate Deposits
Overdue Components
Loans & Deposits Overdue Component Query
17 ACCBIR Queries Customer Summary Customer Summary Query
18 ACCBIRDT Queries Customer Accounts
Balances Customer Account Balance Query
19 ACDCBIRD Queries Customer Accounts
Balances Customer Account Balance Query
20 ACCASHFL Queries Customer Accounts
Cash Flow Customer Account Cash Flow Query
21 ACDCASHF Queries Customer Accounts
Cash Flow Customer Account Cash Flow Query
22 ICQRATES Queries Customer Accounts
Interest Rates Interest & Charges Interest Rates Query
23 ICSRATEQ Queries Customer Accounts
Interest Rates Interest & Charges Interest Rates Query
24 ACDLNDET Queries Customer Accounts
Line Details Customer Account Line Details
25 ACSCODQR Queries Customer Accounts
Overdrawn Accounts
Overdrawn Accounts Query
26 ACDCODQS Queries Customer Accounts
Overdrawn Accounts1
Overdrawn Accounts Query
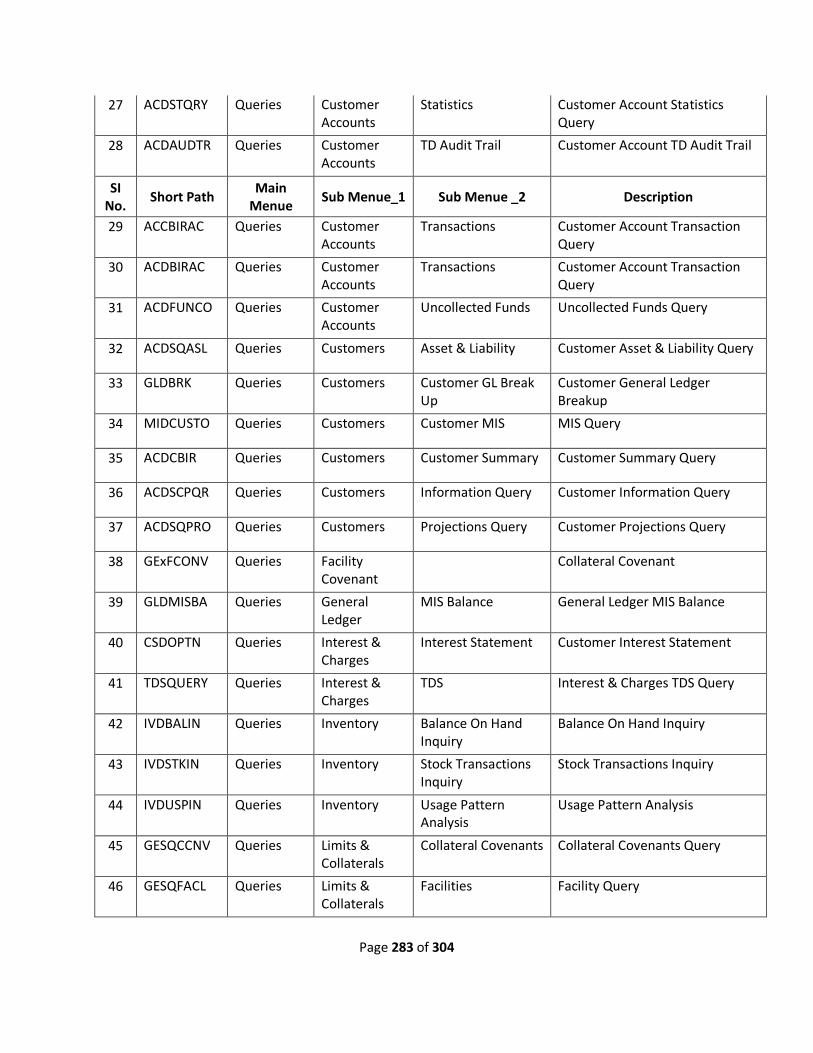
Page 283 of 304
27 ACDSTQRY Queries Customer Accounts
Statistics Customer Account Statistics Query
28 ACDAUDTR Queries Customer Accounts
TD Audit Trail Customer Account TD Audit Trail
SI No.
Short Path Main
Menue Sub Menue_1 Sub Menue _2 Description
29 ACCBIRAC Queries Customer Accounts
Transactions Customer Account Transaction Query
30 ACDBIRAC Queries Customer Accounts
Transactions Customer Account Transaction Query
31 ACDFUNCO Queries Customer Accounts
Uncollected Funds Uncollected Funds Query
32 ACDSQASL Queries Customers Asset & Liability Customer Asset & Liability Query
33 GLDBRK Queries Customers Customer GL Break Up
Customer General Ledger Breakup
34 MIDCUSTO Queries Customers Customer MIS MIS Query
35 ACDCBIR Queries Customers Customer Summary Customer Summary Query
36 ACDSCPQR Queries Customers Information Query Customer Information Query
37 ACDSQPRO Queries Customers Projections Query Customer Projections Query
38 GExFCONV Queries Facility Covenant
Collateral Covenant
39 GLDMISBA Queries General Ledger
MIS Balance General Ledger MIS Balance
40 CSDOPTN Queries Interest & Charges
Interest Statement Customer Interest Statement
41 TDSQUERY Queries Interest & Charges
TDS Interest & Charges TDS Query
42 IVDBALIN Queries Inventory Balance On Hand Inquiry
Balance On Hand Inquiry
43 IVDSTKIN Queries Inventory Stock Transactions Inquiry
Stock Transactions Inquiry
44 IVDUSPIN Queries Inventory Usage Pattern Analysis
Usage Pattern Analysis
45 GESQCCNV Queries Limits & Collaterals
Collateral Covenants Collateral Covenants Query
46 GESQFACL Queries Limits & Collaterals
Facilities Facility Query
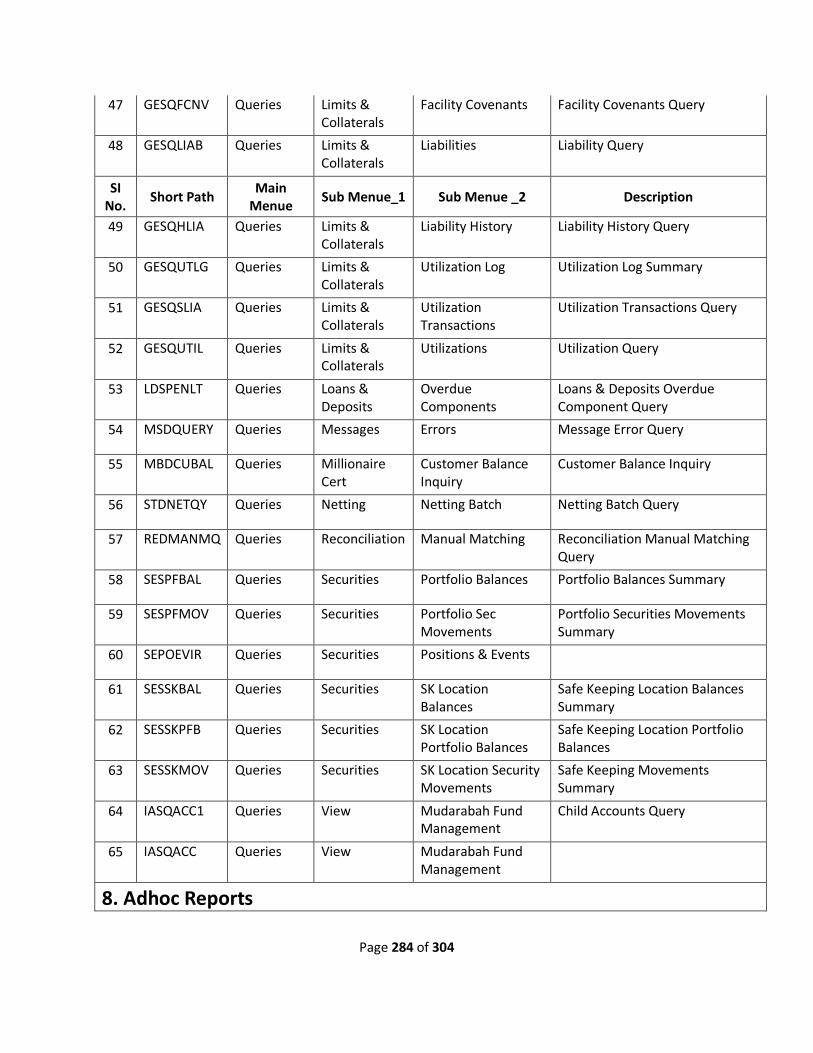
Page 284 of 304
47 GESQFCNV Queries Limits & Collaterals
Facility Covenants Facility Covenants Query
48 GESQLIAB Queries Limits & Collaterals
Liabilities Liability Query
SI No.
Short Path Main
Menue Sub Menue_1 Sub Menue _2 Description
49 GESQHLIA Queries Limits & Collaterals
Liability History Liability History Query
50 GESQUTLG Queries Limits & Collaterals
Utilization Log Utilization Log Summary
51 GESQSLIA Queries Limits & Collaterals
Utilization Transactions
Utilization Transactions Query
52 GESQUTIL Queries Limits & Collaterals
Utilizations Utilization Query
53 LDSPENLT Queries Loans & Deposits
Overdue Components
Loans & Deposits Overdue Component Query
54 MSDQUERY Queries Messages Errors Message Error Query
55 MBDCUBAL Queries Millionaire Cert
Customer Balance Inquiry
Customer Balance Inquiry
56 STDNETQY Queries Netting Netting Batch Netting Batch Query
57 REDMANMQ Queries Reconciliation Manual Matching Reconciliation Manual Matching Query
58 SESPFBAL Queries Securities Portfolio Balances Portfolio Balances Summary
59 SESPFMOV Queries Securities Portfolio Sec Movements
Portfolio Securities Movements Summary
60 SEPOEVIR Queries Securities Positions & Events
61 SESSKBAL Queries Securities SK Location Balances
Safe Keeping Location Balances Summary
62 SESSKPFB Queries Securities SK Location Portfolio Balances
Safe Keeping Location Portfolio Balances
63 SESSKMOV Queries Securities SK Location Security Movements
Safe Keeping Movements Summary
64 IASQACC1 Queries View Mudarabah Fund Management
Child Accounts Query
65 IASQACC Queries View Mudarabah Fund Management
8. Adhoc Reports
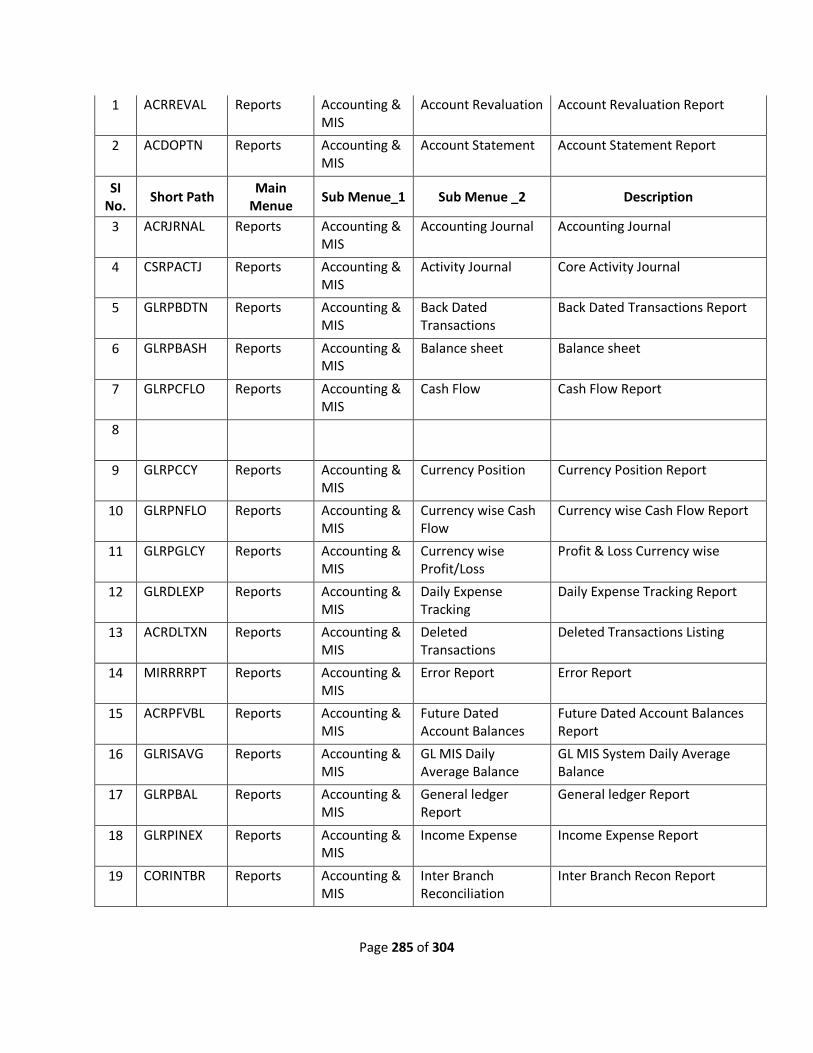
Page 285 of 304
1 ACRREVAL Reports Accounting & MIS
Account Revaluation Account Revaluation Report
2 ACDOPTN Reports Accounting & MIS
Account Statement Account Statement Report
SI No.
Short Path Main
Menue Sub Menue_1 Sub Menue _2 Description
3 ACRJRNAL Reports Accounting & MIS
Accounting Journal Accounting Journal
4 CSRPACTJ Reports Accounting & MIS
Activity Journal Core Activity Journal
5 GLRPBDTN Reports Accounting & MIS
Back Dated Transactions
Back Dated Transactions Report
6 GLRPBASH Reports Accounting & MIS
Balance sheet Balance sheet
7 GLRPCFLO Reports Accounting & MIS
Cash Flow Cash Flow Report
8
9 GLRPCCY Reports Accounting & MIS
Currency Position Currency Position Report
10 GLRPNFLO Reports Accounting & MIS
Currency wise Cash Flow
Currency wise Cash Flow Report
11 GLRPGLCY Reports Accounting & MIS
Currency wise Profit/Loss
Profit & Loss Currency wise
12 GLRDLEXP Reports Accounting & MIS
Daily Expense Tracking
Daily Expense Tracking Report
13 ACRDLTXN Reports Accounting & MIS
Deleted Transactions
Deleted Transactions Listing
14 MIRRRRPT Reports Accounting & MIS
Error Report Error Report
15 ACRPFVBL Reports Accounting & MIS
Future Dated Account Balances
Future Dated Account Balances Report
16 GLRISAVG Reports Accounting & MIS
GL MIS Daily Average Balance
GL MIS System Daily Average Balance
17 GLRPBAL Reports Accounting & MIS
General ledger Report
General ledger Report
18 GLRPINEX Reports Accounting & MIS
Income Expense Income Expense Report
19 CORINTBR Reports Accounting & MIS
Inter Branch Reconciliation
Inter Branch Recon Report
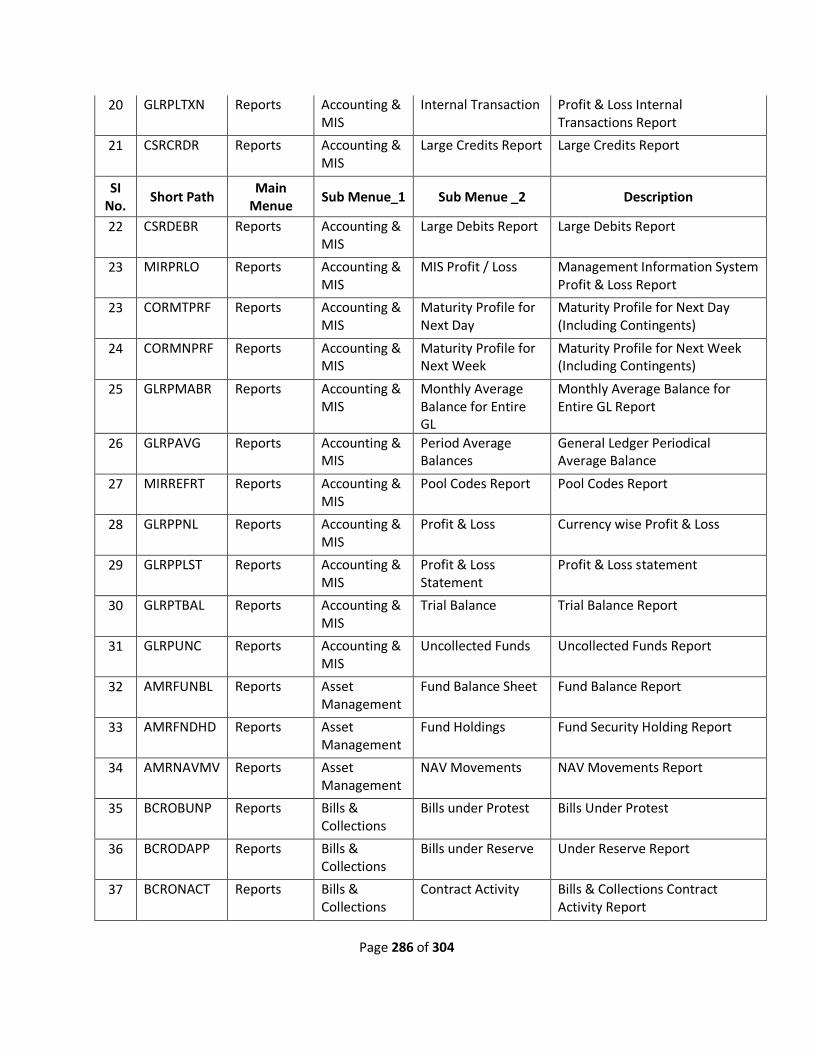
Page 286 of 304
20 GLRPLTXN Reports Accounting & MIS
Internal Transaction Profit & Loss Internal Transactions Report
21 CSRCRDR Reports Accounting & MIS
Large Credits Report Large Credits Report
SI No.
Short Path Main
Menue Sub Menue_1 Sub Menue _2 Description
22 CSRDEBR Reports Accounting & MIS
Large Debits Report Large Debits Report
23 MIRPRLO Reports Accounting & MIS
MIS Profit / Loss Management Information System Profit & Loss Report
23 CORMTPRF Reports Accounting & MIS
Maturity Profile for Next Day
Maturity Profile for Next Day (Including Contingents)
24 CORMNPRF Reports Accounting & MIS
Maturity Profile for Next Week
Maturity Profile for Next Week (Including Contingents)
25 GLRPMABR Reports Accounting & MIS
Monthly Average Balance for Entire GL
Monthly Average Balance for Entire GL Report
26 GLRPAVG Reports Accounting & MIS
Period Average Balances
General Ledger Periodical Average Balance
27 MIRREFRT Reports Accounting & MIS
Pool Codes Report Pool Codes Report
28 GLRPPNL Reports Accounting & MIS
Profit & Loss Currency wise Profit & Loss
29 GLRPPLST Reports Accounting & MIS
Profit & Loss Statement
Profit & Loss statement
30 GLRPTBAL Reports Accounting & MIS
Trial Balance Trial Balance Report
31 GLRPUNC Reports Accounting & MIS
Uncollected Funds Uncollected Funds Report
32 AMRFUNBL Reports Asset Management
Fund Balance Sheet Fund Balance Report
33 AMRFNDHD Reports Asset Management
Fund Holdings Fund Security Holding Report
34 AMRNAVMV Reports Asset Management
NAV Movements NAV Movements Report
35 BCROBUNP Reports Bills & Collections
Bills under Protest Bills Under Protest
36 BCRODAPP Reports Bills & Collections
Bills under Reserve Under Reserve Report
37 BCRONACT Reports Bills & Collections
Contract Activity Bills & Collections Contract Activity Report
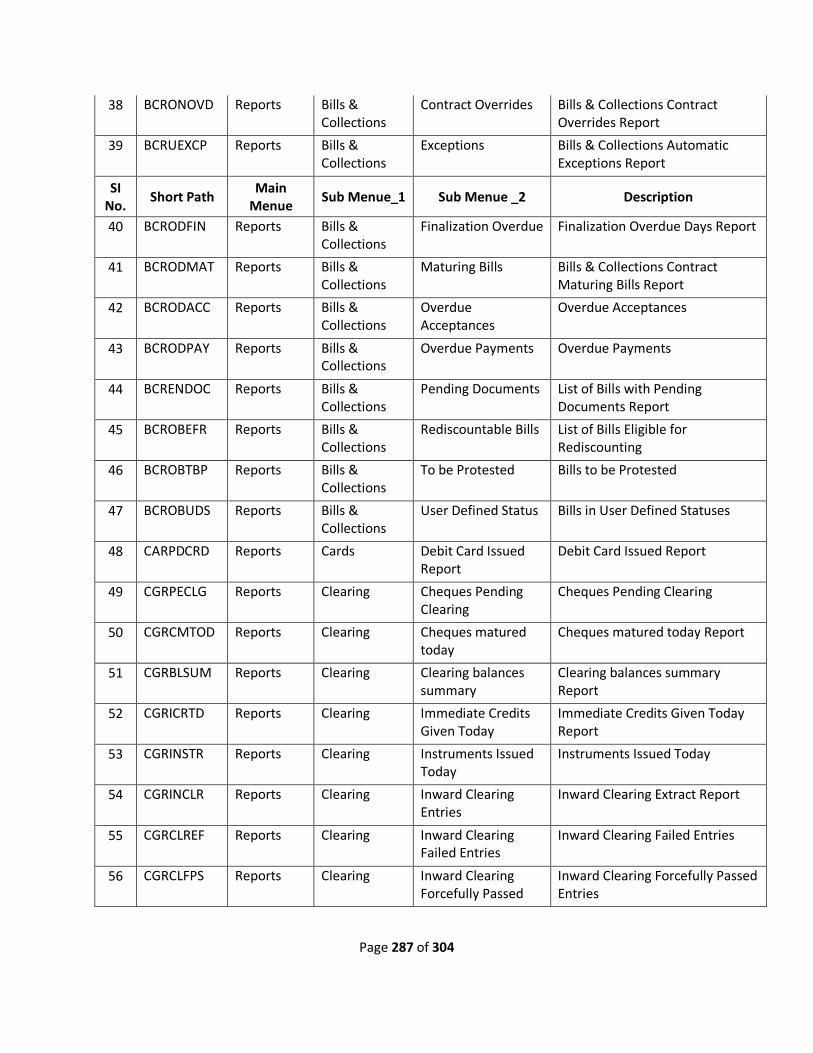
Page 287 of 304
38 BCRONOVD Reports Bills & Collections
Contract Overrides Bills & Collections Contract Overrides Report
39 BCRUEXCP Reports Bills & Collections
Exceptions Bills & Collections Automatic Exceptions Report
SI No.
Short Path Main
Menue Sub Menue_1 Sub Menue _2 Description
40 BCRODFIN Reports Bills & Collections
Finalization Overdue Finalization Overdue Days Report
41 BCRODMAT Reports Bills & Collections
Maturing Bills Bills & Collections Contract Maturing Bills Report
42 BCRODACC Reports Bills & Collections
Overdue Acceptances
Overdue Acceptances
43 BCRODPAY Reports Bills & Collections
Overdue Payments Overdue Payments
44 BCRENDOC Reports Bills & Collections
Pending Documents List of Bills with Pending Documents Report
45 BCROBEFR Reports Bills & Collections
Rediscountable Bills List of Bills Eligible for Rediscounting
46 BCROBTBP Reports Bills & Collections
To be Protested Bills to be Protested
47 BCROBUDS Reports Bills & Collections
User Defined Status Bills in User Defined Statuses
48 CARPDCRD Reports Cards Debit Card Issued Report
Debit Card Issued Report
49 CGRPECLG Reports Clearing Cheques Pending Clearing
Cheques Pending Clearing
50 CGRCMTOD Reports Clearing Cheques matured today
Cheques matured today Report
51 CGRBLSUM Reports Clearing Clearing balances summary
Clearing balances summary Report
52 CGRICRTD Reports Clearing Immediate Credits Given Today
Immediate Credits Given Today Report
53 CGRINSTR Reports Clearing Instruments Issued Today
Instruments Issued Today
54 CGRINCLR Reports Clearing Inward Clearing Entries
Inward Clearing Extract Report
55 CGRCLREF Reports Clearing Inward Clearing Failed Entries
Inward Clearing Failed Entries
56 CGRCLFPS Reports Clearing Inward Clearing Forcefully Passed
Inward Clearing Forcefully Passed Entries
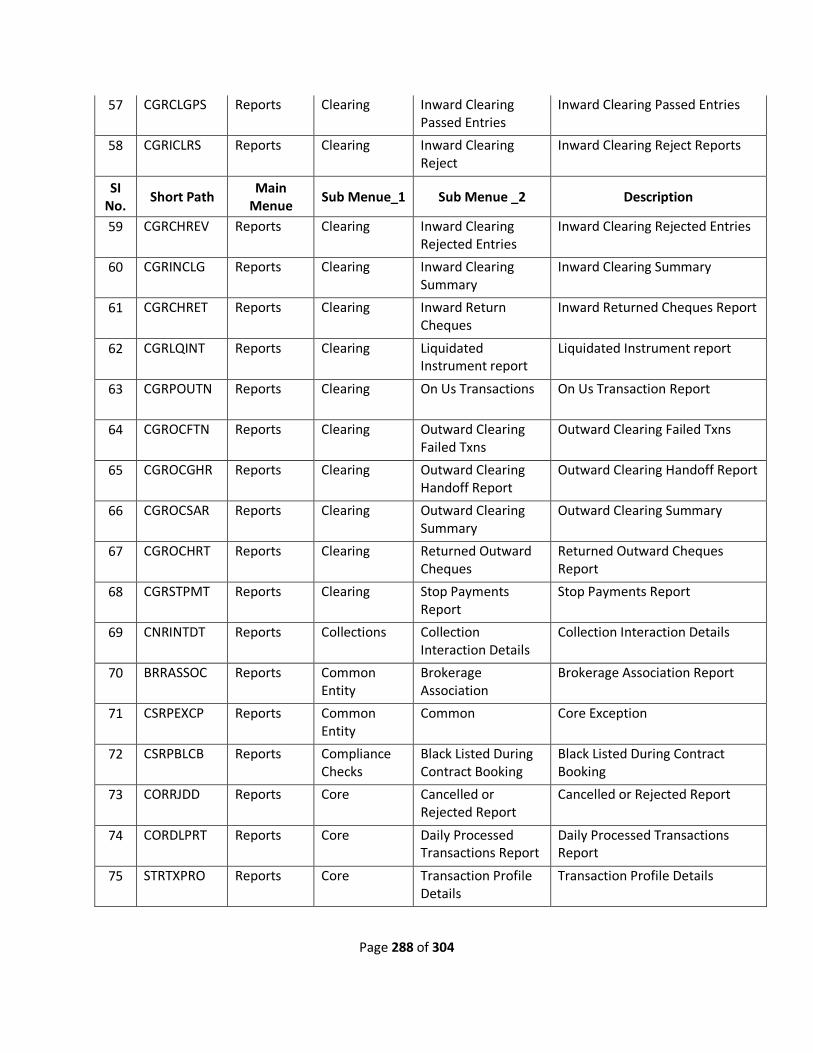
Page 288 of 304
57 CGRCLGPS Reports Clearing Inward Clearing Passed Entries
Inward Clearing Passed Entries
58 CGRICLRS Reports Clearing Inward Clearing Reject
Inward Clearing Reject Reports
SI No.
Short Path Main
Menue Sub Menue_1 Sub Menue _2 Description
59 CGRCHREV Reports Clearing Inward Clearing Rejected Entries
Inward Clearing Rejected Entries
60 CGRINCLG Reports Clearing Inward Clearing Summary
Inward Clearing Summary
61 CGRCHRET Reports Clearing Inward Return Cheques
Inward Returned Cheques Report
62 CGRLQINT Reports Clearing Liquidated Instrument report
Liquidated Instrument report
63 CGRPOUTN Reports Clearing On Us Transactions On Us Transaction Report
64 CGROCFTN Reports Clearing Outward Clearing Failed Txns
Outward Clearing Failed Txns
65 CGROCGHR Reports Clearing Outward Clearing Handoff Report
Outward Clearing Handoff Report
66 CGROCSAR Reports Clearing Outward Clearing Summary
Outward Clearing Summary
67 CGROCHRT Reports Clearing Returned Outward Cheques
Returned Outward Cheques Report
68 CGRSTPMT Reports Clearing Stop Payments Report
Stop Payments Report
69 CNRINTDT Reports Collections Collection Interaction Details
Collection Interaction Details
70 BRRASSOC Reports Common Entity
Brokerage Association
Brokerage Association Report
71 CSRPEXCP Reports Common Entity
Common Core Exception
72 CSRPBLCB Reports Compliance Checks
Black Listed During Contract Booking
Black Listed During Contract Booking
73 CORRJDD Reports Core Cancelled or Rejected Report
Cancelled or Rejected Report
74 CORDLPRT Reports Core Daily Processed Transactions Report
Daily Processed Transactions Report
75 STRTXPRO Reports Core Transaction Profile Details
Transaction Profile Details
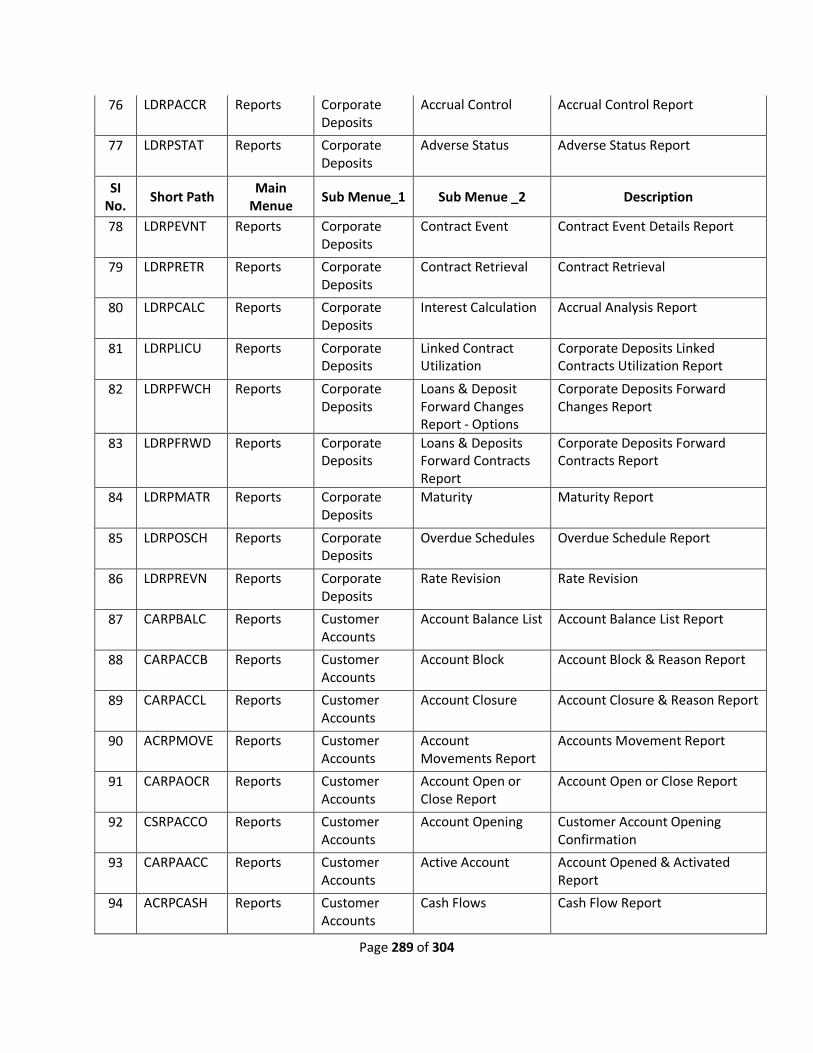
Page 289 of 304
76 LDRPACCR Reports Corporate Deposits
Accrual Control Accrual Control Report
77 LDRPSTAT Reports Corporate Deposits
Adverse Status Adverse Status Report
SI No.
Short Path Main
Menue Sub Menue_1 Sub Menue _2 Description
78 LDRPEVNT Reports Corporate Deposits
Contract Event Contract Event Details Report
79 LDRPRETR Reports Corporate Deposits
Contract Retrieval Contract Retrieval
80 LDRPCALC Reports Corporate Deposits
Interest Calculation Accrual Analysis Report
81 LDRPLICU Reports Corporate Deposits
Linked Contract Utilization
Corporate Deposits Linked Contracts Utilization Report
82 LDRPFWCH Reports Corporate Deposits
Loans & Deposit Forward Changes Report - Options
Corporate Deposits Forward Changes Report
83 LDRPFRWD Reports Corporate Deposits
Loans & Deposits Forward Contracts Report
Corporate Deposits Forward Contracts Report
84 LDRPMATR Reports Corporate Deposits
Maturity Maturity Report
85 LDRPOSCH Reports Corporate Deposits
Overdue Schedules Overdue Schedule Report
86 LDRPREVN Reports Corporate Deposits
Rate Revision Rate Revision
87 CARPBALC Reports Customer Accounts
Account Balance List Account Balance List Report
88 CARPACCB Reports Customer Accounts
Account Block Account Block & Reason Report
89 CARPACCL Reports Customer Accounts
Account Closure Account Closure & Reason Report
90 ACRPMOVE Reports Customer Accounts
Account Movements Report
Accounts Movement Report
91 CARPAOCR Reports Customer Accounts
Account Open or Close Report
Account Open or Close Report
92 CSRPACCO Reports Customer Accounts
Account Opening Customer Account Opening Confirmation
93 CARPAACC Reports Customer Accounts
Active Account Account Opened & Activated Report
94 ACRPCASH Reports Customer Accounts
Cash Flows Cash Flow Report
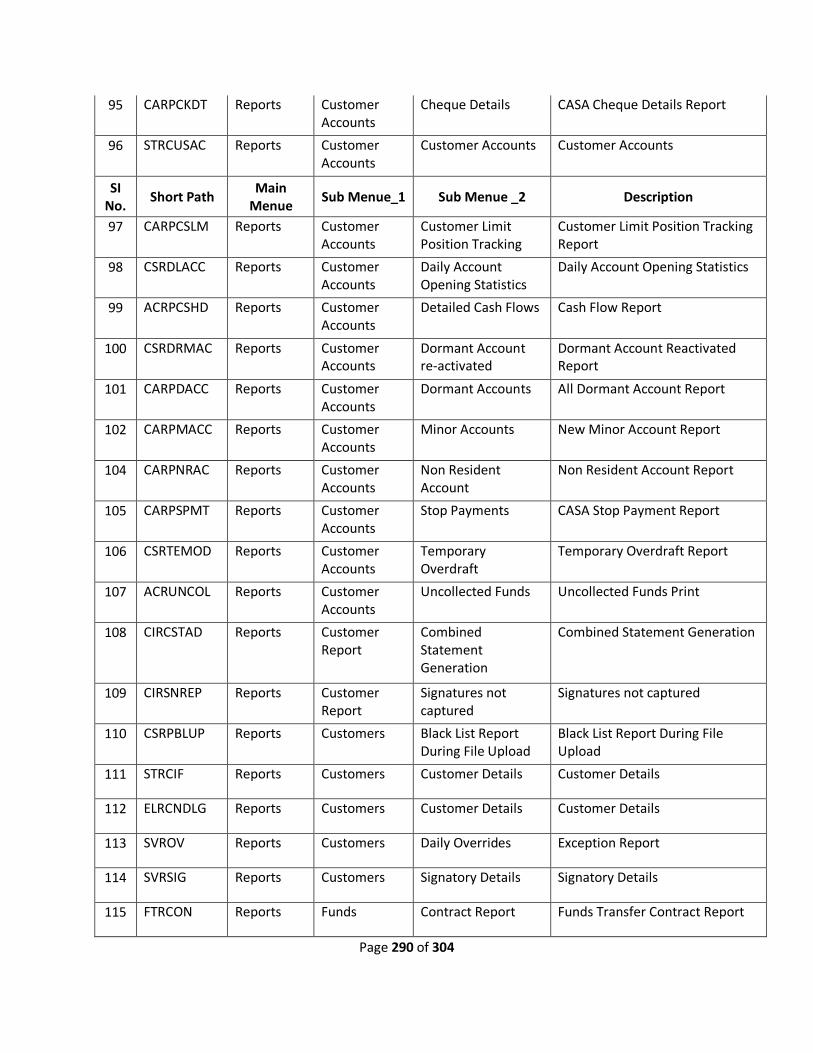
Page 290 of 304
95 CARPCKDT Reports Customer Accounts
Cheque Details CASA Cheque Details Report
96 STRCUSAC Reports Customer Accounts
Customer Accounts Customer Accounts
SI No.
Short Path Main
Menue Sub Menue_1 Sub Menue _2 Description
97 CARPCSLM Reports Customer Accounts
Customer Limit Position Tracking
Customer Limit Position Tracking Report
98 CSRDLACC Reports Customer Accounts
Daily Account Opening Statistics
Daily Account Opening Statistics
99 ACRPCSHD Reports Customer Accounts
Detailed Cash Flows
Cash Flow Report
100 CSRDRMAC Reports Customer Accounts
Dormant Account re-activated
Dormant Account Reactivated Report
101 CARPDACC Reports Customer Accounts
Dormant Accounts All Dormant Account Report
102 CARPMACC Reports Customer Accounts
Minor Accounts New Minor Account Report
104 CARPNRAC Reports Customer Accounts
Non Resident Account
Non Resident Account Report
105 CARPSPMT Reports Customer Accounts
Stop Payments CASA Stop Payment Report
106 CSRTEMOD Reports Customer Accounts
Temporary Overdraft
Temporary Overdraft Report
107 ACRUNCOL Reports Customer Accounts
Uncollected Funds Uncollected Funds Print
108 CIRCSTAD Reports Customer Report
Combined Statement Generation
Combined Statement Generation
109 CIRSNREP Reports Customer Report
Signatures not captured
Signatures not captured
110 CSRPBLUP Reports Customers Black List Report During File Upload
Black List Report During File Upload
111 STRCIF Reports Customers Customer Details Customer Details
112 ELRCNDLG Reports Customers Customer Details Customer Details
113 SVROV Reports Customers Daily Overrides Exception Report
114 SVRSIG Reports Customers Signatory Details Signatory Details
115 FTRCON Reports Funds Contract Report Funds Transfer Contract Report

Page 291 of 304
Transfer
116 CSRPDDRP Reports Funds Transfer
DD Issued DD Issued Report
117 FTRACTD Reports Funds Transfer
Detailed Activity Journal
Funds Transfer Daily Activity Report
SI No.
Short Path Main
Menue Sub Menue_1 Sub Menue _2 Description
118 FTRPREMR Reports Funds Transfer
Non Resident Account
Remittance Received Report
119 ICRACCR Reports Interest & Charges
Accrual Control List Accrual Control List
120 ICRIP Reports Interest & Charges
Interest Calculation Interest Calculation Details
121 ICRISFM Reports Interest & Charges
Interest Statement Interest Statement Maintenance Report
122 RTRPBJRN Reports Retail Teller Batch Journal Report
Batch Journal Report
123 RTRPCCY Reports Retail Teller Cash Position Branch Wise
Cash Position Branch Wise
124 CSRPCHB Reports Retail Teller Cheque Book Issued Cheque Book Issued Report
125 RTRPCHQD Reports Retail Teller Cheque Issued on Daily Basis
Cheque Issued on Daily Basis Report
126 TPROSREP Reports Retail Teller Overage Shortage report
Overage shortage report
127 CSRPPDC Reports Retail Teller PDC Input PDC Input Report
128 RTRPPCHQ Reports Retail Teller Paid Out Cheque Paid Out Cheque Report
129 RTRPFCYC Reports Retail Teller Processed FCY Collection
Processed FCY Collection Transaction Report
130 RTRPSTAL Reports Retail Teller Stale Cheque Stale Cheque Report
131 RTRPSMNG Reports Retail Teller Stationary Management
Stationary Management Report
132 RTRPTRN Reports Retail Teller Teller Transaction Branch Wise
Teller Transaction Branch Wise
133 SVRBACCL Reports Savings Blocked Accounts report
Blocked Accounts report
134 SVRCABLI Reports Savings CASA Balance Listing CASA Balance Listing report
135 SVRIBACC Reports Savings Savings Insignificant Balance Accounts
Savings Insignificant Balance Accounts
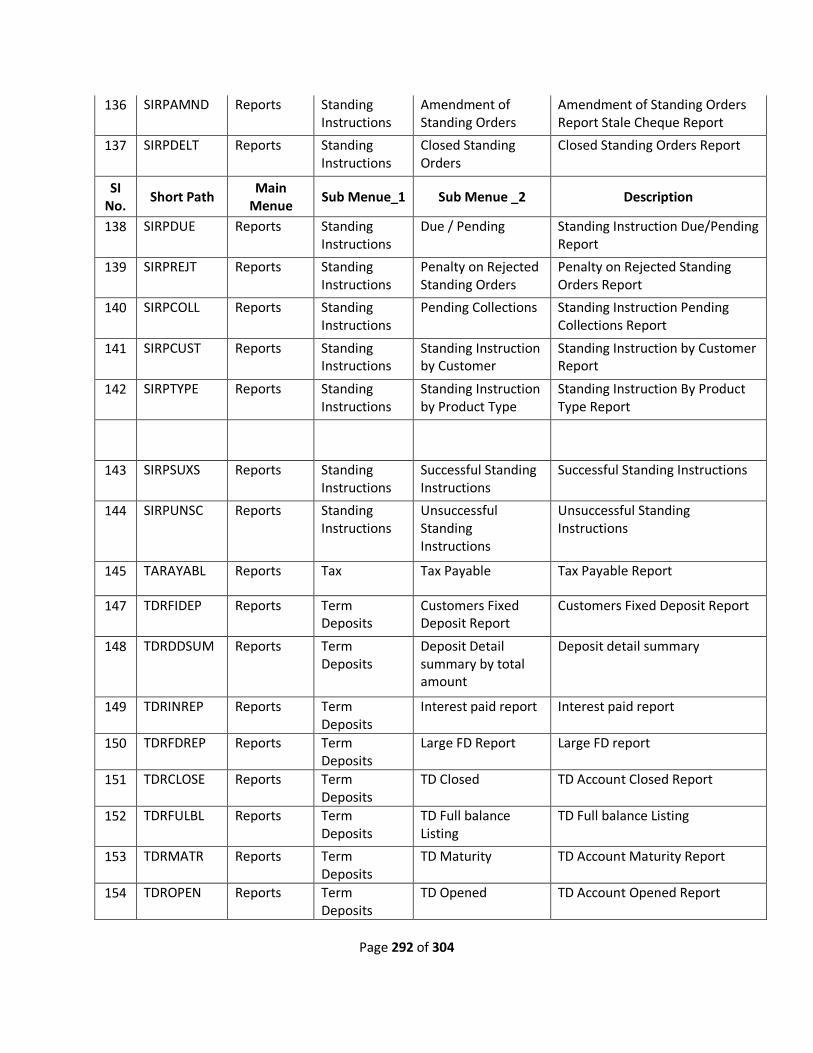
Page 292 of 304
136 SIRPAMND Reports Standing Instructions
Amendment of Standing Orders
Amendment of Standing Orders Report Stale Cheque Report
137 SIRPDELT Reports Standing Instructions
Closed Standing Orders
Closed Standing Orders Report
SI No.
Short Path Main
Menue Sub Menue_1 Sub Menue _2 Description
138 SIRPDUE Reports Standing Instructions
Due / Pending Standing Instruction Due/Pending Report
139 SIRPREJT Reports Standing Instructions
Penalty on Rejected Standing Orders
Penalty on Rejected Standing Orders Report
140 SIRPCOLL Reports Standing Instructions
Pending Collections Standing Instruction Pending Collections Report
141 SIRPCUST Reports Standing Instructions
Standing Instruction by Customer
Standing Instruction by Customer Report
142 SIRPTYPE Reports Standing Instructions
Standing Instruction by Product Type
Standing Instruction By Product Type Report
143 SIRPSUXS Reports Standing Instructions
Successful Standing Instructions
Successful Standing Instructions
144 SIRPUNSC Reports Standing Instructions
Unsuccessful Standing Instructions
Unsuccessful Standing Instructions
145 TARAYABL Reports Tax Tax Payable Tax Payable Report
147 TDRFIDEP Reports Term Deposits
Customers Fixed Deposit Report
Customers Fixed Deposit Report
148 TDRDDSUM Reports Term Deposits
Deposit Detail summary by total amount
Deposit detail summary
149 TDRINREP Reports Term Deposits
Interest paid report Interest paid report
150 TDRFDREP Reports Term Deposits
Large FD Report Large FD report
151 TDRCLOSE Reports Term Deposits
TD Closed TD Account Closed Report
152 TDRFULBL Reports Term Deposits
TD Full balance Listing
TD Full balance Listing
153 TDRMATR Reports Term Deposits
TD Maturity TD Account Maturity Report
154 TDROPEN Reports Term Deposits
TD Opened TD Account Opened Report

Page 293 of 304
155 TDRRENEW Reports Term Deposits
TD Renewed TD Account Renewed Report
156 TDRSOACC Reports Term Deposits
TD statement of accounts
TD statement of accounts
SI No.
Short Path Main
Menue Sub Menue_1 Sub Menue _2 Description
157 SVRDOREP Reports Accounts Dormant Next Month Report
Accounts Dormant Next Month Report
158 SVRREPRT Reports Flat file cheque book reqested
Flat file cheque book reqested
159 GLRSUREP Reports GL Summary report GL Summary report
160 SVRAOREP Reports Saving accounts opend today
Saving accounts opend today
161 SVRACREP Reports Savings Accounts Closed Today Report
Savings Accounts Closed Today Report
162
SVRADREP Reports Savings account dormant today
Savings account dormant today report
163
SVRLBALM Reports Savings large balance movements
Savings large balance movements
164
TDRPRSUM Reports TD Account class summary
TD Account class summary
10. Standing Instructions 1 SIDCYCLE Standing
Instructions Operations Cycle Due /
Expected Standing Instruction Cycle Detail
2
3 SIDDIARY Standing Instructions
Operations Dairy Input Standing Instruction Diary
4 SIDCONAU Standing Instructions
Operations Instruction Authorization
Standing Instruction Contract Authorization
5 SIDCONON Standing Instructions
Operations Instruction Input Standing Instruction Online Detailed
6 SISCYCLE Standing Instructions
View Cycle Due / Expected
Standing Instruction Cycle Summary
7 SISDIARY Standing Instructions
View Dairy Input Standing Instruction Diary Summary
8 SICDIARY Standing Instructions
View Diary Summary Instruction Diary Summary

Page 294 of 304
9 SISCONON Standing Instructions
View Instruction Input Standing Instruction Contract Summary
10 SISINSTR Standing Instructions
View Instruction Types Instruction Type Summary
SI No.
Short Path Main
Menue Sub Menue_1 Sub Menue _2 Description
11 SISPRMNT Standing Instructions
View Products Standing Instruction Product Summary
11. Teller Tarnsactions 1 8302 Teller Bankers
Cheque Transactions
BC Issue against GL BC Issue against GL
2 8301 Teller Bankers Cheque Transactions
BC Issue against Walk-in
BC Issue against Walk-in
3 8309 Teller Bankers Cheque Transactions
BC Liquidation against Account
BC Liquidation against Account
4 8308 Teller Bankers Cheque Transactions
BC Liquidation against GL
BC Liquidation against GL
5 8307 Teller Bankers Cheque Transactions
BC Liquidation against Walk-in
BC Liquidation against Walk-in
6 BCRP Teller Bankers Cheque Transactions
BC Reprint BC Reprint
7 1010 Teller Bankers Cheque Transactions
BC Sale against Account
BC Sale against Account
8 8335 Teller Bankers Cheque Transactions
BC Sale against Cheque
BC Sale against Cheque
9 1350 Teller CASA Account Closure
Close Out Withdrawal by Multi Mode
10 DETILMAP Teller Cash Dispenser
Dispenser Till Mapping
11 DEDAPPOR Teller Cash Dispenser
Give Change

Page 295 of 304
12 7552 Teller Cash Transactions
Book Overage Book Overage
13 7551 Teller Cash Transactions
Book Shortage Book Shortage
SI No.
Short Path Main
Menue Sub Menue_1 Sub Menue _2 Description
14 1401 Teller Cash Transactions
Cash Deposit Cash Deposit
15 1405 Teller Cash Transactions
Cash Transfer Cash Transfer
16 1001 Teller Cash Transactions
Cash Withdrawal Cash Withdrawal
17 1013 Teller Cash Transactions
Cheque Withdrawal Cheque Withdrawal
18 1301 Teller Cash Transactions
Close Out Withdrawal
Close Out Withdrawal
19 DENM Teller Cash Transactions
Denomination Exchange
Denomination Exchange
20 8004 Teller Cash Transactions
FX Purchase (Walk-in)
FX Purchase (Walk-in)
21 8203 Teller Cash Transactions
FX Sale (Walk-in) FX Sale (Walk-in)
22 5001 Teller Cash Transactions
Loan Disbursement By Cash
Loan Disbursement By Cash
23 5401 Teller Cash Transactions
Loan Repayment By Cash
Loan Repayment By Cash
24 1460 Teller Cash Transactions
Miscellaneous GL Credit
Miscellaneous GL Credit
25 1060 Teller Cash Transactions
Miscellaneous GL Debit
Miscellaneous GL Debit
26 9009 Teller Cash Transactions
Receive Cash from Local Office
Receive Cash from Local Office
27 9010 Teller Cash Transactions
Remit Cash to Local Office
Remit Cash to Local Office
28 DEDQUERY Teller Cash Transactions
Retail Teller Transactions
Retail Teller Transaction Query
29 3401 Teller Cash Transactions
Safe Deposit Rental By Cash
Safe Deposit Rental By Cash
30 CADCHQPR Teller Cheque Transactions
Cheque Books Print Cheque Book Print
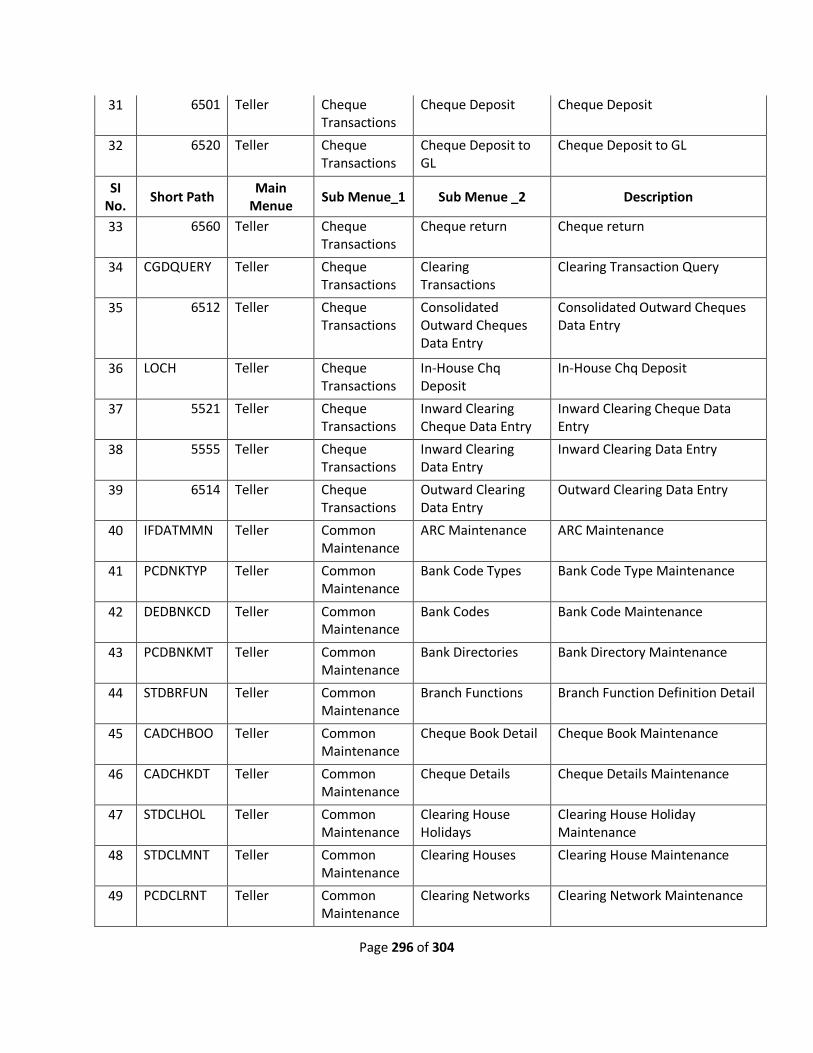
Page 296 of 304
31 6501 Teller Cheque Transactions
Cheque Deposit Cheque Deposit
32 6520 Teller Cheque Transactions
Cheque Deposit to GL
Cheque Deposit to GL
SI No.
Short Path Main
Menue Sub Menue_1 Sub Menue _2 Description
33 6560 Teller Cheque Transactions
Cheque return Cheque return
34 CGDQUERY Teller Cheque Transactions
Clearing Transactions
Clearing Transaction Query
35 6512 Teller Cheque Transactions
Consolidated Outward Cheques Data Entry
Consolidated Outward Cheques Data Entry
36 LOCH Teller Cheque Transactions
In-House Chq Deposit
In-House Chq Deposit
37 5521 Teller Cheque Transactions
Inward Clearing Cheque Data Entry
Inward Clearing Cheque Data Entry
38 5555 Teller Cheque Transactions
Inward Clearing Data Entry
Inward Clearing Data Entry
39 6514 Teller Cheque Transactions
Outward Clearing Data Entry
Outward Clearing Data Entry
40 IFDATMMN Teller Common Maintenance
ARC Maintenance ARC Maintenance
41 PCDNKTYP Teller Common Maintenance
Bank Code Types Bank Code Type Maintenance
42 DEDBNKCD Teller Common Maintenance
Bank Codes Bank Code Maintenance
43 PCDBNKMT Teller Common Maintenance
Bank Directories Bank Directory Maintenance
44 STDBRFUN Teller Common Maintenance
Branch Functions Branch Function Definition Detail
45 CADCHBOO Teller Common Maintenance
Cheque Book Detail Cheque Book Maintenance
46 CADCHKDT Teller Common Maintenance
Cheque Details Cheque Details Maintenance
47 STDCLHOL Teller Common Maintenance
Clearing House Holidays
Clearing House Holiday Maintenance
48 STDCLMNT Teller Common Maintenance
Clearing Houses Clearing House Maintenance
49 PCDCLRNT Teller Common Maintenance
Clearing Networks Clearing Network Maintenance
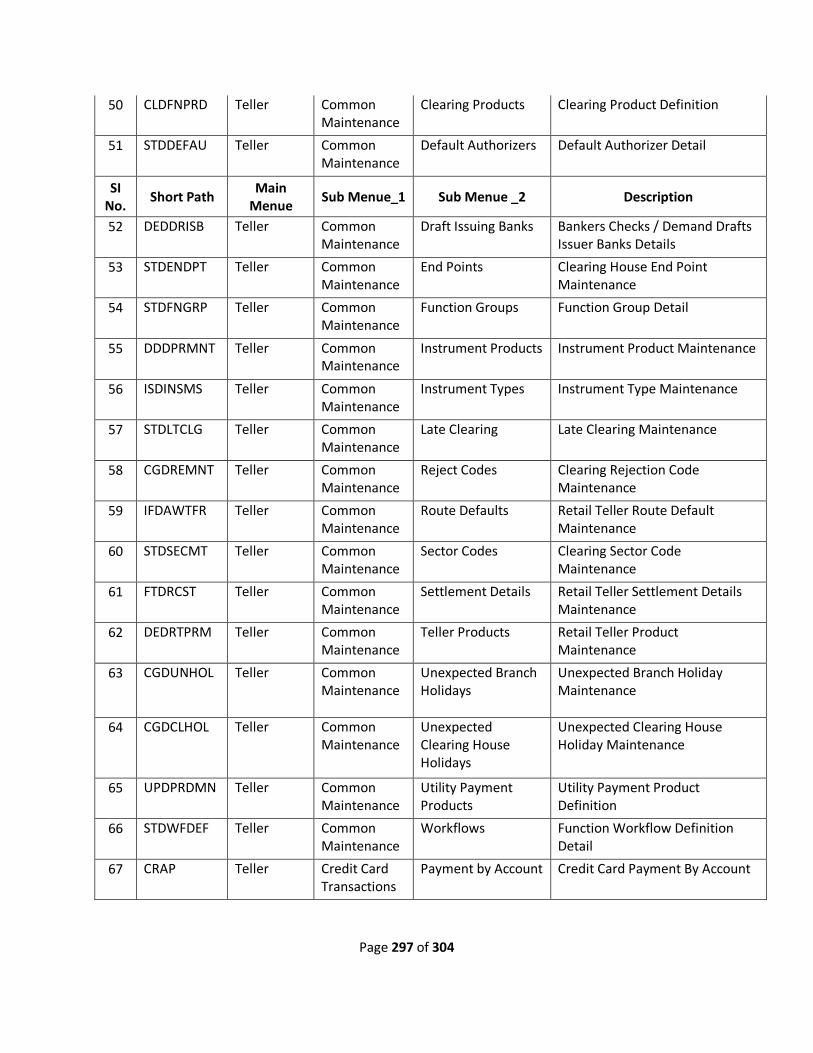
Page 297 of 304
50 CLDFNPRD Teller Common Maintenance
Clearing Products Clearing Product Definition
51 STDDEFAU Teller Common Maintenance
Default Authorizers Default Authorizer Detail
SI No.
Short Path Main
Menue Sub Menue_1 Sub Menue _2 Description
52 DEDDRISB Teller Common Maintenance
Draft Issuing Banks Bankers Checks / Demand Drafts Issuer Banks Details
53 STDENDPT Teller Common Maintenance
End Points Clearing House End Point Maintenance
54 STDFNGRP Teller Common Maintenance
Function Groups Function Group Detail
55 DDDPRMNT Teller Common Maintenance
Instrument Products Instrument Product Maintenance
56 ISDINSMS Teller Common Maintenance
Instrument Types Instrument Type Maintenance
57 STDLTCLG Teller Common Maintenance
Late Clearing Late Clearing Maintenance
58 CGDREMNT Teller Common Maintenance
Reject Codes Clearing Rejection Code Maintenance
59 IFDAWTFR Teller Common Maintenance
Route Defaults Retail Teller Route Default Maintenance
60 STDSECMT Teller Common Maintenance
Sector Codes Clearing Sector Code Maintenance
61 FTDRCST Teller Common Maintenance
Settlement Details Retail Teller Settlement Details Maintenance
62 DEDRTPRM Teller Common Maintenance
Teller Products Retail Teller Product Maintenance
63 CGDUNHOL Teller Common Maintenance
Unexpected Branch Holidays
Unexpected Branch Holiday Maintenance
64 CGDCLHOL Teller Common Maintenance
Unexpected Clearing House Holidays
Unexpected Clearing House Holiday Maintenance
65 UPDPRDMN Teller Common Maintenance
Utility Payment Products
Utility Payment Product Definition
66 STDWFDEF Teller Common Maintenance
Workflows Function Workflow Definition Detail
67 CRAP Teller Credit Card Transactions
Payment by Account Credit Card Payment By Account
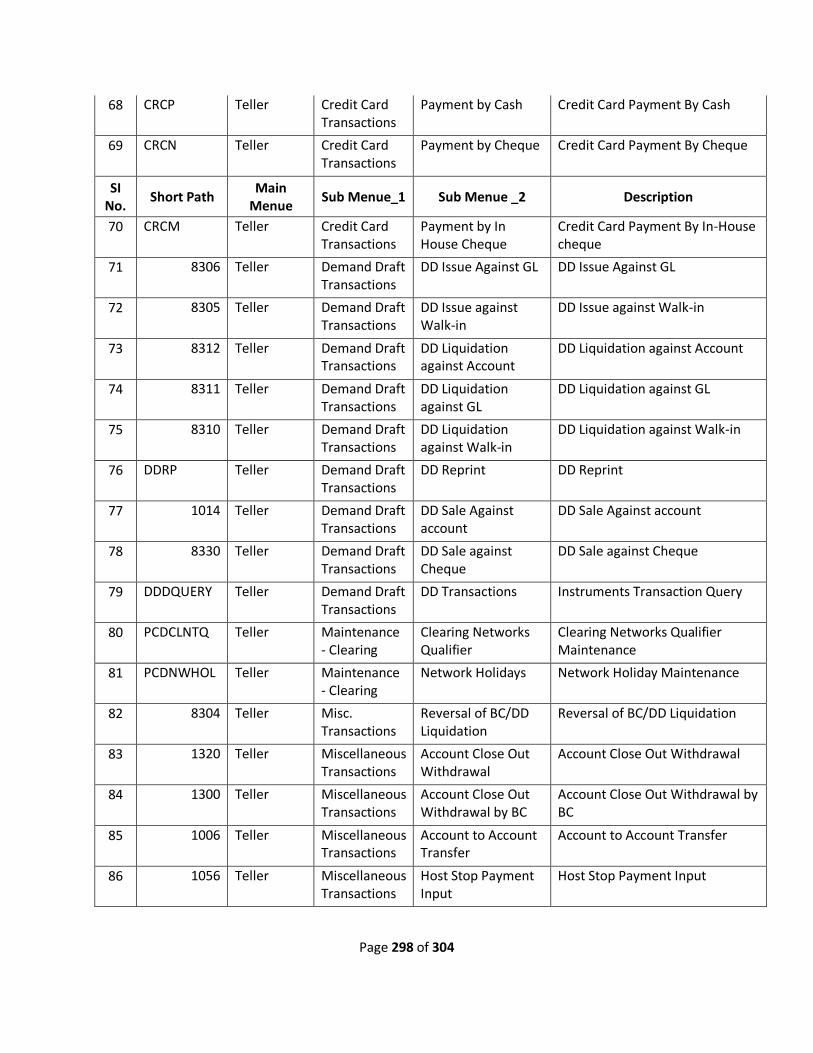
Page 298 of 304
68 CRCP Teller Credit Card Transactions
Payment by Cash Credit Card Payment By Cash
69 CRCN Teller Credit Card Transactions
Payment by Cheque Credit Card Payment By Cheque
SI No.
Short Path Main
Menue Sub Menue_1 Sub Menue _2 Description
70 CRCM Teller Credit Card Transactions
Payment by In House Cheque
Credit Card Payment By In-House cheque
71 8306 Teller Demand Draft Transactions
DD Issue Against GL DD Issue Against GL
72 8305 Teller Demand Draft Transactions
DD Issue against Walk-in
DD Issue against Walk-in
73 8312 Teller Demand Draft Transactions
DD Liquidation against Account
DD Liquidation against Account
74 8311 Teller Demand Draft Transactions
DD Liquidation against GL
DD Liquidation against GL
75 8310 Teller Demand Draft Transactions
DD Liquidation against Walk-in
DD Liquidation against Walk-in
76 DDRP Teller Demand Draft Transactions
DD Reprint DD Reprint
77 1014 Teller Demand Draft Transactions
DD Sale Against account
DD Sale Against account
78 8330 Teller Demand Draft Transactions
DD Sale against Cheque
DD Sale against Cheque
79 DDDQUERY Teller Demand Draft Transactions
DD Transactions Instruments Transaction Query
80 PCDCLNTQ Teller Maintenance - Clearing
Clearing Networks Qualifier
Clearing Networks Qualifier Maintenance
81 PCDNWHOL Teller Maintenance - Clearing
Network Holidays Network Holiday Maintenance
82 8304 Teller Misc. Transactions
Reversal of BC/DD Liquidation
Reversal of BC/DD Liquidation
83 1320 Teller Miscellaneous Transactions
Account Close Out Withdrawal
Account Close Out Withdrawal
84 1300 Teller Miscellaneous Transactions
Account Close Out Withdrawal by BC
Account Close Out Withdrawal by BC
85 1006 Teller Miscellaneous Transactions
Account to Account Transfer
Account to Account Transfer
86 1056 Teller Miscellaneous Transactions
Host Stop Payment Input
Host Stop Payment Input
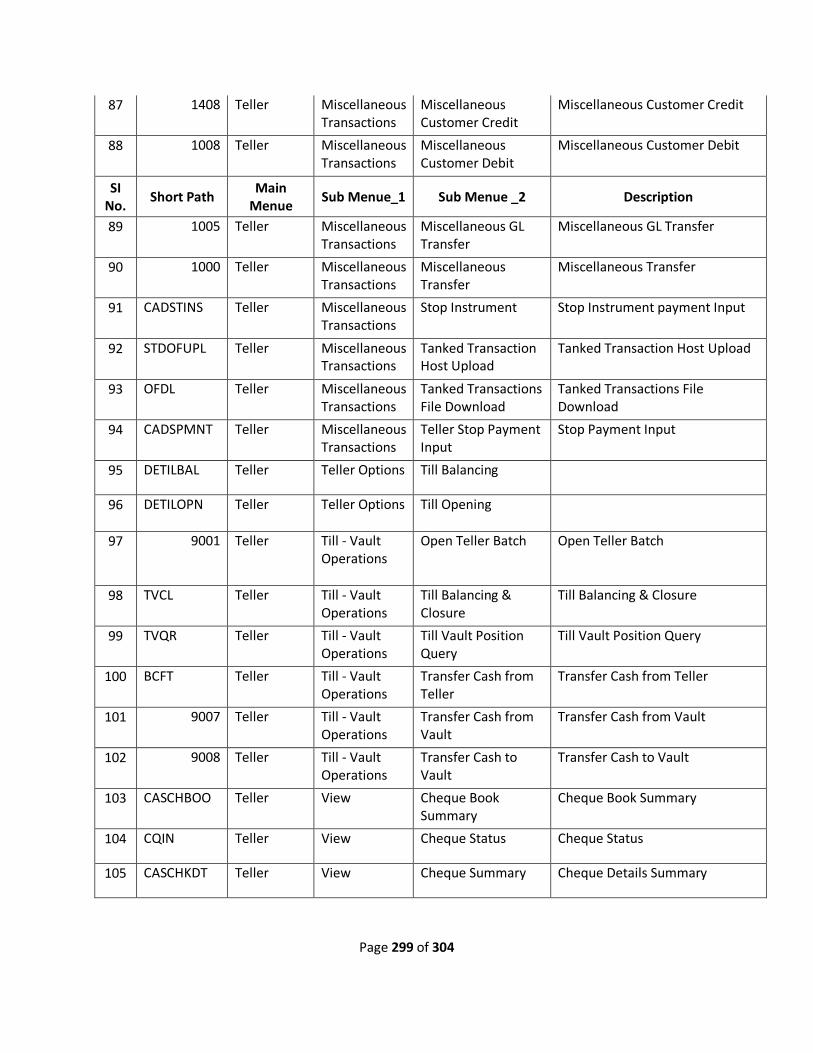
Page 299 of 304
87 1408 Teller Miscellaneous Transactions
Miscellaneous Customer Credit
Miscellaneous Customer Credit
88 1008 Teller Miscellaneous Transactions
Miscellaneous Customer Debit
Miscellaneous Customer Debit
SI No.
Short Path Main
Menue Sub Menue_1 Sub Menue _2 Description
89 1005 Teller Miscellaneous Transactions
Miscellaneous GL Transfer
Miscellaneous GL Transfer
90 1000 Teller Miscellaneous Transactions
Miscellaneous Transfer
Miscellaneous Transfer
91 CADSTINS Teller Miscellaneous Transactions
Stop Instrument Stop Instrument payment Input
92 STDOFUPL Teller Miscellaneous Transactions
Tanked Transaction Host Upload
Tanked Transaction Host Upload
93 OFDL Teller Miscellaneous Transactions
Tanked Transactions File Download
Tanked Transactions File Download
94 CADSPMNT Teller Miscellaneous Transactions
Teller Stop Payment Input
Stop Payment Input
95 DETILBAL Teller Teller Options Till Balancing
96 DETILOPN Teller Teller Options Till Opening
97 9001 Teller Till - Vault Operations
Open Teller Batch Open Teller Batch
98 TVCL Teller Till - Vault Operations
Till Balancing & Closure
Till Balancing & Closure
99 TVQR Teller Till - Vault Operations
Till Vault Position Query
Till Vault Position Query
100 BCFT Teller Till - Vault Operations
Transfer Cash from Teller
Transfer Cash from Teller
101 9007 Teller Till - Vault Operations
Transfer Cash from Vault
Transfer Cash from Vault
102 9008 Teller Till - Vault Operations
Transfer Cash to Vault
Transfer Cash to Vault
103 CASCHBOO Teller View Cheque Book Summary
Cheque Book Summary
104 CQIN Teller View Cheque Status Cheque Status
105 CASCHKDT Teller View Cheque Summary Cheque Details Summary
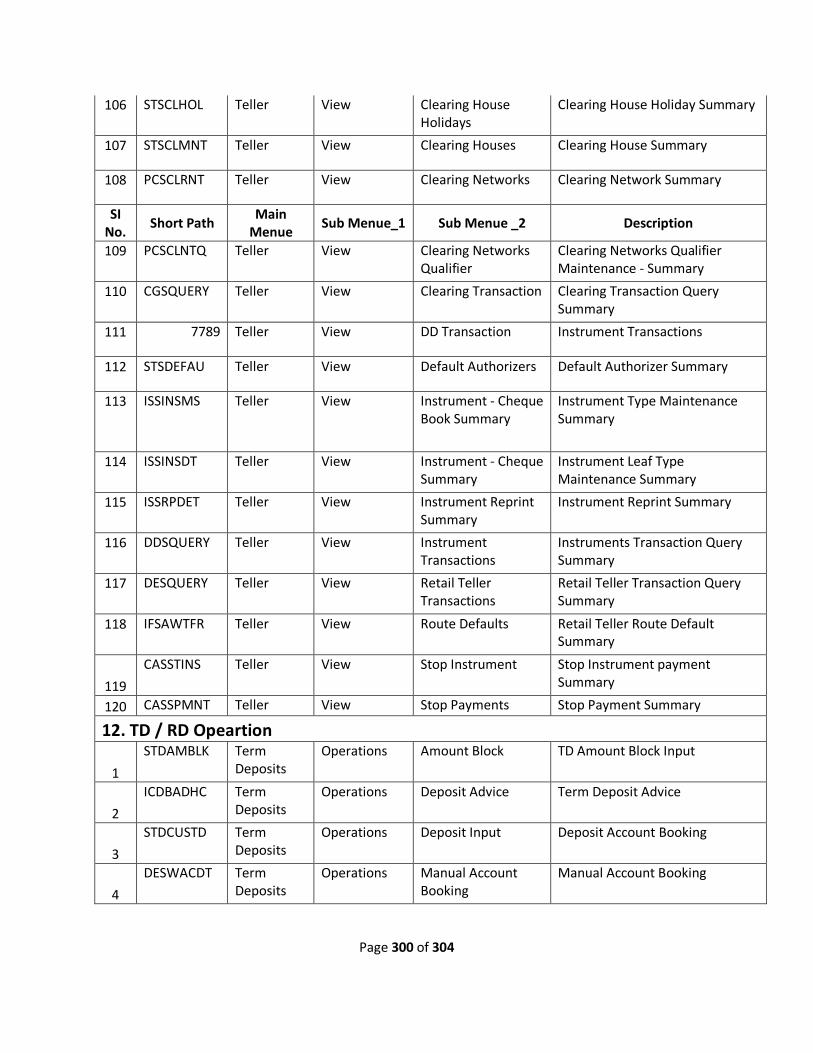
Page 300 of 304
106 STSCLHOL Teller View Clearing House Holidays
Clearing House Holiday Summary
107 STSCLMNT Teller View Clearing Houses Clearing House Summary
108 PCSCLRNT Teller View Clearing Networks Clearing Network Summary
SI No.
Short Path Main
Menue Sub Menue_1 Sub Menue _2 Description
109 PCSCLNTQ Teller View Clearing Networks Qualifier
Clearing Networks Qualifier Maintenance - Summary
110 CGSQUERY Teller View Clearing Transaction Clearing Transaction Query Summary
111 7789 Teller View DD Transaction Instrument Transactions
112 STSDEFAU Teller View Default Authorizers Default Authorizer Summary
113 ISSINSMS Teller View Instrument - Cheque Book Summary
Instrument Type Maintenance Summary
114 ISSINSDT Teller View Instrument - Cheque Summary
Instrument Leaf Type Maintenance Summary
115 ISSRPDET Teller View Instrument Reprint Summary
Instrument Reprint Summary
116 DDSQUERY Teller View Instrument Transactions
Instruments Transaction Query Summary
117 DESQUERY Teller View Retail Teller Transactions
Retail Teller Transaction Query Summary
118 IFSAWTFR Teller View Route Defaults Retail Teller Route Default Summary
119
CASSTINS Teller View Stop Instrument Stop Instrument payment Summary
120 CASSPMNT Teller View Stop Payments Stop Payment Summary
12. TD / RD Opeartion
1
STDAMBLK Term Deposits
Operations Amount Block TD Amount Block Input
2
ICDBADHC Term Deposits
Operations Deposit Advice Term Deposit Advice
3
STDCUSTD Term Deposits
Operations Deposit Input Deposit Account Booking
4
DESWACDT Term Deposits
Operations Manual Account Booking
Manual Account Booking
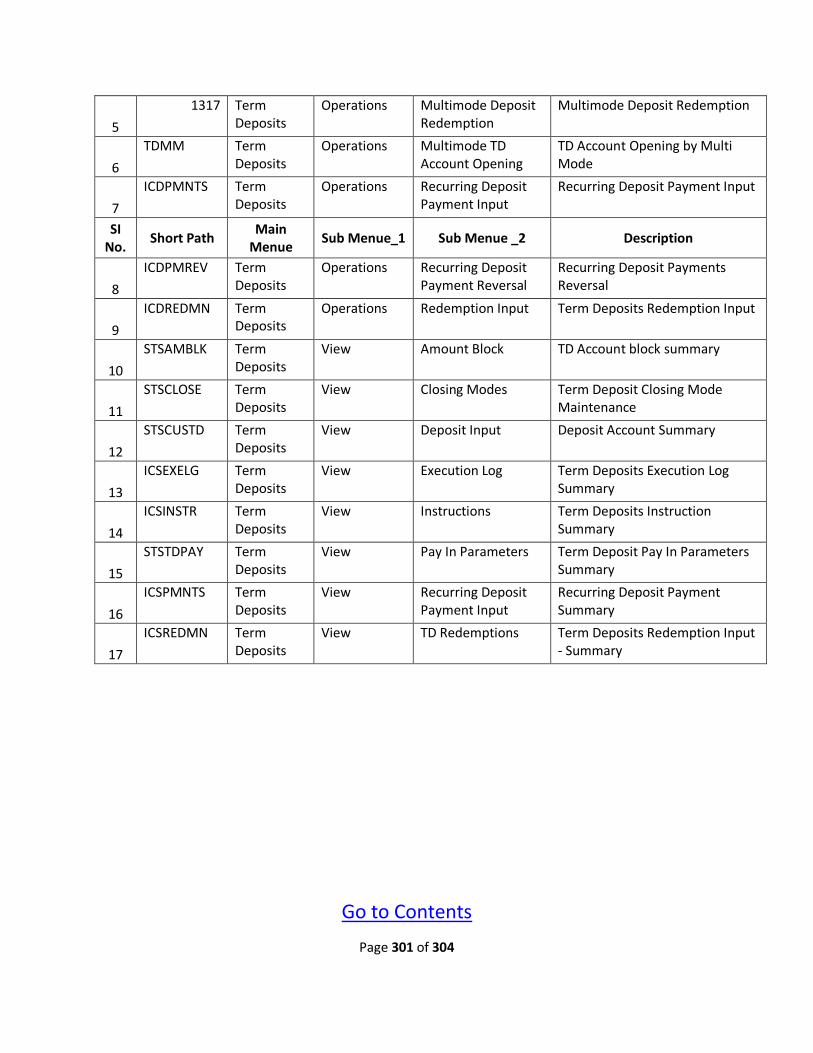
Page 301 of 304
5
1317 Term Deposits
Operations Multimode Deposit Redemption
Multimode Deposit Redemption
6
TDMM Term Deposits
Operations Multimode TD Account Opening
TD Account Opening by Multi Mode
7
ICDPMNTS Term Deposits
Operations Recurring Deposit Payment Input
Recurring Deposit Payment Input
SI No.
Short Path Main
Menue Sub Menue_1 Sub Menue _2 Description
8
ICDPMREV Term Deposits
Operations Recurring Deposit Payment Reversal
Recurring Deposit Payments Reversal
9
ICDREDMN Term Deposits
Operations Redemption Input Term Deposits Redemption Input
10
STSAMBLK Term Deposits
View Amount Block TD Account block summary
11
STSCLOSE Term Deposits
View Closing Modes Term Deposit Closing Mode Maintenance
12
STSCUSTD Term Deposits
View Deposit Input Deposit Account Summary
13
ICSEXELG Term Deposits
View Execution Log Term Deposits Execution Log Summary
14
ICSINSTR Term Deposits
View Instructions Term Deposits Instruction Summary
15
STSTDPAY Term Deposits
View Pay In Parameters Term Deposit Pay In Parameters Summary
16
ICSPMNTS Term Deposits
View Recurring Deposit Payment Input
Recurring Deposit Payment Summary
17
ICSREDMN Term Deposits
View TD Redemptions Term Deposits Redemption Input - Summary
Go to Contents
Page 302 of 304
Glossary of Icons in FCUBS-11.2

Page 303 of 304
Glossary of Icons in FCUBS-11.2
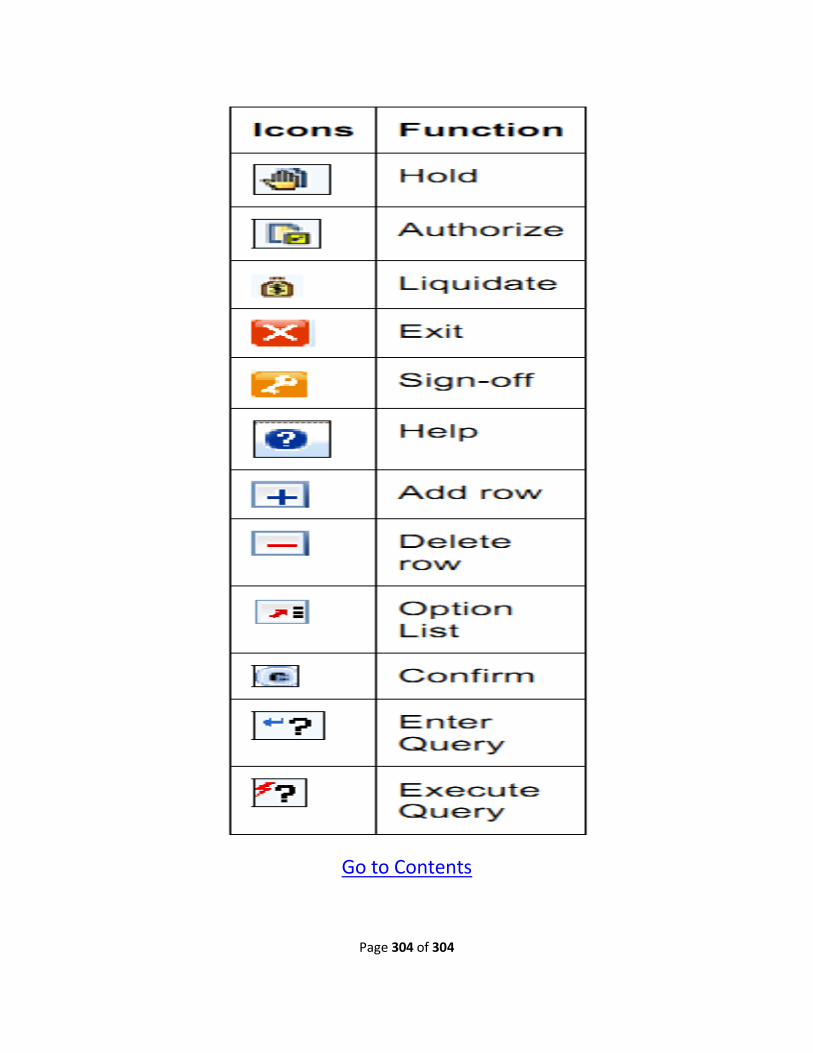
Page 304 of 304
Go to Contents