gendex 765dc user manual g0112-99uinterest...x-ray equipment may cause injury if used improperly....
TRANSCRIPT

765DC
Intraoral x-ray systemUSER MANUAL 1-17
Intraorales RöntgengerätBENUTZERHANDBUCH 18-34
Sistema radiográfico intrabucalMANUAL DEL USUARIO 35-51
MANUEL DE L'OPÉRATEUR
de l'appareil de radiographie intra-orale 52-68
Sistema radiologico intra-oraleMANUALE D'USO 69-85
Printed on: 29 Mär 2012, 05:33:23 pm; Printed by: UWE.ZELLER

765DC
1
Table of Contents
General Description ……………………………… Page 2
Identification Labels ……………………………... Page 3
Compliance with Applicable Standards …………... Page 4
Explanation of Symbols on Technical Labels ……… Page 6
Safety …………………………………………….. Page 7
Operating Controls ………………………………. Page 8
Operating Procedure ……………………………... Page 9
Configuring Control Settings ……………………. Page 10
Default Exposure Tables ………………………... Page 12
Error Display and Conditions …………………… Page 13
System Specifications ……………………………. Page 14
Recommended Maintenance …………………….. Page 17
Cleaning and Disinfecting ………………………. Page 17
Printed on: 29 Mär 2012, 05:33:23 pm; Printed by: UWE.ZELLER

765DC
2
765DC INTRAORAL X-RAY SYSTEM
GENERAL DESCRIPTION
This User Manual is intended to assist the Operator in the safe, and effective operation of
the 765DC high frequency Intraoral x-ray system. It contains the information necessary to operate
the equipment, the technical specifications, and the procedures to perform its simple maintenance.
Before attempting to operate the equipment, read this manual thoroughly. Pay particular attention
to all Warnings and Cautions incorporated in it.
The original language of this manual is English.
SYSTEM COMPONENTS
SUSPENSION Allows the tubehead
to be positioned with a
reach of 55" (140cm),
65" (165cm) or
75" (191cm)
MASTER CONTROL Allows anatomical
setting of time.
Single button selection
of adult or child.
Single button selection
of film or digital.
CONE Standard 8" (20cm)
focal length.
Optional 12" (30cm), or
20 cm rectangular
collimation.
TUBEHEAD Focal spot indicated by
bump on cover.
Secondary operator
controls.
Printed on: 29 Mär 2012, 05:33:23 pm; Printed by: UWE.ZELLER

765DC
3
IDENTIFICATION LABELS
The 765DC Tubehead, Master Control, and Cone have identification labels that specify
the model number, serial number and applicable product approval listings. On specified
components, subject to U.S. Government Radiation Performance Standards 21 CFR, Subchapter
J, a certification statement is included with other required information.
Printed on: 29 Mär 2012, 05:33:23 pm; Printed by: UWE.ZELLER

765DC
4
COMPLIANCE WITH APPLICABLE STANDARDS
The 765DC complies with the following standards:
General (electrical/mechanical) safety:
UL60601-1 File Number: E185414
MEDICAL EQUIPMENT WITH RESPECT TO ELECTRICAL SHOCK, FIRE AND
MECHANICAL HAZARDS ONLY IN ACCORDANCE WITH UL60601-1, IEC60601-1,
CAN/CSA C22.2 NO,601.1-M90, AND TO THE FOLLOWING PARTICULAR STANDARDS,
IEC60601-2-32, IEC60601-2-7 IEC60601-2-28, IEC60601-1-2.
Radiation protection IEC60601-1-3 Radiation protection/x-ray equipment.
The certified components of the 765DC system comply with Radiation Performance
Standards 21 CFR, Subchapter J, at the time of manufacture.
The equipment must only be installed, and operated in accordance
with the safety procedures and operating instructions given in this User
Manual and in the Installation/Maintenance Manual for the purposes and
applications for which it was designed. Modifications and/or additions to the
equipment may only be carried out by Gendex or by third parties expressly
authorized by Gendex to do so. Such changes must comply with legal
requirements as well as with the generally accepted technical rules. It is the
responsibility of the user to ensure that existing legal regulations regarding
installation of the equipment with respect to the building are observed.
IMPORTANT! …… X-RAY PROTECTION
X-ray equipment may cause injury if used improperly.
The instructions contained in this manual must be read and followed when
operating the 765DC. Your Gendex dealer will assist you in placing the 765DC in
operation.
The 765DC intraoral x-ray system provides a high degree of protection from
unnecessary X-radiation. However, no practical design can provide complete
protection, nor prevent operators from exposing themselves or others to
unnecessary radiation.
34SL
Printed on: 29 Mär 2012, 05:33:23 pm; Printed by: UWE.ZELLER
765DC
5
Authorized Representative:
GENDEX Dental Systems s.r.l. GENDEX Dental Systems
Via A, Manzoni 44 901 West Oakton Street
20095 Cusano Milanino - Mi Des Plaines, IL 60018-1884
Tel: +39.02.61800.81 Tel: (847)640-4800
Fax: +39.02.61800.809 Fax (847)640-4891
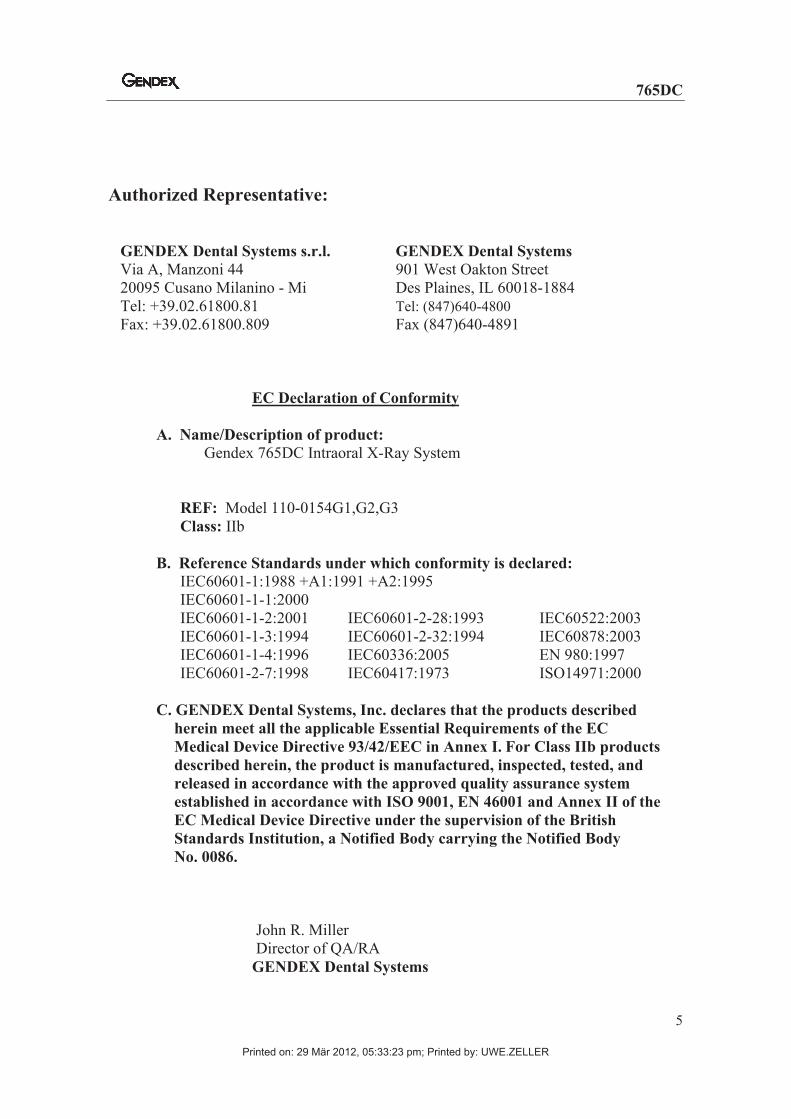
EC Declaration of Conformity
A. Name/Description of product:
Gendex 765DC Intraoral X-Ray System
REF: Model 110-0154G1,G2,G3
Class: IIb
B. Reference Standards under which conformity is declared:
IEC60601-1:1988 +A1:1991 +A2:1995
IEC60601-1-1:2000
IEC60601-1-2:2001 IEC60601-2-28:1993 IEC60522:2003
IEC60601-1-3:1994 IEC60601-2-32:1994 IEC60878:2003
IEC60601-1-4:1996 IEC60336:2005 EN 980:1997
IEC60601-2-7:1998 IEC60417:1973 ISO14971:2000
C. GENDEX Dental Systems, Inc. declares that the products described
herein meet all the applicable Essential Requirements of the EC
Medical Device Directive 93/42/EEC in Annex I. For Class IIb products
described herein, the product is manufactured, inspected, tested, and
released in accordance with the approved quality assurance system
established in accordance with ISO 9001, EN 46001 and Annex II of the
EC Medical Device Directive under the supervision of the British
Standards Institution, a Notified Body carrying the Notified Body
No. 0086.
John R. Miller
Director of QA/RA
GENDEX Dental Systems
Printed on: 29 Mär 2012, 05:33:23 pm; Printed by: UWE.ZELLER

765DC
6
EXPLANATION OF SYMBOLS ON TECHNICAL LABELS
Type b: Protection against electric shock (UL60601-1:2003)
Consult written Instructions in this Operator’s Manual
X-RAY SOURCE Assembly
WARNING X-RAY
THIS X-RAY UNIT MAY BE DANGEROUS TO PATIENT
AND OPERATOR UNLESS SAFE EXPOSURE FACTORS
AND OPERATING INSTRUCTIONS ARE OBSERVED.
X-RAY EMISSION
Mains HOT WIRE
Mains NEUTRAL WIRE
Earth Ground
Electronic Equipment
No recycle into normal trash
Classification
The 765DC is a UL Class I Type b equipment (UL60601-1:2003).
Printed on: 29 Mär 2012, 05:33:23 pm; Printed by: UWE.ZELLER

765DC
7
SAFETY
Radiation safety
Only qualified and authorized personnel may operate this equipment
observing all laws and regulations concerning Radiation Protection.
The operator at all times must remain 6FT. (2m) from the focal spot and
the X-ray beam for operator protection.
Full use must be made of all radiation features on the equipment, and of
all radiation protection devices, accessories, and procedures available to protect
the Patient and Operator from x-ray radiation.
Electrical safety
Covers on the equipment should only be removed by qualified and
authorized service personnel.
This equipment must only be used in rooms or areas that comply with all
applicable laws and recommendations concerning electrical safety in rooms used
for medical purposes, e.g. IEC, US National Electrical Code, or VDE standards
concerning provisions of an additional protective earth (ground) terminal for
power supply connection.
This equipment must always be electrically disconnected from the mains
electrical supply before cleaning or disinfecting.
ORDINARY MEDICAL EQUIPMENT without protection against ingress
of liquids. No water or any other liquid should be allowed to leak inside the
equipment, as they may cause a short-circuit and corrosion.
Explosion safety
This equipment must not be used in the presence of flammable or
potentially explosive disinfecting gases or vapors, which could ignite causing
personal injury and/or damage to the equipment. If such disinfectants are used,
the vapor must be allowed to disperse before using the equipment
Mechanical safety
Where complete safeguarding of the equipment is not possible, due care
must be taken to ensure that no part of the user’s or patient’s body or clothing
can be trapped or injured by any part of the equipment. In particular, make sure
that fingers are not caught or pinched in the articulated arm when closing it.
Printed on: 29 Mär 2012, 05:33:23 pm; Printed by: UWE.ZELLER

765DC
8
OPERATING CONTROLS
1. TIME SELECTION - Allows the
operator to override the anatomical
preset time and adjust the exposure time
up or down to a specific value on the
R10 scale.
2. ANATOMICAL TIME SELECTION
- Allows the operator to select the
exposure time based on the tooth area
desired.
3. IMAGING TYPE SELECTION - A
toggle function that allows the operator
to select between the use of film or a
digital imaging system. This will modify
all of the preset anatomical time
selections.
4. PATIENT SELECTION - A toggle
function that allows the operator to
select either an adult or a child. This will
modify all of the preset anatomical time
selections.
5. READY INDICATOR LAMP -
Indicates that the "On" switch has been
pushed and the system is ready for
operation.
6. COOL-DOWN INDICATOR LAMP -
This lamp will light when the duty cycle
of the system requires that the tubehead
cool before the next exposure.
7. RADIATION INDICATOR LAMP -
This lamp will light when the exposure
button is pressed indicating that x-ray
radiation is being produced.
8. PUSH-BUTTON EXPOSURE
SWITCH - Allows the operator to
initiate the exposure directly from the
control panel when it is mounted outside
the operatory.
9. COIL-CORD EXPOSURE SWITCH
(Optional – Not Shown) - Allows the
operator to exit the operatory and then
initiate the exposure.
10. SECONDARY TUBEHEAD
CONTROLS - This allows the operator
to verify and adjust if necessary the
anatomic exposure times directly at the
tubehead. A lamp also indicates whether
the adult or child setting has been
selected.
11. POWER SWITCH - Depressing the
switch to the "on" position will supply
power to the control. The Ready
Indicator Lamp on the control panel will
indicate that the system is ready for use.
1
2
3
4
5
6
7
8 10
11
Printed on: 29 Mär 2012, 05:33:23 pm; Printed by: UWE.ZELLER

765DC
9
OPERATING PROCEDURES
1. Switch the power switch to the "On" position. The Ready indicator lamp on the front
of the control panel will light.
2. Select or verify that the unit is set for either film or digital imaging. The indicator
light should be lit next to the appropriate graphic icon. Press the button between the
two icons to toggle to the correct selection.
3. Select or verify that the system is set for the appropriate patient selection (i.e. an adult
or child). Press the button between the two icons to toggle to the correct selection.
4. Press the selector button in the center of the control to toggle the indicator lamp until
it lights next to the tooth (or bitewing) symbol for the area that you wish to x-ray.
Note: The exposure time defaults (the times displayed when the system is initially
turned on) can be modified per the instructions in the Configuring Control Settings
section on page 10.
5. If desired, the up or down buttons can be used to select a specific exposure time other
than the default setting using the R10 scale. For recommendations for Occlusal film,
see the Default and Recommended Exposure Tables on page 12.
6. Position the tubehead to the patient using standard accepted positioning procedures.
Note: Care should be taken to not place fingers in areas where they may be
potentially pinched during the movement of the arm. Also, be careful to not have the
tubehead hit the wall after returning the arm to the storage position.
7. Prior to making the exposure, verify or modify the time settings as necessary using
the secondary tubehead controls. Note: The unit is supplied with an 8” (20cm) cone.
An optional longer 12” (30cm) cone can be used to sharpen the image as when the
paralleling technique is used. A rectangular cone is available as an option to reduce
the x-ray field size to that of the film and reduce the radiation to the patient.
8. When using the optional coil-cord exposure switch, it is strongly recommended that
the operator exit the operatory. Note: In order to comply with regulations and good
safety practices, the technique factors must be visible to the operator from the remote
location.
9. Press and hold either the coil-cord or push-button exposure switch until the audible
signal and exposure indicator light terminate. (Note: Releasing the exposure button
at any time will immediately terminate the exposure).
Printed on: 29 Mär 2012, 05:33:23 pm; Printed by: UWE.ZELLER

765DC
10
Configuring Control Settings
The 765DC control panel is preset at the factory (called default settings) for
operation with a standard configuration. This configuration assumes the use of the
standard 8" focal length cone and D-speed film or a DenOptix digital imaging
system. This standard configuration presets the exposure times for the anatomical
selections. These presets can be changed for use with E-speed or F-speed film or
another type of digital imaging system, or with the optional long cone.
The film speed and digital option can be changed using the control panel
buttons and software.
Compensating for the cone length is done by changing a switch inside of
the control box. Note: It is recommended that this be done only by an
authorized Gendex service agent.
Changing the default settings for the film speed used
The 765DC is set at the factory for the use of D-speed film. This can be verified by
turning the control and noting that the time initially displayed is 0.320 seconds. The use of
E-speed or F-speed film requires modifying the exposure times used. The system can be
programmed to accomplish this automatically.
1. Turn the system off.
2. Press and hold the anatomical time selector switch while turning the system on (see Figure 1).
3. The time display will now read "SP 1". This confirms the system is in the film speed menu.
4. To change to E-speed. Press the exposure time 'Up' button. The time display will now read
"SP 2". This confirms that the system is now set for E-speed film.
5. Press the anatomical time selector switch again to store the new setting. The time displayed
should now indicate 0.200 seconds.
6. To change to F-speed. Press the exposure time ‘Up’ button Figure 1
again until the display reads “SP 3”.
7. Press the time selector switch to store the setting. The time
displayed should now indicate 0.125 seconds.
Exposure time select button
Anatomical time selector switch
Film or digital selector switch
Printed on: 29 Mär 2012, 05:33:23 pm; Printed by: UWE.ZELLER

765DC
11
Changing the Digital Option
The 765DC is set at the factory for use with the Gendex DenOptix digital imaging
system. This can be confirmed by turning the system on and pressing the button to select
digital. The time displayed should now indicate 0.160 seconds.
1. Turn the system off.
2. Press and hold the anatomical time selector switch while turning the system on (see Figure 1).
3. The time display will now read "SP 1,2, or 3" depending on which film type is configured.
4. Press the film or digital selector switch until the display reads "D1". Press the exposure time
'UP' button. The display will now indicate "D2". This indicates that the system is now
configured for a CCD type digital imaging system.
5. Press the anatomical time selector switch again to store the new setting.
Changing the power on selection
The 765DC is set at the factory to have the film option for an adult selected when the
unit is first turned on. If desired, the unit can be set so that it automatically selects the
digital option or a child instead when the control is turned on.
1. Turn the system off.
2. Press and hold the anatomical time selector switch while turning the system on (see Figure 1).
3. The time display will now read either "SP 1,2, or 3" or "D1" or "D2" depending on
whether the film or digital option is selected. Note that the green indicator light next to the
selection is flashing.
4. To select for the unit to come on in the digital mode, make certain that the green light is
flashing next to the digital option. Press the anatomical selector switch to store the
information and turn the system off. The unit should now automatically select the digital
option when first turned on.
5. To select for the unit to come on in the child mode, press the adult or child selection button
until the green light is flashing next to the child option. Press the anatomical selector switch
to store the information and turn the unit off. The unit should now automatically select the
child option when the unit is first turned on.
Modifying the system for use with the optional 12" (30 cm) cone
The 765DC is set at the factory for use with the standard supplied 8" (20 cm ) cone.
The 12" (30 cm) long cone is recommended when using the paralleling film positioning
technique along with the Rinn XCP kit. Using the long cone requires the use of longer
exposure times, which can be programmed into the system by changing an internal
electrical setting.
This modification should be performed only by a qualified Gendex service
agent. Contact your Gendex service agent to make the change.
Printed on: 29 Mär 2012, 05:33:23 pm; Printed by: UWE.ZELLER

765DC
12
Default and Recommended Exposure Tables
SPEED 1: D-speed Film8” (20cm) Cone 12” (30cm) Cone
Anatomy Selected Adult Child Adult Child
Bitewing 0.320 second 0.160 second 0.630 second 0.320 second
Lower Molar 0.320 second 0.160 second 0.630 second 0.320 second
Upper Molar 0.400 second 0.200 second 0.800 second 0.400 second
Incisor 0.200 second 0.100 second 0.400 second 0.200 second
Bicuspid 0.250 second 0.125 second 0.500 second 0.250 second
Occlusal 0.500 second 0.250 second 1.00 second 0.500 second
SPEED 2: E-speed Film8” (20cm) Cone 12” (30cm) Cone
Anatomy Selected Adult Child Adult Child
Bitewing 0.200 second 0.100 second 0.400 second 0.200 second
Lower Molar 0.200 second 0.100 second 0.400 second 0.200 second
Upper Molar 0.250 second 0.125 second 0.500 second 0.250 second
Incisor 0.125 second 0.063 second 0.250 second 0.125 second
Bicuspid 0.160 second 0.080 second 0.320 second 0.160 second
Occlusal 0.320 second 0.160 second 0.630 second 0.320 second
SPEED 3: F-speed Film8” (20cm) Cone 12” (30cm) Cone
Anatomy Selected Adult Child Adult Child
Bitewing 0.125 second 0.063 second 0.250 second 0.125 second
Lower Molar 0.125 second 0.063 second 0.250 second 0.125 second
Upper Molar 0.160 second 0.080 second 0.320 second 0.160 second
Incisor 0.080 second 0.040 second 0.160 second 0.080 second
Bicuspid 0.100 second 0.050 second 0.200 second 0.100 second
Occlusal 0.200 second 0.100 second 0.400 second 0.200 second
D1: Digital (DenOptix)8” (20cm) Cone 12” (30cm) Cone
Anatomy Selected Adult Child Adult Child
Bitewing 0.160 second 0.080 second 0.320 second 0.160 second
Lower Molar 0.160 second 0.080 second 0.320 second 0.160 second
Upper Molar 0.200 second 0.100 second 0.400 second 0.200 second
Incisor 0.100 second 0.050 second 0.200 second 0.100 second
Bicuspid 0.125 second 0.063 second 0.250 second 0.125 second
Occlusal 0.250 second 0.125 second 0.500 second 0.250 second
D2: Digital (Sensor)8” (20cm) Cone 12” (30cm) Cone
Anatomy Selected Adult Child Adult Child
Bitewing 0.080 second 0.040 second 0.160 second 0.080 second
Lower Molar 0.080 second 0.040 second 0.160 second 0.080 second
Upper Molar 0.100 second 0.050 second 0.200 second 0.100 second
Incisor 0.050 second 0.025 second 0.100 second 0.050 second
Bicuspid 0.063 second 0.032 second 0.125 second 0.063 second
Occlusal 0.125 second 0.063 second 0.250 second 0.125 second
Printed on: 29 Mär 2012, 05:33:23 pm; Printed by: UWE.ZELLER

765DC
13
Error Display and Conditions
The green ‘Ready’ lamp, amber ‘Cool-down’ lamp and 4 digital 7-segment LED displays
on the face of the Operator Control panel can provide indications that errors have occurred. The
following chart provides an explanation of what the indicators mean and required action.
Error Indication Explanation Action Required
The amber ‘Cool-down’ lamp
comes on and exposure cannot
be made.
Normal operation by design.
‘Cool-down’ lamp comes on if
too many exposures are made in
a short period of time. This
feature protects and extends the
life of the tubehead.
Wait until lamp goes out
indicating that the tube has
properly cooled down.
“Err0” flashes on the 7-
segment LED displays..
The exposure has been
terminated prematurely. This
can be caused by an equipment
malfunction or the operator
releasing the exposure switch
prior to the end of the exposure
time selected.
Pressing any key except
exposure switch on the
Operator Control will clear the
display and restore normal
operation. Care must be taken
to press and hold the exposure
button until the exposure is
finished.
“Err1” flashes on the 7-
segment LED.
Power Supply voltage was
outside of required range:
108V – 132V
198V – 253V
Wait until line voltage returns
to normal (indicated by the
lamp being steady) or have a
qualified electrician check the
power line.
“Err2” is displayed on the 7-
segment LED displays.
Power Supply voltage dropped
below the minimum
requirement (108V or 198V)
during the exposure. The
exposure is not terminated but
output may be below normal.
Pressing any key on the
Operator Control will clear the
flashing and restore normal
operation. If the problem
persists, it is strongly
recommended that a qualified
electrician check the power
line.
“Err3” flashes on the 7-
segment LED displays.
A hardware fault has occurred. Reset the unit by Turn OFF
the power switch for 5 seconds
and Turn ON the power
switch, if the problem persists.
Contact your authorized
Gendex service agent.
“Err4” flashes on the 7-
segment LED displays.
A fault has occurred and
terminated the exposure.
Pressing any key except
exposure switch on the
Operator Control may clear
the Error and restore normal
operation. If the problem
persists. Contact your
authorized Gendex service
agent.
Printed on: 29 Mär 2012, 05:33:23 pm; Printed by: UWE.ZELLER

765DC
14
SYSTEM SPECIFICATIONS
Cooling and duty rating specification apply at altitudes up to 12,000 ft. (3,600 m), average relative
humidity not exceeding 90 percent, and maximum ambient temperature not exceeding 104 degrees F
(40 degrees C).
TUBEHEAD SPECIFICATIONS
Maximum Rated Tube Potential: 65 kV at 7 mA tube current.
Leakage radiation in the loading state: Less than 250 micro Gy/h at 1 meter from the focal spot.
Minimum permissible first Half Value Layer: Greater than 1.5 mm Aluminum equivalent
Nominal Focal spot size: 0.4 mm (IEC 336/1993)
Anode angle: 12.5 degrees
Anode heat storage: 7 kHU
Duty cycle: 1:30
CONE SPECIFICATIONS
X-ray Field Size: Containable in a 6 cm diameter circle, measured at the distal end of the installed cone.
Distance from the focal spot to the distal end of the cone is: 8 or 12 inches (20 or 30 cm).
POWER SUPPLY REQUIREMENTS
Useful
Nominal Tolerance Range
120 VAC ± 10% 108 - 132 VAC
230 VAC + 10%, -14% 198 - 253 VAC
ACCURACY OF TECHNIC FACTORS
Tube Potential 65 kV ± 3 kV
Current 7 mA ± 5%
Time .02 -.50 Seconds ± .005 Seconds
.63 - 2.00 Seconds ± 1%
Printed on: 29 Mär 2012, 05:33:23 pm; Printed by: UWE.ZELLER

765DC
15
Intraoral X-Ray Tube Housing
Product Data Sheet
Gendex© 765DC
The Gendex© 765DC housing is designed to operate with the Gendex© GX 70-10DC insert. The
housing has been designed to operate on the Gendex© 765DC high frequency high voltage
control, making up the Gendex© 765DC Intraoral Dental X-Ray system.
Specifications
Shockproof Housing: Zinc, hermetically sealed under vacuum with high
dielectric insulating oil. Inherent to the housing is an
expansion chamber designed to provide adequate
compensation for the full temperature range.
Operating Temperature: +50°F to 100°F (+10ûC to +40ûC)
Storage Temperature: -40°F to 160°F (-40ûC to +70ûC)
Inherent Filtration:
Radiation Output:
Technique 65kV, 7mA, 0.50sec. Source to Detector Distance 230mm (9”)
410mR ±125mR (3.55 mGy ± 1.05 mGy)
Typical Half Layer: 1.9mm Aluminum at 65kV
Thickness / mm. AHE1/mm. Al. Equivalent
Material Min. Max. 65 kV Min. Max.
Glass 1.27 1.91 0.51 0.65 0.97
Insulating Oil 6.5 7.7 0.08 0.52 0.62
Polycarbonate 16.4 16.7 0.09 1.48 1.50
Total 2.64 3.09
Printed on: 29 Mär 2012, 05:33:23 pm; Printed by: UWE.ZELLER

765DC
16
Leakage Radiation: Complies to 601-1-3 IEC Section 29.204 “Leakage
Radiation”. Maximum continuous power input equals
1,400 heat units per min. (HU/Min.) tube is the limiting
factor. HU/Min. = (kV) x (mA) x (1.4) x (Exp. Time
(sec) / 60)
1,400 HU/Min. = 65 kV x 0.27mA x 1.4 x 60 sec.
X-Ray Coverage: The insert target angle is 12.5°
Circular cone at 8 inches (200 mm) SSD2 60 mm
Dia. +0, -3mm.
Circular cone at 12 inches (300 mm) SSD2 60 mm
Dia. +0, -3mm.
Rectangular cone at 8 inches (200 mm) SSD2 36mm
x 46mm
1 AHE Aluminum Half value Equivalent correlation2 SSD Source to Skin Distance
Weight: 13.0 lbs. 5.9 kg.
Maximum Head Voltage: Anode to Cathode 65 kV
Anode to Ground 70 kVThermal Characteristics:
Housing Heat Storage Capacity 250 kHU’s (177J)
(see Graph for more detail)
Maximum Cooling Rate 3.3 kHU’s/Min.
Heat Units = (kV * mA * time in seconds * 1.4)
Gendex 765DC HousingHeating & Coling Chart
20
25
30
35
40
45
0 25 50 75 100125150175200225250275300325350
Time (min.)
Te
mp
era
ture
(°C
)
0
50
100
150
200
250
300
He
at
Un
its
(k
Hu
's)
Heating, 100% Duty Cycle, ambient
temperature 20°C
Cooling, ambient
temperature 20°C
Printed on: 29 Mär 2012, 05:33:23 pm; Printed by: UWE.ZELLER

765DC
17
RECOMMENDED MAINTANCE
In the interest of equipment safety, a maintencnce program must be established. It is the
owner’s responsibility to arrange for this service and to assure that the personnel
performing this are fully qualified to service GENDEX dental x-ray equipment.
The calibration and adjustments to be performed are listed in the System and Function
Checks section of the 765DC Installation and Maintenance manual supplied with the
product.
It is recommended that the following System and Function Checks and
Maintenance Procedure be performed at installation and every twelve months
thereafter.
System Function Checks listed in Section E, page 35 of the 765DC
Installation / Maintence Manual.
Suspension Arm Maintenance as listed in Section F, page 43 of the 765DC
Installation / Maintenance Manual.
Note: To avoid any potential hazard to operators or patients, any unusual
operation, mechanical functionality, or debris should be reported to your service
agent immediately.
CLEANING AND DISINFECTING
All external and cleanable surfaces can be cleaned and/or disinfected using the
following list of commonly used solutions:
Isopropyl alcohol
Phenylphenl
Benzyl-P-Chlorophenol
Iodophor
Disobutyl phenoxethoxycthyl Dimethyl Benzyl Ammonium Chloride
Note: Use bleach or glutaraldehydes only occasionally.
Verify the contents of any cleaning or disinfecting solution against the list
above applying it the any surfaces of the 765DC.
Printed on: 29 Mär 2012, 05:33:23 pm; Printed by: UWE.ZELLER

765DC
18
Inhaltsverzeichnis
Allgemeine Beschreibung . . . . . .. . . . . . . . . . . . . . . . . Seite 19
Kennzeichnungen . . . . . . . . . . . . . . . . . . . . . . . . . Seite 20
Übereinstimmung mit gültigen Normen . . . . . . . . . . . . . Seite 21
Erklärung der technischen Symbole .. . . . . . . . . . . . . Seite 22
Sicherheit . . . . . . . . . . . . . . . . . . . . . . …. . . . . . . . . . Seite 23
Bedienungselemente . . . . . . . . . . . . .. . . . . . . . . . . . . Seite 24
Bedienung . . . . . . . . . . . . . . . . . . . . . . . . . . . . . . Seite 25
Konfiguration der Timereinstellungen . . . . . . . . . . . . . Seite 26
Standard-Belichtungstabellen . . . . . . . . . . . . . . . . . . . . Seite 29
Fehleranzeige und -zustände . . . . . . . .. . . . . . . . . . . . . Seite 30
Technische Daten des Systems . . . . . . . . . . . . . . . . . . . Seite 31
Empfohlene Wartung . . . . . . . . . . . . . . . . . . . . . . . . . Seite 34
Reinigung und Desinfektion . . . . . . . . . . . . . . . . . . . . . Seite 34
Printed on: 29 Mär 2012, 05:33:23 pm; Printed by: UWE.ZELLER

765DC
19
INTRAORALES RÖNTGENGERÄT 765DC
ALLGEMEINE BESCHREIBUNG
Diese Bedienungsanweisung soll dem Anwender bei der sicheren und effizienten Bedienung desHochfrequenz-Intraoral-Röntgengeräts 765DC unterstützen. Es enthält die zur Bedienung des Gerätserforderlichen Informationen sowie technische Daten und Verfahren zur Durchführung einfacherWartungsarbeiten. Diese Anweisung sorgfältig durchlesen, bevor das Gerät in Betrieb genommen wird.Besonders auf alle in der Anweisung enthaltenen Warn- und Vorsichtshinweise achten.
Dieses Handbuch wurde ursprünglich in englischer Sprache verfasst.
SYSTEMKOMPONENTEN
SCHERENTRAGARM Mit ihm kann der Röntgenstrahler
so positioniert werden, dass erüber eine Reichweite von 140 cm,165 cm oder 191 cm verfügt.
HAUPTBEDIENELEMENTE Erlaubt die Einstellung
des anatomischenAufnahmeobjektes.
Wahl zwischen Erwachsenenund Kindern mit einer Taste.
Wahl zwischen Film und digitalerBilddarstellung mit einer Taste.
TUBUS Standardmäßig 20 cm FFA.
Sonderausstattung: 30 cm FFAoder Rechtwinkelkollimator.
RÖNTGENSTRAHLER Der Brennfleck wird durch die
Schraube im Deckel angezeigt. Einzigartige
Zusatzbedienelemente.
Printed on: 29 Mär 2012, 05:33:23 pm; Printed by: UWE.ZELLER

765DC
20
KENNZEICHNUNG
Der Röntgenstrahler, die Hauptbedienelemente und der Tubus des 765DC verfügen überKennzeichnungsaufkleber, auf denen Modellnummer, Seriennummer und zutreffendeProduktzulassungen angegeben sind. An bestimmten Komponenten, die den U.S. Government RadiationPerformance Standards 21 CFR (Strahlungsleistungsnormen der US-Regierung), Unterkapitel J,entsprechen müssen, wird zusammen mit anderen erforderlichen Informationen eine Zulassungserklärungangeführt.
Printed on: 29 Mär 2012, 05:33:23 pm; Printed by: UWE.ZELLER

765DC
21
ÜBEREINSTIMMUNG MIT GÜLTIGEN NORMEN
Das Röntgengerät 765DC entspricht folgenden Normen:
Allgemeine (elektrische/mechanische) Sicherheit:
UL60601-1 Aktenzeichen: E185414
MEDIZINISCHE AUSRÜSTUNG NUR HINSICHTLICH STROMSCHLAG- UND FEUERGEFAHRSOWIE MECHANISCHER GEFAHREN IN ÜBEREINSTIMMUNG MIT UL60601-1, IEC60601-1,CAN/CSA C22.2 NO,601.1-M90 UND FOLGENDER BESONDERER NORMEN: IEC60601-2-32,IEC60601-2-7, IEC60601-2-28, IEC60601-1-2.
Strahlenschutz IEC60601-1-3 Strahlenschutz/Röntgengeräte.
Die zugelassenen Komponenten des Röntgengeräts 765DC entsprechen zum Zeitpunkt derHerstellung den Radiation Performance Standards 21 CFR, Unterkapitel J.
Das Gerät darf nur in Übereinstimmung mit den Sicherheitsverfahren undBetriebsanweisungen in diesem Benutzerhandbuch und im Installations-/Wartungshandbuch und nur für Zwecke und Anwendungen, für die es konzipiertworden ist, installiert und betrieben werden. Änderungen und/oder Anbauten amGerät dürfen nur von Gendex oder einem von Gendex ausdrücklich dazuberechtigten Unternehmen durchgeführt werden. Solche Änderungen müssensowohl mit den gesetzlichen Anforderungen als auch mit den allgemein gültigentechnischen Regeln übereinstimmen. Es liegt im Verantwortungsbereich desBenutzers, sicherzustellen, dass bestehende gesetzlicheVorschriften in Bezug auf das Gebäude bei der Installation des Geräts eingehaltenwerden.
WICHTIG! …… SCHUTZ VOR RÖNTGENSTRAHLEN
Röntgengeräte können bei unsachgemäßem Gebrauch Verletzungenverursachen.
Vor der Inbetriebnahme des 765DC müssen die Anweisungen in diesem Handbuch gelesenund befolgt werden. Ihr Gendex-Fachhändler unterstützt Sie bei der Inbetriebnahme des 765DC.
Das intraorale Röntgengerät 765DC bietet hochgradigen Schutz vor unnötigerRöntgenstrahlung. Keine praktische Konstruktion kann jedoch umfassenden Schutz bieten oderverhindern, dass die Bediener sich oder andere Personen unnötiger Strahlung aussetzen.
34SL
Printed on: 29 Mär 2012, 05:33:23 pm; Printed by: UWE.ZELLER

765DC
22
ERKLÄRUNG DER SYMBOLE AUF DEN TECHNISCHENAUFKLEBERN
Typ b: Schutz vor Stromschlag (UL60601-1:2003)
Siehe schriftliche Anweisungen in diesem Benutzerhandbuch
RÖNTGENSTRAHLENQUELLE Baugruppe
ACHTUNG RÖNTGENSTRAHLENWENN DIE SICHEREN BELICHTUNGSFAKTOREN UNDBEDIENUNGSANWEISUNGEN NICHT BEACHTET WERDEN,KANN DIESES RÖNTGENGERÄT EINE GEFAHR FÜRPATIENTEN UND BEDIENER DARSTELLEN.
RÖNTGENSTRAHLUNG
STROMFÜHRENDER DRAHT vom Stromversorgungsnetz
NEUTRALER DRAHT vom Stromversorgungsnetz
Erdung
Elektronische AusrüstungNicht im normalen Abfall entsorgen
Klassifikation
Das 765DC gehört zu Geräten der UL Klasse I Typ b (UL60601-1:2003).
Printed on: 29 Mär 2012, 05:33:23 pm; Printed by: UWE.ZELLER

765DC
23
SICHERHEIT
Strahlenschutz
Dieses Gerät darf nur von ausgebildetem und befugtem Personal unterBerücksichtigung aller den Strahlenschutz betreffenden Gesetze und Verordnungenbetrieben werden.
Zum eigenen Schutz muss der Bediener jederzeit einen Abstand von 2 m zumBrennfleck und Röntgenstrahl einhalten.
Zum Schutz des Patienten und des Bedieners vor Röntgenstrahlung müssen allean diesem Gerät vorhandenen Strahlungsmerkmale sowie alle verfügbarenVorrichtungen, sämtlichesZubehör und alle Verfahren zum Strahlenschutz voll ausgenutzt werden.
Elektrische Sicherheit
Die Abdeckungen am Gerät dürfen nur von ausgebildetem und befugtemWartungspersonal entfernt werden.
Dieses Gerät darf nur in Räumen oder Bereichen verwendet werden, die mit allenGesetzen und Empfehlungen übereinstimmen, welche die elektrische Sicherheit in fürmedizinische Zwecke verwendeten Räumen betreffen, z.B. IEC, US National ElectricCode oder VDE-Normen, die Vorkehrungen für eine zusätzliche Erdungsklemme für denStromversorgungsanschluss betreffen.
Vor dem Reinigen und Desinfizieren muss das Gerät immer von derHauptstromversorgung getrennt werden.
GEWÖHNLICHES MEDIZINISCHES GERÄT ohne Schutz vor Eindringen vonFlüssigkeiten. Kein Wasser oder irgendwelche anderen Flüssigkeiten dürfen in das Inneredes Geräts eindringen, da dies zu Kurzschlüssen und Korrosion führen kann.
Explosionsschutz
Dieses Gerät eignet sich nicht für einen Einsatz in der Nähe von entzündlichenGasen oder Dämpfen, da diese sich entzünden und dadurch Verletzungen und/oderSchäden am Gerät verursachen können. Wenn solche Desinfektionsmittel verwendetwerden, muss vor dem Gebrauch des Geräts so lange gewartet werden, bis sich dieDämpfe verflüchtigt haben.
Mechanische Sicherheit
Wo eine vollständige Gewährleistung der Sicherheit nicht möglich ist, muß injedem Falle sichergestellt sein, daß Kleidungsstücke und vor allem Körperteile vonPatient und Bediener sich nicht im Gerät verklemmen bzw. sich nicht am Gerät verletzenkönnen. Insbesonders, vergewissern Sie sich, daß bei Schließen des Scherenarms einFingerquetschen unmöglich ist.
Printed on: 29 Mär 2012, 05:33:23 pm; Printed by: UWE.ZELLER

765DC
24
BEDIENUNGSELEMENTE
1. MANUELLE WAHL DERBELICHTUNGSZEIT –Ermöglicht dem Bediener neben derObjektwahl manuell die Belichtungszeitnach oben oder unten auf einen spezifischenWerte auf der R10-Skala einzustellen.
2. WAHL DER AUFNAHMEOBJEKTES -Ermöglicht dem Bediener, dieBelichtungszeit je nach gewünschtemZahnbereichzu wählen.
3. WAHL DES BILDEMPFÄNGERTYPS -Ermöglicht dem Bediener, zwischen derVerwendung von Film oder eines digitalenBilddarstellungssystemsumzuschalten. Dadurch werden auch alleVoreinstellungen für die Objektwahlgeändert.
4. PATIENTENWAHL - Ermöglicht demBediener die Wahl zwischen einemErwachsenen oder einem Kind. Dadurchwerden auch alle Voreinstellungen für dieObjektwahl geändert.
5. BEREITSCHAFTS-KONTROLLEUCHTE -Zeigt an, dass der Schalter „Ein“ gedrücktwurde und das System betriebsbereit ist.
6. ABKÜHLUNGS-KONTROLLEUCHTE- Diese Leuchte leuchtet auf, wenn aufgrundder Einschaltdauer des Systems vor dernächsten Belichtung ein Abkühlen desRöntgenstrahlers erforderlich ist.
7. STRAHLUNGS-KONTROLLEUCHTE -Diese Leuchte leuchtet auf, wenn dieBelichtungstaste gedrückt wird, umanzuzeigen, dass Röntgenstrahlenerzeugt werden.
8. AUSLÖSESCHALTER- Ermöglicht dem Bediener, die Belichtungdirekt von der Bedienungskonsole auseinzuleiten, wenn dieses sich außerhalb desRöntgenraumes befindet.
9. AUSLÖSESCHALTER MITSPIRALKABEL(Sonderausstattung) - Ermöglicht demBediener, das Behandlungszimmer zuverlassen und danach die Belichtungeinzuleiten.
10. ZUSATZBEDIENUNGSELEMENTEAM RÖNTGENSTRAHLER- Ermöglicht dem Bediener, bei Bedarfdie Wahl des Aufnahmeobjektes direkt amRöntgenstrahler zu prüfen und einzustellen.Durch eine Leuchte wird außerdemangezeigt, ob die Einstellung fürErwachsene oder Kinder gewählt wurde.1
2
3
4
5
6
7
8 10
11
Printed on: 29 Mär 2012, 05:33:23 pm; Printed by: UWE.ZELLER

765DC
25
BEDIENUNG
1. Den Ein/Aus-Schalter in die Stellung „Ein“ schalten. Die Bereitschafts-Kontrollleuchte aufder Vorderseite der Bedienungskonsole leuchtet auf.
2. Das Gerät entweder auf Film oder digitale Bilddarstellung einstellen, oder überprüfen, welcheEinstellung vorgenommen wurde. Die Kontrollleuchte neben dem entsprechenden Symbolsollte aufleuchten. Die Taste zwischen den beiden Symbolen drücken, um die richtige Wahlvorzunehmen.
3. Das Gerät auf die jeweilige Patientenwahl (Erwachsener oder Kind) einstellen, oderüberprüfen, welche Einstellung vorgenommen wurde. Die Taste zwischen den beidenSymbolen drücken, um die richtige Wahl vorzunehmen.
4. Die Wahltaste in der Mitte der Bedienungskonsole drücken, bis die Kontrollleuchte nebendem Zahnsymbol (oder Bissflügelsymbol) für den Bereich, der geröntgt werden soll,aufleuchtet.
Anmerkung: Die Standardeinstellungen für die Belichtungszeit (die nach dem Einschaltendes Geräts zu Beginn angezeigte Zeit) können gemäß den Anweisungen im Abschnitt„Konfiguration der Timereinstellungen“ auf Seite 26 geändert werden.
5. Wenn gewünscht, kann unter Verwendung der R10-Skala mit den Nach-Oben/Unten-Tasteneine bestimmte, von der Standardeinstellung abweichende manuell Belichtungszeit gewähltwerden. Für Empfehlungen zu Okklusionsfilm siehe die empfohlenen Standard-Belichtungstabellen auf Seite 29.
6. Den Röntgenstrahler unter Anwendung geltender Standardverfahren am Patienten in Stellungbringen. Anmerkung: Der standardmäßig gelieferte Tubus mit einem Fokus/Filmanbstandvon 20 cm wird für das Halbwinkel-Verfahren empfohlen. Der als Sonderausstattungerhältliche Tubus mit einem Fokus/Filmabstand von 30 cm wird für das Parallel-Verfahrenempfohlen. Die Voreinstellung für die Verwendung des Tubus mit einem Fokus/Filmabstandvon 30 cm ist intern eingestellt und kann leicht durch einen Servicetechniker vorgenommenwerden.
7. Vor der Belichtung die Zeiteinstellungen mit Hilfe der Zusatzbedienungselemente amRöhrenkopf prüfen oder ändern.
8. Bei Verwendung des als Sonderausstattung erhältlichen Auslöseschalter mit Spiralkabel wirdunbedingt empfohlen, dass der Bediener das Behandlungszimmer verlässt. Anmerkung: ZurEinhaltung der Sicherheitsvorschriften im Strahlenschutz, ist ein optischer und akustischerKontakt vom Auslöseort zum Patienten/Gerät erforderlich.
9. Den Auslöseschalter drücken und festhalten, bis das akustische Signal verstummt und dieBelichtungs-Kontrollleuchte erlischt. (Anmerkung: Die Belichtung wird jederzeit durchLoslassen der Belichtungstaste sofort abgebrochen).
Printed on: 29 Mär 2012, 05:33:23 pm; Printed by: UWE.ZELLER

765DC
26
Konfiguration der Timereinstellungen
Die Bedienungskonsole des 765DC wird ab Werk für den Betrieb mit einerStandardkonfiguration voreingestellt (Standardeinstellungen). Diese Konfiguration basiertauf der Verwendung der standardmäßigen Tubus mit einem Fokus/Filmabstand von 20 cmund eines Films der Empfindlichkeitsstufe D oder eines DenOptix-Digital-Bilddarstellungssystems. Bei dieser Standardkonfiguration sind die Belichtungszeiten fürdie anatomischen Wahlmöglichkeiten voreingestellt. Diese Voreinstellungen können für dieVerwendung von Filmen der Empfindlichkeitsstufe E oder F oder anderen digitalenBilddarstellungssystemen oder des als Sonderausstattung erhältlichen Tubus mit größeremFokus/Filmabstand geändert werden.
Die Filmempfindlichkeit und die digitale Option können mit Hilfe derBedienungskonsolentasten und der Software geändert werden.
Die der Fokus/Filmabstand des Tubus wird durch Umschalten eines Schaltersim Inneren des Schaltkastens kompensiert. Anmerkung: Es wird empfohlen, dassdieses nur durch einen befugten Service -Techniker durchgeführt wird.
Änderung der Standardeinstellungen für die verwendete Filmempfindlichkeit
Das 765DC wird ab Werk für die Verwendung von Filmen derEmpfindlichkeitsstufe D eingestellt. Dies kann überprüft werden, indem dieBedienungskonsole eingeschaltet und darauf geachtet wird, ob die zu Beginn angezeigteZeit 0,320 Sekunden beträgt. Bei Verwendung von Filmen der Empfindlichkeitsstufe E oderF müssen die Belichtungszeiten geändert werden. Das Gerät kann so programmiert werden,dass dieses automatisch durchgeführt wird.
1. Das Gerät ausschalten.2. Die Taste für die Objektwahl drücken und festhalten, während das Gerät eingeschaltet wird.3. Auf dem Display erscheint nun „SP 1“. Damit wird bestätigt, dass sich das Gerät im
Filmempfindlichkeitsmenü befindet.4. Die ‚Nach-Oben‘-Taste für die Belichtungszeit drücken. Auf der Zeitanzeige erscheint nun
„SP 2“. Damit wird bestätigt, dass das Gerät nun für Filme der Empfindlichkeitsstufe Eeingestellt ist.
5. Die Taste für die Objektwahl erneut drücken, um die neue Einstellung zu speichern.Die angezeigte Zeit sollte jetzt 0,200 Sekunden betragen.
6. Die ‚Nach-Oben‘-Taste für die Belichtungszeit drücken. Auf der Zeitanzeige erscheint nun„SP 3“. Damit wird bestätigt, dass das Gerät nun für Filme der Empfindlichkeitsstufe Feingestellt ist.
7. Die Taste für die Objektwahl erneut drücken, um dieneue Einstellung zu speichern. Die angezeigte Zeitsollte jetzt 0,125 Sekunden betragen.
Belichtungszeit-WahltasteObjektwahltasteWahlschalter für Film oder digitale Bilddarstellung
Printed on: 29 Mär 2012, 05:33:23 pm; Printed by: UWE.ZELLER

765DC
27
Änderung der digitalen Option
Das 765DC wird ab Werk für die Verwendung des Gendex-DenOptix-Digital-Bilddarstellungssystems eingestellt. Dies kann bestätigt werden, indem das Geräteingeschaltet und die Taste zum Wählen der digitalen Bilddarstellung gedrückt wird. Dieangezeigte Zeit sollte jetzt 0,200 Sekunden betragen.
1. Das Gerät ausschalten.2. Die Taste für die Objektwahl drücken und festhalten, während das Gerät eingeschaltet wird
(siehe Abbildung 1).3. Auf dem Display erscheint jetzt „SP 1“ oder „SP 2“ oder „SP 3“, je nachdem, für welchen
Filmtyp das Gerät konfiguriert ist.4. Den Wahlschalter für Film oder digitale Bilddarstellung drücken, bis „D1“ angezeigt wird.
Die ‚Nach-Oben‘-Taste für die Belichtungszeit drücken. Auf der Anzeige erscheint jetzt„D2“. Dadurch wird angezeigt, dass das Gerät nun für ein CCD-Digital-Bilddarstellungssystem konfiguriert ist.
5. Die Taste für die Objektwahl erneut drücken, um die neue Einstellung zu speichern.
Änderung der Voreinstellung
Werkseitig ist das 765DC so eingestellt, daß beim Einschalten des Geräts die Optionen„Film“ und „Erwachsener“ gewählt sind. Wenn gewünscht, kann das Gerät so eingestelltwerden, daß es beim Einschalten der Bedienungskonsole automatisch die Optionen„Digital“ oder „Kind“ wählt.
1. Das Gerät ausschalten.2. Die Taste für die Objektwahl drücken und festhalten, während das Gerät eingeschaltet wird
(siehe Abbildung 1).3. Auf dem Display erscheint jetzt entweder „SP 1“, „SP 2“, „SP 3“ „D1“ oder „D2“, je
nachdem, ob die Option „Film“ oder „Digital“ gewählt wurde. Bitte beachten, dass die grüneKontrolleuchte neben der ausgewählten Option blinkt.
4. Damit das Gerät in der digitalen Betriebsart eingeschaltet wird, sicherstellen, dass die grüneLeuchte neben der digitalen Option blinkt. Die Taste für die Objektwahl drücken, um dieInformationen zu speichern, und das Gerät ausschalten. Das Gerät sollte nun nach demEinschalten automatisch die digitale Option wählen.
5. Damit das Gerät in der Betriebsart „Kind“ eingeschaltet wird, den Wählschalter fürErwachsene oder Kinder drücken, bis die grüne Leuchte neben der Option „Kind“ blinkt. DieTaste für die Objektwahl drücken, um die Informationen zu speichern, und das Gerätausschalten. Das Gerät sollte nun nach dem Einschalten automatisch die Option „Kind“wählen.
Printed on: 29 Mär 2012, 05:33:23 pm; Printed by: UWE.ZELLER

765DC
28
Änderung des Geräts bei Verwendung des Tubus mit einem Fokus/Filmabstand von30 cm (Sonderausstattung)
Das 765DC wird ab Werk für die Verwendung der standardmäßig gelieferten Tubus miteinem Fokus/Filmabstand von 20 cm eingestellt. Der Tubus mit einem Fokus/Filmabstand von 30cm wird empfohlen, wenn das Parallel-Filmpositionierungsverfahren zusammen mit dem Rinn-XCP-Satz verwendet wird. Bei Verwendung des Tubus mit dem größeren Fokus/Filmabstandsind längere Belichtungszeiten erforderlich, die durch Änderung der internen elektrischenEinstellungen in das Gerät programmiert werden können.
Diese Änderung sollte nur durch einen qualifizierten Wartungstechniker durchgeführtwerden. Wenden Sie sich zur Durchführung dieser Änderung an Ihren Dental-Fachhändleroder den GENDEX-Service.
Printed on: 29 Mär 2012, 05:33:23 pm; Printed by: UWE.ZELLER

765DC
29
Standard-Belichtungstabellen
SPEED 1: Film der Empfindlichkeitsstufe D Tubus mit 20 cm Fokus/Filmabstand Tubus mit 30 cm Fokus/Filmabstand
Gewählte Anatomie Erwachsener Kind Erwachsener KindBissflügel 0.320 Sekunden 0.160 Sekunden 0.630 Sekunden 0.320 SekundenUntere Molaren 0.320 Sekunden 0.160 Sekunden 0.630 Sekunden 0.320 SekundenObere Molaren 0.400 Sekunden 0.200 Sekunden 0.800 Sekunden 0.400 SekundenSchneidezahn 0.200 Sekunden 0.100 Sekunden 0.400 Sekunden 0.200 SekundenEckzähne 0.250 Sekunden 0.125 Sekunden 0.500 Sekunden 0.250 SekundenOcclusal 0.500 Sekunden 0.250 Sekunden 1.00 Sekunden 0.500 Sekunden
SPEED 2: Film der Empfindlichkeitsstufe E Tubus mit 20 cm Fokus/Filmabstand Tubus mit 30 cm Fokus/Filmabstand
Gewählte Anatomie Erwachsener Kind Erwachsener KindBissflügel 0.200 Sekunden 0.100 Sekunden 0.400 Sekunden 0.200 SekundenUntere Molaren 0.200 Sekunden 0.100 Sekunden 0.400 Sekunden 0.200 SekundenObere Molaren 0.250 Sekunden 0.125 Sekunden 0.500 Sekunden 0.250 SekundenSchneidezahn 0.125 Sekunden 0.063 Sekunden 0.250 Sekunden 0.125 SekundenEckzähne 0.160 Sekunden 0.080 Sekunden 0.320 Sekunden 0.160 SekundenOcclusal 0.320 Sekunden 0.160 Sekunden 0.630 Sekunden 0.320 Sekunden
SPEED 3: Film der Empfindlichkeitsstufe F Tubus mit 20 cm Fokus/Filmabstand Tubus mit 30 cm Fokus/Filmabstand
Gewählte Anatomie Erwachsener Kind Erwachsener KindBissflügel 0.125 Sekunden 0.063 Sekunden 0.250 Sekunden 0.125 SekundenUntere Molaren 0.125 Sekunden 0.063 Sekunden 0.250 Sekunden 0.125 SekundenObere Molaren 0.160 Sekunden 0.080 Sekunden 0.320 Sekunden 0.160 SekundenSchneidezahn 0.080 Sekunden 0.040 Sekunden 0.160 Sekunden 0.080 SekundenEckzähne 0.100 Sekunden 0.050 Sekunden 0.200 Sekunden 0.100 SekundenOcclusal 0.200 Sekunden 0.100 Sekunden 0.400 Sekunden 0.200 Sekunden
D1: Digital (DenOptix) Tubus mit 20 cm Fokus/Filmabstand Tubus mit 30 cm Fokus/Filmabstand
Gewählte Anatomie Erwachsener Kind Erwachsener KindBissflügel 0.160 Sekunden 0.080 Sekunden 0.320 Sekunden 0.160 SekundenUntere Molaren 0.160 Sekunden 0.080 Sekunden 0.320 Sekunden 0.160 SekundenObere Molaren 0.200 Sekunden 0.100 Sekunden 0.400 Sekunden 0.200 SekundenSchneidezahn 0.100 Sekunden 0.050 Sekunden 0.200 Sekunden 0.100 SekundenEckzähne 0.125 Sekunden 0.063 Sekunden 0.250 Sekunden 0.125 SekundenOcclusal 0.250 Sekunden 0.125 Sekunden 0.500 Sekunden 0.250 Sekunden
D2: Digital (Sensor) Tubus mit 20 cm Fokus/Filmabstand Tubus mit 30 cm Fokus/Filmabstand
Gewählte Anatomie Erwachsener Kind Erwachsener KindBissflügel 0.080 Sekunden 0.040 Sekunden 0.160 Sekunden 0.080 SekundenUntere Molaren 0.080 Sekunden 0.040 Sekunden 0.160 Sekunden 0.080 SekundenObere Molaren 0.100 Sekunden 0.050 Sekunden 0.200 Sekunden 0.100 SekundenSchneidezahn 0.050 Sekunden 0.025 Sekunden 0.100 Sekunden 0.050 SekundenEckzähne 0.063 Sekunden 0.032 Sekunden 0.125 Sekunden 0.063 SekundenOcclusal 0.125 Sekunden 0.063 Sekunden 0.250 Sekunden 0.125 Sekunden
Printed on: 29 Mär 2012, 05:33:23 pm; Printed by: UWE.ZELLER

765DC
30
Fehleranzeige und -zustände
Die grüne Leuchte ‚Bereit‘, die gelbe Leuchte ‚Abkühlung‘ und 4 digitale LED-Anzeigen
mit 7 Segmenten an der Vorderseite des Bedienfelds können anzeigen, daß Fehler aufgetreten
sind. In der folgenden Tabelle werden die Bedeutung der Kontrolleuchten und die erforderlichen
Maßnahmen aufgeführt.
Fehleranzeige Erklärung Erforderliche Maßnahme
Die gelbe Leuchte ‚Abkühlung‘
leuchtet auf und die Belichtung
kann nicht durchgeführt werden.
Normale konstruktionsbedingte
Funktion. Die Leuchte
‚Abkühlung‘ leuchtet auf, wenn
zu viele Belichtungen in zu
kurzer Zeit durchgeführt werden.
Diese Funktion schützt den
Röhrenkopf und verlängert seine
Lebensdauer.
Warten, bis die Leuchte erlischt,
wodurch angezeigt wird, daß die Röhre
ausreichend abgekühlt ist
“Err0“ blinkt auf den 7-Segment-
LED-Anzeigen.
Die Belichtung wurde vorzeitig
abgebrochen. Dies kann durch
eine Störung des Geräts oder
dadurch verursacht werden, daß
der Bediener die Belichtungstaste
vor Ablauf der gewählten
Belichtungszeit losläßt.
Durch Drücken irgendeiner Taste außer
der Belichtungstaste auf dem Bedienfeld
wird die Anzeige gelöscht und der
normale Betrieb wiederhergestellt. Es ist
darauf zu achten, daß die
Belichtungstaste so lange gedrückt und
festgehalten wird, bis die Belichtung
beendet ist.
“Err1“ blinkt auf der 7-Segment-
LED.
Die Stromversorgungsspannung
lag außerhalb des erforderlichen
Bereichs:
108 V – 132 V
198 V – 253 V
Warten, bis sich die Netzspannung
normalisiert hat (wird dadurch angezeigt,
daß die Leuchte ständig aufleuchtet) oder
die Stromleitung durch einen
qualifizierten Elektriker überprüfen
lassen.
“Err2“ erscheint auf den 7-
Segment-LED-Anzeigen.
Die Stromversorgungsspannung
ist während der Belichtung unter
den erforderlichen Mindestwert
(108 V oder 198 V) abgefallen.
Die Belichtung wird nicht
abgebrochen, aber die
Strahlungsabgabe kann unter
normal liegen.
Durch Drücken irgendeiner Taste auf
dem Bedienfeld wird die blinkende
Leuchte ausgeschaltet und der normale
Betrieb wiederhergestellt. Wenn das
Problem weiterhin vorliegt, wird
unbedingt empfohlen, die Stromleitung
durch einen qualifizierten Elektriker
überprüfen zu lassen.
“Err3“ blinkt auf den 7-Segment-
LED-Anzeigen.
Ein Hardware-Fehler ist
aufgetreten.
Das Gerät zurücksetzen, indem der
Netzschalter 5 Sekunden AUS und dann
wieder AN gestellt wird. Bleibt das
Problem bestehen, einen befugten
Gendex-Wartungstechniker rufen.
“Err4“ blinkt auf den 7-Segment-
LED-Anzeigen
Ein Fehler ist aufgetreten und hat
die Belichtung beendet.
Durch Drücken irgendeiner Taste außer
der Belichtungstaste auf dem Bedienfeld
wird der Fehler gelöscht und der normale
Betrieb wiederhergestellt. Bleibt das
Problem bestehen, einen befugten
Gendex-Wartungstechniker rufen.
Printed on: 29 Mär 2012, 05:33:23 pm; Printed by: UWE.ZELLER

765DC
31
TECHNISCHE DATEN
Die Spezifikationen zu Kühlung und Nennleistung gelten für Höhen bis zu 3600 m über NN,
einer durchschnittlichen relativen Luftfeuchtigkeit von nicht mehr als 95 % und einer
Umgebungshöchsttemperatur von nicht mehr als 40 °C.
TECHNISCHE DATEN DES RÖNTGENSTRAHLERS
Max. Nennspannung der Röhre: 65 kV bei 7 mA Röhrenstrom.
Leckstrahlung in der Ladephase: Weniger als 250 mGy/h bei 1 Meter Abstand vom Brennpunkt.
Minimale zulässige erste Halbwertsschicht: Größer als 1,5 mm Al äquivalent.
Nominaler Brennfleck: 0,4 mm (IEC 336/1993)
Anodenwinkel: 12,5 Grad
Anodenwärmespeicherkapazität: 7 kHU
Arbeitszyklus: 1:30
TECHNISCHE DATEN DES TUBUS
Röntgenstrahlenfeldgröße: Hat einen Durchmesser von 6 cm ; gemessen am distalen Ende der
montierten Tubus.
Abstand zwischen Brennfleck und distalem Ende des Tubus: 20 oder 30 cm.
STROMVERSORGUNGSANFORDERUNGEN
Nennspannung Toleranz Nutzbereich120 VAC ± 10% 108 - 132 VAC
230 VAC + 10%, -14% 198 - 253 VAC
GENAUIGKEIT DER TECHNISCHEN FAKTOREN
Röhrennennspannung 65 kV ± 3 kV
Röhrennennstrom 7 mA ± 5%
Belichtungszeit .02 -.50 sec. ± .005 sec.
.63 – 2.00 sec. ± 1%
Printed on: 29 Mär 2012, 05:33:23 pm; Printed by: UWE.ZELLER

765DC
32
Gehäuse für intraorale RöntgenröhreProduktdatenblatt
Gendex® 765DC
Das Gehäuse Gendex® 765DC ist zum Betrieb mit dem Einschub Gendex® GX 70-10DC
vorgesehen. Das Gehäuse wurde für den Betrieb an der Hochfrequenz-Hochspannungssteuerung
Gendex® 765DC konstruiert, wodurch das intraorale Zahnröntgengerät Gendex® 765DC gebildet
wird.
Technische Daten
Stoßfestes Gehäuse: Zink, hermetisch versiegelt unter Vakuum mit
hochdielektrischem Isolieröl. In das Gehäuse ist eine
Ausdehnungskammer zum angemessenen Ausgleich für
den vollen Temperaturbereich integriert.
Betriebstemperatur: +50 °F bis 100 °F (+10 °C bis +40 °C)
Lagerungstemperatur: -40 °F bis 160 °F (-40 °C bis +70 °C)
Eigenfilterung:
Dicke / mm AHG1 / mm Aluminiumgleichwert
Material Min. Max. 65 kV Min. Max.
Glas 1,27 1,91 0,51 0,65 0,97
Isolieröl 6,5 7,7 0,08 0,52 0,62
Polykarbonat 16,4 16,7 0,09 1,48 1,50
Insgesamt 2,64 3,09
Strahlungsabgabe:Verfahren 65 kV, 7 mA, 0,50 s
Abstand Quelle-Detektor 9 Zoll (230 mm)
410 mR ±125 mR (3,55 mGy ± 1,05 mGy)
Typische Halbwertsschichtdicke bei 65 kV: 1,9 mm Aluminium bei 65 kV
Leckstrahlung: Entspricht 601-1-3 IEC Abschnitt 29.204
„Leckstrahlung“. Maximale Dauerleistungsaufnahme
Printed on: 29 Mär 2012, 05:33:23 pm; Printed by: UWE.ZELLER

765DC
33
entspricht 1400 Wärmeeinheiten (WE) je min (WE/min).
Die Röhre ist der begrenzende Faktor. WE/Min. = (kV)
x (mA) x (1,4) x (Bestrahlungszeit (s) / 60)
1400 WE/Min. = 65 kV x 0,27 mA x 1,4 x 60 s
Röntgenbedeckung: Der Einschubzielwinkel beträgt 12,5°
Kreiskegel bei 8 Zoll (200 mm) AQH2 60 mm
Durchmesser +0, -3 mm.
Kreiskegel bei 12 Zoll (300 mm) AQH2 60 mm
Durchmesser +0, -3 mm.
Rechteckkegel bei 8 Zoll (200 mm) AQH2 36 mm x
46 mm
1 AHG Aluminium-Halbwert-Gleichwertskorrelation2 AQH Abstand Quelle-Haut
Gewicht: 13,0 Pfund (englisch) 5,9 kg
Maximale Strahlerkopfspannung: Anode zu Kathode 65 kV
Anode zu Masse 70 kVThermoeigenschaften:
Wärmespeicherkapazität des Gehäuses 250 kWE (177 J)
(siehe Diagramm für weitere Details)
Maximale Abkühlungsrate 3,3 kWE/min
Wärmeeinheiten (WE) = (kV * mA * Zeit in Sekunden * 1,4)
Erwärmungs- und Abkühlungsdiagramm für
Gehäuse Gendex765DC
20
25
30
35
40
45
0 20 40 60 80 100
120
140
160
180
200
220
240
260
280
300
320
340
360
Zeit (min)
Tem
pera
tur
(°C
)
0
50
100
150
200
250
300
Wärm
eein
heit
en
(kW
E)
Erwärmung, 100 %
Arbeitszyklus,
Umgebungstemperatur 20 °C
Abkühlung, Umgebungstemperatur 20 °C
Printed on: 29 Mär 2012, 05:33:23 pm; Printed by: UWE.ZELLER

765DC
34
EMPFOHLENE WARTUNG
Im Interesse der Gerätesicherheit muss ein Wartungsprogramm aufgestellt werden. Es liegt
im Verantwortungsbereich des Eigentümers, diese Wartungsarbeiten zu organisieren und
sicherzustellen, dass das mit der Durchführung dieser Arbeiten betraute Personal für die
Wartung von GENDEX-Zahnröntgengeräten qualifiziert ist.
Die durchzuführenden Kalibrierungen und Einstellungen werden im Abschnitt „System-
und Funktionsprüfungen“ des Installations- und Wartungshandbuchs für das 765DC
aufgeführt, das zusammen mit diesem Produkt geliefert wird.
Es wird empfohlen, bei Installation und danach alle zwölf Monate die folgenden
System- und Funktionsüberprüfungen und Wartungsvorgänge durchzuführen.
System- und Funktionsüberprüfungen laut Abschnitt E, Seite 35 des Installations-
/Wartungshandbuchs Nr. 765DC.
Wartung der Schwenkarmaufhängung laut Abschnitt F, Seite 43 des Installations-
/Wartungshandbuchs Nr. 765DC.
Hinweis: Um alle eventuellen Gefahren für Bedienungspersonen und
Patienten zu vermeiden, sollten Sie jede ungewöhnliche Arbeitsweise,
ungewöhnliche mechanische Funktion oder Ablagerungen sofort Ihrem
Kundendienst mitteilen.
REINIGUNG UND DESINFEKTION
Alle äußeren und zugänglichen Flächen können mit folgenden handelsüblichen Lösungen
gereinigt und/oder desinfiziert werden:
Isopropylalkohol
Phenylphenol
Benzyl-P-Chlorophenol
Iodophor
Diisobutylphenoxethoxyethyl-Dimethyl-Benzyl-Ammoniumchlorid
Anmerkung: Bleichmittel oder Glutaraldehyde nur gelegentlich verwenden.
Die Zusammensetzung aller Reinigungs- und Desinfektionslösungen mit der obigen
Liste vergleichen, wenn die Lösungen auf die Oberflächen des 765DC aufgetragen werden.
Printed on: 29 Mär 2012, 05:33:23 pm; Printed by: UWE.ZELLER

765DC
35
Contenido
Descripción general . . . . . . . . . . . . . . . . . . . . . . . . . . Página 36
Etiquetas de identificación . . . . . . . . . . . . . . . . . . . . . Página 37
Conformidad con las normas aplicables .. . . . . . .. . . . . . Página 38
Descripción de los símbolos de las etiquetas técnicas …. .Página 39
Seguridad . . . . . . . . . . . . . . . . . . . . . . . . . . . . . … .. Página 40
Controles de funcionamiento . . . . . . . . . . . . . . . . . . . Página 41
Manejo del equipo . . . . . . . . . . . . . . . . . . . . . . . .. . . Página 42
Configuración de los ajustes de control . . . . . . . . . . . . Página 43
Tablas de valores de exposición predeterminados . . . . . Página 46
Indicaciones y estados de error . . . . . . . . . . . . . . .. . . . Página 47
Especificaciones del sistema . . . . . . . . . . . . . . . . . . . . Página 48
Mantenimiento recomendado . . . . . . . . . . . . . . . . . . . Página 51
Limpieza y desinfección . . . . . . . . . . . . . . . . . . . . . . . Página 51
Printed on: 29 Mär 2012, 05:33:23 pm; Printed by: UWE.ZELLER

765DC
36
SISTEMA RADIOGRAFICO INTRABUCAL 765DC
DESCRIPCION GENERAL
Este manual está destinado a ayudar al operador a utilizar de manera segura y eficaz elsistema radiográfico intrabucal de alta frecuencia 765DC. Contiene la información necesaria paramanejar el equipo, las especificaciones técnicas y los procedimientos para efectuar su sencillomantenimiento. Antes de intentar utilizar el equipo, lea detenidamente este manual. Preste unaatención especial a todos los mensajes de advertencia y precaución incluidos en el manual.
La versión original de este manual es la inglesa.
COMPONENTES DEL SISTEMA
SUSPENSION Permite colocar el cabezal de
radiación a un alcance de 140cm, 165 cm ó 191 cm
CONTROL PRINCIPAL Permite el ajuste anatómico
del tiempo. Selección de adulto o
niño con un solo botón. Selección de película o
digital con un solo botón.
CONO Distancia focal estándar de
20 cm. Colimación rectangular o
de 30 cm opcional.
CABEZAL DE RADIACION Punto focal indicado por una
abolladura situado en lacubierta.
Controles secundariosdel operador.
Printed on: 29 Mär 2012, 05:33:23 pm; Printed by: UWE.ZELLER

765DC
37
ETIQUETAS DE IDENTIFICACION
El control principal, el cabezal de radiación y el cono del 765DC cuentan con etiquetas deidentificación que especifican el número de modelo, el número de serie y las normativasaplicables al producto. Se incluye una declaración de certificación junto con otra informaciónrequerida para los componentes especificados, según las normas de comportamiento de laradiación de EE.UU. CFR 21, subcapítulo J.
Printed on: 29 Mär 2012, 05:33:23 pm; Printed by: UWE.ZELLER

765DC
38
CONFORMIDAD CON LAS NORMAS APLICABLES
El 765DC está conforme con las normas siguientes:
Seguridad general (eléctrica/mecánica):
UL60601-1 Número de archivo: E185414
EQUIPO MÉDICO CLASIFICADO EN CUANTO A RIESGOS DE DESCARGASELECTRICAS, INCENDIO Y RIESGOS MECANICOS SOLO DE CONFORMIDAD CONLAS NORMAS UL60601-1, IEC60601-1, CAN/CSA C22.2 N° 601.1-M90, Y LAS NORMASESPECIFICAS SIGUIENTES: IEC60601-2-32, IEC60601-2-7, IEC60601-2-28, IEC60601-1-2.
Protección contra la radiación IEC60601-1-3 Protección contra laradiación/equipo radiográfico.
Los componentes certificados del sistema 765DC cumplen las normas decomportamiento de radiación 21 CFR, subcapítulo J, en el momento de su fabricación.
El equipo debe ser instalado y utilizado únicamente de acuerdo con
los procedimientos de seguridad y las instrucciones de uso incluidas en este
manual del usuario y en el manual de instalación y mantenimiento, para el
propósito y aplicaciones para los que fue diseñado. Las modificaciones y/o
adiciones al equipo deberán efectuarse solamente por Gendex o terceros
expresamente autorizados por Gendex para tales fines. Dichas
modificaciones deben cumplir los requisitos legales y los reglamentos
técnicos generalmente aceptados. El usuario es responsable de asegurar el
cumplimiento de la legislación existente relativa a la instalación de este
equipo en un edificio.
IMPORTANTE …… PROTECCION CONTRA LOS RAYOS X
Este equipo radiográfico puede causar lesiones si no se utiliza
correctamente.
Antes de utilizar el 765DC, debe leer y respetar todas las instrucciones incluidas en
este manual. El concesionario de Gendex le ayudará a poner en funcionamiento el 765DC.
El sistema radiográfico intrabucal 765DC proporciona un alto grado de protección
contra la exposición innecesaria a los rayos X. Sin embargo, no existe ningún diseño
práctico que pueda proporcionar una protección total ni impedir que los operadores se
expongan o expongan a otros innecesariamente a la radiación.
34SL
Printed on: 29 Mär 2012, 05:33:23 pm; Printed by: UWE.ZELLER

765DC
39
DESCRIPCION DE LOS SIMBOLOS DE LAS ETIQUETAS
TECNICAS
Tipo b: Protección contra descargas eléctricas (UL60601-1:2003)
Consulte las instrucciones del manual del operador
Instalación FUENTE DE RAYOS X
ADVERTENCIA RAYOS XESTE APARATO RADIOGRAFICO PUEDE SER PELIGROSOPARA EL PACIENTE Y EL OPERADOR SI NO SE RESPETAN LOSFACTORES DE EXPOSICION Y LAS INSTRUCCIONES DE USO.
EMISION DE RAYOS X
CABLE CON CORRIENTE de la red eléctrica
CONDUCTOR NEUTRO de la red eléctrica
Puesta a tierra
Equipo electrónicoNo mezclar con el resto de la basura
Clasificación
El 765DC forma parte de los equipos de clase I tipo b UL (UL60601-1:2003).
Printed on: 29 Mär 2012, 05:33:23 pm; Printed by: UWE.ZELLER

765DC
40
SEGURIDAD
Protección contra la radiación
Solamente el personal cualificado y autorizado puede utilizar este equipo,respetando todas las leyes y reglamentos relativos a la protección contra laradiación.
Para estar protegido, el operador debe situarse en todo momento a 2 m delpunto focal y del haz de rayos X.
Con el fin de proteger al paciente y al operador contra la radiación de rayos X,debe utilizar al máximo todas las características de radiación del equipo ytodos los dispositivos, accesorios y procedimientos de protección.
Protección contra riesgos eléctricos
Las cubiertas del equipo solamente deberán ser retiradas por personal deservicio cualificado y autorizado.
Este equipo sólo debe utilizarse en salas o lugares que cumplan con toda lalegislación y recomendaciones aplicables relativas a la seguridad y proteccióncontra riesgos eléctricos de salas utilizadas para fines médicos, por ejemploIEC, Código eléctrico nacional de EE.UU. o normas VDE relativas a lainstalación de un borne adicional de puesta a tierra para la conexión dealimentación eléctrica.
Antes de limpiar o desinfectar el aparato, debe desconectarlo siempre de la redeléctrica.
ESTE ES UN EQUIPO MEDICO CORRIENTE sin protección contra laentrada de líquidos. No permita que entre agua ni ningún otro líquido en elinterior del equipo, ya que podría producir un cortocircuito y corrosión.
Protección contra explosión
Este equipo no se debe utilizar en presencia de gases o vapores desinfectantespotencialmente explosivos o inflamables, que podrían inflamarse produciendolesiones personales y/o daños al equipo. En el caso de utilizar este tipo dedesinfectantes, deje que se disipen los vapores antes de utilizar el equipo.
Seguridad Mecánica
Donde no es posible la completa salvaguarda del equipo, debe tomarse unparticular cuidado para asegurar que ninguna parte del cuerpo o ropa delusuario o del paciente, pueda ser atrapada o marcada por alguna parte delequipo. En particular asegurarse que los dedos no sean pellizcados en el brazoarticulado, cuando se cierra.
Printed on: 29 Mär 2012, 05:33:23 pm; Printed by: UWE.ZELLER

765DC
41
CONTROLES DE FUNCIONAMIENTO
1. SELECCION DEL TIEMPO -Permite al operador anular el tiempoanatómico preestablecido y aumentar odisminuir el tiempo de exposición hastaun valor específico de la escala R10.
2. SELECCION DEL TIEMPO
ANATOMICO - Permite al operadorseleccionar el tiempo de exposiciónbasándose en el área dental deseada.
3. SELECCION DEL TIPO DE
GENERACION DE IMAGEN -Función que permite al operadorseleccionar el uso de película o de unsistema de generación de imagen digital.Esta función modificará todas lasselecciones de tiempo anatómicopredefinidas.
4. SELECCION DEL PACIENTE -Función que permite al operadorseleccionar un adulto o un niño. Estafunción modificará todas las seleccionesde tiempo anatómico predefinidas.
5. INDICADOR DE “LISTO PARA
USAR” - Indica que el equipo estáencendido y preparado para suutilización.
6. INDICADOR DE ENFRIAMIENTO -Se encenderá cuando el ciclo de trabajodel sistema necesite que se enfríe elcabezal de radiación antes de efectuar lasiguiente exposición.
7. INDICADOR DE RADIACION - Seencenderá al pulsar el botón deexposición, indicando que se estáemitiendo radiación de rayos X.
8. CONTROL DE EXPOSICION -Permite al operador iniciar la exposicióndirectamente desde el tablero de controlcuando está montado fuera de la sala enla que está instalado el equipo.
9. CONTROL DE EXPOSICION CON
CABLE EXTENSIBLE (Opcional) -Permite al operador salir de la saladonde está el equipo e iniciar laexposición.
10. CONTROLES SECUNDARIOS DEL
CABE-ZAL DE RADIACION -Permite al operador verificar y ajustarlos tiempos anatómicos de exposicióndirectamente en el cabezal de radiación,si es necesario. Una luz indica si se haseleccionado el ajuste para adultos opara niños.
11. CONTROL DE ENCENDIDO - Alcolocarlo en la posición de encendido sesuministrará alimentación de corriente alcontrol. Una luz del tablero de controlindicará que el sistema está preparadopara su utilización.
1
2
3
4
5
6
7
8
10
11
Printed on: 29 Mär 2012, 05:33:23 pm; Printed by: UWE.ZELLER

765DC
42
MANEJO DEL EQUIPO
1. Encienda el equipo poniendo el control en la posición de encendido. Se encenderá elindicador de “listo para usar” situado en la parte delantera del tablero de control.
2. Seleccione o compruebe que la unidad está preparada para película o para generación deimagen digital. Debería estar encendido el indicador situado junto al icono gráficocorrespondiente. Pulse el botón situado entre los dos iconos para cambiar a la seleccióncorrecta.
3. Seleccione o compruebe que el equipo está preparado con la selección de pacientecorrespondiente (adulto o niño). Pulse el botón situado entre los dos iconos para cambiar a laselección correcta.
4. Pulse el botón selector situado en el centro del control hasta que se encienda la luz situadajunto al símbolo de la dentadura (o ala de mordida) de la zona que desea explorar con rayosX.
Nota: Los valores predeterminados del tiempo de exposición (los tiempos que se muestran al
poner en funcionamiento el sistema) se pueden modificar siguiendo las instrucciones de la
sección “Configuración de los ajustes de control” de la página 43.
5. Si lo desea, puede emplear los botones de aumento y reducción para seleccionar un tiempo deexposición determinado diferente al predeterminado, utilizando la escala R10. Para lasrecomendaciones en cuanto a la película de la oclusión, vea las Tablas de valores deexposición predeterminados y recomendados en la página 46.
6. Sitúe el cabezal de radiación para explorar al paciente utilizando los procedimientos decolocación estándar aceptados. Nota: El cono estándar de 20 cm se recomienda para latécnica de ángulo de bisección. El cono opcional de 30 cm se recomienda para la técnica deparalelo. El preajuste para utilizar el cono de 30 cm es interno y puede realizarlo con facilidadel instalador o el agente de servicio.
7. Antes de realizar la exposición, compruebe o modifique los valores de tiempo según seanecesario utilizando los controles secundarios del cabezal de radiación.
8. Cuando emplee el control de exposición opcional con cable extensible, es muy importanteque el operador salga de la sala donde está el equipo. Nota: Para cumplir con los reglamentosy buenas prácticas de seguridad, el operador tiene que poder ver los factores técnicos desde ellugar en que se haya situado.
9. Pulse y mantenga pulsado el botón pulsador o el control con cable extensible hasta que dejede oírse la señal audible y se apague la luz indicadora de exposición. (Nota: Al soltar el
botón de exposición en cualquier momento se interrumpirá inmediatamente la
exposición).
Printed on: 29 Mär 2012, 05:33:23 pm; Printed by: UWE.ZELLER

765DC
43
Configuración de los ajustes de control
El tablero de control del 765DC está preajustado de fábrica (con los denominados
valores predetermina-dos) para su manejo con una configuración estándar. Esta
configuración supone que se utiliza el cono estándar con una distancia focal de 20 cm y una
película de velocidad D o un sistema de generación de imagen digital DenOptix. Esta
configuración estándar preajusta los tiempos de exposición para las selecciones anatómicas.
Se pueden modificar esos preajustes para utilizar película de velocidad E, otro F, otro tipo
de sistema de generación de imagen digital o el cono largo opcional.
La velocidad de la película y la opción digital pueden cambiarse empleando los
botones del tablero de control y el software.
La compensación de la longitud del cono se realiza con un conmutador situado
en el interior de la caja de control. Nota: Se recomienda que esta operación
solamente la realice un agente de servicio autorizado de Gendex.
Cambio de los valores predeterminados de la velocidad de película utilizada
El 765DC viene ajustado de fábrica para utilizar película de velocidad D. Puede
verificar este punto girando el control y viendo que el tiempo que se muestra inicialmente es
de 0,320 segundo. El uso de película de velocidad E otro F necesita la modificación de los
tiempos de exposición. Puede programar el sistema para que lo haga automáticamente.
1. Apague el sistema.
2. Pulse y mantenga pulsado el selector del tiempo anatómico mientras vuelve a encender el
sistema (vea la Figura 1).
3. La pantalla del tiempo indicará ahora "SP 1". Esto confirma que el sistema está en el menú
para definir la velocidad de la película.
4. Pulse el botón de aumento del tiempo de exposición. La pantalla del tiempo indicará ahora
"SP 2". Esto confirma que el sistema está ajustado ahora para película de velocidad E.
5. Vuelva a pulsar el selector de tiempo anatómico para guardar el nuevo valor. El tiempo
mostrado debería indicar ahora 0,200 segundo.
6. Pulse el botón de aumento del tiempo de exposición. La pantalla del tiempo indicará ahora
"SP 3". Esto confirma que el sistema está ajustado
ahora para película de velocidad F.
7. Vuelva a pulsar el selector de tiempo anatómico
para guardar el nuevo valor. El tiempo mostrado
debería indicar ahora 0,125 segundo.
Botón de selección del tiempo de exposición
Selector del tiempo anatómico
Selector de película o imagen digital
Printed on: 29 Mär 2012, 05:33:23 pm; Printed by: UWE.ZELLER

765DC
44
Cambio de la opción digital
El 765DC viene ajustado de fábrica para utilizar el sistema de generación de imagen
digital DenOptix de Gendex. Puede confirmar este punto poniendo en funcionamiento el
sistema o pulsando el botón para seleccionar el modo digital. El tiempo mostrado debería
indicar ahora 0,200 segundo.
1. Apague el sistema.
2. Pulse y mantenga pulsado el selector del tiempo anatómico mientras vuelve a encender el
sistema (vea la Figura 1).
3. La pantalla del tiempo mostrará ahora "SP 1" o "SP 2" o "SP 3", dependiendo del tipo de
película para el que esté configurado el equipo.
4. Pulse el selector de película o de imagen digital hasta que la pantalla indique "D1". Pulse el
botón de aumento del tiempo de exposición. La pantalla mostrará ahora "D2". Esto indica que
el sistema está configurado ahora para un sistema de generación de imagen digital tipo CCD.
5. Vuelva a pulsar el selector de tiempo anatómico para guardar el nuevo valor.
Cambio de la selección predeterminada del equipo
El 765DC viene ajustado de fábrica para seleccionar automáticamente película y un
adulto al encender el equipo. Si lo desea, puede preparar la unidad para que seleccione
automáticamente la opción digital o un niño al encenderla.
1. Apague el sistema.
2. Pulse y mantenga pulsado el selector del tiempo anatómico mientras vuelve a encender el
sistema (vea la Figura 1).
3. La pantalla del tiempo mostrará ahora "SP 1", "SP 2", "SP 3", "D1" o "D2", dependiendo de
si está seleccionada la opción de película o de imagen digital. Observe que la luz verde
situada junto a la selección parpadea.
4. Para seleccionar que la unidad se encienda en el modo digital, compruebe que parpadea la luz
verde situada junto a la opción digital. Pulse el selector anatómico para guardar la
información y apague el sistema. La unidad debería seleccionar ahora automáticamente el
modo digital al encenderla.
5. Para seleccionar que la unidad se encienda en el modo de niños, pulse el botón de selección
de niño o adulto hasta que la luz verde parpadee junto a la opción de niño. Pulse el selector
anatómico para guardar la información y apague el sistema. La unidad debería seleccionar
ahora automáticamente el modo de niño al encenderla.
Printed on: 29 Mär 2012, 05:33:23 pm; Printed by: UWE.ZELLER

765DC
45
Modificación del sistema para su utilización con el cono opcional de 30 cm
El 765DC viene ajustado de fábrica para utilizar el cono estándar de 20 cm que se
suministra con el equipo. Se recomienda el cono de 30 cm cuando se emplea la técnica de
posicionamiento de la película en paralelo junto con el kit Rinn XCP. El uso del cono largo
necesita tiempos de exposición mayores, que pueden programarse cambiando de posición
un conmutador situado en el interior del sistema.
Esta modificación sólo debería efectuarla un agente de servicio cualificado de Gendex.
Póngase en contacto con el agente de servicio de Gendex para que realice la modificación.
Printed on: 29 Mär 2012, 05:33:23 pm; Printed by: UWE.ZELLER

765DC
46
Tablas de valores de exposición predeterminados
SPEED 1: Pelicula Tipo D Cono de 20 cm Cono de 30 cm
Anatomía seleccionada Adulto Niño Adulto Niño
Ala de mordida 0.320 second 0.160 second 0.630 second 0.320 second
Molar inferior 0.320 second 0.160 second 0.630 second 0.320 second
Molar superior 0.400 second 0.200 second 0.800 second 0.400 second
Incisivo 0.200 second 0.100 second 0.400 second 0.200 second
Bicúspide 0.250 second 0.125 second 0.500 second 0.250 second
Occlusal 0.500 second 0.250 second 1.00 second 0.500 second
SPEED 2: Pelicula Tipo E Cono de 20 cm Cono de 30 cm
Anatomía seleccionada Adulto Niño Adulto Niño
Ala de mordida 0.200 second 0.100 second 0.400 second 0.200 second
Molar inferior 0.200 second 0.100 second 0.400 second 0.200 second
Molar superior 0.250 second 0.125 second 0.500 second 0.250 second
Incisivo 0.125 second 0.063 second 0.250 second 0.125 second
Bicúspide 0.160 second 0.080 second 0.320 second 0.160 second
Occlusal 0.320 second 0.160 second 0.630 second 0.320 second
SPEED 3: Pelicula Tipo F Cono de 20 cm Cono de 30 cm
Anatomía seleccionada Adulto Niño Adulto Niño
Ala de mordida 0.125 second 0.063 second 0.250 second 0.125 second
Molar inferior 0.125 second 0.063 second 0.250 second 0.125 second
Molar superior 0.160 second 0.080 second 0.320 second 0.160 second
Incisivo 0.080 second 0.040 second 0.160 second 0.080 second
Bicúspide 0.100 second 0.050 second 0.200 second 0.100 second
Occlusal 0.200 second 0.100 second 0.400 second 0.200 second
D1: Digital (DenOptix) Cono de 20 cm Cono de 30 cm
Anatomía seleccionada Adulto Niño Adulto Niño
Ala de mordida 0.160 second 0.080 second 0.320 second 0.160 second
Molar inferior 0.160 second 0.080 second 0.320 second 0.160 second
Molar superior 0.200 second 0.100 second 0.400 second 0.200 second
Incisivo 0.100 second 0.050 second 0.200 second 0.100 second
Bicúspide 0.125 second 0.063 second 0.250 second 0.125 second
Occlusal 0.250 second 0.125 second 0.500 second 0.250 second
D2: Digital (CCD captador) Cono de 20 cm Cono de 30 cm
Anatomía seleccionada Adulto Niño Adulto Niño
Ala de mordida 0.080 second 0.040 second 0.160 second 0.080 second
Molar inferior 0.080 second 0.040 second 0.160 second 0.080 second
Molar superior 0.100 second 0.050 second 0.200 second 0.100 second
Incisivo 0.050 second 0.025 second 0.100 second 0.050 second
Bicúspide 0.063 second 0.032 second 0.125 second 0.063 second
Occlusal 0.125 second 0.063 second 0.250 second 0.125 second
Printed on: 29 Mär 2012, 05:33:23 pm; Printed by: UWE.ZELLER

765DC
47
Indicaciones de error y condiciones
Las luces verde de "listo" y ámbar de "enfriamiento", así como los 4 LED
digitales de 7 segmentos situados en la superficie del tablero de control del operador
pueden servir para indicar si se han producido errores. La tabla siguiente proporciona una
explicación del significado de las indicaciones y la acción correspondiente que se
requiere.
Indicación de error Explicación Acción requeridaLa luz ámbar de "enfriamiento"
se ilumina y no es posible
efectuar la exposición.
Funcionamiento normal del
aparato. La luz de “enfriamiento”
se enciende si se toma un número
excesivo de exposiciones en un
periodo muy breve. Esta función
protege el cabezal y prolonga la
vida útil del mismo.
Espere a que la lámpara se
apague, lo cual indica que el
cabezal se ha enfriado
apropiadamente.
En los LED de 7 segmentos
parpadea el mensaje "Err0".
La exposición se ha terminado
prematuramente. Esto puede
deberse a una avería en el equipo
o a que el operador soltó el
interruptor de exposición antes de
que transcurriera el tiempo de
exposición seleccionado.
Si se pulsa cualquiera de las
teclas en el control del operador,
excepto el interruptor de
exposición, se borra la indicación
de la pantalla y se retorna a
funcionamiento normal. Procure
mantener pulsado el botón de
exposición hasta que se termine
la exposición.
En los LED de 7 segmentos
parpadea el mensaje "Err1".
El voltaje de alimentación
excedió la gama requerida:
108 V – 132 V
198 V – 253 V
Espere hasta que el voltaje de
línea retorne al nivel normal (lo
cual se indica cuando la lámpara
se ilumina de modo constante) o
solicite a un electricista calificado
que revise la línea de
alimentación eléctrica.
En los LED de 7 segmentos
aparece el mensaje "Err2".
El voltaje de alimentación ha
descendido por debajo del valor
mínimo (108 V ó 198 V) durante
la exposición. La exposición no
se interrumpe, pero la imagen
resultante puede ser inferior a la
normal.
Si se pulsa cualquiera de las
teclas en el control del operador,
el destello cesa y se retorna a
funcionamiento normal. Si el
problema persiste, se recomienda
solicitar que un electricista
calificado revise la línea de
alimentación eléctrica.
En los LED de 7 segmentos
parpadea el mensaje "Err3".
Se ha producido una falla en el
equipo físico.
Si el problema persiste,
reinicialice la unidad situando el
interruptor en OFF durante 5
segundos y, posteriormente,
sitúelo en ON. Comuníquese con
el agente de servicio autorizado
de Gendex.
En los LED de 7 segmentos
parpadea el mensaje "Err4".
Se ha producido un fallo y la
exposición ha terminado.
Al pulsar cualquiera de las teclas
en el control del operador, se
borra el error y se retorna a
funcionamiento normal. Si el
problema persiste, comuníquese
con el agente de servicio
autorizado de Gendex
Printed on: 29 Mär 2012, 05:33:23 pm; Printed by: UWE.ZELLER

765DC
48
ESPECIFICACIONES DEL SISTEMA
Las especificaciones sobre enfriamiento y ciclo de trabajo nominales se aplican para altitudes no
superiores a los 3600 m, una humedad relativa media que no exceda del 95% y una temperatura
ambiente máxima no superior a los 40°C.
ESPECIFICACIONES DEL CABEZAL DE RADIACION
Voltaje máximo nominal del tubo: 65 kV con 7 mA de corriente del tubo.
Radiación de fuga en estado de carga: Menos de 250 micro Gy/h a 1 metro del punto focal.
Capa de valor inicial medio mínimo permisible: Mayor que el equivalente a 1,5 mm de aluminio
Tamaño nominal del punto focal: 0,4 mm (IEC 336/1993)
Angulo del ánodo: 12,5 grados
Inercia térmica del ánodo: 7 kHU
Ciclo de trabajo: 1:30
ESPECIFICACIONES DEL CONO
Tamaño del campo de los rayos X: Contenido en un círculo de 6 cm de diámetro medido desde el
extremo distal del cono instalado.
Distancia desde el punto focal al extremo distal del cono: 20 ó 30 cm.
REQUISITOS DE ALIMENTACION ELECTRICA
Nominal Tolerancia Gama útil120 VAC ± 10% 108 - 132 VAC
230 VAC + 10%, -14% 198 - 253 VAC
PRECISION DE LOS FACTORES TECNICOS
Potencial nominal del tubo 65 kV ± 3 kV
Corriente nominal del tubo 7 mA ± 5%
Tiempo de exposición .02 - .50 segundo ± .005 segundo
.63 – 2.00 segundo ± 1%
Printed on: 29 Mär 2012, 05:33:23 pm; Printed by: UWE.ZELLER

765DC
49
Caja de tubo para rayos X intrabucal
Hoja de datos del producto
Gendex® 765DC
La caja Gendex® 765DC ha sido diseñada para funcionar con el inserto Gendex® GX 70-10DC.
La caja ha sido diseñada para funcionar con el control Gendex® 765DC de alta frecuencia y de
alto voltaje, componiendo el sistema radiográfico intrabucal dental Gendex® 765DC.
Especificaciones
Caja a prueba de impactos: De zinc, sellada herméticamente al vacío con aceite
aislante con alto coeficiente dieléctrico. La caja tiene una
cámara de expansión diseñada para brindar
compensación adecuada para todo el intervalo de
temperaturas de trabajo.
Temperatura de trabajo: +50°F – 100°F (+10°C – +40°C)
Temperatura de almacenamiento: -40°F – 160°F (-40°C – +70°C)
Filtrado incorporado:
Salida de radiación:
Técnica de 65 kV, 7 mA, 0,50 s Distancia de fuente a detector: 230 mm (9 pulg)
410mR ±125mR (3,55 mGy ± 1,05 mGy)
Capa típica media: 1,9 mm de Aluminio a 65kV
Espesor / mm VEA1/mm Equivalente Al
Material Mín. Máx. 65 kV Mín. Máx.
Cristal 1,27 1,91 0,51 0,65 0,97
Aceite aislante 6,5 7,7 0,08 0,52 0,62
Policarbonato 16,4 16,7 0,09 1,48 1,50
Total 2,636 3,206
Printed on: 29 Mär 2012, 05:33:23 pm; Printed by: UWE.ZELLER

765DC
50
Radiación de fuga: Satisface la norma 601-1-3 IEC, Sección 29.204
“Radiación de fuga”. La entrada de potencia continua
máxima equivale a 1400 unidades calóricas por minuto
(UC/min.). El tubo es el factor limitante. UC/min. =
(kV) x (mA) x (1,4) x (tiempo de exposición (s) / 60)
1400 UC/min. = 65 kV x 0,27 mA x 1,4 x 60 s
Cobertura de rayos X: El ángulo de objetivo de inserto mide 12,5°
Cono circular a 8 pulg (200 mm) DFP2, 60 mm de
diám. +0, -3 mm
Cono circular a 12 pulg (300 mm) DFP2, 60 mm de
diám. +0, -3 mm
Cono rectangular a 8 pulg (200 mm) DFP2, 36 mm x
46 mm
1 VEA Correlación de valor medio equivalente de aluminio2 DFP Distancia de fuente a piel
Peso: 13,0 lb 5,9 kg
Voltaje máximo de cabezal: Anodo a cátodo 65 kV
Anodo a tierra 70 kVCaracterísticas térmicas:
Capacidad de almacenamiento de calor de caja
250 kUC (177 J)
Ritmo máximo de enfriamiento
3,3 kUC/min.
Unidades calóricas (UC) = (kV * mA * tiempo en segundos * 1,4)
Tabla de calentamiento y enfriamiento de caja de
Gendex 765DC
20
25
30
35
40
45
0 20 40 60 80 100
120
140
160
180
200
220
240
260
280
300
320
340
360
Tiempo (min.)
Tem
pera
tura
(°C
)
0
50
100
150
200
250
300
Un
idad
es c
aló
ricas
(kU
C)
Calentamiento, ciclo de trabajo de
100%, temperatura ambiente:
20°C
Enfriamiento, temperatura
ambiente de 20°C
Printed on: 29 Mär 2012, 05:33:23 pm; Printed by: UWE.ZELLER

765DC
51
MANTENIMIENTO RECOMMENDADO
Para mantener la seguridad del equipo, se debe establecer un programa de mantenimiento.
Es responsabilidad del usuario programar este servicio y comprobar que el personal que lo
realiza está plenamente cualificado para mantener equipos radiográficos dentales
GENDEX.
La calibración y ajustes a realizar figuran en la sección de comprobaciones funcionales y
del sistema del manual de mantenimiento e instalación del 765DC que se entrega con el
equipo.
Se recomienda realizar las siguientes comprobaciones del sistema y las
funciones, así como el siguiente procedimiento de mantenimiento, en el
momento de la instalación y cada doce meses a partir de entonces.
Comprobaciones de las funciones del sistema indicadas en la Sección E,
página 35 del Manual de instalación y mantenimiento 765DC.
Mantenimiento del brazo de suspensión según se indica en la Sección F,
página 43 del Manual de instalación y mantenimiento 765DC.
Nota: Para evitar todo peligro potencial para los operarios o pacientes, se
debe notificar al agente de servicio todo funcionamiento, funcionalidad
mecánica o residuo que sea inusual.
LIMPIEZA Y DESINFECCION
Puede limpiar y desinfectar todas las superficies externas susceptibles de limpieza con los
productos siguientes:
Alcohol isopropílico
Fenilfenol
Benzil-P-clorofenol
Yodoformo
Disobutil fenoxetoxitocil dimetil bencil cloruro de amonio
Nota: Use blanqueadores o glutaraldehídos sólo ocasionalmente.
Compruebe el contenido de cualquier solución desinfectante o de limpieza
comparándolo con la lista anterior, aplicándolo a cualesquiera superficies del 765DC.
Printed on: 29 Mär 2012, 05:33:23 pm; Printed by: UWE.ZELLER

765DC
52
Table des matières
Description générale . . . . . . . . . . . . . .. . . . . . . . . . . . . . . . . . . Page 53
Etiquettes d'identification . . . . . . . . . . . .. . . . . . . . . . . . . . . . Page 54
Conformité aux normes applicables . . . . . . . . . . . . . . . . . . . Page 55
Explication des symboles figurant sur les étiquettes techniques . Page 56
Sécurité . . . . . . . . . . . . . . . . . . . . . . . . . . . . . . . . . . . . . . . . . . . . Page 57
Utilisation des commandes . . . . . . . . . . . . . . . . . . . . . . . . . . . . . Page 58
Utilisation . . . . . . . . . . . . . . . . . . . . . . . . . . . . . . . . . . . . . . . . . . Page 59
Configuration des réglages . . . . . . . . . . . . . . . . . . . . . . . . . . . . . Page 60
Tableaux des durées d'exposition par défaut . . . . . . . . . . . . . . . Page 63
Affichage et causes d'erreurs . . . . . . . . . . . . . . . . . . . . . . . . . Page 64
Spécifications de l'appareil . . . . . . . . . . . . . . . . . . . . . . . . . . . . Page 65
Entretien recommandé . . . . . . . . . . . . . . . . . . . . . . . . . . . . . . . . Page 68
Nettoyage et désinfection . . . . . . . . . . . . . . . . . . . . . . . . . . . . . Page 68
Printed on: 29 Mär 2012, 05:33:23 pm; Printed by: UWE.ZELLER

765DC
53
APPAREIL DE RADIOGRAPHIE INTRA-ORALE 765DC
DESCRIPTION GÉNÉRALECe manuel de l’opérateur est conçu pour aider l’opérateur à utiliser l’appareil de radiographieintra-orale à haute fréquence 765DC de manière efficace et sécuritaire. Il contient lesinformations nécessaires pour utiliser l’appareil, les procédures à suivre pour effectuer sonentretien simple ainsi que les données techniques. Lire attentivement ce manuel en entier avantd’essayer d’utiliser l’appareil. Veiller à observer tout particulièrement les avertissements etmises en garde qu’il contient.
Ce manuel a été traduit de l’anglais.
COMPOSANTS DE L’APPAREIL
SUSPENSION Permet de positionner la gaine
avec tube radio-gène sur uneportée de140 cm, 165 cm ou191 cm
COMMANDE PRINCIPALE Permet un réglage de
durée selon l'anatomie. Choix entre adulte et
enfant par un seul bouton. Choix entre film et système
numérique parun seul bouton.
CÔNE Longueur focale de 20 cm
standard. Collimation rectangulaire ou
30 cm en option..
GAINE AVEC TUBERADIOGÈNE Tache focale indiquée par une
vis dans le couvercle. Commandes d'opérateur
secondaires uniques.
Printed on: 29 Mär 2012, 05:33:23 pm; Printed by: UWE.ZELLER

765DC
54
ÉTIQUETTES D’IDENTIFICATIONLa gaine avec tube radiogène, la commande principale et le cône du 765DC comportent desétiquettes d’identification qui indiquent le numéro de modèle, le numéro de série et leshomologations applicables du produit. Sur les composants spécifiés, soumis aux normes deperformance de rayonnement 21 CFR, sous-chapitre J, du gouvernement des États-Unis, unecertification est incluse avec les autres informations requises.
Printed on: 29 Mär 2012, 05:33:23 pm; Printed by: UWE.ZELLER

765DC
55
CONFORMITÉ AUX NORMES APPLICABLES
L’appareil 765DC est conforme aux normes suivantes :
Sécurité générale (électrique/mécanique) :
UL60601-1 Fichier numéro : E185414
ÉQUIPEMENT MEDICAL QUANT AUX RISQUES DE SECOUSSES ÉLECTRIQUES,D’INCENDIE ET D’ORIGINE MÉCANIQUE SEULEMENT, EN CONFORMITÉ AVEC LESNORMES UL60601-1, IEC60601-1, CAN/CSA C22.2 NO,601.1-M90, ET LES NORMESPARTICULIÈRES SUIVANTES : IEC60601-2-32, IEC60601-2-7, IEC60601-2-28, IEC60601-1-2.
Protection contre le rayonnement IEC60601-1-3 protection contre lerayonnement/appareil de radiographie.
Les composants certifiés de l’appareil 765DC sont conformes aux normes de performance derayonnement 21 CFR, sous-chapitre J, au moment de la fabrication.
Le matériel doit être installé et utilisé conformément aux consignes de sécurité etaux instructions d’utilisation figurant dans ce manuel de l’opérateur et dans lemanuel d’installation/entretien, uniquement dans le but et pour les applicationspour lesquelles il a été conçu. Les modifications et/ou additions au matériel nedoivent être effectuées que par Gendex ou par une tierce partie expressémentautorisée par Gendex. De telles modifications doivent être conformes aux exigenceslégales ainsi qu’aux règlements techniques généralement acceptés. L’utilisateur estresponsable de vérifier que la législation existante relative à l’installation dumatériel dans le bâtiment a été respectée.
IMPORTANT ! …… PROTECTION CONTRE LES RAYONS X
Le matériel de radiographie peut causer des lésions s’il n’est pas utilisécorrectement.
Lors de l’utilisation de l’appareil 765DC, lire et suivre les instructions figurant dansce manuel. Le concessionnaire Gendex peut apporter son aide pour la mise en œuvre del’appareil 765DC.
L’appareil de radiographie intra-orale 765DC fournit une protection élevée contrel’exposition inutile au rayonnement. Toutefois, il n’existe aucune conception pratiquefournissant une protection totale et il est impossible d’empêcher les opérateurs de s’exposerou d’exposer autrui inutilement aux rayons X.
34SL
Printed on: 29 Mär 2012, 05:33:23 pm; Printed by: UWE.ZELLER

765DC
56
EXPLICATION DES SYMBOLES FIGURANT SUR LESÉTIQUETTES TECHNIQUES
Type b : Protection contre les secousses électriques (UL60601-1:2003)
Consulter les instructions figurant dans ce manuel de l’opérateur
Assemblage à SOURCE DE RAYONS-X .
AVERTISSEMENT : RAYONS X CET APPAREIL DE RADIOGRAPHIE PEUT PRÉSENTER UN DANGER POUR LE PATIENT ET L’OPÉRATEUR SI LES FACTEURS D’EXPOSITION SANS DANGER ET LES INSTRUCTIONS D’UTILISATION NE SONT PAS OBSERVÉS.
ÉMISSION DE RAYONS X
FIL SOUS TENSION du secteur
FIL NEUTRE du secteur
Terre
Équipement électroniqueNe mettre aucun matériau recyclable dans les ordures ménagères
Classification
L’appareil 765DC fait partie du matériel de classe I UL type b (UL60601-1:2003).
Printed on: 29 Mär 2012, 05:33:23 pm; Printed by: UWE.ZELLER

765DC
57
SÉCURITÉ
Protection contre le rayonnement
Ce matériel ne peut être utilisé que par le personnel qualifié et autoriséqui observe toutes les réglementations concernant la protection contre lerayonnement.
Pour sa protection, l’opérateur doit toujours rester à au moins 2 m de latache focale et du faisceau de rayons X.
Afin de protéger le patient et l’opérateur des rayons X, faire un usagecomplet de tous les dispositifs de rayonnement de l’appareil ainsi que de tous lesdispositifs, accessoires et procédures disponibles pour la protection contre lerayonnement.
Sécurité du matériel électrique
Les couvercles de l’appareil ne doivent être retirés que par le personnelqualifié et autorisé pour l’entretien.
Ce matériel ne doit être utilisé que dans des pièces ou locaux qui sontconformes à toutes les réglementations et recommandations relatives à la sécuritédu matériel électrique dans les locaux à usage médical, par exemple l’IEC, laréglementation d’installations électriques(N.E.C.) des États-Unis, ou les normes VDE concernant la fourniture d’une miseà la terre supplémentaire pour le raccordement de l’alimentation électrique.
Cet appareil doit toujours être débranché de l’alimentation électrique dusecteur avant de le nettoyer ou de le désinfecter.
MATÉRIEL MÉDICAL ORDINAIRE sans protection contre lapénétration de liquides. Veiller à ne pas laisser d’eau ni aucun autre liquidepénétrer à l’intérieur de l’appareil car ils risqueraient de provoquer un court-circuit et de la corrosion.
Protection contre les explosions
Cet appareil ne doit pas être utilisé en présence de gaz ou vapeursinflammables de produits désinfectants qui risqueraient de s’enflammer oud’exploser, provoquant des blessures et/ou des dégâts matériels.
Si de tels désinfectants sont utilisés, attendre que leurs vapeurs sedispersent avant d’utiliser l’appareil
Printed on: 29 Mär 2012, 05:33:23 pm; Printed by: UWE.ZELLER

765DC
58
UTILISATION DES COMMANDES
1. CHOIX DE LA DURÉE - Permet àl’opérateur de contourner la duréepréréglée en fonction de l’anatomieEt d’augmenter ou de diminuer la duréed’exposition jusqu’à une valeurspécifique sur l’échelle R10.
2. CHOIX DE LA DURÉE ENFONCTION DE L’ANATOMIE -Permet à l’opérateur de choisir ladurée d’exposition en fonction de lazone dentaire ciblée.
3. CHOIX DU TYPE D’IMAGERIE -Commande à bascule permettant àl’opérateur de choisir entre l’utilisationd’un film ou d’un système d’imagerienumérique. Dans ce cas, tous les choixde durée pré-réglée en fonction del’anatomie sont modifiés.
4. CHOIX DU TYPE DE PATIENT -Commande à bascule permettant àl’opérateur de choisir entre un adulte etun enfant. Dans ce cas, tous les choix dedurée préréglée en fonction del’anatomie sont modifiés.
5. LAMPE-TÉMOIN « PRÊT » -Indique que l’interrupteur « Marche » aété actionné et que l’appareil est prêt àfonctionner.
6. LAMPE-TÉMOIN DEREFROIDISSEMENT -Cette lampe-témoin s’allume quand lecycle opératoire de l’appareil nécessitele refroidissement de la gaine avec tuberadiogène avant l’exposition suivante.
7. LAMPE-TÉMOIN DERAYONNEMENT - Cette lampe-témoin s’allume quand le boutond’exposition est enfoncé, indiquant queles rayons X sont émis.
8. BOUTON-POUSSOIRD’EXPOSITION - Permet à l’opérateurde déclencher l’exposition directementà partir du panneau de commande quandil est monté à l’extérieur du locald’intervention.
9. DÉCLENCHEUR D’EXPOSITIONSUR COR-DON (option) - Permet àl’opérateur de sortir du locald’intervention puis de déclencherl’exposition.
10. COMMANDES SECONDAIRES DELA GAINE - Elles permettent àl’opérateur de vérifier et de régler,si nécessaire, les durées d’exposition enfonction de l’anatomie directement surla gaine avec tube radiogène. Unelampe-témoin indique aussi le réglage« adulte » ou « enfant » choisi.
11. INTERRUPTEURD’ALIMENTATION - La commandereçoit l’alimentation en courant quandl’interrupteur est enfoncé à la position« marche ».
1
2
3
4
5
6
7
8
10
11
Printed on: 29 Mär 2012, 05:33:23 pm; Printed by: UWE.ZELLER

765DC
59
UTILISATION
1. Mettre l’interrupteur d’alimentation à la position de « Marche ». La lampe-témoin « Prêt » à
l’avant du panneau de commande doit s’allumer.
2. Choisir ou vérifier que l’appareil est réglé soit sur film soit sur imagerie numérique. La
lampe-témoin située près de l’icône appropriée doit être allumée. Appuyer sur la commande à
bascule située entre les deux icônes pour effectuer le choix souhaité.
3. Choisir ou vérifier que l’appareil est réglé pour le patient approprié (adulte ou enfant).
Appuyer sur la commande à bascule située entre les deux icônes pour effectuer le choix
souhaité.
4. Appuyer sur le bouton sélecteur du centre de la commande pour faire basculer la lampe-
témoin jusqu’à ce qu’elle s’allume auprès du symbole de la dent (ou du bite-wing) de la zone
que l’on souhaite passer aux rayons X.
Remarque : Les valeurs par défaut des durées d’exposition (durées affichées lors de la mise
sous tension initiale de l’appareil) peuvent être modifiées selon les instructions de la section
« Configuration des réglages », page 54.
5. Si cela est souhaitable, il est possible d’utiliser les boutons d’augmentation et de diminution
pour choisir une durée d’exposition spécifique autre que la valeur par défaut à l’aide de
l’échelle R10.
6. Positionner la gaine avec tube radiogène par rapport au patient en suivant les procédures de
positionnement généralement acceptées. Remarque : Il est recommandé d’utiliser le cône de
20 cm fourni en équipement standard pour la technique d’angle bissecteur. Le cône de 30 cm
en option est recommandé pour la technique en parallèle. Le préréglage pour l’usage du cône
de 30 cm s’effectue de manière interne et peut être programmé facilement par l’installateur
ou le technicien d’entretien.
7. Avant de procéder à l’exposition, vérifier ou modifier les réglages de durée selon le besoin,
en utilisant les commandes secondaires sur la gaine.
8. Lors de l’utilisation du déclencheur d’exposition sur cordon, il est fortement recommandé à
l’opérateur de quitter le local d’intervention. Remarque : Afin de rester en conformité avec
les réglementations et les mesures de sécurité, l’opérateur doit pouvoir observer les facteurs
techniques depuis son emplacement à distance.
9. Appuyer sur le déclencheur d’exposition sur cordon ou sur le bouton-poussoir d’exposition et
le maintenir jusqu’à ce que le signal sonore s’arrête et que la lampe-témoin d’exposition
s’éteigne. (Remarque : Il est possible de relâcher le bouton d’exposition à tout moment
pour arrêter immédiatement l’exposition).
Printed on: 29 Mär 2012, 05:33:23 pm; Printed by: UWE.ZELLER

765DC
60
Configuration des réglages
Le panneau de commande du 765DC est préréglé en usine (réglages par défaut)
pour fonctionner avec une configuration standard. Cette configuration présuppose l'usage
du cône de longueur focale de 20 cm standard et du film de sensibilité D ou d'un système
d'imagerie numérique DenOptix. Cette configuration standard effectue les préréglages des
durées d'exposition selon les choix d'anatomie. Il est possible de changer ces préréglages
pour utiliser du film de sensibilité E ou F ou un autre type de système d'imagerie
numérique ou le cône long en option.
Les boutons du panneau de commande et le logiciel permettent de changer le
réglage de sensibilité du film et l'option numérique.
La compensation de la longueur du cône s'effectue en changeant un contacteur à
l'intérieur du boîtier de commande. Remarque : Il est recommandé de faire
effectuer cette opération uniquement par un technicien d'entretien autorisé par
Gendex.
Changement des réglages par défaut pour la sensibilité du film utilisé
L'appareil 765DC est réglé en usine pour l'utilisation du film de sensibilité D. Ceci
peut être vérifié en tournant la commande et en notant que la durée affichée initialement est
de 0,320 seconde. L'utilisation de film de sensibilité E ou F exige la modification des durées
d'exposition utilisées. Il est possible de programmer l'appareil pour effectuer cette
opération automatiquement.
1. Mettre l'appareil hors tension.
2. Appuyer et maintenir le sélecteur de durée en fonction de l'anatomie tout en mettant l'appareil
sous tension (voir la figure 1).
3. L'affichage de durée indique maintenant "SP 1". Ceci confirme que l'appareil est au menu de
sensibilité du film.
4. Appuyer sur le bouton d'augmentation de durée d'exposition. L'affichage de durée indique
maintenant "SP 2". Ceci confirme que l'appareil est maintenant réglé pour le film de
sensibilité E.
5. Appuyer de nouveau sur le sélecteur de durée en fonction de l'anatomie pour mettre le
nouveau réglage en mémoire. La durée affichée doit être maintenant de 0,200 seconde.
6. Appuyer sur le bouton d'augmentation de durée d'exposition. L'affichage de durée indique
maintenant "SP 3". Ceci confirme que l'appareil est maintenant réglé pour le film de
sensibilité F.
7. Appuyer de nouveau sur le sélecteur de durée
en fonction de l'anatomie pour mettre le nouve
au réglage en mémoire. La durée affichée doit
être maintenant de 0,125 seconde.
Sélecteur de durée d'exposition
Sélecteur de durée en fonction de l'anatomie
Sélecteur de film ou de système d'imagerie numérique
Printed on: 29 Mär 2012, 05:33:23 pm; Printed by: UWE.ZELLER

765DC
61
Changement de l'option de système d'imagerie numérique
L'appareil 765DC est réglé en usine pour l'utilisation du système d'imagerie
numérique DenOptix de Gendex. Ceci peut être confirmé en mettant l'appareil sous tension
et en appuyant sur le bouton pour choisir l'option numérique. La durée affichée doit être
maintenant de 0,200 seconde.
1. Mettre l'appareil hors tension.
2. Appuyer et maintenir le sélecteur de durée en fonction de l'anatomie tout en mettant l'appareil
sous tension (voir la figure 1).
3. L'affichage de durée indique maintenant "SP 1" ou "SP 2" ou "SP 3" selon le type de film
configuré.
4. Appuyer sur le sélecteur de film ou système numérique jusqu'à ce que l'affichage indique
"D1". Appuyer sur le bouton d'AUGMENTATION de durée d'exposition. L'affichage doit
maintenant indiquer "D2". Ceci signifie que l'appareil est maintenant configuré pour un
système d'imagerie numérique de type CCD.
5. Appuyer de nouveau sur le sélecteur de durée en fonction de l'anatomie pour mettre le
nouveau réglage en mémoire.
Changement du réglage à la mise sous tension
L'appareil 765DC est réglé en usine pour que les options "film" et "adulte" soient
activées à la mise sous tension. Si cela est souhaitable, il est possible de régler l'appareil
pour que les options "numérique" ou "enfant" soient activées automatiquement à la mise
sous tension.
1. Mettre l'appareil hors tension.
2. Appuyer et maintenir le sélecteur de durée en fonction de l'anatomie tout en mettant l'appareil
sous tension (voir la figure 1).
3. L'affichage de durée doit maintenant indiquer "SP 1" ou "SP 2" ou "SP 3", ou "D1" ou "D2"
selon l'option "film" ou "numérique" choisie. Noter que la lampe-témoin verte située près du
choix clignote.
4. Pour choisir l'activation du mode numérique à la mise sous tension de l'appareil, s'assurer que
la lampe-témoin verte clignote près de l'option numérique. Appuyer sur le sélecteur de durée
en fonction de l'anatomie pour enregistrer l'information et mettre l'appareil hors tension.
L'appareil doit maintenant avoir l'option numérique automatiquement activée à la mise sous
tension.
5. Pour choisir l'activation du mode "enfant" à la mise sous tension de l'appareil, appuyer sur le
sélecteur "adulte ou enfant" jusqu'à ce que la lampe-témoin verte clignote près de l'option
"enfant". Appuyer sur le sélecteur de durée en fonction de l'anatomie pour enregistrer
l'information et mettre l'appareil hors tension. L'appareil doit mainte-nant avoir l'option
"enfant" automatiquement activée à la mise sous tension.
Printed on: 29 Mär 2012, 05:33:23 pm; Printed by: UWE.ZELLER

765DC
62
Modification de l'appareil pour l'utilisation du cône de 30 cm en option
L'appareil 765DC est réglé en usine pour être utilisé avec le cône de 20 cm fourni en
équipement standard. Il est recommandé d'utiliser le cône de 30 cm de long lors de la
méthode de positionnement du film en parallèle avec le kit Rinn XCP. L'usage du cône long
nécessite l'emploi de durées d'exposition plus longues qui peuvent être programmées dans
l'appareil en changeant un réglage électrique interne.
Cette modification ne doit être effectuée que par un technicien d'entretien qualifié
Gendex. Contacter le technicien d'entretien Gendex pour effectuer le changement.
Printed on: 29 Mär 2012, 05:33:23 pm; Printed by: UWE.ZELLER

765DC
63
Tableaux des durées d'exposition par défaut
SPEED 1: Film de sensibilité DCône de 20 cm Cône de 30 cm
Anatomie choisie Adulte Enfant Adulte Enfant
Bite-wing 0.320 seconde 0.160 seconde 0.630 seconde 0.320 seconde
Molaire inférieure 0.320 seconde 0.160 seconde 0.630 seconde 0.320 seconde
Molaire supérieure 0.400 seconde 0.200 seconde 0.800 seconde 0.400 seconde
Incisive 0.200 seconde 0.100 seconde 0.400 seconde 0.200 seconde
Prémolaire 0.250 seconde 0.125 seconde 0.500 seconde 0.250 seconde
Occlusal 0.500 seconde 0.250 seconde 1.00 seconde 0.500 seconde
SPEED 2: Film de sensibilité ECône de 20 cm Cône de 30 cm
Anatomie choisie Adulte Enfant Adulte Enfant
Bite-wing 0.200 seconde 0.100 seconde 0.400 seconde 0.200 seconde
Molaire inférieure 0.200 seconde 0.100 seconde 0.400 seconde 0.200 seconde
Molaire supérieure 0.250 seconde 0.125 seconde 0.500 seconde 0.250 seconde
Incisive 0.125 seconde 0.063 seconde 0.250 seconde 0.125 seconde
Prémolaire 0.160 seconde 0.080 seconde 0.320 seconde 0.160 seconde
Occlusal 0.320 seconde 0.160 seconde 0.630 seconde 0.320 seconde
SPEED 3: Film de sensibilité FCône de 20 cm Cône de 30 cm
Anatomie choisie Adulte Enfant Adulte Enfant
Bite-wing 0.125 seconde 0.063 seconde 0.250 seconde 0.125 seconde
Molaire inférieure 0.125 seconde 0.063 seconde 0.250 seconde 0.125 seconde
Molaire supérieure 0.160 seconde 0.080 seconde 0.320 seconde 0.160 seconde
Incisive 0.080 seconde 0.040 seconde 0.160 seconde 0.080 seconde
Prémolaire 0.100 seconde 0.050 seconde 0.200 seconde 0.100 seconde
Occlusal 0.200 seconde 0.100 seconde 0.400 seconde 0.200 seconde
Numérique D1 (DenOptix)Cône de 20 cm Cône de 30 cm
Anatomie choisie Adulte Enfant Adulte Enfant
Bite-wing 0.160 seconde 0.080 seconde 0.320 seconde 0.160 seconde
Molaire inférieure 0.160 seconde 0.080 seconde 0.320 seconde 0.160 seconde
Molaire supérieure 0.200 seconde 0.100 seconde 0.400 seconde 0.200 seconde
Incisive 0.100 seconde 0.050 seconde 0.200 seconde 0.100 seconde
Prémolaire 0.125 seconde 0.063 seconde 0.250 seconde 0.125 seconde
Occlusal 0.250 seconde 0.125 seconde 0.500 seconde 0.250 seconde
Numérique D2 (capteur CCD)Cône de 20 cm Cône de 30 cm
Anatomie choisie Adulte Enfant Adulte Enfant
Bite-wing 0.080 seconde 0.040 seconde 0.160 seconde 0.080 seconde
Molaire inférieure 0.080 seconde 0.040 seconde 0.160 seconde 0.080 seconde
Molaire supérieure 0.100 seconde 0.050 seconde 0.200 seconde 0.100 seconde
Incisive 0.050 seconde 0.025 seconde 0.100 seconde 0.050 seconde
Prémolaire 0.063 seconde 0.032 seconde 0.125 seconde 0.063 seconde
Occlusal 0.125 seconde 0.063 seconde 0.250 seconde 0.125 seconde
Printed on: 29 Mär 2012, 05:33:23 pm; Printed by: UWE.ZELLER
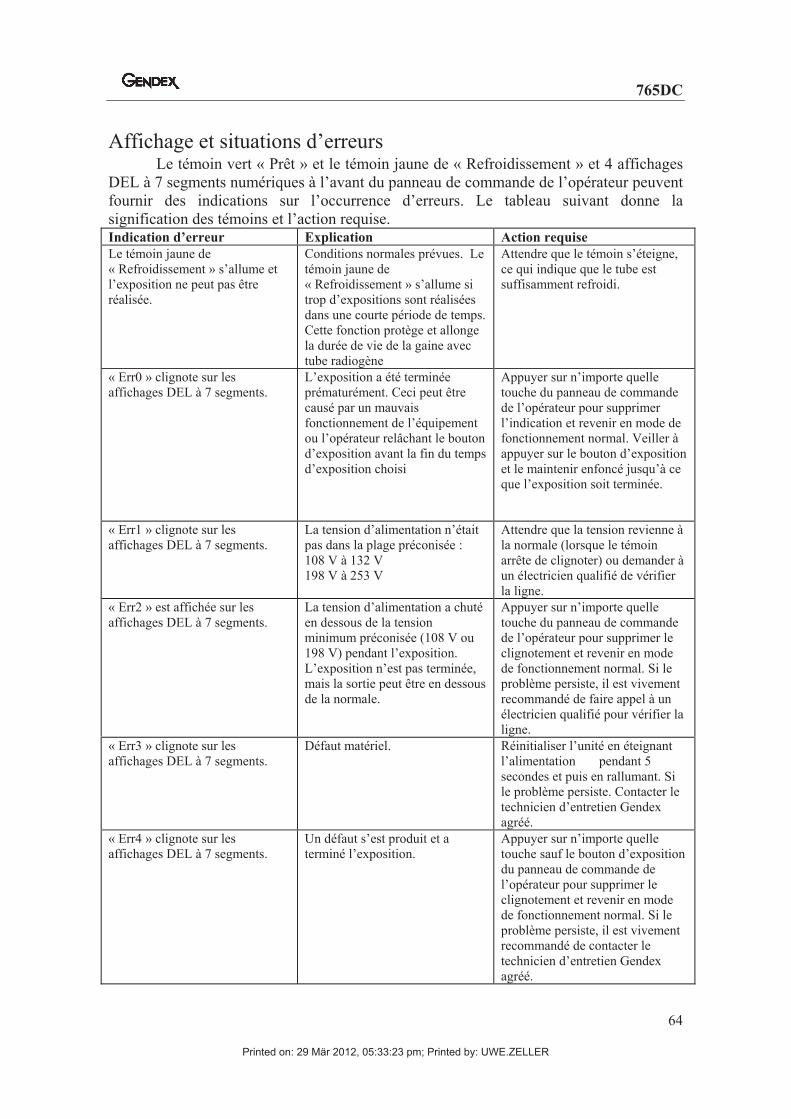
765DC
64
Affichage et situations d’erreursLe témoin vert « Prêt » et le témoin jaune de « Refroidissement » et 4 affichages
DEL à 7 segments numériques à l’avant du panneau de commande de l’opérateur peuvent
fournir des indications sur l’occurrence d’erreurs. Le tableau suivant donne la
signification des témoins et l’action requise.Indication d’erreur Explication Action requise
Le témoin jaune de
« Refroidissement » s’allume et
l’exposition ne peut pas être
réalisée.
Conditions normales prévues. Le
témoin jaune de
« Refroidissement » s’allume si
trop d’expositions sont réalisées
dans une courte période de temps.
Cette fonction protège et allonge
la durée de vie de la gaine avec
tube radiogène
Attendre que le témoin s’éteigne,
ce qui indique que le tube est
suffisamment refroidi.
« Err0 » clignote sur les
affichages DEL à 7 segments.
L’exposition a été terminée
prématurément. Ceci peut être
causé par un mauvais
fonctionnement de l’équipement
ou l’opérateur relâchant le bouton
d’exposition avant la fin du temps
d’exposition choisi
Appuyer sur n’importe quelle
touche du panneau de commande
de l’opérateur pour supprimer
l’indication et revenir en mode de
fonctionnement normal. Veiller à
appuyer sur le bouton d’exposition
et le maintenir enfoncé jusqu’à ce
que l’exposition soit terminée.
« Err1 » clignote sur les
affichages DEL à 7 segments.
La tension d’alimentation n’était
pas dans la plage préconisée :
108 V à 132 V
198 V à 253 V
Attendre que la tension revienne à
la normale (lorsque le témoin
arrête de clignoter) ou demander à
un électricien qualifié de vérifier
la ligne.
« Err2 » est affichée sur les
affichages DEL à 7 segments.
La tension d’alimentation a chuté
en dessous de la tension
minimum préconisée (108 V ou
198 V) pendant l’exposition.
L’exposition n’est pas terminée,
mais la sortie peut être en dessous
de la normale.
Appuyer sur n’importe quelle
touche du panneau de commande
de l’opérateur pour supprimer le
clignotement et revenir en mode
de fonctionnement normal. Si le
problème persiste, il est vivement
recommandé de faire appel à un
électricien qualifié pour vérifier la
ligne.
« Err3 » clignote sur les
affichages DEL à 7 segments.
Défaut matériel. Réinitialiser l’unité en éteignant
l’alimentation pendant 5
secondes et puis en rallumant. Si
le problème persiste. Contacter le
technicien d’entretien Gendex
agréé.
« Err4 » clignote sur les
affichages DEL à 7 segments.
Un défaut s’est produit et a
terminé l’exposition.
Appuyer sur n’importe quelle
touche sauf le bouton d’exposition
du panneau de commande de
l’opérateur pour supprimer le
clignotement et revenir en mode
de fonctionnement normal. Si le
problème persiste, il est vivement
recommandé de contacter le
technicien d’entretien Gendex
agréé.
Printed on: 29 Mär 2012, 05:33:23 pm; Printed by: UWE.ZELLER

765DC
65
SPÉCIFICATIONS DE L’APPAREIL
Les valeurs nominales spécifiées pour le refroidissement et le fonctionnement
s’appliquent aux altitudes inférieures à 3 600 m, à une humidité relative moyenne ne dépassant
pas 95 % et à une température ambiante maximum de 27 °C.
SPÉCIFICATIONS DE LA GAINE AVEC TUBE RADIOGÈNE
Potentiel nominal maximum du tube : 65 kV avec courant de tube de 7 mA.
Facteurs techniques de fuite en charge : Moins de 250 micro Gy/h à 1 mètre de la tache focale.
Première épaisseur de demi-atténuation minimum : supérieur à 1,5 mm aluminium équivalent
Dimension nominale de la tache focale : 0,4 mm (IEC 336/1993)
Angle de l’anode : 12,5 degrés
Stockage de chaleur de l’anode : 7 kHU
Cycle opératoire : 1:30
SPÉCIFICATIONS DU CÔNE
Dimension du champ de rayons X : Contenu dans un cercle de 6 cm de diamètre, mesuré à
l’extrémité distale du cône installé.
Distance entre la tache focale et l’extrémité distale du cône : 20 ou 30 cm.
EXIGENCES D’ALIMENTATION
Nominal Tolérance Plage utile
120 V c.a. ± 10 % 108 - 132 V c.a.
230 V c.a. + 10 % - 14 % 198 - 253 V c.a.
PRÉCISION DES FACTEURS TECHNIQUES
Potentiel nominal du tube 65 kV ± 3 kV
Courant nominal du tube 7 mA ± 5 %
Durée d’exposition 0,02 sec. - 0,50 sec. ± 0,005 sec.
0,63 sec. - 2,00 sec. ± 1%
Printed on: 29 Mär 2012, 05:33:23 pm; Printed by: UWE.ZELLER

765DC
66
Logement du tube pour radiographie intra-oraleFeuille de données techniquesGendex® 765DC
Le logement Gendex® 765DC est conçu pour être utilisé avec l’insert Gendex® GX 70-10DC. Ce
logement a été conçu pour fonctionner avec la commande à haute tension, haute fréquence
Gendex® 765DC, composant l’appareil de radiographie dentaire intra-orale Gendex® 765DC.
Spécifications
Logement résistant aux chocs : Zinc, scellé hermétiquement sous vide, avec huile à haut
pouvoir d’isolement diélectrique. Une chambre
d’expansion est intégrée au logement pour fournir la
compensation adéquate sur toute la plage de
température.
Température de fonctionnement : +50 °F à 100 °F (+10 °C à +40 °C)
Température de stockage : -40 °F à 160 °F (-40 °C à +70 °C)
Filtration intégrée :
Épaisseur / mm EDA1 / mm Équivalent al.
Matériau Min. Max. 65 kV Min. Max.
Verre 1,27 1,91 0,51 0.065 0.97
Huile isolante 6,5 7,7 0,08 0,52 0,62
Polycarbonate 16,4 16,7 0,09 1,48 1,50
Total 2,636 3,206
Sortie du rayonnement :Technique 65 kV, 7 mA, 0,50 s.
Distance source détecteur 230 mm (9 po)
410 mR ±125 mR (3.55 mGy ± 1.05 mGy)
Couche demi-valeur typique : 1,9 mm Aluminium à 65 kV
Printed on: 29 Mär 2012, 05:33:23 pm; Printed by: UWE.ZELLER

765DC
67
Rayonnement de fuite : Conforme à la norme 601-1-3 IEC, section 29.204
“Rayonnement de fuite”. Entrée alimentation continue
maximum égale à 1400 unités caloriques par mn
(UC/mn) le tube étant le facteur de limite. UC/mn =
(kV) x (mA) x (1,4) x (durée exp. (s) / 60)
1400 UC/mn = 65 kV x 0,27 mA x 1,4 x 60 s
Couverture des rayons X : L’angle cible de l’insert est de 12,5°
Cône circulaire à 8 po (200 mm) DSP2 60 mm dia.
+0, -3 mm.
Cône circulaire à 12 po (300 mm) DSP2 60 mm dia.
+0, -3 mm.
Cône rectangulaire à 8 po (200 mm) DSP2 36 mm x
46 mm
1 EDA Corrélation Équivalente demi-valeur Aluminium2 DSP Distance Source Peau
Poids : 13,0 lbs 5,9 kg
Tension tête maximum : Anode à cathode 65 kV
Anode à terre 70 kVCaractéristiques thermiques :
Capacité de stockage de la chaleur du logement 250 kUC (177 J)
(Voir le graphique pour plus de détails)
Taux de refroidissement maximum 3,3 kUC/mn
Unités caloriques (UC) = (kV * mA * durée en secondes * 1,4)
Tableau d'échauffement et de refroidissement du
logement Gendex 765DC
20
25
30
35
40
45
0 20 40 60 80 100
120
140
160
180
200
220
240
260
280
300
320
340
360
Durée (mn)
Te
mp
éra
ture
(°C
)
0
50
100
150
200
250
300
Un
ité
s c
alo
riq
ue
s (
kU
C)
Échauffement, cycle de service 100 %, température ambiante 20°C
Refroidissement, température ambiante 20°C
Printed on: 29 Mär 2012, 05:33:23 pm; Printed by: UWE.ZELLER

765DC
68
ENTRETIEN RECOMMANDÉ
Un programme d’entretien doit être fait pour assurer la sécurité du matériel. Lepropriétaire de l’appareil est responsable de faire cet entretien et il doit s’assurer qu’ilemploie pour cela un personnel qualifié pour l’entretien du matériel radiographiquedentaire GENDEX.
L’étalonnage et les réglages à effectuer sont indiqués à la section « Vérifications del’appareil et de ses fonctions » du manuel d’installation et d’entretien fourni avec le 765DC.
Il est recommandé de réaliser ces contrôles de fonctionnement de système
et procédures d’entretien au moment de l’installation, puis tous les douze
mois :
Contrôles de fonctionnement de système indiqués à la section E, page 35 du
Manuel d’installation/entretien du 765DC.
Entretien du bras de suspension, indiqué à la section F, page 43 du Manuel
d’installation/entretien du 765DC.
Remarque : Pour éviter de soumettre les opérateurs ou les patients à un
danger potentiel, il faudra informer immédiatement votre agent de service
si vous remarquez quoi que ce soit d’inhabituel quant au fonctionnement
ou à la fonctionnalité mécanique du système, ou la présence anormale de
débris.
NETTOYAGE ET DÉSINFECTION
Toutes les surfaces externes et nettoyables peuvent être nettoyées et/ou désinfectées à
l’aide des solutions habituellement utilisées de la liste suivante :
Alcool isopropylique
Phénylphénol
Benzyl-P-chlorophénol
Iodophore
Chlorure d’ammonium benzyl diméthyl disobutylphénoxéthoxyéthyl
Remarque: Utiliser les agents de blanchiment ou glutaraldehydes seulement occasionnellement.
Vérifier les ingrédients des solutions de nettoyage ou de désinfection avec ceux de laliste ci-dessus, employer les sur les surfaces de l’appareil 765DC.
Printed on: 29 Mär 2012, 05:33:23 pm; Printed by: UWE.ZELLER

765DC
69
Indice generale
Introduzione . . . . . . . . . . . . . . . . . . . . . . . . . . . . . . . Pagina 70
Etichette di identificazione . . . . . . . . . . . . . . . . . . . . . . Pagina 71
Omologazioni . . . . . . . . . . . . . . . . . . . . . . . . . . . . . . Pagina 72
Spiegazione dei simboli . . . . . . . . . . . . . . . . . . . . . . . . Pagina 73
Sicurezza . . . . . . . . . . . . . . . . . . . . . . . . . . . . . . . . . Pagina 74
Comandi operativi . . . . . . . . . . . . . . . . . . . . . . . . . . . Pagina 75
Procedura d'uso . . . . . . . . . . . . . . . . . . . . . . . . . . . . . Pagina 76
Configurazione del sistema……………… . . . . . . . . . . Pagina 77
Tabelle dei valori di default di esposizione . .. . . . . . . . . Pagina 80
Visualizzazione errori e anomalie di funzionamento .. .. . Pagina 81
Dati tecnici del sistema . . . . . . . . . . . . . . . . . . . . . . . . Pagina 82
Manutenzione consigliata . . . . . . . . . . . . . . . . . . . . . . Pagina 85
Pulizia e disinfezione . . . . . . . . .. . . . . . . . . . . . . . . . Pagina 85
Printed on: 29 Mär 2012, 05:33:23 pm; Printed by: UWE.ZELLER

765DC
70
SISTEMA RADIOLOGICO INTRA-ORALE 765DC
INTRODUZIONE
Questo manuale si prefigge di assistere l'operatore del sistema radiografico intra-orale ad alta frequenza 765DC nell'uso sicuro ed efficace dell'apparecchio. Vi sono descritte le istruzioni per l'uso, i dati tecnici e le semplici procedure di manutenzione. Prima di utilizzare l'apparecchio, leggere attentamente il manuale, prestando particolare attenzione ai messaggi di Avvertenza ed Attenzione.
Il manuale è stato scritto originalmente in lingua inglese.
COMPONENTI DEL SISTEMA
BRACCIO ARTICOLATO Consente di posizionare il monoblocco ad una distanza pari a 140 cm, 165 cm o 191 cm
PANNELLO DI CONTROLLO Consente l'impostazione dei tempi di esposizione predefiniti della parte anatomica selezionata.Selezione della modalità adulto o bambino. Selezione della modalità pellicola o immagine digitale.
CONOLunghezza focale standard di 20 cm. Opzionale di 30 cm o collimazione rettangolare.
MONOBLOCCO Posizione del fuoco indicata sulla copertura Comandi supplementari per la scelta dei fattori tecnici
Printed on: 29 Mär 2012, 05:33:23 pm; Printed by: UWE.ZELLER

765DC
71
ETICHETTE DI IDENTIFICAZIONE
Le etichette di identificazione poste sul monoblocco, sul comando principale e sul cono del sistema 765DC riportano il numero del modello, il numero di matricola e gli elenchi di approvazione prodotto pertinenti. Una certificazione contenente altre informazioni necessarie viene allegata ad alcuni componenti specifici soggetti alla norma governativa statunitense Radiation Performance Standard 21 CFR, Subchapter J.
Printed on: 29 Mär 2012, 05:33:23 pm; Printed by: UWE.ZELLER

765DC
72
OMOLOGAZIONI
Il sistema 765DC è conforme alle seguenti norme:
Norme generali di sicurezza (elettrica e meccanica):
UL60601-1 N. documento: E185414
APPARECCHIO MEDICO CLASSIFICATO DALLA UNDERWRITERS LABORATORIES INC. PER QUANTO RIGUARDA I SOLI RISCHI DI FOLGORAZIONE, INCENDIO E PERICOLI DI CARATTERE MECCANICO, COME CONFORME ALLE NORME UL60601-1, IEC60601-1, CAN/CSA C22.2 NO,601.1-M90 ED ALLE NORME SPECIFICHE IEC60601-2-32, IEC60601-2-7 IEC60601-2-28, IEC60601-1-2.
Protezione dalle radiazioni IEC60601-1-3 (protezione dalle radiazioni/apparecchiature radiografiche).
Al momento della fabbricazione, i componenti certificati del sistema 765DC erano conformi alla norma Radiation Performance Standard 21 CFR, Subchapter J.
L'apparecchio deve essere installato ed utilizzato in accordo e nel rispetto
delle norme di sicurezza ed istruzioni di funzionamento fornite in questo Manuale
per l'Operatore e nel Manuale di Servizio, per gli scopi e le applicazioni per cui è
stata progettata.Eventuali modifiche o aggiunte all'apparecchio devono essere
effettuate da Gendex o da terze parti espressamente autorizzate da Gendex. Tali
modifiche devono soddisfare i requisiti legali come pure le norme tecniche
generalmente accettate. L'utente è tenuto ad assicurarsi che vengano osservate le
normative di legge vigenti relative all'installazione dell'apparecchiatura.
IMPORTANTE …… PROTEZIONE DAI RAGGI X
Le apparecchiature radiologiche possono causare danni se usate
nel modo sbagliato.
Leggere attentamente e seguire le istruzioni contenute in questo manuale. I
rappresentanti autorizzati della Gendex vi assisteranno nel familiarizzare con le procedure
d'uso del sistema 765DC.
Questo sistema radiografico intra-orale fornisce un livello elevato di protezione
dall'esposizione accidentale ai raggi X. Bisogna tener conto, tuttavia, che non esistono
apparecchiature in grado di fornire una protezione assoluta o di impedire agli operatori di
esporre se stessi ed altri a radiazioni superflue.
34SL
Printed on: 29 Mär 2012, 05:33:23 pm; Printed by: UWE.ZELLER
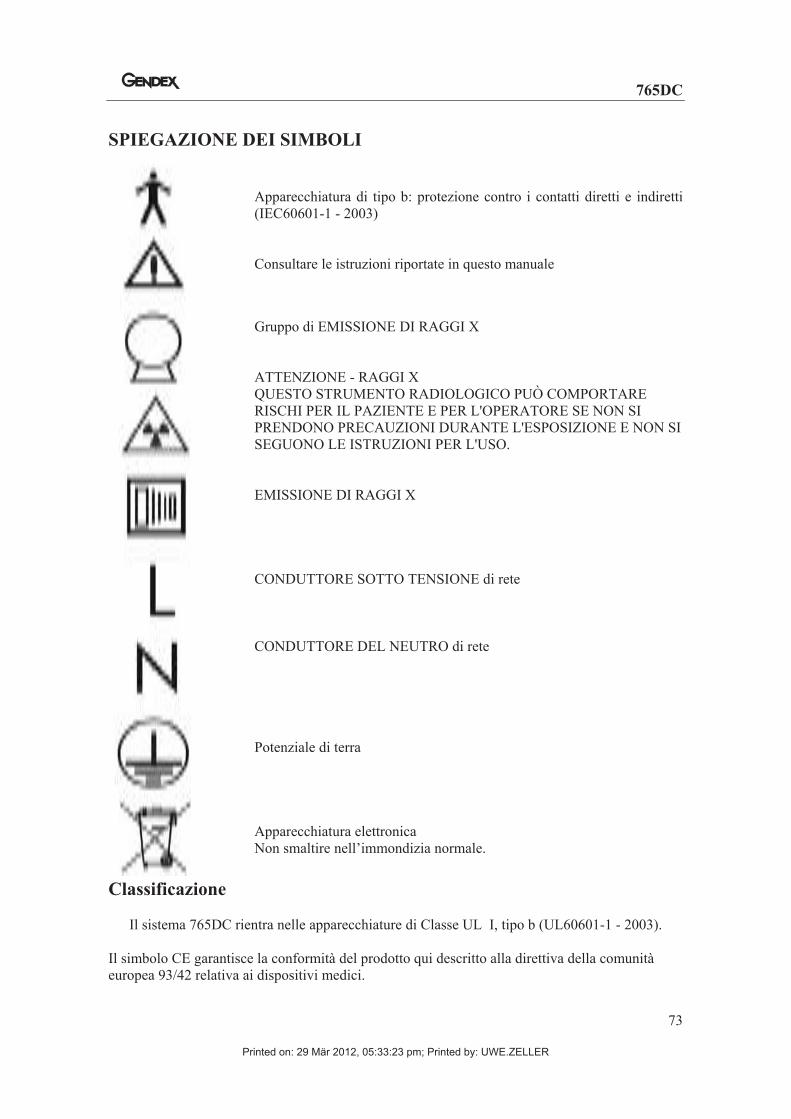
765DC
73
SPIEGAZIONE DEI SIMBOLI
Apparecchiatura di tipo b: protezione contro i contatti diretti e indiretti (IEC60601-1 - 2003)
Consultare le istruzioni riportate in questo manuale
Gruppo di EMISSIONE DI RAGGI X
ATTENZIONE - RAGGI X QUESTO STRUMENTO RADIOLOGICO PUÒ COMPORTARE RISCHI PER IL PAZIENTE E PER L'OPERATORE SE NON SI PRENDONO PRECAUZIONI DURANTE L'ESPOSIZIONE E NON SI SEGUONO LE ISTRUZIONI PER L'USO.
EMISSIONE DI RAGGI X
CONDUTTORE SOTTO TENSIONE di rete
CONDUTTORE DEL NEUTRO di rete
Potenziale di terra
Apparecchiatura elettronicaNon smaltire nell’immondizia normale.
Classificazione
Il sistema 765DC rientra nelle apparecchiature di Classe UL I, tipo b (UL60601-1 - 2003).
Il simbolo CE garantisce la conformità del prodotto qui descritto alla direttiva della comunità europea 93/42 relativa ai dispositivi medici.
Printed on: 29 Mär 2012, 05:33:23 pm; Printed by: UWE.ZELLER

765DC
74
SICUREZZA
Sicurezza relativa alle radiazioni
Il sistema 765DC deve essere utilizzato esclusivamente da personale autorizzato e qualificato, nel pieno rispetto delle norme che regolano la protezione dalle radiazioni.
Per la propria sicurezza, l'operatore deve mantenere sempre una distanza di 2 metri dalla sorgente radiogena e dal fascio di raggi X.
Tutto il personale presente in sala esami deve attenersi alle pratiche di sicurezza previste in tema di protezione da radiazioni. Per proteggere il paziente dall'esposizione non necessaria a radiazioni, quando occorra, possono essere utilizzati altri accessori in aggiunta a quelli normalmente forniti in dotazione.
Sicurezza elettrica
I coperchi installati sull'apparecchio devono essere rimossi esclusivamente da tecnici qualificati e autorizzati.
L'apparecchio deve essere usato solo in locali conformi a tutte le norme di sicurezza elettrica stabilite per gli ambienti adibiti ad uso medico (ad es., alle norme IEC, US National Electrical Code o VDE che richiedono l'installazione di un ulteriore terminale di protezione di terra per connessioni equipotenziali).
Prima della pulizia e della disinfezione, l'apparecchio deve essere sempre scollegato dall'alimentazione di rete.
Il sistema 765DC è un APPARECCHIO PER USO MEDICALE e non è dotato di protezione contro l'ingresso dei liquidi. Bisogna quindi impedire che acqua e altri liquidi penetrino al suo interno, per prevenire cortocircuiti o corrosione.
Sicurezza antiesplosione
L'apparecchio non deve essere adoperato in presenza di gas o vapori di disinfettanti infiammabili o potenzialmente esplosivi, i quali potrebbero incendiarsi provocando gravi lesioni o danni.
In caso occorra usare questi disinfettanti, prima di rimettere in uso l'apparecchio si consiglia di lasciare che il vapore si disperda.
Sicurezza meccanica:
La salvaguardia completa contro rischi fisico-meccanici é impossibile, tuttavia va posta la debita cura affinché nessuna parte del corpo o degli indumenti del paziente o dell'operatore siano intrappolati e/o danneggiati con l'utilizzo dell'apparecchiatura. In particolare, l'operatore deve fare attenzione a non lasciarsi schiacciare la dita nel chiudere il braccio articolato.
Printed on: 29 Mär 2012, 05:33:23 pm; Printed by: UWE.ZELLER

765DC
75
COMANDI OPERATIVI
1. SELEZIONE DEL TEMPO –Consente all'operatore di intervenire manualmente sul tempo predefinito di esposizione.
2. SELEZIONE DEL TEMPO DI
ESPOSIZIONE PREIMPOSTATO -
Consente all'operatore di scegliere il tempo di esposizione in base all'area dentale selezionata.
3. SELEZIONE DEL TIPO DI
IMMAGINE - Questa funzione consente all'operatore di selezionare l'uso della pellicola o di un sistema per immagini digitali. In questo modo si modificano tutte le selezioni di tempo di esposizione predefinito.
4. SELEZIONE DEL PAZIENTE -Questa funzione permette all'operatore di selezionare il tipo di paziente, adulto o bambino. In questo modo si modi-ficano tutte le selezioni dei tempi di esposizione preimpostati.
5. INDICATORE DELLO STATO DI
PRONTO - Indica che è stato premuto l'interruttore "On" (acceso) e che il sistema è pronto per l'uso.
6. SPIA DI RAFFREDDAMENTO -Questa spia si accende durante l'uso se si rende necessario il raffreddamento del monoblocco prima della successiva esposizione.
7. SPIA DELLE RADIAZIONI - Questa spia si accende quando viene premuto il pulsante per l'emissione di raggi X.
8. COMANDO RAGGI
Consente all'operatore di avviare l'esposizione direttamente dal pannello di controllo quando questo è montato all'esterno dell'area operativa.
9. COMANDO RAGGI ESTERNO
(Opzionale)
Permette di avviare l'esposizione fuori dall'area operativa in condizioni di sicurezza (il comando raggi è collegato all'apparecchio per mezzo di un cavo estensibile).
10. COMANDI SUPPLEMENTARI SUL
MONOBLOCCO
Permettono la verifica e l'eventuale modifica dei tempi di esposizione preimpostati, direttamente dal monoblocco. Una spia indica, inoltre, il tipo di paziente selezionato, adulto o bambino.
11. INTERRUTTORE DI
ALIMENTAZIONE
Per alimentare l'apparecchio, premere l'interruttore portandolo su "on" (acceso). Una spia sul pannello di controllo si accenderà segnalando la condizione di pronto.
1
2
3
4
5
6
7
8 10
11
Printed on: 29 Mär 2012, 05:33:23 pm; Printed by: UWE.ZELLER

765DC
76
PROCEDURE D'USO
1. Portare l'interruttore dell'alimentazione sulla posizione "On" (acceso). Si accende la spia dello stato di pronto posta sulla parte anteriore del pannello di controllo.
2. Selezionare pellicola o immagine digitale o verificare che l'unità sia impostata correttamente.La spia relativa alla selezione effettuata deve essere accesa. Per modificare la selezionedesiderata, premere il tasto posto tra le due icone.
3. Selezionare il tipo di paziente (adulto o bambino) o verificare che il sistema sia impostatocorrettamente. Per modificare la selezione desiderata, premere il tasto posto tra le due icone.
4. Premere il selettore posto al centro del pannello di controllo fino a che la spia posta accanto al simbolo del dente che si desidera radiografare si accende.
Nota: è possibile modificare i valori di default del tempo di esposizione (ossia quelli
visualizzati alla prima accensione del sistema) seguendo le istruzioni fornite nella Sezione
Configurazione delle impostazioni dei comandi, a pagina 77.
5. Se lo si desidera, è possibile usare gli appositi tasti di selezione del tempo di esposizione perselezionare un valore diverso dal valore di default. Per le norme relative alla pellicola per occlusione dentaria, consultare le Tabelle dei valori di default e consigliati per l'esposizione,riportate a pagina 80.
6. Posizionare il monoblocco, seguendo le usuali procedure di posizionamento. Nota: in caso di applicazione della tecnica bisettrice, si consiglia l'uso del cono standard da 20 cm in dotazione. Se si adotta la tecnica parallela, si consiglia l’uso del cono opzionale da 30 cm. La predisposizione per il cono da 30 cm è possibile modificando un impostazione interna dell'apparecchio; questa semplice operazione deve essere comunque eseguita da un tecnico autorizzato Gendex.
7. Se necessario, prima di passare all'esposizione, verificare o modificare le impostazioni del tempo, secondo necessità, mediante i comandi supplementari sul monoblocco.
8. Se si usa il comando raggi opzionale, l'operatore è obbligato ad uscire dall'area operativa. Nota: l'operatore deve essere sempre in grado dalla propria posizione di vedere i fattori tecnici impostati per garantire la sicurezza delle operazioni e l'osservanza delle normative.
9. Premere e tenere premuto il pulsante o il comando raggi fino a quando non si esaurisce il segnale acustico e si spegne la spia di emissione raggi. (Nota: se si rilascia in qualsiasi
momento il pulsante od il comando raggi, l'esposizione si interrompe immediatamente).
Printed on: 29 Mär 2012, 05:33:23 pm; Printed by: UWE.ZELLER

765DC
77
Configurazione del sistema
La configurazione del sistema viene impostata in fabbrica per la modalità di
funzionamento standard. Tale configurazione prevede l'uso di un cono da 20cm con una
pellicola tipo D o con un sistema per immagini radiografiche digitali DenOptix. Tuttavia è
sempre possibile modificare la configurazione nel caso di impiego di pellicola tipo E o F o
altro tipo di sistema per immagini digitali oppure del cono lungo(30 cm) opzionale. I tempi
di esposizione preimpostati saranno in modo automatico corrispondentemente modificati.
La scelta della velocità della pellicola o del sistema digitale per immagini è possibile
agendo sui tasti del pannello di controllo come descritto nel paragrafo successivo.
Per compensare la lunghezza del cono, è sufficiente adeguare la posizione di un
interruttore all'interno dell'apparecchio. Nota: questa operazione deve essere
eseguita esclusivamente da un tecnico autorizzato Gendex.
Modifica delle impostazioni di default in base alla velocità della pellicola usata
Il sistema 765DC viene impostato in fabbrica per l'uso di una pellicola a tipo D. Per
verificare questa impostazione, ruotare il comando: il tempo inizialmente visualizzato è pari
a 0,320 secondi. Per l'uso di una pellicola a tipo E, è necessario modificare i tempi di
esposizione usati; il sistema può essere programmato in modo da ottenere una nuova
selezione di tempi di esposizione nel modo seguente.
1. Spegnere il sistema.
1. Mentre si riaccende il sistema, premere e tenere premuto il selettore del tempo di esposizione
della parte anatomica (vedi Figura 1).
2. A questo punto, il display visualizza la dicitura "SP 1". Questo conferma che il sistema si
trova impostato sul menu velocità della pellicola.
3. Premere il tasto di aumento del tempo di esposizione. A questo punto, il display visualizza la
dicitura "SP 2". Questo conferma che il sistema è impostato per la pellicola a velocità E.
4. Per memorizzare la nuova impostazione, premere nuovamente il selettore del tempo di
esposizione della parte anatomica. A questo punto, il tempo visualizzato dovrebbe essere pari
a 0,200 secondi.
5. Premere il tasto di aumento del tempo di esposizione. A questo punto, il display visualizza la
dicitura "SP 3". Questo conferma che il sistema è impostato per la pellicola a velocità F.
6. Per memorizzare la nuova impostazione, premere nuovamente il selettore del tempo di
esposizione della parte anatomica. A questo punto, il tempo visualizzato dovrebbe essere pari
a 0,125 secondi.
Selettore del tempo di esposizione
Selettore del tempo di esposizione
della parte anatomica
Selettore pellicola o immagine digitale
Printed on: 29 Mär 2012, 05:33:23 pm; Printed by: UWE.ZELLER

765DC
78
Modifica dell'opzione immagine digitale
Il sistema 765DC viene impostato in fabbrica per essere usato con il sistema per
immagini digitali Gendex DenOptix. Per verificare questa impostazione, accendere il
sistema e premere il relativo pulsante di selezione. A questo punto, il tempo visualizzato è
0,200 secondi.
1. Spegnere il sistema.
2. Mentre si riaccende il sistema, premere e tenere premuto il selettore del tempo di esposizione
della parte anatomica (vedi Figura 1).
3. A questo punto, il display visualizza la dicitura "SP 1" o "SP 2" o “SP 3”, a seconda del tipo
di pellicola configurato.
4. Premere il selettore pellicola o immagine digitale fino a quando il display non visualizza la
dicitura "D1". Premere il pulsante di aumento del tempo di esposizione. A questo punto, il
display visualizza la dicitura "D2". Ciò significa che il sistema è configurato per un sistema
ad immagine digitale di tipo CCD.
5. Per memorizzare la nuova impostazione, premere nuovamente il selettore del tempo di
esposizione della parte anatomica.
Modifica della selezione all'accensione
Il sistema 765DC viene impostato in fabbrica in modo che, all'accensione dell'unità, sia
selezionata l'opzione pellicola per adulto. Se lo si desidera, è possibile impostare il sistema in
modo che all'accensione vengano selezionati automaticamente l'opzione immagine digitale o
paziente bambino, procedendo nel modo seguente:
1. Spegnere il sistema.
2. Mentre si riaccende il sistema, premere e tenere premuto il selettore del tempo di esposizione
della parte anatomica (vedi Figura 1).
3. A questo punto, il display visualizza la dicitura "SP 1" o "SP 2" o “SP 3” oppure "D1" o
"D2", a seconda che siano selezionate le opzioni pellicola o immagine digitale. Si noti che la
spia verde presso l'opzione selezionata lampeggia.
4. Per selezionare la modalità digitale all’accensione dell'unità, accertarsi che la spia verde
lampeggi presso l'opzione immagine digitale. Per memorizzare l'informazione, premere il
selettore di esposizione della parte anatomica e poi spegnere il sistema. A questo punto,
all'accensione, l'unità deve selezionare automaticamente l'opzione immagine digitale.
5. Per selezionare la modalità bambino all'accensione dell'unità, premere il pulsante di selezione
adulto o bambino fino a quando la spia verde non lampeggia presso l'opzione bambino. Per
memorizzare l'informazione, premere il selettore di esposizione della parte anatomica e poi
spegnere l'unità. A questo punto, all'accensione, l'unità deve selezionare automaticamente
l'opzione bambino.
Printed on: 29 Mär 2012, 05:33:23 pm; Printed by: UWE.ZELLER

765DC
79
Modifica del sistema per l'uso con il cono opzionale da 30 cm
Il sistema 765DC viene impostato in fabbrica per l'uso con il cono da 20 cm fornito in
dotazione. Si consiglia l'uso del cono da 30 cm quando si usa la tecnica parallela e si utilizza
un posizionatore per pellicole (ad esempio il kit Rinn XCP). Questo tipo di cono richiede
tempi di esposizione maggiori, che si possono programmare nel sistema modificando
un'impostazione interna.
Tale modifica deve essere eseguita esclusivamente da un tecnico autorizzato Gendex.
Printed on: 29 Mär 2012, 05:33:23 pm; Printed by: UWE.ZELLER

765DC
80
Tabelle dei valori di default di esposizione
SPEED 1: Pellicola a velocità DCono da 20 cm Cono da 30 cm
Parte anatomica selezionata Adulto Bambino Adulto Bambino
Pellicola bitewing 0.320 secondi 0.160 secondi 0.630 secondi 0.320 secondi
Molare inferiore 0.320 secondi 0.160 secondi 0.630 secondi 0.320 secondi
Molare superiore 0.400 secondi 0.200 secondi 0.800 secondi 0.400 secondi
Incisivo 0.200 secondi 0.100 secondi 0.400 secondi 0.200 secondi
Premolare 0.250 secondi 0.125 secondi 0.500 secondi 0.250 secondi
Occlusal 0.500 secondi 0.250 secondi 1.00 secondi 0.500 secondi
SPEED 2: Pellicola a velocità ECono da 20 cm Cono da 30 cm
Parte anatomica selezionata Adulto Bambino Adulto Bambino
Pellicola bitewing 0.200 secondi 0.100 secondi 0.400 secondi 0.200 secondi
Molare inferiore 0.200 secondi 0.100 secondi 0.400 secondi 0.200 secondi
Molare superiore 0.250 secondi 0.125 secondi 0.500 secondi 0.250 secondi
Incisivo 0.125 secondi 0.063 secondi 0.250 secondi 0.125 secondi
Premolare 0.160 secondi 0.080 secondi 0.320 secondi 0.160 secondi
Occlusal 0.320 secondi 0.160 secondi 0.630 secondi 0.320 secondi
SPEED 3: Pellicola a velocità FCono da 20 cm Cono da 30 cm
Parte anatomica selezionata Adulto Bambino Adulto Bambino
Pellicola bitewing 0.125 secondi 0.063 secondi 0.250 secondi 0.125 secondi
Molare inferiore 0.125 secondi 0.063 secondi 0.250 secondi 0.125 secondi
Molare superiore 0.160 secondi 0.080 secondi 0.320 secondi 0.160 secondi
Incisivo 0.080 secondi 0.040 secondi 0.160 secondi 0.080 secondi
Premolare 0.100 secondi 0.050 secondi 0.200 secondi 0.100 secondi
Occlusal 0.200 secondi 0.100 secondi 0.400 secondi 0.200 secondi
D1: Digitale (DenOptix)Cono da 20 cm Cono da 30 cm
Parte anatomica selezionata Adulto Bambino Adulto Bambino
Pellicola bitewing 0.160 secondi 0.080 secondi 0.320 secondi 0.160 secondi
Molare inferiore 0.160 secondi 0.080 secondi 0.320 secondi 0.160 secondi
Molare superiore 0.200 secondi 0.100 secondi 0.400 secondi 0.200 secondi
Incisivo 0.100 secondi 0.050 secondi 0.200 secondi 0.100 secondi
Premolare 0.125 secondi 0.063 secondi 0.250 secondi 0.125 secondi
Occlusal 0.250 secondi 0.125 secondi 0.500 secondi 0.250 secondi
D2: Digitale (sensore CCD)Cono da 20 cm Cono da 30 cm
Parte anatomica selezionata Adulto Bambino Adulto Bambino
Pellicola bitewing 0.080 secondi 0.040 secondi 0.160 secondi 0.080 secondi
Molare inferiore 0.080 secondi 0.040 secondi 0.160 secondi 0.080 secondi
Molare superiore 0.100 secondi 0.050 secondi 0.200 secondi 0.100 secondi
Incisivo 0.050 secondi 0.025 secondi 0.100 secondi 0.050 secondi
Premolare 0.063 secondi 0.032 secondi 0.125 secondi 0.063 secondi
Occlusal 0.125 secondi 0.063 secondi 0.250 secondi 0.125 secondi
Printed on: 29 Mär 2012, 05:33:23 pm; Printed by: UWE.ZELLER

765DC
81
Condizioni e visualizzazione degli errori
La spia verde di ‘pronto’, quella ambra di ‘raffreddamento’ e i 4 LED digitali a 7
segmenti, situati sulla parte anteriore del quadro di comando dell'operatore, possono
indicare che si sono verificati errori. La tabella seguente spiega il significato delle spie e
l'intervento richiesto.
Indicazione di errore Spiegazione Intervento richiestoSi accende la spia ambra di
‘raffreddamento’ e non si
possono effettuare esposizioni.
Funzionamento normale in base
alla progettazione. Succede se si
effettua un numero eccessivo di
esposizioni in un intervallo di
tempo troppo breve. Questa
caratteristica protegge la testa del
tubo e ne prolunga la durata.
Attendere che la spia,
spegnendosi, indichi che il tubo si
è raffreddato correttamente.
Sul LED a 7 segmenti lampeggia
la scritta “Err0”
L’esposizione è stata interrotta
prematuramente. La causa può
essere un’anomalia
dell’apparecchio o il rilascio
dell’interruttore di esposizione
prima del termine del tempo di
esposizione programmato.
Per azzerare il display e
ripristinare il funzionamento
normale, premere qualsiasi
pulsante (tranne l’interruttore di
esposizione) sul quadro di
comando dell'operatore. Bisogna
prestare attenzione a tenere
premuto il pulsante di esposizione
fino al termine dell'esposizione.
Sul LED a 7 segmenti lampeggia
la scritta “Err1”
La tensione dell'alimentazione era
al di fuori della gamma richiesta:
108 V – 132 V
198 V – 253 V
Attendere che la tensione della
linea torni al valore normale
(questo è indicato dalla spia
accesa costantemente) o fare
controllare la linea stessa da un
elettricista qualificato.
Sul LED a 7 segmenti lampeggia
la scritta “Err2”
La tensione dell'alimentazione è
scesa al di sotto del valore
minimo richiesto (108 V o 198 V)
durante l'esposizione.
L'esposizione non è terminata, ma
la potenza di radiazione può
essere al di sotto del livello
normale.
Per fare in modo che il display
non lampeggi più e ripristinare il
funzionamento normale, premere
qualsiasi pulsante sul quadro di
comando dell'operatore. Se il
problema persiste, si consiglia
vivamente di fare controllare la
linea di alimentazione da un
elettricista qualificato.
Sul LED a 7 segmenti lampeggia
la scritta “Err3”
Si è verificato un guasto
hardware.
Riavviare l’apparecchio portando
l’interruttore di alimentazione su
OFF per 5 secondi e poi di nuovo
su ON. Se il problema persiste
rivolgersi all'addetto all'assistenza
tecnica autorizzato della Gendex.
Sul LED a 7 segmenti lampeggia
la scritta “Err4”
Si è verificato un guasto che ha
causato l’interruzione
dell’esposizione
Per provare ad azzerare il display
e ripristinare il funzionamento
normale, premere qualsiasi
pulsante (tranne l’interruttore di
esposizione) sul quadro di
comando dell'operatore. Se il
problema persiste rivolgersi
all'addetto all'assistenza tecnica
autorizzato della Gendex.
Printed on: 29 Mär 2012, 05:33:23 pm; Printed by: UWE.ZELLER

765DC
82
DATI TECNICI DEL SISTEMA
I dati tecnici relativi al raffreddamento e ciclo di funzionamento si intendono per altitudini fino a
3600 m, umidità relativa media non superiore al 95% e temperatura ambiente massima non
superiore ai 40° C.
DATI TECNICI DEL MONOBLOCCO
Potenziale nominale massimo applicato al tubo: 65 kV a 7 mA.
Radiazione di fuga in stato di caricamento: inferiore a 250 micro Gy/h ad 1 metro dal punto
focale.
Misura minima ammessa del primo strato emivalente: maggiore di 1,5 mm Al
Dimensione nominale della macchia focale: 0,4 mm (IEC 336/1993)
Inclinazione dell’anodo: 12,5 gradi
Carico termico dell'anodo: 7 kHU
Ciclo di funzionamento: 1:30
DATI TECNICI DEL CONO
Dimensione dell'area del fascio raggi X: circoscritta in un cerchio di 6 cm di diametro, misurato
all'estremità del cono installato.
Distanza dal punto focale all'estremità distale del cono: 20 o 30 cm.
CARATTERISTICHE DELL'ALIMENTAZIONE
Nominale Tolleranza Gamma utile120 VAC ± 10% 108 - 132 VAC
230 VAC + 10%, -14% 198 - 253 VAC
ACCURATEZZA DEI FATTORI TECNICI
Potenziale nominale del tubo 65 kV ± 3 kV
Corrente nominale del tubo 7 mA ± 5%
Tempo di esposizione .02 -.50 sec. ± .005 sec.
.63 – 2.00 sec. ± 1%
Printed on: 29 Mär 2012, 05:33:23 pm; Printed by: UWE.ZELLER

765DC
83
Alloggiamento per tubo radiografico intra-orale
Scheda tecnica del prodotto
Gendex® 765DC
L'alloggiamento 765DC Gendex® è progettato per l'uso con l'inserto GX 70-10DC Gendex®.
L'alloggiamento va utilizzato unitamente al comando ad alta frequenza ed alta tensione 765DC
Gendex® ; le due parti usate insieme costituiscono il sistema radiografico intra-orale 765DC
Gendex® per diagnosi dentaria.
Dati tecnici
Alloggiamento antiurto: zinco, sigillato ermeticamente sotto vuoto con olio
isolante altamente dielettrico. L'alloggiamento è dotato
di camera di espansione, per fornire un'adeguata
compensazione per l'intera gamma di temperature.
Temperatura operativa: da + 50 °F a 100 °F (da + 10 °C a + 40 °C)
Temperatura di magazzino: da - 40 °F a 160 °F (da - 40 °C a + 70 °C)
Filtrazione intrinseca:
Spessore / mm ESA1/mm Equivalente per Al.
Materiale Min. Max. 65 kV Min. Max.
Vetro 1,27 1,91 0,51 0,65 0,97
Olio isolante 6,5 7,7 0,08 0,52 0,62
Policarbonato 16,4 16,7 0,09 1,48 1,50
Totale 2,636 3,206
Potenza di radiazione:
tecnica 65 kV, 7 mA, 0,50 sec.
Distanza fonte-rivelatore 230 mm (9 pollici)
410 mR ± 125 mR (3,55 mGy ± 1,05 mGy)
Strato emivalente tipico:Alluminio 1,9 mm a 65kV
Printed on: 29 Mär 2012, 05:33:23 pm; Printed by: UWE.ZELLER

765DC
84
Radiazione dispersa: conforme alla norma IEC 601-1-3 Sezione 29.204
“Radiazione dispersa”. La potenza massima continua in
ingresso è pari a 1400 unità termiche al min. (UT/min.).
Il fattore limite è il tubo. UT/Min. = (kV) x (mA) x (1,4)
x (tempo esp. (sec) / 60)
1400 UT/Min. = 65 kV x 0,27 mA x 1,4 x 60 sec.
Copertura dei raggi X: l'angolo d'azione dell'inserto è pari a 12,5°
Cono circolare ad 8 pollici (200 mm) DFC2 60 mm
Diam. +0, -3 mm.
Cono circolare a 12 pollici (300 mm) DFC2 60 mm
Diam. +0, -3 mm.
Cono rettangolare ad 8 pollici (200 mm) DFC2 36
mm x 46 mm
1 ESA correlazione Equivalente Spessore di semiattenuazione per Alluminio2 DFC Distanza fonte-cute
Peso: 13,0 libbre 5,9 kg
Massima tensione di testa: dall'anodo al catodo 65 kV
dall'anodo a terra 70 kVCaratteristiche termiche:
capacità di accumulo di calore dell'alloggiamento 250 kUT (177 J)
(per ulteriori informazioni si rimanda al grafico)
massima velocità di raffreddamento 3,3 kUT/min.
Unità termiche (UT) = (kV * mA * tempo in secondi * 1,4)
Grafico di riscaldamento e raffreddamento per
alloggiamento Gendex 765DC
20
25
30
35
40
45
0 20 40 60 80 100
120
140
160
180
200
220
240
260
280
300
320
340
360
Tempo (min.)
Tem
pera
tura
(°C
)
0
50
100
150
200
250
300
Un
ità t
erm
ich
e (
kU
T)
Riscaldamento, ciclo di servizio al
100%, temperatura ambiente
20 °C
Raffreddamento, temperatura
ambiente 20 °C
Printed on: 29 Mär 2012, 05:33:23 pm; Printed by: UWE.ZELLER

765DC
85
MANUTENZIONE CONSIGLIATA
Per garantire la sicurezza dell'apparecchio, occorre stabilire un programma dimanutenzione. È responsabilità del proprietario dell'apparecchio organizzare ed osservareun programma per la manutenzione, che deve essere eseguito da tecnici qualificati edautorizzati GENDEX.
Il manuale Installazione e Manutenzione del sistema 765DC, fornito con il prodotto,comprende la sezione Controlli del sistema e delle funzioni, in cui è riportata la lista degliinterventi di taratura e regolazione da eseguire.
Al momento dell’installazione, e, successivamente, ogni dodici mesi, si
raccomanda di controllare il sistema e le sue funzioni nonché di eseguire
la procedura di manutenzione, come di seguito specificato.
Controlli del sistema e delle funzioni: fare riferimento alla Sezione E, pagina 35,
del manuale di installazione e manutenzione 765DC.
Manutenzione del braccio articolato: fare riferimento alla Sezione F, pagina 43,
del manuale di installazione e manutenzione 765DC.
Nota: per evitare il rischio di infortuni agli operatori o ai pazienti,
segnalare al servizio manutenzione del sistema ogni anomalia di
funzionamento, problemi meccanici o presenza di detriti.
PULIZIA E DISINFEZIONE
Pulire e/o disinfettare tutte le superfici esterne usando i prodotti elencati di seguito,
facilmente reperibili in commercio:
Alcool isopropilico
Fenilfenolo
Benzil-P-clorofenolo
Iodoforo
Disobutilfenossietossietile dimetil benzil ammonio cloruro
Nota: esporre solo occasionalmente a glutaradide o ipoclorito di sodia
Prima di pulire le superfici del sistema 765DC, confrontare il contenuto di tutte lesoluzioni detergenti o disinfettanti con la lista sopra riportata.
Printed on: 29 Mär 2012, 05:33:23 pm; Printed by: UWE.ZELLER

USA
Gendex Dental Systems 901 W. Oakton Street Des Plaines, IL 60018-1884 Tel: (888) 275-5286 Fax: (847) 550-1322
Italy
Gendex Dental Systems S.r.1. Via A, Manzoni 44 20095 Cusano Milanino-Mi Tel: +39.02.61800.81 Fax: +39.02.61800.809
Germany
Gendex Dental Systeme Albert-Einstein-Ring 15 22761 Hamburg Tel: +49.40.899.6880 Fax: +49.40.899.68819
France
Gendex Dental Systems ZAC paris Nord 2 Parc des Reflets 165 avenue du Bois de la pie 95700 Roissy-en-France Tel: +01.56.48.72.02 Fax: +01.56.48.72.25
Australia
Ivoclar Vivadent Pty Ltd. 1-5 Overseas Drive Noble Park, Victoria 3174 Tel: +61.3.9795.9599 Fax: +61.3.9795.9645
ABP-2000-5/05 Printed in USA
Doc. No. G0112-99U Rev. 3
Printed on: 29 Mär 2012, 05:33:23 pm; Printed by: UWE.ZELLER