gatemanager installation and operations guide
TRANSCRIPT

GateManager™ model 4250 Installation and Configuration Guide
This document describes how to install the Secomea GateManager 4250 Hardware unit.
The intended audience for this document is the person responsible for IT, or a person responsible for administration of the GateManager, and who can authorize the necessary network configuration for the GateManager to communicate via the Internet.
Version: 1.2, 2014
GateManager 4250 Installation and Configuration Guide Page 2 of 36
Table of Contents 1. Initial GateManager installation and configuration 4
2. Firewall configuration (port forwarding) 7
2.1. Configuring your corporate firewall 7
2.1.1. Ingoing rules: 8 2.1.2. Outgoing rules: 8
3. Verify installation (first login) 9
4. Configuring GateManager environment settings. 11
4.1. Set a Server Name and Browser Title 11
4.2. Enter/verify the Primary DNS server 12
4.3. Enter the Public Hostname or External Public Address 12
4.4. Enter Mail Relay settings. 13
4.5. Setup Server Administrator account(s) 15
4.6. Change password for Appliance Launcher access. 17
5. Ordering and installing production license 19
5.1. Order licenses 19
5.2. Install licenses 21
APPENDIX A, Setting up backup 22
Backup to USB flash drive 22
Backup to FTP server 23
Verify that backup is working 24
APPENDIX B, Upgrading GateManager Firmware 26
APPENDIX C, Enabling the SMS modem 29
APPENDIX D, Using Secomea TrustGate as firewall 30
D1. Configure Firewall rules 31
D2. Configure NAT rules 32 D3. Allow or limit access to the TrustGate WEB GUI 34
APPENDIX E. Recover lost Server Administrator password 35
Preparation 35 Recovery procedure 35
Notices 36

GateManager 4250 Installation and Configuration Guide Page 3 of 36
Prerequisites for installing according to this guide This guide will assist you to plan for, and successfully complete the installa-tion of the Secomea GateManager 4250 hardware unit.
In principle you can install and run the GateManager 4250 in a completely closed environment for testing. I.e. the GateManager will connect to your in-ternal network as any other network device, and be used by LinkManager users and SiteManager devices connected within this closed network.
However, to operate the GateManager as intended, it must be accessible from the Internet.
Prerequisites for a fully functional install of the GateManager according to this guide are:
You have the ability/authority to allocate a public Internet address for the GateManager.
You have the ability/authority to adjust open necessary ports in an Internet firewall / NAT router to direct traffic to and from the server.
The Internet bandwidth available for the GateManager must be at least 128Kb/s.
You have the ability/authority to allow relaying of E-mails generated by the GateManager. (In worst case, you can relay via e.g. a Gmail account)
Version History 0.3 Initial version
1.0 Added TCP port 5800 in section 2.1.1 in relation to GateManager release 5.5 build 14123
1.1 Added Appendix E - Recover lost Server Administrator password.
1.2 Fixed disorder of appendices
GateManager 4250 Installation and Configuration Guide Page 4 of 36
1. Initial GateManager installation and configuration This section will make the basic configuration of the network settings of the GateManager. You can decide to move the GateManager to its intended physical location afterwards.
1. Download and install the Secomea Appliance Launcher from this loca-tion: http://info.secomea.com/appliance-launcher (Version 5.3 or newer is required)
2. Use a standard Ethernet cable (not a crossover cable) to connect the GateManager's WAN port to your internal network (same physical net-work where your PC is connected). The LAN port of the GateManager is currently not used.
NB: If your PC is not located in the same physical network as the GateManager, you can alternatively connect your PC to the WAN or LAN port of the GateManager using the red cross over cable.
3. Apply power to the unit using the power supply delivered with the GateManager.
4. The red Error LED will blink during power on, and when ready it will con-tinuously display 3 blink followed by a pause. This indicates that the GateManager needs attention - in case of first time installation it needs to be configured according to this guide.
5. If the GateManager has received an IP address from the DHCP server in the network, the green Status LED will turn on. This indicates that the GateManager web GUI is operational.
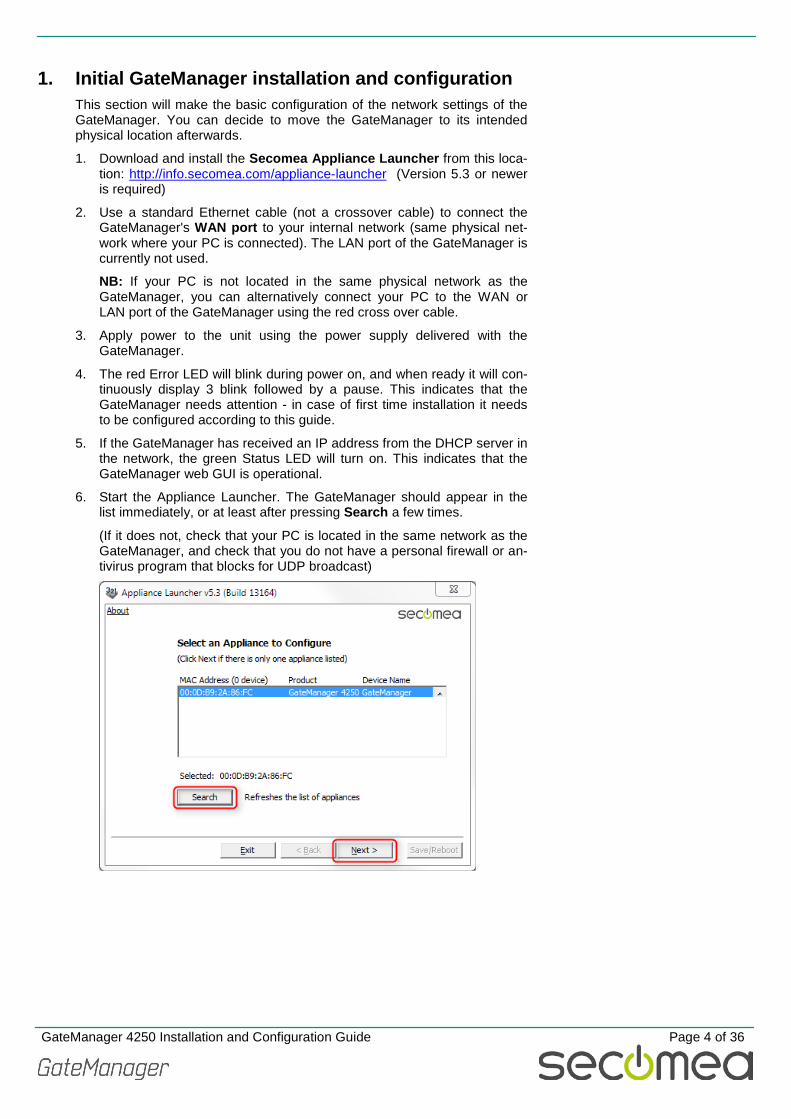
6. Start the Appliance Launcher. The GateManager should appear in the list immediately, or at least after pressing Search a few times.
(If it does not, check that your PC is located in the same network as the GateManager, and check that you do not have a personal firewall or an-tivirus program that blocks for UDP broadcast)

GateManager 4250 Installation and Configuration Guide Page 5 of 36
7. Click Next to enter the WAN/UPLINK page. This will display the address received from the DHCP server.
Make note of this address, as you will need this to access the GateManager with a Web browser.
NOTE: If you intend to relocate the GateManager to a network without a DHCP server (such as a firewall DMZ), you should define a static IP ad-dress and the Default Gateway through which the GateManager can ac-cess the Internet..
8. Click Next to get to the Optional Service Provider's GateManager page.
You should fill this page if you want the supplier of the GateManager to be able to establish remote access to the GateManager for assisting you in configuring or trouble shooting the GateManager configuration.
NOTE: Allowing remote access based on these settings, will make your GateManager establish an encrypted connection to the service provid-er's GateManager. Only authorized administrators on the service provid-er's GateManager will be able to obtain access, and only to the web log-in page on your GateManager (GateManager Administrator Web Portal) and they will have to login with an account that you control.
You can disable such access when the server is fully operational.

GateManager 4250 Installation and Configuration Guide Page 6 of 36
9. Click Next to get to the Finish screen and select Save/Reboot:
10. You will get the following dialogue, which means the initial network set-
tings of the GateManager will be activated. You can now continue with the next section.
Note: You can disregard the message about the password being set to the MAC address.
This password is not used for accessing the GateManager Administrator web portal, but used only for accessing a limited web GUI for the em-bedded OS on which the GateManager runs. Settings accessible via this web GUI can also be configured from within the GateManager Adminis-trator web portal.
Setting the password to the MAC address is primarily to prevent unau-thorized access to the underlying OS from the WAN port. The Appliance Launcher will not prompt for this password. In the GateManager Admin-istrator web portal you can set a password for access by the Appliance Launcher (described later in this guide).
GateManager 4250 Installation and Configuration Guide Page 7 of 36
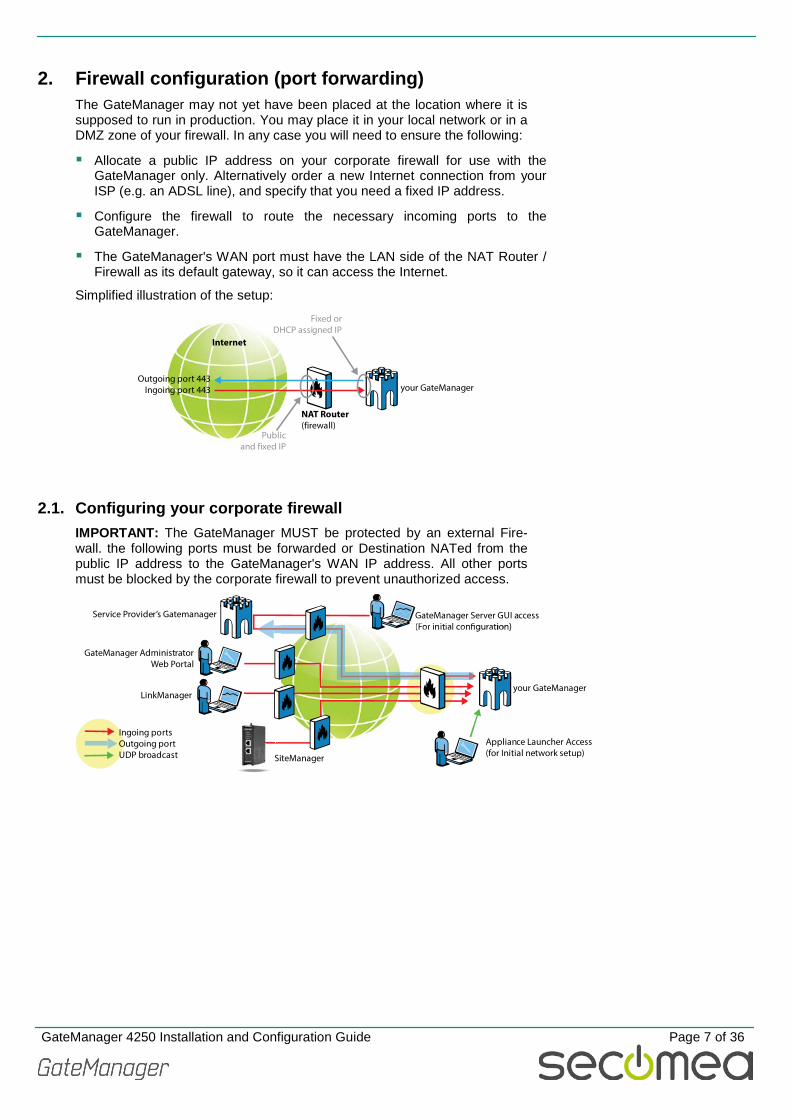
2. Firewall configuration (port forwarding) The GateManager may not yet have been placed at the location where it is supposed to run in production. You may place it in your local network or in a DMZ zone of your firewall. In any case you will need to ensure the following:
Allocate a public IP address on your corporate firewall for use with the GateManager only. Alternatively order a new Internet connection from your ISP (e.g. an ADSL line), and specify that you need a fixed IP address.
Configure the firewall to route the necessary incoming ports to the GateManager.
The GateManager's WAN port must have the LAN side of the NAT Router / Firewall as its default gateway, so it can access the Internet.
Simplified illustration of the setup:
your GateManager
NAT Router(firewall)
Internet
Outgoing port 443Ingoing port 443
Publicand fixed IP
Fixed orDHCP assigned IP
2.1. Configuring your corporate firewall IMPORTANT: The GateManager MUST be protected by an external Fire-wall. the following ports must be forwarded or Destination NATed from the public IP address to the GateManager's WAN IP address. All other ports must be blocked by the corporate firewall to prevent unauthorized access.
Service Provider’s Gatemanager
your GateManager
Appliance Launcher Access(for Initial network setup)SiteManager
LinkManager
GateManager Server GUI access
GateManager AdministratorWeb Portal
Ingoing portsOutgoing portUDP broadcast

GateManager 4250 Installation and Configuration Guide Page 8 of 36
In the following, the ports are marked as follows:
RED: Ports that must be opened for the system to work at all.
BLUE: Ports that must be opened for obtaining optimal functionality
GREEN: Recommended, but only needed for special scenarios
2.1.1. Ingoing rules:
TCP 80 ---> 11444(or 80) (Appliance)
443 ---> 11444(or 443) (Appliance/Web GUI)
11444 ---> 11444 (Appliance)
55000-59999 ---> 55000-59999 (Go To Appliance)
5900 ---> 5900 (VNC support LM Mobile)
5800 ---> 5800 (JavaVNC support LM Mobile)
3389 ---> 3389 (RDP support LM Mobile)
Note: In case the GateManager Server will be accessed from inside the private network where it is located, the destination NAT rules must reflect that. This is the case if access from SiteManager, LinkManager or Admin-istrator portal access is made from the same network as the local address of the GateManager.
Port 5800, 5900, 3389 is for "Go To Appliance" support using the LinkManager Mobile. The ports are controlled and secured by the GateManager, so connection attempts on these ports by anything else than a LM Mobile will be rejected by the GateManager.
See also the example of setting up a firewall in APPENDIX D, Using Secomea TrustGate as firewall.
2.1.2. Outgoing rules:
TCP 21 (Optional: For FTP backup to external server)
443 (For maintenance and Web Proxy)
80 (Optional: WEB Proxy *)
TCP/UDP 53 (DNS)
123 (NTP)
(*) The WEB Proxy allows a PC attached to the DEV port on a SiteManager to be able to browse the internet through the GateManager Server.

GateManager 4250 Installation and Configuration Guide Page 9 of 36
3. Verify installation (first login) 1. Open a browser and enter the IP address of the GateManager server. If
logging in from inside the firewall, you should use the IP address of the WAN interface of the GateManager (from the WAN/UPLINK of the Ap-pliance Launcher setup).
https://172.16.16.246/admin
If connecting from the Internet, you should enter the public IP address that is routed to the GateManager.
The first screen you will see is:
2. Login with the default settings:
User name: Administrator Password: gatemanager

GateManager 4250 Installation and Configuration Guide Page 10 of 36
3. You can now configure the GateManager according to the next section. If, in the Appliance Launcher, you configured the GateManager to con-nect to a service providers GateManager, your service provider should be able to securely access the same Web GUI from remote.
Note: You can verify if the GateManager is in fact connected to your service providers GateManager. Select Server and Log. If you can find the message "Connected to Remote GateManager <service provides GateManager>", the GateManager is accessible by the service provider:

GateManager 4250 Installation and Configuration Guide Page 11 of 36
4. Configuring GateManager environment settings. To make the GateManager fully operational, you must configure the follow-ing minimum settings into the GateManager:
Define a Server Name and web browser title
Enter/verify the primary DNS
Public IP address and/or DNS name that is port-forwarded to the GateManager.
Setup and verify email relay settings.
Create a new Server Administrator account and/or change the adminis-trator account (new password and enable certificate). Also consider making a new server administrator account for access by your Service Provider.
Consider defining a stronger password for Appliance Launcher access.
4.1. Set a Server Name and Browser Title 1. Login with the default administrator account
2. Select Server > Config, and select Edit for the Basic Setup section.
1. Enter a unique name for the server, and the information that should be
displayed as browser name when accessing the server using the GateManager Administrator web portal and LinkManager Mobile. Select Save.
Note: It is a good idea to use the same name as defined for "Name of GateManager" in the appliance launcher (see page 5 step 8)

GateManager 4250 Installation and Configuration Guide Page 12 of 36
4.2. Enter/verify the Primary DNS server The GateManager will need access to a DNS server, in order to resolve the external hostname of itself (if used), and for resolving the mail relay server and NTP server.
1. Under DNS and NTP Settings, ensure that there is a valid DNS server entered. If the GateManager is receiving its WAN address by DHCP, this will be automatically populated with the DNS received from the DHCP server.
4.3. Enter the Public Hostname or External Public Address 2. Under WAN (Public/Private) Interface Setup Enter the Public IP ad-
dress and/or the FQDN (Full Qualified Domain Name) for this server and press Save.
NOTE if no Public Hostname(FQDN) has been assigned to the server then you must enter the Public IP address in both fields.
Do NOT select Restart Server yet!

GateManager 4250 Installation and Configuration Guide Page 13 of 36
Possible error messages when saving:
Failed to resolve the DNS name. This indicates that the DNS name (in this case gm.acme.com) is not valid. Your entered information will not be saved until the GateManager is able to resolve the host name.
Unknown hostname. This indicates either that the DNS server has not been configured, or the DNS server is not working or not accessi-ble.
3. When no error messages are displayed when saving the settings, you can check the “Restart Server” option and press the Save button.
4. The GateManager server will restart, it will take about 60 seconds.
4.4. Enter Mail Relay settings. The ability to send email is absolutely essential to the GateManager!
1. Enter the Mail Settings section and fill in an SMTP server

GateManager 4250 Installation and Configuration Guide Page 14 of 36
2. Verify that you can actually receive mails from the GateManager, by us-ing the Test Mail feature found in the Mail Settings section.
3. The resulting email would look like this:
HINTS:
If you do not receive the mail on your corporate email, try e.g. a Gmail or hotmail account, since it could be that emails sent via a relay server behind the same firewall as the GateManager, may be rejected.
If you cannot get access to your corporate SMTP server, you can use web mail services such as Gmail or Hotmail/Live-mail as relay. The following example uses Gmail (you will need to have a mail account on the mail server, and the relay port 587 must be open outgoing in the firewall)
NOTE: The email to the recipient will show the email account of the Authentication User as sender (in this case [email protected]) for all emails sent from the GateManager. Also it has not been verified if using e.g. Gmail for large volumes of emails would cause problems. So using such public mail services should only be used as an interim solution.

GateManager 4250 Installation and Configuration Guide Page 15 of 36
4.5. Setup Server Administrator account(s) It is highly recommended to change the default Server Administrator account password (gatemanager), to something stronger. It is also advisable to ena-ble two factor login for the account by changing Authentication from Pass-word to X.509.
However, if the account is changed to use X.509 certificate, and the certifi-cate is lost (e.g. it could be rejected by the email server that receives the email with the certificate attachment), you would lock yourself out of the server completely. Therefore it is recommend to create a new Server Admin-istrator account, before changing the default account.
The following explains the recommended steps:
1. Select the Tree tab, and enable viewing of user accounts, by clicking the account icon so its background turns light blue. You will now see the ac-count that you are currently logged in with displayed with a green back-ground.
Click on the Administrator account, and insert your own name and email for the account. Select Save.
GateManager 4250 Installation and Configuration Guide Page 16 of 36
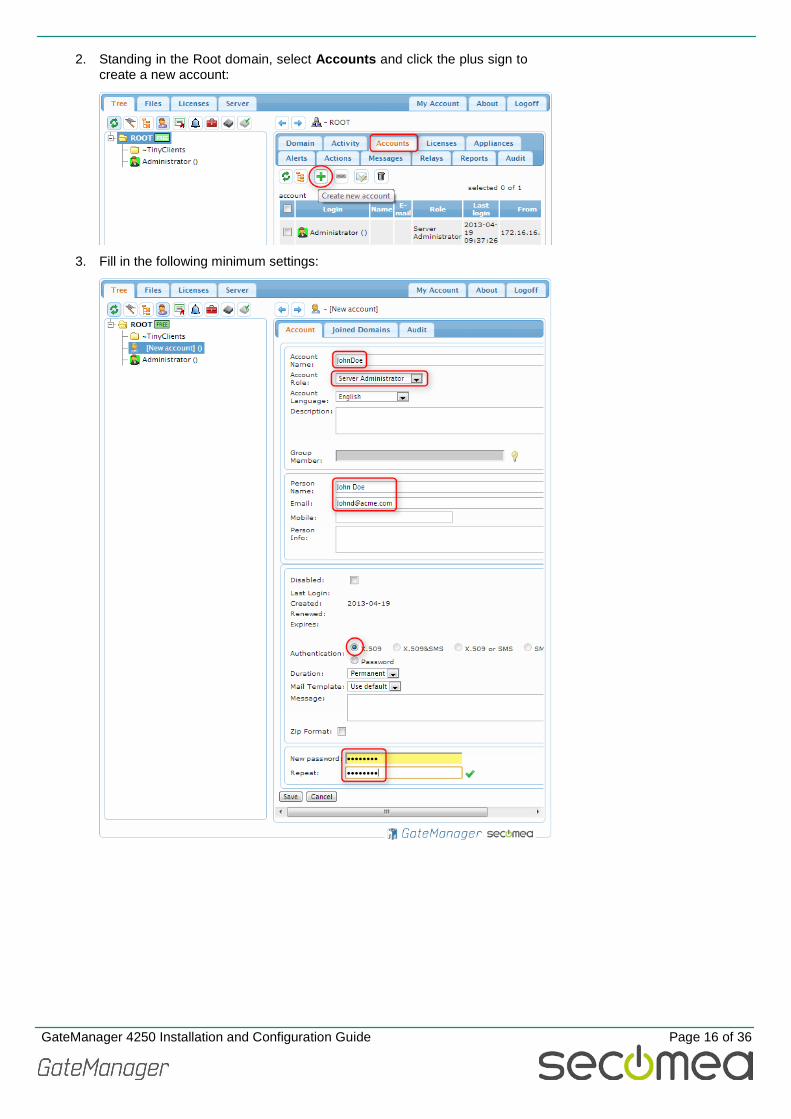
2. Standing in the Root domain, select Accounts and click the plus sign to create a new account:
3. Fill in the following minimum settings:

GateManager 4250 Installation and Configuration Guide Page 17 of 36
4. In the mailbox of the email you entered, you should now receive an email with the certificate attached
5. You now have a backup Server Administrator account, and you can safely change the password of the default Server Administrator account, and also enable X.509 authentication for it, or you could even disable or delete it.
DO NOT LEAVE THE DEFAULT ADMINISTRATOR ACCOUNT WITH THE DEFAULT PASSWORD, AS YOU WOULD RISK UNWANTED ACCESS FROM THE INTERNET.
Also consider creating a new Server Administrator for your Service Pro-vider, in case you want remote support for additional setup of the server.
4.6. Change password for Appliance Launcher access. Select Server and AL Password, and define a new password.
Note that this is only for preventing un-authorized access to the network set-tings from the local network of the GateManager.
The password is not used for accessing the GateManager Administrator web portal, but used only for accessing a limited web GUI for the embedded OS on which the GateManager runs. All settings configurable by the Appli-ance Launcher can also be configured from within the GateManager Admin-istrator web portal.

GateManager 4250 Installation and Configuration Guide Page 18 of 36
CONGRATULATIONS If you have setup the GateManager according to the previous sections the GateManager will be fully operational - but for demo or trial purposes only. For operating the GateManager in production mode, you should install license certificates as explained in the following section. For an introduction to the basic operation of the GateManager Administrator interface, refer to this guide:
http://info.secomea.com/premium

GateManager 4250 Installation and Configuration Guide Page 19 of 36
5. Ordering and installing production license As default the GateManager is running in DEMO mode, which means it sup-ports only one LinkManager and three connected Appliances (Appliances being SiteManagers and/or TrustGates).
You will need to install a license certificate to increase the number of appli-ances to connect and to allow the GateManager to be used for production purposes.
5.1. Order licenses 1. Enter the menu Licenses Order, and fill the form.
(numbered items are explained on the next page)

GateManager 4250 Installation and Configuration Guide Page 20 of 36
Insert your own billing information here.
This information will be inherited by the order forms that GateManager ad-ministrators on this server can use for ordering LinkManager licenses (they can overwrite the information at the time of ordering)
This information is default set to Secomea. If this GateManager was pur-chased from a Secomea distributor, the information should be changed to reflect the details of the distributor.
Note that a copy of the order form will always be sent Secomea's license registration server. The information is regarded confidential and will not be disclosed from Secomea, except if needed to the entity specified the "Send order" to section. The information is used only for securing that Secomea can cross reference the details in order ensure creation of the licenses with the exact information.
This ID should be included in the formal order, and is used by Secomea to match the order with the exact server information.
This is your order details, and should include your company's order num-ber (if you use such)
The value of this field depends on the service agreement you will choose. I in doubt, you should enter 25. Otherwise leave the field empty, which will indicate that you enter the EasyService maintenance agreement. Refer to the price list, or consult the representative of your point of purchase.
2. Selecting Send Order will generate a receipt. Note that you will receive a copy of the order.

GateManager 4250 Installation and Configuration Guide Page 21 of 36
5.2. Install licenses 1. When your order has been processed you will receive a license certifi-
cate by email. The license will look like this:
======BEGIN LICENSE UPGRADE===== ebwENcTP7G-5YxfOVyxtF76PU9qu0FUI Ht379NZsALFFXfJfhtB9HC_xVYEvcfs5 3MM3Kdqm ======END LICENSE UPGRADE=======
2. Copy the text into the clipboard, and open the Licenses > Install menu. Paste the text into the field, and select Install:
3. The "GateManager: Max. Appliances" number will now reflect the num-
ber of the order (in this case 25)
The GateManager is now ready to be used for production.
GateManager 4250 Installation and Configuration Guide Page 22 of 36
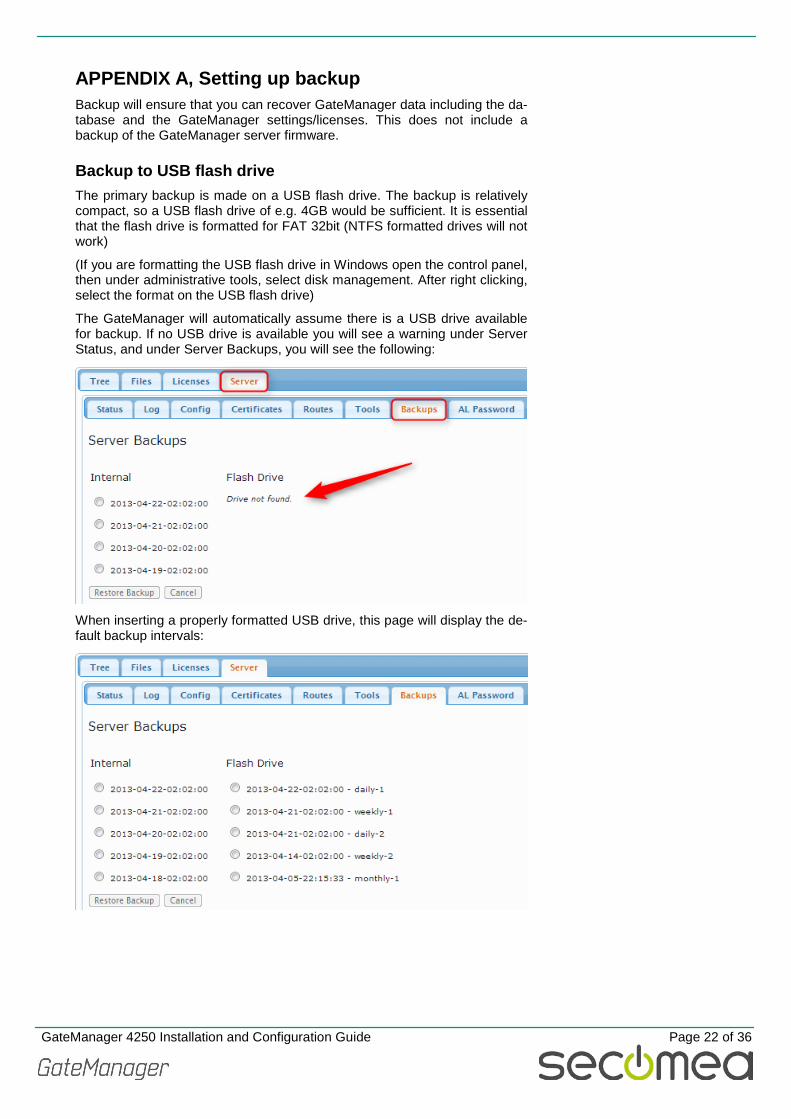
APPENDIX A, Setting up backup Backup will ensure that you can recover GateManager data including the da-tabase and the GateManager settings/licenses. This does not include a backup of the GateManager server firmware.
Backup to USB flash drive The primary backup is made on a USB flash drive. The backup is relatively compact, so a USB flash drive of e.g. 4GB would be sufficient. It is essential that the flash drive is formatted for FAT 32bit (NTFS formatted drives will not work)
(If you are formatting the USB flash drive in Windows open the control panel, then under administrative tools, select disk management. After right clicking, select the format on the USB flash drive)
The GateManager will automatically assume there is a USB drive available for backup. If no USB drive is available you will see a warning under Server Status, and under Server Backups, you will see the following:
When inserting a properly formatted USB drive, this page will display the de-fault backup intervals:

GateManager 4250 Installation and Configuration Guide Page 23 of 36
Under Service Config, you will see that USB flash backup is default enabled, so unless you desire to change the backup intervals, you do not need to do anything:
Backup to FTP server An advantage of a FTP backup is that the FTP server does not have to be in the same location as the GateManager server.
Select Server Config and expand the Server Backup section. Fill in the FTP settings for the server destination and æress the [Save] but-ton. It is not necessary to restart the server.
Note: if no USB driver is set up on this server you should uncheck the option "Backup to USB flash:" Leaving it checked will result in the logon splash screen saying "Last Server Backup failed".
GateManager 4250 Installation and Configuration Guide Page 24 of 36
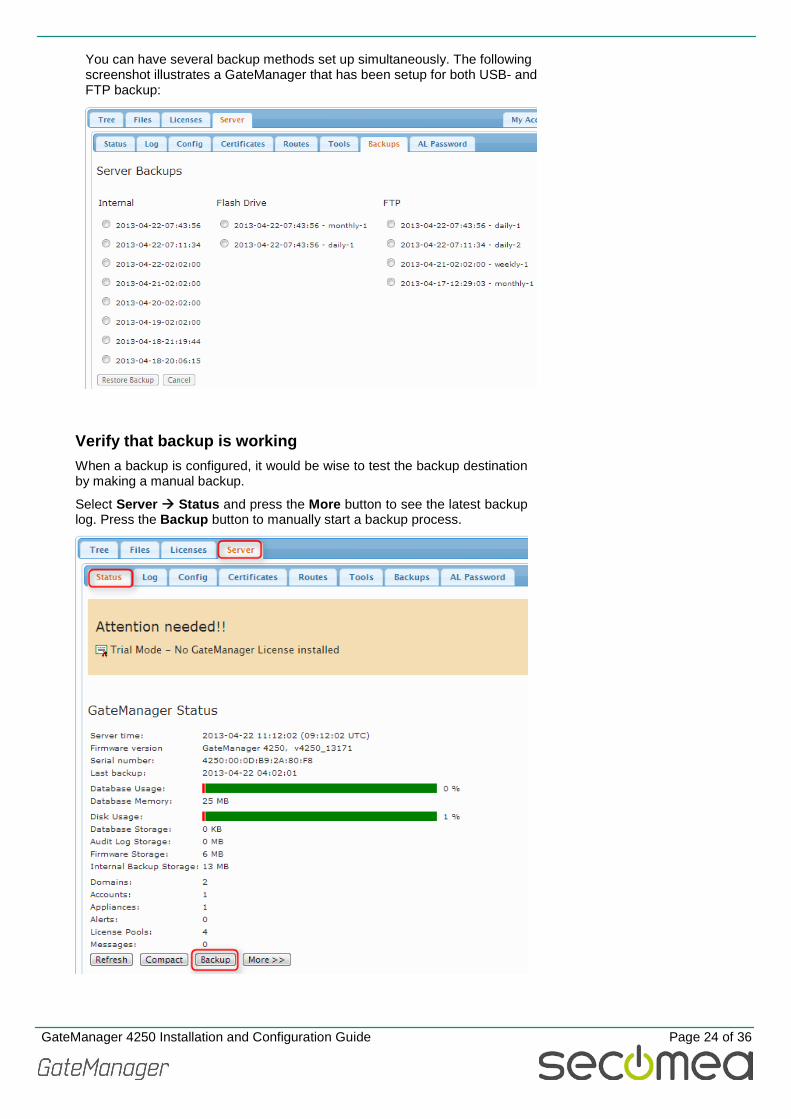
You can have several backup methods set up simultaneously. The following screenshot illustrates a GateManager that has been setup for both USB- and FTP backup:
Verify that backup is working When a backup is configured, it would be wise to test the backup destination by making a manual backup.
Select Server Status and press the More button to see the latest backup log. Press the Backup button to manually start a backup process.

GateManager 4250 Installation and Configuration Guide Page 25 of 36
A successful backup to will be displayed as follows:
GateManager 4250 Installation and Configuration Guide Page 26 of 36
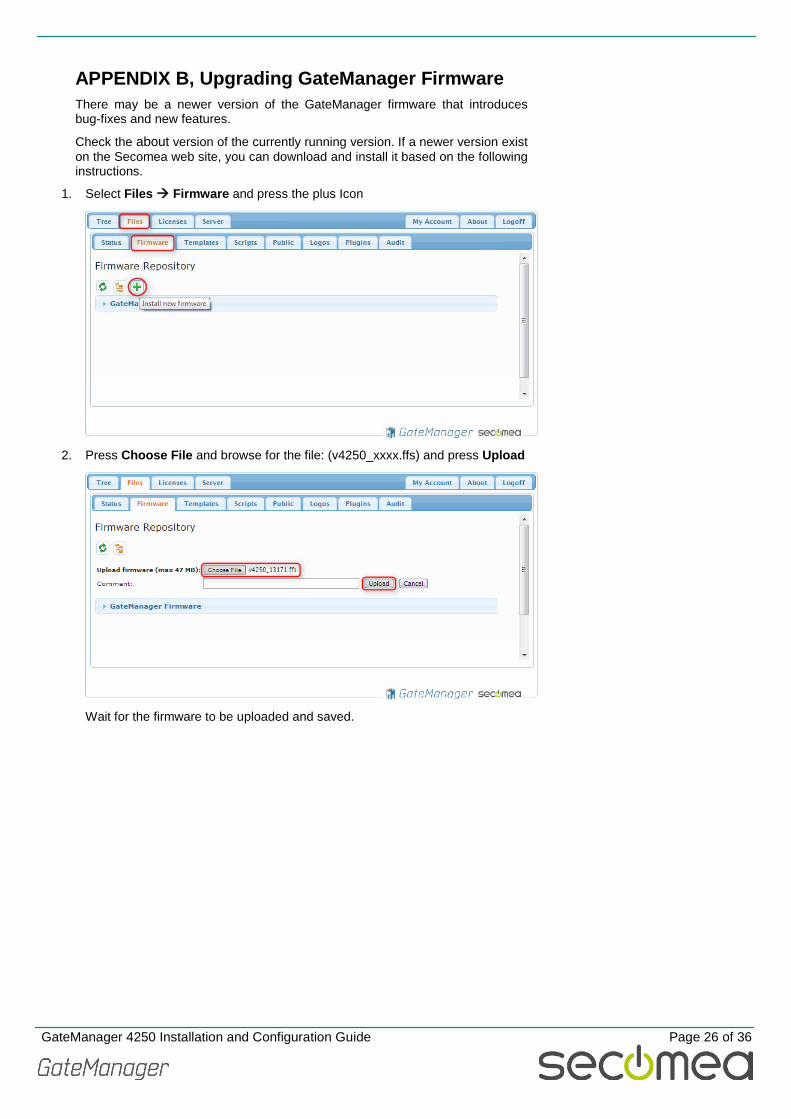
APPENDIX B, Upgrading GateManager Firmware There may be a newer version of the GateManager firmware that introduces bug-fixes and new features.
Check the about version of the currently running version. If a newer version exist on the Secomea web site, you can download and install it based on the following instructions.
1. Select Files Firmware and press the plus Icon
2. Press Choose File and browse for the file: (v4250_xxxx.ffs) and press Upload
Wait for the firmware to be uploaded and saved.

GateManager 4250 Installation and Configuration Guide Page 27 of 36
3. Select the Tree menu and click on the “Show Appliances” Icon in the top Icon-list, and the GateManager server should be listed. In this example it is named by the public IP address that is entered as the External Public Hostname in the WAN configuration.
4. Select the GateManager Agent and press the Upgrade button
5. Press the Upgrade button for the newly uploaded firmware

GateManager 4250 Installation and Configuration Guide Page 28 of 36
6. While upgrading Upgrade in progress is shown on the screen. The upgrade will usually take less than 60 seconds.
7. After that the server is upgraded. You may want to log out and login again, in or-
der to refresh your browser cache.

GateManager 4250 Installation and Configuration Guide Page 29 of 36
APPENDIX C, Enabling the SMS modem The GateManager is delivered with an integrated modem that can be used for sending SMS messages.
SMS messages are currently used for:
Automatically sending the password for a newly created GateManager or LinkManager account (alternative to informing the password verbal-ly or manually by email).
Sending a SMS pass code in association with accounts configured for two-factor authentication by SMS.
In a future version of the GateManager firmware, the SMS modem may be used for sending alerts also. Currently the GateManager sends alerts using email. For sending alerts as SMS you should use a email-to-SMS gateway, or use the integrated SMS Alert feature of the SiteManager xx39 series.
Note that the modem is not used for data connections, and is not required for the GateManager to function, so the SMS feature can be considered op-tional.
To enable the SMS feature you must insert a standard size SIM card with SMS subscription (NOTE: Power Off the GateManager when inserting and removing the SIM card).
The SMS modem is enabled in the Server Config. The minimum settings to focus on is to enable the SMS Services, enter a SIM pincode (leave blank if the pincode has been removed from the SIM card). Enter a default country code prefix that will be used for mobile numbers that have been entered without a country code prefix.

GateManager 4250 Installation and Configuration Guide Page 30 of 36
APPENDIX D, Using Secomea TrustGate as firewall Any firewall with NAT routing capabilities can be used in front of the GateManager. Presumably you will reconfigure your existing corporate fire-wall with the fixed IP address and forwarding rules, and maybe even place the GateManager in a DMZ of the firewall.
This appendix explains how to configure a Secomea TrustGate firewall as firewall for the GateManager. You can use the screenshots as guidelines for configuring your own firewall, or you could consider actually deploying a Secomea TrustGate for this purpose.
The TrustGate firewalls are professional firewalls that have been deployed in thousands of installations in more than a decade. The Secomea TrustGate products are based on the same design philosophy as the Secomea indus-trial solutions, namely to make it simple and yet highly secure. A big ad-vantage of the TrustGate firewalls is the EasyTunnel VPN Server capability that enables traditional VPN tunnels to SiteManagers, in addition to access by the LinkManager client. Additionally the TrustGate can be managed from a GateManager (either another GateManager, or the one that the TrustGate is placed in front of). The GateManager will allow remote access to the TrustGate, and also manages firmware upgrades, backup and access log-ging.
You can read more about the TrustGate firewall here:
http://www.secomea.com/office/home/
Any TrustGate model will fulfill the firewall requirements of the GateManager. The choice of TrustGate model will depend on needs for fail-over, DMZ etc. We would recommend the TrustGate 62 as an entry point. You can always upgrade the model, by moving the entire configuration to a bigger model.
In the following example these IP addresses are used.
GateManager Server = 192.168.1.250
TrustGate LAN = 192.168.1.1
TrustGate WAN (GM public IP) = 80.212.2.8
GateManager 4250 Installation and Configuration Guide Page 31 of 36
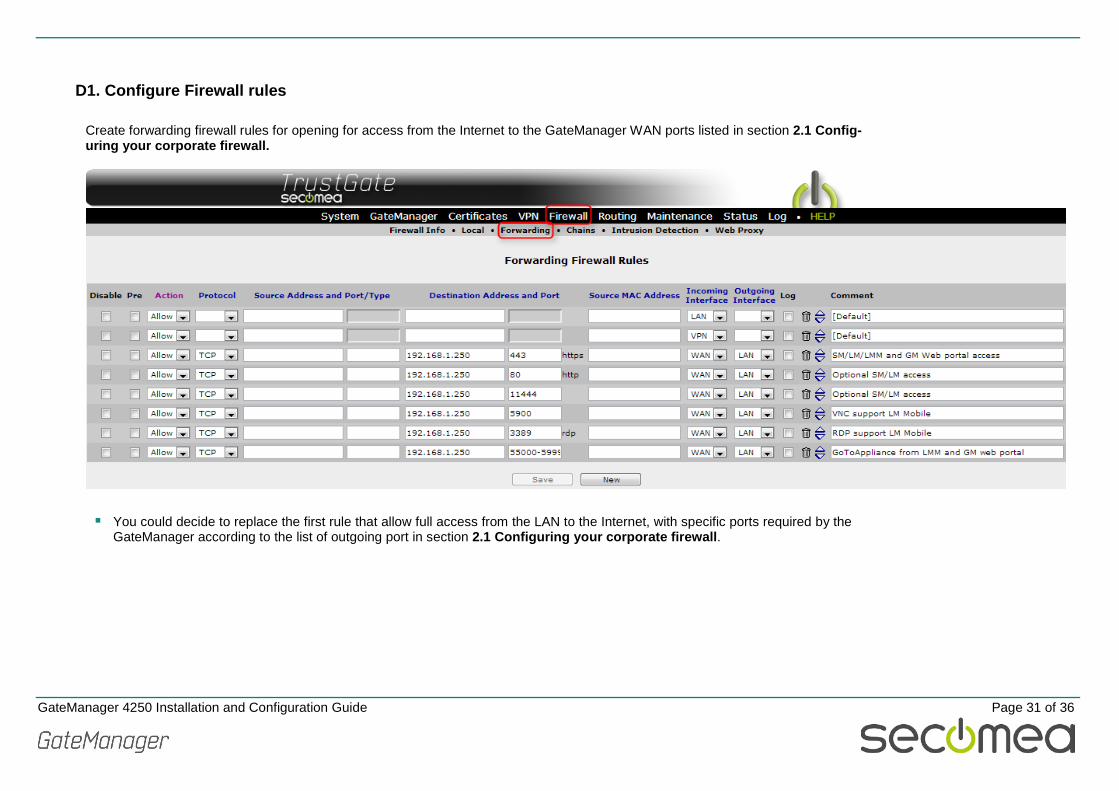
D1. Configure Firewall rules
Create forwarding firewall rules for opening for access from the Internet to the GateManager WAN ports listed in section 2.1 Config-uring your corporate firewall.
You could decide to replace the first rule that allow full access from the LAN to the Internet, with specific ports required by the GateManager according to the list of outgoing port in section 2.1 Configuring your corporate firewall.
GateManager 4250 Installation and Configuration Guide Page 32 of 36
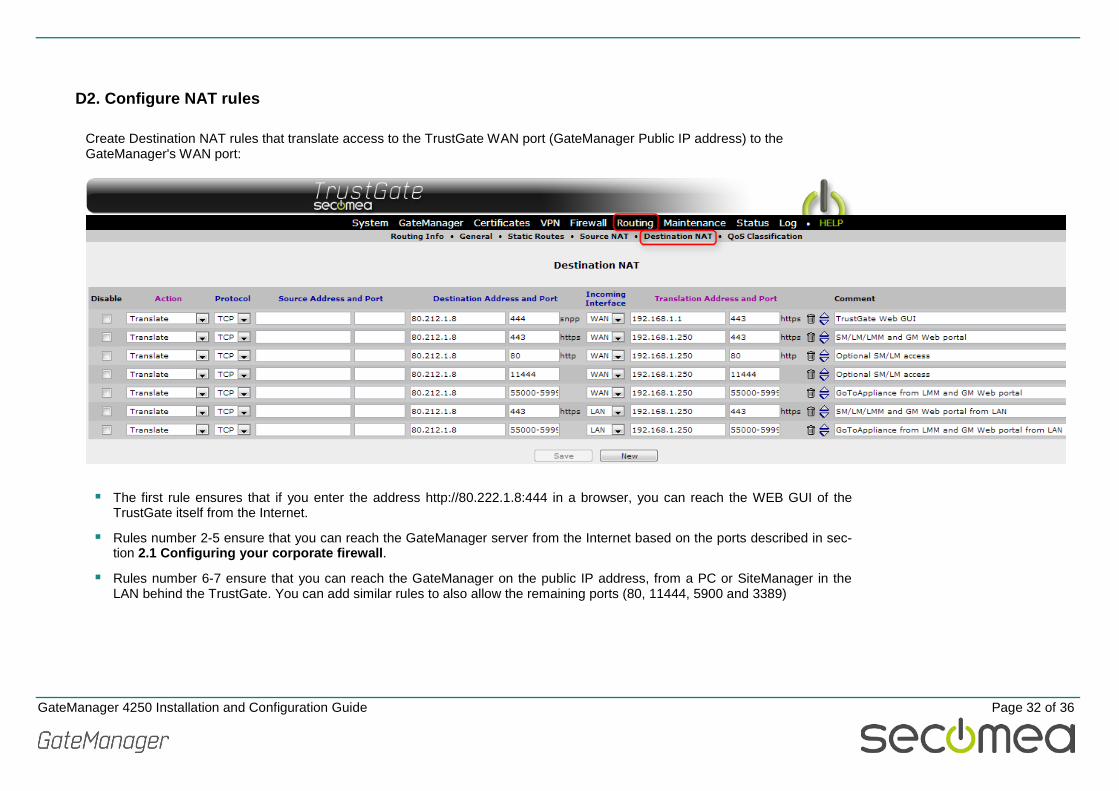
D2. Configure NAT rules Create Destination NAT rules that translate access to the TrustGate WAN port (GateManager Public IP address) to the GateManager's WAN port:
The first rule ensures that if you enter the address http://80.222.1.8:444 in a browser, you can reach the WEB GUI of the TrustGate itself from the Internet.
Rules number 2-5 ensure that you can reach the GateManager server from the Internet based on the ports described in sec-tion 2.1 Configuring your corporate firewall.
Rules number 6-7 ensure that you can reach the GateManager on the public IP address, from a PC or SiteManager in the LAN behind the TrustGate. You can add similar rules to also allow the remaining ports (80, 11444, 5900 and 3389)

GateManager 4250 Installation and Configuration Guide Page 33 of 36
Create Source NAT rules that translate access to the TrustGate WAN IP (GateManager Public IP address) to the GateManager.
The first rule is default included in the TrustGate, and ensures that LAN devices (including the GateManager) can reach the Internet.
The next rules ensure that you can reach the minimum ports of the GateManager from a PC or SiteManager in the LAN be-hind the TrustGate. You can add similar rules to also allow the remaining ports (80, 11444, 5900 and 3389)
Note that the Source Address defines the LAN subnet as source (in this case 192.168.1.0 mask 255.255.255.0). If not limiting the source addresses to the LAN only, the connections from the WAN would be source NATed too, and the GateManager would risk confusing certain types of incoming connections for which it uses the source address to distinguish them.

GateManager 4250 Installation and Configuration Guide Page 34 of 36
D3. Allow or limit access to the TrustGate WEB GUI You should decide if access should be allowed from the Internet to the TrustGate Web GUI. This is controlled by the last rule in this list (This is the factory default configuration of the Local Firewall Rules).
Even if you have defined the destination rule to access the Web GUI of the TrustGate on another port (such as 444 used in this example and defined in the translation NAT rule one), you should still use the translated port (443) in the local firewall rules to control the access.
Even if you disable the last rule, or you set the incoming interface to WAN, which would prevent access to the TrustGate Web GUI from the Internet, you can still access the TrustGate Web GUI on the LAN address of the TrustGate on port 443. Also you can reach the TrustGate Web GUI via Go To Appliance from another GateManager regardless of the setting of this rule.

GateManager 4250 Installation and Configuration Guide Page 35 of 36
APPENDIX E. Recover lost Server Administrator password If you have lost your root administrator account information (ref. section 4.5), you can reactivate the default GateManager Server Administrator account via the Serial port of the GateManager.
Preparation
You will need to connect a computer to the Console port on the front of the GateManager using a null-modem cable (DB9 Fe-male to Female).
If you are using a Windows computer you can with advantage use the HyperTerminal application or a similar telnet application. If your computer does not have a physical COM port, you can use a USB-to-Serial adapter.
Serial parameters are: 38400, 8bit, 1 Stop bit, no parity, no flow control.
Recovery procedure 1. In your terminal application, press Enter and the menu will show on the
screen if the application is configured and connected correctly.
2. Initiate the recovery procedure by typing: recover
3. The server has now created a recovery login. The account credentials
are: Username: RecoveryAdmin Password: gatemanager
4. Now, you are able to change any user’s password, and resend their cer-tificate. Once completed, delete the RecoveryAdmin from the Server > Status menu:
DB9-Female DB9-Female
Pin 2 Pin 3
Pin 3 Pin 2
Pin 4 Pin 6
Pin 5 Pin 5
Pin 6 Pin 4
Null-modem cable pin layout
GateManager 4250 Installation and Configuration Guide Page 36 of 36
Secomea A/S Denmark CVR No. DK 31 36 60 38 E-mail: [email protected]
Notices
Publication and Copyright © Copyright Secomea A/S 2013-2014. All rights reserved.
You may download and print a copy for your own use. As a high-level ad-ministrator, you may use whatever you like from the contents of this docu-ment to create your own instructions for deploying our products. Otherwise, no part of this document may be copied or reproduced in any way, without the written consent of Secomea A/S. We would appreciate getting a copy of the material you produce in order to make our own material better and – if you give us permission – to inspire other users.
Trademarks SiteManager™, LinkManager™, GateManager™ and TrustGate™ are trademarks of Secomea A/S. Other trademarks are the property of their respective owners.
Disclaimer Secomea A/S reserves the right to make changes to this document and to the products described herein without notice. The publication of this docu-ment does not represent a commitment on the part of Secomea A/S.
Considerable effort has been made to ensure that this publication is free of inaccuracies and omissions but we cannot guarantee that there are none.
The following statements do not apply to any country or state where such provisions are inconsistent with local law:
SECOMEA A/S PROVIDES THIS PUBLICATION "AS IS" WITHOUT WAR-RANTY OF ANY KIND, EITHER EXPRESS OR IMPLIED, INCLUDING, BUT NOT LIMITED TO, THE IMPLIED WARRANTIES OF MERCHANTABILITY OR FITNESS FOR A PARTICULAR PURPOSE. SECOMEA A/S SHALL NOT BE LIABLE FOR ANY DIRECT, INDIRECT, INCIDENTAL, CONSE-QUENTIAL, OR OTHER DAMAGE ALLEGED IN CONNECTION WITH THE FURNISHING OR USE OF THIS INFORMATION.