g75 irrigation window controller - dramm · manual operation to manually open the valve, make sure...
TRANSCRIPT

G75 Irrigation WindowController
BACCARA
USERS GUIDEEND
WINDOW
START
ONONONON
OFFOFFOFFOFF14:0010:00
11122333
7
88910
5
TABLE OF CONTENTS
Getting StartedFEATURESPARTS IDENTIFICATIONBASIC CONTROLLER FUNCTIONSINSTALLATIONMANUAL OPERATIONIRRIGATION CYCLE TABLE
Example
Programming the ControllerMEANING OF CONTROLLER ICONSSETTING THE CLOCKSETTING THE WINDOW
Setting Window Start TimeSetting the Window End TimeSetting the ON Time (Duration Time)Setting the OFF Time (Interval)Setting the DaysExample
Maintenance and TroubleshootingBATTERY INSTALLATIONOFF SEASONTROUBLESHOOTING
Contact and Service InformationGUARANTEE
CONTACT INFORMATION
5
67
10
13131415
161617
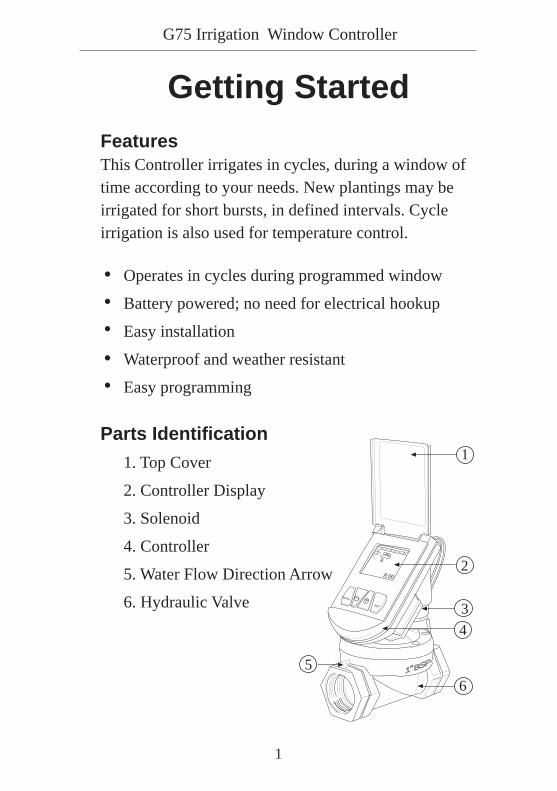
Getting StartedFeaturesThis Controller irrigates in cycles, during a window oftime according to your needs. New plantings may beirrigated for short bursts, in defined intervals. Cycleirrigation is also used for temperature control.
Operates in cycles during programmed window
Battery powered; no need for electrical hookup
Easy installation
Waterproof and weather resistant
Easy programming
Parts Identification1. Top Cover
2. Controller Display
3. Solenoid
4. Controller
5. Water Flow Direction Arrow
6. Hydraulic Valve
BSP1”
SET
MODE
3
4
5
6
8:00
1
2
G75 Irrigation Window Controller
1
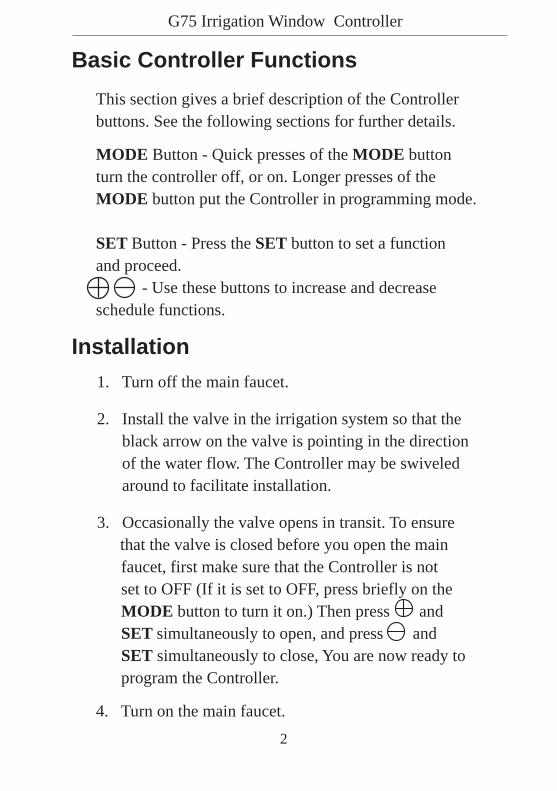
Basic Controller FunctionsThis section gives a brief description of the Controllerbuttons. See the following sections for further details.
MODE Button - Quick presses of the MODE buttonturn the controller off, or on. Longer presses of theMODE button put the Controller in programming mode.
SET Button - Press the SET button to set a functionand proceed. - Use these buttons to increase and decreaseschedule functions.
Installation1. Turn off the main faucet.
2. Install the valve in the irrigation system so that the black arrow on the valve is pointing in the direction of the water flow. The Controller may be swiveled around to facilitate installation.
3. Occasionally the valve opens in transit. To ensurethat the valve is closed before you open the mainfaucet, first make sure that the Controller is notset to OFF (If it is set to OFF, press briefly on theMODE button to turn it on.) Then press andSET simultaneously to open, and press andSET simultaneously to close, You are now ready toprogram the Controller.
4. Turn on the main faucet.
G75 Irrigation Window Controller
2

Manual OperationTo manually open the valve, make sure that the Controlleris not set to OFF (If it is set to OFF, press briefly on theMODE button), then press and SET simultaneously.
The irrigation will continue until the interval definedhas passed. If the irrigation duration has been set to zero,the valve will close after one minute.
To stop irrigating, press and SET simultaneously.
Irrigation Cycle Table
G75 Irrigation Window Controller
3
ExampleYou have just planted new seedlings, and you wish towater them for five minutes, every hour, during thehottest part of the day, every day. Set your WindowStart Time to 10:00; Window End Time to 14:00; ON(Duration) Time to 05 (minutes); and OFF (Interval)Time to 1:00. Your table will look like this:
Window Start Time
Window End Time
ON Time (Duration)
OFF Time (Interval)
Sun. Mon. Tues. Wed. Thurs. Fri. Sat.

G75 Irrigation Window Controller
4
14:0010:00
Window Start Time
Window End Time
ON Time (Duration)
OFF Time (Interval)
Sun. Mon. Tues. Wed. Thurs. Fri. Sat.
10:00
14:00
05
1:00
WINDOW
START END
ON
OFFONONON
OFFOFFOFF

NOTE: You cannot program the Controllerif it is set to manual operation (Page 3) or ifit set to OFF . To release from manualoperation press and SET simultaneously.To release from OFF press briefly on theMODE button.
Programming theController
Meaning of Controller IconsNOTE: Quick presses of the MODE buttonturns the Controller off, or on.Longer presses of the MODE button putthe Controller in programming mode.
1. Irrigating days of the week
2. Cycle start (shows cycle
has started)
3. Irrigation
4. Timing or clock
5. Low battery
6. Time adjustment
G75 Irrigation Window Controller
5
1 2 3 4 5 6 7
START
1
3
6 4
2
5

Setting the ClockIf screen is blank, press MODE to activate.
To set the program, you must be in operating mode.
Before programming the Controller you must setthe clock.
1. Press MODE until the time adjustment icon appears (The minutes will be flashing):
On this screen the numbers represent the current time.
2. Use the and the buttons to adjust the minutes.
3. Press SET to continue.
4. Use the and the buttons to adjust the hours.
5. Press SET to continue.
6. Use the and the buttons to select the current day of the week. The selected day will flash.
7. Press SET to return to operating mode.
G75 Irrigation Window Controller
6
1 2 3 4 5 6 7
CurrentTime
Days ofthe Week
Clock

Setting the WindowThe Window is the time between the Start and End ofthe irrigation. The cycle consists of the ON time (actualirrigation time), and the OFF time (interval betweenirrigations). The cycle recurs during the Window.
During programming, the screen will revert to operatingmode if left inactive for 30 seconds.
Setting Window Start Time
1. Press the MODE button until the clock settings screen appears, then press MODE again until
the following screen appears (the minutes willbe flashing).
On this screen, the clock numbers refer to the time youwish the Window to begin. flashes on the screen,alternating with the numbers.
2. Use the and the buttons to adjust the minutes.3. Press SET to continue.4. Use the and the buttons to adjust the hours.5. Press SET to continue.
G75 Irrigation Window Controller
7
1 2 3 4 5 6 7 1 2 3 4 5 6 7

G75 Irrigation Window Controller
8
Setting the Window End TimeThe following screen will then appear:
On this screen, the clock numbers refer to the time youwish the irrigation Window to end. flashes onthe screen, alternating with the numbers.
1. Use the and the buttons to adjust the minutes.
2. Press SET to continue.
3. Use the and the buttons to adjust the hours.
4. Press SET to continue.
1 2 3 4 5 6 71 2 3 4 5 6 7
On this screen, the numbers refer to the amount of timethe irrigation will be on, each time it activates within the
1 2 3 4 5 6 7 1 2 3 4 5 6 7
Setting the ON Time (Duration Time)The following screen will then appear:
G75 Irrigation Window Controller
9
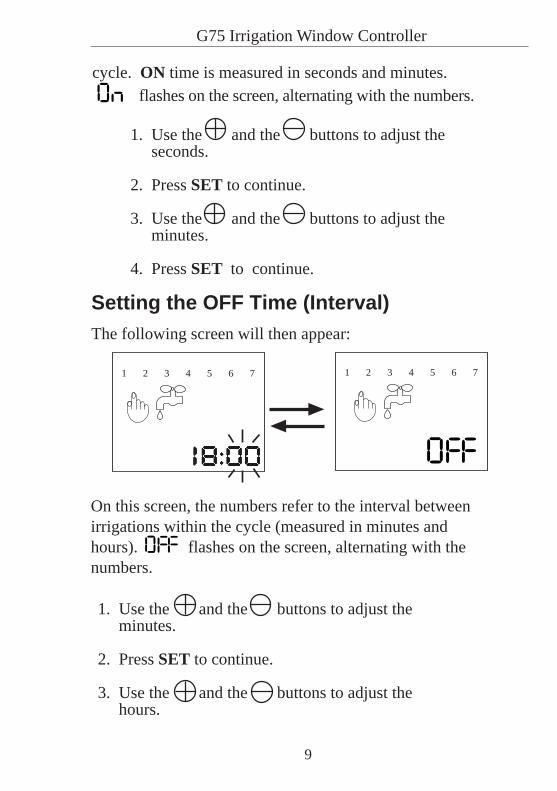
cycle. ON time is measured in seconds and minutes. flashes on the screen, alternating with the numbers.
1. Use the and the buttons to adjust the seconds.
2. Press SET to continue.
3. Use the and the buttons to adjust the minutes.
4. Press SET to continue.
1. Use the and the buttons to adjust the minutes.
2. Press SET to continue.
3. Use the and the buttons to adjust the hours.
1 2 3 4 5 6 71 2 3 4 5 6 7
On this screen, the numbers refer to the interval betweenirrigations within the cycle (measured in minutes andhours). flashes on the screen, alternating with thenumbers.
Setting the OFF Time (Interval)The following screen will then appear:

1. Press SET to reach the day you wish to irrigate.The number (corresponding to the day of theweek) will flash.
2. Press to select that day (the square whichappears indicates day is selected).
3. Press to deselect a day.
4. Press SET until all days are programmed asdesired. Current day continues flashing.
5. Press SET to complete programming.
G75 Irrigation Window Controller
10
4. Press SET to continue.
Setting the DaysThe following screen will then appear:
1 2 3 4 5 6 7
You must select the days you wish the irrigationWindow to operate.
You have just received a new batch of chicks, and a heatwave is forecast. You need to cool the chicken coop withshort bursts (one minute) of the sprinkler system, everyhalf-hour, from 8:00 in the morning till 18:00. Make surethe clock is set, and the day of the week is also set. PressMODE twice to get to Window start time
Example
G75 IrrigationWindow Controller
11
screen (Str). Set this screen to 08:00. End screen thenappears. Set End to 18:00. The next screen is the ONscreen (Duration Time). Set this to 01 (minutes). TheOFF (Interval) screen should be set to 0:30. Each day ofthe week should then be selected on the next screen.The Controller is now programmed and will turn on thesystem for one minute, every half-hour, between 8:00 inthe morning and 18:00 at night, until the Controller isturned OFF, or the program is changed.
G75 Irrigation Window Controller
13
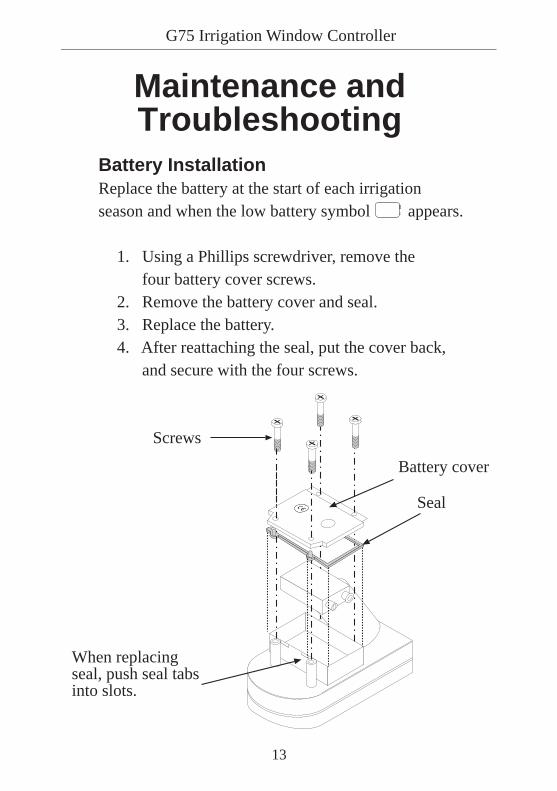
Battery InstallationReplace the battery at the start of each irrigationseason and when the low battery symbol appears.
1. Using a Phillips screwdriver, remove the four battery cover screws.2. Remove the battery cover and seal.3. Replace the battery.4. After reattaching the seal, put the cover back, and secure with the four screws.
Maintenance andTroubleshooting
Seal
Battery cover
Screws
When replacingseal, push seal tabsinto slots.

Off Season
During the season when you do not need to wateryour plants press the MODE button quickly untilOFF is displayed. DO NOT remove the battery.The Controller is equipped with a backupbattery, and removing the main battery for longperiods will cause the backup battery to discharge.
14
G75 Irrigation Window Controller
G75 Irrigation Window Controller
15
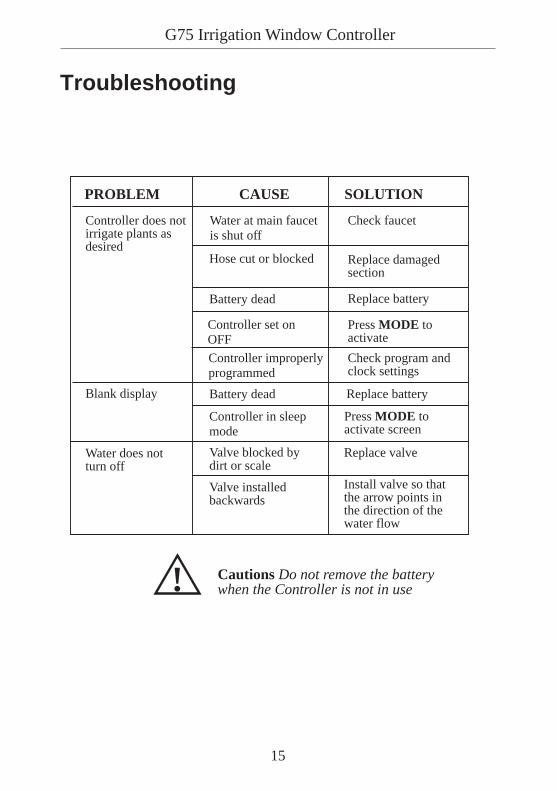
PROBLEM
Controller does notirrigate plants asdesired
Blank display
Water does notturn off
CAUSE SOLUTION
Water at main faucetis shut off
Check faucet
Replace damagedsection
Replace battery
Press MODE toactivate
Hose cut or blocked
Battery dead
Check program andclock settings
Controller set onOFF
Controller improperlyprogrammed
Battery dead Replace battery
Valve blocked bydirt or scale
Valve installedbackwards
Cautions Do not remove the batterywhen the Controller is not in use!
Troubleshooting
Press MODE toactivate screen
Controller in sleepmode
Replace valve
Install valve so thatthe arrow points inthe direction of thewater flow

Contact and ServiceInformation
G75 Irrigation Window Controller
16
Baccara products are guaranteed to be free fromdefects in material and workmanship for a period ofone year from the date of delivery.
This guarantee does nor apply where equipment is notused and installed strictly in accordance with Baccaraspecifications and Users Guide. Neither does it apply tofailures caused by lightning strikes or damage due tofreezing temperatures or mechanical causes (e.g. lawnmowers). Baccara is not liable for indirect, incidental orconsequential damage in connection with the use ofequipment.
To receive guarantee benefits, customers should returndefective units along with the receipt to the nearestBaccara distributor.
Baccara reserves the right to alter, modify or redesignits products, pricing and guarantee at all times withoutcreating any liability for the obsolescence of customerinventory of such parts or products.
This manufacturer guarantee policy may applydifferently in different countries.
Guarantee

G75 Irrigation Window Controller
17
Contact information
FACTORY AND HEAD OFFICEBaccara Automation Control
Kvutzat Geva, 18915, Israel
Tel: 972 4 6535 960
Fax: 972 4 6531 445
E-mail: [email protected]
Web Site: www.baccara.co.il

12
34
56
7
BACCARABaccara Automation ControlHead Office & FactoryKvutzat Geva, 18915, IsraelTel: 972 4 6535960Fax: 972 4 6531445e-mail: [email protected] 06/06
#42572003
ON ON ON ON
OFF OFF OFF OFF
START END
10:00 14:00
WINDOW
START
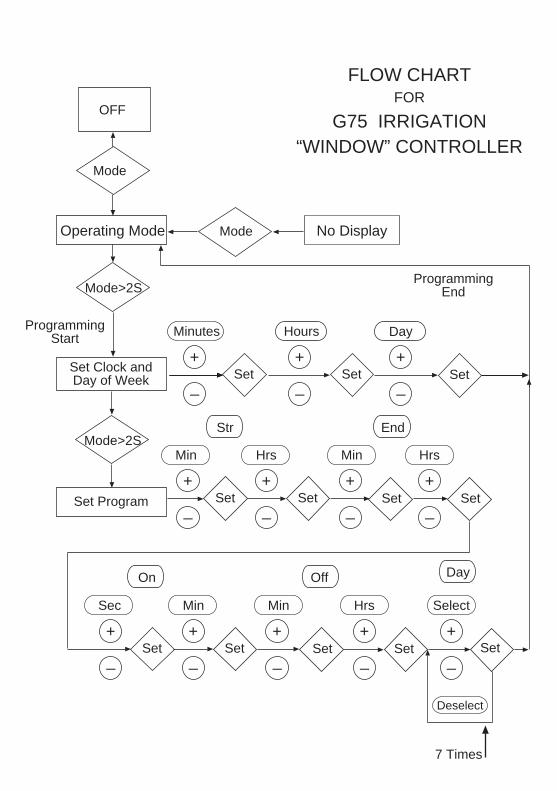
FLOW CHARTFOR
G75 IRRIGATION“WINDOW” CONTROLLER
OFF
Operating Mode
Set Clock andDay of Week
Mode
ProgrammingStart
Mode
Mode>2S
Mode>2S
Set Program
No Display
Set
Minutes
+
_
Hours
+
_
Day
+
_Set Set
Min
+
_Set Set
HrsHrs
+
_Set
+
_
+
_
Min
Set
Sec
+
_Set Set
Min
+
_Set
+
_
Min
Set Set
Select
+
_
Hrs
+
_
Deselect
ProgrammingEnd
On Off Day
7 Times
Str End