g-wan - as2 · g-wan complete install process for ubuntu 11.10 ... computer, and want to install...
TRANSCRIPT
G-WAN
Complete install process for Ubuntu 11.10 (both for the 32 and the 64 OS versions).
G-WAN (Global Web Area Network) is both a web server (for static web pages) and a web application server (for rich
dynamic web pages).
However, one of its singularity, along the first one that is its exceptional performances vs. any other competitor, is to
be able to use a lot of programming languages to create dynamic web pages to make “Web2” sites, including all the
compiled languages using the GCC collection such as ANSI C, C++, ADA, Cobol, D, Fortran, Modula 2/3 or Pascal, but
also Objective C and Objective C++, as well as several scripting interpreted programming languages such as Go, Java,
Javascript server-side, LUA or Python (via specific handlers), to allow Web developers to develop rich interactive
Web2 sites with their programming language of choice!
And the list above isn’t finished since other useful and very used programming languages such as BASIC (using the
excellent QB64 compiler) or PHP (via a multipurpose FastCGI handler) are in the way to be soon available for G-GAN.
However, even if all these programming languages (current or future) may be used with G-WAN, its natural native
language of choice is: ANSI C!
Why?
I’m not here to compare the pros and cons of all these programming languages (even if I’ve my own preference), but I
just want to explain why the ANSI C programming language is the natural G-WAN’s fit.
The GCC ANSI C compiler is naturally installed with every single ”UNIX like” distribution, whatever its release and
both in the relevant 32 or 64 bit versions.
Period!
So, if you need to use G-WAN “from scratch” without installing any other package and using the best of its
performances, you can do so in only four steps:
- Download G-WAN from its website (~300 Kb) @ www.gwan.ch/download
- Unpack G-WAN into a folder (usually into /opt/gwan_linux??-bit) – where ?? is 32 or 64
- Open a console and go to the directory where you’ve unpacked G-WAN
- Start G-WAN (./gwan).
That’s it!
No more, no less (and my job terminates here – LoL).
However, if you need to allow G-WAN to use more than the 1024 TCP-IP simultaneous connections (the by default
system limit), you’ll have to start G-WAN using the following command line: “sudo ./gwan”
Meanwhile, launching G-WAN this way will “link it” to the terminal session from which it was started, and if you close
this terminal session… you will also stop G-WAN! Oops !
So, if you need to start G-WAN independently of the terminal session (i.e. as an independent deamon that will allow
you to close the terminal session while G-WAN still runs), please use the following command line: “sudo ./gwan –d”
where the “–d” parameter means “deamon”.

But now, let’s go back to the different G-WAN’s supported languages.
When you download the G-WAN package, G-WAN comes with several real life small samples to help you understand
how it can be used.
However, even if most of these samples are pure ANSI C codes, some of them request external libraries (such as the
Tokyocabinet), and some other samples using other programming languages than ANSI C (such as Objective C++ or
Java) request to install different relevant parquets.
The goal of this manual is not only to tell you what are these different parquets to install, but more importantly to
show you (using screeshots) how to install them.
So, this manual will now try to explain how to do so for Ubuntu 11.10.
The complete list of the component required to play with all the G-WAN’ sample is:
- g++
- libtokyocabinet-dev
- libsqlite3.0
- gobjc++
- openjava-jdk
- and sooner than later, both QB64 and PHP.
If you just installed Ubuntu 11.10 (whatever 32 or 64 bit) on your computer, and want to install G-WAN and play with
all its demo samples, how can you do that?
First, if you just installed UBUNTU 11.10 from its CD, you have to update your fresh UBUNTU 11.10 install with a
bunch of “stuff” using a bunch of command lines.
But if you’re a true Linux newbie (and don’t understand anything to the command line), don’t worry, I’m not
anymore a command line fan either (I’m too old and both my 2 friends Alzheimer and Microsoft Windows helped me
to forget how to use these “old dogs” - LoL).
However, sometimes I’m obliged to use some of them!
So, be happy, my memory isn’t totally out of order and I’ll show you exactly what must be done with console
screenshots if you’re obliged to use a command line.
I hope this document will help you.

If you just started UNBUNTU and have opened your user session, you should have a screen like this:
The first thing to do after a fresh install is to update your system.
To do so, click on the Update Manager icon.

This will open the following dialog:
From here, click on the [Settings…] button.

This will open the following dialog:
On the Update tab, select the “Pre-released updates (oneiric-proposed)” option.
This will open the following new dialog:
Enter your password and click on the [Authenticate] button.

Then on the “Other Software” tab, select the “Canonical Partners” option and click on the [Close] button.
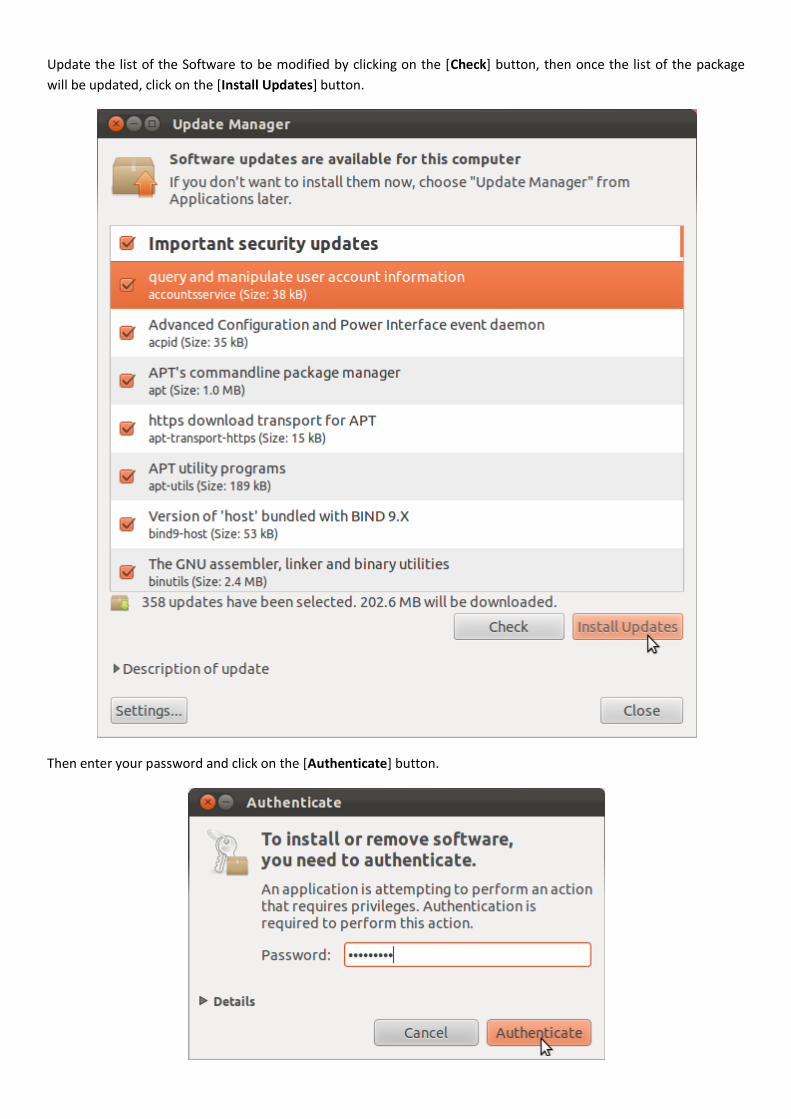
Update the list of the Software to be modified by clicking on the [Check] button, then once the list of the package
will be updated, click on the [Install Updates] button.
Then enter your password and click on the [Authenticate] button.

Then, be patient! (LoL)!
The time needed to download and install all the updates depends both on your Internet connection bandwidth and
on your computer speed (CPU, RAM and Disks).
On my test machine (AMD Athlon FX2-64 – 8 GB – HDD Velociraptor 10.000 RPM) and with a 2 Mb Internet
connection, the complete process to update Ubuntu 11.10 as described above needed approximately 45 minutes.
Once the update process is complete, reboot your system.

Once you’ve rebooted, open the “Dash Home” and click on the “More Apps” icon.

Then type the word “synaptic” into the “Search Applications” entry field.

Then, double click on the “Synaptic Package Manager” icon to install this software.

This will open the following dialog:

Then, select the three unselected Add-ons (Program that can find unusued packages, Debian Documentation
Browser and Generates programs menu for all menu-aware applications) and click on the [Apply Changes] button.
Enter your password and click on the [Authenticate] button.

Then click on the [Install] button.

Once the Synaptic Package Manager is installed, you can add it to the “Launcher”.

Then, start the Synaptic Package Manager by clicking on its icon.
Enter your password and click on the [Authenticate] button.

The Synaptic Package Manager should look like this:

Enter the word “libtokyo” into the “Quick filter” entry field.
This will show you the following selection:

Then, select the “libtokyocabinet-dev” package:
In the following dialog, click on the [√ Mark] button.

Then, click on the [√ Apply] button of the following dialog.

Once the libtokyocabinet componants will be installed, the relevant package will show a green selection area.

Then enter the word “libsqlite3” into the Quick filter entry field.

Select the “libsqlite3-dev” package and click on the [√ Apply] button.
Then validate your selection by clicking on the [Apply] button of the following dialog.

Once the libsqlite3-dev package will be installed, the relevant package will show a green selection area.

Then type le word “g++” into the “Quick filter” entry field and select the “g++” package.
Confirm the additional required changes.

And install the required g++ components.
Once the g++ components will be installed, the relevant packages will show a green selection area.

Then enter the word “openjjk-6” into the “Quick filter” entry field and select the “openjdk-6-jdk” package.
Accept the additional required changes.
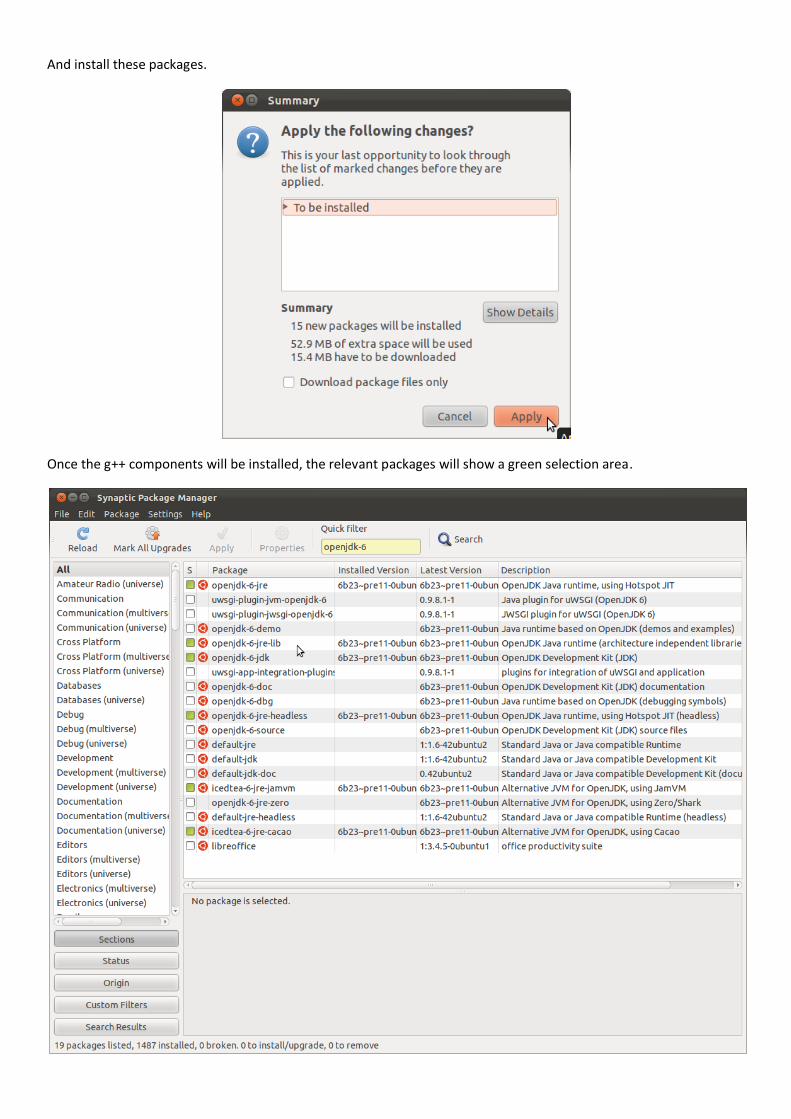
And install these packages.
Once the g++ components will be installed, the relevant packages will show a green selection area.
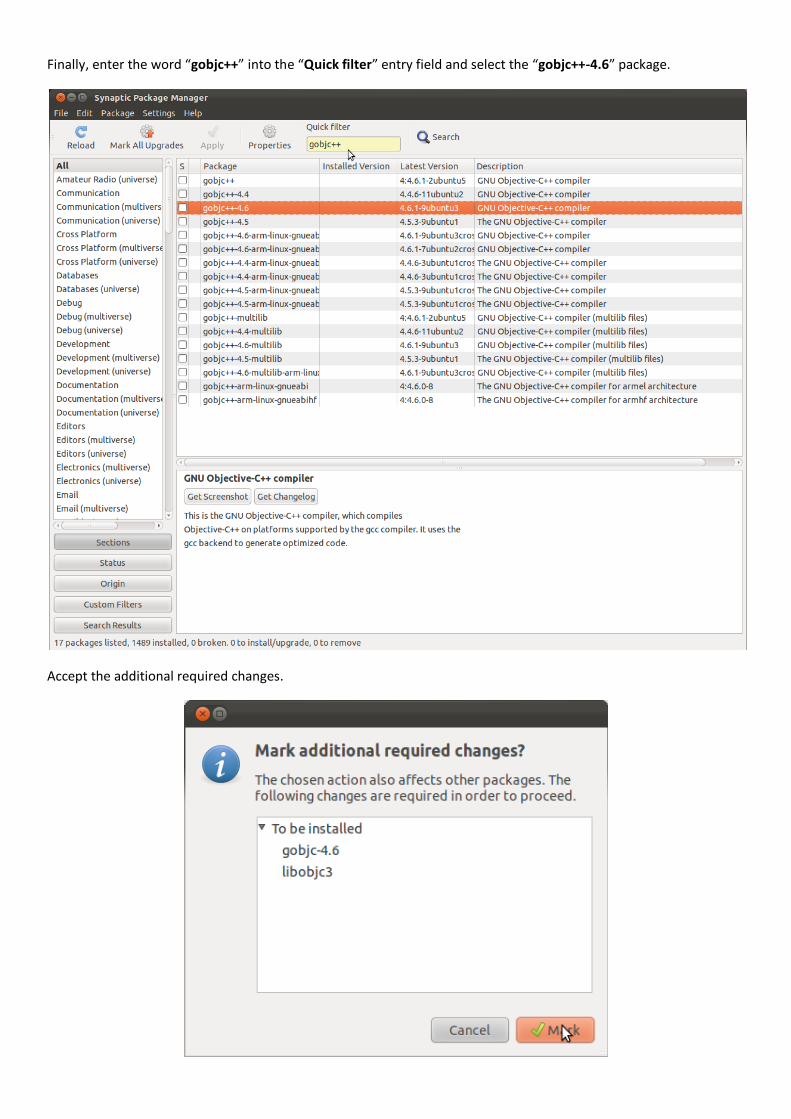
Finally, enter the word “gobjc++” into the “Quick filter” entry field and select the “gobjc++-4.6” package.
Accept the additional required changes.

And install these packages.
Once the Objective C:C++ components will be installed, the relevant packages will show a green selection area

Now, you’re done with all the optional packages required by G-WAN to play with all its samples.
Connect to the G-WAN web site @ “www.gwan.ch” and select the Download tab.
Depending of your OS version (32 or 64 bit), download and save the relevant G-WAN package (32 or 64 bit).

Then, open the folder where you downloaded G-WAN by right clicking on the G-WAN file.
This will open the following dialog.

Then double click on the G-WAN package.
This will open the following dialog where you’ve to right click on the G-WAN folder and select the “Extract…” option
from the pull-down menu.
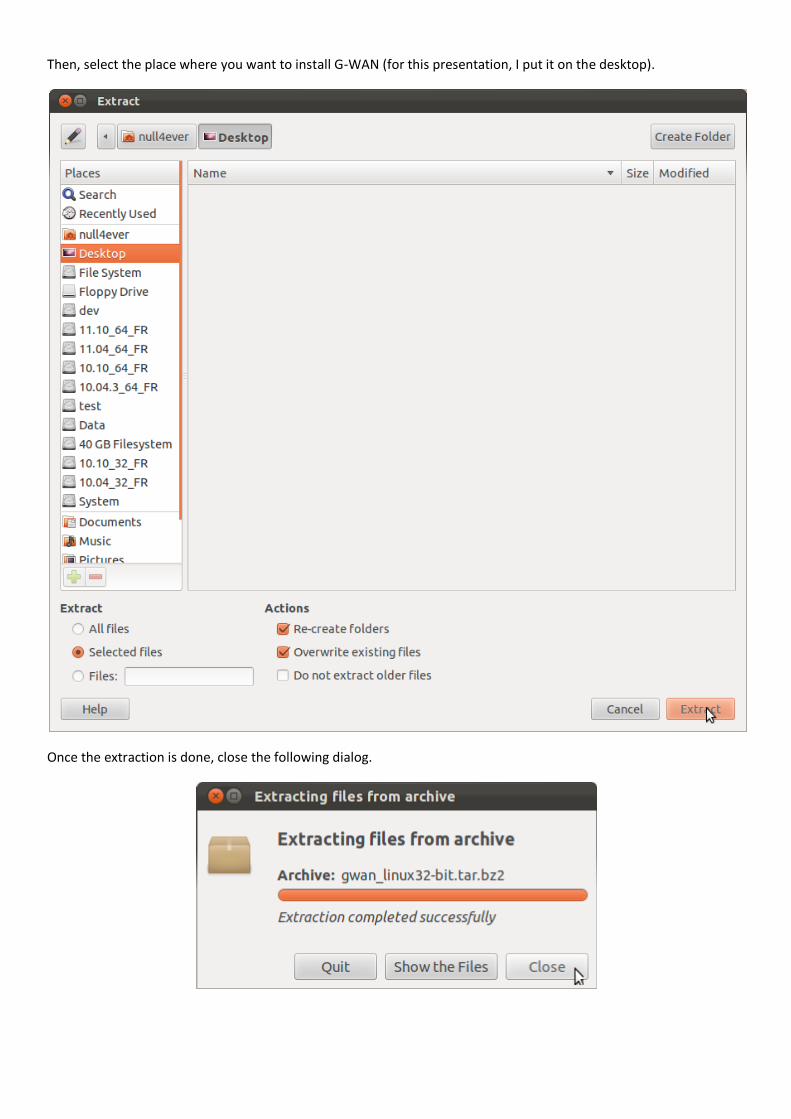
Then, select the place where you want to install G-WAN (for this presentation, I put it on the desktop).
Once the extraction is done, close the following dialog.

Close all the windows and reboot your system.
Once you’ve rebooted, open the Dash home and select the “More Apps” icon.

Start a “Terminal” session.

From the console, go to the directory where you installed G-WAN and launch it.
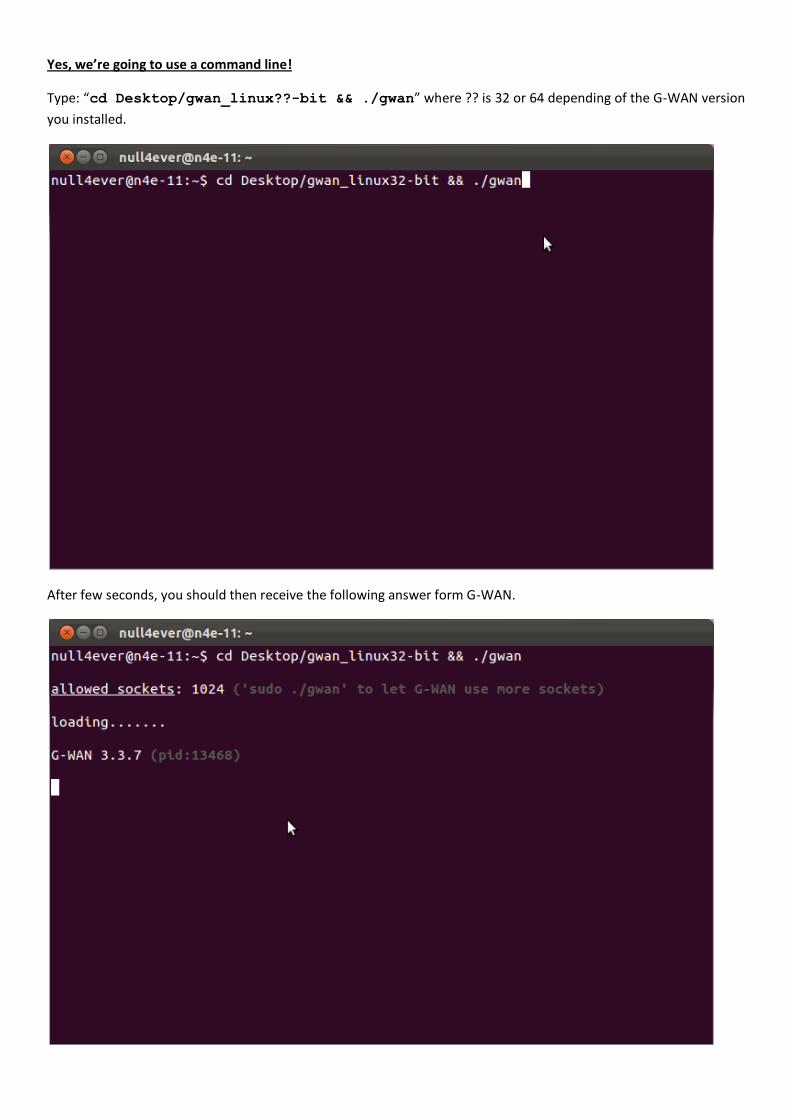
Yes, we’re going to use a command line!
Type: “cd Desktop/gwan_linux??-bit && ./gwan” where ?? is 32 or 64 depending of the G-WAN version
you installed.
After few seconds, you should then receive the following answer form G-WAN.

Then start your browser at the following address: “localhost:8080”

Then you will access to the index.html page of your local G-WAN server.

Select the “Server Report” link.
This page shows both the version of G-WAN (here the 3.3.7 32-bit) and the Ubuntu version (here 11.10 32 bit).

From the index page, select the “loan” link.

Then, compute this loan using the default ANSI C programming language.
The result was done (on my old machine) in 0.06 ms.
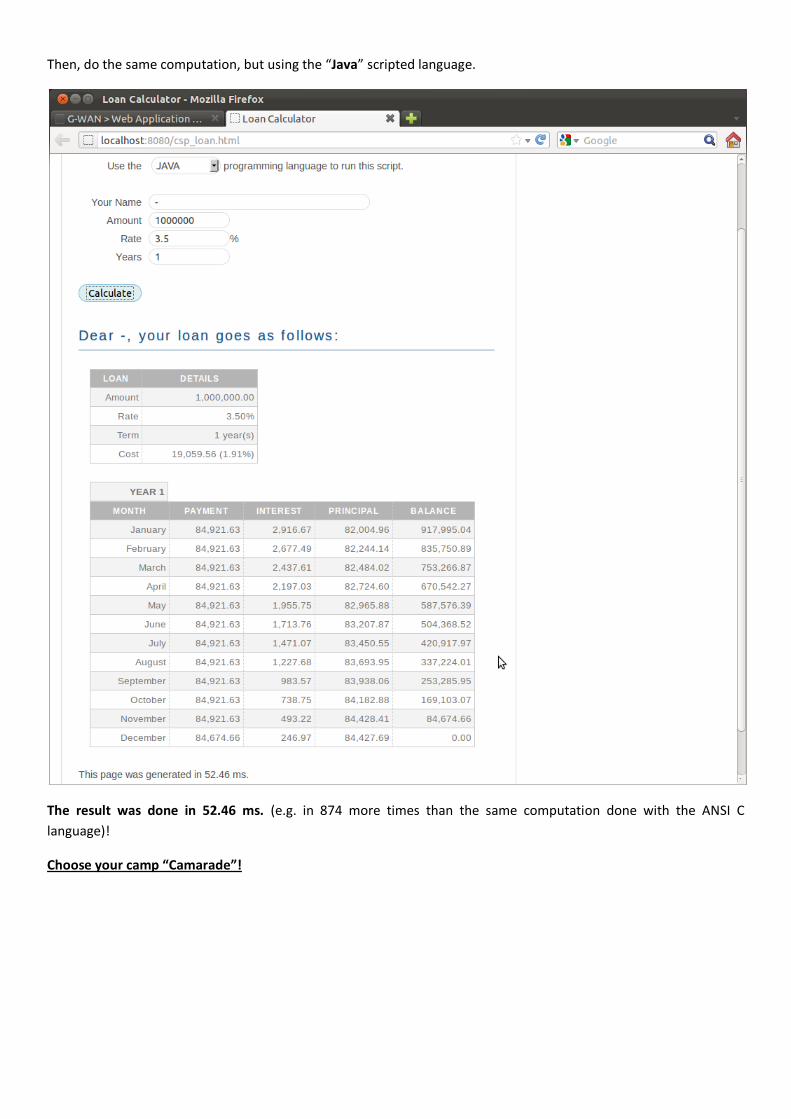
Then, do the same computation, but using the “Java” scripted language.
The result was done in 52.46 ms. (e.g. in 874 more times than the same computation done with the ANSI C
language)!
Choose your camp “Camarade”!

Now, in the address entry field, enter the following command : “localhost:8080/?hello.mm”
This is a short sample using Objective C++.
Now, you can also play with all the other samples that are located into the CSP folder.
Have fun.
*****************
This is the end (for today as of March 15, 2012) of this manual.
I hope it may help some of you, especially if you’re like me a true Newbie with Linux.
Cheers.