fundamentals of multimedia - brooklyn collegegoetz/cisc3630/books/... · fundamentals of multimedia...
TRANSCRIPT

FUNDAMENTALS OF MULTIMEDIA

2 FUNDAMENTALS OF MULTIMEDIA
Table of Contents
1.0 Introduction to Multimedia ......................................................................... 12
1.1.1 What is Multimedia? ...................................................................................................................... 12
1.1.2 Objectives of Multimedia ............................................................................................................... 12
1.1.3 Advantages of Multimedia ............................................................................................................. 12
1.1.4 Disadvantages of Multimedia ........................................................................................................ 13
1.1.5 Components of Multimedia ........................................................................................................... 13
1.1.6 Objects of Multimedia ................................................................................................................... 13
1.1.7 Convergence of Multimedia (Virtual Reality) ................................................................................ 14
1.1.8 Multimedia Standards .................................................................................................................... 14
1.1.9 Multimedia Software ..................................................................................................................... 14
1.1.10 Stages of Multimedia Application Development ......................................................................... 15
1.2 Graphics and Image Data Representations .................................................. 15
1.2.1 What is Resolution? ....................................................................................................................... 15
1.2.2 Basic Differences of Graphic Formats ............................................................................................ 16
1.2.2.1 GIF (Graphics Interchange Format) ......................................................................................... 16
1.2.2.2 PNG (Portable Network Graphic) ............................................................................................ 16
1.2.2.3 JPG (Joint Photographic Experts Group) ................................................................................. 16
1.2.2.4 TIFF (Tagged Image File Format) ............................................................................................. 16
1.3 Color Theory in Design ................................................................................ 17
1.3.1 What are CMYK and RGB? ............................................................................................................. 17
1.3.2 Color Wheel ................................................................................................................................... 17
1.3.3 Color Schemes ................................................................................................................................ 18
1.4 The Designer's Guide to Gestalt Theory ....................................................... 22
1.4.1 Similarity ........................................................................................................................................ 22
1.4.2 Continuation .................................................................................................................................. 24
1.4.3 Closure ........................................................................................................................................... 25
1.4.4 Proximity (aka grouping) ................................................................................................................ 26
1.4.5 Figure/ground ................................................................................................................................ 28
1.4.6 Symmetry and order ...................................................................................................................... 29
1.5 Text in Multimedia ...................................................................................... 31
1.5.1 Size ................................................................................................................................................. 31

3 FUNDAMENTALS OF MULTIMEDIA
1.5.2 Type Font ....................................................................................................................................... 32
1.5.3 Family ............................................................................................................................................. 33
1.5.4 Typeface ......................................................................................................................................... 34
1.5.5 Color ............................................................................................................................................... 35
1.5.6 Leading ........................................................................................................................................... 36
1.5.7 Letter Spacing ................................................................................................................................ 36
1.5.8 Tracking .......................................................................................................................................... 36
1.5.9 Some Guidelines in Using Text in Multimedia ............................................................................... 37
1.5.9.1 WATCH YOUR TEXT COLOR ..................................................................................................... 37
1.5.9.2 USE BOLDFACE CAREFULLY ..................................................................................................... 37
1.5.9.3 THINK BEFORE YOU UNDERLINE TEXT .................................................................................... 37
1.5.9.4 DO NOT TYPE IN ALL CAPITAL LETTERS ................................................................................... 37
1.5.9.5. WATCH YOUR TEXT SIZE ........................................................................................................ 37
1.5.9.6. WATCH THE FONT SELECT...................................................................................................... 38
Exercises ........................................................................................................... 39
References ........................................................................................................ 39
2.0 Introduction to Photoshop .......................................................................... 40
2.1 Getting Started With Photoshop ................................................................. 40
2.1.1 Page Size and Orientation .............................................................................................................. 41
2.1.2 Resolution ...................................................................................................................................... 41
2.1.3 Color Mode .................................................................................................................................... 41
2.1.4 Background Contents ..................................................................................................................... 41
2.1.5 Interface Layout ............................................................................................................................. 42
2.1.5.1 Menu Bar................................................................................................................................. 42
2.1.5.2 Toolbar .................................................................................................................................... 42
2.1.5.3 File Name ................................................................................................................................ 42
2.1.5.4 Options ................................................................................................................................... 42
2.1.6 Palettes .......................................................................................................................................... 42
2.1.6.1 Color, Swatches, Style ............................................................................................................. 43
2.1.6.2 Swatches ................................................................................................................................. 43
2.1.6.3 Adjustments ............................................................................................................................ 44
2.1.6.4 Styles ....................................................................................................................................... 44

4 FUNDAMENTALS OF MULTIMEDIA
2.1.6.5 Layers ...................................................................................................................................... 45
2.1.7 Toolbox .......................................................................................................................................... 46
2.1.8 Selection Tools ............................................................................................................................... 47
2.1.9 Alteration Tools .............................................................................................................................. 47
2.1.10 Drawing and Selection Tools ........................................................................................................ 48
2.1.11 Assisting Tools .............................................................................................................................. 49
2.1.12 Color Boxes and Modes ............................................................................................................... 49
2.2 Layers.......................................................................................................... 50
2.2.1 Create a New Layer ........................................................................................................................ 52
2.2.2 Fill the Layer with Color ................................................................................................................. 52
2.2.3 Layer Lock....................................................................................................................................... 54
2.2.4 Renaming Layer .............................................................................................................................. 55
2.2.5 Layer Arrangement ........................................................................................................................ 57
2.2.6 Layer Blending Options .................................................................................................................. 58
2.2.7 Layer Grouping ............................................................................................................................... 59
2.3 The Move Tool ............................................................................................ 59
2.3.1 Auto Select A Layer ........................................................................................................................ 59
2.3.2 Find the Exact Center of Any Object on Any Layer ........................................................................ 59
2.4 The Brush and Pencil Tool ........................................................................... 60
2.4.1 Option Bar ...................................................................................................................................... 60
2.4.2 Size ................................................................................................................................................. 60
2.4.3 Brush Type ..................................................................................................................................... 61
2.4.4 Mode .............................................................................................................................................. 61
2.4.5 Opacity and Flow ........................................................................................................................... 62
2.5 Marquee Tool ............................................................................................. 62
2.6 Selection Tool ............................................................................................. 65
2.7 Cropping ..................................................................................................... 70
2.8 Lasso Tool ................................................................................................... 71
2.9 Eyedropper Tool .......................................................................................... 74
2.10 Working with Text ..................................................................................... 76
2.10.1 Exploring Horizontal and Vertical Type Tool ................................................................................ 76

5 FUNDAMENTALS OF MULTIMEDIA
2.10.2 Formatting Text Using the Character Window ............................................................................ 78
2.10.3 Warp Text Function ...................................................................................................................... 79
2.10.4 Exploring Horizontal and Vertical Type Mask Tool ..................................................................... 79
2.11 Photoshop Shapes ..................................................................................... 83
2.11.1 The Shape Tools ........................................................................................................................... 83
2.11.2 Choosing a Color For The Shape .................................................................................................. 83
2.11.3 The Rectangle Tool ....................................................................................................................... 83
2.11.4 Drawing A Shape From Its Center ................................................................................................ 84
2.11.5 Drawing Squares .......................................................................................................................... 84
2.11.6 The Rounded Rectangle Tool ....................................................................................................... 84
2.11.7 The Ellipse Tool ............................................................................................................................ 85
2.11.8 The Polygon Tool .......................................................................................................................... 85
2.11.9 Drawing Stars With The Polygon Tool.......................................................................................... 86
2.11.11 The Line Tool .............................................................................................................................. 86
2.12 Spot Healing Tool ...................................................................................... 87
2.14 Clone Stamp Tool ...................................................................................... 90
2.15 Gradient Tool ............................................................................................ 91
2.16 Erase Tool ................................................................................................. 92
2.17 Dodge, Burn and Sponge ........................................................................... 93
2.18 Layer Masking ........................................................................................... 95
2.19 Filters ........................................................................................................ 97
2.8.1 Single –Step Filters ......................................................................................................................... 97
2.8.2 Working with Filter Gallery ............................................................................................................ 99
Exercises ......................................................................................................... 101
References ...................................................................................................... 102
3.0 Introduction to Illustrator ......................................................................... 103
Advantages of Vector Graphics ............................................................................................................. 103
Disadvantages of Vector Graphics ........................................................................................................ 103
3.1 Getting Started With Illustrator ................................................................. 104
3.1.1 Create New Document ................................................................................................................. 104
3.1.2 Illustrator Workspace................................................................................................................... 105

6 FUNDAMENTALS OF MULTIMEDIA
3.1.3 Toolbox ........................................................................................................................................ 106
3.1.4 Floating Palette ............................................................................................................................ 107
3.2 Drawing Basic Shapes ................................................................................ 108
3.2.1 Selection Tools ............................................................................................................................. 108
3.3.2 Shape Tools .................................................................................................................................. 108
3.3.3 Understanding Fill & Stroke ......................................................................................................... 109
3.3.4 Changing Fill Color ....................................................................................................................... 109
3.3.5 Removing Stroke .......................................................................................................................... 109
3.3.6 Constrain Proportions .................................................................................................................. 110
3.3.7 Rotating Shapes ........................................................................................................................... 110
3.3 Drawing with Pencil Tool ........................................................................... 110
3.3.1 Drawing a Line .............................................................................................................................. 110
3.3.2 Closing Paths with Pencil Tool ..................................................................................................... 111
3.3.3 Smoothing Jaggy Lines ................................................................................................................. 111
3.3.4 Pencil Tool Preferences ................................................................................................................ 112
3.4 Drawing with Pen Tool .............................................................................. 113
3.4.1 Drawing Straight Lines ................................................................................................................. 113
3.4.2 Closing a Path ............................................................................................................................... 113
3.4.3 Drawing a Curved Line ................................................................................................................. 113
3.5 Basic Text .................................................................................................. 114
3.5.1 Typing Text Using Point Text ........................................................................................................ 114
3.5.2 Typing Text Using Area Type Tool ................................................................................................ 114
3.5.3 Typing Text on a Path ................................................................................................................... 115
3.5.4 Text with Shapes .......................................................................................................................... 115
3.6 Using Brushes ............................................................................................ 116
3.7 Gradient Mesh .......................................................................................... 117
3.8 Clipping Mask ............................................................................................ 117
3.9 Designing an Emblem ................................................................................ 120
3.10 Image Tracing .......................................................................................... 122
3.11 3D Extrude & Bevel ................................................................................. 125
Exercises ......................................................................................................... 126

7 FUNDAMENTALS OF MULTIMEDIA
References ...................................................................................................... 127
4.0 Introduction to Flash ............................................................................... 128
4.1 Getting Started With Flash ...................................................................... 129
4.1.1 Interface Layout ........................................................................................................................... 129
4.1.2 The Flash Timeline ...................................................................................................................... 130
4.1.3 Types of Frames ........................................................................................................................... 131
4.1.3.1 Gray Frames .......................................................................................................................... 131
4.1.3.2 Blue Frames without an Arrow ............................................................................................ 131
4.1.3.3 Blue-purple Frames with an Arrow ....................................................................................... 131
4.1.3.4 Green Frames with an Arrow ................................................................................................ 131
4.1.4 Movie clip Vs. graphic symbols .................................................................................................... 131
4.2 Tweening in Flash ...................................................................................... 132
4.2.1 Motion Tween .............................................................................................................................. 132
4.2.2 Shape Tween ................................................................................................................................ 132
4.2.3 Classic Tween ............................................................................................................................... 132
4.2.4 Motion Present ..................................................................................................................... 132
4.3 Creating Motion Tween ........................................................................ 132
4.3.1 Basic Motion Tween ..................................................................................................................... 132
4.3.2 Motion Tween Editor ................................................................................................................... 135
4.4 Creating Shape Tween ............................................................................... 136
4.5 Mask Technique ........................................................................................ 138
4.6 Frame by Frame Animation ....................................................................... 141
4.7 Moving Car Animation .............................................................................. 144
4.8 Adding Sound Clip into Flash ..................................................................... 150
4.9 Publish Settings ......................................................................................... 151
Exercises ......................................................................................................... 153
References ...................................................................................................... 154

8 FUNDAMENTALS OF MULTIMEDIA

9 FUNDAMENTALS OF MULTIMEDIA
Course Overview
a. Course Description:
This course provides students with solid foundation on concepts, principles, techniques, and latest tools
surrounding multimedia technology with emphasis on the design and development of multimedia
systems for industrial, educational and personal applications.
b. Course Objectives
In this course, students will learn how to: 1. Survey and analyze various theories, components and elements of multimedia. 2. Conceptualize and develop effective multimedia projects. 3. Critique multimedia applications and determine whether they are effective. 4. Address issues surrounding multimedia design and use. 5. Use tools/ software to create multimedia content.
c. Course Outcomes:
Upon completion of this course, the students should be able to:
1. Discuss the concepts, standards and components of multimedia through practical demonstration.
2. Examine multimedia applications against multimedia principles, standards, and techniques.
3. Demonstrate the use of various elements of multimedia such as text, graphics, sound, video, animation, and virtual reality using the latest tools, technologies, techniques, and standards.
4. Evaluate the processes involved in producing multimedia content to meet specific needs of the target audience.
5. Apply principles of multimedia project management and distribution.
6. Develop multimedia titles or multimedia systems for industrial, educational and
personal applications.
7. Use an appropriate software /tool to design or manipulate images
8. Use an appropriate software /tool to create vectors and animate them.

10 FUNDAMENTALS OF MULTIMEDIA
d. Time Frame:
How long?
The expected duration of this course is from _____ weeks/Hours
Formal study time is required is ______ weeks/Hours
Self-study time is expected/recommended is ______ weeks/Hours
e. Resources:
[1] Adobe Photoshop
[2] Adobe Illustrator
[3] Adobe Flash

11 FUNDAMENTALS OF MULTIMEDIA
f. Margin Icons:
Activity Assessment Assignment Case study Objectives
Discussion Group activity Help Note it! Basic Competence
Outcomes Reading Reflection Study skills Answers to Assessments
Summary Terminology Time Tip
Computer-Based Learning Audio Video Feedback

12 FUNDAMENTALS OF MULTIMEDIA
CHAPTER 1: MULTIMEDIA CONCEPTS
Objectives
Upon the completion of this chapter, the students will be able to:
• Define multimedia and list some examples.
• Enumerate the disadvantages and advantages of multimedia.
• List the components of multimedia system.
• Identify the different objects of multimedia.
• Explain virtual reality and its relationship to multimedia.
• List examples of multimedia standards those are relevant to the field.
• Enumerate and explain the stages of multimedia application development in the correct
sequence.
• Categories multimedia software according to the phase they are used in the life cycle of a
multimedia system.
1.0 Introduction to Multimedia
1.1.1 What is Multimedia?
Multimedia is the media that uses multiple forms of information content and information
processing (e.g. text, audio, graphics, animation, video, interactivity) to inform or entertain the
user.
Multimedia also refers to the use of electronic media to store and experience multimedia content.
Multimedia is similar to traditional mixed media in fine art, but with a broader scope. The term
"rich media" is synonymous for interactive multimedia.
1.1.2 Objectives of Multimedia
The objectives of a multimedia system are as follows:
• to send information
• educate the public
• provide entertainment
1.1.3 Advantages of Multimedia
The use of multimedia offers many advantages:
1. Enhancement of Text Only Messages: Multimedia enhances text only presentations by
adding interesting sounds and compelling visuals.
2. Improves over Traditional Audio-Video Presentations: Audiences are more attentive
to multimedia messages than traditional presentations done with slides or overhead
transparencies.
3. Gains and Holds Attention: People are more interested in multimedia messages which
combine the elements of text, audio, graphics and video. Communication research has

13 FUNDAMENTALS OF MULTIMEDIA
shown that the combination of communication modes (audio and visual) offers greater
understanding and retention of information.
4. Good for "computer-phobics": Those who are intimidated by computer keyboards and
complex instructions are more comfortable with pressing buttons with a mouse or on a
screen.
5. Multimedia is Entertaining as Well as Educational.
1.1.4 Disadvantages of Multimedia
Multimedia also poses some limitation as follows:
1. Information overload. Because it is so easy to use, it can contain too much information
at once.
2. It takes time to compile. Even though it is flexible, it takes time to put the original draft
together.
3. It can be expensive. As mentioned in one of my previous posts, multimedia makes use
of a wide range of resources, which can cost you a large amount of money.
4. Too much makes it unpractical. Large files like video and audio has an effect of the
time it takes for your presentation to load. Adding too much can mean that you have to
use a larger computer to store the files. In case you want to upload it onto the Internet,
there are a few factors to keep in mind, for example bandwidth and the user’s abilities.
1.1.5 Components of Multimedia
A multimedia system includes the following components:
1. Capture Devices
-- Video Camera, Video Recorder, Audio Microphone, Keyboards, mice, graphics tablets,
3D input devices, tactile sensors, VR devices. Digitizing/Sampling Hardware
2. Storage Devices
-- Hard disks, CD-ROMs, Jaz/Zip drives, DVD, etc
3. Communication Networks
-- Ethernet, Token Ring, FDDI, ATM, Intranets, Internets.
4. Computer Systems
-- Multimedia Desktop machines, Workstations, MPEG/VIDEO/DSP Hardware
5. Display Devices
-- CD-quality speakers, HDTV,SVGA, Hi-Res monitors, Colour printers etc.
1.1.6 Objects of Multimedia
Different objects of Multimedia are:
1. Text is the information mix of alphabets, numerals and special characters.
2. Image is a visual representation of something.
3. Graphics are visual images or designs on some surface, such as a wall, canvas, screen,
paper, or stone to inform, illustrate, or entertain.
4. Audio is sound within the acoustic range available to humans. Audio files are usually
compressed for storage or faster transmission.
5. Video is the representation of moving images with the mix of Audio.

14 FUNDAMENTALS OF MULTIMEDIA
6. Animation is the process of creating the illusion of motion and shape change by means
of the rapid display of a sequence of static images that minimally differ from each other.
1.1.7 Convergence of Multimedia (Virtual Reality)
At the convergence of technology and creative invention in multimedia is virtual reality, or VR.
Goggles, helmets, special gloves, and bizarre human interfaces attempt to place you “inside” a
lifelike experience. VR is an extension of multimedia-it uses the basic multimedia elements of
imagery, sound, and animation.
1.1.8 Multimedia Standards
The standards situation for multimedia is quite complex. On one hand it is a fast moving area,
where some standards have been promoted but not accepted. Some standards are in preliminary
phases, and after heavy investment, the might not end up with full acceptance. On the other hand,
because multimedia involves a lot of fields, standards for the different fields might be relevant.
For example, the following incomplete list of multimedia standards, can give an idea of how
many standards might be interesting for multimedia:
• CCITT/ISO (now ITU – T) standards for multimedia include F.700, G.711, G.721, G.722, G.725,
H.221, H.242, H.261, H.320, HyTime, IIF, JBIG, JPEG, MHEG, MPEG, ODA, T.80, X.400, G.723,
G.726, G.727, G.728, G.764, G.765, H.200, H.241, H.243, T.120
• Internet standards include IP Multicast, MIME, RTP, ST-2, RFC 741, Xv and mvex
• W3C standards are also very relevant
• Proprietary standards are Bento, GIF, QuickTime, RIFF, DVI, MIDI.
1.1.9 Multimedia Software
Different software’s used at various phases in the life cycle of multimedia system include:
• 2D animations
▪ Macromedia Director
• Macromedia Flash
• DVD production
▪ DVD Studio Pro
▪ MYDVD
• Adobe Illustrator
• Adobe Photoshop
• Macromedia Fireworks
• Microsoft Publisher
• Adobe Captivate
• Camtasia Studio
• Adobe After Effects
• Adobe Premiere
• Web pages
▪ Adobe Contribute
▪ Adobe Golive

15 FUNDAMENTALS OF MULTIMEDIA
▪ Macromedia Dreamweaver
1.1.10 Stages of Multimedia Application Development
A Multimedia application is developed in stages as all other software are being developed. In
multimedia application development a few stages have to complete before other stages being,
and some stages may be skipped or combined with other stages. Following are the four basic
stages of multimedia project development :
1. Planning and Costing : This stage of multimedia application is the first stage which begins
with an idea or need. This idea can be further refined by outlining its messages and objectives.
Before starting to develop the multimedia project, it is necessary to plan what writing skills,
graphic art, music, video and other multimedia expertise will be required. It is also necessary to
estimate the time needed to prepare all elements of multimedia and prepare a budget accordingly.
After preparing a budget, a prototype or proof of concept can be developed.
2. Designing and Producing : The next stage is to execute each of the planned tasks and create
a finished product.
3. Testing : Testing a project ensure the product to be free from bugs. Apart from bug
elimination another aspect of testing is to ensure that the multimedia Multimedia Systems-
M.Sc(IT) 8 application meets the objectives of the project. It is also necessary to test whether the
multimedia project works properly on the intended deliver platforms and they meet the needs of
the clients.
4. Delivering : The final stage of the multimedia application development is to pack the project
and deliver the completed project to the end user. This stage has several steps such as
implementation, maintenance, shipping and marketing the product.
1.2 Graphics and Image Data Representations
1.2.1 What is Resolution?
Resolution is the number of pixels (individual points of color) contained on a display monitor,
expressed in terms of the number of pixels on the horizontal axis and the number on the vertical
axis. The sharpness of the image on a display depends on the resolution and the size of the
monitor. The same pixel resolution will be sharper on a smaller monitor and gradually lose
sharpness on larger monitors because the same numbers of pixels are being spread out over a
larger number of inches.

16 FUNDAMENTALS OF MULTIMEDIA
1.2.2 Basic Differences of Graphic Formats
1.2.2.1 GIF (Graphics Interchange Format)
Use GIF for simple web graphics with limited colors. GIF files are the smallest of the four
because they are always reduced to 256 colors, making for fast-loading visuals. That said, GIF is
not recommended for files with a large range of colors, like photographs or other detailed
imagery. But if you are working with small graphics like banners, charts and buttons, GIF is the
best format for the job.
1.2.2.2 PNG (Portable Network Graphic)
Choose PNG when you need a small file that maintains its original quality. PNG files support
millions of colors, plus varying degrees of transparency — so they are perfect for graphic image
files, like logos and infographics. However, PNG is not compatible with all software or
applications. If your goal is to find a file format for widespread use, PNG might complicate the
process. But if you need a format that supports millions of colors for your logos and small
images, PNG is for you.
1.2.2.3 JPG (Joint Photographic Experts Group)
JPEG is the go-to format for online photos. It supports a full spectrum of colors, and almost all
devices and programs can open and save to the JPEG format — making it the most universal of
the four. JPEG files are ideal when you want to keep file size down and don’t mind giving up a
little quality to create a very small file. That said, JPEG quality drops when images are edited
and saved. If you plan to continually edit your files, JPEG is not the format for the job. But if
you need to display photos online, JPEG is just right.
1.2.2.4 TIFF (Tagged Image File Format)
TIFF is best for any bitmap images that you intend to edit. TIFF does not compress to make for
smaller files, because they are meant to preserve quality. TIFF files offer options to use tags,
layers, and transparency, and are compatible with photo manipulation programs like Photoshop.
If you are looking for a small file or a web-friendly format, TIFF is not recommended. But if you
plan to edit digital images in a working storage format, consider TIFF your go-to.

17 FUNDAMENTALS OF MULTIMEDIA
1.3 Color Theory in Design
1.3.1 What are CMYK and RGB?
RGB is additive, projected light color system. All colors begin with black "darkness", to which
different color "lights" are added to produce visible colors. RGB "maxes" at white, which is the
equivalent of having all "lights" on at full brightness (red, green, blue).
CMYK (Cyan, Magenta, Yellow and Black) is a subtractive, reflected light color system. All
colors start with white "paper", to which different color "inks" are added to absorb (subtract)
light that is reflected. In theory, CMY are all you need to create black (applying all 3 colors at
100%). Alas, that usually results in a muddy, brownish black, so the addition of K (black) is
added to the printing process. It also makes it easier to print black text (since you don't have to
register 3 separate colors).
Most screens (computer, phone, media player, television, ect) are RGB, the pixels have little
subpixels that just show red, green or blue.
Most printers print in CMYK color.
So if you are ever doing something for a screen, use RGB, if you doing something for print, use
CMYK.
1.3.2 Color Wheel
A color circle, based on red, yellow and blue, is traditional in the field of art. Sir Isaac Newton
developed the first circular diagram of colors in 1666. Since then, scientists and artists have
studied and designed numerous variations of this concept. Differences of opinion about the
validity of one format over another continue to provoke debate. In reality, any color circle or
color wheel which presents a logically arranged sequence of pure hues has merit.
There are also definitions (or categories) of colors based on the color wheel. We begin with a 3-
part color wheel.

18 FUNDAMENTALS OF MULTIMEDIA
Primary Colors: Red, yellow and blue
In traditional color theory (used in paint and pigments), primary colors are the 3 pigment colors
that cannot be mixed or formed by any combination of other colors. All other colors are derived
from these 3 hues.
Secondary Colors: Green, orange and purple
These are the colors formed by mixing the primary colors.
Tertiary Colors: Yellow-orange, red-orange, red-purple, blue-purple, blue-green & yellow-
green
These are the colors formed by mixing a primary and a secondary color. That's why the hue is a
two word name, such as blue-green, red-violet, and yellow-orange.
1.3.3 Color Schemes
Below are shown the basic color chords based on the color wheel.
Complementary color scheme
Colors that are opposite each other on the color wheel are
considered to be complementary colors (example: red and green).
The high contrast of complementary colors creates a vibrant look
especially when used at full saturation. This color scheme must be
managed well so it is not jarring.
Complementary color schemes are tricky to use in large doses, but
work well when you want something to stand out.
Complementary colors are really bad for text.

19 FUNDAMENTALS OF MULTIMEDIA
Analogous color scheme
Analogous color schemes use colors that are next to each other on
the color wheel. They usually match well and create serene and
comfortable designs.
Analogous color schemes are often found in nature and are
harmonious and pleasing to the eye.
Make sure you have enough contrast when choosing an analogous
color scheme.
Choose one color to dominate, a second to support. The third color
is used (along with black, white or gray) as an accent.
Triadic color scheme
A triadic color scheme uses colors that are evenly spaced around the
color wheel.
Triadic color schemes tend to be quite vibrant, even if you use pale
or unsaturated versions of your hues.
To use a triadic harmony successfully, the colors should be
carefully balanced - let one color dominate and use the two others
for accent.

20 FUNDAMENTALS OF MULTIMEDIA
Split-Complementary color scheme
The split-complementary color scheme is a variation of the
complementary color scheme. In addition to the base color, it uses
the two colors adjacent to its complement.
This color scheme has the same strong visual contrast as the
complementary color scheme, but has less tension.
The split-complimentary color scheme is often a good choice for
beginners, because it is difficult to mess up.
Rectangle (tetradic) color scheme
The rectangle or tetradic color scheme uses four colors arranged
into two complementary pairs.
This rich color scheme offers plenty of possibilities for variation.
Tetradic color schemes works best if you let one color be dominant.
You should also pay attention to the balance between warm and
cool colors in your design.

21 FUNDAMENTALS OF MULTIMEDIA
Square color scheme
The square color scheme is similar to the rectangle, but with all four
colors spaced evenly around the color circle.
Square color schemes works best if you let one color be dominant.
You should also pay attention to the balance between warm and
cool colors in your design.

22 FUNDAMENTALS OF MULTIMEDIA
1.4 The Designer's Guide to Gestalt Theory In the 1920s a group of psychologists in Germany developed a series of theories of visual
perception, describing how viewers group together different objects into groups or a single
coherent whole when the separate elements are arranged together in a particular way. The
prominent founders of the collection of theories and principles are Max Wertheimer, Wolfgang
Kohler, and Kurt Koffka.
The term Gestalt means 'unified whole', which is a good way of describing the over-arching
theme behind the principles: if you collect together your design elements in an arrangement
using one of the approaches, your design will feel more connected, coherent and complete.
These principles were developed over a number of years, but came to prominence in part thanks
to Rudolf Arnheim's 1954 book, Art and Visual Perception: A Psychology of the Creative Eye
(ISBN: 978-0-520-02161-7) which has become one of the must-have art books of the 20th
century, and regularly features on university course text lists.
While it's well worth reading Arnheim's book, to summarise there are six common, basic Gestalt
Principles:
1.4.1 Similarity
This design has similarity because the individual elements that make up the design have the same basic
shape characteristics
When objects looks similar to one another, viewers will often see the individual elements as part
of a pattern or group. This effect can be used to create a single illustration, image or message
from a series of separate elements.
23 FUNDAMENTALS OF MULTIMEDIA
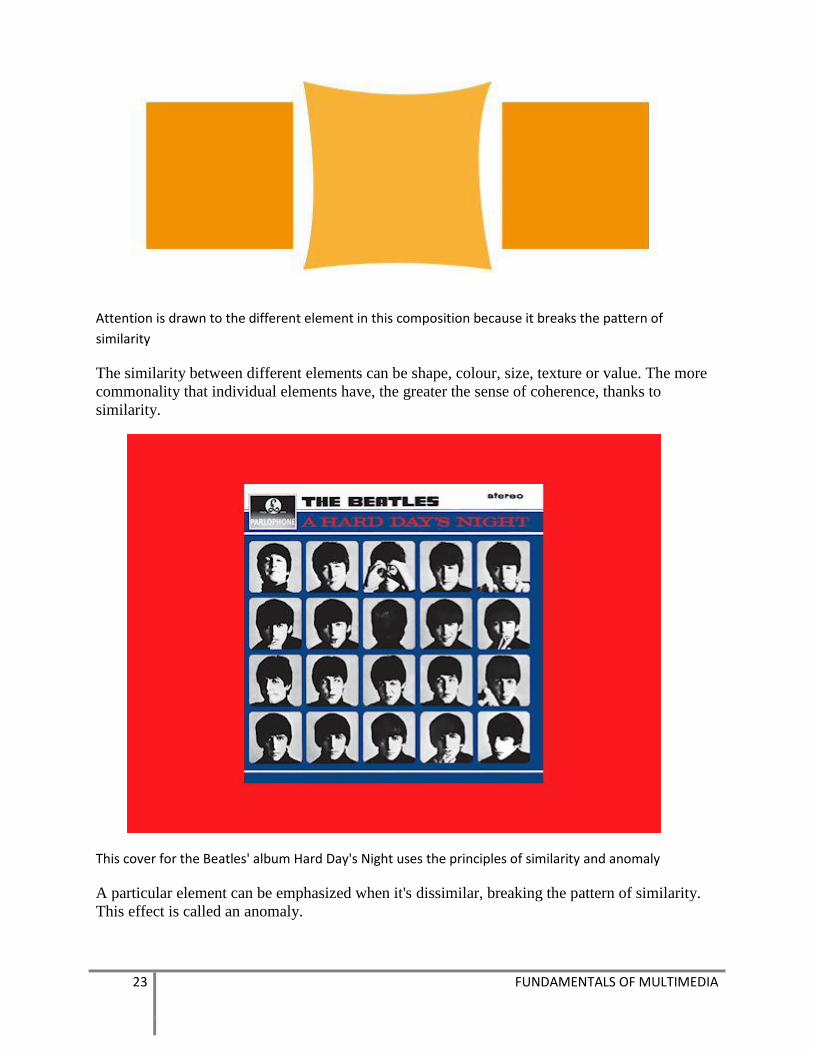
Attention is drawn to the different element in this composition because it breaks the pattern of
similarity
The similarity between different elements can be shape, colour, size, texture or value. The more
commonality that individual elements have, the greater the sense of coherence, thanks to
similarity.
This cover for the Beatles' album Hard Day's Night uses the principles of similarity and anomaly
A particular element can be emphasized when it's dissimilar, breaking the pattern of similarity.
This effect is called an anomaly.

24 FUNDAMENTALS OF MULTIMEDIA
1.4.2 Continuation
In this example the eye is led through the first design element towards the star that aligns with the
curve
Continuation is the principle through which the eye is drawn along a path, line or curve,
preferring to see a single continuous figure than separate lines. This can be used to point towards
another element in the composition, and is seen where a line is cut through one object, often in a
curve, aligning perfectly with a secondary element.

25 FUNDAMENTALS OF MULTIMEDIA
This illustration consists of 4 lines that meet at the central point, but we prefer to see two intersecting
lines rather than 4 lines that converge
1.4.3 Closure

26 FUNDAMENTALS OF MULTIMEDIA
The World Wildlife Fund logo uses the closure principle to describe a panda, even though the shape is
not fully closed
Closure is a common design technique that uses the human eye's tendency to see closed shapes.
Closure works where an object is incomplete or the interior space of an element is not fully
closed, but the viewer perceives a complete shape by filling in the missing information. This
technique is often associated with stenciled artwork, but is also closely associated with logo
forms.
1.4.4 Proximity (aka grouping)
The arrangement of boxes on the left are not close enough to have proximity, while the group on the
right is perceived as a single whole element
Proximity uses the close arrangement of elements to create a group association between those
objects. If individual elements are also similar, they will tend to be perceived as a single whole,
even though they are separate elements.

27 FUNDAMENTALS OF MULTIMEDIA
The shapes don't have to be regular to achieve proximity. Similar shapes arranged together to describe a
bigger image, such as this illustration of a flame
Proximity or grouping can be achieved with lots of different commonality including shape,
colour, texture, size or any other visual attribute.

28 FUNDAMENTALS OF MULTIMEDIA
1.4.5 Figure/ground
Figure and ground often uses the idea of light and shade to help create an image that jumps out from a
series of shapes
This principle describes the eye's tendency to see and separate objects from their surrounding
background. A classic example uses a vase/candlestick illustration to show two faces peering at
each other, but you can also see this effect in a variety of logo designs. It works because human
eyes want to see the figure (foreground object) and background (ground) as two different planes
of focus.
29 FUNDAMENTALS OF MULTIMEDIA
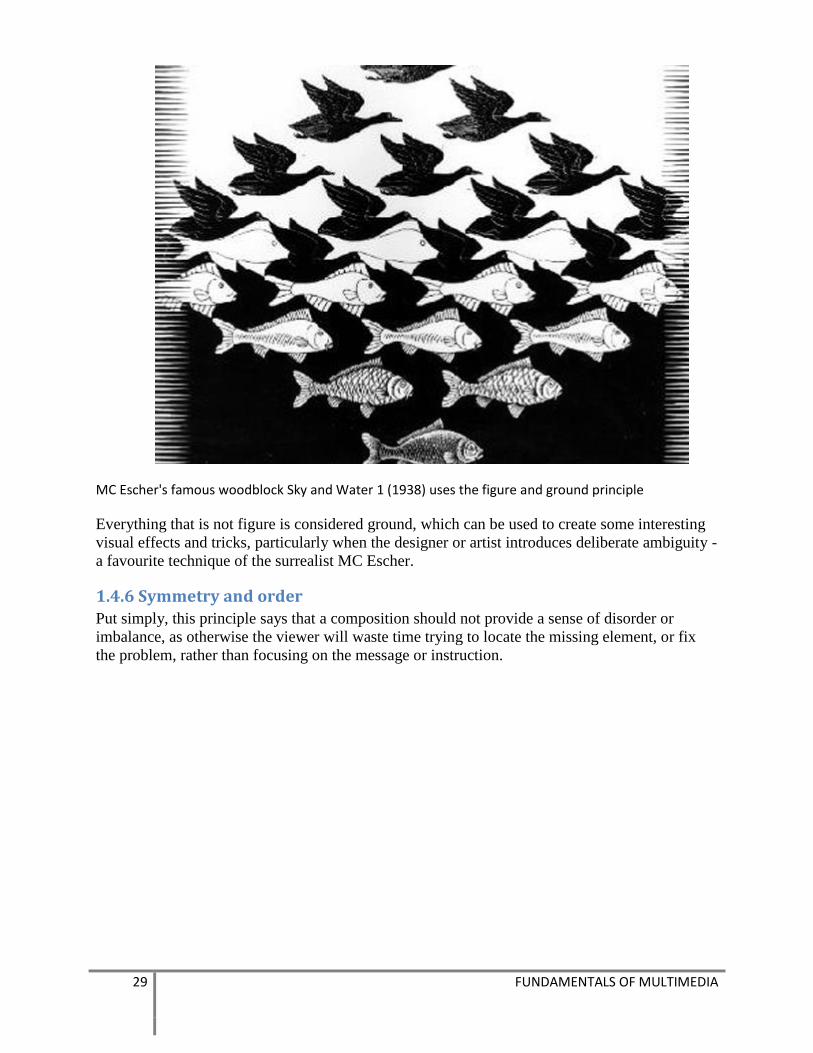
MC Escher's famous woodblock Sky and Water 1 (1938) uses the figure and ground principle
Everything that is not figure is considered ground, which can be used to create some interesting
visual effects and tricks, particularly when the designer or artist introduces deliberate ambiguity -
a favourite technique of the surrealist MC Escher.
1.4.6 Symmetry and order
Put simply, this principle says that a composition should not provide a sense of disorder or
imbalance, as otherwise the viewer will waste time trying to locate the missing element, or fix
the problem, rather than focusing on the message or instruction.

30 FUNDAMENTALS OF MULTIMEDIA
The symmetrical figure that makes up the windmill shown below provides a sense of order and balance
You can achieve symmetry by providing a good balance or sense of symmetry in your design
elements, such as the windmill illustration below. This provides the viewer with a feeling of
harmony.

31 FUNDAMENTALS OF MULTIMEDIA
1.5 Text in Multimedia Text might be the simplest portion of a multimedia experience, but it is often the most important.
Below are some of the important issues we need to consider when using a text.
Typography is the process of selecting and arranging typefaces, sizes, and spacing requirements
for a layout, be it for multimedia or the Web. Typography gives a page a certain personality and
an overall feeling.
1.5.1 Size
Text is measured in points. Point size of the type is determined by measuring the height of the
type body. The point size is found by measuring the distance from the uppermost limit of an
upward-reaching letter (ascender), such as b, f, h, k, or l; to the lowermost limit of a downward-
projecting letter (descender), such as g, j, p, or y.
1 point equal 0.0138 inch and 72 points equals 1 inch. So a 72 point font will be 1 inch in height.

32 FUNDAMENTALS OF MULTIMEDIA
Text sizes usually used for body content is 9- to 12-points. Display sizes usually used for
headlines, titles, and subheadlines (subheads) is 14 points and larger.
1.5.2 Type Font
Type Font is the collection of all the letters, figures, symbols, punctuation, and special characters
of a particular typeface in a certain point size.

33 FUNDAMENTALS OF MULTIMEDIA
1.5.3 Family
A Family of type consists of all variations of a single typeface and includes the different weights,
width, slants, and styles, such as italic, boldface, lightface, condensed, expanded versions, thin,
ultra light, heavy and compressed.

34 FUNDAMENTALS OF MULTIMEDIA
1.5.4 Typeface
Typeface is an entire family of letters of a particular design. Typefaces have a profound effect on
the design of your work. Each has a personality of its own. A typeface either has or does not
have serifs. Serifs are the ending strokes on the arms, stems, and tails of some typeface designs.
If a typeface has serifs it is termed a roman typeface. Mostly used for body text because they are
more readable than the 4 other font types. Examples of serif fonts include but are not limited to
Times New Roman, Palatino, Courier, Times, and Garamond.
Sans serif (without serifs) fonts do not contain the ending strokes. They are easier to read at very
large and especially at very small sizes and are good for captions, very small text (6 points and

35 FUNDAMENTALS OF MULTIMEDIA
smaller), and for titles and subheads (14 point and larger) to contrast body text. Examples of sans
serif fonts include but are not limited to Helvetica, Universe, and Futura.
1.5.5 Color
The Color of type refers to the overall tone, or texture, of the type; the lightness or darkness,
which varies from one typeface and style to another; and also the evenness of the type as
determined by the spacing.

36 FUNDAMENTALS OF MULTIMEDIA
1.5.6 Leading
Leading is the term used to refer to the vertical spacing between lines of type (Line Spacing). It
is measured in points from the baseline of one line to the baseline of the next line. The amount of
leading can add to or detract from how well the text looks.
1.5.7 Letter Spacing
Letter spacing refers to the amount of space between individual characters. It can degrade the
word shapes and make them harder to read. Kerning is the process of subtracting minute
increments of space from between certain character pairs in order to improve their fit and
therefore make them more eye-appealing.
1.5.8 Tracking
Tracking is a character-spacing option that permits the user to specify a small increment of space
that is to be uniformly removed from between all characters.

37 FUNDAMENTALS OF MULTIMEDIA
1.5.9 Some Guidelines in Using Text in Multimedia
Below are some suggested guidelines when using text in multimedia:
1.5.9.1 WATCH YOUR TEXT COLOR
The human eye can see approximately 7,000 different colors. Some color and color combinations
are soothing while others can cause headaches and visual fatigue. Red text represent danger and
the color yellow is an eye irritant.
Different cultures interpret colors differently. In the United States, white is a symbol for purity,
whereas in other cultures it is used for death and funerals.
Color blindness affects text color.
1.5.9.2 USE BOLDFACE CAREFULLY
Place key terms in boldface for emphasis.
1.5.9.3 THINK BEFORE YOU UNDERLINE TEXT
The rules are underlining are different for printed text in a magazine and text on a website.
1.5.9.4 DO NOT TYPE IN ALL CAPITAL LETTERS
Typing in all capital letters is analogous to yelling at a person. Use capital letters for emphasis
and title casing only.
1.5.9.5. WATCH YOUR TEXT SIZE
The size of the text matters. If the text size is too small eyestrain can occur, if it is too large, few
words will fit in the screen window which can frustrate the viewer.

38 FUNDAMENTALS OF MULTIMEDIA
1.5.9.6. WATCH THE FONT SELECT
Make sure the font or font family is readable on several systems (Mac and PC). Fancy fonts like
script can be illegible and common fonts like Courier are boring. Look for fonts that stand out
and are easy to read.

39 FUNDAMENTALS OF MULTIMEDIA
Exercises 1. Identify and discuss multimedia standards.
2. Identify and discuss components of multimedia.
3. Develop multimedia titles for industrial, educational and personal application.
4. Examine multimedia applications against multimedia principles, standards, and techniques.
References http://buc.edu.in/sde_book/multi_system.pdf
http://www.dtic.upf.edu/~jblat/material/doctorat/multimedia_standards.html
https://maiaangel03.wordpress.com/lesson-1-introduction-to-multimedia/
http://whatis.techtarget.com/definition/resolution
http://www.smartimage.com/whats-the-difference-between-gif-png-jpeg-and-tiff/
http://graphicdesign.stackexchange.com/questions/60/what-is-the-difference-between-cmyk-and-rgb-
are-there-other-color-spaces-i-shou
http://www.makeuseof.com/tag/5-basic-principles-graphic-design-take-granted-everyday/
http://www.colormatters.com/color-and-design/basic-color-theory
http://www.tigercolor.com/color-lab/color-theory/color-theory-intro.htm
http://www.creativebloq.com/graphic-design/gestalt-theory-10134960
http://coachmattjames.weebly.com/uploads/1/0/4/6/10463504/1.01_guidelines_for_using_text_in_mu
ltimedia.pdf.

40 FUNDAMENTALS OF MULTIMEDIA
CHAPTER 2: PHOTOSHOP
Objectives
Upon the completion of this chapter, the students will be able to:
• Describe in detail the uses of Adobe Photoshop.
• Identify the different parts of the Photoshop interface layout.
• Manipulate and customize the various tools, pallets and options within the Photoshop
environment to meet the specific needs of the multimedia project.
• Use and modify options of the “Text Tool” in Photoshop to create creative text.
• Create, manage and utilize properly layers in a project.
• Utilize the “Selection Tool” to select parts of an object and use the different modes to edit
the selection.
• Apply image cropping by using the “Cropping Tool”.
• Modify an image by using the “Spot Healing Tool”.
• Combine images and create a new image by “Layer Masking”.
2.0 Introduction to Photoshop Adobe Photoshop is a raster (pixel-based) graphics editor developed and published by Adobe
Systems for Windows and OS X. Photoshop was created in 1988 by Thomas and John Knoll.
2.1 Getting Started With Photoshop Setting up your document correctly from the start will make your job easier as you work through
your project. Thus, it is always recommended to start with the correct size, resolution and
background of your project.
To create a new document, click File > New. This will open the Document Setup dialog box. IT
enables you to name your file, set the page size, resolution, color mode and background content
of your document.

41 FUNDAMENTALS OF MULTIMEDIA
Options include, but are not limited to:
2.1.1 Page Size and Orientation
You can change the page size by typing in new values for width and height. Typing in exact
values for Height and Width gives you more control over the size and orientation of your page.
2.1.2 Resolution
Resolution is the number of pixels on a printed area of an image. The higher the resolution, the
more pixels there are on the page, the better the quality of the image. However, high resolution
increases the size of the file. The standard recommended resolution for printed images is 150-
300, and 72 for web images.
2.1.3 Color Mode
Choose a color mode that will best fit your project. For example, when making a graphic for a
website, choose RGB. When making an image for print choose CMYK.
2.1.4 Background Contents
Choose the background: white, color or transparent. When you have entered all of your
document settings, click Ok.

42 FUNDAMENTALS OF MULTIMEDIA
2.1.5 Interface Layout
Below is the screen layout of photoshop.
2.1.5.1 Menu Bar
If you look at the top of the screen you will see the Menu bar, which contains all the main
functions of Photoshop, such as File, Edit, Image, Layer, Select, Filter, Analysis, 3D, View,
Window, and Help.
2.1.5.2 Toolbar
Most of the major tools are located in the Toolbar for easy access.
2.1.5.3 File Name
The name of any image that you open will be at the top of the image window as shown above.
2.1.5.4 Options
It displays the additional functions that can be used with the current tool selected.
2.1.6 Palettes
Below are the most commonly used palettes in Photoshop.
Toolbar
File Name
Main Bar
Options

43 FUNDAMENTALS OF MULTIMEDIA
2.1.6.1 Color, Swatches, Style
The Color palette displays the current foreground and background colors and RGB values for
these colors. You can use the sliders to change the foreground and background colors in different
color modes. You can also choose a color from the spectrum of colors displayed in the color
ramp at the bottom of the palette.
2.1.6.2 Swatches
In the Swatches palette you can choose a foreground or background color and add a customized
color to the library.
44 FUNDAMENTALS OF MULTIMEDIA
2.1.6.3 Adjustments
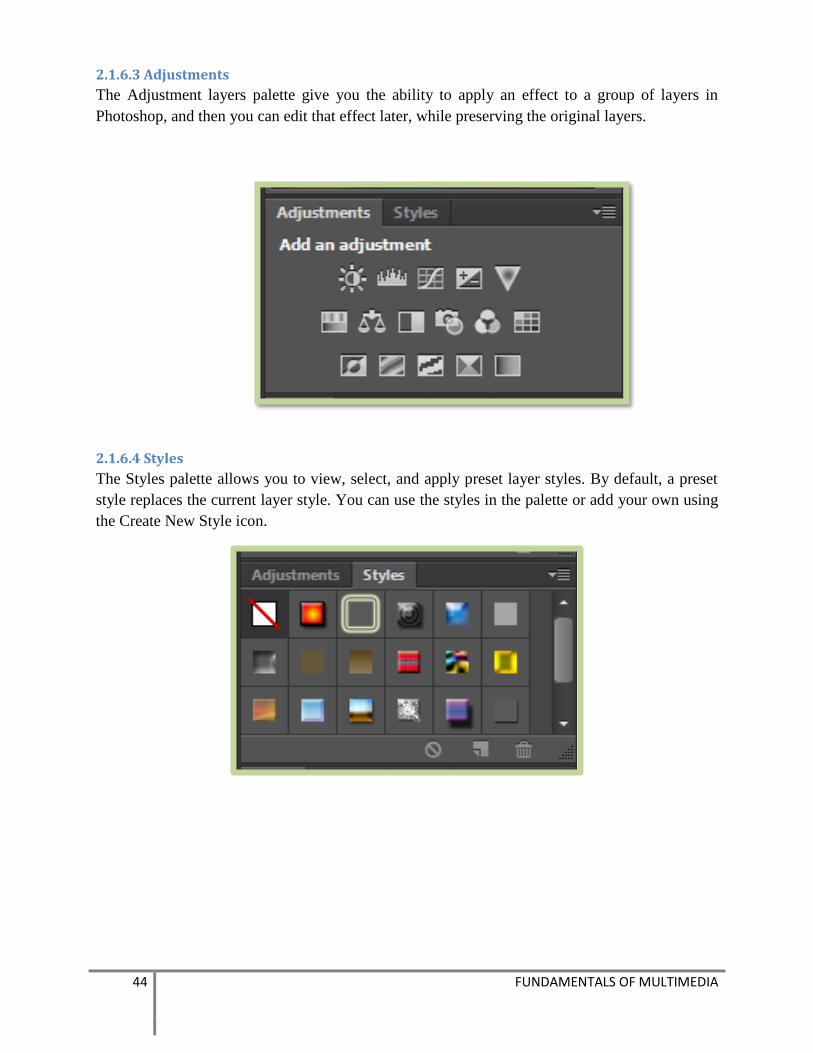
The Adjustment layers palette give you the ability to apply an effect to a group of layers in
Photoshop, and then you can edit that effect later, while preserving the original layers.
2.1.6.4 Styles
The Styles palette allows you to view, select, and apply preset layer styles. By default, a preset
style replaces the current layer style. You can use the styles in the palette or add your own using
the Create New Style icon.

45 FUNDAMENTALS OF MULTIMEDIA
2.1.6.5 Layers
Layers let you organize your work into distinct levels that can be edited and viewed as individual
units. Every Photoshop document contains at least one layer. Creating multiple layers lets you
easily control how your artwork is printed, displayed, and edited.
A) Layer Visibility -The eye shows that the selected layer is visible. Click on or off to see or to
hide a layer.
B) Layer Locking Options -Click the checkered square icon to lock Transparency, click the
brush icon to lock the Image, click the arrow icon to lock the Position, and click the lock icon to
lock all options.
C) Layer Blending Mode -Defines how the layer’s pixels blend with underlying pixels in the
image. By choosing a particular blending mode from the drop-down menu you can create a
variety of special effects.
D) Fill -By typing in a value or dragging the slider you can specify the transparency.
E) Opacity -By typing in a value or dragging the slider, you can specify the transparency of the
entire layer.
F) Layer Lock -The icon shows when the layer is locked and disappears when it is unlocked.
Double-click the icon to unlock the layer.

46 FUNDAMENTALS OF MULTIMEDIA
G) Layer Options Menu -Click the black triangle to display the following options: New Layer,
Duplicate Layer, Delete Layer, Layer Properties, etc. Some of the options are presented as icons
at the bottom of the Layers palette.
H) Link Layers – Can be used to link layers together.
I) Layer Styles -If a layer has a style, an “F” icon shows at the bottom of the Layers palette.
Click the little black triangle to see style options.
J) Layer Mask -Allows you to hide certain parts of the layer, which can then be revealed by
using the paintbrush and the white paint color to expose portions of the layer.
K) Layer Set -This option helps to organize images with multiple layers. Click the icon to create
a folder for several layers.
L) Create New Fill or Adjustment Layer -Have the same opacity and blending mode options as
image layers and can be rearranged, deleted, hidden and duplicated in the same manner as image
layers. Click the icon and select an option to create a new fill or adjustment layer.
M) Create New Layer -Click this icon to create a new layer.
N) Delete Layer -To delete a layer, select a layer in the Layers palette and drag it to the trash can
icon, or select a layer and click the icon.
2.1.7 Toolbox
Toolbox provides your variety of tools you can use to create and finish your
document. Keep in mind that you might not need to use all of the tools.
Some tools in the toolbar have additional “hidden” tools. These tools have small
black triangles in the right-hand corner. To view the “hidden” tools, click and
hold down on any tool that has a gray triangle in the corner.

47 FUNDAMENTALS OF MULTIMEDIA
2.1.8 Selection Tools
Icon Name Description
Move Used to select and move objects on the page.
Marquee Selects an object by drawing a rectangle or an ellipse
around it.
Quick Selection Used to make selections based on pixel color values.
Lasso Selects an object by drawing a freehand border around it.
Crop Resizes the selected area of the image.
Eye Dropper Takes color samples from colors on the page and displays
them in the Color Boxes.
2.1.9 Alteration Tools
Icon Name Description
Brush Draws brush strokes of different thicknesses and colors.
Healing Brush Corrects small blemishes in scanned photos.
Art History
Brush
Paints over an image using the source data from a
specified history state or snapshot.
Clone Stamp Takes a sample of an image and applies over another
image, or a part of the same image.

48 FUNDAMENTALS OF MULTIMEDIA
Gradient Creates a gradual blend between multiple colors.
Eraser Removes part of an existing path or stroke.
Dodge Lighten or darken areas of the image.
Blur Blurs the sharp edges of an image.
2.1.10 Drawing and Selection Tools
Icon Name Description
Type Types text on a page. Every time you click the Type Tool
on a new portion of the page, a new layer will be created.
Pen Draws smooth-edged paths.
Rectangle Shape Draws a rectangle shape. Other shapes that are hidden in
this tool are: Line Tool, Ellipse Tool, Polygon Tool, Line
Tool, and Custom Shape Tool.
Path Selection Selects paths and path segments.

49 FUNDAMENTALS OF MULTIMEDIA
2.1.11 Assisting Tools
Icon Name Description
Magnify Magnifies or reduces the display of any area in your
image window.
Hand Allows you to move around within the image.
2.1.12 Color Boxes and Modes
Icon Name Description
Color Boxes The foreground color appears in the upper color
selection box and represents a color that is currently
active. The background color appears in the lower box
and represents an inactive color.
1. To change the foreground color, click the upper
color selection box in the Toolbox.
2. To change the background color, click the
lower color selection box in the Toolbox.
3. To reverse the foreground and background
colors, click the Switch Colors icon (the arrow)
in the toolbox.
4. To restore the default foreground and
background colors, click the Default Colors
icon (the little black and white boxes) in the
toolbox.
Note: If you are using the Gradient Tool, the currently
selected foreground and background colors will be the
default colors of the gradient.

50 FUNDAMENTALS OF MULTIMEDIA
2.2 Layers Create a new document in Photoshop (File>New).
In the bottom right you should have the layers window. In case you do not see it, go to
Window>Layers:
Here you can visualize, select and modify all the layers that compose your final result. As you
may have noticed, in this moment we have a single white filled layer.
Below is the layer palette:

51 FUNDAMENTALS OF MULTIMEDIA

52 FUNDAMENTALS OF MULTIMEDIA
2.2.1 Create a New Layer
Create a new layer by pressing the appropriate button at the bottom of the layers window. Now
you can see a new layer, but nothing has changed in your canvas. This is because Photoshop
automatically create blank layers.
2.2.2 Fill the Layer with Color
Set the foreground color to black by clicking on the foreground color thumbnail to open the color
picker and selecting black.
Now grab the Paint bucket tool (G) and click on the canvas to fill it with black.

53 FUNDAMENTALS OF MULTIMEDIA
Let us understand the layers window: the blank layer is now black. This is because what we do
on the canvas affects only the layer which is selected. We have 2 layers, one black and one
white. Since the black one is above, it’s displayed while the white one is hidden (layer
hierarchy).
Switch the foreground color to yellow and use the horizontal type tool (T) to write something.
Note that Photoshop has automatically created a new type layer:

54 FUNDAMENTALS OF MULTIMEDIA
2.2.3 Layer Lock
The background layer is locked (note the padlock on the right of the layer thumbnail). This
means it can’t be modified. To unlock the background layer double click on it and hit OK in the
window that appears:
Every time you want to prevent a layer from casual adjustments you can lock it by selecting it
from the layers window and pressing the lock button.

55 FUNDAMENTALS OF MULTIMEDIA
2.2.4 Renaming Layer
You can give a name to each layer. This is a good practice in particular when you work with
complex compositions. Simply double-click on the layer title in the layers window to re-name it.
Select the bottom layer (the white one), set the foreground color to orange, grab the paint bucket
tool and click to fill. Apparently nothing has changed but the bottom layer is now filled with
orange, as you can notice from the layers window.

56 FUNDAMENTALS OF MULTIMEDIA
Select the black layer. Grab the eraser tool (E) and select a round 300px brush:
Click once in the center of the canvas. What happens? Once erased the center of the black layer,
a part of the orange one appears.

57 FUNDAMENTALS OF MULTIMEDIA
2.2.5 Layer Arrangement
In the layers window move the text layer below the black one:
As you may have imagined, a part of the text is covered, while the area below the spot is
preserved (layers hierarchy).

58 FUNDAMENTALS OF MULTIMEDIA
2.2.6 Layer Blending Options
Right-click on the layers thumbnail and select Blending options. Here we can add some
adjustments to the layer. Select “drop shadow” with the following settings. In this way we can
add depth to the image. In this way you can feel more the sensation to work with 3 different
levels one on the top of the other.

59 FUNDAMENTALS OF MULTIMEDIA
2.2.7 Layer Grouping
Grouping and naming layers is beneficial for both short and long term and it results in a more
pleasant work experience and a better end result.
2.3 The Move Tool This tool allows you to take any selection and move it to a different location on the canvas.
Simply click and hold on the selection and then drag the mouse to move the object. The
keyboard shortcut to select the Move Tool is V.
2.3.1 Auto Select A Layer
Often you need to switch between layers when working on an image or design. If your document
contains many elements, each on its own layer, it can be tricky to quickly find the right layer to
select. With the Move tool selected, holding down the Ctrl key, click on the object in the
document. This selects the layer that contains the pixels you clicked. If you look at the Options
bar when you Ctrl click, you’ll see that “Auto-Select” layer is temporarily checked.
2.3.2 Find the Exact Center of Any Object on Any Layer
To easily find the center of an object on any layer (except the background layer), select the Move
tool, click on the object you’re interested in, then click on the “Show Transform Controls” option
in the Options bar.

60 FUNDAMENTALS OF MULTIMEDIA
2.4 The Brush and Pencil Tool
The Brush tool and the Pencil tool paint the current foreground color on an image. The Brush
tool creates soft strokes of color. The Pencil tool creates hard-edged lines.
2.4.1 Option Bar
To alter the brush you're using, take your eyes to the top of the window, you'll see a tool bar has
appeared. Here, you can edit the brush, changing its size, style, opacity and flow.
2.4.2 Size
To change the size of the brush you're using, click on the arrow that's next the where it says
'Brush'. This will open a window where you change the brush size with the Master Diameter
slider or by inputting a value in the box next to it. You can also change the hardness of the brush
in the same window.
61 FUNDAMENTALS OF MULTIMEDIA
.
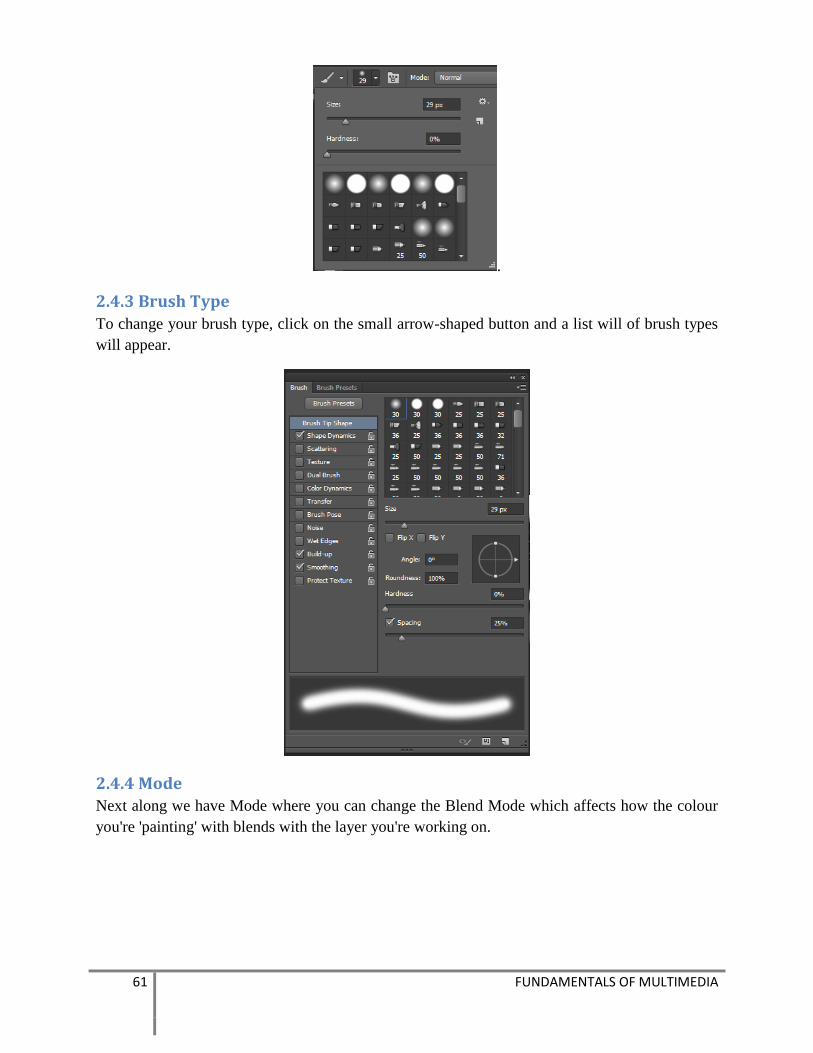
2.4.3 Brush Type
To change your brush type, click on the small arrow-shaped button and a list will of brush types
will appear.
2.4.4 Mode
Next along we have Mode where you can change the Blend Mode which affects how the colour
you're 'painting' with blends with the layer you're working on.
62 FUNDAMENTALS OF MULTIMEDIA
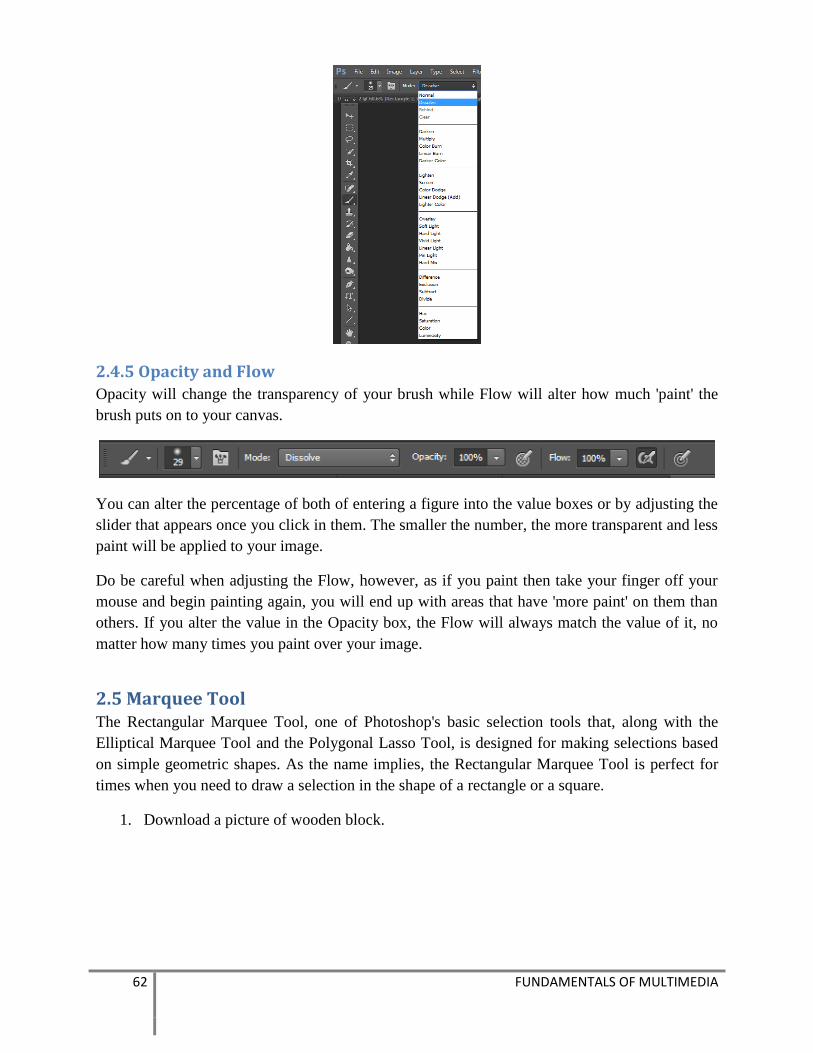
2.4.5 Opacity and Flow
Opacity will change the transparency of your brush while Flow will alter how much 'paint' the
brush puts on to your canvas.
You can alter the percentage of both of entering a figure into the value boxes or by adjusting the
slider that appears once you click in them. The smaller the number, the more transparent and less
paint will be applied to your image.
Do be careful when adjusting the Flow, however, as if you paint then take your finger off your
mouse and begin painting again, you will end up with areas that have 'more paint' on them than
others. If you alter the value in the Opacity box, the Flow will always match the value of it, no
matter how many times you paint over your image.
2.5 Marquee Tool The Rectangular Marquee Tool, one of Photoshop's basic selection tools that, along with the
Elliptical Marquee Tool and the Polygonal Lasso Tool, is designed for making selections based
on simple geometric shapes. As the name implies, the Rectangular Marquee Tool is perfect for
times when you need to draw a selection in the shape of a rectangle or a square.
1. Download a picture of wooden block.

63 FUNDAMENTALS OF MULTIMEDIA
2. Click with your mouse at the point where you want to begin the selection, which will
usually be in the top left corner of the object or area you need to select, then continue
holding your mouse button down as you drag towards the bottom right corner of the
object or area.
3. Change the color of the block, we'll use Photoshop's Hue/Saturation image adjustment.
To select it, go up to the Image menu at the top of the screen where then
choose Adjustments and then Hue/Saturation:

64 FUNDAMENTALS OF MULTIMEDIA
4. The Hue/Saturation image adjustment is great for changing the color of objects in an
image. Set Hue to 28 and Saturation to 25.
5. Remove selections by choosing Deselect from under the Select menu.

65 FUNDAMENTALS OF MULTIMEDIA
2.6 Selection Tool 1. Open up Photoshop and load the image.
2. Locate the Quick Selection Tool. You may have to click and hold on the Magic Wand
tool to show the other options.
Look at the options at the top, right below the menu bar:
Let us take a closer look at these:
Brush Presets Menu

66 FUNDAMENTALS OF MULTIMEDIA
Photoshop treats the Quick Selection Tool as a brush. This means you can have presets,
just like any standard brush. This menu should be empty right now. If you save your
existing settings, it will show up here as a preset.
Brush Mode
You have three options here:
New Selection: Creates a new selection.
Add to Selection: Adds to the existing selection, equivalent to holding the SHIFT key.
Interestingly, unlike other selection tools, you do not need to select Add to
Selection manually after creating a new selection. Photoshop selects this mode
automatically after you make the first selection.
Subtract from Selection: This removes pixels from the existing selection, equivalent to
holding the ALT key.

67 FUNDAMENTALS OF MULTIMEDIA
Brush Options
Since Photoshop treats this tool as a brush, you have the standard options for changing
the hardness, size, spacing, angle and roundness of the brush. This can come very handy
when working with very fine details in images, such as hair or fur.
3. With the Quick Selection Tool selected, click on the top left corner of the image.
Photoshop will automatically select the background, minus the flower.
Click on the pixels adjacent to the selection. Photoshop will “magically” keep selecting
the pixels around the flower. If you make a mistake, you can press CTRL + Z to undo, or
hold ALT to deselect parts of the selection. For better control, try zooming in and
reducing the brush size.

68 FUNDAMENTALS OF MULTIMEDIA
4. After covering all around the flower, click on “Refine Edge” in the top options bar. This
will bring up the Refine Edge menu where we can fine-tune the selection to create
smoother edges.
69 FUNDAMENTALS OF MULTIMEDIA
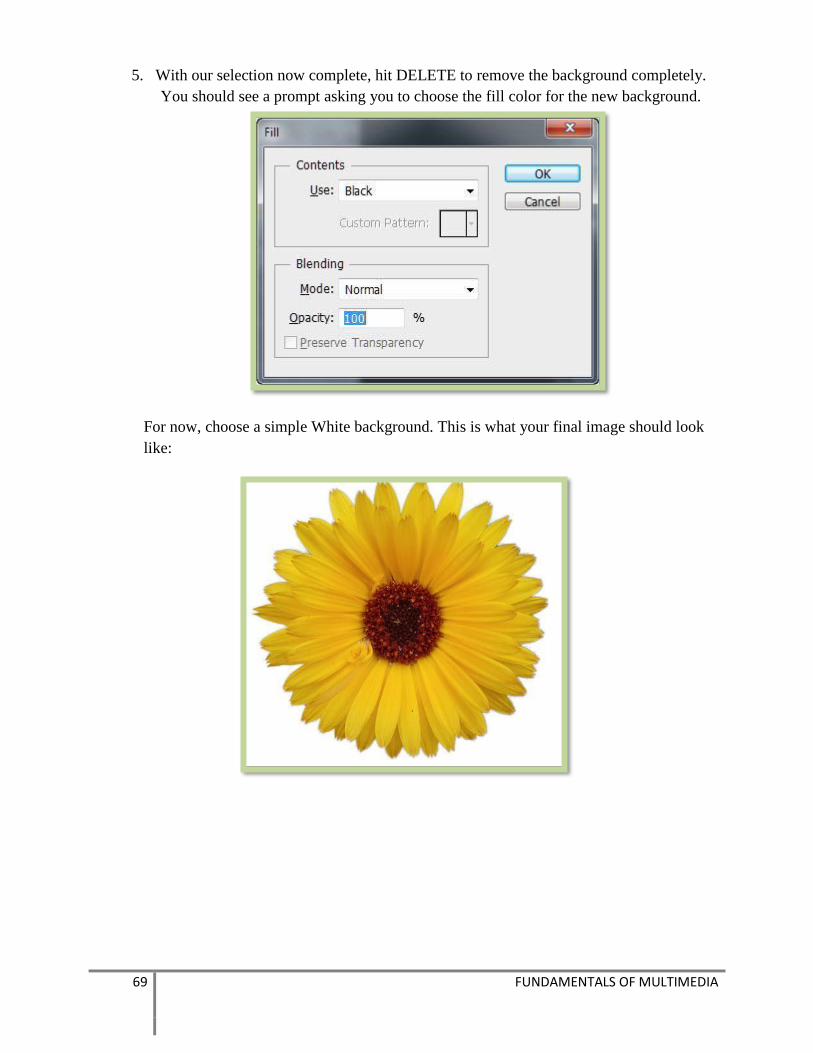
5. With our selection now complete, hit DELETE to remove the background completely.
You should see a prompt asking you to choose the fill color for the new background.
For now, choose a simple White background. This is what your final image should look
like:

70 FUNDAMENTALS OF MULTIMEDIA
2.7 Cropping 1. Load an image.
2. The crop tool is located in the left panel of the screen. Click it or press "C." The crop
handles should appear. These will let you select the area you want to crop from the
original image. Drag the handles around to set your crop.
The outer dark area are the parts of the image Photoshop will crop away. The lighter
inner area is the part that you will keep.

71 FUNDAMENTALS OF MULTIMEDIA
3. To change the orientation of your crop, click the "Rotate" icon in the options bar.
a. Click the icon again if you wish to revert to the previous orientation.
b. You can also hit "X" to change between them.
4. To move the image around in your crop box, click inside the box and drag your mouse.
5. To finalize your crop, head to the "Options" bar and click on the check icon. You can also
hit "Enter" as a shortcut.
2.8 Lasso Tool Of all the selection tools in Photoshop, the Lasso Tool is probably the easiest to use and
understand because you simply drag a freehand selection around the object or area you want to
select, in a similar way to how you would outline something on a piece of paper with a pen or
pencil.

72 FUNDAMENTALS OF MULTIMEDIA
To complete the selection, simply return to the spot where you began and release your mouse
button. You don't necessarily have to return the same spot you started from, but if you don't,
Photoshop will automatically close the selection for you by drawing a straight line from the point
where you released your mouse button to the point where you began, so in most cases, you will
want to finish where you started:
Photoshop will close a selection automatically with a straight line if you don't drag back to the
beginning point.
1. Download a picture of handshake in the internet.
2. Grab the Lasso Tool from the Tools panel then click somewhere along the top of the
sleeve of the person on the left to begin my selection. Once clicked on a starting point,

73 FUNDAMENTALS OF MULTIMEDIA
continue holding the mouse button down as I drag to draw an outline around the area of
the photo. Don't worry about any mistakes with your initial selection. You can fix them
later.
3. If you need to scroll your image around inside the document window as you're drawing
the selection, hold down your spacebar, which will temporarily switch you to Photoshop's
Hand Tool, scroll the image as needed, then release your spacebar and continue drawing
the selection.
4. To add the existing selection, make sure you still have the Lasso Tool selected, hold
down your Shift key. You'll see a small plus sign (+) appear in the bottom right of the
cursor icon, letting you know that you're now in Add to Selection mode. With the Shift
key held down, click somewhere inside of the existing selection, then drag outside of it
and along the edge of the area you want to add. When you're done adding the new area,
drag back inside of the existing selection:

74 FUNDAMENTALS OF MULTIMEDIA
5. Removing the problem area by subtracting it from the selection. To remove an unwanted
area from a selection, hold down your Alt key. This will place you in Subtract from
Selection mode, and you'll see a small minus sign (-) appear in the bottom right corner of
the cursor icon. With the Alt key held down, simply click anywhere outside of the
existing selection to set a starting point, then drag inside the selection and along the edge
of the area you want to remove. In my case, I'm going to drag along the edge of the
finger. When you're done, drag back outside of the existing selection:
2.9 Eyedropper Tool
The Eyedropper tool (the icon in the Toolbar) is used to sample a color from an image to
use this color further. It's practical as it facilitates color selection, for example, an appropriate
color for the skin or the sky.
1. Download a picture of a house and a sky.

75 FUNDAMENTALS OF MULTIMEDIA
2. Click the eyedropper tool. Click a portion of the sky.
Tip 1. When you pick a color with the Eyedropper tool, it appears as the foreground
color in the Toolbar.
If you want to pick a color for the background hold the Alt-key while selecting the color
with the Eyedropper tool. Below you see the foreground/background palette of the
Toolbar.
Tip 2. To make the color selection more precise, press CapsLock on the keyboard and
the Eyedropper will turn into a target so that you can collect one exact pixel of a
picture.
3. Switch the picture to the house and grab the bucket tool to change the background of the
house to the color you have selected using the eyedropper earlier.

76 FUNDAMENTALS OF MULTIMEDIA
2.10 Working with Text You can create text by using the Type tool in your toolbox. There are four different modes that
you can use namely Horizontal Type, Vertical Type, Horizontal Type Mask and Vertical Type
Mask.
2.10.1 Exploring Horizontal and Vertical Type Tool
To put text on your canvas, follow the steps below:
1. Select the Type tool from the tools palette. It looks like a "T." Click on the icon, or
simply press "T" on your keyboard to bring up the text tool.

77 FUNDAMENTALS OF MULTIMEDIA
2. Set your text settings using the menu at the top of the screen. Once you click the Text
tool, a bunch of options will appear at the top of Photoshop allowing you to choose the
color, font, size, and alignment.
Font: lets you select different font names such as Arial and Times New Roman.
Font Size: adjust the points of the font size to make the text bigger or smaller.
Font Alignment: choose whether you want the text to be centered or flushed to the right
or left.
Font Color: clicking on the font color box will allow you to choose different colors for
the text.
3. Type the text you want to appear.
• If you simply click somewhere on the image or canvas, a cursor will appear where
your first letter will appear. You can simply start typing, and Photoshop will add
the words from this starting point.
• If you need the text to fit with a specific area, you can click and drag out the area
before you begin typing. Any text that doesn't fit will not appear unless you shrink
the font size.

78 FUNDAMENTALS OF MULTIMEDIA
4. To put vertical text, click the Vertical type tool and follow the same steps earlier.
2.10.2 Formatting Text Using the Character Window
You can use the "Character," or the "Paragraph," which resemble the text editing boxes in
programs like Microsoft Word. You can find these boxes by clicking on "Window" from the
very top of your screen and checking "Character" and "Paragraph."

79 FUNDAMENTALS OF MULTIMEDIA
2.10.3 Warp Text Function
You can add some effects to your text by using the Warp Text option. Just select the text you
want to format then click on the Warp Text in option bar. Select the style you want to apply.
2.10.4 Exploring Horizontal and Vertical Type Mask Tool
The Type Mask tool enables you to cut type out of solid color or image layers.
Here are the steps to create a type mask:
1. Open an image of your choice.

80 FUNDAMENTALS OF MULTIMEDIA
2. Convert your background into a layer by double-clicking the word Background on the
Layers panel; and then click OK.
This step enables you to jazz up the type with styles later on.
3. Choose the Horizontal Type Mask tool from the Tools panel.
4. Specify your type options (such as font family, style, and size) on the Options bar.
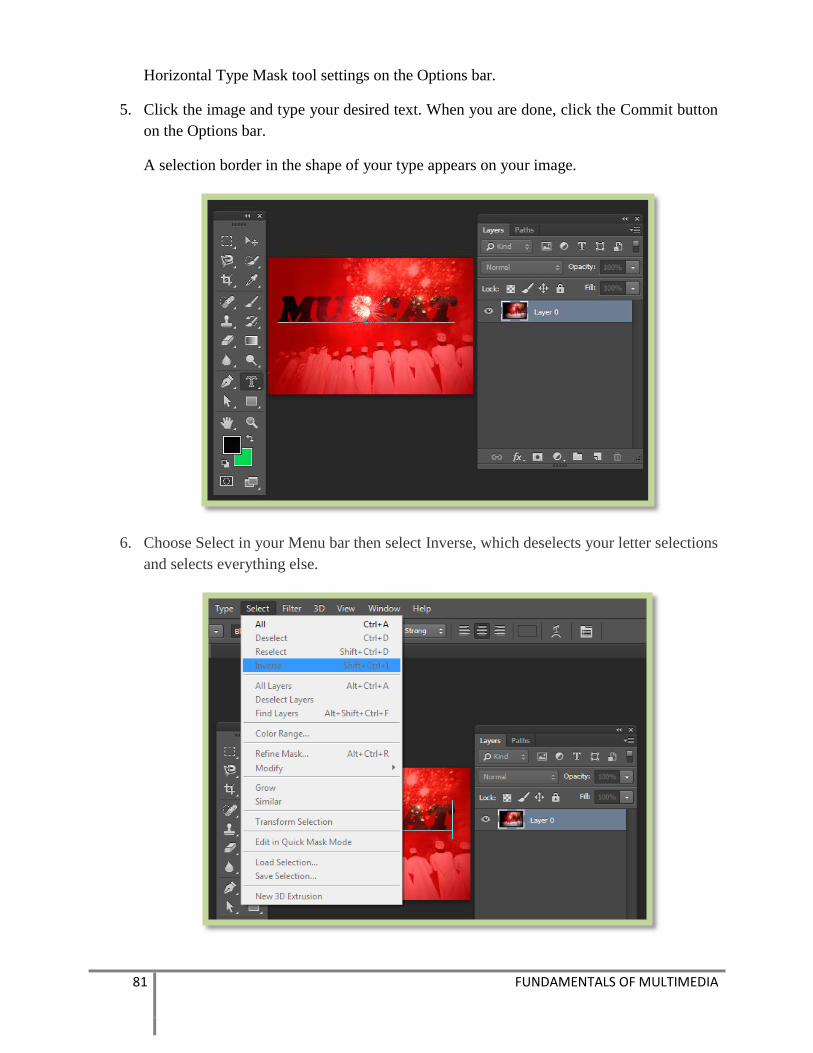
81 FUNDAMENTALS OF MULTIMEDIA
Horizontal Type Mask tool settings on the Options bar.
5. Click the image and type your desired text. When you are done, click the Commit button
on the Options bar.
A selection border in the shape of your type appears on your image.
6. Choose Select in your Menu bar then select Inverse, which deselects your letter selections
and selects everything else.

82 FUNDAMENTALS OF MULTIMEDIA
7. Press the Backspace key to delete everything outside your selection border.
Your type is now filled with your image.

83 FUNDAMENTALS OF MULTIMEDIA
2.11 Photoshop Shapes
2.11.1 The Shape Tools
Photoshop gives us six Shape tools to choose from - the Rectangle Tool, the Rounded Rectangle
Tool, the Ellipse Tool, the Polygon Tool, the Line Tool, and the Custom Shape Tool, and they
are all nested together in the same spot in the Tools panel. By default, the Rectangle Tool is the
one that is visible in the Tools panel, but if we click on the tool's icon and hold our mouse button
down for a second or two, a fly-out menu appears showing us the other Shape tools we can
choose from:
2.11.2 Choosing a Color For The Shape
With the Shape Layers option selected, the next thing we need to do is choose a color for our
shape, and we do that by clicking on the color in the Options Bar:
2.11.3 The Rectangle Tool
As you can probably guess from its name, Photoshop's Rectangle Tool lets us draw four-sided
rectangular shapes. Simply click in the document to set the starting point for your shape, then
keep your mouse button held down and drag diagonally to draw the rest of the shape. As you
drag, you'll see a thin outline of what the shape will look like:

84 FUNDAMENTALS OF MULTIMEDIA
2.11.4 Drawing A Shape From Its Center
If you need to draw a rectangle (or any shape) from its center rather than from a corner, click
inside the document where the center of the rectangle should be and begin dragging out the shape
as you normally would. Once you begin dragging, press your Alt key and keep it held down as
you continue dragging.
2.11.5 Drawing Squares
We can also draw squares with the Rectangle Tool. To draw a square, click inside the document
and begin dragging out a rectangular shape. Once you have started dragging, press your Shift key
on your keyboard and keep it held down while you continue dragging out the shape. Holding the
Shift key down will force the shape into a perfect square no matter which direction you drag in.
2.11.6 The Rounded Rectangle Tool
The Rounded Rectangle Tool is very similar to the standard Rectangle Tool except that it lets us
draw rectangles with nice rounded corners. We control the roundness of the corners using the
Radius option in the Options Bar. The higher the value we enter, the more rounded the corners
will appear.

85 FUNDAMENTALS OF MULTIMEDIA
To draw a rounded rectangle after you've entered a Radius value, click inside the document to set
a starting point, then keep your mouse button held down and drag out the rest of the shape. Just
as we saw with the normal Rectangle Tool, Photoshop displays a thin outline of the shape while
you're drawing it:
2.11.7 The Ellipse Tool
Photoshop's Ellipse Tool lets us draw elliptical or circular shapes. Just as with the Rectangle and
Rounded Rectangle Tools, click inside the document to set a starting point, then keep your
mouse button held down and drag out the rest of the shape:
2.11.8 The Polygon Tool
The Polygon Tool is where things start to get interesting. While the Rectangle Tool is limited to
drawing four-sided polygons, the Polygon Tool lets us draw polygons with as many sides as we
like. It even lets us draw stars, as we'll see in a moment.
Enter the number of sides you need for your polygon shape into the Sides option in the Options
Bar. The default value is 5, but you can enter any value from 3 to 100:
Once you've entered the number of sides, click in the document and drag out your polygon
shape. Photoshop always draws polygon shapes out from their center so there's no need to hold
down your Alt. Holding your Shift key down after you start dragging will limit the number of
angles on which the shape can be drawn, which can help to position the shape the way you need
it:

86 FUNDAMENTALS OF MULTIMEDIA
2.11.9 Drawing Stars With The Polygon Tool
To draw stars with the Polygon Tool, click on the small arrow in the Options Bar to bring up the
Polygon Options, then select Star:
With the Star option selected, just click inside the document and drag out a star shape. The Sides
option in the Options Bar controls the number of points in the star, so with the default Sides
value of 5, for example, we get a 5-pointed star:
2.11.11 The Line Tool
Finally, the Line Tool, which is the last of Photoshop's geometric Shape tools, lets us draw
simple straight lines, but we can also use it to draw arrows. Set the thickness of the line by
entering a value, in pixels, into the Weight option in the Options Bar
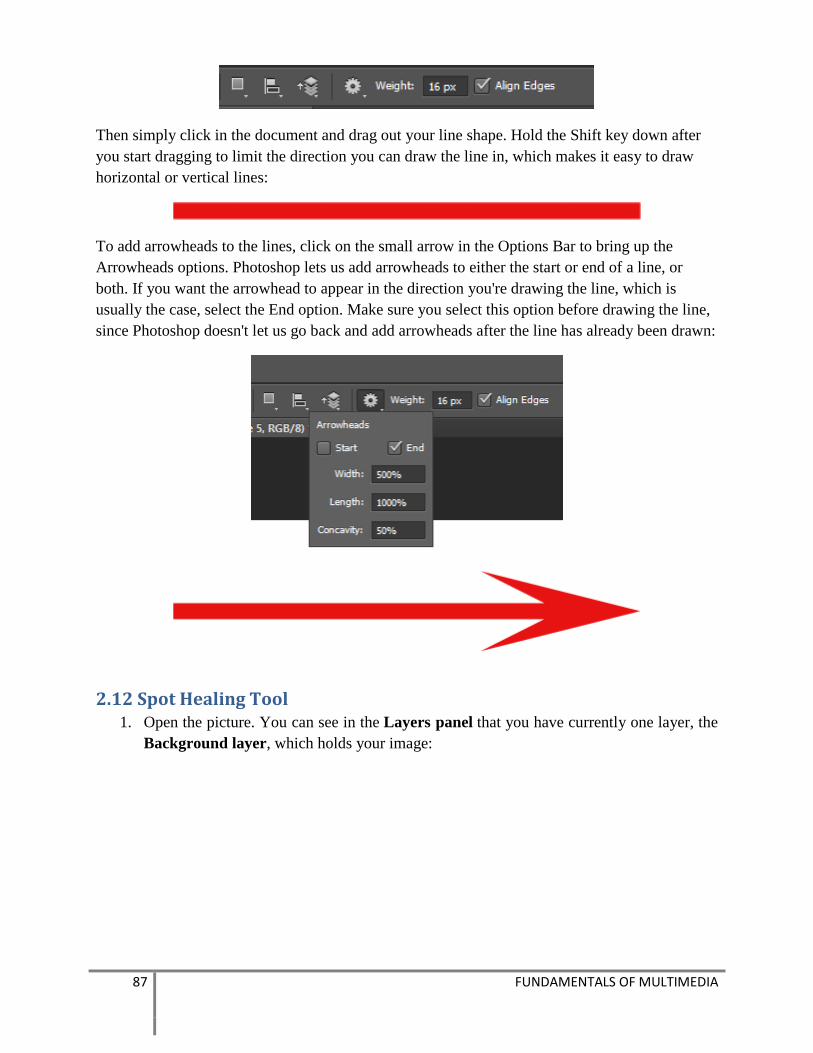
87 FUNDAMENTALS OF MULTIMEDIA
Then simply click in the document and drag out your line shape. Hold the Shift key down after
you start dragging to limit the direction you can draw the line in, which makes it easy to draw
horizontal or vertical lines:
To add arrowheads to the lines, click on the small arrow in the Options Bar to bring up the
Arrowheads options. Photoshop lets us add arrowheads to either the start or end of a line, or
both. If you want the arrowhead to appear in the direction you're drawing the line, which is
usually the case, select the End option. Make sure you select this option before drawing the line,
since Photoshop doesn't let us go back and add arrowheads after the line has already been drawn:
2.12 Spot Healing Tool 1. Open the picture. You can see in the Layers panel that you have currently one layer, the
Background layer, which holds your image:

88 FUNDAMENTALS OF MULTIMEDIA
Even though our goal is to make the photo look better, we still want to protect the
original, so we add a new blank layer above the Background layer. We will do all of our
spot healing work on this separate layer. Click on the New Layer icon at the bottom of
the Layers panel:
2. Select the Spot Healing Brush from the Tools panel. You will find it grouped in with the
other healing tools. If one of the other tools is showing in place of the Spot Healing
Brush, click on the tool and hold your mouse button down for a second or two until a
small fly-out menu appears, then select the Spot Healing Brush from the menu:

89 FUNDAMENTALS OF MULTIMEDIA
3. By default, the Spot Healing Brush works only with the layer that's currently selected in
the Layers panel. That will cause us some problems if we try to use it right now since we
have a blank layer selected, which means all we'd be able to do is replace nothing with
different nothing. We need to tell Photoshop to look at the image on the Background
layer as well. To do that, select the Sample All Layers option in the Options Bar along
the top of the screen:
4. With the Spot Healing Brush, Sample All Layers and Content-Aware (or Proximity
Match) selected, all we need to do now is click on problem areas in the image to fix them.
Zoom in(CTRL ++ ) on an area of the girl's face so you can see the problem spots more
clearly, then move the brush cursor over one of the pimples and adjust the brush size with
the left and right bracket keys so it's just slightly larger than the pimple itself. As
mentioned earlier, sometimes the Spot Healing Brush can make a mistake, so if that
happens, just press Ctrl+Z to undo it and try again. Each time you try again, you'll get a
different result.
5.

90 FUNDAMENTALS OF MULTIMEDIA
6. You can toggle between the layer1 and background layer by clicking the Eye icon to see
the difference of the original image and the new edited picture.
2.14 Clone Stamp Tool The Clone Stamp Tool paints with a sampled pixels of an image.
1. Open an image. With this example we will remove the people in this picture.
2. From the Toolbox, choose the Clone Stamp Tool.
3. In the Options bar, set the tool's tip size and hardness as we did it for the Brush Tool.
4. Point the cursor at the image area you want to paint with, hold down [Alt] key, then
mouse-click. You have just selected the source point for cloning.
5. Paint with the copied pixels.

91 FUNDAMENTALS OF MULTIMEDIA
2.15 Gradient Tool The Gradient tool allows you to specify a gradient of color. Using it is fairly easy, you simply
choose the gradient tool from the toolbox click on the canvas and drag out an area to fill with the
gradient.
1. Create a new document.
2. In your tool box, click the gradient tool. Choose a gradient in the Gradient Picker in the
Option Bar.
3. Drag over the mouse to the end of the document.

92 FUNDAMENTALS OF MULTIMEDIA
4. After releasing the mouse button, Photoshop draws the gradient. Since Foreground color
was set to black and my Background color was set to white, I end up with a black to
white gradient:
2.16 Erase Tool
The Eraser tool is essentially a brush. You can change the size, hardness and spacing, just like
any other brush. It's also possible for you to change the mode from Brush to Pencil or Block.
Instead of painting on the pixels of your image, however, the Eraser deletes the unwanted pixels.
1. Open the picture in Photoshop.
2. Double click the layer to unlock the layer.

93 FUNDAMENTALS OF MULTIMEDIA
3. Grab the erase tool start deleting any portion of the picture.
4. Click the magic erase tool to select group of pixels of the same shade to delete.
2.17 Dodge, Burn and Sponge
Dodge, Burn and Sponge are tools that affect tone. They are used for lightening or darkening
parts of an image.
These tools occupy one cell in the Toolbar, and are represented by the icon of the last tool used.
To choose another tool, right-click on the triangle next to the tool and choose the desired tool

94 FUNDAMENTALS OF MULTIMEDIA
from the menu that appears. This menu can also be accessed from the screen, if you click on the
icon and hold the button down for a few moments.
Dodge. This tool lightens a part of an image, if the cursor is dragged across it.
Burn. This tool darkens a part of an image.
Sponge. The Sponge tool affects the saturation and contrast of an image.
1. Download a picture similar below then open the picture in Photoshop.
2. Choose a Dodge tool from the Toolbar and apply it to the fish so that the color will
lighten.
3. Now choose the Burn Tool and create an illusion of shadow of the fish in the water.

95 FUNDAMENTALS OF MULTIMEDIA
2.18 Layer Masking Layer masks are excellent for blending layers of images and creating soft transitions between
elements. You can gradually brush in transparency and opacity on a selective-pixel basis. You
can even apply gradients and filters to your layer masks to create interesting special effects.
Follow these steps to create a layer mask:
1. Open the image.
2. Place the image in the same canvas. Adjust the Opacity setting it to lesser value to make
it more transparent. And adjust the second image to fit to your subject.

96 FUNDAMENTALS OF MULTIMEDIA
3. Click the Flag layer. In the Layers panel, click the Add Layer Mask icon (circle on a square)
at the top of the panel. You see the appearance of a second thumbnail, directly to the right of
your image thumbnail, in the Layers panel.
4. Set the foreground color to black. With the Brush tool, paint on your layer mask.

97 FUNDAMENTALS OF MULTIMEDIA
2.19 Filters
2.8.1 Single –Step Filters
1. Open the image.
2. From the menu option select FILTERS, select Blur and Iris Blur.
3. Position the pointer to the desired area of the picture and click OK.

98 FUNDAMENTALS OF MULTIMEDIA
5. Your final result will be the same as below. You can select other filter options and watch
Photoshop to do its stuff in your image or selection

99 FUNDAMENTALS OF MULTIMEDIA
2.8.2 Working with Filter Gallery
1. Open the image.
2. In the Menu bar, choose Filter->Filter Gallery.
3. In the center of the editing window, click the folder for the desired filter category.

100 FUNDAMENTALS OF MULTIMEDIA
4. Select your desired filter.
5. In the rightmost section, specify the any settings associated with the filter.
6. When you are happy with the filter, click OK in the top-right corner of the dialog box to apply
the filter and exit.

101 FUNDAMENTALS OF MULTIMEDIA
Exercises 1. Working with text.
a. Create a canvas with size 10x10.
b. Copy exactly the words in the picture.
2. Working with layers.
a. Create a canvas with size 10x10.
b. Download and insert a picture of a ball, and type a text as shown in the picture.
c. Duplicate any layer.
d. Rename any layer.
e. Put together all the text in one group.
f. Apply any blending modes in the text layers.
g. Change the opacity of the picture to 50%.
h. Copy any text from the internet and paste it anywhere in the canvas.
3. Animals in the forest.
a. Download a picture of a forest.
b. Adjust the following properties of the picture:
a. Hue/Saturation
b. Curve
c. Level
d. Brightness/Contrast
c. Download the pictures of five animals.
d. Select and copy those animals in the forest making the forest as the background.

102 FUNDAMENTALS OF MULTIMEDIA
4. Spot Healing Tool
a. Download a picture of a girl with acne.
b. Edit the picture by removing all the acne.
c. Change the background of the picture to BLUE.
5. Half Animal, Half Person
a. Download a picture of a person.
b. Download a picture of lion.
c. Mask together the pictures so that you will create Half Animal and Half Person.
References https://helpx.adobe.com/photoshop
http://wegraphics.net/blog/tutorials/photoshop/photoshop-for-beginners-the-power-of-layers/
https://blog.udemy.com/quick-selection-tool/
http://www.photoshopessentials.com/photo-editing/spot-healing-brush/
http://www.dummies.com/how-to/content/layer-masks-in-photoshop-elements-11.html

103 FUNDAMENTALS OF MULTIMEDIA
CHAPTER 3: ILLUSTRATOR
Objectives
Upon the completion of this chapter, the students will be able to:
• Describe the advantages of using vector based tools such as Illustrator in high quality
graphics.
• Create a new Illustrator document and modify document settings.
• Identify the different parts of the Illustrator workspace and explain its respective use.
• Draw basic shapes using the different tools and alter preferences of the tools to achieve
desired output.
• Design and create a vector-based text graphic using the appropriate tools.
• Edit and modify an image to achieve a creative and unique image.
3.0 Introduction to Illustrator Illustrator is an application for creating and editing vector based illustrations such as logos, brand
marks and drawing illustrations. Unlike bitmap images that stores information in a grid of dots,
Illustrator uses mathematical equations to draw out the shapes.
Advantages of Vector Graphics
• Scalable without resolution loss
• Lines are crisp and sharp at any sizes
• Print at high resolution
• Smaller file size
• Good for drawing illustrations
Disadvantages of Vector Graphics
• Drawings tend to look flat and cartoon
• Hard to produce photo realistic drawings

104 FUNDAMENTALS OF MULTIMEDIA
3.1 Getting Started With Illustrator
3.1.1 Create New Document
Go File > New Document to create your first document. Type in a Name for the document and
set the artboard size, width, and orientation. Click Ok after that.

105 FUNDAMENTALS OF MULTIMEDIA
3.1.2 Illustrator Workspace
Below is the workspace and some common terms for calling it.
Main Bar
Option Bar Toolbox
Artboard
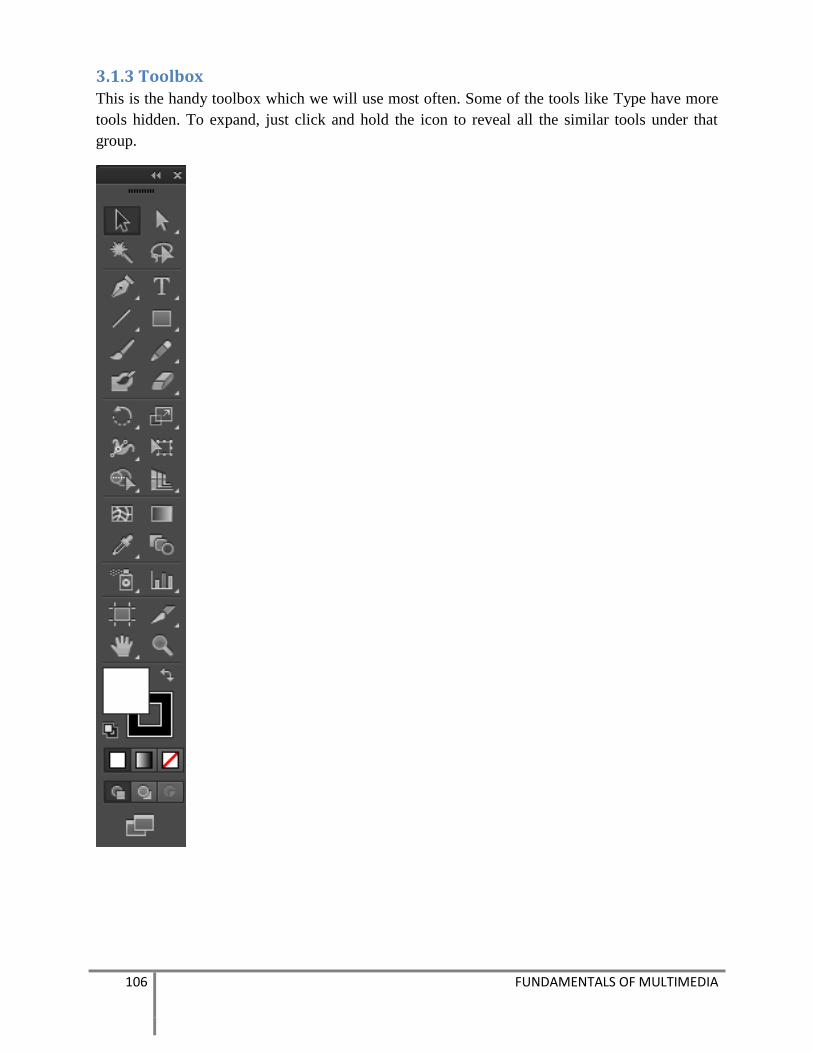
106 FUNDAMENTALS OF MULTIMEDIA
3.1.3 Toolbox
This is the handy toolbox which we will use most often. Some of the tools like Type have more
tools hidden. To expand, just click and hold the icon to reveal all the similar tools under that
group.
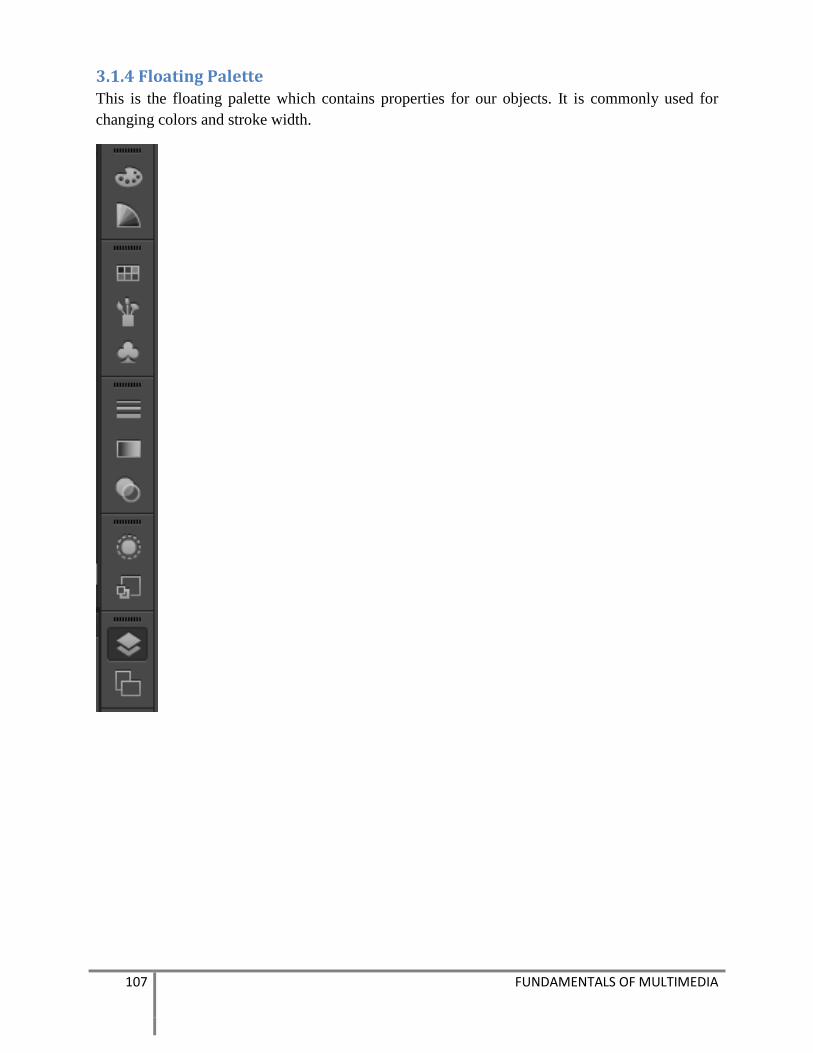
107 FUNDAMENTALS OF MULTIMEDIA
3.1.4 Floating Palette
This is the floating palette which contains properties for our objects. It is commonly used for
changing colors and stroke width.

108 FUNDAMENTALS OF MULTIMEDIA
3.2 Drawing Basic Shapes
3.2.1 Selection Tools
There are 2 types of selection tool in Illustrator used for selection objects.
Selection Tool: Used for selecting and moving a shape. It can also be used to resize a shape.
Direct Selection Tool: Selects a single anchor point instead of the whole shape. Used for editing
anchor point of a shape. Click once on a point to select and hold Shift to select multiple anchor
points.
Using Selection Tool
Using Direct Selection Tool
3.3.2 Shape Tools
When you go to the Tool Palette and hold the Rectangle Tool, a list of shape tools will expand
out for you to pick.

109 FUNDAMENTALS OF MULTIMEDIA
3.3.3 Understanding Fill & Stroke
Click and drag out a Rectangle as shown. By default, it has a white fill and black stroke. Stroke
is the border of the shape.
3.3.4 Changing Fill Color
Let us start changing the fill color for the rectangle. Double click the Fill from the Tool Palette. It
will pop up the Color Picker. Drag the slider to blue and select a deep blue color. Click Ok after
that.
3.3.5 Removing Stroke
Click the Stroke in the Tool Palette once to swap it above Fill. Click the None icon boxed up in
red to set the Stroke to None. The black stroke will disappear.

110 FUNDAMENTALS OF MULTIMEDIA
3.3.6 Constrain Proportions
To draw a perfect square, we will select the Rectangle Tool. Hold Shift and drag to draw a
square. Same for the circle, we will select the Ellipse Tool and hold Shift to drag out a circle.
3.3.7 Rotating Shapes
Select the shape with the Selection Tool and a bounding box will appear. Move your cursor near
the anchor corner and a rotation icon will icon, click and turn it to rotate the square. To snap at
45 degrees increment, hold Shift and turn.
3.3 Drawing with Pencil Tool
3.3.1 Drawing a Line
Select the pencil tool and click and drag to draw a free hand line drawing.
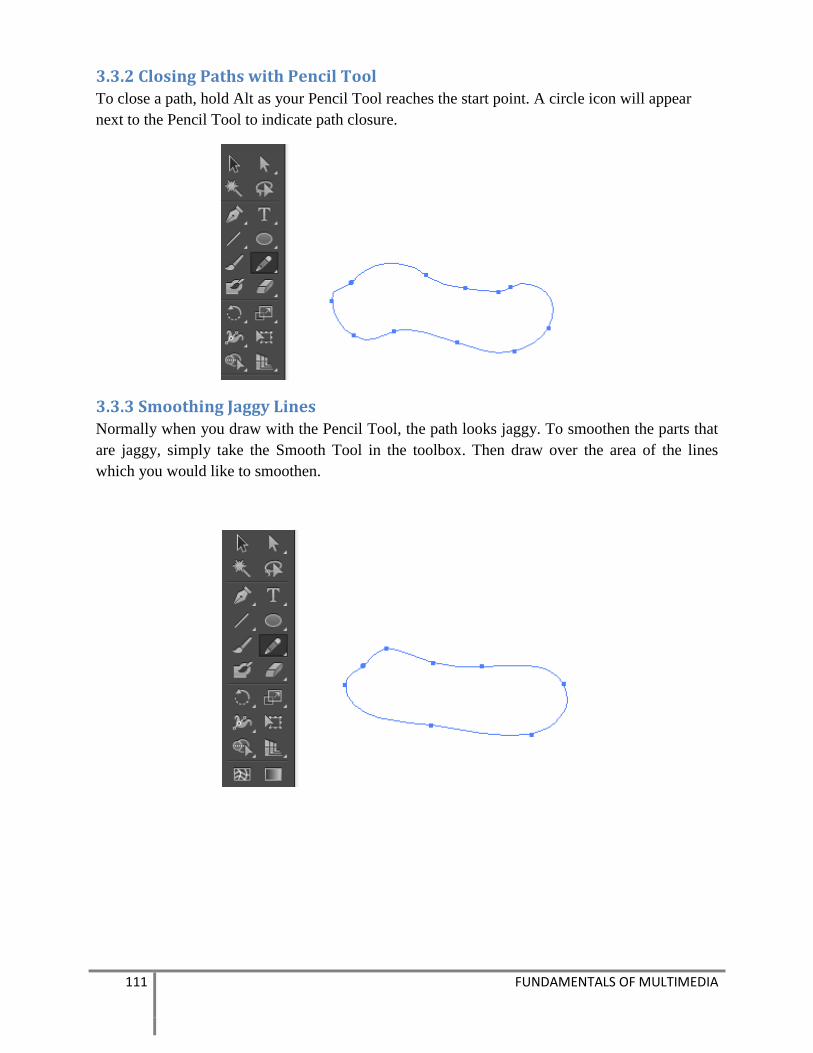
111 FUNDAMENTALS OF MULTIMEDIA
3.3.2 Closing Paths with Pencil Tool
To close a path, hold Alt as your Pencil Tool reaches the start point. A circle icon will appear
next to the Pencil Tool to indicate path closure.
3.3.3 Smoothing Jaggy Lines
Normally when you draw with the Pencil Tool, the path looks jaggy. To smoothen the parts that
are jaggy, simply take the Smooth Tool in the toolbox. Then draw over the area of the lines
which you would like to smoothen.

112 FUNDAMENTALS OF MULTIMEDIA
3.3.4 Pencil Tool Preferences
You can turn on the Pencil Tool Preferences by double clicking on the Pencil Tool. You can
change the fidelity and smoothness to find a combination that works for you.
Fidelity: Determines how close the path is drawn to your mouse movement. Set it at a higher
fidelity if you are not good at drawing with your mouse.
Smoothness: The higher you set for smoothness, the less anchor point it produces, thus,
producing a smoother line.

113 FUNDAMENTALS OF MULTIMEDIA
3.4 Drawing with Pen Tool
3.4.1 Drawing Straight Lines
Select the Pen Tool and click once to add the first anchor point. Move your mouse to the next
position and click again to create the second point. The two anchor points will be connected
together.
3.4.2 Closing a Path
To close a path, click back the starting point to close the shape.
3.4.3 Drawing a Curved Line
Click and drag to put out the handles to create a smooth anchor point.

114 FUNDAMENTALS OF MULTIMEDIA
3.5 Basic Text
3.5.1 Typing Text Using Point Text
To create a point text, simply click once on the artboard using the Type Tool and type out your
text. Point text only allows you to write a one line text without any text wrap.
3.5.2 Typing Text Using Area Type Tool
With area type you can have much control over your text. To create an area type, click and drag
out a box using your Type Tool. The text will wrap inside the text area. To edit the font
characters and sizes, go to Window > Type > Character.

115 FUNDAMENTALS OF MULTIMEDIA
3.5.3 Typing Text on a Path
You can type text on a path or any object. Draw a circle then select the Type on Path Tool and
click on the path to start typing text on the path.
3.5.4 Text with Shapes
Click and drag out a box using your Type Tool and type any text. Draw a shape on top of the
text. Go to Objects in Main menu and select Text wrap.

116 FUNDAMENTALS OF MULTIMEDIA
3.6 Using Brushes Using the Brush Tool, you can add styles to your lines. This will help you add more life to your
line works.
1. Select the Brush Tool and draw your object.
2. Then go to your Brushes Palette and select the crayon brush to apply the effect.

117 FUNDAMENTALS OF MULTIMEDIA
3.7 Gradient Mesh To create a grid of gradient mesh object, you can use the function Object>Create Gradient Mesh.
Enter the number of rows or columns you want to create. You can also create a highlight in the
middle by setting Appearance to Center.
3.8 Clipping Mask 1. Open your image in illustrator

118 FUNDAMENTALS OF MULTIMEDIA
2. Add your text and adjust the font and font size.
3. Select all the objects by pressing CTRL+A. Go to Object in the main menu and select
Clipping mask and choose Make.

119 FUNDAMENTALS OF MULTIMEDIA
4. Put a rectangle and arrange the objects by right clicking your mouse and select Send to
back.
5. You will have similar result as shown below.

120 FUNDAMENTALS OF MULTIMEDIA
3.9 Designing an Emblem 1. Create a new document.
2. Select ellipse tool and select the fill color to black.
3. Add some details to the outline of the badge. Select the circle then go to Effect>Distort &
Transform > Zig Zag.

121 FUNDAMENTALS OF MULTIMEDIA
4. Select the Smooth points option then adjust the settings to around 1 px size and 20 ridges
per segment, although these figures may vary depending on the scale of your document.
5. Create two more circles, one with white fill and a smaller one with black fill.
6. Using the Type on Path Tool and put the name of your organization.

122 FUNDAMENTALS OF MULTIMEDIA
7. Put them together in the logo emblem you designed.
3.10 Image Tracing 1. Open your image in the illustrator
2. Select the image and go to Object > Image Trace > Make
3. Choose the best present to suit your image.
4. Click on Expand from the Image trace sub-menu to turn your image into a vector.
5. Select any unwanted lines with the Direct Selection Tool and delete.

123 FUNDAMENTALS OF MULTIMEDIA
6. With the vectorised image selected, click on the default color swatch to change new color
of your image.

124 FUNDAMENTALS OF MULTIMEDIA
7. Save your file and make sure ‘use compression’ is NOT selected.
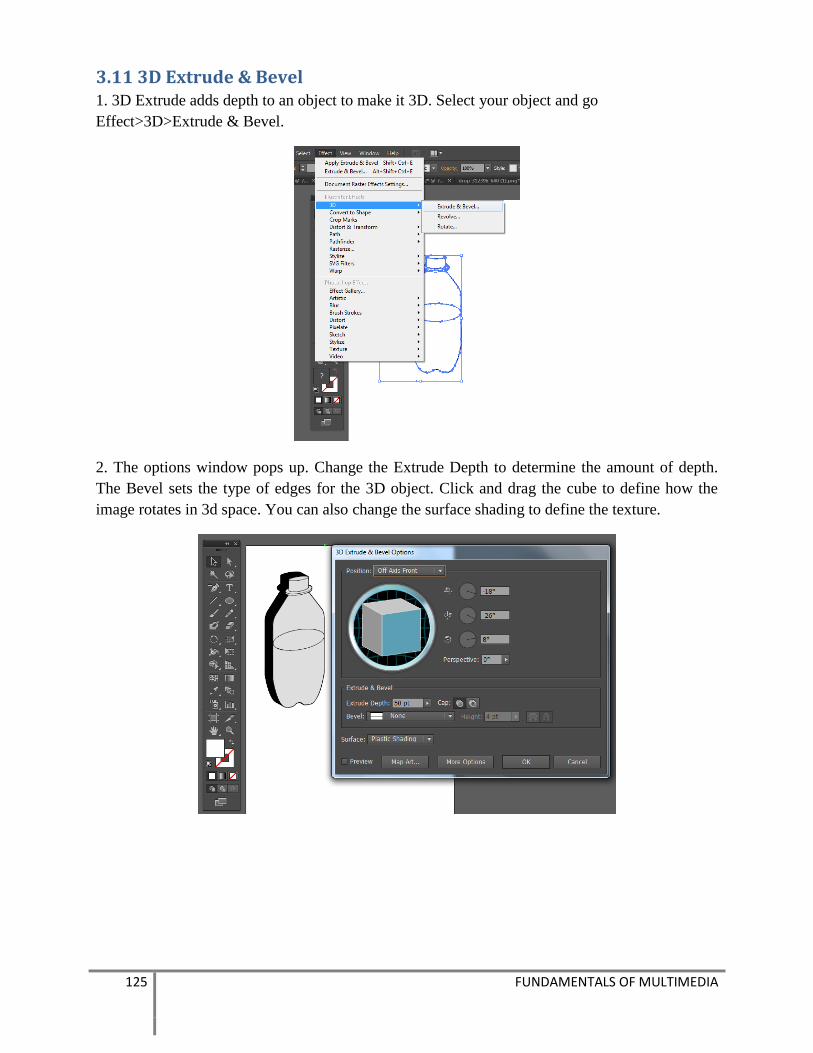
125 FUNDAMENTALS OF MULTIMEDIA
3.11 3D Extrude & Bevel 1. 3D Extrude adds depth to an object to make it 3D. Select your object and go
Effect>3D>Extrude & Bevel.
2. The options window pops up. Change the Extrude Depth to determine the amount of depth.
The Bevel sets the type of edges for the 3D object. Click and drag the cube to define how the
image rotates in 3d space. You can also change the surface shading to define the texture.

126 FUNDAMENTALS OF MULTIMEDIA
Exercises 1. Cartoon Character Drawing (Basic Shapes and Pencil Tool)
a. Create ANY cartoon character drawing using ANY/COMBINATION of the following
tools:
-basic shapes
-pencil tool
b. See sample below:
c. Make sure that your drawings are NOT ABSTRACT.
d. Save it as Exer1.png
e. Upload the file in the eLearning.
2. Pen Tool Shapes
a. Create ANY FOUR shapes/figures similar below using the PEN tool.
b. Save your file as Exer2.png
c. Upload the file in the eLearning.
3. Clipping Mask
a. Create a clipping mask on the following places in Oman.

127 FUNDAMENTALS OF MULTIMEDIA
i. Nizwa
ii. Salalah
iii. Muscat
iv. Al Mussana
v. Shinas
vi. Ibra
vii. Ibri
a. Download appropriate pictures from each place.
b. Be creative and play with fonts and font size.
c. Save your file as Exer3.png
d. Upload the file in the eLearning.
4. Logo Making
a. Create an emblem logo of the Salalah College of Technology
b. Save your file as Exer4.png
c. Upload the file in the eLearning.
References http://www.vectordiary.com/illustrator/learn-adobe-illustrator/
https://www.youtube.com/watch?v=oUaJ3hnwuRE
https://www.youtube.com/watch?v=VIzIJZxLX7I

128 FUNDAMENTALS OF MULTIMEDIA
CHAPTER 4: FLASH
Objectives
Upon the completion of this chapter, the students will be able to:
• Use the different objects in Adobe Flash to create a multimedia system.
• Identify the different Flash Interface Layout and demonstrate how to switch
workspaces.
• Produce an animation using various techniques such as motion tweening, frame by
frame and shape tweening.
4.0 Introduction to Flash
Adobe Flash is a platform for creating digital media content, including graphics, animation,
audio, video and interactive media. Flash is most commonly used to display animated and/or
interactive content on web pages but it can be used for other applications as well. In recent years
Flash has also become a leader in online video delivery.
SWF files are the normal way to deliver Flash on the Internet — the SWF file is embedded in a
web page using special HTML code. The end user must have the Flash Player installed (most
people do).
Flash files can be created as standalone executable files (.exe). These files run as a program in
their own right and do not require the Flash Player. This option is useful for delivering content
on CD or DVD.

129 FUNDAMENTALS OF MULTIMEDIA
4.1 Getting Started With Flash
4.1.1 Interface Layout
Below is the screen layout of Flash. You reset Flash to the Classic workspace, from the Menu
Bar, go to Windows > Workspace > Classic.

130 FUNDAMENTALS OF MULTIMEDIA
4.1.2 The Flash Timeline
What separates Flash from many other graphic programs is its ability to generate a file that
changes over time. Where this change is developed is in the Timeline.
The following are some of the icons you will find in your timeline:
Icon Name Description
Insert Layer
To insert a layer, use the 'Insert Layer' option.
Double-click on the default layer name to use a
descriptive name, so you can easily select the right layer.
Insert Layer Folder
Folders can be used to group specific layers.
Again, try to keep your Adobe Flash animations as
organized as possible, for this saves a lot of time.
Delete Layer
A layer can be deleted with this option.
Select the layer you want to delete, and press on the
'Delete Layer' option or right-click and choose 'Delete
Layer'.
Show/hide All
Layers
This option show or hides a layer.
Click on this option to show/hide all layers, or click on
the black dot underneath the Show/Hide icon to
show/hide individual layers.
Lock/Unlock All
Layers
This feature can be helpful if you want to lock
individual layers, or all layers.
Click on the icon to (un)lock all layers, or click on the
black dot underneath the (un)locked icon to (un)lock
individual layers.

131 FUNDAMENTALS OF MULTIMEDIA
4.1.3 Types of Frames
As you develop your animation you will be developing your Timeline. All the visual graphics
used in your animation must be held within keyframes. Here are some variations of keyframes
you will make and see during development:
Blank keyframes. This means that the frame is empty.
Filled keyframe. This means that the frame already hold something.
4.1.3.1 Gray Frames
Similar to white frames, but indicate there is something on that layer. Gray frames represent
static (unchanged) content from the previous keyframe.
4.1.3.2 Blue Frames without an Arrow
Indicate a frame belonging to a (non-classic) motion tween. If there are no keyframes on the
frame where you playhead is and you edit (move, rotate, etc.) you content, a small black
diamond keyframe is created.
4.1.3.3 Blue-purple Frames with an Arrow
Indicate frames belonging to a classic tween. If you see a dashed line, you tween is broken.
Making changes to an object on a frame that doesn’t have a keyframe will result in a new
keyframe being added.
4.1.3.4 Green Frames with an Arrow
Indicate frames belonging to a shape tween. You cannot edit objects on a shape tween if there is
no keyframe under you playhead.
4.1.4 Movie clip Vs. graphic symbols
One primary difference between a graphic and a movieclip is that the movieclip can exist as an
animation on a single frame of a parent timeline. Regardless of how many frames you extend
that movieclip along the parent timeline you will only see the first frame of it when scrubbing the
timeline. But when you test the file, the movieclip will play thru while it is present.

132 FUNDAMENTALS OF MULTIMEDIA
Graphic symbols can also be animations that get placed in a parent timeline, but they can only
animate if they extend along that timeline for the same number of frames that they contain.
Unlike movieclips, if you scrub the timeline for such a graphic symbol you will see its animation
play out as you scrub. So if you have an animation that you want to place in timeline and you
want top be able to see it animating while scrubbing the timeline, you would want to use a
graphic symbol and spread it along the timeline for the same number of frames that the graphic
contains. If you extend it less frames it will not complete. If you extend it more frames it will
play over for as many frames as it has available.
4.2 Tweening in Flash When animating in Flash, you have two options: create each individual frame (frame-by-frame)
or ask Flash for help (tweening).
"Tween" is actually short for "in-between", and refers to auto-rendering of graphics, by Flash, of
the frames between two author defined keyframes.
Flash's has three forms of tweening - motion (new), Classic (used to be called Motion) and
Shape. For all types of tweening, you ask Flash to help you with the frames in between.
4.2.1 Motion Tween
Motion tween is used to move an object from 1 location to another. Motions tweening requires
that the same base graphic (bitmap or vector) be used at both ends of the tween.
4.2.2 Shape Tween
Shape tweens are used when you want to transform one shape into a completely different shape.
4.2.3 Classic Tween
Classic tweens are an older way of creating animation in Animate. These tweens are similar to
the newer motion tweens, but are somewhat more complicated to create and less flexible.
However, classic tweens do provide some types of control over animation that motion tweens do
not.
4.2.4 Motion Present
Flash has the ability to save any existing tween into a motion preset which can be recalled and
applied form the Motion Presets panel. In, addition, motion presents are saved in Flash itseft and
so they can be used across number of Flash files.
4.3 Creating Motion Tween
4.3.1 Basic Motion Tween
1. Draw a circle using any of the drawing tools in Flash, convert it into a symbol (F8) by
selecting the Graphic option.

133 FUNDAMENTALS OF MULTIMEDIA
2. Click the 20th frame in the Timeline and insert a frame (F5).
3. Now right-click the 20th frame in the Timeline and select Create Motion Tween and
insert a keyframe (F6).

134 FUNDAMENTALS OF MULTIMEDIA
4. Move the ball to the side.
5. Select the 10th frame and insert a keyframe (F6) and move the ball to a different position.
6. Save your work and test the Movie (Ctrl + Enter).

135 FUNDAMENTALS OF MULTIMEDIA
4.3.2 Motion Tween Editor
1. Draw a circle using any of the drawing tools in Flash. Convert into symbol.
2. Go to frame 60 in the timeline and insert a frame.
3. In frame frame 1, insert a motion tween and insert a keyframe. Move your circle to the
other side of the stage to create a path.

136 FUNDAMENTALS OF MULTIMEDIA
4. Click the Motion Edition far right in the timeline to see details of adjusting the motion,
transformation, color effect, filters, and eases.
4.4 Creating Shape Tween 5. Draw a circle using any of the drawing tools in Flash.
6. Click the 20th frame in the Timeline and insert a keyframe (F6). Now draw another shape
say a rectangle.

137 FUNDAMENTALS OF MULTIMEDIA
7. Right-click on any frame in between these two keyframes and select Create Shape Tween
option.
8. Save your work and test the Movie (Ctrl + Enter)

138 FUNDAMENTALS OF MULTIMEDIA
4.5 Mask Technique 1. Create a new Flash document to work in. Add some text in the stage. Rename the layer as
text.
1. In frame 60 in the timeline, add frames.
2. Add another layer and name it as mask.

139 FUNDAMENTALS OF MULTIMEDIA
3. Draw a circle and remove the stoke.
4. Select the first frame in the mask layer, draw the circle, and convert it as symbol.
5. Add a keyframe in timeline 60.

140 FUNDAMENTALS OF MULTIMEDIA
6. Use the selection tool to move the circle to the other side of the stage and add a classic
tween.

141 FUNDAMENTALS OF MULTIMEDIA
7. To convert into mask, right click the mask layer and select mask.
4.6 Frame by Frame Animation 1. Create a new Flash document to work in.
2. Draw the background of your animation by using any drawing tool. Rename the layer to
BACKGROUND to organize your layers and it would be easier to refer to later during
your development.
3. Create a new layer and name it as STICKMAN. Draw the first position of stickman in
frame one.

142 FUNDAMENTALS OF MULTIMEDIA
4. Click the background layer and in frame 50 press F7 to insert a new frame.
5. Click the stickman layer and create a blank keyframe for each frame you want to include
in your animation. You can do this easily by right clicking your mouse to Insert
Keyframe or using the F7 shortcut key. Enable the ONION SKIN by clicking the icon to
see the last 3 frames you have created earlier.

143 FUNDAMENTALS OF MULTIMEDIA
6. Do step no 5, until you reach the frame number 50.
7. Save your work and test the Movie (Ctrl + Enter)

144 FUNDAMENTALS OF MULTIMEDIA
4.7 Moving Car Animation 1. Create a new Flash document to work in.
2. Create 4 layers for the body of the car, wheel 1, wheel 2 and the background.

145 FUNDAMENTALS OF MULTIMEDIA
3. Click and create the image in each layer.

146 FUNDAMENTALS OF MULTIMEDIA
4. Convert all the drawn images to a graphic object by pressing F8. Make sure that the
registration for the two wheels is in the center.

147 FUNDAMENTALS OF MULTIMEDIA
5. Click the body layer and in frame 70 insert the keyframe. Do this step same as for
wheel1, wheel2 and background.

148 FUNDAMENTALS OF MULTIMEDIA
6. Click the wheel1 and insert CLASSIC TWEEN.

149 FUNDAMENTALS OF MULTIMEDIA
7. Adjust the property of the wheel1 rotate to CW and speed of 4.

150 FUNDAMENTALS OF MULTIMEDIA
8. Do the same for the step 6 and 7 for wheel2.
9. Click background layer and insert CLASSIC TWEEN. Then move the box to the right.
10. Run your project.
4.8 Adding Sound Clip into Flash 1. To import an audio file to library, select File > Import > Import To Library
and select the audio file that you want to import.
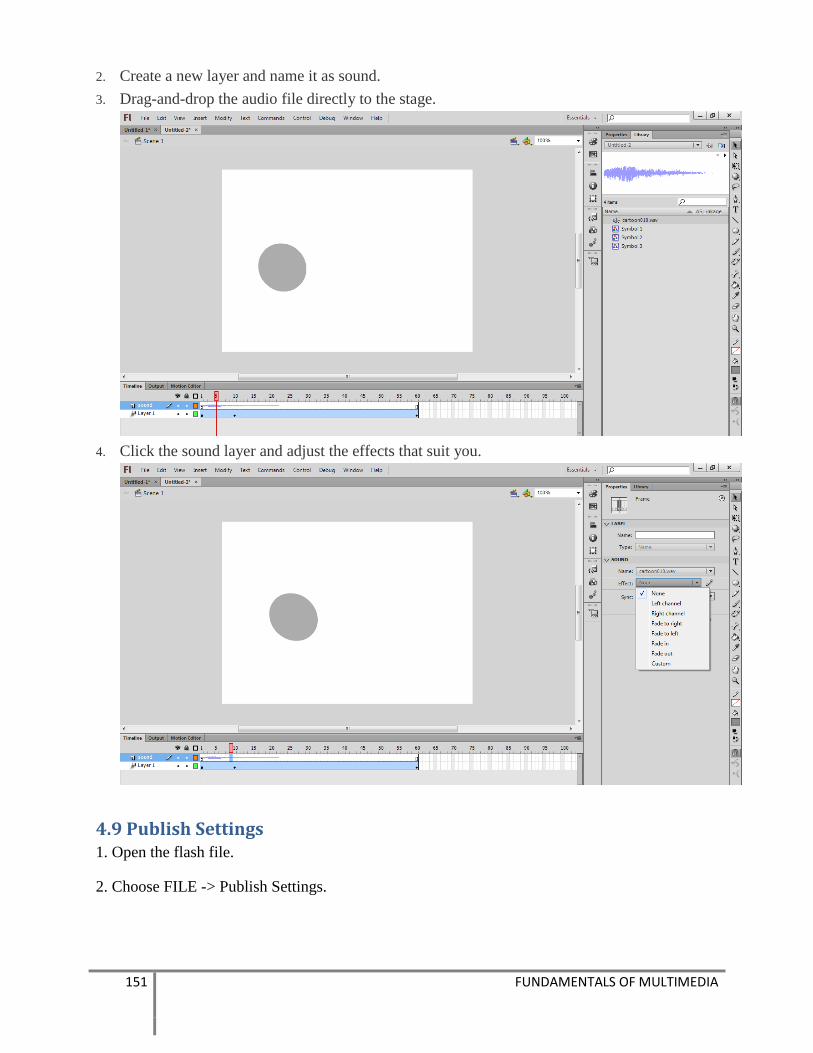
151 FUNDAMENTALS OF MULTIMEDIA
2. Create a new layer and name it as sound.
3. Drag-and-drop the audio file directly to the stage.
4. Click the sound layer and adjust the effects that suit you.
4.9 Publish Settings 1. Open the flash file.
2. Choose FILE -> Publish Settings.

152 FUNDAMENTALS OF MULTIMEDIA
3. Select and change the Output file to the destination directory.
4. Click the PUBLISH button.

153 FUNDAMENTALS OF MULTIMEDIA
Exercises 1. Bouncing Ball
a. Animate a ball bouncing across the screen.
b. See sample image movement below:
c. Save the animation as Exer1
2. Painting Character
a. Animate a character that paints on the wall.
b. See sample image below:
c. Save the animation as Exer2
3. Walk Cycle
a. Animate a character walking
b. See sample image below:
c. Save the animation as Exer3

154 FUNDAMENTALS OF MULTIMEDIA
References http://www.mediacollege.com/adobe/flash/intro.html
http://www.bill-morrison.com/class/adobe-flash/1-graphics-animation/
http://www.dummies.com/how-to/content/how-to-create-framebyframe-animation-in-adobe-
flas.html
https://forums.adobe.com/thread/991571