fundamental electrical-and-electronic-principles
DESCRIPTION
BUKU MATERI ELEKTRONIKA DASAR UNTUK MAHASISWATRANSCRIPT


Fundamental Electrical and Electronic Principles

This page intentionally left blank

Fundamental Electrical and Electronic Principles Third Edition
Christopher R Robertson
AMSTERDAM • BOSTON • HEIDELBERG • LONDON • NEW YORK • OXFORD
PARIS • SAN DIEGO • SAN FRANCISCO • SINGAPORE • SYDNEY • TOKYO
Newnes is an imprint of Elsevier

Newnes is an imprint of Elsevier
Linacre House, Jordan Hill, Oxford OX2 8DP, UK
30 Corporate Drive, Suite 400, Burlington, MA 01803, USA
First published 1993 as Electrical and Electronic Principles 1 by Edward Arnold
Second edition 2001
Third edition 2008
Copyright © C. R. Robertson 1993, 2001
Copyright © 2008 Elsevier Ltd. All rights reserved
The right of Christopher R. Robertson to be identifi ed as the author of this work has
been asserted in accordance with the Copyright, Designs and Patents Act 1988
No part of this publication may be reproduced, stored in a retrieval system or
transmitted in any form or by any means electronic, mechanical, photocopying,
recording or otherwise without the prior written permission of the publisher
Permissions may be sought directly from Elsevier ’ s Science & Technology
Rights Department in Oxford, UK: phone ( � 44) (0) 1865 843830; fax ( � 44) (0)
1865 853333; email: [email protected] . Alternatively you can submit
your request online by visiting the Elsevier web site at http://elsevier.com/locate/
permissions , and selecting Obtaining permission to use Elsevier material
Notice
No responsibility is assumed by the publisher for any injury and/or damage to
persons or property as a matter of products liability, negligence or otherwise, or from
any use or operation of any methods, products, instructions or ideas contained in the
material herein.
British Library Cataloguing in Publication Data
A catalogue record for this book is available from the British Library
Library of Congress Cataloguing in Publication Data
A catalogue record for this book is available from the Library of Congress
ISBN: 978-0-7506-8737-9
Typeset by Charon Tec Ltd., A Macmillan Company.
(www.macmillansolutions.com)
Printed and bound in Slovenia
08 09 10 11 12 10 9 8 7 6 5 4 3 2 1
For information on all Newnes publications visit our
web site at http://books.elsevier.com

Preface ........................................................................................................................................................ix
Introduction ............................................................................................................................................xi
1 Fundamentals ...........................................................................1
1.1 Units .................................................................................................................................................1
1.2 Standard Form Notation ......................................................................................................2
1.3 ‘ Scientifi c ’ Notation ..................................................................................................................2
1.4 Conversion of Areas and Volumes .................................................................................4
1.5 Graphs .............................................................................................................................................5
1.6 Basic Electrical Concepts .....................................................................................................7
1.7 Communication .....................................................................................................................26
Summary of Equations ......................................................................................................29
Assignment Questions ......................................................................................................30
2 D.C. Circuits ............................................................................................. 31
2.1 Resistors in Series ..................................................................................................................31
2.2 Resistors in Parallel ...............................................................................................................35
2.3 Potential Divider ....................................................................................................................40
2.4 Current Divider .......................................................................................................................41
2.5 Series/Parallel Combinations .........................................................................................43
2.6 Kirchhoff ’ s Current Law .....................................................................................................48
2.7 Kirchhoff ’ s Voltage Law .....................................................................................................49
2.8 The Wheatstone Bridge Network ................................................................................55
2.9 The Wheatstone Bridge Instrument ..........................................................................63
2.10 The Slidewire Potentiometer .........................................................................................65
Summary of Equations ......................................................................................................68
Assignment Questions ......................................................................................................69
Suggested Practical Assignments ..............................................................................72
3 Electric Fields and Capacitors .................................................... 75
3.1 Coulomb ’ s Law .......................................................................................................................75
3.2 Electric Fields ...........................................................................................................................76
3.3 Electric Field Strength (E) .................................................................................................78
3.4 Electric Flux (�) and Flux Density (D) .......................................................................79
3.5 The Charging Process and Potential Gradient ....................................................80
3.6 Capacitance (C) ......................................................................................................................83
3.7 Capacitors ..................................................................................................................................84
3.8 Permittivity of Free Space (ε0) .......................................................................................84
3.9 Relative Permittivity (εr) .....................................................................................................84
3.10 Absolute Permittivity (ε) ...................................................................................................85
Contents
v

vi Contents
3.11 Calculating Capacitor Values ..........................................................................................85
3.12 Capacitors in Parallel ...........................................................................................................87
3.13 Capacitors in Series ..............................................................................................................89
3.14 Series/Parallel Combinations .........................................................................................92
3.15 Multiplate Capacitors .........................................................................................................95
3.16 Energy Stored ..........................................................................................................................97
3.17 Dielectric Strength and Working Voltage ...........................................................101
3.18 Capacitor Types ...................................................................................................................102
Summary of Equations ...................................................................................................105
Assignment Questions ...................................................................................................107
Suggested Practical Assignment .............................................................................110
4 Magnetic Fields and Circuits .....................................................111
4.1 Magnetic Materials ............................................................................................................111
4.2 Magnetic Fields ...................................................................................................................111
4.3 The Magnetic Circuit ........................................................................................................114
4.4 Magnetic Flux and Flux Density ................................................................................115
4.5 Magnetomotive Force (mmf ) ....................................................................................116
4.6 Magnetic Field Strength ................................................................................................117
4.7 Permeability of Free Space (�0) .................................................................................118
4.8 Relative Permeability (�r) ...............................................................................................119
4.9 Absolute Permeability (�) .............................................................................................119
4.10 Magnetisation (B/H) Curve ...........................................................................................122
4.11 Composite Series Magnetic Circuits ......................................................................126
4.12 Reluctance (S) .......................................................................................................................128
4.13 Comparison of Electrical, Magnetic and Electrostatic Quantities ........131
4.14 Magnetic Hysteresis .........................................................................................................132
4.15 Parallel Magnetic Circuits ..............................................................................................134
Summary of Equations ...................................................................................................135
Assignment Questions ...................................................................................................136
Suggested Practical Assignments ...........................................................................138
5 Electromagnetism .......................................................................... 141
5.1 Faraday ’ s Law of Electromagnetic Induction ....................................................141
5.2 Lenz ’ s Law ...............................................................................................................................144
5.3 Fleming ’ s Righthand Rule .............................................................................................144
5.4 EMF Induced in a Single Straight Conductor ...................................................147
5.5 Force on a Current-Carrying Conductor ..............................................................151
5.6 The Motor Principle ..........................................................................................................153
5.7 Force between Parallel Conductors .......................................................................156
5.8 The Moving Coil Meter ...................................................................................................158
5.9 Shunts and Multipliers ....................................................................................................162
5.10 Shunts .......................................................................................................................................162
5.11 Multipliers ...............................................................................................................................163

Contents vii
5.12 Figure of Merit and Loading Eff ect .........................................................................166
5.13 The Ohmmeter ....................................................................................................................170
5.14 Wattmeter ...............................................................................................................................171
5.15 Eddy Currents .......................................................................................................................172
5.16 Self and Mutual Inductance ........................................................................................174
5.17 Self-Inductance ...................................................................................................................175
5.18 Self-Inductance and Flux Linkages .........................................................................176
5.19 Factors Aff ecting Inductance .....................................................................................179
5.20 Mutual Inductance ............................................................................................................180
5.21 Relationship between Self- and Mutual-Inductance ...................................182
5.22 Energy Stored .......................................................................................................................184
5.23 The Transformer Principle .............................................................................................186
5.24 Transformer Voltage and Current Ratios ..............................................................188
Summary of Equations ...................................................................................................191
Assignment Questions ...................................................................................................192
Suggested Practical Assignments ...........................................................................195
6 Alternating Quantities ................................................................ 197
6.1 Production of an Alternating Waveform .............................................................197
6.2 Angular Velocity and Frequency ..............................................................................200
6.3 Standard Expression for an Alternating Quantity ..........................................200
6.4 Average Value .......................................................................................................................203
6.5 r.m.s. Value ..............................................................................................................................205
6.6 Peak Factor .............................................................................................................................206
6.7 Form Factor ............................................................................................................................207
6.8 Rectifi ers ..................................................................................................................................208
6.9 Half-wave Rectifi er ............................................................................................................209
6.10 Full-wave Bridge Rectifi er .............................................................................................210
6.11 Rectifi er Moving Coil Meter .........................................................................................212
6.12 Phase and Phase Angle ..................................................................................................213
6.13 Phasor Representation ....................................................................................................216
6.14 Addition of Alternating Quantities ..........................................................................219
6.15 The Cathode Ray Oscilloscope ..................................................................................224
6.16 Operation of the Oscilloscope ...................................................................................226
6.17 Dual Beam Oscilloscopes ..............................................................................................228
Summary of Equations ...................................................................................................229
Assignment Questions ...................................................................................................230
Suggested Practical Assignments ...........................................................................232
7 D.C. Machines .................................................................................... 233
7.1 Motor/Generator Duality ..............................................................................................233
7.2 The Generation of d.c. Voltage ...................................................................................235
7.3 Construction of d.c. Machines ................................................................................... 238
7.4 Classifi cation of Generators .........................................................................................238

viii Contents
7.5 Separately Excited Generator .....................................................................................239
7.6 Shunt Generator .................................................................................................................240
7.7 Series Generator .................................................................................................................242
7.8 D. C. Motors ...........................................................................................................................244
7.9 Shunt Motor ..........................................................................................................................244
7.10 Series Motor ..........................................................................................................................245
Summary of Equations ...................................................................................................247
Assignment Questions ...................................................................................................248
8 D.C. Transients ................................................................................... 249
8.1 Capacitor-Resistor Series Circuit (Charging) ......................................................249
8.2 Capacitor-Resistor Series Circuit (Discharging) ...............................................253
8.3 Inductor-Resistor Series Circuit (Connection to Supply) ...........................256
8.4 Inductor-Resistor Series Circuit (Disconnection) ............................................259
Summary of Equations ...................................................................................................260
Assignment Questions ...................................................................................................261
Suggested Practical Assignments ...........................................................................262
9 Semiconductor Theory and Devices ................................... 263
9.1 Atomic Structure ................................................................................................................263
9.2 Intrinsic (Pure) Semiconductors ................................................................................264
9.3 Electron-Hole Pair Generation and Recombination .....................................266
9.4 Conduction in Intrinsic Semiconductors ............................................................267
9.5 Extrinsic (Impure) Semiconductors ........................................................................268
9.6 n-type Semiconductor ...................................................................................................268
9.7 p-type Semiconductor ...................................................................................................270
9.8 The p-n Junction ................................................................................................................271
9.9 The p-n Junction Diode .................................................................................................272
9.10 Forward-biased Diode ....................................................................................................273
9.11 Reverse-biased Diode .....................................................................................................273
9.12 Diode Characteristics .......................................................................................................274
9.13 The Zener Diode .................................................................................................................276
Assignment Questions ...................................................................................................281
Suggested Practical Assignments ...........................................................................282
Appendix A: SI Units and Quantities ..................................................................................283
Answers to Assignment Questions .....................................................................................285
Index .......................................................................................................................................................289

This Textbook supersedes the second edition of FundamentalElectrical and Electronic Principles. In response to comments from colleges requesting that the contents more closely match the objectives of the BTEC unit Electrical and Electronic Principles,some chapters have been removed and some exchanged with the companion book Further Electrical and Electronic Principles, ISBN 9780750687478. Also, in order to encourage students to use other reference sources, those chapters that have been totally removed may be accessed on the website address http://books.elsevier.com/companions/9780750687379. The previous edition included Supplementary Worked Examples at the end of each chapter. The majority of these have now been included within each chapter as Worked Examples, and those that have been removed may be accessed on the above website.
This book continues with the philosophy of the previous editions in that it may be used as a complete set of course notes for students undertaking the study of Electrical and Electronic Principles in the fi rst year of a BTEC National Diploma/Certifi cate course. It also provides coverage for some other courses, including foundation/bridging courses which require the study of Electrical and Electronic Engineering.
Fundamental Electrical and Electronic Principles contains 349 illustrations, 112 worked examples, 26 suggested practical assignments and 234 assignment questions. The answers to the latter are to be found towards the end of the book.
The order of the chapters does not necessarily follow the order set out in any syllabus, but rather follows a logical step-by-step sequence through the subject matter. Some topic areas may extend beyond current syllabus requirements, but do so both for the sake of completeness and to encourage those students wishing to extend their knowledge.
Coverage of the second year BTEC National Diploma/Certifi cate unit, Further Electrical Principles, is found in the third edition of the companion book Further Electrical and Electronic Principles.
C. Robertson
TonbridgeMarch 2008
Preface
ix

This page intentionally left blank

The chapters follow a sequence that I consider to be a logical progression through the subject matter, and in the main, follow the order of objectives stated in the BTEC unit of Electrical and Electronic Principles. The major exception to this is that the topics of instrumentation and measurements do not appear in a specifi c chapter of that title. Instead, the various instruments and measurement methods are integrated within those chapters where the relevant theory is covered.
Occasionally a word or phrase will appear in bold blue type, and close by will be a box with a blue background. These emphasised words or phrases may be ones that are not familiar to students, and within the box will be an explanation of the words used in the text.
Throughout the book, Worked Examples appear as Q questions in bold type, followed by A answers. In all chapters, Assignment Questions are provided for students to solve.
The fi rst chapter deals with the basic concepts of electricity; the use of standard form and its adaptation to scientifi c notation; SI and derived units; and the plotting of graphs. This chapter is intended to provide a means of ensuring that all students on a given course start with the same background knowledge. Also included in this chapter are notes regarding communication. In particular, emphasis is placed on logical and thorough presentation of information, etc. in the solution of Assignment Questions and Practical Assignment reports.
Introduction
xi

This page intentionally left blank

Fundamentals
Chapter 1
1
1.1 Units
Wherever measurements are performed there is a need for a coherent and practical system of units. In science and engineering the International System of units (SI units) form the basis of all units used. There are seven ‘ base ’ units from which all the other units are derived, called derived units.
Table 1.1 The SI base units
Quantity Unit Unit symbol
Mass kilogram kg
Length metre m
Time second s
Electric current ampere A
Temperature kelvin K
Luminous intensity candela cd
Amount of substance mole mol
A few examples of derived units are shown in Table 1.2 , and it is worth noting that different symbols are used to represent the quantity and its associated unit in each case.
For a more comprehensive list of SI units see Appendix A at the back of the book.
Table 1.2 Some SI derived units
Quantity Unit
Name Symbol Name Symbol
Force F Newton N
Power P Watt W
Energy W Joule J
Resistance R Ohm �

2 Fundamental Electrical and Electronic Principles
1.2 Standard Form Notation
Standard form is a method of writing large and small numbers in a form that is more convenient than writing a large number of trailing or leading zeroes.
For example the speed of light is approximately 300 000 000 m/s. When written in standard form this fi gure would appears as
3 0 10 10 100 000 0008 8. � m/s, where represents
Similarly, if the wavelength of ‘ red ’ light is approximately 0.000 000 767 m, it is more convenient to write it in standard form as
7 67 10 10 1 10 000 0007 7. /� �� �m, where
It should be noted that whenever a ‘ multiplying ’ factor is required, the base 10 is raised to a positive power. When a ‘ dividing ’ factor is required, a negative power is used. This is illustrated below:
10 10 1 10 0 1 10100 10 1 100 0 01 10
1000 10 1 1000 0
1 1
2 2
3
� � �
� � �
� �
�
�
/ ./ ./ .0001 10 3� �
etc. etc.
One restriction that is applied when using standard form is that only the fi rst non-zero digit must appear before the decimal point.
Thus, 46 500 is written as
4 65 10 46 5 104 3. .� � and as not
Similarly, 0.002 69 is written as
2 69 10 26 9 10 269 103 4 5. .� � �� � � and as or not
1.3 ‘ Scientifi c ’ Notation
This notation has the advantage of using the base 10 raised to a power but it is not restricted to the placement of the decimal point. It has the added advantage that the base 10 raised to certain powers have unique symbols assigned.
For example if a body has a mass m � 500 000 g.
In standard form this would be written as
m � �5 0 105. g.
Using scientifi c notation it would appear as
m � 500 500kg ( kilogram)

Fundamentals 3
where the ‘ k ’ in front of the g for gram represents 10 3 .
Not only is the latter notation much neater but it gives a better ‘ feel ’ to the meaning and relevance of the quantity.
See Table 1.3 for the symbols (prefi xes) used to represent the various powers of 10. It should be noted that these prefi xes are arranged in multiples of 10 3 . It is also a general rule that the positive powers of 10 are represented by capital letters, with the negative powers being represented by lower case (small) letters. The exception to this rule is the ‘ k ’ used for kilo.
Worked Example 1.1
Q Write the following quantities in a concise form using (a) standard form, and (b) scientifi c notation
(i) 0.000 018 A (ii) 15 000 V (iii) 250 000 000 W
A
(a) (i) 0.000 018 A � 1.8 � 10 � 5 A (ii) 15 000 V � 1.5 � 10 4 V (iii) 250 000 000 W � 2.5 � 10 8 W
(b) (i) 0.000 018 A � 18 � A (ii) 15 000 V � 15 kV (iii) 250 000 000 W � 250 MW Ans
The above example illustrates the neatness and convenience of the scientifi c or engineering notation.
Worked Example 1.2
Q Write the following quantities in scientifi c (engineering) notation. (a) 25 � 10 � 5 A, (b) 3 � 10 4 W,
(c) 850 000 J, (d) 0.0016 V.
A
(a) 25 � 10 � 5 � 25 � 10 � 10 � 6 � 250 � 10 � 6
and since 10 � 6 is represented by � (micro)
Table 1.3 Unit prefi xes used in ‘scientifi c ’ notation
Multiplying factor Prefi x name Symbol
10 12 tera T
10 9 giga G
10 6 mega M
10 3 kilo k
10 � 3 milli m
10 � 6 micro �
10 � 9 nano n
10 � 12 pico p

4 Fundamental Electrical and Electronic Principles
then 25 � 10 � 5 A � 250 � A Ans
Alternatively, 25 � 10 � 5 � 25 � 10 � 2 � 10 � 3
� 0.25 � 10 � 3
so 25 � 10 � 5 A � 0.25 mA Ans
(b) 3 � 10 � 4 � 3 � 10 � 1 � 10 � 3 or 300 � 10 � 6
so 3 � 10 � 4 W � 0.3 mW or 300 � W Ans
(c) 850 000 � 850 � 10 3 or 0.85 � 10 6
so 850 000 J � 850 kJ or 0.85 MJ Ans
(d) 0.0016 � 1.6 � 10 � 3
so 0.0016 V � 1.6 mV Ans
1.4 Conversion of Areas and Volumes
Consider a square having sides of 1 m as shown in Fig. 1.1 . In this case each side can also be said to be 100 cm or 1000 mm. Hence the area Aenclosed could be stated as:
AAA
� � �
� � � � �
� � � �
1 1 1100 100 10 10 101000 1000 10 10
2
2 2 4 2
3 3
mor cmor �� 106 mm .2
1m
1m
Fig. 1.1
From the above it may be seen that
1 101 10
2 4 2
2 6
m cmand that m mm .2
�
�
Similarly, if the square had sides of 1 cm the area would be
A � � � �� � �1 10 10 102 2 2 4 2cm m .
Again if the sides were of length 1 mm the area would be
A � � � �� � �1 10 10 102 3 3 6 2mm m .
Thus 1 cm 2 � 10 � 4 m 2 and 1 mm 2 � 10 � 6 m 2 .

Fundamentals 5
Since the basic unit for area is m 2 , then areas quoted in other units should fi rstly be converted into square metres before calculations proceed. This procedure applies to all the derived units, and it is good practice to convert all quantities into their ‘ basic ’ units before proceeding with calculations.
It is left to the reader to confi rm that the following conversions for volumes are correct:
1 101 10
3 9
3 6 3
mm mcm m .
3�
�
�
�
Worked Example 1.3
Q A mass m of 750 g is acted upon by a force F of 2 N. Calculate the resulting acceleration given that the
three quantities are related by the equation
F � ma newton
A
m � 750 g � 0.75 kg; F � 2 N
Since newton, then
metre/second
so m/
F ma
aFm
a
�
�
�
�
2
20 752 667
.. ss 2 Ans
1.5 Graphs
A graph is simply a pictorial representation of how one quantity or variable relates to another. One of these is known as the dependent variable and the other as the independent variable. It is general practice to plot the dependent variable along the vertical axis and the independent variable along the horizontal axis of the graph. To illustrate the difference between these two types of variable consider the case of a vehicle that is travelling between two points. If a graph of the distance travelled versus the time elapsed is plotted, then the distance travelled would be the dependent variable. This is because the distance travelled depends on the time that has elapsed. But the time is independent of the distance travelled, since the time will continue to increase regardless of whether the vehicle is moving or not.
Such a graph is shown in Fig. 1.2 , from which it can be seen that over the fi rst three hours the distance travelled was 30 km. Over the next two hours a further 10 km was travelled, and subsequently no further distance was travelled. Since distance travelled divided by the time

6 Fundamental Electrical and Electronic Principles
taken is velocity, then the graph may be used to determine the speed of the vehicle at any time. Another point to note about this graph is that it consists of straight lines. This tells us that the vehicle was travelling at different but constant velocities at different times. It should be apparent that the steepest part of the graph occurs when the vehicle was travelling fastest. To be more precise, we refer to the slope or gradient of the graph. In order to calculate the velocity over the fi rst three hours, the slope can be determined as follows:
Change in time, � t1 � 3 � 0 � 3 h
change in distance � s1 � 30 � 0 � 30 km
slope or gradient � velocity km/hvs
t� � �
��
1
1
30
310
Similarly, for the second section of the graph:
vs
t� �
�
��
��
2
2
40 30
5 35
( )
( )km/h
Considering the fi nal section of the graph, it can be seen that there is no change in distance (the vehicle is stationary). This is confi rmed, since if � s is zero then the velocity must be zero.
In some ways this last example is a special case, since it involved a straight line graph. In this case we can say that the distance is directly proportional to time. In many cases a non-linear graph is produced, but the technique for determining the slope at any given point is similar. Such a graph is shown in Fig. 1.3 , which represents the displacement of a mass when subjected to simple harmonic motion. The resulting graph is a sinewave. To determine the slope at any given instant in time we would have to determine the slope of the tangent to the curve at that point on the graph. If this is done then the fi gure obtained in each case would be the velocity of the mass at that instant. Notice that the slope is steepest at the instants that the curve passes through the zero displacement axis (maximum velocity). It is zero at the ‘ peaks ’ of the graph (zero velocity). Also note that if the graph is sloping upwards
s (km)
40
30
20
10
01 2 3 4 5
t (h)
δ t1
δ s1
δ t2
δ s2
Fig. 1.2

Fundamentals 7
as you trace its path from left to right it is called a positive slope. If it slopes downwards it is called a negative slope.
1.6 Basic Electrical Concepts
All matter is made up of atoms, and there are a number of ‘ models ’used to explain physical effects that have been both predicted and subsequently observed. One of the oldest and simplest of these is the Bohr model. This describes the atom as consisting of a central nucleus containing minute particles called protons and neutrons. Surrounding the nucleus are a number of electrons in various orbits. This model is illustrated in Fig. 1.4 . The possible presence of neutrons in the nucleus has been ignored, since these particles play no part in the electrical concepts to be described. It should be noted that this atomic model is greatly over-simplifi ed. It is this very simplicity that makes it ideal for the beginner to achieve an understanding of what electricity is and how many electrical devices operate.
The model shown in Fig. 1.4 is not drawn to scale since a proton is approximately 2000 times more massive than an electron. Due to this relatively large mass the proton does not play an active part in electrical current fl ow. It is the behaviour of the electrons that is more important. However, protons and electrons do share one thing in
zero slope
t (s)
negativeslope
positiveslope
�
�
S (mm)
0
Fig. 1.3
�
���
��
�
��
�
�
Fig. 1.4

8 Fundamental Electrical and Electronic Principles
common; they both possess a property known as electric charge. The unit of charge is called the coulomb (C ). Since charge is considered as the quantity of electricity it is given the symbol Q. An electron and proton have exactly the same amount of charge. The electron has a negative charge, whereas the proton has a positive charge. Any atom in its ‘ normal ’ state is electrically neutral (has no net charge). So, in this state the atom must possess as many orbiting electrons as there are protons in its nucleus. If one or more of the orbiting electrons can somehow be persuaded to leave the parent atom then this charge balance is upset. In this case the atom acquires a net positive charge, and is then known as a positive ion. On the other hand, if ‘ extra ’ electrons can be made to orbit the nucleus then the atom acquires a net negative charge. It then becomes a negative ion.
An analogy is a technique where the behaviour of one system is compared to the behaviour of another system. The system chosen for this comparison will be one that is more familiar and so more easily understood. HOWEVER, it must be borne in mind that an analogy should not be extended too far. Since the two systems are usually very different physically there will come a point where comparisons are no longer valid
You may now be wondering why the electrons remain in orbit around the nucleus anyway. This can best be explained by considering an analogy . Thus, an electron orbiting the nucleus may be compared to a satellite orbiting the Earth. The satellite remains in orbit due to a balance of forces. The gravitational force of attraction towards the Earth is balanced by the centrifugal force on the satellite due to its high velocity. This high velocity means that the satellite has high kinetic energy. If the satellite is required to move into a higher orbit, then its motor must be fi red to speed it up. This will increase its energy. Indeed, if its velocity is increased suffi ciently, it can be made to leave Earth orbit and travel out into space. In the case of the electron there is also a balance of forces involved. Since both electrons and protons have mass, there will be a gravitational force of attraction between them. However the masses involved are so minute that the gravitational force is negligible. So, what force of attraction does apply here? Remember that electrons and protons are oppositely charged particles, and oppositely charged bodies experience a force of attraction. Compare this to two simple magnets, whereby opposite polarities attract and like (the same) polarities repel each other. The same rule applies to charged bodies. Thus it is the balance between this force of electrostatic attraction and the kinetic energy of the electron that maintains the orbit. It may now occur to you to wonder why the nucleus remains intact, since the protons within it are all positively charged particles! It is beyond the scope of this book (and of the course of study on which you are now embarked) to give a comprehensive answer. Suffi ce to say that there is a force within the nucleus far stronger than the electrostatic repulsion between the protons that binds the nucleus together.

Fundamentals 9
All materials may be classifi ed into one of three major groups—conductors, insulators and semiconductors. In simple terms, the group into which a material falls depends on how many ‘ free ’ electrons it has. The term ‘ free ’ refers to those electrons that have acquired suffi cient energy to leave their orbits around their parent atoms. In general we can say that conductors have many free electrons which will be drifting in a random manner within the material. Insulators have very few free electrons (ideally none), and semiconductors fall somewhere between these two extremes.
Electric current This is the rate at which free electrons can be made to drift through a material in a particular direction. In other words, it is the rate at which charge is moved around a circuit. Since charge is measured in coulombs and time in seconds then logically the unit for electric current would be the coulomb/second. In fact, the amount of current fl owing through a circuit may be calculated by dividing the amount of charge passing a given point by the time taken. The unit however is given a special name, the ampere (often abbreviated to amp). This is fairly common practice with SI units, whereby the names chosen are those of famous scientists whose pioneering work is thus commemorated. The relationship between current, charge and time can be expressed as a mathematical equation as follows:
IQ
tQ It� � amp, or coulomb (1.1)
Worked Example 1.4
Q A charge of 35 mC is transferred between two points in a circuit in a time of 20 ms. Calculate the value
of current fl owing.
A Q � 35 � 10 � 3 C; t � 20 � 10 � 3 s
I
I
�
��
�
�
�
�
Qt
amp
A
35 020 0
75
3
3
1
1
1. Ans
Worked Example 1.5
Q If a current of 120 μ A fl ows for a time of 15 s, determine the amount of charge transferred.
A I � 120 � 10 � 6 A; t � 15 s
Q t
Q
�
� � �
�
�
I coulomb
mC
1 1 1
1
20 0 5
8
6
. Ans

10 Fundamental Electrical and Electronic Principles
Worked Example 1.6
Q 80 coulombs of charge was transferred by a current of 0.5 A. Calculate the time for which the current
fl owed.
A
Q � 80 C; I � 0.5 A
tQ
t
�
�
�
I seconds
s
800 560.
1 Ans
Electromotive Force (emf) The random movement of electrons within a material does not constitute an electrical current. This is because it does not result in a drift in one particular direction. In order to cause the ‘ free ’ electrons to drift in a given direction an electromotive force must be applied. Thus the emf is the ‘ driving ’ force in an electrical circuit. The symbol for emf is E and the unit of measurement is the volt (V). Typical sources of emf are cells, batteries and generators.
The amount of current that will fl ow through a circuit is directly proportional to the size of the emf applied to it. The circuit diagram symbols for a cell and a battery are shown in Figs. 1.5(a) and (b) respectively. Note that the positively charged plate (the long line) usually does not have a plus sign written alongside it. Neither does the negative plate normally have a minus sign written by it. These signs have been included here merely to indicate (for the fi rst time) the symbol used for each plate.
Fig. 1.5
� �
(a)
� � �
(b)
Resistance (R) Although the amount of electrical current that will fl ow through a circuit is directly proportional to the applied emf, the other property of the circuit (or material) that determines the resulting current is the opposition offered to the fl ow. This opposition is known as the electrical resistance, which is measured in ohms ( � ). Thus conductors, which have many ‘ free ’ electrons available for current carrying, have a low value of resistance. On the other hand, since insulators have very few ‘ free ’ charge carriers then insulators have a very high resistance. Pure semiconductors tend to behave more like insulators in this respect. However, in practice, semiconductors tend to be used in an impure form, where the added impurities improve the conductivity of the material. An electrical device that is designed to have a specifi ed value of resistance is called a resistor. The circuit diagram symbol for a resistor is shown in Fig. 1.6 .

Fundamentals 11
Potential Difference (p.d.) Whenever current fl ows through a resistor there will be a p.d. developed across it. The p.d. is measured in volts, and is quite literally the difference in voltage levels between two points in a circuit. Although both p.d. and emf are measured in volts they are not the same quantity. Essentially, emf (being the driving force) causes current to fl ow; whilst a p.d. is the result of current fl owing through a resistor. Thus emf is a cause and p.d. is an effect. It is a general rule that the symbol for a quantity is different to the symbol used for the unit in which it is measured. One of the few exceptions to this rule is that the quantity symbol for p.d. happens to be the same as its unit symbol, namely V. In order to explain the difference between emf and p.d. we shall consider another analogy.
Figure 1.7 represents a simple hydraulic system consisting of apump, the connecting pipework and two restrictors in the pipe.The latter will have the effect of limiting the rate at which the water fl ows around the circuit. Also included is a tap that can be used to interrupt the fl ow completely. Figure 1.8 shows the equivalentelectrical circuit, comprising a battery, the connecting conductors (cables or leads) and two resistors. The latter will limit theamount of current fl ow. Also included is a switch that can beused to ‘ break ’ the circuit and so prevent any current fl ow. As faras each of the two systems is concerned we are going to make some assumptions.
For the water system we will assume that the connecting pipework has no slowing down effect on the fl ow, and so will not cause any pressure
waterflow
restrictors
tap
p1 p2
P
pump
Fig. 1.7
Fig. 1.6

12 Fundamental Electrical and Electronic Principles
drop. Provided that the pipework is relatively short then this is a reasonable assumption. The similar assumption in the electrical circuit is that the connecting wires have such a low resistance that they will cause no p.d. If anything, this is probably a more legitimate assumption to make. Considering the water system, the pump will provide the total system pressure (P) that circulates the water through it. Using some form of pressure measuring device it would be possible to measure this pressure together with the pressure drops (p l and p 2 ) that would occur across the two restrictors. Having noted these pressure readings it would be found that the total system pressure is equal to the sum of the two pressure drops. Using a similar technique for the electrical circuit, it would be found that the sum of the two p.d.s ( V1 and V2 ) is equal to the total applied emf E volts. These relationships may be expressed in mathematical form as:
P p p pascal� �1 2
and
E V V� �1 2 volt (1.2)
When the potential at some point in a circuit is quoted as having a particular value (say 10 V) then this implies that it is 10 V abovesome reference level or datum. Compare this with altitudes. If a mountain is said to be 5000 m high it does not necessarily meanthat it rises 5000 m from its base to its peak. The fi gure of 5000 m refers to the height of its peak above mean sea level. Thus, mean sea level is the reference point or datum from which altitudes are measured. In the case of electrical potentials the datum is taken tobe the potential of the Earth which is 0 V. Similarly, � 10 V means10 V below or less than 0 V.
Conventional current and electron fl ow You will notice in Fig. 1.8 that the arrows used to show the direction of current fl ow indicate that this is from the positive plate of the battery, through the circuit, returning to the negative battery plate. This is called conventional current fl ow. However, since electrons are negatively charged particles, then these must be moving in the opposite direction. The latter is called electron
R1
V1 V2
R2
E
I SW
Fig. 1.8

Fundamentals 13
fl ow. Now, this poses the problem of which one to use. It so happens that before science was suffi ciently advanced to have knowledge of the electron, it was assumed that the positive plate represented the ‘ high ’ potential and the negative the ‘ low ’ potential. So the convention was adopted that the current fl owed around the circuit from the high potential to the low potential. This compares with water which can naturally only fl ow from a high level to a lower level. Thus the concept of conventional current fl ow was adopted. All the subsequent ‘ rules ’ and conventions were based on this direction of current fl ow. On the discovery of the nature of the electron, it was decided to retain the concept of conventional current fl ow. Had this not been the case then all the other rules and conventions would have needed to be changed! Hence, true electron fl ow is used only when it is necessary to explain certain effects (as in semiconductor devices such as diodes and transistors). Whenever we are considering basic electrical circuits and devices we shall use conventional current fl ow i.e. current fl owing around the circuit from the positive terminal of the source of emf to the negative terminal.
Ohm ’ s Law This states that the p.d. developed between the two ends of a resistor is directly proportional to the value of current fl owing through it, provided that all other factors (e.g. temperature) remain constant. Writing this in mathematical form we have:
V I�
However, this expression is of limited use since we need an equation. This can only be achieved by introducing a constant of proportionality; in this case the resistance value of the resistor.
Thus voltV IR� (1.3)
or ampIV
R� (1.4)
and ohmR
V
I� (1.5)
Worked Example 1.7
Q A current of 5.5 mA fl ows through a 33 k � resistor. Calculate the p.d. thus developed across it.
A
I � 5.5 � 10 � 3 A; R � 33 � 10 3 �
V R
V
�
� � � �
�
�
I volt
V
5 5 0 33 0
8 5
3 3.
.
1 1
1 1 Ans

14 Fundamental Electrical and Electronic Principles
Worked Example 1.8
Q If a p.d. of 24 V exists across a 15 � resistor then what must be the current fl owing through it?
A
V � 24 V; R � 15 �
I
I
�
�
�
VR
amp
A
245
6
1
1. Ans
Internal Resistance (r) So far we have considered that the emf E volts of a source is available at its terminals when supplying current to a circuit. If this were so then we would have an ideal source of emf. Unfortunately this is not the case in practice. This is due to the internal resistance of the source. As an example consider a typical 12 V car battery. This consists of a number of oppositely charged plates, appropriately interconnected to the terminals, immersed in an electrolyte . The plates themselves, the internal connections and the electrolyte all combine to produce a small but fi niteresistance, and it is this that forms the battery internal resistance.
B
A
r
E
r 0.1 Ω
12 V
Fig. 1.9
An electrolyte is the chemical ‘ cocktail ’ in which the plates are immersed. In the case of a car battery, this is an acid/water mixture.
In this context, fi nite simply means measurable.
Figure 1.9 shows such a battery with its terminals on open circuit (no external circuit connected). Since the circuit is incomplete no current can fl ow. Thus there will be no p.d. developed across the battery ’ s internal resistance r . Since the term p.d. quite literally means a difference in potential between the two ends of r , then the terminal A must be at a potential of 12 V, and terminal B must be at a potential of 0 V. Hence, under these conditions, the full emf 12 V is available at the battery terminals.
Figure 1.10 shows an external circuit, in the form of a 2 � resistor, connected across the terminals. Since we now have a complete circuit

Fundamentals 15
then current I will fl ow as shown. The value of this current will be 5.71 A (the method of calculating this current will be dealt with early in the next chapter). This current will cause a p.d. across r and also a p.d. across R . These calculations and the consequences for the complete circuit now follow:
p.d. across volt (Ohm’s law applied)
Vp
r Ir�
� �
�
5 71 0 10 571
. .
...d. across volt
V
R IR�
� �
�
5 71 211 42
..
Note: 0.571 � 11.42 � 11.991 V but this fi gure should be 12 V. The very small difference is simply due to ‘ rounding ’ the fi gures obtained from the calculator.
B
A
r
E
0.1 Ω
2 Ω12 V
V R
I
Fig. 1.10
The p.d. across R is the battery terminal p.d. V. Thus it may be seen that when a source is supplying current, the terminal p.d. will always be less than its emf. To emphasise this point let us assume that the external resistor is changed to one of 1.5 � resistance. The current now drawn from the battery will be 7.5 A. Hence:
p.d. across Vand p.d. across
rR
� � �
� � �
7 5 0 1 0 757 5 1 5 11 25
. . .
. . . VV
Note that 11.25 � 0.75 � 12 V (rounding error not involved). Hence, the battery terminal p.d. has fallen still further as the current drawn has increased. This example brings out the following points.
1 Assuming that the battery ’ s charge is maintained, then its emf remains constant. But its terminal p.d. varies as the current drawn is varied, such that
V E Ir� � volt (1.6)
2 Rather than having to write the words ‘ p.d. across R ’ it is more convenient to write this as VAB , which translated, means the potential difference between points A and B.

16 Fundamental Electrical and Electronic Principles
3 In future, if no mention is made of the internal resistance of a source, then for calculation purposes you may assume that it is zero, i.e. an ideal source.
Worked Example 1.9
Q A battery of emf 6 V has an internal resistance of 0.15 � . Calculate its terminal p.d. when delivering a
current of (a) 0.5 A, (b) 2 A, and (c) 10 A.
A
E � 6 V; r � 0.15 �
(a) V � E � Ir volt
� 6 � (0.5 � 0.15) � 6 � 0.075
so, V � 5.925 V Ans
(b) V � 6 � (2 � 0.15) � 6 � 0.3
so, V � 5.7 V Ans
(c) V � 6 � (10 � 0.15) � 6 � 1.5
so, V � 4.5 V Ans
Note: This example verifi es that the terminal p.d. of a source of emf decreases as the load on it (the current drawn from it) is increased.
Worked Example 1.10
Q A battery of emf 12 V supplies a circuit with a current of 5 A. If, under these conditions, the terminal
p.d. is 11.5 V, determine (a) the battery internal resistance, (b) the resistance of the external circuit.
A
E � 12 V; I � 5 A; V � 11.5 V
As with the vast majority of electrical problems, a simple sketch of the circuit diagram will help you to visualise the problem. For the above problem the circuit diagram would be as shown in Fig. 1.11 .
(a)
E V r
E V r
rE V
r
� �
� �
��
��
�
I
I
I
volt
volt
so, ohm
hence,
1 11
1
2 55
0
.
. � AAns
r
E 12 V
V 11.5 V
5 A
I
R (External)
Fig. 1.11

Fundamentals 17
(b)
R
V
R
�
�
�
I ohm
so,
11.
.
55
2 3 � Ans
Energy (W) This is the property of a system that enables it to do work. Whenever work is done energy is transferred from that system to another one. The most common form into which energy is transformed is heat. Thus one of the effects of an electric current is to produce heat (e.g. an electric kettle). J. P. Joule carried out an investigation into this effect. He reached the conclusion that the amount of heat so produced was proportional to the value of the square of the current fl owing and the time for which it fl owed. Once more a constant of proportionality is required, and again it is the resistance of the circuit that is used. Thus the heat produced (or energy dissipated) is given by the equation
W I Rt� 2 joule (1.7)
and applying Ohm ’ s law as shown in equations (1.3) to (1.5)
WV t
R�
2joule (1.8)
or
W VIt� joule (1.9)
Worked Example 1.11
Q A current of 200 mA fl ows through a resistance of 750 � for a time of 5 minutes. Calculate (a) the p.d.
developed, and (b) the energy dissipated.
A
I � 200 mA � 0.2A; t � 5 � 60 � 300 s; R � 750 �
(a)
V R
V
�
� �
�
I volt
V
0 2 750
50
.
1 Ans
(b)
W Rt
W
�
� � �
�
I 2
0 2 750 300
9000 9
joule
J or kJ
.
Ans

18 Fundamental Electrical and Electronic Principles
Note: It would have been possible to use either equation (1.8) or (1.9) to calculate W. However, this would have involved using the calculated value for V. If this value had been miscalculated, then the answers to both parts of the question would have been incorrect. So, whenever possible, make use of data that are given in the question in preference to values that you have calculated. Please also note that the time has been converted to its basic unit, the second.
Power (P) This is the rate at which work is done, or at which energy is dissipated. The unit in which power is measured is the watt (W).
Warning: Do not confuse this unit symbol with the quantity symbol for energy. In general terms we can say that power is energy divided by time.
i.e. wattPW
t�
Thus, by dividing each of equations (1.7), (1.8) and (1.9), in turn, by t,the following equations for power result:
P I R� 2 watt (1.10)
PV
R�
2 watt (1.11)
or wattP VI� (1.12)
Worked Example 1.12
Q A resistor of 680 � , when connected in a circuit, dissipates a power of 85 mW. Calculate (a) the p.d.
developed across it, and (b) the current fl owing through it.
A
R � 680 � ; P � 85 � 10 � 3 W
(a)
PVR
V PR
V PR
V
�
�
�
� � � �
�
�
2
2
385 0 680 57 8
7 6
watt
so,
and volt
so,
1 .
. VV Ans
(b)
P R
PR
PR
�
�
�
��
� �
�
��
I
I
I
I
2
2
3485 0
68025 0
watt
so,
and amp
so,
11 1.
111 1. 8 mA Ans
Fundamentals 19
Note: Since P � VI watt, the calculations may be checked as follows
P � � � �7 6 8 0 3. .11 1 1
so, P � 84.97 mW, which when rounded up to one decimal place gives 85.0 mW — the value given in the question.
Worked Example 1.13
Q A current of 1.4 A when fl owing through a circuit for 15 minutes dissipates 200 KJ of energy. Calculate
(a) the p.d., (b) power dissipated, and (c) the resistance of the circuit.
A
I � 1.4 A; t � 15 � 60 s; W � 2 � 10 5 J
(a)
W V t
VW
t
V
�
�
��
� �
�
I
I
joule
so volt
V
2 04 5 60
58 7
51
1 1
1
.
. Ans
(b)
P V
P
�
� �
�
I watt
W
1 158 7 4
222 2
. .
. Ans
(c)
RV
R
�
�
�
I ohm
1
1
11
58 74
3 4
..
. � Ans
The Commercial Unit of Energy (kWh) Although the joule is the SI unit of energy, it is too small a unit for some practical uses, e.g. where large amounts of power are used over long periods of time. The electricity meter in your home actually measures the energy con-sumption. So, if a 3 kW heater was in use for 12 hours the amount of energy used would be 129.6 MJ. In order to record this the meter would require at least ten dials to indicate this very large number. In addition to which, many of them would have to rotate at an impossible rate. Hence the commercial unit of energy is the kilowatt-hour (kWh). Kilowatt-hours are the ‘ units ’ that appear on electricity bills. The number of units consumed can be calculated by multiplying the power (in kW) by the time interval (in hours). So, for the heater mentioned above, the number of ‘ units ’ consumed would be written as 36 kWh. It should be apparent from this that to record this particular fi gure, fewer dials are required, and their speed of rotation is perfectly acceptable.

20 Fundamental Electrical and Electronic Principles
Worked Example 1.14
Q Calculate the cost of operating a 12.5 kW machine continuously for a period of 8.5 h if the cost per unit
is 7.902 p.
A
W
W
� �
�
� �
�
1
1
1
2 5 8 5
06 25
06 25 7 902
8 40
. .
.
. .
.
kWh
so kWh
and cost
£ Anss
Note: When calculating energy in kWh the power must be expressed in kW, and the time in hours respectively, rather than in their basic units of watts and seconds respectively.
Worked Example 1.15
Q An electricity bill totalled £78.75, which included a standing charge of £15.00. The number of units
charged for was 750. Calculate (a) the charge per unit, and (b) the total bill if the charge/unit had been
9p, and the standing charge remained unchanged.
A
Total bill � £78.75; standing charge � £15.00; units used � 750 � 750 kWh
(a)
Cost of the energy (units) used total standing charge� �
� £78.. . .
..
75 5 00 63 75
63 75750
0 085
� �
� �
�
£ £
££
1
Cost/unit
so, cost/unit 88 5. p Ans
(b) If the cost/unit is raised to 9p, then cost of energy used � £0.09 � 750 � £67.50 total bill � cost of units used � standing charge � £67.50 � £15.00 so, total bill � £82.50 Ans
Alternating and Direct Quantities The sources of emf and resulting current fl ow so far considered are called d.c. quantities. This isbecause a battery or cell once connected to a circuit is capable of driving current around the circuit in one direction only. If it isrequired to reverse the current it is necessary to reverse the battery connections. The term d.c., strictly speaking, means ‘ direct current ’ . However, it is also used to describe unidirectional voltages. Thusa d.c. voltage refers to a unidirectional voltage that may only be reversed as stated above.
However, the other commonly used form of electrical supply is that obtained from the electrical mains. This is the supply that is generated

Fundamentals 21
Factors affecting Resistance The resistance of a sample of material depends upon four factors
(i) its length (ii) its cross-sectional area (csa) (iii) the actual material used (iv) its temperature
Simple experiments can show that the resistance is directly proportional to the length and inversely proportional to the csa. Combining these two statements we can write:
RA
A where length (in metres) and csa (in square metres)��
� � �
The constant of proportionality in this case concerns the third factor listed above, and is known as the resistivity of the material. This is defi ned as the resistance that exists between the opposite faces of a 1 m cube of that material, measured at a defi ned temperature. The symbol for resistivity is � . The unit of measurement is the ohm-metre ( � m). Thus the equation for resistance using the above factor is
RA
� ��
ohm (1.13)
and distributed by the power companies. This is an alternating or a.c. supply in which the current fl ows alternately in opposite directions around a circuit. Again, the term strictly means ‘ alternating current ’ , but the emfs and p.d.s associated with this system are referred to as a.c. voltages. Thus, an a.c. generator (or alternator) produces an alternating voltage. Most a.c. supplies provide a sinusoidal waveform (a sinewave shape). Both d.c. and a.c. waveforms are illustrated in Fig. 1.12 . The treatment of a.c. quantities and circuits is dealt with in Chapters 6, and need not concern you any further at this stage.
varying d.c.
steady d.c.I(A)
a.c.
t(s)0
�
�
Fig. 1.12

22 Fundamental Electrical and Electronic Principles
Worked Example 1.16
Q A coil of copper wire 200 m long and of csa 0.8 mm 2 has a resistivity of 0.02 � � m at normal working
temperature. Calculate the resistance of the coil.
A
ℓ � 200 m; � � 2 � 10 � 8 � m; A � 8 � 10 � 7 m 2
RA
R
�
�� �
�
�
�
�
�
�
�ohm
2 0 2008 0
5
8
7
1
1
Ans
Worked Example 1.17
Q A wire-wound resistor is made from a 250 metre length of copper wire having a circular cross-section
of diameter 0.5 mm. Given that the wire has a resistivity of 0.018 �� m, calculate its resistance value.
A
ℓ � 250 m; d � 5 � 10 � 4 m; � � 1.8 � 10 � 8 � m
RA
A� �� ��
ohm, where cross-sectional area, d
metre
hence,
22
4
m
hence,
A
R
�� �
� �
�� �
�
��
�
� ( ).
..
5 04
9635 0
8 0 2509635
4 27 2
8
11 1
1 1
1 11022 92
7�
�so, R . � Ans
The resistance of a material also depends on its temperature and has a property known as its temperature coeffi cient of resistance. The resistance of all pure metals increases with increase of temperature. The resistance of carbon, insulators, semiconductors and electrolytes decreases with increase of temperature. For these reasons, conductors (metals) are said to have a positive temperature coeffi cient of resistance. Insulators etc. are said to have a negative temperature coeffi cient of resistance. Apart from this there is another major difference. Over a moderate range of temperature, the change of resistance for conductors is relatively small and is a very close approximation to a straight line. Semiconductors on the other hand tend to have very much larger changes of resistance over the same range of temperatures, and follow an exponential law. These differences are illustrated in Fig. 1.13 .
Temperature coeffi cient of resistance is defi ned as the ratio of the change of resistance per degree change of temperature, to the resistance at some specifi ed temperature. The quantity symbol is � and the unit of

Fundamentals 23
measurement is per degree, e.g. /°C. The reference temperature usually quoted is 0°C, and the resistance at this temperature is referred to as R0 . Thus the resistance at some other temperature u1 °C can be obtained from:
R R1 0 11� �( )� ohm (1.14)
In general, if a material having a resistance R0 at 0°C has a resistance R1 at 1
� C and R2 at 2� C, and if � is the temperature coeffi cient at
0°C, then
R R R R1 0 1 2 0 21 1� � � �( ) ( )� � and
soR
R1
2
1
2
1
1�
�
�
��
(1.15)
Worked Example 1.18
Q The fi eld coil of an electric motor has a resistance of 250 � at 15°C. Calculate the resistance if the
motor attains a temperature of 45°C when running. Assume that � � 0.00428/°C referred to 0°C.
A
R 1 � 250 � ; u 1 � 15°C; u 2 � 45°C; � � 4.28 � 10 � 3
Using equation (1.15):
250 4 28 0 54 28 0 45
2500 8923
280 2
2
3
3
2
2
R
R
R
�� � �
� � �
�
�
�
�
1 1 1
1 1
( . )( . )
.
. �� Ans
0 θ (°C)
conductor
R (Ω)
semiconductor
Fig. 1.13

24 Fundamental Electrical and Electronic Principles
Worked Example 1.19
Q A coil of wire has a resistance value of 350 � when its temperature is 0°C. Given that the temperature
coeffi cient of resistance of the wire is 4.26 � 10� 3 /°C referred to 0°C, calculate its resistance at a
temperature of 60°C.
A
R 0 � 350 � ; � � 4.26 � 10 � 3 /°C; u 1 � 60°C
R R R1 1 11
1
� � �
�
0 60350
( ){
� ohm; where is the resistance at C�� � �
� �
� �
�
�( . )}{ . }
..
4 26 0 60350 0 22556350 2556439 6
311
1
1so, R � Anns
Worked Example 1.20
Q A carbon resistor has a resistance value of 120 � at a room temperature of 16°C. When it is connected
as part of a circuit, with current fl owing through it, its temperature rises to 32°C. If the temperature
coeffi cient of resistance of carbon is � 0.000 48/°C referred to 0°C, calculate its resistance under these
operating conditions.
A
u 1 � 16°C; u 2 � 32°C; R 1 � 120 � ; � � � 0.000 48/°C
RR
R
R
1 11
1
1 1 1
1
11
2 2
2
2
20 0 000 48 60 000 48 32
20
��
�
�� � �
� � �
�
��
( . )( . )
..
.
0078
9
2
2
R
R
�
�
1
1
11 1
20.0078
so, � Ans
Use of meters The measurement of electrical quantities is an essential part of engineering, so you need to be profi cient in the use of the various types of measuring instrument. In this chapter we will consider only the use of the basic current and voltage measuring instruments, namely the ammeter and voltmeter respectively.
An ammeter is a current measuring instrument. It has to be connected into the circuit in such a way that the current to be measured is forced to fl ow through it. If you need to measure the current fl owing in a section of a circuit that is already connected together, you will need to ‘ break ’ the circuit at the appropriate point and connect the ammeter in the ‘ break ’ . If you are connecting a circuit (as you will frequently have to do when carrying out practical assignments), then insert the ammeter as the circuit connections are being made. Most ammeters will have their terminals colour coded: red for the positive and black for the negative.

Fundamentals 25
PLEASE NOTE that these polarities refer to conventional current fl ow,so the current should enter the meter at the red terminal and leave via the black terminal. The ammeter circuit symbol is shown in Fig. 1.14 .
A
Fig. 1.14
V
Fig. 1.15
As you would expect, a voltmeter is used for measuring voltages; in particular, p.d.s. Since a p.d. is a voltage between two points in a circuit, then this meter is NOT connected into the circuit in the same way as an ammeter. In this sense it is a simpler instrument to use, since it need only be connected across (between the two ends of) the component whose p.d. is to be measured. The terminals will usually be colour coded in the same way as an ammeter, so the red terminal should be connected to the more positive end of the component, i.e. follow the same principle as with the ammeter. The voltmeter symbol is shown in Fig. 1.15 .
It is most probable that you will have to make use of meters that are capable of combining the functions of an ammeter, a voltmeter and an ohmmeter. These instruments are known as multimeters. One of the most common examples is the AVO. This meter is an example of the type known as analogue instruments, whereby the ‘ readings ’ are indicated by the position of a pointer along a graduated scale. The other type of multimeter is of the digital type (often referred to as a DMM). In this case, the ‘ readings ’ are in the form of a numerical display, using either light emitting diodes or a liquid crystal, as on calculator displays. Although the digital instruments are easier to read, it does not necessarily mean that they give more accurate results. The choice of the type of meter to use involves many considerations. At this stage it is better to rely on advice from your teacher as to which ones to use for a particular measurement.
All multimeters have switches, either rotary or pushbutton, that are used to select between a.c. or d.c. measurements. There is also a facility for selecting a number of current and voltage ranges. To gain a proper understanding of the use of these meters you really need to have the instrument in front of you. This is a practical exercise that your teacher will carry out with you. I will conclude this section by outlining some important general points that you should observe when carrying out practical measurements.
All measuring instruments are quite fragile, not only mechanically (please handle them carefully) but even more so electrically. If an instrument becomes damaged it is very inconvenient, but more
26 Fundamental Electrical and Electronic Principles
importantly, it is expensive to repair and/or replace. So whenever you use them please observe the following rules:
1 Do not switch on (or connect) the power supply to a circuit until your connections have been checked by the teacher or laboratory technician.
2 Starting with all meters switched to the OFF position, select the highest possible range, and then carefully select lower ranges until a suitable defl ection (analogue instrument) or fi gure is displayed (DMM).
3 When taking a series of readings try to select a range that will accommodate the whole series. This is not always possible. However, if the range(s) are changed and the results are used to plot a graph, then a sudden unexpected gap or ‘ jump ’ in the plotted curve may well occur.
4 When fi nished, turn off and disconnect all power supplies, and turn all meters to their OFF position.
1.7 Communication
It is most important that an engineer is a good communicator. He or she must be capable of transmitting information orally, by the written word and by means of sketches and drawings. He or she must also be able to receive and translate information in all of these forms. Most of these skills can be perfected only with guidance and practice. Thus, an engineering student should at every opportunity strive to improve these skills. The art of good communication is a specialised area, and this book does not pretend to be authoritative on the subject. However, there are a number of points, given below, regarding the presentation of written work, that may assist you.
The assignment questions at the end of each chapter are intended to fulfi l three main functions. To reinforce your knowledge of the subject matter by repeated application of the underlying principles. To give you the opportunity to develop a logical and methodical approach to the solution of problems. To use these same skills in the presentation of technical information. Therefore when you complete each assignment, treat it as a vehicle for demonstrating your understanding of the subject. This means that your method and presentation of the solution, are more important than always obtaining the ‘ correct ’ numerical answer. To help you to achieve this use the following procedures:
1 Read the question carefully from beginning to end in order to ensure that you understand fully what is required.
2 Extract the numerical data from the question and list this at the top of the page, using the relevant quantity symbols and units. This is particularly important when values are given for a number of quantities. In this case, if you try to extract the data in the midst of calculations, it is all too easy to pick out the wrong fi gure amongst all the words. At the same time, convert all values into their basic

Fundamentals 27
units. Another advantage of using this technique is that the resulting list, with the quantity symbols, is likely to jog your memory as to the appropriate equation(s) that will be required.
3 Whenever appropriate, sketch the relevant circuit diagram, clearly identifying all components, currents, p.d.s etc. If the circuit is one in which there are a number of junctions then labelling as shown in Fig. 1.16 makes the presentation of your solution very much simpler. For example
A
6 Ω
0.02 Ω
C
10 Ω
15 ΩBR1
R2R2I1
I2 R3
I
r
E
Fig. 1.16
If the diagram had not been labelled, and you wished to refer to the effective resistance between points B and C, then you would have to write out ‘ the effective resistance of R2 and R3 in parallel � … ’ . However, with the diagram labelled you need simply write ‘RBC � … ’ . Similarly, instead of having to write ‘ the current through the 15 � resistor � … ’, all that is required is ‘ I1 � … ’ .
4 Before writing down any fi gures quote the equation being used, together with the appropriate unit of measurement. This serves to indicate your method of solution. Also note that the units should be written in words. The unit symbols should only be used when preceded by a number thus. Thus, V � IR volt for equation, and 24 V for actual value.
5 Avoid the temptation to save space by having numerous ‘� ’ signs along one line. If the line is particularly short then a maximum of two equals signs per line is acceptable.
6 Show ALL fi gures used in the calculations including any sub-answers obtained.
7 Clearly identify your answer(s) by either underlining or by writing ‘ Ans ’ alongside.
You will notice that the above procedures have been followed in all of the worked examples throughout this book.
In addition to written assignments you will be required to undertake others. Although these may not entail using exactly the same procedures as outlined above, they will still require a logical and

28 Fundamental Electrical and Electronic Principles
methodical approach to the presentation. Practical assignments will also be a major feature of your course of study. These will normally involve the use of equipment and measuring instruments in order that you may discover certain technical facts or to verify your theories, etc. This form of exercise also needs to be well documented so that, if necessary, another person can repeat your procedure to confi rm (or refute!) your fi ndings. In these cases a more formalised form of written report is required, and the following format is generally acceptable:
‘ Title ’
Objective: This needs to be a concise and clear statement as to what it is that you are trying to achieve.
Apparatus: This will be a list of all equipment and instruments used, quoting serial numbers where appropriate.
Diagram(s): The circuit diagram, clearly labelled.
Method: This should consist of a series of numbered paragraphs that describe each step of the procedure carried out. This section of the report (as with the rest) should be impersonal and in the past tense. Words such as ‘ I ’ , ‘ we ’ , ‘ they ’ , ‘ us ’ should not be used. Thus, instead of writing a phrase such as ‘ We set the voltage to 0 V and I adjusted it in 0.1 V steps … ’ you should write ‘ The voltage was set to 0 V and then adjusted in 0.1 V steps … ’
Results: All measurements and settings should be neatly tabulated. To avoid writing unit symbols alongside fi gures in the body of the table the appropriate units need to be stated at the top of each column. If there is more than one table of results then each one should be clearly identifi ed. These points are illustrated below:
Table 1
p.d. ( V) I (mA) R (k � )
0.0 0.00 —
1.0 1.25 0.80
2.0 1.75 1.14
etc.
Calculations: This section may not always be required, but if you have carried out any calculations using the measured data then these should be shown here.
Graphs: In most cases the tabulated results form the basis for a graph or graphs which must be carefully plotted on

Fundamentals 29
approved graph paper. Simple lined or squared paper is NOT adequate. Try to use as much of the page as possible, but at the same time choose sensible scales. For example let the graduations on the graph paper represent increments such as 0.1, 0.2, 0.5, 10 000, etc. and not 0.3, 0.4, 0.6, 0.7, 0.8, 0.9 etc. By doing this you will make it much simpler to plot the graph in the fi rst place, and more importantly, very much easier to take readings from it subsequently.
Conclusions: Having gone through the above procedure you need to complete the assignment by drawing some conclusions based on all the data gathered. Any such conclusions must be justifi ed. For example, you may have taken measurements of some variable y for corresponding values of a second variable x. If your plotted graph happens to be a straight line that passes through the origin then your conclusion would be as follows:
‘ Since the graph of y versus x is a straight line passing through the origin then it can be concluded that y is directly proportional to x ’ .
Summary of Equations
Charge: Q � It coulomb
Ohm ’ s law: V � IR volt
Terminal p.d.: V � E � Ir volt
Energy: W � VIt � I2Rt � V t
R
2
joule
Power: P � W
t � VI � I2R �
V
R
2 watt
Resistance: R � ��
A ohm
Resistance at specifi ed temp.: R1 � R0(1��u) ohm
or R
R1
2
1
2
1
1�
�
�
��

30 Fundamental Electrical and Electronic Principles
Assignment Questions
1 Convert the following into standard form.
(a) 456.3 (b) 902 344 (c) 0.000 285 (d) 8000 (e) 0.047 12 (f ) 180 � A (g) 38 mV (h) 80 GN (i) 2000 � F
2 Write the following quantities in scientifi c notation.
(a) 1500 � (b) 0.0033 � (c) 0.000 025 A (d) 750 V (e) 800 000 V (f ) 0.000 000 047 F
3 Calculate the charge transferred in 25 minutes by a current of 500 mA.
4 A current of 3.6 A transfers a charge of 375 mC. How long would this take?
5 Determine the value of charging current required to transfer a charge of 0.55 mC in a time of 600 � s.
6 Calculate the p.d. developed across a 750 � resistor when the current fl owing through it is (a) 3 A, (b) 25 mA.
7 An emf of 50 V is applied in turn to the following resistors: (a) 22 � , (b) 820 � , (c) 2.7 M � , (d) 330 k � . Calculate the current fl ow in each case.
8 The current fl owing through a 470 � resistance is 4 A. Determine the energy dissipated in a time of 2 h. Express your answer in both joules and in commercial units.
9 A small business operates three pieces of equipment for nine hours continuously per day for six days a week. If the three equipments consume 10 kW, 2.5 kW and 600 W respectively, calculate the weekly cost if the charge per unit is 7.9 pence.
10 A charge of 500 � C is passed through a 560 � resistor in a time of 1 ms. Under these conditions determine (a) the current fl owing, (b) the p.d. developed, (c) the power dissipated, and (d) the energy consumed in 5 min.
11 A battery of emf 50 V and internal resistance 0.2 � supplies a current of 1.8 A to an external load. Under these conditions determine (a) the terminal p.d. and (b) the resistance of the external load.
12 The terminal p.d. of a d.c. source is 22.5 V when supplying a load current of 10 A. If the emf is 24 V calculate (a) the internal resistance and (b) the resistance of the external load.
13 For the circuit arrangement specifi ed in Q12 above determine the power and energy dissipated by the external load resistor in 5 minutes.
14 A circuit of resistance 4 � dissipates a power of 16 W. Calculate (a) the current fl owing through it, (b) the p.d. developed across it, and (c) the charge displaced in a time of 20 minutes.
15 In a test the velocity of a body was measured over a period of time, yielding the results shown in the table below. Plot the corresponding graph and use it to determine the acceleration of the body at times t � 0, t � 5 s and t � 9 s. You may assume that the graph consists of a series of straight lines.
v (m/s) 0.0 3.0 6.0 10.0 14.0 15.0 16.0 t (s) 0.0 1.5 3.0 4.5 6.0 8.0 10.0
16 The insulation resistance between a conductor and earth is 30 M � . Calculate the leakage current if the supply voltage is 240 V.
17 A 3 kW immersion heater is designed to operate from a 240 V supply. Determine its resistance and the current drawn from the supply.
18 A 110 V d.c. generator supplies a lighting load of forty 100 W bulbs, a heating load of 10 kW and other loads which consume a current of 15 A. Calculate the power output of the generator under these conditions.
19 The fi eld winding of a d.c. motor is connected to a 110 V supply. At a temperature of 18°C, the current drawn is 0.575 A. After running the machine for some time the current has fallen to 0.475 A, the voltage remaining unchanged. Calculate the temperature of the winding under the new conditions, assuming that the temperature coeffi cient of resistance of copper is 0.004 26/°C at 0°C.
20 A coil consists of 1500 turns of aluminium wire having a cross-sectional area of 0.75 mm 2 . The mean length per turn is 60 cm and the resistivity of aluminium at the working temperature is 0.028 � � m. Calculate the resistance of the coil.

D.C. Circuits
Chapter 2
Learning Outcomes
This chapter explains how to apply circuit theory to the solution of simple circuits and networks by the application of Ohm ’ s law and Kirchhoff’s laws, and the concepts of potential and current dividers.
This means that on completion of this chapter you should be able to:
1 Calculate current fl ows, potential differences, power and energy dissipations for circuit components and simple circuits, by applying Ohm ’ s law.
2 Carry out the above calculations for more complex networks using Kirchhoff’s Laws. 3 Calculate circuit p.d.s using the potential divider technique, and branch currents using the
current divider technique. 4 Understand the principles and use of a Wheatstone Bridge. 5 Understand the principles and use of a slidewire potentiometer.
31
Resistors cascaded or connected in series
or
2.1 Resistors in Series
When resistors are connected ‘ end-to-end ’ so that the same current fl ows through them all they are said to be cascaded or connected in series . Such a circuit is shown in Fig. 2.1 . Note that, for the sake of simplicity, an ideal source of emf has been used (no internal resistance).
E
V1
R1 R2 R3
V2 V3
I
Fig. 2.1

32 Fundamental Electrical and Electronic Principles
From the previous chapter we know that the current fl owing through the resistors will result in p.d.s being developed across them. We also know that the sum of these p.d.s must equal the value of the applied emf. Thus
V IR V IR V IR1 1 2 2 3 3� � �volt; volt; and volt
However, the circuit current I depends ultimately on the applied emf Eand the total resistance R offered by the circuit. Hence
E IRE V V V
�
� � �
volt.Also, volt1 2 3
and substituting for E, V1 , V2 and V3 in this last equation
we have voltIR IR IR IR� � �1 2 3
and dividing this last equation by the common factor I
R R R R� � �1 2 3 ohm (2.1)
where R is the total circuit resistance. From this result it may be seen that when resistors are connected in series the total resistance is found simply by adding together the resistor values.
Worked Example 2.1
Q For the circuit shown in Fig. 2.2 calculate (a) the circuit resistance, (b) the circuit current, (c) the p.d.
developed across each resistor, and (d) the power dissipated by the complete circuit.
A
E � 24 V; R 1 � 330 � ; R 2 � 1500 � ; R 3 � 470 �
E
V1
R1 R2 R3
V2 V3
I
330 Ω 1.5 kΩ 470 Ω
24 V
Fig. 2.2

D.C. Circuits 33
(a) R � R 1 � R 2 � R 3 ohm
� 330 � 1500 � 470
R � 2300 � or 2.3 k � Ans
(b)
I �
�
ER
amp
242300
I � 10.43 mA Ans
(c) V1 � IR 1 volt
� 10.43 � 10 � 3 � 330
V 1 � 3.44 V Ans
V 2 � IR 2 volt
� 10.43 � 10� 3 � 1500
V 2 � 15.65 volts Ans
V 3 � IR 3 volt
� 10.43 � 10 � 3 � 470
V 3 � 4.90 V Ans
Note: The sum of the above p.d.s is 23.99 V instead of 24 V due to the rounding errors in the calculation. It should also be noted that the value quoted for the current was 10.43 mA whereas the calculator answer is 10.4347 mA. This latter value was then stored in the calculator memory and used in the calculations for part (c), thus reducing the rounding errors to an acceptable minimum.
(d) P � EI watt
� 24 � 10.43 � 10 � 3
P � 0.25 W or 250 mW Ans
It should be noted that the power is dissipated by the three resistors in the circuit. Hence, the circuit power could have been determined by calculating the power dissipated by each of these and adding these values to give the total. This is shown below, and serves, as a check for the last answer.
P R
P
P
1 1
1
1 1
1 1 1
�
� � �
�
� � �
�
�
I 2
3 2
23 2
0 43 0 330
35 93
0 43 0 5
watt
mW
( . )
.
( . ) 000
63 33
0 43 0 470
5 8
33 2
�
� � �
�
�
1
1 1
1 1
.
( . )
.
mW
mW
P
total power: watt
so mw
P P P P
P
� � �
�
1 2 3
250 44.
(Note the worsening eff ect of continuous rounding error)

34 Fundamental Electrical and Electronic Principles
Worked Example 2.2
Q Two resistors are connected in series across a battery of emf 12 V. If one of the resistors has a value
of 16 � and it dissipates a power of 4 W, then calculate (a) the circuit current, and (b) the value of the
other resistor.
A
Since the only two pieces of data that are directly related to each other concern the 16 � resistor and the power that it dissipates, then this information must form the starting point for the solution of the problem. Using these data we can determine either the current through or the p.d. across the 16 � resistor (and it is not important which of these is calculated fi rst). To illustrate this point both methods will be demonstrated. The appropriate circuit diagram, which forms an integral part of the solution, is shown in Fig. 2.3 .
E
VAB
A B C16 Ω
VBC
I
12 V
Fig. 2.3
E � 12 V; R BC � 16 � ; P BC � 4 W
(a) I2 R BC � P BC watt
I 2 �
PR
BC
BC
� �46
0.251
so I � 0.5 A Ans
(b) total resistance, RE
�I
ohm
� �120 5.
24 Ω
R AB � R � R BC
� 24 � 16
so R AB � 8 � Ans
Alternatively, the problem can be solved thus:
(a) VR
PBC
BCBC
2� watt
VBC2 � P BC � R BC � 4 � 16
� 64

D.C. Circuits 35
so V BC � 8 V
I �
VR
BC
BCamp
�
861
so I � 0.5 A Ans
(b) V AB � E � V BC volt
� 12 � 8
V AB � 4 V
RV
ABAB�I
�
40 5.
so R AB � 8 � Ans
2.2 Resistors in Parallel
When resistors are joined ‘ side-by-side ’ so that their corresponding ends are connected together they are said to be connected in parallel . Using this form of connection means that there will be a number of paths through which the current can fl ow. Such a circuit consisting of three resistors is shown in Fig. 2.4 , and the circuit may be analysed as follows:
Resistors in Parallel
or or or
I1
I
I2
I3
R1
R2
R3
E
I
Fig. 2.4

36 Fundamental Electrical and Electronic Principles
Since all three resistors are connected directly across the battery terminals then they all have the same voltage developed across them. In other words the voltage is the common factor in this arrangement of resistors. Now, each resistor will allow a certain value of current to fl ow through it, depending upon its resistance value. Thus
IE
RI
E
RI
E
R11
22
33
� � �amp; amp; and amp
The total circuit current I is determined by the applied emf and the total circuit resistance R ,
so ampIE
R�
Also, since all three branch currents originate from the battery, then the total circuit current must be the sum of the three branch currents
so I I I I� � �1 2 3
and substituting the above expression for the currents:
E
R
E
R
E
R
E
R� � �
1 2 3
and dividing the above equation by the common factor E :
1 1 1 1
1 2 3R R R R� � � siemen (2.2)
Note: The above equation does NOT give the total resistance of the circuit, but does give the total circuit conductance ( G) which is measured in Siemens (S). Thus, conductance is the reciprocal of resistance, soto obtain the circuit resistance you must then take the reciprocal ofthe answer obtained from an equation of the form of equation (2.2).
Conductance is a measure of the ‘ willingness ’ of a material or circuit to allow current to fl ow through it
That is siemen; and ohm1 1
RG
GR� � (2.3)
However, when only two resistors are in parallel the combined resistance may be obtained directly by using the following equation:
RR R
R R�
�
�1 2
1 2
ohm (2.4)

D.C. Circuits 37
I1
I2
I3
R1
R2
R3
EI
1.5 kΩ
330 Ω
470 Ω
24 V
Fig. 2.5
In this context, the word identical means having the same value of resistance
A
E � 24 V; R 1 � 330 � ; R 2 � 1500 � ; R 3 � 470 �
(a)
1 1 1 1
1R R R R� � �
2 3siemen
� � �
1 1
1
1
330 500 470
� 0.00303 � 0.000667 � 0.00213
� 0.005825 S so R � 171.68 � Ans (reciprocal of 0.005825)
(b) I11
�ER
amp
�24
330
I 1 � 72.73 mA Ans
I22
�E
Ramp
�
245001
I 2 � 16 mA Ans
Worked Example 2.3
Q Considering the circuit of Fig. 2.5 , calculated (a) the total resistance of the circuit, (b) the three branch
current, and (c) the current drawn from the battery.
If there are ‘x ’ identical resistors in parallel the total resistance is simply R/x ohms.

38 Fundamental Electrical and Electronic Principles
I33
�E
Ramp
�
24470
I 3 � 51.06 mA Ans
(c) I � I 1 � I 2 � I 3 amp � 72.73 � 16 � 51.06 mA so I � 139.8 mA Ans
Alternatively, the circuit current could have been determined by using the values for E and R as follows
I �
ER
amp
�24
7 681 1.
I � 139.8 mA Ans
Compare this example with worked example 2.1 (the same values for the resistors and the emf have been used). From this it should be obvious that when resistors are connected in parallel the total resistance of the circuit is reduced. This results in a corresponding increase of current drawn from the source. This is simply because the parallel arrangement provides more paths for current fl ow.
Worked Example 2.4
Q Two resistors, one of 6 � and the other of 3 � resistance, are connected in parallel across a source of
emf of 12 V. Determine (a) the eff ective resistance of the combination, (b) the current drawn from the
source, and (c) the current through each resistor.
A
The corresponding circuit diagram, suitably labelled is shown in Fig. 2.6.
I1
I
I2
12 V
R2R1E 3 Ω6 Ω
Fig. 2.6

D.C. Circuits 39
E � 12 V; R 1 � 6 � ; R 2 � 3 �
(a) RR R
R R�
�1
1
2
2ohm
�
�
��
6 36 3
89
1
so R � 2 � Ans
(b) I �ER
amp
�
122
so I � 6 A Ans
(c) I11
�ER
amp
�
126
I 1 � 2 A Ans
I22
�E
R
�
123
I2 � 4 A Ans
Worked Example 2.5
Q A 10 � resistor, a 20 � resistor and a 30 � resistor are connected (a) in series, and then
(b) in parallel with each other. Calculate the total resistance for each of the two
connections.
A
R 1 � 10 � ; R 2 � 20 � ; R 3 � 30 �
(a) R � R 1 � R 2 � R 3 ohm
� 10 � 20 � 30
so, R � 60 � Ans
(b) 1 1 1 1
1R R R R� � �
2 3siemen
� � � � � �
1
1
1 11
0 20 300 0 05 0 033. . .
so, R �1
10 83. � 5.46 � Ans

40 Fundamental Electrical and Electronic Principles
Alternatively,
1 1
1
1 1
R� � � �
� �
0 20 306 3 2
60
�
11
60S
so,
R �6011
� 5.46 � Ans
2.3 Potential Divider
When resistors are connected in series the p.d. developed across each resistor will be in direct proportion to its resistance value. This is a useful fact to bear in mind, since it means it is possible to calculate the p.d.s without fi rst having to determine the circuit current. Consider two resistors connected across a 50 V supply as shown in Fig. 2.7 . In order to demonstrate the potential divider effect we will in this case fi rstly calculate circuit current and hence the two p.d.s by applying Ohm’s law:
R R R
R
IE
R
I
V IR
� �
� � �
�
� �
�
� �
1 2
1 1
75 25 100
50
1000 5
0 5 75
ohm
amp
A
volt
�
.
.
VV
V IR
V
1
2 2
2
37 5
0 5 25
12 5
�
�
� �
�
.
.
.
V
volt
V
Ans
Ans
I
E 50 V
R2
75 Ω
25 Ω
R1 V1
V2
Fig. 2.7

D.C. Circuits 41
Applying the potential divider technique, the two p.d.s may be obtained by using the fact that the p.d. across a resistor is given by the ratio of itsresistance value to the total resistance of the circuit, expressed as a proportion of the applied voltage. Although this sounds complicated it is very simple to put into practice. Expressed in the form of an equation it means
VR
R RE1
1
1 2
��
� volt (2.5)
and
VR
R RE2
2
1 2
��
� volt (2.6)
and using the above equations the p.d.s can more simply be calculated as follows:
V
V
1
2
75
10050 37 5
25
10050 12 5
� � �
� � �
.
.
V
and V
Ans
Ans
This technique is not restricted to only two resistors in series, but may be applied to any number. For example, if there were three resistors in series, then the p.d. across each may be found from
VR
R R RE
VR
R R RE
VR
R R RE
11
1 2 3
22
1 2 3
33
1 2 3
�� �
�
�� �
�
�� �
�and volt
2.4 Current Divider
It has been shown that when resistors are connected in parallel the total circuit current divides between the alternative paths available. So far we have determined the branch currents by calculating the common p.d. across a parallel branch and dividing this by the respective resistance values. However, these currents can be found directly, without the need to calculate the branch p.d., by using the current divider theory. Consider two resistors connected in parallel across a source of emf 48 V as shown in Fig. 2.8 . Using the p.d. method we can calculate the two currents as follows:
IE
RI
E
R
I I
11
22
1 2
48
12
48
244 2
� �
� �
� �
and amp
A and A

42 Fundamental Electrical and Electronic Principles
It is now worth noting the values of the resistors and the corresponding currents. It is clear that R1 is half the value of R2 . So, from the calculation we obtain the quite logical result that I1 is twice the value of I2 . That is, a ratio of 2:1 applies in each case. Thus, the smaller resistor carries the greater proportion of the total current. By stating the ratio as 2:1 we can say that the current is split into three equal ‘ parts ’ . Two ‘ parts ’ are fl owing through one resistor and the remaining ‘ part ’ through the other resistor.
Thus 2
3� I fl ows through R1
and 1
3� I fl ows through R2
Since I � 6 A then
I
I
1
2
2
36 4
1
36 2
� � �
� � �
A
A
In general we can say that
IR
R RI1
2
1 2
��
� (2.7)
and
IR
R RI2
1
1 2
��
� (2.8)
Note: This is NOT the same ratio as for the potential divider. If you compare (2.5) with (2.7) you will fi nd that the numerator in (2.5) is R1
whereas in (2.7) the numerator is R2 . There is a similar ‘ cross-over ’ when (2.6) and (2.8) are compared.
Again, the current divider theory is not limited to only two resistors in parallel. Any number can be accommodated. However, with three or
I
I2
R2E 24 Ω
I1
R1 12 Ω48 V
Fig. 2.8

D.C. Circuits 43
more parallel resistors the current division method can be cumbersome to use, and it is much easier for mistakes to be made. For this reason it is recommended that where more than two resistors exist in parallel the ‘ p.d. method ’ is used. This will be illustrated in the next section, but for completeness the application to three resistors is shown below.
Consider the arrangement shown in Fig. 2.9 :
1 1 1 1 1
3
1
4
1
6
4 3 2
121 2 3R R R R� � � � � � �
� �
and examining the numerator, we have 4 � 3 � 2 � 9 ‘ parts ’ .
I1
I2
I3
R1
R2
R3
I18 A
3 Ω
6 Ω
4 Ω
Fig. 2.9
Thus, the current ratios will be 4/9, 3/9 and 2/9 respectively for the three resistors.
So, A; A; AI I I1 2 34
918 8
3
918 6
2
918 4� � � � � � � � �
2.5 Series/Parallel Combinations
Most practical circuits consist of resistors which are interconnected in both series and parallel forms. The simplest method of solving such a circuit is to reduce the parallel branches to their equivalent resistance values and hence reduce the circuit to a simple series arrangement. This is best illustrated by means of a worked example.
Worked Example 2.6
Q For the circuit shown in Fig. 2.10 , calculate (a) the current drawn from the supply, (b) the current
through the 6 � resistor, and (c) the power dissipated by the 5.6 � resistor.
A
The fi rst step in the solution is to sketch and label the circuit diagram, clearly showing all currents fl owing and identifying each part of the circuit as shown in

44 Fundamental Electrical and Electronic Principles
Fig. 2.11 . Also note that since there is no mention of internal resistance it may be assumed that the source of emf is ideal.
5.6 Ω
6 Ω
A
II2
I1
B
4 Ω
C
R1
R2
E 64 V
Fig. 2.11
5.6 Ω 2.4 Ω
VAB VBC
64 VE
A B C
I
Fig. 2.12
(a) To determine the current I drawn from the battery we need to know the total resistance R AC of the circuit.
RBC �
�
�
6 46 4
(using product
sum for two resistors in parallel))
�
2401
so R BC � 2.4 �
The original circuit may now be redrawn as in Fig 2.12 .
6 Ω
4 Ω
5.6 Ω
64 V
E
Fig. 2.10

D.C. Circuits 45
R AC � R AB � R BC ohm (resistors in series)
� 5.6 � 2.4
so R AC � 8 �
I � �
ERAC
amp648
so I � 8 A Ans
(b) To fi nd the current I 1 through the 6 � resistor we may use either of two methods. Both of these are now demonstrated.
p.d. method:
V BC � IR BC volt ( Fig. 2.12 ) � 8 � 2.4 so, V BC � 19.2 V
I1
1
�VRBC amp
( Fig. 2.11 )
�
19 26.
so, I1 � 3.2 A Ans
This answer may be checked as follows:
I1 �
VRBC
2amp
� �
19 24
4 8.
. A
and since I � I 1 � I 2 � 3.2 � 4.8 � 8 A which agrees with the value found in (a).
current division method: Considering Fig. 2.11 , the current I splits into the components I 1 and I 2
according to the ratio of the resistor values. However, you must bear in mind that the larger resistor carries the smaller proportion of the total current.
I I11
��
�R
R R2
2amp
�
��
46 4
8
so, I 1 � 3.2 A Ans
(c) P AB � I 2 R AB watt
� 8 2 � 5.6
so, P AB � 358.4 W Ans
Alternatively, P AB � V AB I watt
where V AB � E � V BC volt � 64 � 19.2 � 44.8 V
P AB � 44.8 � 8
so, P AB � 358.4 W Ans

46 Fundamental Electrical and Electronic Principles
A
The fi rst step in the solution is to label the diagram clearly with letters at the junctions and identifying p.d.s and branch currents. This shown in Fig. 2.14 .
R1R3
R4
R5
R6
R2
4 Ω
6 Ω
3 Ω
6 Ω
8 Ω
5 Ω
E
18 V
VAB VBC VCD
I5I3
I4
I1
I2
I6
A BC
D
I
Fig. 2.14
Worked Example 2.7
Q For the circuit of Fig. 2.13 calculate (a) the current drawn from the source, (b) the p.d. across each
resistor, (c) the current through each resistor, and (d) the power dissipated by the 5 � resistor.
R1R3
R4
R5
R6
R2
4 Ω
6 Ω
3 Ω
6 Ω
8 Ω
5 Ω
E
18 V
Fig. 2.13
(a) RR R
R RAB ��
��
��1
1
2
2
4 64 6
2 4ohm . �
R BC � 5 �
1 1 1 1 1 1 1
R R R RCD� � � � � �
4 5 6 3 6 8
�
� ��
8 4 324
5241
S
R CD � 24
51 � 1.6 �
R � R AB � R BC � R CD ohm
R � 2.4 � 5 � 1.6 � 9 �
I � �
ER
amp189
I � 2 A Ans

D.C. Circuits 47
(b) The circuit has been reduced to its series equivalent as shown in Fig. 2.15 . Using this equivalent circuit it is now a simple matter to calculate the p.d. across each section of the circuit.
V AB � IR AB volt � 2 � 2.4
V AB � 4.8 V Ans
(this p.d. is common to both R 1 and R 2 )
V BC � IR BC volt � 2 � 5
V BC � 10 V Ans
V CD � IR CD volt � 2 � 1.6
V CD = 3.2 V Ans
(this p.d. is common to R 4 , R 5 and R 6 )
I
E
18 V
VAB VBC VCD
2.4 Ω 5 Ω 1.6 ΩA DB C
Fig. 2.15
(c) I 1 � VRAB
1
�4 84.
or I 1 � R
R R2
2
610
21 �
� � �I
I 1 � 1.2 A Ans I 1 � 1.2 A Ans
I 2 �
VR
AB
2
4 86
�.
or I 2 �
RR R
1
1 1�� � �
2
40
2I
I 2 � 0.8 A Ans I 2 � 0.8 A Ans
I 3 � I � 2 A Ans
I 4 �
VRCD
4
3 23
�.
or
1 1 1 1
R R R RCD� � �
4 5 6
I 4 � 1.067 A Ans � � �1 1 1
3 6 8
I 5 � VRCD
5
3 26
�.
� 8 4 3
245
24� �
�1
I 5 � 0.533 A Ans so I 4 � 85
21
�
I 6 � VRCD
6
3 28
�.
I 4 � 1.067 A Ans
I 6 � 0.4 A Ans I 5 � 45
21
�
I 5 � 0.533 A Ans
I 6 �
35
21
�
I 6 � 0.4 A Ans

48 Fundamental Electrical and Electronic Principles
Notice that the p.d. method is an easier and less cumbersomeone than current division when more than two resistors are connected in parallel.
(d) P 3 � I32 R 3 watt or V BC I 3 watt
or VRBC2
3 watt
and using the fi rst of these alternative equation:
P 3 � 2 2 � 5
P 3 � 20 W Ans
It is left to the reader to confi rm that the other two power equations above yield the same answer.
2.6 Kirchhoff ’ s Current Law
We have already put this law into practice, though without stating it explicitly. The law states that the algebraic sum of the currents at any junction of a circuit is zero. Another, and perhaps simpler, way of stating this is to say that the sum of the currents arriving at a junction is equal to the sum of the currents leaving that junction. Thus we have applied the law with parallel circuits, where the assumption has been made that the sum of the branch currents equals the current drawn from the source. Expressing the law in the form of an equation we have:
�I � 0 (2.9)
where the symbol means ‘ the sum of ’ .
Figure 2.16 illustrates a junction within a circuit with a number of currents arriving and leaving the junction. Applying Kirchhoff ’ s current law yields:
I I I I I1 2 3 4 5 0� � � � �
where ‘� ’ signs have been used to denote currents arriving and ‘� ’signs for currents leaving the junction. This equation can be transposed to comply with the alternative statement for the law, thus:
I I I I I1 3 4 2 5� � � �
I2
I3
I1
I4
I5
Fig. 2.16

D.C. Circuits 49
Worked Example 2.8
Q For the network shown in Fig. 2.17 calculate the values of the marked currents.
40 A
10 A80 A
30 A
25 A
A
B C D
I2
I1
I5
I4
I3
F
E
Fig. 2.17
A
Junction A: I 2 � 40 � 10 � 50 A Ans
Junction C:
so A
I I
I
I
1
1
1
� �
� �
�
2 80
50 80
30 Ans
Junction D: I 3 � 80 � 30 � 110 A Ans
Junction E:
so A
I I
I
I
4 3
4
4
25
0 25
85
� �
� �
�
11
Ans
Junction F:
so A
I I
I
I
I
5 4
5
5
5
30
85 30
30 85
55
� �
� �
� �
�� Ans
Note: The minus sign in the last answer tells us that the current I 5 is actually fl owing away from the junction rather than towards it as shown.
2.7 Kirchhoff ’ s Voltage Law
This law also has already been used — in the explanation of p.d. and in the series and series/parallel circuits. This law states that in any closed network the algebraic sum of the emfs is equal to the algebraic sum of the p.d.s taken in order about the network. Once again, the law sounds very complicated, but it is really only common sense, and is simple to apply. So far, it has been applied only to very simple circuits, such as resistors connected in series across a source of emf. In this case we have said that the sum of the p.d.s is equal to the applied emf (e.g. V1 � V2 � E ). However, these simple circuits have had only one source

50 Fundamental Electrical and Electronic Principles
of emf, and could be solved using simple Ohm ’ s law techniques. When more than one source of emf is involved, or the network is more complex, then a network analysis method must be used. Kirchhoff ’ s is one of these methods.
Expressing the law in mathematical form:
� �E IR� (2.10)
A generalised circuit requiring the application of Kirchhoff ’ s laws is shown in Fig. 2.18 . Note the following:
1 The circuit has been labelled with letters so that it is easy to refer to a particular loop and the direction around the loop that is being considered. Thus, if the left-hand loop is considered, and you wish to trace a path around it in a clockwise direction, this would be referred to as ABEFA. If a counterclockwise path was required, it would be referred to as FEBAF or AFEBA.
F E D
CA B
R2
E1
I2I1
R1
R3
(I1 � I2)
E2
Fig. 2.18
2 Current directions have been assumed and marked on the diagram. As was found in the previous worked example (2.8), it may well turn out that one or more of these currents actually fl ows in the opposite direction to that marked. This result would be indicated by a negative value obtained from the calculation. However, to ensure consistency, make the initial assumption that all sources of emf are discharging current into the circuit; i.e. current leaves the positive terminal of each battery and enters at its negative terminal. The current law is also applied at this stage, which is why the current fl owing through R3 is marked as ( I1 � I2 ) and not as I3 . This is an important point since the solution involves the use of simultaneous equations, and the fewer the number of ‘ unknowns ’ the simpler the solution. Thus marking the third-branch current in this way means

D.C. Circuits 51
that there are only two ‘ unknowns ’ to fi nd, namely I1 and I2 . The value for the third branch current, I3 , is then simply found by using the values obtained for I1 and I2 .
3 If a negative value is obtained for a current then the minus sign MUST be retained in any subsequent calculations. However, when you quote the answer for such a current, make a note to the effect that it is fl owing in the opposite direction to that marked, e.g. from C to D.
4 When tracing the path around a loop, concentrate solely on that loop and ignore the remainder of the circuit. Also note that if you are following the marked direction of current then the resulting p.d.(s) are assigned positive values. If the direction of ‘ travel ’ is opposite to the current arrow then the p.d. is assigned a negative value.
Let us now apply these techniques to the circuit of Fig. 2.18 .
Consider fi rst the left-hand loop in a clockwise direction. Tracing around the loop it can be seen that there is only one source of emf within it (namely E1 ). Thus the sum of the emfs is simply E1 volt. Also, within the loop there are only two resistors ( R1 and R2 ) which will result in two p.d.s, I1R1 and ( I1 � I2)R3 volt. The resulting loop equation will therefore be:
ABEFA: E I R I I R1 1 1 1 2 3� � �( ) [1]
Now taking the right-hand loop in a counterclockwise direction it can be seen that again there is only one source of emf and two resistors. This results in the following loop equation:
CBEDC: E I R I I R2 2 2 1 2 3� � �( ) [2]
Finally, let us consider the loop around the edges of the diagram in a clockwise direction. This follows the ‘ normal ’ direction for E1 but is opposite to that for E2 , so the sum of the emfs is E1 � E2 volt. The loop equation is therefore
ABCDEFA: E E I R I R1 2 1 1 2 2� � � [3]
Since there are only two unknowns then only two simultaneous equations are required, and three have been written. However it is a useful practice to do this as the ‘ extra ’ equation may contain more convenient numerical values for the coeffi cients of the ‘ unknown ’ currents.
The complete technique for the applications of Kirchhoff ’ s laws becomes clearer by the consideration of a worked example containing numerical values.

52 Fundamental Electrical and Electronic Principles
Worked Example 2.9
Q For the circuit of Fig. 2.19 determine the value and direction of the current in each branch, and the p.d.
across the 10 � resistor.
10 Ω
2 Ω3 Ω
10 V 4 V
I1
I2
(I1 � I2)A B C
F E D
Fig. 2.20
A
The circuit is fi rst labelled and current fl ows identifi ed and marked by applying the current law. This is shown in Fig. 2.20 .
R1
E2E1
R2
R3 10 Ω
2 Ω3 Ω
10 V 4 V
Fig. 2.19
ABEFA :
1
1
1
1
0 4 3 2
6 3 22
2
� � �
� �
I I
I Iso ……………[ ]
ABCDEFA :
1 1
1
1 1 1
1
1
1
0 3 0
3 0 10
0 3 0 2
2 2
2 2
2
� � �
� � �
� �
I I I
I I I
I I
( )
[ ]so ……………

D.C. Circuits 53
BCDEB :
4 2 0
2 0 10
4 0 2 3
2 2
2 2
2
� � �
� � �
� �
I I I
I I I
I I
1
1
1 1
1
1
1
( )
[ ]so ……………
Inspection of equations [1] and [2] shows that if equation [1] is multiplied by 5 then the coeffi cient of I 2 will be the same in both equations. Thus, if the two are now added then the term containing I 2 will be eliminated, and hence a value can be obtained for I 1 .
30 5 0 5
0 3 0 2
40 28
2
2
� � �
� �
�
1 1 1
1 1 1
1
1
1
I I
I I
I
……………
……………
[ ]
[ ]
so I 1 � 4028
� 1.429 A Ans
Substituting this value for I 1 into equation [3] yields;
4 4 29 2
2 4 4 29
0 292
0 857
2
2
2
� �
� �
��
��
1 1
1 1
1
1
.
.
..
I
I
Iso A (charge) Anns
( ) . . .
( )
.
I I
I I
1 1� � � �
� � �
� �
2
2 2
429 0 857 0 572
0 572
A
volt
Ans
V RCD CD
110
5 72so V VCD � . Ans
Worked Example 2.10
Q For the circuit shown in Fig 2.21 , use Kirchhoff ’ s Laws to calculate (a) the current fl owing in each
branch of the circuit, and (b) the p.d. across the 5 � resistor.
5 Ω
1.5 Ω 2 Ω
6 V 4.5 V
Fig. 2.21

54 Fundamental Electrical and Electronic Principles
A
Firstly the circuit is sketched and labelled and currents identifi ed using Kirchhoff ’ s current law. This is shown in Fig. 2.22 .
1.5 Ω
5 ΩR3
2 ΩR2R1
(I1 � I2)
6 V 4.5 VE1 E2
I1 I2A B C
F E D
Fig. 2.22
(a) We can now consider three loops in the circuit and write down the corresponding equations using Kirchhoff ’ s voltage law:
ABEFA:
E R R1 1 1 1
1 1 1 11 1
� � �
� � � � � �
�
I I I
I I I I I I
( )
. ( ) .2 3
2 26 5 5 5 5 5
6
volt
so, 66 5 5 2. [ ]I I1 1� ……………
CBEDC:
E R R2 2 2 2 3
2 2 2 24 5 2 5 2 5 5
4 5
� � �
� � � � � �
�
I I I
I I I I I I
( )
. ( )
.
1
1 1
volt
so, 55 7 22I I1 � ……………[ ]
ABCDEFA:
E E R R1 1 1
1
1
1
1 1
� � �
� � �
� �
2 2 2
2
2
6 4 5 5 2
5 5 2
I I
I I
I I
volt
so,
. .
. . […………… 33]
Now, any pair of these three equations may be used to solve the problem, using the technique of simultaneous equations. We shall use equations [1] and [3] to eliminate the unknown current I 2 , and hence obtain a value for current I 1 . To do this we can multiply [1] by 2 and [3] by 5, and then add the two modifi ed equations together, thus:
1 1 1 1
1
1
1
1
2 3 0 2
7 5 7 5 0 3 5
9 5 20 5
2
2
� � �
� � �
�
I I
I I
I
……………
……………
. .[ ]
. . [ ]
. . 11
11
1hence, A I � �9 5
20 50 95
.
.. Ans

D.C. Circuits 55
Substituting this value for I 1 into equation [3] gives:
1 1 1
1 1
1 1
. ( . . )
. .
. . .
5 5 0 95 2
5 427 2
2 427 5 0 07
2
2
2
� � �
� �
� � ��
I
I
Ihence, 332
0 03662and A I �� . Ans
Note: The minus sign in the answer for I 2 indicates that this current is actually fl owing in the opposite direction to that marked in Fig. 2.22 . This means that battery E 1 is both supplying current to the 5 � resistor and charging battery E 2 .
Current through 5 resistor amp
so cu
� � � � � �I I1 12 0 95 0 0366. ( . )
rrrent through 5 resistor A � � � �0 95 0 0366 0 9 4. . .1 1 Ans
(b) To obtain the p.d. across the 5 � resistor we can either subtract the p.d. (voltage drop) across R 1 from the emf E 1 or add the p.d. across R 2 to emf E 2 , because E 2 is being charged. A third alternative is to multiply R 3 by the current fl owing through it. All three methods will be shown here, and, provided that the same answer is obtained each time, the correctness of the answers obtained in part (a) will be confi rmed.
V E R
V
BE
BE
� � � � �
� �
�
1 1 1 1 1
1
I volt
so, V
6 0 95 5
6 4265
4 574
( . . )
.
. Ans
OR:
volt
so,
V E R
V
BE
BE
� � � � �
� �
�
2 2 2 4 5 0 0366 2
4 5 0 0732
4 573
I . ( . )
. .
. VV Ans
OR:
V RV
BE
BE
� � � �
�
( ) ..I I1 12 3 0 9 4 5
4 57 volt
so, V Ans
The very small diff erences between these three answers is due simplyto rounding errors, and so the answers to part (a) are verifi ed ascorrect.
2.8 The Wheatstone Bridge Network
This is a network of interconnected resistors or other components, depending on the application. Although the circuit contains only one source of emf, it requires the application of a network theorem such as the Kirchhoff ’ s method for its solution. A typical network, suitably labelled and with current fl ows identifi ed is shown in Fig. 2.23 .

56 Fundamental Electrical and Electronic Principles
Notice that although there are fi ve resistors, the current law has been applied so as to minimise the number of ‘ unknown ’ currents to three. Thus only three simultaneous equations will be required for the solution, though there are seven possible loops to choose from. These seven loops are:
ABCDA; ADCA; ABDCA; ADBCA; ABDA; BCDB; andABCDA
If you trace around these loops you will fi nd that the last three do not include the source of emf, so for each of these loops the sum of the emfs will be ZERO! Up to a point it doesn ’ t matter which three loops are chosen provided that at least one of them includes the source. If you chose to use only the last three ‘ zero emf ’ loops you would succeed only in proving that zero equals zero!
The present level of study does not require you to solve simultaneous equations containing three unknowns. It is nevertheless good practice in the use of Kirchhoff’s laws, and the seven equations for the above loops are listed below. In order for you to gain this practice it is suggested that you attempt this exercise before reading further, and compare your results with those shown below.
ABCA : E1 � I1R1 � ( I1 � I3 ) R3
ADCA : E1 � I2R2 � ( I2 � I3 ) R4
ABDCA : E1 � I1R1 � I3R5 � ( I2 � I3 ) R4
ADBCA : E1 � I2R2 � I3R5 � ( I1 � I3 ) R3
ABDA : 0 � I1R1 � I3R5 � I2R2
BCDB : 0 � ( I1 � I3 ) R3� ( I2 � I3 ) R4 � I3R5
ABCDA : 0 � I1R1 � ( I1 � I3 ) R3 � ( I2 � I3 ) R4 � I2R2
(I1 � I3)
(I2 � I3)
R2R4
R1
R5
R3
CA
I1
I2
I
E1
I3
D
B
Fig. 2.23

D.C. Circuits 57
As a check that the current law has been correctly applied, consider junctions B and C:
current arriving at Btotal current leaving
so
�
� �
� �
II I
I I1 2
1 II
I I I I
I I I I
I I
2
1 3 2 3
1 3 2 3
1 2
current arriving at C � � � �
� � � �
� �
( ) ( )
�� I
Hence, current leaving battery � current returning to battery.
Worked Example 2.11
Q For the bridge network shown in Fig. 2.24 calculate the current through each resistor, and the current
drawn from the supply.
(I1 � I3)
(I2 � I3)
5 Ω
3 Ω 1 Ω
6 Ω 4 Ω
CA
I1
I2
I
10 V
I3
D
B
Fig. 2.24
A
The circuit is fi rst labelled and the currents identifi ed using the current law as shown in Fig. 2.24 .
ABDA :
0 6 5 30 6 3 5 1
3 2
2 3
� � �
� � �
I I I
I I I1
1 ……………[ ]
BDCB :
0 5 45 4 4
0 4 0
3 2 3 3
3 2 3 3
2 3
� � � � �
� � � � �
�� � �
I I I I I
I I I I I
I I I
1
1
1
1
1
( ) ( )
………………[ ]2

58 Fundamental Electrical and Electronic Principles
ADCA :
1 1
1
0 33
0 4 3
2 2 3
2 2 3
2 3
� � �
� � �
� �
I I I
I I I
I I
( )
……………[ ]
Multiplying equation [1] by 2, equation [2] by 3 and then adding them
0 2 6 0 20 2 3 30 2 3
0 3
2 3
2 3
2
� � � �
�� � � �
� � �
1 1 1
11
1
I I I
I I I
I
…………………………
[ ][ ]
440 43I ……………[ ]
Multiplying equation [3] by 3, equation [4] by 4 and then adding them
30 2 3 3 30 2 60 4 4
30 6330
2 3
2 3
3
3
� � �
�� � �
�
�
1
1 1
1
1
I I
I I
I
I
…………………………
[ ][ ]
6630 84� .1 A Ans
Substituting for I 3 in equation [3]
1 111
0 4 0 844 9 8 6
9 8 64
2 454
2
2
2
� �
�
� �
I
I
I
...
. A Ans
Substituting for I 3 and I 2 in equation [2]
0 4 2 454 844 4 294
4 2944
074
�� � �
�
� �
I
I
I
1
1
1
1
1
. ...
. A Ans
I I I
I
� �
� �
�
1
12
074 2 4543 529
. .. A Ans
Since all of the answers obtained are positive values then the currents will fl ow in the directions marked on the circuit diagram.
Worked Example 2.12
Q If the circuit of Fig. 2.24 is now amended by simply changing the value of R DC from 1 � to 2 � , calculate
the current fl owing through the 5 � resistor in the central limb.
A
The amended circuit diagram is shown in Fig. 2.25 .
ABDA :
0 6 5 30 6 3 5
3 2
2 3
� � �
� � �
I I I
I I I1
1 1……………[ ]

D.C. Circuits 59
(I1 � I3)
(I2 � I3)
5 Ω
3 Ω 2 Ω
6 Ω 4 Ω
CA
I1
I2
10 V
I3
D
B
Fig. 2.25
BDCB :
0 5 2 45 2 2 4 4
0 4 2
3 2 3 3
3 2 3 3
2 3
� � � � �
� � � � �
�� � �
I I I I I
I I I I I
I I I
( ) ( )1
1
1 11 ………………[ ]2
Multiplying equation [1] by 2, equation [2] by 3 and adding them
0 2 6 0 20 2 6 33 2 3
0 43
2 3
2 3
3
� � � �
�� � � �
�
1 1 1
11
1
I I I
I I I
I
…………………………
[ ][ ]
soo A I3 0� Ans
At fi rst sight this would seem to be a very odd result. Here we have a resistor in the middle of a circuit with current being drawn from the source, yet no current fl ows through this particular resistor! Now, in any circuit, current will fl ow between two points only if there is a difference of potential between the two points. So we must conclude that the potentials at junctions B and D must be the same. Since junction A is a common point for both the 6 � and 3 � resistors, then the p.d. across the 6 � must be the same as that across the 3 � resistor. Similarly, since point C is common to the 4 � and 2 � resistors, then the p.d. across each of these must also be equal. This may be verifi ed as follows.
Since I3 is zero then the 5 � resistor plays no part in the circuit. In this case we can ignore its presence and re-draw the circuit as in Fig. 2.26 .
Thus the circuit is reduced to a simple series/parallel arrangement that can be analysed using simple Ohm ’ s law techniques.
R R RR
IE
R
I
V
ABC
ABC
ABC
AB
� � � �
�
�
� �
1 3
1
1
6 410
10
101
ohmso
amp
so A
�
�� � � �I R1 1 1 6 6 volt V

60 Fundamental Electrical and Electronic Principles
Similarly,
A
and V
R
I
V
ADC
AD
� � �
� �
� � �
3 2 510
52
2 3 6
2
�
Thus VAB � VAD � 6 V, so the potentials at B and D are equal. In this last example, the values of Rl , R2, R3 and R4 are such to produce what is known as the balance condition for the bridge. Being able to produce this condition is what makes the bridge circuit such a useful one for many applications in measurement systems. The value of resistance in the central limb has no effect on the balance conditions. This is because, at balance, zero current fl ows through it. In addition, the value of the emf also has no effect on the balance conditions, but will of course affect the values for I1 and I2 . Consider the general case of a bridge circuit as shown in Fig. 2.27 , where the values of resistors R1 to R4 are adjusted so that I3 is zero.
Balance condition refers to that condition when zero current fl ows through the central arm of the bridge circuit, due to a particular combination of resistor values in the four ‘ outer ’ arms of the bridge
(I1 � I3)
(I � I3)
R5
R2R4
R1 R3
CA
I1
I2
E
I3
D
B
Fig. 2.27
I1
I2
3 Ω 2 Ω
6 Ω 4 Ω
CA
I1R1
R2
R3
R4I2
10 V
D
B
Fig. 2.26

D.C. Circuits 61
V I R V I RAB AD� �1 1 2 2 and
but under the balance condition VAB � VAD
so I1R1 � I2R2 ……………[1]
Similarly, VBC � VDC
so ( I1�I3 ) � R3 � ( I2 � I3 ) R4
but, I3 � 0, so current through R3 � I1
and current through R4 � I2 , therefore
I1R3 � I2R4 ……………[2]
Dividing equation [1] by equation [2]:
I R
I R
I R
I R
R
R
R
R
1 1
1 3
2 2
2 4
1
3
2
4
�
�so
This last equation may be verifi ed by considering the values used in the previous example where R1 � 6 � , R2 � 3 � , R3 � 4 � and R4 � 2 � .
i.e. 6
3
4
2�
So for balance, the ratio of the two resistors on the left-hand side of the bridge equals the ratio of the two on the right-hand side.
However, a better way to express the balance condition in terms of the resistor values is as follows. If the product of two diagonally opposite resistors equals the product of the other pair of diagonally opposite resistors, then the bridge is balanced, and zero current fl ows through the central limb
i.e. R R R R1 4 2 3� (2.11)
and transposing equation (2.11) to make R4 the subject we have
RR
RR4
2
13� (2.12)
Thus if resistors R1 , R2 and R3 can be set to known values, and adjusted until a sensitive current measuring device inserted in the central limb indicates zero current, then we have the basis for a sensitive resistance measuring device.

62 Fundamental Electrical and Electronic Principles
Worked Example 2.13
Q A Wheatstone Bridge type circuit is shown in Fig. 2.28 . Determine (a) the p.d. between terminals B and
D, and (b) the value to which R 4 must be adjusted in order to reduce the current through R 3 to zero
(balance the bridge).
8 Ω
10 Ω 2 Ω
R1
R2 R5
5 Ω
CA
10 V
D
B
R4
20 Ω
E
R3
Fig. 2.28
A
The circuit is sketched and currents marked, applying Kirchhoff ’ s current law, as shown in Fig. 2.29 .
Kirchhoff ’ s voltage law is now applied to any three loops. Note that as in this case there are three unknowns (I 1 , I 2 , and I 3 ) then we must have at least three equations in order to solve the problem.
ABDA:
0 20 8 00 20 0 8
3 2
2 3
� � �
� � �
I I I
I I I1
1
1
1 1so, ………………. . . . . . . . .[ ]
BDCB:
0 8 2 58 2 2 5 5
0 5 2
3 2 3 3
3 2 3 3
2
� � � � �
� � � � �
�� � �
I I I I I
I I I I I
I I
( ) ( )1
1
1so, 115 23I ………………. . . . . . . .[ ]
ADCA:
1 1
1
1 1
0 0 20 2 2
0 2 2
2 2 3
2 2 3
2 3
� � �
� � �
� �
I I I
I I I
I I
( )
. . . . .so, ……………………… .. .[ ]3
Using equations [1] and [2] to eliminate I 1 we have:
0 20 0 80 20 8 60 2 4
2 3
2 3
� � �
�� � � �
I I I
I I I1
1
1 1………………………
[ ][ ]
and adding,, 0 2 68 42 3�� �I I ………………. . .[ ]

D.C. Circuits 63
and now using equations [3] and [4] we can eliminate I 2 as follows:
1 1
1
1 1
0 2 2 30 2 408 4 6
0 4 0
2 3
2 3
3
� �
�� � �
�
I I
I I
I
………………………
[ ][ ]
and A
volt
so, V
I
I
3
3 3
04 0
0 0244
0 0244 80 95
� �
�
� �
�
1
1
1
.
.
.
V R
V
BD
BD Ans
(b) For balance conditions
R R R R
RR R
R
R
2 4 5
45
2
4
20 20
4
�
�
��
�
1
1
1
ohm
so, � Ans
2.9 The Wheatstone Bridge Instrument
This is an instrument used for the accurate measurement of resistance over a wide range of resistance values. It comprises three arms, the resistances of which can be adjusted to known values. A fourth arm contains the ‘ unknown ’ resistance, and a central limb contains a sensitive microammeter (a galvanometer or ‘ galvo ’ ). The general arrangement is shown in Fig. 2.30 . Comparing this circuit with that of Fig. 2.27 and using equation (2.12), the value of the resistance to be measured ( Rx ) is given by
RR
RRx
m
dv� ohm
(I1 � I3)
(I2 � I3)10 Ω
2 Ω
R1
R38 Ω
R2
R5
5 Ω
CA
I1
I2
10 V
I3
D
B
R420 Ω
E
Fig. 2.29

64 Fundamental Electrical and Electronic Principles
Rm and Rd are known collectively as the ratio arms, where Rm is the multiplier and Rd is the divider arm. Both of these arms are variable in decade steps (i.e. 1, 10, 100, 1000). This does not mean that these fi gures represent actual resistance values, but they indicate the appropriate ratio between these two arms. Thus, if Rd is set to 10 whilst Rm is set to 1000, then the resistance value selected by the variable arm Rv is ‘ multiplied ’ by the ratio 1000/10 � 100.
Worked Example 2.14
Q Two resistors were measured using a Wheatstone Bridge, and the following results were
obtained.
(a) R m � 1000; R d � 1; R v � 3502 �
(b) R m � 1; R d � 1000; R v � 296 �
For each case determine the value of the resistance being measured.
A
(a) R x � 1
1
000 � 3502 � 3.502 M � Ans
(b) R x � 1
1000 � 296 � 0.296 � Ans
G
10001000s
10s
100s100
10
1units
Rv
Rs
Rx
Rd
Rm
1
10
100
1000
2 V
Fig. 2.30

D.C. Circuits 65
From the above example it may be appreciated that due to the ratio arms, the Wheatstone Bridge is capable of measuring a very wide range of resistance values. The instrument is also very accuratebecause it is what is known as a null method of measurement. This term is used because no settings on the three arms are used to determine the value of Rx until the galvo (G) in the central limb indicates zero (null reading). Since the galvo is a very sensitive microammeter it is capable of indicating fractions of a microamp. Hence, the slightest imbalance of the bridge can be detected. Also, since the bridge is adjusted until the galvo indicates zero, then this condition can be obtained with maximum accuracy. The reason for this accuracy is that before any measurements are made (no current through the galvo) it is a simple matter to ensure that the galvo pointer indicates zero. Thus, only the sensitivity of the galvo is utilised, and its accuracy over the remainder of its scale is unimportant. Included in the central limb are a resistor and a switch. These are used to limit the galvo current to a value that will not cause damage to the galvo when the bridge is well off balance. When the ratio arms and the variable arm have been adjusted to give only a small defl ection of the galvo pointer, the switch is then closed to bypass the swamp resistor Rs . This will revert the galvo to its maximum sensitivity for the fi nal balancing using Rv . The bridge supply is normally provided by a 2 V cell as shown.
Do not confuse accuracy with sensitivity. For an instrument to be accurate it must also be sensitive. However, a sensitive instrument is not necessarily accurate. Sensitivity is the ability to react to small changes of the quantity being measured. Accuracy is to do with the closeness of the indicated value to the true value
2.10 The Slidewire Potentiometer
This instrument is used for the accurate measurement of small voltages. Like the Wheatstone Bridge, it is a null method of measurement since it also utilises the fact that no current can fl ow between points of equal potential. In its simplest form it comprises a metre length of wire held between two brass or copper blocks on a base board, with a graduated metre scale beneath the wire. Connected to one end of the wire is a contact, the other end of which can be placed at any point along the wire. A 2 V cell causes current to fl ow along the wire. This arrangement, including a voltmeter, is shown in Fig. 2.31 . The wire between the blocks A and B must be of uniform cross-section and resistivity throughout its length, so that each millimetre of its length has the same resistance as the next. Thus it may be considered as a number of equal resistors connected in series between points A and B. In other words it is a continuous potential divider.

66 Fundamental Electrical and Electronic Principles
A B
Es
Ex
2 V
G
2
1
Fig. 2.32
Let us now conduct an imaginary experiment. If the movable contact is placed at point A then both terminals of the voltmeter will be at the same potential, and it will indicate zero volts. If the contact is now moved to point B then the voltmeter will indicate 2 V. Consider now the contact placed at point C which is midway between A and B. In this case it is exactly halfway along our ‘ potential divider ’ , so it will indicate 1V. Finally, placing the contact at a point D (say 70 cm from A), the voltmeter will indicate 1.4 V. These results can be summarised by the statement that there is a uniform potential gradient along the wire. Therefore, the p.d. ‘ tapped off’ by the moving contact, is in direct proportion to the distance travelled along the wire from point A. Since the source has an emf of 2 V and the wire is of 1 metre length, then the potential gradient must be 2 V/m. In general we can say that
VAC
ABEAC � volt (2.13)
where AC distance travelled along wireAB total length of t
�
� hhe wireand the source voltageE �
Utilising these facts the simple circuit can be modifi ed to become a measuring instrument, as shown in Fig. 2.32 . In this case the voltmeter
E 2 V
BA
V
C D
Fig. 2.31

D.C. Circuits 67
has been replaced by a galvo. The movable contact can be connected either to the cell to be measured or the standard cell, via a switch. Using this system the procedure would be as follows:
1 The switch is moved to position ‘ 1 ’ and the slider moved along the wire until the galvo indicates zero current. The position of the slider on the scale beneath the wire is then noted. This distance from A represents the emf Es of the standard cell.
2 With the switch in position ‘ 2 ’ , the above procedure is repeated, whereby distance along the scale represents the emf Ex of the cell to be measured.
3 The value of Ex may now be calculated from
E Ex s� �AD
AC
where AC represents the scale reading obtained for the standard cell and AD the scale reading for the unknown cell.
It should be noted that this instrument will measure the true emf of the cell since the readings are taken when the galvo carries zero current (i.e. no current is being drawn from the cell under test), hence there will be no p.d. due to its internal resistance.
Worked Example 2.15
Q A slidewire potentiometer when used to measure the emfs of two cells provided balance conditions
at scale settings of (a) 600 mm and (b) 745 mm. If the standard cell has an emf of 1.0186 V and a scale
reading of 509.3 mm then determine the values for the two cell emfs.
A
Let E s , � 1 and � 2 represent the scale readings for the standard cell and cells 1 and 2 respectively. Hence:
� s � 509.3 mm � 1 � 600 mm; � 2 � 745 mm; E s � 1.0186 V
E E
E
ss1
1
1
1 1
1
� �
� �
�
��
volt
V
600509 3
0 86
2.
.
. Ans
E E
E
ss2
2
2
745509 3
0 86
49
� �
� �
�
��
volt
V .
.
.
1 1
1 Ans
It is obviously inconvenient to have an instrument that needs to be one metre in length and requires the measurements of lengths along a scale.

68 Fundamental Electrical and Electronic Principles
In the commercial version of the instrument the long wire is replaced by a series of precision resistors plus a small section of wire with a movable contact. The standard cell and galvo would also be built-in features. Also, to avoid the necessity for separate calculations, there would be provision for standardising the potentiometer. This means that the emf values can be read directly from dials on the front of the instrument.
Summary of Equations
Resistors in series: R � R1 � R2 � R3 � … ohm
Resistors in parallel: 1 1 1 1
1 2 3R R R R� � � � … siemen
and for ONLY two resistors in parallel, RR R
R R�
�1 2
1 2
ohm product
sum
⎛
⎝⎜⎜⎜
⎞
⎠⎟⎟⎟⎟
Potential divider: VR
R RE1
1
1 2
��
� volt
Current divider: IR
R RI1
2
1 2
��
� amp
Kirchhoff ’ s laws: I � 0 (sum of the currents at a junction � 0)
E � IR (sum of the emfs � sum of the p.d.s, in order)
Wheatstone Bridge: Balance condition when current through centre limb � 0 or R1R4 � R2R3
(multiply diagonally across bridge circuit)
Slidewire potentiometer: VAC
ABEAC � � volt

D.C. Circuits 69
1 Two 560 � resistors are placed in series across a 400 V supply. Calculate the current drawn.
2 When four identical hotplates on a cooker are all in use, the current drawn from a 240 V supply is 33 A. Calculate (a) the resistance of each hotplate, (b) the current drawn when only three plates are switched on. The hotplates are connected in parallel.
3 Calculate the total current when six 120 � torch bulbs are connected in parallel across a 9 V supply.
4 Two 20 � resistors are connected in parallel and this group is connected in series with a 4 � resistor. What is the total resistance of the circuit?
5 A 12 � resistor is connected in parallel with a 15 � resistor and the combination is connected in series with a 9 � resistor. If this circuit is supplied at 12 V, calculate (a) the total resistance, (b) the current through the 9 � resistor and (c) the current through the 12 � resistor.
6 For the circuit shown in Fig. 2.33 calculate the values for (a) the current through each resistor, (b) the p.d. across each resistor and(c) the power dissipated by the 20 � resistor.
7 Determine the p.d. between terminals E and F of the circuit in Fig. 2.34 .
8 For the circuit of Fig. 2.35 calculate (a) the p.d. across the 8 � resistor, (b) the current through the 10 � resistor and (c) the current through the 12 � resistor.
9 Three resistors of 5 � , 6 � and 7 � respectively are connected in parallel. This combination is connected in series with another parallel combination of 3 � and 4 � . If the complete circuit is supplied from a 20 V source, calculate (a) the total resistance, (b) the total current, (c) the p.d. across the 3 � resistor and (d) the current through the 4 � resistor.
10 Two resistors of 18 � and 12 � are connected in parallel and this combination is connected in series with an unknown resistor R x . Determine the value of R x if the complete circuit draws a current of 0.6 A from a 12 V supply.
11 Three loads, of 24 A, 8 A, and 12 A are supplied from a 200 V source. If a motor of resistance 2.4 � is also connected across the supply, calculate (a) the total resistance and (b) the total current drawn from the supply.
12 Two resistors of 15 � and 5 � connected in series with a resistor R x and the combination is supplied from a 240 volt source. If the p.d. across the 5 � resistor is 20 V calculate the value of R x .
13 A 200 V, 0.5 A lamp is to be connected in series with a resistor across a 240 V supply. Determine the resistor value required for the lamp to operate at its correct voltage.
14 A 12 � and a 6 � resistor are connected in parallel across the terminals of a battery of emf 6 V and internal resistance 0.6 � . Sketch the circuit diagram and calculate (a) the current drawn from the battery, (b) the terminal p.d. and (c) the current through the 6 � resistor.
15 Ω
20 Ω16 Ω
10 Ω
8 Ω
50 V
Fig. 2.33
8 Ω
8 Ω
8 Ω
8 Ω
16 Ω16 Ω20 V
B
A C
DF
E
Fig. 2.34
8 Ω
12 Ω
18 Ω
10 Ω
24 V
Fig. 2.35
Assignment Questions

70 Fundamental Electrical and Electronic Principles
15 An electric cooker element consists of two parts, each having a resistance of 18 � , which can be connected (a) in series, (b) in parallel, or (c) using one part only. Calculate the current drawn from a 240 V supply for each connection.
16 A cell of emf 2 V has an internal resistance 0.1 � . Calculate the terminal p.d. when (a) there is no load connected and (b) a 2.9 � resistor is connected across the terminals. Explain why these two answers are diff erent.
17 A battery has a terminal voltage of 1.8 V when supplying a current of 9 A. This voltage rises to 2.02 V when the load is removed. Calculate the internal resistance.
18 Four resistors of values 10 � , 20 � , 40 � , and 40 � are connected in parallel across the terminals of a generator having an emf of 48 V and internal resistance 0.5 � . Sketch the circuit diagram and calculate (a) the current drawn from the generator, (b) the p.d. across each resistor and (c) the current fl owing through each resistor.
19 Calculate the p.d. across the 3 � resistor shown in Fig. 2.36 given that V AB is 11 V.
20 Calculate the p.d. V AB in Fig. 2.37 .
21 For the network shown in Fig. 2.38 , calculate (a) the total circuit resistance, (b) the supply current, (c) the p.d. across the 12 � resistor, (d) the total power dissipated in the whole circuit and (e) the power dissipated by the 12 � resistor.
22 A circuit consists of a 15 � and a 30 � resistor connected in parallel across a battery of internal resistance 2 � . If 60 W is dissipated by the 15 � resistor, calculate (a) the current in the 30 � resistor, (b) the terminal p.d. and emf of the battery, (c) the total energy dissipated in the external circuit in one minute and (d) the quantity of electricity through the battery in one minute.
23 Use Kirchhoff ’s laws to determine the three branch currents and the p.d. across the 5 � resistor in the network of Fig. 2.39 .
24 Determine the value and direction of current in each branch of the network of Fig. 2.40 , and the power dissipated by the 4 � load resistor.
25 Two batteries A and B are connected in parallel (positive to positive) with each other and this combination is connected in parallel with a battery C; this is in series with a 25 � resistor, the negative terminal of C being connected to
4 Ω 1 Ω
3 Ω2 Ω4 Ω
A
B
Fig. 2.36
10 Ω 5 Ω
2 Ω
15 Ω
15 Ω
A
B
100 V
Fig. 2.37
5 Ω
4 Ω9 Ω
6 Ω
2 Ω
12 Ω200 V
Fig. 2.38
4 Ω
5 Ω
2 Ω
20 V 10 V
Fig. 2.39
6.5 V8 V
2 Ω 1 Ω
4 Ω
Fig. 2.40
Assignment Questions

D.C. Circuits 71
the positive terminals of A and B. Battery A has an emf of 108 V and internal resistance 3 � , and the corresponding values for B are 120 V and 2 � . Battery C has an emf of 30 V and negligible internal resistance. Sketch the circuit and calculate (a) the value and direction of current in each battery and (b) the terminal p.d. of A.
26 For the circuit of Fig. 2.41 determine (a) the current supplied by each battery, (b) the current through the 15 � resistor and (c) the p.d. across the 10 � resistor.
27 For the network of Fig. 2.42 , calculate the value and direction of all the branch currents and the p.d. across the 80 � load resistor.
28 Figure 2.43 shows a Wheatstone Bridge network, (a) For this network, write down (but
do not solve) the loop equations for loops ABDA, ABCDA, ADCA, and CBDC, (b) to what value must the 2 � resistor be changed to ensure zero current through the 8 � resistor? (c) Under this condition, calculate the currents through and p.d.s across the other four resistors.
29 Three resistances were measured usinga commercial Wheatstone Bridge, yieldingthe following results for the settings onthe multiplying, dividing and variablearms. Determine the resistance value ineach case.
Rd 1000 10 100
Rm 10 100 100
Rv ( �) 349.8 1685 22.5
30 The slidewire potentiometer instrument shown in Fig. 2.44 when used to measurethe emf of cell Ex yielded the followingresults:
(a) galvo current was zero when connected to the standard cell and the movable contact was 552 mm from A;
(b) galvo current was zero when connected to Es and the movable contact was 647 mm from A.
Calculate the value of E x , given E s � 1.0183 V.
It was found initially that E x was connected the opposite way round and a balance could not be obtained. Explain this result.
2 Ω4 Ω
20 V
10 Ω 15 Ω
10 V
Fig. 2.41
100 Ω
100 V
80 Ω
50 Ω
80 V
Fig. 2.42
10 Ω 5 Ω
8 Ω
2 Ω6 Ω
D
A C
B
2 V
Fig. 2.43
A B
Es
Ex
2 V
G
Fig. 2.44
Assignment Questions

72 Fundamental Electrical and Electronic Principles
Note: Component values and specifi c items of equipment when quoted here are only suggestions. Those used in practice will of course depend upon availability within a given institution.
Assignment 1 To investigate Ohm ’ s law and Kirchhoff ’ s laws as applied to series and parallel circuits.
Apparatus:
Three resistors of diff erent values 1 � variable d.c. power supply unit (psu) 1 � ammeter 1 � voltmeter (DMM)
Method:
1 Connect the three resistors in series across the terminals of the psu with the ammeter connected in the same circuit. Adjust the current (as measured with the ammeter) to a suitable value. Measure the applied voltage and the p.d. across each resistor. Note these values and compare the p.d.s to the theoretical (calculated) values.
2 Reconnect your circuit so that the resistors are now connected in parallel across the psu. Adjust the psu to a suitable voltage and measure, in turn, the current drawn from the psu and the three resistor currents. Note these values and compare to the theoretical values.
3 Write an assignment report and in your conclusions justify whether the assignment confi rms Ohm ’ s law and Kirchhoff ’ s laws, allowing for experimental error and resistor tolerances.
Assignment 2 To investigate the application of Kirchhoff ’ s laws to a network containing more than one source of emf.
Apparatus:
2 � variable d.c. psu 3 � diff erent value resistors 1 � ammeter 1 � voltmeter (DMM)
Method:
1 Connect the circuit as shown in Fig. 2.45 . Set psu 1 to 2 V and psu 2 to 4 V. Measure, in turn, the current in each limb of the circuit, and the p.d. across each resistor. For each of the three possible loops in the circuit compare the sum of the p.d.s measured with the sum of the emfs. Carry out a similar exercise regarding the three currents.
Suggested Practical Assignments
R1 R2
R3psu 1 psu 2
� �
� �
Fig. 2.45

D.C. Circuits 73
2 Reverse the polarity of psu 2 and repeat the above.
3 Write the assignment report and in your conclusions justify whether or not Kirchhoff ’ s laws have been verifi ed for the network.
Assignment 3 To investigate potential and current dividers.
Apparatus:
2 � decade resistance boxes 1 � ammeter 1 � voltmeter (DMM) 1 � d.c. psu
Method:
1 Connect the resistance boxes in series across the psu. Adjust one of them ( R 1 ) to 3 k � and the other ( R 2 ) to 7 k � . Set the psu to 10 V and measure the p.d. across each resistor. Compare the measured values with those predicted by the voltage divider theory.
2 Reset both R 1 and R 2 to two or more diff erent values and repeat the above procedure.
3 Reconnect the two resistance boxes in parallel across the psu and adjust the current drawn from the psu to 10 mA. Measure the current fl owing through each resistance and compare to those values predicted by the current division theory.
4 Repeat the procedure of 3 above for two more settings of R 1 and R 2 , but let one of these settings be such that R 1 � R 2 .
Assignment 4 To make resistance measurements using a Wheatstone Bridge.
Apparatus:
1 � commercial form of Wheatstone Bridge 3 � decade resistance boxes 10 � , 6.8 k � , and 470 k � resistors 1 � centre-zero galvo 1 � d. c. psu
Method:
1 Using the decade boxes, galvo and psu (set to 2 V) connect your own Wheatstone Bridge circuit and measure the three resistor values.
2 Use the commercial bridge to re-measure the resistors and compare the results obtained from both methods.
Assignment 5 Use a slidewire potentiometer to measure the emf of a number of primary cells (nominal emf no more than 1.5 V).

This page intentionally left blank

Electric Fields and Capacitors
Chapter 3
Learning Outcomes
This chapter deals with the laws and properties of electric fi elds and their application to electric components known as capacitors.
On completion of this chapter you should be able to:
1 Understand the properties of electric fi elds and insulating materials. 2 Carry out simple calculations involving these properties. 3 Carry out simple calculations concerning capacitors, and capacitors connected in series,
parallel and series/parallel combinations. 4 Describe the construction and electrical properties of the different types of capacitor. 5 Understand the concept of energy storage in an electric fi eld, and perform simple related
calculations.
75
3.1 Coulomb ’ s Law
A force exists between charged bodies. A force of attraction exists between opposite charges and a force of repulsion between like polarity charges. Coulomb ’ s law states that the force is directly proportional to the product of the charges and is inversely proportional to the square of the distance between their centres. So for the two bodies shown in Fig. 3.1 , this would be expressed as
FQ Q
d 1 2
2
In order to obtain a value for the force, a constant of proportionality must be introduced. In this case it is the permittivity of free space, �0 . This concept of permittivity is dealt with later in this chapter, and need not concern you for the time being. The expression for the force in newtons becomes

76 Fundamental Electrical and Electronic Principles
FQ Q
d�
1 2
02e
newton (3.1)
This type of relationship is said to follow an inverse square law because F 1/ d2 . The consequence of this is that if the distance of separation is doubled then the force will be reduced by a factor of four times. If the distance is increased by a factor of four times, the force will be reduced by a factor of sixteen times, etc. The practical consequence is that although the force can never be reduced to zero, it diminishes very rapidly as the distance of separation is increased. This will continue until a point is reached where the force is negligible relative to other forces acting within the system.
3.2 Electric Fields
You are probably more familiar with the concepts and effects of magnetic and gravitational fi elds. For example, you have probably conducted simple experiments using bar magnets and iron fi lings to discover the shape of magnetic fi elds, and you are aware that forces exist between magnetised bodies. You also experience the effects of gravitational forces constantly, even though you probably do not consciously think about them.
Both of these fi elds are simply a means of transmitting the forces involved, from one body to another. However, the fi elds themselves cannot be detected by the human senses, since you cannot see, touch, hear or smell them. This tends to make it more diffi cult to understand their nature. An electric fi eld behaves in the same way as these other two examples, except that it is the method by which forces are transmitted between charged bodies. In all three cases we can represent the appropriate fi eld by means of arrowed lines. These lines are usually referred to as the lines of force.
To illustrate these points, consider Fig. 3.2 which shows two oppositely charged spheres with a small positively charged particle placed on the surface of Q1 . Since like charges repel and unlike charges attract each other, then the small charged particle will experience a force of repulsion from Q1 and one of attraction from Q2 .
d
Q1 Q2
Fig. 3.1

Electric Fields and Capacitors 77
The force of repulsion from Q1 will be very much stronger than the force of attraction from Q2 because of the relative distance involved. The other feature of the forces is that they will act so as to be at right angles to the charged surfaces. Hence there will be a resultant force acting on the particle. Assuming that it is free to move, then it will start to move in the direction of this resultant force. For the sake of clarity, the distance moved in this direction is greatly exaggerated in the diagram. However, when the particle moves to the new position, force F1 will have decreased and F2 will have increased. In addition, the direction of action of each force will have changed. Thus the direction of action of the resultant will have changed, but its magnitude will have remained constant. The particle will now respond to the new resultant force F. This is a continuous process and the particle will trace out a curved path until it reaches the surface of Q2 . If this ‘ experiment ’ was carried out for a number of starting points at the surface of Q1, the paths taken by the particle would be as shown in Fig. 3.3 .
��
�q
Q1 Q2
F2
F2 F2
F2
F1F1 F1
F1
F FF F
Fig. 3.2
� �
Fig. 3.3
The following points should be noted:
1 The lines shown represent the possible paths taken by the positively charged particle in response to the force acting on it. Thus they are called the lines of electric force. They may also be referred to as the lines of electric fl ux, � .
2 The total electric fl ux makes up the whole electric fi eld existing between and around the two charged bodies.
3 The lines themselves are imaginary and the fi eld is three dimensional. The whole of the space surrounding the charged

78 Fundamental Electrical and Electronic Principles
bodies is occupied by the electric fl ux, so there are no ‘ gaps ’ in which a charged particle would not be affected.
4 The lines of force (fl ux) radiate outwards from the surface of a positive charge and terminate at the surface of a negative charge.
5 The lines always leave (or terminate) at right angles to a charged surface.
6 Although the lines drawn on a diagram do not actually exist as such, they are a very convenient way to represent the existence of the electric fi eld. They therefore aid the understanding of its properties and effects.
7 Since force is a vector quantity any line representing it must be arrowed. The convention used here is that the arrows point from the positive to the negative charge.
It is evident from Fig. 3.3 that the spacing between the lines of fl ux varies depending upon which part of the fi eld you consider. This means that the fi eld shown is non-uniform. A uniform electric fi eld may be obtained between two parallel charged plates as shown in Fig. 3.4 .
�Q
�Q
Fig. 3.4
Note that the electric fi eld will exist in all of the space surrounding the two plates, but the uniform section exists only in the space between them. Some non-uniformity is shown by the curved lines at the edges (fringing effect). At this stage we are concerned only with the uniform fi eld between the plates. If a positively charged particle was placed between the plates it would experience a force that would cause it to move from the positive to the negative plate. The value of force acting on the particle depends upon what is known as the electric fi eld strength.
3.3 Electric Field Strength (E)
This is defi ned as the force per unit charge exerted on a test charge placed inside the electric fi eld. (An outdated name for this property is ‘ electric force ’ ).

Electric Fields and Capacitors 79
Hence, fi eld strength �force
charge
So, newton/coulombE �F
q(3.2)
or, newtonF q� E (3.3)
where q is the charge on the particle , and not the plates.
3.4 Electric Flux ( � ) and Flux Density ( D )
In the SI system one ‘ line ’ of fl ux is assumed to radiate from the surface of a positive charge of one coulomb and terminate at the surface of a negative charge of one coulomb. Hence the electric fl ux has the same numerical value as the charge that produces it. Therefore the coulomb is used as the unit of electric fl ux. In addition, the Greek letter psi is usually replaced by the symbol for charge, namely Q .
The electric fl ux density D is defi ned as the amount of fl ux per square metre of the electric fi eld. This area is measured at right angles to the lines of force. This gives the following equation
DA
��
or, coulomb/metreDQ
A� 2 (3.4)
Worked Example 3.1
Q Two parallel plates of dimensions 30 mm by 20 mm are oppositely charged to a value of 50 mC.
Calculate the density of the electric fi eld existing between them.
A Q � 50 � 10 � 3 C; A � 30 � 20 � 10 � 6 m 2
DQA
D
�
��
�
�
�
�
coulomb/metre
so C/m
2
3
6
2
50 0600 0
83 3
1
1
. Ans

80 Fundamental Electrical and Electronic Principles
Worked Example 3.2
Q Two parallel metal plates, each having a csa of 400 mm 2 , are charged from a constant current source
of 50 � A for a time of 3 seconds. Calculate (a) the charge on the plates, and (b) the density of the
electric fi eld between them.
A
A � 400 � 10 � 6 m 2 ; I � 50 � 10 � 6 A; t � 3 s
(a) Q � It coulomb � 50 � 10 � 6 � 3
so, Q � 150 � C Ans
(b)
DQA
D
�
��
�
�
�
�
coulomb/metre
so, C/m
2
6
6
2
50 0400 0
0 25
1
1
1. Ans
3.5 The Charging Process and Potential Gradient
We have already met the concept of a potential gradient when considering a uniform conductor (wire) carrying a current. This concept formed the basis of the slidewire potentiometer discussed in Chapter 2. However, we are now dealing with static charges that have been induced on to plates (the branch of science known as electrostatics). Current fl ow is only applicable during the charging process. The material between the plates is some form of insulator (a dielectric) which could be vacuum, air, rubber, glass, mica, pvc, etc. So under ideal conditions there will be no current fl ow from one plate to the other via the dielectric. None-the-less there will be a potential gradient throughout the dielectric.
Consider a pair of parallel plates (initially uncharged) that can be connected to a battery via a switch, as shown in Fig. 3.5 . Note that the number of electrons and protons shown for each plate are in no way
Fig. 3.5
E
A
B
� � ���
��
�
�� ���
��
��
���
electron flow

Electric Fields and Capacitors 81
representative of the actual numbers involved. They are shown to aid the explanation of the charging process that will take place when the switch is closed. On closing the switch, some electrons from plate A will be attracted to the positive terminal of the battery. In this case, since plate A has lost electrons it will acquire a positive charge. This results in an electric fi eld radiating out from plate A. The effect of this fi eld is to induce a negative charge on the top surface of plate B, by attracting electrons in the plate towards this surface. Consequently, the lower surface of plate B must have a positive charge. This in turn will attract electrons from the negative terminal of the battery. Thus for every electron that is removed from plate A one is transferred to plate B. The two plates will therefore become equally but oppositely charged.
This charging process will not carry on indefi nitely (in fact it will last for only a very short space of time). This is because as the charge on the plates increases so too does the voltage developed between them. Thus the charging process continues only until the p.d. between the plates, V is equal to the emf, E of the battery. The charging current at this time will become zero because plates A and B are positive and negative respectively. Thus, this circuit is equivalent to two batteries of equal emf connected in parallel as shown in Fig. 3.6 . In this case each battery would be trying to drive an equal value of current around the circuit, but in opposite directions. Hence the two batteries ‘ balance out ’ each other, and no current will fl ow.
E E
I I
Fig. 3.6
With suitable instrumentation it would be possible to measure the p.d. between plate B and any point in the dielectric. If this was done, then a graph of the voltage versus distance from B would look like that in Fig. 3.7 . The slope of this graph is uniform and has units of volts/metre i.e. the units of potential gradient
so potential gradient volt/metre�V
d(3.5)
Now, energy � VIt joule, and I �
Q
tamp

82 Fundamental Electrical and Electronic Principles
therefore energy � VQt
t � VQ joule, and transposing this
VQ
�
�
energyjoule/coulomb
i.e. voltJ
C1 1 1……………[ ]
but the joule is the unit used for work done, and work is force �
distance, i.e. newton metre,
so 1 J � 1 Nm……………[2]
Substituting [2] into [1]:
1 volt � 1 Nm/C or V � Nm
C ……………[3]
Dividing both sides of [3] by distance of separation d:
V
d� Nm
Cm
N
C�
Referring back to equation (3.2), we know that electric fi eld strength E is measured in N/C. So potential gradient and electric fi eld strength must be one and the same thing. Now, electric fi eld strength is defi ned in terms of the ratio of the force exerted on a charge to the value of the charge. This is actually an extremely diffi cult thing to measure. However, it is a very simple matter to measure the p.d. and distance between the charged plates. Hence, for practical purposes, electric fi eld strength is always quoted in the units volt/metre
p.d. (volt)
V
0 d distance(m)
Fig. 3.7
i.e. volt/metreE �V
d(3.6)
Notice that the symbol E has been used for electric fi eld strength. This is in order to avoid confusion with the symbol E used for emf.

Electric Fields and Capacitors 83
Worked Example 3.3
Q Two parallel plates separated by a dielectric of thickness 3 mm acquire a charge of 35 mC when
connected to a 150 V source. If the eff ective csa of the fi eld between the plates is 144 mm 2 , calculate (a)
the electric fi eld strength and (b) the fl ux density.
A
d � 3 � 10 � 3 m; Q � 35 � 10 � 3 C; V � 150 V; A � 144 � 10 � 6 m 2
(a)
E
E Ans
� ��
�
�
Vd
volt/metre
so kV/m
1
1
503 0
50
6
(b)
DQA
D
� ��
�
�
�
� coulom /metre
so C/m
b 23
6
2
35 044 0
243
1
1 1
1. Ans
3.6 Capacitance ( C )
We have seen that in order for one plate to be at a different potential to the other one there is a need for a charge. This requirement is known as the capacity of the system. For a given system the ratio of the charge required to achieve a given p.d. is a constant for that system. This is called the capacitance (C) of the system
i.e. faradCQ
V� (3.7)
or coulombQ VC� (3.8)
From equation (3.7) it may be seen that the unit for capacitance is the farad (F). This is defi ned as the capacitance of a system that requires a charge of one coulomb in order to raise its potential by one volt.
The farad is a very large unit, so in practice it is more usual to express capacitance values in microfarads ( � F), nanofarads (nF), or picofarads (pF).
Worked Example 3.4
Q Two parallel plates, separated by an air space of 4 mm, receive a charge of 0.2 mC when connected to
a 125 V source. Calculate (a) the electric fi eld strength between the plates, (b) the csa of the fi eld
between the plates if the fl ux density is 15 C/m 2 , and (c) the capacitance of the plates.
A
d � 4 � 10 � 3 m; Q � 2 � 10 � 4 C; V � 125 V; D � 15 C/m 2

84 Fundamental Electrical and Electronic Principles
(a)
E
E Ans
� ��
�
�
Vd
volt/metre
so, kV/m
1
1
1
254 0
3 25
3
.
(b)
DQA
AQD
A
�
� ��
� �
�
cou mb/metre
so, metre
thus,
lo 2
242 0
5
3 3 0
1
1
1 1. ��6 2 23 3m or mm 1 . Ans
(c)
Q CV
CQV
C
�
� ��
�
�
coulomb
so, farad
thus, F
2 025
6
41
1
1. � Ans
3.7 Capacitors
A capacitor is an electrical component that is designed to have a specifi ed value of capacitance. In its simplest form it consists of two parallel plates separated by a dielectric; i.e. exactly the system we have been dealing with so far.
In order to be able to design a capacitor we need to know what dimensions are required for the plates, the thickness of the dielectric (the distance of separation d ), and the other properties of the dielectric material chosen. Let us consider fi rst the properties associated with the dielectric.
3.8 Permittivity of Free Space ( εo )
When an electric fi eld exists in a vacuum then the ratio of the electric fl ux density to the electric fi eld strength is a constant, known as the permittivity of free space.
The value for F/m.oε � � �8 854 10 12.
Since a vacuum is a well defi ned condition, the permittivity of free space is chosen as the reference or datum value from which the permittivity of all other dielectrics are measured. This is a similar principle to using Earth potential as the datum for measuring voltages.
3.9 Relative Permittivity (εr)
The capacitance of two plates will be increased if, instead of a vacuum between the plates, some other dielectric is used. This difference in capacitance for different dielectrics is accounted for by the relative

Electric Fields and Capacitors 85
permittivity of each dielectric. Thus relative permittivity is defi ned as the ratio of the capacitance with that dielectric to the capacitance with a vacuum dielectric
i.e. rε �C
C2
1
(3.9)
where C1 is with a vacuum and C2 is with the other dielectric.
Note: Dry air has the same effect as a vacuum so the relative permittivity for air dielectrics � 1.
3.10 Absolute Permittivity (ε )
For a given system the ratio of the electric fl ux density to the electric fi eld strength is a constant, known as the absolute permittivity of the dielectric being used.
so farad/metreε �D
E(3.10)
but we have just seen that a dielectric (other than air) is more effective than a vacuum by a factor of εr times, so the absolute permittivity is given by:
ε ε ε� o r farad/metre (3.11)
3.11 Calculating Capacitor Values
From the equation (3.10):
ε
ε
�
� �
�
D
D Q A V d
Qd
VA
EEbut / and /
so
also, / capacitance
therefore
Q V C
Cd
A
�
�ε
and transposing this for C we have
CA
d
A
d� �
ε ε εo r farad (3.12)

86 Fundamental Electrical and Electronic Principles
Worked Example 3.5
Q A capacitor is made from two parallel plates of dimensions 3 cm by 2 cm, separated by a sheet of mica
0.5 mm thick and of relative permittivity 5.8. Calculate (a) the capacitance and (b) the electric fi eld
strength if the capacitor is charged to a p.d. of 200 V.
A
A � 3 � 2 � 10 � 4 m 2 ; d � 5 � 10 � 4 m; ε r � 5.8; V � 200 V
(a)
CA
d
C
�
�� � � �
�
�
� �
�
ε εo r farad
so pF
8 854 0 5 8 6 05 0
6 62
2 4
4
. .
.
1 1
1
1
1
Ans
(b)
E
E Ans
�
��
�
�
Vd
volt/metre
so kV/m
2005 0
400
41
Worked Example 3.6
Q A capacitor of value 0.224 nF is to be made from two plates each 75 mm by 75 mm, using a waxed
paper dielectric of relative permittivity 2.5. Determine the thickness of paper required.
A
C � 0.224 � 10 � 9 F; A � 75 � 75 � 10 � 6 m 2 ; ε r � 2.5
CA
d
dA
C
�
� �� � � � �� �
ε ε
ε ε
o r
o r
farad
so metre8 854 0 2 5 75 75 02 6. .1 11
00 224 0
5 6 0 0 56
9
4
.
. .
�
� � �
�
�
1
1so m mm d Ans
Worked Example 3.7
Q A capacitor of value 47 nF is made from two plates having an eff ective csa of 4 cm 2 and separated by
a ceramic dielectric 0.1 mm thick. Calculate the relative permittivity.
A
C � 4.7 � 10 � 8 F; A � 4 � 10 � 4 m 2 ; d � 1 � 10 � 4 m
CA
d
CdA
�
� �� �
� � �
� �
� �
ε ε
εε
o r
ro
farad
so
s
4 7 0 08 854 0 4 0
8 4
12 4
..
1 1
1 1
oo rε �1327 Ans

Electric Fields and Capacitors 87
Worked Example 3.8
Q A p.d. of 180 V creates an electric fi eld in a dielectric of relative permittivity 3.5, thickness 3 mm and of
eff ective csa 4.2 cm 2 . Calculate the fl ux and fl ux density thus produced.
A
V � 180 V; d � 3 � 10 � 3 m; εr � 3.5; A � 4.2 � 10 � 4 m 2
There are two possible methods of solving this problem; either determine the capacitance and the use Q � VC or determine the electric fi eld strength and use
D � ε o ε r E . Both solutions will be shown.
CA
d
C
� �� � � �
�
�
� �
�
ε εo r farad
so pF
8 854 0 3 5 4 2 03 0
4 34
2 4
3
. . .
.
1 1
1
1
aand since coulomb then
hence,
Q VC
Q
Q
�
� � �
�
�1 1 180 4 34 0
0 78
2.
. nnC Ans
DQA
D
� ��
�
�
�
� coulomb/metre
so C/m
20
4
2
7 8 04 2 0
86
..
.
1
1
1
1
� Ans
Alternatively:
E
E E
� ��
� �
�
Vd
D
volt/metre
so kV/m and using couo r
1
1
803 0
60
3
ε ε llomb/metre
so C/m
2
2 3
2
8 854 0 3 5 60 0
86
D
D
Q DA
� � � � �
�
�
�. .
.
1 1
1
1
� Ans
coulomb
so nC
� � � �
�
� �1 1 1. .
.
86 0 4 2 0
0 78
6 4
Q Ans
3.12 Capacitors in Parallel
Consider two capacitors that are identical in every way (same plate dimensions, same dielectric material and same distance of separation between plates) as shown in Fig. 3.8 . Let them now be moved vertically until the top and bottom edges respectively of their plates make contact. We will now effectively have a single capacitor of twice the csa of one of the original capacitors, but all other properties will remain unchanged.
Fig. 3.8

88 Fundamental Electrical and Electronic Principles
Since C � ε A/d farad, then the ‘ new ’ capacitor so formed will have twice the capacitance of one of the original capacitors. The same effect could have been achieved if we had simply connected the appropriate plates together by means of a simple electrical connection. In other words connect them in parallel with each other. Both of the original capacitors have the same capacitance, and this fi gure is doubled when they are connected in parallel. Thus we can draw the conclusion that with this connection the total capacitance of the combination is given simply by adding the capacitance values. However, this might be considered as a special case. Let us verify this conclusion by considering the general case of three different value capacitors connected in parallel to a d.c. supply of V volts as in Fig. 3.9 .
Q1
Q2
Q3
C1
C2
C3
V
Fig. 3.9
Each capacitor will take a charge from the supply according to its capacitance:
Q1 � VC1 ; Q2 � VC2 ; Q3 � VC3 coulomb
but the total charge drawn from the supply must be:
Q � Q1 � Q2 � Q3
also, total charge, Q � VC
where C is the total circuit capacitance.
Thus, VC � VC1�VC2�VC3 , and dividing through by V
C C C C� � �1 2 3 farad (3.13)
Note: This result is exactly the opposite in form to that for resistorsin parallel.

Electric Fields and Capacitors 89
Worked Example 3.9
Q Three capacitors of value 4.7 � F, 3.9 � F and 2.2 � F are connected in parallel. Calculate the resulting
capacitance of this combination.
A In this case, since all of the capacitor values are in � F then it is not necessary to show the 10 � 6 multiplier in each case, since the answer is best quoted in � F. However it must be made clear that this is what has been done.
C C C C
C
C
� � �
� � �
�
1
1
2 3
4 7 3 9 2 2
0 8
microfarad
so F
. . .
. � Ans
3.13 Capacitors in Series
Three parallel plate capacitors are shown connected in series in Fig. 3.10 . Each capacitor will receive a charge. However, you may wonder how capacitor C2 can receive any charging current since it is sandwiched between the other two, and of course the charging current cannot fl ow through the dielectrics of these. The answer lies in the explanation of the charging process described in section 3.6 earlier. To assist the explanation, the plates of capacitors C1 to C3 have been labelled with letters.
C1
A B C D E
E
F
C2 C3
Fig. 3.10
Plate A will lose electrons to the positive terminal of the supply, and so acquires a positive charge. This creates an electric fi eld in the dielectric of C1 which will cause plate B to attract electrons from plate C of C2 . The resulting electric fi eld in C2 in turn causes plate D to attract electrons from plate E . Finally, plate F attracts electrons from the negative terminal of the supply. Thus all three capacitors become charged to the same value.
Having established that all three capacitors will receive the same amount of charge, let us now determine the total capacitance of the arrangement. Since the capacitors are of different values then each will acquire a different p.d. between its plates. This is illustrated in Fig. 3.11 .

90 Fundamental Electrical and Electronic Principles
VQ
CV
Q
CV
Q
C11
22
33
� � �; ; volt
and V � V1�V2�V3 (Kirchhoff ’ s voltage law)
also, VQ
C� volt, where C is the total circuit capacitance.
Hence, , and dividing by :Q
C
Q
C
Q
C
Q
CQ� � �
1 2 3
C1
V1 V2
V
V3
C2 C3
Q QQ
Fig. 3.11
1 1 1 1
1 2 3C C C C� � � (3.14)
Note: The above equation does not give the total capacitance directly. To obtain the value for C the reciprocal of the answer obtained from equation (3.14) must be found. However, if ONLY TWO capacitors are connected in series the total capacitance may be obtained directly by using the ‘ product/sum ’ form
i.e. faradCC C
C C�
�1 2
1 2(3.15)
Worked Example 3.10
Q A 6 � F and a 4 � F capacitor are connected in series across a 150 V supply. Calculate (a) the total
capacitance, (b) the charge on each capacitor and (c) the p.d. developed across each.
A
Figure 3.12 shows the appropriate circuit diagram.
C 1 � 6 � F; C 2 � 4 � F; V � 150 V

91
(a)
CC C
C C
C
��
��
��
�
1
1
1
2
2
6 46 4
240
2 4
farad
microfarad
so F . � Ans
(b)
Q VC
Q
� � � �
�
� coulomb
so C
1 150 2 4 0
360
6.
� Ans
(same charge on both)
C1
V1
V
V2
C2
6 μF 4 μF
150 V
Fig. 3.12
Since capacitors in series all receive the same value of charge, then this must be the total charge drawn from the supply,
Q VC�
This is equivalent to a series resistor circuit where the current drawn from the supply is common to all the resistors
(c)
VQC
V
11
1
1
1� �
�
�
�
�
� volt
so V
360 06 0
60
6
6
Ans
Similarly, volt
so
Note tha
VQC
V
22
6
6
2
360 04 0
90
� ��
�
�
�
�
1
1
V Ans
tt V V V1 1� � �2 50 V
Worked Example 3.11
Q Capacitors of 3 � F, 6 � F and 12 � F are connected in series across a 400 V supply. Determine the p.d.
across each capacitor.
A
Figure 3.13 shows the relevant circuit diagram.
Electric Fields and Capacitors

92 Fundamental Electrical and Electronic Principles
C1 � 3 � F; C 2 � 6 � F; C 3 � 12 � F; V � 400 V
1 1 1 1 1 1 1
1
1
1 1
11 1
1C C C C
C
Q VC
� � � � � �
�� �
�
� �
�
2 3 3 6 2
4 22
72
27
7 4so F
co
. �
uulomb
C
volt
� � �
�
� ��
�
�
�
�
400 7 4 0
685 7
685 7 03 0
6
6
6
1 1 1
1
111
.
.
.
Q
VQC
�
sso V V1 � 228 6. Ans
Similarly, V
and
V
V
2
6
6
3
6
685 7 06 0
4 3
685 7 0
��
��
��
�
�
�
..
.
1
111
1
Ans
112 057
6��
�11. V Ans
3.14 Series/Parallel Combinations
The techniques required for the solution of this type of circuit are again best demonstrated by means of a worked example.
Worked Example 3.12
Q For the circuit shown in Fig. 3.14 , determine (a) the charge drawn from the supply, (b) the charge on
the 8 � F capacitor, (c) the p.d. across the 4 � F capacitor, and (d) the p.d. across the 3 � F capacitor.
C1 C2 C3
3 μF 6 μF 12 μF
V1 V2 V3
V
400 V
Fig. 3.13

93
A
The fi rst task is to label the diagram as shown in Fig. 3.15 .
2 μF
3 μF 6 μF
4 μF
8 μF
200 V
Fig. 3.14
2 μF
3 μF 6 μF
4 μF
8 μF
200 V
A
E
B
C
D
F
Fig. 3.15
2 μF
2 μF
4 μF
8 μF
A D
FE
B
200 V
Fig. 3.16
Electric Fields and Capacitors
(a)
C
C
BCD
BD
��
��
� � �
3 63 6
2 3 6
2 4 6 3 7
�
�
F (see Fig. )
F (see Fig. )
.
.
1
1

94 Fundamental Electrical and Electronic Principles
1.5 μF
8 μF
A D
FE
200 V
Fig. 3.18
C
C C C
C
Q
AD
AD EF
��
��
� � � �
�
6 26 2
5 3 8
5 8
9 5
1 1
1
. .
.
.
�
�
F (see Fig. )
so F
�� � � �
�
�VC
Q
coulomb
hence, mC
200 9 5 0
9
6.
.
1
1 Ans
2 μF 6 μF
8 μF
A DB
E F
200 V
Fig. 3.17
(b)
Q VC
Q
EF EF
EF
� � � �
�
� coulomb
so mC
200 8 0
6
61
1. Ans
(c) Total charge Q � 1.9 mC and Q EF � 1.6 mC
so Q AD � 1.9 � 1.6 � 0.3 mC (see Fig. 3.18 ).
and referring to Fig. 3.17 , this will be the charge on both the capacitors shown, i.e.
Q QAB BD� � 0 3. mC.
Thus, V BD � p.d. across 4 � F capacitor (see Fig. 3.16 )
VQC
V
BDBD
BD
BD
�
��
�
�
�
�
0 3 06 0
50
3
6
. 1
1 volt
so V Ans

Electric Fields and Capacitors 95
(d)
Q V CBCD BD BCD�
� � �
�
�
(see Figs and )
C
3 6 3 5
50 2 0
00
6
. .1 1
1
1 �
and this will be the charge on both the 3 � F and 6 � F capacitors, i.e.
Q Q
VQC
V
BC CD
BCBC
BC
BC
� �
�
��
�
�
�
�
1
1 1
1
00
03 0
33 33
4
6
�C
Thus volt
so . VV Ans
3.15 Multiplate Capacitors
Most practical capacitors consist of more than one pair of parallel plates, and in these cases they are referred to as multiplate capacitors. The sets of plates are often interleaved as shown in Fig. 3.19 . The example illustrated has a total of fi ve plates. It may be seen that this effectively forms four identical capacitors, in which the three inner plates are common to the two ‘ inner ’ capacitors. Since all the positive plates are joined together, and so too are the negative plates, then this arrangement is equivalent to four identical capacitors connected in parallel, as shown in Fig. 3.20 . The total capacitance of four identical capacitors connected in parallel is simply four times the capacitance of one of them. Thus, this value will be the effective capacitance of the complete capacitor.
The capacitance between one adjacent pair of plates will be
CA
d1 �ε εo r farad
�
�
Fig. 3.19

96 Fundamental Electrical and Electronic Principles
CA N
d11
��ε εo r farad
( )(3.16)
so, the total for the complete arrangement � C1 � 4, but we can express 4 as (5 � 1) so the total capacitance is
CA
d15 1
��ε εo r farad
( )
C1
C2
C3
C4
� �
Fig. 3.20
In general therefore, if a capacitor has N plates, the capacitance is given by the expression:
Since the above equation applies generally, then it must also apply to capacitors having just one pair of plates as previously considered. This is correct, since if N � 2 then ( N � 1) � 1, and the above equation becomes identical to equation (3.12) previously used.
Worked Example 3.13
Q A capacitor is made from 20 interleaved plates each 80 mm by 80 mm separated by mica sheets
1.5 mm thick. If the relative permittivity for mica is 6.4, calculate the capacitance.
A
N � 20; A � 80 � 80 � 10 � 6 m 2 ; d � 1.5 � 10 � 3 m; ε r � 6.4
CA N
d1
1
1
1 1 1
1 1
��
�� � � � �
�
� �
�
ε εo r farad
s
( )
. ..
8 854 0 6 4 6400 0 95 0
2 6
3
oo nF C � 4 6. Ans
Worked Example 3.14
Q A 300 pF capacitor has nine parallel plates, each 40 mm by 30 mm, separated by mica of relative
permittivity 5. Determine the thickness of the mica.

Electric Fields and Capacitors 97
A
N � 9; C � 3 � 10 � 10 F; A � 40 � 30 � 10 � 6 m 2 ; εr � 5
CA N
d
dA N
C
��
��
�� � � ��
ε ε
ε ε
o r
o r
farad
metre
( )
( )
.
1
1
1 118 854 0 5 2002 11
1
1
1
0 83 0
42
6
0
�
�
�
�
�so mm d . Ans
Worked Example 3.15
Q A parallel plate capacitor consists of 11 circular plates, each of radius 25 mm, with an air gap of 0.5 mm
between each pair of plates. Calculate the value of the capacitor.
A
N � 11; r � 25 � 10 � 3 m; d � 5 � 10 � 4 m; ε r � 1(air)
A r
A
CA n
d
� � � �
� �
��
�
�
� �2 2 3 2
3 2
25 0
9635 0
metre
so, m
o r
( )
.
( )
1
1 1
1ε εffarad
thus,
�� � � �
�
� �
� �
�
�
8 854 0 9635 0 05 0
3 48 0
2 3
4
0
. .
.
1 1 1 1
1
1
1
1C FF or pF 348 Ans
3.16 Energy Stored
When a capacitor is connected to a voltage source of V volts we have seen that it will charge up until the p.d. between the plates is also Vvolts. If the capacitor is now disconnected from the supply, the charge and p.d. between its plates will be retained.
Consider such a charged capacitor, as shown in Fig. 3.21 , which now has a resistor connected across its terminals. In this case the capacitor will behave as if it were a source of emf. It will therefore drive current through the resistor. In this way the stored charge will be dissipated as the excess electrons on its negative plate are returned to the positive plate. This discharge process will continue until the capacitor becomes completely discharged (both plates electrically neutral). Note that the discharge current marked on the diagram indicates conventionalcurrent fl ow.

98 Fundamental Electrical and Electronic Principles
so energy stored, jouleW CV�1
22 (3.17)
However, if a discharge current fl ows then work must be done (energy is being dissipated). The only possible source of this energy in these circumstances must be the capacitor itself. Thus the charged capacitor must store energy.
If a graph is plotted of capacitor p.d. to the charge it receives, the area under the graph represents the energy stored. Assuming a constant charging current, the graph will be as shown in Fig. 3.22 .
p.d. (volt)
V
0 Q charge(coulomb)
Fig. 3.22
The area under the graph
but coulomb
�
�
1
2QV
Q CV
� �V
I
R
Fig. 3.21

Electric Fields and Capacitors 99
Worked Example 3.16
Q A 3 μ F capacitor is charged from a 250 V d.c. supply. Calculate the charge and energy stored. The
charged capacitor is now removed from the supply and connected across an uncharged 6 � F capacitor.
Calculate the p.d. between the plates and the energy now stored by the combination.
A
C 1 � 3 � F; V 1 � 250 V; C 2 � 6 � F
Q V C
Q
W C V
� � � �
�
� �
�1 1
1 1
1
1 1
coulomb
so mC
joule
250 3 0
0 75
2
6
2
. Ans
223 0 250
93 75
6 2� � �
�
�1
so mJ W . Ans
When the two capacitors are connected in parallel the 3 � F will share its charge with 6 � F capacitor. Thus the total charge in the system will remain unchanged, but the total capacitance will now be diff erent:
Total capacitance, farad
so F
volt
C C C
C
VQC
� � � �
�
� ��
1 2 3 6
9
7 5
�
. 11
1
1
09 0
83 33
2
4
6
2
�
��
�
�
so V
total energy stored, jou
V
W CV
. Ans
lle
so mJ
� � � �
�
�11
1
29 0 83 33
3 25
6 2.
.W Ans
Note: The above example illustrates the law of conservation of charge, since the charge placed on the fi rst capacitor is simply redistributed between the two capacitors when connected in parallel. The total charge therefore remains the same. However, the p.d. now existing between the plates has fallen, and so too has the total energy stored. But there is also a law of conservation of energy, so what has happened to the ‘ lost ’ energy? Well, in order for the 3 � F capacitor to share its charge with the 6 � F capacitor a charging current had to fl ow from one to the other. Thus this ‘ lost ’ energy was used in the charging process.
Worked Example 3.17
Q Consider the circuit of Fig. 3.23 , where initially all three capacitors are fully discharged, with the
switch in position ‘ 1 ’ .
(a) If the switch is now moved to position ‘ 2 ’ , calculate the charge and energy stored by C 1 .
(b) Once C 1 is fully charged, the switch is returned to position ‘ 1 ’ . Calculate the p.d. now existing
across C 1 and the amount of energy used in charging C 2 and C 3 from C 1 .

100 Fundamental Electrical and Electronic Principles
A
(a)
Q VC
Q
W C V
1 1
1
1 1
1 1
1
� � � �
�
� �
� coulomb
so, mC
joule
200 0 0
2
20
6
2
Ans
.55 0 200
0 2
5 2� �
�
�1
1so, J W . Ans
(b) C 2 and C 3 in series is equivalent to CC C
C C42 3
2 3�
� microfarad
so, FC4
6 8 4 76 8 4 7
2 78��
��
. .
. .. �
and total capacitance of the whole circuit,
C C C
C
� �
� �
�
1
1
1
4
0 2 78
2 78
microfarad
hence, F
.
. �
Now, the charge received by the circuit remains constant, although the total capacitance has increased.
Thus, volt
and V
VQC
V
� ��
�
�
�
�
2 02 78 0
56 5
3
6
1
1 1
1
.
. Ans
Total energy remaining in the circuit, jouleW CV�
� �
1
1
2
0 5
2
. 22 78 0 56 5
0 56
6 2. .
.
� �
�
�1 1
1and JW
the energy used up must be the diff erence between the energy fi rst stored by C 1 and the fi nal energy stored in the system, hence
Energy used � 0.2 � 0.156 � 44 mJ Ans
C2 C3
C16.8 μF
10 μF
4.7 μF
V
200 V
‘1’
‘2’
Fig. 3.23

Electric Fields and Capacitors 101
3.17 Dielectric Strength and Working Voltage
There is a maximum potential gradient that any insulating material can withstand before dielectric breakdown occurs.
There are of course some applications where dielectric breakdown is deliberately produced e.g. a sparking plug in a car engine, which produces an arc between its electrodes when subjected to a p.d. of several kilovolts. This then ignites the air/fuel mixture. However, it is obviously not a condition that is desirable in a capacitor, since it results in its destruction.
Capacitors normally have marked on them a maximum working voltage. When in use you must ensure that the voltage applied between its terminals does not exceed this value, otherwise dielectric breakdown will occur.
Dielectric breakdown is the effect produced in an insulating material when the voltage applied across it is more than it can withstand. The result is that the material is forced to conduct. However when this happens, the sudden surge of current through it will cause it to burn, melt, vaporise or be permanently damaged in some other way
Another way of referring to this maximum working voltage is to quote the dielectric strength. This is the maximum voltage gradient that the dielectric can withstand, quoted in kV/m or in V/mm.
Worked Example 3.18
Q A capacitor is designed to be operated from a 400 V supply, and uses a dielectric which (allowing for a
factor of safety), has a dielectric strength of 0.5 MV/m. Calculate the minimum thickness of dielectric
required.
A
V � 400 V; E � 0.5 � 10 6 V/m
E
E
Ans
�
� ��
�
Vd
dV
d
volt/metre
so metre
mm
4000 5 0
0 8
6.
.
1
Worked Example 3.19
Q A 270pF capacitor is to be made from two metallic foil sheets, each of length 20 cm and width 3 cm,
separated by a sheet of Tefl on having a relative permittivity of 2.1. Determine (a) the thickness of
Tefl on sheet required, and (b) the maximum possible working voltage for the capacitor if the Tefl on
has a dielectric strength of 350 kV/m.

102 Fundamental Electrical and Electronic Principles
A
C � 270 � 10 � 12 F; A � 20 � 3 � 10 � 4 m 2 ; ε r � 2.1; E � 350 � 10 3 V/m
(a)
CA
d
dA
C
�
�
�� � � �� �
ε ε
ε ε
o r
o r
farad
so, metre
8 854 0 2 60 027
2 4. .1 1 11
00 0
0 4 3
2�
�
�1
1
1
thus, mm d . Ans
(b) Dielectric strength is the same thing as electric fi eld strength, expressed in volt/metre, so
E
E
�
� � � � �
�
�
Vd
V d
V
volt/metre
and volt
so,
350 0 0 4 3 0
44 6
3 31 1 1
1
.
. VV Ans
Note: This fi gure is the voltage at which the dielectric will start to break down, so, for practical purposes, the maximum working voltage would be specifi ed at a lower value. For example, if a factor of safety of 20% was required, then the maximum working voltage in this case would be specifi ed as 115 V.
3.18 Capacitor Types
The main difference between capacitor types is in the dielectric used. There are a number of factors that will infl uence the choice of capacitor type for a given application. Amongst these are the capacitance value, the working voltage, the tolerance, the stability, the leakage resistance, the size and the price.
Tolerance is the deviation from the nominal value. This is normally expressed as a percentage. Thus a capacitor of nominal value 2 � F and a tolerance of � 10%, should have an actual value of between 1.8 and 2.2 � F
Since C � ε A/d , then any or all of these factors can be varied to suit particular requirements. Thus, if a large value of capacitance is required, a large csa and/or a small distance of separation will be necessary, together with a dielectric of high relative permittivity. However, if the area is to be large, then this can result in a device that is unacceptably large. Additionally, the dielectric cannot be made too thin lest its dielectric strength is exceeded. The various capacitor types overcome these problems in a number of ways.

Electric Fields and Capacitors 103
Paper This is the simplest form of capacitor. It utilises two strips of aluminium foil separated by sheets of waxed paper. The whole assembly is rolled up into the form of a cylinder (like a Swiss roll). Metal end caps make the electrical connections to the foils, and the whole assembly is then encapsulated in a case. By rolling up the foil and paper a comparatively large csa can be produced with reasonably compact dimensions. This type is illustrated in Fig. 3.24 .
FoilPaperFoilPaper
Fig. 3.24
Fig. 3.25
‘ Plastic ’ With these capacitors the dielectric can be of polyester, polystyrene, polycarbonate or polypropylene. Each material has slightly different electrical characteristics which can be used to advantage, depending upon the proposed application. The construction takes much the same form as that for paper capacitors. Examples of these types are shown in Fig. 3.26 , and their different characteristics are listed in Table 3.1 .
Air Air dielectric capacitors are the most common form of variable capacitor. The construction is shown in Fig. 3.25 . One set of plates is fi xed, and the other set can be rotated to provide either more or less overlap between the two. This causes variation of the effective csa and hence variation of capacitance. This is the type of device connected to the station tuning control of a radio.
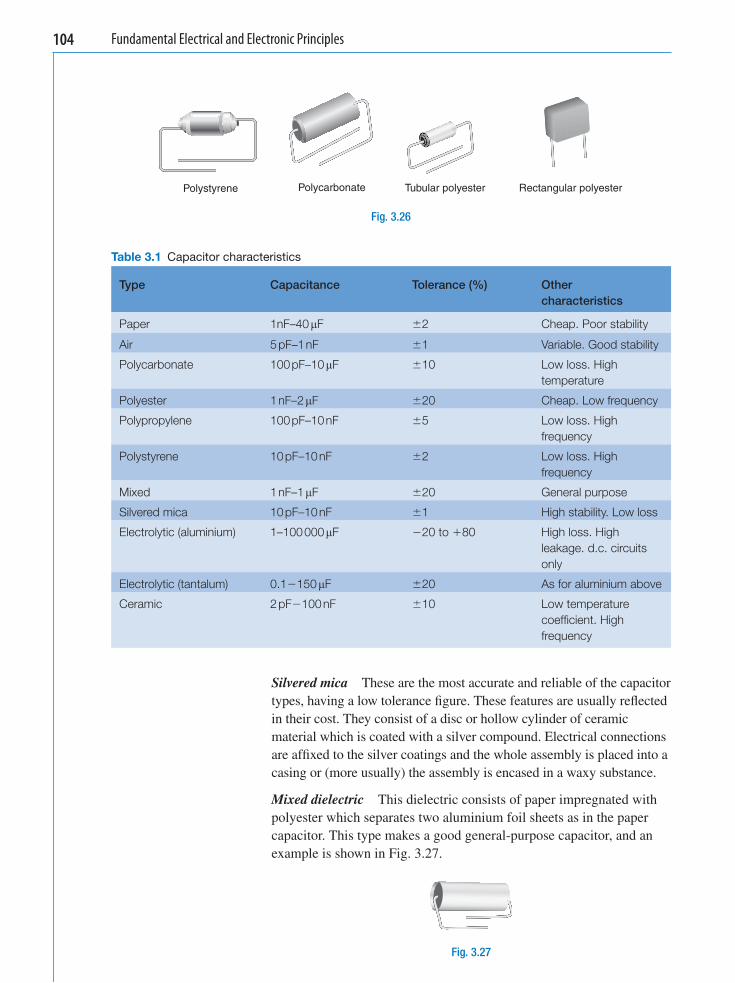
104 Fundamental Electrical and Electronic Principles
Polystyrene Polycarbonate Tubular polyester Rectangular polyester
Fig. 3.26
Table 3.1 Capacitor characteristics
Type Capacitance Tolerance (%) Othercharacteristics
Paper 1 nF–40 �F �2 Cheap. Poor stability
Air 5 pF –1 nF �1 Variable. Good stability
Polycarbonate 100 pF –10 �F �10 Low loss. High temperature
Polyester 1 nF –2 �F �20 Cheap. Low frequency
Polypropylene 100 pF –10 nF �5 Low loss. High frequency
Polystyrene 10 pF–10 nF �2 Low loss. High frequency
Mixed 1 nF–1 �F �20 General purpose
Silvered mica 10 pF–10 nF �1 High stability. Low loss
Electrolytic (aluminium) 1–100 000 �F � 20 to �80 High loss. High leakage. d.c. circuits only
Electrolytic (tantalum) 0.1� 150 �F �20 As for aluminium above
Ceramic 2 pF � 100 nF �10 Low temperature coeffi cient. High frequency
Silvered mica These are the most accurate and reliable of the capacitor types, having a low tolerance fi gure. These features are usually refl ected in their cost. They consist of a disc or hollow cylinder of ceramic material which is coated with a silver compound. Electrical connections are affi xed to the silver coatings and the whole assembly is placed into a casing or (more usually) the assembly is encased in a waxy substance.
Mixed dielectric This dielectric consists of paper impregnated with polyester which separates two aluminium foil sheets as in the paper capacitor. This type makes a good general-purpose capacitor, and an example is shown in Fig. 3.27 .
Fig. 3.27

Electric Fields and Capacitors 105
A polarised capacitor is one in which the dielectric is formed by passing a d.c. current through it. The polarity of the d.c. supply used for this purpose must be subsequently observed in any circuit in which the capacitor is then used. Thus, they should be used only in d.c. circuits
Double-endedSingle-ended
Solid tantalum
Fig. 3.28
Summary of Equations
Force between charges: FQ Q
d� 1 2
2εo
newton
Electric fi eld strength: E � �F
q
V
dnewton/coulomb volt/metre
Electrolytic This is the form of construction used for the largest value capacitors. However, they also have the disadvantages of reduced working voltage, high leakage current, and the requirement to be polarised. Their terminals are marked � and � , and these polarities must be observed when the device is connected into a circuit. Capacitance values up to 100 000 � F are possible.
The dielectric consists of either an aluminium oxide or tantalum oxide fi lm that is just a few micrometres thick. It is this fact that allows such high capacitance values, but at the same time reduces the possible maximum working voltage. Tantalum capacitors are usually very much smaller than the aluminium types. They therefore cannot obtain the very high values of capacitance possible with the aluminium type. The latter consist of two sheets of aluminium separated by paper impregnated with an electrolyte. These are then rolled up like a simple paper capacitor. This assembly is then placed in a hermetically sealed aluminium cannister. The oxide layer is formed by passing a charging current through the device, and it is the polarity of this charging process that determines the resulting terminal polarity that must be subsequently observed. If the opposite polarity is applied to the capacitor the oxide layer is destroyed. Examples of electrolytic capacitors are shown in Fig. 3.28 .

Fundamental Electrical and Electronic Principles106
Electric fl ux density: DQ
A� � ε εo r coulomb/metreE 2
Permittivity: ε ε ε� o r farad/metreD
E
Capacitance: CQ
V
A N
d� �
�farad farado rε ε ( )1
Capacitors in parallel: C � C1 � C2 � C3 � … farad
Capacitors in series: 1 1 1 1
1 2 3
1
C C C C� � � � �… farad
For ONLY two in series: CC C
C C�
�1 2
1 2
faradproduct
sum
⎛
⎝⎜⎜⎜
⎞
⎠⎟⎟⎟⎟
Energy stored: W � 0.5 QV � 0.5CV2 joule

Electric Fields and Capacitors 107
Assignment Questions
1 Two parallel plates 25 cm by 35 cm receive a charge of 0.2 � C from a 250 V supply. Calculate (a) the electric fl ux and (b) the electric fl ux density.
2 The fl ux density between two plates separated by a dielectric of relative permittivity 8 is 1.2 � C/m 2 . Determine the potential gradient between them.
3 Calculate the electrical fi eld strength between a pair of plates spaced 10 mm apart when a p.d. of 0.5 kV exists between them.
4 Two plates have a charge of 30 � C. If the eff ective area of the plates is 5 cm 2 , calculate the fl ux density.
5 A capacitor has a dielectric 0.4 mm thick and operates at 50 V. Determine the electric fi eld strength.
6 A 100 � F capacitor has a p.d. of 400 V across it. Calculate the charge that it has received.
7 A 47 � F capacitor stores a charge of 7.8 mC when connected to a d.c. supply. Calculate the supply voltage.
8 Determine the p.d. between the plates of a 470 nF capacitor if it stores a charge of 0.141 mC.
9 Calculate the capacitance of a pair of plates having a p.d. of 600 V when charged to 0.3 � C.
10 The capacitance of a pair of plates is 40 pF when the dielectric between them is air. If a sheet of glass is placed between the plates (so that it completely fi lls the space between them), calculate the capacitance of the new arrangement if the relative permittivity of the glass is 6.
11 A dielectric 2.5 mm thick has a p.d. of 440 V developed across it. If the resulting fl ux density is 4.7 � C/m 2 determine the relative permittivity of the dielectric.
12 State the factors that aff ect the capacitance of a parallel plate capacitor, and explain how the variation of each of these factors aff ects the capacitance.
Calculate the value of a two plate capacitor with a mica dielectric of relative permittivity 5 and thickness 0.2 mm. The eff ective area of the plates is 250 cm 2 .
13 A capacitor consists of two plates, each of eff ective area 500 cm 2 , spaced 1mm apart in
air. If the capacitor is connected to a 400 V supply, determine (a) the capacitance, (b) the charge stored and (c) the potential gradient.
14 A paper dielectric capacitor has two plates, each of eff ective csa 0.2 m 2 . If the capacitance is 50 nF calculate the thickness of the paper, given that its relative permittivity is 2.5.
15 A two plate capacitor has a value of 47 nF. If the plate area was doubled and the thickness of the dielectric was halved, what then would be the capacitance?
16 A parallel plate capacitor has 20 plates, each 50 mm by 35 mm, separated by a dielectric 0.4 mm thick. If the capacitance is 1000 pF determine the relative permittivity of the dielectric.
17 Calculate the number of plates used in a 0.5 nF capacitor if each plate is 40 mm square, separated by dielectric of relative permittivity 6 and thickness 0.102 mm.
18 A capacitor is to be designed to have a capacitance of 4.7 pF and to operate with a p.d. of 120 V across its terminals. The dielectric is to be tefl on ( ε r � 2.1) which, after allowing for a safety factor has a dielectric strength of 25 kV/m. Calculate (a) the thickness of tefl on required and (b) the area of a plate.
19 Capacitors of 4 � F and 10 � F are connected (a) in parallel and (b) in series. Calculate the equivalent capacitance in each case.
20 Determine the equivalent capacitance when the following capacitors are connected (a) in series and (b) in parallel
(i) 3 � F, 4 � F and 10 � F
(ii) 0.02 � F, 0.05 � F and 0.22 � F
(iii) 20 pF and 470 pF
(iv) 0.01 � F and 220 pF.
21 Determine the value of capacitor which when connected in series with a 2 nF capacitor produces a total capacitance of 1.6 nF.
22 Three 15 � F capacitors are connected in series across a 600 V supply. Calculate (a) the total capacitance, (b) the p.d. across each and (c) the charge on each.
23 Three capacitors, of 6 � F, 8 � F and 10 � F respectively are connected in parallel across a 60 V supply. Calculate (a) the total capacitance,
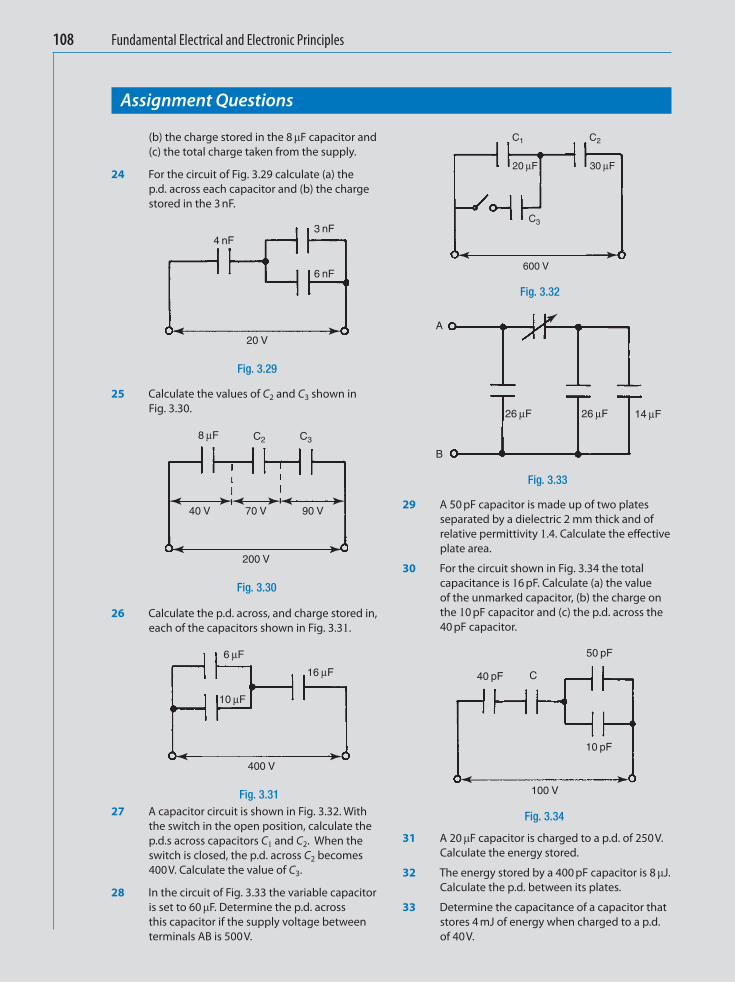
108 Fundamental Electrical and Electronic Principles
(b) the charge stored in the 8 � F capacitor and (c) the total charge taken from the supply.
24 For the circuit of Fig. 3.29 calculate (a) the p.d. across each capacitor and (b) the charge stored in the 3 nF.
25 Calculate the values of C 2 and C 3 shown in Fig. 3.30 .
26 Calculate the p.d. across, and charge stored in, each of the capacitors shown in Fig. 3.31 .
27 A capacitor circuit is shown in Fig. 3.32 . With the switch in the open position, calculate the p.d.s across capacitors C1 and C 2 . When the switch is closed, the p.d. across C 2 becomes 400 V. Calculate the value of C 3 .
28 In the circuit of Fig. 3.33 the variable capacitor is set to 60 � F. Determine the p.d. across this capacitor if the supply voltage between terminals AB is 500 V.
Assignment Questions
4 nF3 nF
6 nF
20 V
Fig. 3.29
8 μF C2
40 V 70 V 90 V
200 V
C3
Fig. 3.30
6 μF
16 μF
10 μF
400 V
Fig. 3.31
29 A 50 pF capacitor is made up of two plates separated by a dielectric 2 mm thick and of relative permittivity 1.4. Calculate the eff ective plate area.
30 For the circuit shown in Fig. 3.34 the total capacitance is 16 pF. Calculate (a) the value of the unmarked capacitor, (b) the charge on the 10 pF capacitor and (c) the p.d. across the 40 pF capacitor.
31 A 20 � F capacitor is charged to a p.d. of 250 V. Calculate the energy stored.
32 The energy stored by a 400 pF capacitor is 8 � J. Calculate the p.d. between its plates.
33 Determine the capacitance of a capacitor that stores 4 mJ of energy when charged to a p.d. of 40 V.
Fig. 3.32
600 V
C3
C1 C2
20 μF 30 μF
Fig. 3.33
A
B
26 μF 26 μF 14 μF
Fig. 3.34
40 pF
50 pF
10 pF
C
100 V

Electric Fields and Capacitors 109
Assignment Questions
34 When a capacitor is connected across a 200 V supply it takes a charge of 8 � C. Calculate (a) its capacitance, (b) the energy stored and (c) the electric fi eld strength if the plates are 0.5 mm apart.
35 A 4 � F capacitor is charged to a p.d. of 400 V and then connected across an uncharged 2 � F capacitor. Calculate (a) the original charge and energy stored in the 4 � F, (b) the p.d. across, and energy stored in, the parallel combination.
36 Two capacitors, of 4 � F and 6 � F are connected in series across a 250 V supply. (a) Calculate the charge and p.d. across each. (b) The capacitors are now disconnected from the supply and reconnected in parallel with each other, with terminals of similar polarity being joined
together. Calculate the p.d. and charge for each.
37 A ceramic capacitor is to be made so that it has a capacitance of 100 pF and is to be operated from a 750 V supply. Allowing for a safety factor, the dielectric has a strength of 500 kV/m. Determine (a) the thickness of the ceramic, (b) the plate area if the relative permittivity of the ceramic is 3.2, (c) the charge and energy stored when the capacitor is connected to its rated supply voltage, and (d) the fl ux density under these conditions.
38 A large electrolytic capacitor of value 100 � F has an eff ective plate area of 0.942 m 2 . If the aluminium oxide fi lm dielectric has a relativepermittivity of 6, calculate its thickness.

110 Fundamental Electrical and Electronic Principles
Suggested Practical Assignment
Assignment 1 To determine the total capacitance of capacitors, when connected in series, and in parallel.
Apparatus:
Various capacitors, of known values 1 � capacitance meter, or capacitance bridge
Method:
1 Using either the meter or bridge, measure the actual value of each capacitor. 2 Connect diff erent combinations of capacitors in parallel, and measure the
total capacitance of each combination. 3 Repeat the above procedure, for various series combinations. 4 Calculate the total capacitance for each combination, and compare these
values to those previously measured. 5 Account for any diff erence between the actual and nominal values, for the
individual capacitors.

Magnetic Fields and Circuits
Chapter 4
Learning Outcomes
This chapter introduces the concepts and laws associated with magnetic fi elds and their application to magnetic circuits and materials.
On completion of this chapter you should be able to:
1 Describe the forces of attraction and repulsion between magnetised bodies. 2 Understand the various magnetic properties and quantities, and use them to solve simple
series magnetic circuit problems. 3 Appreciate the effect of magnetic hysteresis, and the properties of different types of
magnetic material.
111
4.1 Magnetic Materials
All materials may be broadly classifi ed as being in one of two groups. They may be magnetic or non-magnetic, depending upon the degree to which they exhibit magnetic effects. The vast majority of materials fall into the latter group, which may be further classifi ed into dia-magnetic and paramagnetic materials. The magnetic properties of these materials are very slight, and extremely diffi cult even to detect. Thus, for practical purposes, we can say that they are totally non-magnetic. The magnetic materials (based on iron, cobalt and ferrites) are the ferromagnetic materials, all of which exhibit very strong magnetic effects. It is with these materials that we will be principally concerned.
4.2 Magnetic Fields
Magnetic fi elds are produced by permanent magnets and by electric current fl owing through a conductor. Like the electric fi eld, a magnetic fi eld may be considered as being the medium by which forces are

112 Fundamental Electrical and Electronic Principles
transmitted. In this case, the forces between magnetised materials. A magnetic fi eld is also represented by lines of force or magnetic fl ux. These are attributed with certain characteristics, listed below:
1 They always form complete closed loops. Unlike lines of electric fl ux, which radiate from and terminate at the charged surfaces, lines of magnetic fl ux also exist all the way through the magnet.
2 They behave as if they are elastic. That is, when distorted they try to return to their natural shape and spacing.
3 In the space surrounding a magnet, the lines of force radiate from the north (N) pole to the south (S) pole.
4 They never intersect (cross). 5 Like poles repel and unlike poles attract each other.
Characteristics (1) and (3) are illustrated in Fig. 4.1 which shows the magnetic fi eld pattern produced by a bar magnet.
Characteristics (2) and (4) are used to explain characteristic (5), as illustrated in Figs. 4.2 and 4.3 .
In the case of the arrangement of Fig. 4.2 , since the lines behave as if they are elastic, then those lines linking the two magnets try to shorten themselves. This tends to bring the two magnets together.
SN
Fig. 4.1
N S
Fig. 4.2
NN
Fig. 4.3
The force of repulsion shown in Fig. 4.3 is a result of the unnatural compression of the lines between the two magnets. Once more, acting as if they are elastic, these lines will expand to their normal shape. This will tend to push the magnets apart.
Permanent magnets have the advantage that no electrical supply is required to produce the magnetic fi eld. However, they also have several

Magnetic Fields and Circuits 113
disadvantages. They are relatively bulky. The strength of the fi eld cannot be varied. Over a period of time they tend to lose some of their magnetism (especially if subjected to physical shock or vibration). For many practical applications these disadvantages are unacceptable. Therefore a more convenient method of producing a magnetic fi eld is required.
In addition to the heating effect, an electric current also produces a magnetic fi eld. The strength of this fi eld is directly proportional to the value of the current. Thus a magnetic fi eld produced in this way may be turned on and off, reversed, and varied in strength very simply. A magnetic fi eld is a vector quantity, as indicated by the arrows in the previous diagrams. The fi eld pattern produced by a current fl owing through a straight conductor is illustrated in Figs. 4.4(a) and (b). Note that conventional current fl ow is considered. The convention adopted to represent conventional current fl owing away from the observer is a cross, and current towards the observer is marked by a dot. The direction of the arrows on the fl ux lines can easily be determined by considering the X as the head of a cross-head screw. In order to drive the screw away from you, the screw would be rotated clockwise . On the other hand, if you were to observe the point of the screw coming out towards you, it would be rotating anticlockwise . This convention is called the screw rule, and assumes a normal right-hand thread.
Fig. 4.4
X
(a)
I
(b)
I
It should be noted that the magnetic fl ux actually extends the whole length of the conductor, in the same way that the insulation on a cable covers the whole length. In addition, the fl ux pattern extends outwards in concentric circles to infi nity. However, as with electric and gravitational fi elds, the force associated with the fi eld follows an inverse square law. It therefore diminishes very rapidly with distance.
The fl ux pattern produced by a straight conductor can be adapted to provide a fi eld pattern like a bar magnet. This is achieved by winding the conductor in the form of a coil. This arrangement is known as a solenoid. The principle is illustrated in Figs. 4.5(a) and (b) , which show a cross-section of a solenoid. Figure 4.5(a) shows the fl ux patterns produced by two adjacent turns of the coil. However, since lines of fl ux will not intersect, the fl ux distorts to form complete loops around the whole coil as shown in Fig. 4.5(b) .

114 Fundamental Electrical and Electronic Principles
4.3 The Magnetic Circuit
A magnetic circuit is all of the space occupied by the magnetic fl ux. Figure 4.6 shows an iron-cored solenoid, supplied with direct current, and the resulting fl ux pattern. This is what is known as a composite magnetic circuit, since the fl ux exists both in the iron core and in the surrounding air space. In addition, it can be seen that the spacing of the lines within the iron core is uniform, whereas it varies in the air space. Thus there is a uniform magnetic fi eld in the core and a non-uniform fi eld in the rest of the magnetic circuit. In order to make the design and analysis of a magnetic circuit easier, it is more convenient
S
I
N
Fig. 4.6
Fig. 4.5
� �
(a)
� � � � � �
(b)
N S
if a uniform fi eld can be produced. This may be achieved by the use of a completely enclosed magnetic circuit. One form of such a circuit is an iron toroid, that has a current carrying coil wound round it. A toroid is a ‘ doughnut ’ shape having either a circular or a rectangular cross-section. Such an arrangement is shown in Fig. 4.7 , and from this it can

Magnetic Fields and Circuits 115
be seen that only the toroid itself forms the magnetic circuit. Provided that it has a uniform cross-section then the fi eld contained within it will be uniform.
4.4 Magnetic Flux and Flux Density
The magnetic fl ux is what causes the observable magnetic effects such as attraction, repulsion etc. The unit of magnetic fl ux is the weber (Wb). This was the name of a German scientist so it is pronounced as ‘ vayber ’ .
The number of webers of fl ux per square metre of cross-section of the fi eld is defi ned as the magnetic fl ux density ( B ), which is measured in tesla (T). This sometimes causes some confusion at fi rst, since the logical unit would appear to be weber/metre 2 . Indeed, this is the way in which it is calculated: the value of fl ux must be divided by the appropriate area. Tesla was the name of another scientist, whose name is thus commemorated. On refl ection, it should not be particularly confusing, since the logical unit for electrical current would be coulomb/second; but it seems quite natural to use the term ampere.
The quantity symbols for magnetic fl ux and fl ux density are � and Brespectively. Hence, fl ux density is given by the equation:
BA
��
tesla (4.1)
Note: references have been made to iron as a core material and as the material used for toroids etc. This does not necessarily mean that pure iron is used. It could be mild steel, cast iron, silicon iron, or ferrite etc. The term ‘ iron circuit ’ , when used in this context, is merely a simple way in which to refer to that part of the circuit that consists of a magnetic material. It is used when some parts of the circuit may be formed from non-magnetic materials.
N
I
Fig. 4.7

116 Fundamental Electrical and Electronic Principles
Worked Example 4.1
Q The pole face of a magnet is 3 cm by 2 cm and it produces a fl ux of 30 μ Wb. Calculate the fl ux density
at the pole face.
A
A � 3 � 2 � 10 � 4 m 2 ; � � 30 � 10 � 6 Wb
BA
B
�
��
�
�
�
�
�tesla
so mT
30 06 0
50
6
4
1
1Ans
Worked Example 4.2
Q A magnetic fi eld of density 0.6 T has an eff ective csa of 45 � 10 � 6 m 2 . Determine the fl ux.
A
B � 0.6 T; A � 45 � 10 � 6 m 2
Since tesla, then weber
so Wb
BA
BA� �
� � � ��
��
� 0 6 45 0 276. 1 μ Ans
4.5 Magnetomotive Force (mmf)
In an electric circuit, any current that fl ows is due to the existence of an emf. Similarly, in a magnetic circuit, the magnetic fl ux is due to the existence of an mmf. The concept of an mmf for permanent magnets is a diffi cult one. Fortunately it is simple when we consider the fl ux being produced by current fl owing through a coil. This is the case for most practical magnetic circuits.
In section 4.2 we saw that each turn of the coil made a contribution to the total fl ux produced, so the fl ux must be directly proportional to the number of turns on the coil. The fl ux is also directly proportional to the value of current passed through the coil.
Putting these two facts together we can say that the mmf is the product of the current and the number of turns. The quantity symbol for mmf is F (the same as for mechanical force). The number of turns is just a number and therefore dimensionless. The SI unit for mmf is therefore simply ampere. However, this tends to cause considerable confusion to students new to the subject. For this reason, throughout this book , the unit will be quoted as ampere turns (At).
Thus mmf, ampere turnF NI� (4.2)

Magnetic Fields and Circuits 117
Worked Example 4.3
Q A 1500 turn coil is uniformly wound around an iron toroid of uniform csa 5 cm 2 . Calculate the mmf
and fl ux density produced if the resulting fl ux is 0.2 mWb when the coil current is 0.75 A.
A
N � 1500; A � 5 � 10 � 4 m 2 ; � � 0.2 � 10 � 3 Wb; I � 0.75 A
F NF
� � �
�
I ampere turnso At
111
500 0 7525
.Ans
BA
B
� ��
�
�
�
�
�tesla
so T
0 2 05 0
0 4
3
4
.
.
1
1Ans
Worked Example 4.4
Q Calculate the excitation current required in a 600 turn coil in order to produce an mmf
of 1500 At.
A
N � 600; F � 1500 At
since ampere turn, then ampere
so A
F NFN
� �
� �
I I
I1500600
2 5. AAns
4.6 Magnetic Field Strength
This is the magnetic equivalent to electric fi eld strength in electrostatics. It was found that electric fi eld strength is the same as potential gradient, and is measured in volt/metre. Now, the volt is the unit of emf, and we have just seen that mmf and emf are comparable quantities, i.e. mmf can be considered as the magnetic circuit equivalent of electric potential. Hence magnetic fi eld strength is defi ned as the mmf per metre length of the magnetic circuit. The quantity symbol for magnetic fi eld strength is H , the unit of measurement being ampere turn/metre.
HF NI
� �� �
ampere turn/metre (4.3)
where � is the mean or average length of the magnetic circuit. Thus, if the circuit consists of a circular toroid, then the mean length is the mean circumference. This point is illustrated in Figs. 4.8(a) and (b) .

118 Fundamental Electrical and Electronic Principles
Fig. 4.8
�
r
d
(a) (b)
�
Worked Example 4.5
Q A current of 400 mA is passed through a 550 turn coil wound on a toroid of mean diameter 8 cm.
Calculate the magnetic fi eld strength.
A
I � 0.4 A; N � 550; d � 8 � 10 � 2 m
�
�
� � � � �
� ��
�� �d
HN
metre m
ampere turn/metre
8 0 0 25
550 0 40
21 1.
..
I
225875 35
1so At/m H � . Ans
4.7 Permeability of Free Space ( � 0 )
We have seen in electrostatics that the permittivity of the dielectric is a measure of the ‘ willingness ’ of the dielectric to allow an electric fi eld to exist in it. In magnetic circuits the corresponding quantity is the permeability of the material.
If the magnetic fi eld exists in a vacuum, then the ratio of the fl ux density to the magnetic fi eld strength is a constant, called the permeability of free space.
�0 henry/metre�B
H(4.4)
compare this to farad/metre
The value for hen
0
0
ε �
� � �
D
E� 4 10 7� rry/metre
�0 is used as the reference or datum level from which the permea-bilities of all other materials are measured.

Magnetic Fields and Circuits 119
4.8 Relative Permeability ( � r )
Consider an air-cored solenoid with a fi xed value of current fl owing it. The mmf will produce a certain fl ux density in this air core. If an iron core was now inserted, it would be found that the fl ux density would be very much increased. To account for these different results for different core materials, a quantity known as the relative permeability is used. This is defi ned as the ratio of the fl ux density produced in the iron, to that produced in the air, for the same applied mmf.
i.e. r� �B
B2
1(4.5)
where B2 is the fl ux density produced in the iron and B1 is the fl ux density produced in the air.
Compare this to the equation εr �C
C2
1used in electrostatics.
As with ε r , �r has no units, since it is simply a ratio.
Note: For air or any other NON-MAGNETIC material, �r � 1. In other words, all non-magnetic materials have the same magnetic properties as a vacuum.
4.9 Absolute Permeability ( � )
The absolute permeability of a material is the ratio of the fl ux density to magnetic fi eld strength, for a given mmf.
Thus, henry/metre� �B
H(4.6)
but since �0 is the reference value, then � � �0�r .
compare this to the equation ε � ε0εr
Therefore, so, tesla0 r 0 r� � � �� �B
HB H (4.7)
This equation compares directly with D � ε0εrE coulomb/m 2 .
Worked Example 4.6
Q A solenoid with a core of csa of 15 cm 2 and relative permeability 65, produces a fl ux of 200 μ Wb. If
the core material is changed to one of relative permeability 800 what will be the new fl ux and fl ux
density?
A
A � 15 � 10 � 4 m 2 ; � r1 � 65; � 1 � 2 � 10 � 4 Wb; � r2 � 800

120 Fundamental Electrical and Electronic Principles
BA
B
11
1
1
1 1
1
� ��
�
�
�
�
�tesla
so T
2 05 0
0 33
4
4
.
Now, the original core is 65 times more eff ective than air. The second core is 800 times more eff ective than air. Therefore, we can say that the second core will produce a greater fl ux density. The ratio of the two fl ux densities will be 800/65 � 12.31:1. Thus the second core will result in a fl ux density 12.31 times greater than produced by the fi rst core
Thus
so T
and web
B B
B
B A
2 1
2
2 2
2 3 2 3 0 33
64
� � �
�
�
1 1 1 1 1
1 1
. . .
. Ans
� eer
so mWb
� � �
�
�1 1 1 1.
.
64 5 0
2 462
4
2� Ans
Worked Example 4.7
Q A toroid of mean radius 40 mm, eff ective csa 3 cm 2 , and relative permeability 150, is wound with a
900 turn coil that carries a current of 1.5 A. Calculate (a) the mmf, (b) the magnetic fi eld strength and
(c) the fl ux and fl ux density.
A
r � 0.04 m; A � 3 � 10 � 4 m 2 ; � r � 150; N � 900; I � 1.5 A
(a)
F N
F
� � �
�
I ampere turn 900 .5
so 350 At
1
1 Ans
(b)
HF
H
� �
��
�
��ampere turn/metre, where r metre
so,
2
3502 0 04
�
�1
.
5537 51. At/m Ans
(c)
B H
B
BA
� � � � �
�
�
�� �0 r tesla
so T
webe
4 0 50 537 5
0 25
7�
�
1 1 1
1 1
.
. Ans
rr
so Wb
� � �
�
�1 1 1.
.
0 25 3 0
303 75
4
� μ Ans
Worked Example 4.8
Q A steel toroid of the dimensions shown in Fig. 4.9 is wound with a 500 turn coil of wire. What value
of current needs to be passed through this coil in order to produce a fl ux of 250 μ Wb in the toroid, if
under these conditions the relative permeability of the toroid is 300.

Magnetic Fields and Circuits 121
A
r � 3 � 10 � 2 m; A � 4.5 � 10 � 4 m 2 ; N � 500; � � 250 � 10 � 6 Wb; � r � 300 Eff ective length of the toroid, ℓ � 2 � r metre � 2 � � 3 � 10 � 2 m � 0.188 m
BA
B
B H
� ��
�
�
�
�
�
�
� �
tesla
so, T
Now, tesla0 r
250 04 5 0
0 556
6
4
1
1..
aand, ampere turns/weber
so,
0 rH
B
H
�
�� �
�
�
� �
�0 556
4 0 300474
7
.1
1 At/m
ampere turns
thus, At
and, a
F H
F
FN
�
� �
�
�
�
1 1474 0 88
277
.
I mmp
so, A
�
�
277500
0 55I . Ans
Worked Example 4.9
Q A coil is made by winding a single layer of 0.5 mm diameter wire onto a cylindrical wooden dowel,
which is 5 cm long and of csa 7 cm 2 . When a current of 0.2 A is passed through the coil, calculate
(a) the mmf produced, (b) the fl ux density, and (c) the fl ux produced.
A
(a) I � 0.2 A; ℓ � 5 � 10 � 2 m; A � 7 � 10 � 4 m 2 ; d � 0.5 � 10 � 3 ; � r � 1 (wood)
Since F � NI ampere turn, we fi rst need to calculate the number of turns of wire on the coil. Consider Fig. 4.10 which represents the coil wound onto the dowel.
From Fig. 4.10 it may be seen that the number of turns may be obtained by dividing the length of the dowel by the diameter (thickness) of the wire.
Thus,
so,
Thus, At
Nd
N
F
� �
�
� � �
� 500 5
00
00 0 2 20
.
.
1
1 Ans
A � 4.5 cm2
r30 cm
�
Fig. 4.9

122 Fundamental Electrical and Electronic Principles
(b)
B
AB H� �
�� �tesla, or tesla0 r
but since we do not yet know the value for the fl ux, but can calculate the value for H , then the second equation needs to be used.
HF
HB
� ��
�
� �
�
�
�ampere turn/metre
so, At/mand,
205 0
4004 0
2
7
1
1� �� � � �
�
�1 1400 5 026 0503
4.so, T B μ Ans
(c) ��
� � � � �
�
� �BA weberthus, Wb
503 0 7 00 352
6 41 1. μ Ans
4.10 Magnetisation (B/H) Curve
A magnetisation curve is a graph of the fl ux density produced in a magnetic circuit as the magnetic fi eld strength is varied. Since H � NI / � , then for a given magnetic circuit, the fi eld strength may be varied by varying the current through the coil.
If the magnetic circuit consists entirely of air, or any other non-magnetic material then, the resulting graph will be a straight line passing through the origin. The reason for this is that since �r � 1 for all non-magnetic materials, then the ratio B / H remains constant. Unfortunately, the relative permeability of magnetic materials does not remain constant for all values of applied fi eld strength, which results in a curved graph.
This non-linearity is due to an effect known as magnetic saturation. The complete explanation of this effect is beyond the scope of this book, but a much simplifi ed version of this afforded by Ewing ’ s molecular theory. This states that each molecule in a magnetic material may be considered as a minute magnet in its own right. When the material is unmagnetised, these molecular magnets are orientated in a completely random fashion. Thus, the material has no overall magnetic polarisation. This is similar to a conductor in which the free electrons are drifting in a random manner. Thus, when no emf is applied, no current fl ows. This random orientation of the molecular magnets is illustrated in Fig. 4.11 where the arrows represent the north poles.
�
5 cm
d � 0.5 mm
Fig. 4.10

Magnetic Fields and Circuits 123
However, as the coil magnetisation current is slowly increased, so the molecular magnets start to rotate towards a particular orientation. This results in a certain degree of polarisation of the material, as shown in Fig. 4.12 . As the coil current continues to be increased, so the molecular magnets continue to become more aligned. Eventually, the coil current will be suffi cient to produce complete alignment. This means that the fl ux will have reached its maximum possible value. Further increase of the current will produce no further increase of fl ux. The material is then said to have reached magnetic saturation, as illustrated in Fig. 4.13 .
partially magnetised
Fig. 4.12 Fig. 4.11
un-magnetised
saturation
Fig. 4.13
Typical magnetisation curves for air and a magnetic material are shown in Fig. 4.14. Note that the fl ux density produced for a given value of His very much greater in the magnetic material. The slope of the graph is B / H � �0�r , and this slope varies. Since �0 is a constant, then the value of �r for the magnetic material must vary as the slope of the graph varies.
magnetic material
B(T)
air
H (At/m)0
Fig. 4.14

124 Fundamental Electrical and Electronic Principles
μr
O H (At/m)
Fig. 4.15
0 1000 2000 3000 4000 5000 6000 7000 8000
H (At/m)
0.2
0.4
0.6
0.8
1.0
1.2
1.4
1.6
B (T)
Mildsteel Stalloy
Radiometal
Castiron
Mumetal
Ferrite
Fig. 4.16
The variation of �r with variation of H may be obtained from the B / H curve, and the resulting �r / H graph is shown in Fig. 4.15 . The magnetisation curves for a range of magnetic materials is given in Fig. 4.16 .

Magnetic Fields and Circuits 125
For a practical magnetic circuit, a single value for �r cannot be specifi ed unless it is quoted for a specifi ed value of B or H . Thus B / Hdata must be available. These may be presented either in the form of a graph as in Fig. 4.14 , or in the form of tabulated data, from which the relevant section of the B / H curve may be plotted.
Worked Example 4.10
Q An iron toroid having a mean radius of 0.1 m and csa of � cm 2 is wound with a 1000 turn coil. The coil
current results in a fl ux of 0.1775 mWb in the toroid. Using the following data, determine (a) the coil
current and (b) the relative permeability of the toroid under these conditions.
H(At/m) 80 85 90 95 100
B(T) 0.50 0.55 0.58 0.59 0.6
A
The fi rst step in the solution of the problem is to plot the section of B / H graph from the given data.
Note: This must be plotted as accurately as possible on graph paper. The values used in this example have been obtained from such a graph.
BA
B
� ��
�
�
�
�
��
tesla
so T
0 775 00
0 565
3
4
.
.
1 1
1
and from the plotted graph, when B � 0.565 T, H � 88 At/m.
(a) Now, the length of the toroid, � � 2 � r metre � 0.27 � m
and ampere turn/metre
so amp
hence
HN
HN
�
� ��
�
I
I
I
�� 88 0 2
0005
. �1
55 3. mA Ans
(b)
B H
BH
�
� �� �
�
�
� �
�� �
�
0 r
r0
r
tesla
so
hence
0 5654 10 88
5 09
7
.
1 Ans
Worked Example 4.11
Q A cast iron toroid of mean length 15 cm is wound with a 2500 turn coil, through which a magnetising
current of 0.3 A is passed. Calculate the resulting fl ux density and relative permeability of the toroid
under these conditions.
A
Since B / H data are necessary for the solution, but none have been quoted, then the B / H curve for cast iron shown in Fig. 4.16 will be used.
� � 0.15 m; N � 2500; I � 0.3 A

126 Fundamental Electrical and Electronic Principles
HN
H
� ��
�
I
�ampere turn/metre
so At/m
2500 0 30 5
5000
..1
and from the graph for cast iron in Fig. 4.16 , the corresponding fl ux density is
B
B H
BH
�
�
� �� ��
0 75
0 754 0 50007
.
.
T
But, tesla
so
0 r
r0
r
Ans
� �
�� �
�
1
��119 4. Ans
4.11 Composite Series Magnetic Circuits
Most practical magnetic circuits consist of more than one material in series. This may be deliberate, as in the case of an electric motor or generator, where there have to be air gaps between the stationary and rotating parts. Sometimes an air gap may not be required, but the method of construction results in small but unavoidable gaps.
In other circumstances it may be a requirement that two or more different magnetic materials form a single magnetic circuit.
Let us consider the case where an air gap is deliberately introduced into a magnetic circuit. For example, making a sawcut through a toroid, at right angles to the fl ux path.
Worked Example 4.12
Q A mild steel toroid of mean length 18.75 cm and csa 0.8 cm 2 is wound with a 750 turn coil. (a) Calculate
the coil current required to produce a fl ux of 112 μ Wb in the toroid. (b) If a 0.5 mm sawcut is now made
across the toroid, calculate the coil current required to maintain the fl ux at its original value.
A
I � 0.1875 m; A � 8 � 10 � 5 m 2 ; N � 750; � = 112 � 10 � 6 Wb; � gap � 0.5 � 10 � 3 m
(a)
B
A� �
�
�
�
�
�tesla
11 1
1
2 08 0
6
5
So B � 1.4 T, and from the graph for mild steel in Fig. 4.16 , the corresponding value for H is 2000 At/m
F HF
Fe
Fe
ampere turnso At
� � �
�
� 2000 0 875375
.1
Fe is the chemical symbol for iron. In Worked Example 4.12 the mmf required to produce the fl ux in the ‘ iron ’ part of the circuit has been referred to as F Fe . This will distinguish it from the mmf required for the air gap which is shown as F gap

Magnetic Fields and Circuits 127
I
I
� �
�
FNFe amp
so A
375750
0 5. Ans
(b) When the air gap is introduced into the steel the eff ective length of the steel circuit changes by only 0.27%. This is a negligible amount, so the values obtained in part (a) above for H and F Fe remain unchanged. However, the introduction of the air gap will produce a considerable reduction of the circuit fl ux. Thus we need to calculate the extra mmf, and hence current, required to restore the fl ux to its original value.
Since the relative permeability for air is a constant ( � 1), then a B / H graph is not required. The csa of the gap is the same as that for the steel, and the same fl ux exists in it. Thus, the fl ux density in the gap must also be the same as that calculated in part (a) above. Hence the value of H required to maintain this fl ux density in the gap can be calculated from:
B H
HB
H
�
� ��
�
�
�
� �
0 gap
gap0
gap
so ampere turn/metre
and
1
1
1
.
.
44 0 7
111 1
1 11 1
�
�
� � �
0
0 0
6
6
At/m
also, since
then
gap gap gap
gap
F H
F
�
. .55 0 557
375 557
9
3� �
� � � �
�
�1 At
Total circuit mmf,
so,
Fe gapF F F
F 332
932750
243
At
so A
I
I
� �
�
FN1. Ans
Worked Example 4.13
Q A magnetic circuit consists of two stalloy sections A and B as shown in Fig. 4.17 . The mean length
and csa for A are 25 cm and 11.5 cm 2 , whilst the corresponding values for B are 15 cm and 12 cm 2
respectively. A 1000 turn coil wound on section A produces a circuit fl ux of 1.5 mWb. Calculate
the coil current required.
A B
Fig. 4.17

128 Fundamental Electrical and Electronic Principles
A
� A � 0.25 m; A A � 11.5 � 10 � 4 m 2 ; � B � 0.15 m
A B � 12 � 10 � 4 m 2 ; � � 1.5 � 10 � 3 Wb; N � 1000
BA
BAA
AB
B� �
��
��
�
�
�
�
�
�
� �tesla and tesla
1 1
11 1
1 1
1 1
..
.5 05 0
5 02 0
3
4
3
44
3 25so T and TB BA B� �1 1. .
From the B / H curve for stalloy in Fig. 4.16 , the corresponding H values are:
H HF H F H
A B
A A A B
� �
� �
1470 845At/m and At/mampere turn/metre, and I BB B
A BF F
I ampere turn/metre
At� � � �
� �
1 11
470 0 25 845 0 5367 5 26 7
. .. . 55 At
total circuit mmf,
so, At
and
F F F
F
FN
A B� �
�
� �
494 25
494 25100
.
.I
000 494so A I � . Ans
From the last two examples it should now be apparent that in a series magnetic circuit the only quantity that is common to both (all) sections is the magnetic fl ux � . This common fl ux is produced by the current fl owing through the coil, i.e. the total circuit mmf F . Also, if the lengths, csa and/or the materials are different for the sections, then their fl ux densities and H values must be different. For these reasons it is not legitimate to add together the individual H values. It is correct, however, to add together the individual mmfs to obtain the total circuit mmf F . This technique is equivalent to adding together the p.d.s across resistors connected in series in an electrical circuit. The sum of these p.d.s then gives the value of emf required to maintain a certain current through the circuit.
For example, if a current of 4 A is to be maintained through two resistors of 10 � and 20 � connected in series, then the p.d.s would be 40 V and 80 V respectively. Thus, the emf required would be 120 V.
4.12 Reluctance (S)
Comparisons have already been made between the electric circuit and the magnetic circuit. We have compared mmf to emf; current to fl ux ; and potential gradient to magnetic fi eld strength. A further comparison may be made, as follows.
The resistance of an electric circuit limits the current that can fl ow for a given applied emf. Similarly, in a magnetic circuit, the fl ux produced by a given mmf is limited by the reluctance of the circuit. Thus,

Magnetic Fields and Circuits 129
the reluctance of a magnetic circuit is the opposition it offers to the existence of a magnetic fl ux within it.
Current is a movement of electrons around an electric circuit. A magnetic fl ux merely exists in a magnetic circuit; it does not involve a fl ow of particles. However, both current and fl ux are the direct result of some form of applied force
In an electric circuit, currentemf
resistance�
so in a magnetic circuit, fluxmmf
reluctance�
Thus, � � �F
S
NI
Sweber
So reluctance, amp turn/weberSF NI
� �� �
(4.8)
but
so
also,
so
and since 0 r
NI H
SH
BA
SH
BAH
B
�
�
�
�
� �
�
�
�
��
� � �1 1
then amp turn/metre0 r
SA
��
� �(4.9)
Let us continue the comparison between series electrical circuits and series magnetic circuits. We know that the total resistance in the electrical circuit is obtained simply by adding together the resistor values. The same technique may be used in magnetic circuits, such that the total reluctance of a series magnetic circuit, S is given by
S S S S� � � �1 2 3… (4.10)
Assume that the physical dimensions of the sections, and the relative permeabilities (for the given operating conditions) of each section are known. In this case, equations (4.9), (4.10) and (4.8) enable an alternative form of solution.
Worked Example 4.14
Q An iron ring of csa 8 cm 2 and mean diameter 24 cm, contains an air gap 3 mm wide. It is required
to produce a fl ux of 1.2 mWb in the air gap. Calculate the mmf required, given that the relative
permeability of the iron is 1200 under these operating conditions.

130 Fundamental Electrical and Electronic Principles
A
A Fe � A gap � 8 � 10 � 4 m 2 ; � � 1.2 � 10 � 3 ; � r � 1200; � gap � 3 � 10 � 3 m; � Fe � 0.24 � � m
For the iron circuit: ampere turn/WbFeFe
0 rS
A�
��
�
�� �
��
0 244
.11 1 1
1
0 200 8 06 25 0
7 4
5
� �� � �
� �so At/WbFeS .
For the air gap:
so
gapgap
0 rS
A
S
�
��
� � � �
�
� �
�
� �
�3 0
4 0 8 0
3
7 4
1
1 1 1
ggap At/Wb� �2 984 06. 1
Total circuit reluctance,
so
Fe gapS S S� �
� � � �6 25 0 2 984 05 6. .1 1
SSFS
F S
� �
�
�
3 6 06. 1 1 At
Since weber
then ampere turn (compare
�
� to volt)so At
V RF
�
�
I
4331 Ans
The above example illustrates the quite dramatic increase of circuit reluctance produced by even a very small air gap. In this example, the air gap length is only 0.4% of the total circuit length. Yet its reluctance is almost fi ve times greater than that of the iron section. For this reason, the design of a magnetic circuit should be such as to try to minimise any unavoidable air gaps.
Worked Example 4.15
Q A magnetic circuit consists of three sections, the data for which is given below. Calculate (a) the circuit
reluctance and (b) the current required in a 500 turn coil, wound onto section 1, to produce a fl ux of 2 mWb.
Section length (cm) csa (cm 2) μ r
1 85 10 600
2 65 15 950
3 0.1 12.5 1
A
(a)
SA
S
11
1
1
1 1
1
�
�� � � �
�
� �
�� �
�
0 rampere turn/weber
so
0 854 0 600 07 3
.
.11 127 06� At/Wb

Magnetic Fields and Circuits 131
SA
S
22
2
7 4
25
0 654 0 950 5 03 63 0
�
�� � � � �
� �
� �
�� �
�
0 r
so At/Wb
.
.1 1 1
1
SA
S
33
3
3
7 4
35
04 0 2 5 06 37 0
�
�� � � � �
� �
�
� �
�� �
�
0 r
so At/Wb
1
1 1 1 1
1
..
Total reluctance,
so
S S S S� � �
� � � � � �
1
1 1 1 12 3
6 5 527 0 3 63 0 6 37 0. . .SS � �2 3 06.1 1 At/Wb Ans
(b) F � � S ampere turn � 2 � 10 � 3 � 2.13 � 10 6
so At
and amp
so A
FFN
�
� �
�
42544254500
8 5
I
I . 1 Ans
Magnetic fl ux, like most other things in nature tends to take the easiest path available. For fl ux this means the lowest reluctance path. This is illustrated in Fig. 4.18 . The reluctance of the soft iron bar is very much less than the surrounding air. For this reason, the fl ux will opt to distort from its normal pattern, and make use of this lower reluctance path.
S N
softiron
plastic
copper
Fig. 4.18
4.13 Comparison of Electrical, Magnetic and Electrostatic
Quantities
Although a number of comparisons have already been made in the text, it is useful to list these comparisons on one page. This helps to put the three systems into context, and Table 4.1 serves this purpose.

132 Fundamental Electrical and Electronic Principles
Table 4.1 Comparison of Quantities
Electrical Magnetic Electrostatic
Quantity Symbol Unit Quantity Symbol Unit Quantity Symbol Unit
emf E V mmf F At emf E V
current I A fl ux � Wb fl ux Q C
resistance R � reluctance S At/Wb resistance R �
resistivity � �m permeability � H/m permittivity ε F/m
potential gradient
— V/m fi eld strength
H At/m fi eld strength
E V/m
current density
J A/m2 fl ux density B T fl ux density D C/m2
Also listed below are some comparable equations
E � IR volt; F � �S ampere turn
J � I
Aamp/metre2; B �
�A
tesla; D � Q
Acoulomb/metre2
R � R1 � R2 � … ohm; S � S1 � S2 � … ampere turn/weber
potential gradient � E
dvolt/metre; H �
F
� ampere turn/metre;
E � V
d volt/metre
B � �0�rH tesla; D � ε0εrE coulomb/metre2
�rB
B
D
D
C
C� �2
1
2
1
2
1
; or rε
�r � 1 for all non-magnetic materals; εr � 1 air only
�0 � 4� � 10� 7 henry/metre; ε0 � 8.854 � 10� 12 farad/metre
Note: Although the concept of current density has not been covered previously, it may be seen from Table 4.1 that it is simply the value of current fl owing through a conductor divided by the csa of the conductor.
4.14 Magnetic Hysteresis
Hysteresis comes from a Greek word meaning ‘ to lag behind ’ . It is found that when the magnetic fi eld strength in a magnetic material is varied, the resulting fl ux density displays a lagging effect.
Consider such a specimen of magnetic material that initially is completely unmagnetised. If no current fl ows through the magnetising coil then both H and B will initially be zero. The value of H is now increased by increasing the coil current in discrete steps. The corresponding fl ux density is then noted at each step. If these values

Magnetic Fields and Circuits 133
�B(T)
�B
�H (At/m)�HD
G
A
E
F
0
C
Fig. 4.19
are plotted on a graph until magnetic saturation is achieved, the dotted curve (the initial magnetisation curve) shown in Fig. 4.19 results.
Let the current now be reduced (in steps) to zero, and the corresponding values for B again noted and plotted. This would result in the section of graph from A to C . This shows that when the current is zero once more (so H � 0), the fl ux density has not reduced to zero. The fl ux density remaining is called the remanent fl ux density (OC). This property of a magnetic material, to retain some fl ux after the magnetising current is removed, is known as the remanance or retentivity of the material.
Let the current now be reversed, and increased in the opposite direction. This will have the effect of opposing the residual fl ux. Hence, the latter will be reduced until at some value of � H it reaches zero (point D on the graph). The amount of reverse magnetic fi eld strength required to reduce the residual fl ux to zero is known as the coercive force. This property of a material is called its coercivity.
If we now continue to increase the current in this reverse direction, the material will once more reach saturation (at point E). In this case it will be of the opposite polarity to that achieved at point A on the graph.
Once again, the current may be reduced to zero, reversed, and then increased in the original direction. This will take the graph from point E back to A, passing through points F and G on the way. Note that residual fl ux density shown as OC has the same value, but opposite polarity, to that shown as OF. Similarly, coercive force OD � OG.
In taking the specimen through the loop ACDEFGA we have taken it through one complete magnetisation cycle. The loop is referred to as the hysteresis loop. The degree to which a material is magnetised depends upon the extent to which the ‘ molecular magnets ’ have been aligned. Thus, in taking the specimen through a magnetisation cycle, energy must be expended. This energy is proportional to the area enclosed by the loop, and the rate (frequency) at which the cycle is repeated.

134 Fundamental Electrical and Electronic Principles
Magnetic materials may be subdivided into what are known as ‘ hard ’ and ‘ soft ’ magnetic materials. A hard magnetic material is one which possesses a large remanance and coercivity. It is therefore one which retains most of its magnetism, when the magnetising current is removed. It is also diffi cult to demagnetise. These are the materials used to form permanent magnets, and they will have a very ‘ fat ’ loop as illustrated in Fig. 4.20(a) .
A soft magnetic material, such as soft iron and mild steel, retains very little of the induced magnetism. It will therefore have a relatively ‘ thin ’ hysteresis loop, as shown in Fig. 4.20(b) . The soft magnetic materials are the ones used most often for engineering applications. Examples are the magnetic circuits for rotating electric machines (motors and generators), relays, and the cores for inductors and transformers.
Fig. 4.20
H (At/m)
(a)
B(T)
H (At/m)
B(T)
(b)
When a magnetic circuit is subjected to continuous cycling through the loop a considerable amount of energy is dissipated. This energy appears as heat in the material. Since this is normally an undesirable effect, the energy thus dissipated is called the hysteresis loss. Thus, the thinner the loop, the less wasted energy. This is why ‘ soft ’ magnetic materials are used for the applications listed above.
4.15 Parallel Magnetic Circuits
The BTEC syllabus at this level does not require the treatment of parallel magnetic circuits, but since many practical circuits take this form, a brief coverage now follows.
We have seen that the magnetic circuit may be treated in much the same manner as its electrical circuit equivalent. The same is true for parallel circuits in the two systems.
Two equivalent circuits are shown in Fig. 4.21 , and from this the following points emerge:
1 In the electrical circuit, the current supplied by the source of emf splits between the two outer branches according to the resistances

Magnetic Fields and Circuits 135
offered. In the magnetic circuit, the fl ux produced by the mmf splits between the outer limbs according to the reluctances offered.
2 If the two resistors in the outer branches are identical, the current splits equally. Similarly, if the reluctances of the outer limbs are the same then the fl ux splits equally between them.
However, a note of caution. In the electric circuit it has been assumed that the source of emf is ideal (no internal resistance) and that the connecting wires have no resistance. The latter assumption cannot be applied to the magnetic circuit. All three limbs will have a value of reluctance that mustbe taken into account when calculating the total circuit reluctance.
Fig. 4.21
R1
I1 I2
R2E
(a)
I
N
(b) Φ
Φ1 Φ2
N
Summary of Equations
Magnetic fl ux density: B
AH� �
�� �o r tesla
Magnetomotive force (mmf): F NI S� � � ampere turn
Magnetic fi eld strength: H
F NI� �
� �ampere turn/metre
Permeability: � � �� o r henry/metre
B
H
Reluctance: S
A
NI F� � �
�
� � � �o r
ampere turn/weber
Series magnetic circuit: S S S S� � � �1 2 3… ampere turn/weber

136 Fundamental Electrical and Electronic Principles
Assignment Questions
1 The pole faces of a magnet are 4 cm � 3 cm and produce a fl ux of 0.5 mWb. Calculate the fl ux density.
2 A fl ux density of 1.8 T exists in an air gap of eff ective csa 11 cm 2 . Calculate the value of the fl ux.
3 If a fl ux of 5 mWb has a density of 1.25 T, determine the csa of the fi eld.
4 A magnetising coil of 850 turns carries a current of 25 mA. Determine the resulting mmf.
5 It is required to produce an mmf of 1200 At from a 1500 turn coil. What will be the required current?
6 A current of 2.5 A when fl owing through a coil produces an mmf of 675 At. Calculate the number of turns on the coil.
7 A toroid has an mmf of 845 At applied to it. If the mean length of the toroid is 15 cm, determine the resulting magnetic fi eld strength.
8 A magnetic fi eld strength of 2500 At/m exists in a magnetic circuit of mean length 45 mm. Calculate the value of the applied mmf.
9 Calculate the current required in a 500 turn coil to produce an electric fi eld strength of 4000 At/m in an iron circuit of mean length 25 cm.
10 A 400 turn coil is wound onto an iron toroid of mean length 18 cm and uniform csa 4.5 cm 2 . If a coil current of 2.25 A results in a fl ux of 0.5 mWb, determine (a) the mmf, (b) the fl ux density, (c) the magnetic fi eld strength.
11 An air-cored coil contains a fl ux density of 25 mT. When an iron core is inserted the fl ux density is increased to 1.6 T. Calculate the relative permeability of the iron under these conditions.
12 A magnetic circuit of mean diameter 12 cm has an applied mmf of 275 At. If the resulting fl ux density is 0.8 T, calculate the relative permeability of the circuit under these conditions.
13 A toroid of mean radius 35 mm, eff ective csa 4 cm 2 and relative permeability 200, is wound
with a 1000 turn coil that carries a current of 1.2 A. Calculate (a) the mmf, (b) the magnetic fi eld strength, (c) the fl ux density and (d) the fl ux in the toroid.
14 A magnetic circuit of square cross-section 1.5 � 1.5 cm and mean length 20 cm is wound with a 500 turn coil. Given the B / H data below, determine (a) the coil current required to produce a fl ux of 258.8 � Wb and (b) the relative permeability of the circuit under these conditions.
B(T) 0.9 1.1 1.2 1.3
H(At/m) 250 450 600 825
15 For the circuit of Question 14 above, a 1.5 mm sawcut is made through it. Calculate the current now required to maintain the fl ux at its original value.
16 A cast steel toroid has the following B / H data. Complete the data table for the corresponding values of � r and hence plot the � r / H graph, and (a) from your graph determine the values of magnetic fi eld strength at which the relative permeability of the steel is 520, and (b) the value of relative permeability when H � 1200 At/m.
B(T) 0.15 0.35 0.74 1.05 1.25 1.39
H(At/m) 250 500 1000 1500 2000 2500
� r
17 A magnetic circuit made of radiometal is subjected to a magnetic fi eld strength of 5000 At/m. Using the data given in Fig. 4.16 , determine the relative permeability under this condition.
18 A magnetic circuit consists of two sections as shown in Fig. 4.22 . Section 1 is made of mild steel and is wound with a 100 turn coil. Section 2 is made from cast iron. Calculate the coil current required to produce a fl ux of 0.72 mWb in the circuit. Use the B/H data given in Fig. 4.16 .

Magnetic Fields and Circuits 137
19 A circular toroid of mean diameter 25 cm and csa 4 cm 2 has a 1.5 mm air gap in it. The toroid is wound with a 1200 turn coil and carries a fl ux of 0.48 mWb. If, under these conditions, the relative permeability of the toroid is 800, calculate the coil current required.
Assignment Questions
20 A closed magnetic circuit made from silicon steel consists of two sections, connected in series. One is of eff ective length 42 mm and csa 85 mm 2 , and the other of length 17 mm and csa 65 mm 2 . A 50 turn coil is wound on to the second section and carries a current of 0.4 A. Determine the fl ux density in the 17 mm length section if the relative permeability of the silicon iron under this condition is 3000.
21 A magnetic circuit of csa 0.45 cm 2 consists of one part 4 cm long and � r of 1200; and a second part 3 cm long and � r of 750. A 100 turn coil is wound onto the fi rst part and a current of 1.5 A is passed through it. Calculate the fl ux produced in the circuit.
3 cm
4 cm 3 cm
8 cm
20 cm
4 cm
Section 2
Section 1
Fig. 4.22

138 Fundamental Electrical and Electronic Principles
Suggested Practical Assignments
Note: These assignments are qualitative in nature.
Assignment 1 To compare the eff ectiveness of diff erent magnetic core materials.
Apparatus:
1 � coil of wire of known number of turns 1 � d.c. psu 1 � ammeter 1 � set of laboratory weights 1 � set of diff erent ferromagnetic cores, suitable for the coil used.
Method:
1 Connect the circuit as shown in Fig. 4.23 . 2 Adjust the coil current carefully until the magnetic core just holds the
smallest weight in place. Note the value of current and weight. 3 Using larger weights, in turn, increase the coil current until each weight is
just held by the core. Record all values of weight and corresponding current. 4 Repeat the above procedure for the other core materials. 5 Tabulate all results. Calculate and tabulate the force of attraction and mmf in
each case. 6 Write an assignment report, commenting on your fi ndings, and comparing
the relative eff ectiveness of the diff erent core materials.
core
AI�
d.c.p.s.u. N
weight
�
Fig. 4.23
Assignment 2 To plot a magnetisation curve, and initial section of a hysteresis loop, for a magnetic circuit.
Apparatus:
1 � magnetic circuit of known length, and containing a coil(s) of known number of turns 1 � variable d.c. psu 1 � Hall Eff ect probe 1 � ammeter 1 � DVM

Magnetic Fields and Circuits 139
Method:
1 Ensure that the core is completely demagnetised before starting. 2 Zero the Hall probe, monitoring its output with the DVM. 3 Connect the circuit as in Fig. 4.24 . 4 Increase the coil current in 0.1 A steps, up to 2 A. Record the DVM reading at
each step. Note: If you ‘ overshoot ’ a desired current setting. DO NOT then reduce the current back to that setting. Record the value actually set, together with the corresponding DVM reading.
5 Reduce the current from 2 A to zero, in 0.1 A steps. Once more, if you overshoot a desired current setting, DO NOT attempt to correct it.
6 Reverse the connections to the psu, and increase the reversed current in small steps until the DVM indicates zero. Note: The Hall eff ect probe output (as measured by the DVM) represents the fl ux density in the core. The magnetic fi eld strength, H , may be calculated from NI / � .
7 Plot a graph of DVM readings ( B ) versus H . 8 Submit a full assignment report.
A V
magneticcircuit
HallProbeCircuit
d.c.p.s.u.
�
�
probe
Fig. 4.24

This page intentionally left blank

Electromagnetism
Chapter 5
Learning Outcomes
This chapter concerns the principles and laws governing electromagnetic induction and the concepts of self and mutual inductance.
On completion of this chapter you should be able to use these principles to:
1 Understand the basic operating principles of motors and generators. 2 Carry out simple calculations involving the generation of voltage, and the production of
force and torque. 3 Appreciate the signifi cance of eddy current loss. 4 Determine the value of inductors, and apply the concepts of self and mutual inductance to
the operating principles of transformers. 5 Calculate the energy stored in a magnetic fi eld. 6 Explain the principle of the moving coil meter, and carry out simple calculations for the
instrument.7 Describe the operation of a wattmeter and simple ohmmeter.
141
5.1 Faraday ’ s Law of Electromagnetic Induction
It is mainly due to the pioneering work of Michael Faraday, in the nineteenth century, that the modern technological world exists as we know it. Without the development of the generation of electrical power, such advances would have been impossible. Thus, although the concepts involved with electromagnetic induction are very simple, they have far-reaching infl uence. Faraday ’ s law is best considered in two interrelated parts:
1 The value of emf induced in a circuit or conductor is directly proportional to the rate of change of magnetic fl ux linking with it.
2 The polarity of such an emf, induced by an increasing fl ux, is opposite to that induced by a decreasing fl ux.

142 Fundamental Electrical and Electronic Principles
The key to electromagnetic induction is contained in part one of the law quoted above. Here, the words ‘ rate of change ’ are used. If there is no change in fl ux, or the way in which this fl ux links with a conductor, then no emf will be induced. The proof of the law can be very simply demonstrated. Consider a coil of wire, a permanent bar magnet and a galvanometer as illustrated in Figs. 5.1 and 5.2 .
Consider the magnet being moved so that it enters the centre of the coil. When this is done it will be seen that the pointer of the galvo defl ects in one direction. This defl ection of the pointer is only momentary, since it only occurs whilst the magnet is moving. The galvo is of course a current measuring device. However, any current fl owing through it must be due to a voltage between its terminals. Since there is no other source of emf in the circuit, then it must be concluded that an emf has been induced or created in the coil itself. The resulting current indicated by the galvo depends on the value of this emf. It will also be observed that when the magnet is stationary (either inside or outside the coil) the galvo does not defl ect. Hence, emf is induced into the coil only when the magnet is in motion.
Fig. 5.1
Fig. 5.2

Electromagnetism 143
When the magnet is withdrawn from the coil, the galvo will again be seen to defl ect momentarily. This time, the defl ection will be in the opposite direction. Provided that the magnet is removed at the same rate as it was inserted, then the magnitudes of the defl ections will be the same. The polarities of the induced emfs will be opposite to each other, since the current fl ow is reversed. Thus far, we have confi rmation that an emf is induced in the coil when a magnetic fl ux is moving relative to it. We also have confi rmation of part two of the law.
In order to deduce the relationship between the value of induced emf and the rate of change of fl ux, the magnet needs to be moved at different speeds into and out of the coil. When this is done, and the resulting magnitudes of the galvo defl ection noted, it will be found that the faster the movement, the greater the induced emf.
This simple experiment can be further extended in three ways. If the magnet is replaced by a more powerful one, it will be found that for the same speed of movement, the corresponding emf will be greater. Similarly, if the coil is replaced with one having more turns, then for a given magnet and speed of movement, the value of the emf will again be found to be greater. Finally, if the magnet is held stationary within the coil, and the coil is then moved away, it will be found that an emf is once more induced in the coil. In this last case, it will also be found the emf has the same polarity as obtained when the magnet was fi rst inserted into the stationary coil. This last effect illustrates the point that it is the relative movement between the coil and the fl ux that induces the emf.
The experimental procedure described above is purely qualitative. However, if it was refi ned and performed under controlled conditions, then it would yield the following results:
The magnitude of the induced emf is directly proportional to the value of magnetic fl ux, the rate at which this fl ux links with the coil, and the number of turns on the coil. Expressed as an equation we have:
eN
t�
� d
dvolt
�(5.1)
Notes:
1 The symbol for the induced emf is shown as a lower-case letter e.This is because it is only present for the short interval of time during which there is relative movement taking place, and so has only a momentary value.
2 The term d � /d t is simply a mathematical means of stating ‘ the rate of change of fl ux with time ’ . The combination N�/ d t is often referred to as the ‘ rate of change of fl ux linkages ’ .
3 The minus sign is a reminder that Lenz ’ s law applies. This law is described in the next section.

144 Fundamental Electrical and Electronic Principles
4 Equation (5.1) forms the basis for the defi nition of the unit of magnetic fl ux, the weber, thus:
The weber is that magnetic fl ux which, linking a circuit of one turn, induces in it an emf of one volt when the fl ux is reduced to zero at a uniform rate in one second.
In other words, 1 volt � 1 weber/second or 1 weber � 1 volt second.
5.2 Lenz ’ s Law
This law states that the polarity of an induced emf is always such that it opposes the change which produced it. This is similar to the statement in mechanics, that for every force there is an opposite reaction.
5.3 Fleming ’ s Righthand Rule
This is a convenient means of determining the polarity of an induced emf in a conductor. Also, provided that the conductor forms part of a complete circuit, it will indicate the direction of the resulting current fl ow.
The fi rst fi nger, the second fi nger and the thumb of the right hand are held out mutually at right angles to each other (like the three edges of a cube as shown in Fig. 5.3 ). The F irst fi nger indicates the direction of the F lux, the thu M b the direction of M otion of the conductor relative to the fl ux, and the s EC ond fi nger indicates the polarity of the induced E mf, and direction of Current fl ow. This process is illustrated in Fig. 5.4 , which shows the cross-section of a conductor being
thuMb
seCond finger
first finger
Fig. 5.3
v
x
Fig. 5.4

Electromagnetism 145
moved vertically upwards at a constant velocity through the magnetic fi eld.
Note: The thumb indicates the direction of motion of the conductorrelative to the fl ux. Thus, the same result would be obtained from the arrangement of Fig. 5.4 if the conductor was kept stationary and the magnetic fi eld was moved down.
Worked Example 5.1
Q The fl ux linking a 100 turn coil changes from 5 mWb to 15 mWb in a time of 2 ms. Calculate the average
emf induced in the coil; see Fig. 5.5 .
15
10
5
0 1
dt
t(ms)
dΦ
Φ(mWb)
2
Fig. 5.5
A
N � 100; d � � (15 � 5) � 10 � 3 Wb; d t � 2 � 10 � 3 s
eN
t
e
��
�� � � �
�
�� � �
�
�
�
�
�
dd
volt
so
� 1 1 1
1
1 1 1
1
00 5 5 02 0
00 0 02 0
3
3
3
3
( )
���500 V Ans
Note that if the fl ux was reduced from 15 mWb to 5 mWb, then the term shown in brackets above would be � 10. The resulting emf would be � 500 V. When quoting equation (5.1), the minus sign should always be included. However, since it is often the magnitude of the induced emf that is more important, it is normal practice to ignore the minus sign in the subsequent calculation. One of the major exceptions to this practice arises when considering the principles of operation of the transformer.

146 Fundamental Electrical and Electronic Principles
Worked Example 5.2
Q A 250 turn coil is linked by a magnetic fl ux that varies as follows: an increase from zero to 20 mWb in
a time of 0.05 s; constant at this value for 0.02 s; followed by a decrease to 4 mWb in a time of 0.01 s.
Assuming that these changes are uniform, draw a sketch graph (i.e. not to an accurate scale) of the
variation of the fl ux and the corresponding emf induced in the coil, showing all principal values.
A
Firstly, the values of induced emf must be calculated for those periods when the fl ux changes.
d � 1 � (20 � 0) � 10 � 3 Wb; d t 1 � 0.05 s
d � 2 � (4 � 20) � 10 � 3 Wb; d t 2 � 0.01 s
eN
te
Nt1
1
1
1
��
��
�� � �
�� � ��
dd
volt andd
dvolt
� �2
2
2
3250 20 00 05
250.
( 11 1
1
11
6 00 0
00 400
3
2
).
�
�� �
�
so V and Ve e
The resulting sketch graph is shown in Fig. 5.6 .
20
4
0
400
�100
0
e (V)
t(ms)
t(ms)
Φ(mWb)
50 70 80
Fig. 5.6

Electromagnetism 147
Worked Example 5.3
Q A coil when linked by a fl ux which changes at the rate of 0.1 Wb/s, has induced in it an emf of 100 V.
Determine the number of turns on the coil.
A
et
� �1 100 V; dd
Wb/s�
0.
eN
t
Ne
t
N
��
� �
�
dd volt
so d /d
turns
�
�1
1
1
000
000
.
Ans
Note that the minus sign has been ignored in the calculation. A negative value for number of turns makes no sense.
5.4 EMF Induced in a Single Straight Conductor
Consider a conductor moving at a constant velocity v metre per second at right angles to a magnetic fi eld having the dimensions shown in Fig. 5.7 . The direction of the induced emf may be obtained using Fleming ’ s righthand rule, and is shown in the diagram. Equation (5.1) is applicable, and in this case, the value for N is 1.
d
V
�
Fig. 5.7
Thus,d
dvolt, and since is constant
then volt
but
et
et
�
�
��
�
�� �
�
BA
eBA
t
weber
so

148 Fundamental Electrical and Electronic Principles
also, the csa of the fi eld, A � � � d metre 2
so eB d
t�
� and since
d
tv� velocity , then
e B v� � volt (5.2)
The above equation is only true for the case when the conductor is moving at right angles to the magnetic fi eld. If the conductor moves through the fi eld at some angle less than 90°, then the ‘ cutting ’action between the conductor and the fl ux is reduced. This results in a consequent reduction in the induced emf. Thus, if the conductor is moved horizontally through the fi eld, the ‘ cutting ’ action is zero, and so no emf is induced. To be more precise, we can say that onlythe component of the velocity at 90° to the fl ux is responsible for the induced emf. In general therefore, the induced emf is given by:
e B v� � sin volt� (5.3)
where v sin � is the component of velocity at 90° to the fi eld, as illustrated in Fig. 5.8 .
v sinθ
θv cosθ
v
Fig. 5.8
This equation is simply confi rmed by considering the previous two extremes; i.e. when conductor moves parallel to the fl ux, � � 0°; sin � � 0; so e � 0. When it moves at right angles to the fl ux, � � 90°; sin � � 1; so we are back to equation (5.2).
Note: � is known as the effective length of the conductor, since it is that portion of the conductor that actually links with the fl ux. The total length of the conductor may be considerably greater than this, but those portions that may extend beyond the fi eld at either end will not have any emf induced.

Electromagnetism 149
Worked Example 5.4
Q A conductor is moved at a velocity of 5 m/s at an angle of 60° to a uniform magnetic fi eld of 1.6 mWb.
The fi eld is produced by a pair of pole pieces, the faces of which measure 10 cm by 4 cm. If the
conductor length is parallel to the longer side of the fi eld, calculate the emf induced; see Fig. 5.9 .
d
5 m/s
4 cm
10 cm
60°
�
Fig. 5.9
A
v � 5 m/s; u � 60°; � � 1.6 � 10 � 3 Wb; ℓ � 0.1 m; d � 0.04 m (see Fig. 5.9 )
BA
e B v
� ��
��
� � � � �
��
�
tesla T
sin volt s
1 1
1
1
.. .
.
. .
6 00 0 04
0 4
0 4 0 5
3
� iin
so V
60
0 73
�
�e .1 Ans
Worked Example 5.5
Q A conductor of eff ective length 15 cm, when moved at a velocity of 8 m/s at an angle of 55° to a
uniform magnetic fi eld, generates an emf of 2.5 V. Determine the density of the fi eld.
A
ℓ � 0.15 m; v � 8 m/s; u � 55°; e � 2.5 V
e B v Be
v
B
� �
�� �
��
sin volt, so sin
tesla
hence, si
��
2 50 5 8
..1 nn
T
55
2 543
�
�B . Ans
Worked Example 5.6
Q The axle of a lorry is 2.2 m long, and the vertical component of the Earth ’ s magnetic fi eld density,
through which the lorry is travelling, is 38 � T. If the speed of the lorry is 80 km/h, then calculate the
emf induced in the axle.

150 Fundamental Electrical and Electronic Principles
A
ℓ � 2.2 m; v ��
�
80 060 60
31m/s ; B � 38 � 10 � 6 T; sin u � 1, since u � 90°
e B v
e
�
�� � � �
�
�
� sin volt
so, mV
�
38 0 2 2 80 03600
86
6 31 1
1
.
. Ans
This section, covering the induction or generation of an emf in a conductor moving through a magnetic fi eld, forms the basis of the generator principle. However, most electrical generators are rotating machines, and we have so far considered only linear motion of the conductor.
Consider the conductor now formed into the shape of a rectangular loop, mounted on to an axle. This arrangement is then rotated between the poles of a permanent magnet. We now have the basis of a simple generator as illustrated in Fig. 5.10 .
Fig. 5.10
(a) (b)
The two sides of the loop that are parallel to the pole faces will each have an effective length � metre. At any instant of time, these sidesare passing through the fi eld in opposite directions. Applying the righthand rule at the instant shown in Fig. 5.10 , the directions ofthe induced emfs will be as marked, i.e. of opposite polarities. However, if we trace the path around the loop, it will be seen thatboth emfs are causing current to fl ow in the same direction aroundthe loop. This is equivalent to two cells connected in series asshown in Fig. 5.11 .
The situation shown in Fig. 5.10 applies only to one instant in one revolution of the loop (it is equivalent to a ‘ snapshot ’ at that instant).

Electromagnetism 151
If we were to plot a graph of the total emf generated in the loop, for one complete revolution, it would be found to be one cycle of a sinewave, i.e. an alternating voltage. This result should not come as any surprise though, since the equation for the emf generated in each side of the loop is e � Blv sin� volt. This very simple arrangement therefore is the basis of a simple form of a.c. generator or alternator. Exactly the same principles apply to a d.c. generator, but the way in which the inherent a.c. voltage is converted into d.c. automatically by the machine is dealt with in detail in Further Electrical and Electronic Principles .
Note: the ‘ ends ’ of the loop attached to the axle do not have emf induced in them, since they do not ‘ cut ’ the fl ux. Additionally, current can only fl ow around the loop provided that it forms part of a closed circuit.
5.5 Force on a Current-Carrying Conductor
Figure 5.12(a) shows the fi eld patterns produced by two pole pieces, and the current fl owing through the conductor. Since the lines of fl ux obey the rule that they will not intersect, then the fl ux pattern from the poles will be distorted as illustrated in Fig. 5.12(b) . Also, since the lines of fl ux tend to act as if elastic, then they will try to straighten themselves. This results in a force being exerted on the conductor, in the direction shown.
Fig. 5.12
(a) (b)
F
ee
R
�
�
II
�
�
Fig. 5.11
The direction of this force may be more simply obtained by applying Fleming ’ s lefthand rule. This rule is similar to the righthand rule. The major difference is of course that the fi ngers and thumb of the left hand

152 Fundamental Electrical and Electronic Principles
are now used. In this case, the F irst fi nger indicates the direction of the main F lux (from the poles). The se C ond fi nger indicates the direction of C urrent fl ow. The thu M b shows the direction of the resulting force and hence consequent M otion. This is shown in Fig. 5.13 .
thuMb
Firstfinger
seCond finger
Fig. 5.13
Simple experiments can be used to confi rm that the force exerted on the conductor is directly proportional to the fl ux density produced by the pole pieces, the value of current fl owing through the conductor, and the length of conductor lying inside the fi eld. This yields the following equation:
Force, newtonF BI� � (5.4)
The determination of the effective length � of the conductor is exactly the same as that for the generator principle previously considered.So any conductor extending beyond the main fi eld does not contribute to the force exerted.
Equation (5.4) also only applies to the condition when the conductor is perpendicular to the main fl ux. If it lies at some angle less than 90°, then the force exerted on it will be reduced. Thus, in general, the force exerted is given by
F BI� � sin newton� (5.5)
Worked Example 5.7
Q A conductor of eff ective length 22 cm lies at right angles to a magnetic fi eld of density 0.35 T. Calculate
the force exerted on the conductor when carrying a current of 3 A.
A
ℓ � 0.22 m; B � 0.35 T; I � 3 A; � � 90°
F B
F
� � � � �
�
I� sin newton
so, N
� 0 35 3 0 22
0 23
. .
.
1
1 Ans

Electromagnetism 153
Worked Example 5.8
Q A pair of pole pieces 5 cm by 3 cm produce a fl ux of 2.5 mWb. A conductor is placed in this fi eld
with its length parallel to the longer dimension of the poles. When a current is passed through
the conductor, a force of 1.25 N is exerted on it. Determine the value of the current.
If the conductor was placed at 45° to the fi eld, what then would be the force exerted?
A
� � 2.5 � 10 � 3 Wb; ℓ � 0.05 m; d � 0.03 m; F � 1.25 N
csa of the field, m
flux density,
A
BA
� � � �
�
�0 05 0 03 5 0 3 2. . .1 1
�ttesla T
and since , then sin
��
��
� � �
�
�
2 5 05 0
667
90
3
3
.
..
1
1 11
� � 11
1
1
F BF
B� �
��
I I
I
��
sin newton, so amp
therefore
�
.. .
25667 0 055
15� A Ans
F B
F
� � �
� � � �
I�sin newton, where
so
henc
� � 45
667 5 0 05 0 7071 1. . .
ee, N F � 0 884. Ans
The principle of a force exerted on a current carrying conductor as described above forms the basis of operation of a linear motor. However, since most electric motors are rotating machines, the above system must be modifi ed.
5.6 The Motor Principle
Once more, consider the conductor formed into the shape of a rectangular loop, placed between two poles, and current passed through it. A cross-sectional view of this arrangement, together with the fl ux patterns produced is shown in Fig. 5.14 .
The fl ux patterns for the two sides of the loop will be in opposite directions because of the direction of current fl ow through it. The result is that the main fl ux from the poles is twisted as shown in Fig. 5.15 . This produces forces on the two sides of the loop in opposite directions. Thus there will be a turning moment exerted on the loop, in a counterclockwise direction. The distance from the axle (the pivotal point) is r metre, so the torque exerted on each side of the loop is given by
T FrF BI
�
� �
newton metrebut sin newton, and sin � � � 1

154 Fundamental Electrical and Electronic Principles
so torque on each side � BI�r. Since the torque on each side is exerting a counterclockwise turning effect then the total torque exerted on the loop will be
T BI r� 2 � newton metre (5.6)
Worked Example 5.9
Q A rectangular single-turn loop coil 1.5 cm by 0.6 cm is mounted between two poles, which produce a
fl ux density of 1.2 T, such that the longer sides of the coil are parallel to the pole faces. Determine the
torque exerted on the coil when a current of 10 mA is passed through it.
A
ℓ � 0.015 m; B � 1.2 T; I � 10 � 2 A
radius of rotation, m
newton metre
r
T B r
� �
�
�
0 006 2 0 003
2
2
. / .
I�
�� � � �
�
�1 1 1
1
. . .
.
2 0 0 0 5 0 003
08
2
so Nm T m Ans
From the above example it may be seen that a single-turn loop produces a very small amount of torque. It is acknowledged that the dimensions of the coil specifi ed, and the current fl owing through it, are also small. However, even if the coil dimensions were increased by a factor of ten times, and the current increased by a factor of a thousand times (to 10 A), the torque would still be only a very modest 0.108 Nm.
The practical solution to this problem is to use a multi-turn coil, as illustrated in Fig. 5.16 . If the coil now has N turns, then each side has
r
Fig. 5.14
F
F
Fig. 5.15

Electromagnetism 155
an effective length of N � � . The resulting torque will be increased by the same factor. So, for a multi-turn coil the torque is given by
T NBI r� 2 � newton metre
The term 2�r in the above expression is equal to the area ‘ enclosed ’ by the coil dimensions, so this is the effective csa A , of the fi eld affecting the coil.
Thus, 2�r � A metre 2 , and the above equation may be written
T BANI� newton metre (5.7)
The principle of using a multi-turn current-carrying coil in a magnetic fi eld is therefore used for rotary electric motors. However, the same principles apply to the operation of analogue instruments known as moving coil meters. The classic example of such an instrument is the AVO meter, mentioned earlier, in Chapter 1.
Worked Example 5.10
Q The coil of a moving coil meter consists of 80 turns of wire wound on a former of length 2 cm and radius
1.2 cm. When a current of 45 � A is passed through the coil the movement comes to rest when the springs
exert a restoring torque of 1.4 � Nm. Calculate the fl ux density produced by the pole pieces.
A
N � 80; ℓ � 0.02 m; r � 0.012 m; I � 45 � 10 � 6 ; T � 1.4 � 10 � 6 Nm
The meter movement comes to rest when the defl ecting torque exerted on the coil is balanced by the restoring torque of the springs.
T BAN
BT
AN
�
�
��
� � �
�
I
I
newton metre
so, tesla
1 1
1
.. .
4 00 02 2 0 0 2 80
6
�� �
�
�45 0
0 8
61
1so, T B . Ans
�
r
Fig. 5.16

156 Fundamental Electrical and Electronic Principles
5.7 Force between Parallel Conductors
When two parallel conductors are both carrying current their magnetic fi elds will interact to produce a force of attraction or repulsion between them. This is illustrated in Fig. 5.17 .
attraction
repulsion
Fig. 5.17
d
Fig. 5.18
In order to determine the value of such a force, consider fi rst a single conductor carrying a current of I ampere. The magnetic fi eld produced at some distance d from its centre is shown in Fig. 5.18 .
In general, HNI
��
ampere turn/metre
but in this case, N � 1 (one conductor) and � � 2� d metre (the circumference of the dotted circle), so
HNI
d�
2�

157
Now, fl ux density B � �0�r H tesla, and as the fi eld exists in air, then �r � 1. Thus, the fl ux density at distance d from the centre is given by
BI
d�
��
o tesla2
1……………[ ]
Consider now two conductors Y and Z carrying currents I1 and I2
respectively, at a distance of d metres between their centres as in Fig. 5.19 .
Y
d
ZI1 I2
Fig. 5.19
Using equation [1] we can say that the fl ux density acting on Z due to current I1 fl owing in Y is:
BI
d11
2�
��
0 tesla
and the force exerted on Z � B1I2 � newton, or B1 I2 newton per metre length of Z.
Hence, force/metre length acting on Z
�
�� ��
��
��
0 newtonI I
d
I I
d
1 2
71 2
2
4 10
2
so force/metre length acting on Z
�� ��2 10 7
1 2I I
dnewton (5.8)
Now, the current I2 fl owing in Z also produces a magnetic fi eld which will exert a force on Y. Using the same reasoning as above, it can be shown that:
force/metre length acting on Y
�� �2 10 7
1 2dI I newton
so if I1 � I2 � 1 A, and d � l m, then
force exerted on each conductor � 2 � 10 � 7 newton
Electromagnetism

158 Fundamental Electrical and Electronic Principles
This value of force forms the basis for the defi nition of the ampere, namely: that current, which when maintained in each of two infi nitely long parallel conductors situated in vacuo , and separated one metre between centres, produces a force of 2 � 10 � 7 newton per metre length on each conductor.
Worked Example 5.11
Q Two long parallel conductors are spaced 35 mm between centres. Calculate the force exerted between
them when the currents carried are 50 A and 40 A respectively.
A
d � 0.035 m; I 1 � 50 A; I 2 � 40 A
Fd
F
��
�� � �
�
� �2 0 2 0 50 400 035
4
72
71 1
11
1I Inewton
so mN
.
. Ans
Worked Example 5.12
Q Calculate the fl ux density at a distance of 2 m from the centre of a conductor carrying a current of
1000 A. If the centre of a second conductor, carrying 300 A, was placed at this same distance, what
would be the force exerted?
A
d � 2 m; I 1 � 1000 A; I 2 � 300 A
Bd
B
Fd
� �� �
�
��
�
�
� �0 tesla
so, mT
ne
I
I I
1
1
1 1
1
4 0 0002
0 628
2 0
7
72
. Ans
wwton
so mN
�� � �
�
�2 0 300 0002
30
71 1
F Ans
5.8 The Moving Coil Meter
Most analogue (pointer-on-scale) instruments rely on three factors for their operation: a defl ecting torque; a restoring torque; and a dampingtorque.
Defl ecting Torque Essentially, a moving coil meter is a current measuring device. The current to be measured is passed through a multi-turn coil suspended between the poles of a permanent magnet. The coil is made from fi ne copper wire which is wound on to a light aluminium former . Thus the motor effect, described in section 5.6, is utilised. Since the wire is of small diameter, and the aluminium former

Electromagnetism 159
coil onformer
pointer
jewelledbearing
Fig. 5.20
When a current is passed through the coil it will rotate under the infl uence of the defl ecting torque. However, if the ‘ starting ’ position of the coil is as shown in Fig. 5.21 , then it will fi nally settle in the vertical position, regardless of the actual value of the current. The reason is that the effective perpendicular distance from the pivot point (the term r sin � in the expression F � 2 NBI�r sin � ) decreases to zero at this position. Another way to explain this is to consider the forces acting on each side of the coil. These will always act at right angles to the main fl ux. Thus, when the coil reaches the vertical position, these forces are no longer producing a turning effect. This means that the instrument is capable of indicating only the presence of a current, but not the actual
A former
is also very light, then this assembly has very little inertia. This is an essential requirement, to ensure that the instrument is suffi ciently sensitive. This means that it can respond to very small defl ecting torques. To illustrate this point, refer back to Worked Example 5.9, in which the torque exerted on a small coil with a current of 10 mA was found to be only 1.08 � Nm. In order to improve the sensitivity further, the friction of the coil pivots must be minimised. This is achieved by the use of jewelled bearings as shown in Fig. 5.20 .

160 Fundamental Electrical and Electronic Principles
value. Hence, the defl ecting torque (which is dependent upon the value of the coil current) needs to be counter-balanced by another torque.
Restoring Torque This is the counter-balancing torque mentioned above. It is provided by two contrawound spiral springs, one end of each being connected to the top and bottom respectively, of the spindle that carries the coil former. The greater the current passed through the coil, the greater will be the defl ecting torque. The restoring torque provided by the springs will increase in direct proportion to the defl ection applied to them. The pointer, carried by the coil spindle will therefore move to a point at which the defl ecting and restoring torques balance each other. The springs also serve as the means of passing the current to and from the coil. This avoids the problem of the coil having to drag around a pair of trailing leads.
F
F
F
F
Fig. 5.21
The word contrawound means ‘ wound in opposite directions ’ . The reason for winding them in this way is to prevent the pointer position from being affected by temperature changes. If the temperature increases, then both springs tend to expand, by the same amount. Since one spring is acting to push the pointer spindle in one direction, and the other one in the opposite direction, then the effects cancel out
We now have a system in which the defl ection obtained depends upon the value of the coil current. There are still other problems to overcome though. One of these is that the defl ecting torque, due to a given value of current, will vary with the coil position. This would have the effect of non-linear defl ections for linear increments of current. If we could ensure that the coil always lies at right angles to the fi eld, regardless of its rotary position, then this problem would be resolved. The way in which this is achieved is by the inclusion of a soft iron cylinder inside the coil former. This cylinder does not touch the former, but causes a radial fl ux pattern in the air gap in which the coil rotates. This pattern results from the fact that the lines of fl ux will take the path(s) of least reluctance, and so cross the gaps between the pole faces and iron cylinder by the shortest possible path, i.e. at 90° to the surfaces. This effect is illustrated in Fig. 5.22 .

Electromagnetism 161
Damping Torque When current is passed through the coil, the defl ecting torque accelerates the pointer away from the zero position. Now, although the coil and pointer assembly is very light, it will still have suffi cient inertia to ‘ overshoot ’ its fi nal position on the graduated scale. It is also likely to under- and overshoot several times before settling. To prevent this from happening, the movement needs to be slowed down, or damped. This effect is achieved automatically by the generation of eddy currents in the aluminium coil former as it rotates in the magnetic fi eld. The full description of eddy currents is dealt with later in this chapter. However, being induced currents means they are subject to Lenz ’ s law. They will therefore fl ow in the coil former in such a direction as to oppose the change that produced them; that is the rapid defl ection of the coil. If the dimensions of the former are correctly chosen, then the result will be either one very small overshoot, or the overshoots are just prevented from occurring.In the latter case the instrument is said to be critically damped, or ‘ dead beat ’ .
The main advantages of the moving coil instrument are:
1 Good sensitivity: this is due to the low inertia of the coil and pointer assembly. Typically, a current of 50 �A through the coil is suffi cient to move the pointer to the extreme end of the scale (full-scale defl ection or fsd).
2 Linear scale: from equation (5.7) we know that T � BANI . For a given instrument, B,A , and N are fi xed values, so T I.Thus the defl ecting torque is directly proportional to the coil current.
The main disadvantage is the fact that the basic meter movement so far described can be used only for d.c. measurements. If a.c. was applied to the coil, the pointer would try to defl ect in opposite directions alternately. Thus, if only a moderate frequency such as 50 Hz is applied, the pointer cannot respond quickly enough. In this case only a very small vibration of the pointer, about the zero position, might be observed.
The complete arrangement for a moving coil meter is illustrated in Fig. 5.23 .
Fig. 5.22

162 Fundamental Electrical and Electronic Principles
5.9 Shunts and Multipliers
The basic instrument so far described is capable of measuring only small d.c. currents (up to 50 � A typically). This obviously severely limits its usefulness. The fi gure of 50 � A quoted is the value of coil full-scale defl ection current ( Ifsd ) for an AVO meter. As you will now be aware, this meter is in fact capable of measuring up to 10 A, by using the current range switch. This is achieved by means of what are known as shunts. Similarly, this type of meter is also capable of measuring a range of voltages. This is achieved by means of multipliers. Both shunts and multipliers are incorporated into the instrument when it is assembled.
5.10 Shunts
A shunt is a device connected in parallel with the meter ’ s moving coil, in order to extend the current reading range of the instrument. It consists of a very low resistance element, often made from a small strip of copper or aluminium. Being connected in parallel with the coil, it forms an alternative path for current fl ow. It can therefore divert excessive current from the coil itself. In this instance, ‘ excessive current ’ means current in excess of that required to produce full-scale defl ection of the pointer. The latter is known as the full-scale defl ection current, which is normally abbreviated to Ifsd .
The application for a shunt is best illustrated by a worked example.
Fig. 5.23

Electromagnetism 163
Worked Example 5.13
Q A moving coil meter has a coil resistance of 40 � , and requires a current of 0.5 mA to produce f.s.d.
Determine the value of shunt required to extend the current reading range to 3 A.
A
A sketch of the appropriate circuit should be made, and such a diagram is shown in Fig. 5.24 .
I
Is
3 A 0.5 mA 40
Ifsd Rc
Rs
Vc
Fig. 5.24
R C � 40 � ; I tsd � 5 � 10 � 4 A; I � 3 A
V R
V
C fsd C
C
s fsd
� � � �
�
� � � � �
�
�
I
I I I
volt
so V
amp
5 0 40
0 02
3 5 0
4
4
1
1
.
( ))
.so AIs � 2 995
RV
R
sC
s
s
� �
�
Iohm
therefore, m
0 022 9995
6 67
..
. � Ans
5.11 Multipliers
From the previous worked example, it may be seen that the p.d. across the coil ( Vc ) when Ifsd fl ows through it is only 20 mV. This is therefore the maximum voltage that may be applied to the coil. It also represents the maximum voltage measurement that can be made.
In order to extend the voltage reading range, a multiplier must be employed. This is a high value resistance, connected in series with the meter coil. Thus, when a voltage in excess of Vc is applied to the meter terminals, the multiplier will limit the current to Ifsd .
Worked Example 5.14
Q Considering the same meter movement specifi ed in Worked Example 5.13, determine the multiplier
required to extend the voltage reading range to 10 V.
A
R C � 40 � ; I fsd � 5 � 10 � 4 A; V � 10 V

164 Fundamental Electrical and Electronic Principles
From worked Example 5.13, we know that the p.d. across the coil with I fsd fl owing is V C � 0.02 V. The circuit diagram is shown in Fig. 5.25 .
Ifsd
Is
I
Rc
5 A
75 μA
Rs
Vc
Fig. 5.26
10 V
0.5 mA
V
0.02 V
Vm Vc
Ifsd
Rm Rc
40
Fig. 5.25
Total resistance, volt
so k
but
RV
R
R R R
fsd
m c
� ��
�
� �
�I
1
1
05 0
20
4
�
ohm
so
therefore, k
R R R
R
m c
m
� � � �
�
20 000 40
9 961 . � Ans
This problem may also be solved by the following method:
V V V
V
RV
m c
m
mm
fsd
� � � �
�
� �� �
volt
so V
ohm
ther
1
1
0 0 02
9 98
9 985 0 4
.
.
.I
eefore, k Rm �19 96. � Ans
Worked Example 5.15
Q The coil of a moving coil multimeter has a resistance of 1.5 k� , and it requires a current of 75 � A
through it in order to produce full-scale defl ection. Calculate (a) the value of shunt required to enable
the meter to indicate current up to the value of 5 A, and (b) the value of multiplier required to enable
it to indicate voltage up to 10 V.
A

Electromagnetism 165
Coil resistance, R C � 1500 � ; I fsd � 75 � 10 � 6 A; (a) I � 5 A; (b) V � 10 V
(a)
V R
V
C fsd C
C
S fsd
� � � �
�
� � � �
�I
I I I
volt
so, V
amp
75 0 500
0 25
5
61 1
11.
(775 10 6� � )
and,
ohm
and, m
I
I
S
SC
S
S
A
RV
R
�
�
�
�
4 999 925
0 254 999 925
22 5
.
..
.
11
� Anns
Note: Since the value of R S will be very small, all the digits obtained for I S are retained in the calculation in order to minimise any rounding error.
(b) From part (a), V C � 0.1125 V, and the circuit is now equivalent to that shown in Fig. 5.27 .
Rm
75 μAIfsd
Rc
VcVm
V10 V
Fig. 5.27
Thus,
so, V
ohm
V V V
V
RV
m C
m
mm
fsd
� � � �
�
� �
1 110 0 25
9 8875
9 887575
.
.
.I ��
�
�1
1 1
0
3 83
6
so, k Rm . � Ans
Alternatively, total resistance, R � R m � R C ohm
and also, ohm
so, k
and,
RV
R
R R R
fsd
m C
� ��
�
� � �
�I
1
1
1
075 0
33 33
6
.
(
�
11 1 1
1 1
33 33 5 0
3 83
3. . )
.
� �
�thus, k Rm � Ans
When the voltage range switch on an AVO is rotated, it simply connects the appropriate value of multiplier in series with the moving coil. Similarly, when the current range switch is operated, it connects the appropriate value shunt in parallel with the coil. In order to protect the instrument from an electrical overload, you must always start the measurement from the highest available range. Progressively lower range settings can then be selected, until a suitable defl ection is obtained.

166 Fundamental Electrical and Electronic Principles
Note: The range setting marked on any instrument indicates the value of applied voltage or current that will cause full-scale defl ection on that range.
5.12 Figure of Merit and Loading Eff ect
When a moving coil meter is used as a voltmeter, the total resistance between its terminals will depend upon the value of multiplier connected. This will of course vary with the range selected. This total resistance is called the input resistance of the instrument ( Rin ). An ideal voltmeter would draw zero current from the circuit to which it is connected. Thus, for a practical instrument, the higher the value of Rin , the closer it approaches the ideal.
Since Rin changes as the voltage ranges are changed, some other means of indicating the ‘ quality ’ of the instrument is required. This is the fi gure of merit, which is quoted in ohms/volt.
Rin � V
Ifsd
ohm; where
V is the voltage range selected
So, 1
I
R
Vfsd
in� ohms/volt;
and 1
Ifsd
is the fi gure of merit
Thus, the reciprocal of the full-scale defl ection current gives the fi gure of merit for a moving coil instrument, when used as a voltmeter.
The lowest current range on an AVO is 50 � A, which happens to be its Ifsd . Hence, its fi gure of merit
��
��
1
50 1020
6k /� V
Since Rin � fi gure of merit � V, then on the 0.3 V range, Rin � 20 000 �
0.3 � 6 k � . The fi gures for other voltage ranges will therefore be:
1 20 100 2V range, k ; V range, M ; etcR Rin in� �� �
It may therefore be seen that the higher the voltage range selected, the closer Rin approaches the ideal of infi nity. In order to illustrate the practical signifi cance of this, let us consider another example.
Worked Example 5.16
Q A simple potential divider circuit is shown in Fig. 5.28 . The p.d. V 2 is to be measured by an AVO, using
the 10 V range. Calculate the p.d. indicated by this meter, and the percentage error in this reading.

Electromagnetism 167
�12 V
30 k
70 k
V
0V
V2R2
R1
Fig. 5.28
A�12 V
V
OV
C
R2 V2
B
Rin
200 k70 k
30 k R1
Fig. 5.29
RR R
R R
R
BCin
in
BC
��
��
�
2
2
70 200270
5 85
ohm k
so k
�
�1.
and using the potential divider technique:
V25 85
5 85 302 7 6�
�� �
1
11
..
. V;
A
Firstly, we can calculate the p.d. developed across R 2 by applying the potential divider theory, thus
VR
R RV
V
22
2
2
70
2
8 4
��
� �
�
1 11 volt
so, the true value of V.
However, when the voltmeter is connected across R 2, the circuit is eff ectively modifi ed to that shown in Fig. 5.29 . (Since it is an AVO, switched to the 10 V range, then the value for R in is 200 k � .)

168 Fundamental Electrical and Electronic Principles
this is the p.d. that will be indicated by the voltmeter.
so, V V2 7 6� . Ans
The percentage error in the reading is defi ned as:
errorindicated value true value
true value
so, error
��
�
�
100
7
%
.. ..
% . %6 8 4
8 400 9 52
�� ��1 Ans
Hence, it can be seen that the meter does not indicate the true p.d. across R2 , since it indicates a lower value. This is known as the loading effect. The reason for this effect is that, in order to operate, the meter has to draw current from the circuit. The original circuit conditions have therefore been altered, as shown in Fig. 5.29 .
The loading effect does not depend entirely on the value of Rin .The value of Rin , relative to the resistance of the component whose p.d. is being measured, is equally important. It is left to the reader to verify that, if resistors R1 and R2 in Fig. 5.28 were 300 � and 700 �respectively, the loading error would be only 0.004%.
Digital multimeters have an input resistance of 10 to 20 M � . This fi gure remains sensibly constant regardless of the voltage range selected. The loading effect is therefore much less than for an AVO, especially when using the lower voltage ranges. Also, as the indicated values are easier to read, they tend to be used more often than moving coil meters. However, there are other factors that need to be considered when selecting a meter for a given measurement. These are covered in Further Electrical and Electronic Principles.
Worked Example 5.17
Q Two resistors, of 10 k � and 47 k � respectively, are connected in series across a 10 V d.c. supply. The p.d.
developed across each resistor is measured with a moving coil multimeter having a fi gure of merit of
20 k � /V, and switched to its 10 V range. For each measurement calculate (a) the p.d. indicated by the
meter, and (b) the loading error involved in each case.
A
With a fi gure of merit of 20 k � /V the meter internal resistance, R in will be R in � 20 k � � 10 � 200 k �
Without the meter connected, the circuit will be as shown in Fig. 5.30 , and the actual p.d. across each resistor will be V 1 and V 2 respectively.
10 VV
10 k
47 k
R1 V1
V2R2
Fig. 5.30

Electromagnetism 169
VR
R RV
V
VR
R RV
11
1
1
1
1 1
1
1
��
� ��
�
�
��
�
2
22
2
0 00 47
754
volt
so, V
volt
.
���
�
�
47 00 47
8 2462
1
1
and, VV .
(a) With the meter connected across R 1 , the meter will indicate V AB volt as shown in Fig. 5.31 .
10 VV
A
B
200 k
47 k
10 kR1 VAB
R2
Rin
Fig. 5.31
10 VV
C
B
200 k
10 k
47 kR2 VBC
R1
Rin
Fig. 5.32
RR R
R R
R
VR
R R
ABin
in
AB
ABAB
AB
��
��
�
��
1
1
1
1ohm k
so, k
200 02 0
9 524
2
�
�.
�� ��
�
�
V
V VAB
volt
and,
9 524 09 524 47
69
.
.
.
1
1 Ans
In this case the voltmeter reading has been rounded up because it would not be practical to read the scale to two decimal places. Indeed, the indication would probably be read as 1.7 V.
With the meter now connected across R 2 , the circuit is now modifi ed to that as shown in Fig. 5.32 .
RR R
R R
R
VR
R R
BCin
in
BC
BCBC
BC
��
��
�
��
2
2
47 200247
38 057
ohm k
so, k
�
�.
11
1� �
�
�
V
VBC
volt
and, V
38 057 048 057
7 92
..
. Ans

170 Fundamental Electrical and Electronic Principles
(b) error � indicated value true value
true value�
� 100%
so, error for V 1 measurement � 1 1
1
. ..
69 754754�
� 100%
hence, error � � 3.65% Ans
error for V 2 measurement � 7 92 8 246
8 246. .
.�
� 100%
and, error � � 3.95% Ans
Note: Although the two error fi gures are fairly close to each other in value, the percentage error in the second measurement is about 10% greater than that for the fi rst. This illustrates the fact that the higher the meter internal resistance, compared with the resistance across which it is placed, the smaller the loading effect, and hence higher accuracy is obtained. Since the internal resistance of DVMs is usually in the order of megohms, in many cases they are used in preference to the traditional moving coil instrument.
5.13 The Ohmmeter
As the name implies, this instrument is used for the measurement of resistance. This feature is normally included in multimeters. In the case of the AVO, the moving coil movement is also utilised for this purpose. The theory is based simply on Ohm ’ s law. If a known emf is appliedto a resistor, the resulting current fl ow is inversely proportional tothe resistance value. The basic arrangement is shown in Fig. 5.33 .The battery is incorporated into the instrument, as is the variable resistance, R.
metermovement
R
E
Fig. 5.33
To use the instrument in this mode, the terminals are fi rst ‘ shorted ’ together, using the instrument leads. The resistor R is then adjusted so that the pointer indicates zero on the ohms scale. Note that the zero position on this scale is at the righthand extreme of the scale. Having

Electromagnetism 171
‘ zeroed ’ the meter, the ‘ short ’ is removed. Finally, the resistance to be measured is connected between the terminals. The resistance value will then be indicated by the position of the pointer on the ohms scale.
It is not recommended that resistance values be measured using this technique! The scale is extremely cramped over the higher resistance range, and is extremely non-linear. This makes accurate measurement of resistance virtually impossible. However, the use of this facility for continuity checking is useful.
If you wish to measure a resistance value fairly accurately, then use this facility on a digital multimeter. The same basic principle, of applying a known emf and measuring the resulting current, may still be employed. The internal electronic circuitry then converts this into a display of resistance value. By defi nition, the scale cannot be cramped, and is easy to read. If a resistance has to be measured with a high degree of accuracy, then a Wheatstone Bridge must be used.
5.14 Wattmeter
This instrument is used to measure electrical power. In its traditional form it is called a dynamometer wattmeter. It is also available in a purely electronic form. The dynamometer type utilises the motor principle. The meter consists of two sets of coils. One set is fi xed, and is made in two identical parts. This is the current coil, and is made from heavy gauge copper wire. The resistance of this coil is therefore low. The voltage coil is wound from fi ne gauge wire, and therefore has a relatively high resistance. The voltage coil is mounted on a circular former, situated between the two parts of the current coil. The basic arrangement is illustrated in Fig. 5.34 .
voltagecoil
currentcoil
Fig. 5.34

172 Fundamental Electrical and Electronic Principles
The current coil is connected to a circuit so as to allow the circuit current to fl ow through it. The voltage coil is connected in parallel with the load, in the same way as a voltmeter. Both coils produce magnetic fi elds, which interact to produce a defl ecting torque on the voltage coil. Restoring torque is provided by contrawound spiral springs, as in the moving coil meter. The interacting fi elds are proportional to the circuit current and voltage respectively. The defl ecting torque is therefore proportional to the product of these two quantities; i.e. VI which is the circuit power.
The voltage coil may be connected either on the supply side or the load side of the current coil. The choice of connection depends on other factors concerning the load. This aspect is dealt with in FurtherElectrical and Electronic Principles. The manner of connecting the wattmeter into a circuit is shown in Fig. 5.35 .
currentcoil
voltagecoil
supply load
Fig. 5.35
For d.c. circuits, a wattmeter is not strictly necessary. Since power P � VI watt, then V and I may be measured separately by a multimeter. The power can then be calculated simply by multiplying together these two meter readings. However, in an a.c. circuit, this simple technique does not yield the correct value for the true power. Thus a wattmeter is required for the measurement of power in a.c. circuits.
5.15 Eddy Currents
Consider an iron-cored solenoid, as shown in cross-section in Fig. 5.36 . Let the coil be connected to a source of emf via a switch. When the switch is closed, the coil current will increase rapidly to some steady value. This steady value will depend upon the resistance of the coil. The coil current will, in turn, produce a magnetic fi eld. Thus, this fl ux pattern will increase from zero to some steady value. This changing fl ux therefore expands outwards from the centre of the iron core. This movement of the fl ux pattern is shown by the arrowed lines pointing outwards from the core.
Since there is a changing fl ux linking with the core, then an emf will be induced in the core. As the core is a conductor of electricity, then

Electromagnetism 173
the induced emf will cause a current to be circulated around it. This is known as an eddy current, since it traces out a circular path similar to the pattern created by an eddy of water. The direction of the induced emf and eddy current will be as shown in Fig. 5.36 . This has been determined by applying Fleming ’ s righthand rule. Please note, that to apply this rule, we need to consider the movement of the conductorrelative to the fl ux. Thus, the effective movements of the left and right halves of the core are opposite to the arrows showing the expansion of the fl ux pattern.
As the eddy current circulates in the core, it will produce a heating effect. This is normally an undesirable effect. The energy thus dissipated is therefore referred to as the eddy current loss. If the solenoid forms part of a d.c. circuit, this loss is negligible. This is because the eddy current will fl ow only momentarily—when the circuit is fi rst connected, and again when it is disconnected. However, if an a.c. supply is connected to the coil, the eddy current will be fl owing continuously, in alternate directions. Under these conditions, the core is also being taken through repeated magnetisation cycles. This will result in a hysteresis loss also.
In order to minimise the eddy current loss, the resistance of the core needs to be increased. On the other hand, the low reluctance needs to be retained. It would therefore be pointless to use an insulator for the core material, since we might just as well use an air core! The technique used for devices such as transformers, used at mains frequency, is to make the core from laminations of iron. This means that the core is made up of thin sheets (laminations) of steel, each lamination being insulated from the next. This is illustrated in Fig. 5.37 . Each lamination, being thin, will have a relatively high resistance. Each lamination will have an eddy current, the circulation of which is confi ned to that lamination. If
Fig. 5.36

174 Fundamental Electrical and Electronic Principles
the values of these individual eddy currents are added together, it will be found to be less than that for the solid core.
The hysteresis loss is proportional to the frequency f of the a.c. supply. The eddy current loss is proportional to f2 . Thus, at higher frequencies (e.g. radio frequencies), the eddy current loss is predominant. Under these conditions, the use of laminations is not adequate, and the eddy current loss can be unacceptably high. For this type of application, iron dust cores or ferrite cores are used. With this type of material, the eddy currents are confi ned to individual ‘ grains ’ , so the eddy current loss is considerably reduced.
5.16 Self and Mutual Inductance
The effects of self and mutual inductance can be demonstrated by another simple experiment. Consider two coils, as shown in Fig. 5.38 . Coil 1 can be connected to a battery via a switch. Coil 2 is placed close to coil 1, but is not electrically connected to it. Coil 2 has a galvo connected to its terminals.
E
coil 1 coil 2
Fig. 5.38
Fig. 5.37
When the switch is closed, the current in coil 1 will rapidly increase from zero to some steady value. Hence, the fl ux produced bycoil 1 will also increase from zero to a steady value. This changing fl ux links with the turns of coil 2, and therefore induces an emf into it. This will be indicated by a momentary defl ection of the galvo pointer.

Electromagnetism 175
or, self-induced emf, d
dvolte
L i
t�
�(5.9)
Similarly, when the switch is subsequently opened, the fl ux produced by coil 1 will collapse to zero. The galvo will again indicate that a momentary emf is induced in coil 2, but of the opposite polarity tothe fi rst case. Thus, an emf has been induced into coil 2, by achanging current (and fl ux) in coil 1. This is known as a mutually induced emf.
If the changing fl ux can link with coil 2, then it must also link withthe turns of coil 1. Thus, there must also be a momentary emfinduced in this coil. This is known as a self-induced emf. Anyinduced emf obeys Lenz ’ s law. This self-induced emf must therefore be of the opposite polarity to the battery emf. For this reason, it is also referred to as a back emf. Unfortunately, it is extremely diffi cult to demonstrate the existence of this back emf. If a voltmeter was connected across coil 1, it would merely indicate the terminal voltage of the battery.
5.17 Self-Inductance
Self-inductance is that property of a circuit or component which causes a self-induced emf to be produced, when the current through it changes. The unit of self-inductance is the henry, which is defi ned as follows:
A circuit has a self-inductance of one henry (1 H) if an emf of one volt is induced in it, when the circuit current changes at the rate of one ampere per second (1 A/s).
The quantity symbol for self-inductance is L . From the above defi nition, we can state the following equation
Le
i t�
�
d /dhenry
Notes:
1 The minus sign again indicates that Lenz ’ s law applies. 2 The emf symbol is e, because it is only a momentary emf. 3 The current symbol is i, because it is the change of current that is
important.4 The term di/dt is the rate of change of current.

176 Fundamental Electrical and Electronic Principles
Worked Example 5.18
Q A coil has a self-inductance of 0.25 H. Calculate the value of emf induced, if the current through it
changes from 100 mA to 350 mA, in a time of 25 ms.
A
L � 0.25 H; d I � (350 � 100) � 10 � 3 A; d t � 25 � 10 � 3 s
eL i
t
e
��
�� �
�
�
�
�
dd
volt
so V
0 25 250 025 0
2 5
3
3
.
.
1
1
Ans
Worked Example 5.19
Q Calculate the inductance of a circuit in which an emf of 30 V is induced, when the circuit current
changes at the rate of 200 A/s.
A
e
it
�
�30 200Vdd
A/S;
eL i
t
Le
i t
L
��
� �
�
dd
volt
so, d /d
henry
therefore, H
30200
0 5.1 Ans
Worked Example 5.20
Q A circuit of self-inductance 50 mH has an emf of 8 V induced into it. Calculate the rate of change of the
circuit current that induced this emf.
A
L � 50 � 10 � 3 H; e � 8 V
eL i
t
it
eL
it
��
� ��
� �
�
dd
volt
So, dd
amp/s
hencedd
A/s
850 0
60
31
1 Anss
5.18 Self-Inductance and Flux Linkages
Consider a coil of N turns, carrying a current of I amp. Let us assume that this current produces a fl ux of � weber. If the current now changes at a uniform rate of d i /dt ampere per second, it will cause a corresponding change of fl ux of d f /dt weber per second. Let us also assume that the coil has a self-inductance of L henry.

Electromagnetism 177
so,d
dhenryL
N
i�
φ(5.10)
The self-induced emf may be determined from equation (5.9):
eL i
t�
� d
dvolt ……………[ ]1
However, the induced emf is basically due to the rate of change of fl ux linkages. Thus, the emf may also be calculated by using equation (5.1), namely:
eN
t�
� d
dvolt
φ……………[ ]2
Since both equations [1] and [2] represent the same induced emf, then [1] must be equal to [2]. Thus
L i
t
N
t
d
d
d
d�
φ(the minus signs cancel out)
A coil which is designed to have a specifi c value of self-inductance is known as an inductor. An inductor is the third of the main passiveelectrical components. The other two are the resistor and the capacitor.
A passive component is one which (a) requires an external source of emf in order to
serve a useful function, and (b) does not provide any amplifi cation of current or voltage
Now, a resistor will have a specifi c value of resistance, regardless of whether it is in a circuit or not. Similarly, an inductor will have some value of self-inductance, even when the current through it is constant. In other words, an inductor does not have to have an emf induced in it, in order to possess the property of self-inductance. For this reason, equation (5.10) may be slightly modifi ed as follows.
If the current I through an N turn coil produces a fl ux of � weber, then its self-inductance is given by the equation
LN
I�
φhenry (5.11)
In other words, although no change of current and fl ux is specifi ed, the coil will still have some value of inductance. Strictly speaking, equation (5.11) applies only to an inductor with a non-magnetic core. The reason is that, in this case, the fl ux produced is directly proportional to the coil current. However, it is a very close approximation to the true value of inductance for an iron-cored inductor which contains an air gap in it.

178 Fundamental Electrical and Electronic Principles
Worked Example 5.21
Q A coil of 150 turns carries a current of 10 A. This current produces a magnetic fl ux of 0.01 Wb. Calculate
(a) the inductance of the coil, and (b) the emf induced when the current is uniformly reversed in a time
of 0.1 s.
A
N � 150; I � 10 A; � � 0.01 Wb; d t � 0.1 s
(a)
LN
L
� ��
�
�I
henry
so, H
1 1
1
1
50 0 00
5
.
. Ans
(b) Since current is reversed then it will change from 10 A to � 10 A, i.e. a change of 10 � ( � 10). So, d I � 20 A.
eL i
t
e
��
��
�
dd
volt
therefore, V
1
1
..
5 200
300 Ans
Worked Example 5.22
Q A current of 8 A, when fl owing through a 3000 turn coil, produces a fl ux of 4 mWb. If the current is
reduced to 2 A in a time of 100 ms, calculate the emf thus induced in the coil. Assume that the fl ux is
directly proportional to the current.
A
I 1 � 8 A; N � 3000; � 1 � 4 � 10 � 3 Wb; I 2 � 2 A; d t � 0.1 s
This problem may be solved in either of two ways. Both methods will be demonstrated.
eL i
tL
N
L
��
�
�� �
��
dd
volt, where henry
so, H; d
�1
1
11
I
3000 4 08
53
. ii
e
� � �
��
�
8 2 6
5 60
90
A
therefore, V 1
1
..
Ans
Alternatively, � I so � 1 I 1 and � 2 I 2
therefore, and
hence,
��
��
�
2
2
22
2
2
32 4 08
0
� �
�� �
� ��
I
I
I
I1
1
1
11 1 ��
�
�
� � �
��
�� �
�
3
3
3
4 0
3000 3 00
Wb;
and d Wb
dd
volt
so,
φ
φ
( )
.
1 1
1
1e
Nt
e 990 V Ans

Electromagnetism 179
therefore, henry0 rLN A
�� � 2
� (5.12)
hence henryLN
S�
2(5.13)
5.19 Factors Aff ecting Inductance
Consider a coil of N turns wound on to a non-magnetic core, of uniform csa A metre 2 and mean length � metre. The coil carries a current of I amp, which produces a fl ux of � weber. From equation (5.11), we know that the inductance will be
LN
IBA
LNBA
I
� �
�
��henry, but weber
therefore, henry……………[ ]1
Also, magnetic fi eld strength, HNI
��
; so IH
N�
�
and substituting this expression for I into equation [1]
LNBA
H N
BAN
H� �
� �/
22……………[ ]
Now, equation [2] contains the term B
H , which equals �o�r
We also know that �
� �0 r
reluctanceA
� , S
Worked Example 5.23
Q A 600 turn coil is wound on to a non-magnetic core of eff ective length 45 mm and csa 4 cm 2 .
(a) Calculate the inductance, (b) The number of turns is increased to 900. Calculate the inductance
value now produced. (c) The core of the 900 turn coil is now replaced by an iron core having a relative
permeability of 75, and of the same dimensions as the original. Calculate the inductance
in this case.
Notes:
1 Equation (5.12) compares with CA N
d�
�ε εo r ( )1 farad for a
capacitor. 2 If the number of turns is doubled, then the inductance is
quadrupled, i.e. L N2 .3 The terms A and � in equation (5.12) refer to the dimensions of
the core, and NOT the coil.

180 Fundamental Electrical and Electronic Principles
eM i
t21�
� d
dvolt (5.14)
A
N 1 � 600; � � 45 � 10 � 3 m; A � 4 � 10 � 4 m 2 ; � r1 � 1
N 2 � 900; � r2 � 1; N 3 � 900; � r3 � 75
(a)
LN A
L
11 1
1
1 1 1
1
�
�� � � � �
�
�
� �
�
� �
�
0 r henry
so,
2
7 2 4
3
4 0 600 4 045 0
4 02
�
. mmH Ans
(b) Since L N1 1� 2 , and L N2 22� , then
LL
NN
LL NN
L
2 22
2
222
2
3 2
2
2
4 02 0 900600
1 1
1
1
1
�
� �� ��
so,
therefore,
.
�� 9 045. mH Ans
(c) Since � r3 � 75 � � r2 , and there are no other changes, then L 3 � 75 � L 2 therefore, L 3 � 0.678 H Ans
5.20 Mutual Inductance
When a changing current in one circuit induces an emf in another separate circuit, then the two circuits are said to possess mutual inductance. The unit of mutual inductance is the henry, and is defi ned as follows.
Two circuits have a mutual inductance of one henry, if the emf induced in one circuit is one volt, when the current in the other is changing at the rate of one ampere per second.
The quantity symbol for mutual inductance is M, and expressing the above defi nition as an equation we have
M �induced emf in coil
rate of change of current in coil
2
1
���e
i t2
1d /dhenry
and transposing this equation for emf e2

Electromagnetism 181
MN
i� 2 2
1
d
dhenry
φ (5.16)
eN
t22 2�
� d
dvolt
φ(5.15)
MN
I� 2 2
1
�henry (5.17)
This emf may also be expressed in terms of the fl ux linking coil 2. If all of the fl ux from coil 1 links with coil 2, then we have what is called 100% fl ux linkage. In practice, it is more usual for only a proportion of the fl ux from coil 1 to link with coil 2. Thus the fl ux linkage is usually less than 100%. This is indicated by a factor, known as the coupling factor, k . 100% coupling is indicated by k � 1. If there is no fl ux linkage with coil 2, then k will have a value of zero. So if zero emf is induced in coil 2, the mutual inductance will also be zero. Thus, the possible values for the coupling factor k , lie between zero and 1. Expressed mathematically, this is written as
0 1� �k
Consider two coils possessing mutual inductance, and with a coupling factor 1. Let a change of current d i1 /d t amp/s in coil 1 produce a change of fl ux d φ1 /d t weber/s. The proportion of this fl ux change linking coil 2 will be d φ2 /d t weber/s. If the number of turns on coil 2 is N2 , then
However, equations (5.14) and (5.15) both refer to the same induced emf. Therefore we can equate the two expressions
M i
t
N
t
d
d
d
d1 2 2�
φ
and transposing for M , we have
As with self-inductance for a single coil, mutual inductance is aproperty of a pair of coils. They therefore retain this property, regardless of whether or not an emf is induced. Hence, equation (5.16) may be modifi ed to

182 Fundamental Electrical and Electronic Principles
therefore, henryM L L� 1 2 (5.18)
Worked Example 5.24
Q Two coils, A and B, have 2000 turns and 1500 turns respectively. A current of 0.5 A, fl owing in A,
produces a fl ux of 60 � Wb. The fl ux linking with B is 83% of this value. Determine (a) the self-
inductance of coil A, and (b) the mutual inductance of the two coils.
A
N A � 2000; N B � 1500; I A � 0.5 A; � A � 60 � 10 � 6 Wb
(a)
LN
L
AA A
A
A
� �� �
�
��I
henry
so, H
2000 60 00 5
0 24
61
.
. Ans
(b)
MN
M
B B
A� �
� � �
�
��I
henry
so, H
1 1
1
500 0 83 60 00 5
0 49
6..
. Ans
5.21 Relationship between Self- and Mutual-Inductance
Consider two coils of N1 and N2 turns respectively, wound on to a common non-magnetic core. If the reluctance of the core is S ampere turns/weber, and the coupling coeffi cient is unity, then
LN
SL
N
S112
222
� � and
therefore,
L LN N
S
MN
I
N
N
1 212
22
2
2
1
1
1
1�
�
……………[ ]
�henry, and multiplying by
MMN N
N I� 1 2
1 1
�
The above expression contains the term
�N I S
MN N
S
MN N
S
1 1
1 2
2 12
22
2
1
2
�
�
�
so,
therefore, ……………[ ]
and comparing equations [1] and [2]
M L L21 2�

Electromagnetism 183
the above equation is correct only provided that there is 100% coupling between the coils; i.e. k � 1. If k 1, then the general form of the equation, shown below, applies.
M k L L� 1 2 henry (5.19)
Worked Example 5.25
Q A 400 turn coil is wound onto a cast steel toroid having an eff ective length of 25 cm and csa 4.5 cm 2 .
If the steel has a relative permeability of 180 under the operating conditions, calculate the self-
inductance of the coil.
A
N � 400; ℓ � 0.25 m ; A � 4.5 � 10 � 4 m 2 ; � r � 180
LN A
L
� �� � � � �
�
� �� � �0 r henry
so, mH
2 7 2 44 0 80 400 4 5 00 25
65
�
1 1 1..
Anss
Worked Example 5.26
Q Considering Example 5.25, a second coil of 650 turns is wound over the fi rst, and the current through
coil 1 is changed from 2 A to 0.5 A in a time of 3 ms. If 95% of the fl ux thus produced links with coil 2,
then calculate (a) the self-inductance of coil 2, (b) the value of mutual inductance, (c) the self-induced
emf in coil 1, and (d) the mutually induced emf in coil 2.
A
L 1 � 65 � 10 � 3 H; d I 1 � 2 � 0.5 � 1.5 A; d t � 3 � 10 � 3 s; k � 0.95
(a) From the equation for inductance we know that L N 2 , and since all other factors for the two coils are the same, then
LL
NN
LN LN
L
2 22
2
222
2
2
2
2
650 65400
72
1 1
1
1
1
�
�
��
�
so, henry
mH
and, mH Ans
It is left to the student to confi rm this answer by using the equation
L
N A�
� �o r2
�
(b) M k L L
M
� � �
�
1 1
1
2 0 95 65 72
00
henry mH
thus, mH
.
Ans

184 Fundamental Electrical and Electronic Principles
(c)
e Lit
e
1 1
1
1 1
1�� �
� �
�
�
�
�
dd
volt
so, V
65 0 53 0
32 5
3
3
.
. Ans
(d) e M
it
e
2 3
2
00 53 0
50
�� ��
�
�
�
dd
volt
and, V
1 1 1
1
.
Ans
5.22 Energy Stored
As with an electric fi eld, a magnetic fi eld also stores energy. When the current through an inductive circuit is interrupted, by opening a switch, this energy is released. This is the reason why a spark or arc occurs between the contacts of the switch, when it is opened.
Consider an inductor connected in a circuit, in which the current increases uniformly, to some steady value I amp. This current change is illustrated in Fig. 5.39 . The magnitude of the emf induced by this change of current is given by
eLI
t� volt
current
0t
time
I
Fig. 5.39
The average power input to the coil during this time is:
average power average current� �e
From the graph, it may be seen that the average current over this time is I/2 amp.
Therefore,
average power watt� � �1
2 2 2
2eI
LII
t
LI
t

Electromagnetism 185
Equation 5.20 applies to a single inductor. When two coils possess mutual inductance, and are connected in series, both will store energy. In this situation, the total energy stored is given by the equation
W L I L I MI I� � �1
2
1
21 12
2 22
1 2 joule (5.21)
Worked Example 5.27
Q Calculate the energy stored in a 50 mH inductor when it is carrying a current of 0.75 A.
A
L � 50 � 10 � 3 H; I � 0.75 A
W L
W
� �� �
�
�1 1
1 1
250 0 0 75
2
4
23 2
I joule
therefore, mJ
.
. Ans
Worked Example 5.28
Q Two inductors, of inductance 25 mH and 40 mH respectively, are wound on a common ferromagnetic
core, and are connected in series with each other. The coupling coeffi cient, k, between them is 0.8.
When the current fl owing through the two coils is 0.25 A, calculate (a) the energy stored in each,
(b) the total energy stored when the coils are connected (i) in series aiding, and (ii) in series opposition.
A
L 1 � 25 � 10 � 3 H; L 2 � 40 � 10 � 3 H; I 1 � I 2 � 0.25 A; k � 0.8
(a)
W L
W
W L
1 1 1
1
11
1
� � � � �
�
�
�
20 5 25 0 0 25
0 78
2
2 3 2
2 2
I joule
so, mJ
. .
. Ans
II22 3 2
2
0 5 40 0 0 25
25
joule
so, mJ
� � � �
�
�. .
.
1
1W Ans
(b) The general equation for the energy stored by two inductors with fl ux linkage between them is:
W L L M� �1 1
1 1 12 22
2 22
2I I I I� joule
thus, energy stored, jouleW LI�1
22 (5.20)
but, energy stored � average power � time
power joule�LI t
t
2
2

186 Fundamental Electrical and Electronic Principles
Φ1
Φ1
Φ2
Φ2
L1
I
aiding
I
L2
L1
I
opposing
I
L2
Fig. 5.40
M k L LM
� � �
�
1 2 0 8 25 4025 3
henry mHso, mH
..
The values for 1
1 122L I and
1
2 2 22L I have been calculated in part (a) and
MI I1 1 123 225 3 0 0 25 58� � � ��. . . mJ
(i) For series aiding:
WW
� � �
�
0 78 25 583 6
. . .
.1 1 mJ
so, mJ Ans
(ii) For series opposition:
WW
� � �
�
0 78 25 580 45
. . .
.1 1 mJ
so, mJ Ans
5.23 The Transformer Principle
A transformer is an a.c. machine, which utilises the mutual inductance between two coils, or windings. The two windings are wound on to
When the coils are connected in series such that the two fl uxes produced act in the same direction, the total fl ux is increased and the coils are said to be connected in series aiding. In this case the total energy stored in the system will be increased, so the last term in the above equation is added, i.e. the � sign applies. If, however, the connections to one of the coils are reversed, then the two fl uxes will oppose each other, the total fl ux will be reduced, and the coils are said to be in series opposition. In this case the � sign is used. These two connections are shown in Fig. 5.40 .

Electromagnetism 187
a common iron core, but are not electrically connected to each other. The purpose of the iron core is to reduce the reluctance of the magnetic circuit. This ensures that the fl ux linkage between the coils is almost 100%.
V1
I1 I2
E1
N1 N2
E2 RL V2
Φ
Fig. 5.41
Since it is an a.c. machine, an alternating fl ux is produced in the core. The core is therefore laminated, to minimise the eddy current loss. Indeed, the transformer is probably the most effi cient of all machines. Effi ciencies of 98% to 99% are typical. This high effi ciency is due mainly to the fact that there are no moving parts.
The general arrangement is shown in Fig. 5.41 . One winding, called the primary, is connected to an a.c. supply. The other winding, the secondary, is connected to a load . The primary will draw an alternating current I1
from the supply. The fl ux, � , produced by this winding, will therefore
a.c. means alternating current, i.e. one which fl ows alternately, fi rst in one direction, then in the opposite direction. It is normally a sinewave
A load is any device or circuit connected to some source of emf. Thus, a load will draw current from the source. The term load is also loosely used to refer to the actual currentdrawn from a source
also be alternating; i.e. it will be continuously changing. Assuming 100% fl ux linkage, then this fl ux is the only common factor linking the two windings. Thus, a mutually induced emf, E2 , will be developed across the secondary. Also, there will be a back emf, El , induced across

188 Fundamental Electrical and Electronic Principles
5.24 Transformer Voltage and Current Ratios
Let us consider an ideal transformer. This means that the resistance of the windings is negligible, and there are no core losses due to hysteresis and eddy currents. Also, let the secondary be connected to a purely resistive load, as shown in Fig. 5.43 .
N1 : N2
V2V1
Fig. 5.42
N1:N2
V2
I2I1
RLV1 E1 E2
Fig. 5.43
Under these conditions, the primary back emf, El , will be of the same magnitude as the primary applied voltage, V1 . The secondary terminal voltage, V2 , will be of the same magnitude as the secondary induced emf, E2 . Finally, the output power will be the same as the input power.
The two emfs are given by
EN
tE
N
t11
22�
��
�d
dvolt, and
d
dvolt so,
� �
the primary. If the secondary is connected to a load, then it will cause the secondary current I2 to fl ow. This results in a secondary terminal voltage, V2 . Figure 5.42 shows the circuit symbol for a transformer.

Electromagnetism 189
d
d
and d
d
�
�
t
E
N
t
E
N
�
�
1
1
2
2
1
2
……………
……………
[ ]
[ ]
Since both equations [1] and [2] refer to the same rate of change of fl ux in the core, then [1] � [2]:
E
N
E
N
E
E
N
N
1
1
2
2
1
2
1
2
�
�hence,
and since E 1 � V 1 , and E 2 � V 2 , then
V
V
N
N1
2
1
2
� (5.22)
From this equation, it may be seen that the voltage ratio is the same as the turns ratio. This is perfectly logical, since the same fl ux links both windings, and each induced emf is directly proportional to its respective number of turns. This is the main purpose of the transformer. It can therefore be used to ‘ step up ’ or ‘ step down ’ a.c. voltages, depending upon the turns ratio selected.
Worked Example 5.29
Q A transformer is to be used to provide a 60 V output from a 240 V a.c. supply. Calculate (a) the turns
ratio required, and (b) the number of primary turns, if the secondary is wound with 500 turns.
A
V 2 � 60 V; V 1 � 240 V; N 2 � 500
(a)
VV
NN
NN
1 1
1
11
2 2
2
24060
44
� �
�so, turns ratio, or : Ans
(b)
N
N
1
1
15004
2000
�
�therefore, Ans
Since the load is purely resistive, then the output power, P2 , is given by
P V I
P V I2 2 2
1 1
�
�
watt
and the input power, watt1

190 Fundamental Electrical and Electronic Principles
Also since the transformer has been considered to be 100% effi cient (no losses), then
P P
V I V I
I
I
V
V
V
V
N
N
2 1
2 2 1 2
1
2
2
1
2
1
2
1
�
�
� �
therefore,
but
hence,
I
I
N
N1
2
2
1
� (5.23)
i.e. The current ratio is the inverse of the turns ratio.
This result is also logical. For example, if the voltage was ‘ stepped up ’ by the ratio N2 / N1 , then the current must be ‘ stepped down ’ by the same ratio. If this was not the case, then we would get more power out than was put in! Although this result would be very welcome, it is a physical impossibility. It would require the machine to be more than 100% effi cient.
Worked Example 5.30
Q A 15 � resistive load is connected to the secondary of a transformer. The terminal p.d. at the secondary
is 240 V. If the primary is connected to a 600 V a.c. supply, calculate (a) the transformer turns ratio, (b)
the current and power drawn by the load, and (c) the current drawn from the supply. Assume an ideal
transformer.
A
R L � 15 � ; V 2 � 240 V; V 1 � 600 V
The appropriate circuit diagram is shown in Fig. 5.43 .
(a)
NN
VV
N N
1 1
1 1
2 2
2
600240
2 5
� �
�so, turns ratio, / : . Ans
(b)
I
I
I
22
2
2 2 2
2405
6
240 6
� �
�
� � �
VR
P V
Lohm
so, A
watt
therefore
1
1
1
Ans
,, kW P2 3 84� . Ans
(c)
P P
P V
PV
1
1 1 1
11
1
� �
�
� �
2 3 84
3840600
. kW
and, watt
therefore, amp
I
I
hhence, A I1 � 6 4. Ans

Electromagnetism 191
Summary of Equations
Self-induced emf: e Nt
� �d
d volt
φ
Emf in a straight conductor: e � B�υ sin φ volt
Force on a current carrying conductor: F � BI� sin φ volt
Motor principle: T � BANI newton metre
Force between current carrying conductors: FI I
d�
� �2 10 71 2 newton
Voltmeter fi gure of merit: 1
I fsd
ohm/volt
Self-inductance: Self-induced emf, d
d volte L
i
t� �
L Ni
N
I� �
d
d henry
φ �
LN
S
N A� �
2 2� �o r henry�
Energy stored: W � 0.5 LI2 joule
Mutual inductance: Mutually induced emf, d
d volte M
i
t21� �
M Ndi
N
I� �2
2
1
2 2
1
d henry
� �
M k L L� 1 2 henry
Energy stored: W L I L I MI I� � �0.5 0.5 joule1 12
2 22
1 2
Transformer: Voltage ratio, V
V
N
N2
1
2
1
�
Current ratio, I
I
N
N2
1
2
2
�
Alternatively, using the inverse of the turns ratio:
I I
I
11
1
1� � �
�
22 6
2 56 4
NN .
.so, A Ans

192 Fundamental Electrical and Electronic Principles
1 The fl ux linking a 600 turn coil changes uniformly from 100 mWb to 50 mWb in a time of 85 ms. Calculate the average emf induced in the coil.
2 An average emf of 350 V is induced in a 1000 turn coil when the fl ux linking it changes by 200 � Wb. Determine the time taken for the fl ux to change.
3 A fl ux of 1.5 mWb, linking with a 250 turn coil, is uniformly reversed in a time of 0.02 s. Calculate the value of the emf so induced.
4 A coil of 2000 turns is linked by a magnetic fl ux of 400 � Wb. Determine the emf induced in the coil when (a) this fl ux is reversed in 0.05 s, and (b) the fl ux is reduced to zero in 0.15 s.
5 When a magnetic fl ux linking a coil changes, an emf is induced in the coil. Explain the factors that determine (a) the magnitude of the emf, and (b) the direction of the emf.
6 State Lenz ’ s law, and hence explain the term ‘ back emf ’ .
7 A coil of 15 000 turns is required to produce an emf of 15 kV. Determine the rate of change of fl ux that must link with the coil in order to provide this emf.
8 A straight conductor, 8 cm long, is moved with a constant velocity at right angles to a magnetic fi eld. If the emf induced in the conductor is 40 mV, and its velocity is 10 m/s, calculate the fl ux density of the fi eld.
9 A conductor of eff ective length 0.25 m is moved at a constant velocity of 5 m/s, through a magnetic fi eld of density 0.4 T. Calculate the emf induced when the direction of movement relative to the magnetic fi eld is (a) 90°, (b) 60°, and (c) 45°.
10 Figure 5.44 represents two of the armature conductors of a d.c. generator, rotating in a clockwise direction. Copy this diagram and hence:
(a) Indicate the direction of the fi eld pattern of the magnetic poles.
(b) Indicate the direction of induced emf in each side of the coil.
(c) If this arrangement was to be used as a motor, with the direction of rotation as shown, indicate the direction of current fl ow required through the coil.
11 A conductor of eff ective length 0.5 m is placed at right angles to a magnetic fi eld of density 0.45 T. Calculate the force exerted on the conductor if it carries a current of 5 A.
12 A conductor of eff ective length 1.2 m is placed inside a magnetic fi eld of density 250 mT. Determine the value of current fl owing through the conductor, if a force of 0.75 N is exerted on the conductor.
13 A conductor, when placed at right angles to a magnetic fi eld of density 700 mT, experiences a force of 20 mN, when carrying a current of 200 mA. Calculate the eff ective length of the conductor.
14 A conductor, 0.4 m long, lies between two pole pieces, with its length parallel to the pole faces. Determine the force exerted on the conductor, if it carries a current of 30 A, and the fl ux density is 0.25 T.
15 The coil of a moving coil meter is wound with 75 turns, on a former of eff ective length 2.5 cm, and diameter 2 cm. The former rotates at right angles to the fi eld, which has a fl ux density of 0.5 T. Determine the defl ecting torque when the coil current is 50 � A.
16 A moving coil meter has a coil of 60 turns wound on to a former of eff ective length 22.5 mm and diameter 15 mm. If the fl ux density in the air gap is 0.2 T, and the coil current is 0.1 mA. Calculate (a) the force acting on each side of the coil, and (b) the restoring torque exerted by the springs for the resulting defl ection of the coil.
Assignment Questions
An armature is the rotating part of a d.c. machine. If the machine is used as a generator, it contains the coils into which the emf is induced. In the case of a motor, it contains the coils through which current must be passed, to produce the torque
S N
rotation
Fig. 5.44

Electromagnetism 193
17 Two long parallel conductors, are spaced 12 cm between centres. If they carry 100 A and 75 A respectively, calculate the force per metre length acting on them. If the currents are fl owing in opposite directions, will this be a force of attraction or repulsion? Justify your answer by means of a sketch of the magnetic fi eld pattern produced.
18 The magnetic fl ux density at a distance of 1.4 m from the centre of a current carrying conductor is 0.25 mT. Determine the value of the current.
19 A moving coil meter has a coil resistance of 25 � , and requires a current of 0.25 mA to produce full-scale defl ection. Determine the values of shunts required to extend its current reading range to (a) 10 mA, and (b) 1 A. Sketch the relevant circuit diagram.
20 For the meter movement described in question 19 above, show how it may be adapted to serve as a voltmeter, with voltage ranges of 3 V and 10 V. Calculate the values for, and name, any additional components required to achieve this. Sketch the relevant circuit diagram.
21 Explain what is meant by the term ‘ loading eff ect ’ .
22 A voltmeter, having a fi gure of merit of 15 k � /volt, has voltage ranges of 0.1 V, 1 V, 3 V and 10 V. If the resistance of the moving coil is 30 � , determine the multiplier values required for each range. Sketch a circuit diagram, showing how the four ranges could be selected.
23 Figure 5.45 shows a circuit in which the p.d. across resistor R 2 is to be measured. The voltmeter available for this measurement has a fi gure of merit of 20 k � /V, and has voltage ranges of 1 V, 10 V and 100 V. Determine the percentage error in the voltmeter reading, when used to measure this p.d.
24 Calculate the self-inductance of a 700 turn coil, if a current of 5 A fl owing through it produces a fl ux of 8 mWb.
25 A coil of 500 turns has an inductance of 2.5 H. What value of current must fl ow through it in order to produce a fl ux of 20 mWb?
26 When a current of 2.5 A fl ows through a 0.5 H inductor, the fl ux produced is 80 � Wb. Determine the number of turns.
27 A 1000 turn coil has a fl ux of 20 mWb linking it when carrying a current of 4 A. Calculate the coil inductance, and the emf induced when the current is reduced to zero in a time of 25 ms.
28 A coil has 300 turns and an inductance of 5 mH. How many turns would be required to produce an inductance of 0.8 mH, if the same core material were used?
29 If an emf of 4.5 V is induced in a coil having an inductance of 200 mH, calculate the rate of change of current.
30 An iron ring having a mean diameter of 300 mm and cross-sectional area of 500 mm 2 is wound with a 150 turn coil. Calculate the inductance, if the relative permeability of the ring is 50.
31 An iron ring of mean length 50 cm and csa 0.8 cm 2 is wound with a coil of 350 turns. A current of 0.5 A through the coil produces a fl ux density of 0.6 T in the ring. Calculate (a) the relative permeability of the ring, (b) the inductance of the coil, and (c) the value of the induced emf if the current decays to 20% of its original value in 0.01 s, when the current is switched off .
32 When the current in a coil changes from 2 A to 12 A in a time of 150 ms, the emf induced into an adjacent coil is 8 V. Calculate the mutual inductance between the two coils.
33 The mutual inductance between two coils is 0.15 H. Determine the emf induced in one coil when the current in the other decreases uniformly from 5 A to 3 A, in a time of 10 ms.
34 A coil of 5000 turns is wound on to a non-magnetic toroid of csa 100 cm 2 , and mean circumference 0.5 m. A second coil of 1000 turns is wound over the fi rst coil. If a current of 10 A fl ows through the fi rst coil, determine (a) the self-inductance of the fi rst coil, (b) the mutual inductance, assuming a coupling factor of 0.45, and (c) the average emf induced in the second coil if interruption of the current causes the fl ux to decay to zero in 0.05 s.
0 V
�90 V
R2 5 k
R1 5 k
Fig. 5.45
Assignment Questions

194 Fundamental Electrical and Electronic Principles
35 Two air-cored coils, A and B, are wound with 100 and 500 turns respectively. A current of 5 A in A produces a fl ux of 15 � Wb. Calculate (a) the self-inductance of coil A, (b) the mutual inductance, if 75% of the fl ux links with B, and (c) the emf induced in each of the coils, when the current in A is reversed in a time of 10 ms.
36 Two coils, of self-inductance 50 mH and 85 mH respectively, are placed parallel to each other. If the coupling coeffi cient is 0.9, calculate their mutual inductance.
37 The mutual inductance between two coils is 250 mH. If the current in one coil changes from 14 A to 5 A in 15 ms, calculate (a) the emf induced in the other coil, and (b) the change of fl ux linked with this coil if it is wound with 400 turns.
38 The mutual inductance between the two windings of a car ignition coil is 5 H. Calculate the average emf induced in the high tension winding, when a current of 2.5 A, in the low tension winding, is reduced to zero in 1 ms. You may assume 100% fl ux linkage between the two windings.
39 Sketch the circuit symbol for a transformer, and explain its principle of operation. Why is
the core made from laminations? Is the core material a ‘ hard ’ or a ‘ soft ’ magnetic material? Give the reason for this.
40 A transformer with a turns ratio of 20:1 has 240 V applied to its primary. Calculate the secondary voltage.
41 A 4:1 voltage ‘ step-down ’ transformer is connected to a 110 V a.c. supply. If the current drawn from this supply is 100 mA, calculate the secondary voltage, current and power.
42 A transformer has 450 primary turns and 80 secondary turns. It is connected to a 240 V a.c. supply. Calculate (a) the secondary voltage, and (b) the primary current when the transformer is supplying a 20 A load.
43 A coil of self-inductance 0.04 H has a resistance of 15 � . Calculate the energy stored when it is connected to a 24 V d.c. supply.
44 The energy stored in the magnetic fi eld of an inductor is 68 mJ, when it carries a current of 1.5 A. Calculate the value of self-inductance.
45 What value of current must fl ow through a 20 H inductor, if the energy stored in its magnetic fi eld, under this condition, is 60 J?
Assignment Questions

Suggested Practical Assignments
Note: The majority of these assignments are only qualitative in nature.
Assignment 1 To investigate Faraday ’ s laws of electromagnetic induction.
Apparatus:
Several coils, having diff erent numbers of turns 2 � permanent bar magnets 1 � galvanometer
Method:
1 Carry out the procedures outlined in section 5.1 at the beginning of this chapter.
2 Write an assignment report, explaining the procedures carried out, and stating the conclusions that you could draw from the observed results.
Assignment 2 Force on a current carrying conductor.
Apparatus:
1 � current balance 1 � variable d.c. psu 1 � ammeter
Method:
1 Assemble the current balance apparatus. 2 Adjust the balance weight to obtain the balanced condition, prior to
connecting the psu. 3 With maximum length of conductor, and all the magnets in place, vary
the conductor current in steps. For each current setting, re-balance the apparatus, and note the setting of the balance weight.
4 Repeat the balancing procedure with a constant current, and maximum magnets, but varying the eff ective length of the conductor.
5 Repeat once more, this time varying the number of magnets. The current must be maintained constant, as must the conductor length.
6 Tabulate all results obtained, and plot the three resulting graphs. 7 Write an assignment report. This should include a description of the
procedures carried out, and conclusions drawn, regarding the relationships between the force produced and I, �, and B.
Assignment 3 To investigate the loading eff ect of a moving coil meter.
Apparatus:
1 � 10 k � rotary potentiometer, complete with circular scale 1 � d.c. psu 1 � Heavy Duty AVO 1 � DVM (digital voltmeter)
Method:
1 Connect the circuit as shown in Fig. 5.46 , with the psu set to 10 V d.c. 2 Start with the potentiometer moving contact at the ‘ zero ’ end. Measure the
p.d. indicated, in turn, by both the DVM and the AVO, for every 30° rotation of the moving contact.
Note: Do NOT connect both meters at the same time; connect them IN TURN.
Electromagnetism 195

196 Fundamental Electrical and Electronic Principles
Suggested Practical Assignments
�10 V
p.s.u
0V
Fig. 5.46
3 Tabulate both voltmeter readings. Plot graphs (on the same axes) for the voltage readings versus angular displacement.
4 Determine the percentage loading error of the AVO, for displacements of 0°, 180°, and 270°. Write an assignment report, and include comment regarding the variation of loading error found.
Assignment 4 To demonstrate mutual inductance and coupling coeffi cient.
Apparatus:
Several coils, having diff erent numbers of turns. Ferromagnet core 1 � galvo 1 � d.c. psu
Method:
1 Place the two coils as close together as possible. Connect the galvo to one coil, and connect the other coil to the psu via a switch.
2 Close the switch, and note the defl ection obtained on the galvo. 3 Repeat this procedure for increasing distances of separation, and for
diff erent coils. 4 Mount two of the coils on a common magnetic core, and repeat the procedure. 5 Write an assignment report, explaining the results observed.
Assignment 5 To determine the relationship between turns ratio and voltage ratio for a simple transformer.
Apparatus:
Either 1 � single-phase transformer with tappings on both windings; or Several diff erent coils with a ferromagnetic core. Either a low voltage a.c. supply; or 1 � a.c. signal generator. 1 � DVM (a.c. voltage ranges)
Method:
1 Connect the primary to the a.c. source. 2 Measure both primary and secondary voltages, and note the corresponding
number of turns on each winding. 3 Vary the number of turns on each winding, and note the corresponding
values of the primary and secondary voltages. 4 Tabulate all results. Write a brief report, explaining your fi ndings.

Alternating Quantities
Chapter 6
Learning Outcomes
This chapter deals with the concepts, terms and defi nitions associated with alternating quantities. The term alternating quantities refers to any quantity (current, voltage, fl ux, etc.), whose polarity is reversed alternately with time. For convenience, they are commonly referred to as a.c. quantities. Although an a.c. can have any waveshape, the most common waveform is a sinewave. For this reason, unless specifi ed otherwise, you may assume that sinusoidal waveforms are implied.
On completion of this chapter you should be able to:
1 Explain the method of producing an a.c. waveform. 2 Defi ne all of the terms relevant to a.c. waveforms. 3 Obtain values for an a.c., both from graphical information and when expressed in
mathematical form. 4 Understand and use the concept of phase angle. 5 Use both graphical and phasor techniques to determine the sum of alternating quantities.
197
6.1 Production of an Alternating Waveform
From electromagnetic induction theory, we know that the average emf induced in a conductor, moving through a magnetic fi eld, is given by
e B v� � sin volt [ ]� ����� 1
Where B is the fl ux density of the fi eld (in tesla)
� is the effective length of conductor (in metre)
v is the velocity of the conductor (in metre/s)
u is the angle at which the conductor ‘ cuts ’ the lines of magnetic fl ux (in degrees or radians)
i.e. v sin u is the component of velocity at right angles to the fl ux.

198 Fundamental Electrical and Electronic Principles
Consider a single-turn coil, rotated between a pair of poles, as illustrated in Figs. 6.1(a) and (b) . Figure (a) shows the general arrangement. Figure (b) shows a cross-section at one instant in time, such that the coil is moving at an angle of u° to the fl ux.
Fig. 6.1
N S
(a)
Z X
W
Y
�
(b)
Considering Fig. 6.1(b) , each side of the coil will have the same value of emf induced, as given by equation [1] above. The polarities of these emfs will be as shown (Fleming ’ s righthand rule). Although these emfs are of opposite polarities, they both tend to cause current to fl ow in the same direction around the coil. Thus, the total emf generated is given by:
e B v� �2 � sin volt [2]� �����
Still considering Fig. 6.1(b) , at the instant the coil is in the plane W � Y, angle u � 0°. Thus the emf induced is zero. At the instant that it is in the plane X � Z, u � 90°. Thus, the emf is at its maximum possible value, given by:
e B v� �2 � volt [3]�����
Let us consider just one side of the coil, starting at position W. After 90° rotation (to position X), the emf will have increased from zero to its maximum value. During the next 90° of rotation (to position Y), the emf falls back to zero. During the next 180° rotation (from Y to Z to W), the emf will again increase to its maximum, and reduce once more to zero. However, during this half revolution, the polarity of the emf is reversed.
If the instantaneous emf induced in the coil is plotted, for one complete revolution, the sinewave shown in Fig. 6.2 will be produced. For convenience, it has been assumed that the maximum value of the coil emf is 1 V, and that the plot starts with the coil in position W.

Alternating Quantities 199
When the coil passes through one complete revolution, the waveform returns to its original starting point. The waveform is then said to have completed one cycle. Note that one cycle is the interval between any two corresponding points on the waveform. The number of cycles generated per second is called the frequency, f, of the waveform. The unit for frequency is the hertz (Hz). Thus, one cycle per second is equal to 1 Hz.
For the simple two-pole arrangement considered, one cycle of emf is generated in one revolution. The frequency of the waveform is therefore the same as the speed of rotation, measured in revolution per second (rev/s). This yields the following equation
30 60 90 120 150 210 240 270 300 330
1 cycle
1.0
0.5
0
�0.5
�1.0
e(V)
rotation
(deg)
1 cycle
Ep�p
Em
Fig. 6.2
f np� hertz (6.1)
where p � the number of pole pairs
Therefore, if the coil is rotated at 50 rev/s, the frequency will be
f one pair� � �50 1 50Hz ( of poles) Hz
The time taken for the waveform to complete one cycle is called the periodic time, T . Thus, if 50 cycles are generated in one second, then one cycle must be generated in 1/50 of a second. The relationship between frequency and period is therefore

200 Fundamental Electrical and Electronic Principles
The maximum value of the emf in one cycle is shown by the peaks of the waveform. This value is called, either the maximum or peak value, or the amplitude of the waveform. The quantity symbol used may be either Ê , or Em .
The voltage measured between the positive and negative peaks is called the peak-to-peak value. This has the quantity symbol Epk�pk, or Ep�p .
6.2 Angular Velocity and Frequency
In SI units, angles are measured in radians , rather than degrees. Similarly, angular velocity is measured in radian per second, rather than revolutions per second. The quantity symbol for angular velocity is � (lower case Greek omega).
Tf
fT
� �1 1
second, or hertz (6.2)
A radian is the angle subtended at the centre of a circle, by an arc on the circumference, which has length equal to the radius of the circle. Since the circumference � 2 �r, then there must be 2 � such arcs in the circumference. Hence there are 2 � radians in one complete circle; i.e. 2 � rad � 360°
If the coil is rotating at n rev/s, then it is rotating at 360 � n degrees/second. Since there are 2� radians in 360°, then the coil must be rota-ting at 2 � n radian per second.
Thus, angular velocity, � � 2 �n rad/s
but for a 2-pole system, n � frequency, f hertz,
therefore, rad/s� �� 2 f (6.3)
and, hertzf ���2 (6.4)
If the coil is rotating at � rad/s, then in a time of t seconds, it will rotate through an angle of � t radian. Hence the waveform diagram may be plotted to a base of degrees, radians, or time. In the latter case, the time interval for one cycle is, of course, the periodic time, T . These are shown in Fig. 6.3 .
6.3 Standard Expression for an Alternating Quantity
All the information regarding an a.c. can be presented in the form of a graph. The information referred to here is the amplitude,

Alternating Quantities 201
frequency, period, and value at any instant. The last is normally called the instantaneous value. However, presenting the information in this way is not always very convenient. Firstly, the graph has to be plotted accurately, on graph paper. This in itself is a time-consuming procedure. In addition, obtaining precise information from the graph is diffi cult. The degree of accuracy depends on the suitability of the scales chosen, and the individual ’ s interpretation. For example, if several people are asked to obtain a particular value from the graph, their answers are likely to differ slightly from one another. To overcome these diffi culties, the a.c. needs to be expressed in a more convenient form. This results in an equation, sometimes referred to as the algebraic form of the a.c. More correctly, it should be called the trigonometric form. Since many students are put off by these terms, we shall refer to it simply as the standard expression for a waveform.
The emf for an N -turn coil is:
e NB ve NB v
� �
� �
22
��
sin volt, where is in degreesor, sin(
� ��� �t t) volt, where is in radians
and the emf is at its maximum value when sin( � t ), or sin u is equal to 1. Therefore, Em � 2 � NB�v volt, so the expression becomes:
e Em� sin volt� (6.5)
or, sin( ) volte E tm� � (6.6)
or, sin( ) volte E ftm� 2� (6.7)
All three of the above equations are the so-called standard expressions for this a.c. voltage. Equations (6.6), and (6.7) in particular, are those most commonly used. Using these, all the relevant information concerning the waveform is contained in a neat mathematical expression. There is also no chance of ambiguity.
T/4
�/2
�
�
3 �/2 2��
T/2 3 T/4 T t (s)
�t (rad)
emf (V)
0
Fig. 6.3

202 Fundamental Electrical and Electronic Principles
Worked Example 6.1
Q An alternating voltage is represented by the expression v � 35 sin(314.2 t ) volt. Determine, (a) the
maximum value, (b) the frequency, (c) the period of the waveform, and (d) the value 3.5 ms after it
passes through zero, going positive.
A (a) v � 35 sin(314.2t) volt
and comparing this to the standard,
v V ft
Vm
m
�
�
sin( ) volt we can see that:
V
2
35
�
Ans
(b) Again, comparing the two expressions:
2 3 4 2
3 4 22
50
�
�
f
f
�
� �
1
1
.
.so, Hz Ans
(c)
Tf
T
� �
�
1 1
5020
second
so, ms Ans
(d)
When ms; then:
sin( ) volt
sin(
t
v
�
� � � �
�
�
3 5
35 2 50 3 5 0
35
3
.
.
.
� 1
1 0099
35 0 89
3 9
)*
.
therefore, V
� �
�
1
1 1v . Ans
*The term inside the brackets is an angle in RADIAN. You must therefore remember to switch your calculator into the RADIAN MODE.
So far, we have dealt only with an alternating voltage. However, all of the terms and defi nitions covered are equally applicable to any alternating quantity. Thus, exactly the same techniques apply to a.c. currents, fl uxes, etc. The same applies to mechanical alternating quantities involving oscillations, vibrations, etc.
Worked Example 6.2
Q For a current, i � 75 sin(200 � t ) milliamp, determine (a) the frequency, and (b) the time taken for it to
reach 35 mA, for the fi rst time, after passing through zero.
A
(a)
i t
i ftm
�
�
75 200
2
sin( ) milliamp
sin( ) amp
�
�I
so,
and Hz
2 200
2002
00
� �
��
f
f
�
� �1 Ans

Alternating Quantities 203
(b)
35 75 200
3575
200 0 4667
�
� �
sin( ) milliamp
sin( )
�
�
t
t .
therefore, sin *
rad
so,
200 0 4667
0 4855
0 4855200
�
�
t
t
�
�
� �
�1 .
.
.00 773. ms Ans
�
�
t (s)0
Fig. 6.4
i1 i3
Iav
Im
int (s)
Fig. 6.5
6.4 Average Value
Figure 6.4 shows one cycle of a sinusoidal current.
A number of equally spaced intervals are selected, along the time axis of the graph. At each of these intervals, the instantaneous value is determined.
*Remember , use RADIAN mode on your calculator.
From this it is apparent that the area under the curve in the positive half is exactly the same as that for the negative half. Thus, the average value over one complete cycle must be zero. For this reason, the average value is taken to be the average over one half cycle. This average may be obtained in a number of ways. These include, the mid-ordinate rule, the trapezoidal rule, Simpson ’ s rule, and integral calculus. The simplest of these is the mid-ordinate rule, and this will be used here to illustrate average value; see Fig. 6.5 .

204 Fundamental Electrical and Electronic Principles
This results in values for a number of ordinates, i1, i 2, …, i n, where n is the number of ordinates chosen. The larger the number of ordinates chosen, the more accurate will be the fi nal average value obtained. The average is simply found by adding together all the ordinate values, and then dividing this fi gure by the number of ordinates chosen, thus
Ii i i i
navn�
� � � �1 2 3 �
The average value will of course depend upon the shape of the waveform, and for a sinewave only it is
I I Iav m m� �2
0 637�
. (6.8)
Worked Example 6.3
Q A sinusoidal alternating voltage has an average value of 3.5 V and a period of 6.67 ms. Write down the
standard (trigonometrical) expression for this voltage.
A
V av � 3.5 V; T � 6.67 � 10 � 3 s
The standard expression is of the form v � V m sin (2 � ft) volt
V V
VV
V V
fT
av m
mav
m
�
� �
�
�
0 637
0 6373 5
0 637
5 5
.
..
.
.
volt
so, volt
h1
eertz Hz
and, Hz
sin ( ) volt
so,
��
�
� � �
�
1
1
1
6 67 10
50
5 5 2 50
3.
.
f
v t�
vv t� 5 5 300. sin ( ) volt � Ans
Worked Example 6.4
Q For the waveform specifi ed in Example 6.3 above, after the waveform passes through zero, going
positive, determine its instantaneous value (a) 0.5 ms later, (b) 4.5 ms later, and (c) the time taken for
the voltage to reach 3 V for the fi rst time.
A
(a) t � 0.5 � 10 � 3 s; (b) t � 4.5 � 10 � 3 s; (c) v � 3 V
(a)
v Vm� � �
�
� �
� sin ( ) volt
sin
thus
300 0 5 0
5 5 0 47 2
5 5 0 454
3� .
. .
. .
1
1
,, V v � 2 5. Ans

Alternating Quantities 205
(b)
v � � �
�
� � �
�5 5 300 4 5 0
5 5 4 24
5 5 0 89
3. .
. .
. .
sin ( ) volt
sin
( )
a
� 1
1
1
nnd, V v ��4 9. Ans
Note: Remember that the expression inside the brackets is an angle in RADIAN.
(c)
3 5 5 300
3003
5 50 5455
300
�
� �
�
.
..
sin ( ) volt
so, sin ( )
sin
�
�
�
t
t
t ��
�
�
� � �
�
1
1 1
1
rad
and, ms
0 5455 0 5769
0 5769300
6 2 0
0 6 2
4
. .
..
.
t
t
�
AAns
A sketch graph illustrating these answers is shown in Fig. 6.6 .
4.5
Vav
Vm5.5
3.5
6.67
2.5
0.5
�4.9
0 t (ms)
v (V)
Fig. 6.6
6.5 r.m.s. Value
The r.m.s. value of an alternating current is equivalent to that value of direct current, which when passed through an identical circuit, will dissipate exactly the same amount of power. The r.m.s. value of an a.c. thus provides a means of making a comparison between a.c. and d.c. systems.
The term r.m.s. is an abbreviation of the square Root of the Means Squared. The technique for fi nding the r.m.s. value may be based on the same ways as were used to fi nd the average value. However, the r.m.s. value applies to the complete cycle of the waveform. For simplicity, we will again consider the use of the mid-ordinate rule technique.

206 Fundamental Electrical and Electronic Principles
Considering Fig. 6.5 , the ordinates would be selected and measured in the same way as before. The value of each ordinate is then squared. The resulting values are then summed, and the average found. Finally, the square root of this average (or mean) value is determined. This is illustrated below:
Ii i i i
nrmsn�
� � � �12
22
32 2…
and, for a sinewave only, I I Irms m m� �1
20 707. (6.9)
Other waveforms will have a different ratio between r.m.s. and peak values.
Note: The r.m.s. value of an a.c. is the value normally used and quoted. For example, if reference is made to a 240 V a.c. supply, then 240 V is the r.m.s. value. In general therefore, if an unqualifi ed value for an a.c. is given, then the assumption is made that this is the r.m.s. value. Since r.m.s. values are those commonly used, the subscript letters r.m.s. are not normally included. Irms has been used above, simply for emphasis. The following convention is used:
i, v, e, represent instantaneous valuesIav, V av, E av, represent average values Im, V m, E m, represent maximum or peak values, or amplitudeI, V, E, represent r.m.s. values
peak factormaximum value
r.m.s. value
or
�
� �V
Vm
m0 7072 1 414
..
Worked Example 6.5
Q Calculate the amplitude of the household 240 V supply.
A
Since this supply is sinusoidal, then the peak factor will be 2 , so
V V
V
m
m
� � � �
�
2 2 240
339 4
volt
so, V . Ans
6.6 Peak Factor
This is defi ned as the ratio of the peak or maximum value, to the r.m.s. value, of a waveform. Thus, for a sinewave only

Alternating Quantities 207
Worked Example 6.6
Q A non-sinusoidal waveform has a peak factor of 2.5, and an r.m.s. value of 240 V. It is proposed to use
a capacitor in a circuit connected to this supply. Determine the minimum safe working voltage rating
required for the capacitor.
A peak factor ; V
volt
so, V
� �
� � � �
�
2 5 240
2 5 2 5 240
600
.
. .
V
V V
V
m
m
Thus the absolute minimum working voltage must be 600 V Ans
In practice, a capacitor having a higher working voltage would be selected. This would then allow a factor of safety.
6.7 Form Factor
As the name implies, this factor gives an indication of the form or shape of the waveform. It is defi ned as the ratio of the r.m.s. value to the average value.
Thus, for a sinewave ,
form factorr.m.s. value
average value
so, form f
� �0 707
0 637
.
.
aactor � 1 11.
For a rectangular waveform (a squarewave), form factor � 1, since the r.m.s. value, the peak value, and the average value are all the same.
Worked Example 6.7
Q A rectangular coil, measuring 25 cm by 20 cm, has 80 turns. The coil is rotated, about an axis
parallel with its longer sides, in a magnetic fi eld of density 75 mT. If the speed of rotation is
3000 rev/min, calculate, from fi rst principles, (a) the amplitude, r.m.s. and average values of
the emf, (b) the frequency and period of the generated waveform, (c) the instantaneous value,
2 ms after it is zero.
A
� � � � �
� � � �
0 25 0 2 80 0 075
300060
2 0 3
. . .m; m; ; T
rev/s; s
d N B
n t 1
(a) e � 2 � NBℓv sin (2 � ft ) volt Now, we know the rotational speed n , but the above equation requires the tangential velocity, v , in metre per second. This may be found as follows.

208 Fundamental Electrical and Electronic Principles
rotation
d
v
Fig. 6.7
Consider Fig. 6.7 ,
which shows the path travelled by the coil sides.
The circumference of rotation � � d metre � 0.2 � metre.
The coil sides travel this distance in one revolution.
The rotational speed n � 3000/60 � 50 rev/s.
Hence the coil sides have a velocity, v � 50 � 0.2 � m/s.
Therefore, e � 2 � 80 � 0.075 � 0.25 � 50 � 0.27 � sin (2 � ft ) volt and emf is a maximum value when sin (2 � ft ) � 1
so,
V
E
Em
m
� � � � � �
�
2 80 0 075 0 25 50 0 2
94 25
. . .
.
�
Ans
Assuming a sinusoidal waveform:
E E
E
E E
m
av m
� � �
�
� � �
0 707 0 707 94 25
66 64
0 637 0 637 9
. . .
.
. .
so, V
Ans
44 25
60 04
.
.so, V Eav � Ans
Assuming a 2-pole fi eld system, then f � n therefore f � 50 Hz Ans
(b)
Tf
T
� �
�
1 1
50
20
s
so ms Ans
(c)
e E ftm�
� � � �
� �
�
sin( ) volt
sin ( )
s
2
94 25 2 50 2 0
94 25 0 5878
3
�
�.
. .
1
oo, V e � 55 4. Ans
6.8 Rectifi ers
A rectifi er is a circuit which converts a.c. to d.c. The essential component of any rectifi er circuit is a diode. This is a semiconductor device, which allows current to fl ow through it in one direction only.

Alternating Quantities 209
It is the electronic equivalent of a mechanical valve, for example the valve in a car tyre. This device allows air to be pumped into the tyre, but prevents the air from escaping.
The circuit symbol for a diode is shown in Fig. 6.8 . The ‘ arrow head ’part of the symbol is known as the anode. This indicates the direction in which conventional current can fl ow through it. The ‘ plate ’ part of the symbol is the cathode, and indicates that conventional current is prevented from entering at this terminal. Thus, provided that the anode is more positive than the cathode, the diode will conduct. This is known as the forward bias condition. If the cathode is more positive than the anode, the diode is in its blocking mode, and does not conduct. This is known as reverse bias.
Note: The potentials at anode and cathode do not have to be positive and negative. Provided that the anode is more positive than the cathode, the diode will conduct. So if the anode potential is (say) � 10 V, and the cathode potential is � 8 V, then the diode will conduct. Similarly, if these potentials are reversed, the diode will not conduct.
6.9 Half-wave Rectifi er
This is the simplest form of rectifi er circuit. It consists of a single diode, placed between an a.c. supply and the load, for which d.c. is required. The arrangement is shown in Fig. 6.9 , where the resistor Rrepresents the load.
Fig. 6.8
Let us assume that, in the fi rst half cycle of the applied voltage, the instantaneous polarities at the input terminals are as shown in Fig. 6.10 . Under this condition, the diode is forward biased. A half sinewave of current will therefore fl ow through the load resistor, in the direction shown.
In the next half cycle of the input waveform, the instantaneous polarities will be reversed. The diode is therefore reverse biased, and no current will fl ow. This is illustrated in Fig. 6.11 .
R outputinput
Fig. 6.9
R outputinput
l
�
�
Fig. 6.10

210 Fundamental Electrical and Electronic Principles
R outputinput
�
�
Fig. 6.11
The graphs of the applied a.c. voltage, and the corresponding load current, are shown in Fig. 6.12 . The load p.d. will be of exactly the same waveshape as the load current. Both of these quantities are uni-directional, and so by defi nition, are d.c. quantities. The ‘ quality ’ of the d.c. so produced is very poor, since it exists only in pulses of current. The average value of this current is determined over the time period, 0 to t2 . The average value from 0 to time t1 will be 0.637 Im . From t1to t2 it will be zero. The average value of the d.c. will therefore be, Iav � 0.318 Im .
�
�
0
input
0
Im
Iav
t1 t2t (s)
t (s)
Fig. 6.12
6.10 Full-wave Bridge Rectifi er
Both the ‘ quality ’ and average value of the d.c. need to be improved. This may be achieved by utilising the other half cycle of the a.c. supply. The circuit consists of four diodes, connected in a ‘ bridge ’confi guration, as shown in Fig. 6.13 .
We will again assume the instantaneous polarities for the fi rst half cycle as shown. In this case, diodes D 1 and D 4 will be forward biased. Diodes D 2 and D 3 will be reverse biased. Thus, D 1 and D 4 allow current to fl ow, as shown. In the next half cycle, the polarities are reversed. Hence, D 2 and D 3 will conduct, whilst D 1 and D 4 are reverse biased. Current will therefore fl ow as shown in Fig. 6.14 . Notice that

Alternating Quantities 211
D2
D4D3
D1
R
input
I�
�
Fig. 6.13
D2
D4D3
D1
R
input
I�
�
Fig. 6.14
the current through the load resistor is in the same direction, for the whole cycle of the a.c. supply.
The relevant waveforms are shown in Fig. 6.15 . It should be apparent that the average value of the a.c. will now be twice that in the previous circuit. That is Iav � 0.637 Im .
It is this type of rectifi er circuit that is incorporated in multimeters. This enables the measurement of a.c. voltages and currents.
�
�
0
input
0
Im
Iav
t (s)
t (s)
Fig. 6.15

212 Fundamental Electrical and Electronic Principles
6.11 Rectifi er Moving Coil Meter
The circuit arrangement for such a meter is illustrated in Fig. 6.16 . The symbol, with the letter M in it, represents the moving coil movement. The current through the coil will therefore be a series of half-sinewave pulses, as in Fig. 6.15 .
Ma.c. to bemeasured
Fig. 6.16
Due to the inertia of the meter movement, the coil will respond to the average value of this current. Thus, the pointer would indicate the average value of the a.c. waveform being measured. However, the normal requirement is for the meter to indicate the r.m.s. value. Thus, some form of ‘ correction factor ’ is required.
The majority of a.c. quantities to be measured are sinewaves. For this reason, the meter is calibrated to indicate the r.m.s. values of sinewaves. Now, the ratio between r.m.s. and average values is the form factor. For the sinewave, the form factor has a value of 1.11. The values chosen for shunts and multipliers, used on the a.c. ranges, are therefore modifi ed by this factor. Thus, although the pointer position corresponds to the average value, the scale indication will be the r.m.s. value.
Worked Example 6.8
Q A moving coil meter has a fi gure of merit of 10 k � / V. The coil has a resistance of 50 � . Calculate the
value of multiplier required for (a) the 10 V d.c. range, (b) the 10 V a.c. range.
A
R c � 50 � ; fi gure of merit � 10 k � /V; V � 10 V
(a) I fsd � 1/10 000 � 100 μ A
total meter resistance, R � V
fsdIohm �
�
1
1
00 4
so, k ; and since , then:
k
R R R R
R
m c
m
� � �
� � �
1
1
00
00 000 50 99 95
�
�. AAns

Alternating Quantities 213
(b) I fsd � 100 μ A � Iav
therefore, r.m.s. value,
I � � �
��
�
�
�
1 11 1 111
1
111 1
.
.
00
00
90 09
90 0
6
μA
so, k
therefore,
R
Rm
�
990 50
90 04
�
� . k � Ans
The meter is therefore calibrated for the measurement of sinewaves. If any other waveform is measured, the meter reading will be in error, because the waveform will have a different form factor. Provided that the form factor is known, then the true r.m.s. value can be calculated.
Worked Example 6.9
Q A moving coil meter is used to measure both a squarewave and a triangular wave voltage. The meter
reading is 5 V in each case. Calculate the true r.m.s. values.
A
(a) The form factor for a squarewave is 1. The meter, however, has been calibrated for a form factor of 1.11. Thus the indicated reading will be too high by a factor of 1.11:1
Therefore the true value
V
� �
�
5
4 504
1
1 11.
. Ans
(b) If the form factor for the triangular wave is 1.15, then the meter reading will be too low, by a factor of 1.15:1.11.
Therefore the true value
V
� �
�
55
5 8
1 1
1 11
1
.
.
. Ans
A further complication arises when the meter is used to measure small a.c. voltages. When conducting, each diode will have a small p.d. developed across it. This forward voltage drop will be in the order of 0.6 to 0.7 V. At any instant, two diodes are conducting. Thus, there will be a total forward voltage drop of 1.2 to 1.4 V across the diodes. This voltage drop is ‘ lost ’ as far as the meter coil is concerned. This effect also must be taken into account when determining the values of multipliers, for the lower a.c. voltage ranges.
6.12 Phase and Phase Angle
Consider two a.c. voltages, of the same frequency, as shown in Fig. 6.17 . Both voltages pass through the zero on the horizontal axis at the same time. They also reach their positive and negative peaks at the

214 Fundamental Electrical and Electronic Principles
Figure 6.18 shows the same two voltages, but in this case let v2 reach its maximum value � /2 radian (90°) after v1 . It is necessary to consider one of the waveforms as the reference waveform. It is normal practice to consider the waveform that passes through zero, going positive, at the beginning of the cycle, as the reference waveform. So, for the two waveforms shown, v1 is taken as the reference. In this case, v2 is said to lag v1 by � /2 radian or 90°. The standard expressions for the two voltages would therefore be written as follows:
v V ft V
v V ftm m
m
1 1 1
2 2
2
2 2
�
� �
sin( ), or sin volt
sin( / ), or
� �� � (sin ) voltVm2 90� � �
V1
V2
03 �/2
�/2 �
2��t
(rad)
Fig. 6.17
V1
V2
0
�/2
�t(rad)
Fig. 6.18
The minus signs, in the brackets of the above expressions, indicate that v2 lags the reference by the angle quoted. This angle is known as the phase angle , or phase difference , between the two waveforms.
In general, the standard expression for an a.c. voltage is:
v V ftv V t
m
m
� �
� �
sin( ) volt,or sin( ) volt
2��
φφ (6.10)
same time. Thus, the two voltages are exactly synchronised, and are said to be in phase with each other.

Alternating Quantities 215
Although it would be usual to take v1 as the reference in the above example, it is not mandatory. Thus, if for some good reason v2 was chosen as the reference, the expressions would be written as:
v V t V
v V t Vm m
m m
2 2 2
1 1 12
�
� �
sin( ), or sin volt
sin( / ), or
� � � � sin( ) volt� � �90
Note: when the relevant phase angle, f , is quoted in the standard expression, do not mix degrees with radians. Thus, if the initial angular data is in radian ( � t or 2 � ft ), then f must also be expressed in radian. Similarly, if the angular data is initially in degrees ( u ), the f must also be quoted in degrees.
Worked Example 6.10
Q Three alternating currents are specifi ed below. Determine the frequency, and for each current,
determine its phase angle, and amplitude.
i 1 � 5 sin (80 � t � � /6) amp
i 2 � 3 sin 80 � t amp
i 3 � 6 sin (80 � t � � /4) amp
A
All three waveforms have the same value of � , namely 80 � rad/s. Thus all three have the same frequency:
� � �
��
� �
� �
2 80
802
40
f
f
rad/s
therefore, Hz Ans
Since zero phase angle is quoted for i 2 , then this is the reference waveform, of amplitude 3 A Ans
I
Im
m
i1 � �
�
5 6 30
62
3
A, and leads by / rad ( )
A, and lag
� Ans
ss by / rad ( ) i2 4 45� � Ans
The majority of people can appreciate the relative magnitudes of angles, when they are expressed in degrees. Angles expressed in radians are more diffi cult to appreciate. Some of the principal angles encountered are listed below. This should help you to gain a better ‘ feel ’ for radian measure.
degrees radians radians degrees
360 2� �6.28 0.1 5.73
270 3� /2 �4.71 0.2 11.46
180 � �3.14 0.3 17.19
120 2� /3 �2.09 0.4 22.92
90 � /2 �1.57 0.5 28.65
60 � /3 �1.05 1.0 57.30
45 �/4�0.79 1.5 85.94
30 � /6 �0.52 2.0 114.60

216 Fundamental Electrical and Electronic Principles
6.13 Phasor Representation
A phasor is a rotating vector. Apart from the fact that a phasor rotates at a constant velocity, it has exactly the same properties as any other vector. Thus its length corresponds to the magnitude of a quantity. It has one end arrowed, to show the direction of action of the quantity.
Consider two such rotating vectors, v1 and v2, rotating at the same angular velocity, � rad/s. Let them rotate in a counterclockwise direction, with v2 lagging behind v1 by � /6 radian (30°). This situation is illustrated in Fig. 6.19 .
V2
V1V1
V2
0�/6
�/6
�/2 3 �/2
��(rad)2��
� (rad/s)
Fig. 6.19
The instantaneous vertical height of each vector is then plotted for one complete revolution. The result will be the two sinewaves shown.
Notice that the angular difference between v1 and v2 is also maintained throughout the waveform diagram. Also note that the peaks of the two waveforms correspond to the magnitudes, or amplitudes, of the two vectors. In this case, these two waveforms could equally well represent either two a.c. voltages, or currents. If this were the case, then the two a.c. quantities would be of the same frequency. This is because the value of � is the same for both. The angular difference, of � /6 radian, would then be described as the phase difference between them.
We can therefore, represent an alternating quantity by means of a phasor. The length of the phasor represents the amplitude. Its angle, with respect to some reference axis, will represent its phase angle. Considering the two waveforms in Fig. 6.19 , the plot has been started with V1 in the horizontal position (vertical component of V1 � 0). This horizontal axis is therefore taken as being the reference axis. Thus, if these waveforms represent two voltages, v1 and v2 , then the standard expressions would be:
v V tv V t
m
m
1 1
2 2 6�
� �
sin( ) voltand sin( / ) volt
�� �
The inconvenience of representing a.c. quantities in graphical form was pointed out earlier, in section 6.3. This section introduced the concept

Alternating Quantities 217
of using a standard mathematical expression for an a.c. However, a visual representation is also desirable. We now have a much simpler means of providing a visual representation. It is called a phasor diagram. Thus the two voltages we have been considering above may be represented as in Fig. 6.20 .
V1m
V2m
�/6
� (rad/s)
Fig. 6.20
Notice that v1 has been chosen as the reference phasor. This is because the standard expression for this voltage has a phase angle of zero (there is no �f term in the bracket). Also, since the phasors are rotating counterclockwise, and v2 is lagging v1 by � /6 radian, then v2 is shown at this angle below the reference axis.
Notes
1 Any a.c. quantity can be represented by a phasor, provided that it is a sinewave.
2 Any number of a.c. voltages and/or currents may be shown on the same phasor diagram, provided that they are all of the same frequency.
3 Figure 6.20 shows a counterclockwise arrow, with � rad/s. This has been shown here to emphasise the point that phasors must rotate in this direction only. It is normal practice to omit this from the diagram.
4 When dealing with a.c. circuits, r.m.s. values are used almost exclusively. In this case, it is normal to draw the phasors to lengths that correspond to r.m.s. values.
Worked Example 6.11
Q Four currents are as shown below. Draw to scale the corresponding phasor diagram.
i t i ti t1 � � � �
�
2 5 4 4 3
6
2
3
. sin( / ) amp; sin( / ) amp;
sin am
ω π ω πω pp; cos ampi t4 3� ω
A
Before the diagram is drawn, we need to select a reference waveform (if one exists). The currents i 1 and i 2 do not meet this criterion, since they both have an associated phase angle.
This leaves the other two currents. Neither of these has a phase angle shown. However, i 3 is a sinewave, whilst i 4 is a cosine waveform. Now, a cosine wave leads a sinewave by 90°, or � /2 radian.
Therefore, i 4 may also be expressed as i 4 � 3 sin ( � t � � /2) amp. Thus i 3 is chosen as the reference waveform, and will therefore be drawn along the horizontal axis.

218 Fundamental Electrical and Electronic Principles
The resulting phasor diagram is shown in Fig. 6.21 .
�/4
�/36A
4A
2.5A
3A
scale 1 cm: 1A
Fig. 6.21
Worked Example 6.12
Q The phasor diagram representing four alternating currents is shown in Fig. 6.22 , where the length of
each phasor represents the amplitude of that waveform. Write down the standard expression for
each waveform.
Î1 � 7 A
Î2 � 6
Î3 � 5 AÎ4 � 4 A
70�
50�
Fig. 6.22
A
I
I
I
m
m
m
1 1 11� �� � � �
� � � �
�
7 7070
8022
6 0 0
5
2 2
3
A; rad
A; rad
φ
φ
�.
AA; rad
A;
φ
φ
3
4 4
505080
0 873
4 909080
�� � ��
��
� �� � ��
��
�
�
1
11
.
Im ..571 rad
hence, i1 � 7 sin ( ω t � 1.22) amp Ans
i2 � 6 sin ω t amp Ans
i3 � 5 sin ( ω t � 0.873) amp Ans
i4 � 4 sin ( ω t � 1.571) amp Ans

Alternating Quantities 219
6.14 Addition of Alternating Quantities
Consider two alternating currents, i1 � Im1 sin � t amp and i2 � Im2 sin (� t � � /4) amp, that are to be added together. There are three methods of doing this, as listed below.
(a) Plotting them on graph paper. Their ordinates are then added together, and the resultant waveform plotted. This is illustrated in Fig. 6.23 . The amplitude, Im , and the phase angle, f, of the resultant current are then measured from the two axes.
i2
Im
�t(rad)
i1
i
0
�
Fig. 6.23
Thus, sin( ) ampi I tm� �� φ
Note: Although i � i1 � i2 , the AMPLITUDE of the resultant is NOT Iml � Im2 amp. This would only be the case if i1 and i2 were in phase with each other.
(b) Drawing a scaled phasor diagram, as illustrated in Fig. 6.24 . The resultant is found by completing the parallelogram of vectors. The amplitude and phase angle are then measured on the diagram.
(c) Resolving the two currents, into horizontal and vertical components, and applying Pythagoras ’ theorem. This method involves using a sketch of the phasor diagram, followed by a purely mathematical process. This phasor diagram, including the identifi cation of the horizontal and vertical components, is shown in Fig. 6.25 .
Im1
Im2Im
�/4
�
Scale: 1 cm � x amp.
Fig. 6.24
�/4Im1
Im2
Im2 cos �/4
Im2 sin �/4
Fig. 6.25

220 Fundamental Electrical and Electronic Principles
Horizontal Component ( H.C .):
H.C. cos cos /so, H.C. ( ) amp
� �
� � �
I II I
m m
m m
1 2
1 2
0 40 707
�.
Vertical Component ( V.C .):
V.C. sin sin /so, V.C. ( ) amp
� �
� � �
I II
m m
m
1 2
2
0 40 0 707
�.
The triangle of H.C., V.C., and the resultant current, is shown in Fig. 6.26 . From this, we can apply Pythagoras ’ theorem to determine the amplitude and phase angle, thus:
�
Im
H.C.
V.C.
Fig. 6.26
The fi nal answer, regardless of the method used, would then be expressed in the form i � Im sin ( � t � f ) amp.
Let us now compare the three methods, for speed, convenience, and accuracy.
The graphical technique is very time-consuming (even for the addition of only two quantities). The accuracy also leaves much to be desired; in particular, determining the exact point for the maximum value of the resultant. The determination of the precise phase angle is also very diffi cult. This method is therefore not recommended.
A phasor diagram, drawn to scale, can be the quickest method of solution. However, it does require considerable care, in order to ensure a reasonable degree of accuracy. Even so, the precision with which the length—and (even more so) the angle—can be measured, leaves a lot to be desired. This is particularly true when three or more phasors are involved. This method is therefore recommended only for a rapid estimate of the answer.
The use of the resolution of phasors is, with practice, a rapid technique, and yields a high degree of accuracy. Unless specifi ed otherwise it is the technique you should use. Although, at fi rst acquaintance, it may seem to be rather a complicated method, this is not the case. With a little practice, the technique will be found to be relatively simple and quick. Two worked examples now follow.
Im � �
� � �
H.C. V.C. amp
and tan V.C.
H.C. so tan
V.C.
H.C.
2 2
1φ φ,

Alternating Quantities 221
Worked Example 6.13
Q Determine the phasor sum of the two voltages specifi ed below.
v 1 � 25 sin (314 t � � /3), and v 2 � 15 sin (314 t � � /6) volt
A
Figure 6.27 shows the sketch of the phasor diagram.
�/3
�/6
25 V
15 V
Fig. 6.27
Note: Always sketch a phasor diagram.
H.C. cos / cos /
( ) ( )
� � �
� � � �
� �
� �25 3 5 6
25 0 5 5 0 866
2 5 2 9
1
1
1 1
( )
. .
. . 99
25 49so, H.C. V� .
V.C. sin / sin /
( ) ( )
� � �
� � � � �
� �
25 3 5 6
25 0 866 5 0 5
2 65 7
� �1
1
1
( )
. ( . )
. ..
.
5
4 5so, V.C. V�1 1
Figure 6.28 shows the phasor diagram for H.C., V.C. and V m .
H.C.
V.C. Vm
�
Fig. 6.28
V
V
m
m
� � � �
�
� �
H.C. V.C.
so, V
tan V.C.H.C.
2 2 2 225 49 4 5
29 5
4
. .
.
1 1
1
1φ
..
..
. .
1
1
525 49
0 555
0 555 0 507
29
�
� �
�
�
*
so, tan rad
therefore,
φ
v .. .1 15 3 4 0 507 sin( ) volt t � Ans
*radian mode required

222 Fundamental Electrical and Electronic Principles
Worked Example 6.14
Q Calculate the phasor sum of the three currents listed below.
i t
i t
i t
1 �
�
�
6
8 2
4 6
2
3
sin amp
sin( / ) amp
sin( / ) amp
ω
ω π
ω π
�
�
A
The relevant phasor diagrams are shown in Figs. 6.29 and 6.30.
4A
6A
8A
�/6
Fig. 6.29
H.C.
V.C. Im
�
Fig. 6.30
H.C. cos cos / cos /
( ) (8 ) ( )
� � � �
� � � � � �
�
6 0 8 2 4 6
6 0 4 0 866
6
( )
.
π π
1
��
�
� � � �
�
3 46
9 46
6 0 8 2 4 6
.
.
( )
so, H.C. A
V.C. sin sin / sin /π π
(( ) ( ) ( )
so, V.C. A
H.C. V.C.
6 0 8 4 0 5
8 2
6
92 2
� � � � � �
�� �
��
� � �
[ ] .
.
1
Im 446 6
2
69 46
0
2 2� �
�
� ��
� �� � �
( )
so, A
tanV.C.H.C.
tan tan
Im 11
1 1 1
.
.φ ..
.
. .
6342
0 565
2 0 565
so, rad
therefore, sin( ) amp
φ
ω
��
� �i t11 Anns
Worked Example 6.15
Q Three alternating voltages and one current are as specifi ed in the expressions below.
v 1 � 10 sin(628t � � /6) volt
v 2 � 8 sin(628t � � /3) volt
v 3 � 12 sin(628t � � /4) volt
i � 6 sin(628t) amp
(a) For each voltage determine the frequency, phase angle and amplitude.
(b) Determine the phasor sum of the three voltages.

Alternating Quantities 223
A
(a) All four waveforms have the same value of � � 628 rad/s, so they are all of the same frequency, hence
� �
�
� �
�
�
2 628
6282
00
f
f
f
so, Hz
and, Hz 1 Ans
for , / rad or ; and V
for , /
v V
v
m1 1 1φ
φ
�� � � �
��
�
�
6 30 0
32 2
Ans
rrad or ; and V
for , / rad or ; and
� � �
�� � �
60 8
4 453 3
V
v
m Ans
φ � VVm �12 V Ans
(b) Firstly the phasor diagram ( Fig. 6.31 ) is sketched, very roughly to scale. In order to do this a reference waveform needs to be selected, and since the current has a zero phase angle, this is chosen as the reference. However, if the current waveform had not been specifi ed, the horizontal axis would still be taken as the reference from which all phase angles are measured. Since v 2 and v 3 have positive phase angles, and phasors rotate anticlockwise, then these two phasors will appear above the reference axis. The voltage v 1 , having a negative phase angle will appear below the reference axis. Also shown on the phasor diagram are the horizontal and vertical components of each voltage.
Im(ref)
10 V
12 V8 V
�/3�/4
�/6
Fig. 6.31
H.C. 2 cos / cos / cos /
( ) ( ) (
� � �
� � � � � �
1 1
1 1
� � �4 8 3 0 6
2 0 707 8 0 5 0 0 8. . . 666
8 48 4 8 66
2 44
2 4 8 3 0
)
so, H.C. V
V.C. sin / sin / sin
� � �
�
� � �
. .
.1
1 1� � ��/
( ) ( ) ( )
and V.C.
6
2 0 707 8 0 866 0 0 5
8 48 6 928 5
0
� � � � � �
� � �
�
1 1
1
. . .
. .
..4 21 V
The phasor diagram for H.C. and V.C., and the resultant phasor sum is Fig. 6.32 .

224 Fundamental Electrical and Electronic Principles
V
Vm
m
� � � �
�
� ��
H.C. V.C.
so, V
tanV.C.H.C.
2 2 2 22 44 0 4 2
23 83
1 1 1
1
. .
.
φ ttan tan
and, rad
� ��
�
1 11 1
1
0 4 22 44
0 4856
0 452
..
.
.φ
Hence, the phasor sum, v � 23.83 sin (628 t � 0.452) volt Ans
6.15 The Cathode Ray Oscilloscope
The name of this instrument is more often abbreviated to the oscilloscope, the ‘ scope, or CRO. It is a very versatile instrument, that may be used to measure both a.c. and d.c. voltages. For d.c. measurements, a voltmeter is usually more convenient to use. The principal advantages of the oscilloscope when used to measure a.c. quantities are:
1 A visual indication of the waveform is produced. 2 The frequency, period and phase angle of the waveform(s) can be
determined.3 It can be used to measure very high frequency waveforms. 4 Any waveshape can be displayed, and measured with equal accuracy. 5 The input resistance (impedance) is of the same order as a digital
voltmeter. It therefore applies minimal loading effect to a circuit to which it is connected.
6 Some oscilloscopes can display two or more waveforms simultaneously.
Cathode Ray Tube The basic arrangement of a crt is shown in Fig. 6.33 . The main components are contained within an evacuated
H.C.
Vm
Im (ref)
V.C.
�
Fig. 6.32
Xdeflectionanodes
electrongun
Y deflection
graphitecoating
Fig. 6.33

Alternating Quantities 225
glass tube. These components are: the electron gun; a focusing system; a beam defl ection system; and a screen. Each of these will be very briefl y described.
Electron gun assembly This component produces a beam of electrons. This beam can then be accelerated, down the axis of the tube, by a series of high potential anodes.
Focusing system The beam consists entirely of electrons. Since they are all negatively charged, then they will tend to repel each other. The beam will therefore tend to spread out, and this would result in a very fuzzy display. The focusing system consists of a series of high potential anodes. These also provide the acceleration for the electron beam. Each successive anode along the tube, towards the screen, is at a higher potential than the previous one. The electric fi elds, between these anodes, will be of the same shape as a double convex optical lens. This is referred to as an electron lens, and causes the beam to converge to a small spot by the time it reaches the screen.
Defl ection system Two sets of parallel plates are situated after the last anode. One set is mounted in the horizontal, and the other set in the vertical plane. These are the X-plates and the Y-plates. When a p.d. is developed between a pair of plates, an electric fi eld will exist between them. This electric fi eld will cause the electrons in the beam to be defl ected, towards the more positive of the two plates. Thus, the beam can be made to defl ect in both planes. This effect is illustrated in Fig. 6.34 .
� �
� �
��
� �
Fig. 6.34
The screen The inner surface of the screen is coated with a phosphor. Wherever the electron beam strikes the phosphor, it will glow very briefl y. This is because the kinetic energy of the bombarding electrons is converted into ‘ light ’ energy. On the inside of the ‘ bell ’ shape of the tube is a graphite coating. This provides a conducting path to return the electrons to the internal power supply, and hence complete the circuit back to the electron gun.
In order for a waveform to be displayed on the screen, the beam must be swept at a constant speed across the screen. At the same time, the beam has to be defl ected up and down. You can demonstrate this for

226 Fundamental Electrical and Electronic Principles
yourself, as follows. Take a pencil and a sheet of paper. At the left-hand edge of the paper, move the pencil up and down, at as constant a rate as possible. Maintaining this up-and-down rhythm, now move the pencil across the page, again at as constant a rate as possible. The pattern traced on to the paper should now resemble a sinewave.
The electron beam in the crt is subjected to similar forces, exerted by the defl ecting plates, when displaying a sinusoidal waveform. The X-plates cause the beam to be swept across the screen at a constant rate. The Y-plates cause the beam to defl ect up and down, in sympathy with the voltage being displayed.
6.16 Operation of the Oscilloscope
In addition to the crt, the other main components in the oscilloscope enable the user to adjust the display, by means of controls on the front panel. A simplifi ed block diagram of the oscilloscope is shown in Fig. 6.35 .
brightness
Powersupply
focus
Y-amp.
Triggerpulsegen.
Time-basegen.
X-amp
Yinput
Xinput
Ext.trig.
Fig. 6.35
The Power Supply This provides the high potentials required for the anodes. It also provides the d.c. supplies for the amplifi ers, the electron gun, the timebase and trigger pulse generators.
The Focus Control This control allows the potentials applied to the anodes to be varied. This allows the shape of the electron lens to be altered, and hence achieve a sharp clear trace on the screen.
The Brightness Control This varies the potentials applied to the electron gun. The number of electrons forming the beam are thus controlled, which determines the brightness of the display.

Alternating Quantities 227
The Timebase Control This controls the speed at which the beam is swept across the screen, from left to right. It does this by setting the ‘ sweep ’ time of the Timebase generator.
This generator produces a sawtooth voltage, as illustrated in Fig. 6.36 . This waveform is applied to the X-plates. During the sweep time, the beam is steadily defl ected across the screen. During the ‘ fl yback ’ time, the beam is rapidly returned to the left-hand side of the screen, ready for the next sweep. The steepness of the sweep section of this waveform determines the speed of the sweep.
sweep flyback
t
V
Fig. 6.36
At the front of the screen is a graticule, marked out in centimetre squares. The timebase control is marked in units of time/cm. Thus, if this control is set to (say) 10 ms/cm, then each centimetre graduation across the graticule represents a time interval of 10 ms. This facility enables the measurement of the periodic time (and hence frequency), of the displayed waveform.
Trigger Control This enables the user to obtain a single stationary image of the trace on the screen. If this control is incorrectly set, then the trace will scroll continuously across the screen. Alternatively, multiple overlapping traces are displayed, which may also be scrolling. In either case, measurement of the periodic time is impossible. This control determines the point in time at which the sweep cycle of the sawtooth waveform commences. If required an external trigger input may be used.
X-Amplifi er This amplifi es the sawtooth waveform. This ensures that the voltage applied to the X-plates is suffi ciently large to defl ect the beam across the full width of the screen. There is also provision for the application of an external timebase signal.
Y-Amplifi er The waveform to be displayed is applied to this amplifi er. Thus, small amplitude signals can be amplifi ed to give a convenient height of the trace. The gain or amplifi cation of this amplifi er is determined by the user. The control on the front panel is marked in units of volt/cm. Thus, if this control was set to (say) 100 mV/cm, then each vertical graduation on the screen graticule represents a voltage of 100 mV. This enables the measurement of the amplitude of the displayed waveform.

228 Fundamental Electrical and Electronic Principles
X and Y Shift Controls These controls enable the trace position on the screen to be adjusted. This makes the measurement of period and amplitude easier.
6.17 Dual Beam Oscilloscopes
These instruments are widely used, and are more versatile than the single beam type described. They have the advantage that two waveforms can be displayed simultaneously. This enables waveforms to be compared, in terms of their amplitudes, shape, phase angle or frequency.
The principles of operation are exactly the same as for the single beam instrument. They contain two electron gun assemblies, which have common brightness and focusing controls. The timebase generator is also common to both channels. There will be two separate Y-amplifi ers, each controlling its own set of vertical defl ection plates. The inputs to these two amplifi ers are usually marked as channel 1 and channel 2, or as channels A and B.
Worked Example 6.16
Q The traces obtained on a double beam oscilloscope are shown in Fig. 6.37 . The graticule is marked in
1 cm squares. The channel 1 input is displayed by the upper trace. If settings of the controls for the
two channels are as follows, determine the amplitude, r.m.s. value, and frequency of each input.
Channel 1: timebase of 0.1 ms/cm; Y-amp setting of 5 V/cm
Channel 2: timebase of 10 μ s/cm; Y-amp setting of 0.5 V/cm
Fig. 6.37
A
Channel 1: peak to peak occupies 3 cm, so
V
V
V
p p
p p
m
�
�
� � �
� �
�
3 5 5
25
27 5
1
1
V
the amplitude
therefore, V . Ans

Alternating Quantities 229
As the waveform is a sinewave, then r.m.s. value V � V m I 2
therefore, V V � �7 5
25 3
.. Ans
1 cycle occupies 4 cm, so T � 4 � 0.1 � 0.4 ms
fT
f
� ��
�
�
1 1
1Hz
so, kHz
0 4 0
2 5
3.
. Ans
Channel 2: peak to peak occupies 2 cm, so
V Vp p m� � � � �2 0 5 0 5. .1 V, and V Ans
Since it is a squarewave, then r.m.s. value � amplitude,
hence V V � 0 5. Ans
2 cycles occur in 3 cm, so 1 cycle occurs in 2/3 cm
therefore, T � 0.6667 � 10 � 6.667 μ s
fT
f
� ��
�
�
1 1
1
Hz
so, kHz
6 667 10
50
6.
Ans
Summary of Equations
Frequency generated: f � np hertz
Periodic time: Tf
�1
second
Angular velocity: � � 2� f rad/second
Standard expression for a sinewave: e E E tE ft
m m
m
� � � �
� �
sin( ) sin( ) sin( ) volt
� ��
φ φφ2
Average value for a sinewave: II
Iavem
m� �2
0 637�
.
R.m.s. value for a sinewave: II
Imm� �
20 707.
Peak factor for a sinewave: max. value
r.m.s. value� 1 414.
Form factor for a sinewave:r.m.s.value
ave value� 1 11.

230 Fundamental Electrical and Electronic Principles
Assignment Questions
1 A coil is rotated between a pair of poles. Calculate the frequency of the generated emf if the rotational speed is (a) 150 rev/s, (b) 900 rev/minute, (c) 200 rad/s.
2 An alternator has 8 poles. If the motor winding is rotated at 1500 rev/minute, determine (a) the frequency of the generated emf, and (b) the speed of rotation required to produce frequency of 50 Hz.
3 A frequency of 240 Hz is to be generated by a coil, rotating at 1200 rev/min. Calculate the number of poles required.
4 A sinewave is shown in Fig. 6.38 . Determine its amplitude, periodic time and frequency.
5 A sinusoidal current has a peak-to-peak value of 15 mA and a frequency of 100 Hz. (a) Plot this waveform, to a base of time, and (b) write down the standard expression for the waveform.
6 A sinusoidal voltage is generated by an 85 turn coil, of dimensions 20 cm by 16 cm. The coil is rotated at 3000 rev/min, with its longer sides parallel to the faces of a pair of poles. If the fl ux density produced by the poles is 0.5 T, calculate (a) the amplitude of the generated emf, (b) the frequency, (c) the r.m.s. and average values.
7 Write down the standard expression for a voltage, of r.m.s. value 45 V, and frequency 1.5 kHz. Hence, calculate the instantaneous value, 38 � s after the waveform passes through its zero value.
8 For each of the following alternating quantities, determine (a) the amplitude and r.m.s. value, and (b) the frequency and period.
(i) e � 250 sin 50�t volt (ii) i � 75 sin 628.3t milliamp
(iii) f � 20 sin 100�t milliweber
(iv) v � 6.8 sin (9424.8t�f) volt.
9 For a current of r.m.s. value 5 A, and frequency 2 kHz, write down the standard expression. Hence, calculate (a) the instantaneous value 150 μ s after it passes through zero, and (b) the time taken for it to reach 4 A, after passing through zero for the fi rst time.
10 Calculate the peak and average values for a 250 V sinusoidal supply.
11 A sinusoidal current has an average value of 3.8 mA. Calculate its r.m.s. and peak values.
12 An alternating voltage has an amplitude of 500 V, and an r.m.s. value of 350 V. Calculate the peak factor.
13 A waveform has a form factor of 1.6, and an average value of 10 V. Calculate its r.m.s. value.
14 A moving coil voltmeter, calibrated for sinewaves, is used to measure a voltage waveform having a form factor of 1.25. Determine the true r.m.s. value of this voltage, if the meter indicates 25 V. Explain why the meter does not indicate the true value.
15 Explain why only sinusoidal waveforms can be represented by phasors.
16 Sketch the phasor diagram for the two waveforms shown in Fig. 6.39 .
17 Sketch the phasor diagram for the two voltages represented by the following expressions:
v tv t
1 1 11
�
� �
2 3 48 3 4 32
sin volt, sin( / ) volt.�
250
I (mA)�5
�5
50t (�s)
Fig. 6.38
0
I (mA)
5
3
2� �t(rad)
Fig. 6.39

Alternating Quantities 231
18 Determine the phasor sum of the two voltages specifi ed in Question 17 above.
19 Three currents, in an a.c. circuit, meet at a junction. Calculate the phasor sum, if the currents are:
i ti ti t
1 1
1
�
� �
� �
05 4
4 32
3
sin amp sin( / ) amp
sin( / ) amp.
�� �� �
20 Determine the phasor sum of the following voltages, all of which are sinewaves of the same frequency:
v 1 has an amplitude of 25 volt, and a phase angle of zero.
v 2 has an amplitude of 13.5 volt, and lags v 1 by 25°.
v 3 has an amplitude of 7.6 volt, and leads v 2 by 40°.
21 By means of a phasor diagram, drawn to scale, check your answer to Question 19 above.
22 Plot, on the same axes, the graphs of the following two voltages. By adding ordinates, determine the sum of these voltages. Express the result in the form
Assignment Questions
v V tm� � sin( )� φ
v t v t1 1� � �2 8 62 sin , and sin( / ) volt.� �
23 The waveform displayed on an oscilloscope is as shown in Fig. 6.40 . The timebase is set to 100 μ s/cm, and the Y-amp is set to 2 V/cm. Determine the amplitude, r.m.s. value, periodic time and frequency of this waveform.
Fig. 6.40

232 Fundamental Electrical and Electronic Principles
Suggested Practical Assignments
The principal practical exercise relating to this chapter is the usage of the oscilloscope. The actual exercises carried out are left to the discretion of your teacher. Using an oscilloscope is not diffi cult, but does require some practice; particularly in obtaining a clear, stationary trace, from which measurements can be made.

D.C. Machines
Chapter 7
Learning Outcomes
This chapter covers the operating principles of d.c. generators and motors, their characteristics and applications. On completion you should be able to:
1 Understand and explain generator/motor duality. 2 Appreciate the need for a commutator. 3 Identify the different types of d.c. generator, and describe their characteristics. Carry out
practical tests to compare the practical and theoretical characteristics.
233
7.1 Motor/Generator Duality
An electric motor is a rotating machine which converts an electrical input power into a mechanical power output. A generator converts a mechanical power input into an electrical power output. Since one process is the converse of the other, a motor may be made to operate as a generator, and vice versa. This duality of function is not confi ned to d.c. machines. An alternator can be made to operate as a synchronous a.c. motor, and vice versa.
To demonstrate the conversion process involved, let us reconsider two simple cases that were met when dealing with electromagnetic induction.
Consider a conductor being moved at constant velocity, through a magnetic fi eld of density B tesla, by some externally applied force Fnewton. This situation is illustrated in Fig. 7.1 .
Work done in moving the conductor,
W F� d newton metre

234 Fundamental Electrical and Electronic Principles
mechanical power input, PW
t1 � watt
so,d
wattPF
t1 �
and since d /t is the velocity, v at which the conductor is moved,then
P Fv1 1� watt. . . . . . . . . . . . .[ ]
However, when the conductor is moved, an emf will be induced into it. Provided that the conductor forms part of a closed circuit, then the resulting current fl ow will be as shown in Fig. 7.2 . This induced current, i, produces its own magnetic fi eld, which reacts with the main fi eld, producing a reaction force, Fr , in direct opposition to the applied force, F .
Now, Fr � Bi� newton
Fr
N
S
Fig. 7.2
d
F
S
N
Fig. 7.1

D.C. Machines 235
Assuming no frictional or other losses, then the applied force has only to overcome the reaction force, such that:
F F Bi
P Bi vr� �
�
�
�
newton
so eqn [ ] becomes watt. . . . . . . . . . . .1 1 [[2]
Also, induced emf, volt
so generated power,
e B v
P ei
�
�
�
2 watt
therefore, watt. . . . . . . . . . . .[ ]P Bi v2 3� �
Since [3] � [2], then the electrical power generated is equal to the mechanical power input (assuming no losses). Now consider the conductor returned to its original starting position. Let an external source of emf, e volt pass a current of i ampere through the conductor. Provided that the direction of this current is opposite to that shown in Fig. 7.2 , then the conductor will experience a force that will propel it across the fi eld. In this case, the same basic arrangement exhibits the motor effect, since the electrical input power is converted into mechanical power.
Although the above examples involve linear movement of the conductor, exactly the same principles apply to a rotating machine.
7.2 The Generation of d.c. Voltage
We have seen in Chapter 6 already that, if a single-loop coil is rotated between a pair of magnetic poles, then an alternating emf is induced into it. This is the principle of a simple form of alternator. Of course, this a.c. output could be converted to d.c. by employing a rectifi er circuit. Indeed, that is exactly what is done with vehicle electrical systems. However, in order to have a truly d.c. machine, this rectifi cation process needs to be automatically accomplished within the machine itself. This process is achieved by means of a commutator, the principle and action of which will now be described.
Consider a simple loop coil the two ends of which are connected to a single ‘ split ’ slip-ring, as illustrated in Fig. 7.3 . Each half of this slip-ring is insulated from the other half, and also from the shaft on which it is mounted. This arrangement forms a simple commutator, where the connections to the external circuit are via a pair of carbon brushes. The rectifying action is demonstrated in the series of diagrams of Fig. 7.4 . In these diagrams, one side of the coil and its associated commutator segment are identifi ed by a thickened line edge. For the sake of clarity, the physical connection of each end of the coil, to its associated commutator segment, is not shown. Figure 7.4(a) shows the instant when maximum emf is induced in the coil. The current directions have been determined by applying Fleming ’ s right-hand rule. At this

236 Fundamental Electrical and Electronic Principles
instant current will be fed out from the coil, through the external circuit from right to left, and back into the other side of the coil. As the coil continues to rotate from this position, the value of induced emf and current will decrease. Figure 7.4(b) shows the instant when the brushes short-circuit the two commutator segments. However, the induced emf is also zero at this instant, so no current fl ows through the external circuit. Further rotation of the coil results in an increasing emf, but of the opposite polarity to that induced before. Figure 7.4(c) shows the instant when the emf has reached its next maximum. Although the generated emf is now reversed, the current through the external circuit will be in the same direction as before. The load current will therefore be a series of half-sinewave pulses, of the same polarity. Thus the commutator is providing a d.c. output to the load, whereas the armature generated emf is alternating.
A single-turn coil will generate only a very small emf. An increased amplitude of the emf may be achieved by using a multi-turn coil.
rotation
brushcommutator
R
Φ
Fig. 7.3
Fig. 7.4
(a)
I I
(b) (c)
I I

D.C. Machines 237
The resulting output voltage waveform is shown in Fig. 7.5 . Although this emf is unidirectional, and may have a satisfactory amplitude, it is not a satisfactory d.c. waveform. The problem is that we have a concentrated winding. In a practical machine the armature has a number of multi-turn coils. These are distributed evenly in slots around the periphery of a laminated steel core. Each multi-turn coil has its own pair of slots, and the two ends are connected to its own pair of commutator segments. Figure 7.6 shows the armature construction (before the coils have been inserted). The riser is the section of the
E (V)
t (s)0
Fig. 7.5
slot
segments
riser
Fig. 7.6
E (V)
t (s)0
Fig. 7.7
commutator to which the ends of the coils are soldered. Due to the distribution of the coils around the armature, their maximum induced emfs will occur one after the other, i.e. they will be out of phase with each other. Figure 7.7 illustrates this, but for simplicity, only three coils have been considered.
Nevertheless, the effect on the resultant machine output voltage is apparent, and is shown by the thick line along the peaks of the waveform.

238 Fundamental Electrical and Electronic Principles
With a large number of armature coils the ripple on the resultant waveform will be negligible, and a smooth d.c. output is produced.
7.3 Construction of d.c. Machines
The various parts of a small d.c. machine are shown separately in Fig. 7.8 , with the exception that neither the fi eld nor armature windings have been included. The frame shell (bottom left) contains the pole pieces, around which the fi eld winding would be wound. One end frame (top left) would simply contain a bearing for the armature shaft.
Fig. 7.8
The other end frame (bottom right) contains the brushgear assembly in addition to the other armature shaft bearing. The armature (top right) construction has already been described. The slots are skewed to provide a smooth starting and slow-speed torque.
7.4 Classifi cation of Generators
D.C. generators are classifi ed according to whether the fi eld winding is electrically connected to the armature winding, and if it is, whether it is connected in parallel with or in series with the armature. The fi eld current may also be referred to as the excitation current. If this current is supplied internally, by the armature, the machine is said to be self-excited. When the fi eld current is supplied from an external d.c. source, the machine is said to be separately excited. The circuit symbol used

D.C. Machines 239
for the fi eld winding of a d.c. machine is simply the same as that used to represent any other form of winding. The armature is represented by a circle and two ‘ brushes ’ . The armature conductors, as such, are not shown.
7.5 Separately Excited Generator
The circuit diagram of a separately excited generator is shown in Fig. 7.9 . The rheostat, R1 , is included so that the fi eld excitation current, If, can be varied. This diagram also shows the armature being driven at constant speed by some primemover. Since the armature of any generator must be driven, this drive is not normally shown. The load, R L , being supplied by the generator may be connected or disconnected by switch S2 . The resistance of the armature circuit is represented by Ra .
emf
E2
E1
If1 If2 If0
Fig. 7.10
R1
Rf
Ra
RL
S1
S2
VE
If
Ia IL
Fig. 7.9
Consider the generator being driven, with switches S1 and S2 both open. Despite the fact that there will be zero fi eld current, a small emf would be measured. This emf is due to the small amount of residual magnetism retained in the poles. With switch S1 now closed, the fi eld current may be increased in discrete steps, and the corresponding values of generated emf noted. A graph of generated emf versus fi eld current will be as shown in Fig. 7.10 , and is known as the open-circuit characteristic of the machine.

240 Fundamental Electrical and Electronic Principles
It will be seen that the shape of this graph is similar to the magne-tization curve for a magnetic material. This is to be expected, since the emf will be directly proportional to the pole fl ux. The ‘ fl attening ’ of the emf graph indicates the onset of saturation of the machine ’ s magnetic circuit. When the machine is used in practice, the fi eld current would normally be set to some value within the range indicated by If1 and If2 on the graph. This means that the facility exists to vary the emf between the limits E1 and E2 volts, simply by adjusting rheostat R1 .
Let the emf be set to some value E volt, within the range specifi ed above. If the load is now varied, the corresponding values of terminal voltage, V and load current I L may be measured. Note that with this machine the armature current is the same as the load current. The graph of V versus IL is known as the output characteristic of the generator, and is shown in Fig. 7.11 . The terminal p.d. of the machine will be less than the generated emf, by the amount of internal voltage drop due to Ra , such that:
V E I Ra a� � volt (7.1)
IaRa
V
0
voltage
E
IL � Ia
Fig. 7.11
Ideally, the graph of E versus I L would be a horizontal line. However, an effect known as armature reaction causes this graph to ‘ droop ’ at the higher values of current. The main advantage of this type of generator is that there is some scope for increasing the generated emf in order to offset the internal voltage drop, Ia R a , as the load is increased. The big disadvantage is the necessity for a separate d.c. supply for the fi eld excitation.
7.6 Shunt Generator
This is a self-excited machine, where the fi eld winding is connected in parallel (shunt) with the armature winding. The circuit diagram is

D.C. Machines 241
shown in Fig. 7.12 , and from this it may be seen that the armature has to supply current to both the load and the fi eld, such that:
I I Ia L f� � amp (7.2)
Ia
If IL
Ra
Rf
RL
E V
S
Fig. 7.12
This self-excitation process can take place only if there is some residual fl ux in the poles, and if the resistance of the fi eld circuit is less than some critical value. The open-circuit characteristic is illustrated in Fig. 7.13 .
0
E
If
Fig. 7.13
The resistance of the fi eld winding, Rf, is constant and of a relatively high value compared with Ra . Typically, If will be in the order of 1A to 10A, and will remain reasonably constant. The shunt machine is therefore considered to be a constant-fl ux machine. When switch S is closed, the armature current will increase in order to supply the demanded load current, IL . Thus Ia IL, and as the load current is increased, so the terminal voltage will fall, according to the equation, V � E � Ia R a volt. The output characteristic will therefore follow much the same shape as that for the separately excited generator and is shown in Fig. 7.14 . This condition applies until the machine is providing its rated full-load output. If the load should now demand even more current, i.e. the machine is overloaded, the result is that the generator simply stops generating. This effect is shown by the dotted lines in the output characteristics.

242 Fundamental Electrical and Electronic Principles
The shunt generator is the most commonly used d.c. generator, since it provides a reasonably constant output voltage over its normal operating range. Its other obvious advantage is the fact that it is self-exciting, and therefore requires only some mechanical means of driving the armature.
7.7 Series Generator
In this machine the fi eld winding is connected in series with the armature winding and the load, as shown in Fig. 7.15 . In this case, IL � Ia � If , so this is a variable-fl ux machine. Since the fi eld winding must be capable of carrying the full-load current (which could be in hundreds of amps for a large machine), it is usually made from a few turns of heavy gauge wire or even copper strip. This also has the advantage of offering a very low resistance. This generator is a self-excited machine, provided that it is connected to a load when started. Note that a shunt generator will self-excite only when disconnectedfrom its load.
When the load on a series generator is increased, the fl ux produced will increase, in almost direct proportion. The generated emf will therefore
voltage
E
V
0 IL
IaRa
full-load
Fig. 7.14
Ia
RaRL
IL
Rf
If
Ia � If � IL
V
E
Fig. 7.15

D.C. Machines 243
increase with the demanded load. The increase of fl ux, and hence voltage, will continue until the onset of magnetic saturation, as shown in the output characteristic of Fig. 7.16 . The terminal voltage is related to the emf by the equation:
V E I R Ra a f� � �( ) volt (7.3)
The variation of terminal voltage with load is not normally a requirement for a generator, so this form of machine is seldom used. However, the rising voltage characteristic of a series-connected fi eld winding is put to good use in the compound machine, which is described in Further Electrical and Electronic Principles .
Ia
Po
Ra
IL
If
Rf200 Ω
V450V
80kW
E475V
Fig. 7.17
emf
0 IL
Ia(Ra � Rf)
E
V
Fig. 7.16
Worked Example 7.1
Q The resistance of the fi eld winding of a shunt generator is 200 � . When the machine is delivering
80 kW the generated emf and terminal voltage are 475 V and 450 V respectively. Calculate (a) the
armature resistance, and (b) the value of generated emf when the output is 50 kW, the terminal
voltage then being 460 V.
A
R f � 200 � ; P o � 80 � 10 3 watt; V � 450 V; E � 475 V
The circuit diagram is shown in Fig. 7.17 . It is always good practice to sketch the appropriate circuit diagram when solving machine problems.

244 Fundamental Electrical and Electronic Principles
(a)
P VPV
VR
o L Lo
L
f
� �
��
�
�
I I
I
I
watt; so amp
therefore A80 0
45077 8
311 .
ff
a L f
a aR E V
amp A
amp A
volt
� �
� � �
� � � � �
450200
2 25
80 05
475 450
.
.I I I
I
1
225
2580 05
0 139
V
therefore ohmRa � �1 .
. � Ans
(b)
When W, V
thus A
P V
VR
o
L
ff
� � �
��
�
� �
50 0 460
50 0460
08 7
4602
3
3
1
11I
I
.
0002 3
08 7 2 3
460 0 13
�
� � �
� � � � �
.
. .
.
A
hence, A
volt (
I
I
a
a aE V R
1 111
111 99
475 4
)
therefore V E � . Ans
Note : Although the load had changed by about 60%, the fi eld current has changed by only about 2.2%. This justifi es the statement that a shunt generator is considered to be a constant-fl ux machine.
7.8 D.C. Motors
All of the d.c. generators so far described could be operated as motors, provided that they were connected to an appropriate d.c. supply. When the machine is used as a motor, the armature generated emf is referred to as the back-emf, Eb , which is directly proportional to the speed of rotation. However, the speed is inversely proportional to the fi eld fl ux � .
In addition, the torque produced by the machine is proportional to both the fl ux and the armature current. Bearing these points in mind, we can say that:
Speed, ��
Eb (7.4)
and torque, T Ia� (7.5)
7.9 Shunt Motor
When the machine reaches its normal operating temperature, Rf will remain constant. Since the fi eld winding is connected directly to a

D.C. Machines 245
fi xed supply voltage, V volt, then If will be fi xed. Thus, the shunt motor ( Fig. 7.18 ) is a constant-fl ux machine.
As the back-emf will have the same shape graph as that for the generator emf, and using (7.4) and (7.5) the graphs of speed and torque versus current will be as in Fig. 7.19 . Note that when the machine is used as a motor, the supply current is identifi ed as IL . In this case, the subscript ‘ L ’ represents the word ‘ line ’ . Thus IL identifi es the line current drawn from the supply, and Ia is directly proportional to IL .
If
Rf
Ra
IaIL
EbV
Fig. 7.18
speed ortorque
0 IL
T
ω
Fig. 7.19
Shunt motors are used for applications where a reasonably constant speed is required, between no-load and full-load conditions.
7.10 Series Motor
Like the series generator, this machine is a variable-fl ux machine. Despite this, the back-emf of this motor remains almost constant, from light-load to full-load conditions. This fact is best illustrated by considering the circuit diagram ( Fig. 7.20 ), with some typical values.
E V I R Rb a a f� � �( ) volt (7.6)

246 Fundamental Electrical and Electronic Principles
Let us assume the following: V � 200 V; Ra � 0.15 � ; Rf � 0.03 � ; Ia � 5 A on light-load; Ia � 50 A on full-load
Light-load: ( ) VFull-load:
EE
b
b
� � � �
� �
200 5 0 15 0 03 199 1200 50
. . .(( ) V0 15 0 03 191. .� �
From the above fi gures, it may be seen that although the armature current has increased tenfold, the back-emf has decreased by only 4%. Hence, E b remains sensibly constant.
Since � Eb /� , and Eb is constant, then:
��
1
1. . . . . . . . . . . . . . .[ ]
Similarly, T �Ia , and since � Ia until the onset of magnetic saturation,
then . . . . . . . . . . . . . . . . . . . . . . . . . . . . . . . . .[2]and after s
T Ia 2 .aaturation, . . . . . . . . . . . . . . . . [ ]T Ia 3
Using [1] to [3] above, the speed and torque characteristics shown in Fig. 7.21 may be deduced.
V
Ra
Eb
RfIL�Ia
Fig. 7.20
speed ortorque
T
ωT I2
a
T Ia
0 IL
Fig. 7.21
Note: From the speed characteristic it is clear that, on very light loads, the motor speed would be excessive. Theoretically, the no-load speed

D.C. Machines 247
would be infi nite! For this reason a series motor must NEVER be started unless it is connected to a mechanical load suffi cient to prevent a dangerously high speed. Similarly, a series motor must not be used to operate belt-driven machinery, lifting cranes etc., due to the possibility of the load being suddenly disconnected. If a series motor is allowed to run on a very light load, its speed builds up very quickly. The probable outcome of this is the distintegration of the machine, with the consequent dangers to personnel and plant.
The series motor has a high starting torque due to the ‘ square-law ’ response of the torque characteristic. For this reason, it tends to be used mainly for traction purposes. For example, an electric train engine requires a very large starting torque in order to overcome the massive inertia of a stationary train.
Summary of Equations
Generators:
Shunt generator: Ia � IL � If amp
V E I Ra a� � volt
Series generator: Ia � IL � If amp
V E I R Ra a f� � �( ) volt
Motors:
Shunt motor: Eb � V � I a R a volt
Series motor: Eb � V � I a(Ra � Rf) volt
Speed equation: nE Eb b �
��
rev/second; or rad/second
Torque equation: T �Ia newton metre

248 Fundamental Electrical and Electronic Principles
Assignment Questions
1 A shunt generator supplies a current of 85 A at a terminal p.d. of 380 V. Calculate the generated emf if the armature and fi eld resistances are 0.4 � . and 95 � respectively.
2 A generator produces an armature current of 50 A when generating an emf of 400 V. If the terminal p.d. is 390 V, calculate (a) the value
of the armature resistance, and (b) the power loss in the armature circuit.
3 A d.c. shunt generator supplies a 50 kW load at a terminal voltage of 250 V. The armature and fi eld circuit resistances are 0.15 � and 50 � respectively. Calculate the generated emf.

D.C. Transients
Chapter 8
Learning Outcomes
This chapter explains the response of capacitor-resistor, and inductor-resistor circuits, when they are connected to and disconnected from, a d.c. supply.
On completion of this chapter you should be able to:
1 Show how the current and capacitor voltage in a series C-R circuit varies with time, when connected to/disconnected from a d.c. supply.
2 Show how the current through, and p.d. across an inductor in a series L-R circuit varies with time, when connected to/disconnected from a d.c. supply.
3 Defi ne the term time constant for both types of above circuits.
249
8.1 Capacitor-Resistor Series Circuit (Charging)
Before dealing with the charging process for a C-R circuit, let us fi rstly consider an analogous situation. Imagine that you need to infl ate a ‘ fl at ’ tyre with a foot pump. Initially it is fairly easy to pump air into the tyre. However, as the air pressure inside the tyre builds up, it becomes progressively more diffi cult to force more air in. Also, as the internal pressure builds up, the rate at which air can be pumped in decreases. Comparing the two situations, the capacitor (which is to be charged) is analogous to the tyre; the d.c. supply behaves like the pump; the charging current compares to the air fl ow rate; and the p.d. developed between the plates of the capacitor has the same effect as the tyre pressure. From these comparisons we can conclude that as the capacitor voltage builds up, it reacts against the emf of the supply, so slowing down the charging rate. Thus, the capacitor will charge at a non-uniform rate, and will continue to charge until the p.d. between its plates is equal to the supply emf. This last point would also apply to tyre infl ation, when the tyre pressure reaches the maximum pressure available from the pump. At this point the air fl ow into the tyre would

250 Fundamental Electrical and Electronic Principles
cease. Similarly, when the capacitor has been fully charged, the charging current will cease.
Let us now consider the C-R charging circuit in more detail. Such a circuit is shown in Fig. 8.1 . Let us assume that the capacitor is initially fully discharged, i.e. the p.d. between its plates ( vC ) is zero, as will be the charge, q. Note that the lowercase letters v and q are used because, during the charging sequence, they will have continuously changing values, as will the p.d. across the resistor (vR ) and the charging current, i. Thus these quantities are said to have transient values.
R C
VR VC
‘B’ ‘A’
E
i
Fig. 8.1
At some time t � 0, let the switch be moved from position ‘ A ’ to position ‘ B ’ . At this instant the charging current will start to fl ow. Since there will be no opposition offered by capacitor p.d. (vC � 0), then only the resistor, R, will offer any opposition. Consequently, the initial charging current ( I0 ) will have the maximum possible value for the circuit. This initial charging current is therefore given by:
IE
R0 � amp (8.1)
Since we are dealing with a series d.c. circuit, then the following equation must apply at all times:
E v vR C� � volt . . . . . . . . . . . . . . . [ ]1
thus, at time t � 0
E vR� � 0
i.e. the full emf of E volt is developed across the resistor at the instant the supply is connected to the circuit. Since vR � iR, and at time t � 0, i � I0 , this confi rms equation (8.1) above.
Let us now consider the situation when the capacitor has reached its fully-charged state. In this case, it will have a p.d. of E volt, a charge of Q coulomb, and the charging current, i � 0. If there is no current fl ow then the p.d. across the resistor, vR � 0, and eqn [1] is:
E vC� �0

D.C. Transients 251
Having confi rmed the initial and fi nal values for the transients, we now need to consider how they vary, with time, between these limits. It has already been stated that the variations will be non-linear (i.e. not a straight line graph). In fact the variations follow an exponential law.
Any quantity that varies in an exponential fashion will have a graph like that shown in Fig. 8.2(a) if it increases with time, and as in Fig. 8.2(b) for a decreasing function.
Fig. 8.2
τ2τ 3τ 4τ 5τ t (s)0
0.632
X
X initial rate of change
(a)
τ2τ 3τ 4τ 5τ t (s)0
0.368
X0
X
initial rate of change
(b)
In Fig. 8.2(a) , X represents the fi nal steady state value of the variable x,and in Fig. 8.2(b) , X0 represents the initial value of x . In each case the straight line (tangent to the curve at time t � 0) indicates the initial rate of change of x . The time interval shown as shown on both graphs is known as the time constant, which is defi ned as follows:
The time constant is the time that it would take the variable to reach its fi nal steady state if it continued to change at its initial rate.
From the above Figures it can be seen that for an increasing exponential function, the variable will reach 63.2% of its fi nal value after one time constant, and for a decreasing function it will fall to 36.8% of its initial value after seconds.
Note: Considering any point on the graph, it would take one time constant for the variable to reach its fi nal steady value if it continued to change at the same rate as at that point. Thus an exponential graph may be considered as being formed from an infi nite number of tangents, each of which represents the slope at a particular instant in time. This is illustrated in Fig. 8.3 .
Also, theoretically, an exponential function can never actually reach its fi nal steady state. However, for practical purposes it is assumed that the fi nal steady state is achieved after 5 time constants. This is justifi able since the variable will be within 0.67% of the fi nal value after 5 seconds. So for Fig. 8.2(a) , after 5 seconds, x � 0.9973 X.

252 Fundamental Electrical and Electronic Principles
Considering the circuit of Fig. 8.1 , assuming that the capacitor is fully discharged, let the switch be moved to position ‘ B ’ . The capacitor will now charge via resistor R until the p.d. between its plates, vC � E volts. Once fully charged, the circuit current will be zero. The variations of capacitor voltage and charge, p.d. across the resistance and charging current are shown in Figs. 8.4 to 8.7.
τ2τ 3τ 4τ 5τ t (s)0
0.368 I0
I0
i (A)
initial rate of change
Fig. 8.7
τ2τ 3τ 4τ 5τ t (s)0
E
VR(V)
0.386 E
initial rate of change
Fig. 8.6
τ2τ 3τ 4τ 5τ t (s)0
0.632 E
Einitial rate of changeVc(V)
Fig. 8.4
τ2τ 3τ 4τ 5τ t (s)0
0.632 Q
Qinitial rate of changeq (C)
Fig. 8.5
0
X
X
τ 2τ 3τ 4τ 5τ t(s)
Fig. 8.3

D.C. Transients 253
For such a CR circuit the time constant, (Greek letter tau), is CRseconds. It may appear strange that the product of capacitance and resistance yields a result having units of time. This may be justifi ed by considering a simple dimensional analysis, as follows.
CQ
V
It
VR
V
I
CRIt
V
V
It
� � �
� � �
and
so, seconds
Hence, seconds � CR (8.2)
Worked Example 8.1
Q An 8 μ F capacitor is connected in series with a 0.5 M � resistor, across a 200 V d.c. supply. Calculate
(a) the circuit time constant, (b) the initial charging current, (c) the p.d.s across the capacitor and
resistor 4 seconds after the supply is connected. You may assume that the capacitor is initially fully
discharged.
A
C � 8 � 10 � 6 F; R � 0.5 � 10 6 � ; E � 200 V
200 V
0.5 MΩ 8 μF
Fig. 8.8
(a)
� � � � �
�
�CR second
so s
8 0 0 5 0
4
6 61 1.
Ans
(b)
I
I
0 6
0
2000 5 0
400
� ��
�
ER
amp
therefore A
. 1
μ Ans
(c)
After seconds, volt
V
v E
v
v
C
C
R
� � �
�
�
0 632 0 632 200
26 4
. .
.1 Ans
EE v
v
C
R
�
� �
�
volt
so V
200 26 4
73 6
1 .
. Ans
8.2 Capacitor-Resistor Series Circuit (Discharging)
Consider the circuit of Fig. 8.1 , where the switch has been in position ‘ B ’ for suffi cient time to allow the charging process to be completed.

254 Fundamental Electrical and Electronic Principles
Thus the charging current will be zero, the p.d. across the resistor will be zero, the p.d. across the capacitor will be E volt, and it will have stored a charge of Q coulomb.
At some time t � 0, let the switch be moved back to position ‘ A ’ . The capacitor will now be able to discharge through resistor R. The general equation for the voltages in the circuit will still apply.
In other words E v vR C� �
but, at the instant the switch is moved to position ‘ A ’ , the source of emf is removed. Applying this condition to the general equation above yields:
00
0
0
� � � �
� �
v v v E v I RI R E
R C C R; where and so
hence ampIE
R0 � � (8.3)
This means that the initial discharge current has the same value as the initial charging current, but (as you would expect) it fl ows in the opposite direction.
Since the capacitor is discharging, then its voltage will decay fromE volt to zero; its charge will decay from Q coulomb to zero; and the discharge current will also decay from I0 to zero. The circuit time constant will be the same as before i.e. � CR seconds.
The graphs for vC and i are shown in Fig. 8.9 .
5τ t(s)0
E
Vc(V)
Vc
�I0
�i
i
τ
Fig. 8.9

D.C. Transients 255
Note: The time constant for the C-R circuit was defi ned previously in terms of the capacitor charging. However, a time constant also applies to the discharge conditions. It is therefore better to defi ne the time constant in a more general manner, as follows:
The time constant of a circuit is the time that it would have taken for any transient variable to change, from one steady state to a new steady state, if it had maintained its rate of change existing at the time of the fi rst steady state.
Worked Example 8.2
Q A C-R charge/discharge circuit is shown in Fig. 8.10 . The switch has been in position ‘ 1 ’ for a suffi cient
time to allow the capacitor to become fully discharged.
(a) If the switch is now moved to position ‘ 2 ’ , calculate the time constant and initial charging current.
(b) After the capacitor has completely charged the switch is moved back to position ‘ 2 ’ . Calculate the
time constant and the p.d across R 2 at this time.
150 V
E
R1
R2
C
110 kΩ
220 kΩ
‘2’ ‘1’
0.5 μF
Fig. 8.10
A
C � 0.5 μ F ; R 1 � 220 k � ; R 2 � 110 k � ; E � 150 V
(a) When charging, only resistor R 1 is connected in series with the capacitor,so R 2 may be ignored.
� � � � �
�
�
�
�CR
ER
1 1 1
11
1
seconds
so s
amp
0 5 0 220 0
0
50
6 3
0
.
. Ans
I
2220 0
682
3
0
�
�
1
I μA Ans
(b) When discharging, both R 1 and R 2 are connected in series with the capacitor, so their combined resistance R � R 1 � R 2 , will determine the
discharge time constant.
� � � � �
�
�CR seconds
so, s
0 5 0 330 0
0 6
6 3.
.
1 1
1 Ans

256 Fundamental Electrical and Electronic Principles
After one time constant the discharge current will have fallen to 0.368 I 0
I
I
0 3
0
6
2
50330 0
454 5
0 368 454 0
67 26
� ��
�
� � �
�
�
ER
i
i
vR
amp
A
A
1
1
1
1
.
.
.
�
�
�� � � � �
�
�iR
vR
26 3
2
67 26 0 0 0
8 4
volt
V
1 1 11 1
1
.
. Ans
8.3 Inductor-Resistor Series Circuit (Connection to Supply)
Consider the circuit of Fig. 8.11. At some time t � 0, the switch is moved from position ‘ A ’ to position ‘ B ’ . The connection to the supply is now complete, and current will start to fl ow, increasing towards its fi nal
R
‘B’ ‘A’
E
R L
iVR VL
Fig. 8.11
steady value. However, whilst the current is changing it will induce a back-emf across the inductor, of e volt. From electromagnetic induction theory we know that this induced emf will have a value given by:
e Li
t� �
d
d volt
Being a simple series circuit, Kirchhoff ’ s voltage law will apply, such that the sum of the p.d.s equals the applied emf. Also, since we are considering a perfect inductor (the resistor shown may be considered as the coil ’ s resistance), the p.d. across the inductor will be exactly equal but opposite in polarity to the induced emf.
Therefore, d
dvolt
hence, volt
or, d
d
v e Li
tE v v
E iR Li
L
R L
� � �
� �
� �tt
volt . . . . . . . . . . . . . . . [ ]1
Comparing this equation with that for the C-R circuit, it may be seen that they are both of the same form. Using the analogy technique, we

D.C. Transients 257
can conclude that both systems will respond in a similar manner. In the case of the L-R circuit, the current will increase from zero to its fi nal steady value, following an exponential law.
At the instant that the switch is moved from ‘ A ’ to ‘ B ’ ( t � 0), the current will have an instantaneous value of zero, but it will have a certain rate of change, d i /d t amp/s. From eqn [1] above, this initial rate of change can be obtained, thus:
E Li
t� �0
d
d
so, initiald
damp/s
i
t
E
L� (8.4)
When the current reaches its fi nal steady value, there will be no back-emf across the inductor, and hence no p.d. across it. Thus the only limiting factor on the current will then be the resistance of the circuit. The fi nal steady current is therefore given by:
IE
R� amp (8.5)
The time constant of the circuit is obtained by dividing the inductance by the resistance.
Thus seconds �L
R(8.6)
The above equation may be confi rmed by using a simple form of dimensional analysis, as follows.
In general, ; so
and
therefore,
VLI
tL
Vt
I
RV
IL
R
Vt
I
I
Vt
� �
�
� �� seconds
The time constant of the circuit may be defi ned in the general terms given in the ‘Note ’ , in the previous section, dealing with the C-Rcircuit.
The rate of change of current will be at its maximum value at time t � 0, so the p.d. across the inductor will be at its maximum value at this time. This p.d. therefore decays exponentially from E volt to zero. The graphs for i, v R , and vL are shown in Figs. 8.12 to 8.14 respectively.

258 Fundamental Electrical and Electronic Principles
Worked Example 8.3
Q The fi eld winding of a 110 V, d.c. motor has an inductance of 1.5 H, and a resistance of 220 � . From
the instant that the machine is connected to a 110 V supply, calculate (a) the initial rate of change
of current, (b) the fi nal steady current, and (c) the time taken for the current to reach its fi nal steady
value.
A
E � 110 V; L � 1.5 H; R � 220 �
The circuit diagram is shown in Fig. 8.15 .
τ 2τ 3τ 4τ 5τ t (s)0
0.368 E
E
VL (V)
initial rate of change
Fig. 8.14
0.632 I
I
i (A)initial di
dt
τ0 2τ 3τ 4τ 5τ t (s)
Fig. 8.12
τ0
0.632 E
EVR (V)
2τ 3τ 4τ 5τ t (s)
Fig. 8.13
E
110 V
220 Ω 1.5 H
i
Fig. 8.15

D.C. Transients 259
(a)
initialdd
amp/s
so, initialdd
A/s
it
EL
it
� �
�
11
1
05
73 33
.
. Ans
(b)
final current, amp
therefore, A
I
I
� �
�
ER
110220
0 5. Ans
(c)
� �
�
LR
second
hence, ms
1.
.
5220
6 82
Since the system takes approximately 5 seconds to reach its new steady state, then the current will reach its fi nal steady value in a time:
t � � �5 6 82 34. .ms ms 1 Ans
8.4 Inductor-Resistor Series Circuit (Disconnection)
Figure 8.16 shows such a circuit, connected to a d.c. supply. Assume that the current has reached its fi nal steady value of I amps. Let the switch now be returned to position ‘ A ’ (at time t � 0). The current will now decay to zero in an exponential manner. However, the decaying current will induce a back-emf across the coil. This emf must oppose the change of current. Therefore, the decaying current will fl ow inthe same direction as the original steady current. In other words, the back-emf will try to maintain the original current fl ow. The graph of the decaying current, with respect to time, will therefore be as shown in Fig. 8.17. The time constant of the circuit will, of course, still be L / Rsecond, and the current will decay from a value of I � E / R amp. The initial rate of decay will also be E / L amp/s.
τ 2τ 3τ 4τ 5τ t (s)0
0.368 I
i (A)
I
Fig. 8.17
‘B’ ‘A’
R
E
L
i
Fig. 8.16

260 Fundamental Electrical and Electronic Principles
Summary of Equations
C-R circuit:
Time constant, � CR second
Initial current, IE
R0 � amp
steady-state conditions after approx. 5 second
after, second, vC � 0.632E volt; and i � 0.368I0 amp
L-R circuit:
Time constant, second
Initial rate of change of current
�L
R
,,d
d amp/second
final current flowing, amp
i
t
E
L
IE
R
�
�
steady-state conditions after approx. 5 second
after second, VL � 0.368 E volt; and i � 0.632 I amp

D.C. Transients 261
Assignment Questions
1 A 47 μ F capacitor is connected in series with a 39 k � resistor, across a 24 V d.c. supply. Calculate (a) the circuit time constant, (b) the values for initial and fi nal charging current, and (c) the time taken for the capacitor to become fully charged.
2 A 150 mH inductor of resistance 50 � is connected to a 50 V d.c. supply. Determine (a) the initial rate of change of current, (b) the fi nal steady current, and (c) the time taken for the current to change from zero to its fi nal steady value.
3 An inductor of negligible resistance and of inductance 0.25 H, is connected in series with a 1.5 k � resistor, across a 24 V d.c. supply. Calculate the current fl owing after one time constant.
4 A 5 H inductor has a resistance R ohm. This inductor is connected in series with
a10 � resistor, across a 140 V d.c. supply. If the resulting circuit time constant is 0.4 s, determine (a) the value of the coil resistance, and (b) the fi nal steady current.
5 Defi ne the time constant of a capacitor-resistor series circuit.
Such a circuit comprises a 50 μ F capacitor and a resistor, connected to a 100 V d.c. supply via a switch. If the circuit time constant is to be 5 s, determine (a) the resistor value, (b) the initial charging current.
6 The dielectric of a 20 μ F capacitor has a resistance of 65 M � . This capacitor is fully charged from a 120 V d.c. supply. Calculate the time taken, after disconnection from the supply, for the capacitor to become fully discharged.

262 Fundamental Electrical and Electronic Principles
Suggested Practical Assignments
V
A
10 μF
10 MΩ
250 V
‘1’ ‘2’
Fig. 8.18
Assignment 1 To investigate the variation of capacitor voltage and current during charge and discharge cycles.
Apparatus:
1 � 10 μ F capacitor 1 � 10 M � resistor 1 � 2-pole switch 1 � d.c. power supply 1 � ammeter (microammeter) 1 � DVM (with highest possible input resistance) 1 � stopwatch
1 Connect the circuit of Fig. 8.18 , and adjust the psu output to 250 V. 2 Simultaneously move the switch to position ‘ 1 ’ and start the stopwatch. 3 Record the circuit current and capacitor p.d. at 10 s intervals, for the fi rst 60 s. 4 Continue recording the current and voltage readings, at 20 s intervals, for a
further 4 minutes. Reset the stopwatch to zero. Reverse the connections to the ammeter.
5 Move the switch back to position ‘ 2 ’ , and repeat the procedures of paragraphs (3) and (4) above.
6 Plot graphs of current and capacitor p.d., versus time, for both the charging and discharging cycles.
7 Submit a complete assignment report, which should include the following: (i) The comparison of the actual time constant (determined from the
plotted graphs) to the theoretical value. Explain any discrepancy found. (ii) Explain why both the charging and discharging currents tend to ‘ level
off ’ at some small value, rather than continuing to decrease to zero.
Method:

Semiconductor Theory and Devices
Chapter 9
Learning Outcomes
This chapter explains the behaviour of semiconductors and the way in which they are employed in diodes.
On completion of this chapter you should be able to:
1 Understand the way in which conduction takes place in semiconductor materials. 2 Understand how these materials are employed to form devices such as diodes. 3 Understand the action of a zener diode and perform basic calculations involving a simple
regulator circuit.
263
9.1 Atomic Structure
In Chapter 1 it was stated that an atom consists of a central nucleus containing positively charged protons, and neutrons, the latter being electrically neutral, surrounded by negatively charged electrons orbiting in layers or shells. Electrons in the inner orbits or shells have the least energy and are tightly bound into their orbits due to the electrostatic force of attraction between them and the nucleus. Electrons in the outermost shell experience a much weaker binding force, and are known as valence electrons.
In conductors it is these valence electrons that can gain suffi cient energy to break free from their parent atoms. They thus become ‘ free ’ electrons which are available to drift through the material under the infl uence of an emf and hence are mobile charge carriers which produce current fl ow.
The shells are identifi ed by letters of the alphabet, beginning with the letter K for the innermost shell, L for the next and so on. Each shell represents a certain energy level, and each shell can contain only up to a

264 Fundamental Electrical and Electronic Principles
certain maximum number of electrons. This maximum possible number of electrons contained in a given shell is governed by the relationship 2n2 , where n is the number of the shell. Thus the maximum number of electrons in the fi rst four shells will be as shown in Table 9.1 .
Table 9.1
Shell n Max. No. of electrons
K 1 2 � 1 2 � 2
L 2 2 � 2 2 � 8
M 3 2 � 3 2 � 18
N 4 2 � 4 2 � 32
Table 9.2
Shell L M N
Subshell 2s 2p 3s 3p 3d 4s 4p 4d 4f
Max. No. 2 6 2 6 10 2 6 10 14
Total 8 18 32
All things in nature tend to stabilise at their lowest possible energy level, and atoms and electrons are no exception. This results in the lowest energy levels (shells) being fi lled fi rst until all the electrons belonging to that atom are accommodated. Another feature of the system is that if the outermost shell of an atom is completely full (contains its maximum permitted number of electrons) then the binding force on these valence electrons is very strong and the atom is very stable. To illustrate this consider the inert gas neon. The term inert is used because it is very diffi cult to make it react to external infl uences. A neon atom has a total of 10 electrons, two of which are in the K shell and the remaining eight completely fi ll the L shell. Having a full valence shell is the reason why neon, krypton and xenon are inert gases. In contrast, a hydrogen atom has only one electron, so its valence shell is almost empty and it is a highly reactive element. One further point to bear in mind is that the electrons in the shells (from L onwards) may exist at slightly different energy levels known as subshells. These subshells may also contain only up to a certain maximum number of electrons. This is shown, for the L, M and N shells, in Table 9.2 .
9.2 Intrinsic (Pure) Semiconductors
Semiconductors are group 4 elements, which means they have four valence electrons. For this reason they are also known as tetravalent

Semiconductor Theory and Devices 265
elements. Among this group of elements are carbon (C), silicon (Si), germanium (Ge) and tin (Sn). Of these only silicon and germanium are used as intrinsic semiconductors, with silicon being the most commonly used. Carbon is not normally considered as a semconductor because it can exist in many different forms, from diamond to graphite. Similarly, tin is not used because at normal ambient temperatures it acts as a good conductor. The following descriptions of the behaviour of semiconductor materials will be confi ned to silicon although the general properties and behaviour of germanium are the same. The arrangement of electrons in the shells and subshells of silicon are shown in Table 9.3 .
Table 9.3
K L M
1s 2s 2p 3s 3p 3d
2 2 6 2 2 —
From Table 9.3 it may be seen that the four valence electrons are contained in the M shell, where the 3 s subshell is full but the 3p subshell contains only two electrons. However, from Table 9.2 it can be seen that a 3p subshell is capable of containing up to a maximum of six electrons before it is full, so in the silicon atom there is space for a further four electrons to be accommodated in this outermost shell.
Silicon has an atomic bonding system known as covalent bonding whereby each of the valence electrons orbits not only its ‘ parent ’ atom, but also orbits its closest neighbouring atom. This effect is illustrated in Fig. 9.1 , where the fi ve large circles represent the nucleus and shells K and L of fi ve adjacent atoms (identifi ed as A, B, C, D and E) and the small circles represent their valence electrons, where the letters a, b, c etc. identify their ‘ parent ’ atoms.
Concentrating on the immediate space surrounding atom A, it may be seen that there are actually eight valence electrons orbiting this atom; four of its own plus one from each of its four nearest neighbours. This fi gure is only two-dimensional and is centred on atom A. However, the same arrangement would be found if the picture was centred on any given atom in the crystal lattice. In addition, the actual lattice is of course three-dimensional. In this case imagine atom A being located at the centre of an imaginary cube with the other four neighbouring atoms being at four of the corners of the cube. Each of these ‘ corner ’ atoms is in turn at the centre of another imaginary cube, and so on throughout the whole crystal lattice. The result is what is known as the diamond crystal lattice.
From the above description it may be seen that each silicon atom has an apparent valency of 8, which is the same as for the inert gases

266 Fundamental Electrical and Electronic Principles
such as neon. The covalent bonding system is a very strong one so the valence electrons are quite tightly bound into it. It is for this reason that intrinsic silicon is a relatively poor conductor of electrical current, and is called a semiconductor.
9.3 Electron-Hole Pair Generation and Recombination
Although the covalent bond is strong, it is not perfect. Thus, when a sample of silicon is at normal ambient temperature, a few valence electrons will gain suffi cient energy to break free from the bond and so become free electrons available as mobile charge carriers. Whenever such an electron breaks free and drifts away from its parent atom it leaves behind a space in the covalent bond, and this space is referred to as a hole. Thus, whenever a bond is broken an electron-hole pair is generated. This effect is illustrated in Fig. 9.2 , where the short straight lines represent electrons and the small circle represents a corresponding hole. The large circles again represent the silicon atoms complete with their inner shells of electrons.
The atom which now has a hole in its valence band is effectively a positive ion because it has lost an electron which would normally occupy that space. On the atomic scale, the ion is very massive, is locked into the crystal lattice, and so cannot move. However, electron-hole pair generation will be taking place in a random manner throughout the crystal lattice, and a generated free electron will at
D A B
a
a
e
d
a
a
b
c
E
C
Fig. 9.1

Semiconductor Theory and Devices 267
some stage drift into the vicinity of one of these positive ions, and be captured, i.e. the hole will once more be fi lled by an electron. This process is known as recombination, and when it occurs the normal charge balance of that atom is restored.
The hole-pair generation and recombination processes occur continuously, and since heat is a form of energy, will increase as the temperature increases. This results in more mobile charge carriers being available, and accounts for the fact that semiconductors have a negative temperature coeffi cient of resistance, i.e. as they get hotter they conduct more easily. It must be borne in mind that although these thermally generated mobile charge carriers are being produced, the sample of material as a whole still remains electrically neutral. In other words, if a ‘ head count ’ of all the positive and negative charged particles could be made, there would still be a balance between positive and negative, i.e. for every free electron there will be a corresponding hole.
The concept of the drift of free electrons through the material may be readily understood, but the concept of hole mobility is more diffi cult to appreciate. In fact the holes themselves cannot move — they are merely generated and fi lled. However, when a bond breaks down the electron that drifts away will at some point fi ll a hole elsewhere in the lattice. Thus the hole that has been fi lled is replaced elsewhere by the newly generated hole, and will appear to have drifted to a new location. In order to simplify the description of conduction in a semiconductor, the holes are considered to be mobile positive charge carriers whilst the free electrons are of course mobile negative charge carriers.
9.4 Conduction in Intrinsic Semiconductors
Figure. 9.3 illustrates the effect when a source of emf is connected across a sample of pure silicon. The electric fi eld produced by
Si SiSi
Si
Si Si
SiSi
free electronhole
Fig. 9.2

268 Fundamental Electrical and Electronic Principles
the battery will attract free electrons towards the positive plate and the corresponding holes towards the negative plate. Since the external circuit is completed by conductors, and holes exist only in semiconductors, then how does current actually fl ow around the circuit without producing an excess of positive charge (the holes) at the left-hand end of the silicon? The answer is quite simple. For every electron that leaves the right-hand end and travels to the positive plate of the battery, another is released from the negative plate and enters the silicon at the left-hand end, where a recombination can occur. This recombination will be balanced by fresh electron-hole pair generation. Thus, within the silicon there will be a continuous drift of electrons in one direction with a drift of a corresponding number of holes in the opposite direction. In the external circuit the current fl ow is of course due only to the drift of electrons.
9.5 Extrinsic (Impure) Semiconductors
Although pure silicon and germanium will conduct, as explained in the previous section, their characteristics are still closer to insulators than to conductors. In order to improve their conduction very small quantities (in the order of 1 part in 10 8 ) of certain other elements are added. This process is known as doping. The impurity elements that are added are either pentavalent (have fi ve valence electrons) or are trivalent (have three valence electrons) atoms. Depending upon which type is used in the doping process determines which one of the two types of extrinsic semiconductor is produced.
9.6 n-type Semiconductor
To produce this type of semiconductor, pentavalent impurities are employed. The most commonly used are arsenic (As), phosphorus (P), and antimony (Sb). When atoms of such an element are added to the silicon a bonding process takes place such that each impurity atom joins the covalent bonding system of the silicon. However, since each impurity atom has fi ve valence electrons, one of these cannot fi nd a place in a covalent bond. These ‘ extra ’ electrons then tend to drift
I
electrons
holesI(electrons)
Fig. 9.3

Semiconductor Theory and Devices 269
away from their parent atoms and become additional free electrons in the lattice. Since these impurities donate an extra free electron to the material they are also known as donor impurities.
As a consequence of each donor atom losing one of its valence electrons, they become positive ions locked into the crystal lattice. Note that free electrons introduced by this process do not leave a corresponding hole, although thermally generated electron-hole pairs will still be created in the silicon. The effect of the doping process is illustrated in Fig. 9.4 .
Si SiSi
Si
Si Si
SiP
5th ‘free’electron
Fig. 9.4
Since the extra charge carriers introduced by the impurity atom are negatively charged electrons, and these will be in addition to the electron-hole pairs, then there will be more mobile negative charge carriers than positive, which is why the material is known as n-type semiconductor. In this case the electrons are the majority charge carriers and the holes are the minority charge carriers. It should again be noted that the material as a whole still remains electrically neutral since for every extra donated free electron there will be a fi xed positive ion in the lattice. Thus a sample of n-type semiconductor may be represented as consisting of a number of fi xed positive ions with a corresponding number of free electrons, in addition to the thermally generated electron-hole pairs. This is shown in Fig. 9.5 .
e–h pair
fixedpositive
ion
freeelectron
Fig. 9.5

270 Fundamental Electrical and Electronic Principles
The circuit action when a battery is connected across the material is illustrated in Fig. 9.6 . Once more, only electrons fl ow around the external circuit, whilst within the semiconductor there will be movement of majority carriers in one direction and minority carriers in the opposite direction.
9.7 p-type Semiconductor
In this case a trivalent impurity such as aluminium (Al), gallium (Ga), or indium (In) is introduced. These impurity atoms also join the covalent bonding system, but since they have only three valence electrons there will be a gap or hole in the bond where an electron would normally be required. Due to electron-hole pair generation in the lattice, this hole will soon become fi lled, and hence the hole will have effectively drifted off elsewhere in the lattice. Since each impurity atom will have accepted an extra electron into its valence band they are known as acceptor impurities, and become fi xed negative ions. The result of the doping process is illustrated in Fig. 9.7 .
Si SiSi
Si
Si Si
SiAl
e–hpair
Fig. 9.7
holes
electrons
I
Fig. 9.6

Semiconductor Theory and Devices 271
We now have the situation whereby there will be more mobile holes than there are free electrons. Since holes are positive charge carriers, and they will be in the majority, the doped material is called p-type semiconductor, and it may be considered as consisting of a number of fi xed negative ions and a corresponding number of mobile holes as shown in Fig. 9.8 .
e–h pair
fixednegative
ion
mobilehole
Fig. 9.8
holes
electrons
I
Fig. 9.9
The circuit action when a battery is connected across the material is shown in Fig. 9.9 . As the holes approach the left-hand end they are fi lled by incoming electrons from the battery. At the same time, fresh electron-hole pairs are generated; the electrons being swept to and out of the right-hand end, and the holes drift to the left-hand end to be fi lled. Once more, the current fl ow in the semiconductor is due to the movement of holes and electrons in opposite directions, and only electrons in the external circuit. As with the n-type material, p-type is also electrically neutral.
9.8 The p-n Junction
When a sample of silicon is doped with both donor and acceptor impurities so as to form a region of p-type and a second region of n-type material in the same crystal lattice , the boundary where the two regions meet is called a p-n junction. This is illustrated in Fig. 9.10 .

272 Fundamental Electrical and Electronic Principles
Due to their random movement some of the electrons will diffuse across the junction into the p-type, and similarly some of the holes will diffuse across into the n-type. This effect is illustrated in Fig. 9.11 , and from this fi gure it may be seen that region x acquires a net negative charge whilst region y acquires an equal but positive net charge.
The region between the dotted lines is only about 1 � m wide, and the negative charge on x prevents further diffusion on electrons from the n-type. Similarly the positive charge on y prevents further diffusion of holes from the p-type. This redistribution of charge results in a potential barrier across the junction. In the case of silicon this barrier potential will be in the order of 0.6 to 0.7 V, and for germanium about 0.2 to 0.3 V. Once again note that although there has been some redistribution of charge, the sample of material as a whole is still electrically neutral (count up the numbers of positive and negative charges shown in Fig. 9.11 ).
p n
Fig. 9.10
np
Charge�
�
yx
Fig. 9.11
9.9 The p-n Junction Diode
A diode is so called because it has two terminals: the anode, which is the positive terminal, and the cathode, which is the negative

Semiconductor Theory and Devices 273
terminal. In the case of a p-n junction diode the anode is the p-type and the cathode is the n-type. In Chapter 6 it was stated that a diode will conduct in one direction but not in the other. This behaviour is explained as follows.
9.10 Forward-biased Diode
Figure 9.12 shows a battery connected across a diode such that the positive terminal is connected to the anode and the negative terminal to the cathode.
p n
Fig. 9.12
The electric fi eld produced by the battery will cause holes and electrons to be swept toward the junction, where recombinations will take place. For each of these an electron from the battery will enter the cathode. This would have the effect of disturbing the charge balance within the semicoductor, so to counterbalance this a fresh electron-hole pair will be created in the p-type. This newly freed electron will then be attracted to the positive plate of the battery, whilst the hole will be swept towards the junction. Thus the circuit is complete, with electrons moving through the external circuit, and a movement of holes and electrons in the semiconductor. Hence, when the anode of the diode is made positive with respect to the cathode it will conduct, and it is said to be forward biased.
9.11 Reverse-biased Diode
Consider what now happens when the battery connections are reversed ( Fig. 9.13 ). The electric fi eld of the battery will now sweep all the mobile holes into the p-type and all the free electrons into the n-type. This leaves a region on either side of the junction which has been depleted of all of its mobile charge carriers. This layer thus acts
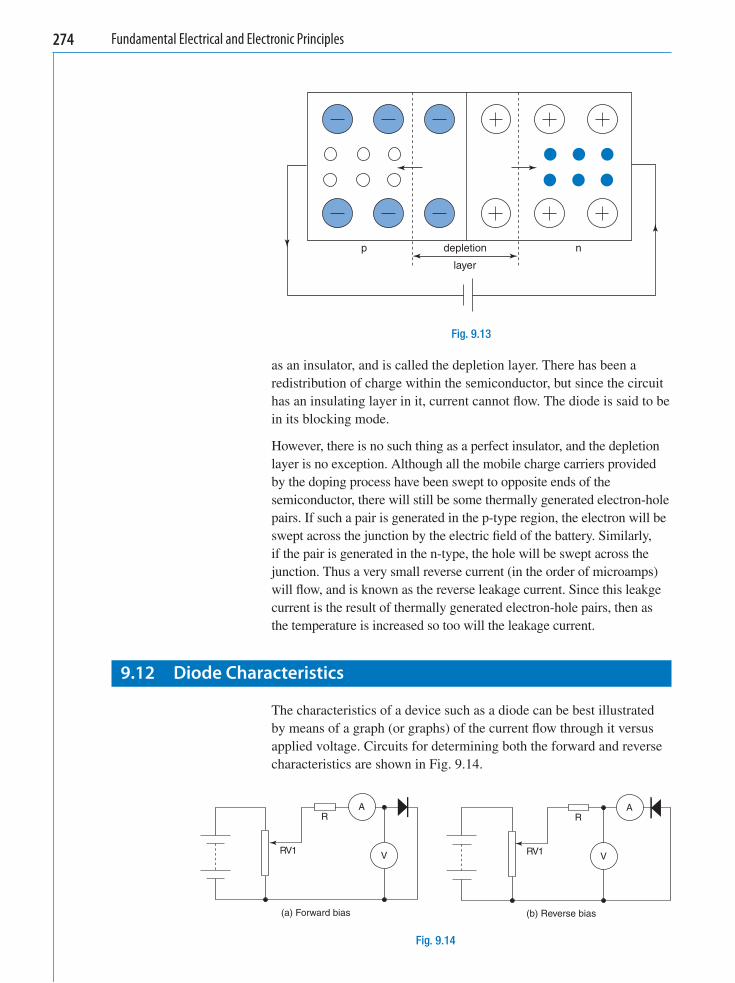
274 Fundamental Electrical and Electronic Principles
as an insulator, and is called the depletion layer. There has been a redistribution of charge within the semiconductor, but since the circuit has an insulating layer in it, current cannot fl ow. The diode is said to be in its blocking mode.
However, there is no such thing as a perfect insulator, and the depletion layer is no exception. Although all the mobile charge carriers provided by the doping process have been swept to opposite ends of the semiconductor, there will still be some thermally generated electron-hole pairs. If such a pair is generated in the p-type region, the electron will be swept across the junction by the electric fi eld of the battery. Similarly, if the pair is generated in the n-type, the hole will be swept across the junction. Thus a very small reverse current (in the order of microamps) will fl ow, and is known as the reverse leakage current. Since this leakge current is the result of thermally generated electron-hole pairs, then as the temperature is increased so too will the leakage current.
9.12 Diode Characteristics
The characteristics of a device such as a diode can be best illustrated by means of a graph (or graphs) of the current fl ow through it versus applied voltage. Circuits for determining both the forward and reverse characteristics are shown in Fig. 9.14 .
depletion
layer
p n
Fig. 9.13
AR
RV1
(a) Forward bias
V
Fig. 9.14
AR
RV1
(b) Reverse bias
V

Semiconductor Theory and Devices 275
Note the change of position of the voltmeter for the two different tests. In (a) the voltmeter measures only the small p.d. across the diode itself, and not any p.d. across the ammeter. In (b) the ammeter measures only the leakage current of the diode, and does not include any current drawn by the voltmeter. Ideally the voltmeter should not draw any current at all, so it is recommended that a DVM is used rather than a moving coil instrument such as an AVOmeter. The procedure in each case is to vary the applied voltage, in steps, by means of RV1 and record the corresponding current values. When these results are plotted, for both silicon and germanium diodes, the graphs will typically be as shown in Fig. 9.15 . The very different scales for both current and voltage for the forward and reverse bias conditions should be noted. Also, the actual values shown for the forward current scale and the reverse voltage scale can vary considerably from those shown, depending upon the type of diode being tested, i.e. whether it be a small signal diode or a power rectifying diode. In the case of the latter, the forward current would usually be in amperes rather than milliamps.
300�VA (V) �VA (V)
�IA (μA)
�IA (mA)
Si
Si
Forward
Ge
Ge
200 100
0
5
10
15
20
0.25 0.5 0.75 1.0
Fig. 9.15
The sudden increase in reverse current occurs at a reverse voltage known as the reverse breakdown voltage. The effect occurs because the intensity of the applied electric fi eld causes an increase in electron-hole pair generation. These electron-hole pairs are not due to temperature, but the result of electrons being torn from bonds by the electric fi eld. This same fi eld will rapidly accelerate the resulting charge carriers and as they cross the junction they will collide with atoms. These collisions will free more charge carriers, and the whole process builds up very rapidly. For this reason the effect is known as avalanche breakdown, and will usually result in the destruction of the diode.
When the impurity doping of the semiconductor is heavier than ‘ normal ’ , the depletion layer produced is much thinner. In this case, when breakdown occurs, the charge carriers can pass through the depletion

276 Fundamental Electrical and Electronic Principles
In Fig. 9.17 , VZ represents the zener breakdown voltage, and if it were an ideal device, this p.d. across it would remain constant, regardless of the value of current, IZ, fl owing through it. In practice the graph will have a fairly steep slope as shown. The inverse of the slope of the graph is defi ned as the diode slope resistance, rZ, as follows
rV
IZD
Z
�
ohm (9.1)
with very little chance of collisions taking place. This type of breakdown is known as zener breakdown and such diodes are called zener diodes.
9.13 The Zener Diode
The main feature of the zener diode is its ability to operate in the reverse breakdown mode without sustaining permanent damage. In addition, during manufacture, the precise breakdown voltage (zener voltage) for a given diode can be predetermined. For this reason they are also known as voltage reference diodes. The major application for these devices is to limit or stabilise a voltage between two points in a circuit. Diodes are available with zener voltages from 2.6 V to about 200 V. The circuit symbol for a zener diode is shown in Fig. 9.16 .
or
Fig. 9.16
The forward characteristic for a zener diode will be the same as for any other p-n junction diode, and also, since the device is always used in its reverse bias mode, only its reverse characteristic need be considered. Such a characteristic is shown in Fig. 9.17 .
�VD (V)
�IZ (min)
�IZ (mA)
�VZ O
ideal
actual
Fig. 9.17

Semiconductor Theory and Devices 277
Typical values for rZ range from 0.5 � to about 150 � . For satisfactory operation the current through the diode must be at least equal to IZ(min) . Due to the diode slope resistance, the p.d. across the diode will vary by a small amount from the ideal of VZ volt as the diode current changes. For example, if rZ � 1 � and VZ � � 15 V, a change in diode current of 30 mA would cause only a 0.02% change in the diode p.d. This fi gure may be verifi ed by applying equation (9.1).
The value of current that may be allowed to fl ow through the device must be limited so as not to exceed the diode power rating. This power rating is always quoted by the manufacturer, and zener diodes are available with power ratings up to about 75 W.
Consider now the application of a zener diode to provide simple voltage stabilisation to a load. A circuit is shown in Fig. 9.18 .
RS
RL
ILIS
IZVZ � VoV
Fig. 9.18
In order for satisfactory operation the supply voltage, VS , needs to be considerably greater than the voltage required at the load. The purpose of the series resistor RS is to limit the maximum diode current to a safe value, bearing in mind the diode ’ s power rating. Considering Fig. 9.18 , the diode current will be at its maximum when the load is disconnected, because under this condition all of the current from the supply will fl ow through the diode, i.e. IZ � IS . When the load is connected it will draw a current IL, and since IZ � IS – IL , then under this condition the diode current will decrease, since it must divert current to the load. The output voltage, however, will remain virtually unchanged. Knowing the diode power rating a suitable value for RS
may be calculated as shown in the following worked example. This example also demonstrates the stabilising action of the circuit.
Worked Example 9.1
Q A 9.1 V, 500 mW zener diode is used in the circuit of Fig. 9.18 to supply a 2.5 k � load. The diode has a
slope resistance of 1.5 � , and the input supply has a nominal value of 12 V.
(a) Calculate a suitable value for the series resistor R s . (b) Calculate the value of diode current when the load resistor is connected to the circuit.
(c) If the input supply voltage decreases by 10%, calculate the percentage change in the p.d. across
the load.

278 Fundamental Electrical and Electronic Principles
A
V Z � 9.1 V; P Z � 0.5 W; r Z � 1.5 � ; V � 12 V; R L � 2500 �
(a)
P V
PV
Z Z Z
ZZ
Z
Z S
�
� �
� �
I
I
I I
watt
amp
so, mA
0 59
54 95
.
.
.
1
( I S � I Z because for this condition the load is disconnected)
V V V
V
RV
R
S Z
S
SS
S
S
� � � �
�
� ��
�
�
volt
V
ohm
1 1
1
2 9
2 9
2 954 95 0
52 78
3
.
.
..
.
I
��
A resistor of this precise value would not be readily available, so the nearest preferred value resistor would be chosen. However, to ensure that the diode power rating cannot be exceeded, the nearest preferred value greater than 52.78 � would be chosen. Thus a 56 � resistor would be chosen.
In order to protect the resistor, its own power rating must be taken into account. In this circuit, the maximum power dissipated by R S is:
P max � IS2 R S watt � (54.95 � 10 � 3 ) 2 � 56
P max � 0.169 W, so a 0.25 W resistor would be chosen,
and the complete answer to part (a) is:
R S should be a 56 � , 0.25 W resistor Ans
(b) With R L � 2500 � and V o � 9.1 V
I
I
I I I
I
Lo
L
L
Z S L
Z
VR
� ��
�
� � � �
�
amp
mA
amp ( ) mA
92 5 10
3 64
55 3 64
5
3
..
.
.
1
11.36 mA Ans
(c) When V falls by 10% from its nominal value, then
V
V
V VRS
Z
S
� � � � �
�
��
��
12 0 2 2 2
0 8
0 8 956
( )
hence, V
amp
. .
.
. .
1 1 1 1
1
1 1I
ISS � 30 36. mA
The current for the load must still be diverted from the diode, so
I I IZ S L� � � � � amp ( ) mA mA30 36 3 64 26 72. . .
therefore, ( ) mA mA, and from equation IZ � � �5 36 26 72 24 641. . . (( ):
volt
V
1 1
1 1
0
24 64 0 5
0 037
3
.
. .
.
V r
VZ Z Z
Z
� � � �
�
�I

Semiconductor Theory and Devices 279
Thus the voltage applied to the load changes by 0.037 V, which expressed as a percentage change is:
change
change % (compared with a % c
� �
�
0 0379
00
0 4 0
..
.1
1
1 1Ans hhange in supply)
Worked Example 9.2
Q A d.c. voltage of 15 V � 5% is required to be supplied from a 24 V unstabilised source. This is to be
achieved by the simple regulator circuit of Fig. 9.19 .
RS
VS
VZ
IZ
IS
Vo
�24 V
0 V
V
Fig. 9.19
The available diodes and resistors are listed below.
(a) For each diode listed determine the appropriate resistor required and hence determine the total
unit cost for each circuit.
(b) In order to satisfy the specifi ed output voltage tolerance of � 5%, determine which of the three
circuits will meet the specifi cation at lowest cost.
Diode No.
V Z (V) Sloperesistance ( � )
Max power (W)
Unit cost (£)
1 15 30 0.5 0.07
2 15 15 1.3 0.20
3 15 2.5 5.0 0.67
Resistors are available in the following values and unit costs
18, 27, 56, 100, 120, 150, 220, 270, and 330 �
0.25 W £0.026
0.5 W £0.038
1.0 W £0.055
2.5 W £0.260
7.5 W £0.280

280 Fundamental Electrical and Electronic Principles
A
(a) For all three diodes:
V S � ( V � V Z ) volt � 24 � 15 � 9 V
Diode :
amp
mA
1
1I
I
ZZ
Z
Z
PV
� �
�
0 55
33 3
.
.
RV
R
SS
Z
S
� ��
�
�I ohm
933 3 0
270
3. 1
�
PVR
P
SS
S
S
� �
�
2 8270
0 3
watt
W
1
.
and, R S � 270 � , 0.5 W Ans
total unit cost � £(0.07 � 0.038) � £0.045 Ans
Diode 2:
IZ � �
1
1
..
35
86 7 amp mA
R
P
S
S
��
�
�
�
986 7 0
03 85
82
3..
11 1
1
1
� � , so choose the 20 resistor
000 675� . W, so choose .0 W rating1
hence, R S � 120 � , 1.0 W Ans
total unit cost � £(0.20 � 0.055) � £0.26 Ans
Diode 3:
IZ � �
55
333 31
. mA
R
P
S
S
��
�
� �
�
9333 3 0
27
827
3 7 5
3.
.
1
1
�
W so choose W resistor
hencee, , W RS � 27 7 5� . Ans
total unit cost � £ (0.67 � 0.28) � £0.95 Ans
(b)
Allowable VVZ �
��
5 500
0 751
1.
Diode : volt V, which is unaccept1 1 VZ zrz� � � � ��I 30 0 30 0 93 . aable
Diode : V, which is acceptable
Dio
2 30 0 5 0 453VZ � � � ��1 1 .
dde : V, which is acceptable3 30 0 2 5 0 0753VZ � � � ��1 . .
Thus to meet the specifi cation at lowest cost, circuit 2 would be adopted Ans

Semiconductor Theory and Devices 281
Assignment Questions
1 A simple voltage stabiliser circuit is shown in Fig. 9.20 . The zener diode is a 7.5 V, 500 mW device and the supply voltage is 12 V. Calculate (a) a suitable value for R S , and (b) the value of zener current when R L � 470 � .
2 Using the circuit of Fig. 9.20 with a 10 V, 1.3 W zener diode having a slope resistance of 2.5 � , and a supply voltage of 24 V, calculate (a) a suitable value for R S , (b) the value of zener current when on no-load, and (c) the variation of zener voltage when R L is changed from 500 � to 200 � .
RS
RLV
Fig. 9.20

282 Fundamental Electrical and Electronic Principles
Suggested Practical Assignments
Assignment 1 To obtain the forward and reverse characteristics for silicon and germanium p-n junction diodes. An investigation into the eff ects of increased temperature on the reverse leakage current could also be undertaken.
Assignment 2 To investigate the operation of the zener diode.
Apparatus:
1 � 5.6 V, 400 mW zener diode 1 � 9.1 V, 400 mW zener diode 1 � 470 � resistor 1 � variable d.c. power supply unit (psu) 1 � voltmeter (DVM) 1 � ammeter
Method:
1 Connect the circuit of Fig. 9.21 using the 5.6 V diode. 2 Vary the input voltage in 1 V steps from 0 V to � 15 V, and note the
corresponding values of V Z and I. 3 Tabulate your results and plot the reverse characteristic for the diode.
4 Repeat steps 1 to 3 above for the 9.1 V diode. 5 From the plotted characteristics, determine the diode slope resistance in
each case.
470 Ω
Vi Vo � VZpsu
�
�
l
Fig. 9.21

283
Physical Quantities with SI and other preferred units
General quantities Symbol Units
Acceleration, linear a m/s 2 (metre/second/second) Area A m 2 (square metre) Energy or work W J (joule) Force F N (newton) Length l m (metre) Mass m kg (kilogram) Power P W (watt) Pressure p Pa (pascal) Temperature value � K or °C (Kelvin or degree
Celsius) Time t s (second) Torque T Nm (newton metre) Velocity, angular � rad/s (radian/second) Velocity, linear v or u m/s (metre/second) Volume V m 3 (cubic metre) Wavelength � m metre
Appendix A
Electrical quantities Symbol Units
Admittance Y � (ohm) Charge (quantity) Q C (coulomb) Conductance G S (siemen) Current I A (ampere) Current density J A/m 2 (ampere/square metre) Electromotive force (emf) E V (volts) Frequency f Hz (hertz) Impedance Z � (ohm) Period T s (second) Potential difference (p.d.) V V (volt) Power, active P W (watt) Power, apparent S VA (volt ampere) Power, reactive Q VAr (volt ampere reactive) Reactance X � (ohm) Resistance R � (ohm) Resistivity � � m (ohm metre) Time constant s (second)

284 Appendix A
Electrostatic quantities Symbol Unit
Capacitance C F (farad) Field strength E V/m (volt/metre) Flux C (coulomb) Flux density D C/m 2 (coulomb/square metre) Permittivity, absolute e F/m (farad/metre)
General quantities Symbol Unit
Permittivity, relative er no units Permittivity, of free space e0 F/m (farad/metre)
Electromagnetic quantities Symbol Unit
Field strength H A/m (ampere/metre) (1)
Flux � Wb (weber) Flux density B T (tesla) Inductance, mutual M H (henry) Inductance, self L H (henry) Magnetomotive force (mmf) F A (ampere) (2)
Permeability, absolute � H/m (henry/metre) Permeability, relative �r no units Permeability, of free space �0 H/m (henry/metre) Reluctance S A/Wb (ampere/weber) (3)
(1) At/m (ampere turn/metre) in this book
(2) (ampere turn) in this book
(3) At/Wb (ampere turn/weber) in this book

Chapter 1
1.1 (a) 4.563 � 10 2 (b) 9.023 � 10 5 (c) 2.85 � 10 � 4 (d) 8 � 10 3 (e) 4.712 � 10 � 2 (f ) 1.8 � 10 � 4 A (g) 3.8 � 10 � 2 V (h) 8 � l0 10 N (i) 2 � 10 � 3 F
1.2 (a) 1.5 k � (b) 3.3 m � (c) 25 � A (d) 750 V or 0.75 kV (e) 800 kV (f ) 47 nF
1.3 750 C
1.4 0.104 s
1.5 0.917A
1.6 (a) 2.25 kV (b) 18.75 V
1.7 (a) 2.273 A (b) 61 mA (c) 18.52 � A (d) 0.512 mA
1.8 54.14 MJ or 15.04 kWh
1.9 £55.88
1.10 (a) 0.5 A (b) 280 V (c) 140 W (d) 42 kJ
1.11 (a) 49.64 V (b) 27.58 �
1.12 (a) 0.15 �
(b) 2.25 �
1.13 225 W; 67.5 kJ
1.14 (a) 2 A (b) 8 V (c) 2.4 kC
1.15 2 m/s 2 ; 2.67 m/s 2 0.5 m/s 2
1.16 8 � A
1.17 19.2 � ; 12.5 A
1.18 15.65 kW
1.19 71.72°C
1.20 33.6 �
Chapter 2
2.1 0.375 A
2.2 (a) 29.1 � (b) 24.75 A
2.3 0.45 A
2.4 14 �
2.5 (a) 15.67 � (b) 0.766 A (c) 0.426 A
2.6 (a) 2.371 A; 1.779 A; 1.804 A; 1.443 A; 0.902 A (b) 35.37 V (15 � and 20 � ); 14.43 V (8 � , 10 � ,
16 � ) (c) 63.26 W
2.7 2.5 V
2.8 (a) 12.63 V (b) 2.4 A (c) 0.947 A
2.9 (a) 3.68 � (b) 5.44 A (c) 9.32 V (d) 2.33 A
2.10 12.8 �
2.11 (a) 1.57 � (b) 127.33 �
2.12 40 �
2.13 80 �
2.14 (a) 1.304 A (b) 5.217 V (c) 0.87 A
2.15 (a) 6.67 A (b) 26.67 A (c) 13.33 A
2.16 (a) 2 V (b) 1.933 V
Answers to Assignment Questions
285

286 Answers to Assignment Questions
2.17 0.024 �
2.18 (a) 9.6 A (b) 43.2 V (c) 4.32 A; 2.16 A; 1.08 A
2.19 3.094 V
2.20 6.82 V
2.21 (a) 20 � (b) 10 A (c) 60 V (d) 2 kW (e) 300 W
2.22 (a) 1 A (b) 30 V; 36 V (c) 54 kJ (d) 180 C
2.23 2.368 A; � 0.263 A; 2.105 A; 10.526 V
2.24 1 A (discharge); 0.5 A (discharge); 1.5 A; 9 W
2.25 (a) � 0.183 A (charge); 5.725 A (discharge); 5.542 A (discharge)
(b) 108.55 V
2.26 (a) 2.273 A (discharge); � 0.455 A (charge); (b) 1.32 A (c) 11.363 V
2.27 0.376 A; 0.388 A; 0.764 A; 61.14 V
2.28 (b) 3 � (c) 0.133 A (10 � and 5 � ); 0.222 A (6 � and 3 � );
1.33 V (10 � and 6 � ); 0.67 V (5 � and 3 � )
2.29 3.498 � ; 16.85 k � ; 22.5 �
2.30 1.194 V
Chapter 3
3.1 (a) 0.2 � C (b) 2.29 � C/m 2
3.2 16.94 kV/m
3.3 50 kV/m
3.4 60 mC/m 2
3.5 125 kV/m
3.6 40 mC
3.7 165.96 V
3.8 300 V
3.9 500 pF or 0.5 nF
3.10 240 pF or 0.24 nF
3.11 3
3.12 5.53 nF
3.13 (a) 442.7pF (b) 0.177 � C (c) 400 kV/m
3.14 0.089 mm
3.15 188 nF
3.16 1.36
3.17 25
3.18 (a) 4.8 mm (b) 1.213 � 10 � 3 m 2
3.19 (a) 14 � F (b) 2.86 � F
3.20 (i) 1.463 � F; 17 � F (ii) 0.013 � F; 0.29 � F (iii) 19.18 pF; 490 pF (iv) 215 pF; 10.2 nF
3.21 8 nF
3.22 (a) 5 � F (b) 200 V (c) 3 mC
3.23 (a) 24 � F (b) 480 � C (c) 1.44 mC
3.24 (a) 13.85 V (4 nF); 6.15 V (b) 18.46 nC
3.25 C 2 � 4.57 � F; C 3 � 3.56 � F
3.26 200 V; 200 V; 1.2 mC; 2 mC; 3.2 mC
3.27 V 1 � 360 V; V 2 � 240 V; C 3 � 40 � F
3.28 200 V
3.29 80.67 cm 2
3.30 (a) 48 pF (b) 267 pC (c) 40 V
3.31 625 mJ
3.32 200 V
3.33 5 � F
3.34 (a) 40 nF (b) 0.8 mJ (c) 400 kV/m
3.35 (a) 1.6 mC; 0.32 J (b) 266.7 V; 0.213 J
3.36 (a) 0.6 mC; 150 V; 100 V (b) 120 V; 0.48 mC; 0.72 mC
3.37 (a) 1.5 mm (b) 52.94 cm 2

Answers to Assignment Questions 287
(c) 75 nC; 28 � J (d) 14.2 � C/m 2
3.38 0.5 � m
Chapter 4
4.1 0.417 T
4.2 1.98 mWb
4.3 40 cm 2
4.4 21.25 At
4.5 0.8 A
4.6 270
4.7 5633 At/m
4.8 112.5 At
4.9 2A
4.10 (a) 900 At (b) 1.11 T (c) 5000 At/m
4.11 64
4.12 278
4.13 (a) 1200 At (b) 5457 At/m (c) 1.37 T (d) 549 � Wb
4.14 (a) 0.206 A (b) 1777
4.15 2.95 A
4.16 (a) 360 At/m; 1830 At/m (b) 582
4.17 176.7
4.18 5.14 A
4.19 1.975 A
4.20 1.54 T
4.21 11.57 � Wb
Chapter 5
5.1 352.9 V
5.2 0.571 ms
5.3 37.5 V
5.4 (a) 32 V (b) 5.33 V
5.7 1 Wb/s
5.8 0.05 T
5.9 (a) 0.5 V
(b) 0.433 V (c) 0.354 V
5.11 1.125 N
5.12 2.5 A
5.13 0.143 m
5.14 3 N
5.15 0.94 � Nm
5.16 (a) 27 � N (b) 0.405 � Nm
5.17 12.5 mN
5.18 1750 A
5.19 (a) 0.641 � (b) 6.25 m �
5.20 11.975 k � ; 39.975 k �
5.22 1.47 k � ; 14.97 k � ; 44.97 k � ; 149.97 k �
5.23 � 0.125%
5.24 1.12 H
5.25 4 A
5.26 15 625
5.27 5 H; 800 V
5.28 120
5.29 22.5 A/s
5.30 0.75 mH
5.31 (a) 1364 (b) 33.6 mH (c) 1.344 V
5.32 0.12 H
5.33 30 V
5.34 (a) 628.3 mH (b) 56.5 mH (c) 5.09 V
5.35 (a) 0.3 mH (b) 1.125 mH (c) 0.3 V; 1.125 V
5.36 58.67 mH
5.37 (a) 150 V (b) 5.625 mWb
5.38 12.5 kV
5.40 12 V
5.41 27.5 V; 400 mA; 11 W
5.42 (a) 42.67 V (b) 3.56 A

288 Answers to Assignment Questions
5.43 51.2 mJ
5.44 60.4 mH
5.45 2.45 A
Chapter 6
6.1 (a) 150 Hz (b) 15 Hz (c) 31.83 Hz
6.2 (a) 100 Hz (b) 12.5 rev/s
6.3 24
6.4 5 mA; 50 � s; 20 kHz
6.5 (b) i � 7.5 sin (200 � t ) milliamp
6.6 (a) 427.3 V (b) 50 Hz (c) 302 V; 272.2 V
6.7 � � 63.64 sin (3000 � t ) volt; 22.31 V
6.8 (a) 250 V; 176.8 V; 75 mA; 53 mA; 20 mWb; 14.14 mWb; 6.8 V; 4.81 V
(b) 25 Hz; 100 Hz; 50 Hz; 1.5 kHz
6.9 i � 7.07 sin (4000 � t ) amp (a) 6.724 A (b) 47.86 � s
6.10 353.6 V; 159.25 V
6.11 4.22 mA; 5.97 mA
6.12 1.429
6.13 16 V
6.14 22.2 V
6.18 � � 17.44 sin (314 t � 0.409) volt
6.19 i � 22.26 sin ( � t � 0.396) amp
6.20 � � 43.06 sin ( � t � 0.019) volt
6.23 3.2 V; 2.26 V; 400 � s ; 2.5 kHz
Chapter 7
7.1 415.6 V
7.2 (a) 0.2 � (b) 500 W
7.3 280.75 V
Chapter 8
8.1 (a) 0.183 s (b) 6.15 mA; 0 A (c) 0.915 s
8.2 (a) 333.3 A/s (b) 1 A (c) 15 ms
8.3 (a) 10.1 mA
8.4 (a) 2.5 �
8.5 (a) 100 � (b) 1 mA
8.6 1.8 h
Chapter 9
9.1 (a) 67.5 � [NPV 68 � , 0.5 W] (b) 50.7 mA
9.2 (a) 108 � [NPV 120 � , 2 W] (b) 117 mA (c) 12 mV

Absolute permeability , 119 Absolute permittivity , 85 Acceptor impurity , 270 Alternating quantities , 21 , 192
angular velocity of , 200 addition of , 218 amplitude of , 200 average value of , 203 expression for , 201 , 214 form factor of , 207 frequency of , 199 maximum value of , 200 peak factor of , 206 periodic time of , 199 phase angle of , 214 phasor representation of , 216 production of , 197 rms value of , 205
Alternator , 151 Ammeter , 22
moving coil , 159 rectifi er moving coil , 212
Ampere , 9 Atom , 7
acceptor , 270 Bohr model , 7 donor , 269 shell structure , 263
Back-emf , 244 Battery , 10 B / H curve , 133 Bridge rectifi er , 210
Capacitance , 83 Capacitors , 84
dielectric strength , 101 energy stored in , 97 in parallel , 87 in series , 89 in series/parallel , 92 multiplate , 95 types of , 102
Cathode ray oscilloscope (CRO) , 224 Cathode ray tube (CRT) , 224
Cell , 10 Charge (Q) , 8 Coercive force , 133 Coercivity , 133 Commercial unit of energy (kWh) , 19 Commutator , 235 Coulomb , 8 Coulomb’s law , 75 Coupling factor , 181 Covalent bond , 265 Current , 9
divider , 41 ratio , 190
Cycle , 199
D.C. , 21 D.C. circuits , 31
parallel , 35 series , 31 series/parallel , 43
D.C. generators , 235 armature , 235 commutator , 235 construction , 238 self excitation , 241 separately excited , 239 series , 242 shunt , 240
D.C. transients , 249 C-R series circuits , 249 L-R series circuits , 256 time constant , 251 , 255 , 257
Diode , 272 characteristics , 274 p-n junction , 272 zener , 276
Eddy currents , 172 Electric
charge , 8 current , 9 fi eld , 76 fi eld strength , 78 fl ux , 79 fl ux density , 79
Index
289

290 Index
Electromagnetic induction , 141 , 147 Electromotive force (emf) , 10 Electron-hole pair , 266 Energy , 17
dissipated by resistance , 17 stored in a capacitor , 97 stored in an inductor , 184
Extrinsic semiconductor , 268
Farad , 83 Faraday’s laws , 141 Ferrite , 174 Ferromagnetic material , 111 Field
electric , 76 magnetic , 111
Field strength electric , 78 magnetic , 111
Figure of merit , 166 Fleming’s lefthand rule , 152 Fleming’s righthand rule , 144 Flux
electric , 79 magnetic , 111
Flux density electric , 79 magnetic , 115
Force between charged bodies , 75 Force between conductors , 156 Form factor , 207 Frequency , 199 Fringing , 78 Full-wave rectifi er , 210
Galvanometer (galvo) , 63 Generation of emf , 147 , 150 , 235
Half-wave rectifi er , 209 Henry , 175 Hysteresis , 132
loop , 133 loss , 134
Induced emf , 142 Inductance , 175
mutual , 180 self , 175
Inductor , 177 energy storage , 184
Internal resistance , 14
Instantaneous value , 198 , 206 Intrinsic semiconductor , 264 Ion
negative , 7 , 270 positive , 7 , 266 , 269
Iron circuit , 115 Iron dust core , 174
Kilowatt-hour (kWh) , 19 Kirchhoff’s laws , 48 , 49
Laminations , 173 Lenz’s law , 144 Loading effect on voltmeter , 166
Magnetic circuits , 114 comparison with other circuits , 132 composite , 126 parallel , 134 series , 126
Magnetic fi eld , 111 fi eld strength (H) , 117 fl ux , 115 fl ux density , 115 hysteresis , 132 reluctance , 128 saturation , 123
Magnetisation curve (B/H) , 122 Magnetomotive force (mmf) , 116 Meter
damping torque , 161 defl ecting torque , 159 full-scale defl ection (fsd) , 161 multiplier , 163 ohmmeter , 170 restoring torque , 160 shunt , 162 wattmeter , 171
Motor principle , 153 Motors , 244
series , 245 shunt , 244
Motor/generator duality , 233 Moving coil meter , 159
n-type semiconductor , 268
Ohm , 10 Ohmmeter , 170 Ohm’s law , 13

Index 291
Peak factor , 206 Peak value , 200 Periodic time , 199 Permeability , 118
absolute , 119 of free space , 118 relative , 119
Permittivity , 84 absolute , 85 of free space , 84 relative , 84
Phase and phase angle , 214 Phasor , 216 Phasor diagram , 217 p-n junction , 271 p-n junction diode , 272
forward characteristics , 273 reverse characteristics , 273
Potential difference (pd) , 11 Potential divider , 40 Potential gradient , 80 Potentiometer , 65 Power , 18 Proton , 7 p-type semiconductor , 270
Recombination , 266 Rectifi er , 208
bridge , 210 full-wave , 210 half-wave , 209 instrument , 212
Relative permeability , 119 Relative permittivity , 84 Reluctance , 128 Remanance , 133 Remanent fl ux density , 133 Resistance , 10
internal , 14 Resistivity , 21 Resistors , 10
in parallel , 35 in series , 31 in series/parallel , 43
Root of the means squared (rms) value , 205
Saturation , 123 Sawtooth waveform , 227 Scientifi c notation , 2 Self-excitation , 244 Self-inductance , 175 Semiconductors , 23 , 263 Separately-excited generator , 239 Series generator , 242 Series motor , 245 Shunt generator , 240 Shunt motor , 244 Sinusoidal waveform , 21 Slidewire potentiometer , 65 Solenoid , 113 Standard form notation , 2
Temperature coeffi cient of resistance , 22 Time constant , 251 , 255 , 257 Transient response , 250 Transformer , 186
current ratio , 190 principle , 186 turns ratio , 189 voltage ratio , 189
Units, 1, Appendix A
Valence shell , 264 Volt , 10 Voltage drop (pd) , 11 Voltmeter , 25
analogue , 25 digital (DVM or DMM) , 25 fi gure of merit , 166 loading effect , 166 multiplier , 163
Watt , 18 Wattmeter , 171 Weber , 115 Wheatstone bridge , 55
balance conditions , 60 , 61 circuit , 56 instrument , 63
Zener diode , 276