full circledl.fullcirclemagazine.org/issue124_en.pdfc
TRANSCRIPT

full circle magazine #1 24 1 contents ^
Full CircleTHE INDEPENDENT MAGAZINE FOR THE UBUNTU LINUX COMMUNITY
ISSUE #1 24 - August 201 7
FFuu llll CCii rrccllee MMaaggaazziinnee ii ss nneeii tthheerr aaffffii llii aa tteedd wwii tthh ,, nnoorr eennddoorrsseedd bbyy,, CCaannoonn ii ccaa ll LLttdd ..
BBAACCKKUUPP SSTTRRAATTEEGGYYWITH ZFS SNAPSHOTS
Photo:PeterMiller(Flickr.com)

full circle magazine #1 24 2 contents ^
The articles contained in this magazine are released under the Creative Commons Attribution-Share Alike 3.0 Unported license. This means youcan adapt, copy, distribute and transmit the articles but only under the following conditions: you must attribute the work to the original authorin some way (at least a name, email or URL) and to this magazine by name ('Full Circle Magazine') and the URL www.fullcirclemagazine.org (but
not attribute the article(s) in any way that suggests that they endorse you or your use of the work). If you alter, transform, or build upon this work, you must distributethe resulting work under the same, similar or a compatible license.Full Circle magazine is entirely independent of Canonical, the sponsor of the Ubuntu projects, and the views and opinions in the magazine should in no way beassumed to have Canonical endorsement.
Full CircleTHE INDEPENDENT MAGAZINE FOR THE UBUNTU LINUX COMMUNITY
Backup With ZFS p.25
Intro To FreeCAD p.1 8
Python p.1 5
Kdenlive p.34
HowTo
Q&A p.43
Command & Conquer p.1 3
Inkscape p.29
KODI Room p.38Letters p.XX
Ubuntu Games p.XX
MyOpinion p.XX
Linux News p.04
Researching With Linux p.35
Book Review p.XX
My Desktop p.45
Graphics
Review p.XX
LinuxLabs p.XX
p.XX

full circle magazine #1 24 3 contents ^
EEDDIITTOORRIIAALL
WELCOME TO THE LATEST ISSUE OF FULL CIRCLE.
As per usual we have some Python, FreeCAD, Inkscape, and Kdenlive for you this month. To
give you a third HowTo we have an article on creating a backup with ZFS snapshots. If you
don't currently have a backup then remember the old saying: themost importantbackup is the one
you don't have. From previous experience I encourage everyone to have a backup of some sort.
Even if it's just your essential files.
Charles has begun a small series about his Kodi setup, and SJ continues with his series on how
he is using Linux in his research.
You may notice a lot of light blue squares on the contents page. This is because I 've no articles
on hand to cover those topics. This is probably the thinnest issue of FCM in quite some time.
When I say we need articles... I mean we NEED articles. Remember: you, the readers, write FCM.
Without contributions each issue will become less and less.
Anyway, enough doom and gloom from me. Enjoy the issue, and don't forget to write
something!
All the best, and keep in touch!
Ronnie
This magazine was created using :
Find Full Circle on:
facebook.com/fullcircle
magazine
twitter.com/#!/fullcirclemag
goo.gl/FRTMl
http://issuu.com/fullcircle
magazine
http://www.magzter.com/
publishers/Full-Circle
Weekly News:http://fullcirclemagazine.org/f
eed/podcast
http://www.stitcher.com/s?fi
d=85347&refid=stpr
http://tunein.com/radio/Full-
Circle-Weekly-News-p855064/

full circle magazine #1 24 4 contents ^
NNEEWWSS
LIBREOFFICE 5.4 OFFICE
SUITE DEBUTS WITH NEW
FEATURES FOR WRITER,CALC & IMPRESS
Supported until June 1 1 , 201 8,
with no less than six
incremental updates, the
LibreOffice 5.4 office suite is here
to add an extra layer of
improvements to the Writer, Calc,
and Impress components. It also
introduces a great number of
incremental improvements to the
Microsoft Office file compatibility
and focuses on file simplicity,
which is a very important concept
for LibreOffice.
The new file simplicity concept
implemented in LibreOffice 5.4
translates to the XML description
of a new document outputted by
LibreOffice being 50% smaller for
ODF/ODT files and around 90%
smaller for OOXML/DOCX files,
compared to the document
formats generated by leading
proprietary office suites like
Microsoft Office.
Here's what's new for Writer,
Calc, Impress, and LibreOffice
Online
Highlights of LibreOffice 5.4
include a new standard color
palette based on the RYB color
model, better support for EMF
vector images, better rendering of
imported PDF documents, along
with better support for embedded
videos, support for OpenPGP keys
for signing ODF documents on
Linux, as well as the ability to
ensure the authenticity of your
signed ODF documents.
Source:
http://news.softpedia.com/news/li
breoffice-5-4-office-suite-debuts-
with-new-features-for-writer-calc-
impress-51 71 85.shtml
WHY UBUNTU MATE 1 7.1 0COULD BE YOUR NEW
FAVORITE LINUX DISTRO?
I n late June, the first Alpharelease of Ubuntu 1 7.1 0 was
pushed by the participating flavors,
i .e., Lubuntu, Kubuntu, and Ubuntu
Kylin. For Ubuntu 1 7.1 0 Alpha 2 has
been released and more flavors
have participated in this release,
including Ubuntu MATE, Ubuntu
Budgie. You can find all the
download links towards the end of
this article.
For those who don’t know,
Ubuntu’s default flavor
participates in the final beta
release. Powered by Linux kernel
4.1 1 , major highlights in this
Ubuntu 1 7.1 0 Alpha 2 release
could be seen in Ubuntu MATE. So,
let’s tell you about it:
The Ubuntu MATE developers
have called the 1 7.1 0 Alpha 2 as
their most “Super” alpha ever. The
biggest change in this release
comes in the form of tons of
improvements in panel layouts.
With the help of feedback from
different sources, the developers
have brought a distinctive look and
different workflow to each panel.
Please note that Ubuntu MATE
1 7.1 0 Alpha 2 is a development
release. So, I won’t recommend you
to install it on your primary home
or work computer. There are some
bugs in the OS and it’s definitely
not recommended for someone
who wishes to use a stable system.
Source:
https://fossbytes.com/ubuntu-
mate-1 7-1 0-linux-distro/
CANONICAL WORKS ON
LINUX 4.1 3 FOR UBUNTU
1 7.1 0, GCC 7 TRANSITION
IN EARLY AUGUST
They promised, and they will
deliver! Canonical recently
announced that they started
working on rebasing the upcoming
Ubuntu 1 7.1 0 (Artful Aardvark)
operating system on the Linux 4.1 3
kernel.
One of the highlights of Ubuntu
Kernel Team's latest newsletter is
the fact that work started on the
building and testing Linux kernel
4.1 3 for Ubuntu 1 7.1 0, and it looks
like users can already install the
Submitted by Arnfried Walbrecht

full circle magazine #1 24 5 contents ^
NEWSsecond Release Candidate (RC)
milestone announced by Linus
Torvalds last week.
Canonical plans to ship the final
release of Ubuntu 1 7.1 0 with the
Linux 4.1 3 kernel, but, for now, the
current daily builds and the
recently released Alpha 2
milestone for opt-in flavors are
powered by the Linux 4.1 1 kernel
packages of Ubuntu 1 7.04 (Zesty
Zapus) , yet the Linux 4.1 2 kernel is
available in the staging repository.
In the meantime, Canonical
engineer Matthias Klose
announced that it would start the
transition to the GCC (GNU
Compiler Collection) 7 as default
for Ubuntu 1 7.1 0 (Artful Aardvark)
as soon as next week, and it also
looks like the Perl 5.26 transition
has already started in the artful-
propose repository.
Moreover, Canonical's Ubuntu
developers recently finished the
OCaml 4.04 and Python 3.6
transition for Ubuntu 1 7.1 0,
changed the behavior of "do-
release-upgrade -d" command to
only upgrade supported Ubuntu
releases to the current
development version, and
addressed reliability issues in
unattended-upgrades.
Source:
http://news.softpedia.com/news/c
anonical-works-on-linux-4-1 3-for-
ubuntu-1 7-1 0-gcc-7-transition-in-
early-august-51 7223.shtml
RED HAT ENTERPRISE LINUX
7.4 IS HERE
Red Hat, Inc is a wonderful
example of how a company
can be successful with open source
solutions. There is this misguided
stereotype that Linux and open
source are just hobbies and that
contributors are typically anti-
social misfits coding in mom's
basement. If you believe such
foolishness, I feel bad for you.
Actually, Red Hat, Inc has made
billions with open source, and its
RHEL distribution is an excellent
choice for the enterprise.
Today, RHEL (Red Hat
Enterprise Linux) reaches version
7.4. It can be had immediately so
that IT departments can begin
testing. Once everything checks
out, they can roll out to company
machines. It has many
improvements, including NVMe
Over Fabric, a preview of System
Roles, and more.
The company further says, "Red
Hat remains committed to
providing customer choice when it
comes to datacenter
infrastructure. Red Hat Enterprise
Linux 7.4 maintains this
commitment with availability
across multiple architectures,
including IBM Power, IBM z
Systems and 64-bit ARM (as a
Development Preview). For the
IBM Power Little Endian
architecture, this release enables
support for the High Availability
and Resilient Storage Add-Ons as
well as the Open Container
Initiative (OCI) runtime and image
format."
Source:
https://betanews.com/201 7/08/01
/red-hat-enterprise-linux-74/
THE CIA’S AERIS MALWARE
CAN EXFILTRATE DATA
FROM LINUX SYSTEMS
Even though most technology
experts consider Linux to be
the most secure operating system,
that is not entirely accurate. Over
the past few months, we have seen
multiple malware types targeoting
the Linux OS, either to install
cryptocurrency mining software or
to exfiltrate important data. Never
one to sit on the sidelines, the CIA
has built its own set of tools to
infiltrate Linux servers around the
world. One of these is Aeris, a
disruptive type of malware capable
of affecting popular Linux distros.
Aeris can infiltrate systems
running Debian Linux 7, Red Hat
Enterprise Linux 6, Solaris 1 1 ,
FreeBSD 8 and seniors 5.3 and 5.7.
That is a large list, considering that
a lot of those Linux flavors are very
common. Aeris can successfully
infiltrate all of these systems and
does its work unabated. Its tools
include a way to snoop on
encrypted communication, hook
into SMTP communication, and
exfiltrate files automatically.
It is not the first time we have
come across CIA malware, and the
Wikileaks team has done an
outstanding job of keeping tabs on
all of these discoveries. The agency
has developed many versions of
malware to serve the same
purpose. No operating system in
the world is safe from CIA
infiltration these days, even

full circle magazine #1 24 6 contents ^
NEWS
though some of its tools are no
longer usable by the look of things.
It is unclear whether Aeris is still an
active threat, but it seems
plausible to assume that could be
the case.
Source:
https://themerkle.com/the-cias-
aeris-malware-can-exfiltrate-data-
from-linux-systems/
LINUX MINT’S SOFTWARE
MANAGER IS GETTING BIG
UPDATES FOR LINUX MINT
1 8.3
I n their latest news letter, theLinux Mint team has announced
the changes which are part of the
development cycle of Linux Mint
1 8.3. Until now, a considerable
number of changes have been
made to Software Manager, the
inbuilt package management
application in Linux Mint. Despite
being an early adopter of a GUI-
based package management
application, not many updates
have been made to the Linux
Mint’s home grown tool called
Software Manager. Such tools are a
handy replacement for the users
who aren’t much comfortable with
the command line in Linux
distributions.
Linux Mint 1 8.2 got released
recently and the Linux Mint team is
eyeing for a major overhaul of the
Software Manager as a part of the
development cycle for Linux Mint
1 8.3.
According to the team, efforts
have been made to make the
application look much cleaner, with
its layout inspired by Gnome
Software. A shift has been made by
porting the entire application to
GtK3 from WebKit. This has
enabled support for HiDPI .
The team says around 3x boost
in the launch time could be
observed for Software Manager. By
default, the Software Manager
runs in user mode while
AptDaemon is in the backend. Also,
it would ask you to enter
passwords less often. In case you
enter the password to
install/remove a package, it’ll be
remembered for a while.
Source:
https://fossbytes.com/linux-mint-
is-updating-software-manager-for-
the-modern-world/
ARCH LINUX 201 7.08.01AND ANTERGOS 1 7.8RELEASED — LINUX FOR
GEEKS AND BEGINNERS
The Arch Linux developers have
released the latest version of
their popular rolling Linux distro in
the form of Arch Linux 201 7.08.01 .
The Antergos developers too have
shipped Antergos 1 7.8 for the
Linux beginners who wish to try
out Arch Linux. Both these come
with updated packages.
Often called a Linux geek’s first
love, Arch Linux is not
recommended for the light-
hearted who wish to install their
operating system with just few
clicks. It aims to teach you a lot and
develop a deeper understanding of
Linux. And, with the arrival of
August, we are here to share the
news of the updated and fresh
Arch Linux distribution.
The Arch Linux 201 7.08.01
release can be burned to a CD or
mounted as an ISO file. You always
have the option to write the image
to a USB disk and follow the
installation instructions.
Please note that this release
contains the updated versions of
different packages. This release
ships with Linux kernel 4.1 2.3 and
occupies just 51 6 MB on a disk.
Source:
https://fossbytes.com/arch-linux-
201 7-08-01 -antergos-1 7-8-
released-linux-geeks-beginners/
AMDGPU-PRO 1 7.30LINUX GRAPHICS DRIVER
BRINGS SUPPORT FOR
UBUNTU 1 6.04.3 LTS
U buntu 1 6.04.3 LTS was
lunched about ten days ago as
the third and most advanced point
release of Canonical's long-term
supported Ubuntu 1 6.04 LTS
(Xenial Xerus) operating system
series, featuring the kernel and
graphics stacks from the most
current Ubuntu release, Ubuntu
1 7.04 (Zesty Zapus).
Of course, this means that
Ubuntu 1 6.04.3 LTS is using the
Linux 4.1 0 kernel, X.Org Server
1 .1 9.3 display server, as well as the
Mesa 1 7.0 3D graphics library.
That's a major update from the

full circle magazine #1 24 7 contents ^
NEWSkernel and graphics stacks used in
Ubuntu 1 6.04.2 LTS, so AMD had to
update its graphics driver, too, to
support the new technologies.
Apart from adding support for
Ubuntu 1 6.04.3 LTS, the AMDGPU-
PRO 1 7.30 graphics driver
introduces support for the Red Hat
Enterprise Linux (RHEL) 6.9 and
CentOS 6.9 operating systems, as
well as support for the Radeon RX
Vega series of graphics cards.
Source:
http://news.softpedia.com/news/a
mdgpu-pro-1 7-30-linux-graphics-
driver-brings-support-for-ubuntu-
1 6-04-3-lts-51 7400.shtml
KDE FRAMEWORKS 5.37.0RELEASED FOR KDEPLASMA 5 DESKTOPS WITH
1 1 9 CHANGES
KDE Frameworks 5.37.0
appears to be a major update
compared to previous releases,
and it adds a total of 1 1 9 changes
across various components and
apps for the latest KDE Plasma 5
desktop environments, including
Plasma Framework, KWayland,
KTextEditor, KIO, KCoreAddons,
KConfig, KActivities, KArchive,
KDeclarative, KDesignerPlugin,
KHTML, KI1 8n, as well as Breeze
icons.
And the biggest changes
included in this release are
Scalable Vector Graphics (SVG) for
the KHTML engine, support to
ipv*.route-metric in
NetworkManagerQt, updated
Akregator system tray icon,
Qt5Widgets build support for
Sonnet, cross-compilation support
for the highlighting indexer,
PowerShell highlighting, along
with Pug and Jade syntax support.
Besides the KDE components
and apps mentioned above, KDE
Frameworks 5.37.0 improves the
KIdleTime, KInit, KNewStuff,
KPackage Framework, KParts,
KUnitConversion, KWallet
Framework, KWidgetsAddons,
KWindowSystem, KXMLGUI ,
NetworkManagerQt, Sonnet, and
ThreadWeaver, as well as syntax
highlighting, which received
numerous changes, and the extra
CMake modules.
Source:
http://news.softpedia.com/news/k
de-frameworks-5-37-0-released-
for-kde-plasma-5-desktops-with-
1 1 9-changes-51 7390.shtml
ELON MUSK IS VERY
FREAKED OUT BY THIS
ARTIFICIAL INTELLIGENCE
SYSTEM'S VICTORY OVER
HUMANS
With all that's happening in
the world, Elon Musk wants
to make sure you don't forget
about what he thinks is the biggest
danger to humanity.
Over the weekend, Musk
returned to tweeting about one of
his favorite topics of discussion:
artificial intelligence. He
referenced the threat of nuclear
war with North Korea to help make
his point.
Ifyou're notconcernedaboutAI
safety, you shouldbe. Vastlymore
risk than North Korea.
pic.twitter.com/2z0tiid0lc
-- ElonMusk (@elonmusk)
August 1 2, 201 7
Nobody likes being regulated, but
everything (cars, planes, food, drugs,
etc) that's a dangerto the public is
regulated. AI shouldbe too.
-- ElonMusk (@elonmusk)
August 1 2, 201 7
Musk's tweets came hours after
an A.I . system developed by
OpenAI defeated some of the
world's best players at a military
strategy game called Dota 2.
According to a blog post by
OpenAI , successfully playing the
game involves predicting how an
opponent will move, improvising in
unfamiliar scenarios, and
convincing the opponent's allies to
help you instead.
OpenAI is the nonprofit
artificial intelligence company
Musk co-founded along with Peter
Thiel and Sam Altman. The
company's purpose is to research
and develop A.I . and develop best
practices to help ensure that the
technology is used for good.
Source:
https://www.inc.com/kevin-j-
ryan/elon-musk-says-artificial-
intelligence-bigger-threat-than-
north-korea.html

full circle magazine #1 24 8 contents ^
NEWS
SOLUS 3 LINUX DISTRO
RELEASED WITH NEW
FEATURES
I n late 201 5, Solus Linux distrowitnessed its first stable release.
From then, it has gathered a loyal
following, thanks to its beautiful
looks, impressive out-of-the-box
experience, and beginner-friendly
nature. In 201 6, Solus project
announced that it’s turning Solus
Linux distro into a rolling release.
Now, Solus developers have
announced the release of Solus 3,
which is the third iteration of Solus
since their adoption of the rolling
release model. It should be noted
that unlike the previous iterations,
Solus 3 is a release and not a
snapshot. What does this mean? It
means that there are lots of
performance improvements and
new features.
In its announcement post,
developers have outlined their
reasoning behind moving away
from the regular snapshot model.
Instead, they aim to combine the
benefits of feature rich releases
and rolling model.
A major feature addition to
Solus 3 comes in the form of the
support for snaps, which is
Canonical-developed package
management system for Linux. This
makes sure that Solus users gain
access to a variety of new software
and relieves the developers from
doing extra work for a specific
Linux distro.
Source:
https://fossbytes.com/solus-3-
linux-distro-released-features-
download-torrent/
UBUNTU BUDGIE DISTRO:SIMPLE, CLEAN AND USER-FRIENDLY
U buntu Budgie is one of the
few Linux distros to offer
integration of a Budgie desktop-
only edition, other than Solus OS,
whose developers created it.
Ubuntu Budgie is classy and
user-friendly. It does not sacrifice
performance for reliance on a
simple design. It is maintained by a
United Kingdom-based developer
community. Previously called
"Budgie-Remix," it is an Ubuntu-
based distribution featuring the
Budgie desktop.
Although based on the Ubuntu
Linux family, Ubuntu Budgie is not
from Canonical, Ubuntu's parent
company. The Solus community
originally developed Budgie from
scratch and tightly integrated the
desktop user interface with the
GNOME stack.
Designed with the modern user
in mind, Budgie is known for its
simplicity and elegance. It has a
plain and clean style and is easy to
use.
The Budgie desktop is not a
fork of any other desktop project.
Its designers planned for an easy
integration into other distros, and
it is an open source project in its
own right.
The integration of an improved
Budgie desktop environment with
a solid Ubuntu core makes Ubuntu
Budgie an interesting and stable
Linux distro.
Source:
http://www.linuxinsider.com/story/
84735.html?rss=1
RASPBIAN LINUX OS FOR
RASPBERRY PI IS NOW
BASED ON DEBIAN
GNU/LINUX 9 "STRETCH"
About two months ago,
Raspberry Pi Foundation's
Simon Long reported on a new
stable update of the Raspbian
operating system for both
Raspberry Pi and x86 computers.
Those appeared to be the last
images based on Debian
GNU/Linux 8 "Jessie" as the
company announced plans to
rebased Raspbian on the latest
Stretch series.
Released on June 1 7, 201 7,
Debian GNU/Linux 9 "Stretch" is
Debian Project's latest and most
advanced stable operating system,
and now, both Desktop and Lite
(Minimal) images of Raspbian Linux
OS, dated 201 7-08-1 6, are based
on Debian Stretch, running the
Linux 4.9 kernel.
The rebasing of the entire OS to
Debian GNU/Linux 9 "Stretch"
means that many packages and
core components have been
updated to new versions, and it
looks like Raspbian 201 7-08-1 6

full circle magazine #1 24 9 contents ^
NEWScomes with Chromium 60 as
default web browser, as well as
NodeRED 0.1 7.4, RealVNC 6.1 .1 ,
and Sonic Pi 3.0.1 .
The Debian Stretch-based
Raspbian 201 7-08-1 6 images also
come with updated wireless
firmware for both Raspberry Pi 3
and Raspberry Pi Zero W single-
board computers patching the
well-known Broadpwn exploit.
Also, PIXEL desktop's LXPanel
plugins were moved into separate
packages.
Source:
http://news.softpedia.com/news/r
aspbian-linux-os-for-raspberry-pi-
is-now-based-on-debian-gnu-linux-
9-stretch-51 7422.shtml
RANCHEROS: A TINY LINUX
FOR DOCKER LOVERS
Like the various Linux server
and desktop distributions, the
container-oriented Linux
distributions mix and match
various projects and components
to construct a complete container
infrastructure. These distros
generally combine a minimal OS
kernel, an orchestration
framework, and an ecosystem of
container services. RancherOS not
only fits the mold, but takes the
minimal kernel and the container
paradigm to extremes.
RancherOS is a container
infrastructure platform that runs
Docker directly on top of a reduced
footprint (20MB) Linux kernel.
Rancher’s take on a minimalist OS
is unique in that even the init
process is a Dockerized service
container. Likewise, traditional
system level services, like NTP and
DNS, have been replaced with
containerized equivalents.
Source:
http://www.infoworld.com/article/
321 6524/containers/rancheros-a-
tiny-linux-for-docker-lovers.html
DEBIAN GNU/LINUX
RUNNING ON MOBILE
DEVICES LIKE POCKETCHIP,SAMSUNG GALAXY,ZEROPHONE, & PYRA
Debian is also called the
universal operating system as
it is used as a base for hundreds of
Linux distributions. So, this claim
also underlines that Debian should
run on mobile devices too–right?
Well, Debian developers are
continuously working to add
support for new devices and adapt
it as per hardware and GUI
capabilities of different devices.
Along the similar lines, during
the recent DebConf1 7, which was
held in Montréal, Canada, more
than 50 developers met to discuss
this issue, as reported by
Softpedia.
Debian Project’s W. Martin
Borgert wrote that a number of
mobile devices running Debian
GNU/Linux were shown at
DebConf1 7. These devices were:
• PocketCHIP — A small handheld
computer with keyboard, USB,
WiFi, running Debian 8 or 9.
• Samsung Galaxy S Relay 4G — A
Android phone with physical
keyboard. It can already run
portions of Debian userspace on
Android kernel.
• ZeroPhone — An open source,
Raspberry Pi Zero-based
smartphone with small screen and
classic keypad. It ran Debian-based
Raspbian OS.
• Pyra — A handheld computer
with touchscreen. It’ll come with
Debian preinstalled.
Source:
https://fossbytes.com/debian-on-
mobile-devices-pocketchip-
samsung-galaxy-zerophone-pyra/
FEDORA 26 LINUX GETS
FIRST SET OF UPDATED LIVE
ISOS WITH LINUX KERNEL
4.1 2.5
Fedora 26 Linux just got several
of its official installation
images rebuilt, which include a
newer kernel and all the latest
software and security patches that
have been published on the
distro's official repositories since
its launch last month on July 1 1 ,
201 7.
Tagged as build version F26-
201 7081 5, the new Fedora 26
Linux ISO respins are available for
Fedora 26 Workstation, Fedora 26
Xfce, Fedora 26 LXDE, Fedora 26
KDE, Fedora 26 Cinnamon, Fedora
26 LXQt, Fedora 26 MATE, Fedora
26 SoaS (Sugar on a Stick) , along
with the multi-desktop image
mentioned above.
If you're wondering what you
can do with these new Fedora 26

full circle magazine #1 24 1 0 contents ^
NEWSLinux ISO respins, let us tell you
that they'll come in handy when
you want to deploy the operating
system on new PCs, as you won't
have to download hundreds of
updates after install. In fact, these
ISO images will save you up to 600
MB of updates.
Updates that you would
normally have to download to keep
the freshly installed Fedora 26
Linux operating system up-to-date.
In addition, you can use these ISO
snapshots to create your own
Fedora 26 respin, using the same
tool that the Fedora Respins-SIG
team used to build them, namely
Livemedia-creator.
Source:
http://news.softpedia.com/new
s/fedora-26-linux-gets-first-set-of-
updated-live-isos-with-linux-
kernel-4-1 2-5-51 7442.shtml
THESSS (THE SMALLEST
SERVER SUITE) 22.2 DEBUTS
WITH LINUX 4.9.43, APACHE
2.4.27
Based on 4MLinux Server 22.2,
TheSSS (The Smallest Server
Suite) 22.2 is here one month after
the 22.1 point release to update
various of its core components of
the built-in LAMP (Linux, Apache,
MariaDB and PHP) server, which is
now powered by Linux kernel
4.9.43 LTS, Apache 2.4.27, MariaDB
1 0.2.7, PHP 7.0.22 and 5.6.31 , as
well as the BIND 9.1 1 .2 DNS server
and Stunnel 5.42 SSL tunnel.
Existing users can update their
TheSSS systems if they run the "zk
update" command in the terminal
emulator. The update process is
fully automatic, so you won't have
to do anything. But, being a small
image, we recommend
downloading the TheSSS 22.2 ISO
right now from our website and
write it on a USB flash drive or
CD/DVD disc.
Those unfamiliar with TheSSS
(The Smallest Server Suite) will be
glad to learn that the project
provides them with a live server
suite that lets them run a full-
featured Linux server without
installing any package on their
computer, directly from the
bootable medium. TheSSS is a
lightweight and fast server
solution, and it's free.
Being designed with the system
administrator in mind, TheSSS is
perfect for webmaster and web
designers who need to put
together a fast and ready-for-
deployment server. Deploying a
server was never this easy and
TheSSS supports HTTP, HTTPS,
MySQL, FTP, SFTP, SSH, DNS, SMTP,
and Telnet.
Source:
http://news.softpedia.com/new
s/thesss-the-smallest-server-suite-
22-2-debuts-with-linux-4-9-43-
apache-2-4-27-51 7440.shtml
VOYAGER 1 6.04.3 LINUX
DISTRO LAUNCHES
OFFICIALLY BASED ON
UBUNTU 1 6.04.3 LTS
A derivative of the recently
launched Ubuntu 1 6.04.3 LTS
(Xenial Xerus) , Voyager 1 6.04.3
debuts powered by the Linux 4.1 0
kernel with support for Intel Kaby
Lake CPUs, as well as the Xfce
4.1 2.3 desktop environment with
components like Xfdashboad 0.6.1 ,
Plank Dock 0.1 1 , Screenlets 0.1 .6,
Covergloobus 1 .7.3, LibreOffice
5.4, Mozilla Firefox 55, Mozilla
Thunderbird 52.2, Corebird 1 .1 .1 ,
and ClamTk 5.2.4.1 .
Among other apps pre-installed
in Voyager 1 6.04.3, we can
mention Parole Media Player,
Conky, Yad, SMTube, Kodi Media
Center, MPV, Media, GIMP, Pitivi,
Clementine, Gradio, gThumb,
Mintstick USB, Xscreensaver, Deja-
Dup, Cheese, Impulse, OS-
Uninstaller, ClamAV, Terminator,
Transmission, Kazam, Grub
Customizer, BleachBit, Pidgin,
Kupfer, and Synaptic Package
Manager.
As mentioned before, Voyager
1 6.04.3 is based on Xubuntu
1 6.04.3 LTS (Xenial Xerus) , which
will receive support for three
years, until April 21 , 201 9. Voyager
will also receive support during
this period, and existing users can
upgrade to the new version as we
speak using the APT utility or a
graphical package manager.
Source:
http://news.softpedia.com/new
s/voyager-1 6-04-3-linux-distro-
launches-officially-based-on-
ubuntu-1 6-04-3-lts-51 7457.shtml
full circle magazine #1 24 1 1 contents ^
NEWS
RED HAT ADDS
MICROSOFT'S .NET CORE
2.0 TO ITS LINUX AND CLOUD
OFFERINGS
H ow things change! Microsoft
is porting SQL Server to Red
Hat's Red Hat Enterprise Linux
(RHEL). And now, Red Hat will
support Microsoft's open-source
.NET Core 2.0 on RHEL, Red Hat
OpenShift Container Platform, and
other Red Hat platforms. It's no
wonder Bill Gates only owns 1 .3
percent of Microsoft these days.
Microsoft's .NET Core is a
lightweight and modular platform
for creating web applications and
micro-services. It enables
developers to create .NET
applications across platforms and
deploy across Red Hat's operating
systems and clouds.
This new Microsoft
programming framework was
released on Aug. 1 4. .NET Core is
the open-source cross-platform
implementation of the .NET
development platform that runs
on Windows, Linux, and macOS.
The latest version of .NET Core
supports .NET Standard 2.0. This
provides enhanced platform
compatibility and portability across
all .NET runtimes and workloads. It
also streamlines application
packaging with easier access to
ASP.NET 2.0 and EF Core 2.0.
Source:
http://www.zdnet.com/article/r
ed-hat-adds-microsofts-net-core-2-
0-to-its-linux-and-cloud-offerings/
BLACK LAB ENTERPRISE
LINUX 1 1 .0.3 UBUNTU-BASED OPERATING SYSTEM
NOW AVAILABLE
The perfect Linux distribution
doesn't exist. Take it from
someone that does a lot of distro-
hopping -- you will find yourself
searching forever. Instead, it is
wise to find a Linux-based
operating system that meets your
needs and try to stick with it. After
all, constantly fiddling with various
distributions will just drain your
energy and steal your time.
With that said, Black Lab
Enterprise Linux 1 1 .0.3 is now
available. Should you download it?
Well, if you are not satisfied with
your current Linux-based operating
system, then maybe. I 've got to tell
you, this Ubuntu-based distro
looks like a winner. It features
modern versions of both Google
Chrome and the Linux kernel, plus
it offers support for many file
systems. Despite being designed
for organizations, it should serve
as a great desktop OS for home
users too.
Source:
https://betanews.com/201 7/08/
21 /black-lab-enterprise-linux-1 1 03/
LINUS TORVALDS PLANS TO
RELEASE THE FINAL LINUX
4.1 3 KERNEL ON SEPTEMBER
3, 201 7
Last week's RC5 release was
smaller than the previous
fourth Release Candidate, and
Linus Torvalds was confident that
things would progress normally for
this development cycle. And he
was right, as RC6 seems to be a
normal patch, not to mention that
things were quite calm during the
past week. It brings only a few
updated networking, sound, and
InfiniBand drivers, along with some
architecture improvements.
Therefore, it's no-brainer that
the seventh and probably last
Release Candidate milestone will
arrive next week, on August 27,
and the final Linux 4.1 3 kernel
release should debut a week later,
on September 3, 201 7. That, of
course, if tomorrow's solar eclipse
won't "brings doom and gloom
even beyond the expected Oregon
trafficalypse," as Linus Torvalds
noted at the end of his
announcement.
On a more serious note, you're
invited to download the source
tarball of the Linux kernel 4.1 3 RC6
release right now from kernel.org
and take it for a test drive on your
computers. However, please try to
keep in mind not to replace your
stable kernel with this
development snapshot, nor deploy
it on production machines. Don't
forget to report bugs, if you
encouter any.
Source:
http://news.softpedia.com/new
s/linus-torvalds-plans-to-release-
the-final-linux-4-1 3-kernel-on-
september-3-201 7-51 7443.shtml

full circle magazine #1 24 1 2 contents ^
NEWS
RED HAT SAYS GOODBYE TO
BTRFS — IS STRATIS THE
FUTURE?
G iven the shroud of mystic
legalese incantations warding
off the union of Linux and ZFS in
many commercial products, Btrfs
was, and still is, intended by many
to fill the void. Btrfs has been
slowly catching up to ZFS in
features, but there’s still a long
way to go. Btrfs still lacks some
relatively mundane features, such
as disk encryption, but this is in
many ways due to the complexity,
and presumably because
implementing such a feature could
easily break backward
compatibility.
Both Btrfs and ZFS allow for
scripting many different
operations, backups, replication,
and customization among them.
Both can be extremely hands off
because they verify their
consistency at all times, because of
this, they are often referred to as
‘admin-less’.
But if Btrfs is so great, why
does Red Hat want to nix it? Well,
it comes down to a few key
problems. The current state of
storage management on Linux
typically requires several layers of
software (volume manager, RAID,
filesystem, encryption, etc) . While
Btrfs combines many of these
layers, it is still not yet a complete
package. Another problem that is
inherent to not only Btrfs, but ZFS
as well, is that the command line
utilities are designed for use by
people. This means that the
information returned by these
commands cannot be used directly
and must be parsed before
anything meaningful can be done
with it. Additionally, the output
can change between versions of
the utilities and system
configurations making it all the
more difficult to parse and use
programmatically.
Source:
https://fossbytes.com/red-hat-
deprecate-btrfs-filesystem-stratis/

full circle magazine #1 24 1 3 contents ^
Over the last two months, both
of my articles have asked
users to share their programming
experiences, specifically how they
got started, and some of their
experiences when learning or
using a language. This month, I will
be compiling the responses I have
received. To anyone who took the
time to respond, thank you!
Note: All responses are quoted as-
is.
" I started programing on a PET
at our local high school. When I
could afford it, I bought a VIC 20. I
devoured every issue of Compute!
to laboriously type in the
programs, learning as I went. Then
on to MS Basic. I loved those
languages, so easy to understand.
Or perhaps my young brain made it
easy. Microsoft’s Visual Studio,
Visual Basic 6 in my case, made
powerful database programming
easy so I wrote several programs
for financial management,
electronic calculations, and hobby
data recording. I am now using
Python and Tkinter as I have
switched to Ubuntu.
I consider myself a dabbler, by
no measure an expert. So I
concentrate on a few coding
aspects at a time, for instance
string formatting and using lists,
tuples and dictionaries. When I
have the use and syntax down, I ’ll
move on to something else. I have
some books on python to get me
started but the internet is my main
goto for help. It is much easier to
enter my exact question into a
search engine and get a relative
answer than to search through the
books where information is
somewhere in a few hundred
pages. I then record the answer in
a file as a snippet.
It is a slow process but gives me
a lot of satisfaction and I hope
keeps my brain learning to delay
senility. It is a hobby, one of many,
so not a lot of time is available to
thoroughly learn a lot. This is why I
keep examples in my snippet files, I
can cut and paste to speed things
up.
When I run out of project ideas,
I refer to the complete programs in
tutorials, pick one at random, close
the book and write my own
version. The topic is not too
important, it’s the learning and
seeing something work when I ’m
done. I just enjoy it, what else can I
say?”
Lee in Ontario, Canada
"I am interested in
programming.
I can help myself in BASIC, the
first language I learned. I can also
help myself to an extent in 6502
assy. However, I find learning
‘modern’ programming languages
to be a PITA.
Taking video courses, I find
‘hello world’ to grate my ghrekin to
no avail. “Introduction” courses
teach you what variables, lists,
tuples are, yes, but then leave you
high and dry.
I have tried taking a
Edx/Coursera or similar course in
Python, but it is just too stressful. I
have very slow internet, and I
usually have the required video’s
downloaded by the Thursday. Your
“answer” has to be in by Friday and
you need to mark other student’s
papers on Saturday, “results” on
Sunday (which leaves NO time for
you to figure out what is going on).
I did try codeschool, when they
were free, and found I could do
most of the exercises without
issue, but again it felt empty.
Udemy I find, teaches you just
enough so you purchase the
second course to find out you
wasted your money and the whole
“course” could be broken down
into 1 0 sentences.
I found Harvard’s “CS50” online,
but the jumps between lessons are
too big. (obviously they do not
post every lecture, but the ‘most
entertaining’ one from the week).
This also does not work for me.
I looked back at how I learned
BASIC and 6502 Assembler. Basic
came from my old ZX Spectrum. I
have BOOKS! filled with grid paper
that I made sprites on. Then I
learned how to make said sprite
CCOOMMMMAANNDD && CCOONNQQUUEERRWritten by Lucas Westermann
PPrrooggrraammmmiinngg SSttoorriieess

full circle magazine #1 24 1 4 contents ^
COMMAND & CONQUER
move horizontally and vertically.
Thereafter, I learned how to make
said sprite move on keypress, and
so forth. You get the idea.
You can say I learned visually.
(this was only every weekend when
I was allowed to use the computer)
Then I came into possession of
a BBC micro. The BBC micro had its
own monitor, so I did not need
permission to use the TV to use
the computer. I got a “big book of
BBC games” which was one of
those ‘type in the code and play
the game’. Heh, you can imagine
how long debugging took. (To be
sure, I also had a slightly different
BBC micro than the book was
intended for.)
When looking for help back
then, I could not even get
someone at the college to help me
as they taught logo and lisp, etc,
and had no idea about assembly.
(no internet) .
I was determined to get my
sprites moving, etc. The only way I
figured out what things did was by
breaking other people’s code.
(using cryptic three letter
acronyms, I had no idea what they
did at that stage)
Basic was just too slow, as the
CPU’s were just too slow.
Today I know JNE is ‘jump if not
equal’ and putting things in the
base register adds them for you.
I still have no idea of memory
allocation, but I used to write the
addresses down in a little book to
make due.
So in conclusion, I find ‘modern’
teaching methods is a factory
approach that does not make
things easy for students, but easy
for the teachers MARKING the
work.
There is no “fun” or
“exploration” in it and 0 practical
use. I don’t give two shits about
giving a variable the property of
“hello world” and printing the
variable or calculating the tax on a
bill. I would rather watch paint dry.
Yes, I paid a lot of money once
to go on a “programming course”
that culminated in making a tax
calculator for a bill.”
Erik
“My first language was IBM
1 401 Autocoder. (An assembler
language with macros!)
My first "personal computer"
was a 1 401 at IBM's Toronto
downtown branch. If I was bored
on a Sunday afternoon, I would go
to the office and fool around on
the computer. I didn't do it to help
my career, but that was one of the
effects.
Sheesh, that was 52 years ago.”
“Hi Lucas,
Back in the /360 days, there
were times when I was a project
leader, which took about a third of
my time. Several times, I wrote sort
exits in Assembler. I have a good
friend who wrote and modified a
lot more Assembler than I did.
If memory serves, all programs
began, BALR 1 3,1 4
When I got my PET, I wrote
several programs in 6502
assembler, including a patch to the
ROMs so interrupt-handling
blocked other interrupts for about
1 05 microseconds instead of 1 /600
of a second.
My most popular program could
load an Applesoft program from
an Apple tape, and leave it in
memory. Applesoft and
Commodore BASIC were not
identical, so the translation was
imperfect -- but I never got any
complaints.”
Gord
To all readers who took the
time to respond: I appreciated your
comments and stories, and
sometimes made me feel relief
about the current state of affairs!
For anyone reading this article: I
hope you find it as inspiring and
interesting a read as I did.
If anyone has any comments,
questions, or requests for future
articles, feel free to email me at
[email protected]. Similarly, if
this article encouraged you to
share stories of your own, feel free
to contact me with them as well,
and I will fit them in as I can. Next
month, we shall return to our
regularly scheduled programming!

full circle magazine #1 24 1 5 contents ^
HHOOWW--TTOOWritten by Greg D. Walters PPyytthhoonn II nn TThhee RReeaall WWoorrlldd -- PPtt 8811
Last month, I gave you some
basic information about the
GPIOZERO library in preparation
for the music box program that
uses the RPi, the MCP3008 from
last month, three potentiometers
and a number of switches to make
a simple music player. The core of
the project is the Fluidsynth
program. Michael Horne was kind
enough to let me talk about his
project. The original project can
be found at
http://www.recantha.co.uk/blog/?
p=1 481 8 and his code is at
https://github.com/recantha/music
box.
Michael’s project includes a
case, amplifier and speaker, but I ’m
not going to deal with those, since
this is a discussion on using the
RPi. I ’ll leave those items to you to
figure out. I ’m using the HDMI
audio out and it works just fine,
with the exception of being
tethered to the monitor by the
HDMI cable.
The first thing you need to do is
install Fluidsynth from the
Add/Remove program on the RPi.
Next, you need to add the
pyfluidsynth python library. You
can do this using pip in a terminal.
pip install pyfluidsynth
I ’m going to assume that you
installed the GPIOZERO library
that we used last month.
Hopefully, you still have the
MCP3008 Analogue to Digital
converter wired up from last
month’s potentiometer project. If
not, all is not lost. You can use the
Fritzing diagram below.
PARTS LIST
For this project you will need:
• Raspberry Pi
• Breadboard
• Jumpers
• MCP3008
• 1 LED
• 1 220 Ohm Resistor
• 3 1 0K potentiometers
• 9 momentary pushbuttons
The potentiometers all have
one lead that connects to ground,
one that connects to 3.3vDC and
the wiper connects to the
MCP3008 pins 1 , 2 and 3. The
switches all have one lead
connecting to ground and the
others connect to GPIO pins 5, 23,
1 3, 6, 1 2, 1 6, 1 9, 20 and 21
(physical pins 29, 1 6, 33, 31 , 32, 36,
35, 38 and 40) . The LED cathode
connects to ground and the anode
connects to one side of the 220
ohm resistor while the other side
of the resistor connects to GPIO
pin 24 (physical pin 1 8)
THE CODE
The code is fairly long, so I
won’t include it all here. I will,
however, pull out various snippets
to discuss some of the less
mundane segments. I also will be
bouncing around within the code,
to point out various things. I do
strongly suggest pulling the full
code from Michael’s github page.
It also includes sound fonts for you
to test with.
full circle magazine #1 24 1 6 contents ^
HOWTO - PYTHON
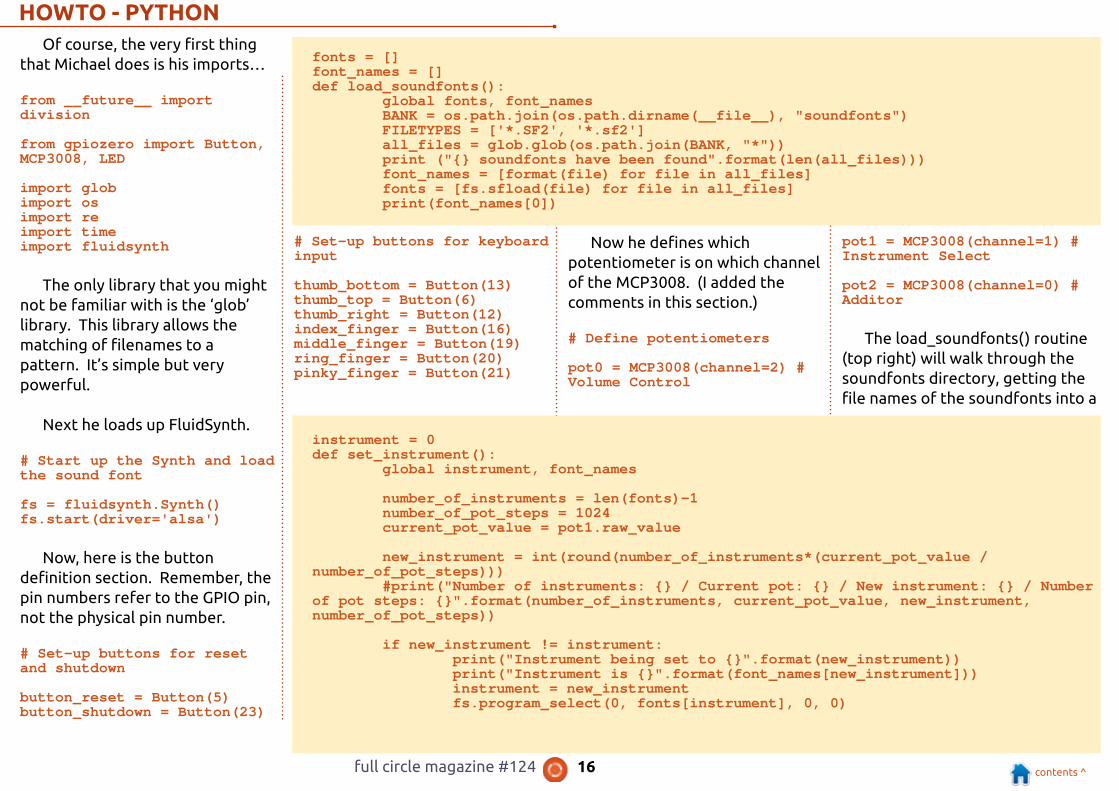
Of course, the very first thing
that Michael does is his imports…
from __future__ importdivision
from gpiozero import Button,MCP3008, LED
import globimport osimport reimport timeimport fluidsynth
The only library that you might
not be familiar with is the ‘glob’
library. This library allows the
matching of filenames to a
pattern. It’s simple but very
powerful.
Next he loads up FluidSynth.
# Start up the Synth and loadthe sound font
fs = fluidsynth.Synth()fs.start(driver='alsa')
Now, here is the button
definition section. Remember, the
pin numbers refer to the GPIO pin,
not the physical pin number.
# Set-up buttons for resetand shutdown
button_reset = Button(5)button_shutdown = Button(23)
# Set-up buttons for keyboardinput
thumb_bottom = Button(13)thumb_top = Button(6)thumb_right = Button(12)index_finger = Button(16)middle_finger = Button(19)ring_finger = Button(20)pinky_finger = Button(21)
Now he defines which
potentiometer is on which channel
of the MCP3008. (I added the
comments in this section.)
# Define potentiometers
pot0 = MCP3008(channel=2) #Volume Control
pot1 = MCP3008(channel=1) #Instrument Select
pot2 = MCP3008(channel=0) #Additor
The load_soundfonts() routine
(top right) will walk through the
soundfonts directory, getting the
file names of the soundfonts into a
fonts = []font_names = []def load_soundfonts():
global fonts, font_namesBANK = os.path.join(os.path.dirname(__file__), "soundfonts")FILETYPES = ['*.SF2', '*.sf2']all_files = glob.glob(os.path.join(BANK, "*"))print ("{} soundfonts have been found".format(len(all_files)))font_names = [format(file) for file in all_files]fonts = [fs.sfload(file) for file in all_files]print(font_names[0])
instrument = 0def set_instrument():
global instrument, font_names
number_of_instruments = len(fonts)-1number_of_pot_steps = 1024current_pot_value = pot1.raw_value
new_instrument = int(round(number_of_instruments*(current_pot_value /number_of_pot_steps)))
#print("Number of instruments: {} / Current pot: {} / New instrument: {} / Numberof pot steps: {}".format(number_of_instruments, current_pot_value, new_instrument,number_of_pot_steps))
if new_instrument != instrument:print("Instrument being set to {}".format(new_instrument))print("Instrument is {}".format(font_names[new_instrument]))instrument = new_instrumentfs.program_select(0, fonts[instrument], 0, 0)

full circle magazine #1 24 1 7 contents ^
Greg Walters is owner of RainyDaySolutions, LLC, a consulting companyin Aurora, Colorado, and has beenprogramming since 1 972. He enjoyscooking, hiking, music, and spendingtime with his family.
HOWTO - PYTHON
usable list. Michael includes 1 5
sample soundfonts in his source
files.
This next routine (previous
page, bottom right) will set the
instrument for the synth based on
the value of potentiometer #1
which as we saw above is on
channel number 1 of the MCP3008.
Here is where Michael sets up
the actions for each of the music
buttons. Basically, there is a
‘when_pressed’ and a
‘when_released’ action that calls a
routine when the action is
performed.
# Assign actions towhen_pressed for each buttonthumb_bottom.when_pressed =thumb_bottom_startthumb_bottom.when_released =thumb_bottom_stopthumb_right.when_pressed =thumb_right_startthumb_right.when_released =thumb_right_stopthumb_top.when_pressed =thumb_top_startthumb_top.when_released =thumb_top_stopindex_finger.when_pressed =index_finger_startindex_finger.when_released =index_finger_stopmiddle_finger.when_pressed =middle_finger_startmiddle_finger.when_released =middle_finger_stopring_finger.when_pressed =
ring_finger_startring_finger.when_released =ring_finger_stoppinky_finger.when_pressed =pinky_finger_startpinky_finger.when_released =pinky_finger_stop
Glancing at index finger button
action routine sets we see what's
shown top right…
The way things work on a synth
is that when a note key is pressed a
noteon event is called and when it
is released, a noteoff event is then
called. (That is why sometimes
when playing a midi file on a
computer you get notes that seem
to be accidentally left on, playing
forever. The noteoff event is
never read by the soft synth.) By
doing this, you could play chords.
These are mostly repeated for
each of the buttons that control
the notes to be played. Also notice
that the value of the additor is
added to the note itself. This
allows you to do various octaves of
the seven notes.
In the following lines, Michael
sets the note definitions for each
button.
thumb_bottom_note = 54thumb_right_note = 56thumb_top_note = 58index_finger_note = 60middle_finger_note = 62ring_finger_note = 64pinky_finger_note = 66
I think that this gives you a
basic understanding of what the
code does, so you can continue on
and play with the project.
Once again, a huge thanks to
Michael for this project.
Until next time, have fun.
last_note_index_finger = index_finger_note
def index_finger_start():global last_note_index_fingerlast_note_index_finger = index_finger_note+note_additorfs.noteon(0, last_note_index_finger, volume)
def index_finger_stop():fs.noteoff(0, last_note_index_finger)

full circle magazine #1 24 1 8 contents ^
HHOOWW--TTOOWritten by Alan Ward
II nnttrroo TToo FFrreeeeCCAADD -- PPtt55
I n this series, we will beexamining the world of FreeCAD,
an open-source CAD modelling
application that is still in Beta, but
has been gaining acceptance in
recent years. Naturally, it is readily
available in the Ubuntu
repositories. In the fourth article
on using FreeCAD, we created a
Sketch object, to place individual
drawing elements such as lines,
arcs, and points, in a precise
relationship to each other using
constraints. We noted the use of
Construction mode elements
within the Sketch object, to aid
construction of the complete
diagram while not appearing in the
final drawing. In this part of the
series, we will change scale
altogether and work on an
architectural project.
SETTING UP OUR UNITS
The main difference between
the small technical parts we have
drawn up so far and an
architectural project lies in the
units used. Small parts tend to be
easily measured in millimeters.
However, in the case of a building
it would make sense to use larger
units such as meters (in the metric
system). To set up the
environment, let us begin by
starting up FreeCAD, and choose a
new Project. Then go to menu
option Edit, and choose
Preferences. Within the General
pane, choose the Units sub-pane
and change “User system” settings
from millimeters to meters - or the
imperial system if that is your
preference.
Though we have changed the
main units, the auxiliary grid that
comes up to help us place
elements will still use the former
aperture value between grid lines.
Having a 1 x1 m grid with lines
every millimeter may not be of
much use to build a house. So,
continue within the Preferences
dialog box, and go to the Draft
pane. Here, choose the Grids and
Spacing sub-pane, and change the
value for “Grid spacing”.
As a quirk, it may be necessary
to save your project, close
FreeCAD and open it once more to
actually see the grid with its new
size. Remember to use the mouse
wheel to zoom out to see a
sufficiently large amount of the X-
Y plane. Remember the visible area
is always indicated in the lower
right corner of the display.
USING THE ARCH
WORKBENCH
Let us begin actual design by
noting the existence of a specific
“Arch” workbench. This toolset has
been specifically conceived to draw
designs of buildings as a Building
Integrated Model, or BIM. In this
concept, building elements are
labelled as such: walls become a
Wall object, openings such as
windows or doors become Window
objects, and objects such as a
Support, a Roof or a complete
Building object can be specified
using the appropriate toolbar.
To begin a new building, one
full circle magazine #1 24 1 9 contents ^
HOWTO - FREECAD
could start in the Draft workbench,
by drawing out the general
floorplan. Simple lines are
sufficient to indicate the position
of each wall. For the time being, no
mention needs to be made of wall
widths and of the placement of
openings. For instance, one could
draw up the following building,
representing a small school
module with two classrooms or
laboratories, one preparation
room between them, and an
exterior corridor.
Once the floorplan has been
drawn in this fashion, move to the
Arch workbench, and select all
lines. Then select the
Wall tool , and all lines
magically become
proper Wall objects. A default
value of 3m is used for wall
heights, and 0.2m for wall
thicknesses.
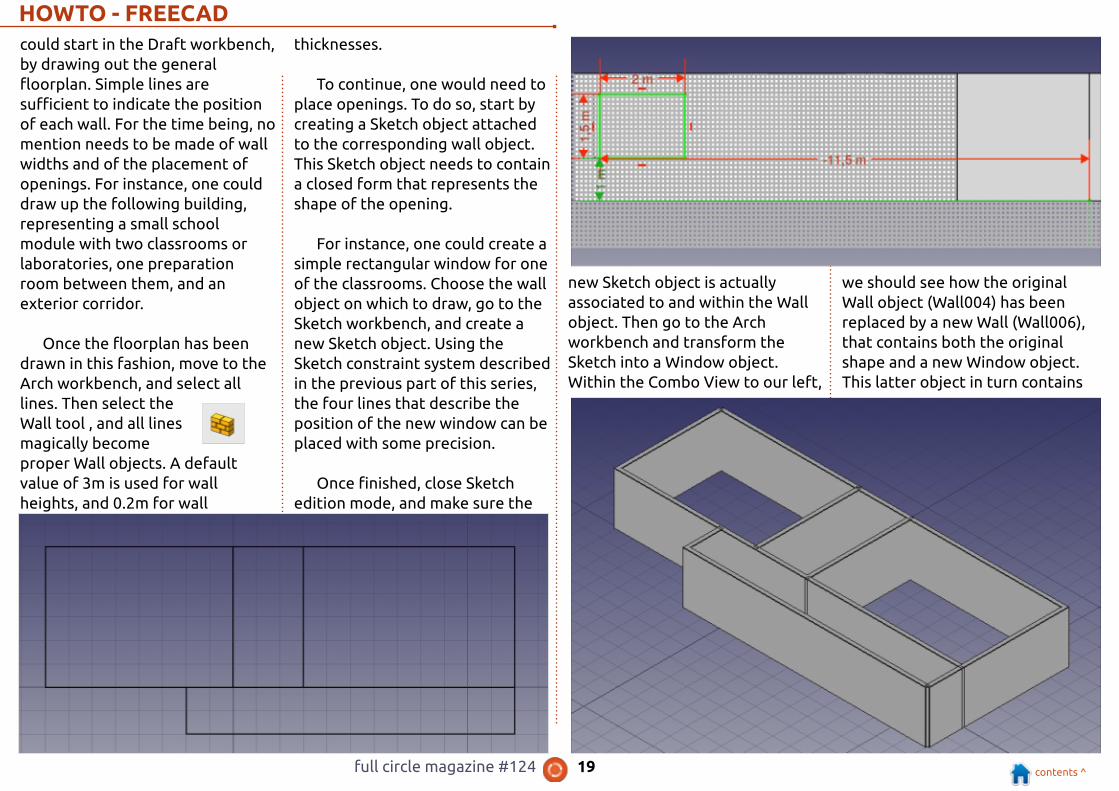
To continue, one would need to
place openings. To do so, start by
creating a Sketch object attached
to the corresponding wall object.
This Sketch object needs to contain
a closed form that represents the
shape of the opening.
For instance, one could create a
simple rectangular window for one
of the classrooms. Choose the wall
object on which to draw, go to the
Sketch workbench, and create a
new Sketch object. Using the
Sketch constraint system described
in the previous part of this series,
the four lines that describe the
position of the new window can be
placed with some precision.
Once finished, close Sketch
edition mode, and make sure the
new Sketch object is actually
associated to and within the Wall
object. Then go to the Arch
workbench and transform the
Sketch into a Window object.
Within the Combo View to our left,
we should see how the original
Wall object (Wall004) has been
replaced by a new Wall (Wall006),
that contains both the original
shape and a new Window object.
This latter object in turn contains

full circle magazine #1 24 20 contents ^
HOWTO - FREECAD
the Sketch. Each internal object
defines the shape of the external
one that contains it.
The Arch workbench and the
BIM approach to building an
architectural project has several
advantages. One is ease of use,
specially when working with a
rapid prototyping approach, under
which several models may be
tested to explore the possibilities
of a new site or construction idea,
before settling on a particular
solution. Just lay down the lines,
and build up your walls. A second
advantage is that, once the new
building’s elements have been
defined as such, the information
contained within the model can be
used to automate calculations,
such as surface area or building
volume.
On the other hand, this part of
the FreeCAD software is possibly
the least mature for the time
being. As work in progress,
developers seem to be exploring
the possibilities of the BIM
approach, and there are some
rough edges. Element placement is
still rather fiddly, and much care
must be given by the user to place
objects correctly within their
containing objects. Roof creation is
an art by itself. Object conception
is made using regular parts that
may, or may not, correspond to the
real world. For instance, working
with a building interior floor that is
not completely flat may become a
challenge, as may be working with
walls that have varying levels of
thickness along their length.
Solving corner intersections
between walls may also become an
issue.
For this reason, the choice of
using the Arch workbench must be
left entirely to each individual user.
Some people may hate the limits
this approach places on their
workflow, while others may revel
in the ease of creation of modern-
looking buildings. In any case, one
of the designers of FreeCAD has
created a rather good tutorial on
its features, that may be of
interest as further reading:
https://www.freecadweb.org/wiki/
Arch_tutorial
A MORE TRADITIONAL
APPROACH
Users who do not need or do
not care for the features of BIM
may feel more comfortable using
the more standard tools in the
Draft and Sketch workbenches to
draw traditional views of our
construction. However, we should
always bear in mind that FreeCAD
is a 3D-oriented computer design
program. For this reason, limiting
ourselves to the more traditional
conception of architectural
drawings - planar projections and
perspectives - can certainly work,
but we would lose out on the
capabilities of visualizing the
building in the third dimension
Photo credit: Wikipedia user Zarateman(https://commons.wikimedia.org/wiki/User:Zarateman ).Original link:https://ca.wikipedia.org/wiki/Catedral_de_Tarragona#/media/File:Tarragona_-_Catedral,_claustro_01 .JPG

full circle magazine #1 24 21 contents ^
HOWTO - FREECAD
that FreeCAD allows us.
To see how this could work out,
let us project something that
would be rather difficult to draw
up using the Arch workbench: an
arcaded cloister. This is typically a
square or rectangular space that
consists in a covered walkway
surrounding a central open area
with vegetation, an arrangement
that has been used both in a
certain type of Islamic garden (e.g.
Patio de los Leones, Alhambra
Palace in Granada, Spain) and in
Christian churches, both in
Romanic and Gothic styles. It is this
latter that will inspire us to design
the cloister arches, such as those
found in Tarragona Cathedral,
Catalonia.
Let us begin by drawing a
simple Gothic arch. In FreeCAD
(bottom left) , go to the Draft
workbench and set the grid
aperture to 500mm. Then go to the
Sketcher workbench, and start a
new Sketch object. Here, we will
probably need to alter the grid
aperture a second time, to 0.5 m
(same value, different units) . We
can then begin by drawing the
base of our arch, using the grid as a
support. Using simple values, I
drew two vertical lines 0.5m high
and set 1 m apart. I was then able
to draw the arched top part of our
figure. In its most traditional form,
this is the combination of two
circular arcs. In the figure below, a
construction circle has been drawn
in blue: centered on the top of the
leftmost vertical segment (green
point) , it passes through the top of
the right post, giving it a radius of
1 m. Using this circle, draw an arc of
a circle from the rightmost post up
towards the centerline of the
figure (snap to the vertical grid
line) , giving the right part of the
arch. Now draw a similar circle
centered on the top of the right
post, and draw the left part of the
arch.
Once we exit editing mode, we
obtain a nice outline of our Gothic
arch, which would in the this case
be called an equilateral arch. Since
real architectural elements have
volume, we now need to find a way
of transforming this into a volume,
keeping as much in character with

full circle magazine #1 24 22 contents ^
HOWTO - FREECAD
real Gothic building techniques as
possible. However, when one
studies carefully the stone parts
that go into making up real Gothic
arches, one almost always finds
that the same profile has been cut
all along soft pieces of white
sandstone. Therefore, if we can
create such a profile and somehow
sweep it along our arch outline, we
should end up with a perfect three
dimensional arch frame.
Please do make sure this shape
is complete, i .e. that all lines
connect well to each other. The
penalty for not doing so would be
a final arch shape that is built up
only in part - with another part
missing.
I drew my arch sketch (previous
page, bottom right) in the XY
plane. I will now create a second
Sketch object, but at right angles
within the XZ plane: the X-axis is in
the left-right direction, Y is top-
bottom, and Z goes along the arch
depth.
Within this new Sketch
Please note that the grid
dimensions have been changed.
We are now working with an
aperture of 5 cm, giving an
element profile that fits within a
1 0x20 cm rectangle. Close this
second sketch, and we can now
proceed to the Part workbench. In
this, select the Sweep tool .
In this tool, we select
one of the sketches as the
form to be swept, and the other as
the path to sweep it along.
However, there are some caveats.
The main point is the relative
placement of each sketch. Their
relative positions will be respected
when one is swept along the other.
It is best to ensure the swept form
is actually placed upon the path
before proceeding. In my case, I
needed to displace it some 0.5 m
leftward of the place where it had
been created, in the vicinity of the

full circle magazine #1 24 23 contents ^
HOWTO - FREECAD
coordinate system’s origin. For
some reason, I also needed to
move the second sketch downward
a small amount - some 25 mm,
presumably to ensure it was not in
the vicinity of a connection point
between segments of our arch
sketch.
In this partial view, one can see
how the wireframe arch sketch is
acting as a support for the second,
profile, sketch, as it goes around
using the first sketch as its path.
Once the final arch
tridimensional shape has been
prepared, what we have actually
achieved is a computer model of
the elegant carved stone frame of
the arch. However, this arch would
not work well in architecture by
itself, but must be part of a wall or
a complete structure.
To create this wall, I draw a
simple rectangle 1 .1 m wide by 2.1
m high in the XY plane,
overlapping the arch by several
centimeters on all sides. I then
extruded this flat piece as a
rectangular volume - as in Part I I of
this series, which I then dyed red.
The final touch is to make a Pocket
indentation in this rectangle, to
accommodate our arch. This done
by selecting one of the outward
faces of the rectangle, and
creating a Sketch on this face, with
the same shape as our original
arch. A copy of the arch sketch
could also be made, and then
attached to the face of the
rectangle. Then use the Pocket
tool in the Part design workbench
to push the sketch form “inwards”.
If sufficient depth is given to it, it
will end up by making a hole
straight through our rectangle, in
the correct shape to place our arch
volume in.
The arch Sweep volume and the

full circle magazine #1 24 24 contents ^
Alan holds a PhD in Information andthe Knowledge Society. He teachescomputer science at EscolaAndorrana de Batxillerat (high-school) . He has previously givenGNU/Linux courses at the Universityof Andorra and taught GNU/Linuxsystems administration at the OpenUniversity of Catalunya (UOC).
HOWTO - FREECAD
red Pocket can then be selected,
and united into a single
Component representing a
complete architectural module.
This module can then be copied
and pasted several times, to form a
series of arches. Each element will
need to be displaced and perhaps
also rotated into its final place,
working with the object’s Data
pane in the lower left toolbox. This
series of arches can be further
replicated, until a complete
architectural ensemble is formed.
WHAT NEXT?
In this article on using FreeCAD,
we worked on an architectural
project in two different ways. In
the first place, we used the Arch
workbench to create a modern
architectural project, in which
supplementary information is
given to the computer, so using
FreeCAD to create a Building
Integrated Model (BIM). Since this
approach is in an early stage of
development, and is limited to
simple forms, we then used a more
traditional approach to create
volumes in the same way as in
previous projects, but on a larger
scale. The sweeping technique
allowed us to create an element
with the shape of an arch by
sweeping one sketch (a profile)
around another sketch (the outline
of an arch).
In the next part of this series,
we will extend FreeCAD’s
possibilities using a little Python
programming, to create a
helicoidal surface in the shape of a
gear wheel.

full circle magazine #1 24 25 contents ^
HHOOWW--TTOOWritten by Alessio Ciregia BBaacckkuupp WWiitthh ZZFFSS SSnnaappsshhoottss
Backups are fundamental
aspects of the IT life: for
personal purposes as well as in
professional environments.
Ranging from personal documents
to server configurations and
databases, sometimes a backup is
life-saving. There is plenty of
documentation around the web:
documents about backup
strategies, how-tos, backup
softwares, and so on.
The big drawback of backups is,
most of the time, space occupancy.
A good software, or a good
strategy, can mitigate this by mean
of incremental backups. But in
some cases, learning and
implementing a specialized backup
software is laborious, tedious, and
the learning curve is too high
especially when we only need “a
simple” copy of the last useful files
or database dump. In any case,
there isn’t a self-configuring
software out there: strategies and
policies are up to the system
administrator or backup
administrator. And last but not
least, what about restore? We all
hope not to need to restore a
backup, but sometimes disasters
can occur: from deletion of an
important document to database
server crash.
Here, in this article, we will talk
about a sort of incremental
backup. How difficult is it to
retrieve a backup or restore a
database from an incremental
backup? In a company, sometimes,
the System Administrator is also
the DBA and even the Backup
Administrator at the same time, so
testing backups’ restoration is,
most times, a zero priority task.
As said before, space occupancy
(hard disk or tapes) is a big
question to address.
Let’s talk about a disk shared
between many users, or the home
directories of such users. Let’s say
we want to use an affordable and
simple solution using well known
tools, that must be a reliable
solution as well. The choice of the
tool, if we work on Linux and Unix,
will usually fall on rsync.
We have to take into account
that rsync doesn’t delete files on
the destination that are not in the
source anymore: but we cannot
store files indefinitely, for example
documents voluntarily deleted by
users or old configuration files,
what a lot of garbage; so we can
use the delete option ((rsync --
delete: delete extraneous files
from dest dirs)) offered by rsync,
but… who knows if the user didn’t
delete a file by mistake?
So, if we use rsync, we must
take care of such things: we must
avoid garbage and we cannot rely
only on one backup, that is the last
time rsync has run. So, usually, we
end up writing a complex script, or
we spend time looking for and
testing some script or software
found on the Internet, falling again
in a pointless learning curve or
using a script that doesn’t fit our
needs.
Well, a filesystem snapshot can
save our bacon. In this article we
will talk about ZFS snapshot
feature.
WHAT IS ZFS
ZFS is a robust, enterprise
grade, filesystem and volume
manager developed by Sun in the
late 2001 ; today it is the default
file system on Solaris and a bunch
of Operating Systems based on the
Open Source I llumos kernel, like
SmartOS, Openindiana, OmniOS,
etc. Due to legal issues related to
the licence, that prevented the
development of a Linux kernel
module, in September 201 3 a side
project was created: OpenZFS. So,
nowadays, the powerful features
of ZFS can be used also on your
preferred Linux distributions.
There was a lot of hype before
Ubuntu 1 6.04 LTS came out, when
it was announced that the ZFS
filesystem module would be
included by default, and the
OpenZFS-based implementation
would have received official
support from Canonical: many
concerns about license issues come
out.
I don’t want to go deep into the
advantages, the technical
characteristics or the options of
ZFS, but I want just to underline
the ease-of-use of some features

full circle magazine #1 24 26 contents ^
HOWTO - BACKUP WITH ZFS SNAPSHOTSthat this file system provides, like,
exactly, snapshots.
Well, also other filesystems like
BtrFS, or Logical Volume managers
(LVM) have snapshot
functionalities as well; even
Windows has something like that,
called Shadow Copy, but ZFS, as far
as I know, is the most simple and
proficient to use.
HOW TO CREATE A ZPOOL
This is only a quick example.
Also, in this case I don’t want to dig
deep into technical details.
So let’s install the ZFS stuff.
sudo apt-get installzfsutils-linux
Plug in an USB drive, and use
fdisk to create a new empty GPT
partition table (g key)
sudo fdisk /dev/sdb
Exit from fdisk, and let’s create
the zpool (look at the zpool like a
volume). “tank” is the name of the
zpool, you can use a name of your
choice.
sudo zpool create tank/dev/sdb
Please look at this link, in order
to understand why using sdb,
instead of the disk UUID, might not
be a good thing
http://zfsonlinux.org/faq.html#Wh
atDevNamesShouldIUseWhenCreat
ingMyPool
Let’s create a ZFS filesystem
inside the zpool
sudo zfs create tank/mybackup
Set on-the-fly compression. Yes:
this is another feature of ZFS. The
LZ4 algorithm has a good balance
between performance and
compression level.
sudo zfs set compression=lz4tank/mybackup
LET’S TAKE THE FIRST
SNAPSHOT
A snapshot is the state of the
file system at a particular point in
time. The command we need to
use in order to take a snapshot is:
zfs snapshot filesystem@name
So in our case the command
could be:
sudo zfs snapshottank/mybackup@201707091030
Since it doesn’t consist of an
incremental copy of files, like Mac
OS X Time Machine, but it is done
at block level, the snapshot
operation is immediate.
Initially, the disk space occupied
by a snapshot is zero, since the
snapshot corresponds exactly to
the original file system. As the files
on the file system change (new
files, deleted ones, updated files) ,
disk space becomes unique to the
snapshot, so the space used by the
snapshot is strictly related to
changes, writes, and deletes,
performed on the file system.
Last, the snapshot is read-only:
there is no danger to lose your
backup or to alter it.
DISPLAYING AND ACCESSING
ZFS SNAPSHOTS
Now you can access data
“backed up” in the snapshot in two
ways: rolling back the snapshot
(overwriting the working file
system, read this as a complete
restore), or accessing it to recover
single files or directories.
Rolling back the snapshot is as
simple as taking it:
zfs rollback filesystem@name
But pay attention: as said,
rolling back a snapshot will
overwrite the working file system!
So a more convenient way to
recover files is to go inside the
snapshot directory and browse
into the frozen directory tree.
Inside the mount point of the file
system there is an hidden directory
called “.zfs” (it is not visible even
with ls -la) .
cd /mountpoint/.zfs/snapshot
Here you can find all your
snapshots, you will see a directory
for every taken snapshot, and you
can use usual commands (cp, rsync,
scp, etc) to copy a previous file
version wherever you need: you
can replace or restore a file or a
directory directly in the working
file system.
That said, the backup policy can
be the following: take a snapshot
just before the rsync command and
you are on your way. So you should
not worry about previous versions
of backups, incremental backups,
huge used space, and so on.

full circle magazine #1 24 27 contents ^
Alessio is a sysadmin at FTGM, aspecialist cardiopulmonary healthfoundation in Italy. Linux and FOSSare not his hobby... they are a job.Sometimes he blogs athttp://blogoless.blogspot.it
HOWTO - BACKUP WITH ZFS SNAPSHOTS
To delete a snapshot, the
command is as simple as
zfs destroy filesystem@name
Then in our example
sudo zfs destroytank/mybackup@201707091030
SAMPLE BACKUP SCRIPT
This is a sample and simple
script to illustrate the concepts.
We use rsync over SSH with key-
based authentication (you can find
a lot of step-by-step guides around
the web on how to set up SSH key-
based login) .
You can find the script here
https://gist.github.com/alcir/7cb79
9edfb677a50fc38741 dc706d73f


full circle magazine #1 24 29 contents ^
HHOOWW--TTOOWritten by Mark Crutch II nnkkssccaappee -- PPaarrtt 6644
This month, we’ll be continuing
our look at some of the new
features of Inkscape 0.9x by
looking at the Symbols dialog. This
is a frequently requested addition
that allows you to create and
maintain collections of related
images that can then be inserted
into the current document as
necessary. Think about the boxes
and shapes in a flowchart, the
bubbles and word balloons in a
cartoon, or the component
symbols in an electronic circuit
diagram, and you’ll be on the right
lines.
The SVG format has always
allowed for symbols. They are
stored in the <defs> section of the
XML, where various definitions are
held that could be re-used
throughout the document. This is
where you’ll also find gradients
and filters, for example. Just
having a <symbol> element in this
section won’t actually render it on
the page, however. For that, you
have to include one or more <use>
elements which refer back to the
symbol. This screenshot of the
XML editor shows the basic idea:
the <defs> section near the top of
the tree holds a single <symbol>
element, which itself acts like a
group, holding all the various parts
of the symbol; meanwhile, at the
bottom of the tree you can see
three <use> elements, all of which
refer to the same symbol via the
“xlink:href” attribute you can see
in the right-hand panel.
There are two advantages to
this approach. The first is file size.
You can see that repeating all the
content of the <symbol> element
three times would take up more
space than simply referring to it
with <use> tags, and the more
complex the symbol the greater
the savings. The second is that
changes to the original symbol will
automatically propagate to any
instances of it in the document. If
that sounds a lot like clones then
you’d be right – clones are also
implemented as <use> elements,
except that the original target is
an object within the document
body, not in the defs section. So, in
some regards, symbols can be
thought of as being clones whose
source object isn’t visible. If you’ve
ever found yourself hiding the
source of a clone behind another
object, or outside the bounds of
the drawing, you can probably see
the advantages. If, however, you’re
scratching your head as to why you
would ever need to hide the
source of a clone, read on.
Consider drawing a flowchart,
in which you want to use the
“decision” block multiple times.
The standard shape for a decision
block is simply a diamond, so you
might draw something like this:
You could use that one for the
first block in your chart, then clone
it for subsequent blocks, and
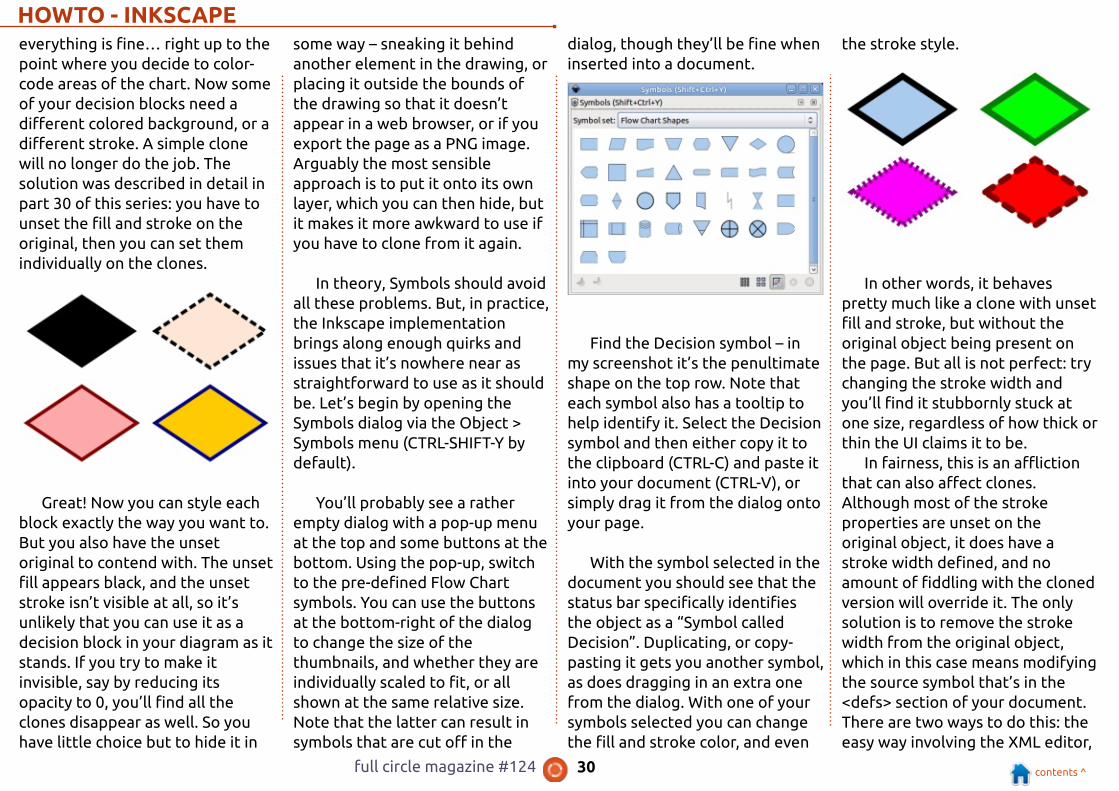
full circle magazine #1 24 30 contents ^
HOWTO - INKSCAPEeverything is fine… right up to the
point where you decide to color-
code areas of the chart. Now some
of your decision blocks need a
different colored background, or a
different stroke. A simple clone
will no longer do the job. The
solution was described in detail in
part 30 of this series: you have to
unset the fill and stroke on the
original, then you can set them
individually on the clones.
Great! Now you can style each
block exactly the way you want to.
But you also have the unset
original to contend with. The unset
fill appears black, and the unset
stroke isn’t visible at all, so it’s
unlikely that you can use it as a
decision block in your diagram as it
stands. If you try to make it
invisible, say by reducing its
opacity to 0, you’ll find all the
clones disappear as well. So you
have little choice but to hide it in
some way – sneaking it behind
another element in the drawing, or
placing it outside the bounds of
the drawing so that it doesn’t
appear in a web browser, or if you
export the page as a PNG image.
Arguably the most sensible
approach is to put it onto its own
layer, which you can then hide, but
it makes it more awkward to use if
you have to clone from it again.
In theory, Symbols should avoid
all these problems. But, in practice,
the Inkscape implementation
brings along enough quirks and
issues that it’s nowhere near as
straightforward to use as it should
be. Let’s begin by opening the
Symbols dialog via the Object >
Symbols menu (CTRL-SHIFT-Y by
default) .
You’ll probably see a rather
empty dialog with a pop-up menu
at the top and some buttons at the
bottom. Using the pop-up, switch
to the pre-defined Flow Chart
symbols. You can use the buttons
at the bottom-right of the dialog
to change the size of the
thumbnails, and whether they are
individually scaled to fit, or all
shown at the same relative size.
Note that the latter can result in
symbols that are cut off in the
dialog, though they’ll be fine when
inserted into a document.
Find the Decision symbol – in
my screenshot it’s the penultimate
shape on the top row. Note that
each symbol also has a tooltip to
help identify it. Select the Decision
symbol and then either copy it to
the clipboard (CTRL-C) and paste it
into your document (CTRL-V), or
simply drag it from the dialog onto
your page.
With the symbol selected in the
document you should see that the
status bar specifically identifies
the object as a “Symbol called
Decision”. Duplicating, or copy-
pasting it gets you another symbol,
as does dragging in an extra one
from the dialog. With one of your
symbols selected you can change
the fill and stroke color, and even
the stroke style.
In other words, it behaves
pretty much like a clone with unset
fill and stroke, but without the
original object being present on
the page. But all is not perfect: try
changing the stroke width and
you’ll find it stubbornly stuck at
one size, regardless of how thick or
thin the UI claims it to be.
In fairness, this is an affliction
that can also affect clones.
Although most of the stroke
properties are unset on the
original object, it does have a
stroke width defined, and no
amount of fiddling with the cloned
version will override it. The only
solution is to remove the stroke
width from the original object,
which in this case means modifying
the source symbol that’s in the
<defs> section of your document.
There are two ways to do this: the
easy way involving the XML editor,

full circle magazine #1 24 31 contents ^
HOWTO - INKSCAPEor the tricky way via the GUI . Yes,
those sentences are the right way
round – somehow the Inkscape
developers have made GUI editing
of symbols so unintuitive that it’s
often easier to wade into the XML!
After opening the XML editor
(Edit > XML Editor, or CTRL-SHIFT-
X) and selecting one of the
symbols in my document you can
see that the relevant line is
highlighted in the left-hand panel
of the dialog.
The attributes on the right
include “xlink:href”, which tells you
the ID of the original symbol in the
<defs> section, prefixed by a
“hash” or “pound” character (#).
Looking at the left-hand panel you
should be able to see the symbol in
question (in this document it’s
actually the only symbol, which
makes finding it even easier) .
Expanding the symbol using the
triangle on the left reveals the
elements inside it. Because this is a
really simple symbol, it’s easy to
guess that the element that needs
to be edited is the path. The
screenshot below shows how the
XML editor looks with the symbol
expanded and the path selected:
You can see that I ’ve also
selected the “style” attribute in the
right-hand panel. Because this only
contains the stroke-width
property, I could remove the entire
attribute by clicking on the “Delete
Attribute” button in the toolbar at
the top. In other cases, however,
there may be additional style
properties that you wish to keep.
In that case you need to select the
attribute, then edit the value in the
bottom-right panel before clicking
the “Set” button to apply your
change. In this specific case the
end result is exactly the same, as
removing the entire text has the
effect of also removing the
attribute, rather than leaving it in
place with an empty value. With

full circle magazine #1 24 32 contents ^
HOWTO - INKSCAPEthat change made, you can now
close the dialog, return to your
symbols, and change their stroke
widths to whatever value you
choose.
Of course you’ll sometimes
want to make changes to a symbol
that go beyond just removing or
altering an attribute or two, and in
that case you have little choice but
to use the GUI method for editing
it. In order to do that, however,
you’ll first have to convert it from a
hidden object in the <defs> section
to a real object in the page. During
this feature’s early development,
this was done through a “Convert
to Group” menu option, which
seemed to me to be a simple and
sensible approach. So, of course, it
was removed from the release
version.
Instead you have to start with a
trip back to the Symbols dialog.
Switch the pop-up menu to
“Current Document” – the same
view that was empty when you
first opened the dialog earlier.
Assuming you’ve added some
symbols to your document, this
view will now contain an image of
each of them. You can think of this
as being a sneaky view into the
normally hidden world of the
<defs>. To edit a symbol, you have
to remove it from the <defs>
section and insert it into the main
document by selecting it in the
dialog, then clicking the second
button at the bottom left.
Confusingly this has a tooltip that
says it’s going to remove the
symbol from the current document
– whereas the actual behaviour is
to insert the symbol, as a group,
into the document, removing it
from the <defs> section and
therefore from this view in the
dialog.
The editable version that is put
into your page has far more in
common with a clone parent than
you might expect. Because it has
an unset fill and stroke, it will
appear black, and if you select any
of the symbols on the page that
were created from it, you’ll find
that the status bar now declares
them to be clones, rather than
symbols. If you were to check the
XML editor, you’d find that they
haven’t changed – they are still
<use> elements with an xlink:href
attribute that links them via an ID –
it’s just that the object with that ID
is now in the page itself, not in the
<defs> section. See, a symbol is
quite literally just a clone parent
that’s stored in the <defs> rather
than on the page. This duality also
means that, if you do need to
convert an individual symbol into a
real object, Edit > Clone > Unlink
Clone will work.
You can now enter the group
and edit as you would normally.
You can add extra elements into
the group, change the shape of the
path, or explicitly set (or unset) the
fill and stroke to determine what
parts of your symbol can be
overridden when it’s used in a
document. If you examine the
Object Properties for the enclosing
group, you’ll find that it’s got a
title and ID (as well as some other
properties) . Leave the ID alone,
unless you want to break the link
to any existing instances of the
symbol in your document, but feel
free to change the title to
distinguish your newly edited
symbol from the original. Finally,
with it still selected in your
document, use the bottom-left
button in the Symbols dialog (“Add
symbol from the current
document”) to insert it back into
the <defs> section of the
document. It also converts the
copy you’ve been editing into a
symbol – so you’ll need to manually
delete it if you don’t need another
one on your page. Once again, the
early builds had a simple menu
option (“Convert to symbol”) , but
with the release version we’re
stuck with confusingly tooltipped
buttons in the dialog.
In practice you can turn any
group into a symbol. Inkscape
automatically creates an ID for
your group, but it’s probably best
to open the object properties and
set something more human-
readable, as well as giving it a title.
Then just select it and use the
bottom-left button in the Symbols
dialog to convert it. Don’t forget to
unset fills and strokes if you want
to be able to alter them for each
instance of the symbol in your
document.
Once you have got to grips with
creating one or two symbols, you
might feel that you need an entire
set, whether it be symbols for
electronic components, crochet
stitches or, in my case, a handy
place to keep some cartoon
characters. All you need to do is
create all the related symbols in a
single document, then give it a
title in the File > Document
Properties dialog (Metadata tab).
Save the document to
/usr/share/inkscape/symbols (for
those you wish to share with other

full circle magazine #1 24 33 contents ^
Mark uses Inkscape to create threewebcomics, 'The Greys' , 'Monsters,Inked' and 'Elvie' , which can all befound athttp://www.peppertop.com/
HOWTO - INKSCAPEusers on the machine), or
~/.config/inkscape/symbols (for
use by a single user – though you’ll
probably have to create the
“symbols” directory). The next
time you start Inkscape, you’ll find
a new entry in the Symbols dialog’s
pop-up, showing the title you gave
to your document. Select it to gain
access to your own symbols.
As this image shows, symbols
aren’t restricted to simple shapes
or single colors. Here I ’ve got
complex groups of paths with a
variety of colors in each. It does
also show, however, that there are
still limitations: the sarcophagus
on the right is supposed to be a
shimmering gold color, but the
repeating gradient of the original
failed to make it into the symbol
version. In general you may find
similar issues with anything that
links to a definition in another part
of the document – such as
gradients, patterns, filters or other
symbols.
But the Symbols dialog is really
intended for simpler shapes – for
domain-specific tags, markers and
building blocks that might be
needed to annotate or create an
informative image, rather than an
artistic one. The standard symbols
shipped with Inkscape are okay as
a starting point, but somewhat
limited in scope. So if you do create
any symbol libraries that are
generally useful, then please
consider sharing them with the
wider community – it’s a great way
that you can give back to the
project without having to write any
code.

full circle magazine #1 24 34 contents ^
HHOOWW--TTOOWritten by Ronnie Tucker KKddeennlliivvee -- PPaarrtt 88
We’ve all heard voiceovers on
the radio where the music
quickly lowers in volume to let the
announcer speak over the quietly
playing audio in the background.
That’s what we’ll look at this
month.
AUDIO/VIDEO
Obviously, we’ll use a video,
playing audio, as our base to work
from. I ’ve dragged in a video file to
Video 1 . Now I add a voiceover file
to the project.
Now, with the video audio
playing, and the voiceover (shown
below), it’ll be a mass of noise. We
want to right-click on the video
and choose Add Effect > Audio
correction > Volume (keyframable).
Keyframable is something you
may remember from previous FCM
Kdenlive articles. It means that
we’ll be able to set points to
control the level of volume.
Select the video clip in Video 1
(which will give it a red border) ,
and you’ll see the ‘Volume
(keyframable) ’ (what I ’ll call Vk
from now on) options in the
Properties tab.
What we want to do is click (in
the timeline) where, in the video,
we want the volume to begin
fading down, then click the large
plus (‘+’) icon in the Vk properties.
You’ll see a red triangle mark that
keyframe.
Note that the black triangle in
the Vk properties is in the same
place as the time slider is in the
timeline.
So that’s where we want it to
start lowering. Do the same again
where you’d want it to be at its
lowest. This time slide the Gain
value down to where you want the
volume for the voice over.
I ’ve set the Gain value (cropped
off in the screen) to -22dB. You’ll
notice the white line in the video
track has lowered – to show,
visually, the volume level.
All that’s left is to do the
opposite on the other side. A
keyframe at the low value (-22dB
in my case), and a final one at the
1 00% (0dB) value.
You can, of course, do a similar
thing with your voiceover file to
have it fade in as the music fades
out. Also, I ’ve made my fade outs
two seconds long, just to show you
how it looks. Your fadeout may be
a second. Maybe even less.

full circle magazine #1 24 35 contents ^
RREESSEEAARRCCHH IINNGG WWIITTHH LLIINNUUXXWritten by S. J. Webb
Research coordinators would
like to believe they are
organized. However, after working
with a project manager, I quickly
realized how poorly organized my
research projects are run. Thus my
need for a digital project planner.
The research activities can be
boiled down to three distinct
phases: organization, collecting,
and post study research. I use
Calligra-plan (C-P) in each of these
phases. Let’s do a quick touch-base
on the life cycle of a research
project.
In the organization phase, the
investigator develops a plausible
research question and will look for
grant funding to answer the
question. Most of my projects are
fully funded by the university. This
is called internal funding. Yet I
have been assigned to a research
project that was funded externally.
An external fund is when the
government or outside
organization offers to pay the cost
of research. Once the funding is
procured, the research study
begins. It is extremely important
on externally funded research to
track all costs incurred on the
research project. This is a caveat
for external funds. The investigator
will contact me and I begin to lay
out all of the tasks for the research
project’s life.
The first step is write the
physical documentation: standard
of procedures, subject recruitment
practices, data management plan,
financial tracking, and study
closure. I would have a detailed
layout of required staff resources
at all levels. A true project
manager would be able to perform
a cost break analysis of each task
associated in the study. I use only a
small sliver of the PMBOK
principles. PMBOK is the overall
code book of project management.
I do not have any full projects from
start to finish loaded into C-P, but I
have a small project listed here.
This is simple data-polish task on a
project that I have guided for the
last 5 years.
I open C-P to get to the main
screen. There will be three options
for developing a plan. I choose the
basic project template for this
example.
The user will then be taken to
the heart of C-P. It’s here that all of
the interconnected principles of
project management become
exposed. The options I use the
most are tasks and Gantt Charts.

full circle magazine #1 24 36 contents ^
RESEARCHING WITH LINUXTasks are simply the detailed
breakdown of the research project;
you can think of this as your to-do
list. In the easiest of terms, Gantt
Charts are a simple timeline bar
chart. Let’s move onto setting up
the tasks in C-P. If you choose a
more complex project
management technique, you will
have more options. The basic
project template autogenerates
the task work functions.
The task ribbon bar becomes
enabled. I choose the Project
Settings option. This is just left of
the Add Task icon. As you can see,
to the left I have inserted the
required information for the fields.
This is what I use to document
what the project is aiming to
complete, and in what timeframe.
After the project settings, I will
enter my hand-collated notes into
the tasks. This can also be
identified as a work breakdown
structure. The purpose of this item
is to have a granular overview of
each step involved in the project. In
an ideal world, a project planner, if
fully utilized, will allow any
research coordinator to pick up
and continue the project if fully
documented.
If you right-click on the blank
field and click Add Task, this
enables a field that can be edited
via a right-click. You can then enter
the appropriate information that is
needed for that task. The
resources would be staff. The
Documents could be written
protocols in that area. The cost
would be the staff billing per hour.
Description is the overall detailed
information for that task. This is
the area where I really notate my
work load.
I like to think of the tasks
settings as an overly detailed
outline. The assigned task can be
manipulated to be at “sublevels” or
primary. As seen below, the task
list is easily manipulated for the
desired look and intent. The main
purpose of the tasks is to
illuminate all the work that I will be
doing on a particular segment of a
study. This helps investigators
understand why it takes so long to
complete so many aspects of data
processing or administrative work.
When I am finished, I can export
the task as a PDF.
SJ Webb is a researcher coordinator.When he is not working, he enjoystime with his wife and kids. Hethanks Mike Ferarri for hismentorship.

full circle magazine #1 24 37 contents ^
HHOOWW--TTOOWritten by Ronnie Tucker WWrrii ttee FFoorr FFuu llll CCii rrccllee MMaaggaazziinnee
GUIDELINES
The single rule for an article is
that it must somehow be
linked to Ubuntu or one of the
many derivatives of Ubuntu
(Kubuntu, Xubuntu, Lubuntu, etc).
RULES
• There is no word limit for articles,
but be advised that long articles
may be split across several issues.
• For advice, please refer to the
Official Full Circle Style Guide:
http://url.fullcirclemagazine.org/7
5d471
• Write your article in whichever
software you choose, I would
recommend LibreOffice, but most
importantly - PLEASE SPELL AND
GRAMMAR CHECK IT!
• In your article, please indicate
where you would like a particular
image to be placed by indicating
the image name in a new
paragraph or by embedding the
image in the ODT (Open Office)
document.
• Images should be JPG, no wider
than 800 pixels, and use low
compression.
• Do not use tables or any type of
bold or italic formatting.
If you are writing a review,
please follow these guidelines :
When you are ready to submit
your article please email it to:
TRANSLATIONS
I f you would like to translate
Full Circle into your native
language please send an email to
we will either put you in touch with
an existing team, or give you
access to the raw text to translate
from. With a completed PDF, you
will be able to upload your file to
the main Full Circle site.
REVIEWS
GAMES/APPLICATIONSWhen reviewing games/applications please state clearly:
• title of the game
• who makes the game
• is it free, or a paid download?
• where to get it from (give download/homepage URL)
• is it Linux native, or did you use Wine?
• your marks out of five
• a summary with positive and negative points
HARDWAREWhen reviewing hardware please state clearly:
• make and model of the hardware
• what category would you put this hardware into?
• any glitches that you may have had while using the hardware?
• easy to get the hardware working in Linux?
• did you have to use Windows drivers?
• marks out of five
• a summary with positive and negative points
You don't need to be an expert to write anarticle - write about the games, applicationsand hardware that you use every day.

full circle magazine #1 24 38 contents ^
Our KODI adventure began
many years ago with other
software: MythTV. MythTV is open
source Digital Video Recorder
(DVR) software used for recording
cable, satellite and over-the-air
television shows. At the time, we
didn’t have a proper television but
we did have a rather large and
heavy 22 inch CRT monitor. Our
computer at the time was an
Athlon XP-based computer, slightly
underpowered, but it did the job.
MythTV is great software, but
when our provider started talking
about switching from analog to
digital, we knew it would be an
uphill battle to decrypt their new
signal. Our cable provider also kept
raising prices and lowering service
standards. So we looked at our
viewing habits and noticed that we
mostly watched the weather
channel and the odd movie.
About this time, DVDs started
coming down a lot in price. We
were very close to a source for
inexpensive DVDs, so our
collection was growing and
growing. As a DVR, MythTV is
awesome, but it’s not so terrific at
storing media… which led us to
XBMC (now known as KODI) .
Our XBMC/KODI setup started
on the same machine we ran
MythTV on, an old Athlon XP-
based system with a 1 TB hard
drive. The Athlon desktop worked,
but it drew lots of power and
lacked SSE2 CPU instructions.
Video playback on systems with
SSE2 instructions was much better
than on the Athlon, which
struggled sometimes even with
standard DVD video. We had a
solution to solve both the power
and playback problems: a Dell
Inspiron Mini 1 0 netbook. The
netbook had only a 250GB hard
drive, but adding the 1 TB desktop
drive was a simple matter of
attaching it via an external drive
cage. Initially we installed XBMC
via XBMCbuntu, a customized
Lubuntu install which booted
directly to XBMC. We added
remote control support using a
standard Microsoft-compatible
remote control and USB receiver,
and the LIRC software package.
The netbook seemed like a
good idea at the time and worked
well with XBMC versions 1 0
through 1 2, but, as our DVD
collection grew, so did our storage
needs, so we added another
external hard drive (2TB). The
Inspiron Mini 1 0 had plenty of USB
ports so we could actually connect
a third drive plus the USB dongle
for the IR remote.
About a year after we set up
the netbook as our XBMC server,
the first Android boxes started to
appear. One of the nicest looking
boxes was the Pivos XIOS DS Media
Play. The XIOS DS was an Android
box that could be flashed with a
customized version of Linux that
KKOODDII RRoooommWritten by Charles McColm
OOuurr KKOODDII SSeettuupp -- PPtt ..11

full circle magazine #1 24 39 contents ^
KODIbooted to XBMC. We bought one
and discovered you could either
run XBMC on Android or run it in
Pivos’ scaled down Linux
distribution. Support for external
devices was simpler on Android,
but XBMC ran much better on the
scaled down Linux distribution.
The one really annoying feature of
the XIOS DS was the remote
controls. We bought the extra
“sense” remote in addition to the
included remote, and neither were
as feature-rich as having a
Windows Media Centre remote
attached to our netbook.
Ultimately, we switched back to
the netbook because running a
full-blown Linux desktop added a
lot more flexibility than running
Android or Pivos’ scaled down
Linux distribution.
We’re fans of simplicity, but our
netbook setup was getting out of
control. When we had one external
hard drive, the setup wasn’t so bad,
but after we added a second and
third external hard drive, our
media center was starting to look
like a web of cabling. Each external
hard drive needed both power and
a USB connection to the netbook.
Sure, cables could be tidied with
zip or velcro ties, but the power
bricks all still needed to be
connected to the wall which meant
adding more power strips. Rather
than simplifying our setup, running
a netbook was actually
complicating the setup.
Thus we switched back to a ‘full
blown PC,’ initially a 3.2GHz
Pentium D, and later (currently) a
Core 2 Quad Q8300 CPU. One of
the awesome things we love about
Linux is being able to scale.
Dropping in a new CPU doesn’t
mean having to buy a new license
like it does on other operating
systems. We’ve used the same
Asus P5K motherboard ever since,
and while it’s on the old side and
the Core 2 Quad CPU consumes
more power than a Core i3
processor, it’s done a great job. We
picked up an open box special on a
1 GB NVidia GeForce 21 0 PCIe
fanless card for $29 from a local
computer store. All 3 drives now sit
in a single box and the only cables
coming out of that box are power,
video, ethernet, and the cable for
the IR remote.
There are far fewer cables at
the back of our television now, and
the performance is a lot better

full circle magazine #1 24 40 contents ^
KODIthan it was on the netbook. The
Q8300 and GeForce 21 0 are strong
enough to handle Bluray content
without stuttering, and the P5K’s
gigabit ethernet delivers Bluray
media via SAMBA just fine to other
PCs in the house.
I use SAMBA to share all our
content, but all our SAMBA shares
are read-only to help prevent all
that data from possible crypto-
infections. So how do I transfer our
media? Via SSH. All the ripping is
done on a Linux desktop, then
transferred via gigabit to our KODI
server. Our Windows machines can
connect to read the data, but not
write to the shares. That said, no
one in the house uses Windows to
connect to the shares.
In one room we have a Zotac
ID81 box running Xubuntu + KODI.
The box is a little on the sluggish
side, and is prone to sleep issues,
but it plays the Bluray content fine
(thanks in part to the fact we have
it running on an SSD).
In another we have a Zoomtak
T8H. The Zoomtak runs Android,
but KODI 1 7 runs really well on it
and the box has no issues playing
shared Bluray content. Although
both small KODI boxes have
wireless, we deliver all content
over our wired gigabit connection;
wireless is just too unreliable and
limiting.
Currently our main KODI server
houses 2 x 3TB and a 2TB hard
drive. One of the 3TB drives is full
only with media we’ve transferred
from part of our Bluray collection.
The other part of the Bluray
collection is starting to fill the
other 3TB drive (which also houses
our OS - Xubuntu). The entirety of
our DVD collection is stored on the
2TB drive with room to spare. This
includes television shows on DVD.
Our DVD collection is larger than
our Bluray collection, but we store
all our Bluray content as
uncompressed data, so the space
requirements are pretty large -
with several movies cresting 45GB
each.
The other part of our media
centre is a Linux desktop where we
do all the media ripping. Years ago,
when we talked to people about
XBMC/KODI, they would look at
you with blank stares. Now
everyone is talking about
XBMC/KODI because of its
streaming capabilities, but we tend
to use it mostly for its ability to
play and scrape our existing media.
DVDs and Blurays are cheaper
than they’ve ever been, especially
if you don’t mind checking out
thrift shops and/or waiting for
department store specials. One
local chain ran a special at boxing
day where almost all of their new
DVDs were $1 .00. Granted the
titles were not new titles, but they
weren’t all B movies either. Our
collection grew a lot that boxing
day. Yes, it takes time to rip and
transfer the media, and it requires
storage space for the physical
media, but the convenience is
wonderful.
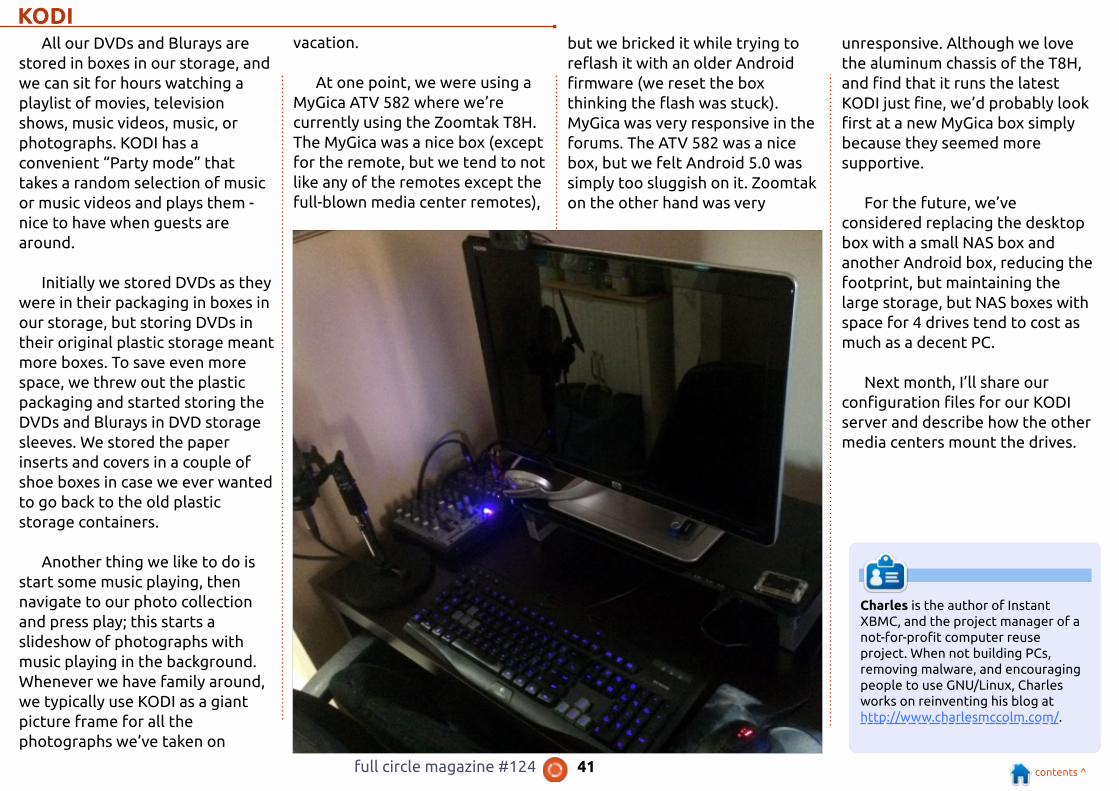
full circle magazine #1 24 41 contents ^
Charles is the author of InstantXBMC, and the project manager of anot-for-profit computer reuseproject. When not building PCs,removing malware, and encouragingpeople to use GNU/Linux, Charlesworks on reinventing his blog athttp://www.charlesmccolm.com/.
KODIAll our DVDs and Blurays are
stored in boxes in our storage, and
we can sit for hours watching a
playlist of movies, television
shows, music videos, music, or
photographs. KODI has a
convenient “Party mode” that
takes a random selection of music
or music videos and plays them -
nice to have when guests are
around.
Initially we stored DVDs as they
were in their packaging in boxes in
our storage, but storing DVDs in
their original plastic storage meant
more boxes. To save even more
space, we threw out the plastic
packaging and started storing the
DVDs and Blurays in DVD storage
sleeves. We stored the paper
inserts and covers in a couple of
shoe boxes in case we ever wanted
to go back to the old plastic
storage containers.
Another thing we like to do is
start some music playing, then
navigate to our photo collection
and press play; this starts a
slideshow of photographs with
music playing in the background.
Whenever we have family around,
we typically use KODI as a giant
picture frame for all the
photographs we’ve taken on
vacation.
At one point, we were using a
MyGica ATV 582 where we’re
currently using the Zoomtak T8H.
The MyGica was a nice box (except
for the remote, but we tend to not
like any of the remotes except the
full-blown media center remotes) ,
but we bricked it while trying to
reflash it with an older Android
firmware (we reset the box
thinking the flash was stuck).
MyGica was very responsive in the
forums. The ATV 582 was a nice
box, but we felt Android 5.0 was
simply too sluggish on it. Zoomtak
on the other hand was very
unresponsive. Although we love
the aluminum chassis of the T8H,
and find that it runs the latest
KODI just fine, we’d probably look
first at a new MyGica box simply
because they seemed more
supportive.
For the future, we’ve
considered replacing the desktop
box with a small NAS box and
another Android box, reducing the
footprint, but maintaining the
large storage, but NAS boxes with
space for 4 drives tend to cost as
much as a decent PC.
Next month, I ’ll share our
configuration files for our KODI
server and describe how the other
media centers mount the drives.

full circle magazine #1 24 42 contents ^
LLEETTTTEERRSSIf you would like to submit a letter for publication, complimentor complaint, please email it to: [email protected] .PLEASE NOTE: some letters may be edited for space.
Join us on:
facebook.com/fullcircle
magazine
twitter.com/#!/fullcirclemag
linkedin.com/company/full-
circle-magazine
ubuntuforums.org/forum
display.php?f=270
goo.gl/FRTMl
FULL CIRCLE NEEDS YOU!
Without reader input
Full Circle would be an
empty PDF file (which I don't
think many people would find
particularly interesting). We
are always looking for articles,
reviews, anything! Even small
things like letters and desktop
screens help fill the magazine.
See the article Writing for Full
Circle in this issue to read our
basic guidelines.
Have a look at the last page of
any issue to get the details of
where to send your
contributions.
full circle magazine #1 24 43 contents ^
QQ&&AACompiled by Gord Campbell
If you have a Linux question, email it to: [email protected] , andGord will answer them in a future issue. Please include as muchinformation as you can about your query.
Q I have tried to do a 1 :1 copy of
a CD to a RW blank CD. Both
failures.
A Rip the CD to .wav files, using
a program such as asunder.
Burn a music CD, selecting the .wav
files, using a program such as
Brasero or K3b.
Q I run:
sudo apt update
and get these error messages:
W: An error occurred duringthe signature verification.The repository is not updatedand the previous index fileswill be used. GPG error:http://dl.google.com/linux/chrome/deb stable Release: Thefollowing signatures couldn'tbe verified because thepublic key is not available:NO_PUBKEY 6494C6D6997C215E
W: Failed to fetchhttp://dl.google.com/linux/chrome/deb/dists/stable/Release.gpg The following signaturescouldn't be verified becausethe public key is notavailable: NO_PUBKEY6494C6D6997C215EW: Some index files failed to
download. They have beenignored, or old ones usedinstead.
A (Thanks to vasa1 in the
Ubuntu Forums) To get the
public key for Google Chrome, run
this command:
wget -q -O -https://dl.google.com/linux/linux_signing_key.pub | sudoapt-key add -
Q I have a small home network
of 5 Windows computers, two
Linux computers, one Mac, and one
Windows server that I want to be
able to authenticate to a Linux-
based file and print server. The key
for me is synchronizing logins. I
don't want individual logins to
each computer and server. When I
ask questions, I 'm not getting any
answers.
A I suspect that the reason you
aren't getting answers is,
99.99% of people here do not do
network authentication. My home
network has half a dozen
computers running a mix of Linux
and Windows. I have a file server
and shared printer. People log on
to their own computer, not "the
network".
I have set up personal and
public shared folders on the file
server using Samba.
Assuming you have installed a
member of the Ubuntu family, the
version of Samba you have is not
even close to being the latest and
greatest. It meets my needs, but
probably not yours.
Have you run across Zentyal? I
had a quick look at it more than a
year ago, but it didn't solve the
problem I was looking at. However,
it might be just the thing in your
environment.
TOP QUESTIONS AT
ASKUBUNTU
* Ubuntu installed on USB stick -
are such installations limited to run
on the same machine?
https://goo.gl/f7GJyw
* Unable to find my files, but they
take up space
https://goo.gl/C4kKMM
* apt remove vs purge
https://goo.gl/qtU2bn
* tlp-stat and power indicator show
different battery levels
https://goo.gl/GqArDj
* Are LTS codenames specifically
intended to imply reliability?
https://goo.gl/uxt1 dx
* Can I restrict root user from
installing or Uninstalling Packages
https://goo.gl/AtLQAd
* Where is this environment
variable set?
https://goo.gl/65WpZo
* One liner to show CPU, RAM and
HDD usage
https://goo.gl/o5iozT
* How to remove a directory
without removing its content?
https://goo.gl/BK9vbn

full circle magazine #1 24 44 contents ^
Gord had a long career in thecomputer industry, then retired forseveral years. More recently, hesomehow found himself "The IT Guy"at a 1 5-person accounting firm indowntown Toronto.
Q&A
TIPS AND TECHNIQUES
Maybe time to upgrade
I f you are running version 1 6.1 0of any of the flavours of Ubuntu,
it is time to upgrade.
Those versions experienced
"end of life" in July. I 'm not a fan of
the nine-month life of Ubuntu's
"interim" releases. I think it would
be much more productive if
Canonical had selected a 1 4-month
life. That would let people have a
year of the interim release, plus a
couple of months for the required
upgrade to settle down.
This doesn't affect me directly,
since I 'm using Xubuntu 1 7.04 as
my daily driver, but in just a few
months I will need to upgrade to
1 7.1 0.

full circle magazine #1 24 45 contents ^
MMYY DDEESSKKTTOOPPWritten by Larry
The machine is home built, with
an older i7 7600k processor, 1 6 GB
of memory, and two 2 TB disks.
Motherboard is a Gigabit p8z68
(several years old now, same as
cpu) Video card is Nvidia fx3700.
MMYY DDEESSKKTTOOPPWritten by Robert Streeter
Operating system: Xubuntu
1 6.04
Icon Theme: Papirus
Theme: Arc-Dark
Wallpaper: WallpaperDay Link to
wallpaper on DA
http://fav.me/d4lhe0g
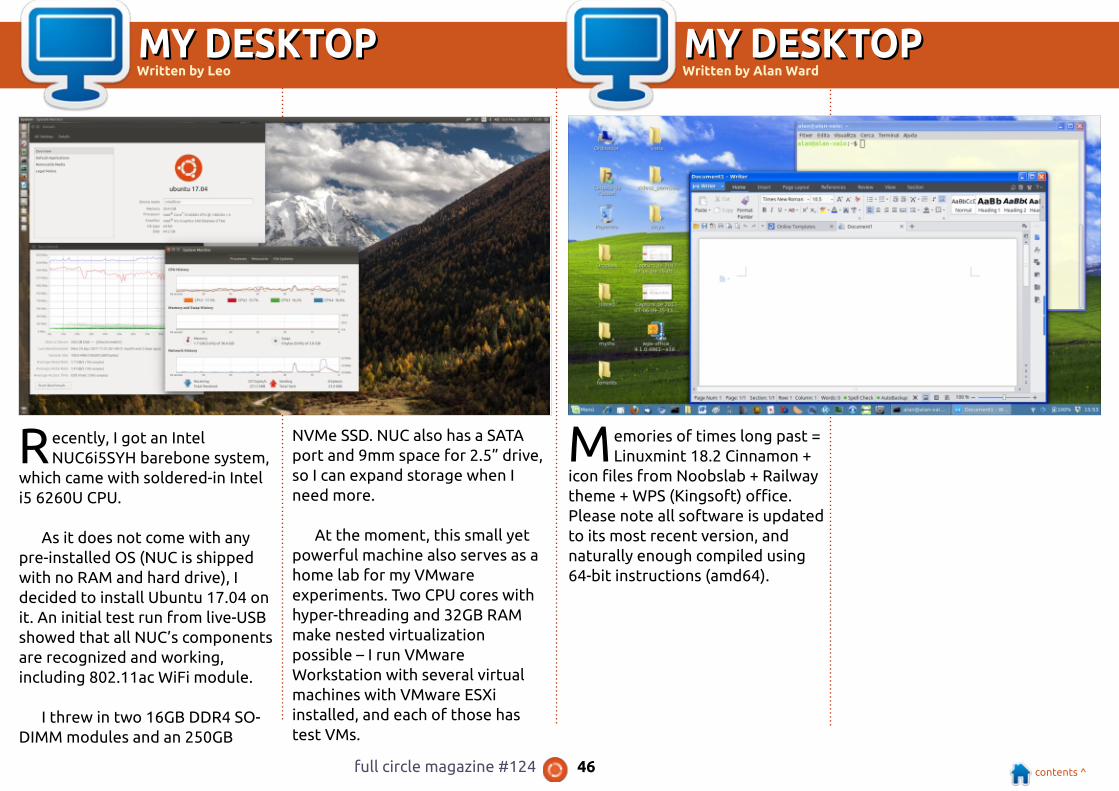
full circle magazine #1 24 46 contents ^
MMYY DDEESSKKTTOOPPWritten by Leo
Recently, I got an Intel
NUC6i5SYH barebone system,
which came with soldered-in Intel
i5 6260U CPU.
As it does not come with any
pre-installed OS (NUC is shipped
with no RAM and hard drive) , I
decided to install Ubuntu 1 7.04 on
it. An initial test run from live-USB
showed that all NUC’s components
are recognized and working,
including 802.1 1 ac WiFi module.
I threw in two 1 6GB DDR4 SO-
DIMM modules and an 250GB
NVMe SSD. NUC also has a SATA
port and 9mm space for 2.5” drive,
so I can expand storage when I
need more.
At the moment, this small yet
powerful machine also serves as a
home lab for my VMware
experiments. Two CPU cores with
hyper-threading and 32GB RAM
make nested virtualization
possible – I run VMware
Workstation with several virtual
machines with VMware ESXi
installed, and each of those has
test VMs.
MMYY DDEESSKKTTOOPPWritten by Alan Ward
Memories of times long past =
Linuxmint 1 8.2 Cinnamon +
icon files from Noobslab + Railway
theme + WPS (Kingsoft) office.
Please note all software is updated
to its most recent version, and
naturally enough compiled using
64-bit instructions (amd64).

full circle magazine #1 24 47 contents ^
PPAATTRROONNSS
MONTHLY PATRONS
201 6:
Bill Berninghausen
Jack McMahon
Linda P
Remke Schuurmans
Norman Phillips
Tom Rausner
Charles Battersby
Tom Bell
Oscar Rivera
Alex Crabtree
Ray Spain
Richard Underwood
Charles Anderson
Ricardo Coalla
Chris Giltnane
William von Hagen
Mark Shuttleworth
Juan Ortiz
Joe Gulizia
Kevin Raulins
Doug Bruce
Pekka Niemi
Rob Fitzgerald
Brian M Murray
Roy Milner
Brian Bogdan
Scott Mack
Dennis Mack
John Helmers
JT
Elizabeth K. Joseph
Vincent Jobard
Chris Giltnane
Joao Cantinho Lopes
John Andrews
201 7:
SINGLE DONATIONS
201 6:
John Niendorf
Daniel Witzel
Douglas Brown
Donald Altman
Patrick Scango
Tony Wood
Paul Miller
Colin McCubbin
Randy Brinson
John Fromm
Graham Driver
Chris Burmajster
Steven McKee
Manuel Rey Garcia
Alejandro Carmona Ligeon
siniša vidović
Glenn Heaton
Louis W Adams Jr
Raul Thomas
Pascal Lemaitre
PONG Wai Hing
Denis Millar
Elio Crivello
Rene Hogan
Kevin Potter
Marcos Alvarez Costales
Raymond Mccarthy
Max Catterwell
Frank Dinger
Paul Weed
Jaideep Tibrewala
Patrick Martindale
Antonino Ruggiero
Andrew Taylor
201 7:
Linda Prinsen
Shashank Sharma
Glenn Heaton
Frank Dinger
Randy E. Brinson
The current site was created thanks toLucas Westermann (Mr. Command &Conquer) who took on the task ofcompletely rebuilding the site, andscripts, from scratch, in his own time.
The Patreon page is to help pay thedomain and hosting fees. The yearlytarget was quickly reached thanks tothose listed on this page. The moneyalso helps with the new mailing list thatI set up.
Several people have asked for a PayPal(single donation) option, so I ’ve added abutton to the right side of the website
A big thank you to all those who’veused Patreon and the PayPal button.It’s a HUGE help.
https://www.patreon.com/fullcirclemagazine
https://paypal.me/ronnietucker

full circle magazine #1 24 48 contents ^
HHOOWW TTOO CCOONNTTRRIIBBUUTTEEFull Circle Team
Editor - Ronnie Tucker
Webmaster - Lucas Westermann
Editing & Proofreading
Mike Kennedy, Gord Campbell, Robert
Orsino, Josh Hertel, Bert Jerred, Jim
Dyer and Emily Gonyer
Our thanks go to Canonical, the many
translation teams around the world
and Thorsten Wilms for the FCM logo.
FULL CIRCLE NEEDS YOU!A magazine isn't a magazine without articles and Full Circle is no
exception. We need your opinions, desktops, stories, how-to's,
reviews, and anything else you want to tell your fellow *buntu users.
Send your articles to: [email protected]
We are always looking for new articles to include in Full Circle. For help and advice
please see the Official Full Circle Style Guide: http://url.fullcirclemagazine.org/75d471
Send your comments or Linux experiences to: [email protected]
Hardware/software reviews should be sent to: [email protected]
Questions for Q&A should go to: [email protected]
Desktop screens should be emailed to: [email protected]
... or you can visit our site via: fullcirclemagazine.org
FCM#1 24Deadline:
Sunday 1 0th Sept. 201 7.
Release:
Friday 29th Sept. 201 7.
EPUB Format - Most editions have a link to the epub file
on that issue's download page. If you have any problems
with the epub file, email: [email protected]
Issuu - You can read Full Circle online via Issuu:
http://issuu.com/fullcirclemagazine. Please share and rate
FCM as it helps to spread the word about FCM and Ubuntu.
Magzster - You can also read Full Circle online via
Magzster: http://www.magzter.com/publishers/Full-Circle.
Please share and rate FCM as it helps to spread the word
about FCM and Ubuntu Linux.
Getting Full Circle Magazine:
For the Full Circle Weekly News:
You can keep up to date with the Weekly News using the RSS
feed: http://fullcirclemagazine.org/feed/podcast
Or, if you're out and about, you can get the Weekly News via
Stitcher Radio (Android/iOS/web):
http://www.stitcher.com/s?fid=85347&refid=stpr
and via TuneIn at: http://tunein.com/radio/Full-Circle-Weekly-
News-p855064/