full arch system manual - artimax · 2007-08-15 · anterior half arch tray base full arch vd or...
TRANSCRIPT
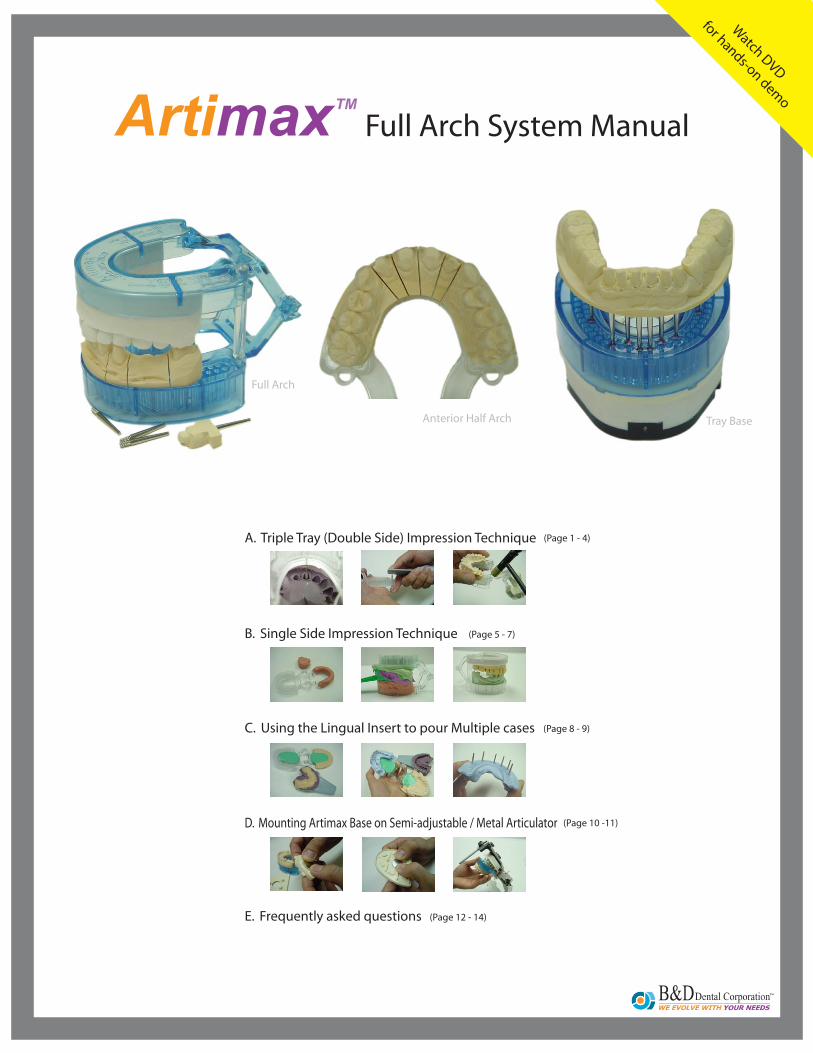
A. Triple Tray (Double Side) Impression Technique
B. Single Side Impression Technique
C. Using the Lingual Insert to pour Multiple cases
D. Mounting Artimax Base on Semi-adjustable / Metal Articulator
Full Arch System Manual
E. Frequently asked questions
(Page 1 - 4)
(Page 5 - 7)
(Page 8 - 9)
(Page 10 -11)
(Page 12 - 14)
Anterior Half Arch Tray Base
Full Arch
Watch DVD
for hands-on demo
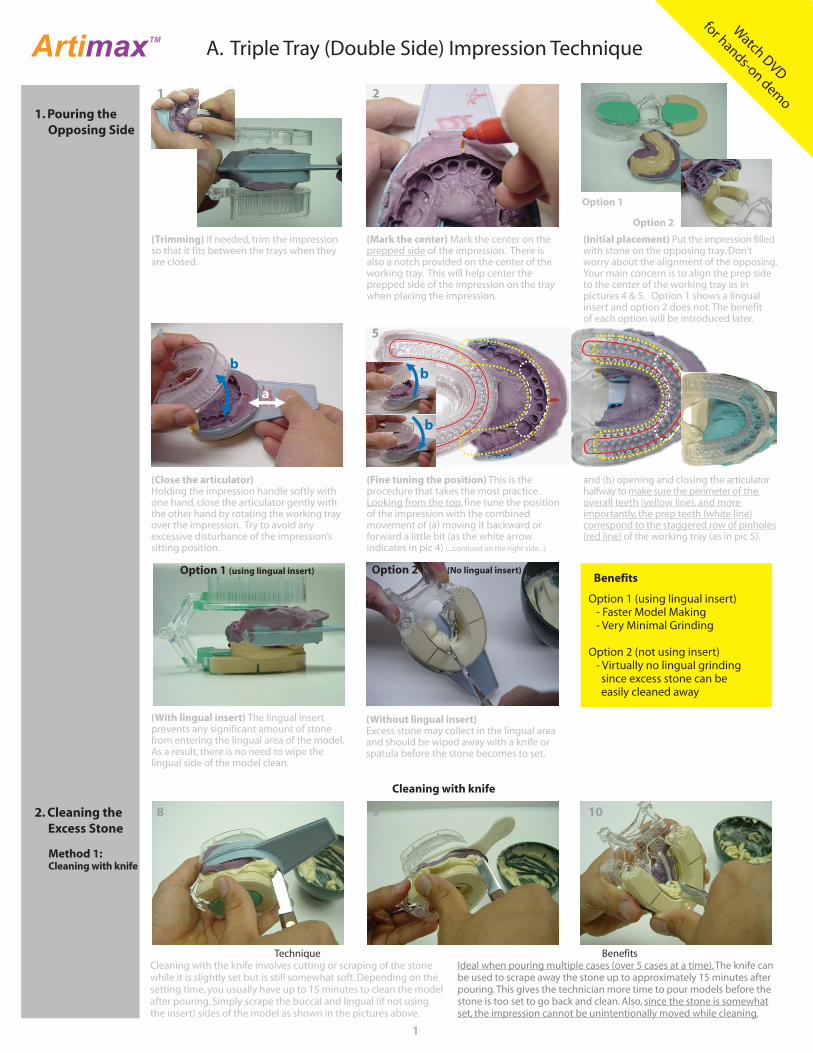
A. Triple Tray (Double Side) Impression Technique
(Trimming) If needed, trim the impressionso that it fits between the trays when theyare closed.
(With lingual insert) The lingual insert prevents any significant amount of stone from entering the lingual area of the model.As a result, there is no need to wipe the lingual side of the model clean.
(Mark the center) Mark the center on theprepped side of the impression. There is also a notch provided on the center of theworking tray. This will help center theprepped side of the impression on the traywhen placing the impression.
(Initial placement) Put the impression filledwith stone on the opposing tray. Don’t worry about the alignment of the opposing. Your main concern is to align the prep side to the center of the working tray as in pictures 4 & 5. Option 1 shows a lingual insert and option 2 does not. The benefit of each option will be introduced later.
(Close the articulator) Holding the impression handle softly with one hand, close the articulator gently with the other hand by rotating the working tray over the impression. Try to avoid any excessive disturbance of the impression’ssitting position.
(Fine tuning the position) This is theprocedure that takes the most practice.Looking from the top, fine tune the positionof the impression with the combined movement of (a) moving it backward orforward a little bit (as the white arrow indicates in pic 4) (...contiued on the right side...)
and (b) opening and closing the articulator halfway to make sure the perimeter of the overall teeth (yellow line), and more importantly, the prep teeth (white line)correspond to the staggered row of pinholes(red line) of the working tray (as in pic 5).
1. Pouring the Opposing Side
1 2 3
4 5 5
6 7
8 9 10
a
b b
b
Watch DVD
for hands-on demo
2. Cleaning the Excess Stone
Option 1
Option 2
(Without lingual insert)Excess stone may collect in the lingual area and should be wiped away with a knife orspatula before the stone becomes to set.
Benefits
Cleaning with knife
Option 1 (using lingual insert) Option 2
BenefitsIdeal when pouring multiple cases (over 5 cases at a time). The knife can be used to scrape away the stone up to approximately 15 minutes after pouring. This gives the technician more time to pour models before the stone is too set to go back and clean. Also, since the stone is somewhat set, the impression cannot be unintentionally moved while cleaning.
TechniqueCleaning with the knife involves cutting or scraping of the stone while it is slightly set but is still somewhat soft. Depending on the setting time, you usually have up to 15 minutes to clean the model after pouring. Simply scrape the buccal and lingual (if not using the insert) sides of the model as shown in the pictures above.
1
Method 1:Cleaning with knife
Option 1 (using lingual insert) - Faster Model Making - Very Minimal Grinding
Option 2 (not using insert) - Virtually no lingual grinding since excess stone can be easily cleaned away
(No lingual insert)

alingment pin
alingment pin
A. Full arch Triple tray (Double side) impression technique
3. Pin alignment
12
11 12 13
14 15 16
17 18 19 (15+16, alternate marking method)
Method 1
Method 2
(Use this methodwhen you do not have an alignment pin readily available)
(Use the alignmentpin to easily locatethe correct pinholes,and to puncture thepinhole membranes)
2
Cleaning with spatula
TechniqueDepending on the setting time of your stone, wait 2-4 minutes before cleaning so that the stone is soft enough to manipulate yet set enough not to affect the integrity of the impression’s sitting position. If the stone has not set long enough and is too runny, cleaning the excess stone may cause the impression to sink slightly on the stone or be tilted to one side.
BenefitsUsually works best when pouring only a few cases (1-5 cases at a time). The spatula is used to clean the stone while it is soft and easy to manipulate. The stone is simply wiped from the tray.
Method 2:
(Approximate alignment) Insert the alignment pin into a pinhole that appears to be in approximate alignment with one of the prepped teeth.Do not push the alignment pin throughthe membrane yet. (The alignment pin has the samebody shape as the dowel pin but has a longer head that extendsup to the impression)
(Turn over & check ) Close the articulatorand turn it over so that the working trayis on top. Check the position of the pinby verifying that the long head of thealignment pin extends up to the centerof the prepped tooth. If the alignment pin
does not line up well, open the articulatorand move the alignment pin to a nearbypinhole that will work better. Check theposition again until you have found the correct pinhole. After pouring a couple cases it becomes very easy to guess the correct pin position on the first or second try.
(Pinhole marking - alternate method) Instead of steps 15 & 16, you can mark eachpin hole with a line while the alignment pinis inserted. Locate the correct pinhole, puncture the membrane and mark a line in front of the alignment pin.
(Puncture the membrane) Use the plastic handle of the impression trayto easily puncture the membrane at the endof the pinhole. Follow this process (pic 11 - 14) of finding the pinholes and puncturing the membranes for all the remaining preppedteeth.
(Find the punctured pinhole) Hold thearticulator against a dark backgroundin order to easily find the punctured pinholes so that they can be marked.
(Mark the punctured pinholes) Insert the tip of a dark colored sharpie into each pinhole that is to receive a dowel pin.Now that the pinholes are marked, theycan be easily recognized for initial dowelpin insertion and for subsequent removaland insertion of the sectioned dies.
(Place dowel pins) Place a dowel pin ineach of the marked pinholes. When insertingthe dowel pin, push the pin gently downinto the pinholes so that it is snug. You canalso use the plastic portion of the impressiontray to gently press the pin into the hole.
(Double check the pin positions) Close the articulator and perform one last check to ensure you have pinned all the appropriate teeth. The model is now ready to be poured.
Cleaning with spatula

Benefits of pin alignment method 1
1. Finding the correct pinhole is veryeasy.
2. You have full control of how snug the pins will seat in the pinholes. Since the membrane is already broken you can use your fingers or plastic portion of theimpression tray to push the pin into the pinhole as deep as you want using varying degrees of force.
A. Triple Tray (Double Side) Impression Technique
(Puncture the membrane with the pin) Push the silver dowel pin through themembrane. Be sure not to push the pinsdeep into the pinholes. If you use excessiveforce to push the pin deep into the holeit may be difficult to remove and reseat thedie later. Simply use enough pressure just to puncture the membrane.
(Remove the excess stone) Use a small spatula or a knife to clean awaythe excess stone as described in section 1.
(Mark the pinholes ) Once all the pins areplaced, use a sharpie to mark a line that extends from the dowel pin out toward the facial side of the tray. This line will be very useful for the technicians to easily identify where the sectioned dies are to be placed back on the tray.
4. Pouring the Working Side& Cleaning
2-4 2-51
20 21 22
23 24
(Pour the impression first) Using the vibrator, pour stone into the impression so that the teeth are covered and the impression is about 50% filled.
(Pour the tray and lightly vibrate) Dab stone over the pinholes of the tray.Once the holes are covered, vibrate lightlyand gently rock the tray to evenly spread the stone.
(Stack more stone) Stack the impression with stone. The stone should be thick enough so that it sits on the impression and does not run down the sides. Make sure you use an adequate amount of stone so that when the articulator is closed the opposing tray and working tray can sit parallel to another
(Put the working side on top) Close the working tray over the impression and let the model sit with the working side on top. Check to make sure you used enough stone so that the trays are parallel to one another.
(Allow setting time) Depending on the setting time of your stone, allow it to set for a few minutes so that it can be easily cleaned away as described previously in section 1. If the stone is too thin in consistency, the effort to clean away the excess may result in the articulator closing too tightly. This may cause the hinge to spring open later.
25
3
2-1 2-2 2-3
2-4 2-5
(Mark the impression) Use a red sharpie to mark the center of eachPrepped tooth. Extend the lines down to theSide of the impression so that they can be Seen from a side view when the articulatorIs closed
(Insert the pin) Insert the pin into the pinhole that matches The marking on the impression (or on the Working tray if applicable).
(Drop the pin for verification)Turn the articulator over (as in pic 2-3 above)And let the pin drop into the impression.Check the position of the pin in relation to The prepped tooth. Choose a better pinhole If necessary.
Method 2
(Use this methodWhen you do not Have an alignment Pin readily available)
Watch DVD
For hands-on demo
A. Triple Tray (Double Side) Impression Technique
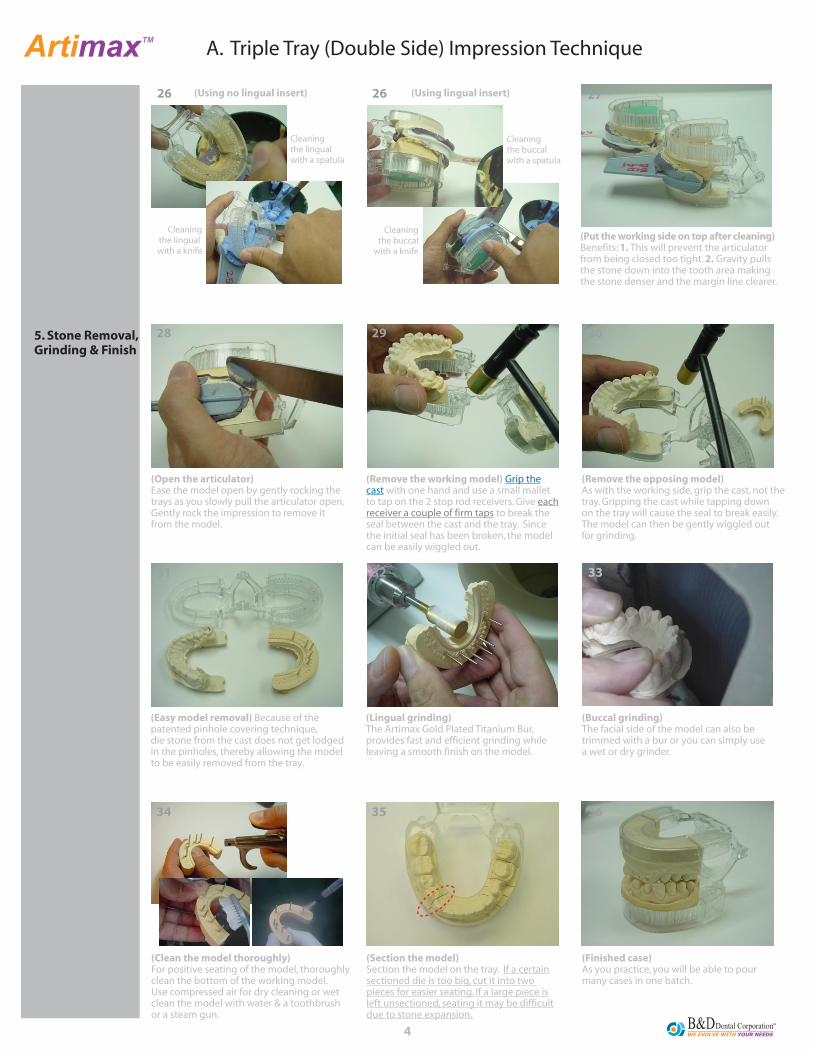
(Buccal grinding)The facial side of the model can also betrimmed with a bur or you can simply usea wet or dry grinder.
(Clean the model thoroughly) For positive seating of the model, thoroughlyclean the bottom of the working model. Use compressed air for dry cleaning or wetclean the model with water & a toothbrushor a steam gun.
(Section the model) Section the model on the tray. If a certainsectioned die is too big, cut it into two pieces for easier seating. If a large piece isleft unsectioned, seating it may be difficultdue to stone expansion.
(Finished case)As you practice, you will be able to pourmany cases in one batch.
26 26
28 29 30
31 32 33
34 35 36
(Open the articulator)Ease the model open by gently rocking thetrays as you slowly pull the articulator open.Gently rock the impression to remove itfrom the model.
(Remove the working model) Grip thecast with one hand and use a small malletto tap on the 2 stop rod receivers. Give eachreceiver a couple of firm taps to break theseal between the cast and the tray. Since the initial seal has been broken, the model can be easily wiggled out.
(Remove the opposing model) As with the working side, grip the cast, not thetray. Gripping the cast while tapping downon the tray will cause the seal to break easily.The model can then be gently wiggled outfor grinding.
(Easy model removal) Because of thepatented pinhole covering technique, die stone from the cast does not get lodgedin the pinholes, thereby allowing the modelto be easily removed from the tray.
(Lingual grinding) The Artimax Gold Plated Titanium Bur,provides fast and efficient grinding whileleaving a smooth finish on the model.
5. Stone Removal,Grinding & Finish
4
(Using no lingual insert) (Using lingual insert)
Cleaning the lingual with a spatula
Cleaningthe lingual with a knife
Cleaningthe buccal with a spatula
Cleaningthe buccal
with a knife
(Put the working side on top after cleaning)Benefits: 1. This will prevent the articulatorfrom being closed too tight. 2. Gravity pulls the stone down into the tooth area making the stone denser and the margin line clearer.
27
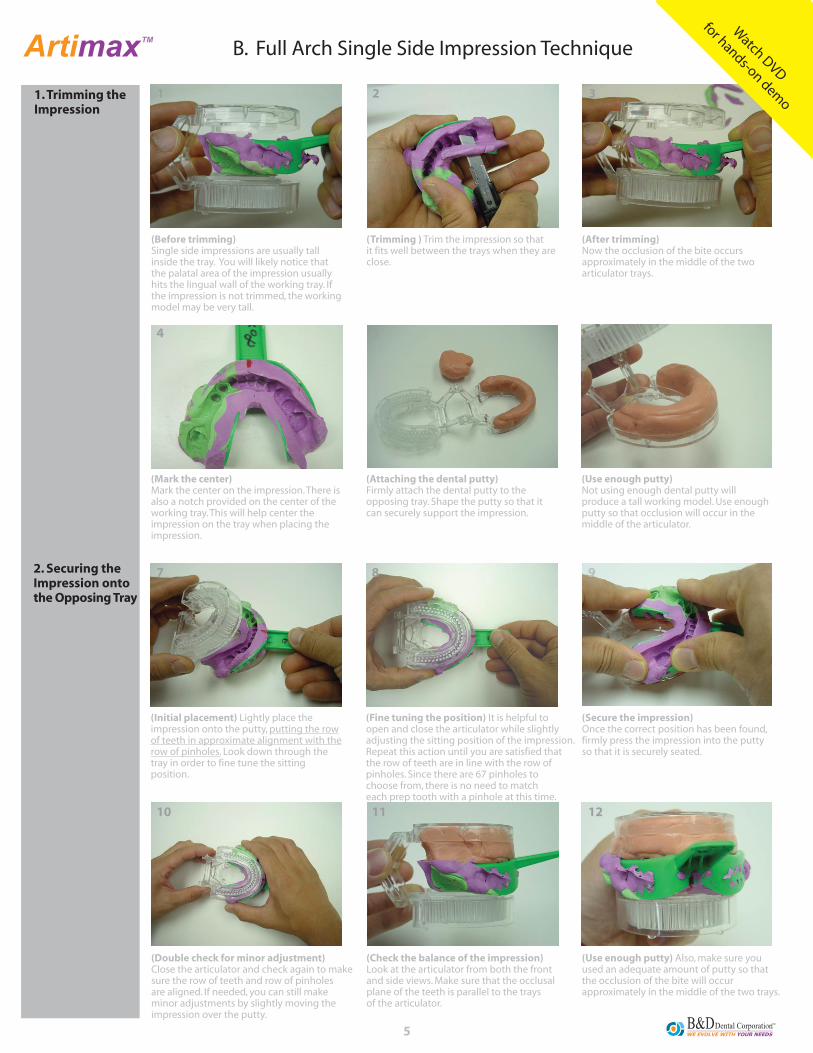
B. Full Arch Single Side Impression Technique
(Before trimming) Single side impressions are usually tallinside the tray. You will likely notice that the palatal area of the impression usually hits the lingual wall of the working tray. If the impression is not trimmed, the working model may be very tall.
(Secure the impression) Once the correct position has been found, firmly press the impression into the putty so that it is securely seated.
(Trimming ) Trim the impression so thatit fits well between the trays when they areclose.
(After trimming) Now the occlusion of the bite occursapproximately in the middle of the twoarticulator trays.
(Double check for minor adjustment) Close the articulator and check again to makesure the row of teeth and row of pinholesare aligned. If needed, you can still make minor adjustments by slightly moving theimpression over the putty.
(Check the balance of the impression) Look at the articulator from both the frontand side views. Make sure that the occlusalplane of the teeth is parallel to the traysof the articulator.
(Use enough putty) Also, make sure you used an adequate amount of putty so that the occlusion of the bite will occur approximately in the middle of the two trays.
1 2 3
4 5 6
7 8 9
10 11 12
(Mark the center)Mark the center on the impression. There isalso a notch provided on the center of the working tray. This will help center the impression on the tray when placing theimpression.
(Attaching the dental putty)Firmly attach the dental putty to theopposing tray. Shape the putty so that itcan securely support the impression.
(Use enough putty)Not using enough dental putty willproduce a tall working model. Use enough putty so that occlusion will occur in the middle of the articulator.
(Initial placement) Lightly place theimpression onto the putty, putting the rowof teeth in approximate alignment with therow of pinholes. Look down through the tray in order to fine tune the sitting position.
(Fine tuning the position) It is helpful to open and close the articulator while slightly adjusting the sitting position of the impression. Repeat this action until you are satisfied that the row of teeth are in line with the row of pinholes. Since there are 67 pinholes to choose from, there is no need to match each prep tooth with a pinhole at this time.
1. Trimming theImpression
Watch DVD
for hands-on demo
2. Securing theImpression ontothe Opposing Tray
5
B. Full Arch Single Side Impression Technique
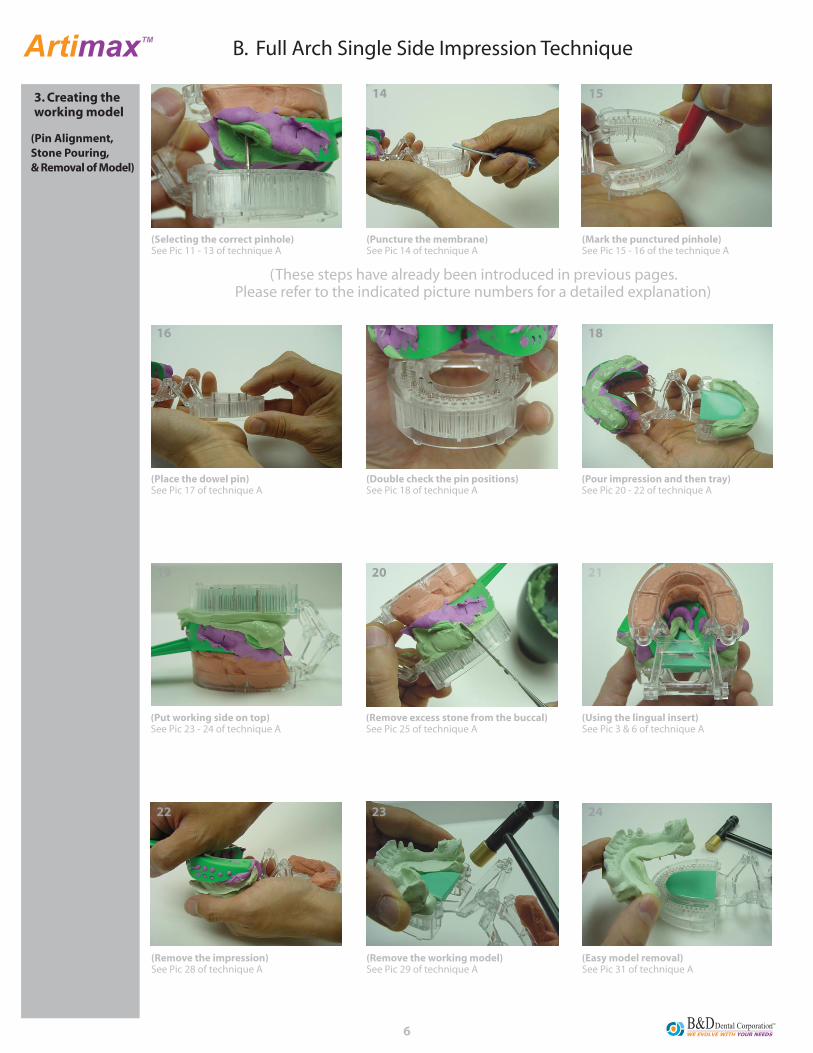
(Selecting the correct pinhole)See Pic 11 - 13 of technique A
(Using the lingual insert)See Pic 3 & 6 of technique A
(Puncture the membrane) See Pic 14 of technique A
(Mark the punctured pinhole)See Pic 15 - 16 of the technique A
(Remove the impression)See Pic 28 of technique A
(Remove the working model)See Pic 29 of technique A
(Easy model removal)See Pic 31 of technique A
13 14 15
16 17 18
19 20 21
22 23 24
(Place the dowel pin)See Pic 17 of technique A
(Double check the pin positions)See Pic 18 of technique A
(Pour impression and then tray)See Pic 20 - 22 of technique A
(Put working side on top)See Pic 23 - 24 of technique A
(Remove excess stone from the buccal)See Pic 25 of technique A
3. Creating the working model
6
(These steps have already been introduced in previous pages.Please refer to the indicated picture numbers for a detailed explanation)
(Pin Alignment,Stone Pouring,& Removal of Model)
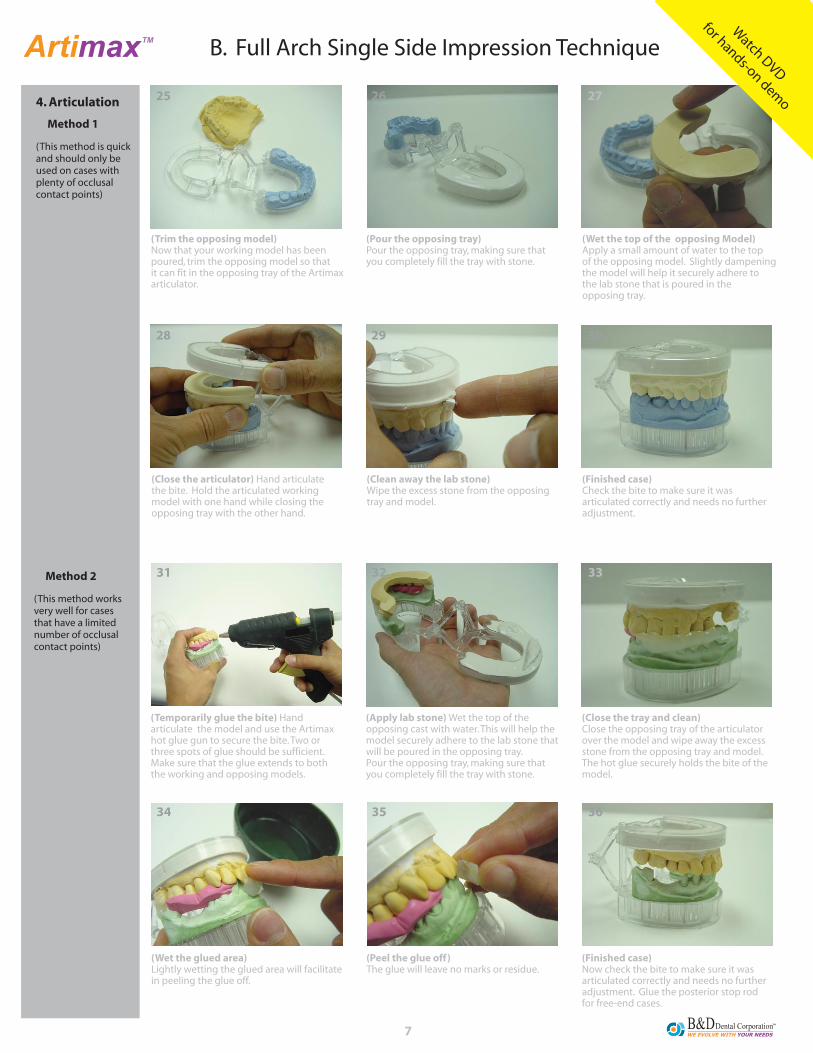
(Close the tray and clean)Close the opposing tray of the articulatorover the model and wipe away the excessstone from the opposing tray and model. The hot glue securely holds the bite of themodel.
(Wet the glued area) Lightly wetting the glued area will facilitatein peeling the glue off.
(Peel the glue off) The glue will leave no marks or residue.
(Finished case)Now check the bite to make sure it wasarticulated correctly and needs no furtheradjustment. Glue the posterior stop rodfor free-end cases.
31 32 33
34 35 36
(Temporarily glue the bite) Hand articulate the model and use the Artimax hot glue gun to secure the bite. Two or three spots of glue should be sufficient. Make sure that the glue extends to both the working and opposing models.
(Apply lab stone) Wet the top of the opposing cast with water. This will help themodel securely adhere to the lab stone thatwill be poured in the opposing tray. Pour the opposing tray, making sure thatyou completely fill the tray with stone.
7
Method 2
(This method works very well for cases that have a limited number of occlusal contact points)
B. Full Arch Single Side Impression Technique
4. Articulation
Method 1
(This method is quickand should only be used on cases with plenty of occlusalcontact points)
(Wet the top of the opposing Model)Apply a small amount of water to the topof the opposing model. Slightly dampeningthe model will help it securely adhere tothe lab stone that is poured in the opposing tray.
(Close the articulator) Hand articulate the bite. Hold the articulated working model with one hand while closing the opposing tray with the other hand.
(Clean away the lab stone) Wipe the excess stone from the opposingtray and model.
(Finished case)Check the bite to make sure it wasarticulated correctly and needs no furtheradjustment.
(Trim the opposing model) Now that your working model has been poured, trim the opposing model so thatit can fit in the opposing tray of the Artimaxarticulator.
(Pour the opposing tray) Pour the opposing tray, making sure thatyou completely fill the tray with stone.
Watch DVD
for hands-on demo25 26 27
28 29 30
C. Using the Lingual Insert to Pour Multiple Cases
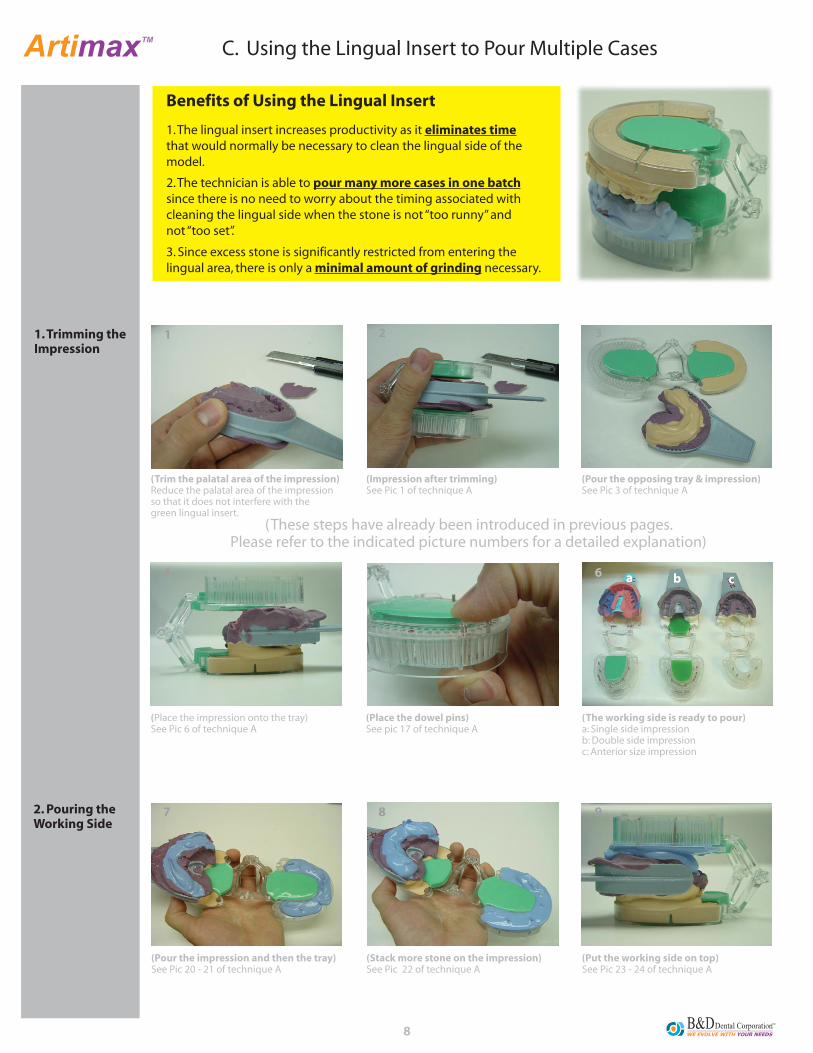
(The working side is ready to pour) a: Single side impressionb: Double side impressionc: Anterior size impression
(Pour the impression and then the tray) See Pic 20 - 21 of technique A
(Stack more stone on the impression)See Pic 22 of technique A
(Put the working side on top)See Pic 23 - 24 of technique A
2 3
4 5 6
7 8 9
(Impression after trimming)See Pic 1 of technique A
(Pour the opposing tray & impression)See Pic 3 of technique A
(Place the impression onto the tray)See Pic 6 of technique A
(Place the dowel pins)See pic 17 of technique A
1. Trimming theImpression
2. Pouring the Working Side
8
Benefits of Using the Lingual Insert
1. The lingual insert increases productivity as it eliminates time that would normally be necessary to clean the lingual side of themodel.
(Trim the palatal area of the impression)Reduce the palatal area of the impressionso that it does not interfere with thegreen lingual insert.
a b c
(These steps have already been introduced in previous pages.Please refer to the indicated picture numbers for a detailed explanation)
3. Since excess stone is significantly restricted from entering the lingual area, there is only a minimal amount of grinding necessary.
2. The technician is able to pour many more cases in one batch since there is no need to worry about the timing associated with cleaning the lingual side when the stone is not “too runny” and not “too set”.
1
C. Using The Lingual Insert for Multiple Pours
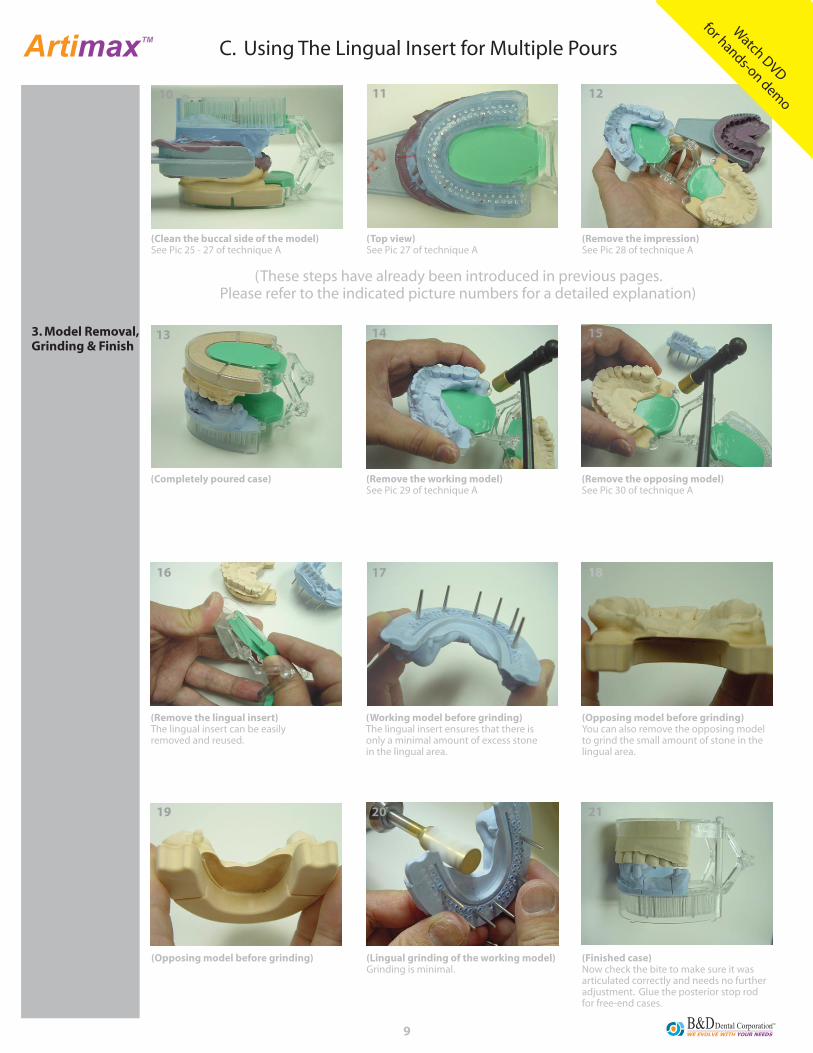
(Opposing model before grinding) You can also remove the opposing modelto grind the small amount of stone in the lingual area.
(Top view) See Pic 27 of technique A
(Remove the impression)See Pic 28 of technique A
(Opposing model before grinding) (Lingual grinding of the working model)Grinding is minimal.
(Finished case) Now check the bite to make sure it wasarticulated correctly and needs no furtheradjustment. Glue the posterior stop rodfor free-end cases.
11 12
14 15
16 17 18
19 20 21
(Remove the working model)See Pic 29 of technique A
(Remove the opposing model)See Pic 30 of technique A
(Remove the lingual insert)The lingual insert can be easily removed and reused.
(Working model before grinding)The lingual insert ensures that there is only a minimal amount of excess stone in the lingual area.
3. Model Removal,Grinding & Finish
Watch DVD
for hands-on demo
9
(Completely poured case)
(Clean the buccal side of the model)See Pic 25 - 27 of technique A
(These steps have already been introduced in previous pages.Please refer to the indicated picture numbers for a detailed explanation)
10
13
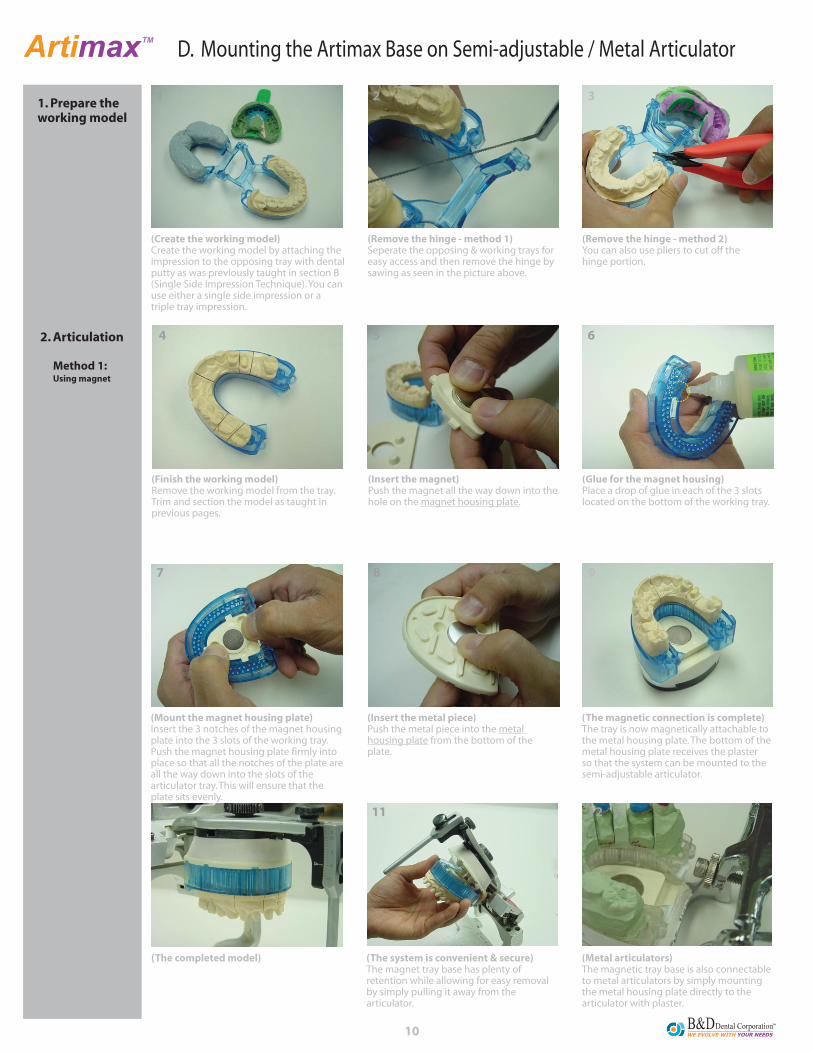
(The magnetic connection is complete)The tray is now magnetically attachable to the metal housing plate. The bottom of the metal housing plate receives the plaster so that the system can be mounted to the semi-adjustable articulator.
(The completed model)
(The system is convenient & secure) The magnet tray base has plenty of retention while allowing for easy removal by simply pulling it away from the articulator.
(Metal articulators)The magnetic tray base is also connectable to metal articulators by simply mounting the metal housing plate directly to the articulator with plaster.
7 8 9
10 11 12
(Mount the magnet housing plate)Insert the 3 notches of the magnet housing plate into the 3 slots of the working tray. Push the magnet housing plate firmly into place so that all the notches of the plate areall the way down into the slots of the articulator tray. This will ensure that the plate sits evenly.
(Insert the metal piece)Push the metal piece into the metal housing plate from the bottom of the plate.
10
D. Mounting the Artimax Base on Semi-adjustable / Metal Articulator
(Remove the hinge - method 2)You can also use pliers to cut off thehinge portion.
(Finish the working model) Remove the working model from the tray.Trim and section the model as taught inprevious pages.
(Insert the magnet)Push the magnet all the way down into the hole on the magnet housing plate.
(Glue for the magnet housing)Place a drop of glue in each of the 3 slotslocated on the bottom of the working tray.
(Create the working model) Create the working model by attaching theimpression to the opposing tray with dentalputty as was previously taught in section B (Single Side Impression Technique). You can use either a single side impression or a triple tray impression.
(Remove the hinge - method 1) Seperate the opposing & working trays for easy access and then remove the hinge bysawing as seen in the picture above.
1 2 3
4 5 6
1. Prepare theworking model
2. Articulation
Method 1:Using magnet
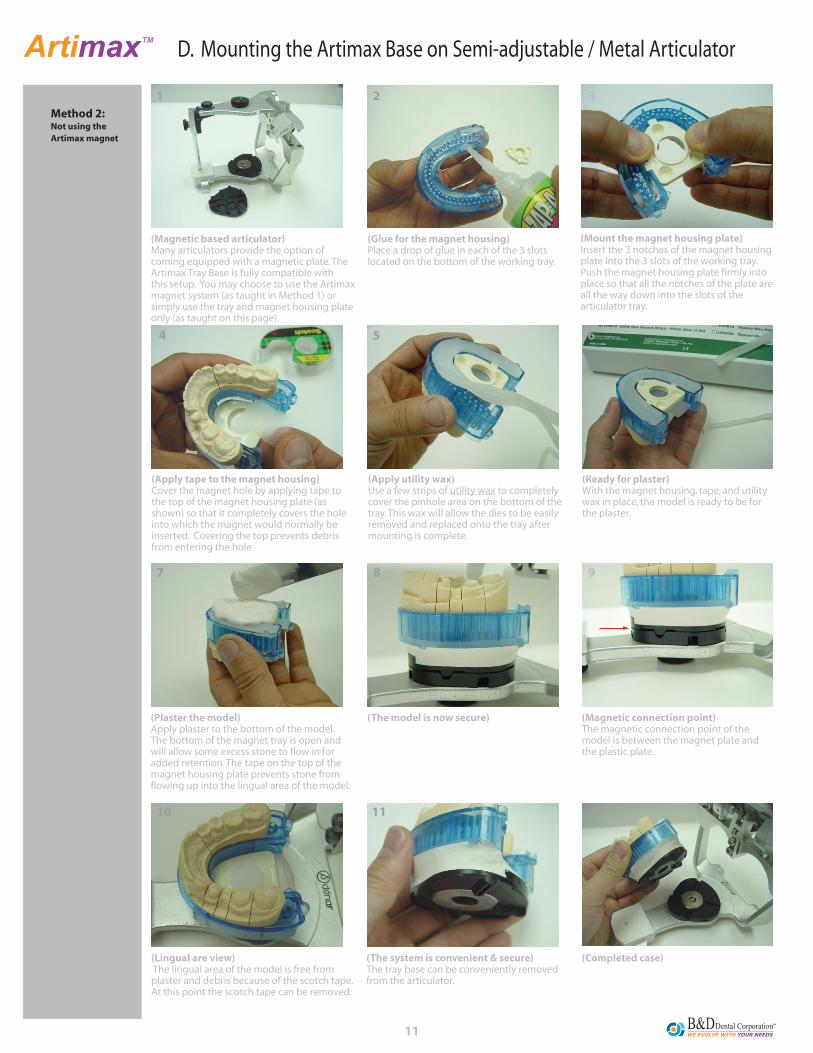
(Magnetic connection point)The magnetic connection point of themodel is between the magnet plate and the plastic plate.
(Lingual are view) The lingual area of the model is free fromplaster and debris because of the scotch tape.At this point the scotch tape can be removed.
(The system is convenient & secure) The tray base can be conveniently removed from the articulator.
(Completed case)
7 8 9
10 11 12
(Plaster the model)Apply plaster to the bottom of the model.The bottom of the magnet tray is open andwill allow some excess stone to flow in for added retention. The tape on the top of the magnet housing plate prevents stone fromflowing up into the lingual area of the model.
(The model is now secure)
11
D. Mounting the Artimax Base on Semi-adjustable / Metal Articulator
(Apply tape to the magnet housing) Cover the magnet hole by applying tape tothe top of the magnet housing plate (as shown) so that it completely covers the hole into which the magnet would normally be inserted. Covering the top prevents debris from entering the hole
(Apply utility wax)Use a few strips of utility wax to completelycover the pinhole area on the bottom of the tray. This wax will allow the dies to be easily removed and replaced onto the tray aftermounting is complete.
(Ready for plaster)With the magnet housing, tape, and utility wax in place, the model is ready to be for the plaster.
(Magnetic based articulator) Many articulators provide the option of coming equipped with a magnetic plate. The Artimax Tray Base is fully compatible with this setup. You may choose to use the Artimax magnet system (as taught in Method 1) or simply use the tray and magnet housing plate only (as taught on this page).
(Glue for the magnet housing)Place a drop of glue in each of the 3 slotslocated on the bottom of the working tray.
1 2 3
4 5 6
Method 2:Not using the Artimax magnet
(Mount the magnet housing plate)Insert the 3 notches of the magnet housing plate into the 3 slots of the working tray. Push the magnet housing plate firmly into place so that all the notches of the plate areall the way down into the slots of the articulator tray.