fujitsu rohs survey tool operating...
TRANSCRIPT

Fujitsu RoHS Survey ToolFujitsu RoHS Survey ToolOperating ManualOperating Manual
Ver. 3.00
All Rights Reserved, Copyright(C) Fujitsu Limited 2003
2005.1. 21
Fujitsu Limited
Procurement GroupCorporate Environmental Affairs GroupCorporate Product Technology Group

Operating EnvironmentOperating EnvironmentOperating System: Windows 98/Me/NT4.0/2000/XPApplication: Microsoft Excel 97/2000/XP
Terms of Granted Use Permit
Fujitsu grants the gratuitous permit for the use, reproduction and distribution of this Software (hereinafter referred to as this Software including the related documents) under the following terms:
1. Copyright and the Terms of Granted Use Permit included in this Software are to be set forth in the whole or partial reproduction of this Software.
2. This Software is neither to be sold singly nor to be sold in its entirety or partially as part of anotherproduct.
3. When publicizing any outcome gained through the use of this Software in publication or officialannouncement, both this Software and our company name are to be clearly put in citation, etc.
4. Fujitsu will not be held liable for correction of errors and any other maintenance of this Software.And Fujitsu will not be held liable for any damages or claims by third party resulting from the use,reproduction and distribution of this Software regardless of any legal reasons.
All Rights Reserved, Copyright(C) Fujitsu Limited 2003

----Table of Contents----
All Rights Reserved, Copyright(C) Fujitsu Limited 2003
Chapter 1 Flow of Fujitsu RoHS Survey
Chapter 2 Flow of Making RoHS Reply File
Chapter 3 Starting RoHS Survey Tool
Chapter 4 Saving Information on Surveyed Company
Chapter 5 Loading JGP Request File
Chapter 6 Entering Data and Information
Chapter 7 Checking Entries
Chapter 8 Confirmation of Each Part Data
Chapter 9 Saving Entries as RoHS Reply File
Chapter 10 Exiting Fujitsu RoHS Survey Tool
Appendixes
1
2
3
5
6
8
12
14
16
19
20

All Rights Reserved, Copyright(C) Fujitsu Limited 2003
Vendor
Flow of Fujitsu RoHS Survey
Receive JGP Request File
Fujitsu RoHS Survey Tool
Send RoHS Reply File
3. Loading
5. Save Data as RoHS Reply File
Fujitsu
Group
1. By E-mail
6. By E-mail
1. Receive a JGP request file from Fujitsu group by e-mail.
6. Send the RoHS reply file to Fujitsu group by e-mail.
You can send each part data as a RoHS reply file one after another to Fujitsu group when it is ready.
4. Reply Data and Information
Reference Terminology
2. Download Fujitsu RoHS Survey Tool placed on the Fujitsu Green Procurement homepage.
4. Reply referring to Fujitsu RoHS Survey Guideline.
JEITA : Japan Electronics and Information Technology Industries AssociationJGPSSI : Japan Green Procurement Survey Standardization InitiativeJGP File : Standard Format File set by JEITA and JGPSSI for Green Procurement Survey (The file extension is .jgp)RoHS File : Fujitsu Unique format file set for RoHS Survey based on JGP file (The file extension is .rohs)
2. Downloading from
Fujitsu Homepage
5. Save your entries as a reply file, which is hereafter called RoHS reply file. The file extension is “ .rohs”.
3. Load the JGP request file into Fujitsu RoHS SurveyTool. The file extension is “ .jgp”.
Chapter 1
- 1 -

All Rights Reserved, Copyright(C) Fujitsu Limited 2003
Flow of Making RoHS Reply FileStarting RoHS Survey Tool
Chapter 2
Start Fujitsu RoHS Survey Tool (Chapter3 P3)
Enter the information on “Surveyed Company” which has direct contact with Fujitsu, Saving Information of Surveyed Company such as company name, address, and the name of a person who is in contact with Fujitsu.
Then save the information as default value. (Chapter 4 P5)* This action is optional, but you can reduce the man-hour by saving the information of
“Surveyed Company” before loading a JGP request file.
*Optional only for the first time
Loading JGP File
Entering Information of Surveyed Company
Load a JGP request file (Chapter 5 P6)
Conformation of Each Part Data
Saving Entries as RoHS Reply File
Exiting RoHS Survey Tool
Entering Basic Information of Parts
Entering Information on Each RoHS Substance
Adding Countries/Sites where
the Final Processing is ConductedIf there are two or more countries or sites of which final processing is conducted for one part, add the names of the countries or sites. (Chapter 6 P10)
Enter the information on each RoHS substance contained in a part, such as the contamination of RoHS substances, their total disuse time. (Chapter 6 P11)
Enter the information on “Surveyed Company” which has direct contact with Fujitsu, such as company name, address, and the name of a person who is in contact with Fujitsu.(Chapter 6 P8)
Enter the information of a part, such as a manufacturer’s name and the part number used at the surveyed company. (Chapter 6 P9)
Confirm entered data and information on each part, and print the entries if need be. (Chapter 8 P14)
Save the entries as a RoHS reply file . The file extension is “.rohs”. (Chapter 9 P16)And please send this reply file to Fujitsu by e-mail.
Exit Fujitsu RoHS Survey Tool. (Chapter 10 P19)
- 2 -
If necessary
If necessary
Checking Entries
Sending RoHS Reply File Send the RoHS reply file to Fujitsu group by e-mail.
Check if data and information are correctly entered. (Chapter 7 P12)

All Rights Reserved, Copyright(C) Fujitsu Limited 2003
Since a default security level is reinforced in Excel 2000 or higher versions, the macro may not function. If the macro does not function, the dialog above does not appear. To enable macro, please refer to Appendix 1-Changing Security Level.
• Fujitsu reserves the right to upgrade version of Fujitsu RoHS Survey Tool at any time and without prior notice.Please check the home page for Fujitsu Green Procurement periodically and reply always by using the current version.
• Since the tool is repeatedly usable, it is not necessary to download every time you get a request file.
Double-click
Click [Enable Macro(E)]
Starting RoHS Survey Tool
1-1 After downloading Fujitsu RoHS Survey Tool, save it to a folder such as the desktop.
Note
1-2 Save the JGP request file received from Fujitsu into a folder such as the desktop. (The file extension is “.jgp”.)1-3 Double-click the icon of Fujitsu RoHS Survey Tool.
1-4 A dialog of security appears. Then click [Enable Macro(E)].(A macro is embedded in this tool. Be sure to enable the macro before using the tool.)
Note
1. How to Start
Chapter 3
- 3 -

Chapter 3 Starting RoHS Survey Tool
2. Start-up WindowThe following window appears when starting Fujitsu RoHS Survey Tool.
All Rights Reserved, Copyright(C) Fujitsu Limited 2003
Loading the JGP Request File(Chapter 5 Section 1)
Confirming each part data (Chapter 8 Section 1)
Saving entries and create RoHS Reply File(Chapter 9 Section 1)
Exiting this tool
(Chapter 10 Section 1)
Parts list is added after loading the JGP Request File.
Checking if there is no incorrect entries (Chapter 7 Section 1)
Storing the Information on a surveyed company from a menu inside. Saving the information before loading a JGP request file helps you to reduce the time of filling data. (Chapter 4 Section 1)
This Help Button gives you explanation of each function. If the explanation is not displayed, please refer to Appendix 3, 1.
- 4 -

All Rights Reserved, Copyright(C) Fujitsu Limited 2003
Enter The SurveyedCompany Info1
Saving Information on Surveyed Company (Optional)
You must save Fujitsu RoHS Survey Tool in order to reuse the information on the surveyed company set as default value.
From the EXCEL menu, select [File] → [Save] or [Save As] to save Fujitsu RoHS Survey Tool.
Save the information on the surveyed company before loading the JGP request file allows you to reduce the time of entering the same information every time you reply. Thus you can reduce man-hour for replying.
1. At first, enter only the information on the surveyed company*.
* “Surveyed company” is a company which has a direct contact with Fujitsu.
2. From the menu [Surveyed Company], select [Save The Surveyed Company Info].
Select2
3. Save the RoHS Survey Tool File.
Chapter 4
- 5 -

All Rights Reserved, Copyright(C) Fujitsu Limited 2003
RoHS Reply files, and Xla(JGPSSI Ver.1 Format) files
can also be loaded.
Reply files of which file extension is .jgp made with
Fujitsu Green Survey Tool can also be loaded.
When multiple files are selected, the files are united
and loaded in selected order.
Loading JGP Request File
Click [Open]3
Click the Load button1
By reusing the information of the surveyed company on the currently working file, man-hour will be reduced.
[Yes(Y)]: Reuse the currently entered information on thesurveyed company.
[No(N)]: Use the information of a newly downloading file.
Select the JPG Request File2
Hints and Tips
1-2 Select the JGP Request File and click [Open].
1-1 Click the 【Load】 button.
1-3 The following dialog appears when you load a new file with the information on a surveyed company entered.
1-4. A dialog notifying the completion of a file loading appears when it’s finished.
1. Load JGP Request File
Chapter 5
- 6 -

Chapter 5. Loading JGP Request File
2. After Loading JGP Request FileAfter loading the JGP file, the following window appears. Please enter in the white cells according to each indication.
All Rights Reserved, Copyright(C) Fujitsu Limited 2003
Chapter 6, 1. Enter the Information on Surveyed Company ** “Surveyed company” is a company which has a direct contact with Fujitsu.
Chapter 6, 3. Enter Countries/Sites Where Final Processing is Conducted
Chapter 6, 2. Enter the Basic Information of parts Chapter 6, 4.
Enter Data for Each RoHS Substance
- 7 -

All Rights Reserved, Copyright(C) Fujitsu Limited 2003
Entering Data and Information1. Enter Information on Surveyed Company
Hints and Tips
Enter the information on surveyed company*. * “Surveyed company” is a company which has a direct contact with Fujitsu.
Select [Display Saved Surveyed Company Info]
With these menus, you can display or hide the area of Surveyed Company information
The saved information on the surveyed company can be reused by displaying from a menu of [Display Saved Surveyed Company Info] as explained in Chapter 4.
Enter Response Date2
If only a few rows for parts are displayed due to the limited window size, you can enlarge the display area of the rows by hiding the area of Surveyed Company information.
Enter the Christian era (four digits)/month (two digits)/date (two digits) in half-sized numbers.
Chapter 6
Enter Information onSurveyed Company1
- 8 -

Chapter 6 Entering Data and Information
2. Enter Basic InformationEnter the basic information of surveying parts.
All Rights Reserved, Copyright(C) Fujitsu Limited 2003- 9 -
Manufacturer's name1 Parts Number2 Data Version3Revision Date4
Enter the final manufacturer's name.
Enter the parts number used at surveyed company.
Enter the final revision date of data in Christian era (four digits)/month (two digits)/date (two digits) in half-sized numbers.
Enter the version of data managed at surveyed company.
Hints and Tips
Ascending Order, Descending OrderAscending Order: In alphabetic order, smaller numerical value priority orderDescending Order: Reverse alphabetic order, larger numerical value priority orderClick [Sort]Select the Sort OrderSelect the Key Information
Copy/Paste The function of Copy/Paste of Excel can be used in all survey items.
Sort The Sort function will allow you to sort parts rows in ascending or descending order by using parts number, parts name,
manufacturer's name, or part number (used at surveyed company) as a key information.

Chapter 6 Entering Data and Information
3. Enter the Name of Counties/Sites in Which Final Processing is Conducted (If necessary)
Add a line(s) if there are two or more countries or sites in which final processing is conducted for one part.
3-1 Click the [Add Line] button.
Click [OK]3
Select the parts for whichcountries/sites are to be added
2
Press this button to select all the parts
Click [Add Line]3-2 The Parts List dialog appears. Select all the parts for which
countries/sites are to be added and click the [OK] button.
1
You can select multiple parts at a time.Please refer to Appendix 2. How to Select Multiple Parts.Once added countries/sites cannot be deleted.
Hints and Tips
The entered basic information of a part before adding lines is copied to the newly added lines for the corresponding part.
Hints and Tips
3-3. When the notification dialog appears, click the [OK] button. Parts row will be added.
A line mistakenly added to a part can not be deleted, so that do not select the part when you check or save the entries.Please refer to Chapter 7,1-2
Note
- 10 - All Rights Reserved, Copyright(C) Fujitsu Limited 2003
Chapter 6 Entering Data and Information
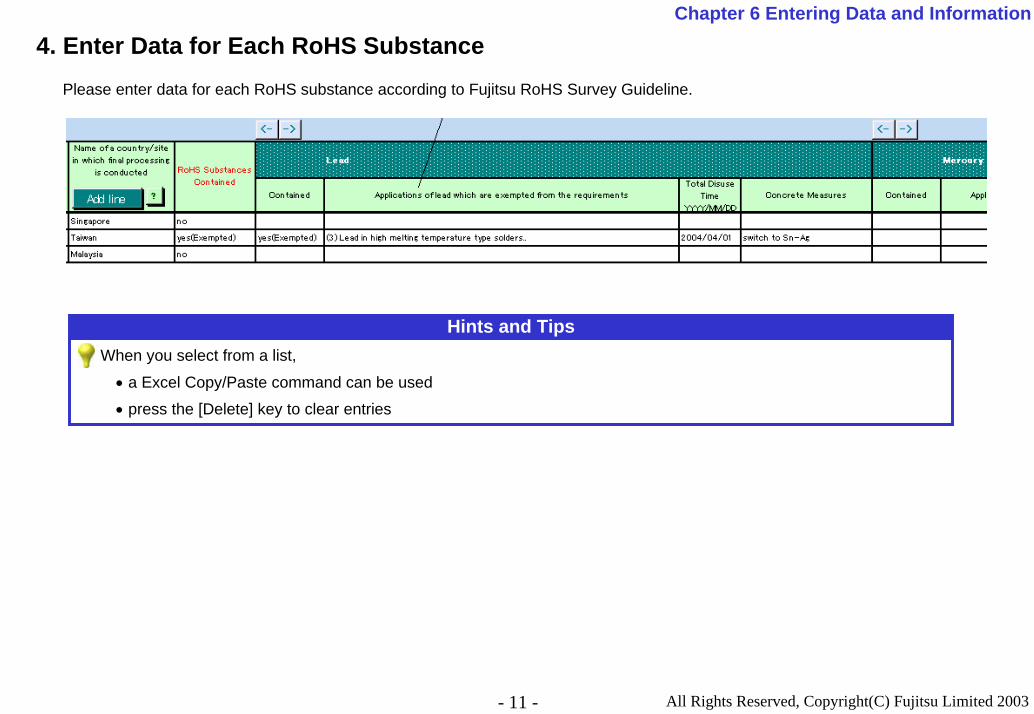
4. Enter Data for Each RoHS SubstancePlease enter data for each RoHS substance according to Fujitsu RoHS Survey Guideline.
All Rights Reserved, Copyright(C) Fujitsu Limited 2003
When you select from a list,
• a Excel Copy/Paste command can be used
• press the [Delete] key to clear entries
Hints and Tips
- 11 -

All Rights Reserved, Copyright(C) Fujitsu Limited 2003
Chapter 7 Checking EntriesCheck if data and information are correctly entered.
Click Check1
1. Check1-1 Click the [Check] button.
1-2. Select part window appears. Select all the parts to be checked.
Select all the parts to be checked2
Click [OK]
Press this button to select all the parts
3
1-3. The entries are checked.
- 12 -

Chapter 7 Checking Entries
2. If There is No Incorrect Entry2-1 A dialog box which notifies that all data and information have been correctly entered appears. Click the OK button.
3. If There is an Incorrect Entry3-1 A dialog box below appears if there is an incorrect entry.
Click [OK]1
3-2 A new book is created to show the place and its solution of the incorrect entries. When you have corrected the entries, please close the book. (Not necessary to save)
3-3 Incorrect entries are marked on RoHS Survey Tool, so that it is easy to find which cells you should reenter.
All Rights Reserved, Copyright(C) Fujitsu Limited 2003- 13 -
[E] appears in the part row.
[*] appears for the selected parts to be saved.Reenter data in the cells indicated with Pink-color.

All Rights Reserved, Copyright(C) Fujitsu Limited 2003
Confirmation of Each Part Data (If necessary) Check and confirm the entries of the respective parts. The sheet titled “Each Part Data” takes the optimum size to be printed in A4 size, so that you can print the parts data on paper if necessary.
Click Each Part Data1
1. Confirmation of Each Part Data1-1 Click the [Each Part Data] button.
1-2. When the parts selection dialog box appears, select all the parts to be respectively confirmed.
Select all the parts to be confirmed2
Click [OK]
Press this button to select all the parts
4
Chapter 8
Select number of Sheets to include in a Book3
1-3. When the notification dialog appears, click the [OK] button.A sheet titled “Each part data” is created in a book for the respective parts.
- 14 -

Chapter 8 Confirmation of Each Part Data
2. Confirmation Window for Each Part DataWhen two or more parts are selected, the respective parts data is shown on respective sheets in a book. When you have completed confirmation or printing, close the book of each part data. (Not necessary to save)
- 15 - All Rights Reserved, Copyright(C) Fujitsu Limited 2003

All Rights Reserved, Copyright(C) Fujitsu Limited 2003- 16 -
Select all the parts to be saved2
The function of selecting parts allows you to save the data and information of parts which is completely-entered in the RoHS Reply File.
Hints and Tips
Press this button to select all the parts
Click [OK]3
Saving Entries as RoHS Reply FileWhen you complete the survey, save the entries as a reply file (RoHS Reply File). The file extension is “ .rohs”.The entries are automatically checked before saved.
1. Save the Entries
Click [Save]1
1-1 Click the [Save] button.
1-2 Select part window appears. Select all the parts to be saved.
Chapter 9
1-3. The entries are automatically checked.

Chapter 9 Save Entries as RoHS Reply File
2. If There is No Incorrect Entry2-1 The Save File box appears. Type a file name in the File Name edit box, if necessary.
Enter the file name1
Click [Save]2
2-2 When saving is completed, the notification dialog appears. Click the [OK] button.
2-3. A RoHS reply file is created. Please send it to Fujitsu by E-mail.
Hints and TipsIn addition to the RoHS Reply File, an information file is created. This file is in text format and saved by the name of “RoHS_info_[Name you typed in].rohs.text”. The file contains the saved information on surveying company and the saved parts list. Please make use of them for management of reply status and others.
- 17 - All Rights Reserved, Copyright(C) Fujitsu Limited 2003

Chapter 9 Save Entries as RoHS Reply File
3. If There is an Incorrect EntryIt is unable to save as a reply file if there is an incorrect entry.
3-1 A dialog box below appears if there is an incorrect entry.
Click [OK]1
3-2 A new book is created to show the place and its solution of the incorrect entries. When you have corrected the entries, please close the book. (Not necessary to save)
3-3 Incorrect entries are marked on RoHS Survey Tool, so that it is easy to find which cells you should reenter. Correct the entries and save it over again. (Chapter 9, 1)
[E] appears in the part row.
All Rights Reserved, Copyright(C) Fujitsu Limited 2003- 18 -
[*] appears for the selected parts to be saved. Reenter data in the cells indicated with Pink-color.

All Rights Reserved, Copyright(C) Fujitsu Limited 2003
Exiting Fujitsu RoHS Survey ToolChapter 10
1-1 When you want to save the tool in the middle of working, choose [Save As] from Excel file menu and type file name
in the File Name edit box.
1-2 If you want to close without saving the tool, choose the [Close] command from Excel file menu.
- 19 -

All Rights Reserved, Copyright(C) Fujitsu Limited 2003
Appendix 1. Changing Security LevelClick [Tool]1
Click [Macro]2
Click [Security]3
Click [Medium]4
When the confirmation tool is started with the "high" security levelReference
1. For Excel2000
The tool starts but does not run when you click the button within the tool.
2. For ExcelXP
The warning dialog box for security appears.
The tool starts but does not run when you click the button within the tool.
- 18 -
All Rights Reserved, Copyright(C) Fujitsu Limited 2003
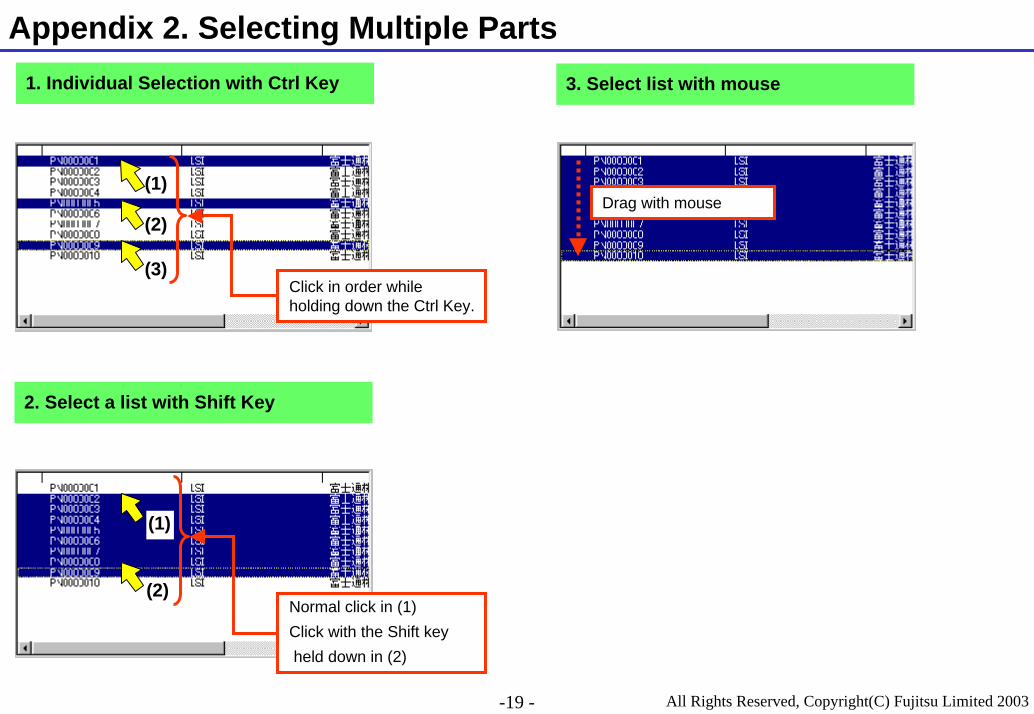
Appendix 2. Selecting Multiple Parts1. Individual Selection with Ctrl Key 3. Select list with mouse
Click in order while holding down the Ctrl Key.
(1)
(2)
(3)
Drag with mouse
2. Select a list with Shift Key
Normal click in (1)Click with the Shift keyheld down in (2)
(2)
(1)
-19 -

All Rights Reserved, Copyright(C) Fujitsu Limited 2003
Appendix 3. Others
1. Button
Press this button to see brief explanation of each function.
* Office Assistant should be made effective in order to use this button.
From EXCEL menus, select [Help] → [Show the Office Assistant].
2. and Button
Press the or button to move quickly within the survey tool.
* This button helps you to jump to the next survey items.
-20 -