fujitsu cloud service s5 introduction guide cloud service s5 introduction guide ver. 1.3 date of...
TRANSCRIPT

1
All Rights Reserved, Copyright FUJITSU AMERICA, INC. 2011
FUJITSU Cloud Service S5
Introduction Guide
Ver. 1.3
FUJITSU AMERICA, INC.

2
All Rights Reserved, Copyright FUJITSU AMERICA, INC. 2011
FUJITSU Cloud Service S5
Introduction Guide Ver. 1.3
Date of publish: September, 2011
All Rights Reserved, Copyright © FUJITSU AMERICA, INC.
No reproduction or republication without written permission.
Modification history
Version Date of issue Description
1.0 May 17, 2011 Original version
1.1 September 2, 2011 Updated version with newer screen shots and streamlined sections
1.2 September 7, 2011 Additional updates to sections 1.7 and beyond
1.3 June 30, 2016 Updates for name change to FUJITSU Cloud Service S5

3
All Rights Reserved, Copyright FUJITSU AMERICA, INC. 2011
Introduction
This document is a how-to guide on developing a new system by using Global Cloud Platform.
Please also refer to following documentation about the details of Global Cloud Platform, which can be
found at https://globalcloud.us.fujitsu.com/portala/ctrl/aboutSopManual
General Documentation
Functional Specification: describes key features of the Global Cloud Platform
Service Portal User’s Guide: provides in-depth information about usage of the Service Portal
Global Cloud Platform Service Catalog: defines technical workings of the platform
Task Specific Documentation
KMS User’s Guide: describes how to activate OS’s license using KMS services
SSL Server Certificate Registration: defines how to register certificates in the Load Balancer (SLB)
W2K3 and W2k8 Sysprep Manuals: offer assistance when create customer specific image templates
API Documentation
API User’s Guide: defines the general usage of the API
API Reference Manual: provides an XML-RPC type API reference manual
Related Documents
KMS Activation Program: a batch file to register a virtual machine with the KMS
API Library: a ZIP file of the API SDK
Other Portal Links
Restriction / Consideration http://globalcloud.us.fujitsu.com/portal/ctrl/aboutSopNote:
FAQ http://globalcloud.us.fujitsu.com/portal/ctrl/aboutSopFaq
Notes
Contents in this guide are subject to change/update without notice.

4
All Rights Reserved, Copyright FUJITSU AMERICA, INC. 2011
Table of contents
Chapter.1 Start-up ................................................................................................................................................................... 5
1.1 General Outline .............................................................................................................................................................................. 6
1.2 Sign-Up for Service (Obtain Administrator ID) ............................................................................................................................... 7
1.2.1 Log-in to Top (Home) page ....................................................................................................................................................... 7
1.2.2 New Registration of Customer (Administrator ID) .................................................................................................................... 8
1.2.3 Login with ID/password ........................................................................................................................................................... 13
1.3 Getting Activated (completing the documentation) ...................................................................................................................... 15
1.3.1 Complete and Return the Application Form (Usage Agreement) .......................................................................................... 16
1.3.2 Complete and Return the Credit Application (for new customers) ......................................................................................... 16
1.3.3 Receive a Notice that your Adminstrator ID is Activated ........................................................................................................ 17
1.4 Administrator Login and Certificate .............................................................................................................................................. 18
1.4.1 Download the Client certificate ............................................................................................................................................... 18
1.4.2 Import the Client certificate ...................................................................................................................................................... 20
1.4.3 Log-in to Service Portal with Administrator’s ID. (Client certificate) ........................................................................................ 25
1.5 Add Resource Controller ID ......................................................................................................................................................... 27
1.5.1 Apply to add new Resource Controller (Registrant’s part) ..................................................................................................... 27
1.5.2 Registration Process (Registered person’s part) .................................................................................................................... 29
1.5.3 Log-in with ID and Password .................................................................................................................................................. 31
1.5.4 Create Certificate and Log-in as Resource Controller............................................................................................................ 31
1.6 Create New System ..................................................................................................................................................................... 35
1.6.1 Login to Service Portal (Client certificate) ............................................................................................................................... 35
1.6.2 Create New Virtual System ..................................................................................................................................................... 35
1.6.3 Confirm the Estimate............................................................................................................................................................... 39
1.6.4 Agree to the terms / deploy virtual system .............................................................................................................................. 39
1.7 Install Middleware and Applications ............................................................................................................................................. 40
1.7.1 SSL-VPN Console Connection .............................................................................................................................................. 40
1.7.2 Install Middleware and Application .......................................................................................................................................... 43
1.7.3 Enable Access to the Internet (Modify Network Settings) ...................................................................................................... 43
1.8 Operate and Monitor Virtual Systems .......................................................................................................................................... 44
Chapter.2 Cancelation ....................................................................................................................................................... 45
2.1 Flow to cancel the contract .......................................................................................................................................................... 46
2.1.1 Save data outside Global Cloud Platform (If necessary) ....................................................................................................... 46
2.1.2 Log-in to Service Portal with Administrator’s ID (Client Authentication) ................................................................................. 46
2.1.3 Return All Virtual Systems ....................................................................................................................................................... 46
2.1.4 Submit a Service Cancellation Request. ................................................................................................................................ 46
2.1.5 Receive a Service Cancellation Request. .............................................................................................................................. 46
Chapter.3 Global Service Desk and Optional Services .......................................................................... 47
3.1 Global Service Desk Support ....................................................................................................................................................... 48
3.1.1 Registering for service (Sign-Up) ............................................................................................................................................ 48
3.1.2 Global Service Desk Support.................................................................................................................................................. 48
3.2 Additional Services ....................................................................................................................................................................... 48
3.2.1 Operating System and Middleware Support (optional / future) .............................................................................................. 48
3.2.2 Intranet Connection Service (optional / future) ....................................................................................................................... 48
5
All Rights Reserved, Copyright FUJITSU AMERICA, INC. 2011
Chapter.1
Start-up This chapter explains the initial activities associated with using this
service.

6
All Rights Reserved, Copyright FUJITSU AMERICA, INC. 2011
1.1 General Outline The following diagram explains the flow to start using this service.
Receive Registration Guide mail.
Receive Registration Completion mail
Receive Service Available notice mail
Receive Registration Guide mail
Receive Registration Completion mail
Operations after activation
1.2 Sign-Up for Service (get Administrator ID
1.3 Apply to the Service (get activated)
1.4 Certificate login with Administrator ID
1.6 Create New System
Workflow Actions at
Service Portal
Application
Activity
Remarks
1.5 Add Resource Controller IDs
1.7 Install Middleware and Application
1.8 Operate / Monitor Virtual Systems
OPTION

7
All Rights Reserved, Copyright FUJITSU AMERICA, INC. 2011
1.2 Sign-Up for Service (Obtain Administrator ID)
This section explains how to “Sign-Up” as a new customer and obtain an Administrator ID.
This service has 2 types of ID: Administrator ID and Resource Controller ID.
ID type Description
Administrator ID This is the ID which manages a contract of FUJITSU Cloud Service
S5. Each contract can obtain only one ID. This ID is also allowed to
create and manage multiple additional Resource Controller ID.
Resource Controller ID This is an ID,created by anAdministrator ID, and can access and
control the FUJITSU Cloud Service S5 system. Multiple Resource
Controllers can be created within each contract. The number of
Resource Controller ID is unlimited.
[ATTENTION] if your organization already has one registered administrator (and Contract number), it is easier to add
additional resource controllers to that account to streamline the number of contracts a customer has. Resource Controllers
can be given any number of rights (including full administrative access).
1.2.1 Log-in to Top (Home) page
Users can access the Service Portal from the client PC’s web browser via Internet using the following URL.
http://globalcloud.us.fujitsu.com
* If displayed language is not in English, please click the pull-down menu at upper-right and select
[English].
System requirements of Service Portal are as follows
.
Screen Resolution 1280 x 1024 or higher (Recommend)
1024 x 768 (Minimum)
Figure 1-1 Home Page of Service Portal

8
All Rights Reserved, Copyright FUJITSU AMERICA, INC. 2011
CPU / Memory / HDD No particular restrictions as long as following OS, Web browser,
Flash Player, and Java are running
OS Microsoft Windows XP SP3 (32bit)
Microsoft Windows Vista SP2 (32bit)
Web browser Microsoft Internet Explorer 7 / 8
Flash Player Adobe Flash Player 10
Java Runtime Environment JRE 6.0 or higher (Required when downloading the Certificate file)
[ATTENTION] there are issues with certain versions of the Java runtime environment. Please review the
FAQ area of the service portal for details.
1.2.2 New Registration of Customer (Administrator ID)
(1) Click “Sign up” button on the top page.
* Click “Subscribe” button.
Figure 1-2 New Registration – Sign-Up / Subscribe

9
All Rights Reserved, Copyright FUJITSU AMERICA, INC. 2011
(2) Enter the e-mail address and agree to the terms.
* [ATTENTION] Registration guide and important information to continue the registration process are
sent to the defined e-mail, so please be sure it is a valid e-mail address.
After checking the agreement check box for the service terms and the catch-all control, please click “Apply”
button.
Figure 1-3 New Registration – Accept Terms / Apply

10
All Rights Reserved, Copyright FUJITSU AMERICA, INC. 2011
(3) Confirm the acceptance of application (1st email to continue the registration)
An e-mail (as shown below) will be sent to the provided e-mail address.
(4) Enter the temporary password.
Enter the temporary password provided in the guidance mail, and click “Go to Registration Procedure”
button.
(5) Enter User Information
Access the URL provided in the guidance e-mail and use the Temporary Password to continue.
NOTE: If users do not proceed with the registration within 24 hours, this application becomes invalid.
Figure 1-4 New Registration – Guidance Email is sent
Figure 1-3 New Registration – Temporary Password
Figure 1-5 New Registration - Email Confirmation

11
All Rights Reserved, Copyright FUJITSU AMERICA, INC. 2011
Figure 1-4 New Registration – Customer Information
Enter the user information and click “Next” button.
* Items with (*) mark are required, so please enter them.
* “Furigana”: For users living outside eastern language area, please enter the name again.
12
All Rights Reserved, Copyright FUJITSU AMERICA, INC. 2011
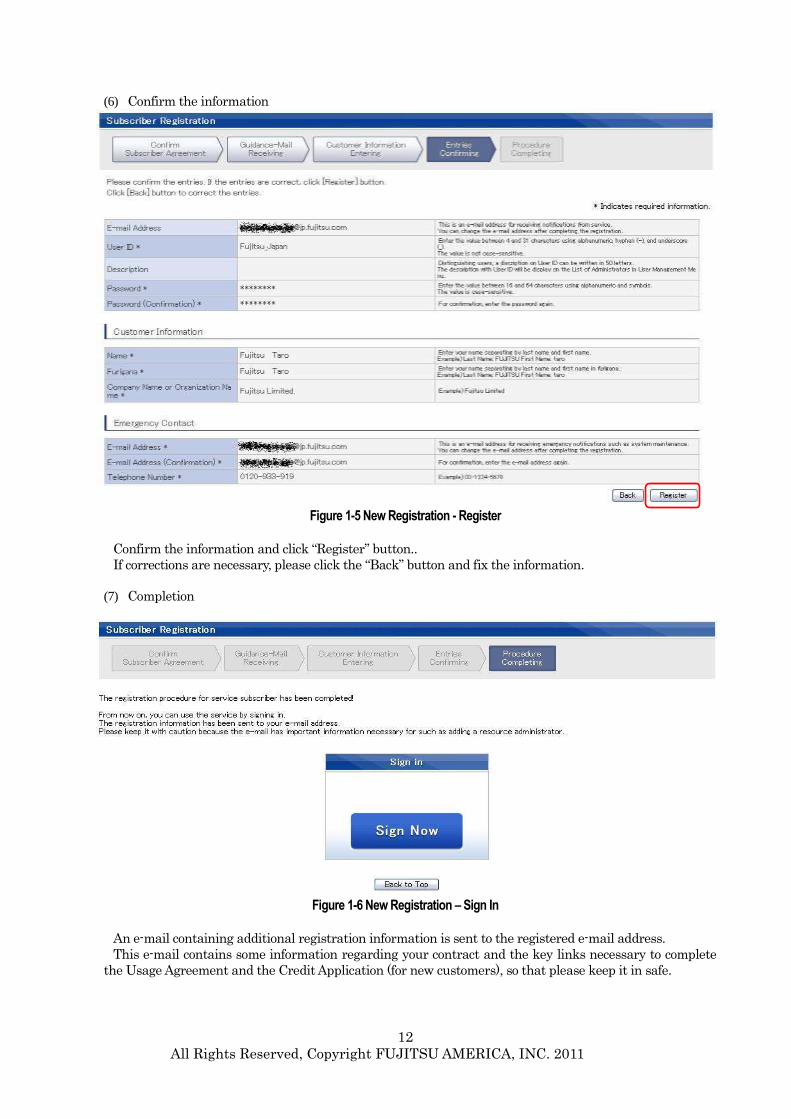
(6) Confirm the information
Figure 1-5 New Registration - Register
Confirm the information and click “Register” button..
If corrections are necessary, please click the “Back” button and fix the information.
(7) Completion
Figure 1-6 New Registration – Sign In
An e-mail containing additional registration information is sent to the registered e-mail address.
This e-mail contains some information regarding your contract and the key links necessary to complete
the Usage Agreement and the Credit Application (for new customers), so that please keep it in safe.

13
All Rights Reserved, Copyright FUJITSU AMERICA, INC. 2011
1.2.3 Login with ID/password
(1) Click “Sign in” button on the top page.
(2) Input the registered information (User ID and password), and then click “Sign in” button.
(3) Complete login
After login is completed, users can estimate the monthly service charge by designing sample systems.
After Administration ID is fully activated [see section Error! Reference source not found. for details], users
will be asked to create a certificate, after which they can create and deploy virtual systems, add
additional Resource Controllers and have full access to the platform.
At the first estimate operation, users need to specify the private IP address space settings. Please
carefully read the notes below, and then specify the setting.
Figure 1-7 Login with ID/password – Sign in
Figure 1-8 Login with ID/password – Enter Credentials
Figure 1-9 Login with ID/password - Estimate

14
All Rights Reserved, Copyright FUJITSU AMERICA, INC. 2011
[Excerpts from Global Cloud Platform Functional Specification (ver. 2.0) – on Private IP Address Space]
Private IP address space
In the private IP address allocation, network addresses with 24 bit netmask are utilized from the range of specified IP addresses, and
allocated to each segment in the system. Private IP addresses are allocated automatically to each resource (VMs and SLB built-in
servers).
* Private IP addresses are set when each resource is deployed, and they are released when resources are deleted. Therefore
private IP address will not change by the start/stop operation of each resource.
The ranges of private IP addresses that can be specified are as follows.
- Class A: 10.0.0.0 - 10.255.255.255
- Class B: 172.16.0.0 - 172.31.255.255
- Class C: 192.168.0.0 - 192.168.255.255
[Attention] * In the above range of private IP address, [10.128.0.0/16] is not available.
[Example of private IP address allocation]
If you are using the full Class C range and configure your first virtual system with 3 segments (DMZ, SECURE1, SECURE2),
private IP addresses will be allocated to each resource as follows.
DMZ segment - - - Any IP address within 192.168.1.0/24.
SECURE1 segment - - - Any IP address within 192.168.2.0/24
SECURE2 segment - - -Any IP address within 192.168.3.0/24
Private IP address is allocated to the each resource at the time of 1st boot, and the IP address is released when the target
resource is deleted. Therefore, the IP address is not changed by the start/stop operation of the resource.
[Attention] About the address overlap when using Private Network Connection (Intranet Connection Service)
If planning to use the Private Network Connection (aka: Intranet Connection Service), the Private network (customer) address
space MUST NOT overlap with the range defined for the Global Cloud Platform. Please specify (on FUJITSU Cloud
Service S5 side) a range of network addresses that is different from the existing customer (private) network address, if Intranet
Connection service is anticipated.
[Attention] About private IP address setting for each resource
Users cannot specify the private IP address for each resource. They can only specify the range of IP address. Please do not
change the private (assigned) IP address of a VM or allocate the virtual IP address to VM manually, or you may not be able to
communicate with those VMs.
[Attention] About the address overlap when using SSL-VPN Console Connection
When users connect via SSL-VPN, the VPN connection will fail if the IP address of client PC overlaps with the range of network
address of the created FUJITSU Cloud Service S5 system. Please specify the range of network address that is different
from the network address of client PC in the private IP address space setting.

15
All Rights Reserved, Copyright FUJITSU AMERICA, INC. 2011
1.3 Getting Activated (completing the documentation)
This section explains about how to “activate” your account by completing the necessary documentation.
* The Administrator’s ID obtained in the previous section is allowed only to estimate virtual systems. In
order to use the complete set of Service Portal functions, the Administrator ID must be activated by the
Service Delivery manager (using the process depicted above)
* [ATTENTION] If theAdministrator ID is not activated within 90 days from the registration date, this
Administrator ID will be deleted.
The e-mail below was provided when the first stage of registration was completed. This e-mail has all the
necessary links and information to complete the activation process.
Download the Application Form (Usage Agreement)
Return the completed Application (Usage)
Receive the completed Application (Usage)
and Credit Application (new customer)
(Usage Agreement)
Activate the Administrator’s ID (*)
Customers
Complete the Application (Usage Agreement)
FUJITSU Cloud Service S5
Send an ID Activation Completion notice. Receive an ID Activation Completion notice.
Download the Credit Application Form
If a new Customer to Fujitsu America
Complete the Credit Application
Return the completed Application (Credit)
Figure 1-13 Activating the Adminstrator ID

16
All Rights Reserved, Copyright FUJITSU AMERICA, INC. 2011
1.3.1 Complete and Return the Application Form (Usage Agreement)
Step 1 in the above Email provides the link to the contracts area of the service portal, where you can find
the Application (Usage Agreement) form. That URL is:
http://globalcloud.us.fujitsu.com/portal/ctrl/aboutSopTermsE
Please download the Usage Agreement from that link, sign it and return it to the email address provided:
Fujitsu Sales will send a Service Application form.
1.3.2 Complete and Return the Credit Application (for new customers)
If you are a new customer to Fujitsu America, you must also complete and return the credit application
from the link provided. http://globalcloud.us.fujitsu.com/portal/ctrl/aboutSopTermsE
Please download and complete the Credit Application, sign it and return it to the email address provided:
Figure 1-14 Email Information for Activation
17
All Rights Reserved, Copyright FUJITSU AMERICA, INC. 2011
1.3.3 Receive a Notice that your Adminstrator ID is Activated
When the above documentation has been received by the Service Delivery Manger, s/he will activate your
Administrator ID and your account will be ready for full access. You will receive an email notice that
your account has been activated.
Upon next login, after the Administrator’s ID is activated, users will be guided through the process of
creating a Client certificate, which is required for 2-factor authenticated access to the full range of Service
Portal features.
[ATTENTION] if you have an existing relationship with a Fujitsu America Client Executive, you may
also be interested in the Proof of Concept or Pilot Programs, which can expedite your access to the system
while the documentation activities progress in parallel.

18
All Rights Reserved, Copyright FUJITSU AMERICA, INC. 2011
1.4 Administrator Login and Certificate
1.4.1 Download the Client certificate
When users log-in to the Service Portal with an ID and password (after Administrator’s ID is activated),
they are asked to create a certificate. The certificate will automatically be installed to the browser used
during its creation, however you will want to “re-install it” if you desire the additional security of 2-factor
authentication. You can also import the certificate to other client PC’s you plan to use.
Please follow the steps outlined below to create and download the certificate
(1) Log-in to Service Portal with ID/password after Administrator’s ID is activated.
[ATTENTION]: if you see the Create Certificate button (as in the screen shot below), your account is
activated and ready for full use. IF you still see the “Estimate” button, your account is NOT yet in an
activated status. If you have completed the documentation steps in the previous section and believe your
account should be activated, please contact the Global Service Desk for support.
(2) Click “Create Certificate” button.
Figure 1 – 15 Client Certificate - Create
(3) Click “Issue/Update Certificate”.
Figure 1-16 Client Certificate - Issue/Update

19
All Rights Reserved, Copyright FUJITSU AMERICA, INC. 2011
(4) Enter the password for the private key.
Figure 1- 17 Client certificate – Private Key
The password for the private key is required when importing a certificate to the client PC.
Enter the password for the private key, and then click “Issue” button.
* [ATTENTION] Between 16 and 31 letters of one-byte alphanumeric characters and symbols for the
password of the private key. The letters are case-sensitive.
* Password of the private key is required information, so please confirm it in the second text box
* If the following security warning message is displayed after clicking the “Issue” button, please click
“No”.
(5) Specify the folder location where certificate files are saved.
Figure 1 – 18 Client certificate - Download
Click “Browse” button, and then specify the folder location where certificate files are saved. After folder
location is specified, please click “Store” button.
* In order to download the certificate, Java Runtime Environment (JRE) 6.0 or higher is required. If JRE

20
All Rights Reserved, Copyright FUJITSU AMERICA, INC. 2011
6.0 or higher is not installed, please install JRE 6.0 or higher first, and then start over this procedure.
* Specifying the folder location where the certificate file is save is required field, so please make sure to
specify it.
[ATTENTION]: there are known issues with certain JRE releases (java 6 Update 24 or higher is
recommended) for updated details on this topic, please see the FAQ area of the Service Portal:
http://globalcloud.us.fujitsu.com/portal/ctrl/aboutSopFaq
(6) Complete the download
Figure 1-109 Client certificate - Complete
1.4.2 Import the Client certificate
If you wish to add 2-factor authentication to the current PC, or import the certificate to other PCs, this
section describes those steps.
Import the certificate which is downloaded from Service Portal.
(1) Execute the downloaded certificate file (UserCert.p12).
When double-clicking the certificate file, the Certificate Import Wizard is displayed.
(2) Start the Certificate Import Wizard
Figure 1-20 Import the Client certificate
The following operations are implemented not on the web browser but on the Windows.

21
All Rights Reserved, Copyright FUJITSU AMERICA, INC. 2011
Click “Next” button and move to the next step.
(3) Specify the Certificate file
Figure 1-21 Import the Client certificate (2)
Specify the Certificate file (UserCert.p12) to import, and then click “Next” button.
If the file is not specified automatically by default, please click “Browse” button and specify the
Certificate file manually.
(4) Enter the password for the private key
Figure 1-22 Import the Client certificate (3)
Enter the password for the private key which was specified when creating and downloading the
Certificate file from the Service Portal.
In addition, in order to provide for higher security level (2-factor authentication), please check the box of
[Enable strong private key protection.] and remove the checkmark of [Mark this key as exportable.].
The option of [Include all extended properties.] may not be displayed depending on the OS. If it is
displayed, please keep the default setting.

22
All Rights Reserved, Copyright FUJITSU AMERICA, INC. 2011
After entering the password and checking the boxes, please click “Next” button.
(5) Specify the Certificate Store
Figure 1 - 23 Import the Client certificate (4)
Select the [Automatically select the certificate store based on the type of certificate] and click “Next”
button.
(6) Complete the Certificate Import Wizard
Figure 1-114 Import the Client certificate (5)
Confirm the specified settings and click “Finish” button.
23
All Rights Reserved, Copyright FUJITSU AMERICA, INC. 2011
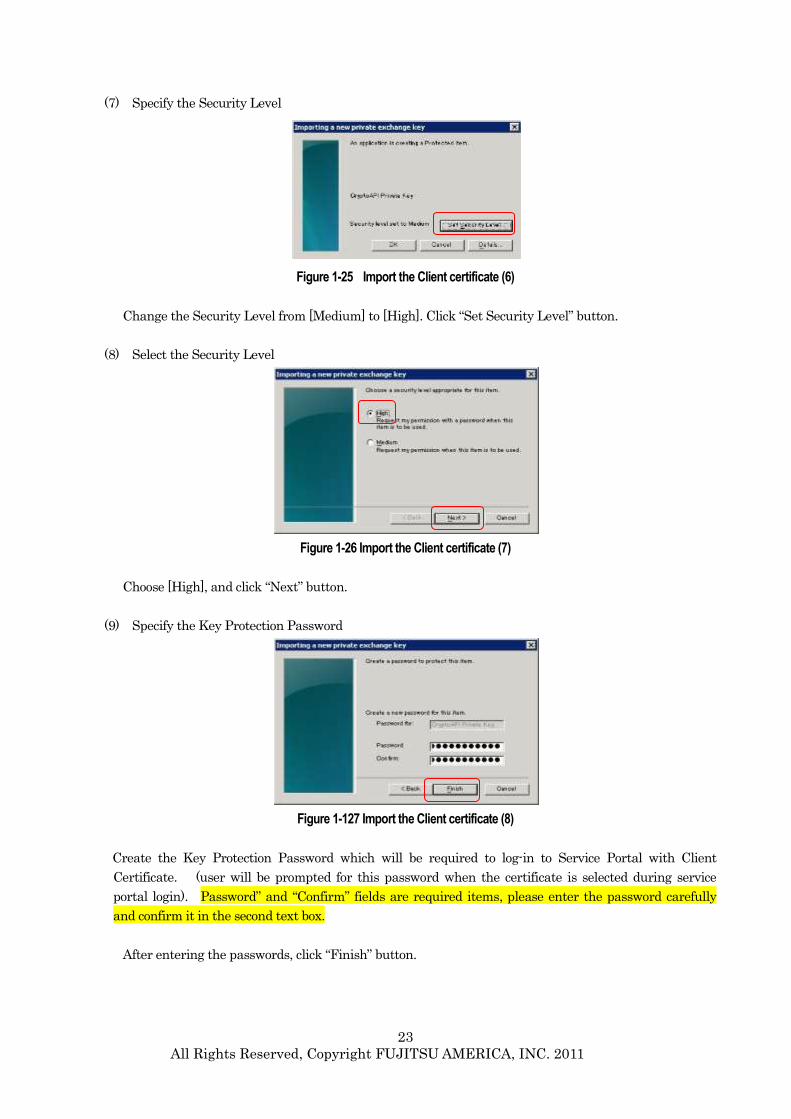
(7) Specify the Security Level
Figure 1-25 Import the Client certificate (6)
Change the Security Level from [Medium] to [High]. Click “Set Security Level” button.
(8) Select the Security Level
Figure 1-26 Import the Client certificate (7)
Choose [High], and click “Next” button.
(9) Specify the Key Protection Password
Figure 1-127 Import the Client certificate (8)
Create the Key Protection Password which will be required to log-in to Service Portal with Client
Certificate. (user will be prompted for this password when the certificate is selected during service
portal login). Password” and “Confirm” fields are required items, please enter the password carefully
and confirm it in the second text box.
After entering the passwords, click “Finish” button.

24
All Rights Reserved, Copyright FUJITSU AMERICA, INC. 2011
(10) Confirm the Security Level
Figure 1-138 Import the Client certificate (9)
Please confirm that the Security Level is “High”.
After the confirmation, please click “OK” button.
(11) Confirm the import of root certificate
Figure 1-149 Import the Client certificate (10)
Please confirm that the value of displayed Thumbprint (sha1) is same as the value of Fingerprint
printed on the following URL.
URL: https://globalcloud.us.fujitsu.com/portals/ctrl/aboutCertificate
After the confirmation, please click “Yes”.
Please confirm that the message “The import was successful” is displayed.
In case any other message is displayed, please contact Support Desk.
[ATTENTION] When the installation is completed, please close all web browsers.
25
All Rights Reserved, Copyright FUJITSU AMERICA, INC. 2011
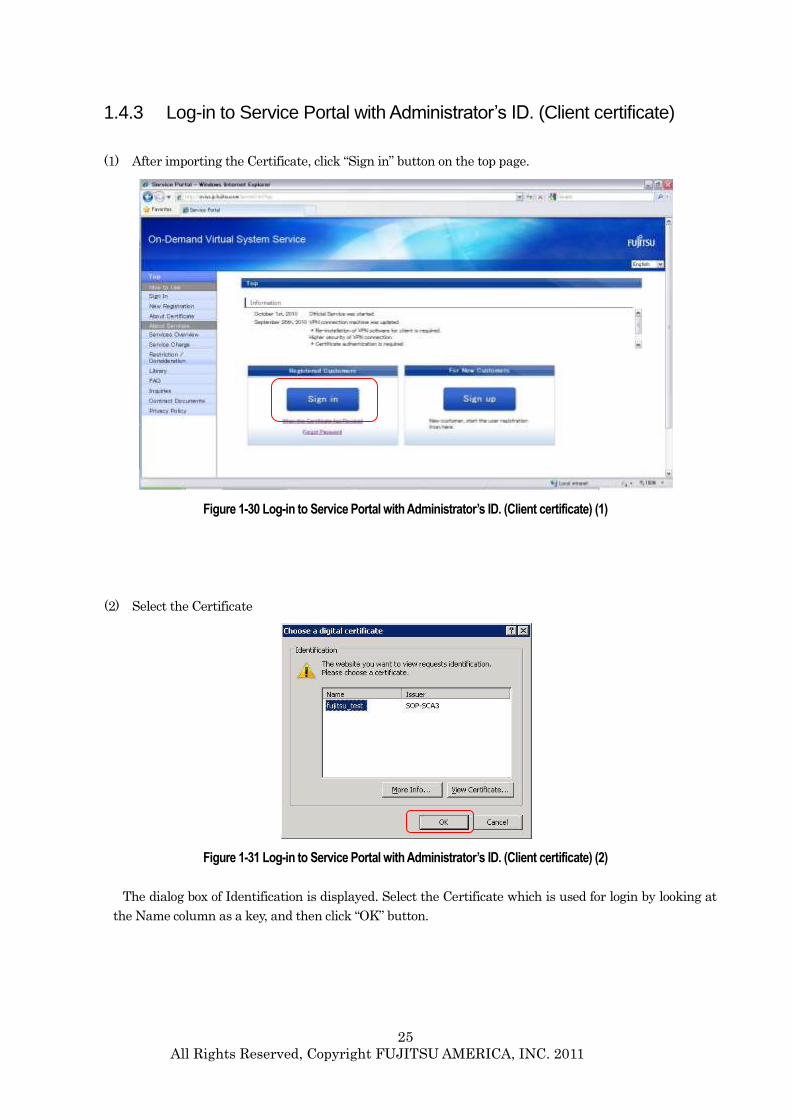
1.4.3 Log-in to Service Portal with Administrator’s ID. (Client certificate)
(1) After importing the Certificate, click “Sign in” button on the top page.
Figure 1-30 Log-in to Service Portal with Administrator’s ID. (Client certificate) (1)
(2) Select the Certificate
Figure 1-31 Log-in to Service Portal with Administrator’s ID. (Client certificate) (2)
The dialog box of Identification is displayed. Select the Certificate which is used for login by looking at
the Name column as a key, and then click “OK” button.

26
All Rights Reserved, Copyright FUJITSU AMERICA, INC. 2011
(3) Select “Grant permission ” and enter the “Key protection password”
Figure 1-32 Log-in to Service Portal with Administrator’s ID. (Client certificate) (3)
The “Key protection password” is a password which is specified when importing the Certificate.
After enter the password, please click “OK” button.
When login is completed, the following menu window is displayed.
Figure 1-153 Log-in to Service Portal with Administrator’s ID (Client certificate) (4)

27
All Rights Reserved, Copyright FUJITSU AMERICA, INC. 2011
1.5 Add Resource Controller ID This section explains how to add a Resource Controller ID. This step is not mandatory, but is strongly
recommended for secure and controlled operation.
[ATTENTION]: as mentioned earlier, the recommended model for FUJITSU Cloud Service S5 usage is to
have one Contract per customer (or business unit), from which several resource controllers can be created.
This will streamline the account management and billing interaction.
The procedure of obtaining Resource Controller ID consists of 2 parts; Registrant part and Registered
person’s part.
1.5.1 Apply to add new Resource Controller (Registrant’s part)
(1) Log-in to Service Portal with Administrator’s ID (Certificate Login).
(2) Select “User Management” from the Portal Menu.
Figure 1-164 Add Resource Controller ID (1)
1.5.1 Apply to add new Resource Controller 1.5.2 Registration Process
1.5.3 Log-in with ID/password
Registrant (Administrator) Registered Person (Resource Controller)
1.5.4 Log-in with Resource Controller’s
Certificate
1.5.5 Allocate privileges to the Created
Resource Controller ID.

28
All Rights Reserved, Copyright FUJITSU AMERICA, INC. 2011
(3) Select “Administrator List” from the User Management menu.
Figure 1 - 35 Add Resource Controller ID (2)
(4) Click “Adding Resource Administrator” button.
Figure 1-176 Add Resource Controller ID (3)
(5) Enter the registered person’s e-mail address.
Figure 1 - 37 Add Resource Controller ID (4)
In order to send a guidance mail to the registered person, please enter the valid e-mail address of that

29
All Rights Reserved, Copyright FUJITSU AMERICA, INC. 2011
person, and then click “Apply” button. The mail which explains the next step is sent to the entered e-mail
address.
* E-mail address is required information, so please makes sure to enter the same e-mail address at both
fields.
(6) Confirm the Registration Application Acceptance
Figure 1 - 38 Add Resource Controller ID (5)
The guidance mail is sent to the entered e-mail address.
Please ask the registered person to implement the registration procedure from [1.5.2].
If the person does not implement the registration procedure within 24 hours, the application becomes
invalid.
1.5.2 Registration Process (Registered person’s part)
(1) Enter the temporary password and agree to the Terms.
The following procedure is performed by the registered person.
Receive the guidance mail, and access to the URL provided in the mail.
If the registration procedure does not complete within 24 hours, the application
becomes invalid, and the administrator will have to re-invite them.

30
All Rights Reserved, Copyright FUJITSU AMERICA, INC. 2011
Figure 1 - 39 Add Resource Controller ID (7)
Check the guidance mail, and enter the temporary password written in the e-mail.
Check and agree to the Terms of service as well as the Agreement items on the Catch-All Control, and
then click “Apply” or “Go to Registration Procedure” button.
(2) Enter the User information
Figure 1-40 Add Resource Controller ID (8)
Enter the customer’s information and click “Next” button.
* Items with (*) mark are required, so please enter them.
(3) Confirm the registration information

31
All Rights Reserved, Copyright FUJITSU AMERICA, INC. 2011
Figure 1 - 41 Add Resource Controller ID (9)
Check the entered information, and click “Register” button If corrections are required, click “Back”
button to move the previous window, and then fix the information.
(4) Registration completion
Figure 1-182 Add Resource Controller ID (10)
1.5.3 Log-in with ID and Password
Follow the same steps provided in section [1.2.3 Login with ID/password].
1.5.4 Create Certificate and Log-in as Resource Controller
Upon first login, the Resource Controller will be asked to create a certificate using the same technique
as the Administrator. Please refer to the section [1.4 Log-in to Service Portal with Administrator’s ID.
(Client certificate)], for the full set of steps necessary to get the Resource Controller’s system configured.
1.5.5 Allocate Privileges to the Created Resource Controller ID
The following procedure is done by the Registrant (Administrator).
By allocating the operation privileges, it is possible for Resource Controller ID to
operate the system (such as deploy new virtual system).

32
All Rights Reserved, Copyright FUJITSU AMERICA, INC. 2011
[ATTENTION] the steps below show how to make the newly added Resource Controller a “Central
Administrator” for the overall contract. If you are interested in more granular Role Based Access Control,
please refer to the Functional Specification and the Service Portal Users guide which are mentioned in the
beginning of this document.
(1) Log-in to Service Portal with Administrator’s ID (Certificate Login).
(2) Select “Access Control” from the Portal Menu.
Figure 1-193 Add Resource Controller ID (11)
(3) Click “Authorization Setting: Authorization List”.
Figure 1 - 44 Add Resource Controller ID (12)
(4) From the “Access Control: Authorization List”, click the target Resource Controller ID.
Figure 1-205 Add Resource Controller ID (13)

33
All Rights Reserved, Copyright FUJITSU AMERICA, INC. 2011
(5) At the “Access Control: Authorization Setting > Set User Authorization” window, select [Central
Administrator], and then click “Next” button.
Figure 1-46 Add Resource Controller ID (14)
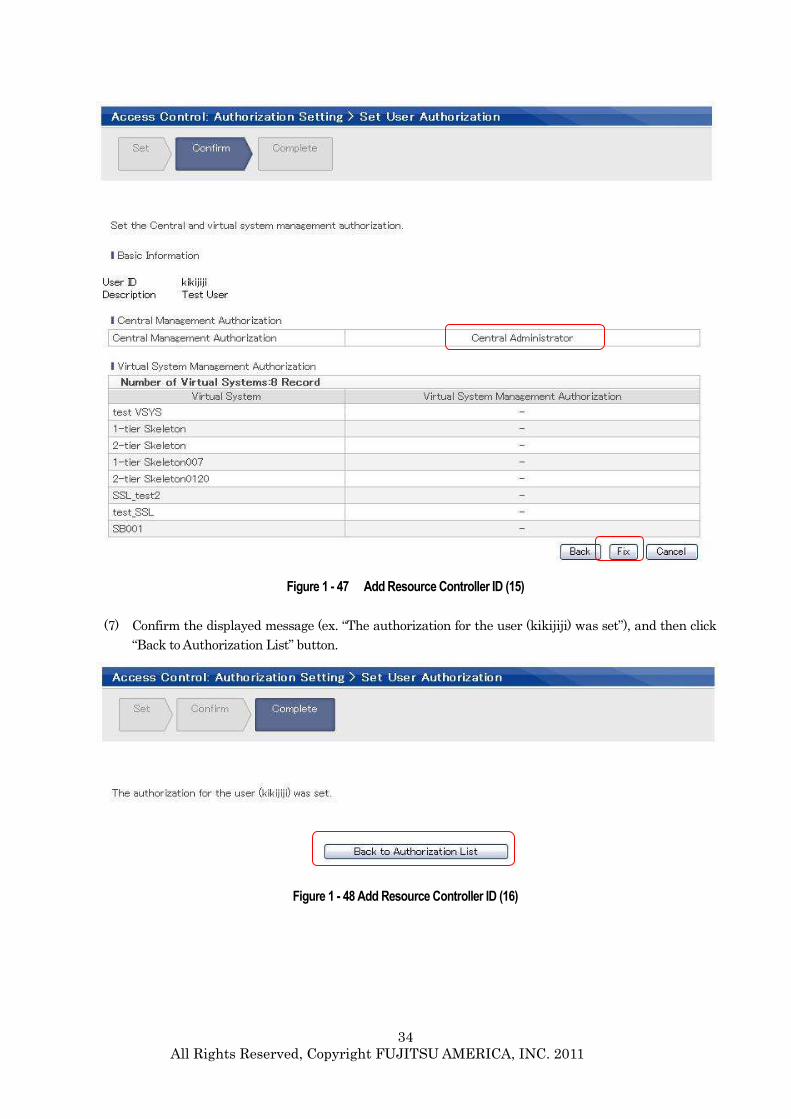
(6) At the “Access Control: Authorization Setting > Set User Authorization” window, confirm that
[Central Administrator] is specified at “Central Management Authorization”, and then click “Fix”
button
34
All Rights Reserved, Copyright FUJITSU AMERICA, INC. 2011
Figure 1 - 47 Add Resource Controller ID (15)
(7) Confirm the displayed message (ex. “The authorization for the user (kikijiji) was set”), and then click
“Back to Authorization List” button.
Figure 1 - 48 Add Resource Controller ID (16)

35
All Rights Reserved, Copyright FUJITSU AMERICA, INC. 2011
1.6 Create New System
1.6.1 Login to Service Portal (Client certificate) Log-in to Service Portal as Resource Controller or Administrator by the Client Certificate login.
1.6.2 Create New Virtual System
Please refer to FUJITSU Cloud Service S5 Portal User’s Guide Chapter 2. Create/modify a Virtual
System] for complete details on creating new virtual systems.
Standard procedure is explained below.
(1) Select “My Portal” from the Portal menu.
Figure 1-219 Create New System (1)
Resource Controller ID or Administrator’s ID
1.6.2 Create New Virtual System
1.6.3 Confirm Estimate
1.6.1 Log-in to the Service Portal (Certificate login)
1.6.4 Agree to the Terms of service /
Deploy a virtual system

36
All Rights Reserved, Copyright FUJITSU AMERICA, INC. 2011
(2) Select “Design Studio” from My Portal.
Figure 1 - 50 Create New System (2)
(3) Specify the Private IP address space setting
When creating (or estimating) the first new virtual system (only onece), the Network Configuration
must be specified. Users need to specify the range of private IP address which will be allocated to the
virtual systems (VMs and load balancers).
Figure 1-221 Create New System (3)
[ATTENTION] Users can configure this setting only when they create a first new virtual system.
Therefore, please refer to the [FUJITSU Cloud Service S5 Functional Specification] as well as the Global
Cloud Platform Portal User’s Guide 2.2 Private IP Address Space Setting] about the details in advance.
If users plan to deploy a virtual system which has 3 segments, they need to specify at least the range of 4
consecutive 24-bits netmask’s network addresses (3 network addresses (used for each 3 segments) + 1
network address (used for private IP address communication))

37
All Rights Reserved, Copyright FUJITSU AMERICA, INC. 2011
Example:
If users plan to deploy 2 separate 3-segment virtual systems, they need to specify 7 consecutive
24-bits netmask network addresses (3 + 3 + 1 = 7).
In such case, please specify as follows.
172.10.0.0 – 172.10.6.255
(4) Create New Virtual System
Figure 1-232 Create New System - Start
Click “Create a new system” link to start creating the system.
(5) Select a Template
Figure 1-243 Create New System - Template
Select a Template (in this case the 3-tier skeleton), then click Next>

38
All Rights Reserved, Copyright FUJITSU AMERICA, INC. 2011
(6) Set Basic Info
Figure 1-254 Create New System – Basic Info
Give the System a Name, select Network connection types and click Next>
(7) Configure the System
Figure 1-265 Create New System - Reconfigure
Configure the system by dragging items from the right Pane (server / other) to the left side window,
configure each item in the lower left window pane, then Click Next> when ready to continue

39
All Rights Reserved, Copyright FUJITSU AMERICA, INC. 2011
1.6.3 Confirm the Estimate
Figure 1-276 Create New System – Confirm Estimate
After users design the virtual system configuration, the approximate estimate of service charge is
displayed. The approximate estimate is based on an assumption that the system will be on for 24 hrs a
day for a full 31 day month (resulting in the 744 hrs in amount of Usage column). Your actual usage
will determine the cost, as this is a true pay per use system.
After confirming the amount, please click “Next” button.
[About the functions in the screen]
PDF Output: Users can download the approximate estimate in PDF format.
CSV Output: Users can download the approximate estimate in CSV format.
Save Estimate: Users can save the Virtual System Configuration
1.6.4 Agree to the terms / deploy virtual system
Figure 1-57 Create New System – Agree to Terms
After users understand and agree the Terms of Service, please check “I agree to the Terms of Service”,
and then click “Final Confirmation” button. When the button is clicked, the virtual system will deploy.

40
All Rights Reserved, Copyright FUJITSU AMERICA, INC. 2011
1.7 Install Middleware and Applications This section describes the following items:
- How to establish a secure connection to your virtual infrastructure
- How to install middleware and application software onto your virtual infrastructure
- How to make avirtual system accessible to the Internet.
1.7.1 SSL-VPN Console Connection By using the SSL-VPN Connection service from the Service Portal (as seen in the diagram below), users
can gain secure access to the VMs via SSL-VPN.
Figure 1-58 Establishing an SSL-VPN Connection
After Clicking the “VPN Connection” button, the user will be asked which segment of the VSYS they wish
to connect to:
Figure 1-59 Select the VSYS segment to connect (tunnel) to

41
All Rights Reserved, Copyright FUJITSU AMERICA, INC. 2011
Select a segment and click Connect.
Figure 1-60 Select the certificate identifying the user and enter the PIN (if set)
Select the proper certificate, click OK, enter the PIN then click OK
Encountering the following screen is normal due to a known Java data issue, click “Continue to this
website”
Figure 1-61 Continue to this Website
If prompted for the Certificate again, please repeat the step listed above in Figure 1 – 60.
When presented with the SSL-VPN login screen, use the FUJITSU Cloud Service S5 credentials you
were provided when your account was activated

42
All Rights Reserved, Copyright FUJITSU AMERICA, INC. 2011
Figure 1-62 Authenticate with FUJITSU Cloud Services S5 Credentials
You should see a connecting message in the browser window, folloed by a lock icon in your taskbar when
the VPN Tunnel has successfully been established.
Figure 1-63 Observe the VPN tunnel being Established
After SSL-VPN connection is established, users can gain access to the VM via RDP (Remote Desktop) for
Windows Servers and via SSH for CentOS.
Please refer to [3.2 VPN Connection (Log-in to VMs)] in the [Service Portal User’s Guide] for the details.
Target OS Remote Connection method Data Transfer method
Windows Server Remote Desktop Protocol (RDP)
connection
Shared resource of the Remote
Desktop connection
CentOS
Red Hat (In planning)
SSH SCP
In addition to the “Data Transfer Methods” provided by the remote connection software, another common
practice is to setup an FTP service on one of the DMZ VMs to accept data transfers that other VMs within
the VSYS can gain access to..
To get the private IP address of each of your Virtual machines, use the list view button of the System
Details window (as shown below).

43
All Rights Reserved, Copyright FUJITSU AMERICA, INC. 2011
Figure 1-64 Identify th private IP addresses of VMs
1.7.2 Install Middleware and Application Once you’ve established a secure connection to the VSYS and the VMs within it, you are able to install
middleware and applications as necessary, to meet your requirements.
If your setup requires access to the internet, some additional configuration is required on your VSYS (to
allow access to internet) and on your VMs to enable DNS. The following section provides some
additional insight on these steps. Connections via an Intranet (private link) are also possible, but
requires additional integration, which is outside the scope of this document.
1.7.3 Enable Access to the Internet (Modify Network Settings) Before connecting virtual systems to the Internet, please review your organization’s security policies and
guidelines to ensure you are adhering to them in an appropriate manner. Users are responsible for the
security when they make the virtual system accessible to the Internet.
For Cloud VMs to communicate with the internet, the following steps must be taken:
DNS Settings: set DNS to “Standard DNS” from VSYS System Details area
Configuration of VM: Set [156.79.66.10] for Primary DNS server for each VM requiring access
Enable global IP address: Enable obtained global IP address at Firewall built-in server.
FW NAT Setting: Set enabled global IP address for SNAPT address at Firewall built-in server.
Firewall Rule Setting (1) (http communication)
o From: Segment including VM which will access to the Internet
o To: Internet
o Source: VM which will accesses to the Internet, or [any]
o Source port: any
o Service: (not select)
o Destination/Service: Select [IP address] and input [any] in the blank
o Destination port: http (80)
o Protocol: TCP
Firewall Rule Setting (2) (https communication)
o From: Segment including VM which will access to the Internet
44
All Rights Reserved, Copyright FUJITSU AMERICA, INC. 2011
o To: Internet
o Source: VM which will access to the Internet, or [any]
o Source port: any
o Service: (not select)
o Destination/Service: Select [IP address] and input [any] in the blank
o Destination port: https (443)
o Protocol: TCP
Firewall Rule Setting (3) (DNS communication)
o From: Segment including VM which will access to the Internet
o To: Internet
o Source: VM which will access to the Internet, or [any]
o Source port: any
o Service: DNS
* In order to access to the Internet, “Internet” must be selected in network access point and firewall is
configured properly.
For complete details on each of the above settings, please consult the Functional Specification or the Portal
Users guide, both which are available from the Libray page of the Service Portal Home screen.
1.8 Operate and Monitor Virtual Systems
As the number of features available to Operate and Monitor the the virtual systems of the FUJITSU
Cloud Service S5 environment are beyond the scope of an introduction Guide, please consult the following
sections of the Portal Users guide for details.
Section 3 of the Portal users guide includes in-depth details for the following “OPERATE” functions:
Starting and stopping VMs, Server Load Balancers and Firewalls
Confirming the initial password assigned to a VM
Establishing a VPN connection to the VSYS segments
Backing up and restoring disks
Configuring the Firewall, NAT and DNS functions
Configuring the Server Load Balancer
Reviewing logs and status errors
And more….
Section 4 of the Portal users guide includes in-depth details for the following “MONITOR” functions:
Using the Portal Home (Top) Page and accessing the System Manager
Listing Virtual Systems in configuration style or list style
Displaying all VMs and their current state
Virtual System details

45
All Rights Reserved, Copyright FUJITSU AMERICA, INC. 2011
Chapter.2
Cancelation This chapter explains how to cancel the contract.
46
All Rights Reserved, Copyright FUJITSU AMERICA, INC. 2011
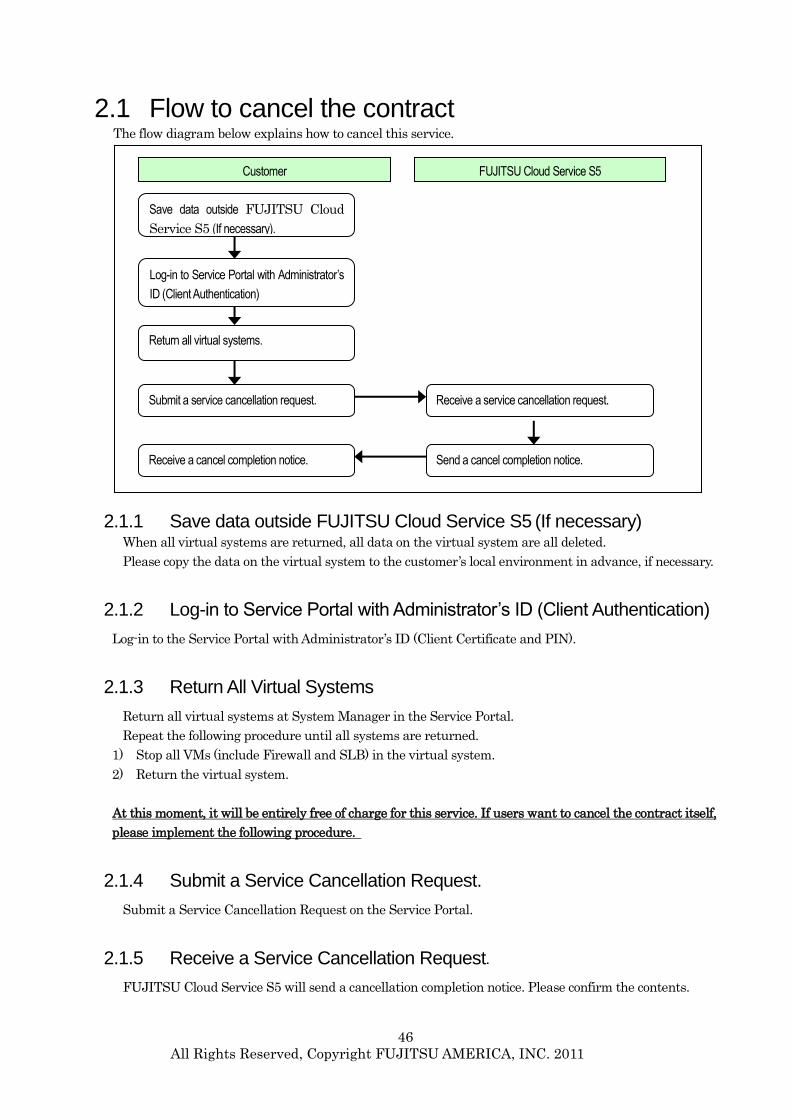
2.1 Flow to cancel the contract The flow diagram below explains how to cancel this service.
2.1.1 Save data outside FUJITSU Cloud Service S5 (If necessary) When all virtual systems are returned, all data on the virtual system are all deleted.
Please copy the data on the virtual system to the customer’s local environment in advance, if necessary.
2.1.2 Log-in to Service Portal with Administrator’s ID (Client Authentication)
Log-in to the Service Portal with Administrator’s ID (Client Certificate and PIN).
2.1.3 Return All Virtual Systems
Return all virtual systems at System Manager in the Service Portal.
Repeat the following procedure until all systems are returned.
1) Stop all VMs (include Firewall and SLB) in the virtual system.
2) Return the virtual system.
At this moment, it will be entirely free of charge for this service. If users want to cancel the contract itself,
please implement the following procedure.
2.1.4 Submit a Service Cancellation Request.
Submit a Service Cancellation Request on the Service Portal.
2.1.5 Receive a Service Cancellation Request.
FUJITSU Cloud Service S5 will send a cancellation completion notice. Please confirm the contents.
Customer FUJITSU Cloud Service S5
Log-in to Service Portal with Administrator’s
ID (Client Authentication)
Return all virtual systems.
Submit a service cancellation request. Receive a service cancellation request.
Send a cancel completion notice. Receive a cancel completion notice.
Save data outside FUJITSU Cloud
Service S5 (If necessary).

47
All Rights Reserved, Copyright FUJITSU AMERICA, INC. 2011
Chapter.3
Global Service Desk and
Optional Services
This chapter explains how the contact the Global Service Desk and
describes additional (optional) services which are available.
48
All Rights Reserved, Copyright FUJITSU AMERICA, INC. 2011
3.1 Global Service Desk Support
3.1.1 Registering for service (Sign-Up)
Please visit the URL listed below, or send an e-mail to the following address regarding questions from
customers planning to use the FUJITSU Cloud Service S5 as well as those interested in additional
consulting or pricing information
E-mail: [email protected]
URL: http://globalcloud.us.fujitsu.com/portal/ctrl/aboutSopQuestion/ (general contact information)
URL: http://globalcloud.us.fujitsu.com/portal/ctrl/UsePrice (service charges overview)
3.1.2 Global Service Desk Support
For questions related to use of the FUJITSU Cloud Service S5 and support for problem resolution, please
contact the Global Service Desk for assistance, using the contact information provided below.
The Global Service Desk can answer questions regarding details of FUJITSU Cloud Service S5
specification, how to provision the VMs and virtual systems, and how to use the FUJITSU Cloud Service
S5
[FUJITSU Cloud Service S5 – Global Service Desk information]
http://globalcloud.us.fujitsu.com/portal/ctrl/aboutSopQuestion
3.2 Additional Services
3.2.1 Operating System and Middleware Support (optional / future)
Currently, the FUJITSU Cloud Service S5 does not provide support for operating systems or middleware,
and relies on the customers to provide. Additional support options are under consideration and
planning.
3.2.2 Intranet Connection Service (optional / future)
The Intranet Connection service is an optional service to connect the FUJITSU Cloud Service S5 with
systems outside of the FUJITSU Cloud Service S5 (such as customer’s in-house system, Fujitsu hosting
service, colo service etc.), through a private connection. This service is available at the Sunnyvale, CA
Data Center.
In order to use this service, users need to initiate an agreement for service with the Sunnyvale Data
Center. Please contact Fujitsu’s Sales Department at

49
All Rights Reserved, Copyright FUJITSU AMERICA, INC. 2011
http://globalcloud.us.fujitsu.com/portal/ctrl/aboutSopQuestion