front view portraits: a beginning guide what to keep in mind when facing a scary blank page
TRANSCRIPT

Front view portraits: a Front view portraits: a beginning guidebeginning guide
What to keep in mind when What to keep in mind when facing a scary blank pagefacing a scary blank page

Underlying structureUnderlying structure
Make 5 statements Make 5 statements regarding regarding proportions of the proportions of the skull and skull and relationships of relationships of features to each features to each other.other.
For example – say For example – say something about something about length, width, ½ length, width, ½ way, etc.way, etc.

Some of the bone namesSome of the bone names
A.A. Frontal BoneFrontal Bone
B.B. MaxillaMaxilla
C.C. MandibleMandible
D. D. Zygomatic BoneZygomatic Bone
E. E. Nasal BoneNasal Bone
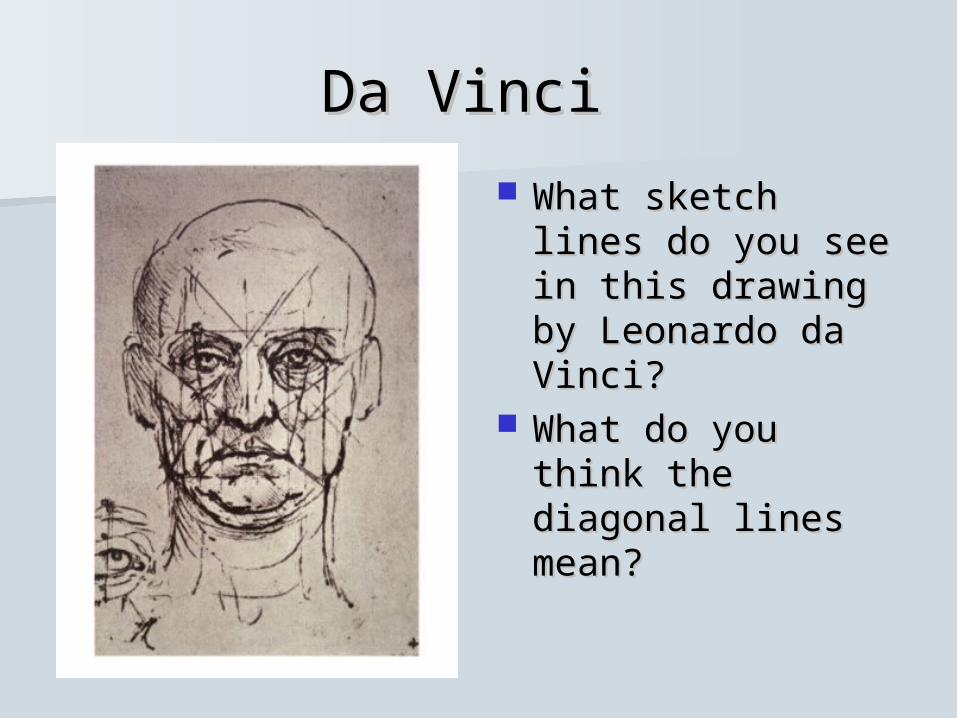
Da Vinci Da Vinci
What sketch lines What sketch lines do you see in this do you see in this drawing by drawing by Leonardo da Vinci?Leonardo da Vinci?
What do you think What do you think the diagonal lines the diagonal lines mean?mean?
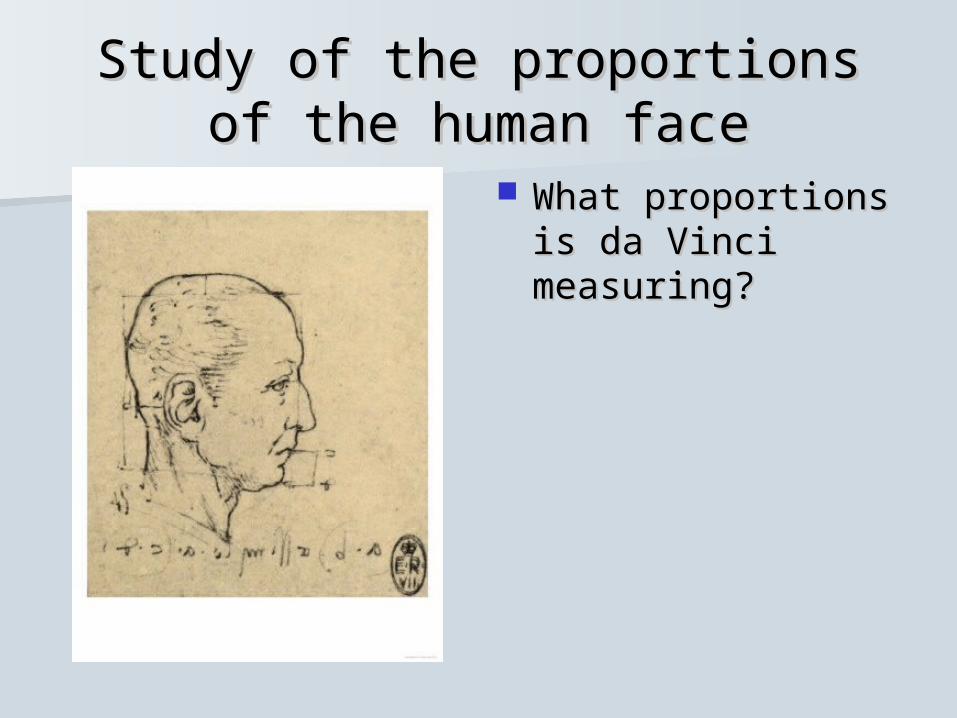
Study of the proportions of the Study of the proportions of the human facehuman face
What proportions is What proportions is da Vinci da Vinci measuring?measuring?

Standard Facial ProportionsStandard Facial ProportionsThe standard proportions for the human headThe standard proportions for the human head
can help you place facial features and findcan help you place facial features and find
their orientation. their orientation.
Here are a list of standard facial proportions Here are a list of standard facial proportions thatthat
can give you a good idea of ideal proportions: can give you a good idea of ideal proportions:
The The eyeseyes are halfway between the top of are halfway between the top of the head and the chin. the head and the chin.
The bottom of the The bottom of the nosenose is halfway between is halfway between the eyes and the chin. the eyes and the chin.

Standard Facial ProportionsStandard Facial Proportions continuedcontinued
The The mouthmouth is halfway between the nose is halfway between the nose and the chin. and the chin.
The The corners of the mouthcorners of the mouth line up with line up with the centers of the eyes. the centers of the eyes.
The The top of the earstop of the ears line up above the line up above the eyes, on the eyebrows. eyes, on the eyebrows.
The The bottom of the earsbottom of the ears line up with the line up with the bottom of the nosebottom of the nose

Head ShapeHead Shape

Eye lineEye line
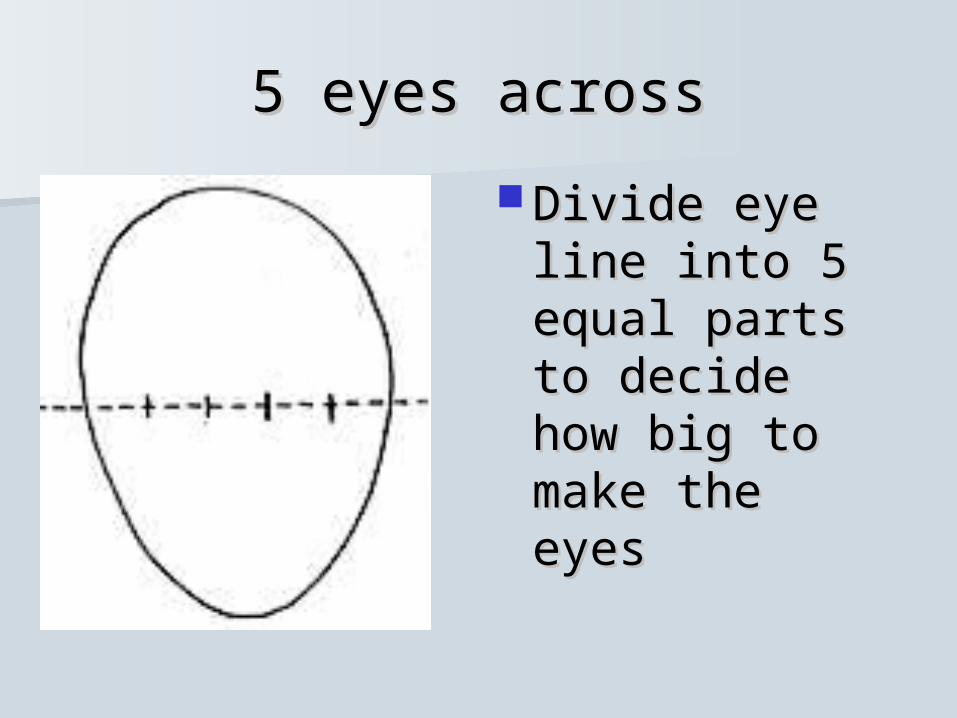
5 eyes across5 eyes across
Divide eye line Divide eye line into 5 equal into 5 equal parts to decide parts to decide how big to how big to make the eyesmake the eyes

Eye size and spacingEye size and spacing
Draw five eyes Draw five eyes to help you to help you remember size remember size and spacingand spacing

Oops - Too highOops - Too high

NoseNose
The size of the The size of the nose depends on nose depends on the person.the person.
The bottom of The bottom of the nose is often the nose is often as wide as the as wide as the inside corner of inside corner of the eyesthe eyes

Placing the nosePlacing the nose
Usually the Usually the bottom of the bottom of the nose is nose is halfway halfway between the between the eye line and eye line and the bottom of the bottom of the chin.the chin.

““Nose box”Nose box”
Now you have Now you have the “nose box” the “nose box” - so draw in - so draw in the nose.the nose.

Mouth lineMouth line
Draw another Draw another line halfway line halfway between the between the nose and chin.nose and chin.
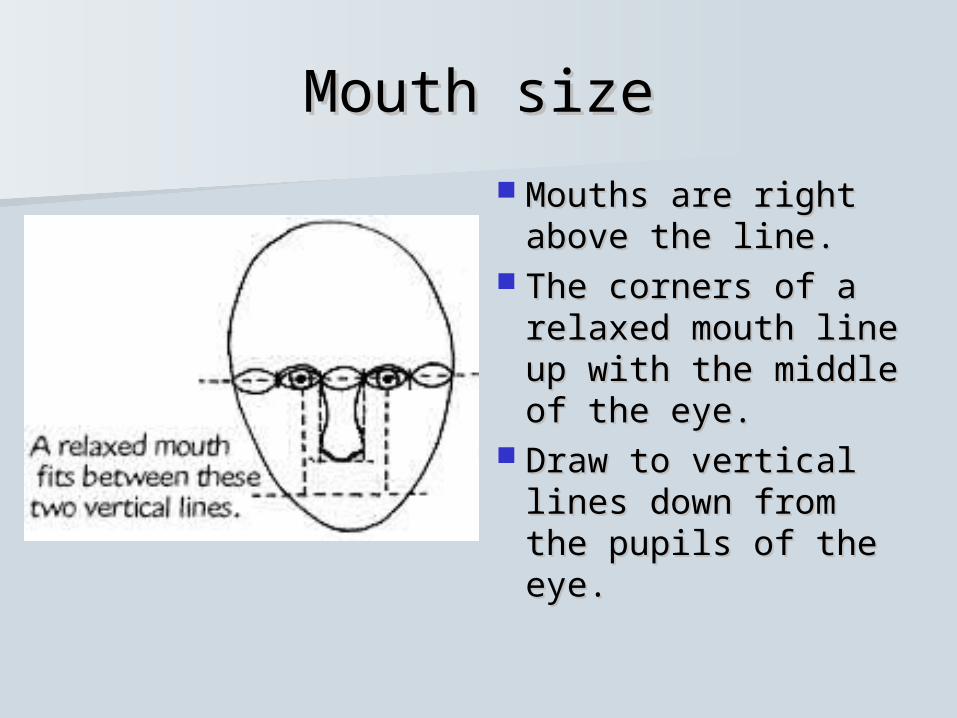
Mouth sizeMouth size
Mouths are right Mouths are right above the line. above the line.
The corners of a The corners of a relaxed mouth line relaxed mouth line up with the middle up with the middle of the eye.of the eye.
Draw to vertical Draw to vertical lines down from lines down from the pupils of the the pupils of the eye.eye.
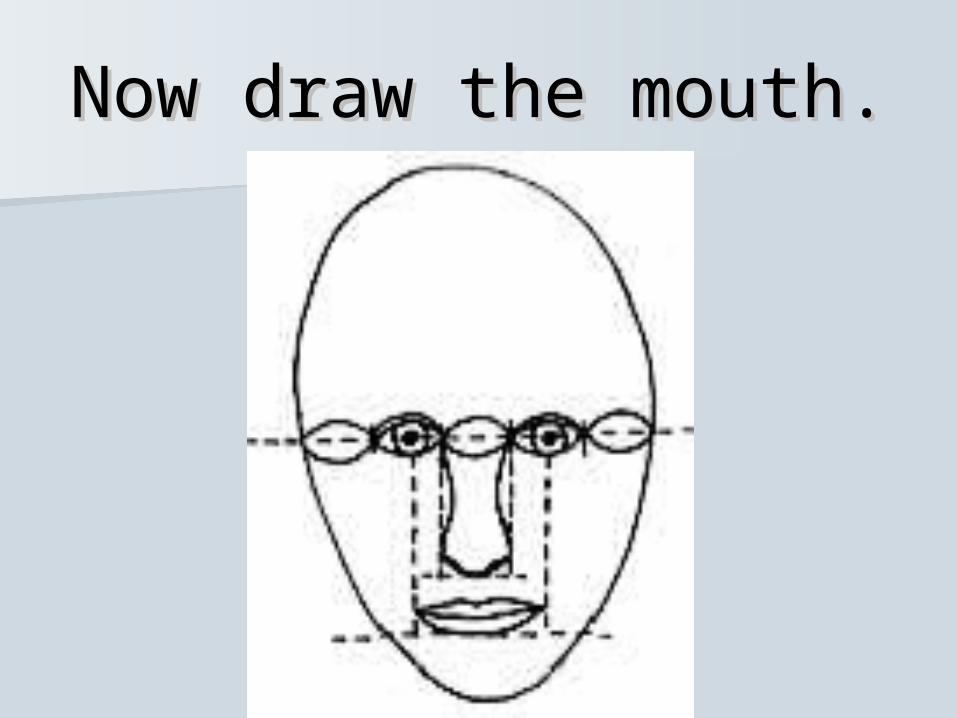
Now draw the mouth.Now draw the mouth.

EarsEars
The ears are bigger The ears are bigger than people think.than people think.
They stretch from They stretch from the eyes to the the eyes to the bottom of the bottom of the nose.nose.
The top of the ears The top of the ears is at the eye line.is at the eye line.
They will end They will end between the nose between the nose and mouth.and mouth.
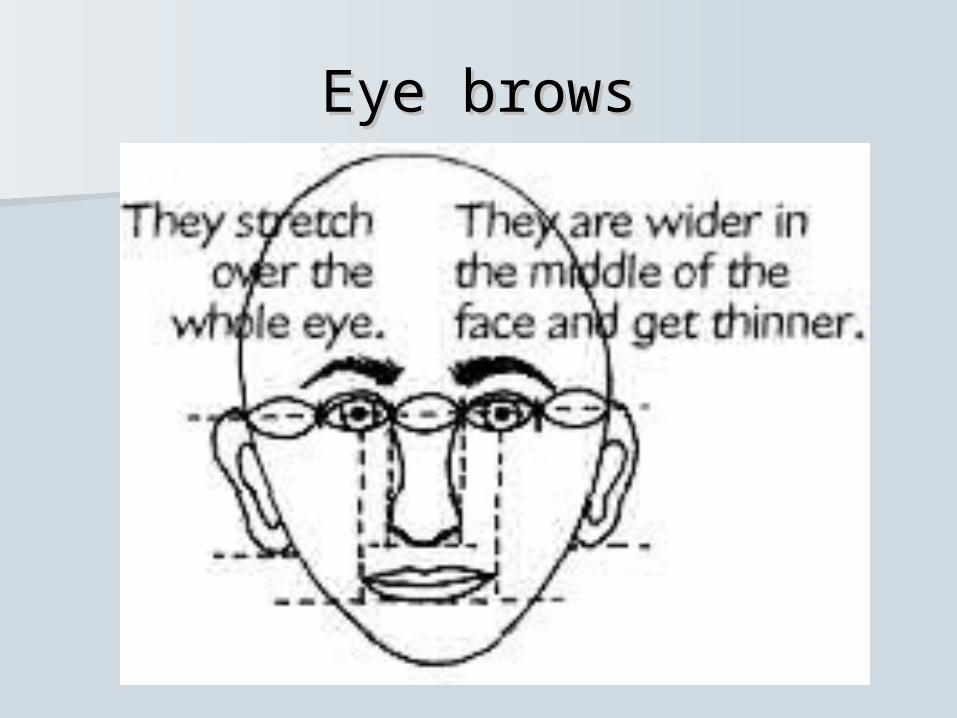
Eye browsEye brows
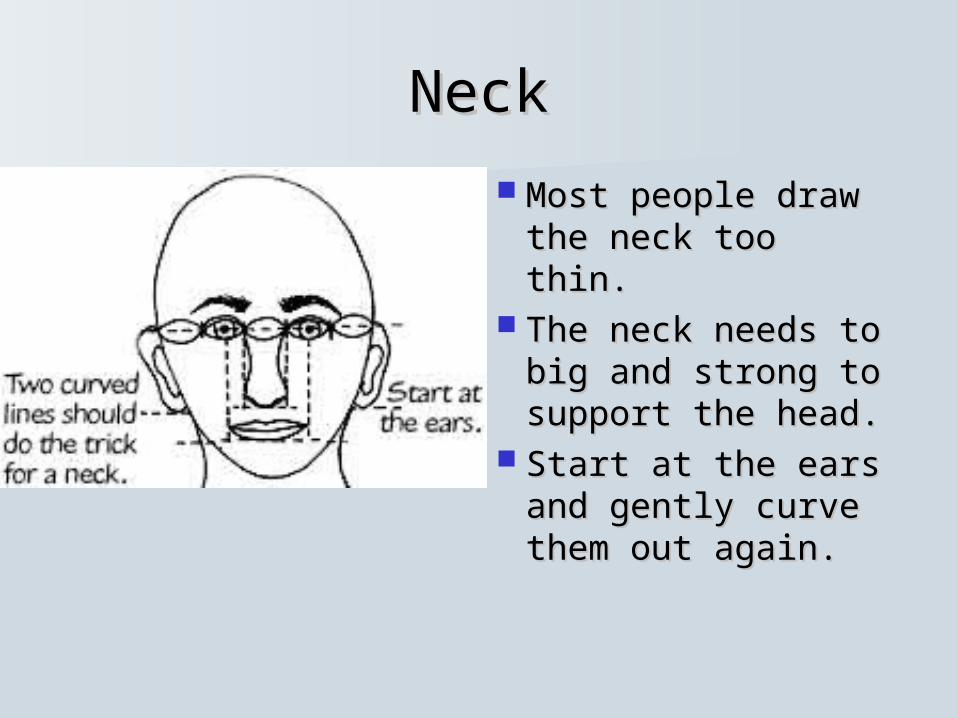
NeckNeck
Most people draw Most people draw the neck too thin.the neck too thin.
The neck needs to The neck needs to big and strong to big and strong to support the head.support the head.
Start at the ears Start at the ears and gently curve and gently curve them out again.them out again.
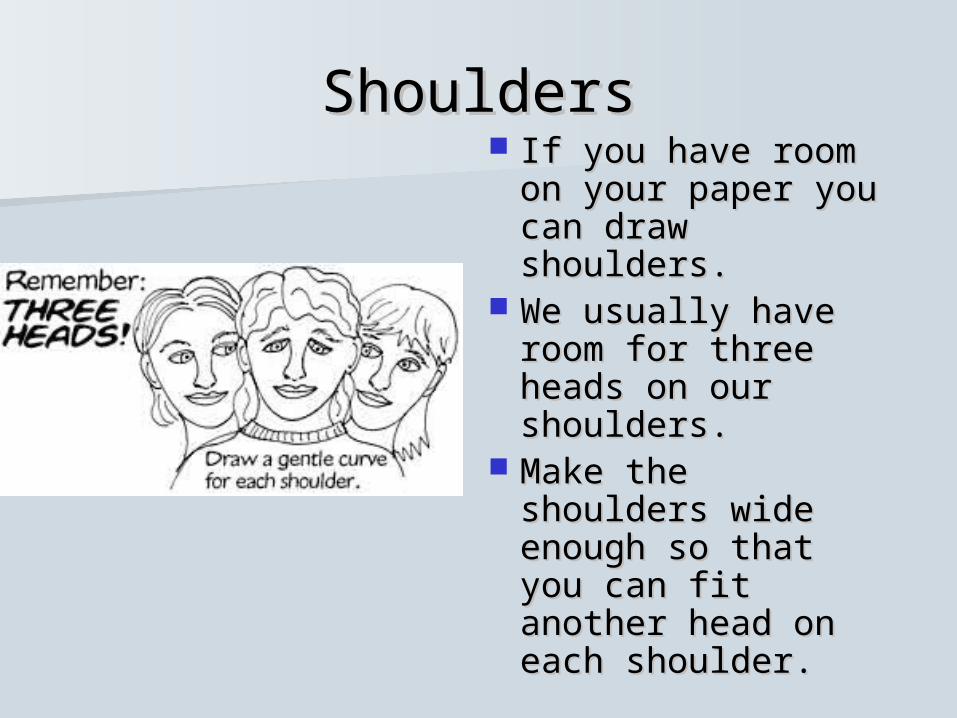
ShouldersShoulders If you have room If you have room
on your paper you on your paper you can draw can draw shoulders.shoulders.
We usually have We usually have room for three room for three heads on our heads on our shoulders.shoulders.
Make the shoulders Make the shoulders wide enough so wide enough so that you can fit that you can fit another head on another head on each shoulder.each shoulder.
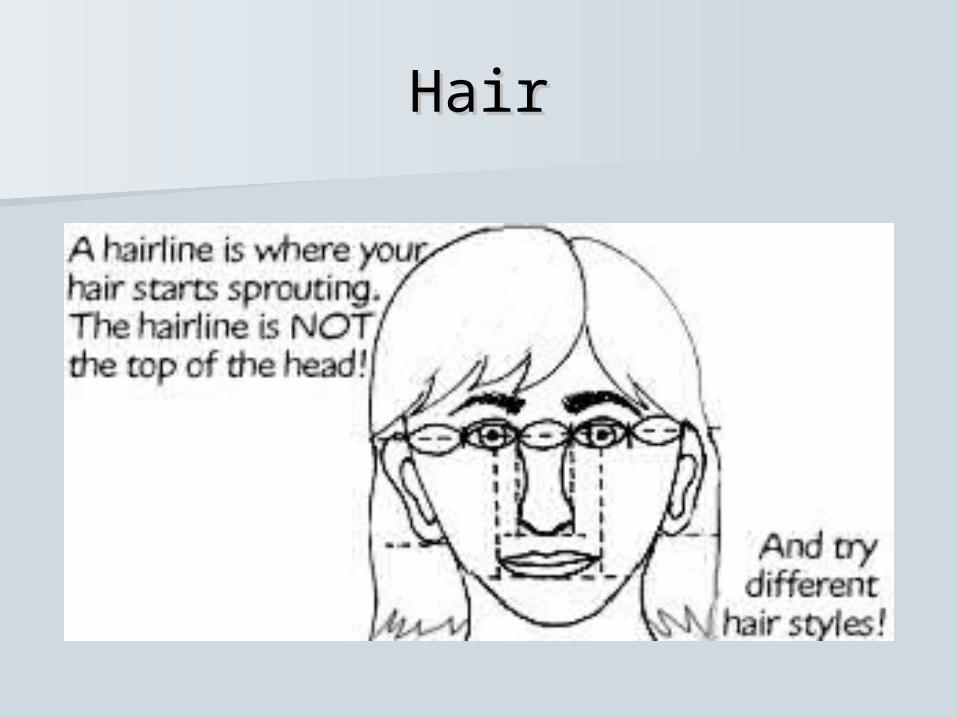
HairHair

Watch for these common Watch for these common errors:errors:
1. Leaving too much or too little space between the eyes.
2. Making any of the features (eyes, nose, mouth, ear) too big or too small compared to other proportions.
3. Positioning the eyes above the halfway point from the top of skull to chin
4. Miscalculating the length of the nose or distance between base of nose and upper lip.

Common errors Common errors continuedcontinued
5. Failing to make the eyes look like they sit back behind the plane of the forehead.
6. Making the nose connect to the corner of the eyes -- it arcs up into the eyebrow ridge.
7. Leaving the outer edge of the face just the round edge of the oval guideline.


Proportions of the headProportions of the head- - make 2 statements about these make 2 statements about these
chartscharts

The proportions of the head The proportions of the head can be divided into four equal can be divided into four equal
quartersquartersMake 4 statements about these quartersMake 4 statements about these quarters

First two quartersFirst two quarters
The The first quarterfirst quarter measures from measures from the top of the the top of the head down to the head down to the hairline.hairline.
The The second second quarterquarter measures down measures down from the hairline from the hairline to the eye lineto the eye line
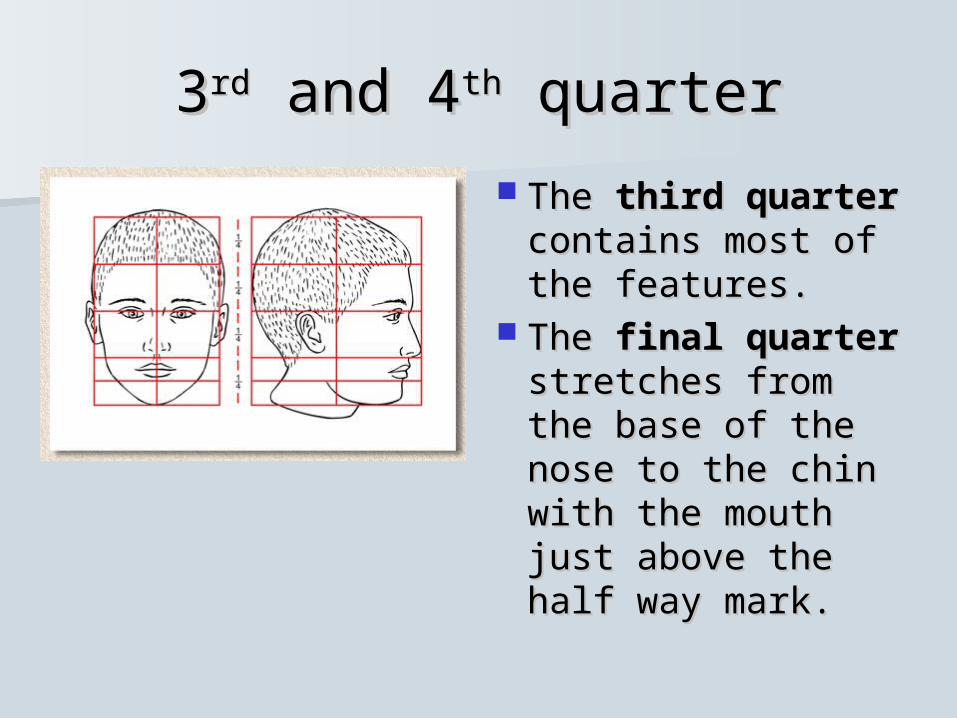
33rdrd and 4 and 4thth quarter quarter
The The third quarterthird quarter contains most of contains most of the features.the features.
The The final quarterfinal quarter stretches from the stretches from the base of the nose to base of the nose to the chin with the the chin with the mouth just above mouth just above the half way mark.the half way mark.

Many artist start a Many artist start a portrait with the portrait with the eyes as they are the eyes as they are the focal point of the focal point of the face.face.
The eyes are The eyes are approximately half approximately half way down the head.way down the head.
The distance The distance between the eyes is between the eyes is similar to the similar to the breadth of the nose.breadth of the nose.

Check your memoryCheck your memory
What is this What is this sketch sketch showing you?showing you?

Head lengthHead length
What is this What is this sketch sketch showing you?showing you?

Aligning featuresAligning features
What do the What do the lines lines
mean?mean? Yellow lines?Yellow lines? Blue?Blue? Green?Green? Red?Red? Purple?Purple?

Face triangleFace triangle
The face triangle is from the center of each The face triangle is from the center of each pupil, through the nostrils of the nose to the pupil, through the nostrils of the nose to the point between the top front teeth. point between the top front teeth. Everyone’s triangle is a little different. Everyone’s triangle is a little different.
The mouth lines up under the pupils, the two The mouth lines up under the pupils, the two iris usually equal the width of the mouth.iris usually equal the width of the mouth.

Face triangleFace triangle
The The face triangleface triangle is from the is from the center of each pupil, through the center of each pupil, through the nostrils of the nose to the point nostrils of the nose to the point between the top front teeth. This between the top front teeth. This is an important trait, everybody’s is an important trait, everybody’s triangle is a little different. triangle is a little different.
The mouth lines up under the The mouth lines up under the pupils, the two iris usually equal pupils, the two iris usually equal the width of the mouth.the width of the mouth.

The EyeThe Eye
Steps to making it look real.Steps to making it look real.

The EyeThe Eye
Begin by drawing Begin by drawing a circle a circle (1)(1) to to represent the represent the spherical form of spherical form of the eye ball.the eye ball.
Draw a pale line Draw a pale line (2)(2) going top to going top to bottom across bottom across the circle to the circle to indicate the indicate the direction the eye direction the eye is looking.is looking.
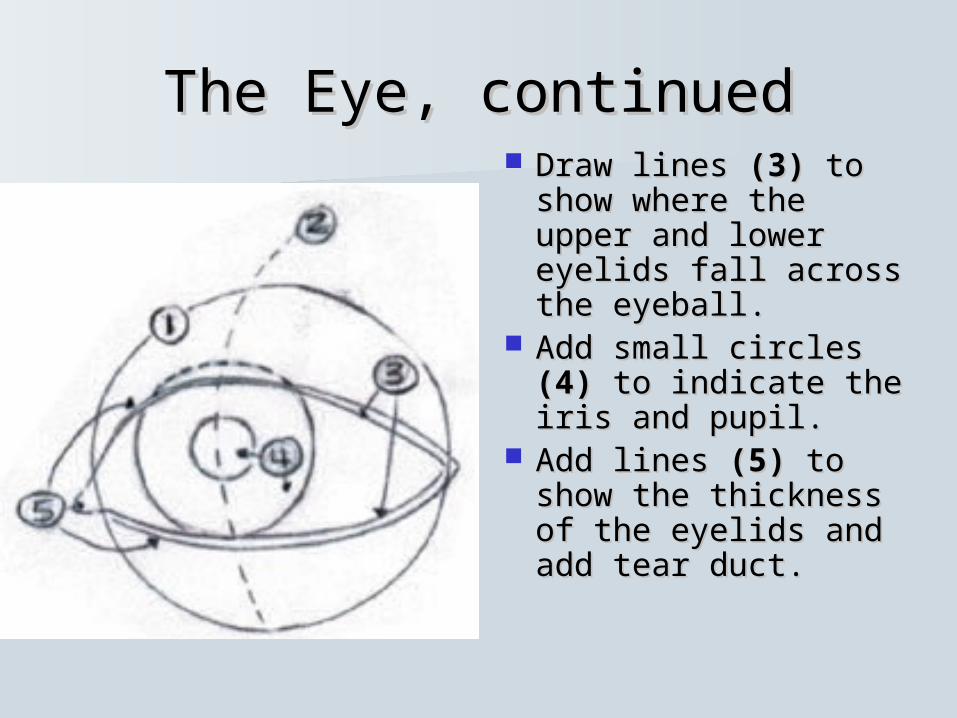
The Eye, continuedThe Eye, continued Draw lines Draw lines (3)(3) to to
show where the show where the upper and lower upper and lower eyelids fall across eyelids fall across the eyeball.the eyeball.
Add small circles Add small circles (4)(4) to indicate the to indicate the iris and pupil.iris and pupil.
Add lines Add lines (5)(5) to to show the thickness show the thickness of the eyelids and of the eyelids and add tear duct.add tear duct.

The Eye - finishingThe Eye - finishing
Add a crease line Add a crease line above the upper above the upper eyelid and below eyelid and below lower eyelid.lower eyelid.
Add eyelashes and Add eyelashes and eyebrow. eyebrow.
Look closely at Look closely at length, angle and length, angle and direction hair direction hair grows.grows.
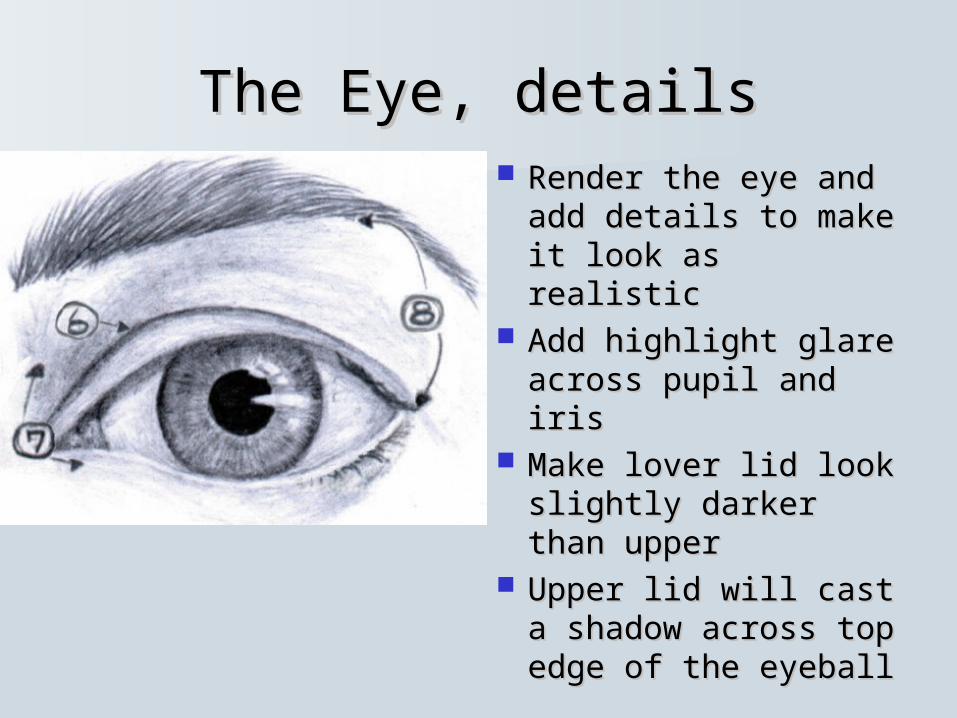
The Eye, detailsThe Eye, details Render the eye and Render the eye and
add details to make add details to make it look as realisticit look as realistic
Add highlight glare Add highlight glare across pupil and irisacross pupil and iris
Make lover lid look Make lover lid look slightly darker than slightly darker than upperupper
Upper lid will cast a Upper lid will cast a shadow across top shadow across top edge of the eyeballedge of the eyeball

Parts of Parts of the eyethe eye
CaruncleCaruncle - a small, red portion of the corner of the eye - a small, red portion of the corner of the eyethat contains modified sebaceous and sweat glands.that contains modified sebaceous and sweat glands.ScleraSclera – the white visible portion of the eyeball. The muscles – the white visible portion of the eyeball. The muscles
thatthatmove the eyeball are attached to the sclera move the eyeball are attached to the sclera

philtrumphiltrum
PhiltrumPhiltrum – [FIL-trum] is – [FIL-trum] is
The groove-like indentationThe groove-like indentation
Often found at the center ofOften found at the center of
the upper lip. It is responsiblethe upper lip. It is responsible
for the biggest difference infor the biggest difference in
shape between the upper andshape between the upper and
lower lips and becomes morelower lips and becomes more
pronounced when the mouth pronounced when the mouth isis
puckered.puckered.
Also known as the infranasalAlso known as the infranasal
depression.depression.
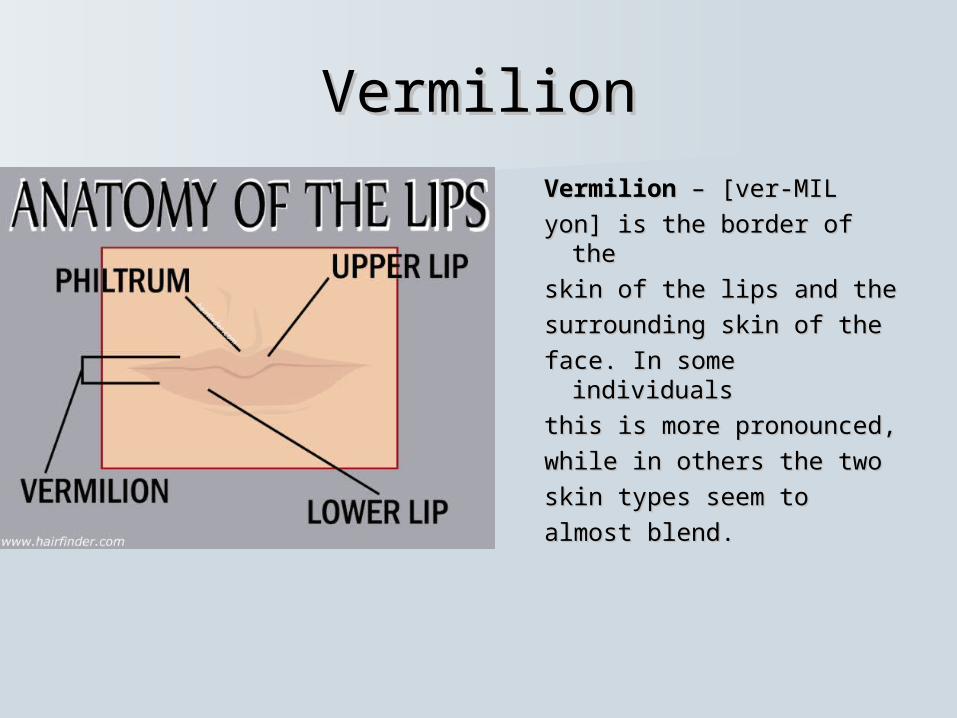
VermilionVermilion
VermilionVermilion – [ver-MIL – [ver-MIL
yon] is the border of theyon] is the border of the
skin of the lips and theskin of the lips and the
surrounding skin of thesurrounding skin of the
face. In some individualsface. In some individuals
this is more pronounced,this is more pronounced,
while in others the twowhile in others the two
skin types seem toskin types seem to
almost blend.almost blend.
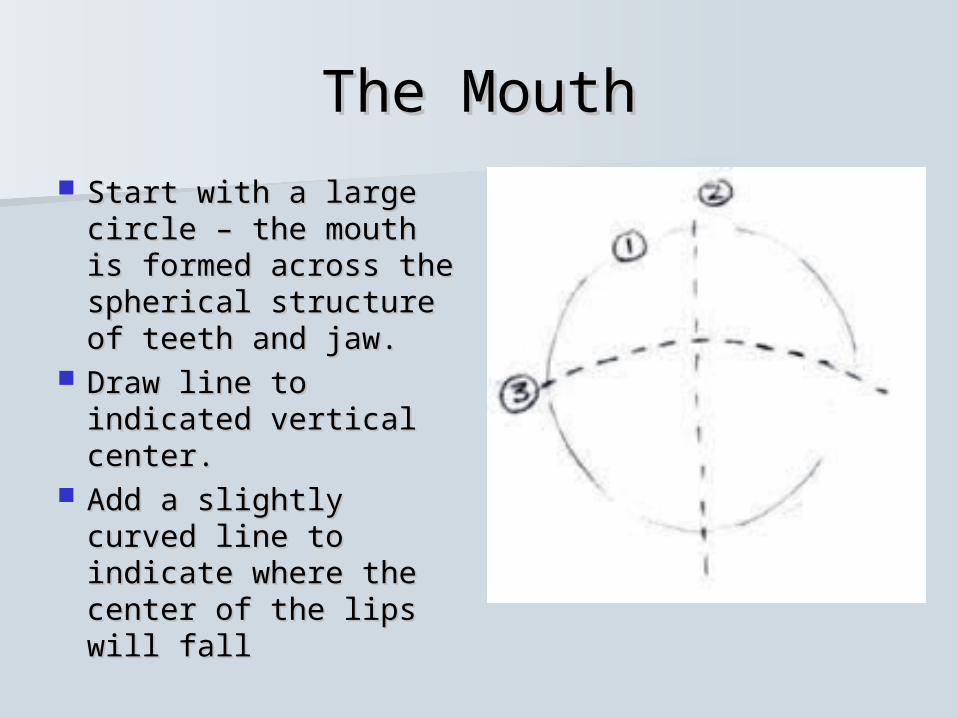
The MouthThe Mouth
Start with a large Start with a large circle – the mouth is circle – the mouth is formed across the formed across the spherical structure of spherical structure of teeth and jaw.teeth and jaw.
Draw line to Draw line to indicated vertical indicated vertical center.center.
Add a slightly curved Add a slightly curved line to indicate line to indicate where the center of where the center of the lips will fallthe lips will fall

The MouthThe Mouth
Add a small oval Add a small oval with a dent in the with a dent in the top to create the top to create the shape needed for shape needed for the center of the the center of the upper lip.upper lip.
Use a slightly larger Use a slightly larger oval to create the oval to create the shape of the center shape of the center of lower lip.of lower lip.
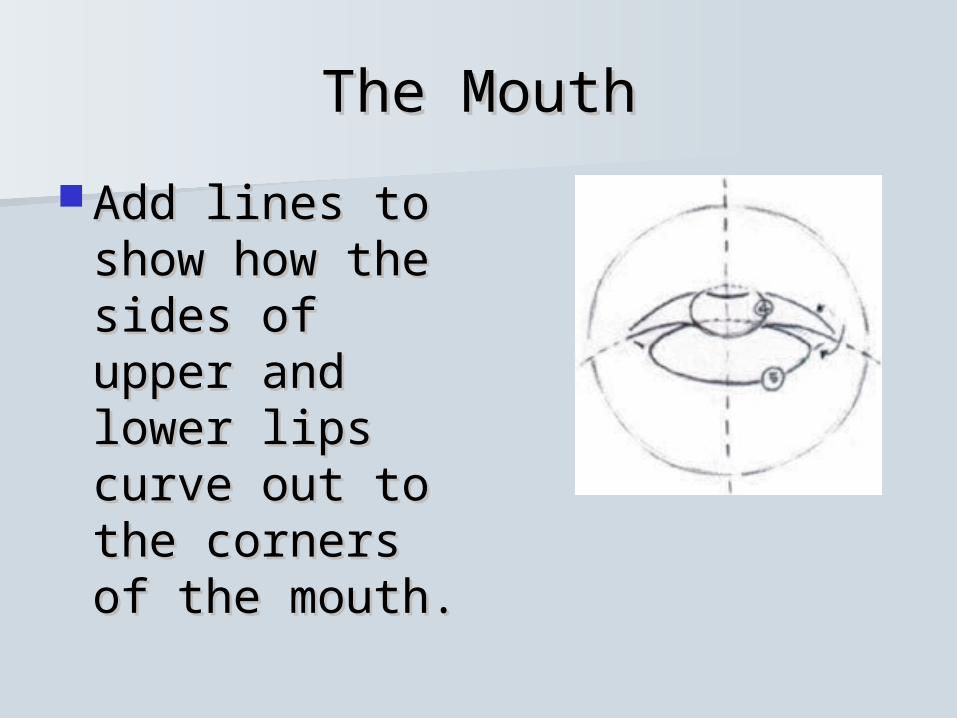
The MouthThe Mouth
Add lines to Add lines to show how the show how the sides of upper sides of upper and lower lips and lower lips curve out to curve out to the corners of the corners of the mouth.the mouth.
The MouthThe Mouth
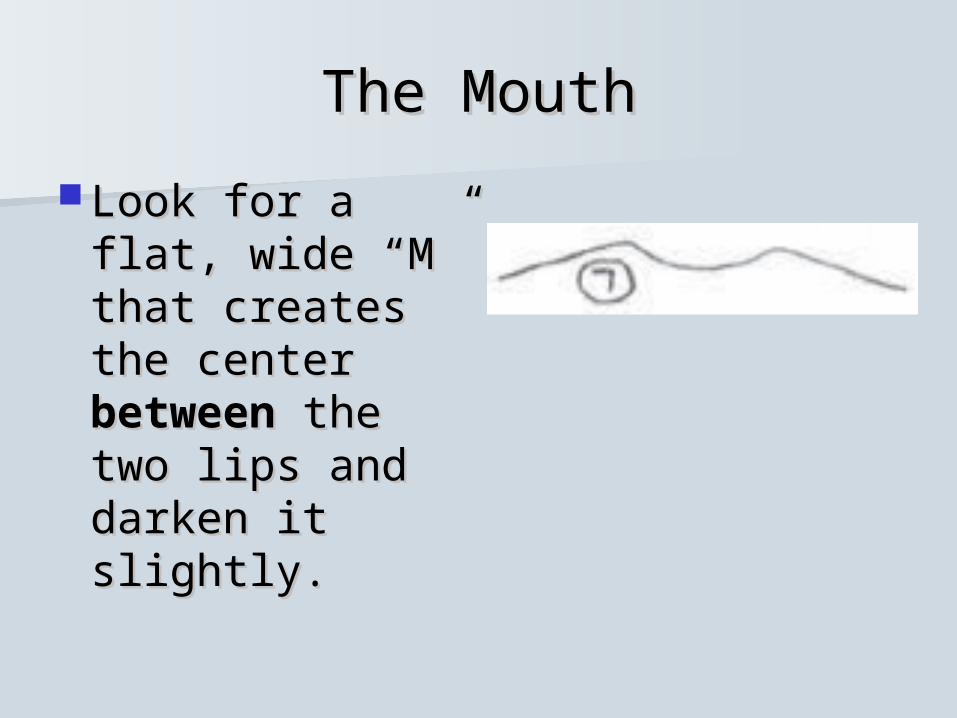
Look for a flat, Look for a flat, wide “M” that wide “M” that creates the creates the center center between between the the two lips and two lips and darken it darken it slightly.slightly.

The MouthThe Mouth
Begin to render the Begin to render the mouth details to mouth details to look as realistic as look as realistic as possible.possible.
Upper lip will be Upper lip will be slightly darker at slightly darker at the sides and lighter the sides and lighter in the center, and is in the center, and is usually darker than usually darker than the lower lip.the lower lip.

The MouthThe Mouth
Show highlights Show highlights that help make that help make lower lip look lower lip look slightly rounded.slightly rounded.
Look for shadows Look for shadows cast by upper lip cast by upper lip onto lower lip.onto lower lip.
(“Melt” lines – get (“Melt” lines – get rid of them – rid of them – render in tones of render in tones of gray and shadow.)gray and shadow.)

The NoseThe Nose
Draw a small Draw a small circle circle (1)(1) that that will represent will represent the bridge of the bridge of the nose.the nose.
Add a narrow Add a narrow thin oval thin oval (2)(2) that overlaps that overlaps that circle.that circle.

The NoseThe Nose
Place a larger Place a larger circle (3) across circle (3) across the bottom of the bottom of the oval for the the oval for the tip of the nose.tip of the nose.
Place two much Place two much smaller circles smaller circles (4) on either side (4) on either side of the large of the large circle to show circle to show the nostrils.the nostrils.

The NoseThe Nose
Begin adding Begin adding lightlight
values down thevalues down the
sides of the oval sides of the oval toto
give it a give it a cylindricalcylindrical
quality. (5)quality. (5)

The noseThe noseNow slightly darkenNow slightly darken
the space thatthe space that
separates the separates the nostrilsnostrils
from the tip of thefrom the tip of the
nose as well as thenose as well as the
lower edge of thoselower edge of those
circles to begincircles to begin
defining the form.(6)defining the form.(6)

The NoseThe Nose Add nostril Add nostril openings below the openings below the separation separation between the nostril between the nostril circles and the tip circles and the tip of the nose. of the nose.
These are often These are often teardrop shapes, teardrop shapes, but look carefully but look carefully at their angle.at their angle.
Darken these Darken these openings - they openings - they need to look hollow need to look hollow and deep.and deep.

The Nose The Nose
Continue rendering Continue rendering the nose details to the nose details to make it look as make it look as realistic as possiblerealistic as possible
When the nose is When the nose is seen from a ¾ or seen from a ¾ or profile view, the profile view, the location of the 2 location of the 2 side circles will be side circles will be different. different.
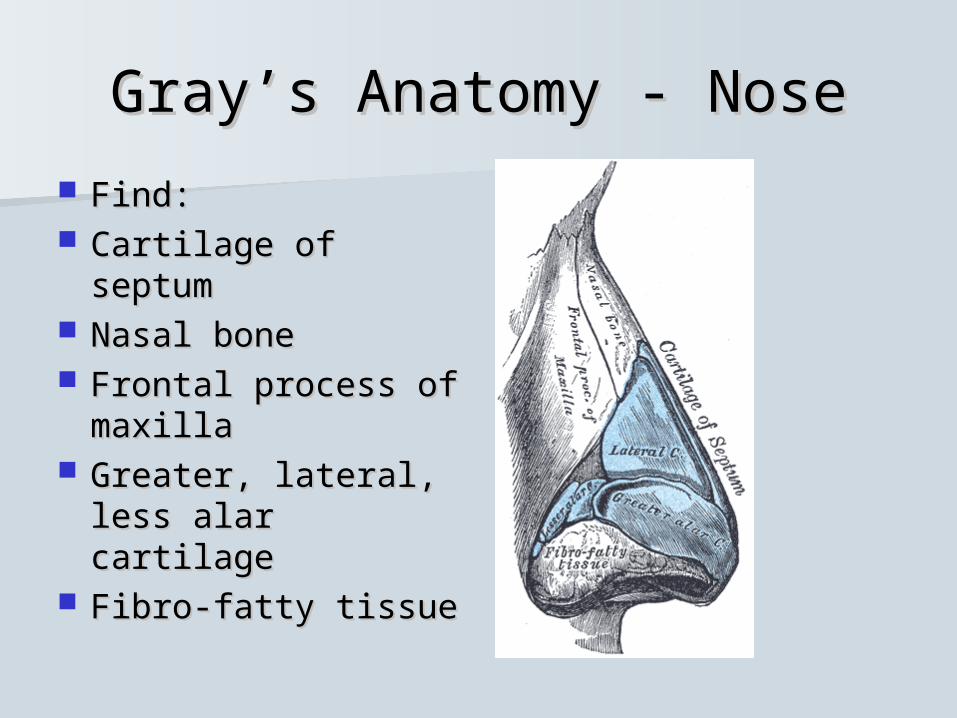
Gray’s Anatomy - NoseGray’s Anatomy - Nose
Find:Find: Cartilage of Cartilage of
septumseptum Nasal boneNasal bone Frontal process of Frontal process of
maxillamaxilla Greater, lateral, Greater, lateral,
less alar cartilage less alar cartilage Fibro-fatty tissueFibro-fatty tissue
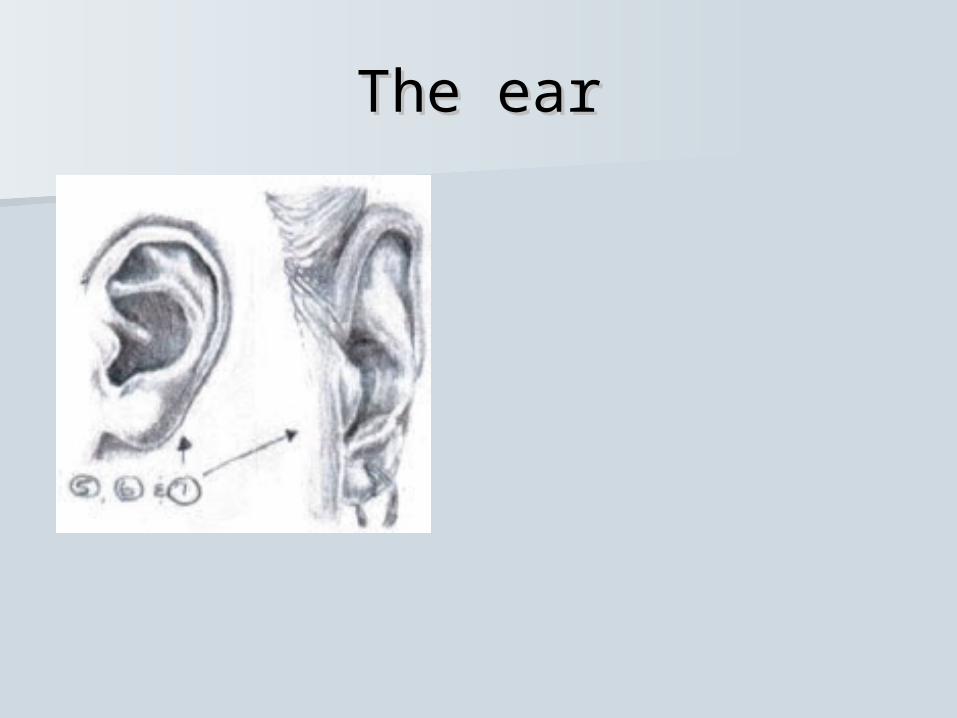
The earThe ear

The EarThe Ear
Draw a large oval. Add a small circle for Draw a large oval. Add a small circle for
the lobe. The lobe circle may need tothe lobe. The lobe circle may need to
overlap or just touch the large ovaloverlap or just touch the large oval
depending on size and shape of ear.depending on size and shape of ear.
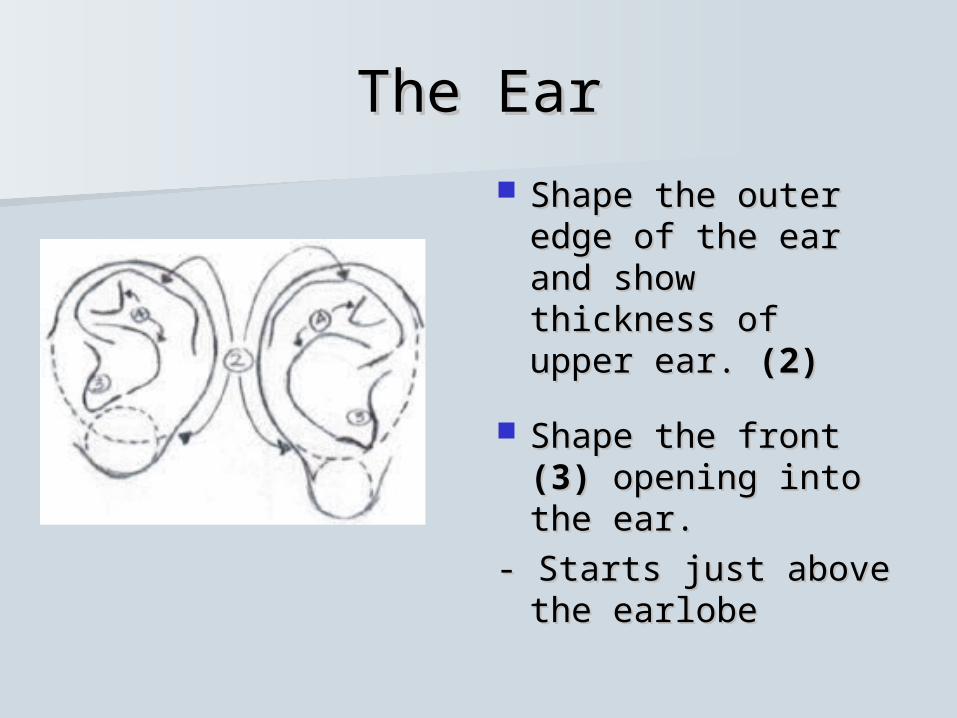
The EarThe Ear
Shape the outer Shape the outer edge of the ear and edge of the ear and show thickness of show thickness of upper ear. upper ear. (2)(2)
Shape the front Shape the front (3)(3) opening into the opening into the ear.ear.
- Starts just above - Starts just above the earlobethe earlobe
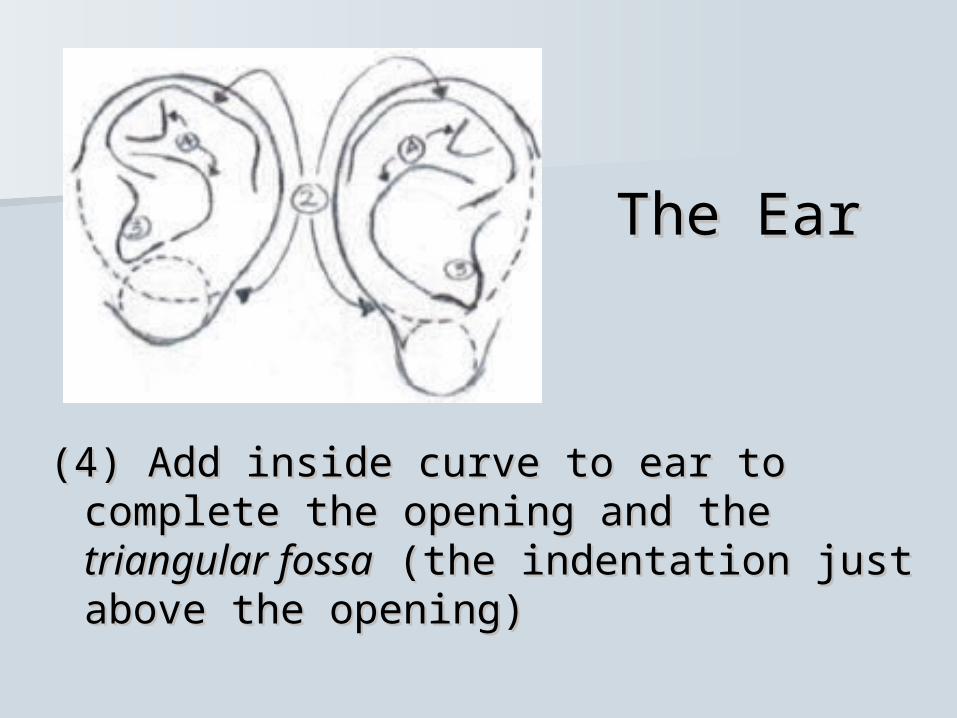
The EarThe Ear
(4) Add inside curve to ear to complete (4) Add inside curve to ear to complete the opening and the the opening and the triangular fossatriangular fossa (the indentation just above the (the indentation just above the opening)opening)
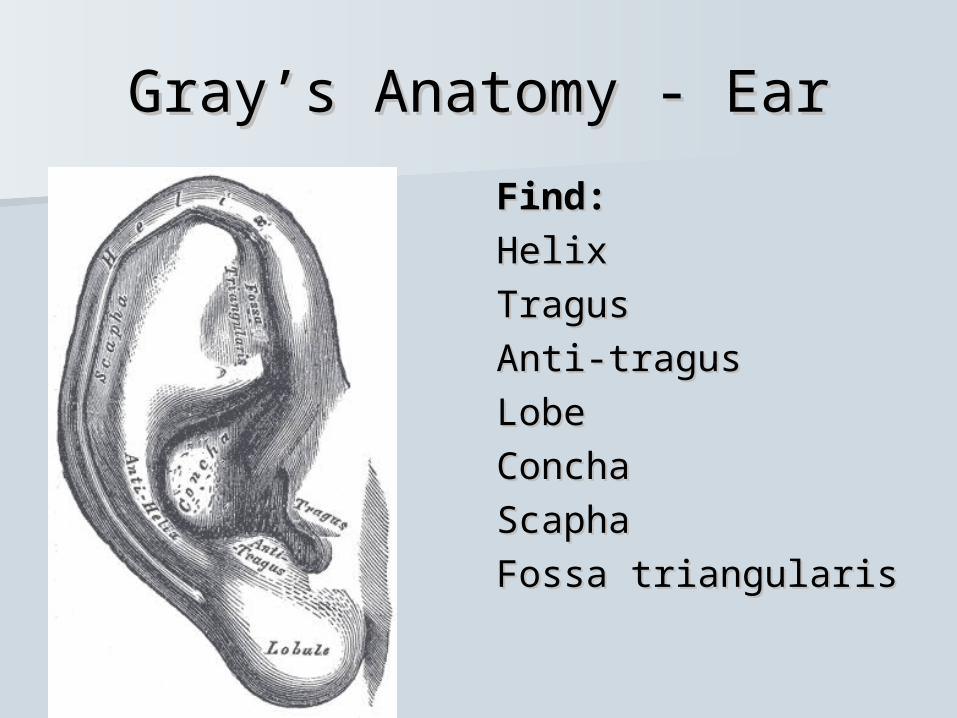
Gray’s Anatomy - EarGray’s Anatomy - Ear
Find:Find:
HelixHelix
TragusTragus
Anti-tragusAnti-tragus
LobeLobe
ConchaConcha
ScaphaScapha
Fossa triangularisFossa triangularis

The EarThe Earprofile and front profile and front
viewview
# (5 – 6 – 7)# (5 – 6 – 7)Render the ear soRender the ear sothat its form andthat its form andstructure are realistic.structure are realistic.
Add tonal values alongAdd tonal values alongthe inside of the upperthe inside of the upperear and inside frontear and inside frontedge of opening.edge of opening.
Give ear lobe a senseGive ear lobe a senseof form alongside ofof form alongside ofcircle.circle.