front cover i5/os v5r4 virtual tape - ibm redbooks v5r4 virtual tape: a guide to planning ... 7.9...
TRANSCRIPT

ibm.com/redbooks
i5/OS V5R4 Virtual Tape:A Guide to Planningand Implementation
Nick HarrisBrian Bohner
Dan JohanssonAlbert Karels
Discover how i5/OS virtual tape works
Learn how to save and restore objects with virtual tape support
Understand how virtual tape works with BRMS
Front cover


i5/OS V5R4 Virtual Tape: A Guide to Planning and Implementation
July 2006
International Technical Support Organization
SG24-7164-00

© Copyright International Business Machines Corporation 2006. All rights reserved.Note to U.S. Government Users Restricted Rights -- Use, duplication or disclosure restricted by GSA ADPSchedule Contract with IBM Corp.
First Edition (July 2006)
This edition applies to Version 5, Release 4, i5/OS (product number 5722-SS1).
Note: Before using this information and the product it supports, read the information in “Notices” on page vii.

Contents
Notices . . . . . . . . . . . . . . . . . . . . . . . . . . . . . . . . . . . . . . . . . . . . . . . . . . . . . . viiTrademarks . . . . . . . . . . . . . . . . . . . . . . . . . . . . . . . . . . . . . . . . . . . . . . . . . . . viii
Preface . . . . . . . . . . . . . . . . . . . . . . . . . . . . . . . . . . . . . . . . . . . . . . . . . . . . . . . ixThe team that wrote this redbook. . . . . . . . . . . . . . . . . . . . . . . . . . . . . . . . . . . . ixBecome a published author . . . . . . . . . . . . . . . . . . . . . . . . . . . . . . . . . . . . . . . . xComments welcome. . . . . . . . . . . . . . . . . . . . . . . . . . . . . . . . . . . . . . . . . . . . . . xi
Chapter 1. Introduction to virtual tape . . . . . . . . . . . . . . . . . . . . . . . . . . . . . 11.1 What is virtual tape . . . . . . . . . . . . . . . . . . . . . . . . . . . . . . . . . . . . . . . . . . . 21.2 Positioning the virtual tape . . . . . . . . . . . . . . . . . . . . . . . . . . . . . . . . . . . . . 2
1.2.1 Other virtual media services . . . . . . . . . . . . . . . . . . . . . . . . . . . . . . . . 21.2.2 Supported applications and operating systems . . . . . . . . . . . . . . . . . 3
1.3 Benefits of virtual tape. . . . . . . . . . . . . . . . . . . . . . . . . . . . . . . . . . . . . . . . . 41.4 Supported physical devices. . . . . . . . . . . . . . . . . . . . . . . . . . . . . . . . . . . . . 51.5 More details about virtual tape . . . . . . . . . . . . . . . . . . . . . . . . . . . . . . . . . . 6
1.5.1 Virtual tape device. . . . . . . . . . . . . . . . . . . . . . . . . . . . . . . . . . . . . . . . 61.5.2 Image catalog . . . . . . . . . . . . . . . . . . . . . . . . . . . . . . . . . . . . . . . . . . . 6
Chapter 2. Planning for virtual tape. . . . . . . . . . . . . . . . . . . . . . . . . . . . . . . . 92.1 What to save through virtual tape . . . . . . . . . . . . . . . . . . . . . . . . . . . . . . . 102.2 Considering the backup strategy. . . . . . . . . . . . . . . . . . . . . . . . . . . . . . . . 10
2.2.1 Backup strategy considerations . . . . . . . . . . . . . . . . . . . . . . . . . . . . 102.2.2 The amount of space needed . . . . . . . . . . . . . . . . . . . . . . . . . . . . . . 11
2.3 The ASP to use for virtual tape . . . . . . . . . . . . . . . . . . . . . . . . . . . . . . . . . 132.3.1 Considering system ASP, user ASP, or iASP for virtual tape . . . . . . 142.3.2 Preparing to use a user ASP or an iASP . . . . . . . . . . . . . . . . . . . . . 162.3.3 Using virtual tape volumes in user ASPs . . . . . . . . . . . . . . . . . . . . . 172.3.4 Using virtual tape in an iASP. . . . . . . . . . . . . . . . . . . . . . . . . . . . . . . 19
2.4 Performance considerations . . . . . . . . . . . . . . . . . . . . . . . . . . . . . . . . . . . 212.5 Requirements . . . . . . . . . . . . . . . . . . . . . . . . . . . . . . . . . . . . . . . . . . . . . . 22
2.5.1 Operating system requirements . . . . . . . . . . . . . . . . . . . . . . . . . . . . 222.5.2 Hardware requirements. . . . . . . . . . . . . . . . . . . . . . . . . . . . . . . . . . . 232.5.3 Resource requirements. . . . . . . . . . . . . . . . . . . . . . . . . . . . . . . . . . . 232.5.4 Security requirements . . . . . . . . . . . . . . . . . . . . . . . . . . . . . . . . . . . . 25
2.6 Limitations . . . . . . . . . . . . . . . . . . . . . . . . . . . . . . . . . . . . . . . . . . . . . . . . . 262.6.1 Installing i5/OS and related software . . . . . . . . . . . . . . . . . . . . . . . . 262.6.2 Unsupported commands and functions. . . . . . . . . . . . . . . . . . . . . . . 262.6.3 Other limitations . . . . . . . . . . . . . . . . . . . . . . . . . . . . . . . . . . . . . . . . 27
© Copyright IBM Corp. 2006. All rights reserved. iii

2.7 Planning for Backup Recovery Media Services . . . . . . . . . . . . . . . . . . . . 27
Chapter 3. Implementing virtual tape storage . . . . . . . . . . . . . . . . . . . . . . 333.1 Setting up virtual tape storage. . . . . . . . . . . . . . . . . . . . . . . . . . . . . . . . . . 343.2 Using a tape image catalog. . . . . . . . . . . . . . . . . . . . . . . . . . . . . . . . . . . . 58
3.2.1 Save using a tape image catalog . . . . . . . . . . . . . . . . . . . . . . . . . . . 613.2.2 Automatic creation of new volumes . . . . . . . . . . . . . . . . . . . . . . . . . 653.2.3 Viewing the virtual volumes. . . . . . . . . . . . . . . . . . . . . . . . . . . . . . . . 673.2.4 Changing virtual media characteristics . . . . . . . . . . . . . . . . . . . . . . . 79
3.3 Copying virtual tape to physical tape. . . . . . . . . . . . . . . . . . . . . . . . . . . . . 893.3.1 Preparing for duplication . . . . . . . . . . . . . . . . . . . . . . . . . . . . . . . . . . 903.3.2 Duplicating virtual tape to physical tape . . . . . . . . . . . . . . . . . . . . . 1023.3.3 Saving virtual tape as an object . . . . . . . . . . . . . . . . . . . . . . . . . . . 112
3.4 Catalog shadowing . . . . . . . . . . . . . . . . . . . . . . . . . . . . . . . . . . . . . . . . . 1203.4.1 Overview of catalog shadowing . . . . . . . . . . . . . . . . . . . . . . . . . . . 1203.4.2 Setting up image catalog shadowing . . . . . . . . . . . . . . . . . . . . . . . 1243.4.3 Utilizing dependent catalogs . . . . . . . . . . . . . . . . . . . . . . . . . . . . . . 1323.4.4 Removing a shadowed volume . . . . . . . . . . . . . . . . . . . . . . . . . . . . 1333.4.5 Deleting a shadowed catalog . . . . . . . . . . . . . . . . . . . . . . . . . . . . . 135
Chapter 4. Multiple virtual tape scenarios . . . . . . . . . . . . . . . . . . . . . . . . 1414.1 Nightly backup using virtual tape. . . . . . . . . . . . . . . . . . . . . . . . . . . . . . . 142
4.1.1 Preparing for nightly backup . . . . . . . . . . . . . . . . . . . . . . . . . . . . . . 1424.1.2 Performing the nightly backup. . . . . . . . . . . . . . . . . . . . . . . . . . . . . 143
4.2 BRMS parallel backup. . . . . . . . . . . . . . . . . . . . . . . . . . . . . . . . . . . . . . . 1484.2.1 Parallel-parallel scenario. . . . . . . . . . . . . . . . . . . . . . . . . . . . . . . . . 1494.2.2 Parallel-serial backup . . . . . . . . . . . . . . . . . . . . . . . . . . . . . . . . . . . 161
4.3 SAVSYS using virtual tape . . . . . . . . . . . . . . . . . . . . . . . . . . . . . . . . . . . 1744.3.1 Preparing for SAVSYS . . . . . . . . . . . . . . . . . . . . . . . . . . . . . . . . . . 1754.3.2 Performing SAVSYS . . . . . . . . . . . . . . . . . . . . . . . . . . . . . . . . . . . . 1764.3.3 Duplicating virtual volumes . . . . . . . . . . . . . . . . . . . . . . . . . . . . . . . 1824.3.4 Summary. . . . . . . . . . . . . . . . . . . . . . . . . . . . . . . . . . . . . . . . . . . . . 187
Chapter 5. Saving Domino with BRMS and virtual tape . . . . . . . . . . . . . 1895.1 Creating the image catalog . . . . . . . . . . . . . . . . . . . . . . . . . . . . . . . . . . . 1905.2 Creating a BRMS backup policy for Domino . . . . . . . . . . . . . . . . . . . . . . 2025.3 Creating a move policy . . . . . . . . . . . . . . . . . . . . . . . . . . . . . . . . . . . . . . 230
5.3.1 Creating a move policy for virtual volumes . . . . . . . . . . . . . . . . . . . 2315.3.2 Adjusting the virtual move policy. . . . . . . . . . . . . . . . . . . . . . . . . . . 2395.3.3 Creating a move policy for physical volumes . . . . . . . . . . . . . . . . . 241
5.4 Adjusting the backup policy. . . . . . . . . . . . . . . . . . . . . . . . . . . . . . . . . . . 2425.5 Running the Domino backup . . . . . . . . . . . . . . . . . . . . . . . . . . . . . . . . . . 250
5.5.1 Checking the results . . . . . . . . . . . . . . . . . . . . . . . . . . . . . . . . . . . . 2545.6 Restoring a mail file. . . . . . . . . . . . . . . . . . . . . . . . . . . . . . . . . . . . . . . . . 262
iv i5/OS V5R4 Virtual Tape: A Guide to Planning and Implementation

5.6.1 Checking the results . . . . . . . . . . . . . . . . . . . . . . . . . . . . . . . . . . . . 276
Chapter 6. BRMS and virtual tape . . . . . . . . . . . . . . . . . . . . . . . . . . . . . . . 2796.1 Implementing BRMS using 5250 emulation . . . . . . . . . . . . . . . . . . . . . . 2806.2 Setting up virtual tape . . . . . . . . . . . . . . . . . . . . . . . . . . . . . . . . . . . . . . . 2806.3 Installing BRMS. . . . . . . . . . . . . . . . . . . . . . . . . . . . . . . . . . . . . . . . . . . . 2816.4 Setting up locations in BRMS for virtual tape . . . . . . . . . . . . . . . . . . . . . 283
6.4.1 Location considerations in BRMS . . . . . . . . . . . . . . . . . . . . . . . . . . 2846.4.2 Setting up virtual devices in BRMS . . . . . . . . . . . . . . . . . . . . . . . . . 2876.4.3 Creating virtual media classes . . . . . . . . . . . . . . . . . . . . . . . . . . . . 2896.4.4 Creating move policies . . . . . . . . . . . . . . . . . . . . . . . . . . . . . . . . . . 2946.4.5 Creating media policies. . . . . . . . . . . . . . . . . . . . . . . . . . . . . . . . . . 2976.4.6 Creating the link list . . . . . . . . . . . . . . . . . . . . . . . . . . . . . . . . . . . . . 3016.4.7 Creating control groups for daily backup of user data. . . . . . . . . . . 3046.4.8 Running the daily backup . . . . . . . . . . . . . . . . . . . . . . . . . . . . . . . . 3106.4.9 Duplicating media . . . . . . . . . . . . . . . . . . . . . . . . . . . . . . . . . . . . . . 3136.4.10 Running media movement . . . . . . . . . . . . . . . . . . . . . . . . . . . . . . 319
6.5 BRMS maintenance . . . . . . . . . . . . . . . . . . . . . . . . . . . . . . . . . . . . . . . . 320
Chapter 7. BRMS and virtual tape working from the Navigator . . . . . . . 3297.1 BRMS and a brief introduction to virtual tape . . . . . . . . . . . . . . . . . . . . . 330
7.1.1 Setting up locations. . . . . . . . . . . . . . . . . . . . . . . . . . . . . . . . . . . . . 3317.2 Defining a move policy . . . . . . . . . . . . . . . . . . . . . . . . . . . . . . . . . . . . . . 335
7.2.1 Creating a move policy . . . . . . . . . . . . . . . . . . . . . . . . . . . . . . . . . . 3367.2.2 Move policy for physical tape volumes . . . . . . . . . . . . . . . . . . . . . . 344
7.3 Designing a tailored backup policy . . . . . . . . . . . . . . . . . . . . . . . . . . . . . 3447.4 Tailoring a backup policy to specific requirements . . . . . . . . . . . . . . . . . 364
7.4.1 The Before activities . . . . . . . . . . . . . . . . . . . . . . . . . . . . . . . . . . . . 3657.4.2 The During activities . . . . . . . . . . . . . . . . . . . . . . . . . . . . . . . . . . . . 3697.4.3 The After activities. . . . . . . . . . . . . . . . . . . . . . . . . . . . . . . . . . . . . . 376
7.5 Adding media to BRMS . . . . . . . . . . . . . . . . . . . . . . . . . . . . . . . . . . . . . . 3787.6 Running the backup . . . . . . . . . . . . . . . . . . . . . . . . . . . . . . . . . . . . . . . . 3857.7 Restoring an object . . . . . . . . . . . . . . . . . . . . . . . . . . . . . . . . . . . . . . . . . 389
7.7.1 Determining whether the restore worked . . . . . . . . . . . . . . . . . . . . 4027.8 Duplicating volumes . . . . . . . . . . . . . . . . . . . . . . . . . . . . . . . . . . . . . . . . 408
7.8.1 Adding physical tape volumes. . . . . . . . . . . . . . . . . . . . . . . . . . . . . 4087.8.2 Duplicating volumes . . . . . . . . . . . . . . . . . . . . . . . . . . . . . . . . . . . . 415
7.9 Parameters available only from Navigator . . . . . . . . . . . . . . . . . . . . . . . 4227.10 Adding a new tape drive to BRMS . . . . . . . . . . . . . . . . . . . . . . . . . . . . 4277.11 Reinstating dialog boxes . . . . . . . . . . . . . . . . . . . . . . . . . . . . . . . . . . . . 429
Chapter 8. Debugging examples using the GUI . . . . . . . . . . . . . . . . . . . . 4318.1 First attempt . . . . . . . . . . . . . . . . . . . . . . . . . . . . . . . . . . . . . . . . . . . . . . 4328.2 Second attempt . . . . . . . . . . . . . . . . . . . . . . . . . . . . . . . . . . . . . . . . . . . . 440
Contents v

8.3 The final attempt . . . . . . . . . . . . . . . . . . . . . . . . . . . . . . . . . . . . . . . . . . . 445
Appendix A. Block sizes . . . . . . . . . . . . . . . . . . . . . . . . . . . . . . . . . . . . . . . 457Block size chart . . . . . . . . . . . . . . . . . . . . . . . . . . . . . . . . . . . . . . . . . . . . . . . 458
Appendix B. Sample command language . . . . . . . . . . . . . . . . . . . . . . . . . 461How command language program works. . . . . . . . . . . . . . . . . . . . . . . . . . . . 462Command language sample source. . . . . . . . . . . . . . . . . . . . . . . . . . . . . . . . 462Command source to use with the command language . . . . . . . . . . . . . . . . . 466Command options . . . . . . . . . . . . . . . . . . . . . . . . . . . . . . . . . . . . . . . . . . . . . 467
Appendix C. Quick start guide . . . . . . . . . . . . . . . . . . . . . . . . . . . . . . . . . . 471Setting up virtual tape. . . . . . . . . . . . . . . . . . . . . . . . . . . . . . . . . . . . . . . . . . . 472
Setting up virtual tape through iSeries Navigator . . . . . . . . . . . . . . . . . . . 472Setting up virtual tape through 5250 emulation. . . . . . . . . . . . . . . . . . . . . 473
Additional steps for BRMS . . . . . . . . . . . . . . . . . . . . . . . . . . . . . . . . . . . . . . . 474
Related publications . . . . . . . . . . . . . . . . . . . . . . . . . . . . . . . . . . . . . . . . . . 477IBM Redbooks . . . . . . . . . . . . . . . . . . . . . . . . . . . . . . . . . . . . . . . . . . . . . . . . 477Other publications . . . . . . . . . . . . . . . . . . . . . . . . . . . . . . . . . . . . . . . . . . . . . 477Online resources . . . . . . . . . . . . . . . . . . . . . . . . . . . . . . . . . . . . . . . . . . . . . . 477How to get IBM Redbooks . . . . . . . . . . . . . . . . . . . . . . . . . . . . . . . . . . . . . . . 478Help from IBM . . . . . . . . . . . . . . . . . . . . . . . . . . . . . . . . . . . . . . . . . . . . . . . . 478
Index . . . . . . . . . . . . . . . . . . . . . . . . . . . . . . . . . . . . . . . . . . . . . . . . . . . . . . . 479
vi i5/OS V5R4 Virtual Tape: A Guide to Planning and Implementation

Notices
This information was developed for products and services offered in the U.S.A.
IBM may not offer the products, services, or features discussed in this document in other countries. Consult your local IBM representative for information on the products and services currently available in your area. Any reference to an IBM product, program, or service is not intended to state or imply that only that IBM product, program, or service may be used. Any functionally equivalent product, program, or service that does not infringe any IBM intellectual property right may be used instead. However, it is the user's responsibility to evaluate and verify the operation of any non-IBM product, program, or service.
IBM may have patents or pending patent applications covering subject matter described in this document. The furnishing of this document does not give you any license to these patents. You can send license inquiries, in writing, to: IBM Director of Licensing, IBM Corporation, North Castle Drive Armonk, NY 10504-1785 U.S.A.
The following paragraph does not apply to the United Kingdom or any other country where such provisions are inconsistent with local law: INTERNATIONAL BUSINESS MACHINES CORPORATION PROVIDES THIS PUBLICATION "AS IS" WITHOUT WARRANTY OF ANY KIND, EITHER EXPRESS OR IMPLIED, INCLUDING, BUT NOT LIMITED TO, THE IMPLIED WARRANTIES OF NON-INFRINGEMENT, MERCHANTABILITY OR FITNESS FOR A PARTICULAR PURPOSE. Some states do not allow disclaimer of express or implied warranties in certain transactions, therefore, this statement may not apply to you.
This information could include technical inaccuracies or typographical errors. Changes are periodically made to the information herein; these changes will be incorporated in new editions of the publication. IBM may make improvements and/or changes in the product(s) and/or the program(s) described in this publication at any time without notice.
Any references in this information to non-IBM Web sites are provided for convenience only and do not in any manner serve as an endorsement of those Web sites. The materials at those Web sites are not part of the materials for this IBM product and use of those Web sites is at your own risk.
IBM may use or distribute any of the information you supply in any way it believes appropriate without incurring any obligation to you.
Information concerning non-IBM products was obtained from the suppliers of those products, their published announcements or other publicly available sources. IBM has not tested those products and cannot confirm the accuracy of performance, compatibility or any other claims related to non-IBM products. Questions on the capabilities of non-IBM products should be addressed to the suppliers of those products.
This information contains examples of data and reports used in daily business operations. To illustrate them as completely as possible, the examples include the names of individuals, companies, brands, and products. All of these names are fictitious and any similarity to the names and addresses used by an actual business enterprise is entirely coincidental.
COPYRIGHT LICENSE: This information contains sample application programs in source language, which illustrates programming techniques on various operating platforms. You may copy, modify, and distribute these sample programs in any form without payment to IBM, for the purposes of developing, using, marketing or distributing application programs conforming to the application programming interface for the operating platform for which the sample programs are written. These examples have not been thoroughly tested under all conditions. IBM, therefore, cannot guarantee or imply reliability, serviceability, or function of these programs. You may copy, modify, and distribute these sample programs in any form without payment to IBM for the purposes of developing, using, marketing, or distributing application programs conforming to IBM's application programming interfaces.
© Copyright IBM Corp. 2006. All rights reserved. vii

TrademarksThe following terms are trademarks of the International Business Machines Corporation in the United States, other countries, or both:
Eserver®Eserver®eServer™AS/400®Domino®iSeries™i5/OS®
IBM®Lotus®NetServer™OS/400®PAL™Redbooks™Redbooks (logo) ™
System i5™System/36™System/38™Tivoli®xSeries®z/OS®
The following terms are trademarks of other companies:
Windows, and the Windows logo are trademarks of Microsoft Corporation in the United States, other countries, or both.
Linux is a trademark of Linus Torvalds in the United States, other countries, or both.
Other company, product, or service names may be trademarks or service marks of others.
viii i5/OS V5R4 Virtual Tape: A Guide to Planning and Implementation

Preface
In this IBM® Redbook we provide a detailed explanation of the new virtual tape support provided by i5/OS® V5R4. We cover the concepts, planning, and use of virtual tape support.
Backup and Recovery Media Services (BRMS) is an important program product for System i5™ customers to enable management of their system and data backups. This publication describes how BRMS uses the new virtual tape support for virtual backups.
This redbook is intended for IBM, Business Partner and client technical professionals who will be planning, implementing, and operating virtual tape support.
The team that wrote this redbookThis redbook was produced by a team of specialists from around the world working at the International Technical Support Organization, Rochester Center.
Nick Harris is a Consulting IT Specialist for the iSeries™ and has spent the last eight years in the International Technical Support Organization, Rochester Center. He specializes in eServer™ i5 and iSeries hardware, i5/OS and OS/400® software, LPAR, High Availability, external disk, Windows® integration, and Linux®. He writes IBM Redbooks™ and teaches IBM classes at ITSO Technical forums worldwide on all these areas and as they are related to system design and server consolidation. He spent 13 years in the United Kingdom (UK) AS/400® Business, where he worked with S/36, S/38, AS/400, and iSeries servers.
You can contact Nick by sending e-mail to:
mailto:[email protected]
Brian Bohner is a Software Engineer for the IBM Rochester iSeries Support Center, Rochester, MN. He has been a specialist on the Save/Restore and BRMS team since 2001. His areas of expertise include upgrades, backups, recoveries, PTFs, BRMS, and virtual media. Brian has authored several technical documents including an article that first introduced Image Catalogs which was published in the eServer iSeries magazine. He continues to provide remote technical support, future release functions/support, and lab testing, and travels
© Copyright IBM Corp. 2006. All rights reserved. ix

nationally and internationally to perform system installations and disaster recovery.
You can contact Brian by sending e-mail to:
mailto:[email protected]
Dan Johansson is a Software Specialist working in Information Technology Services for IBM Sweden. He specializes in software support for System i5, i5/OS, OS/400 and BRMS.
You can contact Dan by sending e-mail to:
mailto:[email protected]
Albert Karels is an IT Specialist Advisory in IBM The Netherlands. He has worked at IBM for 17 years. In 1997 he joined the iSeries software support team in the Netherlands, where he still works today. His areas of expertise include BRMS, save&restore and tape support on iSeries.
You can contact Albert by sending e-mail to:
mailto:[email protected]
Thanks to the following for their contributions to this project:
Joe Kochan
Sanjay A Patel
Lee Prissel
IBM Rochester Development Lab
Mervyn Venter
IBM Rochester Support Center
Debbie Saugen
IBM Business Continuity and Recovery Services
Become a published authorJoin us for a two- to six-week residency program! Help write an IBM Redbook dealing with specific products or solutions, while getting hands-on experience with leading-edge technologies. You'll team with IBM technical professionals, Business Partners and/or customers.
x i5/OS V5R4 Virtual Tape: A Guide to Planning and Implementation

Your efforts will help increase product acceptance and customer satisfaction. As a bonus, you'll develop a network of contacts in IBM development labs, and increase your productivity and marketability.
Find out more about the residency program, browse the residency index, and apply online at:
ibm.com/redbooks/residencies.html
Comments welcomeYour comments are important to us!
We want our Redbooks to be as helpful as possible. Send us your comments about this or other Redbooks in one of the following ways:
� Use the online Contact us review redbook form found at:
ibm.com/redbooks
� Send your comments in an e-mail to:
� Mail your comments to:
IBM Corporation, International Technical Support OrganizationDept. HYTD Mail Station P0992455 South RoadPoughkeepsie, NY 12601-5400
Preface xi

xii i5/OS V5R4 Virtual Tape: A Guide to Planning and Implementation

Chapter 1. Introduction to virtual tape
In this chapter, we introduce virtual tape in i5/OS. First we explain the virtual tape concept and describe how to position it. Next, we compare virtual tape with physical tape and discuss the benefits of using virtual tape.
Finally, we describe the physical devices that are supported, and how virtual tape actually works.
1
© Copyright IBM Corp. 2006. All rights reserved. 1

1.1 What is virtual tapeThe virtual tape concept is a simulated tape environment within i5/OS. It consists of the following:
� Virtual tape drives (up to 35)� Virtual tapes (256 maximum per image catalog)� One or more image catalogs holding the virtual tapes. These are called image
catalog entries.
This virtual environment behaves exactly as though there were real tape drives with real physical tape volumes. The virtual tape volumes are structured exactly like real tapes, with headers, tape marks, trailer labels, and so on.
Use virtual tapes exactly as you would real tapes. Commands such as DSPTAP, CHKTAP, and so on behave in the same manner as they would in real tapes. As a user you will not notice any difference. You can even flip their write protect switch.
Notice the emphasis on the word “exact”. This is because virtual tapes are exactly like real tapes, with only a minor difference: since they are virtual, you should copy the virtual tapes to real tape volumes and store them safely. Apart from this, no other difference exists.
1.2 Positioning the virtual tapeThis section discusses the positioning of virtual tape and compares it with other virtual media services and physical tape.
1.2.1 Other virtual media servicesThe following virtual media services are available:
� Virtual optical
This is available in OS/400 V5R2, i5/OS V5R4, and subsequent releases. With this function, you can load optical images and use them for installation of software and PTFs.
� Virtual Tape Server (VTS)
This is currently not available in i5/OS. This function, which is actually a tape server on which clients can back up their details, is available on some other platforms (for example, the IBM z/OS® platform).
2 i5/OS V5R4 Virtual Tape: A Guide to Planning and Implementation

� Virtual tape
This is available in i5/OS V5R4 and subsequent releases, and can be used to back up and restore data from a virtual tape device.
1.2.2 Supported applications and operating systemsThe virtual tape function in i5/OS provides the same functionality as a physical tape. There are, however, a few exceptions with regard to specific functions. These are discussed in 2.6, “Limitations” on page 26.
Virtual tape in i5/OS acts as a Random Access Cartridge Loader (RACL), which is still a tape device and not a media library. All the save commands in i5/OS can use the virtual tape function.
The following applications and integrated operating systems are supported:
� Backup Recovery and Media Services (BRMS)
BRMS V5R4 fully supports virtual tape. 2.7, “Planning for Backup Recovery Media Services” on page 27 provides more information about BRMS and virtual tape.
� Linux on integrated IBM ^® xSeries® server
For more information about Linux and virtual tape, refer to the IBM ̂iSeries Information Center, which is available on the Web at:
http://publib.boulder.ibm.com/infocenter/iseries/v5r4/index.jsp
In the Contents frame on the left panel, select iSeries Information Center Version 5 Release 4, expand Integrated operating environments, and select Linux → Linux on an integrated xSeries solution.
� Windows on an integrated IBM ̂xSeries server
Only the xSeries servers connected through the new V5R4 iSCSI support can use virtual tape. There is no support for xSeries servers connected via HSL.
� System i5 guest operating system support:
Linux in a guest partition on i5 using virtual I/O (hosted). Currently, there is no support for AIX®.
Chapter 1. Introduction to virtual tape 3

1.3 Benefits of virtual tapeUsing virtual tape offers the following benefits:
� There is no need for physical tape devices to be attached during backup or restore.
This can be due to one or more of the following reasons:
– The tape device or media library is shared between systems or partitions.
– The tape device or media library is being used by another process or job at that time.
– The tape device or media library is unavailable or is unstable due to a hardware defect.
Of course, the virtual media still has to be duplicated to physical media, but the backup can go on.
� Virtual tape can be used to reduce backup time by running concurrent backups in situations where there are insufficient physical tape devices available to perform this task.
� You can FTP the image to other partitions or systems and add it as an entry to the image catalog. There can be multiple reasons why you want the virtual tape image on another system or partition, including the following:
– In the system on which you are running a backup or restore, there is no hardware to support the media you use for backup. In such a situation, you can back up to virtual tape and then transfer the image to a partition or system to which a physical tape device is attached.
– You want to restore data from an image on another system and you do not use a switchable iASP to store the virtual tape images on. The image can be used in either switchable iASP or user ASP.
For user ASP and non-switchable iASP, the only benefit is that the user ASP or iASP are on other DASDs. For switchable iASP, the image can be used for backup and restore on multiple systems, without requiring the image to be transferred to another system. You can simply switch the iASP.
� It can reduce the save time, depending on the configuration and workload.
� There are no media errors with virtual tape.
A permanent media error causes a backup to fail, which implies that there is no complete backup.
� The concept of failed saves when using Save-While-Active (SWA) is no longer present.
When performing a backup to physical tape, there is always a chance of a media error and with SWA checkpoint processing, there is no possibility of
4 i5/OS V5R4 Virtual Tape: A Guide to Planning and Implementation

restarting the backup since the applications or batch jobs are already running. With virtual tape, this is no longer a concern.
� It can reduce recovery time, especially in the case of applications in which it is common practice to restore files frequently. For example, for restoring mail files in Domino®, you can restore the files directly from the virtual volumes.
� It allows having a local copy of data and an offsite duplicated copy of the data. Local copies can be retained on the system for a period of time for recall of the data.
� It has the ability to save more than one library, while a user without BRMS can only save one library per save file.
1.4 Supported physical devices Virtual tape on i5/OS supports every physical tape device that is supported on i5/OS. However, there are four different densities you can choose for virtual tape, and the density should be compatible with the physical device.
For virtual tape, density is used to control the optimum block size that the volume will use. Following are the four densities available for virtual tape:
� *VRT32K
This will not use an optimum block size and will be compatible with all physical devices.
� *VRT64K
This uses an optimum block size of 64 KB and will be compatible with 3490F model 18 track media, VXA, 8 mm devices, 35xx devices, and newer type QIC devices.
� *VRT240K
This uses an optimum block size of 240 KB and will be compatible with VXA, 8 mm devices, 35xx devices, and newer type QIC devices.
� *VRT256K
This uses an optimum block size of 256 KB and will be compatible with 35xx devices and newer type QIC devices.
Appendix A, “Block sizes” on page 457 contains a chart with a list of physical devices and their compatibility with block size.
For maximum performance, use the largest compatible block size. The density can only be changed with the INZTAP command.
Chapter 1. Introduction to virtual tape 5

1.5 More details about virtual tapeThis section provides more information about how virtual tape actually works.
1.5.1 Virtual tape deviceA virtual tape device acts as a real tape device. It uses the same technology used by virtual optical devices, such as an image catalog and image catalog entries. The following specifications apply to virtual tape:
� Every system with V5R4 or a subsequent release installed has an IOP type 268C with a storage controller (IOA) type 6B02. These are the virtual IOPs and IOAs to which the virtual devices will be attached.
� The virtual tape device resources have a type 63B0 and will automatically be created when a virtual tape device description is created specifying *VRT as the hardware resource.
� You can create as many virtual tape device descriptions as you want, but the maximum number of virtual tape resources is 35. Therefore, there can be up to 35 virtual tape devices being varied on at same time.
� Virtual tape resources (type 63B0) will have a status of NOT DETECTED in WRKHDWRSC or DSPHDWRSC after the next IPL, when no device description is attached. There is no need to delete this hardware resource.
1.5.2 Image catalogVirtual tape uses the same technology as virtual optical on i5/OS. It also uses an image catalog with image catalog entries. The properties of the image catalog for virtual tape are:
� An image catalog is an object of type *IMGCLG and resides in QUSRSYS.
� When creating the image catalog, a directory in the Integrated File System (IFS) must be specified, in which the virtual volumes will be stored.
� An image catalog must be loaded. Specify a virtual tape device before using it. The virtual tape device should be varied on.
� One image catalog can hold up to 256 virtual volumes.
� Different density types within one image catalog are allowed.
Note: A backup performed on a volume with a density that is not compatible with the physical device cannot be duplicated.
6 i5/OS V5R4 Virtual Tape: A Guide to Planning and Implementation

Image catalog entriesImage catalog entries in an image catalog represent the virtual tape volumes.
The following specifications apply:
� An image catalog entry is actually a streamfile in IFS residing in the directory specified for the image catalog. This streamfile has a special attribute to prevent the following:
– Save with storage free
– Scan processing (virus checking)
– Journaling
� The maximum size of one image catalog entry (virtual volume) is 1000,000,000,000 bytes (1TB).
� It can be stored in iASPs or user ASPs.
� Virtual volumes can be write protected.
Chapter 1. Introduction to virtual tape 7

8 i5/OS V5R4 Virtual Tape: A Guide to Planning and Implementation

Chapter 2. Planning for virtual tape
Before using virtual tape, it is important to formulate a plan and have a clear understanding of what you require. In this chapter we discuss planning for virtual tape in an enterprise environment. The intention is to provide a clear understanding of the requirements, limitations, and characteristics of virtual tape in order to effectively plan for a new backup and restore strategy.
First we describe what you should save through virtual tape. Next, we discuss backup strategy and space considerations. We explain the various ASP types, and examine performance considerations.
Operating system, hardware, resource, and security requirements are detailed here, as well as the limitations of using virtual tape. Finally, we close the chapter with a discussion of planning for Backup Recovery Media Services (BRMS).
2
© Copyright IBM Corp. 2006. All rights reserved. 9

2.1 What to save through virtual tapeWhen considering using virtual tape rather than physical tape directly, you should, based on the backup strategy, determine which objects can be saved to tape and how much storage this requires.
Every object that can be saved today to physical tape can also be saved to virtual tape. There are no restrictions to saving objects on virtual tape. However, there are restrictions with regard to restoring directly from virtual tape; for more information about this topic see 2.6, “Limitations” on page 26.
2.2 Considering the backup strategyBefore determining how much space you require and whether you want to use a user ASP or iASP, review your backup strategy, since the new backup strategy has to include virtual tape.
2.2.1 Backup strategy considerationsTo review or create a new backup strategy, consider the following:
� Determine what you want to save.
� Determine how often you want it to be saved.
� Determine how much storage space you have on your disk.
� Do you want to have a copy in your system location?
If you already have a copy in your tape library, you can decide to keep a copy on the system, rather than keeping a copy on the physical volume in the tape library.
� Determine how much space is required for virtual tape backup.
Physical tapes offer the benefit of hardware compression, while virtual tapes do not and little compressed is performed. Therefore, backup to virtual tapes may take up more space than backup to physical tapes.
For more information about backup strategy, refer to the IBM ̂iSeries Information Center. In the Contents frame on the left side, select iSeries Information Center Version 5 Release 4, expand Systems management, and select Backup and recovery → Plan a backup and recovery strategy.
Note: Installation of SLIC or base i5/OS is not possible from virtual tape.
10 i5/OS V5R4 Virtual Tape: A Guide to Planning and Implementation

This information can also be accessed on the Web at:
http://publib.boulder.ibm.com/infocenter/iseries/v5r4/index.jsp
Although the backup strategy is related to your environment, and different backup strategies are possible, a simple backup strategy that is modified to include virtual tape is shown in Figure 2-1.
Figure 2-1 Example of backup without and with virtual tape
After the new backup strategy is created, determine the space required for the backups.
2.2.2 The amount of space neededSince virtual images are stored on your disk units, they can use disk space quickly. Ensure that enough disk space is available. While the smallest allowable size for a tape image file volume is 48 MB, the largest allowable size is 1,000,000 MB.
Determining the disk space you haveTo determine how much disk space you have, follow these steps:
1. In IBM ̂iSeries Navigator, expand My Connections → your iSeries server → Configuration and Service → Hardware → Disk Units → Disk Pools.
You will be prompted for a service tools user ID and password. Ask your system administrator to provide you with a valid user ID and password.
Chapter 2. Planning for virtual tape 11

2. Right-click the Disk Pool you want to view, and select Properties.
3. Select the Capacity tab. The Capacity page displays the used space, free space, total capacity, threshold, and percentage of disk space used for the disk pool.
4. In the screen capture command line, type the following commands:
WRKDSKSTS for disk information
or
WRKSYSSTS and for general system information
The number of volumes of virtual images requiredTo determine how many volumes you require, consider the following:
� The amount of data you plan to store � The size of each virtual image
Determine the image size based on what you plan to do with the tape image file. Keep the files small if you want to electronically transfer them to another system. Large images will make it inflexible and there is no need to create images of a size equal to the physical volumes, since you can always append data during duplication to physical media.
Note: Disk usage for systems with a total disk capacity up to 100 GB is limited to 95% of the capacity for virtual tape operation. The virtual tape operation will stop with an end of media error when 95% of the disk capacity is reached.
For systems with a disk capacity above 100 GB, the tape operation will stop when less than 5 GB disk space is remaining.
Note on CHGATR: The virtual volumes are actually streamfiles in IFS, as described in “Image catalog entries” on page 7. When saving IFS data, these streamfiles should be omitted from the backup.
However, you can change the attributes of the directory where the virtual images reside and change the “Can be saved” option to *NO. Following is the command syntax for changing the attribute:
CHGATR OBJ('/MyCatalogDirectory') ATR(*ALWSAV) VALUE(*NO) SUBTREE(*ALL)
12 i5/OS V5R4 Virtual Tape: A Guide to Planning and Implementation

2.3 The ASP to use for virtual tapeYou can use a system ASP, a user ASP, or an iASP to store your virtual tape images on. From a performance point of view, a user ASP or iASP may be a good option.
If you also want to use the virtual volumes on other systems for restore, a switchable iASP is a good option.
Assume you have the ASPs shown in Figure 2-2, with enough disks and disk arms.
Figure 2-2 System ASP(1)
Chapter 2. Planning for virtual tape 13

You decide to reserve disks for another ASP, as shown in Figure 2-3.
Figure 2-3 System ASP(1) with user ASP or iASP
2.3.1 Considering system ASP, user ASP, or iASP for virtual tapeTo determine the ASP in which you plan to store your virtual volume images, apply the following considerations:
� System ASP
Consider the following before you decide to store the virtual images in a System ASP:
– Amount of disk arms.
– Enough free space to store the volume images.
– Possible data loss in case of disk failure in the system ASP.
Virtual tape volumes will also be lost. If they are not yet duplicated to physical tape volumes, data will be lost.
– No additional disk configuration changes.
� User ASP
Consider the following before you decide to store the virtual images in a User ASP:
– Minimal impact on system performance when running backup or when duplicating virtual tape volumes to physical tape.
– Easy to set up.
14 i5/OS V5R4 Virtual Tape: A Guide to Planning and Implementation

– No data loss in case of disk failure in the system ASP and your virtual tape volumes are not duplicated yet. However, this requires additional tasks to be performed after you recover your system ASP. It also requires a disk configuration change if you do not have a user ASP.
� Standalone iASP
A standalone or private iASP is a separate ASP in which you can store your application data or other objects. Consider the following before you decide to use a standalone iASP for storing the virtual tape volumes:
– Minimal impact on system performance when running backup or when duplicating the virtual tape volumes to physical tape.
– One or more disks for creating a standalone iASP. You can either add new disks or remove disks from the system ASP if you have enough disks and disk arms in your system ASP.
– Disk configuration change is required if you do not have an iASP.
– No data loss in case of disk failure in the system ASP and the virtual tape volumes are not yet duplicated.
– No additional steps required to recover the iASP in case of data loss in the system ASP.
� Switchable iASP
A switchable iASP can be used in a cluster environment used by many different systems. In this case, you can store the virtual tape volumes in your switchable iASP. When you want to restore them on another system, switch the iASP to that system and restore the data to that system. For switchable iASP, the following aspects should be considered:
– You cannot use only one disk for setting up a switchable iASP, unless the disk is in a separate tower. In case of a switchable iASP, the entire tower has to be switched.
– Switchable iASP is flexible. Data can be backed up on a system and restored on other systems without moving the images.
– There is no data loss if there is disk failure in the system ASP and virtual tape volumes are not yet duplicated.
– It involves more than simply a disk configuration change; switchable iASP is more complex to set up than a standalone iASP or a user ASP. It can only be used in a cluster environment.
Chapter 2. Planning for virtual tape 15

2.3.2 Preparing to use a user ASP or an iASPWhile planning to set up a user ASP or an iASP, you should decide on the disks to allocate and how to allocate them.
Preparing to add, remove, or move disks While preparing to use a user ASP or iASP for your virtual tape volumes, consider one or more of the following options:
� Moving one or more disks from a system ASP to a user ASP
You can use this option if you have enough disks arms and disk capacity.
� Removing one or more disks in order to reserve the disks for setting up an iASP
In this case, you have to ensure that you have enough disk space and disk arms. You may even consider a switchable or standalone iASP. A switchable iASP can be used by other systems in a cluster environment. A standalone iASP cannot be switched or attached to another system to access virtual volumes. However, in the case of a switchable iASP, the entire tower, with all the IOPs and disks, are switched, which means that you cannot set up a switchable iASP for one disk.
� Adding new disks for setting up an user ASP or an iASP
You can use this option in one of the following cases:
– You want to add new disks because you do not have enough disks or disk arms in your system ASP.
– You just removed disks and want to add them now for setting up an iASP.
– You want to add new disks for setting up an iASP.
Adding, removing, or moving disks using the 5250 consoleTo add, remove, or move disks on a 5250 console, do the following:
1. In your operator panel, select the Manual mode.
2. In the console command line, type:
PWRDWNSYS RESTART(*YES) IPLSRC(B)
3. Once the DST screen is shown on the console, do the following:
a. In the IPL or Install the System menu, select 3.Use Dedicated Service Tools (DST) and sign in with the user ID QSECOFR or any other user ID with sufficient authority.
16 i5/OS V5R4 Virtual Tape: A Guide to Planning and Implementation

b. In the Use Dedicated Service Tools (DST) menu, select 4. Work with disk units, → 1. Work with disk configuration, → 3. Work with ASP configuration.
In this screen, you will find the options to remove the disk units or move them to another ASP.
Adding, removing, or moving disks with iSeries NavigatorFor details about removing or moving disks using IBM ̂iSeries Navigator, refer to the IBM ̂iSeries Information Center. In the Contents frame on the left side, select iSeries Information Center Version 5 Release 4, expand Systems management, and select Disk management → Configure the disks.
This information can also be accessed on the Web at:
http://publib.boulder.ibm.com/infocenter/iseries/v5r4/index.jsp
2.3.3 Using virtual tape volumes in user ASPsAfter you have added one or more disks to ASP2 or another user ASP, a user ASP is created. You should now prepare to create tape images in the user ASP. For storing the tape images in the user ASP, create a User Defined File System (UDFS).
To create a UDFS, follow these steps:
1. In the command line, type the following command, where XX is the ASP number:
CRTUDFS ’/dev/qaspXX/aspXX.udfs’
2. To create a mount point directory, type the following command:
MKDIR ‘/your-path’
3. Mount the UDFS file system with this command:
MOUNT *UDFS ‘/dev/qaspXX/aspXX.udfs’ ‘/mount-point-directory’
Anything you create from now in ‘/mountpoint’ is created in the UDFS.
When you create the image catalog, specify the mount point for the directory name.
The following example shows how a UDFS works:
1. Assume that you have a directory ‘/imgclg/tape/NotMounted’ created in the system ASP before you mounted the UDFS file system. Type WRKLNK ‘/imgclg/tape’, type 5 in the Opt column, and press Enter. A window resembling Figure 2-4 on page 18 is shown.
Chapter 2. Planning for virtual tape 17

Figure 2-4 UDFS file system is not mounted
2. Mount the UDFS file system with the following command, and press F5:
MOUNT TYPE(*UDFS) MFS('/dev/qasp02/asp02.udfs') MNTOVRDIR('/imgclg/tape')
A window resembling Figure 2-5 on page 19 appears.
Work with Object Links Directory . . . . : /imgclg/tape Type options, press Enter. 2=Edit 3=Copy 4=Remove 5=Display 7=Rename 8=Display attributes 11=Change current directory ... Opt Object link Type Attribute Text NotMounted DIR Bottom Parameters or command ===> F3=Exit F4=Prompt F5=Refresh F9=Retrieve F12=Cancel F17=Position to F22=Display entire field F23=More options
18 i5/OS V5R4 Virtual Tape: A Guide to Planning and Implementation

Figure 2-5 UDFS file system mounted
Since you have now mounted the UDFS file system, you can use the directories in the user ASP.
2.3.4 Using virtual tape in an iASPSetting up a standalone iASP or switchable ASP is more complex than setting up a user ASP. The decision about whether to choose a switchable iASP or not depends on what you want to do with the virtual volumes.
If you have chosen a strategy in which you want to restore the volumes to more than one different system, opt to set up a switchable iASP.
Work with Object Links Directory . . . . : /imgclg/tape Type options, press Enter. 2=Edit 3=Copy 4=Remove 5=Display 7=Rename 8=Display attributes 11=Change current directory ... Opt Object link Type Attribute Text MyCatalogDirectory > DIR MyCatalogDirectory > DIR Bottom Parameters or command ===> F3=Exit F4=Prompt F5=Refresh F9=Retrieve F12=Cancel F17=Position to F22=Display entire field F23=More options
Note: You cannot specify the mount-point directory when specifying a path name with the CRTIMGCLG command. Only the directory below the mount-point can be specified.
Mounts of UDFS file systems do not survive IPLs. Therefore, if you want to use your UDFS file system after an IPL, you should mount it again. You can also decide to add this to your startup program.
Chapter 2. Planning for virtual tape 19

For virtual tape you probably need only one tower for an iASP. However, to show the possibilities, a configuration with many switchable iASPs is shown in Figure 2-6.
Figure 2-6 Switchable independent ASPs
For details about how to set up iASPs, refer to the IBM ̂iSeries Information Center. In the Contents frame on the left, select iSeries Information Center Version 5 Release 4, expand Systems management, → Disk management → Plan for disk management → Plan for independent disk pools.
This can also be accessed on the Web at:
http://publib.boulder.ibm.com/infocenter/iseries/v5r4/index.jsp
For more information and practical tips, refer to the IBM Redbook IBM Eserver iSeries Independent ASPs: A Guide to Moving Applications to IASPs, SG24-6802.
IBM Redbooks can be accessed on the Web at:
http://www.redbooks.ibm.com
To use a virtual tape volume in an independent ASP, specify the ASP device name as the first part of the IFS path name. The independent ASP must be varied on before the virtual tape volumes are usable.
Note: RSTLICPGM is not possible from virtual tape volumes that are stored in an iASP.
20 i5/OS V5R4 Virtual Tape: A Guide to Planning and Implementation

2.4 Performance considerationsUsing virtual tape does not guarantee that your save window decreases.
The following items can affect the save/restore performance:
� Amount of disk arms.
In general, the more disk arms you have, the better the virtual tape save performance will be, especially for large file workloads.
� Available main storage in the system.
� Number of virtual tape drives.
Use of multiple virtual drives can result in better performance. However, at some point, the number of virtual tape drives start to give less value from a performance perspective.
� After the data is saved to virtual volumes, the data has to be moved to physical media by using the DUPTAP or DUPMEDBRM command, unless you plan to copy or FTP the image to another system.
� When creating the virtual tape volume images, you can specify a minimum size for the allocated storage size, for example, ADDIMGCLGE ....ALCSTG(*MIN). This means that initially, the minimum size is 4 KB and when required, additional storage is allocated. However, this can significantly affect your save performance, making it up to 30% slower.
Appendix C, “Quick start guide” on page 471, contains virtual tape benchmark statistics of different configurations and types of data.
Note: Duplicating virtual volumes to physical media on systems with a small amount of disk arms will result in poor performance if the virtual volumes are stored in the system ASP. This is because the disk reads increase significantly, thereby affecting the overall system performance.
Chapter 2. Planning for virtual tape 21

2.5 RequirementsVirtual tape implementation requires certain specifics with regard to operating system level, hardware, resources, and security.
2.5.1 Operating system requirementsVirtual tape on i5/OS requires the following operating system requirements:
i5/OS V5R4 or above In order to determine which i5/OS version you have installed, use one of the following commands:
� Enter the following command and press F11:
DSPSFWRSC
� Type GO LICPGM, press Enter, select 10. Display installed licensed programs, then press Enter and F11.
If you do not have V5R4 installed and want to install i5/OS V5R4, follow the instructions provided in the IBM ̂iSeries Information Center. In the Contents frame on the left side, select iSeries Information Center Version 5 Release 4, expand i5OS and related software, and select Upgrading or replacing i5OS and related software.
This can also be accessed on the Web at:
http://publib.boulder.ibm.com/infocenter/iseries/v5r4/index.jsp
PTFsTo determine the level of SF99186 you have installed, use the following command:
WRKPTFGRP
To determine the latest available level of SF99186, go to the following Web site and perform the actions detailed here:
http://www-03.ibm.com/servers/eserver/support/iseries/
Click Technical databases, select Preventive Service Planning → All Group PTFs by release, and select R540.
Note: V5R4 requires a load source with a minimum size of at least 17 GB.
22 i5/OS V5R4 Virtual Tape: A Guide to Planning and Implementation

2.5.2 Hardware requirementsFor backup to virtual tape, you do not require a tape drive or tape library physically attached at backup time. However, the backup images on the system should be moved to the physical media or another system after the backup is completed. The hardware requirements listed here should be considered.
� Physical tape drive or tape library
Do you have a physical tape drive or tape library with an available drive, including the required IOP or IOA to attach to the system in order to duplicate the virtual volumes to physical media?
� Available space in the system ASP
Do you have sufficient space on the system for storing your virtual tape images?
� Possible space for user ASP or iASP
Do you have enough space and disk arms on the system for moving or removing disk units in order to create a user ASP or iASP? If you do not expect to have enough disk space or disk arms, consider adding additional disks.
2.5.3 Resource requirementsAnother requirement is resources, such as skills and test abilities.
Skill requirementsFamiliarize yourself with backup and recovery operations before starting with virtual tape. Although virtual tape is a good solution that fits with your backup strategy, it actually adds an additional step to your backup process.
The skill requirements listed here may hold true, depending on the backup strategy you use.
Tape managementYou should be knowledgeable about tape management on i5/OS and be able to do the following:
� Manage and duplicate volumes.� Manage and use a tape library or tape device.
Backup and restore skillsYou should perform a check on your backup skills and ensure that you are familiar with the following:
� Backup and restoration of any object on i5/OS
Chapter 2. Planning for virtual tape 23

� Database
There can be many situations in which database knowledge is required, for example, if a backup or restore fails due to pending record changes, pending constraints, file dependencies, and so on.
� Journaling
Sometimes it may be necessary to apply journal changes in order to bring the system backup into the original state.
BRMS skillsIf you are using BRMS, you should be familiar with BRMS and possess the knowledge to perform a system recovery with BRMS. You should be able to interpret the recovery reports.
Ability to testWe recommend that you perform a recovery test once you have set up the virtual tape for use in your backup strategy. In case of recovery disaster or data loss, you should be able to recover in order to bring your system back into the latest state. Following are the issues you should consider:
Ability to save and recover at the object levelYou should be able to save and recover the system at the object level, and consider if you have ever tested this.
Recover a system from tapeAsk yourself if you have ever recovered a system from scratch using the backup or done a disaster recovery test. You should be able to do at least this before you start with virtual tape for your backup.
For more information about disaster recovery, refer to the IBM ̂iSeries Information Center. In the Contents frame on the left side, select iSeries Information Center Version 5 Release 4, expand Systems management, and select Backup and recovery → Plan a backup and recovery strategy, Plan a disaster recovery.
This information can be accessed on the Web at:
http://publib.boulder.ibm.com/infocenter/iseries/v5r4/index.jsp
BRMSIf you are using BRMS for your backup, you should be able to use BRMS and recover your system with BRMS.
24 i5/OS V5R4 Virtual Tape: A Guide to Planning and Implementation

Object securityYou should ask yourself if you experienced any network problems or object security problems after conducting a disaster recovery test. If the answer is yes, were you able to find the root cause?
2.5.4 Security requirementsThe authority requirements listed here are related to the image catalog commands and virtual tape commands. A complete list of authority requirements for all save commands and image catalog and virtual tape commands can be found in Appendix B, “Sample command language” on page 461.
To administer or create image catalogs:
� *USE authority to any command that you want to use� *EXECUTE authority to library QUSRSYS� *CHANGE authority to the image catalog� Execute (*X) authority to library QUSRSYS� *USE authority to the virtual device description
To use an existing catalog:
� *USE authority to any desired commands� *EXECUTE authority to library QUSRSYS� *USE authority to the image catalog� Execute (*X) authority to library QUSRSYS� *USE authority to the virtual device description
To add an image file from physical media, *USE authority to the physical device is required.
To add an image file from an existing image located in a different directory, the required authority is the same as for the CPY (Copy Object) command.
Note: The user profile used to create the virtual tape volumes has its maximum storage allowed attribute set to *NOMAX. You can verify and change it with the following command:
WRKUSRPRF USRPRF(YourProfile)
Chapter 2. Planning for virtual tape 25

2.6 LimitationsMost save and restore commands that can write to tape will also be allowed to use virtual tape. The limitations listed here apply for virtual tape.
2.6.1 Installing i5/OS and related softwareWith regard to installation of SLIC, i5/OS base software, and licensed programs, the following limitations apply:
� Installing SLIC or base operating system using virtual tape is currently not supported.
An IPL from virtual tape is not supported. Even if IPL from an optical image catalog is supported, an IPL from a tape catalog is not possible today.
Scratch install from a virtual tape volume is not possible, since there are no virtual tape volumes on the system at that time to IPL. If you have to install a system from scratch, use either a physical optical drive or physical tape device as the alternate IPL device.
� Restore of licensed programs (RSTLICPGM) is supported. However, only system ASP is currently supported for RSTLICPGM.
RSTLICPGM from virtual tape in iASP or user ASP is not supported.
2.6.2 Unsupported commands and functionsAlthough most save, restore, and related commands are supported for virtual tape, there are a few exceptions.
CommandsThe following commands are not supported for virtual tape:
� VFYTAP � SAVSTG
The command for creating an image catalog, CRTIMGCLG, supports only the following file systems:
� “root” (/)� QOpensys� UDFS having a *TYPE2 default file format
26 i5/OS V5R4 Virtual Tape: A Guide to Planning and Implementation

SST and DST functionsThe following SST and DST functions are currently not supported:
� Dump to Media is not supported. This option presents a list of tape devices to choose from. The list does not include virtual tape devices.
� Copying Main Storage Dump (MSD ) to virtual tape is not supported. However, for MSD, there is already an option to copy the MSD to ASP.
� Lifetime statistics and session statistics in PAL™ under SST does not show virtual volumes. The only statistics available for virtual tape volumes are the current number of bytes information retrievable through the API QVOIRCLD.
2.6.3 Other limitationsFollowing are the remaining limitations:
� A maximum number of 35 virtual devices are supported.
� There is no support for virtual tape libraries. Only standalone virtual tape devices are supported. However, this should not be a problem since the virtual tape devices behave as a single drive tape library with a Random Access Automatic Cartridge Loader (RACL), and will automatically mount volumes.
2.7 Planning for Backup Recovery Media ServicesVirtual tape can also be used within Backup Recovery Media Services (BRMS). This section discusses only the BRMS planning steps. Chapter 4, “Multiple virtual tape scenarios” on page 141 discusses using BRMS with virtual tape in detail.
If you are not using BRMS and are not familiar with using BRMS, follow the instructions provided in the IBM ̂iSeries Information Center. In the Contents frame on the left side, select iSeries Information Center Version 5 Release 4, expand Systems management, and select Backup and recovery → Backup, Recovery and Media Services.
This information can be accessed on the Web at:
http://publib.boulder.ibm.com/infocenter/iseries/v5r4/index.jsp
Chapter 2. Planning for virtual tape 27

Installing BRMSIf you do not know whether BRMS is installed on your system, perform the following tasks:
1. Enter the following command:
GO LICPGM
2. Select 10. Display installed licensed programs, press F11 twice, and press PgDn until you see the required products:
– 5722SS1 18 Media and Storage Extensions– 5722BR1 *BASE Backup Recovery and Media Services
You may also have the following BRMS Licensed Programs. However, they are optional and not required for virtual tape:
– 5722BR1 1 BRMS-Network feature– 5722BR1 2 BRMS-Advanced Functions Feature
Installing BRMS if not installed alreadyIf you do not have both the products, install it. In our scenario, only the BRMS *BASE option is used. However, you can also install the other BRMS options.
To install the licensed programs, refer to the IBM ̂iSeries Information Center. In the Contents frame on the left side, select iSeries Information Center Version 5 Release 4, expand i5/OS and related software, and select Install, upgrade, or delete i5/OS and related software → Installing i5/OS and related software on a new server or logical partitioning → Installing additional licensed programs. Click Work with Licensed Programs menu to install IBM licensed programs.
This can be accessed on the Web at:
http://publib.boulder.ibm.com/infocenter/iseries/v5r4/index.jsp
PTFsWe recommend that you apply the most recent backup and recovery group PTFs as a requirement for virtual tape. However, the backup and recovery group PTF also contains fixes for licensed programs Media Storage Extensions and BRMS. To check the group PTF level, follow the instructions in “PTFs” on page 22.
Considerations for BRMS with virtual tape BRMS handles virtual tape devices and virtual tape volumes as physical tape devices and physical tape volumes. However, keep the following in mind:
� Only one volume can be added at a time using ADDMEDBRM. If you want to add a large amount of volumes, write a small CL program that adds all the volumes one by one.
28 i5/OS V5R4 Virtual Tape: A Guide to Planning and Implementation

� Use of catalog shadowing is not possible within BRMS. This means that you cannot restore objects from multiple devices using the same volume at the same time.
� As described in 2.6.3, “Other limitations” on page 27, virtual tape libraries are not supported. This implies that for parallel saves and concurrent saves within BRMS, separate drives must be specified.
� Virtual volumes cannot be shared using the BRMS network feature. When adding a media class within BRMS and specifying a virtual volume density (*VRTxxxK), the Shared Media parameter must be set to *NO. However, there is no need to share these volumes with other systems, since the other systems within the BRMS network are not able to use them.
� BRMS requires unique volume names. Although you can have the same volume names in different image catalogs, you can use only one of them.
In a BRMS network, you have to ensure that the volume name you want to add to BRMS does not exist on any other system in the network.
One of the benefits of virtual tape within BRMS is that you do not have your physical drives available for the actual backup, regardless of whether you use single, concurrent, or parallel backups. However, for parallel backups, you must ensure that the amount of physical drives matches the amount of used virtual drives for the backup.
Virtual tape versus savefiles in BRMSReleases prior to V5R4 BRMS had the ability to use savefiles for temporarily saving the data to DASD. The performance is almost the same for BRMS savefiles and virtual tape. However, virtual tape is more flexible than savefiles. Table 2-1 shows the differences and possibilities.
Table 2-1 Differences between BRMS savefiles and virtual tape
BRMS savefiles Virtual tape
Append data to existing volumes
Yes Yes
Migrate data to physical media
SAVSAVFBRM DUPTAPDUPMEDBRM
Can be created in user ASP
Yes Yes
Can be created in independent ASP
No Yes
*SAVSYSSAVSYSBRM
No Yes
Chapter 2. Planning for virtual tape 29

ChecklistUse the checklist shown in Table 2-2 when planning for virtual tape.
Table 2-2 Checklist for planning for virtual tape
Parallel backup No Yes
Maximum size limit per savefile or single virtual volume
approx 1 TB 1 TB
Maximum size of multiple virtual tape volumes
256 TB
Save While Active *SYNCLIB
No Yes
Task number Description Where to find more information
___Task 1
___Task 2
Hardware:
� Determine the space you have now and determine the required space for virtual tape.
� Move, remove, and add disks.
� 2.2.2, “The amount of space needed” on page 11
� 2.3.2, “Preparing to use a user ASP or an iASP” on page 16
___Task 3
___Task 4
___Task 5
Software:
� Check if V5R4 is installed and install it if it is not.
� If you want to use BRMS, check if BRMS is installed and install it if it is not.
� Check PTF level and apply new PTFs, if necessary.
� 2.5.1, “Operating system requirements” on page 22
� 2.7, “Planning for Backup Recovery Media Services” on page 27
� “PTFs” on page 22
BRMS savefiles Virtual tape
30 i5/OS V5R4 Virtual Tape: A Guide to Planning and Implementation

___Task 6
___Task 7
___Task 8
___Task 9
User ASP:
� Set your user ASP.
� Mount your UDFS in the user ASP.
Standalone iASP:
� Set up your standalone iASP.
Switchable iASP:
� Set up your switchable iASP.
� 2.3.3, “Using virtual tape volumes in user ASPs” on page 17
� 2.3.3, “Using virtual tape volumes in user ASPs” on page 17
� 2.3.4, “Using virtual tape in an iASP” on page 19
� 2.3.4, “Using virtual tape in an iASP” on page 19
___Task 10
___Task 11
___Task 12
___Task 13
___Task 14
___Task15
Operational procedures:
� Change your backup hierarchy to include virtual tape.
� How much data is saved.
� How many saves you want to keep.
� Create documentation for duplicating virtual tape volumes.
� Change or create documentation for restoring objects from virtual tape.
� Test your backup plan by doing a disaster recovery test.
� 2.3.2, “Preparing to use a user ASP or an iASP” on page 16
� 2.2, “Considering the backup strategy” on page 10
� 2.2, “Considering the backup strategy” on page 10
�
�
� “Ability to test” on page 24
Task number Description Where to find more information
Chapter 2. Planning for virtual tape 31

32 i5/OS V5R4 Virtual Tape: A Guide to Planning and Implementation

Chapter 3. Implementing virtual tape storage
In this chapter we describe the commands you need to create and utilize virtual tape storage. We also discuss the steps for creating a tape image catalog and virtual tape media, and how to utilize them to perform a save/restore function.
We also explain here the concept of catalog shadowing, and detail the steps involved in creating dependent image catalogs.
3
© Copyright IBM Corp. 2006. All rights reserved. 33

3.1 Setting up virtual tape storageThis section provides a high-level overview of the steps used to set up virtual tape storage. The overview explains how to set up virtual tape storage for the most common tasks. The exact steps you use to set up virtual tape storage may vary depending on the specific task you want to accomplish.
Information pertaining to most of these actions can be found in IBM ̂iSeries Navigator by selecting Configuration and Service → Hardware → Tape Devices, and then clicking or right-clicking Tape Image Catalogs. If using a 5250 emulation session, most image catalog commands can be found within the GO IMGCLG menu.
The tasks involved in creating a tape image catalog, as illustrated in Figure 3-1, are as follows:
� Create a virtual tape device� Vary on the tape device� Create the tape image dialog� Add virtual tape image to the tape image catalog � Load the image catalog in the virtual device
Figure 3-1 Tape image catalog diagram
We explain these tasks in more detail here:
Create a virtual tape deviceIf you do not have a virtual tape device (type 63B0), then create one. Check your devices through IBM ̂iSeries Navigator by selecting Configuration and Service → Hardware → Tape Devices → Stand-Alone Devices. Your devices
34 i5/OS V5R4 Virtual Tape: A Guide to Planning and Implementation

will show up in the right window pane, with the virtual devices having a Type Model of 63B0 as shown in Figure 3-2.
Figure 3-2 Checking standalone tape devices through Navigator
To view your tape devices from a 5250 emulation session, enter the following command:
WRKDEVD DEVD(*TAP)
To the right of the device description name, there is a field called Type. If your device description is Type 63B0, it means that it is a virtual device and you can proceed to the next step.
Figure 3-3 on page 36 shows the WRKDEVD DEV(*TAP) screen. As you can see, TAPVRT01 is Type 63B0, indicating that it is a virtual tape device.
Chapter 3. Implementing virtual tape storage 35

Figure 3-3 Working with tape devices through 5250 emulation
Perform the following tasks to create a virtual device:
Currently, you cannot create a virtual device through IBM ̂iSeries Navigator directly. However, from IBM ̂iSeries Navigator, you can change an existing device description to be a virtual device, as shown in Figure 3-4 on page 37.
1. Select Configuration and Service → Hardware → Tape Devices → Stand-Alone Devices, right-click your device description and select Properties.
2. For Hardware resource, scroll the down arrow and select Generate virtual resource.
3. Click the Options tab and ensure that Make available when system restarts is checked, then click OK.
Work with Device Descriptions System: RCHITSO Position to . . . . . ______________ Starting characters Type options, press Enter. 2=Change 3=Copy 4=Delete 5=Display 6=Print 7=Rename 8=Work with status 9=Retrieve source Opt Device Type Text _ TAPVRT01 63B0 TAPVRT01 Virtual Tape device
_ TAP01 6382 CREATED BY AUTO-CONFIGURATION _ TAP03 3570 CREATED BY AUTO-CONFIGURATION _ TAP04 3570 CREATED BY AUTO-CONFIGURATION Bottom Parameters or command ===> F3=Exit F4=Prompt F5=Refresh F6=Create F9=Retrieve F12=Cancel F14=Work with status
Note: If you view the virtual tape device from another system, it will show that it is configured as 3580-002.
36 i5/OS V5R4 Virtual Tape: A Guide to Planning and Implementation

Figure 3-4 Changing existing device to virtual device
If using a 5250 emulation session, you can prompt on the Create Device Description (Tape) (CRTDEVTAP) command and enter the values for the parameters.
The DEVD parameter is the name of your device; RSRCNAME should be *VRT for virtual; and ONLINE should be set to *YES. To create your virtual device, enter the following command:
CRTDEVTAP DEVD(TAPVRT01) RSRCNAME(*VRT) ONLINE(*YES)
The CRTDEVTAP parameters are shown in Figure 3-5 on page 38.
Chapter 3. Implementing virtual tape storage 37

Figure 3-5 Create virtual device through 5250 emulation
Vary on the tape deviceVary on your virtual tape device by selecting Configuration and Service → Hardware → Tape Devices → Stand-Alone Devices, right-clicking your device description, and selecting Make Available; see Figure 3-6.
Figure 3-6 Varying on virtual tape device through Navigator
Create Device Desc (Tape) (CRTDEVTAP) Type choices, press Enter. Device description . . . . . . . > TAPVRT01 Name Device type . . . . . . . . . . *RSRCNAME *RSRCNAME, 2440, 3422, 3430..Device model . . . . . . . . . . *RSRCNAME *RSRCNAME, 1, 2, 12, A01... Resource name . . . . . . . . . > *VRT Name, *NONE, *VRT... Online at IPL . . . . . . . . . *YES *YES, *NO Attached controller . . . . . . Name Assign device at vary on . . . . *YES *YES, *NO Unload device at vary off . . . *NO *YES, *NO Message queue . . . . . . . . . *SYSOPR Name, *SYSOPR Library . . . . . . . . . . . Name, *LIBL, *CURLIB Text 'description' . . . . . . . Virtual tape Device TAPVRT01
BottomF3=Exit F4=Prompt F5=Refresh F10=Additional parameters F12=Cancel F13=How to use this display F24=More keys
Important: Do not issue a Reset on a virtual device.
38 i5/OS V5R4 Virtual Tape: A Guide to Planning and Implementation

If using a 5250 emulation session, you can vary on your virtual tape device by issuing the Vary Configuration (VRYCFG) command:
VRYCFG CFGOBJ(TAPVRT01) CFGTYPE(*DEV) STATUS(*ON)
Note: You can have up to 35 virtual tape devices varied on at one time.
If you have already created a virtual device, but do not remember its name, issue the following command and press Enter:
WRKDEVD DEVD(*TAP)
This brings up a list of all your tape devices. Figure 3-7 shows TAPVRT01 as TYPE 63B0.
Figure 3-7 Working with tape devices through 5250 emulation
In the Work with Device Descriptions window, select option 8=Work with Status, and then select option 1=Vary On.
Important: Avoid using the VRYCFG command with STATUS(*RESET) for a virtual device.
Work with Device Descriptions System: RCHITSO Position to . . . . . Starting characters Type options, press Enter. 2=Change 3=Copy 4=Delete 5=Display 6=Print 7=Rename 8=Work with status 9=Retrieve source Opt Device Type Text __ TAPVRT01 63B0 Virtual Tape device 01
__ TAPVRT07 63B0 Virtual Tape device 07 __ TAPVRT08 63B0 Virtual Tape device 08 __ TAP01 6380 CREATED BY AUTO-CONFIGURATION __ TAP02 6382 CREATED BY AUTO-CONFIGURATION Bottom Parameters or command ===>_________________________________________________________________________ F3=Exit F4=Prompt F5=Refresh F6=Create F9=Retrieve F12=Cancel F14=Work with status
Chapter 3. Implementing virtual tape storage 39

If your Assistance level is Basic, the option will be Make Available, which is the same as Vary on. To change your assistance level, press F21 or Shift+F9 and choose 2=Intermediate or 3=Advanced).
Figure 3-8 shows the Work with Status window and the selection of option 1 to vary on the tape device.
Figure 3-8 Work with configuration status through 5250 emulation
After you select option 1 to vary on and press Enter, the tape device should have a status of VARIED ON or AVAILABLE.
Create the tape image catalogFrom IBM ̂iSeries Navigator, create an image catalog by selecting Configuration and Service → Hardware → Tape Devices, right-clicking Tape Image Catalogs, and selecting Create Image Catalog, as shown in Figure 3-9 on page 41.
Work with Configuration Status RCHAS08 12/02/05 17:58:09 Position to . . . . . Starting characters Type options, press Enter. 1=Vary on 2=Vary off 5=Work with job 8=Work with description 9=Display mode status 13=Work with APPN status... Opt Description Status -------------Job-------------- 1 TAPVRT01 VARIED OFF Bottom Parameters or command ===>_________________________________________________________________________ F3=Exit F4=Prompt F12=Cancel F23=More options F24=More keys
40 i5/OS V5R4 Virtual Tape: A Guide to Planning and Implementation

Figure 3-9 Creating image catalog through Navigator
You will see a window where you should choose you Catalog name (opt for a name that helps describes the volumes inside the image catalog, such as Nightly).
Then type in a short Catalog description (use a description to better describe what this catalog is used for, such as Nightly backup of Databases), and select a Directory path in the IFS where you want your image catalog to store its images.
Select Create directory if the directory does not exist already, and select an appropriate Authority level.
Authority level specifies the authority you are giving users who do not have specific authority for the object, who are not on an authorization list, and whose group profile or supplemental group profiles do not have specific authority for the object.
Chapter 3. Implementing virtual tape storage 41

Following are the choices for Authority Level:
� Exclude: This is the default Authority Level. The user cannot access the image catalog unless the user:
– Has *ALLOBJ special authority
– Is the owner of the object
– Is granted authority later
� Library create: The authority for the object is the same as the create authority for QUSRSYS. The create authority for QUSRSYS can be displayed by using the Display Library Description (DSPLIBD) command.
If the create authority for QUSRSYS is set to *SYSVAL, then display the QCRTAUT system value. If the create authority is changed with the Change Library (CHGLIB) command, the new authority does not affect existing objects.
� Change: The user can perform all operations on the object except those limited to the owner or controlled by object existence authority and object management authority. The user can change and perform basic functions on the object. Change authority provides object operational authority and all data authority. If the object is an authorization list, the user cannot add, change, or remove user IDs.
� All: The user can perform all operations except those limited to the owner or controlled by authorization list management authority. The user can control the object's existence, specify the security for the object, change the object, and perform basic functions on the object. The user also can change ownership of the image catalog.
� Use: The user can perform basic operations on the image catalog, such as displaying properties. However, the user cannot change the image catalog, and Use authority provides object operational authority, read authority, and execute authority.
� Name: Specify the name of an authorization list to be used for granting authority to the object. Users included in the authorization list are granted authority to the object, as specified in the list. The authorization list must exist when the object is created.
In the example provided here, *EXCLUDE was selected for Authority Level. This means that no user can access the object or see the image catalog, if working with image catalogs, unless they have specific authority to the image catalog or *ALLOBJ special authority.
42 i5/OS V5R4 Virtual Tape: A Guide to Planning and Implementation

Figure 3-10 shows the creation of an image catalog through IBM ̂iSeries Navigator.
Figure 3-10 Parameters for creating image catalog in Navigator
To create a tape image catalog from a 5250 emulation session, enter the following command:
CRTIMGCLG IMGCLG(NIGHTLY) DIR('/images/tape/nightly') TYPE(*TAP) TEXT('Nightly backup of Databases')
In this command, NIGHTLY is the name of the image catalog, /images/tape/nightly is the IFS directory for the image catalog to place its images, ‘Nightly backup of Databases’ is a short description of the image catalog. You can also change the Authority Level (AUT) default value of *EXCLUDE.
Figure 3-11 on page 44 shows the CRTIMGCLG command and its parameters.
Note: The directory or subdirectories do not have to exist prior to selecting Create directory. V5R4M0 and above have the capability to create the entire directory path.
Chapter 3. Implementing virtual tape storage 43

Figure 3-11 Create image catalog through 5250 emulation
Add the virtual tape image to the tape image catalogAdd the virtual tape volume by performing the following tasks:
� Create a new virtual tape volume
� Add an existing virtual tape file
Create a new virtual tape volumeFigure 3-12 on page 45 and Figure 3-13 on page 47 show the creation of a new volume in IBM ̂iSeries Navigator.
To create a new virtual tape volume through IBM ̂iSeries Navigator, select Configuration and Service → Hardware → Tape Devices, right-click Tape Image Catalogs, then right-click the image catalog and select Add Volume. The window that appears will have two tabs: General and Optional.
The General tab is shown in Figure 3-12 on page 45.
Create Image Catalog (CRTIMGCLG) Type choices, press Enter. Image catalog . . . . . . . . . > NIGHTLY Name Directory . . . . . . . . . . . > '/images/tape/nightly' Image catalog type . . . . . . . > *TAP *OPT, *TAP Create directory . . . . . . . . *YES *YES, *NO Additional Parameters Text 'description' . . . . . . . > 'Nightly backup of Databases'
Bottom F3=Exit F4=Prompt F5=Refresh F10=Additional parameters F12=Cancel F13=How to use this display F24=More keys
44 i5/OS V5R4 Virtual Tape: A Guide to Planning and Implementation

Figure 3-12 Adding new volume options through Navigator
The General tab contains the following parameters:
� The From tape image file (FROMFILE) should have New Image selected. This tells the system to create a new virtual tape file and add it to the image catalog. The image file will be created in the same directory path as the image catalog.
� The To tape image file (TOFILE) option allows you to specify a unique name for the tape image file that will be created in the Image Catalog’s directory. (This is not to be mistaken with a volume name.)
� You can also specify a Volume Index (IMGVOLIDX), which is similar to the slot position in a physical tape cartridge loader. The Volume Index is the position where the virtual volume is positioned in the image catalog. Image catalogs have a maximum of 256 indexes per image catalog.
The Volume Index parameter has a default of First Available, which automatically assigns the lowest index number that is not already being used.
� Replace volume if index already exists (REPLACE) specifies the action to take if a volume with the same index number as that specified in the Volume
Chapter 3. Implementing virtual tape storage 45

Index field already exists in the tape image catalog. The default value for Volume Index is No.
The values are described here:
- Yes: This specifies that the existing image volume will be replaced.
- No: This specifies that the existing volume will not be replaced and an error message will be issued.
- Insert: This specifies that the volume will be added or inserted if an existing index number already exists. If the image volume is inserted, the remaining volumes will be incremented by one up to the next available index number.
� Volume size in MB (IMGSIZ) specifies the size of the new image file that is to be created. For tape type image catalogs, this parameter indicates the maximum size allowed for this tape image file.
If Allocate Storage ALCSTG(*MIN) is specified, only the amount of storage required to initialize the image file will be allocated (4 k) until the volume is auto-initialized the first time it is mounted. As data is written to the volume, additional storage is allocated as needed until the specified maximum volume size is reached.
If Allocate Storage ALCSTG(*IMGSIZ) is specified, the amount of storage allocated will be the value specified on the Volume size (IMGSIZ) parameter.
The Options tab is shown in Figure 3-13 on page 47.
46 i5/OS V5R4 Virtual Tape: A Guide to Planning and Implementation

Figure 3-13 Adding new volume through Navigator
The Options tab has the following parameters:
� Volume name (VOLNAM): This specifies the volume name for this virtual tape volume. You can enter your own volume name or use the special value of *GEN, which means the volume name will be generated by the system.
� Allocate storage (ALCSTG) specifies whether to allocate the entire amount of storage specified on the Image size (IMGSIZ) parameter, for the tape image files. This parameter is only allowed for Tape Type image catalogs (it is not allowed for Reference or Dependent Image catalogs).
- *MIN: This specifies changing the storage allocation to match the storage required to contain the existing image file data. If performing a save, the image file size is increased dynamically.
However, the image file size will no longer increase once the system reaches 5% or 5 GB storage remaining, whichever is less. This value is not valid for dependent catalogs or catalog shadowing.
- IMGSIZ: This specifies changing the storage allocation to match the entire size of storage for a given image file. This is the value specified on the image size (IMGSIZ) parameter of the ADDIMGCLGE command.
Chapter 3. Implementing virtual tape storage 47

� Volume type (VOLTYP): This specifies the type of volume for this virtual tape volume.
- *SL: This specifies the that type of volume is a standard labeled tape volume.
- *NL: This specifies that the type of volume is a non-labeled tape volume.
� Tape density (DENSITY): This specifies the density for this virtual tape volume.
- *VRT256K: The format of the volume is *VRT256K. It is used to write data to a virtual volume using a maximum data block size of 256 KB. Volumes written using this format can only be duplicated to tape devices that support a maximum block size of 256 KB or greater.
- *VRT240K: The format of the volume is *VRT240K. It is used to write data to a virtual volume using a maximum data block size of 240 KB. Volumes written using this format can only be duplicated to tape devices that support a maximum block size of 240 KB or greater.
- *VRT64K: The format of the volume is *VRT64K. It is used to write data to a virtual volume using a maximum data block size of 64 KB. Volumes written using this format can only be duplicated to tape devices that support a maximum block size of 64 KB or greater.
- *VRT32K: The format of the volume is *VRT32K. It is used to write data to a virtual volume using a maximum data block size of 32 KB. Volumes written using this format can be duplicated to all supported tape devices.
� Character code (CODE): This specifies the character code in which the volume label is written. All data that is not save data written after the label must be in the same code. Codes cannot be intermixed on a tape that is not a save tape. This parameter is only used for a volume type of *SL.
- *EBCDIC: The volume label is written in EBCDIC and is an IBM standard label. All additional data must also be written in EBCDIC.
- *ASCII: The volume label is written in ASCII and is an ANSI standard label. All additional data must also be written in ASCII.
Note: For a better understanding of the Allocate Storage (ALCSTG) parameter refer to 3.2, “Using a tape image catalog” on page 58.
Note: The DENSITY parameter should correspond to the block size of the physical tape drive’s capability, where you will eventually copy the virtual volumes to physical tapes.
48 i5/OS V5R4 Virtual Tape: A Guide to Planning and Implementation

� New owner (NEWOWNID): This specifies the identifier of the tape owner for this virtual tape volume. This parameter is only used for a volume type of *SL.
- *BLANK: No identifier will be specified.
- name: Specify no more than 14 characters that identify the owner of the virtual tape volume. If fewer than 14 characters are specified, the field is left-justified and padded on the right with blanks.
You can add enough volumes to your image catalog, as needed, for your backup. However, if your backup runs out of available volumes, additional volumes can be created on the fly. For more information refer to 3.2.2, “Automatic creation of new volumes” on page 65.
To add a new volume through a 5250 emulation session, enter the following command:
ADDIMGCLGE IMGCLG(Nightly) FROMFILE(*NEW) TOFILE(vol001) VOLNAME(VOL1001) TEXT('Sunday nightly backups Vol001') VOLNAM(VOL001) DENSITY(*VRT256K)
Figure 3-14 on page 50 shows the 5250 emulation screen for adding an image catalog entry.
Note: New volumes do not have to be initialized since they are automatically created with a compatible format to the DENSITY that was specified during the volume’s creation.
Note: New volumes do not have to be initialized, since they are automatically created with a compatible format to the DENSITY that was specified during the volume’s creation.
Chapter 3. Implementing virtual tape storage 49
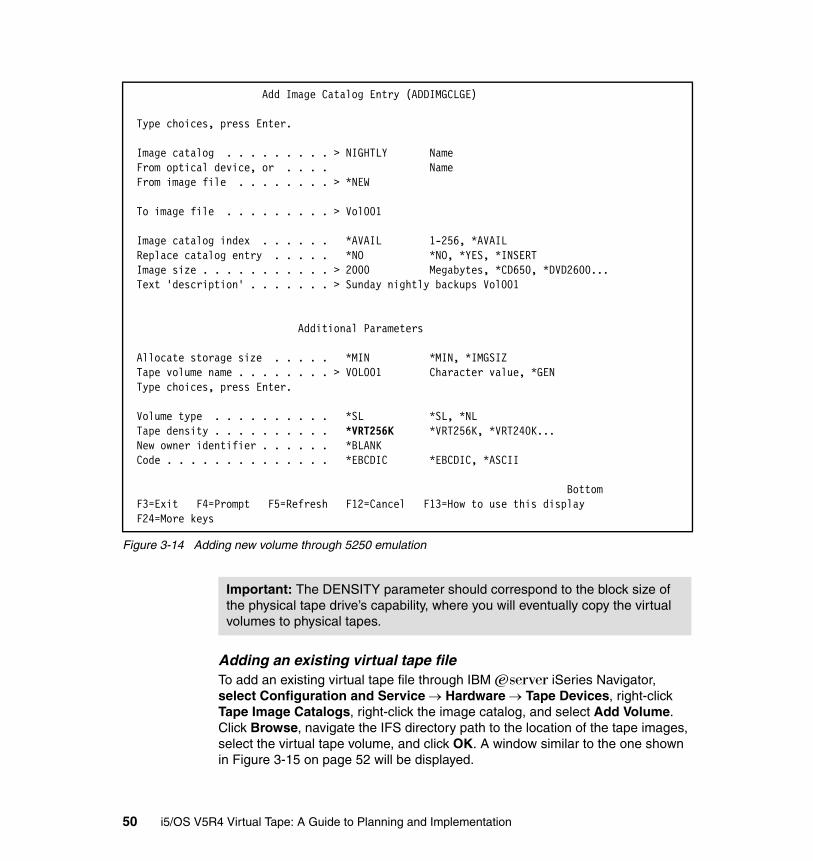
Figure 3-14 Adding new volume through 5250 emulation
Adding an existing virtual tape file To add an existing virtual tape file through IBM ̂iSeries Navigator, select Configuration and Service → Hardware → Tape Devices, right-click Tape Image Catalogs, right-click the image catalog, and select Add Volume. Click Browse, navigate the IFS directory path to the location of the tape images, select the virtual tape volume, and click OK. A window similar to the one shown in Figure 3-15 on page 52 will be displayed.
Add Image Catalog Entry (ADDIMGCLGE) Type choices, press Enter. Image catalog . . . . . . . . . > NIGHTLY Name From optical device, or . . . . Name From image file . . . . . . . . > *NEW To image file . . . . . . . . . > Vol001 Image catalog index . . . . . . *AVAIL 1-256, *AVAIL Replace catalog entry . . . . . *NO *NO, *YES, *INSERT Image size . . . . . . . . . . . > 2000 Megabytes, *CD650, *DVD2600... Text 'description' . . . . . . . > Sunday nightly backups Vol001 Additional Parameters Allocate storage size . . . . . *MIN *MIN, *IMGSIZ Tape volume name . . . . . . . . > VOL001 Character value, *GEN Type choices, press Enter. Volume type . . . . . . . . . . *SL *SL, *NL Tape density . . . . . . . . . . *VRT256K *VRT256K, *VRT240K... New owner identifier . . . . . . *BLANK Code . . . . . . . . . . . . . . *EBCDIC *EBCDIC, *ASCII
Bottom F3=Exit F4=Prompt F5=Refresh F12=Cancel F13=How to use this display F24=More keys
Important: The DENSITY parameter should correspond to the block size of the physical tape drive’s capability, where you will eventually copy the virtual volumes to physical tapes.
50 i5/OS V5R4 Virtual Tape: A Guide to Planning and Implementation

The General tab has the following parameters:
� The From tape image file option shows the directory path of the tape image file, once the existing volume is selected to be added.
� The To tape image file option allows for a special value of From File, which uses the same name as the source image. Otherwise, you can specify a different name in the To tape image file.
� You can also specify a Volume Index, which is similar to the slot position in a physical cartridge loader. The Volume Index is the order where the virtual volume is positioned in the image catalog. Image Catalogs can currently have a maximum of 256 indexes per image catalog. The Volume Index parameter has a default of First Available, which automatically assigns the lowest index number that is not already being used.
� Replace volume if index already exists specifies the action to take if a volume with the same index number as specified in the Volume Index field already exists in the tape image catalog. The default value is No. The values are described below:
- Yes: This specifies that the existing image volume will be replaced.
- No: This specifies that the existing volume will not be replaced and an error message will be issued.
- Insert: This specifies that the volume will be added or inserted if an existing index number already exists. If the image volume is inserted, the remaining volumes will be incremented by one up to the next available index number.
� Volume size in MB is not a valid parameter when adding an existing volume into the image catalog. This parameter is only for creating new volumes. If a value is specified when adding an existing volume, the value is ignored and the added volume retains its original size.
The Options tab is also not valid when adding an existing volume. This tab contains parameters that can be used when adding a new volume.
Figure 3-15 on page 52 illustrates the addition of an existing volume, where the tape file image is in the same directory as the image catalog directory (/images/tape/nightly). Select the image catalog and right-click to show the options, then click option Add Volume.
Chapter 3. Implementing virtual tape storage 51

Figure 3-15 Adding volume through Navigator
In this case, only the image file is specified in the From File (FROMFILE) parameter. The To file (TOFILE) parameter is given a special value of *FROMFILE.
If the existing tape image file is located in a different directory from the Directory path (DIR) of this image catalog (that is, the directory path when the image catalog was created), then the From file (FROMFILE) should have the full directory path, including the image file name, and the To file (TOFILE) could either have a value of *FROMFILE or be given another file name (that is, the image file’s STMF name and not the volume name).
Figure 3-16 on page 53, shows the FROMFILE and TOFILE selections.
52 i5/OS V5R4 Virtual Tape: A Guide to Planning and Implementation

Figure 3-16 Browsing existing volumes
Clicking Browse displays files, as shown in Figure 3-17.
Figure 3-17 Files are displayed
Chapter 3. Implementing virtual tape storage 53

This places the selected volume in the From tape image file box; see Figure 3-18.
Figure 3-18 Parameters for adding existing volume
To add an existing virtual volume through 5250 emulation session, issue the ADDIMGCLGE command:
ADDIMGCLGE IMGCLG(Nightly) FROMFILE(Vol007) TOFILE(*fromfile)
Figure 3-19 on page 55 shows the ADDIMGCLGE on a 5250 emulation session.
54 i5/OS V5R4 Virtual Tape: A Guide to Planning and Implementation

Figure 3-19 Adding image catalog entry through 5250 emulation
Repeat this step for each file you want to add to your catalog. Note that this step assumes that your images already exist in the image catalog directory.
If the file exists in another directory, the full path of the image file must be listed in the FROMFILE parameter as shown in the following command:
ADDIMGCLGE IMGCLG(Nightly) FROMFILE(/Other_directory/subdirectory/Volume) TOFILE(VOL007)
Figure 3-20 on page 56 shows the corresponding window.
Add Image Catalog Entry (ADDIMGCLGE) Type choices, press Enter. Image catalog . . . . . . . . . > NIGHTLY Name From optical device, or . . . . Name From image file . . . . . . . . > Vol007 To image file . . . . . . . . . > *fromfile Image catalog index . . . . . . *AVAIL 1-256, *AVAIL Replace catalog entry . . . . . *NO *NO, *YES, *INSERT Text 'description' . . . . . . . Saturday nightly backups Vol007 Bottom F3=Exit F4=Prompt F5=Refresh F10=Additional parameters F12=Cancel F13=How to use this display F24=More keys
Chapter 3. Implementing virtual tape storage 55

Figure 3-20 Adding image from another directory through 5250 emulation
Repeat these steps for each file you want to add to your catalog.
Load the image catalog in the virtual deviceSelect Configuration and Service → Hardware → Tape Devices, and right-click Tape Image Catalogs.
Next, right-click the image catalog and select Load Image Catalog, as shown in Figure 3-21 on page 57.
Add Image Catalog Entry (ADDIMGCLGE) Type choices, press Enter. Image catalog . . . . . . . . . > NIGHTLY Name From optical device, or . . . . Name From image file . . . . . . . . > /Other_directory/subdirectory/volume To image file . . . . . . . . . > Vol007 Image catalog index . . . . . . *AVAIL 1-256, *AVAIL Replace catalog entry . . . . . *NO *NO, *YES, *INSERT Text 'description' . . . . . . . Saturday nightly backups Vol007 Bottom F3=Exit F4=Prompt F5=Refresh F10=Additional parameters F12=Cancel F13=How to use this display F24=More keys
56 i5/OS V5R4 Virtual Tape: A Guide to Planning and Implementation

Figure 3-21 Loading image catalog through Navigator
To load your image catalog from a 5250 emulation session, issue the following command:
LODIMGCLG IMGCLG(MYCATALOG) DEV(TAPVRT01)
Figure 3-22 on page 58 shows the LODIMGCLG command and its parameters.
Chapter 3. Implementing virtual tape storage 57

Figure 3-22 Loading image catalog through 5250 emulation
Your virtual tape volume is now ready for operation in the same way as a physical tape volume that is loaded into a physical tape device.
3.2 Using a tape image catalogThis section discusses the basic steps involved in using a tape image catalog after it is created. This assumes that the volumes have been created and the image catalog’s status is Loaded or Ready.
Select Configuration and Service → Hardware → Tape Devices, right-click Tape Image Catalogs, then right-click the image catalog and select Properties.
Under the General tab, the Catalog status should indicate Loaded, meaning the image catalog is loaded on to your virtual tape device. This is similar to a tape magazine being inserted back into a tape autoloader.
Figure 3-23 on page 59 shows the Catalog status, indicating the image catalog is Loaded.
Load or Unload Image Catalog (LODIMGCLG) Type choices, press Enter. Image catalog . . . . . . . . . > NIGHTLY Name Virtual device . . . . . . . . . > TAPVRT01 Name Option . . . . . . . . . . . . . *LOAD *LOAD, *UNLOAD Write protect . . . . . . . . . *DFT *DFT, *ALL, *NONE
Bottom
F3=Exit F4=Prompt F5=Refresh F12=Cancel F13=How to use this display F24=More keys
58 i5/OS V5R4 Virtual Tape: A Guide to Planning and Implementation

Figure 3-23 Image catalog properties through Navigator
Before performing a backup operation, ensure that the volume’s status is Loaded in the tape image catalog. You can view the volumes by selecting Configuration and Service → Hardware → Tape Devices.
Then right-click Tape Image Catalogs, right-click the image catalog, and select List Volumes. You will see a window similar to the one shown in Figure 3-24 on page 60.
Chapter 3. Implementing virtual tape storage 59

Figure 3-24 Listing volumes through Navigator
To verify the status of your image catalog and its volumes from a 5250 emulation screen, enter the following command:
WRKIMGCLGE IMGCLG(Nightly)
The screen should display Ready in the upper right-hand corner with at least one volume loaded and available, as shown in Figure 3-25 on page 61.
If it does not, add the volumes by following the steps described for ADDIMGCLGE, and ensuring that the image catalog is loaded on to the virtual device, using the LODIMGCLG command.
60 i5/OS V5R4 Virtual Tape: A Guide to Planning and Implementation

Figure 3-25 Verifying catalog status through 5250 emulation
Once your tape image catalog’s status is Loaded or Ready, it behaves only as an Automatic Cartridge Loader (ACL) tape drive. The image catalog will automatically load/mount the next volume if the backup or restore spans multiple volumes.
Image catalogs are able to utilize volumes, whose status is Mounted or Loaded. If the volume’s status is Unloaded, it is not used during operation.
You are now ready to save or restore using your image catalog.
3.2.1 Save using a tape image catalogThis basic example is provided to give you an idea about how to perform a simple save to the virtual storage. We also mention the parameters available for changing your virtual tape media to better fit your needs.
Work with Image Catalog Entries System: RCHITSO Catalog . . : NIGHTLY Status . . . : Ready Type . . . . : Tape Device . . . : TAPVRT01 Directory . : /images/tape/nightly Type options, press Enter. 1=Add 2=Change 4=Remove 6=Mount 8=Load 9=Unload 10=Initialize volume 11=Display 13=Dump 14=Duplicate Write Opt Index Status Volume Name Density Type Protect *AVAIL 1 Mounted VOL001 *VRT256K *SL No 7 Loaded VOL007 *VRT256K *SL No Bottom F3=Exit F5=Refresh F6=Load image catalog F8=Reorder by index F11=View size information F12=Cancel F22=Display entire field
Chapter 3. Implementing virtual tape storage 61

Saving a library to virtual tapeThe example described here involves saving a library (PRODLIB), to a newly added volume (VOL001), in the tape image catalog NIGHTLY, which is loaded in a device TAPVRT01.
Most virtual tape functions can be performed interactively or submitted to batch. This particular save is run interactively, to better demonstrate this example. For more information about interactive jobs, batch jobs, or backups in general, refer to the IBM ̂iSeries Information Center, which is available on the Web at:
http://publib.boulder.ibm.com/pubs/html/as400/infocenter.html
In the IBM ̂iSeries Navigator:
1. Right-click the system and select Run Command, as shown in Figure 3-26.
Figure 3-26 Issuing the run command through Navigator
2. Type SAVLIB against Command to run, and click Prompt to enter the parameters, as shown in Figure 3-27 on page 63.
62 i5/OS V5R4 Virtual Tape: A Guide to Planning and Implementation

Figure 3-27 Saving library through Navigator
3. Enter the parameters:
a. Enter the library (in this case, PRODLIB) and click Add.
b. Enter the virtual tape device (in this case, TAPVRT01) and click Add.
c. Enter the volume (in this case, VOL001) and click Add. Then click OK in the prompt window; see Figure 3-28 on page 64.
Note: If your volume parameter is set to *MOUNTED and no volume is in a mounted status, then the virtual tape device will mount the volume that is in the next index after the last volume that was mounted.
Chapter 3. Implementing virtual tape storage 63

Figure 3-28 SAVLIB prompted through Navigator
4. Click OK in the Run Command window.
As you can see, there really is no difference in the parameter values when saving to a virtual device instead of a physical device. You tell the system to save to your image catalog by setting the DEVICE parameter to your virtual tape device (TAPVRT01).
The same save is performed from a 5250 emulation session with the following command:
SAVLIB LIB(PRODLIB) DEV(TAPVRT01) VOL(VOL001)
Figure 3-29 on page 65 shows the corresponding screen.
64 i5/OS V5R4 Virtual Tape: A Guide to Planning and Implementation

Figure 3-29 SAVLIB prompted through 5250 emulation
You save to a virtual tape by specifying the virtual tape device where the image catalog is loaded.
3.2.2 Automatic creation of new volumesThis section describes the auto create feature of virtual volumes.
When the End of Volume (EOV) marker is reached during a backup and there no more volumes are available in the image catalog, you will receive a message.If you are using a volume list, you will receive a CPA6798 message, as shown in Example 3-1 on page 66.
Save Library (SAVLIB) Type choices, press Enter. Library . . . . . . . . . . . . > PRODLIB Name, generic*, *NONSYS... + for more values Device . . . . . . . . . . . . . > TAPVRT01 Name, *SAVF, *MEDDFN + for more values Volume identifier . . . . . . . Vol1001 + for more values Sequence number . . . . . . . . *END 1-16777215, *END Label . . . . . . . . . . . . . *LIB File expiration date . . . . . . *PERM Date, *PERM End of media option . . . . . . *REWIND *REWIND, *LEAVE, *UNLOAD Starting library . . . . . . . . *FIRST Name, *FIRST Use optimum block . . . . . . . *YES *YES, *NO Bottom F3=Exit F4=Prompt F5=Refresh F10=Additional parameters F12=Cancel F13=How to use this display F24=More keys
Note: If your Volume (VOL) parameter is set to *MOUNTED and no volume is in a mounted status, the virtual tape device will mount the volume that is in the next index after the last volume that was mounted.
Chapter 3. Implementing virtual tape storage 65

Example 3-1 CPA6798 message text
Message . . . . : No volume to mount on device &1. (C "cartridge id") Cause . . . . . : Either all of the volumes specified in the volume list for the operation have been used or a tape management exit program did not supply a volume to mount. Recovery . . . : Type C to cancel processing, or enter the name of a tape cartridge to be used next.
If you reply: C to cancel the job will end, since no more volumes are available. If you reply: cartridge id, an initialized volume will automatically be created in your image catalog. The volume ID should not already exist in the tape image catalog.
If you specify *MOUNTED for the Volume (VOL) parameter, a volume is automatically created and message CPF4901 is issued, as shown in Example 3-2.
Example 3-2 CPF4901 message text
Message . . . . : End of volume detected for file &2 in &3. Cause . . . . . : End of volume was detected for file &2 in library &3. The next volume that is inserted on device &4 has volume identifier &7. Possible choices for replying to message . . . . . . . . . . . . . . . : G -- Continue processing C -- Cancel processing of the file
The default reply for CPF4901 is G.
If a volume is auto-created, it will be created with the following defaults:
� ADDIMGCLGE IMGCLG (same as previous volume) � FROMFILE(*NEW) � TOFILE(*GEN) � IMGCLGIDX (last available index) - backwards from 256� REPLACE(*NO) � IMGSIZ(*IMGCLGTYPE) � ALCSTG(*MIN) � VOLNAM(*GEN) � VOLTYP (same as previous volume) � DENSITY (same as previous volume) � NEWOWNID (same as previous volume) � CODE (same as previous volume)
66 i5/OS V5R4 Virtual Tape: A Guide to Planning and Implementation

3.2.3 Viewing the virtual volumesThis section shows you how to view the volumes that exist in the image catalog and the contents of the volumes.
� Viewing the volumes in the image catalog
To see all the volumes that your image catalog contains, select Configuration and Service → Hardware → Tape Devices → Tape Image Catalogs. Then right-click the image catalog and select List Volumes.
From the window shown in Figure 3-30, you can see all the volumes in your image catalog. It also displays the following information:
– Index number (IMGCLGIDX)– Volume name (VOLNAM)– Volume status– Volume type (TYPE)– Density (DENSITY)– Write protect (WRTPTC)– Percent used (of maximum size)– Maximum size (IMGSIZ)– File name (TOFILE)– Description (TEXT)
Figure 3-30 List volumes through Navigator
Chapter 3. Implementing virtual tape storage 67

� Viewing the volume contents
To verify whether the save is complete, review the joblog. However, if you want to view the contents in the volume, from the iNav navigation panel, select Configuration and Service → Hardware → Tape Devices. Then right-click the tape device and select Display Volume Labels to display to the screen shown in Figure 3-31.
Figure 3-31 Display volume labels through Navigator
In the Display Volume labels for Tapvrt01, shown in Figure 3-32 on page 69, select the Options tab.
From the two pull-down menus (see Figure 3-33 on page 70), define the sequence numbers to be displayed.
68 i5/OS V5R4 Virtual Tape: A Guide to Planning and Implementation

Figure 3-32 Display volume label options through Navigator
Chapter 3. Implementing virtual tape storage 69

Figure 3-33 Volume labels through Navigator - second screen
Alternatively, you can view information by displaying a printed output. From the iNav navigation panel, select Configuration and Service → Hardware → Tape Devices. Next, right-click the tape device and select Print Tape to display the screen shown in Figure 3-34 on page 71. Then select Save/Restore information. This produces a print file that you can view by selecting Basic Operations → Printer Output.
70 i5/OS V5R4 Virtual Tape: A Guide to Planning and Implementation

Figure 3-34 Print volume save/restore through Navigator
Figure 3-35 shows the display for printing volume information through Navigator. The volume information is displayed, as well as the default end of tape action. Typically you would accept the defaults, check the box Display printer output, and click OK.
Figure 3-35 Print volume information through Navigator
Chapter 3. Implementing virtual tape storage 71

Figure 3-36 shows the display for volume save/restore output through Navigator.
Figure 3-36 Volume save/restore output through Navigator
72 i5/OS V5R4 Virtual Tape: A Guide to Planning and Implementation

You can also view the volumes in your image catalog from a 5250 emulation session. To do this, use the WRKIMGCLGE command:
WRKIMGCLGE IMGCLG(NIGHTLY)
Figure 3-37 on page 74 shows the resulting screen.
Note: The maximum size of the image file is 1000 MB. However, the storage used is 10.7%, or 107 MB. This can be verified by selecting File Systems → Integrated File Systems → Root, and then selecting the directory of your image catalog and its image files. Right-click the image file, select Properties, and click Storage. This lists both the size of the data (the size of only the saved data) and the allocated size (the size reserved and used only for this virtual volume).
If the allocated size is significantly larger than the data size and it has to be freed up for other functions to utilize, then shrink the allocated storage by changing the Allocate Storage (ALCSTG) parameter value to *MIN.
Refer to 3.2.4, “Changing virtual media characteristics” on page 79 for more information about virtual media characteristics.
Chapter 3. Implementing virtual tape storage 73

Figure 3-37 Work with virtual volumes through 5250 emulation
Use F11 to view the size information, as follows:
� Pressing F11 displays additional information about the volumes in the window. This includes the maximum size (IMGSIZ) and percent used of the maximum size.
� Pressing F11 again shows the text description. � Pressing F11 a third time displays the image file name.
Figure 3-38 on page 75 shows the WRKIMGCLGE window after F11 is pressed once.
Work with Image Catalog Entries System: RCHITSO Catalog . . : NIGHTLY Status . . . : Ready Type . . . . : Tape Device . . . : TAPVRT01 Directory . : /images/tape/nightly Type options, press Enter. 1=Add 2=Change 4=Remove 6=Mount 8=Load 9=Unload 10=Initialize volume 11=Display 13=Dump 14=Duplicate Write Opt Index Status Volume Name Density Type Protect *AVAIL 1 Mounted VOL001 *VRT256K *SL No 7 Loaded VOL007 *VRT256K *SL No Bottom F3=Exit F5=Refresh F6=Load image catalog F8=Reorder by index F11=View size information F12=Cancel F22=Display entire field
74 i5/OS V5R4 Virtual Tape: A Guide to Planning and Implementation

Figure 3-38 Volumes additional information through 5250 emulation
Figure 3-38 shows that the per cent used is 10.7%. This is the per cent used of the Maximum Size (IMGSIZ) of 1000 MB.
Work with Image Catalog Entries System: RCHITSO Catalog . . : NIGHTLY Status . . . : Ready Type . . . . : Tape Device . . . : TAPVRT01 Directory . : /images/tape/nightly Type options, press Enter. 1=Add 2=Change 4=Remove 6=Mount 8=Load 9=Unload 10=Initialize volume 11=Display 13=Dump 14=Duplicate Maximum Percent Opt Index Status Volume Name Size Used *AVAIL 1 Mounted VOL001 1000 10.7 7 Loaded VOL007 1000 .1 Bottom F3=Exit F5=Refresh F6=Load image catalog F8=Reorder by index F11=View descriptions F12=Cancel F22=Display entire field
Note: The maximum size of the image file is 1000 MB. However, the actual storage used is 10.7%, or 107 MB. This can be verified by using WRKLNK for the directory path of the object, and then selecting option 8=Display Attributes on the actual Image file (STMF) in the IFS directory. This lists the size of the data (the size of only the saved data) and the allocated space (the size reserved and used only for this virtual volume).
If the allocated size is significantly larger than the data size and it has to be freed up for other functions to utilize, shrink the allocated storage down by changing the Allocate Storage (ALCSTG) parameter’s value to *MIN.
Refer to 3.2.4, “Changing virtual media characteristics” on page 79 for more information about virtual media characteristics.
Chapter 3. Implementing virtual tape storage 75

Figure 3-39 shows using WRKLNK and 8=Display attributes. You can see that the allocated storage size is much larger than the data storage size.
Figure 3-39 Display attributes through 5250 emulation
When viewing the volume information from a 5250 emulation session, it can only be viewed one sequence at a time if displayed on the screen. Therefore, it is usually best to print it to a spool file.
Enter the following DSPTAP command to view the volume information from a 5250 emulation session:
DSPTAP DEV(NIGHTLY) VOL(VOL001) OUTPUT(*PRINT)
Figure 3-40 on page 77 shows the corresponding window.
Display Attributes Object . . . . . . : /images/tape/nightly/vol001 Creation date/time . . . . . . . . . . : 12/06/05 22:42:37 Last access date/time . . . . . . . . : 12/07/05 14:08:23 Data change date/time . . . . . . . . : 12/07/05 14:08:23 Attribute change date/time . . . . . . : 12/07/05 14:08:23 Size of object data in bytes . . . . . : 112251040 Allocated size of object . . . . . . . : 168563246 File format . . . . . . . . . . . . . : *TYPE2 Size of extended attributes . . . . . : 0 Storage freed . . . . . . . . . . . . : No Disk storage option . . . . . . . . . : *DYNAMIC Main storage option . . . . . . . . . : *DYNAMIC Auditing value . . . . . . . . . . . . : *NONE More... Press Enter to continue. F3=Exit F12=Cancel F22=Display entire field
76 i5/OS V5R4 Virtual Tape: A Guide to Planning and Implementation

Figure 3-40 Volume labels through 5250 emulation
This displays the volume labels as shown in Figure 3-41.
Figure 3-41 Output of volume labels through 5250 emulation
Enter the following command to display the save/restore information from a 5250 emulation session:
DSPTAP DEV(TAPVRT01) VOL(VOL001) DATA(*SAVRST) OUTPUT(*PRINT)
Display Tape (DSPTAP) Type choices, press Enter. Device . . . . . . . . . . . . . Nightly Name Volume identifier . . . . . . . vol001 Character value, *MOUNTED File label . . . . . . . . . . . *ALL Sequence number: Starting file sequence number *FIRST 1-16777215, *ALL, *FIRST Ending file sequence number . *LAST 1-16777215, *ONLY, *LAST Data type . . . . . . . . . . . *LABELS *LABELS, *SAVRST Output . . . . . . . . . . . . . *PRINT *, *PRINT, *OUTFILE End of tape option . . . . . . . *REWIND *REWIND, *UNLOAD
Bottom F3=Exit F4=Prompt F5=Refresh F12=Cancel F13=How to use this display F24=More keys
Chapter 3. Implementing virtual tape storage 77

Figure 3-42 shows the corresponding window.
Figure 3-42 Display of save/restore information through 5250 emulation
Display Tape (DSPTAP) Type choices, press Enter. Device . . . . . . . . . . . . . > TAPVRT01 Name Volume identifier . . . . . . . > VOL001 Character value, *MOUNTED File label . . . . . . . . . . . *ALL Sequence number: Starting file sequence number *FIRST 1-16777215, *ALL, *FIRST Ending file sequence number . *LAST 1-16777215, *ONLY, *LAST Data type . . . . . . . . . . . > *SAVRST *LABELS, *SAVRST Output . . . . . . . . . . . . . > *PRINT *, *PRINT, *OUTFILE End of tape option . . . . . . . *REWIND *REWIND, *UNLOAD Bottom F3=Exit F4=Prompt F5=Refresh F12=Cancel F13=How to use this display F24=More keys
78 i5/OS V5R4 Virtual Tape: A Guide to Planning and Implementation

This displays the output of save/restore information as shown in Figure 3-43.
Figure 3-43 Display output of save/restore information through 5250 emulation
3.2.4 Changing virtual media characteristicsThis section reviews some of the options available in changing the characteristics of virtual media. These changes provide you with more flexibility. The values chosen can affect many things, including the following:
� Amount of space allocated, that is, image size and allocate storage� Performance, that is, allocate storage � Organization, that is, volume index � Security, that is, write protect
Changing the image catalog entryTo make changes to the characteristics of your virtual media through IBM ̂iSeries Navigator, do the following.
Select Configuration and Service → Hardware → Tape Devices → Tape Image Catalogs. Then right-click the image catalog and select List Volumes as shown in Figure 3-44 on page 80.
Chapter 3. Implementing virtual tape storage 79

Figure 3-44 List image catalog volumes through Navigator
Next, right-click your volume and select Properties, as shown in Figure 3-45.
Figure 3-45 Volume properties selected through Navigator
This displays a window containing the General tab and the Options tab.
Figure 3-46 on page 81 shows the window that appears when you click the General tab.
80 i5/OS V5R4 Virtual Tape: A Guide to Planning and Implementation

Figure 3-46 Volume properties (General) through Navigator
Figure 3-47 on page 82 shows the window that appears when you click the Options tab.
Chapter 3. Implementing virtual tape storage 81

Figure 3-47 Volume properties (Optional) through Navigator
If you are viewing from a 5250 emulation session, the volume characteristics can be viewed with the Work with Image Catalog Entries (WRKIMGCLGE) command. Pressing Enter and pressing F11 up to three times shows the volume characteristics.
Figure 3-48 on page 83 shows the first screen of the volume characteristics in the Work with Image Catalog Entries window on a 5250 emulation session.
82 i5/OS V5R4 Virtual Tape: A Guide to Planning and Implementation

Figure 3-48 Volume characteristics through 5250 emulation
From Volume Properties in IBM ̂iSeries Navigator or the Work with Image Catalog Entries window on a 5250 emulation session, you can change the following:
� Volume Index (NEWCLGIDX)
This specifies a new index number to be used for the image catalog entry. If an entry currently exists at the specified index location, the new entry will be inserted and all entries at or below the specified index number will be incremented by 1. This determines which order your volumes are located in the image catalog.
– Current (*SAME): The index number will not be changed. – 1-256: Specifies the image catalog index number to be used.
� Write-protect (WRTPTC)
This specifies whether this catalog entry should be write-protected or not. No write operations will be allowed to this catalog entry if you write-protect it. This parameter cannot be changed while the volume’s status is Mounted.
Work with Image Catalog Entries System: RCHITSO Catalog . . : NIGHTLY Status . . . : Not ready Type . . . . : Tape Device . . . : Directory . : /images/tape/nightly Type options, press Enter. 1=Add 2=Change 4=Remove 6=Mount 8=Load 9=Unload 10=Initialize volume 11=Display 13=Dump 14=Duplicate Write Opt Index Status Volume Name Density Type Protect *AVAIL 1 Loaded VOL001 *VRT256K *SL No 7 Loaded VOL007 *VRT256K *SL No Bottom F3=Exit F5=Refresh F6=Load image catalog F8=Reorder by index F11=View size information F12=Cancel F22=Display entire field
Chapter 3. Implementing virtual tape storage 83

This parameter is not allowed for reference or dependent image catalogs.
– Current (*SAME): The value for write-protect will not be changed. – Yes (*YES): This specifies that this catalog entry is to be write-protected.
This will prevent write operation from being carried out.
– No (*NO): This specifies that this catalog entry is not to be write-protected. This will allow write operations to be done to this catalog entry.
� Volume size (IMGSIZ)
This specifies the maximum size allowed for this tape image file. If the specified image size is larger then the current file size, the new maximum size is set and the file size is increased. If the specified size is smaller than the current maximum image size and the data stored in the image file is less than the specified value, the file will be reduced to the specified size. Otherwise, the command will fail.
This parameter is only allowed for tape type image catalogs, and not for reference or dependent image catalogs.
– Minimum size (*MIN): The allocated image file size is truncated or shrunk to the size of the data stored in the file.
– 48-1000000: This specifies the maximum number of megabytes allowed for this tape image file.
� Storage allocation
This specifies whether to allocate the entire amount of storage specified on the image size (IMGSIZ) parameter for tape image files.
This parameter is only allowed for tape type image catalogs. This value cannot be changed while the volume’s status is Mounted. This parameter is not allowed for reference or dependent image catalogs.
– Minimum size (*MIN): This specifies changing storage allocation to match the storage required to contain the existing image file data. If performing a save, the image file size is increased dynamically. However, the image file size will not increase once the system reaches 5% or 5 GB storage remaining, whichever is the lesser value.
This value is not valid for reference or dependent catalogs (that is, catalog shadowing).
– Image size (*IMGSIZ): This specifies changing the storage allocation to match the size of storage for this image file. This is the value that was specified in the image size (IMGSIZ) parameter of the ADDIMGCLGE command.
Earlier, after saving a library to the virtual volume, you saw that the volume took up 10.7% of 1000 MB, the maximum size, allocated for that virtual volume. The amount of 10.7% means that 107 MB of actual data (that is,
84 i5/OS V5R4 Virtual Tape: A Guide to Planning and Implementation

112 MB, including the image file and its information) is contained on the system. In the earlier example, the ALCSTG was not changed. Therefore, it will dynamically allocate space as needed. This means that it allocates 107 MB of space plus any extra space it may have allocated.
In the example, the Properties tab shows that 160 MB is allocated. However, if the Allocate Storage (ALCSTG) was set to Image Size (*IMGSIZ) then, since the maximum size is 1000 MB, the system will still keep the other 893 MB of allocated space so that it cannot be used for anything else except saving to this specific virtual volume.
If you do not wish to preallocate this full space or any extra space for this virtual volume, the proper way to deallocate this extra space and still allow for the volume to write up to a total of 1000 MB is to change the allocation to the Minimum size, that is, ALCSTG(*MIN).
Changing the virtual volumeThis section shows you how to move the volume to a different index or slot, make the volume write-protected, change the volume description, and truncate or shrink the volume’s allocated size down to the actual size of the data.
In the earlier example, a virtual volume was described as having the following attributes:
� Volume index (IMGCLGIDX): 1� Write Protect (WRTPTC): No� Volume Description (TEXT): Sundays nightly backup vol001� Maximum size (IMGSIZ): 1000 MB� Allocate Storage (ALCSTG): Minimum storage� Data storage: 107 MB (112 MB total)� Dynamically allocated size (currently): 168 MB
If you want to change the index, write protection, description, and shrink the allocated size of the virtual volume down to the size of the data saved, select Configuration and Service → Hardware → Tape Devices → Tape Image Catalogs. Then right-click the image catalog, select List Volumes and right-click the volume and select Properties. From Volume Properties, the volume’s characteristics can be changed.
Figure 3-49 on page 86 shows the use of IBM ̂iSeries Navigator for changing the characteristics in the General tab.
Note: Allocate Storage (ALCSTG) and Write Protect (WRTPTC) cannot be changed when the volume’s status is Mounted.
Chapter 3. Implementing virtual tape storage 85

Figure 3-49 Change volume properties (General) through Navigator
Figure 3-50 on page 87 shows the use of IBM ̂iSeries Navigator for changing the characteristics in the Option tab.
86 i5/OS V5R4 Virtual Tape: A Guide to Planning and Implementation

Figure 3-50 Change volume properties (optional) through Navigator
Following are the changes/results:
� Volume index (IMGCLGIDX): 8� Write Protect (WRTPTC): Yes� Volume Description (TEXT): Netherlands, Sweden, and United States� Maximum size (IMGSIZ): 2000 MB� Allocate Storage (ALCSTG): Minimum storage� Data storage: 107 MB (112 MB total)� Dynamically allocated size (currently): 112 MB
Changes to the characteristics of the virtual media through a 5250 emulation session can be performed with the Change Image Catalog Entry (CHGIMGCLGE) command.
From the Change Image Catalog Entry (CHGIMGCLGE) window, you can change the text description as well as the catalog index, write protection, maximum image size, and how the storage is allocated for the virtual volume.
Figure 3-51 on page 88 shows the corresponding window.
Chapter 3. Implementing virtual tape storage 87

Figure 3-51 Change volume attributes through 5250 emulation
The volume is now at index 8, it is write-protected, and has 112 MB of storage allocated, out of a maximum storage capacity of 2000 MB.
By displaying the attributes of the stream file, you can see in Figure 3-52 on page 89 that the allocated storage went down from 168 MB to 112 MB.
Change Image Catalog Entry (CHGIMGCLGE) Type choices, press Enter. Image catalog . . . . . . . . . > NIGHTLY Name Image catalog index . . . . . . > 2 1-256, *VOL New catalog index . . . . . . . > 8 1-256, *SAME Write protect . . . . . . . . . > *YES *SAME, *YES, *NO Image size . . . . . . . . . . . 2000 *SAME, 48-1000000 megabytes Allocate storage size . . . . . > *MIN *SAME, *MIN, *IMGSIZ Text 'description' . . . . . . . 'Netherlands, Sweden, and United States' Bottom F3=Exit F4=Prompt F5=Refresh F12=Cancel F13=How to use this display F24=More keys
88 i5/OS V5R4 Virtual Tape: A Guide to Planning and Implementation

Figure 3-52 Stream file changed attributes through 5250 emulation
3.3 Copying virtual tape to physical tapeThis section discusses the methods for copying virtual tape to physical tapes.
Although virtual tape offers many benefits, it is very important to copy the virtual tape volumes to physical tapes as soon as possible in order to preserve the data in the event of a disaster, where the system or DASD disk drives are no longer accessible.
Most commonly, you will want to duplicate the exact copy of your virtual tape image to a physical volume. This section also discusses copying a portion of the virtual backup to tape and copying the tape image to tape, where it can be restored only as an entire image later.
Display Attributes Object . . . . . . : /images/tape/nightly/vol001 Creation date/time . . . . . . . . . . : 12/06/05 22:42:37 Last access date/time . . . . . . . . : 12/07/05 18:56:13 Data change date/time . . . . . . . . : 12/07/05 18:56:13 Attribute change date/time . . . . . . : 12/07/05 18:56:13 Size of object data in bytes . . . . . : 112251040 Allocated size of object . . . . . . . : 112459776 File format . . . . . . . . . . . . . : *TYPE2 Size of extended attributes . . . . . : 0 Storage freed . . . . . . . . . . . . : No Disk storage option . . . . . . . . . : *DYNAMIC Main storage option . . . . . . . . . : *DYNAMIC Auditing value . . . . . . . . . . . . : *NONE More... Press Enter to continue. F3=Exit F12=Cancel F22=Display entire field
Chapter 3. Implementing virtual tape storage 89

3.3.1 Preparing for duplicationThis section describes how to check that the volumes are ready for duplication. Before copying or duplicating a volume, do the following:
1. Decide which volume or files require duplication.
2. Ensure that the virtual tape device is available, that is, varied on.
This can be checked in IBM ̂iSeries Navigator by selecting Configuration and Service → Hardware → Tape Devices → Stand-Alone Devices. The right window pane should show the tape device as having a status of Available. If it does not show this status, right-click your device and select Make Available.
To check on a 5250 emulation screen, enter the following command:
WRKDEVD *TAP
To get a listing of the tape devices, select option 8 next to the tape device to work with configuration status. The device’s status should be Available or Varied on. If it is not, select option 1 to make available or vary on.
3. Ensure the image catalog that contains the volume to be duplicated is loaded on the virtual tape device.
This can be checked in iSeries Navigator by selecting Configuration and Service → Hardware → Tape Devices → Image Catalogs. The image catalog in the right panel should show a status of Loaded. If it does not, right-click the image catalog and select Load Image Catalog.
From a 5250 emulation screen, use the WRKIMGCLGE command to view the status of the image catalog and the volumes. The image catalog status should be Ready. If not, use the LODIMGCLG command. Refer to “Load the image catalog in the virtual device” on page 56 for more information about loading an image catalog.
4. Ensure that the status of the volume to be duplicated is Loaded or Mounted.
This can be checked in IBM ̂iSeries Navigator by selecting Configuration and Service → Hardware → Tape Devices → Image Catalogs, and right-clicking the image catalog from the right pane and then selecting List volumes.
To display the contents of the volume, right-click the volume and select Display Volume Labels or select Print tape to create a spool file. Refer to 3.2.3, “Viewing the virtual volumes” on page 67 for more information about viewing the contents.
From a 5250 emulation screen, use the WRKIMGCLGE command to view the status of the volumes. The status of the volume to be duplicated should be Loaded or Mounted.
90 i5/OS V5R4 Virtual Tape: A Guide to Planning and Implementation

5. Ensure that the target device’s status is Available, that is, Varied on.
This can be checked in IBM ̂iSeries Navigator by selecting Configuration and Service → Hardware → Tape Devices → Stand-Alone Devices. The right window pane should show your tape device with a status of Available. If it does not, right-click your device and select Make Available.
To check on a 5250 emulation screen:
Enter the following command on the command line to get a listing of the tape devices:
WRKDEVD *TAP
Select option 8 next to your tape device to work with configuration status. The device should have a status of Available or Varied on. If it does not, select option 1 to make available or varied on.
6. Ensure that a tape is loaded or mounted on the target tape device and is in the proper format, whether duplicating to an initialized tape or appending to an existing volume.
Proper format (DENSITY)The DENSITY format of the target volume (that is, physical volume) must have the equivalent or higher block size than the source volume (that is, virtual tape).
To check the DENSITY of your virtual volume (that is, source volume) through IBM ̂iSeries Navigator, select Configuration and Service → Hardware → Tape Devices → Tape Image Catalogs. Then right-click the image catalog and select List Volumes, as shown in Figure 3-53 on page 92.
Chapter 3. Implementing virtual tape storage 91

Figure 3-53 List volumes for density through Navigator
The DENSITY will be listed for each virtual volume, which also gives the block size. For example, a density of *VRT256K has a block size of 256 K, as shown in Figure 3-54.
Figure 3-54 Virtual volume density through Navigator
92 i5/OS V5R4 Virtual Tape: A Guide to Planning and Implementation

To check the density of your virtual volume through 5250 emulation session, use the Work with Image Catalog Entries (WRKIMGCLGE) command. Figure 3-55 shows a window where the volume has a density of *VRT256K. Thus, the block size is 256 K.
Figure 3-55 Virtual volume density through 5250 emulation
New physical volume densityIf you are duplicating to a new physical volume, initialize the tape to a density that has a block size equal to or larger than the virtual volume (that is, source volume). Refer to Appendix A, “Block sizes” on page 457 to determine your tape drive’s block size capability and supported format densities. If your drive or density is not listed, refer to your tape device operator manual.
To initialize the tape volume through Navigator, select Configuration and Service → Hardware → Tape Devices → Stand-Alone Devices. Then right-click the tape drive and select Format, as shown in Figure 3-56 on page 94.
Work with Image Catalog Entries System: RCHASUP2 Catalog . . : NIGHTLY Status . . . : Ready Type . . . . : Tape Device . . . : TAPVRT01 Directory . : /images/tape/nightly Type options, press Enter. 1=Add 2=Change 4=Remove 6=Mount 8=Load 9=Unload 10=Initialize volume 11=Display 13=Dump 14=Duplicate Write Opt Index Status Volume Name Density Type Protect *AVAIL 7 Loaded VOL007 *VRT256K *SL No 8 Mounted VOL001 *VRT256K *SL No Bottom F3=Exit F5=Refresh F6=Load image catalog F8=Reorder by index F11=View size information F12=Cancel F22=Display entire field
Chapter 3. Implementing virtual tape storage 93

Figure 3-56 Format volume through Navigator
The Format Tape window has a General tab and an Options tab.
The General tab is shown in Figure 3-57.
Figure 3-57 Format volume general tab through Navigator
94 i5/OS V5R4 Virtual Tape: A Guide to Planning and Implementation

The General tab has the following parameters:
� New volume label (NEWVOL): This specifies the volume identifier for a tape being initialized for use as a standard labeled tape. If no volume identifier is specified, the tape is initialized for use as an unlabeled tape.
� Check for volume (VOL): This specifies the existing volume identifier of the tape being initialized for use or indicates that the tape currently on the magnetic tape unit should be initialized for use.
� Check for active files (CHECK): This specifies whether a labeled tape volume should be checked for active data files before it is initialized for use. If an unlabeled volume is placed in the specified device, this parameter is ignored.
� End of tape action (ENDOPT): This specifies whether the tape is only rewound, or rewound and unloaded, after the operation ends.
The Options tab has the following parameters, as shown in Figure 3-58.
Figure 3-58 Format volume options tab through Navigator
� New owner (NEWOWNID): This specifies the identifier of the tape owner to write in the volume label.
Note: If the device specified is a media library device, or a virtual tape device, the volume specified should be the cartridge identifier or the virtual tape volume name to be mounted and used.
Chapter 3. Implementing virtual tape storage 95

� Density (DENSITY): This specifies the recording format of the data to be written on the tape.
– *DEVTYPE: The highest capacity density or format supported by the tape device will be used.
– *CTGTYPE: The highest capacity density or format supported by the device for the mounted cartridge type will be used. If the device does not support special cartridge type information, *DEVTYPE is used.
– character-value: This specifies the density or format to use.
� Character code (CODE): This specifies the character code in which the volume label is written. All data that is not save data written after the label, must be in the same code. Codes cannot be intermixed on a tape that is not a save tape. If the tape is being initialized for use as an unlabeled tape with *NONE or no volume identifier specified in the New volume identifier prompt (NEWVOL parameter), this parameter is ignored.
– *EBCDIC: The volume label is written in EBCDIC and is an IBM standard label. All additional data must also be written in EBCDIC.
– *ASCII: The volume label is written in ASCII and is an ANSI standard label. All additional data must also be written in ASCII.
� Delete all files (CLEAR): This specifies whether all previous labels and data are deleted from the tape when it is initialized. If the volume must be cleared of all data, it is spaced from the location of the initializing volume label or tape markers to the end of the tape marker.
To format a new volume using a 5250 emulation session, issue the following INZTAP command:
INZTAP DEV(TAP05) NEWVOL(DUP001) NEWOWNID(DESTINYB) VOL(DUP001) CHECK(*NO) DENSITY(*CTGTYPE)
Figure 3-59 on page 97 shows the corresponding window.
96 i5/OS V5R4 Virtual Tape: A Guide to Planning and Implementation

Figure 3-59 Initialize tape through 5250 emulation
Appended volume densityTo check the block size of a physical tape you are appending, select Configuration and Service → Hardware → Tape Devices → Stand-Alone
Initialize Tape (INZTAP) Type choices, press Enter. Device . . . . . . . . . . . . . > TAP05 Name New volume identifier . . . . . DUP001 Character value, *NONE... New owner identifier . . . . . . DestinyB Volume identifier . . . . . . . DUP001 Character value, *MOUNTED Check for active files . . . . . *NO *YES, *NO, *FIRST Tape density . . . . . . . . . . *CTGTYPE *DEVTYPE, *CTGTYPE, *QIC120... Code . . . . . . . . . . . . . . *EBCDIC *EBCDIC, *ASCII End of tape option . . . . . . . *REWIND *REWIND, *UNLOAD Clear . . . . . . . . . . . . . *NO *NO, *YES Bottom F3=Exit F4=Prompt F5=Refresh F12=Cancel F13=How to use this display F24=More keys
Chapter 3. Implementing virtual tape storage 97

Devices. Then right-click the tape drive and select Display Volume Labels, as shown in Figure 3-60.
Figure 3-60 Display volume for density through Navigator
This will display the window shown in Figure 3-61 on page 99. After selecting the relevant parameters, click OK.
98 i5/OS V5R4 Virtual Tape: A Guide to Planning and Implementation

Figure 3-61 Display label for density through Navigator
This displays Figure 3-62 on page 100, where the Density is shown as *QIC4GB on the top right corner.
Once you know your tape drive or density, refer to Appendix A, “Block sizes” on page 457 to determine its block size. If your drive or density is not listed, refer to your tape device operator manual.
Chapter 3. Implementing virtual tape storage 99

Figure 3-62 Density format of physical tape
To check the density of an existing volume through 5250 emulation session, use the following DSPTAP command:
DSPTAP DEV(TAP05) VOL(DUP001) SEQNBR(*FIRST *ONLY)
The corresponding 5250 emulation screens are shown in Figure 3-63 on page 101 and Figure 3-64 on page 101.
100 i5/OS V5R4 Virtual Tape: A Guide to Planning and Implementation

Figure 3-63 Display sequence through 5250 emulation
Figure 3-64 Display volume for density through 5250 emulation
Display Tape (DSPTAP) Type choices, press Enter. Device . . . . . . . . . . . . . TAP05 Name Volume identifier . . . . . . . DUP001 Character value, *MOUNTED File label . . . . . . . . . . . *ALL Sequence number: Starting file sequence number *FIRST 1-16777215, *ALL, *FIRST Ending file sequence number . *ONLY 1-16777215, *ONLY, *LAST Data type . . . . . . . . . . . *LABELS *LABELS, *SAVRST Output . . . . . . . . . . . . . * *, *PRINT, *OUTFILE End of tape option . . . . . . . *REWIND *REWIND, *UNLOAD
Bottom F3=Exit F4=Prompt F5=Refresh F12=Cancel F13=How to use this display F24=More keys
Display Tape Volume Information Device . . . . . . : TAP05 Volume ID . . . . : DUP001 Owner ID . . . . . : Dino Density . . . . . : *FMT3590E Type . . . . . . . : *SL Code . . . . . . . : *EBCDIC Data file label . . . . . . . . . : DESTINY File sequence . . . . . . . . . . : 0000000001 Record format . . . . . . . . . . : U Block attribute . . . . . . . . . : Record length . . . . . . . . . . : 00000 Block length . . . . . . . . . . . : 032760 File length . . . . . . . . . . . : 0000000414 Buffer offset . . . . . . . . . . : Control character . . . . . . . . : More... Press Enter to continue. F3=Exit F12=Cancel (C) COPYRIGHT IBM CORP. 1980, 2005.
Chapter 3. Implementing virtual tape storage 101

3.3.2 Duplicating virtual tape to physical tapeDuplicating virtual tape to physical tape allows the physical tape to be utilized just as if the backup had been initially saved to the physical media.
The process involved in duplicating virtual tape to physical tape is essentially the same as duplicating from one physical tape to another.
If you are using IBM ̂iSeries Navigator to duplicate an exact copy of a virtual volume to a physical tape, select Configuration and Service → Hardware → Tape Devices → Tape Devices → Tape Image Catalogs. Then right-click the image catalog, select List Volumes and right-click the volume and select Duplicate, as shown in Figure 3-65.
Figure 3-65 Duplicate volume through Navigator
102 i5/OS V5R4 Virtual Tape: A Guide to Planning and Implementation

This displays a window containing the General tab, the Files tab, and the Options tab. When you click the General tab, the window shown in Figure 3-66 appears.
Figure 3-66 Duplicate volume general tab through Navigator
The following parameters can be set in the General tab:
� From device (FROMDEV): This specifies the device from which the tape is copied. This is a required parameter.
name: This specifies the name of the tape device where the tape to be copied is mounted.
� From volume (FROMVOL): This specifies the volume identifier of the tape being duplicated.
– *MOUNTED: Any labeled or unlabeled volume placed on the tape device specified in the From device (FROMDEV) parameter is duplicated.
For a tape media library device, the volume to be used is the next cartridge in the category mounted by the Set Tape Category (SETTAPCGY) command.
Chapter 3. Implementing virtual tape storage 103

For a virtual tape device, the volume to be used is the currently mounted one. If there is no currently mounted volume, the next volume in the loaded status in the image catalog should be used.
character-value: This specifies the identifier of the labeled volume being duplicated.
� To device (TODEV): This specifies the device to which the tape is copied. This is a required parameter.
name: This specifies the name of the tape device where the tape volume to which data is being copied is mounted.
� To volume (TOVOL): This specifies the volume identifiers of the tapes to which data is being copied.
– *MOUNTED: The volume currently placed in the device is used.For a media library device, the volume to be used is the next cartridge in the category mounted by the Set Tape Category (SETTAPCGY) command. For a virtual tape device, the volume to be used is the currently mounted one. If there is no currently mounted volume, then the next volume in loaded status in the image catalog should be used.
– *FROMVOL: The volume label of the tape placed in the device specified on the From device (FROMDEV) parameter is used to initialize the tape placed in the device specified on the To device (TODEV) parameter. Up to eight additional volume labels and nine user volume labels are duplicated.
This value is not supported for tape media library devices and virtual tape devices.
character-value: This specifies the volume identifier of the tapes to which data is being copied. At the end of volume time, you can reinitialize the tape using this volume identifier. If the volume contains the correct volume identifier, but is in the wrong code or density, the tape is reinitialized to the correct code and density. The volume identifier is saved.
Note: If the device specified is a media library device or a virtual tape device, the volume specified should be the cartridge identifier or virtual tape volume name to be mounted and used.
Note: If the device specified is a media library device or a virtual tape device, the volume specified should be the cartridge identifier or virtual tape volume name to be mounted and used.
104 i5/OS V5R4 Virtual Tape: A Guide to Planning and Implementation

Figure 3-67 Duplicate volume files tab through Navigator
The following parameters can be set in the Files tab shown in Figure 3-67:
� Starting sequence number (STRSEQNBR): This specifies which data file sequence numbers are to be copied.
– *ALL: All files are duplicated.
– *FIRST: All files starting with the first file sequence are duplicated.
– 1-16777215: This specifies the starting file sequence number to be duplicated. Only the files in the specified sequence number range are duplicated.
� Ending sequence number (ENDSEQNBR): This specifies which data file sequence numbers are to be copied.
– *LAST: All files ending with the last file sequence are duplicated.
– *ONLY: Only the file specified in the starting file sequence is duplicated.
– 1-16777215: This specifies the ending file sequence number of the range to be duplicated.
Chapter 3. Implementing virtual tape storage 105

� To sequence number (TOSEQNBR): This specifies which sequence number the data files are to be copied to.
– *FROMSEQ: The data files are duplicated to the same file sequences as are specified in the from-file sequence number parameter.
– *END: The data files are added to the logical end of tape. The next valid sequence number is used.
– 1-16777215: This specifies the sequence number in which the data file will be copied to. This value is not allowed if the device does not have overwriting capabilities and the value specified is not the next logical value to be used at the end of the logical tape volume. The duplication begins in the specified file.
� Files to copy (FILES): This specifies whether the expired data files are copied from the tape volume placed in the device specified in the From device (FROMDEV) parameter, to the tape volume placed on the device specified in the To device (TODEV) parameter.
– *ALL: All data files on the tape volume are copied. All existing file sequence numbers are saved.
– *ACTIVE: Only data files with an expiry date later than the current system date are copied. Data files are renumbered consecutively, beginning with the number of the other first file on the volume and omitting any files that have expired.
The Options tab is shown in Figure 3-68 on page 107.
106 i5/OS V5R4 Virtual Tape: A Guide to Planning and Implementation

Figure 3-68 Duplicate volume options through Navigator
The Options tab contains the following parameters:
� From device end action (FROMENDOPT): This specifies whether the tape volume placed on the device specified in the From device (FROMDEV) parameter is rewound, or rewound and unloaded, after the operation is completed.
– *REWIND: The tape is automatically rewound, but not unloaded, after the operation has ended.
– *UNLOAD: The tape is automatically rewound and unloaded after the operation ends.
– *LEAVE: The tape does not rewind or unload after the operation ends. It remains at the current position on the tape drive.
Chapter 3. Implementing virtual tape storage 107

� To device end action (TOENDOPT): This specifies whether the tape volume placed on the device specified in the To device (TODEV) parameter is rewound, or rewound and unloaded, after the operation is completed.
– *UNLOAD: The tape is rewound and unloaded after the operation is completed.
– *REWIND: The tape is rewound, but not unloaded.
– *LEAVE: The tape does not rewind or unload after the operation ends. It remains at the current position on the tape drive.
� Check for active files (CHECK): This specifies whether a tape file on the volume mounted on the To device (TODEV) parameter is checked for active data before it is overwritten. If an unlabeled volume is on the To device, this parameter is ignored.
– *YES: The file to be overwritten is checked for active data. Only the first file to be overwritten is checked for active data. Any subsequent files are not checked. If active files are found, the operation is ended and an error message is sent.
– *NO: Tape duplication continues, with no checking for active files.
� Density (DENSITY): This specifies the density or format in which the copied data is written.
– *DEVTYPE: The highest capacity density or format supported by the tape device will be used.
– *CTGTYPE: The highest capacity density or format supported by the device for the mounted cartridge type will be used. If the device does not support special cartridge type information, *DEVTYPE is used.
– character-value: This specifies the density or format to use.
� Expiration date (EXPDATE): This specifies the expiration date to be assigned to all the files when they are copied. This parameter only applies to standard labeled tapes.
– *FROMFILE: The expiration date currently specified for the file to be copied is used.
– *PERM: All the copied files will be assigned a permanent expiration date.
– date: This specifies the expiration date to be assigned to all the files when they are copied.
108 i5/OS V5R4 Virtual Tape: A Guide to Planning and Implementation

� Compact data (COMPACT): This specifies whether device data compaction is performed. If the device specified does not support compaction, this parameter is ignored.
– *FROMFILE: Device data compaction is performed only if the file being read from the device specified in the From device (FROMDEV) parameter was written using device data compaction.
– *YES: Device data compaction is performed on all files written to the device specified in the To device (TODEV) parameter.
– *NO: Device data compaction is not performed.
� User label program and library (USRLBLPGM): This specifies the name and library of the user program that processes user tape labels. For the device specified in the To device (TODEV) parameter, the user label program sends the user labels that are written to tape. For the device specified in the From device (FROMDEV) parameter, the user labels are sent to the user label program.
– *SYSCOPY: User tape labels are processed to allow proper duplication of System/36™ save and restore tapes. If user header labels are present on the tape volume specified in the FROMDEV parameter, they are copied to the tape volume specified in the TODEV parameter. The same is done for the user trailer labels at the end of the file or for the trailer labels at the end of the file section.
If an end-of-volume condition occurs on the device specified in the TODEV parameter before logical end-of-tape is found on the device specified in the FROMDEV parameter, user trailer and user header labels are created and written to the current and next tape volumes that replicate the data from the user header label read at the beginning of the file.
– *NONE: No user program processes user tape labels. No user labels are written to the tape volume.
Qualifier 1: User label program.
– name: This specifies the name of the user program that processes the user tape labels.
Qualifier 2: Library
– *LIBL: All libraries in the library list for the current thread are searched until the first match is found.
– *CURLIB: The current library for the job is used to locate the user label program. If no library is specified as the current library for the job, QGPL is used.
– name: This specifies the name of the library where the user label program is located.
Chapter 3. Implementing virtual tape storage 109

The duplication tasks are complete. The target volume DUP001 on the physical drive should now be a copy of the source volume VOL001 on the virtual drive.
If you are on a 5250 emulation session and wish to duplicate your media, use the DUPTAP command. If the tape duplication from IBM ̂iSeries Navigator was performed using a command, the following command should be entered:
DUPTAP FROMDEV(TAPVRT01) TODEV(TAP05) FROMVOL(VOL001) TOVOL(DUP001) TODENSITY(*CTGTYPE)
Figure 3-69 shows the corresponding window.
Figure 3-69 Duplicate volume through 5250 emulation
Copying specific objectsAlthough it is more common to copy the entire virtual tape to physical tape, there are times when you may want to copy only parts of the virtual backup to physical tape. Selecting specific objects to be copied directly from a virtual volume to a physical volume cannot be performed by using the Duplicate (DUPTAP) function. However, it is possible to copy portions of the volume duplicating specific sequence numbers of the volume.
Duplicate Tape (DUPTAP) Type choices, press Enter. From device . . . . . . . . . . > TAPVRT01 Name To device . . . . . . . . . . . > TAP05 Name From sequence number: Starting file sequence number *FIRST 1-16777215, *ALL, *FIRST Ending file sequence number . *LAST 1-16777215, *ONLY, *LAST To sequence number . . . . . . . *FROMSEQ 1-16777215, *END, *FROMSEQ Additional Parameters From volume identifier . . . . . > VOL001 Character value, *MOUNTED + for more values To volume identifier . . . . . . > DUP001 Character value, *MOUNTED... + for more values Tape density . . . . . . . . . . > *CTGTYPE *DEVTYPE, *CTGTYPE, *QIC120... Bottom F3=Exit F4=Prompt F5=Refresh F10=Additional parameters F12=Cancel F13=How to use this display F24=More keys
110 i5/OS V5R4 Virtual Tape: A Guide to Planning and Implementation

Rather than duplicating a specific object, duplicate all the objects of a specific sequence. Sequences are written to tape for every Save operation performed to tape. For example, if you perform a SAVLIB of a specific library to tape, that library and all of its objects will be under one sequence. If the SAVLIB is for a special value such as *ALLUSR, all the libraries will be contained under one sequence. You cannot use the Duplicate (DUPTAP) function to copy specific objects out of each sequence directly to tape. If a SAVLIB LIB(*ALLUSR) is performed and is saved under one sequence, you will have to duplicate the entire sequence. You cannot duplicate only one library directly to another tape volume.
Duplication of specific sequences is performed by specifying a Starting sequence number (STRSEQNBR) and an Ending sequence number (ENDSEQNBR). These parameters are found in the Files tab of the Duplicate function in IBM ̂iSeries Navigator. Figure 3-70 shows the Files tab after selecting a volume to duplicate.
Figure 3-70 Duplicate sequence through Navigator
Chapter 3. Implementing virtual tape storage 111

From the example provided, sequence 3 through the last sequence of the source tape will be appended to the next sequence available on the target tape where the data is being duplicated.
If using a 5250 emulation, the STRSEQNBR and ENDSEQNBR parameters are seen on the first screen when the DUPTAP command is used. Figure 3-71 shows a volume on TAPVRT01, where the third sequence through the last sequence is being appended to the next sequence available on the target tape where the data is being duplicated.
Figure 3-71 Duplicate sequence through 5250 emulation
3.3.3 Saving virtual tape as an objectThis section shows how to save the entire virtual tape volume as a STMF that can later be restored to a system, while retaining its virtual volume characteristics.
Duplicate Tape (DUPTAP) Type choices, press Enter. From device . . . . . . . . . . TAPVRT01 Name To device . . . . . . . . . . . TAP05 Name From sequence number: Starting file sequence number 3 1-16777215, *ALL, *FIRST Ending file sequence number . *LAST 1-16777215, *ONLY, *LAST To sequence number . . . . . . . *END 1-16777215, *END, *FROMSEQ Bottom F3=Exit F4=Prompt F5=Refresh F10=Additional parameters F12=Cancel F13=How to use this display F24=More keys
112 i5/OS V5R4 Virtual Tape: A Guide to Planning and Implementation

Saving image objectsVirtual tape volumes can be saved to physical media while still retaining their virtual volume characteristics. This is obtained by saving the STMF object that resides in the IFS. The virtual volume stream file resides in the directory of the image catalog. The object in the directory is the name of the image file name, and not the volume name.
To access the directory, select Configuration and Service → Hardware → Tape Devices. Then right-click Tape Image Catalogs and click Properties. The Properties window shows the location of the image catalog. Figure 3-72 shows an example of the image catalog (Nightly), which is pointed to the location /images/tape/nightly.
Figure 3-72 Image catalog directory through Navigator
To file the image file name, select Configuration and Service → Hardware → Tape Devices. Then right-click Tape Image Catalogs and click List Volumes, which shows the volume and contains a field listing the file name.
Note: Objects cannot be directly restored from the physical tape if the virtual volume is saved to the tape as a STMF object rather than as a duplication to a tape. To restore objects directly from tape, refer to 3.3.2, “Duplicating virtual tape to physical tape” on page 102.
Chapter 3. Implementing virtual tape storage 113

Figure 3-73 shows volume VOL001, which also has the same name, VO001, for the image file.
Figure 3-73 Volume file name through Navigator
To find the image catalog directory through 5250 emulation, work with the image catalog entry WRKIMGCLGE for the image catalog and you will see the directory in the upper left corner as shown in Figure 3-74 on page 115.
Note: The image file name can differ from the volume name.
114 i5/OS V5R4 Virtual Tape: A Guide to Planning and Implementation

Figure 3-74 Image catalog directory through 5250 emulation
To find the image file name for the volume, press F11 three times. This displays the screen shown in Figure 3-75 on page 116.
Work with Image Catalog Entries System: RCHITSO Catalog . . : NIGHTLY Status . . . : Ready Type . . . . : Tape Device . . . : TAPVRT01 Directory . : /images/tape/nightly Type options, press Enter. 1=Add 2=Change 4=Remove 6=Mount 8=Load 9=Unload 10=Initialize volume 11=Display 13=Dump 14=Duplicate Write Opt Index Status Volume Name Density Type Protect *AVAIL 7 Loaded VOL007 *VRT256K *SL No 8 Mounted VOL001 *VRT256K *SL No Bottom F3=Exit F5=Refresh F6=Load image catalog F8=Reorder by index F11=View size information F12=Cancel F22=Display entire field
Chapter 3. Implementing virtual tape storage 115

Figure 3-75 Volume file name through 5250 emulation
SAV the image fileThe image catalog directory contains the location of your virtual images. To save the images, use the SAV command. Issue the Run Command from the IBM ̂iSeries Navigator by right-clicking your system and selecting the Run Command, or enter the SAV command in a 5250 emulation session.
Figure 3-76 on page 117 shows an example of saving a VOL001 image file to tape using the following command:
SAV DEV('/QSYS.LIB/TAP05.DEVD') OBJ(('/images/tape/nightly/vol001'))
Work with Image Catalog Entries System: RCHITSO Catalog . . : NIGHTLY Status . . . : Ready Type . . . . : Tape Device . . . : TAPVRT01 Directory . : /images/tape/nightly Type options, press Enter. 1=Add 2=Change 4=Remove 6=Mount 8=Load 9=Unload 10=Initialize volume 11=Display 13=Dump 14=Duplicate Opt Index Status Image File Name *AVAIL 7 Loaded vol007 8 Mounted vol001 Bottom F3=Exit F5=Refresh F6=Load image catalog F8=Reorder by index F11=View volume information F12=Cancel F22=Display entire field
Note: A Tape Image File cannot be saved if it is loaded in an image catalog with a status of Available or Ready status. This is because an image catalog with Available or Ready status has its *ALWSAV attribute (in the CHGATR command) set to *NO. For more information about CHGATR, refer to the Note on CHGATR on page 12.
116 i5/OS V5R4 Virtual Tape: A Guide to Planning and Implementation

Figure 3-76 SAV image file through 5250 emulation
To save all your virtual volumes in the image catalog, issue the same command, but for the directory. The Include parameter is set to *INCLUDE, which will save all the objects in that directory. However, this saves all the objects in that directory even if they are not an index in the image catalog.
To save the entire image catalog directory, enter the following command:
SAV DEV('/QSYS.LIB/TAP05.DEVD') OBJ(('/images/tape/nightly'))
Figure 3-77 on page 118 shows the corresponding window.
Save Object (SAV) Type choices, press Enter. Device . . . . . . . . . . . . . > '/QSYS.LIB/TAP05.DEVD' + for more values Objects: Name . . . . . . . . . . . . . > '/images/tape/nightly/Vol001' Include or omit . . . . . . . *INCLUDE *INCLUDE, *OMIT + for more values Name pattern: Pattern . . . . . . . . . . . '*' Include or omit . . . . . . . *INCLUDE *INCLUDE, *OMIT + for more values Directory subtree . . . . . . . *ALL *ALL, *DIR, *NONE, *OBJ, *STG Save active . . . . . . . . . . *NO *NO, *YES, *SYNC More... F3=Exit F4=Prompt F5=Refresh F10=Additional parameters F12=Cancel F13=How to use this display F24=More keys
Chapter 3. Implementing virtual tape storage 117

Figure 3-77 SAV image catalog directory through 5250 emulation
Saving image catalog objectIf you are saving your tape file images, you may want to consider saving your image catalog object so that you do not need to create the image catalog again or add your virtual images again. The image catalog object is the name of the image catalog and is a type *IMGLCG. The object resides in the library QUSRSYS. This object can be saved using the SAVOBJ command, or it will get saved when the QUSRSYS library is saved.
To save of an image catalog called Nightly, enter the following command:
SAVOBJ OBJ(NIGHTLY) LIB(QUSRSYS) DEV(TAP05) OBJTYPE(*IMGCLG)
Figure 3-78 on page 119 shows the corresponding window.
Save Object (SAV) Type choices, press Enter. Device . . . . . . . . . . . . . > '/QSYS.LIB/TAP05.DEVD' + for more values Objects: Name . . . . . . . . . . . . . > '/images/tape/nightly' Include or omit . . . . . . . *INCLUDE *INCLUDE, *OMIT + for more values Name pattern: Pattern . . . . . . . . . . . '*' Include or omit . . . . . . . *INCLUDE *INCLUDE, *OMIT + for more values Directory subtree . . . . . . . *ALL *ALL, *DIR, *NONE, *OBJ, *STG Save active . . . . . . . . . . *NO *NO, *YES, *SYNC More... F3=Exit F4=Prompt F5=Refresh F10=Additional parameters F12=Cancel F13=How to use this display F24=More keys
118 i5/OS V5R4 Virtual Tape: A Guide to Planning and Implementation

Figure 3-78 Save image catalog object through 5250 emulation
Transporting virtual storageYour virtual tape storage is made up of an image catalog object of type *IMGCLG and its images of type *STMF in the integrated file system. It is possible to send these objects to another system.
Virtual storage can be transported to another system by one of the following methods:
� IBM ̂iSeries Navigator� FTP� QFilesvr.400� OptiConnect� ObjectConnect� Save/Restore using physical media� NetServer™ shares
For more information about these transportation methods, refer to the IBM knowledge base document No. 30852541, which is available on the Web at:
http://www-912.ibm.com/s_dir/slkbase.NSF/1ac66549a21402188625680b0002037e/cbab7cb7ff94819986256d470075fbe3?OpenDocument
Save Object (SAVOBJ) Type choices, press Enter. Objects . . . . . . . . . . . . Nightly Name, generic*, *ALL + for more values Library . . . . . . . . . . . . QUSRSYS Name, generic*, *USRSPC + for more values Device . . . . . . . . . . . . . TAP05 Name, *SAVF, *MEDDFN + for more values Object types . . . . . . . . . . *IMGCLG *ALL, *ALRTBL, *BNDDIR... + for more values BottomF3=Exit F4=Prompt F5=Refresh F10=Additional parameters F12=Cancel F13=How to use this display F24=More keys
Chapter 3. Implementing virtual tape storage 119

Alternatively, you can visit the IBM ̂iSeries Information Center, which is available on the Web at:
http://publib.boulder.ibm.com/pubs/html/as400/infocenter.html
3.4 Catalog shadowingThis section explains the concept of catalog shadowing, creating dependent catalogs for catalog shadowing, different ways of utilizing the catalogs after shadowing is set up, and ending catalog shadowing by deleting the dependent image catalogs.
3.4.1 Overview of catalog shadowingIn this section we define what catalog shadowing is, identify the benefits it offers, review the terms involved in catalog shadowing, and list the characteristics of reference and dependent catalogs.
Catalog shadowing is a method used to share a single image or multiple virtual images by using more that one virtual device. This is made possible by creating a “snapshot” of the original image catalog. Figure 3-79 on page 121 illustrates catalog shadowing.
120 i5/OS V5R4 Virtual Tape: A Guide to Planning and Implementation

Figure 3-79 Catalog shadowing diagram
Benefits of catalog shadowingCatalog shadowing offers the following benefits:
� It allows more than one operation to be performed on an image catalog or even a single volume. This includes displaying, restoring, installing, and duplicating.
� It helps to protect against accidental deletion of data. This is because all the volumes in a dependent catalog are write protected. There are other security features such as restricting the deletion or initialization of the original volume.
� It helps to reduce the amount of system disk space needed to perform some concurrent operations. This is because multiple true bit-for-bit copies are not needed to perform more than one operation on a catalog or a single volume.
� It can be used to provide an unaltered view of the original image catalog. This is because a dependent catalog is created as a copy of the reference catalog at a single point in time.
� It can be used to only allow users access to specific volumes within an image catalog.
Chapter 3. Implementing virtual tape storage 121

Catalog shadowing termsTwo new terms are introduced with catalog shadowing:
� Reference catalog
A reference catalog is an image catalog that shares its resources (such as catalog information, directory, and image files) with other image catalogs known as dependent catalogs. In catalog shadowing, it is the reference catalog, and not the dependent catalog, that actually contains the image files.
� Dependent catalog
A dependent catalog is an image catalog that is dependent on the resources such as catalog information, directory, and image files, of another image catalog called a reference catalog.
A reference catalog has the following characteristics:
� An object type of *IMGCLG.� The original image catalog becomes a reference catalog when a dependent
catalog is created.� The reference catalog contains the actual image files.� A reference catalog’s image files cannot be removed until all dependent
catalogs have been deleted.� A reference catalog cannot be deleted until all dependent catalogs have been
deleted.� Tape reference catalog image files can be loaded in a virtual device as
writable or read-only.� Optical reference catalog image files can only be loaded in a virtual device as
read-only.
A dependent catalog has the following characteristics:
� An object type of *IMGCLG.� It references a non-dependent catalog’s resources.� It is loaded as read-only (write protected).� It does not set the ALWSAV (allow save) attribute in CHGATR for IFS files.� It cannot delete the image files, including the actual ones belonging to the
reference catalog with RMVIMGCLGE, WRKIMGCLGE, or DLTIMGCLG commands.
� It contains a snapshot of the reference catalog during the point when the dependent catalog was created.
� A dependent catalog does not see any new reference catalog volumes that are added after the dependent catalog is created.
� It does not support the installation of licensed internal code, operating systems, or PTFs.
� It supports the install of licensed program products (LPPs) if residing in a system ASP or independent ASP.
122 i5/OS V5R4 Virtual Tape: A Guide to Planning and Implementation
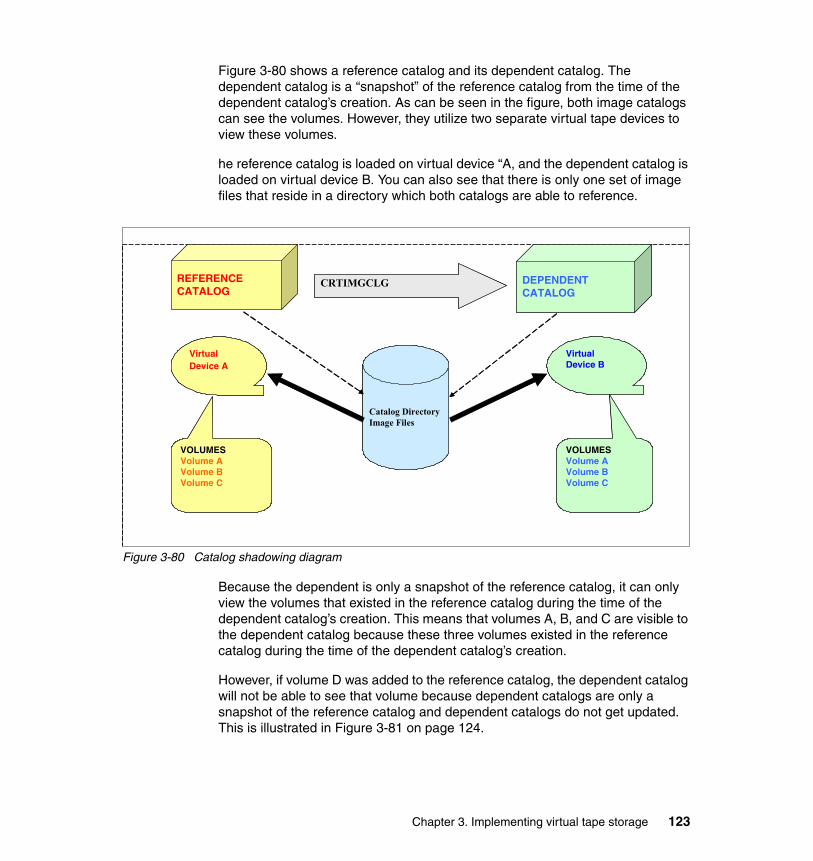
Figure 3-80 shows a reference catalog and its dependent catalog. The dependent catalog is a “snapshot” of the reference catalog from the time of the dependent catalog’s creation. As can be seen in the figure, both image catalogs can see the volumes. However, they utilize two separate virtual tape devices to view these volumes.
he reference catalog is loaded on virtual device “A, and the dependent catalog is loaded on virtual device B. You can also see that there is only one set of image files that reside in a directory which both catalogs are able to reference.
Figure 3-80 Catalog shadowing diagram
Because the dependent is only a snapshot of the reference catalog, it can only view the volumes that existed in the reference catalog during the time of the dependent catalog’s creation. This means that volumes A, B, and C are visible to the dependent catalog because these three volumes existed in the reference catalog during the time of the dependent catalog’s creation.
However, if volume D was added to the reference catalog, the dependent catalog will not be able to see that volume because dependent catalogs are only a snapshot of the reference catalog and dependent catalogs do not get updated. This is illustrated in Figure 3-81 on page 124.
VirtualDevice A
Catalog DirectoryImage Files
VirtualDevice B
VOLUMES Volume AVolume BVolume C
VOLUMES Volume AVolume BVolume C
REFERENCE CATALOG
CRTIMGCLG DEPENDENTCATALOG
VirtualDevice A
Catalog DirectoryImage Files
VirtualDevice B
VOLUMES Volume AVolume BVolume C
VOLUMES Volume AVolume BVolume C
REFERENCE CATALOG
CRTIMGCLG DEPENDENTCATALOG
Chapter 3. Implementing virtual tape storage 123

Figure 3-81 Volume added after dependent catalog creation
3.4.2 Setting up image catalog shadowingThis section explains how to set up catalog shadowing by creating dependent catalogs.
Creating tape type dependent catalogsUse these steps and commands to create dependent catalogs, which automatically sets up catalog shadowing.
After your tape image catalog is set up and contains all the volumes, make sure that the image catalog status is Unloaded in order to create a dependent catalog.
Verify whether your image catalog status is Unloaded by selecting Configuration and Service → Hardware → Tape Devices → Tape Image Catalogs. Your image catalog status should be Unloaded. If it is not, right-click the image catalog and select Unload Image Catalog.
Figure 3-82 on page 125 shows the status of the image catalog and illustrates how to change the status to Unloaded and unload it.
124 i5/OS V5R4 Virtual Tape: A Guide to Planning and Implementation

Figure 3-82 Unload image catalog through Navigator
Create a dependent catalog by selecting Configuration and Service → Hardware → Tape Devices. Then right-click Tape Image Catalogs and selecting Create Image Catalog as shown in Figure 3-83.
Figure 3-83 Create dependent catalog through Navigator
When the Create Catalog window appears, enter the following parameters:
� Catalog name (IMGCLG): This specifies the name of the image catalog to be created.
� Catalog description (TEXT): This specifies up to 50 characters of text that briefly describes the image catalog being created.
� Directory path (DIR): This specifies the directory to be associated with this image catalog. For dependent catalogs, this parameter must have a value of *REFIMGCLG. This specifies another image catalog as a reference for the new image catalog.
� Reference catalog (REFIMGCLG): This specifies the name of the image catalog as a reference for the new image catalog. The new dependent image catalog will contain the image catalog entries that exist in the reference image
Chapter 3. Implementing virtual tape storage 125

catalog at the time the dependent image catalog is created. Any additional changes to the reference image catalog will not be reflected in the dependent image catalog.
� Create directory (CRTDIR): Specifies whether the directory (DIR parameter) should be created if it does not exist.
– *YES: The directory will be created if it does not exist. – *NO: The directory will not be created.
� Authority level (AUT): Authority level specifies the authority you are giving to users who do not have specific authority for the object, who are not on an authorization list, and whose group profile or supplemental group profiles do not have specific authority for the object. Following are the choices for authority levels:
– Exclude: (Default) The user cannot access the image catalog unless the user has *ALLOBJ special authority, the user is the owner of the object, or the user is later granted authority.
– Library create: The authority for the object is the same as the create authority for QUSRSYS. The create authority for QUSRSYS can be displayed by using the Display Library Description (DSPLIBD) command. If the create authority for QUSRSYS is set to *SYSVAL, display the QCRTAUT system value. If the create authority is changed with the Change Library (CHGLIB) command, the new authority does not affect existing objects.
– Change: The user can perform all operations on the object except those limited to the owner or controlled by object existence authority and object management authority. The user can change and perform basic functions on the object. Change authority provides object operational authority and all data authority. If the object is an authorization list, the user cannot add, change, or remove user IDs.
– All: The user can perform all operations except those limited to the owner or controlled by authorization list management authority. The user can control the object's existence, specify the security for the object, change the object, and perform basic functions on the object. The user also can change ownership of the image catalog.
– Use: The user can perform basic operations on the image catalog, such as displaying properties. The user cannot change the image catalog, and use authority provides object operational authority, read authority, and execute authority.
– Name: Specify the name of an authorization list to be used for granting authority to the object. Users included in the authorization list are granted authority to the object as specified in the list. The authorization list must exist when the object is created
126 i5/OS V5R4 Virtual Tape: A Guide to Planning and Implementation

Figure 3-84 shows the parameters used to create a dependent catalog called DEPENDENT1, which will automatically set up catalog shadowing.
Figure 3-84 Create dependent1 through Navigator
A dependent image catalog is created and catalog shadowing set up.
To view your dependent catalog’s volumes, select Configuration and Service → Hardware → Tape Devices → Tape Image Catalogs. Then right-click your dependent image catalog and select List Volumes, as shown in Figure 3-85.
Figure 3-85 List dependent volumes through Navigator
Chapter 3. Implementing virtual tape storage 127

12
Figure 3-86 shows that the volumes in the dependent catalog DEPENDENT1 contain the same volumes as the reference catalog Nightly, at the time of creation.
Figure 3-86 Dependent catalog volumes through Navigator
There is no restriction on the number of dependent catalogs you can create. However, since there is a limit of 35 virtual devices, only 35 dependent catalogs can be in Available or Ready status at the same time.
If using a 5250 emulation session, ensure that the tape image catalog status is Not Ready by issuing the WRKIMGCLGE command:
WRKIMGCLGE IMGCLG(NIGHTLY)
The top right-hand corner of the screen should show a status of Not Ready, as shown in Figure 3-87 on page 129.
8 i5/OS V5R4 Virtual Tape: A Guide to Planning and Implementation

Figure 3-87 Verify status through 5250 emulation
If the status of the image catalog is Ready, press F6 and then press Enter to unload the image catalog, or issue the following command:
LODIMGCLG IMGCLG(NIGHTLY) DEV(TAPVRT01) OPTION(*UNLOAD)
To create a dependent image catalog, enter the following command:
CRTIMGCLG IMGCLG(DEPENDENT1) DIR(*refimgclg) TYPE(*TAP) REFIMGCLG(nightly)TEXT('Dependent1 of Nightly catalog')
Figure 3-88 on page 130 shows the corresponding window.
Work with Image Catalog Entries System: RCHITSO Catalog . . : NIGHTLY Status . . . : Not ready Type . . . . : Tape Device . . . : Directory . : /images/tape/nightly Type options, press Enter. 1=Add 2=Change 4=Remove 6=Mount 8=Load 9=Unload 10=Initialize volume 11=Display 13=Dump 14=Duplicate Write Opt Index Status Volume Name Density Type Protect *AVAIL 7 Loaded VOL007 *VRT256K *SL No 8 Mounted VOL001 *VRT256K *SL Yes Bottom F3=Exit F5=Refresh F6=Load image catalog F8=Reorder by index F11=View size information F12=Cancel F22=Display entire field
Chapter 3. Implementing virtual tape storage 129

Figure 3-88 Create dependent catalog through 5250 emulation
The preceding command creates a dependent image catalog DEPENDENT1 that is created from a snapshot of a non-dependent image catalog NIGHTLY at a single point in time.
Work with image Catalogs (WRKIMGCLG) should now show the *IMGCLG DEPENDENT1. If you press F11 twice, you should see a field called Reference Catalog, and also see the reference catalog listed as NIGHTLY next to your dependent catalog, as shown in Figure 3-89 on page 131.
Create Image Catalog (CRTIMGCLG) Type choices, press Enter. Image catalog . . . . . . . . . > DEPENDENT1 Name Directory . . . . . . . . . . . > *refimgclg Image catalog type . . . . . . . > *TAP *OPT, *TAP Create directory . . . . . . . . *YES *YES, *NO Reference image catalog . . . . > NIGHTLY Name Additional Parameters Text 'description' . . . . . . . > 'Dependent1 of Nightly catalog' Bottom F3=Exit F4=Prompt F5=Refresh F10=Additional parameters F12=Cancel F13=How to use this display F24=More keys
Important: If volumes are added to the reference catalog NIGHTLY after the dependent catalog DEPENDENT1 is created, that newly added volume will not be visible to the dependent catalog DEPENDENT1.
130 i5/OS V5R4 Virtual Tape: A Guide to Planning and Implementation

Figure 3-89 Catalog relationship through 5250 emulation
Select option 12 (WRKIMGCLGE) for DEPENDENT1. You should see the same volumes that were listed in the reference catalog NIGHTLY at the time DEPENDENT1 was created, as shown in Figure 3-90 on page 132.
Work with Image Catalogs System: RCHITSO Type options, press Enter. 1=Create 2=Change 4=Delete 8=Load 9=Unload 10=Verify 12=Work with entries Image Reference Catalog Opt Catalog Catalog Relationship BBAUT BBAUTTEST DEPENDENT1 NIGHTLY Dependent DUPLICATE JAPCATALOG JJPTAP NIGHTLY Reference
Bottom F3=Exit F5=Refresh F11=View status F12=Cancel
Chapter 3. Implementing virtual tape storage 131

Figure 3-90 Dependent volumes through 5250 emulation
At this point, you can load your dependent catalog on to a virtual tape device so that its status is Ready. After the status shows Ready, your dependent catalog is ready for operation.
3.4.3 Utilizing dependent catalogsThis section discusses some of the operations for which a dependent image catalog can be used after it is created.
A dependent catalog can be used for displaying, restoring, installing, and duplicating a volume while it is being used by another virtual device. A dependent catalog has the ability to work with any of its volumes as long as that specific volume is not mounted in the reference catalog. For this reason, you may want to consider creating at least two dependent catalogs per reference catalog if you want to exploit the full potential of catalog shadowing.
A dependent catalog is used similarly to a single or non-dependent image catalog. In order to utilize the volumes, the dependent catalog must be loaded on the virtual optical device and must have a Ready status. After Ready status is
Work with Image Catalog Entries System: RCHITSOCatalog . . : DEPENDENT1 Status . . . : Not ready Type . . . . : Tape Device . . . : Directory . : /images/tape/nightly Type options, press Enter. 1=Add 2=Change 4=Remove 6=Mount 8=Load 9=Unload 10=Initialize volume 11=Display 13=Dump 14=Duplicate Write Opt Index Status Volume Name Density Type Protect *AVAIL 7 Loaded VOL007 *VRT256K *SL Yes 8 Mounted VOL001 *VRT256K *SL Yes BottomF3=Exit F5=Refresh F6=Load image catalog F8=Reorder by index F11=View size information F12=Cancel F22=Display entire field
132 i5/OS V5R4 Virtual Tape: A Guide to Planning and Implementation

reached, you can display, restore, install, and duplicate a volume even if any of these operations are already being performed by another dependent catalog.
3.4.4 Removing a shadowed volumeThis section explains how to remove a volume when catalog shadowing is implemented.
Removing a reference volumeA virtual volume cannot be removed from a reference catalog if the image is also contained in a dependent catalog. Since an image cannot be deleted from a dependent catalog, the only way to remove an image from the reference catalog is to delete all dependent catalogs containing that image file.
This section details how to remove a volume. To remove the entire dependent catalog, refer to 3.4.5, “Deleting a shadowed catalog” on page 135. For details on deleting the entire reference catalog and its dependent catalogs, refer to “Deleting a reference catalog” on page 137.
To remove a volume from a reference image catalog that is not shadowed or whose image file is not contained within a dependent catalog, perform the following tasks:
Select Configuration and Service → Hardware → Tape Devices → Tape Image Catalogs. Then right-click your image catalog and select List Volumes. Right-click the volume to be removed and select Remove Volume, as shown in Figure 3-91 on page 134.
Chapter 3. Implementing virtual tape storage 133

Figure 3-91 Remove non-shadowed volume through Navigator
Then choose whether or not to keep the image files and click OK, as shown in Figure 3-92.
Figure 3-92 Remove non-shadowed volume through Navigator
If using a 5250 emulation session, enter the following command:
RMVIMGCLGE IMGCLG(NIGHTLY) IMGCLGIDX(*VOL) VOL(VOL007) KEEP(*NO)
Figure 3-93 on page 135 shows the corresponding window.
134 i5/OS V5R4 Virtual Tape: A Guide to Planning and Implementation

Figure 3-93 Remove image catalog entry through 5250 emulation
Removing a dependent volumeIt is currently not possible to remove a single volume from a dependent catalog. If you do not want the volume in the dependent catalog, delete all the dependent catalogs that contain the volume. Then, remove the volume from the reference catalog. Now the dependent catalogs can be created from the reference catalog again. Finally, add the volume back into the reference catalog.
3.4.5 Deleting a shadowed catalogIn this section we explain the correct way to end catalog shadowing or delete a catalog that is shadowed, whether it is a reference catalog or a dependent catalog.
Remove Image Catalog Entry (RMVIMGCLGE) Type choices, press Enter. Image catalog . . . . . . . . . > NIGHTLY Name Image catalog index . . . . . . > *VOL 1-256, *VOL Image catalog volume . . . . . . > VOL007 Keep image file . . . . . . . . > *NO *YES, *NO Bottom F3=Exit F4=Prompt F5=Refresh F12=Cancel F13=How to use this display F24=More keys
Note: If the image file was added after the dependent catalogs were created, the dependent catalogs will not contain the volume. Therefore, the dependent catalogs do not have to be deleted.
Chapter 3. Implementing virtual tape storage 135

Ending catalog shadowingCatalog shadowing can be ended by deleting all dependent image catalogs, as explained here.
Deleting a dependent catalogYou can identify and delete a reference catalog’s dependents by following these steps.
In IBM ̂iSeries Navigator, select Configuration and Service → Hardware → Tape Devices → Tape Image Catalogs. Your dependent catalogs will have their reference catalog listed under the Reference Catalog field.
Ensure that the dependent catalog’s status is Unloaded. If it is not, right-click the dependent catalog and select Unload Image Catalog. Then right-click the dependent catalog, select Delete Image Catalog, and click OK, as shown in Figure 3-94.
Repeat these steps for all dependent catalogs.
Figure 3-94 Delete dependent catalog through Navigator
If deleting from a 5250 emulation session, issue the WRKIMGCLG command and then press Enter. Press F11, then press F11 again.
Next, identify the dependent catalog’s reference catalog by the second field Reference Catalog, and press F11 again.
If the dependent catalog is in a status of Not Ready, then enter 4 (Delete) next to the dependent catalog and press Enter to delete it.
If the dependent catalog is in a status of Ready, then enter 9 (Unload) next to the dependent catalog and press Enter twice. This unloads the image catalog from the virtual tape device.
136 i5/OS V5R4 Virtual Tape: A Guide to Planning and Implementation

Now you can enter 4 next to the dependent catalog and then press Enter to delete it.
Figure 3-95 shows the WRKIMGCLG window after F11 has been pressed twice.
Figure 3-95 Identifying dependents through 5250 emulation
A dependent catalog can also be deleted by issuing the following command:
DLTIMGCLG IMGCLG(DEPENDENT2)
Deleting a reference catalogA reference catalog cannot be deleted unless all dependent catalogs are deleted. For this reason, you can manually delete the dependent catalogs first and then delete the reference image catalog, or you can delete the reference and all of its dependent image catalogs at the same time.
In IBM ̂iSeries Navigator, select Configuration and Service → Hardware → Tape Devices → Tape Image Catalogs. Ensure that the status of your reference and dependent catalogs is shown as Unavailable.
Next, right-click your reference catalog and select Delete Image Catalog, as shown in Figure 3-96 on page 138.
Work with Image Catalogs System: RCHITSO Type options, press Enter. 1=Create 2=Change 4=Delete 8=Load 9=Unload 10=Verify 12=Work with entries Image Reference Catalog Opt Catalog Catalog Relationship BBTEST DEPENDENT1 NIGHTLY Dependent DEPENDXX REFERENCE Dependent DEPEND99 REFERENCE Dependent DUPLICATE JAPCATALOG JJPTAP NIGHTLY Reference REFERENCE Reference VRTTAPE V5R4_450 More... F3=Exit F5=Refresh F11=View status F12=Cancel
Chapter 3. Implementing virtual tape storage 137

Figure 3-96 Delete reference catalog through Navigator
To delete dependent catalogs, select Yes, and then click OK, as shown in Figure 3-97.
Figure 3-97 Delete catalog options through Navigator
In a 5250 emulation session, issue the following command:
DLTIMGCLG IMGCLG(NIGHTLY) KEEP(*NO) DEPIMGCLG(*DELETE)
Figure 3-98 on page 139 shows the corresponding window.
138 i5/OS V5R4 Virtual Tape: A Guide to Planning and Implementation

Figure 3-98 Deleting an image catalog through 5250 emulation
Delete Image Catalog (DLTIMGCLG) Type choices, press Enter. Image catalog . . . . . . . . . > NIGHTLY Name Keep image files . . . . . . . . > *NO *YES, *NO Dependent image catalogs . . . . > *DELETE *NODELETE, *DELETE Bottom F3=Exit F4=Prompt F5=Refresh F12=Cancel F13=How to use this display F24=More keys
Note: KEEP(*NO) will delete the actual image files. If you wish to keep the image files and delete only the image catalog objects (type of *IMGCLG), leave KEEP as the default of *YES.
Chapter 3. Implementing virtual tape storage 139

140 i5/OS V5R4 Virtual Tape: A Guide to Planning and Implementation

Chapter 4. Multiple virtual tape scenarios
In this chapter we provide a number of scenarios that serve as examples of ways to use virtual tape support. However, these are not the only ways this support can be used, and you will undoubtedly find others. The most useful characteristic of this support is that it is virtual and therefore you can experiment with it, provided you have i5/OS V5R4 installed.
We also explain here how to perform nightly backups using virtual tape, and describe BRMS parallel backup (parallel-parallel and parallel-serial) and SAVSYS using virtual tape.
4
© Copyright IBM Corp. 2006. All rights reserved. 141

4.1 Nightly backup using virtual tapeIn this scenario we perform a daily nightly backup to virtual tape using the i5/OS function Go Backup. Go Backup is a user-friendly interface that assists you in setting up a backup plan using menus.
If you are already using this function, there are several benefits in using virtual tape in a Go Backup environment:
� No more failed backups due to a wrongly loaded volume
Many user-written backup applications, including Go Backup, require a specific volume name. You can change that to allow any volume to be loaded. However, that can lead to volumes with active data being overwritten.
� No manual operator mounts required during the nightly backup
In many situations, the physical tape drive is a Quarter Inch Cartridge (QIC) using volumes with a small capacity. An operator intervention may be required to mount the next volume, or you may already have modified the backup list to a minimum list in order to get it to fit in one volume. With virtual tape, this is not a concern.
� No failed backups due to media errors
� There is no need to schedule the backup on a time stamp when the physical tape drive is available as the is no real device sharing.
Today, there are many i5 systems with two or more partitions using the same physical tape drive that is attached to each partition on a scheduled move basis. With virtual tape, you can create up to 35 virtual tape devices per partition.
4.1.1 Preparing for nightly backupThis section summarizes the steps involved in setting up the environment for virtual tape as used in this scenario. If you have already set up one or more items, you can skip that step.
To create the virtual device and varying it, enter the following commands:
CRTDEVTAP DEVD(TAPVRT01) RSRCNAME(*VRT)VRYCFG CFGOBJ(TAPVRT01) CFGTYPE(*DEV) STATUS(*ON)
To create the image catalog, enter the following command:
CRTIMGCLG IMGCLG(CATALOG01) DIR('/MyCatalogDirectory01') TYPE(*TAP)
To add the image catalog entries, enter the following commands:
142 i5/OS V5R4 Virtual Tape: A Guide to Planning and Implementation

ADDIMGCLGE IMGCLG(CATALOG01) FROMFILE(*NEW) TOFILE(VRT001) IMGSIZ(8000) ALCSTG(*IMGSIZ) VOLNAM(VRT001) DENSITY(*VRT256K)
To load the image catalog, enter the following command:
LODIMGCLG IMGCLG(CATALOG01) DEV(TAPVRT01)
4.1.2 Performing the nightly backupIn the i5/OS command line, enter the following command:
GO BACKUP
Press Enter. A window similar to the one shown in Figure 4-41 appears.
Figure 4-1 Go backup
In the command line, type option 10 and press Enter. Figure 4-42 shows the Set Up Backup window.
BACKUP Backup Tasks System: RCHAS08 To select one of the following, type its number below and press Enter: 1. Run backup 2. Display backup status 10. Set up backup 20. Initialize a tape 21. Initialize a tape set Type a menu option below
Chapter 4. Multiple virtual tape scenarios 143

Figure 4-2 Set up backup
In the field Type a menu option below, type 1 and press Enter.
Then change the existing values to match your virtual tape environment, as shown in the following figures.
Figure 4-3 Change daily backup options - 1
SETUPBCKUP Set Up Backup System: RCHAS08 To select one of the following, type its number below and press Enter: 1. Change daily backup options 2. Change weekly backup options 3. Change monthly backup options 10. Change library backup list 11. Change folder backup list 20. Change backup schedule
Change Daily Backup Options System: RCHAS08 Type choices below, then press Enter. Where to back up: Backup device . . . . . . . . . . . . . TAPVRT06 Name, F4 for list Tape sets to rotate . . . . . . . . . . *ANY Name, *ANY Erase tape before backup . . . . . . . . Y Y=Yes, N=No More...
144 i5/OS V5R4 Virtual Tape: A Guide to Planning and Implementation

Figure 4-4 Change backup options - 2
Change Daily Backup Options System: RCHAS08 Type choices below, then press Enter. What to back up: User libraries . . . . . . . . . . . . . 1 1=Selected from list 2=All 3=None Folders . . . . . . . . . . . . . . . . 2 1=Selected from list 2=All 3=None User directories . . . . . . . . . . . . 2 2=All 3=None Security data . . . . . . . . . . . . . N Y=Yes, N=No Configuration . . . . . . . . . . . . . N Y=Yes, N=No How to back up: Save changed objects only . . . . . . . N Y=Yes, N=No Submit backup as a batch job . . . . . . Y Y=Yes, N=No Print detailed report . . . . . . . . . Y Y=Yes, N=No Bottom
Chapter 4. Multiple virtual tape scenarios 145

Figure 4-5 Change library backup list
Figure 4-5 shows the Change Library Backup window.
Change Library Backup List System: RCHAS08 Find library . . . . . . Starting characters Type options below, then press Enter. 2=Change backup 5=Display library contents 8=Display details -----------Backup----------- Last Opt Library Daily Weekly Monthly Backup Changed QDSNX Yes Yes Yes 12/05/05 No QGPL Yes Yes Yes 12/08/05 Yes QMGTC Yes Yes Yes 12/05/05 Yes QMGTC2 Yes Yes Yes 12/05/05 Yes QMPGDATA Yes Yes Yes Yes QPFRDATA Yes Yes Yes 12/05/05 Yes QRCL Yes Yes Yes 12/05/05 Yes QSRVAGT Yes Yes Yes 12/05/05 Yes QSYS2 Yes Yes Yes 12/05/05 Yes QUSRBRM Yes Yes Yes Yes QUSRDIRDB Yes Yes Yes 12/05/05 Yes More...
146 i5/OS V5R4 Virtual Tape: A Guide to Planning and Implementation

Figure 4-6 Change the backup schedule
Figure 4-6 shows the Change Backup Schedule window.
Change Backup Schedule Type choices below, then press Enter. Press F4 for list of backups. Run backup using this schedule . . . . . . Y Y=Yes, N=No Backup Backup Time Sunday . . . . . . . . Monday . . . . . . . . Tuesday . . . . . . . . Wednesday . . . . . . . *DAILY 23:00:00 Thursday . . . . . . . Friday . . . . . . . . Saturday . . . . . . . Occurrence of day in month to run monthly backup . . . . . . . . . . . . . . . . . 1-4, *LAST Hours before backup to send load tape message . . . . . . . . . . . . . . . . *NOMSG 1-24, *NOMSG
Chapter 4. Multiple virtual tape scenarios 147

Figure 4-7 Display the backup status
Figure 4-7 shows the Display the Backup Status window.
4.2 BRMS parallel backupThis section discusses two BRMS parallel backup scenarios: parallel-parallel and parallel-serial. The difference between these two types of parallel saves is as follows:
� In parallel-parallel, objects are spread across the drives. Objects of library A will be saved on drive 1 and 2, and objects of library B will be saved on drive 1 and 2, and so on.
� In parallel-serial, the libraries are spread across the drives, but not the objects in it. For example, library A will be saved to drive 1 and library B to drive 2, and so on.
For restoring the parallel backups, you require enough drives to achieve an acceptable restore performance. From a purely technical viewpoint, it is possible to restore both types of parallel backups using a media with one drive, or just one
Display Backup Status RCHAS08 12/14/05 19:14:35 Last Backup Tape What Was Backed Up Date Set User libraries: All . . . . . . . . . . . . . . . . . : All (changes only) . . . . . . . . . . : From list . . . . . . . . . . . . . . : From list (changes only) . . . . . . . : Folders: All . . . . . . . . . . . . . . . . . : All (changes only) . . . . . . . . . . : From list . . . . . . . . . . . . . . : User directories: All . . . . . . . . . . . . . . . . . : All (changes only) . . . . . . . . . . : Security data . . . . . . . . . . . . . : Configuration . . . . . . . . . . . . . : More...
148 i5/OS V5R4 Virtual Tape: A Guide to Planning and Implementation

physical drive. From a practical viewpoint, however, this is a time-consuming restore since it results in excessive swapping of mounted volumes.
Note: The intention of both parallel scenarios is to show the technical details related to virtual tape in BRMS. However, keep in mind that parallel-parallel is designed for large libraries and objects. On systems with many small libraries or objects, it will perform worse than, for example, concurrent backups, which are backups running at the same time, saving different types of objects.
4.2.1 Parallel-parallel scenarioThis section describes a scenario with true parallel backup (parallel-parallel).
The parallel backup is performed against two data libraries belonging to a specific application, with each library having three large files of about 1.3 GB. This is a total of 8 GB for both libraries.
The backup will be performed in true parallel with two virtual drives. After the backup is finished, the volumes will be duplicated to physical volumes.
In this scenario, we assume that you have two physical drives supporting 256 K blocksizes or a media library with at least two drives available, supporting 256 K blocksizes. If you have only one drive, it is possible to duplicate the volumes one at a time on one drive. However, for restore, we recommend you use two physical drives.
Preparing for parallel backupThis section summarizes the steps involved in setting up the environment for virtual tape in BRMS, as used in this scenario. If you have already set up one or more items, you can skip that step.
� To create the virtual devices and vary them, enter the following commands:
CRTDEVTAP DEVD(TAPVRT01) RSRCNAME(*VRT)CRTDEVTAP DEVD(TAPVRT02) RSRCNAME(*VRT)VRYCFG CFGOBJ(TAPVRT01) CFGTYPE(*DEV) STATUS(*ON)VRYCFG CFGOBJ(TAPVRT02) CFGTYPE(*DEV) STATUS(*ON)
� To create image catalogs, enter the following commands:
CRTIMGCLG IMGCLG(CATALOG01) DIR('/MyCatalogDirectory01') TYPE(*TAP)CRTIMGCLG IMGCLG(CATALOG02) DIR('/MyCatalogDirectory02') TYPE(*TAP)
� To add the image catalog entries, enter the following command:
ADDIMGCLGE IMGCLG(CATALOG01) FROMFILE(*NEW) TOFILE(VIR001) VOLNAM(VIR001) DENSITY(*VRT256K)
� To add additional images, enter the following commands:
Chapter 4. Multiple virtual tape scenarios 149

ADDIMGCLGE IMGCLG(CATALOG02) FROMFILE(*NEW) TOFILE(VIR002) VOLNAM(VIR002) DENSITY(*VRT256K)
� To create locations VIRTUAL, COPIED, and VAULT, type the following command and press Enter:
WRKLOCBRM
Now add the following locations, as described in 3.1, “Setting up virtual tape storage” on page 34:
– VIRTUAL
– COPIED, Change Allow volumes to expire to *YES.
� To create virtual devices TAPVRT01 and TAPVRT02, enter the following command and press Enter:
WRKDEBRM
Add the following devices:
– TAPVRT01, Next volume message should be *NO, change Location to VIRTUAL
– TAPVRT02, Next volume message should be *NO, change Location to VIRTUAL
� To create two physical devices, or a tape library with at least two drives
Refer to 4.2.1, “Parallel-parallel scenario” on page 149 for information about this topic.
� To create media classes VRT256K and FMT3590H
If you have another type of physical device, you can create or specify your own media class compatible with your device. In this case, since both media classes are already on the system, they do not have to be created.
� To create move policies TO_OUTDOOR and TO_COPIED, type the following command and press Enter:
WRKPCYBRM *MOV
Add the following locations:
– TO_COPIED
• Home location VIRTUAL• Verify moves *NO• Seq 10• Location COPIED• Duration *EXP
– TO_OUTDOOR
• Home location *HOME
150 i5/OS V5R4 Virtual Tape: A Guide to Planning and Implementation

• Seq 10• Location VAULT• Duration *EXP
� To create media policy VIRTUAL and FMT3590H, or another media class if you are using another device type and another media class, type the following command and press Enter:
WRKPCYBRM *MED
Add the following media policies:
– VIRTUAL
• Retention type 2• Retain media 4• Move policy TO_COPIED• Media class VRT256K• Mark volumes for duplication *YES.
– FMT3590H
• Retention type 2• Retain media 10• Move policy TO_OUTDOOR• Media class *FMT3590H
Backup This section provides information about creating and using a control group named APPLIC01.
To create the backup control group, perform the following tasks:
1. Type the following command:
WRKCTLGBRM
Then press Enter.
2. Select 1 in the Opt column, and in the Control Group column type APPLIC01, then press Enter.
3. Specify your large libraries in the window shown in Figure 4-48 on page 184, in place sequences 20 and 30.
Chapter 4. Multiple virtual tape scenarios 151

Figure 4-8 Create backup control group APPLIC01
4. Then press Enter, F3, and Enter again. This will take you back to the Work With Backup Control Groups window.
5. Type 8 in front of control group APPLIC01 and press Enter.
6. Change the options as shown in Figure 4-9 on page 153 and press Enter.
Create Backup Control Group Entries RCHAS08
Group . . . . . . . . . . : APPLIC01 Default activity . . . . . FFFFFFF Text . . . . . . . . . . . *NONE Type information, press Enter. Auxiliary Weekly Retain Save SWA Backup List Storage Activity Object While Message Seq Items Type Pool Device SMTWTFS Detail Active Queue 10 *EXIT *DFTACT 20 DATALIB01 *SYSBAS *DFTACT *YES *NO
30 DATALIB02 *SYSBAS *DFTACT *YES *NO 40 *EXIT *DFTACT
152 i5/OS V5R4 Virtual Tape: A Guide to Planning and Implementation

Figure 4-9 Change backup control group attributes
Notice that we specified two virtual backup devices in this case. However, you can also use *MEDCLS, in which case up to 32 virtual devices can be used.
7. The control group is created and you can submit the backup. To submit the backup, type the following command:
STRBKUBRM CTLGRP(APPLIC01)
8. The backup will now be submitted. Once the backup is completed, enter the following command:
WRKMEDBRM
9. Scroll down virtual volumes, and a window similar to the one illustrated in Figure 4-10 on page 154 will be shown.
Change Backup Control Group Attributes Group . . . . . . . . . . . . . . . . : DAILY Type information, press Enter. Media policy for: Full backups . . . . . . . . . . . . . VIRTUAL Name, F4 for list Incremental backups . . . . . . . . . VIRTUAL Name, F4 for list Backup devices . . . . . . . . . . . . . TAPVRT01 Name, F4 for list TAPVRT02 Parallel device resources: Minimum resources . . . . . . . . . . 2 1-32, *NONE, *AVAIL Maximum resources . . . . . . . . . . 2 1-32, *AVAIL, *MIN Sign off interactive users . . . . . . . *NO *YES, *NO, *BKUPCY Sign off limit . . . . . . . . . . . . . *BKUPCY 0-999 minutes, *BKUPCY Default weekly activity . . . . . . . . *BKUPCY SMTWTFS(F/I), *BKUPCY Incremental type . . . . . . . . . . . . *BKUPCY *CUML, *INCR, *BKUPCY Force full backup days . . . . . . . . . *BKUPCY 0-365, *NOMAX, *BKUPCY More...
Chapter 4. Multiple virtual tape scenarios 153

Figure 4-10 Work with media showing virtual volumes used
Notice that Dup Sts is 1, which means that the volumes are marked for duplication, but are not duplicated yet.
10.Press F11 in the WRKMEDBRM window to view the Serial and Parallel set information, as shown in Figure 4-11.
Figure 4-11 WRKMEDBRM, F11 (volume system)
Notice that Parallel Set is *YES, which means that this is true parallel.
11.Now select option 6 in front of one of the PARxxx volumes and press Enter. A window similar to the one illustrated in Figure 4-12 on page 155 is shown.
Work With Media System: RCHAS08 Position to . . . . . Starting characters Type options, press Enter. 1=Add 2=Change 4=Remove 5=Display 6=Work with serial set 7=Expire 8=Move 10=Reinitialize ... Volume Creation Expiration Move Media Dup Opt Serial Expired Date Date Location Date Class Sts PAR001 + 12/08/05 12/12/05 VIRTUAL *NONE VRT256K 1 PAR002 + 12/08/05 12/12/05 VIRTUAL *NONE VRT256K 1 PAR003 + 12/08/05 12/12/05 VIRTUAL *NONE VRT256K 1 PAR004 + 12/08/05 12/12/05 VIRTUAL *NONE VRT256K 1 VIR001 + 12/08/05 12/12/05 VIRTUAL *NONE VRT256K 1 VIR002 + 12/08/05 12/12/05 VIRTUAL *NONE VRT256K 1 VIR003 + 12/08/05 12/12/05 VIRTUAL *NONE VRT256K 1 More...
Volume Move Serial ParallelOpt Serial System Policy Set Set PAR001 + APPN.RCHAS08 TO_COPIED *YES *YES PAR002 + APPN.RCHAS08 TO_COPIED *YES *YES PAR003 + APPN.RCHAS08 TO_COPIED *YES *YES PAR004 + APPN.RCHAS08 TO_COPIED *YES *YES VIR001 + APPN.RCHAS08 TO_COPIED *YES *YES VIR002 + APPN.RCHAS08 TO_COPIED *YES *YES VIR003 + APPN.RCHAS08 TO_COPIED *YES *YES
154 i5/OS V5R4 Virtual Tape: A Guide to Planning and Implementation

Figure 4-12 Work with serial set of volume PAR002
12.Next, select option 6 in front of one of the VIRxxx volumes and press Enter. A window similar to the one illustrated in Figure 4-13 is shown.
Figure 4-13 Work with serial set for volume VIR004
This shows all the volumes in the set. In this parallel backup scenario, there are two sets.
13.To check the space used by the virtual volumes, type the following command:
WRKIMGCLG
Then press Enter.
14.Now type 12 in front of image catalog01, and press Enter. A window similar to the one illustrated in Figure 4-14 is shown.
Figure 4-14 Work with image catalog entries of catalog01
15.Type the following command:
Volume Volume Expiration Move Media Dup Opt Serial Seq Expired Date Location Date Class Sts PAR004 0001 12/12/05 VIRTUAL *NONE VRT256K 1 PAR001 0002 12/12/05 VIRTUAL *NONE VRT256K 1 PAR002 0003 12/12/05 VIRTUAL *NONE VRT256K 1 PAR003 0004 12/12/05 VIRTUAL *NONE VRT256K 1
Volume Volume Expiration Move Media DupOpt Serial Seq Expired Date Location Date Class Sts VIR004 0001 12/12/05 VIRTUAL *NONE VRT256K 1 VIR001 0002 12/12/05 VIRTUAL *NONE VRT256K 1 VIR002 0003 12/12/05 VIRTUAL *NONE VRT256K 1 VIR003 0004 12/12/05 VIRTUAL *NONE VRT256K 1
Maximum PercentOpt Index Status Volume Name Size Used *AVAIL 1 Loaded VIR001 1000 99.8 2 Loaded VIR002 1000 99.8 3 Mounted VIR003 1000 64.1 4 Loaded VIR004 1000 99.8
Chapter 4. Multiple virtual tape scenarios 155

WRKIMGCLG
Then press Enter.
16.Type 12 in front of image catalog02, and press Enter. A window similar to the one illustrated in Figure 4-15 is shown.
Figure 4-15 Work with image catalog entries of catalog02
Duplicating the virtual volumesThe data that has been backed up remains on the system.
1. To duplicate the media to physical media, enter the following commands:
SBMJOB CMD(DUPMEDBRM VOL(VIR001) FROMDEV(TAPVRT01) TODEV(NET3590) MEDPCY(FMT3590H) FROMVOL(*SET) SAVMEDINF(*OBJ))
SBMJOB CMD(DUPMEDBRM VOL(PAR001) FROMDEV(TAPVRT02) TODEV(NET3590) MEDPCY(FMT3590H) FROMVOL(*SET) SAVMEDINF(*OBJ))
In this scenario, we submitted two jobs for duplicating the volume sets. The intention is to show that it is possible to duplicate more than one volume at the same time.
However, the subsystem in which the jobs run must to be capable of running two batch jobs at the same time. Another issue that has to be addressed is that, in this case, we have specified volume names for duplication. This is not known in most cases, unless you have a program that checks it.
If you want to schedule the DUPMEDBRM and do not know the volume names, use DUPMEDBRM VOL(*SEARCH), which requires one job.
2. After duplication is completed, go back to the Work with Media screen, type the following command:
WRKMEDBRM
Then press Enter, and a window similar to the one illustrated in Figure 4-16 on page 157 is shown.
Maximum Percent Opt Index Status Volume Name Size Used *AVAIL 1 Loaded PAR001 1000 99.8 2 Loaded PAR002 1000 99.8 3 Mounted PAR003 1000 98.4 4 Loaded PAR004 1000 99.8
156 i5/OS V5R4 Virtual Tape: A Guide to Planning and Implementation

Figure 4-16 Work with media after DUPMEDBRM.
Notice that the DupSts column shows * for the virtual volumes used for backup, which indicates that the volumes are successfully duplicated now.
3. Press F23 to show more options, and type 15 in front of one of the PARxxx volumes, then press Enter. A window similar to the one illustrated in Figure 4-17 is shown.
Figure 4-17 Display duplicate volumes for volume PAR002
4. Press F23 again to show more options, and type 15 in front of one of the VIRxxx volumes, then press Enter. A window similar to the one illustrated in Figure 4-18 on page 158 is shown.
Work With Media System: RHAS08Position to . . . . . Starting characters Type options, press Enter. 1=Add 2=Change 4=Remove 5=Display 6=Work with serial set 7=Expire 8=Move 10=Reinitialize ... Volume Creation Expiration Move Media Dup Opt Serial Expired Date Date Location Date Class Sts PAR001 + 12/08/05 12/12/05 VIRTUAL *NONE VRT256K * PAR002 + 12/08/05 12/12/05 VIRTUAL *NONE VRT256K * PAR003 + 12/08/05 12/12/05 VIRTUAL *NONE VRT256K * PAR004 + 12/08/05 12/12/05 VIRTUAL *NONE VRT256K * VIR001 + 12/08/05 12/12/05 VIRTUAL *NONE VRT256K * VIR002 + 12/08/05 12/12/05 VIRTUAL *NONE VRT256K * VIR003 + 12/08/05 12/12/05 VIRTUAL *NONE VRT256K * More...
Display Duplication Cross Reference RCHAS08 Volume Volume Expiration --- Duplication --- --- Last entry ---Type Serial Seq Date Date Time Date Time *INP PAR004 1 12/12/05 12/08/05 16:16:11 12/08/05 16:00:21*INP PAR001 2 12/12/05 12/08/05 16:16:11 12/08/05 16:00:22*INP PAR002 3 12/12/05 12/08/05 16:16:11 12/08/05 16:00:22*INP PAR003 4 12/12/05 12/08/05 16:16:11 12/08/05 16:00:22*OUT SAM276 1 12/18/05 12/08/05 16:16:11 12/08/05 16:00:22
Chapter 4. Multiple virtual tape scenarios 157

Figure 4-18 Display duplicate volumes for volume VIR003
Moving the volumesAt this point, the volumes are duplicated and now have to be moved. The physical volumes must be moved to bring the data to a save offsite place (VAULT), and the virtual volumes should be moved to a location where they can expire.
In this scenario, for virtual volumes, locations are set up and policies moved in such a way that data will not be lost if duplication is not performed within the retention days as specified in the media policy.
To move the volumes, enter the following commands:
MOVMEDBRM MOVPCY(TO_OUTDOOR)MOVMEDBRM MOVPCY(TO_COPIED)
The data is saved now and the virtual volumes can be reused once they are expired.
Recovery using the parallel backupNow assume that you want to restore the libraries of the application that was saved in this scenario.
To determine which volumes are needed and what the steps are for restoring the libraries, you have to create a recovery report first.
Type the following command:
STRRCYBRM OPTION(*CTLGRP) ACTION(*REPORT) CTLGRP((APPLIC01))
Two reports will be generated now, with spooled file names QP1ARCY and QP1A2RCY. QP1ARCY is a full recovery report, describing every step required to recover the specified items. QP1ARCY is a Recovery Volume Summary Report,
Display Duplication Cross Reference RCHAS08 Volume Volume Expiration --- Duplication --- --- Last entry --- Type Serial Seq Date Date Time Date Time *INP VIR004 1 12/12/05 12/08/05 16:15:56 12/08/05 16:00:21 *INP VIR001 2 12/12/05 12/08/05 16:15:56 12/08/05 16:00:22 *INP VIR002 3 12/12/05 12/08/05 16:15:56 12/08/05 16:00:22 *INP VIR003 4 12/12/05 12/08/05 16:15:56 12/08/05 16:00:22 *OUT SAM275 1 12/18/05 12/08/05 16:15:56 12/08/05 16:00:22
158 i5/OS V5R4 Virtual Tape: A Guide to Planning and Implementation

which lists all the volumes required for recovering the items you specified. This report is shown in Figure 4-19.
Figure 4-19 Recovery volume summary report
Assume that the virtual volumes are still on the system and you have to recover the items as described. In that case use this command:
STRRCYBRM OPTION(*CTLGRP) ACTION(*REPORT) CTLGRP((APPLIC01)) USEDUPMED(*YES)
The Recovery Volume Summary Report will now look as shown in Figure 4-20.
Figure 4-20 Recovery volume summary report using duplicate media
However, this is still a report. For actual restore, as described in the full recovery report QP1A2RCY, type the following command:
STRRCYBRM OPTION(*CTLGRP) ACTION(*RESTORE) CTLGRP((APPLIC01))
Then press Enter. Figure 4-21 on page 160 shows a list of items you can select to restore.
5722BR1 V5R4M0 060210 Recovery Volume Summary Report Volume Media Creation Expiration Location Storage Serial Expired Class Date Date Date Location SAM275 FMT3590TMP 12/08/05 12/18/05 *NONE NET3590 Duplicate volume(s) . . . . . . : VIR004 SAM276 FMT3590TMP 12/08/05 12/18/05 *NONE NET3590 Duplicate volume(s) . . . . . . : PAR004
5722BR1 V5R4M0 060210 Recovery Volume Summary Report Volume Media Creation Expiration Location Storage Serial Expired Class Date Date Date Location PAR001 VRT256K 12/08/05 12/12/05 *NONE VIRTUAL Duplicate volume(s) . . . . . . : SAM276 PAR002 VRT256K 12/08/05 12/12/05 *NONE VIRTUAL PAR003 VRT256K 12/08/05 12/12/05 *NONE VIRTUAL PAR004 VRT256K 12/08/05 12/12/05 *NONE VIRTUAL VIR001 VRT256K 12/08/05 12/12/05 *NONE VIRTUAL Duplicate volume(s) . . . . . . : SAM275 VIR002 VRT256K 12/08/05 12/12/05 *NONE VIRTUAL VIR003 VRT256K 12/08/05 12/12/05 *NONE VIRTUAL VIR004 VRT256K 12/08/05 12/12/05 *NONE VIRTUAL Total volumes needed for recovery . . . . . . . . . . : 8
Chapter 4. Multiple virtual tape scenarios 159

Figure 4-21 Select items for recovery using physical media (USEDUPMED(*NO)
If you still have virtual volumes on the system, use the following command:
STRRCYBRM OPTION(*CTLGRP) ACTION(*RESTORE) CTLGRP((APPLIC01)) USEDUPMED(*YES)
Figure 4-22 shows the list.
Figure 4-22 Select items for recovery using physical media (USEDUPMED(*YES)
You will see that the physical and virtual volumes are “switched” when the virtual volumes are duplicated to physical volumes. This happens only for virtual volumes and is logical, because the virtual volumes are supposed to be temporary and are supposed to be removed when they are duplicated.
Select Recovery Items RCHAS08 Select action . . . . . : *ALL Select volume . . . . . : Type options, press Enter. 1=Select 4=Remove 5=Display 7=Specify object Saved Save Save Save Parallel Volume File Expire Opt Item Date Time Type Devices Serial Sequence Date DATALIB01 12/08/05 16:00:21 *FULL 2 SAM275 1 12/18/05 DATALIB02 12/08/05 16:00:22 *FULL 2 SAM275 2 12/18/05
Select Recovery Items RCHAS08 Select action . . . . . : *ALL Select volume . . . . . : Type options, press Enter. 1=Select 4=Remove 5=Display 7=Specify object Saved Save Save Save Parallel Volume File Expire Opt Item Date Time Type Devices Serial Sequence Date DATALIB01 12/08/05 16:00:21 *FULL 2 VIR004 + 1 12/12/05 DATALIB02 12/08/05 16:00:22 *FULL 2 VIR001 + 2 12/12/05
Note: After a volume or set of volumes is duplicated to physical media, the volumes on the recovery report will be “switched” in order to reflect the physical volumes on the recovery report. However, this happens only once. In case of subsequent duplicates of the same volume set, the recovery report will show the first copied physical volume.
160 i5/OS V5R4 Virtual Tape: A Guide to Planning and Implementation

4.2.2 Parallel-serial backupThis section discusses a parallel-serial backup scenario. Parallel backups are performed on two or more drives, in which the libraries are spread across the drives, but not the objects.
Follow the steps outlined in “Preparing for parallel backup” on page 149 for initial preparation. The parallel backup described in this section will be performed for a *ALLUSR backup. No save while active will be used in this case. *ALLUSR can only be saved in parallel-serial, and not in parallel-parallel.
The same environment, drives, locations, policies, and so on described in “Preparing for parallel backup” on page 149, will be used in this scenario too. Only the save items in the control group will be different.
BackupThis section provides information about creating and using a control group named DAILY.
To create the backup control group, perform the following tasks:
1. Enter the following command:
WRKCTLGBRM
Then press Enter.
2. Select 1 in the Opt column in the Control Group column type DAILY and press Enter.
3. Specify the same sequences, as shown in Figure 4-23 on page 162.
Chapter 4. Multiple virtual tape scenarios 161

Figure 4-23 Create backup control group DAILY
4. Press Enter, then press F3, and Enter again. This will take you back to the Work With Control Groups window.
5. Type 8 in front of control group DAILY and press Enter.
6. Change the options as shown in Figure 4-24 on page 163 and press Enter.
Create Backup Control Group Entries RCHAS08 Group . . . . . . . . . . : DAILY Default activity . . . . . *BKUPCY Text . . . . . . . . . . . *NONE Type information, press Enter. Auxiliary Weekly Retain Save SWA Backup List Storage Activity Object While Message Seq Items Type Pool Device SMTWTFS Detail Active Queue 10 *EXIT *DFTACT 20 *ALLUSR *SYSBAS *DFTACT *YES *NO 30 *EXIT *DFTACT
162 i5/OS V5R4 Virtual Tape: A Guide to Planning and Implementation

Figure 4-24 Change backup control group attributes
Notice that we specified two virtual backup devices in this case. However, you can also use *MEDCLS, in which case up to 32 virtual devices can be used.
7. The new control group DAILY is now created. It can now be submitted for backup. Type the following command:
STRBKUBRM CTLGRP(DAILY)
8. The backup is submitted. Once the backup is completed, enter the following command:
WRKMEDBRM
9. Scroll down the page to the virtual volumes. A window similar to the one illustrated in Figure 4-25 on page 164 is shown.
Change Backup Control Group Attributes Group . . . . . . . . . . . . . . . . : DAILY Type information, press Enter. Media policy for: Full backups . . . . . . . . . . . . . VIRTUAL Name, F4 for list Incremental backups . . . . . . . . . VIRTUAL Name, F4 for list Backup devices . . . . . . . . . . . . . TAPVRT01 Name, F4 for list TAPVRT02 Parallel device resources: Minimum resources . . . . . . . . . . 2 1-32, *NONE, *AVAIL Maximum resources . . . . . . . . . . 2 1-32, *AVAIL, *MIN Sign off interactive users . . . . . . . *NO *YES, *NO, *BKUPCY Sign off limit . . . . . . . . . . . . . *BKUPCY 0-999 minutes, *BKUPCY Default weekly activity . . . . . . . . *BKUPCY SMTWTFS(F/I), *BKUPCY Incremental type . . . . . . . . . . . . *BKUPCY *CUML, *INCR, *BKUPCY Force full backup days . . . . . . . . . *BKUPCY 0-365, *NOMAX, *BKUPCY More...
Chapter 4. Multiple virtual tape scenarios 163

Figure 4-25 Work with media showing virtual volumes used for DAILY backup
10.Scroll down the page to view the next window illustrated in Figure 4-26, which shows the other virtual volumes used.
Figure 4-26 Work with media showing other virtual volumes
Work With Media System: RCHAS08 Position to . . . . . Starting characters Type options, press Enter. 1=Add 2=Change 4=Remove 5=Display 6=Work with serial set 7=Expire 8=Move 10=Reinitialize ... Volume Creation Expiration Move Media Dup Opt Serial Expired Date Date Location Date Class Sts PAR001 *YES 12/05/05 12/05/05 VIRTUAL 12/05/05 VRT256K PAR002 *YES 12/05/05 *NONE VIRTUAL 12/05/05 VRT256K PAR003 *YES 12/05/05 12/05/05 VIRTUAL 12/05/05 VRT256K PAR004 *YES 12/05/05 12/05/05 VIRTUAL 12/05/05 VRT256K PAR005 + 12/05/05 12/09/05 VIRTUAL 12/05/05 VRT256K 1 PAR006 + 12/05/05 12/09/05 VIRTUAL 12/05/05 VRT256K 1 VIR001 *YES 12/05/05 12/05/05 VIRTUAL 12/05/05 VRT256K More...
Work With Media System: RCHAS08Position to . . . . . Starting characters Type options, press Enter. 1=Add 2=Change 4=Remove 5=Display 6=Work with serial set 7=Expire 8=Move 10=Reinitialize ... Volume Creation Expiration Move Media Dup Opt Serial Expired Date Date Location Date Class Sts VIR002 *YES 12/05/05 *NONE VIRTUAL 12/05/05 VRT256K VIR003 + 12/05/05 12/09/05 VIRTUAL 12/05/05 VRT256K 1 VIR004 + 12/05/05 12/09/05 VIRTUAL 12/05/05 VRT256K 1 VIR005 + 12/05/05 12/09/05 VIRTUAL 12/05/05 VRT256K 1 VIR006 + 12/05/05 12/09/05 VIRTUAL 12/05/05 VRT256K 1 Bottom
164 i5/OS V5R4 Virtual Tape: A Guide to Planning and Implementation

You will see that PAR005, PAR006, VIR003, VIR004, VIR005, and VIR006 are used for the backup. The DupSts is 1, which means that the volumes are marked for duplication, but are not duplicated yet.
11.Press F11 to view the Serial and Parallel set information shown in Figure 4-27.
Figure 4-27 WRKMEDBRM, F11 (volume system)
12.Scroll down the page to view the next screen showing the other virtual volumes used; see Figure 4-28 on page 166.
Work With Media System: RCHAS08
Position to . . . . . Starting characters Type options, press Enter. 1=Add 2=Change 4=Remove 5=Display 6=Work with serial set 7=Expire 8=Move 10=Reinitialize ... Volume Move Serial Parallel Opt Serial System Policy Set Set PAR001 APPN.RCHAS08 TO_COPIED *NO *NO PAR002 APPN.RCHAS08 *NONE *NO *NO PAR003 APPN.RCHAS08 TO_COPIED *NO *NO PAR004 APPN.RCHAS08 TO_COPIED *NO *NO PAR005 + APPN.RCHAS08 TO_COPIED *YES *NO PAR006 + APPN.RCHAS08 TO_COPIED *YES *NO VIR001 APPN.RCHAS08 TO_COPIED *NO *NO More...
Chapter 4. Multiple virtual tape scenarios 165

Figure 4-28 WRKMEDBRM, F11 (Volume system) next screen
As indicated in the Parallel Set column, this is not parallel-parallel (true parallel), but rather parallel-serial.
13.Select option 6 in front of one of the PARxxx volumes and press Enter. Figure 4-29 is displayed.
Figure 4-29 Work with serial set of volume PAR005
14.Now select option 6 in front of one of the VIRxxx volumes, and press Enter. This displays a window similar to the one shown in Figure 4-30.
Work With Media System: RCHAS08 Position to . . . . . Starting characters Type options, press Enter. 1=Add 2=Change 4=Remove 5=Display 6=Work with serial set 7=Expire 8=Move 10=Reinitialize ... Volume Move Serial Parallel Opt Serial System Policy Set Set VIR002 APPN.RCHAS08 *NONE *NO *NO VIR003 + APPN.RCHAS08 TO_COPY *YES *NO VIR004 + APPN.RCHAS08 TO_COPY *YES *NO VIR005 + APPN.RCHAS08 TO_COPY *YES *NO VIR006 + APPN.RCHAS08 TO_COPY *YES *NO Bottom
Volume Volume Expiration Move Media Dup Opt Serial Seq Expired Date Location Date Class Sts PAR005 0001 12/09/05 VIRTUAL *NONE VRT256K 1 PAR006 0002 12/09/05 VIRTUAL *NONE VRT256K 1
166 i5/OS V5R4 Virtual Tape: A Guide to Planning and Implementation

Figure 4-30 Work with serial set for volume VIR004
This shows all the volumes in the set. Although this is parallel-serial, there are two sets as in parallel-parallel.
15.To view the space used by the virtual volumes, enter the following command:
WRKIMGCLG
Then press Enter.
16.Type 12 in front of image catalog01, and press Enter. This displays a window similar to Figure 4-31.
Figure 4-31 Work with image catalog entries of catalog01
17.Type the following command:
WRKIMGCLG
Then press Enter.
18.Type 12 in front of image catalog02, and press Enter. A window similar to the one shown in Figure 4-32 on page 168 is displayed.
Volume Volume Expiration Move Media DupOpt Serial Seq Expired Date Location Date Class Sts VIR003 0001 12/09/05 VIRTUAL *NONE VRT256K 1 VIR004 0002 12/09/05 VIRTUAL *NONE VRT256K 1 VIR005 0003 12/09/05 VIRTUAL *NONE VRT256K 1 VIR006 0004 12/09/05 VIRTUAL *NONE VRT256K 1
Maximum Percent Opt Index Status Volume Name Size Used *AVAIL 1 Loaded VRT001 1000 .1 2 Loaded VRT002 1000 .1 3 Loaded VRT003 1000 99.8 4 Loaded VRT004 1000 99.8 5 Loaded VRT005 1000 99.8 6 Mounted VRT006 1000 21.6 7 Loaded VRT007 1000 .0 More...
Chapter 4. Multiple virtual tape scenarios 167

Figure 4-32 Work with image catalog entries of catalog02
Duplicating the virtual volumesThe data that has been backed up is still available on the system. To duplicate the media to physical media, perform the following tasks:
1. Enter the following command:
SBMJOB CMD(DUPMEDBRM VOL(PAR005) FROMDEV(TAPVRT01) TODEV(NET3590) MEDPCY(FMT3590H) FROMVOL(*SET) SAVMEDINF(*OBJ))
SBMJOB CMD(DUPMEDBRM VOL(VIR003) FROMDEV(TAPVRT02) TODEV(NET3590) MEDPCY(FMT3590H) FROMVOL(*SET) SAVMEDINF(*OBJ))
The same command that was used for the parallel-parallel backup is used.
2. After duplication is complete, go back to the Work with Media window. Type the following command:
WRKMEDBRM
Then press Enter. This will display Figure 4-33 on page 169.
Maximum Percent Opt Index Status Volume Name Size Used *AVAIL 1 Loaded PAR001 1000 .1 2 Loaded PAR002 1000 .1 3 Loaded PAR003 1000 .1 4 Loaded PAR004 1000 .1 5 Loaded PAR005 1000 99.8 6 Mounted PAR006 1000 33.1 7 Loaded PAR007 1000 .0 More...
168 i5/OS V5R4 Virtual Tape: A Guide to Planning and Implementation

Figure 4-33 Work with media after DUPMEDBRM
3. Scroll down the page to the WRKMEDBRM window to see the other virtual volumes, as shown in Figure 4-34.
.
Figure 4-34 Next screen of work with media after DUPMEDBRM
Work With Media System: RCHAS08 Position to . . . . . Starting characters Type options, press Enter. 1=Add 2=Change 4=Remove 5=Display 6=Work with serial set 7=Expire 8=Move 10=Reinitialize ... Volume Creation Expiration Move Media Dup Opt Serial Expired Date Date Location Date Class Sts PAR001 *YES 12/05/05 12/05/05 VIRTUAL 12/05/05 VRT256K PAR002 *YES 12/05/05 *NONE VIRTUAL 12/05/05 VRT256K PAR003 *YES 12/05/05 12/05/05 VIRTUAL 12/05/05 VRT256K PAR004 *YES 12/05/05 12/05/05 VIRTUAL 12/05/05 VRT256K PAR005 + 12/05/05 12/09/05 VIRTUAL 12/05/05 VRT256K * PAR006 + 12/05/05 12/09/05 VIRTUAL 12/05/05 VRT256K * VIR001 *YES 12/05/05 12/05/05 VIRTUAL 12/05/05 VRT256K More...
Work With Media System: RCHAS08Position to . . . . . Starting characters Type options, press Enter. 1=Add 2=Change 4=Remove 5=Display 6=Work with serial set 7=Expire 8=Move 10=Reinitialize ... Volume Creation Expiration Move Media Dup Opt Serial Expired Date Date Location Date Class Sts VIR002 *YES 12/05/05 *NONE VIRTUAL 12/05/05 VRT256K VIR003 + 12/05/05 12/09/05 VIRTUAL 12/05/05 VRT256K * VIR004 + 12/05/05 12/09/05 VIRTUAL 12/05/05 VRT256K * VIR005 + 12/05/05 12/09/05 VIRTUAL 12/05/05 VRT256K * VIR006 + 12/05/05 12/09/05 VIRTUAL 12/05/05 VRT256K *
Chapter 4. Multiple virtual tape scenarios 169

You will see that the DupSts column shows * for the virtual volumes used for backup, which indicates that the volumes are successfully duplicated.
4. Press F23 to display more options, then type 15 in front of one of the PARxxx volumes and press Enter. The window in Figure 4-35 is shown.
Figure 4-35 Display duplicate volumes for volume PAR005
5. Press F23 again to display more options, then type 15 in front of one of the VIRxxx volumes and press Enter. The window in Figure 4-36 is shown.
Figure 4-36 Display duplicate volumes for volume VIR003.
Moving the volumesThe volumes are now duplicated and have to be moved. The physical volumes must be moved to bring the data to a save offsite place (VAULT) and the virtual volumes should be moved to a location where they can expire.
Set up the locations and move policies in this scenario for virtual volumes in such a way that data will not be lost if the duplication is not performed within the retention days as specified in the media policy.
To move volumes, enter the following commands:
Display Duplication Cross Reference RCHAS08 Volume Volume Expiration --- Duplication --- --- Last entry ---Type Serial Seq Date Date Time Date Time *INP PAR005 1 12/09/05 12/05/05 15:51:32 12/05/05 15:22:09*INP PAR006 2 12/09/05 12/05/05 15:51:32 12/05/05 15:22:08*OUT SAM223 1 12/15/05 12/05/05 15:51:32 12/05/05 15:22:09
Display Duplication Cross Reference RCHAS08 Volume Volume Expiration --- Duplication --- --- Last entry ---Type Serial Seq Date Date Time Date Time *INP VIR003 1 12/09/05 12/05/05 15:50:06 12/05/05 15:22:09*INP VIR004 2 12/09/05 12/05/05 15:50:06 12/05/05 15:22:08*INP VIR005 3 12/09/05 12/05/05 15:50:06 12/05/05 15:30:01*INP VIR006 4 12/09/05 12/05/05 15:50:06 12/05/05 15:30:35*OUT SAM220 1 12/15/05 12/05/05 15:50:06 12/05/05 15:30:35
170 i5/OS V5R4 Virtual Tape: A Guide to Planning and Implementation

MOVMEDBRM MOVPCY(TO_OUTDOOR)MOVMEDBRM MOVPCY(TO_COPIED)
The data is saved and the virtual volumes can be reused once they are expired.
Recovery using parallel backupAssume that you want to restore the libraries of the application you saved in this scenario. To determine which volumes are needed and what steps should be created for restoring the libraries, create a recovery report first.
Type the following command:
STRRCYBRM OPTION(*ALLUSR) ACTION(*REPORT)
Two reports will be generated, with the spooled file names QP1ARCY and QP1A2RCY. QP1ARCY is a full recovery report, describing every step required to recover the specified items. It is a Recovery Volume Summary Report, which lists all the volumes required for recovering the specified items. This report is shown in Figure 4-37.
Figure 4-37 Select items for recovery using physical media (USEDUPMED(*NO
Assume that the virtual volumes are still on the system and you have to recover the items as described. Use the following command:
STRRCYBRM OPTION(*ALLUSR) ACTION(*REPORT) USEDUPMED(*YES)
The Recovery Volume Summary Report will look as shown in Figure 4-38 on page 172.
5722BR1 V5R4M0 060210 Recovery Volume Summary Report RCHAS08 Volume Media Creation Expiration Location Storage Volume Serial Expired Class Date Date Date Location Slot SAM220 FMT3590TMP 12/05/05 12/15/05 *NONE NET3590 Duplicate volume(s) . . . . . . : VIR003 SAM223 FMT3590TMP 12/05/05 12/15/05 *NONE NET3590 Duplicate volume(s) . . . . . . : PAR005 Total volumes needed for recovery . . . . . . . . . . : 4
Chapter 4. Multiple virtual tape scenarios 171

Figure 4-38 Select items for recovery using physical media (USEDUPMED(*YES)
However, this is still a report. For carrying out an actual restore as described in the full recovery report QP1A2RCY, type the following command:
STRRCYBRM OPTION(*ALLUSR) ACTION(*RESTORE)
Then press Enter.
This displays a list of items you can select to restore, as shown in Figure 4-39 on page 173.
5722BR1 V5R4M0 060210 Recovery Volume Summary Report RCHAS08Volume Media Creation Expiration Location Storage Volume Serial Expired Class Date Date Date Location Slot PAR005 VRT256K 12/05/05 12/09/05 *NONE VIRTUAL 1 Duplicate volume(s) . . . . . . : SAM223 PAR006 VRT256K 12/05/05 12/09/05 *NONE VIRTUAL 5 VIR003 VRT256K 12/05/05 12/09/05 *NONE VIRTUAL 6 Duplicate volume(s) . . . . . . : SAM220 VIR004 VRT256K 12/05/05 12/09/05 *NONE VIRTUAL 7 VIR005 VRT256K 12/05/05 12/09/05 *NONE VIRTUAL 8 VIR006 VRT256K 12/05/05 12/09/05 *NONE VIRTUAL 18 Total volumes needed for recovery . . . . . . . . . . : 7
172 i5/OS V5R4 Virtual Tape: A Guide to Planning and Implementation

Figure 4-39 Start recovery BRM
You will see that this Select Recovery Items window has two new input fields in the upper right corner in V5R4. In releases prior to V5R4, all the items on this window could be selected by pressing F16, or they could be selected one by one.
In V5R4, although F16 can still select all the items, you can change the *ALL value in the upper right corner to *VOL to specify a specific volume, change it to *VOLSET for a volume set, or change it to *CLROPT to clear the selected options in the Opt column.
If you still have virtual volumes on the system, use the following command:
STRRCYBRM OPTION(*ALLUSR) ACTION(*RESTORE) USEDUPMED(*YES)
The list that was initially shown in Figure 4-22 on page 160 is now shown in Figure 4-40 on page 174.
Select Recovery Items RCHAS08
Select action . . . . . : *ALL Select volume . . . . . : Type options, press Enter. 1=Select 4=Remove 5=Display 7=Specify object
Saved Save Save Save Parallel Volume File Expire
Opt Item Date Time Type Devices Serial Sequence Date QDSNX 12/05/05 15:22:08 *FULL SAM220 24 12/15/05 QGPL 12/05/05 15:22:08 *FULL SAM220 3 12/15/05 QMGTC 12/05/05 15:22:08 *FULL SAM223 23 12/15/05 QMGTC2 12/05/05 15:22:08 *FULL SAM220 25 12/15/05 QPFRDATA 12/05/05 15:22:08 *FULL SAM223 24 12/15/05 QRCL 12/05/05 15:22:08 *FULL SAM223 25 12/15/05 QSRVAGT 12/05/05 15:22:08 *FULL SAM223 26 12/15/05 QSYS2 12/05/05 15:22:08 *FULL SAM220 2 12/15/05 QS36F 12/05/05 15:22:08 *FULL SAM223 27 12/15/05 QUSRDIRDB 12/05/05 15:22:08 *FULL SAM220 27 12/15/05 QUSRIJS 12/05/05 15:22:08 *FULL SAM220 28 12/15/05
More... F3=Exit F5=Refresh F9=Recovery defaults F11=Object View F12=Cancel F14=Submit to batch F16=Select
Chapter 4. Multiple virtual tape scenarios 173

Figure 4-40 Start recovery BRM using duplicated media
The physical and virtual volumes are “switched” when the virtual volumes are duplicated to physical volumes. This happens only for virtual volumes and is logical, since the virtual volumes are supposed to be temporary and are supposed to be removed when they are duplicated.
4.3 SAVSYS using virtual tapeIn case of a full system recovery, the first item to be installed or restored is System Licensed Internal Code (SLIC). This is saved with the SAVSYS command. The system must be in a restricted state for this.
Running the SAVSYS command not only performs a save of SLIC, but also saves base i5/OS, user profiles, and configuration data. The recommended frequency for SAVSYS depends on the changes that were performed on SLIC, i5/OS, configuration, or user profiles.
For SLIC and i5/OS, it depends on whether any PTFs have been applied since the last time SAVSYS was performed. If you have applied many PTFs, including cumulative PTF package or a group PTF, a new SAVSYS is recommended.
Select Recovery Items RCHAS08
Select action . . . . . : *ALL Select volume . . . . . : Type options, press Enter. 1=Select 4=Remove 5=Display 7=Specify object Saved Save Save Save Parallel Volume File Expire pt Item Date Time Type Devices Serial Sequence Date QDSNX 12/05/05 15:22:08 *FULL VIR004 24 12/09/05 QGPL 12/05/05 15:22:08 *FULL VIR003 3 12/09/05 QMGTC 12/05/05 15:22:08 *FULL PAR006 23 12/09/05 QMGTC2 12/05/05 15:22:08 *FULL VRT004 25 12/09/05 QPFRDATA 12/05/05 15:22:08 *FULL PAR006 24 12/09/05 QRCL 12/05/05 15:22:08 *FULL PAR006 25 12/09/05 QSRVAGT 12/05/05 15:22:08 *FULL PAR006 26 12/09/05 QSYS2 12/05/05 15:22:08 *FULL VIR003 2 12/09/05 QS36F 12/05/05 15:22:08 *FULL PAR006 27 12/09/05 QUSRDIRDB 12/05/05 15:22:08 *FULL VIR005 27 12/09/05 QUSRIJS 12/05/05 15:22:08 *FULL VIR005 28 12/09/05 More...
174 i5/OS V5R4 Virtual Tape: A Guide to Planning and Implementation

Today, many customers perform a SAVSYS once a month for SLIC, and one a week for configuration and user profiles. However, if there are numerous daily changes in user profiles, we recommend that user profiles be backed up on a daily basis.
In the scenario described here, a SAVSYS is performed from the command line. For the SAVSYS in this scenario, five volumes were created, with a maximum size of 1 GB each. For a small V5R4 system, about 4 GB is required for SAVSYS. However, in order to be sure, five volumes were created. The size required on your system may differ, for example, due to a large number of user profiles.
The physical tape device used in this example is on old type Quarter Inch Cartridge (QIC) tape device. The used tape volume is a QIC4DC cartridge with a maximum size of 8 GB. The only supported block size for this medium is 32 K, which implies that the virtual volumes should be created with a 32 K-compatible density.
If you have a newer-type cartridge device use a larger block size, since this performs better. For compatibility of block sizes, check the block size chart in Appendix A, “Block sizes” on page 457.
4.3.1 Preparing for SAVSYSTo perform a SAVSYS, follow the steps outlined here to set up the environment for virtual tape as used in this scenario. If you have already set up one or more items, you can skip that step.
� To create the virtual device and vary it, enter the following commands:
CRTDEVTAP DEVD(TAPVRT01) RSRCNAME(*VRT)VRYCFG CFGOBJ(TAPVRT01) CFGTYPE(*DEV) STATUS(*ON)
� To create the image catalog, enter the following command:
CRTIMGCLG IMGCLG(CATALOG01) DIR('/MyCatalogDirectory01') TYPE(*TAP)
� To add the image catalog entries, enter the commands shown in Example 4-1.
Example 4-1 Add image catalog entries
ADDIMGCLGE IMGCLG(CATALOG01) FROMFILE(*NEW) TOFILE(VIR001) VOLNAM(VIR001) DENSITY(*VRT32K)ADDIMGCLGE IMGCLG(CATALOG01) FROMFILE(*NEW) TOFILE(VIR002) VOLNAM(VIR002) DENSITY(*VRT32K)ADDIMGCLGE IMGCLG(CATALOG01) FROMFILE(*NEW) TOFILE(VIR003) VOLNAM(VIR003) DENSITY(*VRT32K)ADDIMGCLGE IMGCLG(CATALOG01) FROMFILE(*NEW) TOFILE(VIR004) VOLNAM(VIR004) DENSITY(*VRT32K)
Chapter 4. Multiple virtual tape scenarios 175

ADDIMGCLGE IMGCLG(CATALOG01) FROMFILE(*NEW) TOFILE(VIR005) VOLNAM(VIR005) DENSITY(*VRT32K)
� To load the image catalog, enter the following command:
LODIMGCLG IMGCLG(CATALOG01) DEV(TAPVRT01)
4.3.2 Performing SAVSYSAfter the virtual tape environment is created, you can run the SAVSYS command. Perform the following tasks:
1. Sign into the console (if you have not already done so).
2. Close all applications before bringing the system to restricted state.
Remember that SAVSYS requires the system to be in a restricted state, and we have not outlined all the steps necessary to end your applications and vary the devices.
3. When you are ready to bring the system to restricted state to perform SAVSYS, type the following command:
ENDSBS SBS(*ALL) OPYION(*IMMED)
Then press Enter.
4. Wait until the system is in restricted state. A message (CPF0968) stating System ended to restricted condition appears.
5. Enter the following command:
SAVSYS DEV(TAPVRT01)
Then press Enter. If your virtual tape device’s name is different, use that name.
SAVSYS is now running, and will take about 15 to 20 minutes to be completed, depending on the number of user profiles.
In this scenario, it took 15 minutes on a model 270 with system processor feature 23F5, processor feature 2434, five disks, 6 GB of main storage, and using virtual tape in ASP2 (user ASP 1 disk).
Remember that virtual volumes with a density of *VRT32K have been created. In this scenario, this is required, since the 32 K block size has to be compatible with the QIC type cartridge used in this scenario.
If you are new to virtual tape and are curious about what is on the volumes now, display the contents of the virtual tape volumes by performing the following tasks:
1. Enter the following command:
WRKIMGCLG
176 i5/OS V5R4 Virtual Tape: A Guide to Planning and Implementation

Then press Enter. The screen shown in Figure 4-41 appears.
Figure 4-41 WRKIMGCLG
2. Press F11 to see which volumes contain data. This displays the window shown in Figure 4-42.
Figure 4-42 Work with image catalog entries
Work with Image Catalog Entries System: RCHAS08Catalog . . : CATALOG01 Status . . . : Ready Type . . . . : Tape Device . . . : TAPVRT01 Directory . : /imgclg/tape/MyCatalogDirectory01 Type options, press Enter. 1=Add 2=Change 4=Remove 6=Mount 8=Load 9=Unload 10=Initialize volume 11=Display 13=Dump 14=Duplicate Write Opt Index Status Volume Name Density Type Protect *AVAIL 1 Mounted VRT001 *VRT32K *SL No 2 Loaded VRT002 *VRT32K *SL No 3 Mounted VRT003 *VRT32K *SL No 4 Loaded VRT004 *VRT32K *SL No 5 Loaded VRT005 *VRT32K *SL No
Work with Image Catalog Entries System: RCHAS08Catalog . . : CATALOG01 Status . . . : Ready Type . . . . : Tape Device . . . : TAPVRT06 Directory . : /imgclg/tape/MyCatalogDirectory01 Type options, press Enter. 1=Add 2=Change 4=Remove 6=Mount 8=Load 9=Unload 10=Initialize volume 11=Display 13=Dump 14=Duplicate Maximum Percent Opt Index Status Volume Name Size Used *AVAIL 1 Mounted VRT001 1000 99.8 2 Loaded VRT002 1000 99.8 3 Loaded VRT003 1000 99.8
4 Loaded VRT004 1000 43.0 5 Loaded VRT005 1000 .1
Chapter 4. Multiple virtual tape scenarios 177

Figure 4-42 shows that volumes VRT001, VRT002 VRT003, and VRT004 contain data. This is because the job log of the job in which SAVSYS was performed also reports the volumes that are used.
3. To display the contents of a volume, specify 11 in the Opt column in front of the volume you want to display, and press Enter.
The window displayed in Figure 4-43 is shown.
Figure 4-43 Display tape from the work with image catalog entries screen
4. To view the next labels, press Enter.
5. To see all the labels per volume, enter the following command and press Enter:
DSPTAP DEV(TAPVRT01) VOL(VRT001) LABEL(*ALL) DATA(*LABELS) OUTPUT(*PRINT)
This generates a spooled file QPTAPDSP. Figure 4-44 on page 179 shows the labels on the first volume VRT001.
Display Tape Volume Information Device . . . . . . : TAPVRT06 Volume ID . . . . : VRT001 Owner ID . . . . . : Density . . . . . : *VRT32K Type . . . . . . . : *SL Code . . . . . . . : *EBCDIC Data file label . . . . . . . . . : QFILEIML File sequence . . . . . . . . . . : 0000000001 Record format . . . . . . . . . . : U Block attribute . . . . . . . . . : Record length . . . . . . . . . . : 00000 Block length . . . . . . . . . . . : 032760 File length . . . . . . . . . . . : 0000006501 Buffer offset . . . . . . . . . . : Control character . . . . . . . . : More...
178 i5/OS V5R4 Virtual Tape: A Guide to Planning and Implementation

Figure 4-44 Display tape volume information of VRT001
Following is a brief description of the labels related to SAVSYS:
– QFILEIML
Contains the initial microcode load used when IPL from tape is selected (D-type IPL).
– Q5R4M0L00.L2924
Language feature code identification file for installation. Label = QVxRxMxLxx.Lxxxx, where VxRxMxLxx is the version, release and modification level, and Lxxxx is the current system language.
– QFILESCR
Installation file for Licensed Internal Code that contains SLIC installation screens.
– QIAM400
Contains the personality of the system to indicate that this is an iSeries system.
– QFILELDS
Contains LIC, including DST, security data.
– QFILEMCD
Installation file for Licensed Internal Code or microcode space.
6. To check the tape labels of the second volume, enter the following command:
DSPTAP DEV(TAPVRT01) VOL(VRT002) LABEL(*ALL) DATA(*LABELS) OUTPUT(*PRINT)
Then press Enter. Figure 4-45 on page 180 shows the contents of the second spoolfile, which displays the labels of the second volume VRT002.
5722SS1 V5R4M0 060210 TAPE VOLUME INFORMATION VRT001 RCHAS08Device . . . . . : TAPVRT06 Volume . . . . . : VRT001 Owner ID . . . . : Density . . . . : *VRT32K Type . . . . . . : *SL Code . . . . . . : *EBCDIC Record File Block Recg Record Block File Mvol Mvol Data File Label Sequence Format Tech Length Length Length Ind Sequence QFILEIML 0000000001 *U 00000 032760 0000006501 0000000001 QV5R4M0L00.L2924 0000000002 *U 00000 032760 0000000001 0000000001 QFILESCR 0000000003 *U 00000 032760 0000000216 0000000001 QIAM400 0000000004 *U 00000 032760 0000000001 0000000001 QFILELDS 0000000005 *U 00000 032760 0000000019 0000000001 QFILEMCD 0000000006 *U 00000 032760 0000030214 CONT 0000000001
Chapter 4. Multiple virtual tape scenarios 179

Figure 4-45 Display tape volume information of VRT002
Following is a brief description of the tape labels on the second volumes:
– QFILECMD
Installation file for Licensed Internal Code or microcode space.
– QV5R4M0L00.L2924
Language feature code identification file for installation of label #2.
– QFILEIPL
Contains all the necessary templates to load the initial installation program. It also contains the QSYS user profile.
– QFILEIN
Contains all the installation modules. For automatic installation, it contains the automatic installation profile QLPAUTO.
– QppppSS1vrmM.00x
pppp represents the current i5/OS product identifier, and vrm the version, release, and modification. These files contain programs and objects that are not language-sensitive and internal objects.
7. To check the tape labels of the third volume, enter the following command:
DSPTAP DEV(TAPVRT01) VOL(VRT003) LABEL(*ALL) DATA(*LABELS) OUTPUT(*PRINT)
5722SS1 V5R4M0 060210 TAPE VOLUME INFORMATION VRT002 RCHAS08Device . . . . . : TAPVRT06 Volume . . . . . : VRT002 Owner ID . . . . : Density . . . . : *VRT32K Type . . . . . . : *SL Code . . . . . . : *EBCDIC Record File Block Recg Record Block File Mvol Mvol Data File Label Sequence Format Tech Length Length Length Ind Sequence QFILEMCD 0000000006 *U 00000 032760 0000004177 LAST 0000000002 QV5R4M0L00.L2924 0000000007 *U 00000 032760 0000000001 0000000002 QFILEIPL 0000000008 *U 00000 032760 0000000027 0000000002 QFILEIN 0000000009 *U 00000 032760 0000000061 0000000002 Q5722SS1540M.0001 0000000010 *U 00000 032760 0000002704 0000000002 Q5722SS1540M.0002 0000000011 *U 00000 032760 0000004113 0000000002 Q5722SS1540M.0003 0000000012 *U 00000 032760 0000002374 0000000002 Q5722SS1540M.0004 0000000013 *U 00000 032760 0000006042 0000000002 Q5722SS1540M.0005 0000000014 *U 00000 032760 0000002986 0000000002 Q5722SS1540M.0006 0000000015 *U 00000 032760 0000002440 0000000002 Q5722SS1540M.0007 0000000016 *U 00000 032760 0000002656 0000000002 Q5722SS1540M.0008 0000000017 *U 00000 032760 0000004319 0000000002 Q5722SS1540M.0009 0000000018 *U 00000 032760 0000004566 CONT 0000000002
180 i5/OS V5R4 Virtual Tape: A Guide to Planning and Implementation

Then press Enter. Figure 4-46 shows the contents of the third spoolfile, which displays the labels of volume VRT003.
Figure 4-46 Display tape volume information of VRT003
The tape labels on this volume are the same as described under volume VRT002.
8. To check the tape labels of the fourth volume, enter the following command:
DSPTAP DEV(TAPVRT03) VOL(VRT004) LABEL(*ALL) DATA(*LABELS) OUTPUT(*PRINT)
Then press Enter. The last spoolfile is shown in Figure 4-47 on page 182.
5722SS1 V5R4M0 060210 TAPE VOLUME INFORMATION VRT003 RCHAS08Device . . . . . : TAPVRT06 Volume . . . . . : VRT003 Owner ID . . . . : Density . . . . : *VRT32K Type . . . . . . : *SL Code . . . . . . : *EBCDIC Record File Block Recg Record Block File Mvol Mvol Data File Label Sequence Format Tech Length Length Length Ind Sequence Q5722SS1540M.0009 0000000018 *U 00000 032760 0000000072 LAST 0000000003 Q5722SS1540M.0010 0000000019 *U 00000 032760 0000003486 0000000003 Q5722SS1540M.0011 0000000020 *U 00000 032760 0000003902 0000000003 Q5722SS1540M.0012 0000000021 *U 00000 032760 0000002847 0000000003 Q5722SS1540M.0013 0000000022 *U 00000 032760 0000005462 0000000003 Q5722SS1540M.0014 0000000023 *U 00000 032760 0000015055 0000000003 Q5722SS1540M.0015 0000000024 *U 00000 032760 0000005645 CONT 0000000003
Chapter 4. Multiple virtual tape scenarios 181

Figure 4-47 Display tape volume information of VRT004
In addition to the labels previously described, VRT004 contains two additional labels. Following is a brief description of these two labels:
– QFILEUPR
This contains user data.
– QFILEIOC
This contains configuration data.
4.3.3 Duplicating virtual volumes The SAVSYS backup data continues to remain in the virtual volumes. The virtual volumes should now be duplicated to physical media. For other data (for example, user data), you can decide to keep a copy on the system, but for SLIC and base i5/OS, it is not possible to install from virtual volumes, as described in 2.6.1, “Installing i5/OS and related software” on page 26.
For the physical tape device in this scenario, we used TAP01, which is a QIC2GB-compatible device. The virtual tape device to be specified in the TODEV parameter in the DUPTAP command is the virtual tape device associated with the image catalog in which the virtual volumes reside.
5722SS1 V5R4M0 060210 TAPE VOLUME INFORMATION VRT004 RCHAS08Device . . . . . : TAPVRT06 Volume . . . . . : VRT004 Owner ID . . . . : Density . . . . : *VRT32K Type . . . . . . : *SL Code . . . . . . : *EBCDIC Record File Block Recg Record Block File Mvol Mvol Data File Label Sequence Format Tech Length Length Length Ind Sequence Q5722SS1540M.0015 0000000024 *U 00000 032760 0000006763 LAST 0000000004 Q5722SS1540M.0016 0000000025 *U 00000 032760 0000001076 0000000004 Q5722SS1540240001 0000000026 *U 00000 032760 0000000026 0000000004 Q5722SS1540240002 0000000027 *U 00000 032760 0000000381 0000000004 Q5722SS1540240003 0000000028 *U 00000 032760 0000000373 0000000004 Q5722SS1540240004 0000000029 *U 00000 032760 0000000359 0000000004 Q5722SS1540240005 0000000030 *U 00000 032760 0000001493 0000000004 Q5722SS1540240006 0000000031 *U 00000 032760 0000001479 0000000004 Q5722SS1540240007 0000000032 *U 00000 032760 0000000720 0000000004 Q5722SS1540240090 0000000033 *U 00000 032760 0000001316 0000000004 Q5722SS1540M.0090 0000000034 *U 00000 032760 0000001135 0000000004 QFILEUPR 0000000035 *U 00000 032760 0000000554 0000000004 QFILEIOC 0000000036 *U 00000 032760 0000000036 0000000004
182 i5/OS V5R4 Virtual Tape: A Guide to Planning and Implementation

To duplicate the virtual volumes to physical volumes, enter the following command:
DUPTAP FROMDEV(TAPVRT01) TODEV(TAP01) FROMVOL(*MOUNTED) TOVOL(*MOUNTED)
Then press Enter. After duplication is complete, you can review the joblog shown in Figure 4-48 on page 184.
Chapter 4. Multiple virtual tape scenarios 183

Figure 4-48 Joblog of DUPTAP from virtual to physical tape
*NONE Request 12/12/05 18:08:09.220056 QPTCHECK *N QUICMD QSYS 0461 Message . . . . : -DUPTAP FROMDEV(TAPVRT01) TODEV(TAP01) FROMVOL(*MOUNTED) TOVOL(*MOUNTED) EXPDATE(*FROMFILE)CPI6742 Information 00 12/12/05 18:35:49.984160 QTADUP QSYS 1C2C QUICMD QSYS 048D Message . . . . : Volume VRT001 duplication complete. Cause . . . . . : Some or all files from volume VRT001 on device TAPVRT01 were successfully duplicated to device TAP01.CPI6742 Information 00 12/12/05 19:01:38.972312 QTADUP QSYS 1C2C QUICMD QSYS 048D Message . . . . : Volume VRT002 duplication complete. Cause . . . . . : Some or all files from volume VRT002 on device TAPVRT01 were successfully duplicated to device TAP01.CPI6742 Information 00 12/12/05 19:31:47.560184 QTADUP QSYS 1C2C QUICMD QSYS 048D Message . . . . : Volume VRT003 duplication complete. Cause . . . . . : Some or all files from volume VRT003 on device TAPVRT01 were successfully duplicated to device TAP01.CPI6742 Information 00 12/12/05 19:45:43.328472 QTADUP QSYS 1C2C QUICMD QSYS 048D Message . . . . : Volume VRT004 duplication complete. Cause . . . . . : Some or all files from volume VRT004 on device TAPVRT01 were successfully duplicated to device TAP01.CPC6775 Completion 00 12/12/05 19:45:43.355992 QTADUP QSYS 1C2C QUICMD QSYS 048D Message . . . . : Tape duplication completed successfully. Cause . . . . . : 36 files were successfully duplicated from device TAPVRT01 to device TAP01.
184 i5/OS V5R4 Virtual Tape: A Guide to Planning and Implementation

According to the joblog, 36 files are duplicated. This matches the total amount of sequences on the four virtual volumes.
To be sure, you can print the contents of the physical tape using the following command:
DSPTAP DEV(TAP01) VOL(VOL001) LABEL(*ALL) DATA(*LABELS) OUTPUT(*PRINT)
Figure 4-49 on page 186 shows printout of the spooled file of the tape labels on the physical volume.
Chapter 4. Multiple virtual tape scenarios 185

Figure 4-49 DSPTAP OUTPUT(*PRINT) of the physical volume
SAVSYS is now on the physical volume, and you can remove the virtual volumes by removing the image catalog entries.
Perform the following tasks:
1. To remove the image catalog entries, enter the following command:
Record File Block Recg Record Block File Mvol Mvol Data File Label Sequence Format Tech Length Length Length Ind Sequence QFILEIML 0000000001 *U 00000 032760 0000006501 0000000001QV5R4M0L00.L2924 0000000002 *U 00000 032760 0000000001 0000000001QFILESCR 0000000003 *U 00000 032760 0000000216 0000000001QIAM400 0000000004 *U 00000 032760 0000000001 0000000001QFILELDS 0000000005 *U 00000 032760 0000000019 0000000001QFILEMCD 0000000006 *U 00000 032760 0000034391 0000000001QV5R4M0L00.L2924 0000000007 *U 00000 032760 0000000001 0000000001QFILEIPL 0000000008 *U 00000 032760 0000000027 0000000001QFILEIN 0000000009 *U 00000 032760 0000000061 0000000001Q5722SS1540M.0001 0000000010 *U 00000 032760 0000002704 0000000001Q5722SS1540M.0002 0000000011 *U 00000 032760 0000004113 0000000001Q5722SS1540M.0003 0000000012 *U 00000 032760 0000002374 0000000001Q5722SS1540M.0004 0000000013 *U 00000 032760 0000006042 0000000001 Q5722SS1540M.0005 0000000014 *U 00000 032760 0000002986 0000000001 Q5722SS1540M.0006 0000000015 *U 00000 032760 0000002440 0000000001 Q5722SS1540M.0007 0000000016 *U 00000 032760 0000002656 0000000001 Q5722SS1540M.0008 0000000017 *U 00000 032760 0000004319 0000000001 Q5722SS1540M.0009 0000000018 *U 00000 032760 0000004638 0000000001 Q5722SS1540M.0010 0000000019 *U 00000 032760 0000003486 0000000001 Q5722SS1540M.0011 0000000020 *U 00000 032760 0000003902 0000000001 Q5722SS1540M.0012 0000000021 *U 00000 032760 0000002847 0000000001 Q5722SS1540M.0013 0000000022 *U 00000 032760 0000005462 0000000001 Q5722SS1540M.0014 0000000023 *U 00000 032760 0000015055 0000000001 Q5722SS1540M.0015 0000000024 *U 00000 032760 0000012408 0000000001 Q5722SS1540M.0016 0000000025 *U 00000 032760 0000001076 0000000001 Q5722SS1540240001 0000000026 *U 00000 032760 0000000026 0000000001 Q5722SS1540240002 0000000027 *U 00000 032760 0000000381 0000000001 Q5722SS1540240003 0000000028 *U 00000 032760 0000000373 0000000001 Q5722SS1540240004 0000000029 *U 00000 032760 0000000359 0000000001 Q5722SS1540240005 0000000030 *U 00000 032760 0000001493 0000000001 Q5722SS1540240006 0000000031 *U 00000 032760 0000001479 0000000001 Q5722SS1540240007 0000000032 *U 00000 032760 0000000720 0000000001Q5722SS1540240090 0000000033 *U 00000 032760 0000001316 0000000001Q5722SS1540M.0090 0000000034 *U 00000 032760 0000001135 0000000001QFILEUPR 0000000035 *U 00000 032760 0000000554 0000000001QFILEIOC 0000000036 *U 00000 032760 0000000036 0000000001
186 i5/OS V5R4 Virtual Tape: A Guide to Planning and Implementation

WRKIMGCLG
Then press Enter.
2. Type 9 in front of the image catalog you used (CATALOG01) and press Enter.
3. Type 4 in front of each volume you want to delete and press Enter.
4. Press F3 to exit the Work with Image Catalogs Entries window.
The virtual volumes used for SAVSYS are now removed and the space is freed.
4.3.4 SummaryTable 4-1 compares the total time taken by SAVSYS performed using virtual tape and SAVSYS performed directly to physical tape, using the same physical tape drive as that used for duplication.
Table 4-1 Comparison of SAVSYS to virtual tape and SAVSYS to physical tape
Note the following conclusions:
� In this scenario, from a performance point of view, there is not much difference. However, the major benefit is that the restricted state time decreases significantly with virtual tape.
� In an i5 environment with multiple partitions, there are configurations with only one single physical tape drive shared with other partitions. In such a situation, the tape drive is scheduled to move from one partition to the other.
Although this way of scheduling is very simple, on releases prior to V5R4, you still have to have a physical drive attached to the partition at save time. With virtual tape, you can run the save at the same time.
� Operator intervention is unnecessary.
When using physical tape, there are four possible situations when operator intervention is required:
– Wrong type tape cartridge is inserted.
SAVSYS to virtual tape
SAVSYS to physical tape
Restricted state time (in minutes) 15 101
Duplication time (in minutes) 98 NA
Total time (in minutes) 113 101
Note: The actual restricted state time is 15 minutes, as shown in Table 4-1.
Chapter 4. Multiple virtual tape scenarios 187

– Wrong volume ID inserted.
– Next volume has to be mounted when the first volume is full and reaches the end of volume.
– Any hardware on tape device or media error.
Note: Operator intervention can decrease the restricted save state time.
188 i5/OS V5R4 Virtual Tape: A Guide to Planning and Implementation

Chapter 5. Saving Domino with BRMS and virtual tape
In this chapter we describe how to set up a backup for Domino, using virtual tapes. We also look at the logs that are produced, and at the process involved in restoring a mail file.
The information provided in this chapter is based on the assumption that you have an adequate understanding of the BRMS application working from i5 Navigator. For more information about this topic, refer to the IBM Redbook titled Domino 6 for iSeries Best Practices Guide, SG24-6937.
For more information about fine-tuning BRMS backups, refer to the IBM publication Backup Recovery and Media Services, SC41-5345. This can be accessed on the Web at:
http://www.elink.ibmlink.ibm.com/public/applications/publications/cgibin/pbi.cgi?PAG=C11&SSN=06DZI0007040138732&TRL=TXT&WRD=&PBL=SC41-5345-00&LST=ALL&RPP=10&BTN%3DSRH.x=6&BTN%3DSRH.y=11
Before you back up Domino data using BRMS, visit the following Web site:
http://www-03.ibm.com/servers/eserver/iseries/service/brms/domino.html
5
© Copyright IBM Corp. 2006. All rights reserved. 189

5.1 Creating the image catalogThis scenario, which was set up using i5 Navigator as a graphical interface, appears automatically when working with Domino. To create the image dialog using i5 Navigator, perform the following tasks:
1. Start i5 Navigator, sign in, and go to Image catalogs, by selecting Configuration and Service → Hardware → Tape devices.
2. Right-click Tape Image catalogs and select Create Image catalog, as shown in Figure 5-1.
Figure 5-1 Create new image catalog
3. In the window that appears, as shown in Figure 5-2 on page 191, input the following values, and click OK:
a. Input the image Catalog name (in this scenario, it is dominovrt).
b. Input Catalog description (in this scenario, it is Image catalog for Domino save to virtual tape).
c. Input the desired Directory path (in this scenario, it is /tmp/vrt).
If the directory does not exist, select Yes against Create Directory.
190 i5/OS V5R4 Virtual Tape: A Guide to Planning and Implementation

Figure 5-2 Create image catalog
An image catalog is created. (Press F5 if it does not show up automatically.)
4. Right-click the image catalog and select Add volume, as shown in Figure 5-3 on page 192.
Chapter 5. Saving Domino with BRMS and virtual tape 191

Figure 5-3 Domino with BRMS virtual tape, add volumes to image catalog
5. The window shown in Figure 5-4 on page 193 displays. In the General tab, input a value for the field To tape image file with the volume name (in this scenario, it is dom001).
You may wonder why we are giving dedicated names to virtual volumes. Normally, tape volumes are given general names so that they can be used for anything. However, you can have a specific set of volumes for a single purpose.
Fill in a description if this volume is to be used for a specific purpose.
192 i5/OS V5R4 Virtual Tape: A Guide to Planning and Implementation

Figure 5-4 Domino with BRMS virtual tape, add volumes to image catalog - General tab
6. Click the Options tab, shown in Figure 5-4.
The window shown in Figure 5-5 on page 194 displays. To avoid confusion, use the same name for the volume (the To tape image file) that you input under the General tab shown in Figure 5-4 (in this scenario, it is dom001).
Chapter 5. Saving Domino with BRMS and virtual tape 193

Figure 5-5 Domino with BRMS virtual tape, add volumes to image catalog - Options tab
Repeat the same procedure for the other volumes you want to add. In this scenario, add dom002 and dom003, as well.
7. After adding other volumes, list the volumes to verify that everything is in order by right-clicking the image catalog and selecting List volumes, as shown in Figure 5-6 on page 195.
194 i5/OS V5R4 Virtual Tape: A Guide to Planning and Implementation

Figure 5-6 Domino with BRMS virtual tape, list volumes in image catalog
The volume list displays, as shown in Figure 5-7 on page 196.
Chapter 5. Saving Domino with BRMS and virtual tape 195

Figure 5-7 Domino with BRMS virtual tape, image catalog volume list
8. In order for an image catalog to be operated, it has to be connected to a tape drive. Right-click the image catalog and select Load Image catalog, as shown in Figure 5-8 on page 197.
196 i5/OS V5R4 Virtual Tape: A Guide to Planning and Implementation

Figure 5-8 Domino with BRMS virtual tape - load image catalog
9. In the window that appears, as shown in Figure 5-9, select a suitable tape drive that can handle the density, although all virtual tape drives can. In this scenario, select tapvrt02, and then click OK.
Figure 5-9 Domino with BRMS virtual tape - tape drive to load the image catalog
10.Bring up the list of volumes by right-clicking the image catalog in the window shown in Figure 5-8, and selecting List volumes. This displays the list of
Chapter 5. Saving Domino with BRMS and virtual tape 197

volumes. Figure 5-10 shows the list of volumes, with Volume 1 displaying a status of Mounted.
Figure 5-10 Domino with BRMS virtual tape, list volumes in image catalog - refresh
You now have an image catalog and tape volumes. A mounted volume can be initialized or formatted. This can be done when adding volumes to BRMS.
11.To format, right-click the mounted volume and select Format, as shown in Figure 5-11 on page 199.
Note: Format and initialize are the same. The Navigator uses the term “format”, while BRMS uses the term “initialize” in both 5250 emulation as well as in the Navigator plug-in.
198 i5/OS V5R4 Virtual Tape: A Guide to Planning and Implementation

Figure 5-11 Domino with BRMS virtual tape, select volume for format
12.The Format panel has two tabs, General and Optional. All the fields in the General tab, shown in Figure 5-12 on page 200, are filled. However, you can make changes.
Chapter 5. Saving Domino with BRMS and virtual tape 199

Figure 5-12 Domino with BRMS virtual tape, format options - General tab
All the fields in the Options tab are also filled, but you can make sure the density matches your physical tape drive that will later hold the copy of the virtual tape image, as shown in Figure 5-13. After making changes in the General and Options tabs, click OK.
Figure 5-13 Domino with BRMS virtual tape, format options - Options tab
200 i5/OS V5R4 Virtual Tape: A Guide to Planning and Implementation

13.After the first volume is initialized, mount the next volume to be initialized, as described in step 10 on page 197, and shown in Figure 5-14.
Figure 5-14 Domino with BRMS virtual tape, mount next volume
Repeat the steps until all the volumes are initialized.
This concludes the virtual setup action.
You now have the following:
� An image catalog.� The image catalog contains virtual tape volumes.� There are three initialized virtual tape volumes in the image catalog.� The image catalog is loaded to a virtual tape drive.� One of the tape volumes is mounted. � The other two volumes are loaded or are ready to be mounted.
Chapter 5. Saving Domino with BRMS and virtual tape 201

5.2 Creating a BRMS backup policy for DominoThe virtual tape environment is in place. You can now start with BRMS to set up the backup. To do this, create a backup policy. Along the way, create other definitions such as locations to make the backup work.
Before setting up definitions in BRMS, refer to the information available on the Web at:
http://www-03.ibm.com/servers/eserver/iseries/service/brms/domino.html
Following is a list of topics that are discussed at this Web site:
� Initialize BRMS � Online backup � Saved item catalog � Disaster recovery planning � Single database recovery � Recommendations � How it works � Performance tuning � Copying control groups � Control group EXITs � Incremental backups � Recover an incremental backup � High availability strategy � Graphical User Interface
Figure 5-15 on page 203 displays the “How it works” section of the Web site.
Note: The figures drawn from the Web site into this IBM Redbook are examples that were current at the time of writing, but may have changed since then. We recommend that you access the Web site directly to get the latest information.
202 i5/OS V5R4 Virtual Tape: A Guide to Planning and Implementation

Figure 5-15 Domino with BRMS, Internet home page - how it works
Once you understand how BRMS works in conjunction with Domino, it is easy to implement.
Important: We recommend that you study the information available on the Web site thoroughly before beginning this process.
Chapter 5. Saving Domino with BRMS and virtual tape 203

To set up a backup for a Domino server named Domino02, perform the following tasks:
1. Log in to your i5 server using the Navigator (if you have not already done so).
2. Right-click Backup policy and select New policy, as shown in Figure 5-16.
Figure 5-16 BRMS Backup policy, new
3. In the Welcome window that appears, click Next.
204 i5/OS V5R4 Virtual Tape: A Guide to Planning and Implementation

4. In the New Backup Policy - Policy Name window that appears, input the following information, as shown in Figure 5-17, and click Next:
– Input the value for the backup policy Name field (in this scenario, the value is dominovrt).
– Input an appropriate Description in the corresponding field.
Figure 5-17 BRMS backup policy, policy name
Chapter 5. Saving Domino with BRMS and virtual tape 205

5. In the Select a Save Strategy window shown in Figure 5-18, select Save Lotus® server data or a customized set of objects, and click Next.
Figure 5-18 BRMS backup policy, save strategy
6. In the Customize IBM Data or User Data window shown in Figure 5-19 on page 207, select User data, and click Next.
206 i5/OS V5R4 Virtual Tape: A Guide to Planning and Implementation

Figure 5-19 BRMS backup policy, customize data
7. In the Customize User Data window shown in Figure 5-20 on page 208, check Select Lotus servers for online save, and click Next.
Chapter 5. Saving Domino with BRMS and virtual tape 207

Figure 5-20 BRMS backup policy, customize user data
8. In the Select Lotus Servers for Online Save window displayed in Figure 5-21 on page 209, two Domino servers, DOMINO01 and DOMINO02, are present. In this scenario, only DOMINO02 is backed up. Therefore, the concept of order does not apply.
Select the Domino server (in this scenario, DOMINO02) and click Next.
208 i5/OS V5R4 Virtual Tape: A Guide to Planning and Implementation

Figure 5-21 BRMS backup policy, select Lotus servers for online backup
9. The Domino Save Order window shown in Figure 5-22 on page 210 shows the order in which backup is done. In this scenario, since only one Domino server is selected, the concept of order does not hold good. Click Next.
Chapter 5. Saving Domino with BRMS and virtual tape 209

Figure 5-22 BRMS backup policy, save order
10.The Save Activity window is shown in Figure 5-23 on page 211. Since DOMINO02 is a minor server, everything is backed up to make recovery easier. To do this, select Full save. Against Changes only, select Changes since last save (incremental). Select Allow overrides... and then click Next.
210 i5/OS V5R4 Virtual Tape: A Guide to Planning and Implementation

Figure 5-23 BRMS backup policy, save activity
11.In the Where to Save window shown in Figure 5-24 on page 212, select Save to media, and click Next.
Chapter 5. Saving Domino with BRMS and virtual tape 211

Figure 5-24 BRMS backup policy, where to save
12.In the Select Devices window shown in Figure 5-25 on page 213, against Media pool, select the pool used in this scenario (Vrt256k), and click Next.
212 i5/OS V5R4 Virtual Tape: A Guide to Planning and Implementation

Figure 5-25 BRMS backup policy, select devices
13.Selecting media pool Vrt256k automatically displays the tape drives that can handle pool Vrt256k, as shown in Figure 5-26 on page 214. Select the virtual tape drive (Tapvrt02) and click Add.
Note: All virtual tape drives can handle all virtual densities.
Chapter 5. Saving Domino with BRMS and virtual tape 213

Figure 5-26 BRMS backup policy, select devices for Vrt256k media pool
This adds tape device TAPVRT02, as shown in Figure 5-27 on page 215. Click Next.
214 i5/OS V5R4 Virtual Tape: A Guide to Planning and Implementation

Figure 5-27 BRMS backup policy, select devices - selected
14.Virtual media should always be secured to physical media. In the Duplicate Media window shown in Figure 5-28 on page 216, select Yes, mark the media for duplication, and click Next.
Chapter 5. Saving Domino with BRMS and virtual tape 215

Figure 5-28 BRMS backup policy, duplicate media
15.Since BRMS maintenance will not be run every time a backup of this Domino server is done, in the Run Maintenance window shown in Figure 5-29 on page 217, select No, do not run maintenance after save, and click Next.
216 i5/OS V5R4 Virtual Tape: A Guide to Planning and Implementation
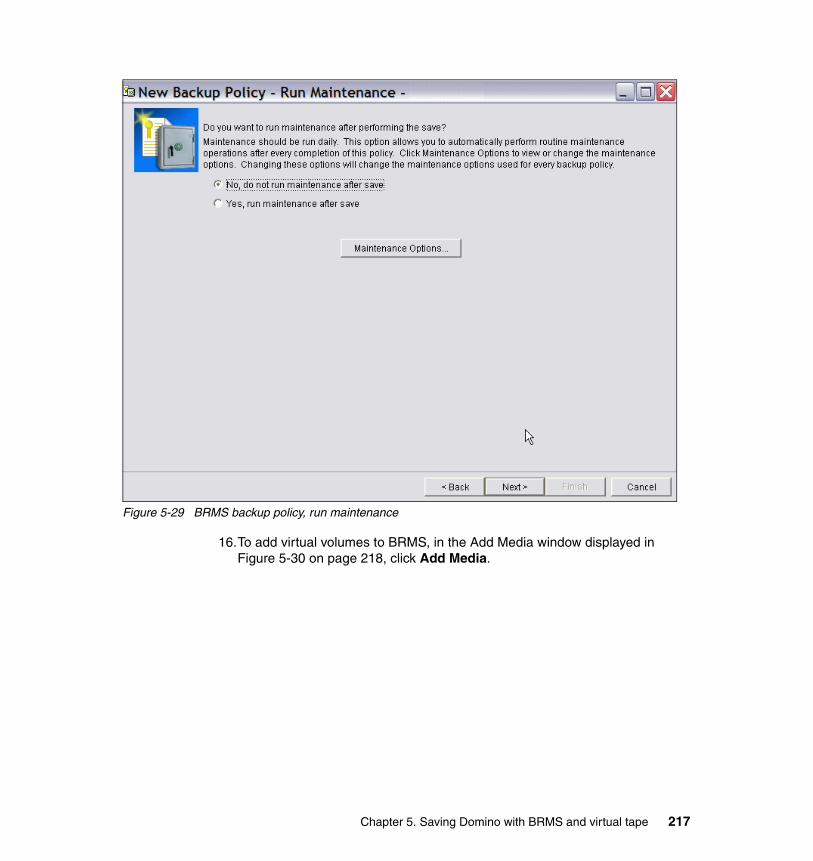
Figure 5-29 BRMS backup policy, run maintenance
16.To add virtual volumes to BRMS, in the Add Media window displayed in Figure 5-30 on page 218, click Add Media.
Chapter 5. Saving Domino with BRMS and virtual tape 217

Figure 5-30 BRMS backup policy, add media
17.In the welcome page that appears, click Next.
18.To specify where the virtual volumes are, scroll down against Image catalog in the Select Image Catalog window shown in Figure 5-31 on page 219, and select the corresponding value (Dominovrt). Click Next.
218 i5/OS V5R4 Virtual Tape: A Guide to Planning and Implementation

Figure 5-31 BRMS backup policy, select image catalog to pick volumes from
19.In this scenario, only three volumes are added. To use all of them, select them one after the other or check Select all, and click Next, as shown in Figure 5-32 on page 220.
Chapter 5. Saving Domino with BRMS and virtual tape 219

Figure 5-32 BRMS backup policy, select volumes
20.The normal start in BRMS is to create locations first. With the Navigator, you do not have to, since it can be done on the fly. Click New Location in the Select Media Storage Location window shown in Figure 5-33 on page 221, select a location, and then click Next.
220 i5/OS V5R4 Virtual Tape: A Guide to Planning and Implementation

Figure 5-33 BRMS backup policy, create media storage location
21.In the New Storage Location window shown in Figure 5-34 on page 222, input the following parameters, and click OK:
– Input a value for Location name (in this scenario, it was dominovrt).
– Input a value for Description.
Note: Do not allow volumes to expire.
Chapter 5. Saving Domino with BRMS and virtual tape 221

Figure 5-34 BRMS backup policy, new storage location
22.Location Dominovrt is created. However, another location is needed to house the volumes so that they can expire after being duplicated. Click New Location in the Select Media Storage Location window shown in Figure 5-35 on page 223, and then click Next.
222 i5/OS V5R4 Virtual Tape: A Guide to Planning and Implementation

Figure 5-35 BRMS backup policy, create next location
23.In the New Storage Location window shown in Figure 5-36 on page 224, input the location name as copy_ok. Input values as was done for location dominovrt (step 21 on page 221). The only exception is that in this window, you must select Allow volumes to expire at this location. Click OK.
Chapter 5. Saving Domino with BRMS and virtual tape 223

Figure 5-36 BRMS backup policy, next location
24.The locations are created. To select the location into which the added volumes will be placed, in the Select Media Storage Location window shown in Figure 5-37 on page 225, scroll down against Location and select the relevant one (Dominovrt) and click Next.
224 i5/OS V5R4 Virtual Tape: A Guide to Planning and Implementation

Figure 5-37 BRMS backup policy, select media storage location
25.BRMS can initialize the volumes, if required. In this scenario, since this is already done, click Next in the Initialize Volumes window shown in Figure 5-38 on page 226.
Chapter 5. Saving Domino with BRMS and virtual tape 225

Figure 5-38 BRMS backup policy, initialize volumes
26.In the Add Media Summary window shown in Figure 5-39 on page 227, click Finish.
226 i5/OS V5R4 Virtual Tape: A Guide to Planning and Implementation

Figure 5-39 BRMS backup policy, add media summary
27.In the Add Media window shown in Figure 5-40 on page 228, click Next.
Chapter 5. Saving Domino with BRMS and virtual tape 227

Figure 5-40 BRMS backup policy, add media done
28.In the New Backup Policy Summary window shown in Figure 5-41 on page 229, click Finish.
228 i5/OS V5R4 Virtual Tape: A Guide to Planning and Implementation

Figure 5-41 BRMS backup policy, summary
29.In the window shown in Figure 5-42 on page 230, click Done.
Chapter 5. Saving Domino with BRMS and virtual tape 229

Figure 5-42 BRMS backup policy, run now or later
30.The base portion of the backup policy is created. Press F5. This concludes the process of creating a backup policy.
5.3 Creating a move policyAfter the base backup policy is created, create a move policy to attach to it. Otherwise, you have to manually move the volumes.
230 i5/OS V5R4 Virtual Tape: A Guide to Planning and Implementation

5.3.1 Creating a move policy for virtual volumesTo create move policy for virtual volumes, perform the following tasks:
1. Expand Backup, Recovery and Media Services, right-click Move Policies, and select New Policy, as shown in Figure 5-43.
Figure 5-43 Domino with BRMS, move policy, new policy
2. After the Welcome window, the Move Policy Name window shown in Figure 5-44 on page 232 is displayed; input the following parameters:
– Input value for Move policy name (in this scenario, it is dominodup).
– Input value in the Description field.
Then click Next.
Chapter 5. Saving Domino with BRMS and virtual tape 231

Figure 5-44 BRMS virtual move policy, name
3. In the Storage Locations window shown in Figure 5-45 on page 233, select the location into which the volume will go into after being duplicated. In this scenario, it is Copy_ok. Click Add Before or Add After, and then click Next.
232 i5/OS V5R4 Virtual Tape: A Guide to Planning and Implementation

Figure 5-45 BRMS virtual move policy, add in location order
4. Since there is only one step in the move policy in this scenario, there is no need for any other action. Click Next in the window, as shown in Figure 5-46 on page 234.
Chapter 5. Saving Domino with BRMS and virtual tape 233
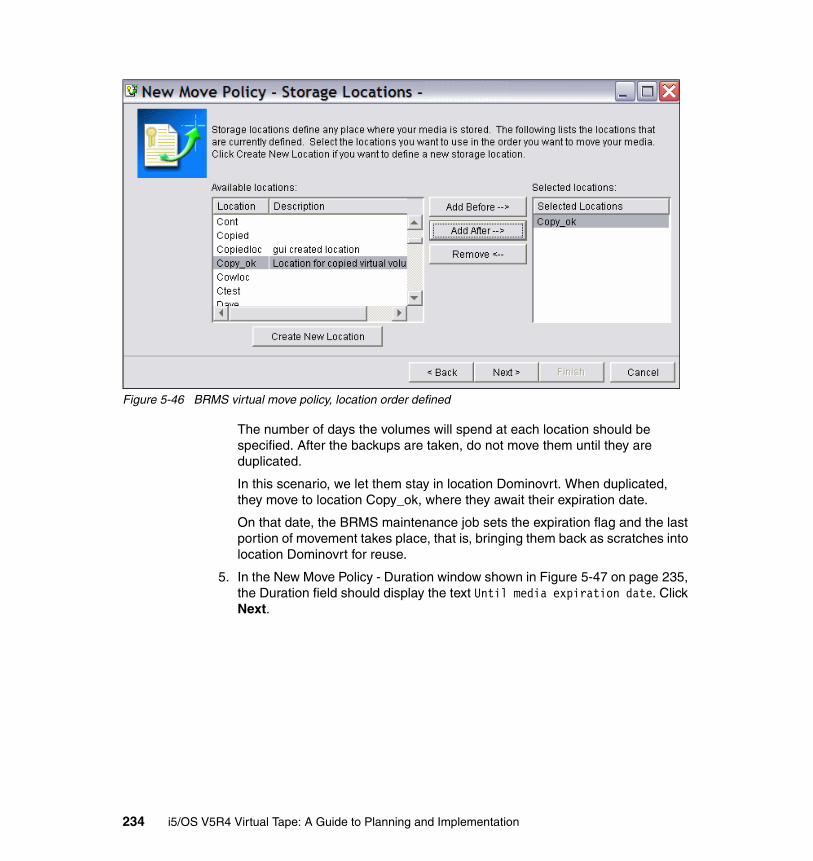
Figure 5-46 BRMS virtual move policy, location order defined
The number of days the volumes will spend at each location should be specified. After the backups are taken, do not move them until they are duplicated.
In this scenario, we let them stay in location Dominovrt. When duplicated, they move to location Copy_ok, where they await their expiration date.
On that date, the BRMS maintenance job sets the expiration flag and the last portion of movement takes place, that is, bringing them back as scratches into location Dominovrt for reuse.
5. In the New Move Policy - Duration window shown in Figure 5-47 on page 235, the Duration field should display the text Until media expiration date. Click Next.
234 i5/OS V5R4 Virtual Tape: A Guide to Planning and Implementation

Figure 5-47 BRMS virtual move policy, duration
6. If you want to verify movement, you can do so in the New Move Policy - Verify Moves window shown in Figure 5-48 on page 236.
However, since this action is not required in this scenario, No was selected. Click Next.
Chapter 5. Saving Domino with BRMS and virtual tape 235

Figure 5-48 BRMS virtual move policy, verify moves
7. Regardless of whether you made a “full” backup or a “changes only” backup, the volumes should reflect the same.
Select both the Full and Changes only options against the corresponding volume, and click Next, in the New Move Policy - Select Policies window shown in Figure 5-49 on page 237.
236 i5/OS V5R4 Virtual Tape: A Guide to Planning and Implementation

Figure 5-49 BRMS virtual move policy, summary
8. In the Summary window shown in Figure 5-50 on page 238, click Finish.
Chapter 5. Saving Domino with BRMS and virtual tape 237

Figure 5-50 BRMS virtual move policy, summary
9. Click Done in the Move Policy Created window shown in Figure 5-51.
Figure 5-51 BRMS virtual move policy, created
The first move policy is now created. This policy is used for the virtual volumes. Another move policy is required for the physical volumes that result from duplicating. However, adjustments should be made to the new virtual move policy first.
The move policy takes care of volumes that are expired. Therefore, a minor adjustment is required in the policy, as described in the next section.
238 i5/OS V5R4 Virtual Tape: A Guide to Planning and Implementation

5.3.2 Adjusting the virtual move policyPerform the following tasks to adjust the newly created virtual move policy:
1. Right-click the new move policy (in this scenario, Dominodup), and select Properties, as shown in Figure 5-52.
Figure 5-52 BRMS move policy for virtual volumes, change
2. In the window shown in Figure 5-53 on page 240, click the Locations tab. The field Location to move when complete probably states Home location. This means that the volumes go back to where they came from. In this scenario, we want them to go back to the location Dominovrt in all cases.
Use Browse... to select the location you want as the end station when the virtual volumes’ retention period is up (in this scenario, it is Dominovrt). Click OK, as shown in Figure 5-53 on page 240.
Chapter 5. Saving Domino with BRMS and virtual tape 239

Figure 5-53 BRMS move policy for virtual volumes, Properties - Locations tab
Figure 5-54 shows that the move policy has changed accordingly. Click OK.
Figure 5-54 BRMS move policy for virtual volumes, changed
This concludes the actions you need to perform regarding the move policy for virtual volumes.
240 i5/OS V5R4 Virtual Tape: A Guide to Planning and Implementation

5.3.3 Creating a move policy for physical volumesA move policy is also required for physical volumes. This policy defines where the physical volumes will go after they are duplicated.
You can create a move policy by bringing up the new move policy for virtual volumes and proceeding as described earlier, with the one exception that you point to a meaningful location.
Alternatively, you can follow our example. In this scenario, we used the move policy OFFSITE automatically created by BRMS. It has only two steps:
1. Bring the volumes to location VAULT, as shown in Figure 5-55.
2. Bring them back when the retention period is up.
Figure 5-55 BRMS standard move policy OFFSITE
As of now, the following are available:
� An image catalog.� The image catalog contains virtual tape volumes.� There are three initialized virtual tape volumes in the image catalog.� The image catalog is loaded to a virtual tape drive.� One of the tape volumes is mounted. � The other two volumes are loaded or are ready to be mounted.
Chapter 5. Saving Domino with BRMS and virtual tape 241

Now, there are two additions:
� A move policy for virtual volumes.� Use the OFFSITE move policy for physical volumes.
The next task is to adjust the backup policy, which also includes marrying it to the move policy.
5.4 Adjusting the backup policyAt this point, the backup policy is ready to run. However, it has to be tailored to specific needs. Therefore, the backup policy should be adjusted, as follows:
1. Click Backup policies.
2. Select Backup, Recovery and Media Services, right-click Dominovrt and select Properties, as shown in Figure 5-56.
Figure 5-56 BRMS move policy change, select properties
242 i5/OS V5R4 Virtual Tape: A Guide to Planning and Implementation

3. You should now verify a few items prior to running the backup. Click Before in the Properties window shown in Figure 5-57.
Figure 5-57 BRMS move policy change, Before/During/After Save
4. In the Before Save window shown in Figure 5-58 on page 244, click the General tab, and make sure that no servers are taken down. Also, allow all users to remain active. Click OK.
Chapter 5. Saving Domino with BRMS and virtual tape 243

Figure 5-58 BRMS move policy change, Before Save - General tab
5. Click During in the Properties window shown in Figure 5-59 on page 245.
244 i5/OS V5R4 Virtual Tape: A Guide to Planning and Implementation

Figure 5-59 BRMS move policy change, select During
6. In the During Save window shown in Figure 5-60 on page 246, click the What tab, make sure that no user defined file systems are unmounted, and then click the Where tab.
Chapter 5. Saving Domino with BRMS and virtual tape 245

Figure 5-60 BRMS move policy change, During - What tab
7. Click Advanced in the window shown in Figure 5-61 on page 247.
246 i5/OS V5R4 Virtual Tape: A Guide to Planning and Implementation

Figure 5-61 BRMS move policy change, during - what tab - advanced
8. In the Advanced Properties window shown in Figure 5-62 on page 248, select Mark saved items for duplication, for both Full and Changes only. Select Dominodup against Move Policy for both Full and Changes only. If you want to prohibit other users from reading these volumes, select the corresponding field. Click OK when done.
Chapter 5. Saving Domino with BRMS and virtual tape 247

Figure 5-62 BRMS move policy change, During - What - Advanced Properties
9. Leave the During Save panel Figure 5-61 on page 247 by clicking OK.
10.In the Properties window (shown in Figure 5-59 on page 245), click After.
11.Then, in the window shown in Figure 5-63 on page 249, deselect Start integrated servers, scroll down Save media information and select Objects, and click OK.
248 i5/OS V5R4 Virtual Tape: A Guide to Planning and Implementation

Figure 5-63 BRMS move policy change, After Save - General tab
12.Since there are no more changes, click OK in the Properties window shown in Figure 5-64 on page 250.
Chapter 5. Saving Domino with BRMS and virtual tape 249

Figure 5-64 BRMS move policy change, Before-During-After Save window
The backup policy is now ready to go live.
5.5 Running the Domino backupTo execute the backup policy, perform the following tasks:
1. Right-click the Backup policy Dominovrt and select Run Now, as shown in Figure 5-65 on page 251.
250 i5/OS V5R4 Virtual Tape: A Guide to Planning and Implementation

Figure 5-65 BRMS run Domino backup, Run Now selected
2. Since there are no backup overrides, click OK in the window shown in Figure 5-66 on page 252.
Chapter 5. Saving Domino with BRMS and virtual tape 251

Figure 5-66 BRMS run Domino backup, overrides
3. Click OK in the window shown in Figure 5-67, and wait until the connection to the central system is complete.
Figure 5-67 BRMS run Domino backup
4. In the window shown in Figure 5-68 on page 253, select Save task output..., and then click OK.
252 i5/OS V5R4 Virtual Tape: A Guide to Planning and Implementation

Figure 5-68 BRMS run Domino backup, save joblog
5. The save job is started in the window shown in Figure 5-69. Click OK.
Figure 5-69 BRMS run Domino backup, job started
6. Figure 5-70 shows that the job is completed.
Figure 5-70 BRMS run Domino backup, job completed
Chapter 5. Saving Domino with BRMS and virtual tape 253

7. Figure 5-71 shows the volumes after the backup is complete. It shows that it used 60% of one volume.
Figure 5-71 BRMS run Domino backup, list volumes after job is complete
5.5.1 Checking the resultsTo check the results, perform the following tasks:
1. Click the Task Output icon; see Figure 5-72. The listings from the job are shown.
Figure 5-72 BRMS run Domino backup, job completed
2. To check the joblog, select Qpjoblog and double-click, as shown in Figure 5-73 on page 255.
254 i5/OS V5R4 Virtual Tape: A Guide to Planning and Implementation

Figure 5-73 BRMS run Domino backup, printer output
Figure 5-74 on page 256 shows an example of the joblog. Among other things, it tells how many objects were saved.
Chapter 5. Saving Domino with BRMS and virtual tape 255

Figure 5-74 BRMS run Domino backup, joblog
3. After you read through the joblog, close it.
4. To check the BRMS log, go to the Management Central section of the i5 Navigator.
Right-click the backup and select BRMS Log, as shown in Figure 5-75 on page 257. BRMS automatically fills in the parameters related to that job.
256 i5/OS V5R4 Virtual Tape: A Guide to Planning and Implementation

Figure 5-75 BRMS run Domino backup, selecting BRMS log
5. In the BRMS Log Include Entry type shown in Figure 5-76 on page 258, select Backup.
Change the date to Current date only, and change the time, if needed. Click OK.
Chapter 5. Saving Domino with BRMS and virtual tape 257

Figure 5-76 BRMS run Domino backup, select entries from BRMS log
Figure 5-77 on page 259 displays the results.
258 i5/OS V5R4 Virtual Tape: A Guide to Planning and Implementation

Figure 5-77 BRMS run Domino backup, BRMS log
6. To check the backup history, go to the Management Central section of i5 Navigator.
Right-click the backup and select View History, as shown in Figure 5-78 on page 260.
Chapter 5. Saving Domino with BRMS and virtual tape 259

Figure 5-78 BRMS run Domino backup, View History selected
7. Figure 5-79 on page 261 shows that the values in backup policy are already filled in. Click OK.
260 i5/OS V5R4 Virtual Tape: A Guide to Planning and Implementation

Figure 5-79 BRMS run Domino backup, select entries from BRMS history log
Chapter 5. Saving Domino with BRMS and virtual tape 261

BRMS presents the backup history for the job where you can see, for example, the number of objects that were saved; see Figure 5-80.
Figure 5-80 BRMS run Domino backup, BRMS history log
This concludes the processes involved in running a Domino backup.
5.6 Restoring a mail fileIn this scenario, we restore a mail file named mail6.ntf. Follow these steps to duplicate the tasks:
1. In Backup, Recovery and Media Services Tasks, click the Restore iSeries data icon, as shown in Figure 5-81 on page 263.
262 i5/OS V5R4 Virtual Tape: A Guide to Planning and Implementation

Figure 5-81 Restore Domino data with BRMS, restore icon
2. Read through the information screen that pops up as shown in Figure 5-82, and click OK.
Figure 5-82 Restore Domino data with BRMS, restore information
3. In the Include window shown in Figure 5-83 on page 264, fill in the values pertaining to the policy to be restored and the corresponding dates.
As an alternative, you can click Browse to find the policy.
Chapter 5. Saving Domino with BRMS and virtual tape 263

Figure 5-83 Restore Domino data with BRMS, Save History Include
4. In the Save History window shown in Figure 5-84 on page 265, right-click the relevant joblog and select Open.
As an alternative, you can use the Open icon in the navigation bar.
264 i5/OS V5R4 Virtual Tape: A Guide to Planning and Implementation

Figure 5-84 Restore Domino data with BRMS, Save History - select
5. Right-click the relevant saved record item and select Open, as shown in Figure 5-85.
Figure 5-85 Restore Domino data with BRMS, Save History - open file for restore
6. This brings up all 48 objects that were saved in that portion of the save, as shown in Figure 5-86 on page 266.
Right-click the save record presented and select Restore....
Chapter 5. Saving Domino with BRMS and virtual tape 265

Figure 5-86 Restore Domino data with BRMS, Save History - select object to restore
7. Read through the Restore window shown in Figure 5-87 on page 267, and click Next.
Note: The number of Domino objects that are saved in each sub-save is defined in Domino. In this example system, it is 50. Contact your Notes administrator if this value does not suit your needs.
The parameter is found in the notes.ini file. If not specified, the default value is 50.
266 i5/OS V5R4 Virtual Tape: A Guide to Planning and Implementation

Figure 5-87 Restore Domino data with BRMS, Welcome panel
8. In the window shown in Figure 5-88 on page 268, select Yes, use same name, and click Next.
Chapter 5. Saving Domino with BRMS and virtual tape 267

Figure 5-88 Restore Domino data with BRMS, Restore - same name
9. In the window shown in Figure 5-89 on page 269, select Yes, restore to the same location, and click Next.
268 i5/OS V5R4 Virtual Tape: A Guide to Planning and Implementation

Figure 5-89 Restore Domino data with BRMS, Restore - same location
10.Before deciding on the tape device to use, ensure that the volumes containing the backup to restore are loaded.
Select the relevant tape drive, and click Add Before or Add After, as shown in Figure 5-90 on page 270.
Chapter 5. Saving Domino with BRMS and virtual tape 269

Figure 5-90 Restore Domino data with BRMS, Restore - select tape device
11.The tape drive is selected. Click Next as shown in Figure 5-91 on page 271.
270 i5/OS V5R4 Virtual Tape: A Guide to Planning and Implementation

Figure 5-91 Restore Domino data with BRMS, Restore - tape device selected
12.In the Restore Summary window shown in Figure 5-92 on page 272, click Advanced Options... and the selection panel shown in Figure 5-93 on page 273 will open.
Chapter 5. Saving Domino with BRMS and virtual tape 271

Figure 5-92 Restore Domino data with BRMS, Restore summary
13.This offers additional printing, selection, and tape actions. If you want to allow differences, create parent directories, or change the end of tape option (the default is rewind), click the radio button or pull-down menu as appropriate.
Then click Finish if you make changes. Otherwise, click Cancel.
272 i5/OS V5R4 Virtual Tape: A Guide to Planning and Implementation

Figure 5-93 Restore Domino data with BRMS, Restore summary - advanced
14.In the Restore Summary panel shown in Figure 5-94 on page 274, click Finish.
Chapter 5. Saving Domino with BRMS and virtual tape 273

Figure 5-94 Restore Domino data with BRMS, Restore summary - Finish
15.If you want the joblog to be saved, select Save task output... and click OK, as shown in Figure 5-95 on page 275.
274 i5/OS V5R4 Virtual Tape: A Guide to Planning and Implementation

Figure 5-95 Restore Domino data with BRMS, Restore - save joblog
16.Figure 5-96 shows that the Restore Items task is started. Click OK.
Figure 5-96 Restore Domino data with BRMS, Restore started
Figure 5-97 shows that the restore job is completed.
Figure 5-97 Restore Domino data with BRMS, Restore completed
Chapter 5. Saving Domino with BRMS and virtual tape 275

5.6.1 Checking the resultsTo check the results, perform the following tasks:
1. Open the joblog by clicking the Task Output icon, as shown in Figure 5-98.
Figure 5-98 Restore Domino data with BRMS, restore - Task Output
2. Double-click the joblog shown in Figure 5-99, or select the joblog and click the Open icon.
Figure 5-99 Restore Domino data with BRMS, Restore - open joblog
3. Figure 5-100 on page 277 shows the joblog. Scroll down until you find a LNT0962 message stating Recovery of following Domino database completed successfully: /domino02/notes/data/mail6.ntf.
276 i5/OS V5R4 Virtual Tape: A Guide to Planning and Implementation

Figure 5-100 Restore Domino data with BRMS, Restore - joblog
To understand the message better, refer to the following Web site:
http://www-03.ibm.com/servers/eserver/iseries/service/brms/domsingledb.html
Its opening page is shown in Figure 5-101 on page 278.
Chapter 5. Saving Domino with BRMS and virtual tape 277

Figure 5-101 Restore Domino data with BRMS, Restore - recover single Lotus database
In the joblog you can also see two CPC370E messages. The first message states 1 object restored and the second message states 48 objects restored, although only one object is restored. This is because of the way the data is laid out.
This is not what you will see for ordinary i5 data. These files are specially adopted for Domino. Some are even hidden. You will not see them in the inventory. You only notice that some sequence numbers are missing.
4. Close the joblog and other opened windows related to this task.
This concludes the restore of the mail file mail6.ntf.
278 i5/OS V5R4 Virtual Tape: A Guide to Planning and Implementation

Chapter 6. BRMS and virtual tape
In this chapter we describe how to use virtual tape within BRMS. We assume that virtual tape is already set up as described in Chapter 3, “Implementing virtual tape storage” on page 33.
The virtual tape devices, image catalog, and virtual volumes must be created before implementing virtual tape with BRMS.
This chapter distinguishes between IBM ̂iSeries Navigator and 5250 emulation, since the approach for BRMS is totally different and it may be confusing when combining them. Here we cover only BRMS using 5250 emulation. BRMS and virtual tape using IBM ̂iSeries Navigator is covered separately in Chapter 7, “BRMS and virtual tape working from the Navigator” on page 329.
The topics covered in this chapter include how to implement BRMS using 5250 emulation, how to set up virtual tape, installing and maintaining BRMS, and setting up locations in BRMS for virtual tape.
6
© Copyright IBM Corp. 2006. All rights reserved. 279

6.1 Implementing BRMS using 5250 emulationBefore you implement BRMS, set up the environment for virtual tape.
Note: In this chapter we describe only the basic steps for setting up virtual tape as required for BRMS. For a complete explanation covering all the options for setting up virtual tape, refer to Chapter 3, “Implementing virtual tape storage” on page 33.
6.2 Setting up virtual tapeIf you have already created the virtual tape devices, image catalog, and virtual volumes, skip the following steps and proceed with the 6.3, “Installing BRMS” on page 281.
Perform the following actions to set up a virtual tape:
1. Create a virtual tape device or devices.
To create a virtual tape device, enter the following command:
CRTDEVTAP DEVD(TAPVRT01) RSRCNAME(*VRT)
You can also create an additional tape device, which will be used later for parallel backup:
CRTDEVTAP DEVD(TAPVRT02) RSRCNAME(*VRT)
2. Vary on the tape device or devices.
After creating the devices, enter the following commands to vary them on:
VRYCFG CFGOBJ(TAPVRT01) CFGTYPE(*DEV) STATUS(*ON)VRYCFG CFGOBJ(TAPVRT02) CFGTYPE(*DEV) STATUS(*ON)
3. Create tape image catalog or catalogs.
To create the image catalog, enter the following command:
CRTIMGCLG IMGCLG(CATALOG01) DIR('/MyCatalogDirectory01') TYPE(*TAP)
To create an additional catalog for later use for parallel backup, enter the following command:
CRTIMGCLG IMGCLG(CATALOG02) DIR('/MyCatalogDirectory02') TYPE(*TAP)
4. Create virtual tape volumes.
In this chapter, *VRT256K density is used. This uses an optimum blocksize compatible with 35xx devices and the newer type QIC devices. If you have an older type physical device, use another density.
280 i5/OS V5R4 Virtual Tape: A Guide to Planning and Implementation

Refer to Chapter 3, “Implementing virtual tape storage” on page 33, for more information about densities and compatibility with physical tape devices.
a. Create a virtual tape volume with the following command:
ADDIMGCLGE IMGCLG(CATALOG01) FROMFILE(*NEW) TOFILE(VRT001) VOLNAM(VRT001) DENSITY(*VRT256K)
One virtual tape volume is created. For additional volumes, create them one at a time. If you have multiple volumes to add, use the sample CL program as described in Appendix B, “Sample command language” on page 461.
b. Create virtual tape volumes in the second image catalog by entering the following command:
ADDIMGCLGE IMGCLG(CATALOG01) FROMFILE(*NEW) TOFILE(PAR001) VOLNAM(PAR001) DENSITY(*VRT256K)
You can now create additional volumes for the second catalog.
6.3 Installing BRMSIn this case we assume that you have set up BRMS, as described in “Installing BRMS” on page 28.
When BRMS is installed and PTFs applied, run the following command before using BRMS:
INZBRM OPTION(*RUNPRDINZ)
If you try to use BRMS after installation without running this command, you will receive the following message, as shown in Figure 6-1 on page 282 on the i5/OS Main Menu:
BRMS product initialization required.
Note: BRMS requires unique volumes even though it is allowed to use the same volume names in different catalogs. Therefore, a different volume name is used in the second catalog.
The volumes in BRMS should be unique in the entire BRMS network.
Chapter 6. BRMS and virtual tape 281

Figure 6-1 INZBRM *RUNPRDINZ required after installation of BRMS
Figure 6-2 on page 283 shows the Additional Message Information screen, which explains why this message was sent.
MAIN i5/OS Main Menu System: RCHAS08
Select one of the following: 1. User tasks 2. Office tasks 3. General system tasks 4. Files, libraries, and folders 5. Programming 6. Communications 7. Define or change the system 8. Problem handling 9. Display a menu 10. Information Assistant options 11. iSeries Access tasks 90. Sign off Selection or command ===> WRKDEVBRM F3=Exit F4=Prompt F9=Retrieve F12=Cancel F13=Information Assistant F23=Set initial menu BRMS product initialization required.
282 i5/OS V5R4 Virtual Tape: A Guide to Planning and Implementation

Figure 6-2 Show BRMS message BRM40A2
INZBRMBefore you use the virtual devices, image catalog, and virtual volumes that have been set up in BRMS, enter the following command:
INZBRM OPTION(*DEVICE)
This brings up the devices in BRMS. Four virtual media classes are also created by BRMS with this command. This will be the case each time you run this command. Therefore, if you create additional virtual tape devices, you should run this command.
6.4 Setting up locations in BRMS for virtual tapeAfter virtual tape is set up and BRMS is installed, then set up BRMS for virtual tape, as explained here.
A location in BRMS represents the place where the volumes and the tape devices or libraries reside. And the first thing to consider is whether you want to use the default locations within BRMS, rather than create your own locations. The default locations that BRMS creates are VAULT and *HOME.
In the case of physical devices and locations, these defaults may be acceptable to use. This chapter discusses the use of VAULT to store physical volumes.
Additional Message Information Message ID . . . . . . : BRM40A2 Severity . . . . . . . : 40 Message type . . . . . : Information Date sent . . . . . . : 12/04/05 Time sent . . . . . . : 12:10:48 Message . . . . : BRMS product initialization required. Cause . . . . . : The Backup, Recovery and Media Services (BRMS) program product has not been successfully initialized. BRMS operations cannot be performed until this initialization process has completed successfully. Recovery . . . : Run the following command to complete BRMS product initialization. INZBRM OPTION(*RUNPRDINZ) BRMS product initialization can be a long running process. Use the following command to
retrieve an estimate of the time needed to complete the initialization process. INZBRM OPTION(*ESTPRDINZ) The estimated time will be returned in message BRM402B. Bottom
Chapter 6. BRMS and virtual tape 283

For virtual tape, however, certain considerations should be kept in mind when determining whether to create your own locations or use the defaults.
6.4.1 Location considerations in BRMSConsider the following points when planning BRMS locations:
� Because you are using virtual volumes, it may be better to create a location to reflect the virtual location for new volumes. You can use *HOME, but it may be confusing when there are also physical volumes on this location.
� After backup, the data that is backed up is still on the system, since the virtual volumes are actually images on the disks. The way you should proceed now depends on your backup strategy:
– After backup, copy the virtual volumes to physical tape volumes using DUPMEDBRM and remove the images after they are duplicated.
– After backup, copy the virtual volumes to physical tape volumes using DUPMEDBRM and keep the images on the system for later use. This option may be an alternative for keeping the volumes in the physical media library for restore purposes.
– After backup, the images have to be transferred or copied to other systems for restore or safety purposes.
In this chapter, we use location VIRTUAL for the virtual volumes. This will also be the home location for virtual volumes. When the virtual volumes are used for backup and are not duplicated, they will still be on location VIRTUAL. For volumes that are used for backup and duplicated to physical media, use location COPIED.
284 i5/OS V5R4 Virtual Tape: A Guide to Planning and Implementation

Adding locationsTo add locations in BRMS, do the following:
1. In the command line, enter the following command:
WRKLOCBRM
2. In the first line below Opt, type 1. Below Location, type VIRTUAL. The screen will now appear as shown in Figure 6-3.
Figure 6-3 Specify 1 to add location VIRTUAL in WRKLOCBRM
Press Enter and type your text on the Add storage Location screen. Notice that we kept the default Allow volumes to expire as *NO, as shown in Figure 6-4 on page 286.
Work with Storage Locations RCHAS08 Position to . . . . . . Starting characters Type options, press Enter. 1=Add 2=Change 3=Copy 4=Remove 5=Display 6=Work with media 7=Work with containers Opt Location Volumes Containers Text 1 VIRTUAL *HOME 11 0 Entry created by BRM configuration VAULT 5 0 Entry created by BRM configuration
Chapter 6. BRMS and virtual tape 285

Figure 6-4 Add storage location VIRTUAL
3. Press Enter to add the location and to go back to the WRKLOCBRM screen.
4. To add another location, type 1 again on the first line below Opt. Type COPIED below Location. The screen will now appear as shown in Figure 6-5.
Figure 6-5 Specify 1 to add location COPIED in WRKLOCBRM
Press Enter and type your text in the Add storage Location screen as shown in Figure 6-6. Notice that Allow volumes to expire is changed to *YES.
Add Storage Location Type choices, press Enter. Storage location . . . . . . . . . VIRTUAL Name Address line 1 . . . . . . . . . . Image catalog on DASD Address line 2 . . . . . . . . . . Address line 3 . . . . . . . . . . Address line 4 . . . . . . . . . . Address line 5 . . . . . . . . . . Contact name . . . . . . . . . . . Contact telephone number. . . . . . Retrieval time . . . . . . . . . . .0 Hours Allow volumes to expire . . . . . . *NO *YES, *NO Media slotting . . . . . . . . . . *NO *YES, *NO Text . . . . . . . . . . . . . . . Location for virtual volumes
Work with Storage Locations RCHAS08 Position to . . . . . . Starting characters Type options, press Enter. 1=Add 2=Change 3=Copy 4=Remove 5=Display 6=Work with media 7=Work with containers Opt Location Volumes Containers Text 1 COPIED *HOME 11 0 Entry created by BRM configuration VAULT 5 0 Entry created by BRM configuration VIRTUAL 0 0
286 i5/OS V5R4 Virtual Tape: A Guide to Planning and Implementation

Figure 6-6 Add storage location VIRTUAL
The process of adding locations is now complete.
6.4.2 Setting up virtual devices in BRMSDevices in BRMS do not have to be set up manually, because INZBRM *DEVICE creates the BRMS devices based on the devices in the native i5/OS. However, the devices are created with defaults. Since virtual devices are being discussed, you should change the parameters to suit your requirements.
To change the BRMS devices you want to use, do the following:
1. Type the following in the command line:
WRKDEVBRM
Then press Enter.
2. Type 2 in front of the device you want to change, as shown in Figure 6-7 on page 288, and press Enter.
Add Storage Location Type choices, press Enter. Storage location . . . . . . . . . COPIED Name Address line 1 . . . . . . . . . . Virtual volumes on DASD Address line 2 . . . . . . . . . . Address line 3 . . . . . . . . . . Address line 4 . . . . . . . . . . Address line 5 . . . . . . . . . . Contact name . . . . . . . . . . . Contact telephone number. . . . . . Retrieval time . . . . . . . . . . .0 Hours Allow volumes to expire . . . . . . *YES *YES, *NO Media slotting . . . . . . . . . . *NO *YES, *NO Text . . . . . . . . . . . . . . . Virtual volumes that have been duplicated
Note: Ensure that virtual volumes containing data and eligible for backup are actually duplicated to physical media.
If they are not duplicated before they expire, the data will be lost when they are reused.
Chapter 6. BRMS and virtual tape 287

Figure 6-7 Work with devices in BRMS
3. Change the parameter Location, shown in Figure 6-8, from *HOME to VIRTUAL. After a volume is processed in this virtual tape device, it will be in location VIRTUAL.
Figure 6-8 Change virtual tape device TAPVRT01
Work with Devices RCHAS08 Position to . . . . . . Starting characters Type options, press Enter. 1=Add 2=Change 4=Remove 5=Display 8=Work with status Opt Device Category Type/Model Text LANTAP *TAP 6380/001 Entry created by BRM configuration MERVVRT *VRTTAP 63B0/001 Entry created by BRM configuration NEWVRT01 *VRTTAP 63B0/001 Entry created by BRM configuration NEWVRT05 *VRTTAP 63B0/001 Entry created by BRM configuration TAPVRTBB *VRTTAP 63B0/001 Entry created by BRM configuration TAPVRTBB1 *VRTTAP 63B0/001 Entry created by BRM configuration TAPVRTBB2 *VRTTAP 63B0/001 Entry created by BRM configuration 2 TAPVRT01 *VRTTAP 63B0/001 Entry created by BRM configuration TAPVRT02 *VRTTAP 63B0/001 Entry created by BRM configuration TAPVRT06 *VRTTAP 63B0/001 Entry created by BRM configuration
Change Virtual Tape Device Virtual device . . . . . . . . . : TAPVRT01 Device type/model . . . . . . . . : 63B0/001 Type changes, press Enter. Text . . . . . . . . . . . . . . . Virtual tape drive TAPVRT01 Location . . . . . . . . . . . . . VIRTUAL Name, F4 for list Use optimum block size . . . . . . *YES *NO, *YES Next volume message . . . . . . . . *NO *YES, *NO Tape mount delay . . . . . . . . . *IMMED *IMMED, 1-999 Auto enroll media . . . . . . . . . *NO *SYSPCY, *NO, *YES Shared device . . . . . . . . . . . *NO *YES, *NO Shared device wait . . . . . . . 30 Seconds
288 i5/OS V5R4 Virtual Tape: A Guide to Planning and Implementation

4. Change the parameter Location of the second virtual tape drive TAPVRT02, as well.
The setting up of BRMS devices is now complete.
6.4.3 Creating virtual media classesTo distinguish between densities or volumes, select or create a media class. For virtual volumes, there are four different densities as described in Chapter 3, “Implementing virtual tape storage” on page 33.
To work with media classes, use the following command:
WRKCLSBRM
This displays a screen similar to the one shown in Figure 6-9 on page 290.
Note: Physical tape devices in BRMS are created by default with the Next volume message parameter *YES. However, in the case of virtual tape devices, the Next volume message parameter is set to *NO by default.
In the case of standalone physical devices, this parameter should be set to *YES to give the operator the time to mount the next volume.
Chapter 6. BRMS and virtual tape 289

Figure 6-9 Work with media classes
Press PgDn for the other media classes, as shown in Figure 6-10 on page 291.
Work with Media Classes RCHAS08 Position to . . . . . . Starting characters Type options, press Enter. 1=Add 2=Change 3=Copy 4=Remove 5=Display 6=Work with media Opt Class Density Capacity Text QIC1000 *QIC1000 *DENSITY Entry created by BRM configuration QIC120 *QIC120 *DENSITY Entry created by BRM configuration QIC150 *QIC150 *DENSITY Entry created by BRM configuration QIC2DC *QIC2DC *DENSITY Entry created by BRM configuration QIC2GB *QIC2GB *DENSITY Entry created by BRM configuration QIC4DC *QIC4DC *DENSITY Entry created by BRM configuration QIC4GB *QIC4GB *DENSITY Entry created by BRM configuration QIC525 *QIC525 *DENSITY Entry created by BRM configuration SAVSYS *QIC4DC *DENSITY Entry created by BRM configuration VRT240K *VRT240K *DENSITY Entry created by BRM configuration VRT256K *VRT256K *DENSITY Entry created by BRM configuration More...
290 i5/OS V5R4 Virtual Tape: A Guide to Planning and Implementation

Figure 6-10 Second page of work with media classes
You can create your own media class, for example, to create separate media classes with the same density. In this chapter, however, we used the VRT256K volume containing the properties shown in Figure 6-11.
Figure 6-11 Display media class
Work with Media Classes RCHAS08 Position to . . . . . . Starting characters Type options, press Enter. 1=Add 2=Change 3=Copy 4=Remove 5=Display 6=Work with media Opt Class Density Capacity Text VRT32K *VRT32K 5 GB 32K density suites all real tape dri VRT64K *VRT64K *DENSITY Entry created by BRM configuration Bottom
Display Media Class Media class . . . . . . . . . . . : VRT256K Density . . . . . . . . . . . . . : *VRT256K Media capacity . . . . . . . . . : *DENSITY Mark for label print . . . . . . . *NONE Label size . . . . . . . . . . . : 6 LPI Label output queue . . . . . . . : *SYSPCY Library . . . . . . . . . . . . : Shared media . . . . . . . . . . : *NO Write once media . . . . . . . . : *NO Text . . . . . . . . . . . . . . : Entry created by BRM configuration
Chapter 6. BRMS and virtual tape 291

To create a media class, follow these steps:
1. In the WRKCLSBRM screen, type 1. Below Class, specify the name you want to use for your own media class, as shown in Figure 6-12. Then press Enter.
Figure 6-12 Create your own media class
2. In the following screen, specify a density (this example assumes that you want a media class of *VRT240K). When you press Enter again, Figure 6-13 on page 293 is displayed.
Work with Media Classes RCHAS08 Position to . . . . . . Starting characters Type options, press Enter. 1=Add 2=Change 3=Copy 4=Remove 5=Display 6=Work with media Opt Class Density Capacity Text 1 MYCLASS QIC1000 *QIC1000 *DENSITY Entry created by BRM configuration QIC120 *QIC120 *DENSITY Entry created by BRM configuration QIC150 *QIC150 *DENSITY Entry created by BRM configuration QIC2DC *QIC2DC *DENSITY Entry created by BRM configuration QIC2GB *QIC2GB *DENSITY Entry created by BRM configuration QIC4DC *QIC4DC *DENSITY Entry created by BRM configuration QIC4GB *QIC4GB *DENSITY Entry created by BRM configuration QIC525 *QIC525 *DENSITY Entry created by BRM configuration SAVSYS *QIC4DC *DENSITY Entry created by BRM configuration VRT240K *VRT240K *DENSITY Entry created by BRM configuration VRT256K *VRT256K *DENSITY Entry created by BRM configuration
292 i5/OS V5R4 Virtual Tape: A Guide to Planning and Implementation

Figure 6-13 Shared media *YES seems to be an invalid option
The Help text shown in Figure 6-14 identifies the problem.
Figure 6-14 Help text at shared media parameter
Add Media Class Type choices, press Enter. Media class . . . . . . . . . . . . MYCLASS Name Density . . . . . . . . . . . . . . *VRT240K F4 for list Media capacity . . . . . . . . . . *DENSITY *DENSITY, Number nnnnn.nn Unit of measure . . . . . . . . . 1=KB, 2=MB, 3=GB Mark for label print . . . . . . . *NONE *NONE, *MOVE, *WRITE Label size . . . . . . . . . . . . 1 1=6 LPI, 2=8 LPI, 3=9 LPI Label output queue . . . . . . . . *SYSPCY Name, *SYSPCY, *PRTF Library . . . . . . . . . . . . . Name, *LIBL Shared media . . . . . . . . . . . *YES *YES, *NO Write once media . . . . . . . . . *NO *YES, *NO Text . . . . . . . . . . . . . . . More... F3=Exit F4=Prompt F12=Cancel Entry specified is not valid.
................................................................: Shared Media - Help :: :: This media class cannot be shared by multiple systems. :: This is the only valid value when the media class uses :: a virtual density (*VRT32K *VRT64K *VRT240K *VRT256K). :: Bottom :: F2=Extended help F10=Move to top F11=Search Index :: F12=Cancel F20=Enlarge F24=More keys :: ::..............................................................:
Chapter 6. BRMS and virtual tape 293

l
6.4.4 Creating move policiesA move policy in BRMS can be used to move volumes to a specific location. Physical volumes should be moved physically to the location according to the move policy. Virtual volumes are still on the system, and to reflect the function of those volumes, location VIRTUAL and location COPIED were created in paragraph locations.
Set up a move policy in which the volume will be moved from VIRTUAL to COPIED after the volumes are duplicated and eligible for expiring.
To work with move policies in BRMS, type the following command:
WRKPCYBRM *MOV
1. To add a new location, type 1 in the Opt column. In the Policy column, type the name of the policy you want to add (in this case, it is TO_COPIED). Press Enter. The screen looks as shown in Figure 6-15.
Figure 6-15 Work with move policies
2. The Create Move Policy screen is shown. Specify the options and parameters as shown in Figure 6-16 on page 295.
Note: Virtual media cannot be shared with other systems in a BRMS network; however these virtual volumes will be visible on other systems.
BRMS does not distinguish between physical and virtual media classes at creation time. We recommend the Shared media parameter in the media class for virtual volumes is changed to *NO.
Work with Move Policies RCHAS08 Position to . . . . . . Starting characters Type options, press Enter. 1=Create 2=Change 3=Copy 4=Delete 5=Display Opt Policy Text 1 TO_COPIED OFFSITE Entry created by BRM configuration
294 i5/OS V5R4 Virtual Tape: A Guide to Planning and Implementation

Figure 6-16 Create a move policy TO_COPIED
3. The volumes using this move policy will be moved to location COPIED, and they will be there until they expire. Use the following command to move volumes:
MOVMEDBRM
After they expire, the volumes will be moved back to the home location, which in this case is VIRTUAL.
4. Verify moves have been changed to *NO, which means that the volumes are automatically moved when the MOVMEDBRM command is issued. No manual intervention is needed in this case. To verify the volumes manually, use the following command:
VFYMOVBRM
The intention of this command is to make the user or operator aware of the fact that the volume is moved. For physical volumes, this can be used to ensure that the physical locations match the locations in the BRMS database.
This chapter does not deal with manual intervention since the virtual volumes should be duplicated. BRMS does not move the volumes according the move policy when they are not duplicated yet.
Create Move Policy RCHAS08 Move policy . . . . . . . . . . TO_COPIED Home location . . . . . . . . . VIRTUAL Name, *SYSPCY, *ORIGIN, F4 list Use container . . . . . . . . . *NO *YES, *NO Verify moves . . . . . . . . . . *NO *YES, *NO Calendar for working days . . . *ALLDAYS Name, *ALLDAYS, F4 for list Calendar for move days . . . . . *ALLDAYS Name, *ALLDAYS, F4 for list Text . . . . . . . . . . . . . . Type choices, press Enter. Seq Location Duration 10 COPIED *EXP
Chapter 6. BRMS and virtual tape 295

If the volumes are used for backup and not duplicated yet, and you try to move them using MOVMEDBRM, message BRM1364 will be sent to the joblog as shown in Figure 6-17.
Figure 6-17 BRM1364 additional message information
At this point, the move policy for the virtual volumes has been created. The next stage is to create the move policy for the physical volumes.
1. Enter the following command:
WRKPCYBRM *MOV
2. Type 1 in the Opt column. In the Policy column, type the name of the policy you want to add (in this case, it is TO_OUTDOOR). The screen looks as shown in Figure 6-18. Press Enter.
Figure 6-18 Work with move policies adding the move policy for physical volumes
3. In the Create Move Policy screen, specify the options and parameters as shown in Figure 6-19 on page 297.
Additional Message Information Message ID . . . . . . : BRM1364 Severity . . . . . . . : 30 Message type . . . . . : Information Date sent . . . . . . : 12/07/05 Time sent . . . . . . : 11:06:55 Message . . . . : Media volume PAR003 not moved to location COPIED. Cause . . . . . : The media volume PAR003 was not moved to location COPIED because the volume is marked for duplication.
Work with Move Policies RCHAS08 Position to . . . . . . Starting characters Type options, press Enter. 1=Create 2=Change 3=Copy 4=Delete 5=Display Opt Policy Text 1 TO_OUTDOOR
OFFSITE Entry created by BRM configuration TO_COPIED
296 i5/OS V5R4 Virtual Tape: A Guide to Planning and Implementation

Figure 6-19 Create a move policy TO_OUTDOOR
So far we have described how to set up locations and a move policy to prevent the volumes from being expired when they are not duplicated. The additional location COPIED is necessary to expire the volumes, because location VIRTUAL does not allow expiring volumes. A move policy for the physical volumes was also created.
6.4.5 Creating media policiesAt this point the location, devices, move policies, and media classes to use have been determined. Next, you create a media policy.
1. Enter the following command to go to media policies:
WRKPCYBRM *MED
Create Move Policy RCHAS08 Move policy . . . . . . . . . . TO_OUTDOOR Home location . . . . . . . . . *HOME Name, *SYSPCY, *ORIGIN, F4 list Use container . . . . . . . . . *NO *YES, *NO Verify moves . . . . . . . . . . *NO *YES, *NO Calendar for working days . . . *ALLDAYS Name, *ALLDAYS, F4 for list Calendar for move days . . . . . *ALLDAYS Name, *ALLDAYS, F4 for list Text . . . . . . . . . . . . . . Type choices, press Enter. Seq Location Duration 10 VAULT *EXP
Chapter 6. BRMS and virtual tape 297

2. In the Opt column, type 1. In the Policy column, type VIRTUAL. The screen looks as shown in Figure 6-20. Press Enter.
Figure 6-20 Work with media policies
3. Change the options in the Create Media Policy screen shown in the next two figures (Figure 6-21 and Figure 6-22 on page 299). After changing the options on the first screen, press PgDn and you will see the second screen.
Work with Media Policies RCHAS08 Position to . . . . . . Starting characters Type options, press Enter 1=Create 2=Change 3=Copy 4=Delete 5=Display Opt Policy Text 1 VIRTUAL ARCHIVAL Entry created by BRM configuration FULL Entry created by BRM configuration INCR Entry created by BRM configuration SAVF Entry created by BRM configuration SAVSYS Entry created by BRM configuration SYSTEM Entry created by BRM configuration Z051124000 Full 35 days Z051124001 Entry created by BRM configuration Z051124002 Entry created by BRM configuration Z051127000 *NONE
298 i5/OS V5R4 Virtual Tape: A Guide to Planning and Implementation

Figure 6-21 Create media policy, first screen
Figure 6-22 Create media policy next screen
Create Media Policy Type choices, press Enter. Media policy . . . . . . . . . . . VIRTUAL Name Retention type . . . . . . . . . . 2 1=Date, 2=Days, 3=Versions, 4=Permanent Retain media . . . . . . . . . . 4 Date, Number Move policy . . . . . . . . . . . TO_COPIED Name, *NONE, *ADSM, F4 Media class . . . . . . . . . . . VRT256K Name, *SYSPCY, *ADSM, F4 Storage location . . . . . . . . . *ANY Name, *ANY, F4 for list Save to save file . . . . . . . . *NO *YES, *NO ASP for save files . . . . . . . *SYSTEM Name, *SYSTEM, 1-32 Save file retention type . . . . 4 1=Date, 2=Days, 3=Permanent, 4=None Retain save files . . . . . . *NONE Date, Number, *NONE ASP storage limit . . . . . . . *SYS *SYS, 1-99 Secure media . . . . . . . . . . . *NO *YES, *NO, *ADSM Text . . . . . . . . . . . . . . . Virtual volumes to be copied More... F3=Exit F4=Prompt F5=Refresh F12=Cancel
Create Media Policy Type choices, press Enter. Required volumes . . . . . . . . . *NONE *NONE, 1-9999 Mark volumes for duplication . . . *YES *NO, *YES Mark history for duplication . . . *NO *NO, *YES
Chapter 6. BRMS and virtual tape 299

The choices available are explained here:
– Retention type: Against this, you can choose to retain the volumes based on the number of days, date, versions, or permanently.
• Date: This means they are based on a specific date.
• Days: This indicates the number of days.
• Versions: This means the number of versions of the same set of data that should be kept. Use caution when using this value, since it can result in volumes that never expire in cases of *ALLUSR, *IBM, and so on. The reason for this is because the datasets can differ due to a deleted or added library.
• Permanent: This means that the volume never expires.
– Retain media: This represents the number of days or versions, depending on what is selected, for which the volumes should be retained.
In this chapter, we do not use savefiles. BRMS savefiles have a similar function as the virtual tape. However, they cannot be moved to other systems and only BRMS knows the contents of the savefile.
These savefiles are stored on the system. To move the data from the system, use the SAVSAVFBRM command.
– Secure Media: In this chapter, we do not use Secure Media. It determines whether or not you want to apply volume security to volumes in this media class. Volumes that are secured can only be read by users with the *ALLOBJ or *SECADM special authorities.
– Required volumes: This can be used if you want to ensure that there are enough volumes before the save. If this is not the case, the backup will not start. This is useful for physical volumes.
However, for virtual volumes, there is no reason to do this. You can create multiple virtual volumes as long as you have disk space, that is, until you reach the 256 maximum limit of volumes per image catalog.
– Mark volumes for duplication: This indicates that the volume has a flag and all the volumes with the flag turned on are eligible for duplication. After they are duplicated, the flag will be turned off. The command to duplicate BRMS volumes is DUPMEDBRM.
This option can be very useful, especially for virtual volumes, since the volumes have to be duplicated to physical media, unless you want to transfer the virtual volume images to another system.
– Mark history for duplication: This is a new option in V5R4 and can be used if you are duplicating parts or sequence numbers of a volume. BRMS then keeps tracking, whether the sequences are duplicated or not. To check
300 i5/OS V5R4 Virtual Tape: A Guide to Planning and Implementation

whether saved data items have turned this flag on, type WRKMEDIBRM, press Enter and press F11 twice.
– Marked for Duplication: This shows whether the flag is turned on or not.
6.4.6 Creating the link listThis section defines the backup items in the control group. One of the items used is a linklist.
1. To define a linklist, enter the following command:
WRKLBRM
Then press Enter.
2. In the next screen, type 1 in the Opt column, IFSUSRDTA in the List Name column, *BKU in the Use column, and *LNK in the Type column. The screen looks as shown in Figure 6-23. Press Enter.
Figure 6-23 Work with lists
3. In the next page, type your text and press Enter again.
4. This takes you back to the screen Work with lists. Change the list that has just been created, to add the IFS entries you want to back up. Type 2 in the Opt column in front of list IFSUSRDTA, and press Enter.
5. In the next page, type a plus sign (+) in the Objects field and press Enter. Now specify the *INCLUDE options and *OMIT options, as shown in Figure 6-24 on page 302.
Work with Lists RCHAS08 Position to . . . . . . Starting characters Type options, press Enter. 1=Add 2=Change 3=Copy 4=Remove 5=Display 6=Print Opt List Name Use Type Text 1 IFSUSRDTA *BKU *LNK ITSODBSAVE *BKU *LNK Saves all ITSO data bases QALLSPLF *BKU *SPL All printed output QIBMLINK *BKU *LNK All IBM directories QLNKOMT *BKU *LNK Associated user omit list for *LINK.
Chapter 6. BRMS and virtual tape 301

Figure 6-24 First screen of change values in linklist
Scroll down the page to the next screen, which is shown in Figure 6-25 on page 303.
Specify More Values for Parameter OBJ Type choices, press Enter. Objects: Name . . . . . . . . . . . . . > '/*' Include or omit . . . . . . . *INCLUDE *INCLUDE, *OMIT Name . . . . . . . . . . . . . > '''/QSYS.LIB'' `' Include or omit . . . . . . . > *OMIT *INCLUDE, *OMIT Name . . . . . . . . . . . . . > 'QDLS' Include or omit . . . . . . . > *OMIT *INCLUDE, *OMIT Name . . . . . . . . . . . . . > 'QFileSvr.400' Include or omit . . . . . . . > *OMIT *INCLUDE, *OMIT More...
302 i5/OS V5R4 Virtual Tape: A Guide to Planning and Implementation

Figure 6-25 More values for parameter OBJ on change list on WRKLBRM
Press Enter twice, and the list will be changed.
This describes is an example of creating a linklist containing user data. You have the option of omitting directories.
Specify More Values for Parameter OBJ Type choices, press Enter. Name . . . . . . . . . . . . . '/QOpensys' Include or omit . . . . . . . *OMIT *INCLUDE, *OMIT Name . . . . . . . . . . . . . '/QNTC' Include or omit . . . . . . . *OMIT *INCLUDE, *OMIT Name . . . . . . . . . . . . . '/QOPT' Include or omit . . . . . . . *OMIT *INCLUDE, *OMIT Name . . . . . . . . . . . . . Include or omit . . . . . . . *INCLUDE *INCLUDE, *OMIT More...
Note: The virtual volumes also reside in an IFS directory, and you can omit the directory in the linklist. You can also change the ALWSAV attribute of the directory, which will prevent this directory from being saved. For more information about this topic, refer to 2.2.2, “The amount of space needed” on page 11.
Chapter 6. BRMS and virtual tape 303

6.4.7 Creating control groups for daily backup of user dataA control group is used to specify the items to be saved, the tape device to be used, the media policy to be used, and so on.
This section describes how to create control groups, with backup items for daily save operations, containing user data in IFS and libraries.
1. Type the following command to go to the control groups:
WRKCTLGBRM
This displays the screen shown in Figure 6-26.
Figure 6-26 Work with backup control groups
You can now add your own control group for daily backup of user data.
2. Type 1 in the Opt column. Type DAILY in the Control Group column, and press Enter.
3. In the next screen (see Figure 6-27 on page 305), create your control group entries, press Enter, and then press F3 to exit the control group.
In the Exit control group screen, type: 1, which indicates save and exit session.
Work with Backup Control Groups RCHAS08 Position to . . . . . . Starting characters Type options, press Enter 1=Create 2=Edit entries 3=Copy 4=Delete 5=Display 6=Add to schedule 8=Change attributes 9=Subsystems to process ... Full Incr Weekly Control Media Media Activity Opt Group Policy Policy SMTWTFS Text *BKUGRP Z051124000 FULL *BKUPCY Backs up all user data *SYSGRP Z051124001 SAVSYS *BKUPCY Backs up all system data *SYSTEM Z051124002 SYSTEM *BKUPCY Backs up the entire system
ITSODBSAVE Z051127000 Z051127001 Saves all ITSO data bases
304 i5/OS V5R4 Virtual Tape: A Guide to Planning and Implementation

Figure 6-27 Create backup control group entries
4. To change the attributes of the control group, go to the screen Work with control groups, type 8 in the Opt column in front of the control group DAILY, and press Enter.
5. In the next screen, change the options as shown in Figure 6-28 on page 306.
Create Backup Control Group Entries RCHAS08
Group . . . . . . . . . . : DAILY Default activity . . . . . FFFFFFF Text . . . . . . . . . . . Control group for daily backups Type information, press Enter. Auxiliary Weekly Retain Save SWA Backup List Storage Activity Object While Message Seq Items Type Pool Device SMTWTFS Detail Active Queue 10 *EXIT *DFTACT 20 *SAVSECDTA *DFTACT *NO 30 *SAVCFG *DFTACT *NO 40 *ALLUSR *SYSBAS *DFTACT *YES *NO 50 *ALLDLO *DFTACT *YES *NO 60 IFSUSRDTA *LNK *ALLAVL *DFTACT *YES *NO 70 *EXIT *DFTACT
Chapter 6. BRMS and virtual tape 305

Figure 6-28 First page of change backup control group attributes
For most parameters, refer to the backup policy. However, this section specifies the actual values that should appear in the fields.
– Media policy: Use VIRTUAL as the media policy, as discussed in 6.4.5, “Creating media policies” on page 297.
– Backup device: Use TAPVRT01 as the backup device. It is connected to image catalog01 in this scenario, with volumes VRT001, VRT002, and so on.
– Parallel device resources: Use this parameter for parallel operations, to specify how many devices should be used.
– Sign off interactive users: Set this to *NO, since it is assumed in this chapter that there is minimal system activity. However, if you want your users to be signed off, set this to *YES.
– Default weekly activity: This is FFFFFFF in this case, since the plan is to perform a full backup of the backup, regardless of the day the backup runs on.
– Incremental type: Select a cumulative backup or an incremental backup. This scenario, however, does not use incremental backup.
Change Backup Control Group Attributes Group . . . . . . . . . . . . . . . . : DAILY Type information, press Enter. Media policy for: Full backups . . . . . . . . . . . . . VIRTUAL Name, F4 for list Incremental backups . . . . . . . . . VIRTUAL Name, F4 for list Backup devices . . . . . . . . . . . . . TAPVRT01 Name, F4 for list Parallel device resources: Minimum resources . . . . . . . . . . 1 1-32, *NONE, *AVAIL Maximum resources . . . . . . . . . . 1 1-32, *AVAIL, *MIN Sign off interactive users . . . . . . . *NO *YES, *NO, *BKUPCY Sign off limit . . . . . . . . . . . . . *BKUPCY 0-999 minutes, *BKUPCY Default weekly activity . . . . . . . . FFFFFFF SMTWTFS(F/I), *BKUPCY Incremental type . . . . . . . . . . . . *BKUPCY *CUML, *INCR, *BKUPCY Force full backup days . . . . . . . . . *BKUPCY 0-365, *NOMAX, *BKUPCY More... F3=Exit F4=Prompt F12=Cancel
306 i5/OS V5R4 Virtual Tape: A Guide to Planning and Implementation

– Force full backup days: This is a new parameter in V5R4, which can be used to force a full backup to ensure that a full backup is done after a specified number of days. Since this option is not used in this scenario, this parameter was left at *BKUPCY.
Scroll down the page to go to the second page of the Change Backup Control Group Attributes screen as, shown in Figure 6-29.
Figure 6-29 Second screen of change backup control group attributes
The parameters to be set here are as follows:
– Automatically backup media information: Use this to specify whether media information should be saved at the end of this control group.
*OBJ is for the most detailed level and *NONE means no media information should be saved, which implies that QUSRBRM is not saved in the BRMS control group, post-processing.
In this scenario, you are saving on virtual media first, and then the media is duplicated to physical media. Therefore, do not save the media now, since it will reflect the virtual volumes on which the data is contained after the backup.
Change Backup Control Group Attributes Group . . . . . . . . . . . . . . . . : DAILY Type information, press Enter. Automatically backup media information . . . . . . . . . *NONE *LIB, *OBJ, *NONE, *BKUPCYSave access paths . . . . . . . . . . . *BKUPCY *YES, *NO, *BKUPCY ... Save contents of save files . . . . . . *BKUPCY *YES, *NO, *BKUPCY Save spooled file data . . . . . . . . . *BKUPCY *NONE, *ALL, *BKUPCY Data compression . . . . . . . . . . . . *BKUPCY *DEV, *YES, *NO, *BKUPCY Data compaction . . . . . . . . . . . . *BKUPCY *DEV, *NO, *BKUPCY Target release . . . . . . . . . . . . . *BKUPCY *CURRENT, *PRV, *BKUPCY Clear . . . . . . . . . . . . . . . . . *BKUPCY *NONE, *ALL... Object pre-check . . . . . . . . . . . . *BKUPCY *YES, *NO, *BKUPCY Append to media . . . . . . . . . . . . *NO *YES, *NO, *BKUPCY End of tape option . . . . . . . . . . . *BKUPCY *UNLOAD, *REWIND... Journaled objects . . . . . . . . . . . *BKUPCY *YES, *NO, *BKUPCY Use optimum block size . . . . . . . . . *BKUPCY *BKUPCY, *DEV, *YES, *NO More... F3=Exit F12=Cancel
Chapter 6. BRMS and virtual tape 307

What is required is the media information with the physical volumes in it. Therefore, media information should be saved later at duplication time. Media information is required for recovery. If you do not have it, you will not be able to recover the backups from the BRMS database.
Another good reason to set this value to *NONE is if you plan to run two or more control groups at the same time, which may be lead to lock conflicts. If you have both control groups set to *NONE for saving the media information, use the SAVMEDIBRM command separately after the saves are completed.
– Append to media: Use this to add data to existing volumes that are active. This can be a useful parameter for physical volumes, especially if you want to use your volumes more efficiently. You can use it for virtual volumes too.
However, if you have specified *MIN for the image catalog size, there is no need to use *APPEND, since the allocated space is minimum.
Now scroll down the page to the third screen of Change Backup Control Group Attributes, which is shown in Figure 6-30 on page 309.
Note: Since most of the options in this screen are common backup parameters, you can refer to the backup policy since they apply for all backups.
308 i5/OS V5R4 Virtual Tape: A Guide to Planning and Implementation

Figure 6-30 Third screen of change backup control group attributes
The parameters to be set here are as follows:
– IPL after backup: In this scenario, set it to *NO, since in this scenario, you have to IPL the system after backup.
– Save active wait time: This points to the Save While Active option in the Backup item list in the control group. Since you do not have to use Save While Active in this scenario, this value does not apply.
– Backup item exit program: This is a new parameter in V5R4. With this option, you can control each backup item entry in the backup control group. The layout and options of the Exit program are provided in Appendix C, “Quick start guide” on page 471.
– Missed object policy: This, too, is a new parameter in V5R4, and it can be set to *YES in order to track the missed objects. These objects will then be added to the control group or the list specified in this parameter. When this control group runs, the missed objects will be saved.
Scroll down the page to go to the final screen of Change Backup Control Group Attributes, which is shown in Figure 6-31 on page 310.
Change Backup Control Group Attributes Group . . . . . . . . . . . . . . . . : DAILY Type information, press Enter. IPL after backup . . . . . . . . . . . . *NO *YES, *NO, *BKUPCY How to end . . . . . . . . . . . . . *BKUPCY *CNTRLD, *IMMED, *BKUPCY Delay time, if *CNTRLD . . . . . . . *BKUPCY Seconds, *NOLIMIT Restart after power down . . . . . . *BKUPCY *YES, *NO, *BKUPCY IPL source . . . . . . . . . . . . . *BKUPCY *PANEL, A, B, *BKUPCY IPL restart type . . . . . . . . . . *BKUPCY *FULL, *IPLA, *SYS ... Save active wait time: Object locks . . . . . . . . . . . . 120 0-99999, *NOMAX Pending record changes . . . . . . . 120 0-99999, *NOCMTBDY, *NOMAX Other pending changes . . . . . . . . 120 0-99999, *NOMAX Backup item exit program . . . . . . . . *BKUPCY Name, *NONE, *BKUPCY Exit program library . . . . . . . . Name Exit program format . . . . . . . . . BKUI0100 Missed object policy . . . . . . . . . . *BKUPCY Name, *NONE, *BKUPCY Clear missed objects . . . . . . . . . *NO *NO, *YES More...
Chapter 6. BRMS and virtual tape 309

Figure 6-31 Final screen of change backup control group attributes
These settings cannot be changed from a 5250 screen. You can change these options only with IBM ̂iSeries Navigator. These options are discussed in 7.9, “Parameters available only from Navigator” on page 422.
Press Enter to confirm all the options that have been set, and press F3 and type option 1 to exit and save the control group attributes.
6.4.8 Running the daily backupNow that the setup for daily backup is complete, you can run the daily backup or schedule the daily nightly backup.
In this scenario, the backup is run interactively from the console. However, in order to understand how to schedule a job from the Work with Backup Control Groups screen, perform the following steps:
1. Enter the following command:
WRKCTLGBRM
Then press Enter.
2. Type option 6 in front of the DAILY backup control group and press Enter. The screen shown in Figure 6-32 on page 311 is displayed.
Additional Backup Policy Properties Client backup policy . . . . . . . . . : DAILY Type information, press Enter. Allow activity overrides . . . . . . . . *YES *NO, *YES Allow retention overrides . . . . . . . *YES *NO, *YES Additional management: TCP/IP servers . . . . . . . . . . . . *NO *NO, *END, *RESTART, *BOTH Lotus servers . . . . . . . . . . . . *NO *NO, *END, *RESTART, *BOTH Integrated screens servers . . . . . . *NO *NO, *VARYOFF, *VARYON ... Guest partitions . . . . . . . . . . . *NO *NO, *VARYOFF, *VARYON ...Unmount user-defined file systems . . . *NO *NO, *YES Run maintenance after backup . . . . . . *NO *NO, *YES
310 i5/OS V5R4 Virtual Tape: A Guide to Planning and Implementation

Figure 6-32 Adding the backup job to the job scheduler
You can change the values here according to your own backup strategy. If you want to run the backup now without scheduling, use the following command:
STRBKUBRM CTLGRP(DAILY) SBMJOB(*YES)
To run the backup interactively, use the following command:
STRBKUBRM CTLGRP(DAILY) SBMJOB(*NO)
After the backup is completed, message BRM1049 is issued, indicating that the backup is completed successfully as shown in Figure 6-33.
Figure 6-33 Backup finished successfully
You can check the virtual volumes on the Work with Media screen shown in Figure 6-34 on page 312.
Add Job Schedule Entry (ADDJOBSCDE) Type choices, press Enter. Job name . . . . . . . . . . . . > QBRMBKUP Name, *JOBD Command to run . . . . . . . . . > STRBKUBRM CTLGRP(DAILY) SBMJOB(*NO) Frequency . . . . . . . . . . . > *WEEKLY *ONCE, *WEEKLY, *MONTHLY Schedule date . . . . . . . . . > *NONE Date, *CURRENT, *MONTHSTR... Schedule day . . . . . . . . . . > *ALL *NONE, *ALL, *MON, *TUE... + for more values Schedule time . . . . . . . . . > '23:00' Time, *CURRENT Save . . . . . . . . . . . . . . *YES *NO, *YES More...
Selection or command ===> F3=Exit F4=Prompt F9=Retrieve F10=Commands F12=Cancel F13=Functions Control group DAILY type *BKU processing is complete.
Chapter 6. BRMS and virtual tape 311

Figure 6-34 Work with media showing the volumes with the DupSts mark
The 1 in the DupSts column indicates that the volumes are marked for duplication, but are not duplicated yet. The volumes display a plus sign (+) after the volume name, which indicates that the volumes are a member of a serial set, a parallel set, or both. This is shown in Figure 6-35 on page 313.
Work With Media System: RCHAS08 Position to . . . . . Starting characters Type options, press Enter. 1=Add 2=Change 4=Remove 5=Display 6=Work with serial set 7=Expire 8=Move 10=Reinitialize ... Volume Creation Expiration Move Media Dup Opt Serial Expired Date Date Location Date Class Sts VRT001 + 12/06/05 12/10/05 VIRTUAL 12/05/05 VRT256K 1 VRT002 + 12/06/05 12/10/05 VIRTUAL 12/05/05 VRT256K 1 VRT003 + 12/06/05 12/10/05 VIRTUAL 12/05/05 VRT256K 1 VRT004 *YES 12/05/05 12/06/05 VIRTUAL 12/05/05 VRT256K VRT005 *YES 12/05/05 12/06/05 VIRTUAL 12/05/05 VRT256K VRT006 + 12/06/05 12/10/05 VIRTUAL 12/05/05 VRT256K 1 VRT007 + 12/06/05 12/10/05 VIRTUAL 12/06/05 VRT256K 1
312 i5/OS V5R4 Virtual Tape: A Guide to Planning and Implementation

Figure 6-35 Work with media showing the volumes that are part of the backup set
For this backup, BRMS used five virtual volumes.
6.4.9 Duplicating mediaVirtual volumes are still on the disk and have to be duplicated to physical media. If you decide to transfer them to another system in order to restore the data on that system, you may decide against duplicating the volumes. However, transferring volumes to other systems is not possible using BRMS, since virtual volumes cannot be shared between systems in a BRMS network today.
1. To duplicate volumes with BRMS, use the following command:
DUPMEDBRM
Then press F4 and F10.
Figure 6-36 on page 314 will be displayed.
Work With Media System: RCHAS08 Position to . . . . . Starting characters Type options, press Enter. 1=Add 2=Change 4=Remove 5=Display 6=Work with serial set 7=Expire 8=Move 10=Reinitialize ... Volume Move Serial Parallel Opt Serial System Policy Set Set VRT001 + APPN.RCHAS08 TO_COPIED *YES *NO VRT002 + APPN.RCHAS08 TO_COPIED *YES *NO VRT003 + APPN.RCHAS08 TO_COPIED *YES *NO VRT004 APPN.RCHAS08 *NONE *NO *NO VRT005 APPN.RCHAS08 *NONE *NO *NO VRT006 + APPN.RCHAS08 TO_COPIED *YES *NO VRT007 + APPN.RCHAS08 TO_COPIED *YES *NO More...
Chapter 6. BRMS and virtual tape 313

Figure 6-36 Duplicate media using BRMS
The following parameters can be set in this screen.
– From volume identifier - the following options can be specified:
• *LIST: This can be used to specify a list of volumes. The names of the volumes have to be specified in the Input volume list parameter.
• *RESUME: This is new in V5R4 and can be used in case a previous duplication failed. The Resume key, which can be found in the Display Media Information screen, must be specified in such a situation.
• *SCHHST: This is new in V5R4 and can be used to copy data from volumes that was not duplicated when the volume was duplicated. This value only works for volumes with the Mark history for duplication flag turned on, as described on page 300.
• *SEARCH: The most common and easiest option to use is *SEARCH, since it duplicates all the volumes with the Mark for Duplication flag on. After they are copied, the flag is turned off.
However, if there are many volumes to copy and you have more than one physical drive to copy to, you can decide to run two or more DUPMEDBRM jobs at the same time. However, you cannot use *SEARCH in that case, because this will result in jobs stealing volumes from the other.
Duplicate Media using BRM (DUPMEDBRM) Type choices, press Enter. From volume identifier . . . . . Character value, *LIST... Resume key . . . . . . . . . . . 1-999999, *ALL File group . . . . . . . . . . . *ALL *ALL, *SYSTEM, *BKUGRP, *SY...File group type . . . . . . . . *ALL *ALL, *BKU, *ARC From media class . . . . . . . . *ALL *ALL, QIC1000, QIC120, QIC1...From device . . . . . . . . . . LANTAP, NEWVRT01, NEWVRT05... To device . . . . . . . . . . . LANTAP, NEWVRT01, NEWVRT05... From sequence number: Starting file sequence number *FIRST 1-16777215, *ALL, *FIRST Ending file sequence number . *LAST 1-16777215, *LAST, *ONLY To sequence number . . . . . . . 1 1, *END To media policy . . . . . . . . *SYSPCY *SYSPCY, *NONE, ARCHIVAL, F...Input volume list . . . . . . . *VOL Character value, *VOL, *SET + for more values From device end option . . . . . *REWIND *REWIND, *LEAVE, *UNLOAD To device end option . . . . . . *UNLOAD *UNLOAD, *LEAVE, *REWIND More...
314 i5/OS V5R4 Virtual Tape: A Guide to Planning and Implementation

• Volume identifier
– From device: This is the virtual device in this scenario.
– To device: This is the physical device to write the physical volumes. In this scenario, an Ultrium2 type media library called SR3582RMU1 is used.
– To media policy: Specify the media policy you want to use for physical volumes (in this scenario, it is DAILY).
– Input volume list: This has two possible options:
• *VOL: Use this when you want to copy a single volume as specified in the VOL parameter From volume identifier.
• *SET: Use this if you want to copy a set of volumes in a batch job. For interactive, using *SET is not necessary for duplicating sets, since the prompt shows the volumes in the set.
Press PgDn to go to the next screen of DUPMEDBRM, as shown in Figure 6-37, and change the options accordingly.
Figure 6-37 Next screen of duplicate media using BRM
The following parameters can be set in this screen.
– Volume identifier: You can specify a specific output volume you want to use (in this case, it is *MOUNTED).
Duplicate Media using BRM (DUPMEDBRM) Type choices, press Enter. Additional Parameters To volume identifier . . . . . . *MOUNTED Character value, *MOUNTED + for more values Retain object detail . . . . . . *NO *NO, *YES Expiration date . . . . . . . . *MEDPCY Date, *MEDPCY, *PERM Move policy . . . . . . . . . . *MEDPCY *MEDPCY, *NONE, OFFSITE, TO...Media class . . . . . . . . . . *MEDPCY *MEDPCY, *SYSPCY, QIC1000, ...Location . . . . . . . . . . . . *MEDPCY *MEDPCY, *ANY, *HOME, COPIE...Secure volume . . . . . . . . . *MEDPCY *MEDPCY, *NO, *YES Required volumes . . . . . . . . *MEDPCY 1-9999, *MEDPCY, *NONE Mark volumes for duplication . . *MEDPCY *MEDPCY, *NO, *YES Mark history for duplication . . *MEDPCY *MEDPCY, *NO, *YES Save media information . . . . . *OBJ *NONE, *BKUPCY, *LIB, *OBJ Bottom
Chapter 6. BRMS and virtual tape 315

– Retain object detail: This has no specific function, since the object detail information will be retained for the output volume if it is available for the input volume on which the backup was performed.
– Expiration date– Move Policy – Media class– Location– Secure volume– Required volumes – Mark volumes for duplication– Mark history for duplication)
These eight parameters can be kept at *MEDPCY, since there is no need to override them in this case.
– Save media information: This is new in V5R4 and is a recommended option for use in duplicating virtual volumes. The files in QUSRBRM are added to the volume when using this option, which are required when you want to recover the data on this volume using this BRMS media information.
Automatically, backup media information has already been detailed in the control group in Figure 6-30 on page 309. If you use the media information saved at the end of the control group, the files contain the wrong information, since that version contains the virtual volumes and at that time, BRMS does not know which volume will be the output volume.
� If you want to duplicate the volumes in a batch, use the following command:
SBMJOB CMD(DUPMEDBRM VOL(VRT001) FROMDEV(TAPVRT01) TODEV(SR3582RMU1) MEDPCY(DAILY) FROMVOL(*SET)) LOG(4 00 *SECLVL) LOGCLPGM(*YES)
Note: The default value of the Save media information option of the DUPMEDBRM command is set to *NONE. However, the recommended value is *OBJ or at least *LIB when duplicating a volume with BRMS.
You can also use *BKUPCY if you have specified it in your backup policy. With this option, the current version of QUSRBRM files is added to the volumes or volume set.
316 i5/OS V5R4 Virtual Tape: A Guide to Planning and Implementation

After the volumes are duplicated, type the following command:
WRKMEDBRM
This will display a screen similar to Figure 6-38 on page 317.
Figure 6-38 Work with media after duplication
Notice the asterisk (*) in the DupSts column in the row of the volumes in the set. Figure 6-34 on page 312 shows that the DupSts column contained a 1 before they were duplicated.
Now press F23. The screen shown in Figure 6-39 on page 318 is displayed.
Work With Media System: RCHAS08 Position to . . . . . Starting characters Type options, press Enter. 1=Add 2=Change 4=Remove 5=Display 6=Work with serial set 7=Expire 8=Move 10=Reinitialize ... Volume Creation Expiration Move Media Dup Opt Serial Expired Date Date Location Date Class Sts VRT001 + 12/06/05 12/10/05 COPIED 12/05/05 VRT256K * VRT002 + 12/06/05 12/10/05 COPIED 12/05/05 VRT256K * VRT003 + 12/06/05 12/10/05 COPIED 12/05/05 VRT256K *
VRT004 *YES 12/05/05 12/06/05 VIRTUAL 12/05/05 VRT256K VRT005 *YES 12/05/05 12/06/05 VIRTUAL 12/05/05 VRT256K
VRT006 + 12/06/05 12/10/05 COPIED 12/05/05 VRT256K * VRT007 + 12/06/05 12/10/05 COPIED 12/06/05 VRT256K * More...
Chapter 6. BRMS and virtual tape 317

Figure 6-39 Work with media showing the volumes and more options
Type 15 in front of one of the volumes in the set and press Enter. This shows the volumes in the set, together with the physical volume to which the virtual volumes are copied (output volume) as shown in Figure 6-40.
Figure 6-40 Display duplicate volumes
Figure 6-41 on page 319 shows physical volume 759AGK with media class ULTRIUM2 used as output volume.
Work With Media System: RCHAS08 Position to . . . . . Starting characters Type options, press Enter. 11=Mark for label print 13=Display contents 14=Duplicate data 15=Display duplicates ...
Volume Creation Expiration Move Media Dup Opt Serial Expired Date Date Location Date Class Sts VRT001 + 12/06/05 12/10/05 COPIED 12/05/05 VRT256K * VRT002 + 12/06/05 12/10/05 COPIED 12/05/05 VRT256K * VRT003 + 12/06/05 12/10/05 COPIED 12/05/05 VRT256K *
VRT004 *YES 12/05/05 12/06/05 VIRTUAL 12/05/05 VRT256K VRT005 *YES 12/05/05 12/06/05 VIRTUAL 12/05/05 VRT256K
VRT006 + 12/06/05 12/10/05 COPIED 12/05/05 VRT256K * VRT007 + 12/06/05 12/10/05 COPIED 12/06/05 VRT256K * More...
Display Duplication Cross Reference RCHAS08 Volume Volume Expiration --- Duplication --- --- Last entry --- Type Serial Seq Date Date Time Date Time *INP VRT006 1 12/10/05 12/06/05 13:30:51 12/06/05 9:27:27 *INP VRT007 2 12/10/05 12/06/05 13:30:51 12/06/05 9:27:27 *INP VRT001 3 12/10/05 12/06/05 13:30:51 12/06/05 9:27:27 *INP VRT002 4 12/10/05 12/06/05 13:30:51 12/06/05 9:27:27 *INP VRT003 5 12/10/05 12/06/05 13:30:51 12/06/05 9:27:27 *OUT 759AGK 1 12/16/05 12/06/05 13:30:51 12/06/05 9:34:16
318 i5/OS V5R4 Virtual Tape: A Guide to Planning and Implementation

Figure 6-41 Work with media showing the physical output volume
Figure 6-42 shows duplicate volumes again, but for volume 759AGK.
Figure 6-42 Display duplicate volumes again, but now for volume 759AGK
6.4.10 Running media movementThe data has been copied to physical media, but now the volumes should be moved to the appropriate location. There are two ways of doing this, as described here:
� One method is to run BRMS maintenance and specify that you want to run media movement.
� The other method is to move them using the MOVMEDBRM command separately.
Work With Media System: RCHAS08 Position to . . . . . Starting characters Type options, press Enter. 1=Add 2=Change 4=Remove 5=Display 6=Work with serial set 7=Expire 8=Move 10=Reinitialize ... Volume Creation Expiration Move Media Dup Opt Serial Expired Date Date Location Date Class Sts 759AGK 12/06/05 12/16/05 SR3582RMU1 *NONE ULTRIUM2 *
Display Duplication Cross Reference RCHAS08 Volume Volume Expiration --- Duplication --- --- Last entry --- Type Serial Seq Date Date Time Date Time *INP VRT006 1 12/10/05 12/06/05 13:30:51 12/06/05 9:27:27 *INP VRT007 2 12/10/05 12/06/05 13:30:51 12/06/05 9:27:27 *INP VRT001 3 12/10/05 12/06/05 13:30:51 12/06/05 9:27:27 *INP VRT002 4 12/10/05 12/06/05 13:30:51 12/06/05 9:27:27 *INP VRT003 5 12/10/05 12/06/05 13:30:51 12/06/05 9:27:27 *OUT 759AGK 1 12/16/05 12/06/05 13:30:51 12/06/05 9:34:16
Chapter 6. BRMS and virtual tape 319

The physical volume must be moved offsite using the move policy TO_OUTDOOR, and the virtual volumes must be moved using the TO_COPIED move policy created in 6.4.4, “Creating move policies” on page 294.
The volumes can be moved with just one command:
MOVMEDBRM
However, if you want to move them separately, run the following commands:
MOVMEDBRM MOVPCY(TO_OUTDOOR)MOVMEDBRM MOVPCY(TO_COPIED)
The virtual volumes are now in the COPIED location and the physical volume in location OUTDOOR.
6.5 BRMS maintenanceBRMS maintenance should be performed on a daily basis. This section discusses the possible options when running BRMS maintenance.
Follow these steps:
1. Type the following command:
STRMNTBRM
Then press F4 to prompt for the options.
Figure 6-43 on page 321 will be displayed.
Note: Before running BRMS maintenance, make sure there is no BRMS activity, since BRMS maintenance should be run when no other BRMS jobs are running.
320 i5/OS V5R4 Virtual Tape: A Guide to Planning and Implementation

Figure 6-43 Start maintenance for BRM
The following parameters are displayed in this screen:
– Expire media: Use this for expiring the media. If you want to expire media separately rather than using the STRMNTBRM command, use the command STREXPBRM.
– Expire media set volumes applies to volumes: If one or more volumes in a set is eligible for expiration and there is active data on one volume, *NO will keep the entire set active until all the data is expired. In case of *YES, only the volume with the active data will be kept active.
– Remove media information: If you want to keep the media information in the BRMS database until the volume is reused, use *REUSE. If you want to keep it anyway, use *NONE. If the information can be removed when the volume expires, use *EXP.
– Remove migration information: Use this for removing media information regarding migration. This option applies only to the BRMS-Advanced Functions feature.
– Run media movement: *YES performs MOVMEDBRM for you with the default options. If you do not want this or if you want to run this command separately, use the command as described in 6.4.10, “Running media movement” on page 319.
Start Maintenance for BRM (STRMNTBRM) Type choices, press Enter. Expire media . . . . . . . . . . *YES *YES, *NO Expire media set volumes . . . . *NO *NO, *YES Remove media information: Media contents . . . . . . . . *EXP *EXP, *NONE, *REUSE Object level detail . . . . . *MEDCON 1-9999, *MEDCON Remove migration information . . 180 1-9999, *NONE Run media movement . . . . . . . *NO *NO, *YES Remove log entries: Type . . . . . . . . . . . . . *ALL *ALL, *NONE, *ARC, *BKU, *M... From date . . . . . . . . . . *BEGIN Date, *BEGIN, *CURRENT, nnnnn To date . . . . . . . . . . . 90 Date, *END, *CURRENT, nnnnn Run cleanup operations . . . . . *YES *YES, *NO Retrieve volume statistics . . . *YES *YES, *NO Audit system media . . . . . . . *NONE + for more values Change BRM journal receivers . . *YES *YES, *NO More...
Chapter 6. BRMS and virtual tape 321

– Remove log entries: Use this to clean up the BRMS history entries.
Run clean up operations for general BRMS cleanup: This option includes various BRMS general routines such as creation of location analysis report, analysis of deleted libraries, and so on.
– Retrieve volume statistics: Use this to retrieve the volume statistics. If necessary, you can print a report with PRTMEDBRM TYPE(*STATISTICS).
– Audit system media: Use this to specify media information as contained by one or more systems in the network group to be audited and differences in media information resolved. If you expect media information inconsistency, use this option. However, as of now, this option only generates a report. The default is *NONE.
– Change journal receivers: This specifies whether to change the receivers for the BRMS journals when the STRMNTBRM command processes. When the BRMS journal receivers are changed, the old BRMS journal receiver is deleted.
Press PgDn to view the next screen of STRMNTBRM command, as shown in Figure 6-44.
Figure 6-44 Next screen of Start Maintenance for BRM
The print options on this screen can be used to print expired media reports, version reports, media information reports, recovery reports, recovery location reports, and system information. Following are the parameters:
Reorganize BRMS database: Use this to reorganize the physical files in QUSRBRM. When *YES is specified, RGZPFM is performed against the files in QUSRBRM and the occupied space of the deleted records will be
Start Maintenance for BRM (STRMNTBRM) Type choices, press Enter. Print expired media report . . . *YES *YES, *NO Print version report . . . . . . *EXPMED *EXPMED, *NO, *YES Print media information . . . . *YES *YES, *NO Print recovery reports . . . . . *ALL *ALL, *NONE, *RCYACT... + for more values Recovery locations . . . . . . . *ALL Name, *ALL, *HOME + for more values Print system information . . . . *NO *NO, *YES Reorganize BRMS database . . . . *NO *NO, *YES Auto-retrieved objects: Refree . . . . . . . . . . . . *NO *NO, *YES
322 i5/OS V5R4 Virtual Tape: A Guide to Planning and Implementation

freed. If you used this option a long time ago or used the RGZPFM command for the QUSRBRM files, it can take a long time, especially if you have retained all object details as specified in the backup control group.
– Auto-retrieved objects: This applies only to the BRMS-Advanced Functions feature.
Until now, we have been working interactively and the options of STRMNTBRM were discussed. Typically, however, it is more common and efficient to use a scheduling function and to run this command on a daily basis.
Create recovery report During maintenance, you can create recovery reports. One of the commands that is actually used to generate recovery reports is STRRCYBRM.
A recovery report shows which media is required to recover your system or recover items. A recovery report is also required, along with physical tapes, to perform recovery.
1. To view the options, type the following command:
STRRCYBRM
Then press F4 and F10.
Figure 6-45 on page 324 will be displayed.
Chapter 6. BRMS and virtual tape 323

Figure 6-45 Start recovery using BRMS
The following parameters are shown:
– Option: In the Option parameter, press F4 to show the complete list of options. The option you specify here determines how to recover.
• If you use *SYSTEM, the recovery will be for the entire system.
• If you specify *ALLUSR, the recovery is based on just recovering *ALLUSR libraries.
– In this scenario, the focus is on *CTLGRP, which means that you want to recover one or more items as specified in control group DAILY. Depending on the option you choose, other options will show up (for example, an option to specify the control group, and so on).
– Action: With this option, you can decide whether you want to recover one or more items immediately from a list shown on the screen, or if you want to create just a report.
– The report option generates two spoolfiles, one for the complete list of recovery steps and one for the summary of volumes to be used.
– Time period for recovery: With this option, you can select a period which you want to recover. Using this option, it is possible to not restore your last saved items, but instead restore a saved item in an earlier period.
Start Recovery using BRM (STRRCYBRM) Type choices, press Enter. Option . . . . . . . . . . . . . > *CTLGRP *SYSTEM, *ALLDLO, *ALLUSR... Action . . . . . . . . . . . . . > *REPORT *REPORT, *RESTORE Time period for recovery: Start time and date: Beginning time . . . . . . . . *AVAIL Time, *AVAIL Beginning date . . . . . . . . *BEGIN Date, *CURRENT, *BEGIN End time and date: Ending time . . . . . . . . . *AVAIL Time, *AVAIL Ending date . . . . . . . . . *END Date, *CURRENT, *END Use save files . . . . . . . . . *YES *YES, *NO Use TSM . . . . . . . . . . . . *YES *YES, *NO Control group selection: Control group . . . . . . . . *SELECT Name, *SELECT, *NONE... Sequence number . . . . . . . 1-99 + for more values More...
324 i5/OS V5R4 Virtual Tape: A Guide to Planning and Implementation

– Use save files: If the most recent data is in BRMS savefiles and not yet on physical volumes, use *YES for this option.
– Use TSM: Use this when you have saved your data to a TSM server.
2. Press PgDn to view the next screen of Start Recovery using BRM as shown in Figure 6-46.
Figure 6-46 Second screen of start recovery using BRM
Following are the parameters in this screen:
– Libraries to omit: Use this to omit libraries. The default value is *DELETE.
– Allow duplicate entries: Use this if you have selected more than one control group to recover and there are multiple entries due to overlap in save items.
– Volume location: Use this to specify volumes from a specific location, for example, if you have both copies offsite on different locations and want to use the volumes of one of the locations.
– From system: Use this for using volumes from a specific system.
– Print system information: This prints system information that should be maintained for disaster recovery and system verification purposes.
– Use duplicate media: Specify *YES if you want to show the duplicate volumes in the list, instead of the original volumes. The default value is *NO, which means that the original volumes are shown. However, in the case of virtual volumes that are successfully duplicated, the list shows the physical volumes with *NO. Virtual volumes are supposed to be expired once they are duplicated, unless you want to keep a copy on your system.
Start Recovery using BRM (STRRCYBRM) Type choices, press Enter. Libraries to omit . . . . . . . *DELETE Name, generic*, *DELETE... + for more values Allow duplicate entries . . . . *NO *NO, *YES Additional Parameters Volume location . . . . . . . . *ALL *ALL, $, *HOME, #, @, AA@#$... + for more values From system . . . . . . . . . . *LCL Print system information . . . . *NO *NO, *YES Use duplicate media . . . . . . *NO *NO, *YES User recovery information . . . *NONE *NONE, *ADD
Chapter 6. BRMS and virtual tape 325

– User recovery information: Use this to add specific user information. Read the help text for more information.
3. To create a recovery report, use this command:
STRRCYBRM OPTION(*CTLGRP) ACTION(*REPORT) CTLGRP((DAILY))
This will generate two reports, one describing a complete list of steps required to recover the data you requested (spooled file name QP1ARCY) and the other showing the list of volumes required for recovery (spooled file name QP1A2RCY). The list of volumes is shown in Figure 6-47.
Figure 6-47 Volumes needed for recovery
4. If you want to recover the control group, rather than create a recovery report, use the following command:
STRRCYBRM OPTION(*CTLGRP) ACTION(*RESTORE) CTLGRP((DAILY))
Figure 6-48 on page 327 shows a part of the list that will be displayed.
File . . . . . : QP1A2RCY Control . . . . . Find . . . . . . *...+....1....+....2....+....3....+....4....+....5....+....6....+....7....+....8....+.... 5722BR1 V5R4M0 060210 Recovery Volume Summary Report RCHAS08 Volume Media Creation Expiration Location Storage Volume Serial Expired Class Date Date Date Location Slot VRT001 VRT256K 12/06/05 12/10/05 12/05/05 VIRTUAL 83
Duplicate volume(s) . . . . . . : 759AGK VRT002 VRT256K 12/06/05 12/10/05 12/05/05 VIRTUAL 1 VRT003 VRT256K 12/06/05 12/10/05 12/05/05 VIRTUAL 85 VRT006 VRT256K 12/06/05 12/10/05 12/05/05 VIRTUAL 89 VRT007 VRT256K 12/06/05 12/10/05 12/06/05 VIRTUAL 2 759AGK ULTRIUM2 12/06/05 12/16/05 *NONE SR3582RMU1 Duplicate volume(s) . . . . . . : VRT001 Total volumes needed for recovery . . . . . . . . . . : 8 * * * * * E N D O F L I S T I N G * * * * *
326 i5/OS V5R4 Virtual Tape: A Guide to Planning and Implementation

Figure 6-48 Select recovery Items
Notice that the physical volumes are shown. This is because you used the default value USEDUPMED(*NO).
If the USEDUPMED(*YES) option had been used, the screen will appear as shown in Figure 6-49 on page 328.
Select Recovery Items RCHAS08 Select action . . . . . : *ALL Select volume . . . . . : Type options, press Enter. 1=Select 4=Remove 5=Display 7=Specify object Saved Save Save Save Parallel Volume File Expire Opt Item Date Time Type Devices Serial Sequence Date QDSNX 12/06/05 9:27:27 *FULL 759AGK 59 12/16/05 QGPL 12/06/05 9:27:27 *FULL 759AGK 79 12/16/05 QMGTC 12/06/05 9:27:27 *FULL 759AGK 60 12/16/05 QMGTC2 12/06/05 9:27:27 *FULL 759AGK 61 12/16/05 QPFRDATA 12/06/05 9:27:27 *FULL 759AGK 62 12/16/05 QRCL 12/06/05 9:27:27 *FULL 759AGK 63 12/16/05 QSRVAGT 12/06/05 9:27:27 *FULL 759AGK 64 12/16/05 QS36F 12/06/05 9:27:27 *FULL 759AGK 65 12/16/05 QUSRDIRDB 12/06/05 9:27:27 *FULL 759AGK 66 12/16/05 QUSRIJS 12/06/05 9:27:27 *FULL 759AGK 67 12/16/05 QUSRNOTES 12/06/05 9:27:27 *FULL 759AGK 68 12/16/05 More...
Chapter 6. BRMS and virtual tape 327

Figure 6-49 Select Recovery Items using USEDUPMED(*YES)
5. The virtual volumes will be shown when using this command:
STRRCYBRM OPTION(*CTLGRP) ACTION(*RESTORE) CTLGRP((DAILY))USEDUPMED(*YES)
Select Recovery Items RCHAS08 Select action . . . . . : *ALL Select volume . . . . . : Type options, press Enter. 1=Select 4=Remove 5=Display 7=Specify object Saved Save Save Save Parallel Volume File Expire pt Item Date Time Type Devices Serial Sequence Date QDSNX 12/06/05 9:27:27 *FULL VRT001 21 12/10/05 QGPL 12/06/05 9:27:27 *FULL VRT006 3 12/10/05 QMGTC 12/06/05 9:27:27 *FULL VRT001 22 12/10/05 QMGTC2 12/06/05 9:27:27 *FULL VRT001 23 12/10/05 QPFRDATA 12/06/05 9:27:27 *FULL VRT001 24 12/10/05 QRCL 12/06/05 9:27:27 *FULL VRT001 25 12/10/05 QSRVAGT 12/06/05 9:27:27 *FULL VRT001 26 12/10/05 QS36F 12/06/05 9:27:27 *FULL VRT001 27 12/10/05 QUSRDIRDB 12/06/05 9:27:27 *FULL VRT001 28 12/10/05 QUSRIJS 12/06/05 9:27:27 *FULL VRT001 29 12/10/05 QUSRNOTES 12/06/05 9:27:27 *FULL VRT001 30 12/10/05 More...
328 i5/OS V5R4 Virtual Tape: A Guide to Planning and Implementation

Chapter 7. BRMS and virtual tape working from the Navigator
In this chapter we explain how to set up a simple backup using the i5 Navigator, and then run the backup. We also restore a single object from a backup taken with this setup.
We describe a setup for a virtual environment. Seen from the backup application perspective, there is almost no difference between the virtual tapes and the real tapes, in that both should have tape drives, tape volumes, the tape drive must be attached to the system, and so on. Backing up to a virtual environment is no different in that respect. The role of BRMS is to specify what to back up, how much to back up, where to write it, and then keep track of the result. We also explain how to retrieve the data, if needed.
Note that the setup instructions for BRMS that we provide in this chapter do not contain information about how to attach tape drives to your system. We also assume here that the required virtual image catalogs, virtual tape volumes, virtual devices and so on already exist.
The resulting BRMS set up in this chapter can be used for any tape environment, virtual or real. Only the policies used should be replaced.
7
© Copyright IBM Corp. 2006. All rights reserved. 329

7.1 BRMS and a brief introduction to virtual tape The best way to understand how BRMS sees the concept of virtual tape is to disregard the term virtual. Think of it as though you are saving to ordinary tape volumes. The only difference is that virtual tape volumes reside in image catalogs and are not real physical objects. But the logic remains the same:
1. Take your backup. 2. Move the volumes to a secure place. 3. Bring them back for reuse when they are expired.
With virtual tapes, however, there is an intermediate step: copy the virtual volumes to real tapes.
In this chapter we show you how to create a simple backup for an application using the i5 Navigator. You can do the same thing in a 5250 environment.
A backup job normally writes data to tape volumes. Because the mission of BRMS is to keep track of those volumes, it has to know where all the tape volumes are, whether they are real or virtual.
Every volume must be in a location. If you do not place a volume in a specific location, BRMS stores them in a location called *HOME, which is an undefined, catch-all repository. Real tape volumes are physical objects and must always be somewhere. Having them in meaningful locations is a much better alternative.
This chapter provides information about setting up BRMS for a virtual environment. Virtual objects exist, but you cannot move them around in the same way as physical objects. Yet, you have to set up your environment as though you can move virtual objects. BRMS sees a volume as a volume, whether real or virtual. The same rules apply to both real and virtual volumes.
A virtual tape is identical to a physical tape. The layout is exactly the same. When virtual tape volumes are duplicated to real media, there is a one-to-one match. This means that the type of virtual image you select must match what the hardware can accept. You cannot put an LTO cartridge in a QIC drive. It is the same with virtual media. If you have selected your virtual tape volume as an image of a LTO cartridge, you cannot copy that logical image to a physical QIC drive, because their layouts are different.
As always, the general rule is to keep everything as simple as possible. The process of recovering data should be kept simple and straightforward.
We strongly encourage you to familiarize yourself with the BRMS application, preferably by signing up for formal education. Before you attend a class, it is useful to refer to the appropriate IBM publications for self-study.
330 i5/OS V5R4 Virtual Tape: A Guide to Planning and Implementation

You may also wish to start up BRMS and try setting up and running a few example backups. Also, try to restore some of it. Recovery is the most important task of all; if you are unable to restore, there is little point to taking backups. If you combine BRMS classes on with some hands-on experience, you can immediately start asking questions and find it easier to follow the lectures.
Listed here are links to IBM services and training sites:
� IBM Rochester AS/400 Solution Center
http://www-1.ibm.com/services/us/index.wss/offering/its/a1001549
Also visit the IBM Services site for your geography to determine whether there are local services available.
� IBM Training Finder
http://www.ibm.com/products/finder/us/finders?pg=trfinder
7.1.1 Setting up locationsFollow the same setup sequence in the Navigator as you would in the 5250 emulation. Using the Navigator, you can do most of the setup in one shot, but it is easy to lose the overall picture. Therefore, in this chapter we show one function at a time, starting with setting up locations.
Why use locations? Locations are important because you need a clear picture about what to do with your backups after they are complete. BRMS must know where every volume is, and they have to be at a location, whether real or virtual.
Even volumes you have lost track of must have a home. You should, in fact, create a location called LOST (or other appropriate name). Tapes considered lost may show up again and if they contained vital data, you would not want to delete the information in the tapes just because you do not know where they are today.
At this point we assume that you know between which locations your volumes should rotate. For more information about that topic, refer to Chapter 2, “Planning for virtual tape” on page 9.
Creating a locationTo create locations as a sub-function under move policies, perform the following tasks.
Right-click Move policies and select Manage Locations, as shown in Figure 7-1 on page 332.
Chapter 7. BRMS and virtual tape working from the Navigator 331

Figure 7-1 BRMS manage locations
This brings up the New Storage Locations panel, where you should fill in the following:
� Location name.� A short description.� The Address field is not really relevant for a virtual location. However, you can
use it to tell, for instance, the purpose of this location, which ASP it refers to, and if there are any specific terms and conditions that apply to the location.
� Contact name, phone number, e-mail address do not really apply, but you can fill them in if desired.
� Specify whether to allow expiration or not.
You will require two locations:
� One for scratches and duplicated volumes that are not yet duplicated.� One where the copied volumes await expiration before going back as
scratches.
In this scenario, the names VIRTUAL and COPIED were picked. As their names indicate, they are used for virtual volumes. Being non-physical, virtual tapes are much more vulnerable to destruction than real tapes. Therefore, special precautions should be taken to shield them for being overwritten. They must stay intact until they are copied to real media. Therefore, in this scenario, they should stay in location VIRTUAL until copied. Do not allow anything to expire in this location.
This requires an explanation since in location VIRTUAL, all are scratch volumes. It sounds risky to have scratches and those that are not copied in the same place. However, this is not a problem because BRMS has to set an expiration flag
332 i5/OS V5R4 Virtual Tape: A Guide to Planning and Implementation

for each volume before reusing it, and location VIRTUAL does not allow expiration.
To achieve expiration, the volumes have to be moved to another location that allows expiration, for example, COPIED. Its sole purpose is to store all copied volumes until their expiration date is up. Allow expiration here. Once their time is up, the maintenance job in BRMS detects that they are overdue and sets the expiration flag. They can now be reused.
However, do not point any tape device to this location. In this scenario, the tape drives are all pointing to the scratch repository = VIRTUAL. The way the expired volumes find their way back to the scratch pool is decided by a Move policy. The following sections create two locations, VIRTUAL and COPIED.
Location VIRTUALTo create a location named VIRTUAL, perform the following tasks:
1. Fill in the Location name as VIRTUAL.2. Give it an appropriate description.3. The other text fields do not really apply to virtual volumes.4. Deselect Allow volumes to expire at this location.5. Click OK, as shown in Figure 7-2.
Figure 7-2 BRMS create location VIRTUAL
Chapter 7. BRMS and virtual tape working from the Navigator 333

Location COPIEDAfter creating location VIRTUAL, create another location where the virtual volumes start and return to after they have been duplicated. This location must allow expiration. Performing the following tasks:
1. Fill in the Location name as COPIED.2. Give it an appropriate description.3. The other text fields do not really apply to virtual volumes.4. Deselect Allow volumes to expire at this location.5. Click OK, as shown in Figure 7-3.
Figure 7-3 BRMS create location COPIED
This concludes the processes involved in creating two locations, VIRTUAL and COPIED.
Note: A location exists only within BRMS. The actual image catalog with its virtual tape volumes is in an ASP somewhere. BRMS only points to where the tapes are, as for real tape volumes.The reason for having information about a location is for recovery purposes. When disaster strikes, there is no time for “hide and seek”. Everything has to go in a straight line without deviations, preferably in several parallel paths to reduce downtime. Therefore, ensure that the names you use are as self-explanatory as possible, and fill in the text and comment fields whenever possible.
334 i5/OS V5R4 Virtual Tape: A Guide to Planning and Implementation

7.2 Defining a move policyWhat is the requirement for move policies? That’s an interesting question, especially since these volumes are virtual and cannot move physically.
Although this is true, logically they can be moved. You may, for instance, want to move the backups you want duplicated to a specific location, say, NOT_COPIED. After they are duplicated, they move back, awaiting the end of their retention period. By doing so, you avoid having them overwritten until they are duplicated, although their retention period may be up. Although that seems logical, you have to do it the opposite way.
As explained in “Creating a location” on page 331, the volumes should be shielded until they are copied. This can be achieved by keeping them in the location VIRTUAL, which does not allow its volumes to expire. When they are duplicated, they can then go to the next location, awaiting the end of their expiration period. In reality, nothing moves. It is only a logical movement. The virtual volumes stay in their image catalogs.
After a volume is used for output, BRMS turns off its expiration flag. From then on, this volume can only be used for adding data to its end until the expiration flag is set again. Every volume has an expiration flag, as does every location. By using these flags, you can achieve what you want.
Once you set the location expiration flag to off, it means “no, it does not matter if the volumes in there have passed their retention period end”. Their expiration flags will never switch to on; that is, the volumes are considered available for reuse, as long as they are in this location. As long as they are there, they are safe unless you delete them manually, which is a safety exposure. With real tape volumes, some amount of physical activity is required to destroy a tape. With virtual volumes, they are gone within a click or two of the mouse.
You should reuse your tape volumes, but not until they are copied. Otherwise, your disk will fill up. As a result of duplication, they move to another location. That location allows expiration. If their retention period is already up, BRMS will, by using the move policy, move them back as scratches. If not, they will wait until that day comes. BRMS moves only those volumes that meet the moving criteria.
Typically, a virtual volume is used for quick restore. For example, you save them for three days, while the duplicated copy or the real tape can have a retention period of weeks, depending on the use.
Important: Your recovery procedure is not worth anything until it is tested and verified. Sign up for a recovery test with a BCRS provider.
Chapter 7. BRMS and virtual tape working from the Navigator 335

In this chapter we assume that all locations required for this example already exist; refer to 7.1.1, “Setting up locations” on page 331. If they do not, you can create them as you go along.
Two move polices are required to achieve your goal:
� One move policy should move the tapes to a location awaiting retention end after they are copied, and then back again.
� Another move policy should specify what to do with the results of the copying (that is, the real tapes).
Name the first move policy TO_COPY. Although TO_BE_DUPLICATED would be a better name, since you can have only ten characters for a name, you can shorten the name to TO_COPY.
7.2.1 Creating a move policyTo create a new move policy, perform the following tasks:1. Right-click Backup Policy and select New Policy, as shown in Figure 7-4.
Figure 7-4 Create new move policy
2. In the window that appears, as shown in Figure 7-5, fill in the policy name as TO_COPY.
Note: You can create locations as a sub-procedure when creating a move policy. For clarity, you can create them as separate tasks.
Note: You could give your move policy the same name as the location. However, to avoid confusion, name them differently.
336 i5/OS V5R4 Virtual Tape: A Guide to Planning and Implementation

3. In the Description field, describe what it is used for, then click Next.
Figure 7-5 New move policy
The example backup in this scenario is simple. After the backup writes to a virtual volume, it should be copied to physical media. Once done, move the virtual volumes to a place where they stay until they get expired. That location is COPIED. When the expiration flag is set, they return to their starting place, which in this case is location VIRTUAL.
All this is controlled by the move policy you force to your written volumes by the media policy* you use. Of course, you could do without a move policy. Everything can be moved manually if you prefer it that way. However, in this example, a move policy is used.
From any location, a volume with this move policy will move in the following order:
– From where it started to location COPIED.– When the expiration flag is set, they move back awaiting reuse (in) this
example, location VIRTUAL.
Note: When working from the Navigator, you will not see any media policy as you do in 5250 emulation. This function is taken over by the move policy.
Chapter 7. BRMS and virtual tape working from the Navigator 337

4. Mark location COPIED.
a. Click Add After or Add Before.
b. Finish by clicking Next, as shown in Figure 7-6.
Figure 7-6 Select locations
For each location, set the duration for which the volumes will stay in each place. In this scenario, with virtual volumes, there is only one place to define as they stay at location COPIED until expiration time is up.
5. Ensure that Duration states Until media expiration date, and click Next, as shown in Figure 7-7 on page 339.
338 i5/OS V5R4 Virtual Tape: A Guide to Planning and Implementation

Figure 7-7 Specify days at each location
6. Before the move policy is complete, you also choose whether to verify all movements, or if the volumes will move without manual intervention.
As mentioned previously, when moving virtual volumes, there is little meaning in verifying movement as it is only a logical movement. Nothing moves physically, so the recommendation is to skip that.
However, you could choose Yes if you want to verify if everything is moved as expected. In this scenario, however, we will trust BRMS and say No, we do not verify, so select No and click Next, as shown in Figure 7-8 on page 340.
Chapter 7. BRMS and virtual tape working from the Navigator 339

Figure 7-8 Verify movements
7. In the window that appears, you can apply this new move policy to any existing backup and archive policy. However, at this point, you cannot do that because you have not yet created any backup policy.
Therefore, continue to the last window by clicking Next, as shown in Figure 7-9 on page 341.
Note: BRMS release 5.4 expires a volume based on the expiration date only. There is no check on whether a volume marked for duplication really got copied or not. This may change in a future release.
340 i5/OS V5R4 Virtual Tape: A Guide to Planning and Implementation

Figure 7-9 Select backup policy
8. The final window shown in the create move policy setup is a summary of the settings, as shown in Figure 7-10 on page 342. Since all the actions are complete, click Finish.
Chapter 7. BRMS and virtual tape working from the Navigator 341

Figure 7-10 Summary
9. The new move policy is now created. Back at the Navigator, press F5 to refresh.
Changing the created move policyWhen creating the move policy, there was nowhere to specify what would happen after the end of the move chain, that is, from VIRTUAL to COPIED. However, after that, you require the virtual volumes to flow back to VIRTUAL so that they can be reused.
BRMS assumes that volumes return back from where they came. That is fine as long as the volumes start from location VIRTUAL. However, if they do not, you should ensure that they always find their way to VIRTUAL when they are free for reuse. For this, make a slight change to the move policy.
1. Right-click your move policy TO_COPY and select Properties as shown in Figure 7-11 on page 343.
342 i5/OS V5R4 Virtual Tape: A Guide to Planning and Implementation

Figure 7-11 Properties
2. Figure 7-12 shows that the move policy has two tabs:
– General– Locations
Click Locations. Click Browse, select location VIRTUAL, then click OK.
Figure 7-12 Change return location
Your move policy for virtual volumes is now complete and ready to use.
Chapter 7. BRMS and virtual tape working from the Navigator 343

7.2.2 Move policy for physical tape volumesCreating a production environment also requires a move policy that specifies what will happen to the data after it is copied to the physical volumes.
Move policy OFFSITEFortunately, BRMS has already created such a location and a move policy pointing to that location.
� The location name is VAULT.� The move policy is OFFSITE.
Tailor these to your needs, preferably copying them with your own naming convention to prevent future application updates from changing them back to their original state. In this scenario, OFFSITE was used without changes.
Move policy OFFSITE will be used by the media duplication process DUPMEDBRM.
In this scenario, we used the move policy BRMS created during the installation process.
7.3 Designing a tailored backup policyIn this section we explain how to create a simple backup for a specific application. Because this application stores its data in i5 libraries, you do not have to deal with data in the Internal File System (IFS), which of course is also possible to set up for backup.
This section covers the following topics:
� What to save� Where to save it � Setting a duration for the saves� Physical media to store on
Tip: Keep everything as simple as possible.
Note: While working with the BRMS graphical interface, you will see buttons that facilitate a number of combinations. In the midst of creating something, you can take a sidestep to create other things, and then get back to what you were doing initially. There are different ways of achieving a desired result. For simplicity, in this chapter we follow a straight line in order to make the concept more understandable.
344 i5/OS V5R4 Virtual Tape: A Guide to Planning and Implementation

What to save and where to save1. Create a backup policy by right-clicking Backup Policy and selecting New
Policy, as shown in Figure 7-13.
Figure 7-13 Create a new policy
1. Save all the ITSO libraries (their names start with DBITSO). Fill in the backup policy Name and Description, as shown in Figure 7-14 on page 346 (in this scenario, the policy is named ITSODB).
Chapter 7. BRMS and virtual tape working from the Navigator 345

Figure 7-14 Create a policy name
2. In the Select a Save Strategy window shown in Figure 7-15 on page 347, there are three selections:
– Save all system and user data equal to a so-called “21-backup”.
– Save all user data is an *ALLUSR backup.
– Save Lotus server data or customize sets of objects.
You only have to save the selected libraries. Select Save Lotus server data or a customized set of objects, and then click Next.
346 i5/OS V5R4 Virtual Tape: A Guide to Planning and Implementation

Figure 7-15 Select a save strategy
3. The window shown in Figure 7-16 on page 348 asks if you want to save IBM-supplied data or user data. Select User data and click Next.
Chapter 7. BRMS and virtual tape working from the Navigator 347

Figure 7-16 Customize IBM-supplied data or user data
4. The Customize user data window shown in Figure 7-17 on page 349 appears. This is a pick and choose concept. Choose Select specific items to save, and click Next.
348 i5/OS V5R4 Virtual Tape: A Guide to Planning and Implementation

Figure 7-17 Customize user data
5. In the window shown in Figure 7-18 on page 350, you can select either of the options. In this scenario, select Specify Generics..., and then click Next.
Chapter 7. BRMS and virtual tape working from the Navigator 349

Figure 7-18 Select items for save
6. Under the generics shown in Figure 7-19 on page 351, select Libraries and click OK.
350 i5/OS V5R4 Virtual Tape: A Guide to Planning and Implementation

Figure 7-19 BRMS backup policy - specifying generics
7. Finally, in the window shown in Figure 7-20, add the libraries you want to back up. Click Add and input the value DBITSO*, then click OK.
Figure 7-20 Customize user data
8. You are taken back to the first selection window, shown in Figure 7-21 on page 352, to add more objects to save. You are finished, so click Next.
Chapter 7. BRMS and virtual tape working from the Navigator 351

Figure 7-21 Select items for save
How much should be savedThe example databases of this scenario are not updated frequently. Therefore, we decided to back up changes only. This gives a quick daily backup. To get an easy recovery, these changes were also selected to be a cumulative backup. By doing so, you will need only two volumes for recovery.
If you plan to let your data stay as virtual volumes only (which is possible, but not recommended), you could choose the changes since the last backup option. This means you will have one backup set for Monday, another for Tuesday, and so on.
We recommend this option only if you have a tape library or, as in this case, virtual volumes. Otherwise, a full recovery becomes difficult because of all the
352 i5/OS V5R4 Virtual Tape: A Guide to Planning and Implementation

tape mountings unless you are 100 % sure that it will be the same files that get updated every time.
To create a change backup, the operating system should have a starting point so that it understands what is changed. That is, the base is a full backup.
However, you do not have to first create a backup policy as a full backup and then go back and flip it to changes only. BRMS is smart enough to convert your request for changes only to a full backup if there are none.
To create a change backup, follow these steps:
1. In the window shown in Figure 7-22 on page 354, select Changes only, Changes since last full save (cumulative), and Allow overrides at run time (this option allows you to make changes to whatever is saved without having to change the backup policy), and then click Next.
Chapter 7. BRMS and virtual tape working from the Navigator 353

Figure 7-22 Save activity
2. Saving to virtual media emulates real physical tape volumes exactly. A tape image on disk must exist. Although you are backing up in a virtual environment, you are, in fact, saving to media.
Select Save to media and click Next, as shown in Figure 7-23 on page 355.
354 i5/OS V5R4 Virtual Tape: A Guide to Planning and Implementation

Figure 7-23 Where to save
Setting a duration for the savesTo save data for least two weeks, set your retention period to, for example, 17 days, in order to cover the weekends. However, remember that you are backing up to virtual volumes. Therefore, after they have been copied to real tape volumes and are not needed for immediate recovery, you have to only shield them from being overwritten for a few days.
As a result, you can set the retention period to three days. If you want cover for long weekends and have enough disk space, you can set this value to be a little longer.
1. In the window shown in Figure 7-24 on page 356, select Days. Input the value 3 for the field Days. Select Allow overrides..., and then click Next.
Chapter 7. BRMS and virtual tape working from the Navigator 355

Figure 7-24 Media retention
Physical media to store onThe example system in this scenario has no tape library, only two QIC tape drives. Since they are of different models, select the lowest possible density. While this is the worst choice from a performance perspective, it does give you the freedom to copy your virtual volumes to any of those two drives. Select what suits your needs best, performance versus flexibility.
1. Select the media pool you want to use in the window shown in Figure 7-25 on page 357. Select Vrt32k against Media pool.
When the Vrt32k media pool is chosen, BRMS automatically presents the virtual tape drives that can use this density. We select those we find reasonable. There can be up to 35 virtual drives active at the same time, tape
356 i5/OS V5R4 Virtual Tape: A Guide to Planning and Implementation

and optical. Depending on how many backups you plan to run simultaneously, you select whatever suits your needs. In this example we only need TAPVRT01.
Select Tapvrt01, and click Add.
Figure 7-25 Select media class
Note: If your tape device is not listed but you can still see a device description from the i5 operating system, it means BRMS is not aware the device. Run INZBRM *DEVICE, which picks up all existing tape drives. For more information about this topic, refer to 7.10, “Adding a new tape drive to BRMS” on page 427.
Chapter 7. BRMS and virtual tape working from the Navigator 357

2. Click Next, as shown in Figure 7-26.
Figure 7-26 Select devices
3. Now decide whether to copy your volumes to physical media. In this scenario, since backups are written to virtual volumes, you should.
In the window shown in Figure 7-27 on page 359, select Yes, mark the media for duplication.
358 i5/OS V5R4 Virtual Tape: A Guide to Planning and Implementation

Figure 7-27 Duplicate media
4. When backup is done, since BRMS maintenance is not going to be run and will be a separate task in this scenario, select No, do not run maintenance after save, and click Next, as shown in Figure 7-28 on page 360.
Chapter 7. BRMS and virtual tape working from the Navigator 359

Figure 7-28 Run maintenance
5. The window shown in Figure 7-30 on page 362 allows you to add media. This can, alternatively, be done as a separate task.
(To add media now, they should already exist. Otherwise you will receive the error message panel shown in Figure 7-29 on page 361.)
360 i5/OS V5R4 Virtual Tape: A Guide to Planning and Implementation

Figure 7-29 BRMS Add media, select image catalog error
6. At this point, since volumes are not being added, click Next, as shown in Figure 7-30 on page 362.
Important: When backing out, be aware that if you cancel the whole task, all previous work will be lost.
Chapter 7. BRMS and virtual tape working from the Navigator 361

Figure 7-30 Add media
Before finishing, the create backup policy process shows a summary window (Figure 7-31 on page 363) displaying an overview of everything that you selected. If something is incorrect, click Back and select something else.
In this scenario everything is complete, so click Finish.
362 i5/OS V5R4 Virtual Tape: A Guide to Planning and Implementation

Figure 7-31 Summary screen - new backup policy
At this point, the backup policy is created.
7. A window appears, asking whether you want to run the backup policy right away or schedule it.
In this scenario, since there are other things to set up, click Done, as shown in Figure 7-32 on page 364.
Chapter 7. BRMS and virtual tape working from the Navigator 363

Figure 7-32 Policy created
8. To see the newly created backup policy, press F5 on the keyboard. This shows Figure 7-33.
Figure 7-33 Policy list
This concludes the setting up of a tailored backup policy.
The next section describes the processes involved in tailoring a backup policy to behave the way you want it to. In a multi-tasking environment, you are not the only player. There are many requirements to consider before allocating objects.
7.4 Tailoring a backup policy to specific requirements
To tailor the backup policy, bring it up again by selecting it from the list of Backup Policies, right-clicking it, and selecting Properties. This displays a window similar to the one shown in Figure 7-34 on page 365.
When running a backup, there are terms and conditions that should to be taken in consideration. They appear within the three buttons shown in Figure 7-34 on page 365:
� Before� During� After
364 i5/OS V5R4 Virtual Tape: A Guide to Planning and Implementation

Figure 7-34 Properties
7.4.1 The Before activitiesPrior to selecting Before in the Properties window, consider the following items before actually starting to save data. The Before section has three tabs:
� General� Job queues� Subsystems
The General tabBecause this backup policy saves only i5 databases, under the General tab, deselect options for taking down file servers, and so on. By default, the check boxes for all the days are tagged, as shown in Figure 7-35 on page 366.
However, you can tailor it to your needs. You r decision about whether you have to throw out your active users is application-dependent. In our scenario, since the databases are not sensitive in that respect, we let them stay online.
You can specify the days on which you allow your backup to run. You can control this with the help of the job scheduler. Click the Before button as shown in Figure 7-34.
Chapter 7. BRMS and virtual tape working from the Navigator 365

Figure 7-35 General tab
The Job Queues tabUnder Job queues, specify which queues to stop before the backup starts. In this scenario, since there is no such requirement, nothing was specified, as shown in Figure 7-36 on page 367.
366 i5/OS V5R4 Virtual Tape: A Guide to Planning and Implementation

Figure 7-36 Job queues
The Subsystems tabSimilarly, under Subsystems, you can stop any subsystem. In this scenario, since there is no requirement for any subsystem to be taken down during the backup, they are left as they are, as shown in Figure 7-37 on page 368.
Chapter 7. BRMS and virtual tape working from the Navigator 367

Figure 7-37 Subsystems
Since all the activities are complete, click OK. This takes you back to the Properties panel, shown in Figure 7-38 on page 369.
368 i5/OS V5R4 Virtual Tape: A Guide to Planning and Implementation

Figure 7-38 Properties
7.4.2 The During activitiesWhen you select During in the Properties window, a window with five tabs appears, as shown in Figure 7-39 on page 371. We briefly explain these tabs here:
� What - what to save� Where - where to save it� Media Retention - how long to keep your backup� Save File Retention - save to save files� Activity - perform full backups, or changes only
Most of this has already been specified. However, there are a few points to be considered, including how much detailed information is needed.
The What tabNormally, you should specify that you want the BRMS inventory files saved to tape. You should also specify the amount of information you want to keep, that is, every detail or just at the library level.
In the case of virtual volumes, you may debate if there is any meaning in writing media information to such volumes. As long as BRMS is running, its online databases are used. If you save BRMS inventory files to virtual volumes, the physical tapes will, in fact, hold two inventory sets at the end.
Chapter 7. BRMS and virtual tape working from the Navigator 369

However, when virtual volumes are duplicated to real volumes, you should make sure that these inventory files are added at the end of the physical tape. These files will, at that point, also contain pointers to the output tapes, and not just to the original virtual volumes. Pointing to virtual volumes only makes sense as long as the virtual volumes are active. Once overwritten, they are gone.
Therefore, saving this type of information to a virtual tape only adds time to the backup and wastes disk space. However, by doing so, you stand a risk of not having the latest media information saved until you have copied your virtual volumes to physical tapes.
Following are the options for what to save:
� All
– All object details are kept in the backup history down to member level.– When storing folders, this is the only option that is available.
� None
– No object detail is kept in the backup history. – You will only be able to get online assistance with restore at the library
level. – In case you restore a single object, you should know its name.
� Errors
– Only information about errors is kept in the backup history.
� Objects
– Only information about objects is kept in the backup history. – Information about members is not kept.
The best course of action is to save everything. There is, however, a downside to this. The more information you collect, combined with the longer you keep that information, the bigger the inventory files will be.
Note: If you do not save BRMS media information (= inventory information discussed earlier), and for whatever reason the system crashes beyond hope of recovery, the inventory files contain information about all the backups.
If you do not duplicate your virtual volumes to physical media, you should at least copy BRMS media information to a real tape on a daily basis and store it in a safe place so that you can get these important files back. They are vital for system recovery.
To get the data back, especially if you save to TSM, BRMS inventory is the only place in which you will find the keys to your data in the Tivoli® server.
370 i5/OS V5R4 Virtual Tape: A Guide to Planning and Implementation

In this scenario, because the example backup is small, no such problem exists. Therefore, we want to see what we have backed up in detail, but not as deep as going to the object member level. Proceed as follows:
1. Click the What tab. Under the column Track Object Detail, select Objects, as shown in Figure 7-39.
Figure 7-39 What to save
2. Click Advanced under the What tab.
Before clicking Advanced, however, you should understand how BRMS acts when saving the data if journaling is involved. The i5 operating system has journaling built in. Journaling is aimed up to the last transaction recovery.
BRMS tries to minimize the backup run time and keep any downtime as brief as possible. When saving changes only, if BRMS detects that files are
Chapter 7. BRMS and virtual tape working from the Navigator 371

journaled, it will not back up the actual file, but only the journal transactions or journal receivers. This is brilliant, but it has a downside. It makes things complicated, when the idea is to keep the recovery as simple as possible.
If you do not select Save journal objects when changing saved objects, keep in mind the following:
– Files that are not journaled are restored normally with all their content.
– For files that are journaled, BRMS restores the latest full backup. You should then add the transactions from the journal receivers using the APYJRNCHGX command.
3. Select Save journal objects when saving changed objects, in the window shown in Figure 7-40 on page 373.
If files are journaled, and you can access their journal and journal receivers, you can recover these files up to the last transaction. This helps you have the best of both worlds. You have an easy recovery using BRMS (assuming you select Save journal objects when changing saved objects), and you can take the restore task a step forward and recover all the journaled files up their last transaction.
Before trying this, however, contact the application provider so that you do not end up with unbalanced data, where some files are recovered up to the last transaction and some are recovered from the last backup.
4. Select Save contents of save files, if you have such files.
5. You can also specify whether restore will be done on a system with a different release. However, in this scenario, since such a requirement is not there, leave it at default. Click OK.
372 i5/OS V5R4 Virtual Tape: A Guide to Planning and Implementation

Figure 7-40 What to save - Advanced
The Where tab1. Click the Where tab. A window similar to the one shown in Figure 7-41 on
page 374 appears.
Chapter 7. BRMS and virtual tape working from the Navigator 373

Figure 7-41 Where to save
Specify whether you will take new volumes for each save, or put the backups at the end of a volume already containing active data. (You need to decide what is best for your environment.)
2. Click Advanced. The window shown in Figure 7-42 on page 375 appears. Here you specify how duplication of the virtual volumes to real tapes should be done.
In a virtual environment, you will probably take new volumes for every backup, so the first option of duplicating the complete volume is the natural choice. That does not mean you need new volumes for the copy. For real tapes, you can add backups one after another on the same physical tape, if you prefer it that way.
3. After making your selections, click OK, as shown in Figure 7-42 on page 375.
374 i5/OS V5R4 Virtual Tape: A Guide to Planning and Implementation

Figure 7-42 Advanced properties
All the other tabs (Media Retention, Save File Retention, Activity) in the During Save window shown in Figure 7-41 on page 374 are only a summary of what has been specified. Therefore, you can leave them unchanged.
4. Click OK in Figure 7-41 on page 374 to return to the Properties window shown in Figure 7-43 on page 376.
Chapter 7. BRMS and virtual tape working from the Navigator 375

Figure 7-43 Properties window
7.4.3 The After activitiesThe After tasks are essentially the opposite of the Before activities.
The General tabIn the Before window, everything dealing with taking down servers was deselected. Therefore, there was no requirement to start them after the backup is finished.
Click After in the Properties window; the window shown in Figure 7-44 on page 377 is displayed.
376 i5/OS V5R4 Virtual Tape: A Guide to Planning and Implementation

Figure 7-44 General tab
The Power Down tabUse Power Down if you want to restart your system after the backup is completed. In this scenario, it is left untouched.
Return to the Properties page by clicking OK. This takes you back to the Backup Policy Properties page. Since there is nothing more to specify, click OK, as shown in Figure 7-45 on page 378.
Chapter 7. BRMS and virtual tape working from the Navigator 377

Figure 7-45 BRMS backup policy, properties - done
Before execution, verify that you have virtual tape volumes relating to the selected density *VRT32K. They should exist in the image catalog, since you are pointing to it. It is much more convenient to have all your volumes in a common image catalog.
This concludes the section on tailoring the backup policy.
7.5 Adding media to BRMSAdding media to BRMS is a logical add only. No tape volumes are created. When adding physical tape volumes, just provide names and they will be added. You can add them in advance.
However, this is not the case for virtual volumes. They have to exist.
378 i5/OS V5R4 Virtual Tape: A Guide to Planning and Implementation

You can add media “on the fly” as well, while creating a backup policy. To make things simple, you can treat it as a separate task, and perform the following actions:
1. Right-click Tape Volumes and select Add, as shown in Figure 7-46.
Figure 7-46 BRMS adding media
2. In the Welcome window that appears, click Next.
3. In the Select Media Pool page that appears, select the media pool (in this case, Vrt32k) as shown in Figure 7-47 on page 380.
Chapter 7. BRMS and virtual tape working from the Navigator 379

Figure 7-47 BRMS adding media, media pools
By clicking Properties, you can make changes to a media pool (for example, specifying a more understandable text). You can also change the amount of megabytes that the resulting virtual tape volumes will store.
In this scenario, since the backup is not very large and disk space should not be wasted on allocating empty areas, they were set to 5000 MB (5 GB), as shown in Figure 7-48 on page 381. When this is full, BRMS will automatically find a new volume the operating system places the data in.
Note: It is the operating system that executes a backup. BRMS only supplies the terms and condition and stores the result when the backup is finished.
380 i5/OS V5R4 Virtual Tape: A Guide to Planning and Implementation

Figure 7-48 BRMS adding media, media pools - properties
The Advanced option in the Properties window shown in Figure 7-48 relates only to physical media, while the Backup and Archive policies option helps you specify whether you want to allow full saves, changes only, or both.
In the Advanced window, you can also indicate if you want to share media across systems. This is normal when several systems back up to a common tape library.
In this scenario, since we are saving to virtual tapes that are created under an image catalog somewhere on an ASP (which makes it a bit complicated to share volumes), this option is left unselected. The same is the case with Write once media, since it applies only to optical media.
To leave the Advanced window, click OK.
4. In the Select media pool window shown in Figure 7-47 on page 380, since pool V32K is already selected, click Next.
5. Specify where to find the volumes that are going to be added to BRMS. All virtual volumes are created in image catalogs. BRMS presents you with all the image catalogs that it is aware of at this point, as shown in Figure 7-49 on page 382. Select your image catalog itsodb, and click Next.
Chapter 7. BRMS and virtual tape working from the Navigator 381

Figure 7-49 BRMS adding media, select media pool
6. A list of all volumes in the selected image catalog is presented.
In this example, there are five volumes. Add all of them to BRMS by selecting them and clicking Next, as shown in Figure 7-50 on page 383.
382 i5/OS V5R4 Virtual Tape: A Guide to Planning and Implementation

Figure 7-50 BRMS adding media, select volumes to add
Now decide on where to place your volumes, since BRMS presents all the existing locations. In this scenario’s move policy, it is specified that the volumes should bounce between locations VIRTUAL and COPIED. Therefore, the obvious thing would be to have them in location VIRTUAL.
You can place them in any location. However, think of these virtual tapes as you would real tapes, that is:
– There should be a tape unit. – The tape unit has to be varied on. – The tape unit has to be ready. – The tape unit has to have a tape mounted or at least loaded.– The tape must be unlocked (write protect switch).– The tape must be of correct density.– The tape should be initialized.– The tape must have a unique name.– The tape must be expired unless you append to its end.– You must have enough volumes to contain the data to be saved.– BRMS must be aware of the tape units’ existence and characteristics.
Make your choice with these points in mind.
Chapter 7. BRMS and virtual tape working from the Navigator 383

7. Add virtual volumes to location VIRTUAL by using the drop-down menu against Location in the Select Media Storage Location window. Select location Virtual, and click Next, as shown Figure 7-51.
Figure 7-51 BRMS adding media, select location
8. The next window, shown in Figure 7-52 on page 385, allows you to initiate the media and virtual tape drive that should be used. Do so, if required.
In this scenario, since it is assumed that they are already initiated, click Next.
384 i5/OS V5R4 Virtual Tape: A Guide to Planning and Implementation

Figure 7-52 BRMS adding media, initialize tape volumes
9. The last window is a summary of the selections made. In this scenario, since you do not have to go back and change anything, click Finish.
This concludes the section on adding media to BRMS. You are now ready to execute your backup policy.
7.6 Running the backupTo execute the backup policy, perform the following tasks:
1. Look up Backup, Recovery and Media Services and ensure that everything is set to run the backup.
Chapter 7. BRMS and virtual tape working from the Navigator 385

2. Right-click Backup, Recovery and Media Services and right-click your policy (in our case, Itsodbsave). Then select Run Now, as shown in Figure 7-53.
Figure 7-53 BRMS running the backup, Run Now selected
Note: We deliberately set it up so the example backup will not work. The backup, as defined, will work. However, we made sure that the virtual image environment is not in a ready state to accept the data, exactly as it would have been, had you forgotten to vary on the tape drive.
We thought it would be useful to show some of the pitfalls, rather than have you discover them by yourself. The examples are found in n Chapter 8, “Debugging examples using the GUI” on page 431.
386 i5/OS V5R4 Virtual Tape: A Guide to Planning and Implementation

As an alternative, you can click the Run icon in the top left corner, as shown in Figure 7-54.
Figure 7-54 BRMS running the backup, run button
3. The window that appears, shown in Figure 7-55, asks if you want to perform any overrides.
Since this is not required in this scenario, click OK, as shown in Figure 7-55.
Figure 7-55 BRMS running the backup, overrides
To run the job, you should be connected to the central system. If you are not, you will be asked to (or the Navigator will try to connect you). This can take a while.
Chapter 7. BRMS and virtual tape working from the Navigator 387

The Management Central servers in the endpoint or BRMS IBM ̂iSeries server should also be running. They should start automatically when an iSeries is powered on.
The central system connects to the endpoint system to initiate the execution of a task (for example, BRMS backup, restore, maintenance, and so on). Wait for the connection to the central system to take place.
4. When this is done, specify whether you want the joblog or not. The first time you run the job, it is useful to view the joblog regardless of the end result, just to understand what the job did. Click OK, as shown in Figure 7-56.
Figure 7-56 BRMS running the backup, save joblog
The Navigator status bar shows a message indicating what is going on, as shown in Figure 7-57.
Figure 7-57 BRMS running the backup, started - indication on status bar
5. Pop-up windows such as the one shown in Figure 7-58 also appear. Click OK.
Figure 7-58 BRMS running the backup, backup policy started pop-up
388 i5/OS V5R4 Virtual Tape: A Guide to Planning and Implementation

A status pop-up window, shown in Figure 7-59, displays while the backup is executing.
Figure 7-59 BRMS running the backup, status started
When finished, the status displayed changes to Completed, as shown in Figure 7-60.
Figure 7-60 BRMS running the backup, status completed
This concludes the section on running the backup.
7.7 Restoring an objectRestoring objects is a simple task, and is done from Backup, Recovery and Media Services Tasks.
It is assumed that:
� The image catalog is in loaded status.� The virtual volumes still exist.� There is a tape unit that is varied on. � The tape unit is ready. � The tape unit should have the backup tape mounted or at least loaded.
Chapter 7. BRMS and virtual tape working from the Navigator 389

In Chapter 8, “Debugging examples using the GUI” on page 431, some scenarios are set up in which these parameters are not fully in place.
To restore an object, perform the following tasks:
1. Under Backup, Recovery and Media Services Tasks, select Restore iSeries data, as shown in Figure 7-61.
Figure 7-61 BRMS restore
If you require help, expand Restore iSeries data by clicking the green arrow on the same line, as shown in Figure 7-62.
Figure 7-62 BRMS restore, help
2. Select Restore iSeries data. A dialog box appears, telling you how to use the next window. Click OK, as shown in Figure 7-63 on page 391.
390 i5/OS V5R4 Virtual Tape: A Guide to Planning and Implementation

Figure 7-63 BRMS Restore instructions
3. In the window that appears, shown in Figure 7-64 on page 392, fill in details about what to restore, select between dates and other selection criteria, if any. Use Browse if required.
The save items window comes up in different shapes, depending on what is to be restored. In this scenario Library, objects and members was selected, which allows you to restore a single object, namely the database file PARTS in the library DBITSODB01.
Since a single object named “parts” is being restored, input the following values, and click OK, as shown in Figure 7-64 on page 392.
– Policy: itsodbsave
– Saved items:
• Type: Libraries, objects or members
• Library: dbitsodb01
• Object: parts
• Object type: File
Chapter 7. BRMS and virtual tape working from the Navigator 391

Figure 7-64 BRMS restore, what to restore
The window that appears states that restore task has been started. There is no cause for worry since nothing will happen until you tell recovery from which backup you want to restore.
The Save History window reappears, showing the backups it found based on the recovery selections, as shown in Figure 7-65 on page 393. In this scenario, two choices were provided:
– A backup from November 27 – A backup from November 30
Both are full backups, in which 67 objects were saved.
392 i5/OS V5R4 Virtual Tape: A Guide to Planning and Implementation

4. Mark the latest backup (that is, November 30) by double-clicking it as shown in Figure 7-65.
Figure 7-65 BRMS restore, mark which save
As an alternative, you can right-click a backup and select Restore, as shown in Figure 7-66.
Figure 7-66 BRMS restore, mark which to save
A third option is to click the Restore icon, as shown in Figure 7-67 on page 394.
Chapter 7. BRMS and virtual tape working from the Navigator 393
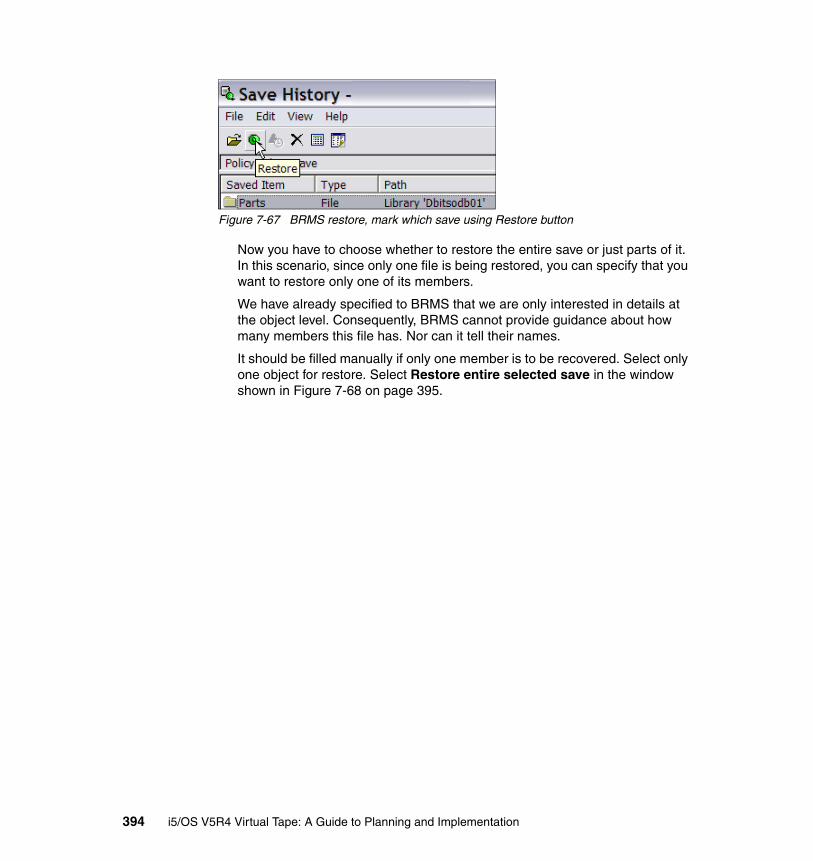
Figure 7-67 BRMS restore, mark which save using Restore button
Now you have to choose whether to restore the entire save or just parts of it. In this scenario, since only one file is being restored, you can specify that you want to restore only one of its members.
We have already specified to BRMS that we are only interested in details at the object level. Consequently, BRMS cannot provide guidance about how many members this file has. Nor can it tell their names.
It should be filled manually if only one member is to be recovered. Select only one object for restore. Select Restore entire selected save in the window shown in Figure 7-68 on page 395.
394 i5/OS V5R4 Virtual Tape: A Guide to Planning and Implementation

Figure 7-68 BRMS restore, entire save or selected objects?
You can also select specific items. Since a single object (that is, a file) is being saved, the only thing you can select is its members. If you had specified restoring an entire library, other options would have shown up.
Click Next.
The second window shown in Figure 7-69 on page 396 asks if you want to restore to the same disk pool or not. Select Yes, restore to the same disk pool, and click Next.
Chapter 7. BRMS and virtual tape working from the Navigator 395

Figure 7-69 BRMS restore, same disk pool
5. To restore to the same location, select Yes, restore to the same location, and click Next, as shown in Figure 7-70 on page 397.
396 i5/OS V5R4 Virtual Tape: A Guide to Planning and Implementation

Figure 7-70 BRMS restore, same location
6. Select which tape drive to use. Earlier in this section, it was pointed out that the recovery media should be thought of as a real tape volume that should sit in a tape drive, which in turn should be varied on and be ready, and so on.
To prevent the system from picking a drive pointing to something totally different, select the same tape drive that saved the data on the virtual volumes. Select Tapvrt01, click Add Before or Add After, and click Next, as shown in Figure 7-71 on page 398.
Chapter 7. BRMS and virtual tape working from the Navigator 397

Figure 7-71 BRMS restore, select tape drive
7. The next window, shown in Figure 7-72 on page 399, asks if you want to see the joblog. In this scenario, since we do, click OK.
398 i5/OS V5R4 Virtual Tape: A Guide to Planning and Implementation
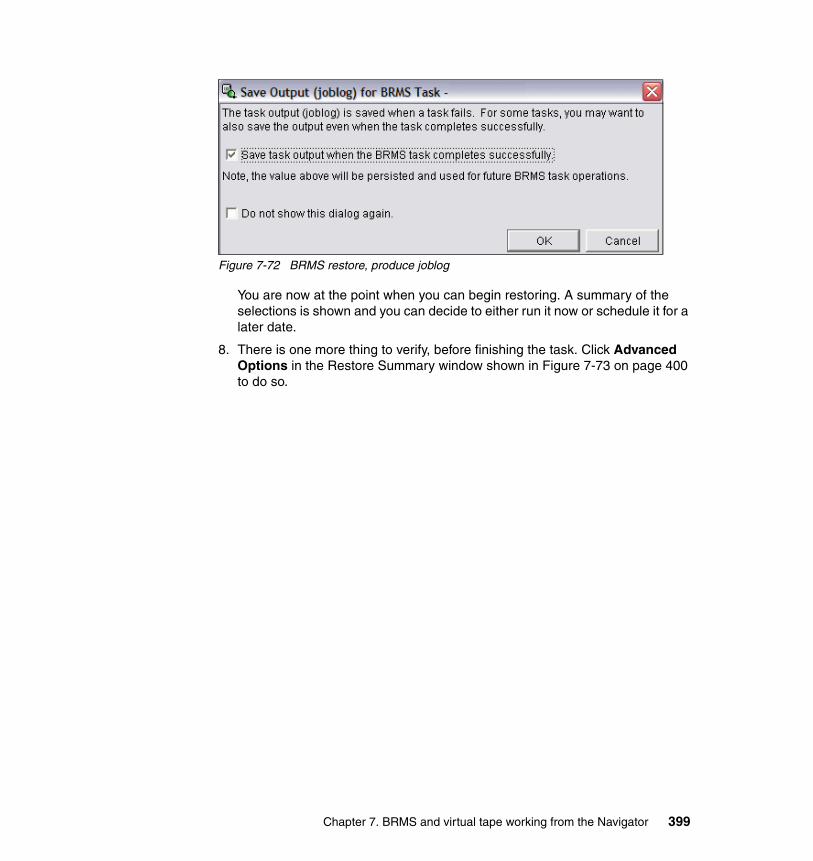
Figure 7-72 BRMS restore, produce joblog
You are now at the point when you can begin restoring. A summary of the selections is shown and you can decide to either run it now or schedule it for a later date.
8. There is one more thing to verify, before finishing the task. Click Advanced Options in the Restore Summary window shown in Figure 7-73 on page 400 to do so.
Chapter 7. BRMS and virtual tape working from the Navigator 399

Figure 7-73 BRMS restore, summary
After clicking Advanced Options..., specify how you want the tape to behave when done. Should it rewind, unload, or stay in the current position? In a virtual environment, this is not so important. However, keep in mind that the virtual volumes are identical to real physical tape volumes. If you display a volume, it starts from the beginning and seeks its way, sequence number by sequence number, until it finds what it is looking for.
For doing a restore, the approach is a bit different. A tape has called block numbers, which BRMS stores in its databases. When BRMS commands that something be restored, it hands out the block number to the operating system. With that in hand, the tape drive can do a fast positioning to the exact spot where the backup is and immediately start restoring.
400 i5/OS V5R4 Virtual Tape: A Guide to Planning and Implementation

This is also the case with append. It directly looks up the last file on the volume and adds the new dataset behind.
The Advanced panel offers a few more options, namely, the database members to restore and whether you want to allow differences or not.
9. In this scenario, since nothing else has to be restored, select Unload against the End of tape action field in the window shown in Figure 7-74.
Select whatever you find reasonable, and then click OK.
Figure 7-74 BRMS restore, end of tape action plus allow differences
10.This brings you back to the Summary page shown in Figure 7-73 on page 400. Since you have nothing more to add, click Finish.
If need be, from the Summary window, you can also schedule it for later execution.
11.This launches the restore, as shown in Figure 7-75 on page 402. Click OK.
Restriction: While some tape drives can do fast positioning, others cannot. All virtual drives can.
Chapter 7. BRMS and virtual tape working from the Navigator 401

Figure 7-75 BRMS restore, execute
This returns you to the status window shown in Figure 7-76.
Figure 7-76 BRMS restore, execute status
The restore action is now completed successfully.
7.7.1 Determining whether the restore workedThere is a long way and a short way of finding out if the restore worked.
The long wayIn the Navigator, perform the following tasks:
1. Select Management Central.
2. Expand Management Central by clicking the plus (+) sign.
402 i5/OS V5R4 Virtual Tape: A Guide to Planning and Implementation

3. Select Backup, Recovery and Media Services. This shows the jobs that were executed and whether their status is completed or failed, as shown in Figure 7-77.
Figure 7-77 BRMS restore, finding out - list of jobs
4. Select your job and click Task Output, as shown in Figure 7-78.
Figure 7-78 BRMS restore - task output
5. This brings up the listings for that job. In this case, it is only the joblog.
Use the Open icon or double-click it, as shown in Figure 7-79 on page 404, to bring up the joblog.
Chapter 7. BRMS and virtual tape working from the Navigator 403

Figure 7-79 BRMS restore, finding out - BRMS restore - task lists
The joblog is displayed, as shown in Figure 7-80. Restoring a single file generates a CPC3703 message stating One object restored.
Figure 7-80 BRMS restore, finding out - joblog
If you drill down, you will see some useful information (although it is difficult to read). You can see, for instance, message CPF3722 stating that an older version of PARTS type FILE in DBITSODB01 was restored: The version restored is older than the VOL(*SAVVOL) version of the object. If the RSTLIB and SAVLIB values are not equal, the save history is lost. Otherwise, the version restored is not the VOL(*SAVVOL) version and the records of the newer versions are lost.
There is obviously a later backup. In this scenario, BRMS was asked to only look up saves that were done within the control group. It may have been a better idea to specify All, which would have included all backups of this object.
The joblog also provides the following information: To restore the former VOL(*SAVVOL) version, specify RSTOBJ OBJ(PARTS) SAVLIB(DBITSODB01)
404 i5/OS V5R4 Virtual Tape: A Guide to Planning and Implementation

DEV(tape-device-name) OBJTYPE(*FILE) VOL(PAR003) LABEL(DBITSODB01). Specify SAVDATE and SAVTIME as 12/01/05 17:17:48.
As mentioned earlier, the CPC3703 message states that 1 object was restored. The details against it are: Data was restored from saved library DBITSODB01 to library DBITSODB01 at 12/01/05 18:18:19. Objects were restored from sequence number 2 on volume V32K03.
This message is also sent to the BRMS log. Therefore, in the next section we describe the easy way of seeing whether the restore worked.
The easy wayThe easiest way to determine whether something is restored is to use the BRMS log. There are a number of ways in which you can select information from this log. Follow these steps:
1. Under the Backup, Recovery and Media Services Task bar, open the BRMS log by selecting Display BRMS Log, as shown in Figure 7-81.
Figure 7-81 BRMS restore - BRMS log using environment tasks
2. The BRMS Log - Include window shown in Figure 7-82 on page 406 appears. Input the appropriate date and time range and click OK.
Chapter 7. BRMS and virtual tape working from the Navigator 405

Figure 7-82 BRMS restore - BRMS log includes
This displays a window similar to the one shown in Figure 7-83 on page 407.
406 i5/OS V5R4 Virtual Tape: A Guide to Planning and Implementation

Figure 7-83 BRMS restore - BRMS log entries
As with any information presented in this manner, you can sort the columns by clicking their headers. The next click sorts in the opposite direction. You can expand or shrink the width of the columns if they are too narrow or too wide.
The window shown in Figure 7-84 shows an example of the window after the sorting action.
Figure 7-84 BRMS restore - BRMS log entries severity 30
Chapter 7. BRMS and virtual tape working from the Navigator 407

Double-clicking a message row returns detailed information to you, as shown in Figure 7-85.
Figure 7-85 BRMS restore, detail message text
This concludes the action of restoring an object.
7.8 Duplicating volumesTo secure your data, copy your virtual backup to physical media. In this scenario, only one volume is added.
7.8.1 Adding physical tape volumesTo duplicate virtual volumes to real tapes, add the target tapes to BRMS. This is no different from adding physical media.
408 i5/OS V5R4 Virtual Tape: A Guide to Planning and Implementation

Following these steps:
1. Under Backup, Recovery and Media Services, right-click Tape Volumes and select Add volumes, as shown in Figure 7-86.
Figure 7-86 BRMS duplicating volumes, add physical media - add volumes
2. In the Welcome wizard window, click Next.
3. The next window asks you to specify the media pool in which you want to place your tape volume. Select one that matches your tape drive or your virtual volume.
Remember that you are now creating a tape that may be used for recovery. Since duplicating tape volumes is an ordinary batch job, there is normally no time constraint. The main issue to keep in mind is, what is important for a recovery situation, speed or flexibility.
In this scenario, since the lowest density for the virtual tapes is taken to be flexible, adhere to that concept and select a low density format for the physical tape.
Make your choice and click Next, as shown in Figure 7-87 on page 410.
Important: Be aware that, although you may have selected the lowest possible virtual volume density, you cannot be certain if a physical low density cartridge can be produced. Most modern physical tape drives do not support writing to low density cartridges. This is because the physical layout of the tape drives’ read and write heads are different. Typically, a high-density drive divides the tape surface into more stripes and writes the bits closer to each other.
Chapter 7. BRMS and virtual tape working from the Navigator 409

Figure 7-87 BRMS duplicating volumes, add physical media - select media pool
4. In the Add volumes window that appears, type the volume name and click Add. Repeat until all the volumes are added to BRMS.
In this scenario, only one is added. Click Next, as shown in Figure 7-88 on page 411.
Important: Volume names should be unique even across systems.
Avoid misleading names such as Monday, and so on, even if you only have a single drive. There is a definite chance of such a naming scheme breaking when the tape for Wednesday has to be mounted on Saturday.
410 i5/OS V5R4 Virtual Tape: A Guide to Planning and Implementation

Figure 7-88 BRMS duplicating volumes, add physical media - add named volumes
5. Add your volume to a location, as shown in Figure 7-89 on page 412.
The quarter-inch tape drives are not tape libraries. They are only simple, single drives. They do not even have a tape loader, so a location does not really apply to them. At this point, you can create locations TAP01, TAP02, and so on, but there is little benefit in doing so, since they can only hold one volume at a time.
In this scenario, the example tape is placed in location *HOME.
As discussed earlier, every volume has to be in a location. This is especially important to physical media. BRMS always creates a location named VAULT, which is used in this example. However, you should also know where your physical scratch tapes are. If you have a tape library, they will be there. If you have only a single drive (as is the case in this scenario), it is beneficial to have a location named TAPESHELF, COMPROOM, DRAWER, or whatever suits you best. Since *HOME is also possible, it is used here.
Click Next.
Chapter 7. BRMS and virtual tape working from the Navigator 411

Figure 7-89 BRMS duplicating volumes, add physical media - add volumes to location
6. Initialize volumes in the window shown in Figure 7-90 on page 413.
However, since the volume is already initialized in this scenario, skip that and click Next.
412 i5/OS V5R4 Virtual Tape: A Guide to Planning and Implementation

Figure 7-90 BRMS duplicating volumes, add physical media - initialize volumes
7. As there is nothing else to be done, in the Summary window shown in Figure 7-91 on page 414, click Finish.
Tip:
� If you initialize only one volume, change Media action when done from Unload to Rewind.
� If you initialize more than one volume, take them in reverse order so that the first to be used can be left in the drive.
Chapter 7. BRMS and virtual tape working from the Navigator 413

Figure 7-91 BRMS duplicating volumes, add physical media - summary
8. Click Finish in Figure 7-91 to return to the window where you started, as shown in Figure 7-92 on page 415. Press F5 for refresh.
Important: BRMS has its own way of keeping track of retention periods. Physically, all BRMS tapes have *PERM (permanent) as retention period to avoid having them overwritten if they are loaded into another system.
If you add a tape volume to BRMS, it assumes that the volume is empty and adds it as *EXPIRED. You will lose whatever was on that volume regardless of whether you initialized it or not.
If the volume is unknown to BRMS and you want to keep the data intact, but let BRMS add data to the same volume, use the 5250 commands Add Media Information to BRM (ADDMEDIBRM) and Extract Media Information to BRM (EXTMEDIBRM). You should also set an appropriate retention period for the volume manually.
414 i5/OS V5R4 Virtual Tape: A Guide to Planning and Implementation

Figure 7-92 BRMS duplicating volumes, add physical media - done
This concludes the first part of duplicating virtual volumes. You now have a physical tape volume that BRMS is aware of and knows where it is.
7.8.2 Duplicating volumesAt the time of writing, duplication using the Navigator could not be done.
The only other option was to use 5250 emulation. Perform the following tasks to duplicate volumes here:
1. Start a 520 emulation screen (if that has not already been done).
If you do not have a shortcut to the screen, from the Windows Start panel, select Programs → IBM iSeries for Windows → Emulator → Start or Configure sessions, as shown in Figure 7-93 on page 416, and create a path if none exists.
Chapter 7. BRMS and virtual tape working from the Navigator 415

Figure 7-93 BRMS duplicating volumes - Start 5250 emulation
A media policy is required for the physical volumes. Only in 5250 emulation, does a Media policy exist on its own. In the Navigator it is not a separate entity, and is built in under the backup policy.
2. To access the media policy in 5250 emulation, enter the following command and press Enter:
WRKPCYBRM *MED
Select Option 1 = Create.
In this scenario, the Media policy is named TWO_WEEKS and the retention period is set to 17 days to cover for long weekends.
Since this media policy deals with physical tapes, a move policy is required. BRMS always creates a base setup, which includes a move policy named
416 i5/OS V5R4 Virtual Tape: A Guide to Planning and Implementation

OFFSITE. It ensures that the volumes are stored in a safe place. Determine an appropriate logical flow for your volumes that suits your business, and create as many locations as required. In this scenario, the OFFSITE move policy is used as shown in Example 7-1.
Example 7-1 BRMS duplicating volumes, create Media policy for physical media
Create Media Policy Type choices, press Enter. Media policy . . . . . . . . . . . TWO_WEEKS Name Retention type . . . . . . . . . . 2 1=Date, 2=Days, 3=Versions, 4=Permanent Retain media . . . . . . . . . . 17 Date, Number Move policy . . . . . . . . . . . OFFSITE Name, *NONE, *ADSM, F4 Media class . . . . . . . . . . . QIC2GB Name, *SYSPCY, *ADSM, F4 Storage location . . . . . . . . . *ANY Name, *ANY, F4 for list Save to save file . . . . . . . . *NO *YES, *NO ASP for save files . . . . . . . *SYSTEM Name, *SYSTEM, 1-32 Save file retention type . . . . 4 1=Date, 2=Days, 3=Permanent, 4=None Retain save files . . . . . . *NONE Date, Number, *NONE ASP storage limit . . . . . . . *SYS *SYS, 1-99 Secure media . . . . . . . . . . . *NO *YES, *NO, *ADSM Text . . . . . . . . . . . . . . . Media policy used for physical media saved 17 days More... F3=Exit F4=Prompt F5=Refresh F12=Cancel
3. When done, you can duplicate by entering the following values for the parameter DUPMEDBRM and pressing Enter:
– VOL: V32K02 – FROMDEV: TAPVRT01 – TODEV: TAP01 – MEDPCY: TWO_WEEKS – FROMVOL: V32K02 – FROMENDOPT: *REWIND – TOENDOPT: *UNLOAD – TOVOL: QIC001 – SAVMEDINF: *OBJ
This job failed because it filled up the volume. Unfortunately, since there were no volumes ready for that media class, the job had to be cancelled as shown in the following message example.
No media of class QIC2GB is available in location *HOME:
– Reply . . : C
Chapter 7. BRMS and virtual tape working from the Navigator 417

The joblog appears as shown in Example 7-2.
Example 7-2 BRMS duplicating volumes, unsuccessful joblog
Tape duplication completed successfully. Duplication mark for volume V32K02 removed. Save or restore operation ended unsuccessfully.
4. There is an easy way of solving the problem of the duplication making it only half-way through. Add another cartridge to BRMS and restart with the following command:
ADDMEDBRM VOL(QIC101) MEDCLS(QIC2GB) INZ(*YES) DEV(TAP01)
Then press Enter.
As an alternative, you can restart from a failing point by using the DUPMEDBRM command. Use the following command:
WRKMEDIBRM VOL(V32K02)
Then press Enter.
Press F11 until you see the columns shown in Example 7-3.
Example 7-3 BRMS duplicating volumes, WRKMEDIBRM - Resume key
Saved Save Save Item Duplicate Marked for DuplicationItem Date Time Type Save Item Duplication Resume Key DBITSODB01 12/05/05 15:59:43 *LIB *YES *NO QUSRBRM 12/05/05 16:00:45 *OBJ *YES *NO 012612
Replace the Volume Name and RSMKEY in the DUPMEDBRM command with the following values:
– VOL: *RESUME – RSMKEY: 012612
The other parameters stay the same. Press Enter.
Example 7-4 on page 419 shows the job log, which states that tape duplication is complete.
Note: The message Tape duplication completed successfully is a bit contradictory to the last message Save or restore operation ended unsuccessfully.
This is because the saved library fit on the volume. What did not fit, however, were the BRMS inventory files needed for disaster recovery.
Since the data was copied correctly, the duplication mark was removed from virtual volume V32K02.
418 i5/OS V5R4 Virtual Tape: A Guide to Planning and Implementation

Example 7-4 BRMS duplicating volumes, joblog complete
Tape duplication completed successfully. Save of BRM media information at level *OBJ complete. 19 objects saved from library QUSRBRM. Tape duplication completed.
You can see that the target volumes automatically moved to location OFFSITE, as outlined by the move policy that was used in the copy operation.
5. Use the following command to verify the volumes:
WRKMEDBRM
Then press Enter.
Example 7-5 shows that the target volumes have moved to a new location.
Example 7-5 BRMS duplicating volumes, target volumes moved to new location
Volume Move Serial System Policy QIC001 APPN.SYSAS08 OFFSITE QIC101 APPN.SYSAS08 OFFSITE
The recovery reportThe recovery report correctly points to the physical volume QIC001. The refers to restoring only library DBISTODB01, which is fitted on tape QIC001. Therefore, the recovery report does not list volume QIC002 here. QIC002 contains only the BRMS media inventory files.
Note: We should point out that the example provided here is not very realistic. First of all, there is little meaning in saving BRMS media inventory to virtual volumes. Normally, you cannot take them anywhere. In a running system, BRMS has all the latest information it requires on its online inventory databases. However, there is a risk if something negative happens between the time of your backup and the time when these inventory files are saved to physical media.
Also, the resulting volume ended up with two sets of BRMS inventory files, with the first set reflecting the time the original backup was taken. Everything in there points to the virtual tape, which is essentially worthless if you have to run to a recovery site, since you normally cannot bring your virtual volumes along. The second inventory set is the only useful one, as it now points out the real physical volume as the recovery media for our data.
Chapter 7. BRMS and virtual tape working from the Navigator 419

The recovery report is normally a result of the BRMS maintenance job. However, you can produce a recovery report by using the following command:
STRRCYBRM
Then press Enter.
Example 7-6 shows a recovery report.
Example 7-6 BRMS duplicating volumes, recovery report - selection only
Saved Save ----- ASP ------ Save Save Item Type Name Number Date Time ---------- ------- ---------- ----- -------- --------DBITSODB01 *FULL *SYSBAS 00001 12/05/05 15:59:43 _______________________________________________________________________________
--- Objects --- Not Sequence Control Volume Saved Saved Number Group Identifier ------- ------- --------- ---------- ---------- 67 0 1 ITSODBSAVE QIC001
To restore older generations, pick a volume that is not yet overwritten, and use the Work with Media Information (WRKMEDIBRM). The results are shown in Example 7-7.
Example 7-7 BRMS duplicating volumes, WRKMEDIBRM
Saved Save Save Save Parallel Volume Item Date Time Type Devices Serial DBITSODB01 11/27/05 13:56:02 *FULL V32K01 DBITSODB01 11/30/05 17:24:39 *FULL V32K03 DBITSODB01 12/05/05 15:59:43 *FULL V32K02 DBITSODB01 12/05/05 15:59:43 *FULL QIC001
Finding what to duplicate automaticallyIn this scenario, a specific volume to copy (that is, V32K02) was used as an example. However, you can also duplicate volumes using two other useful
Note: The disaster recovery report shows whatever date and time range you have specified; that is, the volumes and instructions required to recover the system up to that point in time. It does not show any previous versions of the data.
Note: The target volume from duplication has the same date and time stamp as the volume it was copied from.
420 i5/OS V5R4 Virtual Tape: A Guide to Planning and Implementation

parameters in the DUPMEDBRM command, namely *SEARCH and *SCHHST, as described here:
� *SEARCH
This duplicates complete volumes.
� *SCHHST
This only duplicates data sets that are not already copied.
For more information about these parameters, refer to their help text.
To specify that you only want specific datasets to be marked for duplication, go to the Backup Policy Properties, under Advanced, in the During tab, as shown in Figure 7-94.
Figure 7-94 BRMS duplicating volumes, mark datasets for duplicate
Chapter 7. BRMS and virtual tape working from the Navigator 421

This concludes the recovery action.
7.9 Parameters available only from NavigatorThe naming convention differs between Navigator and the 5250 emulation. In Navigator, both the backup policy and the control group are combined in one task. The backup policy in 5250 is more of a general definition containing default parameters that the system policy does not specify.
The backup policy in 5250 also overrides anything in the system policy if they both contain the same variable. What really counts is the control group, which overrides everything.
When displaying a control group in 5250 emulation, there are some attributes you cannot touch. They are shown, but you cannot change them. They are controlled from the Navigator only; for example, the last page of a 5250 control group (the direct command is WRKCTLG) shown in Example 7-8.
Example 7-8 BRMS Navigator only, 5250 Control group - attributes
Client backup policy . . . . . . . . . : SERVERBACK
Allow activity overrides . . . . . . . . *YES Allow retention overrides . . . . . . . *YES Additional management: TCP/IP servers . . . . . . . . . . . . *BOTH Lotus servers . . . . . . . . . . . . *BOTH Integrated Windows servers . . . . . . *BOTH Guest partitions . . . . . . . . . . . *BOTH Unmount user-defined file systems . . . *YES Run maintenance after backup . . . . . . *NO
Some attributes are specified when you create the backup policy by selecting options such as Yes, unmount user-defined file systems, as shown in Figure 7-95 on page 423.
Note: You cannot run several *SEARCH or *SCHHST jobs at the same time or in combination. The result will be unpredictable.
422 i5/OS V5R4 Virtual Tape: A Guide to Planning and Implementation

Figure 7-95 BRMS Navigator only, unmount file systems
Other attributes hide behind the tabs, shown in Figure 7-96 on page 424, in an existing backup policy.
Chapter 7. BRMS and virtual tape working from the Navigator 423

Figure 7-96 BRMS Navigator only, properties buttons - Before, During, After
Against Before are the following parameters, as shown in Figure 7-97 on page 425:
� Shut down integrated file servers
� Shut down hosted logical partitions
� Shut down TCP/IP servers
� Shut down Lotus servers
424 i5/OS V5R4 Virtual Tape: A Guide to Planning and Implementation

Figure 7-97 BRMS Navigator only, before save - General tab
Against During, What is one of the tabs. It has a parameter at the bottom stating Unmount user-defined file systems, as shown in Figure 7-98 on page 426.
Chapter 7. BRMS and virtual tape working from the Navigator 425

Figure 7-98 BRMS Navigator only, during save - What tab
Against After are the options used to start whatever you took down under Before, as shown in Figure 7-99 on page 427.
426 i5/OS V5R4 Virtual Tape: A Guide to Planning and Implementation

Figure 7-99 BRMS Navigator only, after save - General tab
This concludes the section on the BRMS parameters available only from the Navigator.
7.10 Adding a new tape drive to BRMSAssume that you have created a virtual tape device named TAPVRT03, and it is the one you want to use in the backup policy. In the Stand-Alone Devices list
Chapter 7. BRMS and virtual tape working from the Navigator 427

shown in Figure 7-100, you see this virtual tape drive, but it does not appear on the BRMS list of available devices.
Figure 7-100 BRMS Backup policy, list of Stand-Alone devices
There are two ways of fixing this:
1. In 5250 emulation, enter the following command:
INZBRM *DEVICE
As an alternative, you can bring up Manage devices using the Navigator, as shown in Figure 7-101. (The example used here is from another system.)
Figure 7-101 BRMS Backup policy, Manage devices
2. Click New Media Device to add TAPVRT03, as shown in Figure 7-102 on page 429.
428 i5/OS V5R4 Virtual Tape: A Guide to Planning and Implementation

Figure 7-102 BRMS Backup policy, manage devices
3. This makes BRMS search for any device it does not yet know. It finds TAPVRT03 and it brings it up for tailoring, if required.
Finish by clicking Add, as shown in Figure 7-103.
Figure 7-103 BRMS Backup policy, add new device to BRMS
4. Refresh by pressing F5. The new tape device should now be visible and ready to use in BRMS.
7.11 Reinstating dialog boxesAt some point you may have indicated that you are not interested in joblogs from successful jobs and that you do not wish to see the dialog box again.
Chapter 7. BRMS and virtual tape working from the Navigator 429

However, if you later change your mind, you can reinstate the dialog box by right-clicking Backup, Recovery and Media Services and selecting Enable BRMS Dialogs, as shown in Figure 7-104.
Figure 7-104 BRMS enable dialog boxes
430 i5/OS V5R4 Virtual Tape: A Guide to Planning and Implementation

Chapter 8. Debugging examples using the GUI
This scenario is a follow-up to Chapter 6, “BRMS and virtual tape” on page 279“. It assumes that the backup policy ITSODBSAVE is set up and ready for execution, but that nothing has been done in terms of having tape drives, image catalogs, and so on, ready.
We deliberately set it up this way so that it does not work initially. This is eventually what may happen if you simply jump into the concept of virtual tape without understanding how it works. We thought it would be better to detail the pitfalls, rather than have you discover them. The scenarios described here are meant to educate you. You can run them on your machines to understand them better.
This chapter presents three debugging examples as a first attempt, a second attempt, and a final attempt.
8
© Copyright IBM Corp. 2006. All rights reserved. 431

8.1 First attemptThis debug information follows from the previously described BRMS scenario. In this case, we are trying to run a backup policy and it fails. When you are using virtual tape there still has to be a virtual tape drive that is ready, a volume mounted or at least available, and so on.
Right-click the ITSOBACK backup policy and select Run now, as shown in Figure 8-1, or click Run (this is not shown) in the upper left corner.
Figure 8-1 Starting a backup
432 i5/OS V5R4 Virtual Tape: A Guide to Planning and Implementation

5. A window appears, asking whether you want to override policy settings, as shown in Figure 8-2. Select Use policy setting for both the fields in the Figure, and click OK.
Figure 8-2 Backup overrides
To run the job, you should be connected to the central system. If you are not connected, you will be asked to do so or the Navigator will try to connect you. This could take a while.
When done, specify whether you want the joblog or not. This job is supposed to fail so that a joblog is produced. Select any of the options in the window shown in Figure 8-3 on page 434, then click OK.
Chapter 8. Debugging examples using the GUI 433

Figure 8-3 Save joblog
6. If for some reason you selected Do not show this dialog again in Figure 8-3, but want to get the dialog boxes again, right-click Backup, Recovery and Media Services, and select Enable BRMS Dialogs, as shown in Figure 8-4.
Figure 8-4 Dialog boxes
Meanwhile, the Navigator status bar shows a message indicating what is going on, as shown in Figure 8-5 on page 435.
434 i5/OS V5R4 Virtual Tape: A Guide to Planning and Implementation

Figure 8-5 Status bar message
Pop-up windows also appear, such as the ones shown in Figure 8-6 and Figure 8-7.
Figure 8-6 Status pop-up
Figure 8-7 Status failed
7. Figure 8-7 shows that the job failed. To determine why, click Task output button, as shown in Figure 8-8.
Figure 8-8 Task icon
Chapter 8. Debugging examples using the GUI 435

This brings up the Viewer showing the joblog. In the Viewer, you can find the exact reason why the job failed. In this case, a BRM1034 message states that a device could not be allocated. Therefore, you should look at the device you are trying to use.
Remember that we are saving to virtual volumes, and it is no different from saving to real tape volumes. There still has to be a tape drive that is ready, a volume mounted or at least available, and so on. You should figure out how to do this when dealing with virtual volumes.
8. Scroll down the Navigator until it displays the tape devices, as shown in Figure 8-9.
Figure 8-9 Tape devices
When you look up the tape device Tapvrt01, you will see that the status is Unavailable.
436 i5/OS V5R4 Virtual Tape: A Guide to Planning and Implementation

9. Right-click tape device Tapvrt01 and select Make Available, as shown in Figure 8-10.
Figure 8-10 Make tape drive available
If this too fails, in the dialog box shown in Figure 8-11, select the message, and click Details. Click OK.
Figure 8-11 Select for detailed message
Chapter 8. Debugging examples using the GUI 437

This displays a window similar to the one shown in Figure 8-12.
Figure 8-12 Detailed message
This window indicates that a resource is currently being used by someone else. Find out which resource is creating the problem.
438 i5/OS V5R4 Virtual Tape: A Guide to Planning and Implementation

Go back to the window shown in Figure 8-10 on page 437, right-click the device, and select Properties. A window similar to the one shown in Figure 8-13 is displayed.
Figure 8-13 Tape drive properties
Figure 8-13 shows that the status for resource TAPVRT35 is Unavailable. This indicates it is being used by another device (Mervvrt, as shown in Figure 8-14), thus making it unavailable. Click OK.
10.Make the virtual tape device available, as shown in Figure 8-14, and retry the job.
Figure 8-14 Make other tape drive unavailable
Chapter 8. Debugging examples using the GUI 439

8.2 Second attemptLaunch the job the same way you did in the first attempt. This time around too, the attempt fails, as shown in Figure 8-15.
Figure 8-15 Second attempt started
Perform the same steps as you did when the first attempt failed. This time message CPF41B4 appears, showing the status of the virtual volume as Unavailable; see Figure 8-16. It also states that a virtual volume should be mounted, or at least loaded.
Figure 8-16 Tape image catalog
We recommend that you use the Work with image catalog entries (WRKIMGCLGE) command to fix it. This is a 5250 emulator command.
Since you are in the Navigator, do the following instead:
440 i5/OS V5R4 Virtual Tape: A Guide to Planning and Implementation

1. Right-click the image catalog and select List Volumes, as shown in Figure 8-17.
Figure 8-17 List volumes
A window similar to that displayed in Figure 8-18 appears.
Figure 8-18 Volumes shown
The CPF41B4 message stated that volumes should be loaded or mounted. However, Figure 8-18 shows there are several volumes that are loaded in the image catalog. Go back to read the error message once again.
It only stated that volume V32K06 is not available, but nothing was said about the volumes that were available.
So, let’s first take a look at how BRMS sees a tape device.
Chapter 8. Debugging examples using the GUI 441

2. Right-click Backup, Recovery and Media Services and select Manage Devices, as shown in Figure 8-19.
Figure 8-19 Select manage devices
This displays the window shown in Figure 8-20.
Figure 8-20 List of tape drives
What is odd in Figure 8-20 is that all the tape drives, including the one selected by you, are pointing to a location named Home location, except two drives that use location Virtual. If you recall, you placed all the volumes in location VIRTUAL, and not *HOME.
However, the tape device is now set looking for volumes in *HOME. Since the message explicitly named volume V32K06, take a closer look at the virtual device Tapvrt01.
442 i5/OS V5R4 Virtual Tape: A Guide to Planning and Implementation

3. Select Tapvrt01 and click Edit. Against the General tab in the window shown in Figure 8-21, change the tape drive to the location in which you placed your virtual volumes. You have to do this although it is actually a virtual location.
Figure 8-21 Edit tape drive to point at location
4. To determine why BRMS pinpointed volume V32K06, click Tape Volumes under Backup, Recovery and Media Policies (in Figure 8-19). Figure 8-22 is shown.
Figure 8-22 Tape volumes list
Chapter 8. Debugging examples using the GUI 443

The window shown in Figure 8-22 does not provide information about where the volumes are. Since all the available columns are not shown, add the column Location to your view, as shown in Figure 8-23.
Figure 8-23 Columns to view
5. Add the column Location in the order in which you want it to appear, as shown in Figure 8-24. Click OK.
Figure 8-24 Add column
444 i5/OS V5R4 Virtual Tape: A Guide to Planning and Implementation

In the same window, add other columns that you will require later, such as Marked for duplication, Duplicated volume, and those you find usable. The result will be as shown in Figure 8-25.
Figure 8-25 View after adding columns
The reason why the job did not run was because BRMS was looking in a location pointed by the virtual drive *HOME and there was only one volume, V32k06, and that volume was unavailable since somebody had played with it.
8.3 The final attemptFor the last time, run the example backup again, as shown in Figure 8-26.
Figure 8-26 Final attempt of run backup
It appears to be running well, as shown in Figure 8-27 on page 446.
Chapter 8. Debugging examples using the GUI 445

Figure 8-27 Successful run backup
While running this example backup, we want to show another pitfall you may run into.
Make sure you have eliminated the problems you ran into last time, that the tape drive is available, the correct image catalog is loaded, and there are volumes to write to, as shown in Figure 8-28.
Figure 8-28 Manage tape devices
446 i5/OS V5R4 Virtual Tape: A Guide to Planning and Implementation

1. First, make the virtual tape drive available, as shown in Figure 8-29.
Figure 8-29 Make tape drive available
2. Ensure that the image catalog is loaded, as shown in Figure 8-30.
Figure 8-30 Load image catalog
3. Select the image catalog, as shown in Figure 8-31 on page 448. Click OK.
Chapter 8. Debugging examples using the GUI 447

Figure 8-31 Select image catalog to load
4. Verify whether there are volumes with loaded status (by right-clicking the virtual tape drive and selecting Load Volume as shown in Figure 8-32.)
After the image catalog is loaded, more options are available. For instance, you can operate on individual tape volumes.
Figure 8-32 Load volume
The window that appears, shown in Figure 8-33 on page 449, does not contain all the volumes in the image catalog. Only those that can be loaded are shown. The volumes that are already in loaded status are excluded.
448 i5/OS V5R4 Virtual Tape: A Guide to Planning and Implementation

In this case, the following have appeared for selection:
– V32K06, because somebody else took it, as described previously.
– V32K01, because it was left in the drive from the previous backup. It has the status Mounted, which you can verify from its properties.
Figure 8-33 Select a volume to load
At this point, you do not have to do anything. However, if you want to mount another volume, you can do so, as shown in Figure 8-34.
Figure 8-34 Mount volume
These operations are not related to BRMS at all. The reason they are being described is to show you how to operate in this virtual environment. For running a backup within BRMS, it is sufficient to have the volumes in loaded status. You can mount a volume if you like. However, you cannot be sure whether it will be the one written to. BRMS has its own candidate list regarding the volume it will select. Therefore, at this point, you do not have to mount anything.
Chapter 8. Debugging examples using the GUI 449

However, the volume from the earlier backup is still mounted. Leave this volume as selected, and see what happens (Figure 8-35).
Figure 8-35 Mount a specific volume
Finally you have to check, in BRMS, which location the tape drive points at. Right-click Media under Backup and Recovery Media Services and select Manage devices (Figure 8-19 on page 442). This displays a window shown in Figure 8-36. Verify whether your drive shows location VIRTUAL, since, from a BRMS perspective, it is there that your tape volumes are placed.
Figure 8-36 Manage devices
The goal here is to show what happens when the backup hits a volume end and continues into the next volume. To make that happen, extend what is saved.
Go to the backup policy and double-click it. Under During against the What tab, click Add and include a couple of more libraries. Select something from the IFS for a change. Ensure that it is big enough so that it does not fit on one volume.
450 i5/OS V5R4 Virtual Tape: A Guide to Planning and Implementation

When launching the backup, you can make another alteration. Create a backup policy in such a way that it will save only changes. Since the initial backup became a full backup, with BRMS converting it, this backup will be a “changes only” backup in the true sense of the word. To ensure that you fill a full tape volume, force another full backup at this point (Figure 8-37).
Since you allowed changes at runtime, you can tell it to run another full backup, although it is not required from a recovery standpoint. Your goal should be to fill more than one volume.
Figure 8-37 Override cumulative forcing a full backup
The job will fail after running for a while, as shown in Figure 8-38.
Figure 8-38 Backup job failed
The system operator’s message queue shown in Figure 8-39 on page 452 provides a clue concerning the failure.
Chapter 8. Debugging examples using the GUI 451

.
Figure 8-39 No media available
The job failed since there was no media (volumes) available for your media class in location VIRTUAL. Check the joblog shown in Figure 8-40 for more details.
Figure 8-40 Backup job failed joblog
However, this too is unclear about why the job failed. To determine the cause of the failure, you need to understand how BRMS operates.
BRMS is an application. The i5 concept, all the way back to the System/38™, is single-level storage, a layered structure that shields the programs from the platform they run on, and is truly portable from release to release. As is the case with any other i5 application, BRMS requests that things be executed using the i5 operating system. The only goal of BRMS is to have data backed up and to keep track of it.
BRMS achieves this goal by using a set of policies. It has a number of databases where all this information is stored. Any other operation, such as saving, restoring data, initializing tape volumes, and so on, is done by the operating system on request from BRMS.
No media of class VRT32K is available at location VIRTUAL. (C G) Reply.: C Operation ended by media management. Reason code 0003. Some libraries not saved. Control group ITSODBSAVE type *BKU ended abnormally.
Starting save of library DBITSO* to devices TAPVRT01.Volume V32K03 on device TAPVRT01 is density *VRT32K.13686 blocks processed for sequence 1, volume V32K03, on device TAPVRT01.13231 blocks processed for sequence 2, volume V32K03, on device TAPVRT01.12591 blocks processed for sequence 3, volume V32K04, on device TAPVRT01.End of volume detected for file QSYSTAP in QSYS. The next volume inserted on device TAPVRT01 has volume identifier V32K04.Operation ended by media management. Reason code 0003. 0003 = The user entered a cancel reply for a media mount message.24 objects saved from library DBITSODATA.Some libraries not saved. Save or restore operation ended unsuccessfully.
452 i5/OS V5R4 Virtual Tape: A Guide to Planning and Implementation

The operating system can handle three types of tape devices:
� Direct or fiber attached, including virtual, such as: – Single drives– Tape libraries
� Remote drives such as Tivoli Storage Management servers
In most cases, in order to do something using a single device, you require an operator. Tape libraries, on the other hand, carry out all these operations by themselves—but they require some kind of command telling them what to do.
So for tape libraries, the data flows directly to the tape drive selected by the library manager function. The commands that tell the library what volume to mount and so on, go to the library manager function. Tape libraries are of different brands and are constructed a bit differently. Although the details of that topic is beyond the scope of this chapter, it is important to understand the logic behind tape libraries.
In a tape library environment, the operating system does not have control over the individual tape drives in the tape library. They are varied off. It is the library itself that picks up a suitable drive for you, depending on your needs. The operating system only “speaks” to a library manager function and when contact to the drive (that is, the library manager function selected) is established, the data is sent directly to the tape drive. Any command to a library must contain at least two things: what to do, and which volume to operate upon.
Before discussing single drives, you should understand TSM. From the BRMS standpoint, TSM is simply a tape device sitting in the net. BRMS saves to temporary save files. It inserts an identification tag, chops the save file into pieces, and sends them to a network address, which in fact is the TSM server. When done, BRMS only stores these identification tags so that it can request the data back.
What actually happens to the data in the TSM server is up to TSM to handle. TSM either handles the data by using its own policies, or BRMS tells it which policies to use (or supplies policies).
Our backup scenario uses a virtual tape device which is seen as single tape unit, and not a tape library. If set up properly, a tape library can handle its volume the way it wants to. Normally, a single drive cannot do this. It requires a manual operation when, for instance, it comes to mounting the next tape. In a virtual environment like this, there is no way of doing this, nor is there a need for it since
Note: An IBM ̂iSeries can be a TSM server itself using the QShell environment, but the concept remains the same.
Chapter 8. Debugging examples using the GUI 453

everything is virtual. However, someone has to take care of the next volume mount message that comes from the tape drive end of volume indication.
The operating system checks it to see if it can handle the situation. If not, it passes the message to the application running the job. How BRMS handles that exception is defined in its own tape device descriptions, that is, those that were created when running INZBRM *DEVICE.
Perform the following tasks:
1. Bring up manage devices and click Edit..., as shown in Figure 8-41.
Figure 8-41 List of tape drives
In the window that appears, under the tab Options, you see a field Send message when ready for next volume; see in Figure 8-42 on page 455. If this option is selected, it means that an operator has to mount the next volume and
454 i5/OS V5R4 Virtual Tape: A Guide to Planning and Implementation

reply to the message. In a virtual environment, since this makes no sense, the operation is cancelled and the job is completed after the first volume is filled.
Figure 8-42 Message handling
Fortunately, when working from Navigator, you will not see this problem. It is taken care of automatically.
Chapter 8. Debugging examples using the GUI 455

456 i5/OS V5R4 Virtual Tape: A Guide to Planning and Implementation

Appendix A. Block sizes
A
© Copyright IBM Corp. 2006. All rights reserved. 457

Block size chartTable A-1 shows the tape drive types, highest supported density, block size, and whether the tape drives are capable of using optimum blocking.
Table A-1 Details about tape drive types
Type Highest density Block size Optimum blocking
3480 *FMT3480 64 K No
3490E *FMT3490E 256 K Yes
3490F - 18 track *FMT3480 64 K Yes
3490F - 36 track *FMT3490E 256 K Yes
3570-Bxx *FMT3570 256 K Yes
3570-Cxx *FMT3570E 256 K Yes
3580-001 *ULTRIUM1 256 K Yes
3580-002 *ULTRIUM2 256 K Yes
3580-003 *ULTRIUM3 256 K Yes
3590-Bxx *FMT3590 256 K Yes
3590-Exx *FMT3590E 256 K Yes
3590-Hxx *FMT3590H 256 K Yes
3592-J1A *FMT3592A1 256 K Yes
4685-001 *VXA2 240 K Yes
6335 *QIC3040 32 K No
6341 *QIC120 32 K No
6342 *QIC525 32 K No
6343 *QIC1000 32 K No
6344 *QIC2GB 32 K No
6346 *QIC120 32 K No
6347 *QIC525 32 K No
6348 *QIC1000 32 K No
6349 *QIC2GB 32 K No
458 i5/OS V5R4 Virtual Tape: A Guide to Planning and Implementation

6366 *QIC120 32 K No
6368 *QIC1000 32 K No
6369 *QIC2GB 32 K No
6378 *QIC525 32 K No
6379 *QIC1000 32 K No
6380 *QIC2GB 32 K No
6381 *QIC2DC 32 K No
6382 *QIC4DC 32 K No
6383 *QIC5010 32 K No
6384 *SLR60 256 K Yes
6385 *QIC5010 32 K No
6386 *MLR3 256 K Yes
6387 *SLR100 256 K Yes
6390 *FMT7GB 240 K No
63B0 - virtual *VRT256K 256 K Yes
7207-122 *QIC4DC 32 K No
7207-330
7208-002 *FMT2GB 240 K No
7208-012 *FMT5GB 240 K No
7208-222 *FMT7GB 240 K No
7208-342 *FMT20GB 240 K Yes
7208-345 *FMT60GB 240 K Yes
9346 *QIC120 32 K No
9348 6250 32 K No
Appendix A. Block sizes 459

460 i5/OS V5R4 Virtual Tape: A Guide to Planning and Implementation

Appendix B. Sample command language
BRMS allows the addition of only one virtual volume at a time using the ADDMEDBRM command, as discussed in Chapter 6, “BRMS and virtual tape” on page 279 and Chapter 7, “BRMS and virtual tape working from the Navigator” on page 329.
However, if you have to add many virtual volumes in BRMS, write a program that adds volumes automatically into BRMS.
The material in this appendix has not been submitted to any formal IBM test and is published as is. It has not been subject to rigorous review. Your feedback is welcome to improve the usefulness of the material.
IBM assumes no responsibility for the accuracy or completeness of the information presented in this book. The use of this information or the implementation of any of these techniques is a client responsibility and depends on the client’s ability to evaluate and integrate them into the operational environment
B
© Copyright IBM Corp. 2006. All rights reserved. 461

How command language program worksThe intention of the command language (CL) program is to add multiple virtual volumes to BRMS with one command. Since the virtual volumes in BRMS are based on the virtual volumes in the image catalog, and the image catalog volumes should exist before adding a volume to BRMS, the sample source also creates the virtual volumes in the image catalog.
If a virtual volume with the same name already exists in the image catalog, it will be ignored and the program will proceed with the next volume. However, the existing volume mentioned will be added to BRMS if it is not in the BRMS media inventory.
It also assumes that the virtual tape device is varied on.
Command language sample sourceThe CL source shown in Example B-1 is just an example of how to do this in CL. This CL source must be used in conjunction with the command source listed in Example B-2 on page 466.
Example: B-1 Sample CL source for adding multiple volumes to BRMS
/***********************************************************/ /* Please use this CL source only in conjunction with */ /* the Command source listed on next page. */ /* */ /* The intention of this program is to automate adding */ /* volumes to the image catalog AND BRMS. Remember that */ /* BRMS allows only adding 1 volume at a time. */ /* */ /* Not all parameters are covered for adding virtual */ /* volumes to the image catalog and BRMS. */ /* */ /***********************************************************/
/***** Parameter list **************************************/ PGM PARM(&ImgClg + &TapDev + &MaxVol + &Prefix + &VrtClass + &Location + &Init + &Code)
462 i5/OS V5R4 Virtual Tape: A Guide to Planning and Implementation

/***** Declare variables ***********************************/ /* Total of volumes to add */ DCL VAR(&MaxVol) TYPE(*DEC) LEN(3 0)
/* Volume sequence number to be added */ DCL VAR(&VolNbr) TYPE(*DEC) LEN(3 0)
/* Only used internally in this source for */ /* casting decimal to char */ DCL VAR(&VolNbrChar) TYPE(*CHAR) LEN(3)
/* Volume name will be a combination of Prefix */ /* and volume sequence number (VolNbr */ DCL VAR(&Volume) TYPE(*CHAR) LEN(6)
/* First 3 chars of volume */ DCL VAR(&Prefix) TYPE(*CHAR) LEN(3)
/* Media Class to be used in BRMS */ DCL VAR(&VrtClass) TYPE(*CHAR) LEN(7)
/* Init volume when ADDMEDBRM*/ DCL VAR(&Init) TYPE(*CHAR) LEN(4)
/* Image catalog name */ DCL VAR(&ImgClg) TYPE(*CHAR) LEN(10)
/* Virtual tape device name */ DCL VAR(&TapDev) TYPE(*CHAR) LEN(10)
/* Virtual tape device name */ DCL VAR(&TapDevSts) TYPE(*DEC) LEN(5 0)
/* BRMS location */ DCL VAR(&Location) Type(*CHAR) LEN(10)
/* Label vol ASCII or EBCDIC */ DCL VAR(&Code) TYPE(*CHAR) LEN(7)
/* Density is determined by &VrtClass and is */ /* used for the image catalog */ DCL VAR(&Density) TYPE(*CHAR) LEN(8)
/* Reflect volume name in text in BRMS */ DCL VAR(&VolText) TYPE(*CHAR) LEN(20) + VALUE(X'00')
/* Error Text */ DCL VAR(&ErrorText) TYPE(*CHAR) LEN(50) +
Appendix B. Sample command language 463

VALUE(X'00')
/* Code start **********************************************/
/* Checking existence of Image catalog object */ /* If not, prepare error text and leave the program */ CHKOBJ OBJ(QUSRSYS/&ImgClg) OBJTYPE(*IMGCLG) MONMSG MSGID(CPF9801) + EXEC(DO) /*Object not found */ CHGVAR VAR(&ErrorText) VALUE('Specified Image Catalog' + *BCAT &ImgClg *BCAT 'does not exist.') GOTO CMDLBL(ERR_MSG) ENDDO
/* Checking existence of Virtual Tape Device */ /* If not, prepare error text and leave the program */ CHKOBJ OBJ(QSYS/&TapDev) OBJTYPE(*DEVD) MONMSG MSGID(CPF9801) + EXEC(DO) /*Object not found */ CHGVAR VAR(&ErrorText) VALUE('Specified Tape Device' +
*BCAT &TapDev *BCAT 'does not exist.') GOTO CMDLBL(ERR_MSG) ENDDO
/* Check status of Virtual Tape Device and vary on if it is varied off */ /* If vary on is not possible, then prepare error text and leave program*/ RTVCFGSTS CFGD(&TapDev) CFGTYPE(*DEV) STSCDE(&TapDevSts) IF COND(&TapDevSts *EQ 0) + THEN(DO) /* Virtual Tape device varied off */ VRYCFG CFGOBJ(&TAPDEV) CFGTYPE(*DEV) STATUS(*ON) MONMSG MSGID(CPF0000) DLYJOB DLY(1) RTVCFGSTS CFGD(&TapDev) CFGTYPE(*DEV) STSCDE(&TapDevSts) ENDDO IF COND(&TapDevSts *NE 30) + THEN(DO) CHGVAR VAR(&ErrorText) VALUE('Unable to vary on' + *BCAT &TapDev *BCAT '.') GOTO CMDLBL(ERR_MSG) ENDDO
NxtVol: CHGVAR VAR(&VolNbr) VALUE(&VolNbr + 1) CHGVAR VAR(&VolNbrChar) VALUE(&VolNbr) CHGVAR VAR(&Volume) VALUE(&Prefix *TCAT &VolNbrChar) CHGVAR VAR(&Density) VALUE('*' *TCAT &VrtClass) CHGVAR VAR(&VolText) VALUE('Virtual Volume' *TCAT &VolNbrChar)
464 i5/OS V5R4 Virtual Tape: A Guide to Planning and Implementation

/* Add volume to Image catalog */ /* Before associating a virtual device with the image */ /* catalog (LODIMGCLG) at least 1 volume must be in the catalog */ ADDIMGCLGE IMGCLG(&ImgClg) FROMFILE(*NEW) + TOFILE(&Volume) VOLNAM(&Volume) + DENSITY(&Density) CODE(&Code)
/* Catch messages */ MONMSG MSGID(CPF0000)
/* Load of image catalog needs only to be done once, */ /* but it is required for BRMS. You cannot add a volume */ /* to BRMS when the image catalog isn't loaded. */ IF COND(&VolNbr *EQ 1) + THEN(DO)
/* Now load imagae catalog */ LODIMGCLG IMGCLG(&ImgClg) DEV(&TapDev)
/* Catch messages */ MONMSG MSGID(CPF0000) ENDDO
/* Add volume to BRMS */ ADDMEDBRM VOL(&Volume) MEDCLS(&VrtClass) INZ(&Init) + IMGCLG(&ImgClg) DEV(&TapDev) + LOC(&Location) + CHECK(*YES) CODE(&Code) + TEXT(&VolText)
/* Catch messages */ MONMSG MSGID(CPF0000)
/* Add next volume if total amount of volume isn't */ /* reached yet. */ IF COND(&VolNbr *LT &MaxVol) + THEN(GOTO CMDLBL(NxtVol))
GOTO CMDLBL(END_PGM)
NO_TAPDEV:/* Specified Tape Device does not exist */ SNDPGMMSG MSG('Specified Tape Device' *BCAT &TapDev +
Appendix B. Sample command language 465

*BCAT 'does not exist.')
ERR_MSG: /* Send error message */ SNDPGMMSG MSG(&ErrorText)
END_PGM: /* Program end */ ENDPGM
Command source to use with the command languageTo make it easier to use the CL source and to prevent the most common user errors, the command source shown in Example B-2 should be used in conjunction with the CL source.
Example: B-2 Command source to use in conjunction with the CL
/***********************************************************/ /* Please use this command source in conjunction with */ /* the previous listed CL. */ /***********************************************************/
CMD PROMPT('Add virtual volumes to BRMS')
/* First parameter is Image catalog name */ /* No check is included for a valid Image catalog name */ PARM KWD(IMGCLG) TYPE(*CHAR) LEN(10) MIN(1) + INLPMTLEN(10) PROMPT('Name of Image Catalog')
/* Specify your Virtual tape drive here */ /* No Check is included for a valid Virtual tape device name*/ PARM KWD(TAPDEV) TYPE(*CHAR) LEN(10) RSTD(*NO) + MIN(1) VARY(*NO) PROMPT('Tape Device')
/* A Maximum of 256 virtual volumes can be added to 1 image catalog */ PARM KWD(MAXVOL) TYPE(*DEC) LEN(3) RSTD(*NO) + DFT(1) RANGE(1 256) PROMPT('Amount of + volumes to add')
/* The prefix represents the first 3 characters of the volume name */ PARM KWD(PRFX) TYPE(*CHAR) LEN(3) DFT(VRT) + FULL(*YES) PROMPT('Volume Prefix')
/* The listed values below are used for the density (blocksize) */ /* of the image catalog entry and also for the BRMS media class. */ /* Within BRMS you can create your own media class name, however */
466 i5/OS V5R4 Virtual Tape: A Guide to Planning and Implementation

/* the CL and command source listed here do not cover this. */ PARM KWD(VRTCLS) TYPE(*CHAR) LEN(7) RSTD(*YES) + DFT(VRT256K) VALUES(VRT32K VRT64K VRT240K + VRT256K) DSPINPUT(*PROMPT) + CHOICE(*VALUES) PROMPT('Specify Media Class')
/* The location will be used within BRMS */ /* There is no check if the name is valid. */ PARM KWD(LOC) TYPE(*CHAR) LEN(10) DFT(*HOME) + PROMPT('Location of Volume within BRMS')
/* Init is used to specify if the volume should be initialized */ /* or not when adding the volume to BRMS. */ PARM KWD(INIT) TYPE(*CHAR) LEN(4) RSTD(*YES) + DFT(*YES) VALUES(*YES *NO) VARY(*NO) + PROMPT('Initialize tape')
/* Label volume in EBCDIC or ASCII */ PARM KWD(CODE) TYPE(*CHAR) LEN(7) RSTD(*YES) + DFT(*EBCDIC) VALUES(*EBCDIC *ASCII) + VARY(*NO) PROMPT('Code')
Command optionsAt the command prompt, specify the following options:
� Name of image catalog (IMGCLG)
This is the name of the image catalog you want to use. The image catalog should already exist and does not have to be loaded. After the command is issued and the volumes are added to the image catalog and BRMS, the image catalog is loaded and associated with the tape device specified.
� Tape device (TAPDEV)
This is the name of the virtual tape device you want to use with the image catalog.
� Amount of volumes to add (MAXVOL)
This is the total number of volumes to be added. Possible values vary from 1 to 256, with 256 being the maximum number of volumes per image catalog.
� Volume prefix (PRFX)
This is composed of the first three characters to be used in the volume name. The default value is VRT, which if not changed will result in VRT001, VRT002, VRT003, and so on.
Appendix B. Sample command language 467

Special characters are not allowed for image catalog volume names, but the program or command does not check this.
� Specify media class (VRTCLS)
Specify the BRMS media class name here for the virtual media to be added. There are four different BRMS media class names you can use here: VRT256K, VRT240K, VRT64K, and VRT32K. No other values are allowed in this sample source. Therefore, if you created your own media classes within BRMS, you cannot specify them here.
This parameter is also used for determining the tape density parameter, which has to be specified in the ADDIMGCLGE command.
� Location of volume within BRMS (LOC)
If not specified, the default location of the virtual volumes within BRMS will be *HOME. However, you can specify other locations or the location name you created.
� Initialize tape (INIT)
This parameter, too, is used only within BRMS. Therefore, when adding the virtual volume to BRMS, initialize it. The default is *YES and possible values are *YES and *NO.
� Code (CODE)
This specifies whether the tape label is written in ASCII or EBCDIC. This is used for the tape volumes in the image catalog and within BRMS. Possible values are *ASCII and *EBCDIC.
Figure B-1 on page 469 shows an example of the prompt screen when adding the virtual volumes to BRMS using the sample program.
Note: Ensure that the volume name you want to add to BRMS does not exist on any system in a BRMS network.
468 i5/OS V5R4 Virtual Tape: A Guide to Planning and Implementation

Figure B-1 Example of adding multiple virtual volumes to BRMS
Add virtual volumes to BRMS (ADDVRTVOL) Type choices, press Enter. Name of Image Catalog . . . . . CATALOG01 Character value Tape Device . . . . . . . . . . TAPVRT01 Character value Amount of volumes to add . . . . 20 1-256 Volume Prefix . . . . . . . . . VRT Character value Specify Media Class . . . . . . VRT256K VRT32K, VRT64K, VRT240K...Location of Volume within BRMS VIRTUAL Character value Initialize tape . . . . . . . . *YES *YES, *NO Code . . . . . . . . . . . . . . *EBCDIC *EBCDIC, *ASCII
Appendix B. Sample command language 469

470 i5/OS V5R4 Virtual Tape: A Guide to Planning and Implementation

Appendix C. Quick start guide
In this appendix we provide information that will help you use virtual tape quickly.
Note that we list only the most basic commands and steps here; we do not detail parameters, limitations, or important considerations. For more details about those topics, refer to the applicable chapters in this redbook.
C
© Copyright IBM Corp. 2006. All rights reserved. 471

Setting up virtual tapeWe describe the basic steps and commands for setting up virtual tape here. The first section lists the steps using IBM ̂iSeries Navigator. The following section lists the commands for 5250 emulation users.
Setting up virtual tape through iSeries NavigatorHere are the basic steps involved in setting up virtual tape through iSeries Navigator:
1. Create or change to a virtual tape device.
Currently, virtual tape devices cannot be created through IBM ̂iSeries Navigator. However, an existing device description can be changed to use a virtual resource, or you can create a virtual tape device from a 5250 emulation session.
– Change existing device.
i. Select Configuration and Services → Hardware → Tape Devices → Stand-alone Devices.
ii. Make sure the physical tape device’s status is Unavailable. If it is not, right-click the device and select Make Unavailable.
iii. Right-click the existing tape device and click Properties.
iv. Change the hardware resource parameter to Generate virtual resource and click OK.
– Use the following command to create through the command line:
CRTDEVTAP DEVD(TAPVRT01) RSRCNAME(*VRT)
2. Vary on the virtual tape device.
a. Select Configuration and Services → Hardware → Tape Devices → Stand-Alone Devices.
b. Right-click the device (for example, TAPVRT01) in the right window pane, and select Make Available.
3. Create a virtual tape image catalog.
a. Select Configuration and Service → Hardware → Tape Devices.b. Right-click Tape Image Catalogs.c. Select Create Image Catalog.
• Enter the Catalog name (for example, Backup). • Enter the Directory path (for example, /images/tape/backup).
d. Click OK.
472 i5/OS V5R4 Virtual Tape: A Guide to Planning and Implementation

4. Create virtual images in the image catalog.
a. Select Configuration and Service → Hardware → Tape Devices → Tape Image Catalogs.
b. Right-click the image catalog and select Add Volume.c. Enter the following values:
• From tape image file: New volume• To tape image file: VOL001• Volume name (on the Options tab): VOL001
d. Click OK.
5. Load the image catalog on to the virtual device.
a. Select Configuration and Service → Hardware → Tape Devices Tape Image Catalogs.
a. Right-click the image catalog and select Load Image Catalog.b. Click the drop-down arrow on the Tape Device parameter and select the
tape device (for example, TAPVRT01).c. Click OK.
6. Virtual tape storage is ready for operation.
Use the virtual tape device as the backup device.
Setting up virtual tape through 5250 emulationHere are the basic commands for setting up virtual tape through 5250 emulation:
1. To create a virtual tape device:
CRTDEVTAP DEVD(TAPVRT01) RSRCNAME(*VRT)
2. To vary on the virtual tape device:
VRYCFG CFGOBJ(TAPVRT01) CFGTYPE(*DEV) STATUS(*ON)
3. To create a virtual tape image catalog:
CRTIMGCLG IMGCLG(backup) DIR('/images/tape/backup') TYPE(*TAP) CRTDIR(*YES)
4. To create virtual images in the image catalog:
ADDIMGCLGE IMGCLG(BACKUP) FROMFILE(*NEW) TOFILE(VOL001) VOLNAM(VOL001)
Repeat for as many volumes as needed.
5. To load the image catalog on to the virtual device:
LODIMGCLG IMGCLG(backup) DEV(TAPVRT01)
The virtual tape storage is ready for operation:
TAPVRT01 is used as the device (DEV) parameter.
Appendix C. Quick start guide 473

Additional steps for BRMSIf you are using Backup Recovery and Media Services 5722BR1, you have to perform the following additional steps to incorporate virtual tape into your BRMS environment.
1. Add location.
We recommend that you add a location such as VIRTUAL for your virtual media by performing the following tasks:
a. Enter the following command, and press Enter:
WRKLOCBRM
b. Select 1=Add.
c. Change values, if any.
2. Add virtual devices.
– To do this manually:
i. Enter the following command:
WRKDEVBRM
ii. Select 1=Add.
iii. Change location to virtual media location.
iv. Change other values, if necessary.
v. Repeat for additional devices, if any.
– To do this automatically, enter the following:
INZBRM OPTION(*DEVICE)
This adds all the new devices into BRMS. This also resets the default values for system-supplied devices, if any.
3. Create media class.
Create a media class with the density of your virtual volume.
a. Enter the following command and press Enter:
WRKCLSBRM
b. Select option 1 and add a new media class.
c. Use the density compatible with your virtual volumes, for example, *VRT256K.
d. Enter any other desired values.
474 i5/OS V5R4 Virtual Tape: A Guide to Planning and Implementation

4. Add volumes.
Enter the following command:
ADDMEDBRM VOL(VOL001) MEDCLS(VRT256K) IMGCLG(Backup) LOC(VIRTUAL)
Repeat this step for each volume.
5. Move policy.
Create a move policy, if required.
a. Enter the following command and press Enter:
WRKPCYBRM
b. Select option 1 and specify a move policy.
c. Enter the values.
6. Create media policy.
Create a media policy with your move policy, media class and storage location.
a. Enter the following command:
INZBRM OPTION(*DEVICE)
b. Select option 1 and specify a media policy name.
c. Enter the correct move policy, media class, storage location, and other desired parameters.
7. Create control group.
Create a control group with your virtual tape device and media policy if required.
Appendix C. Quick start guide 475

476 i5/OS V5R4 Virtual Tape: A Guide to Planning and Implementation

Related publications
The publications listed in this section are considered particularly suitable for a more detailed discussion of the topics covered in this redbook.
IBM RedbooksFor information about ordering these publications, see “How to get IBM Redbooks” on page 478. Note that some of the documents referenced here may be available in softcopy only.
� Integrating Backup Recovery and Media Services and IBM Tivoli Storage Manager on the IBM Eserver iSeries Server, SG24-7031
� Backup Recovery and Media Services for OS/400: A Practical Approach, SG24-4840
� IBM Eserver iSeries Independent ASPs: A Guide to Moving Applications to IASPs, SG24-6802
Other publicationsThese publications are also relevant as further information sources:
� OS/400 Backup and Recovery V5R3, SC41-5304
� Backup Recovery and Media Services, SC41-5345
� IBM i5 and iSeries System Handbook, GA19-5846
� IBM i5, iSeries, and AS/400e System Builder, GA24-2155
Online resourcesThese Web sites and URLs are also relevant as further information sources:
� iSeries Information Center, and then navigate to System Management, Backup and Recovery
http://publib.boulder.ibm.com/infocenter/iseries/v5r4/index.jsp
© Copyright IBM Corp. 2006. All rights reserved. 477

How to get IBM RedbooksYou can search for, view, or download Redbooks, Redpapers, Hints and Tips, draft publications and Additional materials, as well as order hardcopy Redbooks or CD-ROMs, at this Web site:
ibm.com/redbooks
Help from IBMIBM Support and downloads
ibm.com/support
IBM Global Services
ibm.com/services
478 i5/OS V5R4 Virtual Tape: A Guide to Planning and Implementation

Index
AAdd backup job sch 311Add image catalog entry via 5250 emulation 55Add image from another directory via 5250 emula-tion 56Add loc COPIED 287Add new volume options via Navigator 45Add new volume via 5250 emulation 50Add new volume via Navigator 47Add volume via Navigator 52ADDIMGCLGE command 47, 54, 84, 468ADDIMGCLGE IMGCLG 143, 149, 175, 281, 465, 473Adding loc VIRTUAL 285adding new tape drive 427ADDMEDBRM Vol 418, 475Authorization list 41–42, 126Automatic Cartridge Loader (ACL) 61Auto-retrieved object 322–323
BBackup finished 311Backup policy 306, 308, 310, 316, 336, 340–341, 344–345, 351, 353, 362–365, 378–379, 385, 388, 416, 422–423, 427–429, 431–432, 450Backup Recovery and Media Policy 443Backup Recovery and Media Service 385–386, 389–390, 403, 405, 409, 430Backup strategy 10–11, 23–24, 284, 311Backup, Recovery and Media Services (BRMS) 279, 300, 432, 434, 441, 443, 445, 449, 451–453backup, restore, maintenance, and so (BRMS) 329–332, 335, 339–340, 342, 344, 353, 356–357, 359, 361, 369–371, 378, 380–383, 385, 388, 394, 400, 404–405, 407–408, 410–411, 414–416, 418–420, 427, 429–430backups one 374base i5/OS 10, 174, 182batch job 5, 62, 145, 156, 315block size 5, 48, 50, 91–93, 97, 99, 175–176, 458BRM configuration 285–286, 288, 290–292, 294, 296, 298BRM1364 296
© Copyright IBM Corp. 2006. All rights reserved.
BRM40A2 283BRMS activity 320, 323BRMS maintenance 319–320BRMS network 29, 281, 468
feature 29other systems 29today 313
BRMS store 330Browse existing volumes 53
CCatalog relationship via 5250 emulation 131Catalog Shadowing Diagram 123Catalog01 entries size serial-parallel 167Catalog02 entries size serial-parallel 168Change attr APPLIC01 153Change CTLG Attr DAILY 163Change volume attributes via 5250 emulation 88Change Volume Properties via Navigator 86Changing existing device to virtual device 37CHGATR OBJ('/MyCatalogDirectory') ATR(*AL-WSAV) VALUE(*NO) SUBTREE(*ALL) 12CHGDEVBRM 288CHGVAR VAR 464command
SAV 116SAVSYS 176SBMJOB CMD 168, 316
Contents frame 3, 10, 17, 20, 22, 24, 27–28control group 305, 310
DAILY type 311ITSODBSAVE type 452
corresponding window 96, 110, 117–118create CTLG APPLIC01 152create CTLG Daily serial-parallel 162create ctlg entries 305create dependent catalog via 5250 emulation 130create dependent catalog via Navigator 125create dependent1 via Navigator 127create image catalog 191create image catalog via 5250 emulation 44create image catalog via Navigator 41create location 333
479

create mov pcy TO_COPIED 295create virtual device via 5250 emulation 38create your own media class 292CRTDEVTAP DEVD 37, 142, 149, 280, 472–473CRTIMGCLG command 19, 43
path name 19CRTIMGCLG IMGCLG 149, 175, 280, 473CRTMEDPCY VIRTUAL 299CRTMOVPCY OUTDOOR 297
Ddata file 95, 106Dedicated Service Tools (DST) 16–17, 27default value 43, 316, 325, 467, 474Density format of physical tape 100dependent catalog 47, 121
single volume 135Dependent catalog volumes via Navigator 128Dependent volume 127, 135Dependent volumes via 5250 emulation 132device description 6, 35–38, 357device TAP01 184Directory path 41, 51, 75, 472
different directory 52Directory subtree 117–118disk arm 13–16, 21, 23
small amount 21disk space 11–12, 16, 23, 300, 355Display attributes via 5250 emulation 76Display Duplicates for PAR 157Display duplicates for VIR 158Display label for density via Navigator 99Display of save/restore information via 5250 emula-tion 78Display output of save/restore information via 5250 emulation 79Display sequence via 5250 emulation 101Display volume for density via 5250 emulation 101Display volume for density via Navigator 98Display volume label Options via Navigator 69Display volume labels via Navigator 68DLTIMGCLG IMGCLG 137–138DSP dup for PAR005 170Dsp dup vol VIR003 170DSPDUPVOL 318DSPMEDCLS 291DSPTAP for physical volume once copied 186DSPTAP using WRKIMGCLG option 11 178
DSPTAP using WRKIMGCLG, option 11 178DSPTAPVOL inf VRT001 (SAVSYS) 179DSPTAPVOL inf VRT002 (SAVSYS) 180DSPTAPVOL inf VRT003 (SAVSYS) 181DSPTAPVOL inf VRT004 (SAVSYS) 182Duplicate sequence via 5250 emulation 112Duplicate sequence via Navigator 111duplicate volume 23, 159, 171, 325–326, 420Duplicate volume files tab via Navigator 105Duplicate volume general tab via Navigator 103Duplicate volume options via Navigator 107Duplicate volume via 5250 emulation 110Duplicate volume via Navigator 102DUPMEDBRM 314DUPMEDBRM command 21, 316, 418, 421
other useful parameters 420DupSts column 312, 317DUPTAP command 110, 112, 182
TODEV parameter 182DUPTAP FROMDEV 110, 183–184DUPTAP joblog 184
Ee-mail address 332emulation session 34–35, 37, 39, 43, 49, 54, 57, 64, 73, 76–77, 82–83, 87, 93, 96, 100, 110, 116, 128, 134, 136, 138, 472
existing volume 100Image Catalog Entries window 82–83tape image catalog 43virtual media 87volume information 76
End of Volume (EOV) 65existing volume 46, 51, 53, 91, 95, 100, 462Expiration date 65, 108, 315–316, 333, 338, 340expiration flag 332, 335, 337
FF11 key 115, 136F4 18–19, 36, 38–40, 44, 50, 55–56, 58, 65, 77–78, 88, 97, 101, 110, 112, 117–119, 130, 135, 139, 144, 147, 153, 163, 282, 288, 293, 295, 297, 299, 306, 311, 320, 323–324, 417Figure Work with Media showing DupSts on. 312file sequence
number 77–78, 101, 105, 110, 112, 314file sequence number 106Files tab 103, 105, 111
480 i5/OS V5R4 Virtual Tape: A Guide to Planning and Implementation

First page change CTLG 306Format volume general tab via Navigator 94Format volume options tab via Navigator 95Format volume via Navigator 94Fourth screen change CTLG 310
GGo Backup 143GOTO CMDLBL 464–465GUI 431
HHelp Text shared media 293
Ii5/OS V5R4 141iASP 4, 15–16, 26, 31IBM Redbook 471
applicable chapters 471image catalog 2, 4, 26, 34, 44, 83, 118, 126, 178, 182, 286, 308, 330, 440, 447–448, 464–465, 472
basic operations 42, 126Different density types 6existing volume 51IFS directory 43Image catalog entries 7image catalog entry WRKIMGCLGE 114same volume names 29short description 43specific volumes 121tape volumes 468virtual images 473virtual volumes 462
image catalog directory via 5250 emulation 115image catalog directory via Navigator 113image catalog entry 6, 50, 177, 466
image catalog 6Image catalog properties via Navigator 59Image Catalogue
virtual images 473image file 11, 25, 73, 473
Display Attributes 75full path 55maximum size 46, 73name 52, 74, 113option 51size 46–47, 84
image size 12, 50, 84, 88initialize tape via 5250 emulation 97Integrated File System (IFS) 6, 119Internal File System (IFS) 344INZBRM *RUNPRDINZ 282INZBRM Option 281, 283, 475INZTAP command 5IPL 16, 19, 26iSeries Navigator 11, 34, 83, 102, 279, 472
virtual tape 472
Jjob log 178, 418
Llibrary QUSRSYS 25, 118List dependent volumes via Navigator 127List image catalog volumes via Navigator 80List volumes for density via Navigator 92List volumes via Navigator 60, 67Load image catalog via 5250 emulation 58Load image catalog via Navigator 57LODIMGCLG command 57, 60, 90LPI 291, 293LTO cartridge 330
MMain Storage Dump (MSD) 27manual operation 453Mark volumes for Duplication 300maximum size 7, 84, 175
QIC4DC cartridge 175Media Class 29, 150, 283, 289–293, 297, 299–300, 314–316, 318, 357, 417, 452, 463, 466–469, 474–475media information 307–308, 314–316, 321–322, 369–370, 414, 419–420media policy 151, 153, 158, 163, 170, 297–298, 337, 475
deal 416name 475
Mount volumes for initialize 197move policy 150, 170, 294–297, 299, 315–316, 320, 333, 335–337, 339–344, 383, 416, 419, 475MOVMEDBRM command 295, 319MOVMEDBRM MOVPCY 158, 171, 320My Text 152
Index 481

NNew volume 44–45, 47, 49–51, 95–96, 380, 473Next DUPMEDBRM 315next screen 165, 299, 301–302, 304–305, 315, 322, 325Next screen STRMNTBRM 322next stage 296next volume 61, 104, 142, 150, 188, 288, 450, 452, 454, 462, 465
Ooffsite place 158, 170operating system 353, 357, 371, 380, 400, 452–453
device description 357requirement 22
Options tab 36, 47, 51, 68, 94–95, 103, 107, 473Other Limitations (planning) 27Output of volume labels via 5250 emulation 77
Pparallel backup 29–30, 148, 280Parameters for adding existing volume 54Parameters for create image catalog in Navigator 43Performance Considerations 21physical device 5, 25, 64, 150, 280, 315physical medium 4, 12, 21, 23, 25, 29, 89, 102, 156, 160, 168, 171, 182, 284, 287, 300, 307, 313, 337, 344, 356, 358, 370, 381, 408, 410–411, 413–415, 417, 419
image file 25Media policy 417
physical tape 1–4, 10, 14–15, 23, 28, 45, 48, 50, 58, 89, 97, 100, 102, 110, 113, 142, 184, 187, 323, 330, 344, 354, 370, 374, 378, 400, 408–409, 415
block size 97device 4, 142, 281, 472low density format 409media policy deals 416virtual tape 1volume 28, 102, 284
physical volume 10, 12, 89, 91, 93, 110, 149, 158, 160, 170, 174, 183, 185, 283–284, 294–297, 300, 308, 315, 318, 320, 325, 327, 344, 416, 419
media information 308QIC001 419SAVSYS 174–176, 178–179, 182, 186–187
tape labels 185useful parameter 308
Pop-up window 388, 435Prepare add loc COPIED 286Prepare for parallel backup 149print volume information via Navigator 71print volume save/restore via Navigator 71proper format 91PTF 174
QQP1ARCY parallel-parallel 159QP1ARCY par-par usedupmed(*YES) 159Quarter Inch Cartridge (QIC) 142, 175QUSRBRM file 316, 323
current version 316RGZPFM command 323
QV5R4M0L00.L292 4 179–180, 186
RRandom Access Cartridge Loader (RACL) 3real tape 2, 408
device 6dri 291drive 2volume 2, 330, 355, 436
recovery report 24, 160, 322–323, 326, 419Recovery report volumes 326Redbooks Web site 478
Contact us xireference catalog 131, 135–136
dependent catalogs 132reference volume 133Resource requirement 23retention period 335, 355, 414, 416Run backup 445Run command via Navigator 62
Ssame sequence 161same time 356
batch jobs 156control groups 308DUPMEDBRM jobs 314same volume 29SCHHST jobs 422
sample CL source 462
482 i5/OS V5R4 Virtual Tape: A Guide to Planning and Implementation

SAV command 116SAV image catalog directory via 5250 emulation 118SAV image file via 5250 emulation 117save image catalog object via 5250 emulation 119save library via Navigator 63savefile or virtual volume
Maximum size limit 30Save-While-Active (SWA) 4SAVLIB prompted via 5250 emulation 65SAVLIB prompted via Navigator 64SAVSYS command 176SBMJOB CMD 168, 316second screen change CTLG 307security requirement 25Select Configuration 36, 44, 50, 56, 58, 67–68, 79, 85, 91, 93, 97, 102, 113, 127, 133, 136–137, 472–473select Property 12, 36, 58, 73, 80, 85, 342, 439Select recovery item dup 328Select recovery item nodup 327Sequence number 65, 77–78, 101, 105–106, 110–112, 300, 314, 324, 400, 405sequence number
sequence number 400Set Up Backup 144shadowed volume 133–134Shared media *YES 293Specifying add VIRTUAL 286Standalone iASP 15–16, 19, 31Stand-alone tape devices via Navigator 35Storage ALCSTG 46storage location 285–286, 299, 384, 417, 475STRBKUBRM CTLGRP 153, 163, 311Stream file changed attributes via 5250 emulation 89STRMNTBRM 321STRMNTBRM command 321–322STRRCYBRM 324STRRCYBRM *RESTORE DUP(*NO) 160STRRCYBRM *RESTORE DUP(*YES) 160STRRCYBRM Option 158–160, 171, 173, 326, 328STRRCYBRM report ser dup(*yes) 172STRRCYBRM report ser nodup 171STRRCYBRM screen2 325STRRCYBRM ser *restore dup(*yes) 174STRRCYBRM ser *RESTORE nodup 173switchable iASP 4, 13, 15–16, 19–20, 31system ASP 13–17, 21, 23, 26, 122
data loss 15disk failure 14–15virtual images 14
System Licensed Internal Code (SLIC) 174–175, 179, 182
TTape Device 3–6, 23, 26–27, 34–36, 38–40, 44, 48, 50, 56, 58–59, 63, 65, 67–68, 79, 85, 90–91, 93, 95–97, 99, 102–104, 108, 113, 123–125, 127, 132–133, 136–137, 175–176, 182, 188, 279–280, 283, 288–289, 304, 333, 357, 436, 446, 453, 462–467, 469, 472–473, 475tape drive 23, 48, 50, 61, 93, 98–99, 107–108, 142, 187, 329, 384, 386, 397–398, 400, 409, 427, 432, 436–437, 439, 443, 446–448, 450, 453–454, 458
current position 107–108physical layout 409type 458
Tape libraryindividual tape drives 453
tape library 10, 23, 27, 150, 352, 356, 381, 411, 453tape loader 411tape volume 44, 47–50, 58, 93, 95, 101, 104, 106–109, 111–112, 329–330, 451, 468
data files 106TCP/IP server 310, 422, 424Third screen change CTLG 309TSM server 325, 453Type 63B0 34–35, 39Type choice 38, 44, 50, 55–56, 58, 65, 77–78, 88, 97, 101, 110, 112, 117–119, 130, 135, 139, 144–145, 147, 286–287, 293, 295, 297, 299, 302–303, 311, 314–315, 321–322, 324–325, 469Type information 152–153, 162–163, 305–307, 309–310Type option 18–19, 36, 39–40, 61, 74–75, 83, 93, 115–116, 129, 131–132, 137, 146, 154, 157, 160, 164–166, 169, 173–174, 177, 285–286, 288, 290–292, 294, 296, 298, 301, 304, 312–313, 317–319, 327–328
UUnload Image Catalog via Navigator 125Unsupported command 26user ASP 13–16, 23user Asp 4, 10, 15–17, 19, 26, 29, 31
tape images 17
Index 483

virtual images 14user data 182, 303–304, 346–348, 351
daily backup 304User Defined File System (UDFS) 17–18, 26, 31
VVary on virtual tape device via Navigator 38Verify catalog status via 5250 emulation 61Verify status via 5250 emulation 129virtual device 6, 27, 34–38, 56, 58, 60, 64, 120, 122, 132, 142, 149–150, 153, 163, 175, 283, 287, 329, 465, 473
image catalog 34maximum number 27
virtual environment 2, 329–330, 354, 374, 400, 449, 453, 455Virtual tape
drive 2, 21, 330, 356, 428drive TAPVRT01 288storage 33–34, 176, 473
virtual tape 1–6, 9–15, 19–31, 33–34, 36, 38–39, 44–45, 47–50, 58, 61–62, 64–65, 89–91, 95, 102, 104, 110, 112, 119, 141–142, 144, 149, 174–176, 182, 187, 279–281, 283–284, 288, 300, 329, 431–432, 439, 447–448, 453, 463–464, 466–467, 471
Benefits 1image catalog 6media errors 4required space 30used density 5
virtual tape device 27virtual tape scenarios 141Virtual Tape Server (VTS) 2virtual tape volume 14–17, 20, 25–28, 31, 329–330virtual volume 5–7, 12–13, 16, 19, 21, 23, 27, 29, 45, 48, 51, 54, 73, 75, 84–85, 87, 91–93, 102, 110, 112–113, 133, 153, 155–160, 163–165, 167–171, 173–176, 182, 185–187, 279–280, 283–284, 286–287, 289, 295–296, 299–300, 303, 307–308, 311, 313, 316, 318, 320, 325, 328, 330, 332–335, 337–339, 342–343, 352, 355–356, 358, 369–370, 374, 378, 381, 384, 389, 397, 400, 408–409, 415, 418–419, 436, 443, 461–462, 464, 468, 474
allocated size 85default location 468extra space 85home location 284
move policy 296Virtual volume density via 5250 emulation 93Virtual volume density via Navigator 92Volume added after dependent created 124Volume characteristics via 5250 emulation 83Volume file name via 5250 emulation 116Volume file name via Navigator 114Volume identifier 65–66, 77–78, 95–97, 101, 103–104, 110, 314–315volume identifier
VOL parameter 315volume label 48, 69, 95–96, 104Volume labels via 5250 emulation 77Volume Labels via Navigator 70Volume name 29, 47, 50, 52, 61, 67, 74–75, 83, 93, 95, 104, 113–115, 132, 142, 281, 410, 463, 466–468
first 3 characters 466Volume properties selected via Navigator 80Volume Properties via Navigator 81Volume save/restore output via Navigator 72volume V32K06 441–443volume VIR003 158, 170volume VIR004 155, 167
serial set 155, 167Volumes additional information via 5250 emulation 75VRYCFG CFGOBJ 39, 142, 149, 175, 280, 464, 473
Wwelcome window 379Work with configuration status via 5250 emulation 40Work with lists 301Work with serial set 155Work with serial set VIR 155Work with tape devices via 5250 emulation 36, 39Work with virtual volumes via 5250 emulation 74WRKCLSBRM 290WRKCTLGBRM 304WRKDEVBRM 288WRKIMGCLG 156WRKIMGCLG (SAVSYS) 177WRKIMGCLG ,F11 catalog01 155WRKIMGCLG, F11 (SAVSYS) 177WRKIMGCLGE command 73, 90, 128WRKMEDBRM after DUP 317
484 i5/OS V5R4 Virtual Tape: A Guide to Planning and Implementation

WRKMEDBRM after DUP serial 169WRKMEDBRM after DUPMEDBRM 157WRKMEDBRM DAILY no dup 164WRKMEDBRM F11 No dup 165WRKMEDBRM PAR* VIR* 154WRKMEDBRM ser-par no Dup 164WRKMEDBRM show physical out 319WRKMEDBRM show vol and more 318WRKMEDBRM showing backup set 313WRKMEDBRM window 154, 169WRKMOVPCY add phys vol 296WRKPCYBRM *MED 298WRKPCYBRM *MOV 294
XxSeries server 3
Index 485

486 i5/OS V5R4 Virtual Tape: A Guide to Planning and Implementation
(1.0” spine)0.875”<
->1.498”
460 <->
788 pages
i5/OS V5R4 Virtual Tape: A Guide to Planning and Im
plementation


®
SG24-7164-00 ISBN 0738497207
INTERNATIONAL TECHNICALSUPPORTORGANIZATION
BUILDING TECHNICALINFORMATION BASED ONPRACTICAL EXPERIENCE
IBM Redbooks are developed by the IBM International Technical Support Organization. Experts from IBM, Customers and Partners from around the world create timely technical information based on realistic scenarios. Specific recommendations are provided to help you implement IT solutions more effectively in your environment.
For more information:ibm.com/redbooks
i5/OS V5R4 Virtual Tape:A Guide to Planningand Implementation
Discover how i5/OS virtual tape works
Learn how to save and restore objects with virtual tape support
Understand how virtual tape works with BRMS
In this IBM Redbook we provide a detailed explanation of the new virtual tape support provided by i5/OS V5R4. We cover the concepts, planning, and use of virtual tape support.
Backup and Recovery Media Services (BRMS) is an important program product for System i5 customers to enable management of their system and data backups. This publication describes how BRMS uses the new virtual tape support for virtual backups.
This redbook is intended for IBM, Business Partner and customer technical professionals who will be planning, implementing, and operating virtual tape support.
Back cover