front cover development
TRANSCRIPT

Front Cover Development
By Johanna Becker

This is my first draft of my front cover. There are items lacking for example:CoverlinePuffsBarcodeIssue numberDateSecondary imagesMy colour scheme and house style were designed on the spot, as the fonts which I found on dafont.com.
I wanted to add a strip to the side of my magazine. Here is an example of Kerrang!'s magazine featuring 30STM.

Having feedback from my audience research I found out that the best colour to change the shirt to is blue. So having taken that advice here is my new draft for my front cover. My new fonts had finally come through so I was able to use them on my front cover. Some fonts still need editing for example the "6 EPIC POSTERS!" - it's still quite plain and uninteresting. I played around with making a better background and making my sub lines stand out more.

I was not happy with the colour scheme I used in my second draft. The colours were too natural and not standing out enough.
I messed around with different colours, until I came across the blue which to me made the sub lines and my coloured editing within the sub lines stand out better. Also previous audience research stated that blue was a colour that stood out well in a shelf full of magazines.I also added a barcode.

There colour of the background was still to natural even after having changed the column to a bright blue so I Changed it to a bright yellow. This time I also didn't add the vignette effect to the background. Because flash was used in the process of making the main image, there is some quite hard light in the models faces so adding the vignette gives the whole image a studio effect whereas without it, it looked quite shallow. (I am going to go out and ask my audience for an opinion on this).Apart from adding the yellow background, I also changed the colour of the title to a brighter red and matched it to the strip going along the bottom. The top strip has famous rock bands written across and "Exclusive" interviews includes extras and a buzzword so anyone flicking through a shelf full of magazines should have that stand out to them as well as the bright colours portrayed in the whole front cover.I have also added a price and an issue number.Tasks ahead of me:•Make the cutting out of the background smoother around the face of the model in the background.•Change the font of "6 EPIC POSTERS!"•Add a teaser for poster (first hand gig photos)•Add secondary photos•Add puffs•Refine house style

We handed in our front cover before the Christmas holidays. When we came back we got given feedback on how to improve this is my improved front cover:

•In this update of the Front Cover I changed these things:
I removed the coloured blue block behind the sublines because audience feedback stated that the block of colour gave the whole front cover a unfinished look. •Because I removed the block of colour I had to change the colour of the 'CANTERBURY' from white to black so that it stands out more.•I added a layer over the top of the main image to change the saturation to give the model a little more colour in his face, as the flash made it very bright. •I added first hand images from concerts and gigs I went to, to the posters strip to give an insight to the audience what kind of images will be in the ' EPIC POSTERS'.
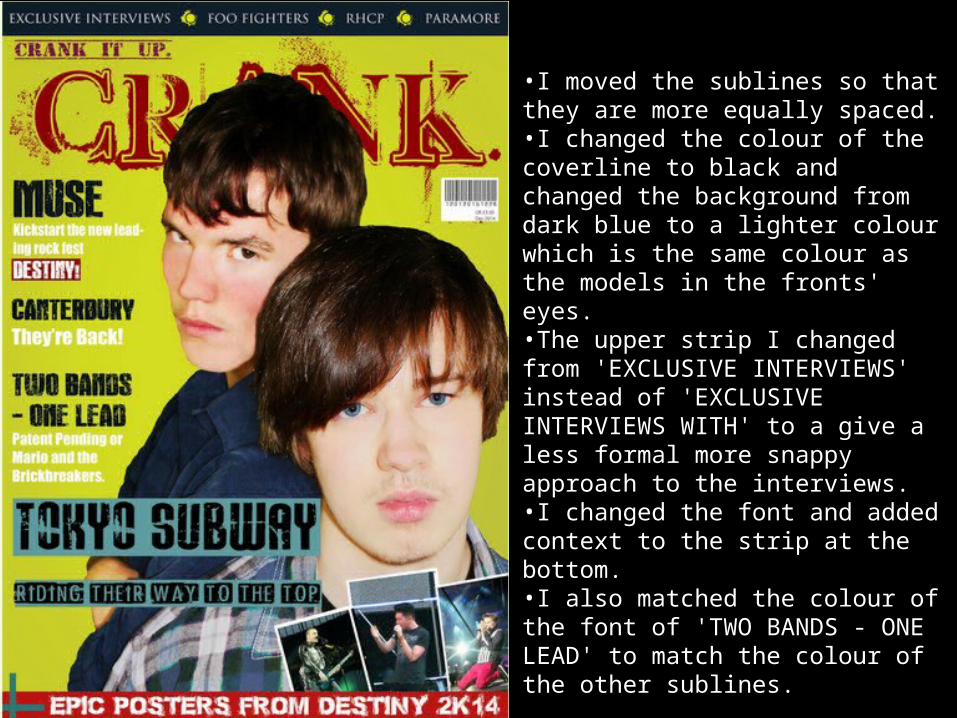
•I moved the sublines so that they are more equally spaced.•I changed the colour of the coverline to black and changed the background from dark blue to a lighter colour which is the same colour as the models in the fronts' eyes. •The upper strip I changed from 'EXCLUSIVE INTERVIEWS' instead of 'EXCLUSIVE INTERVIEWS WITH' to a give a less formal more snappy approach to the interviews. •I changed the font and added context to the strip at the bottom. •I also matched the colour of the font of 'TWO BANDS - ONE LEAD' to match the colour of the other sublines.

•I added another layer over the main image and darkened the image because it was so bright. I regret doing this. I will ask my audience for feedback whether they prefer the bright or dimmed down version.•The only other adjustment is the difference in the opacity because the block colour had the same effect that it looked like a temporary block which made it all look unfinished.

Putting a layer over the main image and adjusting the brightness so that the image has a bit more contrast and more colour and therefore will stand out more were it to be on a shelf in a shop. I changed the font on the top strip to a more fitting font, the other was too formal, whereas the new one (death lord) is more playful.I added captions to the secondary photos at the bottom of the page to anchor down the image to the suitable band.I wasn't sure about the main cover line being black, so I asked my audience which colour stood out more, black or white, they said white so I changed it to white.The 'destiny' was initially white on red, but after mixing colours around I have decided that yellow on black stands out much easier. Same with the 'free posters' I changed it to yellow so it stood out more.I moved the barcode because it was in the wrong place.Changed the font of the 'crank it up' and added an issue number.My initial masthead was behind my main image, which shouldn't be the case for a first issue so I moved it to the front. The font is messy so it didn't work with the magazine anymore so I changed it. I then added another coloured layer underneath to bring it out a bit more.

In my final edition, I moved the masthead higher up and changed the font, colour and the tag line in general to make it stand out more. I changed the tag line from ‘Crank it up.’ to ‘Crank up the volume!’ I also changed the colour of the shirt a little bit by making it darker so that it looked more natural.
