fractalaudio mfc -101 programming for the fractalaudio axe
TRANSCRIPT
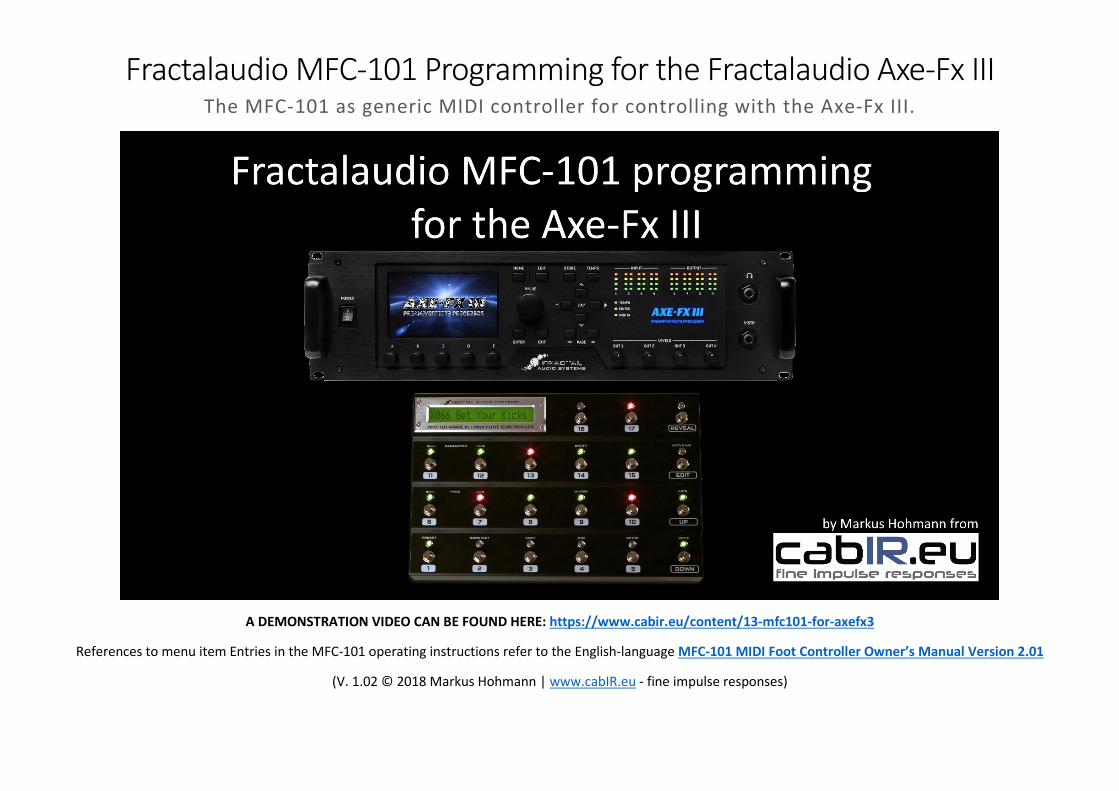
Fractalaudio MFC-101 Programming for the Fractalaudio Axe-Fx III The MFC-101 as generic MIDI controller for controlling with the Axe-Fx III.
A DEMONSTRATION VIDEO CAN BE FOUND HERE: https://www.cabir.eu/content/13-mfc101-for-axefx3
References to menu item Entries in the MFC-101 operating instructions refer to the English-language MFC-101 MIDI Foot Controller Owner’s Manual Version 2.01
(V. 1.02 © 2018 Markus Hohmann | www.cabIR.eu - fine impulse responses)

Introduction:
THE GOOD: WHAT'S POSSIBLE
Anyone who thinks that the MFC-101 can no longer be used to control the Axe-Fx III in a practical way is mistaken. Besides the MFC-101 `Axe-Fx Mode` for bidirectional communication, the MFC-101 is also an extremely powerful generic MIDI controller. And we take advantage of this:
In this tutorial you will find step-by-step instructions in 5 steps on how to configure the MFC-101 so that you can control the following functions of the Axe-Fx III and always keep track of current switching states.
• Call up any 48 Axe-Fx III Presets • 8 Axe-Fx III scenes Switches • 17 IA Axe-Fx III FX bypass, FX channel or Tempo TAP switches
All functions `IN SYNC` with the Axe-Fx III: MFC-101 IA switch LEDs always display the current bypass or channel status of assigned Axe-Fx III FX blocks.
The physical connection is via a One-Way MIDI connection:
MFC-101 MIDI OUT -> AXE-FX III MIDI IN.
On the last page you will find for download:
MFC-101 Original/MKII default configuration.syx and matching Axe-Fx III Systemdaten.syx in a ZIP file. You can install both on your devices with Axe-fx Fractal-Bot and you are ready to go.
THE BAD: WHAT DOESN'T WORK Fractalaudio's MFC-101 does not support `Axe-Fx mode` for the latest Axe-Fx III, eliminating the possibility of bi-directional data communication, which means that the following functions of the MFC-101 are not supported in conjunction with the Axe-Fx III: No MFC-101 support for the Axe-Fx III for the following settings:
12.4 The MIDI Menu 12.5 The Setup Menu
12.4.0 MFC-101 Port [Expansion, Faslink] 12.5.0 Axe-Fx Mode [Standard, Ultra, II, XL, XL+]
12.4.2 Axe-Fx TotalSync 12.5.2 Axe-Fx Display Offset
12.4.7 IA Switch Axe-Fx Functions 12.5.20 Hold Axe-Fx Tempo for Tuner
12.4.3 Axe-Fx Preset Transmit Map 12.5.21 Axe-Fx Instant Access Switch LED Off State
12.5.24 Looper Control Reference: MFC-101 MIDI Foot Controller Owner’s Manual Version 2.01 https://www.fractalaudio.com/downloads/manuals/mfc-101/MFC-101-Owners-Manual.pdf

Axe-Fx III SETUP: MIDI/Remote To remotely control the Axe-Fx III via MIDI commands of the MFC-101, the MIDI channel on which the MIDI communication takes place must be defined. Likewise, all control units you want to address must be assigned corresponding (unique) Control Change Numbers (CC#). Up to 127 unique CC`s# can be assigned. By default, they are all off (NONE), because there are many more entries in the Axe-Fx III than the 127 that can be assigned. Here is my suggestion for a default CC# assignment and further settings, which should normally be sufficient to control the Axe-Fx III without conflicts with the MFC-101. All 127 possible uniquen CC# were
assigned. If you need CC# for other entries, you can of course adapt the CC# assignment to your individual needs.
Under SETUP -> Global Settings -> Config -> I recommend to set default Scene to 1.
STEP 1: Axe-Fx III: SETUP -> MIDI/Remote Menu [Axe-Fx III Manual: 12 Setup Menu | THE MIDI/REMOTE MENU]:
General General External CC# Looper CC# Other CC#
GENERAL INITIAL VALUE External Control 1 1 Record 123 Tempo Tap 13 MIDI Channel 1 External Control 1 100% External Control 2 2 Play 124 Tuner 120 Display Offset 1 External Control 2 0% External Control 3 3 Undo 125 Scene Revert ON External Control 3 0% External Control 4 4 Once 126 SCENE Eff. Bypass Mode VALUE External Control 4 0% External Control 5 5 Reverse 127 Scene Select 15
External Control 5 0% External Control 6 6 Scene Increment NONE PC CONFIGURATION External Control 6 0% External Control 7 7 Scene Decrement NONE Program Change ON External Control 7 0% External Control 8 8 Ignore Redundant PC ON External Control 8 0% External Control 9 9 I/O Send MIDI PC OFF External Control 9 0% External Control 10 10 Input 1 Volume NONE MIDI PC Offset 0 External Control 10 0% External Control 11 11 Input 2 Volume NONE PC Mapping OFF External Control 11 0% External Control 12 NONE Input 3 Volume NONE
External Control 12 0% External Control 13 NONE Input 4 Volume NONE
External Control 13 0% External Control 14 NONE Output 1 Volume 121
External Control 14 0% External Control 15 NONE Output 2 Volume NONE
External Control 15 0% External Control 16 NONE Output 3 Volume NONE
External Control 16 0% Output 4 Volume NONE
Initial Value 100% for External Control 1: External Control 1 I use for the expression pedal, which controls the volume of the VOLUME 1 block. This Block is always placed between amp block and post amp effects such as delay and reverb and is always active. My "Master Volume" pedal. That's why I didn't give a CC# entry for VOLUME1 BYPASS, because it is always active and is not switched on or off.

Bypass even CC# Channel uneven CC# Bypass even CC# Channel uneven CC# Amp 1 16 Amp 1 17 Mixer 3 NONE Mixer 3 NONE Amp 2 18 Amp 2 19 Mixer 4 NONE Mixer 4 NONE Cabinet 1 20 Cabinet 1 21 Multiband Compressor 1 72 Multiband Compressor 1 73 Cabinet 2 NONE Cabinet 2 NONE Multiband Compressor 2 NONE Multiband Compressor 2 NONE Chorus 1 22 Chorus 1 23 Multiplexer 1 74 Multiplexer 1 75 Chorus 2 24 Chorus 2 25 Multiplexer 2 NONE Multiplexer 2 NONE Compressor 1 26 Compressor 1 27 Multitap Delay 1 76 Multitap Delay 1 77 Compressor 2 28 Compressor 2 29 Multitap Delay 2 NONE Multitap Delay 2 NONE Compressor 3 NONE Compressor 3 NONE Output 1 NONE Output 1 NONE Compressor 4 NONE Compressor 4 NONE Output 2 NONE Output 2 NONE Crossover 1 30 Crossover 1 31 Output 3 NONE Output 3 NONE Crossover 2 NONE Crossover 2 NONE Output 4 NONE Output 4 NONE Delay 1 32 Delay 1 33 Parametric EQ 1 78 Parametric EQ 1 79 Delay 2 34 Delay 2 35 Parametric EQ 2 80 Parametric EQ 2 81 Delay 3 NONE Delay 3 NONE Parametric EQ 3 82 Parametric EQ 3 83 Delay 4 NONE Delay 4 NONE Parametric EQ 4 84 Parametric EQ 4 85 Drive 1 36 Drive 1 37 Phaser 1 86 Phaser 1 87 Drive 2 38 Drive 2 39 Phaser 2 88 Phaser 2 89 Drive 3 NONE Drive 3 NONE Pitch 1 90 Pitch 1 91 Drive 4 NONE Drive 4 NONE Pitch 2 92 Pitch 2 93 Enhancer 1 40 Enhancer 1 41 Plex Delay 1 94 Plex Delay 1 95 Enhancer 2 NONE Enhancer 2 NONE Plex Delay 2 NONE Plex Delay 2 NONE Filter 1 42 Filter 1 43 Realtime Analyzer 1 NONE Filter 2 44 Filter 2 45 Resonator 1 96 Resonator 1 97 Filter 3 46 Filter 3 47 Resonator 2 NONE Resonator 2 NONE Filter 4 48 Filter 4 49 Return 1 NONE Flanger 1 50 Flanger 1 51 Return 2 NONE Flanger 2 NONE Flanger 2 NONE Reverb 1 98 Reverb 1 99 Formant 1 52 Formant 1 53 Reverb 2 100 Reverb 2 101 Formant 2 NONE Formant 2 NONE Ring Modulator 1 102 Ring Modulator 1 103 Gate 1 54 Gate 1 55 Rotary 1 104 Rotary 1 105 Gate 2 NONE Gate 2 NONE Rotary 2 NONE Rotary 2 NONE Gate 3 NONE Gate 3 NONE Scene MIDI NONE Gate 4 NONE Gate 4 NONE Send 1 NONE Graphic EQ 1 56 Graphic EQ 1 57 Send 2 NONE Graphic EQ 2 58 Graphic EQ 2 59 Synthesizer 1 106 Synthesizer 1 107 Graphic EQ 3 60 Graphic EQ 3 61 Synthesizer 2 NONE Synthesizer 2 NONE Graphic EQ 4 62 Graphic EQ 4 63 Ten-Tap Delay 1 108 Ten-Tap Delay 1 109
Bypass even CC# Channel uneven CC# Bypass even CC# Channel uneven CC# Input 1 64 Input 1 65 Ten-Tap Delay 2 NONE Ten-Tap Delay 2 NONE Input 2 66 Input 2 67 Tone Match 12 Input 3 NONE Input 3 NONE Tremolo/Panner 1 110 Tremolo/Panner 1 111 Input 4 NONE Input 4 NONE Tremolo/Panner 2 NONE Tremolo/Panner 2 NONE Input USB NONE Input USB NONE Vocoder 1 14 Looper 1 122 Volume 1 NONE Volume 1 NONE Megatap 1 68 Megatap 1 69 Volume 2 112 Volume 2 113 Megatap 2 NONE Megatap 2 NONE Volume 3 114 Volume 3 115 Mixer 1 70 Mixer 1 71 Volume 4 116 Volume 4 117 Mixer 2 NONE Mixer 2 NONE WahWah 1 118 WahWah 1 119 WahWah 2 NONE WahWah 2 NONE
Now the Axe-Fx III is ready and the basis is set to prepare the MFC-101 in the next step and program it to match the CC# values set above!
MFC-101: Preparations STEP 2: MFC-101: EDIT->SETUP
We make the following settings in the MFC-101 SETUP Menu:
EDIT -> SETUP EDIT -> SETUP 12.5.0 Axe--Fx Mode NONE 12.5.11 Global IA Switch Setup NO 12.5.1 Performance Mode PRESET 12.5.12 IA Switch Send w/ Preset YES
12.5.2 Axe--Fx Display Offset 1 12.5.13 IA Switch Names as wanted, if needed
12.5.3 MFC--101 Display Offset 1 12.5.14 IA Switch Link Settings not in use
12.5.4 MIDI Channel Display Offsets 1 12.5.15 Send IA Switch Link OFF Messages Yes
12.5.5 MIDI Channel Names as wanted, if needed 12.5.16 Internal CC Names as wanted, if needed
12.5.6 Bank Size 8 12.5.22 Save Edits Switch ON 12.5.7 Bank Style FIRST 12.5.8 Bank/Song Limit 48 12.5.9 Bank/Song Wrap OFF
12.5.10 IA Switch Types TOGGLE [for FX BYPASS/CHANNEL & TUNER] MOMENTARY [for TAP Tempo]
Axe-Fx Mode NONE means that we use the MFC-101 as generic MIDI controller, because the Axe-Fx III is not supported for Axe-Fx Mode.
BankSize determines how many scenes you can control per preset, here 8. De facto we use each MFC-101 bank for ONE Axe-Fx III preset, which we select directly by BANK UP/DOWN (BankStyle = FIRST). IA Switches used for FX BYPASS or FX CHANNEL or TUNER are set to TOGGLE. An IA Switch, which we use for Tempo, is set to MOMENTARY.
With the Save Edits Switch to ON we enable us to define the status of the global IA switches for each preset and scene and to store them directly in the MFC-101 using the EDIT/SAVE button. We program each IA switch per scene on the MFC-101 and store it. The Axe-Fx III assumes this status per scene, so it is also recommended to save the Axe-Fx III preset after programming is complete. Thus, MFC-101 and Axe-Fx III are now always running ̀ IN SYNC`. For this to work, IA Switch Send w/ Preset must be configured to YES.
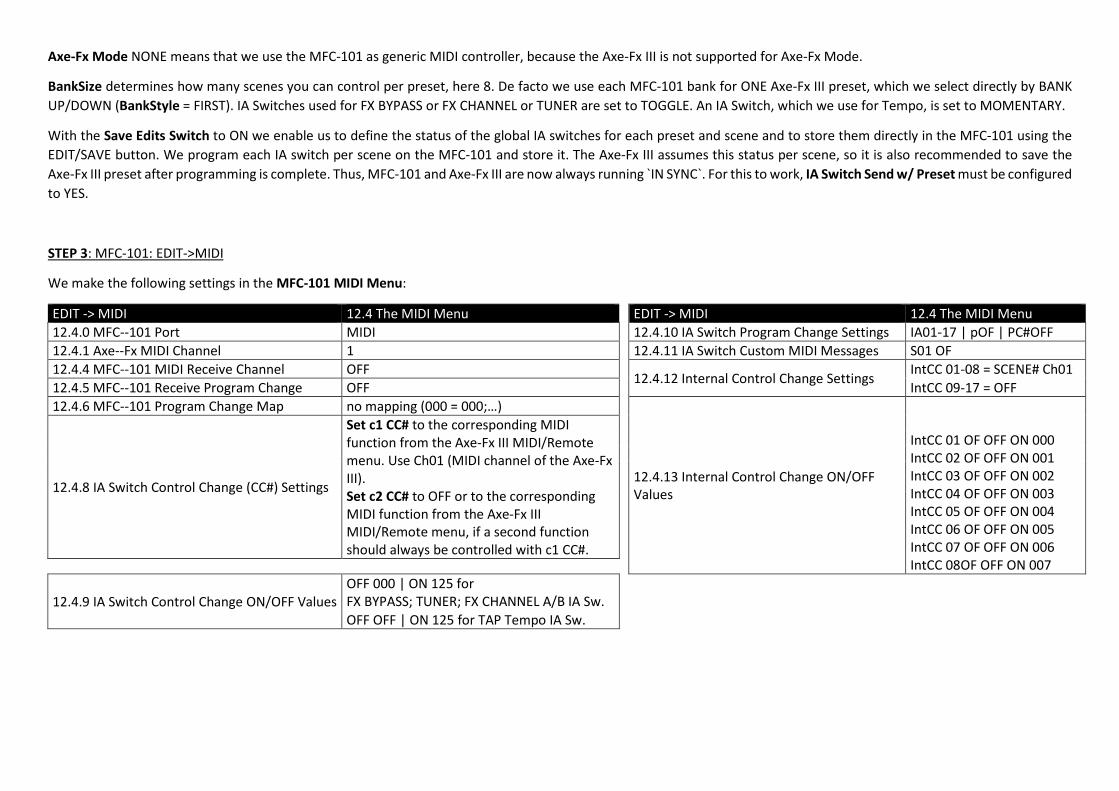
STEP 3: MFC-101: EDIT->MIDI
We make the following settings in the MFC-101 MIDI Menu:
EDIT -> MIDI 12.4 The MIDI Menu EDIT -> MIDI 12.4 The MIDI Menu 12.4.0 MFC--101 Port MIDI 12.4.10 IA Switch Program Change Settings IA01-17 | pOF | PC#OFF 12.4.1 Axe--Fx MIDI Channel 1 12.4.11 IA Switch Custom MIDI Messages S01 OF 12.4.4 MFC--101 MIDI Receive Channel OFF 12.4.12 Internal Control Change Settings IntCC 01-08 = SCENE# Ch01 12.4.5 MFC--101 Receive Program Change OFF IntCC 09-17 = OFF 12.4.6 MFC--101 Program Change Map no mapping (000 = 000;…)
12.4.13 Internal Control Change ON/OFF Values
IntCC 01 OF OFF ON 000 IntCC 02 OF OFF ON 001 IntCC 03 OF OFF ON 002 IntCC 04 OF OFF ON 003 IntCC 05 OF OFF ON 004 IntCC 06 OF OFF ON 005 IntCC 07 OF OFF ON 006 IntCC 08OF OFF ON 007
12.4.8 IA Switch Control Change (CC#) Settings
Set c1 CC# to the corresponding MIDI function from the Axe-Fx III MIDI/Remote menu. Use Ch01 (MIDI channel of the Axe-Fx III). Set c2 CC# to OFF or to the corresponding MIDI function from the Axe-Fx III MIDI/Remote menu, if a second function should always be controlled with c1 CC#.
12.4.9 IA Switch Control Change ON/OFF Values OFF 000 | ON 125 for FX BYPASS; TUNER; FX CHANNEL A/B IA Sw. OFF OFF | ON 125 for TAP Tempo IA Sw.
MFC-101 MIDI Port = MIDI: The MFC-101 must control the Axe-Fx via MIDI. We connect MFC-101 MIDI OUT -> Axe-Fx III MIDI IN. Axe-Fx MIDI Channel: We set MIDI channel 1 because the Axe-Fx III has also been set to MIDI channel 1.
Instead of the global 12.4.7 IA Switch Axe-Fx Functions we use the generic global 12.4.8 IA Switch Control Change (CC#) settings. By specifying the CC# number, we determine which Axe-Fx III controller is addressed (e.g. FX BYPASS, FX CHANNEL, TEMPO, TUNER, etc.). The assignments which CC# number addresses which Axe-Fx III control unit are made in the Axe-Fx III under SETUP: MIDI/Remote.
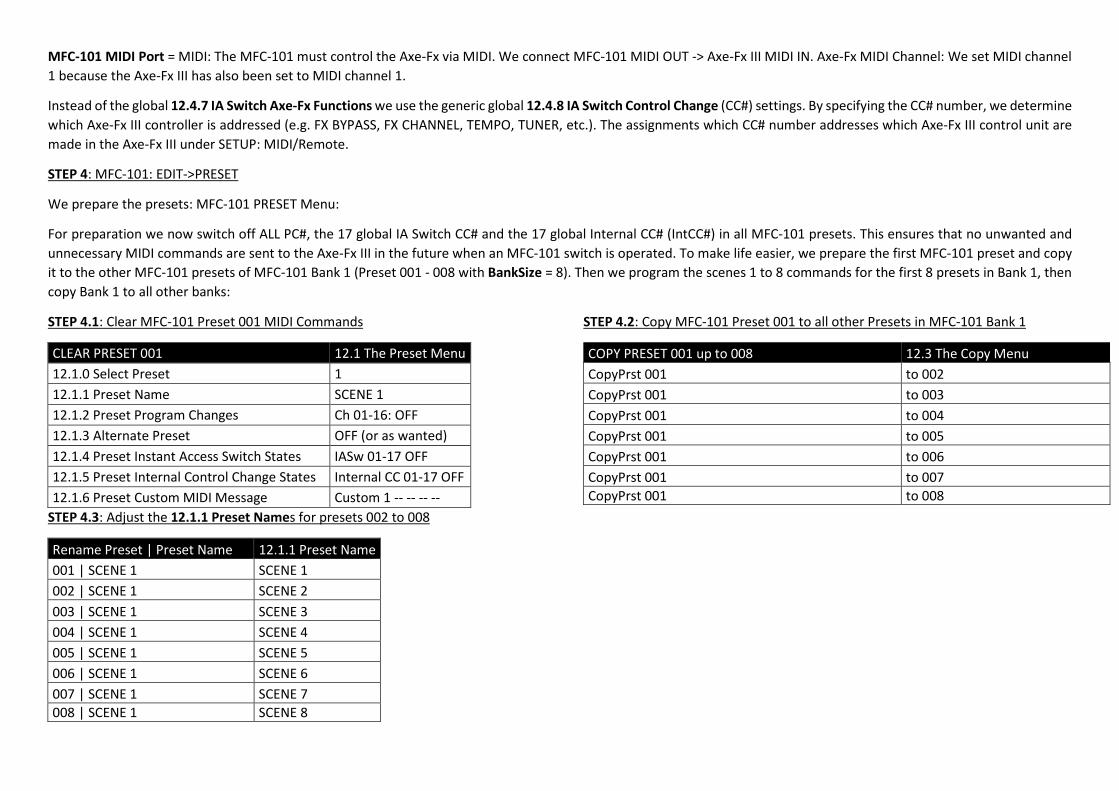
STEP 4: MFC-101: EDIT->PRESET
We prepare the presets: MFC-101 PRESET Menu:
For preparation we now switch off ALL PC#, the 17 global IA Switch CC# and the 17 global Internal CC# (IntCC#) in all MFC-101 presets. This ensures that no unwanted and unnecessary MIDI commands are sent to the Axe-Fx III in the future when an MFC-101 switch is operated. To make life easier, we prepare the first MFC-101 preset and copy it to the other MFC-101 presets of MFC-101 Bank 1 (Preset 001 - 008 with BankSize = 8). Then we program the scenes 1 to 8 commands for the first 8 presets in Bank 1, then copy Bank 1 to all other banks:
STEP 4.1: Clear MFC-101 Preset 001 MIDI Commands
CLEAR PRESET 001 12.1 The Preset Menu 12.1.0 Select Preset 1 12.1.1 Preset Name SCENE 1 12.1.2 Preset Program Changes Ch 01-16: OFF 12.1.3 Alternate Preset OFF (or as wanted) 12.1.4 Preset Instant Access Switch States IASw 01-17 OFF 12.1.5 Preset Internal Control Change States Internal CC 01-17 OFF 12.1.6 Preset Custom MIDI Message Custom 1 -- -- -- --
STEP 4.3: Adjust the 12.1.1 Preset Names for presets 002 to 008
Rename Preset | Preset Name 12.1.1 Preset Name 001 | SCENE 1 SCENE 1 002 | SCENE 1 SCENE 2 003 | SCENE 1 SCENE 3 004 | SCENE 1 SCENE 4 005 | SCENE 1 SCENE 5 006 | SCENE 1 SCENE 6 007 | SCENE 1 SCENE 7 008 | SCENE 1 SCENE 8
STEP 4.2: Copy MFC-101 Preset 001 to all other Presets in MFC-101 Bank 1
COPY PRESET 001 up to 008 12.3 The Copy Menu CopyPrst 001 to 002 CopyPrst 001 to 003 CopyPrst 001 to 004 CopyPrst 001 to 005 CopyPrst 001 to 006 CopyPrst 001 to 007 CopyPrst 001 to 008
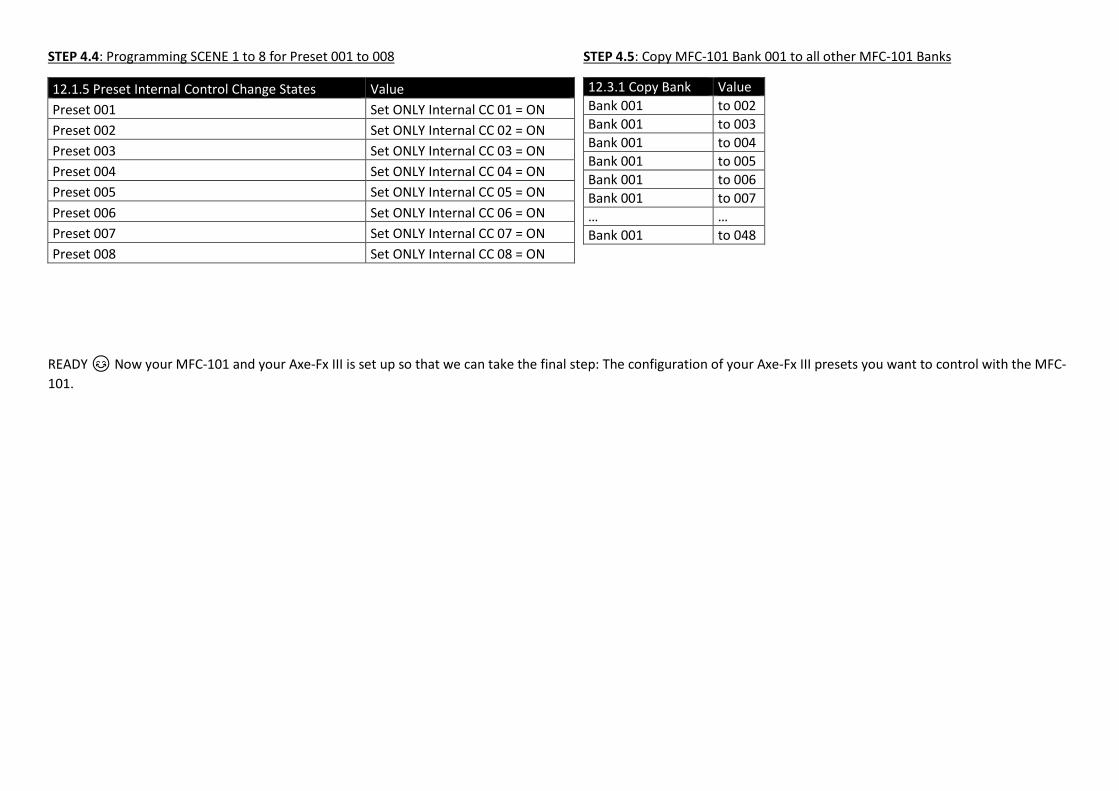
STEP 4.4: Programming SCENE 1 to 8 for Preset 001 to 008
12.1.5 Preset Internal Control Change States Value Preset 001 Set ONLY Internal CC 01 = ON Preset 002 Set ONLY Internal CC 02 = ON Preset 003 Set ONLY Internal CC 03 = ON Preset 004 Set ONLY Internal CC 04 = ON Preset 005 Set ONLY Internal CC 05 = ON Preset 006 Set ONLY Internal CC 06 = ON Preset 007 Set ONLY Internal CC 07 = ON Preset 008 Set ONLY Internal CC 08 = ON
STEP 4.5: Copy MFC-101 Bank 001 to all other MFC-101 Banks
12.3.1 Copy Bank Value Bank 001 to 002 Bank 001 to 003 Bank 001 to 004 Bank 001 to 005 Bank 001 to 006 Bank 001 to 007 … … Bank 001 to 048
READY 😊😊 Now your MFC-101 and your Axe-Fx III is set up so that we can take the final step: The configuration of your Axe-Fx III presets you want to control with the MFC-101.

Programming an MFC-101 bank to control 1 Axe-Fx III preset with 8 scenes (BankSize = 8)
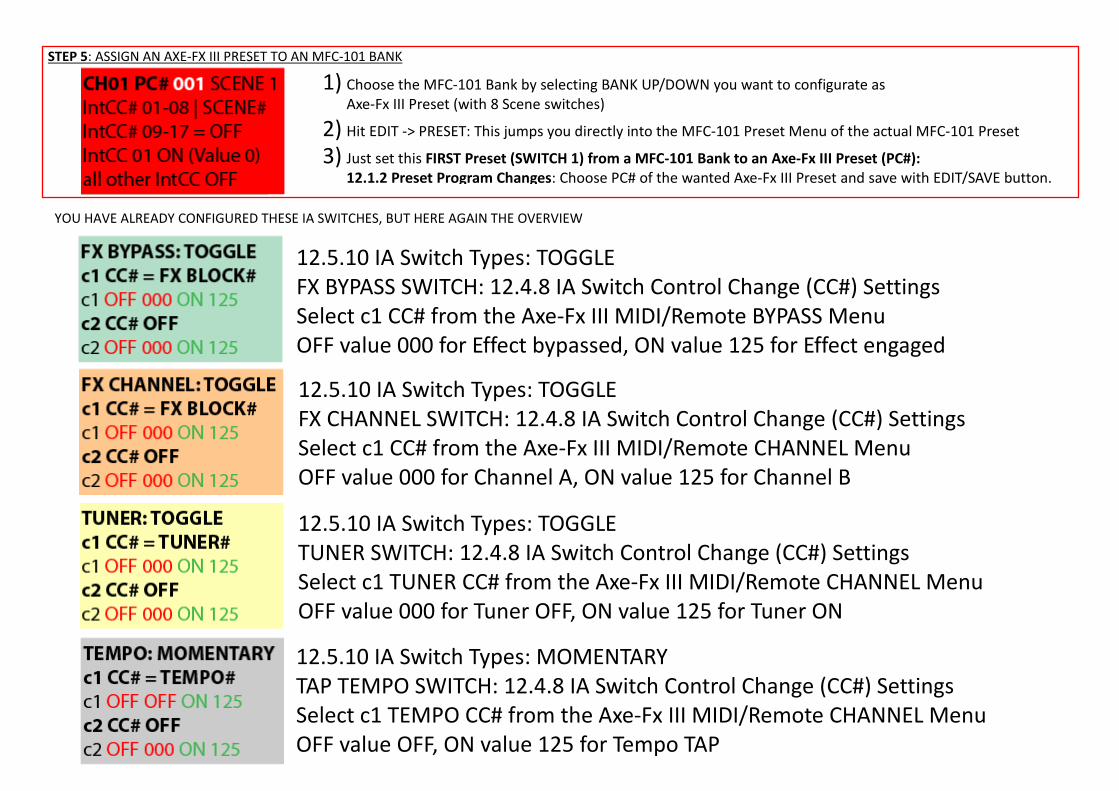
STEP 5: ASSIGN AN AXE-FX III PRESET TO AN MFC-101 BANK
YOU HAVE ALREADY CONFIGURED THESE IA SWITCHES, BUT HERE AGAIN THE OVERVIEW
1) Choose the MFC-101 Bank by selecting BANK UP/DOWN you want to configurate as Axe-Fx III Preset (with 8 Scene switches)
2) Hit EDIT -> PRESET: This jumps you directly into the MFC-101 Preset Menu of the actual MFC-101 Preset
3) Just set this FIRST Preset (SWITCH 1) from a MFC-101 Bank to an Axe-Fx III Preset (PC#): 12.1.2 Preset Program Changes: Choose PC# of the wanted Axe-Fx III Preset and save with EDIT/SAVE button.
12.5.10 IA Switch Types: TOGGLE FX BYPASS SWITCH: 12.4.8 IA Switch Control Change (CC#) Settings Select c1 CC# from the Axe-Fx III MIDI/Remote BYPASS Menu
OFF value 000 for Effect bypassed, ON value 125 for Effect engaged
12.5.10 IA Switch Types: TOGGLE FX CHANNEL SWITCH: 12.4.8 IA Switch Control Change (CC#) Settings Select c1 CC# from the Axe-Fx III MIDI/Remote CHANNEL Menu
OFF value 000 for Channel A, ON value 125 for Channel B
12.5.10 IA Switch Types: TOGGLE TUNER SWITCH: 12.4.8 IA Switch Control Change (CC#) Settings Select c1 TUNER CC# from the Axe-Fx III MIDI/Remote CHANNEL Menu
OFF value 000 for Tuner OFF, ON value 125 for Tuner ON
12.5.10 IA Switch Types: MOMENTARY TAP TEMPO SWITCH: 12.4.8 IA Switch Control Change (CC#) Settings Select c1 TEMPO CC# from the Axe-Fx III MIDI/Remote CHANNEL Menu
OFF value OFF, ON value 125 for Tempo TAP
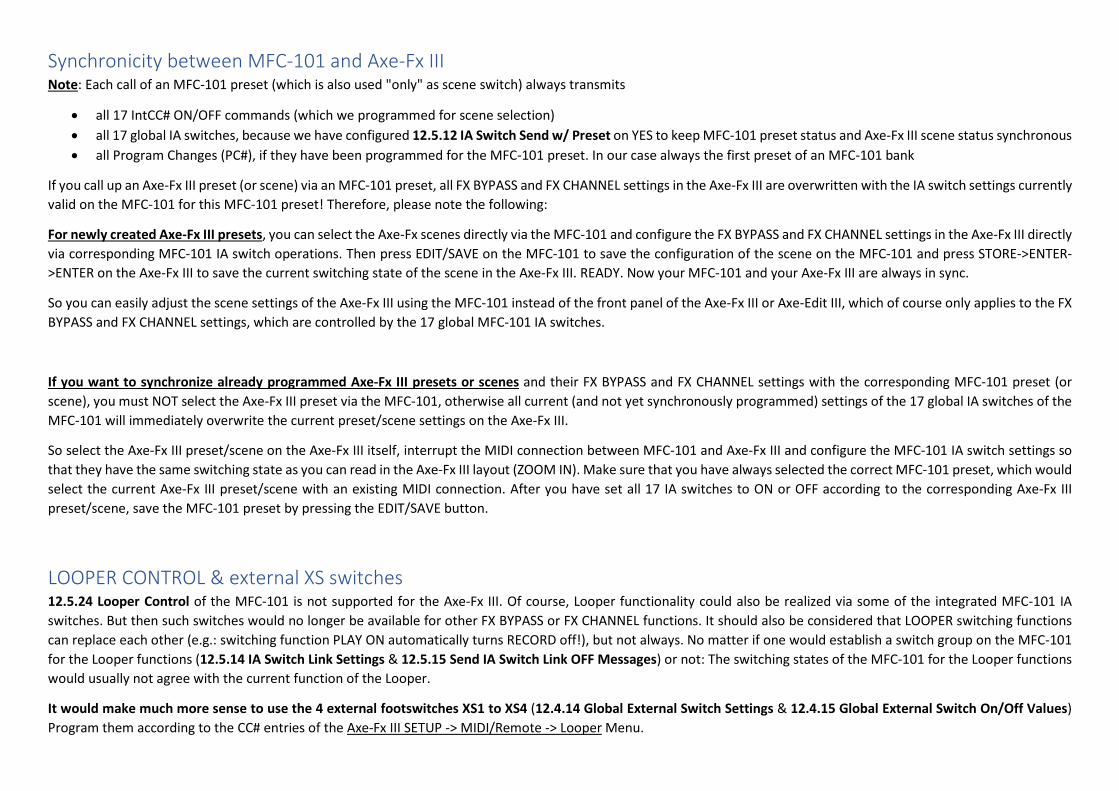
Synchronicity between MFC-101 and Axe-Fx III Note: Each call of an MFC-101 preset (which is also used "only" as scene switch) always transmits
• all 17 IntCC# ON/OFF commands (which we programmed for scene selection) • all 17 global IA switches, because we have configured 12.5.12 IA Switch Send w/ Preset on YES to keep MFC-101 preset status and Axe-Fx III scene status synchronous • all Program Changes (PC#), if they have been programmed for the MFC-101 preset. In our case always the first preset of an MFC-101 bank
If you call up an Axe-Fx III preset (or scene) via an MFC-101 preset, all FX BYPASS and FX CHANNEL settings in the Axe-Fx III are overwritten with the IA switch settings currently valid on the MFC-101 for this MFC-101 preset! Therefore, please note the following:
For newly created Axe-Fx III presets, you can select the Axe-Fx scenes directly via the MFC-101 and configure the FX BYPASS and FX CHANNEL settings in the Axe-Fx III directly via corresponding MFC-101 IA switch operations. Then press EDIT/SAVE on the MFC-101 to save the configuration of the scene on the MFC-101 and press STORE->ENTER->ENTER on the Axe-Fx III to save the current switching state of the scene in the Axe-Fx III. READY. Now your MFC-101 and your Axe-Fx III are always in sync.
So you can easily adjust the scene settings of the Axe-Fx III using the MFC-101 instead of the front panel of the Axe-Fx III or Axe-Edit III, which of course only applies to the FX BYPASS and FX CHANNEL settings, which are controlled by the 17 global MFC-101 IA switches.
If you want to synchronize already programmed Axe-Fx III presets or scenes and their FX BYPASS and FX CHANNEL settings with the corresponding MFC-101 preset (or scene), you must NOT select the Axe-Fx III preset via the MFC-101, otherwise all current (and not yet synchronously programmed) settings of the 17 global IA switches of the MFC-101 will immediately overwrite the current preset/scene settings on the Axe-Fx III.
So select the Axe-Fx III preset/scene on the Axe-Fx III itself, interrupt the MIDI connection between MFC-101 and Axe-Fx III and configure the MFC-101 IA switch settings so that they have the same switching state as you can read in the Axe-Fx III layout (ZOOM IN). Make sure that you have always selected the correct MFC-101 preset, which would select the current Axe-Fx III preset/scene with an existing MIDI connection. After you have set all 17 IA switches to ON or OFF according to the corresponding Axe-Fx III preset/scene, save the MFC-101 preset by pressing the EDIT/SAVE button.
LOOPER CONTROL & external XS switches 12.5.24 Looper Control of the MFC-101 is not supported for the Axe-Fx III. Of course, Looper functionality could also be realized via some of the integrated MFC-101 IA switches. But then such switches would no longer be available for other FX BYPASS or FX CHANNEL functions. It should also be considered that LOOPER switching functions can replace each other (e.g.: switching function PLAY ON automatically turns RECORD off!), but not always. No matter if one would establish a switch group on the MFC-101 for the Looper functions (12.5.14 IA Switch Link Settings & 12.5.15 Send IA Switch Link OFF Messages) or not: The switching states of the MFC-101 for the Looper functions would usually not agree with the current function of the Looper.
It would make much more sense to use the 4 external footswitches XS1 to XS4 (12.4.14 Global External Switch Settings & 12.4.15 Global External Switch On/Off Values) Program them according to the CC# entries of the Axe-Fx III SETUP -> MIDI/Remote -> Looper Menu.

Another advantage of using the external XS switches is that they do not need to send unnecessary MIDI switching commands when calling up an MFC-101 preset. The big advantage is that you can not only configure these XS switches globally, but also set the global settings at MFC-101 preset level to settings that differ from the preset. (12.1.7 Preset External Switch Settings & 12.1.8 Preset External Switch On/Off Values). For example, you could program the 4 external XS switches Global as Amp1 Channel A/B/C/D switches and assign looper functions to the external XS switches only for the MFC-101 presets where you want to use the looper.
Additional TIP: Why not switch the channels of Amp1 & Amp2 with the external 4 XS switches? In the Axe-Fx III MIDI/Remote menu, simply assign the same CC# value to CHANNEL AMP2 that is set for CHANNEL AMP1.
Not enough yet? Let's get to the top: In parallel routing, the signal passes through DRIVE1 and AMP1, DRIVE2 and AMP2 in parallel, set the CHANNEL CC# of all 4 FX blocks to the same value and program this CC# value on the XS1 to XS4 switches (with the CC values XS1=0, XS2=1, XS3=2, XS4=3), then switch the channels of all four blocks with the 4 external XS switches. Which means: Each AMP channel has its own drive channel. And it never hurts to have one dedicated drive per amp, does it?! Or even more? Maybe give the CAB1/2 also the same CHANNEL CC# 😉😉
So have fun controlling your Axe-Fx III with the MFC-101!
Markus from cabIR.eu
Writing this tutorial for you was a time-consuming job. If it helps you, if you have learned something and with its help you now understand your MFC-101 better and can now program your Axe-Fx III in a meaningful way, then I would be pleased about a little recognition. Maybe you'd like to buy me a pizza? Then I would be very happy about a PAYPAL donation from you to https://www.paypal.me/axefx!
Thank you Markus
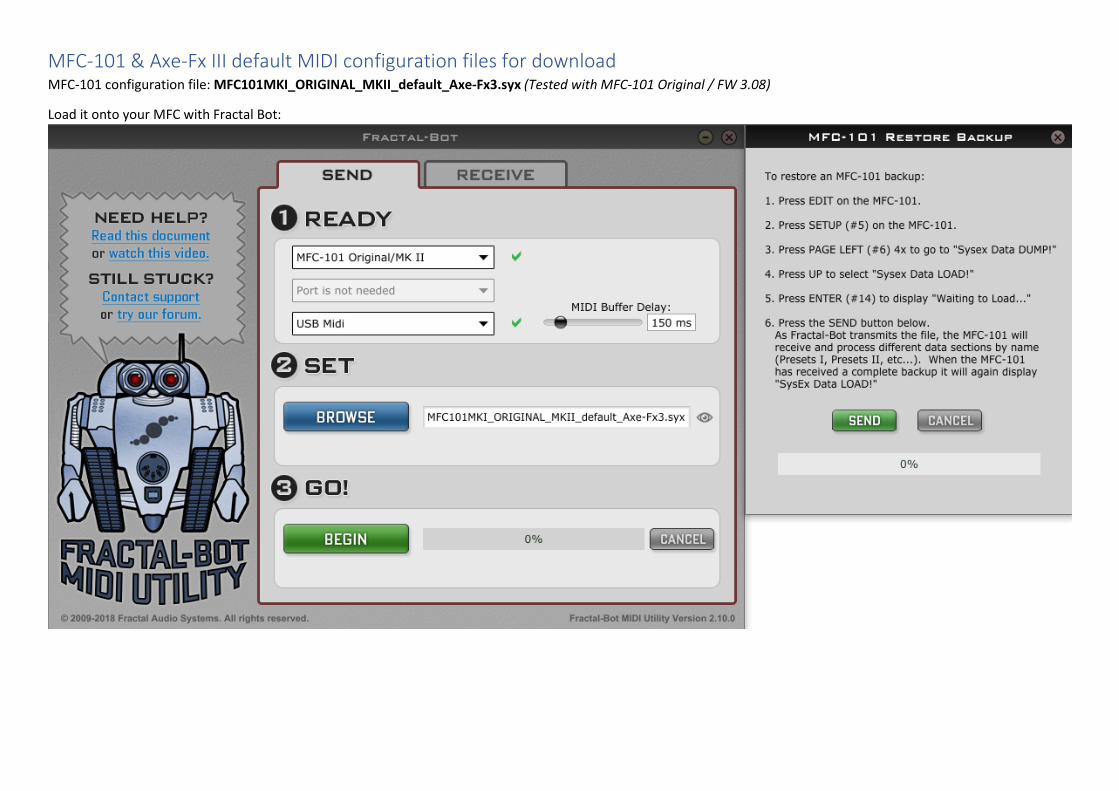
MFC-101 & Axe-Fx III default MIDI configuration files for download MFC-101 configuration file: MFC101MKI_ORIGINAL_MKII_default_Axe-Fx3.syx (Tested with MFC-101 Original / FW 3.08)
Load it onto your MFC with Fractal Bot:
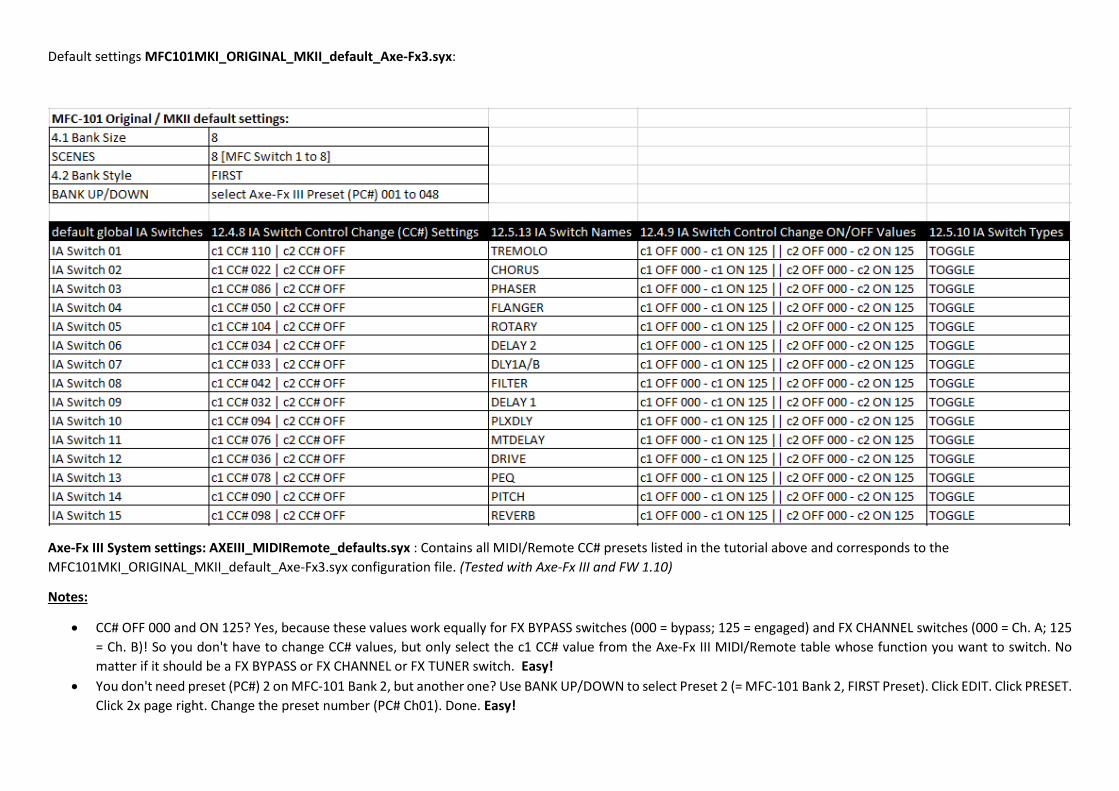
Default settings MFC101MKI_ORIGINAL_MKII_default_Axe-Fx3.syx:
Axe-Fx III System settings: AXEIII_MIDIRemote_defaults.syx : Contains all MIDI/Remote CC# presets listed in the tutorial above and corresponds to the MFC101MKI_ORIGINAL_MKII_default_Axe-Fx3.syx configuration file. (Tested with Axe-Fx III and FW 1.10)
Notes:
• CC# OFF 000 and ON 125? Yes, because these values work equally for FX BYPASS switches (000 = bypass; 125 = engaged) and FX CHANNEL switches (000 = Ch. A; 125 = Ch. B)! So you don't have to change CC# values, but only select the c1 CC# value from the Axe-Fx III MIDI/Remote table whose function you want to switch. No matter if it should be a FX BYPASS or FX CHANNEL or FX TUNER switch. Easy!
• You don't need preset (PC#) 2 on MFC-101 Bank 2, but another one? Use BANK UP/DOWN to select Preset 2 (= MFC-101 Bank 2, FIRST Preset). Click EDIT. Click PRESET. Click 2x page right. Change the preset number (PC# Ch01). Done. Easy!

• You want less scene switches? Maybe only 5 instead of the programmed 8? Select Bank1, Preset 1. click EDIT. click SETUP. Right click page to BankSize. Set five. Then copy (EDIT->COPY->Copy Bank) the new Bank 1 (5 Presets or "Scenen") to all available banks of the MFC-101 and configure the preset numbers of the Axe-Fx III, which are to be controlled per bank, as described above. All you have to do is configure the first preset per MFC-101 Bank! Easy!
DOWNLOAD: https://www.cabir.eu/_external_content/mfc-101+axe-fx3/MFC-101+Axe-Fx3_setup_files_for_Fractal_Bot.zip
Writing this tutorial for you was a time-consuming job. If it helps you, if you have learned something and with its help you now understand your MFC-101 better and can now program your Axe-Fx III in a meaningful way, then I would be pleased about a little recognition. Maybe you'd like to buy me a pizza? Then I would be very happy about a PAYPAL donation from you to https://www.paypal.me/axefx!
Thank you Markus