forte for java 4, mobile edition tutorial · 2010-12-23 · the forte for java 4, mobile edition...
TRANSCRIPT

Sun Microsystems, Inc.4150 Network CircleSanta Clara, CA 95054 U.S.A.650-960-1300
Send comments about this document to: [email protected]
Forte™ for Java™ 4, Mobile EditionTutorial
Forte for Java 4
Part No. 816-5081-10June 2002, Revision A

PleaseRecycle
Copyright © 2002 Sun Microsystems, Inc., 4150 Network Circle, Santa Clara, California 95054, U.S.A. All rights reserved.
Sun Microsystems, Inc. has intellectual property rights relating to technology embodied in the product that is described in this document.
In particular, and without limitation, these intellectual property rights may include one or more of the U.S. patents listed at
http://www.sun.com/patents and one or more additional patents or pending patent applications in the U.S. and in other countries.
This document and the product to which it pertains are distributed under licenses restricting their use, copying, distribution, and
decompilation. No part of the product or of this document may be reproduced in any form by any means without prior written authorization of
Sun and its licensors, if any.
Third-party software, including font technology, is copyrighted and licensed from Sun suppliers.
This product includes code licensed from RSA Data Security.
Sun, Sun Microsystems, the Sun logo, Forte, Java, NetBeans, iPlanet, docs.sun.com, and Solaris are trademarks or registered trademarks of Sun
Microsystems, Inc. in the U.S. and other countries.
All SPARC trademarks are used under license and are trademarks or registered trademarks of SPARC International, Inc. in the U.S. and other
countries. Products bearing SPARC trademarks are based upon architecture developed by Sun Microsystems, Inc.
UNIX is a registered trademark in the United States and other countries, exclusively licensed through X/Open Company, Ltd.
Netscape and Netscape Navigator are trademarks or registered trademarks of Netscape Communications Corporation in the United States and
other countries.
Federal Acquisitions: Commercial Software—Government Users Subject to Standard License Terms and Conditions.
DOCUMENTATION IS PROVIDED “AS IS” AND ALL EXPRESS OR IMPLIED CONDITIONS, REPRESENTATIONS AND WARRANTIES,
INCLUDING ANY IMPLIED WARRANTY OF MERCHANTABILITY, FITNESS FOR A PARTICULAR PURPOSE OR NON-INFRINGEMENT,
ARE DISCLAIMED, EXCEPT TO THE EXTENT THAT SUCH DISCLAIMERS ARE HELD TO BE LEGALLY INVALID.
Copyright © 2002 Sun Microsystems, Inc., 4150 Network Circle, Santa Clara, California 95054, Etats-Unis. Tous droits réservés.
Sun Microsystems, Inc. a les droits de propriété intellectuels relatants à la technologie incorporée dans le produit qui est décrit dans ce
document. En particulier, et sans la limitation, ces droits de propriété intellectuels peuvent inclure un ou plus des brevets américains énumérés
à http://www.sun.com/patents et un ou les brevets plus supplémentaires ou les applications de brevet en attente dans les Etats-Unis et
dans les autres pays.
Ce produit ou document est protégé par un copyright et distribué avec des licences qui en restreignent l’utilisation, la copie, la distribution, et la
décompilation. Aucune partie de ce produit ou document ne peut être reproduite sous aucune forme, parquelque moyen que ce soit, sans
l’autorisation préalable et écrite de Sun et de ses bailleurs de licence, s’il y en a.
Le logiciel détenu par des tiers, et qui comprend la technologie relative aux polices de caractères, est protégé par un copyright et licencié par des
fournisseurs de Sun.
Ce produit comprend le logiciel licencié par RSA Data Security.
Sun, Sun Microsystems, le logo Sun, Forte, Java, NetBeans, iPlanet, docs.sun.com, et Solaris sont des marques de fabrique ou des marques
déposées de Sun Microsystems, Inc. aux Etats-Unis et dans d’autres pays.
Toutes les marques SPARC sont utilisées sous licence et sont des marques de fabrique ou des marques déposées de SPARC International, Inc.
aux Etats-Unis et dans d’autres pays. Les produits protant les marques SPARC sont basés sur une architecture développée par Sun
Microsystems, Inc.
UNIX est une marque enregistree aux Etats-Unis et dans d’autres pays et licenciée exclusivement par X/Open Company Ltd.
Netscape et Netscape Navigator sont des marques de Netscape Communications Corporation aux Etats-Unis et dans d’autres pays.
LA DOCUMENTATION EST FOURNIE “EN L’ÉTAT” ET TOUTES AUTRES CONDITIONS, DECLARATIONS ET GARANTIES EXPRESSES
OU TACITES SONT FORMELLEMENT EXCLUES, DANS LA MESURE AUTORISEE PAR LA LOI APPLICABLE, Y COMPRIS NOTAMMENT
TOUTE GARANTIE IMPLICITE RELATIVE A LA QUALITE MARCHANDE, A L’APTITUDE A UNE UTILISATION PARTICULIERE OU A
L’ABSENCE DE CONTREFAÇON.

Contents
Before You Begin vii
1. Creating a MIDlet and MIDlet Suite 1
Setup Tasks 2
Mounting a Filesystem 2
Setting the Default Emulator 4
Setting an Emulator’s Default Skin 7
Setting the Code Completion Feature 8
Using the Code Completion Feature to Complete Code 9
Compiling and Testing a MIDlet 10
Creating a Package for the MIDlet 11
Creating the ConverterMIDlet MIDlet 12
Coding a MIDlet 14
Compiling a MIDlet 17
Testing a MIDlet 19
iii

Using MIDlet Suites to Package MIDlets 21
Creating a MIDlet Suite 21
Packaging a MIDlet Suite 24
Testing a MIDlet Within a MIDlet Suite 27
Changing the Target Emulator for a MIDlet Suite 29
Executing a MIDlet on Other Device Emulators 31
2. Debugging MIDlets and MIDlet Suites 33
Debugger Basics 33
Debugging a Program 36
Setting a Breakpoint 36
Running a Program in Debug Mode 38
3. Advanced Issues 49
Working With Projects 49
Creating a New Project 50
Setting Emulators 52
Supporting Over-the-Air (OTA) Application Downloading 55
Deploying a MIDlet Suite 57
A. Sample Application Source Code 59
ConverterMIDlet Source Code 59
Converter Source Code 61
Currencies Source Code 64
Settings Source Code 66
iv Forte for Java 4, Mobile Edition Tutorial • June 2002

Figures
FIGURE 1-1 Emulator Property Sheet 7
FIGURE 1-2 Using Code Completion 10
FIGURE 1-3 Icon for Uncompiled MIDlet Classes 17
FIGURE 1-4 Testing a MIDlet Using an Emulator 28
FIGURE 1-5 Converter MIDlet Suite Execution Properties 30
FIGURE 1-6 Converter Program Running on the MinimumPhone Device Emulator 32
FIGURE 2-1 Debugger Window and Its Views 34
FIGURE 2-2 Setting the Emulator Debugger for Debugging MIDlets 35
FIGURE 2-3 Debugger Java Settings 41
FIGURE 2-4 Debug Menu Options at a Breakpoint 42
FIGURE 2-5 Call Stack View and Source Code 45
v

vi Forte for Java 4, Mobile Edition Tutorial • June 2002
Before You Begin
This document provides a tutorial for the Forte™ for Java™ 4, Mobile Edition
integrated development environment (IDE). It is meant for those readers learning
the IDE. Topics covered in the tutorial include:
■ Setup tasks, such as mounting filesystems, creating packages, installing
emulators, and setting the default emulator and an emulator’s default device skin
■ Creating, compiling, and testing MIDlets
■ Creating MIDlet suites and adding MIDlets to the suite
■ Debugging MIDlets
■ Setting up projects
This document instructs you to enter several commands at the command line.
Command lines vary slightly from one platform to another. For example, a Microsoft
Windows command might look like this:
To translate for UNIX® or Linux environments, simply change the prompt and use
forward slashes:
c:\> cd MyWorkDir\MyPackage
% cd MyWorkDir/MyPackage
vii

Before You Read This Book
To use this tutorial, you should have installed the Forte for Java 4, Mobile Edition
product. See the Forte for Java 4, Mobile Edition Getting Started Guide for information
on how to perform this installation.
The Forte for Java 4, Mobile Edition IDE, referred to hereafter as the Mobile Edition
IDE, integrates the Forte for Java 4 IDE with the Java 2 Micro Edition (J2ME™)
platform and the J2ME Wireless Toolkit (WTK). The Mobile Edition IDE supports
developing applications for handheld, wireless devices.
Currently, the IDE supports the J2ME platform for the Mobile Information Device
Profile (MIDP) with the Connected, Limited Device Configuration (CLDC). CLDC is
a standardized and portable minimum-footprint Java environment designed for
small, resource-constrained devices. It runs on top of Sun’s K Virtual Machine
(KVM). MIDP is a set of Java APIs that work with CLDC to provide a complete J2ME
application runtime environment targeted for mobile information devices such as
cellular phones and two-way pagers. The MIDP APIs provide a standard way to
address issues such as user interface, persistence storage, networking, and
application life cycle.
Before starting, you should be familiar with the following subjects:
■ Java programming language
■ Java 2 Micro Edition platform
■ MIDP applications
■ J2ME application assembly and deployment concepts
This book requires a knowledge of J2ME technology and wireless concepts. Refer to
the following web site for more information:
http://java.sun.com/j2me/
Note – Sun is not responsible for the availability of third-party web sites mentioned
in this document and does not endorse and is not responsible or liable for any
content, advertising, products, or other materials on or available from such sites or
resources. Sun will not be responsible or liable for any damage or loss caused or
alleged to be caused by or in connection with use of or reliance on any such content,
goods, or services available on or through any such sites or resources.
viii Forte for Java 4, Mobile Edition Tutorial • June 2002

How This Book Is Organized
Chapter 1 provides the information necessary to set up the Forte for Java 4, Mobile
Edition and to use the Mobile Edition IDE to create and test a MIDlet and a MIDlet
suites.
Chapter 2 describes how to debug a MIDlet application using the Mobile Edition
IDE’s debugger.
Chapter 3 discusses advanced issues, including Over-the-Air support and working
with projects.
Appendix A provides the source code for the ConverterMIDlet application and its
Java classes.
Typographic Conventions
Typeface Meaning Examples
AaBbCc123 The names of commands, files,
and directories; on-screen
computer output
Edit your.login file.
Use ls -a to list all files.
% You have mail .
AaBbCc123 What you type, when contrasted
with on-screen computer output
% su
Password:
AaBbCc123 Book titles, new words or terms,
words to be emphasized
Read Chapter 6 in the User’s Guide.
These are called class options.
You must be superuser to do this.
AaBbCc123 Command-line variable; replace
with a real name or value
To delete a file, type rm filename.
Before You Begin ix
Related Documentation
Forte for Java 4 documentation includes books delivered in Acrobat Reader (PDF)
format, online help, readme files of example applications, and Javadoc™
documentation.
Documentation Available Online
The documents in this section are available from the Forte for Java 4 portal and the
docs.sun.comSM web site.
The documentation link of the Forte for Java Developer Resources portal is at
http://forte.sun.com/ffj/documentation/ . The docs.sun.com web site is
at http://docs.sun.com .
■ Release notes (HTML format)
Available for each Forte for Java 4 edition. Describe last-minute release changes
and technical notes.
■ Forte for Java 4, Mobile Edition Getting Started Guide (PDF format) -
part no. 816-4338-10.
Describes how to install the Forte for Java 4, Mobile Edition product on each
supported platform and includes other pertinent information, such as system
requirements, upgrade instructions, command-line switches, installed
subdirectories, Javadoc setup, and information on how to use the Update Center.
You can also find the completed tutorial applications at
http://forte.sun.com/ffj/documentation/tutorialsandexamples.html
The docs.sun.com web site (http://docs.sun.com ) enables you to read, print,
and buy Sun Microsystems manuals through the Internet. If you cannot find a
manual, see the documentation index installed with the product on your local
system or network.
Online Help
Online help is available inside the Forte for Java 4 development environment. You
can access help by pressing the help key (Help in a Solaris environment, F1 on
Microsoft Windows and Linux), or by choosing Help → Contents. Either action
displays a list of help topics and a search facility.
x Forte for Java 4, Mobile Edition Tutorial • June 2002

Examples
You can download several examples that illustrate a particular Forte for Java 4
feature, as well as the source files for the tutorial applications from the Developer
Resources portal, at:
http://forte.sun.com/ffj/documentation/tutorialsandexamples.html
Javadoc Documentation
Javadoc documentation is available within the IDE for many Forte for Java 4
modules. Refer to the release notes for instructions on installing this documentation.
When you start the IDE, you can access this Javadoc documentation within the
Javadoc pane of the Explorer.
Sun Welcomes Your Comments
Sun is interested in improving its documentation and welcomes your comments and
suggestions. Email your comments to Sun at this address:
Please include the part number (816-5081-10) of your document in the subject line of
your email.
Before You Begin xi

xii Forte for Java 4, Mobile Edition Tutorial • June 2002

CHAPTER 1
Creating a MIDlet and MIDlet Suite
This tutorial shows you how to create a currency converter application. Before you
begin, download the source code from the Forte for Java portal, at
http://forte.sun.com/ffj/documentation/tutorialsandexamples.html
This chapter gets you started with the Forte for Java 4, Mobile Edition tool. The
chapter takes you through the tasks necessary to build a J2ME MIDP/CLDC
application:
■ Creating the code
■ Testing the code in a device emulator
■ Packaging the MIDlet.
The currency converter application, called Converter, converts amounts from one
currency to another. You can customize the currency displayed, such as euros, yen,
or dollars, for both the “from” and “to” currency categories. The application
prompts for the “from” currency amount and then displays the equivalent amount
in the other currency. There are four Java files for the sample application:
■ ConverterMIDlet.java . The code for the MIDlet class
■ Converter.java . A Java class that performs the conversion from one currency
to another
■ Currencies.java . A Java class that maintains the currencies and rates
■ Settings.java . A Java class that keeps track of the application’s settings, such
as the “from” and “to” currencies
As you go through the tutorial, keep in mind that the Mobile Edition IDE often has
more than one way to perform a particular function. The tutorial illustrates one way
to perform a function, but there are often other ways to accomplish the same
function. For example, functions from the drop-down menus can usually be accessed
by right-clicking on an entity and then selecting from its contextual menu. As you
grow more familiar with the tool, you will find the operational mode with which
you are most comfortable.
1

Setup Tasks
You need to perform some basic setup tasks within the Mobile Edition IDE to create
and build the sample MIDlet application. Such setup tasks including mounting a
filesystem, adding an emulator, and setting the emulator’s default skin.
Mounting a Filesystem
Begin by mounting the filesystem (or directory) within which you want to place the
sample application code. Mounting a filesystem lets you browse and work with its
files from within the Mobile Edition IDE. The mounted filesystem is included in the
Java classpath, which is necessary for compiling, running, and debugging code.
Note – When you download and unzip the Converter.zip file, the source files are
unzipped to <download-directory>\exampledir\converter\ . This tutorial assumes
that the files were downloaded to the D:\ffjme directory.
To mount a filesystem:
1. From the File menu, choose Mount Filesystem.
This opens a wizard from which you choose the template for the filesystem.
2 Forte for Java 4, Mobile Edition Tutorial • June 2002

2. Select the Local Directory and click Next.
3. Use the wizard to navigate to the D:\ffjme\exampledir directory. Select thisdirectory and click Finish to complete the mount process.
The D:\ffjme\exampledir directory appears in the Filesystems tab of the
Explorer pane. The directory is mounted and you can browse its contents.
LocalDirectory
Chapter 1 Creating a MIDlet and MIDlet Suite 3

Setting the Default Emulator
An emulator lets you simulate the execution of an application on a target device, just
as the user might experience it. It gives you the ability to run and debug applications
within the IDE. Typically, an emulator includes a sample of devices that it emulates.
These sample devices are called “skins.” The J2ME Wireless Toolkit Emulator is one
such emulator. It includes a number of example devices or skins, such as a Motorola
i85 phone, a Palm OS device, a Default Color Phone, and so forth. You can test your
application on any of the Wireless Toolkit Emulator’s example devices. This feature
also gives you the ability to test the portability of your application across different
devices.
To learn more about emulators, see “Setting Emulators” on page 52. In that section,
you can see how to set multiple instances of an emulator, which makes it faster and
easier to test your application on different devices. For demonstration purposes, the
tutorial assumes that you have created three additional instances of the J2ME
Wireless Toolkit emulator.
The default emulator is the installed emulator that is invoked when you test your
application. For MIDP applications, the tool maintains one default emulator at a
time. The default emulator is used for executing MIDlets that are not part of a
MIDlet suite and newly created MIDlet suites.
4 Forte for Java 4, Mobile Edition Tutorial • June 2002

To set the default emulator:
1. In the Runtime tab of the Explorer, expand the Installed Emulators node andright-click the emulator that you want to set as the default emulator. Choose SetAs Default.
In this example, the selected emulator, J2ME Wireless Toolkit 1.0.3 (4), is now the
default emulator.
Default MIDP emulator
Chapter 1 Creating a MIDlet and MIDlet Suite 5

2. In the Explorer, right-click the first J2ME Wireless Toolkit instance and chooseProperties from the menu.
3. Set the properties for the emulator in the property sheet.
■ Click a box in the right column to change that value. Click the arrow to see the list
of available values, or type a valid value in the box.
■ If a property is dimmed, that property cannot be edited.
■ Use the functions at the top of the Property sheet to sort attributes and view only
editable attributes.
■ Notice also that a Property sheet may have its own set of tabs.
FIGURE 1-1 shows the emulator’s property sheet.
6 Forte for Java 4, Mobile Edition Tutorial • June 2002

FIGURE 1-1 Emulator Property Sheet
Setting an Emulator’s Default Skin
An emulator includes a set of sample devices, which are called skins. You can set
one of the emulator’s skins to be the default skin, and you can change an emulator’s
default skin. The default skin is the device that appears when you test your
application with the default emulator.
Each version of the Wireless Toolkit emulator can be set to a different default skin. If
you want to test an application on different devices, you can easily do so by first
setting each installed emulator instance to a different default skin. Then, when you
test the application, you change default emulators. Or you can leave the same
default emulator in place and change the emulator’s default skin.
To set an emulator’s default skin:
1. In the Runtime tab of the Explorer, expand the Installed Emulators, and thenexpand the newly added J2ME Wireless Toolkit (4) emulator to view its skins.
Notice that none of its devices are marked as the default skin.
2. Right-click one of the emulator’s skins and choose Set as Default.
In this example, the RIMJavaHandheld device is set to be this emulator’s default
skin. The IDE indicates the default by appending the word “default” in brackets.
Chapter 1 Creating a MIDlet and MIDlet Suite 7

Setting the Code Completion Feature
When you enter code through the Source Editor window, you can use the Mobile
Edition IDE’s code completion feature. For developing MIDlets, set code completion
to CLDC/MIDP. You use the code completion feature when you add a method to the
MIDlet class.
To set the code completion feature:
1. From the Tools menu in the main window, choose Options.
The Options window appears.
2. In the Options window, expand the Editing node and click Java Code Completion.
Default skin
8 Forte for Java 4, Mobile Edition Tutorial • June 2002

3. In the Java Code Completion property sheet, select the CLDC/MIDP option forthe Code Completion Mode.
When you type code in the Source Editor window, you can use the code completion
feature to help complete the code. (See FIGURE 1-2.)
Using the Code Completion Feature to Complete
Code
1. To use code completion, start entering some code and press the Control (Ctrl) keyfollowed by the spacebar.
The tool displays possible values to complete your typing.
2. Use an item from the list by clicking on it and pressing Enter.
3. To narrow the list to a closer match, continue typing.
The code completion display remains open until you press Enter or complete the line
of code.
Note – If you press Enter without highlighting an item in the list, the code
completion display closes without affecting the source code.
The items in the code completion display continually change to exactly reflect the
state of the line of code.
Chapter 1 Creating a MIDlet and MIDlet Suite 9

FIGURE 1-2 Using Code Completion
Compiling and Testing a MIDlet
This section of the tutorial shows you how to create, compile, and test a single
MIDlet. You’ll learn how to create a MIDlet class, and then use the source editor and
various tool functions to view and edit the code. Later, the tutorial shows you how
to create a MIDlet suite and add an existing MIDlet, such as the MIDlet created here,
to that MIDlet suite.
In this tutorial, the new MIDlet is created in the package directory myconverter .
When you create a new MIDlet, the tool uses a MIDlet template that contains the
appropriate class definition, package and import statements, and the stubs for the
required MIDlet methods.
Typed code
Codecompletionpossibilities
10 Forte for Java 4, Mobile Edition Tutorial • June 2002

Creating a Package for the MIDlet
Packages are a means of keeping related Java code together. Packages are often
equated to directories. The recommended practice is to keep the Java classes for the
same application in one package.
To create a package for the MIDlet:
1. In the Explorer, click the filesystems tab. Then right-click the D:\ffjme\exampledir directory and Choose New → Java Package.
You can place a new package within any directory in the file system structure.
2. In the New Wizard pane, enter the name for the new package, and click Finish.
A new package called myconverter is created in the D:\ffjme\exampledirdirectory. The package appears as a directory with a folder icon in the Explorer
window.
Chapter 1 Creating a MIDlet and MIDlet Suite 11

Creating the ConverterMIDlet MIDlet
1. In the Explorer, right-click the myconverter package. From the contextual menu,choose New → MIDP → MIDlet.
Selecting the MIDlet template starts the wizard for creating a new MIDlet.
2. Enter the name ConverterMIDlet for the new MIDlet. Click Next.
3. Click Finish to create the MIDlet.
4. View the finished MIDlet in the Filesystem tab of the Explorer window and viewthe code in the Source Editor window.
Notice that ConverterMIDlet extends the javax.microedition.midlet.MIDletinterface and contains the basic MIDlet methods: startApp , pauseApp , and
destroyApp .
Next to the ConverterMIDlet icon there is a pattern of ones and zeros, indicating that
the MIDlet is not compiled. When the MIDlet class is compiled successfully, this
pattern no longer appears.
12 Forte for Java 4, Mobile Edition Tutorial • June 2002

5. Expand the ConverterMIDlet node to view the ConverterMIDlet class and itsfields, constructors, and methods.
Chapter 1 Creating a MIDlet and MIDlet Suite 13

Coding a MIDlet
You can write the code for a MIDlet in one of two ways: either by directly entering
code in the Source Editor or by using the tool functions to add methods, fields,
constructors, initializers, classes, and interfaces. Typically, you use the tool to add
new fields and methods to a class, or modify existing fields and methods, and then
later fine-tune the code directly in the Source Editor.
The following procedures show you how to use the tool and the Source Editor to
enter or change code. However, to save time and effort, you can also copy the
converter code and paste it into the myconverter directory.
Adding a Field to a MIDlet
1. In the Filesystem tab of the Explorer, right-click the ConverterMIDlet class andchoose Add → Field.
The Add New Field dialog box is displayed.
14 Forte for Java 4, Mobile Edition Tutorial • June 2002

2. Complete the Add New Field dialog box.
■ Enter the name of the new field, storedDataStr , in the Name box and select its
type, String , from the Type combo box.
■ In the Modifiers box, select the type of access for the field, private, from the
Access combo box.
■ Check the other modifiers for the field, which in this case is static.
■ Set the initial value for storedDataStr to "FromToCurr" .
3. Double-click the ConverterMIDlet class in the Explorer window to open it in theSource Editor window.
4. Enter the declaration for a new field directly in the code. In the Source Editorwindow, type the declaration for the storedData field, as follows:
private RecordStore storedData;
Modifiers
Name
Type
InitialValue
Chapter 1 Creating a MIDlet and MIDlet Suite 15

Adding a Method to a MIDlet
To add a method to a MIDlet:
1. Double-click on the setScreen method to open the ConverterMIDlet class in theSource Editor. Enter the implementation code for the setScreen method usingthe code completion feature.
Use this implementation code for the setScreen method:
2. Continue entering the code for the ConverterMIDlet class, or copy the source codeand paste it into the Source Editor window.
Practice using the features of the tool to enter the remaining code for the
ConverterMIDlet class. You might prefer to copy the source code from the converter
package and paste it into the Source Editor. If you copy the code, be sure to verify
that the package name matches your package.
Display.getDisplay(instance).setCurrent(d);
16 Forte for Java 4, Mobile Edition Tutorial • June 2002

Adding Additional Classes to a MIDlet
The ConverterMIDlet class relies on three additional Java classes: Converter,
Currencies, and Settings. While these are Java classes, they are not themselves
MIDlets. You can use the wizard to create each class just as you created the
ConverterMIDlet class.
● Define the converter application’s three additional classes by using the tool’sCopy function and Paste functions.
The tool’s Copy function and Paste function can be used to copy the Java code from
the converter directory to the myconverter directory where you’ve placed the
ConverterMIDlet code. Copying and pasting code ensures that the package names
are set correctly.
a. Right-click the class you want to copy and choose Copy.
b. Right-click the filesystem in which you want to place the class and choosePaste → Copy.
Compiling a MIDlet
Once you’ve written your MIDlet, you are ready to compile and test it. A MIDlet
class that needs to be compiled is marked with a set of ones and zeroes next to the
class icon. See FIGURE 1-3.
FIGURE 1-3 Icon for Uncompiled MIDlet Classes
Uncompiledclasses
Compiledclasses
Chapter 1 Creating a MIDlet and MIDlet Suite 17

The tool’s MIDP compiler combines into one sequence several steps that might
otherwise have to be performed individually. The compiler compiles the MIDlet’s
.java file and produces a binary .class file. The compiler also preverifies the
compiled classes. Preverifying occurs after compiling a MIDlet. Mobile Edition IDE
passes the compiled class files to a Preverifier, which prepares the MIDlet for the
CLDC virtual machine. The Preverifier rearranges the bytecode in the compiled
classes to simplify the final stage of byte code verification on the CLDC virtual
machine. The Preverifier also checks for the use of virtual machine features that are
not supported by the CLDC.
To compile a MIDlet:
1. In the Explorer, right-click ConverterMIDlet and choose Compile.
You can use the Compile or Build menu items to compile the ConverterMIDlet class
and its three related Java classes.
2. Check the Output window for the compilation status.
The Output window for the compiler displays the compiler status, either that
compilation was completed successfully or that compilation errors occurred. For
example, the Output window displays the message “Finished ConverterMIDlet”
when the compiler successfully compiles the ConverterMIDlet. Also, the class icons
in the Explorer window no longer display the ones and zeroes.
When a compilation error occurs, the Explorer window marks the icon of the class
with the letter “X” circled in red. The Output window displays the line or lines of
code that contain the error, and the Source Editor highlights these same lines of code
in red. The following figure shows what happens if ConverterMIDlet is compiled
with an incomplete line of code.
18 Forte for Java 4, Mobile Edition Tutorial • June 2002

Testing a MIDlet
You can test a MIDlet after you have successfully compiled it. You use the Execute
menu item to run a compiled MIDlet. The MIDlet application runs using the default
emulator’s current (default) device skin.
Executing a MIDlet
● In the Explorer, right-click ConverterMIDlet and choose Execute.
The ConverterMIDlet application lets you convert from one currency amount to
another. For example, in this test, the application is set to convert from Japanese yen
to euros. The current default emulator is set to use the DefaultGrayPhone skin.
Chapter 1 Creating a MIDlet and MIDlet Suite 19

Notice that when the application starts, the emulator device displays the name of the
application, Converter, at the top of its screen.
To Test a MIDlet on an Emulator’s Device Skin:
1. After you execute the MIDlet, the Converter application is running and you arepositioned at the application’s first prompt or display.
2. Enter the currency amount to convert by clicking the emulator’s numeric keys.
3. Click the emulator’s up and down arrows to choose the Settings option or Exitoption.
4. From Settings, use the same up and down arrows to change the currency typesettings, such as from yen to dollars. Use the Save option from the Settingsdisplay to convert the amount you entered to the other currency.
20 Forte for Java 4, Mobile Edition Tutorial • June 2002

Using MIDlet Suites to Package MIDlets
While you can work with individual MIDlets for developing and testing purposes, it
is best to create MIDlets within a MIDlet suite. The MIDlet suite helps you to
package your MIDlet application and prepare it for deployment.
MIDlet suites give you more control over your MIDP applications. A MIDlet suite
organizes the source files and attribute files for a MIDP application. When you build
a MIDlet suite, the tool automatically creates the necessary JAR file that contains the
application files. Mobile Edition IDE also creates the application descriptor file, or
JAD file, that is required for deployment.
Creating a MIDlet Suite
1. Create a new directory called MyTestSuite in D:\ffjme\exampledir .
This directory will hold the MIDlet suite.
2. In the Explorer, right-click MyTestSuite. Choose New → MIDP → MIDlet Suitefrom the contextual menu.
The MIDletSuite wizard takes you through the steps to create a MIDlet suite.
3. In the MIDletSuite wizard, type the name for the new MIDlet suite. Then clickNext.
Name the new MIDlet suite Converter .
Chapter 1 Creating a MIDlet and MIDlet Suite 21

4. Select the Use Existing MIDlet option and type the name of the MIDlet class touse, or use the Browse button to locate the MIDlet class and select theconverter.ConverterMIDlet class.
5. To set up the MIDlet properties, type ConverterMIDlet as the name that the tooldisplays for the MIDlet.
22 Forte for Java 4, Mobile Edition Tutorial • June 2002

6. Choose the default emulator for the MIDlet suite, and click Finish.
In the Choose Emulator pane, select DefaultColorPhone, which is the default device
skin for the J2ME Wireless Toolkit 1.0.3 (2) emulator.
7. Expand the MyTestSuite node and examine its contents.
8. In the Filesystems tab of the Explorer window, right-click the ConverterMIDleticon within Converter suite.
The MIDlet suite wizard creates the Converter suite. The Converter suite contains a
ConverterMIDlet which in turn contains the ConverterMIDlet class and its fields,
constructors, methods, and bean patterns. The Converter suite also contains a JAR
file, the contents of which is the ConverterMIDlet executable. You can view the
properties for ConverterMIDlet in the bottom half of the window or through the
ConverterMIDlet’s property screen.
Chapter 1 Creating a MIDlet and MIDlet Suite 23

Packaging a MIDlet Suite
Recall that the currency converter application consists of a single MIDlet and three
Java classes. To run the application, the MIDlet must be packaged together with its
Java classes in a JAR file. The MIDlet suite accomplishes the required packaging so
that the MIDlet application can be deployed. The MIDlet suite also contains the Java
Application Descriptor (JAD) file. Both the JAR file and JAD file are required to
package a MIDlet application.
The JAD file contains a predefined set of attributes for a MIDlet in the MIDlet suite.
These attributes allow the application management software to identify, retrieve, and
install MIDlets. You can define your own application-specific attributes and add
them to the JAD file.
A Java Archive (JAR) file contains the Java classes for each MIDlet in the MIDlet
suite and any resource files that the MIDlets use. Resource files are other, non-Java
files. The JAR file also includes a manifest file that describes the JAR contents and
any installation-specific attributes.
MIDlet suite
Highlightedcomponent’sproperties
MIDlet’sdisplayname
JAR filecontents
24 Forte for Java 4, Mobile Edition Tutorial • June 2002

To package a MIDlet suite:
1. In the Edit Suite window for the Converter MIDlet suite, click the Jar Contentstab to view the contents of the MIDlet suite’s JAR file.
2. Select each class (Converter, Currencies, and Settings) to add to the JAR file andclick Add.
Use the Remove or Remove All buttons to remove content from the JAR file.
3. Verify that all classes of the application have been added to the Converter MIDletsuite.
When you finish adding the currency converter application’s Java classes to the JAR
file, verify that the Jar Content for the suite shows the four application classes:
ConverterMIDlet , Converter , Currencies , and Settings .
Chapter 1 Creating a MIDlet and MIDlet Suite 25

4. To change a property for the Converter MIDlet suite, select the Converter MIDletsuite in the Explorer window and change an attribute value in its property sheet.
5. After you change a property value (such as the compression level), right-click theConverter MIDlet suite and choose Update JAR so that the new value takes effect.
26 Forte for Java 4, Mobile Edition Tutorial • June 2002

6. To verify the ConverterMIDlet’s JAD file and JAR manifest file, in the Filesystemstab of the Explorer window, right-click the Converter MIDlet suite and chooseView Manifest/JAD.
The View Manifest/JAD dialog box appears.
7. In the View Manifest/JAD dialog box, click the Application Descriptor tab to viewthe contents of the JAD file. Click the Jar Manifest tab to view the JAR manifestfile.
Note that the IDE automatically generates both the application descriptor and the
manifest from the MIDlet suite property settings and the suite’s MIDlets.
Testing a MIDlet Within a MIDlet Suite
To test a MIDlet:
1. In the Filesystems tab of the Explorer window, right-click MyTestSuite (thedirectory that contains the Converter MIDlet suite). From the contextual menu,choose Compile or Compile All (or Build or Build All) to compile theConverterMIDlet application in the Converter MIDlet suite.
2. In the Filesystems tab of the Explorer window, right-click the Converter MIDletsuite node. From the contextual menu, choose Execute to test the ConverterMIDletapplication.
The Execute function compiles the MIDlet application, if necessary, before it executes
the application.
MIDlet list
Propertysettings
Chapter 1 Creating a MIDlet and MIDlet Suite 27

Notice that the MIDlet suite’s ConverterMIDlet application runs on the emulator
device skin that is configured as the default the MIDlet suite. In this case, the
DefaultColorPhone skin within the J2ME Wireless Toolkit 1.0.3 (2) installation. See
FIGURE 1-4.
FIGURE 1-4 Testing a MIDlet Using an Emulator
Notice, too, that instead of immediately launching the currency converter
application, the emulation device displays a list of applications and asks you to
select the application you want to launch. Because you are executing the MIDlet
application from within a MIDlet suite, the emulator device displays all the MIDlet
applications that are contained by the MIDlet suite and lets you choose from that
list. The ConverterMIDlet is the only MIDlet that appears in the display because the
Converter MIDlet suite contains only one MIDlet.
Select application tobe launched
28 Forte for Java 4, Mobile Edition Tutorial • June 2002

Changing the Target Emulator for a MIDlet Suite
You can change the target emulator and device skin for a MIDlet suite. This change
applies only to the MIDlet suite’s emulator. Each MIDlet suite can use a different
emulator or device skin, and these can differ from the emulator that is defined as the
default for the Mobile Edition IDE.
1. In the Filesystems tab of the Explorer window, right-click the Converter MIDletsuite and choose Properties.
2. In the MIDlet suite’s property sheet, click the Execution tab.
The Execution tab of the property sheet for the MIDlet suite displays the Emulator
attribute and its current setting. The Converter MIDlet suite is set to use the second
instance of the J2ME Wireless Toolkit 1.0.3 installed emulator, and its default device
skin is currently set to DefaultColorPhone.
3. Click the combo box for the Emulator attribute.
You can select from any of the currently installed emulators. The menu displays the
default devices that are set for each of the installed emulators.
Another way to change a MIDlet suite’s emulator device is to change the emulator
instance’s default device skin.
Chapter 1 Creating a MIDlet and MIDlet Suite 29

To change the target emulator for a MIDlet suite by changing the device skin:
1. From the Runtime tab of the Explorer window, expand the Installed Emulatorsnode, then expand the particular emulator instance.
2. Right-click the device in the emulator’s list of device skins and choose the Set asDefault option.
In this example, change the default skin for the J2ME Wireless Toolkit 1.0.3 (2)
instance to Motorola_i85s. See “Setting an Emulator’s Default Skin” on page 7.
3. Verify that you changed the default device skin. In the Filesystems tab of theExplorer window, right-click the ConverterMIDlet suite and choose properties.
Converter’s Execution Properties now show the Motorola_i85s as the default device.
See FIGURE 1-5. Now, executing the Converter MIDlet suite application lets you test
the MIDlet on the Motorola device skin.
FIGURE 1-5 Converter MIDlet Suite Execution Properties
30 Forte for Java 4, Mobile Edition Tutorial • June 2002
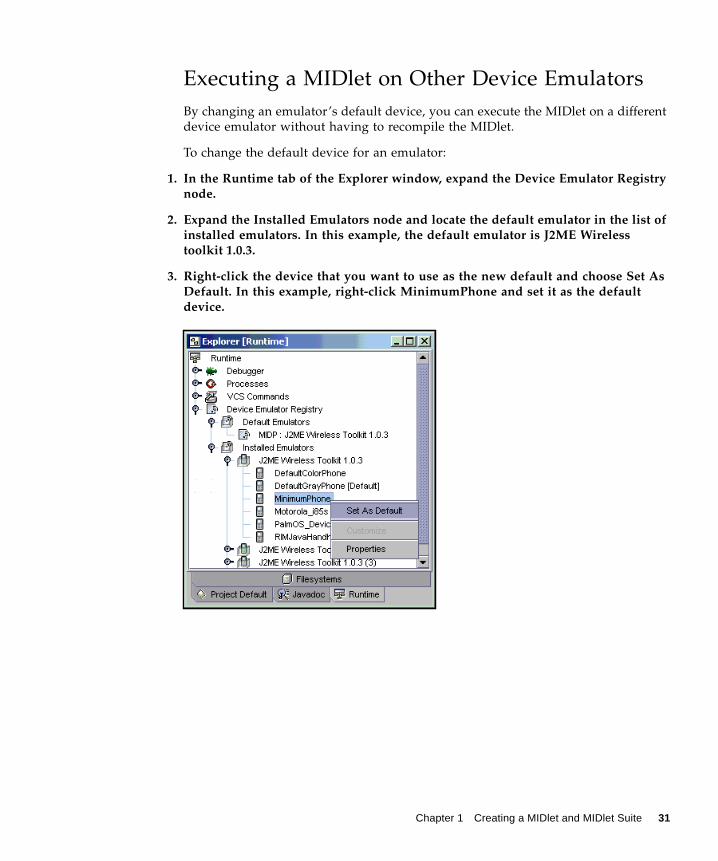
Executing a MIDlet on Other Device Emulators
By changing an emulator’s default device, you can execute the MIDlet on a different
device emulator without having to recompile the MIDlet.
To change the default device for an emulator:
1. In the Runtime tab of the Explorer window, expand the Device Emulator Registrynode.
2. Expand the Installed Emulators node and locate the default emulator in the list ofinstalled emulators. In this example, the default emulator is J2ME Wirelesstoolkit 1.0.3.
3. Right-click the device that you want to use as the new default and choose Set AsDefault. In this example, right-click MinimumPhone and set it as the defaultdevice.
Chapter 1 Creating a MIDlet and MIDlet Suite 31

4. From the Filesystems tab of the Explorer window, execute ConverterMIDlet andtest the currency conversion application on the MinimumPhone device skin.
The application now runs on the MinimumPhone device skin, as shown in
FIGURE 1-6.
FIGURE 1-6 Converter Program Running on the MinimumPhone Device Emulator
32 Forte for Java 4, Mobile Edition Tutorial • June 2002

CHAPTER 2
Debugging MIDlets and MIDletSuites
This chapter describes how to debug MIDlets and MIDlet suites. The Mobile Edition
IDE Debugging feature gives you complete control over the debugging process. The
Mobile Edition enables you to:
■ set break points and watches
■ examine and modify variables
■ step through code
■ examine classes
■ use call stacks
■ take advantage of other debugging features of the IDE.
Debugger Basics
To open the debugging workspace, click the Debugging tab on the main window.
This workspace includes a Debugger window, an Output window, and a Source
Editor window. (You can also open just the Debugger window by choosing the main
window’s Debug → Debug Window option.) This tutorial briefly describes these
windows. Refer to the online help for complete information on the debugging
workspace.
The Debugger window has seven views that show you what is happening in your
application. These views enable you to monitor an application’s:
■ sessions, threads, and breakpoints set in the application current call stack
■ watches set on the code
■ variable values
■ classes.
33

You can change the display of these views using the Debugger window’s tool bar.
(Notice that the icons in each of the views matches an icon in the top tool bar.) The
Debugger window’s second toolbar lets you control what is displayed in the
Variables, Watches, Threads, and Call Stack views. As with other Mobile Edition IDE
windows, right-click an item in a window to display its contextual menu. See
FIGURE 2-1.
FIGURE 2-1 Debugger Window and Its Views
The Output window has two panes. The left pane displays the application output
while the right pane displays status messages from the debugger and details of
breakpoints and threads.
To debug MIDlets, be sure that the IDE debugger is set to Emulator Debugger.
To verify the IDE debugger settings:
1. In the main window, choose Tools → Options.
The Options dialog box opens
2. Expand the Options folder, and then expand the Debugging and Executing folder.
3. Expand Debugger types and choose the Emulator Debugger node.
The properties of the Emulator debugger are displayed in the right pane of the
window.
34 Forte for Java 4, Mobile Edition Tutorial • June 2002

4. Verify that the Identifying name of the debugger is Emulator Debugger.
FIGURE 2-2 shows the emulator debugger setting in the Options window.
You can view or set debugging options for an individual class in the Execution tab of
the MIDlet Property sheet.
FIGURE 2-2 Setting the Emulator Debugger for Debugging MIDlets
This tutorial illustrates debugging one MIDlet. However, Mobile Edition IDE lets
you simultaneously debug any number of MIDlets. The Sessions view of the
Debugger window lists the MIDlets that are currently being debugged. You can
manage these debugging sessions using the contextual menus in the Session view
and by editing a session’s properties. These options are documented further in the
online help.
Chapter 2 Debugging MIDlets and MIDlet Suites 35

Debugging a Program
Start a debugging session in Mobile Edition IDE by setting a breakpoint in the code
and then running the application until it reaches the breakpoint.
Setting a Breakpoint
To begin debugging a MIDlet, you set a breakpoint in the ConverterMIDlet program.
The breakpoint stops execution of the program at a specific line number, method
name, exception, class, variable, or thread. When you set a breakpoint on a variable,
method, line, or exception, you can also set a condition that triggers the breakpoint
when the condition’s expression evaluates to true.
When the debugger reaches a breakpoint, the debugger can suspend debugging and
it can also print some text in the Output window. When you set the breakpoint, you
can control the actions that are taken when the breakpoint is reached. You set a
breakpoint and specify its conditions and actions in the Add Breakpoint dialog box,
which you can find from the main window’s Debug menu. You can also set a
breakpoint in the Source Editor window by positioning the cursor at the breakpoint
location and using the Source Editor’s contextual menu option Toggle Breakpoint.
To set a breakpoint:
1. In the Filesystems tab of the Explorer window, open the code for themyconverter package’s ConverterMIDlet in the Source Editor window.
To do this, expand myconverter and double-click ConverterMIDlet.
2. Set the Source Editor window to display line numbers for the ConverterMIDletcode. Right-click in the Source Editor window, choose Margin from the contextualmenu, and check the box for Show Line Numbers.
It is often useful to see the line numbers for source code when debugging a program,
especially since you might want to set a breakpoint on a particular line. You can
change the line number display by checking or clearing the Show Line Numbers
check box.
36 Forte for Java 4, Mobile Edition Tutorial • June 2002

3. Set a breakpoint on the startApp method. In the Source Editor window, click inthe margin to the left of the startApp method at line 26.
Notice that Mobile Edition IDE highlights the line of code for which a breakpoint
has been set and marks the breakpoint with the appropriate breakpoint icon in the
left margin. (Refer to the online help for a complete listing of the different
breakpoint icons.)
Chapter 2 Debugging MIDlets and MIDlet Suites 37

Running a Program in Debug Mode
Run the ConverterMIDlet program in debug mode by using the main window
Debug menu. Choose these Debug menu options from the Editing workspace or
Running workspace. After you make the selection, Mobile Edition IDE switches to
the Debugging workspace and starts the program in debug mode.
Starting a Program
● In the Filesystems tab of the Explorer window, expand the package myconverterand highlight ConverterMIDlet. Then, from the main window, choose Debug →Start.
Choosing the Debug → Start option changes Mobile Edition IDE to the Debugging
workspace and opens the Debugger window. The debugger’s current status, such as
running, breakpoint location, or finished, appears in the main window’s message bar
to the right of the Debugging tab. Status messages also appear in the appropriate
panes of the Output window. The program runs until the breakpoint at line 26 in the
Settings class is reached. The Debugger window and the Output window reflect the
current state of the ConverterMIDlet program. Not only does the Debugger window
show the breakpoints that have been set, it displays the current sessions and their
status (such as stopped or on breakpoint) and the current active variables and their
values. (The emulator device skin is also displayed because the program has passed
that part of the code.)
38 Forte for Java 4, Mobile Edition Tutorial • June 2002

Chapter 2 Debugging MIDlets and MIDlet Suites 39

Examining and Setting Variable Values
From the Debugger window you can examine the current values set for a program’s
variables, set a watch on a variable, and change a variable’s value.
To set a variable value:
1. Set a Fixed Watch on the initFr variable. Right-click the variable in the Variablesview of the Debugger window and choose Create Fixed View from the contextualmenu.
Notice that the Variables view in the Debugger window displays the program’s
variables along with their current values. You can create a fixed watch on a variable
that appears in the Variables view. A variable for which a fixed watch has been
created appears in the Watches view. Notice that when you create the fixed watch on
initFr , it appears in the Watches view as well as the Variables view.
2. Change the value of a variable. Right-click the variable in the Variable view andopen its property sheet. From the Property sheet you can enter a new value for thevariable.
You can change the value of a variable to test how the value might affect the
program’s execution.
40 Forte for Java 4, Mobile Edition Tutorial • June 2002

Setting Step Options
You can control the debugger’s behavior when it steps into a method. Keep in mind
that when you step into a method, the source code may not be available to the
debugger. Several actions are possible:
■ You can step out of the method.
■ You can stop the debug process.
■ You can try to find the source code.
The Options window lets you control how the debugger handles these situations.
Expand the Debugging and Executing node within the Options window and then
expand the Debugger Settings node. Select the Java node and, from its property
sheet, set the appropriate value for the Action on Step Into attribute. See FIGURE 2-3.
FIGURE 2-3 Debugger Java Settings
You can also set the debugger to stop and display a dialog box that asks you what
action you want to take when you step into a method that has no source. To set this
option, set the Show Action on Step Into Dialog attribute to True.
Chapter 2 Debugging MIDlets and MIDlet Suites 41

Stepping Through a Program
You use the Debug menu options to step through a program. When a program
running in the debugger pauses or stops at a breakpoint, one way to resume its
execution is to step through the program. From the Debug menu, choose one of three
options for stepping through the program: Step Over, Step Into, and Step Out.
Each step option executes the next source line. However, the behavior is different
depending on whether the executed line is a method call. If the line is a method call,
Step Over executes the entire method without stepping through the individual
method instructions. Step Into stops just before executing the first statement of the
method. Step Out, however, is a bit different. If the source line is part of a method,
Step Out executes the remaining lines of the method and returns control to the
method caller. FIGURE 2-4 shows the options that are available from the Debug menu
when a program reaches a breakpoint.
FIGURE 2-4 Debug Menu Options at a Breakpoint
42 Forte for Java 4, Mobile Edition Tutorial • June 2002

To step through a program:
1. Choose the Debug → Step Into option to execute the next line of code. If the lineof code is a method call, Step Into steps to the first line of the method.
The Source Editor highlights the line of code in the Settings class at which the
breakpoint occurs. The program is about to invoke the new method on Currencies.
Choose Debug → Step Into to go to the first line of this method.
When the debugger cannot locate the source code for a method, it displays an
appropriate message.
You can stop execution of the program, step out of the method in question, or have
the debugger try to locate the source code. The Step Out option, which is the default,
will complete execution of the method and return to the method caller. Note that
Step Out in this context is identical to using the Debug → Step Out option.
Breakpoint
Chapter 2 Debugging MIDlets and MIDlet Suites 43

2. When the debugger can locate the method’s source code, it opens the code in theSource Editor and highlights the line to which it has stepped. Use Debug→StepOut to complete execution of the method.
The program stops at the initialization of a Currencies instance. You can step
through the remaining code in this method, or step out of the method to complete its
execution in one operation.
3. Execute the next initialization method call without stepping through itsindividual instructions by choosing Debug → Step Over.
Mobile Edition IDE executes the method and moves to the next line of code, which
is indicated in the Source Editor window.
44 Forte for Java 4, Mobile Edition Tutorial • June 2002

Using the Call Stack
The Debugger window includes a Call Stack view. The Call Stack view shows you
the point you are at in the program and the hierarchy of method calls in the current
thread that have lead up to this point. The method that was last executing is at the
top of the stack, marked with an arrow. The initial method is at the bottom of the
stack.
For example, the Converter program is stopped on line 28 in the Settings class. The
Call Stack view in the Debugger window has the last executed method,
myconverter.Settings.<init> , at the top of the stack. The Source Editor shows
that execution has stopped on line 28 in Settings. See FIGURE 2-5.
FIGURE 2-5 Call Stack View and Source Code
Last executedmethod
Executionstoppedhere
Chapter 2 Debugging MIDlets and MIDlet Suites 45

To use the call stack:
● Use the Debug → Go to Calling Method to move down the call stack (that is,towards the initial method at the bottom of the stack).
Executing the Go to Calling Method option moves you to the
myconverter.Converter.<init> method, which is the method that called the
myconverter.Settings.<init> method. The Call Stack moves its pointer down
one method call and the Source Editor marks line 35 in the Converter class that
invoked the Settings class. Note that you can examine and change variable values
from the Call Stack view. The Call Stack view shows the variables that were in scope
when the method was entered. The variables are shown along with their values.
Changing a variable’s value is limited to the scope of the method call in which you
make the change. The program uses the new value when you continue execution.
46 Forte for Java 4, Mobile Edition Tutorial • June 2002
Continuing Program Execution
● From a stopped point, choose Debug → Continue.
The program executes until it reaches another breakpoint or finishes.
Pausing a Program
● Choose Debug → Pause to stop execution of a program and re-enter debug mode.
This can be useful, for example, when the program is waiting for input from the user
but has not reached a breakpoint.
Ending a Debug Session
● To end the debug session, choose Debug → Finish.
Chapter 2 Debugging MIDlets and MIDlet Suites 47

48 Forte for Java 4, Mobile Edition Tutorial • June 2002

CHAPTER 3
Advanced Issues
This chapter describes several advanced issues. It focuses on
■ Creating a project for your application
■ Adding new emulators to the Mobile Edition IDE
■ Supporting Over-the-Air (OTA) application downloading
■ Deploying your application.
Working With Projects
The IDE organizes the work you do into a project, using a default project if you do
not explicitly set up a project. A project organizes the files that are required to
produce a MIDlet application. By organizing your files into a project, you can
operate on the files as a whole. For example, when you compile a project, you
compile all of the MIDlet files and Java source files in it.
Most importantly, a project organizes the settings for your MIDlets. These include
code completion and settings for the default compiler, executor, and debugger.
You create and manage projects using the Project menu in the main window.
To view the files in the current project:
● Click the Project tab in the Explorer window.
The Project tab is labeled with the name of the current project.
49

Creating a New Project
To create a new project:
1. In the main window, choose Project → Project Manager.
The Project Manager window opens.
When you open the Project Manager, it displays existing projects. (Note that the tool
always has at least one default project, labelled Project Default.) You can open
projects, delete projects that are not open, and rename existing projects in the Project
Manager window.
2. From the Project Manager window, choose New.
3. In the Create New Project dialog box, type CurrencyConverter as the name ofthe new project and click OK.
The IDE creates a new project named CurrencyConverter. The Project Configuration
wizard opens.
50 Forte for Java 4, Mobile Edition Tutorial • June 2002

4. In the Project Configuration wizard, select the Mobile Information Device ProfileCLDC/MIDP configuration and click Finish.
Configuring the project sets its default compiler, executor, debugger, and Java source
code completion. Each project can have its own configuration.
5. Select the Filesystems tab. Right-click the Filesystems node and choose Mount →Local Directory to mount filesystems (directories) that contain source files or otherobjects that you want to include in your project.
This opens the Local Directory wizard, where you can select filesystems to mount.
You must mount filesystems so that their contents are available to the project
manager.
6. Select the Project tab in the Explorer window. Right-click the project name andchoose Add New to add new components to the project or choose Add Existing toadd existing components to the project.
The Explorer’s Project tab displays the name of the current open project. When you
first create a project, Mobile Edition IDE opens that project. When you add a new
component to the project, you first select a template from the list of available
templates, such as a MIDP → MIDlet or MIDP → MIDlet Suite. The appropriate
wizard guides you through the steps to create that particular component.
Chapter 3 Advanced Issues 51

7. Compile or build and execute your code.
Use the Project’s contextual menu to compile and build the application and to
execute it.
Setting Emulators
The Mobile Edition IDE helps you develop MIDP applications that are intended to
be used on wireless devices such as mobile phones. Running the application on its
intended device is an important part of developing and testing an application. To
help with this process, the Mobile Edition IDE maintains a device emulator registry
from which you choose an emulator for testing an application. The registry lists the
installed emulators that are available to you and identifies the currently established
default emulator.
To add an emulator to the Device Emulator Registry:
1. Install the emulator on your system according to the emulator vendor’sinstructions.
52 Forte for Java 4, Mobile Edition Tutorial • June 2002

2. In the Explorer window, expand the Device Emulator Registry node. Right-clickInstalled Emulators and choose Add Emulator.
3. From the Select emulator installation directory dialog box, navigate to thedirectory that contains the emulator. Then click Add.
For the J2ME Wireless Toolkit emulator included with Mobile Edition, the directory
is ffj_install\emulator\j2mewtk-1_0_3- xxx.
4. To add an additional instance of an emulator, expand the Installed Emulatorsnode. Right-click an installed emulator and choose Add Emulator Instance.
Adding additional instances of an emulator lets you change the properties or the
default emulator device that will display the executed MIDlet for that emulator
instance. You can then choose the device emulator to execute your application
Runtime tab
Chapter 3 Advanced Issues 53

through the Execution tab of the MIDlet suite property sheet, rather than going to
the Device Emulator Registry each time you want to test your application under
different conditions.
5. Right-click on the second instance and choose Properties. Then click in theDefault device field and choose MinimumPhone from the combo box.
The MinimumPhone skin is now the default device for the second instance of the
J2ME Wireless Toolkit Emulator. Notice that you can install multiple versions of the
same emulator as well as different emulators.
6. Add two more instances of the Emulator and set a different default device foreach emulator instance.
This adds a third and fourth instance of the J2ME Wireless Toolkit Emulator. These
subsequent versions are numbered 3 and 4.
7. In the Filesystems tab of the Explorer, right-click on a MIDlet suite node andselect Properties.
8. Select the Execution tab, and click on the Emulator field.
The combo box shows you a list of the device emulators you can choose from to
execute and test the MIDlet suite. Try executing the MIDlet suite to see how the
results differ with each emulator.
54 Forte for Java 4, Mobile Edition Tutorial • June 2002

Supporting Over-the-Air (OTA)Application Downloading
Over-the-Air (OTA) is a technology for user-initiated provisioning.The name of this
technology refers to the ability of a wireless device, such as a mobile phone, to
download applications from a special portal or server that hosts the applications.
The download is accomplished without a physical connection between the wireless
device and the host server or portal. OTA gives users the ability to access desired
services “over the air” at almost any time and place.
While Mobile Edition IDE does not have explicit OTA support, there are certain
steps you can take to implement OTA for your MIDlet suite. These steps enable you
to deploy a MIDlet suite to a provisioning server, and then create a download page
for that MIDlet suite.
To enable over-the-air downloading capabilities:
1. Set the Internal Compiler Debug property to False and compile the MIDlet codewithout debugging information.
You should optimize the MIDlet code before packaging and deploying it. Do this by
recompiling the MIDlet code without debugging information. Recall that you set the
Internal Compiler’s Debug property to False and then recompile the source code.
You can find the Internal Compiler from the Tools → Options window, within the
Building → Compiler Types node. See “Deploying a MIDlet Suite” on page 57.
2. Rebuild the JAR file.
See “Packaging a MIDlet Suite” on page 24 for instructions on rebuilding the JAR
file.
3. Configure your web server by adding the correct MIME types for serving JADfiles.
Use the following URL to be sure that the correct MIME types are set for a server:
http:// host: port/servlet/org.netbeans.modules.j2me.jam.JAMServlet/path_to_jad
For example, an installation might set the URL as follows:
http://localhost:8083/servlet/org.netbeans.modules.j2me.jam.JAMServlet/converter.jad
MIDP applications can also be downloaded from Mobile Edition IDE’s internal http
server. For more information on MIME types, see the OTA specification, which can
be found at
http://java.sun.com/products/midp/OTAProvisioning-1.0.pdf .
Chapter 3 Advanced Issues 55

4. Create a download page for the MIDlet suite.
Use your preferred HTML tool to create the download page.
The next step is to use the file transfer protocol (FTP) to copy a MIDlet suite and
deploy it to another location. The suite and its accompanying application descriptor
file are sent to the FTP site you designate. Before you can use the file transfer
protocol to deploy the MIDlet suite, you must first set up an FTP copy service as an
executor option.
5. From the main window, choose Tools → Options, expand the Debugging andExecuting node, and then expand the Execution Types node. Select“FTP to <> on <localhost>” copy executor. Then, enter values for the FTPProperties.
6. Set values for the four FTP copy properties.
Set the FTP properties as follows:
■ Set Host Name to the name of the host FTP site where the file is to be copied. For
example, set the host site to localhost.
■ Set Password to the password for the FTP site.
■ Set Path name to the location on the FTP site where the file is to be copied. For
example, set the path to: D:\midlets\downloadsite .
■ Set User name to the user name that enables access to the FTP site. For example,
set the user name to MobileUser .
When you have entered these four values, click Close.
56 Forte for Java 4, Mobile Edition Tutorial • June 2002

7. To deploy the application, select the MIDlet suite in the Explorer windowand choose Tools → Copy File. The Select Target dialog box opens. Select“FTP to <d:\midlets\downloadsite> on <localhost>” and click OK.
The application is sent to the specified FTP site.
8. Download the MIDlet application to a real device.
Currently, you cannot download an OTA application to an emulator.
Deploying a MIDlet Suite
Before you deploy the application, you need to recompile the application with
debugging turned off. This reduces the final code to its smallest size. Normally, you
take this step after completing the debugging process. (See Chapter 2 for instructions
on how to debug your program.)
While you are developing and testing applications, you should have Mobile Edition
IDE’s preverifier compiler set so that its Java compiler uses internal compilation.
This setting enables you to use the debug functionality. When you have completed
testing the application, you remove this debug functionality by turning off the
internal compilation’s debug property and recompiling the code.
Keep in mind that by default, the preverifier compiler uses internal compilation.
This means that you might have to remove debug functionality and recompile the
code even if you did not explicitly debug your program.
Chapter 3 Advanced Issues 57

To deploy a MIDlet suite:
1. From the main window, choose Tools → Options → Building → Compiler Typesand then right-click Internal Compilation to see its property sheet.
In the property sheet, click the Debug combo box and set its value to False.
2. Recompile all the source code and update the JAR file.
Before compiling the source code, you might want to use the Build → Clean or
Build → Clean All options (from the main window) to ensure that the compiler does
recompile all classes. The application is now compiled and packaged with no debug
additions and is ready to be deployed.
58 Forte for Java 4, Mobile Edition Tutorial • June 2002

APPENDIX A
Sample Application Source Code
This appendix provides the source code for the four files that comprise the sample
ConverterMIDlet application:
■ ConverterMIDlet.java■ Converter.java■ Currencies.java■ Settings.java
ConverterMIDlet Source Code
CODE EXAMPLE A-1 ConverterMIDlet.java
package myconverter;
import javax.microedition.midlet.*;
import javax.microedition.lcdui.*;
import javax.microedition.rms.*;
public class ConverterMIDlet extends MIDlet {
static ConverterMIDlet instance;
private Converter mainScreen;
private static String storedDataStr = "FromToCurr";
private RecordStore storedData;
59
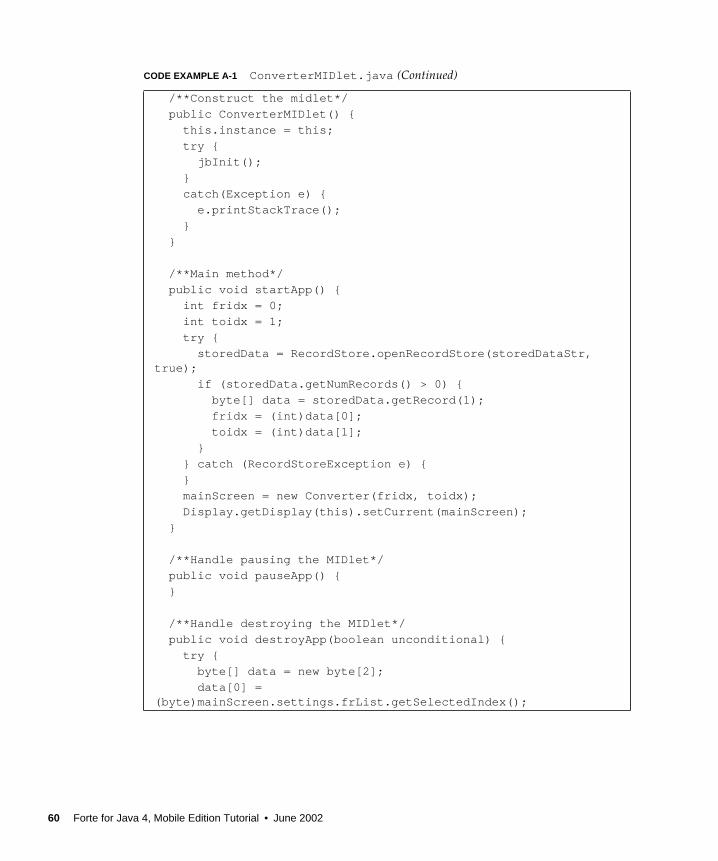
/**Construct the midlet*/
public ConverterMIDlet() {
this.instance = this;
try {
jbInit();
}
catch(Exception e) {
e.printStackTrace();
}
}
/**Main method*/
public void startApp() {
int fridx = 0;
int toidx = 1;
try {
storedData = RecordStore.openRecordStore(storedDataStr,true);
if (storedData.getNumRecords() > 0) {
byte[] data = storedData.getRecord(1);
fridx = (int)data[0];
toidx = (int)data[1];
}
} catch (RecordStoreException e) {
}
mainScreen = new Converter(fridx, toidx);
Display.getDisplay(this).setCurrent(mainScreen);
}
/**Handle pausing the MIDlet*/
public void pauseApp() {
}
/**Handle destroying the MIDlet*/
public void destroyApp(boolean unconditional) {
try {
byte[] data = new byte[2];
data[0] =(byte)mainScreen.settings.frList.getSelectedIndex();
CODE EXAMPLE A-1 ConverterMIDlet.java (Continued)
60 Forte for Java 4, Mobile Edition Tutorial • June 2002

Converter Source Code
data[1] =(byte)mainScreen.settings.toList.getSelectedIndex();
if (storedData.getNumRecords() > 0)
storedData.setRecord(1, data, 0, 2);
else
storedData.addRecord(data, 0, 2);
} catch (Exception e) {
}
}
/**Quit the MIDlet*/
public static void quitApp() {
instance.destroyApp(true);
instance.notifyDestroyed();
instance = null;
}
public static void setScreen(Displayable d) {
Display.getDisplay(instance).setCurrent(d);
}
private void jbInit() throws Exception {
}
}
CODE EXAMPLE A-2 Converter.java
package converter;
import javax.microedition.lcdui.*;
public class Converter extends Form {
static Converter instance = null;
TextField frTextField = new TextField("", "", 1, 1);
StringItem toStringItem = new StringItem("", "");
Settings settings = null;
CODE EXAMPLE A-1 ConverterMIDlet.java (Continued)
Appendix A Sample Application Source Code 61

/**Construct the displayable*/
public Converter(int initFr, int initTo) {
super("Converter");
// set up this Displayable to listen to command events
setCommandListener(new CommandListener() {
public void commandAction(Command c, Displayable d) {
this_commandPerformed(c, d);
}
});
setItemStateListener(new ItemStateListener() {
public void itemStateChanged(Item item) {
int fridx = settings.frList.getSelectedIndex();
int toidx = settings.toList.getSelectedIndex();
convert(fridx, toidx);
}
});
try {
jbInit();
}
catch(Exception e) {
e.printStackTrace();
}
instance = this;
settings = new Settings(initFr, initTo);
changeFrom(initFr);
changeTo(initTo);
}
/**Component initialization*/
private void jbInit() throws Exception {
toStringItem.setLabel("(to)");
frTextField.setLabel("(from)");
frTextField.setConstraints(TextField.NUMERIC);
frTextField.setMaxSize(10);
// add the Exit command
addCommand(new Command("Exit", Command.EXIT, 1));
addCommand(new Command("Settings", Command.SCREEN, 1));
this.append(frTextField);
this.append(toStringItem);
}
CODE EXAMPLE A-2 Converter.java (Continued)
62 Forte for Java 4, Mobile Edition Tutorial • June 2002

/**Handle command events*/
public void this_commandPerformed(Command c, Displayable d) {
if (c.getCommandType() == Command.EXIT) {
// exit the MIDlet
ConverterMIDlet.quitApp();
} else {
ConverterMIDlet.setScreen(settings);
}
}
public static void goBack(int fridx, int toidx) {
instance.convert(fridx, toidx);
ConverterMIDlet.setScreen(instance);
}
void convert(int fridx, int toidx) {
String frvstr = frTextField.getString();
int toval = 0;
if (frvstr.length() > 0) {
toval = Currencies.convert(
Integer.parseInt(frvstr), fridx, toidx);
}
toStringItem.setText(String.valueOf(toval));
}
static void changeFrom(int newidx) {
instance.frTextField.setLabel(Currencies.currencies[newidx]);
}
static void changeTo(int newidx) {
instance.toStringItem.setLabel(Currencies.currencies[newidx]);
}
}
CODE EXAMPLE A-2 Converter.java (Continued)
Appendix A Sample Application Source Code 63

Currencies Source Code
CODE EXAMPLE A-3 Currencies.java
package converter;
import javax.microedition.lcdui.*;
public class Currencies extends List {
static String[] currencies = {
new String("US $"), // US dollar
new String("JP \u00a5"), // yen
new String("Euro")
};
static int[][] ratesTop = {
{ 100, 13315, 112},
{ 100, 100, 100},
{ 100, 11830, 100}
};
static int[][] ratesBot = {
{ 100, 100, 100},
{13315, 100, 11830},
{ 112, 100, 100}
};
static int TYPE_FROM = 0,
TYPE_TO = 1;
private int type;
/**Construct the displayable*/
public Currencies(String name, int type, int initidx) {
super(name + "Currencies", List.EXCLUSIVE);
// set up this Displayable to listen to command events
setCommandListener(new CommandListener() {
public void commandAction(Command c, Displayable d) {
this_commandPerformed(c, d);
}
});
try {
jbInit();
}
64 Forte for Java 4, Mobile Edition Tutorial • June 2002

catch(Exception e) {
e.printStackTrace();
}
this.type = type;
setSelectedIndex(initidx, true);
}
/**Component initialization*/
private void jbInit() throws Exception {
for (int i = 0; i < currencies.length; i++) {
this.append(currencies[i], null);
}
//addCommand(new Command("Back", Command.BACK, 2));
addCommand(new Command("Save", Command.OK, 1));
}
/** Handle command events*/
public void this_commandPerformed(Command c, Displayable d) {
// add your command event handling here
if (c.getCommandType() == Command.OK) {
// save the settings and update the mainScreen
if (type == TYPE_FROM)
Converter.changeFrom(getSelectedIndex());
else
Converter.changeTo(getSelectedIndex());
}
// always goes back to Settings Screen
Settings.goBack();
}
public static int convert(int frval, int fridx, int toidx) {
return (frval * ratesTop[fridx][toidx]) /ratesBot[fridx][toidx];
}
}
CODE EXAMPLE A-3 Currencies.java (Continued)
Appendix A Sample Application Source Code 65
Settings Source Code
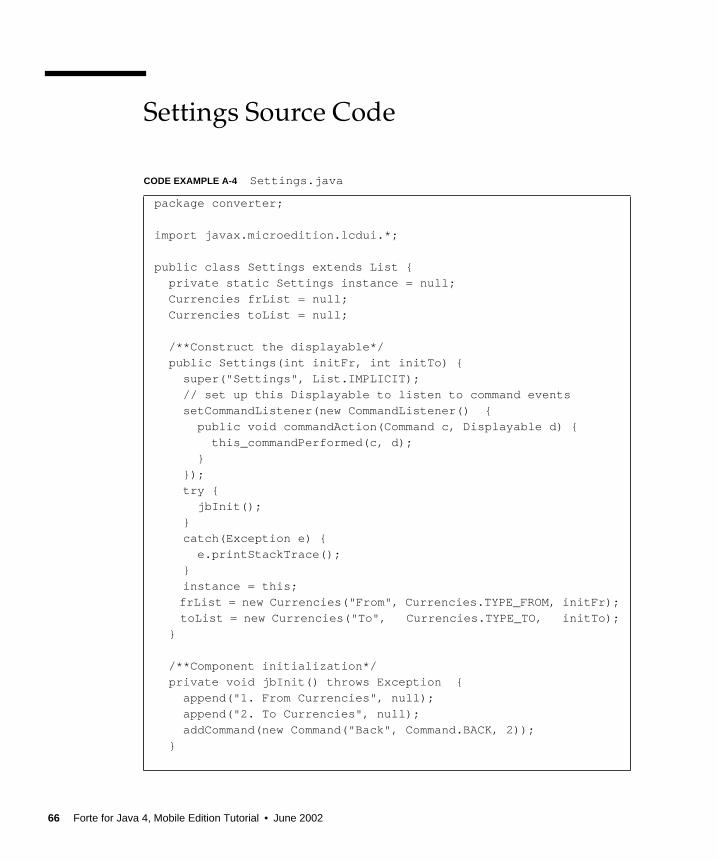
CODE EXAMPLE A-4 Settings.java
package converter;
import javax.microedition.lcdui.*;
public class Settings extends List {
private static Settings instance = null;
Currencies frList = null;
Currencies toList = null;
/**Construct the displayable*/
public Settings(int initFr, int initTo) {
super("Settings", List.IMPLICIT);
// set up this Displayable to listen to command events
setCommandListener(new CommandListener() {
public void commandAction(Command c, Displayable d) {
this_commandPerformed(c, d);
}
});
try {
jbInit();
}
catch(Exception e) {
e.printStackTrace();
}
instance = this;
frList = new Currencies("From", Currencies.TYPE_FROM, initFr);
toList = new Currencies("To", Currencies.TYPE_TO, initTo);
}
/**Component initialization*/
private void jbInit() throws Exception {
append("1. From Currencies", null);
append("2. To Currencies", null);
addCommand(new Command("Back", Command.BACK, 2));
}
66 Forte for Java 4, Mobile Edition Tutorial • June 2002

/** Handle command events*/
public void this_commandPerformed(Command c, Displayable d) {
// add your command event handling here
if (c.getCommandType() == Command.BACK) {
Converter.goBack(frList.getSelectedIndex(),toList.getSelectedIndex());
} else {
if (getSelectedIndex() == 0)
ConverterMIDlet.setScreen(frList);
else
ConverterMIDlet.setScreen(toList);
}
}
public static void goBack() {
ConverterMIDlet.setScreen(instance);
}
}
CODE EXAMPLE A-4 Settings.java (Continued)
Appendix A Sample Application Source Code 67

68 Forte for Java 4, Mobile Edition Tutorial • June 2002