forte · 3 forte 3 basic operations 68 cut, copy and paste objects 68 deleting objects 70 drag and...
TRANSCRIPT
Forte 3Music Notation Software
© Lugert Verlag, 2012

2
Forte 3
Table of Contents
Welcome 11About the Documentation 12What's new in Forte 3 14Overview 19Overview 21 Elements Palette Introduction 21 Properties Window Introduction 22 Mixer Introduction 23 The Status Bar 24 The Toolbars 25 The Toolbars 25 File Toolbar 27 Edit Toolbar 28 Performance Toolbar 31 Time Toolbar 34 Views 35 Views 35 Music Score Introduction 36 Audio Sequencer Introduction 38 Piano Roll Introduction 39 MIDI Events Introduction 40 Options 41 Technical Support 42 Technical Support 42 Soundcard Info 43Getting Started 45 Getting Started 45 The Launch Assistant 47 Create a New Document 48Open a Document 49 Open a Document 49 Open Library of Scores 50Add Music to a Document 51 Add Music to a Document 51 Select a Music Symbol 52Playing Music 53 Playing Music 53 Manage a Performance 54 Managing a Performance 54 Loop Playback 55 Step Playback 56 Punch In / Punch Out 58 Change Track Volume 59 Change Tempo 60 Mute and Solo Tracks 61 Add Reverb, Pan and Chorus 63 Changing an Instrument 65 Performance Options 66Editing Music 67 Editing Music 67

3
Forte 3
Basic Operations 68 Cut, Copy and Paste Objects 68 Deleting Objects 70 Drag and Drop 71 Undo/Redo 72 Editing with the Properties Window 73 Displaying the Properties Window 73Save a Document 74 Save a Document 74 File Formats (Save, Import and Export) 75 Auto Save 77Print a Document 78 Print a Document 78 Print all Layouts 79 Print Preview 80 Print Setup 81 Print Blanc Sheets 82Templates 83 Templates 83 Create a Template 84Menus 85 Menus 85 The View Menu 87 The Actions Menu 88 Shortcut Menus 89Entry Modes 90 About Entry Modes 90 Select Mode 92 Insert Mode 93 Keyboard Mode 94 Keyboard Mode 94 Keyboard Mode Schema 95 Camera Mode 96 Which Mode Am I In? 97Selection 98 The Current Selection 98 Select Events 99 Select Elements (Advanced) 100 Select with the mouse 101 Select Music Symbols with the Mouse 101 Mouse Select Options 103 Selecting All or None 104 Selecting Measures 105 Selecting the Document 106 Selecting Staves 107 Non-selectable Symbols 108Getting Around 109 Getting Around 109 Next/Previous 110 Jump to Marker 111 Goto Dialog 112 Jump to a Time 113 Getting Around Using the Mouse 114

4
Forte 3
Export 115 Export to a MusicXML document 115 Export to an Audio File 116 Export to an Audio File 116 Audio Files 117 Export to a Graphics File 118 Export to a Graphics File 118 Graphics File 119Recording Music 120 Recording Music 120 Preparing To Record 121 Normal Recording 123 Step Recording 124 Loop Recording 126The Device Wizard 128 The Device Wizard 128 MIDI Playback 129 MIDI Thru 130 Digital Audio Options 131Understanding Tracks and Staves 132 Understanding Tracks and Staves 132 Staff Name 133 Staff Type 134 Voices 135 The Music Grid 136 The Music Grid 136 Keeping the Grid Square 137 Add Staves 138 Remove Staves 139 Add Measures 140 Remove Measures 141Understanding Midi and Instruments 142 Understanding MIDI and Instruments 142 Adding Instruments to Staves 144 Instrument File Format 145System Exckusive Messages 149 System Exclusive Messages 149 Channel Mode Messages 152 Channel Mode Editor 152 Channel Mode Messages 153Views 154 Views 154 View Tools 155 View Tools 155 Displaying a View Tool 156 Page View 157 Track View 158 Notation Bar 159 Layouts 160 Layouts 160 How Music is Displayed 161 Create a New Layout 162 Layout Dialog 164

5
Forte 3
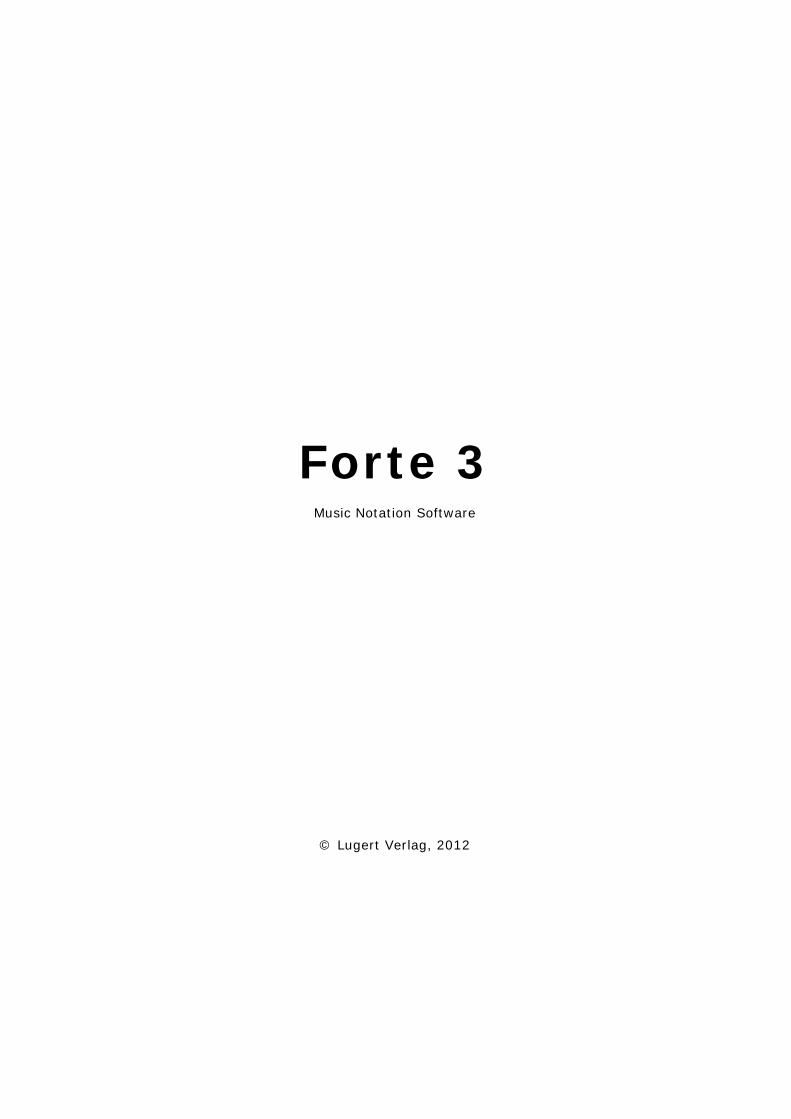
Layout Dialog 164 Layout Setup 166 Layout Margins 167 Layout Spacing 168 Layout Options 169 Edit a Layout 170 Edit Layout with the Inspector 171 Remove a Layout 172 Track Layout 173 Working with Large Scores 174 The Music Score 175 The Music Score 175 The Music Cursor 176 Entering Music in Music Score 178 Entering Music in the Music Score 178 Accents 180 Add and Remove Accents 180 Edit Accents with the Properties Window 182 Edit Accents with the Shortcut Menu 183 Reminder Accidentals (Courtesy Accidentals) 184 Accidentals 185 Add and Remove Accidentals 185 Edit Accidentals with the Properties Window 187 Edit Accidentals with the Shortcut Menu 188 Chord Symbols 189 Add and Remove Chord Symbols 189 Edit Chord Symbols with the Properties Window 191 Insert Chord Dialog 192 Move Chord Symbols 193 Chord Suffix 194 Clefs 196 Add and Remove Clefs 196 Edit Clefs with the Properties Window 198 Move Clefs 199 Dynamic Markings 200 Add and Remove Dynamic Markings 200 Edit Dynamics with the Properties Window 202 Edit Dynamics with the Shortcut Menu 203 Move a Dynamic 204 Grace Notes 205 Add and Remove Grace Notes 205 Edit Grace Notes with the Properties Window 207 Images 208 Add and Remove Images 208 Edit an Image 209 Move and Resize an Image 210 Key Signatures 211 Add and Remove Key Signatures 211 Edit Keys with the Properties Window 213 Move Keys 214 Lyrics 215 Add and Remove Lyrics 215 Add and Remove Multiple Verses 218

6
Forte 3
Edit Lyrics with the Properties Window 221 Edit Lyrics with the Shortcut Menu 222 Add Remove Verse Numbers 223 Add a Chorus or a Refrain 224 Block Lyrics 226 Add and Remove Block Lyrics 226 Edit Block Lyrics with the Properties Window 227 Meters 228 Add and Remove Meters 228 Edit Meters with the Properties Window 230 Octavas 231 Add and Remove Octavas 231 Edit Octavas with the Shortcut Menu 233 Move Octavas 234 Ornaments 235 Add and Remove Ornaments 235 Edit Ornaments with the Shortcut Menu 238 Pedal Marks 239 Add and Remove Pedal Marks 239 Edit Pedal Marks with the Properties Window 241 Edit Pedal Marks with the Shortcut Menu 242 Move Pedal Marks 243 Repeats 244 Add and Remove Repeats 244 Edit Repeats with the Properties Window 246 Move a Repeat 247 Notes 248 Add and Remove Notes 248 Edit Notes with the Properties Window 250 Edit Notes with the Shortcut Menu 251 Notes and the Drum Staff 252 Notes and the Grand Staff 254 Move Notes 255 Rests 256 Add and Remove Rests 256 Edit Rests with the Shortcut Menu 258 Slurs 259 Add and Remove Slurs 259 Edit Slurs with the Properties Window 261 Tempos 262 Add and Remove Tempos 262 Edit Tempos with the Properties Window 265 Move a Tempo 266 Text 267 Add and Remove Text 267 Add and Remove Title Page Text 269 Edit Text with the Properties Window 270 Edit Text with the Shortcut Menu 271 Move Text 272 Multi-Line Text 273 Ties 274 Add and Remove Ties 274 Edit Ties with the Properties Window 276

7
Forte 3
Tuplets 277 Add and Remove Tuplets 277 Edit Tuplets with the Properties Window 279 Edit Tuplets with the Shortcut Menu 280 About Tuplet Values 281 About Tuplets 283 Nudging Symbols 284 Nudge 284 Nudging Beams 285 Nudging Barlines 286 Nudging Notes 287 Nudging Symbols 288 Nudging Systems 289 Nudging Symbols that split System Breaks 290 Music Ruler 291 Advanced Techniques 293 Advanced Techniques 293 Notating two lines of music on one staff (Multivoicing) 294 Beaming 296 Beaming 296 Break and Join Beams 297 Change Metric Divisions 298 Metric Divisions Example 299 Hiding and Displaying Hidden Symbols 300 Pickup Measures 301 Split Measures Across Systems 303 Small Meter Changes 304 The Audio Sequencer 305 The Piano Roll 306 The Piano Roll 306 Envelope View 307 Envelope View 307 What is an Envelope? 308 Envelope Types 309 Displaying Envelopes 310 Add and Remove Envelopes 312 Add and Remove Envelopes 312 Envelope Points 313 Envelope Transitions 314 Select Envelope Points 315 Add and Remove Envelope Points 316 Associate Envelope Points with Notation 318 Edit Envelope Points with the Inspector 319 Move Envelope Points 320 Entering Music in Piano Roll 321 Entering Music in Piano Roll 321 The MIDI Events 323 The MIDI Events 323 List Area 324 Overview Area 325 Filtering Events 326Actions 327 Actions 327

8
Forte 3
Using Actions 328 Chord Symbol Actions 330 Identify Chords 331 Identify Chord 331 Identify Chords 332 Chord Analysis Settings 333 Document Actions 334 Dynamic Actions 336 Note Actions 337 Octava Actions 338 Staff Actions 339 Pedal Actions 341 Tempo Actions 342 Text Actions 343 Transposition 344 Transposition 344 Working with Transposed Scores 345 Working with C Scores 346 Transposing to New Keys 347 Transposing Sections of Music 348 Transposing By Intervals 349 Transposing by Instrument 350 Move 351 Duration 352 Inversion 353 Velocity 354 Retrograde 355 Group Staves 356 Order Staves 357 Quantize 358 Split Staff 359 Copy Staff 360 Voice 361 Merge Staves 362Elements Palette 363 Elements Palette 363 Notes Tab 365 Accents Tab 366 Dynamics Tab 367 Tempo Tab 368 Text/Chords Tab 369 Key Tab 370 Meter Tab 371 Clef Tab 372 Ornaments Tab 373 Repeats Tab 374Mixer 375 Mixer 375 Track Controls 377 Master Controls 378Properties Window 379 Properties Window 379 Properties Window Pages 381Notation Element Properties 382

9
Forte 3
Symbol Properties 382 Accent Properties: Appearance 384 Accent Properties: Performance 385 Accidental Properties: Appearance 386 Barline Properties: Appearance 387 Beam Properties: Appearance 388 Brace Properties: Appearance 389 Chord Symbol Properties: Appearance 390 Clef Properties: Appearance 391 Dot Properties: Appearance 392 Dynamics Properties: Appearance (constant dynamics) 393 Dynamics Properties: Appearance (changing dynamics) 394 Dynamics Properties: Appearance (hairpins) 395 Dynamics Properties: Performance (constant dynamics) 396 Dynamics Properties: Performance (changing dynamics) 397 Grace Note Properties: Appearance 398 Glissando Properties: Appearance 399 Key Properties: Appearance 400 Grace Note Properties: Performance 401 Lyric Properties: Appearance 402 Lyric Properties: Text 403 Lyric Block: Appearance 404 Meter Properties: Appearance 405 Note Properties: Appearance 406 Note Properties: Performance 407 Pedal Properties: Performance 408 Repeat Properties: Appearance (endings) 409 Repeat Properties: Appearance (expressions) 410 Repeat Properties: Performance (End Bracket) 411 Repeat Properties: Performance 412 Slur Properties: Appearance 413 Tempo Properties: Appearance (constant tempo) 414 Tempo Properties: Appearance (changing) 415 Tempo Properties: Appearance (pauses) 416 Tempo Properties: Performance (expressions) 417 Tempo Properties: Performance (changing) 418 Tempo Properties: Performance (pauses) 419 Tie Properties: Appearance 420 Document Properties: Info 421 Staff Properties: Instrument 422 Text Properties: Appearance 423 Layout Properties: Staff 424 Staff Properties: Performance 425 Staff Properties: Instrument (advanced) 426 Layout Properties: System 427 Staff Properties: Appearance 428 General Properties 429 Tuplet Properties: Appearance 430 Wave Properties: Performance 431Options 432 Options 432 General Options 433 General Options 433 Workspace Options 434

10
Forte 3
Save Options 435 Notation Options 436 Notation Options 436 Drum Notation Tab 437 Sequencer Options 438 MIDI In Options 438 MIDI Out Options 439 MIDI Thru Options 440 Sync Options 441 Metronome Options 442 Performance Options 443 Swing Time 443Parts 444 Define a New Part 444 Remove Part 445 Instrument 446Tutorials 447 Tutorials 447 Adding Notes 448 Changing Instruments within a Track 450 Merging Tracks 455 Multivoicing 461 Multiple Endings 464Glossary 469

11
Forte 3
Welcome!
Welcome and thank you for using Forte, a full-featured notation-based MIDI sequenc er forWindows. Forte combines all the tools you need to create, edit, and perform MIDI and digitalaudio with a full-featured score notation engine and visual editing tools for c reatingprofessional-quality printed scores.
-o-

12
Forte 3
About the Documentation
This documentation is intended to provide a comprehensive explanation of the features ofForte.
Please notice that some of the features described here are not available inall editions of Forte. For more information on which features are available inyour edition, please visit www.forte-notation.eu.
Click on one of the topics below to learn more:
The following topics are primarily useful when first installing the application:
OverviewProvides an overview of the tools and views you will use to create and edit music. This roadmap of the program gives you a basic idea of the sorts of things that are possible to help youuse the product better.
Getting StartedThis section familiarizes you with the basics of using the program. Basic steps on creating,editing, recording, playing and printing are covered. More detailed treatments are covered inlater chapters.
Technical SupportHow to contact the Technical Support Team in case of problems or questions. Drop us anemail and let us know how we're doing!
The following topics describe how to use the program:
Understanding Tracks & StavesThis section describes the fundamentals of tracks and staves. Adding and removing tracks,measures, and general MIDI topics are covered.
ViewsThis section describes the different views you can use to edit your docum ent. Detailedinstructions are provided for entering and editing music symbols in each view.
ActionsActions are plug-in music effects used for editing music. This section describes the availableactions and how to use them.
TutorialsThis section contains tutorials on how to perform common tasks in Forte.

13
Forte 3
-o-

14
Forte 3
What's new in Forte 3?
1. The Launch Assistant
The Launch Assistant is displayed when you start the program or when no documents areopened. It helps you to quickly start a new work or open existing Forte documents or otherfiles.
2. Easy creation of Pickup Measures
Now you can create pickup measures on a very easy way. Just select the desired duration, setthe parameters you want and Forte will do the rest for you. More...

15
Forte 3

16
Forte 3
3. Enhanced Lyrics Feature
The lyrics feature was improved and allows you now to enter or edit whole verses as a singletext block. All changes you make on the text, like division, extension, displac ement orinsertion of words or syllables, will be automatically assigned to the sc ore and vice versa. Noother notation software allows you to handle your lyrics on such an efficient way. More...
4. The Audio Sequencer
The new Audio Sequencer brings you the great possibility of adding audio trac ks into yourscore. Now you can import audio files or record your own audio tracks. You also have thepossibility to change the tone or the tempo of some audio data. The Audio Sequencer bringsalso an integrated audio editor, the Forte Audio Editor, that allows you to open som e audiodata for making further audio processing. More...

17
Forte 3
5. Export audio files within seconds
The Audio Export has been enhanced and can now convert your music score to audio fileswithin seconds. This is possible due to an integrated sample-based synthesis using theSoundFont technology. And because Forte also lets you provide your own sam ples through anexternal SoundFont file, there will be no limit on increasing the quality of your audio files.
6. Enhanced Main Menu
The main menu became more intuitive. Some of the main entries have been renamed to moreself-explanatory terms and many menu items have been moved to the place where you’dprobably look for them first. It’s important here to understand that your "Document" can bedisplayed in several different "Views" (the Music Score, the Audio Sequencer, the Piano Roll,the MIDI Events) and that you can perform "Actions" on your document or on the selec tedelements of a view.
7. Print All Layouts
This new feature allows you to print as many copies you want of all available layouts of adocument.

18
Forte 3
8. Print Blank Sheets
Despite all the comfort Forte provides, you may want to occasionally write your music scoreby hand. For these moments, you can now use Forte to print as many copies you want ofempty sheets in five different sizes.
-o-

19
Forte 3
Overview
The workspace consists of the main application window, the menu and status bar, dockabletoolbars, floating tool windows and views for each document. Click on an area of the imagebelow for more details:
The following topics provide summaries of each area. Click on one of the links for detailedinformation about each component.
Toolbars
The colored buttons along the top portion of the main window are actually separate toolbarsthat contains controls for accessing commonly-used features.
There are four different toolbars: the File toolbar contains buttons for managing documents;the Edit toolbar contains buttons for exporting, editing and changing an open document;the Performance toolbar contains transport controls for playing and recording your music;the Time toolbar contains a time display that counts out bars and beats during aperformance.
Views
The main view displayed above is the Music Score, which is one of several different viewsavailable for creating and editing a document. The views are the central work area for yourmusic. Other view you can use are the Piano Roll. Each document has its own set of views.
View Tools
There are three main tool windows that you use during the course of creating yourcompositions. The Elements Palette contains all the music symbols that you can add to yourscore, the Mixer can be used to adjust tempo, volume and other performance properties, andthe Properties Window provides a single location to edit hundreds of music symbolproperties.
Many of these features can be accessed through menu commands as well, but the toolwindows provide a convenient way to access the features you use most often. Use the

20
Forte 3
buttons on the Edit toolbar to toggle the display on any of the tool windows:
-o-

21
Forte 3
Overview
The Elements Palette: An Introduction
The Elements Palette is quite literally a palette of music elements that you can add to yourdocument. Whenever you want to add a music symbol you should go to the Elements Palettefirst.
The music symbols are organized into different pages according to element type. All the notesare in one page, all the dynamic markings are in another page, all the ornaments are in yetanother page, and so on. Once a music symbol is selected in the Elements Palette, it's asimple matter of c licking the mouse in the music to add the symbol.
Depending on which view you use, it may not always be possible to enter every sym bol inevery view. For example, the Piano Roll does not display slurs or ties so it is not possible toenter them there - you must use the Music Score.
For detailed information about the Elements Palette c lick here.
-o-

22
Forte 3
The Properties Window: An Introduction
The Properties Window displays a list of property pages for the current selection and is one ofthe most commonly-used tool windows in the entire application. The Properties Window isused to edit and modify elements after you have inserted them into your music document.
As the current selection changes, so too does the list of property pages displayed in theProperties Window. The Properties Window can be hidden or displayed as needed. You caneven select different types of elements and the Properties Window displays property pagesthat are common to the entire selection.
The Properties Window is used to modify literally hundreds of different elementcharacteristics. Everything from the style of a note, the shape of slurs and ties to the spacingaround a staff can be changed using the Properties Window. The usual method of editing amusic symbol is to select it then use the Properties Window to c hange the desired elementproperties
One of the most powerful features of the Properties Window is its ability to m odify manydifferent elements at once. You can select several notes, for exam ple, and with a singleoperation change all their durations to 8th notes, or all the stem directions. As you begin toedit different music symbols you will appreciate how the Properties Window simplifies yourwork.
For detailed information about the Properties Window c lick here.
-o-

23
Forte 3
The Mixer: An Introduction
The Mixer is used to control the interaction of different tracks in your music document. If youwant one part to sound louder than another does, for example, you use the mixer to adjustthe volumes to get the mix sounding just right. The Mixer is also used to select tracks and setcharacteristics such as Mute, Solo and Record states.
Each track indicator displays the track name, volume, and status. The master area containsmaster controls that affect the performance of all tracks. Tempo, for example, is controlled inthe master area.
The Mixer can be docked/undocked to the main application window, just like a toolbar. Whenthe Mixer is undocked you can resize it horizontally to take up less screen space.
For detailed information about the Mixer c lick here.
-o-

24
Forte 3
The Status Bar
The status bar is a small area at the bottom of the main application window where variousstatus messages and other feedback are displayed.
The status message changes as you highlight different menu commands to display a moredetailed description of the selected command. The message also updates when tool tips aredisplayed above toolbar buttons.
The performance state area is green during playback, red during recording and inactiveotherwise.
The text in the entry mode display is red when the program is in Insert Mode, or blue whenthe program is in Select Mode. When in Insert Mode, the entry mode describes the currenttype of symbol selected from the Elements Palette.
-o-

25
Forte 3
The Toolbars
The Toolbars
A toolbar is a small window that contains buttons or other controls for ac cessingcommonly-used features. There are four toolbars for accessing music editing features - theseserve as convenient shortcuts for commands and also provide visual feedback of the state ofthe document.
As you move the mouse over a button or control in the toolbar, tool tips appear over eachbutton to identify the button (in case you don't remember what the icon means). You canrearrange the toolbars to fit your preferences, and you can show/hide toolbars as needed. Bydefault, each toolbar is attached or "docked" to the main application window, but you can also"float" each toolbar in its own window.
To Float a Toolbar
Click - but do not release - the mouse in an empty portion of the toolbar. Drag the toolbar away from its docked position. As you drag the window you will see a
light outline of the window, showing where the toolbar will end up if you release themouse.
When the tool window is sufficiently far from its docked position, the outline changes to alarger size, indicating that the toolbar will be displayed in a floating window.
Release the mouse to undock the toolbar. When undocked, the toolbar is displayed in asmall floating window.
To Dock a Toolbar
Click - but do not release - the mouse in an empty portion of the toolbar. Drag the toolbar outline toward one edge of the main application window. When the tool
window approaches the edge of the window the outline changes to a smaller size,indicating that the toolbar will be docked.
Release the mouse to dock the toolbar.
Note: You can also alternate between the docked and floating states of a toolbar by

26
Forte 3
double-clicking the mouse in an empty portion of the window.
-o-

27
Forte 3
File Toolbar
The File toolbar contains buttons for quickly accessing commands on the File menu. Usingthese buttons, you can create, open, save, and print files.
To display the File toolbar, select Tools Toolbars File from the menu to toggle the Filetoolbar. A check mark appears next to the File menu item when the File toolbar is visible.
New Creates a new music document. Click New to select atemplate for your new music document.
Open Opens an existing music document. The Open dialogappears, allowing you to select the file you want toopen.
Save Saves the active music document with its currentfilename, location, and file format.
Print Prints all or a selected portion of your musicdocument.
-o-

28
Forte 3
Edit Toolbar
The Edit toolbar contains buttons for switching between different entry modes and fordisplaying the music tools. The buttons function as both controls and indicators - a button isilluminated when something is on/displayed and dark when something is off/hidden.
To display the Edit toolbar, select Tools Toolbars Edit from the menu to toggle the Edittoolbar. A check mark appears next to the Edit menu item when the Edit toolbar is visible.
Mode Buttons
The three blue buttons on the left areUsed to toggle between the different entry m odes.
Select Change to SelectMode so that youcan select musicsymbols. Onceselected, you cancopy, edit, delete,or move symbolswithin the musicdocument. Youcan alsoUse theshortcut key,CTRL+1, tochange to SelectMode.
Insert Change to InsertMode so that youcan add newmusic symbols toyour documentusing the mouse.You can alsoUsethe shortcut key,CTRL+2, tochange to InsertMode.
Keyboard Change to Keyboard Modeso that you canadd new musicsymbols to yourdocument usingthe computerkeyboard. You canalsoUse theshortcut key,CTRL+3, tochange toKeyboard Mode.

29
Forte 3
Camera Change to Camera Mode sothat you canexport part of youscreen to otherapplication. Youcan alsoUse theshortcut key,CTRL+4, tochange to CameraMode.
Music Tool Buttons
The three yellow buttons on the right areUsed to toggle the display of music tools.
Elements Palette The ElementsPalette containsdozens of musicsymbols that youcan add to yourdocument. Youcan alsoUse theshortcut key,ALT+1, to togglethe display of theElements Palette.
Properties Window The PropertiesWindow is usedto inspect andchange musicsymbol properties.As you selectdifferent elementsin your music, theProperties Windowchanges to displayproperties for theselected items.You can alsoUsethe shortcut key,ALT+2, to togglethe display of thePropertiesWindow.
Mixer The Mixercontains controlsfor modifying theperformance ofeach track in yourdocument, and formodifying themaster tempo andvolume. You canalsoUse the

30
Forte 3
shortcut key,ALT+3, to togglethe display of theMixer.
-o-

31
Forte 3
Performance Toolbar
The Performance toolbar contains buttons for playing and recording a composition. Thebuttons are familiar transport controlsUsed on a tape deck or CD player and duplicate thecommands available in the Music Perform menu.
To display the Performance toolbar, select Tools Toolbars Performance from the menu totoggle the Transport toolbar. A check mark appears next to the Edit menu item when the Edittoolbar is visible.
PerformanceOptions
Click this buttonto display thePerformanceOptions dialog,where you canspecifyperformanceoptions such asloop playback,loop recording,lead-in measuresand other optionswhich affect theperformance.
Step Play Use this button tostep through yourmusic. When theRecord button isenabled, thisbutton becomesthe Step Recordbutton.
Record Lets you recordmusic from yourMIDI keyboard orother MIDI device.
Pause Pauses playbackor recording of thecurrent document.When paused, youcan click thisbutton again toresume theperformance.
Stop Stops playback orrecording in thecurrent document.

32
Forte 3
Play Begin playback ofthe currentdocument. Theperformancebegins at the timelocation displayedin the TimeToolbar.
Previous This button movesthe currentperformanceposition (the timedisplayed in theTime Toolbar) tothe previousmarker, or to thebeginning of themusic if nomarker is found.
Next This button movesthe currentperformanceposition (the timedisplayed in theTime Toolbar) tothe next marker,or to the end ofthe music if nomarker is found.
The Rewind and Fast Forward buttons are only displayed during a performance. When thedocument is not playing or recording, the Previous and Next buttons are displayed instead.
Rewind This buttonrewinds thecurrentperformanceposition (the timedisplayed in theTime Toolbar) tothe last positionwhere theplayback was firststarted. Playbackcontinues asnormal.
Fast Forward This buttondoubles the speedof the playback.Click the buttonagain to returnthe playback

33
Forte 3
speed to itsnormal rate.
You canaccomplish thesame operation byadjusting thetempo slider inthe Mixer.
-o-

34
Forte 3
Time Toolbar
The Time toolbar displays the current performance location of the active document. When youplay or record, the displayed time changes along with the music.
Click the mouse on the time value to display the Goto Dialog. Using this dialog, you can seta new performance location for the document. When you change the location the views sc rollto the proper location so you can see the music at that point.
The performance location is displayed in the form BARS:BEATS:TICKS. The TICKS valuerepresents the number of divisions in one quarter note beat (also known as PPQ, for pulsesper quarter note). The minimum value is 0; the maximum value defaults to 480, although youcan change this maximum value using the Options menu.
You can customize the appearance of the time displayed in the toolbar. Right-click the mouseto display a shortcut menu containing commands for changing the time display. Click on themenu displayed below for details:
To display the Time toolbar, select Tools Toolbars Time from the menu to toggle theTransport toolbar. A check mark appears next to the Edit menu item when the Edit toolbar isvisible.
-o-

35
Forte 3
Views
Views
A view is the primary work area that you use to create and edit music. There are severaldifferent views available. The Music Score, for example, is used when one is interested increating music notation; the Audio Sequencer, on the other hand, is used only when settingup digital audio tracks to play along with the MIDI data. Different people have differentpreferences, so try out each view to see which one works best for you.
If you want to display a different view, select the desired view from the Tools menu. You canchange your user preferences so that the program automatically loads a particular view -such as the Piano Roll - when a document is first opened. By default, the Music Score is themain view that is first displayed when you open a doc ument.
Select one of the following topics for more information about each view:
Music Score This view displays music as standard music notation. Thenotes are organized into measures and systems along stafflines that represent the pitch of the notes.
AudioSequencer
This view displays the digital audio files which are to beplayed along with the MIDI information. The view displayswave files as bars along a timeline and provides basiccontrols for adjusting wave performance parameters.
Piano Roll This view represents music much as the scrolls on a playerpiano -- the notes are represented as bars along a grid thatrepresents the underlying measures. The width of each barrepresents the duration of the note.
MIDI Events This view is a simple table of events such as notes, dynamicmarkings and tempos. Different underlying properties suc has note pitch, duration, etc. can be edited directly in thetable.
-o-

36
Forte 3
Music Score: An Introduction
The Music Score represents a music document as standard music notation. Notes, text,dynamic markings, clefs, meters and dozens of other symbols are added directly to the musicsimply by choosing a symbol from the Elements Palette and c licking the mouse at the locationin the music where the symbol should be added.
The Music Score further operates in two different view modes: Page View and Track View.Both views display standard music notation - the difference is how staves and m easures aredisplayed.
Page View
Page View represents music as it will be printed on a piece of paper. Symbols areautomatically spaced and aligned on staff lines to conform to the rules of music notation,staves and measures are divided into systems on a page, and so on. In Page View the num berof tracks you can display at once is limited by what can fit on a printed page.
Formatting preferences are defined in what is known as a layout, which is essentially a stylesheet that describes how the music looks on a piece of paper. You can edit and create newlayouts to suit your needs. Each layout defines the page size, fonts, m argins, tiling optionsand so forth.
Track View
Track View displays all tracks in one long scrolling view. A margin on the left side displaysbasic characteristics of each staff (clef, key, nam e, etc.). In Track View there is no limit to thenumber of tracks that can be displayed at once.
Entering notes and other symbols in Track View can be more convenient than working

37
Forte 3
between systems in Page View (it is unnecessary to scroll the music left or right to get to thenext system on a page). Later, when you're ready to print out the music you can switch toPage View to do any formatting and fine tuning adjustments.
-o-

38
Forte 3
Audio Sequencer: An Introduction
The Audio Sequencer is used to add and position digital audio files in your music document. If you want to add sound effects or singing to your music, for example, you can record orinsert new WAV files into the Audio Sequencer, then position them at the desired measure ortime position. The Audio Sequencer also has several controls for managing the volume andbalance of each wave file.
For detailed information about the Audio Sequencer c lick here.
-o-

39
Forte 3
Piano Roll: An Introduction
The Piano Roll view displays notes as bars along a timeline, much like an old player piano.The up and down direction represents pitch, and the left and right direc tion representsmeasures (time). Since the piano roll is able to display the data more accurately with respectto how it is performed than standard music notation, it is a preferred method of editing MIDIfor many people.
The Envelope View is another important view that is displayed in the same window as thePiano Roll. The Envelope View and the Piano Roll are aligned along the horizontal (e.g. tim e)axis. The Envelope View displays how various musical parameters -- such as volume, pan,reverb and tempo -- change with time. You can create and add new "envelopes" to desc ribehow a chosen musical parameter behaves. The alignment of the two views allows you tosynchronize the envelope with individual notes -- this is cruc ial when working withparameters such as pitch bend or modulation.
For detailed information about the Piano Roll c lick here.
-o-

40
Forte 3
Audio Sequencer: An Introduction
The Event List displays a list of musical events in a table. The left portion of the window isused to select the portion of the document you wish to inspect. Different columns in the tabledescribe important event parameters, such as the start time, duration and MIDI data values.
You can sort the list of events in different ways - by tim e, duration, channel and so on. Thismakes it easy to find all the notes of a partic ular duration, or all the dynamic markings thatoccur within a specific time region, for example.
For detailed information about the Event List c lick here.
-o-

41
Forte 3
Options
Since no two people are alike, a number of options are offered that can be used to c onfigurethe program to behave in different ways.
The options are grouped into 3 broad categories: General, Sequencer and Notation. To displaycurrent preference settings, select Options then select the appropriate category.
The General Options are settings associated with how the application behaves as a whole.These include things like color preferences, which views are first opened when a doc ument isloaded, automatic save preferences and the like.
The Sequencer Options are settings associated with MIDI and digital audio. This is thelocation to set default playback and record devices, quantization and other filtering options forrecording, desired formats for digital audio recording and so forth.
The Notation Options are settings that affect only the music notation in the Music Score.Drum maps and notation settings c an be modified with the corresponding options dialog.
There are other options that are automatically preserved by the program, but which do notrequire user input. For example, all window positions and sizes are stored and recalled fromone session to the next, transposition settings, chord symbol entry and other interfacecomponents are also remembered.
-o-

42
Forte 3
Technical Support
Technical Support
Contact the Technical Support Team if you have questions concerning any of our softwareapplications.
Contact Information
Email: [email protected]
Internet: http://www.forte-notation.eu
Please include the following information when contacting us:
Full name and how you can be reached
Product and version number. Click Help About in the software to obtain thisinformation.
Computer description (CPU speed, RAM, and Operating System)
Sound card manufacturer and model. If possible, also include your soundcard driver information. See Obtaining Information about your SoundCard for instructions.
-o-

43
Forte 3
Obtaining Information about your Sound Card
When you work with the Technical Support Team it is helpful to know the specifics of thesound card on your system. Some sound cards have "known issues" that requireworkarounds, for example, and frequently newer components are available from themanufacturer which fix certain problems. There are two types of information that maybeUseful: the driver version number and the resource settings.
Driver Version Number
The driver version number indicates when the driver software was written. Sound c ardmanufacturers often release newer versions of their drivers for free, and usually there is aweb site where you can download a full upgrade.
Resource Information
The resource information affects how your sound card interfaces with your computer. Thereare three parameters to determine: the Input/Output Range, Interrupt Request (IRQ) andDirect Memory Access (DMA) setting. These terms may sound scary, but you can relax withthe knowledge that they are simply ways to characterize how the sound card is sending andreceiving signals from your computer. Sometimes conflicts with other devic es may cause yoursound card to malfunction or lead to unexpected symptoms.
The steps below describe how to obtain specific details about your sound card. Before c allingtechnical support about issues that seem related to your computer hardware, obtain thisinformation so we can better resolve your problem.
To obtain driver information
Click on the Windows Start button and select Settings Control Panel. Double-click on System, and select the Device Manager tab when the System Properties
dialog appears. In the Device Manager tab, locate the category named Sound, video & game controllers
and double click to display your sound devices. Select the device you want to obtain driver information for, then click the Properties
button to display properties for the device. Within the Device Properties dialog, select the Driver tab and record the value listed in
the Version text field.
Note: If the field does not contain any actual version numbers, select the Driver File Details...button and record the value in the File Version text field.
To obtain resource information:
Display the device properties dialog, steps 1-4 in the instructions to obtain driverinformation.
Within the Device Properties dialog, select the Resources tab. The Resource Settings area displays different resource types and their c orresponding values.Record the values of the Input/Output Range, the Interrupt Request, and the Direc t MemoryAccess -- there may be more than one value in the list, so be sure to get everything.

44
Forte 3
-o-

45
Forte 3
Getting Started
Getting Started
Before you begin, please take a few moments to familiarize yourself with theUser interface.Click here for an overview of the various tools, windows and views you can use for creatingmusic.
As you use the program you will discover that there are often several different ways toperform a command. Shortcuts, pop-up menus, toolbars and mouse actions can all be used toapply commands. Which method should you use? Of course, the one you like the most! Somepeople prefer toUse menus, some like toolbars and still others prefer shortc ut keys.
Using Context-Sensitive Help
At any time in the program you can bring up a context sensitive help topic by selectingShift+F1 from the keyboard and then clicking on a button, control or window. You can alsomove the mouse pointer over a button or control to display a tool tip describing what thecontrol isUsed for.
Using Shortcut Keys
Shortcuts Keys or "keyboard accelerators" save you the hassle of moving the mouse, selectinga menu and then selecting an appropriate command from the menu. For example, PressingCTRL+N on the keyboard performs the same action as selecting the File menu with the mouseand choosing the New… command.
If you prefer toUse shortcut keys, please notice the key combinations given at the right ofsome menu items. If there is not a set of shortcut keys given, that function does not workusing shortcut keys.
Let's Get Started!
Click on one of the topics below to learn more about working with music documents.
Create a New Document
Open an Existing Document
Add Music to a Document
Perform Music
Edit Music
Save a Document
Print a Document

46
Forte 3
-o-

47
Forte 3
The Launch Assistant
The Launch Assistant
The Launch Assistant is displayed when you start the program or when no documents areopened. It helps you to quickly start a new work or open existing Forte documents or otherfiles.
-o-

48
Forte 3
Create a New Document
You begin a new composition by creating a new document to store your music and formatting.All new documents are based on a starting file known as a template. Each template containsa default number of tracks, voicing and so on. Templates are essentially blank documentswith some basic structure already set up for you.
For example, if you want to write a four-part choral piece you can open the SATB tem plate,which already has the soprano, alto, tenor and bass parts. Without the template you wouldneed to set up four staves, add key signatures, clefs, and labels. While this is not difficult, thetemplate saves you the time and effort of doing this each time you want to write a choralpiece.
You can choose from a number of different templates including percussion, choral, orchestral,piano, and ensembles.
To create a new document
Select File New from the menu to display the New dialog.
-OR-
On the File toolbar, click the New button.
Select a template from the list in the dialog.
This is the starting point for your document.
Click the OK button.
A blank sheet of music will appear on the screen with a c lef, time and key signatures, andpart labels. If you would like a different instrumentation, you can try some of the othertemplates or create your own.
-o-

49
Forte 3
Open a Document
Open a Document
You can open any music document that was created as either a Forte Notation File (.FNF),MusicXML (.XML) or a Standard MIDI (.MID) files.
If the program is not already open, you can double-click on a file from Windows Explorer toopen the program with the selected file displayed.
You can also click on a file in the Explorer and drag it into the main application window toopen that file.
Note: A list of the most recent documents you have opened or saved is shown in the Filemenu. Click on any of these file names to open that file without displaying the Open dialog.
To Open a Document
1. Select File Open… from the menu to display the Open dialog
-OR-
On the File toolbar, click the Open button.
-OR-
Type CTRL+O
1. Click on the file(s) you want to open. If the file you want does not appear in the listshown, use the Look In dropdown list to find the folder where the file is stored.
2. Click the Open button. It may take a few seconds to open the file.
-o-

50
Forte 3
Open Library of Scores
Forte includes over 90 scores that you can use. The Open Library c ommand provides theeasiest way for you to find and open the score that you want.
Note: You can alwaysUse the normal open command to open any file, including a scorefrom the library.
You can also click on a file in the Explorer and drag it into the main application window toopen that file.
To Open a Hymn
1. Select File Open Library… from the menu to display the Open Library dialog
-OR-
Type CTRL+H
1. Click on the score you want to open.Use the controls in the Search For area to displayonly scores matching specific search criteria.
2. Click the Open button. It may take a few seconds to open the file.
-o-

51
Forte 3
Add Music to a Document
Add Music to a Document
You can use the mouse to enter notes and other symbols into a view. Typically, you select amusic symbol from the Elements Palette and click the location in the view where you want thesymbol placed. Some symbols - such as crescendos - require you to select both a startlocation and a stop location.
If you prefer you can also record music directly into your document from a MIDI instrument.
For more details select one of the topics below:
Select a Music Symbol
Enter music in the Music Score
Enter music in the Piano Roll
-o-

52
Forte 3
Select a Music Symbol
The Elements Palette is a floating window containing dozens of different music symbols thatyou can add to your document. The symbols are grouped into 8 different groups such asNotes, Accents, Dynamics, Tempos, and so on.
To Select a Symbol
Select the page in the Elements Palette containing the desired type of symbol (e.g. Note,Dynamic, Text).
Move the mouse over the symbol you wish to select.
The button displaying the symbol becomes "active" when the mouse is over the button Click the mouse on the desired symbol to select it.
Selected symbols in the Elements Palette appear as highlighted buttons.
To Display other Symbols
Click one of the tabs in the Elements Palette. The two arrows in the upper right handcorner areUsed to scroll through all of the tabs.
You can right-click the mouse in the Elements Palette to display a popup menu containinga list of all the tabs -- simply select an item to display the page.
This method makes it much easier for you to navigate between the tabs.
-o-

53
Forte 3
Playing Music
Playing Music
After you have inserted or created music, you can play your composition to hear what issounds like. There are many ways to control how the performance sounds. Click on one of the topics below for more information:
Play, Pause and Stop the Performance
Change the Volume of a Track
Change the Tempo
Mute a Track, or Listen to Selected Tracks
Change Reverb, Pan, and Chorus on a Track
Change the Instrument for a Track
-o-

54
Forte 3
Manage a Performance
Managing a Performance
The Transport Controls areUsed to control playback and recording of a performance. You canplay, stop, pause, record, skip between sections, fast forward and rewind within the doc umentand configure looping options -- all from the Transport Controls.
To Begin Playing
Click the play button to begin playing your music
To Pause
Click the pause button during playback to pause the music. Click the buttonagain to resume the performance.
To Stop the Music
Click the stop button when you are done listening.
To Double the Tempo and Fast Forward
Click the fast forward to double the tempo and fast forward through themusic.
Click the button again to return to normal play speed.
To Play From the Last Start Point
Click the rewind button to play from the last starting point.
-o-

55
Forte 3
Loop Playback
Loop playback allows you to continually play a section of music over and over. It is purely asequencer playback feature (there is no notational symbol). For notation based repeats, see Repeats.
Loop Playback is a great way to practice in the privacy of your own home. Lay down somechanges, set the tempo really slow, setup a loop, and shed. Slowly increase the tempo (noneed to stop the loop) or transpose to a different key (again, no need to stop the loop).Now go and impress your friends.
To Loop Playback
From the Performance Options Dialog check the Enable Loop Mode box. Check the Loop Region check box and specify the measures to loop over
(You can still set the range even if the Loop Region check box is grayedout). For example, if you are looping over 32 bars, set the Start to001:01:000 and the End to 033:01:000.
OK out of the dialog and play as usual. The Loop Options button on the transport c ontrol will light up when looping
is enabled.
To Stop Loop Playback
From the Performance Options Dialog uncheck the Enable Loop Modebox.
Make sure that the Play Region and Record Region check boxes areunchecked.
OK out of the dialog.
-o-

56
Forte 3
Step Playback
Step Playback allows you to play back the piece in non-real time. Often this is a good way tohunt for wrong notes in dense passages.
To Step Playback using Mouse
Click the Step button on the Performance toolbar.
-OR-
Select Music Perform Step from the menu.
Click the Play button on the Performance toolbar.
-OR-
Select Music Perform Play from the menu to sound each note in the piece successively.Notes which occur within a certain threshold of each other will sound as c hords.
To Stop Step Playback
Click the Stop button on the Performance toolbar.
-OR-
Select Music Perform Stop from the menu.
To Step Playback using Keyboard
1. Click the Step button on the Performance toolbar.

57
Forte 3
-OR-
Select Music Perform Step from the menu.
2. Hit the Space Bar to sound each note in the piece successively. Notes which occurwithin a certain threshold of each other will sound as chords.
-o-

58
Forte 3
Punch In / Punch Out
Sometimes you'll record a passage, and with the exception of one bungled section, it'sflawless. Instead of re-recording the entire passage, you can Punch In Punch Out and justre-record over the offending section.
The program will only record between the Start and End points (Punch In point and Punch Outpoint) so you can play along with the part to help you get into the flow.
To Enable Punch In/Out
From the Performance Options Dialog uncheck the Enable Loop Mode box. Check the Record Region check box and specify the measure, beat and tick where the
recording will Start and End. Set the Play Region Start to a couple of measures before the Record Region Start, and set
the End to a couple of measures after the Record Region End. Select the Replace existing radio button under the option When recording into a track
containing data. OK out of the dialog and record.
To Disable Punch In/Out
From the Performance Options Dialog uncheck the Enable Loop Mode box. Make sure that the Play Region and Record Region check boxes are unchecked. OK out of the dialog.
-o-

59
Forte 3
Change Track Volume
The Mixer has several controls which allow you to control various characteristics of each track,including volume. Each track is represented as a group of controls in the mixer.
Within each group of track controls the vertical slider to the left of the display meter can beused to control the relative volume of each track.
To Display the Mixer
Use any of the following methods to display the Mixer:
Select Tools Mixer from the menu.
Click the Mixer button in the Edit toolbar:
Press ALT+2 on the computer keyboard.
To Change Track Volume
Change the position of the volume slider on the desired track in the Mixer.
All tracks are affected by the master volume, which is controlled in the MasterArea for the Mixer.
-o-

60
Forte 3
Change Tempo
The Mixer has several controls that allow you to control various characteristics of theperformance, including the tempo.
The right portion of the Mixer contains a set of controls for c hanging the master volume andtempo. A horizontal slider in this "Master Area" represents the relative tempo for theperformance.
To Display the Mixer
Use any of the following methods to display the Mixer:
Select Tools Mixer from the menu.
Click the Mixer button in the Edit toolbar:
Press ALT+2 on the computer keyboard.
To Change the Tempo
Change the position of the tempo slider in the Master Area of the Mixer.
Notice that the beats per minute are displayed to the right of the tempo sliderand changes as you change the tempo.
Click on the text displaying the current tempo - it becomes active so you cantype a new tempo.
Use the buttons below the tempo slider to easily set the tempo to twice or halfnormal speed.
-o-

61
Forte 3
Mute and Solo Tracks
The Mixer has several controls which allow you to control various characteristics of each track,including volume. Each track is represented as a group of controls in the mixer.
To Display the Mixer
Use any of the following methods to display the Mixer:
Select Tools Mixer from the menu.
Click the Mixer button in the Edit toolbar:
Press ALT+2 on the computer keyboard.
To Mute a Track
Click on the Mute button for the desired track controls in the Mixer. The Mute button will lightup when Mute is enabled.
To Solo a Track
Click on the Solo button for the desired track controls in the Mixer. The Solo button will lightup when Solo is enabled.
At the bottom of each group is a small box that displays 3 icons -- these are buttons you useto set the mute, solo and record states for each track:
To Enable Track for Recording
Click on the Record/Play button and toggle the button into it's record (red) state.
To Enable Track for Playback
Click on the Record/Play button and toggle the button into it's play (green) state.

62
Forte 3
-o-

63
Forte 3
Add Reverb, Pan and Chorus
The Mixer has several controls which allow you to control various characteristics of each track,including effects such as reverb, pan and chorus. Each track is represented as a group ofcontrols in the mixer.
Note: These effects are implemented as MIDI controllers. Since some sound synthesizers donot implement all MIDI controllers you may not hear any change.
To Display the Mixer
Use any of the following methods to display the Mixer:
Select Tools Mixer from the menu.
Click the Mixer button in the Edit toolbar:
Press ALT+2 on the computer keyboard.
The 3 icons in the upper left-hand corner of the Mixer are buttons you use tochange the Mixer's display mode:
Changing Effects Values
When the Mixer is displayed in Full Mode, additional controller knobs appearwhich you can use to change the overall values for reverb, pan, chorus andmodulation.

64
Forte 3
ToUse the knobs, click the mouse and drag either up/down or left/right toincrease/decrease the displayed value. You can double-click a knob to reset it toits default position.
Simply adjust one of the knobs to adjust the corresponding effec t.
-o-

65
Forte 3
Changing an Instrument
The Properties Window can be used for inspecting numerous music symbols inyour document.
The Properties Window is also used to inspect and edit tracks. Each track hasnumerous properties, including the staff name, type and instrument.
The instrument characterizes the sound made by notes on each track -- onetrack can play as a harmonica and another as a whistle.
To Change an Instrument
Select the track(s) you want to change in the Mixer. Display the Properties Window and select the Instrument tab. Select the instrument you want toUse in the list. Click the Apply button to apply the changes.
-o-

66
Forte 3
Performance Options
The Performance Options Dialog Allows you to control Transport behavior, Looping, Lead-InMeasures, and Recording behavior. Click on an area below for more information about eachsection.
-o-

67
Forte 3
Editing Music
Editing Music
Once you've added music to your document you can edit it to change how the music soundsor how it looks when printed.There are hundreds of different ways you can edit your music; luckily, they can all be groupedinto one of the following basic operations:
Cut, Copy, Paste & Delete Use familiar edit commands to cutand splice portions of your musictogether in different ways.
Drag and drop Click the mouse directly on a musicsymbol and drag the mouse to copyor move the element to anotherlocation in the music.
Edit with the Properties Window Change dozens of element propertiesusing the Properties Window. Editmultiple elements simultaneously.
Special Menus Context and popup menus provideshortcuts to many commands, andoffer a few special features not foundelsewhere in the program.
Actions Actions are plug-in effects forprocessing your music. Quantize,transpose, merge, split, and othereffects make it easy to experimentand transform your compositions.
-o-

68
Forte 3
Basic Operations
Cut, Copy and Paste Objects
Cut, copy and paste is a common in many software programs. The idea is that you have atemporary storage area (the clipboard) that you can use to shuffle, reorder, c opy andotherwise edit your document.
Here's how it works: you first copy elements into the clipboard. You then paste the elementsfrom the clipboard into some location in your document. The cut command is just like copy,except it also removes the selection from the document. You can paste as many times as youwant -- each time a copy of the clipboard contents is added to your music.
To Cut or Copy Elements
Be sure the current mode is Select Mode, then select the elements youwant to cut/copy.
Select Edit Copy from the menu to copy the notes to the clipboard.
-OR-
Hold down the Ctrl key and press the letter "C" from the keyboard.
You can choose Cut (Ctrl+X) instead if you want to remove the selection fromthe document.
Elements are copied into the clipboard. The contents of the c lipboard arereplaced whenever you copy/cut other elements.
To Paste Elements
Be sure the current mode is Select Mode.
Click the mouse above or below the measure whereyou want to paste the elements. This displays a blinking insert cursor andruler:
Note: If you click the mouse inside the staff lines you will select the systeminstead of displaying the insert cursor.

69
Forte 3
Click the mouse on the beat of the ruler where you want the elements to bepasted.
Select Edit Paste from the menu to paste the objects from the clipboardinto the measure.
-OR-
Hold down the Ctrl key and press the letter "V" from the keyboard.
-o-

70
Forte 3
Deleting Objects
You can delete most objects in your music simply by selecting them and hittingthe Delete key.
The Delete command is similar to Cut, except it does not copy the selec tedelements into the c lipboard.
If you make a mistake you can usually undo your last action to recover thedeleted elements.
To Delete Objects
Be sure the current mode is Select Mode. Select the objects (notes, clefs, etc.) to be deleted.
(See Selecting.)
Click the delete key.
-o-

71
Forte 3
Drag and Drop
Drag and drop is a popular feature that allows you to visually edit your music.You can move or copy elements from one place to another simply by clicking the mouse on anelement, dragging it somewhere else, then dropping the element at the new loc ation.Drag and drop is essentially a shortcut for cut/copy/paste.
To Drag and Drop
Be sure the current mode is Select Mode, then select the elements you want tocopy/move.
Place the mouse cursor over one of the selected objects. Click -- but do not release -- the mouse button. Drag the elements to their new location. As you move the mouse, the view provides the
same visual feedback as when adding new elements from the Elements Palette. Release the mouse button to place the objects in their new location.
-o-

72
Forte 3
Undo/Redo
Sometimes you realize the changes you made were not what you really wanted to do. TheUndo command lets you undo the things you have done. You can also redo an operation if youlike the changes you made after all.
For example, if you transpose your entire piece up a half-step and realize that you reallyliked it better in it's original position, you can undo the transpose. This will return the score tothe condition it was in before you transposed it.
A multiple-layer undo/redo allows you to undo and redo thousands of ac tions. The UndoHistory feature displays all previous changes, making it easy to quickly revert to an earlierversion of the file.
To Undo an Operation
Select Edit Undo from the menu, or press CTRL+Z on the computer keyboard.
-OR-
Click the Undo button on the Performance toolbar.
To Redo an Operation
Select Edit Redo from the menu, or press CTRL+Y on the computer keyboard.
-OR-
Click the Undo button on the Performance toolbar.
To Display the Undo History List
Select Edit History... from the menu.
-o-

73
Forte 3
Editing with the Properties Window
Displaying the Properties Window
The Properties Window allows you to change the properties of just about anything on theMusic Score (e.g. positioning, appear-ance, spacing, performance, etc). You can even change the properties of m ore than oneobject at a time. For instance, you could select all of your dynamic markings and move all ofthem up at once.
To Display the Properties Window
Select the objects you want to edit, then select Tools Properties Window from the menu.
-OR-
Double-click one of the selected objects.
-OR-
Right-click one of the selected objects to display a context m enu, then select PropertiesWindow…
-OR-
From the Tool Bar, select the button
-o-

74
Forte 3
Save a Document
Save a Document
When you save a music document for the first time, you will be prompted to give yourdocument a file name.When you save a previously saved document, you can use the Save As command to save it toa new name. You can save your music documents in one of three file formats.
Make a Backup Copy of your Document
Select File Save As... from the menu. Type a file name in the file name box. (Make a note of where your file is being saved.) Choose the type of format you would like your file saved as. Click the Save button.
To Save a Music Document
Select File Save
-OR-
On the File toolbar, click the Save button.
-OR-
Click CTRL+S.
If you have not yet saved the file, the Save dialog box will automatically open. If you havepreviously saved the file, it will save to that file name.
In the Save In box, select a directory location for the file. In the File Name text box, type the file name you want for the music document. In the Save As Type box, select the file format you want. When you have made all your choices, click Save and your music will be saved to disk
with the file name you specified.
-o-

75
Forte 3
File Formats (Save, Import and Export)
Forte Notation File (.FNF)
This is a proprietary file format that stores all notational and performanceinformation for a file. Files stored in this format can only be exchanged betweenForte products.
Use this format when it is important to store both performance and notation foryour music. All symbols and performance settings are preserved completely withthe FNF format.
Forte Template File (.FTF)
This format is essentially the same as the Forte Notation File except it resides ina special Templates directory and isUsed as a starting point for new documents.
If you find yourself continually working with keyboard, bass, and drums, forexample, you can create your own template with those instruments. You can alsodefine any page layout information such as staff size, measures per system, andfonts, and those will be saved with the template as well.
Standard MIDI File (.MID)
A MIDI file is an industry standard file format that can be exchanged betweennearly all sequencers and score processors. However, the MIDI file format isdefined to include primarily performance information such as when notes startand stop -- it does NOT include much in the way of notation.
If you store a document as a MIDI file you will lose:
slurs, lyrics, clef changes, special meters, barline types, articulationsymbols, dynamics, ornaments, repeats, chord symbols, and hiddensymbols
note spelling (e.g. C-flat vs. B-natural)
breaking and joining of beams and positional offsets or overrides
all layout information, such as which tracks are visible, font preferenc esand margin information.
output device information is not supported in the MIDI file format, so ifyou have more that 16 MIDI channels split across multiple output devices,you shouldUse the .fnf format instead.
articulations, dynamic markings, repeats and transpositions affec t howthe music sounds, but the symbols themselves are not stored.Consequently, if you reload such a file it will sound like it did originally,but the symbols will not appear in the music.
Use this format when you are concerned only with playback and/or would likeother people with other sequencers to read the file.
MusicXML File (.XML)

76
Forte 3
MusicXML is a universal translator for common Western musical notation fromthe 17th century onwards. It is designed as an interchange format for notation,analysis, retrieval, and performance applications. The MusicXML format issupported by over 50 applications.
-o-

77
Forte 3
Auto Save
The AutoSave feature can be set to save your work at regular intervals andcreate backup copies of the file.
The backup file is stored in the same directory and has the same name as theoriginal file except its name is prepended with a "~" character.
When autosave happens, changes to all documents are saved into the backupfile. The original file remains unaffected until you specifically save it.
To use AutoSave
Select Options General... from the Tools menu. Click the Save tab. Click on the checkboxes to select your preferences. Click the OK button when you are done.
AutoSave Choices
Always create backup file: Creates a backup copy of a file when you first openit.
Automatic save every N minutes: Performs autosave every N minutes.
Apply to new files: Applies these preferences to all new files you create.
Prompt to save as FNF file: Asks whether you would like to save as a ForteNotation File in order to retain all music notation (a MIDI file will not retain themusic notation).
-o-

78
Forte 3
Print a Document
Print a Document
When you are ready to see your music on paper, use the following instructions to print yourmusic.
To Print a Music Document
Select File Print from the menu.
-OR-
On the File toolbar, click the Print button.
Adjust the printer settings to your preferences.Click the OK button to print your music score.
-o-

79
Forte 3
Print all Layouts
Print all Layouts
This new feature allows you to print as many copies you want of all available layouts of adocument.
-o-

80
Forte 3
Print Preview
You might want to see a preview of the music you are about to print. This will give you abetter idea of how your score will look on the printed page.
To Select Print Preview
Select File Print Preview from the menu to see a preview. Using the buttons at the top of the preview window, you can page through your score.
You can also zoom in/out, look at one or two pages, or print.
To return to the Music Score, click the close button.
-o-

81
Forte 3
Print Setup
Use the Print Setup dialog to configure basic characteristics of your page, such as the papersize, source and orientation.
To Select Print Preview
Select File Print Setup to display the standard Windows Print Setup dialog. Make necessary changes in the Print Setup dialog. Press the OK button.
-o-

82
Forte 3
Print Blanc Sheets
Print Blank Sheets
Despite all the comfort Forte provides, you may want to occasionally write your music scoreby hand. For these moments, you can now use Forte to print as many copies you want ofempty sheets in five different sizes.
-o-

83
Forte 3
Templates
Templates
A template is a starting point for another document. Templates normally define afrequently-used track and instrument configuration, but a template could contain a completedrum and bass line if desired. There is no real difference between a template and a normal filesaved with a different extension -- in fact, you can even use MIDI files as templates.Normally, however, templates are stored as Forte Template Files (*.ftf) since they containnotation options and other information above and beyond what a MIDI file can store.
When you create a new document you select one of the templates displayed in the Newdialog as a starting point for your document. The program then copies the selected template,initializes it, then opens the copy. The initialization step adjusts certain characteristics of thefile according to current user preferences. For example, even though the individual tracks andinstruments already exist in the template, the MIDI devices must be updated to reflec t thecurrent default MIDI device settings.
For more information about templates, click the topic below:
Creating a Template
-o-

84
Forte 3
Create a Template
How Templates Are used
The template list in the New dialog contains the names of template files that arestored in a special Templates folder. This folder is located in the same directoryas the program.
New templates should be saved to this folder so that they appear as choices inthe template list. You can do this manually, or by using the Save As Templatecommand.
To Create a Template
Create a new document which will become your template. Add all necessarystaves, measures and instrument settings required to define your template.
Select File Save As Template… from the menu to display the Save AsTemplate dialog.
In the Template dialog box, type a descriptive name for the new template. The template will automatically be saved in the application's Templates
folder as a read only file. This is located in the same directory as theapplication.
-o-

85
Forte 3
Menus
Menus
There are several different types of menus available for changing differentaspects of the music.
Context-Sensitive Menus
When an element is selected in a view, you can often right-c lick the mouse inthe view to display commands that pertain to the selection.
Often, this popup menu contains items that are also found in the PropertiesWindow or Tools menu, but certain features are available only in the c ontextmenu.
When a note is selected in the Music Score, for example, the context menucontains items for changing stem direction, enharmonic equivalents, slurs,beams and so on. When the selected item is an accidental the context menucontains items to place the symbol above or in front of a note.
Try right-clicking in views, on windows and so forth to get an idea of what'savailable.
Music menu
Use the Music menu to add or remove measures and staves. Other c ommands inthe menu duplicate functions found in the tool bars and music tools.
For example, the Perform submenu contains commands found in the TransportControls, and the Palette submenu contains commands to display a particulargroup of music symbols in the Elements Palette.
View and Actions Menus
In the main menubar, the Actions and View menus change as you selectdifferent elementsand windows in a document.
When there are no available actions, for example, the Actions menu disappearsaltogether.
Select a topic to learn more:
The View Menu
The Actions Menu
The Context Menus
-o-

86
Forte 3

87
Forte 3
The View Menu
The View menu changes depending on which view is active. When the Music Score is active,for example, the View menu contains options for managing layouts and changing betweenPage/Track views. In general, the View menu contains items that related to the display ofmusic in one of the views
-o-

88
Forte 3
The Actions Menu
If any actions can be used with the current selection a new Actions m enu appears next to theMusic menu. The Actions menu contains a list of all possible actions. When you selec t one ofthe commands the Actions tab in the Properties Window is displayed with the proper Ac tionsProperties Window - you apply the action by clicking the Apply button in the PropertiesWindow. You can Undo most actions by using the Undo feature.
-o-

89
Forte 3
Shortcut Menus
Shortcut menus are convenient ways to perform commands that you use often. When aspecific item is selected in the music, or when the mouse is positioned over certain tools orbuttons, you can right-click the mouse to display a popup menu containing relevantcommands.
For example, if you right-click over the Elements Palette, a popup menu appears that allowsyou to quickly move to another tab of the Elements Palette. This is often easier than using thetabs and buttons in the Elements Palette, especially if you want to move from the Notes Tabto the Repeats tab.
-o-

90
Forte 3
Entry Modes
About Entry Modes
When you write a piece of music by hand, you mightUse a pencil to create notes and othersymbols on a piece of manuscript paper. When you want to change something you choosewhat notes to erase and then rewrite them. In other words, depending on what you're doing,you use a pencil, eraser or maybe even a new sheet of paper.
On a computer the mouse and keyboard take the place of a penc il and eraser, and the virtualsurface in each view serves as your paper. There is only one mouse available for pointing andclicking in the views, so the programUses the notion of entry modes to further inform thecomputer of your intentions.
In some cases, when you click the mouse you really want to select a note so that you canmove, edit or delete it, In other cases, you really want to add new notes to the m usic whenyou click the mouse.
Entry modes inform the computer what you are doing so it knows when to add new notes andwhen to select notes for editing or deletion.
Two main entry modes areUsed: Select Mode, Insert Mode, Keyboard Mode and CameraMode. Whether you know it or not, the program is always "in" one of these two modes.
To Change Modes
Select the appropriate mode from the Edit menu.
- OR -
Select one of the mode buttons in the Edit Toolbar.
- OR -
Press CTRL+1, CTRL+2, CTRL+3 or CTRL+4 on the keyboard to switc h to Select, Insert,Keyboard or Camera, respectively.
- OR -
As you use the mouse in different locations in the program, the entry mode might changeaccording to what you select.
When you select a symbol in the Elements Palette, for example, the program changes toInsert Mode under the assumption that you are now about to insert the selec ted symbol in themusic.
-o-

91
Forte 3

92
Forte 3
Select Mode
Select Mode isUsed when you want to select music symbols in order to perform some othertask, such as copy, delete or edit. Select Mode allows you to target specific elem ents fordifferent operations.
Once the software is in Select Mode, you can click the m ouse on different elements to selectthem. As the selection changes, different components and music tools change to reflect thenew state. For example, the Properties Window changes to display properties for the newselection.
To Change to Select Mode
Select Edit Select Mode from the menu.
- OR -
Press CTRL+1 on the keyboard.
-OR-
From the Tool Bar, select the button
-o-

93
Forte 3
Insert Mode
Insert Mode isUsed to add notes and other music symbols to your composition usingthe mouse.
Once in Insert Mode, subsequent mouse clicks in different views will insert aspecified music symbol into the music.
When you select a symbol in the Elements Palette the program switches to InsertMode automatically.
To Change to Insert Mode
Select Edit Insert Mode from the menu.
- OR -
Press CTRL+2 on the keyboard.
-OR-
From the Tool Bar, select the button
-o-

94
Forte 3
Keyboard Mode
Keyboard Mode
Keyboard Mode isUsed to add notes and other music symbols to your compositionusing the computer keyboard.
When you select a symbol in the Elements Palette the program switches toKeyboard Mode automatically.
To Change to Keyboard Mode
Select Edit Keyboard Mode from the menu.
- OR -
Press CTRL+3 on the keyboard.
-OR-
From the Tool Bar, select the button
For more information about the Keyboard Mode, c lick on the topic below:
Keyboard Mode Schema
-o-

95
Forte 3
Keyboard Mode Schema
A Keyboard Mode Schema is a combination of keys that are used on the Keyboard Mode toinsert and edit notes. The current Keyboard Mode Schema can be set in General Options.
Fast Input Schema
This schema allows you to write your score as you write a single text.Use this schema to avoidusing the mouse when inserting notes and accidentals.
Selection Schema
This schema allows you to select note values and accidentals quic kly using the keyboard.Usethis schema to avoid moving the mouse away from your score when inserting notes andaccidentals.
-o-

96
Forte 3
Camera Mode
Camera Mode isUsed when you want to export a section of the Music Score view.Camera Mode allows you to copy it to the Windows Clipboard to paste to any otherapplication or exported as a graphics file.
During Camera Mode, Edit Mode and Select Mode are disabled.
To Change to Camera Mode
Select Edit Camera Mode from the menu.
- OR -
Press CTRL+4 on the keyboard.
-OR-
From the Tool Bar, select the button
-o-

97
Forte 3
Which Mode Am I In?
As you create and edit your music it is important to know when you are in Insert Mode andwhen you are in Select Mode. There are many different ways to determine what mode theprogram is in.
Look at the Edit Toolbar
The buttons on the left side of this toolbar areUsed to indicate and set the current m ode. Thehighlighted button tells you which mode the application is in.
Look at the Status Bar
When the software is in Select mode the text is displayed in blue -- in Camera Mode thetext is displayed in green -- in Insert Mode the text appears in red and describes whichsymbol in the Elements Palette is selec ted.
Look in the Edit menu
The different modes are listed along with a mark by the current mode.
Look at the Cursor
Most views provide some sort of feedback about the current entry mode by changing thedisplay cursor. The Music Score, for example, displays a line that snaps to the ruler positionswhen a note is selected in the Elements Palette and the software is in Insert Mode, butdisplays a simple arrow cursor when in Select Mode.
-o-

98
Forte 3
Selection
The Current Selection
In order to edit your composition, you need to be able to select the items you want to edit.Just as if you were telling someone what you wanted changed in the music, you must tell thecomputer what symbols to change by selecting them.
One often refers to a document's current selection. This refers to the collection of musicelements that have been selected and are currently highlighted in the views. You c an changethe current selection by selecting other symbols.
Once music symbols are selected, you can copy, cut, delete, edit and apply actions on them .
-o-

99
Forte 3
Select Elements
Sometimes you may want to select several elements at once, yet selecting each elementindividually is too tedious and troublesome. With the Select Elements dialog you can quicklyselect all sorts of combinations. Once the elements are selected, you can use the PropertiesWindow to edit all the elements at once. Click on areas of the image below for more information:
To Display the Select Elements Dialog
Use any of the following methods to display the Selec t Elements dialog:
Select Edit Select Elements... from the menu.
Press CTRL+E on the computer keyboard.
To Select Elements
Display the Select Elements dialog Choose at least one type of element that you want to select from the main list at the top
of the window.
Press the All or None buttons to quickly check or uncheck all element types in the list.
Press the OK button.
-o-

100
Forte 3
Select Elements (Advanced)
Pressing the Advanced button in the Select Elements dialog expands the dialog to showadditional controls for selecting elements by track, time or voice. Simply check one of theboxes to enable one of the select filters, then enter appropriate values.
-o-

101
Forte 3
Select with the mouse
Select Music Symbols with the Mouse
The mouse is the most common way you use to selec t music symbols. Before using the mouseto select elements, make sure the application is in Select Mode, then follow the steps below:
To Select a Music Symbol
In a view, place the mouse cursor over the symbol to be selected.Click on the symbol. The object is highlighted to indicate it is selected. If the PropertiesWindow is visible, it updates to display the properties of the newly-selected elem ent.
Selecting symbols in one view will select that same symbol in all other views (that c an displaythe symbol). This means that you could sort the elements in some special way in the MIDIEvents view, select them, and then edit them visually in the Music Score.
To Select Additional Symbols
Hold down the Ctrl key.
With the Ctrl key held down, click any other symbols to add them to the selec tion.
Notice that the objects you already selected remain selected (highlighted).
To Unselect a Music Symbol
Hold down the Ctrl key.
Click the object to be unselected. The object turns its original color.
To Drag-Select Multiple Symbols
Use this method to quickly select multiple objects.
Click - but do not release - the mouse. As you drag the mouse a selection rectangle isdisplayed. Symbols which fall within this rectangle become selected.

102
Forte 3
Release the mouse button to end the drag-select operation.
Note: By default, the selection rectangle selects notes only. You can change this behavior sothat other element types are also selected during drag-selection.
To Clear the Selection
Click the mouse over some "empty space" in a view.
Some symbols are selected using a slightly different approach. Click on a topic below formore information:
Selecting Staves
Selecting Measures
Selecting the Document
Non-selectable
-o-

103
Forte 3
Mouse Select Options
The Mouse Select Options Dialog determines which elements are selected when youdrag-select with the mouse. By default, only notes are included when you drag-select a regionwith the mouse.
There are times, however, when you want to drag-select other symbols, too. For example,you could drag-select only accents, or only rests to make it easier to do editing on largegroups of symbols in your music.
You can always choose to select specific elem ents using the Select Elements dialog. Themouse drag settings merely provides another convenient way to select the symbols you wantand nothing else.
To Display the Mouse Select Options Dialog
Use any of the following methods to display the dialog:
Select Edit Mouse Select Options... from the menu.
Press CTRL+M on the computer keyboard.
To Select Elements
Display the Mouse Select Options dialog Choose at least one type of element that you want to select from the main list at the top
of the window.
Press the All or None buttons to quickly check or uncheck all element types in the list.
Press the OK button. The next time you drag-select with the mouse, only the specifiedelement types will get selected.
-o-

104
Forte 3
Selecting All or None
The Select All command selects all visible elements in a view. Depending on the view, thismay be all notes on a given track or all elements in the entire score.
The Select None command clears the selection. You can also clear the selection by clickingthe mouse in an unused portion of a view.
When elements are selected they are displayed in the current selection c olor (default is red).
To Select All Elements in a View
Choose Edit Select All from the menu, or simply press CTRL+A.
To Clear the Selection
Choose Edit Select None from the menu, or simply press CTRL+D.
-o-

105
Forte 3
Selecting Measures
Select measures using the following views:
Selecting a Measure in the Music Score
Measures cannot be selected individually in the Music Score. Instead the system that containsthe measure is selected.
Make sure the application is in Select Mode. Click the mouse on the measure. The system which contains the measure will select. Select additional systems by right mouse clicking on the measure and selecting Extend
Selection to Page, or Extend Selection to End
-OR-
Select additions systems by holding down the Ctrl key.
Selecting a Measure from the MIDI Events
Make sure the application is in Select Mode. Click on the measure in the Overview Area. Select additional measures by holding down the Ctrl key.
-o-

106
Forte 3
Selecting the Document
Selecting the Document allows you to run many actions on all of the staves, instead of havingto Ctrl select each staff individually. To select the document, click on an "empty" spacesomewhere in the Music Score.
-o-

107
Forte 3
Selecting Staves
A staff may be selected with the mouse using any of the following views:
Selecting a Staff in the Music Score
Make sure the application is in Select Mode. Position the mouse over a measure contained in the staff. Click the mouse on the measure. The system which contains the measure will highlight.
Click the right mouse button to bring up the context menu and select Select Staff (Trac k).
-OR-
Double-click on the measure.
Selecting a Staff from the MIDI Events
Make sure the application is in Select Mode. Click on the staff in the Overview Area. Select additional staves by holding down the Ctrl key.
Selecting a Staff from the Mixer
Make sure the application is in Select Mode. Click on the track module which corresponds to the staff. Select additional staves by holding down the Ctrl key.
-OR-
Select all staves by right mouse clicking on the module and selecting Select All from thecontext menu.
-o-

108
Forte 3
Non-selectable Symbols
Nearly all symbols that you see in a view are selec table by the mouse. However, somesymbols are selectable only from certain views. For example, you cannot selec t a beam or slurfrom within the List View or the Piano Roll View. Likewise, you cannot select a Wave fromwithin the Music Score. Some notable symbols that cannot be selected in the Music Score areMeasures Numbers and Page Numbers. To control the display of these symbols, see the topicson Layout Options and Layout Fonts .
-o-

109
Forte 3
Getting Around
Getting Around
Each document has a current time position. The Time toolbar displays thisposition for the active document.
As the music plays the timer counts out bars, beats and ticks. When you stop aperformance the program normally rewinds back to the last place you startedplaying from.
As you work with your document you will want to move around from place toplace within the music easily. Several different ways to get to a partic ular spot inthe music are available.
Click one of the links below for detailed information about each topic:
Use the Next/Previous controls
Jump to a particular marker
Jump to a specific time
Change time location using the mouse
-o-

110
Forte 3
Next/Previous
You can use the Next and Previous commands to skip between markers and other sectionspecifiers.In addition to text markers, rehearsal letters and numbers, the Next/Previous command alsoobeys repeat endings.
Note: The Next/Previous buttons in the Transport Controls change to display FF/RW buttonsduring a performance.
To Jump to Next
Click the Next button in the Transport Controls.
To Jump to Previous
Click the Previous button in the Transport Controls.
-o-

111
Forte 3
Jump to Marker
To display the Goto Dialog, click on the time display in the Time toolbar, or select Music Goto... from the menu.
A marker is a rehearsal number, rehearsal letter, custom marker, or cuepoint. Markers areUsed to create quick easy reference points in the music.
If you have defined markers, you can use the Goto Dialog to quickly jump toone of those markers.
To Move to a Specific Marker
Click the Advanced button to display additional controls. In the list of markers, click on the marker you want to skip to. As you
select different markers, the time field updates to display the location ofthe selected marker.
Click the OK button. You will return to the music score, positioned at theselected marker.
-o-

112
Forte 3
Goto Dialog
The Goto Dialog allows you to quickly jump to different parts of the music. For example, if youwant to play from rehearsal letter G, you can use the Goto command to jump to that spot inthe music. You can also enter a specific time location that you want to jump to.
To display the Goto Dialog, click on the time display in the Time toolbar, or select Music Goto... from the menu.
-o-

113
Forte 3
Jump to a Time
To display the Goto Dialog, click on the time display in the Time toolbar, or select Music Goto... from the menu.
To Move to a Specific Time
Display the Goto dialog. Click the Enter Time field to select it, and then type in the time you
want.
You can click in different portion to select bars, beats or ticks.
-OR-
Drag the slider beneath the time field left or right - the time changes as youmove the slider.
Click the OK button to jump to the specified location
To Move to the Beginning or End
Display the Goto dialog. Click on the Beginning or End button to quickly move to the beginning or
end of the piece.
-OR-
Drag the slider beneath the time field all the way to the left or right to m oveto the beginning or end of the document, respectively. Notice that the timechanges as you move the slider.
Click the OK button to jump to the specified location.
-o-

114
Forte 3
Getting Around Using the Mouse
You can set the current time position using the mouse.
This allows you to quickly start playback from anywhere within a measure, or to set the timefor your next recorded note during step record.
To Set the Current Time
Make sure the application is in Select Mode. Hold down the Ctrl key and click just above the measure where you would like the current
time set (clicking in the measure will select the measure). The insert cursor will appear (a blinking vertical line). Move the mouse slightly and the
Music Ruler will appear as well. The insert cursor will be at a specific mark on the ruler which corresponds to a time in the
measure. To change the time, and update the current time, Ctrl click on the Music Ruler.
-o-

115
Forte 3
Export
Export to a MusicXML document
MusicXML is a universal translator for common Western musical notation from the 17thcentury onwards. It is designed as an interchange format for notation, analysis, retrieval, andperformance applications. The MusicXML format is supported by over 50 applications.
Export to a MusicXML Document
Select File Export In the Save In box, select a directory location for the file. In the File Name text box, type the file name you want for the music document. When you have made all your choices, click Save and your music will be saved to disk
with the file name you specified.
-o-

116
Forte 3
Export to an Audio File
Export to an Audio File
Export part or full composition to an Audio File.
To Export to an Audio File
Select File Audio Export from the menu. Select: Capture song to Wav...
Select Audio Device. Select Quality. Assign a name and location to the file.
To control the recording volume, go to Windows Volume Control in Windows.Select Start All Programs Accessories Entertainment Volume Control. InVolume Control select Options Recording and adjust the recording volume.
-o-

117
Forte 3
Audio Files
Wave File (.WAV)
WAVE form audio format, is a Microsoft and IBM audio file format standard for storing audioon PCs. Though a WAV file can hold audio compressed with any codec, by far the mostcommon format is pulse-code modulation (PCM) audio data. Since PCMUses anuncompressed, lossless storage method, which keeps all the samples of an audio track,professionalUsers or audio experts mayUse the WAV format for maximum audio quality. WAVaudio can also be edited and manipulated with relative ease using software.
MP3 file (.MP3)
MPEG Audio Layer-3, or more commonly referred to as MP3, is a popular digital audioencoding and lossy compression format. It was designed to greatly reduce the amount of datarequired to represent audio, yet still sound like a faithful reproduc tion of the originaluncompressed audio to most listeners.
-o-

118
Forte 3
Export to a Graphics File
Export to a Graphics File
Export part or the full score to a Graphics File. Forte gives you two ways to export part orthe full score to a graphics file.
To Export to a Graphics File
Select File Export Graphics... from the menu. Select What to Export.
Select one of the File Format: JPEG, TGA, TIFF, Bitmap, EPS.
Select the Resolution.
If necessary, assign a File Name Prefix. Click OK.
-o-

119
Forte 3
Graphics File
JPEG, TGA, TIFF, DIB/BMP Files (.jpg, .tga, .tif, .dib, bmp)
JPEG is a commonlyUsed standard method of lossy compression for photographicimages. JPEG is the most common formatUsed for storing and transmittingphotographs on the World Wide Web.
Truevision TGA is a raster graphics file format. The format can store image data with1–32 bits of precision per pixel. Color data can be color-mapped, or in directcolor ortruecolor format.
TIFF is a flexible and adaptable file format. It can handle multiple images and data ina single file through the inclusion of "tags" in the file header. Tags can indicate thebasic geometry of the image, such as its size, or define how the image data isarranged and whether various image compression options areUsed.
BMP files are usually not compressed, so they are typic ally much larger thancompressed image file formats for the same image.
Postscript Document (.EPS)
PostScript (PS) is a page description language and programming languageUsed primarily inthe electronic and desktop publishing areas.
-o-

120
Forte 3
Recording Music
Recording Music
When recording music you typically have some sort of MIDI instrument connected to thesoundcard installed in your computer. The software records what you play on the keyboardand stores it with the document.
During normal recording you must keep time with the music. If you've added tempo markingsyou'll need to play along with the changing tempo, for example. The metronome sounds outbeats to help you play at the correct tempo -- you can also disable the metronome if youwish. You can use lead-in measures to count out a few bars of introduction before the actualrecording begins so you can get a feel for what the beat is.
There are two additional special recording modes you can use to assist you in c reating yourmusic. Step recording isUsed when you don't want to have to play in tim e with the music (ormetronome). Loop recording isUsed when you want to try out different "takes" of a sec tion ofyour music.
Click on one of the topics below for details about each aspect of recording:
Preparing to Record
Normal Recording
Step Recording
Loop Recording
-o-

121
Forte 3
Preparing To Record
Before recording it is important to configure the software so that inc oming notes and otherinformation are placed on the correct track. You can also specify a particular voice for arecording, which isUsed for notating the music.
For example, if you are working on a brass trio you need to specify which of the threeinstruments you are recording. If you do not tell the program where you want notes to beplaced it will try to do the best job it can -- sometimes this is what you want, but often it maynot be. By default, the program looks for the first empty track andUses it for the recording.
You should also check that your MIDI keyboard is properly connected.
Select the track that you want to record into
Display the Mixer.
Specify the desired record track by pressing the track mode control.
In this example the Horn track has been selected as the trac k for recording
Select the voice for recording
1. Display the Music Score.
2. In the notation bar at the top of the view, select the desired voice from the Voicedropdown list.
If you leave the voice set to "All Voices" the notation engine will try to determ ine the propervoice for the recording.

122
Forte 3
Check your MIDI connection
1. Display the Mixer.
2. Play a few test notes on your MIDI instrument. You should see the small IN light in thelower right-hand corner of the Mixer light up momentarily.
If your MIDI Thru options are enabled, you will hear any notes that you play.
Other Record Settings
When recording many different MIDI channels simultaneously, you can use the SequencerOptions dialog to change how the channels are split and routed to different tracks andvoices.
Use the Performance Options dialog to specify the behavior when you record into tracksthat already contain music.
-o-

123
Forte 3
Recording from a MIDI Keyboard
You can record standard MIDI information from any MIDI controller that is connected to yourcomputer.
To Start Recording
Be sure you have followed the steps to prepare for the recording.
Click the Record button on the Performance toolbar.
-OR-
Select Music Perform Record from the menu.
If lead-in measures are enabled, the clock will count off the lead-in measures. During thistime, nothing will be recorded, so feel free to practice or test the instrument sound.
If the Metronome is enabled, the Metronome will click on every beat.
Play the part on the MIDI instrument. As you record, note heads will appear on the sc ore.
To Stop Recording
Click the Stop button on the Performance toolbar.
-OR-
Select Music Perform Stop from the menu.
To Pause Recording
Click the Pause button on the Performance toolbar
-OR-
Select Music Perform Pause from the menu.
Click the Pause button again to restart recording.
-o-

124
Forte 3
Step Recording
Step recording is similar to "normal" recording from a MIDI keyboard except that you do notplay along with a specific tempo. The note pitches and veloc ities are recorded from your MIDIkeyboard - just as for normal recording - but the note values (durations) are selec ted fromthe Elements Palette. There is no metronome and no lead-in measures during step recording.
The advantage of step recording is that you can be absolutely sure that notes are placed atthe correct time and have exactly the desired duration. Often recording "live" results in notesthat occur slightly too early or have a different duration than the "exact" value. This, in turn,complicates the notation since a given note may be played like an 8th note - even though youmight want it notated as a quarter note.
To Start Step-Recording
1. Be sure you have followed the steps to prepare for the recording.
2. Click the Step button in the Performance toolbar, then click the Record
button.
-OR-
Select Music Perform Step from the menu, then select Music Perform Record.
The transport controls should look similar to the following:
1. Select a note value from the Notes tab of the Elements Palette.
2. Play a note on the MIDI instrument. The appropriate note will appear in the sc ore, andthe clock will automatically advance to the next position.
3. Follow steps 3-4 to enter notes with different values
To Stop Step-Recording
Click the Stop button on the Performance toolbar.
-OR-
Select Music Perform Stop from the menu.
To Step-Record Rests
1. Select the value of the rest from the Notes tab of the Elements Palette.

125
Forte 3
2. Click the Step button on the Performance toolbar.
-OR-
Select Music Perform Step from the menu.
-OR-
Press the space bar on the computer keyboard.
A rest with the desired duration will be entered in the music, the c lock will advance and thenext note recorded will cause the rest to be entered.
To Step-Record Chords
1. Press - but do not release - the key on the MIDI keyboard corresponding to the firstpitch in the chord
2. Press - but do not release - the keys corresponding to other notes in the chord
3. Release all notes at once. The chord for all notes will be added to the music score as achord.
-o-

126
Forte 3
Loop Recording
Loop recording is a powerful variation of "normal" recording from a MIDI keyboard that allowsyou to lay down tracks, try alternate takes and otherwise piece together your music withfewer internediate steps.
To begin loop recording, you must enable loop mode and configure other performance optionsdepending on how you want the loops to behave. When loop mode is enabled thePerformance Options button in the transport c ontrols is illuminated to let you know:
To Enable Loop Recording
Press the Performance Options button in the performance toolbar - or select Music Perform Performance Options… from the menu. This displays the Performance OptionsDialog.
Check the Enable Loop Mode box. Notice how certain other controls are now enabled. Configure other controls according to how you want to loop-record (details below). Press OK.
To Disable Loop Recording
Display the Performance Options Dialog. Uncheck the Enable Loop Mode box. Notice how certain controls become disabled. Make sure that the Play Region and Record Region check boxes are unchecked. Press OK.
Loop Recording Options
There are four variations of Loop Recording. The instructions below describe how to configurethe Performance Options Dialog for each variation.
Overdubbing
Recording onto the same track for each loop. The new material is merged with the existingmaterial. This method is excellent for laying down drum grooves. You can record the bass drum on thefirst pass, the snare on the second, the hi hat on the third...
Alternate Takes
Recording onto different tracks for each loop. Each previously recorded track is muted.Use this method to lay down a couple of takes for a difficult passage, or try different ideasover a section of music. Then using the loop play feature, mute and solo each track tochoose which one sounds best.
Multiple Takes
Like the Alternate Takes method except that each loop records onto the same track, and

127
Forte 3
previously recorded material is deleted.This method is good for recording difficult passages - once you get it right, stop recording andthere's your perfect take.
Layering
Like the Overdubbing method except that each loop records onto a new trac k.For the more experimentally inclined…
Performance Options Settings
Check the Record Region check box and specify the measure where the loop Starts andwhere the loop Ends.
Set the Loop Region Start and Stop to the same values as the Record Region Start andStop.
Check the Lead-In Measures box and the For each loop box to enable lead-in counts foreach loop.
Select the Merge with existing radio button under the option When recording into a trackcontaining data.
Select theUse same track radio button under the option When loop recording, for eachnew loop.
-o-

128
Forte 3
The Device Wizard
The Device Wizard
The Device Wizard is an easy way to configure common device settings while using theprogram It appears when you run the application for the first time, but can be used anytimeas an alternative to the Sequencer Options dialog.
Using the Device Wizard
ToUse the Device Wizard you complete different forms that describe the properties andsettings for your MIDI and digital audio devices.
Simply complete each form, and then click Next to proceed to the next form . When you havereached the end the Next button changes to read, "Finish" - click the Finish button tocomplete the wizard.
Device Wizard Pages
You can move between the different pages using the Back and Next buttons.
-o-

129
Forte 3
MIDI Playback
This page in the Device Wizard isUsed to select the default deviceUsed to play bac k yourmusic files.
To Specify Instrument Definiton Files
Click the Device Properties... button to specify the instrument definition files to beassociated with the default MIDI device.
Setting Options
Select the MIDI device you want toUse as the default
Click the Test button to send a test note to the selected device. If you do not hearanything, check your MIDI connections, volume and power settings.
Click Next to move to the next page.
-o-

130
Forte 3
MIDI Thru
This page in the Device Wizard isUsed to select the MIDI device and channel that you wanttoUse for MIDI Thru.
Incoming MIDI data is sent back out through the MIDI Thru device. This type of setup allowsyou to play on one instrument yet hear the notes on several different instruments.
To Send a Test Note to a Device
Click the Test button to send a test note to the selected device. If you do not hearanything, check your MIDI connections, volume and power settings.
Setting Options
Choose one of the radio buttons to specify MIDI Thru mode.
Click Back or Next to navigate to another page.
In Automatic mode, the MIDI thru device is configured to the same device and channelUsedfor the track currently being recorded
In Manual mode, you specify the device and MIDI channel toUse for MIDI output. In theChannel combo box you can select a specific channel number or "No change" to send the dataout on the same channel that it came in on.
-o-

131
Forte 3
Digital Audio Options
This page in the Device Wizard isUsed to select the deviceUsed for playingdigital audio (.WAV) files.
To Send a Test Sound
Click the Test button to send a test sound to the selected device. If you donot hear anything, check your speaker connections, volume and power settings.
Other Setting Options
Select the device you want toUse as the default audio playback device
Use the Format combo box to select the formatUsed for playback
Click Back to navigate to another page.
-o-

132
Forte 3
Understanding Tracks and Staves
Understanding Tracks and Staves
MIDI files may contain single instrument or multiple instrument parts. Tracks and staves arebasically two alternative ways of referring to a part.
Staves
The staff is displayed in the Score View as a standard music staff with five horizontal linesand intermediate spaces on which music can be written (Grand Staff c ombines 2 individualstaves with a bracket. Each instrument part will have its own designated and labeled staff,matching the order of tracks in the Mixer.
Tracks
The track provides controls for the part much like that found on a studio mixing board. Eachindividual track is displayed in the Mixer with it's own volume control and effec ts knobs. Whena track is selected in the Mixer, the Properties Window displays property pages for adjustingthe part's instrument, MIDI channel and device.
-o-

133
Forte 3
Staff Name
You can change the name of a selected track in the Mixer View.
Note: This function will also affect how the Staff name appears in the Music Score.
To Change the Name of a Staff
Open the Mixer View. With the Properties Window open, select the desired track module in the Mixer View
then click on the Appearance tab. Click in the box under Staff Name and type in the new name.
-OR-
Open the Mixer View. Select the track you want to rename. Click again on the text in the track. This causes the text to becom e editable and select. Type the new name for the track and hit the Return key.
-o-

134
Forte 3
Staff Type
Four different staff types may be used to suite the instrument part.
For example, drum notation may be displayed on a drum staff or piano notation may bedisplayed on a grand staff (including left and right hand parts).
To Select a Staff Type
Open the Mixer View. With the Properties Window open, select the desired track module in the Mixer View then
click on he Appearance tab. Next to Staff Type, choose one of the options on the drop-down list: Normal Staff, Grand
Staff (Piano), Drum Staff, or Vocal Staff.
-o-

135
Forte 3
Voices
A voice is the termUsed to describe a unique melodic line or part. Most of the time each staffcontains only one voice, but occasionally the need arises to put more than one melodic line ona single staff. One example is two part vocal writing, where the soprano and alto share thesame staff. Other examples include keyboard notation, drum notation, and barbershopquartets.
Support of Voices
You can use up to 8 voices for each staff. To notate several different m usical lines, as forchoral parts, you would enter notes for each part as a separate voice. The notationengineUses the voice designation to determine things like stem direction, beaming patterns,and note groupings. This technique for handling notes and voices keeps eac h part visuallydistinct, even though 2 notes might occur at the same time. The default voice when addingnotes is All. By default, odd-numbered voices (1, 3, 5, ...) are displayed with stem s up andeven-numbered voices (2, 4, 6, ...) are displayed with stems down. In a Grand Staff, voices1-4 areUsed for the treble clef and voices 5-8 (1 L.H. - 4 L.H.) areUsed for the bass clef. Ifyou merge or split staves you will want to do so with these default rules in m ind since theygreatly affect how the notation will end up.
Manipulating Voices Independently
Voices are primarilyUsed for notational purposes, but even so it is som etimes desirable tomanipulate the sound of each voice independently. The most common example is when allparts are to be notated in a Grand Staff, but are to be played through different instruments (apiano playing an alto part and a saxophone playing the tenor part). Using the Staff PropertiesWindow you can specify completely independent MIDI channels and/or devices for each voiceon each track. Although unorthodox, you could have voices 1-3 playing as a harmonica on theinternal synth, voices 4-6 as an organ on an external keyboard, and voice 7-8 as percussionsounds on a drum machine. Keep in mind that ultimately you are still constrained by thenumber of independent MIDI channels you actually have. The ability to control the output ofeach voice makes it easier to manage routing but it does not increase the available MIDIoutput.
-o-

136
Forte 3
The Music Grid
The Music Grid
One can imagine a single staff of music displayed as one long horizontal row of measures.Two staves could be represented as two rows of measures, and so on.
In this way, all the measures and staves in the document can be thought of as a largerectangular "music grid", upon which the notes and other elements are placed.
The Music Score has two different view modes for representing music: Page View and TrackView. In Track View, the music is displayed as a music grid, with all the tracks and measuresdisplayed in one long scrolling view.
It is important to understand that as you change the number of measures and staves (evenindirectly) the grid is resized as well.
To learn more about adding measures and staves, click one of the topic s below.
Keeping the Grid Square
Adding Staves
Deleting Staves
Adding Measures
Deleting Measures
-o-

137
Forte 3
Keeping the Grid Square
When you add staves and measures, you are in fact adding rows and columns to the musicgrid. When you add a staff, a new row is inserted and filled with the sam e number ofmeasures as other staves. When you add a measure, a new column is added -- thiscorresponds to a new measure for each staff.
For notational and organizational purposes, it is desirable -- and often necessary -- to keepthe number of columns in the music grid consistent from row to row. In other words, everystaff must have the same number of measures.
Usually you won't even notice what's going on behind the scenes when you add measures orstaves. If you are viewing the Music Score in Page View, however, it may not be possible todisplay all the music on a page with the current display options. If this is the c ase, you areprompted with a "too-many-staves" dialog for you to adjust the display properties (using alayout) so that all of the music fits.
Note: If you are in the early stages of your composition, it may beUseful to work in TrackView until you're ready to print your music. This is because you may be adding and removingstaves and measures frequently - you can avoid the "too-many-staves" dialog by working inTrack View.
-o-

138
Forte 3
Add Staves
Use the Add Staff dialog to add any number of new staves to your music. Each staff is of aparticular type (e.g. drum staff, grand staff), it has a clef, a key, an instrument and a name.Collectively, these are all referred to as a part. The Add Staff dialog is reallyUsed to add partsto your music.
Select Music Add Staff... to display the Add Staff dialog. Click on the image below fordetails on each control. When you are ready to add the staves, press the OK button; or, pressthe Cancel button to abort the operation.
Click on areas of the image below for more information:
-o-

139
Forte 3
Remove Staves
Use the Remove Staves dialog to remove one or more staves from your music document.
Note: Removal of staves is one of the few things that cannot be undone -- you are prom ptedwith a dialog to warn you.
To Delete a Staff
Select Music Remove Staff... to display the Remove Staves dialog. In the Remove Staves dialog box, select the checkbox next to the staff (or staves) you
wish to remove.
Use the Select buttons at the bottom of the list to quickly check or uncheck all boxes.Click OK to remove the staves.
-o-

140
Forte 3
Add Measures
A measure groups a specific number of beats together according to the time signatureindicated at the beginning of the staff.
When adding measures, the new measures will contain the same staff information, layout,time signature changes and other score markings as found in the music document.
To Add a Measure
Select Music Add Measures... to display the Add Measures dialog. In the Add Measures dialog box, type the number of measures you want to add. Specify where to place the measure(s) - Before or After the specified measure or at the
End of the score. Click the OK button to add the measures.
-o-

141
Forte 3
Remove Measures
You may remove measures from your music score so that it no longer appears in the musicdocument.
Note: To delete the contents of a measure without removing the actual measure, select thenotes, text or other symbols, then use the Cut or Delete command.
To Remove a Measure
Select Music Remove Measures... to display the Remove Measures dialog. In the Remove Measure dialog, type the number of measures you want to delete. In the Remove Measures area, specify the range of measures to remove by entering
measure numbers in the From and To controls. Click the OK button to remove the spec ified measures.
-o-

142
Forte 3
Understanding Midi and Instruments
Understanding MIDI and Instruments
Any music that you create can be played through an instrument. An instrument can beanything from a sound card in a computer to a sophisticated external synthesizer. Allinstruments translate signals from the computer into specific musical equivalents. Differentinstruments synthesize sounds which can be dramatically different from one another. Theproblem of how to ensure that the resulting performance really sounds the way the c omposer(or arranger) intended requires the adoption of a standard set of sounds, shared by softwareand hardware vendors alike.
The First Standard
The first such standard was called General MIDI (GM), a set of definitions for MIDI programchanges. Under this standard, for example, program change 0 is always a piano, programchange 23 is always a harmonica, and so on. Other extensions to General MIDI were latercreated by Roland Corporation (GS) and Yamaha International (XG). In all cases, the goal isthe same: to agree on a numbering scheme so that compositions sound more-or-less thesame as they are performed on different instruments.
Other Supported Standards
These standards are only half the story, however. Many instruments support standards suchas GM, GS and XG, but also offer additional sounds or features that are unique to eac hinstrument. The precise manner in which each instrument responds to the c omputer'sinstructions may differ from instrument to instrument. To solve this problem a special text fileisUsed to describe the mapping between certain MIDI messages and the desired outc ome fora specific device.
There are actually 2 different instrument map files required to describe an instrumentcompletely - one to describe melodic sounds and one to describe percussive sounds. This isbecause many percussive instruments do not have anything that could be desc ribed as a"pitch" (what is the pitch of a hand clap?) -- most instruments instead utilize each pitch valueto represent a different percussive sound. These "drum maps" are also quite specific to eachinstrument and are usually displayed with a specific symbol or notehead type. You c an editthe drum map to automatically associate display styles with percussive values -- see theNotation Options for more details.
Nearly every instrument you find these days supports General MIDI, so the m ap files forGeneral MIDI instruments is the default. If you are using, say, a Roland SC-88 Pro or aYamaha synth, it makes sense toUse appropriate map files so that you have access to all thefeatures and sounds for your device. To change the map files for a device, select Options Sequencer… command from the menu, display the MIDI Out tab, and then selec t theProperties button for the selected device.

143
Forte 3
Note that the terms instrument and device have beenUsed interchangeably in thesediscussions. For the most part a device is the piece of hardware through whic h MIDIinstructions are sent, whereas an instrument is the actual equipment that translates MIDImessages into sounds. The MPU-401 device on your sound card, for example, may beconnected with a MIDI cable to your K-2000 keyboard, which creates the actual sounds. Whenviewing routing connections with the Track Properties Window you can view the connectionsby device name or by instrument.
-o-

144
Forte 3
Adding Instruments to Staves
When you add a staff to the score, a program change, or patch, is added at the start of thevery first measure. The program change tells the receiving MIDI device which instrumenttoUse, and that instrument isUsed throughout the entire performance of the piece. Often, youmay want to change patches in the middle of the piece, to simulate arco strings switching topizzicato, for example. To achieve this you need to add a program change to the staff.
To Add a Program Change to a Staff
Inspect a staff by double-clicking on a measure.
-OR-
Select a staff on the Mixer and Select Tools Properties Window from the menu.
Go to the Instrument tab and select the List >> button. Additional controls will becomevisible on the Instrument tab.
To enable the time control, click the New Patch button.
Enter a time other than 001:01:000 in the time control field.
Select the new patch from the list of patched and hit the Apply button. The new patch willappear in the patch list box.
To Remove a Program Change from a Staff
Inspect a staff by double-clicking on a measure.
-OR-
Select a staff on the Mixer and Select Tools Properties Window from the menu.
Go to the Instrument tab and select the List >> button. Additional controls will becomevisible on the Instrument tab.
Select the patch in the patch list by clicking the piano icon or the Measure:Beat:Tick area.
To remove the patch, click the Delete Patch button.
-o-

145
Forte 3
Instrument File Format
The Instrument File Format (IFF) isUsed to specify instrument maps for physical devices andaids in translating MIDI program changes and bank numbers into legible, easy-to-readstrings. IFF files appear as .ini files in the Instruments folder of the direc tory where you haveForte installed. IFF files for several c ommon MIDI synthesizers are provided in thisfolder.Users can create their own map files for other instruments using the guidelines in thisdocument.
One special note about the Yamaha XG files: the file "Yamaha XG.ini" contains a list of thecomplete set of what Yamaha terms "basic voices." The file "Yamaha XG Ext.ini" includes allthe voices in the basic set, plus the voices which Yamaha terms "extended voices." Pleasenote, however, that not all XG instruments support the complete basic set. If you have aYamaha XG instrument which supports less than the full set, you may want to make a copy ofthe basic XG file, and then simply remove those voices which your instrument does notsupport.
The IFF file is a standard Windows INI file which is organized according to sections, keys andvalues, like so:
[Section1]
Key1=Value1
Key2=Value2
[Section2]
Key1=Value1
Key2=Value2
Note that there cannot be any spaces around the equality ("=") sign.
There are several required sections: [Info], [Groups], and [Banks]. In addition, eac h value inthe [Groups] section corresponds to an additional section that describes voices in that group.Each of these sections is detailed in the following paragraphs.
Info Section
The [Info] section contains basic header information about the instrument, such as its nameand how it handles bank selection.
[Info]
Name=Filename
Type=BankMSB
Name
The value for this key is the actual filename of the INI file (without the INI extension). If yourinstrument file is called "My Instrument File.INI", for example, the entry should read:

146
Forte 3
Name=My Instrument File
Type
This key indicates the type of device and isUsed to indicate the bank selection protocolfollowed by the instrument. Some instruments ignore all bank change messages. Someinstruments recognize only bank change MSB (controller 0), and some recognize both bankchange MSB and LSB (controller 32). The key must be one of the following:
NoBank
BankMSB
BankMSBLSB
If you are unsure, use a value of NoBank.
Groups Section
This section isUsed to group voices with similar characteristics together. For example, allpiano variations can be placed under a single group called "Piano". The General MIDI (GM)specification breaks the 128 different program changes down into 8 different groups. Othergrouping categories can be defined as needed to best organize the different voices on aparticular instrument. It should be noted, however, that the GM spec ification is a widelyadopted standard and should be used whenever possible for grouping different voices. For alisting of specific groups in the GM specification, see the "General Midi.ini" file located in theInstruments directory.
[Groups]
1=Pianos
2=Basses
3=Strings
…etc.
The key for each entry in this section (e.g. 1, 2, 3 above) is ignored but must be unique.
Banks Sections
This section lists bank names, which areUseful if you view the instrument file organized bybanks.
[Banks]
0=General Midi
1=MyBank
2=TheirBank 1
3=TheirBank 2
… etc.

147
Forte 3
Unlike the [Groups] section, the key for each entry is NOT ignored and represents the MIDIbank number (from 0-127). In this example, bank 0 would be labeled "General Midi" in theinstrument view.
A file of type NoBank has one bank entry (yes, we know it doesn’t make sense, but, youknow, computers…). Examples of this type are "General Midi.ini" and "Korg M-1 Native.ini".
A file of type BankMSB may have several bank entries. An example of this type is "AlesisQS-8.ini".
A file of type BankMSBLSB will probably have many bank entries. The key value in this typeis the decimal equivalent of the bank MSB and LSB represented as a 14-bit number. Tocalculate this number, multiply the bank MSB by 128 and add to it the bank LSB. The result isthe key value. Some examples to illustrate this:
MSB LSB calculation key
0 12 (0 * 128) + 12 12
40 3 (40 * 128) + 3 5123
127 127 (127 * 128) + 127 16383
The file "Roland SC-88 Pro.ini" is an example of this type.
Other Sections
For each value in the [Groups] section there must be a corresponding section containingvoices for that group. Using the values above we must therefore have sections entitled[Pianos], [Basses], [Strings], and so on.
Each voice entry represents the name of the voice, the bank number and the programchange number, in that order. Note that bank numbers are zero-based (0-127) whereasprogram changes are one-based (1-128). The preferred method is to separate each value by acomma, as follows:
[Pianos]
0=Acoustic Grand Piano, 0, 1 ; Bank 0, Program Change 1
1=Bright Acoustic Piano, 3, 1 ; Bank 3, Program Change 1
2=Electric Grand Piano, 6, 2 ; Bank 6, Program Change 2
3=Electric Piano 2, 13, 5 ; Bank 13, Program Change 5
etc.
If an entry does not have a bank and program number, bank zero is assumed, and theprogram number is taken from the key (the number of the left side of the "=" sign). In thiscase the key number is significant and should be 1-based rather than 0-based:
[Pianos]
1=Acoustic Grand Piano ; Bank 0, Program Change 1
2=Bright Acoustic Piano ; Bank 0, Program Change 2
5=Electric Piano 2 ; Bank 0, Program Change 5

148
Forte 3
etc.
If an entry has a bank value but does not have a program change value, the key isUsed asthe program change. For example:
[Native Drums]
1=Standard, 0 ; Bank 0, Program Change 1
9=Room, 8 ; Bank 8, Program Change 9
17=Power, 16 ; Bank 16, Program Change 17
etc.
An entry must NOT be empty. In other words, don’t do this:
[Pianos]
1=Piano
2= ; This entry is INVALID!
3=Bass
Note:
EnterprisingUsers who manage to create a well-behaved IFF file and who wish to share itwith other owners of the same instrument are encouraged to e-mail the fruits of their laborto [email protected]. We will include it with future releases of our products.
-o-

149
Forte 3
System Exckusive Messages
System Exclusive Messages
MIDI System Exclusive (Sys/Ex) messages are special messages which lie outside the domainof normal musical elements. They are intended to set performance parameters on specifichardware devices, exclusive of other devices in your set-up. Sys/Ex messages may be edited,added and deleted from your music in the Sys/Ex dialog.
Four of the most common messages (General MIDI On/Off, Yamaha XG On, and Roland GSOn) are provided as conveniences. You may also create your own custom messages.Ordinarily, Sys/Ex messages are added "in-line," that is, you give them a timestamp like anyother element in music, and they will be performed at that time. In many cases, however, it isdesirable to have a short sequence of Sys/Ex messages (for example, General MIDI Onfollowed by XG On) which will be transmitted before the beginning of the song. We c all thisthe Pre-Start sequence. The purpose of a Pre-Start sequence is to perform importantinitialization and set-up procedures in your playback devices before the music begins. Thereason these messages should be transmitted before the piece, and not right at thebeginning, is that synthesizers typically require from 300 to 500 milliseconds after receptionof a system configuration message before they are ready to begin perform ing "normal" datasuch as notes and controllers.
Messages in the Pre-Start list are automatically spaced 500 milliseconds apart. Thus, forexample, if you have four messages in the Pre-Start list, there will be a delay of 2 secondsafter you hit the "Play" transport control button before your music actually starts.
To Add Pre-Start Messages
1. Display the System Exclusive dialog by selecting Music SysEx… from the menu.
2. Click the New… button to bring up the System Exclusive Editor dialog.
3. Select the Pre-Start Message check box to the right of the tim e control field.
4. Click the Add button and select from among pre-defined sysex messages or New todefine your own.
-OR-
Click the Import button to load a SysEx binary from a file.
1. When defining your own custom message, give it a desc riptive name in the Name fieldand enter the data directly into the Message Data box.
2. Click OK to apply the changes.
To Add In-Line Messages
1. Display the System Exclusive dialog by selecting Music SysEx… from the menu.
2. Click the New button to bring up the System Exclusive Editor dialog.
3. Set the time for the message in the time control .

150
Forte 3
4. Click the Add button and select from among pre-defined sysex messages or New todefine your own.
-OR-
Click the Import button to load a SysEx binary from a file.
3. When defining your own custom message, give it a desc riptive name in the Name fieldand enter the data directly into the Message Data box.
4. Click OK to apply the changes.
To Export SysEx binaries (files)
You can export any SysEx message to a binary file forUse in other files.
1. Display the System Exclusive dialog by selecting Music SysEx… from the menu.
2. Select the message you would like to save.
3. Click the Edit… button to bring up the System Exclusive Editor dialog.
4. Click the Export button to bring up the Save As dialog.
To Reorder Pre-Start Messages
1. Display the System Exclusive dialog by selecting Music SysEx… from the menu.
2. Select the message you would like to move in the Pre-Start Messages list.
3. Click the up arrow or the down arrow to move the message.
4. Click OK to apply the changes.
To Edit Messages
1. Display the System Exclusive dialog by selecting Music SysEx… from the menu.
2. Select the message you would like to edit in either the Pre-Start Messages list or theNormal Messages list.
3. Click the Edit… button to bring up the Edit System Exclusive dialog.
4. Edit the message data and click OK to apply the changes.
To Remove Messages
1. Display the System Exclusive dialog by selecting Music SysEx… from the menu.
2. Select the message you would like to remove in either the Pre-Start Messages list orthe Normal Messages list.
3. Click the Remove button.
4. Click OK to apply the changes.
Note: if you have messages in the Pre-Start list and you save your music as a MIDI file, then

151
Forte 3
an extra measure (or more if required) will be created at the beginning of the MIDI file tocontain your Pre-Start messages. The reason for this is that the standard MIDI file formatdoes not have a concept of Pre-Start, or "negative" time, and must therefore delay the entiresong in order to accommodate the messages in the Pre-Start list.
-o-

152
Forte 3
Channel Mode Messages
Channel Mode Editor
The Channel Mode Editor is where you set the message type, time, channel, and receivingdevice of a channel mode message.
-o-

153
Forte 3
Channel Mode Messages
Channel Mode Messages provide a way to control how the receiving devic e will respond to allincoming voice messages (like notes and pitch bends). In addition, som e channel modemessages may be used for such specialized tasks as controlling lights on a MIDI controlledlighting console or for clearing buffers on a MIDI controlled signal processor.
To Add Channel Mode Messages
1. Display the Channel Mode dialog by selecting Music Channel Mode… from the menu.
2. Click the New… button to bring up the Channel Mode Editor dialog.
3. Select the message type, the insertion time, the MIDI channel for the message, andthe device to receive the message.
4. Click OK to insert the message. Click OK again to close the Channel Message dialog.
To Remove Channel Mode Messages
5. Display the Channel Mode dialog by selecting Music Channel Mode… from the menu.
6. Select the message you would like to remove by clicking on the message name.
7. Click the Remove button.
To Edit Channel Mode Messages
1. Display the Channel Mode dialog by selecting Music Channel Mode… from the menu.
2. Select the message you would like to edit and click the Edit… button
-OR-
Double click on the message you would like to edit.
3. From the Channel Mode Editor edit the message type, change the time, change thechannel, or change the receiving device.
4. Click OK to apply the changes.
-o-

154
Forte 3
Views
Views
Views are the primary work area that you use to create and edit music. There are severaldifferent views available. If you want to display a different view, c lick on the Tools menu andselect the desired view from the menu.
Each view is very different from the rest and emphasizes a different aspect of the music. TheMusic Score, for example, isUsed when one is interested in creating music notation; the AudioSequencer, on the other hand, isUsed only when setting up digital audio trac ks to play alongwith the MIDI data. Different people have different preferences, so try out each view to seewhich one works best for you.
Click one of the following topics for more information about each view:
Music Score
This view displays music as standard music notation. The notes are organizedinto measures and systems along staff lines which represent the pitch of thenotes.
Audio Sequencer
This view displays the digital audio files which are to be played along with theMIDI information. The view displays wave files as bars along a tim eline andprovides basic controls for adjusting wave performance parameters.
Piano Roll
This view represents music much as the scrolls on a player piano -- the notesare represented as bars along a grid which represents the underlyingmeasures. The width of each bar represents the duration of the note.
MIDI Events
This view is a simple table of events such as notes, dynamic markings andtempos. Different underlying properties such as note pitch, duration, etc. canbe edited directly in the table.
-o-

155
Forte 3
View Tools
View Tools
Several tools for creating, editing and managing your music are provided.
The Elements Palette, Properties Window and Mixer are the primary view tools you use tocreate, perform and edit your composition.
For more information about specific tools, c lick on a topic below:
Displaying a Tool
Elements Palette
Properties Window
Mixer
-o-

156
Forte 3
Displaying a View Tool
To Display a View Tool
Use any of the following methods to display a view tool:
Select the appropriate item from the View menu.
Press the appropriate tool button in the Edit toolbar.
If you forget what a button represents, you can move the mouse pointer over the button todisplay a tooltip.
Press the appropriate shortcut key: CTRL+1, CTRL+2 or CTRL+3 to toggle display of theElements Palette, the Properties Window and the Mixer, respectively.
-o-

157
Forte 3
Page View
In Page View, the music is displayed as it would be on a piece of paper. Measures arearranged horizontally across the page and begin a new line when they reac h the right margin.If there is more than one staff, the staves are grouped into systems. Systems are arrangedvertically on the page and begin a new page when they reach the bottom margin. On rarecases a measure may split a line break, but a system may never split a page break.
There are dozens of ways to control how the music looks on a piece of paper. Sometimes youmay want smaller notes in order to fit music with many staves on a page, other times youmay want larger notes when printing out a part extrac tion.
All of these formatting preferences are defined in what is known as a layout. A layout isessentially a style sheet that describes how the music looks on a piece of paper - it definesthe page size, margins, fonts, tiling options and so forth. You can edit and create new layoutsto suit your needs.
Keep in mind that the layouts define global settings for the score. You can always edit spacingand layout settings independently for each system on the page. For example, you couldspecify 3 measures on the first system and 7 measures on the next system. Simply select asystem and use the Properties Window to edit its appearance. Every symbol in the music canbe edited using the Properties Window to get your music looking crisp and professional.
-o-

158
Forte 3
Track View
In Track View, the measures are displayed horizontally in one long sc rolling view. There areno line breaks or page breaks in Track View and there is no limit to the number of tracks thatcan be displayed. You can display all tracks or any combination of tracks using the Track droplist found in the Notation Bar above the score.
A margin on the left side displays basic characteristics of each staff ( clef, key, name, etc.).Move the mouse to the edge of the margin to resize or hide the margin.
Track View is often an easier way to enter notes into the score since you do not need tocontinually scroll the page left/right as you must when working with systems in Page View.Later, when you're ready to print the music you can switch to Page View for any fine-tuningadjustment to the appearance or location of musical symbols.
-o-

159
Forte 3
Notation Bar
The Notation Bar is the area of controls displayed the top of the Music Score (but still insidethe window). The bar contains controls for setting view mode, zoom factor, visible staves &layouts, voice, and margin display. These commands are also visible in the View menu whenthe Music Score is the active view.
View Mode
The two buttons on the far left of the Notation Bar areUsed to set the viewing m ode betweenPage View and Track View.
Zoom
There are two sets of controls. The drop list contains several zoom factors you can selectfrom.Use the magnifying glass buttons to zoom the score to the next or previousmagnification factor listed in the zoom factor list.
Layout/Track
In Page View, the Layout drop list isUsed to select the current layout. If you press the sm allarrow button next to the list, a popup menu appears where you can edit or create layouts.
In Track View, the drop list displays the list of tracks to view and the label reads, "Trac ks".You can select from the list, or type in numerical values that represent the staves. Acceptablevalues are in the form, "1", "1-3", "1, 2-5, 9, 10", "1 2 3 4". For example, if you are viewing alarge orchestral piece and you want to view the winds, type in either "1-4", or "1 2 3 4".Selecting the small arrow button next to the list will allow you to edit the layout. There is onlyone Track Layout per file.
Voice
The Voice drop list selects which voices to view, and which voice isUsed when entering notes(either via mouse entry, step recording, or real time recording). Selecting All will view allvoices. Selecting 1-8 will show the selected voice in its normal color, and all other voices willbe grayed out. You can also view what objects are hidden. Hidden objects will appear grayedout when Hidden is selected.
Margin Display
Toggling the Margin Display button shows or hides the margins and system sizes. ThisisUseful when fine-tuning the positions of staves on the page.
-o-

160
Forte 3
Layouts
Layouts
Layouts are style sheets that control page layout, sizing and positioning options. Eac h layoutstores allUser overrides in the score, making it possible to adjust measure spacing, notes andother symbols independently of other layouts. Properties Window pages for c ontrolling theappearance of measures and systems can be used in conjunction with a layout to get themusic looking just right.
Each music document contains its own set of layouts - you can add as m any layouts as youwish. A common scenario is to create a full score layout for the c onductor, and individual partlayouts for each performer.
Layouts control only the visual appearance of your music - they do not affect the music itself.This makes it very easy for you to work on compositions and create printed parts without thehassle of creating different documents for each part.
As an example, suppose you have written a string quartet and you'd like to try it out withyour musician friends. You would create a layout for each part and print out the 4 parts soyour friends could try it out. After hearing the result and feedback from the performers, youmight decide to add or rearrange some sections of the composition. You could do this in themain "Full Score" layout where you can see all the parts and how they interact - then, youcouldUse the same layouts you originally created to print out revised parts for eac hperformer. The music you added would appear in all the different layouts, saving you the tim eand effort of entering the new portions for each part.
Click on a topic below to learn more about using Layouts with your music document.
How Music is Displayed
Create a Layout
Layout Properties
Edit a Layout
Edit a Layout with the Properties Window
Remove a Layout
Track View Layout
-o-

161
Forte 3
How Music is Displayed
When displaying music on a piece of paper it becomes necessary to break the measures apartinto lines, just like words in a book. A "system" is a horizontal block of staves on a piece ofpaper. Depending on how many staves are in the music, a system can be large or small.Measures in each staff are displayed within the system.
The illustration below depicts a composition that contains 3 staves as it m ight be displayedon a piece of paper:
The number of systems that fit onto a page depends on many factors, including the page andstaff size, spacing around each system, and the number of staves that are in the music. Acomposition containing 6 staves, for example, takes more vertical space on the page thandoes a single-staff piece.
The number of measures that can be reasonably displayed within a given system dependsentirely on the music - lots of 32nd notes, for example, takes more horizontal space todisplay, whereas a single whole note doesn't take much room at all.
Note in the illustration that the second system contains more measures than does the firstsystem. By changing the number of measures in each system to fit your music you can createprofessional-looking printouts that are clean and easy-to-read.
-o-

162
Forte 3
Create a New Layout
By default, a layout named "Full Score" is created when a file is loaded.As its name implies, this layout has all staves visible, a regular staff size, and default settingsfor measures per system and systems per page.You can also create as many new layouts as you like, edit and remove existing layouts.By default the new layout will be created as an individual part extraction, meaning only onestaff is displayed in the Display Staves field.
or
To Create a New Layout
Display the Music Score in Page View. Select View Create New Layout… from the menu or from the popup Layout Ac tions
button at the top of the Music Score: Make desired changes to layout using the Layout Dialog. Click the OK button to save the new layout and close the dialog.
- OR -

163
Forte 3
-o-

164
Forte 3
Layout Dialog
Layout Dialog
The Layout Dialog isUsed to specify overall properties of new layouts or to change theproperties of an existing layout. In addition to the Layout Dialog, you can change the positionand spacing of your music using the Properties Window - these changes are stored along withthe layout.
The layout dialog is organized into the following tabs (click on the name of the tab in thetable below for details):
Setup Basic information about which stavesare visible, title page style, staff sizeand fonts.
Margins Margin information for left and rightpages and first system. Paper sizesand orientation and tiling
Spacing Default measures/system andsystems/page, and spacing aroundstaves.
Options Miscellaneous options such asmultiple-measure rests and measureand page numbering options

165
Forte 3
The Layout Sample window is a crude representation of how staves and system will fit onto apiece of paper. As you change the staff size, tiling options and so on the layout sam plewindow changes to give a general idea of how things will look on the page.
-o-

166
Forte 3
Layout Setup
Click on areas of the image below for more information:
This tab contains settings for the layout name, which staves to display, title page style, staffsize, and fonts.
-o-

167
Forte 3
Layout Margins
Click on an area in the image below for details on each control:
This tab contains settings for left page and right page margins, and first system indent.
-o-

168
Forte 3
Layout Spacing
This tab contains settings for measures per system, systems per page, spacing above andbelow the staves, and spacing of lyrics and other symbols. These are defaults only - you canalwaysUse the Properties Window to change values for a specific system or page.
-o-

169
Forte 3
Layout Options
This tab contains various settings for page numbering, measure numbering and multiplemeasure rests.
-o-

170
Forte 3
Edit a Layout
You can edit any existing layout. The Edit Layout dialog is exactly the same as the dialogUsedto create new layouts.You can edit any existing layout. The Edit Layout dialog is exactly the same as the dialogUsedto create new layouts.
To edit an existing layout
Display the Music Score in Page View.
Select the layout you want to edit in the Layout combobox:
Make desired changes to layout using the Layout Dialog.
Click the Apply button to see how the music looks using the current settings. Click the OKbutton to save the changes and close the dialog.
-o-

171
Forte 3
Edit Layout with the Properties Window
Rarely does a score contain the same number of measures per system throughout. Forgeneral readability, four measures per system is usually recommended.
However, dense musical passages, measures containing only footballs, page turnconsiderations, and what looks good may require that some systems contain more measuresthan others. Spacing between staves may also vary from system to system.
The Properties Window provides a way to quickly modify these parameters at a per-systemand per-page level.
To Display the Appropriate Properties Window
1. Display the Music Score in Page View.2. In Select Mode, click on a measure. 3. After clicking on a measure, the system that contains the measure is highlighted. 4. Click the right mouse button to display a popup menu, and choose Extend Selec tion to
Page, Extend Selection to End or Select Staff to select related items.
To Edit the Layout
1. Select the systems you want to edit.2. Select the Staff Spacing or System tab in the Properties Window.3. Make changes to appropriate fields.4. Click the Apply button to apply the changes to the score.
-o-

172
Forte 3
Remove a Layout
Sometimes you may wish to delete layouts that you are no longer using.
You can delete any layout except the default layout -- you can edit the defaultlayout, however.
To Delete a Layout
Display the Music Score in Page View. Select the layout you want to remove in the Layout combo box. Select View Remove Layout from the View from the menu or from the
popup Layout Actions button at the top of the Music Score.
Note that you cannot remove the original "Full Score" layout from a document
-o-

173
Forte 3
Track Layout
The Edit Track Layout Dialog controls the appearance of track view. Like the layouts for pageview, this layout contains settings for staff spacing, symbols spacing, measure options, andfonts. It differs from the page view layouts in that there is only one track layout. There is noconcept of systems, pages, and part extractions in track view. To view only specific staves,see the Layout/Track discussion in the topic The Notation Bar .
-o-

174
Forte 3
Working with Large Scores
When working with large orchestral scores or MIDI files with many staves, the layout mayneed to be edited to fit all of the staves onto a single page.
If this is the case, you will be prompted to edit the layout before Music Score is firstdisplayed. If you do not edit the layout such that all systems can properly fit, you shouldswitch to Track View to do your editing.
There are many ways to modify the layout so that everything to fits. The most commonapproach is to select a smaller staff size (Giant is the largest, Pearl is the smallest). Thisreduces the size of the font and allows for more music to fit on a page. Another approach is tocreate a larger virtual page by tiling 2 or 4 pages together. For an 8 ½ X 11 piece of paper,selecting a tiling value of 2 X 1 with landscape mode creates a virtual page of size 11 X 17,for example.
-o-

175
Forte 3
The Music Score
The Music Score
The Music Score represents a music document as standard music notation. To display theview, select Tools Music Score from the menu.
Notes, text, dynamic markings, clefs, meters and dozens of other symbols are added directlyto the music simply by choosing a symbol from the Elements Palette and clicking the mouseat the location in the music where the symbol should be added.
The Music Score further operates in two different view modes: Page View and Track View.Both views display standard music notation - the difference is how staves and m easures aredisplayed.
At the top of the Music Score is the Notation Bar. This bar contains controls for toggling viewmodes, zoom factors and which tracks to display. A control is also provided for selec ting thevoice that is displayed in the view.
-o-

176
Forte 3
The Music Cursor
When you enter symbols into the Music Score, the Music Cursor provides you with visualfeedback to help you position and place elements.
If you select a note in the Elements Palette and move the mouse to enter a note in the score,for example, a light frame appears around each measure as the mouse moves through it.Above the measure is a Music Ruler which displays the beat marks in the measure. Inaddition to the measure feedback, the "note cursor" displays a dotted line and a smallindicator box at an appropriate pitch value in the staff. These help you locate a prec ise timelocation and pitch where the note is to be added.
Cursors for other elements provide different feedback to help you place music symbols moreeasily. The table below gives a brief description of the different cursors and their behavior.
Symbol Description
Note, Gracenote When the mouse enters a measure, a light frame is drawnaround the measure along with a Music Ruler indicatingthe beats and subdivisions in the measure.
A dotted vertical line appears at the current time locationof the mouse in the measure -- the line snaps to the tic kmarks in the Music Ruler.
A small indicator box is also displayed at the current pitchlocation in the measure (with ledger lines if necessary).
The vertical line and indicator box allow you to prec iselycontrol where notes are inserted in the score.
Tuplet Same as for notes, with the following addition:
When the mouse enters a measure, the tick marksdisplayed in the Music Ruler change to display theirregular tuplet divisions.
Rest Same as for notes, except the pitch indicator box does notappear (since rests do not have a pitch).
Accidentals
Accents
Dots
Ornaments
Pointer changes to a "bulls-eye" when the cursor is over anote or chord; otherwise, the cursor is a standard crosscursor.
You can click and drag out a selection rectangle to selectnotes. When you release the mouse, new elements areadded to the selected notes.
Slurs
Ties
The mouse pointer appears as a cross. You c lick and draga selection frame to select 2 or more adjacent notes. Theselected notes are tied/slurred together when you releasethe mouse
Chords A vertical line appears - just as for entering notes - for

177
Forte 3
Dynamics
Pedals
Repeats
Tempos
specifying the location of the symbol.
For tempos and dynamics that areUsed to specifyconstant values (e.g. mf, andante) the line indicates thelocation of the element.
For symbols that specify changing values (e.g. cresc.,accel.), the dotted vertical line represents only one side ofthe symbol. After clicking the mouse once, another lineappears for specifying the other end of the symbol. Afterboth positions have been specified, the symbol is added.
Text Same as above with the following addition:
Clicking the cursor above the staff will add the text abovethe staff, below the staff will add the text below the staff.Clicking the cursor between the upper and lower staff of agrand staff will add the text between the upper and lowerstaff.
Clefs The cursor is a pointing hand. As the mouse moves overeach measure, a dotted line appears to indicate where theclef will be added.
Key
Meter
The cursor is a pointing hand. As the mouse moves overeach measure, the measure highlights. If the mouse isreleased while over a highlighted measure, the symbol isadded at the beginning of that measure.
-o-

178
Forte 3
Entering Music in Music Score
Entering Music in the Music Score
When you add music symbols to a document the notation engine properly aligns andpositions them according to standard music notation practices. Notes are beamed together orflagged, rests are added around notes, measures resized, etc. in order to get the music to fitproperly.
Entering music begins with selecting a symbol from the Elements Palette. This plac es theapplication into Insert Mode (if it was not already), and changes the cursor to theappropriate type for the element that is selected in the Elements Palette.
In order to control where elements are added, the Music ScoreUses several different musiccursors to guide the process. Essentially, the music cursor ensures that you place symbols inmeaningful locations. For example, you cannot place a key signature on a dynamic marking --after all, what would that mean?
When appropriate, the music cursors provide additional visual feedback so it is clearexactly where the music symbol will end up. For example, as you move the mouse, the notecursor displays a small rectangle where the note will be placed so you can see exac tly whatthe pitch will be for the note.
Inserting the selected music symbol is normally as simple as clicking the mouse in themusic at the location currently displayed by the music cursor. In some cases, additional inputis required before the symbol is added. For example, when entering lyrics you still need totype in the actual text.
Click on one of the following topics to learn how to add the symbol to your music:
General Editing Notes
Accents Octavas
Accidentals Ornaments
Chord Symbols Pedal Marks
Clefs Repeats
Dynamic Markings Rests
Grace Notes Slurs
Images Tempos
Key Signatures Text
Lyrics Ties
Meters Tuplets

179
Forte 3
-o-

180
Forte 3
Accents
Add and Remove Accents
There are several types of accents displayed in the Elements Palette such as articulations,breath marks and bowing symbols.
All accents are associated with particular notes and are added to the music in the samemanner. When you add an accent to a note it is automatically positioned either above orbelow the note, depending on a variety of factors such as the stem direction of the note,voicing and staff type.
Accents affect the playback of the note that they have added to. However, they do notchange the performance data of the note. To return the note to it's original state, sim pledelete the accent.
Once an accent is added to your music you can edit its position, appearance and performanceproperties.
To Add an Accent to a Note
1. Select the Accents tab in the Elements Palette, then select one of the accents.
2. Move the cursor over the note to which you want to add the accent. Notice that thecursor changes into a bullseye and the note highlights when the cursor is over thenote.
3. Click the mouse to add the accent to the note.
To Remove Accents
To remove accents, simply select them with the mouse and select Edit Delete from themenu.
-OR-
Select the accents and press the Delete key.
To Add Accents to Several Notes
1. Select the Accents tab in the Elements Palette, then select one of the accents.
2. Click - but do not release - the mouse in an empty area that is not over a note.

181
Forte 3
3. Drag the mouse to sweep out a rectangular area. Notice that notes that are includedin the selection area are highlighted.
Release the mouse to add accents of the specified type to all the selected notes.
-o-

182
Forte 3
Edit Accents with the Properties Window
The Properties Window is a useful tool for changing the properties of any sym bol, includingaccents.
Be sure the application is in Select Mode, then select the accents you want to edit.
You can select several different accents and change all of their properties at once.
Edit Accents with the Properties Window
Select the accents you want to edit, then display the Properties Window . To change how the accent appears in the notation, select the Appearance tab in the
Properties Window and adjust the appearance properties. To change how the accent sounds during a performance, select the Performance tab in
the Properties Window and adjust the performance properties. Click the Apply button when you are done making changes.
-o-

183
Forte 3
Edit Accents with the Shortcut Menu
If an accent is selected you can right-click the m ouse to display a special shortcut menu. Themenu contains commands for changing accent properties. For simple operations this methodcan be faster and easier than using the Properties Window.
Using the Shortcut Menu
Be sure the current mode is Select Mode, then select the accents you want to edit. Right-click the mouse to display the shortcut menu. Select an item from the context menu to perform the command.
-o-

184
Forte 3
Reminder Accidentals (Courtesy Accidentals)
Reminder Accidentals are accidentals placed in front of notes where the ac cidental is alreadyimplied from the rules of notation. For example, if a C sharp is in a previous measure, and a Cnatural is in the following measure, a natural is not needed in front of the C sinc e the sharponly carries through the previous measure. However, to make things absolutely clear to theplayer, you may want to put a natural in front of the C as a rem inder. Click here for somemore examples of where reminder accidentals areUsed.
To Add Reminders to Existing Notes
Select the Notes tab in the Elements Palette. Choose an accidental in the Notes tab. Click on the reminder symbol (the parentheses to the right of the ac cidentals). Make sure that no note values is selected (To unselect a note value, click on it). Place the cursor over the note that you want to add the rem inder to (The cursor will turn
into a bullseye and the note will become highlighted when you are positioned over thenote). Click to place the reminder.
Entering Notes With Reminders
Select the Notes tab in the Elements Palette. Choose a note in the Notes tab. Choose an accidental in the Notes tab. Click on the reminder symbol. All three symbols should be selected. Enter the note as you would normally.
Removing Parentheses from Reminder Accidentals
See the topic Editing Accidentals with the Menu.
To Add Reminders to Tied Notes
When you tie two notes together that have accidentals, the second accidental is hidden. If thetie is over a system break, you may want to unhide the second accidental to turn it into areminder.
From the Voice drop list in the Notation Bar , select Hidden. The second accidental will appear in a grayed state. Select it, and with the Properties
Window, uncheck the Hidden box.
-o-

185
Forte 3
Accidentals
Add and Remove Accidentals
Accidentals (sharps, flats, etc.) areUsed to represent notes whose pitches do not correspondto the normal staff lines or spaces.
Depending on the clef and key signature, a given pitch may need to be displayed with sharpsor flats. Likewise, adding an accidental to a note effectively changes the note's pitch. As youadd or remove accidentals to notes, keep in mind that you are really changing the pitch ofnotes, and the accidentals you originally added may or may not be displayed in the sc ore(depending on the clef and key).
You can add an accidental to an existing note, or you can attach an accidental to new notesas they are added. Once an accidental is added to your music you can edit its position andappearance properties.
To Add an Accidental to a Note
Select the Notes tab in the Elements Palette, then select one of the accidentals.
Move the cursor over the note to which you want to add the accidental. Notice that the cursorchanges into a bullseye and the note highlights when the cursor is over the note.
Click the mouse to add the accidental to the note.
See Reminder Accidentals to add an accidental that is already in the key or an accidentalthat already appears in the measure.
To Enter a Note with an Accidental
Select the Notes tab in the Elements Palette and choose a new note to add.Choose an accidental to go along with the note.
Enter the note as usual.
To Add Accidentals to Several NotesSelect the Notes tab in the Elements Palette, then select one of the accidentals.Click - but do not release - the mouse in an empty area that is not over a note.

186
Forte 3
3. Drag the mouse to sweep out a rectangular area. Noticethat notes that are incuded in the selection area are highlighted.
Release the mouse to add accidentals of the specified type to all the selected notes.
To Remove Accidentals
To remove accidentals, simply select them with the mouse and select Edit Delete from themenu.
-OR-
Select the accidentals and press the Delete key.
Note that removing an accidental effectively changes the pitch other accidentals m ay bere-added to properly represent the note in the current clef and key.
-o-

187
Forte 3
Edit Accidentals with the Properties Window
The Properties Window is a useful tool for changing the properties of any sym bol, includingaccidentals.Be sure the application is in Select Mode, then select the accidentals you want to edit.You can select several different accidentals and change all of their properties at once.
To Edit Accidentals with the Properties Window
Select the accidentals you want to edit, then display the Properties Window . To change how the accidental appears in the notation, select the Appearance tab in the
Properties Window and adjust the appearance properties. To change general properties of the accidental, such as its position, visibility and c olor,
select the General tab in the Properties Window and adjust the general properties. Click the Apply button when you are done making changes.
-o-

188
Forte 3
Edit Accidentals with the Shortcut Menu
If an accidental is selected you can right-click the mouse to display a special shortcut menu.The menu contains commands for changing accidental properties. For simple operations thismethod can be faster and easier than using the Properties Window.
Using the Shortcut Menu
Be sure the current mode is Select Mode, then select the accidentals you want to edit. Right-click the mouse to display the shortcut menu. Select an item from the context menu to perform the command.
-o-

189
Forte 3
Chord Symbols
Add and Remove Chord Symbols
Chord grids and chord names are two commonly-used ways to represent the overall harmonicstructure of the music.Chord symbols are displayed above measures - much like tempo markings. Once a chordsymbol is added to your music you can edit its position and appearanc e properties.
Chord grids depict the underlying chords as finger patterns on a 6-string guitar. There is onevertical line for each string on the guitar.
The horizontal lines give the guitarist a guide for which fret to play. An "x" above a stringmeans it's not played and an "o" above a string means it's played open. You will most oftenfind these symbols in popular music.
There are hundreds of different sorts of chords that areUsed by guitarists, each a differentcombination of fingers, strings, tunings and patterns. 256 of the most common chords aresupported.
To Add a Chord Symbol to a Measure
Select the Text/Chords tab in the Elements Palette, then select the chord grid symbol.
Move the cursor over the measure to which you want to add the symbol. Notice that thecursor changes into a chord grid and a red dotted line is displayed at the current locationin the Music Score.
Align the dashed red line with the beat on the Music Ruler where you want the chordsymbol.
Click the mouse to display the Insert Chord dialog. In the Insert Chord dialog, specify the properties of the chord, then click the Insert

190
Forte 3
button to add the chord at the specified location in the measure.
Chord names can be used in addition to, or in place of chord grids. Many performers preferchord names since they take up less space than grids. They also allow the perform er someflexibility as to a specific fingering or voicing required to play the chord.
If you want to enter a chord that does not have a corresponding chord grid, you can alwaysenter it as a chord name.
You can use special formatting characters to create chord names using a variety of shorthandstyles. For example, you may prefer "-7" instead of "minor7", "min7", or "m7" to represent aminor 7th chord.
To Remove a Chord Symbol
To remove a clef, simply select it with the mouse and select Edit Delete from the menu.
-OR-
Select the accents and press the Delete key.
-o-

191
Forte 3
Edit Chord Symbols with the Properties Window
The Properties Window is a useful tool for changing the properties of any sym bol, includingchord symbols.
Be sure the application is in Select Mode, then select the chord symbol you want to edit.
You can select several different chord symbols and change all of their properties at once.
Note: If you are finding that you need to move all of the chord symbols higher to clear somenotes, consider adjusting the Symbol Spacing Above setting for the system instead ofadjusting their position.
Edit a Chord Symbol
Select the chord symbols you want to edit, then display the Properties Window . To change the type of chord symbol select the Appearance tab in the Properties Window
and adjust the appearance properties. To change general properties of the clef, such as its position, visibility and color, select
the General tab in the Properties Window and adjust the general properties. To perform an action, such as transpose or move, select the Actions tab in the Properties
Window. Click the Apply button when you are done making changes.
-o-
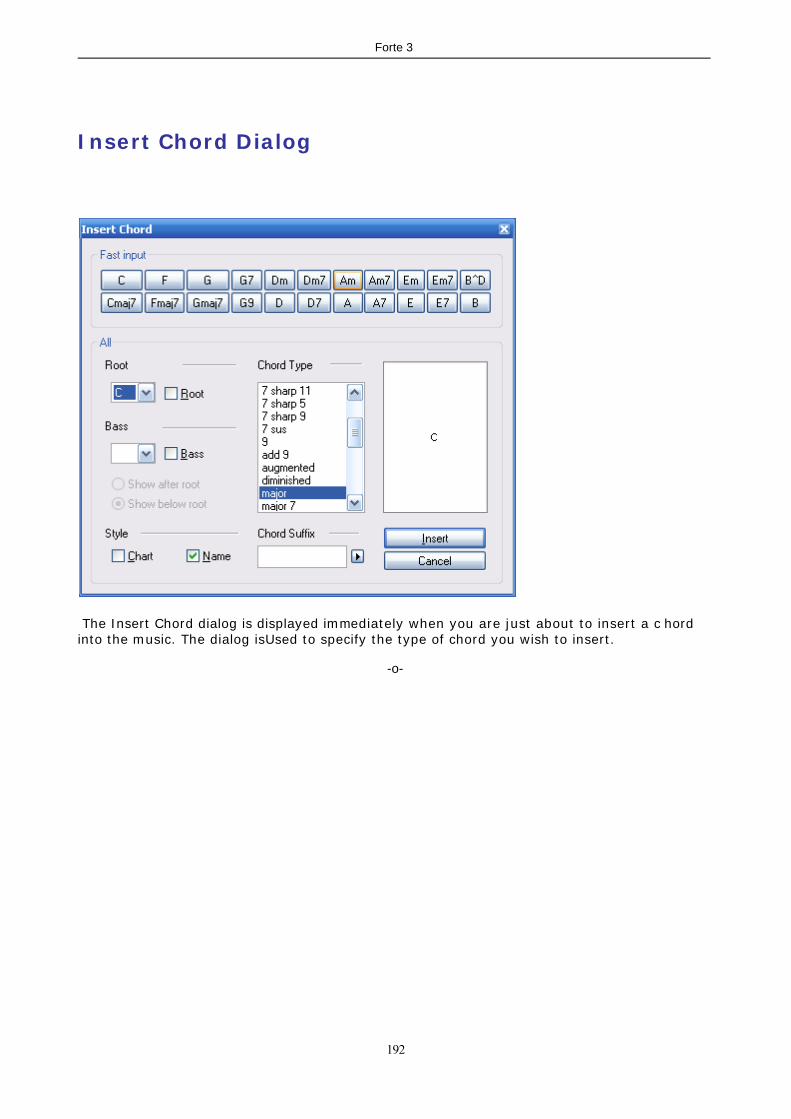
192
Forte 3
Insert Chord Dialog
The Insert Chord dialog is displayed immediately when you are just about to insert a c hordinto the music. The dialog isUsed to specify the type of chord you wish to insert.
-o-

193
Forte 3
Move Chord Symbols
Sometimes you may wish to move an existing symbol to a different location.
Although you can certainly achieve the same results by adding a new symbol and deleting theold one, it may be easier to simply move the symbol.
First, be sure the application is in Select Mode.
Move an Symbol
Click - but do not release - the mouse on the symbol that you wish to move. As you drag the mouse, the music cursor changes to the sameUsed when entering a new
symbol from the Elements Palette. Align the dashed line with the beat where you want the symbol moved to. Release the mouse to move the symbol to the specified location.
-o-

194
Forte 3
Chord Suffix
In addition to root (and possible bass) pitches, every chord also has a suffix that furthercharacterizes the chord. You can select from many common chord suffixes using the list, oryou can "roll your own" if the desired chord does not appear among the list of choices.
The text field directly below the chord list provides a place for you to edit the name of thechord. As you select different options from the list the text updates to reflect the newselection.
The text field displays a special, unformatted version of the chord name. For many chords thisvalue is exactly the same as the chord name displayed in the list. However, some chords(augmented, diminished, 7 flat 9, etc.) can be displayed using a special shorthand notation.For example, rather than writing out "dim" or "diminished" you can use the spec ial symbolthat takes less space on the page.
Special format characters (e.g. ^N, ^A, etc.) areUsed in the unformatted text field to indicateshorthand symbols in the chord. Click the small button next to the text field to display apopup menu. Select an item from the menu to add the appropriate formatting code. Thechord example updates to show how the chord will actually appear in the music.
How it looks Formatcharacter
Shortcut for...
^M major
^N minor
^A augmented
^D diminished
^R minor-major
^S Sharp or raised
^F Flat or lowered

195
Forte 3
If you want symbols or text to appear as superscript atthe end of the chord, enclose the text in brackets [ ].
Below are several example of the chord suffix as itappears in the music as well as the correspondingunformatted suffix:
How it looks Corresponding suffix
maj7[^S4]
^M7
m7[^F5]
-o-

196
Forte 3
Clefs
Add and Remove Clefs
There are nine standard types of clefs in the Elements Palette that you can add to your musicat any location. The clef defines what pitch each line in the staff represents. In a treble clef,for example, the lowest line in the staff is an E; in a bass clef, however, the lowest linerepresents a G that is nearly 2 octaves lower.
Clefs are added at a particular location in a measure. When you view the music in Page View(vs. Track View) the clef is drawn at the left edge of each system - just as it should be whenprinted. The notation engine automatically handles correct display of clefs on each system aswell as "reminder clefs" at the end of a system when a clef begins at the start of the nextsystem.
Once a clef is added to your music you can edit its type, position and appearance.
To Add a Clef
1. Select the Clef tab in the Elements Palette, then select one of the clefs.
2. Move the cursor over the measure to which you want toadd the clef. Notice that the cursor changes into a pointing finger and a red dotted lineis displayed at the current location in the Music Score.
1. Align the dashed line with the beat on the Music Ruler where you want the clef.
2. Click the mouse to add the clef at the specified location in the measure.
To Remove a Clef
To remove a clef, simply select it with the mouse and select Edit Delete from the menu.
-OR-
Select the clef and press the Delete key.
Note: You cannot remove the first clef and you cannot remove the clefs that appear at thestart of each system. To make it such that clefs do not appear at the start of each system,

197
Forte 3
see Lead Sheet options in the Edit Layout topic.
-o-

198
Forte 3
Edit Clefs with the Properties Window
The Properties Window is a useful tool for changing the properties of any sym bol, includingclefs.
Be sure the application is in Select Mode, then select the clef you want to edit.
You can select several different clefs and change all of their properties at once.
Edit a Clef
Select the clefs you want to edit, then display the Properties Window . To change the type of clef or its location in the music, select the Appearance tab in the
Properties Window and adjust the appearance properties. To change general properties of the clef, such as its position, visibility and color, select
the General tab in the Properties Window and adjust the general properties. Click the Apply button when you are done making changes.
-o-

199
Forte 3
Move Clefs
Sometimes you may wish to move an existing clef to a different location.
Although you can certainly achieve the same results by adding a new c lef and removing theold clef, or by editing the start time of the selected clef, it may be easier to simply move theclef.
First, be sure the application is in Select Mode.
Move a Clef
Click - but do not release - the mouse on the clef you wish to move. As you drag the mouse, the music cursor changes to the sameUsed when entering a new
clef from the Elements Palette. Align the dashed line with the beat where you want the clef moved to. Release the mouse to move the clef to the specified location.
-o-

200
Forte 3
Dynamic Markings
Add and Remove Dynamic Markings
Dynamic markings effectively vary the volume of each track during a performance, and can bedivided into 2 distinct groups: dynamic expressions areUsed to set a partic ular volume, andchanging dynamic markings - such as crescendos and hairpins - are instructions to slowlychange from one volume level to another.
Dynamic markings are generally associated with a particular staff. During a performance,MIDI volume controller messages added to the performance correspond to the variousdynamic markings.
Once a dynamic marking is added to your music you can edit its appearanc e andperformance properties.
To Add a Dynamic Expression
1. Select the Dynamics tab in the Elements Palette, then select one of the dynamicexpressions. This includes all the symbols from pppp to ffff.
2. Move the cursor to the location in a staff where you wish to add the dynam ic. Notice thatthe cursor changes into a pencil and a dotted line is displayed at the current loc ation in theMusic Score.
1. Align the dashed line with the beat on the Music Ruler where you want the dynamicexpression.
2. Click the mouse to add the dynamic at the specified location in the staff.
To Remove a Dynamic
To remove a dynamic, simply select it with the mouse and select Edit Delete from the menu.
-OR-
Select the dynamics and press the Delete key.

201
Forte 3
To Add a Changing Dynamic
1. Select the Dynamics tab in the Elements Palette, then select one of the changingdynamics. This includes all symbols except the expressions from pppp to ffff.
2. Move the cursor to the location in a staff where you wish to add the dynam ic. Noticethat the cursor changes into a pencil and a dotted line is displayed at the currentlocation in the Music Score.
3. Align the dashed line with the beat Music Ruler where you want the dynamic tobegin, then click the mouse.
This is the "anchor position" for the dynamic and typically represents the start point for achanging dynamic such as a crescendo. As you move the mouse a solid line remains at the anchor position, while a second dotted
line tracks your mouse movements.
Click the mouse again to define the end point of the dynamic.
Note: You can also click and drag the mouse to define both the start and stop positions.
-o-

202
Forte 3
Edit Dynamics with the Properties Window
The Properties Window is a useful tool for changing the properties of any sym bol, includingdynamic markings.
Be sure the application is in Select Mode, then select the dynamic you want to edit.
You can select several different dynamics and change all of their properties at once.
Note: If you are finding that you need to move all of the dynamics lower to c lear some notes,consider adjusting the Symbol Spacing Below setting for the system instead of adjustingtheir position.
Edit a Dynamic Marking
Select the dynamics you want to edit, then display the Properties Window . To change how the dynamic appears in the notation, select the Appearance tab in the
Properties Window and adjust the appearance properties. To change how the dynamic sounds during a performance, select the Performance tab in
the Properties Window and adjust the performance properties. To perform an action, such as move, select the Actions tab in the Properties Window. Click the Apply button when you are done making changes.
-o-

203
Forte 3
Edit Dynamics with the Shortcut Menu
If a symbol is selected you can right-click the mouse to display a special shortcut menu. Themenu contains commands for changing symbol properties. For simple operations this methodcan be faster and easier than using the Properties Window.
Using the Shortcut Menu
Be sure the current mode is Select Mode, then select the symbols you want to edit. Right-click the mouse to display the shortcut menu. Select an item from the context menu to perform the command.
-o-

204
Forte 3
Move a Dynamic
Sometimes you may wish to move an existing dynamic marking to a different location.
Although you can certainly achieve the same results by adding a new dynamic and deletingthe old one, or by editing the start time of the selected dynamic, it may be easier to simplymove the dynamic marking.
The move operation changes only the start time of the dynamic. Markings such as crescendosand hairpins still retain their original durations.
First, be sure the application is in Select Mode.
Move a Dynamic
Click - but do not release - the mouse on the dynamic marking you wish to move. As you drag the mouse, the music cursor changes to the sameUsed when entering a new
dynamic from the Elements Palette. Align the dashed line with the beat where you want the dynamic moved to. Release the mouse to move the marking to the specified location.
-o-

205
Forte 3
Grace Notes
Add and Remove Grace Notes
Grace notes are ornaments that are placed prior to the note that they embellish. They appearas smaller notes in the music, normally slurred to the note they embellish. You can addmultiple grace notes to a single note to c reate more sophisticated embellishments. Multiplegrace notes are beamed together just like normal notes.
Grace notes are always added to an existing "normal" note. Once a grace note is added toyour music you can edit its position, appearance, and performance properties.
To Add a Grace Note
Select the Notes tab in the Elements Palette, then select the grace note sym bol (next to theparentheses).
Move the cursor just to the left of an existing "normal" note in the music. Notice that this noteis highlighted to indicate where the grace note will be attached, and that a sm all red dotappears to indicate the pitch of the grace note.
Align the red dot on the pitch you would like for the grace note.Click the mouse to add the grace note to the highlighted note at the specified pitch.
To Add Multiple Grace Notes
Follow the same steps for adding a single grace note. You can place new grace notes before,after or between existing grace notes.

206
Forte 3
To Remove Grace Notes
To remove grace notes, simply select them with the mouse and select Edit Delete from themenu.
-OR-
Select the grace notes and press the Delete key.
Note: If you remove a note that has a grace note attached, the grace note is discarded aswell.
-o-

207
Forte 3
Edit Grace Notes with the Properties Window
The Properties Window is a useful tool for changing the properties of any sym bol, includinggrace notes.Be sure the application is in Select Mode, then select the grace notes you want to edit.
You can select several different grace notes and change all of their properties at once.
To Edit Grace Notes with the Properties Window
Select the grace notes you want to edit, then display the Properties Window. To change how the grace note appears in the notation, select the Appearance tab in the
Properties Window and adjust the appearance properties. To change how the grace note sounds during a performance, select the Performance tab
in the Properties Window and adjust the performance properties. Click the Apply button when you are done making changes.
-o-

208
Forte 3
Images
Add and Remove Images
In order to display images, it is necessary for some kind of image-viewing application orcomponent to be installed on your computer. This application must also be capable of beingwhat is known as an OLE server.
The server application does the work of actually displaying a given image, but it does soinside of the Music Score instead of in a separate window. Normally, the Microsoft application,MSPAINT, is included with every Windows operating system which satisfies theserequirements for Windows bitmap (BMP) files.
If you insert images that are not bitmap files (Adobe Photoshop images, for example) or haveinstalled other software which is associated with BMP files, it is crucial that the applic ation beable to render the image as an OLE server. If this is not the case, the image will not display inthe Music Score.
To add an image
Drag & Drop
Drag a selection of an image from the other application into your sc ore.
Copy & Paste
1. Copy a selection of an image in the other application.2. Left-Click at the location where you want to insert the image in your score.3. Paste the selection in your score.
To remove an image
To remove images, simply select them with the mouse and select Edit Delete from the menu.
-OR-
Select the image and press the Delete key.
-o-

209
Forte 3
Edit an Image
Images that you add to the Music Score can later be edited, if desired.The program does not perform the actual editing of images - instead, it is up to the serverapplication associated with the image to do the editing.You can double-click the mouse on the image to perform the default command listed in themenu.Make appropriate changes to the file in the associated application.
-o-

210
Forte 3
Move and Resize an Image
Once an image has been added to your music score, you can move or resize it.Be sure the application is in Select Mode.
To Move an Image
Click - but do not release - the mouse in the center if the image you wish tomove.
As you drag the mouse, a rectangular frame is displayed, indicating wherethe image will be moved to.
Release the mouse to move the image to the specified location, or press theEscape key to cancel the operation.
Note: If you hold down the Control key when you release the mouse, the image iscopied to the new location instead of moved.
To Resize an Image
Select the image you wish to resize. Notice that the 8 "handles" are displayedaround the border of the image:
Place the mouse cursor over one of the handles. Notice how the cursorchanges into a double-headed arrow, indicating the resizing
Click - but do not release - the mouse on one of the handles. As you drag themouse, a thin border is displayed to show the new size of the image.
Release the mouse button to perform the resize, or press the Escape key tocancel the operation.
-o-

211
Forte 3
Key Signatures
Add and Remove Key Signatures
There are 15 standard types of keys in the Elements Palette that you can add to your music.The key displays the accidentals (sharps and flats) normally required to define the pitches onthe staff. For example, in the key of G Major the sharp on the F indicates that all F notes thatdo not have an explicit accidental (such as a natural) are to be played as F-sharp.
Keys are always added to the beginning of a measure. When you view the music in PageView (vs. Track View) the key is drawn at the left edge of each system - just as it should bewhen printed. The notation engine automatically handles correct display of keys on eachsystem as well as "reminder keys" at the end of a system when a key begins at the start ofthe next system.
Adding key does not change or transpose the playback of the music. Instead itUsed tomakes the notation less cluttered by removing accidentals.
To Add a Key
Select the Key tab tab in the Elements Palette, then select a key to insert.
Move the cursor over the measure to which you want to add the key. Notice that the cursorchanges into a pointing finger and that each measure highlights as you move the cursor overit.
Click the mouse to add the key at the beginning of the highlighted m easure.
Once a key is added to your music you can edit its type, position and appearance.
To Remove a Key
To remove a key, simply select it with the mouse and select Edit Delete from the menu.
-OR-
Select the key and press the Delete key.
Note: You cannot remove the first key and you cannot remove the keys that appear at thestart of each system. To make it such that keys do not appear at the start of each system,see Lead Sheet options in the Edit Layout topic..
-o-

212
Forte 3

213
Forte 3
Edit Keys with the Properties Window
The Properties Window is a useful tool for changing the properties of any sym bol, includingkeys.
Be sure the application is in Select Mode, then select the key you want to edit.
You can select several different keys and change all of their properties at once.
Note that changing the key does not change or transpose the playback of the music.
Edit a Key
Select the keys you want to edit, then display the Properties Window . To change the type of key or its location in the music, select the Appearance tab in the
Properties Window and adjust the appearance properties. To change general properties of the key, such as its position, visibility and color, selec t
the General tab in the Properties Window and adjust the general properties. Click the Apply button when you are done making changes.
-o-

214
Forte 3
Move Keys
Sometimes you may wish to move an existing symbol to a different location.
Although you can certainly achieve the same results by adding a new symbol and deleting theold one, it may be easier to simply move the symbol. First, be sure the application is in Select Mode.
Move an Symbol
Click - but do not release - the mouse on the symbol that you wish to move. As you drag the mouse, the music cursor changes to the sameUsed when entering a new
symbol from the Elements Palette. Align the dashed line with the beat where you want the symbol moved to. Release the mouse to move the symbol to the specified location.
-o-

215
Forte 3
Lyrics
Add and Remove Lyrics
You can enter up to 16 separate lyric verses into your music document either beneath a staff,above a staff, or as block text at the end of the piece. You can also enter any num ber ofsingle or double line chorus (refrain) sections throughout the piece. The programautomatically justifies lyrics under notes, spaces hyphens between syllables, and extendsextenders over multiple notes. Although you can enter lyrics on staves of any type, using a Vocal Staff will automatically position articulations, dynamics, and other symbols usingestablished rules of vocal notation.
Once lyrics are added to your music you can edit their text and appearance.
To Add Lyrics
Select the Text/Chords tab in the Elements Palette, then select the button labeled"Lyric". Notice how the Elements Palette resizes to display additional controls. See thetopics on adding verses and choruses for an explanation the additional controls.
Move the cursor over the note to which you want to add the lyric. Notice that the cursorchanges into a standard text insert cursor and a red dotted line is displayed at the c urrentlocation in the Music Score.
Click the mouse either in the staff or below the staff to display a text edit box, then typein text for the new lyric:
Press the space bar or the Tab key to add the lyric and advance the text box to the nextnote. You can also press Shift-Tab to move the lyric box to the previous note.
Press the Return or Escape keys on the keyboard to cancel adding lyrics.
To Add Hyphens Between Syllables
Syllables should be separated by hyphens.
Type a dash ("-") to add a hyphen to the word and advance the text box to the next note.

216
Forte 3
If there are one or more notes between the two syllables, continue adding dashes to advanc ethe text box.
To Add Extender Lines
One-syllable words sung over more than one note or the last syllable of a word sung overmore than one note should have an extender line.
Type an underscore ("_") to add an extender to the word and advance the text box to thenext note. Continue adding underscores to continue the extender line over many notes.
To Remove Lyrics
To remove lyrics, simply select them with the mouse and select Edit Delete from the menu.
-OR-
Select the lyrics and press the Delete key.
-OR-
Edit the lyric and give it an empty value.
-o-

217
Forte 3

218
Forte 3
Add and Remove Multiple Verses
Often a section is repeated, or the entire form is repeated, and each time through differenttext is sung over the same music. To display lyrics in a multi-line fashion, the lyric must be oftype Verse.
To Add Multiple Verses
From the Elements Palette , select Verse from the Lyric Type drop list and either BelowStaff or Between Staves from the Lyric Position drop list.
Below Staff will position the lyrics using the symbol spacing settings from the system.Between Staves will center the lyrics between the staff that the lyrics are in, and the staffdirectly below. If you are entering lyrics into a Grand Staff, or a four voice arrangement(such as a hymn or a barbershop quartet), we recommend using the Between Stavessetting.
Add lyrics as discussed in the Add Remove Lyric topic. Verse Numbers willautomatically be added when a new verse is added to the staff.
When all the notes on a track have lyrics, pressing the space bar or the Tab key advancesthe lyric cursor to the next verse.
You can continue to fill up all 16 verses simply by typing from the keyboard. You can also click the lyric cursor below existing lyrics (or in an area that is not currently
occupied by a lyric) to add a new verse.
If the lyrics are too high or too low in the score and they were entered using the BelowStaff or the Above Staff setting, you can adjust them by inspecting the system and editing the symbol spacing or you can edit the entire layout.
To Add a Verse Above the Staff and a Verse Below the Staff
Some vocal styles have two independent lines of music on one staff, each singing differenttext. The line sung by the upper voice should go above the staff, and the line sung by lowervoice should go below the staff.
To add the upper line, from the Elements Palette, select Verse from the Lyric Type drop

219
Forte 3
list and select Above Staff from the Lyric Position drop list. Enter the lyrics in the staff. To add the lower line, from the Elements Palette, select Verse form the Lyric Type drop list
and select Below Staff from the Lyric Position drop list. Enter the lyrics in the staff. If the lyrics are too high or too low in the score and they were entered using the Below
Staff or the Above Staff setting, you can adjust them by inspecting the system and editing the symbol spacing or you can edit the entire layout
To Remove a Verse
Selecting and deleting all of the lyrics in a verse inc luding the verse number will remove theverse. Subsequent verses will replace the deleted verse. To redo a verse without m ovingsubsequent verses, do not remove the verse number.
To Edit a Particular Verse
Be sure the application is in Insert Mode, then select the Lyric button in the Elements Palette(just as if you are entering a new lyric). Select Verse from the Lyric Type drop list.
Move the lyric cursor over a word in the verse you want to edit, and then click and release themouse. A text box should appear with the old verse selected.
Type a new verse to replace the old one and hit the Return key. Press the space bar toproceed to the next lyric (as usual).
-o-

220
Forte 3

221
Forte 3
Edit Lyrics with the Properties Window
The Properties Window is a useful tool for changing the properties of any sym bol, includinglyrics.
Be sure the application is in Select Mode, then select the lyrics you want to edit.
Note: If you are finding that you need to move all of the lyrics lower to clear some notes,consider adjusting the Symbol Spacing Lyrics Below setting for the system instead ofadjusting their position.
To Edit Lyrics with the Properties Window
Select the lyrics you want to edit, then display the Properties Window. To edit the lyrics as a text block, select the Text tab in the Properties Window. To change how the lyrics appear in the notation, select the Appearance tab in the
Properties Window and adjust the appearance properties. To change general properties of the lyrics, such as their position, visibility and color, select
the General tab in the Properties Window and adjust the general properties. Click the Apply button when you are done making changes.
-o-

222
Forte 3
Edit Lyrics with the Shortcut Menu
If a lyric is selected you can right-click the mouse to display a special shortcut menu. Themenu contains commands for changing lyric properties. For simple operations this method canbe faster and easier than using the Properties Window.
Using the Shortcut Menu
Be sure the current mode is Select Mode, then select the lyrics you want to edit. Right-click the mouse to display the shortcut menu. Select an item from the context menu to perform the command.
-o-

223
Forte 3
Add Remove Verse Numbers
Verse Numbers are automatically added whenever a new verse is added. However, there m aybe times when verse numbers need to be added or removed.
To Add a Verse Number
Be sure the current mode is Select Mode, then select the first lyric in the verse where theverse number should appear.
Right-click the mouse to display the shortcut menu.
Select the item Display Verse Numbers from the context menu to perform the command.
To Remove a Verse Number
Be sure the current mode is Select Mode, then select the Verse Number and hit the Deletekey.
To Edit a Particular Verse Number
Verse Numbers can be edited just as lyrics are using the Lyric Properties Window .
-o-

224
Forte 3
Add a Chorus or a Refrain
Often in vocal music where the entire form is repeated, there is a section where the same textis sung each time through. This is called a chorus or a refrain. When denoting a c horus or arefrain in a multi-verse setting, the lyric must be of type Chorus.
To Add a Chorus
1. From the Elements Palette , select Chorus from the Lyric Type drop list and eitherBelow Staff or Between Staves from the Lyric Position drop list.
2. Below Staff will position the lyrics using the symbol spacing settings from thesystem. Between Staves will center the lyrics between the staff that the lyrics are in,and the staff directly below. If you are entering lyrics into a Grand Staff, or a fourvoice arrangement (such as a hymn or a barbershop quartet), we recommend usingthe Between Staves setting.
3. Add lyrics as discussed in the Add Remove Lyric topic.
To Add a Two Line Chorus
Some vocal styles contain multi-line choruses or refrains. Typically one line is sung by theupper two voices and the other line is sung by the lower two voices (call and response). Othertimes the additional chorus line may be an alternate chorus.
1. To add the upper line, from the Elements Palette, select Chorus from the Lyric Typedrop list and select Below Staff from the Lyric Position drop list.
2. Enter the lyrics in the upper staff.
3. To add the lower line, from the Elements Palette, select Chorus form the Lyric Typedrop list and select Above Staff from the Lyric Position drop list.
4. Enter the lyrics in the lower staff.
5. If the lyrics are too high or too low in the score and they were entered using theBelow Staff or the Above Staff setting, you can adjust them by inspecting the systemand editing the symbol spacing or you can edit the entire layout
To Edit a Chorus
1. Be sure the application is in Insert Mode, then select the Lyric button in theElements Palette (just as if you are entering a new lyric). Selec t Chorus from the LyricType drop list.

225
Forte 3
2. Move the lyric cursor over a word in the chorus you want to edit, and then click andrelease the mouse. A text box should appear with the old verse selected.
Type a new chorus to replace the old one and hit the Return key. Press the space bar toproceed to the next lyric (as usual).
-o-

226
Forte 3
Block Lyrics
Add and Remove Block Lyrics
Block lyrics are normallyUsed when there are far too many verses to display beneath thenotes.
In cases where there are many verses the first few verses are typically displayed beneath thenotes, and the last few verses are displayed as block text at the end of the score.
To Add Block Lyrics
Select the Text/Chords tab in the Elements Palette, then select the button labeled"Lyric". Notice how the Elements Palette resizes to display additional c ontrols.
Check the Block text box to display a large text entry field. Enter text for the verse into the field exactly how you want it to appear in the block. Press the Insert button in the Elements Palette to insert the block text at the end of the
score.
Note: Additional lyric blocks always appears after existing text bloc ks.
To Remove Block Lyrics
To remove block lyrics, simply select it with the mouse and select Edit Delete from themenu.
-OR-
Select the accents and press the Delete key.
-o-

227
Forte 3
Edit Block Lyrics with the Properties Window
The Properties Window is a useful tool for changing the properties of any sym bol, includinglyric blocks.
Be sure the application is in Select Mode, then select the lyrics you want to edit.
Inspecting lyric block is mainlyUsed for controlling how many blocks appear per line.
Edit a Lyric Block
Select the lyric block you want to edit, then display the Properties Window . To change the text in the block lyric, alignment, or number of blocks per line, select the
Appearance tab in the Properties Window and adjust the appearance properties. To change general properties of the block lyric, such as its position, visibility and color,
select the General tab in the Properties Window and adjust the general properties. Click the Apply button when you are done making changes.
-o-

228
Forte 3
Meters
Add and Remove Meters
Meters define how many beats there are in each measure (the top number) and which notevalue gets the beat (the bottom number). For example, 4/4 means there are 4 beats to ameasure and the quarter note gets the beat. When you add or rem ove meters, all measureson all staves are effected by the new meter.
Meters are always added to the beginning of a measure. When you view the music in PageView (vs. Track View) the meter is drawn at the left edge of each system - just as it should bewhen printed. The notation engine automatically handles correct display of meters on eachsystem as well as "reminder meters" at the end of a system when a meter begins at the startof the next system.
Once a meter is added to your music you can edit its type, position and appearance.
To Add a Meter
Select the Meter tab in the Elements Palette, then select one of the meters.
Move the cursor over the measure to which you want to add the meter. Notice that the cursorchanges into a pointing finger and that each measure highlights as you move the cursor overit.
Click the mouse to add the meter at the beginning of the highlighted measure.
If a meter already exists in the measure, it will change to the one you have selec ted.
To Remove a Meter
To remove a meter, simply select it with the mouse and select Edit Delete from the menu.
-OR-
Select the meter and press the Delete key.
Note: You cannot remove the first meter, you can only edit it.

229
Forte 3
-o-

230
Forte 3
Edit Meters with the Properties Window
The Properties Window is a useful tool for changing the properties of any sym bol, includingmeters.Be sure the application is in Select Mode, then select the meter you want to edit.
You can select several different meters and change all of their properties at once.
Edit a Meter
Select the meters you want to edit, then display the Properties Window . To change the type of meter or its location in the music, select the Appearance tab in
the Properties Window and adjust the appearance properties. To change general properties of the key, such as its position, visibility and color, selec t
the General tab in the Properties Window and adjust the general properties. Click the Apply button when you are done making changes.
-o-

231
Forte 3
Octavas
Add and Remove Octavas
Octavas are instructions to the performer to play the notes higher or lower than the writtenvalues (by octaves). Octavas are typicallyUsed make the music easier to read since theperformer doesn't have to read numerous clef changes or numerous ledger lines above orbelow the staff.
Octavas have a start time as well as a duration during which they are active. During aperformance, octavas cause the performed music to transpose (just as a real player would do)so you can hear how the music is supposed to sound.
To Add an Octava
Select the Clef tab in the Elements Palette, then select one of the octavas.
Move the cursor to the location in a staff where you wish to add the octava. Notice that thecursor changes into a pencil and a dotted line is displayed at the current location in the MusicScore.
Align the dashed line with the beat on the Music Ruler where you want the octava to begin,then click the mouse.
This is the "anchor position" for the octava and typically represents the start point for theoctava.
As you move the mouse a solid line remains at the anchor position, while a second dottedline tracks your mouse movements.
Click the mouse again to define the end point of the octava.
Note: You can also click and drag the mouse to define both the start and stop positions.
Types of Octavas
8va Transpose notes up by one octave.
8vb Transpose notes down by one octave.

232
Forte 3
15ma Transpose notes up by 2 octaves.
To Remove an Octava
To remove an octava, simply select it with the mouse and select Edit Delete from the menu.
-OR-
Select the octava and press the Delete key.
-o-

233
Forte 3
Edit Octavas with the Shortcut Menu
If a symbol is selected you can right-click the mouse to display a special shortcut menu. Themenu contains commands for changing symbol properties. For simple operations this methodcan be faster and easier than using the Properties Window.
Using the Shortcut Menu
1. Be sure the current mode is Select Mode, then select the symbols you want to edit.
2. Right-click the mouse to display the shortcut menu.
3. Select an item from the context menu to perform the command.
-o-

234
Forte 3
Move Octavas
Sometimes you may wish to move an existing octava marking to a different location.
Although you can certainly achieve the same results by adding a new octava and deleting theold one, it may be easier to simply move the octava.
The move operation changes only the start time of the octava. The octava still retains itsoriginal duration.
First, be sure the application is in Select Mode.
Move an Octava
Click - but do not release - the mouse on the octava that you wish to move. As you drag the mouse, the music cursor changes to the sameUsed when entering a new
octava from the Elements Palette. Align the dashed line with the beat where you want the octava moved to. Release the mouse to move the symbol to the specified location.
-o-

235
Forte 3
Ornaments
Add and Remove Ornaments
Ornaments are symbols which embellish notes. There are all sorts of ornaments whichinstruct the player to trill, twist and vary the main note in different ways.There are essentially 3 classes of ornaments (listed below) - all ornaments within each groupare added to the music in the same way:
Single-Note Ornaments
Glissando
Arpeggio
Once an ornament is added to your music you can edit its position and appearanc e properties.
To Add an Ornament to a Note
Select the Ornaments tab in the Elements Palette, then select one of the single-noteornaments (e.g. trill).
Move the cursor over the note to which you want to add the ornament. Notice that thecursor changes into a bullseye and the note highlights when the cursor is over the note.
Click the mouse to add the ornament to the note.
To Add an Arpeggio
Select the Ornaments tab in the Elements Palette, then select one of the arpeggios.
Move the cursor over a chord to which you want to add the arpeggio. Notice that the cursorchanges into a bullseye and the chord highlights when the cursor is over the note.
Click the mouse to add the arpeggio to the chord.
To Remove Ornaments

236
Forte 3
To remove ornaments, simply select them with the mouse and select Edit Delete from themenu.
-OR-
Select the ornaments and press the Delete key.
Note that removing an accidental effectively changes the pitch other accidentals m ay bere-added to properly represent the note in the current clef and key.
To Add an Ornament to Several Notes
Select the Ornaments tab in the Elements Palette, then select one of the single-noteornaments (e.g. trill).
Click - but do not release - the mouse in an empty area that is not over a note.
Drag the mouse to sweep out a rectangular area. Notice that notes that are included in theselection area are highlighted.
Release the mouse to add ornaments of the specified type to all the selected notes.
To Add an Glissando
Select the Ornaments tab in the Elements Palette, then select the glissando symbol.
Click - but do not release - the mouse in an empty area that is not over a note.
Drag the mouse to sweep out a rectangular area. Notice that notes that are included in theselection area are highlighted.
Using the selection rectangle, select two adjacent notes that you want the glissando to gobetween.
Release the mouse to add a glissando between the two selected notes.

237
Forte 3
-OR-
Select two adjacent notes you want a glissando between.
Use the shortcut menu to add a glissando to the selected notes.
-o-

238
Forte 3
Edit Ornaments with the Shortcut Menu
If a symbol is selected you can right-click the mouse to display a special shortcut menu. Themenu contains commands for changing symbol properties. For simple operations this methodcan be faster and easier than using the Properties Window.
Using the Shortcut Menu
1. Be sure the current mode is Select Mode, then select the symbols you want to edit.
2. Right-click the mouse to display the shortcut menu.
3. Select an item from the context menu to perform the command.
-o-

239
Forte 3
Pedal Marks
Add and Remove Pedal Marks
Pedal markings are instructions to the performer to press and release the sustain pedal. On apiano, for example, this allows notes to continue to sound, even after the note has finishedplaying.
Pedal markings are generally associated with a partic ular staff. During a performance, MIDIpedal controller messages added to the performance correspond to the various pedalmarkings.
Once a pedal marking is added to your music you can edit its appearance and performanceproperties.
To Add a Pedal Marking
Select the Text/Chords tab in the Elements Palette, then selec t the pedal marking symbol.Notice how the Elements Palette resizes to display additional controls.
Select a pedal marking style from the Pedal Style drop-down list.
Move the cursor to the location in a staff where you wish to add the pedal m arking. Noticethat the cursor changes into a pencil and a dotted line is displayed at the current loc ation inthe Music Score.
Align the dashed line with the beat on the Music Ruler where you want the pedal to begin,then click the mouse - this is the "anchor position" for the pedal.
As you move the mouse a solid line remains at the anchor position, while a sec ond dotted linetracks your mouse movements.
Click the mouse again to define the end point of the pedal.
Note: You can also click and drag the mouse to define both the start and stop positions.
To Remove a Pedal Marking

240
Forte 3
To remove a pedal marking, simply select it with the mouse and select Edit Delete from themenu.
-OR-
Select the pedal and press the Delete key.
-o-

241
Forte 3
Edit Pedal Marks with the Properties Window
The Properties Window is a useful tool for changing the properties of any sym bol, includingpedals.
Be sure the application is in Select Mode, then select the pedal you want to edit.
You can select several different pedals and change all of their properties at once.
Note: If you are finding that you need to move all of the pedal markings lower to clear somenotes, consider adjusting the Symbol Spacing Below setting for the system instead ofadjusting their position.
Edit a Pedal
1. Select the pedals you want to edit, then display the Properties Window .
2. To change the start time or its MIDI data, select the Performance tab in theProperties Window and adjust the performance properties.
3. To change general properties of the pedal, such as its position, visibility and c olor,select the General tab in the Properties Window and adjust the general properties.
4. To perform an action on the pedal, such as moving it, select the Actions tab in theProperties Window.
5. Click the Apply button when you are done making changes.
-o-

242
Forte 3
Edit Pedal Marks with the Shortcut Menu
If a symbol is selected you can right-click the mouse to display a special shortcut menu. Themenu contains commands for changing symbol properties. For simple operations this methodcan be faster and easier than using the Properties Window.
Using the Shortcut Menu
1. Be sure the current mode is Select Mode, then select the symbols you want to edit.
2. Right-click the mouse to display the shortcut menu.
3. Select an item from the context menu to perform the command.
-o-

243
Forte 3
Move Pedal Marks
Sometimes you may wish to move an existing pedal marking to a different location.
Although you can certainly achieve the same results by adding a new pedal and deleting theold one, or by editing the start time of the selected pedal, it may be easier to simply move thepedal marking.
The move operation changes only the start time of the pedal - the marking still retains itsoriginal durations.
First, be sure the application is in Select Mode.
Move an Symbol
Click - but do not release - the mouse on the symbol that you wish to move. As you drag the mouse, the music cursor changes to the sameUsed when entering a new
symbol from the Elements Palette. Align the dashed line with the beat where you want the symbol moved to. Release the mouse to move the symbol to the specified location.
Move a Pedal Marking
Click - but do not release - the mouse on the pedal marking you wish to move. As you drag the mouse, the music cursor changes to the sameUsed when entering a new
pedal from the Elements Palette. Align the dashed line with the beat where you want the pedal moved to. Release the mouse to move the marking to the specified location.
-o-

244
Forte 3
Repeats
Add and Remove Repeats
Repeats areUsed to control the flow of your music. The repeat bars, endings andexpressions direct the performer to repeat certain sections of your music and/or jump toother specially marked sections during a performance. Often, repeats areUsed to reduc e theamount of music that is written on a page.
Repeats are added to particular staff, although they affect the performance of the entirepiece of music. During a performance, the sequencer determines where to repeat and whereto jump to based on the types of repeat expressions that are in the music.
Once a repeat is added to your music you can edit its position and appearance properties.
To Add a Repeat Sign or Expression
Select the Repeats tab in the Elements Palette, then select one of the repeat signs.
Move the cursor over the staff where you wish to add the repeat. Notice that the cursorchanges into a pencil and a dotted line is displayed at the current location in the Music Score.
Align the dashed line with the beat on the Music Ruler where you want the repeat.
Click the mouse to add the repeat at the specified location in the staff.
Note: To add a repeat end bracket at the very end of the piece, insert the repeat on the lastdiv mark of the Music Ruler. This is a special way to give the repeat a time that is outside themeasure. If you really want a repeat bracket with a time of the last div, see the RepeatProperties Window topic to change the time of the repeat.
To Remove Repeats
To remove repeats, simply select them with the mouse and select Edit Delete from themenu.

245
Forte 3
-OR-
Select the repeats and press the Delete key.
To Add a Repeat Ending
Select the Repeats tab in the Elements Palette, then select the repeat ending symbol.
Move the cursor over the staff where you wish to add the ending. Notice that the cursorchanges into a pencil and a dotted line is displayed at the current location in the Music Score.
Align the dashed line with the beat where you want the repeat. You should norm ally place arepeat ending at the start of the measure.
Click the mouse to insert the repeat ending at the specified location in the staff. Notice thatthe ending is automatically positioned to cover the entire measure.
Note: In general, the repeat is automatically sized so that it continues until the next endrepeat sign. If no such repeat can be found, a duration of one measure isUsed.
-o-

246
Forte 3
Edit Repeats with the Properties Window
The Properties Window is a useful tool for changing the properties of any sym bol, includingrepeats.
Be sure the application is in Select Mode, then select the repeats you want to edit.
You can select several different repeat markings and change all of their properties at once.
Edit Repeats
1. Select the repeats you want to edit, then display the Properties Window .
2. To change how the repeat appears in the notation, select the Appearance tab in theProperties Window and adjust the appearance properties.
3. To change performance properties of the repeat, such as time location, and how manytimes to repeat, select the Performance tab in the Properties Window and adjust theperformance properties.
4. To change general properties of the repeat, such as its position, visibility and c olor,select the General tab in the Properties Window and adjust the general properties.
5. Click the Apply button when you are done making changes.
-o-

247
Forte 3
Move a Repeat
Sometimes you may wish to move an existing repeat to a different loc ation.Although you can certainly achieve the same results by adding a new repeat and deleting theold one, it may be easier to simply move the repeat marking.First, be sure the application is in Select Mode.
Move a Pedal Marking
Click - but do not release - the mouse on the repeat marking you wish to move. Use As you drag the mouse, the music cursor changes to the sameUsed when entering a
new repeat from the Elements Palette. Align the dashed line with the beat where you want the repeat moved to. Release the mouse to move the marking to the specified location.
-o-

248
Forte 3
Notes
Add and Remove Notes
There are several different ways to add notes to your music. The most straightforwardapproach is toUse the mouse to add notes from the Elements Palette (you can also recordpitches directly into your score).
Notes are always added to measures in a particular staff. When you enter a new note, thenotation engine automatically determines stem direction, spacing, and so forth. If necessary,the measure is widened to accommodate the new note. If you add a note that will notmusically fit into the time span of a measure, the note is tied to a c omplementary note in thenext measure.
There are dozens of other parameters that affect how a given note is displayed: keysignature, measure width, layout properties, part, and so on. Once a note is added to yourmusic you can edit its appearance and performance properties, slur and beam notes togetherand perform dozens of other actions on groups of notes to get the m usic looking just right.
To Add a Note
Select the Notes tab in the Elements Palette, then select one of the notes.
Select the voice for the note from the Voice drop list on the Notation Bar if you are going tobe notating more than two lines of music on a single staff .
Move the cursor over the measure to which you want to add the note. Notice the feedbackprovided by the note cursor:
The Music Ruler is drawn around the measure to indicate the beats and subdivisionswithin the measure.
The dotted red line shows the time location where the note is to be added.
The small highlighted dot shows the pitch for the new note.1.1. Align the dashed line with the beat on the Music Ruler where you want the note, then

249
Forte 3
align the dot with the desired pitch.2.2. Click the mouse to add the note.
To Remove a Note
To remove a note, simply select it with the mouse and select Edit Delete from the menu.
-OR-
Select the note and press the Delete key.
-o-

250
Forte 3
Edit Notes with the Properties Window
The Properties Window is a useful tool for changing the properties of any sym bol, includingnotes.
Be sure the application is in Select Mode, then select the notes you want to edit.
You can select several different notes and change all of their properties at once.
Edit Notes
1. Select the notes you want to edit, then display the Properties Window .
2. To change how the note appears in the notation, select the Appearance tab in theProperties Window and adjust the appearance properties.
3. To change how the note sounds during a performance, select the Performance tab inthe Properties Window and adjust the performance properties.
4. Click the Apply button when you are done making changes.
-o-

251
Forte 3
Edit Notes with the Shortcut Menu
If a note is selected you can right-click the mouse to display a special shortcut menu. Themenu contains commands for changing note properties. For simple operations this methodcan be faster and easier than using the Properties Window.
Using the Shortcut Menu
1. Be sure the current mode is Select Mode, then select the notes you want to edit.
2. Right-click the mouse to display the shortcut menu.
3. Select an item from the context menu to perform the command.
-o-

252
Forte 3
Notes and the Drum Staff
Most MIDI devices reserve a single MIDI channel for their indefinite pitched percussionsounds (snares, kicks, toms, cymbals, ect). Each percussion instrument is then assigned to anindividual pitch. For example, to get your GM device to play a Kick 2 sound, you would send itMIDI note number 35 (the B two octaves below middle C) on MIDI channel 10. To get theSnare 1 sound, you would send it MIDI note number 38 (the D two octaves below middle C)on MIDI channel 10. Below is an example of what a percussion part with snare, kick, and hihat would look like on a regular staff:
However, when notating indefinite pitched instruments, a special staff, the Drum Staff,should be used instead of a regular staff. The Drum Staff allows you to assign any staff spaceto any indefinite pitched instrument. Below is the same percussion example notated on aDrum Staff:
Adding Notes on a Drum Staff using the Elements Palette
When you add notes onto a drum staff using the mouse, the percussion instrument isdetermined by two things; where in the staff the note is dropped, and the note shape selectedin the Elements Palette. You may want to set the status bar to update using drum namesinstead of note names when entering onto a drum staff. You can do this by inspecting theperformance of a note and right clicking on the Pitc h control. Below are some common noteshape/staff locations and their default mappings for percussion instruments:
For example, to add a Crash Cymbal you would select the notehead style X from theElements Palette and enter the note on the first line above the top line of the drum staff. To

253
Forte 3
add a Kick Drum you would select the notehead style Norm al form the Elements Palette andenter the note on the first space above the bottom line of the drum staff.
Adding flams, ruffs, and rolls
Many special notational elements may be achieved by combining percussion notes withvarious articulation symbols. Click on an area of the score below to see what symbols areinvolved in notating flams, ruffs, and rolls.
-o-

254
Forte 3
Notes and the Grand Staff
The Grand Staff is a special staffUsed for notating keyboard music. The staff consists of twoparts, an upper staff and a lower staff. When adding notes onto a Grand Staff with the m ouse,notes entered above "middle C" will be placed in the upper staff ,and those below "m iddle C"in the lower staff. If notes from the upper staff need to go into the lower staves territory, orvisa-versa, then the additional step of specifying a voice needs to be done.
When specifying a voice from the Notation Bar , voices 1-4 will be placed in the upper staff,and 5-8 in the lower staff. A very common scenario is to have two independent voices on eachpart of the staff. To do this, use voices 1 and 2 for the upper staff, and voices 5 and 6 for thelower staff.
When only part of the measure has independent voices, you can either hide or deleteunwanted rests.
-o-

255
Forte 3
Move Notes
Sometimes you may wish to move existing notes to a different loc ation.
This technique is especiallyUseful when you want to move large groups of notes whilepreserving their time and pitch locations relative to one another.
First, be sure the application is in Select Mode.
Move Notes
Select the notes you wish to move. Click - but do not release - the mouse on one of the selected notes. As you drag the mouse, the music cursor changes to the sameUsed when entering a new
note from the Elements Palette. Align the dashed line with the beat where you want the note, then align the dot with the
desired pitch.
When you move a group of notes, the first note serves as the "guide note" - all other notesare placed relative to the guide note, just as they were originally.
Release the mouse to move the notes to the specified location.
Note: If you hold the Control key down when you release the mouse, the notes are copied tothe new location instead of moved.
-o-

256
Forte 3
Rests
Add and Remove Rests
The application automatically adds rests around notes that are added to the score. Usually thedefault rests are what you want, but sometimes it is desirable to change the rests. You canenter rests in the Music Score similarly as you enter notes.
You can also think of rests as "anti-notes" - when a rest is inserted in the Music Score thenotation automatically fills the remaining time of the measure with rests of the required value(just like a note) but a rest is entered instead of a note.
You can edit the position and appearance of rests using the Properties Window.
To Add a Rest
Select the Notes tab in the Elements Palette, then select one of the notes. Notice how theElements Palette resizes to display additional c ontrols.
In the Elements Palette, check the box labeled Display Rests. Notice how all the notes in theElements Palette change to their rest equivalents. Select a different rest if desired.
Move the cursor over the measure to which you want to add the rest. Notice the feedbackprovided by the rest cursor:
The Music Ruler is drawn around the measure to indicate the beats and subdivisionswithin the measure.
The dotted red line shows the time location where the rest is to be added.
Align the dashed line with the beat on the Music Ruler where you want the rest, then c lick themouse to add the rest.
To Remove a Rest

257
Forte 3
To remove a rest, simply select it with the mouse and select Edit Delete from the menu.
-OR-
Select the rest and press the Delete key.
Note: Whenever you add notes or rests to a measure, the notation engine fills in the spacefrom the insert point to the end of the measure with appropriate rests.
-o-

258
Forte 3
Edit Rests with the Shortcut Menu
If a symbol is selected you can right-click the mouse to display a special shortcut menu. Themenu contains commands for changing symbol properties. For simple operations this methodcan be faster and easier than using the Properties Window.
Using the Shortcut Menu
Be sure the current mode is Select Mode, then select the symbols you want to edit. Right-click the mouse to display the shortcut menu. Select an item from the context menu to perform the command.
-o-

259
Forte 3
Slurs
Add and Remove Slurs
Slurs are markings that instruct the performer to play the spec ified notes smoother. Slurs arealways displayed above or below the notes they affect.
Once a slur is added to your music you can edit its position and appearance properties.
To Add a Slur
Select the Notes tab in the Elements Palette, then select the slur symbol.
Click - but do not release - the mouse in an empty area that is not over a note.
Drag the mouse to sweep out a rectangular area. Notice that notes that are included in theselection area are highlighted.
Select adjacent notes that you wish to slur together, then release the m ouse to add the slur.
-OR-
Select the notes that you want to slur together - the notes must be adjacent.
Use the shortcut menu to add a slur to the selected notes.
To Remove a Slur

260
Forte 3
To remove a slur, simply select it with the mouse and select Edit Delete from the menu.
-OR-
Select the slurs and press the Delete key.
-o-

261
Forte 3
Edit Slurs with the Properties Window
The Properties Window is a useful tool for changing the properties of any sym bol, includingslurs.
Be sure the application is in Select Mode, then select the slurs you want to edit.
You can select several different slurs and change all of their properties at once.
Edit Slurs
Select the slurs you want to edit, then display the Properties Window . To change how the slur appears in the notation, select the Appearance tab in the
Properties Window and adjust the appearance properties. To change general properties of the slur, such as its position, visibility and color, selec t
the General tab in the Properties Window and adjust the general properties. Click the Apply button when you are done making changes.
-o-

262
Forte 3
Tempos
Add and Remove Tempos
Tempo markings vary the tempo of a performance, and can be divided into 3 distinct groups:tempo expressions areUsed to set a particular tempo, changing tempo markings - such asaccelerandos and ritardandos - are instructions to slowly change from one tempo to another,and pauses are instructions to pause the performance briefly before continuing.
Although tempo markings are displayed above a particular staff, they affec t the performanceof the entire piece. During a performance, the tempo is automatically changed according tothe various tempo markings.
Once a tempo marking is added to your music you can edit its appearance and performanceproperties.
To Add a Tempo Expression
Select the Tempo tab in the Elements Palette, then select one of the tempo expressions.Notice how the Elements Palette resizes to display additional controls.
In the Elements Palette, type in text for the tempo expression if desired (e.g. "Not too fast").You can also select the small button next to the text field to display a list of standard tempoexpressions such as Andante, Adagio and so on.
Move the cursor to the location in a staff where you wish to add the tempo. Notice that thecursor changes into a pencil and a dotted line is displayed at the current location in the MusicScore.
Align the dashed line with the beat where you want the tempo expression.
Click the mouse to add the tempo at the specified location.
To Remove a Tempo
To remove a tempo, simply select it with the mouse and select Edit Delete from the menu.

263
Forte 3
-OR-
Select the tempos and press the Delete key.
To Add a Changing Tempo or a Pause
Select the Tempo tab in the Elements Palette, then select one of the changing tempos or apause.
Move the cursor to the location in a staff where you wish to add the tempo. Notice that thecursor changes into a pencil and a dotted line is displayed at the current location in the MusicScore.
Align the dashed line with the beat where you want the tempo to begin, then c lick the mouse.
This is the "anchor position" for the tempo and typically represents the start point for achanging tempo such as an accelerando. As you move the mouse a solid line remains at the anchor position, while a second dotted
line tracks your mouse movements.
Click the mouse again to define the end point of the tempo.
Note: You can also click and drag the mouse to define both the start and stop positions.
To Add a Fermata or a Comma (Breath Mark)
Select the Tempo tab in the Elements Palette for the Fermata, or the Accents tab for theComma.
Move the cursor over the note or rest to which you want to add the ferm ata or comma. Noticethat the cursor changes into a bullseye and the note highlights when the cursor is over thenote.
Click the mouse to add the fermata or comma to the note.
-o-

264
Forte 3

265
Forte 3
Edit Tempos with the Properties Window
The Properties Window is a useful tool for changing the properties of any sym bol, includingtempos.
Be sure the application is in Select Mode, then select the tempo you want to edit.
You can select several different dynamics and change all of their properties at once.
Note: If you are finding that you need to move all of the tempos higher to clear some notes,consider adjusting the Symbol Spacing Above setting for the system instead of adjustingtheir position.
Edit a Tempo
Select the tempos you want to edit, then display the Properties Window . To change how the tempo appears in the notation, select the Appearance tab in the
Properties Window and adjust the appearance properties. To change how the dynamic sounds during a performance, select the Performance tab in
the Properties Window and adjust the performance properties. To perform an action, such as move, select the Actions tab in the Properties Window. Click the Apply button when you are done making changes.
-o-

266
Forte 3
Move a Tempo
Sometimes you may wish to move an existing tempo to a different location.Although you can certainly achieve the same results by adding a new tempo and removingthe old, or by editing the start time of the selected tempo, it may be easier to simply movethe tempo.First, be sure the application is in Select Mode.
Move a Tempo
Click - but do not release - the mouse on the key you wish to move. Use As you drag the mouse, the music cursor changes to the sameUsed when entering a
new tempo from the Elements Palette. Position the cursor over the measure where you want the tempo moved to, then release
the mouse to move the tempo.
Note: If you hold the Control key down when you release the mouse, the tempo is copied tothe new location instead of moved.
-o-

267
Forte 3
Text
Add and Remove Text
You can add text expressions anywhere in your music. In general, text expressions are simplemessages to a performer for reminders about how a given section should be played. You canalso add special title page text that isUsed for the song title, composer and so forth - fordetails, click here.
Although text symbols have no performance value, rehearsal markings and text act asreference points within a document. When you press the Previous/Next buttons in thetransport controls, the document jumps to the previous/next marker in the music.
Text is always added to a particular staff. Once text is added to your music you can edit itsappearance.
To Add Text
Select the Text/Chords tab in the Elements Palette, then select one of the text sym bols. Thisincludes the Text and Marker symbols as well as the two rehearsal markings.
Move the cursor over the staff where you want to add the text. Notice that the cursor changesinto a standard text insert cursor and a red dotted line is displayed at the current loc ation inthe Music Score.
Click the mouse to display a text edit box, then type in text:
Clicking above the staff will add the text above the staff. Clicking below the staff will add thetext below the staff. On a Grand Staff, clicking between the staves will add the text betweenthe staves. Note that Markers and Rehearsal Markings are always above the top most staff.

268
Forte 3
Press the Return key to add the text, or the Escape key to abort the operation.
To Remove Text
To remove text, simply select it with the mouse and select Edit Delete from the menu.
-OR-
Select the text and press the Delete key.
Rehearsal Markings
Rehearsal numbers and letters are commonlyUsed by performers to mark certain sections ofthe music for rehearsals ("Let's start at letter D").
Typically, rehearsal markings are single letters or numbers (A, B, C, S1, S2, etc .)
When you add rehearsal markings a box is automatically displayed around the text.
-o-

269
Forte 3
Add and Remove Title Page Text
Title page text is displayed on the first page (the title page) and includes the song title,subtitle, composer, arranger, text author, a dedication and copyright information.
All title page text is automatically formatted and positioned according to what title page styleis selected in the layout . For example, with the "classic" style selected, the song title isdisplayed in a larger font and centered at the top of the page, the c opyright information iscentered in small type along the bottom edge of the first page, and so forth.
Once you've added title page text, you can edit its position and appearance properties - justlike normal text.
To Add Title Page Text1.
1. Select the Text/Chords tab in the Elements Palette, then select the button labeled"Text". Notice how the Elements Palette resizes to display additional c ontrols.
2.
2. Check the Title page text box to display additional controls, including a drop-down listand a large text entry field.
3.
3. Select the type of title text you wish to add from the drop-down list, then enter textfor the symbol into the text entry field.
4.
4. Press the Insert button in the Elements Palette to insert the text at the end of thescore.
-o-

270
Forte 3
Edit Text with the Properties Window
The Properties Window is a useful tool for changing the properties of any sym bol, includingtext.
Be sure the application is in Select Mode, then select the text you want to edit.
You can select several different text symbols and change all of their properties at once.
Note: If you are finding that you need to move all of the text higher to clear some notes,consider adjusting the Symbol Spacing Above setting for the system instead of adjustingtheir position.
Edit Text
Select the text you want to edit, then display the Properties Window . To change the text formatting and size, select the Appearance tab in the Properties
Window and adjust the appearance properties. To change general properties of the text, such as its position, visibility and color, selec t
the General tab in the Properties Window and adjust the general properties. To perform an action, such as move, select the Actions tab in the Properties Window. Click the Apply button when you are done making changes.
-o-

271
Forte 3
Edit Text with the Shortcut Menu
If text is selected you can right-click the mouse to display a special shortcut menu. The menucontains commands for changing text properties. For simple operations this method can befaster and easier than using the Properties Window.
Using the Shortcut Menu
Be sure the current mode is Select Mode, then select the lyrics you want to edit. Right-click the mouse to display the shortcut menu. Select an item from the context menu to perform the command.
-o-

272
Forte 3
Move Text
Sometimes you may wish to move an existing text symbol to a different location.Although you can certainly achieve the same results by adding new text and removing theold, it may be easier to simply move the text.First, be sure the application is in Select Mode.
Move Text
Click - but do not release - the mouse on the text you wish to move. Use As you drag the mouse, the music cursor changes to the sameUsed when entering
new text from the Elements Palette. Align the dashed line with the beat where you want the text moved to. Release the mouse to move the text to the specified location.
-o-

273
Forte 3
Multi-Line Text
Often, copyrights and other text symbols have multiple lines. You can achieve this by editingthe text symbol with the Properties Window. Below is an example of a multiple line copyrighttext symbol and some multiple line general text symbolsUsed as figured bass.
To Enter Multi-Line Text
Select the text you want to edit, then display the Properties Window. Select the Appearance tab in the Properties Window. Place your cursor at the end of the text in the edit box and hit the Enter key. The cursor
will now be at a new line. Type in the new line of text. Repeat steps 3 and 4 for each new line. Click the Apply button when you are done making changes.
Note: You can select a copyright symbol © from inside the text edit box, right c lick, andselect Copy. Then you can right click Paste it on a new line or in a different text edit box.
-o-

274
Forte 3
Ties
Add and Remove Ties
Ties are notational markings which visually break a single note into two or more notes withoutaffecting the performance. The tied notes are grouped together within the tie m arking andhave a total duration equal to the original note. Tied notes are typicallyUsed when notes donot logically fit within a measure.
When you tie notes together they appear as several different notes, but they are performed asa single note with a longer duration. Ties are always displayed above or below the notes theyaffect.
Once a tie is added to your music you can edit its position and appearance properties.
To Add a Tie
Select the Notes tab in the Elements Palette, then select the tie symbol.
Click - but do not release - the mouse in an empty area that is not over a note.
Drag the mouse to sweep out a rectangular area. Notice that notes that are included in theselection area are highlighted.
Select adjacent notes with the same pitch that you wish to tie together, then release themouse to add the tie.
-OR-
Select the notes that you want to tie together - the notes m ust be adjacent and have thesame pitch.

275
Forte 3
Use the shortcut menu to add a tie to the selected notes.
To Remove a Tie
To remove a tie, simply select it with the mouse and select Edit Delete from the menu.
-OR-
Select the ties and press the Delete key.
-o-

276
Forte 3
Edit Ties with the Properties Window
The Properties Window is a useful tool for changing the properties of any sym bol, includingties.
Be sure the application is in Select Mode, then select the ties you want to edit.
You can select several different ties and change all of their properties at once.
Edit Ties
Select the ties you want to edit, then display the Properties Window . To change how the slur appears in the notation, select the Appearance tab in the
Properties Window and adjust the appearance properties. To change general properties of the tie, such as its position, visibility and color, selec t
the General tab in the Properties Window and adjust the general properties. Click the Apply button when you are done making changes.
-o-

277
Forte 3
Tuplets
Add and Remove Tuplets
A tuplet is a group of notes that form an irregular subdivision of the beat. Triplets (the mostcommon being 3 8ths in a beat), quintuplet (5 divisions of a beat), and sextuplet (6 divisionsof a beat) are some examples.
Adding tuplets is the same as adding notes, but you must also specify the type of tuplet youare creating. The notation engineUses this information to properly notate the notes in thetuplet. The tuplet type is defined by 3 values: a note value, the number of these values thatmake up the "beat", and the number of irregular divisions against the "beat".
Once a tuplet is added to your music you can edit its position and appearance properties. Youcan also edit the notes contained within the tuplet just like any other note.
To Add a Tuplet
Select the Notes tab in the Elements Palette, then select both a note and the tuplet sym bol.Notice how the Elements Palette resizes to display additional controls.
Enter appropriate values for the tuplet using the controls in the Tuplet controls of theElements Palette.
Move the cursor over the measure to which you want to add the tuplet. Notice the feedbackprovided by the note cursor:
The Music Ruler is drawn around the measure to indicate the beats and tupletsubdivisions within the measure.
The dotted red line shows the time location where the note is to be added.
The small highlighted dot shows the pitch for the new note.
1.1. Align the dashed line with the beat where you want the note, then align the dot with
the desired pitch.2.

278
Forte 3
2. Click the mouse to add the note. The tuplet is automatically positioned above or belowthe note you added.
3.3. Continue adding other notes to the tuplet following the same steps. You can select
any other enabled note in the Elements Palette.
To Remove a Tuplet
To remove a tuplet, simply select all the notes contained within the tuplet and selec t Edit Delete from the menu.
-OR-
Select the notes in the tuplet and press the Delete key.
-o-

279
Forte 3
Edit Tuplets with the Properties Window
The Properties Window is a useful tool for changing the properties of any sym bol, includingtuplets.Be sure the application is in Select Mode, then select the tuplet you want to edit. You can select several different tuplets and change all of their properties at once.
Edit a Tuplet
Select the tuplets you want to edit, then display the Properties Window . To change the appearance or placement of the tuplet, select the Appearance tab in the
Properties Window and adjust the appearance properties. To change general properties of the tuplet, such as its position, visibility and color, selec t
the General tab in the Properties Window and adjust the general properties. Click the Apply button when you are done making changes.
-o-

280
Forte 3
Edit Tuplets with the Shortcut Menu
If a symbol is selected you can right-click the mouse to display a special shortcut menu. Themenu contains commands for changing symbol properties. For simple operations this methodcan be faster and easier than using the Properties Window.
Using the Shortcut Menu
Be sure the current mode is Select Mode, then select the symbols you want to edit. Right-click the mouse to display the shortcut menu. Select an item from the context menu to perform the command.
-o-

281
Forte 3
About Tuplet Values
One of the difficulties of notating a tuplet is determining what note values toUse. Even inpublished music, there are many examples of incorrectly notated tuplets, suc h as 7 32ndsagainst 4 16ths (it should be 7 16ths against 4 16ths).
The notation engine automatically calculates the correct tuplet note values for you - whenyou set up a tuplet all that is needed is a representation of the beat that the tuplet is setagainst.
To Setup Tuplet Values
1. Note the duration that the tuplet will occupy in normal beats. For example, you mightsay something like, "I want five notes equally spaced in two beats". So the durationwould be two beats.
2. Find a note value that can represent that duration. In the above example, twoquarters would work, or 4 8ths, or 8 16ths. However, if your duration was a dottedquarter, then a quarter note value would not work, but 3 8ths or 6 16ths would.
3. Take the note value that can represent the duration, and the number of valuesneeded to represent the duration. Set the note value in the Tuplet drop list, and setthe number in the Against field. The above example wouldUse Quarter Note for thevalue and 2 for the Against.
4. Now set the tuplet number in the Number of notes field. A note value will update tothe right of the field. That is the value to select in the palette if you want the notes atequally spaced intervals. The above example wouldUse 5, and 8th notes would be thevalue to choose to get 5 equally spaced notes in the span of 2 quarter notes.
Below are some tuplet examples with their corresponding palette settings.

282
Forte 3
-o-

283
Forte 3
About Tuplets
A tuplet is a group of notes that form an irregular subdivision of the beat. In an 8th notetriplet, for example, 3 8th notes (which normally take 1½ beats in a 4/4 meter) are played inthe time normally occupied by 2 8th notes (only 1 beat). As a result, each note of the tuplet isslightly shorter so that the notes take the same amount of time to play.
There are many types of tuplets (duplet, triplet, sextuplet, quintuplet, etc.) that can beadded to your score. For example, a 16th quintuplet is a group of 5 16th notes played in thetime that is usually taken up by only 4 16th notes. Another desc ription of this tuplet is "5against 4" - 5 represents the "irregular" divisions of the beat and the 4 represents the"regular" divisions. The 16th note specifies the size of eac h regular division.
Notice how the ruler changes to display divisions for the quintuplet. The ruler always displaysthe correct subdivisions of the beat for the type of tuplet you are entering.
You do not have to confine yourself to the "regular" notes that define the duration of thetuplet. You can place any note in the tuplet, as long as it fits within the total duration of thetuplet. Contrast the quintuplets above with those in the following exam ple:
Depending on the tuplet and the note type, there are specific tuplet types that can becreated. For example, in the time that 2 8th notes normally take, you can create a triplet thatconsists of 3 8th notes, a quintuplet that consists of 5 16th notes, a nonuplet that consists of9 32nd notes, and so on. Some tuplets are neverUsed in certain meters. For example, youcannot have a half-note triplet in a 3/4 bar since the triplet spans 4 beats and there are only3 beats in the measure.
-o-

284
Forte 3
Nudging Symbols
Nudge
The arrow keys can be used to "nudge" elements and symbols in the view.
To Nudge an Element
Select the element(s) you want to nudge. You can select multiple elements and types andnudge an entire group of symbols together.
Hold down the CTRL key and press an arrow key to nudge the element up, down, left orright.
-o-

285
Forte 3
Nudging Beams
Nudge using Shortcut Keys
Hold down the Ctrl key, then use the arrow keys to move the beam up or down. Thebeam will retain its beam angle (all stems will lengthen or shorten equally). To c hange thebeam angle, use the Properties Window or edit an individual stem length .
The left and right arrow keys have no effect.
-o-

286
Forte 3
Nudging Barlines
Nudge using Shortcut Keys
Hold down the Ctrl key, then use the arrow keys to move the barline left or right. Themeasure will lengthen or shorten accordingly, and notes in the measure will repositionthemselves. To move the barline without affecting the measure, use the PropertiesWindow instead.
Once a barline has been moved, the measure will remain at that width (even if notes areadded or removed). If a meter is added, or if measures per system are changed, then themeasure will lose its barline override.
The up and down arrow keys have no effect.
-o-

287
Forte 3
Nudging Notes
Nudge using Shortcut Keys
Hold down the Ctrl key, then use the arrow keys to nudge the note right or left. Theactual performed start time of the note does not change, just how it appears in the score.To change the performed start time, use the Properties Window instead.
Hold down the Ctrl key, then use the arrow keys up and down to chromatically changethe pitch up or down. To just change the position of the note, use the PropertiesWindow instead.
-o-

288
Forte 3
Nudging Symbols
When music symbols are added to the music, the notation engine automatically places andpositions them. Sometimes you may wish to make adjustments to the default positions - thisis what nudging is for.
For example, if a dynamic marking is overlapping a note you can move the dynamic markingup, down, left, or right. You can nudge the symbols using the Properties Window or by usingshortcut keys.
When using shortcut keys to nudge, the symbols will move as you press the arrow keys. Thisis nice because you immediately see what your c hanges look like.
Note: There is a difference in slightly adjusting the position of something, and moving it'sperformed location. For example, you may want to nudge a note head to the right to avoid aninterval of a second collision, or you may want to move a note head to another beat. See theMove topics for discussions on moving performed locations.
Nudge with the Properties Window
Select the symbols you wish to nudge. Display the Properties Window, then select the General page. Use the Position controls to specify offsets from the default values.
Nudge using Shortcut Keys
Select the symbols you wish to nudge. Hold down the Ctrl key, then use the arrow keys to move the symbols.
Some symbols have slightly different behavior when using the shortc ut keys for nudging. Seethe following topics for more information:
Nudging Barlines
Nudging Beams
Nudging Notes
Nudging Symbols that split System Breaks
Nudging Systems
-o-

289
Forte 3
Nudging Systems
Nudge using Shortcut Keys
Select a system by single clicking in a measure. Hold down the Ctrl key, then use the arrow keys to move the system up or down. The left and right arrow keys have no effect.
-o-

290
Forte 3
Nudging Symbols that split System Breaks
Many symbols are capable of splitting the system break, that is, they span across the lastmeasure on a line and the first measure on the next line. You can nudge these independently.
Nudge using Shortcut Keys
Select the segment of the symbol you would like to nudge. For segment that are justlines, you may find it easier to set your Mouse Drag Options and drag select the line.
Hold down the Ctrl key, then use the arrow keys to move the symbol up, down, right, orleft. The symbol will move independently from it's other segments. To move all of thesplits simultaneously, use the Properties Window instead
-o-

291
Forte 3
Music Ruler
Symbols that need precise musical start times such as notes, tuplets, and c lefs, use the rulerwhen they are entered in the score. The ruler provides a way of specifying which beat orsub-beat in the measure the symbol is to be entered. The ruler is divided into a series ofdifferent sized marks that correspond to strong beats (the longest), weak beats (slightlyshorter), and sub-beats (the shortest). Below are some examples different rulers overdifferent meters.

292
Forte 3
The music ruler allows you to enter notes anywhere in the measure without first having toenter rests. By default, the ruler is at a resolution of 16th notes allowing you to enter a noteon the "1", "e", "and", or "a" of the beat. You can globally change the resolution of all ofthe measures, or you can just change the current measure's resolution by entering a notewith a value less than a 16th note.
As you move the cursor across a measure, a dotted vertical line (in the selection color)snaps to the beats and sub-beats of the measure, and the current beat and tick is displayed inthe status bar. Clicking the mouse will enter the symbol on the beat or sub-beat where thevertical line is. If the measure is without notes, and you are entering notes, you can enter onany beat or sub-beat of the measure. However, if there are notes in the measure, the cursorwill not allow you to enter a note that starts within the duration of a previous note. See belowfor some examples:
-o-

293
Forte 3
Advanced Techniques
Advanced Techniques
Once you've mastered the ins and outs of entering and editing notes, you may find itUsefulto try out some advanced techniques.
Select from the following to learn more:
Notating two lines of music on onestaff (Multivoicing)
Create staves that contain independentlines of music on the same staff.
Beaming Control how notes are beamedtogether to emphasize differentrhythms or phrasing.
Hidden Symbols Any music symbol can be hidden sothat it does not appear when printed -using this feature you can createpickup measures, split measuresbetween systems and create meterlessmusic.
Pickup Measures Pickup measures are used for phrasesthat start before the initial barline.
Splitting Measures For phrasing considerations, you maywish to display part of a measure onone system, and another part on afollowing system.
Small Meter Changes If you want to insert a meter over asmall range of measures (for example,to split the measure or perform other"tricks" with the score) withoutaffecting the entire score, a few extrasteps are necessary.
-o-

294
Forte 3
Notating two lines of music on one staff(Multivoicing)
Each staff can support up to 8 different voices(parts) for notating several melodic linestogether on the same staff. Quite often in keyboard, instrumental, and vocal music, twodistinct lines of music occupy the same staff. If the two lines differ rhythmically, they shouldbe notated using separate voices so that their independent rhythms are preserved. If the twolines share the same rhymic pattern, they may be notated using a single voice.
The example below illustrates how multivoicing looks in the Music Score:
The notation engine automatically handles many of the nuances of multivoicing music. Forexample, there are different rules for stem direction and length, and for how slurs, ties andaccents are displayed. Note that the notation engine automatically fills each voice with it'sown set of rests. In keyboard music, one may want to hide rests for improved readability.
Change voice with the Properties Window
Select the notes you want to change. Display the Appearance page in the Properties Window. Select the desired voice from the Voice dropdown list, then hit the Apply button to apply
the changes.
Change voice using an action
Select the notes you want to change.
Select Actions Voice from the menu.

295
Forte 3
Select the desired options in the Actions page of the Properties Window, then hit theApply button.
Insert notes using a different voice Select the desired voice in the notation bar displayed at the top of the Music Score. Insert notes as usual.
-o-

296
Forte 3
Beaming
Beaming
A beam is a connecting line that joins 2 or more notes that are subdivisions of a beat in ameasure.
Beaming decisions are based on the metric divisions within a measure. In general, the notesare beamed so that the note groups match the intended rhythmic beat as spec ified in thecurrent meter.Certain phrasing considerations, hemiolas, old vocal notation, and emphasizing different beatsare all reasons to override the default beaming patterns.
Select from the following to learn more
Break and Join Beams
Change Metric Division
Metric Division Example
-o-

297
Forte 3
Break and Join Beams
The most direct way to override a beaming decision is to break or join beams.
To Break a Beam
1. Select any two adjacent beamed notes2. Click the right mouse button to display a popup menu. Select Break Beam from the
menu.3. It is also possible to select a group of beamed notes and break all beams at once by
selecting Break Beam.
To Join a Beam
1. Select any two adjacent notes2. Click the right mouse button to display a popup menu. Select Beam Notes from the
menu.
-o-

298
Forte 3
Change Metric Divisions
Often an easier way to achieve desired beaming patterns is to redefine the metric division ofthe meter.
Since the underlying beaming patterns are based on divisions of the beat, c hanging thosedivisions (or the beat itself) results in different beaming patterns.
This method is far more efficient than individually breaking/joining beams (which can betedious for a long piece) when changing beaming patterns throughout the sc ore.
An example should help explain things:
In 5/8 meter, the default metric division is 2 8th notes + 3 8th notes, so it will beam 8thnotes in groups of 2 + 3.
But another common metric division of 5/8 is 3 + 2. If the underlying meter is changed froma 5/8 to a (3+2)/8 meter the 8th notes will be beamed in groups of 3 + 2 instead of thedefault 2 + 3.
To Change the Metric Divison of the Meter
1. Select the appropriate meter for the section you want to affect.
2. Display the Properties Window for the meter. Select the Appearance tab.
3. Change the meter type to an equivalent custom meter to get the desired beamingpattern. In our 5/8 example, we would change the 5/8 meter into a (3+2)/8 meter.
4. Check the Display As box at the bottom of the Properties Window and type in themeter you want displayed in the score. In our example we would type in 5/8.
5. Click the Apply button. The beaming patterns should now match the underlyingmeter, as it really is (i.e. not the "displayed" version).
-o-

299
Forte 3
Metric Divisions Example
The samples below illustrate several beaming patterns one may achieve with the same notesand the same displayed meter. All 4 samplesUse a meter that has 4 quarter notes in ameasure, and all meters are displayed as the normal 4/4 meter.
Example A really is a genuine 4/4 meter, where the default is to beam 8th notes into 2 groupsof 4.
In Example B, the meter is really a (1+1+1+1)/4 meter, which causes the 8th notes to bebeamed with each beat. This changes the beaming patterns in every measure that is affec tedby the meter.
Example C shows the effects of a (1+2+1)/4 meter, with the first and last beats in eac hmeasure separate from the middle two beats.
Example D shows how a (1+4+2+1)/8 meter affects the beaming decisions. Note that we'veactually changed the underlying beat in this sample -- it's now an 8th note instead of aquarter note.
The actual value of the meter is what ultimately affects how many notes can be added to ameasure, but the displayed value can be anything. WhenUsed in combination with hiddensymbols, this feature makes it possible to create pickup measures and measures which crosssystems, among other things.
-o-

300
Forte 3
Hiding and Displaying Hidden Symbols
You can hide any symbol in the Music Score. This becomes an extremely powerful toolwhenUsed in conjunction with different meters.
Use the General page of the Properties Window to hide or unhide any symbol in the MusicScore.
To display Hidden Symbols
Display the Music Score in Page View In the Voice combo box at the top of the Music Score, select the choice nam ed "Hidden" All symbols that have been defined as hidden are now displayed in light gray.
To Hide a Symbol
Display the Music Score in Page View. Select the symbols you want to hide and display the Properties Window. Select the General tab in the Properties Window and c lick the "Hidden" checkbox Click the Apply button to apply the changes.
To Unhide a Symbol
Display the Music Score in Page View Display hidden symbols in the view and select the symbols you want to unhide. Display the General tab in the Properties Window, and uncheck the "Hidden" checkbox. Click the Apply button.
-o-

301
Forte 3
Pickup Measures
Pickup measures (also known as an Anacrusis or Upbeats) are used for phrases that startbefore the initial barline.
A pickup measure can be created, edited or removed by clicking on the menu "Document" andselecting "Pickup Measure...".
DurationThe duration of the pickup measure consists of the total duration of the selected note values.The information about which note values are selected is irrelevant, only the total duration willbe used to create or edit the pickup measure.
Optionsa) "Insert new bar at the beginning" – If this option is not selected, the first bar of the m usicpiece will be reduced to a pickup measure. Any content that exceeds the duration of thepickup measure will be removed. This option is only available while c reating a pickupmeasure.b) "Don’t change end measure" – If this option is not selected, the last bar of the m usic piecewill be reduced to an incomplete end measure. And any content that exceeds the newduration of the end measure will be removed.
You can also use custom meters and hidden symbols to display pickup measures. This isnecessary if you have a repeat sign and the measures must be incomplete.
Note: We recommend that you create a pickup measure before you really start working in apiece. This is because changing meters after there are lots of notes in the score can result inloss of any user formatting or other customizations you may have done.
To Create a Incomplete Measure
Add a new measure at the beginning of a piece Add the same kind of meter that is in measure 1 to what is now measure 2. Select the meter in the first measure and bring up the Properties Window. Change the meter type in the first measure to correspond to the number of beats you will
need in your pickup measure. Select the Display as checkbox and enter the same meterthat appears at measure.

302
Forte 3
Click the Apply button to apply the changes. Select the meter at measure 2, then display the General tab in the Properties Window and
check the Hidden checkbox. Click the Apply button to hide the meter.
-o-

303
Forte 3
Split Measures Across Systems
You may want to break a measure across a system break to denote phrasing that starts on anupbeat.
Like pickup measures, splitting measures involves custom meters and hidden symbols.
Note: Before splitting measures, make sure that you are finished adding and removingmeasures and staves. Where the measure is split depends on its relationship to the system sin Page View. Adding measures and Staves will change these relationships. Also, like pickupmeasures, it is recommended to split measures before adding any notes.
To split a Measure Between Two Systems
Insert a redundant meter two measures after the measure that you want to split. Insert a meter at the measure you want to split. Set the meter to correspond with the
number of beats that the end of the phrase will go over the barline. Insert a meter at the beginning of the next measure. Set the meter to correspond to the
number of beats needed for the upbeat. Hide all 3 meters that you added in the previous 3 steps. Hide the barline at the end of the measure in the first system
-o-

304
Forte 3
Small Meter Changes
Insertion of a new meter affects all the music from the measure of insertion until either theend of the piece or until the next meter is found, whichever comes first. If you want to changethe meter of a section of your music without affecting the entire piece, a few extra steps arenecessary.
As an example, let's say that you are working on a song whic h is in 4/4 time. You would liketo change the meter in measures 10-19 to 3/4, leaving subsequent measures in the original4/4 meter. The first step is to define the endpoint of your new 3/4 sec tion by insertinganother 4/4 meter at measure 20. A dialog box appears, warning you that the new 4/4 m eteris redundant (strictly speaking, it is, but the notation engine doesn't know what you intend todo - hence the warning). Click on the OK button; the 4/4 time signature at measure 20appears. Now you can insert your 3/4 meter at measure 10, and only measures 10 through19 will be affected.
One word of warning, though. If you are changing the meter such that there are fewer beatsper measure in the new meter than in the old, and you've got notes throughout the entiresection that you are changing, you run the risk of some of these notes getting displaced intothe following section. This is because the length (in beats) of your original sec tion may belonger than the new section will allow, given the same number of measures.
-o-

305
Forte 3
The Audio Sequencer
The Audio Sequencer
The Audio Sequencer is used to record, position and configure digital audio files which areplayed along with your music. The Audio Sequencer is so named after the commonly-usedfile format (.WAV).
The Audio Sequencer displays digital audio files as horizontal bars positioned along a timeline.By arranging the bars along the time ruler you can specify precisely when a digital audio filewill begin playing. After creating your music score, for example, you could try singing alongwith it and have both the music and the singing playing together.
On the left side of the window, each track contains a set of controls that affect the volum e,pan and frequency of the sounds on that track. Other controls for each track are identical tothose in the Mixer and are used to set mute, solo or record/play status of a wave track.
Wave files which occur at the same time are mixed together in realtime so that the end resultis a single left/right channel combination. By adjusting the relative volumes and pans of eachtrack, you can change the composition.
-o-

306
Forte 3
The Piano Roll
The Piano Roll
The Piano Roll view displays notes as bars along a timeline, much like an old player piano.The piano roll is the preferred method of editing MIDI for many people, either because theydo not know how to read notated music or because they find it more intuitive andUseful.
The controls at the top of the window areUsed to specify which track and voice is currentlydisplayed in the Piano Roll and Envelope View.
The Vertical Scale Controls in the lower right-hand corner of the piano roll areUsed to controlthe height of the bars in the Piano Roll, which affects how many pitches are visible. Verticalscaling also changes the height of the piano keys on the left side of the window.
The Envelope View and Controls at the bottom of the window areUsed to create and editenvelopes. An envelope is a representation of how a musical parameter, such as tempo,volume or balance, varies over time.
-o-

307
Forte 3
Envelope View
Envelope View
The Envelope View is included in the same window with the Piano Roll, and graphicallyillustrates how different musical parameters change with time. The Envelope View isintegrated with the Piano Roll view in a single window, aligned along the horizontal (tim e)axis.
-o-

308
Forte 3
What is an Envelope?
An envelope is a representation of how a particular musical parameter changes with time. Anenvelope itself is a graph with the horizontal axis (x) representing time and the vertical axis(y) representing the value of the parameter. By changing the shape of an envelope you c anchange how different parameters (such as volume, pan, reverb and so on) change with time.
The continuous line displayed in the Envelope View represents the envelope. Sometimes theenvelope fades continually from one point to the next, other times it seems to changeabruptly. The shape of the envelope (and the musical parameter it represents) is controlledentirely by the envelope points.
Envelopes allow you to shape different parts of your music for richer compositions. Ratherthan specify each individual controller for, say, master volume, you can create a mastervolume envelope that describes how the master volume changes with time. You can alwaysreshape the envelope simply by moving around displayed points on the envelope.
It's also fun to loop perform a particular area and adjust various envelopes while the music isplaying until you get the sound you want.
-o-

309
Forte 3
Envelope Types
The following types of envelopes may be added to your document. Click on an envelope typeto learn more about the envelope.
Tempo Create envelopes which change thetempo dynamically during aperformance. This can be used to addrubatos, expressions and other"human" elements.
Controller Choose from 128 standard MIDIcontrollers for specifying volume, pan,reverb, chorus and dozens of otherchoices.
RPN Create an envelope to change aRegistered Parameter Number (RPN)dynamically.
NRPN Create an envelope to change aNon-Registered Parameter Number(NRPN) dynamically.
Pitch Bend Create an pitch-bend envelope for eachtrack.
Poly Pressure
Channel Pressure
-o-

310
Forte 3
Displaying Envelopes
There can be literally dozens of different envelopes that are applied to a piece of music. Foreach track there might be volume and balance, possibly reverb and chorus effects. For 8tracks this totals 32 different envelopes, not inc luding tempo or master volume. The controlsat the bottom of the Envelope View areUsed to divide envelopes into specific categories andtypes. In addition, the controls at the top of the window may affect which envelope isdisplayed in the Envelope View.
The Envelope Category box displays several categories. Depending on which category isselected the Envelope Type box may or may not be activated.
The table below summarizes the behavior:
What is Selected Which Envelope is Displayed
Controller When this is selected the Envelope Type box is filledwith the names of all MIDI controller envelopes definedfor the currently selected track/voice combination. Thedisplayed envelope will be whatever is selected in theType box. If there are no controller envelopes definedthe envelope view indicates this.
Pitch Bend The Envelope View displays the MIDI pitch bendenvelope for the currently selected track/voicecombination. The Envelope Type box is deactivatedsince there is only one pitch bend envelope available foreach track/voice.
Chan Pressure The Envelope View displays the channel pressure(aftertouch) envelope for the currently selectedtrack/voice combination. The Envelope Type box isdeactivated since there is only one channel pressureenvelope available for each track/voice.
Poly Pressure The Envelope View displays the polyphonic key pressureenvelope for the currently selected track/voicecombination. The Envelope Type box is deactivatedsince there is only one poly pressure envelope availablefor each track/voice.
RPN When this is selected the Envelope Type box is filledwith the names of all RPN (Registered ParameterNumber) envelopes defined for the currently selectedtrack/voice combination. The displayed envelope will bewhatever is selected in the Type box. If there are noRPN envelopes defined the envelope view indicates this.
NRPN When this is selected the Envelope Type box is filledwith the names of all NRPN (Non-Registered ParameterNumber) envelopes defined for the currently selectedtrack/voice combination. The displayed envelope will bewhatever is selected in the Type box. If there are no

311
Forte 3
NRPN envelopes defined the envelope view indicatesthis.
Tempo The Envelope View displays the tempo envelope for thedocument. The Envelope Type box is deactivated sincethere is only one tempo envelope for the entire piece.
You can add and remove MIDI controller, RPN and NRPN envelopes. When one of thesecategories is selected in the Envelope Category box the buttons next to the Envelope Typebox are enabled. These buttons areUsed to add and remove envelopes.
-o-

312
Forte 3
Add and Remove Envelopes
Add and Remove Envelopes
To Add an Envelope
1. Select the appropriate envelope category. Only MIDI controller, RPN and NRPNenvelopes can be added or removed.
2. Click the Add Envelope button next to the Envelope Type box or select Add Envelope…from the View menu.
A dialog appears for you to select or define an appropriate envelope. When adding a MIDIcontroller envelope, for example, the dialog contains a list of all available MIDI controllersalong with their familiar association (e.g. Volume for controller 7).
To Remove an Envelope
1. Display the envelope you want to remove
2. Click the Remove Envelope button next to the Envelope Type box or selec t RemoveEnvelope from the View menu.
-o-

313
Forte 3
Envelope Points
Envelope points are the backbone of an envelope. By adding, removing and adjustingenvelope points you can dramatically change the way the envelope looks as well as how themusic sounds.
You should understand the visual appearance of the various envelope points displayed in theEnvelope View. The figure below describes the different types of points you may see in anenvelope.
Points that look "hollow" represent"normal" envelope points. These arepoints that comprise most envelopes andhave absolutely no connection with anynotated symbol in the Music Score.
The "solid" envelope points correspond tonotated symbols. If these points aremoved the symbol in the Music Score isalso moved. Similarly, if the symbol in thescore is deleted the points in the envelopeare also deleted.
Some symbols in the Music Score actually correspond to 2 envelope points sinc e they haveboth a start time and a duration - crescendos and accelerandos, for example. For thesesymbols there is one point representing the start time of the element and another pointrepresenting the stop time. Adjusting the second point effectively changes the duration of theelement as it is notated in the score.
-o-

314
Forte 3
Envelope Transitions
Envelope points have another property called its flavor, which describes how the shape of theenvelope behaves around that point. The shape of an envelope depends entirely on theposition and flavor of each envelope point.
You can always change a point's flavor simply by selecting it and clicking the right mousebutton to display a popup menu. Currently we have two flavors, Constant and Dynam ic.
A constant point means the value of theenvelope is the same after the point. Thistype of point is normallyUsed for notatedsymbols such as ff and mp since thosesymbols mean to set the dynamic markingto a certain value.
A dynamic point means the value of theenvelope changes dynamically from thepoint to the next point. This type of pointisUsed for markings such as a crescendowhere the meaning is to graduallyincrease the dynamic value.
It can be helpful to loop over a region and experiment with different envelope points,positions and flavors to see how things change.
-o-

315
Forte 3
Select Envelope Points
Be sure the current mode is Select Mode. Move the cursor over the point until it becomes a pointing finger.
Click and release the mouse to select the point beneath the cursor.
Drag-Select Several Envelope Points Be sure the current mode is Select Mode. Move the cursor in Envelope View so that it is not on top of a point.
Click and drag the mouse to sweep out a rectangular region. As points are inc luded in thisrectangle they are selected, as they fall outside the rectangle they are unselected.
Release the mouse when the desired points are selected.
-o-

316
Forte 3
Add and Remove Envelope Points
You can control the shape of the envelope by adding, removing and positioning envelopepoints. Once added, you can edit the location and value of any envelope point.
To Add an Envelope Point
Be sure the current mode is Edit Mode.
Move the cursor over the envelope until the cursor turns into a pointing finger:
Click (but do not release) the mouse. A new point is created directly beneath the c ursor:
As you drag the cursor the new point moves along with it:
Release the mouse to add the point at the desired position.

317
Forte 3
To Remove Envelope Points
To remove envelope points, simply select them with the mouse and select Edit Delete fromthe menu.
-OR-
Select the envelope points and press the Delete key.
Note: You cannot remove the first or last envelope point.
-o-

318
Forte 3
Associate Envelope Points with Notation
Some envelope points may represent parameters that are also notated in the Music Score.
For example, a crescendo marking in the score actually sends a MIDI volume controller toimplement the crescendo. If you move the crescendo the underlying envelope points mustalso move. Likewise, if you delete an envelope point in the Envelope View that c orresponds toa crescendo, the symbol in the Music Score should be deleted.
As a general rule, symbols entered into the Music Score will create corresponding envelopepoints in the Envelope View, whereas symbols entered directly into the Envelope View will notcreate corresponding symbols in the Music Score.
-o-

319
Forte 3
Edit Envelope Points with the Properties Window
The Properties Window is a useful tool for changing the properties of any sym bol, includingenvelopes.
The appropriate Properties Window for the envelope point depends on the type of envelope itis part of.
For example, the volume controller envelope corresponds to dynamic markings in the MusicScore, so the dynamic markings Properties Window isUsed. Similarly, when editing points inthe tempo envelope, the Properties Window for tempo markings isUsed. For all other points,the Properties Window shows generic performance properties.
Be sure the application is in Select Mode, then select the envelope point you want to edit.
You can select several different points and change all of their properties at once.
Edit an Envelope Point
1. Select the point you want to edit, then display the Properties Window.
2. Select the Performance page in the Properties Window to change the time and valuefor the selected envelope points.
3. If you have selected a symbol which also has notational equivalents, select theappropriate Appearance tab and adjust the appearance properties, if desired.
4. Click the Apply button when you are done making changes.
-o-

320
Forte 3
Move Envelope Points
Sometimes you may wish to move existing envelope points to a different loc ation.
This technique is especiallyUseful when you want to move several envelope points togetherbecause they define a certain "shape" to the envelope.
Vertical changes correspond to larger or smaller envelope values and horizontal changescorrespond to time.
Certain symbols in the Music Score have 2 envelope points in the Envelope View. Changingthe horizontal position on the second point corresponds to editing the duration of the elem ent.
First, be sure the application is in Select Mode.
Move Envelope Points
Select the envelope points that you want to move. Click - but do not release - the mouse on one of the selected points. As you drag the mouse, the points move along together as a group. Release the mouse to move the points to the specified location.
-o-

321
Forte 3
Entering Music in Piano Roll
Entering Music in Piano Roll
To Add Notes
Be sure the current mode is Insert Mode. Display the Elements Palette and select the Notes tab. Select a note you want to add. Click in the piano roll to add the note. As long as the mouse button is held down you can
drag the bar representing the note to the desired pitch and time. Release the mouse to add the note.
To Remove Notes
Be sure the current mode is Select Mode. Select the notes you want to remove. Press the Delete key or select Delete from the Edit menu
To Select a Note
Be sure the current mode is Select Mode. Click and release on a bar representing a note to select the note.
-OR-
Click and drag the mouse to sweep out a rectangular region. As you drag the cursor the noteswhich intersect the rectangle are selected.
To Move Notes
Be sure the curr.ent mode is Select Mode. Select the notes you want to move. Click and drag the mouse to move the bars representing the selected notes. Release the mouse to insert the notes. If during the drag you decide not to move the
notes, simply hit the escape key to abort the operation.
To Change the Duration of a Note
Select the note you want to change. Move the cursor the right edge of the bar representing the note. When the cursor changes
to the horizontal resize cursor you know the mouse is in the correct place. Click and drag the mouse to reposition the right edge of the note bar. . If during the drag
you decide not to change the note, simply hit the escape key to abort the operation. When you release the mouse the note's duration is changed.
-o-

322
Forte 3

323
Forte 3
The MIDI Events
The MIDI Events
The MIDI Events
The MIDI Events view displays a list of events in a table. Different c olumns in the tabledescribe important event parameters, such as the start time, the MIDI information and thetrack the events occur on.
You can sort the MIDI events in different ways - by time, by duration, by channel - making iteasy to find all the notes of a particular duration, or all the dynam ic markings which occurwithin a specific time region, for example.
Click on an area of the image below for more details:
-o-

324
Forte 3
List Area
List Area
The List Area is a table containing a display of events. The rows in the table representindividual events, the columns represent specific bits of information about the event.As you make different selections in the Overview Area, the items in the list change to reflectthe new selection. If you select an item which contains a very large number of events, adialog warns you - this is because displaying a large number of items (more than 5000) canconsume a lot of your computer's memory and resources. You can always select a smallerportion of the document.
The items in the list can be sorted in a variety of ways - by name, event type, start time,duration and so on. Select one of the column headers in the list to sort alphabetically ornumerically by that column. As the list updates, different items are automatically added tothe end of the list. If you check the Sort box at the top of the Event List window, the list willremain sorted at all times.The following table describes each column displayed in the list:
DescriptionA general description of the event, such as "Note" or "Tempo". An icon for the event is alsodisplayed in this column.
ChanThe current MIDI channel that the event is performed on. You cannot edit this value here -you must use the Track Inspector to change the routing of a track.
StartThe start time - in bars, beats and ticks - of the event
DurationThe duration if the event. This field is blank for events that do not have a duration
PitchThis field is used only for notes - it provides a more "user-friendly" way to view the pitch ofthe note (rather than MIDI numbers)
Data1, Data 2These are the MIDI data byte fields. Depending on the event, these values may representcompletely different parameters.
InfoA description of what the numbers in Data1 and Data2 really mean for the event.
-o-

325
Forte 3
Overview Area
Overview Area
The Overview Area contains a hierarchical list containing the document, the staves in thedocument, and the measures in each staff. As you select different items in the OverviewArea, the List Area updates to reflect the appropriate events for the selected items. You canselect multiple items, make discontinuous selections and so on so that you c an display asmuch or as little in the Event List as you want.
-o-

326
Forte 3
Filtering Events
Filtering Events
The buttons at the top of the Event List window are used to select the types of events thatyou want to display in the list.
Depending on the situation, you may be interested only in notes, for example, or onlyprogram changes or controllers of a particular type. When a button is depressed (on) theevent type is displayed; otherwise, it is not.
As you change the filter settings, the list updates to reflect the new choices. Usually there isa slight delay to allow you to select many different choices.
-o-

327
Forte 3
Actions
Actions
Actions are plug-in effects for changing music. Sometimes you might want toUse an ac tion totranspose and move notes, or perhaps you'd like to merge 2 staves into a single Grand Staff.Other times, however, you might simply want to experiment with the music. Actions are goodway to accomplish both tasks.
Actions are always applied to the current selection. As the selection changes, so does the setof possible actions that can be applied. The Actions tab in the Properties Window displays allactions possible for the current selection. Just as the Properties Window changes as theselection changes, so too do the contents of the Actions tab.
Whenever there are any actions available for the current selection an Ac tions menu appearsnext to the Music menu. When you select an item from the Actions menu the appropriate formin the Properties Window is displayed.
For more information about actions, click on one of the topic s below.
Using Actions
Chord Symbol Actions
Document Actions
Dynamic Actions
Note Actions
Octava Actions
Pedal Actions
Staff Actions
Tempo Actions
Text Actions
-o-

328
Forte 3
Using Actions
Once you've got something selected it's a simple matter of seeing what ac tions are available.The easiest way to do this is to look for an Ac tions menu in the main menubar:
The Actions menu displays a list of the available actions for the current selection. If noactions are available the Actions menu does not appear in the menubar. When you select anaction from the menu the Properties Window appears (if it not already visible) andautomatically switches to display the Actions tab:
You can use the dropdown list in the Properties Window as an alternative to selecting anitem from the Actions menu. In either case, the appropriate controls are displayed in theProperties Window for the chosen action.

329
Forte 3
Applying an Action
Once you have configured the controls for an action, simply press the Apply button to applythe action to the current selection.
One of the easiest ways to try out an action is to select a loop region and play it whileapplying different actions. Most actions can be undone, so you can change your m ind later.
-o-

330
Forte 3
Chord Symbol Actions
Once you have chord symbols selected it's a simple matter of seeing what ac tions areavailable. You can use the Actions menu or look at the Properties Window.
To View Available Chord Symbol Actions
Select the chord symbols you want to perform an action on. Select an item from the Actions menu, or click on the Actions tab in the Properties
Window.
Note: Chord Symbol actions are also available when you select a staff, and apply to all c hordsymbols on the selected staff.
Chord Symbol Actions
Click on one of the topics below for more information about each action:
Move
Transpose
-o-

331
Forte 3
Identify Chords
Identify Chord
The Identify Chord action analyzes selected notes and adds a chord symbol that reflects thebasic chord structure of the selected notes.
For example, if you've selected an F, E-flat, A and C, the analysis would conclude that the 4notes are part of an F7 chord.
Note that this action treats all of the notes selected as one chord for analysis. This allows youto analyze notes that dont share the same start time, which can be important forcompensating for chord anticipations, suspensions, or appoggiaturas.
-o-

332
Forte 3
Identify Chords
The Identify Chords action analyzes notes in staves and determines the corresponding chordsthat the notes comprise.
For example, if there is an F and E-flat in the bass clef and an A and C in the treble clef, theanalysis would conclude that the 4 notes are part of an F7 chord.
You can control which staves are used in the analysis as well as other behavior suc h aswhether to prevent duplicate chords.
-o-

333
Forte 3
Chord Analysis Settings
The Chord Analysis dialog is used to specify different analysis choices that areUsed by theAnalyze Chords action. Chord analysis is a theory rather than a science, and these optionsallow you to more precisely control the behavior of the algorithm.
To display the Chord Analysis settings dialog select one of the Identify Chords ac tions andpress the Settings… button in the Properties Window.
-o-

334
Forte 3
Document Actions
Many actions that normally apply to individual notes or staves can also be applied to thedocument as a whole. When nothing else is selected the Properties Window displays theproperties for the active document. The available "document actions" are displayed in theActions menu as well as the Actions tab of the Properties Window.
For example, suppose you want to transpose or quantize the entire doc ument. One way wouldbe to select each staff individually, then apply the action on the selected staves. An easierway, however, is to clear the selection and apply an action to all staves at once.
To View Available Document Actions
Select a blank area in the Music Score. Select an item from the Actions menu, or click on the Actions tab in the Properties
Window.
Staff Actions
The actions listed below can be applied to the document as a whole, or to individual staves:
Copy
Group
Identify Chords
Merge
Order
Split
Note Actions
The actions listed below can be applied to the document as a whole, or to individual notes:
Quantize
Retrograde
Transpose
Velocity
Voice
-o-

335
Forte 3

336
Forte 3
Dynamic Actions
Once you have dynamics selected it's a simple matter of seeing what ac tions are available.You can use the Actions menu or look at the Properties Window.
To View Available Dynamic Actions
Select the dynamics you want to perform an action on. Select an item from the Actions menu, or click on the Actions tab in the Properties
Window.
Dynamic Actions
Click on one of the topics below for more information about each action:
Move
-o-

337
Forte 3
Note Actions
Once you have notes selected it's a simple matter of seeing what actions are available. Youcan use the Actions menu or look at the Properties Window.
To View Available Note Actions
Select the notes you want to perform an action on. Select an item from the Actions menu, or click on the Actions tab in the Properties
Window.
Note Actions
Click on one of the topics below for more information about each action:
Duration
Identify Chord
Inversion
Move
Quantize
Retrograde
Transpose
Velocity
Voice
-o-

338
Forte 3
Octava Actions
Once you have octavas selected it's a simple matter of seeing what actions are available. Youcan use the Actions menu or look at the Properties Window.
To View Available Octava Actions1.1. Select the octavas you want to perform an action on.2.2. Select an item from the Actions menu, or click on the Actions tab in the Properties
Window.
Octava Actions
Click on one of the topics below for more information about each action:
Move
-o-

339
Forte 3
Staff Actions
Once you have a staff selected it's a simple matter of seeing what actions are available. Youcan use the Actions menu or look at the Properties Window.Many actions that normally apply to individual notes can be applied to the staff as a whole.When a staff is selected the available actions includes those that also apply to notes.
To View Available Staff Actions
Select the staves you want to perform an action on. Select an item from the Actions menu, or click on the Actions tab in the Properties
Window.
Staff Actions
Click on one of the topics below for more information about each action:
Copy
Group
Identify Chords
Merge
Order
Split
Note Actions
The actions listed below can be applied to the staff as a whole, or to individual notes:
Duration
Inversion
Move
Quantize
Retrograde
Transpose
Velocity
Voice

340
Forte 3
-o-

341
Forte 3
Pedal Actions
Once you have pedals selected it's a simple matter of seeing what actions are available. Youcan use the Actions menu or look at the Properties Window.
To View Available Pedal Actions
Select the pedal markings you want to perform an action on. Select an item from the Actions menu, or click on the Actions tab in the Properties
Window.
Pedal Actions
Click on one of the topics below for more information about each action:
Move
-o-

342
Forte 3
Tempo Actions
Once you have tempos selected it's a simple matter of seeing what actions are available. Youcan use the Actions menu or look at the Properties Window.
To View Available Tempo Actions
Select the tempos you want to perform an action on. Select an item from the Actions menu, or click on the Actions tab in the Properties
Window.
Tempo Actions
Click on one of the topics below for more information about each action:
Move
-o-

343
Forte 3
Text Actions
Once you have text selected it's a simple matter of seeing what actions are available. You canuse the Actions menu or look at the Properties Window.
To View Available Text Actions
Select the text you want to perform an action on. Select an item from the Actions menu, or click on the Actions tab in the Properties
Window.
Text Actions
Click on one of the topics below for more information about each action:
Move
-o-

344
Forte 3
Transposition
Transposition
Transposition is moving pitches up or down by some interval. All pitches are raised orlowered the same number of half-steps, so melodic contour is preserved and all that hasreally changed is the "key" or pitch.
There are several transposition options that allow you to do such things as transpose entirescores into a new keys, transpose individual parts for part extractions, work in transposedscores, and transpose sections of music.
Click on a topic for more information:
Working with Transposed Scores
Working with C Scores
Transposing to new keys
Transposing sections of music
-o-

345
Forte 3
Working with Transposed Scores
Some instruments, such as B-flat clarinet, do not sound as written. For exam ple, when aclarinet reads a C off of a sheet of music, what is actually heard is a B-flat. Instruments whichdo not sound as written are known as transposing instruments.
When working with scores containing transposing instruments, it is common practice to workwith what is known as a transposed score as well as a C score.
A transposed score contains all of the parts as written. That is, a B-flat clarinet part on thescore is transposed such that when played by a clarinet, it will sound correc tly. Many olderscores are transposed scores (one way to tell is that many staves will be in different keysignatures). One benefit of using transposed scores is that when it comes time to print outthe individual parts, the parts are already transposed.
To Turn a C Score into a Transposed Score
Select the staff/track you want to change. Select Transpose by Instrument from the list of Actions in the Properties Window
- OR -
Select Transpose by Instrument from the Actions menu.
In the From drop list, choose Concert C (assuming that the part was entered as sounds).In the To drop list, select the instrument for which you are transposing into (for example,Alto Saxophone).
Uncheck the Performance box in the Transposition Affects section. This is so that theactual playback will not be altered.
Check the Notation box. Check the Change Key box. Click the Apply button to transpose the music.
Entering Music from a Transposed Score
Determine the key of the piece. You can do this by finding the key signature that anon-transposing instrument is in (such as Flute, Piano, or Violin).
Transpose the entire piece into that key. Following the steps for changing from a C score to a transposed score, setting each staff
to the instrument that it is scored for. Now you can enter the music, as it appears written on the score, and it will playback as it
is supposed to sound.
-o-

346
Forte 3
Working with C Scores
Some instruments, such as B-flat clarinet, do not sound as written. For exam ple, when aclarinet reads a C off of a sheet of music, what is actually heard is a B-flat. Instruments whichdo not sound as written are known as transposing instruments.
When working with scores containing transposing instruments, it is common practice to workwith what is known as a transposed score as well as a C score.
A C Score contains all of the parts written as they sound. So a B-flat clarinet playing in unisonwith a flute on the score would appear identical. However, if a flute player and a c larinetplayer were to play that same unison part, it would sound a major 2nd off. The benefit ofworking in a C Score is that you work with all parts as they sound, and it is easier to "see" theharmonic and melodic relationships between instruments.
Working in a C Score involves no transposition until it comes time to extract and print outindividual parts.
To Transpose an Extracted Part
Select the extracted staff/track you want to change. Select Transpose by Instrument from the list of Actions in the Properties Window
-OR-
Select Transpose by Instrument from the Actions menu.
In the From drop list, choose Concert C. In the To drop list, select the instrument forwhich you are transposing into (for example, Alto Saxophone).
Uncheck the Performance box in the Transposition Affects section. This is so that theactual playback will not be altered.
Check the Notation box. Check the Change Key box. Click the Apply button to transpose the music.
-o-

347
Forte 3
Transposing to New Keys
There are many reasons to transpose an entire score up or down. You may need a new key toaccommodate the range of a vocalist, or perhaps after transposing a part for extraction, yourealize that the part goes out or the range of the instrument.
Transposing to a new key transposes both the Performance (sound) and Notation (display) ofthe music.
To Transpose to a New Key
Select the staff/track you want to change. You can transpose all of the staves at onceby running this action on the selected document.
Select Transpose from the list of Actions in the Properties Window
- OR -
Select Transpose from the Actions menu.
In the Interval section, select the interval of transposition from the drop list. Predefinedintervals range from Prime (no transposition) to Augmented 13th (1 octave + 10 halfsteps).
- OR -
Set the octave and number of half steps in the Octave and Half Steps fields.
Check the Performance box in the Transposition Affects section. Check the Notation box. Check the Change Key box. Click the Apply button to transpose the music.
-o-

348
Forte 3
Transposing Sections of Music
Often you may just want to transpose just a small section of music. Perhaps you areexperimenting and want to try the "bridge" in a different key relative to the rest of the song,or for compositional purposes, you are transposing a theme or motive.
You can also select notes and/or chord symbols and transpose them individually.
To Transpose a Selected Portion of Music
Select the notes you want to change. Select Transpose from the list of Actions in the Properties Window
-OR-
Select Transpose from the Actions menu.
In the Interval section, select the interval of transposition from the drop list. Predefinedintervals range from Prime (no transposition) to Augmented 13th (1 octave + 10 halfsteps).
-OR-
Set the octave and number of half steps in the Octave and Half Steps fields.
Check the Performance box in the Transposition Affects section. Check the Notation box. Click the Apply button to transpose the music.
-o-

349
Forte 3
Transposing By Intervals
This actions shifts pitches up or down by some interval. All pitches are raised or lowered thesame number of half-steps, so the melodic contour is preserved.
Click on the image below for details about each control:
-o-

350
Forte 3
Transposing by Instrument
This action is similar to the Transpose action, except that the interval settings are pre-set forcreating transposed part extractions. This is so that you're not saddled with questions like"what is the transposition for an English Horn" or "do I transpose a B-flat Tenor up or down amajor 2nd".
To use this action just select where you're transposing from (usually Concert C) and whatyou're transposing for (for my B-flat c larinet playing friend).
-o-

351
Forte 3
Move
Move
The Move action applies to several different types of elements, including notes, dynamics,pedal markings and tempos. This action will move elements forward or backward in time inyour music.You can move elements using other methods (drag and drop, for example) but the Moveaction can be used to move by specific time values or when you want to move many elementsat once.
Click on the image below for details about each control:
-o-

352
Forte 3
Duration
This action changes the duration of notes in a variety of ways.
Click on the image below for details about each control:
Note: Changing the duration from this page changes the performed duration, but may notchange the notated duration. If the note carries into another note of the same voice, thefollowing note will not be moved and it's possible that the note will be displayed in the sc oreunchanged. If you want the following notes to "make room" for the new duration, see thetopics on changing the duration using the Performance tab or on Moving elements using theactions tab.
-o-

353
Forte 3
Inversion
This action flips a melodic line about a horizontal axis (pivot point) in such a way that themelodic intervals between any two notes merely changes direction. For example, if the firstinterval was an ascending Perfect 4th, after inversion the interval would be a desc endingPerfect 4th.
Click on the image below for details about each control:
-o-

354
Forte 3
Velocity
The velocity is the intensity of a sound, such as whether you pluck a guitar string or press apiano key hard or softly. Pressing the key softly creates a low-intensity, high-veloc ity sound;plucking a string hard creates a high-intensity, high-velocity sound. You can use velocityscaling to "fade out" at the end of a song.
The Velocity action allows you to scale velocity for all notes between specified points for aselected track.
Click on the image below for details about each control:
-o-

355
Forte 3
Retrograde
Retrograde reverses the order of the notes, yet retains each notes duration. The effect is thatof rotating the notes around a fixed vertical line in the middle of the selection.
There are no User settings for retrograde. Just click the Apply button.
-o-

356
Forte 3
Group Staves
This action allows you to group multiple staves with either a bracket or a brace.
Click on the image below for details about each control:
-o-

357
Forte 3
Order Staves
The Order Staves action lets you to rearrange the order of the staves on the Music Score. Youcan change the order of staves as often as you'd like.
Click on the image below for details about each control:
-o-

358
Forte 3
Quantize
Quantize is a feature that adjusts the start times and durations of elements as a way to fix upa performance in which notes were played too soon or too late (relative to the exact beats). Aquantized performance sounds more rhythmically "perfect".
Click on the image below for details about each control:
-o-

359
Forte 3
Split Staff
This action splits notes on a staff into other staves. This can be useful, for exam ple, when youhave a Grand Staff and you'd like to turn it into two separate staves. The Merge Stavesaction, in contrast, performs the reverse operation by mergin a range of staves into a newtrack.
Click on the image below for details about each control:
-o-

360
Forte 3
Copy Staff
This action copies an existing staff (track) and inserts the new copy at a specific location inyour music.
Click on the image below for details about each control:
-o-

361
Forte 3
Voice
This action quickly changes voices for all selected notes (or all notes in the selectedstaff/document). Click on the image below for details about each control:
There are often many voices (or parts) in a piece of music. In choral music, soprano and altoshare the upper staff, and tenor and bass share the lower staff. In keyboard scores (grandstaff), the voices may not be quite as clear cut, but there still is typically more than one. Agreat example of multivoicing occurs in Bach's Preludes and Fugues. There are often asmany as four voices occurring at any one time in the piece.
Each staff can have up to 8 different voices. The piano grand staff, however, has a total ofeight voices. Four voices in treble clef and four voices in bass clef. You can move yourmelodies to a different voice line using the voice action.
-o-

362
Forte 3
Merge Staves
Use the Merge Staves action to combine two or more staves together. This can beUseful, forexample, when you have two separate staves that you'd like to c ombine into a single GrandStaff. The Split Staves action, in contrast, performs the reverse operation by splitting a givenstaff into several new tracks.
Click on the image below for details about each control:
-o-

363
Forte 3
Elements Palette
Elements Palette
The Elements Palette contains notes, accents, dynam ics, meters and dozens ofOther musicsymbols grouped into different music "tabs" or "pages". Similar symbols are grouped togetheron the same tab. For example, notes, accidentals, slurs, ties, tuplets and dots are all groupedin the Notes tab, since they all have to do with notes.
To Display the Elements Palette
Use any of the following methods to display the Properties Window
On the Edit toolbar, click the Elements Palette button.
Select Tools Elements Palette from the menu.
Change from Select Mode to Insert Mode.
To Select Music Pages
To view a set of notation elements, click a tab to bring it to the front of the palette. If a tabis not visible, use the small arrow keys to move the tabs left and right.
Right-click the mouse anywhere in the Elements Palette to display a shortc ut menu:
Select an item from the menu to display the corresponding music page.
-o-

364
Forte 3

365
Forte 3
Notes Tab
The Notes tab contains the tools for adding notes with durations ranging from double wholenotes to 128th notes. The Notes tab also containsOther symbols generally associated withnotes, such as accidentals, tuplets, slurs, ties and grace notes.
Click on the image below for details about each control:
-o-

366
Forte 3
Accents Tab
The Accents tab contains symbols for accent marks, string and wind instrument marks, andabbreviated accent terms.
Click on the image below for details about each control:
-o-

367
Forte 3
Dynamics Tab
The Dynamics tab contains dynamic markings, divided into two basic groups. The upperportion of the window contains symbols that set a particular dynamic value; those in thelower portion contain markings that change from one value to another.
Click on the image below for details about each control:
-o-

368
Forte 3
Tempo Tab
The Tempo tab contains symbols for tempo marks and expressions, tempo changes, andpause marks.
Click on the image below for details about each control:
-o-

369
Forte 3
Text/Chords Tab
The Text/Chords tab contains a variety of text and graphic s symbols, including simple text,rehearsal markings, lyrics, chords and pedal markings.
Click on the image below for details about each control:
-o-

370
Forte 3
Key Tab
The Key tab contains options for selecting or creating key signatures. All keys, inc luding thosewith up to seven sharps or seven flats, are available.
Click on the image below for details about each control:
-o-

371
Forte 3
Meter Tab
The Meter tab contains symbols you can use to enter meters, also known as time signatures.The left portion of the tab contains some common meters; the controls on the right portion ofthe tab allow you to enter custom meters, including compound and complex meters.
Click on an area in the image below for more information:
-o-

372
Forte 3
Clef Tab
The Clef tab contains 9 different clef types and 3 octava symbols.
Click on an area in the image below for more information:
-o-

373
Forte 3
Ornaments Tab
The Ornaments tab contains symbols for adding various ornaments, including trills, mordents,turns, arpeggios, tremolos, and some modern notational ornaments.
Click on an area in the image below for more information:
-o-

374
Forte 3
Repeats Tab
The Repeats tab contains symbols for adding repeat signs, repeat expressions, and repeatbars. Repeat indicators serve as road signs that instruct players to go back to a specific pointor to repeat a certain portion of the music.
Click on an area in the image below for more information:
-o-

375
Forte 3
Mixer
Mixer
The Mixer isUsed to control the interaction of different tracks during a performance, and tochange the overall properties of the music such as tempo and master volume. If you want onepart to sound louder than another, for example, you couldUse the mixer to adjust the volumesof the tracks until everything sounds right.
To Display the Mixer
Use any of the following methods to display the Mixer:
On the Edit toolbar, click the Mixer button.
Select Tools Mixer from the menu.
Docking and Sizing the Mixer
The Mixer can be docked or undocked to the main application window, just like a toolbar.
When the Mixer is undocked you can resize it horizontally to take up less screen space.
Move the mouse over one side of the window until the cursor changes to a resize cursor, thenclick and drag to resize the window.
Display Modes
The Mixer can be displayed in different modes: Full, Normal and Mini.
In Full mode, all controls are displayed for each track, including knobs for specifying Reverb,Pan, Chorus and Modulation. In Mini mode, only the track name and state controls aredisplayed.
The 3 icons in the upper left-hand corner of the Mixer are buttons you use to change theMixer's display mode:

376
Forte 3
Full
Normal
Mini
-o-

377
Forte 3
Track Controls
Each track in a music document is represented in the Mixer as a group of track c ontrols in ascrolling list. Every track module has several controls for specifying track name, volume, andother performance settings.
Click on an area in the image below for more information:
-o-

378
Forte 3
Master Controls
The Master Control area in the Mixer contains controls that affect the performance of alltracks. Click on areas of the Master controls displayed above to learn more about them.
Located on the Master control console are a volume slider, a VU meter, tempo controls, aMIDI In indicator, and a MIDI Thru button.
-o-

379
Forte 3
Properties Window
Properties Window
The Properties Window is used to modify hundreds of different element properties. Everythingfrom the pitch of a note, the shape of slurs and ties to the spacing around a staff can bechanged using the Properties Window.
The usual method of editing a music symbol is to select it andUse the Properties Window tochange the desired element properties. One of the most powerful features of the PropertiesWindow is its ability to modify many different elements at once. You can selec t several notes,for example, and with a single operation change all their durations to 8th notes, or all thestem directions.
To Display the Properties Window
Use any of the following methods to display the Properties Window:
On the Edit toolbar, click the Properties Window button.
Select Tools Properties Window from the menu.
Double click the mouse on a music symbol.
Right-click on a selected element, then select Properties Window… from the shortcut menu.
To use the Properties Window
Select elements that you want to edit. Display the Properties Window andUse the different property pages to change
characteristics. Press the Apply button to make the changes to the selected elements. If you've made changes in the Properties Window - but haven't applied those changes yet
- press the Reset button to reset the controls to the current values.

380
Forte 3
-o-

381
Forte 3
Properties Window Pages
Common Pages
In general, element properties are classified in terms of the following:
Appearance Properties affect the way the element appears on the score.
Performance Properties affect how the element sounds during playback.
General Properties include some common properties that also affec t how elements look onthe score.
Each of these categories is represented by a "page" or "tab" in the Properties Window.
Action Page
If a selected element has actions associated with it (e.g. notes, staves) the Properties Windowalso displays the Actions tab. This tab contains a list of actions that can be applied to theselected element(s).
Other Pages
Some elements haveOther pages beyond the standard Appearanc e, Performance and General.For example, the Staff Properties Window has pages for spec ifying instrumentation androuting for each track.
-o-

382
Forte 3
Notation Element Properties
Symbol Properties
Click on any music symbol in the image below to learn about its properties, or selec t an itemfrom the list below:
Accent Properties
Accidental Properties
Barline Properties
Beam Properties
Brace/Bracket Properties
Clef Properties
Chord Symbol Properties
Document Properties
Dot Properties
Dynamics Properties
Glissando Properties
Grace Note Properties
Key Properties
Lyric Properties
Meter Properties
Note Properties
Pedal Properties
Repeat Properties
Slur Properties
Staff Properties
Staff Spacing Properties
System Properties
Tempo Properties
Text Properties
Tie Properties
Tuplet Properties
Wave Properties

383
Forte 3
Lyric Block Properties
-o-

384
Forte 3
Accent Properties: Appearance
Click on the image below for details about each control:
Use controls on this page to change the accent type and placement. These settings affect onlyhow the accent appears in the music.
-o-

385
Forte 3
Accent Properties: Performance
Click on the image below for details about each control:
Use controls on this page to edit parameters that change how the note attended by the accentmark sounds during playback. These settings affec t only the performed music, not the originalnote values.
-o-

386
Forte 3
Accidental Properties: Appearance
Click on the image below for details about each control:
Use controls on this page to change the accidental appearance. These settings affect only howthe accidental appears in the music.
-o-

387
Forte 3
Barline Properties: Appearance
Click on the image below for details about each control:
Use controls on this page to change the barline appearance. These settings affect only howthe barline appears in the music.
-o-

388
Forte 3
Beam Properties: Appearance
Click on the image below for details about each control:
Use controls on this page to change the beam appearance. These settings affect only how thebeam appears in the music.
-o-

389
Forte 3
Brace Properties: Appearance
Click on the image below for details about each control:
Use controls on this page to change how the selected braces or brackets appear in the MusicScore.
-o-

390
Forte 3
Chord Symbol Properties: Appearance
Click on the image below for details about each control:
Use controls on this page to change the chord letter and suffix.
-o-

391
Forte 3
Clef Properties: Appearance
Click on the image below for details about each control:
Use controls on this page to change the start time of the clef and the clef type. Note thatchanging the clef type will any notes that follow it.
-o-

392
Forte 3
Dot Properties: Appearance
Click on the image below for details about each control:
-o-

393
Forte 3
Dynamics Properties: Appearance (constantdynamics)
Click on the image below for details about each control:
Use controls on this page to change how constant dynamic markings, such as p, mf and ff,appear in the music notation.Other dynamic markings, such as crescendos and hairpins, haveslightly different appearance properties.
Click on one of the links below to display appearance properties forOther types of dynamicmarkings:
Appearance (changing dynamics)
Appearance (hairpins)
-o-

394
Forte 3
Dynamics Properties: Appearance (changingdynamics)
Click on the image below for details about each control:
Use controls on this page to change how changing dynamic markings, such as cresc.,descresc. and dim., appear in the music notation.Other dynamic markings, such as p, mf andhairpins, have slightly different appearance properties.
Click on one of the links below to display appearance properties forOther types of dynamicmarkings:
Appearance (constant dynamics)
Appearance (hairpins)
-o-

395
Forte 3
Dynamics Properties: Appearance (hairpins)
Click on the image below for details about each control:
Use controls on this page to change how hairpins appear in the music notation.Other dynamicmarkings, such as p, mf and crescendos, have slightly different appearanc e properties.
Click on one of the links below to display appearance properties forOther types of dynamicmarkings:
Appearance (constant dynamics)
Appearance (changing dynamics)
-o-

396
Forte 3
Dynamics Properties: Performance (constantdynamics)
Click on the image below for details about each control:
Use controls on this page to change how constant dynamic markings, such as p, mf and ff,affect the music performance.
Dynamic markings which change over time, such as crescendos and diminuendos, haveslightly different performance properties. Click on one of the links below to displayperformance properties forOther types of dynamic markings:
Performance (changing dynamics)
-o-

397
Forte 3
Dynamics Properties: Performance (changingdynamics)
Click on the image below for details about each control:
Use controls on this page to change how changing dynamic markings, such as crescendos,hairpins and diminuendos, affect the music performance.
Dynamic markings which areUsed to specify constant values, such as p, mf and ff,, haveslightly different performance properties. Click on one of the links below to displayperformance properties forOther types of dynamic markings:
Performance (constant dynamics)
-o-

398
Forte 3
Grace Note Properties: Appearance
Click on the image below for details about each control:
Use controls on this page to change how a grace note looks in the Music Score.
-o-

399
Forte 3
Glissando Properties: Appearance
Click on the image below for details about each control:
-o-

400
Forte 3
Key Properties: Appearance
Click on the image below for details about each control:
Use controls on this page to change the properties of the selected key signatures in the MusicScore.
-o-

401
Forte 3
Grace Note Properties: Performance
Click on the image below for details about each control:
Use controls on this page to change how a grace note looks in the Music Score.
-o-

402
Forte 3
Lyric Properties: Appearance
Click on the image below for details about each control:
Use controls on this page to change how the selected lyrics appear in the Music Score. Thechanges can be applied to a whole verse/chorus or only to the selected elements.
-o-

403
Forte 3
Lyric Properties: Text
Lyric Properties: Text
The Text tab in the Lyric Properties window allows you to enter or edit whole verses as asingle text block. The basic element of the text block is the syllable. Each syllable will beautomatically placed in an appropriated position on your score (under notes or chords).Beside the syllables, there are three special elements you can use to adjust the position andappearance of the lyric text:
The Place Holder (•)The place holder is represented by the special character "•" and it will always "hold" the placeof a position (note or chord) that contains no syllable. Place holders can seen as spaces in anormal text. You can add or remove them by pressing <space bar>, <backspace> or<delete>.
The Hyphen (-)The hyphen is represented by a "hyphen" or "minus sign" and can be used to divide a word intwo or more syllables.
The Extender (_)The extender is represented by an "underscore" and can be used to extend the duration of asyllable over one or more positions. Each extended position is represented in the text by asingle underscore character.
-o-

404
Forte 3
Lyric Block: Appearance
Click on the image below for details about each control:
Use controls on this page to change how the selected lyric blocks appear and to control thenumber of blocks per line.
-o-

405
Forte 3
Meter Properties: Appearance
Click on the image below for details about each control:
Use controls on this page to change how the selected meters (time signatures) appear in theMusic Score.
-o-

406
Forte 3
Note Properties: Appearance Click on the image below for details about each control:
Use controls on this page to change how a note appears in the Music Score.
-o-

407
Forte 3
Note Properties: Performance
Click on the image below for details about each control:
Use controls on this page to change how a note performs.
-o-

408
Forte 3
Pedal Properties: Performance
Click on the image below for details about each control:
Use controls on this page to change how the selected pedal markings affect the musicperformance.
-o-

409
Forte 3
Repeat Properties: Appearance (endings)
Click on the image below for details about each control:
Use controls on this page to change how the selected repeat endings appear in the MusicScore.Click on one of the links below to display appearance properties forOther types of repeatmarkings:
Appearance (expressions)
-o-

410
Forte 3
Repeat Properties: Appearance (expressions)
Click on the image below for details about each control:
Use controls on this page to change how the selected repeat expressions appear in the MusicScore.Click on one of the links below to display appearance properties forOther types of repeatmarkings:
Appearance (endings)
-o-

411
Forte 3
Repeat Properties: Performance (End Bracket)
Click on the image below for details about each control:
Use controls on this page to change how the selected repeat bracket performs in the MusicScore.Click on one of the links below to display appearance properties forOther types of repeatmarkings:
Performance (expressions)
-o-

412
Forte 3
Repeat Properties: Performance
Click on the image below for details about each control:
Use controls on this page to change how the selected repeat performs in the Music Score.
Click on one of the links below to display appearance properties forOther types of repeatmarkings:
Performance (End Bracket)
-o-

413
Forte 3
Slur Properties: Appearance
Click on the image below for details about each control:
Use controls on this page to change how the selected slurs appear in the Music Score.
-o-

414
Forte 3
Tempo Properties: Appearance (constant tempo)
Click on the image below for details about each control:
Use controls on this page to change how constant tempo markings, such as Andante, Allegroand q=, appear in the Music Score.
Other tempo markings, such as accelerandos, ritardandos and pauses, have slightly differentappearance properties. Click on one of the links below to display appearance propertiesforOther types of dynamic markings:
Appearance (changing tempo)
Appearance (pauses)
-o-

415
Forte 3
Tempo Properties: Appearance (changing)
Click on the image below for details about each control:
Use controls on this page to change how changing tempo markings, such as accelerandos andritardandos, appear in the Music Score.
Other tempo markings, such as Andante, Allegro and pauses, have slightly differentappearance properties. Click on one of the links below to display appearance propertiesforOther types of dynamic markings:
Appearance (constant tempo)
Appearance (pauses)
-o-

416
Forte 3
Tempo Properties: Appearance (pauses)
Click on the image below for details about each control:
Use controls on this page to change how pauses appear in the Music Score.
Other tempo markings, such as accelerandos, Andante, and the beat sym bol, have slightlydifferent appearance properties. Click on one of the links below to display appearanc eproperties forOther types of dynamic markings:
Appearance (constant tempo)
Appearance (changing tempo)
-o-

417
Forte 3
Tempo Properties: Performance (expressions) Click on the image below for details about each control:
Use controls on this page to change how constant tempo markings, such as Andante, Allegroand q = 60, affect the music performance.
Other tempo markings, such as accelerandos, ritardandos and pauses, have slightly differentperformance properties. Click on one of the links below to display appearanc e properties forother types of dynamic markings:
Performance (changing tempo)
Performance (pauses)
-o-
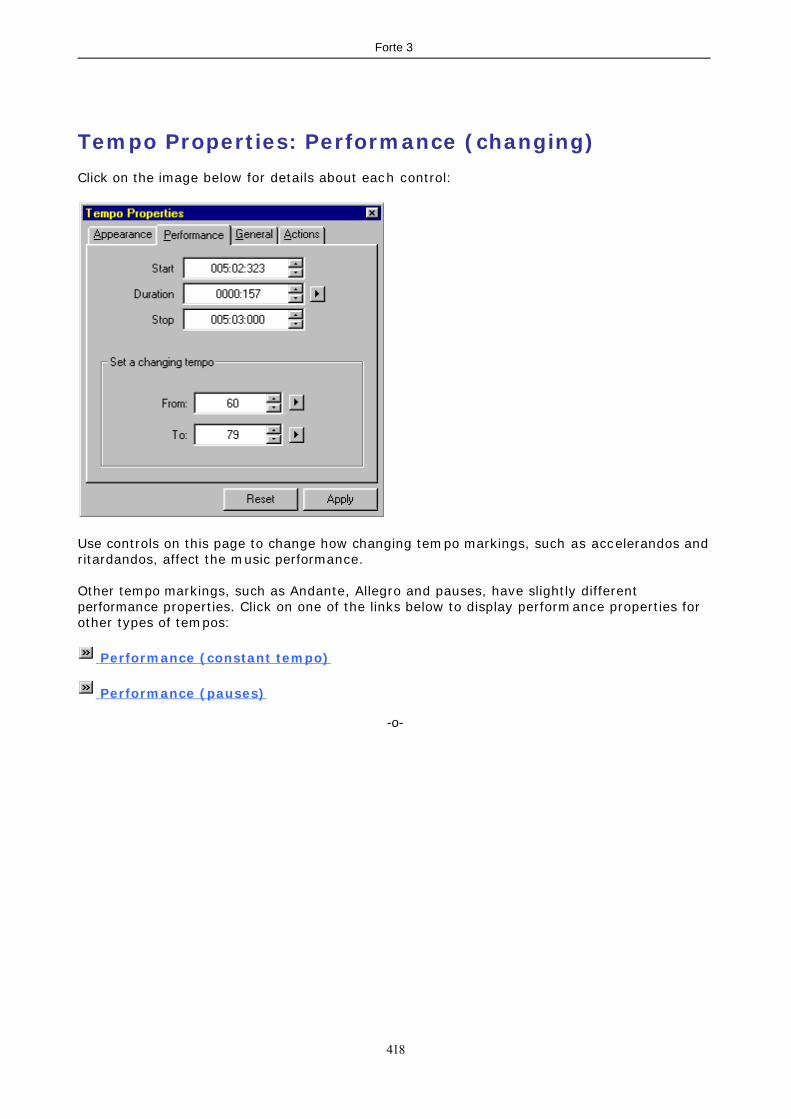
418
Forte 3
Tempo Properties: Performance (changing)
Click on the image below for details about each control:
Use controls on this page to change how changing tempo markings, such as accelerandos andritardandos, affect the music performance.
Other tempo markings, such as Andante, Allegro and pauses, have slightly differentperformance properties. Click on one of the links below to display performance properties forother types of tempos:
Performance (constant tempo)
Performance (pauses)
-o-

419
Forte 3
Tempo Properties: Performance (pauses)
Click on the image below for details about each control:
Use controls on this page to change how pauses affect the music performance.
Other tempo markings, such as Andante, Allegro and accelerandos, have slightly differentperformance properties. Click on one of the links below to display performance properties forother types of tempos:
Performance (constant tempo)
Performance (changing tempo)
-o-

420
Forte 3
Tie Properties: Appearance
Click on the image below for details about each control:
Use controls on this page to change how the selected ties appear in the Music Score.
-o-

421
Forte 3
Document Properties: Info
Click on the image below for details about each control:
This page gives information about the current document such as file name, and date created.
-o-

422
Forte 3
Staff Properties: Instrument
Click on the image below for details about each control:
Use controls on this page to change the instrumentUsed for the selected staves, and toconfigure the routingUsed to play the specified tracks.
-o-

423
Forte 3
Text Properties: Appearance
Click on the image below for details about each control:
Use controls on this page to change how the selected lyrics appear in the Music Score.
-o-

424
Forte 3
Layout Properties: Staff
Click on the image below for details about each control:
Use controls on this page to change staff spacing settingsUsed by lyrics, text, dynam ics,andOther symbols.To bring up this Properties Window, single click on a measure to select the system, rightmouse click, and from the context menu, select Properties Window…
-o-

425
Forte 3
Staff Properties: Performance
Click on the image below for details about each control:
Use controls on this page to change the transpositionUsed for the trac k during a performance.These settings affect only the performance - they do not change how the music looks in theMusic Score.
-o-

426
Forte 3
Staff Properties: Instrument (advanced)
Click on the image below for details about each control:
Use controls on this page to change the instrumentUsed for the selected staves, and toconfigure the routingUsed to play the specified track.
-o-

427
Forte 3
Layout Properties: System
Click on the image below for details about each control:
Use controls on this page to change measures per system on a system by system basis andsystems per page on a page by page basis.
-o-

428
Forte 3
Staff Properties: Appearance
Click on the image below for details about each control:
Use controls on this page to change the staff type, name andOther appearance properties.
-o-

429
Forte 3
General Properties
Click on the image below for details about each control:
Nearly all notation elements have some common display properties (color, visibility, position)that are represented in the General page.
-o-

430
Forte 3
Tuplet Properties: Appearance
Click on the image below for details about each control:
Use controls on this page to change how the selected tuplets appear in the Music Score.
-o-

431
Forte 3
Wave Properties: Performance
Click on the image below for details about each control:
Use controls on this page to change how the selected tuplets appear in the Music Score.
-o-

432
Forte 3
Options
Options
Select Options from the menu to change options in Forte.For more information about specific options, c lick on a topic below:
General Options
Notation Options
Sequencer Options
Select from the Performance Toolbar to set the performance options.
Performance Options
-o-

433
Forte 3
General Options
General Options
The General tab contains miscellaneous options for specifying how the application behaves asa whole. Click on the image below for details on each control.
To display the tab, select Options General then select the General tab.
-o-

434
Forte 3
Workspace Options
The Workspace tab contains miscellaneous options for setting up the look of the workspace.Click on the image below for details on each control.
To display the tab, select Options General then select the Workspace tab.
-o-

435
Forte 3
Save Options
The Save tab contains options used when saving files. Click on the image below for details oneach control.
To display the tab, select Options General then select the Save tab.
-o-

436
Forte 3
Notation Options
Notation Options
The Notation tab contains options for controlling how music is notated in the Music Score.Click on the image below for details on each control.
To display the tab, select Options Notation then select the Notation tab.
-o-

437
Forte 3
Drum Notation Tab
The Drum Notation tab contains options for controlling how drum notation is displayed andentered in the Music Score. Click on the image below for details on each control.
To display the tab, select Options Notation then select the Drum Notation tab.
-o-

438
Forte 3
Sequencer Options
MIDI In Options
The MIDI In tab contains various optionsUsed for recording MIDI data from an externalkeyboard. Click on the image below for details on each control.
To display the tab, select Options Sequencer then select the MIDI In tab.
-o-

439
Forte 3
MIDI Out Options
The MIDI Out tab contains various optionsUsed for playing MIDI. Clic k on the image below fordetails on each control.
To display the tab, select Options Sequencer then select the MIDI Out tab.
-o-

440
Forte 3
MIDI Thru Options
The MIDI Thru tab contains options for setting up MIDI Thru.. Click on the image below fordetails on each control.
To display the tab, select Options Sequencer then select the MIDI Thru tab.
-o-

441
Forte 3
Sync Options
The Sync tab contains various options so that you can synchronize the performance withOtherdevices. Click on the image below for details on each control.
To display the tab, select Options Sequencer then select the Sync tab.
-o-
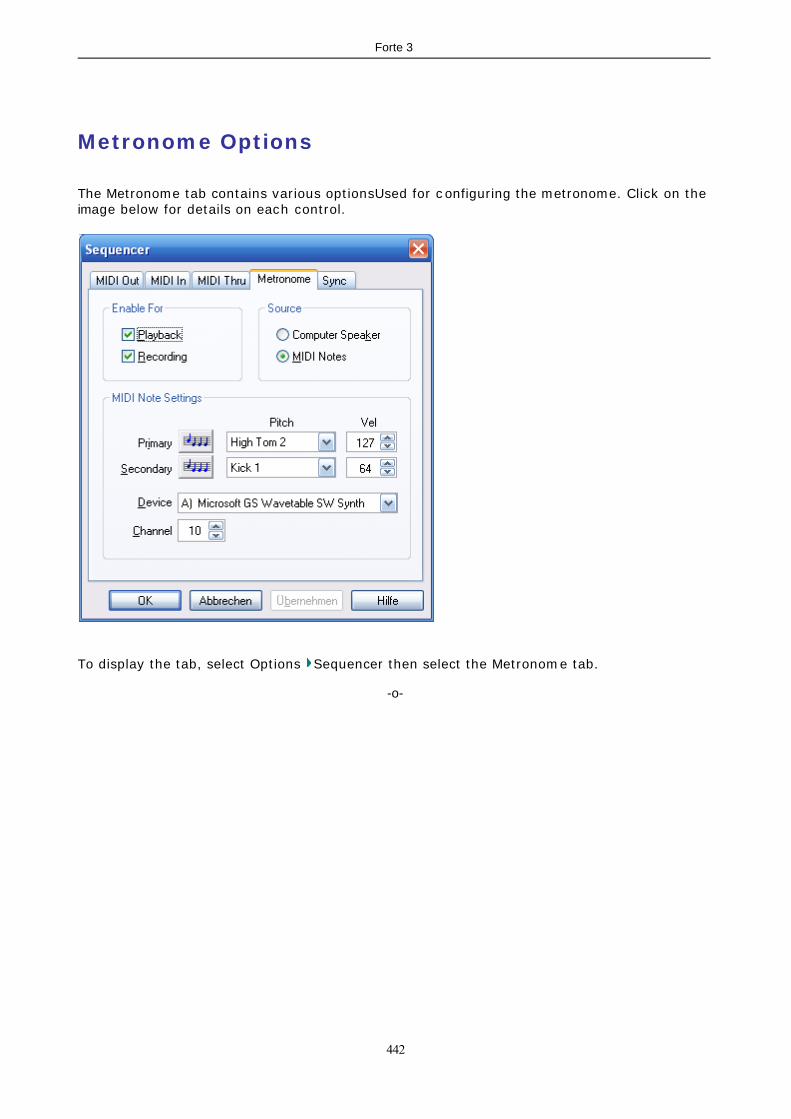
442
Forte 3
Metronome Options
The Metronome tab contains various optionsUsed for c onfiguring the metronome. Click on theimage below for details on each control.
To display the tab, select Options Sequencer then select the Metronome tab.
-o-

443
Forte 3
Performance Options
Swing Time
In jazz, there is a convention that pairs of written beats are not played equally, as thenotation isOtherwise understood, but with the first longer than the second and the shortersecond note having an accent. Generally the first note of each of these pairs is twice as longas the second, giving a triplet feel.
The swing feeling alters the way two eighth notes on the same beat are played. When theslider is in "No Swing" position, each of the notes corresponds to ½ (50%) and ½ (50%) ofthe beat. When the slider is in "Triple-feel Swing" position, the duration of the first eighthnote will be 2/3 of the beat, and the second eighth note will correspond to the rem aining 1/3.By changing the slider, theUser is able to smoothly alter the swing level, c hanging theduration of the first note of the eighth pair from ½ to 2/3 of the beat.
-o-
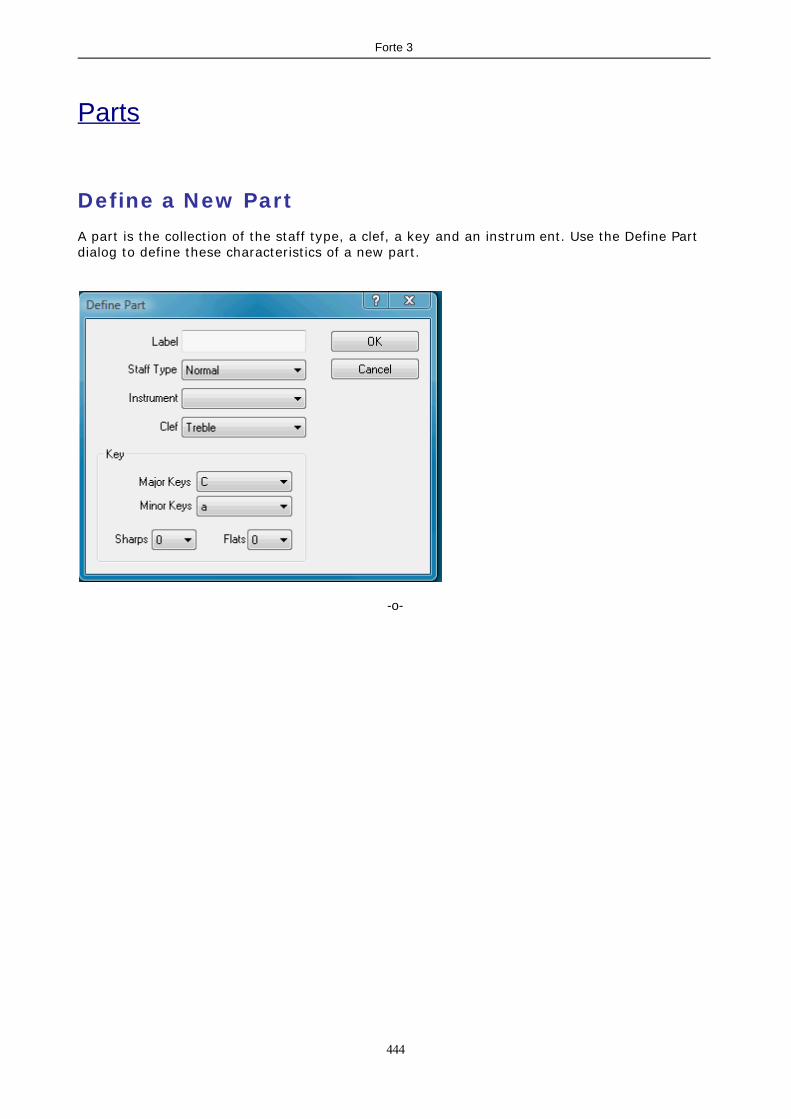
444
Forte 3
Parts
Define a New Part
A part is the collection of the staff type, a clef, a key and an instrum ent. Use the Define Partdialog to define these characteristics of a new part.
-o-

445
Forte 3
Remove Part
Select the Remove Part command from the popup menu to remove the part currentlydisplayed in the drop-down list.When all parts are removed, the list is repopulated with the standard c hoices. There mustalways be at least one part defined at all times.
-o-

446
Forte 3
Instrument
Select an instrument for the new part from the drop-down list. The instruments are listed inalphabetical order.You can always change the instrument for the staff after it has been added to the music usingthe Properties Window.
-o-

447
Forte 3
Tutorials
Tutorials
Hier you find some tutorials on how to perform common tasks in Forte.
Adding Notes
Changing Intruments within a Track
Merging Tracks
Multivoicing
Multiple Endings
-o-

448
Forte 3
Adding Notes
There are several different ways to add notesto your music. The most straightforwardapproach is toUse the mouse to add notesfrom the Elements Palette.
To view the Elements Palette, click on the"note" button on the Music Edit Toolbar.
(You can also record pitches directly into your score - see Recording from a Keyboard.)
Notes are alwaysadded to measuresin a specific staff.When you enter anew note, thenotation engineautomaticallydetermines stemdirection, spacing,etc. for the note.
If necessary, themeasure is widenedto accommodate thenew note.
If you add a notethat will not logicallyfit into the time spanof a measure, thenote is tied to acomplementary notein the nextmeasure.
There are dozens of other parameters that affect how a given note is displayed: Keysignature, measure width, layout properties, voicing, etc. Once a note is added to your m usicyou can edit its appearance and performance properties, slur and beam notes together andperform dozens of other actions on groups of notes to get the m usic looking just right.
Here’s How To Add a Note

449
Forte 3
Select the Notes tab in the Elements Palette, then select one of the notes.
Move the cursor over the measure to which you wish to add the note. (Notice the feedbackprovided by the note cursor.)
The ruler is drawn around the measureto indicate the beats and subdivisionswithin the measure.
The dotted red line shows the timelocation where the note is to be added.
The small highlighted dot shows thepitch for the new note.
Align the dashed line with the beat where you want the note, then align the dot with thedesired pitch.
Click the mouse to add the note.
How To Remove a Note
To remove a note, select itwith the mouse and select Edit/ Delete from the menu.
–OR–
Select the note and press theDelete key on your keyboard.
-o-

450
Forte 3
Changing Instruments within a Track
Selecting an Instrument for a specificTrack is fairly straightforward. Using SelectMode….
…double-click on the Staff inquestion.
When the Staff Properties windowappears, select an instrument fromthe Instrument tab.
Changing Instruments within a Track,however, is less clearly documented.For our example, we will select tochange Instruments within a Track onthe first beat of the 16th measure.
Using the same Staff Propertieswindow, we will click once on the Listbutton.

451
Forte 3
An expanded window will appearcontaining the current Instrumentselected. (This is also known as thePatch or Program Change, but forour purposes we will stick to themore generic term of Instrument.)
Note the current Instrumentselected in the expanded List View.
To change the Instrumentbeginning at measure 16 first clickon the New Patch button.
Within the Instrument List select adifferent Instrument, for thisexampleUse (07)Harpsichord.
Now click in the Time box andusing the up arrow, move the TimeCounter forward to 016:00:000and click Apply.
The new Instrument change willappear beneath the currentInstrument and include themeasure number in which thechange occurs. The next time thefile is played the new Instrumentwill begin playing in measure 16.

452
Forte 3
There are times when several different instrument sounds are required within a Track, likeusing Tremolo Strings (slash on stem) for one section, switching to Pizzicato (pizz) Stringsand then to back to the regular Violin Instrument sound (arco).
One way to accomplish this would be to have separate tracks for each instrument sound.However this procedure would be cumbersome for a String Quartet or Full Orchestra.
To conserve Score space the Properties Window can be used to perform these changes. Seethe printed example below:
This is how a string player might expect the music to be written. To hear this played bac kappropriately through your computer or MIDI keyboard, the following is a step-by-stepprocedure to enter these changes.
Enter the notes either by playing them in from your MIDI keyboard or by dropping in thenotes from the Elements Palette.
Add Tremolo markings to the notes in measure 2 using the Ornaments Tab on theElements Palette.
Now that the appearance is appropriate for Tremolo Strings, let’s enter the Patch orProgram Change so the notes sound like Tremolo Strings.
In Select mode double-click on the Track/Staffin Score View or Mixer View tobring up the PropertiesWindow containing Staff

453
Forte 3
Properties.
To expose the ProgramChange window click on theList button [Toggle Patch ListEditor]. As you can see in thisexample, the Violin instrumenthas already been selected.
To change the sound toTremolo Strings for measure 2click the New Patch buttonand edit the Time dialog boxcontent to reference the firstbeat of measure 2. SelectTremolo Strings and clickApply.
As you can see in thisexample, the Patch orProgram Change List has

454
Forte 3
updated reflecting the TremoloStrings playing on the firstbeat of measure 2.
All that is needed now is torepeat the process and addPizzicato Strings (pizz) to thefirst beat of measure 3 andchange back to the regularViolin Instrument (arco) onthe first beat of measure 4.
This method of using multiple instruments within a track is especially handy when workingwith sound effects. Instead of having several tracks, one for each sound effect, all the soundeffects can be entered on one track.
-o-

455
Forte 3
Merging Tracks
In some instances it may be more desirable to have two parts together on a Track or Staffrather than have them occupy separate Tracks or Staves.
When creating a composition, this can be accomplished by entering the first part orinstrument (default Voice number is 1) and then switching to Voice 2, entering the secondpart. (See Multivoicing.)
But when working with an existing composition, the Merge command offers a more efficientway of accomplishing this. This illustration gives step-by-step instructions to Merge two partsor instruments from two separate Tracks or Staves…
…into one Track or Staff.
To set this up, change the Voice Assignment for all the Part 2 notes. This isaccomplished byclicking Edit…
…Select…
…Elements.

456
Forte 3
In the Select Elementwindow click on theNone button clearing outthe element types.
Scroll down and selectNote.
Click the Advancedbutton.
Click to select Filter byTrack.
Click to select Part 2.
Click OK.
All the notes in Part 2 should change to the highlight color (red) indicating that they havebeen selected.
Click on the Properties bringing up the Note

457
Forte 3
Window button
Properties window.
Using the Appearance Tab change thenumber for Voice to 2.
Click Apply. (Nothing will appear tohappen.)
Click the Mixer button if the Mixer is not alreadydisplayed.
In the Mixer View,double-click on Track Part2…
…bringing up the Staff Properties window.
Using the Actions Tab select MergeStaves.
Click to select Part 1 as well.

458
Forte 3
Click to select Keep original tracksand Preserve Voices.
Click Apply.
The Merged Staff will appear along with Part 1 and Part 2.
At this point Part 1 and Part 2 can be hidden in this Layout if you desire. To ac complish this,click on the Layout Operations button and select Edit Layout.
System Layout
Using the Setup Tab remove the"checkmarks" from Part 1 and Part 2.
If you do not like the current SystemLayout of the page…
…use the Spacing Tab and increase the Systems per page number.

459
Forte 3
New System Layout
In this example 8 was selected, but the piece only required 6 Systems.
Click Apply and OK.
The final result will look something like this…

460
Forte 3
The stems of what were Part 2 notes are now facing down because we assigned them to Voice2. The stem direction default is:
Odd Numbered Voice = Stem Up
Even-Numbered Voice = Stem Down
For more information on using Layouts, see Working with Layouts .
-o-

461
Forte 3
Multivoicing
Each staff can support up to 8 different voices for notating several melodic lines together onthe same staff. Quite often in keyboard, instrumental, and vocal music, two distinct lines ofmusic occupy the same staff. If the two lines differ rhythmically, they should be notated usingseparate voices so that their independent rhythms are preserved. If the two lines share thesame rhythmic pattern, they may be notated using a single voic e. The example belowillustrates how multivoicing looks in the Music Score:
Non-Multivoiced Multivoiced
The notation engine automatically handles many of the nuances of multivoicing music. Forexample, there are different rules for stem direction and length, and for how slurs, ties andaccents are displayed. Note that the notation engine automatically fills each voice with it’sown set of rests. In keyboard music, one may want to hide rests for improved readability.
Let’s look at an example using a familiar tune.
Change voice with the Properties Window
Select the notes you wish to change.
Display the Appearance page in theProperties Window.
Select the desired voice from the Voicedropdown list.

462
Forte 3
Click the Apply button to apply thechanges. See Final Result at the end ofthis document.
Change voice using an Action
Select the notes you wish tochange by either drag selectingor holding down the CTRL keyand selecting each one. [See#1 above – Changing voicewith Properties Window]
Select Actions / Voice from themenu.
Select Change all voices tovoice [2]
Click the Apply button.
Insert notes using adifferent voice
Display the Music Score inPage View. At the top of theMusic Score window, selectVoice 2 from the Voicedrop-down list.
On the Notes tab, select thehalf note.

463
Forte 3
On the Music Score, positionthe Note Entry cursor on theStaff where you wish to placethe note. To help with noteplacement, a dotted verticalline will extend from the rulerguide through the Staff. Clickon the pitch location you desireon the Staff and the note willappear as that pitch. [Note thegreyed out Voice 1 notes. Theywill return to normal whenVoice All is once againselected.]
Final result
After placing or changing your notes [in this example, Voice 2] this is the end product. Usingmultivoicing you allow the possibility of multiple moving/rhythmic lines on the same Staff.
-o-

464
Forte 3
Multiple Endings
In many songs containing multiple verses, the melody is not exactly the same for each verse.Some times the last measure of the first verse will be slightly different than the last m easureof the second verse. Take for example the song ‘Dixie’, or as it is also known, "I wish I was inthe land of cotton."
To shorten the music to one page, multiple Endings wereUsed on the verses.
At the end of the second system (measure 9) is the first Ending and at the beginning of thethird system (measure 10) is the second Ending.
Without doubling up on the verses this composition would be two pages long instead of theone page seen here.
Now we will begin a step-by-step process of inserting the Ending(s) and m aking any otherchanges to improve the "look and play of the composition."

465
Forte 3
After creating the music using either theElements Palette or recording the MIDIdata from a MIDI keyboard, we will add arepeat sign at the beginning of the piece,just after ‘Oh, I". Click on the ElementsPalette and choose the Repeats tab.
Now select the Left Repeat bar to place atthe beginning of measure 2 so that whenthe first Ending is played the performer(and the software) will know where tobegin to play to the second Ending.
Line the cursor up with thefirst beat of the secondmeasure as seen here andclick the mouse button toplace the Left Repeat bar.
Voila! The Left Repeatbar appears to the rightof the measure line atthe beginning of measure2.
Now it is time to enter the First Ending atthe end of the first verse in measure 9.Once again, using the Elements Paletteand the Repeats tab select the Endingmarker.
In measure 9 line up the cursor with thefirst beat and click the mouse button toenter the Ending marker appropriately.
Once again, the selected item (in thiscase the Ending marker) appears.

466
Forte 3
To compliment the Left Repeat bar addedearlier we need to add a correspondingRight Repeat bar. From the ElementsPalette using the Repeats tab select theRight Repeat bar.
Now place the Right Repeat bar at theend of measure 9 by lining up thecursor with the last beat of thatmeasure and clicking the mousebutton.
The result will be measure 9containing both the Endingmarker and the Right Repeat bar.
Adding the second Ending entails selectingthe Ending marker from the ElementsPalette’s Repeats tab.
Line up the cursor with the first beat ofmeasure 10.
Click the mouse to place the second

467
Forte 3
Ending marker appropriately. TheEnding appears, but it still indicates thefirst Ending.
To change the Ending number, click on theSelect button to enter Select Mode.
Double-click on the number 1 withinthe Ending marker to select it. (TheRepeat Properties Window will open.)
In the Repeat Properties Windowchange the Ending Value to 2.
When the number 2 appears in theValue window, click Apply.
The Ending marker has now beenchanged to the number 2 and thesoftware will play the Endings appropriately.

468
Forte 3
Have fun! And remember, if you have multiple Endings and the composition is not playingback the Endings appropriately, verify that there is a Right Repeat bar on the last beat ofeach Ending. This notifies the program to go back and begin at the Left Repeat bar or otherRepeat indicator
-o-

469
Forte 3
Glossary
A accelerando
accent mark
accidental
adagietto
adagio
adagissimo
Aftertouch
allegretto
allegrissimo
allegro
alto clef
andante
andantino
arpeggio
articulation
asterisk *
a tempo
attack
B bar
barline
bass clef
beam
beat

470
Forte 3
beat value
brace
bracket
C Channel
Channel Aftertouch
chord
chord progression
clef
clipboard
coda
common time
complete meter
compound note
controller
counter
crescendo
cut time
D Da Capo
Dal Segno
decrescendo
default
degree
diatonic
diminuendo
dot
double barline
double flat

471
Forte 3
double sharp
driver
duplet
duration
dynamic marks
E enharmonic
expression
F fermata
Fine
fine barline
flag
flat
forte
fortissimo
forzato
G General MIDI
glissando
grace note
grand staff
H
hairpins
half step
I interval

472
Forte 3
inversion
IRQ or Interrupt
J-K Key Aftertouch
key signature
L larghetto
larghissimo
largo
lead-in measure
leading tone
legato
ledger line
lentissimo
lento
loop record
M major
marker
measure
meter
metronome
mezzo forte
mezzo piano
middle C
MIDI
MIDI device
MIDI Event
MIDI file

473
Forte 3
MIDI instrument
MIDI Thru
MIDI volume
minor
mode
moderato
Modulation Wheel
mordent
multi-voicing
N-O natural sign
notation
note
note value
octave
ornament
overdub
P Patch
pedal mark
phrase
pianissimo
piano
pitch
Pitch Bend
pizzicato
polyphony/polyphonic
port
prestissimo

474
Forte 3
presto
Program Change
Q quantize
R real-time recording
repeat
rest
RIFF MIDI file
rhythm
rhythmic unit
ritardando
root
ruler
S scale
score
second
segno
semitone
sequencer
sforzando
sforzato
sharp
single barline
slur
sound source
staccato

475
Forte 3
step record
system
System Common Message
System Exclusive Message
System Realtime Message
T-U tempo
tempo slider
template
tenor clef
third
tick
tie
time signature
tool tips
track
transpose
treble clef
tremolo
triad
trill
triplet
tuplet
turn
V velocity
vivace
vivacissimo
vivo
476
Forte 3
voice
W-Z wave file
whole step
-o-

477
Forte 3
Index
- A -Add and Remove Envelopes 312Audio Sequencer Introduction 38
- B -Blank Sheets 82Block Lyrics 226
- C -Chord Suffix 194Chord Symbols 189Chords
- E -Export to a Graphics File 118
- F -Filtering Events 326
- G -Glossary 469
- I -Identify Chords 331
- L -Launch Assistant 48Layout Dialog 164List Area 324Lyric Properties: Text 403
- M -Meters 228MIDI Events Introduction 40

478
Forte 3
Move 351
- N -Notation Options 436
- O -Ornaments 235Overview Area 325
- P -Print all Layouts 79Print Blanc Sheets 82
- R -Recording Music 120
- T -Text 431The Audio Sequencer 305The Launch Assistant 47
- W -What's new in Forte 3 14

© Lugert Verlag, 2012w w w .forte-notation.eu