formatting framemaker documents from sap … · documentation on formatting framemaker documents 2...
TRANSCRIPT

Formatting FrameMaker Documents from SAP Applications
Documentation on Formatting FrameMaker Documents
2
About this document This document describes important steps that you need to take when using the Adobe FrameMaker to apply and reformat XML data originating from SAP systems. In this application context, you should only perform the commands, functions, and actions described here to guarantee that the files work appropriately. The information provided relates to standard use of the documents in this context and does not cover the full range of functions possible. This document does not discuss how to change data or the content of texts. There are two parts to this document. Part 1 deals with using structured documents in FrameMaker and the output of those documents. Part 2 describes how you change the template files.

Documentation on Formatting FrameMaker Documents
3
Part 1 Installation and Preparation The applications detailed here relate to version 7.0 of Adobe FrameMaker in Windows. These applications require special structure data that is delivered by SAP.
1. You can check whether the SAP structure data is already stored on your PC by choosing Programs > Adobe > FrameMaker (path in the standard delivery) in the program directory of your FrameMaker version. The subfolder should contain structapps.fm, and the SAP folder must contain the files BB_2.dtd, BB_rw.fm, BB_tmpl_land.fm, and BB_tmpl_port.fm. The last two files are template files.
Diagram 1
2. If these files are incomplete or are not found in the locations mentioned above, copy
the missing files or all files to the structure folder. You may have to replace old structure data with the new data or store it in a separate folder. If the files are no longer found in the file system, you can use report UMB_EBB_FM_DOWNLOAD to generate them again from the SAP System.
3. Start the FrameMaker application with the structured interface. When you start the application, the mode appears in the title bar. If you started in normal mode (no additional icons in the title bar), open the preferences (File > Preferences > General), choose Structured FrameMaker in the product interface, and confirm by choosing Apply. You then have to restart the program to activate the mode.

Documentation on Formatting FrameMaker Documents
4
Diagram 2
4. For advanced users only: If you want to use other structure data in parallel with the
SAP structure data, you configure this additional structure data under File > Structure Tools > Edit Application Definitions (see the section Updating and Duplicating the Template File)
Opening and Printing Structured Files and Saving them in Adobe PDF Format Only structured FrameMaker files are used to format XML-based files. Opening Structured Files
1. In the structured FrameMaker, choose File > Open. 2. In the Open Document dialog box, specify the source XML file provided by the SAP
System and choose Open. 3. In the Set Structured Application dialog box, select the entry corresponding to your
template.
Diagram 3
4. Choose Set. The XML data is connected to the structured application, and the layout
of the template file, together with all its content, is displayed in a new FrameMaker document. The name of this FrameMaker document is the same as that of the XML file, just with a different file name extension (.fm).
5. If a dialog box appears asking you whether you want to use the master pages, confirm the dialog box.
Diagram 4

Documentation on Formatting FrameMaker Documents
5
6. If an error occurs when you open the file, contact the programmer for the application or the system administrator. If the wrong structured application has been set by mistake, close the file without saving and call up the original data again.
Printing Structured Files
1. To print a structured file that is open, choose File -> Print. 2. The active printer is designated in the dialog box Print Document (see diagram
below). To specify a different printer, choose Setup. 3. You can specify the print range on the Print Page Range tab page, and the number of
copies with the option Copies. 4. To start printing, choose Print.
Diagram 5
Saving Structured Files in Adobe PDF Format You use the Adobe PDF format (Portable Document Format) to create an exact duplicate of a structured FrameMaker file with complete content and layout. On account of their compact size and compatibility with all important operating systems, Adobe PDF files are particularly suitable for communicating information across different platforms. The receiver does not need the source application (in this case, FrameMaker) to open the file. Instead, the receiver can use Acrobat Reader software, for example, which is available free of charge.
1. To save a structured FrameMaker file that you have open in Adobe PDF format, choose File -> Save As.
2. After you have specified the name and location of the new file, choose the format PDF from the dropdown list box for the Data Type entry field.
3. Choose Save.

Documentation on Formatting FrameMaker Documents
6
Diagram 6
4. If the file name extension was not previously converted automatically into .pdf, a
program message informs you of this. Choose Yes to adopt the .pdf extension so that Windows recognizes the file format as Adobe PDF.
5. In the PDF Setup dialog box that now appears, you can choose from special PDF Job Options to specify the purpose of the Adobe PDF file. This ensures an optimal compromise between effective file size and output quality. Choose Monitor if the Adobe PDF file is mostly going to be sent by e-mail, published on networks, and viewed on screen. With this option, emphasis is placed on achieving smaller data size by compressing the file during the save. Choose Print if the Adobe PDF file is going to be printed or used as the basis for discussions with colleagues. With this option, the file produced is larger but offers better quality.
Diagram 7
6. To generate bookmarks in the Adobe PDF file, go to the Bookmarks tab page. Ensure
that the option Generate PDF Bookmarks is active. 7. Choose Elements from the dropdown list box for the Bookmark Source entry field.
The window below this field lists which elements are transferred. To add or remove elements, choose the appropriate arrow adjacent to the list.

Documentation on Formatting FrameMaker Documents
7
Diagram 8
8. To make it easier to display the Adobe PDF file on PCs with smaller display screens,
(such as PDAs), go to the Tags tab page and activate the option Generate Tagged PDF. In this way, the Adobe PDF file acquires special structure information.
9. After setting up the configuration, choose Apply to create the Adobe PDF file. To open the Adobe PDF file, you must have Adobe Acrobat or Acrobat Reader installed on your PC.

Documentation on Formatting FrameMaker Documents
8
Part 2 If you want to modify the template, observe the following order: First change the normal file and then import the changes into the appropriate template used to create the file. Alternatively, you can create a new template file and then save it as a new structured application. Editing XML data concerns the following basic components of the template: Page format, paragraph format, character format, table format, and master pages. This section of the document describes which of these components you can change and how. Modifications that do not concern the page formats or other formats generally do not have any effect because such modifications are ignored by XML coding the next time the data is used. Changing the Page Format for Documents
1. After you have opened the file, choose Format -> Page Layout -> Format. 2. In the Page Size dialog box, select one of the formats offered or specify the page width
and page height in the appropriate fields. 3. Then choose Apply. The document is created with the new format.
Diagram 9
Changing the Appearance of Texts You edit selected character strings or entire sections of text in the FrameMaker on the basis of formatting templates using both catalogs for character formats or paragraph formats. You cannot use these catalogs to apply character formats and paragraph formats subsequently to SAP data. This task is managed by XML. You can, however, change text in the Character Designer and Paragraph Designer. When you change files, you should not create new formats; you should only use the formats available in the XML file or the template. If you restructure text, observe any style templates for SAP documents. Changing Defined Character Formats and Paragraph Formats
1. Select the text to be changed or place the cursor on a preformatted section of text. 2. If you would like to change the format of a character string, choose Format >
Characters > Designer and open the Character Designer screen. 3. If you have selected a part of the text that already has a character format, the name of
this format appears in the dropdown list box for Character Tag. 4. In the middle column, you can change different attributes by choosing an entry in the
respective dropdown list box. 5. On both screens, there are two pushbuttons Apply and Update All to apply the new
settings. To ensure that the same formatting is applied to the whole text, you should only choose the Update All pushbutton when editing SAP documents. If you choose the Apply pushbutton, the format is not overwritten; only the formatting of the selected

Documentation on Formatting FrameMaker Documents
9
text is overwritten. The same applies for the submenu items Font, Size, and Style in the Format menu, since these items do not have any effect on format attributes.
Diagram 10
6. If you would like to change the format of one or more paragraphs, choose Format >
Paragraphs > Designer and open the Paragraph Designer screen. In contrast to the Character Designer screen, the Paragraph Designer screen consists of several tab pages.
7. If you have selected a part of the text that already has a paragraph format, the name of this format appears in the dropdown list box for Paragraph Tag.
8. If you have selected a section of text within a paragraph and have formatted it on the Paragraph Designer screen, your settings are applied to the entire paragraph. As described above, you may only choose the Update All pushbutton to apply the format.
9. If you do not want to make any changes to a section of text, choose the pushbutton in the title bar to close the respective screen without choosing Update All.
10. When editing paragraphs, you should not change the start position for page breaks (on the Pagination tab page) because this is determined by the XML coding. (Note for advanced users: Alternatively, you can change the XML attribute newpage to yes where necessary.)
Diagram 11
11. To apply a format to text containing different text tags, or to replace a particular text
tag by another, select the text in question and call up Character Designer or Paragraph Designer, as appropriate.
12. Choose the target format from the dropdown list box for Character Tag or Paragraph Tag and then the command Global Update Options in the dropdown list box for Commands. On the top half of the screen that appears, you determine which settings should be applied. On the bottom half, you specify which sections of texts are to be changed. If only the format of the selected text is to be changed, select the All Matching Tags in Selection indicator. If you want to change a text with a specific tag, select the All Tagged indicator and specify a tag in the adjacent dropdown list box.
13. Finally, choose Update and confirm the question with OK. By choosing Cancel, you undo the settings applied.

Documentation on Formatting FrameMaker Documents
10
Diagram 12
Paragraph Numbers
1. To assign numbers to paragraphs automatically, position the insert marker on the document area and then go to the Numbering tab page in the Paragraph Designer screen.
2. Select the checkbox beside Autonumber Format. 3. Modules are used to determine the number structure. In the example, the font style and
the number are specified. 4. Choose the character format and the position in the paragraph (here Paragraph Start).
Diagram 13
5. Choose Update All to perform the numbering for the complete document. If you
previously selected an area of text, choose Apply. Changing the Appearance of Tables Changing Defined Table Formats You can change the appearance of tables using the Table menu and the Table Designer screen. The text alignment and the column width in the table are set automatically by XML and therefore you must not change them manually. Similarly, you cannot change the position of the table title cannot be changed. In defining tables, you should only use/change the table formats delivered with the document.
1. Place the cursor somewhere within the table boundaries. 2. Choose Table -> Table Designer. On this screen, the Table Tag field shows the table
format that is currently valid. 3. On the Basic tab page, you can make some basic settings. Under Space, you can
specify the gap between the text above and the text below the table, for example. The settings under Default Cell Margins specify the size of the indent for the cell content.

Documentation on Formatting FrameMaker Documents
11
Diagram 14
4. On the Ruling tab page, you can highlight the borders for the whole table as well as for
columns and rows. After making your selection, choose Update All to apply the format changes.
5. To make data more legible, you can use the options on the Shading tab page. Here you can specify, for example, that the header and footer of a table are shaded or that alternate default rows are shaded as well. After making your selection, choose Update All to apply the changes.
Diagram 15
6. As described above, you can format texts within a table on the Character Designer
and Paragraph Designer screens. Ensure that you only use or change formats provided in the document and that you apply them by choosing Update All.
7. As mentioned above, the horizontal setting for the table content is determined by XML. You can, however, change the vertical setting in the Table Cell tab page on the Paragraph Designer screen. After selecting an option, choose Update All.
Diagram 16
8. The height of the cells is determined automatically by FrameMaker but you can
change it on the Paragraph Designer or Table Designer screens. 9. If a document contains several tables, you can set the table formatting in a single step.
Use the command Global Update Options on the Commands tab page (see the section Changing the Appearance of Texts).

Documentation on Formatting FrameMaker Documents
12
Changing Master Pages A FrameMaker document can contain three types of pages that together make up the layout: Body pages, master pages, and reference pages. For manual changes to SAP documents, body pages and master pages are most relevant. These two types of page are in a hierarchy, whereby body pages are based on master pages. This means that all elements of a master page also form part of the body pages that are based on that master page. Consequently, any changes made to a master page are also reflected in all such body pages.
1. Choose View -> Master Pages to show the master pages. In the middle of the FrameMaker status line, you see which master page is active.
2. With the default setting, the program creates a document with a header and footer that you can fill with texts. To enter a text, select the relevant background text frame. Enter the new text or overwrite any existing text.
3. By choosing Special -> Variable, you can choose from typical elements for headers and footers (such as the page numbers and the number of pages) that you would like to be updated by FrameMaker.
4. In the dropdown list box in the Variable dialog box, choose Current Page #. Then choose Insert.
5. In the text box on the page, write “of” (after one space). Then use the dialog box to insert the variable Page Count. Choose Add to close the dialog box.
Diagram 17
6. To place graphics – such as a logo – in the background, select the master page in the
target area and choose File > Import > File. 7. In the Import dialog box, choose the source file containing the graphic to be inserted.
Then the Imported Graphic Scaling screen appears. Choose one of the available options and confirm by choosing Apply. The graphic is inserted at the desired place.
8. If the graphic is too large for the area you designated, select the graphic and then change it by choosing Graphics -> Object Properties or Scale.

Documentation on Formatting FrameMaker Documents
13
Diagram 18
9. Choose View -> Body Pages to return to the body pages. 10. In the View menu, the checkbox adjacent to the active page mode is selected.
Changing the Text Flow (for advanced users only)
1. Switch to the Master Pages view by choosing View -> Master Pages. With the default settings, the text flow is managed from this view.
2. Hide the tool palette (see diagram) and activate the selection tool on the right (arrow without insert marker).
Diagram 19
3. Select the text frame for the flow text. 4. To change the position or size, select the corners of the frame, or choose Graphics ->
Object Properties. 5. When you have created the desired space, choose the text frame tool from the tools
palette.
Diagram 20
Documentation on Formatting FrameMaker Documents
14
6. Once you have enlarged the frame, the Add New Text Frame dialog box appears. 7. Under Flow Tag, enter “B” and then choose Insert. Do not keep flow tag A because
this one is reserved for the imported XML data flow, whereas text flow B can take other types of content.
Diagram 21
8. If you receive a layout warning after performing the above action, activate the option Keep Layout Overrides in the warning dialog box, and choose Continue.
9. Switch back to the view Body Pages by choosing View -> Body Pages to display the new layout with its content.
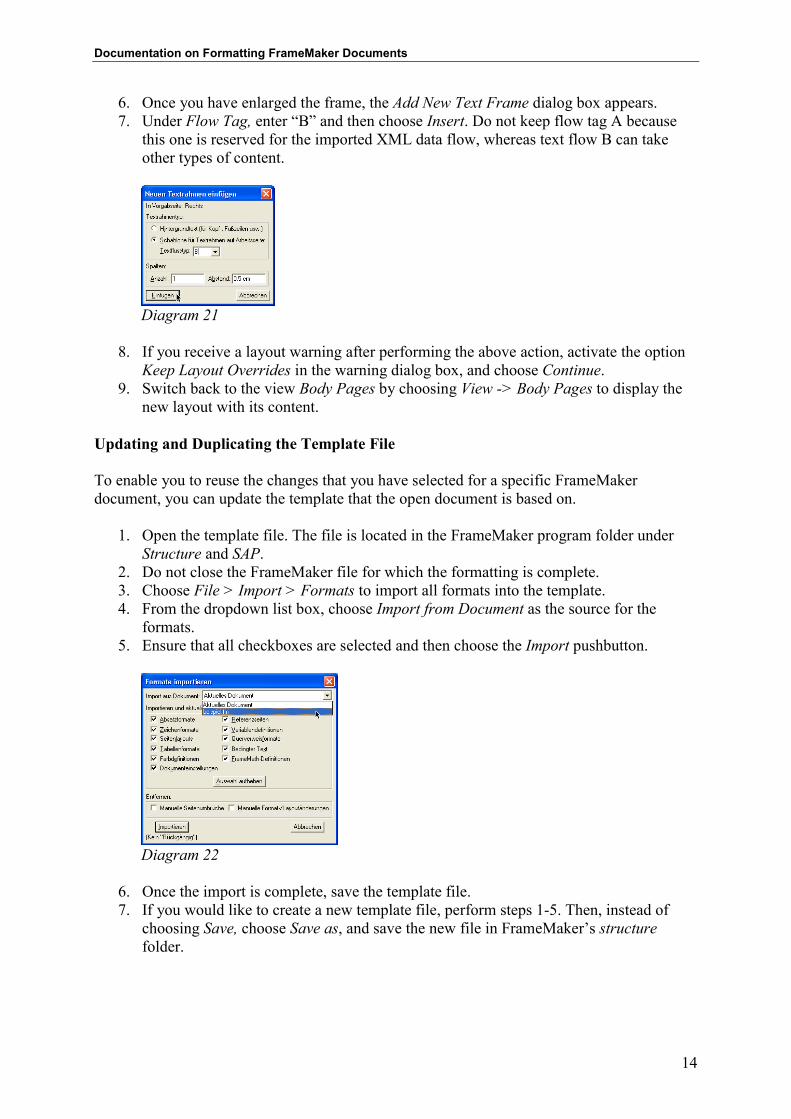
Updating and Duplicating the Template File To enable you to reuse the changes that you have selected for a specific FrameMaker document, you can update the template that the open document is based on.
1. Open the template file. The file is located in the FrameMaker program folder under Structure and SAP.
2. Do not close the FrameMaker file for which the formatting is complete. 3. Choose File > Import > Formats to import all formats into the template. 4. From the dropdown list box, choose Import from Document as the source for the
formats. 5. Ensure that all checkboxes are selected and then choose the Import pushbutton.
Diagram 22
6. Once the import is complete, save the template file. 7. If you would like to create a new template file, perform steps 1-5. Then, instead of
choosing Save, choose Save as, and save the new file in FrameMaker’s structure folder.
Documentation on Formatting FrameMaker Documents
15
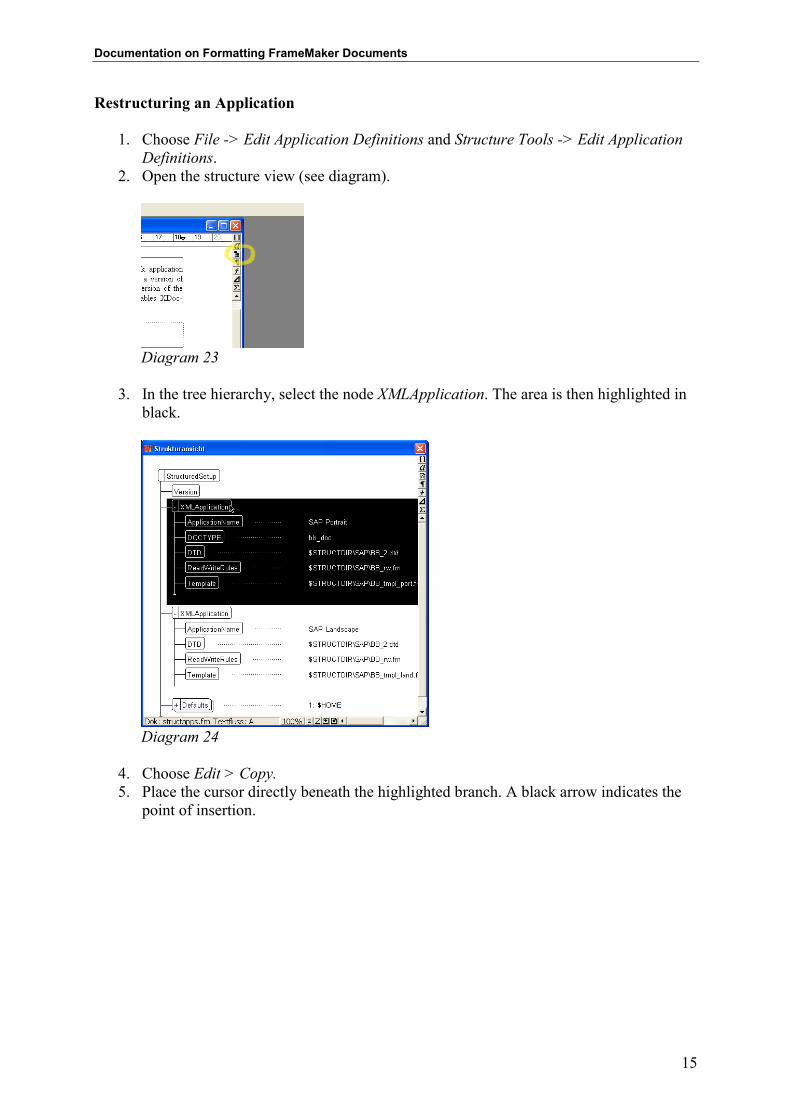
Restructuring an Application
1. Choose File -> Edit Application Definitions and Structure Tools -> Edit Application Definitions.
2. Open the structure view (see diagram).
Diagram 23
3. In the tree hierarchy, select the node XMLApplication. The area is then highlighted in
black.
Diagram 24
4. Choose Edit > Copy. 5. Place the cursor directly beneath the highlighted branch. A black arrow indicates the
point of insertion.

Documentation on Formatting FrameMaker Documents
16
Diagram 25
6. Insert the content from the clipboard. 7. If an area of the structure view is highlighted in red, an error has occurred. In such
cases, close the file without saving (!) and then open the application again and start from the beginning.
8. Now change the application name in the document window. Ensure that you only select and overwrite the name and not any elements in the view. The description that you enter here is later displayed as an option on the Set Structured Application screen when you open a file (see above).
Diagram 26
9. Under Template, enter the name of the file that you created previously. The rest of the folder path must be left unchanged.
Diagram 27
10. Save the application definition file under the same name, ensuring that you leave the
structure file open.

Documentation on Formatting FrameMaker Documents
17
11. Choose File > Structure Tools > Read Application Definitions. 12. Close all open files.

Documentation on Formatting FrameMaker Documents
18
The XML application for SAP - including this documentation – was developed and delivered by XQX. For more information about using FrameMaker, refer to the manual for this product or contact XQX at the following address:
XQX AG XML & Design Lindenweg 9 D-79348 Freiamt Tel: +49.700.www.xqx.de